The Xen Project has announced
the release of Xen 4.20. This release adds support for
AMD Zen 5 CPUs, improved compliance with the MISRA C standard,
work on PCI-passthrough on Arm, and more. Xen 4.20 also removes
support for Xeon
Phi CPUs, which were discontinued
in 2018. See the feature
list and release
notes for more information.
Version
136.0 of the Thunderbird Desktop mail client has been
released. The release includes a quick toggle for adapting messages to
dark mode, and a new “Appearance” setting to control message threading
and sorting order globally, as well as a number of bug fixes. See the security
advisory for a full list of security vulnerabilities addressed in
Thunderbird 136.0.
Version
12.3 of Linux From
Scratch (LFS) has been released, along with Beyond Linux
From Scratch (BLFS) 12.3. LFS provides step-by-step instructions
on building a customized Linux system entirely from source, and BLFS
helps to extend an LFS installation into a more usable system. Notable
changes in this release include toolchain updates to GNU Binutils
2.44, GNU C Library (glibc) 2.41, and Linux 6.13.2. The Changelog
has a full list of changes since the previous stable release.
The cybersecurity landscape is shifting fast—ransomware is evolving, AI is reshaping security operations, and regulations are becoming more complex than ever. Security teams are under pressure to outpace adversaries, manage risk, and defend against sophisticated threats.
That’s why Take Command 2025 is built to deliver the most relevant, actionable insights security leaders need to navigate these challenges. This full-day virtual event brings together top security minds—from Rapid7’s experts to industry analysts and frontline defenders—covering the strategies, tools, and intelligence to help you take command of your attack surface.
A pre-recorded message from Rapid7 CEO Corey Thomas is already live on our event site, providing an inside look at what you can expect from Take Command 2025, and how our global summit will help security teams stay ahead of emerging threats.See the full list of speakers and watch Corey Thomas’s message on the Take Command 2025 registration page.
A Glimpse Into This Year’s Key Themes
This year’s agenda is packed with deep-dive discussions, real-world case studies, and expert insights on the most pressing security topics today. Here are just a few of the key focus areas you can expect at Take Command 2025:
Understanding the Evolving Threat Landscape
Cybercriminals are always one step ahead—until you learn to think like they do. This panel discussion, led by Raj Samani, Rapid7’s Chief Scientist, will explore the latest attack methodologies, emerging ransomware tactics, and evolving adversary behaviors.
Raj will be joined by Trent Teyema, Founder and President of CSG Strategies, a former FBI Special Agent (SES retired), as they analyze real-world attacker techniques and share how security teams can leverage threat intelligence to anticipate and disrupt threats before they escalate.
Session: Inside the Mind of an Attacker: Navigating the Threat Horizon
AI & Cloud Security: Opportunities and Challenges
AI is transforming cybersecurity, but how can organizations implement it responsibly and effectively? Take Command 2025 will examine:
The future of AI-powered security operations—what’s hype vs. reality?
How SOC and MDR teams are leveraging AI to improve detection and response
Cloud security challenges and why cloud detection & response (CDR) is becoming a critical SOC capability
Thom Langford, Regional CTO at Rapid7, will host this discussion, featuring Ted Harrington, Executive Partner at ISE (the Company of Ethical Hackers). Together, they will explore how AI-powered, Zero Trust-based security models are changing how organizations approach risk and resilience, and what the next era of cybersecurity defense will look like in our ‘From Zero to Hero: Building the Perfect Defense’ session.
Exposure Management & Red Teaming: Proactive Security in Action
Security teams can’t afford to wait for attacks to happen. Implementing proactive security strategies are critical. Take Command 2025 will explore:
How red teaming is evolving to match today’s complex threat landscape
Real-world lessons from leading vulnerability management programs
Why organizations are shifting from traditional vulnerability scanning to proactive exposure management
Industry analyst Tyler Shields (ESG) and offensive security consultant Will Hunt (In.Security) will lead key discussions, sharing practical insights on prioritizing risk, testing defenses, and staying ahead of attackers.
Navigating Regulatory & Compliance Complexity
With NIS2, DORA, SEC regulations, and other global mandates becoming more prescriptive, CISOs need to stay ahead of compliance changes—but these evolving policies also present an opportunity to strengthen security programs.
Sessions will focus on:
How regulatory frameworks are reshaping security practices across industries
Key compliance challenges for global organizations and strategies for staying ahead
The intersection of security, policy, and business risk—how to turn compliance into a competitive advantage
Sabeen Malik, Rapid7’s VP of Global Government Affairs & Public Policy, will help demystify cyber regulations, compliance challenges, and evolving data residency concerns in ‘From Chaos to Compliant: Demystifying Cyber Regulations’.
More to Come: A Full Day of Cybersecurity Insights
This is just a preview of the cutting-edge discussions, expert panels, and strategic deep-dives planned for Take Command 2025. Across the day, you’ll also hear from Rapid7’s own SOC experts, product leaders, and security researchers, who will provide real-world insights into:
What’s next for AI-driven security operations
How real-world attack simulations are changing security strategy
Inside the SOC: Expert stories from frontline threat hunters
Whether you’re a practitioner, security leader, or researcher, this event is designed to give you the insights and strategies needed to strengthen your security posture in 2025 and beyond.
Register Now to Take Command
Take Command 2025 is a free, global, virtual event happening on April 9. Don’t miss your chance to hear from security leaders and experts on the biggest challenges shaping the industry.
Ще ме последвате ли в дълбокото? Обещавам да не се удавим. Нека се гмурнем заедно в академичната платформа „Български езикови ресурси онлайн“ (БЕРОН) и да проверим някои думи, които ежедневно употребяваме.
Започваме например с аз. Непосредствено под думата прочитаме: „клас съществително местоимение“. „Клас“ ще рече част на речта¹ и това можем да го асимилираме, но „съществително местоимение“ е… да речем, озадачаващо. Сега това съществително ли е, или местоимение? Сигурно е местоимение, което е съществително. А дали пък не е съществително, което е местоимение? Чакайте, чакайте,
много добре си спомням от училище, че аз е лично местоимение. И това ли вече не е така?
Ако скролнем настрани, ще стигнем до следната информация: „С формите на съществителното местоимение аз се означава авторът на текста – т.е. говорещият (пишещият). По традиция аз се определя като лично местоимение за първо лице“. От този текст разбираме, първо, че аз вероятно се числи към класа на съществителните (имена)², а местоимението ще да е един от подкласовете, и второ, това е добре познатото ни старо лично местоимение, но с нова категоризация.
На какво се дължи тази промяна в класификацията на граматичните класове думи? Както разбираме от публикации в научната периодика, предстои да бъде издадена нова академична граматика на българския език, която ще бъде и нормативна³. Отдавна е време за това – предишната е от миналия век (1982 – 1983).
Засега информацията за бъдещата граматика, изготвяна от учени от Института за български език (ИБЕ) на БАН, е доста ограничена, но все пак знаем, че в нея ще бъде представено нещо принципно различно.
Нова класификация на класовете думи (частите на речта)
В новите мнения, възгледи, концепции, модели и т.н. в науката сами по себе си няма нищо лошо – напротив, така се развива и обогатява човешкото познание за света, който ни заобикаля. Когато на научното поле се срещнат различни мнения и те са солидно аргументирани, обикновено надделяват тези, които по-добре концептуализират (ех, каква завъртяна дума, простете, но тя ми дойде в ума) действителността и ни помагат да я опознаем по-добре, а после и да боравим с овладяната материя.
Да видим какво ни е известно до момента за новата граматична класификация и как/дали това ще ни помогне да си обясняваме по-добре езика и да си служим с него. Ще трябва да тръгнем от съществуващата, традиционната, според която
Тя стъпва на два основни критерия – семантичен и граматичен, тоест всеки от горните класове обединява думи, които имат нещо най-общо в значението си, а също така и общи граматични категории. Прилагателните имена например са обединени от това, че означават признаци на лица и предмети, а също така имат род, число, определеност/неопределеност (могат да се членуват), някои имат и степен. Глаголите назовават действие или състояние и имат лице, число, време, залог и т.н.
Новата класификация игнорира семантичния критерий – тоест най-общото в значението няма значение – и се основава изцяло на формалния подход при разпределянето на думите по класове:
Този подход е базиран на стриктното разграничение между форма и семантика чрез прилагането на строги морфо-синтактични критерии.⁴
Засега имаме по-пълна информация само за класа на прилагателните имена. Ето кои подкласове ще включва той:
1. Прилагателни в собствен смисъл(същински прилагателни).
Това са старите наши познайници – думи като добър, жълт, градски, тоест прилагателните имена, каквито ги знаем и си ги представяме в момента.
2. Прилагателни местоимения.
Новото попълнение в класа на прилагателните имена включва няколко вида от познатите ни местоимения:
Всъщност това са всички местоимения с изключение на личните (аз, ти) и възвратнотолично (себе си).
Основанието да се причислят тези думи към прилагателните имена е, че повечето от тях могат да се променят по род и число и да се членуват, например мой (моя, моят), моя(та), мое(то), мои(те). Тук трябва да направим важното уточнение, че кой, който, някой, никой и всеки са прилагателни в случаи като Всеки приятел ще се зарадва на успеха ти (определение към приятел), но ако са употребени самостоятелно, ще попаднат в големия клас на съществителните имена: Всеки ще се зарадва на успеха ти (в ролята на подлог). И това не е всичко, има случаи, в които думата ще е подлог, обаче вероятно ще трябва да я таксуваме като прилагателно, защото се променя по род: Всяка от вас трябва да внимава (когато говорещият се обръща към жени).
3. Прилагателни числителни.
Познатите ни редни числителни имена (първи, втори, трети) действително много приличат на прилагателните имена по своите граматични характеристики – изменят се по род и число и се членуват. Това се отбелязва от немалко български езиковеди и няма как да се пренебрегне. Редно е също да признаем, че със сегашните числителни бройни (едно, две, три) в момента ги обединява най-вече значението. Все пак имат поне една обща граматична категория – определеност/неопределеност (членуват се).
4. Глаголни прилагателни.
Също както при подкласа на местоименията ще трябва да заострим вниманието си, защото пак ще правим разграничения. Глаголните прилагателни са всъщност част от причастията, които според традиционната класификация представляват глаголни форми. И действително, те са образувани от глаголи. Да си припомним видовете причастия:
Причастията, които се изменят по род и число и се членуват (а, б, г), вече ще бъдат глаголни прилагателни – търсещ(ият) човек, търсеща(та) жена; потърсила(та) правата си майка, потърсили(те) правата си хора; търсена(та) стока, търсени(те) професии.
Тези обаче, с които се образуват форми за различни глаголни времена и наклонения, ще си останат причастия:
Майката търсела правата си. (преизказна форма – минало несвършено деятелно причастие) Майката е търсила правата си. (форма за минало неопределено време, включваща минало свършено деятелно причастие) Тази стока сега е търсена на пазара. (форма за страдателен залог, включваща минало страдателно причастие)
И така, пак ще трябва да разграничаваме едни и същи думи и да ги причисляваме ту към глаголните прилагателни (търсена стока) – ту пък към причастията, тоест към системата на глагола (стоката е търсена). Това се отнася за миналото свършено деятелно причастие и миналото страдателно причастие.
Под секрет ще ви кажа, че и аз започнах да се обърквам – представям си какви усилия трябва да положи един нефилолог, за да проследи тези трансформации, отношения и разграничения. Завършвайки с информацията за глаголните прилагателни, нека се простим.
Сбогом, сегашно деятелно причастие, сбогом, деепричастие! Ще се видим в някой следващ живот може би.
Съдбата на думите, които сега категоризираме като деепричастия, в момента поне на мен не ми е ясна, но предполагам, че ще бъдат отнесени към наречията.
5. Неизменяеми прилагателни.
Само ще маркирам последния подклас прилагателни имена, тъй като той е обект на много дискусии в езиковедската литература. Освен думи като инат, сербез,късметлия, причислявани обикновено към него, все повече набъбва броят на лексемите от западноевропейските езици, особено от английския: супер, екстра, денс, макси и др.
Други граматични класификации
Предлаганото от учените от ИБЕ прекатегоризиране на думите, както можем да предположим, не е изолирано явление в българското езикознание и е редно да го поставим в контекст. В по-ново време може да се посочат класификациите на Юрий Маслов (1981) и Станьо Георгиев (1991). Подробен преглед на концепциите прави Константин Куцаров в своята дисертация „Българските лексемни класове и учението на частите на речта“ (2019)6. Стъпвайки на три критерия – лексико-семантичен, морфологичен и синтактичен, – ученият аргументира обособяването на 12 лексемни класа. Като цяло местоименията не представляват отделен клас, единствено личните (аз, ти, той) са обособени в „дискурсив“. Самостоятелен клас образуват причастията, с изключение на деепричастията, и „детерминативите“, които в момента се разглеждат в синтаксиса като вметнати думи (впрочем, наистина, например). В края на автореферата на дисертацията си Куцаров с основание отбелязва:
… няма класификационен модел, който да не бъде уязвим, тъй като изначално е обременен от субективността на изследователските тези. Това научно съчинение предлага само една от възможните гледни точки по проблема.
Напълно подкрепям виждането на проф. Куцаров. Когато предлагаш нещо принципно ново, отклоняващо се от традицията, ревизиращо традицията и оспорващо традицията, е редно да имаш съзнанието, че това е „само една от възможните гледни точки“, и да не я налагаш като истина от последна инстанция.
Като всеки езиков модел, и сегашната класификация, каквато я знаем от десетилетия, не е съвършена. В никакъв случай не я издигам в култ и не смятам, че е дадена веднъж завинаги и не бива да се търсят по-добри модели. Мисля обаче, че няма как изведнъж да се появи класификация, която веднага да бъде приета от научните среди и обществото и безпроблемно да стане нормативна.
Новата граматична класификация на ИБЕ, отразена в БЕРОН
Може все още да сме в неведение за цялостната концепция на учените от ИБЕ, но тя вече тихомълком е прокарана в БЕРОН, който, по техните думи, е „мощен инструмент за грамотност на всеки българин с достъп до интернет“, „особено ценен за сферата на образованието и най-вече за обучението по български език във и извън България“. Освен че, както споменахме, кой и някой например фигурират като съществителни местоимения и прилагателни местоимения, прекласифицирани са думи като безброй (вече не е наречие, а числително име), колко и толкова (не са местоимения за количество, а са числителни имена (толкова приятели) и наречия (толкова те обичам). Учудване у мен предизвика следният факт: много и малко също са числителни имена и наречия, но само малко може да бъде и съществително име. Защо тази битност е отказана на много? Причастията пък все още са в сегашния си вид и при съответните глаголи са представени всички причастни форми, което ме навежда на мисълта, че прекласифицирането не е доведено докрай.
Дори и в този вид обаче имаме достатъчно основания да се запитаме:
кому е нужно всичко това и каква е ползата от него?
Знаем откъслечни неща за новите класове думи – и то ние, специалистите, които сме се натъкнали на промените, – обаче неизвестни и объркващи дори и филолозите термини, като съществително местоимение, вече фигурират в БЕРОН. Къде е цялостно разработената нова теория за класовете думи? Не трябваше ли тя да бъде публикувана и дискутирана и едва след това евентуално да бъде официализирана и отразена в БЕРОН – една платформа, която, както е декларирано, трябва да служи на „всеки българин“, на цялото общество. Да напомня на колегите от ИБЕ, че същото това общество в огромната си част се състои от нефилолози. Но дори и филолозите – отново в огромната си част – не подозират за намеренията за граматични нововъведения от такъв мащаб.
Учудващо е, че учените от ИБЕ имат смелостта – и това не е точната дума, която си заслужава да употребя – направо да наложат като нормативна една граматична класификация, за която малко специалисти знаят. Да не говорим че въпросната класификация изобщо не е проверена в практиката.
Нека да припомня какво пише в академичната граматика от 1982 – 1983 г.:
С оглед на основната си цел граматиката е съставена с помощта на традиционна в основата си концепция, методология и терминология. По принцип съставителите се опират на утвърдени в българската граматична литература постановки и се избягват подчертано дискусионни положения.7
Питам се защо учените от ИБЕ отстъпват от разумния подход на своите именити предшественици и на какво почива тяхната увереност, че ще поднесат концепция, която най-малкото няма да провокира съществени възражения.
Основният въпрос според мен обаче е какви практически ползи ще ни донесе новата класификация.
По-добре ли ще си обясняваме и ще подреждаме езиковата действителност в съзнанието си? Ще доведе ли това до по-бързо и трайно усвояване на граматичните, правописните и пунктуационните норми? Или напротив – ще прахосаме ценна енергия в прекрояването, преподреждането и новото съшиване на езиковата материя. И междувременно може да се изгубим някъде там, между съществителните местоимения, глаголните прилагателни и думите, които могат да бъдат наречия, числителни и съществителни.
С непрозрачната си езикова политика ИБЕ отдавна е длъжник на българското общество. Още повече Институтът дължи отговори сега, преди някой ден да сме осъмнали под диктата на нова нормативна граматика.
Или по-лошо – с нова нормативна граматика, с която няма да искаме да се съобразяваме.
Изложеното в статията мнение е лично мое и не ангажирам никого с него.
1 Терминът части на речта в българското езикознание вече се измества от (граматични) класове думи/лексеми. Намирам новия термин за коректен.
2 В съществителното местоимение първата дума може да се възприеме и като прилагателно име. Всъщност терминът трябва да се разбира като „клас съществително име, подклас местоимение“.
5 Примерите в скобите не изчерпват всички местоимения от съответния вид.
6 Дисертацията е публикувана като монография със същото заглавие през 2022 г. от издателство „Колибри“.
7 Граматика на съвременния български книжовен език. Т. 1. Фонетика. София: Издателство на БАН, 1982, с. 7.
Езикът може да е вкусен и извън блюдото – онзи, българският език, на който говорим от малки и на който около 24 май се кълнем в обич. А той в същността си е средство за общуване и за да ни служи добре, непрекъснато се променя. Да го погледнем в неговата динамика и да се опитаме да разберем какво става и защо, кои са движещите механизми и как те са свързани с обществените процеси. И тъй като задачата не е лека, ще го правим постепенно – на порции.
This blog post is a continuation of Part 2, where we cleared the ambiguity around title launch observability at Netflix. In this installment, we will explore the strategies, tools, and methodologies that were employed to achieve comprehensive title observability at scale.
Defining the observability endpoint
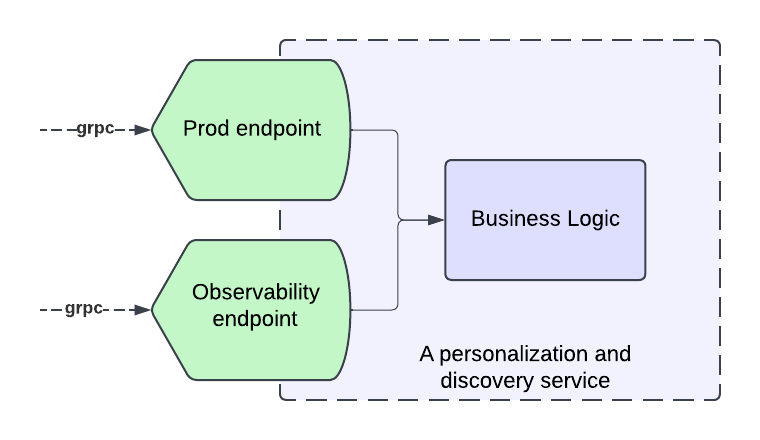
To create a comprehensive solution, we decided to introduce observability endpoints first. Each microservice involved in our Personalization stack that integrated with our observability solution had to introduce a new “Title Health” endpoint. Our goal was for each new endpoint to adhere to a few principles:
Accurate reflection of production behavior
Standardization across all endpoints
Answering the Insight Triad: “Healthy” or not, why not and how to fix it.
Accurately Reflecting Production Behavior
A key part of our solution is insights into production behavior, which necessitates our requests to the endpoint result in traffic to the real service functions that mimics the same pathways the traffic would take if it came from the usual callers.
In order to allow for this mimicking, many systems implement an “event” handling, where they convert our request into a call to the real service with properties enabled to log when titles are filtered out of their response and why. Building services that adhere to software best practices, such as Object-Oriented Programming (OOP), the SOLID principles, and modularization, is crucial to have success at this stage. Without these practices, service endpoints may become tightly coupled to business logic, making it challenging and costly to add a new endpoint that seamlessly integrates with the observability solution while following the same production logic.
A service with modular business logic facilitates the seamless addition of an observability endpoint.
Standardization
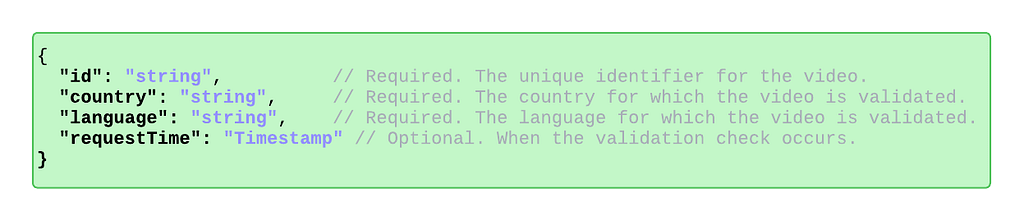
To standardize communication between our observability service and the personalization stack’s observability endpoints, we’ve developed a stable proto request/response format. This centralized format, defined and maintained by our team, ensures all endpoints adhere to a consistent protocol. As a result, requests are uniformly handled, and responses are processed cohesively. This standardization enhances adoption within the personalization stack, simplifies the system, and improves understanding and debuggability for engineers.
The request schema for the observability endpoint.
The Insight Triad API
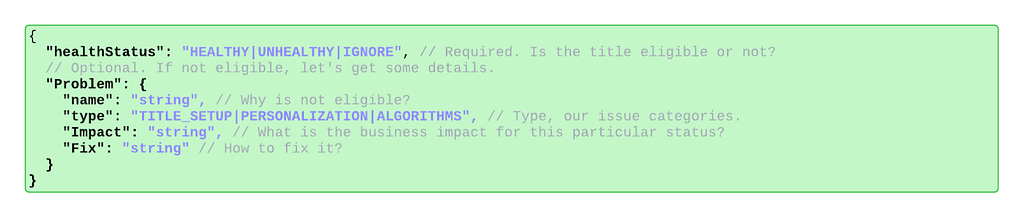
To efficiently understand the health of a title and triage issues quickly, all implementations of the observability endpoint must answer: is the title eligible for this phase of promotion, if not — why is it not eligible, and what can be done to fix any problems.
The end-users of this observability system are Launch Managers, whose job it is to ensure smooth title launches. As such, they must be able to quickly see whether there is a problem, what the problem is, and how to solve it. Teams implementing the endpoint must provide as much information as possible so that a non-engineer (Launch Manager) can understand the root cause of the issue and fix any title setup issues as they arise. They must also provide enough information for partner engineers to identify the problem with the underlying service in cases of system-level issues.
These requirements are captured in the following protobuf object that defines the endpoint response.
The response schema for the observability endpoint.
High level architecture
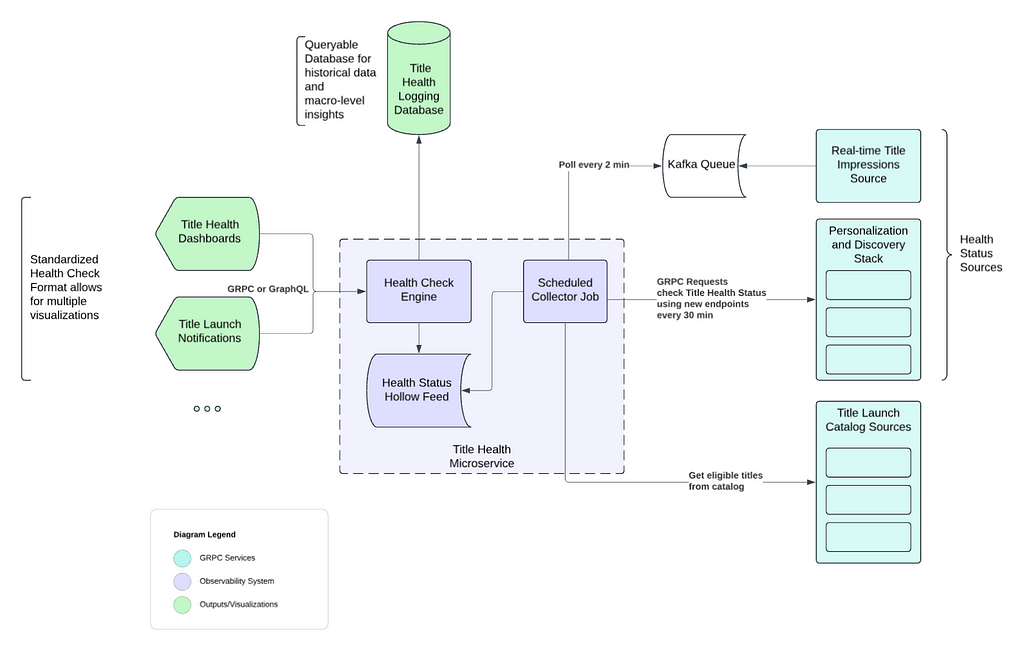
We’ve distilled our comprehensive solution into the following key steps, capturing the essence of our approach:
Establish observability endpoints across all services within our Personalization and Discovery Stack.
Implement proactive monitoring for each of these endpoints.
Track real-time title impressions from the Netflix UI.
Store the data in an optimized, highly distributed datastore.
Offer easy-to-integrate APIs for our dashboard, enabling stakeholders to track specific titles effectively.
“Time Travel” to validate ahead of time.
Observability stack high level architecture diagram
In the following sections, we will explore each of these concepts and components as illustrated in the diagram above.
Key Features
Proactive monitoring through scheduled collectors jobs
Our Title Health microservice runs a scheduled collector job every 30 minutes for most of our personalization stack.
For each Netflix row we support (such as Trending Now, Coming Soon, etc.), there is a dedicated collector. These collectors retrieve the relevant list of titles from our catalog that qualify for a specific row by interfacing with our catalog services. These services are informed about the expected subset of titles for each row, for which we are assessing title health.
Once a collector retrieves its list of candidate titles, it orchestrates batched calls to assigned row services using the above standardized schema to retrieve all the relevant health information of the titles. Additionally, some collectors will instead poll our kafka queue for impressions data.
Real-time Title Impressions and Kafka Queue
In addition to evaluating title health via our personalization stack services, we also keep an eye on how our recommendation algorithms treat titles by reviewing impressions data. It’s essential that our algorithms treat all titles equitably, for each one has limitless potential.
This data is processed from a real-time impressions stream into a Kafka queue, which our title health system regularly polls. Specialized collectors access the Kafka queue every two minutes to retrieve impressions data. This data is then aggregated in minute(s) intervals, calculating the number of impressions titles receive in near-real-time, and presented as an additional health status indicator for stakeholders.
Data storage and distribution through Hollow Feeds
Netflix Hollow is an Open Source java library and toolset for disseminating in-memory datasets from a single producer to many consumers for high performance read-only access. Given the shape of our data, hollow feeds are an excellent strategy to distribute the data across our service boxes.
Once collectors gather health data from partner services in the personalization stack or from our impressions stream, this data is stored in a dedicated Hollow feed for each collector. Hollow offers numerous features that help us monitor the overall health of a Netflix row, including ensuring there are no large-scale issues across a feed publish. It also allows us to track the history of each title by maintaining a per-title data history, calculate differences between previous and current data versions, and roll back to earlier versions if a problematic data change is detected.
Observability Dashboard using Health Check Engine
We maintain several dashboards that utilize our title health service to present the status of titles to stakeholders. These user interfaces access an endpoint in our service, enabling them to request the current status of a title across all supported rows. This endpoint efficiently reads from all available Hollow Feeds to obtain the current status, thanks to Hollow’s in-memory capabilities. The results are returned in a standardized format, ensuring easy support for future UIs.
Additionally, we have other endpoints that can summarize the health of a title across subsets of sections to highlight specific member experiences.
Message depicting a dashboard request.
Time Traveling: Catching before launch
Titles launching at Netflix go through several phases of pre-promotion before ultimately launching on our platform. For each of these phases, the first several hours of promotion are critical for the reach and effective personalization of a title, especially once the title has launched. Thus, to prevent issues as titles go through the launch lifecycle, our observability system needs to be capable of simulating traffic ahead of time so that relevant teams can catch and fix issues before they impact members. We call this capability “Time Travel”.
Many of the metadata and assets involved in title setup have specific timelines for when they become available to members. To determine if a title will be viewable at the start of an experience, we must simulate a request to a partner service as if it were from a future time when those specific metadata or assets are available. This is achieved by including a future timestamp in our request to the observability endpoint, corresponding to when the title is expected to appear for a given experience. The endpoint then communicates with any further downstream services using the context of that future timestamp.
An example request with a future timestamp.
Conclusion
Throughout this series, we’ve explored the journey of enhancing title launch observability at Netflix. In Part 1, we identified the challenges of managing vast content launches and the need for scalable solutions to ensure each title’s success. Part 2 highlighted the strategic approach to navigating ambiguity, introducing “Title Health” as a framework to align teams and prioritize core issues. In this final part, we detailed the sophisticated system strategies and architecture, including observability endpoints, proactive monitoring, and “Time Travel” capabilities; all designed to ensure a thrilling viewing experience.
By investing in these innovative solutions, we enhance the discoverability and success of each title, fostering trust with content creators and partners. This journey not only bolsters our operational capabilities but also lays the groundwork for future innovations, ensuring that every story reaches its intended audience and that every member enjoys their favorite titles on Netflix.
Thank you for joining us on this exploration, and stay tuned for more insights and innovations as we continue to entertain the world.
This post is written by Mark Nguyen, Principal Solutions Architect, AWS and Ryan Fillis, Solutions Architect, AWS.
AWS Outposts brings native AWS services, infrastructure, and operating models to virtually any data center, co-location space, or on-premises facility. Deploying Outposts servers in your environment necessitates additional considerations regarding local network connectivity and Amazon Elastic Compute Cloud (Amazon EC2) instance networking. This post demonstrates the scalability of Outposts servers through automation and the deployment of Amazon EC2 network interfaces. This reduces the number of manual steps required to configure an Outposts server.
This post details physically connecting your servers to your Local Area Network (LAN) and the networking options available for EC2 instances running on Outposts. We cover the physical cabling options, virtual networking components such as VPCs and subnets, and walkthrough an example setup for an EC2 instance with a user-data script to route traffic locally over your on-premises network.
This post assumes that you have some familiarity with Outposts servers. If you would like a general refresher, observe What is AWS Outposts. For more information about how to provision your Outposts server, see Installing an AWS Outposts server.
Basic Amazon EC2 networking using a single interface
When launching an EC2 instance on an Outposts server a single interface is created for network connectivity. This default setting, depicted in the following diagram, is the most direct method for your instance to communicate externally.
Figure 1: Simple network connectivity on an Outposts server
When deploying an EC2 instance to an Outposts server, there are certain differences in using the default Elastic Network Interface (ENI) as compared to deploying in an AWS Region. Understanding these differences is critical before modifying the network configuration, which you do in the next step.
ENI differentiators between Outposts servers and the Region:
Primary interface: The primary interface is an ENI. This ENI is associated to a subnet within a VPC. This VPC is extended from the Region to the Outposts server.
IP address configuration: The primary network interface within the guest operating system (OS) of the EC2 instance must be configured to obtain an IP address through DHCP. The assigned IP address is from the IP address range of the VPC subnet associated with the Outposts server.
Security group: A security group is associated with the ENI. This security group falls within the VPC that is extended from the Region. The user must apply appropriate access control rules to permit access to the EC2 instance. You may reuse security groups that already exist within the VPC.
Outbound traffic: By default, an EC2 instance uses its ENI to direct outbound traffic toward the VPC subnet. Traffic flows according to the routing table associated with the Outposts server’s VPC subnet.
Inbound traffic: If you’re only using an ENI, then traffic destined to EC2 instances on Outposts servers must traverse through the service link. In the preceding diagram, the user communicates with the EC2 instance over the internet. Traffic from the internet reaches the Region through the Internet Gateway of the VPC. Then, the VPC forwards the traffic to the appropriate subnet of the Outposts server (through the service link) and reaches the EC2 instance. The user must configure the necessary VPC components (Internet Gateway and associated routing table entries) for internet connectivity.
Local network connectivity: There is no local network connectivity using the ENI. For local network connectivity, see the next section where we discuss the Outposts server Local Network Interface (LNI).
Local network connectivity for EC2 instances
Outposts servers allow you to communicate through the Local Network Interface (LNI) in addition to the ENI. The LNI is a logical networking component that connects the Amazon EC2 instances in your Outposts subnet to your on-premises network.
The Outposts server EC2 instance local communications characteristics:
Local network traffic needs the use of an LNI.
The subnets on Outposts servers must be enabled for LNIs. This is done by entering the following command:
aws ec2 modify-subnet-attribute \
--subnet-id subnet-1a2b3c4d \
--enable-lni-at-device-index 1
IP address assignment for the LNI can be DHCP or static.
You can’t apply VPC security groups to the LNI. To control traffic on the LNI, you can use an OS based firewall, external on-premises firewall, or other security devices.
Outposts servers don’t tag VLAN traffic. If VLAN tags are needed, then the network interface settings inside the guest OS must apply the VLAN tags. Multiple VLAN interfaces can exist within the same LNI (in this case you would be using the LNI as a VLAN trunk).
EC2 instances that communicate locally always have at least two interfaces: one ENI and one or more LNIs. Therefore, the instance OS’s routing table must be configured based on the desired traffic behavior.
Example configuration: Local traffic for EC2 instance on Outposts server
Figure 2: Example scenario topology
In the example scenario, we want to launch an Amazon Linux 2023 instance and route all default traffic through the local network. Eth0 is the primary interface (ENI) and is used for traffic towards the Region. Eth1 is the LNI and is used for all other traffic. A user-data script is used to make the necessary routing changes at launch.
Here is a sample user-data script. These commands run as root so there is no need to prepend each command with sudo.
When an instance is launched on Outposts server, the instance automatically has a default route that points toward the VPC through the ENI. In the example scenario, the desired configuration is to have all default traffic go through the LNI toward our on-premises LAN, not through the ENI. To accomplish this routing behavior for the ENI, we have to add a route toward the VPC and remove the default route. The first line adds a route through the VPC (172.31.0.0/16), using 172.31.239.1 as the gateway. The second line removes the default route that uses 172.31.239.1 (via the ENI) as the gateway.
Traffic not destined for the VPC routes through the LNI. This includes all local traffic and internet-bound traffic. The local network’s DHCP server provides a default-gateway in its DHCP lease. Therefore, there is already a default route assigned to the LNI. This steers any traffic without a more specific route, including internet traffic, toward the LNI.
Next, the user-data script makes the network settings persistent after reboot. The procedure varies depending on your OS. In the case of Amazon Linux 2023, it uses systemd-networkd.
This command copies the configuration files from the /run/systemd/network/ folder to /etc/systemd/network/. The configuration files in the /etc/systemd/network/ folder override the default settings and load during boot. The next is step is to modify the newly copied network configuration files.
In this case the ENI is ens5. This line appends the static route section to the 70-ens5.network configuration file. This makes the static route added earlier in the script (route add -net 172.31.0.0/16 gw 172.31.239.1) persistent across reboots.
sed -i -e 's/UseGateway=true/UseGateway=false/g' /etc/systemd/network/70- ens5.network.d/eni.conf
Next, the user-script edits the configuration file, eni.conf, such that the default route isn’t used for the ENI at bootup. This is accomplished using sed to search and replace true with false for the UseGateway parameter.
We can break down the parameters used in the preceding command:
--image-id ami-051f8a213df8bc089 \
This specifies the Amazon Machine Image (AMI) ID. ami-051f8a213df8bc089 is the AMI ID for Amazon Linux 2023 in us-east-1.
--count 1 \
This specifies how many EC2 instances to launch. You can launch multiple at the same time.
--instance-type c6id.xlarge
This specifies the instance type. By default, Outposts 2U servers are slotted with the c6id.8xlarge instance type and Outposts 1U servers are slotted with the c6gd.8xlarge instance type. You can adjust the slotting assignment during the ordering process or you can change the slotting assignment later by using the Self-service Capacity Management feature for AWS Outposts.
--key-name my_key
This specifies the public RSA key that is added to your EC2 instance. This key must already be defined in the same Region of your AWS account.
--user-data file://my_userdata.txt
This specifies the filename that contains your user-data script (that was created previously).
This specifies the network interface configuration. By default, a single network interface, the ENI, is created. This example calls for a second interface for the LNI. DeviceIndex:0 is for the ENI and doesn’t change. DeviceIndex:1 is for the LNI, which we defined when we enabled LNI for the subnet (--enable-lni-at-device-index 1). The SubnetId refers to the subnet that was created on the Outposts server. If you want to deploy to a different Outposts server, then change the SubnetId. Groups refer to the security group that you would like assigned to the ENI. Security groups aren’t supported for the LNI, thus the security group specified for DeviceIndex:1 is only to comply with the command syntax check. A security group will not be applied to the LNI.
This assigns a name to the EC2 instance, which in this case is server1.
Conclusion
AWS Outposts servers allow you to run native AWS services on-premises by providing local compute. This supports workloads with low latency and data residency requirements through on-premises processing.
Although Outposts servers integrate seamlessly with the AWS cloud, there are some unique networking considerations when deploying in your data center environment. Amazon EC2 instances on the Outposts server can route traffic over the AWS global network, but you can also enable Local Network Interfaces (LNIs) to directly access your on-premises networks.
In this post we’ve demonstrated using user-data scripts during instance launch to automate hybrid cloud networking flows tailored to your requirements. With proper planning, you can use the benefits of consistent AWS services and tooling while maintaining connectivity to your existing on-premises infrastructure.
Mozilla’s actions have been rubbing many Firefox fans the
wrong way as of late, and inspiring them to look for alternatives.
There are many choices for users who are looking for a browser that
isn’t part of the Chrome monoculture but is full-featured and suitable
for day-to-day use. For those who are willing to stay in the Firefox
“family” there are a number of good options that have taken vastly
different approaches. This includes GNU IceCat, Floorp, LibreWolf, and Zen.
As we dive into 2025, we’re thrilled to announce our latest group of AWS Heroes! These exceptional individuals have demonstrated outstanding expertise and innovation, and are committed to sharing knowledge. Their contributions to the AWS community are greatly appreciated, and today we’re excited to celebrate them.
Ahmed Bebars – New Jersey, USA
Container Hero Ahmed Bebars is a Principal Engineer at The New York Times, where he leads the design and delivery of scalable developer platforms that enhance productivity and empower engineering teams. With deep expertise in containers, Kubernetes, and cloud-native technologies, Ahmed builds robust infrastructure solutions that streamline development workflows and support innovation. As an active member of the AWS and Cloud Native communities, he frequently shares his expertise at events like KubeCon, AWS re:Invent, AWS Community Days, and Kubernetes Community Days. Through his initiative, “Level Up with Ahmed,” he shares practical insights and resources to help engineers grow their skills and stay ahead in the evolving tech landscape.
Badri Narayanan Kesavan – Singapore
Community Hero Badri Narayanan Kesavan is an Engineering Lead and Solutions Architect with over a decade of professional experience, specializing in AWS Cloud solutions, platform engineering, and DevOps automation. Badri’s passion lies in learning and sharing with the community. He has delivered several talks at AWS Singapore Summit, AWS Summit ASEAN 2023, AWS Community Days, and various user group meetups. As an active AWS community leader, he organizes meetups and workshops under the AWS Singapore User Group where he regularly conducts sessions on diverse AWS topics, engaging a wide audience to foster innovation and collaboration. He has also authored the book “Mastering Amazon EC2)” which is a comprehensive guide to building robust and resilient applications on Amazon Elastic Compute Cloud (Amazon EC2).
Marcelo Paiva – Goiânia, Brazil
Community Hero Marcelo Paiva has over 30 years of experience in technology and is the CTO at Softprime Soluções, leading product development and research in digital biometrics, facial recognition, and artificial intelligence (AI). With more than a decade working with cloud computing, he specializes in building scalable and innovative solutions using AWS. Passionate about tech communities, Marcelo founded the AWS User Group in Goiânia in 2018, helping grow the local community. Today, he organizes events such as JoinCommunity and Cloud Summit Cerrado, fostering learning and networking in the Cerrado region.
Raphael Jambalos – Quezon City, Philippines
Community Hero Raphael Jambalos manages the Cloud Native development team at eCloudValley Philippines. His team has implemented dozens of cloud-native applications across multiple industries for customers in the Philippines. He is active in helping the AWS User Groups grow in the Philippines, and is passionate about connecting with the community beyond Manila. In his free time, he loves to read books and write about cloud technologies on his Dev.to blog.
Stav Ochakovski – Tel Aviv, Israel
Container Hero Stav Ochakovski is a DevOps Engineer at Beacon and a cybersecurity expert, managing highly scalable multi-cloud environments. With a background in DevOps engineering and instruction, Stav seamlessly transitioned into the dynamic cybersecurity start-up scene. A champion of container technologies and Amazon Elastic Kubernetes Service (Amazon EKS), she brings deep expertise in Kubernetes, CI/CD pipelines, and logging solutions to the AWS community. Stav actively shares her expertise by speaking at AWS community events, as well as security and container conferences. She is also a leader of the Israel AWS User Group and is a pastry-chef school graduate and licensed skipper.
Learn More
Visit the AWS Heroes website if you’d like to learn more about the AWS Heroes program, or to connect with a Hero near you.
As we explained in our recent blog post, AI Reasoning Models: OpenAI o3-mini, o1-mini, and DeepSeek R1, Chinese startup DeepSeek caused a stir when it released its R1 reasoning model in January of this year. Interestingly, DeepSeek R1 has an OpenAI-compatible API, so applications written for OpenAI should work with DeepSeek R1 with just a configuration change. Since I had a suitable sample app all ready to go, I decided to put their claim to the test.
Why, and why not, use DeepSeek?
A major difference between DeepSeek and OpenAI is cost. At the time of writing, DeepSeek charges $0.55 per million input tokens and $2.19 per million output tokens for its R1 model. That’s about 3.6% of OpenAI’s $15.00 per million input tokens and $60.00 per million output tokens for its flagship o1 reasoning model, and about half of o3-mini’s $1.10 per million input tokens and $4.40 per million output tokens.
Set against this is the fact that, in using the DeepSeek platform’s API, you are sending your data to a startup located in China that has been accused by OpenAI of “inappropriately” basing its work on the output of OpenAI’s models. It’s up to you, and your organizations’ data governance policy, whether the trade-off is worthwhile.
Another consideration is the ability to run DeepSeek’s models locally, on your own infrastructure, or, more likely, your chosen provider’s infrastructure, rather than sending requests to the DeepSeek platform. Spinning up my own DeepSeek instance was out of scope for this blog post, but I’ll likely return to it in a future blog post.
Swapping OpenAI for DeepSeek
Last month, I explained how you can build an AI agent with Backblaze B2, LangChain, and Drive Stats, walking you through a simple chatbot that can answer questions based on our Drive Stats data set—11 years of metrics gathered from the Backblaze B2 Cloud Storage platform’s fleet of hard drives. In that example, the chatbot accepted a natural language question, used OpenAI’s GPT‑4o mini large language model (LLM) to generate a SQL query that might help provide an answer, executed the query against the Drive Stats data set via the Trino SQL engine, and then used OpenAI again to interpret the result set and either repeat the query-interpret cycle, or generate a natural language answer.
I copied the Jupyter notebook from that example and used it as the basis for investigating the feasibility of swapping out OpenAI for DeepSeek. The DeepSeek version of the notebook contains the full source code of my experiments; I’ll include relevant extracts here, edited for clarity.
Since I used the LangChain AI framework, which provides a layer above a range of AI models, the only place that OpenAI surfaced in my code was in creating an instance of LangChain’s ChatOpenAI wrapper:
# OPENAI_API_KEY must be defined in the .env file
load_dotenv()
llm = ChatOpenAI(model="gpt-4o-mini")
The ChatOpenAI class contains all the code required to communicate with OpenAI via its API.
Provide your DeepSeek API key in the same OPENAI_API_KEY environment variable.
Set the API base URL to https://api.deepseek.com.
Provide a DeepSeek model name in place of the OpenAI one.
If this reminds you of the steps for using Backblaze B2’s S3-compatible API, you’re not alone. The OpenAI API has become a de facto standard for integrating with LLMs in much the same way as Amazon’s S3 API allows an ecosystem of apps and tools to interoperate with object storage systems from a variety of vendors.
Looking at the DeepSeek documentation, you can use one of two models, deepseek-reasoner (aka DeepSeek R1) or deepseek-chat. Let’s see what the much-talked-about DeepSeek R1 came up with.
Using DeepSeek R1 in the AI agent
To make it easy to use both the OpenAI and DeepSeek notebooks, I created a second entry in the .env file for the DeepSeek API key, and copied it to the OpenAI environment variable in the notebook code:
# The .env file needs at least DEEPSEEK_API_KEY, and may also contain # OPENAI_API_KEY. Move the DeepSeek API key to the OpenAI environment # variable load_dotenv()
As I set about repeating the steps from the Jupyter notebook that supported my previous blog post, I was disappointed to see DeepSeek fall at the very first hurdle: generating a SQL query for a simple natural language question. Here is the code:
question = {"question": "How many drives are there?"}

write_query(question)
Looking back at the original notebook, OpenAI’s response was valid SQL, although it didn’t have enough information to construct the correct query:
{'query': 'SELECT COUNT(*) AS drive_count FROM drivestats'}
DeepSeek, on the other hand, responded with a Python stack trace and this error:
openai.UnprocessableEntityError: Failed to deserialize the JSON body into the target type: response_format: response_format.type `json_schema` is unavailable now at line 1 column 13827
What went wrong? Searching for the error turns up a comment from a LangChain engineer explaining that we should use BaseChatOpenAI rather than ChatOpenAI since it “[…] accommodates many APIs that are similar to OpenAI. It uses tool calling for structured output by default.”
So, we can redefine llm accordingly, and try generating a query again:
BadRequestError: Error code: 400 - {'error': {'message': 'The last message of deepseek-reasoner must be a user message, or an assistant message with prefix mode on (refer to https://api-docs.deepseek.com/guides/chat_prefix_completion).', 'type': 'invalid_request_error', 'param': None, 'code': 'invalid_request_error'}}
Looking back at the AI agent code, we can see that we used an off-the-shelf prompt from the LangChain Prompt Hub that provides the model with a single, system, message:
================================ System Message ================================

Given an input question, create a syntactically correct {dialect} query to run to help find the answer. Unless the user specifies in his question a specific number of examples they wish to obtain, always limit your query to at most {top_k} results. You can order the results by a relevant column to return the most interesting examples in the database.

Never query for all the columns from a specific table, only ask for a few relevant columns given the question.

Pay attention to use only the column names that you can see in the schema description. Be careful to not query for columns that do not exist. Also, pay attention to which column is in which table.

Only use the following tables:
{table_info}

Question: {input}
Does this mean that DeepSeek is not, in fact, API-compatible with OpenAI? I would argue that it does not. DeepSeek implements the same API request/response syntax as OpenAI, but it is a different platform. Some variation in semantics is to be expected. We see similar variations between Backblaze B2 and Amazon S3; for example, the S3 PutObjectAcl operation sets the access control list (ACL) for an object in a bucket. Amazon S3’s access management model allows you to manipulate an object’s ACL independently of its bucket—for example, you can put a private object in a public bucket, and vice versa.
This flexibility comes with a cost: It becomes difficult to reason about the visibility of data. In fact, AWS now recommends “that you keep ACLs disabled, except in unusual circumstances where you need to control access for each object individually.”
Backblaze B2’s model is much simpler: You control access at the bucket level, and all objects have the same ACL as their bucket. Backblaze B2 implements the PutObjectAcl operation, but, if you try to set an object’s ACL to any other value than its bucket’s ACL, the service responds with an error.
Returning to the AI agent code, we can replace the single-system-message prompt with one that combines a system message with a user message:
import textwrap
from langchain_core.prompts import ChatPromptTemplate

query_prompt_template = ChatPromptTemplate([
    ("system", textwrap.dedent("""Given an input question, create a
    syntactically correct {dialect} query to run to help find the answer.
    Unless the user specifies in his question a specific number of examples
    they wish to obtain, always limit your query to at most {top_k} results.
    You can order the results by a relevant column to return the most
    interesting examples in the database.

    Never query for all the columns from a specific table, only ask for a the
    few relevant columns given the question.

    Pay attention to use only the column names that you can see in the schema
    description. Be careful to not query for columns that do not exist. Also,
    pay attention to which column is in which table.

    Only use the following tables:
    {table_info}""")),
    ("human", "Question: {input}"),
])
Trying the write_query() call for a third time, this is the response:
BadRequestError: Error code: 400 - {'error': {'message': 'deepseek-reasoner does not support Function Calling', 'type': 'invalid_request_error', 'param': None, 'code': 'invalid_request_error'}}
Function calling is a powerful capability that enables Large Language Models (LLMs) to interact with your code and external systems in a structured way. Instead of just generating text responses, LLMs can understand when to call specific functions and provide the necessary parameters to execute real-world actions.
Unfortunately, that is exactly our use case. It’s becoming clear that DeepSeek R1 is not the correct tool for implementing an AI agent—we’ve been trying to use a chisel as a screwdriver!
DeepSeek-V3: A better fit
As its name suggests, the deepseek-chat model is more appropriate for this application. The DeepSeek documentation tells us that it is based on DeepSeek-V3, released in December 2024. DeepSeek-V3 is priced at $0.27 per million input tokens and $1.10 per million output tokens; this is actually more expensive than the GPT-4o mini model I used for the OpenAI agent example ($0.15 per million input tokens, $0.600 per million output tokens), but how does it compare? Let’s take a look.
First, we need to edit the LLM creation code again to set the model name:
Now we can run write_query() again. It’s immediately clear that it’s a better fit than its “big brother:”
{'query': 'SELECT COUNT(*) AS total_drives FROM drivestats LIMIT 10'}
As with the OpenAI agent, this query is well-formed SQL, but it’s not answering the question we set—it’s giving us the total number of rows in the dataset, rather than the number of drives. Also, it’s a little odd to have a LIMIT clause in a SELECT COUNT(*) query, but it’s legal SQL, and the agent is following its instructions very literally: always limit your query to at most {top_k} results, where we set top_k to 10.
question = {"question": "Each drive has its own serial number. How many drives are there?"}

query = write_query(question)

{'query': 'SELECT COUNT(DISTINCT serial_number) AS total_drives FROM drivestats'}
So far, so good!
I’ll skip some intermediate steps here—they are all in the Jupyter notebook if you want to review them, or run them for yourself—and look at how a simple LangChain graph, built on the DeepSeek LLM, answered the question: “Each drive has its own serial number. How many drives did each data center have on 9/1/2024?”
The OpenAI version generated an invalid query, comparing the date column with the string ’2024-09-01’ without using the required DATE type identifier, but DeepSeek generates a correct SQL query and provides a useful natural language response:
/SELECT datacenter, COUNT(DISTINCT serial_number) AS drive_count FROM drivestats WHERE date = DATE ‘2024-09-01’ GROUP BY datacenter ORDER BY drive_count DESC LIMIT 10
On September 1, 2024, the data centers had the following number of drives:
phx1: 89,477 drives
sac0: 78,444 drives
sac2: 60,775 drives
(empty datacenter): 24,080 drives
iad1: 22,800 drives
ams5: 16,139 drives
These are the top data centers with the highest drive counts on that date.
DeepSeek scores a point!
Moving on to the ReAct AI Agent, which allows the LLM to perform multiple SQL queries in generating an answer to a question, DeepSeek performs similarly to OpenAI. Given the question, “Each drive has its own serial number. What is the annualized failure rate of the ST4000DM000 drive model?”, the DeepSeek agent provides the overall failure rate rather than the annualized failure rate (AFR).
When we provide explicit instructions for calculating AFR in its prompt, the DeepSeek agent provides the correct result, identical, in fact, to the OpenAI agent’s response:
The annual failure rate (AFR) for the ST4000DM000 drive model is approximately 2.63%.
However, when given the question, “What was the annual failure rate of the ST8000NM000A drive model in Q3 2024?”, the DeepSeek agent gives us:
[(1.6100573445081607,)]
While OpenAI responds:
The annual failure rate (AFR) of the ST8000NM000A drive model in Q3 2024 is approximately 1.61%.
Wrapping up the investigation, the final question from the OpenAI notebook is more complex:
Considering only drive models which had at least 100 drives in service at the end of the quarter and which accumulated 10,000 or more drive days during the quarter, which drive had the most failures in Q3 2024, and what was its failure rate?
Impressively, the OpenAI agent constructed a well-formed SQL query and provided the correct response:
The drive model with the most failures in Q3 2024 is the TOSHIBA MG08ACA16TA, which had 181 failures. Its failure rate during this period was approximately 1.84%.
BadRequestError: Error code: 400 - {'error': {'message': "An assistant message with 'tool_calls' must be followed by tool messages responding to each 'tool_call_id'. (insufficient tool messages following tool_calls message)", 'type': 'invalid_request_error', 'param': None, 'code': 'invalid_request_error'}}
During task with name 'agent' and id '0aa26ba6-a3ee-ced1-de4d-b60ed7fbca99'
The phrase “insufficient tool messages” suggested that the DeepSeek LLM might need to be reconfigured to allow more tokens. According to the documentation on models and pricing, the deepseek-chat model supports a maximum of 8K output tokens, but defaults to 4K if max_tokens is not specified.
Recreating the DeepSeek wrapper object and agent accordingly, I gave it the last question again:
response = agent_executor.invoke( {"messages": [{"role": "user", "content": "Considering only drive models which had at least 100 drives in service at the end of the quarter and which accumulated 10,000 or more drive days during the quarter, which drive had the most failures in Q3 2024, and what was its failure rate?"}]} )
# Show the SQL query sent to the database print(response['messages'][-3].tool_calls[0]['args']['query'])
# Show the final response message display_markdown(response['messages'][-1].content, raw=True)
This time, DeepSeek was able to generate a similar SQL query to OpenAI:
WITH drive_counts AS (
    SELECT model, COUNT(DISTINCT serial_number) AS drive_count
    FROM drivestats
    WHERE date >= DATE '2024-07-01' AND date <= DATE '2024-09-30'
    GROUP BY model
    HAVING COUNT(DISTINCT serial_number) >= 100
), drive_days AS (
    SELECT model, COUNT(*) AS total_drive_days
    FROM drivestats
    WHERE date >= DATE '2024-07-01' AND date <= DATE '2024-09-30'
    GROUP BY model
    HAVING COUNT(*) >= 10000
), failures AS (
    SELECT model, COUNT(*) AS failure_count
    FROM drivestats
    WHERE date >= DATE '2024-07-01' AND date <= DATE '2024-09-30' AND failure = 1
    GROUP BY model
)
SELECT d.model,
       f.failure_count,
       100 * (CAST(f.failure_count AS DOUBLE) / (CAST(d.total_drive_days AS DOUBLE) / 365)) AS annual_failure_rate
FROM drive_days d
JOIN failures f ON d.model = f.model
JOIN drive_counts dc ON d.model = dc.model
ORDER BY f.failure_count DESC
LIMIT 1
With a correct response:
To answer the question:
The drive model with the most failures in Q3 2024 is TOSHIBA MG08ACA16TA, which had 181 failures. The annualized failure rate (AFR) for this model during that quarter was 1.84%.
Success! But, unfortunately, this isn’t the whole story.
DeepSeek Reliability
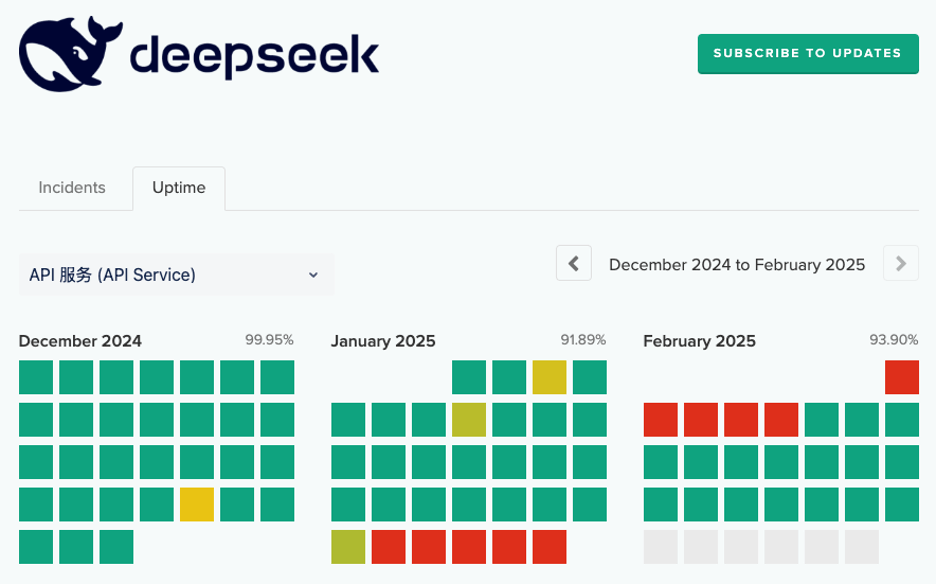
I originally set out to write this blog post at the end of January, but the DeepSeek platform website had gone offline by January 30, so I couldn’t even start until I was able to sign up for an API key on February 5.
Given my shiny new API key, and DeepSeek’s claims of OpenAI API compatibility, I naïvely expected to be able to work through my earlier OpenAI notebook and write up the results in a couple of days. The reality was more like two weeks.
In this blog post I’ve detailed some of the error messages I encountered along the way, but I saw many more that pointed to the DeepSeek API simply being overwhelmed with traffic. For example, for over a day, when the status page reported no issues, most API requests to DeepSeek terminated after a minute with the error message:
json.decoder.JSONDecodeError: Expecting value: line 1 column 1 (char 0)
A time-consuming investigation revealed that this was caused by the DeepSeek API returning the 200 status code and headers as if the request was successful, then hanging for a minute before terminating the connection without returning any actual data. The calling code saw the 200 as success and tried to decode the non-existent API response body, resulting in the error.
I saw several more instances of intermittent errors that all seemed to point in the same direction: DeepSeek needs to add capacity to its API platform. Notably, the platform seemed faster and more stable on a Saturday morning, U.S. Pacific time, the early hours of Sunday morning in China.
Final thoughts
At present, I would have to classify the DeepSeek-V3 API as “promising, but somewhat flaky.” An agent invocation that succeeds one minute could fail the next with any of a range of error messages. That’s a shame, since when it does work, for instance, in creating the SQL query for the final question above, it tends to work very well.
One final caveat: This is a dynamic field; frameworks and services are literally being updated on a daily basis. For example, since yesterday, as I write this, four of the notebook’s module dependencies have been updated. I encourage you to experiment for yourself as your mileage will almost certainly vary, hopefully in a positive direction.
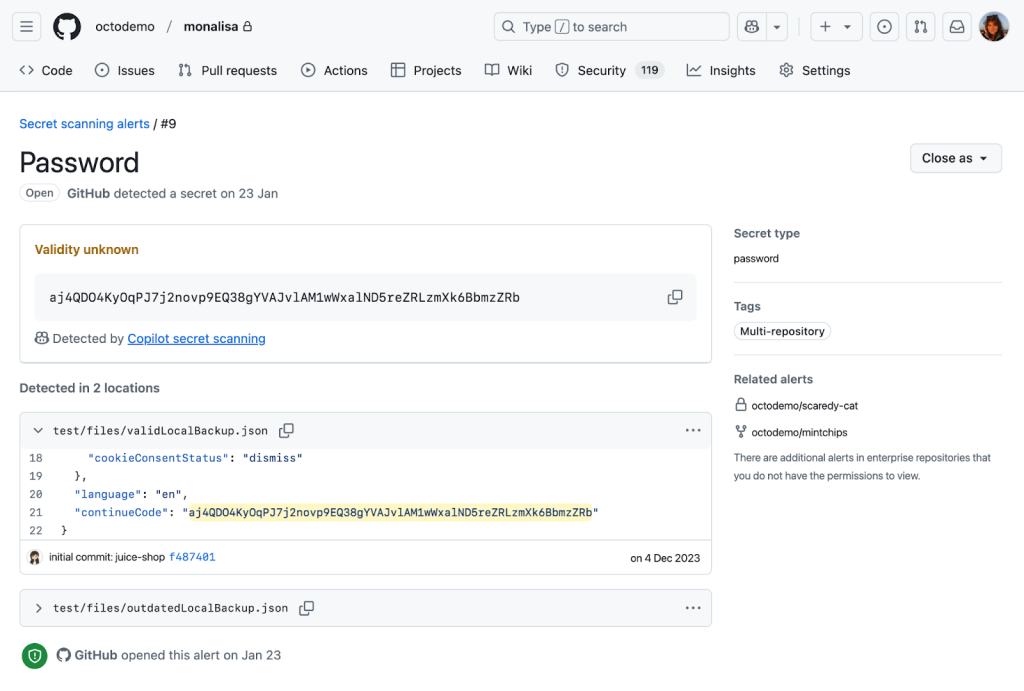
In October 2024, we announced the general availability of Copilot secret scanning, leveraging AI to detect generic passwords in users’ codebases. This post describes how Copilot secret scanning works under the hood, the challenges we ran into when developing it, and the framework we use for testing and iteration.
What is Copilot secret scanning?
Copilot secret scanning is a feature of GitHub Secret Protection, which protects millions of repositories on GitHub by detecting hundreds of pattern types through our partner program. The precision of these detections is paramount for security teams and developers when dealing with security alerts. Historically, our detection approach has relied on regular expressions, which is an effective method for identifying secrets with strict, provider-minted formats. However, this method struggles with the nuanced and varied structures of generic passwords, often generating excessive noise for security teams and developers.
We now detect generic passwords with GitHub Copilot, using AI to analyze context—such as the usage and location of a potential secret—to limit noise and deliver relevant alerts that are critical to the health and security of your repositories.
Getting to the point where we were confident in our password precision was a journey over many test cases, prompt iterations, and model changes. Let’s dive in to explore what we learned along the way and find out where we’re going.
The private preview highlighted a problem early on: unconventional file types and structures
At the core of Copilot secret scanning lies a request to a large language model (LLM), expressed through an LLM prompt consisting of:
General information about the type of vulnerability, in this case passwords.
The source code location and contents of the file where we believe the vulnerability may exist.
A strict JSON format specification for the model output, to allow for automated processing.
Our first iteration of the prompt used the few-shot prompting technique, which provides the LLM with example inputs and outputs to demonstrate how to perform the task. We wanted a resource-effective model to run the detections at scale and landed on GPT-3.5-Turbo. In parallel, we developed a basic offline evaluation framework, including manually curated test cases with both positive and negative findings, to help us validate that our approach was sound before deploying it to customers.
We deployed this first iteration to our private preview participants and immediately noticed a problem. While it worked reasonably well at identifying credentials in our offline evaluation, it would fail spectacularly in some customer repositories. The model had difficulty interpreting file types and structures not typically seen in the conventional coding languages and patterns that LLMs train on.
This experience revealed the complexity of the problem and the limiting nature of LLMs. We had to reevaluate our approach.
The road to public preview: Improving offline evaluation and prompting
In response to these initial results, we enhanced the offline evaluation framework in a few key ways. First, we added reports from private preview participants to increase the diversity of our test cases. Next, we enhanced the framework so that we could visually identify and analyze deviations resulting from model or prompt changes. This allowed us to better see the impact of customizing different steps in our prompting strategy. Finally, we leveraged the GitHub Code Security team’s evaluation processes to create a data collection pipeline, and used GPT-4 to create our own test cases based on learnings from existing secret scanning alerts in open source repositories.
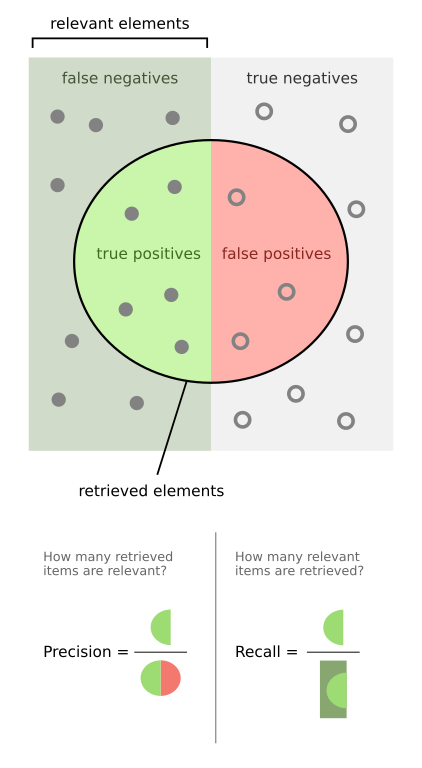
This improved offline evaluation and gave us the breadth needed to measure both precision and recall. Precision is the ability to find secrets more accurately, with concerns to the false positive rate, while recall is the ability to find secrets more reliably, with concerns to the false negative rate.
From here, we ran a series of experiments to evaluate detection quality:
What if we tried a different model?
What if we ran the prompt multiple times and somehow combined the responses?
What if we ran two different prompts on two different models in sequence?
How do we better handle the nondeterministic nature of LLM responses?
More specifically, we started experimenting with a few different mechanisms to improve our detection with the LLM.
We tried voting (asking the model the same question many times), which allowed for more deterministic responses but had no material impact on our precision.
We also tried using a larger model (GPT-4) trained on a larger set of parameters as a confirming scanner, to validate the accuracy of candidates found by GPT-3.5-Turbo. This helped improve precision without reducing our recall, but was also more resource intensive.
We also tried a few different prompting strategies, such as Fill-in-the-Middle, Zero-Shot, and Chain-of-Thought. We ended up collaborating with our colleagues at Microsoft and used their MetaReflection technique, a novel offline reinforcement learning technique that allows experiential learnings from past trials to come up with a hybrid Chain of Thought (CoT) and few-shot prompt that improves precision with a small penalty in recall.
We ultimately ended up using a combination of all these techniques and moved Copilot secret scanning into public preview, opening it widely to all GitHub Secret Protection customers. This brings us to our next hurdle: scale.
Scaling out capacity for a public preview
Secret scanning not only scans incoming Git pushes, but also your entire Git history on all branches. With each new customer, the necessary resources increase linearly. Rather than simply expanding LLM capacity, we focused on striking the most effective balance between value and cost to ensure optimal performance and efficiency. Before tackling how we managed the resources, we tried to find ways to reduce resource usage itself by:
Identifying and excluding a class of changes from scanning (such as media files or language files that contain “test,” “mock,” or “spec” in the filepath), because we expected they would never contain credentials or they would be incomprehensible to the model.
Experimenting with newer models, such as GPT-4-Turbo and GPT-4o-mini, that were expected to be less resource intensive without compromising on performance and latency.
Experimenting with different context windows to find one that reduced resources without significantly increasing latency for the LLM to respond to our queries.
Making improvements to how we tokenize the content we want to scan, including retaining some memory of previous tokenizations while processing new parts of a file.
While some of these efforts proved fruitful, such as limiting the content we scanned, other efforts were less effective. For example, breaking down content into smaller pieces didn’t have much of an impact, while using a more powerful model did.
Ultimately, the most impactful change came from creating a workload-aware request management system that allowed us to maximize and equitably share LLM capacity against the variety of different workloads we run during scans.
In building the system, we noticed a fundamental problem that needed addressing in our capacity management: assigning specific rate limits to individual workloads (such as scanning incoming Git commits or scanning the full history) was suboptimal. As each workload was tied to specific traffic patterns—Git commits, for example, tend to correlate with working hours, while full history scanning correlates with discrete events like a security manager or administrator enabling the feature on a new organization—it was easy to land in a situation where an individual workload could run into rate limits within its operational context, leaving additional resources available elsewhere unused.
We drew significant inspiration from existing solutions in this space, such as Doorman, GitHub’s own Freno, and various other weighted, fair-priority, queue-related algorithms. We came up with an algorithm that allows us to set a range of limits for each workload, preventing the workload from completely overwhelming the LLM, while allowing it to tap into resources from other workloads going unused at the moment. This strategy was so effective at maximizing utilization that we ended up using it within Copilot Autofix and security campaigns as well.
Mirror testing our way to general availability
Achieving confidence in detection quality was crucial for moving Copilot secret scanning to general availability. We implemented a mirror testing framework that ran our prompt and filtering changes against a subset of repositories that participated in our public preview. Rescanning these repositories with our latest improvements allowed us to assess the change in real alert volumes and false positive resolutions, without impacting users.
We found a huge drop in detections and false positives with very few missing real passwords. In some cases, we saw a 94% reduction in false positives across organizations! This before-and-after comparison indicated that all the different changes we made during private and public preview led to increased precision without sacrificing recall, and that we were ready to provide a reliable and efficient detection mechanism to all GitHub Secret Protection customers.
Lessons for the future
Copilot secret scanning is now detecting passwords on nearly 35% of all GitHub Secret Protection repositories. We’re continuing to monitor performance and apply lessons learned as we leverage the tooling we created along the way:
A focus on precision: Security and development teams need accurate and actionable alerts without the noise—this is always our primary goal.
Including diverse test cases: We continue to incorporate examples based on learnings from customer feedback into our test bed as we refine our detection capabilities.
Effective resource management: We always need to balance scalability with performance.
Collaborative innovation: Partnering with other GitHub and Microsoft teams helps us push the boundaries of what Copilot can achieve.
These learnings are also shared across Copilot Autofix, which continues to expand coverage for code scanning alerts and helps development teams remediate code scanning alerts quickly.
Since our general availability launch, enablement for Copilot secret scanning has been included in security configurations, allowing you to control which repositories are detecting secrets across your organizations or enterprise. We’re dedicated to continuous improvement through ongoing monitoring, mirror testing, and approach refinement based on customer feedback and detection trends. Copilot secret scanning serves as a critical component for robust application security and will evolve to meet the dynamic needs of our users.
Copilot secret scanning is a feature of GitHub Secret Protection, which offers enterprise-ready solutions for preventing accidental secret exposure in your repositories. GitHub Secret Protection is available to purchase starting April 1, 2025.
To provide the best experiences, we use technologies like cookies to store and/or access device information. Consenting to these technologies will allow us to process data such as browsing behavior or unique IDs on this site. Not consenting or withdrawing consent, may adversely affect certain features and functions.
Functional
Always active
The technical storage or access is strictly necessary for the legitimate purpose of enabling the use of a specific service explicitly requested by the subscriber or user, or for the sole purpose of carrying out the transmission of a communication over an electronic communications network.
Preferences
The technical storage or access is necessary for the legitimate purpose of storing preferences that are not requested by the subscriber or user.
Statistics
The technical storage or access that is used exclusively for statistical purposes.The technical storage or access that is used exclusively for anonymous statistical purposes. Without a subpoena, voluntary compliance on the part of your Internet Service Provider, or additional records from a third party, information stored or retrieved for this purpose alone cannot usually be used to identify you.
Marketing
The technical storage or access is required to create user profiles to send advertising, or to track the user on a website or across several websites for similar marketing purposes.