Post Syndicated from James Beswick original https://aws.amazon.com/blogs/compute/build-real-time-applications-with-amazon-eventbridge-and-aws-appsync/
This post is written by Josh Kahn, Tech Leader, Serverless.
Amazon EventBridge now supports publishing events to AWS AppSync GraphQL APIs as native targets. The new integration enables builders to publish events easily to a wider variety of consumers and simplifies updating clients with near real-time data. You can use EventBridge and AWS AppSync to build resilient, subscription-based event-driven architectures across consumers.
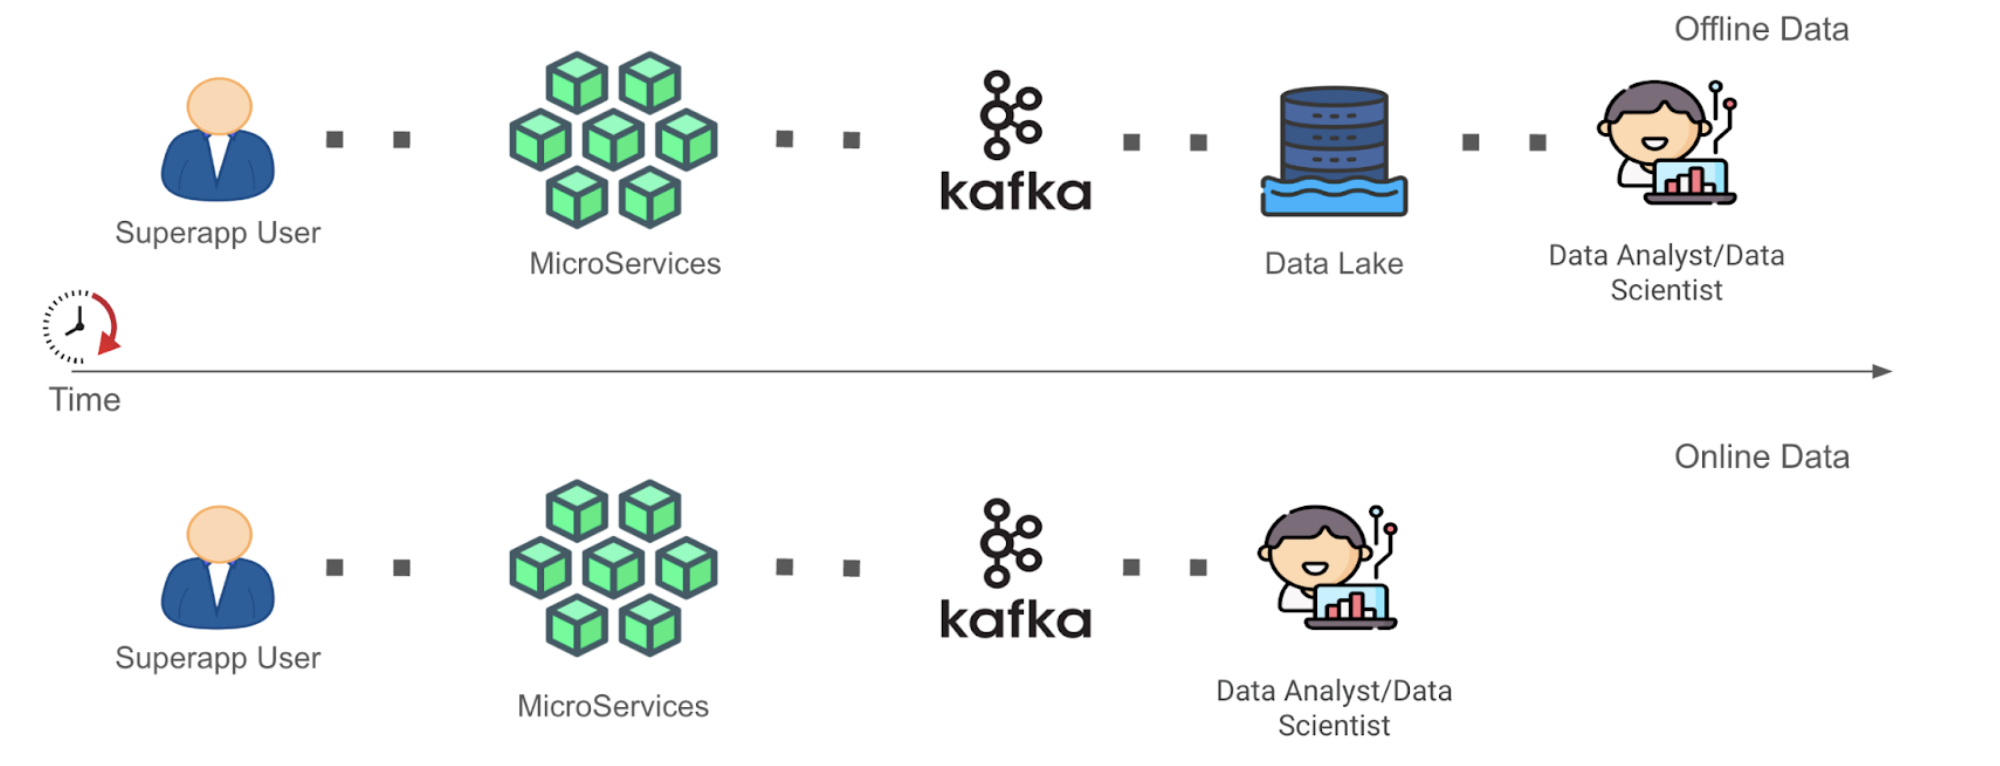
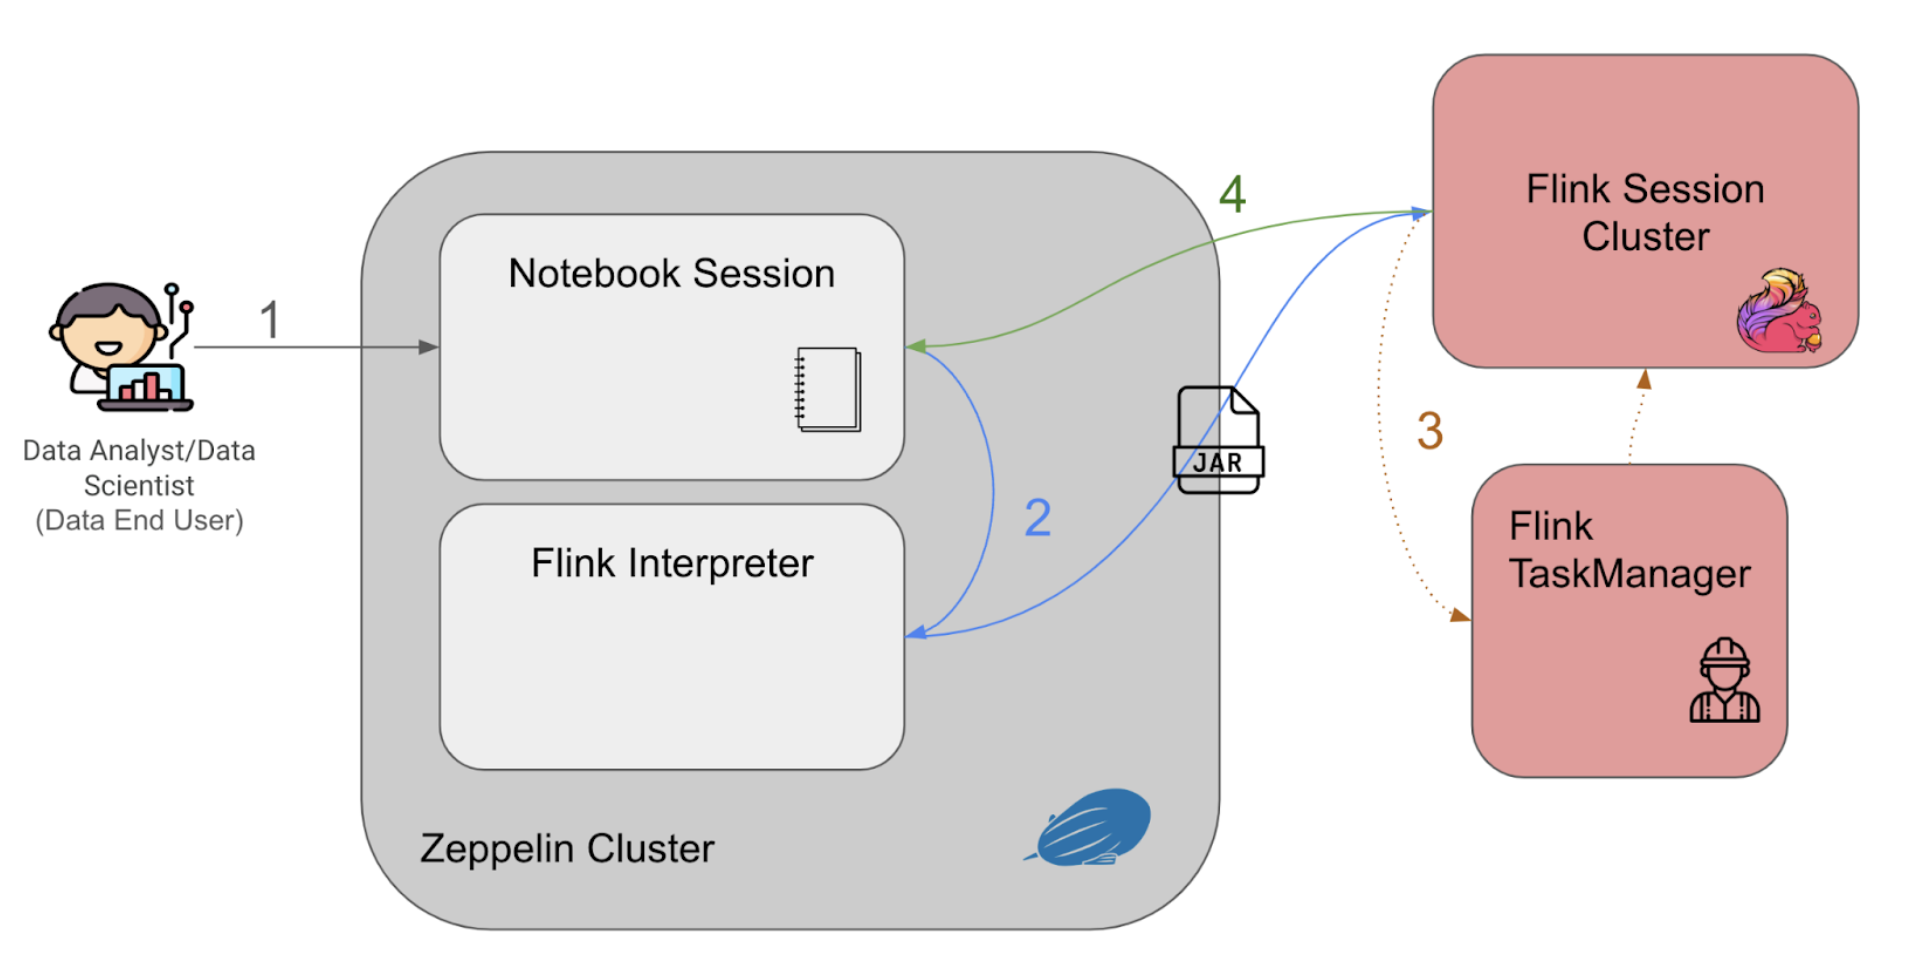
To illustrate using EventBridge with AWS AppSync, consider a simplified airport operations scenario. In this example, airlines publish flight events (for example, boarding, push back, gate changes, and delays) to a service that maintains flight status on in-airport displays. Airlines also publish events that are useful for other entities at the airport, such as baggage handlers and maintenance, but not to passengers. This depicts a conceptual view of the system:

Passengers want the in-airport displays to be up-to-date and accurate. There are a number of ways to design the display application so that data remains up-to-date. Broadly, these include the application polling some API or the application subscribing to data changes.
Subscriptions for this scenario are better as the data changes are small and incremental relative to the large amount of information displayed. In a delay, for example, the display updates the status and departure time but no other details of a single flight among a larger list of flight information.

AWS AppSync can enable clients to listen for real-time data changes through the use of GraphQL subscriptions. These are implemented using a WebSocket connection between the client and the AWS AppSync service. The display application client invokes the GraphQL subscription operation to establish a secure connection. AWS AppSync will automatically push data changes (or mutations) via the GraphQL API to subscribers using that connection.
Previously, builders could use EventBridge API Destinations to wire events published and routed through EventBridge to AWS AppSync, as described in an earlier blog post, and available in Serverless Land patterns (API Key, OAuth). The approach is useful for dealing with “out-of-band” updates in which data changes outside of an AWS AppSync mutation. Out-of-band updates generally require a NONE data source in AWS AppSync to notify subscribers of changes, as described in the AWS re:Post Knowledge Center. The addition of AWS AppSync as a target for EventBridge simplifies these use cases as you can now trigger a mutation in response to an event without additional code.
Airport Operations Events
Expanding the scenario, airport operations events look like this:
{
  "flightNum": 123,
  "carrierCode": "JK",
  "date": "2024-01-25",
  "event": "FlightDelayed",
  "message": "Delayed 15 minutes, late aircraft",
  "info": "{ \"newDepTime\": \"2024-01-25T13:15:00Z\", \"delayMinutes\": 15 }"
}
The event field identifies the type of event and if it is relevant to passengers. The event details provide further information about the event, which varies based on the type of event. The airport publishes a variety of events but the airport displays only need a subset of those changes.
AWS AppSync GraphQL APIs start with a GraphQL schema that defines the types, fields, and operations available in that API. AWS AppSync documentation provides an overview of schema and other GraphQL essentials. The partial GraphQL schema for the airport scenario is as follows:
type DelayEventInfo implements EventInfo {
	message: String
	delayMinutes: Int
	newDepTime: AWSDateTime
}

interface EventInfo {
	message: String
}

enum StatusEvent {
	FlightArrived
	FlightBoarding
	FlightCancelled
	FlightDelayed
	FlightGateChanged
	FlightLanded
	FlightPushBack
	FlightTookOff
}

type StatusUpdate {
	num: Int!
	carrier: String!
	date: AWSDate!
	event: StatusEvent!
	info: EventInfo
}

input StatusUpdateInput {
	num: Int!
	carrier: String!
	date: AWSDate!
	event: StatusEvent!
	message: String
	extra: AWSJSON
}

type Mutation {
	updateFlightStatus(input: StatusUpdateInput!): StatusUpdate!
}

type Query {
	listStatusUpdates(by: String): [StatusUpdate]
}

type Subscription {
	onFlightStatusUpdate(date: AWSDate, carrier: String): StatusUpdate
		@aws_subscribe(mutations: ["updateFlightStatus"])
}

schema {
	query: Query
	mutation: Mutation
	subscription: Subscription
}
Connect EventBridge to AWS AppSync
EventBridge allows you to filter, transform, and route events to a number of targets. The airport display service only needs events that directly impact passengers. You can define a rule in EventBridge that routes only those events (included in the preceding GraphQL schema) to the AWS AppSync target. Other events are routed elsewhere, as defined by other rules, or dropped. Details on creating EventBridge rules and the event matching pattern format can be found in EventBridge documentation.
The previous flight delayed event would be delivered using EventBridge as follows:
{
  "id": "b051312994104931b0980d1ad1c5340f",
  "detail-type": "Operations: Flight delayed",
  "source": "airport-operations",
  "time": "2024-01-25T16:58:37Z",
  "detail": {
    "flightNum": 123,
    "carrierCode": "JK",
    "date": "2024-01-25",
    "event": "FlightDelayed",
    "message": "Delayed 15 minutes, late aircraft",
    "info": "{ \"newDepTime\": \"2024-01-25T13:15:00Z\", \"delayMinutes\": 15 }"
  }
}
In this scenario, there is a specific list of events of interest, but EventBridge provides a flexible set of operations to match patterns, inspect arrays, and filter by content using prefix, numerical, or other matching. Some organizations will also allow subscribers to define their own rules on an EventBridge event bus, allowing targets to subscribe to events via self-service.
The following event pattern matches on the events needed for the airport display service:
{
  "source": [ "airport-operations" ],
  "detail": {
    "event": [ "FlightArrived", "FlightBoarding", "FlightCancelled", ... ]
  }
}
To create a new EventBridge rule, you can use the AWS Management Console or infrastructure as code. You can find the CloudFormation definition for the completed rule, with the AWS AppSync target, later in this post.

Create the AWS AppSync target
Now that EventBridge is configured to route selected events, define AWS AppSync as the target for the rule. The AWS AppSync API must support IAM authorization to be used as an EventBridge target. AWS AppSync supports multiple authorization types on a single GraphQL type, so you can also use OpenID Connect, Amazon Cognito User Pools, or other authorization methods as needed.
To configure AWS AppSync as an EventBridge target, define the target using the AWS Management Console or infrastructure as code. In the console, select the Target Type as “AWS Service” and Target as “AppSync.” Select your API. EventBridge parses the GraphQL schema and allows you to select the mutation to invoke when the rule is triggered.
When using the AWS Management Console, EventBridge will also configure the necessary AWS IAM role to invoke the selected mutation. Remember to create and associate a role with an appropriate trust policy when configuring with IaC.

EventBridge supports input transformation to customize the contents of an event before passing the information as input to the target. Configure the input transformer to extract needed values from the event using JSON path and a template in the input format expected by the AWS AppSync API. EventBridge provides a handy utility in the Console to pass and test the output of a sample event.

Finally, configure the selection set to include the response from the AWS AppSync API. These are the fields that will be returned to EventBridge when the mutation is invoked. While the result returned to EventBridge is not overly useful (aside from troubleshooting), the mutation selection set will also determine the fields available to subscribers to the onFlightStatusUpdate subscription.

Define the EventBridge to AWS AppSync rule in CloudFormation
Infrastructure as code templates, including AWS CloudFormation and AWS CDK, are useful for codifying infrastructure definitions to deploy across Regions and accounts. While you can write CloudFormation by hand, EventBridge provides a useful CloudFormation export in the AWS Management Console. You can use this feature to export the definition for a defined rule.

This is the CloudFormation for the previous configured rule and AWS AppSync target. This snippet includes both the rule definition and the target configuration.
PassengerEventsToDisplayServiceRule:
    Type: AWS::Events::Rule
    Properties:
      Description: Route passenger related events to the display service endpoint
      EventBusName: eb-to-appsync
      EventPattern:
        source:
          - airport-operations
        detail:
          event:
            - FlightArrived
            - FlightBoarding
            - FlightCancelled
            - FlightDelayed
            - FlightGateChanged
            - FlightLanded
            - FlightPushBack
            - FlightTookOff
      Name: passenger-events-to-display-service
      State: ENABLED
      Targets:
        - Id: 12344535353263463
          Arn: <AppSync API GraphQL API ARN>
          RoleArn: <EventBridge Role ARN (defined elsewhere)>
          InputTransformer:
            InputPathsMap:
              carrier: $.detail.carrierCode
              date: $.detail.date
              event: $.detail.event
              extra: $.detail.info
              message: $.detail.message
              num: $.detail.flightNum
            InputTemplate: |-
              {
                "input": {
                  "num": <num>,
                  "carrier": <carrier>,
                  "date": <date>,
                  "event": <event>,
                  "message": "<message>",
                  "extra": <extra>
                }
              }
          AppSyncParameters:
            GraphQLOperation: >-
              mutation
              UpdateFlightStatus($input:StatusUpdateInput!){updateFlightStatus(input:$input){
                event
                date
                carrier
                num
                info {
                  __typename
                  ... on DelayEventInfo {
                    message
                    delayMinutes
                    newDepTime
                  }
                }
              }}
The ARN of the AWS AppSync API follows the form arn:aws:appsync:<AWS_REGION>:<ACCOUNT_ID>:endpoints/graphql-api/<GRAPHQL_ENDPOINT_ID>. The ARN is available in CloudFormation (see GraphQLEndpointArn return value) or can be created using the identifier found in the AWS AppSync GraphQL endpoint. The ARN included in the EventBridge execution role policy is the AWS AppSync API ARN (a different ARN).
The AppSyncParameters field includes the GraphQL operation for EventBridge to invoke on the AWS AppSync API. This must be well formatted and match the GraphQL schema. Include any fields that must be available to subscribers in the selection set.
Testing subscriptions
AWS AppSync is now configured as a target for the EventBridge rule. The real-life display application would use a GraphQL library, such as AWS Amplify, to subscribe to real-time data changes. The AWS Management Console provides a useful utility to test. Navigate to the AWS AppSync console and select Queries in the menu for your API. Enter the following query and choose Run to subscribe for data changes:
subscription MySubscription {
  onFlightStatusUpdate {
    carrier
    date
    event
    num
    info {
      __typename
      … on DelayEventInfo {
        message
        delayMinutes
        newDepTime
      }
    }
  }
}
In a separate browser tab, navigate to the EventBridge console, and choose Send events. On the Send events page, select the required event bus and set the Event source to “airport-operations.” Then enter a detail type of your choice. Finally, paste the following as the Event detail, then choose Send.
{
  "id": "b051312994104931b0980d1ad1c5340f",
  "detail-type": "Operations: Flight delayed",
  "source": "airport-operations",
  "time": "2024-01-25T16:58:37Z",
  "detail": {
    "flightNum": 123,
    "carrierCode": "JK",
    "date": "2024-01-25",
    "event": "FlightDelayed",
    "message": "Delayed 15 minutes, late aircraft",
    "info": "{ \"newDepTime\": \"2024-01-25T13:15:00Z\", \"delayMinutes\": 15 }"
  }
}
Return to the AWS AppSync tab in your browser to see the changed data in the result pane:

Conclusion
Directly invoking AWS AppSync GraphQL API targets from EventBridge simplifies and streamlines integration between these two services, ideal for notifying a variety of subscribers of data changes in event-driven workloads. You can also take advantage of other features available from the two services. For example, use AWS AppSync enhanced subscription filtering to update only airport displays in the terminal in which they are located.
To learn more about serverless, visit Serverless Land for a wide array of reusable patterns, tutorials, and learning materials. Newly added to the pattern library is an EventBridge to AWS AppSync pattern similar to the one described in this post. Visit EventBridge documentation for more details.
For more serverless learning resources, visit Serverless Land.