Post Syndicated from corbet original https://lwn.net/Articles/998863/
Version 4.3 of
the Blender animation system has been released. “Brush assets, faster
“
sculpting, a revolutionized Grease Pencil, and more. Blender 4.3 got you
covered.
Post Syndicated from corbet original https://lwn.net/Articles/998863/
Version 4.3 of
the Blender animation system has been released. “Brush assets, faster
“
sculpting, a revolutionized Grease Pencil, and more. Blender 4.3 got you
covered.
Post Syndicated from daroc original https://lwn.net/Articles/998856/
CHICKEN Scheme, a portable Scheme compiler, is gearing up for its next major release. Maintainer Felix Winkelmann has
shared
an article about what changes to expect in version 6 of the language, including better Unicode support and support for the
R7RS (small) Scheme standard.
Every major release is a chance of fixing long-standing problems with the codebase and address bad design decisions. CHICKEN is now nearly 25 years old and we had many major overhauls of the system. Sometimes these caused a lot of pain, but still we always try to improve things and hopefully make it more enjoyable and practical for our users. There are places in the code that are messy, too complex, or that require cleanup or rewrite, always sitting there waiting to be addressed. On the other hand CHICKEN has been relatively stable compared to many other language implementations and has a priceless community of users that help us improving it. Our users never stop reminding us of what could be better, where the shortcomings are, where things are hard to use or inefficient.
Post Syndicated from Ryan Blanchard original https://blog.rapid7.com/2024/11/20/rapid7-extends-aws-support-to-include-coverage-for-newly-launched-resource-control-policies-rcps/

In today’s cloud-first world, security and innovation go hand-in-hand. Rapid7 is excited to announce our support for Amazon Web Services’ (AWS) new Resource Control Policies (RCPs), a powerful tool designed to bolster security controls for organizations using AWS infrastructure. As a launch partner for this feature, Rapid7’s Exposure Command now extends its capabilities even further, helping organizations set precise, scalable guardrails within their AWS environments.
Cloud platforms like AWS have transformed business agility by enabling rapid development, fast deployments, and real-time scalability. Yet, as organizations increase their reliance on cloud infrastructure, they face a heightened risk landscape. Rapid development cycles and AI-driven cloud services often result in more identities, permissions, and resources—all of which can lead to excessive access and increased risk.
The need for stringent guardrails has never been more urgent. Without them, organizations risk unintentionally exposing data or resources as they rapidly scale operations.
AWS addresses this challenge with two main types of policies:
Exposure Command supports AWS RCPs through features that enhance security posture and operational insight by providing a centralized view of RCP use within the organization, enabling teams to monitor usage and governance of these policies. Cloud and Security teams can easily search, inspect, and understand RCP impacts on cloud resources, allowing for proactive adjustments with best practice recommendations that guide users through best practices in adopting RCPs.
This RCP support further extends the robust identity analysis capabilities offered by Exposure Command and InsightCloudSec, enabling organizations to automatically refine permissions organization-wide, uncovering and addressing overly permissive roles or unused access. By doing so, security teams are able to implement and effectively scale LPA adherence across AWS resources, enhancing security without compromising agility.
Exposure Command and InsightCloudSec support broad AWS coverage that extends well beyond RCPs and SCPs, encompassing a suite of tools to secure AWS cloud resources:
As organizations embrace the cloud’s full potential, maintaining robust security while supporting rapid growth is critical. Rapid7’s Exposure Command, now with AWS RCP support, empowers security teams to adopt a zero-trust approach while maintaining the agility and flexibility that cloud environments demand. Together with AWS, we’re committed to helping organizations reduce risk, ensure compliance, and innovate confidently in the cloud.
Interested in learning more about RCPs and our expanded AWS support? Be sure to swing by booth #697 at AWS Re:Invent to chat and see the Command Platform in action!
Post Syndicated from Светла Енчева original https://www.toest.bg/za-kupaneto-i-higienata-v-bulgaria-i-v-zapadna-evropa-bez-kompleksi/

Страстите около пиесата на Джордж Бърнард Шоу от 1894 г. „Оръжията и човекът“, поставена от Джон Малкович в Народния театър, започнаха да поотшумяват. Един от поводите за протест срещу постановката беше представянето на българите в нея като къпещи се веднъж в седмицата (ако изобщо). И следва да признаем, че макар кампанията срещу „Оръжията и човекът“ да беше резултат от грижливо подготвено активно мероприятие, доста хора искрено се възмутиха от иронизирането на хигиената на сънародниците ни отпреди век и 30 години. Затова е време за една трезва ретроспекция на къпането и хигиената – не само в България.
Критики към шегата на тема хигиена в „Оръжията и човекът“ се отправят скоро след поставянето на пиесата за първи път, разказва историкът Стефан Дечев. Според него „Шоу не е много убедителен“, когато твърди, че всъщност е иронизирал британците, а не българите, понеже поради мръсния въздух в големите градове сънародниците му трябвало да се къпят по-често. Шоу казва и че
ни най-малко не е имал намерение да внуши, че българският майор, който се мие веднъж седмично заради социалното си положение, или неговият баща, който не се е къпал през живота си, са нечистоплътни хора.
Също така провалянето на премиерата през 2024 г. в София не е прецедент. Звучи, като да се е случило век по-късно, но през 20-те години на ХХ век ВМРО проваля опит за поставянето на спектакъла в Петрич, а през 1921 г. български студенти протестират срещу него във Виена. И макар най-пиперливите пасажи да са премахнати от текста, пиесата е свалена след четири дни.
Накрая обиденият писател решава, че българите нямат чувство за хумор и самоирония. А това според него е белег на недостатъчно цивилизована култура. Той не поставя под въпрос собствената си позиция на привилегирован представител на висш социален слой на доминираща политически и културно държава.
За първи път „Оръжията и човекът“ (под заглавието „Шоколадовият войник“) се играе на българска сцена чак 101 години след създаването ѝ – през 1995 г. във Враца. След това – през 2000 г. в Русе. И двата пъти поставянето на пиесата минава без скандали.
Допускането, че в края на XIX век българите се къпят веднъж седмично, впрочем е твърде оптимистично. Дечев се позовава на свидетелства и изследвания, според които някои са били къпани само по време на кръщене, след като умрат или ако ги навали дъжд. Други са отивали на баня по Великден и по Коледа.
И няма как да е било иначе. Не можем да очакваме хората да се къпят всеки ден, ако нямат съответните условия в дома си.
Никой няма да тръгне да се къпе, когато няма вода, а сложните заплитания на момите изискват много време. Това е излишно хабене на ресурс, на време,
казва етноложката Виолета Коцева пред Нова телевизия, която е авторка на книгата „Честита баня“.
В 300-те ѝ страници са представени изследванията ѝ върху хигиената на българите след 1878 г.
Къпането в неделя, обяснява Коцева, не е било свързано с хигиената, а се е правело (доколкото изобщо се е правело) по-скоро по религиозни съображения – да отидеш на църква „чист духовно и физически“. Разбирането, че има връзка между чистотата и здравето, не се е радвало на особена популярност. По-скоро хората са се страхували да не настинат на течение. Оттам и „разпространеното мнение, че от некъпане никой не е умрял, но от настинки гробищата са пълни“.
Британските протестантски мисионери, дошли по българските земи по време на Възраждането, схващат себе си, подобно на Бърнард Шоу, като носители на цивилизационно и културно превъзходство. Него те предават и на българските пастори, които обучават.
За отбелязване е, че първата работа на евангелските работници е била да обучат населението на най-елементарни познания по хигиена: да се мият, да си режат косите, да си готвят храната, да се обличат,
се казва в сборника „Вестители на истината. История на евангелските църкви в България“ под редакцията на Кристо Куличев.
Цитираният в сборника пастор Димитър Фурнаджиев пък разказва, че когато пастор Никола Бояджиев пристигнал в Ямбол през 1874 г.,
намерил хората да спят на земята, върху пръстта и влагата, да ядат седешком на земята с дебели дървени лъжици, които не всеки ден виждали вода за измиване. […] Една от първите му работи била да научи хората да живеят като възпитани и разумни хора […], изобщо да се отучат да живеят „така, както е останало от баба и дядо.
Фактът, че едни българи се опитват да „цивилизоват“ други българи, навежда на мисълта, че отношението към хигиената не е въпрос толкова на националност, колкото на начин на живот и социален статус.
В студията си „Психология на военната дисциплина“, включена в „Оптимистична теория за нашия народ“, Иван Хаджийски описва два основни типа войници в периода преди Втората световна война в България. Единият, когото Хаджийски самоиронично нарича Иван, е от средите на градската буржоазия. Тренчо пък е от село и не се е докосвал много-много до цивилизацията. Иван притежава развита индивидуалност, която животът в казармата пречупва. При Тренчо няма нищо за пречупване – него казармата по-скоро го изгражда и окултурява.
За Иван например, който е свикнал да си чете сутрешния вестник в домашната тоалетна, липсата на лично пространство в казармения клозет е мъчение. Докато Тренчо се чувства „като финландец в банята си. Бави се, води оживени разговори, пуща шеги, забавлява се и се чуди защо го карат да мие нужниците и да ги варосва. Най-сетне роптае, че му забраняват да прави своите излияния, където намери за по-удобно и по-близо: до дърво или в някое кьоше“.
По същия начин, докато казармената хигиена е крайно недостатъчна за Иван, на Тренчо трябва „всеки ден да проверяват врата, ръцете и ноктите, за да се види дали ги е докоснал до тази безцветна и безсмислена течност, наречена „вода“. Толкова борба трябва да се води, за да го накарат да не плюе по пода, да се пере и си сменя гащите, ризата, да си мие краката, да си пере миризливите вълнени чорапи, да иде на баня“.
По времето на социализма протича процес на урбанизация – повече хора се преселват от селата в градовете. В градовете пък се строят жилищни блокове, в които вътрешната баня и тоалетна стават подразбиращ се стандарт. Същевременно немалка част от населението продължава да живее в къщи, много от които са без баня, често с външна тоалетна, а топла вода тече само през проточния бойлер „Юнга“ в кухнята.
Затова обществените бани (в населените места, в които ги има) се посещават масово чак до 90-те години. Неделята продължава да бъде „ден за баня“, но вече не по религиозни съображения, а по традиция и най-вече защото е почивен и неучебен ден.
Макар социалистическата пропаганда да призовава към хигиенни навици, посланията ѝ са доста по-различни от днешните представи за хигиена. От социалистическия човек се очаква сутрин не да си тегли душ, а да си измие лицето с вода. А в книга с наставления за правилния начин на живот може да прочетем следното:
Личното бельо не трябва да се преносва повече от една седмица, а при усилена работа – повече от четири дни.
Културата има свойството да се променя по-бавно от условията за живот. От наличието на баня у дома не следва, че обитателите на съответния дом автоматично ще започнат да я използват всекидневно. Ако са свикнали, че човек се къпе веднъж седмично – в неделя, те с голяма вероятност ще продължат да го правят. И нищо чудно да твърдят, че всекидневната баня е вредна.
Нерядко промяната настъпва чак при следващите поколения, чиито представители имат баня вкъщи, откакто се помнят, и са изложени на повече внушения, представящи честото къпане като нещо естествено и правилно. Затова не е учудващ отговорът на възрастния мъж в репортажа на Нова телевизия за етноложката Виолета Коцева, който казва, че се къпе веднъж на 4–5 дни.
По данни на НСИ 11,5% от съвременните жилища в България не разполагат с вътрешна тоалетна, а близо 7% са без баня. В селата вътрешна тоалетна нямат 20% от домакинствата. Делът на хората без тоалетна и/или баня със сигурност е в пъти по-голям от този на жилищата и домакинствата – по данни от последното преброяване едно градско домакинство се състои средно от 2,2 членове, а селското – от 2,4. Освен това едно жилище може да се обитава от повече домакинства.
Връщам се след три дни. Не се къпи,
гласи известно писмо на Наполеон до съпругата му Жозефин.
От съвременна гледна точка тази заръка звучи, меко казано, странно. Но допреди някой и друг век не само по българските земи, а и в Западна Европа естествената телесна миризма не се възприема като гнусна, а може дори да е възбуждаща.
В книгата си „Относно процеса на цивилизация“ немският социолог Норберт Елиас изследва прехода от средновековно към модерно общество. Противно на разпространеното мнение за рестриктивното Средновековие, Елиас привежда доказателства, че срамът от собственото тяло и естествените потребности и изобщо способността да се самоконтролираш и самопринуждаваш са плод на Ренесанса и Просвещението и все повече се усилват през модерността.
При това връзката на самоконтрола с хигиената е много късна „опера“ – чак от XIX век нататък. Преди това тялото става по-скоро обект на срам, а този срам може и да е в противоречие с хигиената. През 1558 г. например Джовани дела Каза, архиепископ на Беневент, съветва:
Когато се връща от отходното място, [човек] не си измива ръцете пред отбрано общество, ако причината, поради която се мие, ще накара людете да си представят някаква гнусота.
По времето на индустриалната революция къпането става белег на социален статус. Градовете се препълват с нископлатени работници, живеещи сред мръсотия и без достъп до чиста вода. За разлика от тях, представителите на висшите класи толкова се привързват към своите бани, че дори си имат вани за пътуване. Бедността се възприема не само като недостойна, а и като смрадлива.
Хигиената впрочем става част от модерната култура не поради някакви възвишени съображения, а по необходимост. Лошите условия, в които живеят и се трудят работниците през XIX век, води до серия епидемии от холера. Междувременно Луи Пастьор открива връзка между микробите и болестите. И така, втората половина на XIX век във Великобритания става време на опити за реформиране на общественото здраве, за прокарване на водопроводи и канализация, изграждане на тоалетни, контрол на чистотата в кланици и магазини.
И все пак и през миналото столетие всекидневното къпане не е повсеместно разпространено не само в страни като България, а и в Западна Европа, защото и там в немалко домове е липсвала баня. И за хората, които са ги обитавали, както и за българите, обичайният вариант е бил ходене на баня веднъж седмично.
По-рядкото къпане в не толкова далечното минало в сравнение с наши дни се иронизира в някои германски сериали. Действието в „Берлински Вавилон“ например се развива от края на 20-те до края на 30-те години на ХХ век. Още в първия епизод виждаме как Шарлоте Ритер, главната героиня, небрежно се позамива с вода от леген след дълга нощ на сексуален труд. В един от следващите сезони инспектор Гереон Рат не заварва Шарлоте вкъщи, защото „днес ѝ е ден за баня“.
Действието в друг сериал – „Ku’damm 56“ – се развива през 50-те години на ХХ век в престижен район на Берлин. След като майката на една от героините продължава да се опитва да я сватоса с мъж, който я е изнасилил, младата жена споделя, че се чувства мръсна. „Ами изкъпи се! Нищо че днес е сряда“ – отговаря майката, правейки се, че не разбира.
Впрочем би било наивно да допускаме, че и през XXI век на Запад всички се къпят поне по веднъж ден. Не само защото и там не всички разполагат със съответните условия. А и защото някои съзнателно избират да не се къпят толкова редовно – било защото принадлежат към определена субкултура, било по здравословни съображения – защото смятат, че твърде честото миене разрушава естествения микробиом на кожата и прави организма по-податлив на инфекции.
Като погледнем на къпането в по-широка перспектива, виждаме, че всъщност нямаме никакво основание да се обиждаме. Дори ако Бърнард Шоу, а след него и Джон Малкович гледат на българите от позицията на някакво културно и цивилизационно превъзходство. Защото общество, в което всички се къпят всеки ден, не е съществувало нито в края на XIX век, нито има такова днес. Модерната цивилизация е повече шарена, отколкото чиста. И понякога понамирисва.
Post Syndicated from Patrick Kennedy original https://www.servethehome.com/this-is-the-microsoft-azure-hbv5-and-amd-mi300c-nvidia/
At SC24 we saw the custom 96 core AMD MI300C HBM3 CPU and four-socket system powering the Microsoft Azure HBv5 instances
The post This is the Microsoft Azure HBv5 and AMD MI300C appeared first on ServeTheHome.
Post Syndicated from daroc original https://lwn.net/Articles/998854/
Security updates have been issued by Debian (guix, libmodule-scandeps-perl, needrestart, and thunderbird), SUSE (gh), and Ubuntu (kernel, linux, linux-aws, linux-aws-hwe, linux-azure, linux-azure-4.15, linux-gcp,
linux-gcp-4.15, linux-hwe, linux-kvm, linux-oracle, linux, linux-aws, linux-gcp, linux-gcp-6.8, linux-gke, linux-hwe-6.8,
linux-ibm, linux-nvidia, linux-nvidia-6.8, linux-nvidia-lowlatency,
linux-oem-6.8, linux-oracle, linux-raspi, linux-iot, linux-lowlatency, linux-lowlatency-hwe-6.8, needrestart, python2.7, python3.10, python3.12, python3.8, and Waitress).
Post Syndicated from The History Guy: History Deserves to Be Remembered original https://www.youtube.com/watch?v=-GOb_TgbpBA
Post Syndicated from Mateusz Romaniuk original https://blog.zabbix.com/monitoring-vmware-vsphere-with-zabbix/29193/
Zabbix is an open-source monitoring tool designed to oversee multiple IT infrastructure components, including networks, servers, virtual machines, and cloud services. It operates using both agent-based and agentless monitoring methods. Agents can be installed on monitored devices to collect performance data and report back to a centralized Zabbix server.
Zabbix provides comprehensive integration capabilities for monitoring VMware environments, including ESXi hypervisors, vCenter servers, and virtual machines (VMs). This integration allows administrators to effectively track performance metrics and resource usage across their VMware infrastructure.
In this post, I will show you how to set up Zabbix monitoring with a VMware vSphere infrastructure.
Table of Contents

First things first, let’s create a service user on the vCenter that will be used by the Zabbix server to collect data. To make life easier, in my lab setup the user [email protected] will have full Administrator privileges. Read-only permissions should be enough, however.
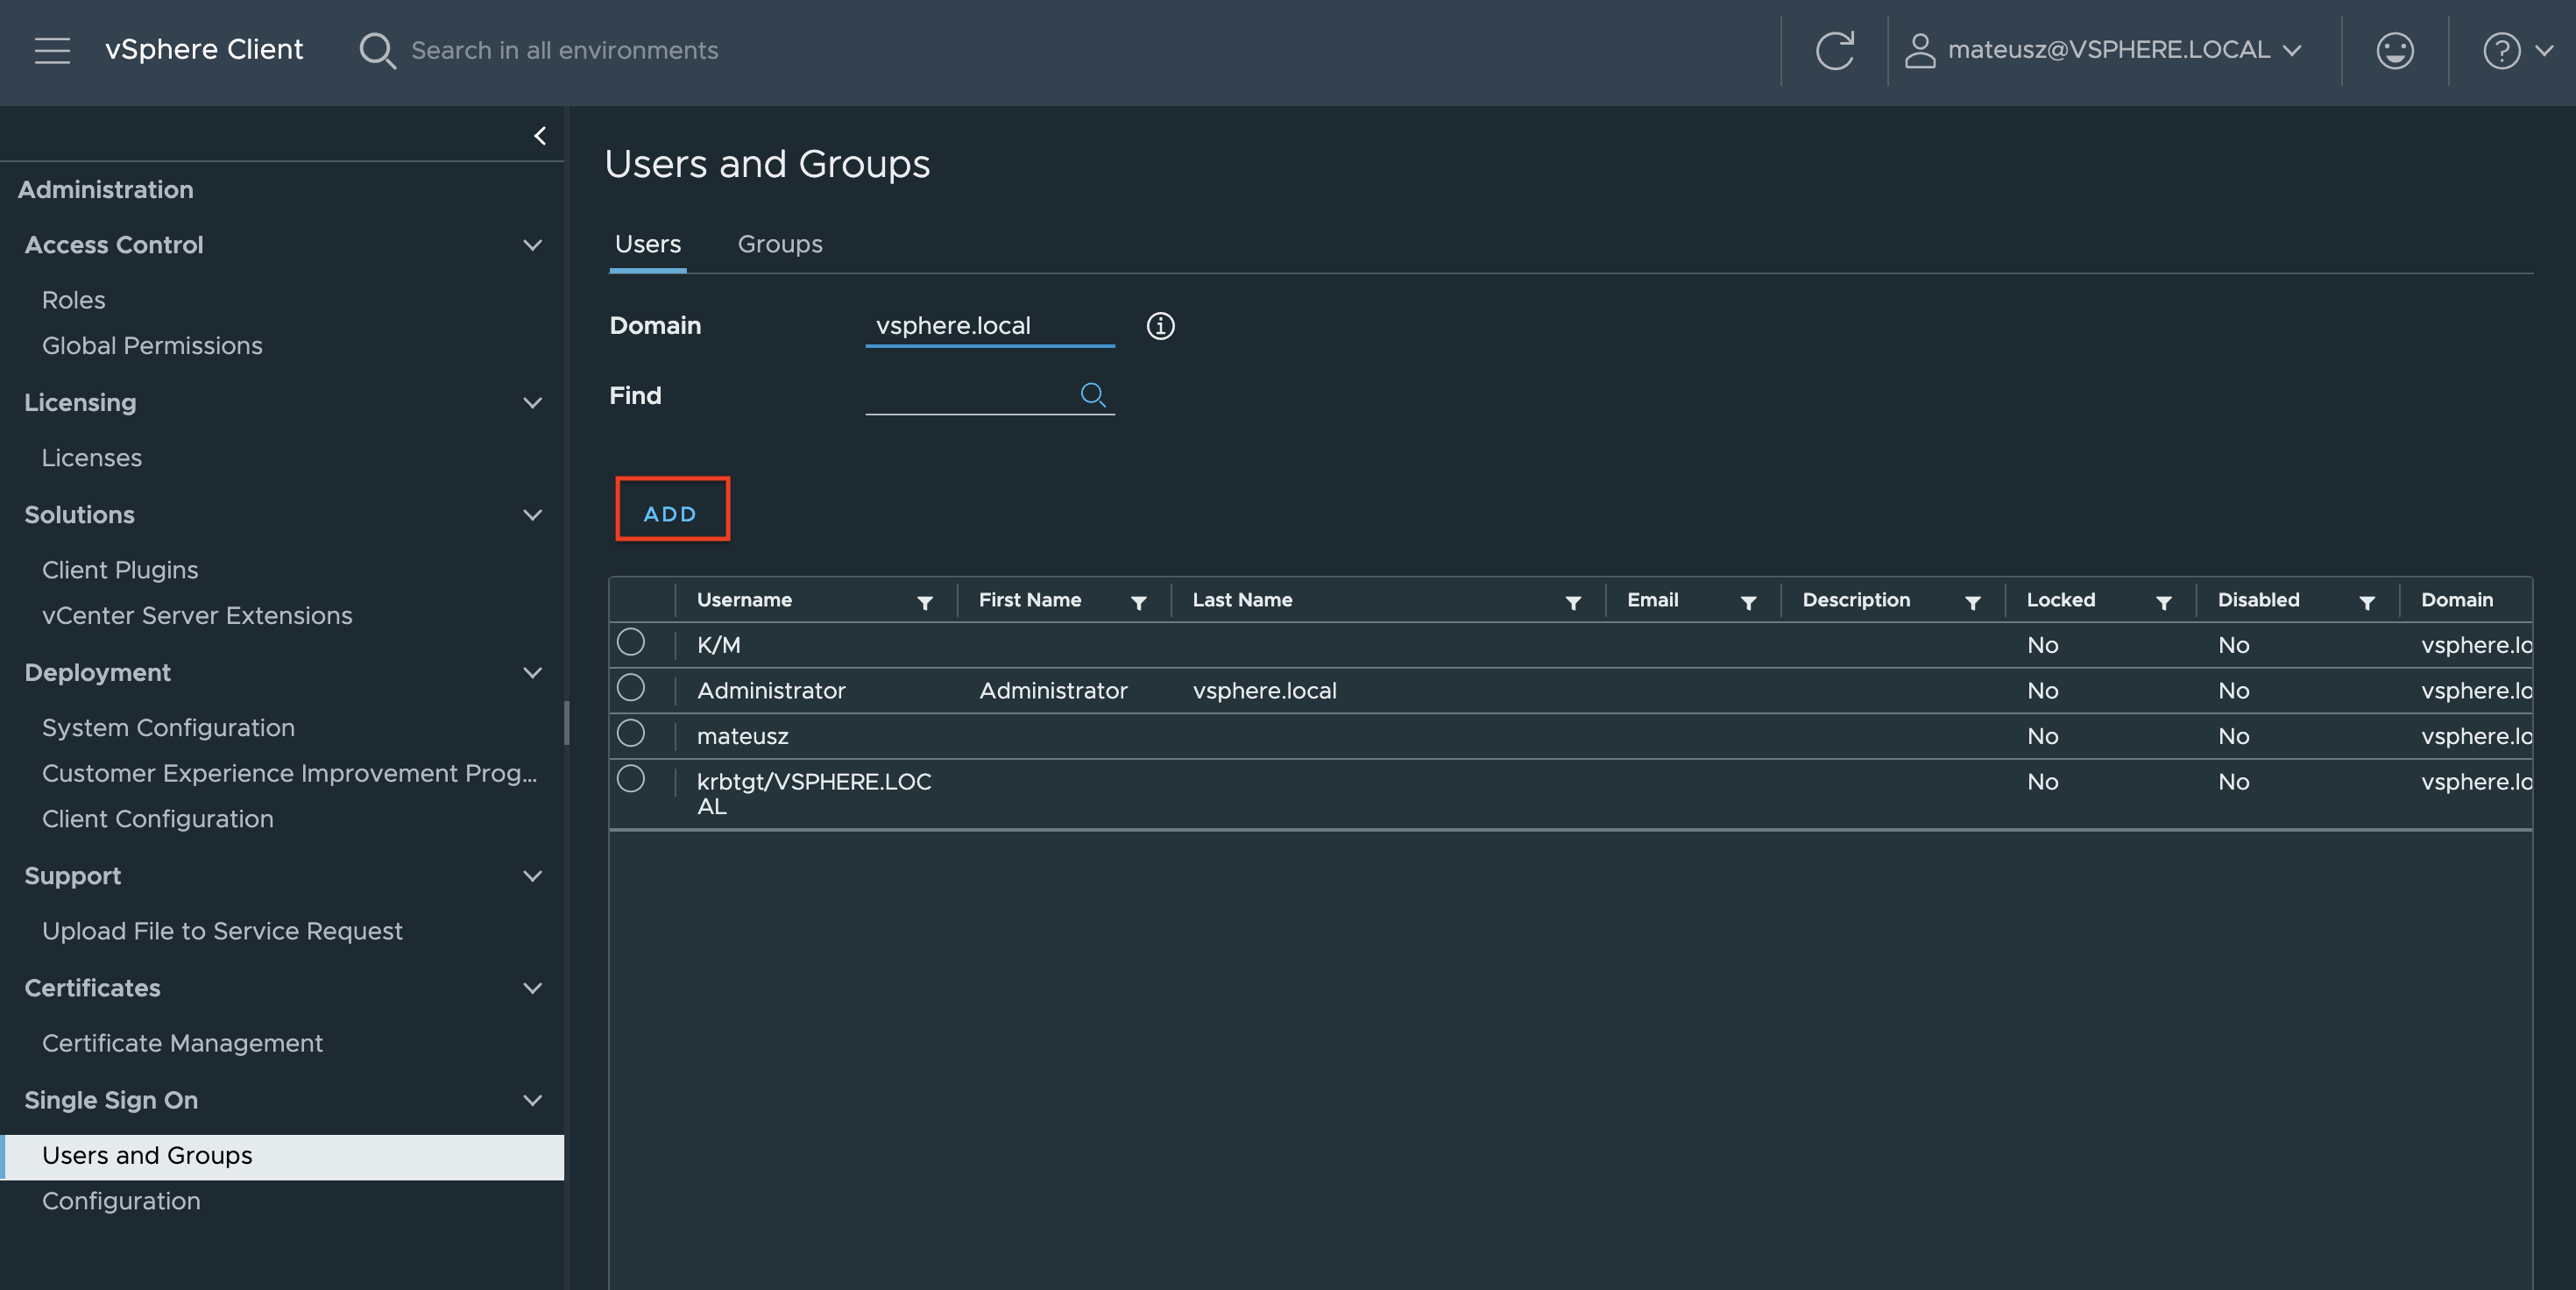
1. In the vSphere Client, choose Menu -> Administration -> Users and Groups. From the Users tab, select Domain vsphere.local, and click the ADD button to add a new user.
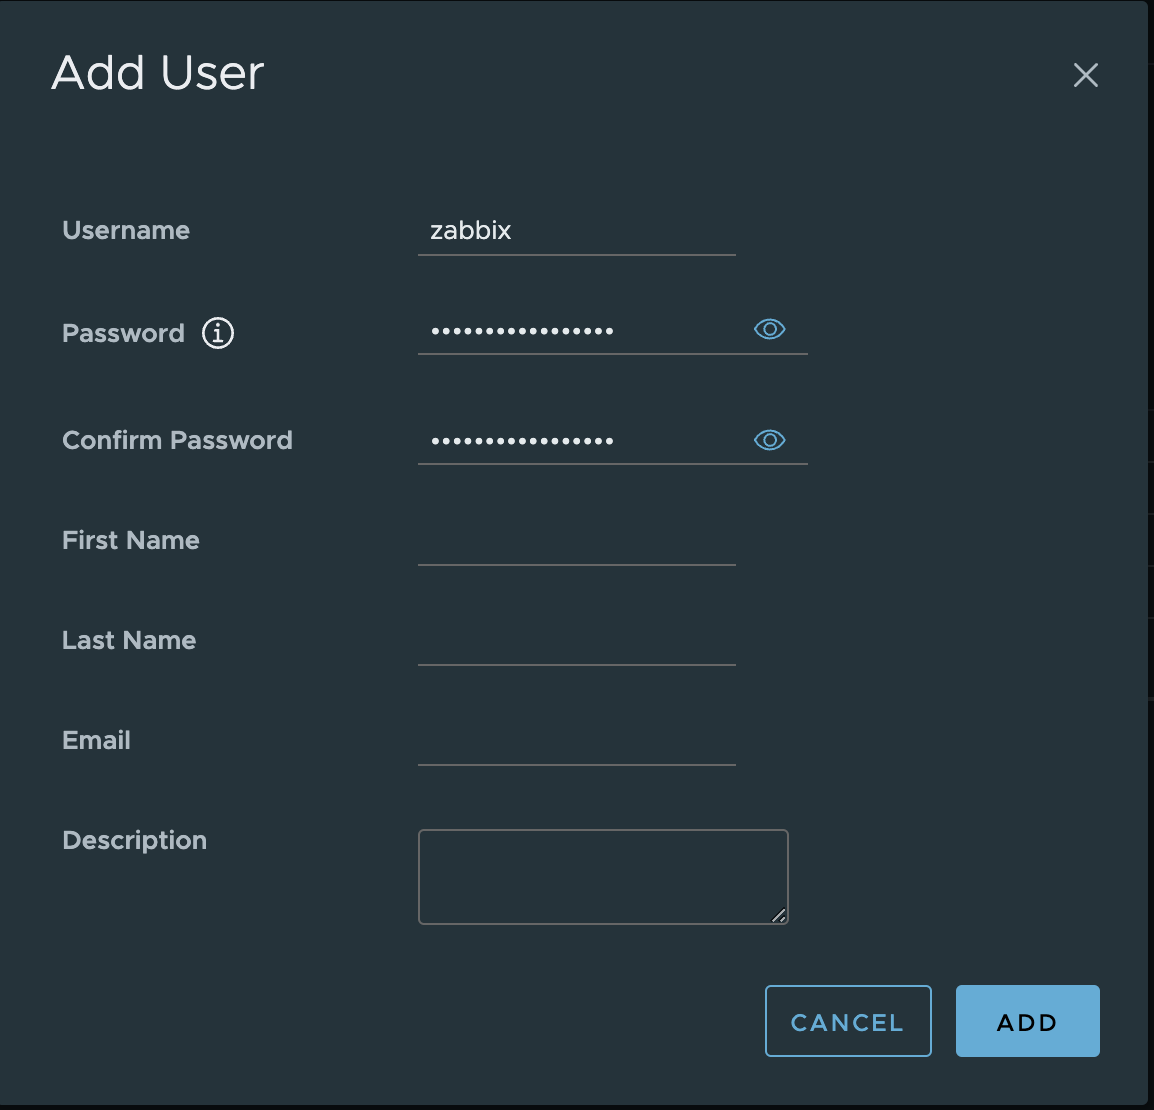
2. Type a username and password. Click ADD to create a new user.
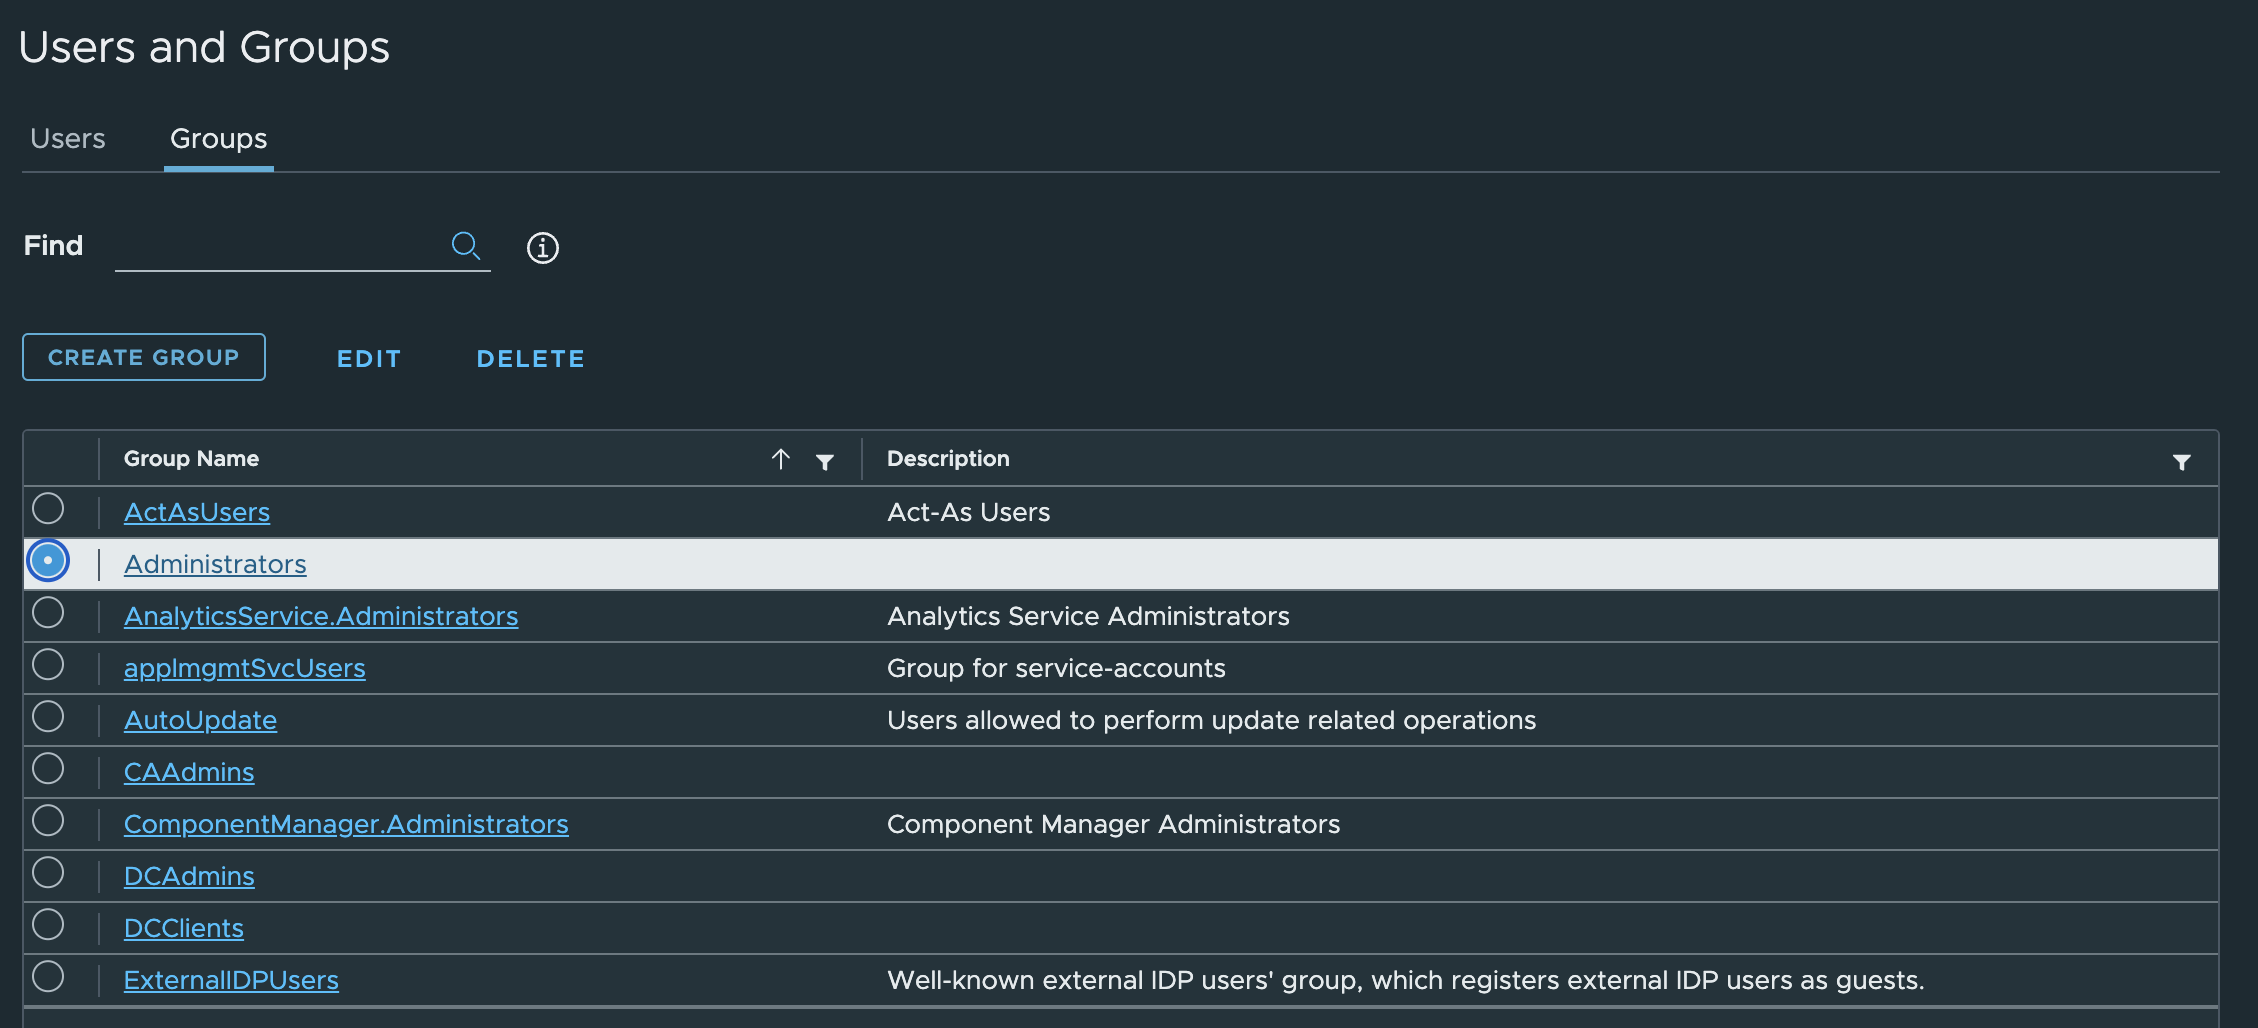
3. Change the tab to Groups and select the Administrators group.
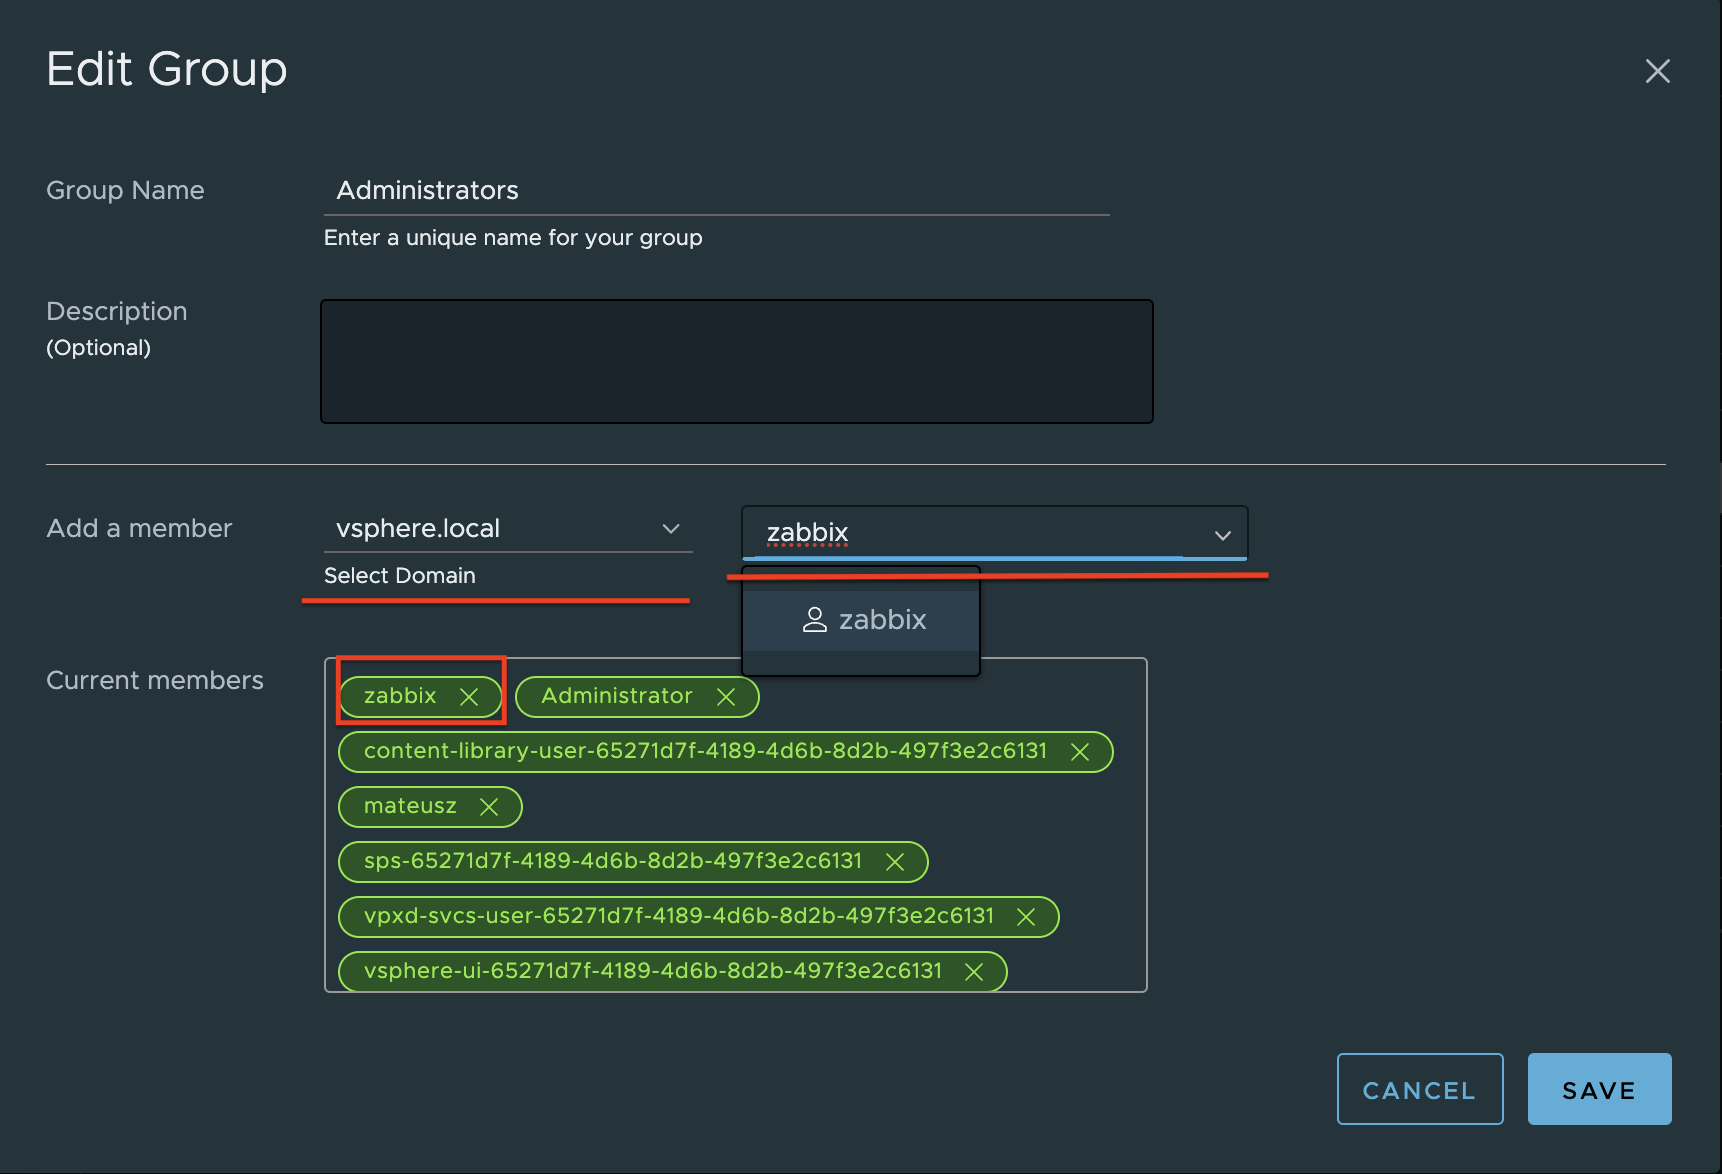
4. Find a new user zabbix, click on it and save. The user is added to the Administrators group.
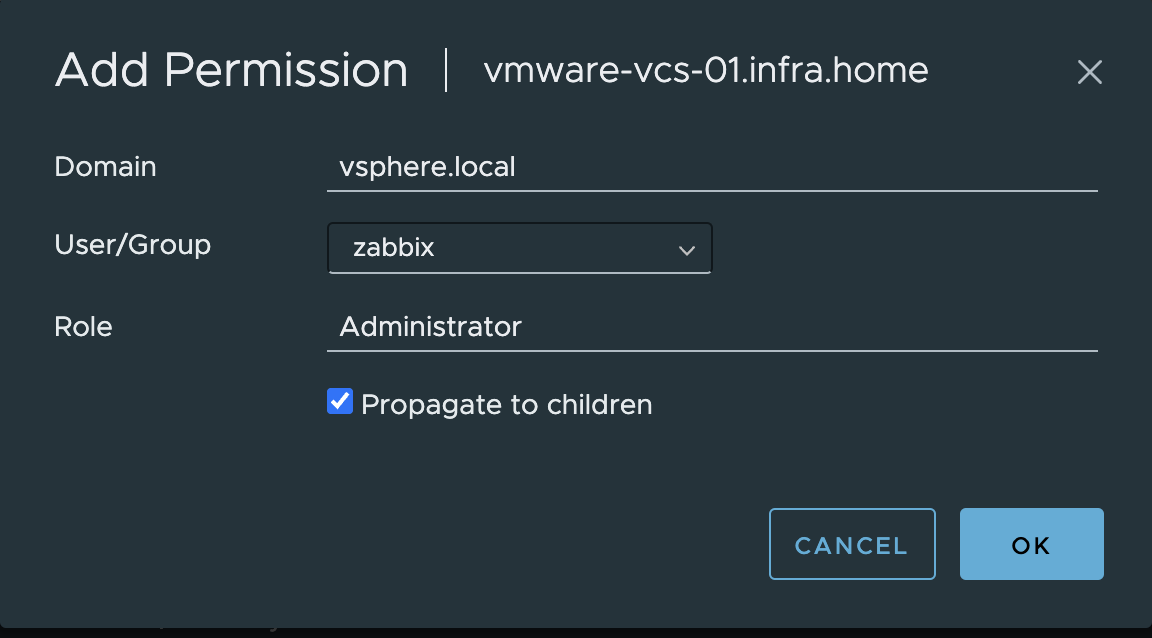
5. From the Host and Clusters view, choose vCenter name and go to the Permissions tab. Click the Add button.

6. Choose a proper domain (vsphere.local), find the user zabbix, set the role to Administrator, and check Propagate to children. Click OK to give those permissions.
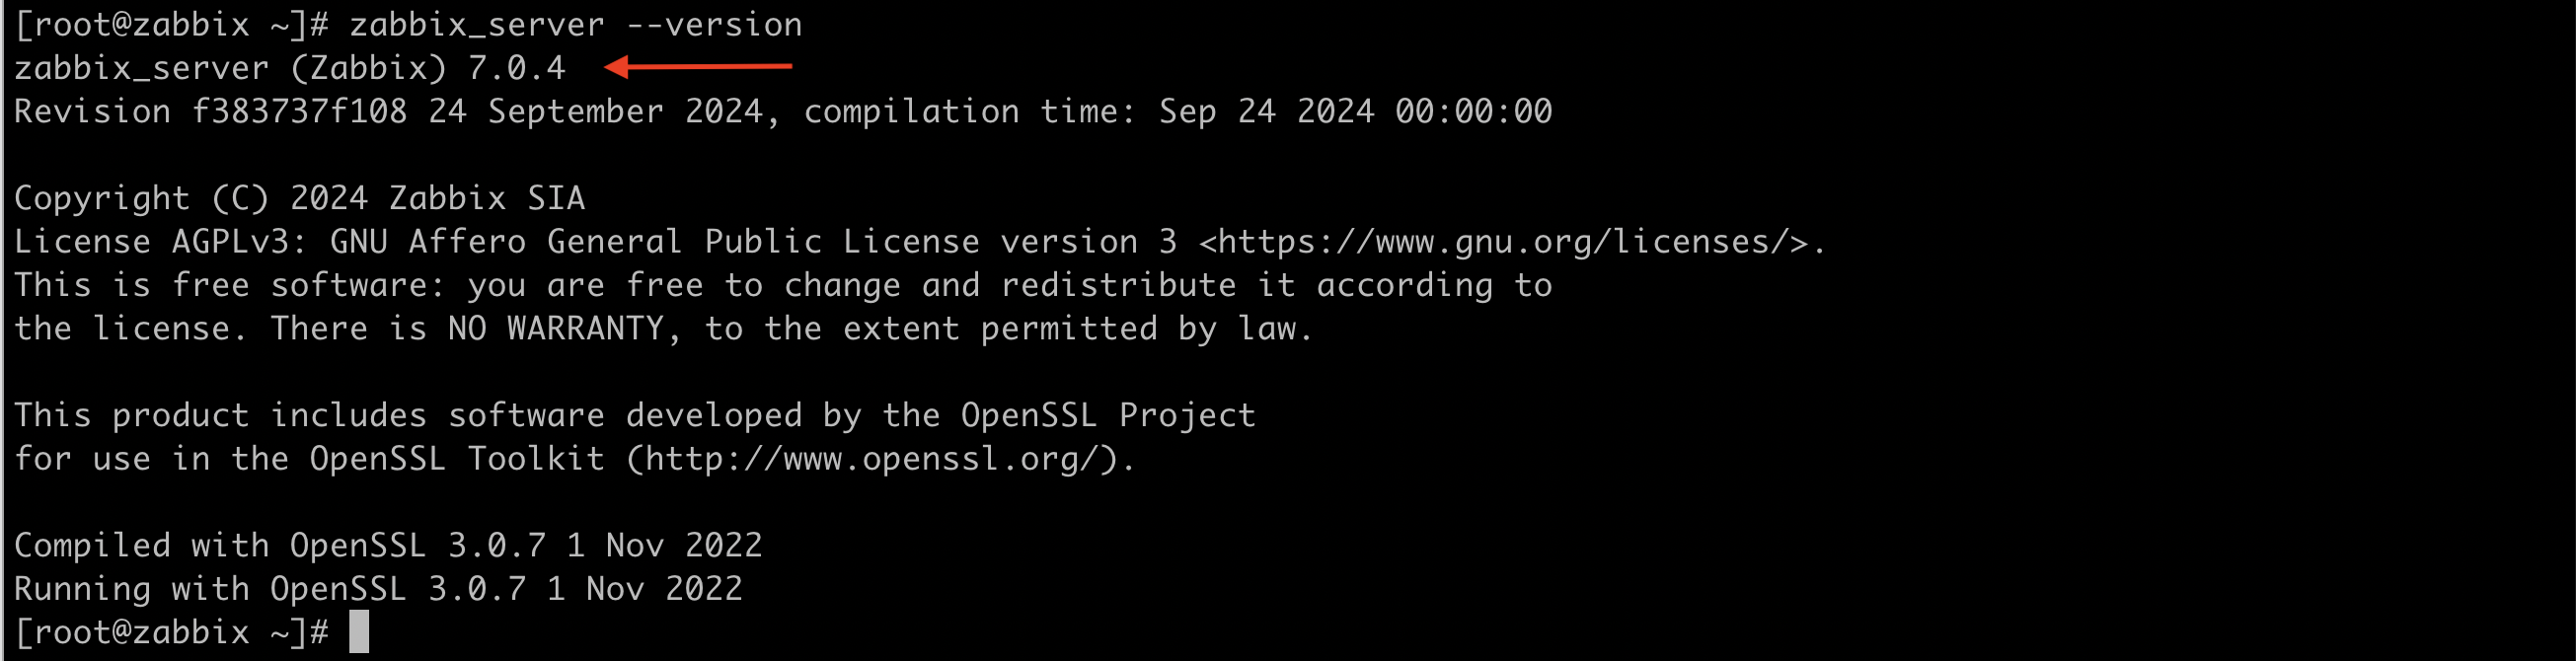
Next, we need to edit zabbix_server.conf. In this file we need to enable the vmware collector process. It’s necessary to start VMware monitoring. FYI, I have installed Zabbix server in version 7.0.4.
1. Edit a configuration file zabbix_server.conf

vim /etc/zabbix/zabbix_server.conf
2. Find the StartVMwareCollectors parameter, delete “#” before it and change the value from 0 to at least 2. Save the file and exit.
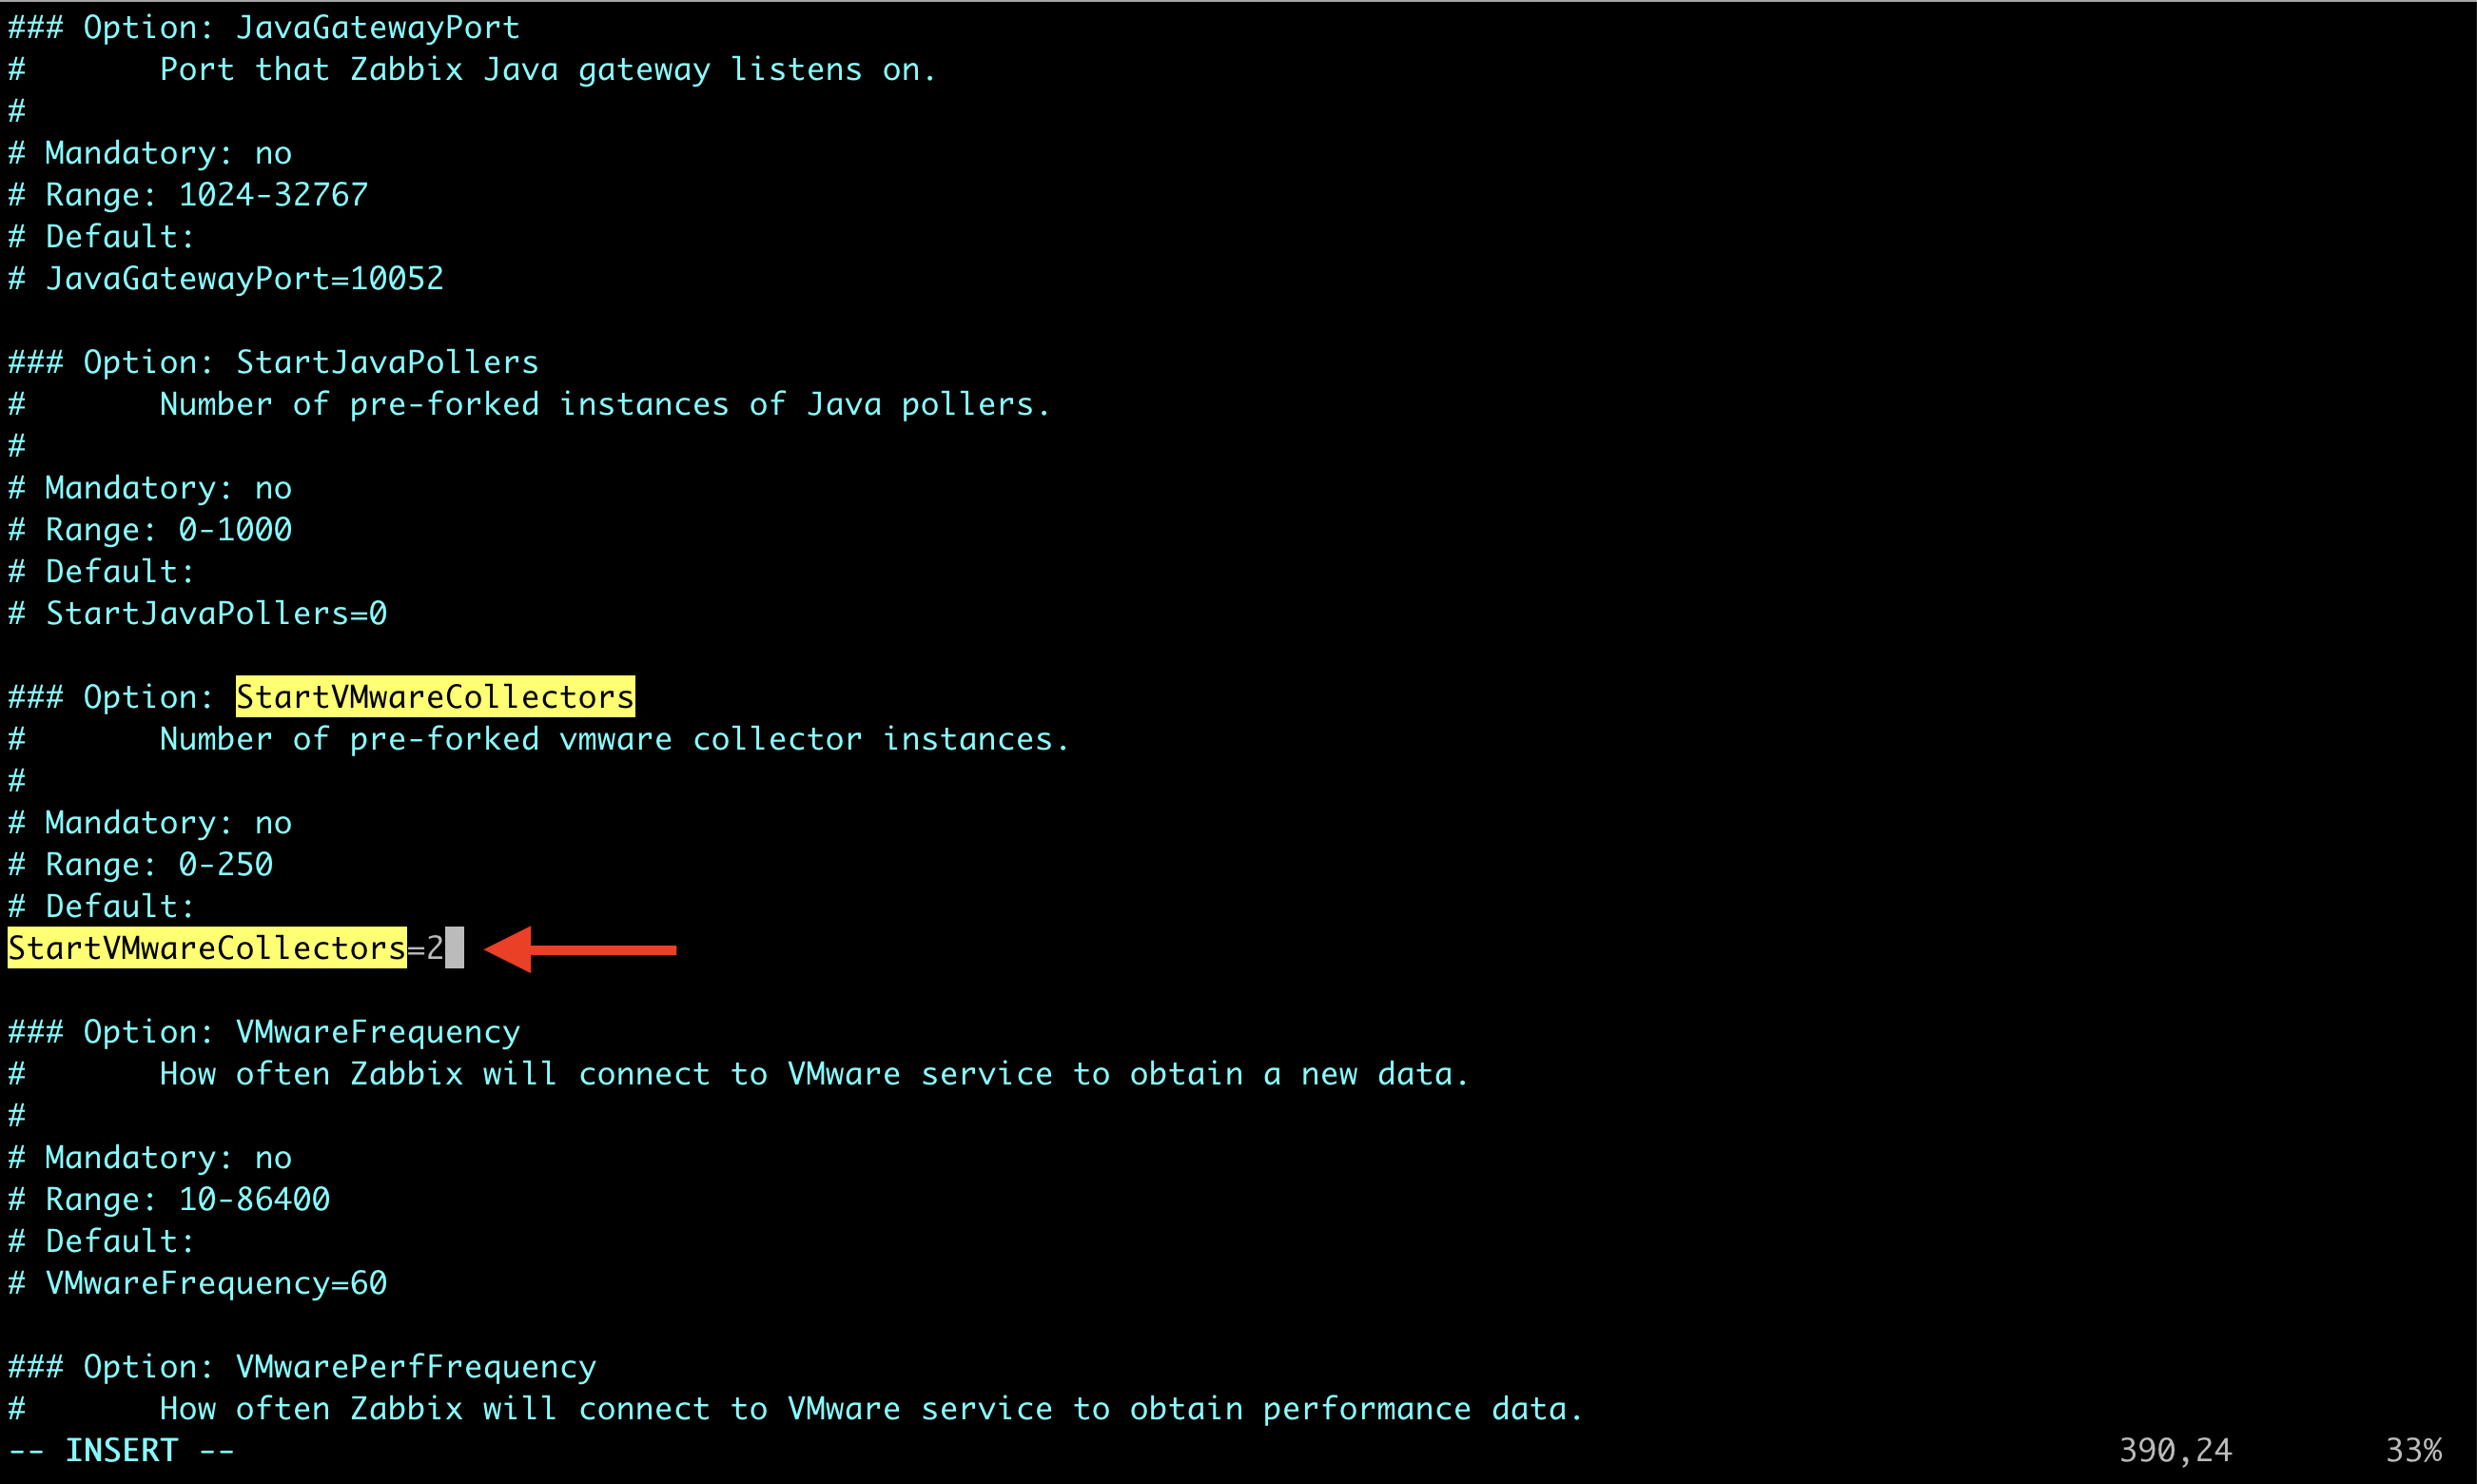
Except for StartVMwareCollectors which is mandatory, it’s possible to enable and modify additional VMware parameters. You can find more details about them HERE.
VMwareCacheSize
VMwareFrequency
VMwarePerfFrequency
VMwareTimeout
3. Restart the zabbix-server service.

systemctl restart zabbix-server
1.Log in to the Zabbix server via GUI – http://zabbix_server/zabbix. Go to the Hosts section under the Monitoring tab.
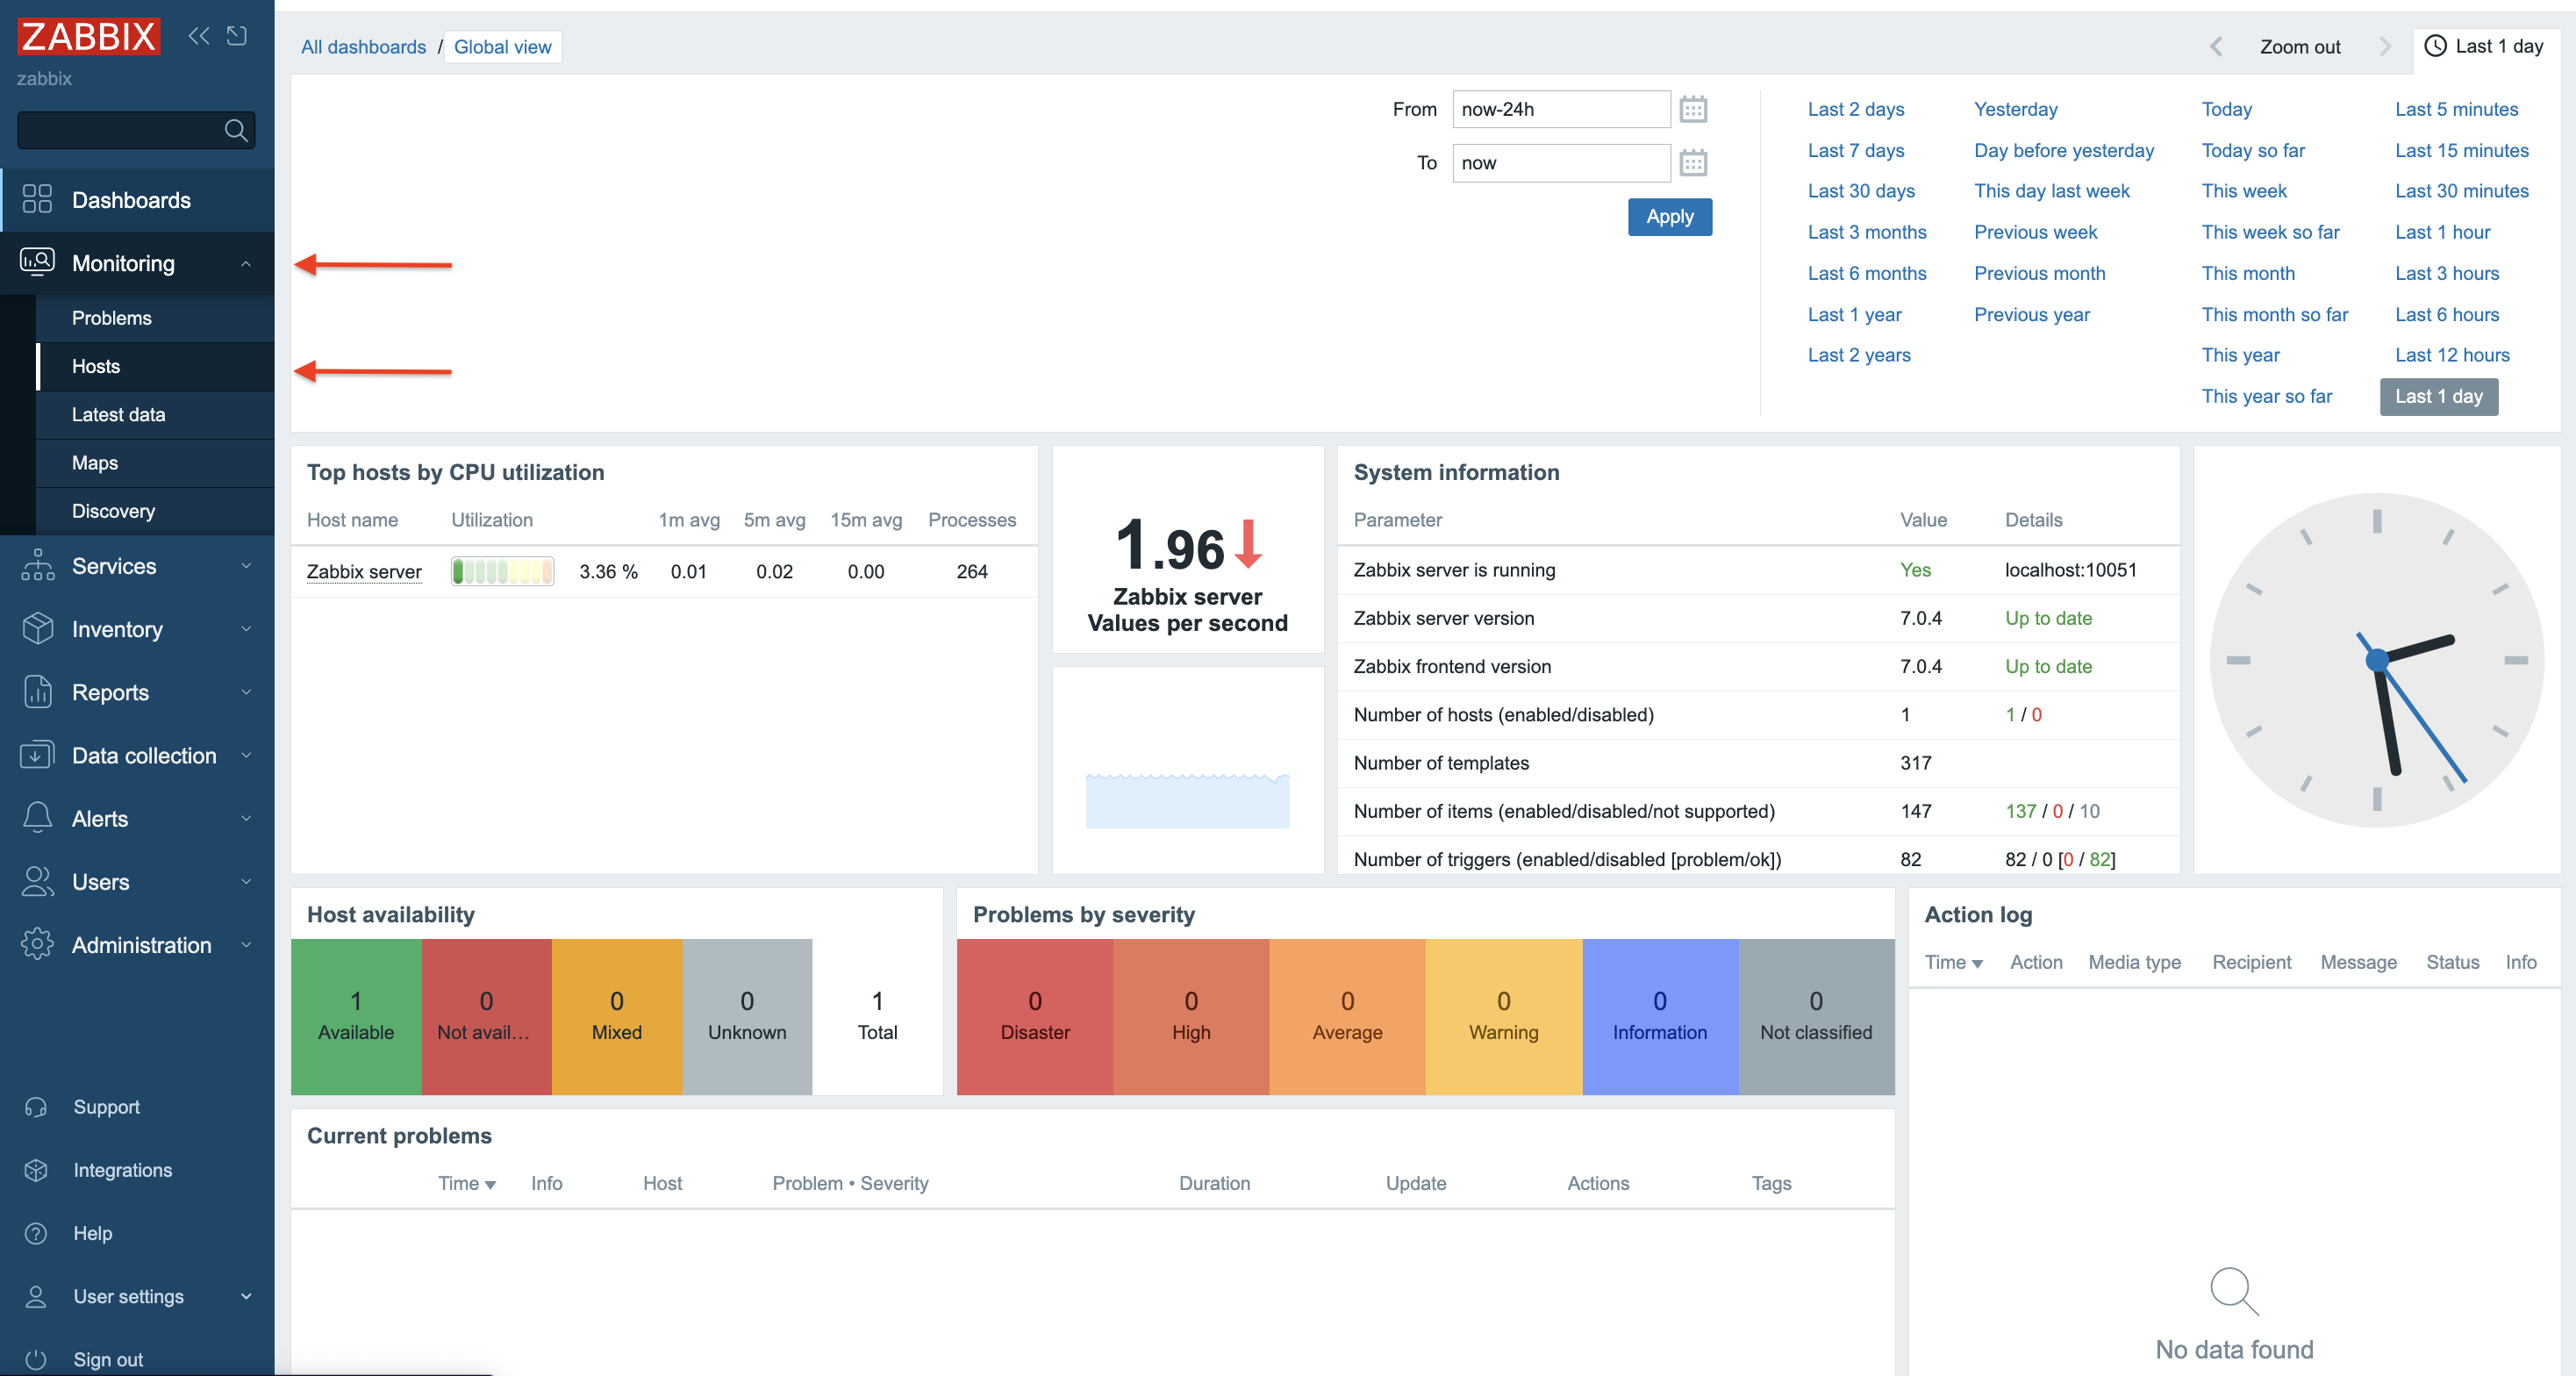
2. Create a new “Host.” Click Create Host in the right upper corner.
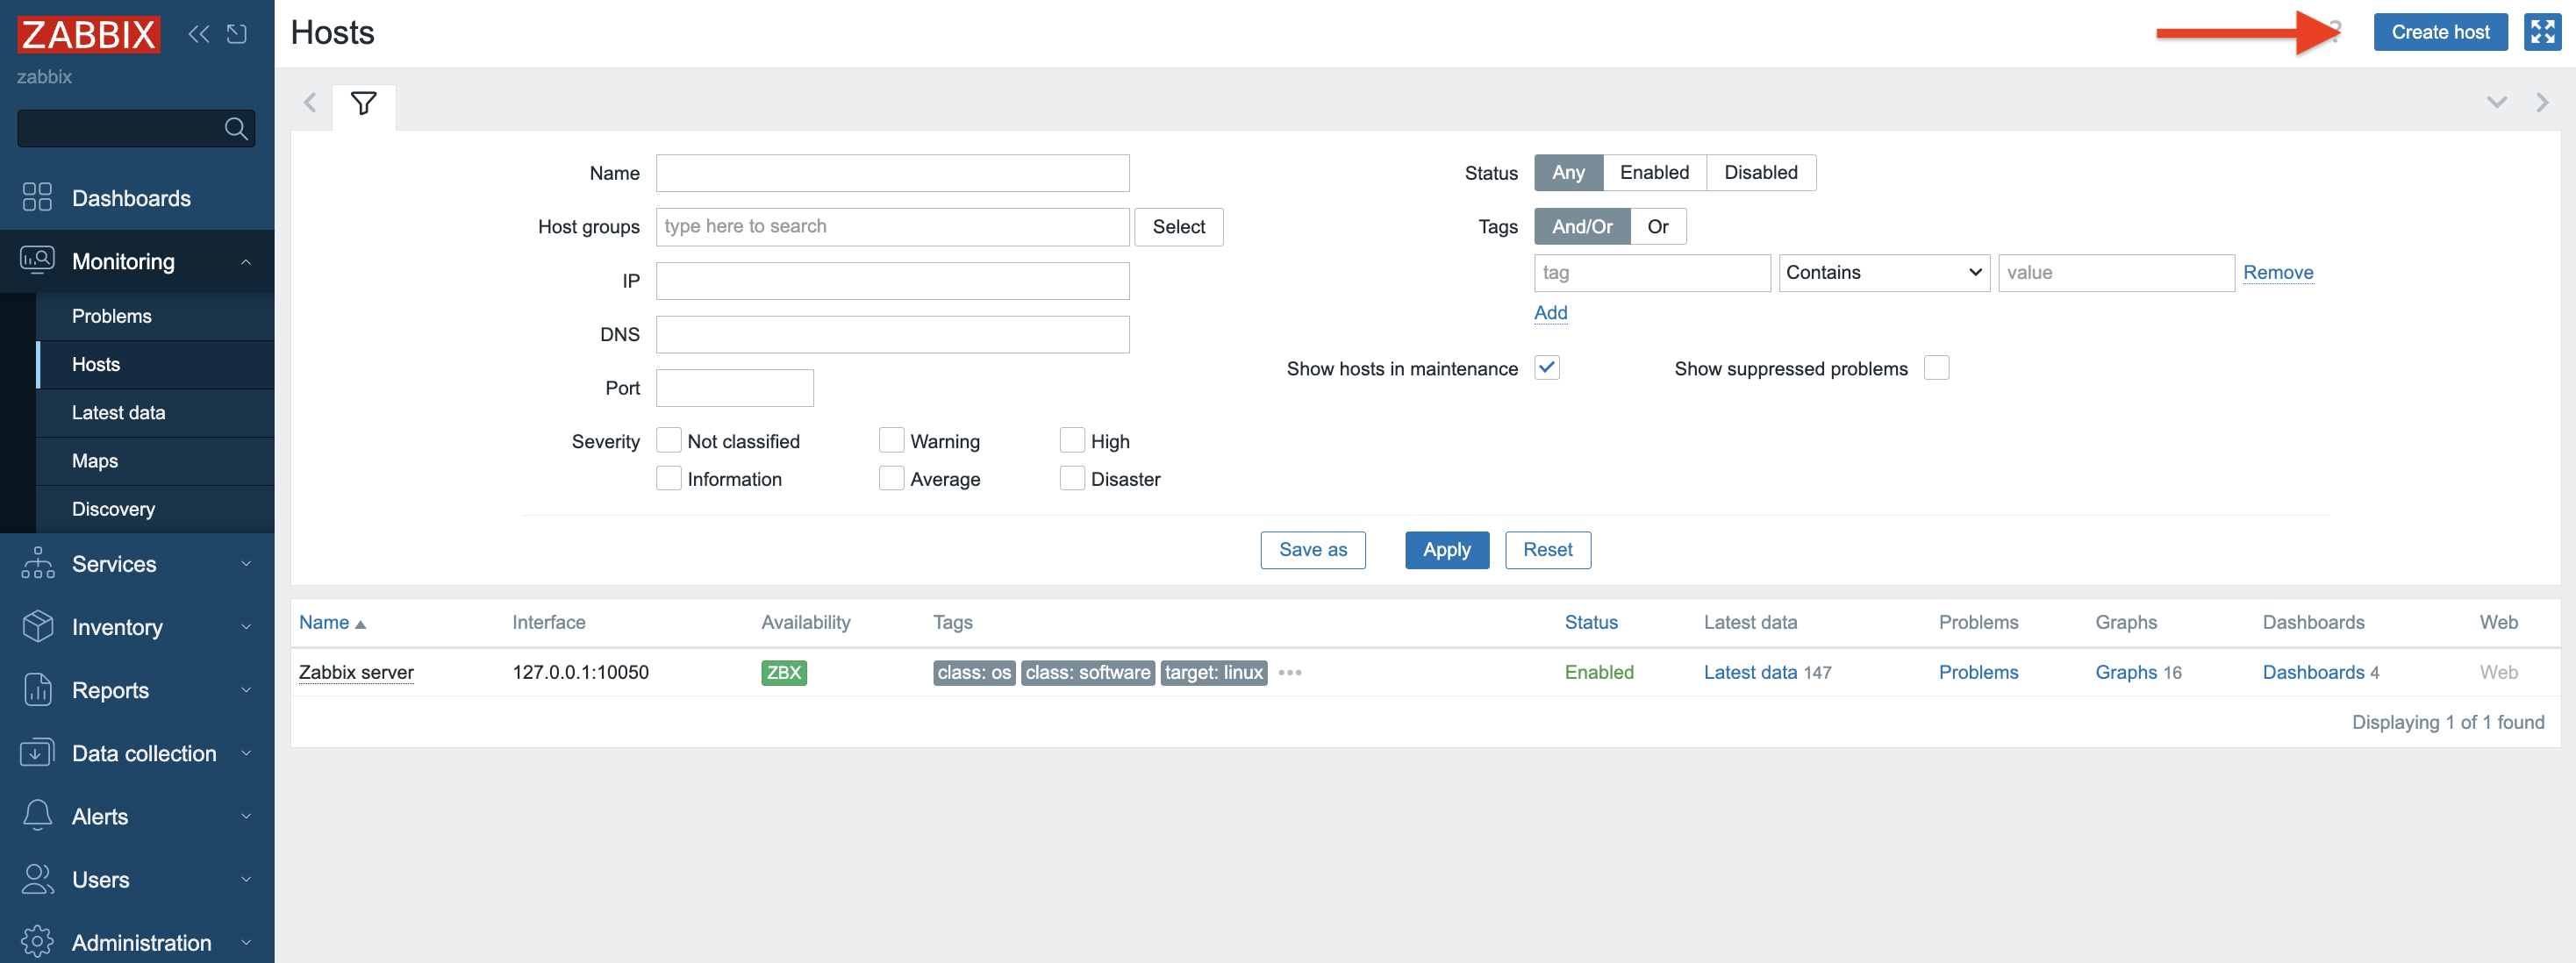
3. In the Host tab provide the following details:
Host name – type the name of the system that we want to monitor – here it is VMware Infrastructure.
Templates – type/find template name “VMware”, more info about VMware template you can find HERE.
Host groups – find/type “VMware(new)” host group.
At this point, go to the Macros tab.
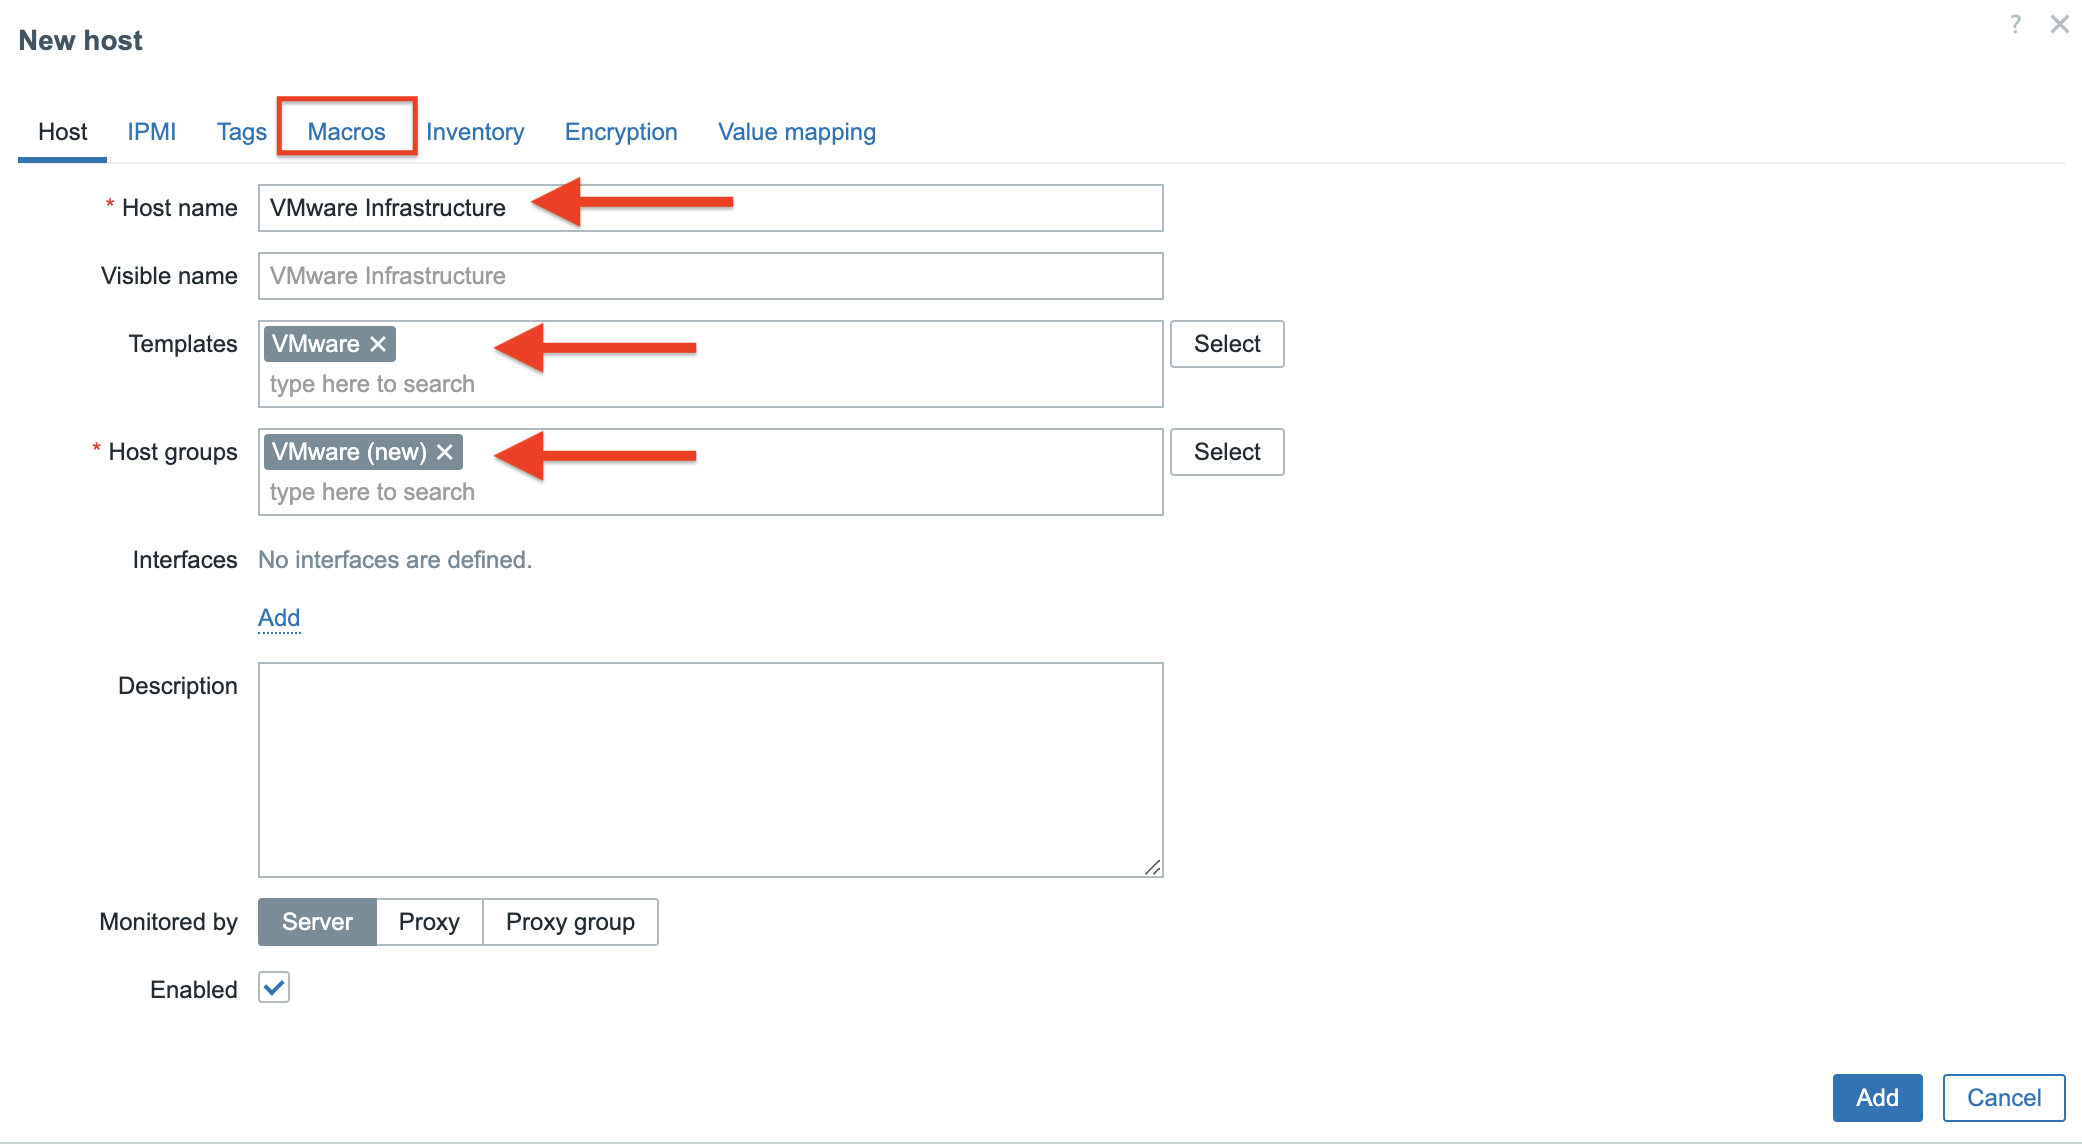
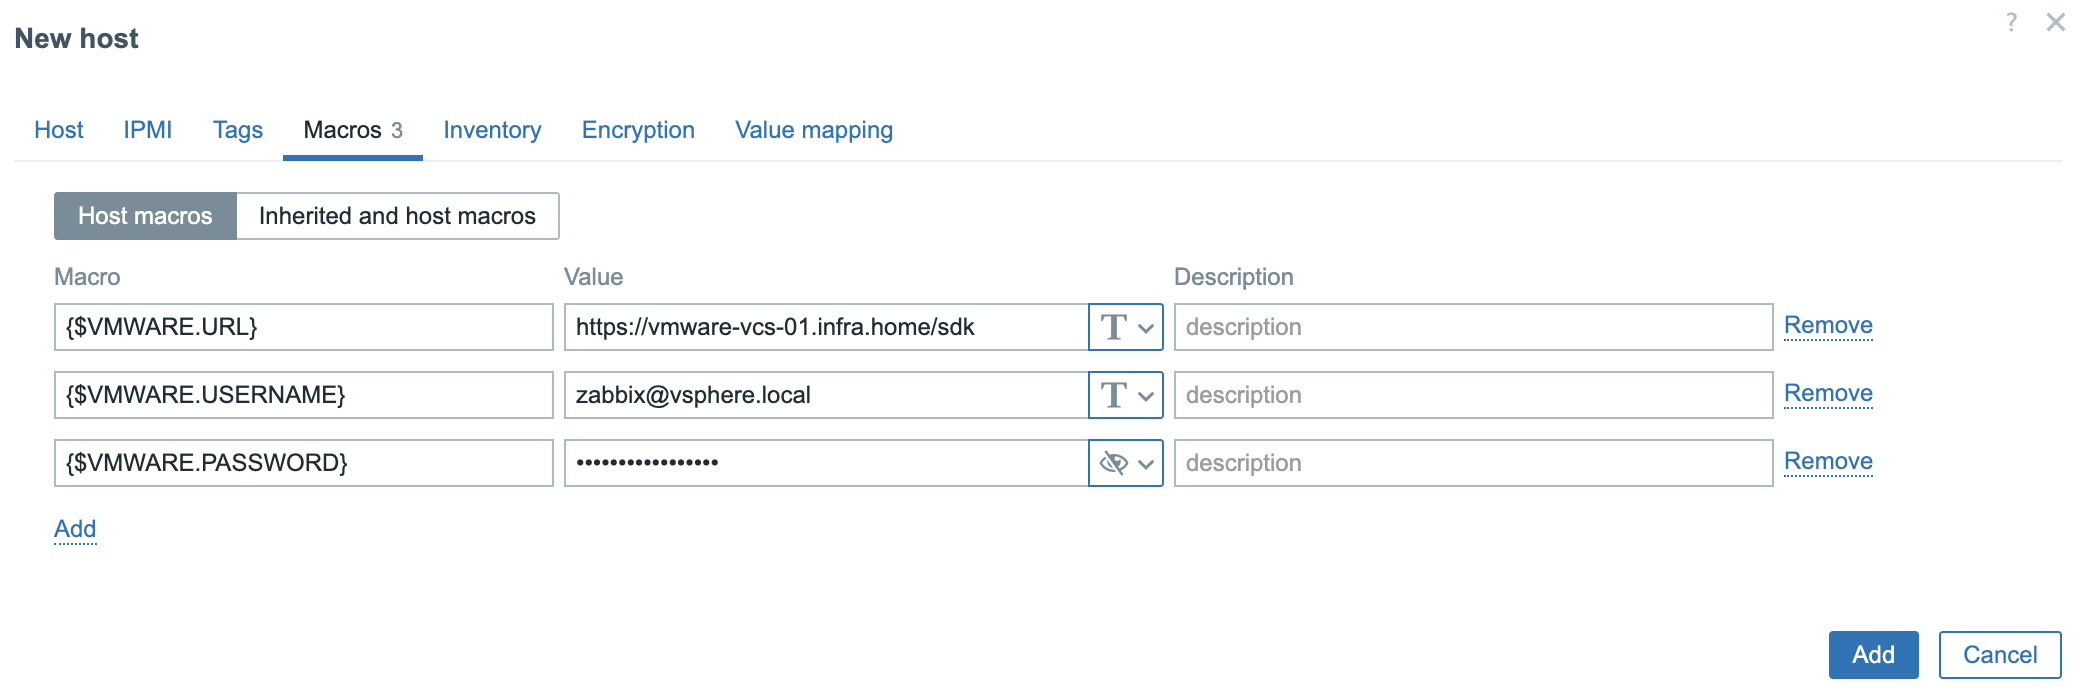
4. In the Macros tab you need to provide 3 values/macros. These macros describes data that is needed to connect Zabbix to the VMware vCenter:
{$VMWARE.URL} – VMware service (vCenter or ESXi hypervisor) SDK URL (https://servername/sdk) that we want to connect.
{$VMWARE.USERNAME} – VMware service username created in the 1 section.
{$VMWARE.PASSWORD} – VMware service user password created in the 1 section.
Click the Add button.
5. A new Host was created and data collection is in progress.
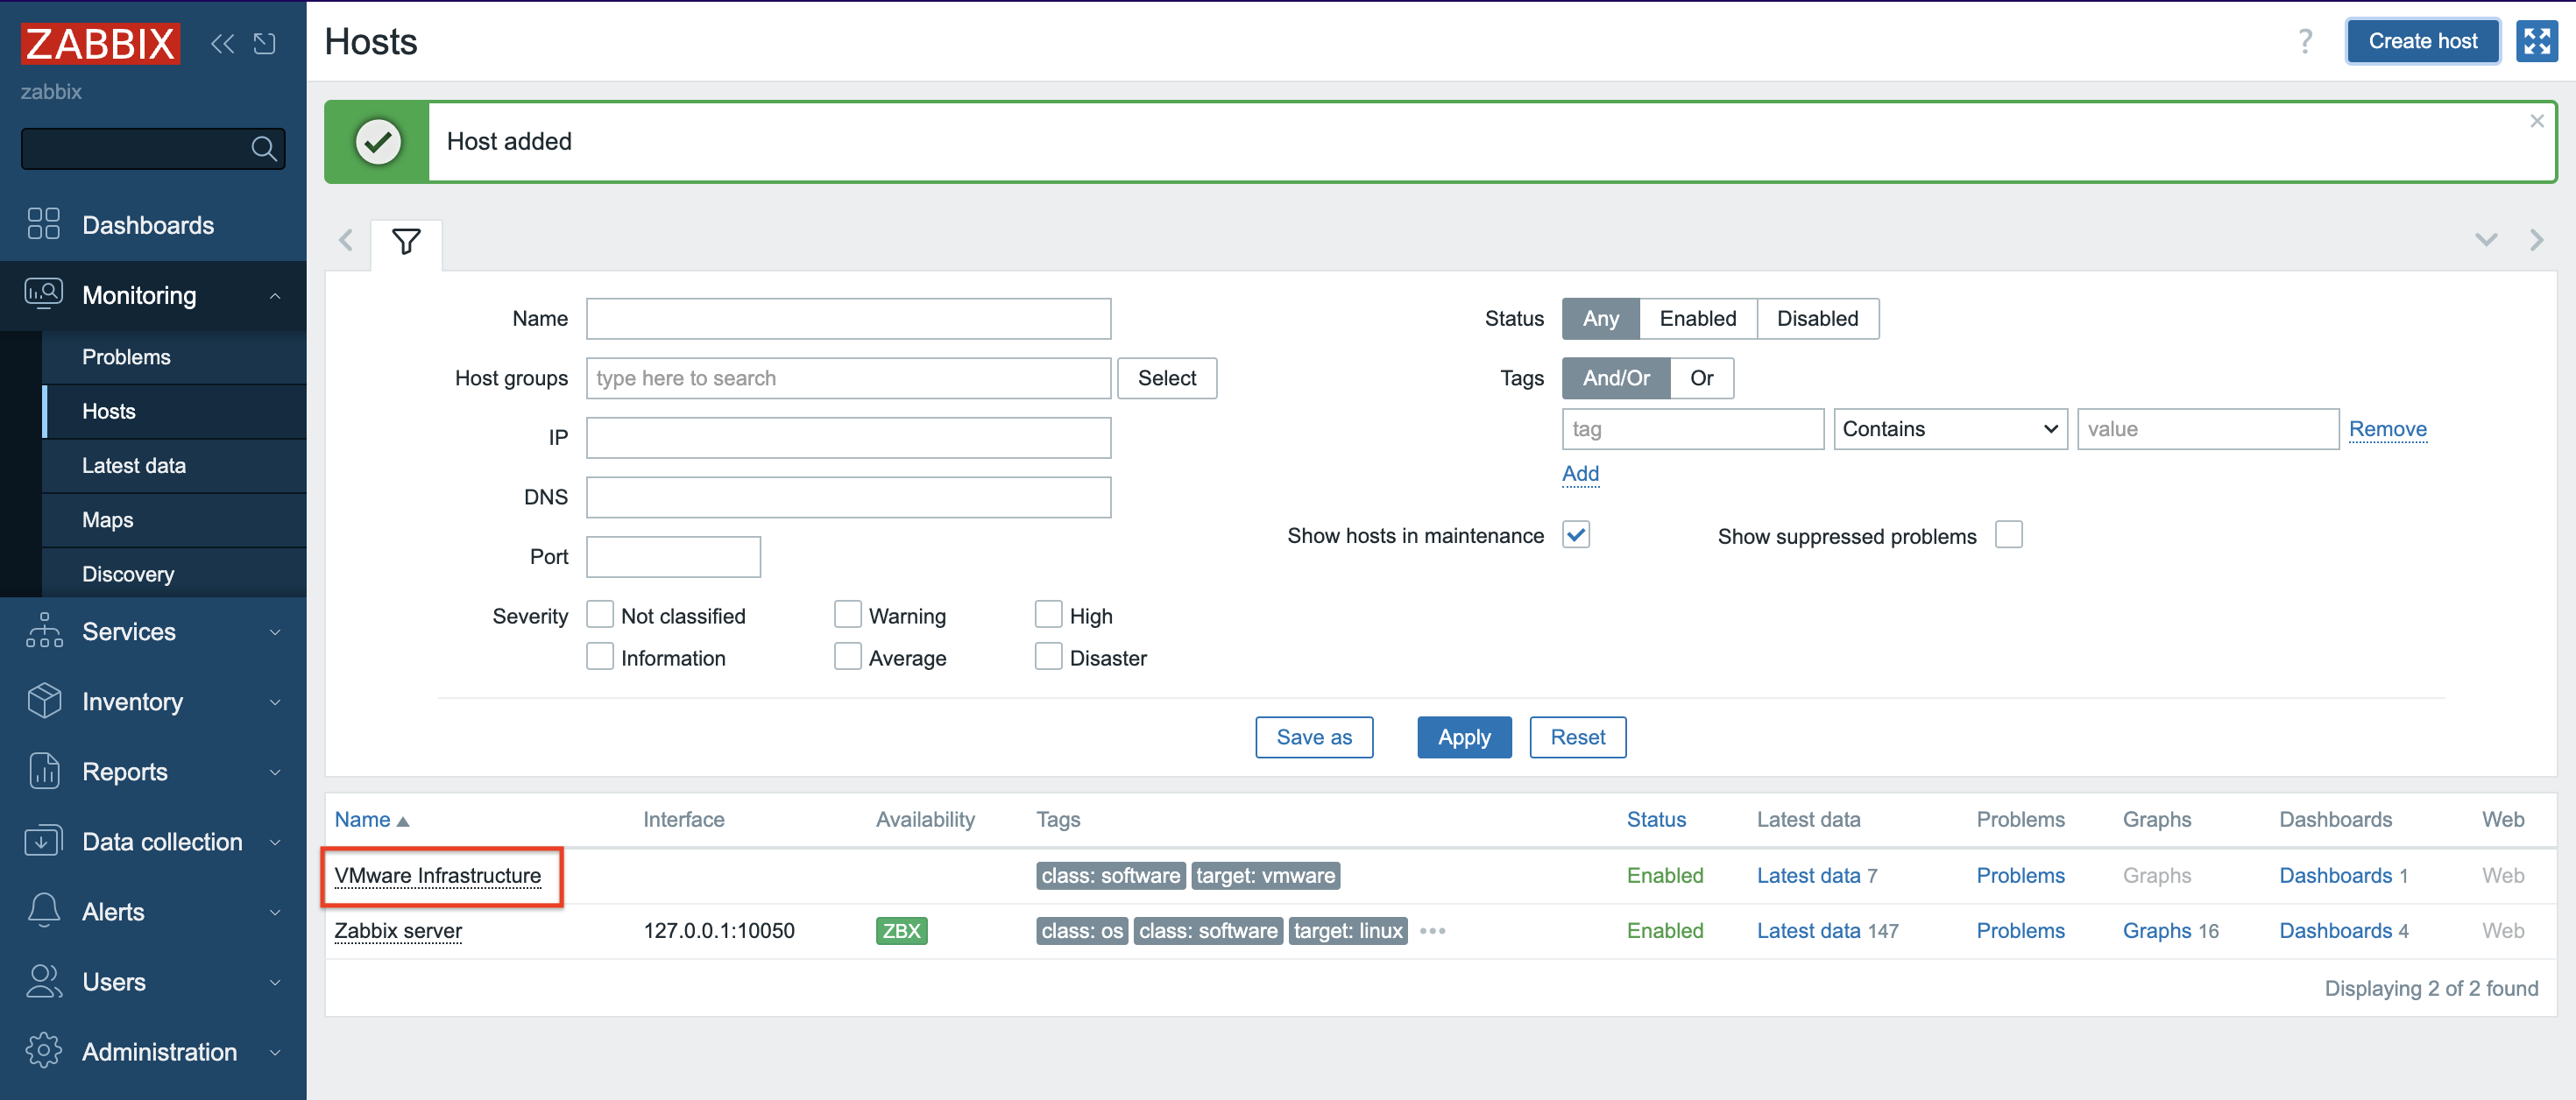
6. Depending on the size of the infrastructure, data collection takes different amounts of time. Once configured, Zabbix will automatically discover VMs and begin collecting performance data. You can find an overview of the latest data in the Dashboard screen.
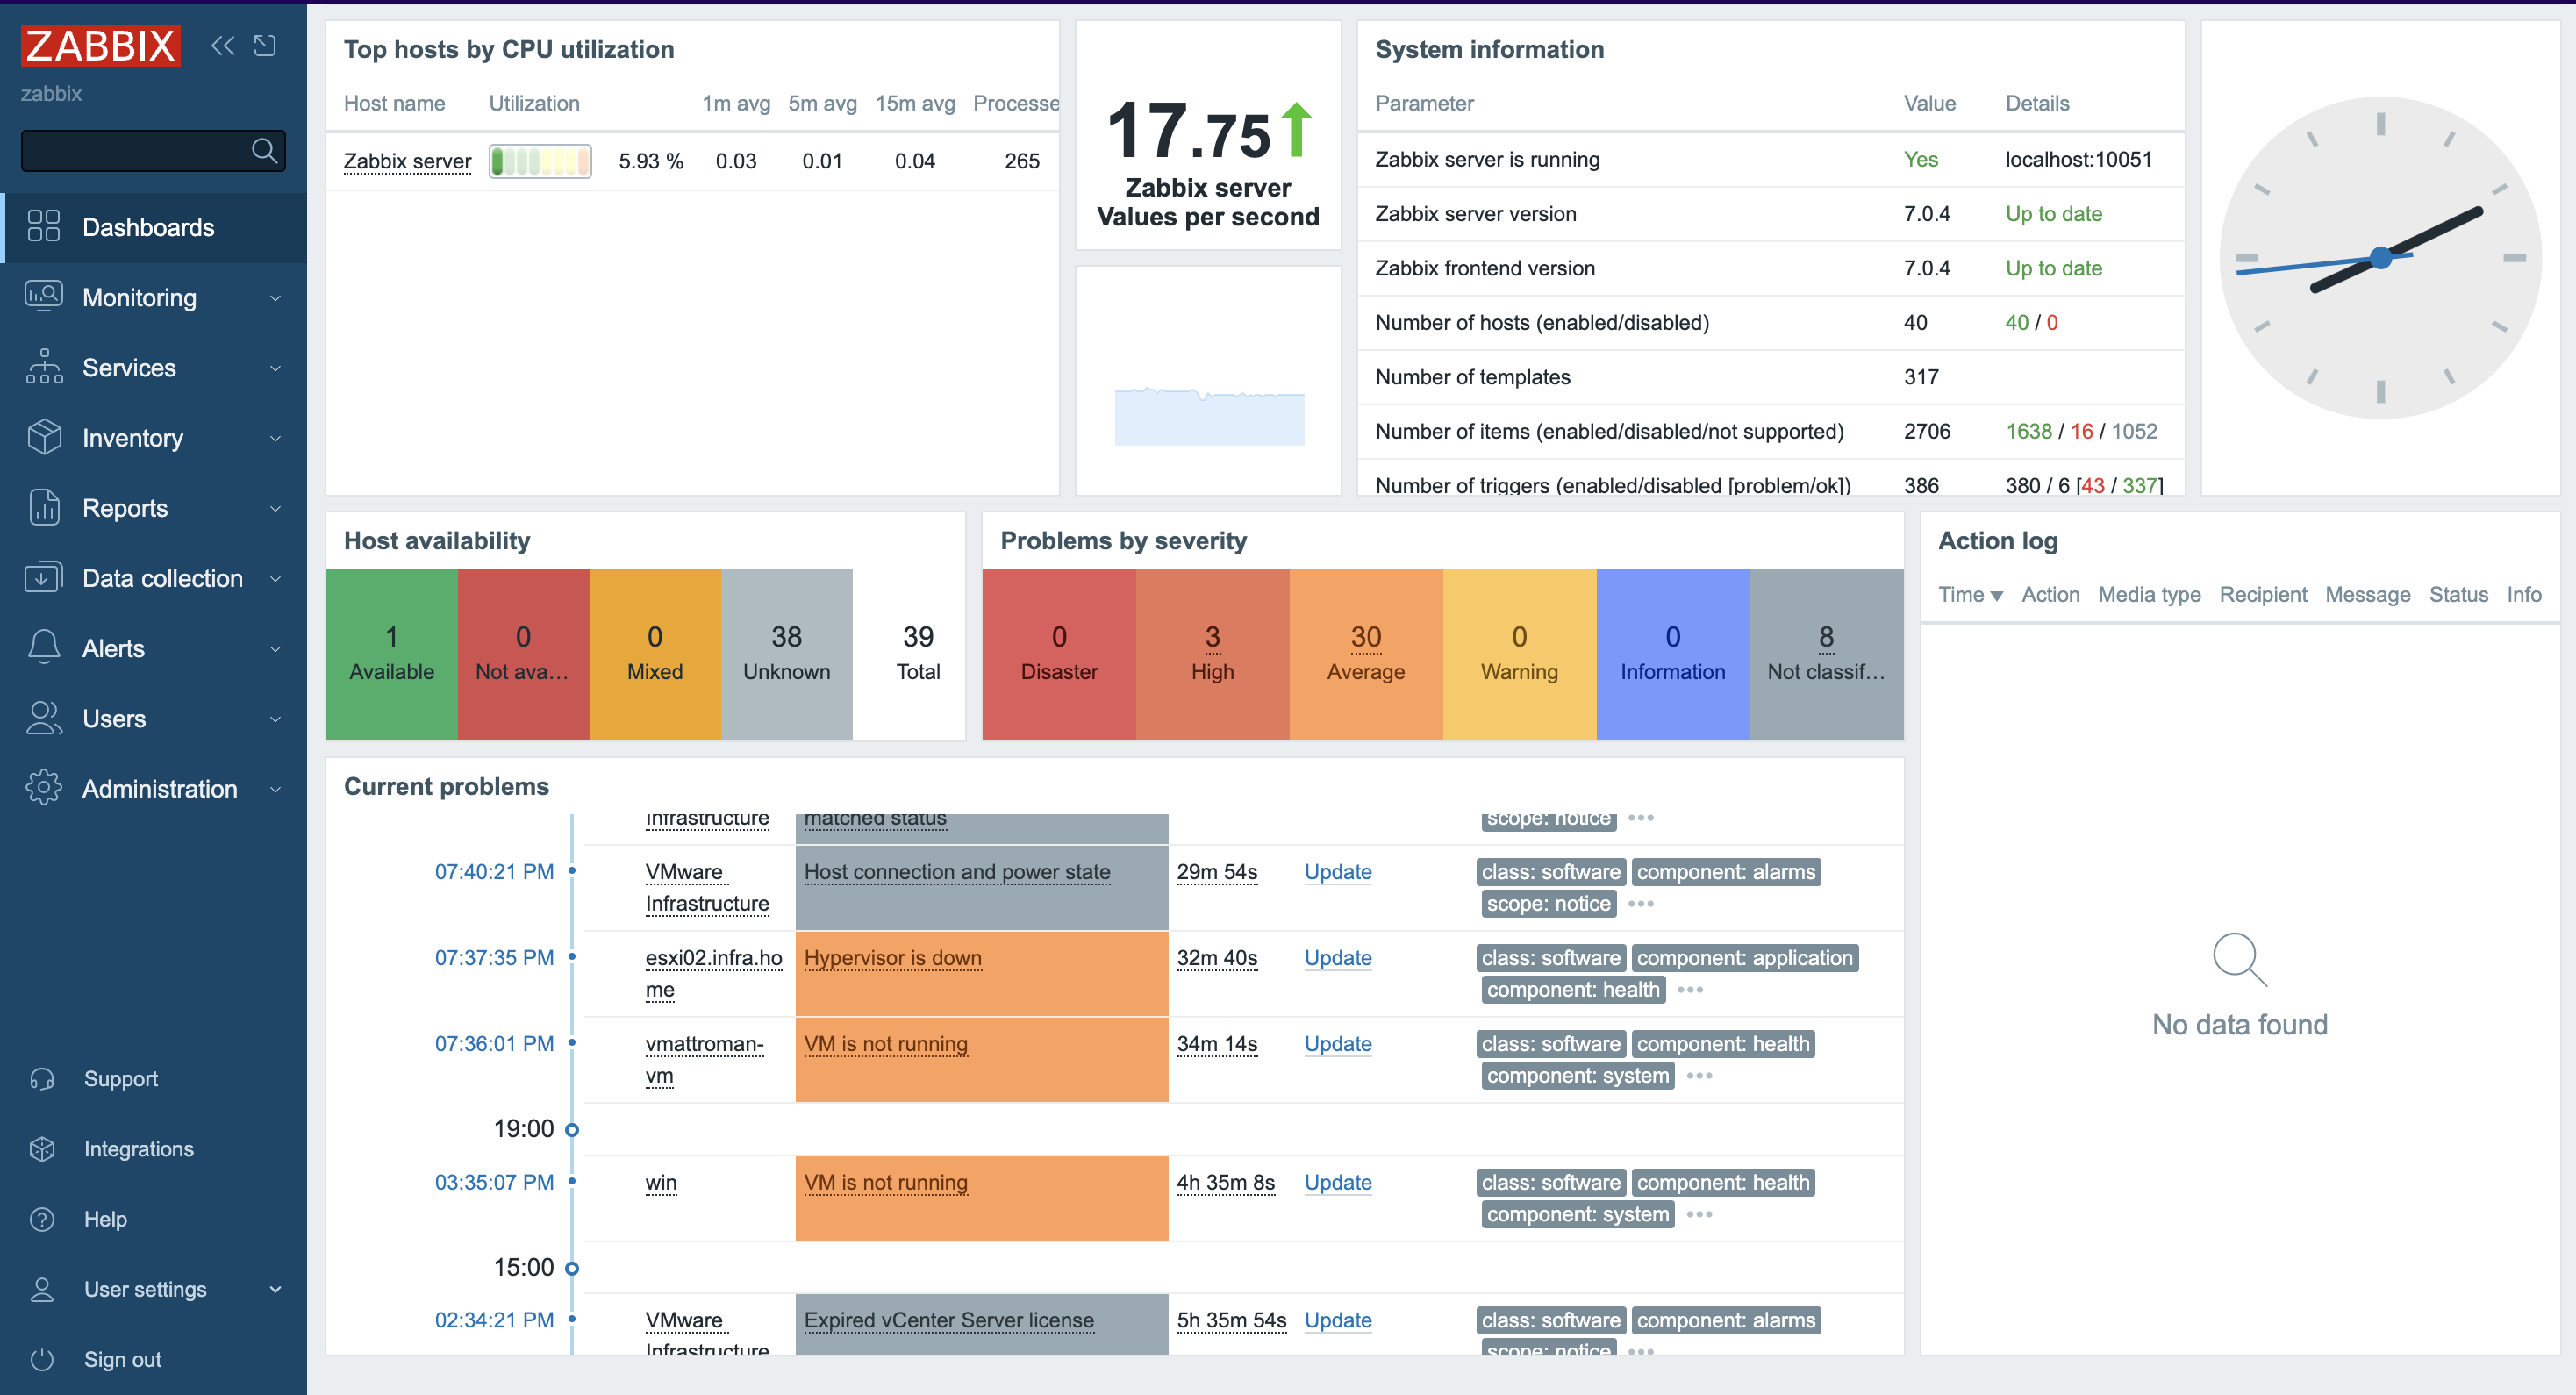
7. More specific and detailed data can be found in Latest data under the Monitoring tab.
In Host groups or Hosts choose the name of the item you are looking for (you can also click the “Select” button). Select the name of the ESXi host, the virtual machine, the vCenter name, the datastore, or all VMware information.
Zabbix can collect multiple metrics from VMware using its built-in templates. These metrics include:
– CPU usage
– Memory consumption
– Disk I/O statistics
– Network traffic
– Datastore capacity
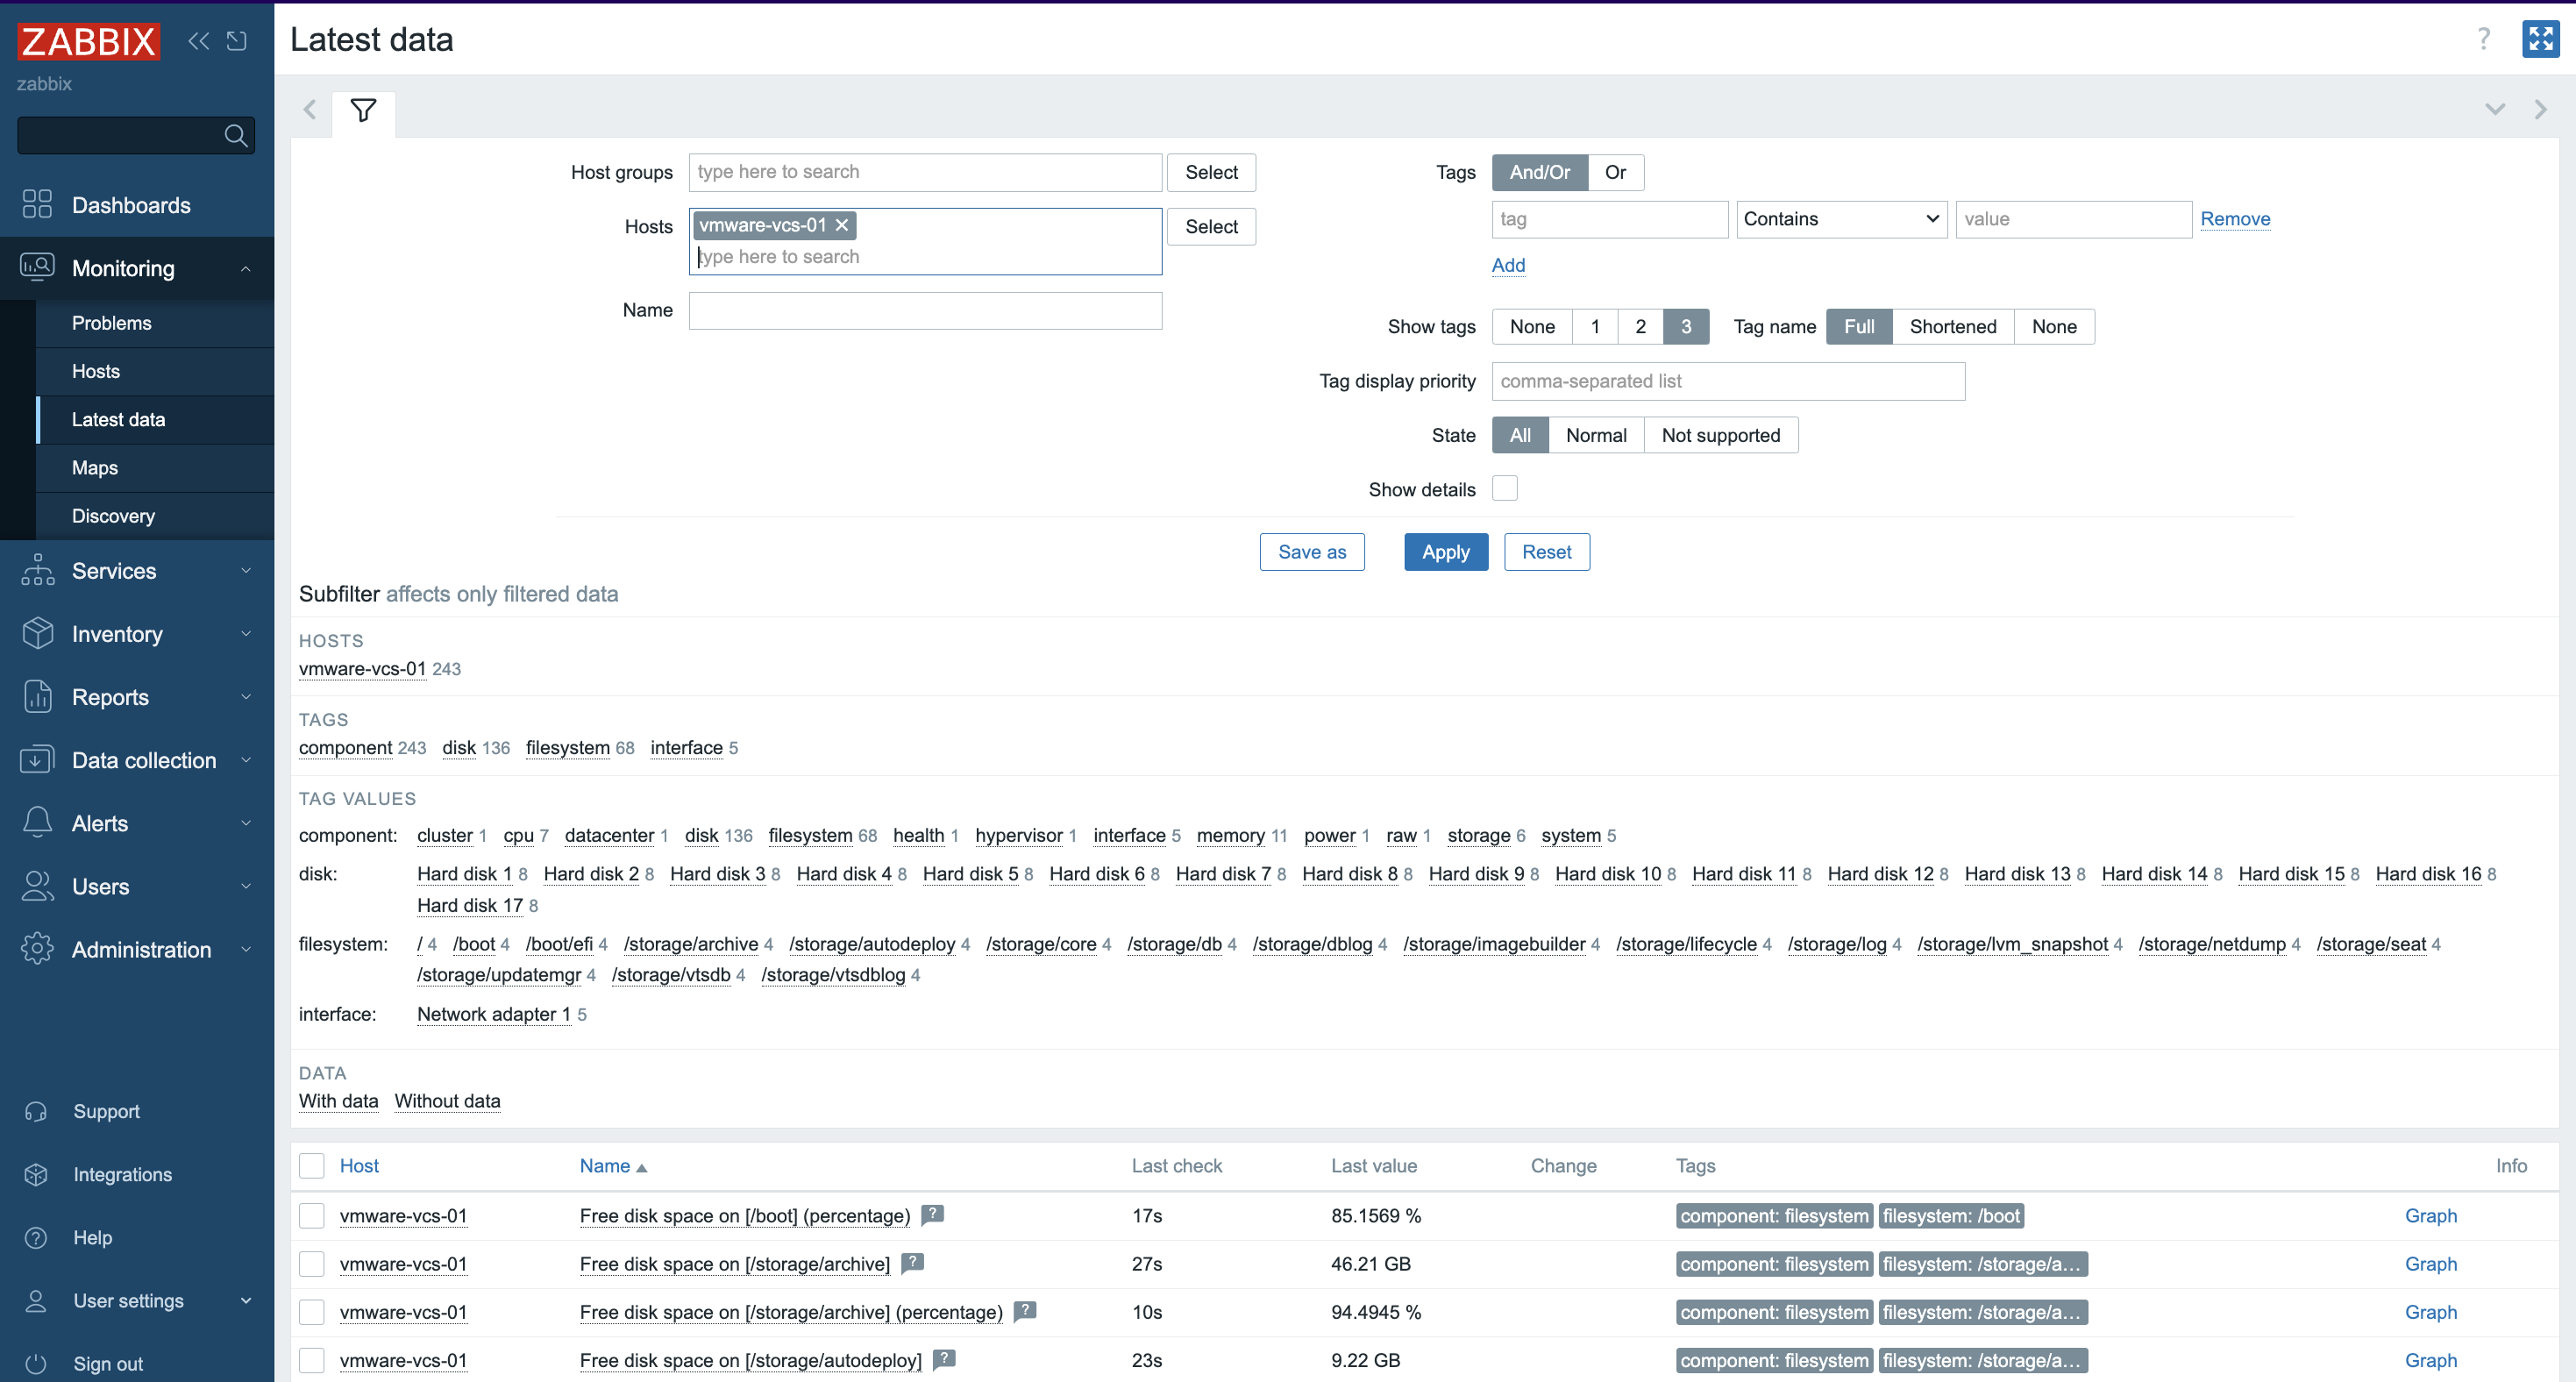
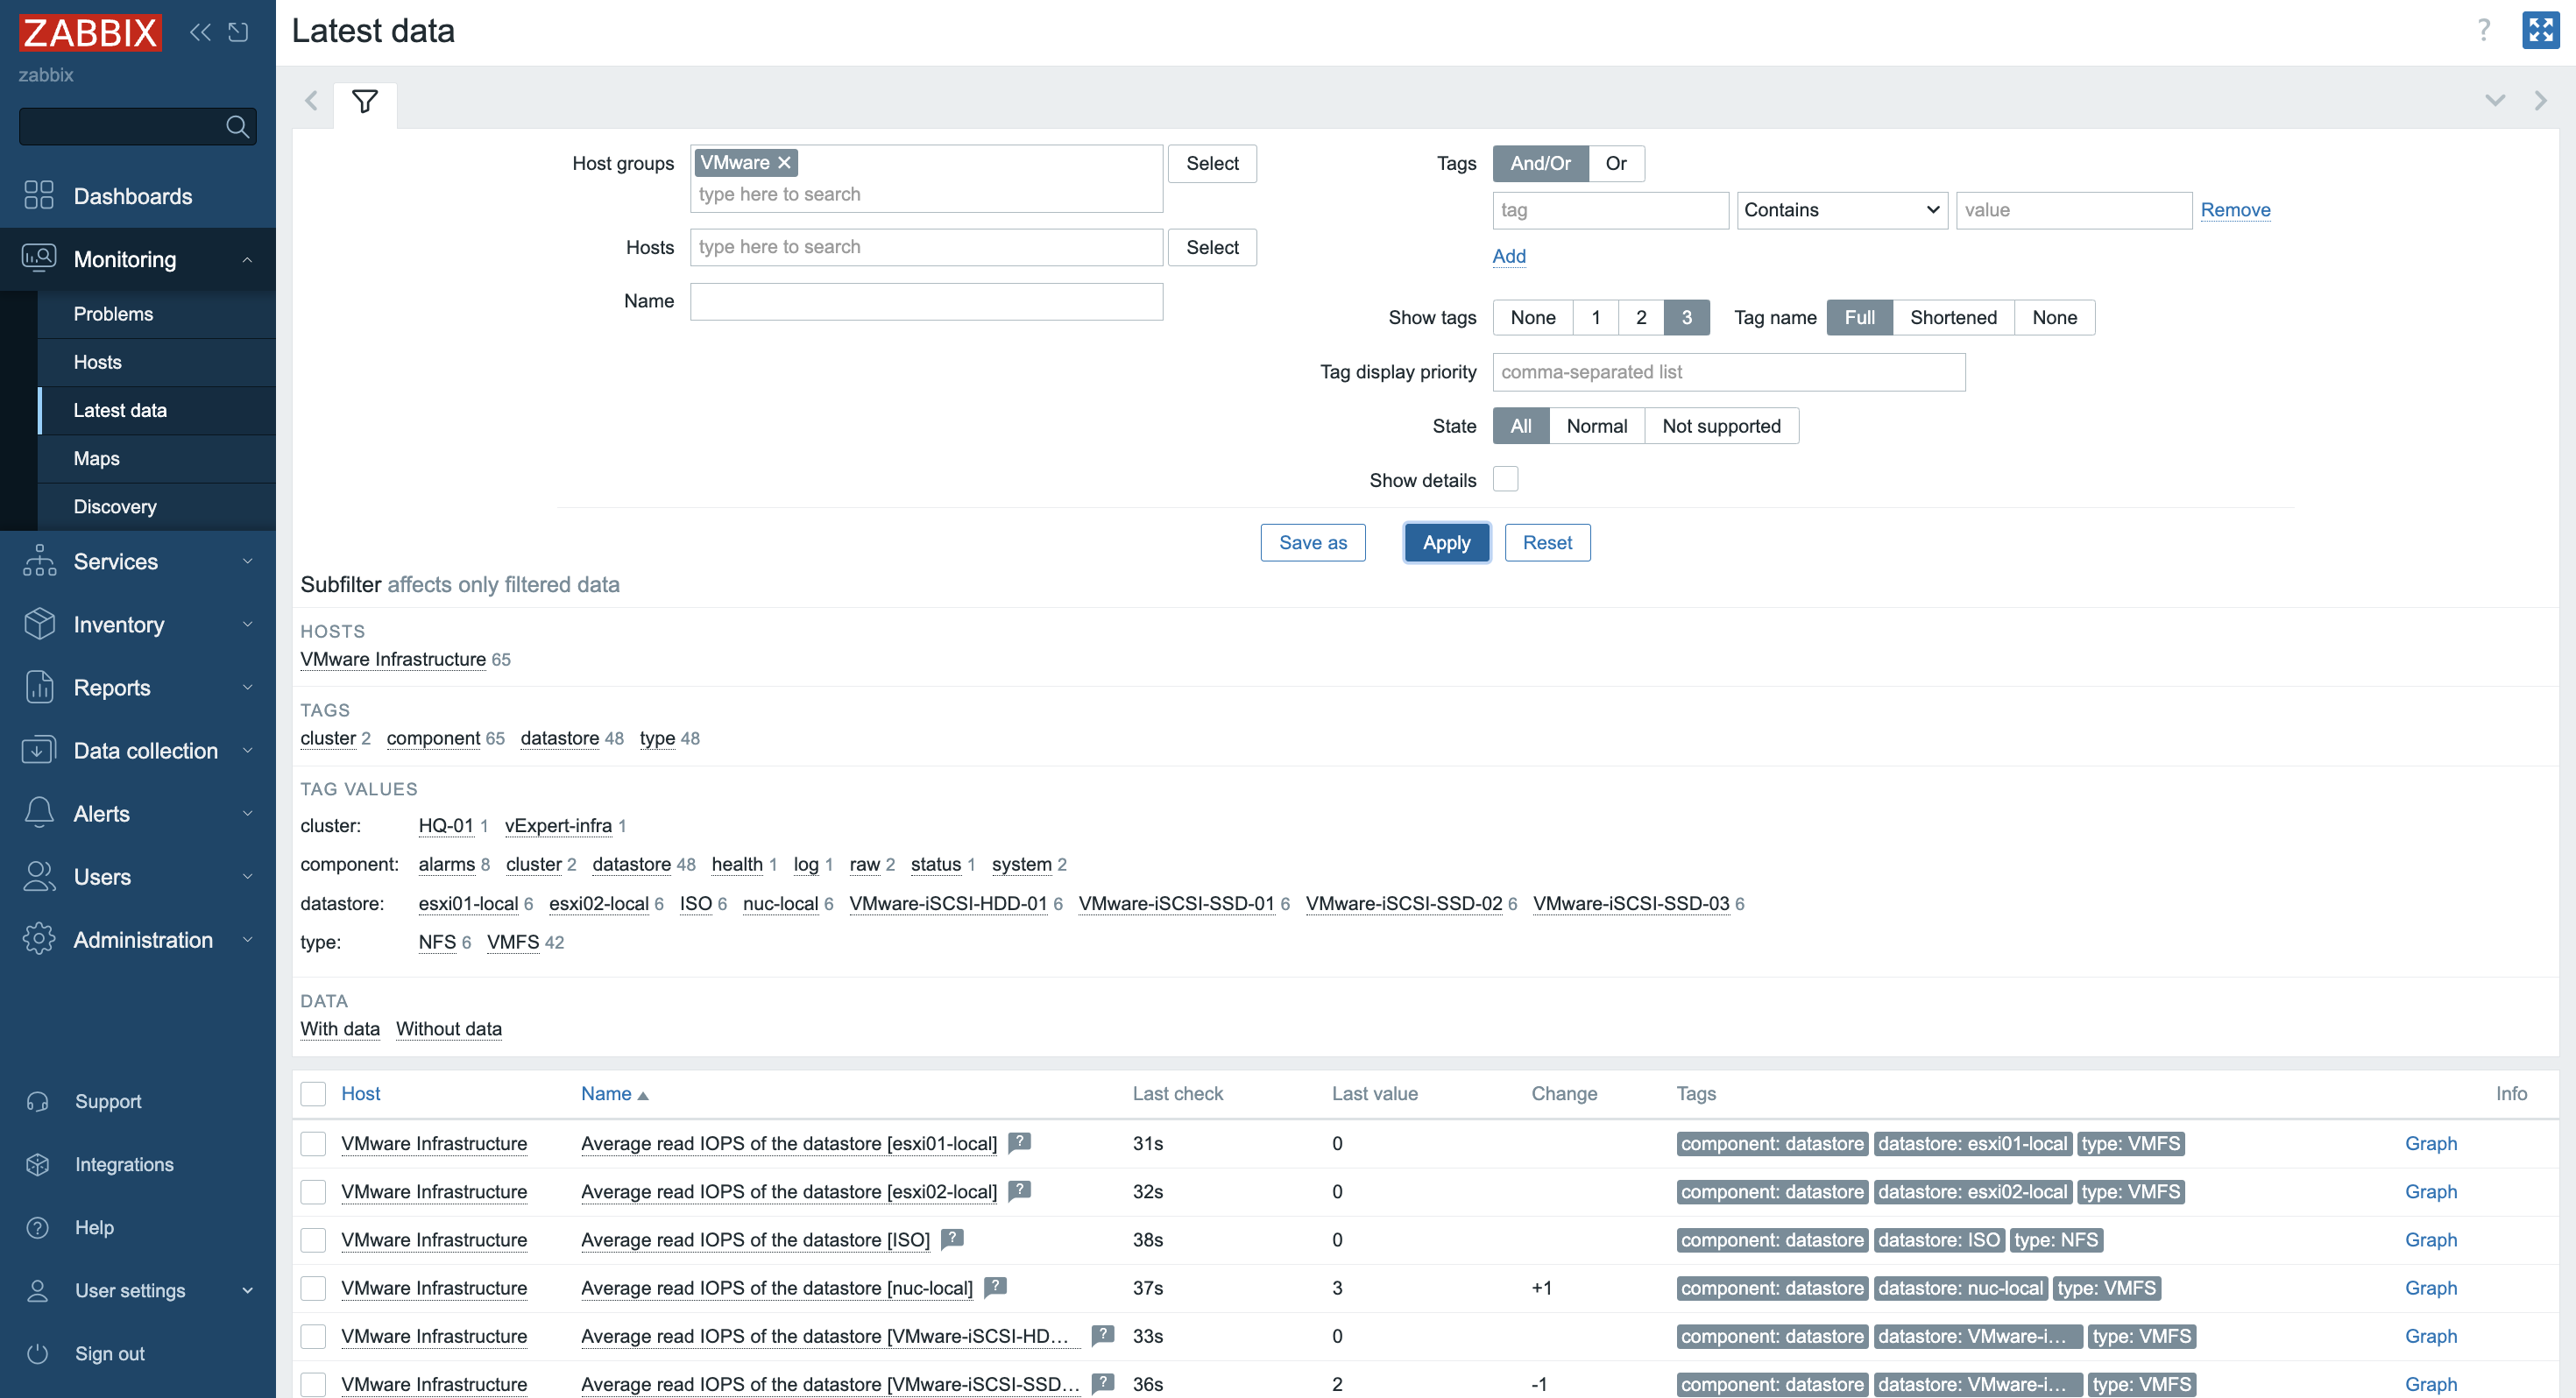
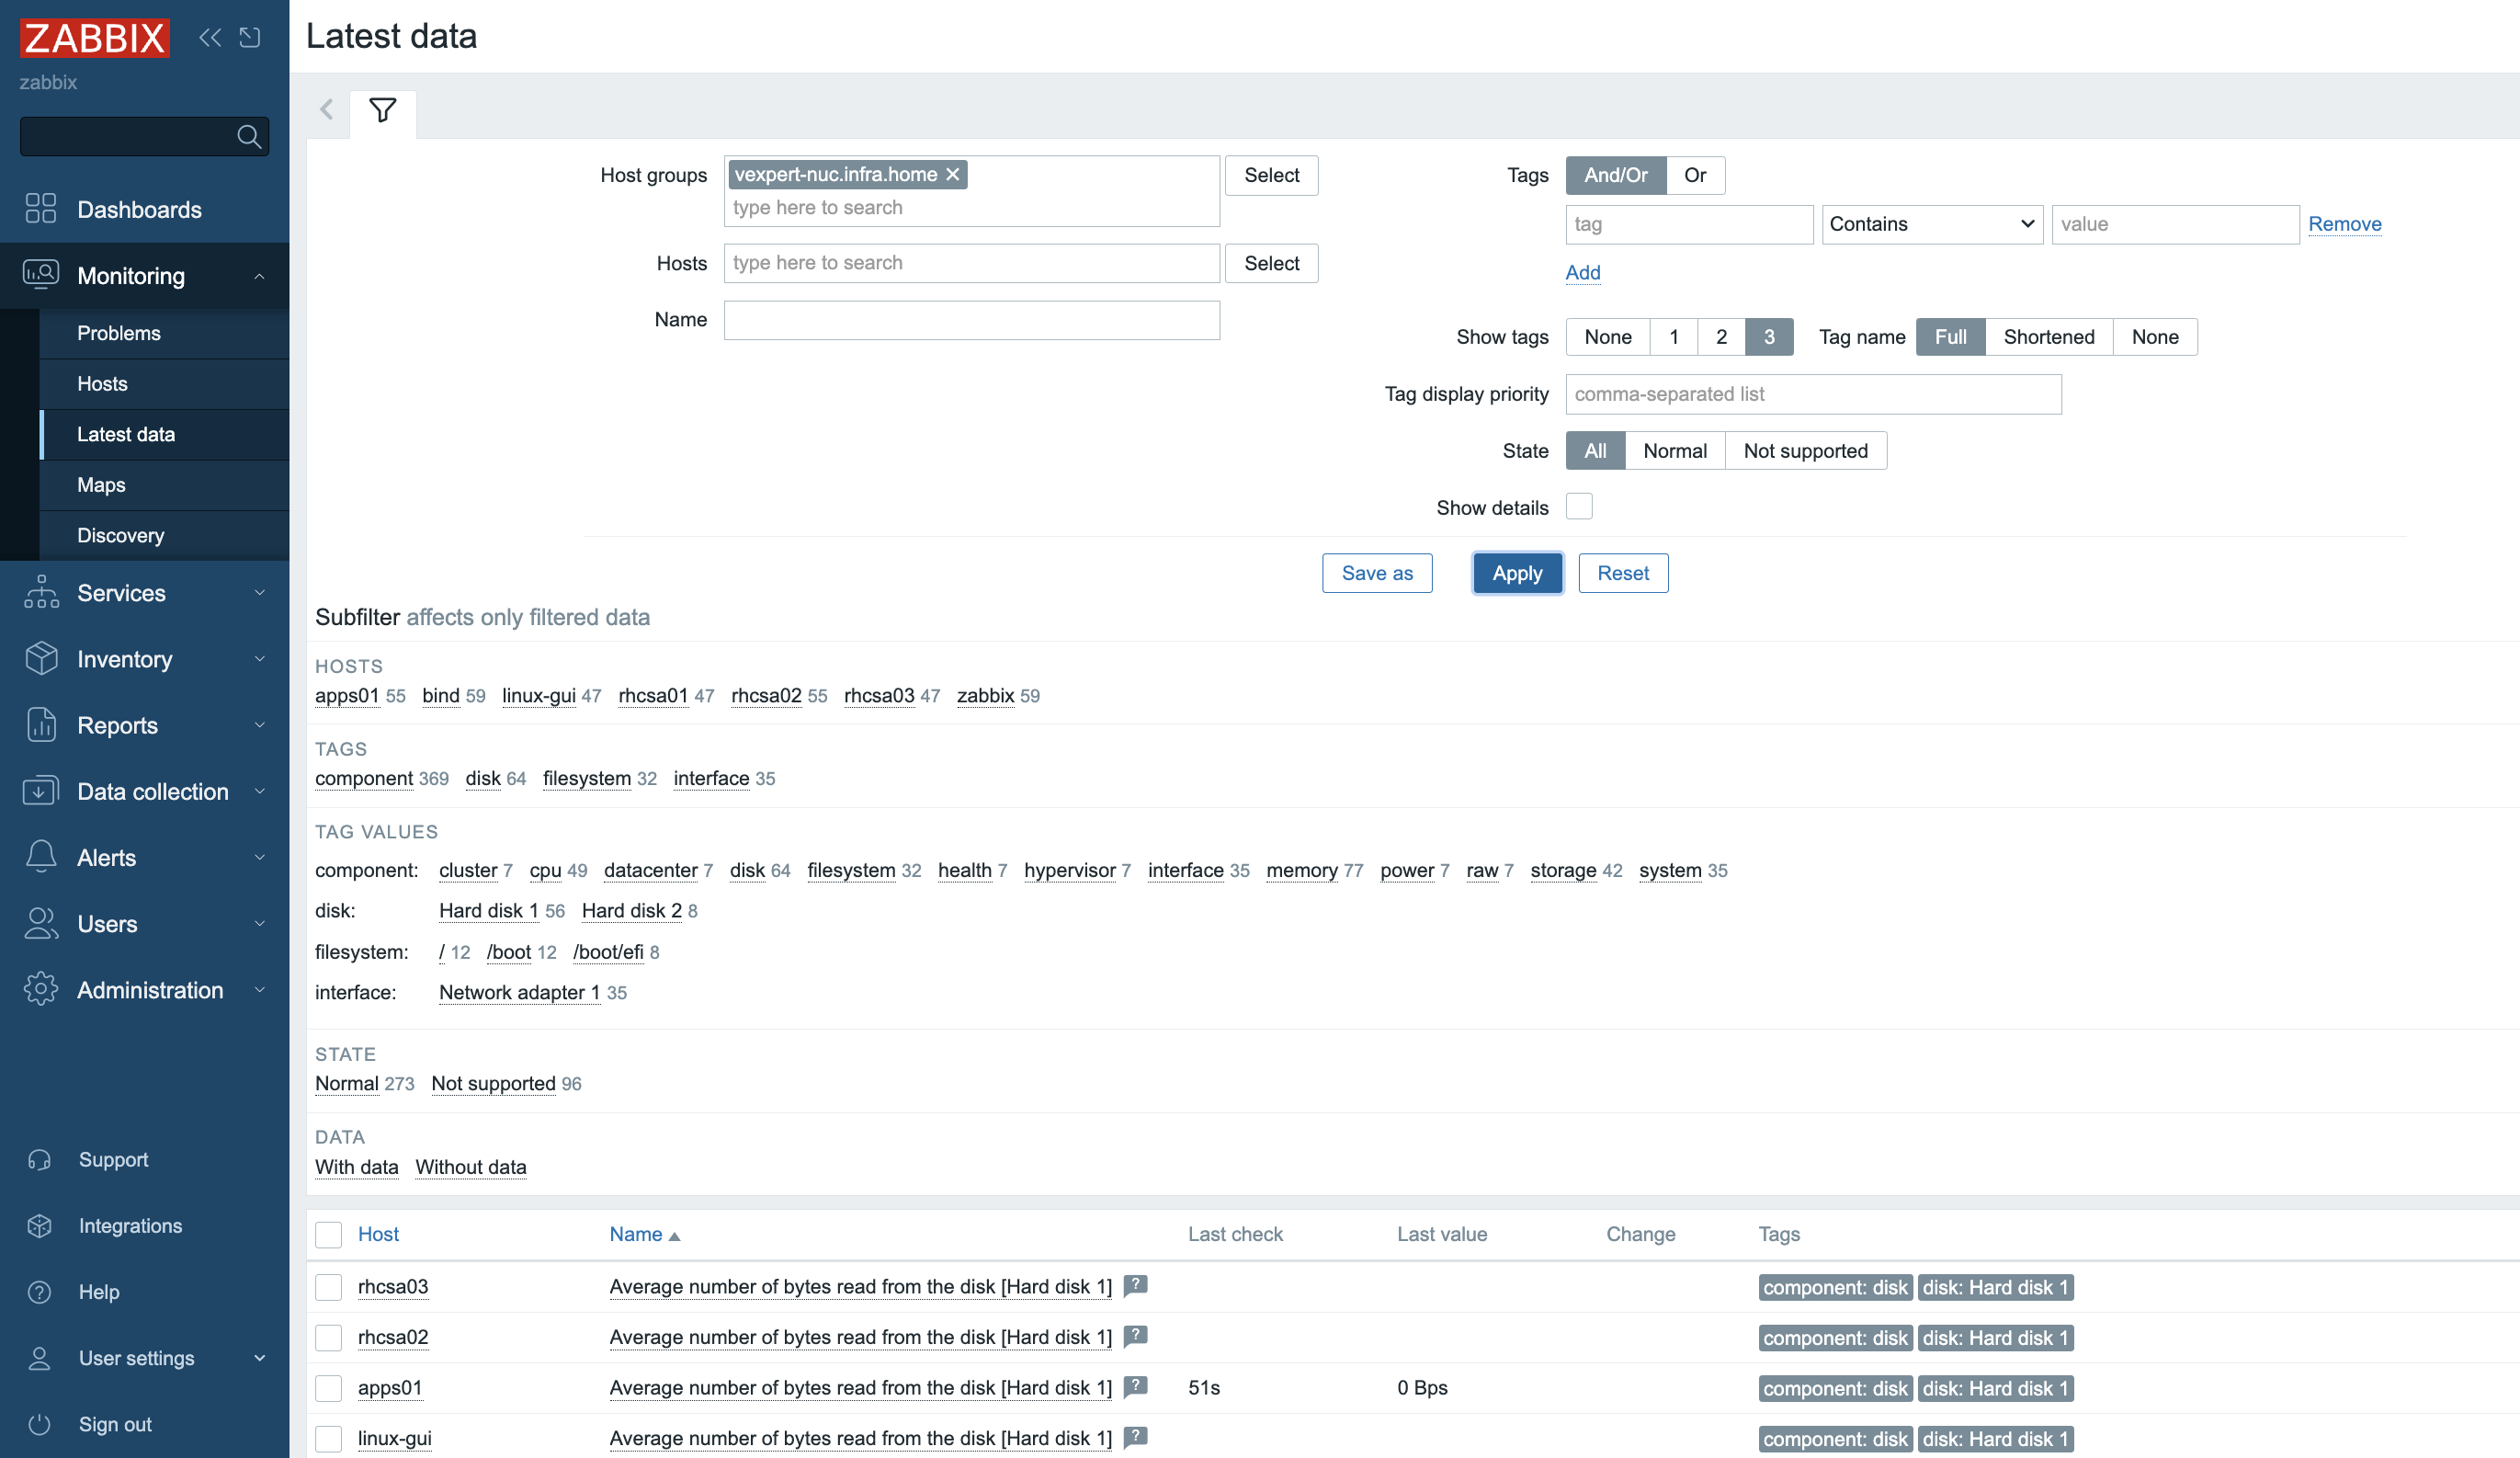
Integrating Zabbix with VMware provides a robust solution for monitoring virtualized environments and enhancing visibility into system performance and resource utilization, while enabling timely alerts and responses to operational issues.
The post Monitoring VMware vSphere with Zabbix appeared first on Zabbix Blog.
Post Syndicated from The History Guy: History Deserves to Be Remembered original https://www.youtube.com/watch?v=kDkkyMvy-Ik
Post Syndicated from corbet original https://lwn.net/Articles/998809/
Version
9.5 of the Rocky Linux distribution is out. As with the AlmaLinux 9.5
release, Rocky Linux 9.5 tracks the changes in upstream RHEL 9.5. See the release notes
for details.
Post Syndicated from Explosm.net original https://explosm.net/comics/bathroom
New Cyanide and Happiness Comic
Post Syndicated from xkcd.com original https://xkcd.com/3014/

Post Syndicated from corbet original https://lwn.net/Articles/998807/
It took more than 20 years, but the FreeCAD computer-aided design project
has just made
its 1.0 release.
Since the very beginnings, the FreeCAD community had a clear view
of what 1.0 represented for us. What we wanted in it. FreeCAD
matured over the years, and that list narrowed down to just two
major remaining pieces: fixing the toponaming problem, and having a
built-in assembly module.Well, I’m very proud to say those two issues are now solved.
Post Syndicated from Will Quillin original https://aws.amazon.com/blogs/messaging-and-targeting/reinvent-2024-your-amazon-ses-aws-end-user-messaging-guide-to-awss-biggest-event/
On December 2, AWS re:Invent conference returns to Las Vegas for our 13th year. With the conference approaching, our tailored sessions for Amazon SES and AWS End User Messaging will make your re:Invent experience worthwhile.
Discover new ideas and reaffirm your AWS skills
BIZ205: Simplify your email with Amazon SES and Amazon Q*
Monday, Dec 2nd| 12:00 PM–2:00 PM PST
*Note: This session’s title is out of date in the re:Invent catalog.
BIZ209: Unlock higher email deliverability rates with Amazon SES
Monday, Dec 2nd| 10:00 AM–11:00 AM PST
BIZ206: Implementing resilient omni-channel notifications with AWS
Monday, Dec 2nd| 8:00 AM–10:00 AM PST
BIZ311: Send high-volume one-time passwords via SMS and email
Wednesday, Dec 4th| 9:00 AM–10:00 AM PST
BIZ301: Integrating SMS capabilities with AWS End User Messaging
Monday, Dec 2nd| 2:30 PM–3:30 PM PST
Wednesday, Dec 4th| 4:00 PM–5:00 PM PST
If you have signed up for re:Invent, you can directly reserve your spot in the sessions here (login required).
Map out your schedule with re:Invent attendee guides
With sessions up and down the Las Vegas Strip, planning your agenda is critical to make the most of your time at re:Invent. Find specific attendee guides below:
Explore the session catalog to see available sessions, including chalk talks, workshops, builders’ sessions, and more.
Can’t make it in-person? Join the virtual re:Invent 2024 experience
If you’re unable to travel to Vegas this year, you can still watch remotely! All keynotes and leadership sessions will be livestreamed and available on demand. After the event, breakout sessions will be available to stream; closed captioning is available as well. There will also be other livestreamed events, like behind-the-scenes programming, commentary from special guests, and more.
Register now to take your AWS knowledge to the next level. Plan your time in Las Vegas to make the most of the available sessions, get inspired by the global cloud community, and learn the latest from AWS.
Check out the FAQs for answers to all your re:Invent questions.
See you at re:Invent 2024!
Post Syndicated from Talks at Google original https://www.youtube.com/watch?v=X_TB4VxPjPo
Post Syndicated from Bruno Giorgini original https://aws.amazon.com/blogs/messaging-and-targeting/build-a-secure-one-time-password-architecture-with-aws/
In today’s digital landscape, where cyberattacks continue to grow more sophisticated, the need for robust security measures has never been more paramount. One-Time Passwords (OTPs) have long been a crucial component of multi-factor authentication. They provide an additional layer of security to protect user accounts from unauthorized access.
The landscape of OTP delivery is evolving rapidly. While organizations increasingly favor more secure, phishing-resistant methods like passwordless solutions and hardware security keys, many still rely on SMS-based OTPs or require time to transition to newer technologies.
For organizations already leveraging Okta as their identity provider, AWS offers a comprehensive guidance on implementing phone-based multi-factor authentication. The “AWS Guidance for Okta Phone-Based Multi-Factor Authentication on AWS” provides a detailed reference architecture and implementation steps for integrating Okta with AWS services to deliver OTPs via SMS or voice calls.
This blog post offers a comprehensive guide for implementing a reliable, multi-channel OTP solution using AWS services including Amazon DynamoDB, Amazon Simple Email Service (SES), and AWS End User Messaging.
By the end of this blog, you’ll understand how to generate, store, and deliver OTPs via email, SMS, and voice. You’ll also learn best practices for secure OTP implementation. This solution serves organizations that need to maintain SMS-based OTP capabilities.
Let’s explore how to build a secure, multi-channel OTP solution on AWS.
AWS End User Messaging is the new name for Amazon Pinpoint’s SMS, MMS, push, WhatsApp, and text to voice messaging capabilities.
Let’s imagine a hypothetical scenario where a bank customer want’s to access his online account:
Alex, a customer of the XYZ financial institution, needed to access their online account. They initiated the login process and requested an OTP from the mobile or web application provided by the bank. Upon receiving the request, the bank’s server created a user-specific session to handle the OTP generation and verification. A unique one-time password was then generated and sent to Alex’s registered mobile number via SMS. Alex received the OTP on their phone and had three attempts to enter the correct code within a 10-minute timeframe. This security measure prevented unauthorized access to their account. If Alex couldn’t receive the SMS, they had another option. They could request the bank to send the same OTP to their registered email address, if they had one on file. If Alex entered the correct OTP, the login process would be successful, and they would be granted access to their online banking services. However, if they exceeded the three attempts in the 10-minute time limit, their ability to login to the account would be temporarily suspended for security reasons and Alex would have to call the bank to lift the suspension or wait 2 hours to retry again. The bank implements this multi-factor authentication process with an alternative email-based OTP delivery. This approach safeguards Alex’s sensitive financial information and enhances the security of digital banking services. It also provides a backup option if the primary SMS channel is unavailable.

Prerequisites
To use the code examples provided in this blog post, you’ll need to have the following AWS resources in place:
With these prerequisites in place, you’ll be ready to use the code examples provided in the following sections to implement your secure OTP solution.

Flow Explained:
Typical architecture for a secure one-time password (OTP) solution would involve the following components:
In a production environment, it’s also important to consider the following security measures:
This architecture enables organizations to build a comprehensive and secure one-time password solution. It protects users’ sensitive information and offers a seamless authentication experience.
To generate the OTPs, the server used the pyotp (link) library in Python. This library provides a secure random number generator to create unique, hexadecimal-encoded tokens. The server-side generation ensures that the OTPs are truly random and unpredictable, a crucial requirement for effective one-time password authentication.
The server generates a 6-character hexadecimal OTP, creating approximately 16.8 million possible unique combinations. This approach keeps codes short and easy for users to enter while maintaining security. After generation, the server securely stores the OTP and sends it to the user through the chosen delivery channel (SMS, email, or voice).
Sample Code:
import secrets
import pyotp

def generate_otp():
    """
    Generates a secure one-time password using the pyotp library.

    Returns:
        str: The generated one-time password.
    """
    # Generate a random base32 secret - https://pyauth.github.io/pyotp/
    totp = pyotp.TOTP(pyotp.random_base32())

    # Use the Time-based One-Time Password (TOTP) algorithm to generate a 6-digit OTP
    return totp.now()
It’s important to note that the generated OTP values should be encrypted on the client-side before being sent to the server for storage. This can be achieved by using AWS Key Management Service (KMS) to securely encrypt the OTP values.
By encrypting the OTP values before storing them in the DynamoDB table, you can further enhance the security of the solution and protect against potential data breaches. The encrypted values ensure that even if the database is compromised, the raw OTP values are not directly accessible.
Next, the encrypted OTP values are stored in the DynamoDB table, along with necessary metadata to manage the OTP lifecycle. This metadata includes creation timestamp, expiration, and verification attempts. The specifics of this storage process are covered in the ‘Securely Storing OTPs’ section.
Once generated, the OTPs will be stored in an Amazon DynamoDB table. DynamoDB is a fully managed NoSQL database service that provides reliable, high-performance data storage and retrieval, making it an ideal choice for our secure OTP solution. To store the OTPs, you’ll create a DynamoDB table with the user_id as the primary key. This approach ensures that the same user can’t generate multiple OTPs. The put_item() operation will fail if it encounters a duplicate user_id value. Depending your use case, you can change this to be a random id or a concatenation of the user id and a random id.
Once generated, the OTPs are stored in an Amazon DynamoDB table. DynamoDB, a fully managed NoSQL database service, provides reliable, high-performance data storage and retrieval, making it ideal for our secure OTP solution.
To store the OTPs, create a DynamoDB table with the user_id as the primary key. This approach allows for efficient retrieval of a user’s current OTP. When storing a new OTP for a user:
This method ensures that each user has only one active OTP at a time, while still allowing users to request new OTPs when needed (for example, if the previous one expired).
Depending on your use case, you can modify the primary key to be a random id or a concatenation of the user id and a random id for additional security.
In addition to the user_id and otp_code, we’ll also include the following attributes:
creation_timestamp: The timestamp indicating when the OTP was generated. This is compared with the timestamp of each attempt to ensure all attempts fall within the allowed time window.ttl: The Unix timestamp representing the time-to-live (TTL) for the OTP, after which the DynamoDB item will be automatically deleted. Set this value to 24 hours from the creation time. This allows for a reasonable cleanup period while ensuring expired OTPs are removed from the database.attempts: The number of remaining verification attempts for the OTP.verified: A boolean flag indicating whether the OTP has been successfully verified.locked: A boolean flag indicating whether the user’s account has been locked due to exhausted verification attempts.Sample Code:
import time
import boto3
from datetime import datetime, timedelta

dynamodb = boto3.resource('dynamodb')
table = dynamodb.Table('otp_main')
def store_otp(user_id, otp_code):
    """
    Stores the generated one-time password in an Amazon DynamoDB table with a creation timestamp, TTL, and remaining attempts.

    Args:
        user_id (str): The unique identifier for the user.
        otp_code (str): The generated one-time password.

    Returns:
        dict: The response from the DynamoDB put_item operation.
    """
    # Get the current timestamp
    creation_timestamp = datetime.now().isoformat()

    # Calculate the expiration time for the OTP (10 minutes from now)
    expiration_time = datetime.now() + timedelta(minutes=10)

    # Convert the expiration time to a Unix timestamp for the DynamoDB TTL
    ttl_value = int(time.mktime(expiration_time.timetuple()))

    # Store the OTP, creation timestamp, TTL, remaining attempts, and verification status in the DynamoDB table
    response = table.put_item(
        Item={
            'user_id': user_id,
            'otp_code': otp_code,
            'creation_timestamp': creation_timestamp,
            'ttl': ttl_value,
            'attempts': 3,
            'verified': False,
            'locked': False
        }
    )

    return response
We use the user_id as the primary key and store creation timestamp, TTL, remaining attempts, verification status, and account lock status. This approach ensures a secure and efficient OTP storage and retrieval process. This approach also allows for precise management of OTP expiration and account locking, as demonstrated in the Verifying OTPs section.
The encrypted OTP values are stored in the otp_code attribute. Encryption is performed on the client-side using a secure key management solution, like the AWS KMS client-side library. This ensures that the raw OTP values are never transmitted or stored in plain text, further enhancing the security of the solution.
Note: As an optional enhancement, you could use Amazon SQS with a visibility timeout set to the OTP validity period. A payload containing the user_id is sent to a Lambda function. After the visibility timeout, the function processes the SQS message and deletes the corresponding DynamoDB item. This approach provides greater precision compared to relying solely on DynamoDB TTL, though it adds complexity to the implementation. The current solution compares each verification attempt’s timestamp with the creation timestamp, ensuring that no attempts occur after the OTP has expired.
Now that we have a secure way to generate and store the OTPs, it’s time to focus on delivering them to your users. Our solution leverages the AWS End User Messaging capabilities to provide a seamless and redundant OTP delivery experience across multiple communication channels.
AWS End User Messaging offers a versatile platform for OTP delivery across multiple channels, including email, SMS, voice calls, push notifications, and WhatsApp. This provides a redundant and convenient authentication experience for your users, ensuring they can receive their one-time passwords via their preferred method.
Sample Code:
import boto3

def send_otp_sms(mobile_number, otp_code, user_id, region_name):
    """
    Sends an OTP code to the user's mobile number using AWS End User Messaging SMS.

    Args:
        mobile_number (str): The phone number to send the OTP to.
        otp_code (str): The one-time password to be sent.
        user_id (str): The unique identifier for the user.
        region_name (str): The AWS region to use for the SESv2 client.

    Returns:
        dict: The response from the End User Messaging SMS send_text_message operation.
    """
    # Construct the SMS message with the OTP code
    message = f"""
    This is an AWS End User Messaging OTP message.

    Your one-time password is: {otp_code}.
    """

    try:
        # Create a new SMS-Voice v2 client
        aws_sms = boto3.client('pinpoint-sms-voice-v2')
        # Use the End User Messaging SMS client to send the SMS message
        response = aws_sms.send_text_message(
            DestinationPhoneNumber=mobile_number,
            MessageBody=message,
            MessageType='TRANSACTIONAL'
        )
        return {'StatusCode': 200, 'Response': response['MessageId']}
    except ClientError as e:
        error_message = e.response['Error']['Message']
        return {'StatusCode': 500, 'Response': error_message}
To deliver OTPs via email, we’ll use the Amazon SES (Simple Email Service) SendEmail API. SES is a highly scalable and cost-effective email service. It can send notifications, alerts, and in our case, one-time passwords to users.
Sample Code:
import boto3
from botocore.exceptions import ClientError

def send_otp_email(user_id, email_address, otp_code, region_name):
    """
    Sends an OTP code to the user's email address using Amazon SESv2.

    Args:
        user_id (str): The unique identifier for the user.
        email_address (str): The email address to send the OTP to.
        otp_code (str): The one-time password to be sent.
        region_name (str): The AWS region to use for the SESv2 client.

    Returns:
        dict: The response from the SESv2 send_email operation.
    """
    try:
        # Create a new SESv2 client
        ses = boto3.client('sesv2', region_name=region_name)

        # Construct the email message with the OTP code
        message = "<p>Your one-time password is: </p> {otp_code}"
        html_body = message.format(otp_code=otp_code)

        # Use the SESv2 client to send the email
        response = aws_email.send_email(
            FromEmailAddress='[email protected]',
            Destination={
                'ToAddresses': [
                    email_address,
                ]
            },
            Content={
                'Simple': {
                    'Subject': {
                        'Charset': 'UTF-8',
                        'Data': 'Your AWS OTP code'
                    },
                    'Body': {
                        'Html': {
                            'Charset': 'UTF-8',
                            'Data': html_body
                        }
                    }
                }
            }
        )
        return {'StatusCode': 200, 'Response': response['MessageId']}
    except ClientError as e:
        error_message = e.response['Error']['Message']
        return {'StatusCode': 500, 'Response': error_message}
The final piece of our secure OTP solution is the process of verifying the one-time passwords entered by your users. This is a crucial step in the authentication flow, as it ensures that only legitimate users are granted access to your applications or services.
The OTP verification logic is handled by a Lambda function that interacts directly with the DynamoDB table where the OTPs are stored. This Lambda function performs the following steps:
user_id as the primary key. This metadata includes the creation timestamp and the number of remaining attempts.Sample Code:
import boto3
from boto3.dynamodb.conditions import Key
from datetime import datetime, timedelta

dynamodb = boto3.resource('dynamodb')
table = dynamodb.Table('otp_main')

def verify_otp(otp_entered, user_id):
    """
    Verifies the one-time password entered by the user against the stored OTP in DynamoDB.

    Args:
        otp_entered (str): The one-time password entered by the user.
        user_id (str): The unique identifier for the user.

    Returns:
        dict: The result of the OTP verification, containing the verification status and the OTP code.
    """
    try:
        # Query the DynamoDB table to find the stored OTP for the given user
        response = table.query(
            KeyConditionExpression=Key('user_id').eq(user_id)
        )

        if 'Items' in response and response['Items']:
            for item in response['Items']:
                # decrypt the retrieved OTP value using the KMS client-side library
                if str(otp_entered) == decrypt_otp(item['otp_code'], user_id):
                    # Check if the OTP has expired
                    creation_timestamp = datetime.fromisoformat(item['creation_timestamp'])
                    if datetime.now() - creation_timestamp < timedelta(minutes=10):
                        # Update the verification status and delete the DynamoDB item
                        update_item = table.update_item(
                            Key={'user_id': user_id},
                            UpdateExpression='SET verified = :verified',
                            ExpressionAttributeValues={':verified': True}
                        )
                        table.delete_item(Key={'user_id': user_id})
                        return {'result': True, 'otp': item['otp_code']}
                    else:
                        # Deduct an attempt from the remaining attempts count
                        update_item = table.update_item(
                            Key={'user_id': user_id},
                            UpdateExpression='SET attempts = attempts - :1',
                            ExpressionAttributeValues={':1': 1}
                        )
                        if item['attempts'] <= 0:
                            # Lock the account if the attempts are exhausted
                            update_item = table.update_item(
                                Key={'user_id': user_id},
                                UpdateExpression='SET locked = :locked',
                                ExpressionAttributeValues={':locked': True}
                            )
                        return {'result': False, 'otp': item['otp_code']}
                else:
                    # Handle invalid OTPs
                    pass

        # If the OTP is not found or does not match, return a failure result
        return {'result': False, 'otp': None}
    except Exception as e:
        error_message = str(e)
        return {'result': False, 'error': error_message}

def decrypt_otp(encrypted_otp, user_id):
    """
    decryptes the OTP value using the KMS client-side library.

    Args:
        encrypted_otp (str): The encrypted OTP value stored in DynamoDB.
        user_id (str): The unique identifier for the user.

    Returns:
        str: The unencrypted OTP value.
    """
    # decrypt the OTP value using the KMS client-side library
    return decrypt_using_kms(encrypted_otp, user_id)
In this implementation, a Lambda function handles the OTP verification logic. This ensures sensitive operations like OTP decryption and managing expiration and attempt counts occur in a secure, serverless environment.
As you implement a secure one-time password solution, it’s important to consider the following best practices:
When delivering OTPs via email, SMS, or voice, clearly specify the sender and the content of the message. For example, the email subject and body, as well as the SMS or voice message, should include information like:
“This is a one-time password from [Company Name] for payment confirmation of your flight ABC123.”
Include a security reminder in the OTP message to encourage users to report any unauthorized access attempts. For example:
“If you did not request this OTP, please call [phone number] to report it.”
This helps raise user awareness and provides a clear course of action if they suspect their account has been compromised.
Include appropriate configuration sets and Context or EmailTags when using AWS End User Messaging services to deliver OTPs. This records message delivery events and traces them to your organization. Read more about Amazon SES and AWS End User Messaging configuration sets.
For example, in the send_otp_sms() and send_otp_email() functions, you should include the following parameters:
response = aws_sms.send_text_message(
    DestinationPhoneNumber=mobile_number,
    MessageBody=message,
    MessageType='TRANSACTIONAL',
    ConfigurationSetName='otp-config-set',
    OriginationNumber='+12345678901',
    Context={
        'user_id': user_id
    }
)
response = ses.send_email(
    FromEmailAddress='[email protected]',
    Destination={'ToAddresses': [email_address]},
    Content={
        # ...
    },
    ConfigurationSetName='otp-config-set',
    EmailTags=[
        {
            'Name': 'user_id',
            'Value': user_id
        }
    ]
)After a successful OTP verification, it’s recommended to delete the corresponding DynamoDB item. This helps maintain a clean and up-to-date database, reducing the risk of unauthorized access or potential data breaches.
Consider adding a column in the DynamoDB table to track the number of verification attempts for each OTP. This can help you implement rate-limiting and other security measures to prevent brute-force attacks.
As mentioned earlier, the OTP values should be encrypted on the client-side using a secure key management solution, such as the AWS KMS client-side library. This ensures that the raw OTP values are never transmitted or stored in plain text, further enhancing the security of the solution.
Following these best practices ensures your one-time password solution is secure and user-friendly. It also maintains necessary controls and traceability for production use cases.
In this guide, we’ve demonstrated a secure, multi-channel One-Time Password (OTP) solution using AWS services. You can now generate, store, and deliver OTPs via email, SMS, and voice channels using Amazon DynamoDB, Amazon SES, and AWS End User Messaging.
We’ve covered several important points throughout this process. We discussed using a secure random number generator and encrypting algorithms to generate and store OTPs. This ensures strong protection for your users’ sensitive information. By integrating with Amazon SES and AWS End User Messaging, you provide users with a convenient, redundant authentication experience through multiple channels.
This guide equips you with tools to maintain SMS-based OTP capabilities. However, it’s important to note the industry’s shift towards more secure, phishing-resistant authentication methods. These include passwordless solutions and hardware security keys. We encourage you to explore and implement these newer technologies as you develop your OTP solution.
Looking ahead, consider potential enhancements to this solution. Integrating support for standards like FIDO2 WebAuthn and Passkeys could allow seamless authentication without traditional OTPs. Keep these options as backup or alternative methods. Also, consider incorporating a mechanism to escalate users to live support for authentication issues.
Implement the secure OTP solution outlined in this guide and continuously update your authentication strategies. This approach ensures your organization remains equipped to protect users and assets from evolving digital threats.
Post Syndicated from Brendan Jenkins original https://aws.amazon.com/blogs/devops/expanded-resource-awareness-in-amazon-q-developer/
Recently, Amazon Q Developer announced expanded support for account resource awareness with Amazon Q in the AWS Management Console along with the general availability of Amazon Q Developer in AWS Chatbot, enabling you to ask questions from Microsoft Teams or Slack. Additionally, Amazon Q will now provide context-aware assistance for your questions about resources in your account depending on where you are in the console. Amazon Q in the console gives you the ability to use natural language with the Amazon Q Developer chat capability to list resources in your AWS account, get specific resource details, and ask about related resources, launched in preview on April 30, 2024.
In this blog, I will highlight the new expanded functionality of this feature in Amazon Q Developer including understanding relationships between account resources, context-awareness, and the general availability of the AWS Chatbot integration with Microsoft Teams and Slack.
Prior to the launch of the expanded support, you could ask Amazon Q Developer to list resources in your AWS Account with prompts such as “List all my EC2 instances in us-east-1” and the service would list all your Amazon Elastic Compute Cloud (Amazon EC2) instances. Now, with the expanded support, you can ask more complex questions about your AWS account resources. I will show a few examples in this section of this post.
For our first example, imagine that you’re a developer who is responsible for maintaining code as a part of the software development lifecycle (SDLC) and you frequently use AWS Lambda for development and Amazon Relational Database Service (RDS) in the backend as a part of your development process. With this new update, a developer could open a new Q chat in the AWS Management Console, and enter a prompt such as: “Which RDS clusters are due for an update?”

Figure 1: Amazon Q Developer listing RDS clusters needing an update
As a result, the Amazon Q Developer console chat will return a list of all your Amazon RDS clusters that have available updates as shown in Figure 1 above.
Now, for another example, you want to update any Lambda functions in your AWS account that had a Simple Notification Service (SNS) topic as a trigger due to moving to a new SNS topic you recently created. To identify which SNS topics are still being used, you could enter a prompt such as “List all the SNS topics that trigger a lambda function.”

Figure 2: Amazon Q listing SNS topics that are lambda triggers
As shown in the prior example, Amazon Q Developer was able to identify any SNS topics in the form of Amazon resource name (ARN) that was set to trigger a lambda function in the AWS account as intended.
Additionally, you can ask a follow up question in the same chat to investigate more. You can send a prompt such as “Which lambda function uses the arn:aws:sns:us-east-1:76859XXXX:FailoverHealthcheck SNS topic?”

Figure 3: Asking Q Developer a follow up question about a resource
From Figure 3 above, you can see that there is a Lambda function/endpoint associated with the SNS topic resource that Amazon Q Developer was able to identify.
Outside of the examples above, here are some other prompts/examples that can be explored for the expanded support:
– “Do I have any ECS clusters with pending tasks?”
– “Are there any ECS clusters in my account with services in DRAINING status?”
Amazon Q Developer in the AWS Management Console now provides context-aware assistance for your questions about resources in your account. This feature allows you to ask questions directly related to the console page you’re viewing, eliminating the need to specify the service or resource in your query. Q Developer uses the current page as additional context to provide more accurate and relevant responses, streamlining your interaction with AWS services and resources.
Prior to the update, a user would have to prompt, “What is the public IPv4 address of my instance i-08ccXXXXXX?” Now, if you are viewing an EC2 instance in the console and prompt Amazon Q, “What is the public IPv4 address of my instance?” you will not need to specify the instance you are referring to.

Figure 4: Asking Amazon Q about an EC2 instance being viewed
In figure 4 above, Amazon Q’s console chat was able to use its context-awareness to pick up on what the IPv4 address was on the console page where I was currently working, despite me not specifying which instance I was referring to.
Recently, we announced the general availability of Amazon Q Developer in AWS Chatbot, which provides answers to customers’ AWS resource related queries in Microsoft Teams and Slack. This gives teams the ability to quickly find relevant resources to troubleshoot issues using natural language queries in the chat channels of Microsoft Teams or Slack.
For example, you could integrate the AWS Chatbot Service with Amazon Q Developer to allow you to enter a prompt in Slack such as “@aws show EC2 instances in running state in us-east-1”.

Figure 5: Amazon Q listing all EC2 resources in Slack
As shown in figure 5 above, Amazon Q was able to list all the EC2 resources and place them into a slack channel showing an example of the functionality in action.
Amazon Q Developer has enhanced its cloud resource management capabilities, enabling more intuitive and intelligent interactions with AWS resources. The new features allow developers to ask complex, context-aware questions about their cloud infrastructure directly through the AWS Management Console, Microsoft Teams, and Slack. Users can now easily discover new details about specific resources with natural language queries that provide precise, contextual information. These improvements represent a significant step forward in simplifying cloud resource management, making it faster and more user-friendly for development teams to understand, track, and maintain their AWS environments. To learn more about chatting with your AWS resources, check out Console documentation and AWS Chatbot documentation.
Post Syndicated from The History Guy: History Deserves to Be Remembered original https://www.youtube.com/watch?v=lswsI9hxTuI
Post Syndicated from Catarina Pires Mota original https://blog.cloudflare.com/do-it-again
In October 2024, we talked about storing billions of logs from your AI application using AI Gateway, and how we used Cloudflare’s Developer Platform to do this.
With AI Gateway already processing over 3 billion logs and experiencing rapid growth, the number of connections to the platform continues to increase steadily. To help developers manage this scale more effectively, we wanted to offer an alternative to implementing HTTP/2 keep-alive to maintain persistent HTTP(S) connections, thereby avoiding the overhead of repeated handshakes and TLS negotiations with each new HTTP connection to AI Gateway. We understand that implementing HTTP/2 can present challenges, particularly when many libraries and tools may not support it by default and most modern programming languages have well-established WebSocket libraries available.
With this in mind, we used Cloudflare’s Developer Platform and Durable Objects (yes, again!) to build a WebSockets API that establishes a single, persistent connection, enabling continuous communication.
Through this API, all AI providers supported by AI Gateway can be accessed via WebSocket, allowing you to maintain a single TCP connection between your client or server application and the AI Gateway. The best part? Even if your chosen provider doesn’t support WebSockets, we handle it for you, managing the requests to your preferred AI provider.

By connecting via WebSocket to AI Gateway, we make the requests to the inference service for you using the provider’s supported protocols (HTTPS, WebSocket, etc.), and you can keep the connection open to execute as many inference requests as you would like.
To make your connection to AI Gateway more secure, we are also introducing authentication for AI Gateway. The new WebSockets API will require authentication. All you need to do is create a Cloudflare API token with the permission “AI Gateway: Run” and send that in the cf-aig-authorization header.

In the flow diagram above:
1️⃣ When Authenticated Gateway is enabled and a valid token is included, requests will pass successfully.
2️⃣ If Authenticated Gateway is enabled, but a request does not contain the required cf-aig-authorization header with a valid token, the request will fail. This ensures only verified requests pass through the gateway.
3️⃣ When Authenticated Gateway is disabled, the cf-aig-authorization header is bypassed entirely, and any token — whether valid or invalid — is ignored.
We recently used Durable Objects (DOs) to scale our logging solution for AI Gateway, so using WebSockets within the same DOs was a natural fit.
When a new WebSocket connection is received by our Cloudflare Workers, we implement authentication in two ways to support the diverse capabilities of WebSocket clients. The primary method involves validating a Cloudflare API token through the cf-aig-authorization header, ensuring the token is valid for the connecting account and gateway.
However, due to limitations in browser WebSocket implementations, we also support authentication via the “sec-websocket-protocol” header. Browser WebSocket clients don’t allow for custom headers in their standard API, complicating the addition of authentication tokens in requests. While we don’t recommend that you store API keys in a browser, we decided to add this method to add more flexibility to all WebSocket clients.
// Built-in WebSocket client in browsers
const socket = new WebSocket("wss://gateway.ai.cloudflare.com/v1/my-account-id/my-gateway/", [
   "cf-aig-authorization.${AI_GATEWAY_TOKEN}"
]);


// ws npm package
import WebSocket from "ws";
const ws = new WebSocket("wss://gateway.ai.cloudflare.com/v1/my-account-id/my-gateway/",{
   headers: {
       "cf-aig-authorization": "Bearer AI_GATEWAY_TOKEN",
   },
});
After this initial verification step, we upgrade the connection to the Durable Object, meaning that it will now handle all the messages for the connection. Before the new connection is fully accepted, we generate a random UUID, so this connection is identifiable among all the messages received by the Durable Object. During an open connection, any AI Gateway settings passed via headers — such as cf-aig-skip-cache (which bypasses caching when set to true) — are stored and applied to all requests in the session. However, these headers can still be overridden on a per-request basis, just like with the Universal Endpoint today.
Once the connection is established, the Durable Object begins listening for incoming messages. From this point on, users can send messages in the AI Gateway universal format via WebSocket, simplifying the transition of your application from an existing HTTP setup to WebSockets-based communication.
import WebSocket from "ws";
const ws = new WebSocket("wss://gateway.ai.cloudflare.com/v1/my-account-id/my-gateway/",{
   headers: {
       "cf-aig-authorization": "Bearer AI_GATEWAY_TOKEN",
   },
});

ws.send(JSON.stringify({
   type: "universal.create",
   request: {
      "eventId": "my-request",
      "provider": "workers-ai",
      "endpoint": "@cf/meta/llama-3.1-8b-instruct",
      "headers": {
         "Authorization": "Bearer WORKERS_AI_TOKEN",
         "Content-Type": "application/json"
      },
      "query": {
         "prompt": "tell me a joke"
      }
   }
}));

ws.on("message", function incoming(message) {
   console.log(message.toString())
});
When a new message reaches the Durable Object, it’s processed using the same code that powers the HTTP Universal Endpoint, enabling seamless code reuse across Workers and Durable Objects — one of the key benefits of building on Cloudflare.
For non-streaming requests, the response is wrapped in a JSON envelope, allowing us to include additional information beyond the AI inference itself, such as the AI Gateway log ID for that request.
Here’s an example response for the request above:
{
  "type":"universal.created",
  "metadata":{
     "cacheStatus":"MISS",
     "eventId":"my-request",
     "logId":"01JC3R94FRD97JBCBX3S0ZAXKW",
     "step":"0",
     "contentType":"application/json"
  },
  "response":{
     "result":{
        "response":"Why was the math book sad? Because it had too many problems. Would you like to hear another one?"
     },
     "success":true,
     "errors":[],
     "messages":[]
  }
}
For streaming requests, AI Gateway sends an initial message with request metadata telling the developer the stream is starting.
{
  "type":"universal.created",
  "metadata":{
     "cacheStatus":"MISS",
     "eventId":"my-request",
     "logId":"01JC40RB3NGBE5XFRZGBN07572",
     "step":"0",
     "contentType":"text/event-stream"
  }
}
After this initial message, all streaming chunks are relayed in real-time to the WebSocket connection as they arrive from the inference provider. Note that only the eventId field is included in the metadata for these streaming chunks (more info on what this new field is below).
{
  "type":"universal.stream",
  "metadata":{
     "eventId":"my-request",
  }
  "response":{
     "response":"would"
  }
}
This approach serves two purposes: first, all request metadata is already provided in the initial message. Second, it addresses the concurrency challenge of handling multiple streaming requests simultaneously.
With WebSocket connections, client and server can send messages asynchronously at any time. This means the client doesn’t need to wait for a server response before sending another message. But what happens if a client sends multiple streaming inference requests immediately after the WebSocket connection opens?
In this case, the server streams all the inference responses simultaneously to the client. Since everything occurs asynchronously, the client has no built-in way to identify which response corresponds to each request.
To address this, we introduced a new field in the Universal format called eventId, which allows AI Gateway to include a client-defined ID with each message, even in a streaming WebSocket environment.
So, to fully answer the question above: the server streams both responses in parallel chunks, and the client can accurately identify which request each message belongs to based on the eventId.
Once all chunks for a request have been streamed, AI Gateway sends a final message to signal the request’s completion. For added flexibility, this message includes all the metadata again, even though it was also provided at the start of the streaming process.
{
  "type":"universal.done",
  "metadata":{
     "cacheStatus":"MISS",
     "eventId":"my-request",
     "logId":"01JC40RB3NGBE5XFRZGBN07572",
     "step":"0",
     "contentType":"text/event-stream"
  }
}
AI Gateway’s real-time Websocket API is now in beta and open to everyone!
To try it out, copy your gateway universal endpoint URL, and replace the “https://” with “wss://”, like this:
wss://gateway.ai.cloudflare.com/v1/my-account-id/my-gateway/

Then open a WebSocket connection using your Universal Endpoint, and guarantee that it is authenticated with a Cloudflare token with the AI Gateway Run permission.
Here’s an example code using the ws npm package:
import WebSocket from "ws";
const ws = new WebSocket("wss://gateway.ai.cloudflare.com/v1/my-account-id/my-gateway/", {
   headers: {
       "cf-aig-authorization": "Bearer AI_GATEWAY_TOKEN",
   },
});

ws.on("open", function open() {
   console.log("Connected to server.");
   ws.send(JSON.stringify({
      type: "universal.create",
      request: {
         "provider": "workers-ai",
         "endpoint": "@cf/meta/llama-3.1-8b-instruct",
         "headers": {
            "Authorization": "Bearer WORKERS_AI_TOKEN",
            "Content-Type": "application/json"
         },
         "query": {
            "stream": true,
            "prompt": "tell me a joke"
         }
      }
   }));
});


ws.on("message", function incoming(message) {
   console.log(message.toString())
});
Here’s an example code using the built-in browser WebSocket client:
const socket = new WebSocket("wss://gateway.ai.cloudflare.com/v1/my-account-id/my-gateway/", [
   "cf-aig-authorization.${AI_GATEWAY_TOKEN}"
]);

socket.addEventListener("open", (event) => {
  console.log("Connected to server.");
   socket.send(JSON.stringify({
      type: "universal.create",
      request: {
         "provider": "workers-ai",
         "endpoint": "@cf/meta/llama-3.1-8b-instruct",
         "headers": {
            "Authorization": "Bearer WORKERS_AI_TOKEN",
            "Content-Type": "application/json"
         },
         "query": {
            "stream": true,
            "prompt": "tell me a joke"
         }
      }
   }));
});

socket.addEventListener("message", (event) => {
  console.log(event.data);
});
In Q1 2025, we plan to support WebSocket-to-WebSocket connections (using DOs), allowing you to connect to OpenAI’s new real-time API directly through our platform. In the meantime, you can deploy this Worker in your account to proxy the requests yourself.
If you have any questions, reach out on our Discord channel. We’re also hiring for AI Gateway, check out Cloudflare Jobs in Lisbon!
Post Syndicated from Laura Verghote original https://aws.amazon.com/blogs/security/securing-the-rag-ingestion-pipeline-filtering-mechanisms/
Retrieval-Augmented Generative (RAG) applications enhance the responses retrieved from large language models (LLMs) by integrating external data such as downloaded files, web scrapings, and user-contributed data pools. This integration improves the models’ performance by adding relevant context to the prompt.
While RAG applications are a powerful way to dynamically add additional context to an LLM’s prompt and make model responses more relevant, incorporating data from external sources can pose security risks.
For example, let’s assume you crawl a public website and ingest the data into your knowledge base. Because it’s public data, you risk also ingesting malicious content that was injected into that website by threat actors with the goal of exploiting the knowledge base component of the RAG application. Through this mechanism, threat actors can intentionally change the model’s behavior.
Risks like these emphasize the need for security measures in the design and deployment of RAG systems in general. Security measures should be applied not only at inference time (that is, filtering model outputs), but also when ingesting external data into the knowledge base of the RAG application.
In this post, we explore some of the potential security risks of ingesting external data or documents into the knowledge base of your RAG application. We propose practical steps and architecture patterns that you can implement to help mitigate these risks.
Before diving into specifics of mitigating risk in the ingestion pipeline, let’s have a look at a generic RAG workflow and which aspects you should keep in mind when it comes to securing a RAG application. For this post, let’s assume that you’re using Amazon Bedrock Knowledge Bases to build a RAG application. Amazon Bedrock Knowledge Bases offers built-in, robust security controls for data protection, access control, network security, logging and monitoring, and input/output validation that help mitigate many of the security risks.
In a RAG workflow with Amazon Bedrock Knowledge Bases, you have the following environments:

Figure 1: Visual representation of the knowledge base data ingestion flow
Looking at the workflow shown in Figure 1 for the ingestion of data into a knowledge base, an ingestion request is started by invoking the StartIngestionJob Bedrock API. From that point:
When it comes to encryption at rest for the different environments:
Throughout the RAG ingestion workflow, data is encrypted in transit. Amazon Bedrock Knowledge Bases uses TLS encryption for communication with third-party vector stores where the provider permits and supports TLS encryption in transit. Customer data is not persistently stored in the Amazon Bedrock service accounts.
For identity and access management, it’s important to follow the principle of least privilege while creating the custom service role for Amazon Bedrock Knowledge Bases. As part of the role’s permissions, you create a trust relationship that allows Amazon Bedrock to assume this role and create and manage knowledge bases. For more information about the necessary permissions, see Providing secure access, usage, and implementation to generative AI RAG techniques.
RAG applications inherently rely on foundation models, introducing additional security considerations beyond the traditional application safeguards. Foundation models can analyze complex linguistic patterns and provide responses depending on the input context, and can be subject to malicious events such as jailbreaking, data poisoning, and inversion. Some of these LLM-specific risks are mapped out in documents such as the OWASP Top 10 for LLM Applications and MITRE ATLAS.
A risk that’s particularly relevant for the RAG ingestion pipeline, and one of the most common risks we see nowadays, is prompt injection. In prompt injection attacks, threat actors manipulate generative AI applications by feeding them malicious inputs disguised as legitimate user prompts. There are two forms of prompt injection: direct and indirect.
Direct prompt injections occur when a threat actor overwrites the underlying system prompt. This might allow them to probe backend systems by interacting with insecure functions and data stores accessible through the LLM. When it comes to securing generative AI applications against prompt injection, this type tends to be the one that customers focus on the most. To mitigate risks, you can use tools such as Amazon Bedrock Guardrails to set up inference-time filtering of the LLM’s completions.
Indirect prompt injections occur when an LLM accepts input from external sources that can be controlled by a threat actor, such as websites or files. This injection type is particularly important when you consider the ingestion pipeline of RAG applications, where a threat actor might embed a prompt injection in external content which is ingested into the database. This can enable the threat actor to manipulate additional systems that the LLM can access or return a different answer to the user. Additionally, indirect prompt injections might not be recognizable by humans. Security issues can result not only from the LLM’s responses based on its training data, but also from the data sources the RAG application has access to from its knowledge base. To mitigate these risks, you should focus on the intersection of the LLM, knowledge base, and external content ingested into the RAG application.
To give you a better idea of indirect prompt ingestion, let’s first discuss an example.
Let’s say a threat actor crafts a document or injects content into a website. This content is designed to manipulate an LLM to generate incorrect responses. To a human, such a document could be indistinguishable from legitimate ones. However, the document could contain an invisible sequence, which, when used as a reference source for RAG, could manipulate the LLM into generating an undesirable response.
For example, let’s assume you have a file describing the process for downloading a company’s software. This file is ingested into a knowledge base for an LLM-powered chatbot. A user can ask the chatbot where to find the correct link to download software packages and then download the package by clicking on the link.
A threat actor could include a second link in the document using white text on a white background. This text is invisible to the reader and the company downloading the document to store in their knowledge base. However, it’s visible when parsed by the document parser and saved in the knowledge base. This could result in the LLM returning the hidden link, which could lead the user to download malware hosted by the threat actor on a site they manage, rather than legitimate software from the expected site.
If your application is connected to plugins or agents so that it can call APIs or execute code, the model could be manipulated to run code, open URLs chosen by the threat actor, and more.
If you look at Figure 2 that follows, you can see what the typical RAG workflow is and how an indirect prompt injection attack can happen (this example uses Amazon Bedrock Knowledge Bases).

Figure 2: Visual representation of the RAG workflow with both a generic file and a malicious file that looks identical to the generic one
As shown in Figure 2, for data ingestion (starting at the bottom right), File 1, the legitimate and unmodified file, is saved in the data source (typically an S3 bucket). During ingestion, the document is parsed by a document parser, split into chunks, converted into embeddings, and then saved in the vector store. When a user (top left) asks a question about the file, information from this file will be added as context to the user prompt. However, you might have a malicious File 2 instead, that looks exactly the same to a human reader but contains an invisible character sequence. After this sequence is inserted into the prompt sent to the LLM, it can influence the overall response of the environment.
Threat actors might analyze the following three aspects in the RAG workflow to create and place a malicious sequence:
Threat actors can release documents containing well-constructed and well-placed invisible sequences onto the internet, thereby posing a threat to RAG applications that ingest this external content. Therefore, whenever possible, only ingest data from trusted sources. However, if your application requires you to use and ingest data from untrusted sources, it’s recommended to process them carefully to mitigate risks such as indirect prompt injection. To harden your RAG ingestion pipeline, you can use the following mitigation techniques to place additional security measures on your RAG ingestion pipeline. These can be implemented individually or together.
For more advice on mitigating risks in generative AI applications, see the mitigations listed in the OWASP Top 10 for LLMs and MITRE ATLAS.

Figure 3: Visual representation of a potential workflow to remove threat sequences from your files is using a format breaker and Amazon Textract
One potential workflow to remove potential threat sequences from your ingest files is to use a format breaker and Amazon Textract. This workflow specifically focuses on invisible threat vectors. The preceding Figure 3 shows a potential setup using AWS services that allows you to automate this.
start_ingestion_job() API call or use an Amazon S3 event trigger on the destination bucket to configure a new Lambda function to run when a file is uploaded to this S3 bucket. Synchronization is incremental, so changes from the previous synchronization are incorporated. More info on managing your data sources can be found in Connect to your data repository for your knowledge base.In addition to invisible sequences, threat actors can add sophisticated threat sequences that are difficult to classify or filter. Manually checking each document for unusual content isn’t feasible at scale, and creating a filter or model that accurately detects misleading information in such documents is challenging.
One powerful characteristic of LLMs is that they can analyze complex linguistic patterns. An optional pathway is to add a filtering LLM to your knowledge base ingest pipeline to detect malicious or misleading content, susceptible code, or unrelated context that might mislead your model.
Again, it’s important to note that threat actors might deliberately choose content that’s difficult to classify or filter and that resembles normal content. More capable, general-purpose LLMs provide a larger surface for threat actors, because they aren’t tuned to detect these specific attempts. The question is: can we train models to be robust against a wide variety of threats? Currently, there’s no definitive answer, and it remains a highly researched topic. However, some models address specific use cases. For example, LLamaGuard, a fine-tuned version of Meta’s Llama model, predicts safety labels in 14 categories such as elections, privacy, and defamation. It can classify content in both LLM inputs (prompt classification) and LLM responses (response classification).
For document classification, relevant for filtering ingest data, even a small model like BERT can be used. BERT is an encoder-only language model with a bi-directional attention mechanism, making it strong in tasks requiring deep contextual understanding, such as text classification, named entity recognition (NER), and question answering (QA). It’s open source and can be fine-tuned for various applications. This includes use cases in cybersecurity, such as phishing detection in email messages or detecting prompt injection attacks. If you have the resources in-house and work on critical applications that need advanced filtering for specific threats, consider fine-tuning a model like BERT to classify documents that might contain undesirable material.
In addition to natural-language text, threat actors might use data encoding techniques to obfuscate or conceal undesirable payloads within documents. These techniques include encoded scripts, malware, or other harmful content disguised using methods like base64 encoding, hexadecimal encoding, morse code, uucode, ASCII art, and more.
An effective way to detect such sequences is by using the Amazon Comprehend DetectDominantLanguage API. If a document is written entirely in a supported language, DetectDominantLanguage will return a high confidence score, indicating the absence of encoded data. Conversely, if a document contains encoded strings, such as base64, the API will struggle to categorize this text, resulting in a low confidence score. To automate the detection process, you can route documents to a human review stage if the confidence score falls below a certain threshold (for example, 85 percent). This reduces the need for manual checks for potentially malicious encoded data.
Additionally, the encoding and decoding capabilities of LLMs can assist in decoding encoded data. Various LLMs understand encoding schemes and can interpret encoded data within documents or files. For example, Anthropic’s Claude 3 Haiku can decode a base64 encoded string such as TGVhcm5pbmcgaG93IHRvIGNhbGwgU2FnZU1ha2VyIGVuZHBvaW50cyBmcm9tIExhbWJkYSBpcyB2ZXJ5IHVzZWZ1bC4 into its original plaintext form: “Learning how to call Amazon SageMaker endpoints from Lambda is very useful.” While this example is benign, it demonstrates the ability of LLMs to detect and decode encoded data, which can then be stripped before ingestion into your vector store.

Figure 4: Visual representation of a potential workflow to trigger a human in the loop review in case threat sequences are detected in your ingest files
In the preceding Figure 4, you can see a workflow that shows how you can integrate the above features into your document processing workflow to detect malicious content in ingest documents:
DetectDominantLanguage API, which flags documents if the confidence score of the language is below a certain threshold, indicating that the text might contain encoded data or data in other formats (such as a language Amazon Comprehend doesn’t recognize) that might be malicious.In previous sections, we focused on filtering patterns and current recommendations to secure the RAG ingestion pipeline. However, content filters that address indirect prompt injection aren’t the only mitigation to keep in mind when building a secure RAG application. To effectively secure generative AI-powered applications, responsible AI considerations and traditional security recommendations are still crucial.
To moderate content in your ingest pipeline, you might want to remove toxic language and PII data from your ingest documents. Amazon Comprehend offers built-in features for toxic content detection and PII detection in text documents. The Toxicity Detection API can identify content in categories such as hate speech, insults, and sexual content. This feature is particularly useful for making sure that harmful or inappropriate content isn’t ingested into your system. You can use the Toxicity Detection API to analyze up to 10 text segments at a time, each with a size limit of 1 KB. You might need to split larger documents into smaller segments before processing. For detailed guidance on using Amazon Comprehend toxicity detection, see Amazon Comprehend Toxicity Detection. For more information on PII detection and redaction with Amazon Comprehend, we recommend Detecting and redacting PII using Amazon Comprehend.
Keep the principle of least privilege in mind for your RAG application. Think about which permissions your application has, and give it only the permissions it needs to successfully function. Your application sends data in the context or orchestrates tools on behalf of the LLM, so it’s important that these permissions are limited. If you want to dive deep into achieving least privilege at scale, we recommend Strategies for achieving least privilege at scale. This is especially important when your RAG applications involves agents that might call APIs or databases. Make sure you carefully grant permissions to prevent potential security issues such as an SQL injection attack on your database.
Develop a threat model for your RAG application. It’s recommended that you document potential security risks in your application and have mitigation strategies for each risk. This session from Re:Invent 2023 gives an overview of how to approach threat modeling a generative AI workload. In addition, you can use the Threat Composer tool, which comes with a sample generative AI application, to help you in threat modeling your applications.
Lastly, when deciding what data to ingest into your RAG application, make sure to ask the right questions about the origin of the content, such as “who has access and edit rights to this content?” For example, anyone can edit a Wikipedia page. In addition, assess what the scope of your application is. Can the RAG application run code? Can it query a database? If so, this poses additional risks, so external data in your vector database should be carefully filtered.
In this blog post, you read about some of the security risks of RAG applications, with a specific focus on the RAG ingestion pipeline. Threat actors might engineer sophisticated methods to embed invisible content within websites or files. Without filtering or an evaluation mechanism, these might result in the LLM generating incorrect information, or worse, depending on the capabilities of the application (such as execute code, query a database, and so on). This makes it challenging to spot these threats when reviewing content.
You learned about some strategies and architectural patterns with filtering mechanisms to mitigate these risks. It’s important to note that the filtering mechanisms might not catch all undesirable content that should be removed from a file (for example, PII, base64 encoded data, and other undesirable sequences). Therefore, an evaluation mechanism and a human in the loop are crucial because there’s no model trained to detect such sequences for techniques like indirect prompt injection at this time (although there are models trained specifically to detect impolite language, but this doesn’t cover all possible cases).
Although there is currently no way to completely mitigate threats like injection attacks, these strategies and architectural patterns are a first step and form part of a layered approach to securing your application. In addition to these, make sure to evaluate your data regularly, consider having a human in the loop, and stay up to date on advancements in this space such as OWASP top 10 for LLM Applications or MITRE ATLAS
If you have feedback about this post, submit comments in the Comments section below.