Post Syndicated from Matt Granger original https://www.youtube.com/watch?v=wiCoI70NGvY
[$] LWN.net Weekly Edition for October 29, 2026
Post Syndicated from jzb original https://lwn.net/Articles/1102136/
Inside this week’s LWN.net Weekly Edition:
- Front: Python JIT; Kernel clean up; Rust panics; Future Rust features; Northstar browser; 7.4 merge window; Smaller kernel stacks.
- Briefs: KeePassXC 2.8.0; Redox ring buffers; Rust in systemd; Quotes; …
- Announcements: Newsletters, conferences, security updates, patches, and more.
What Republicans Today Could Learn From George W. Bush
Post Syndicated from The Atlantic original https://www.youtube.com/shorts/nJdyEIsLLrs
A Good Day for Cryptography
Post Syndicated from Let's Encrypt original https://letsencrypt.org/2026/10/29/good-day-cryptography.html
October 16, 2026 was a good day for the cryptography community. A 25-year-old question about the math behind some of the Internet’s most widely used encryption was finally answered. The previously lost method used to create the widely-used NIST elliptic curves has been found.
In 2023, Filippo Valsorda created a bounty for answering the question, with a twist: if the solvers gave the prize to a nonprofit, it would be tripled, from $12,288 to $36,864. A group of engineers raised their hands to fund the bounty prize. Such a generous and thoughtful idea. And you guessed it! The solvers, a team of researchers at Anthropic, took Filippo up on it and donated the bounty to ISRG. ISRG is grateful for the generous support and we’re grateful because the answer itself strengthens confidence in cryptography that secures much of the web. A good day indeed.
What was the bounty? What was the answer? It’s a long story. TL;DR: The NIST elliptic curves, used in encryption across the Internet, were built from “seeds” that two NSA engineers generated in the late 1990s. Years later, nobody could remember exactly how they’d made them. Humans do what humans do, and without an answer, some people grew skeptical. That kind of doubt chips away at trust, which obviously isn’t great for cryptographic infrastructure. The answer turned out to be reassuring: the seeds came from an ordinary random number generator, seeded with the time.
What we love most about this story is that Filippo and our community wanted to uphold the public’s trust. We build and protect Internet infrastructure, and work to keep it secure every day. Filippo didn’t have to create this bounty, but he wanted answers for his fellow engineers and the public. The engineers who chipped in didn’t have to put up their hard-earned dollars, but they wanted to help put the speculation to rest. And the team at Anthropic didn’t have to spend time solving it, but enlisted Claude’s help in closing this cryptographic chapter of history.
Who do you know that is helping make the Internet better? Thank them! Many of them are paid to do this work, but they also do it on their own time because they care deeply. And so do we.
In the cryptography and security community, we are working every day to protect our teams, our organizations, our friends and family, and in ISRG’s case, billions of users online. Consider making a donation in honor of that work. You can give online or make your donation via stock, crypto, check, DAF, and more. Learn more in the Ways To Give section of our donation page.
The following individuals made all this possible:
-
Filippo Valsorda, who started the NIST Elliptic Curves Seeds Bounty. Read his bounty announcement and his post when the bounty was claimed.
-
John Wood, Henry de Valence, Ava Howell, Zack Voase, Lucy Sweet, Amir Omidi, Paul Crowley, Iain McGinniss, Nicholas Carlini, and Steve Weis, the team at Anthropic who solved it and chose to send the prize to ISRG. Read Anthropic’s writeup.
-
Amir Omidi, Chris Palmer, Colm MacCárthaigh, David Adrian, David Anderson, Filippo Valsorda, Jeff Hodges, Matt Green, Matthew McPherrin, Paul Kehrer, Ryan Sleevi, and Soatok, who chipped in their own money to fund the bounty.
Thank you for making the Internet more secure every day.
A report from the LPC sched_ext microconference
Post Syndicated from corbet original https://lwn.net/Articles/1103426/
The Linux Plumbers Conference blog has a
report from the sched_ext microconference held in Prague.
Three main topics dominated the discussions
- Priority inversion and how to handle it in sched_ext: lock holder and
lock waiter preemption, time slice extension, and making proxy execution
work together with BPF schedulers.- Paravirtualized scheduling: letting the host and guest schedulers
cooperate across the VM boundary, with sched_ext as the policy engine on
the host.- Device and topology-aware scheduling: using hardware feedback (Intel
HFI), device/accelerator locality and cache topology to drive task
placement.
Observing AWS Lambda durable functions with the Durable Execution Telemetry Exporter
Post Syndicated from Pooya Paridel original https://aws.amazon.com/blogs/compute/observing-aws-lambda-durable-functions-with-the-durable-execution-telemetry-exporter/
A durable function is an AWS Lambda function that might run for minutes, days, or even up to a year. You build these functions with the Durable Execution SDK, which provides operations such as steps, waits, and parallel. A single durable execution might be spread across many Lambda invocations, with waits and retries in between. So observing a durable execution, made of many invocations, needs different tools. The question that you want answered is rarely “what did this invocation do?” It’s “how far did my durable execution get, which step failed, how many times did it retry, and how long did the whole thing take?”
After you run thousands of executions, the questions widen from one execution to all of them. Some questions are operational. Which step fails most often, and with which error? Which step causes the most retries? Did a step get slower after last week’s deployment? Other questions are about the business the workflow runs. Which customers did last night’s payment failures affect? How long does each manual approval step take? Of the orders that started, how many reached the payment step, and where did the rest stop? Answering these questions needs per execution telemetry data that includes relevant data such as status, timing, steps, and the input and output fields that you choose to emit.
Traditional Lambda observability works well for a single invocation. Lambda writes a log stream per invocation, so a durable execution that suspends four times writes to four separate log streams, interleaved with every other concurrent execution. Amazon CloudWatch metrics tell you the function’s error rate, but not which of your workflow’s steps is responsible. Distributed tracing, such as AWS X-Ray or OpenTelemetry, shows the timing of one execution. It isn’t built to answer questions across many executions, such as which step failed most often this week. For that, you need one queryable record per execution.
Today we’re introducing the Durable Execution Telemetry Exporter, an observability plugin for AWS Lambda durable functions. We’re also introducing the Durable Execution Telemetry MCP server, a Model Context Protocol (MCP) server that lets an AI coding agent query the telemetry data. The exporter is open source for TypeScript, Python, Java, and Go, in each language’s Durable Execution SDK repository. AWS provides the MCP server as open source in the aws-durable-execution-sdk-js repository.
With a one-line configuration change, you get a record of each execution, with every step, wait, callback, and invoke, including timing, retry attempts, status, and errors. The exporter delivers it to a destination you choose. There’s no custom instrumentation to write and no separate agent to run.
How the durable execution telemetry exporter works
The Durable Execution Telemetry Exporter is a plugin for the durable execution SDK. It runs inside your Lambda function, in the same process as your handler, and subscribes to the SDK’s instrumentation lifecycle. It doesn’t run in your request path.
On every invocation of a durable execution, the plugin builds a cumulative snapshot of that execution, rather than a delta or per-invocation view. Because the durable execution SDK replays your handler from the beginning on each resume and the SDK passes the checkpointed state to the plugin, the plugin can reconstruct the whole execution so far from any invocation. That snapshot is a single JSON document called a DurableExecutionTelemetryRecord:
Each record is complete on its own. One row in a table is one durable execution, which means the questions you ask (slowest step, most-retried step, executions that failed after the payment step) become ordinary queries instead of requiring you to correlate logs across streams.
Getting started
Install the plugin alongside the durable execution SDK:
Then pass it to withDurableExecution:
That is the entire integration. With no configuration, the default LambdaLogExporter writes records as JSON to your function’s own CloudWatch log group. You don’t need to create any infrastructure or grant additional AWS Identity and Access Management (IAM) permissions, because your function already writes its own logs. You can query the result immediately with Amazon CloudWatch Logs Insights:
Choosing where records go
The plugin includes 13 destination exporters so you can send records where they are useful:
| Destination | Exporter | Good for |
| Function’s own log group | LambdaLogExporter |
Getting started, zero setup |
| Any CloudWatch log group | CloudWatchLogsExporter |
Centralizing records across functions |
| Amazon Simple Storage Service (Amazon S3) | S3Exporter |
Amazon Athena SQL, long-term retention |
| Amazon DynamoDB | DynamoDBExporter |
Fast lookup by execution, live dashboards |
| Amazon Aurora | AuroraExporter |
Joining workflow data with business data |
| Amazon Redshift | RedshiftExporter |
Large-scale cross-function analytics |
| Amazon OpenSearch Service | OpenSearchExporter |
Full-text search, dashboards |
| Amazon EventBridge | EventBridgeExporter |
Alerting and remediation on failure |
| Amazon Data Firehose | FirehoseExporter |
Fan-out to S3, Splunk, or third parties |
| Amazon Simple Queue Service (Amazon SQS) | SQSExporter |
Decoupled downstream processing |
| Any OTLP endpoint | OTelExporter |
Third-party observability platforms |
| Any HTTPS endpoint | HttpExporter |
Custom backends and webhooks |
| Filesystem or Amazon Elastic File System (Amazon EFS) | FileExporter |
Local development, EFS persistence |
The plugin sends records to all configured exporters in parallel. This allows you to route data to different stores based on their characteristics, such as using a fast store for real-time lookups and a less expensive, high-capacity store for long-term storage:
With the S3 exporter, the plugin writes records under Hive-style partitions (year=YYYY/month=MM/day=DD/) that an AWS Glue crawler discovers automatically, so Athena queries work without additional modeling:
Controlling frequency and content
Three settings govern what a production deployment costs and exposes.
emitMode determines when the plugin sends a record. The default, on-complete, emits once when an execution reaches SUCCEEDED or FAILED. Use on-failure for the lowest overhead when you only care about errors, or on-change when you want to watch executions progress in near real time.
samplingRate reduces frequency. The plugin derives the sampling decision from a hash of the execution ARN. The execution ARN is stable across replays, so the decision is deterministic: a sampled-in execution emits all of its records, and a sampled-out execution emits none. You never receive a half-recorded workflow.
content controls what leaves your function. By default, the plugin includes execution input and output as-is, which is convenient in development and often unacceptable in production. Pass a transform to redact:
Each destination supports different payload sizes: CloudWatch Logs events at 256 KB, DynamoDB items at 400 KB. Each exporter has a maxRecordSizeBytes, and when a record exceeds it the plugin truncates for one destination without affecting other destinations: operation results first, then whole operations oldest-first, then execution input and output last. The plugin never drops identity and timeline fields, and it marks a trimmed record truncated: true, so a truncated record is always distinguishable from a complete one. We recommend using content transforms to bound payloads deliberately rather than relying on truncation.
Querying execution history from an AI agent
Answering “why did last night’s batch fail” requires knowing which data store you configured, which query dialect it uses, and what the record schema looks like. DynamoDB PartiQL, Athena’s Trino SQL, Aurora PostgreSQL, Amazon Redshift, OpenSearch, and CloudWatch Logs Insights all differ.
The Durable Execution Telemetry MCP server removes that requirement. It’s a local stdio server that exposes your configured destination to any MCP-capable agent, including Kiro, Claude Code, and Cursor. Add it with one command:
Configuration is environment-only and credentials come from the standard AWS SDK provider chain, so there’s no state file and no secret. The server exposes five tools:
test_destinationruns read-only connectivity checks. If a required variable is unset, it names the exact variable and returns without making any AWS call.describe_schemareturns the record schema, query dialect, and row cap for whichever destination is configured. Agents should call this before writing a query.list_executionsfilters by status, function name, and time range with no query language involved. This handles most questions.get_executionfetches one record by execution ARN.queryhandles questions the filters cannot express.
You ask a question and the agent picks the tools:
Which steps in order-processor failed most often in the last 24 hours, and what was the average retry count?
On the SQL destinations, write each query as a SELECT statement, or as a WITH statement that ends in a SELECT. These are the only forms the server runs. It checks a query before it makes any AWS call, so a statement that would change data never reaches your destination. On the CloudWatch Logs destinations, the Logs Insights query language has no statements that write data. So every query through the server is read-only.
Best practices and considerations
Choose operationDetail deliberately. The default, top-level, records only top-level operations and produces the same set of operations no matter when a record is emitted. full-tree includes children of contexts such as map items and parallel branches, but by default the durable execution backend prunes finished contexts’ children from the state passed to later invocations. To keep the full tree across a suspend and resume, also set pluginsConfig.childOperationsDepth on withDurableExecution. That preservation has a cost: it forces a replay pass over each preserved context on resume, so enable only the depth you need.
Choose operation names that your destination can query. The plugin uses names verbatim as keys and identifiers and never sanitizes them. A . in a name is a field-path separator in CloudWatch Logs Insights and OpenSearch. Letters, digits, -, and _ are portable everywhere.
Understand what the plugin cannot see. The Durable Execution Telemetry Exporter runs inside your function, so it can only emit records when your function is invoked. Terminal states that originate in the Lambda service without an invocation never reach the plugin: STOPPED from a manual stop, and TIMED_OUT when the execution timeout is exceeded. For complete lifecycle coverage, subscribe to Lambda durable execution lifecycle events on the default Amazon EventBridge bus and update your destination from a small handler:
Account for the cost of the destination. The plugin adds at most one export each time it emits a record, because it sends only the latest of any updates that pile up. Each record is a complete snapshot, and the latest supersedes all earlier ones. If updates arrive faster than an exporter can handle, the plugin drops the intermediate snapshots. The charges that matter are the ones your destination incurs: CloudWatch Logs ingestion, DynamoDB writes, Aurora capacity, and so on. Combine samplingRate and emitMode to control them.
Conclusion
The Durable Execution Telemetry Exporter gives AWS Lambda durable functions an observability model that matches how they run: one complete record per execution, sent to a destination that fits your team. The Durable Execution Telemetry MCP server lets an AI agent answer questions against that data directly.
To get started with durable functions, see the AWS Lambda Developer Guide. For the plugin’s full exporter reference, configuration options, and an AWS Cloud Development Kit (AWS CDK) stack that deploys every destination for testing, see the package README.
About the author
Altera Agilex 27 is the First Agilex 2X Platform Adding 800GbE and 1.6TbE and More
Post Syndicated from Patrick Kennedy original https://www.servethehome.com/altera-agilex-27-800gbe-1-6tbe-hyperflow/
Altera announced its new Agilex 2X series with the higher-end Agilex 27 with features like LPDDR6 and 1.6TbE support coming in 2027
The post Altera Agilex 27 is the First Agilex 2X Platform Adding 800GbE and 1.6TbE and More appeared first on ServeTheHome.
How Revinate accelerated API adoption with Amazon API Gateway
Post Syndicated from Abe Raghib original https://aws.amazon.com/blogs/architecture/how-revinate-accelerated-api-adoption-with-amazon-api-gateway/
Accelerating API adoption while reducing operational overhead is a challenge that every growing organization faces. For Revinate, a hospitality provider serving over 12,500 hotels worldwide and powering more than 1.25 billion guest profiles, Amazon API Gateway became the foundation of their solution.
Revinate empowers hoteliers to connect directly with guests at every touchpoint, driving $24 billion in lifetime direct revenue through an AI-powered Customer Data Platform (CDP) that helps reduce reliance on online travel agencies (OTAs) and deliver data-driven insights.
With the expansion of CDP capabilities, Revinate needed to expose rich guest data through APIs, so that hotel properties and partners can programmatically access guest profiles, reservation data, and other critical hospitality information.
This post explores how Revinate used Amazon API Gateway and the newly released Amazon API Gateway Portal to create a scalable, secure, and developer-friendly API program.
Business need: Evolving API infrastructure to match growth
As Revinate expanded its CDP capabilities and began exposing guest profile and reservation data through APIs, the limitations of managing API infrastructure in-house became clear. Each new partner integration required manual provisioning, custom security configuration, and ongoing maintenance. The team needed an API gateway solution that could scale with growing partner demand without adding operational burden. Rather than building and maintaining a self-hosted solution, Revinate wanted an approach that would open up engineering time, streamline partner integrations, and align infrastructure costs with actual usage. The team identified four key business drivers:
- Operational efficiency and agility – Accelerate API deployment cycles and reduce time spent on infrastructure maintenance so the engineering team can focus on building features that directly serve customers.
- Faster partner and developer onboarding – Helping external developers and partners to discover and adopt Revinate’s APIs required a faster, more self-service experience.
- Growth aligned costs – Infrastructure costs needed to scale proportionately with revenue generation. An on-demand pricing model, where costs flex with actual API usage rather than fixed overhead, was essential to support sustainable growth. Equally important was the ability to attribute API costs per consumer, enabling transparent cost allocation across hotel properties and partners.
- Enhanced security and compliance – API security controls including authentication, authorization, rate limiting, and threat protection. Meeting compliance requirements and maintaining customer trust demanded strong security without adding complexity to the development workflow or requiring the team to build and maintain custom security infrastructure.
These requirements shaped the team’s evaluation of available solutions.
Evaluating alternatives
When evaluating API gateway solutions, the team translated the business drivers into four core technical requirements. On-demand pricing was essential to align infrastructure costs with actual API usage and enable per-consumer cost attribution. Authentication federation allows integration with Revinate’s existing identity provider, so partners can onboard faster without building custom auth infrastructure. Rate limiting was needed to protect backend services and enforce fair usage across hotel properties and partners as the API program scales. Finally, strong security, including threat protection, audit logging, and access controls, was required to meet compliance requirements for protecting sensitive guest data.
The engineering team evaluated three approaches. Each approach came with distinct tradeoffs across cost, flexibility, and operational burden.
Self-managed API management
Deploying a self-managed API gateway would provide flexibility and avoid licensing fees, but requires ongoing infrastructure management, security patching, scaling, and monitoring. The team would also need to build a custom developer portal from scratch.
Custom-built
Building a proprietary API gateway tailored to Revinate’s exact needs offers maximum control but demands significant upfront development investment and ongoing maintenance. Every capability, including routing, authentication, rate limiting, and documentation, would need to be built and maintained in-house, diverting engineering resources from core hospitality platform features.
Enterprise API management platforms
Enterprise platforms offer comprehensive out-of-the-box features, but introduce vendor dependencies, higher costs, and fixed-term licensing models where costs misalign with revenue growth.
All three approaches shared a common drawback: they would divert resources, whether engineering time, budget, or both, toward capabilities that don’t differentiate Revinate’s product, delaying time-to-market for features that directly serve hotel customers.
The solution: Amazon API Gateway with Developer Portal
Revinate needed the comprehensive capabilities of an enterprise API management platform without the fixed-term licensing, vendor dependencies, and operational overhead. Amazon API Gateway, combined with the newly released Amazon API Gateway Portal, delivered exactly that, aligning with both the technical requirements and business objectives that shaped the evaluation.
Fully managed infrastructure
Amazon API Gateway removes the need to manage underlying infrastructure, so the engineering team can focus on the core hospitality solution rather than API gateway operations.
Native AWS integration
Amazon API Gateway provides native integration with other AWS services, including Amazon Elastic Kubernetes Service (Amazon EKS) for backend services and AWS Lambda authorizers for federated authentication with an external identity provider. This allows Revinate to authenticate API consumers against the existing identity provider infrastructure with minimal development effort.
Infrastructure as code with Terraform
The team maintains strict infrastructure-as-code practices, using Terraform exclusively for all production deployments. The AWS provider for Terraform enables defining the Amazon API Gateway configuration, including REST APIs, stages, usage plans, and authorizers as version-controlled code. This approach verifies consistency across environments, enables peer review of infrastructure changes, and provides complete audit trails for compliance requirements. The declarative nature of Terraform enables rapidly iterating on the API Gateway configuration during development while maintaining confidence in production deployments.
Cost-effective pay-per-use model
Amazon API Gateway’s pay-per-use pricing model aligned perfectly with Revinate’s growth strategy. During the initial rollout phase, costs remained minimal and scaled naturally as new API consumers onboarded. Usage plans allow Revinate to track and attribute costs per consumer, providing clear visibility into which hotel properties and partners drive API usage. This per-consumer cost attribution, combined with tiered pricing that scales from tens to hundreds of customers, replaced fixed annual licensing fees that required upfront investment regardless of actual usage.
Managed Developer Portal
The November 2025 release of Amazon API Gateway Portal provided a fully managed, AWS-native Developer Portal that served as the central hub for API discovery, documentation, and governance. This removes months of custom development work that building a comparable solution would require.
Developers can use the managed portal to:
- Set up a branded Developer Portal in minutes rather than months.
- Provide hotel property developers with self-service API discovery and interactive documentation.
- Maintain centralized control over API documentation freshness and access governance.
- Deliver a professional developer experience that accelerates customer onboarding from weeks to days.
Strong security
API Gateway provides built-in security features that meet stringent requirements for protecting sensitive guest data:
- OAuth2 client credentials for machine-to-machine (M2M) authentication.
- Authorization logic using AWS Lambda authorizers integrating with an external identity provider of choice.
- Request throttling and quota management to prevent abuse.
- Integration with AWS WAF and Amazon CloudFront for layered protection against common web exploits and DDoS threats.
- Comprehensive audit logging through AWS CloudTrail for compliance and access tracking.
- Real-time observability through Amazon CloudWatch metrics and dashboards, with support for streaming to third-party observability platforms.
Architecture overview
The solution uses a modern, scalable AWS architecture designed to serve hotel properties globally. Hotel properties access the platform as API consumers through Amazon CloudFront for edge caching and low-latency responses, with AWS WAF providing comprehensive protection against common web threats and bots. Requests flow through Amazon API Gateway, which serves as the unified entry point for API operations. Lambda authorizers handle authentication and authorization by integrating with an identity provider (IdP) to provide secure, token-based access control for each request. After authentication, API Gateway routes traffic to backend services running on Amazon EKS, providing the flexibility and scalability needed for containerized microservices. The EKS application layer orchestrates requests to the Customer Data Platform.
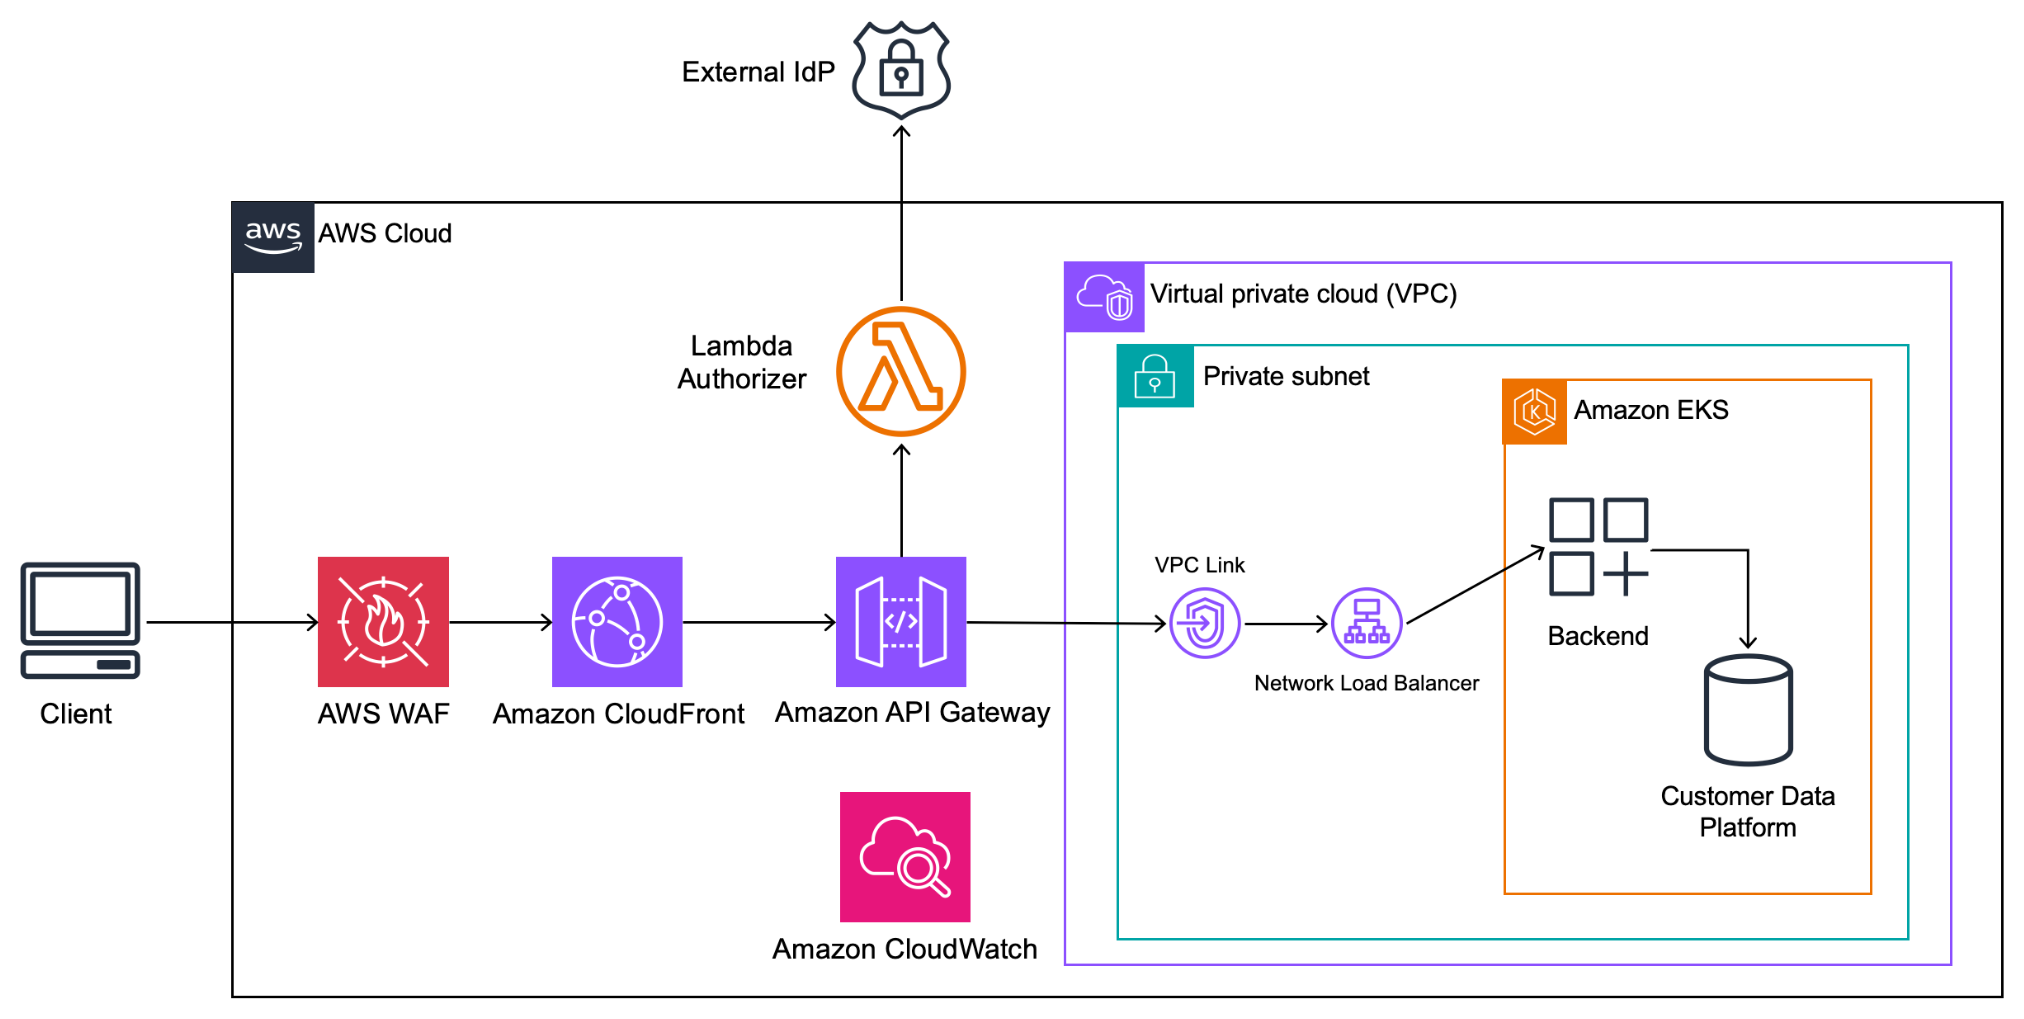
Figure 1: Architecture diagram showing the end-to-end flow from hotel property consumers accessing the Amazon API Gateway Portal, through Amazon API Gateway, to backend services running on Amazon EKS.
Connecting API Gateway to EKS
A critical design decision emerged: how to securely and efficiently connect API Gateway to backend services in Amazon EKS while keeping traffic within the AWS backbone network using VPC Link. The team evaluated four options:
Option 1: NGINX ingress controller: Route traffic through a Kubernetes-native NGINX Ingress Controller with a Load Balancer service.
Pros: Highly customizable routing, flexible header manipulation, consistent with common Kubernetes patterns.
Cons: Adds extra latency hop, requires manual lifecycle management (upgrades, configs, scaling), non-AWS-native monitoring.
Option 2: AWS load balancer controller: Use the AWS Load Balancer Controller to manage LB resources as Kubernetes Ingress objects.
Pros: Bridges AWS and Kubernetes natively, supports path-based routing, AWS-managed Load Balancer (LB) lifecycle.
Cons: Introduces an additional hop (Amazon API Gateway → LB → service).
Option 3: Target group binding: Directly bind Amazon EKS pods to Network Load Balancer (NLB) Target Groups using the AWS Load Balancer Controller’s TargetGroupBinding feature.
Pros: Removes ingress controller overhead, lowest latency, native AWS integration, cost-efficient (shared NLB across multiple Target Groups), fine-grained control over health checks and scaling.
Cons: More complex initial setup, less Kubernetes-native (more AWS-specific), different applications will need individual NLB.
Option 4: LoadBalancer service: Expose each service directly via a Kubernetes LoadBalancer service (NLB/ALB).
Pros: Most straightforward setup, minimal routing complexity, no ingress controller needed.
Cons: No path-based routing, costly at scale (each service requires its own load balancer), limited observability, requires TLS offloading configuration, different applications will need individual NLB.
The team selected Target group binding because it effectively balances performance, cost-efficiency, and AWS-native integration. By removing the extra hop introduced by traditional ingress controllers, this approach provides direct control over Target Groups and health checks while maintaining sub-second latency at scale.
Security implementation
The API Gateway implementation uses OAuth 2.0 client credentials flow with an external identity provider, delivering strong authentication for machine-to-machine (M2M) communication. This approach provides secure, scalable access control as Revinate onboards new hotel properties and partners.
API Gateway enforces usage plans with configurable throttling and quota limits, for fair usage and protection against abuse.
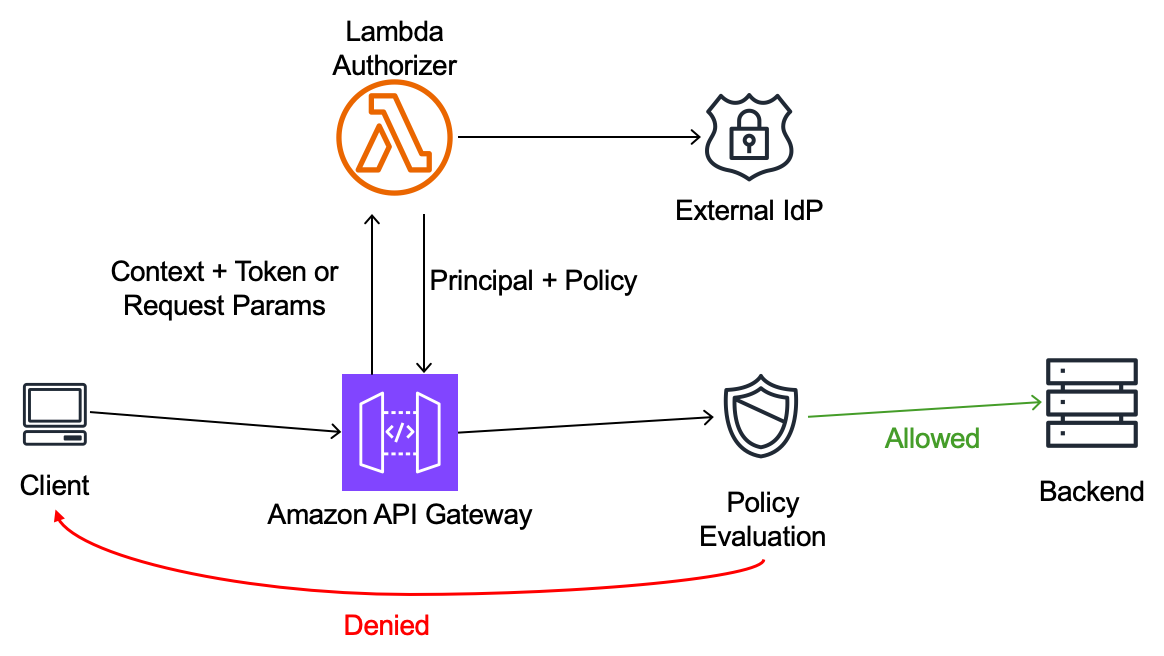
Figure 2: Sequence diagram illustrating the OAuth 2.0 authentication flow using AWS Lambda authorizers.
AWS Lambda authorizers take the caller’s identity as the input and return an IAM policy as the output. This architecture provides flexibility to implement sophisticated authorization logic while maintaining the simplicity of the API Gateway managed infrastructure. The team also deploys and manages the Lambda authorizer functions through Terraform, maintaining infrastructure as code (IaC) standards.
Developer Portal experience
The Amazon API Gateway Portal serves as the central hub for the API operations, providing developers using APIs with a streamlined experience.
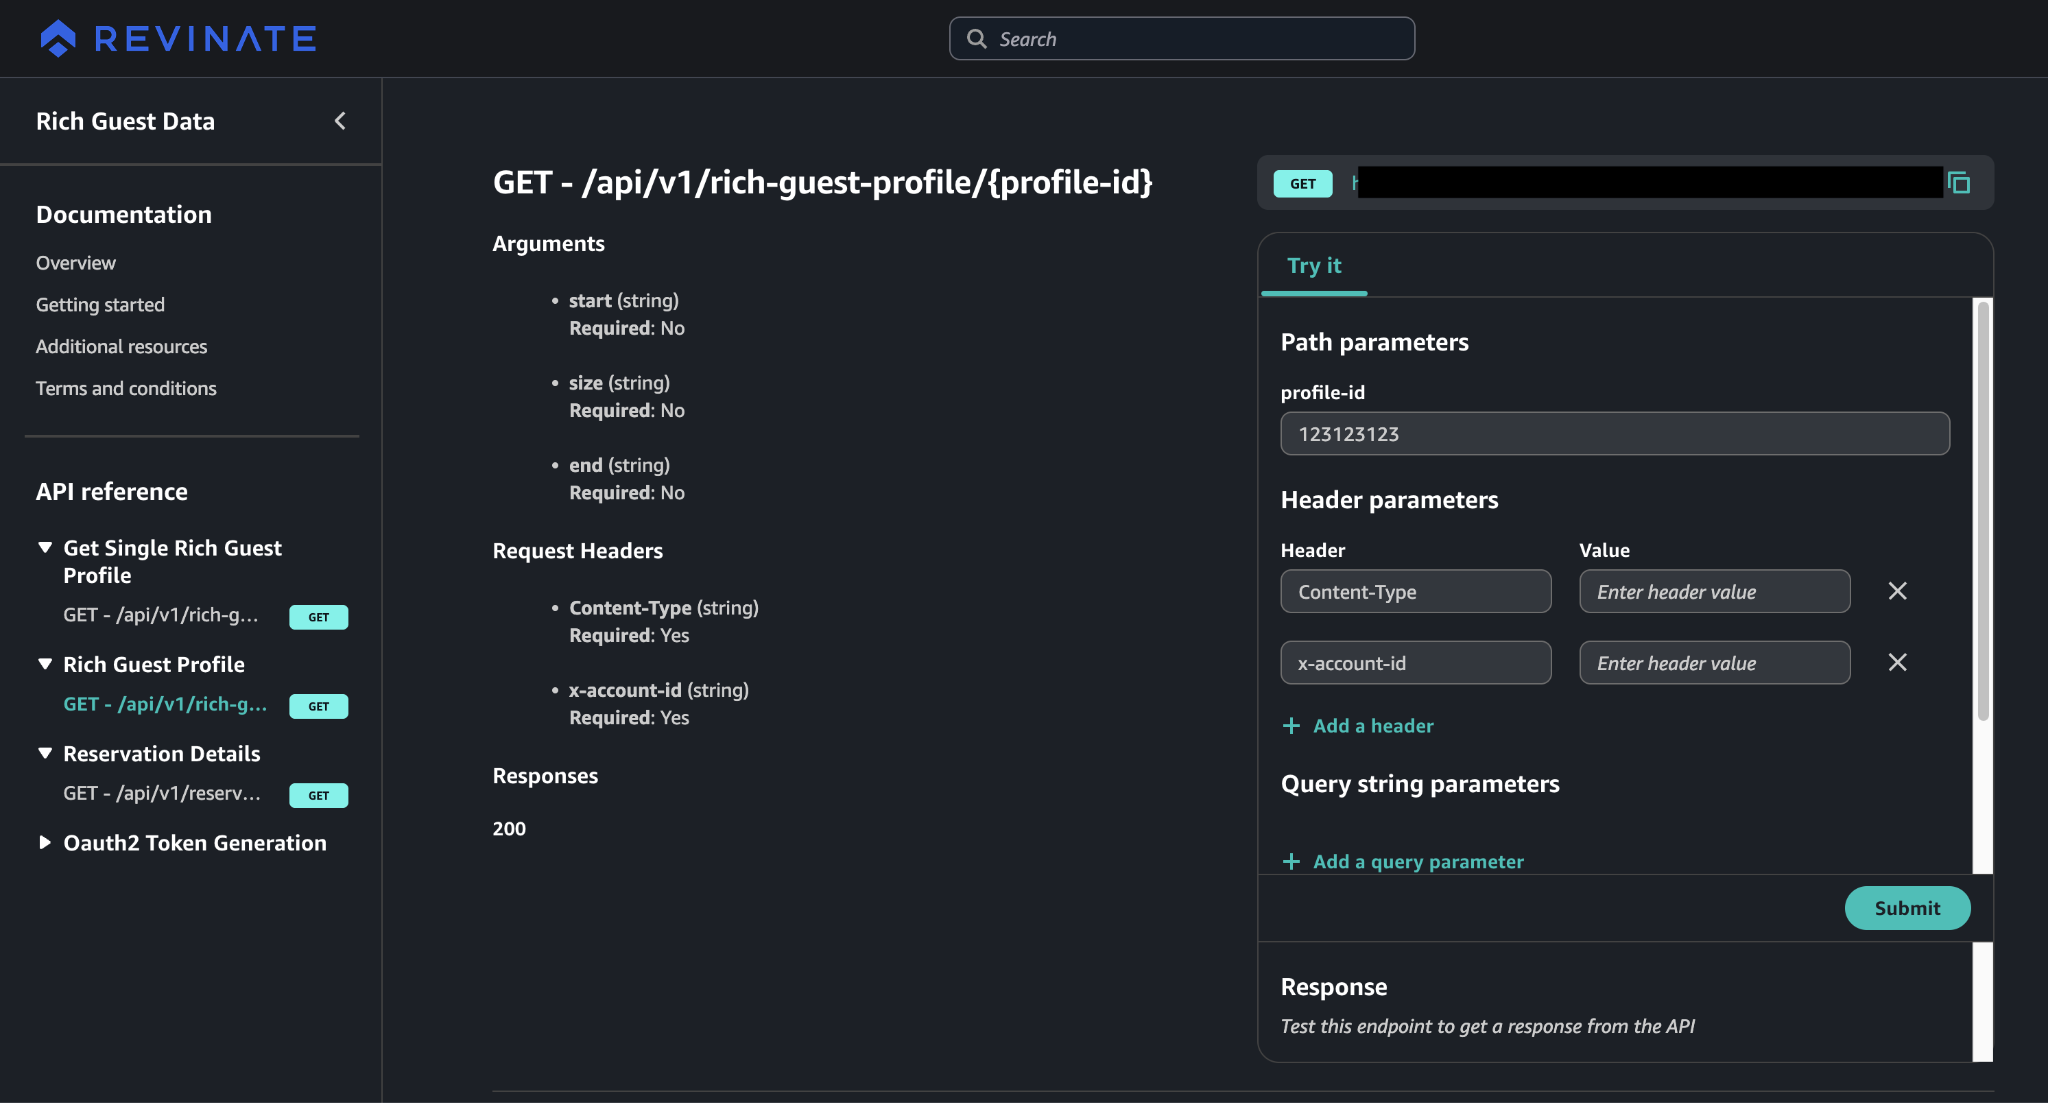
Figure 3: User interface flow showing the developer journey through the Amazon API Gateway Portal, including API discovery, interactive documentation with try-it-now functionality, and subscription management.
Developers can:
- Browse available REST APIs with comprehensive documentation.
- Test API endpoints directly in the portal with interactive examples.
- Access code samples and integration guides.
This self-service model reduced burden on support while accelerating customer time-to-value.
Results and benefits
The implementation of Amazon API Gateway and the Developer Portal delivered significant qualitative benefits across operational efficiency, developer experience, and business scalability.
Reduced operational overhead
By choosing a fully managed API gateway, the engineering team avoided the burden of maintaining, scaling, and troubleshooting self-hosted infrastructure. With the fully managed API gateway, the team can focus on core platform innovations that directly benefit hotel customers rather than undifferentiated gateway operations.
Improved developer experience
The centralized Developer Portal transformed the integration experience for hotel properties and partners. Self-service API discovery and interactive documentation reduced onboarding time from weeks to days. Developers consistently praised the professional portal experience and comprehensive documentation.
Accelerated customer onboarding
With the Developer Portal’s self-service capabilities, new customers can discover APIs and begin integration without waiting for manual provisioning or support intervention. This self-service approach positions Revinate to scale API access to hundreds of hotel properties and partners as demand grows.
Enhanced governance and control
The solution centralized control over API documentation, versioning, and access policies, verifying consistency across customer integrations. A single source of truth for API specifications removes documentation drift and reduces integration errors. Managing infrastructure through Terraform verifies changes follow proper review and approval processes.
Cost optimization
The pay-per-use pricing model aligns costs with actual usage and revenue generation. Usage plans and API keys provide per-consumer cost attribution, giving Revinate clear visibility into infrastructure spend by customer. As usage scales, tiered pricing verifies predictable cost growth that tracks with business value, replacing fixed licensing models that require upfront investment regardless of adoption.
Positioned for growth
The API layer, from Amazon API Gateway to the Developer Portal, scales automatically to meet demand without capacity planning or operational intervention. The team can confidently pursue growth targets knowing the API infrastructure will scale automatically.
Enhanced security posture
Amazon API Gateway provides strong security capabilities built into the platform, including centralized authentication and authorization mechanisms, request throttling and rate limiting to protect against abuse, and automatic threat protection through AWS Shield integration. Built-in security capabilities remove the need to build and maintain custom infrastructure while verifying consistent security policies across API endpoints. The centralized approach reduces the attack surface and provides comprehensive audit trails through CloudWatch integration, so the team can maintain robust security without additional operational overhead.
Key takeaways
The successful implementation of Amazon API Gateway and the Amazon API Gateway Portal offers valuable lessons for organizations exposing APIs to external customers and partners:
Managed services accelerate time-to-market – By using fully managed infrastructure and the new Amazon API Gateway Portal, the team avoided months of custom development work and launched the API program faster than would have been possible with self-managed alternatives.
Developer experience drives adoption – The professional, self-service Amazon API Gateway Portal significantly reduced friction in the customer onboarding process, so API access can rapidly scale as new hotel properties and partners onboard.
Infrastructure as code verifies consistency – Using Terraform for all production deployments provided the infrastructure team with version control, peer review, and audit trails while maintaining deployment consistency across environments.
Pay-per-use aligns costs with value – For organizations in growth mode, pay-per-use pricing removes the risk of overcommitting to fixed costs before achieving product-market fit with API offerings.
OAuth 2.0 delivers strong security at scale – Implementing OAuth 2.0 client credentials flow with an external identity provider enables a robust, scalable authentication foundation that grows securely alongside its expanding customer base.
Native AWS integration reduces complexity – For organizations already running on AWS, API Gateway’s native integration with services like EKS, Lambda, and CloudWatch minimizes architectural complexity and operational overhead.
Future enhancements
With the outbound API program successfully launched, the team is planning to extend API Gateway to inbound APIs, where partners push data into Revinate’s service. This will provide consistent security, monitoring, and governance across API traffic.
The team is also exploring advanced API Gateway features including request and response transformation, caching for improved performance, and deeper integration with AWS WAF for enhanced security against evolving threats.
Conclusion
Choosing Amazon API Gateway with the Developer Portal demonstrates how fully managed services can accelerate innovation while reducing operational complexity. By embracing AWS-native solutions and infrastructure-as-code practices, Revinate built a scalable, secure API program that supports growth as more customers get onboarded.
As the hospitality industry continues its digital transformation, this API-first approach positions them to empower hoteliers with the data and integrations needed to deliver exceptional guest experiences and drive direct revenue growth.
Next steps
Whether you’re in hospitality, software as a service (SaaS), healthcare, or any industry where partners and customers need programmatic access to your service, the pattern Revinate followed is broadly applicable. Start by mapping your business drivers to concrete technical requirements. This grounds your API gateway choices in outcomes, not only features. From there, explore Amazon API Gateway’s REST and HTTP API options to find the right fit for your traffic patterns and integration needs. Use the Amazon API Gateway Portal to give your developers a self-service onboarding experience from day one. If you’re already running workloads on AWS, the native integration with services like EKS, Lambda, and CloudWatch means you can build on your existing architecture rather than introducing new operational complexity. For teams that follow infrastructure as code practices, the Terraform AWS Provider for API Gateway helps you to define your entire API configuration as version-controlled code. To get started, visit the Amazon API Gateway documentation or reach out to your AWS account team for architecture guidance tailored to your use case and scale.
Resources
- Amazon API Gateway
- Improve API discoverability with the new Amazon API Gateway Portal
- AWS Lambda authorizers
- Deploying Amazon API Gateway and Lambda with Terraform
About the authors
Automating agentic AI Well-Architected reviews with the AWS Agentic AI Lens
Post Syndicated from Dinesh Subramani original https://aws.amazon.com/blogs/architecture/automating-agentic-ai-well-architected-reviews-with-the-aws-agentic-ai-lens/
In regulated industries, there’s no room for a move fast and break things approach, especially when AI agents are handling sensitive customer communications data. In this post, we show how Smarsh, a leading archiving and compliance platform for communications intelligence, used the AWS Well-Architected Framework’s Agentic AI Lens to conduct a rigorous, evidence-based review of its first agentic workload. The Agentic AI Lens is available today as prescriptive guidance, though it is not yet selectable as a lens in the AWS Well-Architected Framework.
To operationalize the review, Smarsh built a custom skill for Claude, Anthropic’s AI assistant. The skill assessed the workload against all 150 best practices in the lens, pulling evidence directly from the workload’s GitHub repository and producing a comprehensive review workbook in hours rather than days. In this post, we walk through the skill’s architecture, the assessment methodology, how the team validated the skill itself, and how the resulting findings strengthened Smarsh’s engagement with its AWS account team.
About Smarsh
Smarsh is a recognized global leader in electronic communications archiving and digital communications governance. For over 20 years, the multinational software as a service (SaaS) company has enabled more than 7,000 organizations, from small businesses to large multinational financial institutions, to capture, retain, monitor, and analyze communications across 100+ channels, including email, mobile, voice, video, chat, and AI assistants, at scale. The company’s enterprise archive business runs on Amazon Web Services (AWS), and its next generation of AI capabilities are being built on Amazon Bedrock AgentCore, a platform to build, connect, and optimize agents at scale, with any framework or model. Smarsh uses AgentCore’s runtime, gateway, registry, and identity capabilities to power these solutions. A 2025 AWS Partner of the Year Award winner, Smarsh holds a deep partnership with AWS.
Prerequisites
To follow along with the approach described in this post, you need the following:
- An AWS account with access to Amazon Bedrock and Amazon Bedrock AgentCore.
- Familiarity with the AWS Well-Architected Framework and its lens model.
- A GitHub repository containing your agentic workload’s source code, infrastructure definitions, and documentation.
- Access to Claude (Anthropic’s AI assistant) with the ability to install custom skills.
The challenge: A lens you can read, but not run
Smarsh operates in a highly regulated industry where compliance and security are paramount. Every agentic solution must pass a Well-Architected review before it reaches an end customer. So when a Smarsh architect set out to review the company’s first multi-agent workload, the natural choice was the AWS Well-Architected Framework’s Agentic AI Lens. That workload is an intelligent agent review system for compliance alerts built on the runtime, gateway, registry, and identity capabilities of Amazon Bedrock AgentCore.
The Serverless Applications Lens and other lenses can be added directly in the AWS Well-Architected Tool. The Agentic AI Lens, by contrast, existed only as published documentation: 150 best practices across 41 questions and six pillars, each with a risk level and a desired outcome, but with no way to run the review natively on the console. That left two apparent options: a multi-day manual effort in which every reviewer structured the assessment differently, or waiting for console support. Smarsh chose a third: make the lens executable, in a way every future workload could reuse.
Solution architecture: The lens as data, the reviewer as a skill
Smarsh packaged the review process as a Claude skill: a versioned bundle of instructions, reference data, and executable scripts that Claude discovers through a frontmatter description and loads on demand. Progressive disclosure keeps the token cost near zero until a review is actually requested. The skill has three components:
lens_data.json– All 150 best practices from the published lens documentation, extracted into a structured JSON dataset: best-practice ID, pillar, review question, title, risk level (90 High, 59 Medium, 1 Low), and desired outcome. Risk levels were cross-validated against the lens appendix to catch extraction errors. This dataset is the single source of truth, and the skill is instructed never to invent or renumber items.assessment-guide.md– A five-value status rubric (Compliant, Partially Compliant, Non-Compliant, Not Applicable, and Not Reviewed), an evidence-gathering checklist, per-pillar signals to look for, and a set of honesty rules. The checklist covers README and architecture docs, decision records, infrastructure as code, continuous integration and continuous delivery (CI/CD) workflows, and test and evaluation suites. Every status must cite evidence found in the repository, items with no signal are marked Not Reviewed rather than guessed, and the same underlying fact must produce a consistent status wherever it appears across pillars.build_report.py– A deterministic Python script (openpyxl) that renders the model’s assessment into a formatted workbook. The generator validates its input, so unknown best-practice IDs or invalid statuses abort the build and hallucinated items cannot silently ship. The output includes per-item status with data-validation dropdowns and conditional formatting. It also provides columns for cited evidence, gaps, and remediation, plus a summary sheet whose pillar counts and high-risk exposure tracker are live COUNTIF formulas rather than hardcoded numbers.
The assessment contract between the reasoning and the rendering is in a single JSON document:
Running a review is a one-line request: point Claude at a repository and ask for a Well-Architected review. From there, the skill drives the following workflow:
- Claude loads the skill and reads the frontmatter description to understand the review scope and methodology.
- The skill pulls the
lens_data.jsondataset containing all 150 best practices across six pillars. - Claude gathers evidence read-only from the target repository: README, architecture docs, infrastructure-as-code, CI/CD workflows, and test suites.
- The skill assesses all 150 items against the gathered evidence, applying the five-value rubric and honesty rules from
assessment-guide.md. - Claude calls
build_report.pyto generate the formatted workbook, validating row counts and flagging blank statuses. - The skill returns an executive summary of the top high-risk gaps.
- Human reviewers validate findings, feed a remediation backlog, and surface open system questions for a focused AWS deep dive.
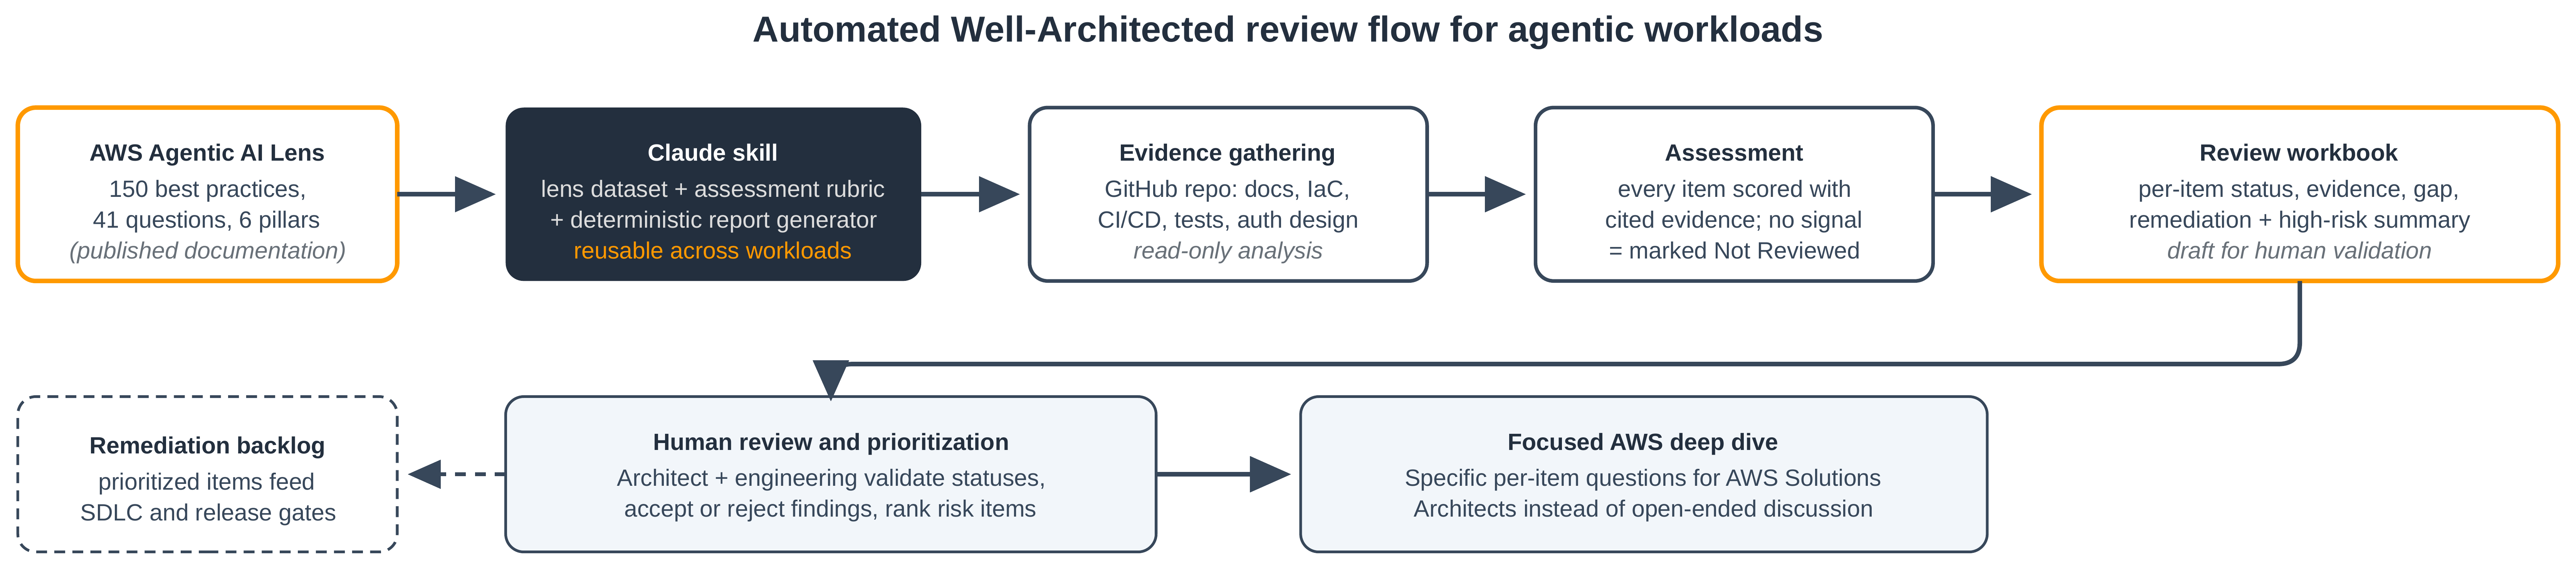
Figure 1: From published lens documentation to an evidence-backed review workbook
Testing the tester: Evaluating the skill before trusting it
Smarsh evaluated the skill before relying on its output. The team built two synthetic fixture repositories: a moderately mature LangGraph-style workload and a deliberately rough proof of concept, complete with hardcoded credentials and a runaway-cost incident in its history. The team ran reviews both with and without the skill. Each run was graded against eight verifiable expectations per fixture: all 150 lens items present, no blank statuses, evidence cited for every definitive status, honest calibration, and fixture-specific findings such as the hardcoded credential being flagged. With the skill, runs passed 16 of 16 expectations. Baseline runs without it passed only 8 of 16, producing ad-hoc 18–39 item checklists with no lens traceability. The eval set ships inside the skill, so regression testing continues as the skill evolves.
What the first review found
Against the real workload, the skill read the repository’s architecture and authentication documentation, AWS Cloud Development Kit (AWS CDK) infrastructure definitions, GitHub Actions workflows, registry and gateway design records, and test suites. The skill then assessed all 150 items in hours. The workbook showed a credible mix of strengths and gaps. Strengths included per-agent AWS Identity and Access Management (IAM) execution roles scoped to named runtime Amazon Resource Names (ARNs) and SigV4-signed Model Context Protocol (MCP) calls through AgentCore Gateway, a capability of Amazon Bedrock AgentCore. The workbook also recorded schema-validated inputs with typed error contracts, exported decision audit trails, and continuous quality monitoring through AgentCore online evaluations. High-risk gaps included the gateway ingress authorizer running with authentication disabled under a documented risk acceptance, no prompt-injection screening on bad actor-influenced message content, rate limiting recorded as a TODO, and no automated cost controls. Each gap was tied to the lens item, the evidence, and a recommended remediation.
Next, the Smarsh architect brought in the engineering team. Together they triaged the findings, validating statuses against what the team knew, accepting or challenging results right in the workbook, and ranking the remediation backlog. Engineering’s input reshaped the review: several items collapsed into one anomaly-detection epic, and a single finding was upgraded once the team pointed to evidence the repository had overlooked. Dependency scanning was already running on every pull request.
Sharper questions, better AWS engagement
Triage surfaced a class of gaps no repository can answer: system-semantics questions about the AWS services themselves. Rather than booking a general architecture review, the team built a focused agenda for its AWS Solutions Architects, mapping each question to the checklist item it would close. The agenda covered:
- The durability and consistency of AgentCore runtime, a capability of Amazon Bedrock AgentCore, as a session checkpoint store.
- The retry and idempotency semantics of the
InvokeAgentRuntimeAPI. - Break-glass patterns for halting agent invocations.
- Amazon Bedrock Guardrails patterns for screening untrusted content.
- Penetration-testing rules of engagement for Amazon Bedrock AgentCore.
- Amazon GuardDuty and AWS CloudTrail coverage for agentic-runtime threat detection.
The deep dive became a working session with a definition of done.
Why AWS
The security and compliance posture of Amazon Bedrock and Amazon Bedrock AgentCore, spanning runtime, gateway, registry, identity, and evaluation capabilities, meets the bar Smarsh’s regulated customers expect. The AWS Well-Architected Framework already anchors how Smarsh evaluates workloads. Extending it to agentic AI through the published lens, and pairing automated reviews with AWS Solutions Architect expertise to close the hard gaps, is a natural continuation of how the two teams work together.
Results and expected outcomes
These numbers reflect Smarsh’s first internal uses and the outcomes the team is tracking toward.
- Review effort – A complete 150-item, evidence-cited draft in hours instead of a multi-day manual effort, with human time refocused on validation and prioritization.
- Comparable reviews – Every workload produces the same standardized workbook, which Smarsh expects to translate into faster security approvals and improved time-to-market for agentic solutions.
- Sharper use of AWS expertise – Instead of broad discussions, AWS engagements became itemized working sessions, each mapped to a specific best-practice gap.
What’s next
- Publish the skill internally as the standard evaluation tool for Smarsh agentic workloads. It has been contributed to the company’s internal AI-SDLC plugin marketplace and has already been run against a second, architecturally different agentic repository.
- Bake reviews into the software development lifecycle so well-architected checks run continuously during development, not as a one-time gate at the end.
- Enforce governance by making the review workbook required evidence in Smarsh’s project milestone and gate process before agentic workloads reach production.
- Expand the lens-as-data pattern to other AWS Well-Architected lenses and additional repositories, eventually covering the broader application portfolio.
Conclusion
The gap Smarsh hit, prescriptive guidance published faster than console tooling can absorb it, is one many customers will meet as agentic AI best practices evolve. The answer generalizes: treat the lens as data, encode the reviewer’s discipline as a skill with enforced honesty rules, validate the tool with its own evaluation suite, keep humans on judgment, and let findings drive precise conversations with AWS. A review that once implied days of manual effort is now a repeatable capability the whole organization can run, before, not after, an agentic workload meets a regulated customer.
To get started:
- Explore the AWS Well-Architected Framework and the Agentic AI Lens documentation.
- See the Amazon Bedrock AgentCore documentation for building agentic workloads.
- Contact your AWS account team to schedule a Well-Architected review of your own agentic workloads.
We’d love to hear how you’re approaching Well-Architected reviews for your own agentic workloads. Share your experience in the comments, or reach out to your AWS account team to get started.
About the authors
Bernie Sanders Thinks the Democratic Party Is Moving Toward Him
Post Syndicated from The Atlantic original https://www.youtube.com/shorts/zMwMVUd0vLQ
I Already Have an NVR — Do I Really Need Frigate?
Post Syndicated from BeardedTinker original https://www.youtube.com/watch?v=8Xuzu-WceDY
The Man Who Risked Death Documenting ISIS | The David Frum Show
Post Syndicated from The Atlantic original https://www.youtube.com/watch?v=L4XcUKM09II
[$] The campaign to push Northstar into Linux distributions
Post Syndicated from jzb original https://lwn.net/Articles/1102738/
There is not a broad selection of mature, open-source web-browser engines
for Linux users. Most of the browsers available for Linux are based on one of
just three projects: Chromium’s Blink, Firefox’s
Gecko, or WebKit. A new entrant would
generally be seen as a welcome alternative, but the recent campaign to push one
of the LLM-written Nordstjernen browsers
into Debian and Arch Linux has raised some questions about
the project’s development and security processes.
Redox OS ring buffers project summary
Post Syndicated from jzb original https://lwn.net/Articles/1103359/
The Redox OS project, which is a
Unix-like microkernel-based operating system written in Rust, has published a report on the work
that it has done in the last year to implement io_uring-like
I/O.
Last year, the Redox team received a grant to develop io_uring-like Ring
Buffer support at the system task level, as a first step towards ring buffer
communications between the application and the majority of system services. This
phase of the work finished up in September, as the last pieces were put in
place.[…] In addition to implementing the Ring Buffer machinery for our system
services and drivers that can support it, an io_uring and
liburing-like API for applications was completed and
demonstrated. There was also substantial work done on support crates, including
an async executor for drivers.And there was some very exciting work on various performance improvements, to
allow much faster switching between applications and their system services. But
I will let the team tell you all the technical details.
That’s a wrap! Coolest Projects 2026
Post Syndicated from Helen Gardner original https://www.raspberrypi.org/blog/thats-a-wrap-coolest-projects-2026/
There are a few Coolest Projects events still to come in the Coolest Projects 2026 cycle, but we are already getting ready to kick off Coolest Projects 2027. Before we do, we’re taking a look back at some of the incredible things the young tech creators in the global Coolest Projects community have achieved this year, both through the online showcase and at in-person events around the world.
More than 15,000 young people from 40 countries shared over 4500 creations in the Coolest Projects online showcase. The Coolest Projects team hosted events in the UK, Ireland, India, and two locations across the US, while our partners brought creators together at in-person events in a further 11 countries, with events in Malaysia, South Africa and Argentina still to come.
With young people sharing their brilliant ideas, ambitious projects, and creativity with the world, 2026 has been a year to remember, and we can’t wait to see what comes next!
But don’t just take our word for it — hear from members of the Coolest Projects community about their experiences too.

From the community
For some, the events are about celebrating a shared passion for making with family and friends.
“I went to Coolest Projects last year with my cousins and thought it was cool, so I wanted to apply this year. I was very late applying so only had 3 days to create a project before the deadline. It was pretty intense! My highlight was being at the event with my cousin, Noah. It was great fun!” – Leo, creator, Coolest Projects Ireland
It’s not just creators who enjoy being part of the community. Mentors take away lasting impressions and a feeling of connection too.
“We usually avoid competitions because coding’s about curiosity, creativity, and sharing knowledge, not racing against each other. But Coolest Projects is completely different: it’s like one big party where everyone’s invited to share what they’ve made. We’re so grateful Project Code Cloud got to be part of it.” – Dannielle, Coolest Projects mentor, Australia
We are also very thankful to our VIP judges, who encourage and give feedback to creators both in the online showcase and at in-person events. Ben, a VIP judge for the online showcase, shared some powerful advice with creators:
“Keep building. Keep experimenting. Keep trying things. […] Always stay curious. Always try to stay learning. […] And the most important thing is it’s OK to fail. Trying new things is difficult and you’re always going to make mistakes, but that’s the best way to learn.” – Ben Powley, Senior Developer, Jagex
Catch up on the livestream to hear advice and feedback from all the VIP judges involved in the online showcase this year and check out their favourite projects.
Some more highlights from 2026
A judge who’s been in their shoes
Akari, a 16-year-old CoderDojo member from Japan who has showcased her own projects at Coolest Projects seven times, joined us as a VIP judge for the online showcase. We were delighted that young creators could hear a genuine peer voice on the panel, alongside industry judges, offering inspiration and encouragement.
This year’s Broadcom Coding with Commitment® recipient
The Broadcom Coding With Commitment® award is a special recognition for a creator who uses coding to support their community through a project that aligns with the United Nations Sustainable Development Goals. In this year’s online showcase, the award went to Egehan from Türkiye, for their Scratch project Viridia — Back to the World, an educational game that teaches players about water conservation. Egehan shared some thoughts about the challenges they faced while building it:
“Writing the code I used to create the 3D visuals for this game was a bit of a challenge for me. I would often dream about the mathematical calculations required for the code (which, to be honest, was quite interesting).” – Egehan
Partner events around the globe
With 14 partner events due to have taken place around the world by the end of 2026, more creators than ever before have been able to share their projects and connect with a like-minded community locally. Here are a few highlights from the events.
The first event of the year was Coolest Projects Belgium, which took place in March and was organised by CoderDojo Belgium. Ruhee, Global Partnerships Coordinator at the Raspberry Pi Foundation, who attended the event, was particularly impressed by Zeno and Lukas’s Orbitol 6 project, a three-axis robotic arm they’ve been developing for several years, with plans to take it from three axes to six in the future! She also highlighted Jack’s Moppentrappen, a joke-telling project that uses AI to replicate Jack’s voice, allowing it to tell jokes in French as well as English.
Coolest Projects Japan, organised by CoderDojo Japan, was also held in March and welcomed 79 entries, which you can explore here.
Coolest Projects Sudan, organised by Orientations Training Centre, ran for the second time this year. The event was held in Egypt and was designed to provide a safe and accessible space for young Sudanese people affected by displacement. Among the projects on display was an AI-based fruit freshness detector, built by 7-year-olds Khalid and Nour.
“This showcase reflects our belief that Sudan’s future depends on empowering young people to learn, create, and solve problems. We are committed to building the opportunities and platforms they need to shape a better future for Sudan.” – Abbdelmoneim M. Ahmed, CEO, Orientations Training Centre

Looking ahead to 2027
We are excited to share that the Coolest Projects 2027 online showcase will open for entries in January, and the Coolest Projects online showcase celebration will take place on 23 June.
We’ll also be running in-person Coolest Projects events in Ireland, the UK, India, the US, South Africa, and Kenya next year, with further in-person events due to be run by partners around the world. We will announce the full calendar of in-person events soon.
You can already save the date for:
Coolest Projects Belgium — 13 March 2027
Coolest Projects USA Minnesota — 17 April 2027
Coolest Projects Ireland — 24 April 2027 at Explorium, Dublin
Coolest Projects UK Bradford — 15 May 2027 at Life Centre, Bradford
Coolest Projects USA Georgia — 15 May 2027
Coolest Projects UK Cardiff — 22 May 2027 at Wales Millennium Centre, Cardiff
Coolest Projects global showcase celebration — 23 June 2027, online
If you would like to be first to hear news and dates for the 2027 online showcase and in-person events, sign up to our newsletter or follow the Coolest Projects social channels (find us on LinkedIn, Facebook, and Instagram).
The post That’s a wrap! Coolest Projects 2026 appeared first on Raspberry Pi Foundation.
Studying Fraudulent North Korean IT Workers
Post Syndicated from Bruce Schneier original https://www.schneier.com/blog/archives/2026/10/studying-fraudulent-north-korean-it-workers.html
Researchers set up a fake start-up company to study fraudulent North Korean IT workers.
How LIU and Zabbix Make Enterprise-Grade Monitoring Accessible
Post Syndicated from Hadi Slim original https://blog.zabbix.com/how-liu-and-zabbix-make-enterprise-grade-monitoring-accessible/33738/
The Lebanese International University (LIU) conducts applied networking research aimed at making professional-grade monitoring practices accessible in academic settings through its Department of Computer and Communication Engineering.
The department recently completed a research project that explored how Zabbix could be used to monitor a fully virtualized network environment, with the goal of offering a model that any academic or training lab could adopt.
The challenge
Networking education broadly relies on physical lab equipment (routers, switches) that is expensive to acquire, maintain, and scale, putting realistic, hands-on monitoring practice out of reach for many programs.
The research set out to test whether a simulated network environment could be monitored exactly as one would monitor production infrastructure – collecting live metrics, visualizing device health, and practicing remote management, while operating on a budget appropriate for an academic lab.
The solution
The team built a virtual network topology in PNETLab (routers, switches, and end devices using multi-vendor images) and connected it to a Zabbix server running on a low-cost Raspberry Pi 5.
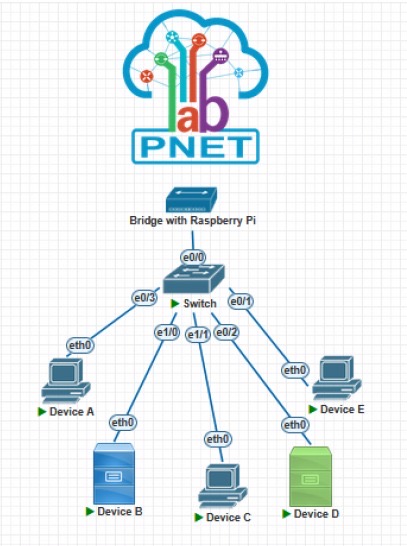
Each virtual device was assigned IP addressing compatible with the Zabbix monitoring network, allowing Zabbix to poll the simulated devices via SNMP and ICMP exactly as it would poll physical infrastructure, which in turn allowed students to understand more how the infrastructure is behaving based on these polls.
This demonstrated that students and researchers can interact with a monitoring stack that behaves identically to an enterprise deployment, entirely on virtualized, reproducible lab infrastructure that costs a fraction of physical networking gear.
The results
The integration proved that a virtual topology is indistinguishable from a physical one from Zabbix’s perspective – polling latency across 10 simulated devices averaged just 2.5ms, with the Raspberry Pi host staying under 15% CPU usage throughout testing.
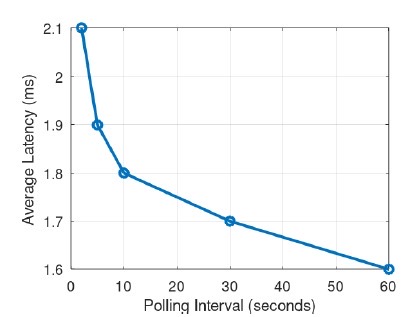
The result was a reproducible, low-cost training model where networking and monitoring concepts can be taught hands-on, repeated across cohorts, and scaled by simply adding more virtual nodes in PNETLab rather than purchasing additional hardware – one that other academic institutions facing the same budget constraints could replicate directly.
In conclusion
By combining Zabbix, PNETLab, and a Raspberry Pi 5, the team at LIU created a low-cost, reproducible virtual lab that delivers hands-on monitoring experience without the expense of physical networking equipment.
With polling latency averaging just 2.5 ms across 10 simulated devices and CPU usage remaining below 15%, the results highlight the potential of virtualized environments for teaching real-world networking and monitoring skills.
Most importantly, this approach provides a practical, scalable model that other academic institutions can adopt to make hands-on IT infrastructure monitoring more accessible to the next generation of networking professionals.
For a more in-depth look at LIU’s project or to cite the published research, visit this website.
To find out more about what Zabbix can do for eduactional institutions, contact us.
The post How LIU and Zabbix Make Enterprise-Grade Monitoring Accessible appeared first on Zabbix Blog.
Gravitational Square Wave
Post Syndicated from xkcd.com original https://xkcd.com/3317/

Introducing Route 53 Resolved IP Validation for AWS Network Firewall
Post Syndicated from Lawton Pittenger original https://aws.amazon.com/blogs/security/introducing-route-53-resolved-ip-validation-for-aws-network-firewall/
Your workloads reach most destinations by domain name, but a firewall can only act on what it sees in the traffic. For HTTP and HTTPS, AWS Network Firewall domain rules match the name that the client puts in the request, and the client chooses that name. The connections for protocols such as SSH and SSH File Transfer Protocol (SFTP) don’t carry the domain name. The client uses the name only for the DNS lookup and then connects straight to the IP address that DNS returned. As a result, Network Firewall rules for these protocols have used IP addresses, which change over time. For web and non-web traffic alike, Network Firewall had no view of the answers that your DNS resolver returned, because that shared visibility between DNS and the firewall didn’t exist.
On October 21, 2026, we launched Route 53 Resolved IP Validation for AWS Network Firewall, at no additional charge. Amazon Route 53 Resolver now shares the IP addresses that it returns for each domain name with Network Firewall, and Network Firewall checks each new outbound connection against them. With this launch, you can now filter non-web traffic by domain name, and you can prevent Server Name Indication (SNI) manipulation on TLS traffic without needing to enable TLS inspection.
In this post, we explain how the feature works, show how to turn it on in alert mode, and walk through two common use cases. They’re examples; the same check applies to any outbound traffic that you control by domain name.
How it works
Amazon Route 53 Resolver answers DNS queries from resources in your virtual private cloud (VPC) configured to use it, and it’s available by default in every VPC. With this feature, Route 53 Resolver keeps the IP addresses that it returns for each domain name in a resolved IP cache. When a new outbound connection starts, Network Firewall checks the destination address against that cache.
- The workload asks Route 53 Resolver at
10.0.0.2forfiles.partner.example.com. - DNS Firewall checks the query first. Domain rules can block or alert on it; an empty rule group lets it through.
- Route 53 Resolver answers
203.0.113.10and records the answer in the resolved IP cache. - The SFTP connection to
203.0.113.10on port 22 reaches the Network Firewall endpoint. - The policy checks the first packet. The address is in the cache, so the connection continues.
- The stateful rule passes it, because Route 53 Resolver returned the address for
files.partner.example.com. - The connection leaves through the NAT gateway and internet gateway.
- The flow log and alert log record the new fields.
The feature has three parts:
- An Amazon Route 53 Resolver DNS Firewall rule group – It defines the scope. The answers that Route 53 Resolver returns in every VPC associated with this rule group go into the resolved IP cache. The rule group can be empty. Add rules to it and the same rule group also filters the DNS queries themselves, for example, by blocking lookups of known threat domains. Together, DNS Firewall checks the lookup and Network Firewall checks the connection that follows.
- The Network Firewall policy setting – On the first packet of each new connection, before your stateful rules run, Network Firewall checks whether Route 53 Resolver returned the destination address for a domain name. If it did, the connection continues to your stateful rules. If it didn’t, Network Firewall applies the action you chose: Alert, Drop, or Reject.
- Resolved-domain rules – In your stateful rule groups, these rules match a connection by the domain name that its destination address was resolved for, so they work with every protocol. Use the name that your clients look up.
The following diagram shows this architecture.
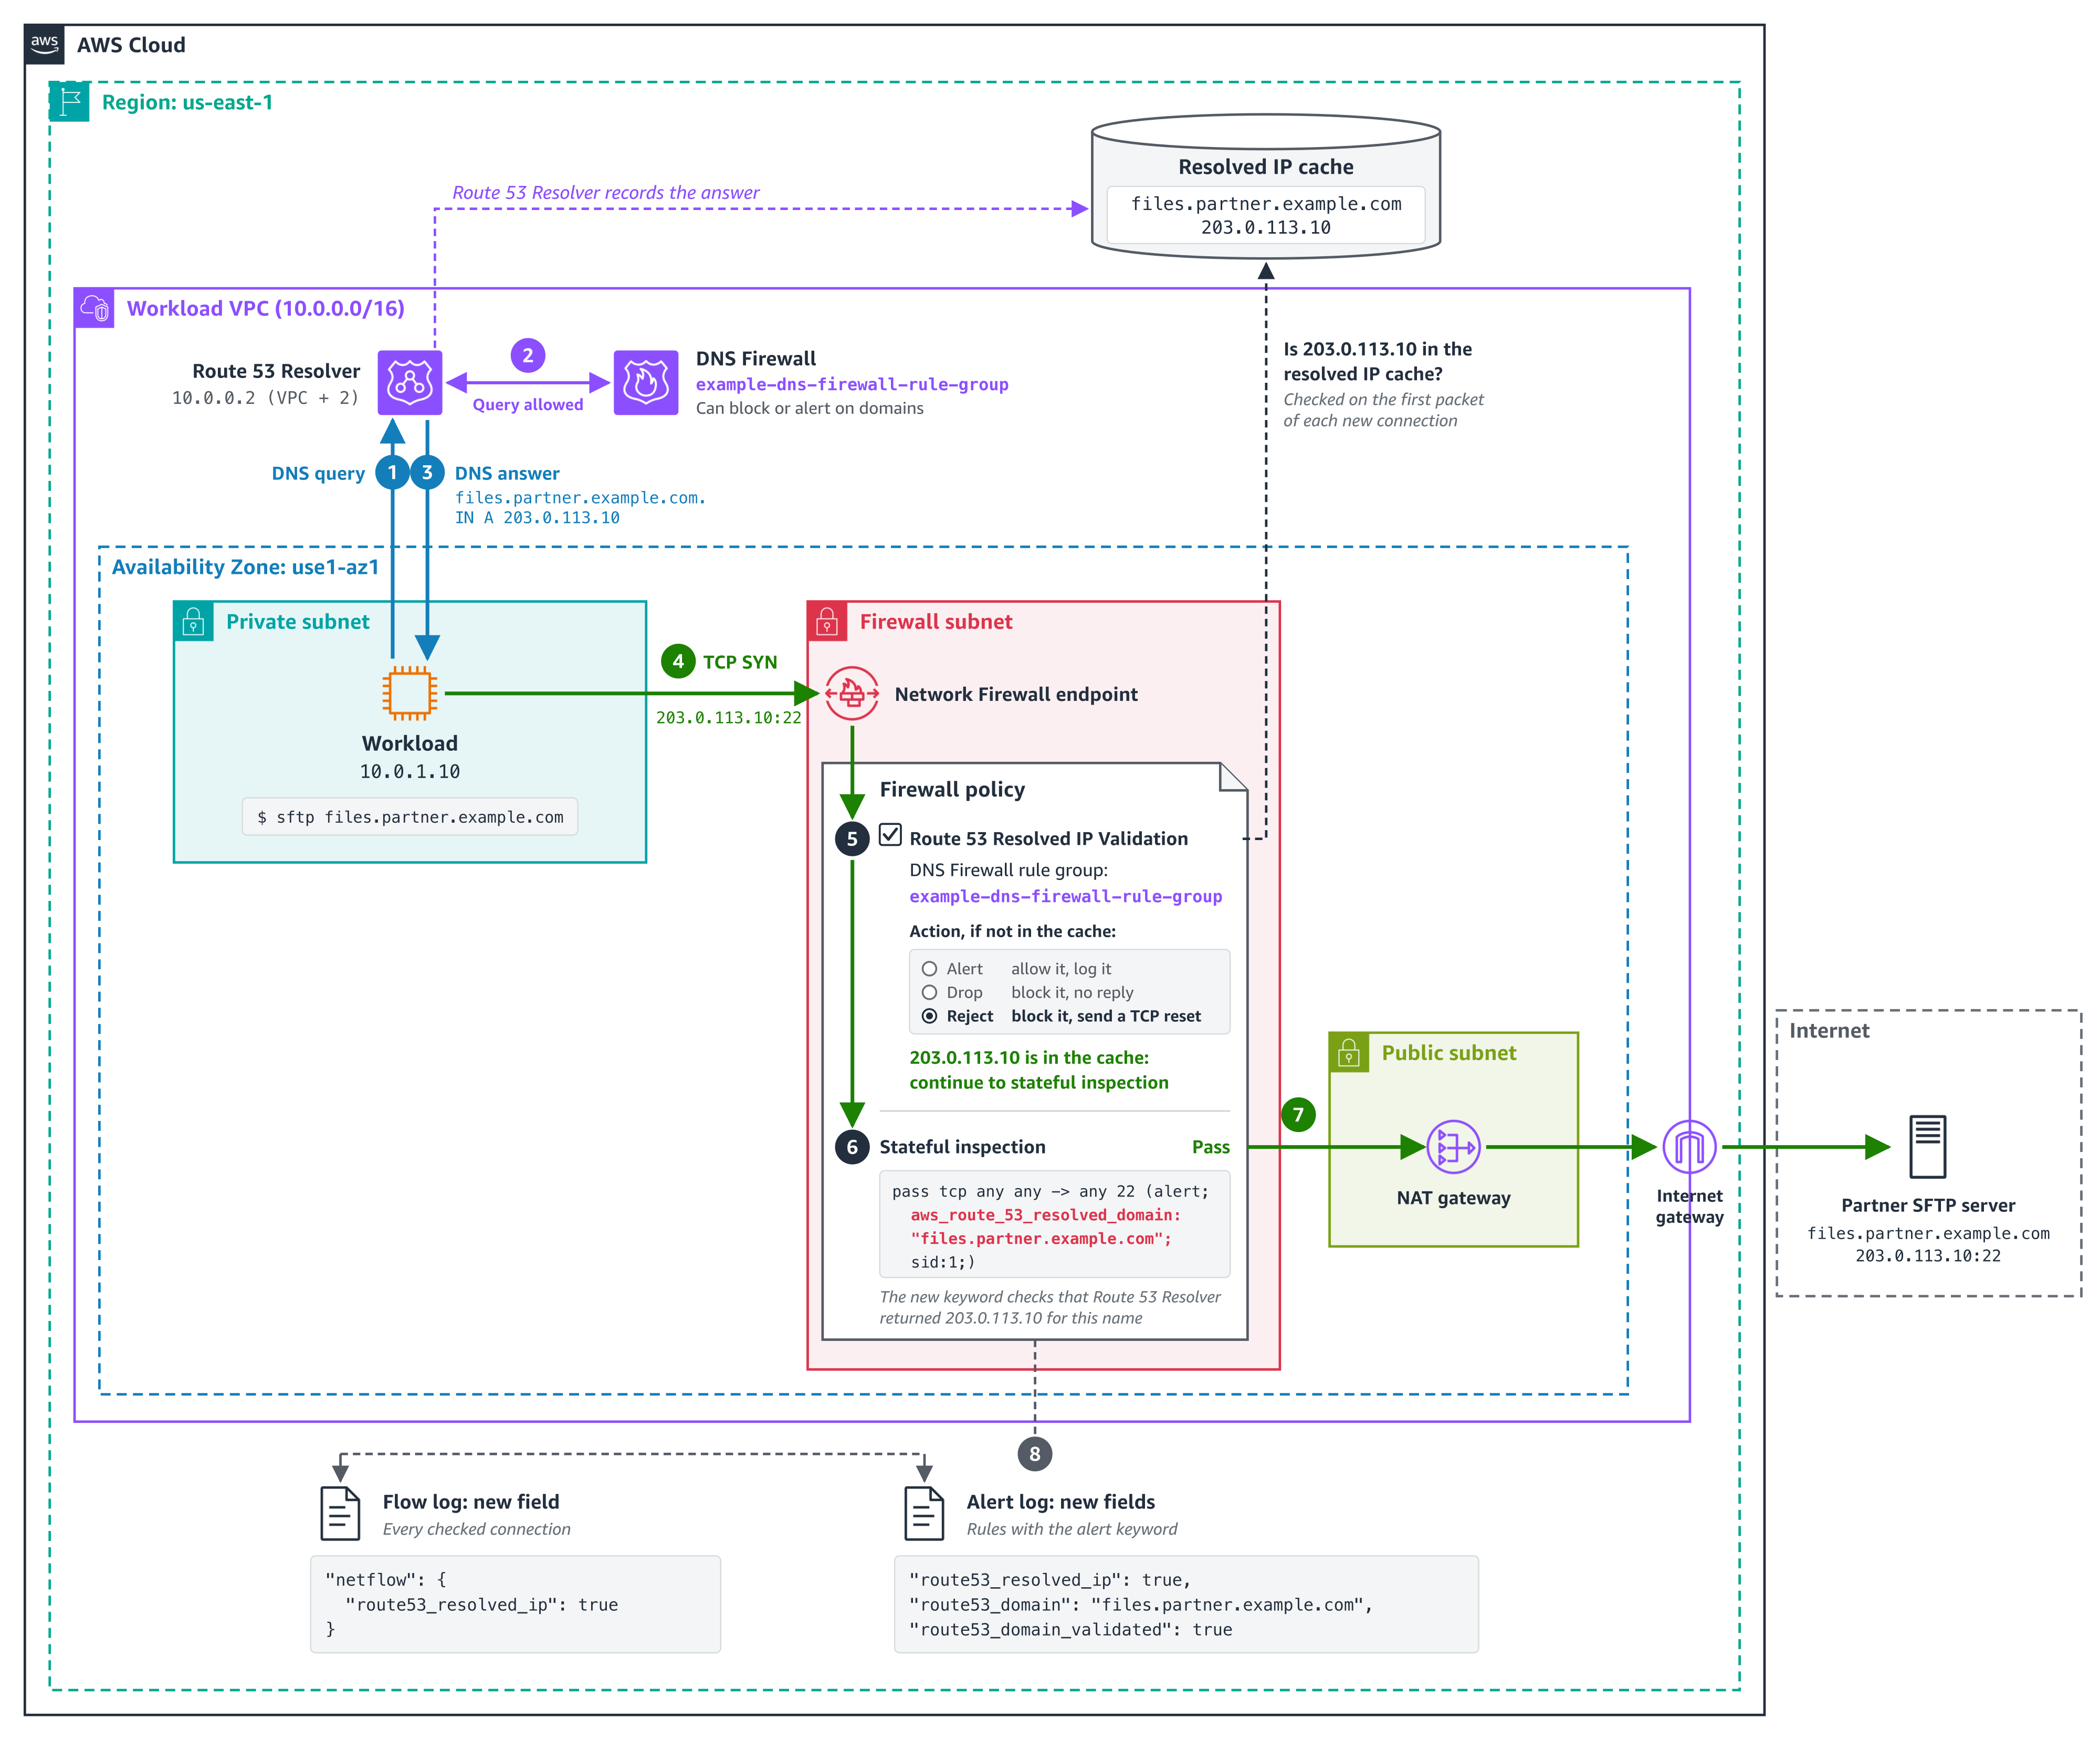
Figure 1. How Network Firewall checks the SFTP connection from use case 1 against the answers that Route 53 Resolver returned
The policy setting checks every connection, not only web traffic. A connection to an IP address that no client looked up through Route 53 Resolver, such as a hardcoded address, fails the check. If any of your workloads connect straight to IP addresses, add those addresses to Bypass destination validation IP ranges before you enforce. A stateful pass rule doesn’t exempt them because the policy check runs before your rules. The check is per address: when any client in an associated VPC looks up a name, its addresses pass the check for every client in scope in the same Availability Zone. For details, see Resolved IP validation in AWS Network Firewall in the AWS Network Firewall Developer Guide.
Prerequisites
To follow along, you need:
- DNS through Amazon Route 53 Resolver – Network Firewall can check only answers that Route 53 Resolver returned. Queries that reach Route 53 Resolver through Resolver endpoints or Resolver forwarding rules count.
- A Route 53 Resolver DNS Firewall rule group associated with the VPCs whose DNS answers Network Firewall should check connections against.
- The policy setting turned on before you add resolved-domain rules – Rules that use domain filtering (the
aws_route_53_resolved_domainkeyword) need Route 53 Resolved IP Validation turned on in the same firewall policy. Turn the setting on first, in alert mode, then add the rules. - A supported deployment model – The feature works with distributed deployments, including multiple firewall endpoints, where clients reach a firewall endpoint in their own Availability Zone, and with centralized deployments where the firewall is attached natively to AWS Transit Gateway. If routing sends a client to a firewall endpoint in another Availability Zone, its connections fail the check. To move a centralized deployment to a natively attached firewall, see Why and how to migrate to a Transit Gateway attached AWS Network Firewall.
How to turn it on in alert mode
Start in alert mode because clients cache DNS answers. Network Firewall recognizes only the answers that Route 53 Resolver returns after the DNS Firewall rule group is associated with the VPC and selected in the policy. A client that still uses an answer it cached earlier fails the check until it looks up the name again, usually when its cached record expires. Alert mode lets you see this without blocking anything. Allow about 24 hours in alert mode for clients to refresh their caches.
- Create a DNS Firewall rule group (it can be empty) and associate it with the VPCs whose DNS answers Network Firewall should check connections against. For the steps, see Creating a rule group and rules.
- Or, to use a DNS Firewall rule group that you already have, make sure it’s associated with those VPCs and only those. An answer returned in any associated VPC is valid for every client that the firewall checks. Which clients are checked is set by source IP ranges in step 6.
- In the Amazon Virtual Private Cloud (Amazon VPC) console, under Network Firewall, choose Firewall policies, then choose the policy that your firewall uses. On the Traffic inspection tab, in the Route 53 Resolved IP validation section, choose Edit and select Enable Route 53 Resolved IP validation.
- For Action, choose Alert. For DNS Firewall rule group, choose the rule group from step 1 or 2.
- For DNS expiry exception policy, choose what happens to a connection that’s already open when its entry expires from the resolved IP cache. Continue keeps it running, Drop stops it silently, and Reject stops it with a TCP reset. We recommend Continue so that long-running sessions, such as file transfers, aren’t cut off midway. However, choose the option that fits your security requirements.
- For source IP ranges, list the clients to check. If you don’t set it, Network Firewall checks clients in the firewall’s VPC and in any additional VPCs attached to the firewall. If your clients are in other VPCs, such as spoke VPCs that send traffic to a firewall attached to a transit gateway, enter their CIDR ranges; otherwise, Network Firewall doesn’t check their connections. Add destinations that you allow by IP address to Bypass destination validation IP ranges. Choose Save.
The following screenshot illustrates these steps.
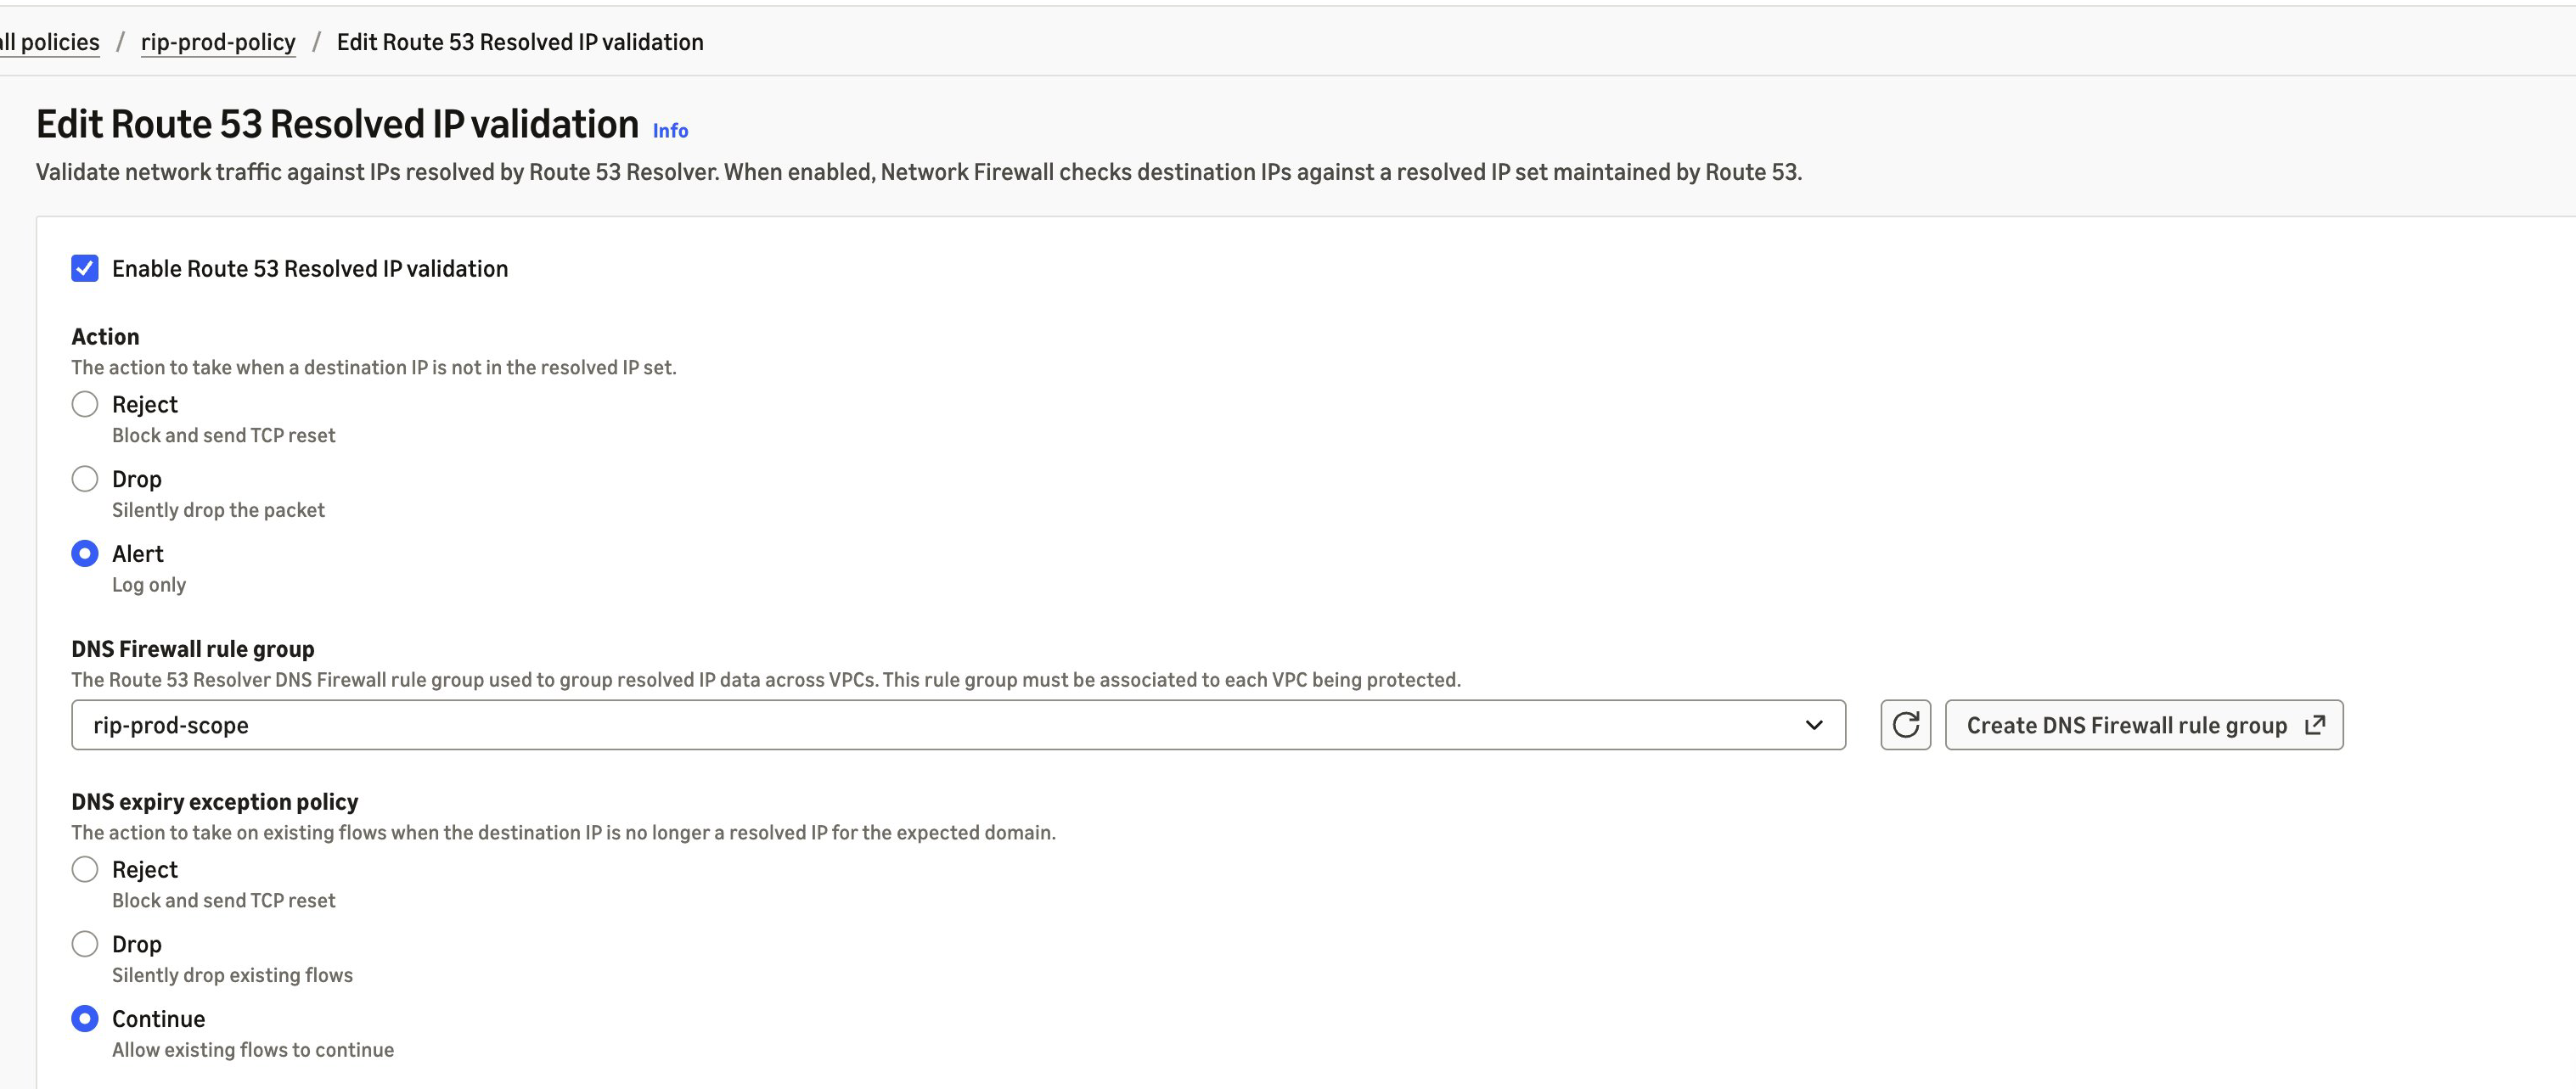
Figure 2. Route 53 Resolved IP Validation turned on in alert mode
In alert mode, Network Firewall doesn’t block a connection that fails the check, and it doesn’t write an alert of its own. It records the result in your flow logs, in the route53_resolved_ip field of each connection. A value of true means Route 53 Resolver returned the destination address for a domain name. A value of false means it didn’t, so enforcement would block the connection. The same field also appears in alert log records that a rule or the policy’s default action writes for the connection. Pass rules don’t write one unless they have the alert; keyword. The DnsUnresolvedFlows metric in Amazon CloudWatch counts the connections that fail the check, and DnsAzUnavailableFlows counts connections from an Availability Zone that doesn’t support the feature. The following alert log record (trimmed, with example values) was written by a default action that alerts, for a connection to an address that Route 53 Resolver returned:
In alert mode, this record is for a TLS connection that presented an allowed domain name but went to an address that Route 53 Resolver didn’t return for it, blocked by the policy’s default action in use case 2:
Before you switch Action to Drop or Reject, check that connections that fail the check are ones you expect and that destinations you allow by IP address are in the bypass ranges. Reject sends a TCP reset, so a blocked TCP client fails right away instead of waiting for a timeout. After you enforce, blocked connections appear in your flow logs with route53_resolved_ip as false, not in your alert logs. For the metrics and log fields to watch, see Monitoring and troubleshooting resolved IP validation.
Use case 1: Filter non-web traffic by domain name
Before this launch, Network Firewall rules for protocols that carry no domain name, such as SFTP, used IP addresses. Now, you can allow them by domain name. In this example, a workload sends files over SFTP to a partner at files.partner.example.com on TCP port 22, and the partner can change the addresses behind that name at any time. The same approach works for SSH, MySQL, and other non-web protocols. You create it as a standard stateful rule. Follow these steps:
- Under Network Firewall, choose Network Firewall rule groups, then choose Create rule group. Choose Stateful rule group and Standard stateful rule, and choose the rule evaluation order that your policy uses.
- Choose Add rule. For Protocol, choose TCP. For Destination port, enter
22. Under Domain filtering, enterfiles.partner.example.com. For Action, choose Pass. - Create the rule group, then add it to your firewall policy.
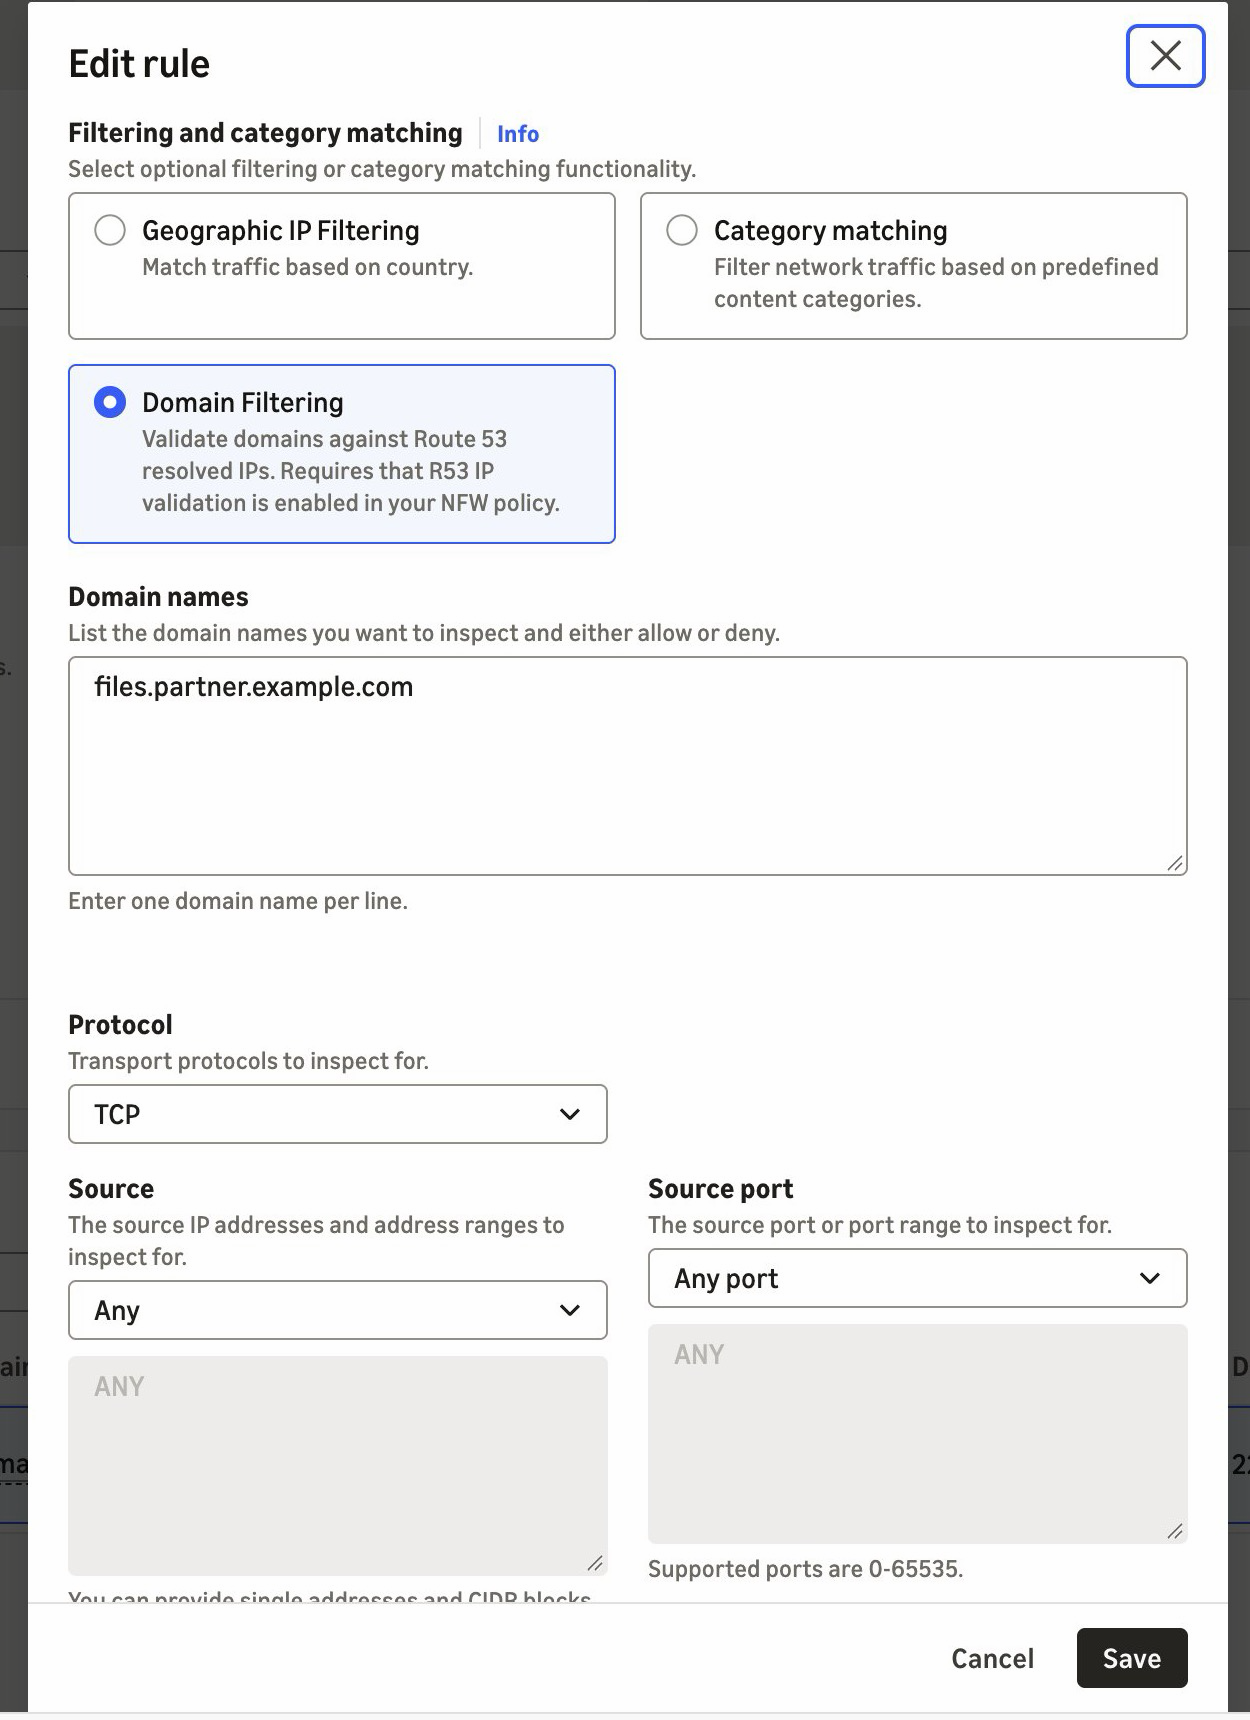
Figure 3. A pass rule for SFTP on TCP port 22, scoped to the partner’s domain name
If you manage rules as code, the equivalent Suricata rule is shown in the following code. It adds the alert; keyword so that the firewall logs allowed connections. The console rule doesn’t add it.
When the partner moves its server to a new address, the next DNS answer adds it to the resolved IP cache. There’s no IP list to maintain. The cache keeps earlier answers for longer than their DNS time to live (TTL), so the old address can still pass for a while.
Use case 2: Prevent SNI spoofing without TLS inspection
With SNI spoofing, a client presents an allowed domain name in its TLS request while it connects to a different server. Preventing that has required TLS inspection, which decrypts the traffic. Route 53 Resolved IP Validation prevents it without TLS inspection. In this example, a workload calls a partner API at api.partner.example.com over HTTPS. TLS traffic on port 443 must reach only the addresses that Route 53 Resolver returned for that name. You create a pass rule in a standard stateful rule group, as in use case 1, and the firewall policy’s default action drops everything that no rule passes. Follow these steps:
- Under Network Firewall, choose Network Firewall rule groups, and then choose Create rule group. Choose Stateful rule group and Standard stateful rule, then choose Strict order.
- Choose Add rule. For Protocol, choose TLS. For Destination port, enter
443. Under Domain filtering, enterapi.partner.example.com. For Action, choose Pass. - Create the rule group, then add it to your firewall policy.
- In the firewall policy, use strict rule order. For the stateful default actions, choose Application drop established (server-directed only) and Application alert established (server-directed only). The alert action logs what the drop action blocks. For why we recommend these default actions, see Firewall policy configuration in the AWS Security Services Best Practices guide.
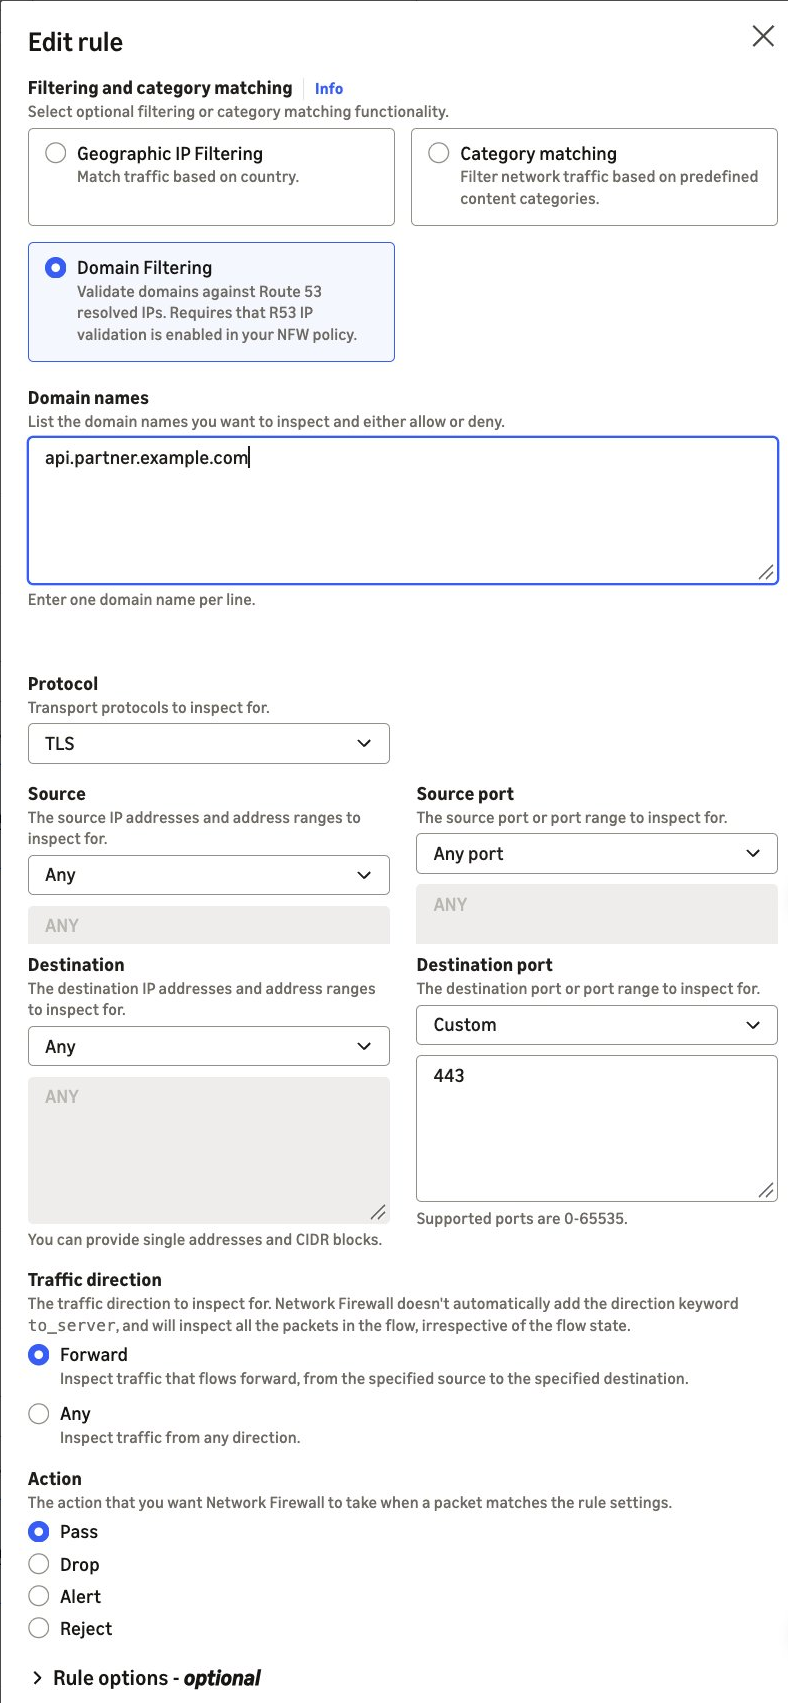
Figure 4. A pass rule for TLS on port 443, scoped to the partner’s domain name
If you manage rules as code, the equivalent Suricata rule is:
The pass rule matches the destination address, not the name in the TLS request. TLS traffic on port 443 passes only when Route 53 Resolver returned the destination address for api.partner.example.com. If the partner’s addresses also serve other domain names, such as behind a content delivery network (CDN), those names pass too. To also require the partner’s name in the TLS request, add an exact SNI match to the same rule: tls.sni; content:"api.partner.example.com"; startswith; endswith; nocase;.
Without startswith and endswith, the content match accepts any SNI that contains the name.
A connection that presents the partner’s name but goes to another address doesn’t match the pass rule. If Route 53 Resolver never returned that address, the policy setting’s enforcement action blocks the connection before your rules run. In alert mode, the policy setting lets the connection through to your rules instead, and the stateful default action drops it because the pass rule doesn’t match. Its alert log record shows route53_resolved_ip as false, as in the second example previously. If Route 53 Resolver returned the address for a different domain name, the connection passes the policy check. The stateful default action then drops it because the pass rule doesn’t match, and that record shows route53_resolved_ip as true.
Best practices
We recommend that you follow these best practices:
- Keep DNS on Route 53 Resolver – Block outbound UDP and TCP port 53 DNS to other resolvers, including DNS over HTTPS (DoH) and DNS over TLS (DoT), on Network Firewall, so that clients don’t bypass the check. Route 53 Resolved IP Validation alone doesn’t do this. If any client looks up a public resolver’s name, such as
dns.google, that resolver’s addresses pass the check. - Keep DNS Firewall rules in those VPCs – Route 53 Resolved IP Validation checks the connections that follow a DNS lookup, not the DNS queries themselves. DNS Firewall blocks lookups of known threat domains with AWS managed domain lists, and its advanced rule groups detect data leaving through DNS queries, such as DNS tunneling.
- Start small – Add domain filtering to a few rules at a time, then add more when the results look clean. For domain allow list patterns, see Allow rules and domain allowlisting.
- Turn on flow and alert logging and detailed monitoring – Connections that fail the resolved IP check show in your flow logs (
route53_resolved_ip: false) and in theDnsUnresolvedFlowsmetric, not in your alert logs. Pass rules without thealert;keyword don’t write an alert log record.
Pricing and availability
Route 53 Resolved IP Validation is available today in all commercial AWS Regions (Regions other than the AWS GovCloud (US) Regions and the China Regions) where AWS Network Firewall and Amazon Route 53 Resolver DNS Firewall are available, at no additional charge. For the list of Regions, see AWS Capabilities by Region. A DNS Firewall rule group with no rules doesn’t incur DNS Firewall charges. Standard DNS Firewall pricing applies after you add rules. See AWS Network Firewall pricing and Amazon Route 53 pricing.
Conclusion
In this post, we showed you how Route 53 Resolved IP Validation works and how to turn it on in alert mode. Network Firewall now checks each connection’s destination against the IP addresses that Amazon Route 53 Resolver returned for the DNS query. Filtering SFTP, SSH, database, and other non-web traffic by domain name and preventing SNI spoofing without TLS inspection are two common examples of what that makes possible. To get started, turn the feature on in alert mode and review the results before you enforce. For the full walkthrough, see Getting started with resolved IP validation.
To learn more, visit the AWS Network Firewall product page and the feature documentation.
If you have questions about this post, contact AWS Support.
Introducing time series collections for the next generation of Amazon OpenSearch Serverless
Post Syndicated from Kevin Fallis original https://aws.amazon.com/blogs/big-data/introducing-the-next-generation-of-serverless-time-series-for-amazon-opensearch-service/
Today, we’re announcing support for time series collections on the next generation of Amazon OpenSearch Serverless. With time series collections, you can ingest, store, and analyze logs, metrics, traces, and event data without provisioning or managing clusters. Time series collections absorb ingest spikes automatically, keep recent data fast to query, and make months or years of history searchable at low cost, all in the same collection. Time series collections also bring alerting and anomaly detection to OpenSearch Serverless, so you can find and act on problems as they happen. With support for up to 100 TB of hot storage per collection, they’re built for high-scale observability workloads such as application monitoring, security analytics, and IoT telemetry.
Observability data is voluminous, and it surges sharply during events like bad deployments and outages, right when teams need answers fastest. An undersized cluster falls behind and delays the very logs engineers are waiting for, so teams size for the worst day and pay for that capacity every other day. Hot storage gets expensive as history grows, so teams cut retention or move older data to snapshots that someone must restore before running a query. Clusters also need constant tuning and capacity planning, which pulls engineers away from the investigations the data is meant to support. Every decision becomes a tradeoff between cost, retention, and how quickly you can answer questions about your systems.
Time series collections on OpenSearch Serverless remove that tradeoff. When an incident drives a surge in log volume, compute scales in seconds to keep up, so the logs engineers are waiting for arrive on time. When traffic settles, compute scales back down, all the way to zero, so you stop paying for worst-day capacity. Older data moves to a lower-cost warm tier and stays queryable, so you can keep years of history without cutting retention or restoring snapshots. There are no clusters to size or tune. You set compute limits and a few index settings, and the service handles the rest.
Pay less for the data you query less
Most queries against time series data target the last few hours or days, while older data is less frequently queried but still needs to be available. With the new index.warm.after setting, you decide how long data stays in the hot tier before it moves to the lower-cost warm tier. You can set it in days or hours, from a minimum of 1 day (24h or 1d) up to 10 years (3650d), and it can’t exceed the index’s retention period. If you don’t set it, data moves to warm after 1 day.
At ingest, each document is written to a low-latency hot tier and to Amazon Simple Storage Service (Amazon S3). As data reaches the age you set, oldest first, the hot copy is released and the data lives in the warm tier on Amazon S3. When a query needs warm data, the service loads that data back into the hot tier to serve it. The first query on that data takes longer, and later queries on the same data run at hot-tier latency. That suits investigations and reporting over older data, where the same time range is often queried repeatedly. When a query spans both tiers, results come back in a single response. You pay hot storage rates only for data in the hot tier.
Figure 1: Data moves from the hot tier to the warm tier after 7 days, persisted to Amazon S3 throughout
Retain data for as long as your workload requires
Retention is set on the index itself, so there is no separate lifecycle policy to create or maintain. Set index.data.retention in an index template, and every index that matches the pattern inherits it. You can retain data for anywhere from 1 day to 3,650 days (10 years), specified as a whole number of days.
Tiering and retention are independent. Tiering controls query speed and cost, and retention controls when data is deleted. For example, you can keep application logs hot for 7 days and retain them for 30 days, or keep audit data in the warm tier for years to meet compliance requirements. When an audit comes up, you query that history in the same collection, and search compute scales up to handle the extra load. There is no snapshot restore and no forensic cluster to stand up.
Figure 2: Data tiering and retention
Designate the event timestamp for each index
Every document in a time series collection must now include a timestamp field. Each index has one designated time field that the service uses to organize and sort your data, and documents with a missing, null, or invalid timestamp are rejected.
By default, the time field is @timestamp. If your events already carry a different field, such as event_time, set index.timestamp_field when you create the index or in an index template, so you don’t need to change your producers. The field must be a top-level date field, and a document’s timestamp can’t be changed after it is indexed.
Rejections apply to individual documents, not whole requests. In a _bulk request, the valid documents are indexed and the rejected ones are listed in the errors block of the response, so one bad record doesn’t fail the batch.
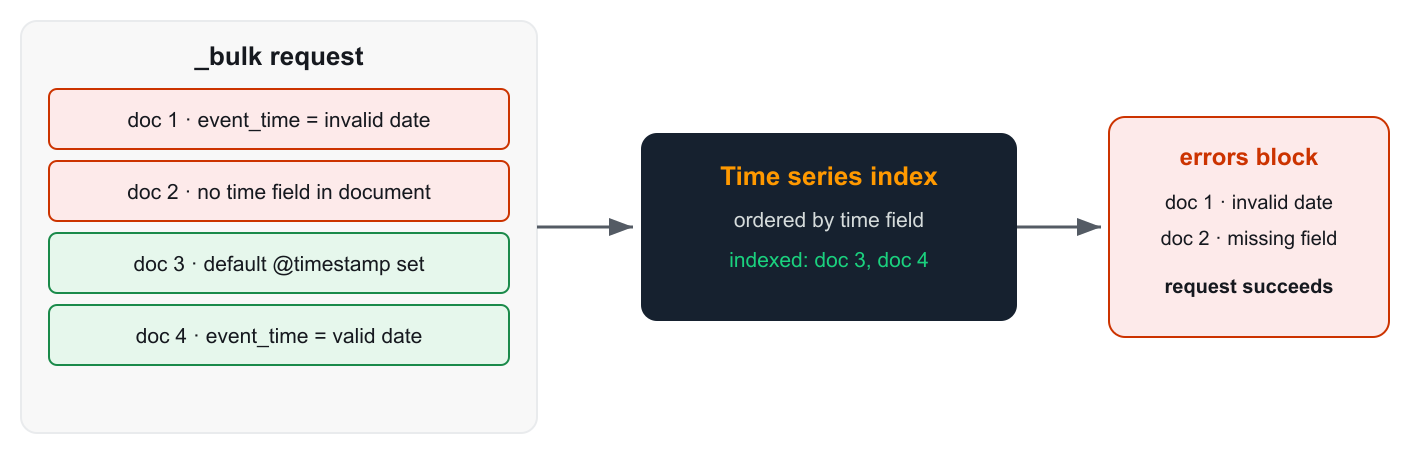
Figure 3: How the time field determines whether each document is indexed or rejected
Catch problems before they become outages
Time series collections now support alerting and anomaly detection, which Classic serverless collections didn’t offer. Instead of relying on a separate system to tell you when something breaks, you can monitor, detect, and notify from the collection that stores your data. Now, operations teams can get notified when error rates or latency spike, security teams can catch a burst of failed logins, and business teams can spot a sudden drop in orders.
Alerting monitors query your data on a schedule and notify you through the channel you choose when a condition is met. Per-query monitors alert on a single value, such as average latency crossing a threshold. Per-bucket monitors evaluate each group separately, such as every host whose error rate climbs too high. PPL monitors handle more complex logic in Piped Processing Language (PPL).
Anomaly detection uses the Random Cut Forest (RCF) machine learning algorithm to learn your data’s normal pattern and flag deviations in near real time, with no fixed thresholds to guess. Point a monitor at the detector’s results to get notified the moment an anomaly appears.
You manage monitors and detectors in OpenSearch UI workspaces, where access follows the workspace’s collaborator permissions. Read-only collaborators can view monitors and alerts, while read/write and admin collaborators can also create, update, and acknowledge them. The Observability workspace puts alerts alongside dashboards and PPL queries, so your team can go from an alert to the events behind it, across serverless collections and existing Amazon OpenSearch Service domains.
Getting started
For a single-click experience, use Express Create in the Amazon OpenSearch Service console. It sets up the collection group, encryption, network access, and data access for you. To control each step yourself, use the AWS Command Line Interface (AWS CLI) as shown in the following steps.
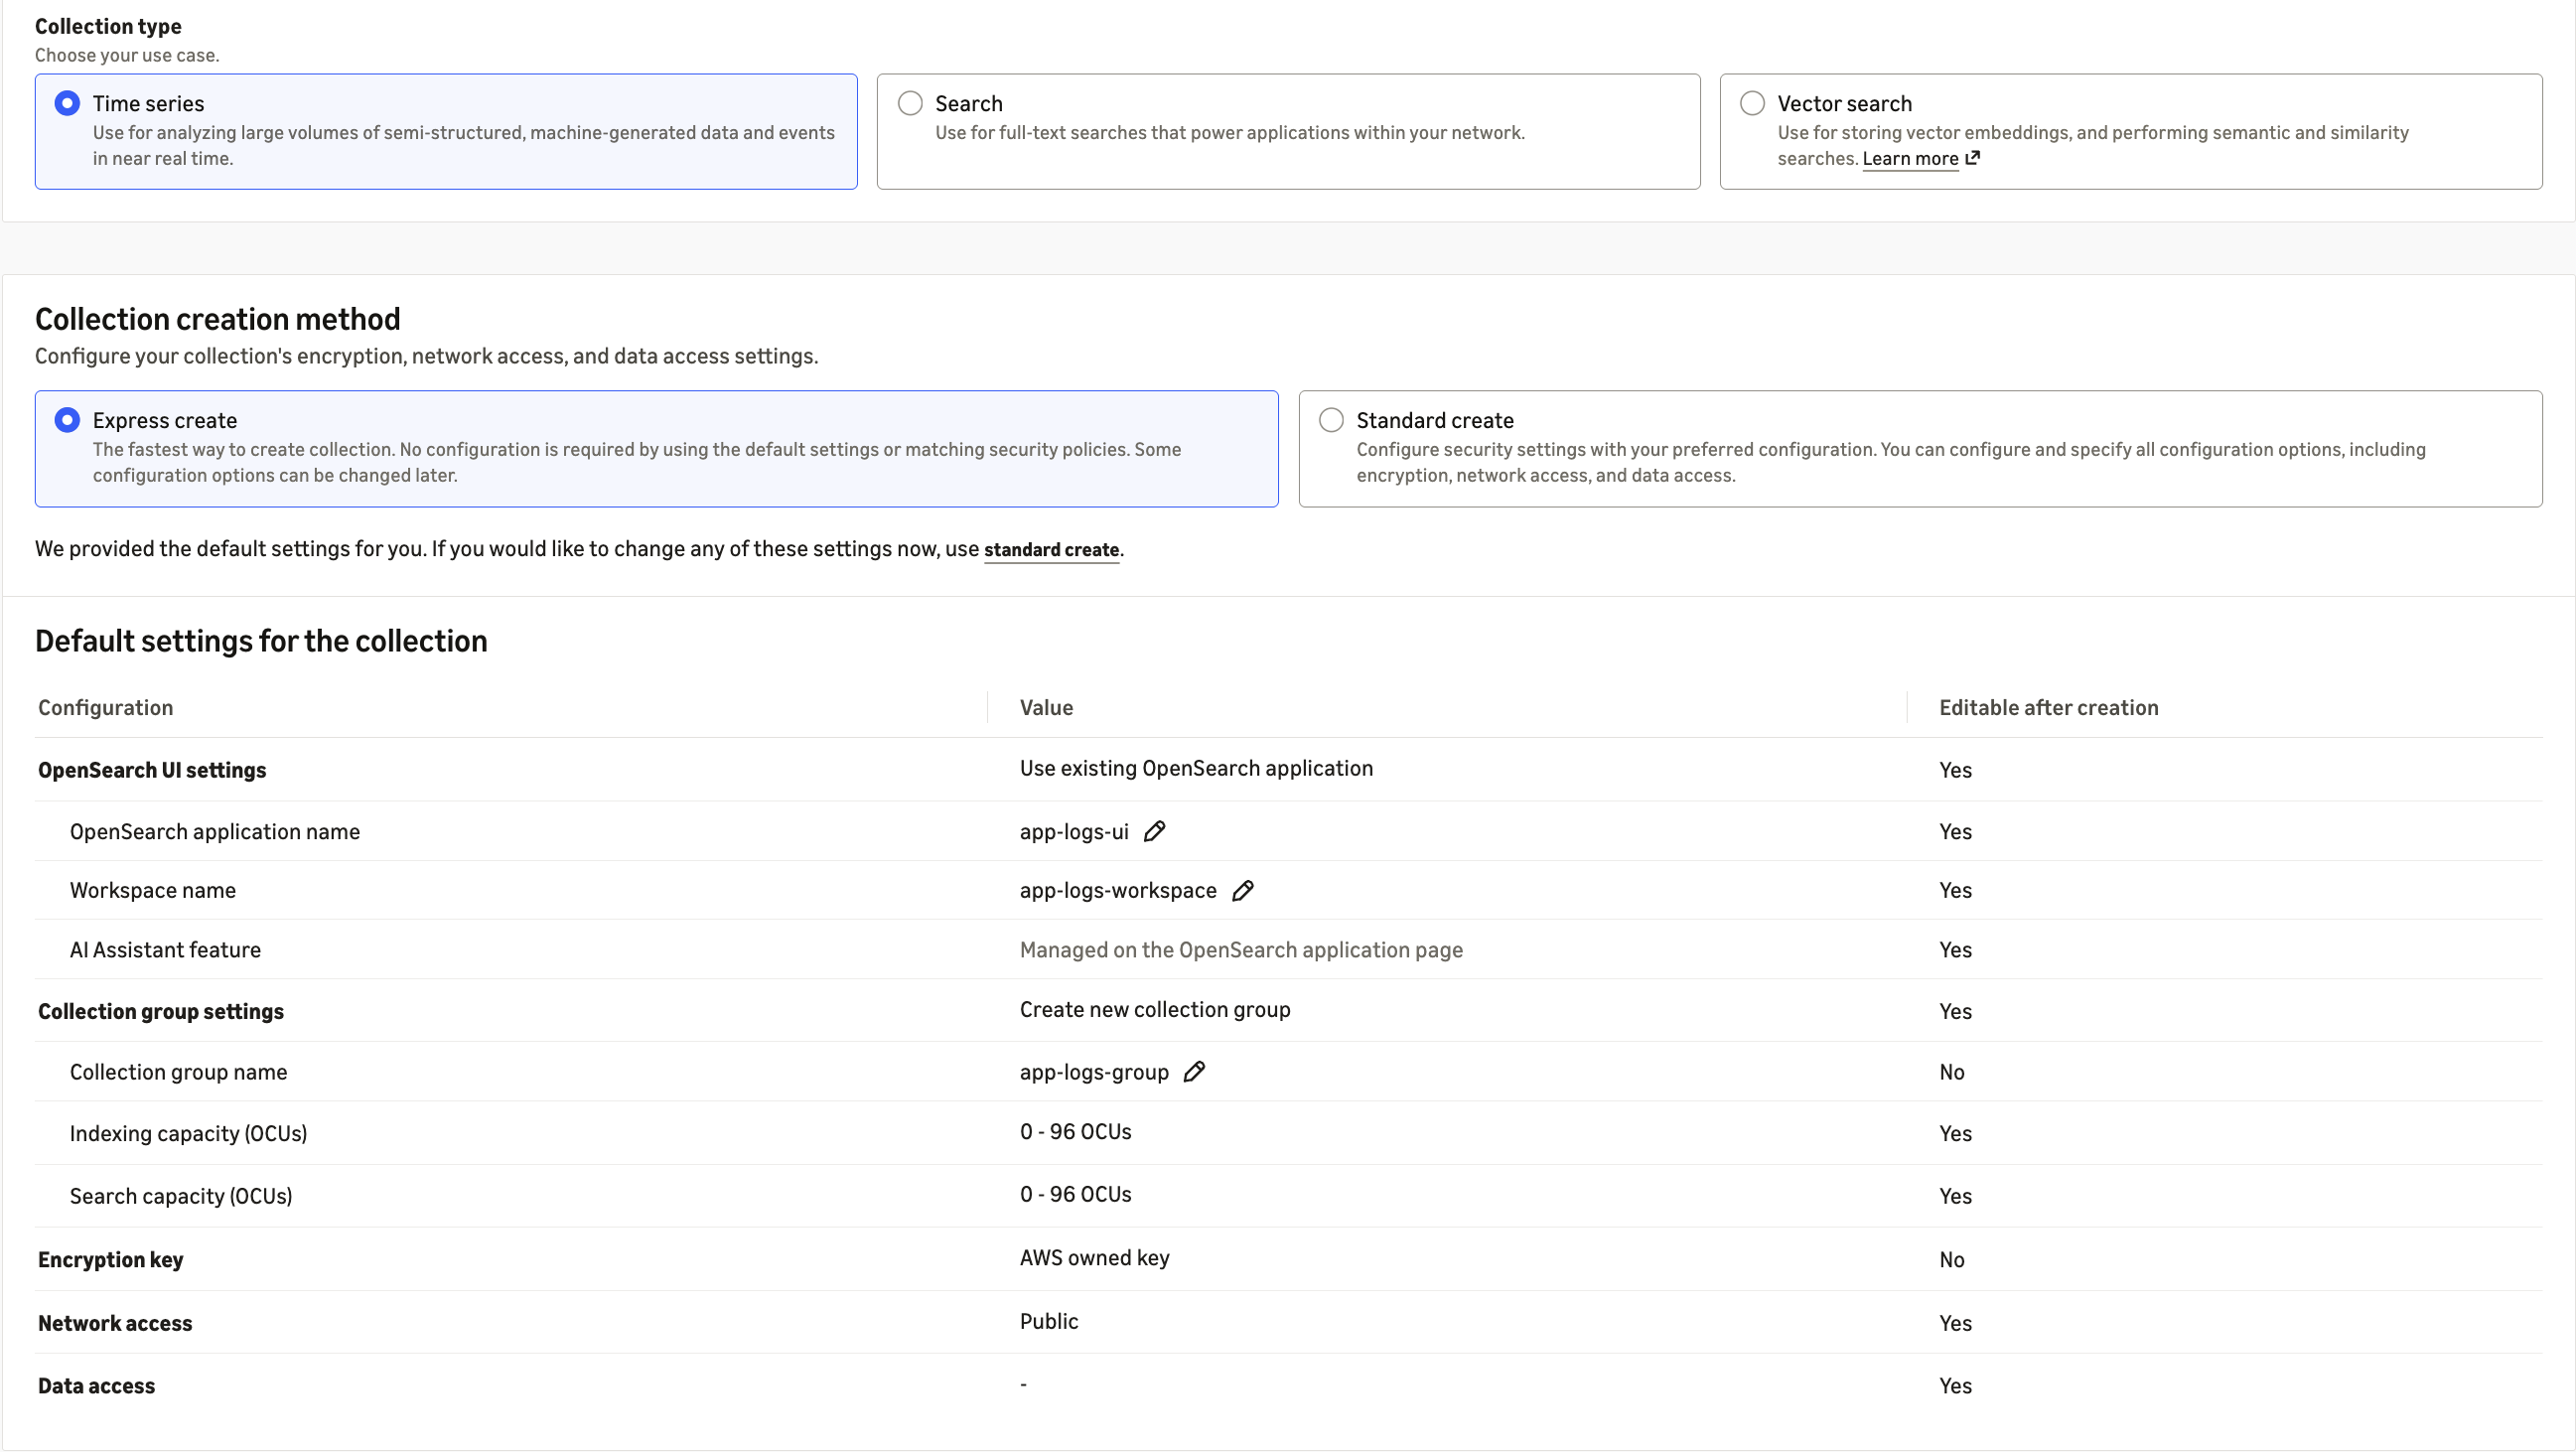
Figure 4: Express Create sets up the collection group, encryption, and network access with default settings
First, create a next-generation collection group. The collection group sets the compute limits that all of its collections share. A minimum of 0 OpenSearch Compute Units (OCUs) lets the group scale to zero when it’s idle, and the maximum caps your spend.
Next, create a network policy to control where the collection can be reached from, and a data access policy to control which AWS Identity and Access Management (IAM) principals can read and write data.
Then create the time series collection in the collection group:
After the collection is active, create an index template with the time field, tiering, and retention settings that fit your workload. Every index whose name matches the pattern picks up these settings automatically:
Finally, ingest your data into the collection, then open the Observability workspace in OpenSearch UI to build your first dashboards, monitors, and anomaly detectors.
Now available
Time series collections are available today in all AWS commercial Regions where the next generation of OpenSearch Serverless is available. You pay for the compute you use in OCUs, and for hot and warm storage in GB-month. For pricing details, visit the Amazon OpenSearch Service pricing page.
To learn more, visit the Amazon OpenSearch Serverless product page and the Amazon OpenSearch Serverless Developer Guide.
Give it a try in the Amazon OpenSearch Service console, and send feedback through AWS re:Post or your usual AWS Support contacts.