Proactively manage the Spot Instance lifecycle using the new Capacity Rebalancing feature for EC2 Auto Scaling

Post Syndicated from Chad Schmutzer original https://aws.amazon.com/blogs/compute/proactively-manage-spot-instance-lifecycle-using-the-new-capacity-rebalancing-feature-for-ec2-auto-scaling/

By Deepthi Chelupati and Chad Schmutzer

AWS now offers Capacity Rebalancing for Amazon EC2 Auto Scaling, a new feature for proactively managing the Amazon EC2 Spot Instance lifecycle in an Auto Scaling group. Capacity Rebalancing complements the capacity optimized allocation strategy (designed to help find the most optimal spare capacity) and the mixed instances policy (designed to enhance availability by deploying across multiple instance types running in multiple Availability Zones). Capacity Rebalancing increases the emphasis on availability by automatically attempting to replace Spot Instances in an Auto Scaling group before they are interrupted by Amazon EC2.

In order to proactively replace Spot Instances, Capacity Rebalancing leverages the new EC2 Instance rebalance recommendation, a signal that is sent when a Spot Instance is at elevated risk of interruption. The rebalance recommendation signal can arrive sooner than the existing two-minute Spot Instance interruption notice, providing an opportunity to proactively rebalance a workload to new or existing Spot Instances that are not at elevated risk of interruption.

Capacity Rebalancing for EC2 Auto Scaling provides a seamless and automated experience for maintaining desired capacity through the Spot Instance lifecycle. This includes monitoring for rebalance recommendations, attempting to proactively launch replacement capacity for existing Spot Instances when they are at elevated risk of interruption, detaching from Elastic Load Balancing if necessary, and running lifecycle hooks as configured. This post provides an overview of using Capacity Rebalancing in EC2 Auto Scaling to manage your Spot Instance backed workloads, and dives into an example use case for taking advantage of Capacity Rebalancing in your environment.

EC2 Auto Scaling and Spot Instances – a classic love story

First, let’s review what Spot Instances are and why EC2 Auto scaling provides an optimal platform to manage your Spot Instance backed workloads. This will help illustrate how Capacity Rebalancing can benefit these workloads.

Spot Instances are spare EC2 compute capacity in the AWS Cloud available for steep discounts off On-Demand prices. In exchange for the discount, Spot Instances come with a simple rule – they are interruptible and must be returned when EC2 needs the capacity back. Where does this spare capacity come from? Since AWS builds capacity for unpredictable demand at any given time (think all 350+ instance types across 77 Availability Zones and 24 Regions), there is often excess capacity. Rather than let that spare capacity sit idle and unused, it is made available to be purchased as Spot Instances.

As you can imagine, the location and amount of spare capacity available at any given moment is dynamic and continually changes in real time. This is why it is extremely important for Spot customers to only run workloads that are truly interruption tolerant. Additionally, Spot workloads should be flexible, meaning they can be shifted in real time to where the spare capacity currently is (or otherwise be paused until spare capacity is available again). In practice, being flexible means qualifying a workload to run on multiple EC2 instance types (think big: multiple families, sizes, and generations), and in multiple Availability Zones, at any given time.

This is where EC2 Auto Scaling comes in. EC2 Auto Scaling is designed to help you maintain application availability. It also allows you to automatically add or remove EC2 instances according to conditions you define. We’ve continued to innovate on behalf of our customers by adding new features to EC2 Auto Scaling to natively support flexible configurations for EC2 workloads. One of these innovations is the mixed instances policy (launched in 2018), which supports multiple instance types and purchase options in a single Auto Scaling group. Another innovation is the capacity optimized allocation strategy (launched in 2019), an allocation strategy designed to locate optimal spare capacity for Spot Instances backed workloads. These features are aimed at supporting flexible workload best practices, and reacting to the dynamic shifts in capacity automatically.

The next level – moving from reactive to proactive Spot Capacity Rebalancing in EC2 Auto Scaling

The default behavior for EC2 Auto Scaling is to take a reactive approach to Spot Instance interruptions. This means that EC2 Auto Scaling attempts to replace an interrupted Spot Instance with another Spot Instance only after the instance has been shut down by EC2 and the health check fails. The reactive approach to interruptions works fine for many workloads. However, we have received feedback from customers requesting that EC2 Auto Scaling take a more proactive approach to handling Spot Instance interruptions.

Capacity Rebalancing in EC2 Auto Scaling is the answer to this request. Capacity Rebalancing is designed to take a proactive approach in handling the dynamic nature of EC2 capacity. It does this by monitoring for the EC2 Instance rebalance recommendation signal in addition to the “final” two-minute Spot Instance interruption notice. When a rebalance recommendation signal is detected, it automatically attempts to get a head start in replacing Spot Instances with new Spot Instances before they are shut down. In addition to attempting to maintain desired capacity through interruptions by launching replacement Spot Instances, Capacity Rebalancing gives customers the opportunity to gracefully remove Spot Instances from an Auto Scaling group by taking Spot Instances through the normal shut down process, such as deregistering from a load balancer and running terminating lifecycle hooks.

Capacity Rebalancing in EC2 Auto Scaling works best when combined with a few best practices. Let’s quickly review them:

  1. Be flexible. Capacity Rebalancing thrives on flexibility, and works best when using the EC2 Auto Scaling mixed instances policy and as many instance types and Availability Zones as possible. Remember to think big and qualify multiple families, sizes, and generations for your workload, and use all Availability Zones if possible.
  2. Use the capacity optimized allocation strategy. Capacity rebalance works optimally when combined with the capacity optimized allocation strategy and a flexible list of instance types and Availability Zones, because the goal is to find the optimal spare capacity to rebalance your workload on.
  3. Take advantage of termination lifecycle hooks (optional). Termination lifecycle hooks are powerful in case you need to perform any final tasks before shutdown.

Example tutorial – Web application workload

Now that you understand the best practices for taking advantage of Capacity Rebalancing in EC2 Auto Scaling, let’s dive into the example workload. In this scenario, we have a web application powered by 75% Spot Instances and 25% On-Demand Instances in an Auto Scaling group, running behind an Application Load Balancer. We’d like to maintain availability, and have the Auto Scaling group automatically handle Spot Instance interruptions and rebalancing of capacity.

The Auto Scaling group configuration looks like this (note the best practices of instance type and Availability Zone flexibility combined with the capacity optimized allocation strategy in the mixed instances policy):

{
   "AutoScalingGroupName": "myAutoScalingGroup",
   "CapacityRebalance": true,
   "DesiredCapacity": 12,
   "MaxSize": 15,
   "MinSize": 12,
   "MixedInstancesPolicy": {
      "InstancesDistribution": {
         "OnDemandBaseCapacity": 0,
         "OnDemandPercentageAboveBaseCapacity": 25,
         "SpotAllocationStrategy": "capacity-optimized"
      },
      "LaunchTemplate": {
         "LaunchTemplateSpecification": {
            "LaunchTemplateName": "myLaunchTemplate",
            "Version": "$Default"
         },
         "Overrides": [
            {
               "InstanceType": "c5.large"
            },
            {
               "InstanceType": "c5a.large"
            },
            {
               "InstanceType": "m5.large"
            },
            {
               "InstanceType": "m5a.large"
            },
            {
               "InstanceType": "c4.large"
            },
            {
               "InstanceType": "m4.large"
            },
            {
               "InstanceType": "c3.large"
            },
            {
               "InstanceType": "m3.large"
            }
         ]
      }
   },
   "TargetGroupARNs": [
      "arn:aws:elasticloadbalancing:us-west-2:123456789012:targetgroup/my-targets/a1b2c3d4e5f6g7h8"
   ],
   "VPCZoneIdentifier": "mySubnet1,mySubnet2,mySubnet3"
}

Next, create the Auto Scaling group as follows:

aws autoscaling create-auto-scaling-group \
  --cli-input-json file://myAutoScalingGroup.json

We also use a lifecycle hook to download logs before an instance is shut down:

aws autoscaling put-lifecycle-hook \
  --lifecycle-hook-name myTerminatingHook \
  --auto-scaling-group-name myAutoScalingGroup \
  --lifecycle-transition autoscaling:EC2_INSTANCE_TERMINATING \
  --heartbeat-timeout 300

In this example scenario, let’s say that the above config results in nine Spot Instances and three On-Demand instances being deployed in the Auto Scaling group, three Spot Instances, and one On-Demand instance in each Availability Zone. With Capacity Rebalancing enabled, if any of the nine Spot Instances receive the EC2 Instance rebalance recommendation signal, EC2 Auto Scaling will automatically request a replacement Spot Instance according to the allocation strategy (capacity optimized), resulting in 10 running Spot Instances. When the new Spot Instance passes EC2 health checks, it is joined to the load balancer and placed into service. Upon placing the new Spot Instance in service, EC2 Auto Scaling then proceeds with the shutdown process for the Spot Instance that has received the rebalance recommendation signal. It detaches the instance from the load balancer, drains connections, and then carries out the terminating lifecycle hook. Once the terminating lifecycle hook is complete, EC2 Auto Scaling shuts down the instance, bringing capacity back to nine Spot Instances.

Conclusion

Consider using the new Capacity Rebalancing feature for EC2 Auto Scaling in your environment to proactively manage Spot Instance lifecycle. Capacity Rebalancing attempts to maintain workload availability by automatically rebalancing capacity as necessary, providing a seamless and hands-off experience for managing Spot Instance interruptions. Capacity Rebalancing works best when combined with instance type flexibility and the capacity optimized allocation strategy, and may be especially useful for workloads that can easily rebalance across shifting capacity, including:

  • Containerized workloads
  • Big data and analytics
  • Image and media rendering
  • Batch processing
  • Web applications

To learn more about Capacity Rebalancing for EC2 Auto Scaling, please visit the documentation.

To learn more about the new EC2 Instance rebalance recommendation, please visit the documentation.

[$] A Matrix overview

Post Syndicated from original https://lwn.net/Articles/835880/rss

At this year’s (virtual) Open
Source Summit Europe
, Oleg Fiksel gave an overview
talk
on the Matrix decentralized,
secure communication network project. Matrix has been seeing increasing
adoption recently, he said, including by governments (beyond France, which
we already reported on in an article on a FOSDEM
2019 talk
) and other organizations. It also aims to bridge all of the
different chat mechanisms that people are using in order to provide a
unified interface for all of them.

Stable kernel 5.9.4

Post Syndicated from original https://lwn.net/Articles/836157/rss

Greg Kroah-Hartman has released stable kernel 5.9.4. “This is only a bugfix for the
5.9.3 kernel release which had some problems with some symlinks for the
powerpc selftests.
” If you did not have any issues with 5.9.3 there
is no need to upgrade.

Amazon MQ Update – New RabbitMQ Message Broker Service

Post Syndicated from Channy Yun original https://aws.amazon.com/blogs/aws/amazon-mq-update-new-rabbitmq-message-broker-service/

In 2017, we launched Amazon MQ – a managed message broker service for Apache ActiveMQ, a popular open-source message broker that is fast and feature-rich. It offers queues and topics, durable and non-durable subscriptions, push-based and poll-based messaging, and filtering. With Amazon MQ, we have enhanced lots of new features by customer feedback to improve […]

Determining What Video Conference Participants Are Typing from Watching Shoulder Movements

Post Syndicated from Bruce Schneier original https://www.schneier.com/blog/archives/2020/11/determining-what-video-conference-participants-are-typing-from-watching-shoulder-movements.html

Accuracy isn’t great, but that it can be done at all is impressive.

Murtuza Jadiwala, a computer science professor heading the research project, said his team was able to identify the contents of texts by examining body movement of the participants. Specifically, they focused on the movement of their shoulders and arms to extrapolate the actions of their fingers as they typed.

Given the widespread use of high-resolution web cams during conference calls, Jadiwala was able to record and analyze slight pixel shifts around users’ shoulders to determine if they were moving left or right, forward or backward. He then created a software program that linked the movements to a list of commonly used words. He says the “text inference framework that uses the keystrokes detected from the video … predict[s] words that were most likely typed by the target user. We then comprehensively evaluate[d] both the keystroke/typing detection and text inference frameworks using data collected from a large number of participants.”

In a controlled setting, with specific chairs, keyboards and webcam, Jadiwala said he achieved an accuracy rate of 75 percent. However, in uncontrolled environments, accuracy dropped to only one out of every five words being correctly identified.

Other factors contribute to lower accuracy levels, he said, including whether long sleeve or short sleeve shirts were worn, and the length of a user’s hair. With long hair obstructing a clear view of the shoulders, accuracy plummeted.

Security updates for Wednesday

Post Syndicated from original https://lwn.net/Articles/836137/rss

Security updates have been issued by Arch Linux (chromium and firefox), Fedora (nss), openSUSE (pacemaker), Red Hat (bind, binutils, bluez, cloud-init, container-tools:rhel8, cryptsetup, cups, curl, cyrus-imapd, cyrus-sasl, dovecot, dpdk, edk2, evolution, expat, file-roller, fontforge, freeradius:3.0, freerdp and vinagre, freetype, frr, gd, glibc, GNOME, gnome-software and fwupd, gnupg2, grafana, httpd:2.4, idm:DL1 and idm:client, kernel, kernel-rt, libarchive, libexif, libgcrypt, libldb, libpcap, librabbitmq, libreoffice, librsvg2, libsolv, libssh, libtiff, libvpx, libX11, libxml2, libxslt, mailman:2.1, mingw-expat, nodejs:12, oddjob, oniguruma, opensc, openssl, openwsman, pcre2, pki-core:10.6 and pki-deps:10.6, poppler, prometheus-jmx-exporter, python-pip, python27:2.7, python3, python38:3.8, qt5-qtbase and qt5-qtwebsockets, resource-agents, SDL, spamassassin, sqlite, squid:4, subversion:1.10, sysstat, systemd, targetcli, tcpdump, thunderbird, varnish:6, vim, and virt:rhel and virt-devel:rhel), SUSE (apache-commons-httpclient, gnome-settings-daemon, gnome-shell, kernel, libvirt, opensc, ovmf, python, rmt-server, and sane-backends), and Ubuntu (accountsservice, gdm3, libytnef, python-cryptography, and spice-vdagent).

Field Notes: How to Identify and Block Fake Crawler Bots Using AWS WAF

Post Syndicated from Vijay Menon original https://aws.amazon.com/blogs/architecture/field-notes-how-to-identify-and-block-fake-crawler-bots-using-aws-waf/

In this blog post, we focus on how to identify fake bots using these AWS services: AWS WAF, Amazon Kinesis Data Firehose, Amazon S3 and AWS Lambda. We use fake Google/Bing bots to demonstrate, but the principles can be applied to other popular crawlers like Slurp Bot from Yahoo, DuckDuckBot from DuckDuckGo, Alexa crawler from Alexa internet ranking service.

For industries like media, online retailors, news or social websites, content is critical and often sets them apart from other competitors. These companies put in a significant amount of effort to make the content as visible and accessible as possible. To do that these companies rely on crawler bots, so that legitimate users searching for content can find the content easily. Crawler bots are useful for indexing the site pages and helping make the content more searchable and improve rankings.

However, this capability can be misused. So it is important to distinguish between genuine crawler bots and fake ones that are doing more than just indexing your site. It’s important to properly identify good and bad actors so that you can stop the bad ones without impacting the ability of good ones, and at scale. This helps in driving more traffic, visitors, and more revenue from your websites.

Identifying bots

There are two primary sources of information required to identify a fake bot:

  • HTTP Header User-Agent: Fake bots try to present themselves as real bots, for example as Google or Bing, by using the same user agent string used by Google or Bing.
  • IP Address: You can look at the source IP address of the incoming request and determine if it belongs to the search engine provider network like Google or Bing. You can do this by performing a forward and reverse look up and comparing the results. These methods are well documented by the search engine providers Google and Bing.

Solution Overview

The solution leverages the capabilities of AWS WAF. Our demonstration application is a static website hosted on Amazon S3 fronted by Amazon CloudFront. This means that we can provide permission of access to the S3 bucket only to CloudFront using origin access identity.

The logs are streamed in near real time using Amazon Kinesis Data Firehose, inspected using a Lambda function to help identify fake bots before storing the logs on Amazon S3. The Lambda function does two things:

  1. Inspect the traffic using the rules to identify bad or fake bots. In this case it uses forward and reverse DNS lookup results of the Client IP address of packets with User-Agent string resembling GoogleBot or BingBot.
  2. Once identified as a fake bot, the Lambda function updates AWS WAF IP-Set to permanently block the requests coming from IP addresses of fake bots.

Note: For the sake of this demonstration, we are using a static website hosted on Amazon S3 with CloudFront. This requires the AWS WAF and IP-Set used by AWS WAF to be of scope ‘CLOUDFRONT’. You can modify it to use scope ‘REGIONAL’ if you chose to protect your web properties behind Application Load Balancer or API Gateway.

Solution Architecture

WAF Solution Architecture

Prerequisites

Readers of this blog post should be familiar with HTTP and the following AWS services:

For this walkthrough, you should have the following:

  • AWS Account
  • AWS Command Line Interface (AWS CLI): You need AWS CLI installed and configured on the workstation from where you are going to try the steps mentioned below.
  • Credentials configured in AWS CLI should have the required IAM permissions to spin up and modify the resources mentioned in this post.
  • Make sure that you deploy the solution to us-east-1 Region and your AWS CLI default Region is us-east-1. If us-east-1 is not the default Region, reference the Regions explicitly while executing AWS CLI commands using --region us-east-1 switch.
  • Amazon S3 bucket in us-east-1 region

Walkthrough

1.     Create an Amazon S3 static Website and put it behind an Amazon CloudFront distribution. You can follow these steps. Note down the CloudFront distribution ID. We will use it in subsequent steps.

2.     Download and unzip the file containing CloudFormation template and lambda function code from here to a folder in your local workstation. You will need to run all of the subsequent commands from this folder.

3.     Zip the lambda function lambda_function.py and upload it to an Amazon S3 bucket of your choice in us-east-1. Note the bucket name as it will be used in the subsequent steps. The blog uses waf-logs-fake-bots-us-east-1 for reference as the S3 bucket name.

$ zip lambda_function.py lambda_function.py.zip
$ aws s3 cp lambda_function.py.zip s3://waf-logs-fake-bots-us-east-1/

4.     Create the resources required for this blog post by deploying the AWS CloudFormation template and running the below command:

aws cloudformation create-stack \
--stack-name FakeBotBlockBlog \
--template-body file://BotBlog.yml \
--parameters ParameterKey=KinesisBufferIntervalSeconds,ParameterValue=900 ParameterKey=KinesisBufferSizeMB,ParameterValue=3 ParameterKey=IPSetName,ParameterValue=BlockFakeBotIPSet ParameterKey=IPSetScope,ParameterValue=CLOUDFRONT ParameterKey=S3BucketWithDeploymentPackage,ParameterValue=waf-logs-fake-bots-us-east-1 ParameterKey=DeploymentPackageZippedFilename,ParameterValue=lambda_function.py.zip \
--capabilities CAPABILITY_IAM \
--region us-east-1

You need to provide the following information, and you can change the parameters based on your specific needs:

a.     KinesisBufferIntervalSeconds and KinesisBufferSizeMB. These will define the interval at which Kinesis Firehose ships the logs to Amazon S3, the Default is 900 seconds and 3MB respectively, whichever is met first.

b.     IPSetName. Name of the IP Set which will be used to record the client IP address of fake bots. Default value is BlockFakeBotIPSet.

c.     IPSetScope. Scope of the IP Set. I am using CLOUDFRONT and associate it with the CloudFront distribution created in step 1. You can choose to make it REGIONAL in which case WebACLassociation will need to be with an ALB or an API Gateway.

d.     S3BucketWithDeploymentPackage. Name of S3 bucket used in step 3. The blog assumes waf-logs-fake-bots-us-east-1.

e.     DeploymentPackageZipedFilename. Lambda function filename without the file extension. For example, the blog assumes lambda_function.py.zip is available on the Amazon S3 bucket and uses this value for this parameter.

Some stack templates might include resources that can affect permissions in your AWS account, for example, by creating new AWS Identity and Access Management (IAM) role. For those stacks, you must explicitly acknowledge this by specifying CAPABILITY_IAM or CAPABILITY_NAMED_IAM value for the –capabilities parameter.

Stack creation will take you approximately 5-7 minutes. Check the status of the stack by executing the below command every few minutes. You should see StackStatus value as CREATE_COMPLETE.

Example:

aws cloudformation describe-stacks --stack-name FakeBotBlockBlog | grep StackStatus

The CloudFormation template will create the following resources:

  • IP Set for AWS WAF
  • WebACL with rules to block the client IP addresses of fake bots, and an AWS-managed common rule set.
  • Lambda function to help detect fake bots and modify the AWS WAF IP Set to block them
  • Kinesis Firehose delivery stream, which will use the above Lambda function for processing
  • IAM roles with required permissions for the Lambda function and Kinesis Firehose
  • S3 bucket for AWS WAF logs

5.     Enable logging for the WebACL using AWS CLI. For this you need the ARN of the WebACL and Kinesis Firehose. You can find that information from the output of the CloudFormation stack created in step 4 using the below AWS CLI command

aws cloudformation describe-stacks --stack-name FakeBotBlockBlog

Please note the 2 ARNs and run the following commands by replacing (1) ResourceArn value with WebACL ARN and (2) LogDestinationConfigs value with Kinesis Firehose delivery stream ARN.

Example:

aws wafv2 put-logging-configuration –-logging-configuration ResourceArn=arn:aws:wafv2:us-east-1:123456789012:global/webacl/FakeBotWebACL/259ea98f-24ba-4acd-8803-3e7d02e8d482,LogDestinationConfigs=arn:aws:firehose:us-east-1:123456789012:deliverystream/aws-waf-logs-FakeBotBlockBlog --region us-east-1

6.     Associate CloudFront distribution with this WebACL: Sign in to the AWS Management Console and open the AWS WAF and Shield console at https://console.aws.amazon.com/wafv2/homev2/web-acls?region=global .

  • Click on the WebACL created earlier in this procedure
  • Navigate to ‘Associated AWS resources’ tab and select Add AWS resources
  • In the subsequent screen, select the CloudFront distribution created in step 1
  • Select Add

Note: If you are using an ALB or API Gateway for your web property, then you need to use REGIONAL WebACL and IP Set.  Review the procedure to associate an ALB or API Gateway to the WebACL.

You can monitor WebACL performance from the Overview section of WebACL from the AWS WAF and Shield console.

Testing

To test, you will need to generate some traffic which will trigger the lambda function to detect and block the fake bots created earlier in this blog. The web traffic can be generated from the local machine or from an EC2 instance with access to the internet using curl. Manually set the user agent to resemble Googlebot by running the following command from shell:

Replace http://www.awsdemodesign.com/ with the URL of your CloudFront distribution you created in step 1 of the walkthrough.

for i in {1..1000}; do curl -I -A "Mozilla/5.0 (compatible; Googlebot/2.1; +http://www.google.com/bot.html)" http://www.awsdemodesign.com/; done

Initially you will see HTTP1.1/ 200 OK response. This will trigger Lambda and modify the IP Set to include your public IP address to be blocked. You can verify that by inspecting the IP set from AWS WAF and Shield console.

  • Sign in to the AWS Management Console and open the AWS WAF and Shield console
  • Click on IP Set created earlier in this blog. In the subsequent screen you can see your public IP address in the list of IP addresses.

If you run the curl command again, you will see that the response now is HTTP/1.1 403 Forbidden.

Clean Up

  • Disassociate the CloudFront Distribution from WebACL
  • Delete the S3 bucket and CloudFront Distribution created in Step 1
  • Empty and delete the S3 bucket created by the CloudFormation stack for AWS WAF logs.
  • Delete CloudFormation stack created in Step 4.

Conclusion

In this blog post, we demonstrated how you can set up and inspect incoming web traffic using AWS Lambda, AWS WAF native logging capabilities, and Kinesis Firehose to help detect and block bad or fake bots at scale. Furthermore, the solution outlined in this post provides a framework which can be extended to identify similar unwanted traffic impersonating as other good bots.

Field Notes provides hands-on technical guidance from AWS Solutions Architects, consultants, and technical account managers, based on their experiences in the field solving real-world business problems for customers.


Celebrating future engineers

Post Syndicated from Katie Gouskos original https://www.raspberrypi.org/blog/celebrating-future-engineers-this-is-engineering/

We’re proud to show our support for This is Engineering Day, an annual campaign from the Royal Academy of Engineering to bring engineering to life for young people by showcasing its variety and creativity. This year’s #BeTheDifference theme focuses on the positive impact engineering can have on everyday life and on the world we live in. So what better way for us to celebrate than to highlight our community’s young digital makers — future engineers — and their projects created for social good!

A Coolest Projects participant, a future engineer we're celebrating on today's This is Engineering Day
So many Coolest Projects participants present tech projects they’ve created for social good.

We’re also delighted to have special guest Dr Lucy Rogers on our This Is Engineering–themed Digital Making at Home live stream today at 5.30pm GMT, where she will share insights into her work as a creative inventor.

Dr Lucy Rogers, here shown with soap bubbles, will be our guest our This is Engineering Day–themed live stream for young people. Photo credit: Karla Gowlett
Your young people can ask inventor Dr Lucy Rogers their questions live today! Photo credit: Karla Gowlett

Future engineers creating projects for social good

In July, we were lucky enough to have Dr Hayaatun Sillem, CEO of the Royal Academy of Engineering (RAEng), as a judge for Coolest Projects, our technology fair for young creators. Dr Hayaatun Sillem says, “Engineering is a fantastic career if you want to make a difference, improve people’s lives, and shape the future.”

A Coolest Projects participant, a future engineer we're celebrating on today's This is Engineering Day
Our community’s young digital makers want to #BeTheDifference

In total, the young people taking part in Coolest Projects 2020 online presented 560 projects, of which over 300 projects were made specifically for social good. Here’s a small sample from some future engineers across the world:

Carlos, Blanca & Mario from Spain created El ojo que te observa (The all-seeing eye)

“Our project is a virtual big eye doorman that detects if you wear a mask […] we chose this project because we like artificial intelligence and robotics and we wanted to help against the coronavirus.”

Momoka from Japan created AI trash can

“I want people to put trash in the correct place so I made this AI trash can. This AI trash can separates the trash. I used ML2 Scratch. I used a camera to help the computer learn what type of trash it is.”

Abhiy from the UK created Burglar Buster

“As we know, burglary cases are very frequent and it is upsetting for the families whose houses are burglarised and [can] make them feel fearful, sad and helpless. Therefore, I tried to build a system which will help everyone to secure their houses.”

Tune in today: This is Engineering-themed live stream with special guest Dr Lucy Rogers

Professor Lucy Rogers PhD is an inventor with a sense of fun! She is a Fellow of the RAEng, and RAEng Visiting Professor of Engineering:Creativity and Communication at Brunel University, London. She’s also a Fellow of the Institution of Mechanical Engineers. Adept at bringing ideas to life, from robot dinosaurs to mini mannequins — and even a fartometer for IBM! — she has developed her creativity and communication skills and shares her tricks and tools with others. 

Here Dr Lucy Rogers shares her advice for young people who want to get involved in engineering:

1. Create your own goal 

A goal or a useful problem will help you get over the steep learning curve that is inevitable in learning about new pieces of technology. Your goal does not have to be big: my first Internet of Things project was making a LED shine when the International Space Station was overhead.

2. Make your world a little better

To me “engineering” is really “problem-solving”. Find problems to solve. You may have to make something, program something, or do something. How can you make your own world a little better? 

3. Learn how to fail safely 

Learn how to fail safely: break projects into smaller pieces, and try each piece. If it doesn’t work, you can try again. It’s only at the end of a project that you should put all the “working” pieces together (and even then, they may not work nicely together!)

Dr Lucy Rogers will be joining our Digital Making at Home educators on our This is Engineering-themed live stream today at 5.30pm GMT.

This is your young people’s chance to be inspired by this amazing inventor! And we will take live questions via YouTube, Facebook, Twitter, and Twitch, so make sure your young people are able to get Dr Lucy’s live answers to their own questions about digital making, creativity, and all things engineering!

Engineering at home, right now

To get inspired about engineering right now, your young people can follow along step by step with Electricity generation, our brand-new, free digital making project on the impact of non-renewable energy on our planet!

Try out coding a Scratch project about electricity generation on  today's This is Engineering Day

While coding this Scratch project, learners input real data about the type and amount of natural resources that countries across the world use to generate electricity, and they then compare the results using an animated data visualisation.

The data we’ve made part of this project was compiled by the International Energy Agency, and we were also kindly given guidance by the Renewable Energy Foundation.

To find out more about This is Engineering Day, please visit  www.ThisisEngineering.org.uk.

The post Celebrating future engineers appeared first on Raspberry Pi.

4 Important Considerations To Avoid Wasted Cloud Spend

Post Syndicated from Andy Haine original https://www.anchor.com.au/blog/2020/11/4-important-considerations-to-avoid-wasted-cloud-spend/

Growth for cloud services is at an all-time high in 2020, partly due to the COVID-19 pandemic and businesses scrambling to migrate to the cloud as soon as possible. But with that record growth, wasted spend on unnecessary or unoptimised cloud usage is also at an all-time high.


Wasted cloud spend generally boils down to paying for services or resources that you aren’t using. You can most commonly attribute wasted spend on services that aren’t being used at all in either the development or production stages, services that are often idle (not being used 80-90% of the time), or simply over-provisioned resources (more resources than necessary).


Wasted cloud spend is expected to reach as high as $17.6 billion in 2020. In a 2019 report from Flexera, they measured the actual waste of cloud spending at 35 percent of all cloud services revenue. This highlights how crucial it can be, and how much money a business can save, by having an experienced and dedicated AWS management team looking after their cloud services. In many cases, having the right team managing your cloud services can more than repay any associated management costs. Read on below for some further insight into the most common pitfalls of wasted cloud spending.

Lack Of Research, Skills and/or Management

A lack of proper research, skills or management involved in a migration to cloud services is probably the most frequent and costly pitfall. Without proper AWS cloud migration best practices and a comprehensive strategy in place, businesses may dive into setting up their services without realising how complex the initial learning curve can be to sufficiently manage their cloud spend. It’s a common occurrence for not just businesses, but anyone first experimenting with cloud, to see a bill that’s much higher than they first anticipated. This can lead a business to believe the cloud is significantly more expensive than it really needs to be.


It’s absolutely crucial to have a strategy in place for all potential usage situations, so that you don’t end up paying much more than you should. This is something that a managed cloud provider can expertly design for you, to ensure that you’re only paying for exactly what you need and potentially quite drastically reducing your spend over time.

Unused Or Unnecessary Snapshots

Snapshots can create a point in time backup of your AWS services. Each snapshot contains all of the information that is needed to restore your data to the point when the snapshot was taken. This is an incredibly important and useful tool when managed correctly. However it’s also one of the biggest mistakes businesses can make in their AWS cloud spend.


Charges for snapshots are based on the amount of data stored, and each snapshot increases the amount of data that you’re storing. Many users will take and store a high number of snapshots and never delete them when they’re no longer needed, and in a lot of cases, not realise that this is exponentially increasing their cloud spend.

Idle Resources

Idle resources account for another of the largest parts of cloud waste. Idle resources are resources that aren’t being used for anything, yet you’re still paying for them. They can be useful in the event of resource spike, but for the most part may not be worth you paying for them when you look at your average usage over a period of time. A good analogy for this would be paying rent for a holiday home all year round, when you only spend 2 weeks using it every Christmas. This is where horizontal scaling comes into play. When set up by skilled AWS experts, horizontal scaling can turn services and resources on or off depending on when they are actually needed.

Over-Provisioned Services

This particular issue somewhat ties into idle resources, as seen above. Over-provisioned services refers to paying for entire instances that are not in use whatsoever, or very minimally. This could be an Amazon RDS service for a database that’s not in use, an Amazon EC2 instance that’s idle 100% of the time, or any number of other services. It’s important to have a cloud strategy in place that involves frequently auditing what services your business is using and not using, in order to minimise your cloud spend as much as possible.

Conclusion

As you can see from the statistics provided by Flexera above, wasted cloud spend is one of the most significant problems facing businesses that have migrated to the cloud. But with the right team of experts in place, wasted spend can easily be avoided, and even mitigate management costs, leaving you in a far better position in terms of both service performance, reliability and support, and overall costs.

The post 4 Important Considerations To Avoid Wasted Cloud Spend appeared first on AWS Managed Services by Anchor.

[$] An introduction to Pluto

Post Syndicated from original https://lwn.net/Articles/835930/rss

Pluto is a new computational
notebook for the Julia programming language. Computational
notebooks are a way to program inside of a web browser, storing code,
annotations, and output, including graphics, in a single place. They became
popular with the advent of the Jupyter notebook, which originally targeted
Julia, Python, and R—the names got mashed together to make the word
“Jupyter”.

Signed pushes for kernel.org

Post Syndicated from original https://lwn.net/Articles/835985/rss

Kernel.org manager Konstantin Ryabitsev describes
the Git signed-push functionality
, which is now supported by the
kernel.org system. “To help hedge against this problem, git provides
developers a way to sign their actual pushes, as a means to attest ‘yes, I
actually did intend to push these commits into this ref in this repository
on this server, and here’s my PGP signature to prove it.’
” Among
other things, these signatures can be preserved in a commit transparency
log, which
is also now provided
by kernel.org.

Rosenzweig: From Panfrost to production, a tale of Open Source graphics

Post Syndicated from original https://lwn.net/Articles/835976/rss

Alyssa Rosenzweig reports
on the progress
of the Panfrost driver. “Since our previous update on Panfrost, the open source stack for Arm’s Mali Midgard and Bifrost GPUs, we’ve focused on taking our driver from its reverse-engineered origins on Midgard to a mature stack. We’ve overhauled both the Gallium driver and the backend compiler, and as a result, Mesa 20.3 — scheduled for release at the end-of-the-month — will feature some Bifrost support out-of-the-box.

Announcing Outposts and local gateway sharing for multi-account access

Post Syndicated from Shubha Kumbadakone original https://aws.amazon.com/blogs/compute/announcing-outposts-and-local-gateway-sharing-for-multi-account-access/

This post was contributed by James Devine, Sr. Outposts SA

AWS Outposts enables customers to run AWS services in their on-premises environments. With the release of Outposts and local gateway (LGW) sharing, customers can now configure multi-account access and sharing within an AWS Organization.

Prior to this release, an Outpost was only viable within a single AWS account. VPC sharing was the main way to enable multiple accounts to use Outposts capacity. With the release of Outposts and LGW sharing support, there is now additional functionality to enable multi-account access Outpost capacity within an AWS Organization.

Outposts and LGW sharing is facilitated through AWS Resource Access Manager (RAM). It enables Outposts and LGWs to be shared with AWS accounts within the same AWS Organization. The account that orders Outposts is the owner account that can create resource shares. The accounts that have access to the share are called consumer accounts. Each consumer account can create its own VPCs with subnets that reside on the shared Outpost.

This post will discuss how to start using this new functionality and considerations to take into account.

Use cases

Per AWS best practices, customers typically deploy a number of AWS accounts. Utilizing multiple accounts allows for reduced blast radius and the ability to provide infrastructure isolation by line of business, environment type, and even down to individual workloads. Outposts sharing enables customers to extend their existing AWS account structures to seamlessly integrate with Outposts.

Getting started – creating a resource share

Before any resources can be shared, the first step is to configure an AWS Organization (if one does not already exist). Outposts resources can only be shared with accounts under the same AWS Organization. The Outposts can reside in any account under an organization. For centralized management of Outposts, it is recommend to create a dedicated account, or set of accounts, to host Outposts.

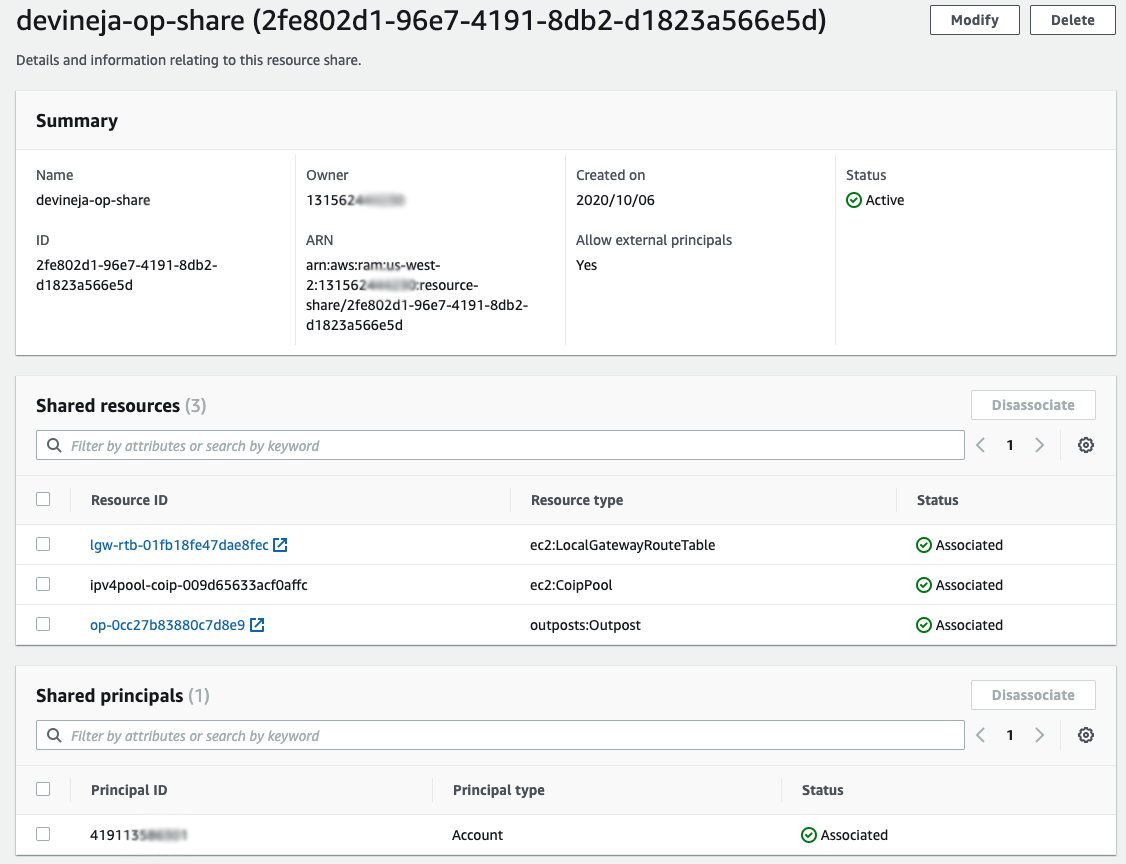
Once an organization is created with member AWS accounts, resources shares can then be created. It’s possible to place multiple resources into a resource share. To facilitate Outposts, LGW, and customer-owned IP (CoIP) sharing, a single resource share can be created that includes all three resources. Principals can then be added to the resource share. The principals can be both organizational units (OUs) and individual AWS account IDs within the AWS Organization. In this case, I’ve shared all three resources with a consumer account ID as a principal, as demonstrated in the following screenshot.

Screen shot of resource sharing.

Sharing an Outpost

After an Outposts is provisioned, the logical Outpost ID can be shared with any account under the AWS Organization. The consumer account then has access to provision resources on the Outposts, such as Amazon EBS volumes and Outposts subnets, as well as launching instances on the shared Outpost.

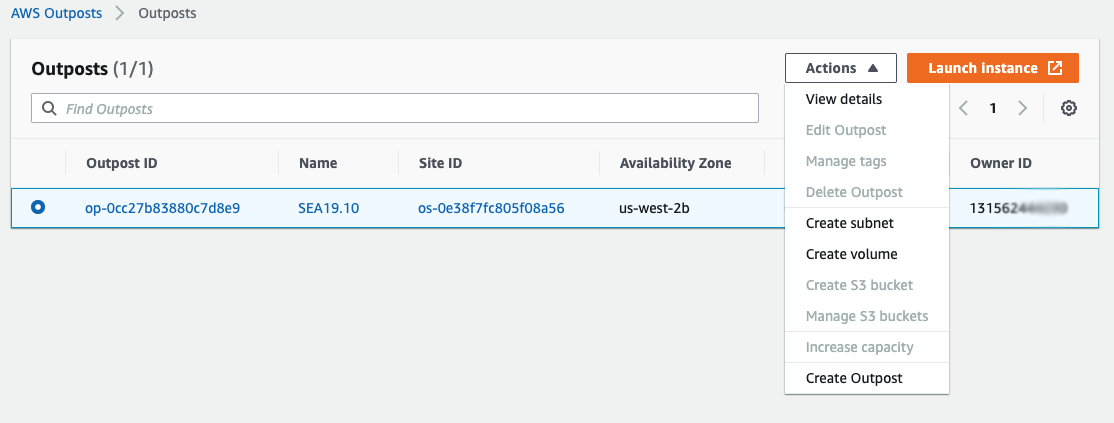
From the AWS Management Console in the consumer account, I can see the shared Outposts ID, its associated Availability Zone, and the owner account ID.

From the AWS Management Console in the consumer account, I can see the shared Outposts ID, its associated Availability Zone, and the owner account ID.

Once the Outposts ID is selected, I can use the Actions drop down menu to create Outposts subnets and EBS volumes. I can also select Launch instance to provision instances on the Outpost.

Once the Outposts ID is selected, I can use the Actions drop down menu to create Outposts subnets and EBS volumes. I can also select Launch instance to provision instances on the Outpost.

Sharing an LGW

Each consumer account can create their own Outposts subnets within their own VPCs. LGW sharing enables the consumer account to create routes an Outposts subnet route table that has a shared LGW as the destination. This enables Outposts subnets in the consumer account to have communication with the on-premises network through the shared LGW.

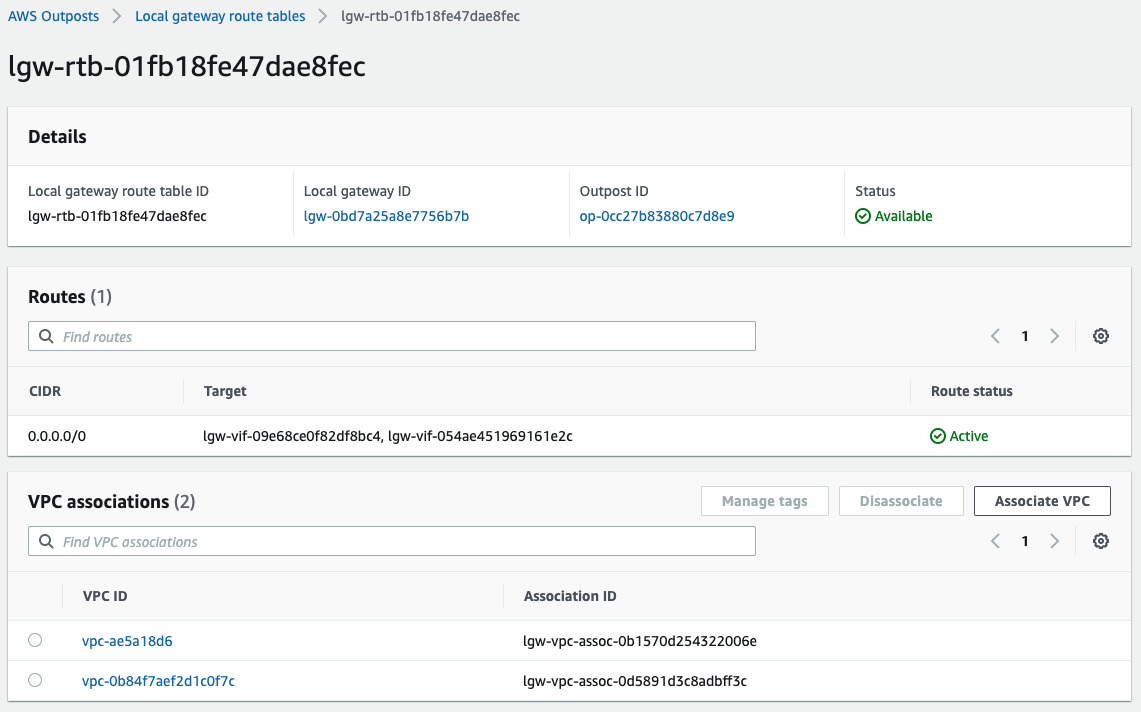
The consumer account view shared LGWs, as shown in the following screenshot.

The consumer account view shared LGWs, as shown in the following screenshot.

The consumer account can then select VPCs within the account to associate with the LGW route table. This enables routing to on-premises if a CoIP is assigned to an instance.

This enables routing to on-premises if a CoIP is assigned to an instance.

Considerations

LGW and Outposts sharing is meant to enable sharing of resources between various accounts within a larger organizational structure. It is not suitable for multi-tenancy outside of an AWS Organization. Additional considerations around capacity planning, access, and local network connectivity should be taken into account.

Resources created in the consumer account are only visible from within the consumer account. The AWS account that owns the Outpost does not have the ability to view instances, EBS volumes, VPCs, subnets, or any other resource created within the consumer account. Since the consumer account is part of an AWS Organization, it is possible to use the default OrganizationAccountAccessRole role that is created by AWS Organizations. This allows for visibility and management of Outpost resources across the AWS Organization.

Capacity information is not shared with the consumer account. However, it is possible to use cross-account CloudWatch metric sharing. Outposts utilization metrics from the account that owns the Outpost can be shared with the consumer account. This allows the consumer account to see what capacity is available on the shared Outposts. I’ve configured the cross-account sharing, and from my consumer account I can see that there is ample c5.xlarge capacity on the shared Outposts.

I’ve configured the cross-account sharing, and from my consumer account I can see that there is ample c5.xlarge capacity on the shared Outposts.

If a principal (consumer account or organizational unit) no longer requires access to Outposts capacity, the resource share can be deleted through RAM in the primary Outposts account. It is important to note that this does not delete subnets, EBS volumes, instances, or other resources running on the shared Outposts. Proper cleanup of Outposts resources within the consumer account (EBS volumes, instances, subnets, etc.) should be planned for whenever removing principals from a resource share to ensure that the capacity is released.

Conclusion 

In the blog post, I described the Outposts and LGW sharing capabilities and demonstrated how they can be used to enable multi-account sharing of an Outpost within an AWS Organization. These new capabilities unlock even more customer use cases and allow for stronger blast-radius and account isolation. It’s exciting to see continued functionality come to Outposts! You can start using LGW and Outposts sharing today. There’s no need to upgrade or modify your Outposts in any way to take advantage of this new and exciting functionality.

The collective thoughts of the interwebz

By continuing to use the site, you agree to the use of cookies. more information

The cookie settings on this website are set to "allow cookies" to give you the best browsing experience possible. If you continue to use this website without changing your cookie settings or you click "Accept" below then you are consenting to this.

Close