Backblaze is happy to announce that Chris Opat has joined our team as senior vice president of cloud operations. Chris will oversee the strategy and operations of the Backblaze global cloud storage platform.
What Chris Brings to Backblaze
Chris expands the company’s leadership by bringing his impressive cloud and infrastructure knowledge with more than 25 years of industry experience.
Previously, Chris served as senior vice president leading platform engineering and operations at StackPath, a specialized provider in edge technology and content delivery. He also held leadership roles at CyrusOne, CompuCom, Cloudreach, and Bear Stearns/JPMorgan. Chris earned his Bachelor of Science degree in television and digital media production from Ithaca College.
Backblaze CEO, Gleb Budman, shared that Chris is a forward-thinking cloud leader with a proven track record of leading teams that are clever and bold in solving problems and creating best-in-class experiences for customers. His expertise and approach will be pivotal as more customers move to an open cloud ecosystem and will help advance Backblaze’s cloud strategy as we continue to grow.
Chris’ Role as SVP of Cloud Operations
As SVP of Cloud Operations, Chris oversees cloud strategy, platform engineering, and technology infrastructure, enabling Backblaze to further scale capacity and improve performance to meet larger-sized customers’ needs, as we continue to see success in moving up-market.
Chris says of his new role at Backblaze:
Backblaze’s vision and mission resonate with me. I’m proud to be joining a company that is supporting customers and advocating for an open cloud ecosystem. I’m looking forward to working with the amazing team at Backblaze as we continue to scale with our customers and accelerate growth.
This post was originally published in 2017 and updated in 2019 and 2023 to share the latest information on cloud storage tiering.
Temperature, specifically a range from cold to hot, is a common way to describe different levels of data storage. It’s possible these terms originated based on where data was historically stored. Hot data was stored close to the heat of the spinning drives and CPUs. Cold data was stored on drives or tape away from the warmer data center, likely tucked away on a shelf somewhere.
Today, they’re used to describe how easily you can access your data. Hot storage is for data you need fast or access frequently. Cold storage is typically used for data you rarely need. The terms are used by most data storage providers to describe their tiered storage plans. However, there are no industry standard definitions for what hot and cold mean, which makes comparing services across different storage providers challenging.
It’s a common misconception that hot storage means expensive storage and that cold storage means slower, less expensive storage. Today, we’ll explain why these terms may no longer be serving you when it comes to anticipating storage cost and performance.
Defining Hot Storage
Hot storage serves as the go-to destination for frequently accessed and mission-critical data that demands swift retrieval. Think of it as the fast lane of data storage, tailored for scenarios where time is of the essence. Industries relying on real-time data processing and rapid response times, such as video editing, web content, and application development, find hot storage to be indispensable.
To achieve the necessary rapid data access, hot storage is often housed in hybrid or tiered storage environments. The hotter the service, the more it embraces cutting-edge technologies, including the latest drives, fastest transport protocols, and geographical proximity to clients or multiple regions. However, the resource-intensive nature of hot storage warrants a premium, and leading cloud data storage providers like Microsoft’s Azure Hot Blobs and AWS S3 reflect this reality.
Data stored in the hottest tier might use solid-state drives (SSDs), which are optimized for lower latency and higher transactional rates compared to traditional hard drives. In other cases, hard disk drives are more suitable for environments where the drives are heavily accessed due to their higher durability standing up to intensive read/write cycles.
Regardless of the storage medium, hot data workloads necessitate fast and consistent response times, making them ideal for tasks like capturing telemetry data, messaging, and data transformation.
Defining Cold Storage
On the opposite end of the data storage spectrum lies cold storage, catering to information accessed infrequently and without the urgency of hot data. Cold storage houses data that might remain dormant for extended periods, months, years, decades, or maybe forever. Practical examples might include old projects or records mandated for financial, legal, HR, or other business record-keeping requirements.
Cold cloud storage systems prioritize durability and cost-effectiveness over real-time data manipulation capabilities. Services like Amazon Glacier and Google Coldline take this approach, offering slower retrieval and response times than their hot storage counterparts. Lower performing and less expensive storage environments, both on-premises and in the cloud, commonly host cold data.
Linear Tape Open (LTO or Tape) has historically been a popular storage medium for cold data, though manual retrieval from storage racks renders it relatively slow. To access data from LTO, the tapes must be physically retrieved from storage racks and mounted in a tape reading machine, making it one of the slowest, therefore coldest, methods of storing data.
While cold cloud storage systems generally boast lower overall costs than warm or hot storage, they may incur higher per-operation expenses. Accessing data from cold storage demands patience and thoughtful planning, as the response times are intentionally sluggish.
With the landscape of data storage continually evolving, the definition of cold storage has also expanded. In modern contexts, cold storage might describe completely offline data storage, wherein information resides outside the cloud and remains disconnected from any network. This isolation, also described as air gapped, is crucial for safeguarding sensitive data. However, today, data can be virtually air-gapped using technology like Object Lock.
Traditional Views of Cold and Hot Data Storage
Cold
Hot
Access Speed
Slow
Fast
Access Frequency
Seldom or Never
Frequent
Data Volume
Low
High
Storage Media
Slower drives, LTO, offline
Faster drives, durable drives, SSDs
Cost
Lower
Higher
What Is Hot Cloud Storage?
Today there are new players in data storage, who, through innovation and efficiency, are able to offer cloud storage at the cost of cold storage, but with the performance and availability of hot storage.
The concept of organizing data by temperature has long been employed by diversified cloud providers like Amazon, Microsoft, and Google to describe their tiered storage services and set pricing accordingly. But, today, in a cloud landscape defined by the open, multi-cloud internet, customers have come to realize the value and benefits they can get from moving away from those diversified providers.
A wave of independent cloud providers are disrupting the traditional notions of cloud storage temperatures, offering cloud storage that’s as cost-effective as cold storage, yet delivering the speed and availability associated with hot storage. If you’re familiar with Backblaze B2 Cloud Storage, you know where we’re going with this.
Backblaze B2 falls into this category. We can compete on price with LTO and other traditionally cold storage services, but can be used for applications that are usually reserved for hot storage, such as media management, workflow collaboration, websites, and data retrieval.
The newfound efficiency of this model has prompted customers to rethink their storage strategies, opting to migrate entirely from cumbersome cold storage and archival systems.
What Temperature Is Your Cloud Storage?
When it comes to choosing the right storage temperature for your cloud data, organizations must carefully consider their unique needs. Ensuring that storage costs align with actual requirements is key to maintaining a healthy bottom line. The ongoing evolution of cloud storage services, driven by efficiency, technology, and innovation, further amplifies the need for tailored storage solutions.
Still have questions that aren’t answered here? Join the discussion in the comments.
Are you confident that your backup strategy has you covered? If not, it’s time to confront the reality that your backup strategy might not be as strong as you think. And even if you’re feeling great about it, it can never hurt to poke holes in your strategy to see where you need to shore up your defenses.
Whether you’re a small business owner wearing many hats (including the responsibility for backing up your company’s data) or a seasoned IT professional, you know that protecting your data is a top priority. The industry standard is the 3-2-1 backup strategy, which states you should have three copies of your data on two different kinds of media with at least one copy off-site or in the cloud. But a lot has changed since that standard was introduced.
In this post, we’ll identify several ways your 3-2-1 strategy (and your backups in general) could fail. These are common mistakes that even professional IT teams can make. While 3-2-1 is a great place to start, especially if you’re not currently following that approach, it can now be considered table stakes.
For larger businesses or any business wanting to fail proof its backups, read on to learn how you can plug the gaps in your 3-2-1 strategy and better secure your data from ransomware and other disasters.
Join the Webinar
There’s more to learn about how to shore up your data protection strategy. Join Backblaze on Thursday, August 10 at 10 a.m. PT/noon CT/5 p.m. UTC for a 30-minute webinar on “10 Common Data Protection Mistakes.”
Let’s start with a quick review of the 3-2-1 strategy.
The 3-2-1 Backup Strategy
A 3-2-1 strategy means having at least three total copies of your data, two of which are local but on different media, and at least one off-site copy or in the cloud. For instance, a business may keep a local copy of its data on a server at the main office, a second copy of its data on a NAS device in the same location, and a third copy of its data in the public cloud, such as Backblaze B2 Cloud Storage. Hence, there are three copies of its data with two local copies on different media (the server and NAS) and one copy stored off-site in the cloud.
The 3-2-1 rule originated in 2005 when Peter Krogh, a photographer, writer, and consultant, introduced it in his book, “The DAM Book: Digital Asset Management for Photographers.” As this rule was developed almost 20 years ago, you can imagine that it may be outdated in some regards. Consider that 2005 was the year YouTube was founded. Let’s face it, a lot has changed since 2005, and today the 3-2-1 strategy is just the starting point. In fact, even if you’re faithfully following the 3-2-1 rule, there may still be some gaps in your data protection strategy.
While backups to external hard drives, tape, and other recordable media (CDs, DVDs, and SD cards) were common two decades ago, those modalities are now considered legacy storage. The public cloud was a relatively new innovation in 2005, so, at first, 3-2-1 did not even consider the possibilities of cloud storage.
Arguably, the entire concept of “media” in 3-2-1 (as in having two local copies of your data on two different kinds of media) may not make sense in today’s modern IT environment. And, while an on-premises copy of your data typically offers the fastest Recovery Time Objective (RTO), having two local copies of your data will not protect against the multitude of potential natural disasters like fire, floods, tornados, and earthquakes.
The “2” part of the 3-2-1 equation may make sense for consumers and sole proprietors (e.g., photographers, graphic designers, etc.) who are prone to hardware failure and for whom having a second copy of data on a NAS device or external hard drive is an easy solution, but enterprises have more complex infrastructures.
Enterprises may be better served by having more than one off-site copy, in case of an on-premises data disaster. This can be easily automated with a cloud replication tool which allows you to store your data in different regions. (Backblaze offers Cloud Replication for this purpose.) Replicating your data across regions provides geographical separation from your production environment and added redundancy. The bottom line is that 3-2-1 is a good starting point for configuring your backup strategy, but it should not be taken as a one-size-fits-all approach.
The 3-2-1-1-0 Strategy
Some companies in the data protection space, like Veeam, have updated 3-2-1 with the 3-2-1-1-0 approach. This particular definition stipulates that you:
Maintain at least three copies of business data.
Store data on at least two different types of storage media.
Keep one copy of the backups in an off-site location.
Keep one copy of the media offline or air gapped.
Ensure all recoverability solutions have zero errors.
The 3-2-1-1-0 approach addresses two important weaknesses of 3-2-1. First, 3-2-1 doesn’t address the prevalence of ransomware. Even if you follow 3-2-1 with fidelity, your data could still be vulnerable to a ransomware attack. The 3-2-1-1-0 rule covers this by requiring one copy to be offline or air gapped. With Object Lock, your data can be made immutable, which is considered a virtual air gap, thus fulfilling the 3-2-1-1-0 rule.
Second, 3-2-1 does not consider disaster recovery (DR) needs. While backups are one part of your disaster recovery plan, your DR plan needs to consider many more factors. The “0” in 3-2-1-1-0 captures an important aspect of DR planning, which is that you must test your backups and ensure you can recover from them without error. Ultimately, you should architect your backup strategy to support your DR plan and the potential need for a recovery, rather than trying to abide by any particular backup rule.
Additional Gaps in Your Backup Strategy
As you can tell by now, there are many shades of gray when it comes to 3-2-1, and these varying interpretations can create areas of weakness in a business’ data protection plan. Review your own plan for the following seven common mistakes and close the gaps in your strategy by implementing the suggested best practices.
1. Using Sync Functionality Instead of Backing Up
You may be following 3-2-1, but if copies of your data are stored on a sync service like Google Drive, Dropbox, or OneDrive, you’re not fully protected. Syncing your data does not allow you to recover from previous versions with the level of granularity that a backup offers.
Best Practice: Instead, ensure you have three copies of your data protected by true backup functionality.
2. Counting Production Data as a Backup
Some interpret the production data to be one of the three copies of data or one of the two different media types.
Best Practice: It’s open to interpretation, but you may want to consider having three copies of data in addition to your production data for the best protection.
3. Using a Storage Appliance That’s Vulnerable to Ransomware
Many on-premises storage systems now support immutability, so it’s a good time to reevaluate your local storage.
Best Practice: New features in popular backup software like Veeam even enable NAS devices to be protected from ransomware. Learn more about Veeam support for NAS immutability and how to orchestrate end-to-end immutability for impenetrable backups.
4. Not Backing Up Your SaaS Data
It’s a mistake to think your Microsoft 365, Google Workspace, and other software as a service (SaaS) data is protected because it’s already hosted in the cloud. SaaS providers operate under a “shared responsibility model,” meaning they may not back up your data as often as you’d like or provide effective means to recovery.
Best Practice: Be sure to back up your SaaS data to the cloud to ensure complete coverage of the 3-2-1 rule.
5. Relying On Off-Site Legacy Storage
It’s always a good idea to have at least one copy of your data on-site for the fastest RTO. But if you’re relying on legacy storage, like tape, to fulfill the off-site requirement of the 3-2-1 strategy, you probably know how expensive and time-consuming it can be. And sometimes that expense and timesuck means your off-site backups are not updated as often as they should be, which leads to mistakes.
Best Practice: Replace your off-site storage with cloud storage to modernize your architecture and prevent gaps in your backups. Backblaze B2 is one-fifth of the cost of AWS, so it’s easily affordable to migrate off tape and other legacy storage systems.
6. No Plan for Affected Infrastructure
Faithfully following 3-2-1 will get you nowhere if you don’t have the infrastructure to restore your backups. If your infrastructure is destroyed or disrupted, you need a way to ensure business continuity in the face of data disaster.
Best Practice: Be sure your disaster recovery plan outlines how you will access your DR documentation and implement the plan even if your environment is down. Using a tool like Cloud Instant Business Recovery (Cloud IBR), which offers an on-demand, automated solution that allows Veeam users to stand up bare metal servers in the cloud, allows you to immediately begin recovering data while rebuilding infrastructure.
7. Keeping Your Off-Site Copy Down the Street
The 3-2-1 policy states that one copy of your data be kept off-site, and some companies maintain a DR site for that exact purpose. However, if your DR facility is in the same local area as your main office, you have a big gap in your data protection strategy.
Best Practice: Ideally, you should have an off-site copy of your data stored in a public cloud data center far from your data production site, to protect against regional natural disasters.
Telco Adopts Cloud for Geographic Separation
AcenTek’s existing storage scheme covered the 3-2-1 basics, but their off-site copy was no further away than their own data center. In the case of a large natural disaster, their one off-site copy could be vulnerable to destruction, leaving them without a path to recovery. With Backblaze B2, AcenTek has an additional layer of resilience for its backup data by storing it in a secure, immutable cloud storage platform across the country from their headquarters in Minnesota.
Modernize Your Backup Strategy
The 3-2-1 strategy is a great starting point for small businesses that need to develop a backup plan, but larger mid-market and enterprise organizations must think about business continuity more holistically.
Backblaze B2 Cloud Storage makes it easy to modernize your backup strategy by sending data backups and archives straight to the cloud—without the expense and complexity of many public cloud services.
At one-fifth of the price of AWS, Backblaze B2 is an affordable, time-saving alternative to the hyperscalers, LTO, and traditional DR sites. Get started today or contact Sales for more information on Backblaze B2 Reserve, Backblaze’s all-inclusive capacity-based pricing that includes premium support and no egress fees. The intricacies of operations, data management, and potential risks demand a more advanced approach to ensure uninterrupted operations. By leveraging cloud storage, you can create a robust, cost-effective, and flexible backup strategy that you can easily customize to your business needs.
Interested in learning more about backup, business continuity, and disaster recovery best practices? Check out the free Backblaze resources below.
At the end of Q2 2023, Backblaze was monitoring 245,757 hard drives and SSDs in our data centers around the world. Of that number, 4,460 are boot drives, with 3,144 being SSDs and 1,316 being HDDs. The failure rates for the SSDs are analyzed in the SSD Edition: 2022 Drive Stats review.
Today, we’ll focus on the 241,297 data drives under management as we review their quarterly and lifetime failure rates as of the end of Q2 2023. Along the way, we’ll share our observations and insights on the data presented, tell you about some additional data fields we are now including and more.
Q2 2023 Hard Drive Failure Rates
At the end of Q2 2023, we were managing 241,297 hard drives used to store data. For our review, we removed 357 drives from consideration as they were used for testing purposes or drive models which did not have at least 60 drives. This leaves us with 240,940 hard drives grouped into 31 different models. The table below reviews the annualized failure rate (AFR) for those drive models for Q2 2023.
Notes and Observations on the Q2 2023 Drive Stats
Zero Failures: There were six drive models with zero failures in Q2 2023 as shown in the table below.
The table is sorted by the number of drive days each model accumulated during the quarter. In general a drive model should have at least 50,000 drive days in the quarter to be statistically relevant. The top three drives all meet that criteria, and having zero failures in a quarter is not surprising given the lifetime AFR for the three drives ranges from 0.13% to 0.45%. None of the bottom three drives has accumulated 50,000 drive days in the quarter, but the two Seagate drives are off to a good start. And, it is always good to see the 4TB Toshiba (model: MD04ABA400V), with eight plus years of service, post zero failures for the quarter.
The Oldest Drive? The drive model with the oldest average age is still the 6TB Seagate (model: ST6000DX000) at 98.3 months (8.2 years), with the oldest drive of this cohort being 104 months (8.7 years) old.
The oldest operational data drive in the fleet is a 4TB Seagate (model: ST4000DM000) at 105.2 months (8.8 years). That is quite impressive, especially in a data center environment, but the winner for the oldest operational drive in our fleet is actually a boot drive: a WDC 500GB drive (model: WD5000BPKT) with 122 months (10.2 years) of continuous service.
Upward AFR: The AFR for Q2 2023 was 2.28%, up from 1.54% in Q1 2023. While quarterly AFR numbers can be volatile, they can also be useful in identifying trends which need further investigation. In this case, the rise was expected as the age of our fleet continues to increase. But was that the real reason?
Digging in, we start with the annualized failure rates and average age of our drives grouped by drive size, as shown in the table below.
For our purpose, we’ll define a drive as old when it is five years old or more. Why? That’s the warranty period of the drives we are purchasing today. Of course, the 4TB and 6TB drives, and some of the 8TB drives, came with only two year warranties, but for consistency we’ll stick with five years as the point at which we label a drive as “old”.
Using our definition for old drives eliminates the 12TB, 14TB and 16TB drives. This leaves us with the chart below of the Quarterly AFR over the last three years for each cohort of older drives, the 4TB, 6TB, 8TB, and 10TB models.
Interestingly, the oldest drives, the 4TB and 6TB drives, are holding their own. Yes, there has been an increase over the last year or so, but given their age, they are doing well.
On the other hand, the 8TB and 10TB drives, with an average of five and six years of service respectively, require further attention. We’ll look at the lifetime data later on in this report to see if our conclusions are justified.
What’s New in the Drive Stats Data?
For the past 10 years, we’ve been capturing and storing the drive stats data and since 2015 we’ve open sourced the data files that we used to create the Drive Stats reports. From time to time, new SMART attribute pairs have been added to the schema as we install new drive models which report new sets of SMART attributes. This quarter we decided to capture and store some additional data fields about the drives and the environment they operate in, and we’ve added them to the publicly available Drive Stats files that we publish each quarter.
The New Data Fields
Beginning with the Q2 2023 Drive Stats data, there are three new data fields populated in each drive record.
Vault_id: All data drives are members of a Backblaze Vault. Each vault consists of either 900 or 1,200 hard drives divided evenly across 20 storage servers. The vault is a numeric value starting at 1,000.
Pod_id: There are 20 storage servers in each Backblaze Vault. The Pod_id is a numeric field with values from 0 to 19 assigned to one of the 20 storage servers.
Is_legacy_format: Currently 0, but will be useful over the coming quarters as more fields are added.
The new schema is as follows:
date
serial_number
model
capacity_bytes
failure
vault_id
pod_id
is_legacy_format
smart_1_normalized
smart_1_raw
Remaining SMART value pairs (as reported by each drive model)
Occasionally, our readers would ask if we had any additional information we could provide with regards to where a drive lived, and, more importantly, where it died. The newly-added data fields above are part of the internal drive data we collect each day, but they were not included in the Drive Stats data that we use to create the Drive Stats reports. With the help of David from our Infrastructure Software team, these fields will now be available in the Drive Stats data.
How Can We Use the Vault and Pod Information?
First a caveat: We have exactly one quarter’s worth of this new data. While it was tempting to create charts and tables, we want to see a couple of quarters worth of data to understand it better. Look for an initial analysis later on in the year.
That said, what this data gives us is the storage server and the vault of every drive. Working backwards, we should be able to ask questions like: “Are certain storage servers more prone to drive failure?” or, “Do certain drive models work better or worse in certain storage servers?” In addition, we hope to add data elements like storage server type and data center to the mix in order to provide additional insights into our multi-exabyte cloud storage platform.
Over the years, we have leveraged our Drive Stats data internally to improve our operational efficiency and durability. Providing these new data elements to everyone via our Drive Stats reports and data downloads is just the right thing to do.
There’s a New Drive in Town
If you do decide to download our Drive Stats data for Q2 2023, there’s a surprise inside—a new drive model. There are only four of these drives, so they’d be easy to miss, and they are not listed on any of the tables and charts we publish as they are considered “test” drives at the moment. But, if you are looking at the data, search for model “WDC WUH722222ALE6L4” and you’ll find our newly installed 22TB WDC drives. They went into testing in late Q2 and are being put through their paces as we speak. Stay tuned. (Psst, as of 7/28, none had failed.)
Lifetime Hard Drive Failure Rates
As of June 30, 2023, we were tracking 241,297 hard drives used to store customer data. For our lifetime analysis, we removed 357 drives that were only used for testing purposes or did not have at least 60 drives represented in the full dataset. This leaves us with 240,940 hard drives grouped into 31 different models to analyze for the lifetime table below.
Notes and Observations About the Lifetime Stats
The Lifetime AFR also rises. The lifetime annualized failure rate for all the drives listed above is 1.45%. That is an increase of 0.05% from the previous quarter of 1.40%. Earlier in this report by examining the Q2 2023 data, we identified the 8TB and 10TB drives as primary suspects in the increasing rate. Let’s see if we can confirm that by examining the change in the lifetime AFR rates of the different drives grouped by size.
The red line is our baseline as it is the difference from Q1 to Q2 (0.05%) of the lifetime AFR for all drives. Drives above the red line support the increase, drives below the line subtract from the increase. The primary drives (by size) which are “driving” the increased lifetime annualized failure rate are the 8TB and 10TB drives. This confirms what we found earlier. Given there are relatively few 10TB drives (1,124) versus 8TB drives (24,891), let’s dig deeper into the 8TB drives models.
The Lifetime AFR for all 8TB drives jumped from 1.42% in Q1 to 1.59% in Q2. An increase of 12%. There are six 8TB drive models in operation, but three of these models comprise 99.5% of the drive failures for the 8TB drive cohort, so we’ll focus on them. They are listed below.
For all three models, the increase of the lifetime annualized failure rate from Q1 to Q2 is 10% or more which is statistically similar to the 12% increase for all of the 8TB drive models. If you had to select one drive model to focus on for migration, any of the three would be a good candidate. But, the Seagate drives, model ST8000DM002, are on average nearly a year older than the other drive models in question.
Not quite a lifetime? The table above analyzes data for the period of April 20, 2013 through June 30, 2023, or 10 years, 2 months and 10 days. As noted earlier, the oldest drive we have is 10 years and 2 months old, give or take a day or two. It would seem we need to change our table header, but not quite yet. A drive that was installed anytime in Q2 2013 and is still operational today would report drive days as part of the lifetime data for that model. Once all the drives installed in Q2 2013 are gone, we can change the start date on our tables and charts accordingly.
A Word About Drive Failure
Are we worried about the increase in drive failure rates? Of course we’d like to see them lower, but the inescapable reality of the cloud storage business is that drives fail. Over the years, we have seen a wide range of failure rates across different manufacturers, drive models, and drive sizes. If you are not prepared for that, you will fail. As part of our preparation, we use our drive stats data as one of the many inputs into understanding our environment so we can adjust when and as we need.
So, are we worried about the increase in drive failure rates? No, but we are not arrogant either. We’ll continue to monitor our systems, take action where needed, and share what we can with you along the way.
The Hard Drive Stats Data
The complete data set used to create the information used in this review is available on our Hard Drive Stats Data webpage. You can download and use this data for free for your own purpose. All we ask are three things: 1) you cite Backblaze as the source if you use the data, 2) you accept that you are solely responsible for how you use the data, and 3) you do not sell this data to anyone; it is free.
If you want the tables and charts used in this report, you can download the .zip file from Backblaze B2 Cloud Storage which contains an MS Excel spreadsheet with a tab for each of the tables or charts..
Good luck and let us know if you find anything interesting.
It’s no secret that artificial intelligence (AI) is driving innovation, particularly when it comes to processing data at scale. Machine learning (ML) and deep learning (DL) algorithms, designed to solve complex problems and self-learn over time, are exploding the possibilities of what computers are capable of.
It’s no secret that artificial intelligence (AI) is driving innovation, particularly when it comes to processing data at scale. Machine learning (ML) and deep learning (DL) algorithms, designed to solve complex problems and self-learn over time, are exploding the possibilities of what computers are capable of.
As the problems we ask computers to solve get more complex, there’s also an unavoidable, explosive growth in the number of processes they run. This growth has led to the rise of specialized processors and a whole host of new acronyms.
Joining the ranks of central processing units (CPUs), which you may already be familiar with, are neural processing units (NPUs), graphics processing units (GPUs), and tensile processing units (TPUs).
So, let’s dig in to understand how some of these specialized processors work, and how they’re different from each other. If you’re still with me after that, stick around for an IT history lesson. I’ll get into some of the more technical concepts about the combination of hardware and software developments in the last 100 or so years.
Central Processing Unit (CPU): The OG
Think of the CPU as the general of your computer. There are two main parts of a CPU, an arithmetic-logic unit (ALU) and a control unit. An ALU allows arithmetic (add, subtract, etc.) and logic (AND, OR, NOT, etc.) operations to be carried out. The control unit controls the ALU, memory, and IO functions, which tells them how to respond to the program that’s just been read from the memory.
The best way to track what the CPU does is to think of it as an input/output flow. The CPU will take the request (input), access the memory of the computer for instructions on how to perform that task, delegate the execution to either its own ALUs or another specialized processor, take all that data back into its control unit, then take a single, unified action (output).
For a visual, this is the the circuitry map for an ALU from 1970:
From our good friends at Texas Instruments: the combinational logic circuitry of the 74181 integrated circuit, an early four-bit ALU. Image source.
But, more importantly, here’s a logic map about what a CPU does:
CPUs have gotten more powerful over the years as we’ve moved from single-core processors to multicore processors. Basically, there are several ALUs executing tasks that are being managed by the CPU’s control unit, and they perform tasks in parallel. That means that it works well in combination with specialized AI processors like GPUs.
The Rise of Specialized Processors
When a computer is given a task, the first thing the processor has to do is communicate with the memory, including program memory (ROM)—designed for more fixed tasks like startup—and data memory (RAM)—designed for things that change more often like loading applications, editing a document, and browsing the internet. The thing that allows these elements to talk is called the bus, and it can only access one of the two types of memory at one time.
In the past, processors ran more slowly than memory access, but that’s changed as processors have gotten more sophisticated. Now, when CPUs are asked to do a bunch of processes on large amounts of data, the CPU ends up waiting for memory access because of traffic on the bus. In addition to slower processing, it also uses a ton of energy. Folks in computing call this the Von Neumann bottleneck, and as compute tasks like those for AI have become more complex, we’ve had to work out ways to solve this problem.
One option is to create chips that are optimized to specific tasks. Specialized chips are designed to solve the processing difficulties machine learning algorithms present to CPUs. In the race to create the best AI processor, big players like Google, IBM, Microsoft, and Nvidia have solved this with specialized processors that can execute more logical queries (and thus more complex logic). They achieve this in a few different ways. So, let’s talk about what that looks like: What are GPUs, TPUs, and NPUs?
Graphics Processing Unit (GPU)
GPUs started out as specialized graphics processors and are often conflated with graphics cards (which have a bit more hardware to them). GPUs were designed to support massive amounts of parallel processing, and they work in tandem with CPUs, either fully integrated on the main motherboard, or, for heavier loads, on their own dedicated piece of hardware. They also use a ton of energy and thus generate heat.
GPUs have long been used in gaming, and it wasn’t until the 2000s that folks started using them for general computing—thanks to Nvidia. Nvidia certainly designs chips, of course, but they also introduced a proprietary platform called CUDA that allows programmers to have direct access to a GPU’s virtual instruction set and parallel computational elements. This means that you can set up compute kernels, or clusters of processors that work together and are ideally suited to specific tasks, without taxing the rest of your resources. Here’s a great diagram that shows the workflow:
This made GPUs wildly applicable for machine learning tasks, and they benefited from the fact that they leveraged existing, well-known processes. What we mean by that is: oftentimes when you’re researching solutions, the solution that wins is not always the “best” one based on pure execution. If you’re introducing something that has to (for example) fundamentally change consumer behavior, or that requires everyone to relearn a skill, you’re going to have resistance to adoption. So, GPUs playing nice with existing systems, programming languages, etc. aided wide adoption. They’re not quite plug-and-play, but you get the gist.
As time has gone on, there are now also open source platforms that support GPUs that are supported by heavy-hitting industry players (including Nvidia). The largest of these is OpenCL. And, folks have added tensor cores, which this article does a fabulous job of explaining.
Tensor Processing Unit (TPU)
Great news: the TL:DR of this acronym boils down to: It’s Google’s proprietary AI processor. They started using them in their own data centers in 2015, released them to the public in 2016, and there are some commercially available models. They run on ASICs (hard-etched chips I’ll talk more about later) and Google’s TensorFlow software.
Compared with GPUs, they’re specifically designed to have slightly lower precision, which makes sense given that this makes them more flexible to different types of workloads. I think Google themselves sum it up best:
If it’s raining outside, you probably don’t need to know exactly how many droplets of water are falling per second—you just wonder whether it’s raining lightly or heavily. Similarly, neural network predictions often don’t require the precision of floating point calculations with 32-bit or even 16-bit numbers. With some effort, you may be able to use 8-bit integers to calculate a neural network prediction and still maintain the appropriate level of accuracy.
GPUs, on the other hand, were originally designed for graphics processing and rendering, which relies on each point’s relationship to each other to create a readable image—if you have less accuracy in those points, you amplify that in their vectors, and then you end up with Playstation 2 Spyro instead of Playstation 4 Spyro.
Another important design choice that deviates from CPUs and GPUs is that TPUs are designed around a systolic array. Systolic arrays create a network of processors that are each computing a partial task, then sending it along to the next node until you reach the end of the line. Each node is usually fixed and identical, but the program that runs between them is programmable. It’s called a data processing unit (DPU).
Neural processing unit (NPU)
“NPU” is sometimes used as the category name for all specialized AI processors, but it’s more often specifically applied to those designed for mobile devices. Just for confusion’s sake, note that Samsung also refers to its proprietary chipsets as NPU.
NPUs contain all the necessary information to complete AI processing, and they run on a principle of synaptic weight. Synaptic weight is a term adapted from biology which describes the strength of connection between two neurons. Simply put, in our bodies if two neurons find themselves sharing information more often, the connection between them becomes literally stronger, making it easier for energy to pass between them. At the end of the day, that makes it easier for you to do something. (Wow, the science between habit forming makes a lot more sense now.) Many neural networks mimic this.
When we say AI algorithms learn, this is one of the ways—they track likely possibilities over time, and give more weight to that connected node. The impact is huge when it comes to power consumption. Parallel processing runs each task next to each other, but isn’t great at accounting for the completion of tasks, especially as your architecture scales and processing units might be more separate.
Quick Refresh: Neural Networks and Decision Making in Computers
As we discuss in AI 101, when you’re thinking about the process of making a decision, what you see is that you’re actually making many decisions in a series, and often the things you’re considering before you reach your final decision affect the eventual outcome. Since computers are designed on a strict binary, they’re not “naturally” suited to contextualizing information in order to make better decisions. Neural networks are the solution. They’re based on matrix math, and they look like this:
Basically, you’re asking a computer to have each potential decision check in with all the other possibilities, to weigh the outcome, and to learn from their own experience and sensory information. That all translates to more calculations being run at one time.
Recapping the Key Differences
That was a lot. Here’s a summary:
Functionality: GPUs were developed for graphics rendering, while TPUs and NPUs are purpose-built for AI/ML workloads.
Parallelism: GPUs are made for parallel processing, ideal for training complex neural networks. TPUs take this specialization further, focusing on tensor operations to achieve higher speeds and energy efficiencies.
Customization: TPUs and NPUs are more specialized and customized for AI tasks, while GPUs offer a more general-purpose approach suitable for various compute workloads.
Use Cases: GPUs are commonly used in data centers and workstations for AI research and training. TPUs are extensively utilized in Google’s cloud infrastructure, and NPUs are prevalent in AI-enabled devices like smartphones and Internet of Things (IoT) gadgets.
Availability: GPUs are widely available from various manufacturers and accessible to researchers, developers, and hobbyists. TPUs are exclusive to Google Cloud services, and NPUs are integrated into specific devices.
Do the Differences Matter?
The definitions of the different processors start to sound pretty similar after a while. A multicore processor combines multiple ALUs under a central control unit. A GPU combines more ALUs under a specialized processor. A TPU combines multiple compute nodes under a DPU, which is analogous to a CPU.
At the end of the day, there’s some nuance about the different design choices between processors, but their impact is truly seen at scale versus at the consumer level. Specialized processors can handle larger datasets more efficiently, which translates to faster processing using less electrical power (though our net power usage may go up as we use AI tools more).
It’s also important to note that these are new and changing terms in a new and changing landscape. Google’s TPU was announced in 2015, just eight years ago. I can’t count the amount of conversations I’ve had that end in a hyperbolic impression of what AI is going to do for/to the world, and that’s largely because people think that there’s no limit to what it is.
But, the innovations that make AI possible were created by real people. (Though, maybe AIs will start coding themselves, who knows.) And, chips that power AI are real things—a piece of silicon that comes from the ground and is processed in a lab. Wrapping our heads around what those physical realities are, what challenges we had to overcome, and how they were solved, can help us understand how we can use these tools more effectively—and do more cool stuff in the future.
Bonus Content: A Bit of a History of the Hardware
Which brings me to our history lesson. In order to more deeply understand our topic today, you have to know a little bit about how computers are physically built. The most fundamental language of computers is binary code, represented as a series of 0s and 1s. Those values correspond to whether a circuit is closed or open, respectively. When a circuit is closed, you cannot push power through it. When it’s open, you can. Transistors regulate current flow, generate electrical signals, and act as a switch or gate. You can connect lots of transistors with circuitry to create an integrated circuit chip.
The combination of open and closed patterns of transistors can be read by your computer. As you add more transistors, you’re able to express more and more numbers in binary code. You can see how this influences the basic foundations of computing in how we measure bits and bytes. Eight transistors store one byte of data: two possibilities for each of the eight transistors, and then every possible combination of those possibilities (2^8) = 256 possible combinations of open/closed gates (bits), so 8 bits = one byte, which can represent any number between 0 and 255.
Transistors combining to create logic. You need a bunch of these to run a program. Image source.
Improvements in reducing transistor size and increasing transistor density on a single chip has led to improvements in capacity, speed, and power consumption, largely due to our ability to purify semiconductor materials, leverage more sophisticated tools like chemical etching, and improve clean room technology. That all started with the integrated circuit chip.
Integrated circuit chips were invented around 1958, fueled by the discoveries of a few different people who solved different challenges nearly simultaneously. Jack Kilby of Texas Instruments created a hybrid integrated circuit measuring about 7/16” by 1/16” (11.1 mm by 1.6 mm). Robert Noyce (eventual co-founder of Intel) went on to create the first monolithic integrated circuit chip (so, all circuits held on the same chip) and it was around the same size. Here’s a blown-up version of it, held by Noyce:
Note those first chips only held about 60 transistors. Current chips can have billions of transistors etched onto the same microchip, and are even smaller. Here’s an example of what a integrated circuit looks like when it’s exposed:
And, that, folks, is one of the reasons you can now have a whole computer in your pocket in the guise of a smartphone. As you can imagine, something the size of a modern laptop or rack-mounted server can combine more of these elements more effectively. Hence, the rise of AI.
One More Acronym: What are FGPAs?
So far, I’ve described fixed, physical points on a chip, but chip performance is also affected by software. Software represents the logic and instructions for how all these things work together. So, when you create a chip, you have two options: you either know what software you’re going to run and create a customized chip that supports that, or you get a chip that acts like a blank slate and can be reprogrammed based on what you need.
The first method is called application-specific integrated circuits (ASIC). However, just like any proprietary build in manufacturing, you need to build them at scale for them to be profitable, and they’re slower to produce. Both CPUs and GPUs typically run on hard-etched chips like this.
Reprogrammable chips are known as field-programmable gate arrays (FPGA). They’re flexible and come with a variety of standard interfaces for developers. That means they’re incredibly valuable for AI applications, and particularly deep learning algorithms—as things rapidly advance, FPGAs can be continuously reprogrammed with multiple functions on the same chip, which lets developers test, iterate, and deliver them to market quickly. This flexibility is most notable in that you can also reprogram things like the input/output (IO) interface, so you can reduce latency and overcome bottlenecks. For that reason, folks will often compare the efficacy of the whole class of ASIC-based processors (CPUs, GPUs, NPUs, TPUs) to FPGAs, which, of course, has also led to hybrid solutions.
Summing It All Up: Chip Technology is Rad
Improvements in materials science and microchip construction laid the foundation for providing the processing capacity required by AI, and big players in the industry (Nvidia, Intel, Google, Microsoft, etc.) have leveraged those chips to create specialized processors.
Simultaneously, software has allowed many processing cores to be networked in order to control and distribute processing loads for increased speeds. All that has led us to the rise in specialized chips that enable the massive demands of AI.
Hopefully you have a better understanding of the different chipsets out there, how they work, and the difference between them. Still have questions? Let us know in the comments.
Have you ever had that nagging feeling that you are forgetting something important? It’s like when you were back in school and sat down to take a test, only to realize you studied the wrong material. Worrying about your business data can feel like that. Are you fully protected? Are you doing all you can to ensure your data is backed up, safe, and easily restorable?
If you aren’t backing up your Microsoft 365 data, you could be leaving yourself unprepared and exposed. It’s a common misconception that data stored in software as a service (SaaS) products like Microsoft 365 is already backed up because it’s in a cloud application. But, anyone who’s tried to restore an entire company’s Microsoft 365 instance can tell you that’s not the case.
In this post, you’ll get a better understanding of how your Microsoft 365 data is stored and how to back it up so you can reliably and quickly restore it should you ever need to.
What Is Microsoft 365?
More than one million companies worldwide use Microsoft 365 (formerly Office 365). Microsoft 365 is a cloud-based productivity platform that includes a suite of popular applications like Outlook, Teams, Word, Excel, PowerPoint, Access, OneDrive, Publisher, SharePoint, and others.
Chances are that if you’re using Microsoft 365, you use it daily for all your business operations and rely heavily on the information stored within the cloud. But have you ever checked out the backup policies in Microsoft 365?
If you are not backing up your Microsoft 365 data, you have a gap in your backup strategy which may put your business at risk. If you suffer a malware or ransomware attack, natural disaster, or even accidental deletion by an employee, you could lose that data. In addition, it may cost you a lot of time and money trying to restore from Microsoft after a data emergency.
Why You Need to Back Up M365
You might assume that, because it’s in the cloud, your SaaS data is backed up automatically for you. In reality, SaaS companies and products like Microsoft 365 operate on a shared responsibility model, meaning they back up the data and infrastructure to maintain uptime, not to help you in the event you need to restore. Practically speaking, that means that they may not back up your data as often as you would like or archive it for as long as you need. Microsoft does not concern itself with fully protecting your files. Most importantly, they may not offer a timely recovery option if you lose the data, which is critical to getting your business back online in the event of an outage.
The bottom line is that Microsoft’s top priority is to keep its own services running. They replicate data and have redundancy safeguards in place to ensure you can access your data through the platform reliably, but they do not assume responsibility for their users’ data.
All this to say, you are ultimately responsible for backing up your data and files in Microsoft 365.
M365 Native Backup Tools
But wait—what about Microsoft 365’s native backup tools? If you are relying on native backup support for your crucial business data, let’s talk about why that may not be the best way to make sure your data is protected.
Retention Period and Storage Costs
First, there are default settings within Microsoft 365 that dictate how long items are retained in the Recycle Bin and Deleted Items folders. You can tweak those settings for a longer retention period, but there is also a storage limit, so you might run out of space quickly. To keep your data longer, you must upgrade your license type and purchase additional storage, which could quickly become costly. Additionally, if an employee accidentally or purposefully deletes items from the trash bin, the item may be gone forever.
Replication Is Not a Backup
Microsoft replicates data as part of its responsibility, but this doesn’t help you meet the requirements of a solid 3-2-1 strategy, where there are three copies of your data, one of which is off-site. So Microsoft doesn’t fully protect you and doesn’t support compliance standards that call for immutability. When Microsoft replicates data, they’re only making a second copy, and that copy is designed to be in sync with your production data. This means that an item gets corrupted and then replicated, the archive version is also corrupted, and you could lose crucial data. You can’t bank on M365’s replication to protect you.
Sync Is Not a Backup
Similarly, syncing is not backup protection and could end up hurting you. Syncing is designed to have a single copy of a file always up-to-date with changes you or other users have made on different devices. For example, if you use OneDrive as your cloud backup service, the bad news is that OneDrive will sync corrupted files overwriting your healthy ones. Essentially, if a file is deleted or infected, it will be infected or deleted on all synchronized devices. In contrast, a true backup allows you to restore from a specific point in time and provides access to previous versions of data, which can be useful in case of a ransomware attack or deletion.
Back Up Frequency and Control
Lastly, one of the biggest drawbacks of relying on Microsoft’s built-in backup tools is that you lack the ability to dial in your backup system the way you may want or need. There are several rules to follow in order to be able to recover or restore files in Microsoft 365. For instance, it’s strongly recommended that you save your documents in the cloud, both for syncing purposes and to enable things like Version History. But, if you delete an online-only file, it doesn’t go to your Recycle Bin, which means there’s no way to recover it.
And, there are limits to the maximum numbers of versions saved when using Version History, the period of time a file is recoverable for, and so on. Some of the recovery periods even change depending on file type. For example, you can’t restore email after 30 days, but if you have an enterprise-level account, other file types are stored in your Recycle Bin or trash for up to 93 days.
Backups may not be created as often as you like, and the recovery process isn’t quick or easy. For example, Microsoft backs up your data every 12 hours and retains it for 14 days. If you need to restore files, you must contact Microsoft Support, and they will perform a “full restore,” overwriting everything, not just the specific information you need. The recovery process probably won’t meet your recovery time objective (RTO) requirements.
Compliance and Cyber Insurance
Many people want more control over their backups than what Microsoft offers, especially for mission-critical business data. In addition to having clarity and control over the backup and recovery process, data storage and backups are often an essential element in supporting compliance needs, particularly if your business stores personal identifiable information (PII). Different industries and regions will have different standards that need to be enforced, so it’s always a good idea to have your legal or compliance team involved in the conversation.
Similarly, with the increasing frequency of ransomware attacks, many businesses are adding cyber insurance. Cyber insurance provides protection for a variety of things, including legal fees, expenditure related to breaches, court-ordered judgments, and forensic post-break review expenses. As a result, they often have stipulations about how and when you’re backing up to mitigate the fallout of business downtime.
Backing Up M365 With a Third Party Tool to the Cloud
Instead of the native Microsoft 365 backup tool, you could use one of the many popular backup applications that provide Microsoft 365 backup support. Options include:
Note that some of these applications include Microsoft 365 protection with their standard license, but it’s an optional add-on module with others. Be sure to check licensing and pricing before choosing an option.
One thing to keep in mind with these tools: if you store on-premises, the backup data they generate can be vulnerable to local disasters like fire or earthquakes and to cyberattacks. For example, if you keep backups on network attached storage (NAS) that doesn’t tier to the cloud, then your data would not be fully protected
Backing your data up to the cloud puts a copy off-site and geographically distant from your production data, so it’s better protected from things like natural disasters. When you’re choosing a cloud storage provider, make sure you check out where they store their data—if their data center is just down the road, then you’ll want to pick a different region.
Backblaze B2 + Microsoft 365
Backblaze B2 Cloud Storage is reliable, affordable, and secure backup cloud storage, and it integrates seamlessly with the third party applications listed above for backing up Microsoft 365. Some of the benefits of using Backblaze B2 include:
Retain your files as long as you want and back up as often as you’d like: Backblaze B2 is one-fifth of the cost of other cloud providers.
Restore data immediately: Backblaze B2 is always-hot so you never have to wait for cold storage delays.
Start backing up your Microsoft 365 data to Backblaze B2 today.
Protect Your M365 Data for Peace of Mind
Whether you are a business professional or an IT director, your goal is to protect your company data. Backing up your Microsoft 365 data to the cloud satisfies your RTO goals and better protects you against various threats.
Relying on Microsoft 365 native tools is inefficient and slow, which means you could blow your RTO targets. Backing up to the cloud allows you to meet retention requirements, ensuring that you retain the data you need for as long as required without destroying your operational budget.
Your business-critical data is too important to trust to a native backup tool that doesn’t meet your needs. In the event of a catastrophic situation, you need complete control and quick access to all your files from a specific point in time. Backing your Microsoft 365 data up to the cloud gives you more control, more freedom, and better protection.
This post was originally published in 2018 and updated in 2021. We’re sharing an update to this post to provide the latest information on VMs and containers.
Both virtual machines (VMs) and containers help you optimize computer hardware and software resources via virtualization.
Containers have been around for a while, but their broad adoption over the past few years has fundamentally changed IT practices. On the other hand, VMs have enjoyed enduring popularity, maintaining their presence across data centers of various scales.
As you think about how to run services and build applications in the cloud, these virtualization techniques can help you do so faster and more efficiently. Today, we’re digging into how they work, how they compare to each other, and how to use them to drive your organization’s digital transformation.
First, the Basics: Some Definitions
What Is Virtualization?
Virtualization is the process of creating a virtual version or representation of computing resources like servers, storage devices, operating systems (OS), or networks that are abstracted from the physical computing hardware. This abstraction enables greater flexibility, scalability, and agility in managing and deploying computing resources. You can create multiple virtual computers from the hardware and software components of a single machine. You can think of it as essentially a computer-generated computer.
What Is a Hypervisor?
The software that enables the creation and management of virtual computing environments is called a hypervisor. It’s a lightweight software or firmware layer that sits between the physical hardware and the virtualized environments and allows multiple operating systems to run concurrently on a single physical machine. The hypervisor abstracts and partitions the underlying hardware resources, such as central processing units (CPUs), memory, storage, and networking, and allocates them to the virtual environments. You can think of the hypervisor as the middleman that pulls resources from the raw materials of your infrastructure and directs them to the various computing instances.
There are two types of hypervisors:
Type 1, bare-metal hypervisors, run directly on the hardware.
Type 2 hypervisors operate within a host operating system.
Hypervisors are fundamental to virtualization technology, enabling efficient utilization and management of computing resources.
VMs and Containers
What Are VMs?
The computer-generated computers that virtualization makes possible are known as virtual machines (VMs)—separate virtual computers running on one set of hardware or a pool of hardware. Each virtual machine acts as an isolated and self-contained environment, complete with its own virtual hardware components, including CPU, memory, storage, and network interfaces. The hypervisor allocates and manages resources, ensuring each VM has its fair share and preventing interference between them.
Each VM requires its own OS. Thus each VM can host a different OS, enabling diverse software environments and applications to exist without conflict on the same machine. VMs provide a level of isolation, ensuring that failures or issues within one VM do not impact others on the same hardware. They also enable efficient testing and development environments, as developers can create VM snapshots to capture specific system states for experimentation or rollbacks. VMs also offer the ability to easily migrate or clone instances, making it convenient to scale resources or create backups.
Since the advent of affordable virtualization technology and cloud computing services, IT departments large and small have embraced VMs as a way to lower costs and increase efficiencies.
VMs, however, can take up a lot of system resources. Each VM runs not just a full copy of an OS, but a virtual copy of all the hardware that the operating system needs to run. It’s why VMs are sometimes associated with the term “monolithic”—they’re single, all-in-one units commonly used to run applications built as single, large files. (The nickname, “monolithic,” will make a bit more sense after you learn more about containers below.) This quickly adds up to a lot of RAM and CPU cycles. They’re still economical compared to running separate actual computers, but for some use cases, particularly applications, it can be overkill, which led to the development of containers.
Benefits of VMs
All OS resources available to apps.
Well-established functionality.
Robust management tools.
Well-known security tools and controls.
The ability to run different OS on one physical machine.
Cost savings compared to running separate, physical machines.
With containers, instead of virtualizing an entire computer like a VM, just the OS is virtualized.
Containers sit on top of a physical server and its host OS—typically Linux or Windows. Each container shares the host OS kernel and, usually, the binaries and libraries, too, resulting in more efficient resource utilization. (See below for definitions if you’re not familiar with these terms.) Shared components are read-only.
Why are they more efficient? Sharing OS resources, such as libraries, significantly reduces the need to reproduce the operating system code—a server can run multiple workloads with a single operating system installation. That makes containers lightweight and portable—they are only megabytes in size and take just seconds to start. What this means in practice is you can put two to three times as many applications on a single server with containers than you can with a VM. Compared to containers, VMs take minutes to run and are an order of magnitude larger than an equivalent container, measured in gigabytes versus megabytes.
Container technology has existed for a long time, but the launch of Docker in 2013 made containers essentially industry standard for application and software development. Technologies like Docker or Kubernetes to create isolated environments for applications. And containers solve the problem of environment inconsistency—the old “works on my machine” problem often encountered in software development and deployment.
Developers generally write code locally, say on their laptop, then deploy that code on a server. Any differences between those environments—software versions, permissions, database access, etc.—leads to bugs. With containers, developers can create a portable, packaged unit that contains all of the dependencies needed for that unit to run in any environment whether it’s local, development, testing, or production. This portability is one of containers’ key advantages.
Containers also offer scalability, as multiple instances of a containerized application can be deployed and managed in parallel, allowing for efficient resource allocation and responsiveness to changing demand.
Microservices architectures for application development evolved out of this container boom. With containers, applications could be broken down into their smallest component parts or “services” that serve a single purpose, and those services could be developed and deployed independently of each other instead of in one monolithic unit.
For example, let’s say you have an app that allows customers to buy anything in the world. You might have a search bar, a shopping cart, a buy button, etc. Each of those “services” can exist in their own container, so that if, say, the search bar fails due to high load, it doesn’t bring the whole thing down. And that’s how you get your Prime Day deals today.
More Definitions: Binaries, Libraries, and Kernels
Binaries: In general, binaries are non-text files made up of ones and zeros that tell a processor how to execute a program.
Libraries: Libraries are sets of prewritten code that a program can use to do either common or specialized things. They allow developers to avoid rewriting the same code over and over.
Kernels: Kernels are the ringleaders of the OS. They’re the core programming at the center that controls all other parts of the operating system.
Container Tools
Linux Containers (LXC): Commonly known as LXC, these are the original Linux container technology. LXC is a Linux operating system-level virtualization method for running multiple isolated Linux systems on a single host.
Docker: Originally conceived as an initiative to develop LXC containers for individual applications, Docker revolutionized the container landscape by introducing significant enhancements to improve their portability and versatility. Gradually evolving into an independent container runtime environment, Docker emerged as a prominent Linux utility, enabling the seamless creation, transportation, and execution of containers with remarkable efficiency.
Kubernetes: Kubernetes, though not a container software in its essence, serves as a vital container orchestrator. In the realm of cloud-native architecture and microservices, where applications deploy numerous containers ranging from hundreds to thousands or even billions, Kubernetes plays a crucial role in automating the comprehensive management of these containers. While Kubernetes relies on complementary tools like Docker to function seamlessly, it’s such a big name in the container space it wouldn’t be a container post without mentioning it.
Benefits of Containers
Reduced IT management resources.
Faster spin ups.
Smaller size means one physical machine can host many containers.
Reduced and simplified security updates.
Less code to transfer, migrate, and upload workloads.
What’s the Diff: VMs vs. Containers
The virtual machine versus container debate gets at the heart of the debate between traditional IT architecture and contemporary DevOps practices.
VMs have been, and continue to be, tremendously popular and useful, but sadly for them, they now carry the term “monolithic” with them wherever they go like a 25-ton Stonehenge around the neck. Containers, meanwhile, pushed the old gods aside, bedecked in the glittering mantle of “microservices.” Cute.
To offer another quirky tech metaphor, VMs are to containers what glamping is to ultralight backpacking. Both equip you with everything you need to survive in the wilds of virtualization. Both are portable, but containers will get you farther, faster, if that’s your goal. And while VMs bring everything and the kitchen sink, containers leave the toothbrush at home to cut weight. To make a more direct comparison, we’ve consolidated the differences into a handy table:
VMs
Containers
Heavyweight.
Lightweight.
Limited performance.
Native performance.
Each VM runs in its own OS.
All containers share the host OS.
Hardware-level virtualization.
OS virtualization.
Startup time in minutes.
Startup time in milliseconds.
Allocates required memory.
Requires less memory space.
Fully isolated and hence more secure.
Process-level isolation, possibly less secure.
Uses for VMs vs. Uses for Containers
Both containers and VMs have benefits and drawbacks, and the ultimate decision will depend on your specific needs.
When it comes to selecting the appropriate technology for your workloads, virtual machines (VMs) excel in situations where applications demand complete access to the operating system’s resources and functionality. When you need to run multiple applications on servers, or have a wide variety of operating systems to manage, VMs are your best choice. If you have an existing monolithic application that you don’t plan to or need to refactor into microservices, VMs will continue to serve your use case well.
Containers are a better choice when your biggest priority is maximizing the number of applications or services running on a minimal number of servers and when you need maximum portability. If you are developing a new app and you want to use a microservices architecture for scalability and portability, containers are the way to go. Containers shine when it comes to cloud-native application development based on a microservices architecture.
You can also run containers on a virtual machine, making the question less of an either/or and more of an exercise in understanding which technology makes the most sense for your workloads.
In a nutshell:
VMs help companies make the most of their infrastructure resources by expanding the number of machines you can squeeze out of a finite amount of hardware and software.
Containers help companies make the most of the development resources by enabling microservices and DevOps practices.
Are You Using VMs, Containers, or Both?
If you are using VMs or containers, we’d love to hear from you about what you’re using and how you’re using them. Drop a note in the comments.
A little over a year ago, we announced general availability of Backblaze Cloud Replication, the ability to automatically copy data across buckets, accounts, or regions. There are several ways to use this service, but today we’re focusing on how to use Cloud Replication to replicate data between environments like testing, staging, and production when developing applications.
First we’ll talk about why you might want to replicate environments and how to go about it. Then, we’ll get into the details: there are some nuances that might not be obvious when you set out to use Cloud Replication in this way, and we’ll talk about those so that you can replicate successfully.
Other Ways to Use Cloud Replication
In addition to replicating between environments, there are two main reasons you might want to use Cloud Replication:
Data Redundancy: Replicating data for security, compliance, and continuity purposes.
Data Proximity: Bringing data closer to distant teams or customers for faster access.
Maintaining a redundant copy of your data sounds, well, redundant, but it is the most common use case for cloud replication. It supports disaster recovery as part of a broad cyber resilience framework, reduces the risk of downtime, and helps you comply with regulations.
Four Levels of Testing: Unit, Integration, System, and Acceptance
Friendly reminder to both drink and code responsibly (and probably not at the same time).
The Most Interesting Man in the World may test his code in production, but most of us prefer to lead a somewhat less “interesting” life. If you work in software development, you are likely well aware of the various types of testing, but it’s useful to review them to see how different tests might interact with data in cloud object storage.
Let’s consider a photo storage service that stores images in a Backblaze B2 Bucket. There are several real-world Backblaze customers that do exactly this, including Can Stock Photo and CloudSpot, but we’ll just imagine some of the features that any photo storage service might provide that its developers would need to write tests for.
Unit Tests
Unit tests test the smallest components of a system. For example, our photo storage service will contain code to manipulate images in a B2 Bucket, so its developers will write unit tests to verify that each low-level operation completes successfully. A test for thumbnail creation, for example, might do the following:
Directly upload a test image to the bucket.
Run the “‘Create Thumbnail” function against the test image.
Verify that the resulting thumbnail image has indeed been created in the expected location in the bucket with the expected dimensions.
Delete both the test and thumbnail images.
A large application might have hundreds, or even thousands, of unit tests, and it’s not unusual for development teams to set up automation to run the entire test suite against every change to the system to help guard against bugs being introduced during the development process.
Typically, unit tests require a blank slate to work against, with test code creating and deleting files as illustrated above. In this scenario, the test automation might create a bucket, run the test suite, then delete the bucket, ensuring a consistent environment for each test run.
Integration Tests
Integration tests bring together multiple components to test that they interact correctly. In our photo storage example, an integration test might combine image upload, thumbnail creation, and artificial intelligence (AI) object detection—all of the functions executed when a user adds an image to the photo storage service. In this case, the test code would do the following:
Run the “Add Image” procedure against a test image of a specific subject, such as a cat.
Verify that the test and thumbnail images are present in the expected location in the bucket, the thumbnail image has the expected dimensions, and an entry has been created in the image index with the “cat” tag.
Delete the test and thumbnail images, and remove the image’s entry from the index.
Again, integration tests operate against an empty bucket, since they test particular groups of functions in isolation, and require a consistent, known environment.
System Tests
The next level of testing, system testing, verifies that the system as a whole operates as expected. System testing can be performed manually by a QA engineer following a test script, but is more likely to be automated, with test software taking the place of the user. For example, the Selenium suite of open source test tools can simulate a user interacting with a web browser. A system test for our photo storage service might operate as follows:
Open the photo storage service web page.
Click the upload button.
In the resulting file selection dialog, provide a name for the image, navigate to the location of the test image, select it, and click the submit button.
Wait as the image is uploaded and processed.
When the page is updated, verify that it shows that the image was uploaded with the provided name.
Click the image to go to its details.
Verify that the image metadata is as expected. For example, the file size and object tag match the test image and its subject.
When we test the system at this level, we usually want to verify that it operates correctly against real-world data, rather than a synthetic test environment. Although we can generate “dummy data” to simulate the scale of a real-world system, real-world data is where we find the wrinkles and edge cases that tend to result in unexpected system behavior. For example, a German-speaking user might name an image “Schloss Schönburg.” Does the system behave correctly with non-ASCII characters such as ö in image names? Would the developers think to add such names to their dummy data?
Non-ASCII characters: our excuse to give you your daily dose of seratonin. Source.
Acceptance Tests
The final testing level, acceptance testing, again involves the system as a whole. But, where system testing verifies that the software produces correct results without crashing, acceptance testing focuses on whether the software works for the user. Beta testing, where end-users attempt to work with the system, is a form of acceptance testing. Here, real-world data is essential to verify that the system is ready for release.
How Does Cloud Replication Fit Into Testing Environments?
Of course, we can’t just use the actual production environment for system and acceptance testing, since there may be bugs that destroy data. This is where Cloud Replication comes in: we can create a replica of the production environment, complete with its quirks and edge cases, against which we can run tests with no risk of destroying real production data. The term staging environment is often used in connection with acceptance testing, with test(ing) environments used with unit, integration, and system testing.
Caution: Be Aware of PII!
Before we move on to look at how you can put replication into practice, it’s worth mentioning that it’s essential to determine whether you should be replicating the data at all, and what safeguards you should place on replicated data—and to do that, you’ll need to consider whether or not it is or contains personally identifiable information (PII).
The National Institute of Science and Technology (NIST) document SP 800-122 provides guidelines for identifying and protecting PII. In our example photo storage site, if the images include photographs of people that may be used to identify them, then that data may be considered PII.
In most cases, you can still replicate the data to a test or staging environment as necessary for business purposes, but you must protect it at the same level that it is protected in the production environment. Keep in mind that there are different requirements for data protection in different industries and different countries or regions, so make sure to check in with your legal or compliance team to ensure everything is up to standard.
In some circumstances, it may be preferable to use dummy data, rather than replicating real-world data. For example, if the photo storage site was used to store classified images related to national security, we would likely assemble a dummy set of images rather than replicating production data.
How Does Backblaze Cloud Replication Work?
To replicate data in Backblaze B2, you must create a replication rule via either the web console or the B2 Native API. The replication rule specifies the source and destination buckets for replication and, optionally, advanced replication configuration. The source and destination buckets can be located in the same account, different accounts in the same region, or even different accounts in different regions; replication works just the same in all cases. While standard Backblaze B2 Cloud Storage rates apply to replicated data storage, note that Backblaze does not charge service or egress fees for replication, even between regions.
It’s easier to create replication rules in the web console, but the API allows access to two advanced features not currently accessible from the web console:
Setting a prefix to constrain the set of files to be replicated.
Excluding existing files from the replication rule.
Don’t worry: this blog post provides a detailed explanation of how to create replication rules via both methods.
Once you’ve created the replication rule, files will begin to replicate at midnight UTC, and it can take several hours for the initial replication if you have a large quantity of data. Files uploaded after the initial replication rule is active are automatically replicated within a few seconds, depending on file size. You can check whether a given file has been replicated either in the web console or via the b2-get-file-info API call. Here’s an example using curl at the command line:
In the example response, replicationStatus returns the response pending; once the file has been replicated, it will change to completed.
Here’s a short Python script that uses the B2 Python SDK to retrieve replication status for all files in a bucket, printing the names of any files with pending status:
import argparse
import os

from dotenv import load_dotenv

from b2sdk.v2 import B2Api, InMemoryAccountInfo
from b2sdk.replication.types import ReplicationStatus

# Load credentials from .env file into environment
load_dotenv()

# Read bucket name from the command line
parser = argparse.ArgumentParser(description='Show files with "pending" replication status')
parser.add_argument('bucket', type=str, help='a bucket name')
args = parser.parse_args()

# Create B2 API client and authenticate with key and ID from environment
b2_api = B2Api(InMemoryAccountInfo())
b2_api.authorize_account("production", os.environ["B2_APPLICATION_KEY_ID"], os.environ["B2_APPLICATION_KEY"])

# Get the bucket object
bucket = b2_api.get_bucket_by_name(args.bucket)

# List all files in the bucket, printing names of files that are pending replication
for file_version, folder_name in bucket.ls(recursive=True):
    if file_version.replication_status == ReplicationStatus.PENDING:
        print(file_version.file_name)
Note: Backblaze B2’s S3-compatible API (just like Amazon S3 itself) does not include replication status when listing bucket contents—so for this purpose, it’s much more efficient to use the B2 Native API, as used by the B2 Python SDK.
You can pause and resume replication rules, again via the web console or the API. No files are replicated while a rule is paused. After you resume replication, newly uploaded files are replicated as before. Assuming that the replication rule does not exclude existing files, any files that were uploaded while the rule was paused will be replicated in the next midnight-UTC replication job.
How to Replicate Production Data for Testing
The first question is: does your system and acceptance testing strategy require read-write access to the replicated data, or is read-only access sufficient?
Read-Only Access Testing
If read-only access suffices, it might be tempting to create a read-only application key to test against the production environment, but be aware that testing and production make different demands on data. When we run a set of tests against a dataset, we usually don’t want the data to change during the test. That is: the production environment is a moving target, and we don’t want the changes that are normal in production to interfere with our tests. Creating a replica gives you a snapshot of real-world data against which you can run a series of tests and get consistent results.
It’s straightforward to create a read-only replica of a bucket: you just create a replication rule to replicate the data to a destination bucket, allow replication to complete, then pause replication. Now you can run system or acceptance tests against a static replica of your production data.
To later bring the replica up to date, simply resume replication and wait for the nightly replication job to complete. You can run the script shown in the previous section to verify that all files in the source bucket have been replicated.
Read-Write Access Testing
Alternatively, if, as is usually the case, your tests will create, update, and/or delete files in the replica bucket, there is a bit more work to do. Since testing intends to change the dataset you’ve replicated, there is no easy way to bring the source and destination buckets back into sync—changes may have happened in both buckets while your replication rule was paused.
In this case, you must delete the replication rule, replicated files, and the replica bucket, then create a new destination bucket and rule. You can reuse the destination bucket name if you wish since, internally, replication status is tracked via the bucket ID.
Always Test Your Code in an Environment Other Than Production
In short, we all want to lead interesting lives—but let’s introduce risk in a controlled way, by testing code in the proper environments. Cloud Replication lets you achieve that end while remaining nimble, which means you get to spend more time creating interesting tests to improve your product and less time trying to figure out why your data transformed in unexpected ways.
Now you have everything you need to create test and staging environments for applications that use Backblaze B2 Cloud Object Storage. If you don’t already have a Backblaze B2 account, sign up here to receive 10GB of storage, free, to try it out.
Projects and technologies come and go, and with each new tool comes new workflow changes. But changing the way you move media around can be tough. Maybe you’ve always done things a certain way, and using a new tool feels like too much of a learning curve especially when you’re pressed for time. But the way you’ve always done things isn’t always the best, easiest, or fastest way. Sometimes you need to change the status quo to level up your media operations.
As a freelance editor, I worked on a recent project that presented some challenges that demanded new approaches to media storage challenges you might also be facing. I solved them with the cloud—but not an all-in-one cloud. My solution was a mix of cloud tools, including Adobe Premiere Pro, which gives me customization and flexibility—the best of all worlds in media workflows.
Right Opportunity at the Right Time
Last year I had the opportunity to serve as a digital imaging technician (DIT) on the set of an indie film titled “Vengeance” produced by Falcon Pictures. The role of a DIT can vary. In many instances you’re simply a data wrangler making backups of the data being shot. In others, you work in the color space of the project creating color corrected dailies on set. For “Vengeance”, I was mostly data wrangling.
“Vengeance” was an 11-day shoot in the mountains of Northern California near Bass Lake. While the rest of the crew spent their days hiking around with equipment, I was stationed back at home base with my DIT cart. With a lot of free time, I found myself logging data as it came in. Logging clip names soon turned into organizing bins and prepping the project for editing. And, while I was not the editor on the project, I was happy to help edit while I was on set.
The Challenge
A few months after my work as DIT ended, it became clear that “Vengeance” needed a boost in post-production. The editing was a bit stuck—they had no assistant editor to complete logging and to sound sync all the footage. So, I was asked to help out. The only problem: I needed to be able to share my work with another editor who lived 45 miles away.
Editing “Vengeance” in Adobe Premiere Pro.
Evaluating the World of Workflows and Cloud Tools
So we began to evaluate a few different solutions. It was clear that Adobe Premiere Pro would be used, but data storage was still a big question. We debated a few methods for sharing media:
The traditional route: Sharing a studio. With the other editor 45 miles away, commuting and scheduling time with each other was going to be cumbersome.
Email: We could email project files back and forth as we worked, but how would we keep track of versioning? Project bloat was a big concern.
Sharing a shuttle drive. Or what I’m calling “Sneakernet 2.0.” This is a popular method, but far from efficient.
Google Drive or Dropbox: Another popular option, but also one that comes with costs and service limitations like rate limiting.
None of these options were great, so we went back to the drawing board.
The Solution: A Hybrid Workflow Designed for Our Needs
To come to a final decision for this workflow, we made a list of our needs:
The ability to share a Premiere Pro project file for updates.
The ability to share media for the project.
No exchanging external hard drives.
No driving (a car).
Changes need to be real time.
Based on those needs, here’s where we landed.
Sharing Project Files
Adobe recently released a new update to its Team Projects features within Premiere Pro. Team Projects allows you to host a Premiere Pro project in the Adobe cloud and share it with other Adobe Creative Cloud users. This gave us the flexibility to share a single project and share updates in real time. This means no emailing of project files, versioning issues, or bloated files. That left the issues of the media. How do we share media?
Sharing Media Files
You may think that it would be obvious to share files in the Adobe Creative Cloud where you get 100GB free. And while 100GB may be enough storage for .psd and .ai files, 100GB is nothing for video, especially when we are talking about RED (.r3d) files which start off as approximately 4GB chunks and can quickly add up to terabytes of footage.
So we put everything in a Backblaze B2 Bucket. All the .r3d source files went directly from my Synology network attached storage (NAS) into a Backblaze B2 Bucket using the Synology Cloud Sync tool. In addition to the source files, I used Adobe Media Encoder to generate proxy files of all the .r3d files. This folder of proxy files also synced with Backblaze automatically.
Making Changes in Real Time
What was great about this solution is that all of the uploading is done automatically via a seamless Backblaze + Synology integration, and the Premiere Pro Team Project had a slew of publish functions perfect for real-time updates. And because the project files and proxies are stored in the cloud, I could get to them from several computers. I spent time at my desktop PC logging and syncing footage, but was also able to move to my couch and do the same from my MacBook Pro. I never had to move hard drives around, copy projects files, or worry about version control.
The other editor was able to connect to my Backblaze B2 Bucket using Cyberduck, a cloud storage browser for Mac. Using Cyberduck, he was able to pull down all the proxy files I created and share any files that he created. So, we were synced for the entire duration of the project.
Once the technology was configured, I was able to finish logging for “Vengeance”, sync all the sound, build out stringouts and assemblies, and even a rough cut of every scene for the entire movie, giving the post-production process the boost it needed.
The Power of Centralized Storage for Media Workflows
Technology is constantly evolving, and, in most circumstances, technology makes how we work a lot easier. For years filmmakers have worked on projects by physically moving our source material, whether it was on film reels, tapes, or hard drives. The cloud changed all that.
The key to getting “Vengeance” through post-production was our centralized approach to file management. Files existed in Backblaze already, we simply brought Premiere Pro to the data rather than moving the huge amount of files to Premiere Pro via the Creative Cloud.
The mix of technologies lets us create a customized flow that works for us. Creative Cloud had the benefit of providing a project sharing mechanism, and Backblaze provided a method of sharing media (Synology and Cyberduck) regardless of the tooling each editor had.
Once we hit picture lock, the centralized files will serve as a distribution point for VFX, color, and sound, making turnover a breeze. It can even be used as a distribution hub—check out how American Public Television uses Backblaze to distribute their finished assets.
Centralizing in the cloud not only made it easy for me to work from home, it allowed us to collaborate on a project with ease eliminating the overhead of driving, shuttle drive delivery (Sneakernet 2.0), and version control. The best part? A workflow like this is affordable for any size production and can be set up in minutes.
Have you recently moved to a cloud workflow? Let us know what you’re using and how it went in the comments.
When you’re working hard on an IT or development project, you need to be able to find instructions about the tools you’re using quickly. And, it helps if those instructions are easy to use, easy to understand, and easy to share.
On the Technical Publications team, we spend a lot of time thinking about how to make our docs just that—easy.
The documentation portal has been completely overhauled to deliver on-demand content with a modern look and feel. Whether you’re a developer, web user, or someone who wants to understand how our products and services work, our portal is designed to be user-friendly, with a clean and intuitive interface that makes it easy to navigate and find the information you need.
Here are some highlights of what you can look forward to:
New and updated articles right on the landing page—so you’re always the first to know about important content changes.
A powerful search engine to help you find topics quickly.
A more logical navigation menu that organizes content into sections for easy browsing.
Information about all of the Backblaze B2 features and services in the About section.
You can get started using the Backblaze UI quickly to create application keys, create buckets, manage your files, and more. If you’re programmatically managing your data, we’ve included resources such as SDKs, developer quick-start guides, and step-by-step integration guides.
Perhaps the most exciting enhancement is our API documentation. This resource provides endpoints, parameters, and responses for all three of our APIs: S3-Compatible, B2 Native, and Partner API.
For Fun: A Brief History of Technical Documentation
As our team put our heads together to think about how to announce the new portal, we went down some internet rabbit holes on the history of technical documentation. Technical documentation was recognized as a profession around the start of World War II when technical documents became a necessity for military purposes. (Note: This was also the same era that a “computer” referred to a job for a person, meaning “one who computes”.) But the first technical content in the Western world can be traced back to 1650 B.C—the Rhind Papyrus describes some of the mathematical knowledge and methods of the Egyptians. And the title of first Technical Writer? That goes to none other than poet Geoffrey Chaucer of Canterbury Tales fame for his lesser-known work “A Treatise on the Astrolabe”—a tool that measures angles to calculate time and determine latitude.
After that history lesson, we ourselves waxed a bit poetic about the “old days” when we wrote long manuals in word processing software that were meant to be printed, compiled long indexes for user guides using desktop publishing tools, and wrote more XML code in structured authoring programs than actual content. These days we use what-you-see-is-what-you-get (WYSIWYG) editors in cloud-based content management systems which make producing content much easier and quicker—and none of us are dreaming in HTML anymore.
<section><p>Or maybe we are.</p></section>
Overall, the history of documentation in the tech industry reflects the changing needs of users and the progression of technology. It evolved from technical manuals for experts to user-centric, accessible resources for audiences of all levels of technical proficiency.
The Future of Backblaze Technical Documentation Portal
In the coming months, you’ll see even more Backblaze B2 Cloud Storage content including many third-party integration guides. Backblaze Computer Backup documentation will also find a home here in this new portal so that you’ll have a one-stop-shop for all of your Backblaze technical and help documentation needs.
We are committed to providing the best possible customer-focused documentation experience. Explore the portal to see how our documentation can make using Backblaze even easier!
Recently, artificial intelligence has been having a moment: It’s gone from an abstract idea in a sci-fi movie, to an experiment in a lab, to a tool that is impacting our everyday lives. With headlines from Bing’s AI confessing its love to a reporter to the struggles over who’s liable in an accident with a self-driving car, the existential reality of what it means to live in an era of rapid technological change is playing out in the news.
The headlines may seem fun, but it’s important to consider what this kind of tech means. In some ways, you can draw a parallel to the birth of the internet, with all the innovation, ethical dilemmas, legal challenges, excitement, and chaos that brought with it. (We’re totally happy to discuss in the comments section.)
So, let’s keep ourselves grounded in fact and do a quick rundown of some of the technical terms in the greater AI landscape. In this article, we’ll talk about three basic terms to help you define the playing field: artificial intelligence (AI), machine learning (ML), and deep learning (DL).
What Is Artificial Intelligence (AI)?
If you were to search “artificial intelligence,” you’d see varying definitions. Here are a few from good sources.
From Google, and not Google as in the search engine, but Google in their thought leadership library:
Artificial intelligence is a broad field, which refers to the use of technologies to build machines and computers that have the ability to mimic cognitive functions associated with human intelligence, such as being able to see, understand, and respond to spoken or written language, analyze data, make recommendations, and more.
Although artificial intelligence is often thought of as a system in itself, it is a set of technologies implemented in a system to enable it to reason, learn, and act to solve a complex problem.
From IBM, a company that has been pivotal in computer development since the early days:
At its simplest form, artificial intelligence is a field, which combines computer science and robust datasets, to enable problem-solving. It also encompasses sub-fields of machine learning and deep learning, which are frequently mentioned in conjunction with artificial intelligence. These disciplines are comprised of AI algorithms which seek to create expert systems which make predictions or classifications based on input data.
From Wikipedia, the crowdsourced and scholarly-sourced oversoul of us all:
Artificial intelligence is intelligence demonstrated by machines, as opposed to intelligence displayed by humans or by other animals. “Intelligence” encompasses the ability to learn and to reason, to generalize, and to infer meaning. Example tasks… include speech recognition, computer vision, translation between (natural) languages, as well as other mappings of inputs.
Allow us to give you the Backblaze summary: Each of these sources are saying that artificial intelligence is what happens when computers start thinking (or appearing to think) for themselves. It’s the what. You call a bot you’re training “an AI;” you also call the characteristic of a computer making decisions AI; you call the entire field of this type of problem solving and programming AI.
However, using the term “artificial intelligence” does not define how bots are solving problems. Terms like “machine learning” and “deep learning” are how that appearance of intelligence is created—the complexity of the algorithms and tasks to perform, whether the algorithm learns, what kind of theoretical math is used to make a decision, and so on. For the purposes of this article, you can think of artificial intelligence as the umbrella term for the processes of machine learning and deep learning.
What Is Machine Learning (ML)?
Machine learning (ML) is the study and implementation of computer algorithms that improve automatically through experience. In contrast with AI and in keeping with our earlier terms, AI is when a computer appears intelligent, and ML is when a computer can solve a complex, but defined, task. An algorithm is a set of instructions (the requirements) of a task.
We engage with algorithms all the time without realizing it—for instance, when you visit a site using a URL starting with “https:” your browser is using SSL (or, more accurately in 2023, TLS), a symmetric encryption algorithm that secures communication between your web browser and the site. Basically, when you click “play” on a cat video, your web browser and the site engage in a series of steps to ensure that the site is what it purports to be, and that a third-party can neither eavesdrop on nor modify any of the cuteness exchanged.
Machine learning does not specify how much knowledge the bot you’re training starts with—any task can have more or fewer instructions. You could ask your friend to order dinner, or you could ask your friend to order you pasta from your favorite Italian place to be delivered at 7:30 p.m.
Both of those tasks you just asked your friend to complete are algorithms. The first algorithm requires your friend to make more decisions to execute the task at hand to your satisfaction, and they’ll do that by relying on their past experience of ordering dinner with you—remembering your preferences about restaurants, dishes, cost, and so on.
By setting up more parameters in the second question, you’ve made your friend’s chances of a satisfactory outcome more probable, but there are a ton of things they would still have to determine or decide in order to succeed—finding the phone number of the restaurant, estimating how long food delivery takes, assuming your location for delivery, etc.
I’m framing this example as a discrete event, but you’ll probably eat dinner with your friend again. Maybe your friend doesn’t choose the best place this time, and you let them know you don’t want to eat there in the future. Or, your friend realizes that the restaurant is closed on Mondays, so you can’t eat there. Machine learning is analogous to the process through which your friend can incorporate feedback—yours or the environment’s—and arrive at a satisfactory dinner plan.
Machines Learning to Teach Machines
A real-world example that will help us tie this down is teaching robots to walk (and there are a ton of fun videos on the subject, if you want to lose yourself in YouTube). Many robotics AI experiments teach their robots to walk in simulated, virtual environments before the robot takes on the physical world.
The key is, though, that the robot updates its algorithm based on new information and predicts outcomes without being programmed to do so. With our walking robot friend, that would look like the robot avoiding an obstacle on its own instead of an operator moving a joystick to avoid the obstacle.
There’s an in-between step here, and that’s how much human oversight there is when training an AI. In our dinner example, it’s whether your friend is improving dinner plans from your feedback (“I didn’t like the food.”) or from the environment’s feedback (the restaurant is closed). With our robot friend, it’s whether their operator tells them there is an obstacle, or they sense it on their own. These options are defined as supervised learning and unsupervised learning.
Supervised Learning
An algorithm is trained with labeled input data and is attempting to get to a certain outcome. A good example is predictive maintenance. Here at Backblaze, we closely monitor our fleet of over 230,000 hard drives; every day, we record the SMART attributes for each drive, as well as which drives failed that day. We could feed a subset of that data into a machine learning algorithm, building a model that captures the relationships between those SMART attributes (the input data) and a drive failure (the label). After this training phase, we could test the algorithm and model on a separate subset of data to verify its accuracy at predicting failure, with the ultimate goal of preventing failure by flagging problematic drives based on unlabeled, real-time data.
Unsupervised Learning
An AI is given unlabeled data and asked to identify patterns and probable outcomes. In this case, you’re not asking the bot for an outcome (“Find me an article on AI.”), you’re asking what exists in the dataset (“What types of articles are in this library? What’s the best way to organize this library?”). For example, Google News uses unsupervised learning to categorize articles on the same story from various online news outlets. It recognizes clusters of contemporaneous articles that share key words, and groups them under a suitable heading.
Generative AI: ChatGPT and Bing, DALL-E and Lensa
Most folks’ exposure to AI has been in the form of generative AI. What generative AIs have done that’s revolutionary is to allow us to make a human-speak query to generate “new” material. You can almost think of a generative AI as a DJ with a huge song library—it’s rapidly pulling information from a huge dataset, remixing that information, and presenting you the result.
So, when you ask ChatGPT to write you a story about a spy, they’re going to go back to all the spy text they’ve seen and give you a story based on those patterns. If you ask it to write a story about James Bond, it’s got a more limited dataset with more predictable patterns. If you ask it to write a six sentence paragraph giving you a good spy plot based on James Bond with the main character Oogly Boogly, you might confuse it (or come up with something totally awesome) because “Oogly Boogly” doesn’t really sound like a name you’d see in spy novels.
Obviously We Had ChatGPT Write the Story
And here it is, for your amusement:
In the realm of espionage, Oogly Boogly, a suave and cunning agent, embarks on a high-stakes mission akin to James Bond’s daring escapades. Sent to retrieve a stolen prototype weapon, he finds himself entangled in a web of international intrigue. Posing as a debonair art collector, Oogly infiltrates an extravagant gala hosted by a nefarious arms dealer known only as “The Viper.” With his wit and charm, Oogly seduces the Viper’s right-hand woman, gaining access to the secret underground lair where the weapon is hidden. In a thrilling climax, Oogly engages in a heart-stopping duel with The Viper, narrowly escaping the clutches of death. With the weapon recovered, Oogly delivers a clever one-liner before vanishing into the night, leaving the world in awe of his daring exploits and longing for his next thrilling adventure.
I couldn’t live without knowing the clever one-liner, so I asked ChatGPT: “Based on the previous response, what was Oogly’s clever one-liner?”
As Oogly outwitted The Viper and secured the weapon, he flashed a sly smile and uttered his clever one-liner, “Looks like this snake’s venom has run dry.”
We can only assume that Oogly then put on sunglasses while the CSI: Miami theme started in the background.
As a tool, generative AI certainly has both possibilities and limitations. In order to train an AI, you need huge amounts of data, which can come from various sources—one example is when consumers share data in exchange for free or improved apps or services, as evidenced by some (ahem) surprising photos surfacing from a Roomba.
Also, just to confuse things before we’ve even gotten to defining deep learning: Some people are calling generative AI’s processes “deep machine learning” based on its use of metadata as well as tools like image recognition, and because the algorithms are designed to learn from themselves in order to give you better results in the future.
An important note for generative AI: It’s certainly not out of the question to make your own library of content—folks call that “training” an AI, though it’s usually done on a larger scale. Check out Backblaze Director of Solution Engineers Troy Liljedahl’s article on Stable Diffusion to see why and how you might want to do that.
What Is Deep Learning (DL)?
Deep learning is the process of training an AI for complex decision making. “Wait,” you say. “I thought ML was already solving complex tasks.” And you’re right, but the difference is in orders of magnitude, branching possibilities, assumptions, task parameters, and so on.
To understand the difference between machine learning and deep learning, we’re going to take a brief time-out to talk about programmable logic. And, we’ll start by using our robot friend to help us see how decision making works in a seemingly simple task, and what that means when we’re defining “complex tasks.”
The direction from the operator is something like, “Robot friend, get yourself from the lab to the front door of the building.” Here are some of the possible decisions the robot then has to make and inputs the robot might have to adjust for:
Now?
If yes, then take a step.
If no, then wait.
What are valid reasons to wait?
If you wait, when should you resume the command?
Take a step.
That step could land on solid ground.
Or, there could be a pencil on the floor.
If you step on the pencil, was it inconsequential or do you slip?
If you slip, do you fall?
If you fall, did you sustain damage?
If yes, do you need to call for help?
If not or if it’s minor, get back up.
If you sustained damage but you could get back up, do you proceed or take the time to repair?
If there’s no damage, then take the next step.
First, you’ll have to determine your new position in the room.
Take the next step. All of the first-step possibilities exist, and some new ones, too.
With the same foot or the other foot?
In a straight line or make a turn?
And so on and so forth. Now, take that direction that has parameters—where and how—and get rid of some of them. Your direction for a deep learning AI might be, “Robot, come to my house.” Or, it might be telling the robot to go about a normal day, which means it would have to decide when and how to walk for itself without a specific “walk” command from an operator.
Neural Networks: Logic, Math, and Processing Power
Thus far in the article, we’ve talked about intelligence as a function of decision making. Algorithms outline the decision we want made or the dataset we want the AI to engage with. But, when you think about the process of decision making, you’re actually talking about many decisions getting made in a series. With machine learning, you’re giving more parameters for how to make decisions. With deep learning, you’re asking open-ended questions.
You can certainly view these definitions as having a big ol’ swath of gray area and overlap in their definitions. But at a certain point, all those decisions a computer has to make starts to slow a computer down and require more processing power. There are processors for different kinds of AI by the way, all designed to increase processing power. Whatever that point is, you’ve reached a deep learning threshold.
If we’re looking at things as yes/nos, we assume there’s only one outcome to each choice. Ultimately, yes, our robot is either going to take a step or not. But all of those internal choices, as you can see from the above messy and incomplete list, create nested dependencies. When you’re solving a complex task, you need a structure that is not a strict binary, and that’s when you create a neural network.
Neural networks learn, just like other ML mechanisms. As its name suggests, a neural network is an interlinked network of artificial neurons based on the structure of biological brains. Each neuron processes data from its incoming connections, passing on results to its outgoing connections. As we train the network by feeding it data, the training algorithm adjusts those processes to optimize the output of the network as a whole. Our robot friend may slip the first few times it steps on a pencil, but, each time, it’s fine-tuning its processing with the goal of staying upright.
You’re Giving Me a Complex!
As you can probably tell, training is important, and the more complex the problem, the more time and data you need to train to consider all possibilities. All possibilities necessarily means providing as much data as possible so that an AI can learn what’s relevant to solving a problem and give you a good solution to your question. Frankly, if or when you’ve succeeded, often scientists have difficulty tracking how neural networks make decisions.
That’s not surprising, in some ways. Deep learning has to solve for shades of gray—for the moment when one user would choose one solution and another would use another solution and it’s hard to tell which was the “better” solution between the two. Take natural language models: You’re translating “I want to drive a car” from English to Spanish. Do you include the implied subject—”yo quiero” instead of “quiero”—when both are correct? Do you use “el coche” or “el carro” or “el auto” as your preferred translation of “car”? Great, now do all that for poetry, with its layers of implied meanings even down to using a single word, cultural and historical references, the importance of rhythm, pagination, lineation, etc.
And that’s before we even get to ethics. Just like in the trolley problem, you have to define how you define what’s “better,” and “better” might just change with context. The trolley problem presents you with a scenario: a train is on course to hit and kill people on the tracks. You can change the direction of the train, but you can’t stop the train. You have two choices:
You can do nothing, and the train will hit five people.
You can pull a lever and the train will move to a side track where it will kill one person.
The second scenario is better from a net-harm perspective, but it makes you directly responsible for killing someone. And, things become complicated when you start to add details. What if there are children on the track? Does it matter if the people are illegally on the track? What if pulling the lever also kills you—how much do you/should you value your own survival against other peoples’? These are just the sorts of scenarios that self-driving cars have to solve for.
Deep learning also leaves room for assumptions. In our walking example above, we start with challenging a simple assumption—Do I take the first step now or later? If I wait, how do I know when to resume? If my operator is clearly telling me to do something, under what circumstances can I reject the instruction?
Yeah, But Is AI (or ML or DL) Going to Take Over the World?
Okay, deep breaths. Here’s the summary:
Artificial intelligence is what we call it when a computer appears intelligent. It’s the umbrella term.
Machine learning and deep learning both describe processes through which the computer appears intelligent—what it does. As you move from machine learning to deep learning, the tasks get more complex, which means they take more processing power and have different logical underpinnings.
Our brains organically make decisions, adapt to change, process stimuli—and we don’t really know how—but the bottom line is: it’s incredibly difficult to replicate that process with inorganic materials, especially when you start to fall down the rabbit hole of the overlap between hardware and software when it comes to producing chipsets, and how that material can affect how much energy it takes to compute. And don’t get us started on quantum math.
AI is one of those areas where it’s easy to get lost in the sauce, so to speak. Not only does it play on our collective anxieties, but it also represents some seriously complicated engineering that brings together knowledge from various disciplines, some of which are unexpected to non-experts. (When you started this piece, did you think we’d touch on neuroscience?) Our discussions about AI—what it is, what it can do, and how we can use it—become infinitely more productive once we start defining things clearly. Jump into the comments to tell us what you think, and look out for more stories about AI, cloud storage, and beyond.
Running an industry-standard benchmark, and because AWS is almost five times more expensive, we were expecting to see a trade-off between better performance on the single cloud AWS deployment and lower cost on the multi-cloud Backblaze/Vultr equivalent, but we were very pleasantly surprised by the results we saw.
Spoiler alert: not only was the Backblaze B2 + Vultr combination significantly cheaper than Amazon S3/EC2, it also outperformed the Amazon services by a wide margin. Read on for the details—we cover a lot of background on this experiment, but you can skip straight ahead to the results of our tests if you’d rather get to the good stuff.
First, Some History: The Evolution of Big Data Storage Architecture
Back in 2004, Google’s MapReduce paper lit a fire under the data processing industry, proposing a new “programming model and an associated implementation for processing and generating large datasets.” MapReduce was applicable to many real-world data processing tasks, and, as its name implies, presented a straightforward programming model comprising two functions (map and reduce), each operating on sets of key/value pairs. This model allowed programs to be automatically parallelized and executed on large clusters of commodity machines, making it well suited for tackling “big data” problems involving datasets ranging into the petabytes.
The Apache Hadoop project, founded in 2005, produced an open source implementation of MapReduce, as well as the Hadoop Distributed File System (HDFS), which handled data storage. A Hadoop cluster could comprise hundreds, or even thousands, of nodes, each one responsible for both storing data to disk and running MapReduce tasks. In today’s terms, we would say that each Hadoop node combined storage and compute.
With the advent of cloud computing, more flexible big data frameworks, such as Apache Spark, decoupled storage from compute. Now organizations could store petabyte-scale datasets in cloud object storage, rather than on-premises clusters, with applications running on cloud compute platforms. Fast intra-cloud network connections and the flexibility and elasticity of the cloud computing environment more than compensated for the fact that big data applications were now accessing data via the network, rather than local storage.
Today we are moving into the next phase of cloud computing. With specialist providers such as Backblaze and Vultr each focusing on a core capability, can we move storage and compute even further apart, into different data centers? Our hypothesis was that increased latency and decreased bandwidth would severely impact performance, perhaps by a factor of two or three, but cost savings might still make for an attractive alternative to colocating storage and compute at a hyperscaler such as AWS. The tools we chose to test this hypothesis were the Trino open source SQL Query Engine and the TPC-DS benchmark.
Benchmarking Deployment Options With TPC-DS
The TPC-DS benchmark is widely used to measure the performance of systems operating on online analytical processing (OLAP) workloads, so it’s well suited for comparing deployment options for big data analytics.
A formal TPC-DS benchmark result measures query response time in single-user mode, query throughput in multiuser mode and data maintenance performance, giving a price/performance metric that can be used to compare systems from different vendors. Since we were focused on query performance rather than data loading, we simply measured the time taken for each configuration to execute TPC-DS’s set of 99 queries.
Helpfully, Trino includes a tpcds catalog with a range of schemas each containing the tables and data to run the benchmark at a given scale. After some experimentation, we chose scale factor 10, corresponding to approximately 10GB of raw test data, as it was a good fit for our test hardware configuration. Although this test dataset was relatively small, the TPC-DS query set simulates a real-world analytical workload of complex queries, and took several minutes to complete on the test systems. It would be straightforward, though expensive and time consuming, to repeat the test for larger scale factors.
We generated raw test data from the Trino tpcds catalog with its sf10 (scale factor 10) schema, resulting in 3GB of compressed Parquet files. We then used Greg Rahn’s version of the TPC-DS benchmark tools, tpcds-kit, to generate a standard TPC-DS 99-query script, modifying the script syntax slightly to match Trino’s SQL dialect and data types. We ran the set of 99 queries in single user mode three times on each of three combinations of compute/storage platforms: EC2/S3, EC2/B2 and Vultr/B2. The EC2/B2 combination allowed us to isolate the effect of moving storage duties to Backblaze B2 while keeping compute on Amazon EC2.
A note on data transfer costs: AWS does not charge for data transferred between an Amazon S3 bucket and an Amazon EC2 instance in the same region. In contrast, the Backblaze + Vultr partnership allows customers free data transfer between Backblaze B2 and Vultr Cloud Compute across any combination of regions.
Deployment Options for Cloud Compute and Storage
AWS
The EC2 configuration guide for Starburst Enterprise, the commercial version of Trino, recommends a r4.4xlarge EC2 instance, a memory-optimized instance offering 16 virtual CPUs and 122 GiB RAM, running Amazon Linux 2.
Following this lead, we configured an r4.4xlarge instance with 32GB of gp2 SSD local disk storage in the us-west-1 (Northern California) region. The combined hourly cost for the EC2 instance and SSD storage was $1.19.
We created an S3 bucket in the same us-west-1 region. After careful examination of the Amazon S3 Pricing Guide, we determined that the storage cost for the data on S3 was $0.026 per GB per month.
Vultr
We selected Vultr’s closest equivalent to the EC2 r4.4xlarge instance: a Memory Optimized Cloud Compute instance with 16 vCPUs, 128GB RAM plus 800GB of NVMe local storage, running Debian 11, at a cost of $0.95/hour in Vultr’s Silicon Valley region. Note the slight difference in the amount of available RAM–Vultr’s virtual machine (VM) includes an extra 6GB, despite its lower cost.
Backblaze B2
We created a Backblaze B2 Bucket located in the Sacramento, California data center of our U.S. West region, priced at $0.005/GB/month, about one-fifth the cost of Amazon S3.
Trino Configuration
We used the official Trino Docker image configured identically on the two compute platforms. Although a production Trino deployment would typically span several nodes, for simplicity, time savings, and cost-efficiency we brought up a single-node test deployment. We dedicated 78% of the VM’s RAM to Trino, and configured its Hive connector to access the Parquet files via the S3 compatible API. We followed the Trino/Backblaze B2 getting started tutorial to ensure consistency between the environments.
Benchmark Results
The table shows the time taken to complete the TPC-DS benchmark’s 99 queries. We calculated the mean of three runs for each combination of compute and storage. All times are in minutes and seconds, and a lower time is better.
We used Trino on Amazon EC2 accessing data on Amazon S3 as our starting point; this configuration ran the benchmark in 20:43.
Next, we kept Trino on Amazon EC2 and moved the data to Backblaze B2. We saw a surprisingly small difference in performance, considering that the data was no longer located in the same AWS region as the application. The EC2/B2 Storage Cloud combination ran the benchmark just 38 seconds slower (that’s about 3%), clocking in at 21:21.
When we looked at Trino running on Vultr accessing data on Amazon S3, we saw a significant increase in performance. On Vultr/S3, the benchmark ran in 15:07, 27% faster than the EC2/S3 combination. We suspect that this is due to Vultr providing faster vCPUs, more available memory, faster networking, or a combination of the three. Determining the exact reason for the performance delta would be an interesting investigation, but was out of scope for this exercise.
Finally, looking at Trino on Vultr accessing data on Backblaze B2, we were astonished to see that not only did this combination post the fastest benchmark time of all, Trino on Vultr/Backblaze B2’s time of 12:39 was 16% faster than Vultr/S3 and 39%faster than Trino on EC2/S3!
Note: this is not a formal TPC-DS result, and the query times generated cannot be compared outside this benchmarking exercise.
The Bottom Line: Higher Performance at Lower Cost
For the scale factor 10 TPC-DS data set and queries, with comparably specified instances, Trino running on Vultr retrieving data from B2 is 39% faster than Trino on EC2 pulling data from S3, with 20% lower compute cost and 76% lower storage cost.
You can get started with both Backblaze B2 and Vultr free of charge—click here to sign up for Backblaze B2, with 10GB free storage forever, and click here for $250 of free credit at Vultr.
The Cybersecurity and Infrastructure Security Agency (CISA) released a joint ransomware advisory last Wednesday, reporting that LockBit ransomware has proven to be the most popular ransomware variant in the world after executing at least 1,700 attacks and raking in $91 million in ransom payments.
Today, I’m recapping the advisory and sharing some best practices for protecting your business from this prolific threat.
What Is LockBit?
LockBit is a ransomware variant that’s sold as ransomware as a service (RaaS). The RaaS platform requires little to no skill to use and provides a point and click interface for launching ransomware campaigns. That means the barrier to entry for would-be cybercriminals is staggeringly low—they can simply use the software as affiliates and execute it using LockBit’s tools and infrastructure.
LockBit either gets an up-front fee, subscription payments, a cut of the profits from attacks, or a combination of all three. Since there are a wide range of affiliates with different skill levels and no connection to one another other than their use of the same software, no LockBit attack is the same. Observed tactics, techniques, and procedures (TTP) vary which makes defending against LockBit particularly challenging.
Who Is Targeted by LockBit?
LockBit victims range across industries and sectors, including critical infrastructure, financial services, food and agriculture, education, energy, government, healthcare, manufacturing, and transportation. Attacks have been carried out against organizations large and small.
What Operating Systems (OS) Are Targeted by LockBit?
By skimming the advisory, you may think that this only impacts Windows systems, but there are variants available through the LockBit RaaS platform that target Linux and VMware ESXi.
How Do Cybercriminals Gain Access to Execute LockBit?
The Common Vulnerabilities and Exposures (CVEs) Exploited section lists some of the ways bad actors are able to get in to drop a malicious payload. Most of the vulnerabilities listed are older, but it’s worth taking a moment to familiarize yourself with them and make sure your systems are patched if they affect you.
In the MITRE ATT&CK Tactics and Techniques section, you’ll see the common methods of gaining initial access. These include:
Drive-By Compromise: When a user visits a website that cybercriminals have planted with LockBit during normal browsing.
Public-Facing Applications: LockBit cybercriminals have used vulnerabilities like Log4J and Log4Shell to gain access to victims’ systems.
External Remote Services: LockBit affiliates exploit remote desktop procedures (RDP) to gain access to victims’ networks.
Phishing: LockBit affiliates have used social engineering tactics like phishing, where they trick users into opening an infected email.
Valid Accounts: Some LockBit affiliates have been able to obtain and abuse legitimate credentials to gain initial access.
How to Prevent a LockBit Attack
CISA provides a list of mitigations that aim to enhance your cybersecurity posture and defend against LockBit. These recommendations align with the Cross-Sector Cybersecurity Performance Goals (CPGs) developed by CISA and the National Institute of Standards and Technology (NIST). The CPGs are based on established cybersecurity frameworks and guidance, targeting common threats, tactics, techniques, and procedures. Here are some of the key mitigations organized by MITRE ATT&CK tactic (this is not an exhaustive list):
Initial Access:
Implement sandboxed browsers to isolate the host machine from web-borne malware.
Enforce compliance with NIST standards for password policies across all accounts.
Require longer passwords with a minimum length of 15 characters.
Prevent the use of commonly used or compromised passwords.
Implement account lockouts after multiple failed login attempts.
Disable password hints and refrain from frequent password changes.
Require multifactor authentication (MFA).
Execution:
Develop and update comprehensive network diagrams.
Control and restrict network connections using a network flow matrix.
Enable enhanced PowerShell logging and configure PowerShell instances with the latest version and logging enabled.
Configure Windows Registry to require user account control (UAC) approval for PsExec operations.
Privilege Escalation:
Disable command-line and scripting activities and permissions.
Enable Credential Guard to protect Windows system credentials.
Implement Local Administrator Password Solution (LAPS) if using older Windows OS versions.
Defense Evasion:
Apply local security policies (e.g., SRP, AppLocker, WDAC) to control application execution.
Establish an application allowlist to allow only approved software to run.
Credential Access:
Restrict NTLM usage with security policies and firewalling.
Discovery:
Disable unused ports and close unused RDP ports.
Lateral Movement:
Identify and eliminate critical Active Directory control paths.
Use network monitoring tools to detect abnormal activity and potential ransomware traversal.
Command and Control:
Implement a tiering model and trust zones for sensitive assets.
Reconsider virtual private network (VPN) access and move towards zero trust architectures.
Exfiltration:
Block connections to known malicious systems using a TLS Proxy.
Use web filtering or a Cloud Access Security Broker (CASB) to restrict or monitor access to public-file sharing services.
Impact:
Develop a recovery plan and maintain multiple copies of sensitive data in a physically separate and secure location.
Maintain offline backups of data with regular backup and restoration practices.
Encrypt backup data, make it immutable, and cover the entire data infrastructure.
By implementing these mitigations, organizations can significantly strengthen their cybersecurity defenses and reduce the risk of falling victim to cyber threats like LockBit. It is crucial to regularly review and update these measures to stay resilient in the face of evolving threats.
Ransomware Resources
Take a look at our other posts on ransomware for more information on how businesses can defend themselves against an attack, and more.
Whether you’re protecting your business against drive failures or optimizing performance, choosing the right RAID level for your NAS is important for data safety and efficiency. A simple question inspired this blog: At what size of RAID should you have a two-drive tolerance instead of one for your NAS device? The answer isn’t complex per se, but there were enough “if/thens” that we thought it warranted a bit more explanation.
So today, I’m explaining everything you need to know to choose the right RAID level for your needs, including their benefits, drawbacks, and different use cases.
Refresher: What’s NAS? What Is RAID?
NAS stands for network attached storage. It is an excellent solution for organizations and users that require shared access to large amounts of data. NAS provides cost-effective, centralized storage that can be accessed by multiple users, from different locations, simultaneously. However, as the amount of data stored on NAS devices grows, the risk of data loss also increases.
This is where RAID levels come into play. RAID stands for redundant array of independent disks (or “inexpensive disks” depending on who you ask). It’s crucial for NAS users to understand the different RAID levels so they can effectively protect data while ensuring optimal performance of their NAS system.
Both NAS devices and RAID are disk arrays. That is, they are a set of several hard disk drives (HDDs) and/or solid state drives (SSDs) that store large amounts of data, orchestrating the drives to work as one unit. The biggest difference is that NAS is configured to work over your network. That means that it’s easy to configure your NAS device to support RAID levels—you’re combining the RAID’s data storage strategy and the NAS’s user-friendly network capabilities to get the best of both worlds.
This combination allows NAS users to implement RAID types that align with their needs, whether for data redundancy, increased write performance, or a balance of both. With proper configuration, a NAS device equipped with RAID provides both flexibility and enhanced data protection.
What Is RAID Storage?
RAID was first introduced by researchers at the University of California, Berkeley in the late 1980s. The original paper, “A Case for Redundant Arrays of Inexpensive Disks (RAID)”, was authored by David Patterson, Garth A. Gibson, and Randy Katz, where they introduced the concept of combining multiple smaller disks into a single larger disk array for improved performance and data redundancy.
They also argued that the top-performing mainframe disk drives of the time could be beaten on performance by an array of the inexpensive drives. Since then, RAID has become a widely used data storage technology in the data storage industry, and many different levels of RAID levels evolved over time.
RAID storage is now utilized in systems ranging from NAS devices to enterprise-grade data centers, offering configurations that balance write performance, data protection, and fault tolerance. This flexibility makes RAID an important part of storage architectures, helping businesses and individuals store and protect their data blocks efficiently.
Different Types of RAID Storage Techniques
Before we learn more about the different types of RAID levels, it’s important to understand the different types of RAID storage techniques so that you will have a better understanding of how RAID levels work.
There are essentially three types of RAID storage techniques—striping, mirroring, and parity. Depending on the level, RAID systems combine these methods in different ways to achieve varying balances of performance, redundancy, and storage efficiency.
Striping
Striping distributes your data over multiple drives. If you use a NAS device, striping spreads the blocks that comprise your files across the available hard drives simultaneously. This allows you to create one large drive, giving you faster read and write access since data can be stored and retrieved concurrently from multiple disks. However, striping doesn’t provide any redundancy whatsoever, and it’s typically found in systems where performance is prioritized over data redundancy. If a single drive fails in the storage array, all data on the device can be lost. Striping is usually used in combination with other techniques, as we’ll explore below.
Striping
Mirroring
As the name suggests, mirroring makes a copy of your data. Data is written simultaneously to two disks, thereby providing redundancy by having two copies of the data. Even if one disk fails, your data can still be accessed from the other disk.
Mirroring
There’s also a performance benefit here for reading data—you can request blocks concurrently from the drives (e.g. you can request block 1 from HDD1 at the same time as block 2 from HDD2). The disadvantage is that mirroring requires twice as many disks for the same total storage capacity. Mirroring is typically used in RAID levels such as RAID 1 and RAID 10.
Parity
Parity is all about error detection and correction. The system creates an error correction code (ECC) and stores the code along with the data on the disk. This code allows the RAID controller to detect and correct errors that may occur during data transmission or storage, thereby reducing the risk of data corruption or data loss due to disk failure. If a drive fails, you can install a new drive and the NAS device will restore your files based on the previously created ECC.
Parity is commonly used in RAID 5 and RAID 6, and the latter uses double parity, meaning that two sets of parity data are stored for additional protection.
Parity
What Is RAID Fault Tolerance?
In addition to the different RAID storage techniques, the other essential factor to consider before choosing a RAID level is RAID fault tolerance.” RAID fault tolerance refers to the ability of a RAID configuration to continue functioning even in the event of a hard disk failure.
In other words, fault tolerance gives you an idea of how many drives you can afford to lose in a RAID level configuration, but continue to access or re-create the data.
Different RAID levels offer varying degrees of fault tolerance and redundancy, and it’s essential to understand the trade-offs in storage capacity, performance, and cost as we’ll cover next.
What Are the Different RAID Levels?
RAID levels are standardized by the Storage Networking Industry Association (SNIA) and are assigned a number based on how they affect data storage and redundancy.
While RAID levels evolved over time, the standard RAID levels available today are RAID 0, RAID 1, RAID 5, RAID 6, and RAID 10. In addition to RAID configurations, non-RAID drive architectures also exist like JBOD, which we’ll explain first.
Now that you understand the basics of RAID storage, let’s take a look at the different RAID level configurations for NAS devices, including their benefits, use cases, and degree of fault tolerance.
JBOD: Simple Arrangement, Data Written Across All Drives
JBOD, also referred to as “Just a Bunch of Disks” or “Just a Bunch of Drives”, is a storage configuration where multiple drives are combined as one logical volume. In JBOD, data is written in a sequential way, across all drives without any RAID configuration. This approach allows for flexible and efficient storage utilization, but it does not provide any data redundancy or fault tolerance.
JBOD: Just a bunch of disks.
JBOD has no fault tolerance to speak of. On the plus side, it’s the simplest storage arrangement, and all disks are available for use. But, there’s no data redundancy and no performance improvements.
RAID 0: Striping, Data Evenly Distributed Over All Disks
RAID 0, also referred to as a “stripe set” or “striped volume”, stores the data evenly across all disks. Blocks of data are written to each disk in the array in turn, resulting in faster read and write speeds. However, RAID 0 doesn’t provide fault tolerance or redundancy. The failure of one drive can cause the entire storage array to fail, resulting in total loss of data.
RAID 0 also has no fault tolerance. There are some pros: it’s easy to implement, you get faster read/write speeds, and it’s cost effective. But there’s no data redundancy and an increased risk of data loss.
RAID 0 is typically used in scenarios where speed is critical but data safety isn’t a priority, such as video editing or temporary storage of unimportant files.
RAID 0: Data evenly distributed across two drives.
Raid 0: The Math
We can do a quick calculation to illustrate how RAID 0, in fact, increases the chance of losing data. To keep the math easy, we’ll assume an annual failure rate (AFR) of 1%. This means that, out of a sample of 100 drives, we’d expect one of them to fail in the next year; that is, the probability of a given drive failing in the next year is 0.01.
Now, the chance of the entire RAID array failing–its AFR–is the chance that any of the disks fail. The way to calculate this is to recognize that the probability of the array surviving the year is simply the product of the probability of each drive surviving the year. Note: we’ll be rounding all results in this article to two significant figures.
Multiply the possibility of one drive failing by the number of drives you have. In this example, there are two.
0.99 x 0.99 = 0.98
Subtract that result from one to calculate the percentage. So, the AFR is:
1 – 0.98 = 0.02, or 2%
So the two-drive RAID array is twice as likely to fail as a single disk.
For larger arrays, the risk increases exponentially as the number of drives increases, which makes RAID 0 unsuitable for critical or long-term data storage.
RAID 1: Mirroring, Exact Copy of Data on Two or More Disks
RAID 1 uses disk mirroring to create an exact copy of a set of data on two or more disks to protect data from disk failure. The data is written to two or more disks simultaneously, resulting in disks that are identical copies of each other. If one disk fails, the data is still available on the other disk(s). The array can be repaired by installing a replacement disk and copying all the data from the remaining drive to the replacement. However, there is still a small chance that the remaining disk will fail before the copy is complete.
RAID 1 has a fault tolerance of one drive. Advantages include data redundancy and improved read performance. Disadvantages include reduced storage capacity compared to disk potential. It also requires twice as many disks as RAID 0.
RAID 1: Exact copy of data on two or more disks.
RAID 1: The Math
To calculate the AFR for a RAID 1 array, we need to take into account the time needed to repair the array—that is, to copy all of the data from the remaining good drive to the replacement. This can vary widely depending on the drive capacity, write speed, and whether the array is in use while it is being repaired.
For simplicity, let’s assume that it takes a day to repair the array, leaving you with a single drive. The chance that the remaining good drive will fail during that day is simply (1/365) x AFR:
(1/365) x 0.01 = 0.000027
Now, the probability that the entire array will fail is the probability that one drive will fail and also the remaining good drive fail during that one-day repair period:
0.01 x 0.000027 = 0.00000027
Since there are two drives, and so two possible ways for this to happen, we need to combine the probabilities as we did in the RAID 0 case:
1 – (1 – 0.00000027) x 2 = 0.00000055 = 0.000055%
That’s a tiny fraction of the AFR for a single disk—out of two million RAID arrays, we’d expect just one of them to fail over the course of a year, as opposed to 20,000 out of a population of two million single disks.
This calculation highlights how RAID 1 dramatically reduces the likelihood of data loss, making it a safer option than RAID 0 for critical data storage.
When AFRs are this small, we often flip the numbers around and talk about reliability in terms of “number of nines.” Reliability is the probability that a device will survive the year. Then, we just count the nines after the decimal point, disregarding the remaining figures. Our single drive has reliability a of 0.99, or two nines, and the RAID 0 array has just a single nine with a reliability of 0.98.
The reliability of this two-drive RAID 1 array, given our assumption that it will take a day to repair the array, is:
1 – 0.00000055 = 0.99999945
Counting the nines, we’d also call this six nines.
RAID 5: Striping and Parity With Error Correction
RAID 5 uses a combination of disk striping and parity to distribute data evenly across multiple disks, along with creating an error correction code. Parity, the error correction information, is calculated and stored in one block per stripe set. This way, even if there is a disk failure, the data can be reconstructed using error correction.
RAID 5 also has a fault tolerance of one drive. On the plus side, you get data redundancy and improved performance. It’s a cost-effective solution for those who need redundancy and performance. On the minus side, you only get limited fault tolerance: RAID 5 can only tolerate one disk failure. If two disks fail, data will be lost.
RAID 5 is well-suited for environments like web hosting or file servers where storage efficiency and reliability are critical but not at the cost of excessive redundancy.
RAID 5: Striping and parity distributed across disks.
RAID 5: The Math
Let’s do the math. The array fails when one disk fails, and any of the remaining disks fail during the repair period. A RAID 5 array requires a minimum of three disks. We’ll use the same numbers for AFR and repair time as we did previously.
We’ve already calculated the probability that either disk fails during the repair time as 0.000027.
And, given that there are three ways that this can happen, the AFR for the three-drive RAID array is:
1 – (1 – 0.000027)3 = 0.000082 = 0.0082%
To calculate the durability, we’d perform the same operation as previous sections (1 – AFR), which gives us four nines. That’s much better durability than a single drive, but much worse than a two-drive RAID 1 array. We’d expect 164 of two million three-drive RAID 5 arrays to fail. The tradeoff is in cost-efficiency—67% of the three-drive RAID 5 array’s disk space is available for data, compared with just 50% of the RAID 1 array’s disk space.
Increasing the number of drives to four increases the available space to 75%, but, since the array is now vulnerable to any of the three remaining drives failing, it also increases the AFR, to 0.033%, or just one nine.
RAID 6: Striping and Dual Parity With Error Correction
RAID 6 uses disk striping with dual parity. As with RAID 5, blocks of data are written to each disk in turn, but RAID 6 includes two parity blocks in each stripe set. This provides additional data protection compared to RAID 5, and a RAID 6 array can withstand two drive failures and continue to function.
With RAID 6, you get a fault tolerance of two drives. Advantages include higher data protection and improved performance. Disadvantages include reduced write speed. Due to dual parity, write transactions are slow. It also takes longer to repair the array because of its complex structure.
RAID 6 is ideal for large-scale environments like enterprise data centers where drive failures are more likely, and downtime is unacceptable.
RAID 6: Striping and dual parity with error correction.
RAID 6: The Math
The calculation for a four-drive RAID 6 array is similar to the four-drive RAID 5 case, but this time, we can calculate the probability that any two of the remaining three drives fail during the repair. First, the probability that a given pair of drives fail is:
(1/365) x (1/365) = 0.0000075
There are three ways this can happen, so the probability that any two drives fail is:
1 – (1 – 0.0000075)3 = 0.000022
So the probability of a particular drive failing, then a further two of the remaining three failing during the repair is:
0.01 * 0.000022 = 0.00000022
There are four ways that this can happen, so the AFR for a four-drive RAID array is therefore:
1 – (1 – 0.000000075)4 = 0.0000009, or 0.00009%
Subtracting our result from one, we calculate six nines of durability. We’d expect just two drives out of approximately two million to fail within a year. It’s not surprising that the AFR is similar to RAID 1, since, with a four-drive RAID 6 array, 50% of the storage is available for data.
As with RAID 5, we can increase the number of drives in the array, with a corresponding increase in the AFR. A five-drive RAID 6 array allows use of 60% of the storage, with an AFR of 0.00011%, or five nines; two of our approximately two million drives would fail.
RAID 1+0: Striping and Mirroring for Protection and Performance
RAID 1+0, also known as RAID 10, is a combination of RAID 0 and RAID 1, in which it combines both striping and mirroring to provide enhanced data protection and improved performance. In RAID 1+0, data is striped across multiple mirrored pairs of disks. This means that if one disk fails, the other disk on the mirrored pair can still provide access to the data.
RAID 1+0 requires a minimum of four disks, of which two will be used for striping and two for mirroring, allowing you to combine the speed of RAID 0 with the dependable data protection of RAID 1. It can tolerate multiple disk failures as long as they are not in the same mirrored pair of disks.
With RAID 1+0, you get a fault tolerance of one drive per mirrored set. This gives you high data protection and improved performance over RAID 1 or RAID 5. However, it comes at a higher cost as it requires more disks for data redundancy. Your storage capacity is also reduced (only 50% of the total disk space is usable).
RAID 10: Striping and mirroring for protection and performance.
The below table shows a quick summary of the different RAID levels, their storage methods, and their fault tolerance levels.
RAID Level
Storage Method
Fault Tolerance
Advantages
Disadvantages
JBOD
Just a bunch of disks
None
Simplest storage arrangement.
All disks are available for use.
No data redundancy.
No performance improvements.
RAID 0
Block-level striping
None
Easy to implement.
Faster read and write speeds.
Cost-effective.
No data redundancy.
Increased risk of data loss.
RAID 1
Mirroring
One drive
Data redundancy.
Improved read performance.
Reduced storage capacity compared to disk potential.
Requires twice as many disks.
RAID 5
Block-level striping with distributed parity
One drive
Data redundancy.
Improved performance.
Cost-effective for those who need redundancy and performance.
Limited fault tolerance.
RAID 6
Block-level striping with dual distributed parity
Two drives
Higher data protection.
Improved performance.
Reduced write speed: Due to dual parity, write transactions are slow.
Repairing the array takes longer because of its complex structure.
RAID 1+0
Block-level striping with mirroring
One drive per mirrored set
High data protection.
Improved performance over RAID 1 and RAID 5.
Higher cost, as it requires more disks for data redundancy.
Reduced storage capacity.
How Many Parity Disks Do I Need?
We’ve limited ourselves to the standard RAID levels in this article. It’s not uncommon for NAS vendors to offer proprietary RAID configurations offering features such as the ability to combine different sizes of disks into a single array, but the calculation usually comes down to fault tolerance, which is the same as the number of parity drives in the array.
The common case of a four-drive NAS device, assuming a per-drive AFR of 1% and a repair time of one day:
RAID Level
Storage Method
Fault Tolerance Level
Notes
RAID 2
Bit-level striping, variable number of dedicated parity disks
Variable
More complex than RAID 5 and 6 with negligible gains.
RAID 3
Byte-level striping, dedicated parity drive
One drive
Again, more complex than RAID 5 and 6 with no real benefit.
RAID 4
Block-level striping, dedicated parity drive
One drive
The dedicated parity drive is a bottleneck for writing data, and there is no benefit over RAID 5.
RAID 5, dedicating a single disk to parity, is a good compromise between space efficiency and reliability. Its AFR of 0.033% equates to an approximately one in 3000 chance of failure per year. If you prefer longer odds, then you can move to mirroring or two parity drives, giving you odds of between one in one million and one in three million.
A note on our assumptions: In our calculations, we assume that it will take one day to repair the array in case of disk failure. So, as soon as the disk fails, the clock is ticking! If you have to go buy a disk, or wait for an online order to arrive, that repair time increases, with a corresponding increase in the chances of another disk failing during the repair. A common approach is to buy a NAS device that has space for a “hot spare”, so that the replacement drive is always ready for action. If the NAS device detects a drive failure, it can immediately bring the hot spare online and start the repair process, minimizing the chances of a second, catastrophic, failure.
Even the Highest RAID Level Still Leaves You Vulnerable
Like we said, answering the question “What RAID level do you need?” isn’t super complex, but there are a lot of if/thens. Now, you should have a good understanding of the different RAID levels, the fault tolerance they provide, and their pros and cons. But, even with the highest RAID level, your data could still be vulnerable.
While different RAID levels offer different levels of data redundancy, they are not enough to provide complete data protection for NAS devices. RAID provides protection against physical disk failures by storing multiple copies of NAS data on different disks to achieve fault tolerance objectives. However, it does not protect against the broader range of events that could result in data loss, including natural disasters, theft, or ransomware attacks. Neither does RAID protect against user error. If you inadvertently delete an important file from your NAS device, it’s gone from that array, no matter how parity disks you have.
Of course, that assumes you have no backup files. To ensure complete NAS data protection, it’s important to implement additional measures for a complete backup strategy, such as off-site cloud backup—not that we’re biased or anything. Cloud storage solutions are an effective tool to protect your NAS data with a secure, off-site cloud backup, ensuring your data is secured against various data loss threats or other events that could affect the physical location of the NAS.
At the end of the day, taking a multi-layered approach is the safest way to protect your data. RAID is an important component to achieve data redundancy, but additional measures should also be taken for increased cyber resilience.
We’d love to hear from you about any additional measures you’re taking to protect your NAS data besides RAID. Share your thoughts and experiences in the comments below.
Over the past several years, folks have come to embrace the solid state drive (SSD) as their standard data storage device. It’s gotten to the point where people are breathlessly predicting the imminent death of the venerable hard drive. While we don’t see the demise of the hard drive happening any time soon, SSDs are here to stay and we want to share what we know about them. To that end, we’ve previously compared hard drives and SSDs as it relates to power, reliability, speed, price, and so on. But, the one area we’ve left primarily unexplored for SSDs is SMART.
SMART—or, more properly, S.M.A.R.T.—stands for Self Monitoring, Analysis, and Reporting Technology. This is a monitoring system built into hard drives and SSDs whose primary function is to detect and report on the state of the drive by populating specific SMART attributes. These include time-in-service and temperature, as well as reliability-based attributes for media condition, operational efficiency, and many more.
Both hard drives and SSDs populate SMART attributes, but given how different these drive types are, the information produced is quite different as well. For example, hard drives have sectors, while SSDs have pages and blocks. Let’s take a look at the common attributes of hard drives and SSDs, and then we’ll dig into the SSD SMART attributes we’ve found useful, interesting, or just weird.
Let’s Get SMARTed
For each SSD model, the drive manufacturer decides which SMART attributes to populate. Attributes are numbered from 1 to 255, with raw and normalized values for each attribute. Some SMART reference material will also list attributes in hexadecimal (HEX), for example, decimal 12 will also be shown as “HEX 0C.”
At Backblaze, we have over a dozen different SSD models in service, and we pull daily SMART stats from each. To simplify the task at hand for the purposes of this blog post, we chose three SSD models, one each from Seagate, Western Digital, and Crucial, to show the similarities and differences between the models. All three are 250GB SSDs.
To that end, we have created a table of the SMART attributes used by each of those three drive models. You can download a PDF of the table, or jump to the end of this post to view the table. Things to note about the table:
Only 44 of the 255 available attributes are used by these SSDs. Most of the other attributes are exclusive to hard drives or not used at all.
The attribute names and definitions were gathered from multiple sources which are referenced at the end of this post. The consistency of the names and definitions across all SSD manufacturers is, well, not as consistent as we would like.
Of the 44 attributes listed in the table, the Seagate SSD (model: Seagate BarraCuda 120 SSD ZA250CM10003) uses 20, the Western Digital (model: WDC WDS250G2B0A) uses 25, and the Crucial (model: CT250MX500SSD1) uses 23.
The SMART values listed for each SSD model are those that were recorded using the smartctl utility from the smartmontools package.
One of the things you’ll notice as you examine the list of attributes is that there are several which have similar names, but are different attribute numbers. That is, different vendors use a different attribute for basically the same thing. This highlights a deficiency in SMART: Participation is voluntary. While the vendors try to play nice with each other, who uses a given attribute for what purpose is subject to the whims, patience, and persistence of the many SSD manufacturers in the market today.
Often manufacturers have created their own SMART monitoring tools to use on their drives. As they add, change, and delete the SMART attributes they use, they update their tools. Drive agnostic tools such as smartctl, which we use, have to chase down updates that have occurred in each of the manufacturer’s homegrown SMART monitoring tools. There are other tools out there as well. DriveDX is another vendor-agnostic SSD monitoring tool, and here’s a link to their release notes page. They made 38 updates in release 1.10.0 (700) alone just to keep up with the drive manufacturers.
Making things more complicated, manufacturers differ widely in how they advertise the attributes and definitions they use. Kingston, for example, is very good about publishing a table of named SMART attributes and definitions for each of their drives, whereas similar information for Western Digital SSDs is difficult to find in the public domain. The net result is that agnostic SMART tools such as smartctl, DriveDx, and others have to work extra hard to keep up with new, updated, and deleted attributes.
Common Attributes
Of the 44 attributes we list in our table, only five are common for all three of the SSD models we are examining. Let’s start with the three of the common attributes that are also common to nearly every hard drive in production today.
SMART 9: Power-On Hours. The count of hours in power-on state.
SMART 12: Power Cycle Count. The number of times the disk is powered off and then powered back on. This is cumulative over the life of the drive.
SMART 194: Temperature. The internal temperature of the drive. For some drive models, the normalized value ranges from 0 to 255, for other drive models the range is 0 to 100, and for others the normalized value is the same as the raw value. In all cases, the raw value is in degrees Celsius.
SSD Unique Common Attributes
These two attributes are specific to SSDs and are common to all three of the models we are examining.
SMART 173: SSD Wear Leveling. Counts the maximum worst erase count on a single block.
SMART 174: Unexpected Power Loss Count. The number of unclean (unexpected) shutdowns, like when you kick out the plug of your external drive. This value is cumulative over the life of the SSD. This attribute is a subset of the count for SMART 12 and with a little math you can get the number of normal shutdowns if that is interesting to you.
Not Much In Common
As noted, only five of the 44 SMART attributes are common between our three SSD models. This lack of commonality, 11%, seemed low to us, and we wondered what the commonality was between the SMART attributes on the hard drive models we use. We reviewed the SMART attributes for three 14TB hard drive models in our drive stats data set, one model each from Seagate, Western Digital, and Toshiba. We found that 42% of the SMART attributes were common between the three models. That’s nearly four times more than the SSD commonality, but admittedly less than we thought.
Useful Attributes
For the purpose at hand, we’ll define a useful attribute as something that clearly indicates the health of the SSD. That led us to focus on two concepts: Lifetime remaining (or used) percentage, and logical block addressing (LBA) read/write counts. Let’s take a look at how each of the drive models reports on these attributes.
This attribute measures the approximate life left from a combination of program-erase cycles and available reserve blocks of the device. A brand new SSD will report a value of “100” for the Normalized value and decrease down to “0” as the drive is used.
SMART 202: Percentage of Lifetime Used (Crucial)
This attribute measures how much of the drive’s projected lifetime has been used at any point in time. For a brand new drive, the attribute will report “0”, and when its specified lifetime has been reached, it will show “100,” reporting that 100 percent of the lifetime has been used.
SMART 231: Life Left (Seagate)
This attribute indicates the approximate SSD life left, in terms of program/erase cycles or available reserved blocks. A brand new SSD has a normalized value of “100” and decreases from there with a threshold value at “10” indicating a need for replacement. A value of “0” may mean that the drive is operating in read-only mode.
All three use program/erase cycles (SMART 232) and available reserved blocks (SMART 170) to compute their percentages, although as is seen, SMART 202 counts up, while the other two count down. Lifetime, as defined here, is relative. That is you could be at 50% lifetime after six months or six years depending on the SSD usage.
LBAs Written/Read
In an SSD, data is written to and read from a page, also known as a NAND page. A group of pages forms a block. The LBA written/read count is just that, a count of blocks written/read. Each time a block is written or read the respective SMART attribute counter increases by one. For example, if various pieces of data on the pages within a single block are read 10 times, it will increase the SMART counter by 10.
SMART 241: LBAs Written (Seagate and Western Digital)
Total count of LBAs written.
SMART 242: LBAs Read (Seagate and Western Digital)
Total count of LBAs read.
SMART 246: Cumulative Host Sectors Written (Crucial)
LBAs written due to a computer request. Note that the name of this attribute seems incorrect as it states sectors versus blocks.
Crucial also counts NAND pages written due to a computer request (SMART 247) and NAND pages written due to a background operation such as garbage collection (SMART 248). Crucial does not seem to have a SMART attribute for total count of LBAs read. Nor does it seem to record LBAs written for background operations.
Interesting Attributes
Below we’ve gathered several SSD SMART attributes we found interesting and one could argue potentially useful. In no particular order, let’s take a look.
SMART 230: Drive Life Protection Status (Western Digital)
This attribute indicates whether the SSD’s usage trajectory is outpacing the expected life curve. This attribute implies a couple of interesting things. First, there is a usage trajectory calculation and value. This could be SMART 169 noted previously. Second, there is a defined expected life. We assume that the expected life curve is fixed for a given SSD model and perhaps uses the warranty period as its zero date, but we’re only guessing here.
Redundant Array of Independent NAND (RAIN) is similar to gaining data redundancy using RAID in a drive array, except RAIN redundancy is accomplished within the drive, i.e., all the data written to this SSD is made redundant on the SSD itself. This redundancy is not free and either consumes some of disk space from the total space specified (250GB in this case), or uses additional space not counted in the total. Either way, this is a really cool feature and allows for data to be recovered transparently to the user even when initially it couldn’t be read due to a bad page or block.
SMART 232: Endurance Remaining (Seagate and Western Digital)
The number of physical erase cycles completed on the SSD as a percentage of the maximum physical erase cycles the drive is designed to endure. At first look, this seems similar to SMART 231 (Life Left), but this attribute does not consider available reserved blocks as part of its calculus. Still, this attribute could be a harbinger of what’s to come, as erasing SSD blocks at an accelerated rate often leads to having to utilize available reserved blocks downstream as the SSD cells wear out.
SMART 233: Media Wearout Indicator (Seagate and Western Digital)
Similar to SMART 232 (but without the math) as this attribute records the count of the actual NAND erase cycles. The normalized value starts at 100 for a new drive and decreases to a minimum of 1. As it decreases, the NAND erase cycles count (raw value) increases from 0 to the maximum-rated number of cycles.
SMART 171: SSD Program Fail Count (Western Digital and Crucial)andSMART 172: SSD Erase Count Fail (Western Digital and Crucial)
Both of these attributes count their respective failures (Program Fail and Erase Count) from when the drive was deployed. As a drive ages, one would expect these counts to increase and eventually pass some threshold value which would indicate a problem. While this is helpful in determining the health of a drive, these attributes alone provide only a partial picture as they can miss a rapid acceleration of failures over a short period of time.
Weird Things
There are a handful of attributes which seem odd based on our table and the attribute names and the definitions we have found. We’d like to point these out to start the conversation—If anyone can shed some light on these oddities, jump in the comments. Your input is much appreciated.
SMART 16: Total LBAs Read (Seagate)
There are two odd things here. First, the definition states that this attribute is only found on select Western Digital hard drive models—yet it was found in most of our Seagate SSDs. This could be a definition problem, but then there’s the second thing: Seagate SSDs record Total LBAs Read in attribute 242 (noted above). So, it seems it could also be an attribute name problem.
SMART 17: Unknown (Seagate)
We could not find any information on SMART 17, except for the fact that our Seagate drives report on this attribute.
Our Crucial drives report values for these attributes, but this is another case where the names and definitions don’t make sense, as they are talking about sectors which are hard drive-specific.
SMART 206: Flying Height (Crucial)
Another attribute reported by our Crucial drives which makes no sense based on the name and definition. I think we can all agree that measuring the flying height of the cells within an SSD is not meaningful.
The questions around the Crucial reported attributes could be straightforward to answer as Crucial has their own free SMART monitoring software, Storage Executive. If you are using this software, we’d appreciate any info you can share on the Crucial names and definitions of these attributes.
Data Retention
Many of us have an external hard drive or two sitting on a shelf somewhere acting as a backup or perhaps even an archive of our data. Every so often, we take out one of those drives, plug it in, and hope it spins up. This can go on for years.
Can SSDs be used for offline data storage, and if so how long can they safely remain unplugged? It’s a good question and one that has been debated many times over the years with time frames ranging from a few weeks to several years. The current thinking is that when an SSD is new, it can safely store your data without power for a year or so, but as the drive wears out the data retention period begins to diminish.
This begs the question: How worn out is your SSD? For Crucial SSDs, the answer is SMART 202: Percentage Lifetime Used. We discussed this attribute earlier in relation to drive life, but it also plays a role in data retention when the drive is unpowered. Using the normalized value, Crucial estimates the following:
“0” indicates that the drive can be stored unpowered for up to one year.
“50” indicates that the drive can be stored unpowered for up to six months.
“100” indicates that the drive can be stored unpowered for up to one month.
Anything above “100” and your data is at risk when the SSD is powered off.
In theory, you should be able to use the SMART 231: Life Left (Seagate) or SMART 169: Remaining Lifetime Percentage (Western Digital) to perform the same analysis as was done above with SMART 202 and the Crucial SSD model. Remember that these two attributes (231 and 169) count downward, that is “100” is good and “0” is bad. All that said, this is just a theory, as we’ve found no documentation this is actually the case (but it does seem to make sense).
SMART Could Be Even SMARTer
It’s great that SSD manufacturers are using SMART attributes to record relevant information about the status and health of their drive models. It’s also great that many manufacturers also provide software that monitors these SMART stats and provides the user feedback. All is wonderful when you are buying all your SSDs from the same manufacturer. But that’s just not the reality for most IT shops who are managing servers, networking gear, and so on from different vendors. It is also not the reality when it comes to running a cloud storage company.
Having accurate, up-to-date, vendor agnostic SSD monitoring tools is important to many organizations as part of their ability to cost effectively manage their systems and keep them healthy. Having to use a multitude of different tools to monitor SSDs doesn’t benefit anyone. Maybe it’s time we take SMART for SSDs beyond voluntary and look to standardize the attributes and their names and definitions across the board for all SSD manufacturers.
Sources
Multiple sources were consulted in researching this post, they are listed below. We may have missed one or two sources, and we apologize in advance if we did.
We only used sources which are available to us without purchasing something. That is, we didn’t buy agnostic monitoring applications or purchase a specific manufacturer’s SSD to have something to use their free monitoring application on. We took our Drive Stats data and then, just like you, we ventured into the internet to search out SSD SMART attribute information that was publicly available.
SMART Attributes Table
The following table contains the SMART attributes for the three SSD models listed. These attributes are collected by the smartctl utility within the smartmon toolset.
“Nobody ever got fired for buying AWS.” It’s true: AWS’s one-size-fits-all solution worked great for most businesses, and those businesses made the shift away from the traditional model of on-prem and self-hosted servers—what we think of as Cloud 1.0—to an era where AWS was the cloud, the one and only, which is what we call Cloud 2.0. However, as the cloud landscape evolves, it’s time to question the old ways. Maybe nobody ever got fired for buying AWS, but these days, you can certainly get a lot of value (and kudos) for exploring other options.
Developers and IT teams might hesitate when it comes to moving away from AWS, but AWS comes with risks, too. If you don’t have the resources to manage and maintain your infrastructure, costs can get out of control, for one. As we enter Cloud 3.0 where the landscape is defined by the open, multi-cloud internet, there is an emerging trend that is worth considering: the rise of specialized cloud providers.
Today, I’m sharing how software as a service (SaaS) startups and modern businesses can take advantage of these highly-focused, tailored services, each specializing and excelling in specific areas like cloud storage, content delivery, cloud compute, and more. Building on a specialized stack offers more control, return on investment, and flexibility, while being able to achieve the same performance you expect from hyperscaler infrastructure.
From a cost of goods sold perspective, AWS pricing wasn’t a great fit. From an engineering perspective, we didn’t want a net-new platform. So the fact that we got both with Backblaze—a drop-in API replacement with a much better cost structure—it was just a no-brainer.
Specialized providers—including content delivery networks (CDNs) like Fastly, bunny.net, and Cloudflare, as well as cloud compute providers like Vultr—offer services that focus on a particular area of the infrastructure stack. Rather than trying to be everything to everyone, like the hyperscalers of Cloud 2.0, they do one thing and do it really well. Customers get best-of-breed services that allow them to build a tech stack tailored to their needs.
Use Cases for Specialized Cloud Providers
There are a number of businesses that might benefit from switching from hyperscalers to specialized cloud providers, including:
Businesses dealing with large amounts of data that need an easy cost-effective way of storing their data.
In order for businesses to take advantage of the benefits (since most applications rely on more than just one service), these services must work together seamlessly.
Let’s Take a Closer Look at How Specialized Stacks Can Work For You
If you’re wondering how exactly specialized clouds can “play well with each other,” we ran a whole series of application storage webinars that talk through specific examples and uses cases. I’ll share what’s in it for you below.
1. Low Latency Multi-Region Content Delivery with Fastly and Backblaze
Did you know a 100-millisecond delay in website load time can hurt conversion rates by 7%? In this session, Pat Patterson from Backblaze and Jim Bartos from Fastly discuss the importance of speed and latency in user experience. They highlight how Backblaze’s B2 Cloud Storage and Fastly’s content delivery network work together to deliver content quickly and efficiently across multiple regions. Businesses can ensure that their content is delivered with low latency, reducing delays and optimizing user experience regardless of the user’s location.
2. Scaling Media Delivery Workflows with bunny.net and Backblaze
Delivering content to your end users at scale can be challenging and costly. Users expect exceptional web and mobile experiences with snappy load times and zero buffering. Anything less than an instantaneous response may cause them to bounce.
In this webinar, Pat Patterson demonstrates how to efficiently scale your content delivery workflows from content ingestion, transcoding, storage, to last-mile acceleration via bunny.net CDN. Pat demonstrates how to build a video hosting platform called “Cat Tube” and shows how to upload a video and play it using HTML5 video element with controls. Watch below and download the demo code to try it yourself.
3. Balancing Cloud Cost and Performance with Fastly and Backblaze
With a global economic slowdown, IT and development teams are looking for ways to slash cloud budgets without compromising performance. E-commerce, SaaS platforms, and streaming applications all rely on high-performant infrastructure, but balancing bandwidth and storage costs can be challenging. In this 45-minute session, we explored how to recession-proof your growing business with key cloud optimization strategies, including ways to leverage Fastly’s CDN to balance bandwidth costs while avoiding performance tradeoffs.
4. Reducing Cloud OpEx Without Sacrificing Performance and Speed
Greg Hamer from Backblaze and DJ Johnson from Vultr explore the benefits of building on best-of-breed, specialized cloud stacks tailored to your business model, rather than being locked into traditional hyperscaler infrastructure. They cover real-world use cases, including:
How Can Stock Photo broke free from AWS and reduced their cloud bill by 55% while achieving 4x faster generation.
How Monument Labs launched a new cloud-based photo management service to 25,000+ users.
How Black.ai processes 1000s of files simultaneously, with a significant reduction of infrastructure costs.
5. Leveling Up a Global Gaming Platform while Slashing Cloud Spend by 85%
James Ross of Nodecraft, an online gaming platform that aims to make gaming online easy, shares how he moved his global game server platform from Amazon S3 to Backblaze B2 for greater flexibility and 85% savings on storage and egress. He discusses the challenges of managing large files over the public internet, which can result in expensive bandwidth costs. By storing game titles on Backblaze B2 and delivering them through Cloudflare’s CDN, they achieve reduced latency since games are cached at the edge, and pay zero egress fees thanks to the Bandwidth Alliance. Nodecraft also benefited from Universal Data Migration, which allows customers to move large amounts of data from any cloud services or on-premises storage to Backblaze’s B2 Cloud Storage, managed by Backblaze and free of charge.
Migrating From a Hyperscaler
Though it may seem daunting to transition from a hyperscaler to a specialized cloud provider, it doesn’t have to be. Many specialized providers offer tools and services to make the transition as smooth as possible.
S3-compatible APIs, SDKs, CLI: Interface with storage as you would with Amazon S3—switching can be as easy as dropping in a new storage target.
Universal Data Migration: Free and fully managed migrations to make switching as seamless as possible.
Free egress: Move data freely with the Bandwidth Alliance and other partnerships between specialized cloud storage providers.
As the decision maker at your growing SaaS company, it’s worth considering whether a specialized cloud stack could be a better fit for your business. By doing so you could potentially unlock cost savings, improve performance, and gain flexibility to adapt your services to your unique needs. The one-size-fits-all is no longer the only option out there.
Want to Test It Out Yourself?
Take a proactive approach to cloud cost management: Get 10GB free to test and validate your proof of concept (POC) with Backblaze B2. All it takes is an email to get started.
With recent reports showing the global NAS market size is projected to grow from $26 billion to $82.9 billion in 2030, it’s clear that NAS isn’t going anywhere. So, let’s talk about how to choose an enterprise-level NAS solution.
What Is an Enterprise NAS?
Enterprise NAS is a large-scale data storage system that is connected to a local network to provide data storage and access to the organization. It’s designed for large-scale business environments that require high-capacity storage, superior performance, and advanced data management capabilities.
Compared with home-use NAS devices, enterprise NAS devices often come with superior hardware specifications, including powerful processors, large amounts of memory (RAM), and numerous drive bays to accommodate vast amounts of data.
How Do Enterprises Use NAS Devices?
Enterprises use NAS devices for a wide range of use cases and applications:
File storage and sharing: NAS devices provide a centralized platform for storing and sharing files across a network. This fosters collaboration, as employees can easily access shared files regardless of their physical location.
Data protection: With built-in redundancy features, NAS devices offer robust data protection. This ensures data remains safe and accessible even in the event of a disk failure.
Disaster recovery: Snapshot and replication features allow for quick restoration of data minimizing downtime and data loss from hardware failures, cyberattacks, or natural disasters. However, it’s important to note that NAS devices alone don’t provide this protection—they’re subject to the same vulnerabilities as all on-premises devices. Rather, this benefit comes from a NAS setup that tiers to the cloud.
Hosting business applications: Businesses can also use NAS devices to host business applications. Much the same as how you would use a server, since these devices can handle high volumes of data traffic and support multiple connections, they are well suited for running enterprise-level applications that require high availability and performance.
Running virtual machines (VMs): Virtualization software providers, like VMware, support running their products on NAS. With proper configuration, including potentially adding RAM to your device, you can easily spin up virtual machines using NAS.
Using NAS as a file server: NAS devices can function as dedicated file servers, offering high-performance, stable environments, which are useful for businesses with large user bases requiring concurrent access to shared files.
Archiving: Long-term storage and archiving is another key application of NAS devices in the enterprise. There are benefits to having archival data on-premises. It can reduce recovery times in case you need to restore from backups.
Enterprise NAS vs. Server Area Networks (SAN)
As you’re choosing how to create an enterprise-level storage system, it’s important to know the differences between NAS and SAN. The short answer: From the perspective of the user, there’s not much difference. From the perspective of the person managing the system, SAN setups are more complex and have more customization options, particularly in your network connections.
However, NAS companies have done an excellent job of adding functionality to NAS devices, making those features easily manageable. Since they’re less complex, they may be easier for your internal IT team to manage—and that can translate to OpEx savings and more time for your IT team to stay on top of challenges in an ever-changing tech landscape.
What Is the Difference Between Entry-Level, Mid-Market, and Enterprise NAS Devices?
NAS devices can be grouped into three major categories based on factors such as storage capacity, performance, and scalability. The following table provides a side-by-side comparison of the key features and differences between entry-level, mid-market, and enterprise NAS devices.
Feature
Entry-Level NAS
Mid-Market NAS
Enterprise NAS
Storage Capacity
Up to a few terabytes.
Can range from a few terabytes to tens of terabytes.
Usually hundreds of terabytes or more, scalable to meet enterprise needs.
Performance
Adequate for home use and basic file sharing.
Enhanced performance for small to medium businesses with higher data traffic.
High-performance systems designed to handle heavy workloads and concurrent access.
Reliability & Redundancy
Basic redundancy usually with RAID 1 or RAID 5 options.
More advanced redundancy options, including multiple RAID configurations.
Highly reliable with advanced redundancy features (RAID, replication, etc.).
Scalability
Limited scalability.
Moderate scalability, depending on model.
Highly scalable with clustering options.
Advanced Features
Basic features like media streaming, remote access, and basic data redundancy.
More advanced features like virtualization, data encryption, access control, and snapshot capability.
Enterprise-grade features like high-speed data transfers, advanced backup and disaster recovery options, deduplication, encryption, and virtualization support.
How Do I Choose an Enterprise NAS Device?
Now that you understand the difference between the different types of NAS devices and their respective features, it’s crucial to understand your specific business needs before choosing an enterprise NAS device. There are several aspects to consider, so let’s take them one by one.
1. Storage Capacity
One of the first things to consider is the amount of storage your enterprise requires. This isn’t just about your current needs, but also about the projected growth of your data over time. In a NAS system, storage is defined by the number of drives, the total amount of shared volume they create, and their striping scheme. A striping scheme defines where data is stored and what kinds of redundancies it has, and is also known as RAID levels that are usually defined like so: RAID 0, 1 5, 6, etc.
There are a few ways to add storage to a NAS device.
You can add drives to your NAS unit if you originally provisioned one with extra bays. This is most applicable to entry-level units.
You can purchase another NAS device and network it with your first device. On the enterprise level, you’ll likely have a more complex architecture of connected NAS devices acting as clusters or nodes on your network.
Finally, cloud-connected NAS devices mean that you can provision both primary and backup data to the cloud, so your setup is infinitely scalable. This means you can also nimbly add more storage on a short time frame—no need to wait for hardware upgrades (though you may still want to make upgrades in the longer term).
2. Data Access Speeds
The speed at which data can be accessed from your NAS device is another crucial factor. NAS devices are built to be directly connected to your local area network (LAN) and usually require a direct ethernet connection. An entry-level NAS system will have a gigabit ethernet connection (1GigE), and is suitable for entry-level or home NAS users.
But for enterprises that want to provide frequent and intensive data access to a large number of users, NAS vendors offer higher capacity ethernet connections on their systems. Some vendors offer 2.5 Gb/s or 5 Gb/s connections on their systems, but they usually require that you get a compatible network switch, USB adapters, or expansion cards. Still other NAS systems provide the option of Thunderbolt connections in addition to ethernet connections to provide higher bandwidth—up to 40GigE—and are good for systems that need to edit large files directly on the NAS.
3. Scalability
As your business grows, your data needs will likely increase. Therefore, it’s essential that your NAS device has the ability to grow with your business. You may not know exactly how much data you’ll need in a year or five, but you can certainly make an estimate based on your product roadmap, current rate of growth, and so on. And, we put together this handy NAS Buyer’s Guide so you can compare that potential growth to existing NAS features.
With any good backup strategy, you’ll want to set up recurring and automatic backups of all your systems. Also, in complex environments like a business, backups are just as much about data management—that is, knowing where all your data is stored (the shared file system vs. employee workstations vs. the cloud) and how to back it up effectively.
Enterprise NAS devices provide advanced data protection and backup features to protect NAS data against data loss and enhance accessibility. These include advanced RAID configurations (i.e. on what server and how redundant your data storage is), automated backup features, cloud storage integrations, enterprise grade encryption features, advanced backup and disaster recovery options, data deduplication, encryption, and virtualization support, etc.
Other features to look for can include snapshot technology, which allows capturing the state of the system at different points in time, and replication features which enable copying of data from one NAS device to another for redundancy.
5. Evaluating Total Cost of Ownership
When evaluating an investment in an enterprise NAS device, it’s important to not limit your focus on the initial purchase price of the NAS device itself. Keep in mind that with a NAS device, you’ll need to purchase hard drives (HDDs) or solid-state drives (SSDs) (and possibly other devices) to complete your setup.
Depending on the kind of data durability you want to create, the storage hardware cost can add up if you’re aiming for high capacity storage with advanced RAID configurations. Also, make sure to take into account energy consumption, software licenses, labor and IT costs, and maintenance costs.
6. Vendor Support and Warranty
One of the often ignored and underestimated parts of selecting an enterprise NAS device is the support and warranty provided by the NAS vendors. Enterprise NAS devices are complex pieces of technology. NAS devices, in general, are designed to be user-friendly, but once you’re networking NAS devices on the enterprise level, things get more complex.
When you encounter an issue, addressing the challenges as quickly as possible can mean the difference between prolonged downtime and quick resolution. Of course, this means having in-house IT support, but it’s also absolutely critical to choose an enterprise NAS vendor that provides robust support and a good warranty to ensure the resilience and longevity of your enterprise NAS solution.
Level Up: Connect Your Enterprise NAS to the Cloud
Okay, so you’ve chosen your enterprise NAS and devised your on-site, connected NAS solution. In industry parlance, what you’ve essentially done is to create a private cloud: storage dedicated solely to your organization, but accessible from anywhere. But, if you only have on-site storage, your data is vulnerable to theft, natural disasters, fire, and so on; and, as we mentioned above, you always want to have multiple copies of your data with at least one copy stored off-site.
The easiest way to achieve this is to connect your NAS to a public cloud service provider (CSP) like Backblaze. Make sure that you take into account the location of the CSP’s data centers to ensure that you have adequate geographic separation between your data. And, once connected to a CSP, you can take advantage of services like cloud replication to create yet another redundant copy of your data automatically.
Beyond backups, data storage on your NAS vs. in the cloud can have performance (speed) differences. This has implications on both your internal workflows and your external workflows. Take the use case of a media and entertainment company: when you’re editing files, you’re typically working with large, raw files that take time to transmit. That means that on-site storage can be faster for your team. But, teams have become more remote, and you might be using freelancers.
The great news is that most NAS devices have data management and syncing features, as noted above. A NAS hybrid cloud setup lets your employees or freelancers access remotely. They can access data via cloud storage, and your NAS client takes care of making sure all versions are up-to-date.
Once you have your business’ hybrid cloud setup, then you’ve opened up several opportunities to enhance how you store, manage, and use your data.
Store your data closer to delivery endpoints for faster speeds. If you’re creating, editing, or delivering large files like you would in the media and entertainment industry, the physical location of your data makes a difference to how fast you can deliver it to the end user. Depending on where your endpoints are located and what region you choose, using cloud storage as an active archive allows you to store data closer to delivery endpoints for fast access.
Integrate your NAS device with software as a service (SaaS) tools. In our SaaS landscape, all of our programs are internet-connected, and all of them need to be connected to storage. Many of these tools have their own clouds (like Google Drive or Adobe Creative Cloud) that you can bypass by connecting your own cloud storage account. Your NAS client then has excellent sync tools to keep your files updated as necessary, and, since that file is on your network instead of the tool’s cloud, it will be protected by your backup rules.
Actively strengthen your backups. We’ve talked about the need for geographic separation, and storing in the cloud is the easiest way to do this. (People used to ship tape backups back in the distant past of the 1990s and early 2000s.) You can also set up different rules for your different files. Your primary storage obviously needs to be modifiable, but you can use tools like Object Lock to set immutable rules on your backups as well.
Scale your storage flexibly. One of the biggest challenges of on-site storage is that adding more storage means buying more drives—it’s not an instant solution—and you’re more vulnerable to fluctuations in the supply chain. (Remember the Thailand Drive Crisis?) While you want to plan for future storage needs, cloud storage lets you add more storage immediately should you have unexpected needs.
Sum Up and Get Started
As you can see, having a clear understanding of your business needs is crucial before you build your storage strategy. Choosing an enterprise NAS is not only about getting a device that works now, but one that will continue to serve your business efficiently as your organization grows and evolves. A well thought-out enterprise NAS selection can boost your data management, provide robust data protection, and support your business’s growth goals.
If you have any questions or thoughts, please feel free to share them in the comments.
If you’re responsible for securing your company’s data, you’re likely well-acquainted with the basics of backups. You may be following the 3-2-1 rule and may even be using cloud storage for off-site backup of essential data.
But there’s a new model of iterative, process-improvement driven outcomes to improve business continuity, and it’s called cyber resilience. What is cyber resilience and why does it matter to your business? That’s what we’ll talk about today.
Join Us for Our Upcoming Webinar
Learn more about how to strengthen your organization’s cyber resilience by protecting systems, responding to incidents, and recovering with minimal disruption at our upcoming webinar “Build Your Company’s Cyber Resilience: Protect, Respond, and Recover from Security Incidents” on Friday, June 9 at 10 a.m. PT/noon CT.
Plus, see a demo of Instant Business Recovery, an on-demand, fully managed disaster recovery as a service (DRaaS) solution that works seamlessly with Veeam. Deploy and recover via a simple web interface or a phone call to instantly begin recovering critical servers and Veeam backups.
The Case for Cyber Resilience
The advance of artificial intelligence (AI) technologies, geopolitical tensions, and the ever-present threat of ransomware have all fundamentally changed the approach businesses must take to data security. In fact, the White House has prioritized cybersecurity by announcing a new cybersecurity strategy because of the increased risks of cyberattacks and the threat to critical infrastructure. And, according to the World Economic Forum’s Global Cybersecurity Outlook 2023, business continuity (67%) and reputational damage (65%) concern organization leaders more than any other cyber risk.
Cyber resilience assumes that it’s not if a security incident will occur, but when.
Being cyber resilient means that a business is able to not only identify threats and protect against them, but also withstand attacks as they’re happening, respond effectively, and bounce back better—so that the business is better fortified against future incidents.
What Is Cyber Resilience?
Cyber resilience is ultimately a holistic and continuous view of data protection; it implies that businesses can build more robust security practices, embed those throughout the organization, and put processes into place to learn from security threats and incidents in order to continuously shore up defenses. In the cyber resilience model, improving data security is no longer a finite series of checkbox items; it is not something that is ever “done.”
Unlike common backup strategies like 3-2-1 or grandfather-father-son that are well defined and understood, there is no singular model for cyber resilience. The National Institute of Standards and Technology defines cyber resiliency as the ability to anticipate, withstand, recover from, and adapt to incidents that compromise systems. You’ll often see the cyber resilience model depicted in a circular fashion because it is a cycle of continuous improvement. While cyber resilience frameworks may vary slightly from one another, they all typically focus on similar stages, including:
Identify: Stay informed about emerging security threats, especially those that your systems are most vulnerable to. Share information throughout the organization when employees need to install critical updates and patches.
Protect: Ensure systems are adequately protected with cybersecurity best practices like multi-factor authentication (MFA), encryption at rest and in transit, and by applying the principle of least privilege. For more information on how to shore up your data protection, including data protected in cloud storage, check out our comprehensive checklist on cyber insurance best practices. Even if you’re not interested in cyber insurance, this checklist still provides a thorough resource for improving your cyber resilience.
Detect: Proactively monitor your network and system to ensure you can detect any threats as soon as possible.
Respond and Recover: Respond to incidents in the most effective way and ensure you can sustain critical business operations even while an incident is occurring. Plan your recovery in advance so your executive and IT teams are prepared to execute on it when the time comes.
Adapt: This is the key part. Run postmortems to understand what happened, what worked and what didn’t, and how it can be prevented in the future. This is how you truly build resilience.
Why Is Cyber Resilience Important?
Traditionally, IT leaders have excelled at thinking through backup strategy, and more and more IT administrators understand the value of next level techniques like using Object Lock to protect copies of data from ransomware. But, it’s less common to give attention to creating a disaster recovery (DR) plan, or thinking through how to ensure business continuity during and after an incident.
In other words, we’ve been focusing too much on the time before an incident occurs and not enough on time on what to do during and after an incident. Consider the zero trust principle, which assumes that a breach is happening and it’s happening right now: taking such a viewpoint may seem negative, but it’s actually a proactive, not reactive, way to increase your business’ cyber resilience. When you assume you’re under attack, then your responsibility is to prove you’re not, which means actively monitoring your systems—and if you happen to discover that you are under attack, then your cybersecurity readiness measures kick in.
How Is Cyber Resilience Different From Cybersecurity?
Cybersecurity is a set of practices on what to do before an incident occurs. Cyber resilience asks businesses to think more thoroughly about recovery processes and what comes after. Hence, cybersecurity is a component of cyber resilience, but cyber resilience is a much bigger framework through which to think about your business.
How Can I Improve My Business’ Cyber Resilience?
Besides establishing a sound backup strategy and following cybersecurity best practices, the biggest improvement that data security leaders can make is likely in helping the organization to shift its culture around cyber resilience.
Reframe cyber resilience. It is not solely a function of IT. Ensuring business continuity in the face of cyber threats can and should involve operations, legal, compliance, finance teams, and more.
Secure executive support now. Don’t wait until an incident occurs. Consider meeting on a regular basis with stakeholders to inform them about potential threats. Present if/then scenarios in terms that executives can understand: impact of risks, potential trade-offs, how incidents might affect customers or external partners, expected costs for mitigation and recovery, and timelines.
Practice your disaster recovery scenarios. Your business continuity plans should be run as fire drills. Ensure you have all stakeholders’ emergency/after hours contact information. Run tabletop exercises with any teams that need to be involved and conduct hypothetical retrospectives to determine how you can respond more efficiently if a given incident should occur.
It may seem overwhelming to try and adopt a cyber resiliency framework for your business, but you can start to move your organization in this direction by helping your internal stakeholders first shift their thinking. Acknowledging that a cyber incident will occur is a powerful way to realign priorities and support for data security leaders, and you’ll find that the momentum behind the effort will naturally help advance your security agenda.
Cyber Resilience Resources
Interested in learning more about how to improve business cyber resilience? Check out the free Backblaze resources below.
Looking for Support to Help Achieve Your Cyber Resilience Goals?
Backblaze provides end-to-end security and recovery solutions to ensure you can safeguard your systems with enterprise-grade security, immutability, and options for redundancy, plus fully-managed, on-demand disaster recovery as a service (DRaaS)—all at one-fifth the cost of AWS. Get started today or contact Sales for more information on B2 Reserve, our all-inclusive capacity-based pricing that includes premium support and no egress fees.
In today’s fast-paced media landscape, efficient collaboration is essential for success. With teams managing large files between geographically dispersed team members on tight deadlines, the need for a robust, flexible storage solution has never been greater. Hybrid cloud storage addresses this need by combining the power of on-premises solutions, like network attached storage (NAS) devices, with cloud storage, creating an ideal setup for enhanced productivity and seamless collaboration.
In this post, I’ll walk you through some approaches for optimizing media workflows using hybrid cloud storage. You’ll learn how to unlock fast local storage, easy file sharing and collaboration, and enhanced data protection, which are all essential components for success in the media and entertainment industry.
Plus, we’ll share specific media workflows for different types of collaboration scenarios and practical steps you can take to get started with your hybrid cloud approach today using Synology NAS and Backblaze B2 Cloud Storage as an example.
Common Challenges for Media Teams
Before we explore a hybrid cloud approach that combines NAS devices with cloud storage, let’s first take a look at some of the common challenges media teams face, including:
Data storage and accessibility.
File sharing and collaboration.
Security and data protection.
Data Storage and Accessibility Challenges
It’s no secret that recent data growth has been exponential. This is no different for media files. Cameras are creating larger and higher-quality files. There are more projects to shoot and edit. And editors and team members require immediate access to those files due to the high demand for fresh content.
File Sharing and Collaboration Challenges
Back in 2020, everyone was forced to go remote and the workforce changed. Now you can hire freelancers and vendors from around the world. This means you have to share assets with external contributors, and, in the past, this used to exclusively mean shipping hard drives to said vendors (and sometimes, it can still be necessary). Different contractors, freelancers, and consultants may use different tools and different processes.
Security and Data Protection Challenges
Data security poses unique challenges for media teams due to the industry’s specific requirements including managing large files, storing data on physical devices, and working with remote teams and external stakeholders. The need to protect sensitive information and intellectual property from data breaches, accidental deletions, and device failures adds complexity to data protection initiatives.
How Does Hybrid Cloud Help Media Teams Solve These Challenges?
As a quick reminder, the hybrid cloud refers to a computing environment that combines the use of both private cloud and public cloud resources to achieve the benefits of each platform.
A private cloud is a dedicated and secure cloud infrastructure designed exclusively for a single tenant or organization. It offers a wide range of benefits to users. With NAS devices, organizations can enjoy centralized storage, ensuring all files are accessible in one location. Additionally, it offers fast local access to files that helps streamline workflows and productivity.
The public cloud, on the other hand, is a shared cloud infrastructure provided by cloud storage companies like Backblaze. With public cloud, organizations can scale their infrastructure up or down as needed without the up-front capital costs associated with traditional on-premises infrastructure.
By combining cloud storage with NAS, media teams can create a hybrid cloud solution that offers the best of both worlds. Private local storage on NAS offers fast access to large files while the public cloud securely stores those files in remote servers and keeps them accessible at a reasonable price.
How To Get Started With A Hybrid Cloud Approach
If you’d like to get started with a hybrid cloud approach, using NAS on-premises is an easy entry point. Here are a few tips to help you choose the right NAS device for your data storage and collaboration needs.
Storage Requirements: Begin by assessing your data volume and growth rate to determine how much storage capacity you’ll need. This will help you decide the number of drives required to support your data growth.
Compute Power: Evaluate the NAS device’s processor, controller, and memory to ensure it can handle the workloads and deliver the performance you need for running applications and accessing and sharing files.
Network Infrastructure: Consider the network bandwidth, speed, and port support offered by the NAS device. A device with faster network connectivity will improve data transfer rates, while multiple ports can facilitate the connection of additional devices.
Data Collaboration: Determine your requirements for remote access, sync direction, and security needs. Look for a NAS device that provides secure remote access options, and supports the desired sync direction (one-way or two-way) while offering data protection features such as encryption, user authentication, and access controls.
By carefully reviewing these factors, you can choose a NAS device that meets your storage, performance, network, and security needs. If you’d like additional help choosing the right NAS device, download our complete NAS Buyer’s Guide.
Real-World Examples: Using Synology NAS + Backblaze B2
Let’s explore a hybrid cloud use case. To discuss specific media workflows for different types of collaboration scenarios, we’re going to use Synology NAS as the private cloud and Backblaze B2 Cloud Storage as the public cloud as examples in the rest of this article.
Scenario 1: Working With Distributed Teams Across Locations
In the first scenario, let’s assume your organization has two different locations with your teams working from both locations. Your video editors work in one office, while a separate editorial team responsible for final reviews operates from the second location.
To facilitate seamless collaboration, you can install a Synology NAS device at both locations and connect them to Backblaze B2 using Cloud Sync.
Here’s a video guide that demonstrates how to synchronize Synology NAS to Backblaze B2 using cloud sync.
This hybrid cloud setup allows for fast local access, easy file sharing, and real-time synchronization between the two locations, ensuring that any changes made at one site are automatically updated in the cloud and mirrored at the other site.
Scenario 2: Working With Distributed Teams
In this second scenario, you have teams working on your projects from different regions, let’s say the U.S. and Europe. Downloading files from different parts of the world can be time-consuming, causing delays and impacting productivity. To solve this, you can use Backblaze B2 Cloud Replication. This allows you to replicate your data automatically from your source bucket (U.S. West) to a destination bucket (EU Central).
Source files can be uploaded into B2 Bucket on the U.S. West region. These files are then replicated to the EU Central region so you can move data closer to your team in Europe for faster access. Vendors and teams in Europe can configure their Synology NAS devices with Cloud Sync to automatically sync with the replicated files in the EU Central data center.
Scenario 3: Working With Freelancers
In both scenarios discussed so far, file exchanges can occur between different companies or within the same company across various regions of the world. However, not everyone has access to these resources. Freelancers make up a huge part of the media and entertainment workforce, and not every one of them has a Synology NAS device.
But that’s not a problem!
In this case, you can still use a Synology NAS to upload your project files and sync them with your Backblaze B2 Bucket. Instead of syncing to another NAS or replicating to a different region, freelancers can access the files in your Backblaze B2 Bucket using third-party tools like Cyberduck.
This approach allows anyone with an internet connection and the appropriate access keys to access the required files instantly without needing to have a NAS device.
Scenario 4: Working With Vendors
In this final scenario, which is similar to the first one, you collaborate with another company or vendor located elsewhere instead of working with your internal team. Both parties can install their own Synology NAS device at their respective locations, ensuring centralized access, fast local access, and easy file sharing and collaboration.
The two NAS devices are then connected to a Backblaze B2 Bucket using Cloud Sync, allowing for seamless synchronization of files and data between the two companies.
Whenever changes are made to files by one company, the updated files are automatically synced to Backblaze B2 and subsequently to the other company’s Synology NAS device. This real-time synchronization ensures that both companies have access to the latest versions of the files, allowing for increased efficiency and collaboration.
Making Hybrid Cloud Work for Your Production Team
As you can see, there are several different ways you can move your media files around and get them in the hands of the right people—be it another one of your offices, vendors, or freelancers. The four scenarios discussed here are just a few common media workflows. You may or may not have the same scenario. Regardless, a hybrid cloud approach provides you with all the tools you need to customize your workflow to best suit your media collaboration needs.
In addition to Synology NAS, Backblaze B2 Cloud Storage integrates seamlessly with other NAS devices such as Asustor, Ctera, Dell Isilon, iOsafe, Morro Data, OWC JellyFish, Panzura, QNAP, TrueNAS, and more. Regardless of which NAS device you use, getting started with a hybrid cloud approach is simple and straightforward with Backblaze B2.
Hybrid Cloud Unlocks Collaboration and Productivity for Media Teams
Easing collaboration and boosting productivity in today’s fast-paced digital landscape is vital for media teams. By leveraging a hybrid cloud storage solution that combines the power of NAS devices with the flexibility of cloud storage, organizations can create an efficient, scalable, and secure solution for managing their media assets.
This approach not only addresses storage capacity and accessibility challenges, but also simplifies file sharing and collaboration, while ensuring data protection and security. Whether you’re working within your team from different locations, collaborating with external partners, or freelancers, a hybrid cloud solution offers a seamless, cost-effective, and high-performance solution to optimize your media workflows and enhance productivity in the ever-evolving world of media and entertainment.
We’d love to hear about other different media workflow scenarios. Share with us how you collaborate with your media teams and vendors in the comments below.
Cybersecurity is a major concern for individuals as well as small businesses, and there are several strategies bad actors use to exploit small businesses and their employees. In fact, around 60% of small businesses that experienced a data breach were forced to close their doors within six months of being hacked.
From monitoring your network endpoints to routinely educating your employees, there are several proactive steps you can take to protect against cyber attacks. In this article, we’ll share six cybersecurity protection strategies to help protect your small business.
1. Implement Layered Security
According to the FBI’s Internet Crime Report, the cost of cybercrimes to small businesses reached $2.4 billion in 2021. Yet, many small business owners believe they are not in danger of an attack. Robust and layered security allows small businesses to contend with the barrage of hackers after their information.
System Level Security. This is the security of the system you are using. For instance, many systems require a password to access their files.
Network Level Security. This layer is where the system connects to the internet. Typically, a firewall is used to filter network traffic and halt suspicious activity.
Application Level Security. Security is needed for any applications you choose to use to run your business, and should include safeguards for both the internal and the client side.
Transmission Level Security. Data when it travels from network to network also needs to be protected. Virtual private networks (VPNs) can be used to safeguard information.
As a business, you should always operate on the principle of least privilege. This ensures that access at each of these levels of security is limited to only those necessary to do the task at hand and reduces the potential for breaches. It also can “limit the blast radius” in the event of a breach.
The Human Element: Employee Training Is Your First Defense
The most common forms of cyberattack leverage social engineering, particularly in phishing attacks. This means that they target employees, often during busy times of the year, and attempt to gain their trust and get them to lower their guard. Training employees to spot potential phishing red flags—like incorrect domains, misspelling information, and falsely urgent requests—is a powerful tool in your arsenal.
Additionally, you’ll note that most of the things on this list just don’t work unless your employees understand how, why, and when to use them. In short, an educated staff is your best defense against cyberattacks.
2. Use Multi-Factor Authentication
Multi-factor authentication (MFA) has become increasingly common, and many organizations now require it. So what is it? Multi-factor authentication requires at least two different forms of user verification to access a program, system, or application. Generally, a user must input their password. Then, they will be prompted to enter a code they receive via email or text. Push notifications may substitute email or text codes, while biometrics like fingerprints can substitute a password.
The second step prevents unauthorized users from gaining entry even if login credentials have been compromised. Moreover, the code or push notification alerts the user of a potential breach—if you receive a notification when you did not initiate a login attempt, then you know your account has a vulnerability.
3. Make Sure Your Tech Stack Is Configured Properly
When systems are misconfigured, they are vulnerable. Some examples of misconfiguration are when passwords are left as their system default, software is outdated, or security settings are not properly enabled. As businesses scale and upgrade their tools, they naturally add more complexity to their tech stacks.
It’s important to run regular audits to make sure that IT best practices are being followed, and to make sure that all of your tools are working in harmony. (Bonus: regular audits of this type can result in OpEx savings since you may identify tools you no longer use in the process.)
4. Encrypt Your Data
Encryption uses an algorithm to apply a cipher to your data. The most commonly used algorithm is known as Advanced Encryption Standard (AES). AES can be used in authenticating website servers from both the server end and the client end, as well as to encrypt transferred files between users. This can also be extended to include digital documents, messaging histories, and so on. Using encryption is often necessary to meet compliance standards, some of which are stricter based on your or your customers’ geographic location or industry.
Once it’s encrypted properly, data can only be accessed with an encryption key. There are two main types of encryption key: symmetric (private) and asymmetric (public).
Symmetric (Private) Encryption Keys
In this model, you use one key to both encode and decode your data. This means that it’s particularly important to keep this key secret—if it were obtained by a bad actor, they could use it to decrypt your data.
Asymmetric (Public) Encryption Keys
Using this method, you use one key to encrypt your data and another to decrypt it. You then make the decryption key public. This is a widely-used method, and makes internet security protocols like SSL and HTTPS possible.
Server Side Encryption (SSE)
Some providers are now offering a service known as server side encryption (SSE). SSE encrypts your data as it is stored, so stolen data is unable to be read or viewed, and even your data storage provider doesn’t have access to sensitive client information. To make data even more secure when stored, you can also make it immutable by enabling Object Lock. This means you can set periods of time that the data cannot be changed—even by those who set the object lock rules.
Combined with SSE, you can see how it would be key to protecting against a ransomware attack: Cyberattackers may access data, but it would be difficult to decrypt with SSE, and with object lock, they wouldn’t be able to delete or modify data.
5. Have a Breach Plan
Unfortunately, as cybercrime has increased, breaches have become nearly inevitable. To mitigate damage, it is paramount to have a disaster recovery (DR) plan in place.
This plan starts with robust and layered security. For example, a cybercriminal may gain a user’s login information, but having MFA enabled would help ensure that they don’t gain access to the account. Or, if they do gain access to an account, by operating on the principle of least privilege, you have limited the amount of information the user can access or breach. Finally, if they do gain access to your data, SSE and Object Lock can prevent sensitive data from being read, modified, or deleted.
Hopefully, you’ve set things up so that you have all the protections you need in place before an attack, but once you’re or in the midst of an attack (or you’ve discovered a previous breach), it’s important that everyone knows what to do. Here are a few best practices to help you develop your DR plan:
Back Up Regularly and Test Your Backups
The most important thing to do is to make sure that you can reconstitute your data to continue business operations as normal—and that means that you have a solid backup plan in place, and that you’ve tested your backups and your DR plan ahead of time.
Establish Procedures for Immediate Action
First and foremost, employees should immediately inform IT of suspicious activity. The old adage “if you see something, say something,” very much applies to security. And, there should also be clear discovery and escalation procedures in effect to both evaluate and address the incident.
Change Credentials and Monitor Accounts
Next, it is crucial to change all passwords, and identify where and how the issue occurred. Each issue is unique, so this step takes careful information gathering. Having monitoring tools set up in advance of a breach will help you gain insight into what happened.
Support Employees
It may sound out of place to consider this, but given that employees are your first line of defense and the most targeted security vulnerability, there is a measurable impact from the stress of ransomware attacks. Once the dust has settled and your business is back online, good recovery includes both insightful and responsive training as well as employee support.
Is Cyber Insurance Worth It?
You may want to consider cyber insurance as you’re thinking through different disaster recovery scenarios. Cyber insurance is still a growing field, and it can cover things like your legal fees, business expenses related to recovery, and potential liability costs. Still, even the process of preparing your business for cyber insurance coverage can be beneficial to improving your business’ overall security procedures.
6. Use Trusted Services
Every business needs to rely on other businesses to operate smoothly, but it can also expose your business to risk if you don’t perform your due diligence. Whether it is a credit card processor, bank, supplier, or another support, you will need to select reliable, reputable, and businesses that also employ good security practices. Evaluating new tools should be a multi-faceted process that engages teams with different expertises, including the stakeholder teams, security, IT, finance, and anyone else who you deem appropriate.
And, remember that more tools are being created all the time! Often, they make things easier on employees while also solving security conundrums. Some good examples are single sign on (SSO) services, password management tools, specialized vendors that evaluate harmful links, automatic workstation backup that runs in the background, and more. Staying up-to-date on the new frontier of tools can solve long-standing problems in innovative ways.
Cybersecurity Is An Ongoing Process
The prevalence of cyber crime means it is not a matter of if a breach will happen, but when a breach will happen. These prevention measures can reduce your risk of becoming the victim of a successful attack, but you should still be prepared for when one occurs.
Bear in mind, cybersecurity is an ongoing process. Your strategies will need to be reviewed routinely, passwords need to be changed, and software and systems will need to be updated. Lastly, knowing what types of scams are prevalent and their signs will help keep you, your business, your employees, and your clients safe.
To provide the best experiences, we use technologies like cookies to store and/or access device information. Consenting to these technologies will allow us to process data such as browsing behavior or unique IDs on this site. Not consenting or withdrawing consent, may adversely affect certain features and functions.
Functional
Always active
The technical storage or access is strictly necessary for the legitimate purpose of enabling the use of a specific service explicitly requested by the subscriber or user, or for the sole purpose of carrying out the transmission of a communication over an electronic communications network.
Preferences
The technical storage or access is necessary for the legitimate purpose of storing preferences that are not requested by the subscriber or user.
Statistics
The technical storage or access that is used exclusively for statistical purposes.The technical storage or access that is used exclusively for anonymous statistical purposes. Without a subpoena, voluntary compliance on the part of your Internet Service Provider, or additional records from a third party, information stored or retrieved for this purpose alone cannot usually be used to identify you.
Marketing
The technical storage or access is required to create user profiles to send advertising, or to track the user on a website or across several websites for similar marketing purposes.


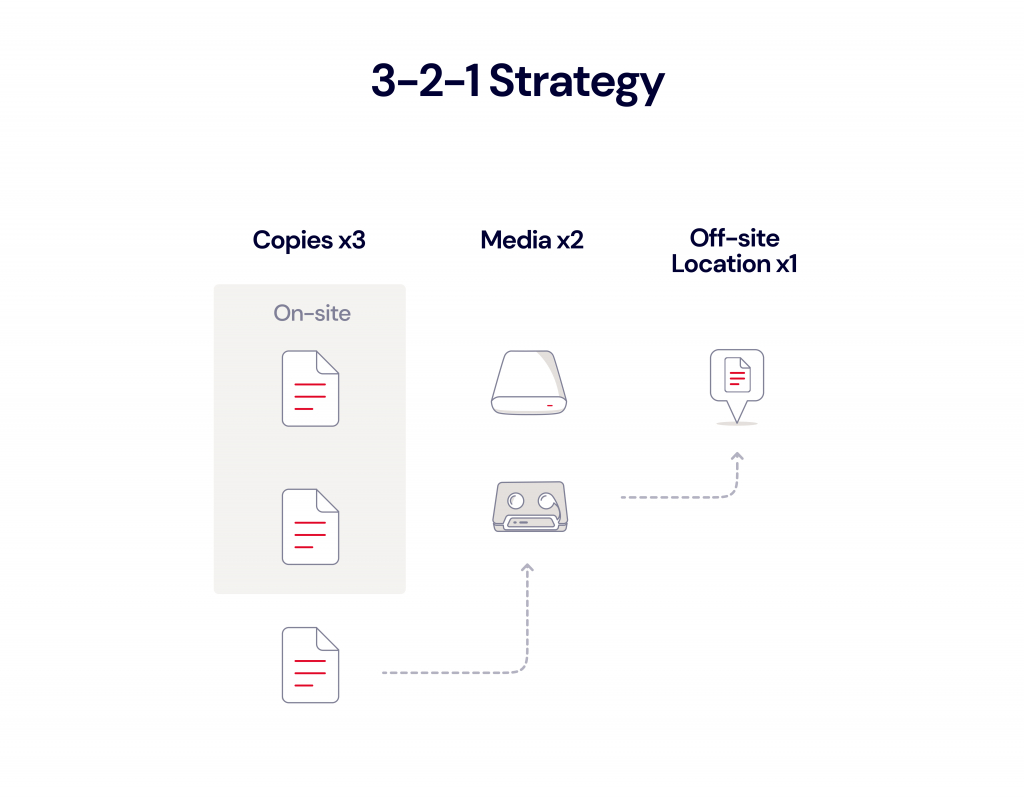
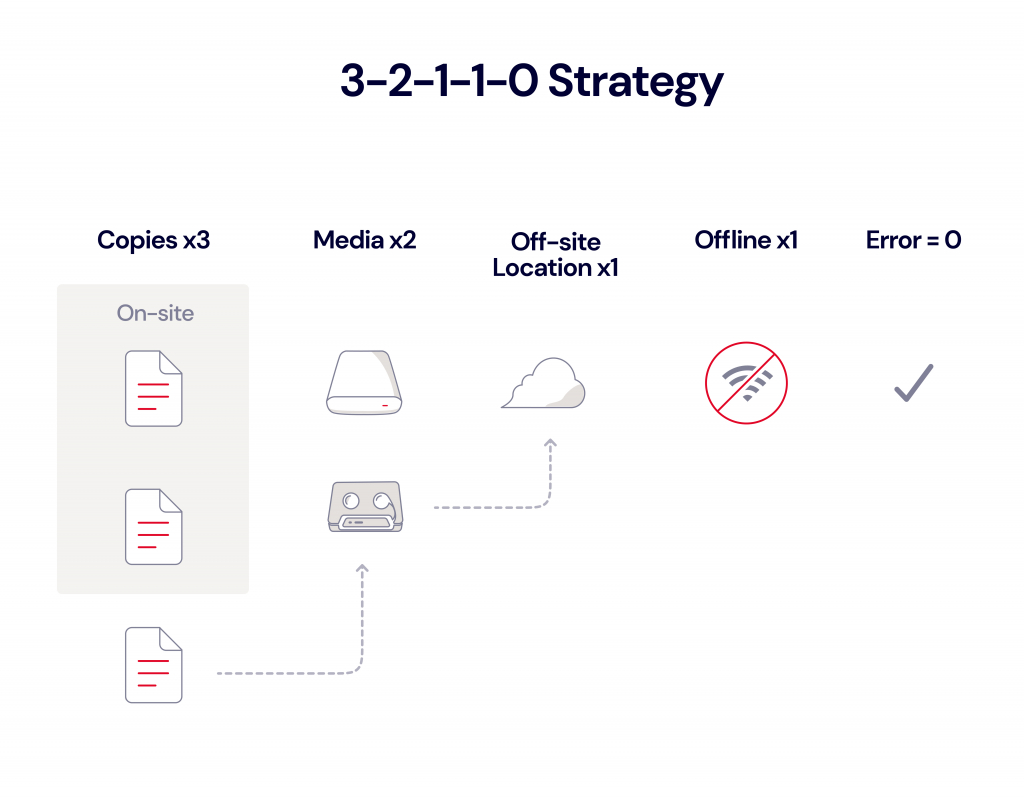

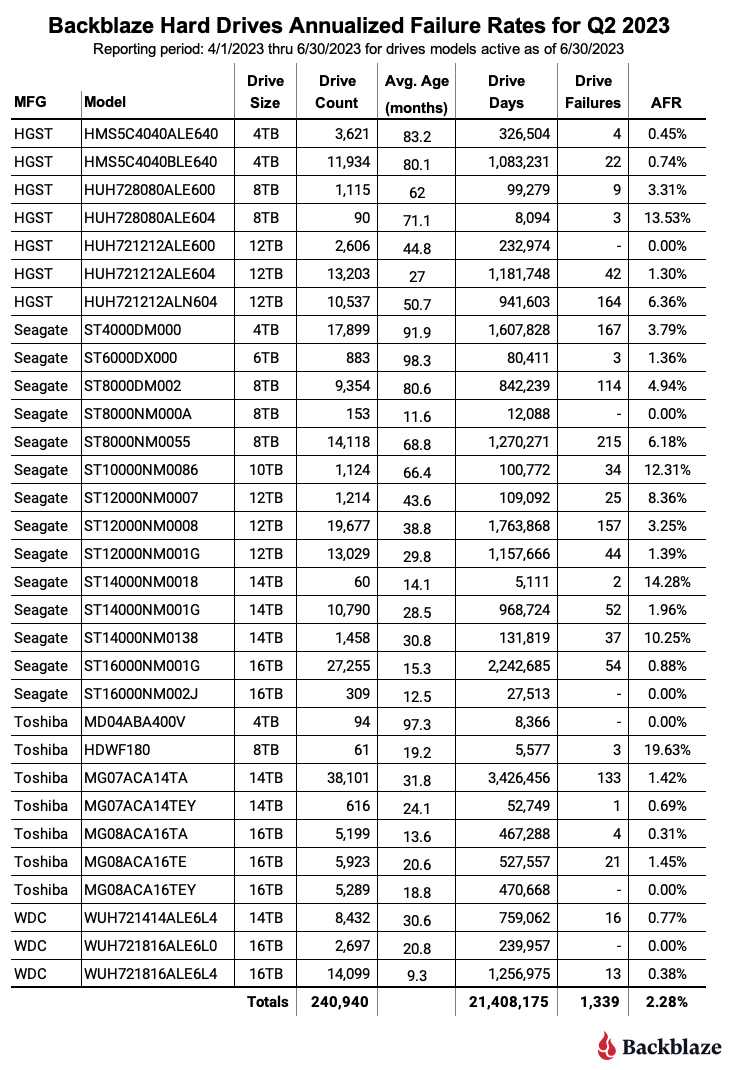
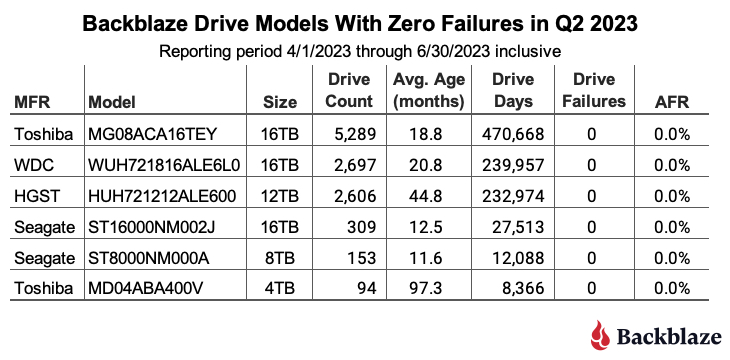
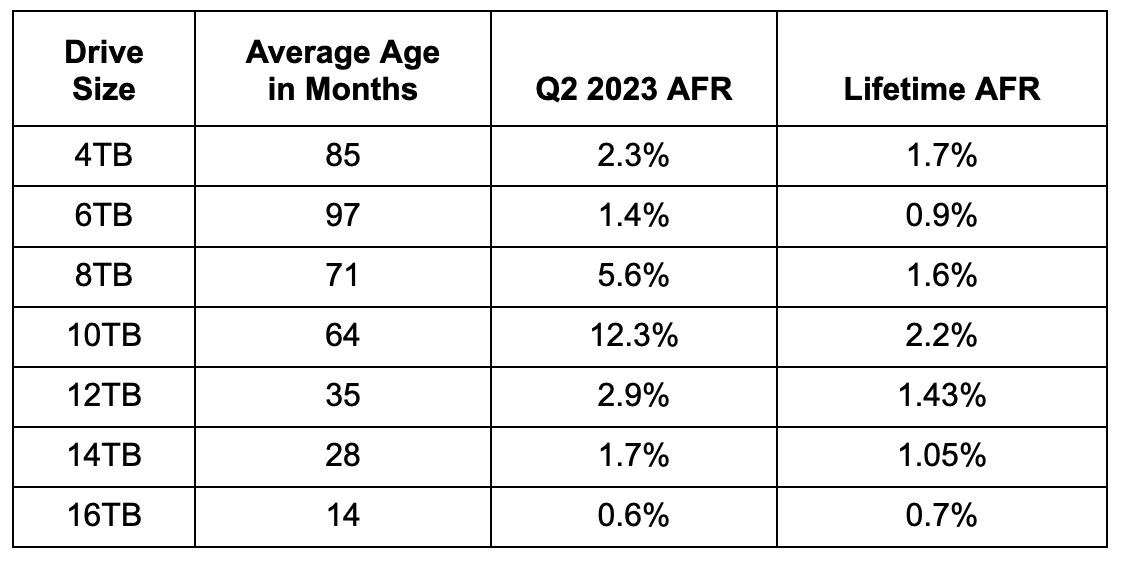
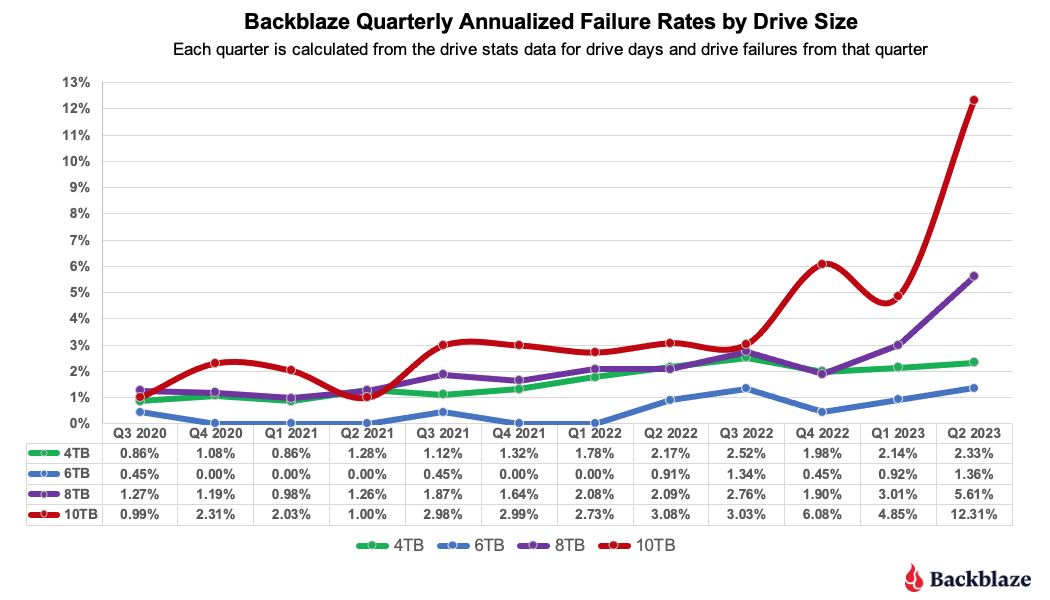
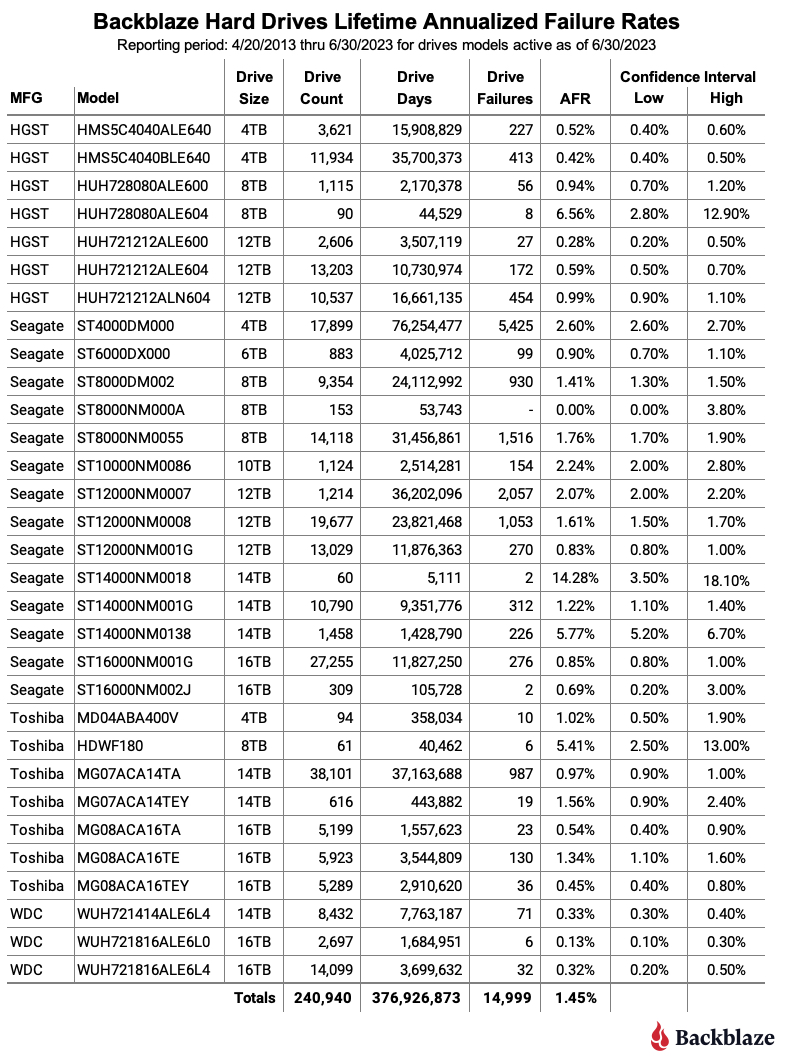
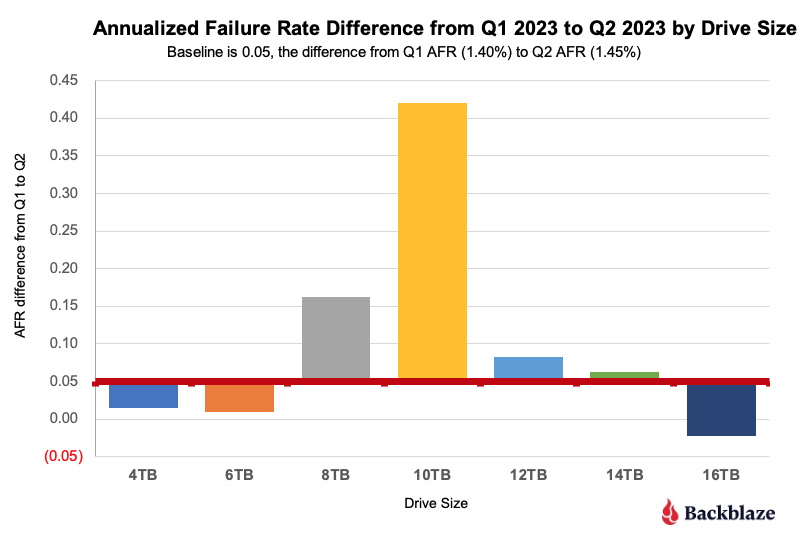
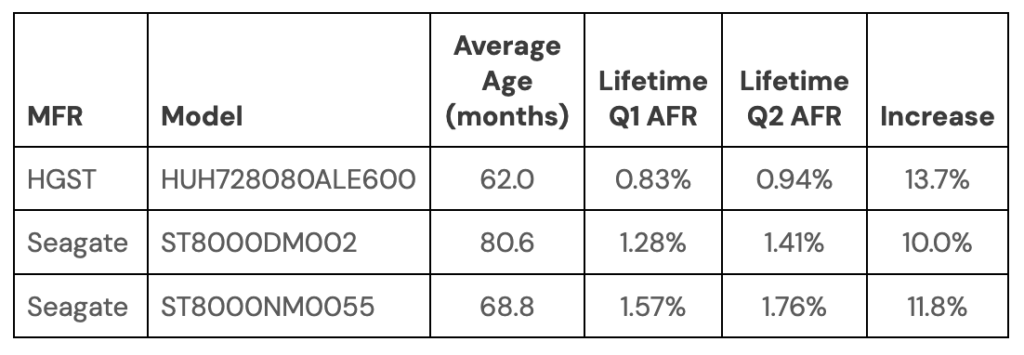


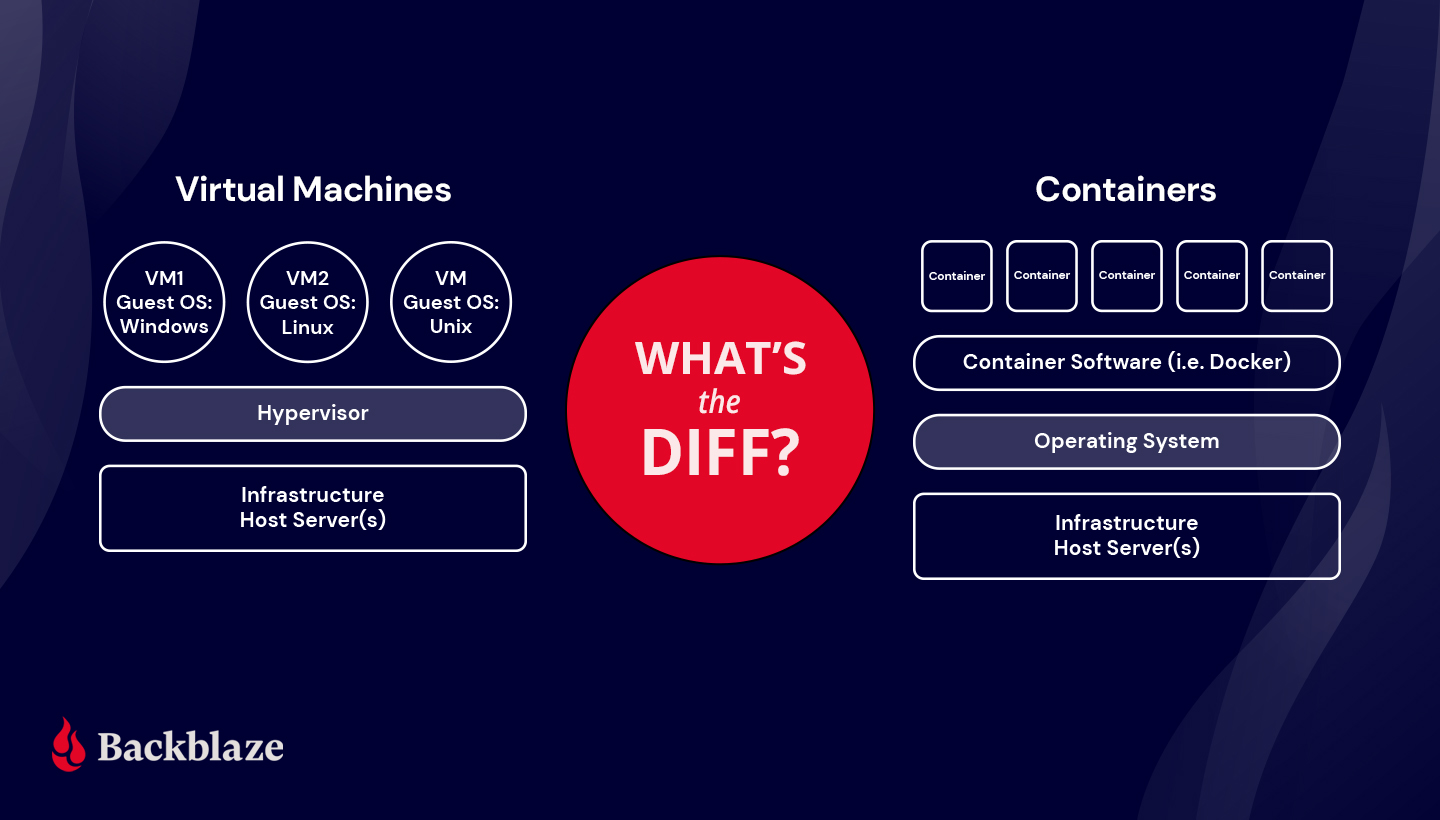
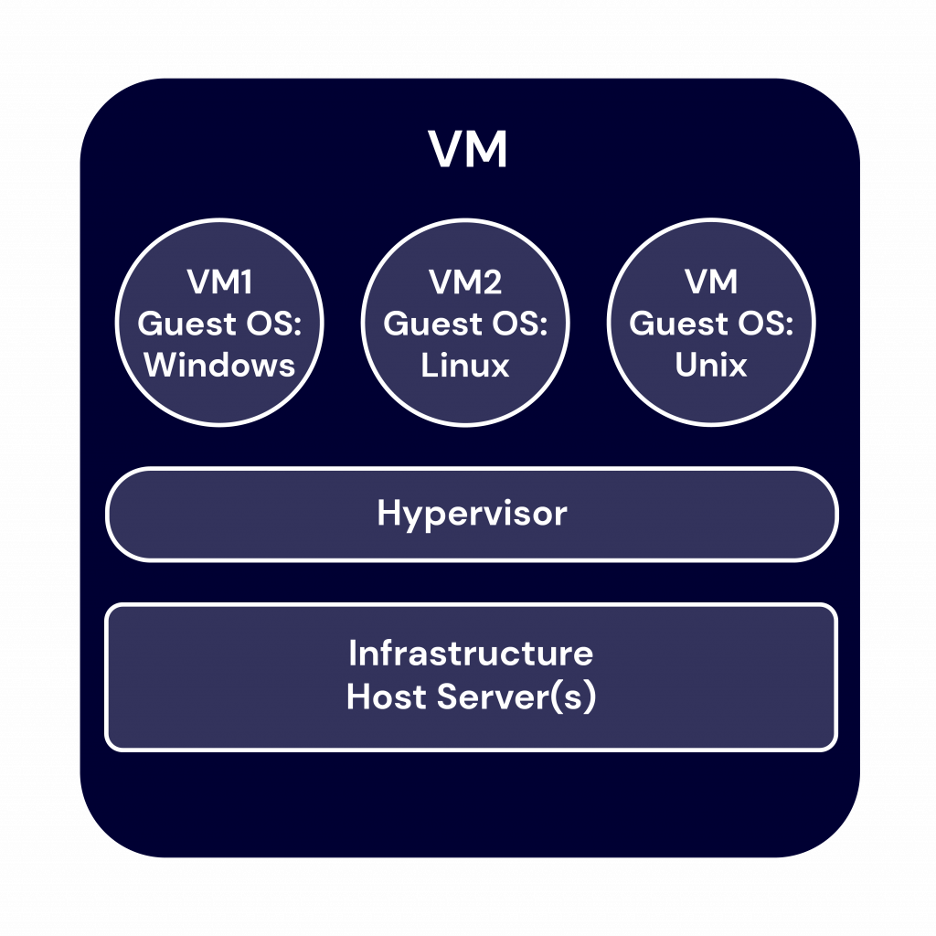
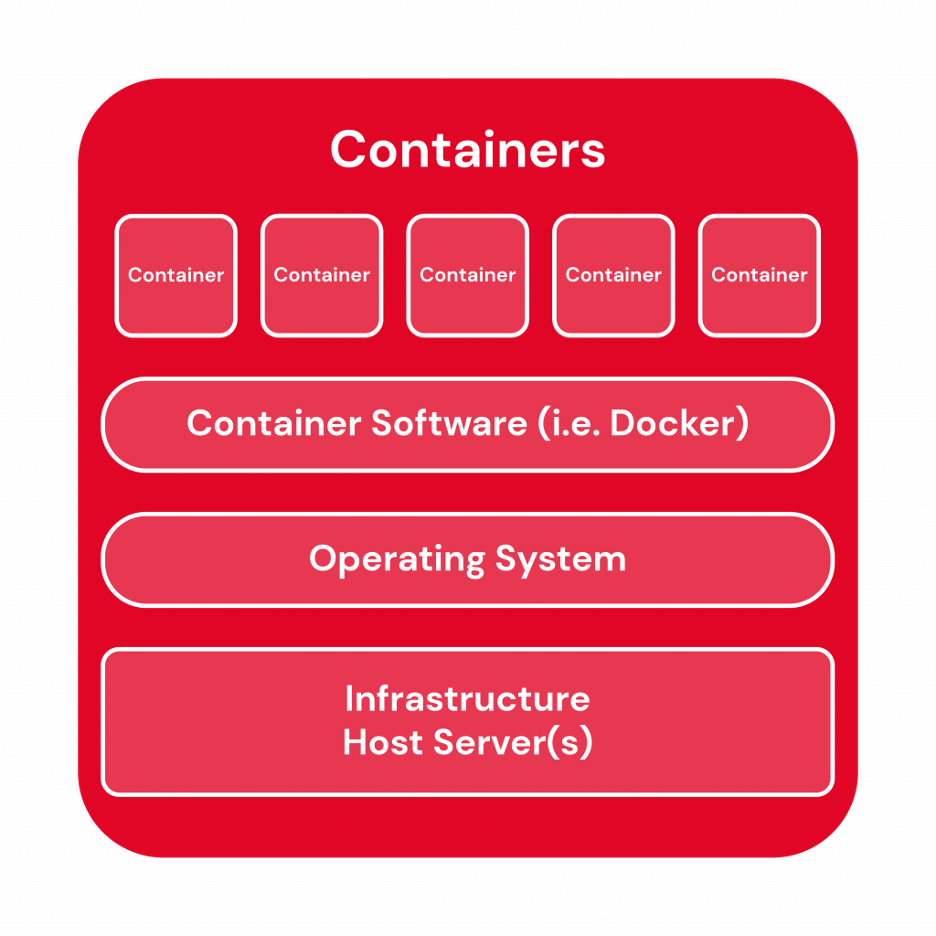
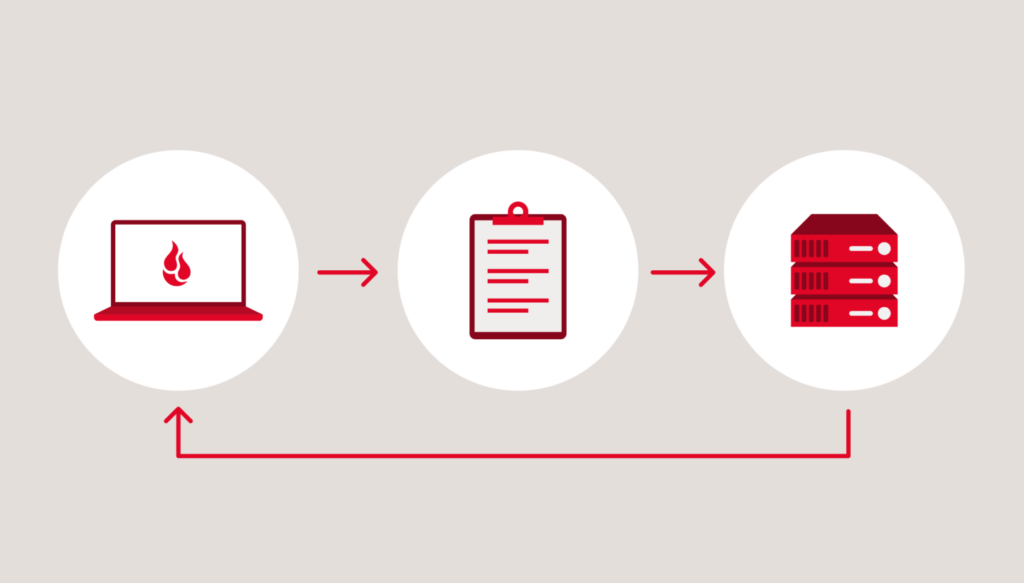


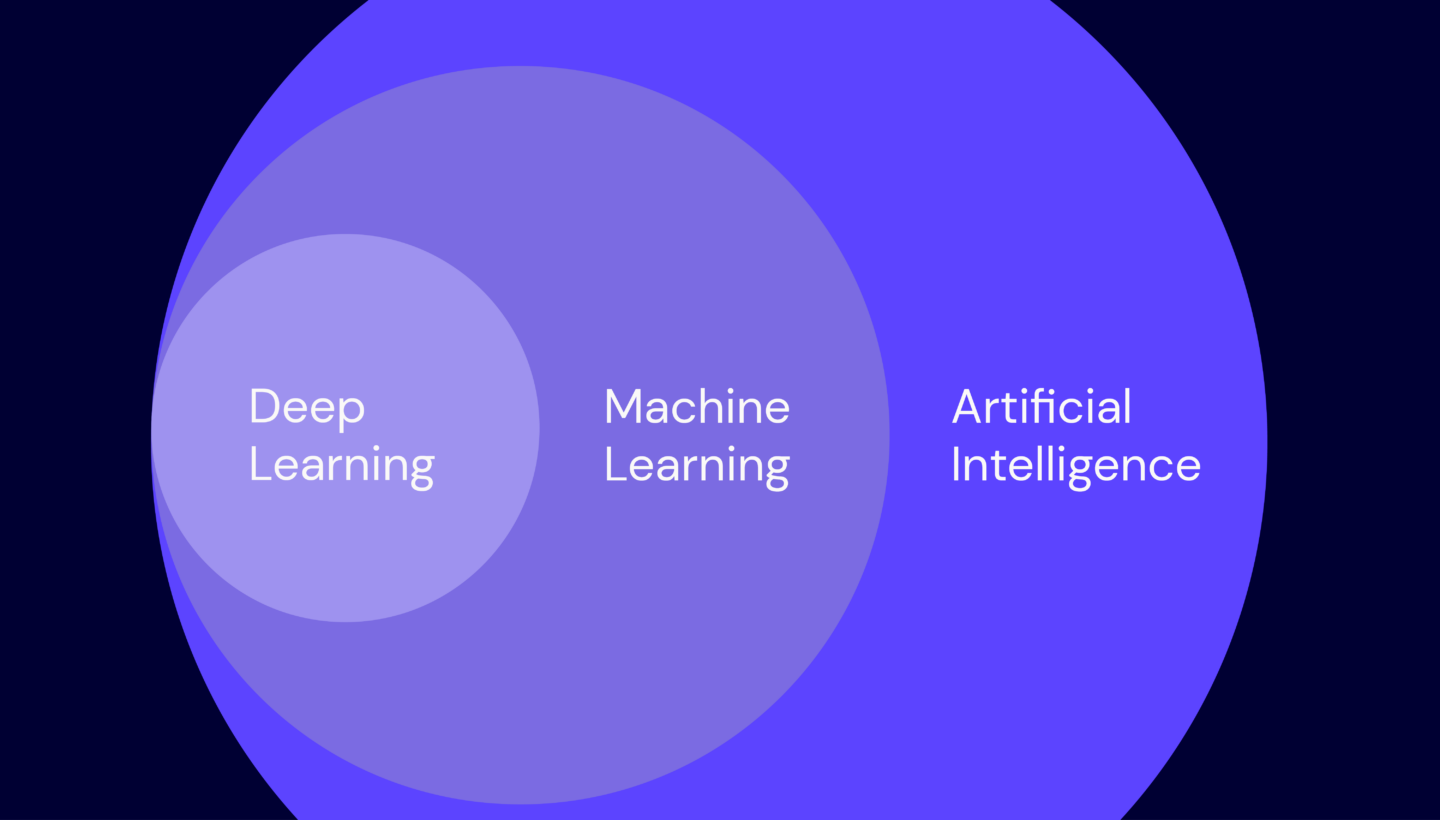
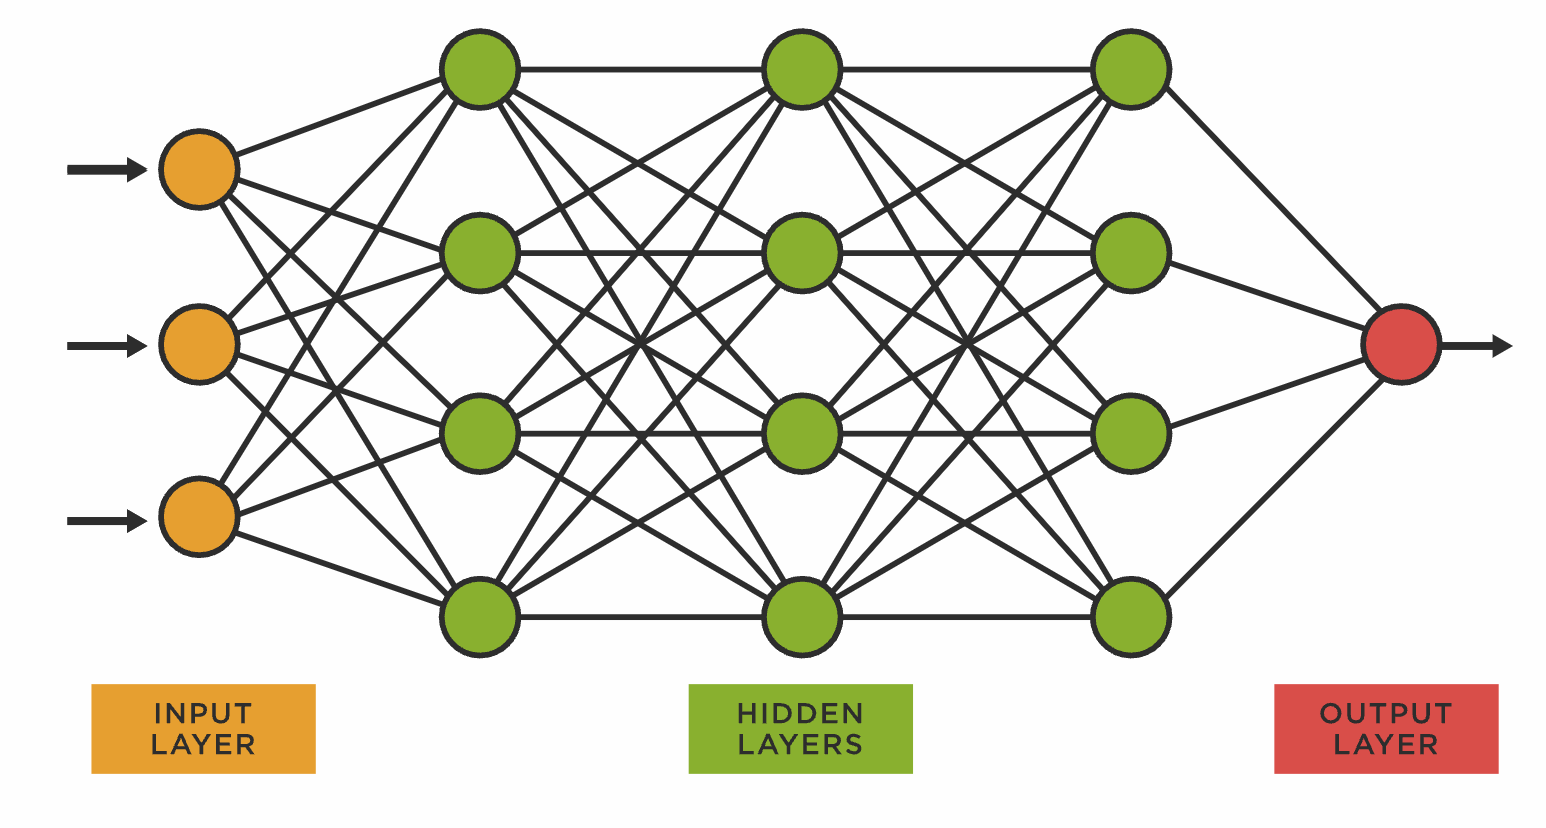

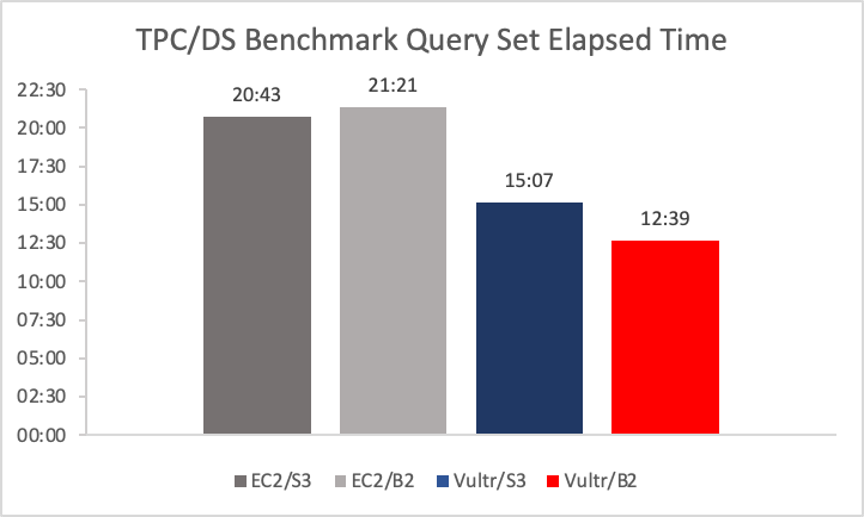

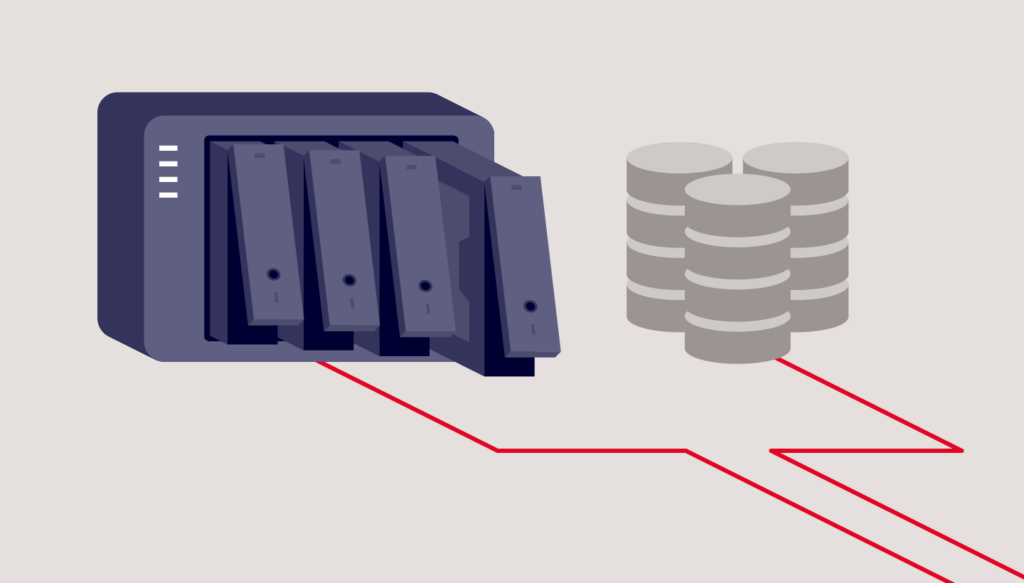
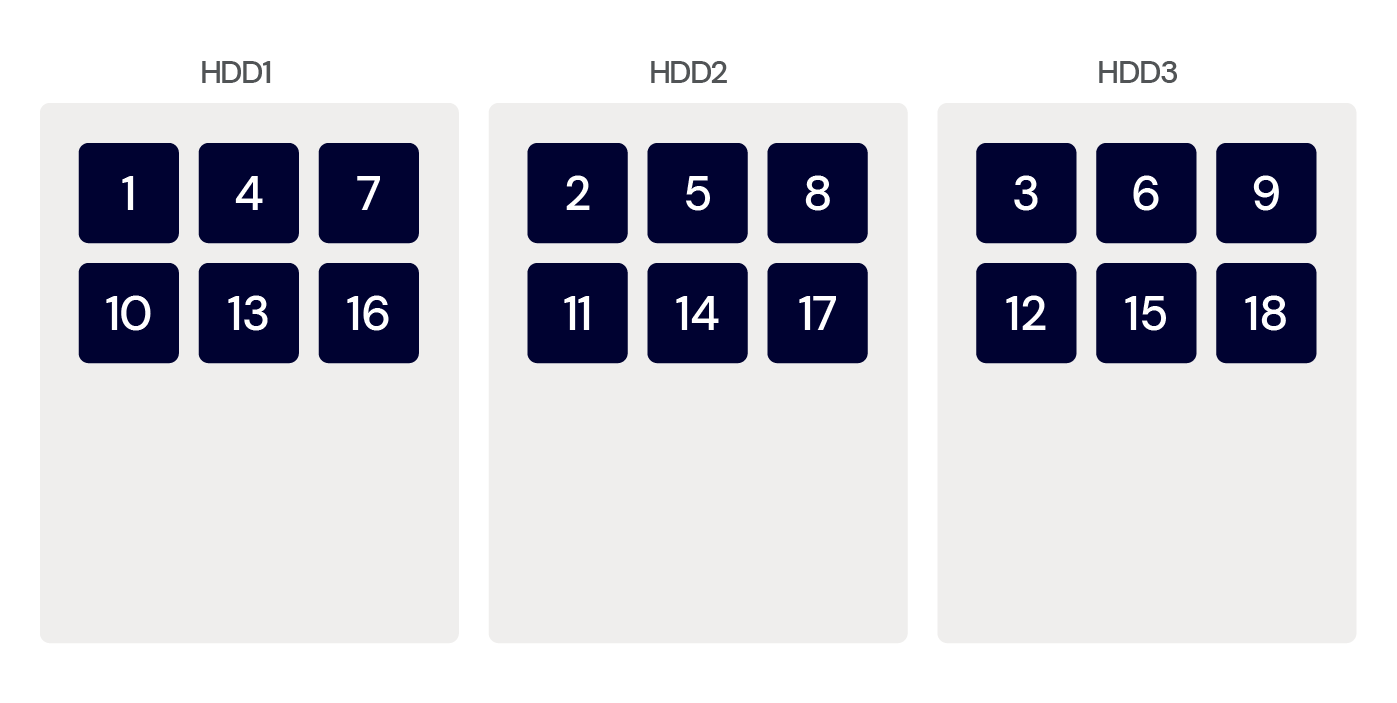

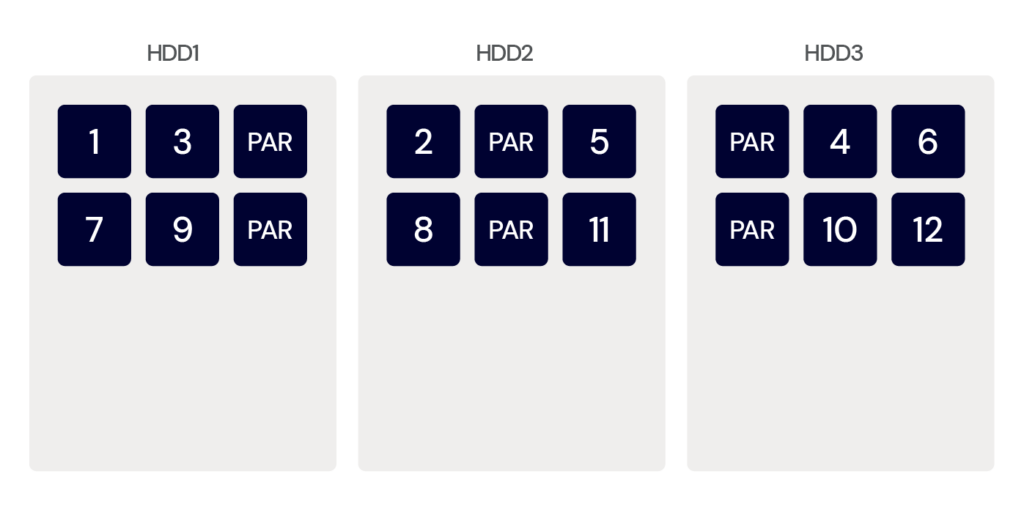
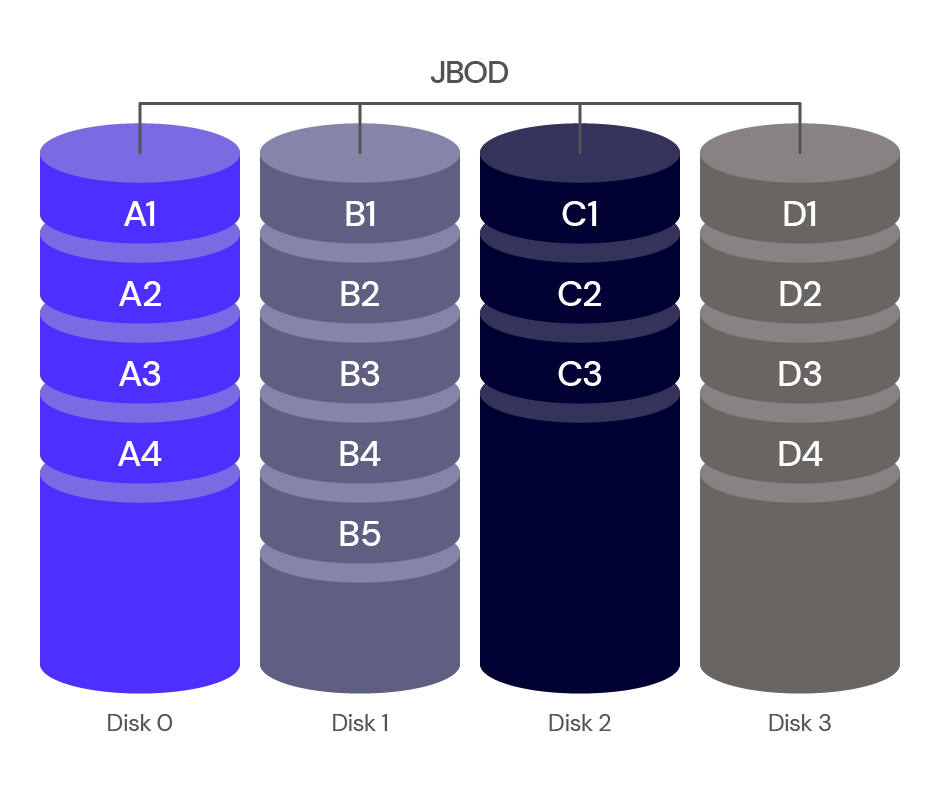
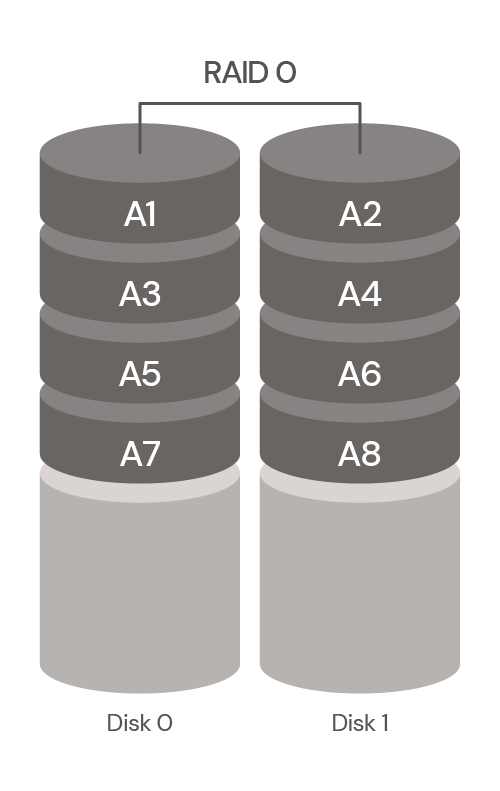
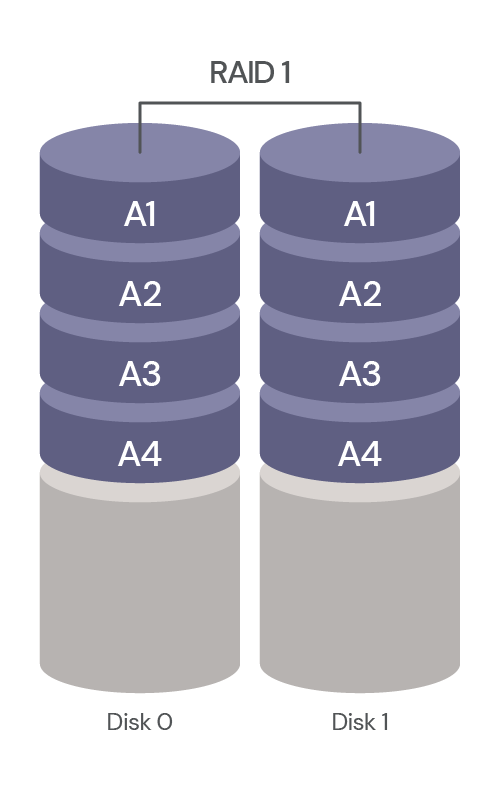
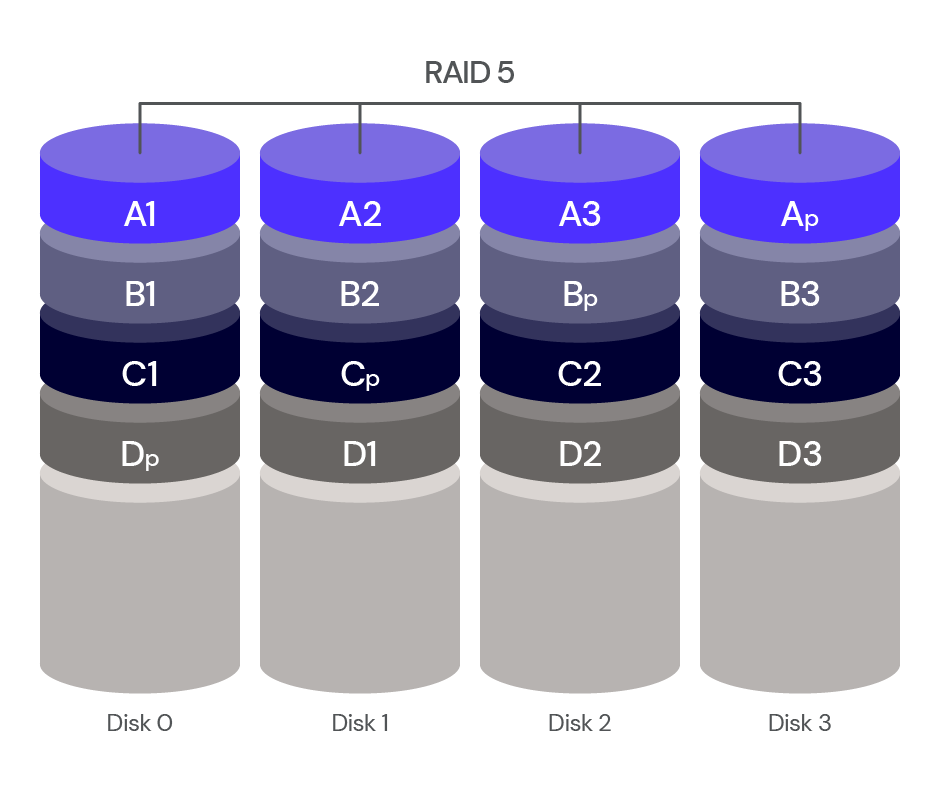
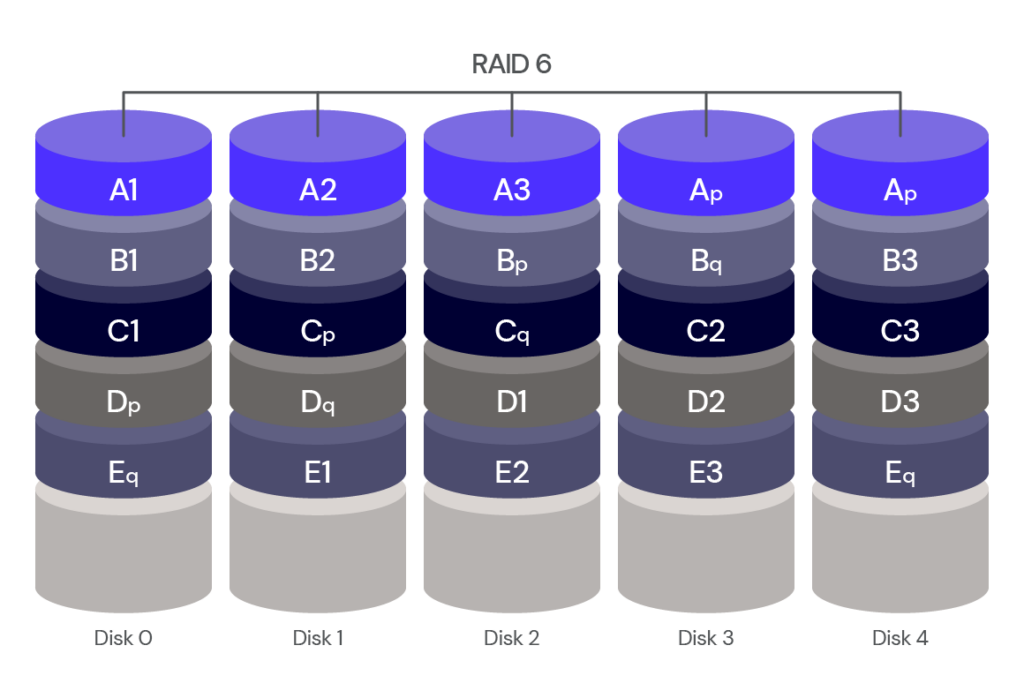
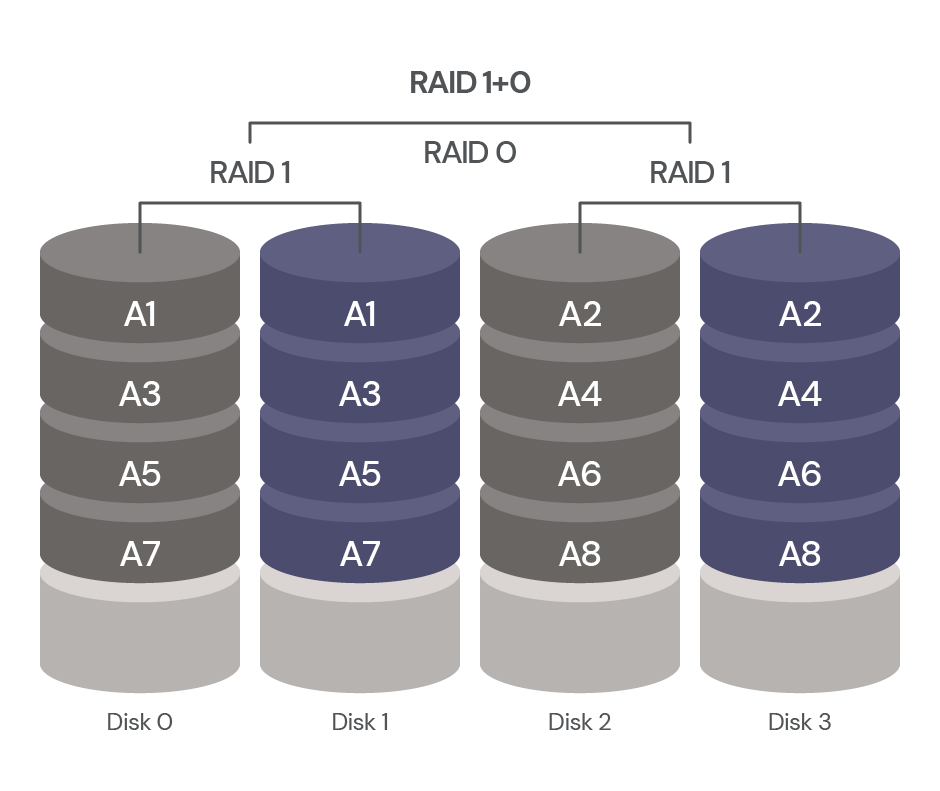


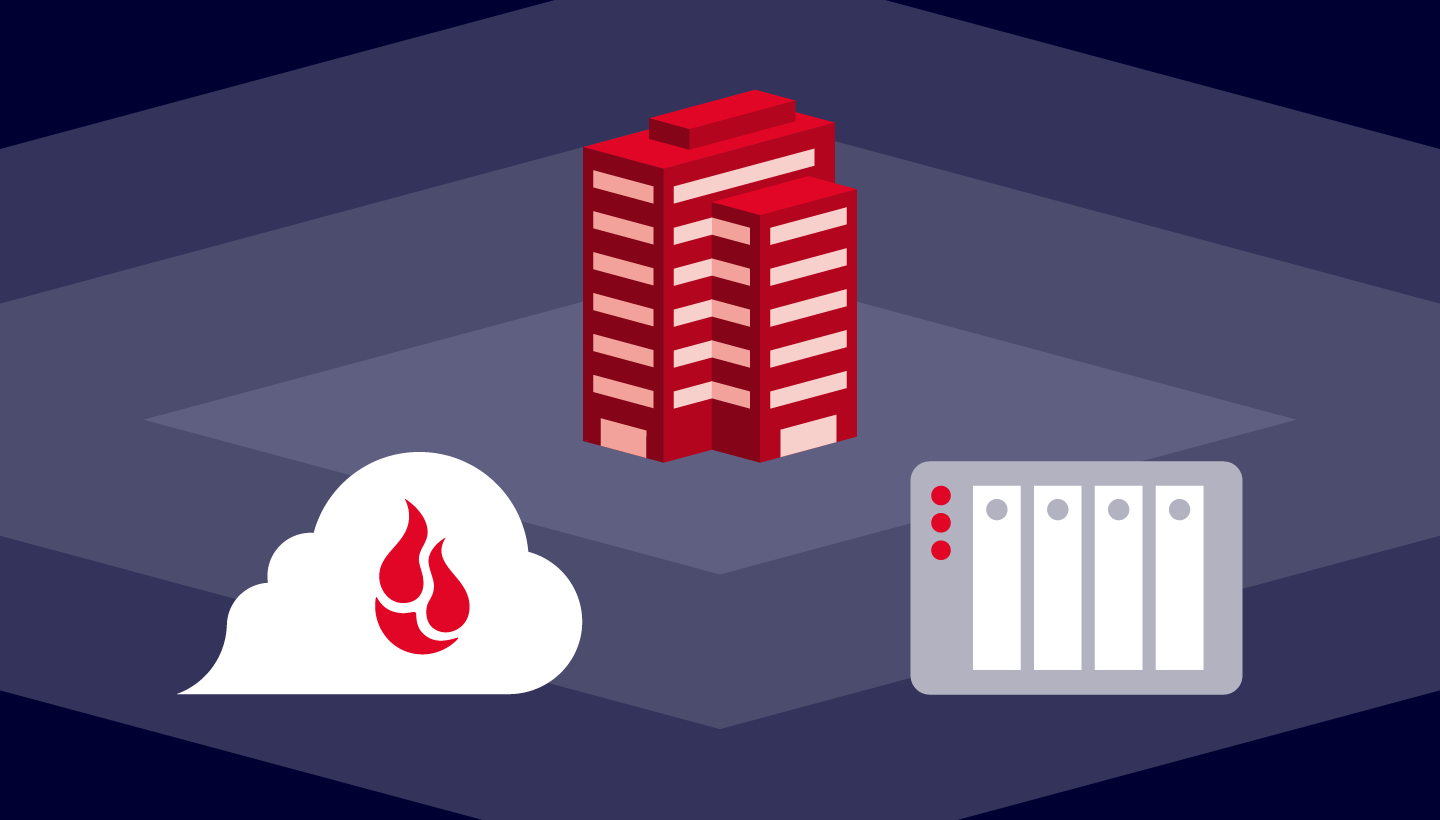


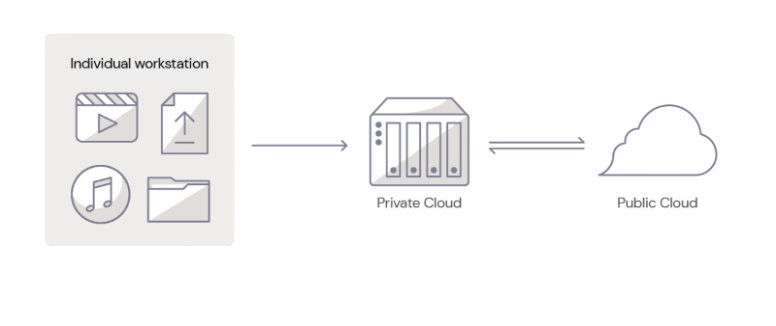

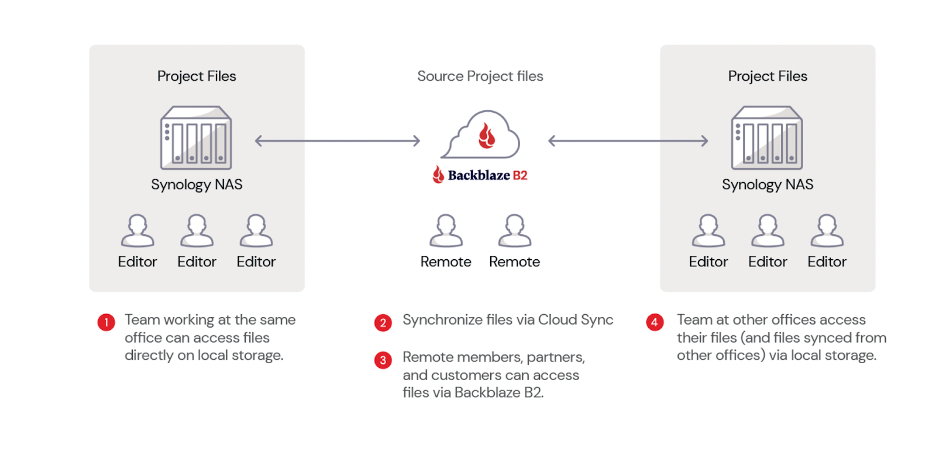
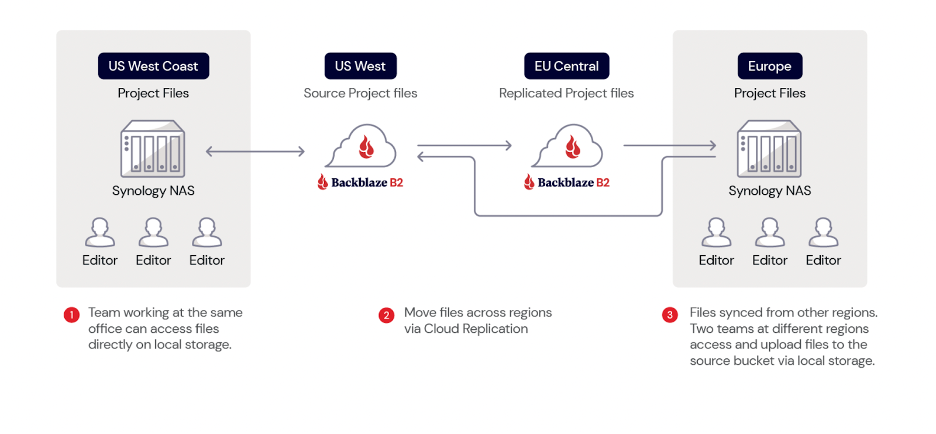
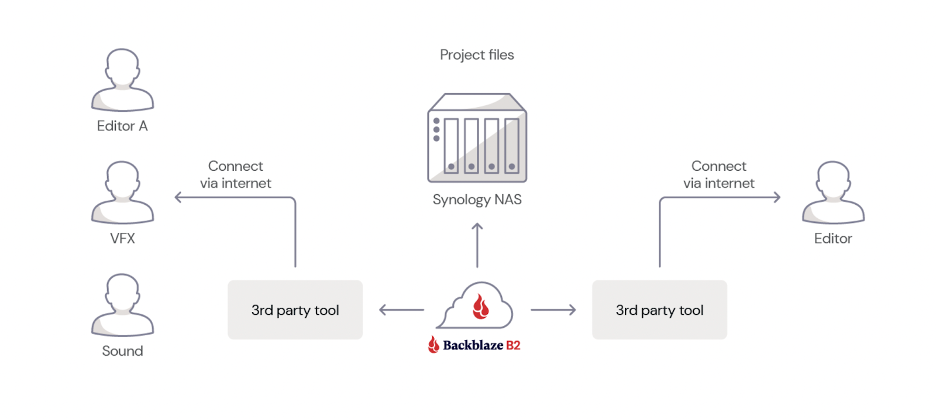
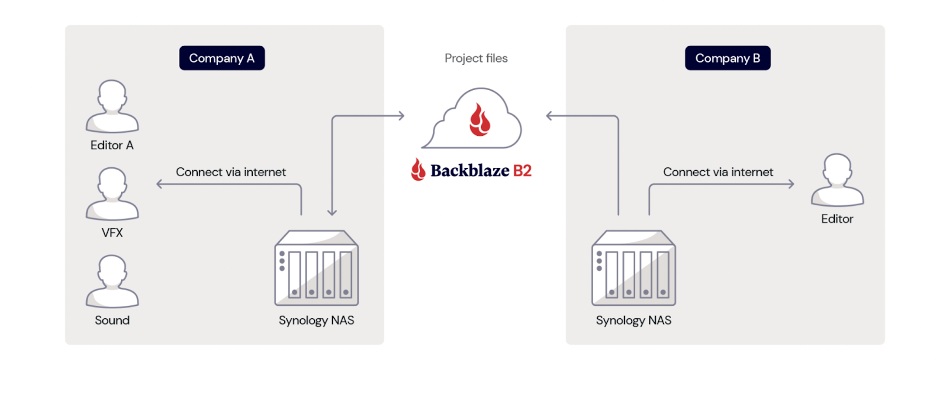
.PNG)
.JPG)