Tag Archives: CodeArtifact

CICD on Serverless Applications using AWS CodeArtifact

Post Syndicated from Anand Krishna original https://aws.amazon.com/blogs/devops/cicd-on-serverless-applications-using-aws-codeartifact/

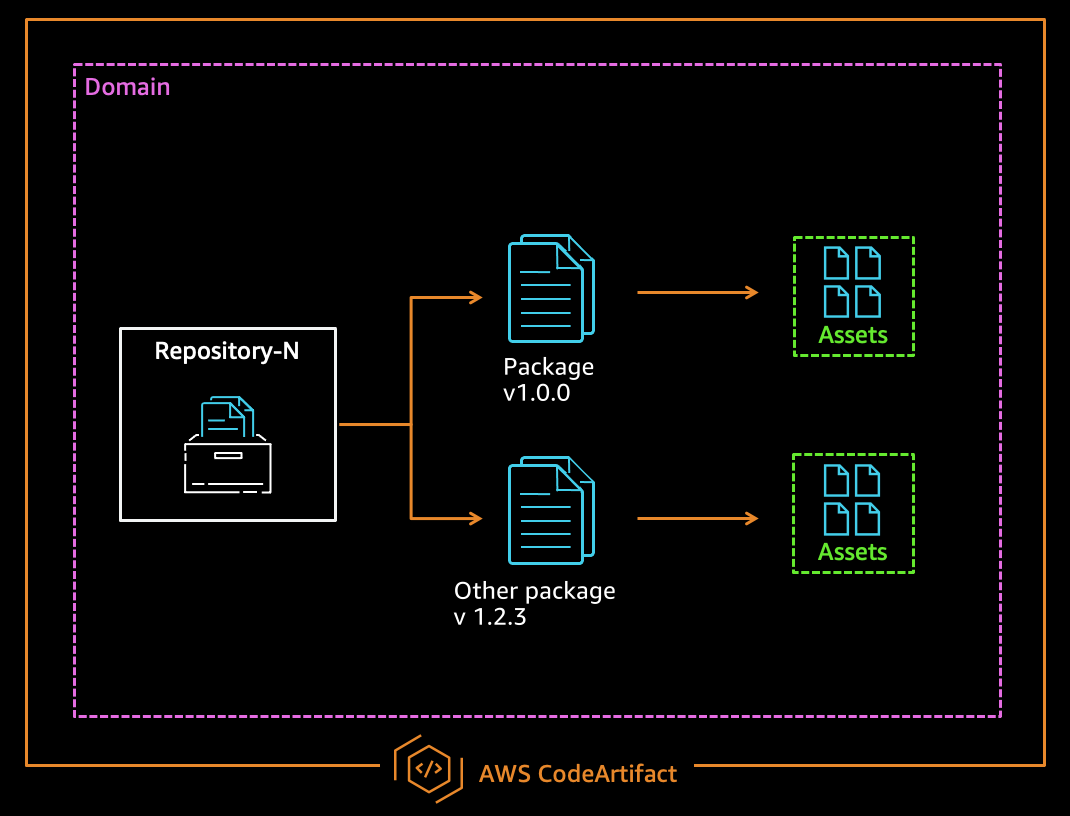
Developing and deploying applications rapidly to users requires a working pipeline that accepts the user code (usually via a Git repository). AWS CodeArtifact was announced in 2020. It’s a secure and scalable artifact management product that easily integrates with other AWS products and services. CodeArtifact allows you to publish, store, and view packages, list package dependencies, and share your application’s packages.

In this post, I will show how we can build a simple DevOps pipeline for a sample JAVA application (JAR file) to be built with Maven.

Solution Overview

We utilize the following AWS services/Tools/Frameworks to set up our continuous integration, continuous deployment (CI/CD) pipeline:

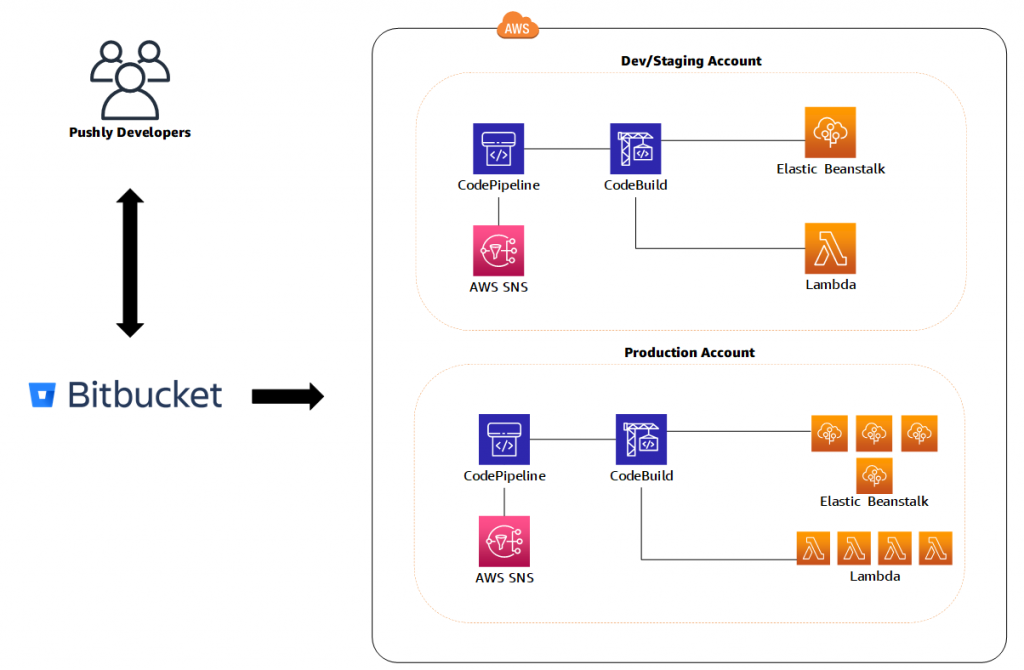
The following diagram illustrates the pipeline architecture and flow:


aws-codeartifact-pipeline


Our pipeline is built on CodePipeline with CodeCommit as the source (CodePipeline Source Stage). This triggers the pipeline via a CloudWatch Events rule. Then the code is fetched from the CodeCommit repository branch (main) and sent to the next pipeline phase. This CodeBuild phase is specifically for compiling, packaging, and publishing the code to CodeArtifact by utilizing a package manager—in this case Maven.

After Maven publishes the code to CodeArtifact, the pipeline asks for a manual approval to be directly approved in the pipeline. It can also optionally trigger an email alert via Amazon Simple Notification Service (Amazon SNS). After approval, the pipeline moves to another CodeBuild phase. This downloads the latest packaged JAR file from a CodeArtifact repository and deploys to the AWS Lambda function.

Clone the Repository

Clone the GitHub repository as follows:

git clone https://github.com/aws-samples/aws-cdk-codeartifact-pipeline-sample.git

Code Deep Dive

After the Git repository is cloned, the directory structure is shown as in the following screenshot :

aws-codeartifact-pipeline-code

Let’s study the files and code to understand how the pipeline is built.

The directory java-events is a sample Java Maven project. Find numerous sample applications on GitHub. For this post, we use the sample application java-events.

To add your own application code, place the pom.xml and settings.xml files in the root directory for the AWS CDK project.

Let’s study the code in the file lib/cdk-pipeline-codeartifact-new-stack.ts of the stack CdkPipelineCodeartifactStack. This is the heart of the AWS CDK code that builds the whole pipeline. The stack does the following:

  • Creates a CodeCommit repository called ca-pipeline-repository.
  • References a CloudFormation template (lib/ca-template.yaml) in the AWS CDK code via the module @aws-cdk/cloudformation-include.
  • Creates a CodeArtifact domain called cdkpipelines-codeartifact.
  • Creates a CodeArtifact repository called cdkpipelines-codeartifact-repository.
  • Creates a CodeBuild project called JarBuild_CodeArtifact. This CodeBuild phase does all of the code compiling, packaging, and publishing to CodeArtifact into a repository called cdkpipelines-codeartifact-repository.
  • Creates a CodeBuild project called JarDeploy_Lambda_Function. This phase fetches the latest artifact from CodeArtifact created in the previous step (cdkpipelines-codeartifact-repository) and deploys to the Lambda function.
  • Finally, creates a pipeline with four phases:
    • Source as CodeCommit (ca-pipeline-repository).
    • CodeBuild project JarBuild_CodeArtifact.
    • A Manual approval Stage.
    • CodeBuild project JarDeploy_Lambda_Function.


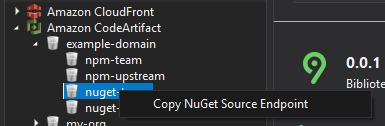
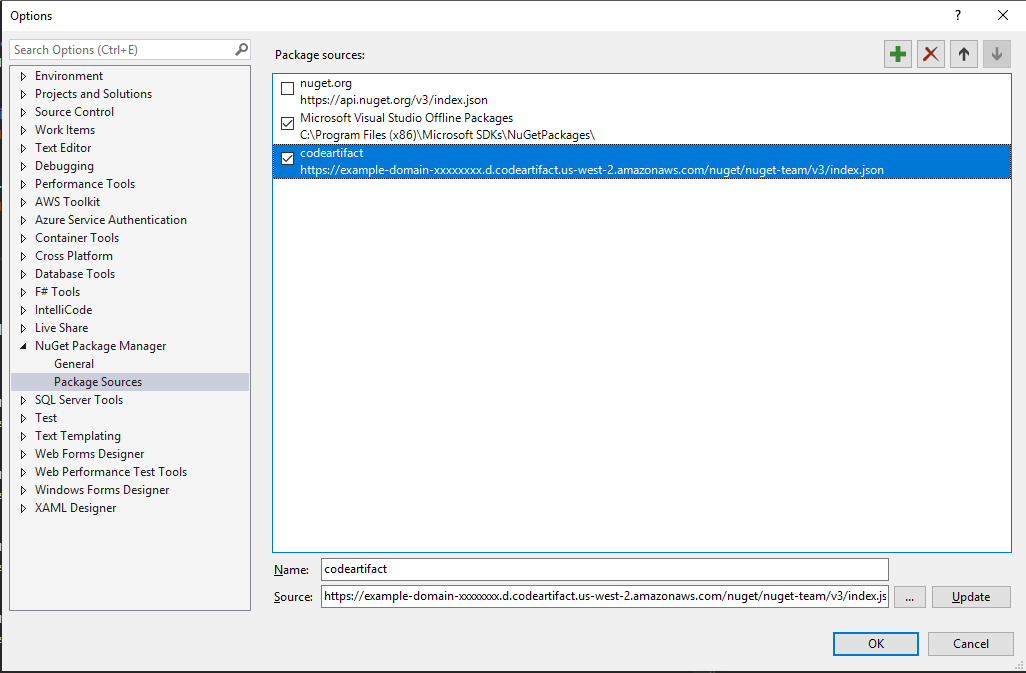
CodeArtifact shows the domain-specific and repository-specific connection settings to mention/add in the application’s pom.xml and settings.xml files as below:

aws-codeartifact-repository-connections

Deploy the Pipeline

The AWS CDK code requires the following packages in order to build the CI/CD pipeline:

  • @aws-cdk/core
  • @aws-cdk/aws-codepipeline
  • @aws-cdk/aws-codepipeline-actions
  • @aws-cdk/aws-codecommit
  • @aws-cdk/aws-codebuild
  • @aws-cdk/aws-iam
  • @aws-cdk/cloudformation-include


Install the required AWS CDK packages as below:

npm i @aws-cdk/core @aws-cdk/aws-codepipeline @aws-cdk/aws-codepipeline-actions @aws-cdk/aws-codecommit @aws-cdk/aws-codebuild @aws-cdk/pipelines @aws-cdk/aws-iam @ @aws-cdk/cloudformation-include

Compile the AWS CDK code:

npm run build

Deploy the AWS CDK code:

cdk synth
cdk deploy

After the AWS CDK code is deployed, view the final output on the stack’s detail page on the AWS CloudFormation :

aws-codeartifact-pipeline-cloudformation-stack


How the pipeline works with artifact versions (using SNAPSHOTS)

In this demo, I publish SNAPSHOT to the repository. As per the documentation here and here, a SNAPSHOT refers to the most recent code along a branch. It’s a development version preceding the final release version. Identify a snapshot version of a Maven package by the suffix SNAPSHOT appended to the package version.

The application settings are defined in the pom.xml file. For this post, we define the following:

  • The version to be used, called 1.0-SNAPSHOT.
  • The specific packaging, called jar.
  • The specific project display name, called JavaEvents.
  • The specific group ID, called JavaEvents.

The screenshot below shows the pom.xml settings we utilised in the application:

aws-codeartifact-pipeline-pom-xml


You can’t republish a package asset that already exists with different content, as per the documentation here.

When a Maven snapshot is published, its previous version is preserved in a new version called a build. Each time a Maven snapshot is published, a new build version is created.

When a Maven snapshot is published, its status is set to Published, and the status of the build containing the previous version is set to Unlisted. If you request a snapshot, the version with status Published is returned. This is always the most recent Maven snapshot version.

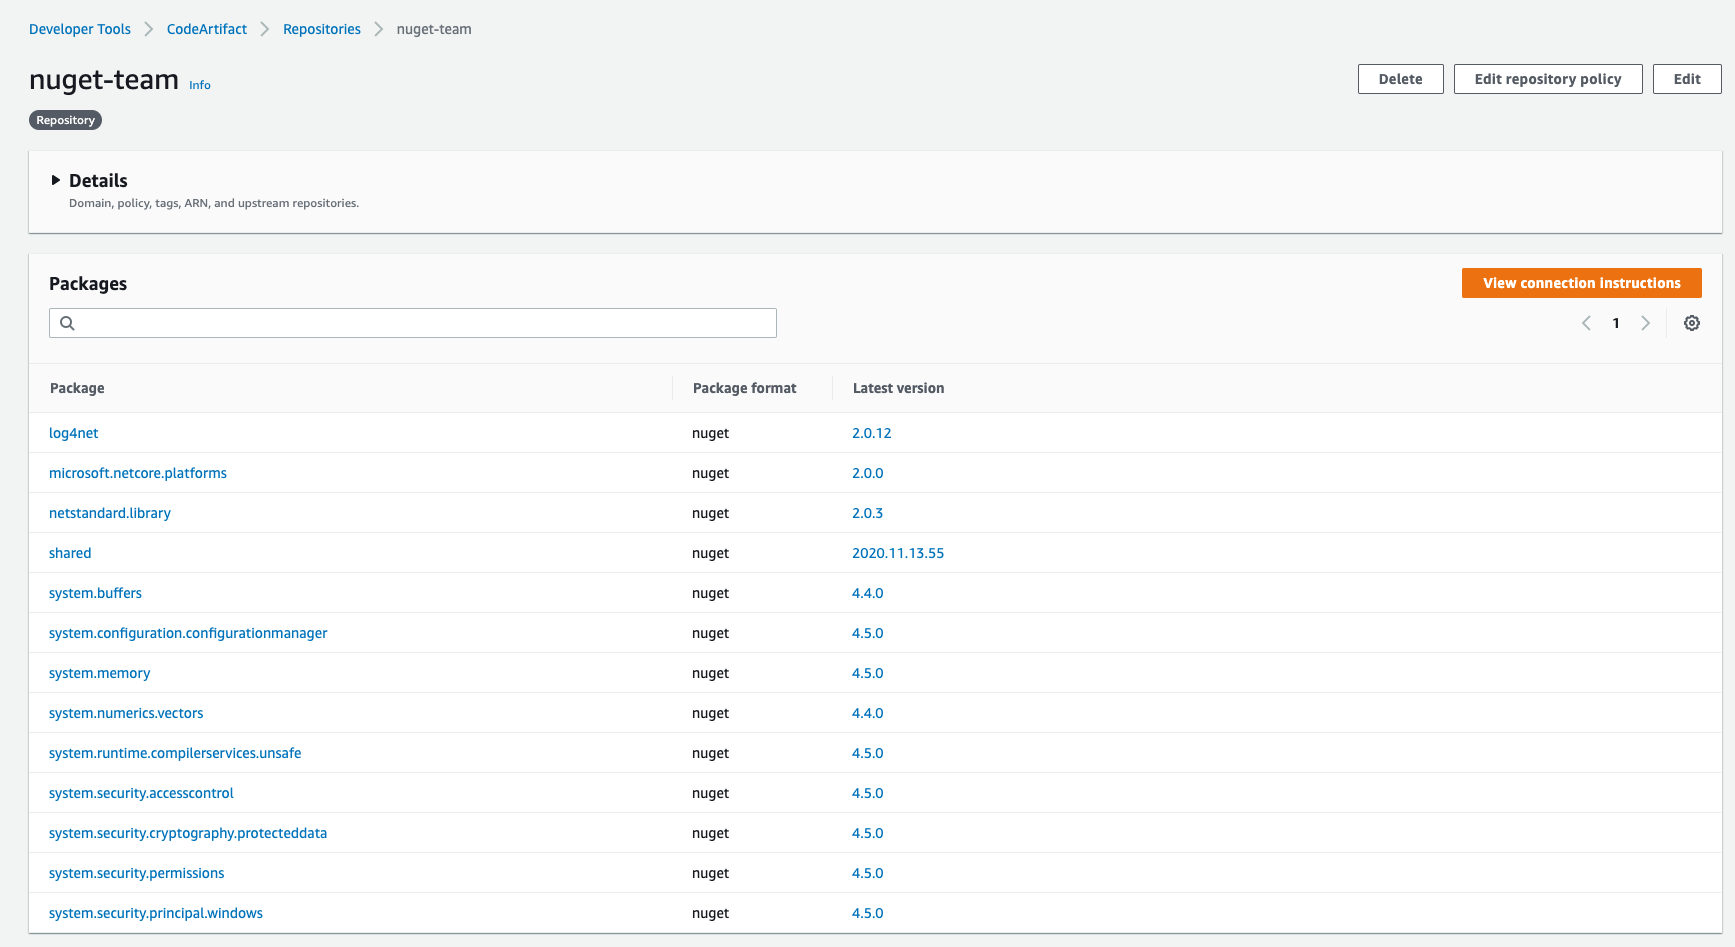
For example, the image below shows the state when the pipeline is run for the FIRST RUN. The latest version has the status Published and previous builds are marked Unlisted.

aws-codeartifact-repository-package-versions


For all subsequent pipeline runs, multiple Unlisted versions will occur every time the pipeline is run, as all previous versions of a snapshot are maintained in its build versions.

aws-codeartifact-repository-package-versions


Fetching the Latest Code

Retrieve the snapshot from the repository in order to deploy the code to an AWS Lambda Function. I have used AWS CLI to list and fetch the latest asset of package version 1.0-SNAPSHOT.


Listing the latest snapshot

export ListLatestArtifact = `aws codeartifact list-package-version-assets —domain cdkpipelines-codeartifact --domain-owner $Account_Id --repository cdkpipelines-codeartifact-repository --namespace JavaEvents --format maven --package JavaEvents --package-version "1.0-SNAPSHOT"| jq ".assets[].name"|grep jar|sed ’s/“//g’`

NOTE : Please note the dynamic CDK variable $Account_Id which represents AWS Account ID.


Fetching the latest code using Package Version

aws codeartifact get-package-version-asset --domain cdkpipelines-codeartifact --repository cdkpipelines-codeartifact-repository --format maven --package JavaEvents --package-version 1.0-SNAPSHOT --namespace JavaEvents --asset $ListLatestArtifact demooutput

Notice that I’m referring the last code by using variable $ListLatestArtifact. This always fetches the latest code, and demooutput is the outfile of the AWS CLI command where the content (code) is saved.


Testing the Pipeline

Now clone the CodeCommit repository that we created with the following code:

git clone https://git-codecommit.<region>.amazonaws.com/v1/repos/codeartifact-pipeline-repository


Enter the following code to push the code to the CodeCommit repository:

cp -rp cdk-pipeline-codeartifact-new /* ca-pipeline-repository
cd ca-pipeline-repository
git checkout -b main
git add .
git commit -m “testing the pipeline”
git push origin main

Once the code is pushed to Git repository, the pipeline is automatically triggered by Amazon CloudWatch events.

The following screenshots shows the second phase (AWS CodeBuild Phase – JarBuild_CodeArtifact) of the pipeline, wherein the asset is successfully compiled and published to the CodeArtifact repository by Maven:

aws-codeartifact-pipeline-codebuild-jarbuild

aws-codeartifact-pipeline-codebuild-screenshot

aws-codeartifact-pipeline-codebuild-screenshot2


The following screenshots show the last phase (AWS CodeBuild Phase – Deploy-to-Lambda) of the pipeline, wherein the latest asset is successfully pulled and deployed to AWS Lambda Function.

Asset JavaEvents-1.0-20210618.131629-5.jar is the latest snapshot code for the package version 1.0-SNAPSHOT. This is the same asset version code that will be deployed to AWS Lambda Function, as seen in the screenshots below:

aws-codeartifact-pipeline-codebuild-jardeploy

aws-codeartifact-pipeline-codebuild-screenshot-jarbuild

The following screenshot of the pipeline shows a successful run. The code was fetched and deployed to the existing Lambda function (codeartifact-test-function).

aws-codeartifact-pipeline-codepipeline

Cleanup

To clean up, You can either delete the entire stack through the AWS CloudFormation console or use AWS CDK command like below –

cdk destroy

For more information on the AWS CDK commands, please check the here or sample here.

Summary

In this post, I demonstrated how to build a CI/CD pipeline for your serverless application with AWS CodePipeline by utilizing AWS CDK with AWS CodeArtifact. Please check the documentation here for an in-depth explanation regarding other package managers and the getting started guide.

Developing enterprise application patterns with the AWS CDK

Post Syndicated from Krishnakumar Rengarajan original https://aws.amazon.com/blogs/devops/developing-application-patterns-cdk/

Enterprises often need to standardize their infrastructure as code (IaC) for governance, compliance, and quality control reasons. You also need to manage and centrally publish updates to your IaC libraries. In this post, we demonstrate how to use the AWS Cloud Development Kit (AWS CDK) to define patterns for IaC and publish them for consumption in controlled releases using AWS CodeArtifact.

AWS CDK is an open-source software development framework to model and provision cloud application resources in programming languages such as TypeScript, JavaScript, Python, Java, and C#/.Net. The basic building blocks of AWS CDK are called constructs, which map to one or more AWS resources, and can be composed of other constructs. Constructs allow high-level abstractions to be defined as patterns. You can synthesize constructs into AWS CloudFormation templates and deploy them into an AWS account.

AWS CodeArtifact is a fully managed service for managing the lifecycle of software artifacts. You can use CodeArtifact to securely store, publish, and share software artifacts. Software artifacts are stored in repositories, which are aggregated into a domain. A CodeArtifact domain allows organizational policies to be applied across multiple repositories. You can use CodeArtifact with common build tools and package managers such as NuGet, Maven, Gradle, npm, yarn, pip, and twine.

Solution overview

In this solution, we complete the following steps:

  1. Create two AWS CDK pattern constructs in Typescript: one for traditional three-tier web applications and a second for serverless web applications.
  2. Publish the pattern constructs to CodeArtifact as npm packages. npm is the package manager for Node.js.
  3. Consume the pattern construct npm packages from CodeArtifact and use them to provision the AWS infrastructure.

We provide more information about the pattern constructs in the following sections. The source code mentioned in this blog is available in GitHub.

Note: The code provided in this blog post is for demonstration purposes only. You must ensure that it meets your security and production readiness requirements.

Traditional three-tier web application construct

The first pattern construct is for a traditional three-tier web application running on Amazon Elastic Compute Cloud (Amazon EC2), with AWS resources consisting of Application Load Balancer, an Autoscaling group and EC2 launch configuration, an Amazon Relational Database Service (Amazon RDS) or Amazon Aurora database, and AWS Secrets Manager. The following diagram illustrates this architecture.


Traditional stack architecture

Serverless web application construct

The second pattern construct is for a serverless application with AWS resources in AWS Lambda, Amazon API Gateway, and Amazon DynamoDB.

Serverless application architecture

Publishing and consuming pattern constructs

Both constructs are written in Typescript and published to CodeArtifact as npm packages. A semantic versioning scheme is used to version the construct packages. After a package gets published to CodeArtifact, teams can consume them for deploying AWS resources. The following diagram illustrates this architecture.

Pattern constructs

Prerequisites

Before getting started, complete the following steps:

  1. Clone the code from the GitHub repository for the traditional and serverless web application constructs:
    git clone https://github.com/aws-samples/aws-cdk-developing-application-patterns-blog.git
    cd aws-cdk-developing-application-patterns-blog
  2. Configure AWS Identity and Access Management (IAM) permissions by attaching IAM policies to the user, group, or role implementing this solution. The following policy files are in the iam folder in the root of the cloned repo:
    • BlogPublishArtifacts.json – The IAM policy to configure CodeArtifact and publish packages to it.
    • BlogConsumeTraditional.json – The IAM policy to consume the traditional three-tier web application construct from CodeArtifact and deploy it to an AWS account.
    • PublishArtifacts.json – The IAM policy to consume the serverless construct from CodeArtifact and deploy it to an AWS account.

Configuring CodeArtifact

In this step, we configure CodeArtifact for publishing the pattern constructs as npm packages. The following AWS resources are created:

  • A CodeArtifact domain named blog-domain
  • Two CodeArtifact repositories:
    • blog-npm-store – For configuring the upstream NPM repository.
    • blog-repository – For publishing custom packages.

Deploy the CodeArtifact resources with the following code:

cd prerequisites/
rm -rf package-lock.json node_modules
npm install
cdk deploy --require-approval never
cd ..

Log in to the blog-repository. This step is needed for publishing and consuming the npm packages. See the following code:

aws codeartifact login \
     --tool npm \
     --domain blog-domain \
     --domain-owner $(aws sts get-caller-identity --output text --query 'Account') \
     --repository blog-repository

Publishing the pattern constructs

  1. Change the directory to the serverless construct:
    cd serverless
  2. Install the required npm packages:
    rm package-lock.json && rm -rf node_modules
    npm install
    
  3. Build the npm project:
    npm run build
  4. Publish the construct npm package to the CodeArtifact repository:
    npm publish

    Follow the previously mentioned steps for building and publishing a traditional (classic Load Balancer plus Amazon EC2) web app by running these commands in the traditional directory.

    If the publishing is successful, you see messages like the following screenshots. The following screenshot shows the traditional infrastructure.

    Successful publishing of Traditional construct package to CodeArtifact

    The following screenshot shows the message for the serverless infrastructure.

    Successful publishing of Serverless construct package to CodeArtifact

    We just published version 1.0.1 of both the traditional and serverless web app constructs. To release a new version, we can simply update the version attribute in the package.json file in the traditional or serverless folder and repeat the last two steps.

    The following code snippet is for the traditional construct:

    {
        "name": "traditional-infrastructure",
        "main": "lib/index.js",
        "files": [
            "lib/*.js",
            "src"
        ],
        "types": "lib/index.d.ts",
        "version": "1.0.1",
    ...
    }

    The following code snippet is for the serverless construct:

    {
        "name": "serverless-infrastructure",
        "main": "lib/index.js",
        "files": [
            "lib/*.js",
            "src"
        ],
        "types": "lib/index.d.ts",
        "version": "1.0.1",
    ...
    }

Consuming the pattern constructs from CodeArtifact

In this step, we demonstrate how the pattern constructs published in the previous steps can be consumed and used to provision AWS infrastructure.

  1. From the root of the GitHub package, change the directory to the examples directory containing code for consuming traditional or serverless constructs.To consume the traditional construct, use the following code:
    cd examples/traditional

    To consume the serverless construct, use the following code:

    cd examples/serverless
  2. Open the package.json file in either directory and note that the packages and versions we consume are listed in the dependencies section, along with their version.
    The following code shows the traditional web app construct dependencies:

    "dependencies": {
        "@aws-cdk/core": "1.30.0",
        "traditional-infrastructure": "1.0.1",
        "aws-cdk": "1.47.0"
    }

    The following code shows the serverless web app construct dependencies:

    "dependencies": {
        "@aws-cdk/core": "1.30.0",
        "serverless-infrastructure": "1.0.1",
        "aws-cdk": "1.47.0"
    }
  3. Install the pattern artifact npm package along with the dependencies:
    rm package-lock.json && rm -rf node_modules
    npm install
    
  4. As an optional step, if you need to override the default Lambda function code, build the npm project. The following commands build the Lambda function source code:
    cd ../override-serverless
    npm run build
    cd -
  5. Bootstrap the project with the following code:
    cdk bootstrap

    This step is applicable for serverless applications only. It creates the Amazon Simple Storage Service (Amazon S3) staging bucket where the Lambda function code and artifacts are stored.

  6. Deploy the construct:
    cdk deploy --require-approval never

    If the deployment is successful, you see messages similar to the following screenshots. The following screenshot shows the traditional stack output, with the URL of the Load Balancer endpoint.

    Traditional CloudFormation stack outputs

    The following screenshot shows the serverless stack output, with the URL of the API Gateway endpoint.

    Serverless CloudFormation stack outputs

    You can test the endpoint for both constructs using a web browser or the following curl command:

    curl <endpoint output>

    The traditional web app endpoint returns a response similar to the following:

    [{"app": "traditional", "id": 1605186496, "purpose": "blog"}]

    The serverless stack returns two outputs. Use the output named ServerlessStack-v1.Api. See the following code:

    [{"purpose":"blog","app":"serverless","itemId":"1605190688947"}]

  7. Optionally, upgrade to a new version of pattern construct.
    Let’s assume that a new version of the serverless construct, version 1.0.2, has been published, and we want to upgrade our AWS infrastructure to this version. To do this, edit the package.json file and change the traditional-infrastructure or serverless-infrastructure package version in the dependencies section to 1.0.2. See the following code example:

    "dependencies": {
        "@aws-cdk/core": "1.30.0",
        "serverless-infrastructure": "1.0.2",
        "aws-cdk": "1.47.0"
    }

    To update the serverless-infrastructure package to 1.0.2, run the following command:

    npm update

    Then redeploy the CloudFormation stack:

    cdk deploy --require-approval never

Cleaning up

To avoid incurring future charges, clean up the resources you created.

  1. Delete all AWS resources that were created using the pattern constructs. We can use the AWS CDK toolkit to clean up all the resources:
    cdk destroy --force

    For more information about the AWS CDK toolkit, see Toolkit reference. Alternatively, delete the stack on the AWS CloudFormation console.

  2. Delete the CodeArtifact resources by deleting the CloudFormation stack that was deployed via AWS CDK:
    cd prerequisites
    cdk destroy –force
    

Conclusion

In this post, we demonstrated how to publish AWS CDK pattern constructs to CodeArtifact as npm packages. We also showed how teams can consume the published pattern constructs and use them to provision their AWS infrastructure.

This mechanism allows your infrastructure for AWS services to be provisioned from the configuration that has been vetted for quality control and security and governance checks. It also provides control over when new versions of the pattern constructs are released, and when the teams consuming the constructs can upgrade to the newly released versions.

About the Authors

Usman Umar


Usman Umar is a Sr. Applications Architect at AWS Professional Services. He is passionate about developing innovative ways to solve hard technical problems for the customers. In his free time, he likes going on biking trails, doing car modifications, and spending time with his family.


Krishnakumar Rengarajan


Krishnakumar Rengarajan is a DevOps Consultant with AWS Professional Services. He enjoys working with customers and focuses on building and delivering automated solutions that enables customers on their AWS cloud journeys.

Continuously building and delivering Maven artifacts to AWS CodeArtifact

Post Syndicated from Vinay Selvaraj original https://aws.amazon.com/blogs/devops/continuously-building-and-delivering-maven-artifacts-to-aws-codeartifact/

Artifact repositories are often used to share software packages for use in builds and deployments. Java developers using Apache Maven use artifact repositories to share and reuse Maven packages. For example, one team might own a web service framework that is used by multiple other teams to build their own services. The framework team can publish the framework as a Maven package to an artifact repository, where new versions can be picked up by the service teams as they become available. This post explains how you can set up a continuous integration pipeline with AWS CodePipeline and AWS CodeBuild to deploy Maven artifacts to AWS CodeArtifact. CodeArtifact is a fully managed pay-as-you-go artifact repository service with support for software package managers and build tools like Maven, Gradle, npm, yarn, twine, and pip.

Solution overview

The pipeline we build is triggered each time a code change is pushed to the AWS CodeCommit repository. The code is compiled using the Java compiler, unit tested, and deployed to CodeArtifact. After the artifact is published, it can be consumed by developers working in applications that have a dependency on the artifact or by builds running in other pipelines. The following diagram illustrates this architecture.

Architecture diagram of the solution


All the components in this pipeline are fully managed and you don’t pay for idle capacity or have to manage any servers.


Prerequisites

This post assumes you have the following tools installed and configured:


Creating your resources

To create the CodeArtifact domain, CodeArtifact repository, CodeCommit, CodePipeline, CodeBuild, and associated resources, we use AWS CloudFormation. Save the provided CloudFormation template below as codeartifact-cicd-pipeline.yaml and create a stack:


---
Description: Code Artifact CI/CD Pipeline

Parameters:
  GitRepoBranchName:
    Type: String
    Default: main

Resources:

  ArtifactBucket:
    Type: AWS::S3::Bucket
  
  CodeArtifactDomain:
    Type: AWS::CodeArtifact::Domain
    Properties:
      DomainName: !Sub "${AWS::StackName}-domain"
  
  CodeArtifactRepository:
    Type: AWS::CodeArtifact::Repository
    Properties:
      DomainName: !GetAtt CodeArtifactDomain.Name
      RepositoryName: !Sub "${AWS::StackName}-repo"

  CodeRepository:
    Type: AWS::CodeCommit::Repository
    Properties:
      RepositoryDescription: Maven artifact code repository
      RepositoryName: !Sub "${AWS::StackName}-maven-artifact-repo"
  
  CodeBuildProject:
    Type: AWS::CodeBuild::Project
    Properties:
      Name: !Sub "${AWS::StackName}-CodeBuild"
      Artifacts:
        Type: CODEPIPELINE
      Environment:
        EnvironmentVariables:
          - Name: CODEARTIFACT_DOMAIN
            Type: PLAINTEXT
            Value: !GetAtt CodeArtifactDomain.Name
          - Name: CODEARTIFACT_REPO
            Type: PLAINTEXT
            Value: !GetAtt CodeArtifactRepository.Name
        Type: LINUX_CONTAINER
        ComputeType: BUILD_GENERAL1_SMALL
        Image: aws/codebuild/amazonlinux2-x86_64-standard:3.0
      ServiceRole: !GetAtt CodeBuildServiceRole.Arn
      Source:
        Type: CODEPIPELINE
        BuildSpec: buildspec.yaml
  
  Pipeline:
    Type: AWS::CodePipeline::Pipeline
    Properties:
      ArtifactStore:
        Type: S3
        Location: !Ref ArtifactBucket
      RoleArn: !GetAtt CodePipelineServiceRole.Arn
      Stages:
      - Name: Source
        Actions:
        - Name: SourceAction
          ActionTypeId:
            Category: Source
            Owner: AWS
            Version: '1'
            Provider: CodeCommit
          OutputArtifacts:
          - Name: SourceBundle
          Configuration:
            BranchName: !Ref GitRepoBranchName
            RepositoryName: !GetAtt CodeRepository.Name
          RunOrder: '1'

      - Name: Deliver
        Actions:
        - Name: CodeBuild
          InputArtifacts:
          - Name: SourceBundle
          ActionTypeId:
            Category: Build
            Owner: AWS
            Version: '1'
            Provider: CodeBuild
          Configuration:
            ProjectName: !Ref CodeBuildProject
          RunOrder: '1'

  CodeBuildServiceRole:
    Type: AWS::IAM::Role
    Properties:
      AssumeRolePolicyDocument:
        Version: '2012-10-17'
        Statement:
        - Sid: ''
          Effect: Allow
          Principal:
            Service:
            - codebuild.amazonaws.com
          Action: sts:AssumeRole
      Policies:
      - PolicyName: CodePipelinePolicy
        PolicyDocument:
          Version: '2012-10-17'
          Statement:
          - Sid: CloudWatchLogsPolicy
            Effect: Allow
            Action:
            - logs:CreateLogGroup
            - logs:CreateLogStream
            - logs:PutLogEvents
            Resource:
            - "*"
          - Sid: CodeCommitPolicy
            Effect: Allow
            Action:
            - codecommit:GitPull
            Resource:
            - !GetAtt CodeRepository.Arn
          - Sid: S3GetObjectPolicy
            Effect: Allow
            Action:
            - s3:GetObject
            - s3:GetObjectVersion
            Resource:
            - !Sub "arn:aws:s3:::${ArtifactBucket}/*"
          - Sid: S3PutObjectPolicy
            Effect: Allow
            Action:
            - s3:PutObject
            Resource:
            - !Sub "arn:aws:s3:::${ArtifactBucket}/*"
          - Sid: BearerTokenPolicy
            Effect: Allow
            Action:
            - sts:GetServiceBearerToken
            Resource: "*"
            Condition:
              StringEquals:
                sts:AWSServiceName: codeartifact.amazonaws.com
          - Sid: CodeArtifactPolicy
            Effect: Allow
            Action:
            - codeartifact:GetAuthorizationToken
            Resource:
            - !Sub "arn:aws:codeartifact:${AWS::Region}:${AWS::AccountId}:domain/${CodeArtifactDomain.Name}"
          - Sid: CodeArtifactPackage
            Effect: Allow
            Action:
            - codeartifact:PublishPackageVersion
            - codeartifact:PutPackageMetadata
            - codeartifact:ReadFromRepository
            Resource:
            - !Sub "arn:aws:codeartifact:${AWS::Region}:${AWS::AccountId}:package/${CodeArtifactDomain.Name}/${CodeArtifactRepository.Name}/*"
          - Sid: CodeArtifactRepository
            Effect: Allow
            Action:
            - codeartifact:ReadFromRepository
            - codeartifact:GetRepositoryEndpoint
            Resource:
            - !Sub "arn:aws:codeartifact:${AWS::Region}:${AWS::AccountId}:repository/${CodeArtifactDomain.Name}/${CodeArtifactRepository.Name}"          

  CodePipelineServiceRole:
    Type: AWS::IAM::Role
    Properties:
      AssumeRolePolicyDocument:
        Version: '2012-10-17'
        Statement:
        - Sid: ''
          Effect: Allow
          Principal:
            Service:
            - codepipeline.amazonaws.com
          Action: sts:AssumeRole
      Policies:
      - PolicyName: CodePipelinePolicy
        PolicyDocument:
          Version: '2012-10-17'
          Statement:
          - Action:
            - s3:GetObject
            - s3:GetObjectVersion
            - s3:GetBucketVersioning
            Resource: !Sub "arn:aws:s3:::${ArtifactBucket}/*"
            Effect: Allow
          - Action:
            - s3:PutObject
            Resource:
            - !Sub "arn:aws:s3:::${ArtifactBucket}/*"
            Effect: Allow
          - Action:
            - codecommit:GetBranch
            - codecommit:GetCommit
            - codecommit:UploadArchive
            - codecommit:GetUploadArchiveStatus
            - codecommit:CancelUploadArchive
            Resource:
              - !GetAtt CodeRepository.Arn
            Effect: Allow
          - Action:
            - codebuild:StartBuild
            - codebuild:BatchGetBuilds
            Resource: 
              - !GetAtt CodeBuildProject.Arn
            Effect: Allow
          - Action:
            - iam:PassRole
            Resource: "*"
            Effect: Allow
Outputs:
  CodePipelineArtifactBucket:
    Value: !Ref ArtifactBucket
  CodeRepositoryHttpCloneUrl:
    Value: !GetAtt CodeRepository.CloneUrlHttp
  CodeRepositorySshCloneUrl:
    Value: !GetAtt CodeRepository.CloneUrlSsh

aws cloudformation deploy                         \
  --stack-name codeartifact-pipeline               \
  --template-file codeartifact-cicd-pipeline.yaml  \
  --capabilities CAPABILITY_IAM


If you have a Maven project you want to use, you can use that. Otherwise, create a new one:


mvn archetype:generate        \
  -DgroupId=com.mycompany.app \
  -DartifactId=my-app         \
  -DarchetypeArtifactId=maven-archetype-quickstart \
  -DarchetypeVersion=1.4 -DinteractiveMode=false


Initialize a Git repository for the Maven project and add the CodeCommit repository that was created in the CloudFormation stack as a remote repository:


cd my-app
git init
CODECOMMIT_URL=$(aws cloudformation describe-stacks --stack-name codeartifact-pipeline --query "Stacks[0].Outputs[?OutputKey=='CodeRepositoryHttpCloneUrl'].OutputValue" --output text)
git remote add origin $CODECOMMIT_URL


Updating the POM file

The Maven project’s POM file needs to be updated with the distribution management section. This lets Maven know where to publish artifacts. Add the distributionManagement section inside the project element of the POM. Be sure to update the URL with the correct URL for the CodeArtifact repository you created earlier. You can find the CodeArtifact repository URL with the get-repository-endpoint CLI command:


aws codeartifact get-repository-endpoint --domain codeartifact-pipeline-domain  --repository codeartifact-pipeline-repo --format maven


Add the following to the Maven project’s pom.xml:


<distributionManagement>
  <repository>
    <id>codeartifact</id>
    <name>codeartifact</name>
    <url>Replace with the URL from the get-repository-endpoint command</url>
  </repository>
</distributionManagement>

Creating a settings.xml file

Maven needs credentials to use to authenticate with CodeArtifact when it performs the deployment. CodeArtifact uses temporary authorization tokens. To pass the token to Maven, a settings.xml file is created in the top level of the Maven project. During the deployment stage, Maven is instructed to use the settings.xml in the top level of the project instead of the settings.xml that normally resides in $HOME/.m2. Create a settings.xml in the top level of the Maven project with the following contents:


<settings>
  <servers>
    <server>
      <id>codeartifact</id>
      <username>aws</username>
      <password>${env.CODEARTIFACT_TOKEN}</password>
    </server>
  </servers>
</settings>

Creating the buildspec.yaml file

CodeBuild uses a build specification file with commands and related settings that are used during the build, test, and delivery of the artifact. In the build specification file, we specify the CodeBuild runtime to use pre-build actions (update AWS CLI), and build actions (Maven build, test, and deploy). When Maven is invoked, it is provided the path to the settings.xml created in the previous step, instead of the default in $HOME/.m2/settings.xml. Create the buildspec.yaml as shown in the following code:


version: 0.2

phases:
  install:
    runtime-versions:
      java: corretto11

  pre_build:
    commands:
      - pip3 install awscli --upgrade --user

  build:
    commands:
      - export CODEARTIFACT_TOKEN=`aws codeartifact get-authorization-token --domain ${CODEARTIFACT_DOMAIN} --query authorizationToken --output text`
      - mvn -s settings.xml clean package deploy


Running the pipeline

The final step is to add the files in the Maven project to the Git repository and push the changes to CodeCommit. This triggers the pipeline to run. See the following code:


git checkout -b main
git add settings.xml buildspec.yaml pom.xml src
git commit -a -m "Initial commit"
git push --set-upstream origin main


Checking the pipeline

At this point, the pipeline starts to run. To check its progress, sign in to the AWS Management Console and choose the Region where you created the pipeline. On the CodePipeline console, open the pipeline that the CloudFormation stack created. The pipeline’s name is prefixed with the stack name. If you open the CodePipeline console before the pipeline is complete, you can watch each stage run (see the following screenshot).

CodePipeline Screenshot

If you see that the pipeline failed, you can choose the details in the action that failed for more information.

Checking for new artifacts published in CodeArtifact

When the pipeline is complete, you should be able to see the artifact in the CodeArtifact repository you created earlier. The artifact we published for this post is a Maven snapshot. CodeArtifact handles snapshots differently than release versions. For more information, see Use Maven snapshots. To find the artifact in CodeArtifact, complete the following steps:

  1. On the CodeArtifact console, choose Repositories.
  2. Choose the repository we created earlier named myrepo.
  3. Search for the package named my-app.
  4. Choose the my-app package from the search results.
    CodeArtifact Assets
  5. Choose the Dependencies tab to bring up a list of Maven dependencies that the Maven project depends on.CodeArtifact Dependencies


Cleaning up

To clean up the resources you created in this post, you need to remove them in the following order:


# Empty the CodePipeline S3 artifact bucket
CODEPIPELINE_BUCKET=$(aws cloudformation describe-stacks --stack-name codeartifact-pipeline --query "Stacks[0].Outputs[?OutputKey=='CodePipelineArtifactBucket'].OutputValue" --output text)
aws s3 rm s3://$CODEPIPELINE_BUCKET --recursive

# Delete the CloudFormation stack
aws cloudformation delete-stack --stack-name codeartifact-pipeline

Conclusion

This post covered how to build a continuous integration pipeline to deliver Maven artifacts to AWS CodeArtifact. You can modify this solution for your specific needs. For more information about CodeArtifact or the other services used, see the following:


Using NuGet with AWS CodeArtifact

Post Syndicated from John Standish original https://aws.amazon.com/blogs/devops/using-nuget-with-aws-codeartifact/

Managing NuGet packages for .NET development can be a challenge. Tasks such as initial configuration, ongoing maintenance, and scaling inefficiencies are the biggest pain points for developers and organizations. With its addition of NuGet package support, AWS CodeArtifact now provides easy-to-configure and scalable package management for .NET developers. You can use NuGet packages stored in CodeArtifact in Visual Studio, allowing you to use the tools you already know.

In this post, we show how you can provision NuGet repositories in 5 minutes. Then we demonstrate how to consume packages from your new NuGet repositories, all while using .NET native tooling.

All relevant code for this post is available in the aws-codeartifact-samples GitHub repo.

Prerequisites

For this walkthrough, you should have the following prerequisites:

Architecture overview

Two core resource types make up CodeArtifact: domains and repositories. Domains provide an easy way manage multiple repositories within an organization. Repositories store packages and their assets. You can connect repositories to other CodeArtifact repositories, or popular public package repositories such as nuget.org, using upstream and external connections. For more information about these concepts, see AWS CodeArtifact Concepts.

The following diagram illustrates this architecture.

AWS CodeArtifact core concepts

Figure: AWS CodeArtifact core concepts

Creating CodeArtifact resources with AWS CloudFormation

The AWS CloudFormation template provided in this post provisions three CodeArtifact resources: a domain, a team repository, and a shared repository. The team repository is configured to use the shared repository as an upstream repository, and the shared repository has an external connection to nuget.org.

The following diagram illustrates this architecture.

Example AWS CodeArtifact architecture

Figure: Example AWS CodeArtifact architecture

The following CloudFormation template used in this walkthrough:

AWSTemplateFormatVersion: '2010-09-09'
Description: AWS CodeArtifact resources for dotnet

Resources:
  # Create Domain
  ExampleDomain:
    Type: AWS::CodeArtifact::Domain
    Properties:
      DomainName: example-domain
      PermissionsPolicyDocument:
        Version: 2012-10-17
        Statement:
          - Effect: Allow
            Principal:
              AWS: 
              - !Sub arn:aws:iam::${AWS::AccountId}:root
            Resource: "*"
            Action:
              - codeartifact:CreateRepository
              - codeartifact:DescribeDomain
              - codeartifact:GetAuthorizationToken
              - codeartifact:GetDomainPermissionsPolicy
              - codeartifact:ListRepositoriesInDomain

  # Create External Repository
  MyExternalRepository:
    Type: AWS::CodeArtifact::Repository
    Condition: ProvisionNugetTeamAndUpstream
    Properties:
      DomainName: !GetAtt ExampleDomain.Name
      RepositoryName: my-external-repository       
      ExternalConnections:
        - public:nuget-org
      PermissionsPolicyDocument:
        Version: 2012-10-17
        Statement:
          - Effect: Allow
            Principal:
              AWS: 
              - !Sub arn:aws:iam::${AWS::AccountId}:root
            Resource: "*"
            Action:
              - codeartifact:DescribePackageVersion
              - codeartifact:DescribeRepository
              - codeartifact:GetPackageVersionReadme
              - codeartifact:GetRepositoryEndpoint
              - codeartifact:ListPackageVersionAssets
              - codeartifact:ListPackageVersionDependencies
              - codeartifact:ListPackageVersions
              - codeartifact:ListPackages
              - codeartifact:PublishPackageVersion
              - codeartifact:PutPackageMetadata
              - codeartifact:ReadFromRepository

  # Create Repository
  MyTeamRepository:
    Type: AWS::CodeArtifact::Repository
    Properties:
      DomainName: !GetAtt ExampleDomain.Name
      RepositoryName: my-team-repository
      Upstreams:
        - !GetAtt MyExternalRepository.Name
      PermissionsPolicyDocument:
        Version: 2012-10-17
        Statement:
          - Effect: Allow
            Principal:
              AWS: 
              - !Sub arn:aws:iam::${AWS::AccountId}:root
            Resource: "*"
            Action:
              - codeartifact:DescribePackageVersion
              - codeartifact:DescribeRepository
              - codeartifact:GetPackageVersionReadme
              - codeartifact:GetRepositoryEndpoint
              - codeartifact:ListPackageVersionAssets
              - codeartifact:ListPackageVersionDependencies
              - codeartifact:ListPackageVersions
              - codeartifact:ListPackages
              - codeartifact:PublishPackageVersion
              - codeartifact:PutPackageMetadata
              - codeartifact:ReadFromRepository

Getting the CloudFormation template

To use the CloudFormation stack, we recommend you clone the following GitHub repo so you also have access to the example projects. See the following code:

git clone https://github.com/aws-samples/aws-codeartifact-samples.git
cd aws-codeartifact-samples/getting-started/dotnet/cloudformation/

Alternatively, you can copy the previous template into a file on your local filesystem named deploy.yml.

Provisioning the CloudFormation stack

Now that you have a local copy of the template, you need to provision the resources using a CloudFormation stack. You can deploy the stack using the AWS CLI or on the AWS CloudFormation console.

To use the AWS CLI, enter the following code:

aws cloudformation deploy \
--template-file deploy.yml \
--region <YOUR_PREFERRED_REGION> \
--stack-name CodeArtifact-GettingStarted-DotNet

To use the AWS CloudFormation console, complete the following steps:

  1. On the AWS CloudFormation console, choose Create stack.
  2. Choose With new resources (standard).
  3. Select Upload a template file.
  4. Choose Choose file.
  5. Name the stack CodeArtifact-GettingStarted-DotNet.
  6. Continue to choose Next until prompted to create the stack.

Configuring your local development experience

We use the CodeArtifact credential provider to connect the Visual Studio IDE to a CodeArtifact repository. You need to download and install the AWS Toolkit for Visual Studio to configure the credential provider. The toolkit is an extension for Microsoft Visual Studio on Microsoft Windows that makes it easy to develop, debug, and deploy .NET applications to AWS. The credential provider automates fetching and refreshing the authentication token required to pull packages from CodeArtifact. For more information about the authentication process, see AWS CodeArtifact authentication and tokens.

To connect to a repository, you complete the following steps:

  1. Configure an account profile in the AWS Toolkit.
  2. Copy the source endpoint from the AWS Explorer.
  3. Set the NuGet package source as the source endpoint.
  4. Add packages for your project via your CodeArtifact repository.

Configuring an account profile in the AWS Toolkit

Before you can use the Toolkit for Visual Studio, you must provide a set of valid AWS credentials. In this step, we set up a profile that has access to interact with CodeArtifact. For instructions, see Providing AWS Credentials.

Visual Studio Toolkit for AWS Account Profile Setup

Figure: Visual Studio Toolkit for AWS Account Profile Setup

Copying the NuGet source endpoint

After you set up your profile, you can see your provisioned repositories.

  1. In the AWS Explorer pane, navigate to the repository you want to connect to.
  2. Choose your repository (right-click).
  3. Choose Copy NuGet Source Endpoint.
AWS CodeArtifact repositories shown in the AWS Explorer

Figure: AWS CodeArtifact repositories shown in the AWS Explorer


You use the source endpoint later to configure your NuGet package sources.

Setting the package source using the source endpoint

Now that you have your source endpoint, you can set up the NuGet package source.

  1. In Visual Studio, under Tools, choose Options.
  2. Choose NuGet Package Manager.
  3. Under Options, choose the + icon to add a package source.
  4. For Name , enter codeartifact.
  5. For Source, enter the source endpoint you copied from the previous step.
Configuring Nuget package sources for AWS CodeArtifact

Figure: Configuring NuGet package sources for AWS CodeArtifact


Adding packages via your CodeArtifact repository

After the package source is configured against your team repository, you can pull packages via the upstream connection to the shared repository.

  1. Choose Manage NuGet Packages for your project.
    • You can now see packages from nuget.org.
  2. Choose any package to add it to your project.
Exploring packages while connected to a AWS CodeArtifact repository

Exploring packages while connected to a AWS CodeArtifact repository

Viewing packages stored in your CodeArtifact team repository

Packages are stored in a repository you pull from, or referenced via the upstream connection. Because we’re pulling packages from nuget.org through an external connection, you can see cached copies of those packages in your repository. To view the packages, navigate to your repository on the CodeArtifact console.

Packages stored in a AWS CodeArtifact repository

Packages stored in a AWS CodeArtifact repository

Cleaning Up

When you’re finished with this walkthrough, you may want to remove any provisioned resources. To remove the resources that the CloudFormation template created, navigate to the stack on the AWS CloudFormation console and choose Delete Stack. It may take a few minutes to delete all provisioned resources.

After the resources are deleted, there are no more cleanup steps.

Conclusion

We have shown you how to set up CodeArtifact in minutes and easily integrate it with NuGet. You can build and push your package faster, from hours or days to minutes. You can also integrate CodeArtifact directly in your Visual Studio environment with four simple steps. With CodeArtifact repositories, you inherit the durability and security posture from the underlying storage of CodeArtifact for your packages.

As of November 2020, CodeArtifact is available in the following AWS Regions:

  • US: US East (Ohio), US East (N. Virginia), US West (Oregon)
  • AP: Asia Pacific (Mumbai), Asia Pacific (Singapore), Asia Pacific (Sydney), Asia Pacific (Tokyo)
  • EU: Europe (Frankfurt), Europe (Ireland), Europe (Stockholm)

For an up-to-date list of Regions where CodeArtifact is available, see AWS CodeArtifact FAQ.

About the Authors

John Standish

John Standish is a Solutions Architect at AWS and spent over 13 years as a Microsoft .Net developer. Outside of work, he enjoys playing video games, cooking, and watching hockey.

Nuatu Tseggai

Nuatu Tseggai is a Cloud Infrastructure Architect at Amazon Web Services. He enjoys working with customers to design and build event-driven distributed systems that span multiple services.

Neha Gupta

Neha Gupta is a Solutions Architect at AWS and have 16 years of experience as a Database architect/ DBA. Apart from work, she’s outdoorsy and loves to dance.

Elijah Batkoski

Elijah is a Technical Writer for Amazon Web Services. Elijah has produced technical documentation and blogs for a variety of tools and services, primarily focused around DevOps.

Integrating Jenkins with AWS CodeArtifact to publish and consume Python artifacts

Post Syndicated from Matt Ulinski original https://aws.amazon.com/blogs/devops/using-jenkins-with-codeartifact/

Python packages are used to share and reuse code across projects. Centralized artifact storage allows sharing versioned artifacts across an organization. This post explains how you can set up two Jenkins projects. The first project builds the Python package and publishes it to AWS CodeArtifact using twine (Python utility for publishing packages), and the second project consumes the package using pip and deploys an application to AWS Fargate.

Solution overview

The following diagram illustrates this architecture.

Architecture Diagram


The solution consists of two GitHub repositories and two Jenkins projects. The first repository contains the source code of a Python package. Jenkins builds this package and publishes it to a CodeArtifact repository.

The second repository contains the source code of a Python Flask application that has a dependency on the package produced by the first repository. Jenkins builds a Docker image containing the application and its dependencies, pushes the image to an Amazon Elastic Container Registry (Amazon ECR) registry, and deploys it to AWS Fargate using AWS CloudFormation.

Prerequisites

For this walkthrough, you should have the following prerequisites:

To create a new Jenkins server that includes the required dependencies, complete the following steps:

  1. Launch a CloudFormation stack with the following link:
    Launch CloudFormation stack
  2. Choose Next.
  3. Enter the name for your stack.
  4. Select the Amazon Elastic Compute Cloud (Amazon EC2) instance type for your Jenkins server.
  5. Select the subnet and corresponding VPC.
  6. Choose Next.
  7. Scroll down to the bottom of the page and choose Next.
  8. Review the stack configuration and choose Create stack.

AWS CloudFormation creates the following resources:

  • JenkinsInstance – Amazon EC2 instance that Jenkins and its dependencies is installed on
  • JenkinsWaitCondition – CloudFormation wait condition that waits for Jenkins to be fully installed before finishing the deployment
  • JenkinsSecurityGroup – Security group attached to the EC2 instance that allows inbound traffic on port 8080

The stack takes a few minutes to deploy. When it’s fully deployed, you can find the URL and initial password for Jenkins on the Outputs tab of the stack.

CloudFormation outputs tab

Use the initial password to unlock the Jenkins installation, then follow the setup wizard to install the suggested plugins and create a new Jenkins user. After the user is created, the initial password no longer works.

On the Jenkins homepage, complete the following steps:

  1. Choose Manage Jenkins.
  2. Choose Manage Plugins.
  3. On the Available tab, search for “Docker Pipeline” and select it.
    Jenkins plugins available tab
  4. Choose Download now and install after restart.
  5. Select Restart Jenkins when installation is complete and no jobs are running.

Jenkins plugins installation complete

Jenkins is ready to use after it restarts. Log in with the user you created with the setup wizard.

Setting up a CodeArtifact repository

To get started, create a CodeArtifact repository to store the Python packages.

  1. On the CodeArtifact console, choose Create repository.
  2. For Repository name, enter a name (for this post, I use my-repository).
  3. For Public upstream repositories, choose pypi-store.
  4. Choose Next.
    AWS CodeArtifact repository wizard
  5. Choose This AWS account.
  6. If you already have a CodeArtifact domain, choose it from the drop-down menu. If you don’t already have a CodeArtifact domain, choose a name for your domain and the console creates it for you. For this post, I named my domain my-domain.
  7. Choose Next.
  8. Review the repository details and choose Create repository.
    CodeArtifact repository overview

You now have a CodeArtifact repository created, which you use to store and retrieve Python packages used by the application.

Configuring Jenkins: Creating an IAM user

  1. On the IAM console, choose User.
  2. Choose Add user.
  3. Enter a name for the user (for this post, I used the name Jenkins).
  4. Select Programmatic access as the access type.
  5. Choose Next: Permissions.
  6. Select Attach existing policies directly.
  7. Choose the following policies:
    1. AmazonEC2ContainerRegistryPowerUser – Allows Jenkins to push Docker images to ECR.
    2. AmazonECS_FullAccess – Allows Jenkins to deploy your application to AWS Fargate.
    3. AWSCloudFormationFullAccess – Allows Jenkins to update the CloudFormation stack.
    4. AWSCodeArtifactAdminAccessAllows Jenkins access to the CodeArtifact repository.
  8. Choose Next: Tags.
  9. Choose Next: Review.
  10. Review the configuration and choose Create user.
  11. Record the Access key ID and Secret access key; you need them to configure Jenkins.

Configuring Jenkins: Adding credentials

After you create your IAM user, you need to set up the credentials in Jenkins.

  1. Open Jenkins.
  2. From the left pane, choose Manage Jenkins
  3. Choose Manage Credentials.
  4. Hover over the (global) domain and expand the drop-down menu.
  5. Choose Add credentials.
    Jenkins credentials
  6. Enter the following credentials:
    1. Kind – User name with password.
    2. Scope – Global (Jenkins, nodes, items, all child items).
    3. Username – Enter the Access key ID for the Jenkins IAM user.
    4. Password – Enter the Secret access key for the Jenkins IAM user.
    5. ID – Name for the credentials (for this post, I used AWS).
  7. Choose OK.

You use the credentials to make API calls to AWS as part of the builds.

Publishing a Python package

To publish your Python package, complete the following steps:

  1. Create a new GitHub repo to store the source of the sample package.
  2. Clone the sample GitHub repo onto your local machine.
  3. Navigate to the package_src directory.
  4. Place its contents in your GitHub repo.
    Package repository contents

When your GitHub repo is populated with the sample package, you can create the first Jenkins project.

  1. On the Jenkins homepage, choose New Item.
  2. Enter a name for the project; for example, producer.
  3. Choose Freestyle project.
  4. Choose OK.
    Jenkins new project wizard
  5. In the Source Code Management section, choose Git.
  6. Enter the HTTP clone URL of your GitHub repo into the Repository URL
  7. To make sure that the workspace is clean before each build, under Additional Behaviors, choose Add and select Clean before checkout.
    Jenkins source code managnment
  8. To have builds start automatically when a change occurs in the repository, under Build Triggers, select Poll SCM and enter * * * * * in the Schedule
    Jenkins build triggers
  9. In the Build Environment section, select Use secret text(s) or file(s).
  10. Choose Add and choose Username and password (separated).
  11. Enter the following information:
    1. UsernameAWS_ACCESS_KEY_ID
    2. PasswordAWS_SECRET_ACCESS_KEY
    3. Credentials – Select Specific Credentials and from the drop-down menu and choose the previously created credentials.
      Jenkins credential binding
  12. In the Build section, choose Add build step.
  13. Choose Execute shell.
  14. Enter the following command and replace my-domain, my-repository, and my-region with the name of your CodeArtifact domain, repository, and Region:
    python3 setup.py sdist bdist_wheel
    aws codeartifact login --tool twine --domain my-domain --repository my-repository --region my-region
    python3 -m twine upload dist/* --repository codeartifact

    These commands do the following:

    • Build the Python package
    • Run the aws codeartifact login AWS Command Line Interface (AWS CLI) command, which retrieves the access token for CodeArtifact and configures the twine client
    • Use twine to publish the Python package to CodeArtifact
  15. Choose Save.
  16. Start a new build by choosing Build Now in the left pane.After a build starts, it shows in the Build History on the left pane. To view the build’s details, choose the build’s ID number.
    Jenkins project builds
  17. To view the results of the run commands, from the build details page, choose Console Output.
  18. To see that the package has been successfully published, check the CodeArtifact repository on the console.
    CodeArtifact console showing package

When a change is pushed to the repo, Jenkins will start a new build and attempt to publish the package. CodeArtifact will prevent publishing duplicates of the same package version, failing the Jenkins build.

If you want to publish a new version of the package, you will need to increment the version number.

The sample package uses semantic versioning (major.minor.maintenance), to change the version number modify the version='1.0.0' value in the setup.py file. You can do this manually before pushing any changes to the repo, or automatically as part of the build process by using the python-semantic-release package, or a similar solution.

Consuming a package and deploying an application

After you have a package published, you can use it in an application.

  1. Create a new GitHub repo for this application.
  2. Populate it with the contents of the application_src directory from the sample repo.
    Sample application repository

The version of the sample package used by the application is defined in the requirements.txt file. If you have published a new version of the package and want the application to use it modify the fantastic-ascii==1.0.0 value in this file.

After the repository created, you need to deploy the CloudFormation template application.yml. The template creates the following resources:

  • ECRRepository – Amazon ECR repository to store your Docker image.
  • ClusterAmazon Elastic Container Service (Amazon ECS) cluster that contains the service of your application.
  • TaskDefinition – ECS task definition that defines how your Docker image is deployed.
  • ExecutionRole – IAM role that Amazon ECS uses to pull the Docker image.
  • TaskRole – IAM role provided to the ECS task.
  • ContainerSecurityGroup – Security group that allows outbound traffic to ports 8080 and 80.
  • Service – Amazon ECS service that launches and manages your Docker containers.
  • TargetGroup – Target group used by the Load Balancer to send traffic to Docker containers.
  • Listener – Load Balancer Listener that listens for incoming traffic on port 80.
  • LoadBalancer – Load Balancer that sends traffic to the ECS task.
  1. Choose the following link to create the application’s CloudFormation stack:
    Launch CloudFormation stack
  2. Choose Next.
  3. Enter the following parameters:
    1. Stack name – Name for the CloudFormation stack. For this post, I use the name Consumer.
    2. Container Name – Name for your application (for this post, I use application).
    3. Image Tag – Leave this field blank. Jenkins populates it when you deploy the application.
    4. VPC – Choose a VPC in your account that contains two public subnets.
    5. SubnetA – Choose a public subnet from the previously chosen VPC.
    6. SubnetB – Choose a public subnet from the previously chosen VPC.
  4. Choose Next.
  5. Scroll down to the bottom of the page and choose Next.
  6. Review the configuration of the stack.
  7. Acknowledge the IAM resources warning to allow CloudFormation to create the TaskRole IAM role.
  8. Choose Create Stack.

After the stack is created, the Outputs tab contains information you can use to configure the Jenkins project.

Application stack outputs tab

To access the sample application, choose the ApplicationUrl link. Because the application has not yet been deployed, you receive an error message.

You can now create the second Jenkins project, which uses a configured through a Jenkinsfile stored in the source repository. The Jenkinsfile defines the steps that the build takes to build and deploy a Docker image containing your application.

The Jenkinsfile included in the sample instructs Jenkins to perform these steps:

  1. Get the authorization token for CodeArtifact:
    withCredentials([usernamePassword(
        credentialsId: CREDENTIALS_ID,
        passwordVariable: 'AWS_SECRET_ACCESS_KEY',
        usernameVariable: 'AWS_ACCESS_KEY_ID'
    )]) {
        authToken = sh(
                returnStdout: true,
                script: 'aws codeartifact get-authorization-token \
                --domain $AWS_CA_DOMAIN \
                --query authorizationToken \
                --output text \
                --duration-seconds 900'
        ).trim()
    }

  2. Start a Docker build and pass the authorization token as an argument to the build:
    sh ("""
        set +x
        docker build -t $CONTAINER_NAME:$BUILD_NUMBER \
        --build-arg CODEARTIFACT_TOKEN='$authToken' \
        --build-arg DOMAIN=$AWS_CA_DOMAIN-$AWS_ACCOUNT_ID \
        --build-arg REGION=$AWS_REGION \
        --build-arg REPO=$AWS_CA_REPO .
    """)

  3. Inside of Docker, the passed argument is used to configure pip to use CodeArtifact:
    RUN pip config set global.index-url "https://aws:$CODEARTIFACT_TOKEN@$DOMAIN.d.codeartifact.$REGION.amazonaws.com/pypi/$REPO/simple/"
    RUN pip install -r requirements.txt

  4. Test the image by starting a container and performing a simple GET request.
  5. Log in to the Amazon ECR repository and push the Docker image.
  6. Update the CloudFormation template and start a deployment of the application.

Look at the Jenkinsfile and Dockerfile in your repository to review the exact commands being used, then take the following steps to setup the second Jenkins projects:

  1. Change the variables defined in the environment section at the top of the Jenkinsfile:
    environment {
        AWS_ACCOUNT_ID = 'Your AWS Account ID'
        AWS_REGION = 'Region you used for this project'
        AWS_CA_DOMAIN = 'Name of your CodeArtifact domain'
        AWS_CA_REPO = 'Name of your CodeArtifact repository'
        AWS_STACK_NAME = 'Name of the CloudFormation stack'
        CONTAINER_NAME = 'Container name provided to CloudFormation'
        CREDENTIALS_ID = 'Jenkins credentials ID
    }
  2. Commit the changes to the GitHub repo.
  3. To create a new Jenkins project, on the Jenkins homepage, choose New Item.
  4. Enter a name for the project, for example, Consumer.
  5. Choose Pipeline.
  6. Choose OK.
    Jenkins pipeline wizard
  7. To have a new build start automatically when a change is detected in the repository, under Build Triggers, select Poll SCM and enter * * * * * in the Schedule field.
    Jenkins source polling configuration
  8. In the Pipeline section, choose Pipeline script from SCM from the Definition drop-down menu.
  9. Choose Git for the SCM
  10. Enter the HTTP clone URL of your GitHub repo into the Repository URL
  11. To make sure that your workspace is clean before each build, under Additional Behaviors, choose Add and select Clean before checkout.
    Jenkins source configuration
  12. Choose Save.

The Jenkins project is now ready. To start a new job, choose Build Now from the navigation pane. You see a visualization of the pipeline as it moves through the various stages, gathering the dependencies and deploying your application.

Jenkins application pipeline visualization

When the Deploy to ECS stage of the pipeline is complete, you can choose ApplicationUrl on the Outputs tab of the CloudFormation stack. You see a simple webpage that uses the Python package to display the current time.

Deployed application displaying in browser

Cleaning up

To avoid incurring future charges, delete the resources created in this post.

To empty the Amazon ECR repository:

  1. Open the application’s CloudFormation stack.
  2. On the Resources tab, choose the link next to the ECRRepository
  3. Select the check-box next to each of the images in the repository.
  4. Choose Delete.
  5. Confirm the deletion.

To delete the CloudFormation stacks:

  1. On the AWS CloudFormation console, select the application stack you deployed earlier.
  2. Choose Delete.
  3. Confirm the deletion.

If you created a Jenkins as part of this post, select the Jenkins stack and delete it.

To delete the CodeArtifact repository:

  1. On the CodeArtifact console, navigate to the repository you created.
  2. Choose Delete.
  3. Confirm the deletion.

If you’re not using the CodeArtifact domain for other repositories, you should follow the previous steps to delete the pypi-store repository, because it contains the public packages that were used by the application, then delete the CodeArtifact domain:

  1. On the CodeArtifact console, navigate to the domain you created.
  2. Choose Delete.
  3. Confirm the deletion.

Conclusion

In this post I showed how you can use Jenkins to publish and consume a Python package with Jenkins and CodeArtifact. I walked you through creating two Jenkins projects, a Jenkins freestyle project that built a package and published it to CodeArtifact, and a Jenkins pipeline project that built a Docker image that used the package in an application that was deployed to AWS Fargate.

About the author

Matt Ulinski is a Cloud Support Engineer with Amazon Web Services.


How Pushly Media used AWS to pivot and quickly spin up a StartUp

Post Syndicated from Eddie Moser original https://aws.amazon.com/blogs/devops/how-pushly-media-used-aws-to-pivot-and-quickly-spin-up-a-startup/

This is a guest post from Pushly. In their own words, “Pushly provides a scalable, easy-to-use platform designed to deliver targeted and timely content via web push notifications across all modern desktop browsers and Android devices.”

Introduction

As a software engineer at Pushly, I’m part of a team of developers responsible for building our SaaS platform.

Our customers are content publishers spanning the news, ecommerce, and food industries, with the primary goal of increasing page views and paid subscriptions, ultimately resulting in increased revenue.

Pushly’s platform is designed to integrate seamlessly into a publisher’s workflow and enables advanced features such as customizable opt-in flow management, behavioral targeting, and real-time reporting and campaign delivery analytics.

As developers, we face various challenges to make all this work seamlessly. That’s why we turned to Amazon Web Services (AWS). In this post, I explain why and how we use AWS to enable the Pushly user experience.

At Pushly, my primary focus areas are developer and platform user experience. On the developer side, I’m responsible for building and maintaining easy-to-use APIs and a web SDK. On the UX side, I’m responsible for building a user-friendly and stable platform interface.

The CI/CD process

We’re a cloud native company and have gone all in with AWS.

AWS CodePipeline lets us automate the software release process and release new features to our users faster. Rapid delivery is key here, and CodePipeline lets us automate our build, test, and release process so we can quickly and easily test each code change and fail fast if needed. CodePipeline is vital to ensuring the quality of our code by running each change through a staging and release process.

One of our use cases is continuous reiteration deployment. We foster an environment where developers can fully function in their own mindset while adhering to our company’s standards and the architecture within AWS.

We deploy code multiple times per day and rely on AWS services to run through all checks and make sure everything is packaged uniformly. We want to fully test in a staging environment before moving to a customer-facing production environment.

The development and staging environments

Our development environment allows developers to securely pull down applications as needed and access the required services in a development AWS account. After an application is tested and is ready for staging, the application is deployed to our staging environment—a smaller reproduction of our production environment—so we can test how the changes work together. This flow allows us to see how the changes run within the entire Pushly ecosystem in a secure environment without pushing to production.

When testing is complete, a pull request is created for stakeholder review and to merge the changes to production branches. We use AWS CodeBuild, CodePipeline, and a suite of in-house tools to ensure that the application has been thoroughly tested to our standards before being deployed to our production AWS account.

Here is a high level diagram of the environment described above:

Diagram showing at a high level the Pushly environment.Ease of development

Ease of development was—and is—key. AWS provides the tools that allow us to quickly iterate and adapt to ever-changing customer needs. The infrastructure as code (IaC) approach of AWS CloudFormation allows us to quickly and simply define our infrastructure in an easily reproducible manner and rapidly create and modify environments at scale. This has given us the confidence to take on new challenges without concern over infrastructure builds impacting the final product or causing delays in development.

The Pushly team

Although Pushly’s developers all have the skill-set to work on both front-end-facing and back-end-facing projects, primary responsibilities are split between front-end and back-end developers. Developers that primarily focus on front-end projects concentrate on public-facing projects and internal management systems. The back-end team focuses on the underlying architecture, delivery systems, and the ecosystem as a whole. Together, we create and maintain a product that allows you to segment and target your audiences, which ensures relevant delivery of your content via web push notifications.

Early on we ran all services entirely off of AWS Lambda. This allowed us to develop new features quickly in an elastic, cost efficient way. As our applications have matured, we’ve identified some services that would benefit from an always on environment and moved them to AWS Elastic Beanstalk. The capability to quickly iterate and move from service to service is a credit to AWS, because it allows us to customize and tailor our services across multiple AWS offerings.

Elastic Beanstalk has been the fastest and simplest way for us to deploy this suite of services on AWS; their blue/green deployments allow us to maintain minimal downtime during deployments. We can easily configure deployment environments with capacity provisioning, load balancing, autoscaling, and application health monitoring.

The business side

We had several business drivers behind choosing AWS: we wanted to make it easier to meet customer demands and continually scale as much as needed without worrying about the impact on development or on our customers.

Using AWS services allowed us to build our platform from inception to our initial beta offering in fewer than 2 months! AWS made it happen with tools for infrastructure deployment on top of the software deployment. Specifically, IaC allowed us to tailor our infrastructure to our specific needs and be confident that it’s always going to work.

On the infrastructure side, we knew that we wanted to have a staging environment that truly mirrored the production environment, rather than managing two entirely disparate systems. We could provide different sets of mappings based on accounts and use the templates across multiple environments. This functionality allows us to use the exact same code we use in our current production environment and easily spin up additional environments in 2 hours.

The need for speed

It took a very short time to get our project up and running, which included rewriting different pieces of the infrastructure in some places and completely starting from scratch in others.

One of the new services that we adopted is AWS CodeArtifact. It lets us have fully customized private artifact stores in the cloud. We can keep our in-house libraries within our current AWS accounts instead of relying on third-party services.

CodeBuild lets us compile source code, run test suites, and produce software packages that are ready to deploy while only having to pay for the runtime we use. With CodeBuild, you don’t need to provision, manage, and scale your own build servers, which saves us time.

The new tools that AWS is releasing are going to even further streamline our processes. We’re interested in the impact that CodeArtifact will have on our ability to share libraries in Pushly and with other business units.

Cost savings is key

What are we saving by choosing AWS? A lot. AWS lets us scale while keeping costs at a minimum. This was, and continues to be, a major determining factor when choosing a cloud provider.

By using Lambda and designing applications with horizontal scale in mind, we have scaled from processing millions of requests per day to hundreds of millions, with very little change to the underlying infrastructure. Due to the nature of our offering, our traffic patterns are unpredictable. Lambda allows us to process these requests elastically and avoid over-provisioning. As a result, we can increase our throughput tenfold at any time, pay for the few minutes of extra compute generated by a sudden burst of traffic, and scale back down in seconds.

In addition to helping us process these requests, AWS has been instrumental in helping us manage an ever-growing data warehouse of clickstream data. With Amazon Kinesis Data Firehose, we automatically convert all incoming events to Parquet and store them in Amazon Simple Storage Service (Amazon S3), which we can query directly using Amazon Athena within minutes of being received. This has once again allowed us to scale our near-real-time data reporting to a degree that would have otherwise required a significant investment of time and resources.

As we look ahead, one thing we’re interested in is Lambda custom stacks, part of AWS’s Lambda-backed custom resources. Amazon supports many languages, so we can run almost every language we need. If we want to switch to a language that AWS doesn’t support by default, they still provide a way for us to customize a solution. All we have to focus on is the code we’re writing!

The importance of speed for us and our customers is one of our highest priorities. Think of a news publisher in the middle of a briefing who wants to get the story out before any of the competition and is relying on Pushly—our confidence in our ability to deliver on this need comes from AWS services enabling our code to perform to its fullest potential.

Another way AWS has met our needs was in the ease of using Amazon ElastiCache, a fully managed in-memory data store and cache service. Although we try to be as horizontal thinking as possible, some services just can’t scale with the immediate elasticity we need to handle a sudden burst of requests. We avoid duplicate lookups for the same resources with ElastiCache. ElastiCache allows us to process requests quicker and protects our infrastructure from being overwhelmed.

In addition to caching, ElastiCache is a great tool for job locking. By locking messages by their ID as soon as they are received, we can use the near-unlimited throughput of Amazon Simple Queue Service (Amazon SQS) in a massively parallel environment without worrying that messages are processed more than once.

The heart of our offering is in the segmentation of subscribers. We allow building complex queries in our dashboard that calculate reach in real time and are available to use immediately after creation. These queries are often never-before-seen and may contain custom properties provided by our clients, operate on complex data types, and include geospatial conditions. No matter the size of the audience, we see consistent sub-second query times when calculating reach. We can provide this to our clients using Amazon Elasticsearch Service (Amazon ES) as the backbone to our subscriber store.

Summary

AWS has countless positives, but one key theme that we continue to see is overall ease of use, which enables us to rapidly iterate. That’s why we rely on so many different AWS services—Amazon API Gateway with Lambda integration, Elastic Beanstalk, Amazon Relational Database Service (Amazon RDS), ElastiCache, and many more.

We feel very secure about our future working with AWS and our continued ability to improve, integrate, and provide a quality service. The AWS team has been extremely supportive. If we run into something that we need to adjust outside of the standard parameters, or that requires help from the AWS specialists, we can reach out and get feedback from subject matter experts quickly. The all-around capabilities of AWS and its teams have helped Pushly get where we are, and we’ll continue to rely on them for the foreseeable future.