Tag Archives: launch

In the Works – 3 More AWS Local Zones in 2020, and 12 More in 2021

Post Syndicated from Jeff Barr original https://aws.amazon.com/blogs/aws/in-the-works-more-aws-local-zones/

We launched the first AWS Local Zone in Los Angeles last December, and added a second one (also in Los Angeles) in August of 2020. In my original post, I quoted Andy Jassy’s statement that we would be giving consideration to adding Local Zones in more geographic areas.

Our customers are using the EC2 instances and other compute services in these zones to host artist workstations, local rendering, sports broadcasting, online gaming, financial transaction processing, machine learning inferencing, virtual reality, and augmented reality applications, among others. These applications benefit from the extremely low latency made possible by geographic proximity.

More Local Zones
I’m happy to be able to announce that we are opening three more Local Zones today and plan to open twelve more in 2021.

Local Zones in Boston, Houston, and Miami are now available in preview form and you can request access now. In 2021, we plan to open Local Zones in other key cities and metropolitan areas including New York City, Chicago, and Atlanta.

We are choosing the target cities with the goal of allowing you to provide access with single-digit millisecond latency to the vast majority of users in the Continental United States. You can deploy the parts of your application that are the most sensitive to latency in Local Zones, and deliver amazing performance to your users. In addition to the use cases that I mentioned above, I expect to see many more that have yet to be imagined or built.

Using Local Zones
I stepped through the process of using a Local Zone in my original post, and all that I said there still applies. Here’s what you need to do:

  1. Request access to the preview and await a reply.
  2. Create a new VPC subnet for the Local Zone.
  3. Launch EC2 instances, create EBS volumes, and deploy your application.

Things to Know
Here are a couple of things that you should know about the new and upcoming Local Zones:

Instance Types – The Local Zones will have a wide selection of EC2 instance types including C5, R5, T3, and G4 instances..

Purchasing Models – You can use compute capacity in Local Zones on an On-Demand basis and you can also purchase a Savings Plan in order to receive discounts. Some of the Local Zones also support the use of Spot Instances, .

AWS Services – Local Zones support Amazon Elastic Compute Cloud (EC2), Amazon Elastic Block Store (EBS), Amazon Elastic Kubernetes Service (EKS), and Amazon Virtual Private Cloud, with the door open for other services in the future. You can use services such as Auto Scaling, AWS CloudFormation, and Amazon CloudWatch in the parent region to launch, control, and monitor the AWS resources in a Local Zone.

Direct Connect – As I mentioned earlier, some of our customers are using AWS Direct Connect to establish private connections between Local Zones and their existing on-premises or colo IT infrastructure. We are working with our Direct Connect Partners to make Direct Connect available for the new zones and the specifics will vary on a zone-by-zone basis.

The AWS Local Zones Features page contains additional zone-by-zone information on all of the items listed above.

Learn More
Here are some resources to help you to learn more about Local Zones:

Blog PostLow-Latency Computing with AWS Local Zones.

SitesAWS Local Zones home page, AWS Local Zones FAQ.

Jeff;

re:Invent 2020 – Preannouncements for Tuesday, December 1

Post Syndicated from Jeff Barr original https://aws.amazon.com/blogs/aws/reinvent-2020-preannouncements-for-tuesday-december-1/

Andy Jassy just gave you a hint about some upcoming AWS launches, and I’ll have more to say about them when they are ready. To tide you over until then, here’s a summary of what he pre-announced:

Smaller AWS Outpost Form Factors – We are introducing two new sizes of AWS Outposts, suitable for locations such as branch offices, factories, retail stores, health clinics, hospitals, and cell sites that are space-constrained and need access to low-latency compute capacity. The 1U (rack unit) Outposts server will be equipped with AWS Graviton 2 processors; the 2U Outposts server will be equipped with Intel® processors. Both sizes will be able to run EC2, ECS, and EKS workloads locally, all provisioned and managed by AWS (including automated patching and updates).

Amazon ECS Anywhere – You will soon be able to run Amazon Elastic Container Service (ECS) in your own data center, giving you the power to select and standardize on a single container orchestrator that runs both on-premises and in the cloud. You will have access to the same ECS APIs, and you will be able to manage all of your ECS resources with the same cluster management, workload scheduling, and monitoring tools and utilities. Amazon ECS Anywhere will also make it easy for you to containerize your existing on-premises workloads, run them locally, and then connect them to the AWS Cloud.

Amazon EKS Anywhere – You will also soon be able to run Amazon Elastic Kubernetes Service (EKS) in your own data center, making it easy for you to set up, upgrade, and operate Kubernetes clusters. The default configuration for each new cluster will include logging, monitoring, networking, and storage, all optimized for the environment that will host the cluster. You will be able to spin up clusters on demand, and you will be able to backup, recover, patch, and upgrade production clusters with minimal disruption.

Again, I’ll have more to say about these when they are ready, so stay tuned, and enjoy the rest of AWS re:Invent!

Jeff;

Amazon Lookout for Vision – New ML Service Simplifies Defect Detection for Manufacturing

Post Syndicated from Marcia Villalba original https://aws.amazon.com/blogs/aws/amazon-lookout-for-vision-new-machine-learning-service-that-simplifies-defect-detection-for-manufacturing/

Today, I’m excited to announce Amazon Lookout for Vision, a new machine learning (ML) service that helps customers in industrial environments to detect visual defects on production units and equipment in an easy and cost-effective way.

Can you spot the circuit board with the defect in these images?

Image of 3 circuit boards - one is faulty

Maybe you can if you are familiar with circuit boards, but I have to say that it took me a while to discover the error. Humans, when properly trained and are well rested, are great at finding anomalies in a set of objects. However, when they are tired or not properly trained – like me in this example – they can be slow, prone to errors and inconsistent.

That’s why many companies use machine vision technologies to detect anomalies. However, these technologies need to be calibrated with controlled lighting and camera viewpoints. In addition, you need to specify hard-coded rules that define what is a defect and what is not, making the technologies very specialized and complex to build.

Lookout for Vision is a new machine learning service that helps increase industrial product quality and reduce operational costs by automating visual inspection of product defects across production processes. Lookout for Vision uses deep learning models to replace hard-coded rules and handles the differences in camera angle, lighting and other challenges that arise from the operational environment. With Lookout for Vision, you can reduce the need for carefully controlled environments.

Using Lookout for Vision, you can detect damages to manufactured parts, identify missing components or parts, and uncover underlying process-related issues in your manufacturing lines.

How to Get Started With Lookout for Vision
The first thing I want to mention is that to use Lookout for Vision, you don’t need to be a machine learning expert. Lookout for Vision is a fully managed service and comes with anomaly detection models that can be optimized for your use case and your data.

There are several steps for using Lookout for Vision. The first is preparing the dataset, which includes creating a dataset of images and adding labels to the images. Then, Lookout for Vision uses this dataset to automatically train the ML model that learns to detect anomalies in your product. The final part is using the model in production. You can keep evaluating the performance of your trained model and improve it at any time using tools that Lookout for Vision provides.

Service console tutorial for getting started

Preparing the Data
To get started with the model, you first need a set of images of your product. For better results, include images with normal (no defects) and anomalous content (includes defects). To get started with training, you will need at least 20 normal images and 10 anomalous images.

There are many ways of importing images into Lookout for Vision from the AWS Management Console: You can provide manifests for annotated images using the Amazon SageMaker Ground Truth service, provide images from an S3 bucket or upload directly from your computer.

Different ways to import your images.

After you upload the images, you need to add labels to classify the images in your dataset as normal or anomalous. Labeling is a very important step, as this is the key information that Lookout for Vision uses to train the model for your use case.

For this demo, I import the images from an S3 bucket. If you’ve organized the images in your S3 bucket by folder name (/anomaly/01.jpeg), Lookout for Vision will automatically import the folder structure into corresponding labels.

Training the Model
When our dataset is ready, we need to train our model with it. The training button is enabled once you have the minimum number of labeled images: 20 normal and 10 anomalous.

Depending on the size of the dataset, training may take a while to complete: for me, it took around an hour to train the model with 100 images. Note that you will begin incurring costs when Lookout for Vision starts to actually train the model. After training is complete, your model is ready to detect anomalies in new images.

Screenshot of a model in training.

Evaluating the Model
There are a couple of ways to evaluate whether your model is ready to be deployed to production. The first is to review the performance metrics of the model and the second is to run some productionlike tests that will help you to verify if the model is ready to be deployed.

There are three main performance metrics: precision, recall and the F1 score. Precision measures the percentage of times the model prediction is correct and recall measures the percentage of true defects the model identified. F1 score is used to determine the model performance metric.

Screenshot of model performance metrics

If you want to run some production-like tests to verify if your model is ready, use the run trial detection feature. This will enable you to run your Lookout for Vision model and predict anomalies on new images. You can further improve the model by manually verifying the results and adding new training images.

Create a new job to predict anomalies.

I used the three images that appear at the beginning of this post for my trial detection. The trial detection job ran for 15-20 minutes, and after that Lookout for Vision used the trained model to classify the images into “Normal” and “Anomaly.” When Lookout for Vision finalizes the trial detection job, you can verify the results as correct or incorrect, and add this images to the dataset.

Screenshot verifying the results of the trial

Using the Model in Production
To use Lookout for Vision, you need to integrate the AWS SDKs or CLI in the systems that are processing the images of the products in the manufacturing line, and internet connectivity is required for this to work. The first thing you need to do is to start the model. When using Lookout for Vision, you are billed for the time your model is running and making inferences. For example, if you start your model at 8 a.m. and stop it at 5 p.m., you will be billed for 9 hours.

# Example CLI
aws lookoutvision start-model 
--project-name circuitBoard 
--model-version 1
--additional-output-config "Bucket=<OUTPUT_BUCKET>,Prefix=<PREFIX_KEY>" 
--min-anomaly-detection-units 10 

# Example response
{ "status" : "STARTING_HOSTING" }

When your model is ready, you can call the detect-anomalies API from Lookout for Vision.

# Example CLI
aws lookoutvision detect-anomalies 
--project-name circuitBoard 
--model-version 1 

And this API will return a JSON response that shows if the image is an anomaly or not, along with the confidence level of that prediction.

{
    "DetectAnomalyResult": {
        "Source": {
            "Type": "direct"
        },
        "IsAnomalous": true,
        "Confidence": 0.97
    }
}

When you are done with detecting anomalies for the day, use the stop-model API. In the Lookout for Vision service console you can find code snippets on how to use these APIs.

When you are using Lookout for Vision in production, you’ll find a dashboard that helps you to sort and track the production lines by most defective line, line with the most recent defects, and the line with the highest anomaly ratio.

Available Today
Lookout for Vision is available in all AWS Regions.

To get started with Amazon Lookout for Vision, visit the service page today.

Marcia

Amazon Connect – Now Smarter and More Integrated With Third-Party Tools

Post Syndicated from Sébastien Stormacq original https://aws.amazon.com/blogs/aws/amazon-connect-smarter-and-more-integrated/

We launched Amazon Connect in 2017 and, since then, thousands of customers have created their own contact centers in the cloud. Amazon Connect makes it easy for non-technical customers to design interaction flows, manage agents, and track performance metrics.

For example, when I book a Best Western hotel room in Europe by phone, the call is managed by Amazon Connect. In the UK, the Post Office went from ideation to production rollout in just three weeks. In France, WebHelp, a global leader in Business Process Outsourcing, activated thousands of workstations and remote agents in just 72 hours.

Since I last blogged about Amazon Connect, the team has been continuously listening for your feedback and, today, I am happy to announce a new set of capabilities to make Amazon Connect smarter and more integrated with third-party tools.

We are using Machine Learning (ML) to make Amazon Connect smarter at analyzing conversations in real time, finding relevant information needed by contact center agents, and authenticating customers by the sound of their voice. The second set of capabilities makes Amazon Connect easier to integrate with third party tools or services to present unified customer profile information to contact center agents, and to make it easier to manage their tasks.

Let’s go into the details, one by one.

Contact Lens Real Time
Contact Lens for Amazon Connect is a set of machine learning (ML) capabilities allowing contact center supervisors to better understand the sentiment, trends, and compliance of customer conversations. It was first announced during re:Invent 2019 and available since July 2020. It allows to effectively train agents, replicate successful interactions, and to identify crucial company and product feedback.

Starting today, you can get real-time insights into customer experience during the live calls, such as a customer expressing dissatisfaction. Customer experience analytics and alerts for live calls are delivered in Amazon Connect’s real-time metrics dashboard. It makes it easy for supervisors to identify when to listen-in on a critical call, and to provide guidance to the agent via chat, or have the agent transfer the call to them for assistance.

You, as the contact center manager, can define rules using specific terms such as “not happy,” “poor quality product,” and “cancel my subscription.” Contact Lens uses natural language processing (NLP) to perform intelligent matching to automatically detect variations of the spoken words even when the example phrases are limited.

Create Rules for real time analytics

Contact Lens analyzes in-progress calls in real time to detect when the rule criteria for a customer experience issue is met, and immediately creates an alert next to the live call in the Amazon Connect dashboard to notify supervisors of the situation.

Real Time alert based on rules

With this launch, we are adding 13 language variants to post-call analytics, in addition to the 5 already supported :English (United States), English (Great Britain), English (Australia), English (India), and Spanish (United States).

The new language variants for post-call analytics are: English (Ireland), English (Scotland), English (Wales), Spanish (Spain), French (Canada), French (France), Portuguese (Portugal), Portuguese (Brazil), German (Germany), German (Switzerland), Italian (Italy), Arabic (Gulf), and Hindi (India).

Contact Lens for Amazon Connect real-time is available in 4 language variants: English (United States), English (Great Britain), English (Australia), and Spanish (United States). More language variants will be added at later stage.

For more details visit this launch page.

Amazon Connect Wisdom (Preview)
Wisdom provides built-in agent assistance capabilities in Amazon Connect, including machine learning (ML) powered search and real-time recommendations, to quickly enable agents with relevant information for resolving customer issues.

As an agent, I can type questions or phrases in the Wisdom search box, without guessing what keyword I should use. Wisdom understands what information I am searching for. It surfaces results in the agent’s preferred Amazon Connect application, the web-based one we do provide, or the ones you built.

Amazon Connect Wisdom search results

Wisdom comes with pre-built connectors to third-party knowledge repositories to provide most relevant results to agents. Wisdom includes connectors for Salesforce and ServiceNow during the preview, with more to come at launch.

Wisdom may use Contact Lens Real Time analytics to analyse the conversation in real-time. It detects the customer issue, finds related content in the connected repositories, and provides proactive recommendations to help the agent resolve it. For example, Wisdom can detect that a customer is talking about a problem with the handbag they bought last week, recommend an article that describes similar products defect, and provide instructions with a link to the order management application needed to initiate an exchange.

Wisdom is available in preview, you can signup today or visit the launch page.

Amazon Connect Voice ID (Preview)
Amazon Connect Voice ID provides real-time caller authentication which makes voice interactions in contact centers more secure and efficient.

To effectively recognise me as “Sébastien”, Voice ID must learn how I am talking. This is the enrolment phase. Then it compares the sound of my voice with the one enrolled earlier. This is the verification phase.

To meet with personal data protection laws, contact center agents capture my consent to use Voice ID.

During the enrolment phase, Voice ID listens to the call until it has captured 30 seconds of my voice. Then it creates my voiceprint, which uniquely authenticates me. A voiceprint is a mathematical representation that captures unique aspects of an individual’s voice such as speech rhythm, pitch, intonation, and loudness. I do not need to say or repeat any specific phrases to let Voice ID create my voiceprint. Voice ID provides an API that can be used to opt-out a customer.

When I call back in, Voice ID just needs 10 seconds of my voice to authenticate me. My voice can be captured as part of a typical interaction with the Interactive Voice Response (IVR) happening at the start of the call, or when I first start to talk with the agent. For example when I am answering questions, such as “what’s your first and last name?” and “what are you calling about?”, Voice ID uses this audio to generate my voiceprint again. It compares it with the one enrolled earlier. Voice ID then generates an authentication score depending on the confidence of the match. Contact center managers can use this score to create policies in Amazon Connect to let agents see a real-time result (“authenticated” or “not authenticated”) in their web-based application. Agents can then decide to proceed with the call or ask for additional authentication credentials.

Amazon Connect Voice ID is available in preview. You can signup today or visit this launch page.

Amazon Connect Customer Profiles
Customer Profiles is a unified profile for Amazon Connect that brings together customer information from disparate sources without having to build integrations or wrangle data.

Providing agents (or automatic IVR systems) with accurate and unified customer profile information at the right moment helps them to deliver better service to customers, and to resolve calls faster. Using Customer Profiles, agents must not navigate out of Amazon Connect, or switch between different applications to get the customer insights they need.

With just a few clicks, System Administrators can integrate customer profile data from applications like Salesforce, ServiceNow, Zendesk, and Marketo to build your own homegrown integration. Setting up connectors for Customer Profiles requires no programming or data integration expertise.

Once enabled, Customer Profiles automatically detects customer records from the applications. It matches and deduplicates them. This results in accurate and up-to-date profiles displayed to agents within their Connect web-based experience.

Amazon Connect Customer Profile

Learn more about Amazon Connect Customer Profile by visiting the launch page.

Amazon Connect Tasks
Amazon Connect Tasks makes it easy to automate, track, and manage contact center agent tasks. It provides a single place for contact center managers to prioritize, assign, and track customer service tasks across the disparate applications used by agents, so that they are focused on the highest priority work of any type.

Tasks can be sourced from third-party applications, such as a CRM solution, or to update a business-specific system. For example, you can programmatically create tasks for agents to follow-up on a customer case in a third party application like Salesforce, or complete an action item in a business-specific application, such as processing a claim in an insurance system. You can also automate tasks that dont require agent interaction, to ensure your agents spend more time focused on customers.

Using Amazon Connect tasks, agents no longer need to switch between applications to know what work should be completed, and with what priority. Agents can see all their assigned tasks right from the Amazon Connect contact control panel, the same web-based application they use to interact with customers over calls and chat. When a task is assigned, the agent receives a notification with the description of the task, and when required, links to any external applications needed to complete the action. Agents can also create tasks so that follow-up work is not forgotten, for example calling a customer back to provide a status update.

Amazon Connect Accept Tasks Amazon Connect View Task Create a task uisng Amazon Connect Tasks
Incoming Tasks Task Details Create a new Task

Amazon Connect Tasks provides pre-built connectors fo Salesforce and Zendesk. With just a few clicks, you can easily set up rules to automatically create tasks based on pre-defined conditions, as sown on the screenshot hereunder. It also provides an API to create tasks from any other application.

Amazon Connect Task Rules

Learn more about how to configure and to get started with Tasks by visiting the launch page.

Available Today
Three of these new capabilities are available today: Contact Lens Real Time, Customer Profiles, and Tasks. You must register to the preview program to test Wisdom and Voice ID.

Customer Profile and Tasks are available in all AWS Regions where Amazon Connect is available : US East (N. Virginia), US East (Ohio), US West (N. California), US West (Oregon), Asia Pacific (Sydney), Asia Pacific (Singapore), Asia Pacific (Tokyo), Europe (Frankfurt), and Europe (London). Contact Lens Real Time is available in US West (Oregon), US East (N. Virginia), and Asia Pacific (Sydney) at the moment. Wisdom is available in US East (N. Virginia) and US West (Oregon) during the preview, while Voice ID is available only in US West (Oregon) during the preview.

With Amazon Connect, you only pay for what you use. There are no required up-front payments, long-term commitments, or minimum monthly fees. The price metrics for these new capabilities are detailed on the Amazon Connect pricing page.

Should you need help adding Amazon Connect any of these capabilities to contact flows, please reach out to one of the dozens of Amazon Connect partners available worldwide.

— seb

New for AWS Lambda – Functions with Up to 10 GB of Memory and 6 vCPUs

Post Syndicated from Danilo Poccia original https://aws.amazon.com/blogs/aws/new-for-aws-lambda-functions-with-up-to-10-gb-of-memory-and-6-vcpus/

AWS Lambda runs your code on an highly available and scalable compute infrastructure so that you can focus on what you want to build. Do you want to get the advantages of Lambda for workloads that are memory or computationally intensive? Wait no more!

Starting today, you can allocate up to 10 GB of memory to a Lambda function. This is more than a 3x increase compared to previous limits. Lambda allocates CPU and other resources linearly in proportion to the amount of memory configured. That means you can now have access to up to 6 vCPUs in each execution environment. In this way, your multithreaded and multiprocess applications run faster. Since Lambda charges are proportional to memory configured and function duration (GB-seconds), the additional costs for using more memory may be offset by lower duration. I have more on this in the example below.

With more memory and CPU power, and support for the AVX2 instruction set, new use cases — such as machine learning applications; batch and extract, transform, load (ETL) jobs; modelling; genomics; gaming; high-performance computing (HPC); and media processing — become easier to implement and scale with Lambda functions.

Let’s see how this works in practice!

Lambda Function Performance as Memory Increases
When I first wrote about the capability of mounting a shared Amazon Elastic File System (EFS) for Lambda functions, one of the examples I used was a function doing machine learning inference to classify images of birds. The function is using PyTorch to run the inference, applying a pre-trained machine learning model.

Now, I can execute the same function in the updated Lambda execution environment. Let’s see how increasing memory affects the duration of the function. Here are the results of using memory configurations between 1 and 10 GB. To get these numbers, I ran 20 invocations for each memory configuration. Then, I computed the average duration, discarding function initializations. To avoid possible outliers, I also excluded from the average the top and bottom 10% of reported durations. Based on the results, I estimated the charges I would have for 1 million invocations with each configuration.

Graph showing Function Duration and Charges for 1M Invocations as Memory Increases

As you can see, the function is able to use the additional CPU power that comes with more memory, decreasing the duration of the invocations. What is interesting is the impact of increasing memory on my costs.

Lambda charges are related to memory and duration, so if I increase memory and this is reducing duration by the same proportion, the overall charges are about the same. For example, looking at the graph above, when I configure 5 GB of memory, I have the same costs as when I have 1 GB of memory (about $61 for one million invocations), but the function is 5x faster. If I need lower latency, I can increase memory up to 10 GB, where the function is 7.6x faster and I pay a little more ($80 for one million invocations).

Depending on your code and business case, you can find out which memory configuration gives the optimal trade-off between cost and performance. To help you with that, my colleague and friend Alex Casalboni started the AWS Lambda Power Tuning project to help you optimize your Lambda functions in a data-driven way. This open source tool is really useful and has been improved by the support of many contributors. Give it a try!

In my tests, PyTorch is also using the optimizations of the Advanced Vector Extensions 2 (AVX2) instruction set, now available in the Lambda execution environment. With the AVX2 instruction set, the processor allows running a certain set of operations simultaneously. This is extremely beneficial for applications with operations that can run in parallel such as matrix multiplication. As a result, using AVX2 can improve performance by increasing CPU throughput per cycle. This typically helps compute intensive workloads such as machine learning inference, multimedia processing, scientific simulations, and financial modeling applications.

Available Now
AWS Lambda support for larger functions is available in Africa (Cape Town), Asia Pacific (Mumbai), Asia Pacific (Seoul), Asia Pacific (Singapore), Asia Pacific (Sydney), Asia Pacific (Tokyo), Canada (Central), EU (Frankfurt), EU (Ireland), EU (London), EU (Milano), EU (Paris), EU (Stockholm), South America (Sao Paulo), US East (N. Virginia), US East (Ohio), US West (N. California), US West (Oregon).

You can configure up to 10 GB of memory for new or existing Lambda functions using the AWS Management Console, AWS Command Line Interface (CLI), AWS SDKs, and Serverless Application Model.

Here’s a snapshot of the new console experience. We replaced the slider with a field, and you can now configure memory in 1 MB increments (it was 64MB increments before). In this way, the console works similarly to the Lambda API that always accepted memory configurations with 1MB granularity.

There is no change in Lambda pricing, you pay for requests and usage, with duration and Provisioned Concurrency charged at a rate proportional to the amount of memory configured.

Start using Lambda functions with up to 10 GB of memory and 6 vCPUs today.

Danilo

New for AWS Lambda – 1ms Billing Granularity Adds Cost Savings

Post Syndicated from Danilo Poccia original https://aws.amazon.com/blogs/aws/new-for-aws-lambda-1ms-billing-granularity-adds-cost-savings/

What I like about AWS Lambda is that it lets you run code without provisioning or managing servers, and you pay only for what you use. Since we launched Lambda in 2014, you have been charged for the number of times your code is triggered (requests) and for the time your code executes, rounded up to the nearest 100ms (duration).

Starting today, we are rounding up duration to the nearest millisecond with no minimum execution time.

With this new pricing, you are going to pay less most of the time, but it’s going to be more noticeable when you have functions whose execution time is much lower than 100ms, such as low latency APIs.

For example, let’s look at a simple web app that I have running. In the Amazon CloudWatch Logs, for each invocation there is a REPORT line. To improve readability, I am breaking the REPORT line into three lines here:

REPORT RequestId: 35a7e0cb-4902-490d-b8d3-eb315dded660
Duration: 27.40 ms  Billed Duration: 100 ms Memory Size: 1024 MB  Max Memory Used: 472 MB

With 1ms billing granularity that becomes:

REPORT RequestId: a24d03b5-429d-4ca3-a490-878a52a0182f
Duration: 27.55 ms  Billed Duration: 28 ms Memory Size: 1024 MB  Max Memory Used: 472 MB

My application doesn’t have a lot of traffic, so let’s do a simple production scenario. Let’s say I have 100,000 users for a web/mobile app. I expect each user to call this function via the web/mobile app about 20 times per day. The duration of those invocations is on average 28ms. Each month, I should expect:

  • 100,000 users * 20 invocations * 30 days = 60 million invocations.

Let’s estimate the costs in US East (N. Virginia). For simplicity, I am not considering the Lambda free tier.

The Lambda monthly request charges are unchanged:

  • 60 million invocations * $0.20 per 1M requests = $12

To that, I have to add compute charges based on duration.

The Lambda monthly compute charges with the old 100ms rounded up pricing would have been:

  • 60 million invocations* 100ms * 1G memory * $0.0000166667 for every GB-second = $100

With the new 1ms billing granularity, the duration costs are:

  • 60 million invocations * 28ms * 1G memory * $0.0000166667 for every GB-second = $28

For this scenario, overall costs including request and compute charges are much cheaper ($40) than before ($112).

With this pricing, there is now more of an incentive to optimize the duration of functions even if it is already well below 100ms. Your engineering efforts can reduce costs even more.

If you increase memory to get more CPU power and speed up your functions, you now get the benefit of a lower billed duration below 100ms as well. That means that increasing performance and reducing latency is going to be cheaper than before.

We are applying 1ms billing granularity for duration, including when you have Provisioned Concurrency enabled, in all AWS Regions with the exception of those based in China starting with the December 2020 billing period. Regions in China will get the change from January.

Enjoy the new pricing!

Danilo

Amazon Elastic Container Registry Public: A New Public Container Registry

Post Syndicated from Martin Beeby original https://aws.amazon.com/blogs/aws/amazon-ecr-public-a-new-public-container-registry/

In November, we announced that we intended to create a public container registry, and today at AWS re:Invent, we followed through on that promise and launched Amazon Elastic Container Registry Public (ECR Public).

ECR Public allows you to store, manage, share, and deploy container images for anyone to discover and download globally. You have long been able to host private container images on AWS with Amazon Elastic Container Registry, and now with the release of ECR Public, you can host public ones too, enabling anyone (with or without an AWS account) to browse and pull your published container artifacts.

As part of the announcement, a new website allows you to browse and search for public container images, view developer provided details, and discover the commands you need to pull containers.

If you check the website out now, you will see we have hosted some of our container images on the registry, including including the Amazon EKS Distro images. We also have hundreds of images from partners such as Bitnami, Canonical and HashiCorp.

Publishing A Container
Before I can upload a container, I need to create a repository. There is now a Public tab in the Repositories section of the Elastic Container Registry console. In this tab, I click the button Create repository.

I am taken to the Create repository screen, where I select that I would like the repository to be public.

I give my repository the name news-blog and upload a logo that will be used on the gallery details page. I provide a description and select Linux as the Content type, There is also an option to select the CPU architectures that the image supports, if you have a multi-architecture image you can select more than one architecture type. The content types are used for filtering on the gallery website, this will enable people using the gallery to filter their searches by architecture and operating system support.

I enter some markdown in the About section. The text I enter here will be displayed on the gallery page and would ordinarily explain what’s included in the repository, any licensing details, or other relevant information. There is also a Usage section where I enter some sample text to explain how to use my image and that I created the repository for a demo. Finally, I click Create repository.

Back at the repository page, I now have one public repository. There is also a button that says View push commands. I click on this so I can learn more about how to push containers to the repository.

I follow the four steps contained in this section. The first step helps me authenticate with ECR Public so that I can push containers to my repository. Steps two, three, and four show me how to build, tag, and push my container to ECR Public.

The application that I have containerized is a simple app that runs and outputs a terminal message. I use the docker CLI to push my container to my repository, it’s quite a small container, so it only takes a minute or two.

Once complete, I head over to the ECR Public gallery and can see that my image is now publicly available for anyone to pull.

Pulling A Container
You pull containers from ECR Public using the familiar docker pull command with the URL of the image.

You can easily find this URL on the ECR Public website, where the image URL is displayed along with other published information. Clicking on the URL copies the image URL to your clipboard for an easy copy-paste.

ECR Public image URLs are in the format public.ecr.aws/<namespace>/<image>:<tag>

For example, if I wanted to pull the image I uploaded earlier, I would open my terminal and run the following command (please note: you will need docker installed locally to run these commands).

docker pull public.ecr.aws/r6g9m2o3/news-blog:latest

I have now download the Docker Image onto my machine, and I can run the container using the following command:

docker run public.ecr.aws/r6g9m2o3/news-blog:latest

My application runs and writes a message from Jeff Barr. If you are wondering about the switches and parameters I have used on my docker run command, it’s to make sure that the log is written in color because we wouldn’t want to miss out on Jeff’s glorious purple hair.

Nice to Know
ECR Public automatically replicates container images across two AWS Regions to reduce download times and improve availability. Therefore, using public images directly from ECR Public may simplify your build process if you were previously creating and managing local copies. ECR Public caches image layers in Amazon CloudFront, to improve pull performance for a global audience, especially for popular images.

ECR Public also has some nice integrations that will make working with containers easier on AWS. For example, ECR Public will automatically notify services such as AWS CodeBuild to rebuild an application when a public container image changes.

Pricing
All AWS customers will get 50 GB of free storage each month, and if you exceed that limit, you will pay nominal charges. Check out the pricing page for details.

Anyone who pulls images anonymously will get 500 GB of free data bandwidth each month, after which they can sign up or sign in to an AWS account to get more. Simply authenticating with an AWS account increases free data bandwidth up to 5 TB each month when pulling images from the internet.

Finally, workloads running in AWS will get unlimited data bandwidth from any region when pulling publicly shared images from ECR Public.

Verification and Namespaces
You can create a custom namespace such as your organization or project name to be used in a ECR Public URL subdomain unless it’s a reserved namespace. Namespaces such as sagemaker and eks that identify AWS services are reserved. Namespaces that identify AWS Marketplace sellers are also reserved.

Available Today
ECR Public is available today and you can find out more over on the product page. Visit the gallery to explore and use available public container software and log into the ECR Console to share containers publicly.

Happy Containerizing!

— Martin

Coming Soon – Amazon EC2 G4ad Instances Featuring AMD GPUs for Graphics Workloads

Post Syndicated from Steve Roberts original https://aws.amazon.com/blogs/aws/new-amazon-ec2-g4ad-instances-featuring-amd-gpus-for-graphics-workloads/

Customers with high performance graphic workloads, such as game streaming, animation, and video rendering for example, are always looking for higher performance with less cost. Today, I’m happy to announce new Amazon Elastic Compute Cloud (EC2) instances in the G4 instance family are in the works and will be available soon, to improve performance and reduce cost for graphics-intensive workloads. The new G4ad instances feature AMD’s latest Radeon Pro V520 GPUs and 2nd generation EPYC processors, and are the first in EC2 to feature AMD GPUs.

G4dn instances, released in 2019 and featuring NVIDIA T4 GPUs, were previously the most cost-effective GPU-based instances in EC2. G4dn instances are ideal for deploying machine learning models in production and also graphics-intensive applications. However, when compared to G4dn the new G4ad instances enable up to 45% better price performance for graphics-intensive workloads, including the aforementioned game streaming, remote graphics workstations, and rendering scenarios. Compared to an equally-sized G4dn instance, G4ad instances offer up to 40% improvement in performance.

G4dn instances will continue to be the best option for small-scale machine learning (ML) training and GPU-based ML inference due to included hardware optimizations like Tensor Cores. Additionally, G4dn instances are still best suited for graphics applications that need access to NVIDIA libraries such as CUDA, CuDNN, and NVENC. However, when there is no dependency on NVIDIA’s libraries, we recommend customers try the G4ad instances to benefit from the improved price and performance.

AMD Radeon Pro V520 GPUs in G4ad instances support DirectX 11/12, Vulkan 1.1, and OpenGL 4.5 APIs. For operating systems, customers can choose from Windows Server 2016/2019, Amazon Linux 2, Ubuntu 18.04.3, and CentOS 7.7. Instances using G4ad can be purchased as On-Demand, Savings Plan, Reserved Instances, or Spot Instances. Three instance sizes are available, from G4ad.4xlarge, with 1 GPU, to G4ad.16xlarge with 4 GPUs, as shown below.

Instance Size GPUs GPU Memory (GB) vCPUs Memory (GB) Storage EBS Bandwidth (Gbps) Network Bandwidth (Gbps)
g4ad.4xlarge 1 8 16 64 600 Up to 3 Up to 10
g4ad.8xlarge 2 16 32 128 1200 3 15
g4ad.16xlarge 4 32 64 256 2400 6 25

The new G4ad instances will be available soon in US East (N. Virginia), US West (Oregon), and Europe (Ireland).

Learn more about G4ad instances.

— Steve

New EC2 M5zn Instances – Fastest Intel Xeon Scalable CPU in the Cloud

Post Syndicated from Jeff Barr original https://aws.amazon.com/blogs/aws/new-ec2-m5zn-instances-fastest-intel-xeon-scalable-cpu-in-the-cloud/

We launched the compute-intensive z1d instances in mid-2018 for customers who asked us for extremely high per-core performance and a high memory-to-core ratio to power their front-end Electronic Design Automation (EDA), actuarial, and CPU-bound relational database workloads.

In order to address a complementary set of use cases, customers have asked us for an EC2 instance that will give them high per-core performance like z1d, with no local NVMe storage, higher networking throughput, and a reduced memory-to-vCPU ratio. They have indicated if we built an instance with this set of attributes, it would be an excellent fit for workloads such as gaming, financial applications, simulation modeling applications such as those used in the automobile, aerospace, energy and telecommunication industries, and High Performance Computing (HPC).

Introducing M5zn
Building on the success of the z1d instances, we are launching M5zn instances in seven sizes today. These instances use 2nd generation custom Intel® Xeon® Scalable (Cascade Lake) processors with a sustained all-core turbo clock frequency of up to 4.5 GHz. M5zn instances feature high frequency processing, are a variant of the general-purpose M5 instances, and are built on the AWS Nitro System. These instances also feature low latency 100 Gbps networking and the Elastic Fabric Adapter (EFA), in order to improve performance for HPC and communication-intensive applications.

Here are the M5zn instances (all VPC-only, HVM-only, and EBS-Optimized, with support for Optimize vCPU). As you can see, the memory-to-vCPU ratio on these instances is half that of the existing z1d instances:

Instance Name vCPUs
RAM
Network Bandwidth EBS-Optimized Bandwidth
m5zn.large 2 8 GiB Up to 25 Gbps Up to 3.170 Gbps
m5zn.xlarge 4 16 GiB Up to 25 Gbps Up to 3.170 Gbps
m5zn.2xlarge 8 32 GiB Up to 25 Gbps 3.170 Gbps
m5zn.3xlarge 12 48 GiB Up to 25 Gbps 4.750 Gbps
m5zn.6xlarge 24 96 GiB 50 Gbps 9.500 Gbps
m5zn.12xlarge 48 192 GiB 100 Gbps 19 Gbps
m5zn.metal 48 192 GiB 100 Gbps 19 Gbps

The Nitro Hypervisor allows M5zn instances to deliver performance that is just about indistinguishable from bare metal. Other AWS Nitro System components such as the Nitro Security Chip and hardware-based processing for EBS increase performance, while VPC encryption provides greater security.

Things To Know
Here are a couple of “fun facts” about the M5zn instances:

Placement Groups – M5zn instances can be used in Cluster (for low latency and high network throughput), Spread (to keep critical instances separate from each other), and Partition (to reduce correlated failures) placement groups.

Networking – M5zn instances support the Elastic Network Adapter (ENA) with dedicated 100 Gbps network connections and a dedicated 19 Gbps connection to EBS. If you are building distributed ML or HPC applications for use on a cluster of M5zn instances, be sure to take a look at the Elastic Fabric Adapter (EFA). Your HPC applications can use the Message Passing Interface (MPI) to communicate efficiently at high speed while scaling to thousands of nodes.

C-State Control – You can configure CPU Power Management on m5zn.6xlarge and m5zn.12xlarge instances. This is definitely an advanced feature, but one worth exploring in those situations where you need to squeeze every possible cycle of available performance from the instance.

NUMA – You can make use of Non-Uniform Memory Access on m5zn.12xlarge instances. This is also an advanced feature, but worth exploring in situations where you have an in-depth understanding of your application’s memory access patterns.

To learn more about these and other features, visit the EC2 M5 Instances page.

Available Now
As you can see, the M5zn instances are a great fit for gaming, HPC and simulation modeling workloads such as those used by the financial, automobile, aerospace, energy, and telecommunications industries.

You can launch M5zn instances today in the US East (N. Virginia), US East (Ohio), US West (N. California), US West (Oregon), Europe (Ireland), Europe (Frankfurt), and Asia Pacific (Tokyo) Regions in On-Demand, Reserved Instance, Savings Plan, and Spot form. Dedicated Instances and Dedicated Hosts are also available.

Support is available in the EC2 Forum or via your usual AWS Support contact. The EC2 team is interested in your feedback and you can contact them at [email protected].

Jeff;


Coming Soon – EC2 C6gn Instances – 100 Gbps Networking with AWS Graviton2 Processors

Post Syndicated from Danilo Poccia original https://aws.amazon.com/blogs/aws/coming-soon-ec2-c6gn-instances-100-gbps-networking-with-aws-graviton2-processors/

Based on the amazing feedback from customers such as Snap, NextRoll, Intuit, SmugMug, and Honeycomb who are running their workloads on Amazon Elastic Compute Cloud (EC2) instances powered by AWS Graviton2, today we are announcing an addition to our broad Arm-based Graviton2 portfolio with C6gn instances that deliver up to 100 Gbps network bandwidth, up to 38 Gbps Amazon Elastic Block Store (EBS) bandwidth, up to 40% higher packet processing performance, and up to 40% better price/performance versus comparable current generation x86-based network optimized instances.

Compared to C6g instances, this new instance type provides 4x higher network bandwidth, 4x higher packet processing performance, and 2x higher EBS bandwidth. This means that customers with workloads that need high networking bandwidth such as high performance computing (HPC), network appliance, real-time video communications, and data analytics, will be able to bring their biggest and most challenging applications to Arm and take advantage of the performance and cost-optimization.

C6gn instances will be available in 8 sizes:

Name vCPUs Memory
(GiB)
Network Bandwidth
(Gbps)
EBS Throughput
(Gbps)
c6gn.medium 1 2 Up to 25 Up to 9.5
c6gn.large 2 4 Up to 25 Up to 9.5
c6gn.xlarge 4 8 Up to 25 Up to 9.5
c6gn.2xlarge 8 16 Up to 25 Up to 9.5
c6gn.4xlarge 16 32 25 9.5
c6gn.8xlarge 32 64 50 19
c6gn.12xlarge 48 96 75 28.5
c6gn.16xlarge 64 128 100 38

The new instances are built on the AWS Nitro System, a collection of AWS-designed hardware and software innovations that maximize resource efficiency. C6gn instances support Elastic Fabric Adapter (EFA) on the c6gn.16xlarge sizes for workloads that can take advantage of lower network latency (such as HPC and video processing) and use Message Passing Interface (MPI) for highly scalable clusters. These new instances also fully support network frameworks like Data Plane Development Kit (DPDK), making it easier to migrate network appliance workloads.

Coming Soon
EC2 C6gn instances will be available later this month and make it easier to optimize costs for HPC and workloads that require high network bandwidth and low latency. Let me know what you are going to build with them!

To get practice with the AWS Graviton2 architecture, you can try t4g.micro instances for free for up to 750 hours per month until March 31st, 2021.

Learn more about EC2 C6gn instances today.

Danilo

EC2 Update – D3 / D3en Dense Storage Instances

Post Syndicated from Jeff Barr original https://aws.amazon.com/blogs/aws/ec2-update-d3-d3en-dense-storage-instances/

We have launched several generations of EC2 instances with dense storage including the HS1 in 2012 and the D2 in 2015. As you can guess from the name, our customers use these instances when they need massive amounts of very economical on-instance storage for their data warehouses, data lakes, network file systems, Hadoop clusters, and the like. These workloads demand plenty of I/O and network throughput, but work fine with a high ratio of storage to compute power.

New D3 and D3en Instances
Today we are launching the D3 and D3en instances. Like their predecessors, they give you access to massive amounts of low-cost on-instance HDD storage. The D3 instances are available in four sizes, with up to 32 vCPUs and 48 TB of storage. Here are the specs:

Instance Name vCPUs RAM HDD Storage Aggregate Disk Throughput
(128 KiB Blocks)
Network Bandwidth EBS-Optimized Bandwidth
d3.xlarge 4 32 GiB 6 TB (3 x 2 TB)  580 MiBps Up to 15 Gbps 850 Mbps
d3.2xlarge 8 64 GiB 12 TB (6 x 2 TB) 1,100 MiBps Up to 15 Gbps 1,700 Mbps
d3.4xlarge 16 128 GiB 24 TB (12 x 2 TB) 2,300 MiBps Up to 15 Gbps 2,800 Mbps
d3.8xlarge 32 256 GiB 48 TB (24 x 2 TB) 4,600 MiBps 25 Gbps 5,000 Mbps

As you can see from the table above, the D3 instances are available in the same configurations as the D2 instances for easy migration. You’ll get 5% more memory per vCPU, a 30% boost in compute power, and 2.5x higher network performance if you migrate from D2 to D3. The instances provide low-cost dense storage that delivers high performance sequential access to large data sets. They are perfect for distributed file systems such as HDFS and MapR FS, big data analytical workloads, data warehouses, log processing, and data processing.

The D3en instances are available in six sizes, with up to 48 vCPUs and 336 TB of storage. Here are the specs:

Instance Name vCPUs RAM HDD Storage Aggregate Disk Throughput
(128 KiB Blocks)
Network Bandwidth EBS-Optimized Bandwidth
d3en.xlarge 4 16 GiB 28 TB (2 x 14 TB) 500 MiBps Up to 25 Gbps 850 Mbps
d3en.2xlarge 8 32 GiB 56 TB (4 x 14 TB) 1,000 MiBps Up to 25 Gbps 1,700 Mbps
d3en.4xlarge 16 64 GiB 112 TB (8 x 14 TB) 2,000 MiBps 25 Gbps 2,800 Mbps
d3en.6xlarge 24 96 GiB 168 TB (12 x 14 TB) 3,100 MiBps 40 Gbps 4,000 Mbps
d3en.8xlarge 32 128 GiB  224 TB (16 x 14 TB) 4,100 MiBps 50 Gbps 5,000 Mbps
d3en.12xlarge 48 192 GiB 336 TB (24 x 14 TB) 6,200 MiBps 75 Gbps 7,000 Mbps

The D3en instances have a high ratio of storage to vCPU, and are optimized for high throughput and high sequential I/O to very large data sets, with a cost-per-TB that is 80% lower than on D2 instances. D3en instances can host Lustre, BeeGFS, GPFS, and other distributed file systems, they can store your data lakes, and they can run your Amazon EMR, Spark, and Hadoop analytical workloads.

Both of the instance types are built on the AWS Nitro System and are powered by custom Intel® Second Generation Scalable Xeon® (Cascade Lake) processors that can deliver all-core turbo performance of up to 3.1 GHz. The HDD storage is encrypted at rest using AES-256-XTS; traffic between D3 or D3en instances in the same VPC or within peered VPCs is encrypted using a 256-bit key.

Things to Know
Here are a couple of things that you should keep in mind regarding the D3 and D3en instances:

Regions – D3en instances are available in the US East (N. Virginia), US West (Oregon), and Europe (Ireland) Regions; D3en instances are available in all of those regions and also in the US East (Ohio) Region, with more regions coming soon.

Purchase Options – You can purchase D3 and D3 instances in On-Demand, Savings Plan, Reserved Instance, Spot, and Dedicated Instance form.

AMIs – You must use AMIs that include the Elastic Network Adapter (ENA) and NVMe drivers.

Now Available
D3 and D3en instances are available now and you can start using them today!

Jeff;

New – Use Amazon EC2 Mac Instances to Build & Test macOS, iOS, ipadOS, tvOS, and watchOS Apps

Post Syndicated from Jeff Barr original https://aws.amazon.com/blogs/aws/new-use-mac-instances-to-build-test-macos-ios-ipados-tvos-and-watchos-apps/

Throughout the course of my career I have done my best to stay on top of new hardware and software. As a teenager I owned an Altair 8800 and an Apple II. In my first year of college someone gave me a phone number and said “call this with modem.” I did, it answered “PENTAGON TIP,” and I had access to ARPANET!

I followed the emerging PC industry with great interest, voraciously reading every new issue of Byte, InfoWorld, and several other long-gone publications. In early 1983, rumor had it that Apple Computer would soon introduce a new system that was affordable, compact, self-contained, and very easy to use. Steve Jobs unveiled the Macintosh in January 1984 and my employer ordered several right away, along with a pair of the Apple Lisa systems that were used as cross-development hosts. As a developer, I was attracted to the Mac’s rich collection of built-in APIs and services, and still treasure my phone book edition of the Inside Macintosh documentation!

New Mac Instance
Over the last couple of years, AWS users have told us that they want to be able to run macOS on Amazon Elastic Compute Cloud (EC2). We’ve asked a lot of questions to learn more about their needs, and today I am pleased to introduce you to the new Mac instance!


The original (128 KB) Mac

Powered by Mac mini hardware and the AWS Nitro System, you can use Amazon EC2 Mac instances to build, test, package, and sign Xcode applications for the Apple platform including macOS, iOS, iPadOS, tvOS, watchOS, and Safari. The instances feature an 8th generation, 6-core Intel Core i7 (Coffee Lake) processor running at 3.2 GHz, with Turbo Boost up to 4.6 GHz. There’s 32 GiB of memory and access to other AWS services including Amazon Elastic Block Store (EBS), Amazon Elastic File System (EFS), Amazon FSx for Windows File Server, Amazon Simple Storage Service (S3), AWS Systems Manager, and so forth.

On the networking side, the instances run in a Virtual Private Cloud (VPC) and include ENA networking with up to 10 Gbps of throughput. With EBS-Optimization, and the ability to deliver up to 55,000 IOPS (16KB block size) and 8 Gbps of throughput for data transfer, EBS volumes attached to the instances can deliver the performance needed to support I/O-intensive build operations.

Mac instances run macOS 10.14 (Mojave) and 10.15 (Catalina) and can be accessed via command line (SSH) or remote desktop (VNC). The AMIs (Amazon Machine Images) for EC2 Mac instances are EC2-optimized and include the AWS goodies that you would find on other AWS AMIs: An ENA driver, the AWS Command Line Interface (CLI), the CloudWatch Agent, CloudFormation Helper Scripts, support for AWS Systems Manager, and the ec2-user account. You can use these AMIs as-is, or you can install your own packages and create custom AMIs (the homebrew-aws repo contains the additional packages and documentation on how to do this).

You can use these instances to create build farms, render farms, and CI/CD farms that target all of the Apple environments that I mentioned earlier. You can provision new instances in minutes, giving you the ability to quickly & cost-effectively build code for multiple targets without having to own & operate your own hardware. You pay only for what you use, and you get to benefit from the elasticity, scalability, security, and reliability provided by EC2.

EC2 Mac Instances in Action
As always, I asked the EC2 team for access to an instance in order to put it through its paces. The instances are available in Dedicated Host form, so I started by allocating a host:

$ aws ec2 allocate-hosts --instance-type mac1.metal \
  --availability-zone us-east-1a --auto-placement on \
  --quantity 1 --region us-east-1

Then I launched my Mac instance from the command line (console, API, and CloudFormation can also be used):

$ aws ec2 run-instances --region us-east-1 \
  --instance-type mac1.metal \
  --image-id  ami-023f74f1accd0b25b \
  --key-name keys-jbarr-us-east  --associate-public-ip-address

I took Luna for a very quick walk, and returned to find that my instance was ready to go. I used the console to give it an appropriate name:

Then I connected to my instance:

From here I can install my development tools, clone my code onto the instance, and initiate my builds.

I can also start a VNC server on the instance and use a VNC client to connect to it:

Note that the VNC protocol is not considered secure, and this feature should be used with care. I used a security group that allowed access only from my desktop’s IP address:

I can also tunnel the VNC traffic over SSH; this is more secure and would not require me to open up port 5900.

Things to Know
Here are a couple of fast-facts about the Mac instances:

AMI Updates – We expect to make new AMIs available each time Apple releases major or minor versions of each supported OS. We also plan to produce AMIs with updated Amazon packages every quarter.

Dedicated Hosts – The instances are launched as EC2 Dedicated Hosts with a minimum tenancy of 24 hours. This is largely transparent to you, but it does mean that the instances cannot be used as part of an Auto Scaling Group.

Purchase Models – You can run Mac instances On-Demand and you can also purchase a Savings Plan.

Apple M1 Chip – EC2 Mac instances with the Apple M1 chip are already in the works, and planned for 2021.

Launch one Today
You can start using Mac instances in the US East (N. Virginia), US East (Ohio), US West (Oregon), Europe (Ireland), and Asia Pacific (Singapore) Regions today, and check out this video for more information!

Jeff;


re:Invent 2020 Liveblog: Andy Jassy Keynote

Post Syndicated from Jeff Barr original https://aws.amazon.com/blogs/aws/reinvent-2020-liveblog-andy-jassy-keynote/

I’m always ready to try something new! This year, I am going to liveblog Andy Jassy‘s AWS re:Invent keynote address, which takes place from 8 a.m. to 11 a.m. on Tuesday, December 1 (PST). I’ll be updating this post every couple of minutes as I watch Andy’s address from the comfort of my home office. Stay tuned!

Jeff;


New – Attributes Based Access Control with AWS Single Sign On

Post Syndicated from Sébastien Stormacq original https://aws.amazon.com/blogs/aws/new-attributes-based-access-control-with-aws-single-sign-on/

Starting today, you can pass user attributes in the AWS session when your workforce sign-in into the cloud using AWS Single Sign-On. This gives you the centralized account access management of AWS Single Sign-On and ABAC, with the flexibility to use AWS SSO, Active Directory, or an external identity provider as your identity source. To learn more about the advantages of ABAC policies on AWS, you may read my previous blog post on the subject.

Overview
On one side, system administrators configure user attributes on the AWS Single Sign-On identity repository, or the managed Active Directory. System administrators may also configure an external identity provider, such as Okta, OneLogin or PingFederate to pass existing user attributes in the AWS sessions when their workforce federates into AWS. These attributes are known as session tags in AWS. On the other side, cloud administrators create fine-grained permissions policies such that your workforce get only access to cloud resources with matching resource tags.

Creating policies based on matching attributes instead of functional roles helps to reduce the number of distinct permissions and roles you must create and manage in your AWS environment. For example, when developers Bob from team red and Alice from team blue sign-in into AWS and assume the same AWS Identity and Access Management (IAM) role, they get distinct permissions to project resources tagged for their team. The identity system sends the team name attribute in the AWS session when Bob and Alice sign-in into AWS. The role’s permissions grant access to project resources with matching team name tags. Now, if Bob moves to team blue and system administrators update his team name in their identity provider directory, Bob automatically gets access to team blue’s project resources without requiring permissions updates in IAM.

How to Configure AWS SSO to Map User Attributes
Before to configure AWS SSO, there are two important points to highlight. First, ABAC will work with attributes from any identity source configured in AWS SSO : AWS SSO itself, a managed Active Directory, or an external identity provider. Second, there are two ways to pass attributes for access control to AWS SSO. Either you can pass attributes directly in the SAML assertion using the prefix https://aws.amazon.com/SAML/Attributes/AccessControl, or you can use attributes that are in the AWS SSO identity store. Those attributes are configured by your AWS SSO administrator for users created in AWS SSO, synchronized in from an Active Directory, or synchronized in from an external identity provider using automatic provisioning (SCIM).

For this demo, I choose to use an external identity provider and SCIM.

I can enable ABAC in AWS using AWS SSO with three steps:

Step 1: I configure my identity source with the associated user identities and attributes in the external identity provider. As of today, AWS SSO supports identity synchronization via SCIM with Azure AD, Okta, OneLogin, and PingFederate. Check this page to get an up-to-date list. The specifics depend on each identity provider.

Step 2: I configure the SCIM attributes I want to use for access control using the new Access Control Attributes global setting in the AWS SSO console or API. This screen allows me to select attributes for access control from the identity source I configured in step 1.

Attributes for Access Control

Step 3: I author ABAC rules through permission sets and resource-based policies using the attributes I configured in Step 2. More about this in a minute.

Now, when my workforce federates into an AWS account using SSO, they get access to their AWS resources based on matching attributes.

Attributes are passed as session tags. They are passed as comma-separated key:value pairs. The total character length of all the attributes together must be less than or equal to 460 characters.

What Does a Policy Look Like?
I now can use user attributes in my permission sets using the aws:PrincipalTag condition key when creating access control rules. For example, I can tag all the resources in my organization with their respective department name, and use a single permission set that grants developers access only to their department resources. Now, whenever developers federate into the AWS account, AWS SSO creates a department session tag with the value received from the identity provider. The security policies allow them to only get access to the resources in their respective department. As the team adds more developers and resources to their project, I only have to tag resources with the correct department name. As a result, as the organization adds new resources and developers to departments, developers can only manage resources aligned to their department without needing any permission updates.

An ABAC SSO permission set policy might look like this:

{
    "Version": "2012-10-17",
    "Statement": [
        {
            "Effect": "Allow",
            "Action": [ "ec2:DescribeInstances"],
            "Resource": "*"
        },
        {
            "Effect": "Allow",
            "Action": ["ec2:StartInstances","ec2:StopInstances"],
            "Resource": "*",
            "Condition": {
                "StringEquals": {
                    "ec2:ResourceTag/Department": "${aws:PrincipalTag/Department}"
                }
            }
        }
    ]
}

This policy allows anybody to DescribeInstances, but only users with a aws:PrincipalTag/Department tag’s value matching the EC2 instance ec2:ResourceTag/Department tag’s value are authorized to stop or to start instances.

I attach this policy to an AWS Account’s Permission Set. On the left part of the AWS Single Sign-On console, I click AWS Accounts and select the Permission sets tab. Then I click Create permission set. On the next screen, I select Create a customer permission set.

Create a custom permission set

I enter a name and description, I make sure Create a custom permissions policy is selected. Then I can copy/paste the previous policy allowing to start and stop EC2 instances when the department name tag value is equal to the person’s department name tag value.

Create Custom Policy for Permission Set

On the next screen, I enter some tags, then I review my configuration before clicking Create. Et voila, I am ready to go.

If you have existing federation configured with AWS Security Token Service, remember that external identity providers consider AWS SSO as a new application configuration. This means when you move from direct IAM federation to AWS SSO, you have to update your external identity provider configuration to connect with AWS SSO and to introduce attributes as session tags for this configuration.

Available Today
There is no additional charge to configure user attributes with AWS Single Sign-On. You can start to use it today in all AWS Regions where AWS SSO is available.

— seb

Introducing Amazon Managed Workflows for Apache Airflow (MWAA)

Post Syndicated from Danilo Poccia original https://aws.amazon.com/blogs/aws/introducing-amazon-managed-workflows-for-apache-airflow-mwaa/

As the volume and complexity of your data processing pipelines increase, you can simplify the overall process by decomposing it into a series of smaller tasks and coordinate the execution of these tasks as part of a workflow. To do so, many developers and data engineers use Apache Airflow, a platform created by the community to programmatically author, schedule, and monitor workflows. With Airflow you can manage workflows as scripts, monitor them via the user interface (UI), and extend their functionality through a set of powerful plugins. However, manually installing, maintaining, and scaling Airflow, and at the same time handling security, authentication, and authorization for its users takes much of the time you’d rather use to focus on solving actual business problems.

For these reasons, I am happy to announce the availability of Amazon Managed Workflows for Apache Airflow (MWAA), a fully managed service that makes it easy to run open-source versions of Apache Airflow on AWS, and to build workflows to execute your extract-transform-load (ETL) jobs and data pipelines.

Airflow workflows retrieve input from sources like Amazon Simple Storage Service (S3) using Amazon Athena queries, perform transformations on Amazon EMR clusters, and can use the resulting data to train machine learning models on Amazon SageMaker. Workflows in Airflow are authored as Directed Acyclic Graphs (DAGs) using the Python programming language.

A key benefit of Airflow is its open extensibility through plugins which allows you to create tasks that interact with AWS or on-premise resources required for your workflows including AWS Batch, Amazon CloudWatch, Amazon DynamoDB, AWS DataSync, Amazon ECS and AWS Fargate, Amazon Elastic Kubernetes Service (EKS), Amazon Kinesis Firehose, AWS Glue, AWS Lambda, Amazon Redshift, Amazon Simple Queue Service (SQS), and Amazon Simple Notification Service (SNS).

To improve observability, Airflow metrics can be published as CloudWatch Metrics, and logs can be sent to CloudWatch Logs. Amazon MWAA provides automatic minor version upgrades and patches by default, with an option to designate a maintenance window in which these upgrades are performed.

You can use Amazon MWAA with these three steps:

  1. Create an environment – Each environment contains your Airflow cluster, including your scheduler, workers, and web server.
  2. Upload your DAGs and plugins to S3 – Amazon MWAA loads the code into Airflow automatically.
  3. Run your DAGs in Airflow – Run your DAGs from the Airflow UI or command line interface (CLI) and monitor your environment with CloudWatch.

Let’s see how this works in practice!

How to Create an Airflow Environment Using Amazon MWAA
In the Amazon MWAA console, I click on Create environment. I give the environment a name and select the Airflow version to use.

Then, I select the S3 bucket and the folder to load my DAG code. The bucket name must start with airflow-.

Optionally, I can specify a plugins file and a requirements file:

  • The plugins file is a ZIP file containing the plugins used by my DAGs.
  • The requirements file describes the Python dependencies to run my DAGs.

For plugins and requirements, I can select the S3 object version to use. In case the plugins or the requirements I use create a non-recoverable error in my environment, Amazon MWAA will automatically roll back to the previous working version.


I click Next to configure the advanced settings, starting with networking. Each environment runs in a Amazon Virtual Private Cloud using private subnets in two availability zones. Web server access to the Airflow UI is always protected by a secure login using AWS Identity and Access Management (IAM). However, you can choose to have web server access on a public network so that you can login over the Internet, or on a private network in your VPC. For simplicity, I select a Public network. I let Amazon MWAA create a new security group with the correct inbound and outbound rules. Optionally, I can add one or more existing security groups to fine-tune control of inbound and outbound traffic for your environment.

Now, I configure my environment class. Each environment includes a scheduler, a web server, and a worker. Workers automatically scale up and down according to my workload. We provide you a suggestion on which class to use based on the number of DAGs, but you can monitor the load on your environment and modify its class at any time.

Encryption is always enabled for data at rest, and while I can select a customized key managed by AWS Key Management Service (KMS) I will instead keep the default key that AWS owns and manages on my behalf.

For monitoring, I publish environment performance to CloudWatch Metrics. This is enabled by default, but I can disable CloudWatch Metrics after launch. For the logs, I can specify the log level and which Airflow components should send their logs to CloudWatch Logs. I leave the default to send only the task logs and use log level INFO.

I can modify the default settings for Airflow configuration options, such as default_task_retries or worker_concurrency. For now, I am not changing these values.

Finally, but most importantly, I configure the permissions that will be used by my environment to access my DAGs, write logs, and run DAGs accessing other AWS resources. I select Create a new role and click on Create environment. After a few minutes, the new Airflow environment is ready to be used.

Using the Airflow UI
In the Amazon MWAA console, I look for the new environment I just created and click on Open Airflow UI. A new browser window is created and I am authenticated with a secure login via AWS IAM.

There, I look for a DAG that I put on S3 in the movie_list_dag.py file. The DAG is downloading the MovieLens dataset, processing the files on S3 using Amazon Athena, and loading the result to a Redshift cluster, creating the table if missing.

Here’s the full source code of the DAG:

from airflow import DAG
from airflow.operators.python_operator import PythonOperator
from airflow.operators import HttpSensor, S3KeySensor
from airflow.contrib.operators.aws_athena_operator import AWSAthenaOperator
from airflow.utils.dates import days_ago
from datetime import datetime, timedelta
from io import StringIO
from io import BytesIO
from time import sleep
import csv
import requests
import json
import boto3
import zipfile
import io
s3_bucket_name = 'my-bucket'
s3_key='files/'
redshift_cluster='redshift-cluster-1'
redshift_db='dev'
redshift_dbuser='awsuser'
redshift_table_name='movie_demo'
test_http='https://grouplens.org/datasets/movielens/latest/'
download_http='http://files.grouplens.org/datasets/movielens/ml-latest-small.zip'
athena_db='demo_athena_db'
athena_results='athena-results/'
create_athena_movie_table_query="""
CREATE EXTERNAL TABLE IF NOT EXISTS Demo_Athena_DB.ML_Latest_Small_Movies (
  `movieId` int,
  `title` string,
  `genres` string 
)
ROW FORMAT SERDE 'org.apache.hadoop.hive.serde2.lazy.LazySimpleSerDe'
WITH SERDEPROPERTIES (
  'serialization.format' = ',',
  'field.delim' = ','
) LOCATION 's3://pinwheeldemo1-pinwheeldagsbucketfeed0594-1bks69fq0utz/files/ml-latest-small/movies.csv/ml-latest-small/'
TBLPROPERTIES (
  'has_encrypted_data'='false',
  'skip.header.line.count'='1'
); 
"""
create_athena_ratings_table_query="""
CREATE EXTERNAL TABLE IF NOT EXISTS Demo_Athena_DB.ML_Latest_Small_Ratings (
  `userId` int,
  `movieId` int,
  `rating` int,
  `timestamp` bigint 
)
ROW FORMAT SERDE 'org.apache.hadoop.hive.serde2.lazy.LazySimpleSerDe'
WITH SERDEPROPERTIES (
  'serialization.format' = ',',
  'field.delim' = ','
) LOCATION 's3://pinwheeldemo1-pinwheeldagsbucketfeed0594-1bks69fq0utz/files/ml-latest-small/ratings.csv/ml-latest-small/'
TBLPROPERTIES (
  'has_encrypted_data'='false',
  'skip.header.line.count'='1'
); 
"""
create_athena_tags_table_query="""
CREATE EXTERNAL TABLE IF NOT EXISTS Demo_Athena_DB.ML_Latest_Small_Tags (
  `userId` int,
  `movieId` int,
  `tag` int,
  `timestamp` bigint 
)
ROW FORMAT SERDE 'org.apache.hadoop.hive.serde2.lazy.LazySimpleSerDe'
WITH SERDEPROPERTIES (
  'serialization.format' = ',',
  'field.delim' = ','
) LOCATION 's3://pinwheeldemo1-pinwheeldagsbucketfeed0594-1bks69fq0utz/files/ml-latest-small/tags.csv/ml-latest-small/'
TBLPROPERTIES (
  'has_encrypted_data'='false',
  'skip.header.line.count'='1'
); 
"""
join_tables_athena_query="""
SELECT REPLACE ( m.title , '"' , '' ) as title, r.rating
FROM demo_athena_db.ML_Latest_Small_Movies m
INNER JOIN (SELECT rating, movieId FROM demo_athena_db.ML_Latest_Small_Ratings WHERE rating > 4) r on m.movieId = r.movieId
"""
def download_zip():
    s3c = boto3.client('s3')
    indata = requests.get(download_http)
    n=0
    with zipfile.ZipFile(io.BytesIO(indata.content)) as z:       
        zList=z.namelist()
        print(zList)
        for i in zList: 
            print(i) 
            zfiledata = BytesIO(z.read(i))
            n += 1
            s3c.put_object(Bucket=s3_bucket_name, Key=s3_key+i+'/'+i, Body=zfiledata)
def clean_up_csv_fn(**kwargs):    
    ti = kwargs['task_instance']
    queryId = ti.xcom_pull(key='return_value', task_ids='join_athena_tables' )
    print(queryId)
    athenaKey=athena_results+"join_athena_tables/"+queryId+".csv"
    print(athenaKey)
    cleanKey=athena_results+"join_athena_tables/"+queryId+"_clean.csv"
    s3c = boto3.client('s3')
    obj = s3c.get_object(Bucket=s3_bucket_name, Key=athenaKey)
    infileStr=obj['Body'].read().decode('utf-8')
    outfileStr=infileStr.replace('"e"', '') 
    outfile = StringIO(outfileStr)
    s3c.put_object(Bucket=s3_bucket_name, Key=cleanKey, Body=outfile.getvalue())
def s3_to_redshift(**kwargs):    
    ti = kwargs['task_instance']
    queryId = ti.xcom_pull(key='return_value', task_ids='join_athena_tables' )
    print(queryId)
    athenaKey='s3://'+s3_bucket_name+"/"+athena_results+"join_athena_tables/"+queryId+"_clean.csv"
    print(athenaKey)
    sqlQuery="copy "+redshift_table_name+" from '"+athenaKey+"' iam_role 'arn:aws:iam::163919838948:role/myRedshiftRole' CSV IGNOREHEADER 1;"
    print(sqlQuery)
    rsd = boto3.client('redshift-data')
    resp = rsd.execute_statement(
        ClusterIdentifier=redshift_cluster,
        Database=redshift_db,
        DbUser=redshift_dbuser,
        Sql=sqlQuery
    )
    print(resp)
    return "OK"
def create_redshift_table():
    rsd = boto3.client('redshift-data')
    resp = rsd.execute_statement(
        ClusterIdentifier=redshift_cluster,
        Database=redshift_db,
        DbUser=redshift_dbuser,
        Sql="CREATE TABLE IF NOT EXISTS "+redshift_table_name+" (title	character varying, rating	int);"
    )
    print(resp)
    return "OK"
DEFAULT_ARGS = {
    'owner': 'airflow',
    'depends_on_past': False,
    'email': ['[email protected]'],
    'email_on_failure': False,
    'email_on_retry': False 
}
with DAG(
    dag_id='movie-list-dag',
    default_args=DEFAULT_ARGS,
    dagrun_timeout=timedelta(hours=2),
    start_date=days_ago(2),
    schedule_interval='*/10 * * * *',
    tags=['athena','redshift'],
) as dag:
    check_s3_for_key = S3KeySensor(
        task_id='check_s3_for_key',
        bucket_key=s3_key,
        wildcard_match=True,
        bucket_name=s3_bucket_name,
        s3_conn_id='aws_default',
        timeout=20,
        poke_interval=5,
        dag=dag
    )
    files_to_s3 = PythonOperator(
        task_id="files_to_s3",
        python_callable=download_zip
    )
    create_athena_movie_table = AWSAthenaOperator(task_id="create_athena_movie_table",query=create_athena_movie_table_query, database=athena_db, output_location='s3://'+s3_bucket_name+"/"+athena_results+'create_athena_movie_table')
    create_athena_ratings_table = AWSAthenaOperator(task_id="create_athena_ratings_table",query=create_athena_ratings_table_query, database=athena_db, output_location='s3://'+s3_bucket_name+"/"+athena_results+'create_athena_ratings_table')
    create_athena_tags_table = AWSAthenaOperator(task_id="create_athena_tags_table",query=create_athena_tags_table_query, database=athena_db, output_location='s3://'+s3_bucket_name+"/"+athena_results+'create_athena_tags_table')
    join_athena_tables = AWSAthenaOperator(task_id="join_athena_tables",query=join_tables_athena_query, database=athena_db, output_location='s3://'+s3_bucket_name+"/"+athena_results+'join_athena_tables')
    create_redshift_table_if_not_exists = PythonOperator(
        task_id="create_redshift_table_if_not_exists",
        python_callable=create_redshift_table
    )
    clean_up_csv = PythonOperator(
        task_id="clean_up_csv",
        python_callable=clean_up_csv_fn,
        provide_context=True     
    )
    transfer_to_redshift = PythonOperator(
        task_id="transfer_to_redshift",
        python_callable=s3_to_redshift,
        provide_context=True     
    )
    check_s3_for_key >> files_to_s3 >> create_athena_movie_table >> join_athena_tables >> clean_up_csv >> transfer_to_redshift
    files_to_s3 >> create_athena_ratings_table >> join_athena_tables
    files_to_s3 >> create_athena_tags_table >> join_athena_tables
    files_to_s3 >> create_redshift_table_if_not_exists >> transfer_to_redshift

In the code, different tasks are created using operators like PythonOperator, for generic Python code, or AWSAthenaOperator, to use the integration with Amazon Athena. To see how those tasks are connected in the workflow, you can see the latest few lines, that I repeat here (without indentation) for simplicity:

check_s3_for_key >> files_to_s3 >> create_athena_movie_table >> join_athena_tables >> clean_up_csv >> transfer_to_redshift
files_to_s3 >> create_athena_ratings_table >> join_athena_tables
files_to_s3 >> create_athena_tags_table >> join_athena_tables
files_to_s3 >> create_redshift_table_if_not_exists >> transfer_to_redshift

The Airflow code is overloading the right shift >> operator in Python to create a dependency, meaning that the task on the left should be executed first, and the output passed to the task on the right. Looking at the code, this is quite easy to read. Each of the four lines above is adding dependencies, and they are all evaluated together to execute the tasks in the right order.

In the Airflow console, I can see a graph view of the DAG to have a clear representation of how tasks are executed:

Available Now
Amazon Managed Workflows for Apache Airflow (MWAA) is available today in US East (Northern Virginia), US West (Oregon), US East (Ohio), Asia Pacific (Singapore), Asia Pacific (Toyko), Asia Pacific (Sydney), Europe (Ireland), Europe (Frankfurt), and Europe (Stockholm). You can launch a new Amazon MWAA environment from the console, AWS Command Line Interface (CLI), or AWS SDKs. Then, you can develop workflows in Python using Airflow’s ecosystem of integrations.

With Amazon MWAA, you pay based on the environment class and the workers you use. For more information, see the pricing page.

Upstream compatibility is a core tenet of Amazon MWAA. Our code changes to the AirFlow platform are released back to open source.

With Amazon MWAA you can spend more time building workflows for your engineering and data science tasks, and less time managing and scaling the infrastructure of your Airflow platform.

Learn more about Amazon MWAA and get started today!

Danilo

New – Code Signing, a Trust and Integrity Control for AWS Lambda

Post Syndicated from Channy Yun original https://aws.amazon.com/blogs/aws/new-code-signing-a-trust-and-integrity-control-for-aws-lambda/

Code signing is an industry standard technique used to confirm that the code is unaltered and from a trusted publisher. Code running inside AWS Lambda functions is executed on highly hardened systems and runs in a secure manner. However, function code is susceptible to alteration as it moves through deployment pipelines that run outside AWS.

Today, we are launching Code Signing for AWS Lambda. It is a trust and integrity control that helps administrators enforce that only signed code packages from trusted publishers run in their Lambda functions and that the code has not been altered since signing.

Code Signing for Lambda provides a first-class mechanism to enforce that only trusted code is deployed in Lambda. This frees up organizations from the burden of building gatekeeper components in their deployment pipelines. Code Signing for AWS Lambda leverages AWS Signer, a fully managed code signing service from AWS. Administrators create Signing Profile, a resource in AWS Signer that is used for creating signatures and grant developers access to the signing profile using AWS Identity and Access Management (IAM). Within Lambda, administrators specify the allowed signing profiles using a new resource called Code Signing Configuration (CSC). CSC enables organizations to implement a separation of duties between administrators and developers. Administrators can use CSC to set code signing policies on the functions, and developers can deploy code to the functions.

How to Create a Signing Profile
You can use AWS Signer console to create a new Signing profile. A signing profile can represent a group of trusted publishers and is analogous to the use of a digital signing certificate.

By clicking Create Signing Profile, you can create a Signing Profile that can be used to create signed code packages.

You can assign Signature validity period for the signatures generated by a Signing Profile between 1 day and 135 months.

How to create a Code Signing Configuration (CSC)
You can configure your functions to use Code Signing through the AWS Lambda console, Command-line Interface (CLI), or APIs by creating and attaching a new resource called Code Signing Configuration to the function. You can find Code signing configurations under Additional resources menu.

You can click Create configuration to define signing profiles that are allowed to sign code artifacts for this configuration, and set signature validation policy. To add an allowed signing profile, you can either select from the dropdown, which shows all signing profiles in your AWS account, or add a signing profile from a different account by specifying the version ARN.

Also, you can set the signature validation policy to either ‘Warn’ or ‘Enforce’. With ‘Warn’, Lambda logs a Cloudwatch metric if there is a signature check failure but accepts the deployment. With ‘Enforce’, Lambda rejects the deployment if there is a signature check failure. Signature check fails if the signature signing profile does not match one of the allowed signing profiles in the CSC, the signature is expired, or the signature is revoked. If the code package is tampered or altered since signing, the deployment is always rejected, irrespective of the signature validation policy.

You can use new Lambda API CreateCodeSigningConfig to create a CSC too. You can see the JSON request syntax below.

{
     "CodeSigningConfigId": string,
     "CodeSigningConfigArn": string,
     "Description": string,
     "AllowedPublishers": {
           "SigningProfileVersionArns": [string]
      },
     "CodeSigningPolicies": {
     "UntrustedArtifactOnDeployment": string,   // WARN OR ENFORCE
    },
     "LastModified”: string
}

Let’s Enable Code Signing for Your Lambda Functions
To enable Code Signing feature for your Lambda functions, you can select a function and click Edit in Code signing configuration section.

Select one of the available CSCs and click the Save button.

Once your function is configured to use code signing, you need to upload signed .zip file or Amazon S3 URL of a signed .zip made by a signing job in AWS Signer.

How to Create a Signed Code Package
Choose one of the allowed signing profiles and specify the S3 location of the code package ZIP file to be signed. Also, specify a destination path where the signed code package should be uploaded.

A signing job is an asynchronous process that generates a signature for your code package and puts the signed code package in the specified destination path.

Once signing job is succeeded, you can find signed ZIP packages in your assigned S3 bucket.

Back to Lambda console, you can now publish the signed code package to the Lambda function. Lambda will perform signature checks to verify that the code has not been altered since signing and that the code is signed by one of the allowed signing profile.

You can also enable code signing for a function using CreateFunction or PutFunctionCodeSigningConfig APIs by attaching a CSC to the function.

Developers can also use SAM CLI to sign code packages. They do this by specifying the signing profiles at package or deploy stage. SAM CLI automatically starts the signing workflow before deploying the code to Lambda.

Code Signing is also supported by Infrastructure as code tools like AWS CloudFormation and Terraform. Terraform also allows developers to sign code, in addition to declaring and creating code signing resources.

Now Available
Code Signing for AWS Lambda is available in all commercial regions except AWS China Regions, AWS GovCloud (US) Regions, and Asia Pacific (Osaka) Region. There is no additional charge for using code signing, and customers pay the standard price for Lambda functions.

To learn more about Code Signing for AWS Lambda and AWS Signer, please visit the Lambda developer guide and send us feedback either in the forum for AWS Lambda or through your usual AWS support contacts.

Channy;

New – Multi-Factor Authentication with WebAuthn for AWS SSO

Post Syndicated from Sébastien Stormacq original https://aws.amazon.com/blogs/aws/multi-factor-authentication-with-webauthn-for-aws-sso/

Starting today, you can add WebAuthn as a new multi-factor authentication (MFA) to AWS Single Sign-On, in addition to currently supported one-time password (OTP) and Radius authenticators. By adding support for WebAuthn, a W3C specification developed in coordination with FIDO Alliance, you can now authenticate with a wide variety of interoperable authenticators provisioned by your system administrator or built into your laptops or smartphones. For example, you can now tap a hardware security key, touch a fingerprint sensor on your Mac, or use facial recognition on your mobile device or PC to authenticate into the AWS Management Console or AWS Command Line Interface (CLI).

With this addition, you can now self-register multiple MFA authenticators. Doing so allows you to authenticate on AWS with another device in case you lose or misplace your primary authenticator device. We make it easy for you to name your devices for long-term manageability.

WebAuthn two-factor authentication is available for identities stored in the AWS Single Sign-On internal identity store and those stored in Microsoft Active Directory, whether it is managed by AWS or not.

What are WebAuthn and FIDO2?

Before exploring how to configure two-factor authentication using your FIDO2-enabled devices, and to discover the user experience for web-based and CLI authentications, let’s recap how FIDO2, WebAuthn and other specifications fit together.

FIDO2 is made of two core specifications: Web Authentication (WebAuthn) and Client To Authenticator Protocol (CTAP).

Web Authentication (WebAuthn) is a W3C standard that provides strong authentication based upon public key cryptography. Unlike traditional code generator tokens or apps using TOTP protocol, it does not require sharing a secret between the server and the client. Instead, it relies on a public key pair and digital signature of unique challenges. The private key never leaves a secured device, the FIDO-enabled authenticator. When you try to authenticate to a website, this secured device interacts with your browser using the CTAP protocol.

WebAuthn is strong: Authentication is ideally backed by a secure element, which can safely store private keys and perform the cryptographic operations. It is scoped: A key pair is only useful for a specific origin, like browser cookies. A key pair registered at console.amazonaws.com cannot be used at console.not-the-real-amazon.com, mitigating the threat of phishing. Finally, it is attested: Authenticators can provide a certificate that helps servers verify that the public key did in fact come from an authenticator they trust, and not a fraudulent source.

To start to use FIDO2 authentication, you therefore need three elements: a website that supports WebAuthn, a browser that supports WebAuthn and CTAP protocols, and a FIDO authenticator. Starting today, the SSO Management Console and CLI now support WebAuthn. All modern web browsers are compatible (Chrome, Edge, Firefox, and Safari). FIDO authenticators are either devices you can use from one device or another (roaming authenticators), such as a YubiKey, or built-in hardware supported by Android, iOS, iPadOS, Windows, Chrome OS, and macOS (platform authenticators).

How Does FIDO2 Work?
When I first register my FIDO-enabled authenticator on AWS SSO, the authenticator creates a new set of public key credentials that can be used to sign a challenge generated by AWS SSO Console (the relaying party). The public part of these new credentials, along with the signed challenge, are stored by AWS SSO.

When I want to use WebAuthn as second factor authentication, the AWS SSO console sends a challenge to my authenticator. This challenge can then be signed with the previously generated public key credentials and sent back to the console. This way, AWS SSO console can verify that I have the required credentials.

How Do I Enable MFA With a Secure Device in the AWS SSO Console?
You, the system administrator, can enable MFA for your AWS SSO workforce when the user profiles are stored in AWS SSO itself, or stored in your Active Directory, either self-managed or a AWS Directory Service for Microsoft Active Directory.

To let my workforce register their FIDO or U2F authenticator in self-service mode, I first navigate to Settings, click Configure under Multi-Factor Authentication. On the following screen, I make four changes. First, under Users should be prompted for MFA, I select Every time they sign in. Second, under Users can authenticate with these MFA types, I check Security Keys and built-in authenticators. Third, under If a user does not yet have a registered MFA device, I check Require them to register an MFA device at sign in. Finally, under Who can manage MFA devices, I check Users can add and manage their own MFA devices. I click on Save Changes to save and return.

Configure SSO 2

That’s it. Now your workforce is prompted to register their MFA device the next time they authenticate.

What Is the User Experience?
As an AWS console user, I authenticate on the AWS SSO portal page URL that I received from my System Administrator. I sign in using my user name and password, as usual. On the next screen, I am prompted to register my authenticator. I check Security Key as device type. To use a biometric factor such as fingerprints or face recognition, I would click Built-in authenticator.

Register MFA Device

The browser asks me to generate a key pair and to send my public key. I can do that just by touching a button on my device, or providing the registered biometric, e.g. TouchID or FaceID.Register a security keyThe browser does confirm and shows me a last screen where I have the possibility to give a friendly name to my device, so I can remember which one is which. Then I click Save and Done.Confirm device registrationFrom now on, every time I sign in, I am prompted to touch my security device or use biometric authentication on my smartphone or laptop. What happens behind the scene is the server sending a challenge to my browser. The browser sends the challenge to the security device. The security device uses my private key to sign the challenge and to return it to the server for verification. When the server validates the signature with my public key, I am granted access to the AWS Management Console.

Additional verification required

At any time, I can register additional devices and manage my registered devices. On the AWS SSO portal page, I click MFA devices on the top-right part of the screen.

MFA device management

I can see and manage the devices registered for my account, if any. I click Register device to register a new device.

How to Configure SSO for the AWS CLI?
Once my devices are configured, I can configure SSO on the AWS Command Line Interface (CLI).

I first configure CLI SSO with aws configure sso and I enter the SSO domain URL that I received from my system administrator. The CLI opens a browser where I can authenticate with my user name, password, and my second-factor authentication configured previously. The web console gives me a code that I enter back into the CLI prompt.aws configure sso

When I have access to multiple AWS Accounts, the CLI lists them and I choose the one I want to use. This is a one-time configuration.

Once this is done, I can use the aws CLI as usual, the SSO authentication happens automatically behind the scene. You are asked to re-authenticate from time to time, depending on the configuration set by your system administrator.

Available today
Just like AWS Single Sign-On, FIDO2 second-factor authentication is provided to you at no additional cost, and is available in all AWS Regions where AWS SSO is available.

As usual, we welcome your feedback. The team told me they are working on other features to offer you additional authentication options in the near future.

You can start to use FIDO2 as second factor authentication for AWS Single Sign-On today. Configure it now.

— seb

AWS Network Firewall – New Managed Firewall Service in VPC

Post Syndicated from Channy Yun original https://aws.amazon.com/blogs/aws/aws-network-firewall-new-managed-firewall-service-in-vpc/

Our customers want to have a high availability, scalable firewall service to protect their virtual networks in the cloud. Security is the number one priority of AWS, which has provided various firewall capabilities on AWS that address specific security needs, like Security Groups to protect Amazon Elastic Compute Cloud (EC2) instances, Network ACLs to protect Amazon Virtual Private Cloud (VPC) subnets, AWS Web Application Firewall (WAF) to protect web applications running on Amazon CloudFront, Application Load Balancer (ALB) or Amazon API Gateway, and AWS Shield to protect against Distributed Denial of Service (DDoS) attacks.

We heard customers want an easier way to scale network security across all the resources in their workload, regardless of which AWS services they used. They also want customized protections to secure their unique workloads, or to comply with government mandates or commercial regulations. These customers need the ability to do things like URL filtering on outbound flows, pattern matching on packet data beyond IP/Port/Protocol and the ability to alert on specific vulnerabilities for protocols beyond HTTP/S.

Today, I am happy to announce AWS Network Firewall, a high availability, managed network firewall service for your virtual private cloud (VPC). It enables you to easily deploy and manage stateful inspection, intrusion prevention and detection, and web filtering to protect your virtual networks on AWS. Network Firewall automatically scales with your traffic, ensuring high availability with no additional customer investment in security infrastructure.

With AWS Network Firewall, you can implement customized rules to prevent your VPCs from accessing unauthorized domains, to block thousands of known-bad IP addresses, or identify malicious activity using signature-based detection. AWS Network Firewall makes firewall activity visible in real-time via CloudWatch metrics and offers increased visibility of network traffic by sending logs to S3, CloudWatch and Kinesis Firehose. Network Firewall is integrated with AWS Firewall Manager, giving customers who use AWS Organizations a single place to enable and monitor firewall activity across all your VPCs and AWS accounts. Network Firewall is interoperable with your existing security ecosystem, including AWS partners such as CrowdStrike, Palo Alto Networks, and Splunk. You can also import existing rules from community maintained Suricata rulesets.

Concepts of Network Firewall
AWS Network Firewall runs stateless and stateful traffic inspection rules engines. The engines use rules and other settings that you configure inside a firewall policy.

You use a firewall on a per-Availability Zone basis in your VPC. For each Availability Zone, you choose a subnet to host the firewall endpoint that filters your traffic. The firewall endpoint in an Availability Zone can protect all of the subnets inside the zone except for the one where it’s located.

You can manage AWS Network Firewall with the following central components.

  • Firewall – A firewall connects the VPC that you want to protect to the protection behavior that’s defined in a firewall policy. For each Availability Zone where you want protection, you provide Network Firewall with a public subnet that’s dedicated to the firewall endpoint. To use the firewall, you update the VPC route tables to send incoming and outgoing traffic through the firewall endpoints.
  • Firewall policy – A firewall policy defines the behavior of the firewall in a collection of stateless and stateful rule groups and other settings. You can associate each firewall with only one firewall policy, but you can use a firewall policy for more than one firewall.
  • Rule group – A rule group is a collection of stateless or stateful rules that define how to inspect and handle network traffic. Rules configuration includes 5-tuple and domain name filtering. You can also provide stateful rules using Suricata open source rule specification.

AWS Network Firewall – Getting Started
You can start AWS Network Firewall in AWS Management Console, AWS Command Line Interface (CLI), and AWS SDKs for creating and managing firewalls. In the navigation pane in VPC console, expand AWS Network Firewall and then choose Create firewall in Firewalls menu.

To create a new firewall, enter the name that you want to use to identify this firewall and select your VPC from the dropdown. For each availability zone (AZ) where you want to use AWS Network Firewall, create a public subnet to for the firewall endpoint. This subnet must have at least one IP address available and a non-zero capacity. Keep these firewall subnets reserved for use by Network Firewall.

For Associated firewall policy, select Create and associate an empty firewall policy and choose Create firewall.

Your new firewall is listed in the Firewalls page. The firewall has an empty firewall policy. In the next step, you’ll specify the firewall behavior in the policy. Select your newly created the firewall policy in Firewall policies menu.

You can create or add new stateless or stateful rule groups – zero or more collections of firewall rules, with priority settings that define their processing order within the policy, and stateless default action defines how Network Firewall handles a packet that doesn’t match any of the stateless rule groups.

For stateless default action, the firewall policy allows you to specify different default settings for full packets and for packet fragments. The action options are the same as for the stateless rules that you use in the firewall policy’s stateless rule groups.

You are required to specify one of the following options:

  • Allow – Discontinue all inspection of the packet and permit it to go to its intended destination.
  • Drop – Discontinue all inspection of the packet and block it from going to its intended destination.
  • Forward to stateful rule groups – Discontinue stateless inspection of the packet and forward it to the stateful rule engine for inspection.

Additionally, you can optionally specify a named custom action to apply. For this action, Network Firewall sends an CloudWatch metric dimension named CustomAction with a value specified by you. After you define a named custom action, you can use it by name in the same context where you have define it. You can reuse a custom action setting among the rules in a rule group and you can reuse a custom action setting between the two default stateless custom action settings for a firewall policy.

After you’ve defined your firewall policy, you can insert the firewall into your VPC traffic flow by updating the VPC route tables to include the firewall.

How to set up Rule Groups
You can create new stateless or stateful rule groups in Network Firewall rule groups menu, and choose Create rule group. If you select Stateful rule group, you can select one of three options: 1) 5-tuple format, specifying source IP, source port, destination IP, destination port, and protocol, and specify the action to take for matching traffic, 2) Domain list, specifying a list of domain names and the action to take for traffic that tries to access one of the domains, and 3) Suricata compatible IPS rules, providing advanced firewall rules using Suricata rule syntax.

Network Firewall supports the standard stateless “5 tuple” rule specification for network traffic inspection with priority number that indicates the processing order of the stateless rule within the rule group.

Similarly, a stateful 5 tuple rule has the following match settings. These specify what the Network Firewall stateful rules engine looks for in a packet. A packet must satisfy all match settings to be a match.

A rule group with domain names has the following match settings – Domain name, a list of strings specifying the domain names that you want to match, and Traffic direction, a direction of traffic flow to inspect. The following JSON shows an example rule definition for a domain name rule group.

{
  "RulesSource": {
    "RulesSourceList": {
      "TargetType": "FQDN_SNI","HTTP_HOST",
      "Targets": [
        "test.example.com",
        "test2.example.com"
      ],
      "GeneratedRulesType": "DENYLIST"
    }
  } 
}

A stateful rule group with Suricata compatible IPS rules has all settings defined within the Suricata compatible specification. For example, as following is to detect SSH protocol anomalies. For information about Suricata, see the Suricata website.

alert tcp any any -> any 22 (msg:"ALERT TCP port 22 but not SSH"; app-layer-protocol:!ssh; sid:2271009; rev:1;)

You can monitor Network Firewall using CloudWatch, which collects raw data and processes it into readable, near real-time metrics, and AWS CloudTrail, a service that provides a record of API calls to AWS Network Firewall by a user, role, or an AWS service. CloudTrail captures all API calls for Network Firewall as events. To learn more about logging and monitoring, see the documentation.

Network Firewall Partners
At this launch, Network Firewall integrates with a collection of AWS partners. They provided us with lots of helpful feedback. Here are some of the blog posts that they wrote in order to share their experiences (I am updating this article with links as they are published).

Available Now
AWS Network Firewall is now available in US East (N. Virginia), US West (Oregon), and Europe (Ireland) Regions. Take a look at the product page, price, and the documentation to learn more. Give this a try, and please send us feedback either through your usual AWS Support contacts or the AWS forum for Amazon VPC.

Learn all the details about AWS Network Firewall and get started with the new feature today.

Channy;

Lightsail Containers: An Easy Way to Run your Containers in the Cloud

Post Syndicated from Sébastien Stormacq original https://aws.amazon.com/blogs/aws/lightsail-containers-an-easy-way-to-run-your-containers-in-the-cloud/

When I am delivering an introduction to the AWS Cloud for developers, I usually spend a bit of time to mention and to demonstrate Amazon Lightsail. It is by far the easiest way to get started on AWS. It allows you to get your application running on your own virtual server in a matter of minutes. Today, we are adding the possibility to deploy your container-based workloads on Amazon Lightsail. You can now deploy your container images to the cloud with the same simplicity and the same bundled pricing Amazon Lightsail provides for your virtual servers.

Amazon Lightsail is an easy-to-use cloud service that offers you everything needed to deploy an application or website, for a cost effective and easy to understand monthly plan. It is ideal to deploy simple workloads, websites, or to get started with AWS. The typical Lightsail customers range from developers to small businesses or startups who are looking to get quickly started in the cloud and AWS. At any time, you can later adopt the broad AWS Services when you are getting more familiar with the AWS cloud.

Under the hood, Lightsail is powered by Amazon Elastic Compute Cloud (EC2), Amazon Relational Database Service (RDS), Application Load Balancer, and other AWS services. It offers the level of security, reliability, and scalability you are expecting from AWS.

When deploying to Lightsail, you can choose between six operating systems (4 Linux distributions, FreeBSD, or Windows), seven applications (such as WordPress, Drupal, Joomla, Plesk…), and seven stacks (such as Node.js, Lamp, GitLab, Django…). But what about Docker containers?

Starting today, Amazon Lightsail offers an simple way for developers to deploy their containers to the cloud. All you need to provide is a Docker image for your containers and we automatically containerize it for you. Amazon Lightsail gives you an HTTPS endpoint that is ready to serve your application running in the cloud container. It automatically sets up a load balanced TLS endpoint, and take care of the TLS certificate. It replaces unresponsive containers for you automatically, it assigns a DNS name to your endpoint, it maintains the old version till the new version is healthy and ready to go live, and more.

Let’s see how it works by deploying a simple Python web app as a container. I assume you have the AWS Command Line Interface (CLI) and Docker installed on your laptop. Python is not required, it will be installed in the container only.

I first create a Python REST API, using the Flask simple application framework. Any programming language and any framework that can run inside a container works too. I just choose Python and Flask because they are simple and elegant.

You can safely copy /paste the following commands:

mkdir helloworld-python
cd helloworld-python
# create a simple Flask application in helloworld.py
echo "

from flask import Flask, request
from flask_restful import Resource, Api

app = Flask(__name__)
api = Api(app)

class Greeting (Resource):
   def get(self):
      return { "message" : "Hello Flask API World!" }
api.add_resource(Greeting, '/') # Route_1

if __name__ == '__main__':
   app.run('0.0.0.0','8080')

"  > helloworld.py

Then I create a Dockerfile that contains the steps and information required to build the container image:

# create a Dockerfile
echo '
FROM python:3
ADD helloworld.py /
RUN pip install flask
RUN pip install flask_restful
EXPOSE 8080
CMD [ "python", "./helloworld.py"]
 '  > Dockerfile

Now I can build my container:

docker build -t lightsail-hello-world .

The build command outputs many lines while it builds the container, it eventually terminates with the following message (actual ID differs):

Successfully built 7848e055edff
Successfully tagged lightsail-hello-world:latest

I test the container by launching it on my laptop:

docker run -it --rm -p 8080:8080 lightsail-hello-world

and connect a browser to localhost:8080

Testing Flask API in the container

When I am satisfied with my app, I push the container to Docker Hub.

docker tag lightsail-hello-world sebsto/lightsail-hello-world
docker login
docker push sebsto/lightsail-hello-world

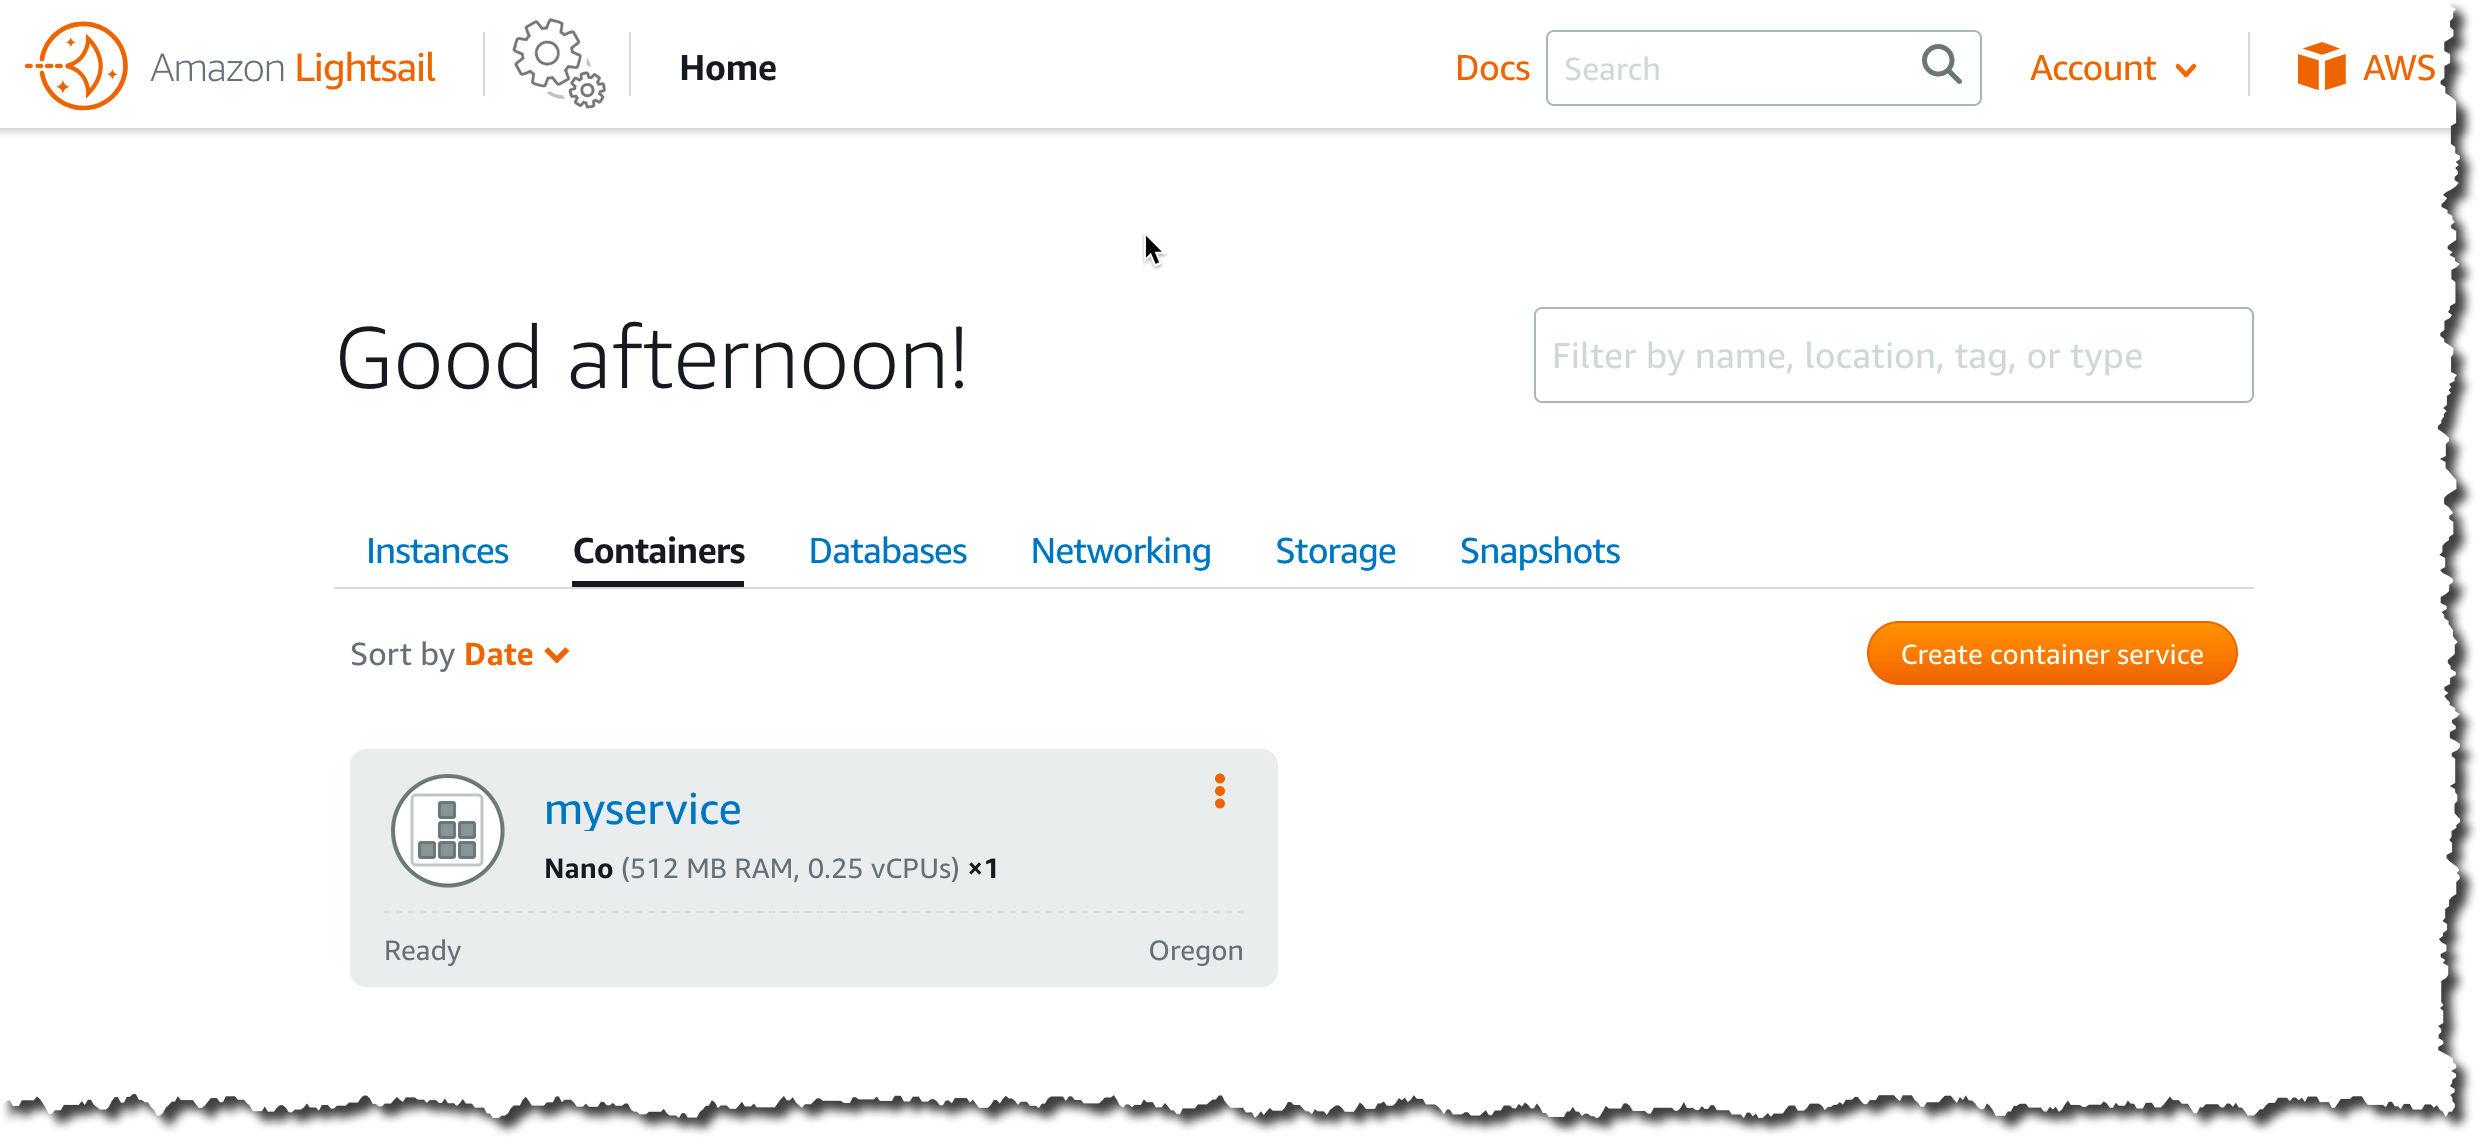
Now that I have a container ready on Docker Hub, let’s create a Lightsail Container Service.

I point my browser to the Amazon Lightsail console. I can see container services already deployed and I can manage them. To create a new service, I click Create container service:Lighsail Container Console

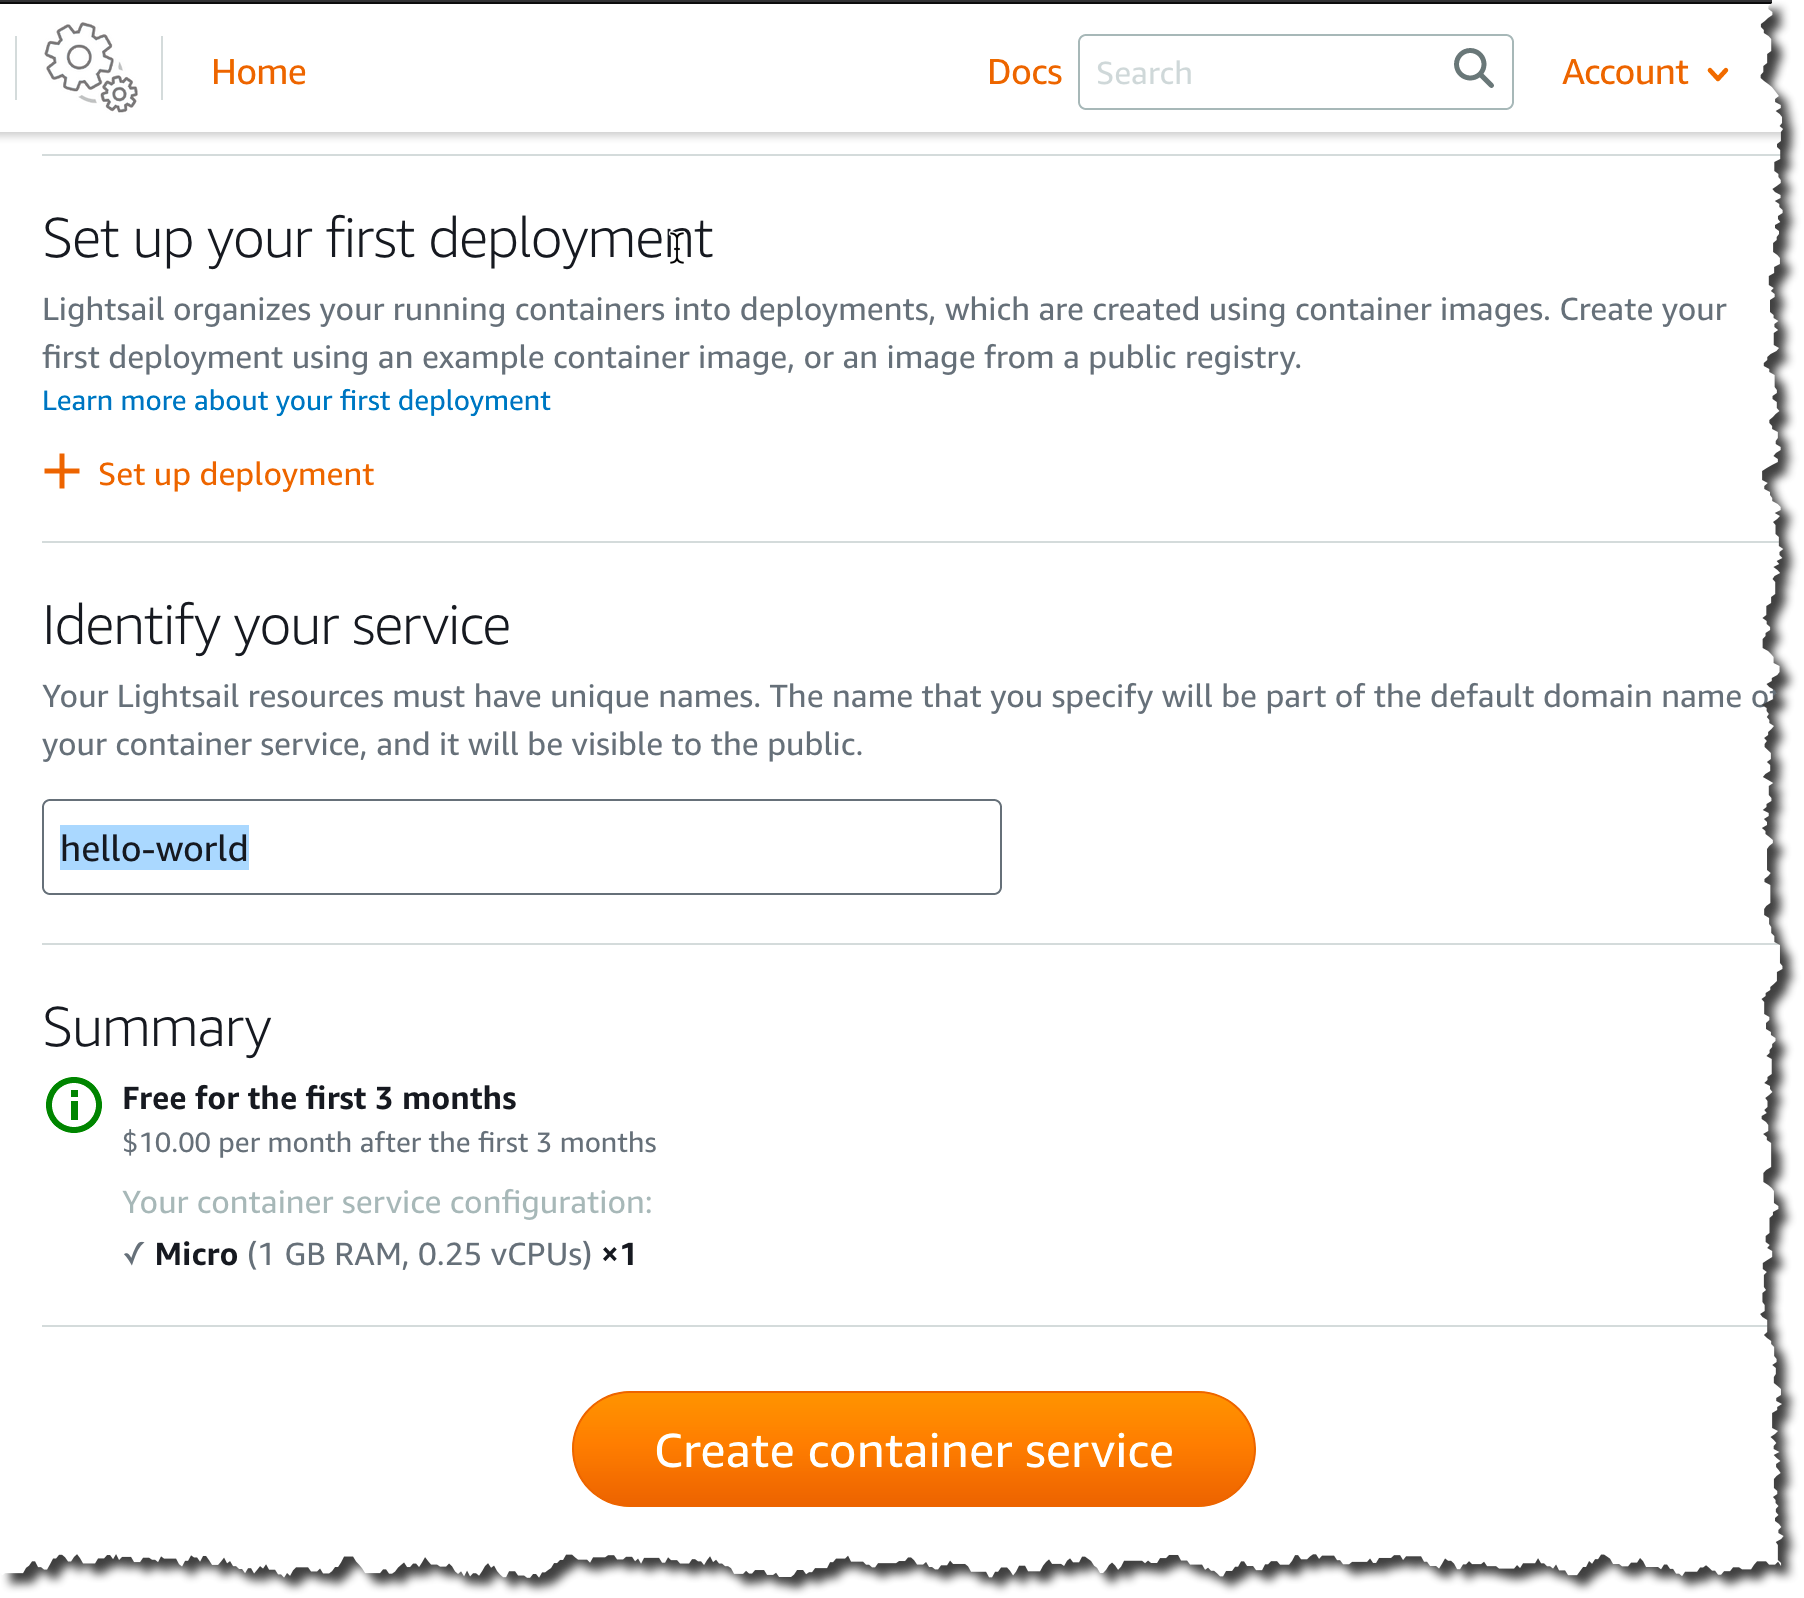
On the next screen, I select the size of the container I want to use, in terms of vCPU and memory available to my application. I also select the number of container instances I want to run in parallel for high availability or scalability reasons. I can change the number of container instances or their power (vCPU and RAM) at any time, without interrupting the service. Both these parameters impact the price AWS charges you per month. The price is indicated and dynamically adjusted on the screen, as shown on the following video.

Lightsail choose capacity

Slightly lower on the screen, I choose to skip the deployment for now. I give a name for the service (“hello-world“). I click Create container service.

Lightsail container name

Once the service is created, I click Create your first deployment to create a deployment. A deployment is a combination of a specific container image and version to be deployed on the service I just created.

I chose a name for my image and give the address of the image on Docker Hub, using the format user/<my container name>:tag. This is also where I have the possibility to enter environment variables, port mapping, or a launch command.

My container is offering a network service on port TCP 8080, so I add that port to the deployment configuration. The Open Ports configuration specifies which ports and protocols are open to other systems in my container’s network. Other containers or virtual machines can only connect to my container when the port is explicitly configured in the console or EXPOSE‘d in my Dockerfile. None of these ports are exposed to the public internet.

But in this example, I also want Lightsail to route the traffic from the public internet to this container. So, I add this container as an endpoint of the hello-world service I just created. The endpoint is automatically configured for TLS, there is no certificate to install or manage.

I can add up to 10 containers for one single deployment. When ready, I click Save and deploy.

Lightsail Deployment

After a while, my deployment is active and I can test the endpoint.

Lightsail Deployment Active

The endpoint DNS address is available on the top-right side of the console. If I must, I can configure my own DNS domain name.

Lightsail endpoint DNSI open another tab in my browser and point it at the https endpoint URL:

Testing Container DeploymentWhen I must deploy a new version, I use the console again to modify the deployment. I spare you the details of modifying the application code, build, and push a new version of the container. Let’s say I have my second container image version available under the name sebsto/lightsail-hello-world:v2. Back to Amazon Lightsail console, I click Deployments, then Modify your Deployments. I enter the full name, including the tag, of the new version of the container image and click Save and Deploy.

Lightsail Deploy updated VersionAfter a while, the new version is deployed and automatically activated.

Lightsail deployment sucesful

I open a new tab in my browser and I point it to the endpoint URI available on the top-right corner of Amazon Lightsail console. I observe the JSON version is different. It now has a version attribute with a value of 2.

lightsail v2 is deployed

When something goes wrong during my deployment, Amazon Lightsail automatically keeps the last deployment active, to avoid any service interruption. I can also manually activate a previous deployment version to reverse any undesired changes.

I just deployed my first container image from Docker Hub. I can also manage my services and deploy local container images from my laptop using the AWS Command Line Interface (CLI). To push container images to my Amazon Lightsail container service directly from my laptop, I must install the LightSail Controler Plugin. (TL;DR curl, cp and chmod are your friends here, I also maintain a DockerFile to use the CLI inside a container.)

To create, list, or delete a container service, I type:

aws lightsail create-container-service --service-name myservice --power nano --scale 1

aws lightsail get-container-services
{
   "containerServices": [{
      "containerServiceName": "myservice",
      "arn": "arn:aws:lightsail:us-west-2:012345678901:ContainerService/1b50c121-eac7-4ee2-9078-425b0665b3d7",
      "createdAt": "2020-07-31T09:36:48.226999998Z",
      "location": {
         "availabilityZone": "all",
         "regionName": "us-west-2"
      },
      "resourceType": "ContainerService",
      "power": "nano",
      "powerId": "",
      "state": "READY",
      "scale": 1,
      "privateDomainName": "",
      "isDisabled": false,
      "roleArn": ""
   }]
}

aws lightsail delete-container-service --service myservice

I can also use the CLI to deploy container images directly from my laptop. Be sure lightsailctl is installed.

# Build the new version of my image (v3)
docker build -t sebsto/lightsail-hello-world:v3 .

# Push the new image.
aws lightsail push-container-image --service-name hello-world --label hello-world --image sebsto/lightsail-hello-world:v3

After a while, I see the output:

Image "sebsto/lightsail-hello-world:v3" registered.
Refer to this image as ":hello-world.hello-world.1" in deployments.

I create a lc.json file to hold the details of the deployment configuration. it is aligned to the options I see on the console. I report the name given by the previous command on the image property:

{
  "serviceName": "hello-world",
  "containers": {
     "hello-world": {
        "image": ":hello-world.hello-world.1",
        "ports": {
           "8080": "HTTP"
        }
     }
  },
  "publicEndpoint": {
     "containerName": "hello-world",
     "containerPort": 8080
  }
}

Finally, I create a new service version with:
aws lightsail create-container-service-deployment --cli-input-json file://lc.json

I can query the deployment status with
aws lightsail get-container-services

...
"nextDeployment": {
   "version": 4,
   "state": "ACTIVATING",
   "containers": {
      "hello-world": {
      "image": ":hello-world.hello-world.1",
      "command": [],
      "environment": {},
      "ports": {
         "8080": "HTTP"
      }
     }
},
...

After a while, the status  becomes  ACTIVE, and I can test my endpoint.

curl https://hello-world.nxxxxxxxxxxx.lightsail.ec2.aws.dev/
{"message": "Hello Flask API World!", "version": 3}

If you plan to later deploy your container to Amazon ECS or Amazon Elastic Kubernetes Service, no changes are required. You can pull the container image from your repository, just like you do with Amazon Lightsail.

You can deploy your containers on Lightsail in all AWS Regions where Amazon Lightsail is available. As of today, this is US East (Ohio), US East (N. Virginia), US West (Oregon), Asia Pacific (Mumbai), Asia Pacific (Seoul), Asia Pacific (Singapore), Asia Pacific (Sydney), Asia Pacific (Tokyo), Canada (Central), Europe (Frankfurt), Europe (Ireland), Europe (London), and Europe (Paris).

As usual when using Amazon Lightsail, pricing is easy to understand and predictable. Amazon Lightsail Containers have a fixed price per month per container, depending on the size of the container (the vCPU/memory combination you use). You are charged on the prorated hours you keep the service running. The price per month is the maximum price you will be charged for running your service 24h/7. The prices are identical in all AWS Regions. They are ranging from $7 / month for a Nano container (512MB memory and 0.25 vCPU) to $160 / month for a X-Large container (8GB memory and 4 vCPU cores). This price not only includes the container itself, but also the load balancer, the DNS, and a generous data transfer tier. The details and prices for other AWS Regions are on the Lightsail pricing page.

I can’t wait to discover what solutions you will build and deploy on Amazon Lightsail Containers!

— seb

Meet the newest AWS Heroes including the first DevTools Heroes!

Post Syndicated from Ross Barich original https://aws.amazon.com/blogs/aws/meet-the-newest-aws-heroes-including-the-first-devtools-heroes/

The AWS Heroes program recognizes individuals from around the world who have extensive AWS knowledge and go above and beyond to share their expertise with others. The program continues to grow, to better recognize the most influential community leaders across a variety of technical disciplines.

Introducing AWS DevTools Heroes
Today we are introducing AWS DevTools Heroes: passionate advocates of the developer experience on AWS and the tools that enable that experience. DevTools Heroes excel at sharing their knowledge and building community through open source contributions, blogging, speaking, community organizing, and social media. Through their feedback, content, and contributions DevTools Heroes help shape the AWS developer experience and evolve the AWS DevTools, such as the AWS Cloud Development Kit, the AWS SDKs, and AWS Code suite of services.

The first cohort of AWS DevTools Heroes include:

Bhuvaneswari Subramani – Bengaluru, India

DevTools Hero Bhuvaneswari Subramani is Director Engineering Operations at Infor. With two decades of IT experience, specializing in Cloud Computing, DevOps, and Performance Testing, she is one of the community leaders of AWS User Group Bengaluru. She is also an active speaker at AWS community events and industry conferences, and delivers guest lectures on Cloud Computing for staff and students at engineering colleges across India. Her workshops, presentations, and blogs on AWS Developer Tools always stand out.

Jared Short – Washington DC, USA

DevTools Hero Jared Short is an engineer at Stedi, where they are using AWS native tooling and serverless services to build a global network for exchanging B2B transactions in a standard format. Jared’s work includes early contributions to the Serverless Framework. These days, his focus is working with AWS CDK and other toolsets to create intuitive and joyful developer experiences for teams on AWS.

Matt Coulter – Belfast, Northern Ireland

DevTools Hero Matt Coulter is a Technical Architect for Liberty IT, focused on creating the right environment for empowered teams to rapidly deliver business value in a well-architected, sustainable, and serverless-first way. Matt has been creating this environment by building CDK Patterns, an open source collection of serverless architecture patterns built using AWS CDK that reference the AWS Well Architected Framework. Matt also created CDK Day, which was the first community driven, global conference focused on everything CDK (AWS CDK, CDK for Terraform, CDK for Kubernetes, and others).

Paul Duvall – Washington DC, USA

DevTools Hero Paul Duvall is co-founder and former CTO of Stelligent. He is principal author of “Continuous Integration: Improving Software Quality and Reducing Risk,” and is also the author of many other publications including “Continuous Compliance on AWS,” “Continuous Encryption on AWS,” and “Continuous Security on AWS.” Paul hosted the DevOps on AWS Radio podcast for over three years and has been an enthusiastic user and advocate of AWS Developer Tools since their respective releases.

Sebastian Korfmann – Hamburg, Germany

DevTools Hero Sebastian Korfmann is an entrepreneurial Software Engineer with a current focus on Cloud Tooling, Infrastructure as Code, and the Cloud Development Kit (CDK) ecosystem in particular. He is a core contributor to the CDK for Terraform project, which enables users to define infrastructure using TypeScript, Python, and Java while leveraging the hundreds of providers and thousands of module definitions provided by Terraform and the Terraform ecosystem. With cdk.dev, Sebastian co-founded a community-driven hub for all things CDK, and he runs a weekly newsletter covering the growing CDK ecosystem.

Steve Gordon – East Sussex, United Kingdom

DevTools Hero Steve Gordon is a Pluralsight author and senior engineer who is passionate about community and all things .NET related, having worked with .NET for over 16 years. Steve has used AWS extensively for five years as a platform for running .NET microservices. He blogs regularly about running .NET on AWS, including deep dives into how the .NET SDK works, building cloud-native services, and how to deploy .NET containers to Amazon ECS. Steve founded .NET South East, a .NET Meetup group based in Brighton.

Thorsten Höger – Stuttgart, Germany

DevTools Hero Thorsten Höger is CEO and cloud consultant at Taimos, where he is advising customers on how to use AWS. Being a developer, he focuses on improving development processes and automating everything to build efficient deployment pipelines for customers of all sizes. As a supporter of open-source software, Thorsten is maintaining or contributing to several projects on GitHub, like test frameworks for AWS Lambda, Amazon Alexa, or developer tools for AWS. He is also the maintainer of the Jenkins AWS Pipeline plugin and one of the top three non-AWS contributors to AWS CDK.


Meet the rest of the new AWS Heroes
There is more good news! We are thrilled to introduce the remaining new AWS Heroes in this cohort, including the first Heroes from Argentina, Lebanon, and Saudi Arabia:

Ahmed Samir – Riyadh, Saudi Arabia

Community Hero Ahmed Samir is a Cloud Architect and mentor with more than 12 years of experience in IT. He is the leader of three Arabic Meetups in Riyadh: AWS, Amazon SageMaker, and Kubernetes, where he has organized and delivered over 40 Meetup events. Ahmed frequently shares knowledge and evangelizes AWS in Arabic through his social media accounts. He also holds AWS and Kubernetes certifications.

Anas Khattar – Beirut, Lebanon

Community Hero Anas Khattar is co-founder of Digico Solutions. He founded the AWS User Group Lebanon in 2018 and coordinates monthly meetups and workshops on a variety of cloud topics, which helped grow the group to more than 1,000 AWSome members. He also regularly speaks at tech conferences and authors tech blogs on Dev Community, sharing his AWS experiences and best practices. In close collaboration with the regional AWS community leaders and builders, Anas organized AWS Community Day MENA, which started in September 2020 with 12 User Groups from 10 countries, and hosted 27 speakers over 2 days.

Chris Gong – New York, USA

Community Hero Chris Gong is constantly exploring the different ways that cloud services can be applied in game development. Passionate about sharing his knowledge with the world, he routinely creates tutorials and educational videos on his YouTube channel, Flopperam, where the primary focus has been AWS Game Tech and Unreal Engine, specifically the multiplayer and networking aspects of game development. Although Amazon GameLift has been his biggest interest, Chris has plans to cover the usage of other AWS services in game development while exploring how they can be integrated with other game engines besides Unreal Engine.

Damian Olguin – Cordoba, Argentina

Community Hero Damian Olguin is a tech entrepreneur and one of the founders of Teracloud, an AWS APN Partner. As a community leader, he promotes knowledge-sharing experiences in user communities within LATAM. He is co-organizer of AWS User Group Cordoba and co-host of #DeepFridays, a Twitch streaming show that promotes AI/ML technology adoption by playing with DeepRacer, DeepLens, and DeepComposer. Damian is a public speaker who has spoken at AWS Community Day Buenos Aires 2019, AWS re:Invent 2019, and AWS Community Day LATAM 2020.

Denis Bauer – Sydney, Australia

Data Hero Denis Bauer is a Principal Research Scientist at Australia’s government research agency (CSIRO). Her open source products include VariantSpark, the Machine Learning tool for analysing ultra-high dimensional data, which was the first AWS Marketplace health product from a public sector organization. Denis is passionate about facilitating the digital transformation of the health and life-science sector by building a strong community of practice through open source technology, keynote presentations, and inclusive interdisciplinary collaborations. For example, the collaboration with her organization’s visionary Scientific Computing and Cloud Platforms experts as well as AWS Data Hero Lynn Langit has enabled the creation of cloud-based bioinformatics solutions used by 10,000 researchers annually.

Denis Dyack – St. Catharines, Canada

Community Hero Denis Dyack, a video game industry veteran of more than 30 years, is the Founder and CEO of Apocalypse Studios. His studio evangelizes using a cloud-first approach in game development and partners with AWS Game Tech to move the medium of the games industry forward. In his years of experience speaking at games conferences and within AWS communities, Denis has been an advocate for building on Amazon Lumberyard and more recently in moving over game development pipelines to AWS.

Emrah Şamdan – Ankara, Turkey

Serverless Hero Emrah Şamdan is the VP of Products at Thundra. In order to expand the serverless community globally in a pandemic, he co-organized the quarterly held ServerlessDays Virtual. He’s also a local community organizer for AWS Community Day Turkey, ServerlessDays Istanbul, and bi-weekly meetups at Cloud and Serverless Turkey. He’s currently part of the core organizer team of global ServerlessDays and is continuously looking for ways to expand the community. He frequently writes about serverless and cloud-native microservices on Medium and on the Thundra blog.

Franck Pachot – Lausanne, Switzerland

Data Hero Franck Pachot is the Principal Consultant and Database Evangelist at dbi services (an AWS Select Partner) and is passionate about all databases. With over 20 years of experience in development, data modeling, infrastructure, and all DBA tasks, Franck is a recognized database expert across Oracle and AWS. Franck is also an AWS Academy educator for Powercoders, and holds AWS Certified Database Specialty and Oracle Certified Master certifications. Franck contributes to technical communities, educating customers on AWS Databases through his blog, Twitter, and podcast in French. He is active in the Data community, and enjoys talking and meeting other data enthusiasts at conferences.

Hiroko Nishimura – Washington DC, USA

Community Hero Hiroko Nishimura (Hiro) is the founder of AWS Newbies and Cloud Newbies, which help people with non-traditional technical backgrounds begin their explorations into the AWS Cloud. As a “career switcher” herself, she has been community building since 2018 to help others deconstruct Cloud Computing jargon so they, too, can begin a career in the Cloud. Finally putting her degrees in Special Education to good use, Hiro teaches “Introduction to AWS for Non-Engineers” courses at LinkedIn Learning, and introductory coding lessons at egghead.

Juliano Cristian – Santa Catarina, Brazil

Community Hero Juliano Cristian is CEO of Game Business Accelerator Academy and co-founder of Game Developers SC which participates in the AWS APN program. He organizes the AWS Game Tech Lumberyard User Group in Florianópolis, Brazil, holding Meetups, Practical Labs, Game Jams, and Workshops. He also conducts many lectures at universities, speaking with more than 90 educational institutions across Brazil, introducing students to cloud computing and AWS Game Tech services. Whenever he can, Juliano also participates in other AWS User Groups in Brazil and Latin America, working to build an increasingly motivated and productive community.

Jungyoul Yu – Seoul, Korea

Machine Learning Hero Jungyoul Yu works at Danggeun Market as a DevOps Engineer, and is a leader of the AWS DeepRacer Group, part of the AWS Korea User Group. He was one of the AWS DeepRacer League finalists in AWS Summit Seoul and AWS re:Invent 2019. Starting off with zero ML experience, Jungyoul used AWS DeepRacer to learn ML techniques and began sharing his learnings both in the AWS DeepRacer Community, with User Groups, at AWS Community Day, and at various meetups. He has also shared many blog posts and sample code such as DeepRacer Reward Function Simulator, Rank Notifier, and Auto submit bot.

Juv Chan – Singapore

Machine Learning Hero Juv Chan is an AI automation engineer at UBS. He is the AWS DeepRacer League Singapore Summit 2019 champion and a re:Invent Championship Cup 2019 finalist. He is the lead organizer for the AWS DeepRacer Beginner Challenge global virtual community race in 2020. Juv is also involved in sharing his DeepRacer and Machine Learning knowledge with the AWS Machine Learning community at both global and regional scale. Juv is a contributing writer for both Towards Data Science and Towards AI platforms, where he blogs about AWS AI/ML and cloud relevant topics.

Lukonde Mwila – Johannesburg, South Africa

Container Hero Lukonde Mwila is a Senior Software Engineer at Entelect. He has a passion for sharing knowledge through speaking engagements such as meetups and tech conferences, as well as writing technical articles. His talk at DockerCon 2020 on deploying multi-container applications to AWS was one of the top rated and most viewed sessions of the event. He is 3x AWS certified and is an advocate for containerization and serverless technologies. Lukonde enjoys sharing experiences of building out AWS infrastructure on Medium and sharing open source projects on GitHub for the developer community to easily consume, replicate, and improve for their own benefit.

Magdalena Zawada – Rybnik, Poland

Community Hero Magdalena Zawada is Director of Strategy and Expansion at LCloud Ltd. She has been working in IT for 11 years and started her adventure with AWS technology in 2013 as CEO of Hostersi Ltd. Magdalena willingly shares her knowledge and experience with the community, co-organizing AWS UG Warsaw meetings. She also organizes a series of events to support preparation for obtaining AWS Cloud Practitioner Certifications. Magdalena belongs to numerous industry organizations, including FinOps Foundation and ISSA Information Systems Security Association Poland, and in 2019 she was a participant of the AWS re:Invent Community Leader “We Power Tech” Diversity Grant in Las Vegas.

Nick Walter – Lincoln, USA

Data Hero Nick Walter has over 15 years of experience with enterprise IT solutions, including expertise and certifications in AWS, VMware, and Oracle. A passionate evangelist for data management solutions on AWS, Nick can often be found blogging, hosting webinars, or presenting at conferences regarding the latest trends in business critical database technologies. Recently, Nick has focused on helping clients find cost effective ways to handle both the technical and licensing challenges of migrating application stacks backed by commercial database engines, such as Oracle or MS SQL Server, into AWS.

Renato Losio – Berlin, Germany

Data Hero Renato Losio is the Principal Cloud Architect at Funambol, a provider of white label cloud services. He has been working with AWS technologies since 2011, and holds 7 AWS certifications (including the Database Specialty). Renato enjoys speaking at international events, including DevOps Pro Europe, DevOpsConf Russia, All Day DevOps, Codemotion, and Percona Live. Passionate about knowledge sharing, Renato is an editor at InfoQ and writes about different cloud-related topics on his blog, cloudiamo.com. Through his various platforms, he has covered different topics across AWS Databases, such as Amazon RDS Proxy, Amazon RDS, and Amazon Aurora.

Tomasz Lakomy – Poznan, Poland

Community Hero Tomasz Lakomy is a Senior Frontend Engineer at OLX Group, and an egghead.io instructor. Over the last two years, he’s been diving into the world of AWS and sharing what he’s learned with others. After passing the AWS Certified Solutions Architect: Associate exam in 2019 he has recorded multiple courses on serverless technologies, including “Build an App with the AWS Cloud Development Kit” and “Learn AWS Lambda from Scratch.” In addition, he’s active on his Twitter, blog (tlakomy.com), as well as The Practical Dev community, where he posts articles on career advice, testing and – of course – AWS.


If you’d like to learn more about the new Heroes, or connect with a Hero near you, please visit the AWS Hero website.

Ross;