The release of 6.11-rc1
marked the end of the 6.11 merge window on July 28. By that time,
12,102 non-merge changesets had been pulled into the mainline repository;
about 8,000 of those came in after the
first-half summary was written. Quite a few significant changes were
to be found in those changesets; there is also one big change that did not
make it.
Testing code is a fundamental step in the field of software development. It ensures that applications are reliable, meet quality standards, and work as intended. Automated software tests help to detect issues and defects early, reducing impact to end-user experience and business. In addition, tests provide documentation and prevent regression as code changes over time.
In this blog post, we show how the integration of generative AI tools like Amazon Q Developer can further enhance unit testing by automating test scenarios and generating test cases.
Amazon Q Developer helps developers and IT professionals with all of their tasks across the software development lifecycle – from coding, testing, and upgrading, to troubleshooting, performing security scanning and fixes, optimizing AWS resources, and creating data engineering pipelines. It integrates into your Integrated Development Environment (IDE) and aids with providing answers to your questions. Amazon Q Developer supports you across the Software Development Lifecycle (SLDC) by enriching feature and test development with step-by-step instructions and best practices. It learns from your interactions and training itself over time to output personalized, and tailored answers.
Solution overview
In this blog, we show how to use Amazon Q Developer to:
learn about software testing concepts and frameworks
identify unit test scenarios
write unit test cases
refactor test code
mock dependencies
generate sample data
Note: Amazon Q Developer may generate an output different from this blog post’s examples due to its nondeterministic nature.
Using Amazon Q Developer to learn about software testing frameworks and concepts
As you start gaining experience with testing, Amazon Q Developer can accelerate your learning through conversational Q&A directly within the AWS Management Console or the IDE. It can explain topics, provide general advice and share helpful resources on testing concepts and frameworks. It gives personalized recommendations on resources which makes the learning experience more interactive and accelerates the time to get started with writing unit tests. Let’s introduce an example conversation to demonstrate how you can leverage Amazon Q Developer for learning before attempting to write your first test case.
Example – Select and install frameworks
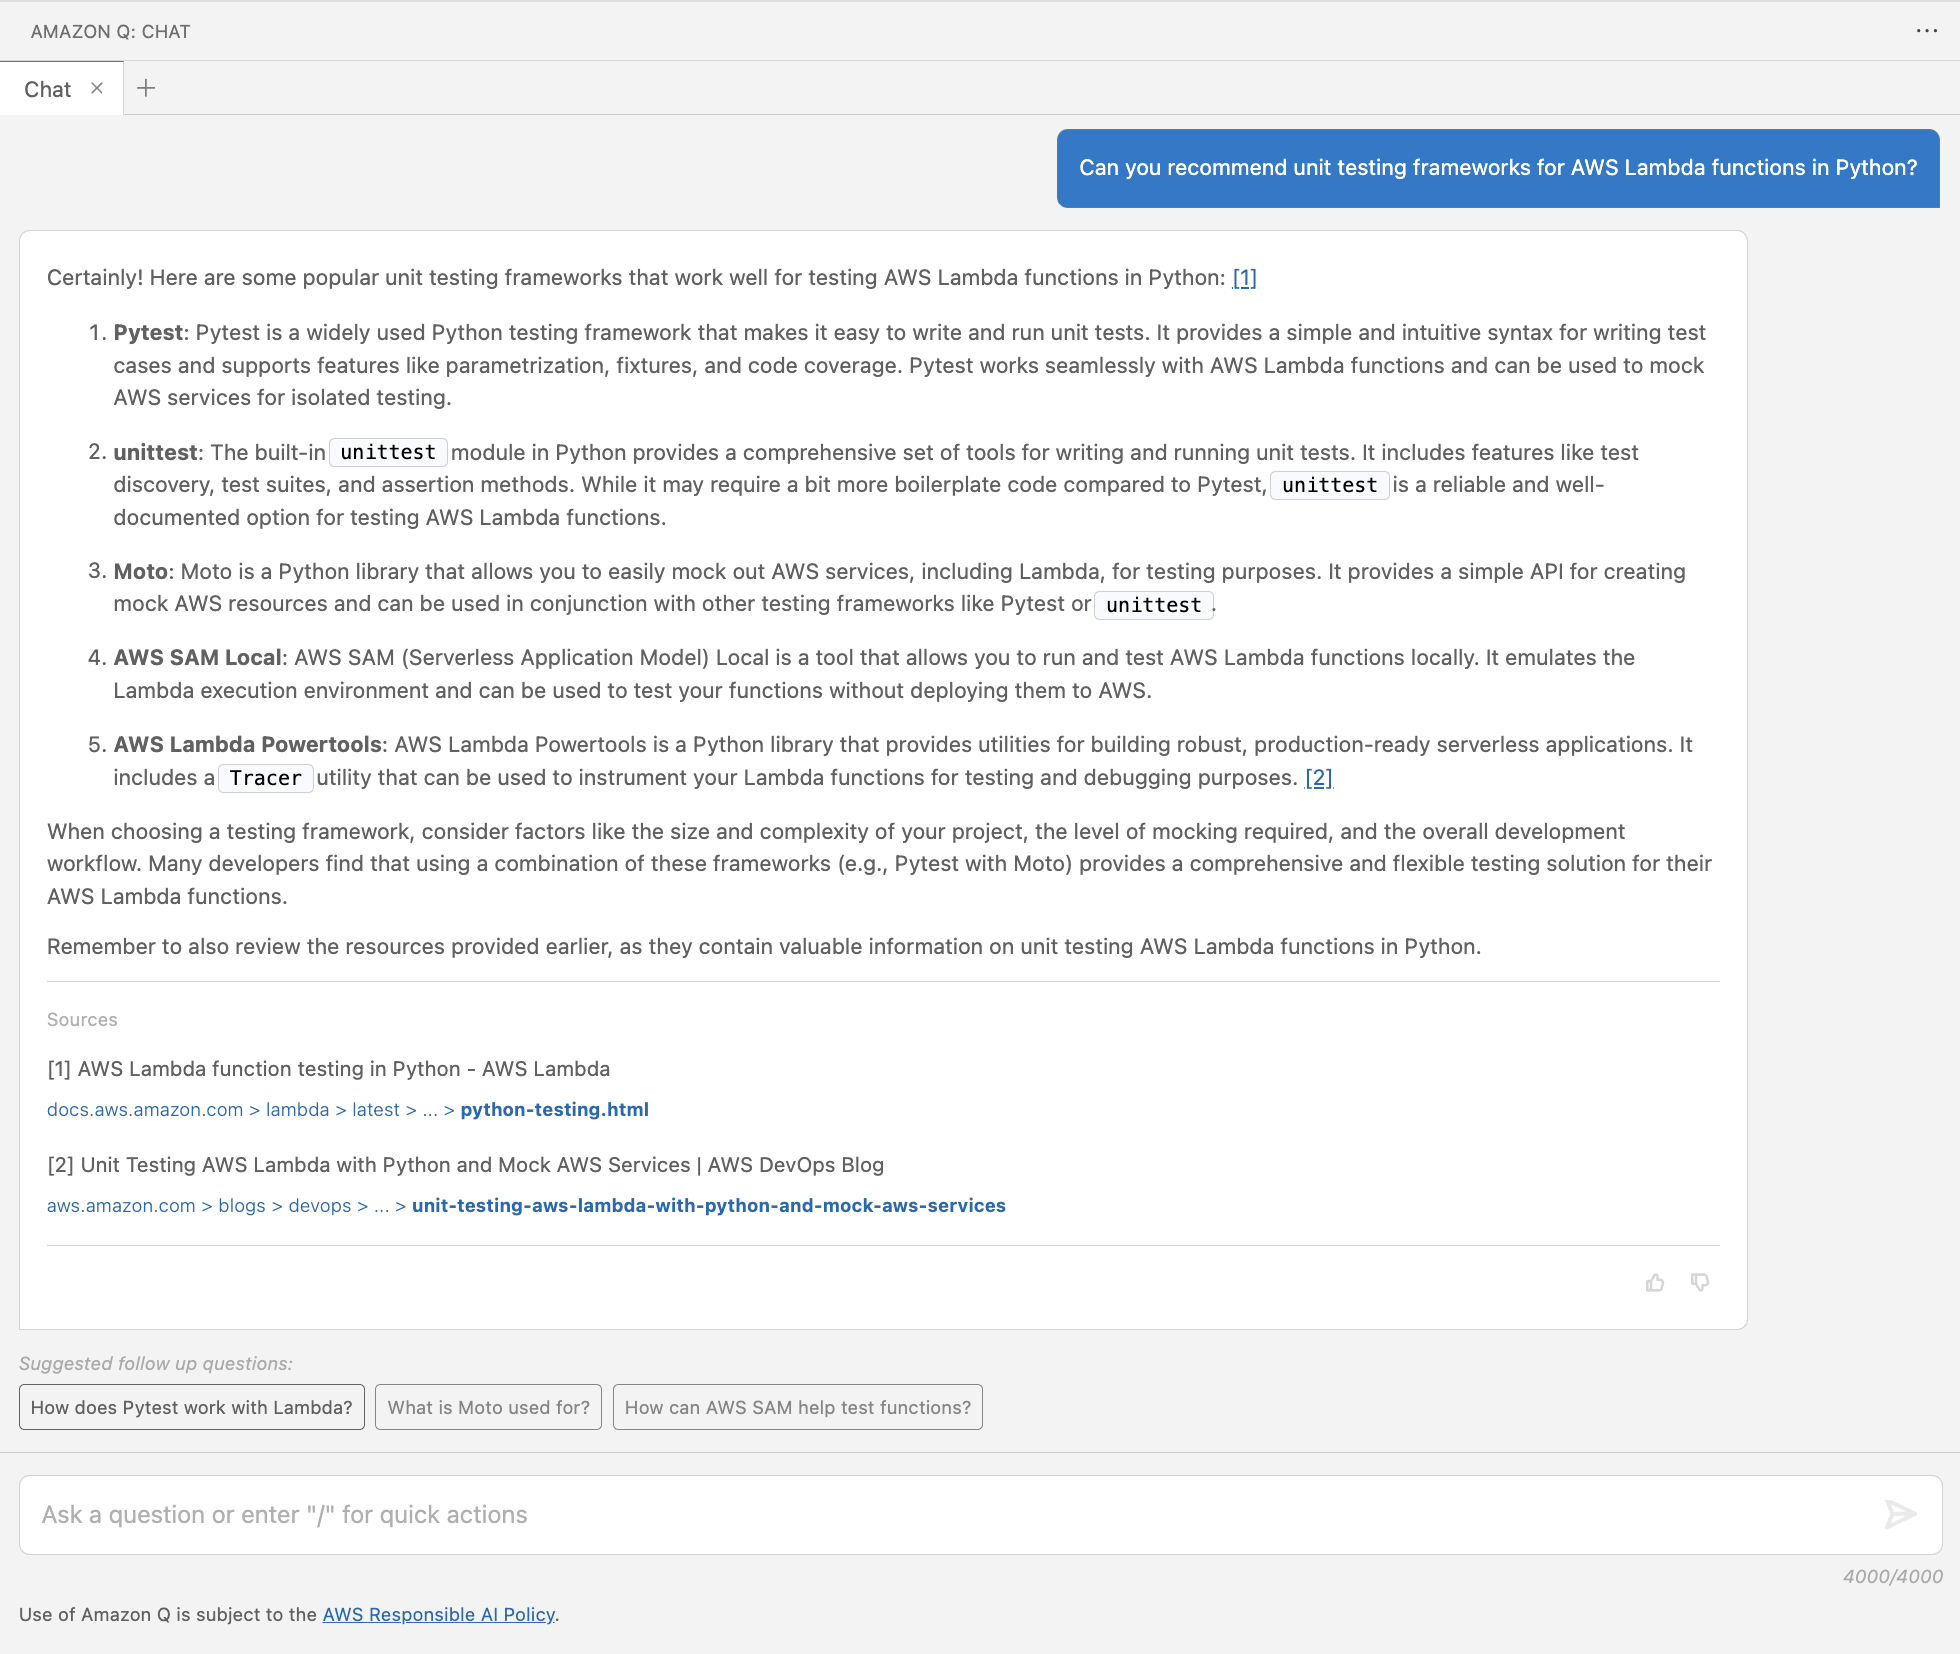
A unit testing framework is a software tool used for test automation, design and management of test cases. Upon starting a software project, you may be faced with the selection of a framework depending on the type of tests, programming language, and underlying technology. Let’s ask for recommendations around unit testing frameworks for Python code running in an AWS Lambda function.
Figure 1: Recommend unit testing frameworks for AWS Lambda functions in Python
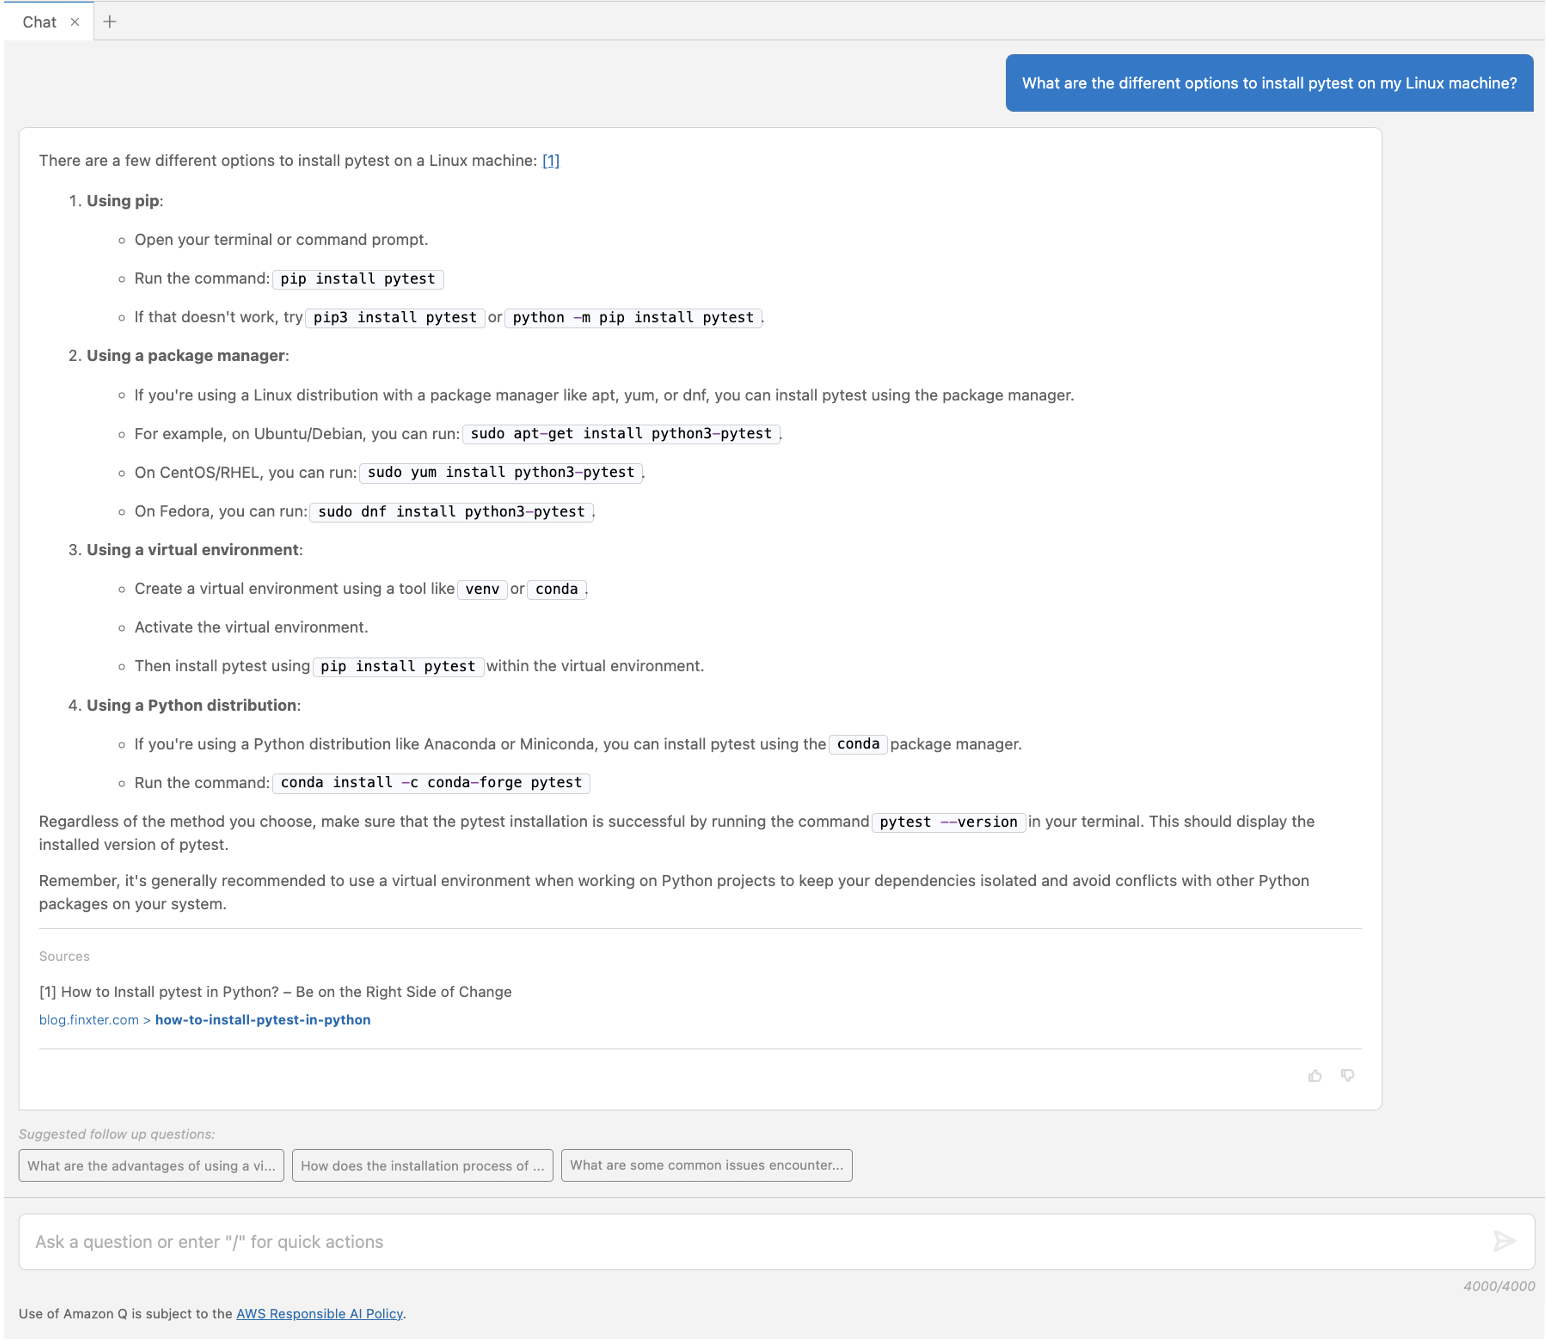
In Figure 1, Amazon Q Developer answers with popular frameworks (pytest, unittest, Moto, AWS SAM Command Line Interface, and Powertools for AWS Lambda) including a brief description for each of them. It provides a reference to the sources of its response at the bottom and suggested follow up questions. As a next step, you may want to refine what you are looking for with a follow-up question. Amazon Q Developer uses the context from your previous questions and answers to give more precise answers as you continue the conversation. For example, one of the frameworks it suggested using was pytest. If you don’t know how to install that locally, you can ask something like “What are the different options to install pytest on my Linux machine?”. As shown in Figure 2, Amazon Q Developer provides installation recommendation using Python.
Figure 2: Options to install pytest
Example – Explain concepts
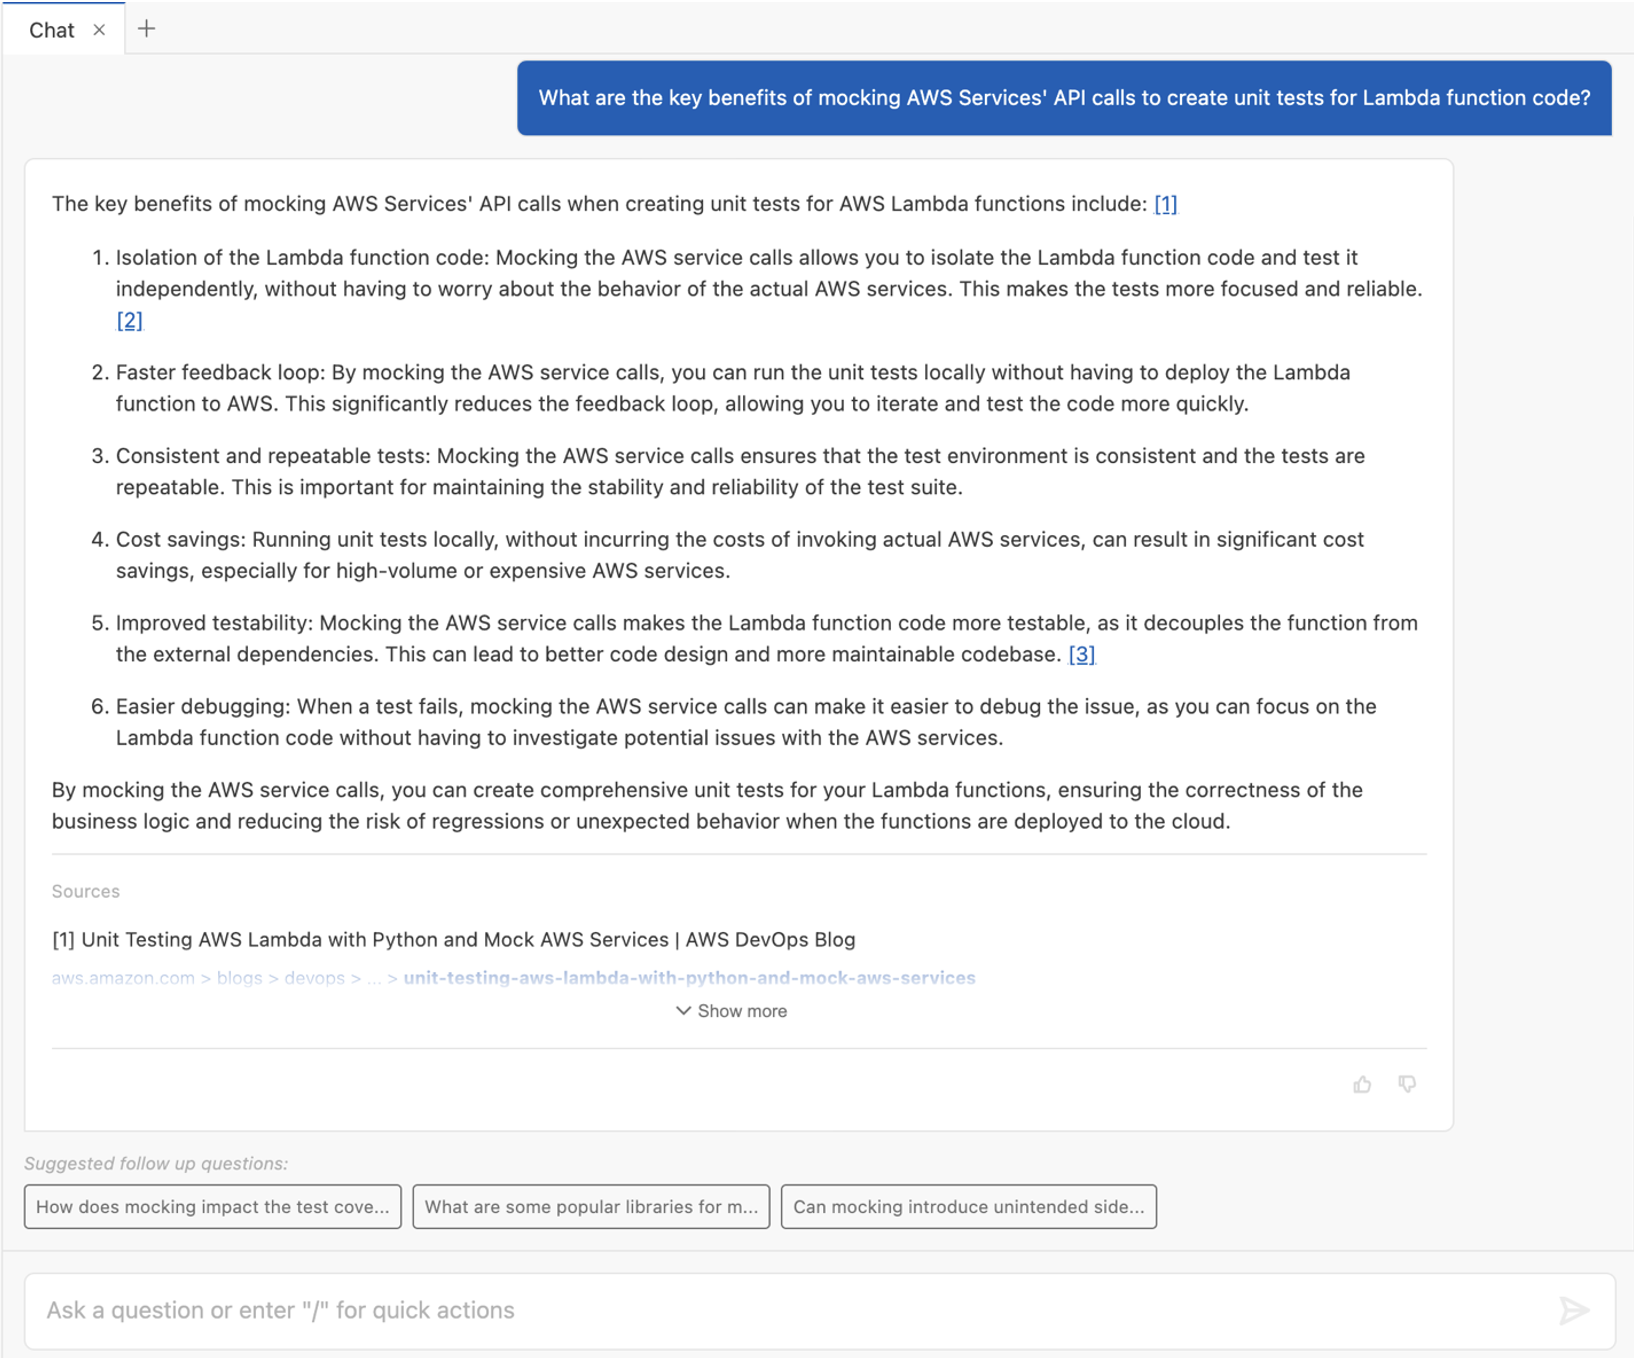
Amazon Q Developer can also help you to get up to speed with testing concepts, such as mocking service dependencies. Let’s ask another follow up question to explain the benefits of mocking AWS services.
Figure 3: Benefits of mocking AWS services
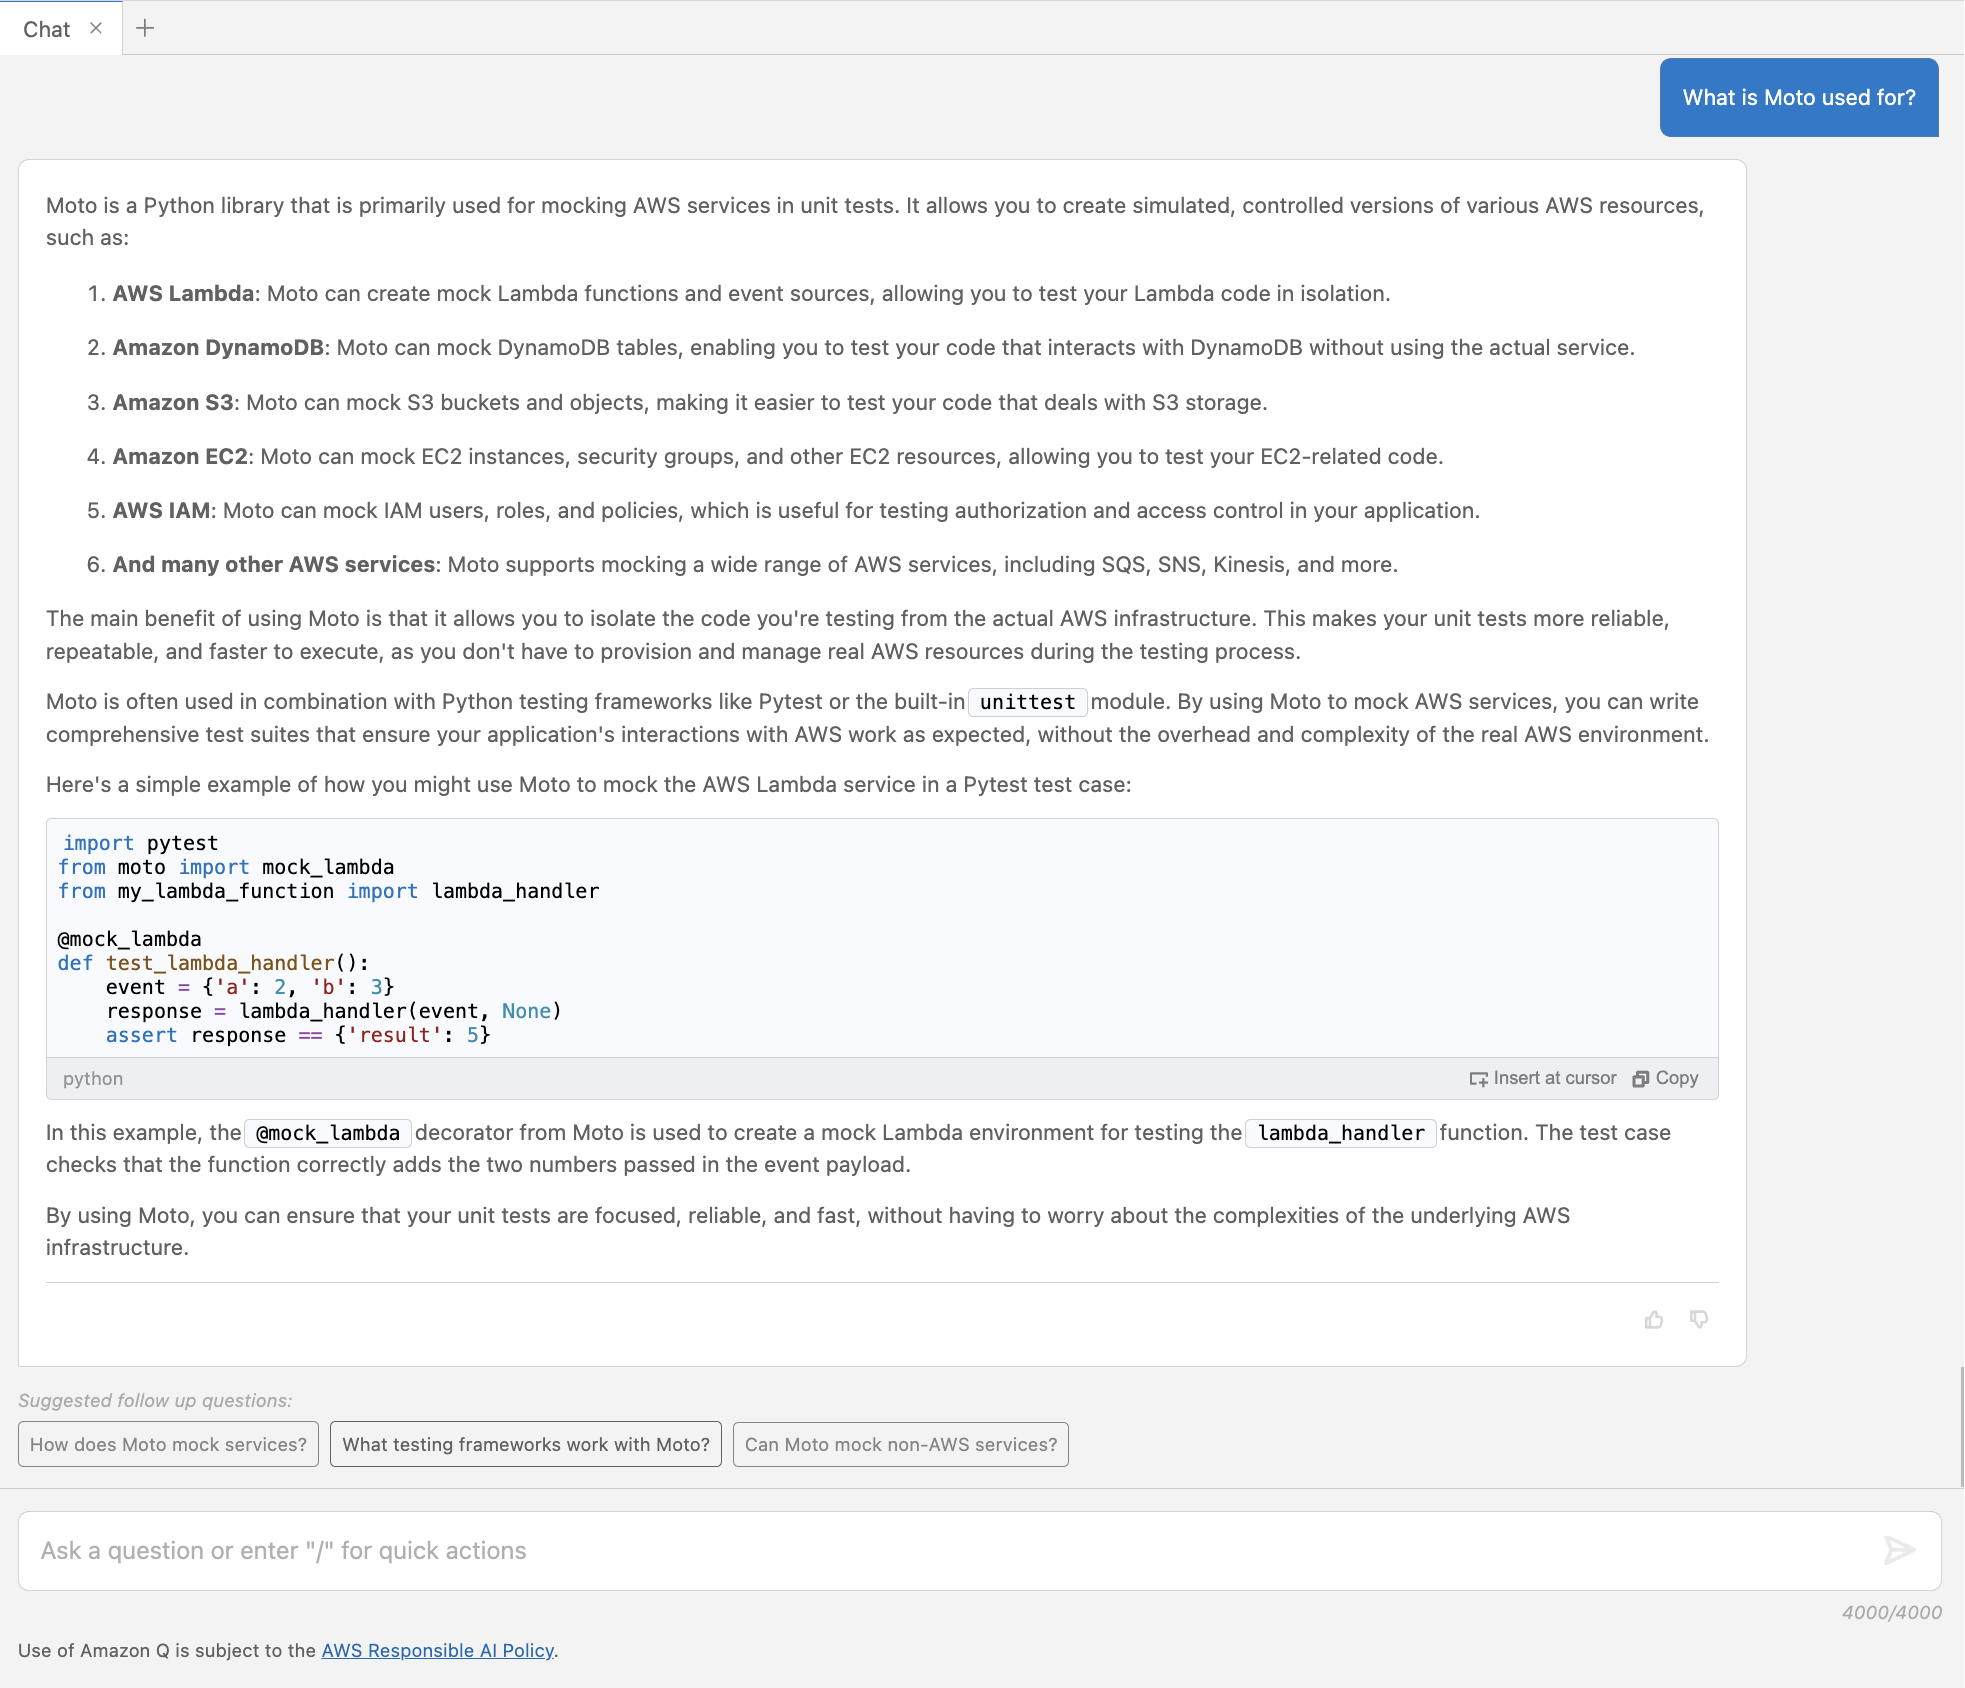
The above conversation in Figure 3 shows how Amazon Q Developer can help to understand concepts. Let’s learn more about Moto.
Figure 4: Follow up question about Moto
In Figure 4, Amazon Q Developer gives more details about the Moto framework and provides a short example code snippet for mocking an AWS Lambda service.
Best Practice – Write clear prompts
Writing clear prompts helps you to get the desired answers from Amazon Q. A lack of clarity and topic understanding may result in unclear questions and irrelevant or off-target responses. Note how those prompts contain specific description of what the answer should provide. For example, Figure 1 includes the programming language (Python) and service (AWS Lambda) to be considered in the expected answer. If unfamiliar with a topic, leverage Amazon Q Developer as part of your research, to better understand that topic.
Using Amazon Q Developer to identify unit test cases
Understanding the purpose and intended functionality of the code is important for developing relevant test cases. We introduce an example use case in Python, which handles payroll calculation for different hour rates, hours worked, and tax rates.
"""
This module provides a Payroll class to calculate the net pay for an employee.

The Payroll class takes in the hourly rate, hours worked, and tax rate, and
calculates the gross pay, tax amount, and net pay.
"""

class Payroll:
    """
    A class to handle payroll calculations.
    """

    def __init__(self, hourly_rate: float, hours_worked: float, tax_rate: float):
        self._validate_inputs(hourly_rate, hours_worked, tax_rate)
        self.hourly_rate = hourly_rate
        self.hours_worked = hours_worked
        self.tax_rate = tax_rate

    def _validate_inputs(self, hourly_rate: float, hours_worked: float, tax_rate: float) -> None:
        """
        Validate the input values for the Payroll class.

        Args:
            hourly_rate (float): The employee's hourly rate.
            hours_worked (float): The number of hours the employee worked.
            tax_rate (float): The tax rate to be applied to the employee's gross pay.

        Raises:
            ValueError: If the hourly rate, hours worked, or tax rate is not a positive number,
            or if the tax rate is not between 0 and 1.
        """
        if hourly_rate <= 0:
            raise ValueError("Hourly rate must be a non-negative number.")
        if hours_worked < 0:
            raise ValueError("Hours worked must be a non-negative number.")
        if tax_rate < 0 or tax_rate >= 1:
            raise ValueError("Tax rate must be between 0 and 1.")

    def gross_pay(self) -> float:
        """
        Calculate the employee's gross pay.

        Returns:
            float: The employee's gross pay.
        """
        return self.hourly_rate * self.hours_worked

    def tax_amount(self) -> float:
        """
        Calculate the tax amount to be deducted from the employee's gross pay.

        Returns:
            float: The tax amount.
        """
        return self.gross_pay() * self.tax_rate

    def net_pay(self) -> float:
        """
        Calculate the employee's net pay after deducting taxes.

        Returns:
            float: The employee's net pay.
        """
        return self.gross_pay() - self.tax_amount()
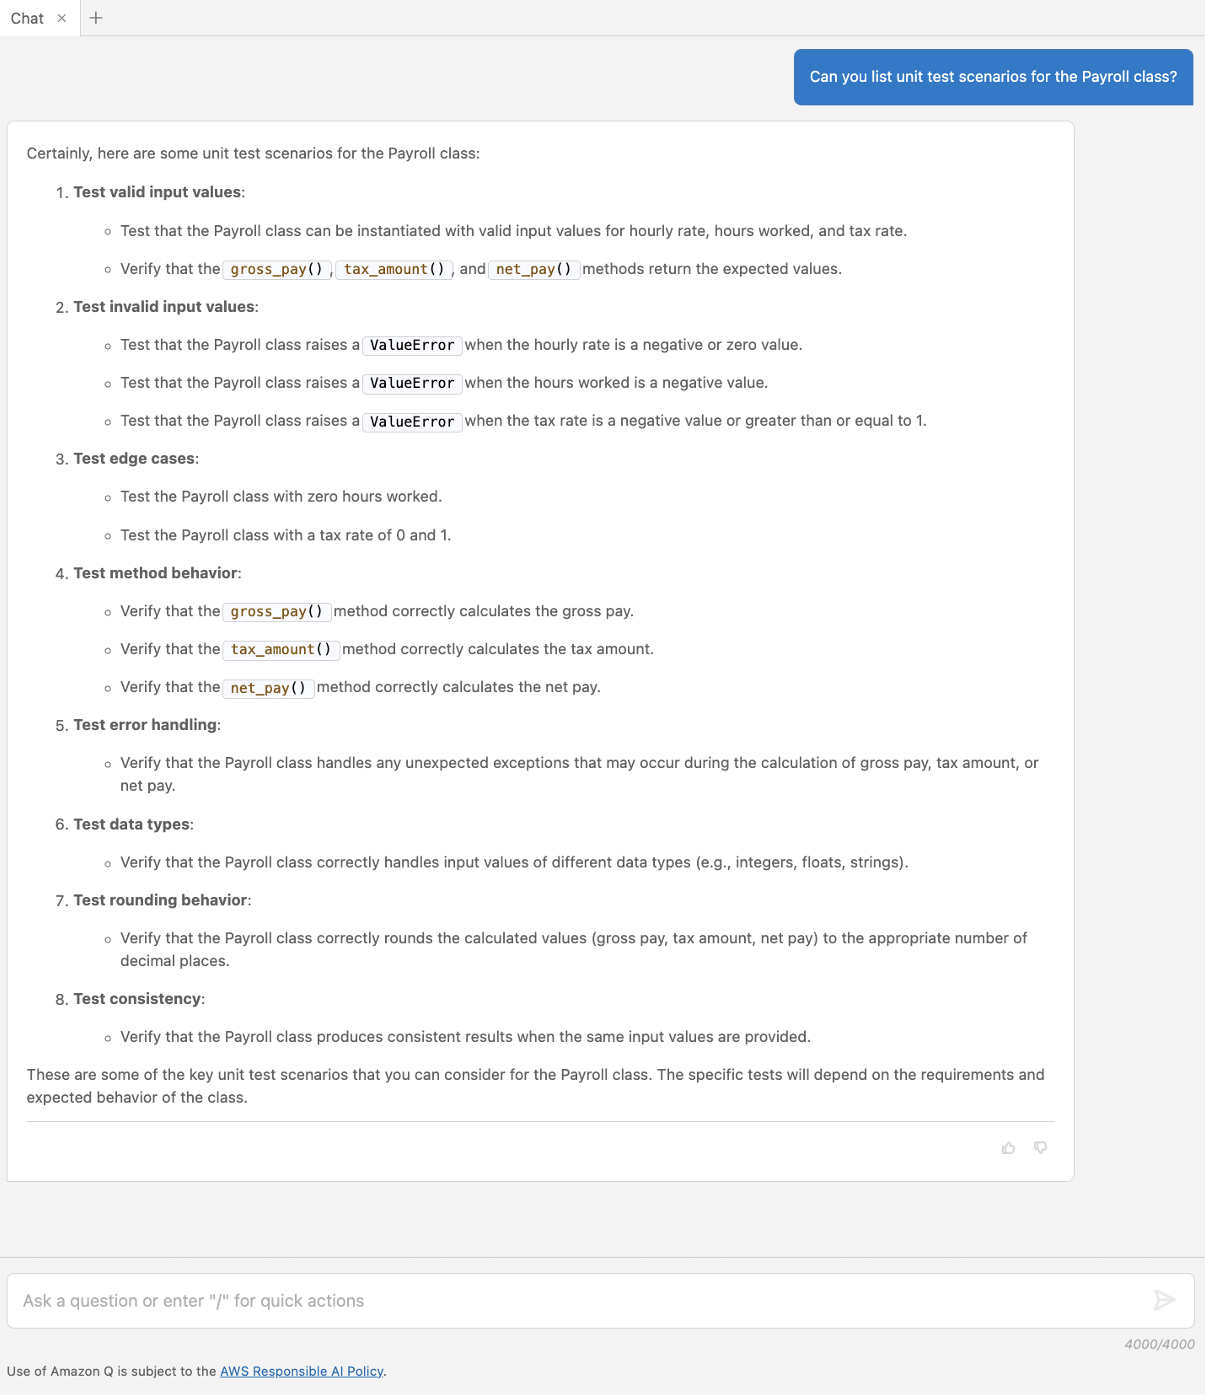
The example shows how Amazon Q Developer can be used to identify test scenarios before writing the actual cases. Let’s ask Amazon Q Developer to suggest test cases for the Payroll class.
Figure 5: Suggest unit test scenarios
In Figure 5, Amazon Q Developer provides a list of different scenarios specific to the Payroll class, including valid, error, and edge cases.
Using Amazon Q Developer to write unit tests
Developers can have a collaborative conversation with Amazon Q Developer, which helps to unpack the code and think through testing cases to check that important test cases are captured but also edge cases are identified. This section focuses on how to facilitate the quick generation of unit test cases, based on the cases recommended in the previous section. Let’s start with a question around best practices when writing unit tests with pytest.
Figure 6: Recommended best practices for testing with pytest
In Figure 6, Amazon Q Developer provides a list of best practices for writing effective unit tests. Let’s follow up by asking to generate one of the suggested test cases.
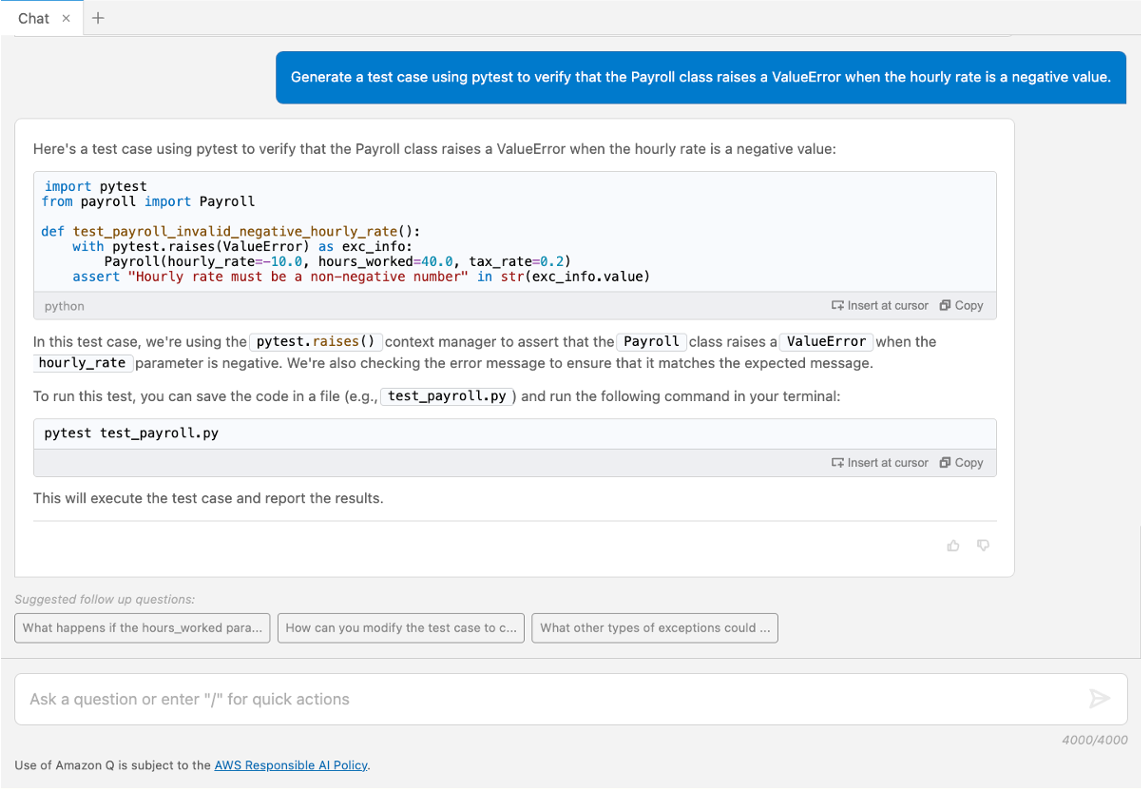
Figure 7: Generate a unit test case
Amazon Q Developer includes code in its response which you can copy or insert directly into your file by choosing Insert at cursor. Figure 7 displays valid unit tests covering some of the suggested scenarios and best practices, such as being simple and holding descriptive naming. It also states how to run the test using a command for the terminal.
Best Practice – Provide context
Context allows Amazon Q Developer to offer tailored responses that are more in sync with the conversation. In the chat interface, the flow of the ongoing conversation and past interactions are a critical contextual element. Other ways to provide context are selecting the code-under-test, keeping any relevant files, such as test examples, open in the editor and leveraging conversation context such as asking for best practices and example test scenarios before writing the test cases.
Using Amazon Q Developer to refactor unit tests
To improve code quality, Amazon Q Developer can be used to recommend improvements and refactor parts of the code base. To illustrate Amazon Q Developer refactoring functionality, we prepared test cases for the Payroll class which deviate from some of the suggested best practices.
Example – Send to Amazon Q Refactor
Let’s follow up by asking to refactor the code built-in Amazon Q > Refactor functionality.
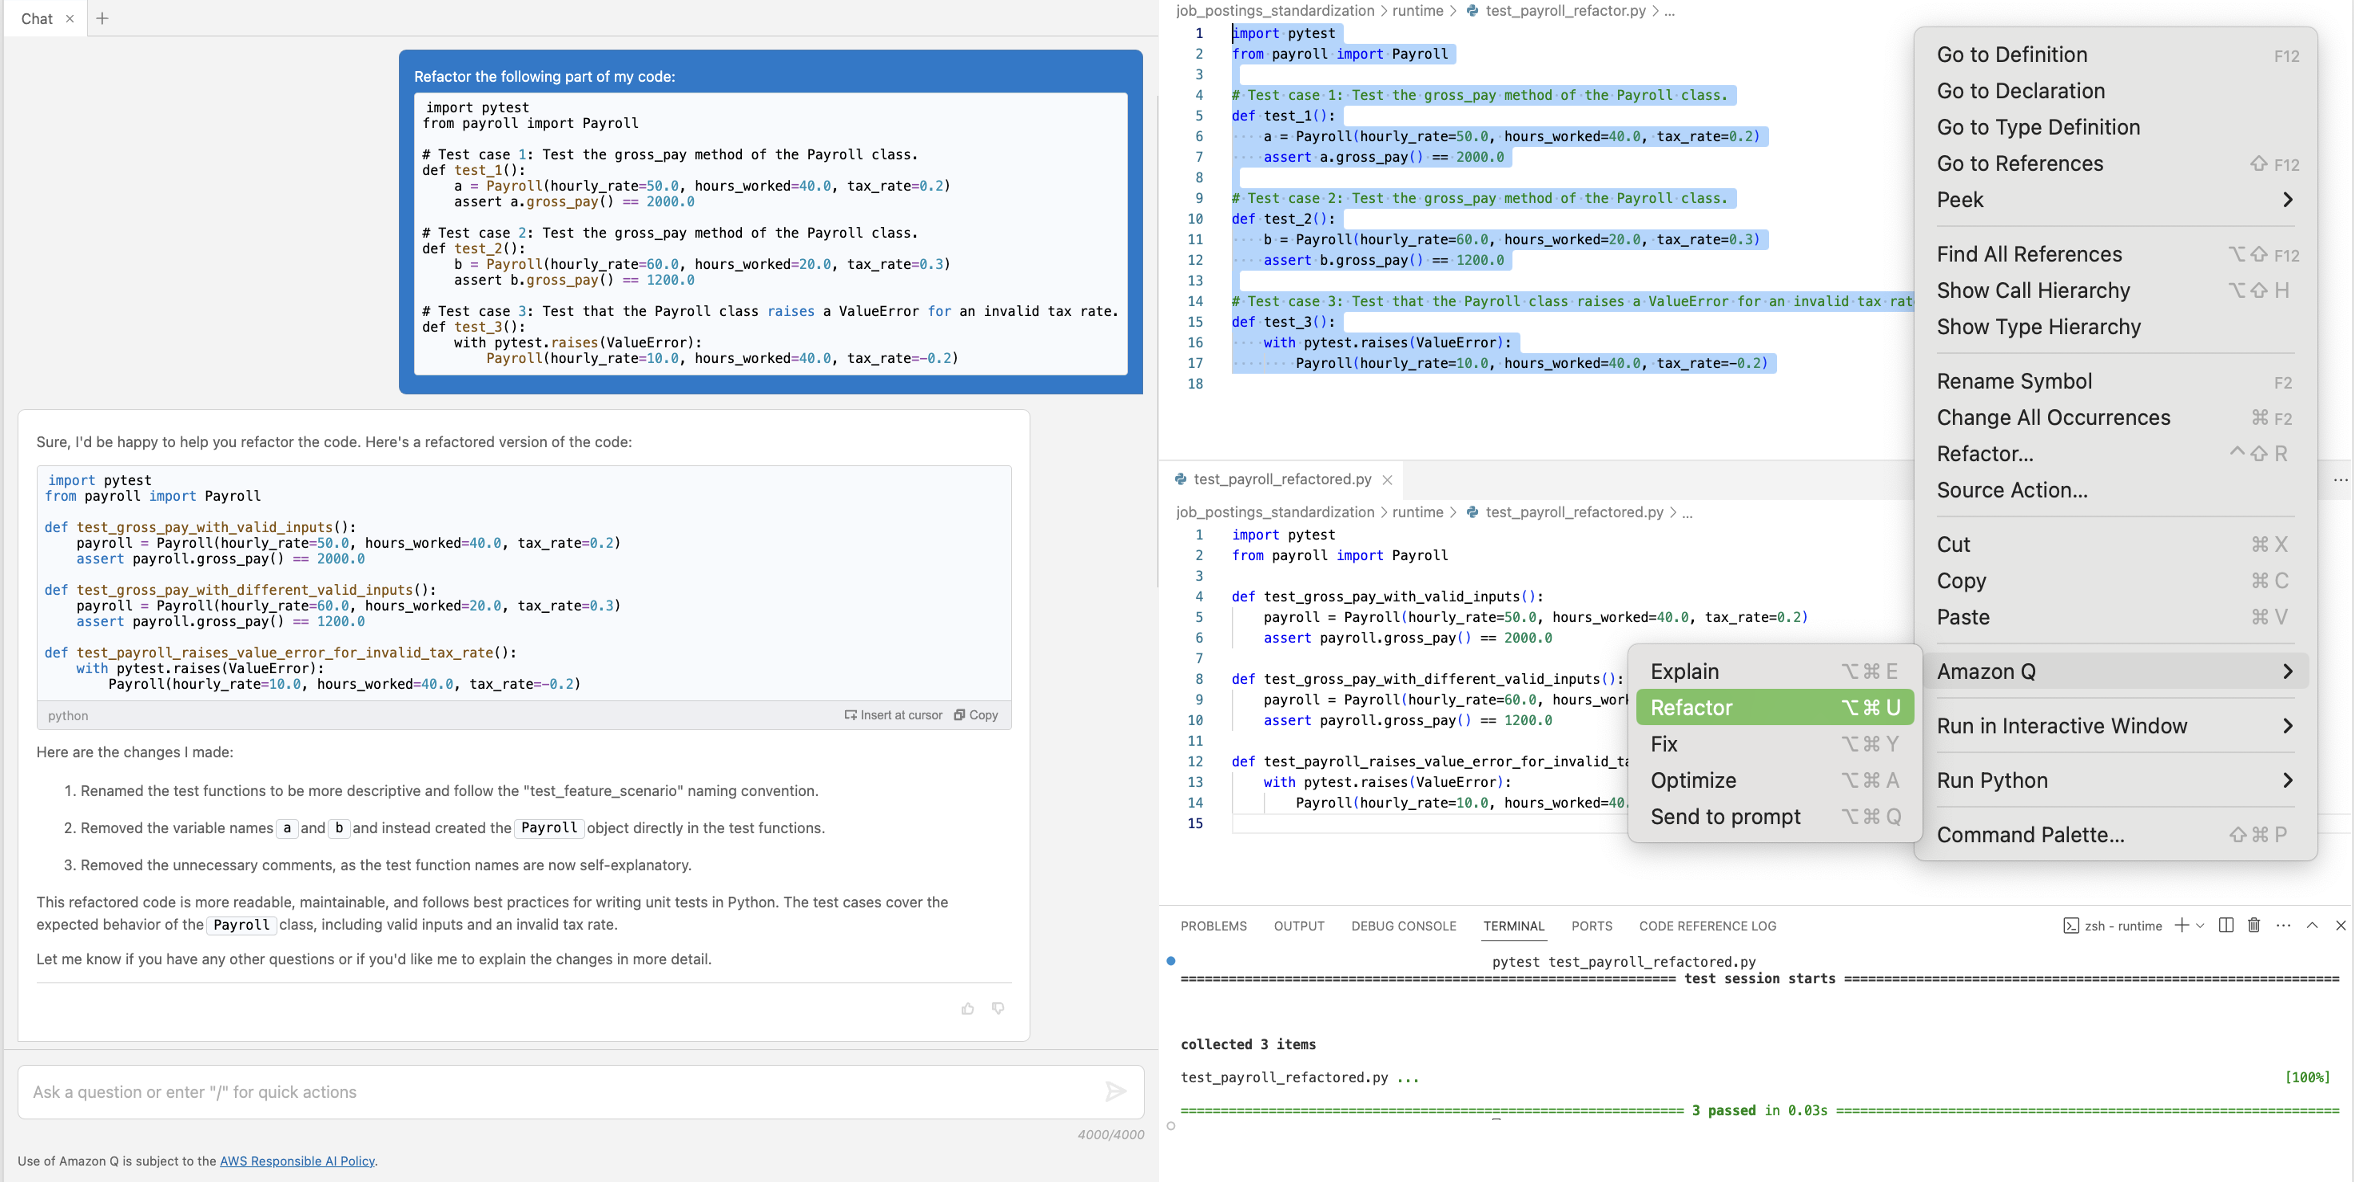
Figure 8: Refactor test cases
In Figure 8, the refactoring renamed the function and variable names to be more descriptive and therefore removed the comments. The recommendation is inserted in the second file to verify it runs correctly.
Best Practice – Apply human judgement and continuously interact with Amazon Q Developer
Note that code generations should always be reviewed and adjusted before used in your projects. Amazon Q Developer can provide you with initial guidance, but you might not get a perfect answer. A developer’s judgement should be applied to value usefulness of the generated code and iterations should be used to continuously improve the results.
Using Amazon Q Developer for mocking dependencies and generating sample data
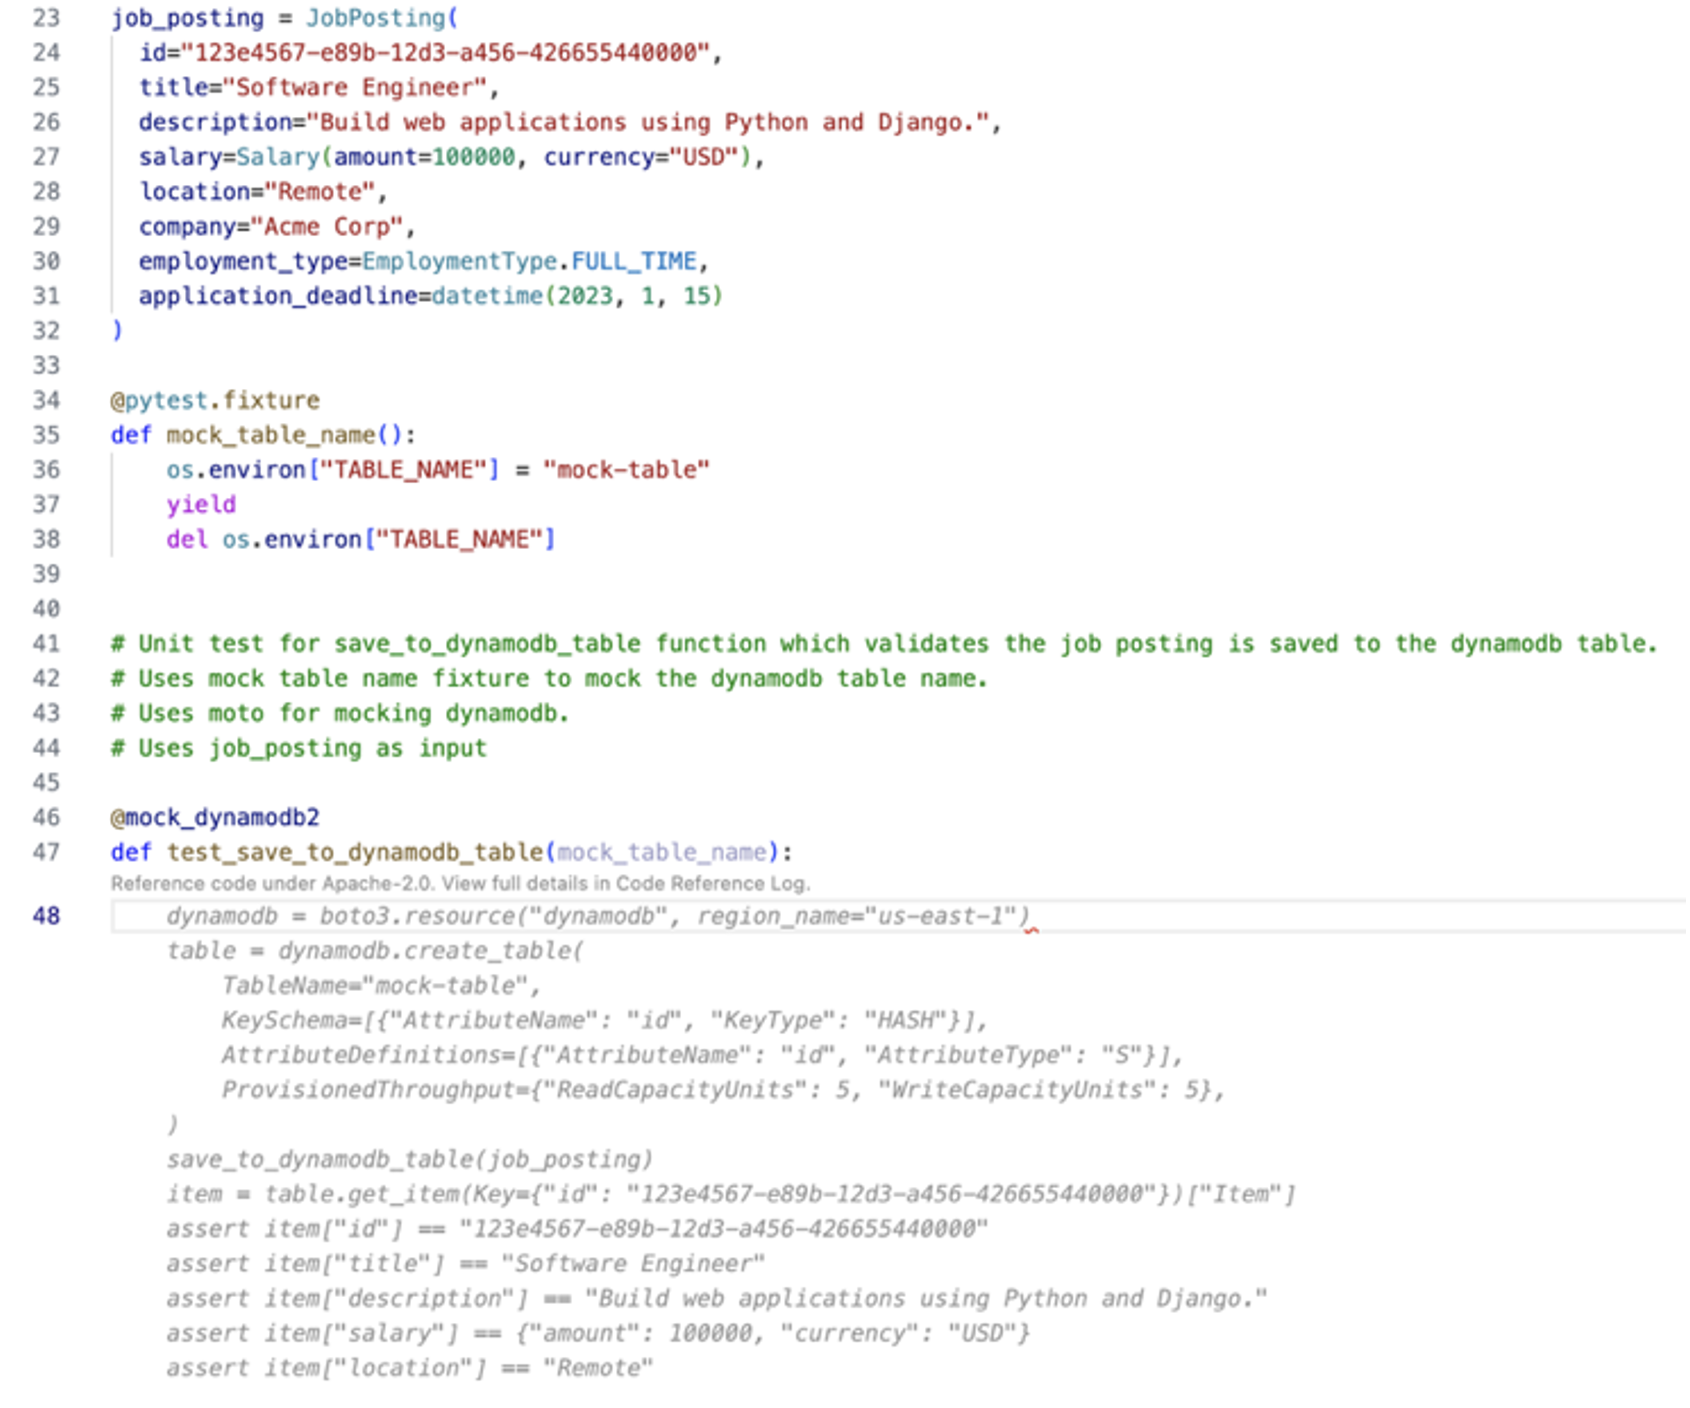
More complex application architectures may require developers to mock dependencies and use sample data to test specific functionalities. The second code example contains a save_to_dynamodb_table function that writes a job_posting object into a specific Amazon DynamoDB table. This function references the TABLE_NAME environment variable to specify the name of the table in which the data should be saved.
We break down the tasks for Amazon Q Developer into three smaller steps for testing: Generate a fixture for mocking the TABLE_NAME environment variable name, generate instances of the given class to be used as test data, and generate the test.
Example – Generate fixtures
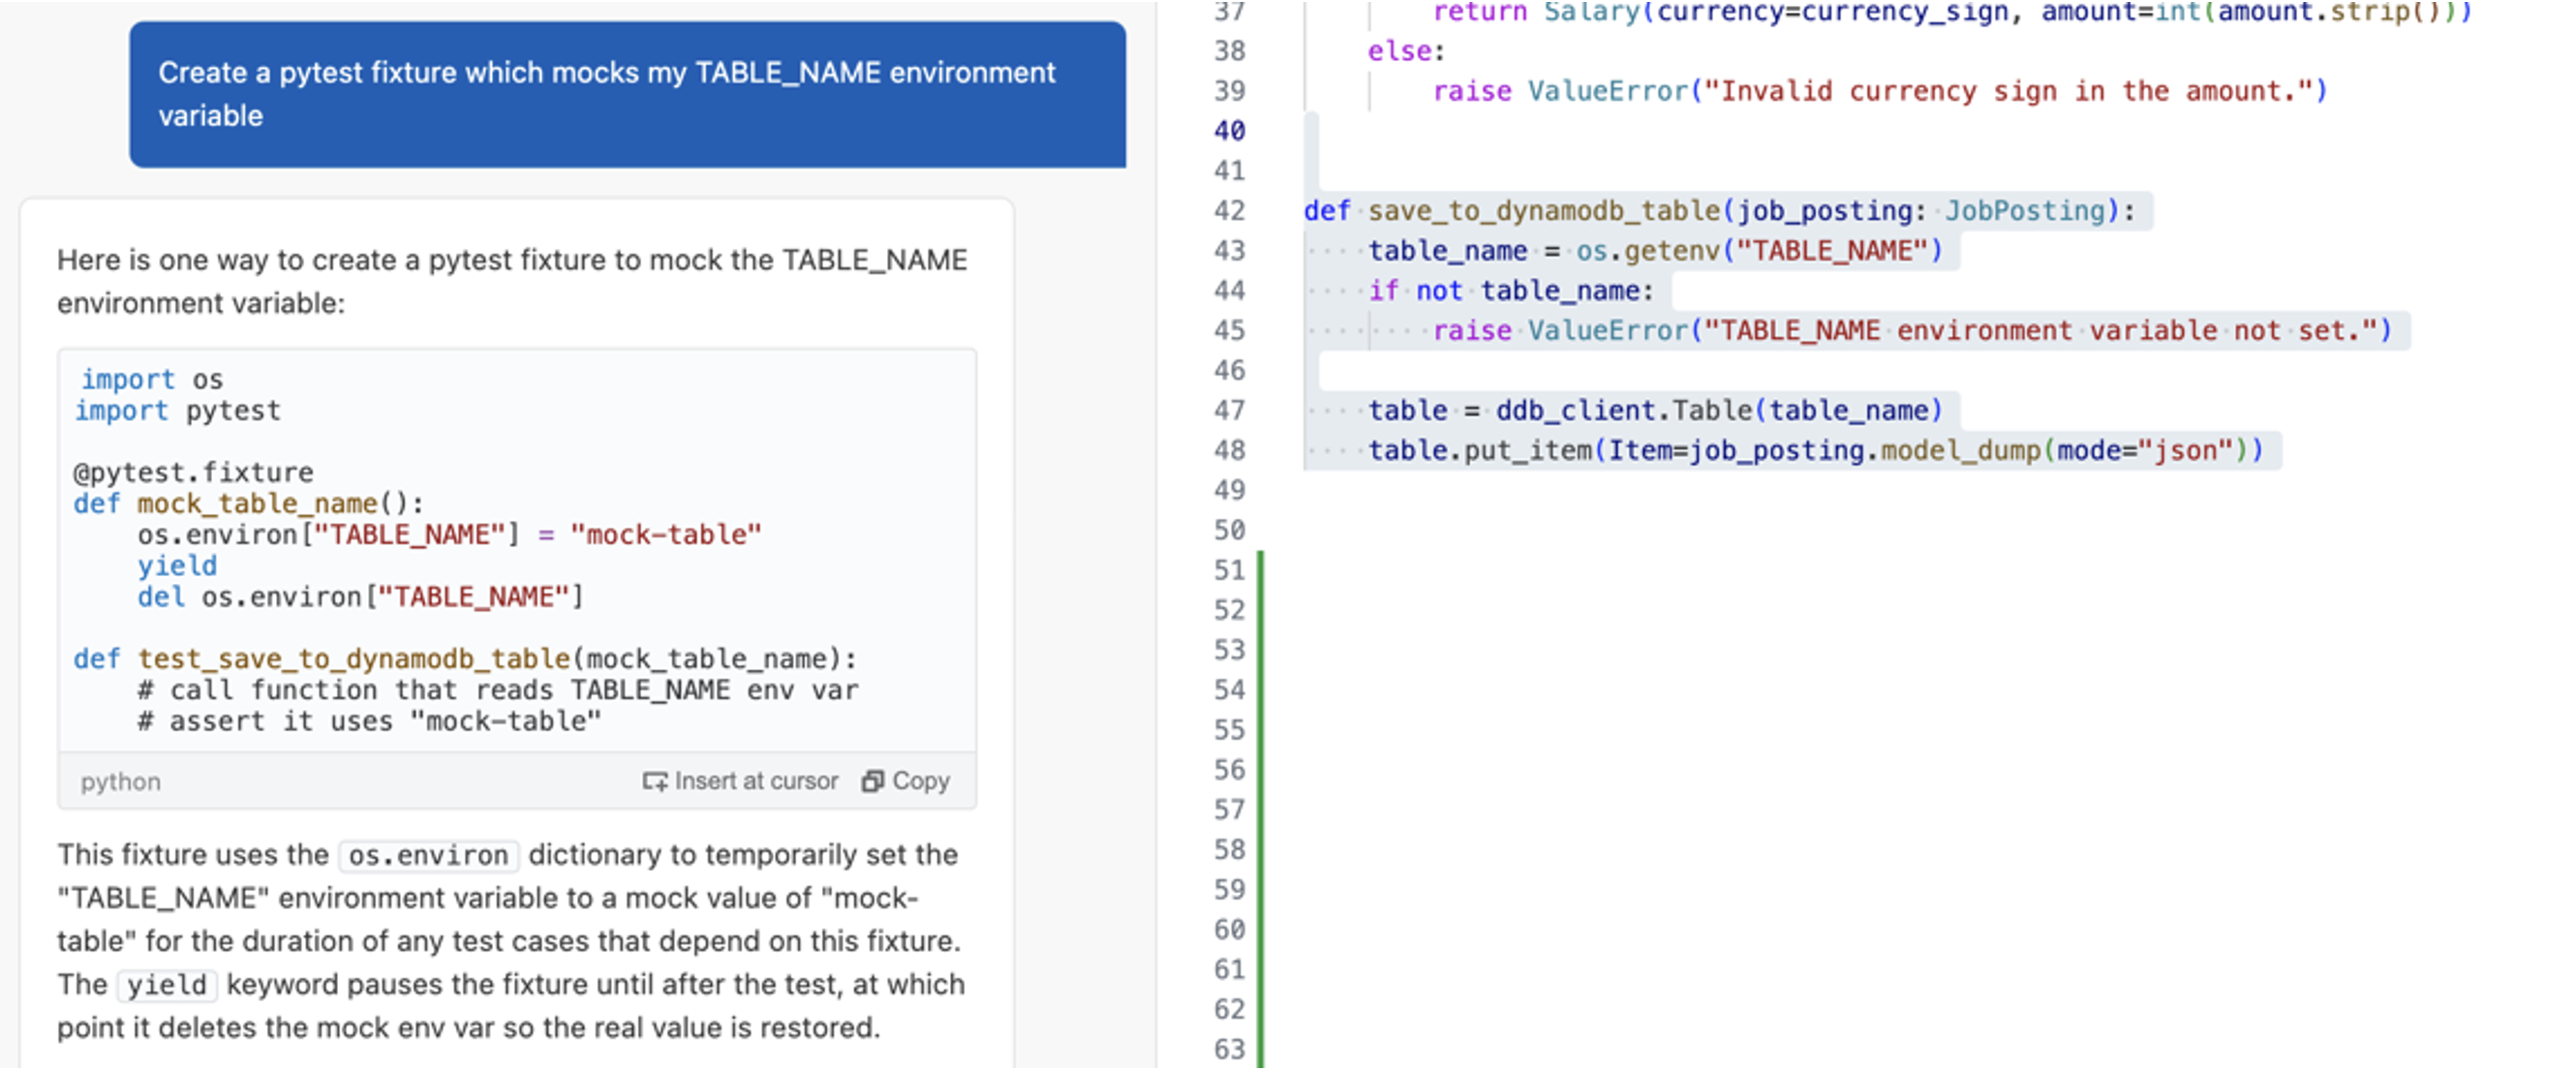
Pytest provides the capability to define fixtures to set defined, reliable, and consistent context for tests. Let’s ask Amazon Q Developer to write a fixture for the TABLE_NAME environment variable.
Figure 9: Generate a pytest fixture
The result in Figure 9 shows that Amazon Q Developer generated a simple fixture for the TABLE_NAME environment variable. It provides code showing how to use the fixture in the actual test case with additional comments for its content.
Example – Generate data
Amazon Q Developer provides capabilities that can help you generate input data for your tests based on a schema, data model, or table definition. The save_to_dynamodb_table saves an instance of the job posting class to the table. Let’s ask Amazon Q Developer to create a sample instance based on this definition.
Figure 10: Generate sample data
The answer shows a valid instance of the class in Figure 10 containing common example values for the fields.
Example – Generate unit test cases with context
The code being tested relies on an external library, boto3. To make sure that this dependency is included, we leave a comment specifying that boto3 should be mocked using the Moto library. Additionally, we tell Amazon Q Developer to consider the test instance named job_posting and the fixture named mock_table_name for reference. Developers can now provide a prompt to generate the test case using the context from previous tasks or use comments as inline prompts to generate the test within the test file itself.
Figure 11: Inline prompts for generating unit test case
Figure 11 shows the recommended code using inline prompts, which can be accepted as the unit test for the save_to_dynamodb_table function.
Best Practice – Break down larger tasks into smaller ones
For cases where Amazon Q Developer does not have much context or example code to refer to, such as writing unit tests from scratch, it is helpful to break down the tasks into smaller tasks. Amazon Q Developer will get more context with each step and can result in more effective responses.
Conclusion
Amazon Q Developer is a powerful tool that simplifies the process of writing and executing unit tests for your application. The examples provided in this post demonstrated that it can be a helpful companion throughout different stages of your unit test process. From initial learning to investigation and writing of test cases, the Chat, Generate, and Refactor capabilities allow you to speed up and improve your test generation. Using clear and concise prompts, context, an iterative approach, and small scoped tasks to interact with Amazon Q Developer improves the generated answers.
To learn more about Amazon Q Developer, see the following resources:
Many organizations with workloads hosted on AWS leverage the advantage of AWS services like AWS CloudFormation, AWS CodeDeploy, and other AWS developer tools while integrating with their existing development workflows. These customers seek to maintain their preferred version control systems, such as GitHub, and continue using their established continuous integration and continuous deployment (CI/CD) pipelines from popular solutions, like Azure DevOps.
AWS Toolkit for Azure DevOps is an extension for Microsoft Azure DevOps and Microsoft Azure DevOps Server that makes it easy to manage and deploy applications using AWS. It provides tasks that enable integration with many AWS services. It can also run commands using the AWS Tools for Windows PowerShell module and the AWS Command Line Interface (AWS CLI).
Solution Overview
For this blog post, we use Azure Repos as version control. Our Continuous Integration/Continuous Deployment (CI/CD) pipeline is in Azure DevOps. We use AWS CloudFormation to deploy a sample web application and the required infrastructure in AWS. We then use the AWS CodeDeploy Blue/Green deployment method to deploy a newer version of the code to the sample web application running on Amazon EC2 instances in AWS.
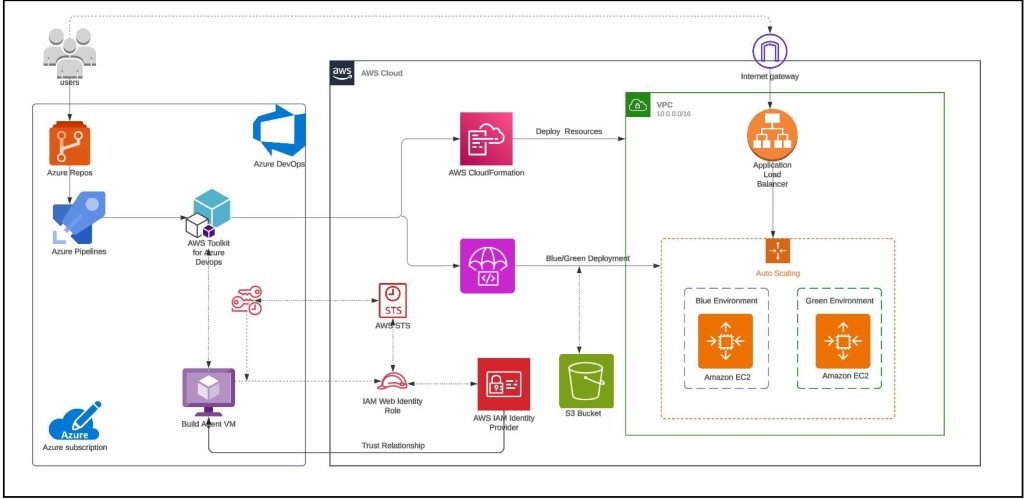
For build agent, we have used self-hosted Linux agent running on Ubuntu virtual machine with a user-assigned managed identity in Azure. Azure DevOps customers opt for self-hosted agents when their requirements surpass the capabilities offered by Microsoft-hosted agents. Instead of storing and securing long-term credentials, the Azure Pipeline tasks get temporary credential information from AWS Security Token Service (AWS STS) through an OpenID Connect (OIDC) provider in AWS Identity and Access Management (IAM) to access AWS resources. Figure 1 shows the solution architecture that explains the setup. The sample application code and the CloudFormation template used in this example are available in this GitHub repository.
Figure 1 – Sample solution architecture
The solution architecture involves the following steps:
User pushes code to an Azure Repo that automatically runs an Azure DevOps Pipeline.
The pipeline agent acquires AWS STS provided temporary security credentials using OpenID Connect (OIDC) and assuming an IAM Role with the permissions. The IAM Role’s trust policy allows the Azure Pipelines OIDC Identity Provider to assume the role.
Pipeline tasks use the temporary credentials to invoke CloudFormation to provision resources defined in the template.
The subsequent pipeline task starts a CodeDeploy Blue/Green deployment
Note: You can also use Amazon EC2 Instances to run the self-hosted Azure DevOps agent. For build agents running on EC2 instances, the tasks can automatically get credential and region information from instance metadata associated with the Amazon EC2 instance. To use Amazon EC2 instance metadata credentials, the instance must have started with an instance profile that references a role that grants permissions to the task. This allows the role to make calls to AWS on your behalf. For more information, see Using an IAM role to grant permissions to applications running on Amazon EC2 instances.
Note: Skip Step 3 through Step 6 if you are running the Azure DevOps agent on Amazon EC2 Instances
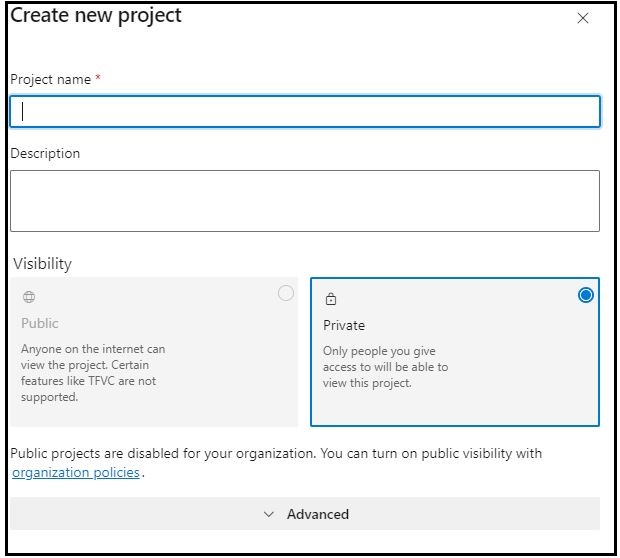
Step 3: Register a new application in Azure
In the Azure portal, select Microsoft Entra ID.
Select App registrations.
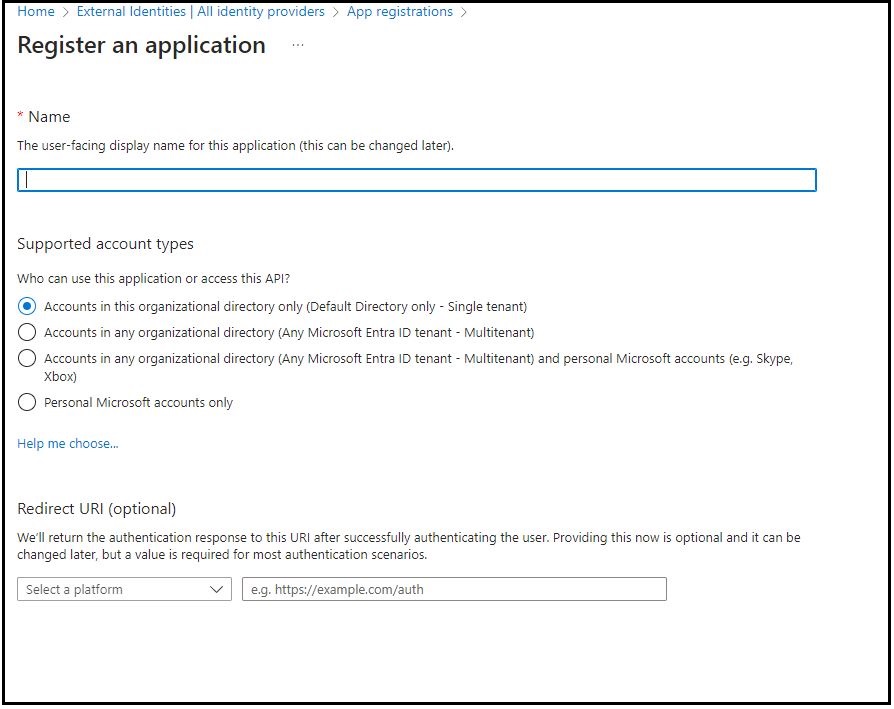
Choose New registration.
Enter a name for your application and then select an option in Supported account types (in this example, we chose Accounts in this Organization directory only). Leave the other options as is. Then choose Register.
Figure 3 – Register an application in Microsoft Entra ID.
Step 4: Configure the application ID URI
In the Azure portal, select Microsoft Entra ID.
Select App registrations.
On the App registrations page, select All applications and choose the newly registered application.
On the newly registered application’s overview page, choose Application ID URI and then select Add.
On the Edit application ID URI page, enter the value of the URI, which looks like urn://<name of the application> or api://<name of the application>.
You will use the application ID URI as the audience in the identity provider (idP) section of AWS.
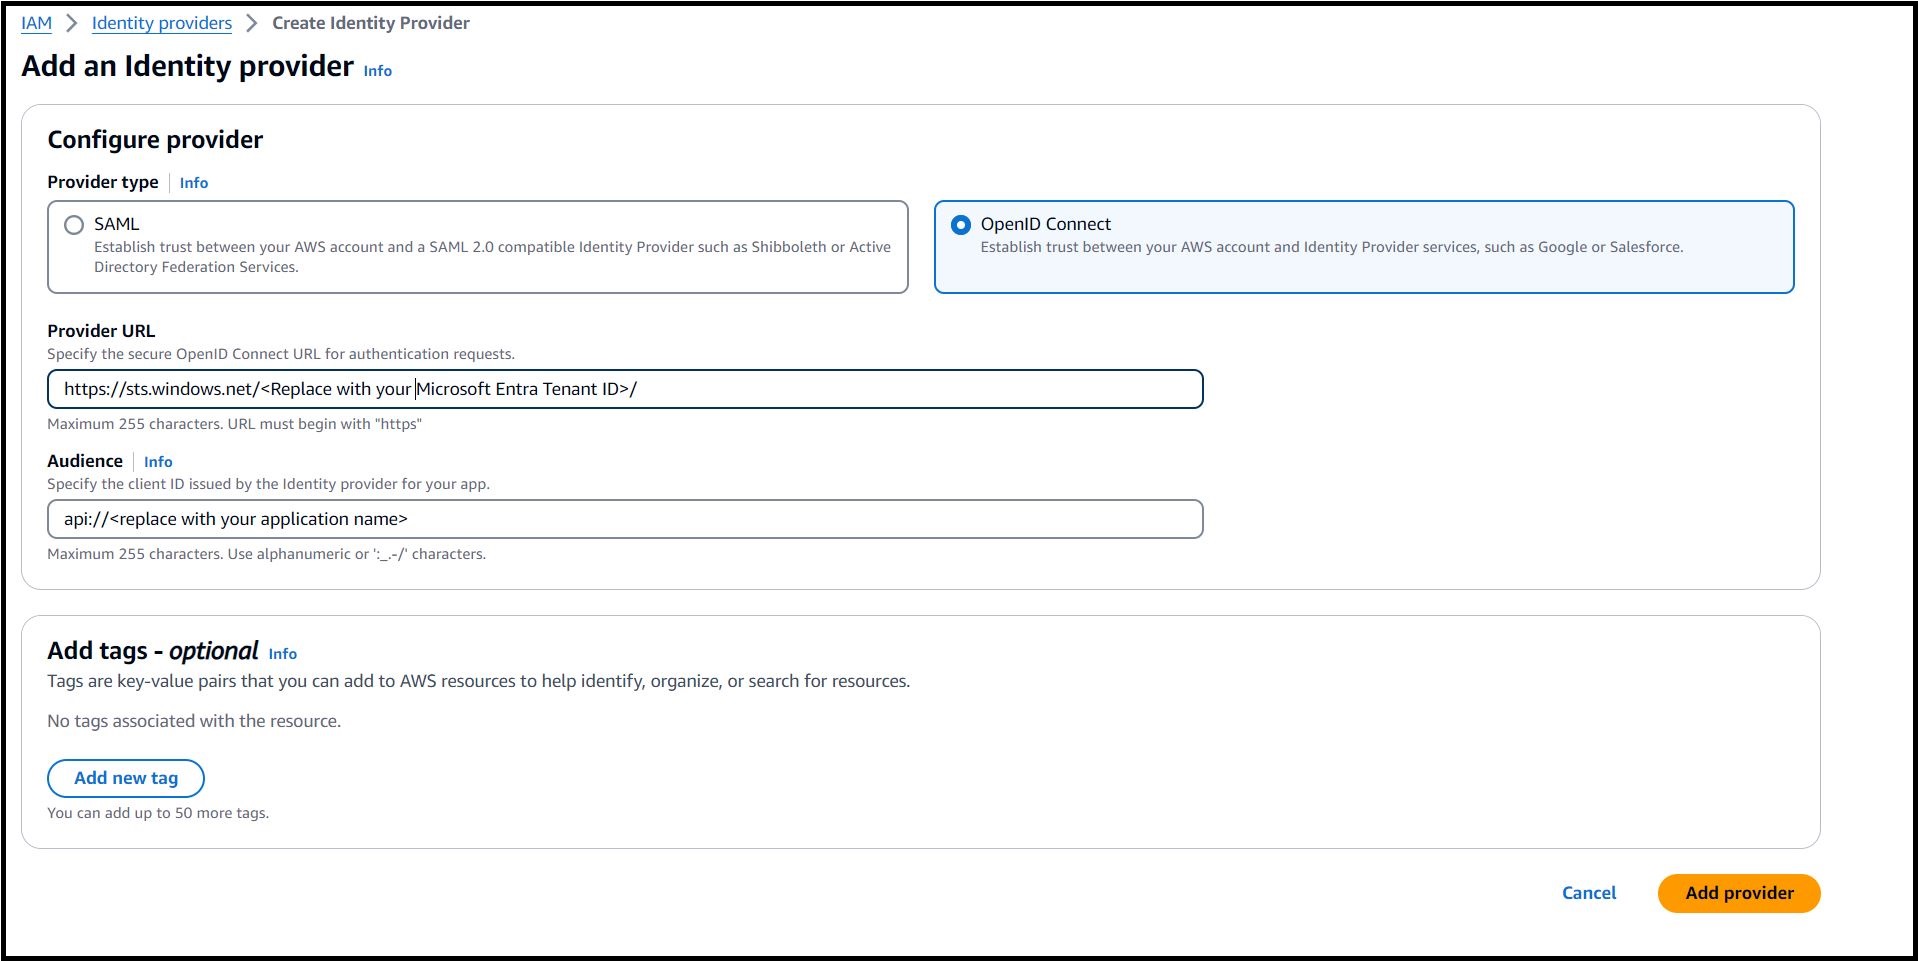
For Provider URL, enter https://sts.windows.net/<Microsoft Entra Tenant ID>. Replace <Microsoft Entra Tenant ID> with your Tenant ID from Azure. This allows only identities from your Azure tenant to access your AWS resources.
For Audience use the application ID URI from enterprise application configured in Step 4.
Figure 4 – Configure OpenID Connect provider in AWS.
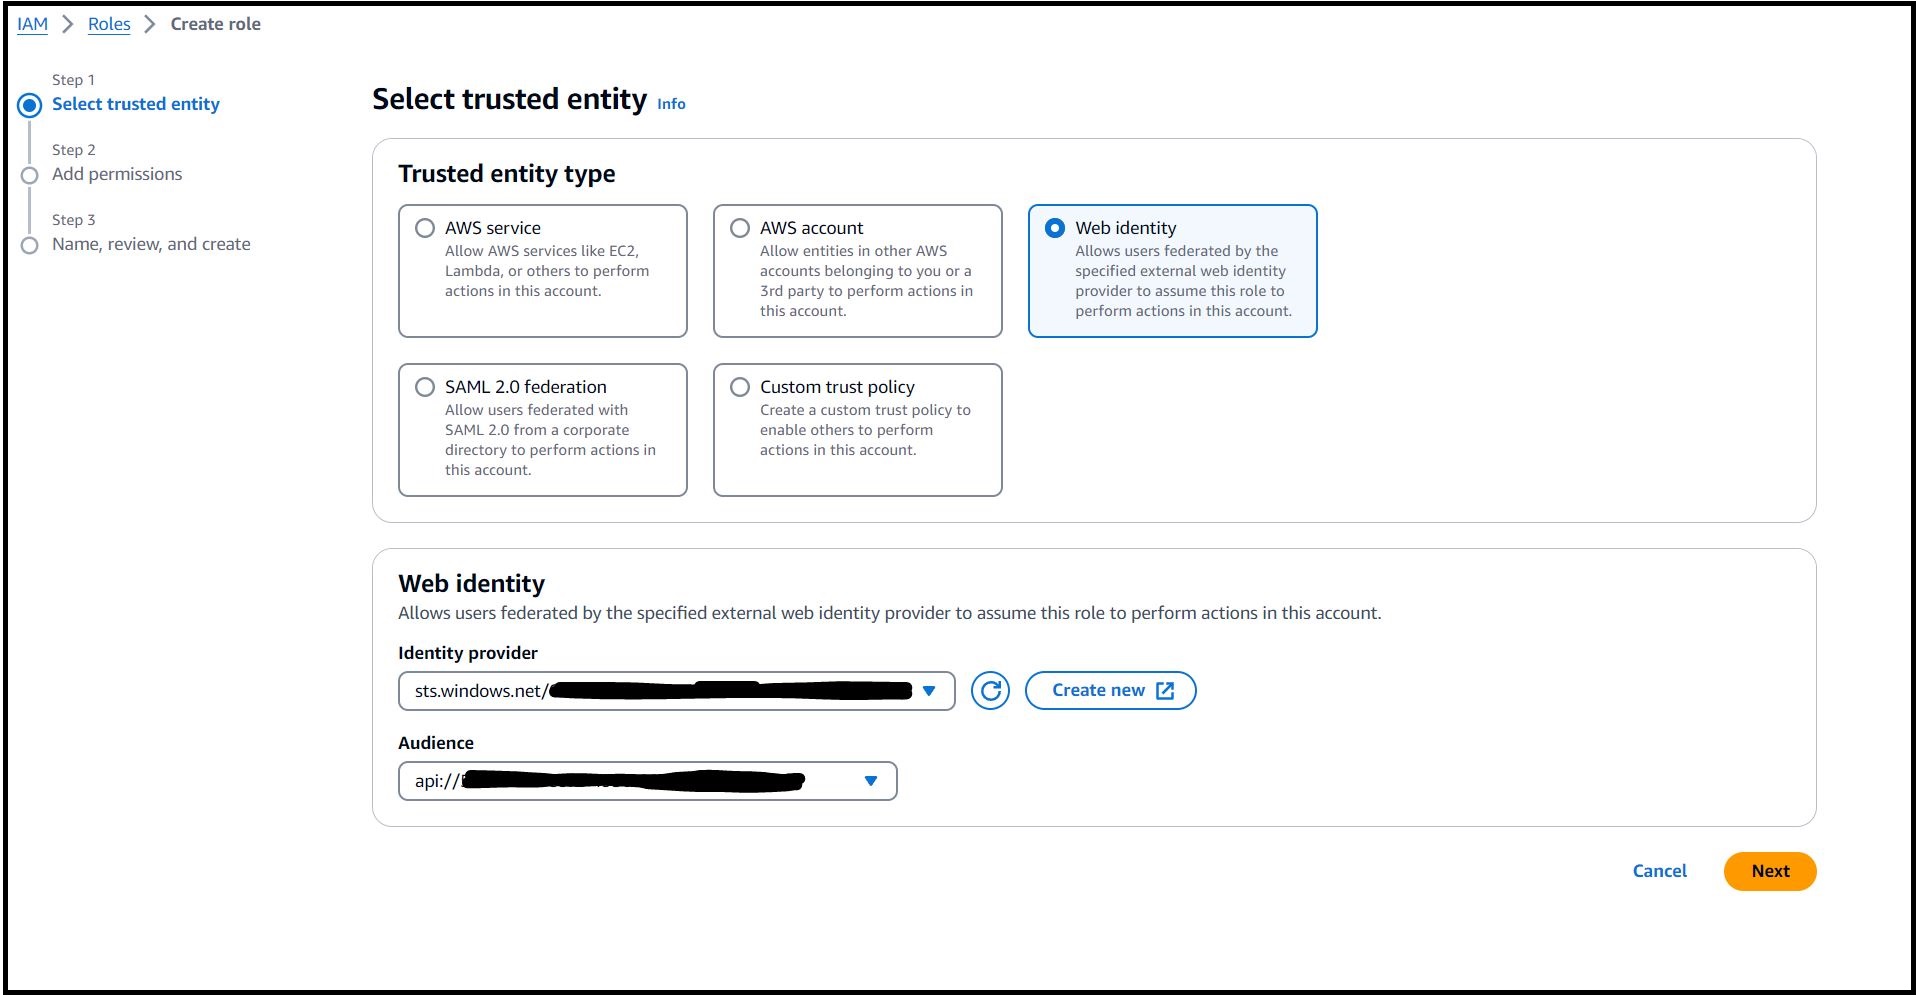
Step 6: Create an IAM Web Identity Role and associate it with the IdP established in Step 5. Select the specific audience that was created previously. Ensure you grant the desired permissions to this role and keep the principle of least privilege in mind when associating the IAM policy with the IAM Role.
In the navigation pane, choose Identity providers, and then select the provider you created in Step 5.
Click on Assign Role and select ‘Create a new role’.
Select Web identity and chose the Audience from the drop down as depicted in Figure 5.
Figure 5 – Create an IAM Web Identity Role in AWS.
Click on Next and choose one or more policies to attach to your new role.
Click on Next.
Enter a role name and validate the trust policy to make sure that only the intended identities assume the role, provide an audience (aud) as the condition in the role trust policy for this IAM role.
Step 7: Install Azure Pipeline agent on the Ubuntu VM.
In this example, we used the following commands to install the latest version of the agent on the VM: Note: 3.241.0 is the current agent version as of publication. Configure and run the agent as per Self-hosted Linux agents instructions.
mkdir myagent && cd myagent
wget https://vstsagentpackage.azureedge.net/agent/3.241.0/vsts-agent-linux-arm64-3.241.0.tar.gz
tar zxvf vsts-agent-linux-arm64-3.241.0.tar.gz
Note: 3.241.0 is the current agent version as of publication.
Step 8: Validate if the agent is installed correctly and shows as online.
Sign in to your organization (https://dev.azure.com/{yourorganization}).
Choose Azure DevOps, Organization settings.
Choose Agent pools.
Select the pool on the right side of the page and then click Agents.
Figure 6- Self-hosted agent installed on Ubuntu VM in Azure
Step 9: Create new Azure Pipelines by following the Create your first pipeline instructions. In this example, we have defined three pipeline tasks as below within the Azure Pipeline.
Bash Script: Task 1 runs a bash script to establish connectivity with AWS that allows authentication through a service principal in Microsoft Entra ID to get temporary credentials using AssumeRoleWithWebIdentity. Note: This task is not required if you use Amazon EC2 Instances to run a self-hosted Azure DevOps agent.
- task: Bash@3
  inputs:
    targetType: 'inline'
    script: |
      AUDIENCE="<replace with application ID URI configured in step 4>"
      ROLE_ARN="<replace with IAM Role ARN created in step 6>"
      access_token=$(curl "http://169.254.169.254/metadata/identity/oauth2/token?api-version=2018-02-01&resource=${AUDIENCE}" -H "Metadata:true" -s| jq -r '.access_token')
      credentials=$(aws sts assume-role-with-web-identity --role-arn ${ROLE_ARN} --web-identity-token ${access_token} --role-session-name AWSAssumeRole | jq '.Credentials' | jq '.Version=1')
      AccessKeyId=$(echo "$credentials" | jq -r '.AccessKeyId')
      SecretAccessKey=$(echo "$credentials" | jq -r '.SecretAccessKey')
      SessionToken=$(echo "$credentials" | jq -r '.SessionToken')
      echo "##vso[task.setvariable variable=AWS.AccessKeyID]$AccessKeyId"
      echo "##vso[task.setvariable variable=AWS.SecretAccessKey]$SecretAccessKey"
      echo "##vso[task.setvariable variable=AWS.SessionToken]$SessionToken"
We have specified no long-term AWS credentials to be used by the tasks in the build agent environment. The tasks are fetching temporary credentials from the named variables in our build- AWS.AccessKeyID, AWS.SecretAccessKey, and AWS.SessionToken.
The IAM authentication and authorization process is as follows:
Azure VM gets an Azure access token from the user assigned managed identity and sends it to AWS STS to retrieve temporary security credentials.
An IAM role created with a valid Azure tenant audience and subject validates that it sourced the claim from a trusted entity and sends temporary security credentials to the requesting Azure VM.
Azure VM accesses AWS resources using the AWS STS provided temporary security credentials.
AWS CloudFormation Create/Update Stack: Task 2 creates a new AWS CloudFormation stack or updates the stack if it exists. In the example below, we deployed a new CloudFormation stack to provision AWS resources using a template file named deploy-app-to-aws.yml:
AWS CodeDeploy Application Deployment: Task 3 deploys an application to Amazon EC2 instance(s) using AWS CodeDeploy. The below example Azure DevOps pipeline task deploys to a CodeDeploy application named ‘aws-toolkit-for-azure-devops‘ and a CodeDeploy deployment group named ‘my-sample-bg-deployment-group‘ in the US East 1 (N. Virginia) region. It took the deployment package from the Azure DevOps pipeline workspace, uploaded to an S3 bucket, and any existing file with the same name is overwritten.
Expanding on the Inputs used in the pipeline tasks:
regionName: The AWS region where the CloudFormation stack will be created or updated.
stackName: This parameter specifies the name of the CloudFormation stack. Here, it’s set to ‘aws-sample-app‘.
templateSource: This parameter specifies the source of the CloudFormation template. Here, it’s set to ‘file‘, which means the template is a local file.
templateFile: This parameter specifies the path to the CloudFormation template file.
applicationName: This parameter specifies the name of the CodeDeploy application to be used for deployment.
deploymentGroupName: This parameter specifies the name of the CodeDeploy deployment group to which the application will be deployed.
deploymentRevisionSource: Specifies the source of the revision to be deployed. Here, it’s set to ‘workspace‘, which means the task will create or use an existing zip archive in the location specified to Revision Bundle, upload the archive to an S3 bucket and supply the key of the S3 object to CodeDeploy as the revision source.
bucketName: This parameter specifies the name of the S3 bucket where the deployment package will be uploaded.
fileExistsBehavior: This parameter specifies the behavior- how AWS CodeDeploy should handle files that already exist in a deployment target location. Here, it’s set to ‘OVERWRITE‘, which means it will overwrite the existing file with the new source file.
To use “S3” as deploymentRevisionSource, you may define your task as below:
trigger:
  branches:
    include:
    - main
stages:
- stage: __default
  jobs:
  - job: Job
    steps:
    - task: AWSShellScript@1
      inputs:
        regionName: 'us-east-1'
        scriptType: 'inline'
        inlineScript: |
          zip -r  $(Build.BuildNumber).zip .
          aws s3 cp $(Build.BuildNumber).zip s3://<Replace with your S3 bucket name>/
    - task: CodeDeployDeployApplication@1
      inputs:
        regionName: 'us-east-1'
        applicationName: 'aws-toolkit-for-azure-devops'
        deploymentGroupName: 'my-sample-bg-deployment-group'
        deploymentRevisionSource: 's3'
        bucketName: '<Replace with your S3 bucket name>'
        bundleKey: $(Build.BuildNumber).zip
Step 10: Run and validate the pipeline.
The pipeline will run automatically when a change is pushed to main branch. From the pipeline run summary you can view the status of your run, both while it is running and when it is complete. Refer View and manage your pipelines for more details.
Navigate to your Azure Devops project (https://dev.azure.com/{yourorganization}/{yourproject}).
Select Pipelines from the left-hand menu to go to the pipelines landing page.
Choose Recent to view recently run pipelines (the default view).
Select a pipeline to manage that pipeline and view the runs.
Choose Runs and choose a job to see the steps for that job.
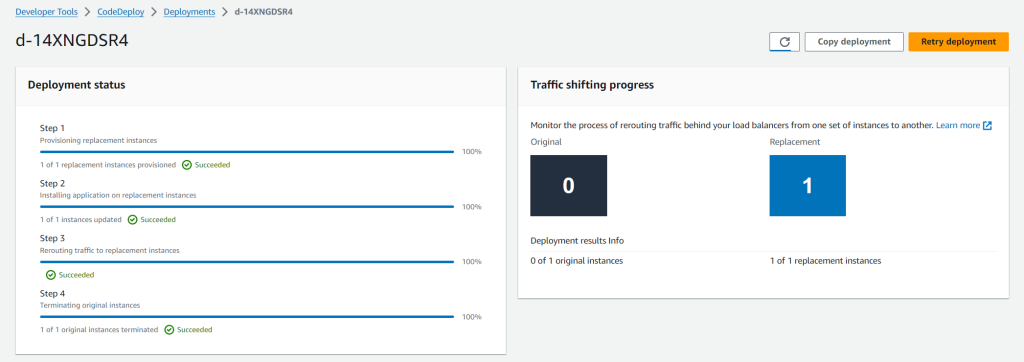
Upon successful completion of the pipeline execution, you can validate the deployment status in the CodeDeploy console. In this example, the successful CodeDeploy deployment looks like:
Figure 7: CodeDeploy Deployment details in AWS console
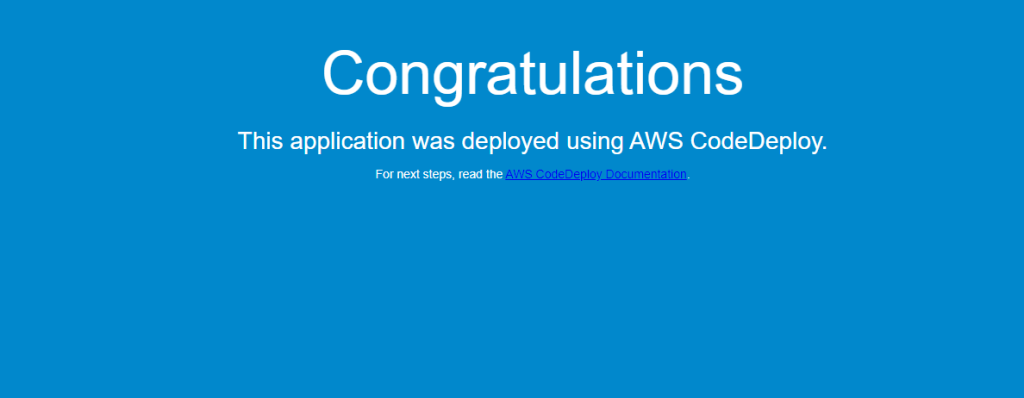
You can also validate the website URL in a browser to confirm if it’s working as expected. After completing the pipeline execution, hit the website URL on a browser to check if it’s working.
On the CloudFormation stack ‘aws-sample-app‘ Outputs tab, look for the WebsiteURL key and click on the URL.
For a successful deployment, it will open a default page similar to Figure 8 below.
Figure 8: Sample application home page
Cleanup
After you have tested and verified your pipeline, remove all resources created for this example to avoid incurring any unintended expenses.
In this blog post, we showed how to leverage the AWS Toolkit for Azure DevOps extension to deploy resources to your AWS account from Azure DevOps and perform a Blue/Green deployment using AWS CodeDeploy. We explored obtaining temporary credentials in AWS Identity and Access Management (IAM) by leveraging the AWS Security Token Service (AWS STS) with Azure managed identities and Azure App Registration. This approach enhances security by eliminating the need to store long-term credentials, adhering to best practices for credential management. For customers looking to host their code on GitHub and deploy to AWS, they can leverage GitHub Actions with AWS CodeBuild’s support for managed GitHub Action runners. This integration potentially helps to reduce costs and simplifying the operational overhead associated with CI/CD processes.
In today’s world, technology is quickly evolving and some practices that were once considered the gold standard are quickly becoming outdated. At Cloudflare, we stay close to industry changes to ensure that we can provide the best solutions to our customers. One practice that we’re continuing to see in use that no longer serves its original purpose is certificate pinning. In this post, we’ll dive into certificate pinning, the consequences of using it in today’s Public Key Infrastructure (PKI) world, and alternatives to pinning that offer the same level of security without the management overhead.
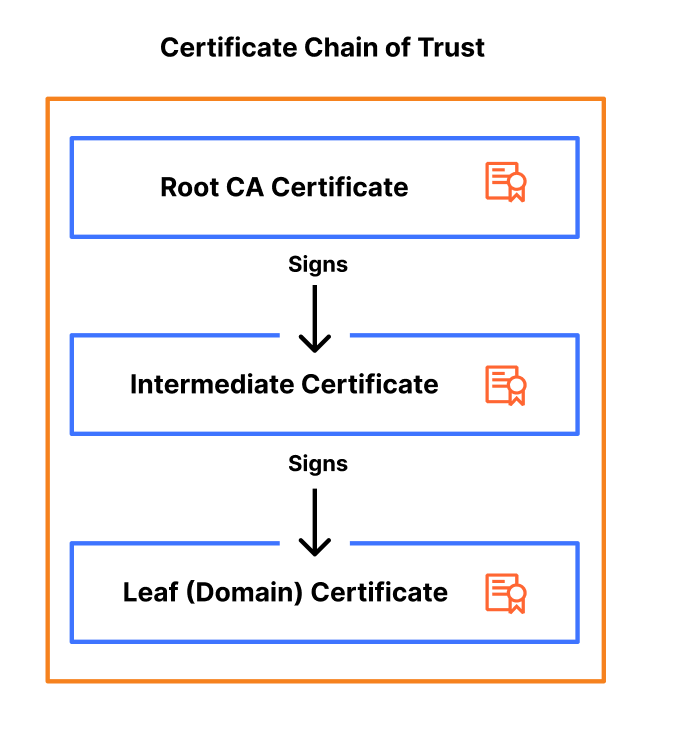
PKI exists to help issue and manage TLS certificates, which are vital to keeping the Internet secure – they ensure that users access the correct applications or servers and that data between two parties stays encrypted. The mis-issuance of a certificate can pose great risk. For example, if a malicious party is able to issue a TLS certificate for your bank’s website, then they can potentially impersonate your bank and intercept that traffic to get access to your bank account. To prevent a mis-issued certificate from intercepting traffic, the server can give a certificate to the client and say “only trust connections if you see this certificate and drop any responses that present a different certificate” – this practice is called certificate pinning.
In the early 2000s, it was common for banks and other organizations that handle sensitive data to pin certificates to clients. However, over the last 20 years, TLS certificate issuance has evolved and changed, and new solutions have been developed to help customers achieve the security benefit they receive through certificate pinning, with simpler management, and without the risk of disruption.
Cloudflare’s mission is to help build a better Internet, which is why our teams are always focused on keeping domains secure and online.
Why certificate pinning is causing more outages now than it did before
Certificate pinning is not a new practice, so why are we emphasizing the need to stop using it now? The reason is that the PKI ecosystem is moving towards becoming more agile, flexible, and secure. As a part of this change, certificate authorities (CAs) are starting to rotate certificates and their intermediates, certificates that bridge the root certificate and the domain certificate, more frequently to improve security and encourage automation.
These more frequent certificate rotations are problematic from a pinning perspective because certificate pinning relies on the exact matching of certificates. When a certificate is rotated, the new certificate might not match the pinned certificate on the client side. If the pinned certificate is not updated to reflect the contents of the rotated certificate, the client will reject the new certificate, even if it’s valid and issued by the same CA. This mismatch leads to a failure in establishing a secure connection, causing the domain or application to become inaccessible until the pinned certificate is updated.
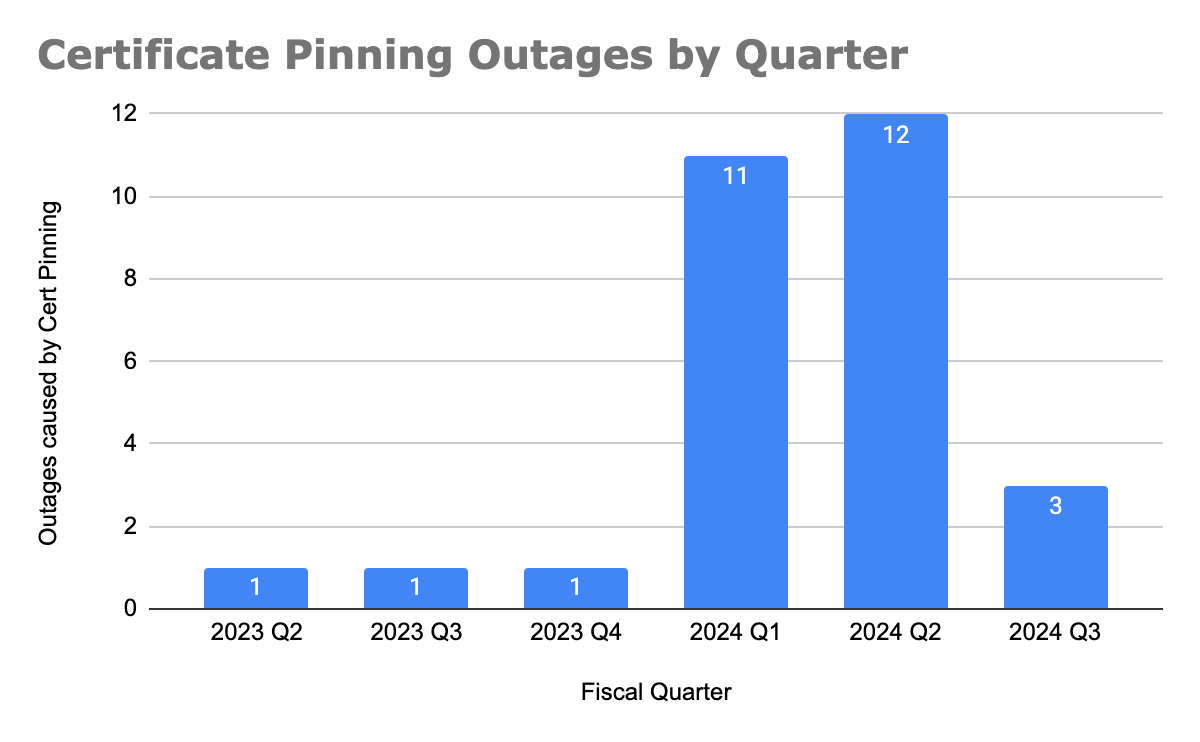
Since the start of 2024, we have seen the number of customer reported outages caused by certificate pinning significantly increase. (As of this writing, we are part way through July and Q3 has already seen as many outages as the last three quarters of 2023 combined.)
We can attribute this rise to two major events: Cloudflare migrating away from using DigiCert as a certificate authority and Google and Let’s Encrypt intermediate CA rotations.
Before migrating customer’s certificates away from using DigiCert as the CA, Cloudflare sent multiple notifications to customers to inform them that they should update or remove their certificate pins, so that the migration does not impact their domain’s availability.
However, what we’ve learned is that almost all customers that were impacted by the change were unaware that they had a certificate pin in place. One of the consequences of using certificate pinning is that the “set and forget” mentality doesn’t work, now that certificates are being rotated more frequently. Instead, changes need to be closely monitored to ensure that a regular certificate renewal doesn’t cause an outage. This goes to show that to implement certificate pinning successfully, customers need a robust system in place to track certificate changes and implement them.
We built our Universal SSL pipeline to be resilient and redundant, ensuring that we can always issue and renew a TLS certificate on behalf of our customers, even in the event of a compromise or revocation. CAs are starting to make changes like more frequent certificate rotations to encourage a move towards a more secure ecosystem. Now, it’s up to domain owners to stop implementing legacy practices like certificate pinning, which cause breaking changes, and instead start adopting modern standards that aim to provide the same level of security, but without the management overhead or risk.
Modern standards & practices are making the need for certificate pinning obsolete
Shorter certificate lifetimes
Over the last few years, we have seen certificate lifetimes quickly decrease. Before 2011, a certificate could be valid for up to 96 months (eight years) and now, in 2024, the maximum validity period for a certificate is 1 year. We’re seeing this trend continue to develop, with Google Chrome pushing for shorter CA, intermediate, and certificate lifetimes, advocating for 3 month certificate validity as the new standard.
This push improves security and redundancy of the entire PKI ecosystem in several ways. First, it reduces the scope of a compromise by limiting the amount of time that a malicious party could control a TLS certificate or private key. Second, it reduces reliance on certificate revocation, a process that lacks standardization and enforcement by clients, browsers, and CAs. Lastly, it encourages automation as a replacement for legacy certificate practices that are time-consuming and error-prone.
Cloudflare is moving towards only using CAs that follow the ACME (Automated Certificate Management Environment) protocol, which by default, issues certificates with 90 day validity periods. We have already started to roll this out to Universal SSL certificates and have removed the ability to issue 1-year certificates as a part of our reduced usage of DigiCert.
Regular rotation of intermediate certificates
The CAs that Cloudflare partners with, Let’s Encrypt and Google Trust Services, are starting to rotate their intermediate CAs more frequently. This increased rotation is beneficial from a security perspective because it limits the lifespan of intermediate certificates, reducing the window of opportunity for attackers to exploit a compromised intermediate. Additionally, regular rotations make it easier to revoke an intermediate certificate if it becomes compromised, enhancing the overall security and resiliency of the PKI ecosystem.
Cloudflare customers using Advanced Certificate Manager have the ability to choose their issuing CA. The issue is that even if Cloudflare uses the same CA for a certificate renewal, there is no guarantee that the same certificate chain (root or intermediate) will be used to issue the renewed certificate. As a result, if pinning is used, a successful renewal could cause a full outage for a domain or application.
This happens because certificate pinning relies on the exact matching of certificates. When an intermediate certificate is rotated or changed, the new certificate might not match the pinned certificate on the client side. As a result, the client will reject the renewed certificate, even if it’s a valid certificate issued by the same CA. This mismatch leads to a failure on the client side, causing the domain to become inaccessible until the pinned certificate is updated to reflect the new intermediate certificate. This risk of an unexpected outage is a major downside of continuing to use certificate pinning, especially as CAs increasingly update their intermediates as a security measure.
Increased use of certificate transparency
Certificate transparency (CT) logs provide a standardized framework for monitoring and auditing the issuance of TLS certificates. CT logs help detect misissued or malicious certificates and Cloudflare customers can set up CT monitoring to receive notifications about any certificates issued for their domain. This provides a better mechanism for detecting certificate mis-issuance, reducing the need for pinning.
Why modern standards make certificate pinning obsolete
Together, these practices – shorter certificate lifetimes, regular rotations of intermediate certificates, and increased use of certificate transparency – address the core security concerns that certificate pinning was initially designed to mitigate. Shorter lifetimes and frequent rotations limit the impact of compromised certificates, while certificate transparency allows for real time monitoring and detection of misissued certificates. These advancements are automated, scalable, and robust and eliminate the need for the manual and error-prone process of certificate pinning. By adopting these modern standards, organizations can achieve a higher level of security and resiliency without the management overhead and risk associated with certificate pinning.
Reasons behind continued use of certificate pinning
Originally, certificate pinning was designed to prevent monster-in-the-middle (MITM) attacks by associating a hostname with a specific TLS certificate, ensuring that a client could only access an application if the server presented a certificate issued by the domain owner.
Certificate pinning was traditionally used to secure IoT (Internet of Things) devices, mobile applications, and APIs. IoT devices are usually equipped with more limited processing power and are oftentimes unable to perform software updates. As a result, they’re less likely to perform things like certificate revocation checks to ensure that they’re using a valid certificate. As a result, it’s common for these devices to come pre-installed with a set of trusted certificate pins to ensure that they can maintain a high level of security. However, the increased frequency of certificate changes poses significant risk, as many devices have immutable software, preventing timely updates to certificate pins during renewals.
Similarly, certificate pinning has been employed to secure Android and iOS applications, ensuring that only the correct certificates are served. Despite this, both Apple and Google warn developers against the use of certificate pinning due to the potential for failures if not implemented correctly.
Understanding the trade-offs of different certificate pinning implementations
While certificate pinning can be applied at various levels of the certificate chain, offering different levels of granularity and security, we don’t recommend it due to the challenges and risks associated with its use.
Pinning certificates at the root certificate
Pinning the root certificate instructs a client to only trust certificates issued by that specific Certificate Authority (CA).
Advantages:
Simplified management: Since root certificates have long lifetimes (>10 years) and rarely change, pinning at the root reduces the need to frequently update certificate pins, making this the easiest option in terms of management overhead.
Disadvantages:
Broader trust: Most Certificate Authorities (CAs) issue their certificates from one root, so pinning a root CA certificate enables the client to trust every certificate issued from that CA. However, this broader trust can be problematic. If the root CA is compromised, every certificate issued by that CA is also compromised, which significantly increases the potential scope and impact of a security breach. This broad trust can therefore create a single point of failure, making the entire ecosystem more vulnerable to attacks.
Neglected Maintenance: Root certificates are infrequently rotated, which can lead to a “set and forget” mentality when pinning them. Although it’s rare, CAs do change their roots and when this happens, a correctly renewed certificate will break the pin, causing an outage. Since these pins are rarely updated, resolving such outages can be time-consuming as engineering teams try to identify and locate where the outdated pins have been set.
Pinning certificates at the intermediate certificate
Pinning an intermediate certificate instructs a client to only trust certificates issued by a specific intermediate CA, issued from a trusted root CA. With lifetimes ranging from 3 to 10 years, intermediate certificates offer a better balance between security and flexibility.
Advantages:
Better security: Narrows down the trust to certificates issued by a specific intermediate CA.
Simpler management: With intermediate CA lifetimes spanning a few years, certificate pins require less frequent updates, reducing the maintenance burden.
Disadvantages:
Broad trust: While pinning on an intermediate certificate is more restrictive than pinning on a root certificate, it still allows for a broad range of certificates to be trusted.
Maintenance: Intermediate certificates are rotated more frequently than root certificates, requiring more regular updates to pinned certificates.
Less predictability: With CAs like Let’s Encrypt issuing their certificates from varying intermediates, it’s no longer possible to predict which certificate chain will be used during a renewal, making it more likely for a certificate renewal to break a certificate pin and cause an outage.
Pinning certificates at the leaf certificate
Pinning the leaf certificate instructs a client to only trust that specific certificate. Although this option offers the highest level of security, it also poses the greatest risk of causing an outage during a certificate renewal.
Advantages:
High security: Provides the highest level of security by ensuring that only a specific certificate is trusted, minimizing the risk of a monster-in-the-middle attack.
Disadvantages:
Risky: Requires careful management of certificate renewals to prevent outages.
Management burden: Leaf certificates have shorter lifetimes, with 90 days becoming the standard, requiring constant updates to the certificate pin to avoid a breaking change during a renewal.
Alternatives to certificate pinning
Given the risks and challenges associated with certificate pinning, we recommend the following as more effective and modern alternatives to achieve the same level of security (preventing a mis-issued certificate from intercepting traffic) that certificate pinning aims to provide.
Shorter certificate lifetimes
Using shorter certificate lifetimes ensures that certificates are regularly renewed and replaced, reducing the risk of misuse of a compromised certificate by limiting the window of opportunity for attackers.
By default, Cloudflare issues 90-day certificates for customers. Customers using Advanced Certificate Manager can request TLS certificates with lifetimes as short as 14 days.
CAA records to restrict which CAs can issue certificates for a domain
Certification Authority Authorization (CAA) DNS records allow domain owners to specify which CAs are allowed to issue certificates for their domain. This adds an extra layer of security by restricting issuance to trusted authorities, providing a similar benefit as pinning a root CA certificate. For example, if you’re using Google Trust Services as your CA, you can add the following CAA DNS record to ensure that only that CA issues certificates for your domain:
example.com CAA 0 issue "pki.goog"
By default, Cloudflare sets CAA records on behalf of customers to ensure that certificates can be issued from the CAs that Cloudflare partners with. Customers can choose to further restrict that list of CAs by adding their own CAA records.
Certificate Transparency & monitoring
Certificate Transparency (CT) provides the ability to monitor and audit certificate issuances. By logging certificates in publicly accessible CT logs, organizations are able to monitor, detect, and respond to misissued certificates at the time they are issued.
Cloudflare customers can set up CT Monitoring to receive notifications when certificates are issued in their domain. Today, we notify customers using the product about all certificates issued for their domains. In the future, we will allow customers to filter those notifications, so that they are only notified when an external party that isn’t Cloudflare issues a certificate for the owner’s domain. This product is available to all customers and can be enabled with the click of a button.
Multi-vantage point Domain Control Validation (DCV) checks to prevent mis-issuances
For a CA to issue a certificate, the domain owner needs to prove ownership of the domain by serving Domain Control Validation (DCV) records. While uncommon, one attack vector of DCV validation allows an actor to perform BGP hijacking to spoof the DNS response and trick a CA into mis-issuing a certificate. To prevent this form of attack, CAs have started to perform DCV validation checks from multiple locations to ensure that a certificate is only issued when a full quorum is met.
Cloudflare has developed its own solution that CAs can use to perform multi vantage point DCV checks. In addition, Cloudflare partners with CAs like Let’s Encrypt who continue to develop these checks to support new locations, reducing the risk of a certificate mis-issuance.
Specifying ACME account URI in CAA records
A new enhancement to the ACME protocol allows certificate requesting parties to specify an ACME account URI, the ID of the ACME account that will be requesting the certificates, in CAA records to tighten control over the certificate issuance process. This ensures that only certificates issued through an authorized ACME account are trusted, adding another layer of verification to certificate issuance. Let’s Encrypt supports this extension to CAA records which allows users with a Let’s Encrypt certificate to set a CAA DNS record, such as the following:
With this record, Let’s Encrypt subscribers can ensure that only Let’s Encrypt can issue certificates for their domain and that these certificates were only issued through their ACME account.
Cloudflare will look to support this enhancement automatically for customers in the future.
Conclusion
Years ago, certificate pinning was a valuable tool for enhancing security, but over the last 20 years, it has failed to keep up with new advancements in the certificate ecosystem. As a result, instead of providing the intended security benefit, it has increased the number of outages caused during a successful certificate renewal. With new enhancements in certificate issuance standards and certificate transparency, we’re encouraging our customers and the industry to move towards adopting those new standards and deprecating old ones.
If you’re a Cloudflare customer and are required to pin your certificate, the only way to ensure a zero-downtime renewal is to upload your own custom certificates. We recommend using the staging network to test your certificate renewal to ensure you have updated your certificate pin.
In today’s world, technology is quickly evolving and some practices that were once considered the gold standard are quickly becoming outdated. At Cloudflare, we stay close to industry changes to ensure that we can provide the best solutions to our customers. One practice that we’re continuing to see in use that no longer serves its original purpose is certificate pinning. In this post, we’ll dive into certificate pinning, the consequences of using it in today’s Public Key Infrastructure (PKI) world, and alternatives to pinning that offer the same level of security without the management overhead.
PKI exists to help issue and manage TLS certificates, which are vital to keeping the Internet secure – they ensure that users access the correct applications or servers and that data between two parties stays encrypted. The mis-issuance of a certificate can pose great risk. For example, if a malicious party is able to issue a TLS certificate for your bank’s website, then they can potentially impersonate your bank and intercept that traffic to get access to your bank account. To prevent a mis-issued certificate from intercepting traffic, the server can give a certificate to the client and say “only trust connections if you see this certificate and drop any responses that present a different certificate” – this practice is called certificate pinning.
In the early 2000s, it was common for banks and other organizations that handle sensitive data to pin certificates to clients. However, over the last 20 years, TLS certificate issuance has evolved and changed, and new solutions have been developed to help customers achieve the security benefit they receive through certificate pinning, with simpler management, and without the risk of disruption.
Cloudflare’s mission is to help build a better Internet, which is why our teams are always focused on keeping domains secure and online.
Why certificate pinning is causing more outages now than it did before
Certificate pinning is not a new practice, so why are we emphasizing the need to stop using it now? The reason is that the PKI ecosystem is moving towards becoming more agile, flexible, and secure. As a part of this change, certificate authorities (CAs) are starting to rotate certificates and their intermediates, certificates that bridge the root certificate and the domain certificate, more frequently to improve security and encourage automation.
These more frequent certificate rotations are problematic from a pinning perspective because certificate pinning relies on the exact matching of certificates. When a certificate is rotated, the new certificate might not match the pinned certificate on the client side. If the pinned certificate is not updated to reflect the contents of the rotated certificate, the client will reject the new certificate, even if it’s valid and issued by the same CA. This mismatch leads to a failure in establishing a secure connection, causing the domain or application to become inaccessible until the pinned certificate is updated.
Since the start of 2024, we have seen the number of customer reported outages caused by certificate pinning significantly increase. (As of this writing, we are part way through July and Q3 has already seen as many outages as the last three quarters of 2023 combined.)
We can attribute this rise to two major events: Cloudflare migrating away from using DigiCert as a certificate authority and Google and Let’s Encrypt intermediate CA rotations.
Before migrating customer’s certificates away from using DigiCert as the CA, Cloudflare sent multiple notifications to customers to inform them that they should update or remove their certificate pins, so that the migration does not impact their domain’s availability.
However, what we’ve learned is that almost all customers that were impacted by the change were unaware that they had a certificate pin in place. One of the consequences of using certificate pinning is that the “set and forget” mentality doesn’t work, now that certificates are being rotated more frequently. Instead, changes need to be closely monitored to ensure that a regular certificate renewal doesn’t cause an outage. This goes to show that to implement certificate pinning successfully, customers need a robust system in place to track certificate changes and implement them.
We built our Universal SSL pipeline to be resilient and redundant, ensuring that we can always issue and renew a TLS certificate on behalf of our customers, even in the event of a compromise or revocation. CAs are starting to make changes like more frequent certificate rotations to encourage a move towards a more secure ecosystem. Now, it’s up to domain owners to stop implementing legacy practices like certificate pinning, which cause breaking changes, and instead start adopting modern standards that aim to provide the same level of security, but without the management overhead or risk.
Modern standards & practices are making the need for certificate pinning obsolete
Shorter certificate lifetimes
Over the last few years, we have seen certificate lifetimes quickly decrease. Before 2011, a certificate could be valid for up to 96 months (eight years) and now, in 2024, the maximum validity period for a certificate is 1 year. We’re seeing this trend continue to develop, with Google Chrome pushing for shorter CA, intermediate, and certificate lifetimes, advocating for 3 month certificate validity as the new standard.
This push improves security and redundancy of the entire PKI ecosystem in several ways. First, it reduces the scope of a compromise by limiting the amount of time that a malicious party could control a TLS certificate or private key. Second, it reduces reliance on certificate revocation, a process that lacks standardization and enforcement by clients, browsers, and CAs. Lastly, it encourages automation as a replacement for legacy certificate practices that are time-consuming and error-prone.
Cloudflare is moving towards only using CAs that follow the ACME (Automated Certificate Management Environment) protocol, which by default, issues certificates with 90 day validity periods. We have already started to roll this out to Universal SSL certificates and have removed the ability to issue 1-year certificates as a part of our reduced usage of DigiCert.
Regular rotation of intermediate certificates
The CAs that Cloudflare partners with, Let’s Encrypt and Google Trust Services, are starting to rotate their intermediate CAs more frequently. This increased rotation is beneficial from a security perspective because it limits the lifespan of intermediate certificates, reducing the window of opportunity for attackers to exploit a compromised intermediate. Additionally, regular rotations make it easier to revoke an intermediate certificate if it becomes compromised, enhancing the overall security and resiliency of the PKI ecosystem.
Cloudflare customers using Advanced Certificate Manager have the ability to choose their issuing CA. The issue is that even if Cloudflare uses the same CA for a certificate renewal, there is no guarantee that the same certificate chain (root or intermediate) will be used to issue the renewed certificate. As a result, if pinning is used, a successful renewal could cause a full outage for a domain or application.
This happens because certificate pinning relies on the exact matching of certificates. When an intermediate certificate is rotated or changed, the new certificate might not match the pinned certificate on the client side. As a result, the client will reject the renewed certificate, even if it’s a valid certificate issued by the same CA. This mismatch leads to a failure on the client side, causing the domain to become inaccessible until the pinned certificate is updated to reflect the new intermediate certificate. This risk of an unexpected outage is a major downside of continuing to use certificate pinning, especially as CAs increasingly update their intermediates as a security measure.
Increased use of certificate transparency
Certificate transparency (CT) logs provide a standardized framework for monitoring and auditing the issuance of TLS certificates. CT logs help detect misissued or malicious certificates and Cloudflare customers can set up CT monitoring to receive notifications about any certificates issued for their domain. This provides a better mechanism for detecting certificate mis-issuance, reducing the need for pinning.
Why modern standards make certificate pinning obsolete
Together, these practices – shorter certificate lifetimes, regular rotations of intermediate certificates, and increased use of certificate transparency – address the core security concerns that certificate pinning was initially designed to mitigate. Shorter lifetimes and frequent rotations limit the impact of compromised certificates, while certificate transparency allows for real time monitoring and detection of misissued certificates. These advancements are automated, scalable, and robust and eliminate the need for the manual and error-prone process of certificate pinning. By adopting these modern standards, organizations can achieve a higher level of security and resiliency without the management overhead and risk associated with certificate pinning.
Reasons behind continued use of certificate pinning
Originally, certificate pinning was designed to prevent monster-in-the-middle (MITM) attacks by associating a hostname with a specific TLS certificate, ensuring that a client could only access an application if the server presented a certificate issued by the domain owner.
Certificate pinning was traditionally used to secure IoT (Internet of Things) devices, mobile applications, and APIs. IoT devices are usually equipped with more limited processing power and are oftentimes unable to perform software updates. As a result, they’re less likely to perform things like certificate revocation checks to ensure that they’re using a valid certificate. As a result, it’s common for these devices to come pre-installed with a set of trusted certificate pins to ensure that they can maintain a high level of security. However, the increased frequency of certificate changes poses significant risk, as many devices have immutable software, preventing timely updates to certificate pins during renewals.
Similarly, certificate pinning has been employed to secure Android and iOS applications, ensuring that only the correct certificates are served. Despite this, both Apple and Google warn developers against the use of certificate pinning due to the potential for failures if not implemented correctly.
Understanding the trade-offs of different certificate pinning implementations
While certificate pinning can be applied at various levels of the certificate chain, offering different levels of granularity and security, we don’t recommend it due to the challenges and risks associated with its use.
Pinning certificates at the root certificate
Pinning the root certificate instructs a client to only trust certificates issued by that specific Certificate Authority (CA).
Advantages:
Simplified management: Since root certificates have long lifetimes (>10 years) and rarely change, pinning at the root reduces the need to frequently update certificate pins, making this the easiest option in terms of management overhead.
Disadvantages:
Broader trust: Most Certificate Authorities (CAs) issue their certificates from one root, so pinning a root CA certificate enables the client to trust every certificate issued from that CA. However, this broader trust can be problematic. If the root CA is compromised, every certificate issued by that CA is also compromised, which significantly increases the potential scope and impact of a security breach. This broad trust can therefore create a single point of failure, making the entire ecosystem more vulnerable to attacks.
Neglected Maintenance: Root certificates are infrequently rotated, which can lead to a “set and forget” mentality when pinning them. Although it’s rare, CAs do change their roots and when this happens, a correctly renewed certificate will break the pin, causing an outage. Since these pins are rarely updated, resolving such outages can be time-consuming as engineering teams try to identify and locate where the outdated pins have been set.
Pinning certificates at the intermediate certificate
Pinning an intermediate certificate instructs a client to only trust certificates issued by a specific intermediate CA, issued from a trusted root CA. With lifetimes ranging from 3 to 10 years, intermediate certificates offer a better balance between security and flexibility.
Advantages:
Better security: Narrows down the trust to certificates issued by a specific intermediate CA.
Simpler management: With intermediate CA lifetimes spanning a few years, certificate pins require less frequent updates, reducing the maintenance burden.
Disadvantages:
Broad trust: While pinning on an intermediate certificate is more restrictive than pinning on a root certificate, it still allows for a broad range of certificates to be trusted.
Maintenance: Intermediate certificates are rotated more frequently than root certificates, requiring more regular updates to pinned certificates.
Less predictability: With CAs like Let’s Encrypt issuing their certificates from varying intermediates, it’s no longer possible to predict which certificate chain will be used during a renewal, making it more likely for a certificate renewal to break a certificate pin and cause an outage.
Pinning certificates at the leaf certificate
Pinning the leaf certificate instructs a client to only trust that specific certificate. Although this option offers the highest level of security, it also poses the greatest risk of causing an outage during a certificate renewal.
Advantages:
High security: Provides the highest level of security by ensuring that only a specific certificate is trusted, minimizing the risk of a monster-in-the-middle attack.
Disadvantages:
Risky: Requires careful management of certificate renewals to prevent outages.
Management burden: Leaf certificates have shorter lifetimes, with 90 days becoming the standard, requiring constant updates to the certificate pin to avoid a breaking change during a renewal.
Alternatives to certificate pinning
Given the risks and challenges associated with certificate pinning, we recommend the following as more effective and modern alternatives to achieve the same level of security (preventing a mis-issued certificate from intercepting traffic) that certificate pinning aims to provide.
Shorter certificate lifetimes
Using shorter certificate lifetimes ensures that certificates are regularly renewed and replaced, reducing the risk of misuse of a compromised certificate by limiting the window of opportunity for attackers.
By default, Cloudflare issues 90-day certificates for customers. Customers using Advanced Certificate Manager can request TLS certificates with lifetimes as short as 14 days.
CAA records to restrict which CAs can issue certificates for a domain
Certification Authority Authorization (CAA) DNS records allow domain owners to specify which CAs are allowed to issue certificates for their domain. This adds an extra layer of security by restricting issuance to trusted authorities, providing a similar benefit as pinning a root CA certificate. For example, if you’re using Google Trust Services as your CA, you can add the following CAA DNS record to ensure that only that CA issues certificates for your domain:
example.com CAA 0 issue "pki.goog"
By default, Cloudflare sets CAA records on behalf of customers to ensure that certificates can be issued from the CAs that Cloudflare partners with. Customers can choose to further restrict that list of CAs by adding their own CAA records.
Certificate Transparency & monitoring
Certificate Transparency (CT) provides the ability to monitor and audit certificate issuances. By logging certificates in publicly accessible CT logs, organizations are able to monitor, detect, and respond to misissued certificates at the time they are issued.
Cloudflare customers can set up CT Monitoring to receive notifications when certificates are issued in their domain. Today, we notify customers using the product about all certificates issued for their domains. In the future, we will allow customers to filter those notifications, so that they are only notified when an external party that isn’t Cloudflare issues a certificate for the owner’s domain. This product is available to all customers and can be enabled with the click of a button.
Multi-vantage point Domain Control Validation (DCV) checks to prevent mis-issuances
For a CA to issue a certificate, the domain owner needs to prove ownership of the domain by serving Domain Control Validation (DCV) records. While uncommon, one attack vector of DCV validation allows an actor to perform BGP hijacking to spoof the DNS response and trick a CA into mis-issuing a certificate. To prevent this form of attack, CAs have started to perform DCV validation checks from multiple locations to ensure that a certificate is only issued when a full quorum is met.
Cloudflare has developed its own solution that CAs can use to perform multi vantage point DCV checks. In addition, Cloudflare partners with CAs like Let’s Encrypt who continue to develop these checks to support new locations, reducing the risk of a certificate mis-issuance.
Specifying ACME account URI in CAA records
A new enhancement to the ACME protocol allows certificate requesting parties to specify an ACME account URI, the ID of the ACME account that will be requesting the certificates, in CAA records to tighten control over the certificate issuance process. This ensures that only certificates issued through an authorized ACME account are trusted, adding another layer of verification to certificate issuance. Let’s Encrypt supports this extension to CAA records which allows users with a Let’s Encrypt certificate to set a CAA DNS record, such as the following:
With this record, Let’s Encrypt subscribers can ensure that only Let’s Encrypt can issue certificates for their domain and that these certificates were only issued through their ACME account.
Cloudflare will look to support this enhancement automatically for customers in the future.
Conclusion
Years ago, certificate pinning was a valuable tool for enhancing security, but over the last 20 years, it has failed to keep up with new advancements in the certificate ecosystem. As a result, instead of providing the intended security benefit, it has increased the number of outages caused during a successful certificate renewal. With new enhancements in certificate issuance standards and certificate transparency, we’re encouraging our customers and the industry to move towards adopting those new standards and deprecating old ones.
If you’re a Cloudflare customer and are required to pin your certificate, the only way to ensure a zero-downtime renewal is to upload your own custom certificates. We recommend using the staging network to test your certificate renewal to ensure you have updated your certificate pin.
The latest in what will be a continuing arms race between creating and detecting videos:
The new tool the research project is unleashing on deepfakes, called “MISLnet”, evolved from years of data derived from detecting fake images and video with tools that spot changes made to digital video or images. These may include the addition or movement of pixels between frames, manipulation of the speed of the clip, or the removal of frames.
Such tools work because a digital camera’s algorithmic processing creates relationships between pixel color values. Those relationships between values are very different in user-generated or images edited with apps like Photoshop.
But because AI-generated videos aren’t produced by a camera capturing a real scene or image, they don’t contain those telltale disparities between pixel values.
The Drexel team’s tools, including MISLnet, learn using a method called a constrained neural network, which can differentiate between normal and unusual values at the sub-pixel level of images or video clips, rather than searching for the common indicators of image manipulation like those mentioned above.
От един месец България гори. Унищожени са стотици хиляди декари гори и земи. Горят къщи и села, човешки съдби. Пожари и взривове в складове и оръжейни предприятия взеха човешки жертви.…
Linus Torvalds has released 6.11-rc1 and closed the
merge window for this development cycle. “The merge window felt pretty
normal, and the stats all look pretty normal too. I was expecting things to
be quieter because of summer vacations, but that (still) doesn’t actually
seem to have been the case.”
Note that the extensible scheduler class
(“sched_ext”) was not merged, even though Torvalds had said he would back in June. Sched_ext, it
seems, will need another development cycle out of tree.
Изречението „Науката, образованието и културата са национални ценности“ е обявено за противоконституционно. Защото:
„Конституционният съд [..] поддържа, в контекста на изложеното, че като не свързва ангажимента на държавата, по смисъла на оспорената промяна в чл. 23, с „националната“ култура, тази промяна не просто изменя установения в Основния закон модел на изграждане на национална културна идентичност – основа на националната идентичност, но и като не дефинира културата именно като „национална“, оспорената промяна в чл. 23 премества акцента от дух на общност, т.е. от оня отличителен начин на съществуване, с който се идентифицираме като нация и който другите разпознават, към общности, въплъщение на други отличителни ценности, традиции и вярвания, с които нацията не се идентифицира, с което нарушава базисна конституционна ценност – единството на нацията, което е елемент на фундамента на държавата, такава, каквато е изградена с Конституцията от 1991 г.“
Значи, като запишем, че културата е национален приоритет, а не „националната култура“, ще сринем единството на нацията.
Вместо да отменя важността на науката, образованието и културата, можеше КС да влезе в ролята си на тълкувател, и да каже, че щом е национален приоритет, значи става дума за национална култура и така да си реши вътрешните съмнения.
Но извън конкретния въпрос, тук има по-голям проблем. Че Конституционният съд се самопровъзгласява за последна инстанция по политическа целесъобразност, което не е в неговите правомощия.
Правомощията на Конституционния съд по отмяна на изменения на Конституцията, ако изобщо ги има (защото това не следва от текстовете в Конституцията) могат да бъдат само по процедурата на приемане и по правото на обикновено Народно събрание да изменя дадени норми, изключени в чл.158.
С решение 3 от 2003 г., и неговото циментиране с настоящото решение, както и с отмяната на текстове поради твърдяна политическа нецелесъобразност, Конституционният съд си присвоява правомощия, които няма. Той се поставя над волята на т.нар. производна учредителна власт, каквото е Народното събрание със 160/180 гласа. И тъй като няма пред кого да бъде оспорена законосъобразността на решенията на Конституционния съд, той става самодостатъчен.
След като явно Конституционният съд е влязъл на терена на политическата целесъобразност, най-малкото, което може да се направи, е съдиите да влизат в открит дебат със законодателя, чиито норми са оспорени, преди да се произнесе. КС е негативен законодател, а не съд, и като такъв следва да участва в законодателен дебат преди да „спуска“ решения.
В последните години настъпихме всички мини, заложени волно или неволно в Конституцията. И всички са свързани с липса на достатъчно взаимен контрол между институциите.
В ключови части от техните правомощия, безконтролни се оказаха главният прокурор, президентското служебно правителство и Конституционният съд. От тези три проблема, решихме само втория, но основен фактор за политическата нестабилност остава първият, закрепен от третия.
Демократичните общества учат уроци и влагат наученото в споделените си идеи и правни норми. Но тези неща отнемат време и много съпротива.
To provide the best experiences, we use technologies like cookies to store and/or access device information. Consenting to these technologies will allow us to process data such as browsing behavior or unique IDs on this site. Not consenting or withdrawing consent, may adversely affect certain features and functions.
Functional
Always active
The technical storage or access is strictly necessary for the legitimate purpose of enabling the use of a specific service explicitly requested by the subscriber or user, or for the sole purpose of carrying out the transmission of a communication over an electronic communications network.
Preferences
The technical storage or access is necessary for the legitimate purpose of storing preferences that are not requested by the subscriber or user.
Statistics
The technical storage or access that is used exclusively for statistical purposes.The technical storage or access that is used exclusively for anonymous statistical purposes. Without a subpoena, voluntary compliance on the part of your Internet Service Provider, or additional records from a third party, information stored or retrieved for this purpose alone cannot usually be used to identify you.
Marketing
The technical storage or access is required to create user profiles to send advertising, or to track the user on a website or across several websites for similar marketing purposes.