На 10 ноември 1989 г. падна Тодор Живков. С него обаче не изчезнаха хората, контактите, информацията и зависимостите, натрупани от репресивния апарат на комунистическия режим. Промяната на политическата система се…
Не съм отворена спрямо сексуалната си ориентация, защото тази тема никога не е била засягана в училище преди и след закона. „Пропаганда“ никога не е имало.
Думите са на анонимна 12-класничка от София, взела участие в третото национално проучване (след първото от 2018 г. и второто от 2024 г.) на нагласите към ЛГБТИ+ учениците в българските училища. То е проведено през лятото на 2026 г. от Фондация „Сингъл Степ“, а в доклада върху изследването с правен анализ се включва и Сдружение „ЛГБТИ Действие“. Следва да отбележа, че бях редакторка на доклада, както и на този от 2024 г.
Актьори четат цитати от участници в изследването на „Сингъл Степ“
Анализът на резултатите включва отговорите на 1071 ЛГБТИ+ младежи от всички 28 области в България.
Респондентите са между 14- и 20-годишни и през учебната 2025/2026 г. са били ученици. Проучването, както и подборът на участниците са осъществени изцяло онлайн. То не е представително, но няма и как да бъде. Както уточних и в статията си за втората вълна на изследването от 2024 г., не е възможно да има представително изследване на ЛГБТИ+ хората. Защото не знаем колко са те и какви са основните им социално-демографски характеристики.
Въпреки това обаче методологията на проучването е изключително прецизна и е скрупульозно описана в доклада. Тя е изработена по образец на методологията на Националното проучване на училищния климат на американската организация Glisten.
пропаганда, популяризиране или подстрекаване по какъвто и да е начин, пряко или косвено, на идеи и възгледи, свързани с нетрадиционна сексуална ориентация и/или определяне на полова идентичност, различна от биологичната.
Проучването си поставя за цел да се разбере дали за ЛГБТИ+ учениците са настъпили промени след приемането на т.нар. закон за ЛГБТ пропагандата и ако да – какви са те. Това се установява по два начина. Първо, във въпросника е включен специален панел за последствията от закона. Второ, наличието на три вълни от изследването дава възможност за проследяване на тенденции – как се променят отговорите на едни и същи въпроси, зададени през 2018, 2024 г. и след закона – през 2026 г.
Последствията от закона
В края на май 2026 г. депутати от „Да, България“ внесоха в Народното събрание предложения за промени в ЗПУО, между които беше и отпадането на забраната на т.нар. ЛГБТ пропаганда. След последвалата вълна от хомофобски реакции обаче оттеглиха предложението за отпадане на забраната. Елисавета Белобрадова, която беше една от вносителките, защити оттеглянето с аргумента, че тази тема е изместила общественото внимание от останалите предложения на „Да, България“, и заяви (оригиналният правопис в този и останалите цитати е коригиран):
Интересът на обществото бе привлечен към едно-единствено предложение за отпадане на един „мъртъв“ текст, касаещ измислен и несъществуващ проблем, за който няма и никога не е имало нито един регистриран сигнал в МОН. Няма и да има.
Да, проблемът с „ЛГБТ пропагандата“ в училище е „измислен и несъществуващ“. Може ли обаче да настъпят реални вреди, ако забраните нещо, което не съществува?
Резултатите от изследването на „Сингъл Степ“ показват, че отговорът на този въпрос е положителен. Близо 80% от респондентите посочват, че знаят за закона – доста висока степен на осведоменост, като се има предвид, че тийнейджърите по принцип не се интересуват особено от законодателни промени. От тях близо една четвърт (23,8%) са чули учител или друг член на училищния персонал да се оправдава със закона, като прави негативни коментари за ЛГБТИ+ хората. Повече от половината (52,1%) имат съученици, които са постъпвали по същия начин. 29% пък са чули от работещи в училището, че заради закона или заради официална политика не може да се обсъждат ЛГБТИ+ теми в положителен контекст.
23,8%
са чули учител или друг служител да се оправдава със закона и да прави негативни коментари за ЛГБТИ+ хората
52,1%
имат съученици, които са постъпвали по същия начин
29%
са чули от работещи в училището, че заради закона не може да се говори положително за ЛГБТИ+ теми
Данни: Фондация „Сингъл Степ“, проучване 2026 г.
Понякога цензурата се отразява и на теми, включени в учебната програма – респондентка осмокласничка например споделя:
Тази година изучавахме Сафо по литература и госпожата предварително ни предупреди да не споменаваме нищо, свързано с лесбийство, че иначе ще трябвало да си учим произведението вкъщи сами.
Заради закона са настъпили промени и в достъпа до информация на респондентите. Поне на онези респонденти, в чиито училища е имало информация по ЛГБТИ+ теми – от 87-те участници, отговорили свободно на въпроса дали изобщо е имало подобни ресурси в училище преди закона, 79 отговарят отрицателно. А 106 от знаещите за закона (14,8%) познават поне един ЛГБТИ+ ученик, който по някакъв начин е бил репресиран от училищния персонал – наказан, докладван, разкрит или набелязан.
Затова не е изненадващо, че близо 80% смятат, че законът ги кара да се чувстват по-невидими, а според 46,4% след въвеждането му положението на ЛГБТИ+ учениците в училището им се е влошило. Според почти толкова (43,1%) пък положението си е същото като преди. Но ако климатът и преди не е бил подкрепящ, „същото“ означава „пак лошо“. Респондент 12-класник обобщава ситуацията със следните думи:
Мога да кажа, че учители, които си бяха хомофобски настроени преди закона, все още говорят негативно за ЛГБТИ общността в часовете. Някои учители, които имат донякъде положително отношение към ЛГБТИ общността, вече не говорят за ЛГБТИ теми, само един учител тази година заяви пред класа, че подкрепя ЛГБТИ обществото.
Не е учудващо и че почти половината от запознатите със закона не смеят да повдигат ЛГБТИ+ теми в час. Според 38,1% законът е влошил психичното им здраве, а малко над половината не смеят да потърсят подкрепа в училище заради притеснение от закона или от училищните политики. А понякога търсенето на подкрепа допълнително би влошило нещата. Един от респондентите например споделя:
Психоложката е била казала на нашите: „Ама нали знаете, че сега с този закон […] ние не можем да говорим за толерантност.“
47,6%
са по-малко склонни да повдигат ЛГБТИ+ теми в час
38,1%
оценяват, че законът е влошил психичното им здраве
51,9%
са избягвали да потърсят подкрепа в училище заради закона или училищните политики
Данни: Фондация „Сингъл Степ“, проучване 2026 г.
От друга страна, законът може да се използва и за разправа с учители, които не се харесват на някои от учениците си:
Миналата година целият ми клас беше направил план за уволнение на госпожата ни […]. Питаха я дали подкрепя ЛГБТ, тя отговори, че подкрепя хетеросексуалните, понеже нейните деца са били хетеросексуални, но пък би ги подкрепяла, ако са били и хомосексуални. След това класът ми отиде при класната и съобщи, че госпожата е била говорила за гейовете […] Госпожата просто беше строга и не я харесваха, но пък подобно [нещо би] могло да се случи на реален учител, който е гей, транс, т.н. Този закон е опасен.
Тревожни тенденции
Тенденциите, които анализът на изследването проследява, са групирани в пет области. Първата включва теми, свързани с тормоза и безопасността в училище. Втората изследва какви са ресурсите за подкрепа, до които участниците в трите вълни на изследването имат достъп в училище и вкъщи. Третата е посветена на психичното здраве и включва болезнени теми, като например отношението към самоубийството. Четвъртата е посветена на нагласите към емиграция на респондентите, а петата – на сигнализирането за случаи на тормоз и нападение.
Но вместо да преразказвам доклада, нека спомена някои от най-притеснителните тенденции, при които през 2026 г. се наблюдава статистически значима разлика спрямо 2024 г. и 2018 г. Започвам с най-тревожния резултат:
През 2026 г. повече от половината респонденти – 58,5%, сериозно са обмисляли опит за самоубийство през последните 12 месеца.
За сравнение, през 2024 г. подобни суицидни идеи са имали 49,4% от отговорилите на този въпрос. Ръстът спрямо 2024 г. е 9,1 процентни пункта. Ако делът на участниците, които поне веднъж са били нарочно изключвани или изолирани от съучениците си, през 2018 г. и 2024 г. е 71,1%, през 2026 г. той вече е 80,7%. Онлайн тормоз или заплахи поне веднъж са преживели 40,8% от респондентите през 2026 г. Точно една трета от участниците избягват тоалетните, понеже ги е страх. През 2024 г. така са постъпвали една четвърт, а през 2018 г. – една пета.
Сериозно са обмисляли опит за самоубийство
42,1%
2018 г.
49,4%
2024 г.
58,5%
2026 г.
Изключвани или изолирани от съученици
2018 г.71,1%
2024 г.71,1%
2026 г.80,7%
Преживели онлайн тормоз или заплахи
2018 г.34,1%
2024 г.35,5%
2026 г.40,8%
Избягват тоалетните заради несигурност
2018 г.20,3%
2024 г.24,8%
2026 г.33,3%
Данни: Фондация „Сингъл Степ“, проучване 2026 г.
Нараства и делът на участниците, според които съучениците им не приемат ЛГБТИ+ хората – от 54% през 2018 г., през 57,6% през 2024 г., до 63% през 2026 г. Същото се отнася и до хомофобските подмятания – от 40% през 2018 г. до 54,2% през 2026 г. Една от респондентките споделя:
В училище винаги чувам някой да нарича друг „гей“ или „лесбийка“ по негативен начин. Няколко пъти са ме питали дали съм лесбийка, и винаги трябва да кажа „не“, но усещам колко ми трепери гласът и как изчаквам малко, преди да отговоря, и как сърцето ми започва да тупти по-бързо. Когато чуя съученик да говори лошо за ЛГБТ, винаги искам да питам защо мисли така, но просто замълчавам от страх.
Съучениците не приемат ЛГБТИ+ хората
2018 г.54%
2024 г.57,6%
2026 г.63%
Повечето ученици правят хомофобски подмятания
2018 г.40%
2024 г.48,3%
2026 г.54,2%
Данни: Фондация „Сингъл Степ“, проучване 2026 г.
След приемането на закона се затвърждават и половите стереотипи. Например все повече респонденти чуват често или много често упреци към момичета, че не изглеждат достатъчно „женствени“ – 46,6% спрямо около 36% за предишните две издания на изследването. При аналогичния упрек към момчета – че не изглеждат достатъчно мъжествени – резултатът от 65,9% представлява статистически значимо увеличение само спрямо 2024 г., когато така са отговорили 55,3%, докато шест години по-рано нагласите към мъжествеността са подобни на днешните – 62,1%.
При това общо влошаване на климата в училище не е учудващ спадът в дела на участниците, които са разкрити за сексуалната си ориентация или половата си идентичност пред всичките си съученици. Докато през 2018 г. са разкрити 12,1%, през 2024 г. малко повече – 12,3%, две години след приемането на закона се наблюдава срив до 6,8%. Не е изненада и че чувството за принадлежност към училището прогресивно отслабва, както се вижда на графиката по-долу.
Подмятания за момичета, че не изглеждат достатъчно „женствени“
2018 г.36,1%
2024 г.36%
2026 г.46,4%
Подмятания за момчета, че не изглеждат достатъчно „мъжествени“
2018 г.64,1%
2024 г.55,3%
2026 г.65,9%
Разкрити пред всички съученици
2018 г.12,1%
2024 г.12,3%
2026 г.6,8%
Не чувстват, че принадлежат към училището си
2018 г.52,4%
2024 г.59,6%
2026 г.67,4%
Данни: Фондация „Сингъл Степ“, проучване 2026 г.
Що се отнася до чувството за принадлежност към училището,
следва да споменем, че някои от въпросите, зададени в изследването, съвпадат с въпроси, на които са отговаряли учениците (15–16-годишни) в международното представително изследване PISA през 2025 г. В доклада се отделят отговорите на участниците в проучването на „Сингъл Степ“, които са на същата възраст, и се сравняват с дадените от българските ученици за PISA.
Резултатите от съпоставката показват, че ЛГБТИ+ респондентите в тази възрастова група се чувстват много по-отчуждени от училището спрямо връстниците си в България. Например според резултатите от PISA над 80% от 15–16-годишните ученици в България лесно създават приятелства в училище, докато през 2026 г. по-малко от половината от връстниците им в изследването на „Сингъл Степ“ отговарят така.
Пълноценна част от училището се чувстват 76,3% от всички спрямо близо два пъти по-малко – 39%, от ЛГБТИ+ ученици. Три четвърти от всички спрямо малко над 44% от респондентите на „Сингъл Степ“ се чувстват харесвани в училище, а близо 24% спрямо 61,8% се смятат за аутсайдери. Подобни са отговорите и на въпроса дали учениците се чувстват странно и не на място в училище. Самота изпитват 1/5 от 15–16-годишните спрямо близо половината от ЛГБТИ+ връстниците им сред респондентите на „Сингъл Степ“. Както казва една участничка в изследването:
Понякога се чувствам, като че ли никога няма да съм като връстниците си, и това е факт […] и съм по-склонна да стоя в тишина и да потъвам в собствените си мисли, отколкото да разговарям с класа ми.
Ученици на 15–16 години
Лесно създават приятелства
PISA 2025 г.82,6%
ЛГБТИ+ 2026 г.48,3%
Чувстват се пълноценна част от училището
PISA 2025 г.76,3%
ЛГБТИ+ 2026 г.39%
Мислят, че съучениците ги харесват
PISA 2025 г.75%
ЛГБТИ+ 2026 г.44,3%
Чувстват се аутсайдери
PISA 2025 г.23,9%
ЛГБТИ+ 2026 г.61,8%
Чувстват се странно и не на място в училище
PISA 2025 г.26,2%
ЛГБТИ+ 2026 г.61%
Чувстват се самотни в училище
PISA 2025 г.20,5%
ЛГБТИ+ 2026 г.47,7%
Данни: PISA 2025 г. и „Сингъл Степ“ 2026 г.
Отчуждението не е само от училището, а и от държавата.
И през трите вълни на изследването над 80% (за 2026 г. делът е 88,25) планират или обмислят да напуснат България. От тях през 2026 г. 77,8% посочват идентичността си като част от причините да емигрират (две години по-рано този дял е 72,3%, а през 2018 г. – 51,9%). А 72,2% от учениците, които знаят за закона за „ЛГБТ пропагандата“, биха напуснали страната заради него.
88,25%
планират или обмислят да напуснат България
От тях – посочват идентичността си като част от причините да емигрират
2018 г.51,9%
2024 г.72,3%
2026 г.77,8%
72,2%
от учениците, които знаят за закона за „ЛГБТ пропагандата“, биха напуснали страната заради него
Данни: Фондация „Сингъл Степ“, проучване 2026 г.
Ето какво казват за емиграцията някои от участниците в изследването:
Хората и преди този закон бяха много токсично настроени към ЛГБТИ+ хората. Хомофобията е страшно нещо, особено в България. Често съм мислила, че е време да се местя. Тук няма да бъда приета.
Единственото нещо, което законът постигна, е да покаже, че младежите от тази прослойка нямат бъдеще в България.
Приетият закон позволява аз и хората като мен да бъдем тормозени и да си мислим за бъдеще в чужбина, където това, което сме, няма да бъде считано за „неморално“ и странно.
Стадии на отчуждението
Резултатите от трите издания на проучването на „Сингъл Степ“ разкриват плашеща картина след промените в ЗПУО. Средата в училище, където ЛГБТИ+ младежите прекарват голяма част от времето си, е станала по-неприемаща и враждебна. Дискриминационната реторика на политическо равнище се отразява негативно и на отношенията у дома – ако през 2024 г. 40,9% от респондентите не са били разкрити пред нито един член на семейството си, през 2026 г. така постъпват вече близо половината – 49,9%. Това обяснява защо участниците в изследването са все по-отчуждени.
Отчуждението обаче има степени. Първо ЛГБТИ+ младежите не се чувстват на мястото си в училище и/или вкъщи. В резултат на дискриминационното законодателство и враждебния климат в обществото обаче голяма част от тях не виждат бъдещето си в България, а искат да емигрират.
Ала най-радикалната форма на отчуждение е отказът от живота.
Фактът, че през 2026 г. близо 60% от ЛГБТИ+ младежите, участвали в проучването на „Сингъл Степ“, сериозно са обмисляли самоубийство, би трябвало да бъде червена лампа за институциите. Защото най-високата цена, която плащаме за популисткото и насаждащо омраза законодателство, е човешкият живот.
Помните ли, когато кината бяха много, а филмите – малко и пристигаха през гъста идеологическа цедка с по година-две закъснение? Подвиквали ли сте умолително „Повече билети?“ пред вратите на разпродадена зала преди прожекцията? Още ли ви боли от закриването на любимите ви салони, или по-лошо – обръщането им на магазини и хотели? Ако да, то вероятно сте отдавнашни участници в съдбата на „Световната кинопанорама“, която в зората на демокрацията се превърна в „Киномания“ и устоя четири десетилетия въпреки недалновидните или направо несъществуващи български културни политики, конкуренцията на стрийминг платформите и варварското нашествие на телефоните срещу големия екран.
Ако пък сте от по-скорошните попълнения в киноманската публика, то сега е моментът да видите какво и как е било. На 12 ноември късометражният филм на Борис Мисирков и Георги Богданов „Киномания: началото“ще ни даде тази възможност, преди юбилейното издание на фестивала да започне официално с „Див кон девет“ на Мартин Макдона – превъзходна трагикомедия, която уж е разположена в далечни ширини и времена, но прокарва смразяващи паралели с настоящето.
София Лорен и Марчело Мастрояни в „Един особен ден“ (1977) / Кадър от „Слънце, лято и студенти“ (1922), реж. Лау Лаурицен-баща
Сами по себе си
Повечето филми от „Киномания 2026“ имат поне по 3–4 прожекции, та си струва да започнем с няколко събития, които са само по веднъж, а не бива да се пропускат.
Преди сто години зрителите в русенското кино „Олимпия“ присъстват на паметна прожекция концерт: датска романтична комедия, придружена от джаз на живо. На 28 ноември т.г. от 20:00 ч. в „Люмиер“ триото „Братя Владигерови“ ще съпроводи с музика на живо същия ням филм – „Слънце, лято и студенти“, един от десетките с прочутата някога хумористична двойка Крачун и Малчо – и по всичко изглежда, че също ще е славно.
Пак за 28 ноември, но от 16:00 ч., в „Одеон“ е предвиден шедьовърът на Ѐторе Скола„Един особен ден“. Свещените чудовища на италианското кино София Ло̀рен и Марчело Мастрояни нерядко са играли заедно, но никога така впечатляващо, както тук. Денят от заглавието е онзи, в който през 1938 г. Хитлер приключва гостуването си на Мусолини в Италия. Докато по майските улици фашистите скандират с плам в чест на нацистите, в притихнала римска кооперация се разиграва странната, отчаяна среща сблъсък на една презряна от семейството си многодетна домакиня и един презрян от режима интелектуалец…
Агата Туркот в щастливото начало на „Дом добър“ на Смажовски
„Кинотека“ е заглавието на полския раздел в рамките на фестивала: всяка от седемте творби в него ще се прожектира еднократно и безплатно от 19:00 ч. в Дома на киното. Три филма – „Обетована земя“, „Катин“ и „Остатъчни образи“ – представят различни епохи от творчеството на Анджей Вайда, стогодишнината от чието рождение отбелязахме на 6 март. Но може би най-належащ за гледане в подборката (на 15 ноември) е Dom dobry на Войчех Смажовски – друг полски великан, чиито съвременници имаме късмета да сме.
Смажовски често работи с едни и същи актьори и не страни от най-болезнените теми –
създава сложни истории, способни да те превземат отвътре и да те държат с месеци.
Може да се каже, че „Дом добър“ (лош превод и непрехвърлен мост към друг важен филм на автора, Dom zly, познат у нас като „Къщата на злото“) е за домашното насилие, само че така фината му, многослойна тъкан ще бъде несправедливо банализирана. Интелигентна млада жена попада в минираната територия на гаслайтинга и съзнанието ѝ влиза в драматичен конфликт с изопачената от други реалност. В един момент героинята е толкова объркана, че смисълът на вече преживяното и посоката на предстоящото в главата ѝ започват конвулсивно да се променят – Dom dobry възхитително и плашещо изобразява тъкмо това.
Наричат Смажовски „екзорсист на националните демони“, но демоните тук са от най-интернационалните.
За „Страхливец“ дебютантът Еманюел Макия спечели в Кан награда за най-добър актьор / Матилде Арсел в ролята на изстрадалата Мари в „Непозната жена“
Някои от най-обсъжданите
филми с премиера през изтеклата година са – както винаги – в сърцевината на фестивалната програма. И ако от тях трябва да откроя по-специално един, то той ще е „Страхливец“ на Люкас Донт – заради майсторството на екипа и поетичната му мощ, която от калния ад на Първата световна война успява по оригинален начин да извлече нещо сладостно за споделяне. Хуманността, изкуството и свободата като противоотрова срещу цинизма и страха са ни остро необходими сега и винаги.
Апропо за „Страхливец“ вече говорихме в репортаж от Карлови Вари, в който с добро споменахме и „Любимо същество“ на Родриго Сорогойен – и той селектиран за „Киномания 2026“, но под заглавието „Обич“(гледайте го, Хавиер Бардем и Вики Луенго правят чудни роли).
От Берлин със „Златна мечка“, от Кан със „Златна палма“ и от Венеция със „Златен лъв“ в София, Пловдив, Стара Загора идват отличниците на 2026-та: „Жълти писма“ на Илкер Чатак (Турция), „Фиорд“ на Кристиян Мунджиу и „Непозната жена“ на Май ел-Туки (Дания). Знаменателно е, че и трите обрисуват травмиращия натиск върху индивида от страна на колективната машина, поела в грешна посока.
В „Жълти писма“авторитарната държава санкционира артисти за възгледите им. Във „Фиорд“ едно семейство е убедено, че институциите го насилват, докато институциите са убедени, че се борят с насилието в семейството. В „Непозната жена“отшумяващата Втора световна война вдига тежка мътилка и „добрите“ със смущаваща лекота стават „лоши“… „Непозната жена“ би бил моят избор от трите, ако избор се налагаше – освен поглед към една размирна епоха той е и точен обзор на част от начините, по които жената е била (и в много места и случаи си остава) една неизвестна и недогледана от обществото величина, често третирана като предмет.
Неотдавна в репортаж от Сан Себастиан обсъдихме по-пространно „Фиорд“, като пътьом зачекнахме безрадостната сивота на „Минотавър“на Андрей Звягинцев и смисленото усилие на „Джоузефин“/„Жозефин“ на Бет де Араужо, а в друг текст от същия фестивал се порадвахме на милата северна история „Ледена земя“ на Аманда Кернел и се разочаровахме от предвидимия „Дебютът“ на Джеси Айзенбърг. Всички те са на „Киномания 2026“, както и „Черни пари за бели нощи“на Кристина Грозева и Петър Вълчанов, за който казахме няколко сдържани думи от Карлови Вари. Хубаво е, че в идните дни ще можем да ги гледаме и в България и да поспорим.
Автопортрет на документалиста Марк Казънс
Един от най-коментираните филми в момента е „Можеш да видиш всичко“на Ланс Опенхайм и Нейтън Фийлдър. В него е направен опит за доближаване до Елизабет Холмс, основателката на компанията „Теранос“, която уж изобретява машинка за бърз анализ на кръвни проби. Защо подобна машинка не съществува и е сигурно, че Холмс е наясно, че лъже, докато взема милиони от инвеститори, може да се прочете в едно кратко и ясно становище на американското Министерство на правосъдието (и в хиляди статии по цял свят).
Двамата кинаджии обаче решават да поживеят с Елизабет, капризния ѝ мъж и двете им невръстни дечица
в месеца, преди тя да влезе в затвора. В трите мъчителни часа, произтекли от това съжителство, изобилстват мълчанията, неловките обмени на фрази и свръхблизките планове, пълни с драматична музика и втренчени погледи, но не и информация или наслада. За да си съставите представа, без да си хабите живота, стига да си пуснете тийзъра и веднага след него – една или друга пародия от стотиците, наводнили YouTube.
За радост, документалистиката е представена в програмата и с нещо далеч по-съдържателно: два епизода (за 60-те и за 80-те години) от 16-часовия сериал „История на документалния филм“. Неговият автор – ирландецът Марк Казънс, ще дойде лично в „Одеон“ (на 25 ноември) и в „Люмиер“ (26 ноември), за да ги представи и да разговаря с публиката, а това наистина си заслужава: Казънс знае много, умее да намира връзки между даденостите и страстно вярва в заниманията си.
(Добра идея е да се запознаем и с другите му изследвания – 15-те епизода на „История на киното: една одисея“ например или 14-те на „Жените правят кино“, който впрочем започва с „А бяхме млади“ на Бинка Желязкова…)
„Всички обичат Бил Евънс“, реж. Грант Джи („Сребърна мечка“ за режисура) / „Татко след полунощ“, реж. Джонатан Фърстман
Упования
Възлагам специални надежди на няколко заглавия от „Киномания 2026“, които още не съм гледала. Да речем, „Големите майстори на киното“ на Паоло Чивати – защото беседите с девет съвременни режисьори, сред които Джейн Кемпиън, Асгар Фархади, Пабло Лараин и Тим Бъртън, няма как да са скучни. „Всички обичат Бил Евънс“ – заради предчувствието за елегантност (черно-бялото, джазът) и Андерш Даниелсен Ли, който умее да изиграе блестящо всичко от чувствителен изгряващ писател до морален изрод. Или „Татко след полунощ“ на актьора, сценарист и режисьор Джонатан Фърстман – тъй като беше сред любимците на младежкото жури в Сан Себастиан, а то се слави с безкомпромисния си вкус…
И още: „Дом за нея“на Мелиса Годе (истории от едно действително място за подкрепа на жени в беда) и „Изоставен от всички“на Венсан Гаренк(по реалната трагедия на учителя Самюел Пати, убит от един глупав слух и един заблуден тийнейджър) – понеже френското социално кино има високи критерии и отдавнашни традиции. И е безкрайно интересно да се гледа как едно държащо на себе си общество се справя с най-вредния си атавизъм – нагона за насилие.
Всичко е фикция. За мен документалистиката е алтернативен начин за правене на художествено кино… Веднага щом сложиш камерата някъде, ти вече тълкуваш. Един документален филм никога не е копие на реалността, а интерпретация…
Това твърди големият Никола Филибер, а от думите му резонно може да се тръгне и по обратния път: художественото кино също е вид документалистика. Съпреживяването, едновременното замисляне или заостряне на вниманието в залата е съвсем реален факт от живота на публиката. Един фестивал е не просто преглед на личните фантазии и повествователните вещини, а и поле за най-истински събития, техен архив и залог за бъдещето ни далеч извън залите.
Amazon OpenSearch Service already offers high availability within a single AWS Region through Multi-Availability Zone (Multi-AZ) deployments. Some organizations, however, need a multi-Region architecture to meet specific business requirements. These include strict recovery point and recovery time objectives, data residency mandates, and business continuity plans for mission-critical search and AI workloads.
Until now, meeting that bar on Amazon OpenSearch Service meant building and operating your own replication with cross-cluster replication or dual writes to multiple Regions. That took months of engineering and ongoing maintenance, offered no coordinated way to switch roles between Regions, and gave no guaranteed recovery point objective (RPO).
Amazon OpenSearch Service now offers managed disaster recovery for domains running OpenSearch 3.7 or later. Managed disaster recovery replicates your data from a primary domain in one Region to a secondary domain in another and keeps the secondary continuously in sync. When you need to move your workload, you use API-driven switchover and failover. It provides an RPO under 1 minute and a recovery time objective (RTO) under 20 minutes, and you can set it up in two steps.
In this post, we explain how managed disaster recovery works, what to check before you start, and how to set it up, monitor it, and switch Regions.
Who should use managed disaster recovery
Managed disaster recovery is built for workloads where downtime or data loss has a direct business, customer, or compliance cost. Common patterns include:
Customer-facing search: Ecommerce, product catalog, and site search, where downtime means lost revenue and a degraded customer experience.
Financial services and risk: Fraud detection, transaction search, and risk analytics, where regulators expect demonstrated cross-Region recoverability and regular disaster recovery exercises.
Mission-critical operational data: Search and analytics that support incident response, security investigations, or regulated record retrieval, where teams need uninterrupted access to data.
If your recovery plan requires a copy of your OpenSearch data in another Region and a tested way to move your workload there, managed disaster recovery replaces the replication pipeline you would otherwise build and operate yourself.
Solution overview
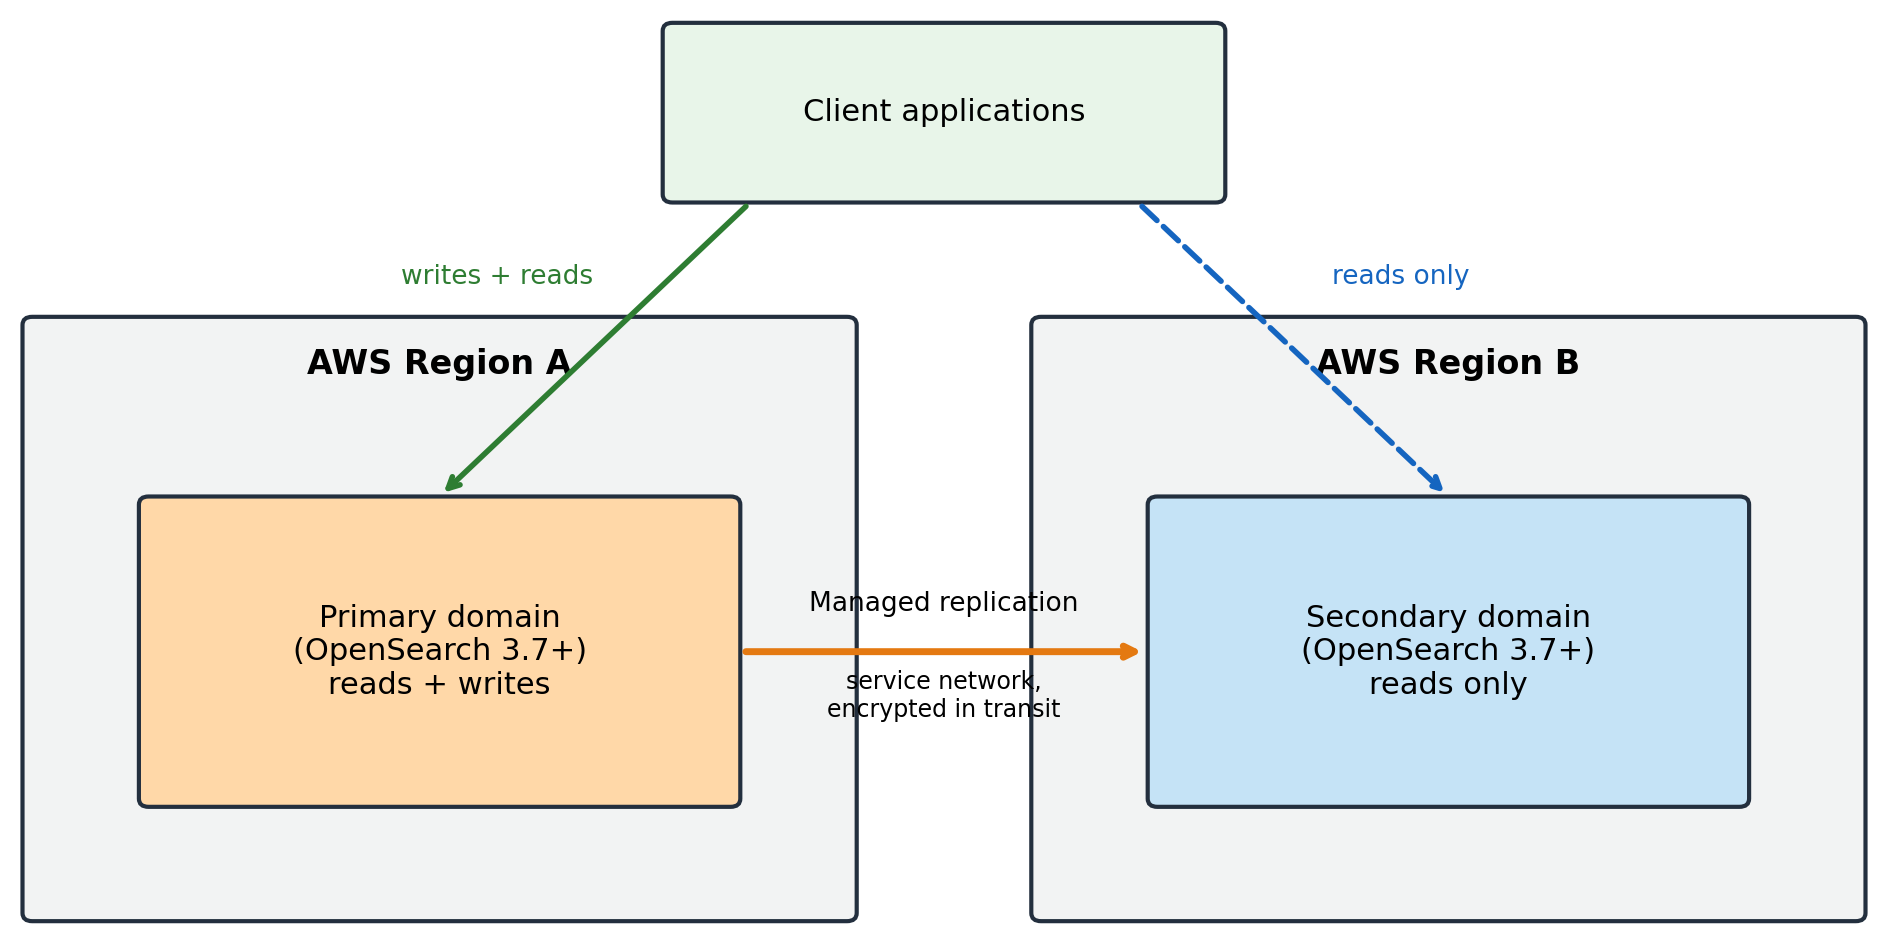
Managed disaster recovery pairs two OpenSearch Service domains in different Regions. One domain is the primary: It accepts reads and writes. The other is the secondary: It continuously receives changes from the primary and serves reads only. The following diagram shows the architecture.
Figure 1: Managed disaster recovery pairs a primary domain in one Region with a read-only secondary domain in another, with managed replication between them
When you pair the domains, the service first copies the existing Lucene segments from the primary to the secondary. After this initial copy, every new document and update is indexed on both the primary and the secondary domain. Replication traffic stays within the OpenSearch Service network, so you don’t need to set up virtual private cloud (VPC) peering or any networking, and data is encrypted in transit. Because both domains index the data, the secondary is ready to take over as primary at any time.
Both domains serve reads, but only the current primary accepts writes. When roles change, you redirect your application’s writes to the new primary. For more details, see the Switch Regions section later in this post.
There are two ways to move the primary role to the other Region. The following table compares them and later sections refer back to this table.
Switchover
Failover
Type of event
Planned
Unplanned
Coordination
Coordinated role swap between both domains.
Unilateral promotion of the secondary.
Data loss
Zero: pending writes replicate before roles swap.
Writes not yet replicated are lost, bounded by replication lag (RPO).
When to use
Regulatory exercises, maintenance, planned Region moves, issues outside OpenSearch Service.
The primary domain is unavailable.
Call on
The secondary domain being promoted.
The secondary domain being promoted.
You can also manage replication health from a built-in dashboard on the AWS Management Console, and the service supports customer managed AWS Key Management Service (AWS KMS) keys for encryption at rest.
Prerequisites and limitations
Before you start, confirm that your environment meets the following requirements:
Engine version: Both domains run OpenSearch 3.7 or later. If you’re on an earlier version, see Upgrade to OpenSearch 3.7 with a clone-based upgrade at the end of this section.
Same AWS account: The primary and secondary domains must be in the same AWS account, in different Regions.
Matching sizes: Both domains index all data and use the same number of primary shards and replicas, so they need similar CPU, memory, and storage capacity.
UltraWarm, Writable Warm, and Optimized engine for log analytics: Domains that use UltraWarm or Writable Warm storage or the OpenSearch Optimized engine for log analytics aren’t supported in this release.
Configuration isn’t replicated: Managed disaster recovery replicates data. Index State Management (ISM) policies, index templates, settings, and roles aren’t replicated, so manage them on both domains with infrastructure as code (see Best practices later in this post).
Client redirection: The service doesn’t redirect application writes after a switchover or failover. Your application or runbook must do this.
Upgrade to OpenSearch 3.7 with a clone-based upgrade
If your domains run an earlier version, you can upgrade them to OpenSearch 3.7 with a clone-based upgrade. Instead of upgrading your existing cluster in place, OpenSearch Service creates a clone of your domain on the target version and keeps it in sync with your data. Your domain keeps serving traffic from the original cluster. With a clone-based upgrade, you can:
Validate first: Test the clone with your own read requests before it takes effect.
Cut over when you’re ready: You choose when to move traffic. Writes are blocked during cutover, which can last up to several minutes.
Cancel or roll back: Cancel any time before cutover, or roll back to the original cluster during a retention period that you set.
Clone-based upgrades are available for domains running Elasticsearch 7.10 or OpenSearch 1.1 or later. Earlier versions need an in-place upgrade first. You’re charged for both the original cluster and the clone while you validate and during the retention period. Before you upgrade, take a manual snapshot and run the pre-upgrade check. For details, see Upgrading Amazon OpenSearch Service domains.
Set up managed disaster recovery
You can set up managed disaster recovery on the console or with the AWS Command Line Interface (AWS CLI). In both cases, the flow is:
Create the primary domain (OpenSearch 3.7 or later) and start indexing and searching.
Create the secondary domain of the same version in a different Region, with matching size.
Pair the primary with the secondary.
Check the replication status.
Set up on the console
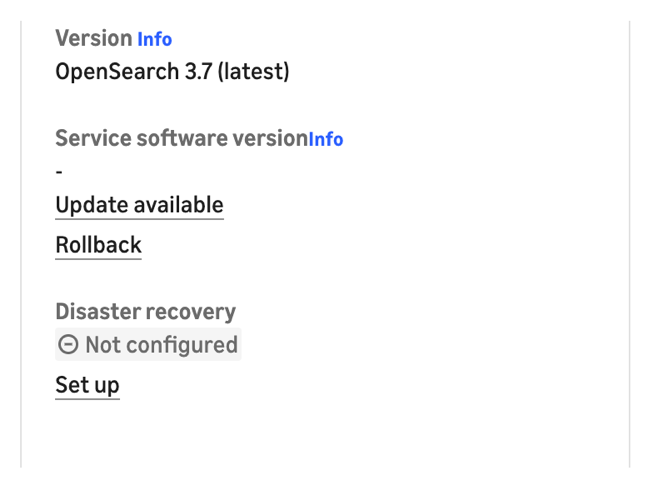
On the AWS Management Console, open Amazon OpenSearch Service and select your primary domain. The disaster recovery section is available for domains running OpenSearch 3.7 or later.
Figure 2: The domain summary shows the disaster recovery status as Not configured with a Set up link
Figure 3: An information banner offering a Set up disaster recovery button
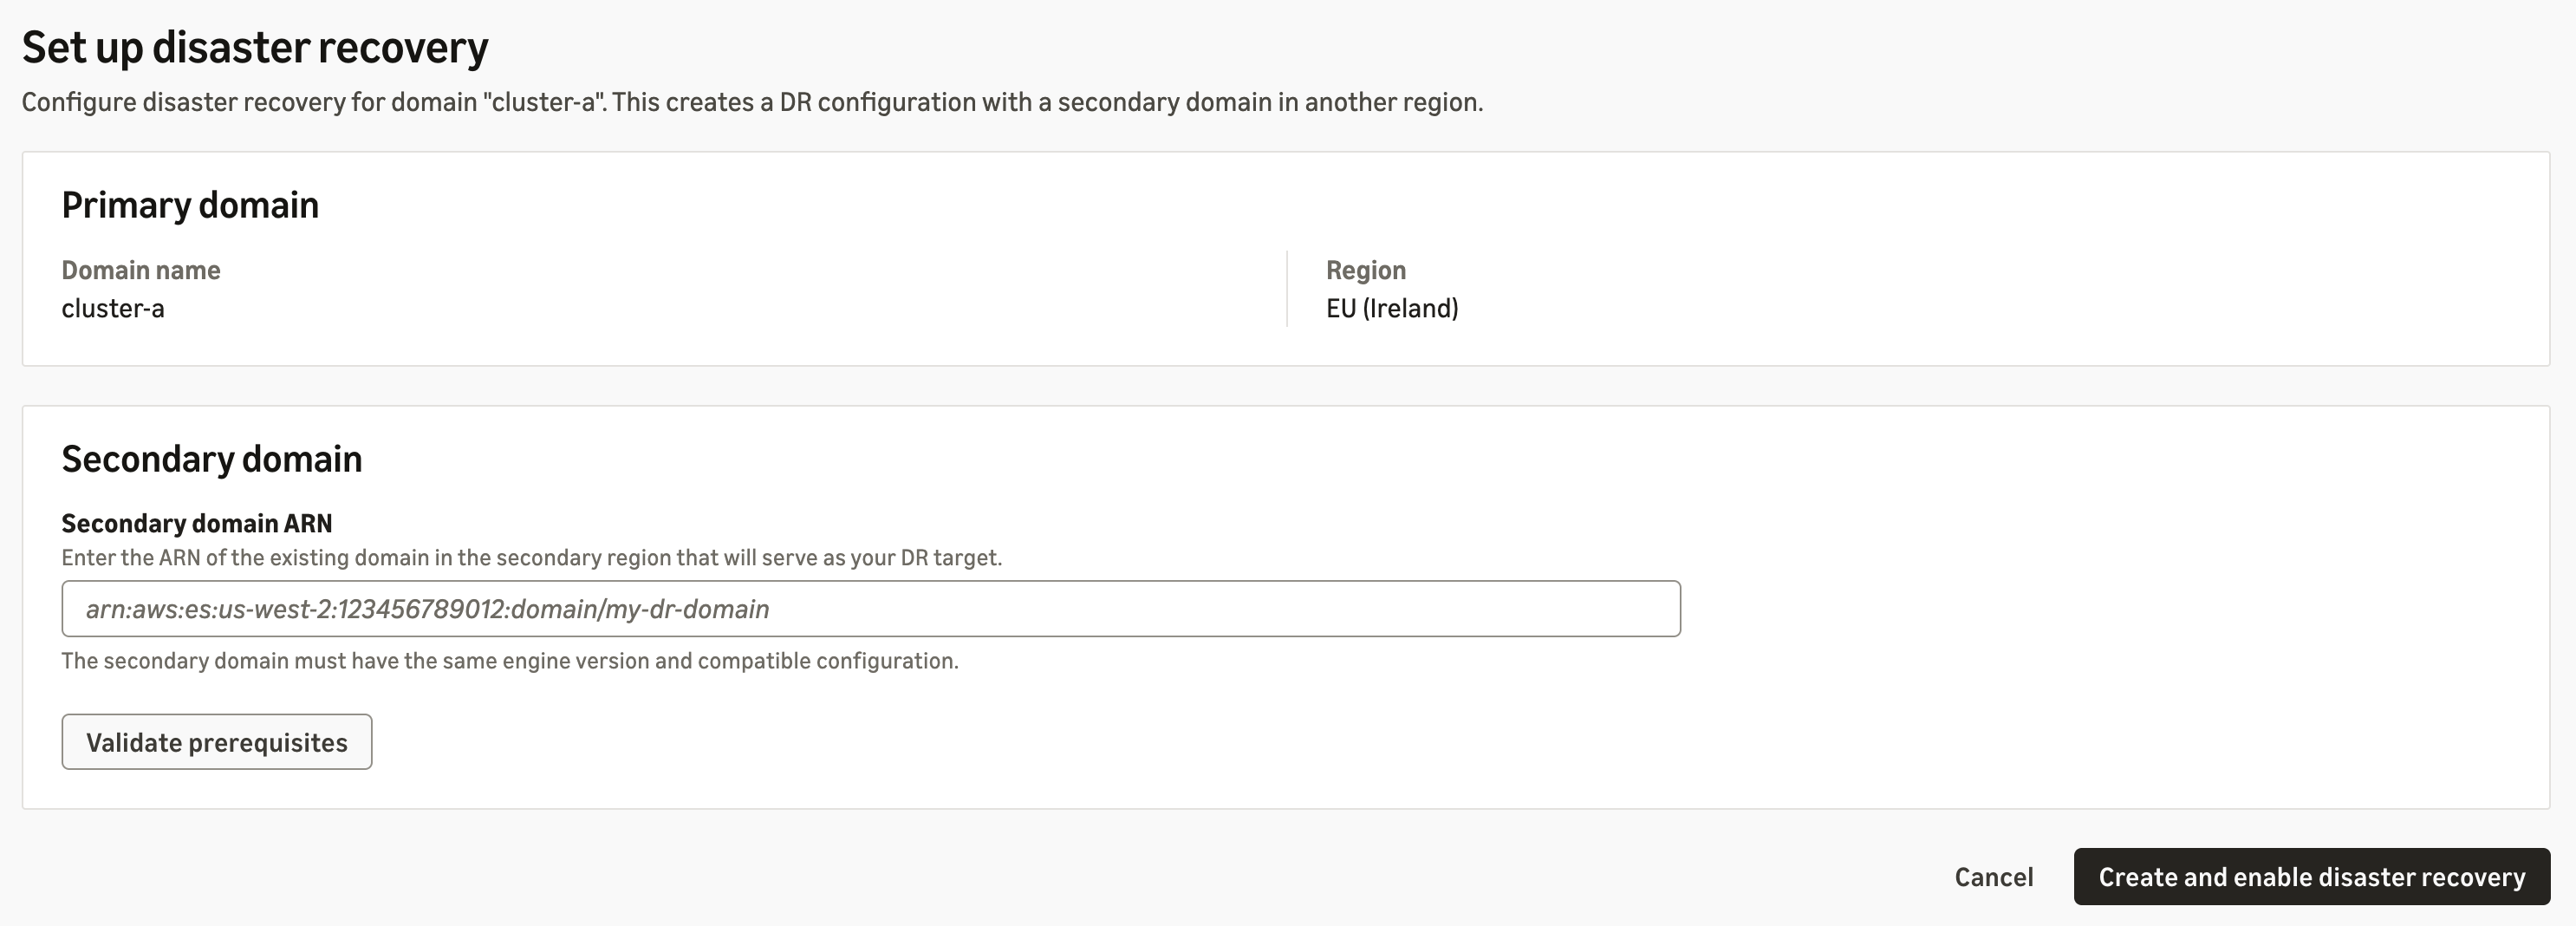
Choose Set up or Set up disaster recovery, and then enter the Amazon Resource Name (ARN) of the secondary domain.
Figure 4: The setup page, where you enter the secondary domain ARN and validate the prerequisites
Choose Validate prerequisites. When the domains are compatible, the console displays the message “These domains can be paired for disaster recovery.” Choose Create and enable disaster recovery. Pairing takes a few minutes.
Set up with the AWS CLI
Run the following command in the primary Region to add the secondary domain as a replication peer:
Before pairing, you can call the CompareDomainConfiguration API to find where the two domains’ configurations differ across key categories.
Check the replication status
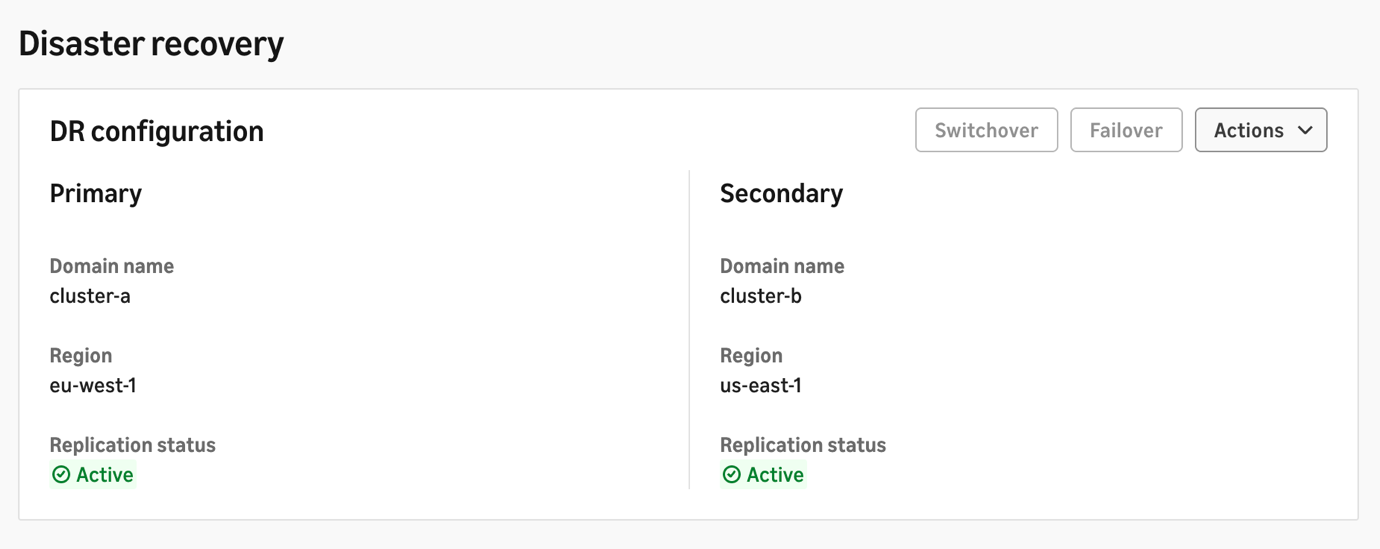
On the console, choose Manage in the disaster recovery section to view the peer role and replication status.
Figure 5: The disaster recovery dashboard, showing both domains with an Active replication status
With the AWS CLI, call DescribeDomainReplication on either domain to see the peer role and replication status. To stop replication, call RemoveReplicationPeer. Each domain keeps its data.
Use switchover for planned events and failover when the primary is unavailable (see the comparison table in Solution overview). In both cases, call the API on the secondary domain that you’re promoting.
Perform a planned switchover
SwitchoverReplication performs a coordinated role swap with zero data loss. Run it on the secondary domain:
FailoverReplication promotes the secondary to primary unilaterally. Data written to the old primary but not yet replicated is lost. The loss is bounded by the replication lag. Because of this, the command requires the --allow-data-loss flag:
Managed disaster recovery doesn’t redirect your applications. Both domains stay readable, but only the primary is writable, so after a switchover or failover your applications must send writes to the newly promoted primary. Make the write-path update part of the same runbook step as the API call, for example by updating a DNS record, a configuration parameter, or a service discovery entry.
After a switchover or failover
After a switchover, the former primary becomes the secondary and replication continues in the reverse direction with no further action.
After a failover, when the original domain is available again, you can fail back. The original domain needs to be re-seeded before it can be used again for replication. After the re-seed, you can switch over to restore the original primary Region.
Performance results
We measured setup, initial sync, steady-state replication lag, planned switchover, and unplanned failover across multiple r7g instance sizes and data footprints. The tests used synthetic Apache log data with a sustained write load of 240 MBps.
Domain details:
R7g.4xlarge domain: 6 data nodes + 3× m7g.large cluster managers, 12 TiB gp3 per node.
R7g.8xlarge domain: 6 data nodes + 3× m7g.large cluster managers, 12 TiB gp3 per node.
Indices use 12 primary shards + 1 replica, rollover at 50 GB per primary shard.
Note: Results can vary by workload, data size, and configuration.
Setup and initial sync
Pairing is one API call and completed in 1 to 3 minutes in our tests, from 1 TiB to 10 TiB. Initial sync time depends on data size.
Data
Instance
Turn on disaster recovery
Full initial sync
1 TiB
r7g.4xlarge
~1 min
20min
10 TiB
r7g.4xlarge
~1 min
2 hr 31 min
10 TiB
r7g.8xlarge
~1 min
2 hr 18 min
Steady-state replication lag
Replication lag is how far behind the secondary is under sustained write load, measured with DisasterRecoveryReplicationLagTime (p95 over the test window).
Data
Instance
Write load
Replication lag (p95)
1 TiB
r7g.4xlarge
240 MBps
~10 s
10 TiB
r7g.4xlarge
240 MBps
~10 s
10 TiB
r7g.8xlarge
240 MBps
~10 s
Planned switchover
Pending writes replicate to the new primary before the role swap completes, so data loss is zero. RTO is how long clients see writes fail before the new primary accepts them.
Data
Instance
Write load
Writes down (RTO)
Data loss
1 TiB
r7g.4xlarge
240 MBps
36.8 s
0
10 TiB
r7g.4xlarge
240 MBps
38 s
0
10 TiB
r7g.8xlarge
240 MBps
57 s
0
Unplanned failover
RPO is how many seconds of writes were lost. Role flip confirmed is how long until the control plane confirms the promotion. Writes down is how long until clients receive HTTP 201 from the new primary.
Data
Instance
Write load
Role flip confirmed
Writes down (RTO)
Data loss (RPO)
1 TiB
r7g.4xlarge
240 MBps
6.4 s
69 s
~8 s (~2.0M docs)
10 TiB
r7g.4xlarge
240 MBps
8.1 s
61 s
~10 s (~2.46M docs)
10 TiB
r7g.8xlarge
240 MBps
5.8 s
60 s
~10 s (~2.46M docs)
Key takeaways
In our tests, we saw the following results:
RPO: Unplanned failover lost about 8 to 10 seconds of writes, well within the under-1-minute RPO target. Planned switchover lost no data.
RTO: Writes resumed in about 1 minute after failover and under 1 minute after switchover, well within the under-20-minute RTO target.
Scale: Pairing time, lag, and recovery times stayed roughly constant from 1 TiB to 10 TiB. Only the one-time initial sync grows with data size.
Best practices
Manage configuration with infrastructure as code – Keep index templates, ISM policies, settings, and roles in a Git repository and apply them to both domains, for example with the OpenSearch Terraform provider.
Upgrade the secondary first – When upgrading engine versions, upgrade the secondary domain first and the active primary last. We recommend testing the performance of the new version on the secondary, then upgrading the primary after the secondary domain upgrade is validated. Don’t run mixed versions permanently.
Size domains to match – Keep instance types, counts, storage, and shard configuration aligned, and use CompareDomainConfiguration to detect drift.
Decide your failover automation – Failover is manual by design, because the right trigger differs by business. You can build event-driven automation using CloudWatch alarms and the failover and switchover APIs.
Exercise your runbook – Use switchover regularly to rehearse Region moves, including the client write redirection step.
Managed disaster recovery gives Amazon OpenSearch Service domains continuous cross-Region replication, a zero-data-loss planned switchover, and a bounded-RPO failover, without building and operating your own replication pipeline. It serves regulated industries and business-critical workloads with strict availability, recovery, and business continuity requirements.
To get started:
Create or upgrade domains to OpenSearch 3.7 or later in two Regions in the same AWS account.
Pair them on the console or with the AddReplicationPeer API.
Set CloudWatch alarms on the replication metrics, and build and rehearse your switchover and failover runbook.
Every day, Zillow sends home shoppers more than 100 million personalized email and push notifications: saved search alerts, home recommendations, property updates, seller reports, and reminders. These messages are one of Zillow’s core ways to engage home shoppers, and Zillow delivers them on time with consistent behavior across every campaign. Today, each of those notifications runs as its own short-lived workflow execution on AWS Step Functions Express Workflows.
The underlying shape of this work isn’t unique to real estate. Many systems run the same kind of workflow at high volume: take an event, enrich it from several services, apply rules, assemble an output, and send it. This post shows how Zillow built one configuration-driven orchestration system to run that pattern at scale, and what teams across many domains can reuse from it.
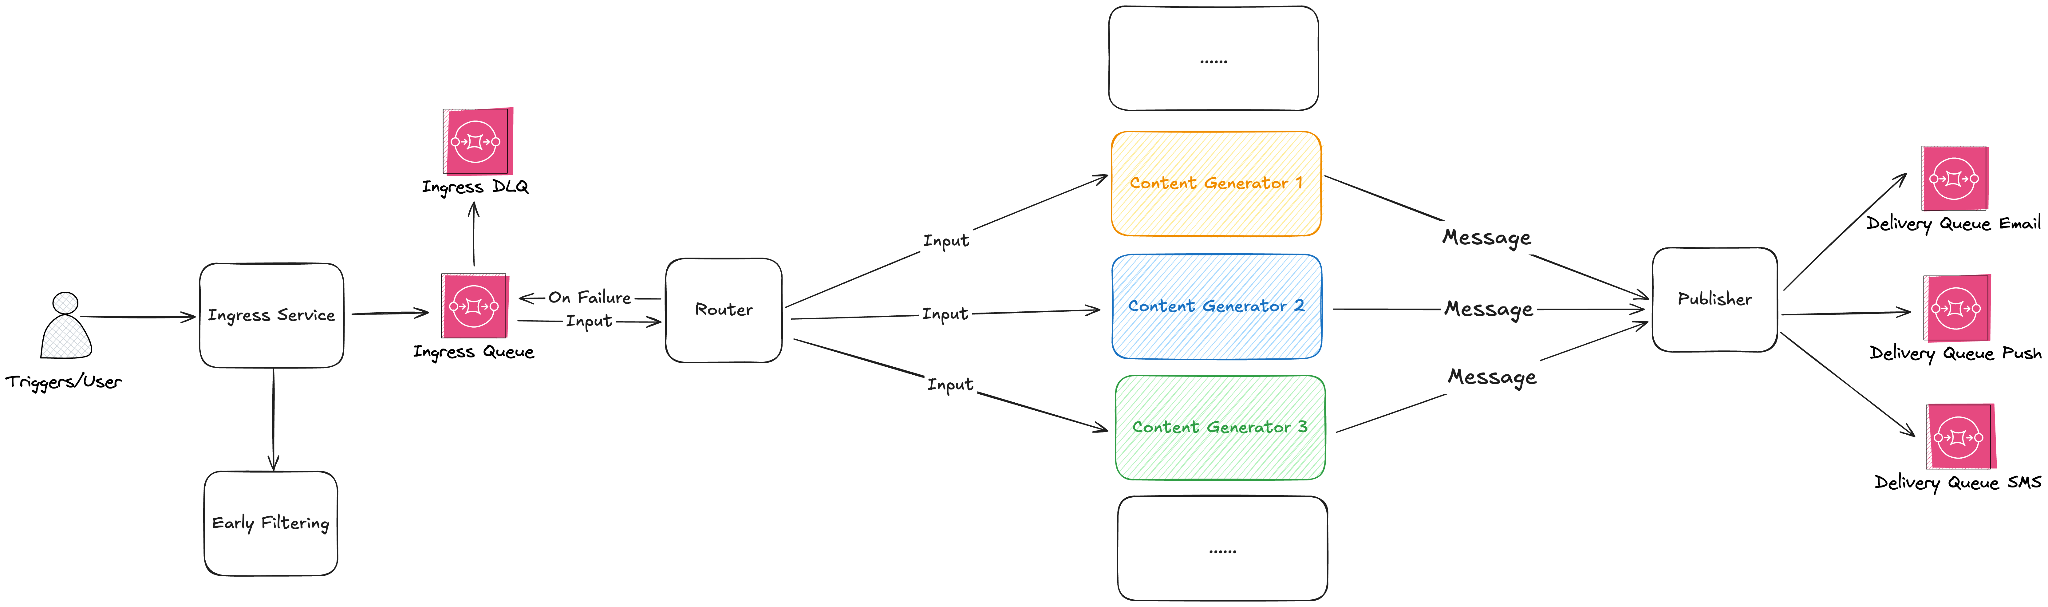
Historically at Zillow a separate generator service produced each of these campaigns, and each service carried its own workflow, data models, and business rules. As the number of notification campaigns grew, so did duplicated engineering work, inconsistent behavior, and operational cost. Product teams needed to launch campaigns faster, reuse shared capabilities, and run consistent experiments without system-specific work.
To meet that need, the Zillow Comms Experience team, working with AWS, built two things. The first is the Campaign Orchestrator, which is a configuration-driven orchestration layer that runs each notification as a short-lived workflow execution on Step Functions Express Workflows. The second is the Universal Content Generator (UCG), a library of reusable, schema-driven content modules that those workflows call. Together they make campaign creation faster and more consistent, and they give AI-assisted tooling a declarative format to work with.
The challenge: why the original system needed replacing
The previous content generation model slowed product delivery. Zillow’s Comms Experience supported more than 20 email and push campaigns generated by more than 10 microservices. Each microservice owned its own workflow, models, business rules, and assembly logic.
Most campaigns followed the same pattern: receive a trigger, hydrate data, apply rules, assemble content, and send the message. Each campaign service implemented that pattern separately, creating duplicate engineering work and inconsistent behavior. It also added operational overhead across releases, monitoring, logs, dashboards, and on-call support.
Each campaign was built as its own service because, when these systems were first built, scale was the main challenge. As Zillow added more products, the tradeoff changed. Similar features ended up implemented differently across campaigns, so every new capability had to be rebuilt and retested in each service. That made it hard to roll out features across products and slowed development. The push to centralize came from that cost: we needed to move faster and stay consistent across every customer experience. With one shared implementation, a feature could be built once and reused everywhere, while each campaign kept the flexibility to tailor its experience. Before evaluating workflow engines, we first had to extract shared logic into reusable modules and move campaign decisions into configuration.
The following diagram shows the original architecture, where each campaign generator carries its own copy of the workflow, data models, and business rules.
Figure 1: Original system
Competitive evaluation
We evaluated Temporal, Flowable, an in-house engine, and Step Functions Standard and Express Workflows against four criteria. Those criteria were reliability, total cost of ownership, development speed, and how well the service would scale across teams. The engine had to be managed, configuration-driven, and able to orchestrate both newer and older services. Pricing also had to fit our volume.
Temporal and Flowable would have added another infrastructure component to operate. That worked against two of our core goals: cutting the release, monitoring, and on-call overhead that the original system created, and getting pilot projects running quickly. Neither is available as a managed AWS service, so we would have had to run and scale them ourselves. Step Functions is serverless, so we had no servers or worker fleets to run, and a team could start a pilot without first setting up infrastructure. An in-house engine offered control but required custom lifecycle management, worker pools, queue integration, and monitoring. Step Functions met the core orchestration needs at roughly a quarter of the estimated build effort and a quarter of the ongoing maintenance effort. It was the clear choice for the minimum viable product (MVP).
Express mode compared with Standard mode
Our planning model assumed high-throughput, low-latency workflows. The MVP plan ramped from 14 million workflows per day to more than 100 million across all campaigns. At full scale that means several thousand executions per second at peak. Each workflow runs for only a few seconds, and a notification has to arrive while it’s still relevant. We evaluated both Step Functions execution modes, and for our use case Express Workflows were the better fit.
At least once, sufficient with idempotent modules.
Our workflows are high volume, short-lived, finish well within the five-minute Express limit, and are designed around idempotent module calls. We validated quota, latency, and operational behavior during the traffic ramp-up.
The architecture
Campaign Orchestrator is a configuration-driven workflow platform. Each message is input data combined with persisted campaign configuration. The configuration is relatively static for each workflow, while the input data stays flexible based on how the configured steps are assembled.
A shared orchestration layer reads queued campaign events, groups work where appropriate, and invokes the corresponding Step Functions Express Workflow for each campaign. Campaign metadata describes product constants, ownership, and Zillow environment features. Workflow configuration describes step topology, step-level configuration, mappings, branching, delay behavior, and send behavior.
The following JSON shows a simplified workflow input, combining the message payload with the platform, campaign, and configuration metadata that drive the workflow:
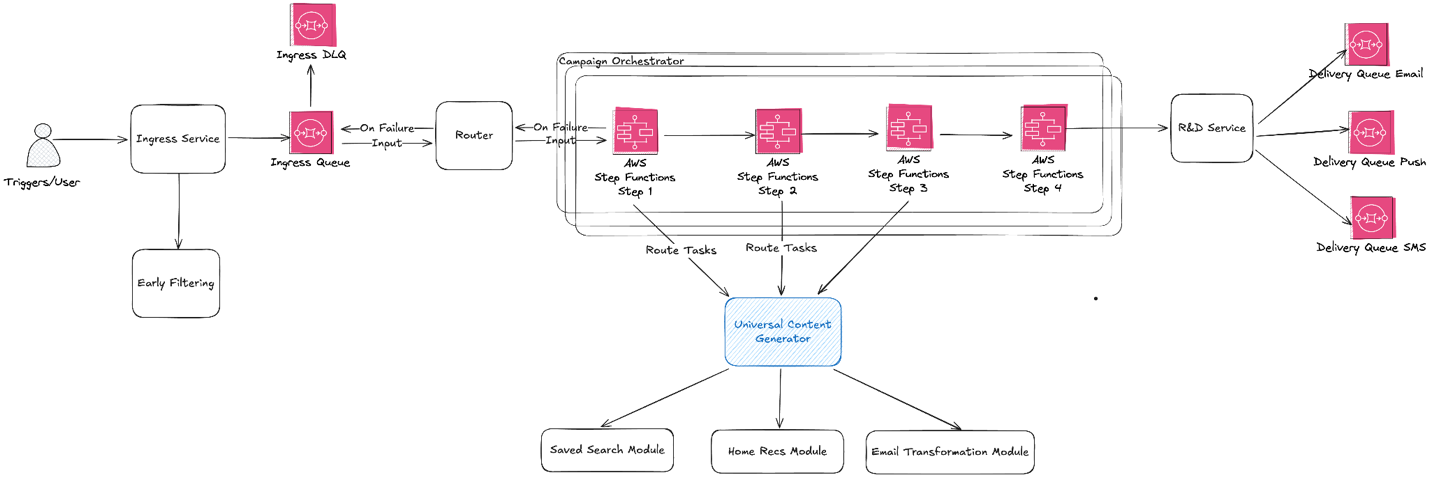
The following diagram shows the new architecture, where a single shared orchestration layer and one library of reusable modules serve every campaign. A message moves through the diagram from left to right. The ingress service queues it, and the router applies campaign controls and starts the workflow. Campaign Orchestrator runs the Step Functions steps, each step calls a UCG module, and the delivery service sends the result.
Figure 2: The new system
Router
Our campaigns need a set of controls applied before a workflow starts: queue polling, batching, idempotency checks, pause and resume behavior, replay coordination, speed control, and campaign routing decisions. Some of these controls are specific to how we order and throttle campaign sends, so they live outside Step Functions.
We centralized these controls in an in-house router service that reads from Amazon Simple Queue Service (Amazon SQS) and starts the right Step Functions workflow. Keeping them in one place gives us a single point to pause a campaign, replay a batch, or adjust send speed without changing any workflow definition.
Shared modules (UCG)
The Universal Content Generator is the modular content generation layer behind Campaign Orchestrator. Instead of each campaign owning a separate generator, UCG organizes shared capabilities into reusable modules. Before UCG, this logic was spread across more than 10 separate generators. Centralizing it in one service also smoothed its traffic. Some daily campaigns used to run for about four hours and leave their generator idle for the other 20. Now all campaigns share one fleet, so the load spreads across the day.
Modules handle capabilities such as property hydration (loading listing details such as price, photos, and address for each home in a message), hidden homes (listings a user has chosen to hide, which we filter out of notifications), common data (the subscriptions, saved homes, eligibility flags, and propensity scores every campaign loads for a recipient), recommendations, A/B testing, and content assembly. They are stateless and schema-driven.
Direct service invocation with HTTP Invoke
A key design choice was to call UCG directly through Step Functions HTTP Invoke. This fits the workload for two reasons. First, our content generation logic already ran as long-lived containerized services inside our private service environment, with network access, service discovery, and authentication established. Second, routing workflow steps to UCG added no new compute cost.
With Step Functions HTTP Invoke, we call UCG modules for data hydration, rule checks, and content assembly as they already run. Authentication runs through an Amazon EventBridge connection. Each HTTP Invoke task points to the connection with a ConnectionArn. The connection holds an API key, and UCG checks that key on every request. Amazon EventBridge keeps the key in AWS Secrets Manager and adds it to the request at call time. The workflow definition never contains the key, and neither does our application code. When the key rotates, we rotate it once in the connection and every workflow picks it up.
To avoid repeating the same HTTP Invoke settings in every workflow, we introduced component inheritance. Components are written in a slightly modified version of the Step Functions task definition we deploy through AWS CloudFormation. A base component holds the settings that many steps share, and other components extend it. The following base component, content_module_call, defines how every workflow step calls UCG services directly through HTTP Invoke: the resource, method, headers, and the ConnectionArn for the connection described earlier.
Business modules extend the shared HTTP component and supply only the module endpoint. Before deployment, our build script replaces each component with a standard Task state: it loads the component named in Extends, merges the step’s own fields on top, and writes the result into the Terraform we deploy. Workflow definitions stay focused on product intent rather than network plumbing:
Step Functions state machine definitions, JSONata expressions, and infrastructure definitions are powerful, but they are not the right interface for every campaign owner. We added a higher-level configuration layer so campaign owners can define their own workflows without having to understand Step Functions CloudFormation configuration. Each campaign config describes a workflow: which modules run, in what order, and how data moves between them. The system translates that config into the Step Functions definition and CloudFormation template that gets deployed. Campaigns don’t share one generic workflow that picks modules at runtime. Each campaign gets its own workflow, built from the same shared modules and components. As a next step, we are considering a generic workflow that assembles modules in real time from config. Each campaign would still run its own copy of that workflow, so ownership stays isolated per campaign.
Campaign owners specify the modules needed for an email template or push notification. Each module exposes input, output, and configuration schemas. Campaign owners define module outputs to satisfy the template input schema. Module inputs define what triggers need to provide.
With this structure, campaign owners onboard through a declarative process. They work with configuration instead of raw workflow code or JSONata expressions. They can also run controlled experiments and give AI tools a format they can inspect, generate, and modify with appropriate validation.
The following simplified A/B test config is adapted from a real Campaign Orchestrator config. It injects an A/B test module before email transformation and maps the experiment result into the next step without directly touching Step Functions or CloudFormation definition.
Because a campaign is declared as schema-validated configuration, the same contracts that protect human changes also apply to AI-assisted tooling. Our internal assistants already draft module selections and mappings from a product brief, and the output must pass the same schema checks, JSONata tests, and Step Functions validation before it can be deployed.
Batch mode optimization
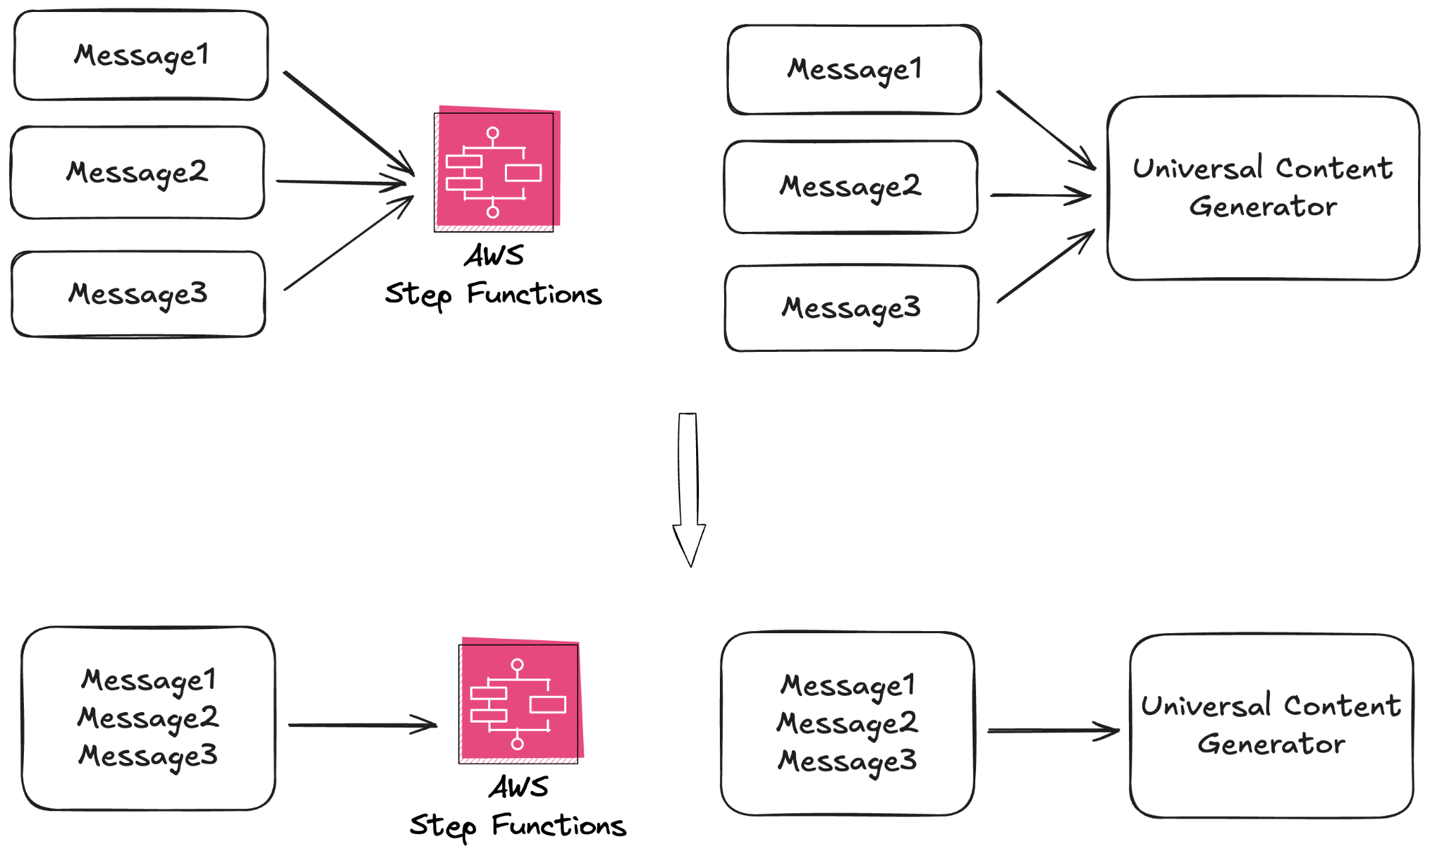
Campaign Orchestrator supports batching, which improves overall throughput while reducing cost. Instead of launching one workflow per message, the router can group messages and invoke one workflow for the batch.
For example, processing 100 messages individually could produce 100 workflow executions and 400 HTTP requests to UCG services. With batching, the same messages can be processed in one workflow with four HTTP requests, assuming each step supports bulk input and output. That matters at our volume for two reasons. Express Workflows charge for each request and for run time. Batching cuts the number of requests, but each batch runs longer. A rule of thumb: a batch of 10 messages costs less than 10 separate runs as long as it takes no more than 10 times as long as one run. In the preceding four-step example, one message takes about 1.2 seconds, so a batch of 10 saves money if it finishes within 12 seconds. In practice, a batch runs only 10 to 20 percent longer than a single message, about 1.4 seconds instead of 12. That makes a batch of 10 about 90 percent cheaper than 10 separate runs. The batched payload stays under the 256 KiB limit, so memory is still billed at the 64 MB minimum. Fewer executions and HTTP requests also use less of the StartExecution rate, HTTP Invoke concurrency, and logging throughput we size for. That leaves headroom to send more notifications on the same quotas.
The batching model appears in the Step Functions definition and JSONata expressions. This simplified example shapes a batched payload into a bulk UCG request while preserving each tracking ID:
Batching works only if every step in the workflow can handle a batch rather than a single message. For UCG, that requirement is built into the module API. Each module’s schemas define its input, output, and config models, and the module API accepts those models as a batch keyed by tracking ID. A module that doesn’t follow that API won’t build. Our JSONata mappings and upstream and downstream service contracts already accepted bulk input internally, so adding batching didn’t require reworking them.
Batching also can’t cost us visibility into individual messages. Because each batch is keyed by tracking ID, as the preceding example shows, UCG returns a result from each module for each tracking ID. The router uses those per-message results to deliver, retry, or drop each message individually, so one failed message doesn’t fail the whole batch.
The following diagram shows how the router groups messages into a single batched workflow execution.
Figure 3: Batching mode
Scaling: Performance and organizational
At our target throughput, service quotas are part of the architecture. We reviewed Step Functions StartExecution rate limits, HTTP Invoke concurrency, and Amazon CloudWatch logging throughput before traffic ramped. HTTP Invoke concurrency needed attention first, because its default quota is lower than the rate at which Express Workflows can start. We sized the required concurrency from our capacity model and worked with AWS to raise the quota before each rollout phase, so throughput limits never gated the traffic ramp.
We planned the rollout in phases, from early traffic to more than 100 million daily executions. With this approach, we could validate cost, quotas, latency, and operations before full scale.
The architecture also supports organizational scaling. Product teams own campaign modules, steps, configuration, and the Step Functions cost tied to their traffic, so they can launch and change campaigns without waiting on the central team. Central teams own shared infrastructure such as the router service, Step Functions patterns, Amazon SQS integration, and deployment tooling, so one improvement reaches every campaign.
Shared code doesn’t mean shared failure. Every campaign’s Express state machine is generated from the same templates and modules, so isolation adds no duplicate code. Each campaign still runs its own state machine and its own Amazon SQS queue, and the router gives each queue its own polling threads, worker pool, and circuit breakers. When one campaign fails or backs up, only its own breaker trips, and we can pause its queue without touching the others. A traffic spike or downstream failure in one campaign doesn’t become a noisy neighbor for the rest.
Testing
Configuration-driven workflows require strong validation because much of the behavior lives in JSONata expressions and campaign configuration. We keep shared JSONata expressions in dedicated files and require unit tests for them. These tests are not offline string evaluations. The test runner builds a small Step Functions state and executes it through the Step Functions TestState API, validating expressions against the same runtime used by Step Functions.
For example, this shared user profile expression converts a batch of campaign messages into UCG module requests:
Every test case for the expressions we reference through @jsonata runs through the TestState API in continuous integration (CI), and a failing case blocks the deploy. With this approach, teams get reusable mappings and can reduce the risk of malformed payloads, runtime expression errors, or configuration changes that fail inside Step Functions.
Conclusion: Measured impact
The largest impact of the new architecture is product velocity. By replacing repeated custom engineering with reusable modules and configuration-driven workflows, Zillow shortened development cycles for new products and features, opened up greater self-service, and reduced cross-team dependencies. Teams now iterate through configuration, shared modules, and validated JSONata mappings instead of building or modifying a dedicated generator for each idea.
In the original system, testing a new variant or launching a campaign meant changing a dedicated generator service, and often several. Now a team edits a config, reuses modules other teams have already built, and validates the workflow before it reaches production.
The orchestration service also reduced workflow engine build and maintenance cost. Zillow’s internal engineering estimates put the build at 9 development weeks, down from 32 for a comparable in-house engine. Ongoing maintenance fell along the same lines, from roughly 8 hours per week to 2. We sized the system to scale from early traffic phases to more than 100 million workflows per day.
Most of what made this work can be reused by teams with high-volume, short-lived workflows: describe each message as input data plus configuration, keep modules stateless and tested, make every step accept batches, and plan service quotas before traffic ramps. Step Functions Express made those practices practical to run at Zillow’s scale.
This post shows you how to diagnose and tune compaction in Apache HBase on Amazon EMR. Compaction is the background process that merges store files. When it competes with your workload during peak hours, you can see higher read and write latency, write stalls, and RegionTooBusyException errors. Amazon EMR on Amazon Simple Storage Service (Amazon S3), you can also see more 503 Slow Down responses when you increase your cluster’s request rate.
This is the second post in a two-part series on operating Apache HBase on Amazon EMR:
Part 1 covers the three-level troubleshooting model and three availability issues: an HBase coordinator that doesn’t finish initializing, a RegionServer that stops unexpectedly, and HBase regions that stay in transition (RIT).
Part 2 (this post) covers performance: how to confirm that compaction is the cause, which parameters to tune first, and when to contact AWS Support.
This post covers the following:
How compaction affects performance.
How to confirm whether compaction is causing the latency.
The compaction parameters to tune, their defaults, and what each one does.
Practices that reduce compaction work.
When to stop and contact AWS Support, and what to bring to a support case.
This post doesn’t cover the following:
Coordinator startup, RegionServers that stop unexpectedly, and regions in transition, which are covered in Part 1 of this series.
Compaction algorithm internals or writing custom compaction policies.
Schema design and row key distribution (the Practices that reduce compaction work section covers how they affect compaction).
This post is for operations teams, data engineers, HBase administrators, and site reliability engineers (SREs) who see recurring latency spikes, write stalls, RegionTooBusyException errors, or high Amazon S3 request rates during compaction on HBase on Amazon EMR.
Terminology
Apache HBase names the process that coordinates the cluster HMaster, and Amazon EMR runs it on the primary node. This post refers to it as the HBase coordinator. Names that contain master, such as the hbase-master service and the hbase-hbase-master-*.log log files, appear only in commands and log output, where you need the exact name.
In HBase, a region is a range of rows in a table, and a RegionServer is the process that serves regions. Neither is related to an AWS Region.
Prerequisites
Read Part 1 of this series, in particular the Three levels of troubleshooting and Quick reference sections.
Confirm that you have access to the HBase web UI (coordinator on port 16010, RegionServer on port 16030).
Confirm that you have SSH access to the primary and core nodes.
Know whether your cluster uses Hadoop Distributed File System (HDFS) or Amazon S3 as its storage mode, and how to apply configuration changes through the hbase-site classification in Amazon EMR. For storage-mode specifics, see HBase on Amazon S3.
Be familiar with minor and major compaction in HBase.
How compaction affects performance
By default, HBase runs a major compaction roughly every seven days and uses a jitter factor of 0.5 to spread the start times so that HBase regions don’t all compact at once. For guidance specific to Amazon EMR, see the HBase best practices in the Amazon EMR best practices guide.
Major compaction reads and rewrites all store files in a region. It improves read performance and removes deleted and expired cells, but when it runs during peak hours it competes with client requests and can increase latency. Tuning compaction means controlling when major compaction runs and how much I/O it uses.
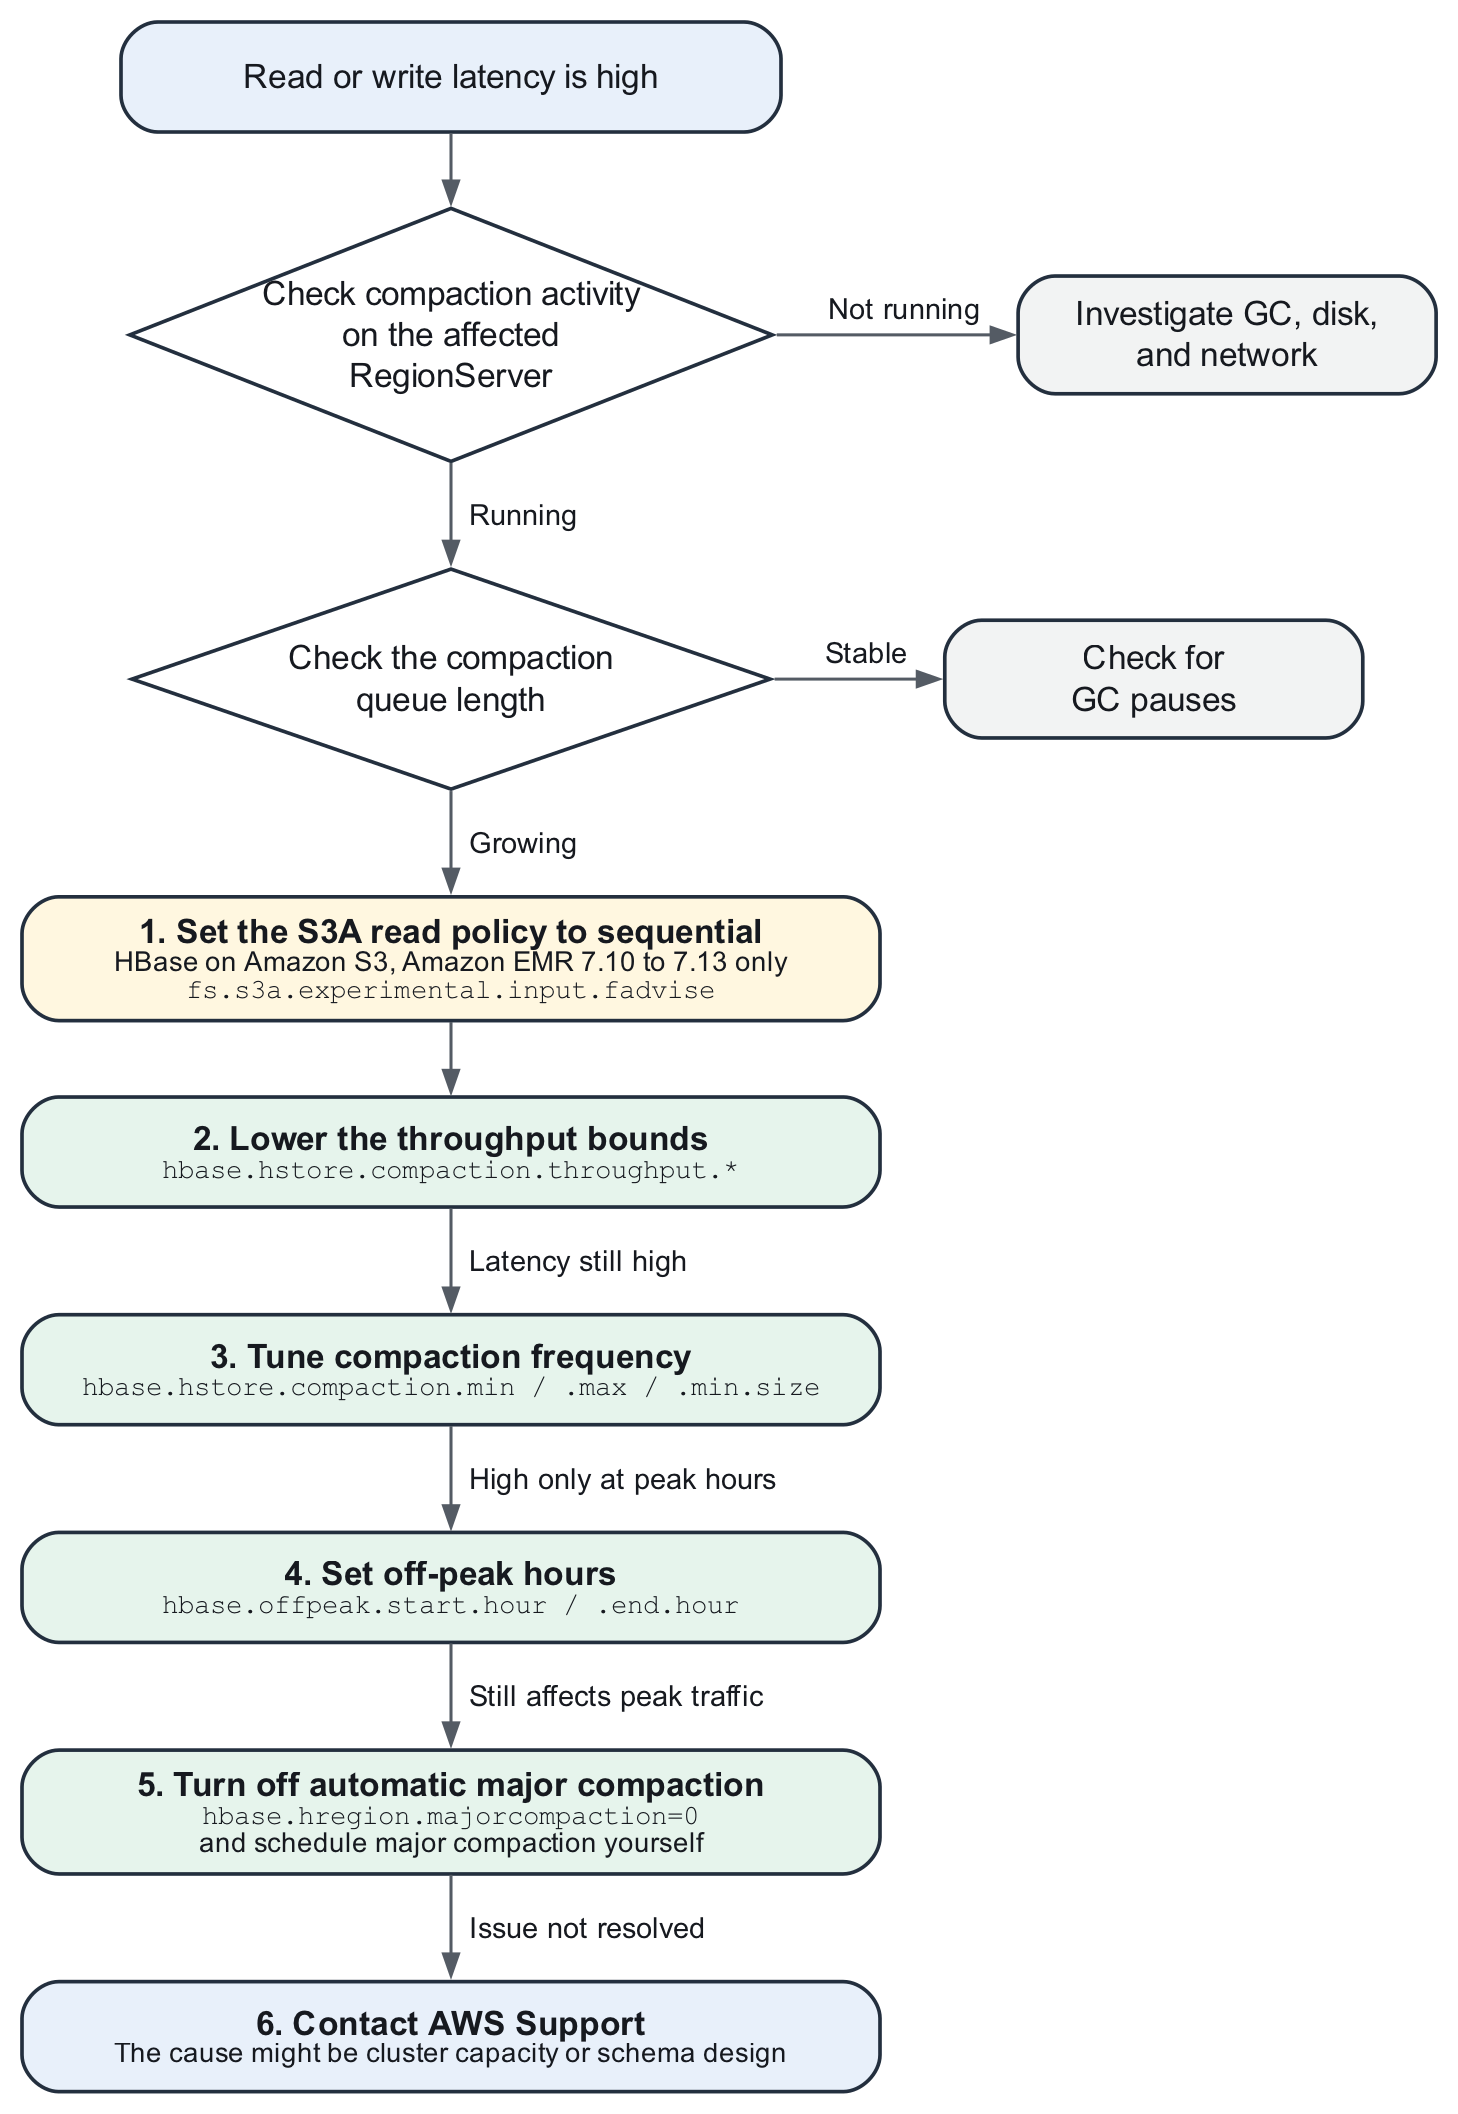
Compaction decision flow
Before you change any parameters, use the following decision flow to identify the cause.
Figure 1: Compaction decision flow
The flow has the following steps:
If latency is high, check whether compaction is running on the affected RegionServer. If it isn’t, investigate garbage collection (GC), disk, and network instead.
If compaction is running, check whether the compaction queue is growing. If it isn’t, check for GC pauses.
If compaction is running and the queue is growing, work through the following steps in order:
On HBase on Amazon S3 with Amazon EMR 7.10 to 7.13, set the S3A read policy to sequential before you change any compaction parameter. See Step 3 in Diagnose compaction pressure.
Lower the throughput bounds (hbase.hstore.compaction.throughput.*) to reduce the I/O that compaction takes from client requests. The queue can grow while the limit is lower. HBase removes the limit when any store reaches hbase.hstore.blockingStoreFiles, so the limit doesn’t keep a store at the blocking threshold.
If latency is still high, tune compaction frequency (hbase.hstore.compaction.min, hbase.hstore.compaction.max, and hbase.hstore.compaction.min.size).
If latency is high only during peak hours, set off-peak hours (hbase.offpeak.start.hour and hbase.offpeak.end.hour) so that more compaction work runs outside them.
If compaction still affects peak traffic, turn off automatic major compaction (hbase.hregion.majorcompaction=0) and schedule it yourself.
If none of these steps resolves the issue, contact AWS Support. The cause might be cluster capacity or schema design.
Note: Changing the previous configuration requires EMR HBase Restart. For reconfiguration behavior, refer to Reconfiguration behaviors in the Amazon EMR Management Guide.
Signs of compaction pressure
The following symptoms indicate compaction pressure. They don’t all appear at once. Start with the first two, because you can confirm them in the HBase web UI:
Read and write latency rises on some RegionServers but not others. The affected set changes over time as different regions reach their compaction window.
The compaction queue length on the affected RegionServer keeps increasing.
Long-running reads (report generation, Apache Spark table scans) pause and then resume.
Clients receive RegionTooBusyException, call timeouts, or retries. The RegionServer log shows Region is too busy due to exceeding memstore size limit warnings for the same regions.
Writes stall periodically. When a store reaches hbase.hstore.blockingStoreFiles store files, HBase delays MemStore flushes until compaction reduces the count, for up to hbase.hstore.blockingWaitTime (90 seconds by default). If the MemStore exceeds hbase.hregion.memstore.flush.size multiplied by hbase.hregion.memstore.block.multiplier in the meantime, HBase blocks updates to the region.
On HBase on Amazon S3, more requests return 503 Slow Down when the request rate from your cluster to an Amazon S3 prefix is high. These responses ask your cluster to reduce its request rate. Compaction reads and rewrites store files in Amazon S3, so it adds to that rate.
On Amazon EMR 7.10 to 7.13 with HBase on Amazon S3, compactions, scans, and bulk loads run slower than expected and the number of HFiles keeps increasing. See Step 3 in Diagnose compaction pressure.
The pattern recurs on a weekly rhythm, which matches the default seven-day major compaction interval.
Diagnose compaction pressure
Work through the following steps in order. Step 1 uses the HBase web UI (Level 1). Steps 2 and 3 use logs, operating system tools, and configuration files (Level 2). None of these checks change the cluster.
Step 1 (Level 1): Check the HBase web UI
In the HBase web UI, sort RegionServers by request count and by store file count to find the outliers. A server with a much higher store file count might be running, or waiting for, a compaction.
On the RegionServer web UI of an affected server, check the compaction queue length and store file count per region. A queue that keeps growing means compaction can’t keep up with your write volume, so add capacity or tune your configuration.
Check the BlockCache hit rate. A lower hit rate also increases latency. On HBase on Amazon S3, RegionServers cache reads in the BlockCache (memory) and the BucketCache (local disk). A cache miss reads the store file from Amazon S3, which has higher latency than a local read. If the hit rate dropped when compaction started, compaction might be replacing frequently read data in the cache.
Step 2 (Level 2): Check the logs and the operating system
Confirm that compaction is running, and on which HBase regions:
grep -E "Starting compaction|Completed (major )?compaction|too many store files" \
/var/log/hbase/hbase-hbase-regionserver-*.log | tail -40
Rule out GC as the cause, because heavy compaction and heap pressure look the same to clients:
free -m                  # check free memory
top -b -n1 | head -20    # CPU
df -h                    # disk capacity
Use the canary tool to measure read latency per HBase region. The tool writes its results to the console and to /var/log/hbase/hbase.log. Save the output as a baseline to compare against after each change:
sudo -u hbase hbase canary my_table
Check the store file layout of the table to see whether it has many small files (from frequent flushes) or a few large ones. Store files are under the HBase root directory, which is in HDFS or Amazon S3, depending on your storage mode. On HBase on Amazon S3 with Amazon EMR 7.4 and later, HBase tracks the store files it reads in a meta file in each store directory instead of relying on directory listings, so use the store file count in the RegionServer web UI as the count of active files:
Step 3 (Level 2): Check the S3A read policy (Amazon EMR 7.10 to 7.13)
Starting with Amazon EMR 7.10, HBase on Amazon S3 uses the S3A file system client, and fs.s3a.experimental.input.fadvise defaults to normal. In this mode, S3A can switch to a random read policy even when HBase continues to read sequentially, which slows compactions, scans, and bulk loads. Use the recommended setting for Amazon EMR 7.10, 7.11, 7.12, and 7.13. The symptoms are similar to compaction pressure: slow compactions, an increasing number of HFiles, and blocked flushes that return RegionTooBusyException.
If the release is 7.10 to 7.13 and the property isn’t set, or is set to normal, set it to sequential in the hbase-site classification before you tune compaction. Changing the setting requires a restart, so it’s a Level 3 action:
Apply the setting to hbase-site.xml on all nodes, then restart the HBase coordinator and RegionServer processes. Setting the property on individual commands instead doesn’t improve compaction and scan performance. For more information, see HBase on Amazon S3 in the Amazon EMR Release Guide.
Compaction tuning parameters
The following table lists the compaction parameters that this post covers. Apply changes through the hbase-site configuration classification in Amazon EMR. Changing these parameters is a Level 3 action. Change one parameter at a time and compare the results with the canary baseline from Step 2, because several of these parameters interact.
Note: The Amazon EMR column lists defaults from the HBase on Amazon S3 documentation. Where a default isn’t listed there, check the effective value in /etc/hbase/conf/hbase-site.xml on your cluster, and verify component versions on the Amazon EMR release components page. For example, hbase.hstore.blockingStoreFiles is 16 in Apache HBase 2.x, but Amazon EMR sets it to 10 for HBase on Amazon S3.
Parameter
What it does
Apache HBase 2.x default
Amazon EMR default (HBase on Amazon S3)
hbase.hstore.compaction.throughput.higher.bound
Upper limit on compaction throughput per RegionServer when store file pressure is high.
104857600 (100 MB/s)
Not listed
hbase.hstore.compaction.throughput.lower.bound
Lower limit on compaction throughput per RegionServer when store file pressure is low.
52428800 (50 MB/s)
Not listed
hbase.hstore.compaction.min
Minimum number of eligible store files before a minor compaction runs. If it isn’t set, HBase uses hbase.hstore.compactionThreshold.
3
Not listed
hbase.hstore.compaction.max
Maximum number of store files included in a single minor compaction.
10
Not listed
hbase.hstore.compaction.min.size
HBase always considers store files smaller than this size eligible for minor compaction.
134217728 (128 MB)
Not listed
hbase.hstore.compaction.ratio
Size ratio that decides which larger files are included in a minor compaction.
1.2
Not listed
hbase.hstore.blockingStoreFiles
Number of store files in a store at which HBase delays MemStore flushes, for up to hbase.hstore.blockingWaitTime (90 seconds), until compaction reduces the count.
16
10
hbase.hregion.memstore.flush.size
MemStore size, in bytes, at which HBase flushes to a new store file.
134217728 (128 MB)
134217728 (128 MB)
hbase.hregion.memstore.block.multiplier
HBase blocks updates when a MemStore exceeds the product of hbase.hregion.memstore.flush.size and this value.
4
4
hbase.hregion.max.filesize
Region size at which HBase splits the region.
10737418240 (10 GB)
10737418240 (10 GB)
hbase.offpeak.start.hour hbase.offpeak.end.hour
Off-peak window (hours 0–23). During this window, the larger hbase.hstore.compaction.ratio.offpeak (default 5.0) applies, and compaction throughput isn’t limited unless you set hbase.hstore.compaction.throughput.offpeak.
-1 (no off-peak window)
Not listed
hbase.hregion.majorcompaction
Time between automatic major compactions, in milliseconds. 0 turns off automatic major compaction.
604800000 (7 days)
Not listed
hbase.hregion.majorcompaction.jitter
HBase uses this value to spread major compaction start times so that Regions do n’t all compact at once.
0.5
Not listed
hbase.bucketcache.size
Local disk space, in MB, on each RegionServer for the BucketCache (instance store and Amazon Elastic Block Store (Amazon EBS) volumes).
Not set
8,192 MB
fs.s3a.experimental.input.fadvise
S3A read policy for HBase on Amazon S3. See Step 3 in Diagnose compaction pressure.
Not applicable
normal (7.10 and later)
Warning: If you turn off automatic major compaction (hbase.hregion.majorcompaction=0), you are responsible for scheduling it. Minor compactions still merge store files, but delete markers and deleted cells stay in store files until a major compaction runs. This slows reads and delays reclaiming storage. If you turn it off:
Schedule major_compact yourself, per table, in a maintenance window. Run it on the primary cluster only, because read-replica clusters must not run manual compactions. On Amazon EMR releases earlier than 7.4.0, also turn off compaction on the read-replica cluster (hbase.regionserver.compaction.enabled=false). From 7.4.0, store file tracking makes this unnecessary.
Alarm when the store file count of any store approaches hbase.hstore.blockingStoreFiles (for example, at 80 percent of that value), so that you notice if the schedule slips before writes are delayed.
Use the following HBase shell commands to run a major compaction and check its progress:
hbase> major_compact 'my_table'
hbase> major_compact 'my_table', 'cf1'   # a single column family
hbase> compaction_state 'my_table'       # check progress
Practices that reduce compaction work
Tuning limits the effect of compaction on your workload. The following practices reduce how much compaction work the cluster has to do:
Limit region size and the number of regions per RegionServer. Large regions make major compaction expensive, because major compaction rewrites every store file in the region. HBase splits a region when it reaches hbase.hregion.max.filesize (10737418240 bytes, or 10 GB, by default on HBase on Amazon S3). Pre-split tables where you can predict the key distribution, using the SPLITS option of the HBase shell create command or the RegionSplitter tool.
Fix hotspotting at the row key. A row key that concentrates writes on one region (sequential timestamps, monotonically increasing IDs) produces frequent flushes and repeated compaction on a single RegionServer. To spread writes across HBase regions, salt, hash, or reverse the key.
Reduce small flushes. Many small MemStore flushes create many small store files, which increases compaction work. Compare the MemStore flush size (hbase.hregion.memstore.flush.size) with your write pattern. If regions flush every few seconds, the flush size might be too small, or the RegionServer might be under memory pressure. On HBase on Amazon S3, consider increasing hbase.hregion.memstore.flush.size and hbase.hregion.memstore.block.multiplier. This increases the time between compactions, but it also increases replication lag if you use a read-replica cluster. Make sure that the RegionServer heap can hold the larger MemStores.
Size the BucketCache on HBase on Amazon S3. The BucketCache stores reads on the local instance store and Amazon EBS volumes of each RegionServer. The more of your dataset it holds, the fewer reads go to Amazon S3, so compaction competes less with client reads. Increase hbase.bucketcache.size (default 8,192 MB) and choose an instance type with enough instance storage. See HBase on Amazon S3 and the Amazon S3 best practices in the Amazon EMR best practices guide.
Use multiple primary nodes. On an Amazon EMR cluster with multiple primary nodes, the HBase coordinator keeps running if one primary node in your cluster stops, so region assignment and split procedures continue. See Plan and configure primary nodes.
Alarm on compaction metrics. Set alarms on compaction queue length and store file count per region, which increase as compaction falls behind. Also alarm on Java virtual machine (JVM) pause frequency and the number of stopped RegionServers. For the metrics that are available, see the observability guidance in the Amazon EMR best practices guide.
When to stop and contact AWS Support
Some repair actions change cluster metadata and are difficult to reverse. Stop and open a case with AWS Support when any of the following is true:
HBCK2 bypass or setRegionState is your next step. Both can leave procedures or regions in an inconsistent state that you then must correct, and bypass might require a coordinator restart to release locks. AWS Support can validate your diagnosis and confirm the command before you run it.
Your next step is to delete znodes. Removing /hbase children discards state that HBase keeps in ZooKeeper, such as the location of hbase:meta, RegionServer registrations, and, on Amazon EMR, store file tracking data. This makes the problem harder to resolve. Don’t delete znodes as a first step.
A procedure is stuck and you cannot identify why from the logs. If three thread dumps and the coordinator log have not explained what is holding the procedure, AWS Support can help identify the cause.
Several RegionServers stop at the same time. Look for a cause on your cluster that the RegionServers share, such as the network configuration between cluster nodes, the ZooKeeper ensemble, or HDFS.
You have tuned compaction parameters twice and latency has not improved. The cause might be schema design, row key distribution, or cluster capacity, and further tuning can hide it without resolving it.
The stack trace contains exceptions that you don’t recognize. If the error doesn’t appear in this post or the Apache HBase Reference Guide, it might be an Apache HBase issue that is fixed in a later release. Check the Amazon EMR Release Guide and the Apache HBase JIRA before debugging further.
What to bring to the support case
Collect the following information before you open the case:
Artifact
How to get it
Coordinator log extract (first ERROR plus 100 lines of context)
Run grep -n -m1 "ERROR" /var/log/hbase/hbase-hbase-master-*.log, then sed -n 'X,+100p' from that line number
RegionServer log extract from the affected server
Run the same commands on the affected core node against /var/log/hbase/hbase-hbase-regionserver-*.log
Thread dumps (3, taken 30 seconds apart) from the affected JVM
Find the process ID with sudo jps -l, then run sudo -u hbase jstack -l <PID> three times, 30 seconds apart
Stuck procedure identifiers
list_procedures in the HBase shell, or the Procedures and Locks page in the HBase web UI
Encoded region names involved
From the HBCK Report tab or the Regions in Transition list
Amazon EMR release and HBase version
aws emr describe-cluster --cluster-id <cluster-id> --query 'Cluster.ReleaseLabel' for the release, and sudo -u hbase hbase version for the HBase version
Amazon CloudWatch metrics, cluster events in the Amazon EMR console, and any configuration changes or scaling actions
Compaction metrics: queue length, store file count, duration of recent compactions
The RegionServer web UI, or the Completed compaction and Completed major compaction log lines, which include how long each compaction took
Any configuration changes you have already made
List the parameters you changed and their before and after values
Providing this information up front reduces the number of follow-up requests from AWS Support.
Quick reference: Compaction log signatures
Search for the first occurrence of each signature in the following table, which shows when the condition started. Unless the table says otherwise, the signatures appear in the RegionServer log. For example:
grep -m1 -n "too many store files" /var/log/hbase/hbase-hbase-regionserver-*.log
Signature
Meaning
too many store files
A store reached the blocking threshold. HBase is delaying MemStore flushes until compaction reduces the number of store files.
RegionTooBusyException
A MemStore exceeded hbase.hregion.memstore.flush.size multiplied by hbase.hregion.memstore.block.multiplier, for example because flushes are delayed by too many store files. The RegionServer logs Region is too busy due to exceeding memstore size limit, and clients receive the exception.
Completed major compaction
A major compaction finished on that store. A major compaction that rewrote every file also shows (all).
Completed compaction
A minor compaction finished. The line includes the number of files, the resulting store size, and how long the compaction took. Use it to establish a baseline.
Detected pause in JVM / JvmPauseMonitor
A GC pause. Compare its timestamp with the compaction start time to see which came first.
SlowDown
Amazon S3 returned HTTP 503 with the error code SlowDown, which asks your cluster to reduce its request rate to a prefix. Compaction adds to the request rate on HBase on Amazon S3.
ServerCrashProcedure
Appears in the coordinator log (hbase-hbase-master-*.log). HBase is reassigning the regions of a RegionServer that stopped. Check whether a GC pause during heavy compaction caused it to stop.
Finished flush of
A MemStore flush completed and wrote a new store file. Many of these lines in a short period mean frequent small flushes, which increase compaction work.
Conclusion and next steps
In this post, you learned how to confirm whether compaction is causing latency on HBase on Amazon EMR, and how to tune it, starting with the least invasive change.
For coordinator startup, RegionServers that stop unexpectedly, and regions in transition, see Part 1 of this series.
Next steps
Add the triage flow from both posts to your team’s runbook, with your own alarm names, dashboards, and on-call procedures.
Set up the alarms described in Practices that reduce compaction work.
Stage the HBCK2 jar for your HBase version on the cluster now, so that it’s ready before you need it.
Record a compaction baseline. Run grep -E "Completed (major )?compaction" across a week of RegionServer logs to learn the normal duration and frequency for your tables, so that you can recognize unusual behavior.
Review the guidance in the HBase best practices and troubleshooting sections of the Amazon EMR best practices guide.
This is Part 2 of a two-part series for developers and technical teams at betting and gaming operators registering SMS messaging for multi-factor authentication (MFA) and account verification through AWS End User Messaging. Part 1 covered why betting and gaming operators face heightened carrier scrutiny, how the AWS and carrier registration roles work, and how to prepare before you apply.
Here in Part 2, we move from preparation to execution: what to include in your application to maximize approval odds, how to maintain compliance and deliverability after approval, and what to do if your registration is denied.
Prerequisites: This guidance applies exclusively to transactional and MFA messaging (for example, one-time passcodes, account verification, and security alerts). AWS End User Messaging does not support marketing or promotional messages for the betting and gaming industry. If you have not read Part 1, we recommend starting there.
The registration process: Best practices for approval
The following sections cover what to include in your application to maximize your chances of registration approval.
Provide detailed use cases
Don’t submit vague use-case descriptions. “We send notifications to users” is not sufficient. For each message type, explain:
The specific trigger (for example, “sent when a user logs in from an unrecognized device”).
The audience (for example, “verified players who have completed account registration and opted in to MFA”).
The content, including your actual one-time password (OTP) template.
The basis (for example, “account security notification, MFA only, not promotional”).
The expected volume (for example, “approximately 5,000 to 15,000 messages monthly based on current active user count”).
Document your opt-in workflow
Opt-in documentation is one of the most scrutinized components of a betting and gaming technology company’s registration. Include the following:
Implement double opt-in – A double opt-in process (where a user provides their number, receives a confirmation message, and replies to confirm) creates a clear consent record and reduces complaint rates.
Make opt-out instructions explicit in every message – Every message you send should include clear opt-out instructions (for example, “Reply STOP to unsubscribe”).
Document the consent flow with screenshots or flow diagrams – Show exactly where and how users provide consent on your application. Include the exact language of your consent disclosure.
Figure 1: A sample double opt-in consent flow showing the SMS consent disclosure, STOP and HELP instructions, and links to terms and conditions and the privacy policy
Include relevant operating documentation
Don’t wait to be asked. Include your betting and gaming technology licenses, regulatory approvals, and messaging compliance documentation with your initial application. Providing this detail helps reduce back-and-forth with reviewers and increases your chances of approval.
Post-registration: Maintaining compliance and deliverability
Approval by the carrier is the beginning, not the end. Betting and gaming technology operators that treat registration as a one-time hurdle often find their messaging programs throttled or suspended months later. Long-term deliverability requires ongoing discipline, including the following best practices:
Manage message volume carefully
Declare your expected message volume during registration. Expressly state how many messages you plan to send monthly in the registration.
Maintain consistent sending patterns. Irregular volume (quiet for weeks, then a massive burst) looks like spam or suspicious activity to carriers, aggregators, and AWS monitoring systems. Sudden spikes can result in throttling or suspension, even if the traffic is legitimate. If you expect a temporary increase (major sporting events or new market launches, for example), open an AWS Support case in advance so the team can note the expected volume change and help prevent automated throttling during the spike.
Monitor and optimize your content
Regularly review message content. Regulations change, carrier policies evolve, and language that was acceptable last year might be filtered today.
Avoid language that could trigger gambling-related filters. Work with AWS Support to understand which terms are most likely to cause issues in your specific use cases.
Focus on account security messaging only. Keeping your active message templates strictly within that scope is both a compliance requirement and an effective way to maintain deliverability.
Manage feedback proactively
Set up alerts for spam complaint spikes. Investigate immediately. Carriers, aggregators, and AWS can suspend your messaging if complaint rates stay elevated.
Track delivery rates by template. If your password reset messages drop while OTP delivery stays stable, that’s a signal worth investigating. It is a sign of content-based carrier filtering, origination identity blocking, or malicious account takeover attempts targeting your application.
Maintain open communication with AWS Support. Do not hesitate to reach out to AWS Support if you have any questions.
If your registration is denied
Denial is a common outcome for gaming and betting registrations. If your application is rejected, here is how to move forward.
Understand the rejection
Review the rejection reason against official documentation. AWS publishes the full list of rejection reasons with remediation steps at Understanding rejection reasons. When your registration is rejected, the console displays a specific reason. Match it to the documentation to understand exactly what needs to be changed.
Rejection reasons most relevant to gaming registrations:
Category
Rejection Reason (exact text)
What It Means
Action
Brand
Brand associated with or website references gambling which is prohibited by mobile operators
The carrier flagged your brand based on your website content or industry classification, regardless of your messaging use case.
Make sure your website clearly separates gaming operations from your MFA/security messaging program. Consider whether a dedicated subdomain for account security communications would reduce this signal.
Campaign
Use case is considered restricted or disallowed by mobile operators: Gambling
Your campaign use case was categorized as gambling-related by the carrier, even if scoped to MFA.
Rewrite your use case description to emphasize transactional/security messaging exclusively. Remove any language that references gaming operations beyond identifying your industry.
Campaign
Campaign description does not match sample messages or use case
The reviewer found a mismatch between your stated use case and the sample messages you provided.
Align your campaign description, use case selection, and sample messages, so they all describe the same MFA-only program consistently.
Opt-in workflow
Opt-in workflow indicates that use case is considered restricted or disallowed by mobile operators: Gambling
Your opt-in screenshots or workflow revealed gambling-related content, causing the reviewer to flag it as a restricted use case.
Remove gambling-related branding, imagery, or language from the screens shown in your opt-in flow. The opt-in should present a clean, security-focused experience.
Opt-in workflow
Opt-in workflow does not obtain sufficient consent
Your opt-in screenshots did not demonstrate explicit, affirmative user consent for SMS messaging (express written consent is required).
Update your opt-in flow to show a clear, unchecked checkbox or button that the user must actively select. Provide new screenshots showing the revised flow.
Opt-in workflow
Opt-in workflow URL or image is missing or inaccessible and could not be verified
No opt-in workflow screenshot or URL was provided, or the URL you submitted was inaccessible to the reviewer.
Provide a working URL to your live opt-in page or upload a screenshot/mockup showing your complete opt-in flow. Verify that the URL is publicly accessible before resubmitting.
Opt-in workflow
Opt-in workflow not compliant or is missing required terms and conditions language
Your opt-in page does not include complete terms and conditions language or a link to your full T&C.
Add a visible link to your complete messaging terms and conditions at the point of consent or include the full T&C language inline. Resubmit with updated screenshots.
Opt-in workflow
Opt-in workflow not compliant or is missing statement that data will not be shared with third parties or link to privacy policy disclosure
Your opt-in page does not include a privacy policy link or a statement that mobile opt-in data will not be shared with third parties.
Add a visible link to your privacy policy and a statement that phone numbers/opt-in data will not be shared with third parties at the point of consent.
Sample messages
Sample message(s) indicates that message content is related to gambling and is not permitted by US carriers
Your message templates contain language or keywords that trigger gambling content filters.
Revise message templates to remove any gambling-related terms (brand names containing “bet” or “casino,” for example). Use neutral phrasing for OTP delivery (for example, “Your verification code is 123456”).
Revise and resubmit
If the rejection includes actionable feedback:
Address every point raised in the denial specifically.
Strengthen areas the reviewer questioned (additional documentation, revised message samples, clearer use case scoping).
Consider narrowing your initial scope further (for example, registering for a single message type such as login OTP before expanding).
Resubmit with a cover note explaining what you changed and why.
If the rejection is generic or provides no actionable detail, a resubmission with the same information is unlikely to produce a different result.
Conclusion
Messaging registration for betting and gaming technology operators is complex, and approval is never guaranteed. Carrier and registry decisions are ultimately outside an applicant’s control. However, companies that position themselves well approach registration as a thoughtful compliance exercise, not a technical checkbox. They invest time in documentation before they apply, lead with their MFA use cases, and treat post-approval compliance as an ongoing operational responsibility. Even when initial applications are denied, a well-prepared submission strengthens the foundation for appeals and future attempts.
Betting and gaming technology operators that follow this approach (thorough pre-registration documentation, a clearly scoped MFA-only program, and consistent post-approval hygiene) are better positioned for carrier approval and sustained message deliverability. That translates directly to fewer failed logins, lower account lockout rates, and a smoother onboarding experience for new players.
With AWS End User Messaging, you have the infrastructure to help you deliver MFA more reliably at scale. The suggested best practices described in this post give you the framework to support carrier approval and keep your messaging program running reliably.
Missed Part 1?
If you have not yet read Part 1, start there for the landscape and preparation steps. Together, the two parts give you an end-to-end playbook for getting your MFA messaging approved and keeping it deliverable.
Global betting and gaming technology operators face a distinct challenge. Despite operating as fully licensed and regulated businesses in their respective jurisdictions, they consistently encounter messaging service registration challenges when registering their phone numbers for SMS messaging with telecommunication carriers.
Carriers and messaging providers classify betting and gaming technology operators as “high-risk” or gambling. This classification subjects their applications to heightened scrutiny, stricter content filtering, and rejection rates that far exceed those seen in other industries. A betting and gaming operator that follows the same registration steps that might work for a retail or software as a service (SaaS) company will often find that their application requires additional documentation or revision. These revisions can span multiple review cycles, often without clear guidance on what to change.
This post is written for developers and technical teams at betting and gaming operators who need to submit an SMS messaging registration for multi-factor authentication (MFA) and account verification use cases through AWS End User Messaging. The guidance below represents suggested best practices that can help betting and gaming operators give their application a stronger foundation when seeking SMS messaging approval from carriers. We cover the specific challenges such operators may face, how to prepare before submitting a registration application, what to do during the registration process, what happens if the application is denied by the telecommunications carrier, and the ongoing practices that help keep operator MFA messaging active and deliverable after approval.
Important note: This guidance applies exclusively to transactional and MFA messaging (for example, one-time passcodes, account verification, and security alerts). AWS End User Messaging does not support marketing or promotional messages for the betting and gaming industry.
How registration works: AWS and telecommunication carrier roles
Understanding the registration flow helps set expectations. Your application is submitted through AWS, but the carrier or aggregator decides whether to approve it.
Registration through AWS End User Messaging includes the following steps:
You submit a registration request through the AWS End User Messaging console that includes your business details, use case descriptions, and relevant compliance documentation.
AWS forwards your registration to the downstream carrier or aggregator (based on the origination identity type you selected, such as 10DLC, toll-free, or short code).
The carrier or aggregator reviews your application and makes an approval or denial decision. An aggregator is the application-to-person (A2P) messaging provider that routes traffic to carriers such as T-Mobile and AT&T. AWS does not control this decision.
AWS communicates the approval or denial to you through the AWS End User Messaging console. You can also configure event notifications to be alerted automatically.
The key takeaway: AWS facilitates the submission and relays the outcome, but the aggregator or carrier holds the approval authority.
The challenges: Why betting and gaming technology is different
Betting and gaming technology operators face two primary obstacles that generic messaging registration guides may not address. First, messages from this industry historically generate higher complaint rates. For that reason, The Campaign Registry (TCR) classifies gambling as a Special Use Case that requires enhanced vetting, which makes carriers more cautious about approving new betting and gaming registrations. Second, certain words or phrases can trigger content filters at the carriers, which can cause service disruption and increased scrutiny for future applications. Even legitimate one-time password (OTP) messages can get blocked if your company name contains gambling-related keywords. For example, a message such as “exampleGames: here is your OTP 1234 to start betting” may be filtered because “betting” triggers automated content rules, even though the message is a valid security code. This contributes to higher rejection rates by carriers during number registration. To reduce registration approval delays, provide as detailed and accurate a description of your use case as possible in your application.
Pre-registration preparation
Carriers and aggregators want to see that you’re a legitimate business operating legally before they approve your registration. To help do so, you should:
Establish a clear business identity
Use a legitimate business domain email – Registration applications submitted with Gmail or other personal email addresses signal a lack of organizational legitimacy. Use a duly registered email address on your company’s registered domain.
Make your website transparent – Your website should clearly describe your services, the jurisdictions where you’re licensed to operate, and links to your active gaming licenses or regulatory approvals. Carriers will review it. Include links to your applicable licenses, terms of service, and privacy policy in accessible locations.
Plan your messaging content strategically
Develop message templates before you apply – Your registration application will ask for sample messages. Your samples should focus exclusively on:
Account security alerts (new device login, password changes, and suspicious activity).
Avoid promotional gambling language in your samples – Use clear language, accurately describe your use case, and provide all the necessary details.
Prepare examples of your message types – For each template, document who receives it, what triggers it, what the message contains, and how the recipient opted in. The more specific and operational your use case descriptions, the more confidence you give reviewers that this is a well-governed program.
Assemble your applicable compliance documentation
Before submitting any registration through AWS End User Messaging, gather:
Your business registration and tax identification documents.
Your opt-in consent process documentation.
Your Telephone Consumer Protection Act (TCPA) compliance policy or equivalent.
Your data retention and privacy policy.
Figure 1: The 10DLC registration journey for OTP messaging, from pre-registration preparation through carrier review to post-registration compliance
Coming up in Part 2
You now understand why betting and gaming operators face heightened scrutiny, how the AWS and carrier registration roles work, and how to prepare a strong application before you submit. In Part 2, we cover the registration process itself: how to write use-case descriptions and opt-in documentation that get approved, how to maintain compliance and deliverability after approval, and what to do if your registration is denied.
Building a data foundation ready for agentic AI is becoming a priority for organizations deploying AWS. This foundation relies on a unified lakehouse and interoperability protocols like Model Context Protocol (MCP). You can move from prototype to production. Yet many teams struggle to know where to start.
According to Gartner, more than 40 percent of agentic AI projects will be canceled by 2027 for failing to deliver the expected value. While Gartner points to several contributing factors, we believe the root cause comes down to two things: a lack of governance and inconsistent data.
If you’re building a data platform for AI agents, you probably recognize four barriers. Your data is fragmented across silos. Your unstructured data is available but hard to use. Your agents and your systems lack a common way to communicate. Gaps in quality and governance weaken trust and create hallucinations.
Each barrier holds back agentic AI. Closing them requires rethinking your data foundation as a whole, rather than fixing pipelines one at a time.
In this post, we walk you through four pillars for building a data foundation on AWS that is ready for agentic AI.
Pillar 1: Building a unified lakehouse with zero-ETL
The foundation starts with where your data lives and how you query it.
Beyond the data lake and the data warehouse: The lakehouse as your foundation
Every data platform sits between two approaches. Data lakes offer flexible storage, open formats, and raw data preserved on Amazon Simple Storage Service (Amazon S3) at low cost, which suits data science and AI workloads. However, this flexibility often comes with weak governance. Data warehouses provide native ACID transactions, high-performance SQL, and strong governance, but they become rigid when handling growing volumes or unstructured data.
Amazon SageMaker Lakehouse combines both approaches without requiring a full migration. Your operational, analytical, and AI data live in one place. Amazon S3 Tables, a capability of Amazon S3, provides native, open-source Apache Iceberg support. You can read and write from Spark, Amazon Athena, Amazon EMR, or Amazon Redshift.
Three essential lakehouse capabilities for agentic AI
A lakehouse built for agents needs three capabilities. Zero-ETL ingestion removes the need to manage pipelines. A federated catalog gives you a unified view of tables across S3, Amazon Redshift, Snowflake, or Databricks. With query federation, you can interrogate multiple sources without duplicating data.
SELECT customer_id, sentiment_score FROM s3tables.sales_db.orders WHERE order_date > '2024-01-01';
Native zero-ETL integrations to feed the lakehouse
AWS Glue connectors bring in operational sources like Amazon Aurora, Amazon DynamoDB, and Amazon Relational Database Service (Amazon RDS). They also support SaaS sources including Salesforce, ServiceNow, and SAP. Streaming sources include Amazon Managed Streaming for Apache Kafka (Amazon MSK) and Amazon Kinesis. Raw data and vector embeddings land in the same governed foundation, ready for the next pillar: context engineering.
Figure 1: Amazon SageMaker Lakehouse unifying data through zero-ETL ingestion and a federated catalog
Pillar 2: Context engineering for high-performing AI agents
A lakehouse makes data accessible, but agents also need curated, relevant context to act on it effectively. Large language models (LLMs) remain stateless, with a finite context window. Feeding an agent excessive data often backfires. Research on long-context models identifies a lost in the middle effect, where information placed away from the prompt’s start or end gets effectively ignored (Liu et al., 2023). Context engineering addresses this challenge through a context manager built on three components: knowledge bases, session state and history, and data tools.
Figure 2: The context manager built on knowledge bases, session state and history, and data tools
For knowledge bases, AWS offers several vector store options, including Amazon OpenSearch, Amazon Aurora PostgreSQL, and Amazon Neptune. Amazon S3 Vectors, a capability of Amazon S3, stands out because raw data and indexed embeddings reside in the same governed lakehouse foundation. This means agents and business intelligence tools consume the same source of truth without duplicating data or managing a separate system.
The following snippet is illustrative pseudocode that shows the flow. Check the Amazon Bedrock Knowledge Bases API reference for the exact parameter names and model identifiers.
Static knowledge covers only half the problem. Agentic memory preserves dynamic context across sessions through two tiers. Short-term memory holds raw session history. Long-term memory stores vectorized records.
Amazon Bedrock AgentCore memory, a capability of Amazon Bedrock AgentCore, automates this process with an extraction module. This module identifies key terms, such as a client name or project, in raw events. It writes them into long-term storage for reuse. The result includes personalization, conversation continuity, and fewer hallucinations.
Data tools complete the context manager. Rather than receiving everything in the prompt, an agent calls a tool to fetch only the curated data it needs, such as the result of a SQL query. These capabilities prepare agents before they start communicating with each other and with your systems. MCP, the topic of our next pillar, standardizes that tool access.
Figure 3: Amazon Bedrock AgentCore memory extracting key terms from raw events into short-term and long-term memory
Pillar 3: Multi-agent interoperability with MCP and open protocols
After agents can retrieve the right context, the next challenge is collaboration, both between agents and with existing systems. Multi-agent debate techniques, where models review and correct each other’s outputs, can help improve reliability compared to a single model (Du et al., 2023). Two open protocols address this need. Agent2Agent (A2A) handles agent-to-agent communication. Model Context Protocol (MCP) connects agents to your systems.
Agent-to-agent communication with open protocols
With A2A, agents collaborate over standard HTTP and JSON, without sharing memory or a direct connection. It supports long-running tasks. An agent handling a lengthy video processing job can report progress while an orchestrator decides whether to wait or reassign the task. Each agent publishes an agent card describing its capabilities, inputs, and outputs. Popular open-source agent orchestration frameworks can query this card before delegating work.
Connecting the agentic world to your systems with MCP
MCP standardizes how agents access your data and tools through three components. Resources expose read-only data. Tools run actions like SQL queries. Prompts provide reusable instructions.
Amazon Bedrock AgentCore Gateway, a capability of Amazon Bedrock AgentCore, centralizes this access. It connects to an AWS Lambda function, an API, or a SaaS integration like Salesforce. It also enforces authentication and audit logging in one place.
Semantic search and tool discovery
As your gateway grows, agents risk being overwhelmed by available tools. AgentCore Gateway addresses this with semantic search: agents query in natural language, and the gateway returns only the relevant, permission-scoped tools based on AWS Identity and Access Management (IAM) policies.
Pillar 4: Data and AI governance for trust and compliance
Agents now communicate and act through MCP, so the data they rely on must be trustworthy. Governance has become your true differentiator. Foundation models (FMs) are widely accessible, so your data and how you manage it are what set your agents apart. Amazon SageMaker Data Catalog addresses this need through three capabilities: discovery, governance, and collaboration.
Most enterprise data remains unstructured, with incomplete metadata. The catalog automatically generates summaries, glossaries, data lineage, and quality indicators for each dataset. This gives users confidence in the data before they connect an agent to it.
Governance follows a publish-and-subscribe model. Producers publish datasets, and consumers subscribe with access scoped to their needs, through full access, row-level filtering, or column-level filtering.
These workflows run through IAM and expose APIs, so teams can automate approval flows instead of managing access requests manually.
Amazon SageMaker Unified Studio brings producers, analysts, and data scientists into a shared environment. A built-in generative AI assistant translates natural language requests into SQL, Python, or visualization cells that teammates can run immediately. This turns data exploration into a shared, auditable notebook instead of disconnected scripts.
Together, these four pillars (lakehouse, context engineering, interoperability, and governance) form a foundation you can build at enterprise scale. You can find a full technical walkthrough in the recorded session video from AWS Summit Paris.
Figure 4: Lakehouse, context engineering, interoperability, and governance as the four pillars of an agentic AI data foundation
Conclusion
In this post, we outlined a four-pillar framework for an AI-ready data foundation on AWS, designed around connected capabilities rather than patched individual pipelines. Amazon SageMaker Lakehouse addresses the fragmentation and silo barrier. It brings operational, analytical, and AI data into one governed foundation with S3 Tables and native Apache Iceberg support. Context engineering with Amazon S3 Vectors and Amazon Bedrock AgentCore memory tackles the second barrier: unstructured data that is technically accessible but not usable. It turns your unified data into knowledge and persistent memory that agents can act on, instead of overloading a context window.
After your agents have the right context, MCP and Amazon Bedrock AgentCore Gateway address the interoperability barrier. They give agents a secure, centralized way to reach your tools and systems. Semantic search keeps tool discovery manageable as your gateway grows. Finally, Amazon SageMaker Data Catalog closes the governance gap that erodes trust and can introduce hallucinations. Its discovery, publish-and-subscribe access, and lineage capabilities give you the traceability that agentic AI needs to run in production.
If you’re starting this journey, sequence matters. Get your lakehouse and zero-ETL ingestion right first, because every downstream pillar depends on having a single, governed source of truth. Then invest in context engineering before you scale to multi-agent orchestration. Agents that hallucinate or lose session context will only compound errors after they start communicating with each other through A2A or MCP.
Treat governance as a parallel track from day one, not a final checkpoint. Column- and row-level access controls are far easier to build in early than to retrofit later.
These pillars also apply to workloads such as media personalization, customer service automation, and fraud detection pipelines. In each, multiple agents need to share a consistent, trustworthy view of enterprise data.
Platform engineers who support data and AI teams face a recurring challenge: analytics, machine learning (ML), and AI developer teams each need different tools. When each team operates its own tools and infrastructure, governance becomes fragmented. Organizations face duplicated effort and limited collaboration. Data engineers, data scientists, and AI developers might all work with the same underlying data. Yet they navigate separate consoles, manage distinct AWS Identity and Access Management (IAM) configurations, and lack a shared view of each other’s work.
Amazon SageMaker Unified Studio brings these capabilities together in one governed workspace. Every practitioner gets access to the tools they need: SQL editors, JupyterLab notebooks, and the Amazon Bedrock IDE. At the same time, they share a common business data catalog, security model, and project structure, all governed centrally within Amazon SageMaker Unified Studio. Teams collaborate within projects, while access to data, compute, and development artifacts is managed centrally.
Setting up this kind of multi-team environment means coordinating IAM roles, blueprints, project profiles, and user onboarding on top of the initial domain configuration. New user roles and use cases might require enabling new blueprints and combining them into new project profiles to extend the functionality supported by the domain. To keep this repeatable and consistent, we use the Amazon SageMaker Unified Studio Terraform module to codify the entire setup. The module creates three purpose-built project profiles, one for each team, on a shared domain, plus an initial project to get you started. Creating the remaining per-team projects is a single additional sub-module block.
Consider a mid-size technology company with three teams that need cloud-based data and AI capabilities:
Team
What they need
Key AWS services
Data Analytics
Query and transform data across Amazon Simple Storage Service (Amazon S3), Apache Spark jobs, and Amazon Redshift, build and orchestrate data pipelines, manage a data catalog
Build chat agents, knowledge bases, prompt flows, and guardrails
Amazon Bedrock
A common issue today is that customers don’t have a unified strategy to deploy and manage their infrastructure. The analytics team has a standalone Amazon Redshift cluster, the ML team provisions SageMaker notebooks ad hoc, and the generative AI team experiments with Bedrock through the console. Each team runs its own infrastructure. Because these environments are separate, there’s no shared data catalog, no consistent access control, and no central visibility into what’s running or what it costs.
The goal: a single unified environment where each team gets exactly the capabilities they need, with shared data access, consistent security, and infrastructure you define entirely as code.
Solution overview
We use the Amazon SageMaker Unified Studio Terraform module to create a single domain with three project profiles, one per team. A project profile is a collection of blueprints which are configurations used to create projects, while the domain provides shared governance, IAM roles, and networking.
Key module capabilities:
Dual provider: Uses both the AWS provider and AWS Cloud Control (AWSCC) provider for full Amazon SageMaker Unified Studio resource coverage.
Service role flexibility: All IAM roles are auto-created with least-privilege policies, or you can supply existing roles to be used by Amazon SageMaker Unified Studio.
Domain and project level access using AWS Identity and Access Management (IAM), single sign-on (SSO) with AWS IAM Identity Center or both.
KMS encryption: Optionally encrypt domain metadata with a customer-managed AWS Key Management Service (AWS KMS) key using kms_key_identifier.
Model governance: The domain module automatically provisions a model governance project for Generative AI administrators to be added to. Members of the project can enable or disable specific models accessible in the domain.
Figure 1: Multi-team Amazon SageMaker Unified Studio architecture
The Terraform module follows a layered architecture with four composable modules:
Layer 1: Domain module. Creates the domain, Tooling blueprint, IAM roles, and S3 bucket:
At a high level, the deployment mentioned in this post performs the following:
Terraform creates the Amazon SageMaker Unified Studio domain with shared IAM roles and networking.
Terraform enables all required blueprints on the domain (DataLake, RedshiftServerless, Bedrock services, EMR, and so on).
Terraform composes three project profiles (one per team), selecting the appropriate blueprints and parameters.
Terraform creates a project from the first available profile (All Capabilities profile).
Project members (SSO users, SSO groups, IAM users, or IAM roles) are assigned as owners or contributors to the created project.
What each team gets
After deployment and teams are assigned to their respective projects, each team can:
Data Analytics team (SQL Analytics profile):
Query data across Amazon S3 and Amazon Redshift using SageMaker Lakehouse.
Manage a shared data catalog with AWS Glue.
Create and share SQL notebooks and dashboards.
Machine Learning team (All Capabilities profile):
Run ML experiments with MLflow integration.
Process data at scale with Amazon EMR Serverless.
Access all SQL analytics and generative AI capabilities.
Build end-to-end ML pipelines with Workflows.
Generative AI team (Generative AI profile):
Build chat agents and knowledge bases with Amazon Bedrock.
Create and test prompt flows and guardrails.
Evaluate model performance with Bedrock Evaluation.
Deploy serverless AI functions.
All three teams share the same governed domain, data catalog, IAM policies, and networking. This eliminates the silos that existed before. Team isolation is achieved by assigning users or groups to projects created from the appropriate project profile.
Prerequisites
Before you begin, verify the following:
An AWS account with permissions to create and manage Amazon DataZone, AWS Identity and Access Management (IAM), Amazon Simple Storage Service (Amazon S3), Amazon Elastic Compute Cloud (Amazon EC2), and Amazon Virtual Private Cloud (Amazon VPC) resources. See Changing permissions for an IAM user for guidance.
AWS IAM Identity Center configured (required only if using SSO-based project membership). If using IAM-only membership, Identity Center isn’t required.
Solution walkthrough
We complete the setup in four steps:
Clone the module repository.
Configure the Terraform variables for each team.
Apply the Terraform configuration.
Verify the platform and onboard teams.
Step 1: Clone the repository
Clone the Amazon SageMaker Unified Studio Terraform module and navigate to the quick-setup example:
git clone https://github.com/aws-ia/terraform-aws-sagemaker-unified-studio.git
cd terraform-aws-sagemaker-unified-studio
The module directory structure:
Figure 2: Directory structure of the Amazon SageMaker Unified Studio Terraform module
Change into the quick-setup example directory:
cd examples/quick-setup
Step 2: Configure the Terraform variables
Copy the example variables file and edit it:
cp terraform.tfvars.example terraform.tfvars
For our multi-team scenario, we enable all three project profiles:
# Domain configuration
domain_name        = "acme-ai-platform"
domain_description = "Multi-team AI and analytics domain"
aws_region         = "us-east-1"
environment        = "prod"

# Project configuration
project_name        = "analytics-pilot"
project_description = "Initial pilot project for the analytics team"

# Enable all three team profiles
enable_sql_analytics    = true   # Data Analytics team
enable_generative_ai    = true   # Generative AI team
enable_all_capabilities = true   # ML team (includes SQL + AI + ML + EMR)

# SSO user access
enable_sso = true
sso_users  = [
  "[email protected]"
]

# Project membership
project_owners = {
  sso_users = ["a1b2c3d4-5678-90ab-cdef-EXAMPLE11111"]
}

project_contributors = {
  sso_groups = ["a1b2c3d4-5678-90ab-cdef-EXAMPLE22222"]
  iam_roles  = ["arn:aws:iam::123456789012:role/CI-CD-DeployRole"]
}

# Note: If your organization doesn't use Identity Center, set enable_sso = false and use iam_users and iam_roles instead. See "Adding IAM principals to projects" below. This is a one way door decision. If you change this later on the domain and all dependent resources need to be destroyed and recreated

# Optional: Use a specific VPC instead of the default
# vpc_id     = "vpc-0abc123def456"
# subnet_ids = ["subnet-0abc123", "subnet-0def456"]
Network auto-discovery: If you don’t specify vpc_id and subnet_ids, the module automatically discovers and uses your default VPC and its subnets.
Customizing blueprint parameters: The quick-setup example uses recommended defaults. For production, you can customize Amazon Redshift capacity, Glue database names, or deployment modes in the sql_analytics_blueprint_config and generative_ai_blueprint_config locals in main.tf. For example, to increase Redshift Serverless max capacity:
Configure your AWS CLI credentials for the target account and Region, then:
Run terraform init to download the modules and providers.
Run terraform plan and review the output to verify:
An Amazon SageMaker Unified Studio domain will be created.
Three IAM roles will be created (domain execution, manage access, provisioning).
An S3 bucket for tooling storage will be created.
All selected blueprints will be enabled on the domain.
Three project profiles will be created (SQL Analytics, Generative AI, All Capabilities).
A project will be created from the first available profile.
Project memberships will be configured for SSO identities, IAM principals or both.
Run terraform apply and allow the apply to complete.
Figure 3: Successful terraform apply output showing the domain URL, project ID, and project profile IDs
View the key outputs:
# Domain portal URL — share this with your teams
terraform output domain_url

# Project URL — direct link to the created project
terraform output project_url

# All enabled blueprints
terraform output blueprint_ids

# Project profile IDs (one per team)
terraform output project_profile_ids

# IAM role ARNs for auditing
terraform output domain_execution_role_arn
terraform output manage_access_role_arn
terraform output provisioning_role_arn
Step 4: Verify the platform and onboard teams
Verify the deployment. Confirm the environment is healthy before onboarding teams:
Open the domain_url from the Terraform output and confirm the Amazon SageMaker Unified Studio portal loads, and you can sign in using a principal that was added to the project.
In the portal, confirm the three project profiles (SQL Analytics, Generative AI, All Capabilities) appear under the domain.
Confirm the initial project created by terraform apply is listed and project members can access the project interface.
Cross-check the Terraform outputs (terraform output blueprint_ids, terraform output project_profile_ids) against the blueprints and profiles you expected.
Access the portal: Open the domain_url from the Terraform output. Any user added as an owner or member of the project can sign in immediately and access their project.
Create team-specific projects: The initial terraform apply creates one project. To create additional projects for each team, add more "project" sub-moduleblocks referencing different profiles:
You can also create projects from the Amazon SageMaker Unified Studio portal using the available profiles.
Onboard additional users: To isolate teams, create separate projects using the appropriate project profiles as shown earlier, then add members (SSO users, SSO groups, IAM users, or IAM roles) to each project using the project_membership module. Each principal type can be used independently or in combination. This restricts each team to the capabilities defined by their project profile. For details on adding IAM principals, see the next section.
Adding IAM principals to projects
Amazon SageMaker Unified Studio uses project membership to control who can access a project’s resources (data, environments, and development artifacts). The Terraform module supports four principal types for project membership:
SSO users: Individual IAM Identity Center users.
SSO groups: IAM Identity Center groups (all members inherit access).
IAM users: Native IAM user ARNs.
IAM roles: IAM role ARNs (assumed by humans, services, or automation).
Project membership defines which principals are authorized to access a project. It also sets what actions they are allowed to perform as either project owners or contributors. When a principal is added to a project through project membership, they are automatically added to the domain membership list and are authorized to access the interface.
Why add IAM principals to projects?
While Identity Center users and groups cover most human access patterns, IAM principals unlock additional use cases:
Use Case
Principal Type
Example
Continuous integration and continuous delivery (CI/CD) pipeline deploys environments in a project
Project members can be defined as owners or contributors. The AWS caller identity that runs this Terraform code is added as a project owner so that it has permission to manage project resources and update team membership. To know what permissions each of these roles have please refer to the full documentation here.
How the module registers principals
The module automatically creates the required domain-level profile for each principal before assigning membership. No manual pre-registration is needed. The module handles the full lifecycle.
IAM identity prerequisite: IAM roles and users must have the AWS managed SageMakerStudioUserIAMConsolePolicy (or equivalent) attached to access the Amazon SageMaker Unified Studio interface. This policy provides permissions for domain listing, project creation, and other portal operations. The module doesn’t automatically attach this policy to IAM roles.
Example: Granting a CI/CD pipeline access to a project
The pipeline role can now create and manage environments within the project scope, without domain-wide access.
Example: IAM-only project membership
Organizations that don’t use Identity Center can manage project membership entirely through IAM principals by setting enable_sso = false in the domain module.
Note: Currently, only IAM principals within the same AWS account as the domain can access the Amazon SageMaker Unified Studio portal. Cross-account IAM role access might be limited. Verify cross-account support in your Region before relying on it for production access patterns.
Additional considerations
As you move this setup toward production, consider the following areas.
Scaling to multiple environments
For production readiness, deploy separate domains for development, staging, and production using Terraform workspaces or separate state files:
# Development
terraform workspace new dev
terraform apply -var="domain_name=acme-ai-dev" -var="environment=dev"

# Production
terraform workspace new prod
terraform apply -var="domain_name=acme-ai-prod" -var="environment=prod"
Cost management
The base infrastructure (domain, IAM roles, S3 bucket) has minimal ongoing costs. Primary charges occur when teams create and use environments:
Redshift Serverless: Pay per RPU-hour when queries are running.
EMR Serverless: Pay per vCPU and memory per second.
Bedrock: Pay per input and output token.
S3: Standard storage pricing.
Use the parameter_overrides in blueprint configurations to set capacity limits (for example, redshiftMaxCapacity) and control costs.
Security and governance
The module creates least-privilege service roles by default. For additional permissions, attach custom policies to the user role:
You can also configure VPC endpoints for private connectivity and enable AWS CloudTrail for audit logging of all Amazon DataZone API calls.
DevOps best practices
Version control: Store configurations in a code repository with automated CI/CD pipelines.
Module registry: Publish organization-specific module compositions to a private Terraform registry.
Cleanup
To destroy all resources:
# Empty the S3 bucket first
terraform output s3_bucket_name
aws s3 rm s3://BUCKET_NAME --recursive

# Destroy all resources
terraform destroy
Warning: This deletes all resources including the domain, projects, and any data stored in the S3 bucket. Additionally, extra resources created manually within the console won’t be affected by this terraform destroy.
Conclusion
In this post, we walked through a real-world scenario: building a multi-team AI and analytics unified environment where data analysts, ML engineers, and generative AI developers each get tailored capabilities on a shared, governed domain. Terraform provisions and manages the full set of Amazon SageMaker Unified Studio resources, including the domain, blueprints, project profiles, and an initial project. As your needs grow, you can extend the configuration by adding projects per team through the project sub-module.
Key benefits of this approach:
Team-specific profiles: Each team gets exactly the blueprints they need, nothing more.
Shared governance: One domain, one set of IAM roles, one data catalog, consistent policies.
Infrastructure as Code: Repeatable, auditable, version-controlled deployments.
Auto-discovery: Minimal configuration required; VPC, subnets, and instance details are discovered automatically.
Scalable: Add teams, environments, or accounts by extending the same Terraform configuration.
Flexible membership: Add SSO users, IAM users, IAM roles, or any combination as project members.
Starting on Amazon Web Services (AWS) is now more straightforward and more secure by default than it’s ever been. Over the past several months, we rolled out a new AWS experience that changes how you start building. It brings together a set of sensible, secure defaults, and taken one at a time, it’s easy to miss the bigger picture of what we’re building and why.
When we first built how you get started on AWS, cloud was a new concept. It was a world where RSS and APIs were the exciting new thing. Twenty years later, we’ve come a long way and learned a lot about how people start, build, and grow on AWS.
So, before I get into the recent launches, let me state the vision plainly: Make AWS straightforward to start on without giving up the depth, the pricing, or the security that make it the right place to grow. You shouldn’t have to choose between getting started quickly and staying secure. The rest of this post builds out this idea and highlights the defaults that make it real.
What developers told us
For years, developers have told us a version of the same thing. They knew AWS was where they wanted to grow, but they wanted to start fast, not plan for scale on day one. The same depth that lets AWS grow with you also meant more to set up on day one. There’s a payment method to enter before you can start, a console built for experienced administrators to get oriented in, and permissions to configure before your app can run. That feedback is fair, and it’s a big part of why we keep building a better AWS. The new experience is our answer to that, and most of it comes down to sensible, secure defaults.
The secure defaults behind the new experience
The new AWS experience sets secure defaults for you, so your setup starts secure instead of something you harden later. The defaults are sensible ones, drawn from what we’ve learned about how people start on AWS. Here are a few and what they do:
Builder ID sign-in, with two-factor protection built in. In the early days of AWS, you signed in as the account’s root user. You could set up separate identities for everyone, but that took real effort, so sharing one login was often the path of least resistance. We’ve learned a lot since then. AWS Builder ID is a personal identity that represents you as an individual, and you use it to sign in with email and password or through a social login like Google or Apple. When you start working with others, each person signs in with their own Builder ID rather than sharing one set of credentials, so access is tied to a person, not passed around. It’s the straightforward path rather than the hard one. In addition to that, you can register multi-factor authentication (MFA, an authenticator app or security key) that applies to whichever sign-in method you choose. This used to require deliberate setup. Now it’s there from the start.
A managed organization with AWS Organizations doing the heavy lifting behind the scenes. The starting flow is straightforward: you sign up and land in a project where you can start building right away. What I find interesting is what’s happening underneath. A project is more than an account. It pairs an account with its own spend limit and its own set of collaborators, so each project is a self-contained boundary with access scoped to just the people you invite. Rather than dropping you into a bare account, AWS creates and manages an organization for you, with your project as a member account inside it, and sensible guardrails already in place. As you grow, you add more projects—each its own member account—when you have work that needs its own budget or collaboration boundary, like a personal experiment kept separate from the beta you’re putting in front of your first users. This is the structure experienced teams land on eventually, usually after learning the hard way that putting resources with different budget or collaboration boundaries in the same account is tough to unwind later. The difference is we create the organization that enables this best practice for you from the start, so you’re set up for success well beyond day one without having to design or operate any of it yourself. When you’re ready for full control, you can activate advanced features in a single step and take over the organization directly, with no migration or downtime.
A data perimeter that grows with you. This is another default that I really want people to notice. You start with a foundational data perimeter already in place, restricting access to your resources from principals outside your organization. It’s a secure starting point rather than the complete, multi-dimensional data perimeter a larger organization would eventually build out. But the direction is that your security boundary should grow with you as you succeed on AWS, and here a brand-new developer gets that baseline automatically, without knowing the term or writing a line of policy.
A single AWS Region by default. Your resources run in one home Region to start, assigned when you sign up (aside from the handful of AWS services that are global by nature). That keeps your footprint simple and predictable: a smaller surface to secure and reason about, and a clear answer to where your data lives. When you need to operate more broadly, you can activate advanced features.
Spend limits that put you in control. You can set a hard spend limit on a project, starting at $20 a month, with notifications as you approach it. If a project reaches its limit, AWS pauses it rather than letting charges keep climbing, and you decide whether to raise the limit and resume. For an individual developer or a small team, that means no surprise bills: you set the ceiling, and no charges accrue past it without your say-so. You stay in control, and you can think big knowing the guardrails are already in place. A spend limit can also serve as an early signal. Unexpected spend is a classic indicator of inappropriate access or a runaway process, and because the project pauses at the ceiling you set, it also caps how far a cost surprise can go.
Roles set up for you, so IAM isn’t step one. As a new developer, you want to spend your early days building and experimenting, not wiring up IAM permissions. IAM Role Manager is on by default in the new AWS experience, so it creates and attaches the IAM roles your app needs as you build. Those roles start with the permissions an app typically needs to call other AWS services, enough to get you moving, not meant to last forever. As your app matures and tightening permissions matters, you take those roles over and right-size them, and by then you’ll know exactly what it needs. You focus on your app, AWS handles the plumbing.
Why the foundation matters
Starting from a secure base changes things in two ways. For you, it means the environment you start in is the one you keep. When you’re ready to scale, you grow it rather than building a new one. For us, it means secure by default is something we can keep extending, because a structured, secure starting point gives us a place to add to. We’re able to turn on additional governance controls as a natural part of the experience. One example we’re already working on is setting account-level Amazon S3 Block Public Access protections for newly created environments. I’m not going to put a timeline here, but I want to be clear about the trajectory.
Building for security and ease of use
Ease of use and strong security are too often framed as opposites. Everything we’ve shipped here is an argument that they don’t have to be. You can give someone the fastest possible path to building something real and have that path be secure and cost-safe by default. The same experience makes the easy things easy, like connecting your coding agent in a single step or inviting a collaborator by email, without extra setup. Each of these is useful on its own, but they were all designed around the same idea, that the easy path and the secure path should be the same path.
If you’ve tried the new experience, I’d genuinely like to hear what resonated and what you’d want next, including how we can make activating advanced features feel more managed over time. If you haven’t yet, the fastest way to see these defaults in action is to create an account and start your first project. We’re listening.
This post is co-written with Ajay Gunasekaran, ML Platform Engineer at Samsung Ads.
Samsung Ads, the advertising division of Samsung Electronics, keeps its feature data in Snowflake as Apache Iceberg tables. Its machine learning (ML) team trains large-scale models on Amazon SageMaker AI, serving programmatic buyers who reach Samsung Smart TV and connected TV audiences. Connecting the two usually means copying the data into Amazon Simple Storage Service (Amazon S3) on a schedule. That adds a second pipeline to operate, a second copy to store, and two sets of permissions to keep in agreement.
Instead of copying the data, a team can write the final pipeline stage as Snowflake-managed Iceberg tables in Amazon S3 and federate them into AWS Lake Formation. Amazon Cognito supplies the OAuth2 tokens that Snowflake trusts. Both applications then read one copy of the data in Amazon S3, with Snowflake managing the tables and the team using Lake Formation to control which principals can read them. Model engineers can choose the query engine that fits each training job, without duplicating data or maintaining a second pipeline.
In this post, we show you how to build the pattern Samsung Ads used. You federate Snowflake Iceberg tables into AWS Lake Formation with Amazon Cognito, then query them from Amazon Athena.
Solution overview
This solution federates the Snowflake Horizon Catalog into AWS Lake Formation, using Amazon Cognito to issue OAuth2 tokens for machine-to-machine authentication. AWS Glue connection runs inside an Amazon Virtual Private Cloud (Amazon VPC), reaching Snowflake through AWS PrivateLink and the Cognito token endpoint through a NAT gateway. AWS analytics engines then query Snowflake-managed Iceberg tables under Lake Formation governance, with no second copy of the tables to maintain. The following diagram shows the query path, from Amazon Athena through AWS Lake Formation and the AWS Glue connection to Snowflake and Amazon S3.
Figure 1: Architecture for Snowflake Horizon Catalog federation to AWS Lake Formation using Amazon Cognito
Here’s how the workflow runs:
A user or application submits a SQL query in Amazon Athena that references a federated table in the Snowflake catalog.
Athena delegates catalog resolution and permission checks to Lake Formation, which evaluates fine-grained access controls on the federated catalog entry.
Lake Formation resolves the table reference through the AWS Glue Data Catalog, which holds the connection configuration for Snowflake and invokes the AWS Glue connection.
AWS Glue connection runs in a private subnet. It sends a client_credentials request to the Amazon Cognito token endpoint with the client ID, client secret, and scope. The request leaves through the NAT gateway and internet gateway because the machine-to-machine token endpoint is public.
Amazon Cognito invokes the Pre Token Generation Lambda trigger (V3_0), which adds the aud claim that Snowflake External OAuth validation requires. Amazon Cognito returns the access token to the connection.
Using that token, AWS Glue connection calls the Snowflake Horizon Catalog Iceberg REST endpoint for table metadata. The response includes the schema and the location of the data files in Amazon S3. An Amazon Route 53 private hosted zone resolves the hostname, because the Snowflake endpoint service doesn’t provide private DNS. The request travels through the VPC endpoint over AWS PrivateLink.
The connection returns the metadata to Lake Formation, which generates temporary, scoped Amazon S3 credentials and passes them to Athena.
Athena uses those credentials to read the Iceberg metadata and Parquet data files from the registered Amazon S3 location, runs the query, and returns results.
Why Amazon Cognito
AWS Glue connection authenticates with the OAuth2 client_credentials grant, so providers Snowflake trusts that support that grant can issue the token. Samsung Ads chose Amazon Cognito for three reasons:
Each table lookup against Snowflake depends on a token from the provider, so the team wanted to own it alongside the rest of the solution.
An enterprise identity provider is typically administered by a central security team, so each new machine-to-machine client is a cross-team request. Owning the user pool makes it self-service.
Each app client is a distinct machine identity, and the security integration trusts the user pool rather than an individual client. You can therefore serve several workloads from one integration, each with its own read-only Snowflake role.
Prerequisites
Before you begin, verify that you have the following:
Snowflake account hosted on AWS in the same AWS Region where you create the AWS resources in this post, on the Business-Critical edition or higher, which AWS PrivateLink requires. Confirm the Region with SELECT CURRENT_REGION();. You need ACCOUNTADMIN to create the security integration and to authorize PrivateLink.
Snowflake-managed Iceberg tables created in Snowflake Horizon Catalog using CATALOG = 'SNOWFLAKE' with an external volume pointing to the S3 bucket. If you don’t have one, see Configure an external volume for Amazon S3 in the Snowflake documentation.
AWS account with an AWS Identity and Access Management (IAM) principal that has data lake administrator permissions in AWS Lake Formation. The principal also needs permissions to create IAM roles and policies, Amazon Cognito user pools, AWS Lambda functions, VPC resources, and AWS CloudShell. We use AWS Command Line Interface (AWS CLI) commands throughout this post.
Amazon S3 bucket that holds your Snowflake-managed Iceberg data files.
An AWS user with long-term access keys that you delete immediately after Step 4:
SYSTEM$AUTHORIZE_PRIVATELINK needs a federation token from the long-term keys of an IAM user, because sts:GetFederationToken rejects role-session credentials. Snowflake persists the authorization, so you can delete the key and the user afterwards and the federation keeps working.
Walkthrough
Two AWS CloudFormation stacks cover the setup that is identical in every deployment. The Snowflake and Lake Formation steps stay as explicit SQL and AWS CLI commands, so you can adapt them to your existing Snowflake account and VPC.
Step
What you configure
How you run it
1 & 2
Cognito user pool, machine-to-machine app client, and the Lambda function that adds the aud claim
Launch Stack, snowflake-federation-oauth
3
Snowflake security integration, read-only role, service user, and table grants
Snowflake SQL worksheet
4
PrivateLink authorization for your AWS account
AWS CLI and Snowflake SQL worksheet
5
VPC, PrivateLink endpoint, Route 53 private hosted zone, and the Lake Formation data access role
Launch Stack, snowflake-federation-network
6
S3 location registration, AWS Glue connection, federated catalog, and Lake Formation permissions
AWS CLI
7
Query validation
Athena console
Step 1: Deploy the Cognito user pool and token customization Lambda function
Snowflake External OAuth validation requires an aud claim in each access token. The OAuth2 client_credentials grant doesn’t define that claim, so the Pre Token Generation trigger adds it. This stack creates the user pool, the machine-to-machine app client, and a Pre Token Generation Lambda function that adds the claim. The stack also writes the app client secret to AWS Secrets Manager in the format the AWS Glue connection expects. It then generates the Snowflake SQL statements you run in Step 3.
Choose Launch Stack.
In the Region selector, confirm the Region matches your Snowflake account Region, then choose Next.
For Stack name, keep snowflake-federation-oauth. Leave all parameters at their default values, then choose Next.
On Configure stack options, keep the defaults and choose Next.
On Review and create, select I acknowledge that AWS CloudFormation might create IAM resources with custom names, then choose Submit.
When the stack status is CREATE_COMPLETE, choose the Outputs tab.
You use six of the outputs in later steps.
Output
Used in
VerifyAudClaimCommand
Step 2
SnowflakeSecurityIntegrationSQL
Step 3
OAuthClientSecretArn
Step 5 and Step 6
CognitoTokenEndpoint, CognitoClientId and CognitoScope
Step 3 and Step 6
Figure 2: CloudFormation Outputs tab showing the values used in later steps
Note: After the connection validates in Step 6, AWS Glue caches the token it mints by writing it back into this secret. Treat read access to the secret as read access to the federated tables.
Step 2: Verify the access token
Confirm that the Lambda function is adding the claim before you configure Snowflake. A missing claim doesn’t fail here. It surfaces several steps later as an AWS Glue connection that can’t authenticate, which is harder to attribute.
On the Outputs tab, copy the value of VerifyAudClaimCommand.
Choose the AWS CloudShell icon on the console navigation bar, as shown in the following screenshot.
Paste the command and run it. Confirm two values in the output. The aud claim matches your Cognito client ID, and scope is snowflake/catalog.read.
Figure 3: Decoded access token payload showing the injected aud claim and the catalog.read scope
Step 3: Configure Snowflake
In this step you configure Snowflake to trust Cognito tokens, create the service user that Lake Formation authenticates as, and grant it read access to your tables.
Run the following statement in a Snowflake worksheet, replacing the three placeholders with the CognitoIssuerUri, CognitoJwksUrl, and CognitoClientId outputs from Step 1. The SnowflakeSecurityIntegrationSQL output contains the same statement with your values filled in. CREATE omits OR REPLACE, so it fails rather than overwriting an existing integration.
USE ROLE ACCOUNTADMIN;

-- Return a row if the integration exists. If so, use ALTER SECURITY INTEGRATION instead of CREATE
SHOW INTEGRATIONS LIKE 'lakeformation_cognito_oauth';

CREATE SECURITY INTEGRATION lakeformation_cognito_oauth
  TYPE = EXTERNAL_OAUTH
  ENABLED = TRUE
  EXTERNAL_OAUTH_TYPE = CUSTOM
  EXTERNAL_OAUTH_ISSUER = '<CognitoIssuerUri>'
  EXTERNAL_OAUTH_JWS_KEYS_URL = '<CognitoJwksUrl>'
  EXTERNAL_OAUTH_TOKEN_USER_MAPPING_CLAIM = 'sub'
  EXTERNAL_OAUTH_SNOWFLAKE_USER_MAPPING_ATTRIBUTE = 'login_name'
  EXTERNAL_OAUTH_AUDIENCE_LIST = ('<CognitoClientId>')
  EXTERNAL_OAUTH_ANY_ROLE_MODE = 'ENABLE'
  EXTERNAL_OAUTH_BLOCKED_ROLES_LIST = ('ACCOUNTADMIN', 'SECURITYADMIN', 'USERADMIN', 'SYSADMIN');
Snowflake normally takes the role from a session:role:<ROLE> scope, which Amazon Cognito custom scopes can’t carry because they use the form resourceServer/scope. The statement therefore sets EXTERNAL_OAUTH_ANY_ROLE_MODE to ENABLE, which lets the session use any role granted to the service user, so keep that user to a single role. The blocked roles list also covers SYSADMIN and USERADMIN, which the Snowflake default list doesn’t.
Create the read-only role and the service user. Set LOGIN_NAME to the CognitoClientId output, because the token’s sub claim carries the client ID and the integration maps sub to login_name.
CREATE ROLE lakeformation_catalog_reader
  COMMENT = 'Read-only access for AWS Lake Formation catalog federation';

CREATE USER lakeformation_service_user_cognito
  LOGIN_NAME = '<CognitoClientId from Step 1>'
  DEFAULT_ROLE = lakeformation_catalog_reader
  TYPE = SERVICE;

GRANT ROLE lakeformation_catalog_reader TO USER lakeformation_service_user_cognito;
Grant the role read access to the tables you want to federate. For the privileges the Iceberg REST Catalog API requires, see Configure access control in the Snowflake documentation.
GRANT USAGE ON DATABASE <database>
  TO ROLE lakeformation_catalog_reader;

GRANT USAGE ON SCHEMA <database>.<schema>
  TO ROLE lakeformation_catalog_reader;

GRANT SELECT ON ALL ICEBERG TABLES IN SCHEMA <database>.<schema>
  TO ROLE lakeformation_catalog_reader;

GRANT SELECT ON FUTURE ICEBERG TABLES IN SCHEMA <database>.<schema>
  TO ROLE lakeformation_catalog_reader;
Note: Federate a schema that contains only Snowflake-managed Iceberg tables. An externally managed table can fail the entire table listing. Converted tables, tables loaded from Iceberg-compatible Parquet files and clones whose source table the role can’t access aren’t supported. Tables with mixed-case quoted names aren’t federated, because the connection you create in Step 6 sets CATALOG_CASING_FILTER to UPPERCASE_ONLY.
Snowflake masking and row access policies don’t apply when Athena reads a federated table, because Lake Formation vends the Amazon S3 credentials and Athena reads the Parquet files directly. Keep tables that rely on them out of the federated schema or recreate the controls in Lake Formation and test them.
Next, find the Amazon S3 bucket and prefix your external volume writes to. You need both in Step 5.
DESC EXTERNAL VOLUME <your_external_volume>;
STORAGE_BASE_URL holds the bucket and an optional prefix. For s3://my-bucket/iceberg/, the bucket is my-bucket and the prefix is iceberg. If nothing follows the bucket name, leave the prefix blank in Step 5. A prefix is better, because it limits the data access role to that path. If ENCRYPTION_TYPE is AWS_SSE_KMS, note the key in ENCRYPTION_KMS_KEY_ID for Step 5. If it is NONE, check the bucket’s default encryption in the Amazon S3 console. The Snowflake role that owns the Iceberg tables must keep the USAGE privilege on the external volume, or operations that request vended credentials fail.
If the bucket uses a customer managed KMS key, set KMS_KEY_ID on the external volume to the full key ARN. Then add the following statement to the key policy, so the session Snowflake uses for the role in STORAGE_AWS_ROLE_ARN can read the encrypted files. Without it, the AWS Glue connection fails with an error that says no session policy allows kms:Decrypt.
Snowflake requires proof that you own the AWS account before it accepts a PrivateLink connection. You provide that proof as an AWS Security Token Service (AWS STS) federation token. You must call get-federation-token with the long-term credentials of an IAM user, because AWS STS doesn’t support calling it with temporary credentials from an assumed role.
Using an IAM user with long-term access keys, generate a federation token:
Retrieve the two values you need for the stack in Step 5:
WITH cfg AS (SELECT PARSE_JSON(SYSTEM$GET_PRIVATELINK_CONFIG()) AS j)
SELECT j:"regionless-privatelink-account-url"::string AS privatelink_hostname,
       j:"privatelink-vpce-id"::string AS vpce_service_name
FROM cfg;
Record both values. privatelink_hostname is the Snowflake PrivateLink hostname, and vpce_service_name is the endpoint service name.
After authorization succeeds, delete the temporary IAM user and its access key. Revoking PrivateLink access later requires a new federation token, so recreate a similar user at that point. For more information, see How to retrieve a Federation Token from AWS for PrivateLink Self-Service.
Step 5: Set up VPC and PrivateLink connectivity
This stack creates the interface VPC endpoint to the Snowflake PrivateLink service and the Amazon Route 53 private hosted zone that resolves your Snowflake hostname to it. It also creates the security group that the endpoint shares with the AWS Glue connection. Keep Existing VPC ID blank and it also builds a VPC with public and private subnets and a NAT gateway.
To use an existing VPC, supply Existing VPC ID and two or more private subnet IDs in different Availability Zones. The stack then creates no subnets and no NAT gateway, so confirm three things first:
You have enabled DNS resolution and DNS hostnames on the VPC.
The private subnets have a 0.0.0.0/0 route to a NAT gateway, which the AWS Glue connection uses to reach the Amazon Cognito token endpoint. Amazon Cognito doesn’t support AWS PrivateLink, but the traffic stays on the AWS network because both sit in the same Region. Without this route, the stack still succeeds and the connection fails in Step 6.
No Amazon Route 53 private hosted zone for privatelink.snowflakecomputing.com is already associated with the VPC. A second zone for the same domain makes name resolution unpredictable.
To deploy the stack, complete the following steps:
Choose Launch Stack.
Confirm the Region selector matches your Snowflake account Region, then choose Next.
For Stack name, keep snowflake-federation-network, then enter the following parameters.
Parameter
Value
Snowflake PrivateLink hostname
privatelink_hostname from Step 4
Snowflake PrivateLink service name
vpce_service_name from Step 4
Iceberg S3 bucket name
The bucket in the STORAGE_BASE_URL output from Step 3
Iceberg data key prefix
The prefix in the STORAGE_BASE_URL output from Step 3. Leave blank if you have none
Iceberg bucket KMS key ARN
KMS key ARN. Leave blank if the bucket does’t use KMS
OAuth client secret ARN
OAuthClientSecretArn from Step 1
If the bucket uses SSE-KMS, the stack grants the data access role kms:Decrypt on the key you enter. The default key policy already allows this. If your key policy doesn’t delegate access to IAM, add the role as a key user.
Choose Next, keep the defaults on Configure stack options, and choose Next.
On Review and create, select I acknowledge that AWS CloudFormation might create IAM resources with custom names, then choose Submit.
When the stack status is CREATE_COMPLETE, which takes about 5 minutes, choose the Outputs tab and record PrivateSubnetIds, GlueConnectionSecurityGroupId, LakeFormationDataRoleArn, and RegisteredS3Location. You use all four values in Step 6.
NAT gateway and the interface VPC endpoint carry hourly and data processing charges. For more information, see Amazon VPC pricing.
Step 6: Register with Lake Formation and create the federated catalog
The remaining setup is a sequence of AWS CLI commands. Run them in AWS CloudShell in the same Region as both stacks.
Set the values used by the commands that follow. Fill in the Region, and the stack outputs from Step 1 and Step 5.
REGION='<your Region>'
ACCT=$(aws sts get-caller-identity --query Account --output text)
PREFIX=snowflake-federation
CONN=$PREFIX-iceberg-connection
CATALOG=$PREFIX-catalog
S3_LOCATION='<RegisteredS3Location from Step 5>'
LFROLE='<LakeFormationDataRoleArn from Step 5>'
SECRET_ARN='<OAuthClientSecretArn from Step 1>'
TOKEN_URL='<CognitoTokenEndpoint from Step 1>'
CLIENT_ID='<CognitoClientId from Step 1>'
SCOPE='<CognitoScope from Step 1>'
SUBNET='<one subnet ID from PrivateSubnetIds in Step 5>'
SG='<GlueConnectionSecurityGroupId from Step 5>'
WORKSPACE_URL='https://<privatelink_hostname from Step 4>/polaris/api/catalog'
REMOTE_DB='<Snowflake database name, uppercase>'
SCHEMA='<Snowflake schema name, lowercase>'
QUERY_PRINCIPAL='<IAM role or user ARN that will run Athena queries>'
Register the Amazon S3 location that holds your Iceberg data. This is what lets Lake Formation vend scoped credentials to Athena for the underlying data files.
Check the connection status. AWS Glue validates asynchronously. It creates the network interface, completes the OAuth2 exchange with Amazon Cognito, and calls the Snowflake Iceberg REST API over AWS PrivateLink. Repeat this command until it returns READY, which takes approximately 5–10 minutes.
aws glue get-connection --name $CONN --query Connection.Status --output text
If it returns FAILED, read the reason and correct the Snowflake configuration from Step 3. A missing security integration, service user, or grant is the usual cause.
aws glue get-connection --name $CONN --query Connection.StatusReason --output text
Then delete the connection before you retry, because the name stays in use.
Grant Lake Formation permissions to the data teams that will query the tables. The principal that created the catalog can already query it. Every other principal needs an explicit grant, including other Lake Formation administrators.
Note: The catalog ID for a federated catalog is :, not the bare account ID. Using the bare account ID grants permissions on the local AWS Glue Data Catalog instead, which succeeds and then leaves Athena returning an access denied error.
Step 7: Query the federated tables from Amazon Athena
Open the Amazon Athena console and choose Query editor. If this is the first time you use Athena in this Region, choose Settings, then Manage, and set an Amazon S3 location for query results.
In the left panel, select the following.
Field
Value
Data source
AwsDataCatalog
Catalog
Your federated catalog, for example snowflake-federation-catalog
Database
Your Snowflake schema name, in lowercase
Run the following query:
SELECT * FROM "<snowflake_schema>"."<snowflake_tablename>" LIMIT 10;
Rows in the results pane confirm the federation works end to end, as shown in the following screenshot.
Figure 5: Query results in Amazon Athena from a Snowflake-managed Iceberg table
To confirm that Athena reads current Snowflake data rather than a copy, insert a row in Snowflake and run the query again. The new row appears with no additional data movement into your AWS account.
Dropping a table in Snowflake doesn’t revoke the Lake Formation permissions granted on it. Revoke those permissions explicitly when you remove a federated table.
Clean up
To avoid incurring future charges, delete the resources you created while following this post. Complete the following steps in both your AWS account and your Snowflake account.
AWS account
On the AWS Lake Formation console, choose Catalogs, select your federated catalog, then choose Actions and Delete catalog.
Record the network interfaces the AWS Glue connection created, while the connection still exists. Filtering on the Step 5 security group and the ICEBERGRESTCATALOG description keeps the list to this deployment.
Deregister and delete the AWS Glue connection. Do this before you delete the stacks, because the stack deletion fails while the connection’s network interfaces still hold the security group. Run the following in AWS CloudShell, replacing the Region, account ID, and connection name with your values.
Deleting the connection releases its network interfaces, but they stay in the in-use state for several minutes and AWS Glue doesn’t remove them. Wait for each one to reach available, because the Amazon Elastic Compute Cloud (Amazon EC2) console Detach action fails even with Force detachment selected. The following script checks each interface you recorded and deletes it when ready.
#!/bin/bash
while read -r eni; do
  [ -z "$eni" ] && continue
  for attempt in $(seq 1 20); do
    status=$(aws ec2 describe-network-interfaces \
      --network-interface-ids "$eni" \
      --query 'NetworkInterfaces[0].Status' \
      --output text 2>/dev/null || echo deleted)
    if [ "$status" = "available" ]; then
      aws ec2 delete-network-interface --network-interface-id "$eni"
      echo "$eni deleted"
      break
    fi
    if [ "$status" = "deleted" ]; then
      echo "$eni no longer exists"
      break
    fi
    echo "$eni is $status, checking again in 30 seconds"
    sleep 30
  done
done < glue-enis.txt
On the Lake Formation console, under Administration, choose Data lake locations, select the registered Amazon S3 location, then choose Actions and Remove.
On the AWS CloudFormation console, delete snowflake-federation-network first, then snowflake-federation-oauth. This removes the VPC endpoint, the Amazon Route 53 private hosted zone, the security group, and the IAM role. It also removes the Amazon Cognito user pool, the AWS Lambda function, and the client secret. If the stack created the VPC, subnets, and NAT gateway, it removes those too.
Snowflake account
Open a SQL worksheet and run the following:
USE ROLE ACCOUNTADMIN;
DROP SECURITY INTEGRATION lakeformation_cognito_oauth;

USE ROLE USERADMIN;
DROP USER lakeformation_service_user_cognito;
DROP ROLE lakeformation_catalog_reader;
Revoke the PrivateLink authorization for your AWS account. This requires a fresh federation token, generated the same way as during setup, from an IAM user with long-term access keys:
Deleting the federated catalog and connection doesn’t delete data in Snowflake or Amazon S3. It only removes the federation configuration in your AWS account.
Conclusion
In this post, you learned how to federate Snowflake Horizon Catalog Iceberg tables into AWS Lake Formation and query them from Amazon Athena. Amazon Cognito handled the OAuth2 tokens for machine-to-machine authentication. To extend this pattern to additional workloads, create a new app client in your Cognito user pool and a corresponding read-only Snowflake role.
To provide the best experiences, we use technologies like cookies to store and/or access device information. Consenting to these technologies will allow us to process data such as browsing behavior or unique IDs on this site. Not consenting or withdrawing consent, may adversely affect certain features and functions.
Functional
Always active
The technical storage or access is strictly necessary for the legitimate purpose of enabling the use of a specific service explicitly requested by the subscriber or user, or for the sole purpose of carrying out the transmission of a communication over an electronic communications network.
Preferences
The technical storage or access is necessary for the legitimate purpose of storing preferences that are not requested by the subscriber or user.
Statistics
The technical storage or access that is used exclusively for statistical purposes.The technical storage or access that is used exclusively for anonymous statistical purposes. Without a subpoena, voluntary compliance on the part of your Internet Service Provider, or additional records from a third party, information stored or retrieved for this purpose alone cannot usually be used to identify you.
Marketing
The technical storage or access is required to create user profiles to send advertising, or to track the user on a website or across several websites for similar marketing purposes.