Earlier this year, a group of external researchers identified and reported a vulnerability in Cloudflare’s SSL for SaaS v1 (Managed CNAME) product offering through Cloudflare’s bug bounty program. We officially deprecated SSL for SaaS v1 in 2021; however, some customers received extensions for extenuating circumstances that prevented them from migrating to SSL for SaaS v2 (Cloudflare for SaaS). We have continually worked with the remaining customers to migrate them onto Cloudflare for SaaS over the past four years and have successfully migrated the vast majority of these customers. For most of our customers, there is no action required; for the very small number of SaaS v1 customers, we will be actively working to help migrate you to SSL for SaaS v2 (Cloudflare for SaaS).
Background on SSL for SaaS v1 at Cloudflare
Back in 2017, Cloudflare announced SSL for SaaS, a product that allows SaaS providers to extend the benefits of Cloudflare security and performance to their end customers. Using a “Managed CNAME” configuration, providers could bring their customer’s domain onto Cloudflare. In the first version of SSL for SaaS (v1), the traffic for Custom Hostnames is proxied to the origin based on the IP addresses assigned to the zone. In this Managed CNAME configuration, the end customers simply pointed their domains to the SaaS provider origin using a CNAME record. The customer’s origin would then be configured to accept traffic from these hostnames.
What are the security concerns with v1 (Managed CNAME)?
While SSL for SaaS v1 enabled broad adoption of Cloudflare for end customer domains, its architecture introduced a subtle but important security risk – one that motivated us to build Cloudflare for SaaS.
As adoption scaled, so did our understanding of the security and operational limitations of SSL for SaaS v1. The architecture depended on IP-based routing and didn’t verify domain ownership before proxying traffic. That meant that any custom hostname pointed to the correct IP could be served through Cloudflare — even if ownership hadn’t been proven. While this produced the desired functionality, this design introduced risks and created friction when customers needed to make changes without downtime.
A malicious CF user aware of another customer’s Managed CNAME (via social engineering or publicly available info), could abuse the way SSL for SaaS v1 handles host header redirects through DNS manipulation and Man-in-The-Middle attack because of the way Cloudflare serves the valid TLS certificate for the Managed CNAME.
For regular connections to Cloudflare, the certificate served by Cloudflare is determined by the SNI provided by the client in the TLS handshake, while the zone configuration applied to a request is determined based on the host-header of the HTTP request.
In contrast, SSL for SaaS v1/Managed CNAME setups work differently. The certificate served by Cloudflare is still based on the TLS SNI, but the zone configuration is determined solely based on the specific Cloudflare anycast IP address the client connected to.
For example, let’s assume that 192.0.2.1 is the anycast IP address assigned to a SaaS provider. All connections to this IP address will be routed to the SaaS provider’s origin server, irrespective of the host-header in the HTTP request. This means that for the following request:
The certificate served by Cloudflare will be valid for www.cloudflare.com, but the request will not be sent to the origin server of www.cloudflare.com. It will instead be sent to the origin server of the SaaS provider assigned to the 192.0.2.1 IP address.
While the likelihood of exploiting this vulnerability is low and requires multiple complex conditions to be met, the vulnerability can be paired with other issues and potentially exploit other Cloudflare customers if:
The adversary is able to perform DNS poisoning on the target domain to change the IP address that the end-user connects to when visiting the target domain
The adversary is able to place a malicious payload on the Managed CNAME customer’s website, or discovers an existing cross-site scripting vulnerability on the website
Mitigation: A Phased Transition
To address these challenges, we launched SSL for SaaS v2 (Cloudflare for SaaS) and deprecated SSL for SaaS v1 in 2021. Cloudflare for SaaS transitioned away from IP-based routing towards a verified custom hostname model. Now, custom hostnames must pass a hostname verification step alongside SSL certificate validation to proxy to the customer origin. This improves security by limiting origin access to authorized hostnames and reduces downtime through hostname pre-validation, which allows customers to verify ownership before traffic is proxied through Cloudflare.
When Cloudflare for SaaS became generally available, we began a careful and deliberate deprecation of the original architecture. Starting in March 2021, we notified all v1 users of the then upcoming sunset in favor of v2 in September 2021 with instructions to migrate. Although we officially deprecated Managed CNAME, some customers were granted exceptions and various zones remained on SSL for SaaS v1. Cloudflare was notified this year through our Bug Bounty program that an external researcher had identified the SSL for SaaS v1 vulnerabilities in the midst of our continued efforts to migrate all customers.
The majority of customers have successfully migrated to the modern v2 setup. For those few that require more time to migrate, we’ve implemented compensating controls to limit the potential scope and reach of this issue for the remaining v1 users. Specifically:
This feature is unavailable for new customer accounts, and new zones within existing customer accounts, to configure via the UI or API
Cloudflare actively maintains an allowlist of zones & customers that currently use the v1 service
We have also implemented WAF custom rules configurations for the remaining customers such that any requests targeting an unauthorized destination will be caught and blocked in their L7 firewall.
The architectural improvement of Cloudflare for SaaS not only closes the gap between certificate and routing validation but also ensures that only verified and authorized domains are routed to their respective origins—effectively eliminating this class of vulnerability.
Next steps
There is no action necessary for Cloudflare customers, with the exception of remaining SSL for SaaS v1 customers, with whom we are actively working to help migrate. While we move to the final phases of sunsetting v1, Cloudflare for SaaS is now the standard across our platform, and all current and future deployments will use this secure, validated model by default.
Conclusion
As always, thank you to the external researchers for responsibly disclosing this vulnerability. We encourage all of our Cloudflare community to submit any identified vulnerabilities to help us continually improve upon the security posture of our products and platform.
We also recognize that the trust you place in us is paramount to the success of your infrastructure on Cloudflare. We consider these vulnerabilities with the utmost concern and will continue to do everything in our power to mitigate impact. Although we are confident in our steps to mitigate impact, we recognize the concern that such incidents may induce. We deeply appreciate your continued trust in our platform and remain committed not only to prioritizing security in all we do, but also acting swiftly and transparently whenever an issue does arise.
Airportr is a service that allows passengers to have their luggage picked up, checked, and delivered to their destinations. As you might expect, it’s used by wealthy or important people. So if the company’s website is insecure, you’d be able to spy on lots of wealthy or important people. And maybe even steal their luggage.
Researchers at the firm CyberX9 found that simple bugs in Airportr’s website allowed them to access virtually all of those users’ personal information, including travel plans, or even gain administrator privileges that would have allowed a hacker to redirect or steal luggage in transit. Among even the small sample of user data that the researchers reviewed and shared with WIRED they found what appear to be the personal information and travel records of multiple government officials and diplomats from the UK, Switzerland, and the US.
“Anyone would have been able to gain or might have gained absolute super-admin access to all the operations and data of this company,” says Himanshu Pathak, CyberX9’s founder and CEO. “The vulnerabilities resulted in complete confidential private information exposure of all airline customers in all countries who used the service of this company, including full control over all the bookings and baggage. Because once you are the super-admin of their most sensitive systems, you have have [sic] the ability to do anything.”
Наскоро от запитвания на депутати, кметове и общински съветници стана ясно, че не съществуват обещаните подробни анализи дали наистина онези над 4400 държавни имота са ненужни. Междувременно, както писах на 7-ми юли, вече усилено са започнали да продават имоти от списъка – още преди дори да публикуват уж предварителния списък.
На 30-ти юли открих обаче, че списъкът с тези имоти, който ми предоставиха по ЗДОИ, е изчезнал от страницата на МРРБ. Новината, че го публикуват е там, но са махнали пикачената таблица. Скрили са списъка някъде между 7-ми и 30-ти юли като по-вероятно да е след 18-ти юли, защото тогава започнах да получавам съобщения от объркани хора, които не го намират. Едва преди два дни отговорих да видя дали има някакви новини и видях, че е изчезнал.
Качих моето копие под първата ми статия по темата и допълних информацията там и другите статии по темата. Описах също в социалките казуса. Добавих и друго интересно нещо – че два от търговете, които открих на 7-ми юли за имоти от списъка за били изтрити. Когато един търг не е успешен, просто го архивират. В случая обаче направо са изтрити. От тогава открих още три. Тук ще намерите изтритите търгове. Информацията за тях е запазена на картата ми:
Информацията за тях се пази в данните ми. Автоматизирах засичането на изтрити търгове. В началото просто не ми хрумна, че ще прибегнат и до това. Както казах за застрояването на София – бедна ни е фантазията. Ще се отбелязва автоматично в бъдеще на картата.
Имоти за едни общини, но не за други
Друго притеснително действие от страна на кабинета на Желязков, което рязко противоречи със заявките му, са съмненията за схеми с определени общини и местна власт под контрола на ГЕРБ и Пеевски. От началото на май 2025-та, когато обявиха, че ще продават масово държавно имущество, е имало 12 заседания на министерски съвет. За този период са взели 41 решения, с които се разпореждат някак с имотите изключвайки решението за 4400-те имота от 8-ми май. 19 от тези решения са за смяна на вида на имота (обикновено от държавна публична на държавна частна или обратно), предоставяне на управление на агенция или държавна фирма или уреждане на други права, но при запазване на собствеността на държавата. 6 решения са за отчуждаване на частни имоти, повечето заради ЖП инфраструктурни проекти. Едно решение има позволявайки на „ЗЕМИНВЕСТ“ ЕАД собственост на Министерство на земеделието и храните да продава имоти.
Останалите 13 решения са за безвъзмездно прехвърляне на имоти на общини – Омуртаг, Гърмен, Свищов, Плевен, Долни Чифлик, Велико Търново, Доспат, Самоков, Перущица и по две решения за Созопол и Монтана. От тях местната власт на две общини се контролират пряко от Пеевски, 7 се контролират от ГЕРБ, а две от БСП. Доколкото е добра идея да се използва ненужна земя за паркове, училища и градини. Буди притеснение защо след обявяването на списъка се прехвърлят имоти само на общински съвети пряко или косвено овладени от Пеевски. В същото време други общини от години призовават доста от имотите да бъдат прехвърлени, понякога заради проекти, по които може да се изгуби финансиране или за които има сериозно обществено внимание.
По-лесна продажба на държавни имоти
Вчера парламентът прие с процедурни нарушения и в разрез с решения на европейския съд и законодателство промени в нормативната рамка, които улесняват продажбата на държавни имоти, създаване на инфраструктура на частни земи, махане на забранителен списък и контрол на парламента и други. Божидар Божанов вече писа, че нарушенията са повод за обжалване в конституционния съд.
Кабинетът обаче не губи време – часове след гласуването в парламента и още преди промените да излязат в Държавен вестник пуснаха още 11 търга във Велико Търново, Добрич, Кърджали и Монтана. Повечето от Земинвест ЕАД, която е в ликвидация и един от областния управител на Монтана.
Възможност за действие – подайте сигнал
Целият този хаос от липсващи документи, разнопосочни изказвания и машинации човек би бил извинен да подозира добре смазана машина за разграбване на публична собственост. В няколко интервюта казах, че не търся зла умисъл там, където нещо може да се обясни с некадърност. Това не означава, че хаоса по места не се прокарват редовните схеми на дребно, с каквито местата власт се слави и заради които Борисов и Пеевски инвестират толкова голям ресурс на сплашване и атаки, за да запазят.
Затова беше създадена платформата uchastvai.bg. Там ще намерите тази карта и друга, която направих за финансиране на общините от държавния бюджет. Това е тема, която тепърва ще следим, но имаме нужда от вас. Там може да подавате сигнали, да задавате въпроси и да давате обратна връзка. Доколкото ЗДОИ е силен инструмент, виждаме, че не е достатъчно бърз и често не се отговаря. През uchastvai.bg въпросите и сигналите ще бъдат получавани директно от депутати и общински съветници, които имат механизми и достъп да заставят кабинета да отговори.
Филтри и търсачка в картата
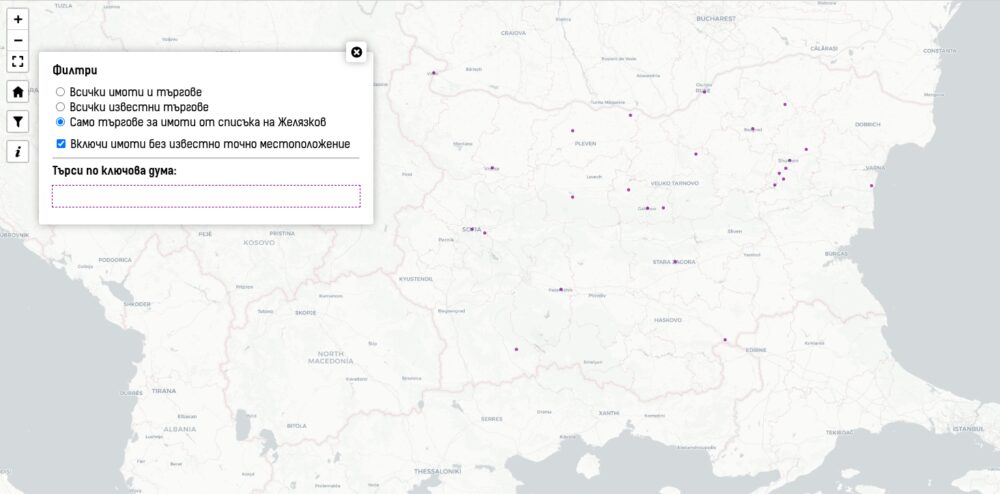
Гледайки тези данни реших да добавя няколко нови функции на картата. Споменах вече, че изтрити търгове ще бъдат отбелязвани като такива с датата, на която това е установено. Данните за търговете се обновяват на всеки няколко часа. Добавих и филтър, с който лесно да се търся имоти и търгове. Ще намерите бутона над този за информация за проекта.
Започва с три опции. Първата показва всичко. Втората показва само местата с търгове като включва и тези за които не знам конкретния имот, а само общината. Третата опция показва само търговете, за които автоматично съм установил, че се отнасят до имоти от списъка на Желязков. Тук има някои, които не са установени като имоти и други, където се продава апартамент, офис или сграда в парцел споменат в онзи списък. Тук виждате третия филтър.
Последната отметка скрива от картата имоти и парцели, за които не е известно точно къде са. Т.е. информацията по общини. За някои е по-прегледно.
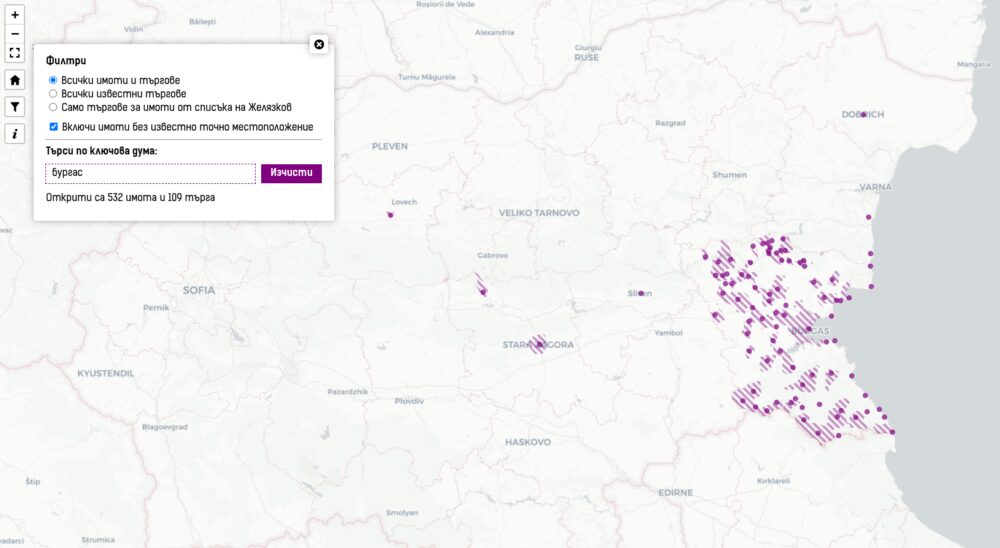
По-интересно е другото търсене – по текст. Докато пишете в полето ще се филтрират на картата имотите, които съдържат в която и да е част от описанието си търсеното от вас. Това може да е град, име на фирма, идентификатор на имот, екатте номер на община или каквото и да е. Когато натиснете на мястото ще се показват всички имоти и търгове, но ще бъдат замъглени онези, които не отговарят на търсеното.
Направих го, защото открих, че сам трудно намирам конкретни търгове и информация. Не планирам да добавям повече филтри за сега. Картата стана достатъчно сложна с 1000 реда код с всички допълнения и подобрения, които направих в последния месец.
Modern applications increasingly rely on Serverless technologies such as Amazon Web Services (AWS) Lambda to provide scalability, cost efficiency, and agility. The Serverless Applications Lens for the AWS Well-Architected Framework focuses on how to design, deploy, and architect your Serverless applications to overcome some of these challenges.
Powertools for AWS Lambda is a developer toolkit that helps you implement Serverless best practices and directly translates AWS Well-Architected recommendations into actionable, developer friendly utilities. Following the community’s continued successful adoption of Powertools for AWS in Python, Java, TypeScript, and .NET, this post announces the general availability of Powertools for AWS Lambda (Java) v2 coming with major performance improvements, enhanced core utilities, and a brand-new Kafka utility.
Powertools for AWS (Java) v2 provides three updated core utilities:
Logging: A re-designed Java idiomatic logging module providing structured logging that streamlines log aggregation and analysis.
Tracing: An annotation-based way to collect distributed tracing data with AWS X-Ray to visualize and analyze request flows.
Along with the updated core utilities, v2 of the developer toolkit adds two brand new features:
GraalVM native image support: Native image support for GraalVM across all core utilities reducing Lambda cold start times up to 75.61% (p95).
Kafka utility: This new utility integrates with Amazon Managed Streaming for Apache Kafka (Amazon MSK) and self-managed Kafka event sources on Lambda and allows developers to deserialize directly into Kafka native types such as ConsumerRecords.
Learn more about how to migrate to v2 in our upgrade guide.
Getting started using Powertools for AWS Lambda (Java) v2
Powertools for AWS Lambda (Java) v2 is readily accessible as a Java package on Maven Central and integrates with popular build tools such as Maven and Gradle. This post focuses on Maven-based implementation samples to help you get started quickly. Gradle examples are available for all utilities in the documentation and the examples repository.
The toolkit is compatible with Java 11 and newer versions, making sure you can use modern Java features while building Serverless applications. Examples on how to install each utility are outlined in each section of the post and complete configuration examples are also available in the Powertools documentation.
Logging
The Logging utility helps implement structured logging when running on Lambda while still using familiar Java logging libraries such as slf4j, log4j, and logback. v2 of Logging allows you to do the following:
Output structured JSON logs enriched with Lambda context
Choose the logging backend of your choice among log4j2 and logback
Add structured arguments to logs that get serialized into arbitrarily nested JSON objects
To add the logging utility to your project, include it as a dependency in your Java Maven project. The following example shows how to add the log4j2 logging backend to your application:
<!-- In the dependencies section -->
<dependency>
    <groupId>software.amazon.lambda</groupId>
    <artifactId>powertools-logging-log4j</artifactId>
    <!-- Alternatively, if you wish to use the logback backend
    <artifactId>powertools-logging-logback</artifactId>
    -->
    <version>2.1.1</version>
</dependency>
<!-- In the build plugins section -->
<plugin>
    <groupId>dev.aspectj</groupId>
    <artifactId>aspectj-maven-plugin</artifactId>
    <configuration>
        <aspectLibraries>
            <aspectLibrary>
                <groupId>software.amazon.lambda</groupId>
                <artifactId>powertools-logging</artifactId>
                <version>2.1.1</version>
            </aspectLibrary>
        </aspectLibraries>
    </configuration>
</plugin>
Create a custom JsonTemplateLayout appender in your log4j2.xml file:
To add structured logging to your functions, apply the @Logging annotation to your Lambda handler and use the familiar slf4j Java API when writing log statements. This allows you to adopt the logging utility without major code refactoring. Powertools handles routing to the correct logging backend for you. The following example shows how to add global log keys using MDC, and add a structured entry argument to your log message:
public class App implements RequestHandler<SQSEvent, String> {
    private static final Logger log = LoggerFactory.getLogger(App.class);

    @Logging
    public String handleRequest(final SQSEvent input, final Context context) {
        // Add a global log key using Mapped Diagnostic Context MDC
        MDC.put("myCustomKey", "willBeLoggedForAllLogStatements");

        // Log a message with a structured argument (any JSON serializable Object)
        log.info("My message", entry("anotherCustomKey", Map.of("nested", "object")));

        // ... return response
    }
}
Lambda sends the following JSON-formatted output to Amazon CloudWatch Logs (note how the Java Map gets auto-serialized into a JSON object):
CloudWatch offers essential built-in service metrics for monitoring application throughput, error rates, and resource usage. Users also need to capture workload specific custom metrics relevant to their business use-case following AWS Well-Architected best-practices.
Powertools for AWS (Java) enables you to create custom metrics asynchronously by outputting metrics in CloudWatch EMF directly to standard output—an approach that needs no other configuration. The Lambda service sends the EMF formatted metrics to CloudWatch on your behalf.
The Metrics utility allows you to:
Create custom metrics asynchronously using CloudWatch EMF
Reduce latency by avoiding synchronous metric publishing
Automatically track cold starts in a custom CloudWatch metric
Avoid manually validating your output against the EMF specification
Keep you code clean by avoiding manual flushing to standard output
To add the Metrics utility to your project, add the following Maven dependency:
<!-- In the dependencies section -->
<dependency>
    <groupId>software.amazon.lambda</groupId>
    <artifactId>powertools-metrics</artifactId>
    <version>2.1.1</version>
</dependency>
<!-- In the build plugins section -->
<plugin>
    <groupId>dev.aspectj</groupId>
    <artifactId>aspectj-maven-plugin</artifactId>
    <configuration>
        <aspectLibraries>
            <aspectLibrary>
                <groupId>software.amazon.lambda</groupId>
                <artifactId>powertools-metrics</artifactId>
                <version>2.1.1</version>
            </aspectLibrary>
        </aspectLibraries>
    </configuration>
</plugin>
To add custom metrics to your Lambda function, place the @FlushMetrics annotation on your Lambda handler. The library takes care of validating and flushing your metrics to standard output before the Lambda function terminates. The following example shows how you can automatically capture a cold start metric and emit your own custom metrics:
public class App implements RequestHandler<SQSEvent, String> {
    private static final Logger log = LoggerFactory.getLogger(App.class);
    private static final Metrics metrics = MetricsFactory.getMetricsInstance();

    // This configures a default namespace and service dimension for all metrics
    @FlushMetrics(namespace = "ServerlessAirline", service = "payment", captureColdStart = true)
    public String handleRequest(final SQSEvent input, final Context context) {
        // The Metrics instance is a singleton
        metrics.addMetric("CustomMetric1", 1, MetricUnit.COUNT);

        // Publish metrics with non-default configuration options
        DimensionSet dimensionSet = new DimensionSet();
        dimensionSet.addDimension("Service", "AnotherService");
        metrics.flushSingleMetric("CustomMetric2", 1, MetricUnit.COUNT, "AnotherNamespace", dimensionSet);

        // ... return response
    }
}
Figure 1. AWS CloudWatch Metrics Graph View
Tracing
The Tracing utility provides an annotation-based integration with X-Ray for distributed tracing with minimal configuration. Tracing allows you to:
Gain visibility into your own methods calls and AWS service interactions visualized in the X-Ray console
Automatically capture method responses and errors
Automatically capture Lambda cold start information as part of your traces
Add custom metadata to traces for more context and debugging information
Enable or disable tracing features through environment variables without code changes
To add the Tracing utility to your project, add the following Maven dependency:
<!-- In the dependencies section -->
<dependency>
    <groupId>software.amazon.lambda</groupId>
    <artifactId>powertools-tracing</artifactId>
    <version>2.1.1</version>
</dependency>
<!-- In the build plugins section -->
<plugin>
    <groupId>dev.aspectj</groupId>
    <artifactId>aspectj-maven-plugin</artifactId>
    <configuration>
        <aspectLibraries>
            <aspectLibrary>
                <groupId>software.amazon.lambda</groupId>
                <artifactId>powertools-tracing</artifactId>
                <version>2.1.1</version>
            </aspectLibrary>
        </aspectLibraries>
    </configuration>
</plugin>
To enable tracing in your Lambda function, annotate your Lambda handler and your custom methods that you want to trace with the @Tracing annotation. Each annotation maps to a sub-segment of your main Lambda handler in X-Ray and becomes visible in the console.
public class App implements RequestHandler<APIGatewayProxyRequestEvent, APIGatewayProxyResponseEvent> {
    private static final Logger log = LoggerFactory.getLogger(App.class);

    @Tracing
    public APIGatewayProxyResponseEvent handleRequest(final APIGatewayProxyRequestEvent input, final Context context) {
        // ... business logic

        // Get calling IP with tracing
        String location = getCallingIp("https://checkip.amazonaws.com");

        // ... return response
    }

    @Tracing(segmentName = "Location service")
    private String getCallingIp(String address) {
        // Implementation to get IP address
        log.info("Retrieving caller IP address");

        // Add custom metadata to current sub-segment
        URL url = new URL(address);
        putMetadata("getCallingIp", address);

        // ...
        return "127.0.0.1";
    }
}
The X-Ray console displays a generated service map when traffic begins flowing through your application. Applying the Tracing annotation to your Lambda function handler method or any other methods in the execution chain provides you with comprehensive visibility into the traffic patterns throughout your application. The following figure shows how the custom metadata added in the example is associated with the custom sub-segment.
Figure 2. AWS X-Ray waterfall trace view
Reducing Lambda cold start duration
A key feature in Powertools for AWS Lambda (Java) v2 is GraalVM native image support for all core utilities. Compiling your Lambda functions to native executables allows you to significantly reduce cold start times and memory usage. Using Powertools v2 with GraalVM allows you to reduce cold starts up to 75.61% (p95) compared to using the managed Java runtime. The following benchmark compares the cold start times of an application using all core utilities (logging, metrics, tracing) on the managed java21 runtime as compared to the Lambda provided.al2023 runtime running a GraalVM compiled native image (go to the supported Lambda runtimes):
Environment
p95 (ms)
Min (ms)
Avg (ms)
Max (ms)
Max Memory (MB)
N
Powertools for AWS (Java) v2: JVM
1682.92
1224.55
1224.55
2229.81
205.04
234
Powertools for AWS (Java) v2: GraalVM
542.86
404.92
504.77
752.85
93.46
369
This improvement is particularly valuable for latency-sensitive applications and functions that scale frequently. Check out a full working example on GitHub.
Lambda MSK Event Source Mapping Integration
The new Kafka utility introduced with Powertools for AWS Lambda (Java) v2 streamlines working with the Lambda MSK Event Source Mapping (ESM) and self-managed Kafka event sources. It provides a familiar experience for developers working with Apache Kafka by allowing direct conversion from Lambda events to Kafka’s native types. The key features include:
Direct deserialization into Kafka ConsumerRecords<K, V> objects while using the Lambda-native RequestHandler interface
Support for deserializing JSON, Avro, and Protobuf encoded records for key and value fields with and without usage of a Schema Registry when producing the messages
To add the Kafka utility to your project, include the powertools-kafka library as a Maven dependency in your pom.xml:
<!-- In the dependencies section -->
<dependency>
    <groupId>software.amazon.lambda</groupId>
    <artifactId>powertools-kafka</artifactId>
    <version>2.1.1</version>
</dependency>
<!-- Kafka clients dependency - compatibility works for >= 3.0.0 -->
<dependency>
    <groupId>org.apache.kafka</groupId>
    <artifactId>kafka-clients</artifactId>
    <version>4.0.0</version>
</dependency>
Use the @Deserialization annotation on your Lambda handler to deserialize messages as native Kafka ConsumerRecords. Make sure to specify the deserializer type. The following example shows how to deserialize Avro encoded record values with String keys. As in a regular Lambda handler, declare the input type to your function in the RequestHandler generic parameters and the utility discovers the deserialization types automatically. The AvroProduct class in the following example is an auto-generated Java class using the Java org.apache.avro.avro library.
public class App implements RequestHandler<ConsumerRecords<String, AvroProduct>, Void> {
    private static final Logger log = LoggerFactory.getLogger(App.class);

    @Deserialization(type = DeserializationType.KAFKA_AVRO)
    public Void handleRequest(ConsumerRecords<String, AvroProduct> consumerRecords, Context context) {
        log.info("Deserialized {} records.", consumerRecords.records().size());

        // ... Business logic

        return null;
    }
}
Conclusion
Powertools for AWS Lambda (Java) v2 represents the next evolution in the toolkit for building robust, observable, and high-performing Serverless applications. Throughout this post, we’ve explored the enhanced core observability utilities with their new features, the performance gains through GraalVM native image support, and the new Kafka utility that supports using familiar Kafka patterns when working on Lambda.
Powertools also offers more utilities to handle common Serverless design patterns. Each utility is designed with the same principles of clarity and minimal overhead.To learn more:
Visit the documentation for detailed guides and examples
This blog post discusses the AWS Lambda as orchestrator anti-pattern and how to redesign serverless solutions using AWS Step Functions with native integrations.
Step Functions is a serverless workflow service that you can use to build distributed applications, automate processes, orchestrate microservices, and create data and machine learning (ML) pipelines. Step Functions provides native integrations with over 200 AWS services in addition to external third-party APIs. You can use these integrations to deploy production-ready solutions with less effort, reducing code complexity, improving long-term maintainability, and minimizing technical debt when operating at scale.
The Lambda as orchestrator anti-pattern
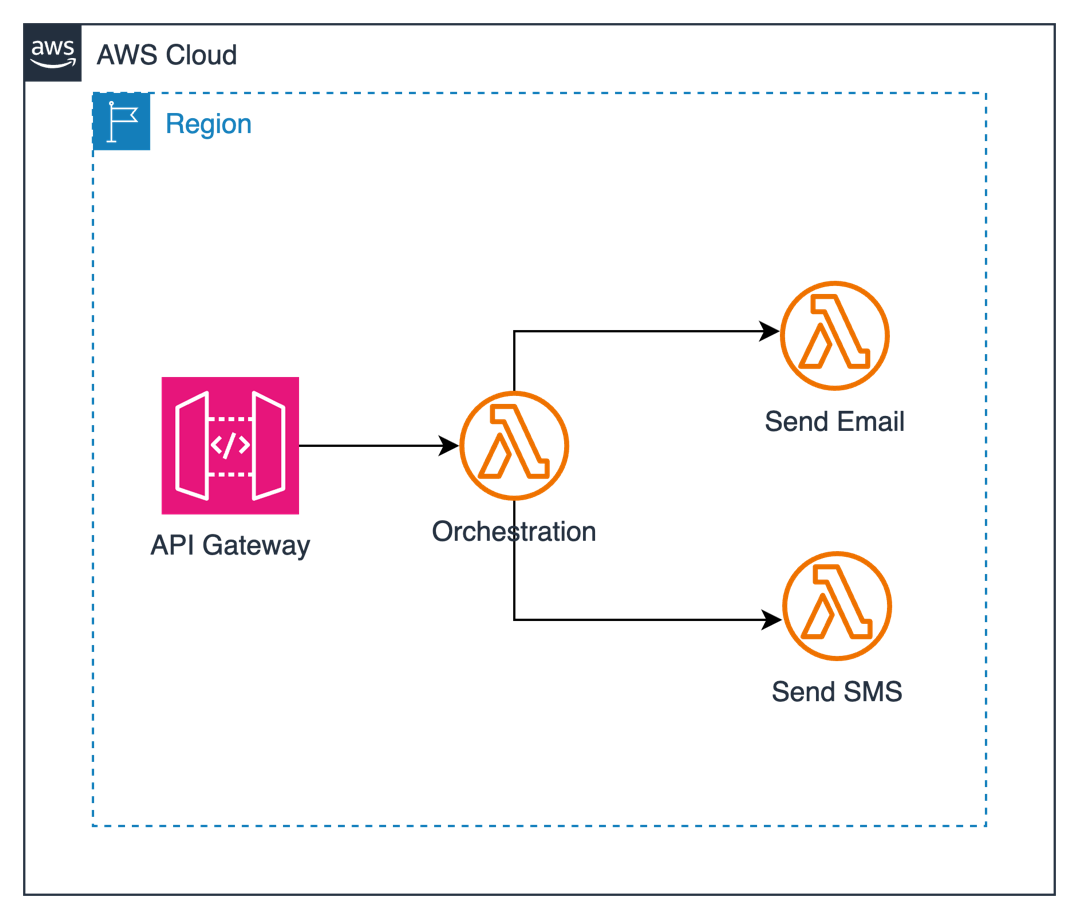
Let’s examine a common anti-pattern: using a Lambda function as an orchestrator for message distribution across multiple channels. Consider this real-world scenario where a system needs to send notifications through SMS or email channels based on user preferences, as shown in the following diagram.
Here’s how it typically starts—with a Lambda function acting as an orchestrator:
import boto3
import json
# Initialize Lambda client
# You can specify region if needed: boto3.client('lambda', region_name='us-east-1')
lambda_client = boto3.client('lambda')
def lambda_handler(event, context):
    try:
        # Parse the incoming event
        body = json.loads(event['body'])

        # Validate required fields
        if 'channel' not in body:
            return {
                'statusCode': 400,
                'body': json.dumps('Missing channel parameter')
            }

        if 'message' not in body:
            return {
                'statusCode': 400,
                'body': json.dumps('Missing message content')
            }

        if body['channel'] == 'both':
            # Invoke SMS Lambda function
            lambda_client.invoke(
                FunctionName='send-sns',
                InvocationType='Event',
                Payload=json.dumps(body)
            )

            # Invoke Email Lambda function
            lambda_client.invoke(
                FunctionName='send-email',
                InvocationType='Event',
                Payload=json.dumps(body)
            )
        else:
            # Validate channel value
            if body['channel'] not in ['sms', 'email']:
                return {
                    'statusCode': 400,
                    'body': json.dumps('Invalid channel specified')
                }

            # Invoke function based on specified channel
            function_name = 'send-sns' if body['channel'] == 'sms' else 'send-email'
            lambda_client.invoke(
                FunctionName=function_name,
                InvocationType='Event',
                Payload=json.dumps(body)
            )

        return {
            'statusCode': 200,
            'body': json.dumps('Messages sent successfully')
        }

    except json.JSONDecodeError:
        return {
            'statusCode': 400,
            'body': json.dumps('Invalid JSON in request body')
        }
    except Exception as e:
        return {
            'statusCode': 500,
            'body': json.dumps(f'Error: {str(e)}')
        }
This approach has the following problems:
Complex error handling: The orchestrator needs to manage errors from multiple function invocations.
Tight coupling: Functions are directly dependent on each other.
Limited execution time: The orchestrator Lambda function continues running while sub Lambda functions execute. This could lead to the orchestrator Lambda function timing out.
Idle resources: Because the orchestrator Lambda function is sitting idle waiting for returns from other Lambda functions, in this case, the user is now paying for idle resources.
Rearchitecting with Step Functions
You can rebuild the logic using Step Functions and Amazon States Language to replace the Lambda orchestrator function. You can use the Choice state in Amazon States Language to define logical conditions to follow a specific path. This approach reduces code maintenance complexity because you define the conditions using Amazon States Language. You can also use it to to extend the functionality with minimal changes to the codebase.
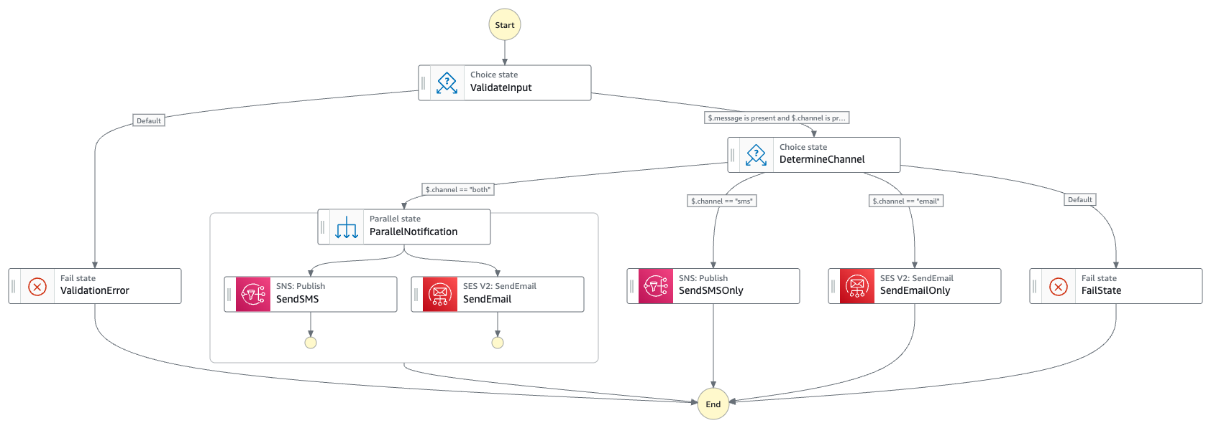
The following Step Functions workflow diagram shows the rearchitected version of the previous Orchestrator Lambda function:
The following Amazon State Language represents the workflow:
Visual workflow: The execution flow is visible and maintainable through the AWS Management Console
Built-in error handling: Retry policies and error states can be defined declaratively
Parallel execution: The Parallel state handles multiple channel delivery efficiently
Simplified logic: The Choice state replaces complex if-else statements
Centralized data flow: Input and output are managed consistently across states
Enhanced workflow duration capabilities: Step Functions Standard workflows support executions that run for up to one year, compared to the 15-minute maximum execution time for Lambda functions
Comparing Lambda function as orchestrator to Step Functions
The summary of different features implemented on Lambda function as orchestrator and Step Functions is reflected in the following table:
Feature
Lambda function as orchestrator
Step Functions
Orchestration logic
Implemented in Python with nested if-else statements.
Defined declaratively using the Choice state
Multi-channel delivery
Sequential function invocations. Parallel execution using function’s logic.
Parallel execution using the Parallel state
Service integration
Requires SDK calls or separate Lambda functions.
Direct integration with AWS services (Amazon SNS, DynamoDB)
Error handling
Custom try-except blocks in Python.
Built-in error states and retry policies
Data persistance
Custom code to interact with DynamoDB.
Native DynamoDB integration with putItem task
Metrics logging
Custom code to call CloudWatch.
CloudWatch Metrics SDK integration
Implementation considerations
Review the following considerations when re-architecting a Lambda function orchestrator to Step Functions:
State machine type: Choose between Standard (up to 1 year runtime) and Express (up to 5 minutes) workflows based on your needs.
Input/output management: Parameters manipulation reduces the development effort and give flexible alternatives to implement the workflow:
Parameters: Selects specific input fields to pass to the next state
ResultSelector: Filters the state response to include only relevant fields
ResultPath: Stores the processed result in a specific path of the state input
OutputPath: Determines what data passes to the next state A code snippet for these features is:
Error handling: Implement retry policies and catch errors at both the task and state machine levels.
Monitoring: Set up CloudWatch logs and metrics for your state machine to track executions and performance.
Benefits of using Step Functions
Using Step Functions for rearchitecting scenarios bring the following benefits:
Reduced code complexity: The business logic is now defined in Amazon States Language rather than distributed across multiple Lambda functions.
Improved maintainability: Developers can make workflow changes by modifying the Amazon States Language, often modifying several Lambda functions.
Native AWS service integrations: Step Functions offers direct integrations with over 200 AWS services, which you can use to connect and coordinate AWS resources without writing custom integration code.
Cost optimization: By using direct service integrations, there are fewer Lambda invocations and reduced costs.
Long-running processes: Step Functions can manage workflows that run for up to a year, beyond the 15-minute limit for Lambda functions.
Conclusion
Rearchitecting Lambda-based applications with Step Functions can significantly improve maintainability, scalability, and operational efficiency. By moving orchestration logic into Step Functions and using its native service integrations, you can create more robust and manageable serverless applications.
While this post focused on a message distribution workflow, the principles apply to many serverless architectures. As you develop your applications, consider how Step Functions can help you build more resilient and scalable solutions.
To learn more about serverless architectures visit Serverless Land.
Recent security research has highlighted the importance of CI/CD pipeline configurations, as documented in AWS Security Bulletin AWS-2025-016. This post pulls together existing guidance and recommendations into one guide.
Continuous integration and continuous deployment (CI/CD) practices help development teams deliver software efficiently and reliably. AWS CodeBuild provides managed build services that integrate with source code repositories like GitHub, GitLab, and other Source Control Management (SCM) systems. While this guide uses GitHub examples, the security principles and webhook configuration approaches apply to other supported source control systems.
However, certain configurations require careful attention. We strongly recommend that you do not use automatic pull request builds from untrusted repository contributors without proper security controls and a clear understanding of your threat model. This configuration allows untrusted code to execute in your build environment with access to repository credentials and environment variables. Webhook configurations determine which repository events trigger builds and what code gets executed during the build process. Understanding these configurations is essential for maintaining appropriate security boundaries while preserving the automation benefits that make CI/CD valuable.
Security teams and DevOps engineers can use these practical approaches to configure AWS CodeBuild to meet their security goals while maintaining development velocity. We’ll explore webhook configurations, trust boundaries, and implementation strategies that emphasize threat model assessment, least-privilege access, and proactive monitoring of your pipeline configurations.
Security of the pipeline implications
Under the shared responsibility model, while AWS manages the security of the underlying AWS CodeBuild infrastructure, customers are responsible for securing their pipeline configurations, access controls, and the code that runs within their build environments. This shared responsibility is critical when considering the security of the pipeline itself.
When AWS CodeBuild processes pull requests automatically, it builds the code in an environment with access to repository credentials, environment variables, and potentially sensitive information. This creates specific security of the pipeline considerations:
Repository access: AWS CodeBuild projects require repository credentials to read source code and create webhooks. These credentials provide specific permissions that vary based on your configuration.
Build execution: The build process runs the retrieved source code, which may include build scripts, dependency definitions, or test files from pull requests.
Build environment: AWS CodeBuild environments may have access to environment variables, AWS credentials, or other configuration data needed for the build process.
Establishing trust boundaries
Effective security of the pipeline starts with clearly defining trust boundaries for different types of code contributions:
Internal contributors: Team members with repository write access who have been verified through your organization’s access management processes.
External contributors: Contributors from outside your organization who submit pull requests from forked repositories.
Automated processing: Code that runs without manual review as part of the build process.
These trust boundaries form the foundation for threat modeling your specific environment. Internal and trusted environments can often rely more heavily on automation with contributor filtering and least-privilege controls. Public and open source projects require more stringent controls due to the inherent risks of processing untrusted contributions – these environments benefit from stricter webhook filtering, comprehensive approval gates, or the self-hosted GitHub Actions runner approach discussed later.
The key principle is finding the appropriate balance between security controls and development velocity based on your specific risk profile and contributor trust levels. With these considerations in mind, let’s examine how to assess and configure your current AWS CodeBuild webhook settings.
Configuring secure webhooks
Webhooks represent the preferred mechanism by which external events trigger AWS CodeBuild processes. When properly configured, webhooks provide a powerful and efficient way to automate your build processes in response to repository changes. However, improper webhook configuration can create security vulnerabilities by allowing untrusted code to execute in privileged environments.The security of your webhook configuration depends on understanding exactly which events trigger builds, what level of access those builds have, and what code gets executed during the build process. This section provides a comprehensive approach to authoring, assessing, configuring, and maintaining secure webhook configurations.
Assessing current webhook configurations
Begin by reviewing your existing AWS CodeBuild projects to understand their current webhook configurations. The following AWS CLI commands provide a systematic approach to gathering this information:
# List all CodeBuild projects in your region
aws codebuild list-projects --region us-west-2

# Retrieve detailed configuration for analysis
aws codebuild batch-get-projects --region us-west-2 \
  --names $(aws codebuild list-projects --region us-west-2 \
  --query 'projects[*]' --output text | tr '\n' ' ')
When you run these commands, pay particular attention to the webhook section in the output. This section contains the filterGroups configuration, which determines exactly which repository events trigger builds.
Now that you understand how to review your current setup, let’s examine common configuration patterns and their security implications.
Webhook configuration patterns
Understanding common webhook configuration patterns helps you quickly identify potential security concerns and implement appropriate improvements. The following patterns represent different approaches to webhook configuration, each with specific security implications.
Note: These patterns are not recommended for use and are shown here to help you identify configurations that may need attention.
This configuration allows contributors who can create a pull request to trigger code execution in your build environment. We strongly recommend that you do not use automatic pull request builds from untrusted repository contributors.
Configuration requiring immediate review – No event filtering
Without filtering, this configuration can trigger builds for a wide variety of repository events.
Recommended secure webhook configurations
The following configurations represent security best practices that balance automation benefits with appropriate security controls. These patterns help to reduce security risks while maintaining the development velocity that makes CI/CD valuable.
Push-based builds (Recommended for most use cases)
Push-based builds make sure that only users with repository write access can trigger builds, which means contributors have already been vetted through your repository’s access control mechanisms.
Organizations that rely heavily on external open-source contributions may find this approach too restrictive. For example, a popular open-source project that receives dozens of pull requests daily from external contributors would need to manually merge each contribution before builds can run, significantly slowing down the contribution review process. In such cases, contributor-filtered builds or the self-hosted GitHub Actions runner approach may be more appropriate.
Contributor-filtered builds (Recommended for trusted contributors only)
This configuration allows pull request builds from specific, trusted contributors.
Important: Filtering applies to the GitHub account ID, not repository ownership. Contributors working from forked repositories can still introduce untrusted code that executes in your build environment.
Before implementing these configurations in your environment, consider these key factors that will help facilitate a smooth transition.
Webhook configuration implementation steps
While implementing the webhook security measures below, consider these broader practices:
Threat modeling: Assess your specific risk profile before selecting approaches.
Infrastructure as code: Use Infrastructure as Code (IaC) tools for production implementations.
Gradual implementation: Implement changes incrementally with observation periods.
Testing and rollback: Validate changes in non-production environments first.
The following implementation approach moves from most restrictive to more automated configurations. Choose the approach that best fits your organization’s risk tolerance and operational requirements. This three-step process moves from the most restrictive approach to more automated configurations while maintaining security controls. Each step builds upon the previous one, creating layers of security that work together to protect your pipeline.
Note: The following examples use the AWS CLI for demonstration purposes. Similar configuration steps can be performed using the AWS Management Console through the AWS CodeBuild project settings.
Step 1: Configure push-only builds
Push-based builds help make sure that only verified contributors can trigger builds. This approach is more secure, because contributors must already be vetted through your repository’s access control mechanisms before they can push code. Configure your webhook to trigger only on push events:
Branch-based filtering adds an additional layer of security by making sure that builds are triggered only for changes to specific branches. This approach recognizes that not all branches in a repository have the same security requirements or risk profiles.
For example, changes to main or production branches typically require more stringent security controls than changes to feature or development branches. By implementing branch-based filtering, you can apply appropriate security measures based on the criticality and exposure of different branches.
Contributor filtering can be used to manage pull request builds by allowing automation for trusted contributors while requiring manual review for others. This approach recognizes that different contributors represent different risk profiles and should be treated accordingly.
The first step in implementing contributor filtering is identifying the GitHub user IDs of your trusted contributors.
Retrieve GitHub user IDs for trusted contributors:
Important: Contributor allowlists require ongoing maintenance as team membership changes. Consider using Infrastructure as Code templates like the Cloudformation examples to manage webhook configurations and contributor lists in version control.
Webhook filtering provides the first layer of security by controlling which events trigger builds. However, comprehensive pipeline security requires additional controls around the permissions and credentials available to those builds once they execute. The following section covers how to implement defense-in-depth security through proper access controls and credential management.
Access control and credential management
This section covers specific approaches to limit the permissions available to build processes, scope repository access tokens appropriately, and create isolated environments that help contain potential security issues. These practices work together to implement defense-in-depth security while maintaining the operational benefits of automated CI/CD workflows.
Implementing least-privilege access
AWS CodeBuild projects require IAM service roles to access AWS resources during the build process. The principle of least privilege dictates that each role should have only the minimum permissions necessary to perform its intended function. By creating separate, purpose-built IAM roles for different types of builds, you can help reduce the potential impact of unauthorized access to build environments.
The following examples demonstrate how to structure minimal IAM roles for different build scenarios. These examples serve as starting points that you should customize based on your specific requirements, adding only the permissions your builds actually need.
Service role configuration
Create minimal IAM roles that provide only the permissions required for specific build types:
Leveraging IAM Access Analyzer for CodeBuild security
AWS IAM Access Analyzer can generate least-privilege policies for your AWS CodeBuild service roles based on actual CloudTrail activity from your build executions. This eliminates guesswork by analyzing the specific AWS API calls your builds make, rather than requiring you to predict what permissions might be needed.
After running your CodeBuild projects for a representative period, use Access Analyzer’s policy generation feature to create refined policies. This approach proves particularly valuable for complex build processes where the required permissions might not be immediately obvious.
When processing external contributions, the principle of least privilege becomes important for repository access tokens. If an unauthorized user gains access to a token through an untrusted build, properly scoped tokens limit the potential impact to only the permissions necessary for the build process.
Configure fine-grained GitHub Personal Access Tokens with minimal permissions to help reduce this risk. Even if accessed inappropriately, a properly scoped token can only read source code (already accessible through the PR) and write status messages – it cannot push code, modify repository settings, or access other repositories.
The following permissions represent the minimum required access for processing external pull requests, demonstrating how to limit token scope to only essential operations:
contents:read – Read-only access to repository source code (already accessible through the PR)
statuses:write – Write commit status messages only (cannot modify code or settings)
metadata:read – Access basic repository information (name, description, public status)
Important: Use fine-grained personal access tokens restricted to the target repository only. Otherwise, this could allow access to other repositories beyond what is necessary for the build process.
This scoped approach ensures that even if a token is accessed inappropriately, the potential impact is limited to reading already-accessible information and writing status messages. The token cannot push code, modify repository settings, create webhooks, or access other repositories.
Credential storage and rotation
The following examples demonstrate how to securely store and reference these tokens using AWS Secrets Manager. AWS Secrets Manager provides automatic rotation capabilities, encryption at rest and in transit, and fine-grained access controls that help prevent tokens from being exposed in build logs or configuration files. This approach also enables centralized token management across multiple CodeBuild projects while maintaining audit trails of token access.
The centralized storage enables credential rotation capabilities, helping to minimize the window of exposure compared to hardcoded tokens that would require infrastructure updates to rotate.
Build environment isolation
Establishing proper build environment security controls helps maintain pipeline integrity. The foundation of this approach involves implementing separation between test and release builds, which helps prevent credential escalation and limits the scope of potential unauthorized access.
Network isolation represents another layer of protection. Configure VPC settings specifically for builds that process external code by creating dedicated security groups with carefully restricted outbound access. These security groups should permit only necessary connections, such as HTTPS traffic for downloading legitimate dependencies, while blocking unnecessary network access that could be exploited by untrusted code.
Update your AWS CodeBuild projects to leverage this network isolation through proper VPC configuration, including specified subnets and the restricted security groups you’ve established.
Multi-stage pipeline security with human review gates
Implementing security controls across multiple pipeline stages helps provide proper validation and approval processes, especially when processing external contributions. This approach combines automated scanning with human oversight to identify issues before they reach production.
Code inspection integration
Configure your build specification to automatically run security tools like Automated Security Helper during the build process. These tools scan for code security issues and dependency problems, generating detailed reports for review.
Structure the build to continue execution even when issues are found, allowing all scans to complete while automatically failing builds that contain security problems requiring attention. Store all scan artifacts to provide security teams with detailed information for approval decisions.
Manual approval gates
After code passes automated security scans, configure manual approval gates to involve human reviewers for final validation. This helps provide appropriate human review before proceeding to sensitive environments.
The access control and credential management practices outlined in this section provide specific, actionable approaches to implementing defense-in-depth security for AWS CodeBuild pipelines. These controls work together to create multiple layers of protection while maintaining the operational benefits that make CI/CD automation valuable.
Alternative approach – Self-hosted GitHub Actions runners
AWS CodeBuild’s self-hosted GitHub Actions runner capability addresses the configuration issues described in this guide by isolating repository credentials from the build environment and using GitHub Actions’ execution framework instead of AWS CodeBuild webhook processing.
For organizations that need to process external contributions automatically, configure runners with proper access controls, use ephemeral runners to minimize persistent access, and apply standard security practices for runner management.
The security controls outlined in previous sections provide protection at build time, but comprehensive defense-in-depth security requires ongoing visibility into your pipeline activities and configuration changes. Monitoring and compliance tracking serve as the final layer of your security framework, helping you detect configuration drift, audit access patterns, and maintain security posture over time.
AWS CloudTrail provides detailed logging of API calls made to AWS services, including AWS CodeBuild. Enable CloudTrail logging to create a comprehensive audit trail of all build-related activities in your environment.
AWS Config tracks AWS CodeBuild project configurations over time, providing an inventory of projects and a complete history of configuration changes. This includes webhook modifications, resource relationships, and compliance tracking across your environment. Configure AWS Config to monitor AWS CodeBuild projects and receive notifications when security-critical configurations like webhook filters are modified. For more information, see the AWS Config sample with CodeBuild documentation.
Conclusion
Implementing defense-in-depth security for AWS CodeBuild pipelines requires layered controls that address different security considerations. The most effective approach combines webhook filtering, access controls, credential management, and monitoring to provide comprehensive protection. By implementing these layered practices outlined in this guide, you can maintain development velocity while establishing robust pipeline security. Key principles to remember:
Assess your threat model first – different projects require different security approaches
Establish clear trust boundaries between different types of contributors
Use webhook filtering to control when builds are triggered
Implement least-privilege access for build environments
Monitor and audit configurations regularly using AWS Config and CloudTrail
Store secrets in AWS Secrets Manager or SSM Parameter Store and enable rotation
AWS CodeBuild provides the flexibility to implement these security measures while maintaining the operational benefits that make pipelines valuable. Apply the configurations and mitigations in this guide based on your specific risk profile and operational requirements. Regular review and updates of your configurations will help your pipelines remain secure as your organization’s needs evolve.
Stay tuned for additional practical guides for implementing CI/CD security best practices. If you have questions or feedback about this post, including suggestions for topics that would help you most, start a new thread on re:Post : Begimher or contact AWS Support.
As a developer who has embraced the power of the Model Context Protocol (MCP)to enhance my workflows, I’m thrilled to see the addition of custom agents in the Amazon Q Developer CLI. This new feature takes the capabilities I’ve come to rely on to a whole new level, allowing me to seamlessly manage different development contexts and easily switch between them.
In my previous post, I discussed how MCP servers have revolutionized the way I interact with AWS services, databases, and other essential tools. MCP integration in Amazon Q Developer allows me to query my database schemas, automate infrastructure deployments, and so much more. However, as I started juggling multiple projects, each with their own unique tech stacks and requirements, I found myself needing a more structured approach to managing these diverse development environments.
Enter custom agents. With this new feature, I can now create and use a custom agent by bringing together specific tools, prompt, context and tool permissions for tasks appropriate for the stage of development. In this post I will explain how to configure a cusom agent for front-end and back-end development. Allowing me to easily optimize Amazon Q Developer for each task.
Background
Imagine that I am working on a multi-tier web application. The application has a React front-end written in Typescript and a FastAPI back-end written in Python. In addition to me, the team includes a designer that uses Figma, and the database administrator that manages a PostgreSQL database. There are subtle differences in how I communicate with the designer and the database administrator. For example, when I discuss a “table” with the designer, I’m likely referring to an HTML table and how the page is structured. However, when I discuss a table with the database administrator, I’m likely talking about a SQL table and how data is stored.
In the past, I had both the Figma Dev Mode MCP server and Amazon Aurora PostgreSQL MCP server configured in my environment. While this allowed me to easily work on either the front-end or back-end code, it introduced some challenges. If I asked Amazon Q Developer “how many tables do I have?” Amazon Q Developer would have to guess if I was talking about HTML tables or SQL tables. If the question is about HTML, it should use the Figma server. If the question is about SQL, it should use the Aurora server. This is not a technical limitation, it’s a language limitation. Just as I have to adjust my assumptions to talk with the designer and database administrator, Amazon Q Developer has to make the same adjustments.
Enter Amazon Q Developer CLI custom agents. Custom agents allow me to optimize Q Developer’s configuration for each scenario. Let’s walk through my front-end and back-end configuration to understand the impact.
Front-end agent
My front-end custom agent is optimized for front-end web development using React and Figma. The following code example is the configuration for my front-end agent stored in ~/.aws/amazonq/agents/front-end.json. Let’s discuss the major sections of the configuration.
mcpServers – Here I have configured the Figma Dev Mode MCP Server. This simply communicates with the Figma Web Design App installed locally. Note that this replaces the MCP configuration that was stored in ~/.aws/amazonq/mcp.json
tools and allowedTools – These two sections are related, so I will discuss them together. tools defines the tools are available to Amazon Q Developer while allowedTools defines which tools are trusted. In other words, Q Developer is able to use all configured tools, and it does not have to ask my permission to use fs_read, fs_write, and @Figma. @Figma allows Amazon Q Developer to use all Figma tools without asking for permission. More on this in the next section.
resources – Here I have configured the files that should be added to the context. I have included the README.md (stored in the project folder) and my own preferences for React (stored in my profile). You can read more in the context management section of the user guide.
hooks – In addition to the resources, I have also included a hook. This hook will run a command and inject it into the context at runtime. In the example, I am adding the current git status. You can read more in the context hooks section of the user guide.
{
  "description": "Optimized for front-end web development using React and Figma",
  "mcpServers": {
    "Figma": {
      "command": "npx",
      "args": [
        "mcp-remote",
        "http://127.0.0.1:3845/sse"
      ]
    }
  },
  "tools": ["*"],
  "allowedTools": [
    "fs_read",
    "fs_write",
    "report_issues",
    "@Figma"
  ],
  "resources": [
    "file://README.md",
    "file://~/.aws/amazonq/react-preferences.md"
  ],
  "hooks": {
    "agentSpawn": [
      {
        "command": "git status"
      }
    ]
  }
}
Back-end agent
My back-end custom agent is optimized for back-end development with Python and PostgreSQL. The following code example is the configuration for my back-end agent stored in ~/.aws/amazonq/agents/back-end.json. Rather than describing the sections, as I did earlier, I will focus on the differences between the front-end and back-end.
mcpServers – Here I have configured the Amazon Aurora PostgreSQL MCP Server. This allows Amazon Q Developer to query my dev database to learn about the schema. Notice that I have configured a read-only connection to ensure that I don’t accidentally update the database.
tools and allowedTools – Once again, I have enabled Amazon Q Developer to use all tools. However, notice that I am more restrictive about what tools are trusted. Amazon Q Developer will need to ask permission to use fs_write or @PostgreSQL/run_query. Notice that I can allow the entire MCP server as I did with Figma or specific tools as I did here.
resources – Again, I have included the README.md (stored in the project folder) and my own preferences for Python and SQL (both stored in my profile). Note that I can also use glob patterns here. For example, file://.amazonq/rules/**/*.md would include the rules created by the Amazon Q Developer IDE plugins.
hooks – Finally, I have also included the hook for the front-end and back-end. However, I could have included project specific options such as npm run for the front-end and pip freeze for the back-end.
The real power of agents becomes evident when I need to switch between these different development contexts. I can now simply run q chat --agent front-end when I am working on React and Figma or q chat --agent back-end when I am working with Python and SQL. Amazon Q Developer will configure the correct agent with all my preferences.
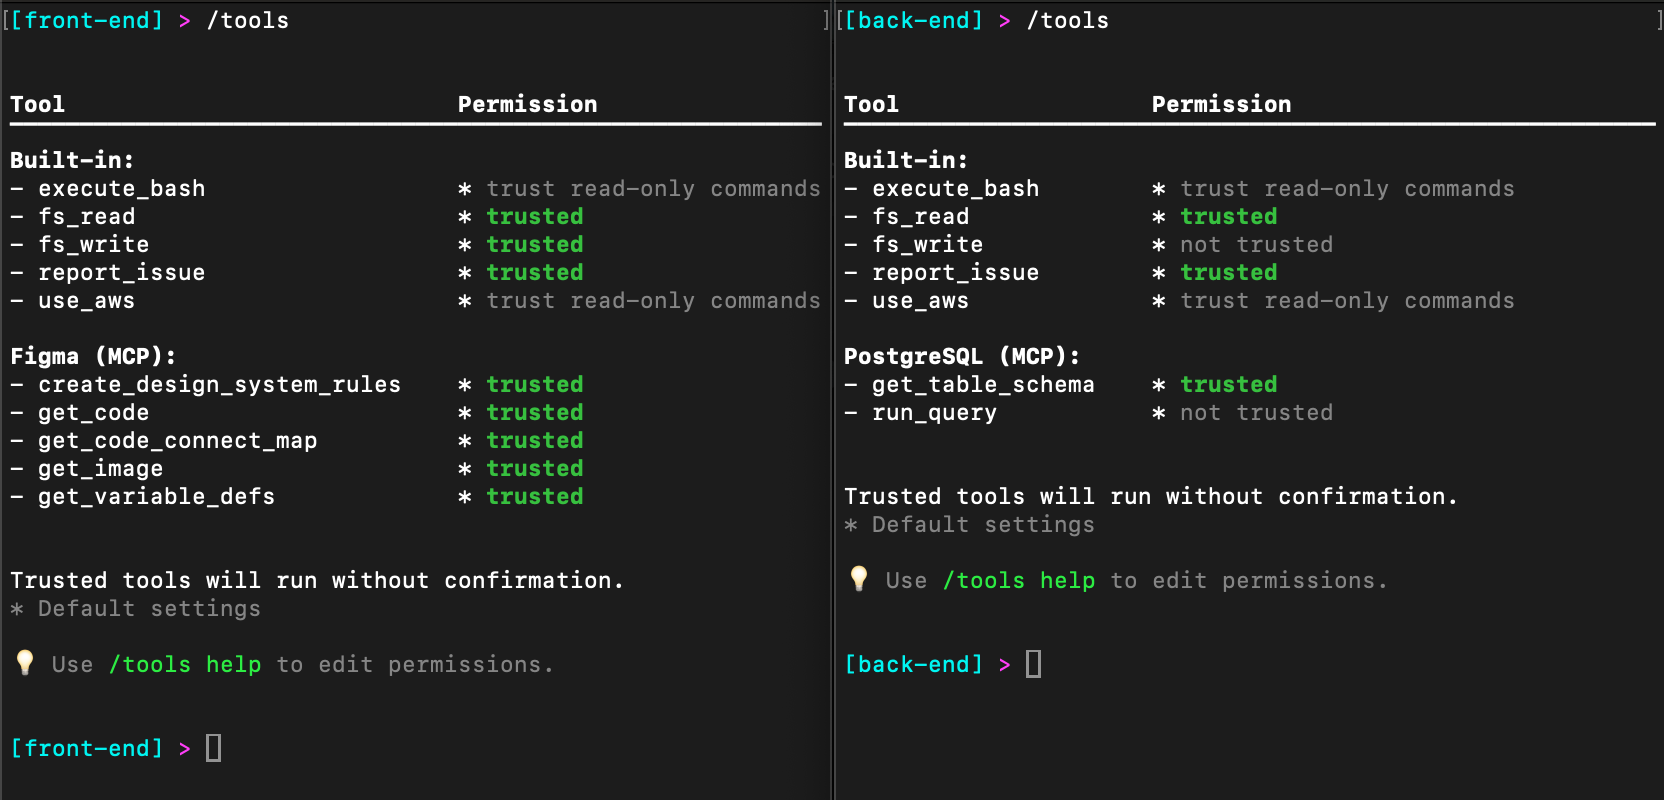
In the following image, you can see the configuration in the Amazon Q Developer CLI. Notice that the front-end agent has an additional tool called Figma while the back-end agent has an additional tool called PostgreSQL. In addition, the front-end agent trusts fs_write and all of the Figma tools while the back-end agent will ask permission to use fs_write and only trusts one of the two PostgreSQL tools.
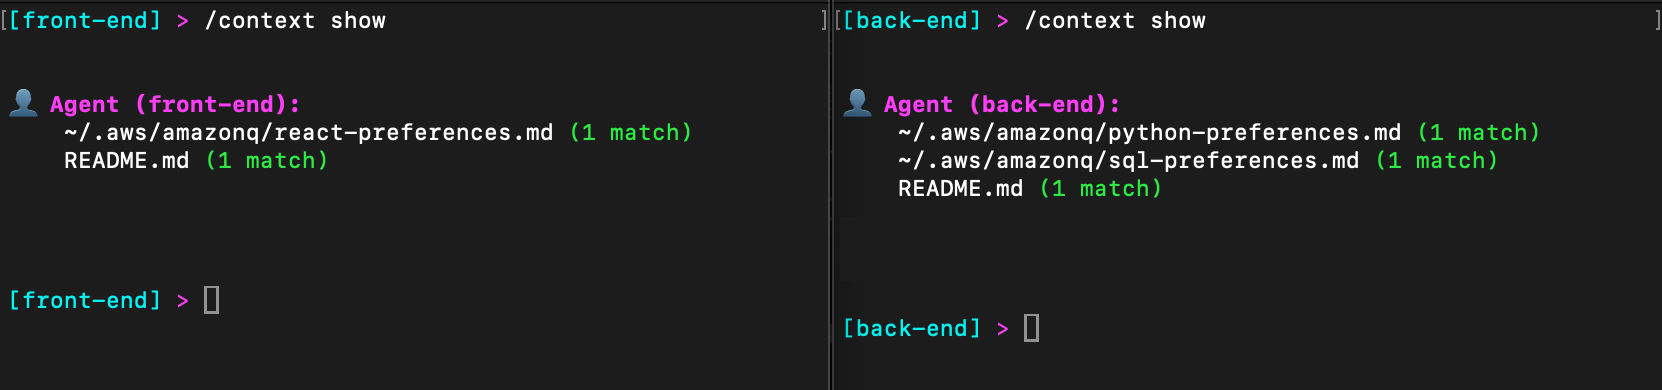
Similarly, let’s look at the context configuration in both the front-end and back-end agents. In the following image, I have included my React preferences for front-end development, and both Python and SQL preferences for back-end development.
As you can see, custom agents allow me to optimize the Amazon Q Developer CLI for each task. Of course, front-end and back-end agents are just an example. You might have a developer and testing agents, data science and analytics agents, etc. Custom agents allow you to tailor the configuration to most any task.
Conclusion
Amazon Q Developer CLI custom agents represent a significant improvement in managing complex development environments. By allowing developers to seamlessly switch between different contexts, they eliminate the cognitive overhead of manually reconfiguring tools and permissions for different tasks. Ready to streamline your development workflow? Get started with Amazon Q Developer today.
As introduced in Part 1 of this series, implementing secure file sharing solutions in AWS requires a comprehensive understanding of your organization’s needs and constraints. Before selecting a specific solution, organizations must evaluate five fundamental areas: access patterns and scale, technical requirements, security and compliance, operational requirements, and business constraints. These areas cover everything from how files will be shared and what protocols are needed, to security measures, day-to-day operations, and business limitations.
See Part 1 of this series for detailed information about each of these fundamental areas and their specific considerations. Part 1 also covers solutions including AWS Transfer Family, Transfer Family web apps, and Amazon Simple Storage Service (Amazon S3) pre-signed URLs. This part continues our analysis with additional AWS file sharing solutions to help you make an informed decision based on your specific requirements.
Solutions
Let’s start by looking at the various file sharing mechanisms that AWS supports. The following table identifies the key AWS services needed for each solution, describes the security and cost implications of the solutions, and describes their complexity and protocol support capabilities.
Solution
AWS services
Security features
Cost*
Region control
CloudFront signed URLs
CloudFront, Amazon S3, and Lambda
Optional edge security using AWS Lambda@Edge, WAF integration, SSL/TLS, geo restrictions, and AWS Shield Standard (included automatically)
Content delivery network (CDN) costs, request pricing, and data transfer fees
Global service by design; origin can be AWS Region-specific
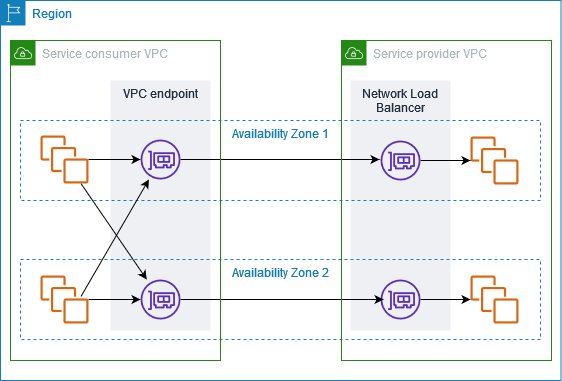
Amazon VPC endpoint service
AWS PrivateLink, Amazon VPC, and Network Load Balancer (NLB)
Complete network isolation, private connectivity, and multi-layer security
Endpoint hourly charges, NLB costs, and data processing fees
Service endpoints are strictly Region-specific; must create endpoints in each Region where access is needed
Data transfer fees apply based on standard S3 rates
Amazon VPC endpoint charges apply when using VPC endpoints with access points
Access points are Region-specific
Each access point is created in the same Region as its S3 bucket
Cross-Region access requires separate access points in each Region
VPC-specific access points are limited to the VPC’s Region
The following table shows the solutions described in Part 1.
Solution
AWS services
Security features
Cost*
Region control
AWS Transfer Family
Transfer Family, Amazon S3, API Gateway, and Lambda
Managed security, encryption in transit and at rest, IAM integration, and custom authentication
$0.30 per hour per protocol, data transfer fees, and storage costs
Can deploy to specific AWS Regions, can only transfer files to and from S3 buckets in the same Region
Transfer Family web apps
Transfer Family, S3, and CloudFront
Browser-based access, IAM Identity Center integration, and S3 Access Grants
Pay-per-file operation, CloudFront costs, and storage costs
Uses CloudFront (global) for web access, but backend components can be Region-specific
Amazon S3 pre-signed URLs
S3
Time-limited URLs, IAM controls for URL generation, and HTTPS
S3 request and data transfer fees
Can be restricted to specific Regions
Serverless application with Amazon S3 presigned URLs
S3, Lambda, and API Gateway
Time-limited URLs, HTTPS, IAM controls, customizable authentication
Pay per request and minimal infrastructure cost
Components can be Region-specific
* Pricing information provided is based on AWS service rates at the time of publication and is intended as an estimation only. Additional costs may be incurred depending on your specific implementation and usage patterns. For the most current and accurate pricing details, please consult the official AWS pricing pages for each service mentioned.
Let’s examine each of the solutions in detail. Part 1 talked about AWS Transfer Family, Transfer Family web apps, and Amazon S3 pre-signed URLs. Here in Part 2, we explain the remaining solutions to help you make the right choice for your use case.
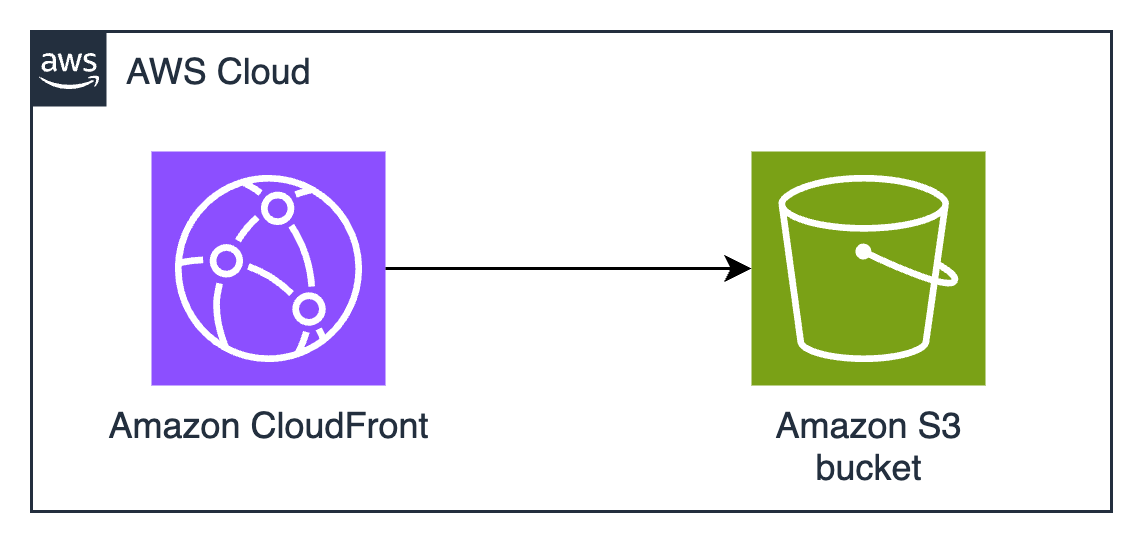
CloudFront signed URLs with Amazon S3
Amazon CloudFront signed URLs combine Amazon S3 storage with the global edge network of CloudFront to deliver files securely with lower latency.
CloudFront edge locations cache content geographically closer to users, which usually reduces latency and gives better performance for users. CloudFront also reduces the number of origin requests to Amazon S3. CloudFront integration with AWS Shield and AWS WAF provides options for additional security layers, helping to protect against DDoS events and unintended requests. You can use custom domains with AWS-provided or your own SSL/TLS certificates managed through AWS Certificate Manager (ACM), helping to facilitate secure connections from users to edge locations.
When a user requests a file, the system generates a signed URL using either a CloudFront key pair or a custom trusted signer (such as Lambda Edge) that includes security parameters such as IP restrictions, time windows, and custom policies. The major difference is the content distribution network (CDN) making performance faster by caching data geographically close to the user downloading it.
The built-in logging and monitoring capabilities of CloudFront provide detailed insights into content access patterns, cache hit ratios, and security events. CloudFront integrates seamlessly with Amazon S3 to support origin access identity (OAI), helping to make sure that the S3 objects can be accessed only through CloudFront and not directly through S3 APIs.
Figure 1: CloudFront signed URLs with Amazon S3 architecture
Pros
If Amazon S3 pre-signed URLs sound good, but you need higher performance at a global scale, CloudFront signed URLs are the right choice. The AWS global edge network has points of presence (POPs) all over the world, which significantly reduces latency for users and minimizes data transfer costs through caching. This architecture provides substantial cost savings for frequently accessed content, because edge locations serve cached copies without retrieving objects from the S3 origin. The integration with AWS security services offers protection against various threats, including sophisticated distributed denial of service (DDoS) events and web application issues, making it particularly suitable for public-facing file sharing applications. Choose CloudFront instead of S3 if you tend to make the same file available to many people who download it many times, such as in software distribution or documentation distribution.
The solution’s security model provides extensive flexibility in access control implementation. You can define granular permissions through custom policies, implement geo-restriction rules, and enforce IP-based access controls. The ability to use custom TLS certificates and domains maintains brand consistency while helping to facilitate secure communications. The integration with AWS WAF enables advanced request filtering and rate limiting, while detailed access logging and real-time metrics provide visibility into content delivery and security events. The solution’s support for both signed URLs and signed cookies offers flexibility in implementing various access control scenarios. Signed cookies are used when you want to provide access to multiple restricted files. For example, if you need to provide access to many files in a private directory, you can use signed cookies to avoid having to create individual signed URLs for each file. When choosing between CloudFront signed URLs (ideal for individual file access) or signed cookies (better for providing access to multiple files, like a subscriber’s content library), consider your content distribution needs and whether your clients support cookies.
Cons
If you implement CloudFront, you must develop expertise in its configuration options, including robust key management processes and secure key rotation procedures. Self-managed certificates don’t automatically renew. You must track expiration dates and make sure you renew on time, or your users will get warnings and errors when they try to download. ACM can simplify TLS certificate management and automatically renew certificates before they expire. while trusted signer workflows enhance your security posture.
Note: To create signed URLs, you need a signer. A signer is either a trusted key group that you create in CloudFront, or an AWS account that contains a CloudFront key pair.
Misconfigured web caches have many surprising and frustrating effects for users. Understanding and configuring CloudFront cache behavior is key to helping to prevent unintended content exposure or availability issues. You need to add cache invalidation to your publication workflows so that old versions are no longer available from the cache. This might introduce additional costs and operational overhead, especially in scenarios with frequent content changes. If you frequently change the content that you share, if the content is unique to an individual (such as a personalized report), or if the same content isn’t downloaded many times by many people in many locations, you won’t realize much cost savings or reduced latency from CloudFront caching. The additional complexity added by cache configuration might not be justified unless the cache is used a lot.
If you use the CloudFront global content delivery network, your content will be stored in caches in hundreds of locations around the world. ACM will store your TLS certificates for CloudFront (whether ACM is issuing them or you manage them yourself) in the us-east-1 AWS Region. Because CloudFront is a global service, it automatically distributes the certificate from the us-east-1 Region to the Regions associated with your CloudFront distribution. Caching data and keys around the world might not be acceptable if you have data sovereignty requirements to keep your data in one country.
From a cost perspective, while CloudFront can provide savings through caching, the pricing model has other variables to consider. Data transfer costs vary by Region and can be significant for large-scale distributions. If you need custom domain names and custom TLS certificates, that might introduce additional costs. Implementation expertise is needed when dealing with dynamic content or when specific origin request handling is required. CloudFront only delivers via HTTPS and HTTP protocols, so you won’t be able to use it if you require support for other file transfer protocols. CloudFront distributions provide statistics on cache hit-and-miss rates—pay attention to these because low cache hit rates mean that you’re pulling data from the origin frequently, which limits the possible cost savings.
Amazon VPC endpoint service with custom application
Amazon VPC endpoint services, powered by AWS PrivateLink, enable private connectivity between VPCs without requiring internet access, VPN connections, or direct physical connections. This solution creates a highly secure, private network path for file sharing by exposing services through Network Load Balancers (NLB) and allowing other VPCs to access them through interface endpoints. The architecture isolates the file sharing service from the public internet, operating entirely within the AWS private network infrastructure.
The best use cases for this architecture involve sharing data or distributing software around your AWS infrastructure without exposing it to the public internet.
Figure 2: Amazon VPC endpoint service architecture
The solution, shown in Figure 2, typically involves deploying a custom file sharing application behind an NLB in the service VPC, which is then exposed as an endpoint service. Consumer VPCs create interface endpoints to connect to this service, establishing private connectivity through the AWS backbone network. Traffic remains within the AWS network, is encrypted in transit, and is subject to security controls at both the endpoint and VPC levels. The architecture supports many TCP-based protocols, making it versatile for various file transfer requirements.
This architecture provides secure pathways for data to travel by using multiple layers, including VPC security groups, network access control lists (ACLs), endpoint policies, and the custom application’s authentication mechanisms. The built-in security features of PrivateLink are designed so that only approved AWS principals can create interface endpoints to connect to the service, while detailed VPC flow logs provide network traffic visibility.
Pros
Amazon VPC endpoint services provide complete network isolation and private connectivity that’s inaccessible from the public internet. This reduces the exposure footprint and helps meet security requirements for sensitive data transfer operations. The solution maintains private connectivity across different AWS accounts and Regions while keeping traffic within the AWS network infrastructure.
This solution also provides the most flexible protocol support. Other solutions require you to use HTTPS, AWS API calls (which are HTTPS), or one of the protocols supported by Transfer Family (such as SFTP). If you have software that uses custom protocols, and you need security controls and network isolation, this architecture provides predictable performance through dedicated network paths and supports high throughput requirements without internet bandwidth constraints. The granular control over network security through VPC security groups, network ACLs, and endpoint policies enables organizations to implement defense-in-depth strategies effectively. Additionally, the solution’s integration with AWS Organizations facilitates centralized management and governance across multiple accounts.
Cons
Setting up and maintaining VPC endpoints requires significant expertise in AWS networking, including VPC design, PrivateLink configuration, and network security controls. The initial architecture design must carefully consider IP address management, service quotas, and Regional availability to provide scalability and reliability. Organizations must also develop and maintain the custom file sharing application in addition to the VPC endpoints.
This solution has many components that incur hourly and bandwidth-related charges. Each interface endpoint incurs hourly charges and data processing fees, which can accumulate significantly in multi-VPC or multi-Region deployments. NLBs add another cost component, and you must maintain sufficient capacity for peak loads. The solution also has operational costs because of the need for specialized expertise and ongoing maintenance. Additionally, while the private connectivity model provides superior security, it can make troubleshooting more challenging and might require additional tooling for effective monitoring and diagnostics. The Regional nature of VPC endpoints might necessitate additional architecture for multi-Region deployments, potentially increasing both costs and operational overhead. This solution is most suitable when private network security considerations are the highest priority, and cost considerations are secondary.
Amazon S3 Access Points
Amazon S3 Access Points simplify managing data access at scale for applications using shared data sets on S3. Access points are named network endpoints attached to S3 buckets that streamline managing access to shared datasets. Each access point has its own AWS Identity and Access Management (IAM) policy that controls access to the data, allowing you to create custom access permissions for different applications or user groups accessing the same bucket.
The architecture uses S3 buckets with access points providing dedicated access paths to the data. Each access point has its own hostname (URL) and access policy that works in conjunction with the bucket policy. You can create access points that only allow connections from your Amazon Virtual Private Cloud (Amazon VPC) for private network access to Amazon S3 or create access points with Internet connectivity. You can use this flexibility to implement sophisticated access control patterns while maintaining a single source of truth in S3.
Figure 3: S3 Access Points with VPC endpoints
Pros
Amazon S3 Access Points simplify permissions management and security to accommodate multiple access patterns and use cases. For example, if an S3 bucket contains data that needs to be accessed by multiple applications, each requiring different levels of access, you can create a dedicated access point for each application with precisely the permissions it needs, rather than managing a long monolithic bucket policy.
You can implement access control workflows, such as restricting access to specific VPCs, encryption, or limit access to specific objects or prefixes. The service requires no new infrastructure management, reducing operational overhead and allowing you to focus on business logic implementation.
Access points provide a way to enforce network controls through VPC-only access points, helping to make sure that data can only be accessed from within your private network. IAM permissions management becomes more granular and straightforward to audit when each application or user group has its own access point with a dedicated policy. You can associate different access points with different network origins.
Another possible use case is when you need to provide temporary access to specific data within a bucket without modifying the bucket policy. You can create a temporary access point with the necessary permissions and delete it when the access is no longer needed.
Cons
Access points add another layer to your Amazon S3 architecture that needs to be managed and monitored. Each access point has its own Amazon Resource Name (ARN) and hostname that applications need to use instead of the bucket name, which might require changes to your application code.
There are limits to the number of access points you can create for each bucket, which might be a constraint for large-scale applications. Access points can only control access to the bucket they’re associated with, not across multiple buckets, so if your application needs to access data across buckets, you’ll need multiple access points.
When implementing this solution, you need to design your access point policies to make sure that they work correctly with your bucket policy. Think of your S3 bucket policy as the primary security framework, while access point policies act as specialized gatekeepers. These two layers of security must work in harmony. The bucket policy takes precedence. For example, if your bucket policy explicitly denies access from specific IP ranges, an access point policy can’t override this restriction. This hierarchical relationship requires strategic planning. Start by defining your broad security boundaries in the bucket policy—perhaps allowing access only from specific VPCs or requiring encryption. Then create your access point policies within these boundaries.
While Amazon S3 Access Points offer powerful flexibility, understanding their boundaries is crucial. Cross-account scenarios, common in large enterprises or partner collaborations, require careful configuration. Imagine you’re working with an external auditing firm that needs temporary access to your financial data stored in S3. Setting up a cross-account access point requires creating the access point in your account, configuring a trust policy to allow the external account, verifying that the bucket policy permits access from the access point, and providing the auditors with the access point ARN and necessary IAM permissions in their account. This process maintains tight control over your data while enabling secure cross-account access.
Some Amazon S3 operations are only controlled at the bucket level and can’t be controlled by access points. Core bucket operations such as configuring versioning, logging, managing lifecycle policies, and setting up cross-Region replication require direct bucket access. For these operations, you need to interact directly with the bucket through the appropriate permissions. This limitation helps make sure that fundamental bucket configurations remain centralized and controlled by bucket owners.
Creating a dedicated IAM role for bucket administration tasks—separate from the roles that interact with data through access points—enhances security and aligns with the principle of least privilege.
Conclusion
In this second part of a two-part post, you’ve learned about multiple solutions for secure file sharing using AWS services and the pros and cons of each. You can find additional options and a full decision matrix in Part 1. The optimal solution depends on your specific organizational requirements, technical capabilities, and budget constraints. You don’t have to choose just one option, you can implement multiple solutions to address different use cases, creating a file sharing strategy that balances security, cost, and operational efficiency.
SilverBullet is a MIT-licensed note-taking application, designed to run as a
self-hosted web server. Started in 2022, the project is approaching
its 2.0 release, making this a good time to explore the features it offers.
SilverBullet stores notes as plain
Markdown files, and provides a
Lua
scripting API to customize the application’s appearance and behavior.
Matthew Garrett has posted a detailed followup to
our recent article on the coming
expiration if Microsoft’s Secure Boot signing key.
The upshot is that nobody actually enforces these expiry dates – here’s
the reference code that disables it. In a year’s time we’ll
have gone past the expiration date for ‘Microsoft Windows UEFI
Driver Publisher’ and everything will still be working, and a few
months later ‘Microsoft Windows Production PCA 2011’ will also
expire and systems will keep booting Windows despite being signed
with a now-expired certificate. This isn’t a Y2K scenario where
everything keeps working because people have done a huge amount of
work – it’s a situation where everything keeps working even if
nobody does any work.
The big cloud providers already offer everything you need, including storage. So, why complicate things, right? At first glance, that sounds convincing. Hyperscalers like AWS, Azure, and Google Cloud offer massive service catalogs, global infrastructure, and a wide range of storage options. For many teams, they seem like a convenient one-stop shop.
But in practice, things aren’t nearly as straightforward.
While hyperscalers offer extensive storage capabilities, their multi-tier systems prioritize versatility over optimization. The result? Hidden costs and performance headaches that cloud-native teams can’t afford to ignore.
The claim that hyperscaler storage meets all cloud-native needs because of scale and functionality is a stubborn myth, one of many that still permeate the development landscape.
This post kicks off a blog series tackling these myths and misconceptions about specialized cloud storage and what a best-of-breed, interoperable approach to storage and infrastructure entails.
New Cloud Native Times Call for New Cloud Storage Approaches
Learn more about how the open cloud supports faster development, improved workflows, and reduced cost complexity in our free ebook, “New Cloud Native Times Call for New Cloud Storage Approaches.”
Reading the fine print of hyperscaler storage
On the surface, hyperscaler storage looks comprehensive and capable. But dig a little deeper, and some underlying cracks start to show.
Premium performance isn’t the default
Hyperscalers can deliver high performance, but not without tradeoffs:
They charge more. Premium tiers designed for workloads like analytics or streaming can cost five to eight times more than interoperable solutions.
They prioritize themselves. When hyperscalers face high-performance demands (e.g., AI workloads competing for GPUs and storage bandwidth), they tend to prioritize their own data centers. Smaller teams might have to navigate opaque processes to request higher performance, and their access to advanced optimizations can be limited.
They play favorites. File size adds yet another layer of difficulty. Many hyperscaler storage systems handle large files more efficiently than small ones because of I/O overhead. Hyperscalers may help their biggest customers fine-tune configurations, but most are left to troubleshoot bottlenecks on their own.
Juggling tiers (and hoping nothing gets dropped)
Hot, cool, and cold storage options may look flexible on paper, but they require separate access controls, replication rules, and performance tuning. Teams are left juggling interfaces like AWS Identity and Access Management (IAM), scripting policies, and managing tooling just to keep systems functional.
And the more storage types you manage, the greater the chance for human error. A misplaced lifecycle rule or a mistyped IAM permission can result in:
Unexpected data unavailability
Delayed retrievals
Accidental deletions
When complexity undermines reliability
Keeping storage tied tightly to hyperscaler infrastructure may seem efficient—but it often results in brittle setups. Misaligned storage, compute, and access layers can lead to latency issues or even full-blown downtime.
Performance-sensitive applications like real-time analytics or video streaming suffer most. Even a small delay can ripple through the user experience and cause customer churn. To patch gaps, teams often layer on caches, fine-tuning, or quick fixes that only add technical debt.
Who has time to babysit storage?
Developers, DevOps, and site reliability engineers (SREs) are always racing to ship features, scale services, and maintain uptime. For cloud-native teams, optimizing storage isn’t usually at the top of anyone’s to-do list.
Let’s face it: proactively analyzing storage access patterns and configuring tiering rules takes time that cloud-native teams often don’t have. Many teams therefore operate reactively and address storage issues only after performance degrades or surprise bills arrive.
Support tickets don’t feel your pain
Finally, there’s support. Unless you’re a premium customer paying for top-tier service contracts, you’re often stuck with ticketing systems and community forums. That might suffice for routine issues, but when storage problems impact production workloads, waiting for responses through standard channels adds unnecessary stress and delays.
When one size doesn’t fit your cloud
Unlike hyperscaler storage that takes a one-size-fits-all approach, specialized cloud storage solutions directly tackle these challenges. Backblaze B2 is purpose-built to simplify storage for cloud-native teams:
A single, high-performance tier gives you instant access to all your data, with no tier juggling or lifecycle policies.
Predictable, transparent pricing means no unexpected fees or surprise retrieval charges.
S3-compatible APIs simplify integration, allowing you to plug Backblaze B2 directly into your existing cloud-native stack.
For cloud-native teams who value speed, simplicity, and cost control, specialized storage isn’t a complication; it’s a simplification. You get the performance you need, without the complexity you don’t.
Stay tuned for the next post in this series where we tackle Myth #2: Storage isn’t a big enough problem to remediate. (Spoiler: It is.)
To provide the best experiences, we use technologies like cookies to store and/or access device information. Consenting to these technologies will allow us to process data such as browsing behavior or unique IDs on this site. Not consenting or withdrawing consent, may adversely affect certain features and functions.
Functional
Always active
The technical storage or access is strictly necessary for the legitimate purpose of enabling the use of a specific service explicitly requested by the subscriber or user, or for the sole purpose of carrying out the transmission of a communication over an electronic communications network.
Preferences
The technical storage or access is necessary for the legitimate purpose of storing preferences that are not requested by the subscriber or user.
Statistics
The technical storage or access that is used exclusively for statistical purposes.The technical storage or access that is used exclusively for anonymous statistical purposes. Without a subpoena, voluntary compliance on the part of your Internet Service Provider, or additional records from a third party, information stored or retrieved for this purpose alone cannot usually be used to identify you.
Marketing
The technical storage or access is required to create user profiles to send advertising, or to track the user on a website or across several websites for similar marketing purposes.