Automate data lineage on Amazon MWAA with OpenLineage

Post Syndicated from Stephen Said original https://aws.amazon.com/blogs/big-data/automate-data-lineage-on-amazon-mwaa-with-openlineage/

In modern data architectures, datasets are combined across an organization using a variety of purpose-built services to unlock insights. As a result, data governance becomes a key component for data consumers and producers to know that their data-driven decisions are based on trusted and accurate datasets. One aspect of data governance is data lineage, which captures the flow of data as it goes through various systems and allows consumers to understand how a dataset was derived.

In order to capture data lineage consistently across various analytical services, you need to use a common lineage model and a robust job orchestration that is able to tie together diverse data flows. One possible solution is the open-source OpenLineage project. It provides a technology-agnostic metadata model for capturing data lineage and integrates with widely used tools. For job orchestration, it integrates with Apache Airflow, which you can run on AWS conveniently through the managed service Amazon Managed Workflows for Apache Airflow (Amazon MWAA). OpenLineage provides a plugin for Apache Airflow that extracts data lineage from Directed Acyclic Graphs (DAGs).

In this post, we show how to get started with data lineage on AWS using OpenLineage. We provide a step-by-step configuration guide for the openlineage-airflow plugin on Amazon MWAA. Additionally, we share an AWS Cloud Development Kit (AWS CDK) project that deploys a pre-configured demo environment for evaluating and experiencing OpenLineage first-hand.

OpenLineage on Apache Airflow

In the following example, Airflow turns OLTP data into a star schema on Amazon Redshift Serverless.

After staging and preparing source data from Amazon Simple Storage Service (Amazon S3), fact and dimension tables are eventually created. For this, Airflow orchestrates the execution of SQL statements that create and populate tables on Redshift Serverless.

Overview on DAGs in Amazon MWAA

The openlineage-airflow plugin collects metadata about creation of datasets and dependencies between them. This allows us to move from a jobs-centric approach of Airflow to a datasets-centric approach, improving the observability of workflows.

The following screenshot shows parts of the captured lineage for the previous example. It’s displayed in Marquez, an open-source metadata service for collection and visualization of data lineage with support for the OpenLineage standard. In Marquez, you can analyze the upstream datasets and transformations that eventually create the user dimension table on the right.

Data lineage graph in marquez

The example in this post is based on SQL and Amazon Redshift. OpenLineage also supports other transformation engines and data stores such as Apache Spark and dbt.

Solution overview

The following diagram shows the AWS setup required to capture data lineage using OpenLineage.
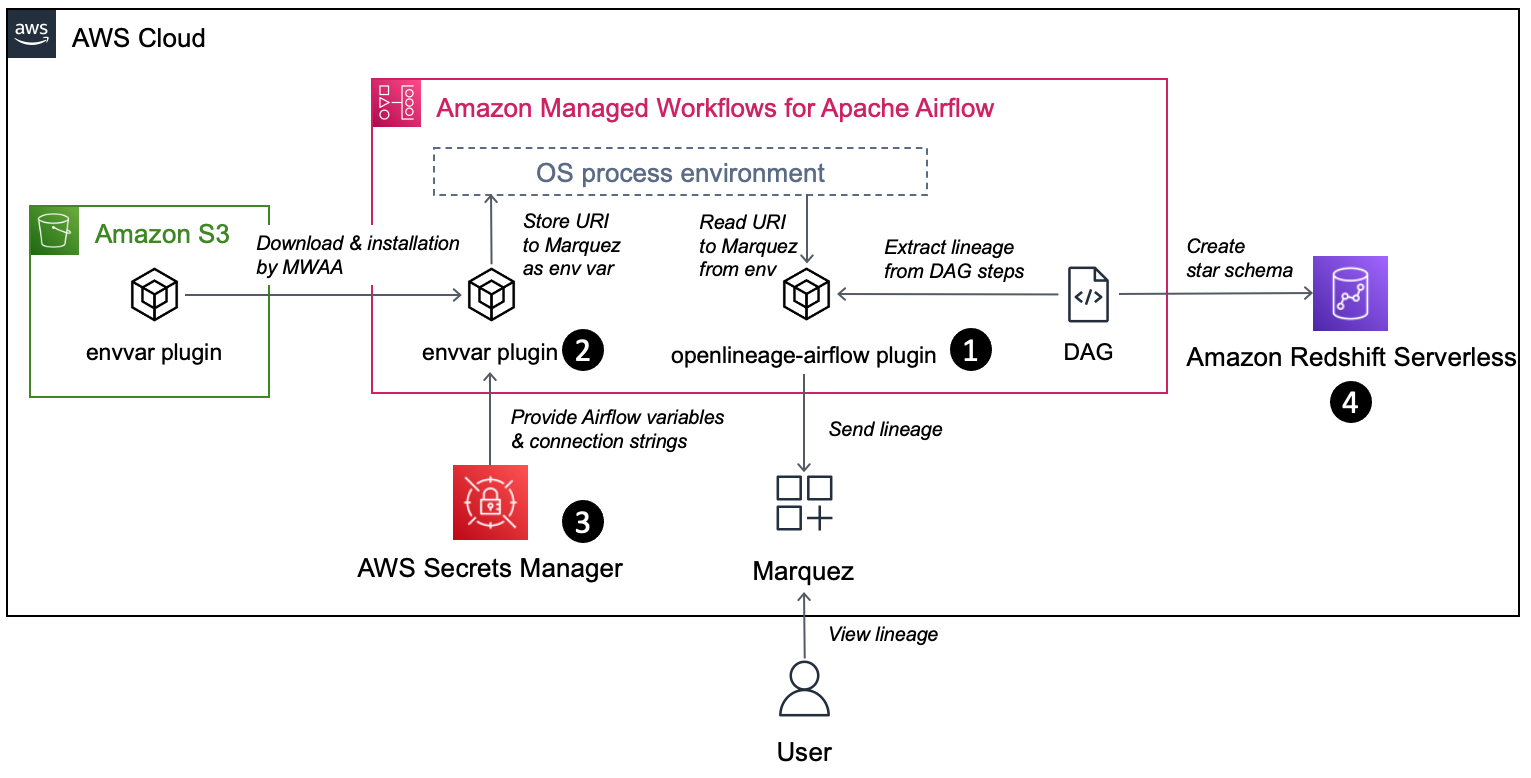
Solution overview

The workflow includes the following components:

  1. The openlineage-airflow plugin is configured on Airflow as a lineage backend. Metadata about the DAG runs is passed by Airflow core to the plugin, which converts it into OpenLineage format and sends it to an external metadata store. In our demo setup, we use Marquez as the metadata store.
  2. The openlineage-airflow plugin receives its configuration from environment variables. To populate these variables on Amazon MWAA, a custom Airflow plugin is used. First, the plugin reads source values from AWS Secrets Manager. Then, it creates environment variables.
  3. Secrets Manager is configured as a secrets backend. Typically, this type of configuration is stored in Airflow’s native metadata database. However, this approach has limitations. For instance, in case of multiple Airflow environments, you need to track and store credentials across multiple environments, and updating credentials requires you to update all the environments. With a secrets backend, you can centralize configuration.
  4. For demo purposes, we collect data lineage from a data pipeline, which creates a star schema in Redshift Serverless.

In the following sections, we walk you through the steps for end-to-end configuration.

Install the openlineage-airflow plugin

Specify the following dependency in the requirements.txt file of the Amazon MWAA environment. Note that the latest Airflow version currently available on Amazon MWAA is 2.4.3; for this post, use the compatible version 0.19.2 of the plugin:

openlineage-airflow==0.19.2

For more details on installing Python dependencies on Amazon MWAA, refer to Installing Python dependencies.

For Airflow < 2.3, configure the plugin’s lineage backend through the following configuration overrides on the Amazon MWAA environment and load it immediately at Airflow start by disabling lazy load of plugins:

AirflowConfigurationOptions:
    core.lazy_load_plugins: False
    lineage.backend: openlineage.lineage_backend.OpenLineageBackend

For more information on configuration overrides, refer to Configuration options overview.

Configure the Secrets Manager backend with Amazon MWAA

Using Secrets Manager as a secrets backend for Amazon MWAA is straightforward. First, provide the execution role of Amazon MWAA with read permission to Secrets Manager. You can use the following policy template as a starting point:

{
  "Version": "2012-10-17",
  "Statement": [
    {
      "Effect": "Allow",
      "Action": [
        "secretsmanager:GetResourcePolicy",
        "secretsmanager:GetSecretValue",
        "secretsmanager:DescribeSecret",
        "secretsmanager:ListSecretVersionIds"
      ],
      "Resource": "arn:aws:secretsmanager:AWS_REGION:<YOUR_ACCOUNT_ID>:secret:"
    },
    {
      "Effect": "Allow",
      "Action": "secretsmanager:ListSecrets",
      "Resource": ""
    }
  ]
}

Second, configure Secrets Manager as a backend in Amazon MWAA through the following configuration overrides:

AirflowConfigurationOptions:
secrets.backend: airflow.contrib.secrets.aws_secrets_manager.SecretsManagerBackend
secrets.backend_kwargs: '{"connections_prefix" : "airflow/connections", "variables_prefix" : "airflow/variables"}'

For more information configuring a secrets backend in Amazon MWAA, refer to Configuring an Apache Airflow connection using a Secrets Manager secret and Move your Apache Airflow connections and variables to AWS Secrets Manager.

Deploy a custom envvar plugin to Amazon MWAA

Apache Airflow has a built-in plugin manager through which it can be extended with custom functionality. In our case, this functionality is to populate OpenLineage-specific environment variables based on values in Secrets Manager. Natively, Amazon MWAA allows environment variables with the prefix AIRFLOW__, but the openlineage-airflow plugin expects the prefix OPENLINEAGE__.

The following Python code is used in the plugin. We assume the file is called envvar_plugin.py:

from airflow.plugins_manager import AirflowPlugin
from airflow.models import Variable
import os

os.environ["OPENLINEAGE_URL"] = Variable.get('OPENLINEAGE_URL', default_var='')

class EnvVarPlugin(AirflowPlugin):
  name = "env_var_plugin"

Amazon MWAA has a mechanism to install a plugin through a zip archive. You zip your code, upload the archive to an S3 bucket, and pass the URL to the file to Amazon MWAA:

zip plugins.zip envvar_plugin.py

Upload plugins.zip to an S3 bucket and configure the URL in Amazon MWAA. The following screenshot shows the configuration via the Amazon MWAA console.

Configuration of a custom plugin in Amazon MWAA

For more information on installing custom plugins on Amazon MWAA, refer to Creating a custom plugin that generates runtime environment variables.

Configure connectivity between the openlineage-airflow plugin and Marquez

As a last step, store the URL to Marquez in Secrets Manager. For this, create a secret called airflow/variables/OPENLINEAGE_URL with value <protocol>://<hostname/ip>:<port> (for example, https://marquez.mysite.com:5000).

Configuration of OPENLINEAGE_URL as secret

In case you need to spin up Marquez on AWS, you have multiple options to host, including running it on Amazon Elastic Kubernetes Service (Amazon EKS) or Amazon Elastic Compute Cloud (Amazon EC2). Refer to Running Marquez on AWS or check out our infrastructure template in the next section to deploy Marquez on AWS.

Deploy with an AWS CDK-based solution template

Assuming you want to set up a demo infrastructure for all of the above in one step, you can use the following template based on the AWS CDK.

The template has the following prerequisites:

Complete the following steps to deploy the template:

  1. Clone GitHub repository and install Python dependencies. Bootstrap the AWS CDK if required.
    git clone https://github.com/aws-samples/aws-mwaa-openlineage 
    	cd aws-mwaa-openlineage
    	python3 -m venv .env && source .env/bin/activate
    	python3 -m pip install -r requirements.txt
    	cdk bootstrap

  2. Update the value for the variable EXTERNAL_IP in constants.py to your outbound IP for connecting to the internet:
    # Set variable to outbound IP for connecting to the internet.
    EXTERNAL_IP = "255.255.255.255"

    This configures security groups so that you can access Marquez but block other clients. constants.py is found in the root folder of the cloned repository.

  3. Deploy the VPC_S3 stack to provision a new VPC dedicated for this solution as well as the security groups that are used by the different components:
    cdk deploy vpc-s3

    It creates a new S3 bucket and uploads the source raw data based on the TICKIT sample database. This serves as the landing area from the OLTP database. We then need to parse the metadata of these files through an AWS Glue crawler, which facilitates the native integration between Amazon Redshift and the S3 data lake.

  4. Deploy the lineage stack to create an EC2 instance that hosts Marquez:
    cdk deploy marquez

    Access the Marquez web UI through https://{ec2.public_dns_name}:3000/. This URL is also available as part of the AWS CDK outputs for the lineage stack.

  5. Deploy the Amazon Redshift stack to create a Redshift Serverless endpoint:
    cdk deploy redshift

  6. Deploy the Amazon MWAA stack to create an Amazon MWAA environment:
    cdk deploy mwaa

    You can access the Amazon MWAA UI through the URL provided in the AWS CDK output.

Test a sample data pipeline

On Amazon MWAA, you can see an example data pipeline deployed that consists of two DAGs. It builds a star schema on top of the TICKIT sample database. One DAG is responsible for loading data from the S3 data lake into an Amazon Redshift staging layer; the second DAG loads data from the staging layer to the dimensional model.

Datamodel of star schema

Open the Amazon MWAA UI through the URL obtained in the deployment steps and launch the following DAGs: rs_source_to_staging and rs_staging_to_dm. As part of the run, the lineage metadata is sent to Marquez.

After the DAG has been run, open the Marquez URL obtained in the deployment steps. In Marquez, you can find the lineage metadata for the computed star schema and related data assets on Amazon Redshift.

Clean up

Delete the AWS CDK stacks to avoid ongoing charges for the resources that you created. Run the following command in the aws-mwaa-openlineage project directory so that all resources are undeployed:

cdk destroy --all

Summary

In this post, we showed you how to automate data lineage with OpenLineage on Amazon MWAA. As part of this, we covered how to install and configure the openlineage-airflow plugin on Amazon MWAA. Additionally, we provided a ready-to-use infrastructure template for a complete demo environment.

We encourage you to explore what else can be achieved with OpenLineage. A job orchestrator like Apache Airflow is only one piece of a data platform and not all possible data lineage can be captured on it. We recommend exploring OpenLineage’s integration with other platforms like Apache Spark or dbt. For more information, refer to Integrations.

Additionally, we recommend you visit the AWS Big Data Blog for other useful blog posts on Amazon MWAA and data governance on AWS.


About the Authors

Stephen Said is a Senior Solutions Architect and works with Digital Native Businesses. His areas of interest are data analytics, data platforms and cloud-native software engineering.

Vishwanatha Nayak is a Senior Solutions Architect at AWS. He works with large enterprise customers helping them design and build secure, cost-effective, and reliable modern data platforms using the AWS cloud. He is passionate about technology and likes sharing knowledge through blog posts and twitch sessions.

Paul Villena is an Analytics Solutions Architect with expertise in building modern data and analytics solutions to drive business value. He works with customers to help them harness the power of the cloud. His areas of interests are infrastructure-as-code, serverless technologies and coding in Python.

Security updates for Wednesday

Post Syndicated from original https://lwn.net/Articles/920318/

Security updates have been issued by Fedora (awstats), Oracle (dpdk, libxml2, postgresql:10, systemd, and virt:ol and virt-devel:rhel), Red Hat (kernel), Slackware (git, httpd, libXpm, and mozilla), SUSE (libzypp-plugin-appdata), and Ubuntu (git, libxpm, linux-ibm-5.4, linux-oem-5.14, and ruby2.3).

Manually Approving Security Changes in CDK Pipeline

Post Syndicated from original https://aws.amazon.com/blogs/devops/manually-approving-security-changes-in-cdk-pipeline/

In this post I will show you how to add a manual approval to AWS Cloud Development Kit (CDK) Pipelines to confirm security changes before deployment. With this solution, when a developer commits a change, CDK pipeline identifies an IAM permissions change, pauses execution, and sends a notification to a security engineer to manually approve or reject the change before it is deployed.

Introduction

In my role I talk to a lot of customers that are excited about the AWS Cloud Development Kit (CDK). One of the things they like is that L2 constructs often generate IAM and other security policies. This can save a lot of time and effort over hand coding those policies. Most customers also tell me that the policies generated by CDK are more secure than the policies they generate by hand.

However, these same customers are concerned that their security engineering team does not know what is in the policies CDK generates. In the past, these customers spent a lot of time crafting a handful of IAM policies that developers can use in their apps. These policies were well understood, but overly permissive because they were often reused across many applications.

Customers want more visibility into the policies CDK generates. Luckily CDK provides a mechanism to approve security changes. If you are using CDK, you have probably been prompted to approve security changes when you run cdk deploy at the command line. That works great on a developer’s machine, but customers want to build the same confirmation into their continuous delivery pipeline. CDK provides a mechanism for this with the ConfirmPermissionsBroadening action. Note that ConfirmPermissionsBroadening is only supported by the AWS CodePipline deployment engine.

Background

Before I talk about ConfirmPermissionsBroadening, let me review how CDK creates IAM policies. Consider the “Hello, CDK” application created in AWS CDK Workshop. At the end of this module, I have an AWS Lambda function and an Amazon API Gateway defined by the following CDK code.

// defines an AWS Lambda resource
const hello = new lambda.Function(this, 'HelloHandler', {
  runtime: lambda.Runtime.NODEJS_14_X,    // execution environment
  code: lambda.Code.fromAsset('lambda'),  // code loaded from "lambda" directory
  handler: 'hello.handler'                // file is "hello", function is "handler"
});

// defines an API Gateway REST API resource backed by our "hello" function.
new apigw.LambdaRestApi(this, 'Endpoint', {
  handler: hello
});

Note that I did not need to define the IAM Role or Lambda Permissions. I simply passed a refence to the Lambda function to the API Gateway (line 10 above). CDK understood what I was doing and generated the permissions for me. For example, CDK generated the following Lambda Permission, among others.

{
  "Effect": "Allow",
  "Principal": {
    "Service": "apigateway.amazonaws.com"
  },
  "Action": "lambda:InvokeFunction",
  "Resource": "arn:aws:lambda:us-east-1:123456789012:function:HelloHandler2E4FBA4D",
  "Condition": {
    "ArnLike": {
      "AWS:SourceArn": "arn:aws:execute-api:us-east-1:123456789012:9y6ioaohv0/prod/*/"
    }
  }
}

Notice that CDK generated a narrowly scoped policy, that allows a specific API (line 10 above) to call a specific Lambda function (line 7 above). This policy cannot be reused elsewhere. Later in the same workshop, I created a Hit Counter Construct using a Lambda function and an Amazon DynamoDB table. Again, I associated them using a single line of CDK code.

table.grantReadWriteData(this.handler);

As in the prior example, CDK generated a narrowly scoped IAM policy. This policy allows the Lambda function to perform certain actions (lines 4-11) on a specific table (line 14 below).

{
  "Effect": "Allow",
  "Action": [
    "dynamodb:BatchGetItem",
    "dynamodb:ConditionCheckItem",
    "dynamodb:DescribeTable",
    "dynamodb:GetItem",
    "dynamodb:GetRecords",
    "dynamodb:GetShardIterator",
    "dynamodb:Query",
    "dynamodb:Scan"
  ],
  "Resource": [
    "arn:aws:dynamodb:us-east-1:123456789012:table/HelloHitCounterHits"
  ]
}

As you can see, CDK is doing a lot of work for me. In addition, CDK is creating narrowly scoped policies for each resource, rather than sharing a broadly scoped policy in multiple places.

CDK Pipelines Permissions Checks

Now that I have reviewed how CDK generates policies, let’s discuss how I can use this in a Continuous Deployment pipeline. Specifically, I want to allow CDK to generate policies, but I want a security engineer to review any changes using a manual approval step in the pipeline. Of course, I don’t want security to be a bottleneck, so I will only require approval when security statements or traffic rules are added. The pipeline should skip the manual approval if there are no new security rules added.

Let’s continue to use CDK Workshop as an example. In the CDK Pipelines module, I used CDK to configure AWS CodePipeline to deploy the “Hello, CDK” application I discussed above. One of the last things I do in the workshop is add a validation test using a post-deployment step. Adding a permission check is similar, but I will use a pre-deployment step to ensure the permission check happens before deployment.

First, I will import ConfirmPermissionsBroadening from the pipelines package

import {ConfirmPermissionsBroadening} from "aws-cdk-lib/pipelines";

Then, I can simply add ConfirmPermissionsBroadening to the deploySatage using the addPre method as follows.

const deploy = new WorkshopPipelineStage(this, 'Deploy');
const deployStage = pipeline.addStage(deploy);

deployStage.addPre(    
  new ConfirmPermissionsBroadening("PermissionCheck", {
    stage: deploy
})

deployStage.addPost(
    // Post Deployment Test Code Omitted
)

Once I commit and push this change, a new manual approval step called PermissionCheck.Confirm is added to the Deploy stage of the pipeline. In the future, if I push a change that adds additional rules, the pipeline will pause here and await manual approval as shown in the screenshot below.

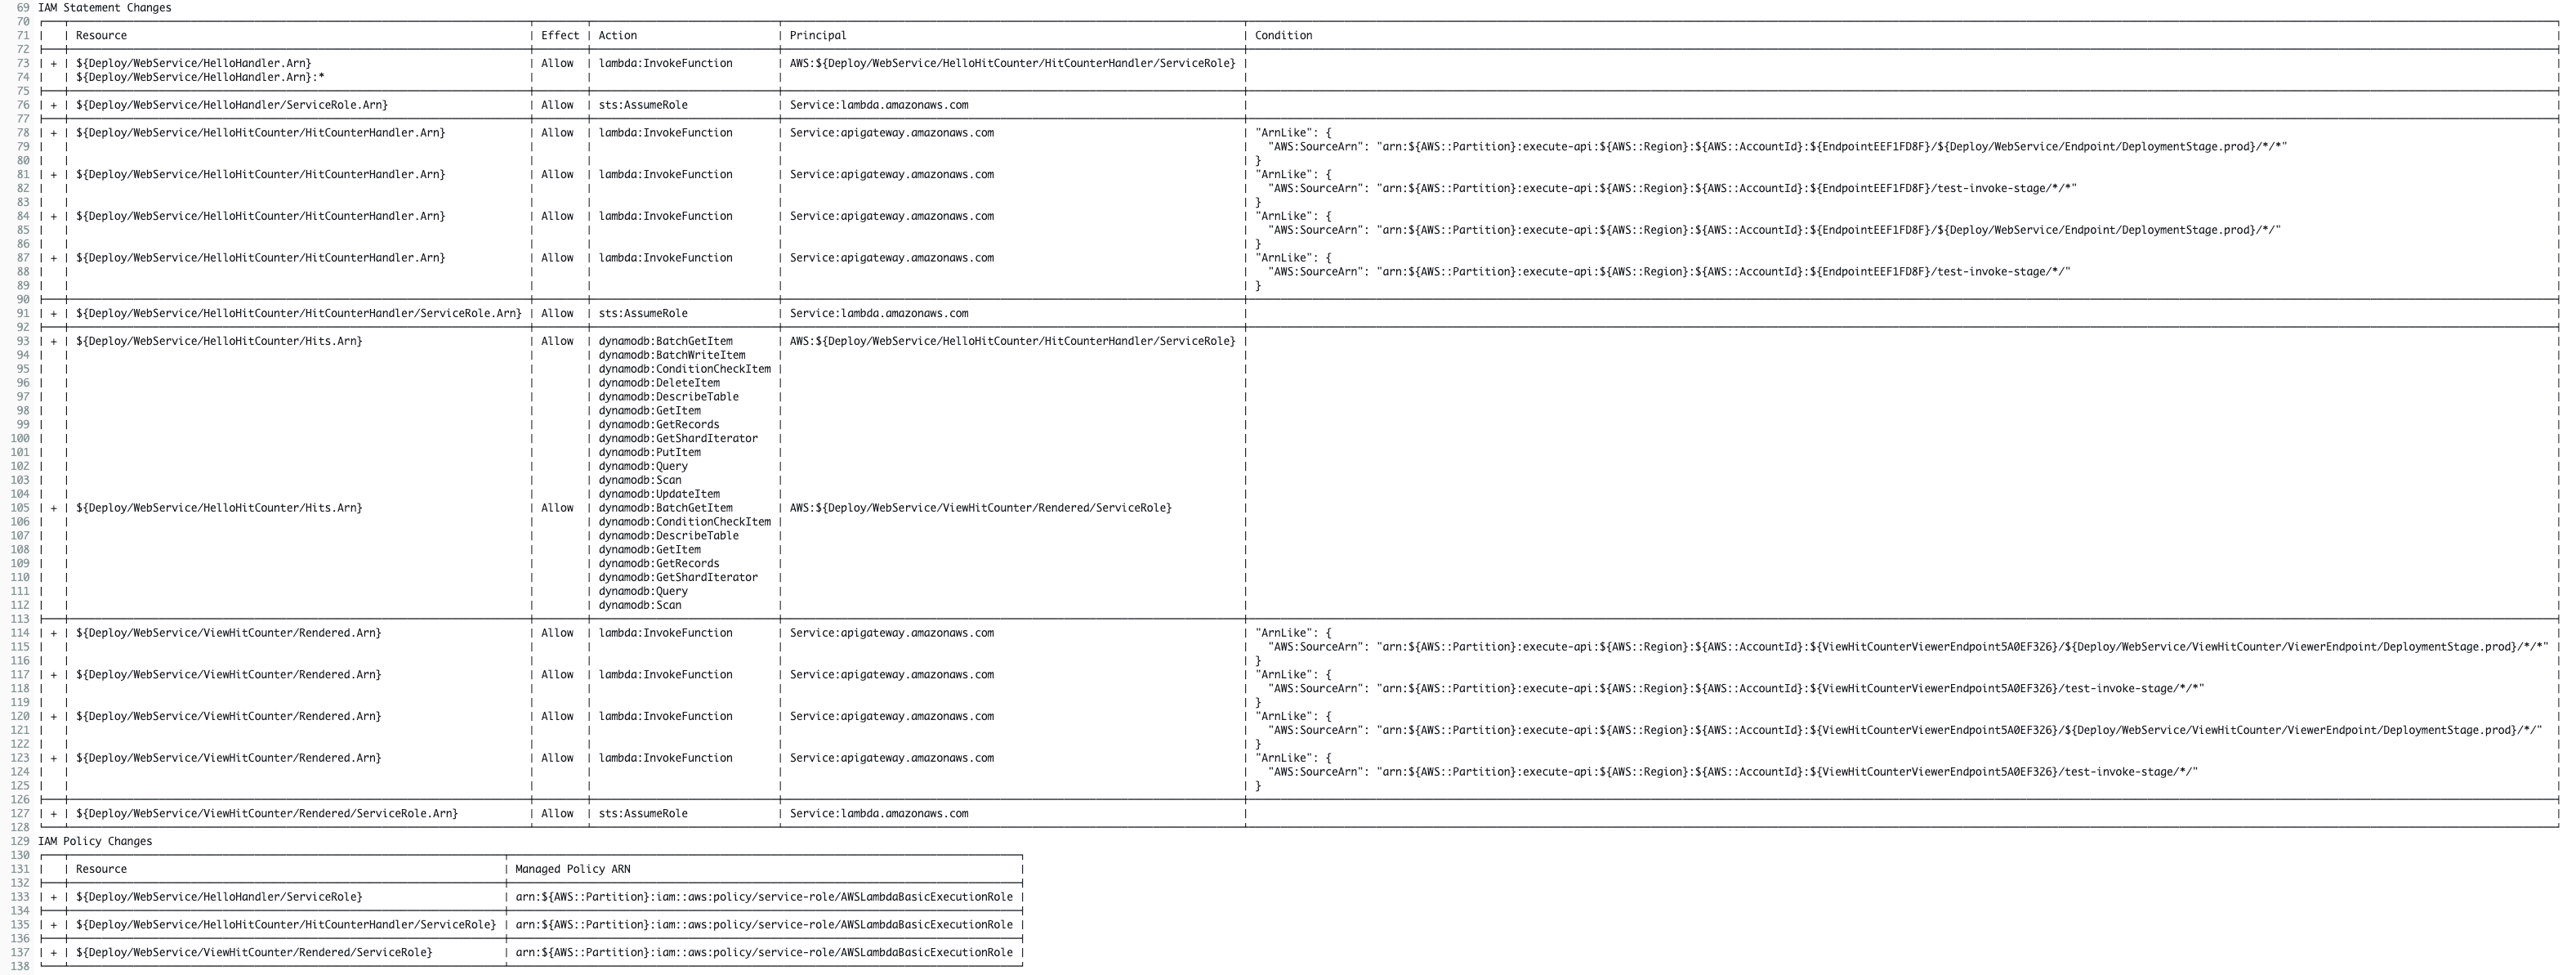
Figure 1. Pipeline waiting for manual review

Figure 1. Pipeline waiting for manual review

When the security engineer clicks the review button, she is presented with the following dialog. From here, she can click the URL to see a summary of the change I am requesting which was captured in the build logs. She can also choose to approve or reject the change and add comments if needed.

Figure 2. Manual review dialog with a link to the build logsd

Figure 2. Manual review dialog with a link to the build logs

When the security engineer clicks the review URL, she is presented with the following sumamry of security changes.

Figure 3. Summary of security changes in the build logs

Figure 3. Summary of security changes in the build logs

The final feature I want to add is an email notification so the security engineer knows when there is something to approve. To accomplish this, I create a new Amazon Simple Notification Service (SNS) topic and subscription and associate it with the ConfirmPermissionsBroadening Check.

// Create an SNS topic and subscription for security approvals
const topic = new sns.Topic(this, 'SecurityApproval’);
topic.addSubscription(new subscriptions.EmailSubscription('[email protected]')); 

deployStage.addPre(    
  new ConfirmPermissionsBroadening("PermissionCheck", {
    stage: deploy,
    notificationTopic: topic
})

With the notification configured, the security engineer will receive an email when an approval is needed. She will have an opportunity to review the security change I made and assess the impact. This gives the security engineering team the visibility they want into the policies CDK is generating. In addition, the approval step is skipped if a change does not add security rules so the security engineer does not become a bottle neck in the deployment process.

Conclusion

AWS Cloud Development Kit (CDK) automates the generation of IAM and other security policies. This can save a lot of time and effort but security engineering teams want visibility into the policies CDK generates. To address this, CDK Pipelines provides the ConfirmPermissionsBroadening action. When you add ConfirmPermissionsBroadening to your CI/CD pipeline, CDK will wait for manual approval before deploying a change that includes new security rules.

About the author:

Brian Beach

Brian Beach has over 20 years of experience as a Developer and Architect. He is currently a Principal Solutions Architect at Amazon Web Services. He holds a Computer Engineering degree from NYU Poly and an MBA from Rutgers Business School. He is the author of “Pro PowerShell for Amazon Web Services” from Apress. He is a regular author and has spoken at numerous events. Brian lives in North Carolina with his wife and three kids.

AI and Political Lobbying

Post Syndicated from Bruce Schneier original https://www.schneier.com/blog/archives/2023/01/ai-and-political-lobbying.html

Launched just weeks ago, ChatGPT is already threatening to upend how we draft everyday communications like emails, college essays and myriad other forms of writing.

Created by the company OpenAI, ChatGPT is a chatbot that can automatically respond to written prompts in a manner that is sometimes eerily close to human.

But for all the consternation over the potential for humans to be replaced by machines in formats like poetry and sitcom scripts, a far greater threat looms: artificial intelligence replacing humans in the democratic processes—not through voting, but through lobbying.

ChatGPT could automatically compose comments submitted in regulatory processes. It could write letters to the editor for publication in local newspapers. It could comment on news articles, blog entries and social media posts millions of times every day. It could mimic the work that the Russian Internet Research Agency did in its attempt to influence our 2016 elections, but without the agency’s reported multimillion-dollar budget and hundreds of employees.

Automatically generated comments aren’t a new problem. For some time, we have struggled with bots, machines that automatically post content. Five years ago, at least a million automatically drafted comments were believed to have been submitted to the Federal Communications Commission regarding proposed regulations on net neutrality. In 2019, a Harvard undergraduate, as a test, used a text-generation program to submit 1,001 comments in response to a government request for public input on a Medicaid issue. Back then, submitting comments was just a game of overwhelming numbers.

Platforms have gotten better at removing “coordinated inauthentic behavior.” Facebook, for example, has been removing over a billion fake accounts a year. But such messages are just the beginning. Rather than flooding legislators’ inboxes with supportive emails, or dominating the Capitol switchboard with synthetic voice calls, an AI system with the sophistication of ChatGPT but trained on relevant data could selectively target key legislators and influencers to identify the weakest points in the policymaking system and ruthlessly exploit them through direct communication, public relations campaigns, horse trading or other points of leverage.

When we humans do these things, we call it lobbying. Successful agents in this sphere pair precision message writing with smart targeting strategies. Right now, the only thing stopping a ChatGPT-equipped lobbyist from executing something resembling a rhetorical drone warfare campaign is a lack of precision targeting. AI could provide techniques for that as well.

A system that can understand political networks, if paired with the textual-generation capabilities of ChatGPT, could identify the member of Congress with the most leverage over a particular policy area—say, corporate taxation or military spending. Like human lobbyists, such a system could target undecided representatives sitting on committees controlling the policy of interest and then focus resources on members of the majority party when a bill moves toward a floor vote.

Once individuals and strategies are identified, an AI chatbot like ChatGPT could craft written messages to be used in letters, comments—anywhere text is useful. Human lobbyists could also target those individuals directly. It’s the combination that’s important: Editorial and social media comments only get you so far, and knowing which legislators to target isn’t itself enough.

This ability to understand and target actors within a network would create a tool for AI hacking, exploiting vulnerabilities in social, economic and political systems with incredible speed and scope. Legislative systems would be a particular target, because the motive for attacking policymaking systems is so strong, because the data for training such systems is so widely available and because the use of AI may be so hard to detect—particularly if it is being used strategically to guide human actors.

The data necessary to train such strategic targeting systems will only grow with time. Open societies generally make their democratic processes a matter of public record, and most legislators are eager—at least, performatively so—to accept and respond to messages that appear to be from their constituents.

Maybe an AI system could uncover which members of Congress have significant sway over leadership but still have low enough public profiles that there is only modest competition for their attention. It could then pinpoint the SuperPAC or public interest group with the greatest impact on that legislator’s public positions. Perhaps it could even calibrate the size of donation needed to influence that organization or direct targeted online advertisements carrying a strategic message to its members. For each policy end, the right audience; and for each audience, the right message at the right time.

What makes the threat of AI-powered lobbyists greater than the threat already posed by the high-priced lobbying firms on K Street is their potential for acceleration. Human lobbyists rely on decades of experience to find strategic solutions to achieve a policy outcome. That expertise is limited, and therefore expensive.

AI could, theoretically, do the same thing much more quickly and cheaply. Speed out of the gate is a huge advantage in an ecosystem in which public opinion and media narratives can become entrenched quickly, as is being nimble enough to shift rapidly in response to chaotic world events.

Moreover, the flexibility of AI could help achieve influence across many policies and jurisdictions simultaneously. Imagine an AI-assisted lobbying firm that can attempt to place legislation in every single bill moving in the US Congress, or even across all state legislatures. Lobbying firms tend to work within one state only, because there are such complex variations in law, procedure and political structure. With AI assistance in navigating these variations, it may become easier to exert power across political boundaries.

Just as teachers will have to change how they give students exams and essay assignments in light of ChatGPT, governments will have to change how they relate to lobbyists.

To be sure, there may also be benefits to this technology in the democracy space; the biggest one is accessibility. Not everyone can afford an experienced lobbyist, but a software interface to an AI system could be made available to anyone. If we’re lucky, maybe this kind of strategy-generating AI could revitalize the democratization of democracy by giving this kind of lobbying power to the powerless.

However, the biggest and most powerful institutions will likely use any AI lobbying techniques most successfully. After all, executing the best lobbying strategy still requires insiders—people who can walk the halls of the legislature—and money. Lobbying isn’t just about giving the right message to the right person at the right time; it’s also about giving money to the right person at the right time. And while an AI chatbot can identify who should be on the receiving end of those campaign contributions, humans will, for the foreseeable future, need to supply the cash. So while it’s impossible to predict what a future filled with AI lobbyists will look like, it will probably make the already influential and powerful even more so.

This essay was written with Nathan Sanders, and previously appeared in the New York Times.

Edited to Add: After writing this, we discovered that a research group is researching AI and lobbying:

We used autoregressive large language models (LLMs, the same type of model behind the now wildly popular ChatGPT) to systematically conduct the following steps. (The full code is available at this GitHub link: https://github.com/JohnNay/llm-lobbyist.)

  1. Summarize official U.S. Congressional bill summaries that are too long to fit into the context window of the LLM so the LLM can conduct steps 2 and 3.
  2. Using either the original official bill summary (if it was not too long), or the summarized version:
    1. Assess whether the bill may be relevant to a company based on a company’s description in its SEC 10K filing.
    2. Provide an explanation for why the bill is relevant or not.
    3. Provide a confidence level to the overall answer.
  3. If the bill is deemed relevant to the company by the LLM, draft a letter to the sponsor of the bill arguing for changes to the proposed legislation.

Here is the paper.

PKCS#11. hardware keystores, and Apple frustrations

Post Syndicated from original https://mjg59.dreamwidth.org/64968.html

There’s a bunch of ways you can store cryptographic keys. The most obvious is to just stick them on disk, but that has the downside that anyone with access to the system could just steal them and do whatever they wanted with them. At the far end of the scale you have Hardware Security Modules (HSMs), hardware devices that are specially designed to self destruct if you try to take them apart and extract the keys, and which will generate an audit trail of every key operation. In between you have things like smartcards, TPMs, Yubikeys, and other platform secure enclaves – devices that don’t allow arbitrary access to keys, but which don’t offer the same level of assurance as an actual HSM (and are, as a result, orders of magnitude cheaper).

The problem with all of these hardware approaches is that they have entirely different communication mechanisms. The industry realised this wasn’t ideal, and in 1994 RSA released version 1 of the PKCS#11 specification. This defines a C interface with a single entry point – C_GetFunctionList. Applications call this and are given a structure containing function pointers, with each entry corresponding to a PKCS#11 function. The application can then simply call the appropriate function pointer to trigger the desired functionality, such as “Tell me how many keys you have” and “Sign this, please”. This is both an example of C not just being a programming language and also of you having to shove a bunch of vendor-supplied code into your security critical tooling, but what could possibly go wrong.

(Linux distros work around this problem by using p11-kit, which is a daemon that speaks d-bus and loads PKCS#11 modules for you. You can either speak to it directly over d-bus, or for apps that only speak PKCS#11 you can load a module that just transports the PKCS#11 commands over d-bus. This moves the weird vendor C code out of process, and also means you can deal with these modules without having to speak the C ABI, so everyone wins)

One of my work tasks at the moment is helping secure SSH keys, ensuring that they’re only issued to appropriate machines and can’t be stolen afterwards. For Windows and Linux machines we can stick them in the TPM, but Macs don’t have a TPM as such. Instead, there’s the Secure Enclave – part of the T2 security chip on x86 Macs, and directly integrated into the M-series SoCs. It doesn’t have anywhere near as many features as a TPM, let alone an HSM, but it can generate NIST curve elliptic curve keys and sign things with them and that’s good enough. Things are made more complicated by Apple only allowing keys to be used by the app that generated them, so it’s hard for applications to generate keys on behalf of each other. This can be mitigated by using CryptoTokenKit, an interface that allows apps to present tokens to the systemwide keychain. Although this is intended for allowing a generic interface for access to such tokens (kind of like PKCS#11), an app can generate its own keys in the Secure Enclave and then expose them to other apps via the keychain through CryptoTokenKit.

Of course, applications then need to know how to communicate with the keychain. Browsers mostly do so, and Apple’s version of SSH can to an extent. Unfortunately, that extent is “Retrieve passwords to unlock on-disk keys”, which doesn’t help in our case. PKCS#11 comes to the rescue here! Apple ship a module called ssh-keychain.dylib, a PKCS#11 module that’s intended to allow SSH to use keys that are present in the system keychain. Unfortunately it’s not super well maintained – it got broken when Big Sur moved all the system libraries into a cache, but got fixed up a few releases later. Unfortunately every time I tested it with our CryptoTokenKit provider (and also when I retried with SecureEnclaveToken to make sure it wasn’t just our code being broken), ssh would tell me "provider /usr/lib/ssh-keychain.dylib returned no slots" which is not especially helpful. Finally I realised that it was actually generating more debug output, but it was being sent to the system debug logs rather than the ssh debug output. Well, when I say “more debug output”, I mean "Certificate []: algorithm is not supported, ignoring it", which still doesn’t tell me all that much. So I stuck it in Ghidra and searched for that string, and the line above it was

iVar2 = __auth_stubs::_objc_msgSend(uVar7,"isEqual:",*(undefined8*)__got::_kSecAttrKeyTypeRSA);

with it immediately failing if the key isn’t RSA. Which it isn’t, since the Secure Enclave doesn’t support RSA. Apple’s PKCS#11 module appears incapable of making use of keys generated on Apple’s hardware.

There’s a couple of ways of dealing with this. The first, which is taken by projects like Secretive, is to implement the SSH agent protocol and have SSH delegate key management to that agent, which can then speak to the keychain. But if you want this to work in all cases you need to implement all the functionality in the existing ssh-agent, and that seems like a bunch of work. The second is to implement a PKCS#11 module, which sounds like less work but probably more mental anguish. I’ll figure that out tomorrow.

comment count unavailable comments

Intel Does a 360 on Discontinuing VROC Around Sapphire Rapids Server Launch

Post Syndicated from Patrick Kennedy original https://www.servethehome.com/intel-does-a-360-on-discontinuing-vroc-around-sapphire-rapids-server-launch/

Intel did a 360 on VROC support, discontinuing and then reinstating the product bookending the Sapphire Rapids Xeon launch

The post Intel Does a 360 on Discontinuing VROC Around Sapphire Rapids Server Launch appeared first on ServeTheHome.

Enable cross-account sharing with direct IAM principals using AWS Lake Formation Tags

Post Syndicated from Aarthi Srinivasan original https://aws.amazon.com/blogs/big-data/enable-cross-account-sharing-with-direct-iam-principals-using-aws-lake-formation-tags/

With AWS Lake Formation, you can build data lakes with multiple AWS accounts in a variety of ways. For example, you could build a data mesh, implementing a centralized data governance model and decoupling data producers from the central governance. Such data lakes enable the data as an asset paradigm and unleash new possibilities with data discovery and exploration across organization-wide consumers. While enabling the power of data in decision-making across your organization, it’s also crucial to secure the data. With Lake Formation, sharing datasets across accounts only requires a few simple steps, and you can control what you share.

Lake Formation has launched Version 3 capabilities for sharing AWS Glue Data Catalog resources across accounts. When moving to Lake Formation cross-account sharing V3, you get several benefits. When moving from V1, you get more optimized usage of AWS Resource Access Manager (AWS RAM) to scale sharing of resources. When moving from V2, you get a few enhancements. First, you don’t have to maintain AWS Glue resource policies to share using LF-tags because Version 3 uses AWS RAM. Second, you can share with AWS Organizations using LF-tags. Third, you can share to individual AWS Identity and Access Management (IAM) users and roles in other accounts, thereby providing data owners control over which individuals can access their data.

Lake Formation tag-based access control (LF-TBAC) is an authorization strategy that defines permissions based on attributes called LF-tags. LF-tags are different from IAM resource tags and are associated only with Lake Formation databases, tables, and columns. LF-TBAC allows you to define the grant and revoke permissions policy by grouping Data Catalog resources, and therefore helps in scaling permissions across a large number of databases and tables. LF-tags are inherited from a database to all its tables and all the columns of each table.

Version 3 offers the following benefits:

  • True central governance with cross-account sharing to specific IAM principals in the target account
  • Ease of use in not having to maintain an AWS Glue resource policy for LF-TBAC
  • Efficient reuse of AWS RAM shares
  • Ease of use in scaling to hundreds of accounts with LF-TBAC

In this post, we illustrate the new features of cross-account sharing Version 3 in a producer-consumer scenario using TPC datasets. We walk through the setup of using LF-TBAC to share data catalog resources from the data producer account to direct IAM users in the consumer account. We also go through the steps in the receiving account to accept the shares and query the data.

Solution overview

To demonstrate the Lake Formation cross-account Version 3 features, we use the TPC datasets available at s3://aws-data-analytics-workshops/shared_datasets/tpcparquet/. The solution consists of steps in both accounts.

In account A, complete the following steps:

  1. As a data producer, register the dataset with Lake Formation and create AWS Glue Data Catalog tables.
  2. Create LF-tags and associate them with the database and tables.
  3. Grant LF-tag based permissions on resources directly to personas in consumer account B.

The following steps take place in account B:

  1. The consumer account data lake admin reviews and accepts the AWS RAM invitations.
  2. The data lake admin gives CREATE DATABASE access to the IAM user lf_business_analysts.
  3. The data lake admin creates a database for the marketing team and grants CREATE TABLE access to lf_campaign_manager.
  4. The IAM users create resource links on the shared database and tables and query them in Amazon Athena.

The producer account A has the following personas:

  • Data lake admin – Manages the data lake in the producer account
  • lf-producersteward – Manages the data and user access

The consumer account B has the following personas:

  • Data lake admin – Manages the data lake in the consumer account
  • lf-business-analysts – The business analysts in the sales team needs access to non-PII data
  • lf-campaign-manager – The manager in the marketing team needs access to data related to products and promotions

Prerequisites

You need the following prerequisites:

  • Two AWS accounts. For this demonstration of how AWS RAM invites are created and accepted, you should use two accounts that are not part of the same organization.
  • An admin IAM user in both accounts to launch the AWS CloudFormation stacks.
  • Lake Formation mode enabled in both the producer and consumer account with cross-account Version 3. For instructions, refer to Change the default permission model.

Lake Formation and AWS CloudFormation setup in account A

To keep the setup simple, we have an IAM admin registered as the data lake admin.

  1. Sign into the AWS Management Console in the us-east-1 Region.
  2. On the Lake Formation console, under Permissions in the navigation pane, choose Administrative roles and tasks.
  3. Select Choose Administrators under Datalake administrators.
  4. In the pop-up window Manage data lake administrators, under IAM users and roles, choose IAM admin user and choose Save.
  5. Choose Launch Stack to deploy the CloudFormation template:
    BDB-2063-launch-cloudformation-stack
  6. Choose Next.
  7. Provide a name for the stack and choose Next.
  8. On the next page, choose Next.
  9. Review the details on the final page and select I acknowledge that AWS CloudFormation might create IAM resources.
  10. Choose Create.

Stack creation should take about 2–3 minutes. The stack establishes the producer setup as follows:

  • Creates an Amazon Simple Storage Service (Amazon S3) data lake bucket
  • Registers the data lake bucket with Lake Formation
  • Creates an AWS Glue database and tables
  • Creates an IAM user (lf-producersteward) who will act as producer steward
  • Creates LF-tags and assigns them to the created catalog resources as specified in the following table
Database Table LF-Tag Key LF-Tag Value Resource Tagged
lftpcdb . Sensitivity Public DATABASE
lftpcdb items HasCampaign true TABLE
lftpcdb promotions HasCampaign true TABLE
lftpcdb customers table columns = "c_last_name","c_first_name","c_email_address" Sensitivity Confidential TABLECOLUMNS

Verify permissions in account A

After the CloudFormation stack launches, complete the following steps in account A:

  1. On the AWS CloudFormation console, navigate to the Outputs tab of the stack.

  1. Choose the LFProducerStewardCredentials value to navigate to the AWS Secrets Manager console.
  2. In the Secret value section, choose Retrieve secret value.
  3. Note down the secret value for the password for IAM user lf-producersteward.

You need this to log in to the console later as the user lf-producersteward.

  1. On the LakeFormation console, choose Databases on the navigation pane.
  2. Open the database lftpcdb.
  3. Verify the LF-tags on the database are created.

  1. Choose View tables and choose the items table to verify the LF-tags.

  1. Repeat the steps for the promotions and customers tables to verify the LF-tags assigned.

  1. On the Lake Formation console, under Data catalog in the navigation pane, choose Databases.
  2. Select the database lftpcdb and on the Actions menu, choose View Permissions.
  3. Verify that there are no default permissions granted on the database lftpcdb for IAMAllowedPrincipals.
  4. If you find any, select the permission and choose Revoke to revoke the permission.
  5. On the AWS Management Console, choose the AWS CloudShell icon on the top menu.

This opens AWS CloudShell in another tab of the browser. Allow a few minutes for the CloudShell environment to set up.

  1. Run the following AWS Command Line Interface (AWS CLI) command after replacing {BUCKET_NAME} with DataLakeBucket from the stack output.
aws s3 cp s3://aws-data-analytics-workshops/shared_datasets/tpcparquet/ s3://${BUCKET_NAME}/tpcparquet/  --recursive

If CloudShell isn’t available in your chosen Region, run the following AWS CLI command to copy the required dataset from your preferred AWS CLI environment as the IAM admin user.

  1. Verify that your S3 bucket has the dataset copied in it.
  2. Log out as the IAM admin user.

Grant permissions in account A

Next, we continue granting Lake Formation permissions to the dataset as a data steward within the producer account. The data steward grants the following LF-tag-based permissions to the consumer personas.

Consumer Persona LF-tag Policy
lf-business-analysts Sensitivity=Public
lf-campaign-manager HasCampaign=true
  1. Log in to account A as user lf-producersteward, using the password you noted from Secrets Manager earlier.
  2. On the Lake Formation console, under Permissions in the navigation pane, choose Data Lake permissions.
  3. Choose Grant.
  4. Under Principals, select External accounts.
  5. Provide the ARN of the IAM user in the consumer account (arn:aws:iam::<accountB_id>:user/lf-business-analysts) and press Enter.

  1. Under LF_Tags or catalog resources, select Resources matched by LF-Tags.
  2. Choose Add LF-Tag to add a new key-value pair.
  3. For the key, choose Sensitivity and for the value, choose Public.
  4. Under Database permissions, select Describe, and under Table permissions, select Select and Describe.

  1. Choose Grant to apply the permissions.
  2. On the Lake Formation console, under Permissions in the navigation pane, choose Data Lake permissions.
  3. Choose Grant.
  4. Under Principals, select External accounts.
  5. Provide the ARN of the IAM user in the consumer account (arn:aws:iam::<accountB_id>:user/lf-campaign-manager) and press Enter.
  6. Under LF_Tags or catalog resources, select Resources matched by LF-Tags.
  7. Choose Add LF-Tag to add a new key-value pair.
  8. For the key, choose HasCampaign and for the value, choose true.

  1. Under Database permissions, select Describe, and under Table permissions, select Select and Describe.
  2. Choose Grant to apply the permissions.
  3.  Verify on the Data lake permissions tab that the permissions you have granted show up correctly.

AWS CloudFormation setup in account B

Complete the following steps in the consumer account:

  1. Log in as an IAM admin user in account B and launch the CloudFormation stack:
    BDB-2063-launch-cloudformation-stack
  2. Choose Next.
  3. Provide a name for the stack, then choose Next.
  4. On the next page, choose Next.
  5. Review the details on the final page and select I acknowledge that AWS CloudFormation might create IAM resources.
  6. Choose Create.

Stack creation should take about 2–3 minutes. The stack sets up the following resources in account B:

  • IAM users datalakeadmin1, lf-business-analysts, and lf-campaign-manager, with relevant IAM and Lake Formation permissions
  • A database called db_for_shared_tables with Create_Table permissions to the lf-campaign-manager user
  • An S3 bucket named lfblog-athenaresults-<your-accountB-id>-us-east-1 with ListBucket and write permissions to lf-business-analysts and lf-campaign-manager

Note down the stack output details.

Accept resource shares in account B

After you launch the CloudFormation stack, complete the following steps in account B:

  1. On the CloudFormation stack Outputs tab, choose the link for DataLakeAdminCredentials.

This takes you to the Secrets Manager console.

  1. On the Secrets Manager console, choose Retrieve secret value and copy the password for DataLakeAdmin user.
  2. Use the ConsoleIAMLoginURL value from the CloudFormation template output to log in to account B with the data lake admin user name datalakeadmin1 and the password you copied from Secrets Manager.
  3. Open the AWS RAM console in another browser tab.
  4. In the navigation pane, under Shared with me, choose Resource shares to view the pending invitations.

You should see two resource share invitations from the producer account A: one for database-level share and one for table-level share.

  1. Choose each resource share link, review the details, and choose Accept.

After you accept the invitations, the status of the resource shares changes from Active from Pending.

Grant permissions in account B

To grant permissions in account B, complete the following steps:

  1. On the Lake Formation console, under Permissions on the navigation pane, choose Administrative roles and tasks.

  1. Under Database creators, choose Grant.

  1. Under IAM users and roles, choose lf-business-analysts.
  2. For Catalog permissions, select Create database.
  3. Choose Grant.
  4. Log out of the console as the data lake admin user.

Query the shared datasets as consumer users

To validate the lf-business-analysts user’s data access, perform the following steps:

  1. Log in to the console as lf-business-analysts, using the credentials noted from the CloudFormation stack output.
  2. On the Lake Formation console, under Data catalog in the navigation pane, choose Databases.

  1. Select the database lftpcdb and on the Actions menu, choose Create resource link.

  1. Under Resource link name, enter rl_lftpcdb.
  2. Choose Create.
  3. After the resource link is created, select the resource link and choose View tables.

You can now see the four tables in the shared database.

  1. Open the Athena console in another browser tab and choose the lfblog-athenaresults-<your-accountB-id>-us-east-1 bucket as the query results location.
  2. Verify data access using the following query (for more information, refer to Running SQL queries using Amazon Athena):
Select * from rl_lftpcdb.customers limit 10;

The following screenshot shows the query output.

Notice that account A shared the database lftpcdb to account B using the LF-tag expression Sensitivity=Public. Columns c_first_name, c_last_name, and c_email_address in table customers were overwritten with Sensitivity=Confidential. Therefore, these three columns are not visible to user lf-business-analysts.

You can preview the other tables from the database similarly to see the available columns and data.

  1. Log out of the console as lf-business-analysts.

Now we can validate the lf-campaign-manager user’s data access.

  1. Log in to the console as lf-campaign-manager using the credentials noted from the CloudFormation stack output.
  2. On the Lake Formation console, under Data catalog in the navigation pane, choose Databases.
  3. Verify that you can see the database db_for_shared_tables shared by the data lake admin.

  1. Under Data catalog in the navigation pane, choose Tables.

You should be able to see the two tables shared from account A using the LF-tag expression HasCampaign=true. The two tables show the Owner account ID as account A.

Because lf-campaign-manager received table level shares, this user will create table-level resource links for querying in Athena.

  1. Select the promotions table, and on the Actions menu, choose Create resource link.

  1. For Resource link name, enter rl_promotions.

  1. Under Database, choose db_for_shared_tables for the database to contain the resource link.
  2. Choose Create.
  3. Repeat the table resource link creation for the other table items.

Notice that the resource links show account B as owner, whereas the actual tables show account A as the owner.

  1. Open the Athena console in another browser tab and choose the lfblog-athenaresults-<your-accountB-id>-us-east-1 bucket as the query results location.
  2. 11. Query the tables using the resource links.

As shown in the following screenshot, all columns of both tables are accessible to lf-campaign-manager.

In summary, you have seen how LF-tags are used to share a database and select tables from one account to another account’s IAM users.

Clean up

To avoid incurring charges on the AWS resources created in this post, you can perform the following steps.

First, clean up resources in account A:

  1. Empty the S3 bucket created for this post by deleting the downloaded objects from your S3 bucket.
  2. Delete the CloudFormation stack.

This deletes the S3 bucket, custom IAM roles, policies, and the LF database, tables, and permissions.

  1. You may choose to undo the Lake Formation settings also and add IAM access back from the Lake Formation console Settings page.

Now complete the following steps in account B:

  1. Empty the S3 bucket lfblog-athenaresults-<your-accountB-id>-us-east-1 used as the Athena query results location.
  2. Revoke permission to lf-business-analysts as database creator.
  3. Delete the CloudFormation stack.

This deletes the IAM users, S3 bucket, Lake Formation database db_for_shared_tables, resource links, and all the permissions from Lake Formation.

If there are any resource links and permissions left, delete them manually in Lake Formation from both accounts.

Conclusion

In this post, we illustrated the benefits of using Lake Formation cross-account sharing Version 3 using LF-tags to direct IAM principals and how to receive the shared tables in the consumer account. We used a two-account scenario in which a data producer account shares a database and specific tables to individual IAM users in another account using LF-tags. In the receiving account, we showed the role played by a data lake admin vs. the receiving IAM users. We also illustrated how to overwrite column tags to mask and share PII data.

With Version 3 of cross-account sharing features, Lake Formation makes possible more modern data mesh models, where a producer can directly share to an IAM principal in another account, instead of the entire account. Data mesh implementation becomes easier for data administrators and data platform owners because they can easily scale to hundreds of consumer accounts using the LF-tags based sharing to organizational units or IDs.

We encourage you to upgrade your Lake Formation cross-account sharing to Version 3 and benefit from the enhancements. For more details, see Updating cross-account data sharing version settings.


About the authors

Aarthi Srinivasan is a Senior Big Data Architect with AWS Lake Formation. She likes building data lake solutions for AWS customers and partners. When not on the keyboard, she explores the latest science and technology trends and spends time with her family.

Srividya Parthasarathy is a Senior Big Data Architect on the AWS Lake Formation team. She enjoys building analytics and data mesh solutions on AWS and sharing them with the community.

Разследване на Валя Ахчиева Белезници за журналиста

Post Syndicated from Екип на Биволъ original https://bivol.bg/opos-valya-ahchieva.html

сряда 18 януари 2023


Никога не съм предполагала, че в наши дни, атаките срещу свободата на словото ще достигнат  това срамно дъно – един журналист да дава обяснения в полицията, че неговата професионална работа…

Fall 2022 PCI DSS report available with six services added to compliance scope

Post Syndicated from Michael Oyeniya original https://aws.amazon.com/blogs/security/fall-2022-pci-dss-report-available-with-six-services-added-to-compliance-scope/

We’re continuing to expand the scope of our assurance programs at Amazon Web Services (AWS) and are pleased to announce that six additional services have been added to the scope of our Payment Card Industry Data Security Standard (PCI DSS) certification. This provides our customers with more options to process and store their payment card data and architect their cardholder data environment (CDE) securely on AWS.

You can see the full list of services on our Services in Scope by Compliance program page. The six additional services are:

AWS was evaluated by Coalfire, a third-party Qualified Security Assessor (QSA). Customers can access the Attestation of Compliance (AOC) report demonstrating our PCI compliance status through AWS Artifact.

To learn more about our PCI program and other compliance and security programs, see the AWS Compliance Programs page. As always, we value your feedback and questions; reach out to the AWS Compliance team through the Contact Us page.

Want more AWS Security news? Follow us on Twitter.

Author

Michael Oyeniya

Michael is a Compliance Program Manager at AWS on the Global Audits team, managing the PCI compliance program. He holds a Master’s degree in management and has over 18 years of experience in information technology security risk and control.

[$] A survey of the Python packaging landscape

Post Syndicated from original https://lwn.net/Articles/920132/

Over the past several months, there have been wide-ranging discussions in
the Python community about difficulties users have with installing packages
for the language. There is a bewildering array of options for
package-installation tools and Python distributions focused on particular use
cases (e.g. scientific computing); many of those options do not
interoperate well—or at all—so they step on each others’ toes.
The discussions have focused on where solutions might be found to make it
easier on users, but lots of history and entrenched use cases need to be
overcome in order to get there—or even to make progress in that direction.

Build a serverless streaming pipeline with Amazon MSK Serverless, Amazon MSK Connect, and MongoDB Atlas

Post Syndicated from Igor Alekseev original https://aws.amazon.com/blogs/big-data/build-a-serverless-streaming-pipeline-with-amazon-msk-serverless-amazon-msk-connect-and-mongodb-atlas/

This post was cowritten with Babu Srinivasan and Robert Walters from MongoDB.

Amazon Managed Streaming for Apache Kafka (Amazon MSK) is a fully managed, highly available Apache Kafka service. Amazon MSK makes it easy to ingest and process streaming data in real time and use that data easily within the AWS ecosystem. With Amazon MSK Serverless, you can automatically provision and manage required resources to provide on-demand streaming capacity and storage for your applications.

Amazon MSK also supports integration of data sources such as MongoDB Atlas via Amazon MSK Connect. MSK Connect allows serverless integration of MongoDB data with Amazon MSK using the MongoDB Connector for Apache Kafka.

MongoDB Atlas Serverless provides database services that dynamically scale up and down with data size and throughput—and the cost scales accordingly. It’s best suited for applications with variable demands to be managed with minimal configuration. It provides high performance and reliability with automated upgrade, encryption, security, metrics, and backup features built in with the MongoDB Atlas infrastructure.

MSK Serverless is a type of cluster for Amazon MSK. Just like MongoDB Atlas Serverless, MSK Serverless automatically provisions and scales compute and storage resources. You can now create end-to-end serverless workflows. You can build a serverless streaming pipeline with serverless ingestion using MSK Serverless and serverless storage using MongoDB Atlas. In addition, MSK Connect now supports private DNS hostnames. This allows Serverless MSK instances to connect to Serverless MongoDB clusters via AWS PrivateLink, providing you with secure connectivity between platforms.

If you’re interested in using a non-serverless cluster, refer to Integrating MongoDB with Amazon Managed Streaming for Apache Kafka (MSK).

This post demonstrates how to implement a serverless streaming pipeline with MSK Serverless, MSK Connect, and MongoDB Atlas.

Solution overview

The following diagram illustrates our solution architecture.

Data flow between AWS MSK and MongoDB Atlas

The data flow starts with an Amazon Elastic Compute Cloud (Amazon EC2) client instance that writes records to an MSK topic. As data arrives, an instance of the MongoDB Connector for Apache Kafka writes the data to a collection in the MongoDB Atlas Serverless cluster. For secure connectivity between the two platforms, an AWS PrivateLink connection is created between the MongoDB Atlas cluster and the VPC containing the MSK instance.

This post walks you through the following steps:

  1. Create the serverless MSK cluster.
  2. Create the MongoDB Atlas Serverless cluster.
  3. Configure the MSK plugin.
  4. Create the EC2 client.
  5. Configure an MSK topic.
  6. Configure the MongoDB Connector for Apache Kafka as a sink.

Configure the serverless MSK cluster

To create a serverless MSK cluster, complete the following steps:

  1. On the Amazon MSK console, choose Clusters in the navigation pane.
  2. Choose Create cluster.
  3. For Creation method, select Custom create.
  4. For Cluster name, enter MongoDBMSKCluster.
  5. For Cluster type¸ select Serverless.
  6. Choose Next.Serverless MSK Cluster creation UI
  7. On the Networking page, specify your VPC, Availability Zones, and corresponding subnets.
  8. Note the Availability Zones and subnets to use later.Cluster settings showing VPC and Subnets
  9. Choose Next.
  10. Choose Create cluster.

When the cluster is available, its status becomes Active.

Cluster Available for Use

Create the MongoDB Atlas Serverless cluster

To create a MongoDB Atlas cluster, follow the Getting Started with Atlas tutorial. Note that for the purposes of this post, you need to create a serverless instance.

Create new cluster dialog

After the cluster is created, configure an AWS private endpoint with the following steps:

  1. On the Security menu, choose Network Access.Network Access location in the Security menu
  2. On the Private Endpoint tab, choose Serverless Instance.
    Serverless Instance network access
  3. Choose Create new endpoint.
  4. For Serverless Instance, choose the instance you just created.
  5. Choose Confirm.Create Private Endpoint UI
  6. Provide your VPC endpoint configuration and choose Next.VPC Endpoint Configuration UI
  7. When creating the AWS PrivateLink resource, make sure you specify the exact same VPC and subnets that you used earlier when creating the networking configuration for the serverless MSK instance.
  8. Choose Next.VPC Endpoint Subnet Configuration UI
  9. Follow the instructions on the Finalize page, then choose Confirm after your VPC endpoint is created.

Upon success, the new private endpoint will show up in the list, as shown in the following screenshot.

Network Access Confirmation Page

Configure the MSK Plugin

Next, we create a custom plugin in Amazon MSK using the MongoDB Connector for Apache Kafka. The connector needs to be uploaded to an Amazon Simple Storage Service (Amazon S3) bucket before you can create the plugin. To download the MongoDB Connector for Apache Kafka, refer to Download a Connector JAR File.

  1. On the Amazon MSK console, choose Customized plugins in the navigation pane.
  2. Choose Create custom plugin.
  3. For S3 URI, enter the S3 location of the downloaded connector.
  4. Choose Create custom plugin.

MSK plugin details

Configure an EC2 client

Next, let’s configure an EC2 instance. We use this instance to create the topic and insert data into the topic. For instructions, refer to the section Configure an EC2 client in the post Integrating MongoDB with Amazon Managed Streaming for Apache Kafka (MSK).

Create a topic on the MSK cluster

To create a Kafka topic, we need to install the Kafka CLI first.

  1. On the client EC2 instance, first install Java:

sudo yum install java-1.8.0

  1. Next, run the following command to download Apache Kafka:

wget https://archive.apache.org/dist/kafka/2.6.2/kafka_2.12-2.6.2.tgz

  1. Unpack the tar file using the following command:

tar -xzf kafka_2.12-2.6.2.tgz

The distribution of Kafka includes a bin folder with tools that can be used to manage topics.

  1. Go to the kafka_2.12-2.6.2 directory and issue the following command to create a Kafka topic on the serverless MSK cluster:

bin/kafka-topics.sh --create --topic sandbox_sync2 --bootstrap-server <BOOTSTRAP SERVER> --command-config=bin/client.properties --partitions 2

You can copy the bootstrap server endpoint on the View Client Information page for your serverless MSK cluster.

Bootstrap Server Connection Page

You can configure IAM authentication by following these instructions.

Configure the sink connector

Now, let’s configure a sink connector to send the data to the MongoDB Atlas Serverless instance.

  1. On the Amazon MSK console, choose Connectors in the navigation pane.
  2. Choose Create connector.
  3. Select the plugin you created earlier.
  4. Choose Next.Sink Connector UI
  5. Select the serverless MSK instance that you created earlier.
  6. Enter your connection configuration as the following code:
connector.class=com.mongodb.kafka.connect.MongoSinkConnector
key.converter.schema.enable=false
value.converter.schema.enable=false
database=MongoDBMSKDemo
collection=Sink
tasks.max=1
topics=MongoDBMSKDemo.Source
connection.uri=(MongoDB Atlas Connection String Gos Here) 
value.converter=org.apache.kafka.connect.storage.StringConverter 
key.converter=org.apache.kafka.connect.storage.StringConverter

Make sure that the connection to the MongoDB Atlas Serverless instance is through AWS PrivateLink. For more information, refer to Connecting Applications Securely to a MongoDB Atlas Data Plane with AWS PrivateLink.

  1. In the Access Permissions section, create an AWS Identity and Access Management (IAM) role with the required trust policy.
  2. Choose Next.IAM Role configuration
  3. Specify Amazon CloudWatch Logs as your log delivery option.
  4. Complete your connector.

When the connector status changes to Active, the pipeline is ready.

Connector Confirmation Page

Insert data into the MSK topic

On your EC2 client, insert data into the MSK topic using the kafka-console-producer as follows:

bin/kafka-console-producer.sh --topic sandbox_sync2 --bootstrap-server <BOOTSTRAP SERVER> --producer.config=bin/client.properties

To verify that data successfully flows from the Kafka topic to the serverless MongoDB cluster, we use the MongoDB Atlas UI.

MongoDB Atlas Browse Collections UI

If you run into any issues, be sure to check the log files. In this example, we used CloudWatch to read the events that were generated from Amazon MSK and the MongoDB Connector for Apache Kafka.

CloudWatch Logs UI

Clean up

To avoid incurring future charges, clean up the resources you created. First, delete the MSK cluster, connector, and EC2 instance:

  1. On the Amazon MSK console, choose Clusters in the navigation pane.
  2. Select your cluster and on the Actions menu, choose Delete.
  3. Choose Connectors in the navigation pane.
  4. Select your connector and choose Delete.
  5. Choose Customized plugins in the navigation pane.
  6. Select your plugin and choose Delete.
  7. On the Amazon EC2 console, choose Instances in the navigation pane.
  8. Choose the instance you created.
  9. Choose Instance state, then choose Terminate instance.
  10. On the Amazon VPC console, choose Endpoints in the navigation pane.
  11. Select the endpoint you created and on the Actions menu, choose Delete VPC endpoints.

Now you can delete the Atlas cluster and AWS PrivateLink:

  1. Log in to the Atlas cluster console.
  2. Navigate to the serverless cluster to be deleted.
  3. On the options drop-down menu, choose Terminate.
  4. Navigate to the Network Access section.
  5. Choose the private endpoint.
  6. Select the serverless instance.
  7. On the options drop-down menu, choose Terminate.Endpoint Termination UI

Summary

In this post, we showed you how to build a serverless streaming ingestion pipeline using MSK Serverless and MongoDB Atlas Serverless. With MSK Serverless, you can automatically provision and manage required resources on an as-needed basis. We used a MongoDB connector deployed on MSK Connect to seamlessly integrate the two services, and used an EC2 client to send sample data to the MSK topic. MSK Connect now supports Private DNS hostnames, enabling you to use private domain names between the services. In this post, the connector used the default DNS servers of the VPC to resolve the Availability Zone-specific private DNS name. This AWS PrivateLink configuration allowed secure and private connectivity between the MSK Serverless instance and the MongoDB Atlas Serverless instance.

To continue your learning, check out the following resources:


About the Authors

Igor Alekseev is a Senior Partner Solution Architect at AWS in Data and Analytics domain. In his role Igor is working with strategic partners helping them build complex, AWS-optimized architectures. Prior joining AWS, as a Data/Solution Architect he implemented many projects in Big Data domain, including several data lakes in Hadoop ecosystem. As a Data Engineer he was involved in applying AI/ML to fraud detection and office automation.

Kiran Matty is a Principal Product Manager with Amazon Web Services (AWS) and works with the Amazon Managed Streaming for Apache Kafka (Amazon MSK) team based out of Palo Alto, California. He is passionate about building performant streaming and analytical services that help enterprises realize their critical use cases.

 Babu Srinivasan is a Senior Partner Solutions Architect at MongoDB. In his current role, he is working with AWS to build the technical integrations and reference architectures for the AWS and MongoDB solutions. He has more than two decades of experience in Database and Cloud technologies . He is passionate about providing technical solutions to customers working with multiple Global System Integrators(GSIs) across multiple geographies.

Robert Walters is currently a Senior Product Manager at MongoDB. Previous to MongoDB, Rob spent 17 years at Microsoft working in various roles, including program management on the SQL Server team, consulting, and technical pre-sales. Rob has co-authored three patents for technologies used within SQL Server and was the lead author of several technical books on SQL Server. Rob is currently an active blogger on MongoDB Blogs.

How NETSCOUT built a global DDoS awareness platform with Amazon OpenSearch Service

Post Syndicated from Hardik Modi original https://aws.amazon.com/blogs/big-data/how-netscout-built-a-global-ddos-awareness-platform-with-amazon-opensearch-service/

This post was co-written with Hardik Modi, AVP, Threat and Migitation Products at NETSCOUT.

NETSCOUT Omnis Threat Horizon is a global cybersecurity awareness platform providing users with highly contextualized visibility into “over the horizon” threat activity on the global DDoS (Distributed Denial of Service) landscape—threats that could be impacting their industry, their customers, or their suppliers. It allows visitors to create custom profiles and understand DDoS activity that is being observed in near-real time through NETSCOUT’s ATLAS visibility platform. Users can create free accounts to create customized profiles that lead to a map-based visualization (as in the following screenshot) as well as tailored summary reporting. DDoS attacks can be impactful to services delivered over the internet. Visibility of this nature is key to anyone who wishes to understand what is happening on the threat landscape. Omnis Threat Horizon has been generally available since August 2019.

NETSCOUT Omnis Threat Horizon: Real-Time DDoS Attack Map

To provide continuous visibility at a low per-user cost (to enable a free service), the NETSCOUT development team chose a series of AWS technologies to power the collection, storage, analysis, warehousing, user authentication, and delivery of the application. In particular, they chose Amazon OpenSearch Service as the core analytics engine. They store all processed attack records in OpenSearch Service.

This post discusses the challenges and design patterns NETSCOUT used on its path to representing the details of roughly 10 million annual DDoS attacks in near-real time.

Background

NETSCOUT, through its Arbor product line, is a long-time provider of solutions for network visibility and DDoS mitigation for service providers and enterprises. Since 2007, NETSCOUT has operated a program called ATLAS, in which customers can opt to share anonymized data about the DDoS attacks they are observing on their network. As this program has matured, NETSCOUT has comprehensive visibility into the DDoS attack landscape—both the number and nature of attacks. This visibility informs and improves their products, allowing them to share analysis findings in the form of papers, blog posts, and a biannual threat report. Since NETSCOUT started collecting and analyzing data in the current form in September 2012, they have observed 96 million attacks, allowing them to perform considerable analysis of trends across regions and verticals, as well as understand the vectors used and sizes of attacks.

Omnis Threat Horizon is a solution to display this information to a broader audience—essentially anyone interested in the threat landscape, and specifically the DDoS attack trends at any given time. In addition to providing real-time maps, the solution allows the user to go back in time to observe visually or in summary form what might have been happening at a given time.

They wanted to make sure that the visual elements and application was responsive globally, both in terms of representing real-time data as well as showing historical information. Furthermore, they wanted to keep the incremental cost per user as low as possible, in order to be able to provide this service for free globally.

Solution overview

The following diagram illustrates the solution architecture.

One of the objectives behind the chosen solution was to utilize native AWS services in every instance possible. Furthermore, they chose to break component functionality into their own microservices, and make consistent use of this through the solution.

Individual monitoring sensors deliver data to Amazon Simple Storage Service (Amazon S3) on an hourly basis. As new entries are received, Amazon Simple Notification Service (Amazon SNS) notifications are delivered, resulting in processing of the data. Successive microservices are responsible for:

  • Parsing
  • Running algorithms to identify and separate spurious entries
  • Deduplication
  • Scoring
  • Confidence

After this processing, each attack is represented as a separate document in the OpenSearch Service domain. As of writing this post, NETSCOUT has approximately 96 million attacks in the cluster, all of which can be represented in some form in the maps and reports in Omnis Threat Horizon.

The data is organized in hourly bin files, and served to the application via Amazon CloudFront.

Lessons learned related to Elasticsearch

On previous projects, NETSCOUT tried Apache Cassandra, a popular NoSQL open-source database, and considered it inadequate for aggregation queries. While developing Horizon, they chose Elasticsearch to get access to more powerful aggregation query capabilities with significantly less developer time.

They started with a self-managed instance, but faced the following issues:

  • Considerable expenditure of person hours simply to manage the infrastructure
  • Each version upgrade was an involved process, requiring a lot of planning and still posing technical challenges along the way
  • No auto scaling and big aggregation queries could break Elasticsearch

After a few cycles of powering through this, they moved to OpenSearch Service to overcome these challenges.

Outcome

NETSCOUT saw the following benefits from this architecture:

  • Fast processing of attack data – The time from when attack data is received to when it is available in the data store is of the order of seconds, allowing them to provide near-real-time visibility in the solution.
  • Lower management overhead – The data store grows consistently, and by using a managed service, teams avoid having to perform tasks related to cluster management. This was a big pain point with previous solutions adopted involving the same technology.
  • Scalable architecture – It’s possible to add new capabilities into the pipeline as requirements emerge, without rearchitecting other components.

Conclusion

With OpenSearch Service, NETSCOUT has been able to build a resilient data store for the attack data they capture. As a result of architectural choices made and the underlying AWS services, they’re able to provide visibility into their data at small incremental costs, allowing them to provide a global visibility platform at no cost to the end-user.

With the most experience, the most reliable, scalable, and secure cloud, and the most comprehensive set of services and solutions, AWS is the best place to unlock value from your data and turn it into insight.


About the Authors

Hardik-Modi
Hardik Modi is AVP, Threat and Migitation Products at NETSCOUT. In this role, he oversees the teams responsible for mitigation products as well as the creation of security content for NETSCOUTs products, enabling best-in-class protection for users, as well as the continuous delivery and publication of impactful research across the DDoS and Intrusion landscapes.

Sujatha-Kuppuraju
Sujatha Kuppuraju is a Principal Solutions Architect at Amazon Web Services (AWS). She engages with customers to create innovative solutions that address customer business problems and accelerate the adoption of AWS services.

Mike-Arruda
Mike Arruda is a Senior Technical Account Manager at AWS, based in the New England area. He works with AWS Enterprise customers, supporting their success in adopting best practices and helping them achieve their desired business outcomes with AWS.

The collective thoughts of the interwebz