Post Syndicated from Govindarajan Varadan original https://aws.amazon.com/blogs/security/migrate-and-secure-your-windows-pki-to-aws-with-aws-cloudhsm/
AWS CloudHSM provides a cloud-based hardware security module (HSM) that enables you to easily generate and use your own encryption keys in AWS. Using CloudHSM as part of a Microsoft Active Directory Certificate Services (AD CS) public key infrastructure (PKI) fortifies the security of your certificate authority (CA) private key and ensures the security of the trust hierarchy. In this blog post, we walk you through how to migrate your existing Microsoft AD CS CA private key to the HSM in a CloudHSM cluster.
The challenge
Organizations implement public key infrastructure (PKI) as an application to provide integrity and confidentiality between internal and customer-facing applications. A PKI provides encryption/decryption, message hashing, digital certificates, and digital signatures to ensure these security objectives are met. Microsoft AD CS is a popular choice for creating and managing a CA for enterprise applications such as Active Directory, Exchange, and Systems Center Configuration Manager. Moving your Microsoft AD CS to AWS as part of your overall migration plan allows you to continue to use your existing investment in Windows certificate auto enrollment for users and devices without disrupting existing workflows or requiring new certificates to be issued. However, when you migrate an on-premises infrastructure to the cloud, your security team may determine that storing private keys on the AD CS server’s disk is insufficient for protecting the private key that signs the certificates issued by the CA. Moving from storing private keys on the AD CS server’s disk to a hardware security module (HSM) can provide the added security required to maintain trust of the private keys.
This walkthrough shows you how to migrate your existing AD CS CA private key to the HSM in your CloudHSM cluster. The resulting configuration avoids the security concerns of using keys stored on your AD CS server, and uses the HSM to perform the cryptographic signing operations.
Prerequisites
For this walkthrough, you should have the following in place:
- Windows Server configured as a Certificate Authority (CA) with CloudHSM.
- An on-premises CA server with a private key backed by the Microsoft Software Key Storage Provider.
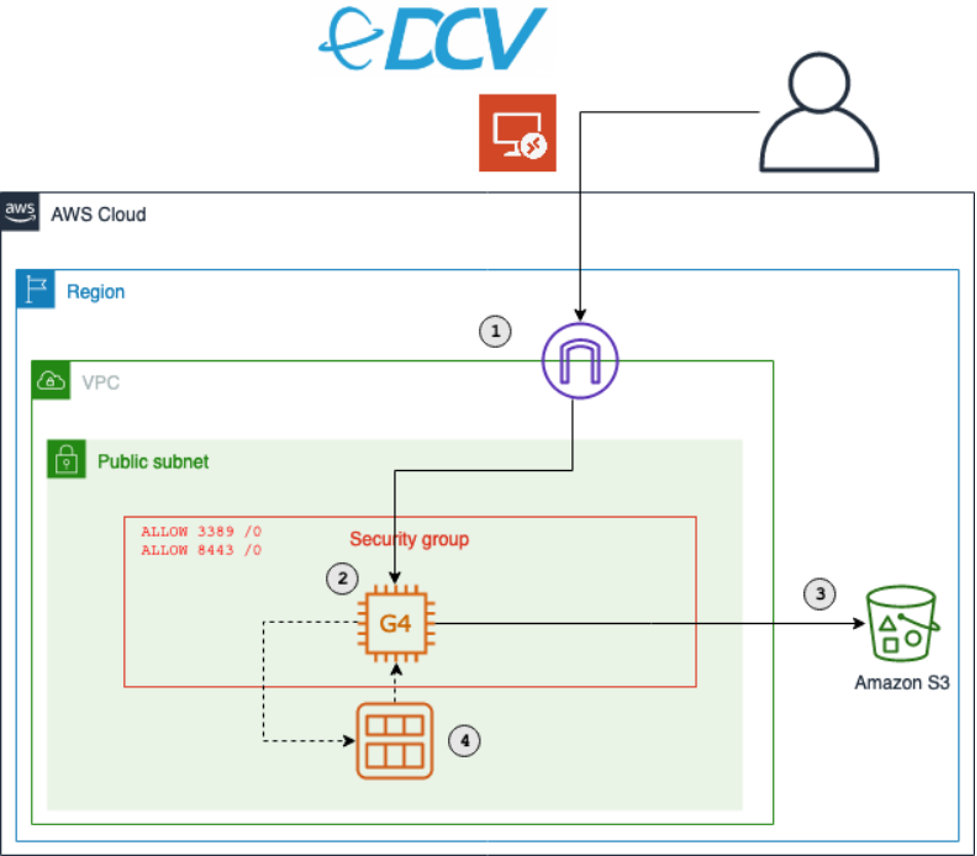
- An Amazon Elastic Compute Cloud (Amazon EC2) instance provisioned in an Amazon Virtual Private Cloud (Amazon VPC) that will serve as a new CA server and will store its CA private key in CloudHSM.
- The CloudHSM client installed on both the on-premises and Amazon EC2 CA servers. For instructions, see Install and Configure the AWS CloudHSM Client in the Getting Started section of the AWS CloudHSM User Guide.
- An AWS CloudHSM cluster accessible from the on-premises and new EC2 CA servers on TCP ports 2223-2225. For instructions, see Create a Cluster, Initialize the Cluster, and Activate the Cluster in the Getting Started section of the AWS CloudHSM User Guide.
- Network connectivity between the existing CA server and the CloudHSM cluster in your VPC, by using either AWS Virtual Private Network (AWS VPN) or AWS Direct Connect.
- In order to ensure a smooth migration, we recommend that you review the Active Directory Certificate Services Migration Guide for Windows Server 2012 R2 for more information about migrating Active Directory Certificate Services, planning your CA migration, and the supporting infrastructure for Certificate Revocation List (CRL) distribution and Authority Information Access (AIA) endpoints.
Migrating a domain
In this section, you will walk through migrating your AD CS environment to AWS by using your existing CA certificate and private key that will be secured in CloudHSM. In order to securely migrate the private key into the HSM, you will install the CloudHSM client and import the keys directly from the existing CA server.
This walkthrough includes the following steps:
- Create a crypto user (CU) account
- Import the CA private key into CloudHSM
- Export the CA certificate and database
- Configure and import the certificate into the new Windows CA server
- Install AD CS on the new server
The operations you perform on the HSM require the credentials of an HSM user. Each HSM user has a type that determines the operations you can perform when authenticated as that user. Next, you will create a crypto user (CU) account to use with your CA servers, to manage keys and to perform cryptographic operations.
To create the CU account
- From the on-premises CA server, use the following command to log in with the crypto officer (CO) account that you created when you activated the cluster. Be sure to replace <co_password> with your CO password.
- Use the following command to create the CU account. Replace <cu_user> and <cu_password> with the username and password you want to use for the CU.
- Use the following command to set the login credentials for the HSM on your system and enable the AWS CloudHSM client for Windows to use key storage providers (KSPs) and Cryptography API: Next Generation (CNG) providers. Replace <cu_user> and <cu_password> with the username and password of the CU.
Now that you have the CloudHSM client installed and configured on the on-premises CA server, you can import the CA private key from the local server into your CloudHSM cluster.
To import the CA private key into CloudHSM
- Open an administrative command prompt and navigate to C:\Program Files\Amazon\CloudHSM.
- To identify the unique container name for your CA’s private key, enter certutil -store my to list all certificates stored in the local machine store. The CA certificate will be shown as follows:
- Verify that the key is backed by the Microsoft Software Key Storage Provider and make note of the <unique_container_name> from the output, to use it in the following steps.
- Use the following command to set the environment variable n3fips_password. Replace <cu_user> and <cu_password> with the username and password for the CU you created earlier for the CloudHSM cluster. This variable will be used by the import_key command in the next step.
- Use the following import_key command to import the private key into the HSM. Replace <unique_container_name> with the value you noted earlier.
The import_key command will report that the import was successful. At this point, your private key has been imported into the HSM, but the on-premises CA server will continue to run using the key stored locally.
The Active Directory Certificate Services Migration Guide for Windows Server 2012 R2 uses the Certification Authority snap-in to migrate the CA database, as well as the certificate and private key. Because you have already imported your private key into the HSM, next you will need to make a slight modification to this process and export the certificate manually, without its private key.
To export the CA certificate and database
- To open the Microsoft Management Console (MMC), open the Start menu and in the search field, enter MMC, and choose Enter.
- From the File menu, select Add/Remove Snapin.
- Select Certificates and choose Add.
- You will be prompted to select which certificate store to manage. Select Computer account and choose Next.
- Select Local Computer, choose Finish, then choose OK.
- In the left pane, choose Personal, then choose Certificates. In the center pane, locate your CA certificate, as shown in Figure 1.

Figure 1: Microsoft Management Console Certificates snap-in
- Open the context (right-click) menu for the certificate, choose All Tasks, then choose Export.
- In the Certificate Export Wizard, choose Next, then choose No, do not export the private key.
- Under Select the format you want to use, select Cryptographic Message Syntax Standard – PKCS #7 format file (.p7b) and select Include all certificates in the certification path if possible, as shown in Figure 2.

Figure 2: Certificate Export Wizard
- Save the file in a location where you’ll be able to locate it later, so you will be able to copy it to the new CA server.
- From the Start menu, browse to Administrative Tools, then choose Certificate Authority.
- Open the context (right-click) menu for your CA and choose All Tasks, then choose Back up CA.
- In the Certificate Authority Backup Wizard, choose Next. For items to back up, select only Certificate database and certificate database log. Leave all other options unselected.
- Under Back up to this location, choose Browse and select a new empty folder to hold the backup files, which you will move to the new CA later.
- After the backup is complete, in the MMC, open the context (right-click) menu for your CA, choose All Tasks, then choose Stop service.


At this point, until you complete the migration, your CA will no longer be issuing new certificates.
To configure and import the certificate into the new Windows CA server
- Open a Remote Desktop session to the EC2 instance that you created in the prerequisite steps, which will serve as your new AD CS certificate authority.
- Copy the certificate (.p7b file) backup from the on-premises CA server to the EC2 instance.
- On your EC2 instance, locate the certificate you just copied, as shown in Figure 3. Open the certificate to start the import process.

Figure 3: Certificate Manager tool
- Select Install Certificate. For Store Location, select Local Machine.
- Select Place the Certificates in the following store. Allowing Windows to place the certificate automatically will install it as a trusted root certificate, rather than a server certificate.
- Select Browse, select the Personal store, and then choose OK.
- Choose Next, then choose Finish to complete the certificate installation.

At this point, you’ve installed the public key and certificate from the on-premises CA server to your EC2-based Windows CA server. Next, you need to link this installed certificate with the private key, which is now stored on the CloudHSM cluster, in order to make it functional for signing issued certificates and CRLs.
To link the certificate with the private key
- Open an administrative command prompt and navigate to C:\Program Files\Amazon\CloudHSM.
- Use the following command to set the environment variable n3fips_password. Replace <cu_user> and <cu_password> with the username and password for the CU that you created earlier for the CloudHSM cluster. This variable will be used by the import_key command in the next step.
- Use the following import_key command to represent all keys stored on the HSM in a new key container in the key storage provider. This step is necessary to allow the cryptography tools to see the CA private key that is stored on the HSM.
- Use the following Windows certutil command to find your certificate’s unique serial number.
Take note of the CA certificate’s serial number.
- Use the following Windows certutil command to link the installed certificate with the private key stored on the HSM. Replace <certificate_serial_number> with the value noted in the previous step.
- Enter the command certutil -store my. The CA certificate will be shown as follows. Verify that the certificate is now linked with the HSM-backed private key. Note that the private key is using the Cavium Key Store Provider. Also note the message Encryption test passed, which means that the private key is usable for encryption.
Now that your CA certificate and key materials are in place, you are ready to setup your EC2 instance as a CA server.
To install AD CS on the new server
- In Microsoft’s documentation to Install the Certificate Authority role on your new EC2 instance, follow steps 1-8. Do not complete the remaining steps, because you will be configuring the CA to use the existing HSM backed certificate and private-key instead of generating a new key.
- In Confirm installation selections, select Install.
- After your installation is complete, Server Manager will show a notification banner prompting you to configure AD CS. Select Configure Active Directory Certificate Services from this prompt.
- Select either Standalone or Enterprise CA installation, based upon the configuration of your on-premises CA.
- Select Use Existing Certificate and Private Key and browse to select the CA certificate imported from your on-premises CA server.
- Select Next and verify your location for the certificate database files.
- Select Finish to complete the wizard.
- To restore the CA database backup, from the Start menu, browse to Administrative Tools, then choose Certificate Authority.
- Open the context (right-click) menu for the certificate authority and choose All Tasks, then choose Restore CA. Browse to and select the database backup that you copied from the on-premises CA server.
Review the Active Directory Certificate Services Migration Guide for Windows Server 2012 R2 to complete migration of your remaining Microsoft Public Key Infrastructure (PKI) components. Depending on your existing CA environment, these steps may include establishing new CRL and AIA endpoints, configuring Windows Routing and Remote Access to use the new CA, or configuring certificate auto enrollment for Windows clients.
Conclusion
In this post, we walked you through migrating an on-premises Microsoft AD CS environment to an AWS environment that uses AWS CloudHSM to secure the CA private key. By migrating your existing Windows PKI backed by AWS CloudHSM, you can continue to use your Windows certificate auto enrollment for users and devices with your private key secured in a dedicated HSM.
For more information about setting up and managing CloudHSM, see Getting Started with AWS CloudHSM and the AWS Security Blog post CloudHSM best practices to maximize performance and avoid common configuration pitfalls.
If you have feedback about this blog post, submit comments in the Comments section below. You can also start a new thread on the AWS CloudHSM forum to get answers from the community.
Want more AWS Security how-to content, news, and feature announcements? Follow us on Twitter.
![[Security Nation] Jack Cable on Ransomwhere](https://blog.rapid7.com/content/images/2021/10/headhsot.jpeg)