Post Syndicated from The Atlantic original https://www.youtube.com/watch?v=PRBovjwh5L0
The Role of the Senate With Senator Ben Sasse
Post Syndicated from The Atlantic original https://www.youtube.com/watch?v=CDwKCQuMeyc
[$] Taming the BPF superpowers
Post Syndicated from original https://lwn.net/Articles/870269/rss
Work toward the signing of BPF programs has
been finding its way into recent mainline kernel releases; it is intended
to improve security by limiting the BPF programs that can be successfully
loaded into the kernel. As John Fastabend described in his “Watching
the super powers” session at the 2021 Linux Plumbers Conference,
this new feature has the potential to completely break his tools. But
rather than just complain, he decided to investigate solutions; the result
is an outline for an auditing mechanism that brings greater flexibility to
the problem of controlling which programs can be run.
[Security Nation] Rob Graham on Mike Lindell’s Cyber Symposium
Post Syndicated from Rapid7 original https://blog.rapid7.com/2021/09/29/security-nation-rob-graham-on-mike-lindells-cyber-symposium/
![]()
In this episode of Security Nation, Jen and Tod chat with Rob Graham of Errata Security about his experience attending pillow magnate Mike Lindell’s Cyber Symposium, where he claimed packet captures would reveal incontrovertible evidence of widespread fraud in the 2020 US presidential election. (Spoiler alert: Nothing resembling that description actually occurred at Lindell’s event.) An expert on packet captures, Graham recounts the Kafkaesque forensic logic behind the Cyber Symposium data — some of which was presented in a file type only known to a single living person — as well as the value of having real experts attend highly dubious events like this one.
Stick around for the Rapid Rundown, where Tod and Jen discuss Microsoft’s plan to turn off Basic Auth in Exchange Online next year and the Autodiscover bug that may have prompted the change.
Robert Graham
![[Security Nation] Rob Graham on Mike Lindell's Cyber Symposium](https://blog.rapid7.com/content/images/2021/09/graham-robert.jpg)
Rob Graham is a well-known cybersecurity expert. He created the BlackICE personal firewall, the first IPS, sidejacking, and masscan. He frequently speaks at conferences and blogs.
Show notes
Interview links
- Rob’s live Tweet thread
- Rob’s archive of the provided RTFs (hex decoded)
- Rob’s BLX Container Extractor
- All about Dennis Montgomery. Warning: this is a Wiki rabbit hole.
- A Torrent of several gives of data from the Cyber-Symposium is available at:
magnet:?xt=urn:btih:39a9590de21e77687fdf7eacee4dd743f2683d72&dn=cyber-symposium&tr=udp://9.rarbg.me:2780/announce
Rapid Rundown links
- The original Bleeping Computer story on Microsoft shutting off Basic Auth
- The related story about Amit’s Autodiscover bug finding that may have prompted the above
- A somewhat early reference to some WPAD bugs
- The earliest reference Tod could find about WPAD exploits… which happened to be written by the very same Tod back in 2009.
Like the show? Want to keep Jen and Tod in the podcasting business? Feel free to rate and review with your favorite podcast purveyor, like Apple Podcasts.
“Diana: The Musical”
Post Syndicated from The Atlantic original https://www.youtube.com/watch?v=TomtElWBvcY
Improving Performance and Reducing Cost Using Availability Zone Affinity
Post Syndicated from Michael Haken original https://aws.amazon.com/blogs/architecture/improving-performance-and-reducing-cost-using-availability-zone-affinity/
One of the best practices for building resilient systems in Amazon Virtual Private Cloud (VPC) networks is using multiple Availability Zones (AZ). An AZ is one or more discrete data centers with redundant power, networking, and connectivity. Using multiple AZs allows you to operate workloads that are more highly available, fault tolerant, and scalable than would be possible from a single data center. However, transferring data across AZs adds latency and cost.
This blog post demonstrates an architectural pattern called “Availability Zone Affinity” that improves performance and reduces costs while still maintaining the benefits of Multi-AZ architectures.
Cross Availability Zone effects
AZs are physically separated by a meaningful distance from other AZs in the same AWS Region. Although they all are within 60 miles (100 kilometers) of each other. This produces roundtrip latencies usually under 1-2 milliseconds (ms) between AZs in the same Region. Roundtrip latency between two instances in the same AZ is closer to 100-300 microseconds (µs) when using enhanced networking.1 This can be even lower when the instances use cluster placement groups. Additionally, when data is transferred between two AZs, data transfer charges apply in both directions.
To better understand these effects, we’ll analyze a fictitious workload, the “foo service,” shown in Figure 1. The foo service provides a storage platform for other workloads in AWS to redundantly store data. Requests are first processed by an Application Load Balancer (ALB). ALBs always use cross-zone load balancing to evenly distribute requests to all targets. Next, the request is sent from the load balancer to a request router. The request router performs a few operations, like authorization checks and input validation, before sending it to the storage tier. The storage tier replicates the data sequentially from the lead node, to the middle node, and finally the tail node. Once the data has been written to all three nodes, it is considered committed. The response is sent from the tail node back to the request router, back through the load balancer, and finally returned to the client.

Figure 1. An example system that transfers data across AZs
We can see in Figure 1 that, in the worst case, the request traversed an AZ boundary eight times. Let’s calculate the fastest possible, zeroth percentile (p0), latency. We’ll assume the best time for non-network processing of the request in the load balancer, request router, and storage tier is 4 ms. If we consider 1 ms as the minimum network latency added for each AZ traversal, in the worst-case scenario of eight AZ traversals, the total processing time can be no faster than 12 ms. At the 50th percentile (p50), meaning the median, let’s assume the cross-AZ latency is 1.5 ms and non-network processing is 8 ms, resulting in a total of 20 ms for overall processing. Additionally, if this system is processing millions of requests, the data transfer charges could become substantial over time. Now, let’s imagine that a workload using the foo service must operate with p50 latency under 20 ms. How can the foo service change their system design to meet this goal?
Availability Zone affinity
The AZ Affinity architectural pattern reduces the number of times an AZ boundary is crossed. In the example system we looked at in Figure 1, AZ Affinity can be implemented with two changes.
- First, the ALB is replaced with a Network Load Balancer (NLB). NLBs provide an elastic network interface per AZ that is configured with a static IP. NLBs also have cross-zone load balancing disabled by default. This ensures that requests are only sent to targets that are in the same AZ as the elastic network interface that receives the request.
- Second, DNS entries are created for each elastic network interface to provide an AZ-specific record using the AZ ID, which is consistent across accounts. Clients use that DNS record to communicate with a load balancer in the AZ they select. So instead of interacting with a Region-wide service using a DNS name like foo.com, they would instead use use1-az1.foo.com.
Figure 2 shows the system with AZ Affinity. We can see that each request, in the worst case, only traverses an AZ boundary four times. Data transfer costs are reduced by approximately 40 percent compared to the previous implementation. If we use 300 μs as the p50 latency for intra-AZ communication, we now get (4×300μs)+(4×1.5ms)=7.2ms. Using the median 8 ms processing time, this brings the overall median latency to 15.2 ms. This represents a 40 percent reduction in median network latency. When thinking about p90, p99, or even p99.9 latencies, this reduction could be even more significant.

Figure 2. The system now implements AZ Affinity
Figure 3 shows how you could take this approach one step farther using service discovery. Instead of requiring the client to remember AZ-specific DNS names for load balancers, we can use AWS Cloud Map for service discovery. AWS Cloud Map is a fully managed service that allows clients to look up IP address and port combinations of service instances using DNS and dynamically retrieve abstract endpoints, like URLs, over the HTTP-based service Discovery API. Service discovery can reduce the need for load balancers, removing their cost and added latency.
The client first retrieves details about the service instances in their AZ from the AWS Cloud Map registry. The results are filtered to the client’s AZ by specifying an optional parameter in the request. Then they use that information to send requests to the discovered request routers.

Figure 3. AZ Affinity implemented using AWS Cloud Map for service discovery
Workload resiliency
In the new architecture using AZ Affinity, the client has to select which AZ they communicate with. Since they are “pinned” to a single AZ and not load balanced across multiple AZs, they may see impact during an event affecting the AWS infrastructure or foo service in that AZ.
During this kind of event, clients can choose to use retries with exponential backoff or send requests to the other AZs that aren’t impacted. Alternatively, they could implement a circuit breaker to stop making requests from the client in the affected AZ and only use clients in the others. Both approaches allow them to use the resiliency of Multi-AZ systems while taking advantage of AZ Affinity during normal operation.
Client libraries
The easiest way to achieve the process of service discovery, retries with exponential backoff, circuit breakers, and failover is to provide a client library/SDK. The library handles all of this logic for users and makes the process transparent, like what the AWS SDK or CLI does. Users then get two options, the low-level API and the high-level library.
Conclusion
This blog demonstrated how the AZ Affinity pattern helps reduce latency and data transfer costs for Multi-AZ systems while providing high availability. If you want to investigate your data transfer costs, check out the Using AWS Cost Explorer to analyze data transfer costs blog for an approach using AWS Cost Explorer.
For investigating latency in your workload, consider using AWS X-Ray and Amazon CloudWatch for tracing and observability in your system. AZ Affinity isn’t the right solution for every workload, but if you need to reduce inter-AZ data transfer costs or improve latency, it’s definitely an approach to consider.
- This estimate was made using t4g.small instances sending ping requests across AZs. The tests were conducted in the us-east-1, us-west-2, and eu-west-1 Regions. These results represent the p0 (fastest) and p50 (median) intra-AZ latency in those Regions at the time they were gathered, but are not a guarantee of the latency between two instances in any location. You should perform your own tests to calculate the performance enhancements AZ Affinity offers.
Securely extend and access on-premises Active Directory domain controllers in AWS
Post Syndicated from Mangesh Budkule original https://aws.amazon.com/blogs/security/securely-extend-and-access-on-premises-active-directory-domain-controllers-in-aws/
If you have an on-premises Windows Server Active Directory infrastructure, it’s important to plan carefully how to extend it into Amazon Web Services (AWS) when you’re migrating or implementing cloud-based applications. In this scenario, existing applications require Active Directory for authentication and identity management. When you migrate these applications to the cloud, having a locally accessible Active Directory domain controller is an important factor in achieving fast, reliable, and secure Active Directory authentication.
In this blog post, I’ll provide guidance on how to securely extend your existing Active Directory domain to AWS and optimize your infrastructure for maximum performance. I’ll also show you a best practice that implements a remote desktop gateway solution to access your domain controllers securely while using the minimum required ports. Additionally, you will learn about how AWS Systems Manager Session Manager port forwarding helps provide a secure and simple way to manage your domain resources remotely, without the need to open inbound ports and maintain RDGW hosts.
Administrators can use this blog post as guidance to design Active Directory on Amazon Elastic Compute Cloud (Amazon EC2) domain controllers. This post can also be used to determine which ports and protocols are required for domain controller infrastructure communication in a segmented network.
Design and guidelines for EC2-hosted domain controllers
This section provides a set of best practices for designing and deploying EC2-hosted domain controllers in AWS.
AWS has multiple options for hosting Active Directory on AWS, which are discussed in detail in the Active Directory Domain Services on AWS Design and Planning Guide. One option is to use AWS Directory Service for Microsoft Active Directory (AWS Managed Microsoft AD). AWS Managed Microsoft AD provides you with a complete new forest and domain to start your Active Directory deployment on AWS. However, if you prefer to extend your existing Active Directory domain infrastructure to AWS and manage it yourself, you have the option of running Active Directory on EC2-hosted domain controllers. See our Quick Start guide for instructions on how to deploy both of these options (AWS Managed Microsoft AD or EC2-hosted domain controllers on AWS).
If you’re operating in more than one AWS Region and require Active Directory to be available in all these Regions, use the best practices in the Design and Planning Guide for a multi-Region deployment strategy. Within each of the Regions, follow the guidelines and best practices described in this blog post.
Figure 1 shows an example of how to deploy Active Directory on EC2 instances in multiple Regions with multiple virtual private clouds (VPCs). In this example, I’m showing the Active Directory design in multiple Regions that interconnect to each other by using AWS Transit Gateway.

Figure 1: Extended EC2 domain controllers architecture
In order to extend your existing Active Directory deployment from on-premises to AWS as shown in the example, you do two things. First, you add additional domain controllers (running on Amazon EC2) to your existing domain. Second, you place the domain controllers in multiple Availability Zones (AZs) within your VPC, in multiple Regions, by keeping the same forest (Example.com) and domain structure.
Consider these best practices when you deploy or extend Active Directory on EC2 instances:
- We recommend deploying at least two domain controllers (DCs) in each Region and configuring a minimum of two AZs, to provide high availability.
- If you require additional domain controllers to achieve your performance goals, add more domain controllers to existing AZs or deploy to another available AZ.
- It’s important to define Active Directory sites and subnets correctly to prevent clients from using domain controllers that are located in different Regions, which causes increased latency.
- Configure the VPC in a Region as a single Active Directory site and configure Active Directory subnets accordingly in the AD Sites and Services console. This configuration confirms that your clients correctly select the closest available domain controller.
- If you have multiple VPCs, centralize the Active Directory services in one of your existing VPCs or create a shared services VPC to centralize the domain controllers.
- Make sure that robust inter-Region connectivity exists between all of the Regions. Within AWS, you can leverage cross-Region VPC peering to achieve highly available private connectivity between Regions. You can also use the Transit Gateway VPC solution, as shown in Figure 1, to interconnect multiple Regions.
- Make sure that you’re deploying your domain controllers in a private subnet without internet access.
- Keep your security patches up to date on EC2 domain controllers. You can use AWS Systems Manager to patch your domain controllers in a controlled manner.
- Have a dedicated AWS account for directory services and don’t share the account with other general services and applications. This helps you to control access to the AWS account and add domain controller–specific automation.
- If your users need to manage AWS services and access AWS applications with their Active Directory credentials, we recommend integrating your identity service with the management account in AWS Organizations. You can configure the AWS Single Sign-On (AWS SSO) service to use AD Connector in a primary account VPC to connect to self-managed Active Directory domain controllers that are hosted in a Shared Services account.
Alternatively, you can deploy AWS Managed Microsoft AD in the management account, with trust to your EC2 Active Directory domain, to allow users from any trusted domain to access AWS applications. However, you could host these EC2 domain controllers in the primary account, similar to the AWS Managed AD option.
- Build domain controllers with end-to-end automation using version control (for example, GIT and AWS CodeCommit) and Desired State Configuration (DSC)/PowerShell.
Security considerations for EC2-hosted domains
This section explains how you can maximize the security of your extended EC2-hosted domain controller infrastructure, and use AWS services to help achieve security compliance. You should also refer to your organization’s IT system security policies to determine the most relevant recommendations to implement.
AWS operates under a shared security responsibility model, where AWS is responsible for the security of the underlying cloud infrastructure and you are responsible for securing workloads you deploy in AWS.
Our recommendations for security for EC2-hosted domains are as follows:
- We recommend that you place EC2-hosted domain controllers in a single dedicated AWS account or deploy them in your AWS Organizations management account. This makes it possible for you to use your Active Directory credentials for authentication to access the AWS Management Console and other AWS applications.
- Use tag-based policies to restrict access to domain controllers if you’re using the Shared Services account for hosting domain controllers.
- Take advantage of the EC2 Image Builder service to deploy a domain controller that uses a CIS standard base image. By doing this, you can avoid manual deployment by setting up an image pipeline.
- Secure the AWS account where the domain controllers are running by following the principle of least privilege and by using role-based access control.
- Take advantage of these AWS services to help secure your workloads and application:
- AWS Landing Zone–A solution that helps you more quickly set up a secure, multi-account AWS environment, based on AWS best practices.
- AWS Organizations–A service that helps you centrally manage and govern your environment as you grow and scale your AWS resources.
- Amazon Guard Duty–An automated threat detection service that continuously monitors for suspicious activity and unauthorized behavior to protect your AWS accounts, workloads, and data that are stored in Amazon Simple Storage Service (Amazon S3).
- Amazon Detective–A service that can analyze, investigate, and quickly identify the root cause of potential security issues or suspicious activities.
- Amazon Inspector–An automated security assessment service that helps improve the security and compliance of applications that are deployed on AWS.
- AWS Security Hub–A service that provides customers with a comprehensive view of their security and compliance status across their AWS accounts. You can import critical patch compliance findings into Security Hub for easy reference.
Use data encryption
AWS offers you the ability to add a layer of security to your data at rest in the cloud, providing scalable and efficient encryption features. These are some best practices for data encryption:
- Encrypt the Amazon Elastic Block Store (Amazon EBS) volumes that are attached to the domain controllers, and keep the customer master key (CMK) safe with AWS Key Management Service (AWS KMS) or AWS CloudHSM, according to your security team’s guidance and policies.
- Consider using a separate CMK for the Active Directory and restrict access to the CMK to a specific team.
- Enable LDAP over SSL (LDAPS) on all domain controllers, for secure authentication, if your application supports LDAPS authentication.
- Deploy and manage a public key infrastructure (PKI) on AWS. For more information, see the Microsoft PKI Quick Start guide.
Restrict account and instance access
Provide management access for directory service accounts and domain controller instances only to the specific team that manages the Active Directory. To do this, follow these guidelines:
- Restrict access to an EC2 domain controller’s start, stop, and terminate behavior by using AWS Identity and Access Management (IAM) policy and resources tags. Example: Restrict-ec2-iam
- Restrict access to Amazon EBS volumes and snapshots.
- Restrict account root access and implement multi-factor authentication (MFA) for this access.
Network access control for domain controllers
Whenever possible, block all unnecessary traffic to and from your domain controllers to limit the communication so that only the necessary ports are opened between a domain controller and another computer. Use these best practices:
- Allow only the required network ports between the client and domain controllers, and between domain controllers.
- Use a security group to narrow down the access to domain controllers.
- Use network access control lists (network ACLs) to filter Active Directory ports as this gives you better control than using ephemeral ports.
- Deploy domain controllers in private subnets.
- Route only the required subnets into the VPC that contains the domain controllers.
Secure administration
AWS provides services that continuously monitor your data, accounts, and workloads to help protect them from unauthorized access. We recommend that you take advantage of the following services to securely administer your domain controller’s deployment:
- Use AWS Systems Manager Session Manager or Run Command to manage your instances remotely. The command actions are sent to Amazon CloudWatch Logs or Amazon S3 for auditing purposes. Leaving inbound Remote Desktop Protocol (RDP), WinRM ports, and remote PowerShell ports open on your instances greatly increases the risk of entities running unauthorized or malicious commands on the instances. Session Manager helps you improve your security posture by letting you close these inbound ports, which frees you from managing SSH keys and certificates, bastion hosts, and jump boxes.
- Use Amazon EventBridge to set up rules to detect when changes happen to your domain controller EC2 instances and to send notifications by using Amazon Simple Notification Service (Amazon SNS) when a command is run.
- Manage configuration drift on EC2 instances. Systems Manager State Manager helps you automate the process of keeping your domain controller EC2 instances in the desired state and integrates with Systems Manager Compliance.
- Avoid any manual interventions while you build and manage domain controllers. Automate the domain join process for Amazon EC2 instances from multiple AWS accounts and Regions.
- For developing your applications with domain controllers, use the Windows DC locator service or use the Dynamic DNS (DDNS) service of your AWS Managed Microsoft AD to locate domain controllers. Do not hard-code applications with the address of a domain controller.
- Use AWS Config to manage your domain controller configuration.
- Use Systems Manager Parameter Store or Secrets Manager to store all secrets, as well as configurations for your domain controller automation.
- Use version control to update the domain controller source code with pipeline approvals to avoid any misconfigurations and faulty deployments.
Logging and monitoring
AWS provides tools and features that you can use to see what’s happening in your AWS environment. We recommend that you use these logging and monitoring practices for your EC2-hosted domain controllers:
- Enable VPC Flow Logs data for each domain controller’s accounts to monitor the traffic that’s reaching your domain controller instance.
- Log Windows and Active Directory events in Amazon CloudWatch Logs for increased visibility.
- Consider setting up alerts and notifications for key security events for EC2 domain controllers, in real time. These alerts can be sent to your Red and Blue security response teams for further analysis.
- Deploy the CloudWatch agent or the Amazon Kinesis Agent for Windows on EC2 for detail monitoring and alerting at the domain controller operating system level.
- Log Systems Manager API calls with AWS CloudTrail.
Other security considerations
As a best practice, implement domain controller security at the operating system level, according to your security team’s recommendations. We recommend these options:
- Block executables from running on domain controllers.
- Prevent web browsing from domain controllers.
- Configure a Windows Server Core base image for domain controllers.
- Integrate bastion hosts with Systems Manager Session Manager and use MFA to manage domain controllers remotely.
- Perform regular system state backups of your Active Directory environments. Encrypt these backups.
- Perform Active Directory administrative management from a remote server, and avoid logging in to domain controllers interactively unless needed.
- For FSMO roles, you can follow the same recommendations you would follow for your on-premises deployment to determine FSMO roles on domain controllers. For more information, see these best practices from Microsoft. In the case of AWS Managed Microsoft AD, all domain controllers and FSMO role assignments are managed by AWS and don’t require you to manage or change them.
Domain controller ports
In this section, I’m going to cover the network ports and protocols that are needed to deploy domain services securely. Understanding how traffic flows and is processed by a network firewall is essential when someone requests or implements firewall rules, to avoid any connectivity issues.
Here are some common problems that you might observe because of network port blockage:
- The RPC server is unavailable
- Name resolution issues
- A connectivity issue is detected with LDAP, LDAPS, and Kerberos
- Domain replication issues
- Domain authentication issues
- Domain trust issues between on-premises Active Directory and AWS Managed Microsoft AD
- AD Connector connectivity issues
- Issues with domain join, password reset, and more
Understand Active Directory firewall ports
You must allow traffic from your on-premises network to the VPC that contains your extended domain controllers. To do this, make sure that the firewall ports that opened with the VPC subnets that were used to deploy your EC2-hosted domain controllers and the security group rules that are configured on your domain controllers both allow the network traffic to support domain trusts.
Domain controller to domain controller core ports requirements
The following table lists the port requirements for establishing DC-to-DC communication in all versions of Windows Server.
| Source | Destination | Protocol | Port | Type | Active Directory usage | Type of traffic |
| Any domain controller | Any domain controller | TCP and UDP | 53 | Bi-directional | User and computer authentication, name resolution, trusts | DNS |
| TCP and UDP | 88 | Bi-directional | User and computer authentication, forest level trusts | Kerberos | ||
| UDP | 123 | Bi-directional | Windows Time, trusts | Windows Time | ||
| TCP | 135 | Bi-directional | Replication | RPC, Endpoint Mapper (EPM) | ||
| UDP | 137 | Bi-directional | User and computer authentication | NetLogon, NetBIOS name resolution | ||
| UDP | 138 | Bi-directional | Distributed File System (DFS), Group Policy | DFSN, NetLogon, NetBIOS Datagram Service | ||
| TCP | 139 | Bi-directional | User and computer authentication, replication | DFSN, NetBIOS Session Service, NetLogon | ||
| TCP and UDP | 389 | Bi-directional | Directory, replication, user, and computer authentication, Group Policy, trustss | LDAP | ||
| TCP and UDP | 445 | Bi-directional | Replication, user, and computer authentication, Group Policy, trusts | SMB, CIFS, SMB2, DFSN, LSARPC, NetLogonR, SamR, SrvSvc | ||
| TCP and UDP | 464 | Bi-directional | Replication, user, and computer authentication, trusts | Kerberos change/set password | ||
| TCP | 636 | Bi-directional | Directory, replication, user, and computer authentication, Group Policy, trusts | LDAP SSL (required only if LDAP over SSL is configured) | ||
| TCP | 3268 | Bi-directional | Directory, replication, user, and computer authentication, Group Policy, trusts | LDAP Global Catalog (GC) | ||
| TCP | 3269 | Bi-directional | Directory, replication, user, and computer authentication, Group Policy, trusts | LDAP GC SSL (required only if LDAP over SSL is configured) | ||
| TCP | 5722 | Bi-directional | File replication | RPC, DFSR (SYSVOL) | ||
| TCP | 9389 | Bi-directional | AD DS web services | SOAP | ||
| TCP Dynamic | 49152–65535 | Bi-directional | Replication, user, and computer authentication, Group Policy, trusts | RPC, DCOM, EPM, DRSUAPI, NetLogonR, SamR, File Replication Service (FRS) | ||
| UDP Dynamic | 49152–65535 | Bi-directional | Group Policy | DCOM, RPC, EPM |
Note: There is no need to open a DNS port on domain controllers if you are not using a domain controller as a DNS server, or if you’re using any third-party DNS solutions.
Client to domain controller core ports requirements
The following table lists the port requirements for establishing client to domain controller communication for Active Directory.
| Source | Destination | Protocol | Port | Type | Usage | Type of traffic |
| All internal company client network IP subnets | Any domain controller | TCP | 53 | Uni-directional | DNS | DNS |
| UDP | 53 | Uni-directional | DNS | Kerberos | ||
| TCP | 88 | Uni-directional | Kerberos Auth | Kerberos | ||
| UDP | 88 | Uni-directional | Kerberos Auth | Kerberos | ||
| UDP | 123 | Uni-directional | Windows Time | Windows Time | ||
| TCP | 135 | Uni-directional | RPC, EPM | RPC, EPM | ||
| UDP | 137 | Uni-directional | NetLogon, NetBIOS name | User and computer authentication | ||
| UDP | 138 | Uni-directional | DFSN, NetLogon, NetBIOS datagram service | DFS, Group Policy, NetBIOS, NetLogon, browsing | ||
| TCP | 389 | Uni-directional | LDAP | Directory, replication, user, and computer authentication, Group Policy, trust | ||
| UDP | 389 | Uni-directional | LDAP | Directory, replication, user, and computer authentication, Group Policy, trust | ||
| TCP | 445 | Uni-directional | SMB, CIFS, SMB3, DFSN, LSARPC, NetLogonR, SamR, SrvSvc | Replication, user, and computer authentication, Group Policy, trust | ||
| TCP | 464 | Uni-directional | Kerberos change/set password | Replication, user, and computer authentication, trust | ||
| UDP | 464 | Uni-directional | Kerberos change/set password | Replication, user, and computer authentication, trust | ||
| TCP | 636 | Uni-directional | LDAP SSL | Directory, replication, user, and computer authentication, Group Policy, trust | ||
| TCP | 3268 | Uni-directional | LDAP GC | Directory, replication, user, and computer authentication, Group Policy, trust | ||
| TCP | 3269 | Uni-directional | LDAP GC SSL | Directory, replication, user, and computer authentication, Group Policy, trust | ||
| TCP | 9389 | Uni-directional | SOAP | AD DS web service | ||
| TCP | 49152–65535 | Uni-directional | DCOM, RPC, EPM | Group Policy |
Note:
- You must allow network traffic communication from your on-premises network to the VPC that contains your AWS-hosted EC2 domain controllers.
- You also can restrict DC-to-DC replication traffic and DC-to-client communications to specific ports.
- Packet fragmentation can cause issues with services such as Kerberos. You should make sure that maximum transmission unit (MTU) sizes match your network devices.
- Additionally, unless a tunneling protocol is used to encapsulate traffic to Active Directory, ranges of ephemeral TCP ports between 49152 to 65535 are required. Ephemeral ports are also known as service response ports. These ports are created dynamically for session responses for each client that establishes a session. These ports are required not only for Windows but for Linux and UNIX.
Manage domain controllers securely using a bastion host and RDGW
We recommend that you restrict the domain controller’s management by using a secure, highly available, and scalable Microsoft Remote Desktop Gateway (RDGW) solution in conjunction with bastion hosts. A bastion host that is designed to work with a specific part of the infrastructure should work with that unit only, and nothing else. Limiting the use of bastion hosts to a specific instance example domain controller can help improve your security posture.
The reference architecture shown in Figure 2 restricts management access to your domain controllers and access via port 443. The bastion hosts in the diagram are configured to only allow RDP from the RDGW.

For additional security, follow these best practices:
- Configure RDGW and bastions hosts to use MFA for logins.
- Implement login restrictions by using a Group Policy Object (GPO), so that only required administrators log in to RDGW and the bastion host, based on their group membership.
Bastion host to domain controllers ports requirements
The following table lists the port requirements for establishing bastion host-to-DC communication in all versions of Windows Server.
| Source | Destination | Protocol | Ports | Type | Usage | Type of traffic |
| Bastion host to domain controller | Any domain controller subset | TCP | 443 | Uni-directional | TPKT | Remote Protocol Gateway access |
| UDP | 3389 | Uni-directional | TPKT | Remote Desktop Protocol | ||
| TCP | 3389 | Uni-directional | WS-Man | Remote Desktop Protocol | ||
| TCP | 5985 | Bi-directional | HTTPS | Windows Remote Management (WinRM) | ||
| TCP | 5985 | Bi-directional | WS-Man | Windows Remote Management (WinRM) |
You can also take advantage of Systems Manager Session Manager to manage domain joined resources instead of using bastion hosts for management. This option eliminates the need to manage bastion infrastructure and open any inbound rules. It also integrates natively with IAM and AWS CloudTrail, two services that enhance your security and audit posture. In the next section, I’ll discuss Session Manager and how it is useful in this context.
Session Manager port forwarding
Active Directory administrators are accustomed to managing domain resources by using Remote Server Administrators Tools (RSAT) that are installed on either their workstations or a member server in the domain (for example, RDP to a bastion host). Although RDP is effective, using RDP requires more management, such as managing inbound rules for port 3389. In some cases, having this port exposed to the internet might put your systems at risk. For example, systems can be susceptible to brute force or unauthorized dictionary activity. Instead of using a RDGW host and opening RDP inbound RDP ports, we recommend using the Session Manager Service, which provides port-forwarding ability without opening inbound ports.
Port forwarding provides the ability to forward traffic between your clients to open ports on your EC2 instance. After you configure port forwarding, you can connect to the local port and access the server application that is running inside the instance, as shown in Figure 3. To configure the port-forwarding feature in Session Manager, you can use IAM policies and the AWS-StartPortForwardingSession document.

Figure 3: Session Manager tunnel
To start a session using the AWS Command Line Interface (AWS CLI), run the following command.
Note: You can use any available ephemeral port. 9999 is just an example. Install and configure the AWS CLI, if you haven’t already.
You can also start a session by using an IAM policy like the one shown in the following example. To learn more about creating IAM policies for Session Manager, see the topic Quickstart default IAM policies for Session Manager.
In this policy example, I created the policy for Systems Manager for both AWS-StartPortForwadingSession and AWS-StartSSHSession for Linux (SSH) environments, for your reference and guidance.
When you use the port-forwarding feature in Session Manager, you have the option to use an auditing service like AWS CloudTrail to provide a record of the connections made to your instances. You can also monitor the session by using Amazon CloudWatch Events with Amazon SNS to receive notifications when a user starts or ends session activity.
There is no additional charge for accessing EC2 instances by using Session Manager port forwarding. Port forwarding is available today in all AWS Regions where Systems Manager is available. You will be charged for the outgoing bandwidth from the NAT Gateway or your VPC Private Link.
Bastion host architecture using Session Manager
In this section, I discuss how to use a bastion host with Session Manager. Session Manager uses the Systems Manager infrastructure to create an SSH-like session with an instance. Session Manager tunnels real SSH connections, which allows you to tunnel to another resource within your VPC directly from your local machine. A managed instance that you create, acts as a bastion host, or gateway, to your AWS resources. The benefits of this configuration are:
- Increased security: This configuration uses only one EC2 instance (the bastion host), and connects outbound port 443 to Systems Manager infrastructure. This allows you to use Session Manager without any inbound connections. The local resource must allow inbound traffic only from the instance that is acting as bastion host. Therefore, there is no need to open any inbound rule publicly.
- Ease of use: You can access resources in your private VPC directly from your local machine.
In the example shown in Figure 4, the EC2 instance is acting as a domain controller that must be accessed securely by an Active Directory administrator who is working remotely via bastion host. To support this use case, I’ve chosen to use an interface VPC endpoint for Systems Manager, in order to facilitate private connectivity between Systems Manager Agent (SSM Agent) on the EC2 instance that is acting as a bastion host, and the Systems Manager service endpoints. You can configure Session Manager to enable port forwarding between the administrator’s local workstation and the private EC2 bastion instances, so that they can securely access the bastion host from the internet. This architecture helps you to eliminate RDGW infrastructure setup and reduce management efforts. You can add MFA at the bastion host level to enhance security.

Note:
- If you want to use the AWS CLI to start and end sessions that connect you to your managed instances, you must first install the Session Manager plugin on your local machine.
- Make sure that the bastion host has SSM Agent installed, because Session Manager only works with Systems Manager managed instances.
- Follow the steps in Creating an interface endpoint to create the following interface endpoints:
- com.amazonaws.<region>.ssm – The endpoint for the Systems Manager service.
- com.amazonaws.><region>.ec2messages – Systems Manager uses this endpoint to make calls from the SSM Agent to the Systems Manager service.
- com.amazonaws.<region>.ec2 – The endpoint to the EC2 service. If you’re using Systems Manager to create VSS-enabled snapshots, you must ensure that you have this endpoint. Without the EC2 endpoint defined, a call to enumerate attached EBS volumes fails. This causes the Systems Manager command to fail.
- com.amazonaws.<region>.ssmmessages – This endpoint is required for connecting to your instances through a secure data channel by using Session Manager, in this case the port-forwarding requirement.
Support for domain controllers in Session Manager
You can use Session Manager to connect EC2 domain controllers directly, as well. To initiate a connection with either the default Session Manager connection or the port-forwarding feature discussed in this post, complete these steps.
To initiation a connection
- Create the ssm-user in your domain.
- Add the ssm-user to the domain groups that grant the user local access to the domain controller. One example is to add the user to the Domain Admins group.
IMPORTANT: Follow your organization’s security best practices when you grant the ssm-user access to the domain.
Conclusion
In this blog post, I described best practices for deploying domain controllers on EC2 instances and extending on-premises Active Directory to AWS for your guidance and quick reference. I also covered how you can maximize security for your extended EC2-hosted domain controller infrastructure by using AWS services. In addition, you learned about how AWS Systems Manager Session Manager port forwarding to RDP provides a simple and secure way to manage your domain resources remotely, without the need to open inbound ports and maintain RDGW hosts. Port forwarding works for Windows and Linux instances. It’s available today in all AWS Regions where Systems Manager is available. Depending on your use case, you should consider additional protection mechanisms per your organization’s security best practices.
To learn more about migrating Windows Server or SQL Server, visit Windows on AWS. For more information about how AWS can help you modernize your legacy Windows applications, see Modernize Windows Workloads with AWS. Contact us to start your modernization journey today.
If you have feedback about this post, submit comments in the Comments section below.
Want more AWS Security how-to content, news, and feature announcements? Follow us on Twitter.
Rodrigo Oliveira | Mocotó – Culinária Brasileira | Talks at Google
Post Syndicated from Talks at Google original https://www.youtube.com/watch?v=jvvsbEklKsU
Announcing Backblaze Developer Day: Build Blazing Apps
Post Syndicated from Jeremy Milk original https://www.backblaze.com/blog/announcing-backblaze-developer-day-build-blazing-apps/

Join us for our inaugural Backblaze Developer Day on October 21st. This event is jam-packed with announcements, tech talks, lessons, SWAG, and more to help you understand how Backblaze B2 Cloud Storage can work for you. And it’s free, the good news just keeps coming.
Here’s What’s on the Horizon:
- What’s New: Learn about brand new and recent partner alliances and integrations to serve more of your development needs.
- Tour With Some Legends: Join Co-founder and CTO, Brian Wilson, and our Director of Evangelism, Andy Klein (of Drive Stats fame), for a decidedly unscripted, sure-to-be unexpected tour through the B2 Cloud Storage architecture, including APIs, SDKs, and CLI.
- How to Put It Together: Get a rapid demo on one of our popular B2 Cloud Storage + compute + CDN combinations to meet functionality that will free your budget and your tech to do more.
- A Panel on Tomorrow’s Development: The sunset of monolithic, closed ecosystems is here, so join us to discuss the future of microservices and interoperability.
- What Comes Next: Finally, hear what’s next on the B2 Cloud Storage roadmap—and tell our head of product what you think should come next.
And so much more: We’ll be posting updates on partners and friends that will be joining us, as well as information about getting SWAG from the inaugural Backblaze Developer Day. Keep an eye on this space… So register today for free to grab your spot and we’ll see you on October 21st.
The post Announcing Backblaze Developer Day: Build Blazing Apps appeared first on Backblaze Blog | Cloud Storage & Cloud Backup.
Introducing Amazon Redshift Query Editor V2, a Free Web-based Query Authoring Tool for Data Analysts
Post Syndicated from Alex Casalboni original https://aws.amazon.com/blogs/aws/amazon-redshift-query-editor-v2-web-query-authoring/
When it comes to manipulating and analyzing relational data, Structured Query Language (SQL) has been an international standard since 1986, a couple of years before I was born. And yet, it sometimes takes hours to get access to a new database or data warehouse, configure credentials or single sign-on, download and install multiple desktop libraries or drivers, and get familiar with the new schema—all this before you even run a query. Not to mention the challenge of sharing queries, results, and analyses securely between members of the same team or across teams.
Today, I’m glad to announce the general availability of Amazon Redshift Query Editor V2, a web-based tool that you can use to explore, analyze, and share data using SQL. It allows you to explore, analyze, share, and collaborate on data stored on Amazon Redshift. It supports data warehouses on Amazon Redshift and data lakes through Amazon Redshift Spectrum.
Amazon Redshift Query Editor V2 provides a free serverless web interface that reduces the operational costs of managing query tools and infrastructure. Because it’s a managed SQL editor in your browser and it’s integrated with your single sign-on provider, the Query Editor V2 reduces the number of steps to the first query so you gain insights faster. You also get in-place visual analysis of query results (no data download required), all in one place. As an additional team productivity boost, it improves collaboration with saved queries and the ability to share results and analyses between users.
From a security standpoint, analysts can access Query Editor V2 without requiring any admin privileges on the Amazon Redshift cluster, using an IAM role for READ, WRITE, or ADMIN access. Check out the documentation for more details.
Connection Setup for Amazon Redshift Query Editor V2
First, you’ll need to configure the connection to your Amazon Redshift cluster.
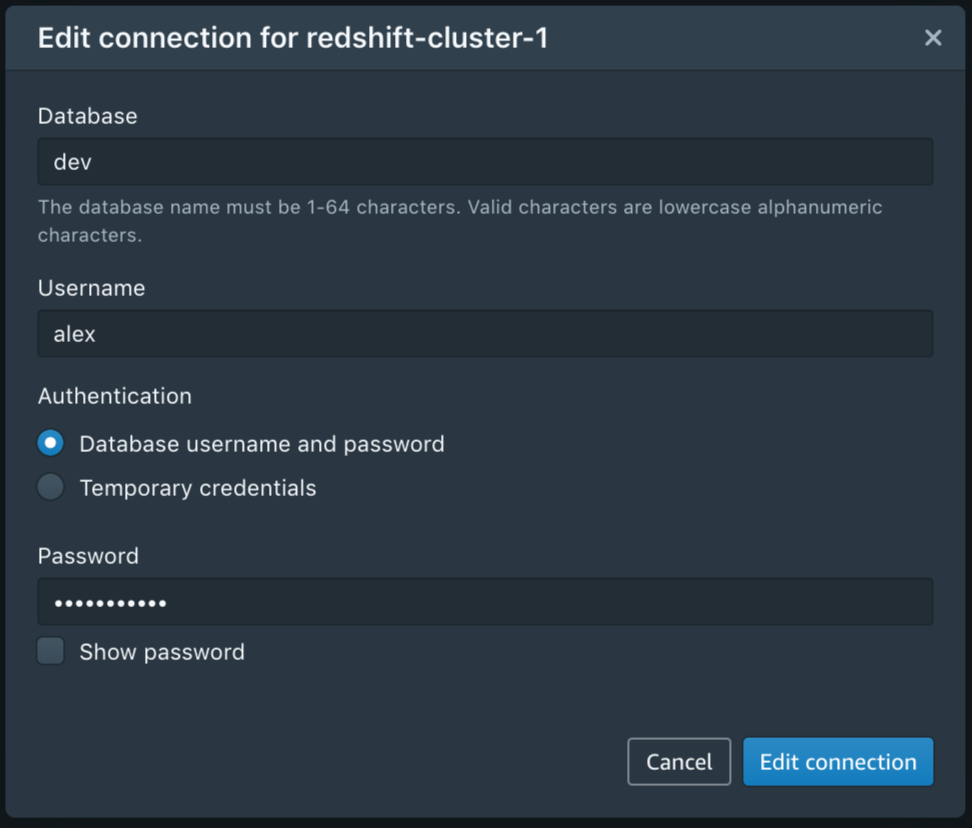
After you have configured the connection, you can reuse it for future sessions. And, of course, you can edit or delete a connection at any time.
Simply click on a cluster to connect with Query Editor V2.
Amazon Redshift Query Editor V2 in Action
The web interface allows you to browse schemas, tables, views, functions, and stored procedures. You can also preview a table’s columns with one click and create or delete schemas, tables, or functions.

The interface is intuitive for newcomers and expert users alike. You can resize panels, create tabs, and configure your editor preferences.

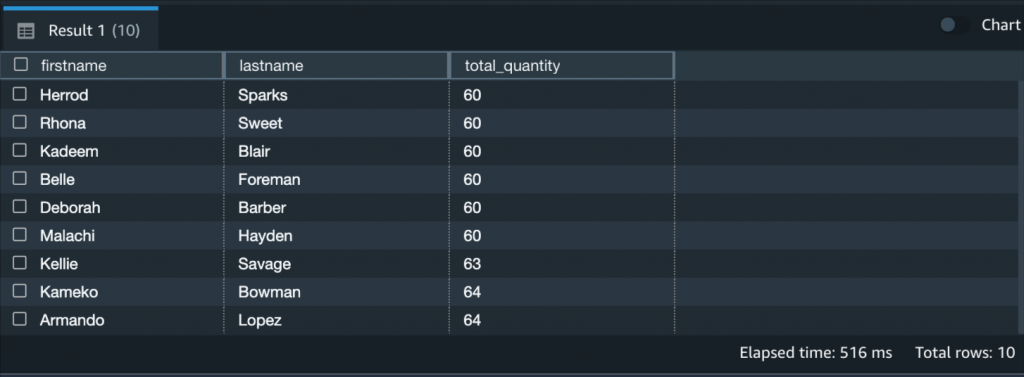
Running or explaining a query is quite straightforward: You simply write (or paste) the query and choose Run. You can visualize and interact with the result set in the bottom pane. For example, you might want to change the row ordering or search for a specific word. Even though Amazon Redshift Query Editor V2 is a browser-based tool, the data movement between your browser and the Amazon Redshift cluster is optimized, so your browser doesn’t need to download any raw data. A lot of the filtering and reordering happens directly in the browser, without any wait time.
To export a result set as a JSON or CSV file on your local machine, simply right-click it.
So far so good! Running queries is the minimum you’d expect from a Query Editor. Let’s have a look at some of the more interesting features.
Team Collaboration with Amazon Redshift Query Editor V2
Amazon Redshift Query Editor V2 allows you to manage the permissions of your team members based on their IAM roles, so that you can easily share queries and cluster access in a secure way.
For example, you can use IAM managed policies such as AmazonRedshiftQueryEditorV2FullAccess, AmazonRedshiftQueryEditorV2ReadSharing, or AmazonRedshiftQueryEditorV2ReadWriteSharing. Also, don’t forget to include the redshift:GetClusterCredentials permission.
After you’ve set up the IAM roles for your team, choose Save to save a query.
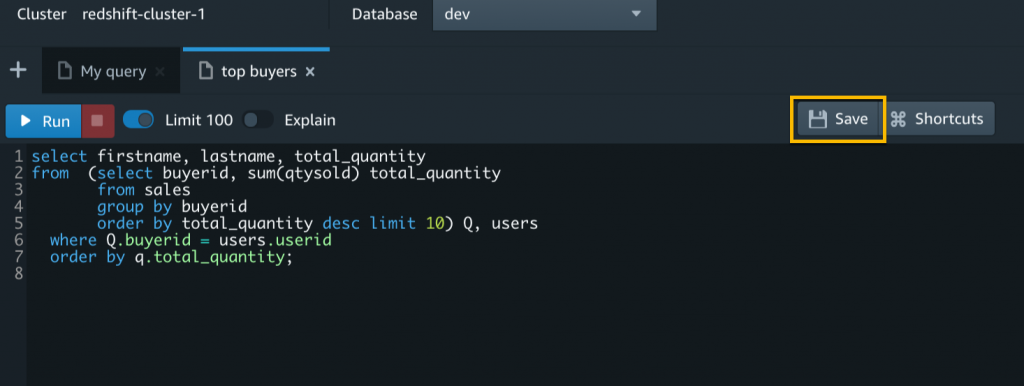
The Untitled tab will show the query name. From now on, you edit this saved query to make updates and then choose Save again.
Individual users with WRITE access can run, edit, and delete shared queries, while users with READ access can only run shared queries.
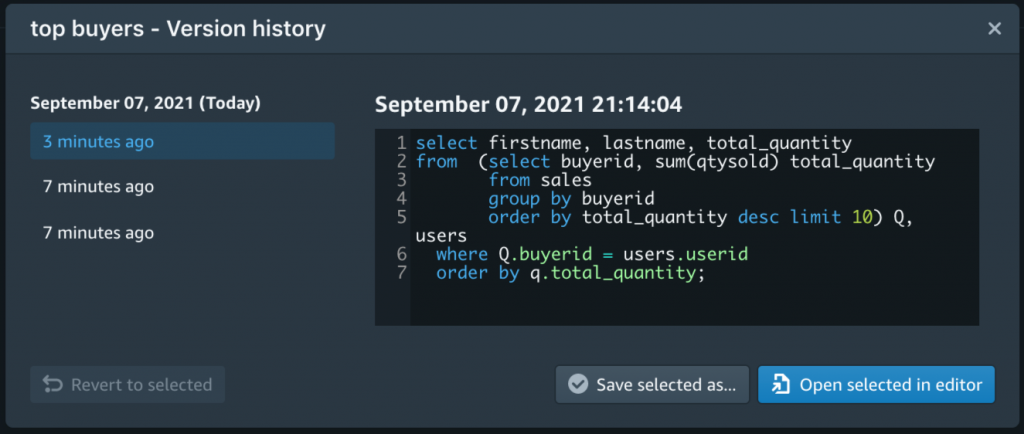
If you work on multiple projects and collaborate with many different teams, it might be difficult to remember query names or even find them in a long list. In Amazon Redshift Query Editor V2, saved and shared queries are available from the left navigation in Queries. You can keep your queries organized into folders. Even nested folders are supported.
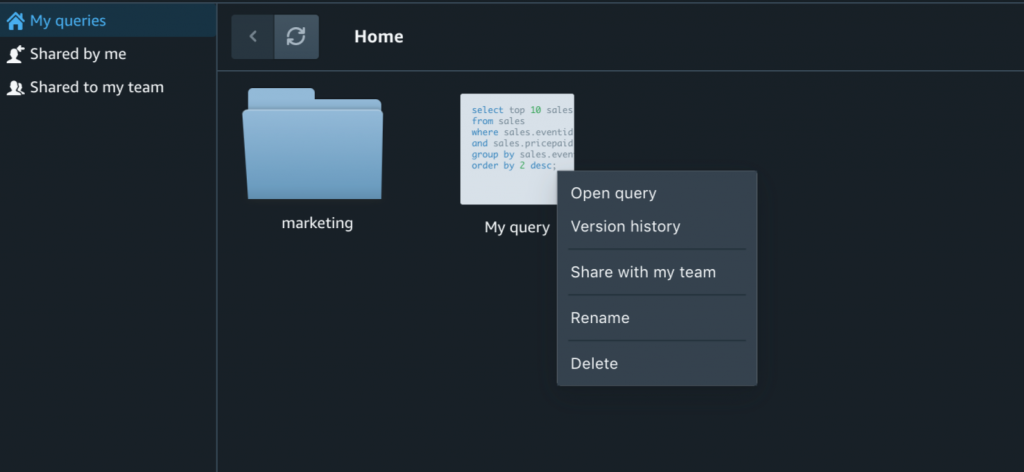
Last but not least, each saved query is versioned and the version history is always available. That’s pretty useful when you need to restore an older version.
Plot Your Queries with Amazon Redshift Query Editor V2
Sharing queries with teammates is great, but wouldn’t it even better if you could visualize a result set, export it as PNG or JPEG, and save the chart for later? Amazon Redshift Query Editor V2 allows you to perform in-place visualizations of your results. When you’re happy with the look and feel of your chart, you can save it for later and organize all your saved charts into folders. This allows you to simply choose a saved chart, rerun the corresponding query, and export the new image. No need to configure the plot from scratch or remember the configuration of hundreds of charts and queries across different projects.

Available Today
Amazon Redshift Query Editor V2 is available today in all commercial AWS Regions, except AP-Northeast-3 regions. It requires no license and it’s free, except for the cost for your Amazon Redshift cluster.
You can interact with the service using the Amazon Redshift console. It doesn’t require any driver or software on your local machine.
For more information, see the Amazon Redshift Query Editor V2 technical documentation or take a look at this video:
We look forward to your feedback.
— Alex
Security updates for Wednesday
Post Syndicated from original https://lwn.net/Articles/871227/rss
Security updates have been issued by Fedora (iaito, libssh, radare2, and squashfs-tools), openSUSE (hivex, shibboleth-sp, and transfig), SUSE (python-urllib3 and shibboleth-sp), and Ubuntu (apache2, linux, linux-aws, linux-aws-hwe, linux-azure, linux-azure-4.15, linux-dell300x, linux-gcp, linux-gcp-4.15, linux-hwe, linux-kvm, linux-oracle, linux-snapdragon, and linux-hwe-5.11, linux-azure, linux-azure-5.11, linux-oracle-5.11).
Building an API poller with AWS Step Functions and AWS Lambda
Post Syndicated from James Beswick original https://aws.amazon.com/blogs/compute/building-an-api-poller-with-aws-step-functions-and-aws-lambda/
This post is written by Siarhei Kazhura, Solutions Architect.
Many customers have to integrate with external APIs. One of the most common use cases is data synchronization between a customer and their trusted partner.
There are multiple ways of doing this. For example, the customer can provide a webhook that the partner can call to notify the customer of any data changes. Often the customer has to poll the partner API to stay up to date with the changes. Even when using a webhook, a complete synchronization happening on schedule is necessary.
Furthermore, the partner API may not allow loading all the data at once. Often, a pagination solution allows loading only a portion of the data via one API call. That requires the customer to build an API poller that can iterate through all the data pages to fully synchronize.
This post demonstrates a sample API poller architecture, using AWS Step Functions for orchestration, AWS Lambda for business logic processing, along with Amazon API Gateway, Amazon DynamoDB, Amazon SQS, Amazon EventBridge, Amazon Simple Storage Service (Amazon S3), and the AWS Serverless Application Model (AWS SAM).
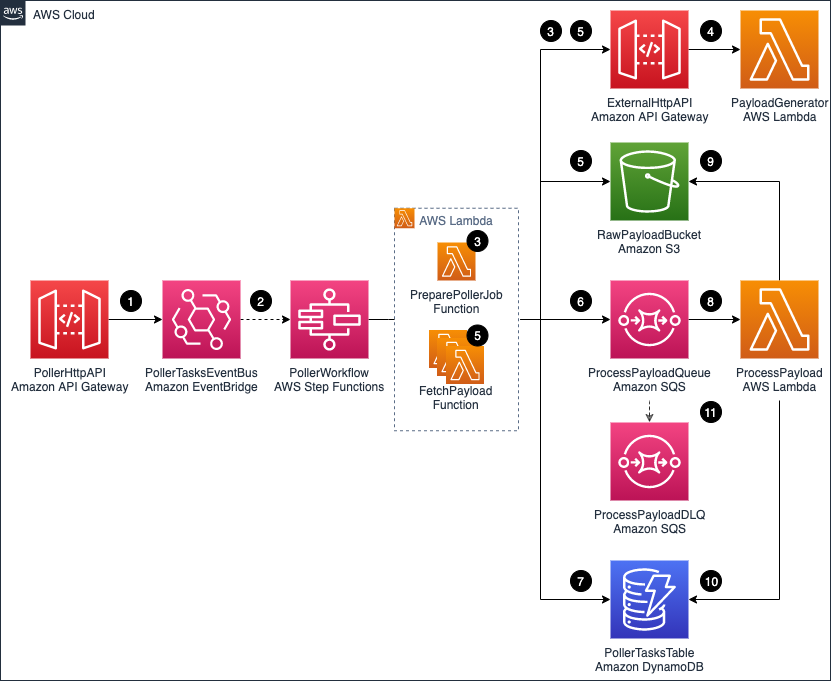
Overall architecture

The application consists of the following resources defined in the AWS SAM template:
- PollerHttpAPI: The front door of the application represented via an API Gateway HTTP API.
- PollerTasksEventBus: An EventBridge event bus that is directly integrated with API Gateway. That means that an API call results in an event being created in the event bus. EventBridge allows you to route the event to the destination you want. It also allows you to archive and replay events as needed, adding resiliency to the architecture. Each event has a unique id that this solution uses for tracing purposes.
- PollerWorkflow: The Step Functions workflow.
- ExternalHttpApi: The API Gateway HTTP API that is used to simulate an external API.
- PayloadGenerator: A Lambda function that is generating a sample payload for the application.
- RawPayloadBucket: An Amazon S3 bucket that stores the payload received from the external API. The Step Functions supported payload size is up to 256 KB. For larger payloads, you can store the API payload in an S3 bucket.
- PollerTasksTable: A DynamoDB table that tracks each poller’s progress. The table has a TimeToLive (TTL) attribute enabled. This automatically discards tasks that exceed the TTL value.
- ProcessPayoadQueue: Amazon SQS queue that decouples our payload fetching mechanism from our payload processing mechanism.
- ProcessPayloadDLQ: Amazon SQS dead letter queue is collecting the messages that we are unable to process.
- ProcessPayload: Lambda function that is processing the payload. The function reports progress of each poller task, marking it as complete when given payload is processed successfully.
Data flow
When the API poller runs:
- After a POST call is made to PollerHttpAPI /jobs endpoint, an event containing the API payload is put on the PollerTasksEventBus.
- The event triggers the PollerWorkflow execution. The event payload (including the event unique id) is passed to the PollerWorkflow.
- The PollerWorkflow starts by running the PreparePollerJob function. The function retrieves required metadata from the ExternalHttpAPI. For example, the total number of records to be loaded and maximum records that can be retrieved via a single API call. The function creates poller tasks that are required to fetch the data. The task calculation is based on the metadata received.
- The PayloadGenerator function generates random ExternalHttpAPI payloads. The PayloadGenerator function also includes code that simulates random errors and delays.
- All the tasks are processed in a fan-out fashion using dynamic-parallelism. The FetchPayload function retrieves a payload chunk from the ExternalHttpAPI, and the payload is saved to the RawPayloadBucket.
- A message, containing a pointer to the payload file stored in the RawPayloadBucket, the id of the task, and other task information is sent to the ProcessPayloadQueue. Each message has jobId and taskId attributes. This helps correlate the message with the poller task.
- Anytime a task is changing its status (for example, when the payload is saved to S3 bucket, or when a message has been sent to SQS queue) the progress is reported to the PollerTaskTable.
- The ProcessPayload function is long-polling the ProcessPayloadQueue. As messages appear on the queue, they are being processed.
- The ProcessPayload function is removing an object from the RawPayloadBucket. This is done to illustrate a type of processing that you can do with the payload stored in the S3 bucket.
- After the payload is removed successfully, the progress is reported to the PollerTasksTable. The corresponding task is marked as complete.
- If the ProcessPayload function experiences errors, it tries to process the message several times. If it cannot process the message, the message is pushed to the ProcessPayloadDLQ. This is configured as a dead-letter queue for the ProcessPayloadQueue.
Step Functions state machine
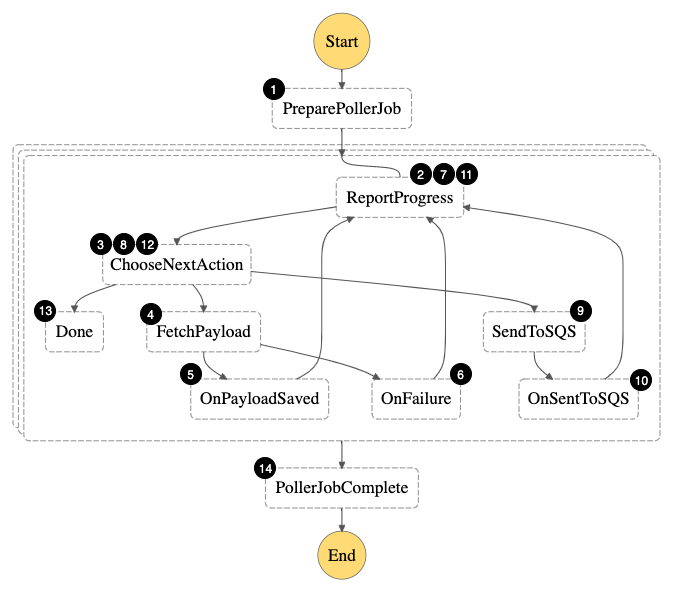
The Step Functions state machine orchestrates the following workflow:
- Fetch external API metadata and create tasks required to fetch all payload.
- For each task, report that the task has entered Started state.
- Since the task is in the Started state, the next action is FetchPayload
- Fetch payload from the external API and store it in an S3 bucket.
- In case of success, move the task to a PayloadSaved state.
- In case of an error, report that the task is in a failed state.
- Report that the task has entered PayloadSaved (or failed) state.
- In case the task is in the PayloadSaved state, move to the SendToSQS step. If the task is in a failed state, exit.
- Send the S3 object pointer and additional task metadata to the SQS queue.
- Move the task to an enqueued state.
- Report that the task has entered enqueued state.
- Since the task is in the enqueued state, we are done.
- Combine the results for a single task execution.
- Combine the results for all the task executions.
Prerequisites to implement the solution
The following prerequisites are required for this walk-through:
- An AWS account.
- The AWS SAM CLI installed.
- Node.js 14, npm, TypeScript, and jq installed.
Step-by-step instructions
You can use AWS Cloud9, or your preferred IDE, to deploy the AWS SAM template. Refer to the cleanup section of this post for instructions to delete the resources to stop incurring any further charges.
- Clone the repository by running the following command:
git clone https://github.com/aws-samples/sam-api-poller.git - Change to the sam-api-poller directory, install dependencies and build the application:
npm install
sam build -c -p - Package and deploy the application to the AWS Cloud, following the series of prompts. Name the stack sam-api-poller:
sam deploy --guided --capabilities CAPABILITY_NAMED_IAM  After stack creation, you see
 ExternalHttpApiUrl,PollerHttpApiUrl,StateMachineName, andRawPayloadBucketin the outputs section.

- Store API URLs as variables:
POLLER_HTTP_API_URL=$(aws cloudformation describe-stacks --stack-name sam-api-poller --query "Stacks[0].Outputs[?OutputKey=='PollerHttpApiUrl'].OutputValue" --output text) EXTERNAL_HTTP_API_URL=$(aws cloudformation describe-stacks --stack-name sam-api-poller --query "Stacks[0].Outputs[?OutputKey=='ExternalHttpApiUrl'].OutputValue" --output text) - Make an API call:
REQUEST_PYLOAD=$(printf '{"url":"%s/payload"}' $EXTERNAL_HTTP_API_URL) EVENT_ID=$(curl -d $REQUEST_PYLOAD -H "Content-Type: application/json" -X POST $POLLER_HTTP_API_URL/jobs | jq -r '.Entries[0].EventId') - The EventId that is returned by the API is stored in a variable. You can trace all the poller tasks related to this execution via the EventId. Run the following command to track task progress:
curl -H "Content-Type: application/json" $POLLER_HTTP_API_URL/jobs/$EVENT_ID - Inspect the output. For example:
{"Started":9,"PayloadSaved":15,"Enqueued":11,"SuccessfullyCompleted":0,"FailedToComplete":0,"Total":35}% - Navigate to the Step Functions console and choose the state machine name that corresponds to the StateMachineName from step 4. Choose an execution and inspect the visual flow.

- Inspect each individual step by clicking on it. For example, for the PollerJobComplete step, you see:

 After stack creation, you see


Cleanup
- Make sure that the `RawPayloadBucket` bucket is empty. In case the bucket has some files, follow emptying a bucket guide.
- To delete all the resources permanently and stop incurring costs, navigate to the CloudFormation console. Select the sam-api-poller stack, then choose Delete -> Delete stack.
Cost optimization
For Step Functions, this example uses the Standard Workflow type because it has a visualization tool. If you are planning to re-use the solution, consider switching from standard to Express Workflows. This may be a better option for the type of workload in this example.
Conclusion
This post shows how to use Step Functions, Lambda, EventBridge, S3, API Gateway HTTP APIs, and SQS to build a serverless API poller. I show how you can deploy a sample solution, process sample payload, and store it to S3.
I also show how to perform clean-up to avoid any additional charges. You can modify this example for your needs and build a custom solution for your use case.
For more serverless learning resources, visit Serverless Land.
Make your own Zigbee remote for Home Assistant 8-20 buttons
Post Syndicated from BeardedTinker original https://www.youtube.com/watch?v=w-uWYaFztoQ
Cloudflare for Offices
Post Syndicated from James Allworth original https://blog.cloudflare.com/cloudflare-for-offices/


Cloudflare’s network is one of the biggest, most connected, and fastest in the world. It extends to more than 250 cities. In those cities, we’re often present in multiple data centers in order to connect to as many networks and bring our services as close to as many users as possible. We’re always asking ourselves: how can we get closer to even more of the world’s Internet users?
Today, we’re taking a big step toward that goal.
Introducing Cloudflare for Offices. We are creating strategic partnerships that will enable us to extend Cloudflare’s network into over 1,000 of the world’s busiest office buildings and multi-dwelling units. These buildings span the globe, and are where millions of people work every day; now, they’re going to be microseconds away from our global network. Our first deployments will include 30 Hudson Yards, 4 Times Square, and 520 Madison in New York; Willis Tower in Chicago; John Hancock Tower in Boston; and the Embarcadero Center and Salesforce Tower in San Francisco.
And we’re not done. We’ve built custom secure hardware and partnered with fiber providers to scale this model globally. It will bring a valuable new resource to the literal doorstep of building tenants.
Cloudflare has built a mutually beneficial relationship with the world’s ISPs by reducing their operational costs and improving customer performance. Similarly, we expect a mutually beneficial relationship as we roll out Cloudflare for Offices. Real estate operators & service offices upgraded with this amenity increase the value and occupancy of their portfolio. IT teams can enforce a consistent security posture while enabling flexible work environments from any location their employees prefer. And employees in these smart spaces, experiencing faster Internet performance, can be more productive, seamlessly working as they choose, be it at the office, at home, or on the go.
Why offices?
There’s no disputing the fact that the nature of work has undergone a tremendous shift over the past 18 months. While we still don’t know what the future of work will look like exactly, here’s what we do know: it’s going to require more flexibility, all while maintaining security and performance standards that are a prerequisite for operating on today’s Internet. Enabling flexibility, and improving performance AND security (as opposed to trading one off for the other) has been a long held belief of Cloudflare. Alongside, of course, driving value for organizations.
Cloudflare for Offices — by connecting directly with enterprises — enables us to now do that for commercial office space.
No More Band-Aid Boxes in the Basement
There are a variety of advantages to Cloudflare for Offices. First and foremost, it eliminates the need to rely on the costly, rigid hardware solutions and multiple, regional, third parties that are often required to provide secure and performant branch office connectivity. Businesses have maintained expensive and hardware-intensive office networks since the dawn of the modern Internet.
Never have they gotten less return on that investment than through the pandemic.
The hybrid future of work will only exacerbate the high costs and complexity of maintaining and securing this outdated infrastructure. MPLS links. WANs. Hardware firewalls. VPNs. All these remain mainstays of the modern office. In the same way that we look back on maintaining server rooms for compute and storage as complete anachronisms, so too will we soon look back on maintaining all these boxes in an office. We’ve spoken to customers who now have over half of their workforce remote, and who are considering giving up their office space or increasing their presence in shared workspaces. Some are being hamstrung because of a need for MPLS to make their network operate securely. But it’s not just customers. This is a problem that we ourselves have been facing. Setting up new offices, or securing and optimizing shared workspaces, is a huge lift, physically as well as technologically.
Cloudflare for Offices simplifies this: a direct connection to Cloudflare’s network puts all office traffic behind Cloudflare’s services. Now, creating an office is as simple as plugging a cable into our box, and all the security and performance features that an office typically needs are microseconds away. It also enables the creation of custom topologies on Cloudflare’s network, dramatically increasing the flexibility of your physical footprint.
“Throughout the pandemic, we’ve supported our over 12,000 employees to work safely and seamlessly from home or from our offices. Cloudflare solutions have been critical, and we’re excited to continue to partner on efficient and strong solutions.”
– Mark Papermaster, CTO and Executive Vice President, Technology and Engineering, AMD
Zero (Trust) to 100 performance
COVID-19 hasn’t just driven a paradigm shift in where people work, however. It’s also driven a paradigm shift in how organizations think about IT security.
The old model — castle and moat — was designed during the desktop era, when most computing happened on premises. Everyone within the walls of the enterprise was considered authenticated; if you were outside the office, you needed to “tunnel” in through the moat in the castle of the office. As more and more users entered the portable era — through laptops and smartphones — then more tunnels were created.
The pandemic made it so that everyone was outside the moat, tunneling into an empty castle. Nobody was in the office anymore. The paradigm has been stretched to a parody.
Google was one of the first organizations to start to think about how things could be done differently: it proposed a model called BeyondCorp, which treated internal employees to an organization similar to how it treated external customers or suppliers to an organization. To put it simply: nobody is trusted, no matter if they’re in the office or not. If you want access to something, be prepared to prove you are who you say you are.
Fast-forward to 2021, and this model — otherwise known as Zero Trust — has become the gold standard of enterprise security, to which more and more organizations are implementing. Cloudflare’s Zero Trust solution — Cloudflare for Teams — has become increasingly popular for not just its advanced functionality and its ease of use, but because, when coupled with our enterprise connectivity offerings, allows you to run more and more of your traffic across Cloudflare’s network. We call this holistic solution Cloudflare One, and it provides your organization a virtual private network in the cloud, with all the associated security and visibility benefits.
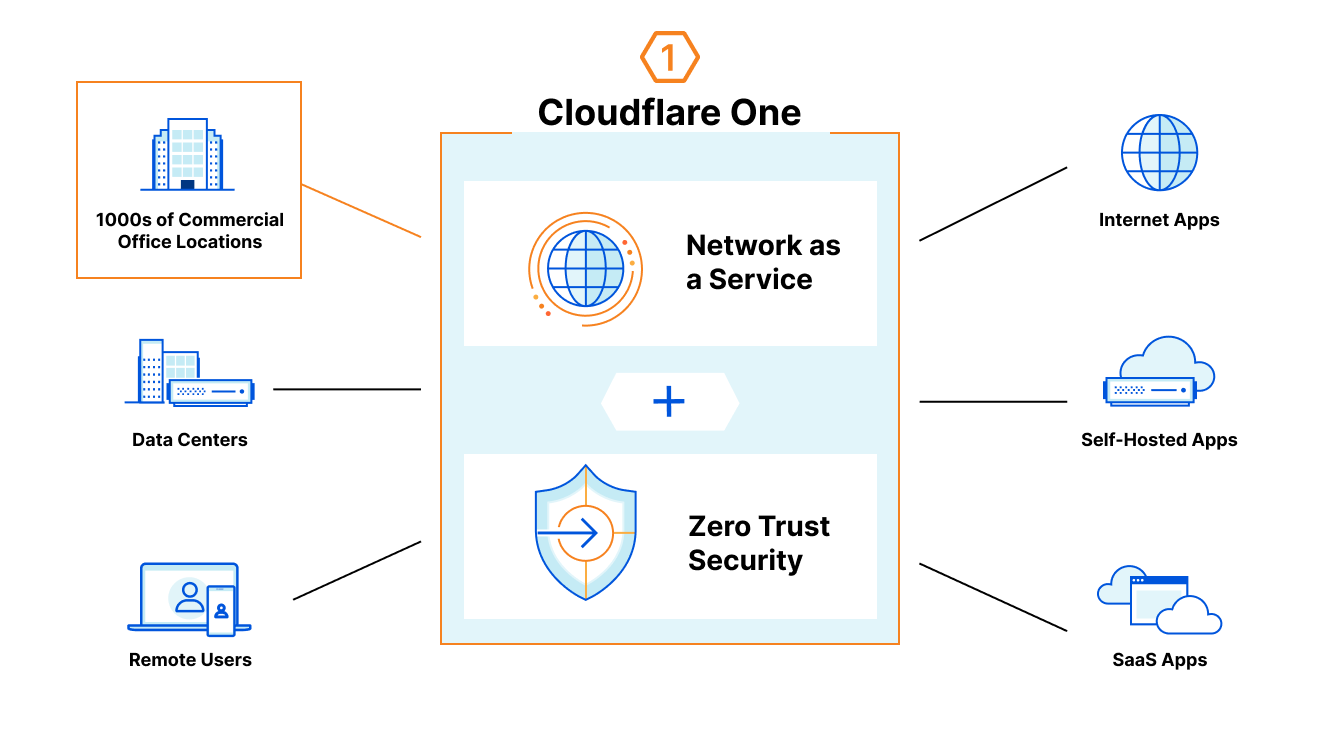
Cloudflare for Offices is the onramp for offices onto Cloudflare One. It’s a fast, private onramp for your office network traffic straight onto the Cloudflare network — with all the security and visibility benefits that running your traffic over our network provides.
We also realize that for many organizations, Zero Trust is a journey. Not every customer is ready to go from MPLS and built-out networks to trusting the public Internet overnight. Cloudflare for Offices is a great start in the journey — by building out your own networks on top of Cloudflare, you reduce your threat vectors while being able to keep your existing topologies. This gives you the privacy and security of Cloudflare One, but with the flexibility to build Zero Trust any way you choose.
But security and visibility are not the only benefits. One of the common complaints we hear from customers about competing solutions is that performance can be extremely variable. The proximity Cloudflare has to so many people around the world is important because when employees connect using a Zero Trust solution, at least a subset (but often all) the traffic going from an end-user device needs to connect to the Zero Trust provider. Having Cloudflare equipment close means that the performance of the user device will be vastly increased as opposed to having to connect to a far off data center. You’ve probably read about what happens when Cloudflare takes control of your Last Mile connectivity and your network to your data centers. And you know that connecting to a Cloudflare data center in the same city increases performance, but imagine what happens when you’re connecting to Cloudflare in your office basement. And when you think about all the employees that you have are running on a zero trust model, that performance difference sums up to a lot of additional employee productivity.
Up until now, something like this has been extremely expensive, complicated, and oftentimes, slow.
“We see a lot of potential in the way Cloudflare is bringing its network directly to our office locations. It’s critical that we empower our employees to work productively and securely, and this makes it that much easier for us to do so no matter where our teams are working from in the future–and reducing our network costs along the way.”
– Aaron Dearinger, Edge Architect, Garmin International
Cloudflare for Offices allows for customers to choose their Network as a Service: let us manage your footprint and build your network out however you like.
Living on the Edge
But it’s not just zero trust that gets a boost. Workers, Cloudflare’s serverless platform, runs on the edge from the nearest data center to the user making the request. As you might have already read: it’s fast. With more and more business and application logic being moved to Workers, your end users stand to benefit.
But it does beg the question: just how fast are we talking?

One example building we’re planning to enable is Salesforce Tower, in San Francisco. It’s 1,070 feet tall. A light signal running from the top of the building to the basement along a single-mode fiber cable would take no more than 6 µs (6 microseconds) to complete its journey. This puts customers fractions of a millisecond away from Cloudflare’s network.
The edge is becoming indistinguishable in performance from local compute.
Built for Purpose
We’ve written many times before about how Cloudflare designs our hardware. But deploying Cloudflare hardware outside of data centers — and into office basements — presented a new set of challenges. Cooling, energy efficiency, and resiliency were even more important in the design. Similarly, these are going to be deployed to offices all over the world; they needed to be cost-effective. Finally, and perhaps most importantly, there is also a security aspect to this: we could not assume the same level of access control inside a building as we could inside a data center.
This is where the inherent advantages of designing and owning the hardware come to the fore. Because of it, we’re able to build exactly what we need for the environment: ranging from how resilient these devices need to be, to an appropriate level of security given where they’re going to be operating. In fact, we have been working on hardware security for the last five years in anticipation of the launch of Cloudflare for Offices. We’re starting with switching, and we plan to add compute and storage capabilities in short order. Stay tuned for more details.
Join the Revolution
If you’re an organization (tenant) in a large office building, an owner/operator of multi-tenant (or multi-dwelling) real estate, or a co-working space looking to bring Cloudflare to your doorstep — with all the flexibility, performance and security enhancements, and cost savings that would entail — then we’d love for you to get in touch with us.
Dark Mode for the Cloudflare Dashboard
Post Syndicated from Garrett Galow original https://blog.cloudflare.com/dark-mode/


Today, dark mode is available for the Cloudflare Dashboard in beta! From your user profile, you can configure the Cloudflare Dashboard in light mode, dark mode, or match it to your system settings.
For those unfamiliar, dark mode, or light on dark color schemes, uses light text on dark backgrounds instead of the typical dark text on light (usually white) backgrounds. In low-light environments, this can help reduce eyestrain and actually reduce power consumption on OLED screens. For many though, dark mode is simply a preference supported widely by applications and devices.
How to enable dark mode
- Log into Cloudflare.
- Go to your user profile.
- Under Appearance, select an option: Light, Dark, or Use system setting. For the time being, your choice is saved into local storage.

There are many primers and how-tos on implementing dark mode, and you can find articles talking about the general complications of implementing a dark mode including this straightforward explanation. Instead, we will talk about what enabled us to be able to implement dark mode in only a matter of weeks.
Cloudflare’s Design System – Our Secret Weapon
Before getting into the specifics of how we implemented dark mode, it helps to understand the system that underpins all product design and UI work at Cloudflare – the Cloudflare Design System.
Cloudflare’s Design System defines and documents the interface elements and patterns used to build products at Cloudflare. The system can be used to efficiently build consistent experiences for Cloudflare customers. In practice, the Design System defines primitives like typography, color, layout, and icons in a clear and standard fashion. What this means is that anytime a new interface is designed, or new UI code is written, an easily referenceable, highly detailed set of documentation is available to ensure that the work matches previous work. This increases productivity, especially for new employees, and prevents repetitious discussions about style choices and interaction design.
Built on top of these design primitives, we also have our own component library. This is a set of ready to use components that designers and engineers can combine to form the products our customers use every day. They adhere to the design system, are battle tested in terms of code quality, and enhance the user experience by providing consistent implementations of common UI components. Any button, table, or chart you see looks and works the same because it is the same underlying code with the relevant data changed for the specific use case.
So, what does all of this have to do with dark mode? Everything, it turns out. Due to the widespread adoption of the design system across the dashboard, changing a set of variables like background color and text color in a specific way and seeing the change applied nearly everywhere at once becomes much easier. Let’s take a closer look at how we did that.
Turning Out the Lights
The use of color at Cloudflare has a well documented history. When we originally set out to build our color system, the tools we built and the extensive research we performed resulted in a ten-hue, ten-luminosity set of colors that can be used to build digital products. These colors were built to be accessible — not just in terms of internal use, but for our customers. Take our blue hue scale, for example.
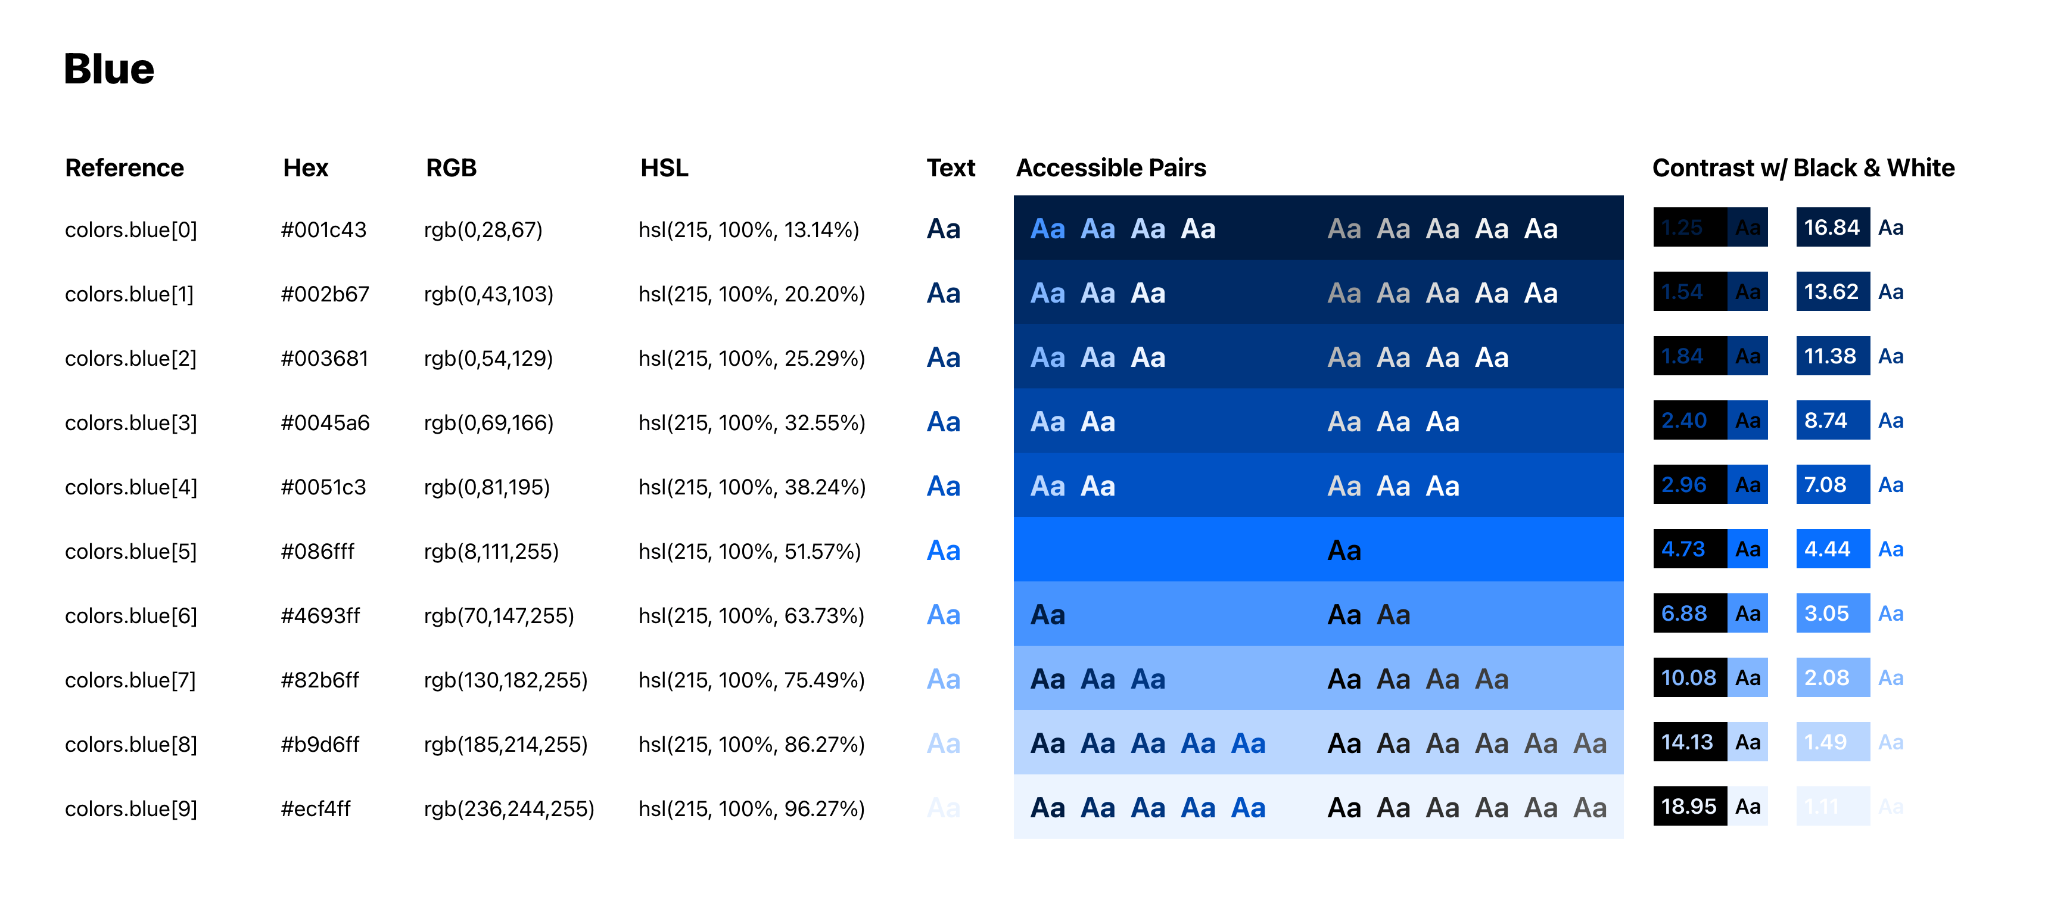
Each hue in our color scale contains ten colors, ordered by luminosity in ten increasing increments from low luminosity to high luminosity. This color scale allows us to filter down the choice of color from the 16,777,216 hex codes available on the web to a much simpler choice of just hue and brightness. As a result, we now have a methodology where designers know the first five steps in a scale have sufficient color contrast with white or lighter text, and the last five steps in a scale have sufficient contrast with black or darker text.
Color scales also allow us to make changes while designing in a far more fluid fashion. If a piece of text is too bright relative to its surroundings, drop down a step on the scale. If an element is too visually heavy, take a step-up. With the Design System and these color scales in place, we’ve been able to design and ship products at a rapid rate.
So, with this color system in place, how do we begin to ship a dark mode? It turns out there’s a simple solution to this, and it’s built into the JS standard library. We call reverse() and flip the luminosity scales.
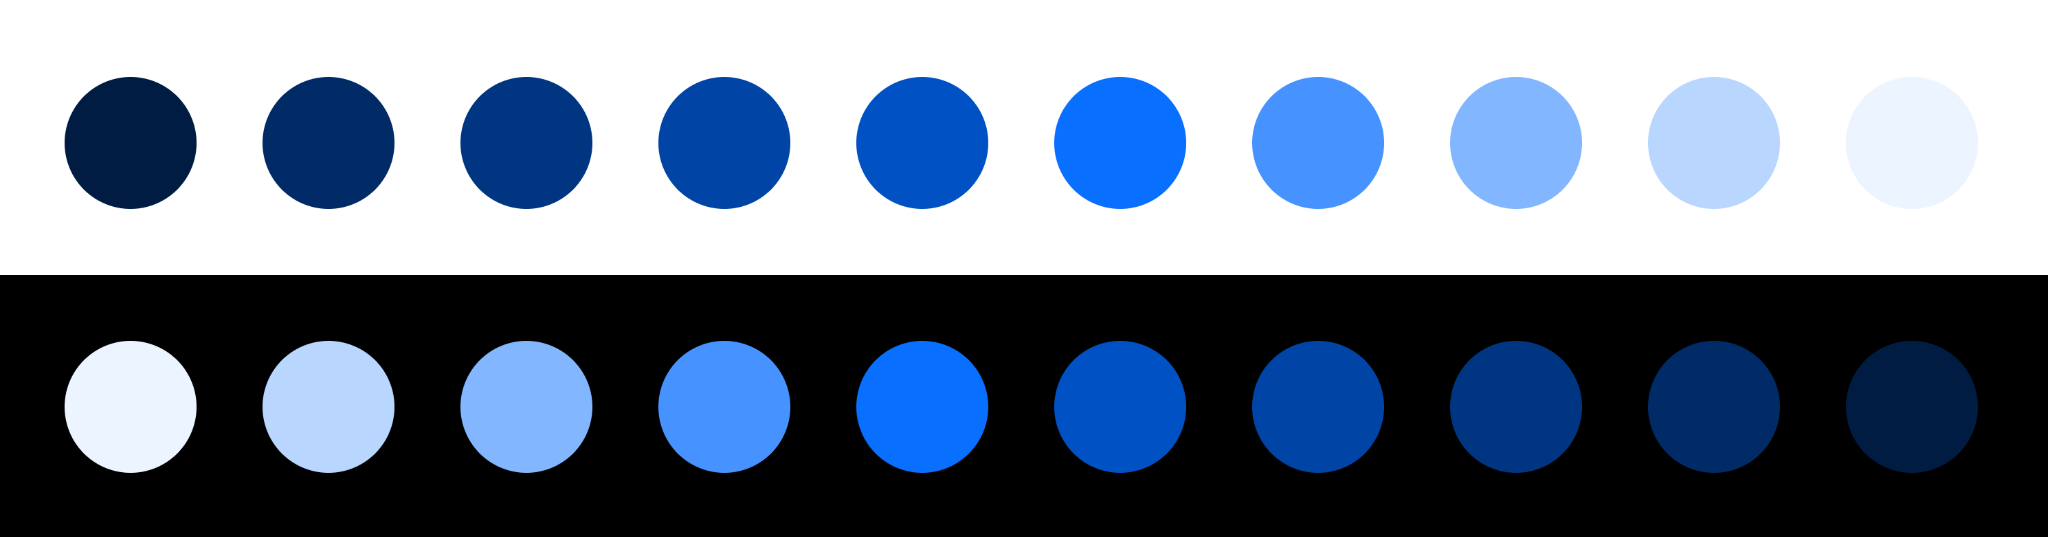
By performing this small change within our dashboard’s React codebase and shipping a production preview deploy, we were able to see the Cloudflare Dashboard in dark mode with a whole new set of colors in a matter of minutes.
While not perfect, this brief prototype gave us an incredibly solid baseline and validated the approach with a number of benefits.
Every product built using the Cloudflare Design System now had a dark mode theme built in for free, with no additional work required by teams.
Our color contrast principles remain sound — just as the first five colors in a scale would be accessible with light text, when flipped, the first five colors in the scale are accessible with dark text. Our scales aren’t perfectly symmetrical, but when using white and black, the principle still holds.
In a traditional approach of “inverting” colors, we face the issue of a color’s hue being changed too. When a color is broken down into its constituent hue, saturation, and luminosity values, inverting it would mean a vibrant light blue would become a dull dark orange. Our approach of just inverting the luminosity of a color means that we retain the saturation and hue of a color, meaning we retain Cloudflare’s brand aesthetic and the associated meaning of each hue (blue buttons as calls-to-action, and so on).
Of course, shipping a dark mode for a product as complex as the Cloudflare Dashboard can’t just be done in a matter of minutes.
Not Quite Just Turning the Lights Off
Although our prototype did meet our initial requirements of facilitating the dashboard in a dark theme, some details just weren’t quite right. The data visualization and mapping libraries we use, our icons, text, and various button and link states all had to be audited and required further iterations. One of the most obvious and prominent examples was the page background color. Our prototype had simply changed the background color from white (#FFFFFF) to black (#000000). It quickly became apparent that black wasn’t appropriate. We received feedback that it was “too intense” and “harsh.” We instead opted for off black, specifically what we refer to as “gray.0” or #1D1D1D. The difference may not seem noticeable, but at larger dimensions, the gray background is much less distracting.
Here is what it looks like in our design system:


And here is a more realistic example:

The numbers at the end of each row represent the contrast of the text color on the background. According to the Web Content Accessibility Guidelines (WCAG), the standard contrast ratio for text should be at least 4.5:1. In our case, while both of the above examples exceed the standard, the gray background ends up being less harsh to use across an entire application. This is not the case with light mode as dark text on white (#FFFFFF) background works well.
Our technique during the prototyping stage involved flipping our color scale; however, we additionally created a tool to let us replace any color within the scale arbitrarily. As the dashboard is made up of charts, icons, links, shadows, buttons and certainly other components, we needed to be able to see how they reacted in their various possible states. Importantly, we also wanted to improve the accessibility of these components and pay particular attention to color contrast.
For example, a button is made up of four distinct states:
1) Default
2) Focus
3) Hover
4) Active
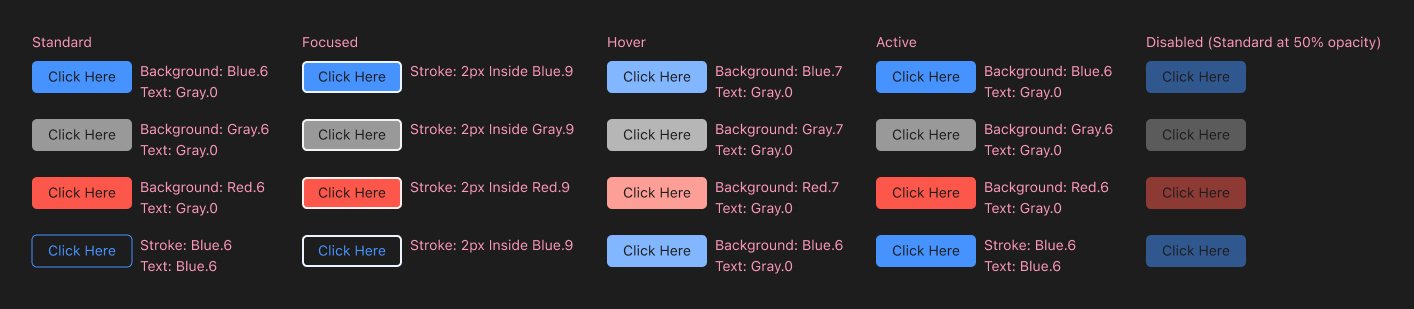
We wanted to ensure that each of these states would be at least compliant with the AA accessibility standards according to the WCAG. Using a combination of our design systems documentation and a prioritized list of components and pages based on occurrence and visits, we meticulously reviewed each state of our components to ensure their compliance.
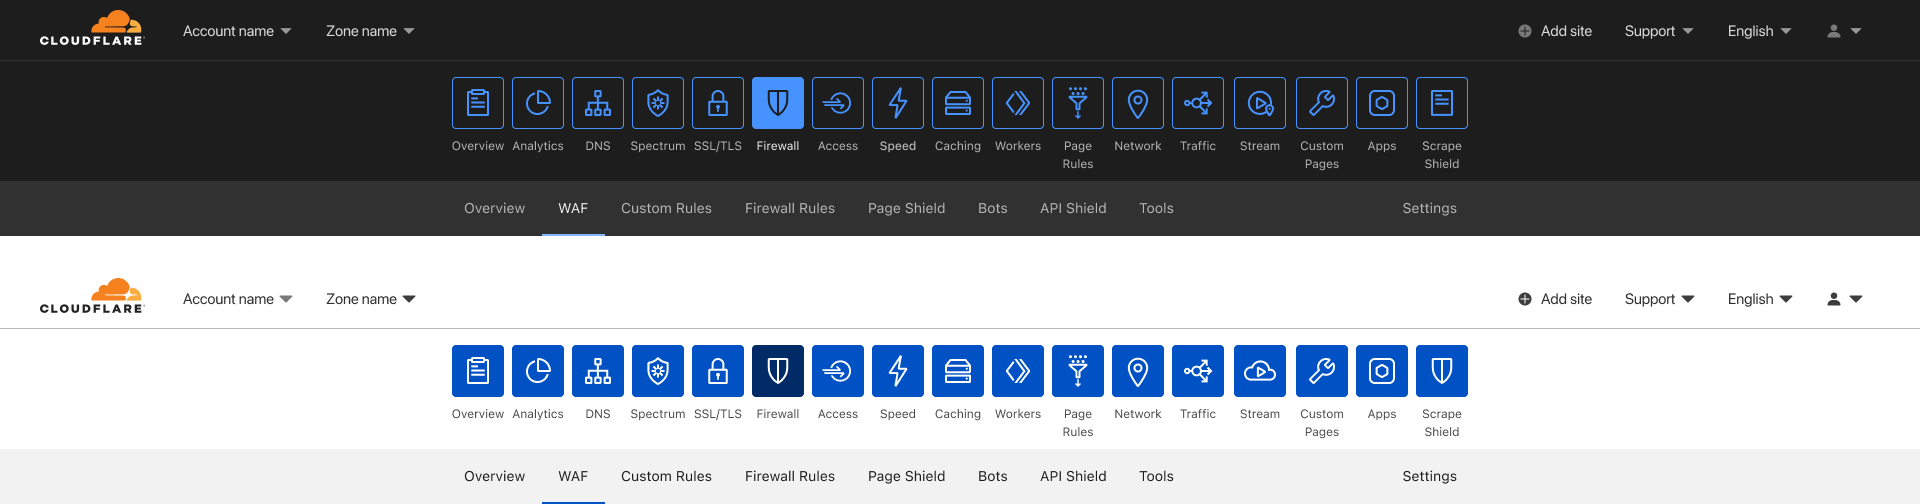
The navigation bar used to select between the different applications was a component we wanted to treat differently compared to light mode. In light mode, the app icons are a solid blue with an outline of the icon; it’s a distinct look and certainly one that grabs your attention. However, for dark mode, the consensus was that it was too bright and distracting for the overall desired experience. We wanted the overall aesthetic of dark mode to be subtle, but it’s important to not conflate aesthetic with poor usability. With that in mind, we made the decision for the navigation bar to use outlines around each icon, instead of being filled in. Only the selected application has a filled state. By using outlines, we are able to create sufficient contrast between the current active application and the rest. Additionally, this provided a visually distinct way to present hover states, by displaying a filled state.
After applying the same methodology as described to other components like charts, icons, and links, we end up with a nicely tailored experience without requiring a substantial overhaul of our codebase. For any new UI that teams at Cloudflare build going forward, they will not have to worry about extra work to support dark mode. This means we get an improved customer experience without any impact to our long term ability to keep delivering amazing new capabilities — that’s a win-win!
Welcome to the Dark Side
We know many of you have been asking for this, and we are excited to bring dark mode to all. Without the investment into our design system by many folks at Cloudflare, dark mode would not have seen the light of day. You can enable dark mode on the Appearance card in your user profile. You can give feedback to shape the future of the dark theme with the feedback form in the card.
If you find these types of problems interesting, come help us tackle them! We are hiring across product, design, and engineering!
Fitz John’s Folly: An Accident of the Most Thrilling Nature
Post Syndicated from The History Guy: History Deserves to Be Remembered original https://www.youtube.com/watch?v=xbgHRdM-MXg
Raspberry Pi helped restore this boat to former glory
Post Syndicated from Ashley Whittaker original https://www.raspberrypi.org/blog/raspberry-pi-helped-restore-this-boat-to-former-glory/
Baltic is a handsome 1962 vintage tugboat that was built in Norway, where she operated until the 1980s. She’s now in English waters, having been registered in Southampton once renovations were complete. After some initial hull restoration work in France she sailed to the western Ligurian coast in Italy, where it took about five years to complete the work. The boat’s original exterior was restored, while the inside was fully refurbished to the standard of a luxury yacht.

But where is the Raspberry Pi?
Ulderico Arcidiaco, who coordinated the digital side of Baltic’s makeover, is the CEO of Sfera Labs, so naturally he turned to Raspberry Pi Compute Module 3+ in the guise of Sfera’s Strato Pi CM Duo for the new digital captain of the vessel.
Strato Pi CM Duo is an industrial server comprising a Raspberry Pi Compute Module 3+ inside a DIN-rail case with a slew of additional features. The MagPi magazine took a good look at them when they launched.

The Strato Pi units are the four with red front panels in the cabinet pictured below. There are four other Raspberry Pi Compute Modules elsewhere onboard. Two are identical to the Strato Pi CM Duos in this photo; another is inside an Iono Pi Max; and there’s a Compute Module 4 inside an Exo Sense Pi down in the galley.
Thoroughly modern makeover
Baltic now has fully integrated control of all core and supplementary functions, from power distribution to tanks and pump control, navigation, alarms, fire, lighting, stabilisers, chargers, inverters, battery banks, and video. All powered by Raspberry Pi.

Ulderico says:
“When it was built sixty years ago, not even the wildest science fiction visionary could have imagined she would one day be fully computer controlled, and not by expensive dedicated computer hardware, but by a tiny and inexpensive device that any kid can easily buy and play with to have fun learning.
And, if there is some old-fashioned patriotism in things, the Raspberry Pi on board will surely like the idea of being back under their home British Flag.”
The post Raspberry Pi helped restore this boat to former glory appeared first on Raspberry Pi.
Comic for 2021.09.29
Post Syndicated from Explosm.net original http://explosm.net/comics/5990/
New Cyanide and Happiness Comic
Two-Factor Security Key
Post Syndicated from original https://xkcd.com/2522/

Getting started with RimWorld modding on Linux
Post Syndicated from arp242.net original https://www.arp242.net/rimworld-mod-linux.html
This describes how to create RimWorld mods on Linux; this is an introduction to
both RimWorld modding and developing C♯ with Mono; it’s essentially the steps I
followed to get started.
This doesn’t assume any knowledge of Unity, Mono, or C♯ but some familiarity
with Linux and general programming is assumed; if you’re completely new to
programming then this probably isn’t a good resource. A lot of this will work on
Windows or macOS too; it’s just the C♯ build steps that are really
Linux-specific, as are various pathnames etc.
RimWorld mods consist of two parts:
-
A set of XML definitions (“Defs”) which defines everything from items, actions
you can take, research projects, weather, etc. This is the “glue” that
actually makes stuff appear in the game, applies effects, etc.For (very) simple mods this may actually be enough, and no “real” coding is
required. You can use XML files to both add new stuff, and RimWorld has
facilities to patch existing in-game content. -
C♯ code which either adds entire new stuff, or monkey-patches existing code.
As an example we’ll make a little mod that makes it rain blood. Why? It seemed
easy enough to do while also exploring some of the core concepts. Also, I was
playing Slayer when I started on this. The complete example mod is on
GitHub, but I encourage people to modify things manually (and maybe play
around with things a bit) rather than copy/paste stuff from there; it’s just a
better way to learn things.
Getting started
Before we start with the C♯ stuff let’s set up a basic mod which adds a new
weather type; we just need to edit some XML for this.
Mods are located in the Mods/ directory in your RimWorld installation
directory; I’m using the version I bought from the RimWorld website and
extracted to ~/rimworld so that’s nice and simple. GOG.com games usually store
the actual game data in a game/ subdirectory, and I don’t know where Steam
stores things 🤷
This directory should already exist with a Mods/Place mods here.txt. A mod
must have an About/About.xml file; a minimal version looks like:
<?xml version="1.0" encoding="utf-8"?>
<ModMetaData>
    <!-- Must contain a dot; usually <author>.<modname> -->
    <packageId>arp242.RainingBlood</packageId>
    <name>Raining blood</name>

    <!-- Game versions this mod supports. More on game versions later. -->
    <supportedVersions>
        <li>1.1</li>
        <li>1.2</li>
        <li>1.3</li>
    </supportedVersions>
</ModMetaData>
See ModUpdating.txt in the RimWorld installation directory for a full
description of the About.xml fields. For now, this is enough.
The official content uses essentially the same structure as a mod except that
it’s in the Data/ directory; e.g. Data/Core/ contains the base game,
Data/Royalty the Royalty expansion, etc. To find the weather definitions I
just used:
[~/rimworld/Data/Core]% ls (#i)**/*weather*.xml
Defs/WeatherDefs/Weathers.xml
The (#i) makes things case-insensitive in zsh, FYI. zsh is nice. You can also
use find -iname if you enjoy more typing.
Weathers.xml seems to define all the weather types. I copied the definition of
“rain” to Mods/RainingBlood/Defs/WeatherDefs/RainingBlood.xml with some
modifications:
<?xml version="1.0" encoding="utf-8" ?>
<Defs>
<WeatherDef>
	<defName>RainingBlood</defName>
	<label>raining blood</label>
	<description>It's raining blood; what the hell?!</description>

    <!-- ThoughtDefs/RainingBlood.xml -->
    <!-- <exposedThought>SoakingWet</exposedThought> -->
	<exposedThought>BloodCovered</exposedThought>

	<!-- Copied from rain -->
	<temperatureRange>0~100</temperatureRange>
	<windSpeedFactor>1.5</windSpeedFactor>
	<accuracyMultiplier>0.8</accuracyMultiplier>
	<favorability>Neutral</favorability>
	<perceivePriority>1</perceivePriority>

	<rainRate>1</rainRate>
	<moveSpeedMultiplier>0.9</moveSpeedMultiplier>
	<ambientSounds>
		<li>Ambient_Rain</li>
	</ambientSounds>
	<overlayClasses>
		<li>WeatherOverlay_Rain</li>
	</overlayClasses>
	<commonalityRainfallFactor>
		<points>
			<li>(0, 0)</li>
			<li>(1300, 1)</li>
			<li>(4000, 3.0)</li>
		</points>
	</commonalityRainfallFactor>

	<!-- Colours modified to be reddish; just a crude effect. -->
	<skyColorsDay>
		<sky>(0.8,0.2,0.2)</sky>
		<shadow>(0.92,0.2,0.2)</shadow>
		<overlay>(0.7,0.2,0.2)</overlay>
		<saturation>0.9</saturation>
	</skyColorsDay>

	<skyColorsDusk>
		<sky>(1,0,0)</sky>
		<shadow>(0.92,0.2,0.2)</shadow>
		<overlay>(0.6,0.2,0.2)</overlay>
		<saturation>0.9</saturation>
	</skyColorsDusk>

	<skyColorsNightEdge>
		<sky>(0.35,0.10,0.15)</sky>
		<shadow>(0.92,0.22,0.22)</shadow>
		<overlay>(0.5,0.1,0.1)</overlay>
		<saturation>0.9</saturation>
	</skyColorsNightEdge>

	<skyColorsNightMid>
		<sky>(0.35,0.20,0.25)</sky>
		<shadow>(0.92,0.22,0.22)</shadow>
		<overlay>(0.5,0.2,0.2)</overlay>
		<saturation>0.9</saturation>
	</skyColorsNightMid>
</WeatherDef>
</Defs>
The location where you store it doesn’t actually matter as long as it’s in
Defs; Defs/xxx.xml will work too. Internally all XML files in Defs/ are
scanned in the same data structure; it just recursively searches for *.xml
files and uses <defName>RainingBlood</defName> to identify them rather than
the path.
It’s not very fancy. We also need a new “exposed thought”; that’s the mood
modifier that shows up in the “needs” tab; “Soaking wet” doesn’t really seem
applicable if you’re “soaking wet in blood” 🙃
Let’s grep for it:
[~/rimworld/Data/Core]% rg SoakingWet
Defs/TerrainDefs/Terrain_Water.xml
12:    <traversedThought>SoakingWet</traversedThought>

Defs/ThoughtDefs/Thoughts_Memory_Misc.xml
297:    <defName>SoakingWet</defName>

Defs/WeatherDefs/Weathers.xml
98:    <exposedThought>SoakingWet</exposedThought>
202:    <exposedThought>SoakingWet</exposedThought>
267:    <exposedThought>SoakingWet</exposedThought>
Thoughts_Memory_Misc.xml seems to be what we want, so make a copy of that to
Mods/RainingBlood/Defs/ThoughtDefs/RainingBlood.xml:
<?xml version="1.0" encoding="utf-8" ?>
<Defs>
<ThoughtDef>
    <defName>BloodCovered</defName>
    <durationDays>0.1</durationDays>
    <stackLimit>1</stackLimit>
    <stages>
        <li>
            <label>blood covered</label>
            <description>I'm covered in blood; yuk!</description>
            <baseMoodEffect>-30</baseMoodEffect>
        </li>
    </stages>
</ThoughtDef>
</Defs>
The meaning of the fields in both XML files should be mostly self-explanatory,
but if you want to know what exactly something does you’ll need to decompile
the game to read the source code. We’ll cover that later.
At this point, the basic mod should be done; let’s test it.
Running the game
Start the name normally and select the mod in the Mods panel. After this you can
start the game with ./RimworldLinux -quicktest, which will start the game in a
new small map with the last selected mods.
You can select “Development mode” in options, which will give you a few buttons
at the top, it will also allow you to open the console with ` and
you can speed up things a wee bit more by pressing 4 (ludicrous speed!) Most
of the buttons etc. should be self-explanatory; there’s some more information
on the RimWorld wiki.
Click the “debug actions” button at the top, which has “Change Weather” (filter
in the top-left corner; you may need to scroll down). After clicking RainBlood
it takes a few seconds for the weather to transition and the status to show up
in your colonists.
Patching the biomes
It’s all very good that we can select this from our magical debug actions, but
does it actually appear in a regular game? Let’s search where the
RainyThunderstorm weather is referenced (as that’s a bit more unique than just
“rain”):
[~/rimworld/Data/Core]% rg RainyThunderstorm
Defs/BiomeDefs/Biomes_Cold.xml
101:      <RainyThunderstorm>1</RainyThunderstorm>
234:      <RainyThunderstorm>1</RainyThunderstorm>
389:      <RainyThunderstorm>1</RainyThunderstorm>
513:      <RainyThunderstorm>0</RainyThunderstorm>
611:      <RainyThunderstorm>0</RainyThunderstorm>

Defs/BiomeDefs/Biomes_Temperate.xml
104:      <RainyThunderstorm>1</RainyThunderstorm>
262:      <RainyThunderstorm>1</RainyThunderstorm>

Defs/BiomeDefs/Biomes_Warm.xml
109:      <RainyThunderstorm>1.7</RainyThunderstorm>
277:      <RainyThunderstorm>1.7</RainyThunderstorm>

Defs/BiomeDefs/Biomes_WarmArid.xml
79:      <RainyThunderstorm>1</RainyThunderstorm>
204:      <RainyThunderstorm>1</RainyThunderstorm>
312:      <RainyThunderstorm>1</RainyThunderstorm>

Defs/WeatherDefs/Weathers.xml
193:    <defName>RainyThunderstorm</defName>
e.g. Biomes_Cold.xml has:
<baseWeatherCommonalities>
    <Clear>18</Clear>
    <Fog>1</Fog>
    <Rain>2</Rain>
    <DryThunderstorm>1</DryThunderstorm>
    <RainyThunderstorm>1</RainyThunderstorm>
    <FoggyRain>1</FoggyRain>
    <SnowGentle>4</SnowGentle>
    <SnowHard>4</SnowHard>
</baseWeatherCommonalities>
Now let’s try adding our bloody rain with a high chance of spawning:
<baseWeatherCommonalities>
    <Clear>18</Clear>
    <Fog>1</Fog>
    <Rain>2</Rain>
    <DryThunderstorm>1</DryThunderstorm>
    <RainyThunderstorm>1</RainyThunderstorm>
    <FoggyRain>1</FoggyRain>
    <SnowGentle>4</SnowGentle>
    <SnowHard>4</SnowHard>

    <RainingBlood>64</RainBlood> <!-- References the defName -->
</baseWeatherCommonalities>
Why 64? Well, the other numbers add up to 32 and if they’re relative weights
then 64 means a 2/3rd chance of our raining blood weather. “Trying it and seeing
what happens” is pretty much what I’m doing here. Throw enough macaroni at a
wall and sooner or later some of it will stick.[1]
The easiest way to override this is to copy the XML file to your
Mods/[..]/Defs/ directory. Again, the path doesn’t matter, it just looks at
the defName attribute; the last one overrides any previous ones.
This is pretty useful for testing, debugging, etc. as you can focus on just the
XML without worrying if it’s patched correctly. The obvious downside is that you
won’t include any future updates (which may break the game due to missing fields
etc.), and if someone decides to make a “RainingMen” mod then one will override
the other, and you can’t have both mods. You never want to do this in a
published mod, but for testing it’s useful.
Testing this is a bit annoying, since you need to wait for it to take effect.
Also, it seems the game always sets the initial weather for at least 10 in-game
days, so you may want to load a save game instead of using -quicktest.
Remember You can press 4 for if you enabled the dev console, which speeds up
the game to 15× (3 is 6×). You can also make 4 speed it up to a whopping
150× by going to the “TweakValues” developer menu and enabling
TickManager.UltraSpeedBoost. I am disappointed this is called UltraFast and
UltraSpeedBoost instead of RidiculousSpeed and LudicrousSpeed.
After confirming that our “override it all”-method works let’s properly patch
stuff. There are several ways of patching XML resources; I’ll use XPath
here, which is the easiest if you just need to patch some XML. Any XML file in
Patches/ is treated as patch.
Our patch will just all biomes in Patches/Biomes.xml, but you can select for
[defName=..] if you only want to patch specific ones. Remember to remove the
overrides if you have any.
<?xml version="1.0" encoding="utf-8" ?>
<Patch>
<!-- Class, not class! -->
<Operation Class="PatchOperationAdd">
    <xpath>/Defs/BiomeDef/baseWeatherCommonalities</xpath>
    <value>
        <RainingBlood>64</RainingBlood>
    </value>
</Operation>
</Patch>
As previously mentioned all XML files in Defs/ are in the same data structure,
so don’t worry about the pathnames. There are a number of other operations you
can do; see the full documentation for more details on how patching
works.
You can use xmllint from libxml2 to test queries on the commandline:
% xmllint --xpath '/Defs/BiomeDef/baseWeatherCommonalities' \
    Data/Core/Defs/BiomeDefs/Biomes_Cold.xml
Writing C♯ code
Let’s expand the mod a bit by making cannibals like raining blood and give
them a mood boost, rather than a mood penalty. There isn’t any way to express
that in the XML defs, so we need some code for that.
Decompiling the code
Some of the game’s source code is in the installation directory (e.g.
~/rimworld/Source) but it’s not a lot; there’s
Source/Verse/Defs/DefTypes/WeatherDef.cs, but it’s not all that useful. You
can more or less ignore this directory.
To actually figure out how to write mods we’ll need to decompile the C♯ code in
RimWorldLinux_Data/Managed/Assembly-CSharp.dll.[2] There are several
tools for this; I’ll use ILSpy. This doesn’t seem packaged in most
distros but there are Linux binaries for the GUI available as
AvaloniaILSpy. This seems to work well enough, but I prefer to extract all the
code at once so I can use Vim and grep and whatnot, and the GUI doesn’t seem to
do that (there is “save code”, but that doesn’t seem to do anything).
You need to build the ilspycmd binary from source, there isn’t a pre-compiled
version as far as I can find. Basic instructions:
# The ".NET home".
% export DOTNET_ROOT=$HOME/dotnet
% mkdir -p $DOTNET_ROOT

# Needs .NET SDK 5 and .NET Core 3.1; binaries from:
#   https://dotnet.microsoft.com/download/dotnet/5.0
#   https://dotnet.microsoft.com/download/dotnet/3.1
# Versions may be different; this is just indicative.
% tar xf dotnet-sdk-5.0.401-linux-x64.tar.gz -C $DOTNET_ROOT
% tar xf dotnet-sdk-3.1.413-linux-x64.tar.gz -C $DOTNET_ROOT

# Add the dotnet path, the binaries we compile later will be in ~/.dotnet/tools
% export PATH=$PATH:$HOME/dotnet:$HOME/.dotnet/tools

# Just the "source code" tar.gz from the GitHub release:
# https://github.com/icsharpcode/ILSpy/archive/refs/tags/v7.1.tar.gz
% tar xf ILSpy-7.1.tar.gz
% cd ILSpy-7.1
% dotnet tool install ilspycmd -g

# Now decompile the lot to src.
% cd ~/rimworld
% mkdir src
% ilspycmd ./RimWorldLinux_Data/Managed/Assembly-CSharp.dll -p -o src

# Hurray!
% ls src
Assembly-CSharp.csproj       FleckUtility.cs         RimWorld/
ComplexWorker_Ancient.cs     HistoryEventUtility.cs  Verse/
ComplexWorker.cs             Ionic/                  WeaponClassDef.cs
DarknessCombatUtility.cs     Properties/             WeaponClassPairDef.cs
FleckParallelizationInfo.cs  ResearchUtility.cs
You only need to do this once. Note that the DOTNET_ROOT is a runtime
dependencies of ilspycmd, so don’t remove it unless you’re sure you don’t need
to run it again.
The decompiled source doesn’t have any comments, and some variables seem changed
from the original (e.g. num1, num2, num3, etc.) but it’s mostly fairly
readable. The versions in Source do have comments, but the paths don’t quite
match up (it seems many subdirs are lost in the decompile?) I considered copying
them over to src but I’m not sure if the code in Source matches the exact
version.
Building the Assembly
“Assembly” is C♯ speak for any compiled output such as an executable (.exe) or
shared library (.dll). We need to set up a “build solution” (C♯ “Makefiles”) to
build them. Let’s start by just setting up a basic example before we start
actually writing code.
By convention the source code lives in Mods/.../Source/, but I don’t think
this is required since the game doesn’t do anything with it directly. The
resulting DLL files should be in Mods/.../Assemblies/. Note that you will use
a .dll file on Linux as well – it’s just how Mono/C♯ on Linux works. They are
cross-platform, an assembly built on Linux should also work on Windows and
vice-versa.
The game code lives in two namespaces: Verse and RimWorld. Verse is the
game engine and RimWorld is the game built on that. At least, I think that was
the intention at some point as all sort of RimWorld-specific things seem to be
in Verse (which also references the RimWorld namespace frequently) and there
isn’t really a clear dividing line, but mostly: general “engine-y things” are in
Verse and “RimWorld-y things” are in RimWorld, except when they’re not.
In Source/RainingBlood.cs we’ll add a simple example to log something to the
developer console:
namespace RainingBlood {
    [Verse.StaticConstructorOnStartup]
    public static class RainingBlood {
        static RainingBlood() {
            Verse.Log.Message("Hello, world!");
        }
    }
}
The [Verse.StaticConstructorOnStartup] annotation makes the code run when the game
starts. Basically, the game searches for all static constructors with this
annotation and startup and executes them. If you really want to know how it
works you can use something like rg '[^\[]StaticConstructorOnStartup'.
Another way is inheriting from the Verse.Mod class, which allows some more
advanced things (most notably implementing settings), but I’m not
going to cover that here.
To build this we’ll need to set up a “build solution”, which consists of a
.csproj XML file and a .sln file. This is something I mostly just copied and
modified from other projects; it seems that most people are auto-generating this
from Visual Studio or MonoDevelop, with little instructions on how to write
these things manually. There’s probably a better way of doing some things (not a
huge fan of the hard-coded paths instead of using some LDPATH analogue), but I
haven’t dived in to this yet.
Anyway, here’s what I ended up with in Mods/RainingBlood/RainingBlood.csproj:
<?xml version="1.0" encoding="utf-8"?>
<Project ToolsVersion="14.0" DefaultTargets="Build" xmlns="http://schemas.microsoft.com/developer/msbuild/2003">

    <Import
        Project="$(MSBuildExtensionsPath)/$(MSBuildToolsVersion)/Microsoft.Common.props"
        Condition="Exists('$(MSBuildExtensionsPath)/$(MSBuildToolsVersion)/Microsoft.Common.props')"
    />

    <PropertyGroup>
        <RootNamespace>RainingBlood</RootNamespace>
        <AssemblyName>RainingBlood</AssemblyName>
        <!-- You probably want to modify this GUID for your mod, as it's supposed to be unique.
             This is also referenced in the .sln file.
             My system has "uuidgen" to generate UUIDs. -->
        <ProjectGuid>{7196d15e-d480-441a-a2e0-87b9696dd38f}</ProjectGuid>

        <Configuration Condition=" '$(Configuration)' == '' ">Debug</Configuration>
        <Platform Condition=" '$(Platform)' == '' ">AnyCPU</Platform>
        <OutputType>Library</OutputType>
        <AppDesignerFolder>Properties</AppDesignerFolder>
        <TargetFrameworkVersion>v4.7.2</TargetFrameworkVersion>
        <FileAlignment>512</FileAlignment>
        <TargetFrameworkProfile />
    </PropertyGroup>

    <!-- Debug build -->
    <PropertyGroup Condition=" '$(Configuration)|$(Platform)' == 'Debug|AnyCPU' ">
        <DebugSymbols>false</DebugSymbols>
        <DebugType>none</DebugType>
        <Optimize>false</Optimize>
        <OutputPath>Assemblies/</OutputPath>
        <DefineConstants>DEBUG;TRACE</DefineConstants>
        <ErrorReport>prompt</ErrorReport>
        <WarningLevel>4</WarningLevel>
        <UseVSHostingProcess>false</UseVSHostingProcess>
        <Prefer32Bit>false</Prefer32Bit>
    </PropertyGroup>
    <!-- Release build -->
    <PropertyGroup Condition=" '$(Configuration)|$(Platform)' == 'Release|AnyCPU' ">
        <DebugType>none</DebugType>
        <Optimize>true</Optimize>
        <OutputPath>Assemblies/</OutputPath>
        <DefineConstants>TRACE</DefineConstants>
        <ErrorReport>prompt</ErrorReport>
        <WarningLevel>3</WarningLevel>
        <Prefer32Bit>false</Prefer32Bit>
    </PropertyGroup>

    <!-- Dependencies -->
    <ItemGroup>
        <!-- The main game code (RimWorld and Verse) -->
        <Reference Include="Assembly-CSharp">
            <HintPath>../../RimWorldLinux_Data/Managed/Assembly-CSharp.dll</HintPath>
            <Private>False</Private>
        </Reference>

        <!-- C#/.NET stdlib -->
        <Reference Include="System" />
        <Reference Include="System.Core" />
        <Reference Include="System.Runtime.InteropServices.RuntimeInformation" />
        <Reference Include="System.Xml.Linq" />
        <Reference Include="System.Data.DataSetExtensions" />
        <Reference Include="Microsoft.CSharp" />
        <Reference Include="System.Data" />
        <Reference Include="System.Net.Http" />
        <Reference Include="System.Xml" />
    </ItemGroup>

    <!-- File list -->
    <ItemGroup>
        <Compile Include="Source/RainingBlood.cs" />
    </ItemGroup>

    <Import Project="$(MSBuildToolsPath)/Microsoft.CSharp.targets" />
</Project>
And Mods/RainingBlood/RainingBlood.sln:
Microsoft Visual Studio Solution File, Format Version 12.00
# Visual Studio 15
VisualStudioVersion = 15.0.27703.2035
MinimumVisualStudioVersion = 10.0.40219.1
Project("{57073194-e8b4-4a20-b60c-ee0e10947af0}") = "RainingBlood", "RainingBlood.csproj", "{7196d15e-d480-441a-a2e0-87b9696dd38f}"
EndProject
Global
    GlobalSection(SolutionConfigurationPlatforms) = preSolution
        Debug|Any CPU = Debug|Any CPU
        Release|Any CPU = Release|Any CPU
    EndGlobalSection
    GlobalSection(ProjectConfigurationPlatforms) = postSolution
        {7196d15e-d480-441a-a2e0-87b9696dd38f}.Debug|Any CPU.ActiveCfg = Debug|Any CPU
        {7196d15e-d480-441a-a2e0-87b9696dd38f}.Debug|Any CPU.Build.0 = Debug|Any CPU
        {7196d15e-d480-441a-a2e0-87b9696dd38f}.Release|Any CPU.ActiveCfg = Release|Any CPU
        {7196d15e-d480-441a-a2e0-87b9696dd38f}.Release|Any CPU.Build.0 = Release|Any CPU
    EndGlobalSection
    GlobalSection(SolutionProperties) = preSolution
        HideSolutionNode = FALSE
    EndGlobalSection
    GlobalSection(ExtensibilityGlobals) = postSolution
        SolutionGuid = {31005EA7-3F04-446F-80B2-016137708540}
    EndGlobalSection
EndGlobal
To build it you’ll need msbuild, which is not included in the Standard Mono
installation. It does have xbuild, but that gives a deprecated warning
pointing towards msbuild. Maybe it works as well, but I didn’t try it. Luckily
msbuild does seem commonly packaged, so I just installed it from there.
I put the solution files in the project root; other people prefer to put it in
the Source/ directory, but you’ll need to modify some of the paths if you put
it there. To build it, simply run msbuild from the directory, or use msbuild to specify a path. After this you should have
Mods/RainingBlood
Assemblies/RainingBlood.dll.
After starting the game now and opening the developer console you should see
“Hello, world!” in there.
Writing the code
Alrighty, now that all the plumbing is working we can actually start doing some
stuff. Let’s see what grepping for exposedThought gives us:
[~/rimworld/src]% rg exposedThought
Verse/AI/Pawn_MindState.cs
415: if (curWeatherLerped.exposedThought != null && !pawn.Position.Roofed(pawn.Map))
417:     pawn.needs.mood.thoughts.memories.TryGainMemoryFast(curWeatherLerped.exposedThought);

Verse/WeatherDef.cs
35: public ThoughtDef exposedThought;
Verse/AI/Pawn_MindState.cs seems to be what we want, and reading through
MindStateTick() the logic seems straightforward enough:
namespace Verse.AI {
    public class Pawn_MindState : IExposable {
        // [..]

        public void MindStateTick() {
            // [..]

            if (Find.TickManager.TicksGame % 123 == 0 &&
                pawn.Spawned && pawn.RaceProps.IsFlesh && pawn.needs.mood != null
            ) {
                TerrainDef terrain = pawn.Position.GetTerrain(pawn.Map);
                if (terrain.traversedThought != null) {
                    pawn.needs.mood.thoughts.memories.TryGainMemoryFast(terrain.traversedThought);
                }

                WeatherDef curWeatherLerped = pawn.Map.weatherManager.CurWeatherLerped;
                if (curWeatherLerped.exposedThought != null && !pawn.Position.Roofed(pawn.Map)) {
                    pawn.needs.mood.thoughts.memories.TryGainMemoryFast(curWeatherLerped.exposedThought);
                }
            }

            // [..]
        }
    }
}
So every 123rd “tick” it checks the terrain and weather and applies any mood
effects. Digging a bit deeper:
-
The
Pawnclass describes a person or animal (“pawn”) in the game; every Pawn
has a MindState attached to it. -
On every “tick” it calls the MindStateTick() method on the attached MindState
instsance as long as the pawn isn’t dead (as well as a number of other
things). -
One “tick” corresponds to 1/60th real second, which is 1.44 minutes in-game
time. This is the game’s Planck time: everything that happens will take at
least 1.44 minutes in-game. -
There are also “rare ticks” (= 250 ticks = 4.15 real seconds = 6 hours
in-game, or 1/4th of a day) and “long ticks” (= 1000 ticks = 33.33 real
seconds = 1 day in-game) that you can hook in to various places. -
If you speed up the game then ticks are just emitted faster: 3× or 6×. So
instead of emitting a tick once every 1/60th second it becomes once every
1/180th second or 1/360th second.
You can find a bit more about this in Verse/Tick*.cs. It’s not really needed
to know this for a simple mod like this, but it’s useful to know if you want to
write actual real mods.
Anyway, so how to add our custom logic? Let’s first add a new “thought” we want
to apply to Defs/ThoughtDefs/RainingBlood.xml we created earlier:
<ThoughtDef>
    <defName>BloodCoveredCannibal</defName>
    <durationDays>0.1</durationDays>
    <stackLimit>1</stackLimit>
    <stages>
        <li>
            <label>blood covered</label>
            <description>Reigning in blood!</description>
            <baseMoodEffect>10</baseMoodEffect>
        </li>
    </stages>
</ThoughtDef>
And in the Defs/WeatherDefs/RainingBlood.xml let’s add some new fields next to
the exposedThought we already have:
<modExtensions>
	<!-- Class, not class! -->
	<li Class="RainingBlood.WeatherDefExtension">
		<exposedThoughtCannibal>BloodCoveredCannibal</exposedThoughtCannibal>
	</li>
</modExtensions>
The way the XML maps to C♯ code is that every entry in the XML file is expected
to be a field in the *Def class (inherits from Verse.Def), for example for
the existing exposedThought the WeatherDef class has:
public ThoughtDef exposedThought;
If you were to just add exposedThoughtCannibal you’d get an error telling you
that exposedThoughtCannibal isn’t a field in the class:
<exposedThoughtCannibal>[...] doesn't correspond to any field in in type WeatherDef
But RimWorld comes with the modExtensions field to extend Defs. In this case
we’re adding it to an entire new Def, but you can also patch existing Defs with
XPath and PatchOperationAddModExtension.
You’ll also need to add a new class inhereting from Verse.DefModExtension:
namespace RainingBlood {
    public class WeatherDefExtension : Verse.DefModExtension {
        public RimWorld.ThoughtDef exposedThoughtCannibal;
    }
}
The Class attribute in the XML links the XML fields to this class. The name
can be anything. We can get the value in C♯ with the GetModExtension<T>()
method on any Def class, where T is the type (class name) you want. For
example, GetModExtension<WeatherDefExtension>() in this case. By using the
type system multiple mods can attach their own extensions and not conflict.
Using Harmony
To make this actually do something we need to hook in some code; RimWorld
itself doesn’t really have a “mod system” for this, but we can use Harmony.
Harmony is a C♯ library to patch existing code and can do a number of things,
but the most useful (and least error-prone) is to run code before or after a
method. In our case, we want to run code after
Pawn_MindState.MindStateTick() to apply the exposedThoughtCannibal thought.
To use this we’ll need to register it as a dependency in our About/About.xml file:
<modDependencies>
    <li>
        <packageId>brrainz.harmony</packageId>
        <displayName>Harmony</displayName>
        <steamWorkshopUrl>steam://url/CommunityFilePage/2009463077</steamWorkshopUrl>
        <downloadUrl>https://github.com/pardeike/HarmonyRimWorld/releases/latest</downloadUrl>
    </li>
</modDependencies>
We’ll also have to add it to the RainingBlood.csproj file as a dependency
before the Assembly-CSharp dependency:
<!-- Dependencies -->
<ItemGroup>
    <!-- Harmony must be loaded first -->
    <Reference Include="0Harmony">
        <HintPath>../HarmonyRimWorld/Current/Assemblies/0Harmony.dll</HintPath>
        <Private>False</Private>
    </Reference>

    <!-- The main game code (RimWorld and Verse) -->
    <Reference Include="Assembly-CSharp">
        <HintPath>../../RimWorldLinux_Data/Managed/Assembly-CSharp.dll</HintPath>
        <Private>False</Private>
    </Reference>

    [..]
Now we can use it to run some code after the Pawn_MindState.MindStateTick()
method:
namespace RainingBlood {
    public class WeatherDefExtension : Verse.DefModExtension {
        public RimWorld.ThoughtDef exposedThoughtCannibal;
    }

    [Verse.StaticConstructorOnStartup]
    public static class Patch {
        static Patch() {
            // Get the method we want to patch.
            var m = typeof(Verse.AI.Pawn_MindState).GetMethod("MindStateTick");

            // Get the method we want to run after the original.
            var post = typeof(RainingBlood.Patch).GetMethod("PostMindStateTick",
                       System.Reflection.BindingFlags.Static|System.Reflection.BindingFlags.Public);

            // Patch stuff! The string passed to the Harmony constructor can be
            // anything, and can be used to identify/remove patches if need be.
            new HarmonyLib.Harmony("arp242.rainingblood").Patch(m,
                postfix: new HarmonyLib.HarmonyMethod(post));
        }

        // The special __instance parameter has the original class instance
        // we're extending. This is based on the argument name.
        public static void PostMindStateTick(Verse.AI.Pawn_MindState __instance) {
            var pawn = __instance.pawn;

            // Same condition as MindStateTick, but inversed for early return.
            if (Verse.Find.TickManager.TicksGame % 123 != 0 ||
                !pawn.Spawned || !pawn.RaceProps.IsFlesh || pawn.needs.mood == null)
                return;

            // Is this pawn a cannibal? If not, then there's nothing to do. You
            // can also expand this by checking for the Ideology cannibalism
            // memes, but this just checks the "cannibalism" trait on colonists.
            if (!pawn.story.traits.HasTrait(RimWorld.TraitDefOf.Cannibal))
                return;

            // Let's see if the current weather has our new exposedThoughtCannibal.
            var w = pawn.Map.weatherManager.CurWeatherLerped;
            if (!w.HasModExtension<WeatherDefExtension>())
                return;
            var t = w.GetModExtension<WeatherDefExtension>().exposedThoughtCannibal;
            if (t == null)
                return;

            // Remove any existing thought that was applied and apply our
            // cannibalistic thoughts.
            if (w.exposedThought != null)
                pawn.needs.mood.thoughts.memories.RemoveMemoriesOfDef(w.exposedThought);
            pawn.needs.mood.thoughts.memories.TryGainMemoryFast(t);
        }
    }
}
I use the “manual method” here as that’s a bit easier to debug if you did
something wrong, but you can also use the annotations. Again, see the Harmony
documentation. One thing you need to watch out for is getting the
BindingFlags.[..] right. If you don’t then the reflection library won’t find
your method and it’ll return null. See the GetMethod() documentation. This
part actually took me quite a bit to get working. Unfortunately RimWorld doesn’t
have a REPL or console (AFAIK?) but you can use some printf-debugging with
Verse.Log.Message($"{var}") and the like.
I’m not going to step through the rest of the code in more detail here; I think
most of it should be obvious. I mostly just found this be looking through
various code and some strategic grepping. You can test this by using the Debug
Actions menu, which allows assigning the Cannibalism trait to a colonist.
Next steps
The above wasn’t really all that useful as such, and there are many more parts
of RimWorld modding – most of which I haven’t looked at in detail yet – but this
should at least give a decent base to get started with.
I have to say that I found a lot of documentation and guides on the topic to be
of, ehm, less-than-stellar quality :-/ The RimWorld wiki has a whole bunch of
pages, but – with a few exceptions linked in the article here – I found many are
unclear, outdated, or both, and in a few cases just downright wrong. Keep that
in mind if something doesn’t work: usually it’s a mistake to assume the
documentation is wrong instead of you, but here it might actually be the case.
I’ll see if I’ll write some more if I keep up interest in this.
Some additional reading for topics not covered:
-
Details how to make a mod compatible with both 1.2 and 1.3. I elided this for
simplicity, and also because quite frankly I don’t really care as I’m just
interested in writing some mods that work for me to fix/improve some things 🤷 -
The original PSD files for all art in RimWorld. Useful if you want to use a
modified version in your mod. -
Covers some things not used in this example, such as sounds, textures, and
i18n. -
TDBug adds some debug things which
seem useful. Haven’t tried it yet.
Missing parts
And some things I’d still like to improve/figure out:
-
I would really really like a REPL, debugger, or some other way to speed up the
dev cycle. RimWorld takes fairly long to start (almost a minute on my laptop)
and toying around with things is kinda annoying and time-consuming.The closest I found is How I got RimWorld debugging to work; the CLI
works on Linux (run withdnSpy.Console.exe, from the .NET download) but the
GUI doesn’t (and never will, as the Windows-specific GUI toolkit things aren’t
implemented on Linux), but this doesn’t support the debugger (just
decompilation).I tried the generic sdb Mono debugger, but the game doesn’t load directly
with Mono but rather via the 32MUnityPlayer.so, so using that seems
difficult. Using gdb works, but actually doing useful stuff with it (i.e.
breakpoints, calling functions, displaying variable values) seems harder, but
I haven’t spent that much time with it yet.Making the game start faster would help too, or an automatic “script” to run
on startup (i.e. to apply certain debug actions). -
On Linux the Assemblies are in
RimWorldLinux_Data/, but on Windows and macOS
this directory isRimWorldWin64_Data/andRimWorldMac_Data/. Right now the
build solution builds just on Linux, but I’d like to be able to make it build
on all systems.Hard-coding this path seems common; to get other mods to build I had to
manually s/Win64/Linux/ some things, which is not ideal. I couldn’t figure out
how to make it cross-platform. -
There are probably some other C♯/.NET things that could be improved. I’m
really a n00b at this.
Footnotes
-
Although I later did confirm that they’re relative weights, see
Verse.TryRandomElementByWeight(), which can be examined after
decompiling the source, which we’ll cover later. ↩ -
Explicitly allowed in the EULA it
turns out: “You’re allowed to ‘decompile’ our game assets and look
through our code, art, sound, and other resources for learning
purposes, or to use our resources as a basis or reference for a Mod.
However, you’re not allowed to rip these resources out and pass them
around independently.” I wish they’d just make this easier by
distributing more code, but ah well. ↩