Hybrid Cloud Architectures Using Self-hosted Apache Kafka and AWS Glue

Post Syndicated from Brandon Rubadou original https://aws.amazon.com/blogs/architecture/hybrid-cloud-architectures-using-self-hosted-apache-kafka-and-aws-glue/

Using analytics to gain insights from a variety of datasets is key to successful transformation. There are many options to consider to realize the full value and potential of our data in a hybrid cloud infrastructure. Common practice is to route data produced from on-premises to a central repository or data lake. Here it can be consumed by multiple applications.

You can use an Apache Kafka cluster for data movement from on-premises to the data lake, using Amazon Simple Storage Service (Amazon S3). But you must either replicate the topics onto a cloud cluster, or develop a custom connector to read and copy the topics to Amazon S3. This presents a challenge for many customers.

This blog presents another option; an architecture solution leveraging AWS Glue.

Kafka and ETL processing

Apache Kafka is an open-source distributed event streaming platform used by thousands of companies for high-performance data pipelines, streaming analytics, data integration, and mission-critical applications. You can use Kafka clusters as a system to move data between systems. Producers typically publish data (or push) to a Kafka topic, where an application can consume it. Consumers are usually custom applications that feed data into respective target applications. These targets can be a data warehouse, an Amazon OpenSearch Service cluster, or others.

AWS Glue offers the ability to create jobs that will extract, transform, and load (ETL) data. This allows you to consume from many sources, such as from Apache Kafka, Amazon Kinesis Data Streams, or Amazon Managed Streaming for Apache Kafka (Amazon MSK). The jobs cleanse and transform the data, and then load the results into Amazon S3 data lakes or JDBC data stores.

Hybrid solution and architecture design

In most cases, the first step in building a responsive and manageable architecture is to review the data itself. For example, if we are processing insurance policy data from a financial organization, our data may contain fields that identify customer data. These can be account ID, an insurance claim identifier, and the dollar amount of the specific claim. Glue provides the ability to change any of these field types into the expected data lake schema type for processing.

Figure 1. Data flow - Source to data lake target

Figure 1. Data flow – Source to data lake target

Next, AWS Glue must be configured to connect to the on-premises Kafka server (see Figure 1). Private and secure connectivity to the on-premises environment can be established via AWS Direct Connect or a VPN solution. Traffic from the Amazon Virtual Private Cloud (Amazon VPC) is allowed to access the cluster directly. You can do this by creating a three-step streaming ETL job:

  1. Create a Glue connection to the on-premises Kafka source
  2. Create a Data Catalog table
  3. Create an ETL job, which saves to an S3 data lake

Configuring AWS Glue

  1. Create a connection. Using AWS Glue, create a secure SSL connection in the Data Catalog using the predefined Kafka connection type. Enter the hostname of the on-premises cluster and use the custom-managed certificate option for additional security. If you are in a development environment, you are required to generate a self-signed SSL certificate. Use your Kafka SSL endpoint to connect to Glue. (AWS Glue also supports client authentication for Apache Kafka streams.)
  2. Specify a security group. To allow AWS Glue to communicate between its components, specify a security group with a self-referencing inbound rule for all TCP ports. By creating this rule, you can restrict the source to the same security group in the Amazon VPC. Ensure you check the default security group for your VPC, as it could have a preconfigured self-referencing inbound rule for ALL traffic.
  3. Create the Data Catalog. Glue can auto-create the data schema. Since it’s a simple flat file, use the schema detection function of Glue. Set up the Kafka topic and refer to the connection.
  4. Define the job properties. Create the AWS Identity and Access Management (IAM) role to allow Glue to connect to S3 data. Select an S3 bucket and format. In this case, we use CSV and enable schema detection.

The Glue job can be scheduled, initiated manually, or by using an event driven architecture. Note that Glue does not yet support the “test connection” option within the console. Make sure you set the “Job Timeout” and enter a duration in minutes because the default value is blank.

When the job runs, it pulls the latest topics from the source on-premises Kafka cluster. Glue supports checkpoints to ensure that all source data is processed. By default, AWS Glue processes and writes out data in 100-second windows. This allows data to be processed efficiently and permits aggregations to be performed on data arriving later. You can modify this window size to increase timeliness or aggregation accuracy. AWS Glue streaming jobs use checkpoints rather than job bookmarks to track the data that has been read. AWS Glue bills hourly for streaming ETL jobs only while they are running.

Now that the connection is complete and the job is created, we can format the source data needed for the data lake. AWS Glue offers a set of built-in transforms that you can use to process your data using your ETL script. The transformed data is then placed in S3, where it can be leveraged as part of a larger data lake environment.

Many additional steps can be taken to render even more value from the information. For example, one team may choose to use a business intelligence tool like Amazon QuickSight to visualize and embed the data into an internal dashboard. Another team may want to use event driven architectures to notify financial analysts and initiate downstream actions when specific types of data are discovered. There are endless opportunities that should be determined by the business needs.

Summary

In this blog post, we have given an overview of an architecture that provides hybrid cloud data integration and analytics capability. Once the data is transformed and hosted in the S3 data lake, we can provide secure, reliable access to gain valuable insights. This solution allows for a variety of different producers and consumers, with the ability to handle increasing volumes of data.

AWS Glue along with Apache Kafka will ensure that your on-premises workloads are tightly integrated with your larger data lake solution.

If you have questions, post your thoughts in the comments section.

For further reading:

SPDX Becomes Internationally Recognized Standard for Software Bill of Materials

Post Syndicated from original https://lwn.net/Articles/868882/rss

The Linux Foundation has announced that Software Package Data Exchange (SPDX) has become an international standard (ISO/IEC 5962:2021). SPDX has been used in the kernel and other projects to identify the licenses and attach other metadata to software components.

Between eighty and ninety percent (80%-90%) of a modern application is assembled from open source software components. An SBOM [software bill of materials] accounts for the software components contained in an application — open source, proprietary, or third-party — and details their provenance, license, and security attributes. SBOMs are used as a part of a foundational practice to track and trace components across software supply chains. SBOMs also help to proactively identify software issues and risks and establish a starting point for their remediation.

SPDX results from ten years of collaboration from representatives across industries, including the leading Software Composition Analysis (SCA) vendors – making it the most robust, mature, and adopted SBOM standard.

ВСС предлага на Кьовеши прокурор смачкал разследване за злоупотреби с европари

Post Syndicated from Димитър Стоянов original https://bivol.bg/anita-djamalova-zemen.html

петък 10 септември 2021


Висшият съдебен съвет е на път да се провали за пореден път в опита си да излъчи прокурори за българската квота на Европейската прокуратура. Едва два дни след като всички…

[$] The folio pull-request pushback

Post Syndicated from original https://lwn.net/Articles/868598/rss

When we last caught up with the page folio patch set, it appeared to be on
track to be pulled into the mainline during the 5.15 merge window. Matthew
Wilcox duly sent a pull
request
in August to make that happen. While it is possible that
folios could still end up in 5.15, that has not happened as of this writing
and appears increasingly unlikely. What we got instead was a lengthy
discussion on the merits of the folio approach.

Security updates for Friday

Post Syndicated from original https://lwn.net/Articles/868863/rss

Security updates have been issued by Debian (firefox-esr, ghostscript, ntfs-3g, and postorius), Fedora (java-1.8.0-openjdk-aarch32, libtpms, and salt), openSUSE (libaom, libtpms, and openssl-1_0_0), Red Hat (openstack-neutron), SUSE (grilo, java-1_7_0-openjdk, libaom, libtpms, mariadb, openssl-1_0_0, openssl-1_1, and php74-pear), and Ubuntu (firefox and ghostscript).

The Rise of Disruptive Ransomware Attacks: A Call To Action

Post Syndicated from boB Rudis original https://blog.rapid7.com/2021/09/10/the-rise-of-disruptive-ransomware-attacks-a-call-to-action/

The Rise of Disruptive Ransomware Attacks: A Call To Action

Our collective use of and dependence on technology has come quite a long way since 1989. That year, the first documented ransomware attack — the AIDS Trojan — was spread via physical media (5 1⁄4″ floppy disks) delivered by the postal service to individuals subscribed to a mailing list. The malware encrypted filenames (not the contents) and demanded payment ($189 USD) to be sent to a post office box to gain access to codes that would unscramble the directory entries.

That initial ransomware attack — started by an emotionally disturbed AIDS researcher — gave rise to a business model that has evolved since then to become one of the most lucrative and increasingly disruptive cybercriminal enterprises in modern history.

In this post, we’ll:

  • Examine what has enabled this growth
  • See how tactics and targets have morphed over the years
  • Take a hard look at the societal impacts of more recent campaigns
  • Paint an unfortunately bleak picture of where these attacks may be headed if we cannot work together to curtail them

Building the infrastructure of our own demise: Ransomware’s growth enablers

As PCs entered homes and businesses, individuals and organizations increasingly relied on technology for everything from storing albums of family pictures to handling legitimate business processes of all shapes and sizes. They were also becoming progressively more connected to the internet — a domain formerly dominated by academics and researchers. Electronic mail (now email) morphed from a quirky, niche tool to a ubiquitous medium, connecting folks across the globe. The World Wide Web shifted from being a medium solely used for information exchange to the digital home of corporations and a cadre of storefronts.

The capacity and capabilities of cyberspace grew at a frenetic pace and fueled great innovation. The cloud was born, cheaply putting vast compute resources into the hands of anyone with a credit card and reducing the complexity of building internet-enabled services. Today, sitting on the beach in an island resort, we can speak to the digital assistant on our smartphones and issue commands to our home automatons thousands of miles away.

Despite appearances, this evolution and expansion was — for the most part — unplanned and emerged with little thought towards safety and resilience, creating (unseen by most) fragile interconnections and interdependencies.

The concept and exchange mechanisms of currency also changed during this time. Checks in the mail and wire transfers over copper lines have been replaced with digital credit and debit transactions and fiat-less digital currency ledger updates.

So, we now have blazing fast network access from even the most remote locations, globally distributed, cheap, massive compute resources, and baked-in dependence on connected technology in virtually every area of modern life, coupled with instantaneous (and increasingly anonymous) capital exchange. Most of this infrastructure — and nearly all the processes and exchanges that run on it — are unprotected or woefully under protected, making it the perfect target for bold, brazen, and clever criminal enterprises.

From pictures to pipelines: Ransomware’s evolving targets and tactics

At their core, financially motivated cybercriminals are entrepreneurs who understand that their business models must be diverse and need to evolve with the changing digital landscape. Ransomware is only one of many business models, and it’s taken a somewhat twisty path to where we are today.

Attacks in the very early 2000s were highly regional (mostly Eastern Europe) and used existing virus/trojan distribution mechanisms that randomly targeted businesses via attachments spread by broad stroke spam campaigns. Unlike their traditional virus counterparts, these ransomware pioneers sought small, direct payouts in e-gold, one of the first widely accessible digital currency exchanges.

By the mid-2000s, e-gold was embroiled in legal disputes and was, for the most part, defunct. Instead of assuaging attackers, even more groups tried their hands at the ransomware scheme, since it had a solid track record of ensuring at least some percentage of payouts.

Many groups shifted attacks towards individuals, encrypting anything from pictures of grandkids to term papers. Instead of currency, these criminals forced victims to procure medications from online pharmacies and hand over account credentials so the attackers could route delivery to their drop boxes.

Others took advantage of the fear of exposure and locked up the computer itself (rather than encrypt files or drives), displaying explicit images that could be dismissed after texting or calling a “premium-rate” number for a code.

However, there were those who still sought the refuge of other fledgling digital currency markets, such as Liberty Reserve, and migrated the payout portion of encryption-based campaigns to those exchanges.

By the early 2010s — due, in part, to the mainstreaming of Bitcoin and other digital currencies/exchanges, combined with the absolute reliance of virtually all business processes on technology — these initial, experimental business models coalesced into a form we should all recognize today:

  • Gain initial access to a potential victim business. This can be via phishing, but it’s increasingly performed via compromising internet-facing gateways or using legitimate credentials to log onto VPNs — like the attack on Colonial Pipeline — and other remote access portals. The attacks shifted focus to businesses for higher payouts and also a higher likelihood of receiving a payout.
  • Encrypt critical files on multiple critical systems. Attackers developed highly capable, customized utilities for performing encryption quickly across a wide array of file types. They also had a library of successful, battle-tested techniques for moving laterally throughout an organization. Criminals also know the backup and recovery processes at most organizations are lacking.
  • Demanding digital currency payout in a given timeframe. Introducing a temporal component places added pressure on the organization to pay or potentially lose files forever.

The technology and business processes to support this new model became sophisticated and commonplace enough to cause an entire new ransomware as a service criminal industry to emerge, enabling almost anyone with a computer to become an aspiring ransomware mogul.

On the cusp of 2020 a visible trend started to emerge where victim organizations declined to pay ransom demands. Not wanting to lose a very profitable revenue source, attackers added some new techniques into the mix:

  • Identify and exfiltrate high-value files and data before encrypting them. Frankly, it’s odd more attackers did not do this before the payment downturn (though, some likely did). By spending a bit more time identifying this prized data, attackers could then use it as part of their overall scheme.
  • Threaten to leak the data publicly or to the individuals/organizations identified in the data. It should come as no surprise that most ransomware attacks go unreported to the authorities and unseen by the media. No organization wants the reputation hit associated with an attack of this type, and adding exposure to the mix helped return payouts to near previous levels.

The high-stakes gambit of disruptive attacks: Risky business with significant collateral damage

Not all ransomware attacks go unseen, but even the ones that gained some attention rarely make it to mainstream national news. In the U.S. alone, hundreds of schools and municipalities have experienced disruptive and costly ransomware attacks each year going back as far as 2016.

Municipal ransomware attacks

When a town or city is taken down by a ransomware attack, critical safety services such as police and first responders can be taken offline for days. Businesses and citizens cannot make payments on time-critical bills. Workers, many of whom exist paycheck-to-paycheck, cannot be paid. Even when a city like Atlanta refuses to reward criminals with a payment, it can still cost taxpayers millions of dollars and many, many months to have systems recovered to their previous working state.

School-district ransomware attacks

Similarly, when a school district is impacted, schools — which increasingly rely on technology and internet access in the classroom — may not be able to function, forcing parents to scramble for child care or lose time from work. As schools were forced online during the pandemic, disruptive ransomware attacks also made remote, online classes inaccessible, exacerbating an already stressful learning environment.

Hobbled learning is not the only potential outcome as well. Recently, one of the larger districts in the U.S. fell victim to a $547,000 USD ransom attack, which was ultimately paid to stop sensitive student and personnel data from becoming public. The downstream identity theft and other impacts of such a leak are almost impossible to calculate.

Healthcare ransomware attacks

Hundreds of healthcare organizations across the U.S. have also suffered annual ransomware attacks over the same period. When the systems, networks, and data in a hospital are frozen, personnel must revert to back up “pen-and-paper” processes, which are far less efficient than their digital counterparts. Healthcare emergency communications are also increasing digital, and a technology blackout can force critical care facilities into “divert” mode, meaning that incoming ambulances with crisis care patients will have to go miles out of their way to other facilities and increase the chances of severe negative outcomes for those patients — especially when coupled with pandemic-related outbreak surges.

The U.K. National Health Service was severely impacted by the WannaCry ransom-“worm” gone awry back in 2017. In total, “1% of NHS activity was directly affected by the WannaCry attack. 80 out of 236 hospital trusts across England [had] services impacted even if the organisation was not infected by the virus (for instance, they took their email offline to reduce the risk of infection); [and,] 595 out of 7,4545 GP practices (8%) and eight other NHS and related organisations were infected,” according to the NHS’s report.

An attack on Scripps Health in the U.S. in 2021 disrupted operations across the entire network for over a month and has — to date — cost the organization over $100M USD, plus impacted emergency and elective care for thousands of individuals.

An even more deliberate massive attack against Ireland’s healthcare network is expected to ultimately cost taxpayers over $600M USD, with recovery efforts still underway months after the attack, despite attackers providing the decryption keys free of charge.

Transportation ransomware attacks

San Francisco, Massachusetts, Colorado, Montreal, the UK, and scores of other public and commercial transportation systems across the globe have been targets of ransomware attacks. In many instances, systems are locked up sufficiently to prevent passengers from getting to destinations such as work, school, or medical care. Locking up freight transportation means critical goods cannot be delivered on time.

Critical infrastructure ransomware attacks

U.S. citizens came face-to-face with the impacts of large-scale ransomware attacks in 2021 as attackers disrupted access to fuel and impacted the food supply chain, causing shortages, panic buying, and severe price spikes in each industry.

Water systems and other utilities across the U.S. have also fallen victim to ransomware attacks in recent years, exposing deficiencies in the cyber defenses in these sectors.

Service provider ransomware attacks

Finally, one of the most high-profile ransomware attacks of all time has been the Kaseya attack. Ultimately, over 1,500 organizations — everything from regional retail and grocery chains to schools, governments, and businesses — were taken offline for over a week due to attackers compromising a software component used by hundreds of managed service providers. Revenue was lost, parents scrambled for last-minute care, and other processes were slowed or completely stopped. If the attackers had been just a tad more methodical, patient, and competent, this mass ransomware attack could have been even more far-reaching and even more devastating than it already was.

The road ahead: Ransomware will get worse until we get better

The first section of this post showed how we created the infrastructure of our own ransomware demise. Technology has advanced and been adopted faster than our ability to ensure the safety and resilience of the processes that sit on top of it. When one of the largest distributors of our commercial fuel supply still supports simple credential access for remote access, it is clear we have all not done enough — up to now — to inform, educate, and support critical infrastructure security, let alone those of schools, hospitals, municipalities, and businesses in general.

As ransomware attacks continue to escalate and become broader in reach and scope, we will also continue to see increasing societal collateral damage.

Now is the time for action. Thankfully, we have a framework for just such action! Rapid7 was part of a multi-stakeholder task force charged with coming up with a framework to combat ransomware. As we work toward supporting each of the efforts detailed in the report, we encourage all other organizations and especially all governments to dedicate time and resources towards doing the same. We must work together to stem the tide, change the attacker economics, and reduce the impacts of ransomware on society as a whole.

NEVER MISS A BLOG

Get the latest stories, expertise, and news about security today.

How to execute an object file: Part 3

Post Syndicated from Ignat Korchagin original https://blog.cloudflare.com/how-to-execute-an-object-file-part-3/

Dealing with external libraries

How to execute an object file: Part 3

In the part 2 of our series we learned how to process relocations in object files in order to properly wire up internal dependencies in the code. In this post we will look into what happens if the code has external dependencies — that is, it tries to call functions from external libraries. As before, we will be building upon the code from part 2. Let’s add another function to our toy object file:

obj.c:

#include <stdio.h>
 
...
 
void say_hello(void)
{
    puts("Hello, world!");
}

In the above scenario our say_hello function now depends on the puts function from the C standard library. To try it out we also need to modify our loader to import the new function and execute it:

loader.c:

...
 
static void execute_funcs(void)
{
    /* pointers to imported functions */
    int (*add5)(int);
    int (*add10)(int);
    const char *(*get_hello)(void);
    int (*get_var)(void);
    void (*set_var)(int num);
    void (*say_hello)(void);
 
...
 
    say_hello = lookup_function("say_hello");
    if (!say_hello) {
        fputs("Failed to find say_hello function\n", stderr);
        exit(ENOENT);
    }
 
    puts("Executing say_hello...");
    say_hello();
}
...

Let’s run it:

$ gcc -c obj.c
$ gcc -o loader loader.c
$ ./loader
No runtime base address for section

Seems something went wrong when the loader tried to process relocations, so let’s check the relocations table:

$ readelf --relocs obj.o
 
Relocation section '.rela.text' at offset 0x3c8 contains 7 entries:
  Offset          Info           Type           Sym. Value    Sym. Name + Addend
000000000020  000a00000004 R_X86_64_PLT32    0000000000000000 add5 - 4
00000000002d  000a00000004 R_X86_64_PLT32    0000000000000000 add5 - 4
00000000003a  000500000002 R_X86_64_PC32     0000000000000000 .rodata - 4
000000000046  000300000002 R_X86_64_PC32     0000000000000000 .data - 4
000000000058  000300000002 R_X86_64_PC32     0000000000000000 .data - 4
000000000066  000500000002 R_X86_64_PC32     0000000000000000 .rodata - 4
00000000006b  001100000004 R_X86_64_PLT32    0000000000000000 puts - 4
...

The compiler generated a relocation for the puts invocation. The relocation type is R_X86_64_PLT32 and our loader already knows how to process these, so the problem is elsewhere. The above entry shows that the relocation references 17th entry (0x11 in hex) in the symbol table, so let’s check that:

$ readelf --symbols obj.o
 
Symbol table '.symtab' contains 18 entries:
   Num:    Value          Size Type    Bind   Vis      Ndx Name
     0: 0000000000000000     0 NOTYPE  LOCAL  DEFAULT  UND
     1: 0000000000000000     0 FILE    LOCAL  DEFAULT  ABS obj.c
     2: 0000000000000000     0 SECTION LOCAL  DEFAULT    1
     3: 0000000000000000     0 SECTION LOCAL  DEFAULT    3
     4: 0000000000000000     0 SECTION LOCAL  DEFAULT    4
     5: 0000000000000000     0 SECTION LOCAL  DEFAULT    5
     6: 0000000000000000     4 OBJECT  LOCAL  DEFAULT    3 var
     7: 0000000000000000     0 SECTION LOCAL  DEFAULT    7
     8: 0000000000000000     0 SECTION LOCAL  DEFAULT    8
     9: 0000000000000000     0 SECTION LOCAL  DEFAULT    6
    10: 0000000000000000    15 FUNC    GLOBAL DEFAULT    1 add5
    11: 000000000000000f    36 FUNC    GLOBAL DEFAULT    1 add10
    12: 0000000000000033    13 FUNC    GLOBAL DEFAULT    1 get_hello
    13: 0000000000000040    12 FUNC    GLOBAL DEFAULT    1 get_var
    14: 000000000000004c    19 FUNC    GLOBAL DEFAULT    1 set_var
    15: 000000000000005f    19 FUNC    GLOBAL DEFAULT    1 say_hello
    16: 0000000000000000     0 NOTYPE  GLOBAL DEFAULT  UND _GLOBAL_OFFSET_TABLE_
    17: 0000000000000000     0 NOTYPE  GLOBAL DEFAULT  UND puts

Oh! The section index for the puts function is UND (essentially 0 in the code), which makes total sense: unlike previous symbols, puts is an external dependency, and it is not implemented in our obj.o file. Therefore, it can’t be a part of any section within obj.o.
So how do we resolve this relocation? We need to somehow point the code to jump to a puts implementation. Our loader actually already has access to the C library puts function (because it is written in C and we’ve used puts in the loader code itself already), but technically it doesn’t have to be the C library puts, just some puts implementation. For completeness, let’s implement our own custom puts function in the loader, which is just a decorator around the C library puts:

loader.c:

...
 
/* external dependencies for obj.o */
static int my_puts(const char *s)
{
    puts("my_puts executed");
    return puts(s);
}
...

Now that we have a puts implementation (and thus its runtime address) we should just write logic in the loader to resolve the relocation by instructing the code to jump to the correct function. However, there is one complication: in part 2 of our series, when we processed relocations for constants and global variables, we learned we’re mostly dealing with 32-bit relative relocations and that the code or data we’re referencing needs to be no more than 2147483647 (0x7fffffff in hex) bytes away from the relocation itself. R_X86_64_PLT32 is also a 32-bit relative relocation, so it has the same requirements, but unfortunately we can’t reuse the trick from part 2 as our my_puts function is part of the loader itself and we don’t have control over where in the address space the operating system places the loader code.

Luckily, we don’t have to come up with any new solutions and can just borrow the approach used in shared libraries.

Exploring PLT/GOT

Real world ELF executables and shared libraries have the same problem: often executables have dependencies on shared libraries and shared libraries have dependencies on other shared libraries. And all of the different pieces of a complete runtime program may be mapped to random ranges in the process address space. When a shared library or an ELF executable is linked together, the linker enumerates all the external references and creates two or more additional sections (for a refresher on ELF sections check out the part 1 of our series) in the ELF file. The two mandatory ones are the Procedure Linkage Table (PLT) and the Global Offset Table (GOT).

We will not deep-dive into specifics of the standard PLT/GOT implementation as there are many other great resources online, but in a nutshell PLT/GOT is just a jumptable for external code. At the linking stage the linker resolves all external 32-bit relative relocations with respect to a locally generated PLT/GOT table. It can do that, because this table would become part of the final ELF file itself, so it will be "close" to the main code, when the file is mapped into memory at runtime. Later, at runtime the dynamic loader populates PLT/GOT tables for every loaded ELF file (both the executable and the shared libraries) with the runtime addresses of all the dependencies. Eventually, when the program code calls some external library function, the CPU "jumps" through the local PLT/GOT table to the final code:

How to execute an object file: Part 3

Why do we need two ELF sections to implement one jumptable you may ask? Well, because real world PLT/GOT is a bit more complex than described above. Turns out resolving all external references at runtime may significantly slow down program startup time, so symbol resolution is implemented via a "lazy approach": a reference is resolved by the dynamic loader only when the code actually tries to call a particular function. If the main application code never calls a library function, that reference will never be resolved.

Implementing a simplified PLT/GOT

For learning and demonstrative purposes though we will not be reimplementing a full-blown PLT/GOT with lazy resolution, but a simple jumptable, which resolves external references when the object file is loaded and parsed. First of all we need to know the size of the table: for ELF executables and shared libraries the linker will count the external references at link stage and create appropriately sized PLT and GOT sections. Because we are dealing with raw object files we would have to do another pass over the .rela.text section and count all the relocations, which point to an entry in the symbol table with undefined section index (or 0 in code). Let’s add a function for this and store the number of external references in a global variable:

loader.c:

...
 
/* number of external symbols in the symbol table */
static int num_ext_symbols = 0;
...
static void count_external_symbols(void)
{
    const Elf64_Shdr *rela_text_hdr = lookup_section(".rela.text");
    if (!rela_text_hdr) {
        fputs("Failed to find .rela.text\n", stderr);
        exit(ENOEXEC);
    }
 
    int num_relocations = rela_text_hdr->sh_size / rela_text_hdr->sh_entsize;
    const Elf64_Rela *relocations = (Elf64_Rela *)(obj.base + rela_text_hdr->sh_offset);
 
    for (int i = 0; i < num_relocations; i++) {
        int symbol_idx = ELF64_R_SYM(relocations[i].r_info);
 
        /* if there is no section associated with a symbol, it is probably
         * an external reference */
        if (symbols[symbol_idx].st_shndx == SHN_UNDEF)
            num_ext_symbols++;
    }
}
...

This function is very similar to our do_text_relocations function. Only instead of actually performing relocations it just counts the number of external symbol references.

Next we need to decide the actual size in bytes for our jumptable. num_ext_symbols has the number of external symbol references in the object file, but how many bytes per symbol to allocate? To figure this out we need to design our jumptable format. As we established above, in its simple form our jumptable should be just a collection of unconditional CPU jump instructions — one for each external symbol. However, unfortunately modern x64 CPU architecture does not provide a jump instruction, where an address pointer can be a direct operand. Instead, the jump address needs to be stored in memory somewhere "close" — that is within 32-bit offset — and the offset is the actual operand. So, for each external symbol we need to store the jump address (64 bits or 8 bytes on a 64-bit CPU system) and the actual jump instruction with an offset operand (6 bytes for x64 architecture). We can represent an entry in our jumptable with the following C structure:

loader.c:

...
 
struct ext_jump {
    /* address to jump to */
    uint8_t *addr;
    /* unconditional x64 JMP instruction */
    /* should always be {0xff, 0x25, 0xf2, 0xff, 0xff, 0xff} */
    /* so it would jump to an address stored at addr above */
    uint8_t instr[6];
};
 
struct ext_jump *jumptable;
...

We’ve also added a global variable to store the base address of the jumptable, which will be allocated later. Notice that with the above approach the actual jump instruction will always be constant for every external symbol. Since we allocate a dedicated entry for each external symbol with this structure, the addr member would always be at the same offset from the end of the jump instruction in instr: -14 bytes or 0xfffffff2 in hex for a 32-bit operand. So instr will always be {0xff, 0x25, 0xf2, 0xff, 0xff, 0xff}: 0xff and 0x25 is the encoding of the x64 jump instruction and its modifier and 0xfffffff2 is the operand offset in little-endian format.

Now that we have defined the entry format for our jumptable, we can allocate and populate it when parsing the object file. First of all, let’s not forget to call our new count_external_symbols function from the parse_obj to populate num_ext_symbols (it has to be done before we allocate the jumptable):

loader.c:

...
 
static void parse_obj(void)
{
...
 
    count_external_symbols();
 
    /* allocate memory for `.text`, `.data` and `.rodata` copies rounding up each section to whole pages */
    text_runtime_base = mmap(NULL, page_align(text_hdr->sh_size)...
...
}

Next we need to allocate memory for the jumptable and store the pointer in the jumptable global variable for later use. Just a reminder that in order to resolve 32-bit relocations from the .text section to this table, it has to be "close" in memory to the main code. So we need to allocate it in the same mmap call as the rest of the object sections. Since we defined the table’s entry format in struct ext_jump and have num_ext_symbols, the size of the table would simply be sizeof(struct ext_jump) * num_ext_symbols:

loader.c:

...
 
static void parse_obj(void)
{
...
 
    count_external_symbols();
 
    /* allocate memory for `.text`, `.data` and `.rodata` copies and the jumptable for external symbols, rounding up each section to whole pages */
    text_runtime_base = mmap(NULL, page_align(text_hdr->sh_size) + \
                                   page_align(data_hdr->sh_size) + \
                                   page_align(rodata_hdr->sh_size) + \
                                   page_align(sizeof(struct ext_jump) * num_ext_symbols),
                                   PROT_READ | PROT_WRITE, MAP_PRIVATE | MAP_ANONYMOUS, -1, 0);
    if (text_runtime_base == MAP_FAILED) {
        perror("Failed to allocate memory");
        exit(errno);
    }
 
...
    rodata_runtime_base = data_runtime_base + page_align(data_hdr->sh_size);
    /* jumptable will come after .rodata */
    jumptable = (struct ext_jump *)(rodata_runtime_base + page_align(rodata_hdr->sh_size));
 
...
}
...

Finally, because the CPU will actually be executing the jump instructions from our instr fields from the jumptable, we need to mark this memory readonly and executable (after do_text_relocations earlier in this function has completed):

loader.c:

...
 
static void parse_obj(void)
{
...
 
    do_text_relocations();
 
...
 
    /* make the jumptable readonly and executable */
    if (mprotect(jumptable, page_align(sizeof(struct ext_jump) * num_ext_symbols), PROT_READ | PROT_EXEC)) {
        perror("Failed to make the jumptable executable");
        exit(errno);
    }
}
...

At this stage we have our jumptable allocated and usable — all is left to do is to populate it properly. We’ll do this by improving the do_text_relocations implementation to handle the case of external symbols. The No runtime base address for section error from the beginning of this post is actually caused by this line in do_text_relocations:

loader.c:

...
 
static void do_text_relocations(void)
{
...
    for (int i = 0; i < num_relocations; i++) {
...
        /* symbol, with respect to which the relocation is performed */
        uint8_t *symbol_address = = section_runtime_base(&sections[symbols[symbol_idx].st_shndx]) + symbols[symbol_idx].st_value;
...
}
...

Currently we try to determine the runtime symbol address for the relocation by looking up the symbol’s section runtime address and adding the symbol’s offset. But we have established above that external symbols do not have an associated section, so their handling needs to be a special case. Let’s update the implementation to reflect this:

loader.c:

...
 
static void do_text_relocations(void)
{
...
    for (int i = 0; i < num_relocations; i++) {
...
        /* symbol, with respect to which the relocation is performed */
        uint8_t *symbol_address;
        
        /* if this is an external symbol */
        if (symbols[symbol_idx].st_shndx == SHN_UNDEF) {
            static int curr_jmp_idx = 0;
 
            /* get external symbol/function address by name */
            jumptable[curr_jmp_idx].addr = lookup_ext_function(strtab +  symbols[symbol_idx].st_name);
 
            /* x64 unconditional JMP with address stored at -14 bytes offset */
            /* will use the address stored in addr above */
            jumptable[curr_jmp_idx].instr[0] = 0xff;
            jumptable[curr_jmp_idx].instr[1] = 0x25;
            jumptable[curr_jmp_idx].instr[2] = 0xf2;
            jumptable[curr_jmp_idx].instr[3] = 0xff;
            jumptable[curr_jmp_idx].instr[4] = 0xff;
            jumptable[curr_jmp_idx].instr[5] = 0xff;
 
            /* resolve the relocation with respect to this unconditional JMP */
            symbol_address = (uint8_t *)(&jumptable[curr_jmp_idx].instr);
 
            curr_jmp_idx++;
        } else {
            symbol_address = section_runtime_base(&sections[symbols[symbol_idx].st_shndx]) + symbols[symbol_idx].st_value;
        }
...
}
...

If a relocation symbol does not have an associated section, we consider it external and call a helper function to lookup the symbol’s runtime address by its name. We store this address in the next available jumptable entry, populate the x64 jump instruction with our fixed operand and store the address of the instruction in the symbol_address variable. Later, the existing code in do_text_relocations will resolve the .text relocation with respect to the address in symbol_address in the same way it does for local symbols in part 2 of our series.

The only missing bit here now is the implementation of the newly introduced lookup_ext_function helper. Real world loaders may have complicated logic on how to find and resolve symbols in memory at runtime. But for the purposes of this article we’ll provide a simple naive implementation, which can only resolve the puts function:

loader.c:

...
 
static void *lookup_ext_function(const char *name)
{
    size_t name_len = strlen(name);
 
    if (name_len == strlen("puts") && !strcmp(name, "puts"))
        return my_puts;
 
    fprintf(stderr, "No address for function %s\n", name);
    exit(ENOENT);
}
...

Notice though that because we control the loader logic we are free to implement resolution as we please. In the above case we actually "divert" the object file to use our own "custom" my_puts function instead of the C library one. Let’s recompile the loader and see if it works:

$ gcc -o loader loader.c
$ ./loader
Executing add5...
add5(42) = 47
Executing add10...
add10(42) = 52
Executing get_hello...
get_hello() = Hello, world!
Executing get_var...
get_var() = 5
Executing set_var(42)...
Executing get_var again...
get_var() = 42
Executing say_hello...
my_puts executed
Hello, world!

Hooray! We not only fixed our loader to handle external references in object files — we have also learned how to "hook" any such external function call and divert the code to a custom implementation, which might be useful in some cases, like malware research.

As in the previous posts, the complete source code from this post is available on GitHub.

ProtonMail Now Keeps IP Logs

Post Syndicated from Bruce Schneier original https://www.schneier.com/blog/archives/2021/09/protonmail-now-keeps-ip-logs.html

After being compelled by a Swiss court to monitor IP logs for a particular user, ProtonMail no longer claims that “we do not keep any IP logs.”

EDITED TO ADD (9/14): This seems to be more complicated. ProtonMail is not yet saying that they keep logs. Their privacy policy still states that they do not keep logs except in certain circumstances, and outlines those circumstances. And ProtonMail’s warrant canary has an interesting list of data orders they have received from various authorities, whether they complied, and why or why not.

Save orchards from pests with Raspberry Pi

Post Syndicated from Ashley Whittaker original https://www.raspberrypi.org/blog/save-orchards-from-pests-with-raspberry-pi/

Researchers from the University of Trento have developed a Raspberry Pi-powered device that automatically detects pests in fruit orchards so they can get sorted out before they ruin a huge amount of crop. There’s no need for farmer intervention either, saving their time as well as their harvest.

orchard pest detection prototype
One of the prototypes used during indoor testing

The researchers devised an embedded system that uses machine learning to process images captured inside pheromone traps. The pheromones lure the potential pests in to have their picture taken.

Hardware

Each trap is built on a custom hardware platform that comprises:

  • Sony IMX219 image sensor to collect images (chosen because it’s small and low-power)
  • Intel Neural Compute module for machine learning optimisation
  • Long-range radio chip for communication
  • Solar energy-harvesting power system
Fig. 2: Solar energy harvester and power management circuit schematic block.
Here’s a diagram showing how all the hardware works together

The research paper mentions that Raspberry Pi 3 was chosen because it offered the best trade-off between computing capability, energy demand, and cost. However, we don’t know which Raspberry Pi 3 they used. But we’re chuffed nonetheless.

How does it work?

The Raspberry Pi computer manages the sensor, processing the captured images and transmitting them for classification.

Then the Intel Neural Compute Stick is activated to perform the machine learning task. It provides a boost to the project by reducing the inference time, so we can tell more quickly whether a potentially disruptive bug has been caught, or just a friendly bug.

In this case, it’s codling moths we want to watch out for. They are major pests to agricultural crops, mainly fruits, and they’re the reason you end up with apples that look like they’ve been feasted on by hundreds of maggots.

codling moth detection
Red boxes = bad codling moths
Blue boxes = friendly bugs

When this task is done manually, farmers typically check codling moth traps twice a week. But this automated system checks the pheromone traps twice every day, making it much more likely to detect an infestation before it gets out of hand.

The brains behind the project

This work was done by Andrea Albanese, Matteo Nardello and Davide Brunelli from the University of Trento. All the images used here are from the full research paper, Automated Pest Detection with DNN on the Edge for Precision Agriculture, which you can read for free.

The post Save orchards from pests with Raspberry Pi appeared first on Raspberry Pi.

Cro: Maintain it With Zig

Post Syndicated from original https://lwn.net/Articles/868781/rss

This blog post by
Loris Cro
makes the claim that the Zig
language
is
the solution to a lot of low-level programming problems:

Freeing the art of systems programming from the grips of C/C++
cruft is the only way to push for real change in our industry, but
rewriting everything is not the answer. In the Zig project we’re
making the C/C++ ecosystem more fun and productive. Today we have a
compiler, a linker and a build system, and soon we’ll also have a
package manager, making Zig a complete toolchain that can fetch
dependencies and build C/C++/Zig projects from any target, for any
target.

(LWN looked at Zig last year).

Embed multi-tenant dashboards in SaaS apps using Amazon QuickSight without provisioning or managing users

Post Syndicated from Raji Sivasubramaniam original https://aws.amazon.com/blogs/big-data/embed-multi-tenant-dashboards-in-saas-apps-using-amazon-quicksight-without-provisioning-or-managing-users/

Amazon QuickSight is a fully-managed, cloud-native business intelligence (BI) service that makes it easy to connect to your data, create interactive dashboards, and share these with tens of thousands of users, either within QuickSight itself, or embedded in software as a service (SaaS) apps.

QuickSight Enterprise Edition recently added row-level security (RLS) using tags, a new feature that allows developers to share a single dashboard with tens of thousands of users, while ensuring that each user can only see and have access to particular data. This means that when an independent software vendor (ISV) adds a QuickSight-embedded dashboard in their app, they don’t have to provision their end-users in QuickSight, and can simply set up tags to filter data based on who the dashboard is being served to. For example, if an ISV wanted to set up a dashboard that was to be shared with 20,000 users across 100 customers of an app, with all users within a customer having access to identical data, this new feature allows you to share a single dashboard for all users, without having to set up or manage the 20,000 users in QuickSight.

RLS enforced using tags makes sure that each end-user only sees data that is relevant to them, while QuickSight automatically scales to meet user concurrency to ensure every end-user sees consistently fast performance. In this post, we look at how this can be implemented.

Solution overview

To embed dashboards without user provisioning, we use the API GenerateEmbedURLForAnonymousUser, which works with QuickSight’s session capacity pricing. With this API, the embedding server (logic in the SaaS app) determines and manages the identity of the user to whom the dashboard is being displayed (as opposed to this identity being provisioned and managed within QuickSight).

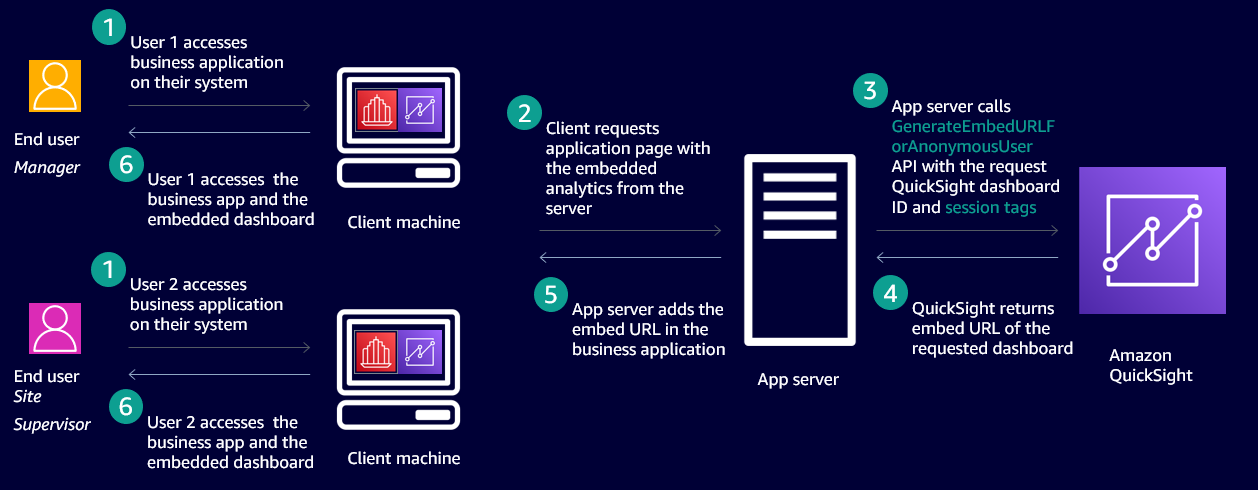
The following diagram shows an example workflow of embedded dashboards that secures data based on who is accessing the application using RLS with tags.

In this case, an ISV has a SaaS application that is accessed by two end-users. One is a manager and other is a site supervisor. Both users access the same application and the same QuickSight dashboard embedded in the application and they’re not provisioned in QuickSight. When the site supervisor accesses the dashboard, they only see data pertaining to their site, and when the manager accesses the dashboard, they see data pertaining to all the sites they manage.

To achieve this behavior, we use a new feature that enables configuring the row-level security using tags. This method of securing data on embedded dashboards works only when dashboards are embedded without user provisioning (also called anonymous embedding). The process includes two steps:

  1. Set up tag keys on the columns of the datasets used to build the dashboard.
  2. Set values for the tag keys at runtime when embedding the dashboard anonymously.

Set up tag keys on columns in the datasets used to build the dashboard

ISVs or developers can set columns on the datasets using the CreateDataset or UpdateDataset APIs as follows:

create-data-set
--aws-account-id 
--data-set-id 
--name 
--physical-table-map 
[--logical-table-map ]
--import-mode 
[--column-groups ]
[--field-folders ]
[--permissions ]
[--row-level-permission-data-set ]
[--column-level-permission-rules ]
[--tags ]
[--cli-input-json ]
[--generate-cli-skeleton ]
[--row-level-permission-tag-configuration //upto 50 tagkeys can be added at this time
    '{
       "Status": "ENABLED",
       "TagRules": 
        [
            {
               "TagKey": "tag_name_1", //upto 128 characters
               "ColumnName": "column_name_1",
               "TagMultiValueDelimiter": ",",
               "MatchAllValue": "*"
            },
            {
               "TagKey": "tag_name_2", //upto 128 characters
               "ColumnName": "column_name_2"
            }
        ]
    }'
]
update-data-set
--aws-account-id <value>
--data-set-id <value>
--name <value>
--physical-table-map <value>
[--logical-table-map <value>]
--import-mode <value>
[--column-groups <value>]
[--field-folders <value>]
[--row-level-permission-data-set <value>]
[--column-level-permission-rules <value>]
[--cli-input-json <value>]
[--generate-cli-skeleton <value>]
[--row-level-permission-tag-configuration //upto 50 tagkeys can be added at this time
    '{
       "Status": "ENABLED",
       "TagRules": 
        [
            {
               "TagKey": "tag_name_1", //upto 128 characters
               "ColumnName": "column_name_1",
               "TagMultiValueDelimiter": ",",
               "MatchAllValue": "*"
            },
            {
               "TagKey": "tag_name_2", //upto 128 characters
               "ColumnName": "column_name_2",
               "MatchAllValue": "*"
            },
           {
               "TagKey": "tag_name_3", //upto 128 characters
               "ColumnName": "column_name_3"
           } 
        ]
    }'
]

In the preceding example code, row-level-permission-tag-configuration is the element that you can use to define tag keys on the columns of a dataset. For each tag, you can define the following optional items:

  1. TagMultiValueDelimiter – This option when set on a column enables you to pass more than one value to the tag at runtime, and the values are delimited by the string set for this option. In this sample, a comma is set as a delimiter string.
  2. MatchAllValue – This option when set on a column enables you to pass all values of a column at runtime, and the values are represented by the string set for this option. In this sample, an asterisk is set as a match all string.

After we define our tags, we can enable or disable these rules using the Status element of the API. In this case the value is set to ENABLED. To disable the rules, the value is DISABLED. After the tags are enabled, we can pass values to the tags at runtime to secure the data displayed based on who is accessing the dashboard.

Each dataset can have up to 50 tag keys.

We receive the following response for the CreateDataset or UpdateDataset API:

{
"Status": 201,
“Arn”: “string”, //ARN of the dataset
“DataSetId”: “string”, //ID of the dataset
“RequestId”: “string”
}

Enable authors to access data protected by tag keys when authoring analysis

After tags keys are set and enabled on the dataset, it is secured. Authors when using this dataset to author a dashboard don’t see any data. They must be given permissions to see any of the data in the dataset when authoring a dashboard. To give QuickSight authors permission to see data in the dataset, create a permissions file or a rules dataset. For more information, see Creating Dataset Rules for Row-Level Security. The following is an example rules dataset.

UserName column_name_1 column_name_2 column_name_3
admin/sampleauthor

In this sample dataset, we have the author’s username listed in the UserName column. The other three columns are the columns from the dataset on which we set tag keys. The values are left empty for these columns for the author added to this table. This enables the author to see all the data in these columns without any restriction when they’re authoring analyses.

Set values to the tag keys at runtime when embedding the dashboard

After the tag keys are set for columns of the datasets, developers set values to the keys at runtime when embedding the dashboard. Developers call the API GenerateDashboardEmbedURLForAnonymousUser to embed the dashboard and pass values to the tag keys in the element SessionTags, as shown in the following example code:

POST /accounts//embed-url/anonymous-user HTTP/1.1
Content-type: application/json
{
    "AwsAccountId": "string",
    "SessionLifetimeInMinutes": integer,
    "Namespace": "string", 
    "SessionTags": 
        [ 
            {
                "Key": "tag_name_1", // Length: [1-128]
                "Value": "value1, value2" // Length: [0-256]
            }
            {
               "Key": "tag_name_2", // Length: [1-128]
               "Value": "*" // Length: [0-256]
            }
            {
               "Key": "tag_name_3", // Length: [1-128]
               "Value": "value3" // Length: [0-256]
            }
        ],
    "AuthorizedResourceArns": 
        [ 
            // Length: [1-25]
            // Dashboard ARNs in the same AWS Account
            "string" 
        ],
        
        "ExperienceConfiguration": 
        {
            "Dashboard": 
            {
                "InitialDashboardId": "string" 
            }
        }
    }
} 

Because this feature secures data for users not provisioned in QuickSight, the API call is for AnonymousUser only and therefore this feature works only with the API GenerateDashboardEmbedURLForAnonymousUser.

The preceding example code has the following components:

  • For tag_name_1, you set two values (value1 and value2) using the TagMultiValueDelimiter defined when setting the tag keys (in this case, a comma).
  • For tag_name_2, you set one value as an asterisk. This enables this tag key to have all values for that column assigned because we defined asterisk as the MatchAllValue when setting a tag key on the column earlier.
  • For tag_name_3, you set one value (value3).

API response definition

The response of the API has the EmbedURL, Status, and RequestID. You can embed this URL in your HTML page. Data in this dashboard is secured based on the values passed to the tag keys when calling the embedding API GenerateDashboardEmbedURLForAnonymousUser:

  • EmbedUrl (string) – A single-use URL that you can put into your server-side webpage to embed your dashboard. This URL is valid for 5 minutes. The API operation provides the URL with an auth_code value that enables one (and only one) sign-on to a user session that is valid for up to 10 hours. This URL renders the dashboard with RLS rules applied based on the values set for the RLS tag keys.
  • Status (integer) – The HTTP status of the request.
  • RequestId (string) – The AWS request ID for this operation.

Fine-grained access control

You can achieve fine-grained access control by using dynamic AWS Identity and Access Management (IAM) policy generation. For more information, see Isolating SaaS Tenants with Dynamically Generated IAM Policies. When using the GenerateEmbedUrlForAnonymousUser API for embedding, you need to mention two resource types in the IAM policy: the namespace ARNs your anonymous users virtually belong to, and the dashboard ARNs that can be used in the AuthorizedResourceArns input parameter value. The sessions generated using this API can access the authorized resources and the ones (dashboards) shared with the namespace.

Because anonymous users are part of a namespace, any dashboards shared with the namespace are accessible to them, regardless of whether they are passed explicitly via the AuthorizedResourceArns parameter.

To allow the caller identity to generate a URL for any user and any dashboard, the Resource block of the policy can be set to *. To allow the caller identity to generate a URL for any anonymous user in a specific namespace (such as Tenant1), the Resource part of the policy can be set to arn:aws:quicksight:us-east-1:<YOUR_AWS_ACCOUNT_ID>:namespace/Tenant1. This is the same for the dashboard ID. For dynamic policy generation, you can also use placeholders for the namespace and users.

The following code is an example IAM policy:

{
  "Version": "2012-10-17",
  "Statement": [
    {
      "Sid": "QuickSightEmbeddingRole",
      "Effect": "Allow",
      "Action": [
        "quicksight:GenerateEmbedUrlForAnonymousUser"
      ],
      "Resource": [
        "arn:aws:quicksight:us-east-1::namespace/tenant1",
        "arn:aws:quicksight:us-east-1::dashboard/dashboard-id-123"
 
        // You can add specific Namespace IDs (tenant IDs), or namespace prefixes here
        // e.g. "arn:aws:quicksight:us-east-1::namespace/{{tenant-id}}" will allow the role to
        // generate embedding URL for namespace dynamically substituted
        // into the placeholder {{tenant-id}}
 
        // or "arn:aws:quicksight:us-east-1::namespace/MyTenantIdPrefix*" will allow the role to
        // generate embedding URL for namespaces having prefix MyTenantIdPrefix.
        
        
        // You can add specific Dashboard IDs, or ID prefixes here
        // e.g. "arn:aws:quicksight:us-east-1::dashboard/{{dashboard-id}}" will allow the role to
        // generate embedding URL for dashboard dynamically substituted
        // into the placeholder {{dashboard-id}}
 
        // or "arn:aws:quicksight:us-east-1::dashboard/MyDashboardIdPrefix*" will allow the role to
        // generate embedding URL for namespaces having prefix MyDashboardIdPrefix.
      ]
    }
  ]
}

Use case

OkTank is an ISV in the healthcare space. They have a SaaS application that is used by different hospitals across different regions of the country to manage their revenue. OkTank has thousands of healthcare employees accessing their application and has embedded operations related to their business in a QuickSight dashboard in their application. OkTank doesn’t want to manage their users in QuickSight separately, and wants to secure data based on which user from which hospital is accessing their application. OkTank is securing the data on the dashboards at runtime using row-level security using tags.

OkTank has hospitals (North Hospital, South Hospital, and Downtown Hospital) in regions Central, East, South, and West.

In this example, the following users access OkTank’s application and the embedded dashboard. Each user has a certain level of restriction rules that define what data they can access in the dashboards. PowerUser is a super user that can see the data for all hospitals and regions.

OkTank’s application’s user Hospital Region
NorthUser North Hospital Central and East
NorthAdmin North Hospital All regions
SouthUser South Hospital South
SouthAdmin South Hospital All regions
PowerUser All hospitals All regions

None of these users have been provisioned in QuickSight. OkTank manages these users in its own application and therefore knows which region and hospital each user belongs to. When any of these users access the embedded QuickSight dashboard in the application, OkTank must secure the data on the dashboard so that users can only see the data for their region and hospital.

First, OkTank created tag keys on the dataset they’re using to power the dashboard. In their UpdateDataset API call, the RowLevelPermissionTagConfiguration element on the dataset is as follows:

"RowLevelPermissionTagConfiguration": 
        {
            "Status": "ENABLED",
            "TagRules": [
                {
                    "TagKey": "customer_region",
                    "ColumnName": "region",
                    "TagMultiValueDelimiter": ",",
                    "MatchAllValue": "*"
                },
                {
                    "TagKey": "customer_hospital",
                    "ColumnName": "hospital",
                    "TagMultiValueDelimiter": ",",
                    "MatchAllValue": "*"
                }
            ]
        }

Second, at runtime when embedding the dashboard via the GenerateDashboardEmbedURLForAnonymousUser API, they set SessionTags for each user.

SessionTags for NorthUser in the GenerateDashboardEmbedURLForAnonymousUser API call are as follows:

"SessionTags": 
        [ 
            {
                "Key": "customer_hospital",
                "Value": "North Hospital"
            },
            {
               "Key": " customer_region",
               "Value": "Central, East"
            }
        ]

SessionTags for NorthAdmin are as follows:

"SessionTags": 
        [ 
            {
                "Key": " customer_hospital",
                "Value": "North Hospital"
            },
            {
               "Key": " customer_region",
               "Value": "*"
            }
        ]

SessionTags for SouthUser are as follows:

"SessionTags": 
        [ 
            {
                "Key": " customer_hospital",
                "Value": "South Hospital"
            },
            {
               "Key": " customer_region",
               "Value": "South"
            }
        ]

SessionTags for SouthAdmin are as follows:

"SessionTags": 
        [ 
            {
                "Key": " customer_hospital",
                "Value": "South Hospital"
            },
            {
               "Key": " customer_region",
               "Value": "*"
            }
        ]

SessionTags for PowerUser are as follows:

"SessionTags": 
        [ 
            {
                "Key": " customer_hospital",
                "Value": "*"
            },
            {
               "Key": " customer_region",
               "Value": "*"
            }
        ]

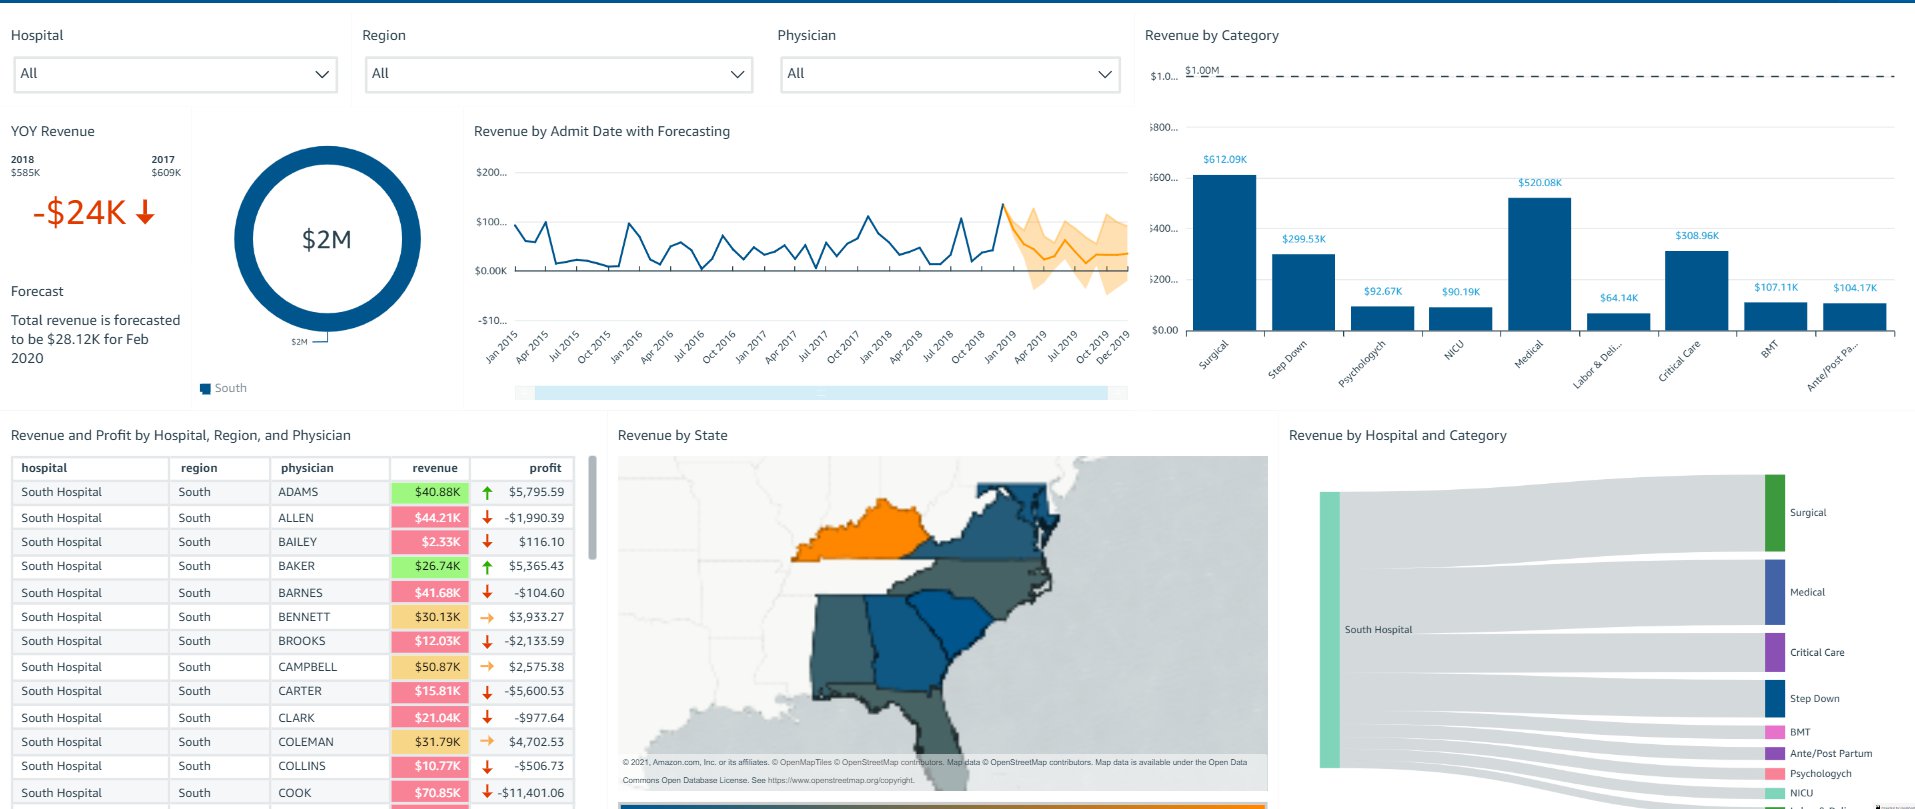
The following screenshot shows what SouthUser sees pertaining to South Hospital in the South region.

The following screenshot shows what SouthAdmin sees pertaining to South Hospital in all regions.

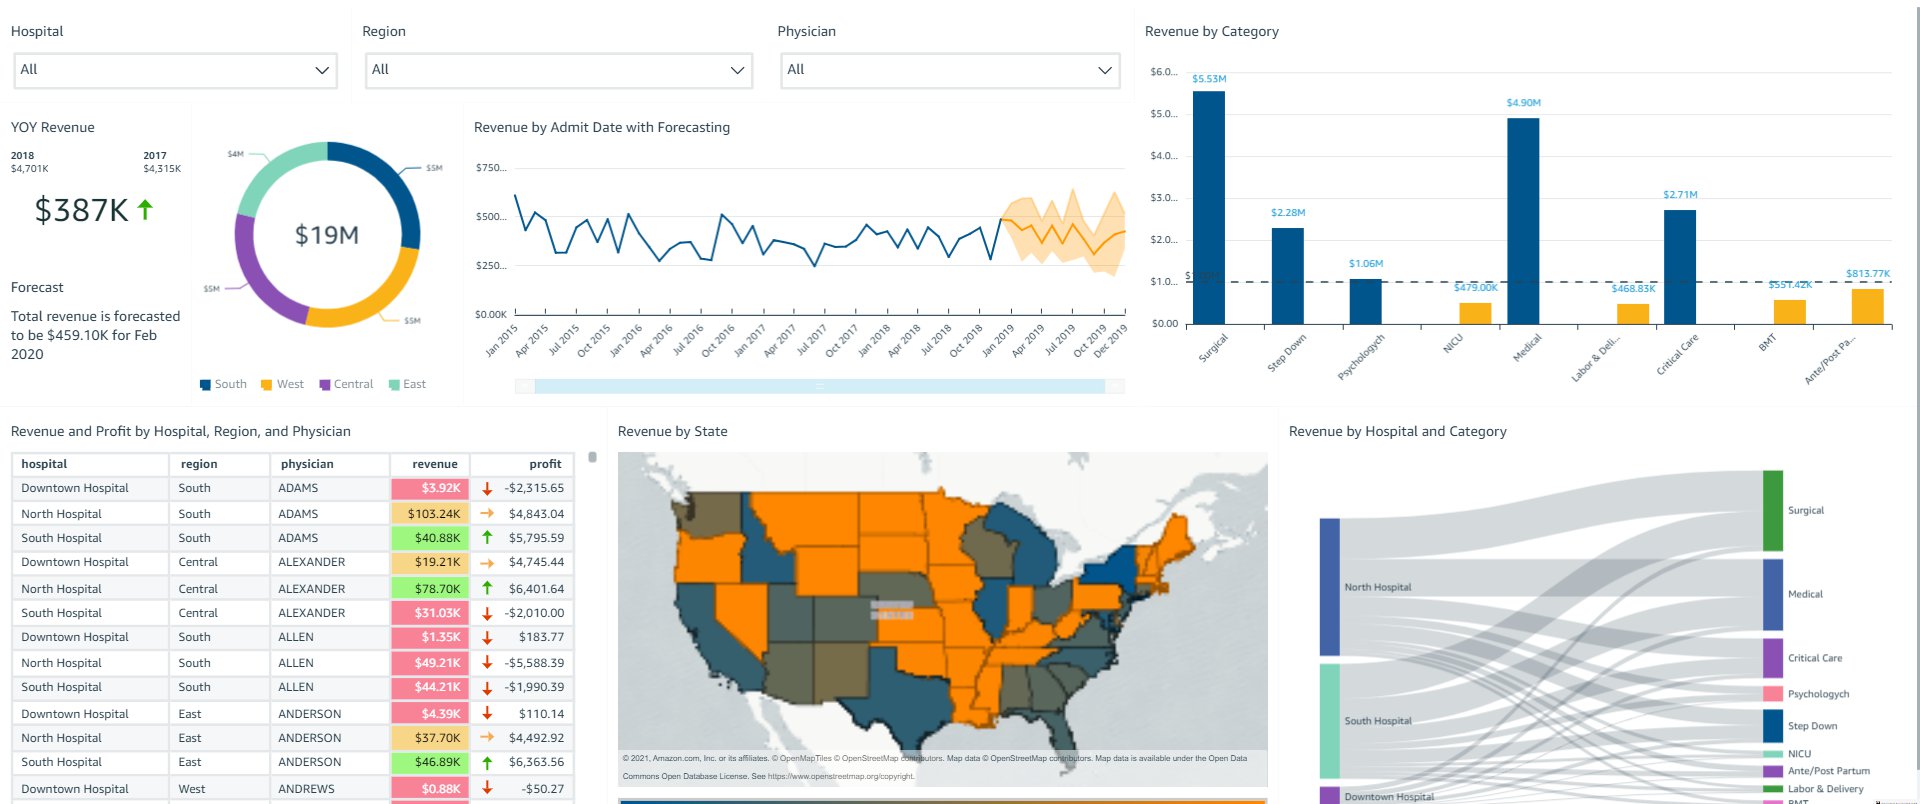
The following screenshot shows what PowerUser sees pertaining to all hospitals in all regions.

Based on session tags, OkTank has secured data on the embedded dashboards such that each user only sees specific data based on their access. You can access the dashboard as one of the users (by changing the user in the drop-down menu on the top right) and see how the data changes based on the user selected.

Overall, with row-level security using tags, OkTank is able to provide a compelling analytics experience within their SaaS application, while making sure that each user only sees the appropriate data without having to provision and manage users in QuickSight. QuickSight provides a highly scalable, secure analytics option that you can set up and roll out to production in days, instead of weeks or months previously.

Conclusion

The combination of embedding dashboard for users not provisioned in QuickSight and row-level security using tags enables developers and ISVs to quickly and easily set up sophisticated, customized analytics for their application users—all without any infrastructure setup or management while scaling to millions of users. For more updates from QuickSight embedded analytics, see What’s New in the Amazon QuickSight User Guide.


About the Authors

Raji Sivasubramaniam is a Specialist Solutions Architect at AWS, focusing on Analytics. Raji has 20 years of experience in architecting end-to-end Enterprise Data Management, Business Intelligence and Analytics solutions for Fortune 500 and Fortune 100 companies across the globe. She has in-depth experience in integrated healthcare data and analytics with wide variety of healthcare datasets including managed market, physician targeting and patient analytics. In her spare time, Raji enjoys hiking, yoga and gardening.

Srikanth Baheti is a Specialized World Wide Sr. Solution Architect for Amazon QuickSight. He started his career as a consultant and worked for multiple private and government organizations. Later he worked for PerkinElmer Health and Sciences & eResearch Technology Inc, where he was responsible for designing and developing high traffic web applications, highly scalable and maintainable data pipelines for reporting platforms using AWS services and Serverless computing.

Kareem Syed-Mohammed is a Product Manager at Amazon QuickSight. He focuses on embedded analytics, APIs, and developer experience. Prior to QuickSight he has been with AWS Marketplace and Amazon retail as a PM. Kareem started his career as a developer and then PM for call center technologies, Local Expert and Ads for Expedia. He worked as a consultant with McKinsey and Company for a short while.

The collective thoughts of the interwebz