Post Syndicated from Explosm.net original http://explosm.net/comics/5969/
New Cyanide and Happiness Comic
Post Syndicated from Explosm.net original http://explosm.net/comics/5969/
New Cyanide and Happiness Comic
Post Syndicated from original https://xkcd.com/2512/

Post Syndicated from original https://lwn.net/Articles/868406/rss
Version 21.02.0 of the OpenWrt router distribution is out. “It
incorporates over 5800 commits since branching the previous OpenWrt 19.07
release and has been under development for about one and a half
year“. Significant changes include WPA3 support by default, TLS
support in opkg and in the LuCi interface, initial Distributed
Switch Architecture support, new hardware support, and more. See the release
notes for more information.
Post Syndicated from BeardedTinker original https://www.youtube.com/watch?v=eiISptg2YhA
Post Syndicated from BeardedTinker original https://www.youtube.com/watch?v=eVzTuK8GzeQ
Post Syndicated from Explosm.net original http://explosm.net/comics/5968/
New Cyanide and Happiness Comic
Post Syndicated from Matt Granger original https://www.youtube.com/watch?v=-fTFPfKSuNY
Post Syndicated from Oglaf! -- Comics. Often dirty. original https://www.oglaf.com/treatyourself/


Post Syndicated from Matt Granger original https://www.youtube.com/watch?v=TChXreQChD0
Post Syndicated from Talks at Google original https://www.youtube.com/watch?v=fYOvOLPdRCE
Post Syndicated from Techmoan original https://www.youtube.com/watch?v=90-gIAMvQNs
Post Syndicated from Explosm.net original http://explosm.net/comics/5967/
New Cyanide and Happiness Comic
Post Syndicated from Bruce Schneier original https://www.schneier.com/blog/archives/2021/09/friday-squid-blogging-squid-communication.html
Interesting article on squid communication.
As usual, you can also use this squid post to talk about the security stories in the news that I haven’t covered.
Read my blog posting guidelines here.
Post Syndicated from Girish Chanchlani original https://aws.amazon.com/blogs/architecture/field-notes-automate-disaster-recovery-for-aws-workloads-with-druva/
This post was co-written by Akshay Panchmukh, Product Manager, Druva and Girish Chanchlani, Sr Partner Solutions Architect, AWS.
The Uptime Institute’s Annual Outage Analysis 2021 report estimated that 40% of outages or service interruptions in businesses cost between $100,000 and $1 million, while about 17% cost more than $1 million. To guard against this, it is critical for you to have a sound data protection and disaster recovery (DR) strategy to minimize the impact on your business. With the greater adoption of the public cloud, most companies are either following a hybrid model with critical workloads spread across on-premises data centers and the cloud or are all in the cloud.
In this blog post, we focus on how Druva, a SaaS based data protection solution provider, can help you implement a DR strategy for your workloads running in Amazon Web Services (AWS). We explain how to set up protection of AWS workloads running in one AWS account, and fail them over to another AWS account or Region, thereby minimizing the impact of disruption to your business.
In the following architecture, we describe how you can protect your AWS workloads from outages and disasters. You can quickly set up a DR plan using Druva’s simple and intuitive user interface, and within minutes you are ready to protect your AWS infrastructure.
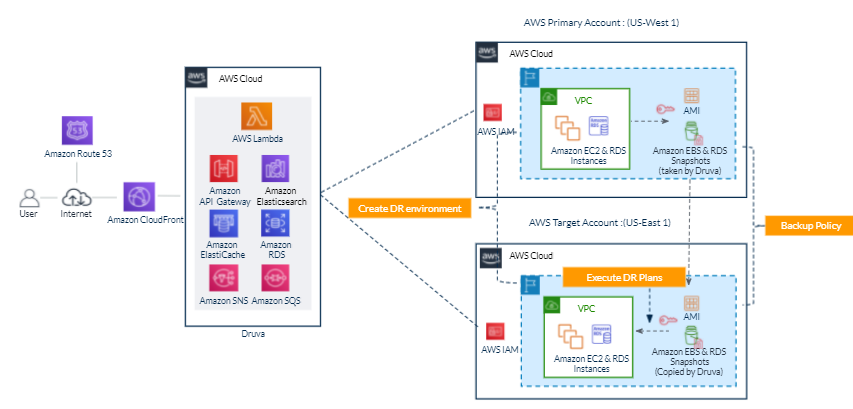
Figure 1. Druva architecture
Druva’s cloud DR is built on AWS using native services to provide a secure operating environment for comprehensive backup and DR operations. With Druva, you can:
Other notable features include support for automated runbook initiation, selection of target AWS instance types for DR, and simplified orchestration and testing to help protect and recover data at scale. Druva provides the flexibility to adopt evolving infrastructure across geographic locations, adhere to regulatory requirements (such as, GDPR and CCPA), and recover workloads quickly following disasters, helping meet your business-critical recovery time objectives (RTOs). This unified solution offers taking snapshots as frequently as every five minutes, improving RPOs. Because it is a software as a service (SaaS) solution, Druva helps lower costs by eliminating traditional administration and maintenance of storage hardware and software, upgrades, patches, and integrations.
We will show you how to set up Druva to protect your AWS workloads and automate DR.
After you sign into the Druva Cloud Platform, you will need to grant Druva third-party access to your AWS account by pressing Add New Account button, and following the steps as shown in Figure 2.
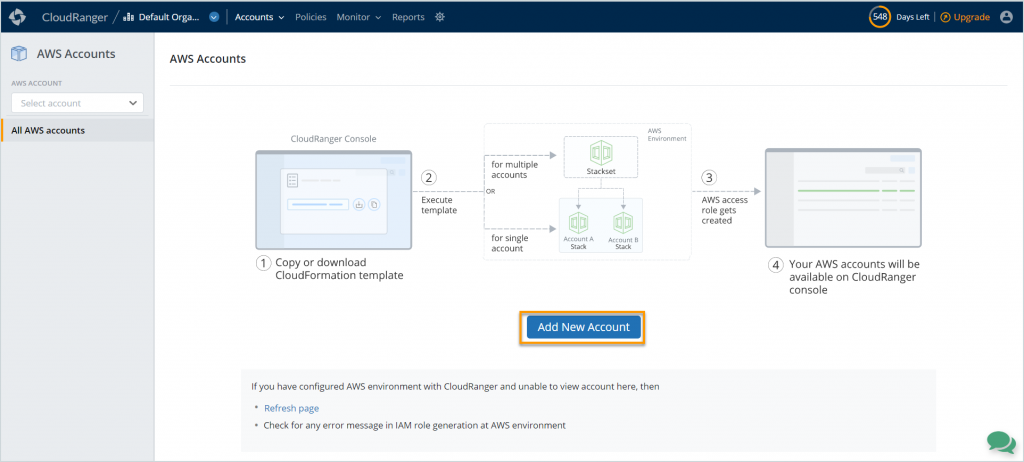
Figure 2. Add AWS account information
Druva uses AWS Identity and Access Management (IAM) roles to access and manage your AWS workloads. To help you with this, Druva provides an AWS CloudFormation template to create a stack or stack set that generates the following:
The generated Amazon Resource Name (ARN) of the IAM role is then linked to Druva so that it can run backup and DR jobs for your AWS workloads. Note that Druva follows all security protocols and best practices recommended by AWS. All access permissions to your AWS resources and Regions are controlled by IAM.
After you have logged into Druva and set up your account, you can now set up DR for your AWS workloads. The following steps will allow you to set up DR for AWS infrastructure.
A source environment refers to a logical grouping of Amazon VPCs, subnets, security groups, and other infrastructure components required to run your application.
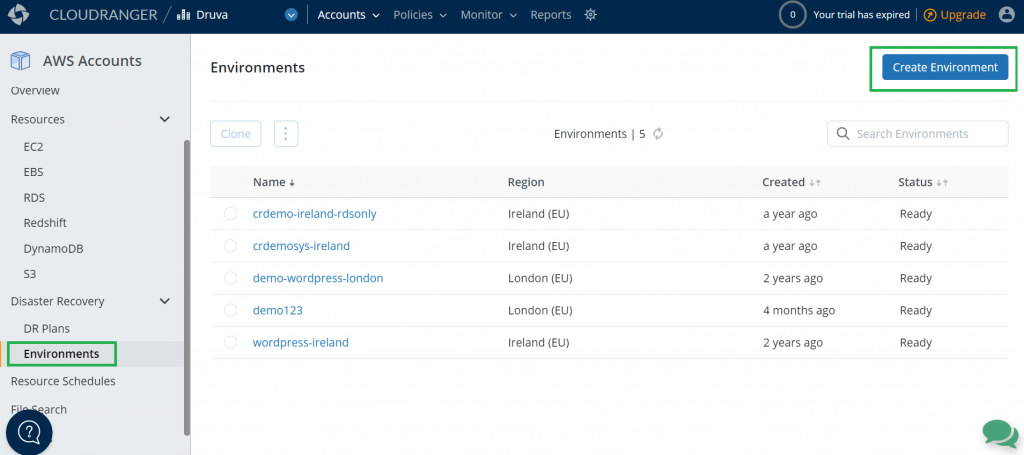
Figure 3. Create a source environment
In this step, create your source environment by selecting the appropriate AWS resources you’d like to set up for failover. Druva currently supports Amazon EC2 and Amazon RDS as sources that can be protected. With Druva’s automated DR, you can failover these resources to a secondary site with the press of a button.
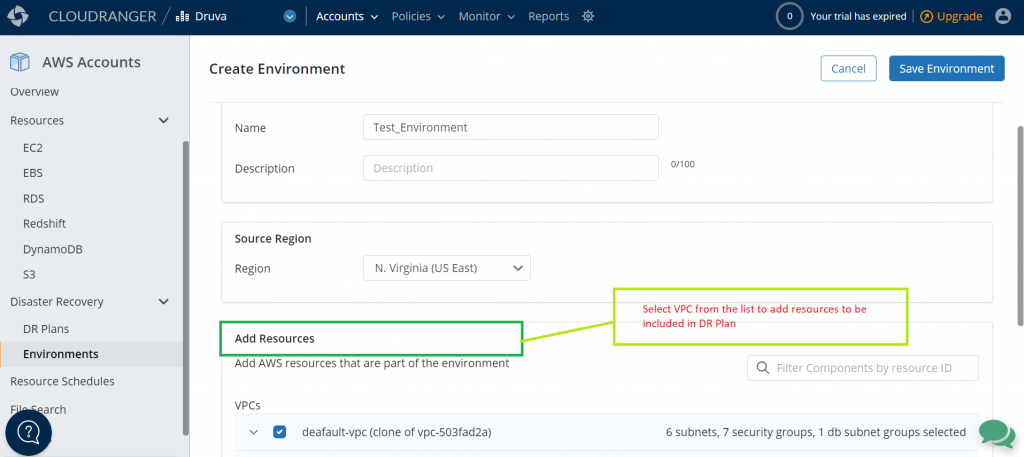
Figure 4. Add resources to a source environment
Note that creating a source environment does not create or update existing resources or configurations in your AWS account. It only saves this configuration information with Druva’s service.
The next step is to clone the source environment to a Region where you want to failover in case of a disaster. Druva supports cloning the source environment to another Region or AWS account that you have selected. Cloning essentially replicates the source infrastructure in the target Region or account, which allows the resources to be failed over quickly and seamlessly.
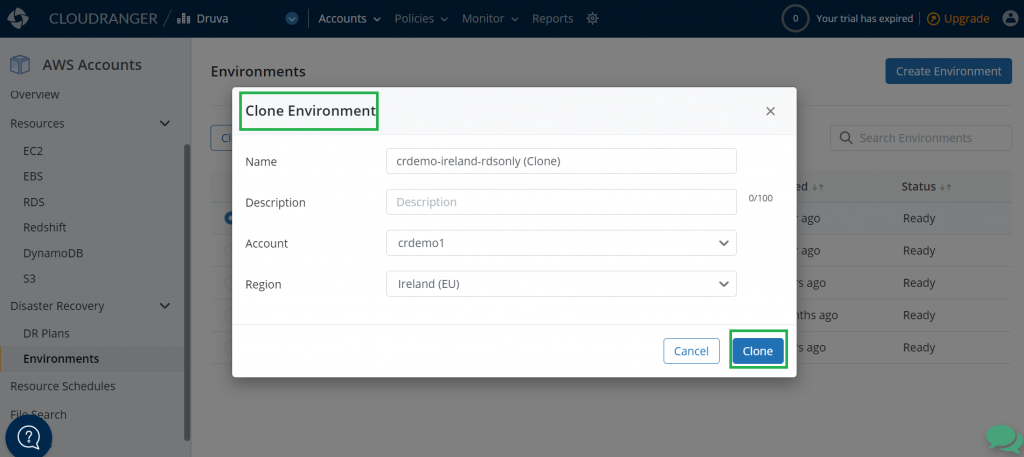
Figure 5. Clone the source environment
You can create a new backup policy or use an existing backup policy to create backups in the cloned or target Region. This enables Druva to restore instances using the backup copies.

Figure 6. Create a new backup policy or use an existing backup policy
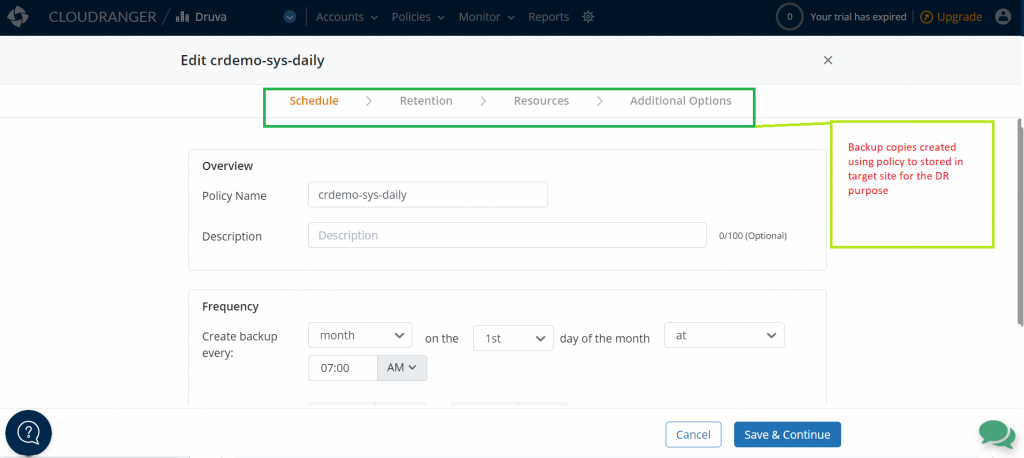
Figure 7. Customize the frequency of backup schedules
A DR plan is a structured set of instructions designed to recover resources in the event of a failure or disaster. DR aims to get you back to the production-ready setup with minimal downtime. Follow these steps to create your DR plan.

Figure 8. Create a disaster recovery plan
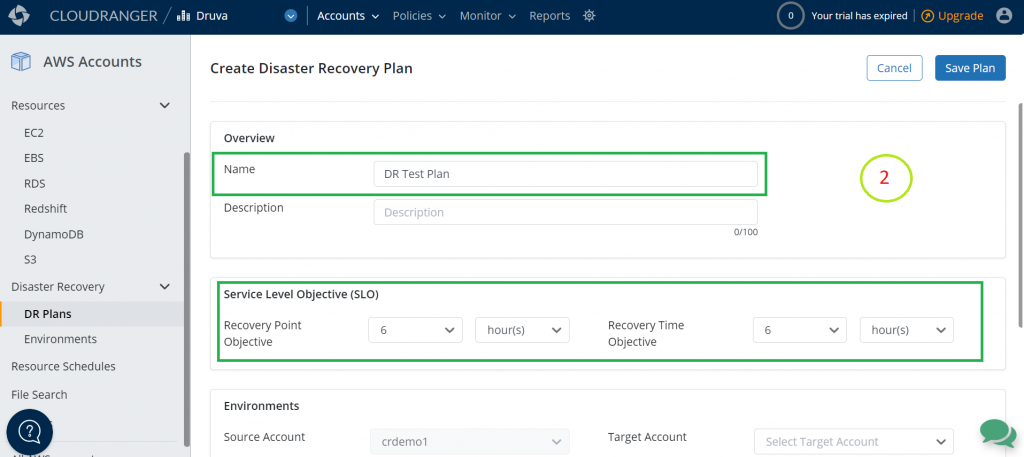
Figure 9. Add your RTO and RPO requirements
| Environments | |
|---|---|
| Source Account | By default, this is the Druva account in which you are currently creating the DR plan. |
| Source Environment | Select the source environment applicable within the Source Account (your Druva account in which you’re creating the DR plan). |
| Target Account | Select the same or a different target account. |
| Target Environment | Select the Target Environment, applicable within the Target Account. |
| Resources | |
|---|---|
| Create Policy | If you do not have a backup policy, then you can create one. |
| Add Resources | Add resources from the source environment that you want to restore. Make sure the verification column shows a ‘Valid Backup Policy’ status. This ensures that the backup policy is frequently creating copies as per the RPO defined previously. |
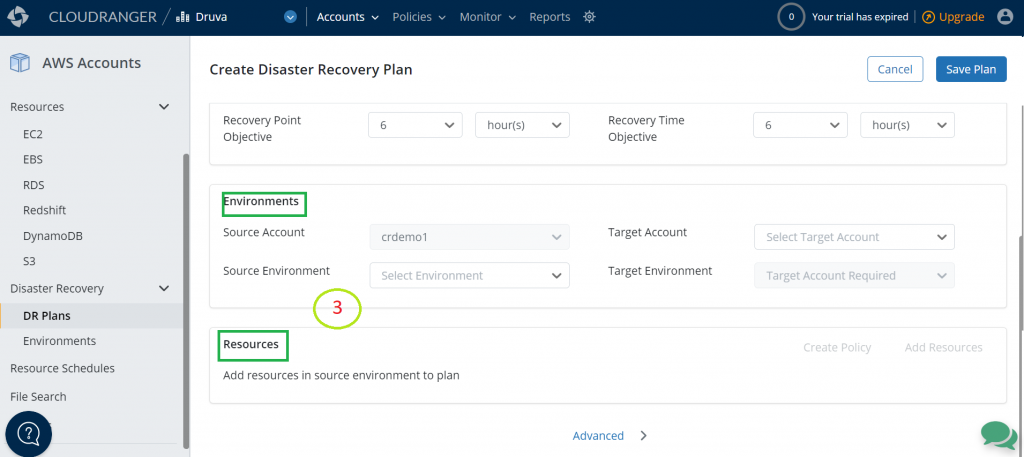
Figure 10. Create DR plan based off the source environment, target environment, and resources
| Target Instance Type | Target Instance Type can be selected. If instance type is not selected then:
|
| Test Plan Instance Type | There are many options. To reduce incurring cost, the lower instance type can be selected from all available AWS instance types. |
| Run Books | Select this option if you would like to shutdown the source server after failover occurs. |
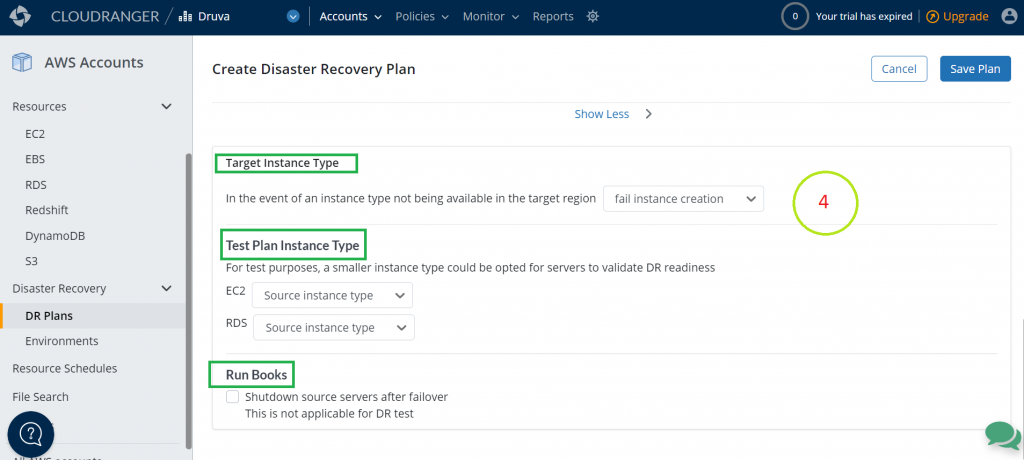
Figure 11. Identify target instance type, test plan instance type, and run books
After you have defined your DR plan, it is time to test it so that you can—when necessary—initiate a failover of resources to the target Region. You can now easily try this on the resources in the cloned environment without affecting your production environment.
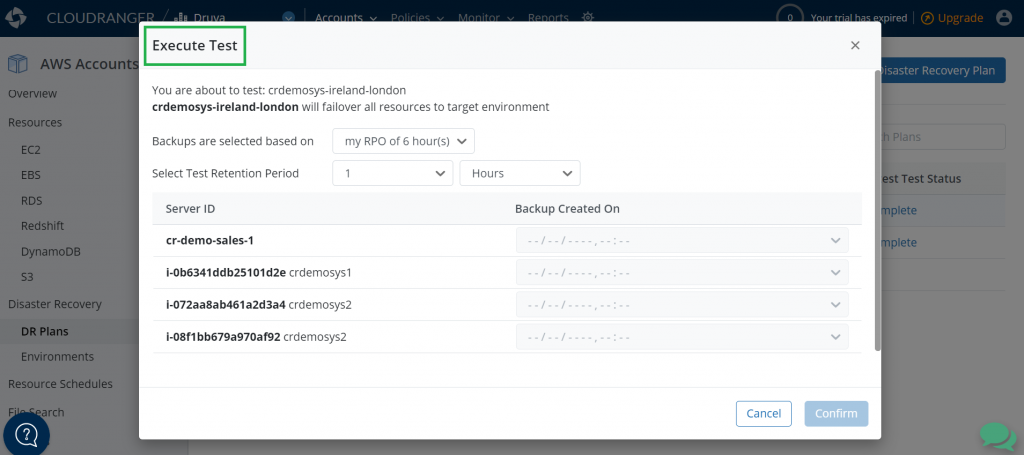
Figure 12. Test the DR plan
Testing your DR plan will help you to find answers for some of the questions like: How long did the recovery take? Did I meet my RTO and RPO objectives?
After you have successfully tested the DR plan, it can easily be initiated with the click of a button to failover your resources from the source Region or account to the target Region or account.
With the growth of cloud-based services, businesses need to ensure that mission-critical applications that power their businesses are always available. Any loss of service has a direct impact on the bottom line, which makes business continuity planning a critical element to any organization. Druva offers a simple DR solution which will help you keep your business always available.
Druva provides unified backup and cloud DR with no need to manage hardware, software, or costs and complexity. It helps automate DR processes to ensure your teams are prepared for any potential disasters while meeting compliance and auditing requirements.
With Druva, you can easily validate your RTO and RPO with automated regular DR testing, cross-account DR for protection against attacks and accidental deletions, and ensure backups are isolated from your primary production account for DR planning. With cross-Region DR, you can duplicate the entire Amazon VPC environment across Regions to protect you against Regionwide failures. In conclusion, Druva is a complete solution built with a goal to protect your native AWS workloads from any disasters.
To learn more, visit: https://www.druva.com/use-cases/aws-cloud-backup/
Post Syndicated from Bruce Schneier original https://www.schneier.com/blog/archives/2021/09/hacker-themed-board-game.html
Black Hat is a hacker-themed board game.
Post Syndicated from LGR original https://www.youtube.com/watch?v=BxL7-XLGfDg
Post Syndicated from Randy DeFauw original https://aws.amazon.com/blogs/architecture/emerging-solutions-for-operations-research-on-aws/
Operations research (OR) uses mathematical and analytical tools to arrive at optimal solutions for complex business problems like workforce scheduling. The mathematical techniques used to solve these problems, such as linear programming and mixed-integer programming, require the use of optimization software (solvers). There are several popular and powerful solvers available, ranging from commercial options like IBM CPLEX to open-source packages like ORTools. While these solvers incorporate decades of algorithmic expertise and can solve large and complex problems effectively, they have some scalability limitations.
In this post, we’ll describe three alternatives that you can consider for solving OR problems (see Figure 1). None of these are as general purpose as traditional solvers, but they should be on your “emerging technologies” radar.

Figure 1. OR optimization options
These include:
Let’s start with a reference problem and solve it with a traditional solver. We’ll tackle an inventory management issue (see Figure 2). We have a sales depot that supplies products for local sales outlets. For the depot’s Region, there are seven weeks of historical sales data for each product. We also know how much each product costs and for how much it can be sold. Finally, we know the overall weekly capacity of the depot. This depends on logistical constraints like the size of the warehouse and transportation availability. This scenario is loosely based on the Grupo Bimbo retailer’s Kaggle competition and dataset.

Figure 2. Sales depot inventory management scenario
Our job is to place an inventory order to restock our sales depot each week. We quantify our work through a reward function. We want to maximize our revenue:
revenue = (sale price * number of units sold)
(Note that the sample dataset does not include cost of goods sold, only sale price.)
We use these constraints:
total units sold <= depot capacity
0 <= quantity sold of any given item <= forecasted demand for that item
There are many possible solutions to this problem. Using ORTools, we get an average reward (profit) of about $5,700, in about 1,000 simulations.
We can make the scenario slightly more realistic by acknowledging that our sales forecasts are not perfect. After we get the solution from the solver, we can penalize the reward (profit) by subtracting the cost of unsold goods. With this approach, we get a reward of about $2,450.
An alternative approach to the traditional solver is reinforcement learning (RL). RL is a field of ML that handles problems where the right answer is not immediately known, like playing a game of chess. RL fits our sales depot scenario, because we don’t know how well we will do until after we place the order and are able to view a week of sales activity.
Our sales depot problem resembles a knapsack problem. This is a common OR pattern where we want to fill a container (in this case, our sales depot) with as many items as possible until capacity is reached. Each item has a value (sales price) and a weight (cost). In RL we have to translate this into an observation space, an action space, a state, and a reward (see Figure 3).
The observation space is what our purchasing agent sees. This includes our depot capacity, the sales price, and the forecasted demand. The action space is what our agent can do. In the simplest case, it’s the number of each item to order for the depot, each week. The state is what the agent sees right now, and we model that as the sales results from last week. Finally, the reward function is our profit equation.
One important distinction between OR solvers and RL is that we can’t easily enforce hard constraints in RL. We can limit the amount of an individual product we purchase each week, but we can’t enforce an overall limit on the number of items purchased. We may exceed the capacity of our depot. The simplest way to handle that is to enforce a penalty. There are more sophisticated techniques available, such as interpreting our action as the percentage of budget to spend on each item. But let’s illustrate the simple case here.
Using an RL algorithm from the Ray RLLib package, our reward was $7,000 on average, including penalties for ordering too much of any given item.

Figure 3. Translating OR problem to RL
It’s possible to model a knapsack problem using ML rather than RL in some cases, and there are simple reference implementations available. The design assumes that we know, or can accurately estimate the reward for a given week. With our simple scenario, we can compute the reward using estimates of future sales. We can use this in a custom loss function to train a neural network.
Quantum computers are fundamentally different than the computers most of us use. The appeal of quantum computers is that they can tackle some types of problems much more efficiently than standard computers. Quantum computers can, in theory, solve prime number factoring for decryption in orders of magnitude faster than a standard computer. But they are still in their infancy and limited to the size of problem they can handle, due to hardware limitations.
D-Wave Systems, which make some of the types of quantum computers available through Amazon Braket, has a solver called QBSolv. QBSolv works on a specific type of optimization problem called quadratic unconstrained binary optimization (QUBO). It breaks large problems into smaller pieces that a quantum computer can handle. There is a reference pattern for translating a knapsack problem to a QUBO problem.
Running the sales depot problem through QBSolv on Amazon Braket and using a subset of the data, I was able to obtain a reward of $900. When I tried to run on the full dataset, I was not able to complete the decomposition step, likely due to a hardware limitation.
In this blog post, I review OR problems and traditional OR solvers. I then discussed three alternative approaches, RL, ML, and quantum computing. Each of these alternatives has drawbacks and none is a general-purpose replacement for traditional OR solvers.
However, RL and ML are potentially more scalable because you can train those solutions on a cluster of machines, rather than running an OR solver on a single machine. RL agents can also learn from experience, giving them flexibility to handle scenarios that may be difficult to incorporate into an OR solver. Quantum computing solutions are promising but the current state of the art for quantum computers limits their application to small-scale problems at the moment. All of these alternatives can potentially derive a solution more quickly than an OR solver.
Further Reading:
Post Syndicated from Netflix Technology Blog original https://netflixtechblog.com/practical-api-design-at-netflix-part-1-using-protobuf-fieldmask-35cfdc606518
By Alex Borysov, Ricky Gardiner
At Netflix, we heavily use gRPC for the purpose of backend to backend communication. When we process a request it is often beneficial to know which fields the caller is interested in and which ones they ignore. Some response fields can be expensive to compute, some fields can require remote calls to other services. Remote calls are never free; they impose extra latency, increase probability of an error, and consume network bandwidth. How can we understand which fields the caller doesn’t need to be supplied in the response, so we can avoid making unnecessary computations and remove calls? With GraphQL this comes out of the box through the use of field selectors. In the JSON:API standard a similar technique is known as Sparse Fieldsets. How can we achieve a similar functionality when designing our gRPC APIs? The solution we use within the Netflix Studio Engineering is protobuf FieldMask.

Protocol Buffers, or simply protobuf, is a data serialization mechanism. By default, gRPC uses protobuf as its IDL (interface definition language) and data serialization protocol.
FieldMask is a protobuf message. There are a number of utilities and conventions on how to use this message when it is present in an RPC request. A FieldMask message contains a single field named paths, which is used to specify fields that should be returned by a read operation or modified by an update operation.

Let’s assume there is a Production service that manages Studio Content Productions (in the film and TV industry, the term production refers to the process of making a movie, not the environment to run a software).
GetProduction returns a Production message by its unique ID. A production contains multiple fields such as: title, format, schedule dates, scripts aka screenplay, budgets, episodes, etc, but let’s keep this example simple and focus on filtering out schedule dates and scripts when requesting a production.
Let’s say we want to get production information for a particular production such as “La Casa De Papel” using the GetProduction API. While a production has many fields, some of these fields are returned from other services such as schedule from the Schedule service, or scripts from the Script service.

The Production service will make RPCs to Schedule and Script services every time GetProduction is called, even if clients ignore the schedule and scripts fields in the response. As mentioned above, remote calls are not free. If the service knows which fields are important for the caller, it can make an informed decision about making expensive calls, starting resource-heavy computations, and/or calling the database. In this example, if the caller only needs production title and production format, the Production service can avoid making remote calls to Schedule and Script services.
Additionally, requesting a large number of fields can make the response payload massive. This can become an issue for some applications, for example, on mobile devices with limited network bandwidth. In these cases it is a good practice for consumers to request only the fields they need.

A naïve way of solving these problems can be adding additional request parameters, such as includeSchedule and includeScripts:
This approach requires adding a custom includeXXX field for every expensive response field and doesn’t work well for nested fields. It also increases the complexity of the request, ultimately making maintenance and support more challenging.
Instead of creating one-off “include” fields, API designers can add field_mask field to the request message:
Consumers can set paths for the fields they expect to receive in the response. If a consumer is only interested in production titles and format, they can set a FieldMask with paths “title” and “format”:
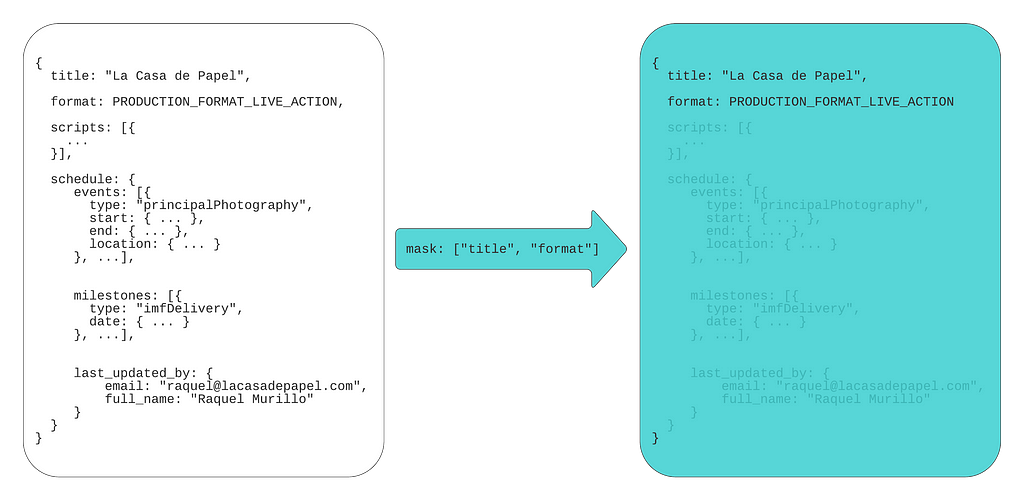
Please note, even though code samples in this blog post are written in Java, demonstrated concepts apply to any other language supported by protocol buffers.
If consumers only need a title and an email of the last person who updated the schedule, they can set a different field mask:
By convention, if a FieldMask is not present in the request, all fields should be returned.
You might notice that paths in the FieldMask are specified using field names, whereas on the wire, encoded protocol buffers messages contain only field numbers, not field names. This (alongside some other techniques like ZigZag encoding for signed types) makes protobuf messages space-efficient.
To understand the difference between field numbers and field names, let’s take a detailed look at how protobuf encodes and decodes messages.
Our protobuf message definition (.proto file) contains Production message with five fields. Every field has a type, name, and number.
When the protobuf compiler (protoc) compiles this message definition, it creates the code in the language of your choice (Java in our example). This generated code contains classes for defined messages, together with message and field descriptors. Descriptors contain all the information needed to encode and decode a message into its binary format. For example, they contain field numbers, names, types. Message producer uses descriptors to convert a message to its wire format. For efficiency, the binary message contains only field number-value pairs. Field names are not included. When a consumer receives the message, it decodes the byte stream into an object (for example, Java object) by referencing the compiled message definitions.
As mentioned above, FieldMask lists field names, not numbers. Here at Netflix we are using field numbers and convert them to field names using FieldMaskUtil.fromFieldNumbers() utility method. This method utilizes the compiled message definitions to convert field numbers to field names and creates a FieldMask.
However, there is an easy-to-overlook limitation: using FieldMask can limit your ability to rename message fields. Renaming a message field is generally considered a safe operation, because, as described above, the field name is not sent on the wire, it is derived using the field number on the consumer side. With FieldMask, field names are sent in the message payload (in the paths field value) and become significant.
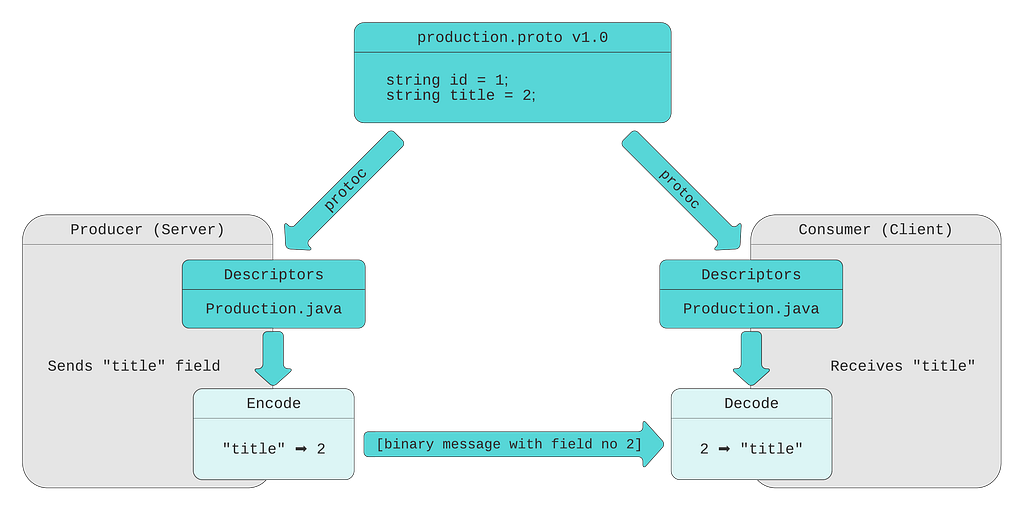
Suppose we want to rename the field title to title_name and publish version 2.0 of our message definition:
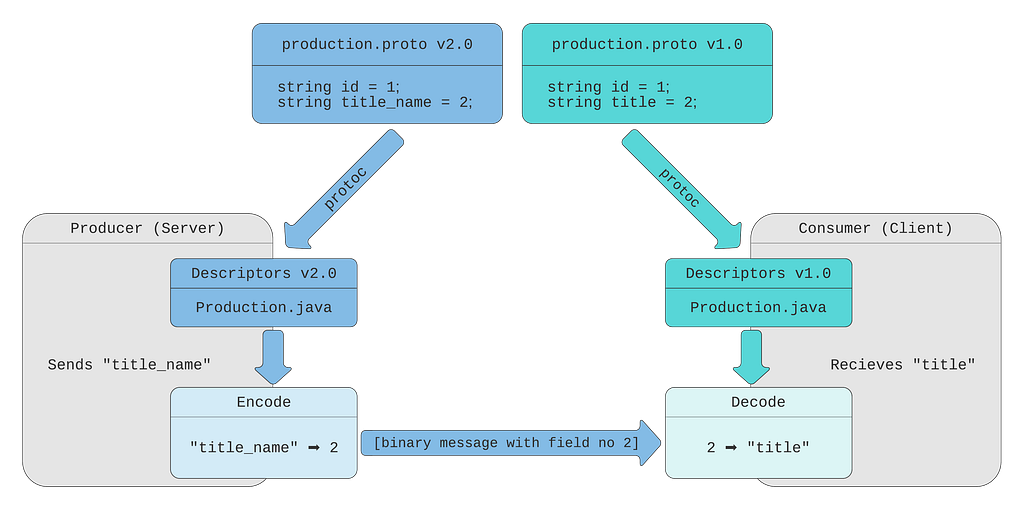
In this chart, the producer (server) utilizes new descriptors, with field number 2 named title_name. The binary message sent over the wire contains the field number and its value. The consumer still uses the original descriptors, where the field number 2 is called title. It is still able to decode the message by field number.
This works well if the consumer doesn’t use FieldMask to request the field. If the consumer makes a call with the “title” path in the FieldMask field, the producer will not be able to find this field. The producer doesn’t have a field named title in its descriptors, so it doesn’t know the consumer asked for field number 2.

As we see, if a field is renamed, the backend should be able to support new and old field names until all the callers migrate to the new field name (backward compatibility issue).
There are multiple ways to deal with this limitation:
Regardless of the solution, it is important to remember that FieldMask makes field names an integral part of your API contract.
On the producer (server) side, unnecessary fields can be removed from the response payload using the FieldMaskUtil.merge() method (lines ##8 and 9):
If the server code also needs to know which fields are requested in order to avoid making external calls, database queries or expensive computations, this information can be obtained from the FieldMask paths field:
This code calls the makeExpensiveCallToScheduleServicemethod (line #21) only if the schedule field is requested. Let’s explore this code sample in more detail.
(1) The SCHEDULE_FIELD_NAME constant contains the name of the field. This code sample uses message type Descriptor and FieldDescriptor to lookup field name by field number. The difference between protobuf field names and field numbers is described in the Protobuf Field Names vs Field Numbers section above.
(2) FieldMaskUtil.normalize() returns FieldMask with alphabetically sorted and deduplicated field paths (aka canonical form).
(3) Expression (lines ##14 – 17) that yields the scheduleFieldRequestedvalue takes a stream of FieldMask paths, maps it to a stream of top-level fields, and returns true if top-level fields contain the value of the SCHEDULE_FIELD_NAME constant.
(4) ProductionSchedule is retrieved only if scheduleFieldRequested is true.
If you end up using FieldMask for different messages and fields, consider creating reusable utility helper methods. For example, a method that returns all top-level fields based on FieldMask and FieldDescriptor, a method to return if a field is present in a FieldMask, etc.
Some access patterns can be more common than others. If multiple consumers are interested in the same subset of fields, API producers can ship client libraries with FieldMask pre-built for the most frequently used field combinations.
Providing pre-built field masks simplifies API usage for the most common scenarios and leaves consumers the flexibility to build their own field masks for more specific use-cases.

Protobuf FieldMask is a simple, yet powerful concept. It can help make APIs more robust and service implementations more efficient.
This blog post covered how and why it is used at Netflix Studio Engineering for APIs that read the data. Part 2 will shed light on using FieldMask for update and remove operations.
![]()
Practical API Design at Netflix, Part 1: Using Protobuf FieldMask was originally published in Netflix TechBlog on Medium, where people are continuing the conversation by highlighting and responding to this story.
Post Syndicated from original https://www.backblaze.com/blog/back-to-school-backup-for-school/

Students are starting to head back to the classroom all over the world and, while the timing might be the same, the way we’re thinking about school has changed a lot recently. Schoolwork and projects that previously would have been printed out and handed in have moved online along with classrooms and collaboration. The amount of flexibility this has allowed teachers, parents, students, and childcare professionals is great, but it also means that more schoolwork than ever is at risk of data loss.
As young folks are heading back to classrooms, especially those heading off to college farther afield, now is a great time to help teach the value of backing up their data.
Whether they are in person, online, or on a hybrid system, students will still be creating, collaborating, and consuming files on their computers. Setting them up with a backup service, or helping them install one can prevent them from calling you late at night in a panic after spilling Redbull or coffee on the machine they’re diligently (we’re sure) doing schoolwork on.
Spilling something and frying the electronics inside of a computer is not the only way to lose data, so having an all-encompassing view to data care is important. At Backblaze, we recommend the 3-2-1 backup approach. That means keeping:
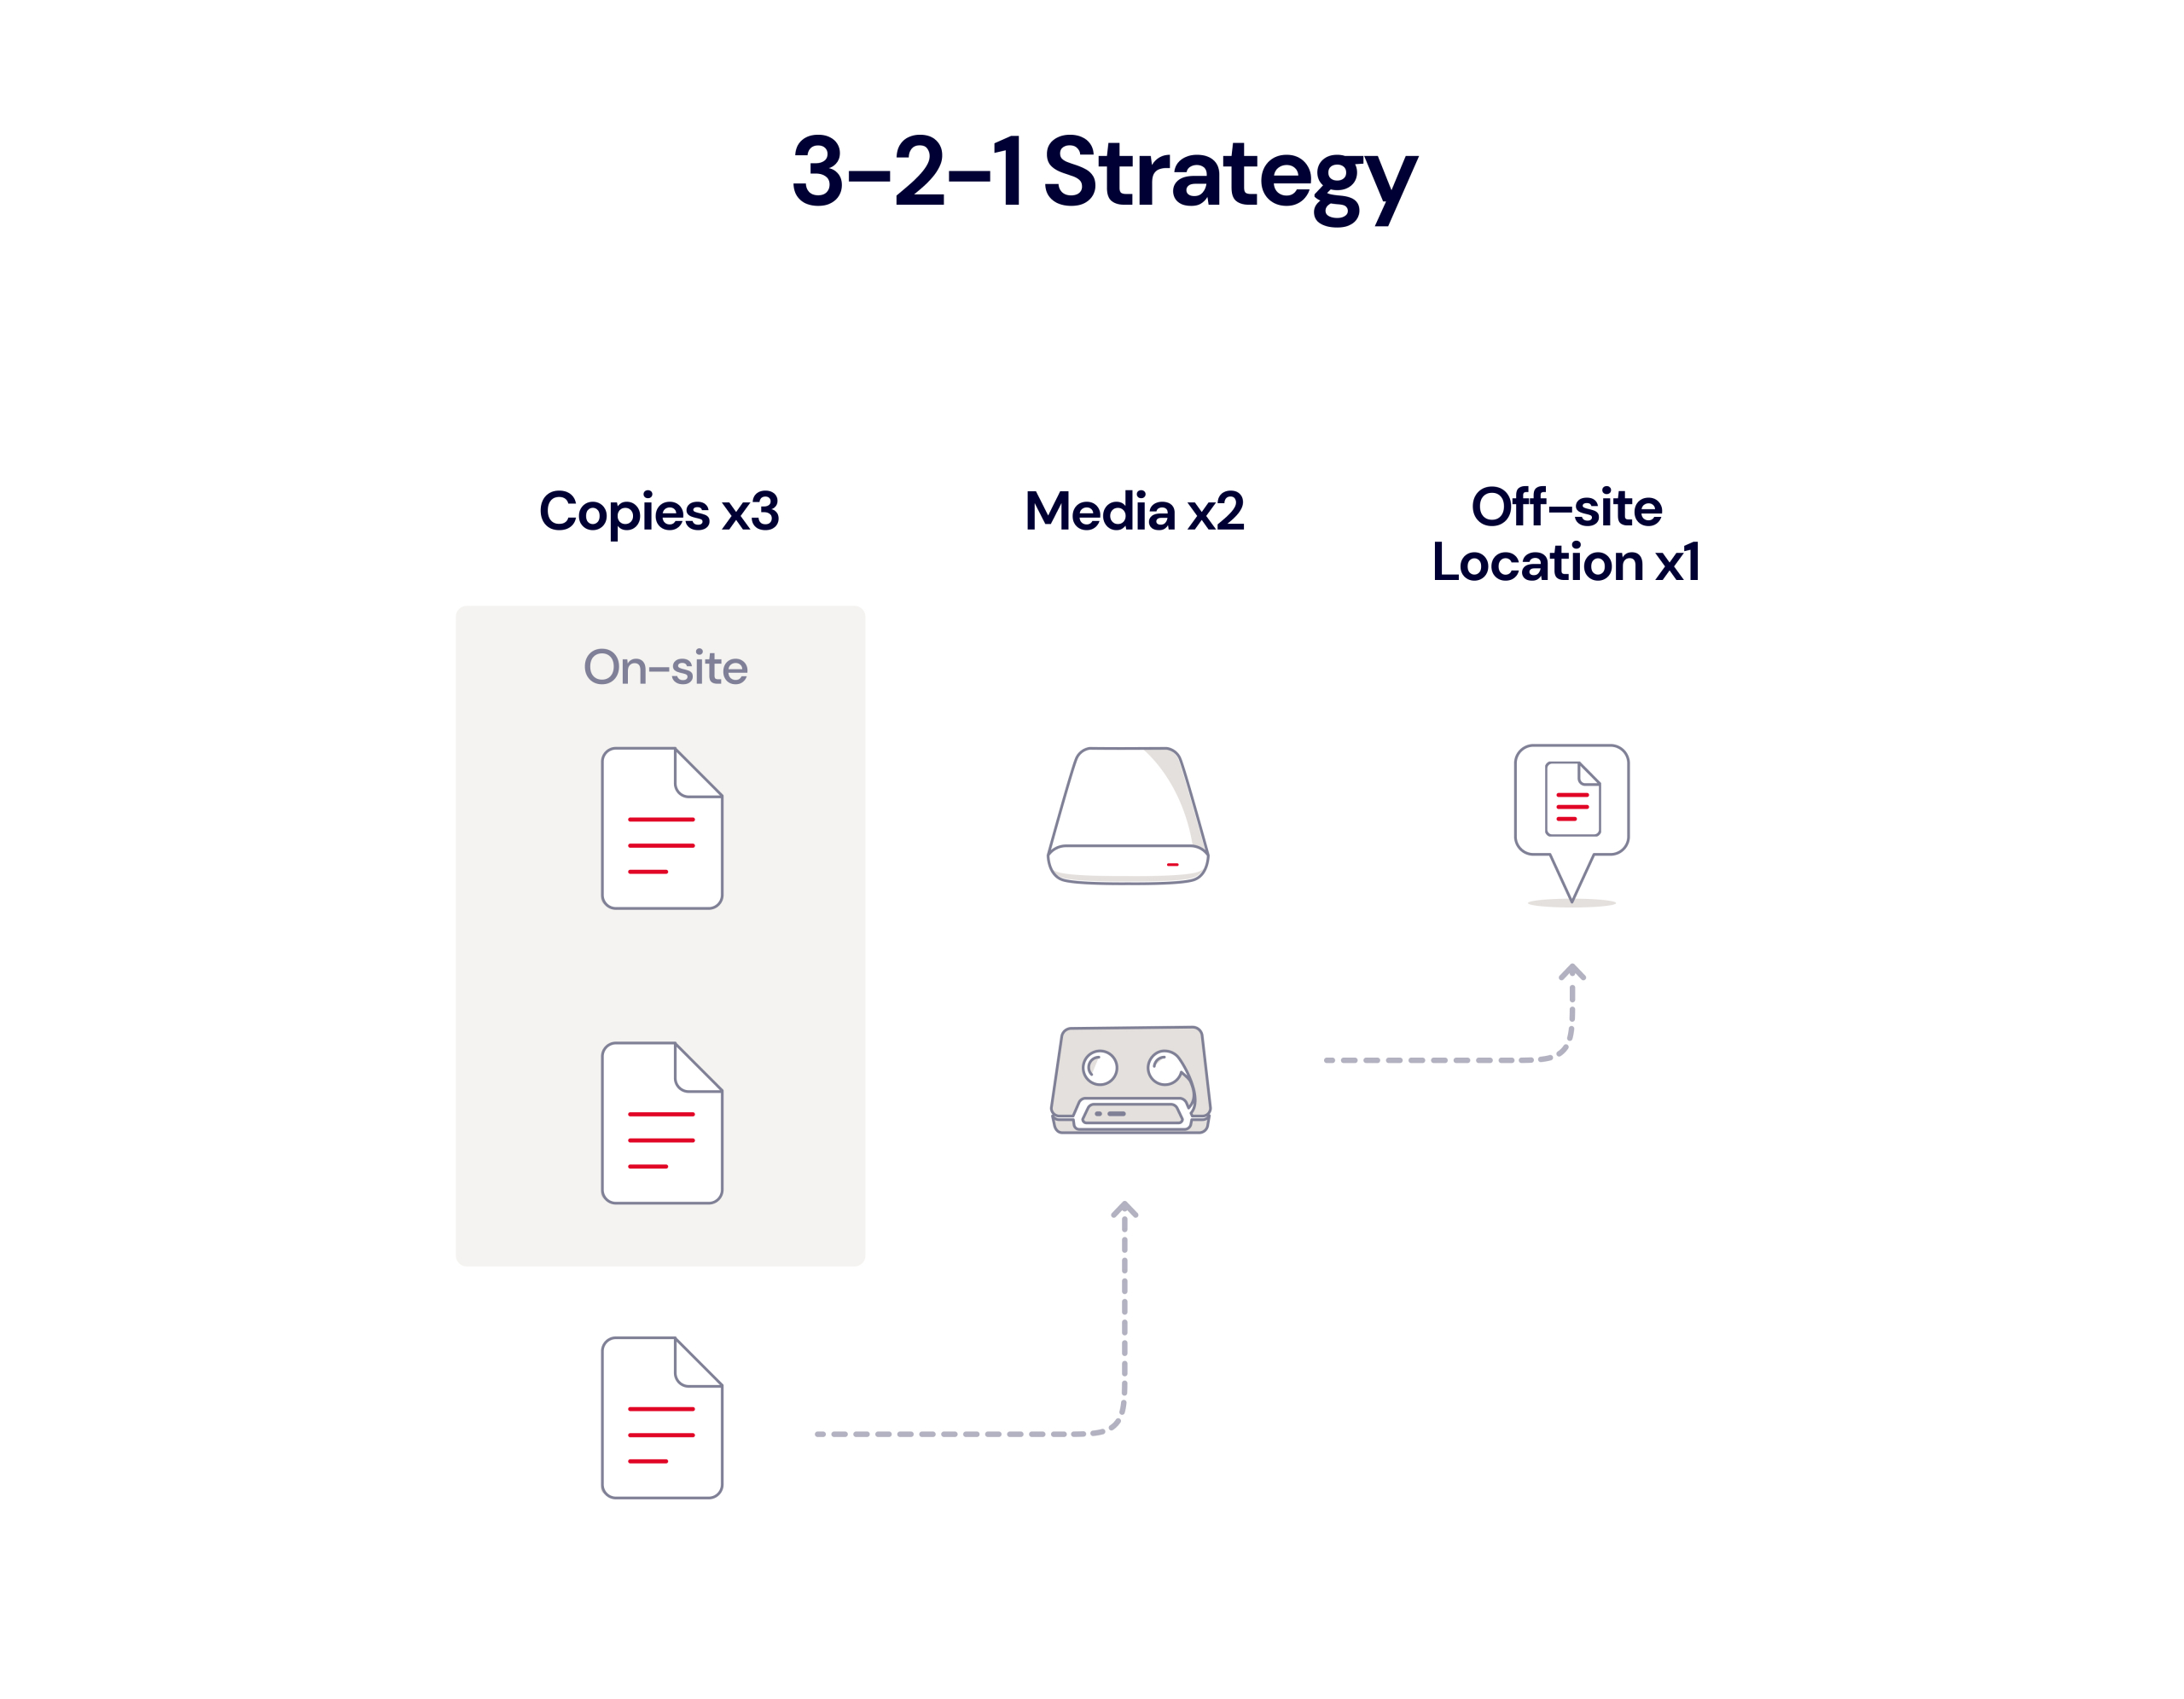
In addition to your basic 3-2-1 approach, there are a few best practices students can follow (and parents can encourage) to help them avoid scrambling to find their term paper the night before the final, including:
One common way of losing data is simply forgetting where it was created or saved, similar to misplacing a pair of keys. The easiest way to combat that is to have clear naming conventions for your folders and files and to use them consistently. Having a folder for every year of study, then semester, or quarter inside of it, then class inside of that, helps categorize data and is a great way to start building up good data hygiene.
A typical student’s data is scattered across a variety of devices, apps, clouds, and computers—we call this “data scatter.” Even if they are using good data hygiene when naming and organizing these various locations, having a central repository—even if just for final documents—is important.
When they have their data in one centralized location, students can back it up frequently, so that even if work is lost from a collaborative place (like someone deleting a file or presentation from a shared folder), they’ll still have a copy locally and in an accessible location.
Once the data is saved to the new location, the next best thing to do is make sure that there are automated backups running, so that—should anything happen to that machine or device—the data will still be accessible somewhere else (all part of the 3-2-1 strategy).
When selecting a backup tool, you want to look for something simple, affordable, and most importantly, accessible. That’s where apps like Backblaze really shine when it comes to computer backup, since they are designed to be unobtrusive, and the backed up data can be accessed anywhere in the world via web or mobile apps.
Creating archives is another tool in the fight to combat data loss and maintain good data hygiene. Archives differ from backups in that they tend to be permanent. Backups tend to be on a rolling basis (similar to an alarm system keeping a certain amount of video before it gets recycled—the thought being, if something happens you can recover the video for a certain period of time, but if nothing occurs it’s better to get that space back).
Archives, on the other hand, are more immutable in nature. Once you have an archive, it’s rare to remove it, unless you want to get rid of everything associated with it. There are many methods that people employ to archive their data, including having hard drives for every month or year that they create an archive for, but there are online tools as well. Backblaze B2 Cloud Storage has an Object Lock feature which allows users to upload data and have it stay there until expressly deleted by the user.
It’s probably not your top priority, but your student is likely just as concerned with backing up their social profiles and photos as they are with backing up their Econ 101 homework. Fortunately, we’ve got both covered. To help your student back up their digital social life, we put together a few handy guides:
The best time to start backing up is now. If Backblaze is a good choice for your family and school-aged kiddos, there’s a few ways to get started:
Just like developing good habits for anything else, a strong understanding of data, where it lives, how it can be lost, and how to save it can be an incredibly important skill to develop. As the amount of data in the world increases and it increasingly becomes the digital world’s most precious resource, maintaining it will become one of the more important habits we can instill in our younger generations!
The post Back to School, Backup for School appeared first on Backblaze Blog | Cloud Storage & Cloud Backup.
Post Syndicated from Julien Simon original https://aws.amazon.com/blogs/aws/decoding-the-social-effects-of-media-with-machine-learning/
What if media were optimized to benefit people? This thought-provoking question is at the core of Harmony Labs‘ mission. A nonprofit organization headquartered in New York City, Harmony Labs strives to better understand the impact of media on society, and build communities and tools to reform and transform media systems.
 As Brian Wanieswki, Executive Director at Harmony Labs puts it: “The media systems that we have now, for better or worse, have become outrage machines and sorting machines that put people into groups of like minds. The business incentive structures of these systems are such that the more outrage there is, the more profit there is. Political events across the world in recent years have borne out what these media systems produce, and it’s really pretty toxic, and pretty hard to get anything done within. There are all kinds of natural divisions between people, but these media systems tend to reinforce these divisions. So, the first question that we’re asking is, What’s the scope of this problem? And then, What can we do to solve it?”
Harmony Labs use data science and machine learning to answer these questions. Starting from user surveys and media data, they developed advanced natural language processing pipelines that can identify how social issues are represented in media, how they are consumed by different audiences, and what kind of influence that consumption has.
So how do you get that data in first place? Brian says: “All the media data that we need lives inside private companies. We knew that data sharing would be central to our mission, and this is why we’re structured as a nonprofit. We are working in the public’s interest in a non-partisan way. We’ve done big data sharing deals with large companies, as well as startups scraping different corners of the media ecosystem that we’re interested in: internet TV, internet radio, and so on. We have about 10 data partners at the moment, and we’re always looking to expand.”
Thanks to their data partners, Harmony Labs has collected over 50 Terabytes of diverse media: TV, web, mobile, song lyrics, closed captions, social media, and more. This definitely fits the definition of big data (volume, velocity and variety). Working with languages like Golang, Python and R, the Harmony Labs data science and engineering teams rely on AWS services such as Amazon Aurora, Amazon Athena, AWS Glue and Amazon Elastic Kubernetes Service (EKS) to build their data ingestion and processing workflows.
 Once the data is in-house, Harmony Labs make it safe, secure, and accessible to a network of academic researchers who use it to investigate the influence of media systems on politics, society, and culture. Laura Edelson is one of these researchers. A Ph.D. Candidate in Computer Science at NYU’s Tandon School of Engineering, she studies online political communication and develops methods to identify inauthentic content and activity. Harmony Labs supported her on the Ad Observatory project, an exploration of political ads on Facebook.
Harmony Labs also work on their own projects, such as the Narrative Observatory. “A narrative is a story pattern that recurs across different kinds of stories and media. You’ll find them in song lyrics, TV shows, news articles, and more“, says Brian. The Narrative Observatory helps identify narratives on particular topics and track them over long periods of time, and across different media types.
With initial funding from the Bill & Melinda Gates Foundation, Harmony Labs studied narratives linked to the topic of poverty and economic mobility in the United States. Collecting millions of documents (online news, social media, music), they first identified the main narratives present in media. Then, using segmentation techniques, behavioral data on over 50,000 Americans and surveys, Harmony Labs defined four audiences, as well as their dominant narrative, their core values, and their views on specific social issues. Finally, Harmony Labs studied how each audience consumed narratives.
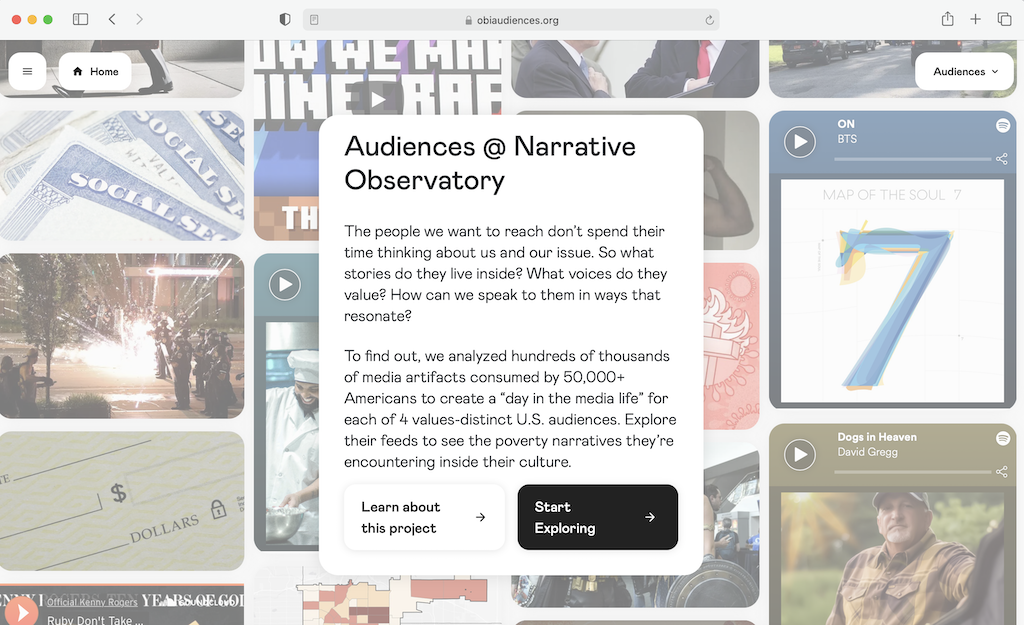
To enable funders, partners, and media companies to gain a deeper understanding of the cultural spaces their audiences occupy, they built a fascinating website, obiaudiences.org, where you can pick an audience and view the associated media feed. In other words, you can literally see the world in someone else’s eyes: what issues they care most about, what media they read most, and so on. This helps to understand the perceptions that different people have on certain issues, and as Brian puts it: “If you’re trying to reach people, it’s important to understand the media world they inhabit, and what can be actually relevant to that world.”
Recently, Harmony Labs led a project funded by the Mozilla Foundation on defining a healthy narrative for artificial intelligence (AI). Studying the TV consumption habits of over 80,000 US adults, and connecting them with closed captioned transcripts and ads, they identified and named the main media narratives on AI. Each narrative includes a definition of AI, the emotion that it creates in people, and whether they think that AI will lead to a happy or an unhappy ending.
Harmony Labs identified four main narratives on AI. Two are extremely negative and fear-inducing. “Tool of Tyranny” says that AI will be used by governments to oppress people. “Robot Overlords” says that we’ll never be able to control AI, and it will end up ruling us. At the other end of the spectrum, the “Wishes Granted” narrative is extremely positive: sure, we don’t understand AI, but it’s a magic wand that will solve all our issues. The last narrative, “Augmented Intelligence”, is more balanced: yes, AI is a great opportunity to improve our daily lives, but it’s also capable of being unfair and even dangerous. We are responsible for designing it, controlling it, and making sure it’s used to help us, not to hurt us.
Harmony Labs found that the “Wishes Granted” narrative was the most prominent (67%). It shines a positive light on AI, but its naive and over-optimistic vision can hide the legitimate questions that AI raises. Still, it’s a good starting point to engage audiences, educate them with the “Augmented Intelligence” narrative, and increase their awareness on both opportunities and challenges.
Closing this post, I’m wondering which AI narrative I’ve actually promoted here, willingly or not! What do you think? One thing is certain: Harmony Labs is using AI to help us understand how media influences us every day, and how we can create a more democratic society. This is important work, and we’re humbled that they picked AWS to help them reach their goals.
For more information on Harmony Labs, please visit harmonylabs.org and harmonylabs.medium.com.