Calling All Security Researchers: Join the Backblaze Bug Bounty Program

Post Syndicated from Ola Nordstrom original https://www.backblaze.com/blog/calling-all-security-researchers-join-the-backblaze-bug-bounty-program/

Here at Backblaze, we help people build applications, host content, manage media, back up and archive data, and more securely in the cloud—and that “securely” part of the equation has always been paramount. We use a variety of tools and techniques to stay ahead of any potential security threats, including our participation over the past year plus in the Bugcrowd security platform. Today, we are opening up our Bugcrowd Bug Bounty Program to all security researchers.

Now, anyone can join Bugcrowd and start hacking away at our desktop and mobile apps, APIs, or web applications in order to help us find any vulnerabilities and strengthen the security of our services. Read on to learn more about the program and the other measures we take to spot and address potential security vulnerabilities.

Join Ola Nordstrom, Lead Application Security Engineer; Chris Vickery, Senior Risk Assessment Specialist; and Pat Patterson, Chief Developer Evangelist, on April 21, 2022 at 1 p.m. PDT to learn more about why we decided to implement the Bugcrowd Bug Bounty Program, how it fits into the Backblaze security portfolio, and how you can join in on either side: as hacker or hackee.
 
➔ Register for the Webinar Today

How Backblaze Keeps Customer Data Safe

Over the years, Backblaze has consistently invested in maintaining and upgrading its security portfolio. User files are encrypted by default, we also support server-side encryption for the Backblaze S3 Compatible API, and have doubled the size of our Security team over the last year under the leadership of CISO Mark Potter.

But all those security features and frankly all software, not just Backblaze, are vulnerable to security bugs that can expose user information and data. Oftentimes, these are caused by implementation mistakes or changes in how a piece of software is used over time. The recent Log4j (aka Log4Shell) vulnerability affected nearly everyone due to its ubiquitous use across software platforms and the industry as a whole.

I’ve been working to secure software my whole career. Before the advent of crowdsourced security platforms such as Bugcrowd, managing vulnerability reports was a painful task. Emails, typically sent to [email protected], were copied back and forth between bug tracking platforms. Reviewing submissions and gathering metrics was difficult since every engineering team or organization always had their own process for tagging and categorizing bug reports. Everything was copied back and forth to make any sense of the data (Think Excel spreadsheets!). In a world where zero-day vulnerabilities are commonplace, such processes are just too slow and you end up playing catch-up with the bad guys.

How Does Bugcrowd Fit Into the Backblaze Security Portfolio?

Bugcrowd takes the grunt work out of the process to let us focus on addressing the vulnerability and communicating with researchers. Bugcrowd encourages white hat hackers to attack businesses, find vulnerabilities in their software and processes, and aid in guiding the remediation of those vulnerabilities before they can be exploited by anyone else.

What’s more, and perhaps most important to security researchers around the world, is that Bugcrowd allows us to pay security researchers for finding vulnerabilities. Without Bugcrowd, Backblaze wouldn’t have a cost-effective way to pay for a bug report from a researcher in another country or another continent. It’s only fair we pay for the work they do to help us out, and in addition, having a public program ensures transparency and fairness for everyone.

How You Can Join the Backblaze Bugcrowd Bug Bounty Program

Backblaze’s private beta has been running for over a year, but now that the program is public, any interested security researcher can sign up to hack away the company’s in-scope products and networks. If you think you’ve found a vulnerability or you’d like more information about the in-scope products, URLs, or bounty ranges, check out the Backblaze Bugcrowd Bug Bounty Program here. And, don’t forget to register for our webinar to learn more about the program.

The post Calling All Security Researchers: Join the Backblaze Bug Bounty Program appeared first on Backblaze Blog | Cloud Storage & Cloud Backup.

[$] A way out for a.out

Post Syndicated from original https://lwn.net/Articles/888741/

The a.out executable
format
dates back to the earliest days of Linux — and before. It has
not been used in any serious way for decades, but support still exists in
the Linux kernel and has resisted all attempts at its removal. Back in
January, Borislav Petkov tried yet
again
to delete support for this format, leading to another extended
discussion. There is one difference this time around, though: the effort
to get rid of a.out support might just succeed.

Reflecting on Women’s History Month at Rapid7

Post Syndicated from Rapid7 original https://blog.rapid7.com/2022/03/24/reflecting-on-womens-history-month-at-rapid7/

Reflecting on Women’s History Month at Rapid7

During Women’s History Month, we invited some of our team members to share their best advice for other women in technology, celebrate their strengths, and reflect on how they’ve challenged convention within their roles and built their networks.

Reflecting on Women’s History Month at Rapid7

What is the best advice that someone has given you in your career?

Nino Nardize, Director, Technical Customer Success: One piece of advice that resonated with me early on was that you have to be comfortable making decisions with only 80% of the information available. That stuck with me because I think, as women, sometimes we feel we need to have all of the information, be 100% qualified for a role, or be able to achieve perfection. In reality, things don’t always work out that way. I’ve found it’s important to ask ourselves, “Have we done our best to gather the right information in relation to this decision?” Even if that means we still have things outstanding, that’s OK. We have to be comfortable with taking risks and feeling good about moving forward with what we have in front of us.

Jane Man, Director, Product Management – VRM: The most important advice I got early on was to be open and always look for opportunities to grow. If you are at a point in your career where you think to yourself, “I’ve got this,” and you know exactly what you are doing every day, you probably aren’t being challenged enough. This perspective has always pushed me to look for areas where I don’t feel comfortable and to seek out areas to grow my career — and myself as a person.

Jessica Reinne, Account Executive, Large: As a sales executive, the best advice I received was that buying is emotional, and people buy products most often from people they trust and have a relationship with. I’ve found firsthand that once you establish that rapport, people will want to engage with you and either communicate what they need in order to move forward or — just as valuable — tell you why they aren’t moving forward or why something isn’t actually working. When you have that open dialogue, you can really be a better partner to them, versus trying to sell them something they aren’t bought into.

Noreen Camelo, VP Enterprise Applications: One piece of advice I heard was to be brave, be brilliant, but be brief. I think this is important because sometimes we can get caught up in explaining our ideas or spend too much time setting the stage. As you progress in your career and are working with executives, it’s important that your key message comes across very clearly, as everyone is pressed for time. Be brave and speak up when you see opportunities, be brilliant and always keep challenging convention, but be brief and make sure to get your thoughts across in a succinct way.

Sarah Sidford, Manager, Commercial Sales: In life, and especially for women, it sometimes can feel like you’re trying to juggle a bunch of different balls in the air. You have your career as one ball, your travel plans as another, your family as another, your social life, and so on. It’s important to remember that most of those balls are rubber, if you drop them, they will bounce right back and be OK. But family and health are two that are glass — and you can never, ever drop them. Keeping perspective about what’s really important with a focus on family and health being most important can help you prioritize and know when you need to let go of another one of those rubber balls.

Paola Chadwell, VP, Customer Success Management: Always advocate for yourself — especially when negotiating your salary. I think, as women, we hesitate to ask for more because we’re afraid we will lose the offer that’s already on the table. In reality, the worst someone can say is no, or maybe they don’t go as high as you ask but are able to meet you in the middle somewhere. I’ve negotiated every salary throughout my career, and I think it’s helped me to own my voice and advocate for my worth.

Turning that around, what advice would you give to women who are early in their career and looking to challenge convention?

Jane Man: I would say to be confident in your own voice. At the end of the day, the goal is to create a better solution and work more effectively, and that means that when you have something to add, it’s your responsibility to speak up and you shouldn’t be afraid to do that — because it makes all of us better and stronger.

Paola Chadwell: When I was younger, I moved around a lot. The process of putting myself out there and making friends throughout childhood has translated into my ability to build strong relationships in my career. I’m in customer success, so I have to not only build strong relationships with our customers, but I also be able to have internal and cross-functional relationships so that I can be a better advocate for our customer needs and deliver the right solutions for their needs.

Nino Nardize: In the workplace, there are a number of different ways that each individual can contribute at a given time. Whether it’s in meetings or through a one-to-one conversation, each person’s ability to influence others can be a little bit different. Find where you are most comfortable and can create impact in a meaningful way and lean into that — don’t fight it to be something you are not.

How are you challenging convention in your role at Rapid7?

Sarah Sidford: I think one way that I challenge convention is that I am very vocal about the need to hire more women in sales. There are still so many double standards for women in sales — we might describe a male as being assertive and have a positive association with that behavior, but when a woman is assertive, we’re quick to judge her as being pushy. The more we can prioritize diversifying our teams, the more we can start to challenge these stereotypes. I think a lot of times, people hire people who remind them of themselves — so if we have more men in leadership positions doing the hiring, how does it hurt those efforts if they are carrying that internal bias? I’m working closely with our talent acquisition team to really change the traditional landscape of sales and prioritize bringing a more balanced workforce into the field.

Jessica Rennie: I’m someone who is really open-minded and willing to try new things. One example is that when I joined the company, I saw an opportunity and went out on a limb to create a new program. At first, it can be challenging to get something like this that is new up and running, but we were able to create this network of give and get with our prospects that has ultimately benefited our business and our sales organization. It was great to be able to formulate a vision and strategy and be supported along the way by my manager and peers.

Nino Nardize: I challenge convention by encouraging different perspectives. Diversity of thought and experiences is a crucial component to any team. I can only be one voice, and my voice is reflective of my own personal journey. Whenever we are having a crucial conversation, we need to have the representation of multiple perspectives in order to make educated decisions. Asking ourselves, “What else are we missing? Are there too many voices from one business group and not enough from another?” can lead to a better decision and product in the end.

What strengths do you believe your identity and personal experiences bring to your role?

Jane Man: I come from an immigrant family. My parents immigrated from the big city of Hong Kong to the tiny island nation of New Zealand. Through my experiences, I’ve become interested in what makes people think a certain way, and I often find myself asking questions that dig into what we are doing and the purpose or “why” behind it. That natural curiosity is something that comes from being part of that small island community.

Jessica Reinne: I didn’t come from a cybersecurity background prior to Rapid7, but I was in the startup world. Some of the places I worked earlier in my career were so new that on some days the heat didn’t even work or the lights wouldn’t turn on — so I experienced the early growth grind that happens in the technology world where you have this pressure to prove yourself and everyone’s work has such a direct impact on the company. I developed almost this chip on my shoulder where I really want to push myself and always have that grit and determination. Doing it at Rapid7, where we are so established and have not only a great team and product but great amenities and support systems, really just puts it on a whole new level.

Noreen Camelo: I bring a lot of optimism to my team, and I think some of that comes from my past roles and being able to put things into perspective. Earlier in my career I worked in Oncology, so there was a lot of pressure around our decisions because of the impact it had on patients’ lives. When we feel stressed out or a task seems too big for us to tackle, I try to help my team keep things in perspective so they can prioritize, while encouraging them to find creative solutions. I really do believe that there is no challenge we cannot solve as long as we are willing to take the right amount of time and work together.

It’s often said that an important part of being successful is building a supportive network around you. How have you built your own personal network, and how has it helped you be successful?

Paola Chadwell: I think, first off, women sometimes have a tendency to look at other women as competition rather than allies. That’s not a mindset I ever want to have or that I want to encourage people to challenge, because we all have so much to add and to contribute to one another. I’ve been so lucky to have been surrounded by such strong and powerful women at Rapid7 and at previous companies. I’ve been monitored by them and have also been able to be a mentor to them at times. The beautiful thing about building a network and having a mentor is that it becomes a two-way street. We have so much to learn from one another and can really help each other grow.

Noreen Camelo: I’ve built my network through the different roles and companies I’ve been at. It’s been a proactive experience of reaching out and staying in touch, and the result is a diverse network of people to lean on where we can all give guidance to each other at different points. What I’ve experienced is that your network is a huge part of advancing your career, as well as rounding you out as the leader you are.

Sarah Sidford: I’m grateful to have been able to create such a great network of women around  me. In sales, it’s important to have relationships where you can be honest about what you’re going through and can talk about when you are having a hard day or when things are also going well. As women, we don’t want to share our struggles and appear weak, but then at the same time, you don’t want to celebrate or you will be seen as braggadocious — so you need to have a safe space to share that vulnerability and the highs and the lows, especially when it’s people who have also been through it and who can share their experiences with you, too. Whether it’s asking about what to wear to a client onsite or working through a unique challenge with a customer, having that safe space can help you feel so much more prepared and empowered. As a leader, that’s the kind of space I want to create with my team.

Want join our team? We’re hiring! Browse our open roles at Rapid7 here.

Additional reading:

Security updates for Thursday

Post Syndicated from original https://lwn.net/Articles/889120/

Security updates have been issued by Debian (php-twig), Mageia (abcm2ps, libpano13, and pesign), openSUSE (nextcloud and xen), Oracle (kernel, kernel-container, and openssl), SUSE (java-1_7_1-ibm and xen), and Ubuntu (linux-oem-5.14, openvpn, and thunderbird).

Cloudflare Radar’s new ASN pages

Post Syndicated from Celso Martinho original https://blog.cloudflare.com/asn-on-radar/

Cloudflare Radar’s new ASN pages

Cloudflare Radar’s new ASN pages

An AS, or Autonomous System, is a group of routable IP prefixes belonging to a single entity, and is one of the key building blocks of the Internet. Internet providers, public clouds, governments, and other organizations have one or more ASes that they use to connect their users or systems to the rest of the Internet by advertising how to reach them.

Per AS traffic statistics and trends help when we need insight into unusual events, like Internet outages, infrastructure anomalies, targeted attacks, or any other changes from service providers.

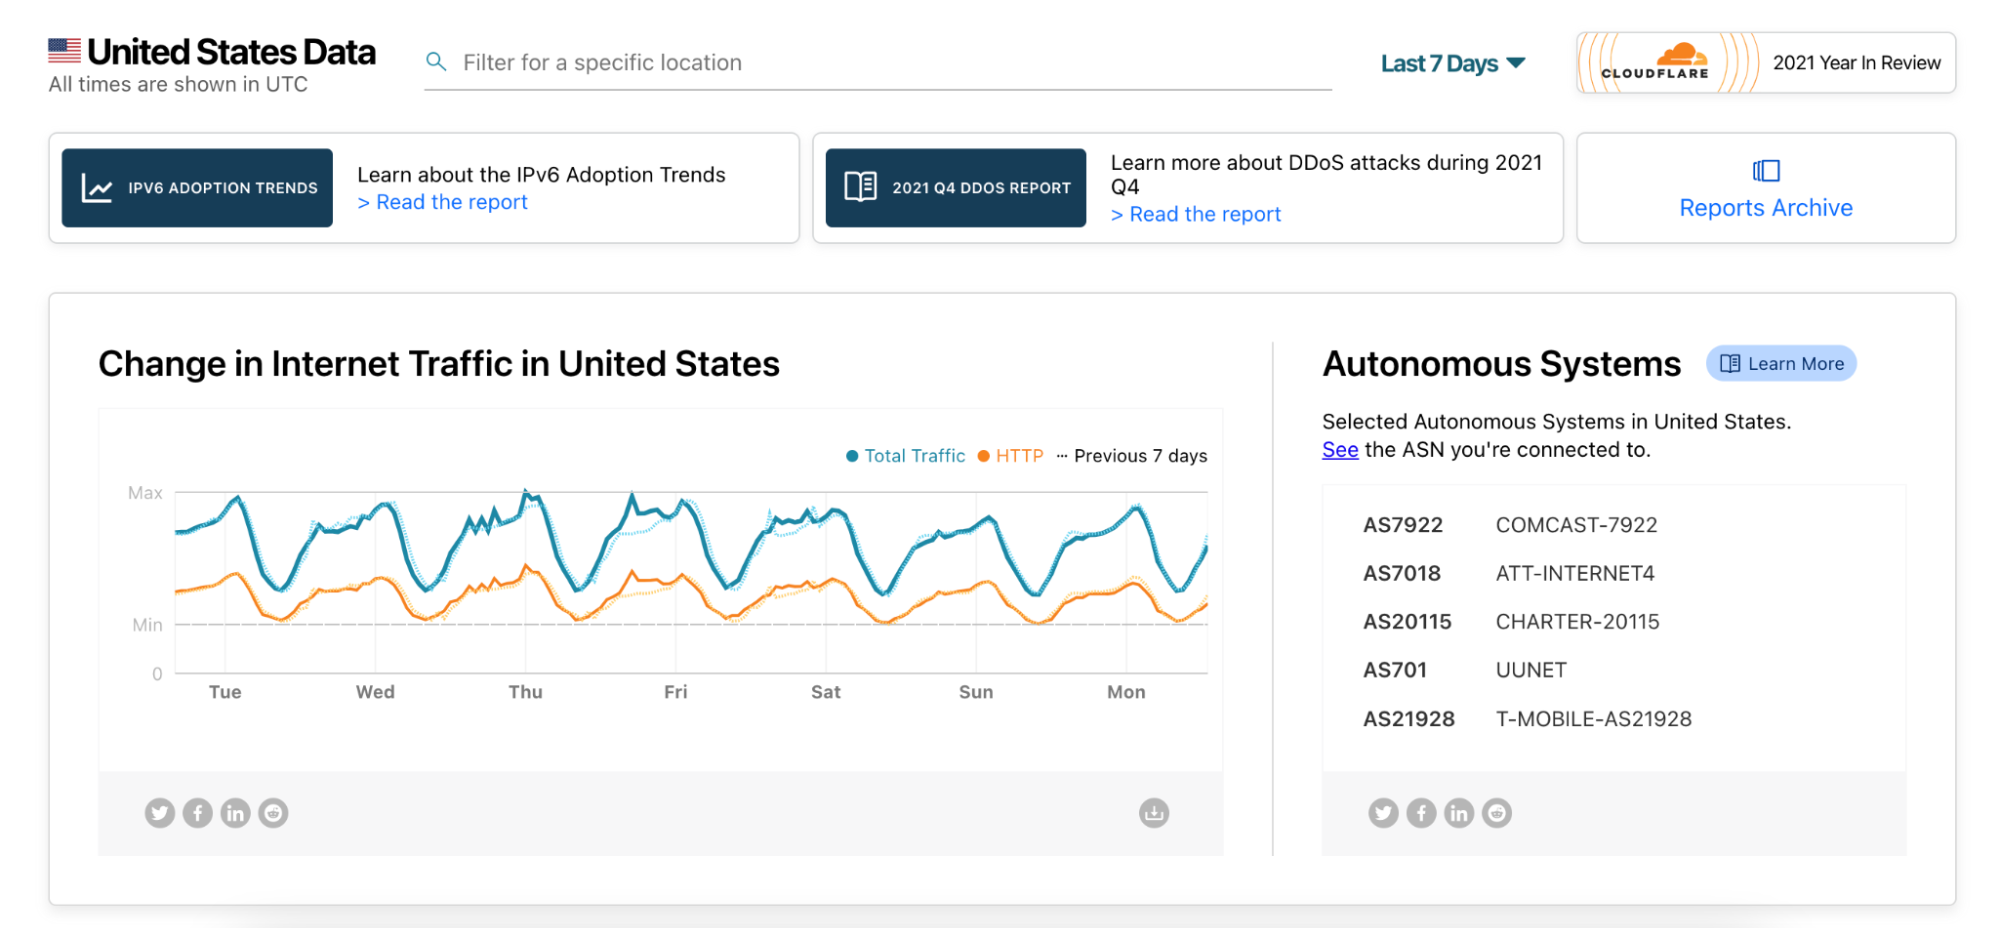
Today, we are opening more of our data and launching the Cloudflare Radar pages for Autonomous Systems. When navigating to a country or region page on Cloudflare Radar you will see a list of five selected ASes for that country or region. But you shouldn’t feel limited to those, as you can deep dive into any AS by plugging its ASN (Autonomous System Number) into the Radar URL (https://radar.cloudflare.com/asn/<number>). We have excluded some statistical trends from ASes with small amounts of traffic as that data would be difficult to interpret.

Cloudflare Radar’s new ASN pages

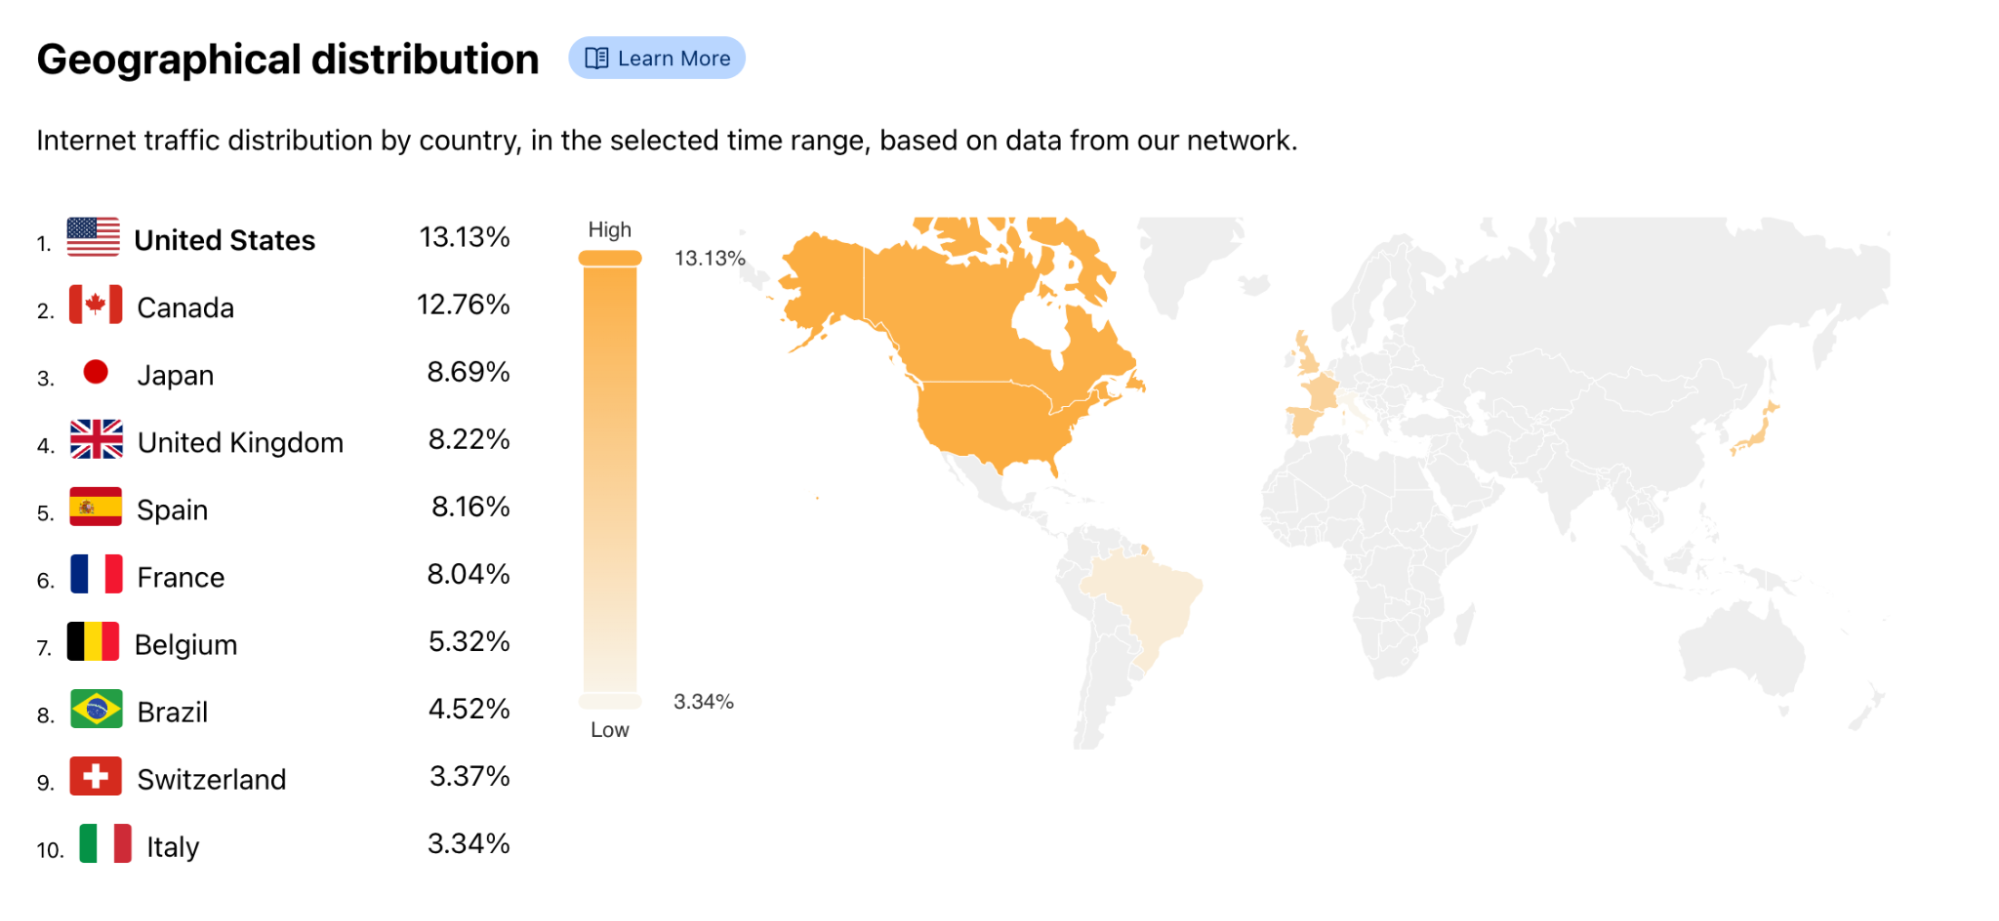
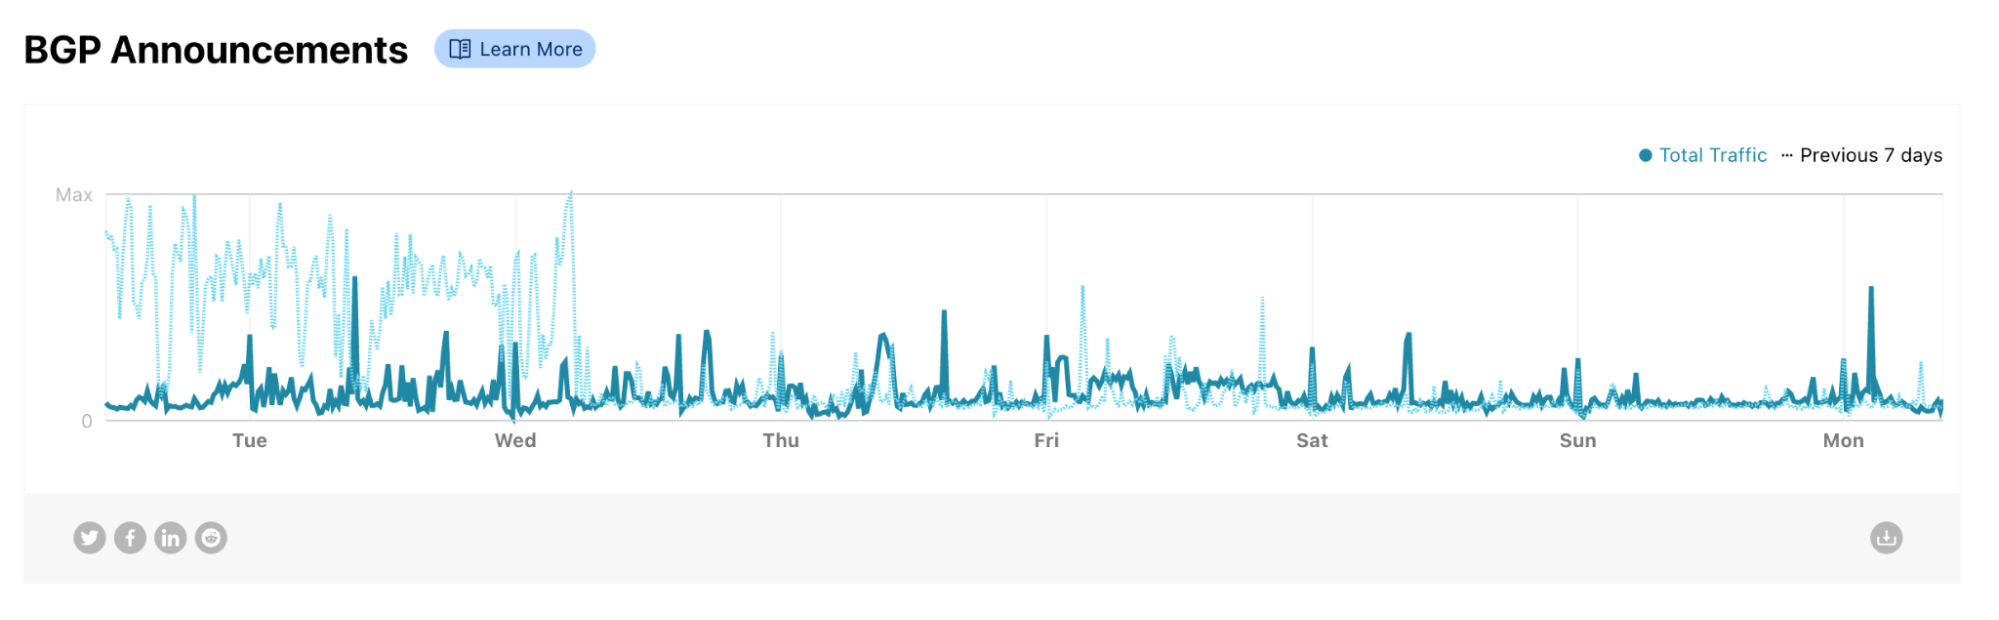
The AS page is similar to the country page on Cloudflare Radar. You can find traffic levels, protocol use, and security details such as application and network-level DDoS attack information. Additionally, we show a geographical distribution map of the traffic and the volume of BGP announcements we see for the list of prefixes associated with the specific AS.

Cloudflare Radar’s new ASN pages

A sudden increase in BGP announcements often suggests disruptive changes to the Internet in the region or institution associated with the AS. Spikes in BGP announcements were visible when the submarine cable was cut in Tonga in 2022, on the Facebook outage in October 2021, and when governments limited the Internet access in their countries (as seen in Sudan and Syria in 2021).

Cloudflare Radar’s new ASN pages

At Cloudflare, we are committed to keep increasing transparency on the inner workings of the Internet, so that we can all do our part in keeping the Internet more open and secure for everyone. Keep an eye on Cloudflare Radar for more insights like these.

How telematics helps Grab to improve safety

Post Syndicated from Grab Tech original https://engineering.grab.com/telematics-at-grab

Telematics is a collection of sensor data such as accelerometer data, gyroscope data, and GPS data that a driver’s mobile phone provides, and we collect, during the ride. With this information, we apply data science logic to detect traffic events such as harsh braking, acceleration, cornering, and unsafe lane changes, in order to help improve our consumers’ ride experience.

Introduction

As Grab grows to meet our consumers’ needs, the number of driver-partners has also grown. This requires us to ensure that our consumers’ safety continues to remain the highest priority as we scale. We developed an in-house telematics engine which uses mobile phone sensors to determine, evaluate, and quantify the driving behaviour of our driver-partners. This telemetry data is then evaluated and gives us better insights into our driver-partners’ driving patterns.

Through our data, we hope to improve our driver-partners’ driving habits and reduce the likelihood of driving-related incidents on our platform. This telemetry data also helps us determine optimal insurance premiums for driver-partners with risky driving patterns and reward driver-partners who have better driving habits.

In addition, we also merge telematics data with spatial data to further identify areas where dangerous driving manoeuvres happen frequently. This data is used to inform our driver-partners to be alert and drive more safely in such areas.

Background

With more consumers using the Grab app, we realised that purely relying on passenger feedback is not enough; we had no definitive way to tell which driver-partners were actually driving safely, when they deviated from their routes or even if they had been involved in an accident.

To help address these issues, we developed an in-house telematics engine that analyses telemetry data, identifies driver-partners’ driving behaviour and habits, and provides safety reports for them.

Architecture details

Real time ingestion architecture

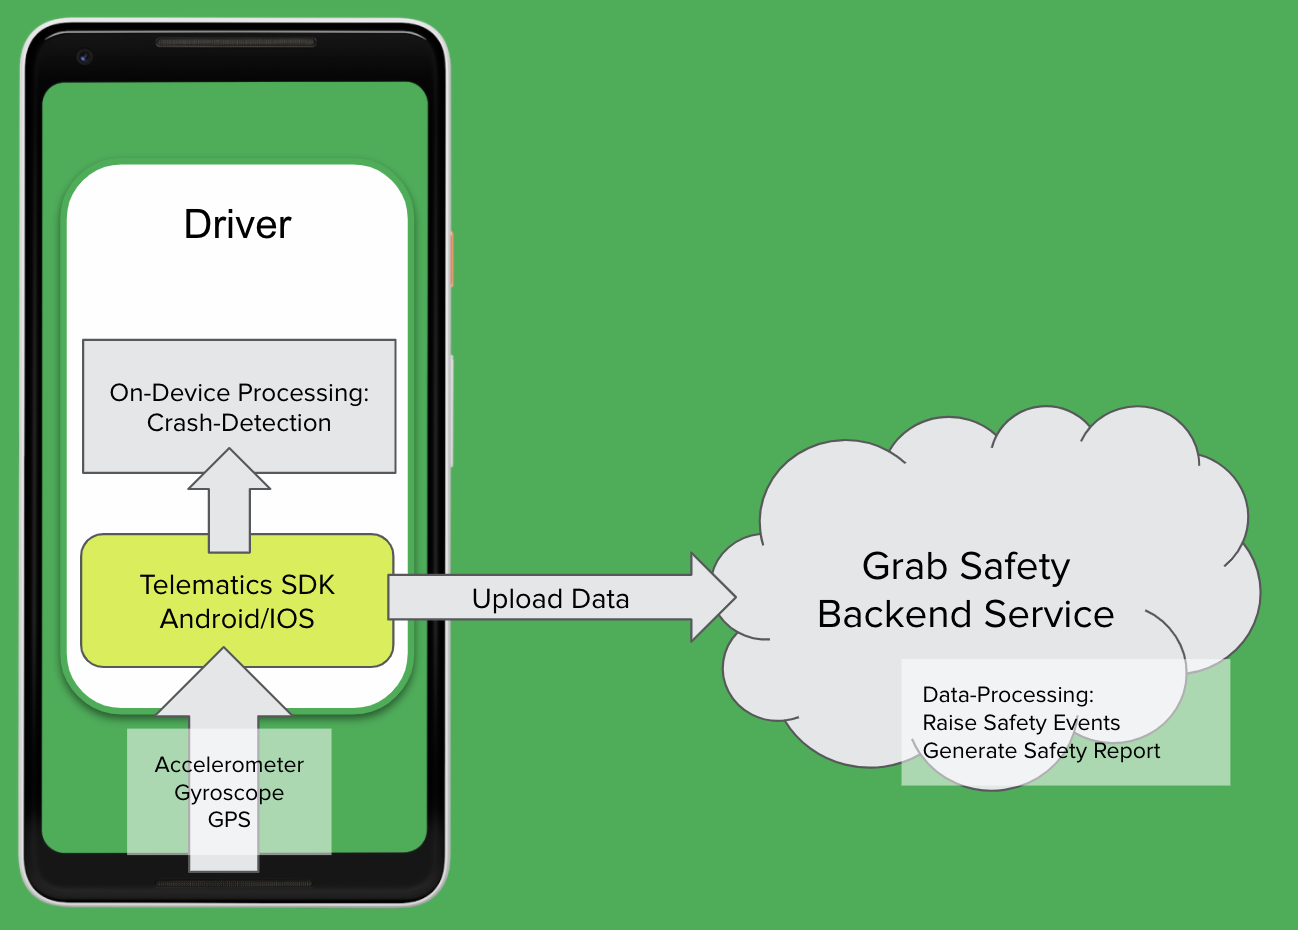
As shown in the diagram, our telematics SDK receives raw sensor data from our driver-partners’ devices and processes it in two ways:

  1. On-device processing for crash detection: Used to determine situations such as if the driver-partner has been in an accident.
  2. Raising traffic events and generating safety reports after each job: Useful for detecting events like speeding and harsh braking.

Note: Safety reports are generated by our backend service using sensor data that is only uploaded as a text file after each ride.

Implementation

Our telematics framework relies on accelerometer, gyroscope and GPS sensors within the mobile device to infer the vehicle’s driving parameters. Both accelerometer and gyroscope are triaxial sensors, and their respective measurements are in the mobile device’s frame of reference.

That being said, the data collected from these sensors have no fixed sample rate, so we need to implement sensor data time synchronisation. For example, there will be temporal misalignment between gyroscope and accelerometer data if they do not share the same timestamp. The sample rate that comes from the accelerometer and gyroscope also varies independently. Therefore, we need to uniformly sample the sensor data to be at the same frequency rate.

This synchronisation process is done in two steps:

  1. Interpolation to uniform time grid at a reasonably higher frequency.
  2. Decimation from the higher frequency to the output data rate for accelerometer and gyroscope data.

We then use the Fourier Transform to transform a signal from time domain to frequency domain for compression. These components are then written to a text file on the mobile device, compressed, and uploaded after the end of each ride.

Learnings/Conclusion

There are a few takeaways that we learned from this project:

  • Sensor data frequency: There are many device manufacturers out there for Android and each one of them has a different sensor chipset. The frequency of the sensor data may vary from device to device.
  • Four-wheel (4W) vs two-wheel (2W): The behaviour is different for a driver-partner on 2W vs 4W, so we need different rules for each.
  • Hardware axis-bias: The device may not be aligned with the vehicle during the ride. It cannot be assumed that the phone will remain in a fixed orientation throughout the trip, so the mobile device sensors might not accurately measure the acceleration/braking or sharp turning of the vehicle.
  • Sensor noise: There are artifacts in sensor readings, which are basically a single outlier event that represents an error and is not a valid sensor reading.
  • Time-synchronisation: GPS, accelerometer, and gyroscope events are captured independently by three different sensors and have different time formats. These events will need to be transformed into the same time grid in order to work together. For example, the GPS location from 30 seconds prior to the gyroscope event will not work as they are out of sync.
  • Data compression and network consumption: Longer rides will contain more telematics data.  It will result in a bigger upload size and increase in time for file compression.

What’s next?

There are a few milestones that we want to accomplish with our telematics framework in the future. However, our number one goal is to extend telematics to all bookings across Grab verticals. We are also planning to add more on-device rules and data processing for event detections to further eliminate future delays from backend communication for crash detection.

With the data from our telematics framework, we can improve our passengers’ experience and improve safety for both passengers and driver-partners.

Join us

Grab is a leading superapp in Southeast Asia, providing everyday services that matter to consumers. More than just a ride-hailing and food delivery app, Grab offers a wide range of on-demand services in the region, including mobility, food, package and grocery delivery services, mobile payments, and financial services across over 400 cities in eight countries.

Powered by technology and driven by heart, our mission is to drive Southeast Asia forward by creating economic empowerment for everyone. If this mission speaks to you, join our team today!

[$] A method for replacing Python tuple entries

Post Syndicated from original https://lwn.net/Articles/888945/

A recent discussion on the python-ideas mailing list gives some insight
into how to—or how not to—propose a feature to be added to the language. At first
blush, adding a method to Python’s immutable tuple
type for replacing one of its elements is not a particularly strange idea,
nor one that would cause much in the way of backward-compatibility
concerns. Even though there was some evidence offered that such a method might be
useful, it seems pretty unlikely that the idea will go anywhere, at least
in part because of the repetitive, bordering on aggressive, manner in which its
benefits were argued.

Improve reusability and security using Amazon Athena parameterized queries

Post Syndicated from Blayze Stefaniak original https://aws.amazon.com/blogs/big-data/improve-reusability-and-security-using-amazon-athena-parameterized-queries/

Amazon Athena is a serverless interactive query service that makes it easy to analyze data in Amazon Simple Storage Service (Amazon S3) using standard SQL, and you only pay for the amount of data scanned by your queries. If you use SQL to analyze your business on a daily basis, you may find yourself repeatedly running the same queries, or similar queries with minor adjustments. Athena parameterized queries enable you to prepare statements you can reuse with different argument values you provide at run time. Athena parameterized queries also provide a layer of security against SQL injection attacks, and mask the query string in AWS CloudTrail for workloads with sensitive data.

This post shows you how to create and run parameterized queries in Athena. This post provides an example of how Athena parameterized queries protect against SQL injection, and shows the CloudTrail events with the masked query string. Lastly, the post reviews functions related to managing Athena prepared statements. If you want to follow along, this post provides steps to set up the components with a sample dataset; alternatively, you can use your own dataset.

Reusability

Athena prepared statements allow you to run and reuse queries within your Athena workgroup. By decoupling the queries from the code, you can update your prepared statements and your applications independent from one another. If a data lake has schema updates, it could require query updates. If multiple applications share the same Athena workgroup and are using similar queries, you can create a new query or update the existing query to serve multiple use cases, without each application being required to adjust similar queries in their own source code. Parameterized queries are currently supported for SELECT, INSERT INTO, CTAS, and UNLOAD statements. For the most current list, refer to Considerations and Limitations in Querying with Prepared Statements.

Security

Athena prepared statements provide a layer of protection against SQL injection. If you are using Athena behind an application interface, free text inputs inherently present a SQL injection threat vector which, if left unmitigated, could result in data exfiltration. When the parameterized query is run, Athena interprets the arguments as literal values, not as executable commands nor SQL fragments like SQL operators.

When using Athena, CloudTrail captures all Athena API calls as audit events to provide a record of actions taken by an AWS user, role, or AWS service. Customers with sensitive data in their data lakes, such as personally identifiable information (PII), have told us they don’t want query strings in their CloudTrail event history for compliance reasons. When running parameterized queries, the query string is masked with HIDDEN_DUE_TO_SECURITY_REASONS in the CloudTrail event, so you don’t show protected data within your log streams.

Solution overview

This post documents the steps using the public Amazon.com customer reviews dataset; however, you can follow similar steps to use your own dataset.

The example query is to find a product’s 4-star (out of 5 stars) reviews voted as the most helpful by other customers. The intent behind the query is to find query results that indicate constructive product feedback. The intent is to validate the feedback and get helpful feedback incorporated into the product roadmap. The product used in this use case is the Amazon Smile eGift Card.

Prerequisites

As a prerequisite, you need a foundational understanding of SQL syntax, as well as a foundational understanding the following AWS services:

This post assumes you have:

Deploy resources for the example dataset

If you’re using the example dataset, follow the steps in this section. The data is in an S3 bucket in an AWS-managed AWS account. You need to create Athena and AWS Glue resources to get started.

This post provides a CloudFormation template that deploys the following resources in your AWS account:

  • AthenaWorkGroup – An Athena workgroup for your dataset and prepared statements. On the console, this workgroup is named PreparedStatementsWG.
  • GlueDatabase – A database in the AWS Glue Data Catalog for table metadata. The database is named athena_prepared_statements.
  • GlueTableAmazonReviews – An external table with Amazon.com customer reviews in the Data Catalog.

The following diagram shows how the resources interact when the query runs.
Diagram depicting a customer's AWS account and an AWS managed AWS account. In the customer account, there is a region box. In the region, there is an Amazon Athena workgroup taking 3 steps. In the first step, the workgroup accesses metadata from the AWS Glue Data Catalog named default. The catalog has a dotted line to an AWS Glue table called amazon_reviews_parquet, which has the attributes and S3 bucket location. The second step from the workgroup queries data from the S3 bucket. The S3 bucket is in the AWS managed AWS account. The bucket is for the Amazon Customer Reviews dataset. In the third step, the workgroup stores the query results in the Amazon S3 bucket in the customer AWS account. The query results can then be read by users with read access to the Athena workgroup.

To deploy the CloudFormation template, follow these steps:

  1. Navigate to this post’s GitHub repository.
  2. Clone the repository or copy the CloudFormation template athena-prepared-statements.yaml.
  3. On the AWS CloudFormation console, choose Create stack.
  4. Select Upload a template file and choose Choose file.
  5. Upload athena-prepared-statements.yaml, then choose Next.
  6. On the Specify stack details page, enter the stack name athena-prepared-statements-blog.
  7. For S3QueryResultsBucketName, enter your S3 bucket name.
  8. If you leave AthenaWorkGroupName as default, the Athena workgroup is named PreparedStatementsWG. If you change the value, the Athena workgroup name must be unique in your AWS Region.
  9. Choose Next.
  10. On the Configure stack options page, choose Next.
  11. On the Review page, choose Create stack.

The script takes less than a minute to run and change to a CREATE_COMPLETE state. If you deploy the stack twice in the same AWS account and Region, the AWS Glue database, table, or Athena workgroup may already exist, and the process fails with a message indicating that the resource already exists in another template.

For least-privilege authorization for deployment of the CloudFormation template, you can create an AWS CloudFormation service role with the following IAM policy actions. To do this, you must create an IAM policy and IAM role, and choose this role when configuring stack options.

{
  "Version": "2012-10-17",
  "Statement": [
    {
      "Effect": "Allow",
      "Action": [
        "glue:CreateDatabase"
      ],
      "Resource": [
        "arn:${Partition}:glue:${Region}:${Account}:catalog",
        "arn:${Partition}:glue:${Region}:${Account}:database/athena_prepared_statements"
      ]
    },
    {
      "Effect": "Allow",
      "Action": [
        "glue:DeleteDatabase"
      ],
      "Resource": [
        "arn:${Partition}:glue:${Region}:${Account}:catalog",
        "arn:${Partition}:glue:${Region}:${Account}:database/athena_prepared_statements",
        "arn:${Partition}:glue:${Region}:${Account}:table/athena_prepared_statements/*",
        "arn:${Partition}:glue:${Region}:${Account}:userDefinedFunction/athena_prepared_statements/*"
      ]
    },
    {
      "Effect": "Allow",
      "Action": [
        "glue:CreateTable"
      ],
      "Resource": [
        "arn:${Partition}:glue:${Region}:${Account}:catalog",
        "arn:${Partition}:glue:${Region}:${Account}:database/athena_prepared_statements",
        "arn:${Partition}:glue:${Region}:${Account}:table/athena_prepared_statements/amazon_reviews_parquet"
      ]
    },
    {
      "Effect": "Allow",
      "Action": [
        "glue:DeleteTable"
      ],
      "Resource": [
        "arn:${Partition}:glue:${Region}:${Account}:catalog",
        "arn:${Partition}:glue:${Region}:${Account}:database/athena_prepared_statements",
        "arn:${Partition}:glue:${Region}:${Account}:table/athena_prepared_statements/amazon_reviews_parquet"
      ]
    },
    {
      "Effect": "Allow",
      "Action": [
        "athena:CreateWorkGroup",
        "athena:DeleteWorkGroup",
        "athena:GetWorkGroup"
      ],
      "Resource": "arn:${Partition}:athena:${Region}:${Account}:workgroup/PreparedStatementsWG"
    }
  ]
}

For authorization for the IAM principal running the CloudFormation template and following along, this post was tested with the following AWS managed policies and the customer managed policy below.

AWS managed policies:

  • AmazonAthenaFullAccess
  • AWSCloudTrailReadOnlyAccess
  • AWSCloudFormationFullAccess

Customer managed policy:

{
    "Version": "2012-10-17",
    "Statement": [
        {
            "Sid": "ViewS3BucketsWithoutErrors",
            "Effect": "Allow",
            "Action": [
                "s3:ListAllMyBuckets"
            ],
            "Resource": [
                "*"
            ]
        },
        {
            "Sid": "InteractWithMyBucketAndDataSetBucket",
            "Effect": "Allow",
            "Action": [
                "s3:GetObject",
                "s3:GetBucketLocation",
                "s3:ListBucket",
                "s3:PutObject"
            ],
            "Resource": [
                "arn:aws:s3:::${my-bucket-name}*",
                "arn:aws:s3:::amazon-reviews-pds*"
            ]
        },
        {
            "Sid": "UploadCloudFormationTemplate",
            "Effect": "Allow",
            "Action": "s3:PutObject",
            "Resource": "arn:aws:s3:::cf-template*"
        },
        {
            "Sid": "CleanUpResults",
            "Effect": "Allow",
            "Action": [
                "s3:DeleteObject"
            ],
            "Resource": [
                "arn:aws:s3:::${my-bucket-name}/results*"
            ]
        },
        {
            "Sid": "ListRolesForCloudFormationDeployment",
            "Effect": "Allow",
            "Action": [
                "iam:ListRoles"
            ],
            "Resource": [
                "*"
            ]
        },
        {
            "Sid": "IAMRoleForCloudFormationDeployment",
            "Effect": "Allow",
            "Action": [
                "iam:PassRole"
            ],
            "Resource": [
                "arn:${Partition}:iam::${Account}:role/${role-name}"
            ],
            "Condition": {
                "StringEquals": {
                    "iam:PassedToService": "cloudformation.amazonaws.com"
                }
            }
        }
    ]
}

Partition the example dataset

The CloudFormation template created an external table pointing at a dataset of over 130 million customer reviews from Amazon.com. Partitioning data improves query performance and reduces cost by restricting the amount of data scanned by each query. The external table for this dataset has Hive-compatible partitions. The MSCK REPAIR TABLE SQL statement scans the prefix paths in the S3 bucket and updates the metadata in the Data Catalog with the partition metadata. To access the dataset, the external table’s partitions must be updated.

After you deploy the CloudFormation template, complete the following steps:

  1. On the Athena console, choose Query editor in the navigation pane.
  2. For Data Source, enter AwsDataCatalog.
  3. For Database, enter athena_prepared_statements.
  4. On the Workgroup drop-down menu, choose PreparedStatementsWG.
  5. Choose Acknowledge to confirm.
  6. In the query editor pane, run the following SQL statement for your external table:
MSCK REPAIR TABLE athena_prepared_statements.amazon_reviews_parquet;

This query takes approximately 15 seconds to run when tested in us-east-1.

  1. Run the following query to list the available partitions. The example dataset has partitions based on product_category.
SHOW PARTITIONS athena_prepared_statements.amazon_reviews_parquet;
  1. Run a SELECT statement to output a sample of data available in the table:
SELECT * FROM athena_prepared_statements.amazon_reviews_parquet limit 10;

Create prepared statements

To use Athena parameterized queries, first you run the PREPARE SQL statement and specify your positional parameters, denoted by question marks. The Athena prepared statement is stored with a name you specify.

Run the following PREPARE statement in the Athena query editor. This example query, named product_helpful_reviews, provides customer reviews with three parameters for a specified product ID, star rating provided by the reviewer, and minimum number of helpful votes provided to the review by other Amazon.com customers.

PREPARE product_helpful_reviews FROM
SELECT product_id, product_title, star_rating, helpful_votes, review_headline, review_body
FROM amazon_reviews_parquet WHERE product_id = ? AND star_rating = ? AND helpful_votes > ?
ORDER BY helpful_votes DESC
LIMIT 10;

You could also use the CreatePreparedStatement API or SDK. For example, to create your prepared statement from AWS CLI, run the following command:

aws athena create-prepared-statement \
--statement-name "product_helpful_reviews" \
--query-statement "SELECT product_id, product_title, star_rating, helpful_votes, review_headline, review_body FROM amazon_reviews_parquet WHERE product_id = ? AND star_rating = ? AND helpful_votes > ? ORDER BY helpful_votes DESC LIMIT 10;" \
--work-group PreparedStatementsWG \
--region region

For more information on creating prepared statements, refer to SQL Statements in Querying with Prepared Statements.

Run parameterized queries

You can run a parameterized query against the prepared statement with the EXECUTE SQL statement and a USING clause. The USING clause specifies the argument values for the prepared statement’s parameters.

Run the following EXECUTE statement in the Athena query editor. The prepared statement created in the previous section is run with parameters to output 4-star reviews for the Amazon Smile eGift Card product ID with at least 10 helpful votes.

EXECUTE product_helpful_reviews USING 'BT00DDVMVQ', 4, 10;

If you receive the message PreparedStatement product_helpful_reviews was not found in workGroup primary, make sure you selected the PreparedStatementsWG workgroup.

For more information on running parameterized queries, refer to SQL Statements in Querying with Prepared Statements.

Mask query string data in CloudTrail events using parameterized queries

You may want to use parameterized queries to redact sensitive data from the query string visible in CloudTrail events. For example, you may have columns containing PII as parameters, which you don’t want visible in logs. Athena automatically masks query strings from CloudTrail events for EXECUTE statements, replacing the query string with the value HIDDEN_DUE_TO_SECURITY_REASONS. This helps you avoid displaying protected data in your log streams.

To access the CloudTrail event for the query, complete the following steps:

  1. Navigate to the Event history page on the CloudTrail console.
  2. On the drop-down menu, choose Event name.
  3. Search for StartQueryExecution events.

CloudTrail event records for parameterized queries include a queryString value redacted with HIDDEN_DUE_TO_SECURITY_REASONS. The query string is visible in the Athena workgroup’s query history. You can control access by using least-privilege IAM policies to Athena, the AWS Glue Data Catalog, and the Amazon S3 query output location in your workgroup settings. For more information on viewing recent queries, refer to Viewing Recent Queries. For more information on IAM policies, refer to Actions, resources, and condition keys for AWS services.

Layer of protection for SQL injection

In this section, you’re shown an example of a SQL injection attack, and how prepared statements can protect against the same attack. We use the Athena console to invoke the StartQueryExecution API against a table named users with three rows.

SQL injection is an attempt to insert malicious SQL code into requests to change the statement and extract data from your dataset’s tables. Without Athena parameterized queries, if you’re querying a dataset directly or appending user input to a SQL query, and users can append SQL fragments, the dataset may be vulnerable to SQL injection attacks which return unauthorized data in the result set.

This post shows an example of inserting a SQL fragment in a malicious way. In the example, an OR condition which will always return true (such as OR 1=1) is appended to the WHERE clause. The same example query is shown with Athena parameterized queries, and the query fails because it contains an invalid parameter value, since the parameter value is expected to be an integer but contains the characters “OR”. If the parameter was based on a String column, then the same SQL injection attempt would result in the query returning no results because the positional argument is interpreted as a literal parameter value.

Athena provides an additional layer of defense against multi-statement SQL injection attacks. Attempting to perform SQL injection with an executable command (such as DROP) results in a failed query with Athena providing an error Only one sql statement is allowed, because Athena only accepts one executable command per SQL statement submission.

Although Athena prepared statements provide a layer of protection against SQL injection attacks, other precautions provide additional layers of defense. Athena prepared statements can be a part of your defense-in-depth strategy. For more information on layers of security, refer to Amazon Athena Security.

SQL injection example

The intended use of the SELECT query in the example is to receive a small set of values. However, an attacker can manipulate the input to append malicious SQL code. For example, an attacker can input a value of 1 OR 1=1, which appends a true condition to the WHERE clause and returns all records in the table:

SELECT * FROM users WHERE id = 1 OR 1=1;

By appending malicious SQL code, the attacker can retrieve all rows of the users table, as shown in the following screenshot.
An image of the Athena graphical user interface. A query SELECT * FROM users WHERE id = 1 OR 1=1; has been run. All 3 users in the table, with ids 1, 2, and 3, returned with all columns of the table.

SQL injection attempt with a prepared statement

If we create prepared statements with the same query from the previous example, the executable command is passed as a literal argument for the parameter’s value. If a user tries to pass additional SQL, they receive a syntax error because the WHERE clause is based on ID, which expects an integer value.

  1. Create a prepared statement using the same query against the users table:
PREPARE get_user FROM SELECT * FROM users WHERE id = ?
  1. Set the parameter to a legitimate value:
EXECUTE get_user USING 1

The expected result returns, as shown in the following screenshot.

Graphical user interface of Athena running query EXECUTE get_user USING 1. Only the user with id 1 returned.

  1. Now, attempt to pass a malicious value:
EXECUTE get_user USING 1 OR 1=1

Running this prepared statement produces a syntax error, because an integer value is expected, but it receives an invalid integer value of 1 OR 1=1. The query and syntax error are shown in the following screenshot.

Graphical user interface of Athena querying EXECUTE get_user USING 1 OR 1=1. There is an error. The error says "SYNTAX_ERROR: line 1:24: Left side of logical expression must evaluate to a boolean (actual: integer). This query ran against the "default" database, unless qualified by the query. Please post the error message in our forum."

Working with prepared statements

This section describes administrative functions to make it easier to work with prepared statements.

List all prepared statements in my AWS account

To list all prepared statements in an Athena workgroup from the AWS Command Line Interface (AWS CLI), you can run the following command:

aws athena list-prepared-statements --work-group workgroup_name --region region_name

If following the example above, the command will return the following response.

{
  "PreparedStatements": [
    {
      "StatementName": "product_helpful_reviews",
      "LastModifiedTime": "2022-01-14T15:33:07.935000+00:00"
    }
  ]
}

To list all available prepared statements in your AWS account, you can use the AWS APIs. This post provides a sample script using the AWS SDK for Python (Boto3) to loop through all Regions in your account, and provide the prepared statements per Athena workgroup.

Make sure you have AWS credentials where you plan to run the Python script. For more information, refer to Credentials.

Clone the GitHub repo or copy the Python script list-prepared-statements.py from the repo and run the script:

python3 list-prepared-statements.py

Replace <my-profile-name> with your AWS profile name when it prompts you, or leave empty to use default local credentials.

Enter the AWS CLI profile name or leave blank if using instance profile: <my-profile-name>

The following text is the output of the script. If following along, the response returns only the product_helpful_reviews prepared statement.

eu-north-1:
ap-south-1:
eu-west-3:
eu-west-2:
eu-west-1:
ap-northeast-3:
ap-northeast-2:
ap-northeast-1:
sa-east-1:
ca-central-1:
ap-southeast-1:
ap-southeast-2:
eu-central-1:
us-east-1:
        athena-v2-wg: my_select
        PreparedStatementsWG: get_user
        PreparedStatementsWG: get_contacts_by_company
        PreparedStatementsWG: product_helpful_reviews
        PreparedStatementsWG: count_stars
        PreparedStatementsWG: helpful_reviews
        PreparedStatementsWG: get_product_info
        PreparedStatementsWG: check_avg_stars_of_category
        PreparedStatementsWG: my_select_v1
        PreparedStatementsWG: my_select_v2
us-east-2:
us-west-1:
us-west-2:

Update prepared statements

You have a few options for updating prepared statements. You may want to do this to optimize your query performance, change the values you select, or for several other reasons.

  1. Rerun the PREPARE statement with the changes in the Athena query editor or against the StartQueryExecution API.
  2. Use the UpdatePreparedStatement API via the AWS CLI or SDK.

You can use this API to add a description to your prepared statements or update your queries. To update your query statement via this method, you must provide the statement name, workgroup name, updated query statement, and optionally a new description. For more information about the UpdatePreparedStatement API, refer to update-prepared-statement.

You may want to roll out versions of your query. To maintain backward-compatibility for users, you could create a new prepared statement with a different name. For example, the prepared statement could have a version number in its name (such as my_select_v1 and my_select_v2). When necessary, you could communicate changes to teams who rely on the prepared statement, and later deallocate the old prepared statement versions.

Delete prepared statements

To delete a prepared statement, you can use the following query syntax when against the StartQueryExecution API, or from within the Athena query editor:

DEALLOCATE PREPARE product_helpful_reviews

You could also use the DeletePreparedStatement API or SDK. For example, to delete your prepared statement from AWS CLI, run the following command:

aws athena delete-prepared-statement --statement-name product_helpful_reviews --work-group PreparedStatementsWG --region region

Clean up

If you followed along with this post, you created several components that may incur costs. To avoid future charges, remove the resources with the following steps:

  1. Delete the S3 bucket’s results prefix created after you run a query on your workgroup.

With the default template, it’s named <S3QueryResultsBucketName>/athena-results. Use caution in this step. Unless you are using versioning on your S3 bucket, deleting S3 objects cannot be undone.

  1. Delete the Athena prepared statements in the PreparedStatementsWG

You can follow the steps in the Delete prepared statements section of this post using either the DEALLOCATE PREPARE statement or delete-prepared-statement API for each prepared statement you created.

  1. To remove the CloudFormation stack, select the stack on the AWS CloudFormation console, choose Delete, and confirm.

Conclusion

Athena parameterized queries make it easy to decouple your code base from your queries by providing a way to store common queries within your Athena workgroup. This post provided information about how Athena parameterized queries can improve your code reusability and data lake security. We showed how you can set up a sample data lake and start using parameterized queries today. We also provided an example of the protections parameterized queries offers, and detailed additional administrative functions.

You can get started with Athena prepared statements via the Athena console, the AWS CLI, or the AWS SDK. To learn more about Athena, refer to the Amazon Athena User Guide.

Thanks for reading this post! If you have questions about Athena parameterized queries, don’t hesitate to leave a comment in the comments section.


About the Authors

Blayze Stefaniak is a Senior Solutions Architect at AWS who works with public sector, federal financial, and healthcare organizations. Blayze is based out of Pittsburgh. He is passionate about breaking down complex situations into something practical and actionable. His interests include artificial intelligence, distributed systems, and Excel formula gymnastics. Blayze holds a B.S.B.A. in Accounting and B.S. in Information Systems from Clarion University of Pennsylvania. In his spare time, you can find Blayze listening to Star Wars audiobooks, trying to make his dogs laugh, and probably talking on mute.

Daniel Tatarkin is a Solutions Architect at Amazon Web Services (AWS) supporting Federal Financial organizations. He is passionate about big data analytics and serverless technologies. Outside of work, he enjoys learning about personal finance, coffee, and trying out new programming languages for fun.


An update on recent service disruptions

Post Syndicated from Keith Ballinger original https://github.blog/2022-03-23-an-update-on-recent-service-disruptions/

Over the past few weeks, we have experienced multiple incidents due to the health of our database, which resulted in degraded service of our platform. We know this impacts many of our customers’ productivity and we take that very seriously. We wanted to share with you what we know about these incidents while our team continues to address these issues.

The underlying theme of our issues over the past few weeks has been due to resource contention in our mysql1 cluster, which impacted the performance of a large number of our services and features during periods of peak load. Over the past several years, we’ve shared how we’ve been partitioning our main database in addition to adding clusters to support our growth, but we are still actively working on this problem today. We will share more in our next Availability Report, but I’d like to be transparent and share what we know now.

Timeline

March 16 14:09 UTC (lasting 5 hours and 36 minutes)

At this time, GitHub saw an increased load during peak hours on our mysql1 database, causing our database proxying technology to reach its maximum number of connections. This particular database is shared by multiple services and receives heavy read/write traffic. All write operations were unable to function during this outage, including git operations, webhooks, pull requests, API requests, issues, GitHub Packages, GitHub Codespaces, GitHub Actions, and GitHub Pages services.

The incident appeared to be related to peak load combined with poor query performance for specific sets of circumstances. Our MySQL clusters use a classic primary-replica set up for high-availability where a single node primary is able to accept writes, while the rest of the cluster consists of replica nodes that serve read traffic. We were able to recover by failing over to a healthy replica and started investigations into traffic patterns at peak load related to query performance during these times.

March 17 13:46 UTC (lasting 2 hours and 28 minutes)

The following day, we saw the same peak traffic pattern and load on mysql1. We were not able to pinpoint and address the query performance issues before this peak, and we decided to proactively failover before the issue escalated. Unfortunately, this caused a new load pattern that introduced connectivity issues on the new failed-over primary, and applications were once again unable to connect to mysql1 while we worked to reset these connections. We were able to identify the load pattern during this incident and subsequently implemented an index to fix the main performance problem.

March 22 15:53 UTC (lasting 2 hours and 53 minutes)

While we had reduced load seen in the previous incidents, we were not fully confident in the mitigations. We wanted to do more to analyze performance on this database to prevent future load patterns or performance issues. In this third incident, we enabled memory profiling on our database proxy in order to look more closely at the performance characteristics during peak load. At the same time, client connections to mysql1 started to fail, and we needed to again perform a primary failover in order to recover.

March 23 14:49 UTC (lasting 2 hours and 51 minutes)

We again saw a recurrence of load characteristics that caused client connections to fail and again performed a primary failover in order to recover. In order to reduce load, we throttled webhook traffic and will continue to use that as a mitigation to prevent future recurrence during peak load times as we continue to investigate further mitigations.

Next steps

In order to prevent these types of incidents from occurring in the future, we have started an audit of load patterns for this particular database during peak hours and a series of performance fixes based on these audits. As part of this, we are moving traffic to other databases in order to reduce load and speed up failover time, as well as reviewing our change management procedures, particularly as it relates to monitoring and changes during high load in production. As the platform continues to grow, we have been working to scale up our infrastructure including sharding our databases and scaling hardware.

In summary

We sincerely apologize for the negative impacts these disruptions have caused. We understand the impact these types of outages have on customers who rely on us to get their work done every day and are committed to efforts ensuring we can gracefully handle disruption and minimize downtime. We look forward to sharing additional information as part of our March Availability Report in the next few weeks.

ISO/IEC 27001 certificates now available in French and Spanish

Post Syndicated from Rodrigo Fiuza original https://aws.amazon.com/blogs/security/iso-iec-27001-certificates-now-available-in-french-and-spanish/

French version
Spanish version

We continue to listen to our customers, regulators, and stakeholders to understand their needs regarding audit, assurance, certification, and attestation programs at Amazon Web Services (AWS). We are pleased to announce that ISO/IEC 27001 certificates for AWS are now available in French and Spanish on AWS Artifact. These translated reports will help drive greater engagement and alignment with customer and regulatory requirements across Latin America, Canada, and EMEA.

Current translated (French and Spanish) ISO/IEC 27001 certificates are available through AWS Artifact. Future ISO certificates will be published on an annual basis in accordance with the audit period.

We value your feedback and questions—feel free to reach out to our team or give feedback about this post through our Contact Us page.

If you have feedback about this post, submit comments in the Comments section below.

Want more AWS Security news? Follow us on Twitter.

.


Les certificats ISO/IEC 27001 sont désormais disponibles en français et en espagnol

Nous restons à l’écoute de nos clients, des régulateurs et des parties prenantes pour comprendre leurs besoins en matière de programmes d’audit, d’assurance, de certification et d’attestation chez Amazon Web Services (AWS). Nous avons le plaisir d’annoncer que les certificats ISO/IEC 27001 d’AWS sont désormais disponibles en français et en espagnol sur AWS Artifact. Ces rapports traduits permettront de renforcer l’engagement et l’alignement sur les exigences des clients et des réglementations en Amérique latine, au Canada et en EMEA.

Les certificats ISO/IEC 27001 actuellement traduits (français et espagnol) sont disponibles via AWS Artifact. Les futurs certificats ISO seront publiés sur une base annuelle en fonction de la période d’audit.

Vos commentaires et vos questions sont importants pour nous. N’hésitez pas à contacter notre équipe ou à nous faire part de vos commentaires sur cet article par le biais de notre page Nous contacter.

Si vous avez des commentaires sur cet article, envoyez-les dans la section Commentaires ci-dessous.

Vous voulez plus d’informations sur la sécurité AWS ? Suivez-nous sur Twitter.

.


Los certificados ISO/IEC 27001 ahora están disponibles en francés y español

Seguimos escuchando a nuestros clientes y reguladores y entendemos sus necesidades con respecto a los programas de garantías en Amazon Web Services (AWS) y nos complace anunciar que los certificados ISO/IEC 27001 ya están disponibles en francés y español. Estos certificados traducidos ayudarán a impulsar los requisitos regulatorios y de los clientes locales en las regiones de LATAM, Canadá y EMEA.

Los certificados ISO/IEC 27001 traducidos actualmente (Francés y Español) están disponibles en AWS Artifact. Los futuros certificados ISO se publicarán anualmente según el período de auditoría.

Valoramos sus comentarios y preguntas; no dude en ponerse en contacto con nuestro equipo o enviarnos sus comentarios sobre esta publicación a través de nuestra página Contáctenos.

Si tienes comentarios sobre esta publicación, envía comentarios en la sección Comentarios a continuación.

¿Desea obtener más noticias sobre seguridad de AWS? Síguenos en Twitter.

Author

Rodrigo Fiuza

Rodrigo is a security audit manager at AWS, based in São Paulo. He leads audits, attestations, certifications, and assessments across Latin America, the Caribbean, and Europe. Rodrigo previously worked in risk management, security assurance, and technology audits for 12 years.

Naranjan Goklani

Naranjan Goklani

Naranjan is a security audit manager at AWS, based in Toronto. He leads audits, attestations, certifications, and assessments across North America and Europe. Naranjan has previously worked in risk management, security assurance, and technology audits for the past 12 years.

Author

Sonali Vaidya

Sonali is a compliance program manager at AWS, where she leads multiple global compliance programs including HITRUST, ISO 27001, ISO 27017, ISO 27018, ISO 27701, ISO 9001, ISO 22301, and CSA STAR. Sonali has over 20 years of experience in information security and privacy management and holds multiple certifications such as CISSP, CCSK, CEH, CISA, and ISO 22301 LA.

SIEM and XDR: What’s Converging, What’s Not

Post Syndicated from Amy Hunt original https://blog.rapid7.com/2022/03/23/siem-and-xdr-whats-converging-whats-not/

SIEM and XDR: What’s Converging, What’s Not

Let’s start with the conclusion: Security incident and event management (SIEM) isn’t going anywhere anytime soon.

Today, most security analysts are using their SIEMs for detection and response, making it the core tool within the security operations center (SOC). SIEM aggregates and monitors critical security telemetry, enables companies to monitor and detect threats specific to their environment and policy violations, and addresses key regulatory and compliance use cases. It has served – and will continue to serve – very important, specific purposes in the security technology stack.

Where SIEMs have traditionally struggled is in keeping pace with the threat landscape. It expands and changes daily. Very, very few security teams have the resources to consume all the relevant threat intelligence, then create the rules and configure the detections necessary to find them.

Rapid7’s SIEM, InsightIDR, is the exception, designed with a detections-first approach.

InsightIDR leverages internal and external threat intelligence, encompassing your entire attack surface. Our detection library includes threat intelligence from Rapid7’s open-source community, advanced attack surface mapping, and proprietary machine learning. Detections are curated and constantly fine-tuned by our expert Threat Intelligence and Detections Engineering team.

InsightIDR is the only SIEM that can actually do extended detection and response (XDR). And we can’t help but think all the XDR buzz is the security industry’s way of letting you know that, yes, detection and response performance is still lacking.

A cloud SIEM can provide a strong XDR foundation — agile, tailored, adaptable, and elastic

A cloud SIEM approach gives you an elastic data lake that lets you collect and process telemetry across the environment. And the core benefits of SIEM are yours: log retention, fast and flexible search, reporting, and the ability to fine-tune and customize policy violations or other rules specifically for their environment or organization. Cloud SIEM with user and entity behavior analytics (UEBA) and correlation capabilities can already achieve XDR, tying disparate data sources together to normalize, correlate/attribute, and analyze.

Of course, some customers that purchased traditional SIEM for detection and response haven’t been able to get those outcomes. They don’t have a next-generation SIEM that supports big data and real-time event analysis. Perhaps machine learning and behavioral analytics aren’t there yet.

Or maybe the SIEM has security teams drowning in alerts, ignoring too many of them. Detection and response is really hard — and it really is a symphony — especially as the environment continues to sprawl and resources remain scarce.

XDR aims to solve the challenges of the SIEM tool for effective detection and response to targeted attacks and includes behavior analysis, threat intelligence, behavior profiling, recommendations, and automation. The foundation is everything.

When we introduced InsightIDR some time ago, some criticized it as trying to do “too much”

It turns out we were doing XDR.

Today, our highly manicured detections library is expertly vetted by our global Rapid7 Managed Detection and Response (MDR) SOC, where we also get emergent threat coverage. It’s single-platform, integrated with raw threat intel from Rapid7’s open-source communities (Metasploit, Heisenberg, Sonar, Velociraptor) and strengthened signal-to-noise following our acquisition of IntSights external threat intelligence.

Call it what you like

SIEM and XDR are described as “alternatives,” “complementary,” and also barreling toward one another destined to collide. We’ve read how one is dead and the other is the future. (Must it always be this way?)

No matter what you call it, focus on the outcomes, not the acronyms. It’s easy to get lost in the buzz, but the best products for your business will be those that address your top priorities.

Additional reading:

NEVER MISS A BLOG

Get the latest stories, expertise, and news about security today.

Federated access to Amazon Redshift clusters in AWS China Regions with Active Directory Federation Services

Post Syndicated from Clement Yuan original https://aws.amazon.com/blogs/big-data/federated-access-to-amazon-redshift-clusters-in-aws-china-regions-with-active-directory-federation-services/

Many customers already manage user identities through identity providers (IdPs) for single sign-on access. With an IdP such as Active Directory Federation Services (AD FS), you can set up federated access to Amazon Redshift clusters as a mechanism to control permissions for the database objects by business groups. This provides a seamless user experience, and centralizes the governance of authentication and permissions for end-users. For more information, refer to the blog post series “Federate access to your Amazon Redshift cluster with Active Directory Federation Services (AD FS)” (part 1, part 2).

Due to the differences in the implementation of Amazon Web Services in China, customers have to adjust the configurations accordingly. For example, AWS China Regions (Beijing and Ningxia) are in a separate AWS partition, therefore all the Amazon Resource Names (ARNs) include the suffix -cn. AWS China Regions are also hosted at a different domain: www.amazonaws.cn.

This post introduces a step-by-step procedure to set up federated access to Amazon Redshift in AWS China Regions. It pinpoints the key differences you should pay attention to and provides a troubleshooting guide for common errors.

Solution overview

The following diagram illustrates the process of Security Assertion Markup Language 2.0 (SAML)-based federation access to Amazon Redshift in AWS China Regions. The workflow includes the following major steps:

  1. The SQL client provides a user name and password to AD FS.
  2. AD FS authenticates the credential and returns a SAML response if successful.
  3. The SQL client makes an API call to AWS Security Token Service (AWS STS) to assume a preferred role with SAML.
  4. AWS STS authenticates the SAML response based on the mutual trust and returns temporary credentials if successful.
  5. The SQL client communicates with Amazon Redshift to get back a database user with temporary credentials, then uses it to join database groups and connect to the specified database.

The architecture

We organize the walkthrough in the following high-level steps:

  1. Configure an AD FS relying party trust for AWS China Regions and define basic claim rules.
  2. Provision an AWS Identity and Access Management (IAM) identity provider and roles.
  3. Complete the remaining relying party trust’s claim rules based on the IAM resources.
  4. Connect to Amazon Redshift with federated access via a JDBC-based SQL client.

Prerequisites

This post assumes that you have the following prerequisites:

  • Windows Server 2016
  • The ability to create users and groups in AD
  • The ability to configure a relying party trust and define claim rules in AD FS
  • An AWS account
  • Sufficient permissions to provision IAM identity providers, roles, Amazon Virtual Private Cloud (Amazon VPC) related resources, and an Amazon Redshift cluster via AWS Cloud Development Kit (AWS CDK)

Configure an AD FS relying party trust and define claim rules

A relying party trust allows AWS and AD FS to communicate with each other. It is possible to configure two relying party trusts for both AWS China Regions and AWS Regions in the same AD FS at the same time. For AWS China Regions, we need to use a different SAML metadata document at https://signin.amazonaws.cn/static/saml-metadata.xml. The relying party’s identifier for AWS China Regions is urn:amazon:webservices:cn-north-1, whereas that for AWS Global Regions is urn:amazon:webservices. Note down this identifier to use later in this post.

Relying party metadata XML

Add AD groups and users

With SAML-based federation, end-users assume an IAM role and use it to join multiple database (DB) groups. The permissions on such roles and DB groups can be effectively managed by AD groups. We use different prefixes in AD group names to distinguish them, which help map to roles and DB group claim rules. It’s important to distinguish correctly the two types of AD groups because they’re mapped to different AWS resources.

We continue our walkthrough with an example. Suppose in business there are two roles: data scientist and data engineer, and two DB groups: oncology and pharmacy. Data scientists can join both groups, and data engineers can only join the pharmacy group. On the AD side, we define one AD group for each role and group. On the AWS side, we define one IAM role for each role and one Amazon Redshift DB group for each DB group. Suppose Clement is a data scientist and Jimmy is a data engineer, and both are already managed by AD. The following diagram illustrates this relationship.

AD group and user mapping to IAM role and DB group

You may create the AD groups and users with either the AWS Command Line Interface (AWS CLI) or the AWS Management Console. We provide sample commands in the README file in the GitHub repo.

Follow substeps a to o of Step 2 in Setting up JDBC or ODBC Single Sign-on authentication with AD FS to set up the relying party with the correct SAML metadata document for AWS China Regions and define the first three claim rules (NameId, RoleSessionName, and Get AD Groups). We resume after the IAM identity provider and roles are provisioned.

Provision an IAM identity provider and roles

You establish the trust for AD with AWS by provisioning an IAM identity provider. The IAM identity provider and assumed roles should be in one AWS account, otherwise you get the following error message during federated access: “Principal exists outside the account of the Role being assumed.” Follow these steps to provision the resources:

  1. Download the metadata file at https://yourcompany.com/FederationMetadata/2007-06/FederationMetadata.xml from your AD FS server.
  2. Save it locally at /tmp/FederationMetadata.xml.
  3. Check out the AWS CDK code on GitHub.
  4. Use AWS CDK to deploy the stack named redshift-cn:
export AWS_ACCOUNT=YOUR_AWS_ACCOUNT
export AWS_DEFAULT_REGION=cn-north-1
export AWS_PROFILE=YOUR_PROFILE

cdk deploy redshift-cn --require-approval never

The AWS CDK version should be 2.0 or newer. For testing purposes, you may use the AdministratorAccess managed policy for the deployment. For production usage, use a profile with least privilege.

The following table summarizes the resources that the AWS CDK package provisions.

Service Resource Count Notes
Amazon VPC VPC 1 .
Subnet 2 .
Internet gateway 1 .
Route table 1 .
Security group 1 .
IAM SAML Identity provider 1 .
Role 3 1 service role for cluster
2 federated roles
Amazon Redshift Cluster 1 1 node, dc2.large
AWS Secrets Manager Secret 1 .

In this example, the Publicly Accessible setting of the Amazon Redshift cluster is set to Enabled for simplicity. However, in a production environment, you should disable this setting and place the cluster inside a private subnet group. Refer to How can I access a private Amazon Redshift cluster from my local machine for more information.

Configure a security group

Add an inbound rule for your IP address to allow connection to the Amazon Redshift cluster.

  1. Find the security group named RC Default Security Group.
  2. Obtain the pubic IP address of your machine.
  3. Add an inbound rule for this IP address and the default port for Amazon Redshift 5439.

Complete the remaining claim rules

After you provision the IAM identity provider and roles, add a claim rule to define SAML roles. We add a customer claim rule with the name Roles. It finds AD groups with the prefix role_ and replaces it with a combined ARN string. Pay attention to the ARNs of the resources where the partition is aws-cn. Replace AWS_ACCOUNT with your AWS account ID. The following table demonstrates how the selected AD groups are transformed to IAM role ARNs.

Selected AD Group Transformed IAM Role ARN
role_data_scientist arn:aws-cn:iam::AWS_ACCOUNT:role/rc_data_scientist
role_data_engineer arn:aws-cn:iam::AWS_ACCOUNT:role/rc_data_engineer

Relying party claim rule

To add the claim rule, open the AD FS management console in your Windows Server and complete the following steps:

  1. Choose Relying Party Trusts, then choose the relying party for AWS China.
  2. Choose Edit Claim Issuance Policy, then choose Add Role.
  3. On the Claim rule template menu, choose Send Claims Using a Custom Rule.
  4. For Claim rule name, enter Roles.
  5. In the Custom rule section, enter the following:
c:[Type == "http://temp/variable", Value =~ "(?i)^role_"]
=> issue(Type = "https://aws.amazon.com/SAML/Attributes/Role",
Value = RegExReplace(c.Value, "role_",
"arn:aws-cn:iam::AWS_ACCOUNT:saml-provider/rc-provider,arn:aws-cn:iam::AWS_ACCOUNT:role/rc_"));

The optional parameters of DbUser, AutoCreate, and DbGroups can be provided via either JDBC connection parameters or SAML attribute values. The benefit of user federation is to manage users in one place centrally. Therefore, the DbUser value should be automatically provided by the SAML attribute. The AutoCreate parameter should always be true, otherwise you have to create DB users beforehand. Finally, the DbGroups parameter could be provided by SAML attributes provided that such relationship is defined in AD.

To summarize, we recommend to provide at least DbUser and AutoCreate in SAML attributes, such that the end-user can save time by composing shorter connection strings. In our example, we provide all three parameters via SAML attributes.

  1. Add a customer claim rule named DbUser. We use an email address as the value for DbUser:
c:[Type == "http://schemas.microsoft.com/ws/2008/06/identity/claims/windowsaccountname", 
 Issuer == "AD AUTHORITY"]
=> issue(store = "Active Directory",
types = ("https://redshift.amazon.com/SAML/Attributes/DbUser"),
query = ";mail;{0}", param = c.Value);

You can also choose a Security Accounts Manager (SAM) account name, which is usually the user name of the email address. Using an email address plays an important role in IAM role policy setting. We revisit this issue later.

  1. Add the custom claim rule named AutoCreate:
=> issue(type = "https://redshift.amazon.com/SAML/Attributes/AutoCreate", value = "true");
  1. Add a customer claim rule named DbGroups. It finds all AD groups with the prefix group_ and lists them as values for DbGroups:
c:[Type == "http://temp/variable", Value =~ "(?i)^group_"]
=> issue(Type = "https://redshift.amazon.com/SAML/Attributes/DbGroups", Value = c.Value);

You can test the preceding setting is correct by obtaining the SAML response via your browser.

  1. Visit https://yourcompany.com/adfs/ls/IdpInitiatedSignOn.aspx on your Windows Server, log in with user clement, and check that the following SAML attributes exist. For user jimmy, the role is rc_data_engineer and the DB group contains only group_pharmacy.
<AttributeStatement>
    <Attribute Name="https://aws.amazon.com/SAML/Attributes/RoleSessionName">
        <AttributeValue>[email protected]</AttributeValue>
    </Attribute>
    <Attribute Name="https://aws.amazon.com/SAML/Attributes/Role">
        <AttributeValue>arn:aws-cn:iam::AWS_ACCOUNT:saml-provider/rc-provider,arn:aws-cn:iam::AWS_ACCOUNT:role/rc_data_scientist</AttributeValue>
    </Attribute>
    <Attribute Name="https://redshift.amazon.com/SAML/Attributes/DbUser">
        <AttributeValue>[email protected]</AttributeValue>
    </Attribute>
    <Attribute Name="https://redshift.amazon.com/SAML/Attributes/AutoCreate">
        <AttributeValue>true</AttributeValue>
    </Attribute>
    <Attribute Name="https://redshift.amazon.com/SAML/Attributes/DbGroups">
        <AttributeValue>group_pharmacy</AttributeValue>
        <AttributeValue>group_oncology</AttributeValue>
    </Attribute>
</AttributeStatement>

The preceding SAML attribute names are verified valid for AWS China Regions. The URLs end with amazon.com. It’s incorrect to change them to amazonaws.cn or amazon.cn.

Connect to Amazon Redshift with a SQL client

We use JDBC-based SQL Workbench/J (SQL client) to connect to the Amazon Redshift cluster. Amazon Redshift uses a DB group to collect DB users. The database privileges are managed collectively at group level. In this post, we don’t dive deep into privilege management. However, you need to create the preceding two DB groups.

  1. Connect to the provisioned cluster and create the groups. You can connect on the AWS Management Console via the query editor with temporary credentials, or via a SQL client with database user admin and password. The password is stored in AWS Secrets Manager. You may need proper permissions for the above operations.
create group group_oncology;
create group group_pharmacy;
  1. Follow the instructions in Connect to your cluster by using SQL Workbench/J to download and install the SQL client and the Amazon Redshift JDBC driver.

We recommend the JDBC driver version 2.1 with AWS SDK driver-dependent libraries.

  1. Test that the cluster is connectable via its endpoint. The primary user name is admin. You retrieve the secret value of the cluster’s password via Secrets Manager. Specify DSILogLevel and LogPath to collect driver logs and help diagnosis. The connection string looks like the following code. Replace CLUSTER_ENDPOINT with the correct value and delete all line breakers. We split the line for readability.
jdbc:redshift://CLUSTER_ENDPOINT.cn-north-1.redshift.amazonaws.com.cn:5439/main
;ssl_insecure=true
;DSILogLevel=3
;LogPath=/tmp

For AWS China Regions, one extra JDBC driver option loginToRp must be set as you set up a separate relying party trust for the AWS China Regions. If an AD user is mapped to more than one AWS role, in the connection string, use preferred_role to specify the exact role to assume for federated access.

  1. Copy the role ARN directly and pay attention to the aws-cn partition.

If the user is mapped to only one role, this option can be omitted.

  1. Replace CLUSTER_ID with the correct cluster identifier. For the user name, enter yourcompany\clement; for the password, enter the credential from AD:
jdbc:redshift:iam://CLUSTER_ID:cn-north-1/main
;ssl_insecure=true
;DSILogLevel=3
;LogPath=/tmp
;loginToRp=urn:amazon:webservices:cn-north-1
;plugin_name=com.amazon.redshift.plugin.AdfsCredentialsProvider
;idp_host=adfsserver.yourcompany.com
;preferred_role=arn:aws-cn:iam::AWS_ACCOUNT:role/rc_data_scientist
  1. When you’re connected, run the SQL statement as shown in the following screenshot.

The user prefixed with IAMA indicates that the user connected with federated access and was auto-created.

SQL Workbench to query users

  1. As an optional step, in the connection string, you can set the DbUser, AutoCreate, and DbGroups parameters.

Parameters from the connection string are before those from SAML attributes. We recommend you set at least DbUser and AutoCreate via SAML attributes. If it’s difficult to manage DB groups in AD users or you want flexibility, specify DbGroups in the connection string. See the following code:

jdbc:redshift:iam://CLUSTER_ID:cn-north-1/main
;ssl_insecure=true
;DSILogLevel=3
;LogPath=/tmp
;loginToRp=urn:amazon:webservices:cn-north-1
;plugin_name=com.amazon.redshift.plugin.AdfsCredentialsProvider
;idp_host=adfsserver.yourcompany.com
;preferred_role=arn:aws-cn:iam::AWS_ACCOUNT:role/rc_data_scientist
;[email protected]
;AutoCreate=true
;DbGroups=group_oncology

Use an email or SAM account name as DB user

The role policy follows the example policy for using GetClusterCredentials. It further allows redshift:DescribeClusters on the cluster because the role queries the cluster endpoint and port based on its identifier and Region. To make sure that the DB user is the same as the AD user, in this post, we use the following condition to check, where ROLE_ID is the unique identifier of the role:

{"StringEqualsIgnoreCase": {"aws:userid": "ROLD_ID:${redshift:DbUser}"}}

The example policy uses the following condition:

{"StringEqualsIgnoreCase": {"aws:userid": "ROLD_ID:${redshift:DbUser}@yourcompany.com"}}

The difference is apparent. The aws:userid contains the RoleSessionName, which is the email address. The SAM account name is the string before @ in the email address. Because the connection string parameter is before the SAML attribute parameter, we summarize the possible cases as follows:

  • If SAML attributes contain DbUser:
    • If the condition value contains a domain suffix:
      • If the DbUser SAML attribute value is an email address, DbUser must be in the connection string without the domain suffix.
      • If the DbUser SAML attribute value is a SAM account name, DbUser can be omitted in the connection string. Otherwise, the value must not contain a domain suffix.
    • If the condition value doesn’t contain a domain suffix:
      • If the DbUser SAML attribute value is an email address, DbUser can be omitted in the connection string. Otherwise, the value must contain a domain suffix.
      • If the DbUser SAML attribute value is a SAM account name, DbUser must be in the connection string with a domain suffix.
  • If SAML attributes don’t contain DbUser:
    • If the condition value contains a domain suffix, DbUser must be in the connection string without a domain suffix.
    • If the condition value doesn’t contain a domain suffix, DbUser can be omitted in the connection string, because RoleSessionName value which is the email address acts as DbUser. Otherwise, the value must contain a domain suffix.

IAM policy condition judgment workflow

Troubleshooting

Federated access to Amazon Redshift is a non-trivial process. However, it consists of smaller steps that we can divide and conquer when problems occur. Refer to the access diagram in the solution overview. We can split the process into three phrases:

  1. Is SAML-based federation successful? Verify this by visiting the single sign-on page of AD FS and make sure you can sign in to the console with the federated role. Do you configure the relying party with the AWS China specific metadata document? Obtain the SAML response and check if the destination is https://signin.amazonaws.cn/saml. Are the SAML provider ARN and IAM role ARNs correct? Check if the role’s trust relationship contains the correct value for SAML:aud. For other possible checkpoints, refer to Troubleshooting SAML 2.0 federation with AWS.
  2. Are the role policies correct? If SAML-based federation is successful, check the role policies are correct. Compare yours with those provided by this post. Did you use aws where aws-cn should be used? If the policy condition contains a domain suffix, is it the correct domain suffix? You can obtain the domain suffix in use if you get the error that the assumed role isn’t authorized to perform an action.
  3. Is the SQL client connecting successfully? Is the cluster identifier correct? Make sure that your connection string contains the loginToRp option and points to the AWS China relying party. If multiple IAM roles are mapped, make sure preferred_role is one of them with the correct role ARN. You can get the list of roles in the SAML response. Try to set ssl_insecure to true temporarily for debugging. Check the previous subsection and make sure the DbUser is properly used or set according to the DbUser SAML attribute and condition value for aws:user. Turn on the driver logs and get debug hints there. Sometimes you may need to restart the SQL client to clear the cache and retry.

Security concerns

In a production environment, we suggest applying the following security settings, which aren’t used in this post.

For the Amazon Redshift cluster, complete the following:

  • Disable the publicly accessible option and place the cluster inside a private or isolated subnet group
  • Encrypt the cluster, for example, with a customer managed AWS Key Management Service (AWS KMS) key
  • Enable enhanced VPC routing such that the network doesn’t leave your VPC
  • Configure the cluster to require Secure Sockets Layer (SSL) and use one-way SSL authentication

For the IAM federated roles:

  • Specify the exact DB groups for action redshift:JoinGroup. If you want to use a wildcard, make sure it doesn’t permit unwanted DB groups.
  • Check StringEquals for aws:user against the role ID along with the Amazon Redshift DB user. This condition can be checked for GetClusterCredentials, CreateClusterUser, and JoinGroup actions. Refer to the sample code for detailed codes.

In Amazon Redshift, the DB group is used to manage privileges for a collection of DB users. A DB user joins some DB groups during a login session and is granted the privileges associated to the groups. As we discussed before, you can use either the SAML attribute value or the connection property to specify the DB groups. The Amazon Redshift driver prefers the value from the connection string to that from the SAML attribute. As a result, the end-user can override the DB groups in the connection string. Therefore, to confine the privileges a DB user can be granted, the IAM role policy must restrict which DB groups the DB user is allowed to join safely, otherwise there might be a security risk. The following policy snippet shows such a risk. Always follow the least privilege principle when defining permission policies.

{
    "Effect": "Allow",
    "Action": "redshift:JoinGroup",
    "Resource": "*"
}

Clean up

Run the following command to destroy the resources and stop incurring charges:

cdk destroy redshift-cn --force

Remove the users and groups created in the AD FS. Finally, remove the relying party trust for AWS China Regions in your AD FS if you don’t need it anymore.

Conclusion

In this post, we walked you through how to connect to Amazon Redshift in China with federated access based on AD FS. AWS China Regions are in a partition different from other AWS Regions, so you must pay special attention during the configuration. In summary, you need to check AWS resources ARNs with the aws-cn partition, SAML-based federation with the AWS China specific metadata document, and an Amazon Redshift JDBC driver with extra connecting options. This post also discusses different usage scenarios for the redshift:Dbuser parameter and provides common troubleshooting suggestions.

For more information, refer to the Amazon Redshift Cluster Management Guide. Find the code used for this post in the following GitHub repository.


About the Authors


Clement YuanWenjun Yuan
is a Cloud Infra Architect in AWS Professional Services based in Chengdu, China. He works with various customers, from startups to international enterprises, helping them build and implement solutions with state-of-the-art cloud technologies and achieve more in their cloud explorations. He enjoys reading poetry and traveling around the world in his spare time.

Khoa NguyễnKhoa Nguyen is a Big Data Architect in AWS Professional Services. He works with large enterprise customers and AWS partners to accelerate customers’ business outcomes by providing expertise in Big Data and AWS services.

Yewei Li is a Data Architect in AWS Professional Services based in Shanghai, China. He works with various enterprise customers to design and build data warehousing and data lake solutions on AWS. In his spare time, he loves reading and doing sports.

Prompted by Bivol and the Panama Papers: Anti-corruption body acts on Bivol’s findings about Vassil Bozhkov’s property

Post Syndicated from Николай Марченко original https://bivol.bg/anti-corruption-body-acts-on-bivols-findings-about-vassil-bozhkovs-property.html

сряда 23 март 2022


Bulgaria’s Commission for Anti-Corruption and Illegal Assets Forfeiture (CACIAF) is working on seizing the property of gambling boss Vassil Bozhkov, known as the Skull, identified by Bivol in an investigation…

Let’s Architect! Architecting for Blockchain

Post Syndicated from Luca Mezzalira original https://aws.amazon.com/blogs/architecture/lets-architect-architecting-for-blockchain/

You’ve likely read about or heard someone talk about blockchain. This distributed and decentralized ledger collects immutable blocks of information and helps secure your data without going through third party. It is commonly used to maintain secure and decentralized records for registries, consensus, cryptocurrencies, and the latest trend: non-fungible tokens (NFTs).

This collection of content will help you learn the basics of blockchain and drill down in to the mindset to apply while architecting for blockchain. We focus on the architectural aspects to explain what the blockchain is from a technological perspective, how it works, when we need it, as well as its characteristics applied to different scenarios.

Amazon Managed Blockchain: When to use blockchain

There is a lot of buzz about blockchain, but when should you use it? What are its benefits and limitations? This video introduces you to Amazon Managed Blockchain and will help you identify if blockchain is a good solution for you and what type of blockchain is best suited for your use case.

John Liu covers the characteristics and benefits of private and public blockchain

John Liu covers the characteristics and benefits of private and public blockchain

Deep Dive on Amazon Managed Blockchain

In this video, Johnathan Fritz, a Principal Product Manager for Managed Blockchain shares some challenges his team faced while building a distributed and immutable network and how they overcame them. The talk provides a good example of mental models you can use to understand and solve challenges while architecting.

Blockchain is based on a consensus mechanism in a distributed system

Blockchain is based on a consensus mechanism in a distributed system

Mint and deploy NFTs to the Ethereum blockchain using Amazon Managed Blockchain

Buying NFTs is a hot topic right now. But how do you create your own? This blog post provides you a step-by-step guide that shows you how to create an NFT and how to establish a workflow to deploy ERC-721 contracts to the public blockchain Ethereum Rinkeby testnet.

The architecture uses Managed Blockchain to take advantage of maintained Ethereum nodes and allow developers to focus on smart contracts

The architecture uses Managed Blockchain to take advantage of maintained Ethereum nodes and allow developers to focus on smart contracts

How Specright uses Amazon QLDB to create a traceable supply chain network

Blockchain and distributed ledger technologies focus on decentralizing applications involving multiple parties where no single entity owns the application. When your application is decentralized and involves multiple, unknown parties, blockchains can be appropriate. On the other hand, if your application only requires a complete and verifiable history of data changes, you can consider a ledger database.

This post shows how Specright uses use Amazon Quantum Ledger Database (Amazon QLDB) to generate a complete, verifiable history of data changes, to generate an append-only immutable journal of events. Their architecture makes sure that all members of the network have access to the same and latest version of the specification to instantly track change history to investigate quality issues.

This architecture allows all members of the supply chain network to access the same and latest versions of specifications

This architecture allows all members of the supply chain network to access the same and latest versions of specifications

See you next time!

Thanks for reading! If you’re looking for more ways tools to architect your workload, check out the AWS Architecture Center.

See you in a couple of weeks when we discuss strategies for running microservices with containers!

Other posts in this series

How to re-platform and modernize Java web applications on AWS

Post Syndicated from Rick Armstrong original https://aws.amazon.com/blogs/compute/re-platform-java-web-applications-on-aws/

This post is written by: Bill Chan, Enterprise Solutions Architect

According to a report from Grand View Research, “the global application server market size was valued at USD 15.84 billion in 2020 and is expected to expand at a compound annual growth rate (CAGR) of 13.2% from 2021 to 2028.” The report also suggests that Java based application servers “accounted for the largest share of around 50% in 2020.” This means that many organizations continue to rely on Java application server capabilities to deliver middleware services that underpin the web applications running their transactional, content management and business process workloads.

The maturity of the application server technology also means that many of these web applications were built on traditional three-tier web architectures running in on-premises data centers. And as organizations embark on their journey to cloud, the question arises as to what is the best approach to migrate these applications?

There are seven common migration strategies when moving applications to the cloud, including:

  • Retain – keeping applications running as is and revisiting the migration at a later stage
  • Retire – decommissioning applications that are no longer required
  • Repurchase – switching from existing applications to a software-as-a-service (SaaS) solution
  • Rehost – moving applications as is (lift and shift), without making any changes to take advantage of cloud capabilities
  • Relocate – moving applications as is, but at a hypervisor level
  • Replatform – moving applications as is, but introduce capabilities that take advantage of cloud-native features
  • Refactor – re-architect the application to take full advantage of cloud-native features

Refer to Migrating to AWS: Best Practices & Strategies and the 6 Strategies for Migrating Applications to the Cloud for more details.

This blog focuses on the ‘replatform’ strategy, which suits customers who have large investments in application server technologies and the business case for re-architecting doesn’t stack up. By re-platforming their applications into the cloud, customers can benefit from the flexibility of a ‘pay-as-you-go’ model, dynamically scale to meet demand and provision infrastructure as code. Additionally, customers can increase the speed and agility to modernize existing applications and build new cloud-native applications to deliver better customer experiences.

In this post, we walk through the steps to replatform a simple contact management Java application running on an open-source Tomcat application server, along with modernization aspects that include:

  • Deploying a Tomcat web application with automatic scaling capabilities
  • Integrating Tomcat with Redis cache (using Redisson Session Manager for Tomcat)
  • Integrating Tomcat with Amazon Cognito for authentication (using Boyle Software’s OpenID Connect Authenticator for Tomcat)
  • Delegating user log in and sign up to Amazon Cognito

Overview of solution

Solution architecture overview diagram

The solution is comprised of the following components:

  • A VPC across two Availability Zones
  • Two public subnets, two private app subnets, and two private DB subnets
  • An Internet Gateway attached to the VPC
    • A public route table routing internet traffic to the Internet Gateway
    • Two private route tables routing traffic internally within the VPC
  • A frontend web server application Elastic Load Balancing that routes traffic to the Apache Web Servers
  • An Auto Scaling group that launches additional Apache Web Servers based on defined scaling policies. Each instance of the web server is based on a launch template, which defines the same configuration for each new web server.
  • A hosted zone in Amazon Route 53 with a domain name that routes to the frontend web server Elastic Load Balancing
  • An application Elastic Load Balancing that routes traffic to the Tomcat application servers
  • An Auto Scaling group that launches additional Tomcat Application Servers based on defined scaling policies. Each instance of the Tomcat application server is based on a launch template, which defines the same configuration and software components for each new application server
  • A Redis cache cluster with a primary and replica node to store session data after the user has authenticated, making your application servers stateless
  • A Redis open-source Java client, with a Tomcat Session Manager implementation to store authenticated user session data in Redis cache
  • A MySQL Amazon Relational Database Service (Amazon RDS) Multi-AZ deployment for MySQL RDS to store the contact management and role access tables
  • An Amazon Simple Storage Service (Amazon S3) bucket to store the application and framework artifacts, images, scripts and configuration files that are referenced by any new Tomcat application server instances provisioned by automatic scaling
  • Amazon Cognito with a sign-up Lambda function to register users and insert a corresponding entry in the user account tables. Cognito acts as an identity provider and performs the user authentication using an OpenID Connect Authenticator Java component

Walkthrough

The following steps overviews how to deploy the blog solution:

  • Clone and build the Sample Web Application and AWS Signup Lambda Maven projects from GitHub repository
  • Deploy the CloudFormation template (java-webapp-infra.yaml) to create the AWS networking infrastructure and the CloudFormation template (java-webapp-rds.yaml) to create the database instance
  • Update and build the sample web application and signup Lambda function
  • Upload the packages into your S3 bucket
  • Deploy the CloudFormation template (java-webapp-components.yaml) to create the blog solution components
  • Update the solution configuration files and upload them into your S3 bucket
  • Run a script to provision the underlying database tables
  • Validate the web application, session cache and automatic scaling functionality
  • Clean up resources

Prerequisites

For this walkthrough, you should have the following prerequisites:

  • An AWS account
  • An Amazon Elastic Compute Cloud (Amazon EC2) key pair (required for authentication). For more details, see Amazon EC2 key pairs
  • A Java Integrated Development Environment (IDE) such as Eclipse or NetBeans. AWS also offers a cloud-based IDE that lets you write, run and debug code in your browser without having to install files or configure your development machine, called AWS Cloud9. I will show how AWS Cloud9 can be used as part of a DevOps solution in a subsequent post
  • A valid domain name and SSL certificate for the deployed web application. To validate the OAuth 2.0 integration, Cognito requires the URL that the user is redirected to after successful sign-in to be HTTPS. Refer to a configuring a user pool app client for more details
  • Downloaded the following JARs:

Note: the solution was validated in the preceding versions and therefore, the launch template created for the CloudFormation solution stack refers to these specific JARs. If you decide to use different versions, then the ‘java-webapp-components.yaml’ will need to be updated to reflect the new versions. Alternatively, you can externalize the parameters in the template.

Clone the GitHub repository to your local machine

This repository contains the sample code for the Java web application and post confirmation sign-up Lambda function. It also contains the CloudFormation templates required to set up the AWS infrastructure, SQL script to create the supporting database and configuration files for the web server, Tomcat application server and Redis cache.

Deploy infrastructure CloudFormation template

  1. Log in to the AWS Management Console and open the CloudFormation service.

Diagram showing the first step in creating a CloudFormation stack.

2. Create the infrastructure stack using the java-webapp-infra.yaml template (located in the ‘config’ directory of the repo).

3. Infrastructure stack outputs:

Diagram showing the outputs generated from the infrastructure stack creation

Deploy database CloudFormation template

  1.  Log in to the AWS Management Console and open the CloudFormation service.
  2. Create the infrastructure stack using the java-webapp-rds.yaml template (located in the ‘config’ directory of the repo).
  3. Database stack outputs.

Diagram showing the outputs generated from the relational database service stack creation

Update and build sample web application and signup Lambda function

  1. Import the ‘sample-webapp’ and ‘aws-signup-lambda’ Maven projects from the repository into your IDE.
  2. Update the sample-webapp’s UserDAO class to reflect the RDSEndpoint, DBUserName, and DBPassword from the previous step:”
    // Externalize and update jdbcURL, jdbcUsername, jdbcPassword parameters specific to your environment
    	private String jdbcURL = "jdbc:mysql://<RDSEndpoint>:3306/webappdb?useSSL=false";
    	private String jdbcUsername = "<DBUserName>";
    	private String jdbcPassword = "<DBPassword>";

  3. To build the ‘sample-webapp’ Maven project, use the standard ‘clean install’ goals.
  4. Update the aws-signup-lambda’s signupHandler class to reflect RDSEndpoint, DBUserName, and DBPassword from the solution stack:
    // Update with your database connection details
    		String jdbcURL = "jdbc:mysql://<RDSEndpoint>:3306/webappdb?useSSL=false";
    		String jdbcUsername = "<DBUserName>";
    		String jdbcPassword = "<DBPassword>";

  5. To build the aws-signup-lambda Maven project, use the ‘package shade:shade’ goals to include all dependencies in the package.
  6. Two packages are created in their respective target directory: ‘sample-webapp.war’ and ‘create-user-lambda-1.0.jar’

Upload the packages into your S3 bucket

  1. Log in to the AWS Management Console and open the S3 service.
  2. Select the bucket created by the infrastructure CloudFormation template in an earlier step.

Diagram showing the S3 bucket interface with no objects.

3.  Create a ‘config’ and ‘lib’ folder in the bucket.

Diagram showing the S3 bucket interface with the new folders.

4.  Upload the ‘sample-webapp.war’ and ‘create-user-lambda-1.0.jar’ created an earlier step (along with the downloaded packages from the pre-requisites section) into the ‘lib’ folder of the bucket. The ‘lib’ folder should look like this:

Diagram showing the S3 bucket interface and objects in the lib folder

Note: the solution was validated in the preceding versions and therefore, the launch template created for the CloudFormation solution stack refers to these specific package names.

Deploy the solution components CloudFormation template

1.       Log in to the AWS Management Console and open the CloudFormation service (if you aren’t already logged in from the previous step).

2.       Create the web application solution stack using the ‘java-webapp-components.yaml’ template (located in the ‘config’ directory of the repo).

3.       Guidance on the different template input parameters:

a.       BastionSGSource – default is 0.0.0.0/0, but it is recommended to restrict this to your allowed IPv4 CIDR range for additional security

b.       BucketName – the bucket name created as part of the infrastructure stack. This blog uses the bucket name is ‘chanbi-java-webapp-bucket’

c.       CallbackURL – the URL that the user is redirected to after successful sign up/sign in is composed of your domain name (blog.example.com), the application root (sample-webapp), and the authentication form action ‘j_security_check’. As noted earlier, this needs to be over HTTPS

d.       CreateUserLambdaKey – the S3 object key for the signup Lambda package. This blog uses the key ‘lib/create-user-lambda-1.0.jar’

e.       DBUserName – the database user name for the MySQL RDS. Make note of this as it will be required in a subsequent step

f.        DBUserPassword – the database user password. Make note of this as it will be required in a subsequent step

g.       KeyPairName – the key pair to use when provisioning the EC2 instances. This key pair was created in the pre-requisite step

h.       WebALBSGSource – the IPv4 CIDR range allowed to access the web app. Default is 0.0.0.0/0

i.         The remaining parameters are import names from the infrastructure stack. Use default settings

4.       After successful stack creation, you should see the following java web application solution stack output:

 Diagram showing the outputs generated from the solution components stack creation.

Update configuration files

  1. The GitHub repository’s ‘config’ folder contains the configuration files for the web server, Tomcat application server and Redis cache, which needs to be updated to reflect the parameters specific to your stack output in the previous step.
  2. Update the virtual hosts in ‘httpd.conf’ to proxy web traffic to the internal app load balancer. Use the value defined by the key ‘AppALBLoadBalancerDNS’ from the stack output.
    <VirtualHost *:80>
    ProxyPass / http://<AppALBLoadBalancerDNS>:8080/
    ProxyPassReverse / http://<AppALBLoadBalancerDNS>:8080/
    </VirtualHost>

  3. Update JDBC resource for the ‘webappdb’ in the ‘context.xml, with the values defined by the RDSEndpoint, DBUserName, and DBPassword from the solution components CloudFormation stack:
    <Resource name="jdbc/webappdb" auth="Container" type="javax.sql.DataSource"
                   maxTotal="100" maxIdle="30" maxWaitMillis="10000"
                   username="<DBUserName>" password="<DBPassword>" driverClassName="com.mysql.jdbc.Driver"
                   url="jdbc:mysql://<RDSEndpoint>:3306/webappdb"/>

  4. Log in to the AWS Management Console and open the Amazon Cognito service. Select ‘Manage User Pools’ and you will notice that a ‘java-webapp-pool’ has been created by the solution components CloudFormation stack. Select the ‘java-webapp-pool’ and make note of the ‘Pool Id’, ‘App client id’ and ‘App client secret’.

Diagram showing the Cognito User Pool interface general settings

Diagram showing the Cognito User Pool interface app client settings

5.  Update ‘Valve’ configuration in the ‘context.xml’, with the ‘Pool Id’, ‘App client id’ and ‘App client secret’ values from the previous step. The Cognito IDP endpoint specific to your Region can be found here. The host base URI needs to be replaced with the domain for your web application.

    <Valve className="org.bsworks.catalina.authenticator.oidc.tomcat90.OpenIDConnectAuthenticator"
       providers="[
           {
               name: 'Amazon Cognito',
               issuer: https://<cognito-idp-endpoint-for-you-region>/<cognito-pool-id>,
               clientId: <user-pool-app-client-id>,
               clientSecret: <user-pool-app-client-secret>
           }
       ]"
        hostBaseURI="https://<your-sample-webapp-domain>" usernameClaim="email" />

6.  Update the ‘address’ parameter in ‘redisson.yaml’ with Redis cluster endpoint. Use the value defined by the key ‘RedisClusterEndpoint’ from the solution components CloudFormation stack output.

singleServerConfig:
    address: "redis://<RedisClusterEndpoint>:6379"

7.  No updates are required to the following files:

a.  server.xml – defines a data source realm for the user names, passwords, and roles assigned to users

      <Realm className="org.apache.catalina.realm.DataSourceRealm"
   dataSourceName="jdbc/webappdb" localDataSource="true"
   userTable="user_accounts" userNameCol="user_name" userCredCol="user_pass"
   userRoleTable="user_account_roles" roleNameCol="role_name" debug="9" />
      </Realm>

b.  tomcat.service – allows Tomcat to run as a service

c.  uninstall-sample-webapp.sh – removes the sample web application

Upload configuration files into your S3 bucket

  1. Upload the configuration files from the previous step into the ‘config’ folder of the bucket. The ‘config’ folder should look like this:

Diagram showing the S3 bucket interface and objects in the config folder

Update the Auto Scaling groups

  1. Auto Scaling groups manage the provisioning and removal of the web and application instances in our solution. To start an instance of the web server, update the Auto Scaling group’s desired capacity (1), minimum capacity (1) and maximum capacity (2) as shown in the following image:

Diagram showing the web server auto scaling group interface and group details.

2.  To start an instance of the application server, update the Auto Scaling group’s desired capacity (1), minimum capacity (1) and maximum capacity (2) for as shown in the following image:

Diagram showing the web server auto scaling group interface and group details.

The web and application scaling groups will show a status of “Updating capacity” (as shown in the following image) as the instances start up.

Diagram showing the auto scaling groups interface and updating capacity status.

After web and application servers have started, an instance will appear under ‘Instance management’ with a ‘Healthy’ status for each Auto Scaling group (as shown in the following image).

Diagram showing the web server auto scaling group interface and instance status

Diagram showing the application server auto scaling group interface and instance status

Run the database script webappdb_create_tables.sql

  1. The database script creates the database and underlying tables required by the web application. As the database server resides in the DB private subnet and is only accessible from the application server instance, we need to first connect (via SSH) to the bastion host (using public IPv4 DNS), and from there we can connect (via SSH) to the application server instance (using its private IPv4 address). This will in turn allow us to connect to the database instance and run the database script. Refer to connecting to your Linux instance using SSH for more details. Instance details are located under the ‘Instances’ view (as shown in the following image).

Diagram showing the instances interface and the running instances for the VPC

2.  Transfer the database script webappdb_create_tables.sql to the application server instance via the Bastion Host. Refer to transferring files using a client for details.

3.  Once connected to the application server via SSH, execute the command to connect to the database instance:

mysql -h <RDSEndpoint> -P 3306 -u <DBUserName> -p

4. Enter the DB user password used when creating the database instance. You will be presented with the MySQL prompt after successful login:

Welcome to the MariaDB monitor.  Commands end with ; or \g.
Your MySQL connection id is 300
Server version: 8.0.23 Source distribution

Copyright (c) 2000, 2018, Oracle, MariaDB Corporation Ab and others.

Type 'help;' or '\h' for help. Type '\c' to clear the current input statement.

MySQL [(none)]>

5. Run the command to run the database script webappdb_create_tables.sql:

source /home/ec2-user/webappdb_create_tables.sql

Add an HTTPS listener to the external web load balancer

  1. Log in to the AWS Management Console and select Load Balancers as part of the EC2 service
    Diagram showing the load balancer interface
  2. Add a HTTPS listener on port 443 for the web load balancer. The default action for the listener is to forward traffic to the web instance target group. Refer to create an HTTPS listener for your Application Load Balancer for more details.
    Diagram showing the load balancer add listener interface

Reference the SSL certificate for your domain. In the following example, I have used a certificate from AWS Certificate Manager (ACM) for my domain. You also have the option of using a certificate from Identity Access Management or importing your own certificate.

Diagram showing the secure listener settings interface

Update your DNS to route traffic from the external web load balancer

  1. In this example, I use Amazon Route 53 as the Domain Name Server (DNS) service, but the steps will be similar when using your own DNS service.
  2. Create an A record type that routes traffic from your domain name to the external web load balancer. For more details, refer to creating records by using the Amazon Route 53 console.
    Diagram showing the hosted zone interface

Validate the web application

  1. In your browser, access the following https://<yourdomain.example.com>/sample-webapp
    Diagram showing the log in page for the sample web application.
  2. Select “Amazon Cognito” to authenticate using Cognito as the Identity Provider (IdP). You will be redirected to the login page for your Cognito domain.
    Diagram showing the sign in page provided by Amazon Cognito
  3. Select the “Sign up” to create a new user and enter your email and password. Note the password strength requirements that can be configured as part of the user pool’s policies.
    Diagram showing the sign up page provided by Amazon Cognito
  4. An email with the verification code will be sent to the sign-up email address. Enter the code on the verification code screen.
    Diagram showing the account confirmation page with verification code provided by Amazon Cognito
  5. After successful confirmation, you will be re-directed to the authenticated landing page for the web application.
    Diagram showing the main page with the list of contacts for the sample web application.
  6. The simple web application allows you to add, edit, and delete contacts as shown in the following image.
    Diagram showing the list of contacts for the sample web application with edit and delete functionality.

Validate the session data on Redis

  1. Follow the steps outlined in connecting to nodes for details on connecting to your Redis cache cluster. You will need to connect to your application server instance (via the bastion host) to perform this as the Redis cache is only accessible from the private subnet.
  2. After successfully installing the Redis client, search for your authenticated user session key in the cluster by running the command (from within the ‘redis-stable’ directory):
    src/redis-cli -c -h <RedisClusterEndpoint> -p 6379 -–bigkeys

  3. You should see an output with your Tomcat authenticated session (if you can’t, perform another login via the Cognito login screen):
    # Scanning the entire keyspace to find biggest keys as well as
    # average sizes per key type.  You can use -i 0.1 to sleep 0.1 sec
    # per 100 SCAN commands (not usually needed).
    
    [00.00%] Biggest hash   found so far '"redisson:tomcat_session:AE647D93F2BECEFEE07B5B42C435E3DE"' with 8 fields

  4. Connect to the cache cluster:
    # src/redis-cli -c -h <RedisClusterEndpoint> -p 6379

  5. Run the HGETALL command to get the session details:
    java-webapp-redis-cluster.<xxxxxx>.0001.apse2.cache.amazonaws.com:6379> HGETALL "redisson:tomcat_session:AE647D93F2BECEFEE07B5B42C435E3DE"
     1) "session:creationTime"
     2) "\x04L\x00\x00\x01}\x16\x92\x1bX"
     3) "session:lastAccessedTime"
     4) "\x04L\x00\x00\x01}\x16\x92%\x9c"
     5) "session:principal"
     6) "\x04\x04\t>@org.apache.catalina.realm.GenericPrincipal$SerializablePrincipal\x00\x00\x00\x00\x00\x00\x00\x01\x00\x00\x00\x04>\x04name\x16\x00>\bpassword\x16\x00>\tprincipal\x16\x00>\x05roles\x16\x00\x16>\[email protected]>\[email protected]\x01B\x01\x14>\bstandard"
     7) "session:maxInactiveInterval"
     8) "\x04K\x00\x00\a\b"
     9) "session:isValid"
    10) "\x04P"
    11) "session:authtype"
    12) "\x04>\x04FORM"
    13) "session:isNew"
    14) "\x04Q"
    15) "session:thisAccessedTime"
    16) "\x04L\x00\x00\x01}\x16\x92%\x9c"

Scale your web and application server instances

  1. Amazon EC2 Auto Scaling provides several ways for you to scale instances in your Auto Scaling group such as scaling manually as we did in an earlier step. But you also have the option to scale dynamically to meet changes in demand (such as maintaining CPU Utilization at 50%), predictively scale in advance of daily and weekly patterns in traffic flows, or scale based on a scheduled time. Refer to scaling the size of your Auto Scaling group for more details.
    Diagram showing the auto scaling groups interface and scaling policies
  2. We will create a scheduled action to provision another application server instance.
    Diagram showing the auto scaling group's create schedule action interface.
  3. As per our scheduled action, at 11.30 am, an additional application server instance is started.
    Diagram showing the activity history for the instance.
  4. Under instance management, you will see an additional instance in ‘Pending’ state as it starts.
    Diagram showing the auto scaling groups interface and additional instances.
  5. To test the stateless nature of your application, you can manually stop the original application server instance and observe that your end-user experience is unaffected i.e. you are not prompted to re-authenticate and can continue using the application as your session data is stored in Redis ElastiCache and not tied to the original instance.

Cleaning up

To avoid incurring future charges, remove the resources by deleting the java-webapp-components, java-webapp-rds and java-webapp-infra CloudFormation stacks.

Conclusion

Customers with significant investments in Java application server technologies have options to migrate to the cloud without requiring a complete re-architecture of their applications. In this blog, we’ve shown an approach to modernizing Java applications running on Tomcat Application Server in AWS. And in doing so, take advantage of cloud-native features such as automatic scaling, provisioning infrastructure as code, and leveraging managed services (such as ElastiCache for Redis and Amazon RDS) to make our application stateless. We also demonstrated modernization features such as authentication and user provisioning via an external IdP (Amazon Cognito). For more information on different re-platforming patterns refer to the AWS Prescriptive Guidance on Migration.

The collective thoughts of the interwebz