How to re-platform and modernize Java web applications on AWS

Post Syndicated from Rick Armstrong original https://aws.amazon.com/blogs/compute/re-platform-java-web-applications-on-aws/

This post is written by: Bill Chan, Enterprise Solutions Architect

According to a report from Grand View Research, “the global application server market size was valued at USD 15.84 billion in 2020 and is expected to expand at a compound annual growth rate (CAGR) of 13.2% from 2021 to 2028.” The report also suggests that Java based application servers “accounted for the largest share of around 50% in 2020.” This means that many organizations continue to rely on Java application server capabilities to deliver middleware services that underpin the web applications running their transactional, content management and business process workloads.

The maturity of the application server technology also means that many of these web applications were built on traditional three-tier web architectures running in on-premises data centers. And as organizations embark on their journey to cloud, the question arises as to what is the best approach to migrate these applications?

There are seven common migration strategies when moving applications to the cloud, including:

  • Retain – keeping applications running as is and revisiting the migration at a later stage
  • Retire – decommissioning applications that are no longer required
  • Repurchase – switching from existing applications to a software-as-a-service (SaaS) solution
  • Rehost – moving applications as is (lift and shift), without making any changes to take advantage of cloud capabilities
  • Relocate – moving applications as is, but at a hypervisor level
  • Replatform – moving applications as is, but introduce capabilities that take advantage of cloud-native features
  • Refactor – re-architect the application to take full advantage of cloud-native features

Refer to Migrating to AWS: Best Practices & Strategies and the 6 Strategies for Migrating Applications to the Cloud for more details.

This blog focuses on the ‘replatform’ strategy, which suits customers who have large investments in application server technologies and the business case for re-architecting doesn’t stack up. By re-platforming their applications into the cloud, customers can benefit from the flexibility of a ‘pay-as-you-go’ model, dynamically scale to meet demand and provision infrastructure as code. Additionally, customers can increase the speed and agility to modernize existing applications and build new cloud-native applications to deliver better customer experiences.

In this post, we walk through the steps to replatform a simple contact management Java application running on an open-source Tomcat application server, along with modernization aspects that include:

  • Deploying a Tomcat web application with automatic scaling capabilities
  • Integrating Tomcat with Redis cache (using Redisson Session Manager for Tomcat)
  • Integrating Tomcat with Amazon Cognito for authentication (using Boyle Software’s OpenID Connect Authenticator for Tomcat)
  • Delegating user log in and sign up to Amazon Cognito

Overview of solution

Solution architecture overview diagram

The solution is comprised of the following components:

  • A VPC across two Availability Zones
  • Two public subnets, two private app subnets, and two private DB subnets
  • An Internet Gateway attached to the VPC
    • A public route table routing internet traffic to the Internet Gateway
    • Two private route tables routing traffic internally within the VPC
  • A frontend web server application Elastic Load Balancing that routes traffic to the Apache Web Servers
  • An Auto Scaling group that launches additional Apache Web Servers based on defined scaling policies. Each instance of the web server is based on a launch template, which defines the same configuration for each new web server.
  • A hosted zone in Amazon Route 53 with a domain name that routes to the frontend web server Elastic Load Balancing
  • An application Elastic Load Balancing that routes traffic to the Tomcat application servers
  • An Auto Scaling group that launches additional Tomcat Application Servers based on defined scaling policies. Each instance of the Tomcat application server is based on a launch template, which defines the same configuration and software components for each new application server
  • A Redis cache cluster with a primary and replica node to store session data after the user has authenticated, making your application servers stateless
  • A Redis open-source Java client, with a Tomcat Session Manager implementation to store authenticated user session data in Redis cache
  • A MySQL Amazon Relational Database Service (Amazon RDS) Multi-AZ deployment for MySQL RDS to store the contact management and role access tables
  • An Amazon Simple Storage Service (Amazon S3) bucket to store the application and framework artifacts, images, scripts and configuration files that are referenced by any new Tomcat application server instances provisioned by automatic scaling
  • Amazon Cognito with a sign-up Lambda function to register users and insert a corresponding entry in the user account tables. Cognito acts as an identity provider and performs the user authentication using an OpenID Connect Authenticator Java component

Walkthrough

The following steps overviews how to deploy the blog solution:

  • Clone and build the Sample Web Application and AWS Signup Lambda Maven projects from GitHub repository
  • Deploy the CloudFormation template (java-webapp-infra.yaml) to create the AWS networking infrastructure and the CloudFormation template (java-webapp-rds.yaml) to create the database instance
  • Update and build the sample web application and signup Lambda function
  • Upload the packages into your S3 bucket
  • Deploy the CloudFormation template (java-webapp-components.yaml) to create the blog solution components
  • Update the solution configuration files and upload them into your S3 bucket
  • Run a script to provision the underlying database tables
  • Validate the web application, session cache and automatic scaling functionality
  • Clean up resources

Prerequisites

For this walkthrough, you should have the following prerequisites:

  • An AWS account
  • An Amazon Elastic Compute Cloud (Amazon EC2) key pair (required for authentication). For more details, see Amazon EC2 key pairs
  • A Java Integrated Development Environment (IDE) such as Eclipse or NetBeans. AWS also offers a cloud-based IDE that lets you write, run and debug code in your browser without having to install files or configure your development machine, called AWS Cloud9. I will show how AWS Cloud9 can be used as part of a DevOps solution in a subsequent post
  • A valid domain name and SSL certificate for the deployed web application. To validate the OAuth 2.0 integration, Cognito requires the URL that the user is redirected to after successful sign-in to be HTTPS. Refer to a configuring a user pool app client for more details
  • Downloaded the following JARs:

Note: the solution was validated in the preceding versions and therefore, the launch template created for the CloudFormation solution stack refers to these specific JARs. If you decide to use different versions, then the ‘java-webapp-components.yaml’ will need to be updated to reflect the new versions. Alternatively, you can externalize the parameters in the template.

Clone the GitHub repository to your local machine

This repository contains the sample code for the Java web application and post confirmation sign-up Lambda function. It also contains the CloudFormation templates required to set up the AWS infrastructure, SQL script to create the supporting database and configuration files for the web server, Tomcat application server and Redis cache.

Deploy infrastructure CloudFormation template

  1. Log in to the AWS Management Console and open the CloudFormation service.
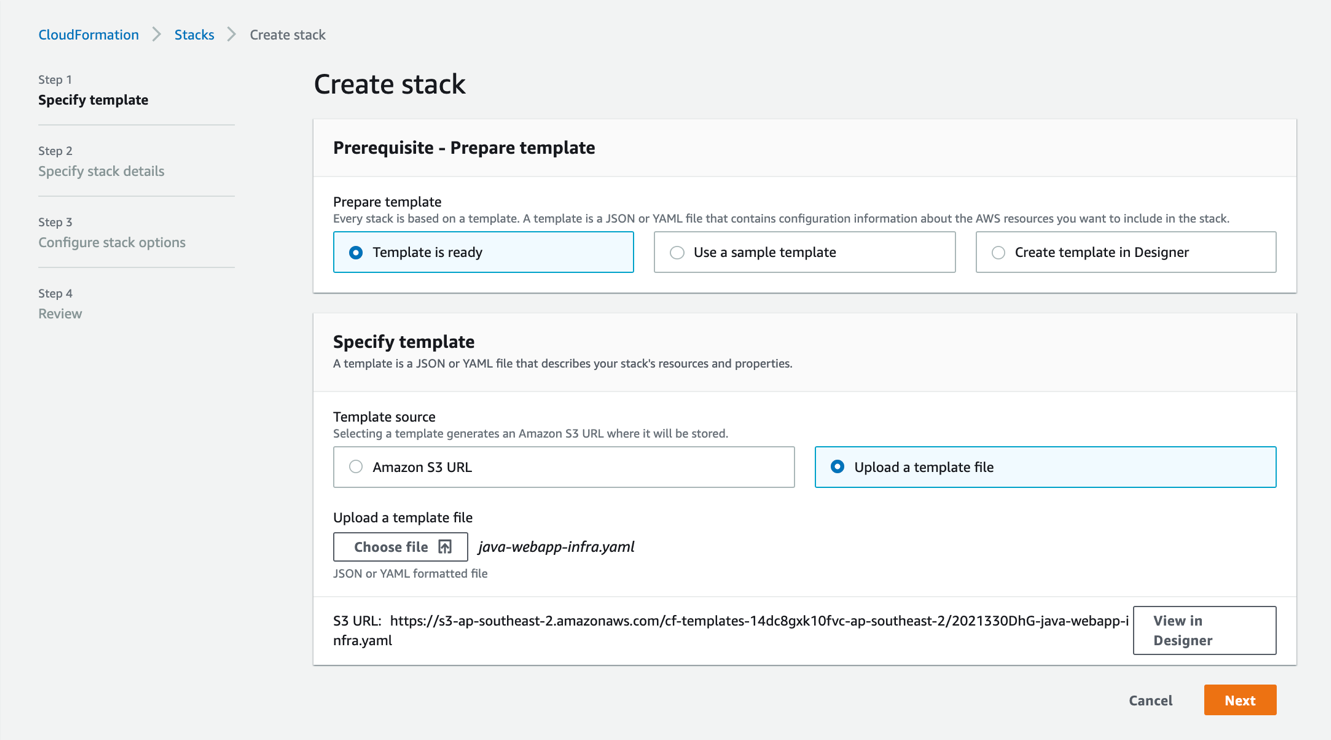
Diagram showing the first step in creating a CloudFormation stack.

2. Create the infrastructure stack using the java-webapp-infra.yaml template (located in the ‘config’ directory of the repo).

3. Infrastructure stack outputs:

Diagram showing the outputs generated from the infrastructure stack creation

Deploy database CloudFormation template

  1.  Log in to the AWS Management Console and open the CloudFormation service.
  2. Create the infrastructure stack using the java-webapp-rds.yaml template (located in the ‘config’ directory of the repo).
  3. Database stack outputs.

Diagram showing the outputs generated from the relational database service stack creation

Update and build sample web application and signup Lambda function

  1. Import the ‘sample-webapp’ and ‘aws-signup-lambda’ Maven projects from the repository into your IDE.
  2. Update the sample-webapp’s UserDAO class to reflect the RDSEndpoint, DBUserName, and DBPassword from the previous step:”
    // Externalize and update jdbcURL, jdbcUsername, jdbcPassword parameters specific to your environment
    	private String jdbcURL = "jdbc:mysql://<RDSEndpoint>:3306/webappdb?useSSL=false";
    	private String jdbcUsername = "<DBUserName>";
    	private String jdbcPassword = "<DBPassword>";

  3. To build the ‘sample-webapp’ Maven project, use the standard ‘clean install’ goals.
  4. Update the aws-signup-lambda’s signupHandler class to reflect RDSEndpoint, DBUserName, and DBPassword from the solution stack:
    // Update with your database connection details
    		String jdbcURL = "jdbc:mysql://<RDSEndpoint>:3306/webappdb?useSSL=false";
    		String jdbcUsername = "<DBUserName>";
    		String jdbcPassword = "<DBPassword>";

  5. To build the aws-signup-lambda Maven project, use the ‘package shade:shade’ goals to include all dependencies in the package.
  6. Two packages are created in their respective target directory: ‘sample-webapp.war’ and ‘create-user-lambda-1.0.jar’

Upload the packages into your S3 bucket

  1. Log in to the AWS Management Console and open the S3 service.
  2. Select the bucket created by the infrastructure CloudFormation template in an earlier step.

Diagram showing the S3 bucket interface with no objects.

3.  Create a ‘config’ and ‘lib’ folder in the bucket.

Diagram showing the S3 bucket interface with the new folders.

4.  Upload the ‘sample-webapp.war’ and ‘create-user-lambda-1.0.jar’ created an earlier step (along with the downloaded packages from the pre-requisites section) into the ‘lib’ folder of the bucket. The ‘lib’ folder should look like this:

Diagram showing the S3 bucket interface and objects in the lib folder

Note: the solution was validated in the preceding versions and therefore, the launch template created for the CloudFormation solution stack refers to these specific package names.

Deploy the solution components CloudFormation template

1.       Log in to the AWS Management Console and open the CloudFormation service (if you aren’t already logged in from the previous step).

2.       Create the web application solution stack using the ‘java-webapp-components.yaml’ template (located in the ‘config’ directory of the repo).

3.       Guidance on the different template input parameters:

a.       BastionSGSource – default is 0.0.0.0/0, but it is recommended to restrict this to your allowed IPv4 CIDR range for additional security

b.       BucketName – the bucket name created as part of the infrastructure stack. This blog uses the bucket name is ‘chanbi-java-webapp-bucket’

c.       CallbackURL – the URL that the user is redirected to after successful sign up/sign in is composed of your domain name (blog.example.com), the application root (sample-webapp), and the authentication form action ‘j_security_check’. As noted earlier, this needs to be over HTTPS

d.       CreateUserLambdaKey – the S3 object key for the signup Lambda package. This blog uses the key ‘lib/create-user-lambda-1.0.jar’

e.       DBUserName – the database user name for the MySQL RDS. Make note of this as it will be required in a subsequent step

f.        DBUserPassword – the database user password. Make note of this as it will be required in a subsequent step

g.       KeyPairName – the key pair to use when provisioning the EC2 instances. This key pair was created in the pre-requisite step

h.       WebALBSGSource – the IPv4 CIDR range allowed to access the web app. Default is 0.0.0.0/0

i.         The remaining parameters are import names from the infrastructure stack. Use default settings

4.       After successful stack creation, you should see the following java web application solution stack output:

 Diagram showing the outputs generated from the solution components stack creation.

Update configuration files

  1. The GitHub repository’s ‘config’ folder contains the configuration files for the web server, Tomcat application server and Redis cache, which needs to be updated to reflect the parameters specific to your stack output in the previous step.
  2. Update the virtual hosts in ‘httpd.conf’ to proxy web traffic to the internal app load balancer. Use the value defined by the key ‘AppALBLoadBalancerDNS’ from the stack output.
    <VirtualHost *:80>
    ProxyPass / http://<AppALBLoadBalancerDNS>:8080/
    ProxyPassReverse / http://<AppALBLoadBalancerDNS>:8080/
    </VirtualHost>

  3. Update JDBC resource for the ‘webappdb’ in the ‘context.xml, with the values defined by the RDSEndpoint, DBUserName, and DBPassword from the solution components CloudFormation stack:
    <Resource name="jdbc/webappdb" auth="Container" type="javax.sql.DataSource"
                   maxTotal="100" maxIdle="30" maxWaitMillis="10000"
                   username="<DBUserName>" password="<DBPassword>" driverClassName="com.mysql.jdbc.Driver"
                   url="jdbc:mysql://<RDSEndpoint>:3306/webappdb"/>

  4. Log in to the AWS Management Console and open the Amazon Cognito service. Select ‘Manage User Pools’ and you will notice that a ‘java-webapp-pool’ has been created by the solution components CloudFormation stack. Select the ‘java-webapp-pool’ and make note of the ‘Pool Id’, ‘App client id’ and ‘App client secret’.

Diagram showing the Cognito User Pool interface general settings

Diagram showing the Cognito User Pool interface app client settings

5.  Update ‘Valve’ configuration in the ‘context.xml’, with the ‘Pool Id’, ‘App client id’ and ‘App client secret’ values from the previous step. The Cognito IDP endpoint specific to your Region can be found here. The host base URI needs to be replaced with the domain for your web application.

    <Valve className="org.bsworks.catalina.authenticator.oidc.tomcat90.OpenIDConnectAuthenticator"
       providers="[
           {
               name: 'Amazon Cognito',
               issuer: https://<cognito-idp-endpoint-for-you-region>/<cognito-pool-id>,
               clientId: <user-pool-app-client-id>,
               clientSecret: <user-pool-app-client-secret>
           }
       ]"
        hostBaseURI="https://<your-sample-webapp-domain>" usernameClaim="email" />

6.  Update the ‘address’ parameter in ‘redisson.yaml’ with Redis cluster endpoint. Use the value defined by the key ‘RedisClusterEndpoint’ from the solution components CloudFormation stack output.

singleServerConfig:
    address: "redis://<RedisClusterEndpoint>:6379"

7.  No updates are required to the following files:

a.  server.xml – defines a data source realm for the user names, passwords, and roles assigned to users

      <Realm className="org.apache.catalina.realm.DataSourceRealm"
   dataSourceName="jdbc/webappdb" localDataSource="true"
   userTable="user_accounts" userNameCol="user_name" userCredCol="user_pass"
   userRoleTable="user_account_roles" roleNameCol="role_name" debug="9" />
      </Realm>

b.  tomcat.service – allows Tomcat to run as a service

c.  uninstall-sample-webapp.sh – removes the sample web application

Upload configuration files into your S3 bucket

  1. Upload the configuration files from the previous step into the ‘config’ folder of the bucket. The ‘config’ folder should look like this:

Diagram showing the S3 bucket interface and objects in the config folder

Update the Auto Scaling groups

  1. Auto Scaling groups manage the provisioning and removal of the web and application instances in our solution. To start an instance of the web server, update the Auto Scaling group’s desired capacity (1), minimum capacity (1) and maximum capacity (2) as shown in the following image:

Diagram showing the web server auto scaling group interface and group details.

2.  To start an instance of the application server, update the Auto Scaling group’s desired capacity (1), minimum capacity (1) and maximum capacity (2) for as shown in the following image:
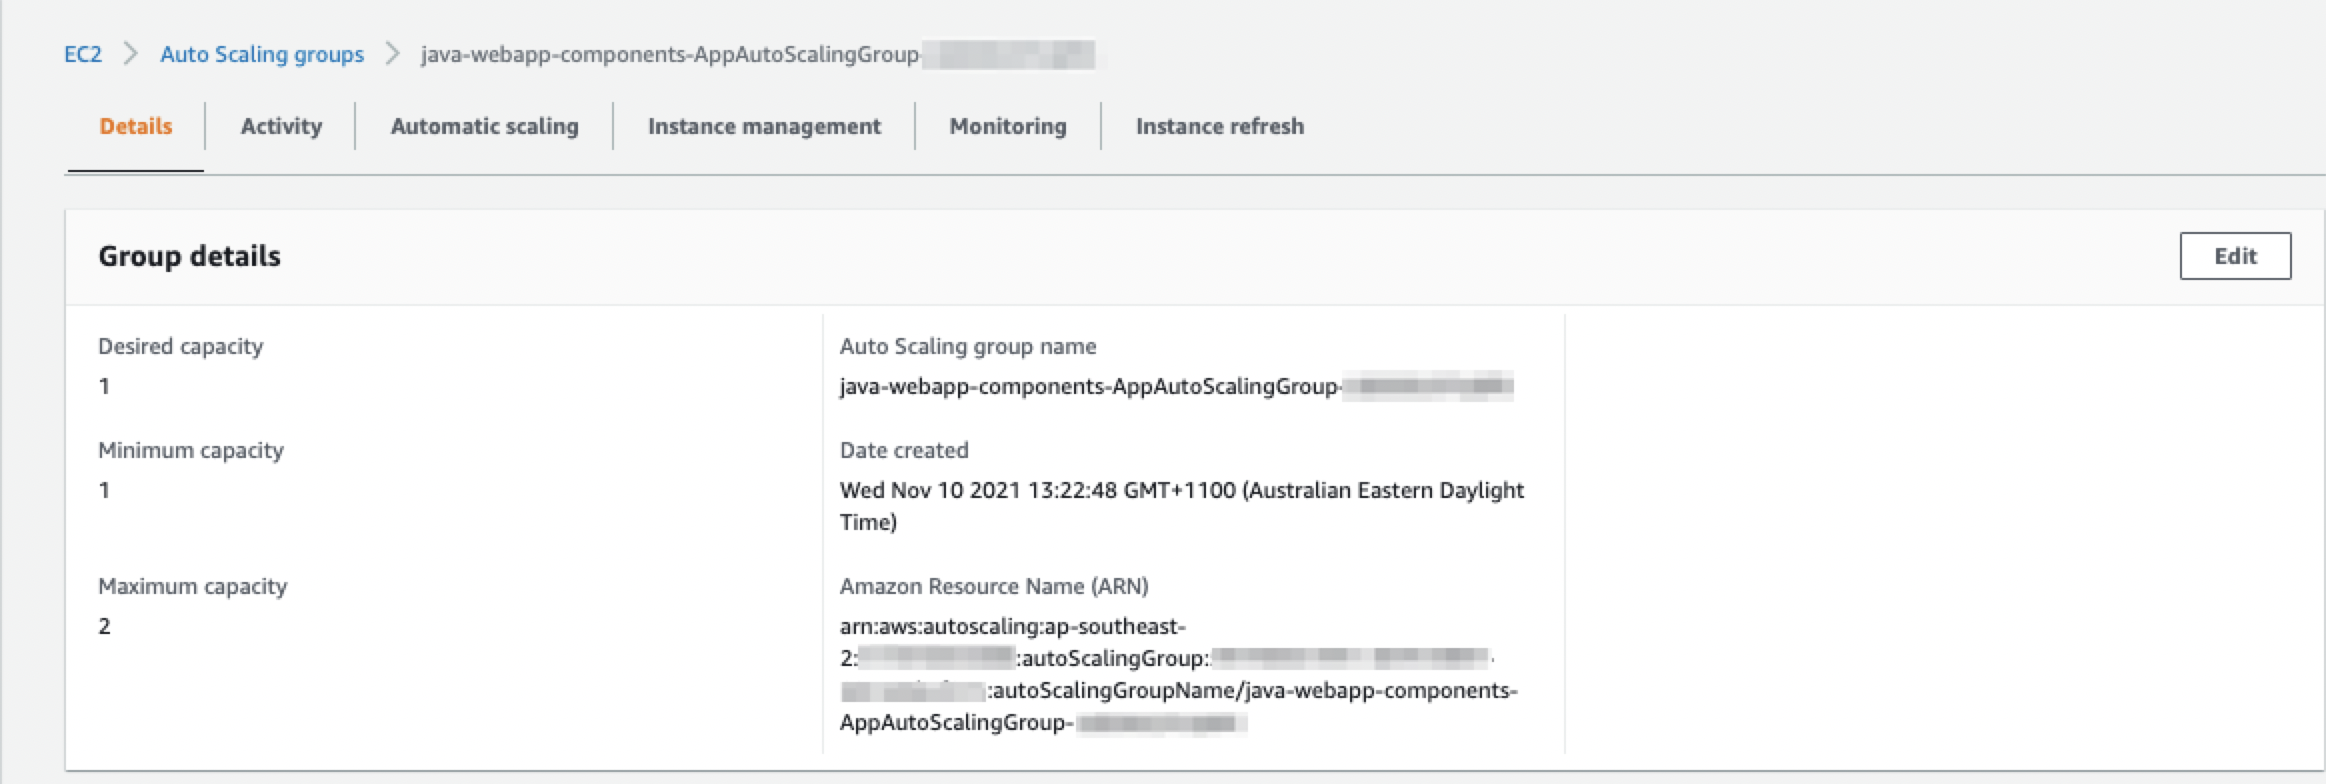
Diagram showing the web server auto scaling group interface and group details.

The web and application scaling groups will show a status of “Updating capacity” (as shown in the following image) as the instances start up.

Diagram showing the auto scaling groups interface and updating capacity status.

After web and application servers have started, an instance will appear under ‘Instance management’ with a ‘Healthy’ status for each Auto Scaling group (as shown in the following image).

Diagram showing the web server auto scaling group interface and instance status

Diagram showing the application server auto scaling group interface and instance status

Run the database script webappdb_create_tables.sql

  1. The database script creates the database and underlying tables required by the web application. As the database server resides in the DB private subnet and is only accessible from the application server instance, we need to first connect (via SSH) to the bastion host (using public IPv4 DNS), and from there we can connect (via SSH) to the application server instance (using its private IPv4 address). This will in turn allow us to connect to the database instance and run the database script. Refer to connecting to your Linux instance using SSH for more details. Instance details are located under the ‘Instances’ view (as shown in the following image).

Diagram showing the instances interface and the running instances for the VPC

2.  Transfer the database script webappdb_create_tables.sql to the application server instance via the Bastion Host. Refer to transferring files using a client for details.

3.  Once connected to the application server via SSH, execute the command to connect to the database instance:

mysql -h <RDSEndpoint> -P 3306 -u <DBUserName> -p

4. Enter the DB user password used when creating the database instance. You will be presented with the MySQL prompt after successful login:

Welcome to the MariaDB monitor.  Commands end with ; or \g.
Your MySQL connection id is 300
Server version: 8.0.23 Source distribution

Copyright (c) 2000, 2018, Oracle, MariaDB Corporation Ab and others.

Type 'help;' or '\h' for help. Type '\c' to clear the current input statement.

MySQL [(none)]>

5. Run the command to run the database script webappdb_create_tables.sql:

source /home/ec2-user/webappdb_create_tables.sql

Add an HTTPS listener to the external web load balancer

  1. Log in to the AWS Management Console and select Load Balancers as part of the EC2 service
    Diagram showing the load balancer interface
  2. Add a HTTPS listener on port 443 for the web load balancer. The default action for the listener is to forward traffic to the web instance target group. Refer to create an HTTPS listener for your Application Load Balancer for more details.
    Diagram showing the load balancer add listener interface

Reference the SSL certificate for your domain. In the following example, I have used a certificate from AWS Certificate Manager (ACM) for my domain. You also have the option of using a certificate from Identity Access Management or importing your own certificate.

Diagram showing the secure listener settings interface

Update your DNS to route traffic from the external web load balancer

  1. In this example, I use Amazon Route 53 as the Domain Name Server (DNS) service, but the steps will be similar when using your own DNS service.
  2. Create an A record type that routes traffic from your domain name to the external web load balancer. For more details, refer to creating records by using the Amazon Route 53 console.
    Diagram showing the hosted zone interface

Validate the web application

  1. In your browser, access the following https://<yourdomain.example.com>/sample-webapp
    Diagram showing the log in page for the sample web application.
  2. Select “Amazon Cognito” to authenticate using Cognito as the Identity Provider (IdP). You will be redirected to the login page for your Cognito domain.
    Diagram showing the sign in page provided by Amazon Cognito
  3. Select the “Sign up” to create a new user and enter your email and password. Note the password strength requirements that can be configured as part of the user pool’s policies.
    Diagram showing the sign up page provided by Amazon Cognito
  4. An email with the verification code will be sent to the sign-up email address. Enter the code on the verification code screen.
    Diagram showing the account confirmation page with verification code provided by Amazon Cognito
  5. After successful confirmation, you will be re-directed to the authenticated landing page for the web application.
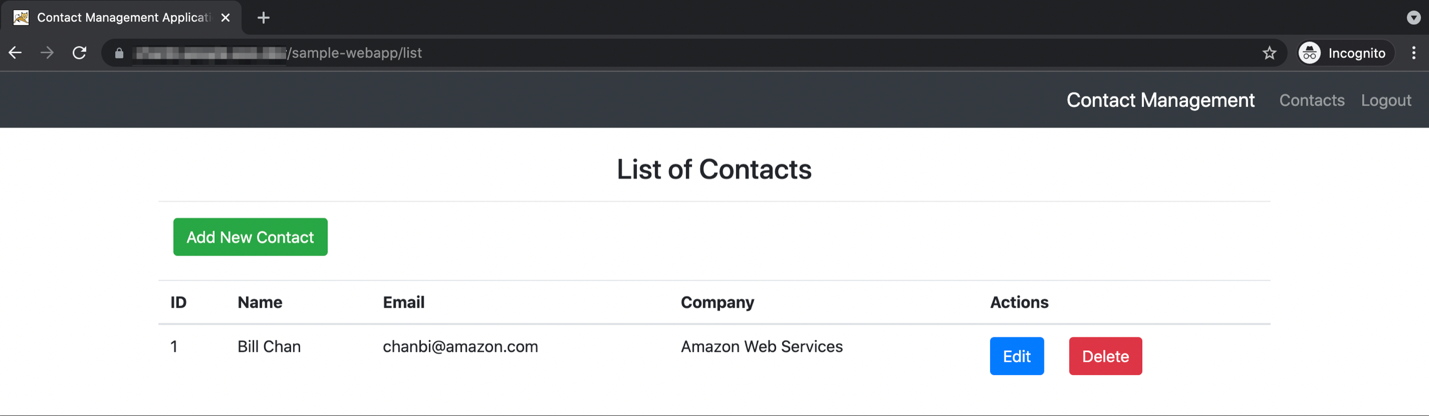
    Diagram showing the main page with the list of contacts for the sample web application.
  6. The simple web application allows you to add, edit, and delete contacts as shown in the following image.
    Diagram showing the list of contacts for the sample web application with edit and delete functionality.

Validate the session data on Redis

  1. Follow the steps outlined in connecting to nodes for details on connecting to your Redis cache cluster. You will need to connect to your application server instance (via the bastion host) to perform this as the Redis cache is only accessible from the private subnet.
  2. After successfully installing the Redis client, search for your authenticated user session key in the cluster by running the command (from within the ‘redis-stable’ directory):
    src/redis-cli -c -h <RedisClusterEndpoint> -p 6379 -–bigkeys

  3. You should see an output with your Tomcat authenticated session (if you can’t, perform another login via the Cognito login screen):
    # Scanning the entire keyspace to find biggest keys as well as
    # average sizes per key type.  You can use -i 0.1 to sleep 0.1 sec
    # per 100 SCAN commands (not usually needed).
    
    [00.00%] Biggest hash   found so far '"redisson:tomcat_session:AE647D93F2BECEFEE07B5B42C435E3DE"' with 8 fields

  4. Connect to the cache cluster:
    # src/redis-cli -c -h <RedisClusterEndpoint> -p 6379

  5. Run the HGETALL command to get the session details:
    java-webapp-redis-cluster.<xxxxxx>.0001.apse2.cache.amazonaws.com:6379> HGETALL "redisson:tomcat_session:AE647D93F2BECEFEE07B5B42C435E3DE"
     1) "session:creationTime"
     2) "\x04L\x00\x00\x01}\x16\x92\x1bX"
     3) "session:lastAccessedTime"
     4) "\x04L\x00\x00\x01}\x16\x92%\x9c"
     5) "session:principal"
     6) "\x04\x04\t>@org.apache.catalina.realm.GenericPrincipal$SerializablePrincipal\x00\x00\x00\x00\x00\x00\x00\x01\x00\x00\x00\x04>\x04name\x16\x00>\bpassword\x16\x00>\tprincipal\x16\x00>\x05roles\x16\x00\x16>\[email protected]>\[email protected]\x01B\x01\x14>\bstandard"
     7) "session:maxInactiveInterval"
     8) "\x04K\x00\x00\a\b"
     9) "session:isValid"
    10) "\x04P"
    11) "session:authtype"
    12) "\x04>\x04FORM"
    13) "session:isNew"
    14) "\x04Q"
    15) "session:thisAccessedTime"
    16) "\x04L\x00\x00\x01}\x16\x92%\x9c"

Scale your web and application server instances

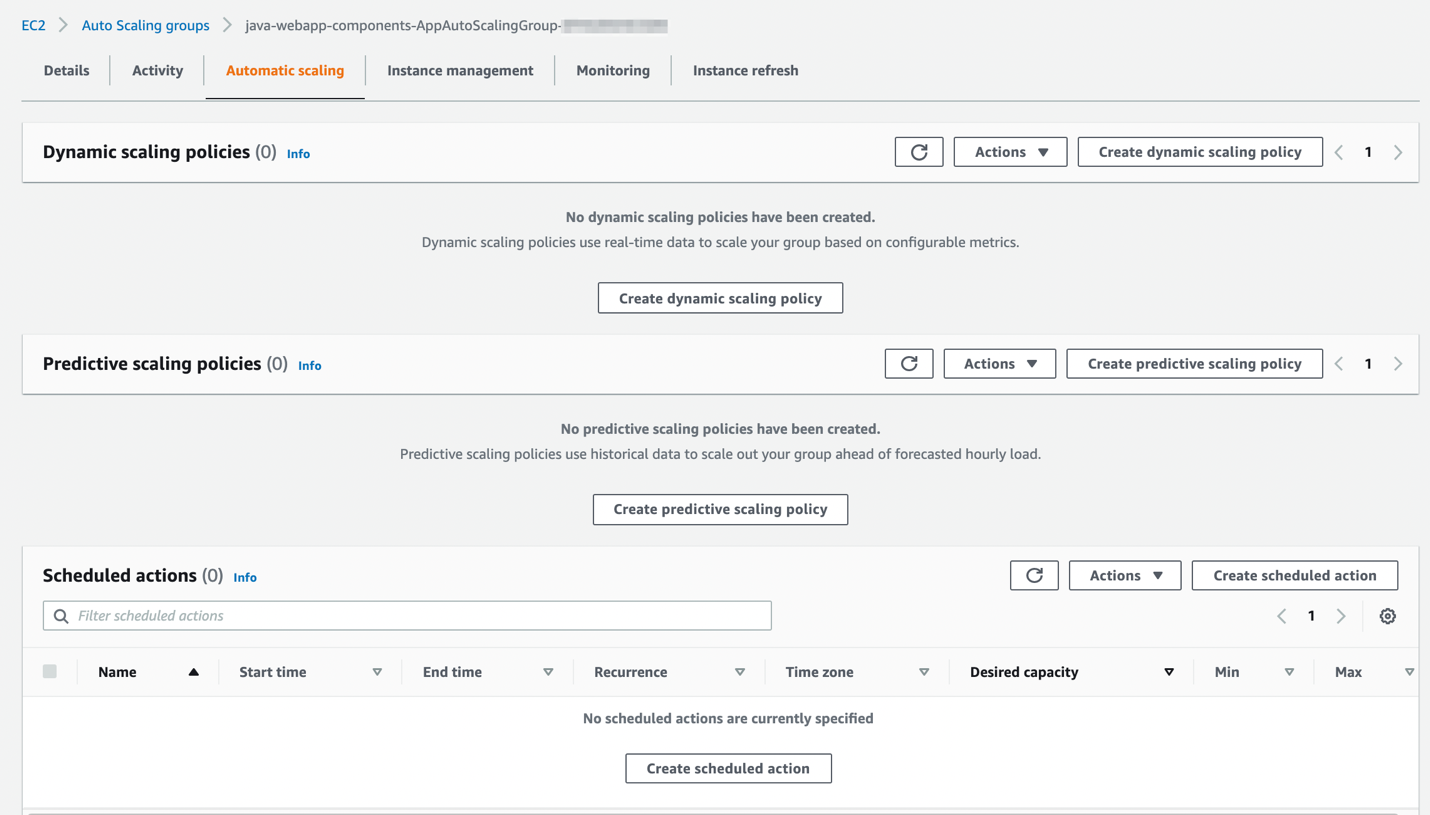
  1. Amazon EC2 Auto Scaling provides several ways for you to scale instances in your Auto Scaling group such as scaling manually as we did in an earlier step. But you also have the option to scale dynamically to meet changes in demand (such as maintaining CPU Utilization at 50%), predictively scale in advance of daily and weekly patterns in traffic flows, or scale based on a scheduled time. Refer to scaling the size of your Auto Scaling group for more details.
    Diagram showing the auto scaling groups interface and scaling policies
  2. We will create a scheduled action to provision another application server instance.
    Diagram showing the auto scaling group's create schedule action interface.
  3. As per our scheduled action, at 11.30 am, an additional application server instance is started.
    Diagram showing the activity history for the instance.
  4. Under instance management, you will see an additional instance in ‘Pending’ state as it starts.
    Diagram showing the auto scaling groups interface and additional instances.
  5. To test the stateless nature of your application, you can manually stop the original application server instance and observe that your end-user experience is unaffected i.e. you are not prompted to re-authenticate and can continue using the application as your session data is stored in Redis ElastiCache and not tied to the original instance.

Cleaning up

To avoid incurring future charges, remove the resources by deleting the java-webapp-components, java-webapp-rds and java-webapp-infra CloudFormation stacks.

Conclusion

Customers with significant investments in Java application server technologies have options to migrate to the cloud without requiring a complete re-architecture of their applications. In this blog, we’ve shown an approach to modernizing Java applications running on Tomcat Application Server in AWS. And in doing so, take advantage of cloud-native features such as automatic scaling, provisioning infrastructure as code, and leveraging managed services (such as ElastiCache for Redis and Amazon RDS) to make our application stateless. We also demonstrated modernization features such as authentication and user provisioning via an external IdP (Amazon Cognito). For more information on different re-platforming patterns refer to the AWS Prescriptive Guidance on Migration.

Choosing the right solution for AWS Lambda external parameters

Post Syndicated from Julian Wood original https://aws.amazon.com/blogs/compute/choosing-the-right-solution-for-aws-lambda-external-parameters/

This post is written by Thomas Moore, Solutions Architect, Serverless.

When using AWS Lambda to build serverless applications, customers often need to retrieve parameters from an external source at runtime. This allows you to share parameter values across multiple functions or microservices, providing a single source of truth for updates. A common example is retrieving database connection details from an external source and then using the retrieved hostname, user name, and password to connect to the database:

Lambda function retrieving database credentials from an external source

Lambda function retrieving database credentials from an external source

AWS provides a number of options to store parameter data, including AWS Systems Manager Parameter Store, AWS AppConfig, Amazon S3, and Lambda environment variables. This blog explores the different parameter data that you may need to store. I cover considerations for choosing the right parameter solution and how to retrieve and cache parameter data efficiently within the Lambda function execution environment.

Common use cases

Common parameter examples include:

  • Securely storing secret data, such as credentials or API keys.
  • Database connection details such as hostname, port, and credentials.
  • Schema data (for example, a structured JSON response).
  • TLS certificate for mTLS or JWT validation.
  • Email template.
  • Tenant configuration in a multitenant system.
  • Details of external AWS resources to communicate with such as an Amazon SQS queue URL, Amazon EventBridge event bus name, or AWS Step Functions ARN.

Key considerations

There are a number of key considerations when choosing the right solution for external parameter data.

  1. Cost – how much does it cost to store the data and retrieve it via an API call?
  2. Security – what encryption and fine-grained access control is required?
  3. Performance – what are the retrieval latency requirements?
  4. Data size – how much data is there to store and retrieve?
  5. Update frequency – how often does the parameter change and how does the function handle stale parameters?
  6. Access scope – do multiple functions or services access the parameter?

These considerations help to determine where to store the parameter data and how often to retrieve it.

For example, a 4KB parameter that updates hourly and is used by hundreds of functions needs to be optimized for low retrieval costs and high performance. Choosing a solution that supports low-cost API GET requests at a high transaction per second (TPS) would be better than one that supports large data.

AWS service options

There are a number of AWS services available to store external parameter data.

Amazon S3

S3 is an object storage service offering 99.999999999% (11 9s) of data durability and virtually unlimited scalability at low cost. Objects can be up to 5 TB in size in any format, making S3 a good solution to store larger parameter data.

Amazon DynamoDB

Amazon DynamoDB is a fully managed, serverless, key-value NoSQL database designed for single-digit millisecond performance at any scale. Due to the high performance of this service, it’s a great place to store parameters when low retrieval latency is important.

AWS Secrets Manager

AWS Secrets Manager makes it easier to rotate, manage, and retrieve secret data. This makes it the ideal place to store sensitive parameters such as passwords and API keys.

AWS Systems Manager Parameter Store

Parameter Store provides a centralized store to manage configuration data. This data can be plaintext or encrypted using AWS Key Management Service (KMS). Parameters can be tagged and organized into hierarchies for simpler management. Parameter Store is a good default choice for general-purpose parameters in AWS. The standard version (no additional charge) can store parameters up to 4 KB in size and the advanced version (additional charges apply) up to 8 KB.

For a code example using Parameter Store for Lambda parameters, see the Serverless Land pattern.

AWS AppConfig

AppConfig is a capability of AWS Systems Manager to create, manage, and quickly deploy application configurations. AppConfig allows you to validate changes during roll-outs and automatically roll back, if there is an error. AppConfig deployment strategies help to manage configuration changes safely.

AppConfig also provides a Lambda extension to retrieve and locally cache configuration data. This results in fewer API calls and reduced function duration, reducing costs.

AWS Lambda environment variables

You can store parameter data as Lambda environment variables as part of the function’s version-specific configuration. Lambda environment variables are stored during function creation or updates. You can access these variables directly from your code without needing to contact an external source. Environment variables are ideal for parameter values that don’t need updating regularly and help make function code reusable across different environments. However, unlike the other options, values cannot be accessed centrally by multiple functions or services.

Lambda execution lifecycle

It is worth understanding the Lambda execution lifecycle, which has a number of stages. This helps to decide when to handle parameter retrieval within your Lambda code, including cache management.

Lambda execution lifecycle

Lambda execution lifecycle

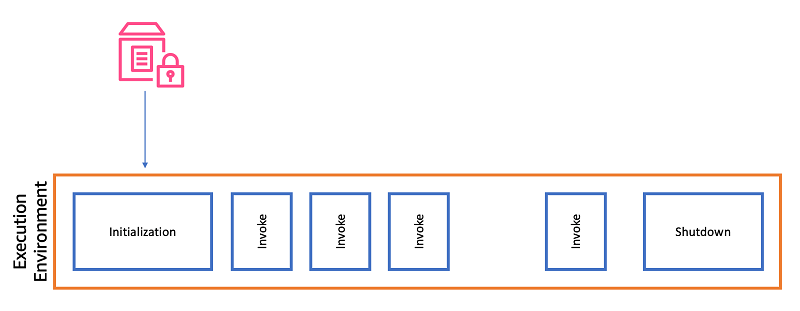
When a Lambda function is invoked for the first time, or when Lambda is scaling to handle additional requests, an execution environment is created. The first phase in the execution environment’s lifecycle is initialization (Init), during which the code outside the main handler function runs. This is known as a cold start.

The execution environment can then be re-used for subsequent invocations. This means that the Init phase does not need to run again and only the main handler function code runs. This is known as a warm start.

An execution environment can only run a single invocation at a time. Concurrent invocations require additional execution environments. When a new execution environment is required, this starts a new Init phase, which runs the cold start process.

Caching and updates

Retrieving the parameter during Init

Retrieving the parameter during Init

Retrieving the parameter during Init

As Lambda execution environments are re-used, you can improve the performance and reduce the cost of retrieving an external parameter by caching the value. Writing the value to memory or the Lambda /tmp file system allows it to be available during subsequent invokes in the same execution environment.

This approach reduces API calls, as they are not made during every invocation. However, this can cause an out-of-date parameter and potentially different values across concurrent execution environments.

The following Python example shows how to retrieve a Parameter Store value outside the Lambda handler function during the Init phase.

import boto3
ssm = boto3.client('ssm', region_name='eu-west-1')
parameter = ssm.get_parameter(Name='/my/parameter')
def lambda_handler(event, context):
    # My function code...

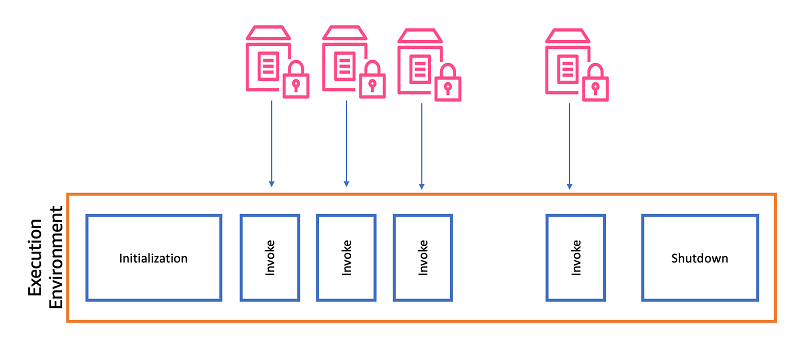
Retrieving the parameter on every invocation

Retrieving the parameter on every invocation

Retrieving the parameter on every invocation

Another option is to retrieve the parameter during every invocation by making the API call inside the handler code. This keeps the value up to date, but can lead to higher retrieval costs and longer function durations due to the added API call during every invocation.

The following Python example shows this approach:

import boto3
ssm = boto3.client('ssm', region_name='eu-west-1')
def lambda_handler(event, context):
    parameter = ssm.get_parameter(Name='/my/parameter')
    # My function code...

Using AWS AppConfig Lambda extension

Using AWS AppConfig Lambda extension

Using AWS AppConfig Lambda extension

AppConfig allows you to retrieve and cache values from the service using a Lambda extension. The extension retrieves the values and makes them available via a local HTTP server. The Lambda function then queries the local HTTP server for the value. The AppConfig extension refreshes the values at a configurable poll interval, which defaults to 45 seconds. This improves performance and reduces costs, as the function only needs to make a local HTTP call.

The following Python code example shows how to access the cached parameters.

import urllib.request
def lambda_handler(event, context):
    url = f'http://localhost:2772/applications/application_name/environments/environment_name/configurations/configuration_name'
    config = urllib.request.urlopen(url).read()
    # My function code...

For caching secret values using a Lambda extension local HTTP cache and AWS Secrets Manager, see the AWS Prescriptive Guidance documentation.

Using Lambda Powertools for Python or Java

Lambda Powertools for Python or Lambda Powertools for Java contains utilities to manage parameter caching. You can configure the cache interval, which defaults to 5 seconds. Supported parameter stores include Secrets Manager, AWS Systems Manager Parameter Store, AppConfig, and DynamoDB. You also have the option to bring your own provider. The following example shows the Powertools for Python parameters utility retrieving a single value from Systems Manager Parameter Store.

from aws_lambda_powertools.utilities import parameters
def handler(event, context):
    value = parameters.get_parameter("/my/parameter")
    # My function code…

Security

Parameter security is a key consideration. You should evaluate encryption at rest, in-transit, private network access, and fine-grained permissions for each external parameter solution based on the use case.

All services highlighted in this post support server-side encryption at rest, and you can choose to use AWS KMS to manage your own keys. When accessing parameters using the AWS SDK and CLI tools, connections are encrypted in transit using TLS by default. You can force most to use TLS 1.2.

To access parameters from inside an Amazon Virtual Private Cloud (Amazon VPC) without internet access, you can use AWS PrivateLink and create a VPC endpoint for each service. All the services mentioned in this post support AWS PrivateLink connections.

Use AWS Identity and Access Management (IAM) policies to manage which users or roles can access specific parameters.

General guidance

This blog explores a number of considerations to make when using an external source for Lambda parameters. The correct solution is use-case dependent. There are some general guidelines when selecting an AWS service.

  • For general-purpose low-cost parameters, use AWS Systems Manager Parameter Store.
  • For single function, small parameters, use Lambda environment variables.
  • For secret values that require automatic rotation, use AWS Secrets Manager.
  • When you need a managed cache, use the AWS AppConfig Lambda extension or Lambda Powertools for Python/Java.
  • For items larger than 400 KB, use Amazon S3.
  • When access frequency is high, and low latency is required, use Amazon DynamoDB.

Conclusion

External parameters provide a central source of truth across distributed systems, allowing for efficient updates and code reuse. This blog post highlights a number of considerations when using external parameters with Lambda to help you choose the most appropriate solution for your use case.

Consider how you cache and reuse parameters inside the Lambda execution environment. Doing this correctly can help you reduce costs and improve the performance of your Lambda functions.

There are a number of services to choose from to store parameter data. These include DynamoDB, S3, Parameter Store, Secrets Manager, AppConfig, and Lambda environment variables. Each comes with a number of advantages, depending on the use case. This blog guidance, along with the AWS documentation and Service Quotas, can help you select the most appropriate service for your workload.

For more serverless learning resources, visit Serverless Land.

По следите на Биволъ и PanamaPapers КПКОНПИ реализира разследване на Биволъ за имотите на Черепа

Post Syndicated from Екип на Биволъ original https://bivol.bg/%D0%BA%D0%BF%D0%BA%D0%BE%D0%BD%D0%BF%D0%B8-%D1%80%D0%B5%D0%B0%D0%BB%D0%B8%D0%B7%D0%B8%D1%80%D0%B0-%D1%80%D0%B0%D0%B7%D1%81%D0%BB%D0%B5%D0%B4%D0%B2%D0%B0%D0%BD%D0%B5-%D0%BD%D0%B0-%D0%B1%D0%B8%D0%B2.html

сряда 23 март 2022


Комисията за противодействие на корупция и отнемане на незаконно придобито имущество (КПКОНПИ) работи по запориране на имотите на хазартния бос Васил Божков – Черепа, описани в разследване на “Биволъ” по…

GNOME 42 released

Post Syndicated from original https://lwn.net/Articles/889025/

Version 42 of the GNOME desktop environment is out.

This release introduces Dark mode and an entirely new screenshot
workflow. Beyond that, there are several improved Settings panels,
many of the GNOME applications have been ported to GTK 4 and
libadwaita, and much more.

See the release notes for more
information.

How to Scale a Storage-heavy Startup

Post Syndicated from Molly Clancy original https://www.backblaze.com/blog/how-to-scale-a-storage-heavy-startup/

No developer likes to feel stuck with a cloud vendor, especially when you’re paying for the trap. Being locked in because the expense of moving is prohibitive or the risk of service disruption is too great can be singularly frustrating. Unfortunately, Gavin Wade, Founder and CEO of CloudSpot, found himself in exactly that position.

Gavin shared how he restructured his cloud architecture (containing more than 700TB of images under management), enabling him to:

  • Cut storage costs in half.
  • Slow the rate at which storage costs compound by half.
  • Cut data transfer costs by 90%.
  • Lower breakeven customer volume.
  • Increase margins.
What Is CloudSpot?

CloudSpot is a software as a service (SaaS) business platform based in Irvine, CA that makes professional photographers’ lives easier. The CloudSpot app allows photographers to deliver images digitally to clients in beautiful galleries through a seamless system.

Amazon Web Services gave CloudSpot free credits for storage. When those credits ran out, CloudSpot would have happily left to avoid escalating storage costs but felt trapped by high egress fees.

“We had a few internal conversations where we concluded that we were stuck with Amazon. That’s never a good feeling in business.”
—Gavin Wade, Founder & CEO, CloudSpot

How CloudSpot Solved for Escalating Storage Costs

In the short term, CloudSpot’s development team, led by their vice president of engineering, took a few key steps to manage costs:

  1. They untangled their monolithic system into a cluster of microservices.
  2. They moved to a Kubernetes environment where images upload directly to storage, then CloudSpot’s microservices retroactively query the data they need.

The transition to microservices made their infrastructure more nimble, but Gavin still had to reluctantly cut key promotional offers like free migration for prospective customers in order to maintain margins.

When Cost-cutting Measures Still Don’t Suffice

Even after optimizing workflows, storage costs continued to snowball. Namely:

  • The service grew—customers were uploading five times the previous year’s volume.
  • Gavin wanted to position the company for triple-digit growth in the upcoming year.

They decided to move their production data to Backblaze B2 Cloud Storage. The potential ROI of switching to Backblaze B2 was too substantial to ignore for a data-heavy startup, and Backblaze’s Cloud to Cloud Migration service allowed them to move 700TB of data in one day with zero transfer fees.

Migrating Storage Clouds Without Service Disruption

CloudSpot’s data is accessed frequently, and the CloudSpot development team had to make sure customers saw no disruptions. To do so, they supported both environments—on Amazon S3 and Backblaze B2—simultaneously for one week to ensure everything was working. Then, they disabled uploads to Amazon S3 and redirected new uploads to Backblaze B2.

“It was like changing the tires on a car while it’s flying down the road at 100 mph,” but a change that resulted in no loss of operational efficiency, speed, or reliability.
—Gavin Wade, Founder & CEO, CloudSpot

Cloud to Cloud Migration Is Not Out of Reach

Like many developers, Gavin thought he was trapped in a walled garden with Amazon S3. Improving CloudSpot’s workflows unlocked the switch to Backblaze B2, enabling CloudSpot to:

  • Structure workflows using best-of-breed providers.
  • Reintroduce free migration.
  • Grow margins.
  • Demonstrate savvy decision-making to future investors.

“Software margins are expected to be high. If you can take a big cut of that, it allows you to scale more rapidly. It just makes our story so much better, especially as a SaaS business looking to scale, grow, and raise capital.”
—Gavin Wade, Founder & CEO, CloudSpot

Unlocking Capacity to Scale With Backblaze B2

Read more about how CloudSpot overcame vendor lock-in to realize exponential growth, and check out our Cloud to Cloud Migration offer and partners—we’ll pay for your data transfer if you need to move more than 10TB out of Amazon.

The post How to Scale a Storage-heavy Startup appeared first on Backblaze Blog | Cloud Storage & Cloud Backup.

Deploy Quarkus-based applications using AWS Lambda with AWS SAM

Post Syndicated from Joan Bonilla original https://aws.amazon.com/blogs/architecture/deploy-quarkus-based-applications-using-aws-lambda-with-aws-sam/

­Quarkus offers Java developers the capability of building native images based on GraalVM. A native image is a binary that includes everything: your code, libraries, and a smaller virtual machine (VM). This approach improves the startup time of your AWS Lambda functions, because it is optimized for container-based environments. These use cloud native and serverless architectures with a container-first philosophy.

In this blog post, you learn how to integrate the Quarkus framework with AWS Lambda functions, using the AWS Serverless Application Model (AWS SAM).

Reduce infrastructure costs and improve latency

When you develop applications with Quarkus and GraalVM with native images, the bootstrap file generated requires more time to compile, but it has a faster runtime. GraalVM is a JIT compiler that generates optimized native machine code that provides different garbage collector implementations, and uses less memory and CPU. This is achieved with a battery of advanced compiler optimizations and aggressive and sophisticated inlining techniques. By using Quarkus, you can also reduce your infrastructure costs because you need less resources.

With Quarkus and AWS SAM features, you can improve the latency performance of your Java-based AWS Lambda functions by reducing the cold-start time. A cold-start is the initialization time that a Lambda function takes before running the actual code. After the function is initialized for the first time, future requests will reuse the same execution environment without incurring the cold-start time, leading to improved performance.

Overview of solution

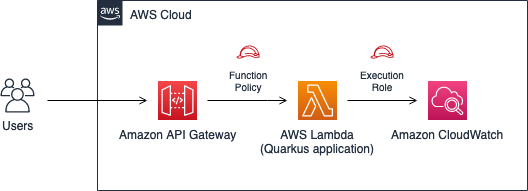
Figure 1 shows the AWS components and workflow of our solution.

Architecture diagram deploying an AWS SAM template using the Amazon API Gateway and AWS Lambda services with Amazon CloudWatch metrics

Figure 1. Architecture diagram for Quarkus (AWS Lambda) application

With AWS SAM, you can easily integrate external frameworks by using custom runtimes and configuring properties in the template file and the Makefile.

Prerequisites

For this walkthrough, you should have the following prerequisites:

Creating a Java-based AWS Lambda function

AWS SAM provides default templates to accelerate the development of new functions. Create a Java-based function by following these steps:

Run the following command in your terminal:

sam init -a x86_64 -r java11 -p Zip -d maven -n java11-mvn-default

These parameters select a x86 architecture, java11 as Java runtime LTS version, Zip as a build artifact, and Maven as the package and dependency tool. It also defines the project name.

Choose the first option to use a template for your base code:

1 – AWS Quick Start Templates

Finally, with the previous selection you have different templates to choose from to create the base structure of your function. In our case, select the first one, which creates an AWS Lambda function calling an external HTTPS endpoint. This will get the IP address and return it with a “Hello World” response to the user in JSON:

1 – Hello World Example

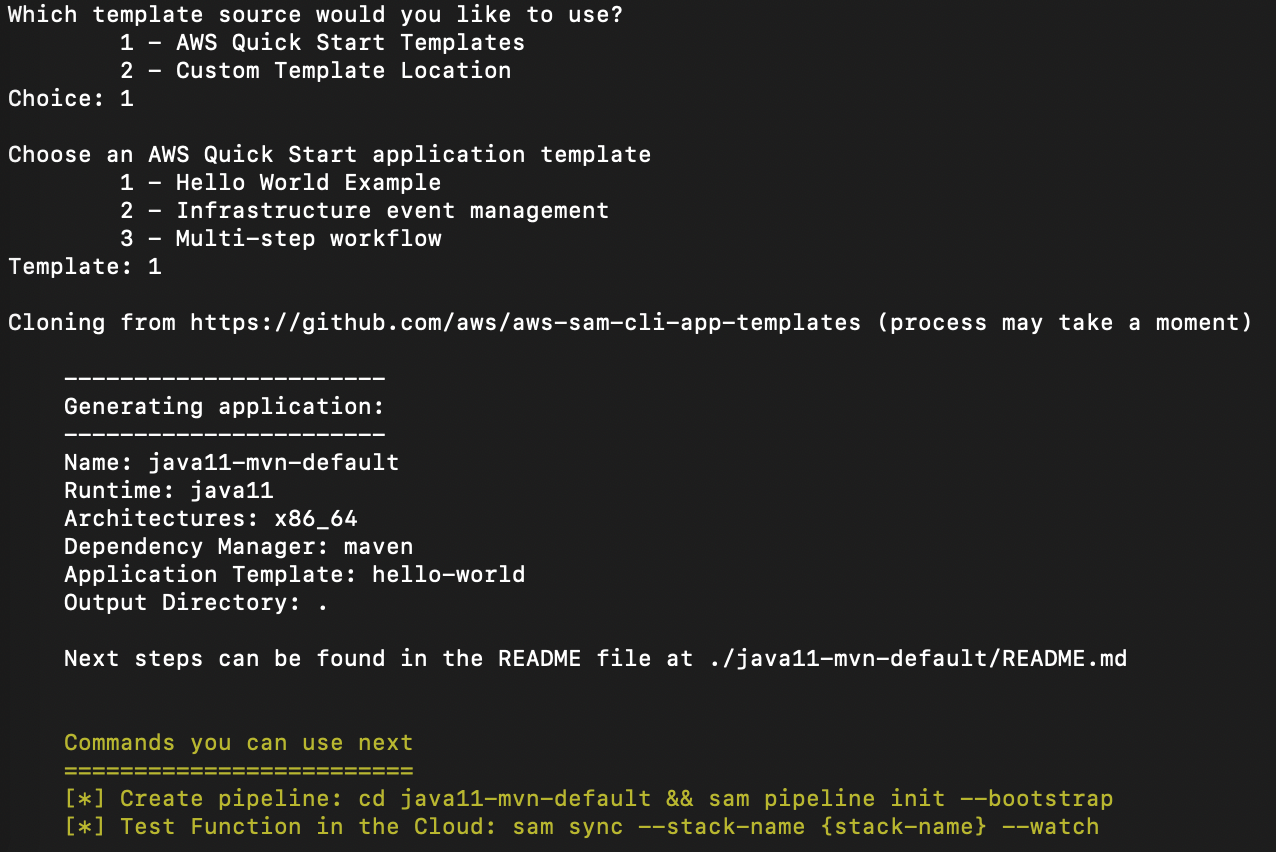
The output will yield the following, shown in Figure 2:

AWS SAM input fields to select the programming language, the build artifact, the project name and the dependency tool for our sample.

Figure 2. AWS SAM configuration input data

Integrating Quarkus framework

Using AWS SAM, you can easily integrate non-AWS custom runtimes in your AWS Lambda functions. With this feature, you can integrate the Quarkus framework. Follow the next four steps:

1. Create a Makefile file

Create a “Makefile” file in the “HelloWorldFunction” directory with this code:

  build-HelloWorldFunction:
  mvn clean package -Pnative -Dquarkus.native.container-build=true -Dquarkus.native.builder-image=quay.io/quarkus/ubi-quarkus-mandrel:21.3-java11
  @ unzip ./target/function.zip -d $(ARTIFACTS_DIR)

With this snippet, you are configuring AWS SAM to build the bootstrap runtime using Maven instructions for AWS SAM.

Using Quarkus, you can build a Linux executable without having to install GraalVM with the next option:

  -Dquarkus.native.container-build=true

For more information, you can visit the official site and learn more about building a native image.

2. Configure Maven dependencies

As a Maven project, include the necessary dependencies. Change the pom.xml file in the “HelloWorldFunction” directory to remove the default libraries:

<dependencies>
  <dependency>
    <groupId>com.amazonaws</groupId>
    <artifactId>aws-lambda-java-core</artifactId>
    <version>1.2.1</version>
  </dependency>
  <dependency>
    <groupId>com.amazonaws</groupId>
    <artifactId>aws-lambda-java-events</artifactId>
    <version>3.6.0</version>
  </dependency>
</dependencies>

Add the Quarkus libraries, profile, and plugins in the right pom.xml section as shown in the following XML configuration. At the current time, the latest version of Quarkus is 2.7.1.Final. We highly recommend using the latest versions of the libraries and plugins:

<dependencies>
  <dependency>
    <groupId>io.quarkus</groupId>
    <artifactId>quarkus-amazon-lambda</artifactId>
    <version>2.7.1.Final</version>
  </dependency>
  <dependency>
    <groupId>io.quarkus</groupId>
    <artifactId>quarkus-arc</artifactId>
    <version>2.7.1.Final</version>
  </dependency>
  <dependency>
    <groupId>junit</groupId>
    <artifactId>junit</artifactId>
    <version>4.13.1</version>
    <scope>test</scope>
  </dependency>
</dependencies>

<build>
  <finalName>function</finalName>
  <plugins>
    <plugin>
      <groupId>io.quarkus</groupId>
      <artifactId>quarkus-maven-plugin</artifactId>
      <version>2.7.1.Final</version>
      <extensions>true</extensions>
      <executions>
        <execution>
          <goals>
            <goal>build</goal>
            <goal>generate-code</goal>
            <goal>generate-code-tests</goal>
          </goals>
        </execution>
      </executions>
    </plugin>
  </plugins>
</build>

<profiles>
  <profile>
    <id>native</id>
    <activation>
      <property>
        <name>native</name>
      </property>
    </activation>
    <properties>
      <quarkus.package.type>native</quarkus.package.type>
    </properties>
  </profile>
</profiles>

3. Configure the template.yaml to use the previous Makefile

To configure the AWS SAM template to use your own Makefile configuration using Quarkus and Maven instructions correctly, edit the template.yaml file to add the following properties:

Resources:
  HelloWorldFunction:
    Metadata:
      BuildMethod: makefile
    Properties:
      Runtime: provided

4. Add a new properties file to enable SSL configuration

Finally, create an application.properties file in the directory: ../HelloWorldFunction/src/main/resources/ with the following property:

quarkus.ssl.native=true

This property is needed because the sample function uses a secure connection to https://checkip.amazonaws.com. It will get the response body in the sample you selected previously.

Now you can build and deploy your first Quarkus function with the following AWS SAM commands:

sam build

This will create the Zip artifact using the Maven tool and will build the native image to deploy on AWS Lambda based on your previous Makefile configuration. Finally, run the following AWS SAM command to deploy your function:

sam deploy -–guided

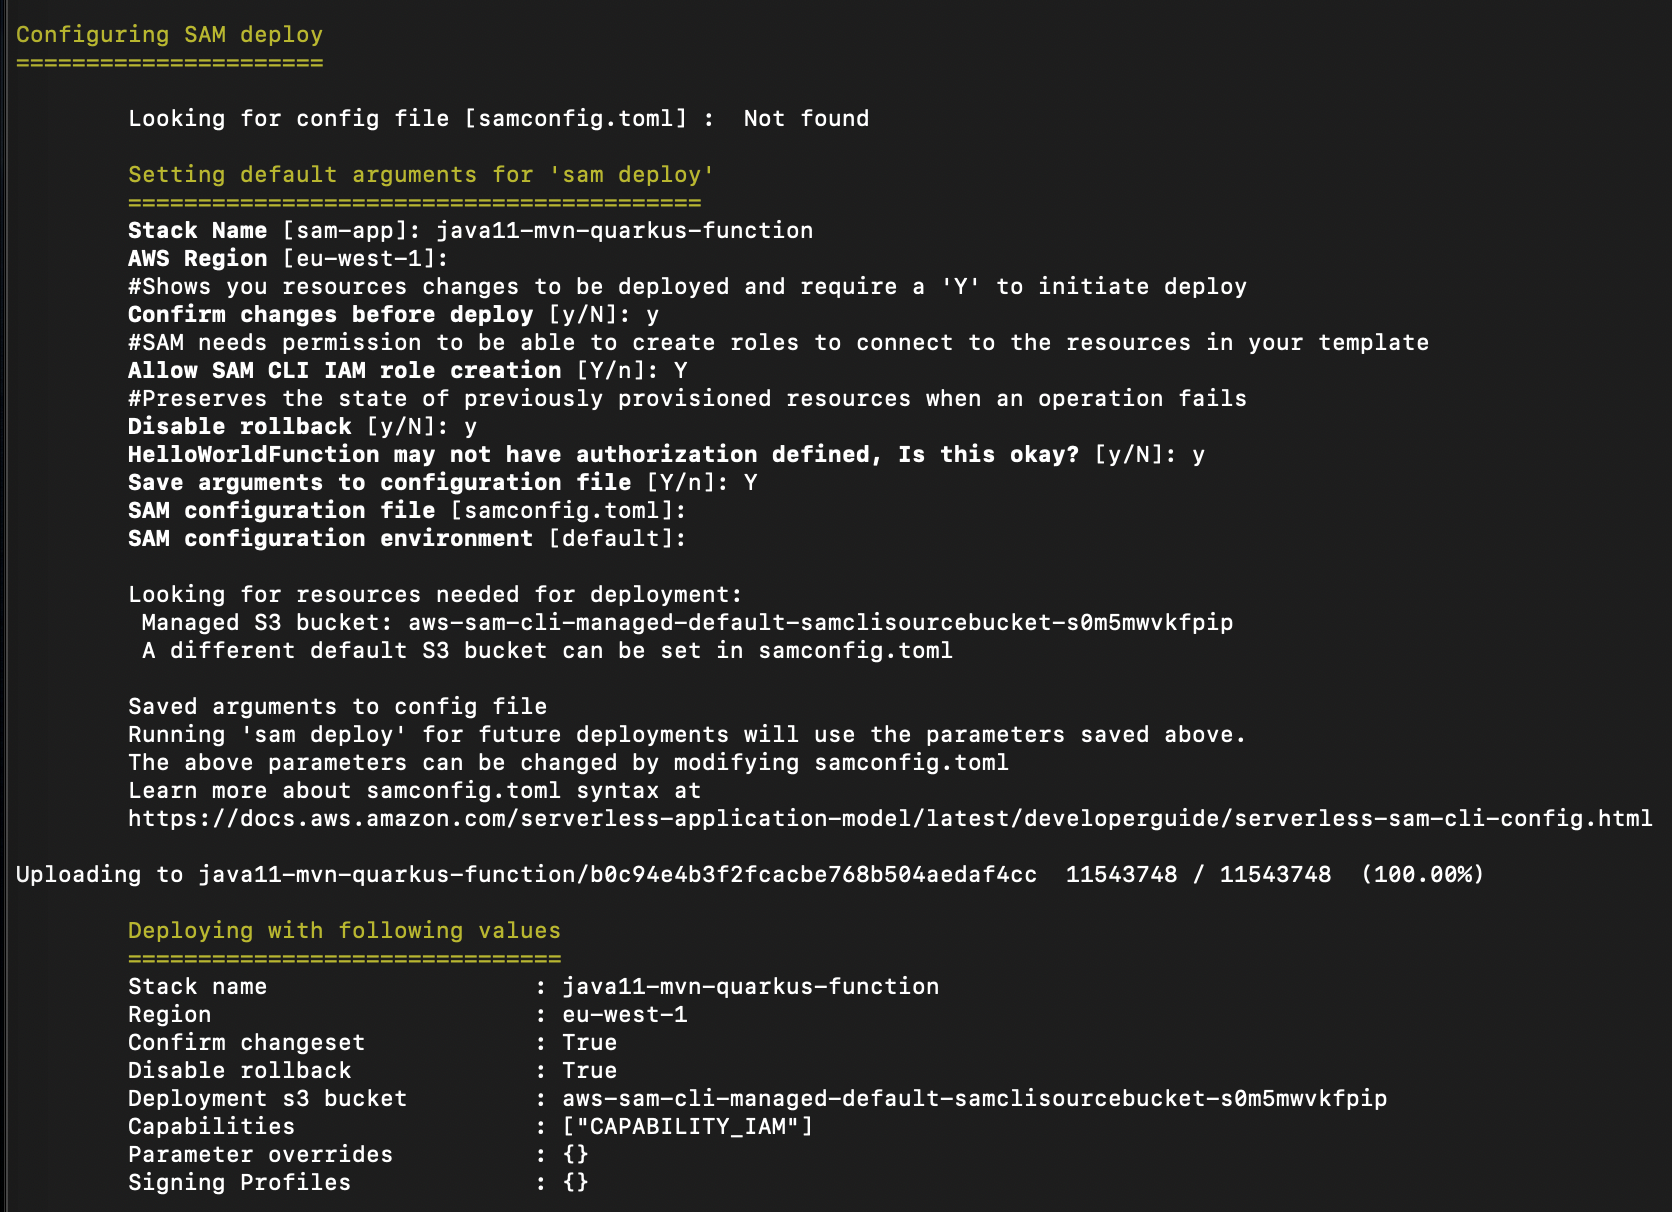
The first time you deploy an AWS SAM application, you can customize some configurations or parameters like the Stack name, the AWS Region, and more (see Figure 3). You can also accept the default one. For more information about AWS SAM deploy options, read the AWS SAM documentation.

AWS SAM input fields to configure the deployment options in our sample.

Figure 3. Lambda deployment configuration input data

This sample configuration enables you to configure the necessary IAM permissions to deploy the AWS SAM resources for this sample. After completing the task, you can see the AWS CloudFormation Stack and resources created by AWS SAM.

You have now created and deployed an HTTPS API Gateway endpoint with a Quarkus application on AWS Lambda that you can test.

Testing your Quarkus function

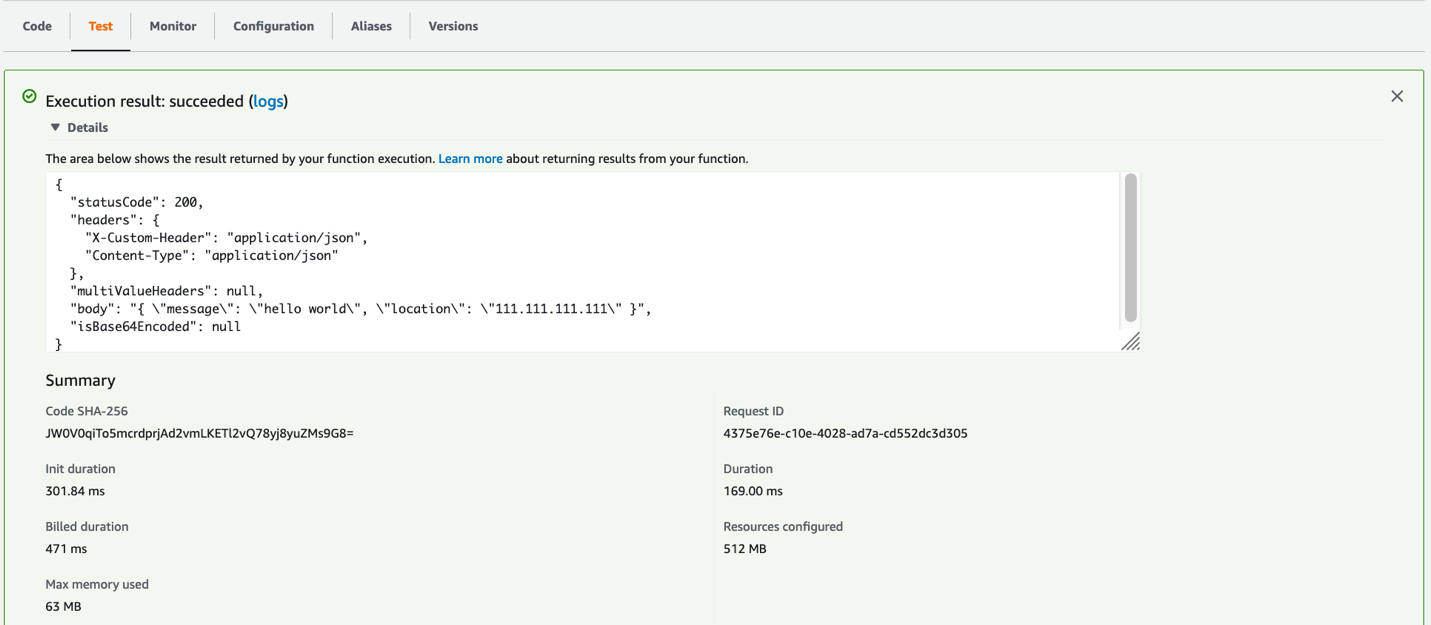
Finally, test your Quarkus function in the AWS Management Console by selecting the new function in the AWS Lambda functions list. Use the test feature included in the console, as shown in Figure 4:

Test Quarkus execution result succeeded showing the response body returning the IP address.

Figure 4. Lambda execution test example

You will get a response to your Lambda request and a summary. This includes information like duration, or resources needed in your new Quarkus function. For more information about testing applications on AWS SAM, you can read Testing and debugging serverless applications. You can also visit the official site to read more information using AWS SAM with Quarkus.

Cleaning up

To avoid incurring future charges, delete the resources created in your AWS Lambda stack. You can delete resources with the following command:

sam delete

Conclusion

In this post, we demonstrated how to integrate Java frameworks like Quarkus on AWS Lambda using custom runtimes with AWS SAM. This enables you to configure custom build configurations or your preferred frameworks. These tools improve the developer experience, standardizing the tool used to develop serverless applications with future requirements, showing a strong flexibility for developers.

The Quarkus native image generated and applied in the AWS Lambda function reduces the heavy Java footprint. You can use your Java skills to develop serverless applications without having to change the programming language. This is a great advantage when cold-starts or compute resources are important for business or technical requirements.

Rapid7 Recognized as Top Ranked in Current Offering Category in Forrester Wave™ for Cloud Workload Security

Post Syndicated from Ben Austin original https://blog.rapid7.com/2022/03/23/rapid7-recognized-as-top-ranked-in-current-offering-category-in-forrester-wave-for-cloud-workload-security/

Rapid7 Recognized as Top Ranked in Current Offering Category in Forrester Wave™ for Cloud Workload Security

The widespread growth in cloud adoption in recent years has given businesses across all industries the ability to transform and scale in ways never before possible. But the speed of those changes, combined with the increased volume and complexity of resources in cloud environments, often forces organizations to choose between slowing the pace of innovation or taking on massive amounts of unmanaged risk.

Because of this, cloud misconfigurations have become a leading attack vector for malicious breaches. Organizations are now scrambling to evolve their cloud security programs to properly secure their most sensitive and valuable data — before it falls into the hands of an adversary.

This requires going beyond the siloed toolsets and manual efforts of increasingly hard-to-find cloud security professionals. Instead, businesses need to leverage comprehensive cloud workload security solutions that allow their teams to get a broad set of capabilities in a single platform in order to move more efficiently and effectively.

But in the still-emerging and rapidly evolving cloud security space, narrowing down a shortlist of vendors can be challenging and confusing.

To help buyers select the right vendor for their needs among the industry’s many players, Forrester Research evaluated the top 12 cloud security providers to equip evaluators with necessary context on each provider’s current offering and strategy. We’re excited to share that Rapid7 has been included among these top vendors and recognized as a Strong Performer in the Forrester Wave™: Cloud Workload Security, Q1 2022.

Most notably, Forrester’s report showed Rapid7 as the top-ranked solution in the Current Offering category.

This is the first time the Forrester Wave™ for Cloud Workload Security has been published since Rapid7’s acquisition of DivvyCloud and Alcide, which culminated in the launch of InsightCloudSec in July 2021. We believe the results of this Forrester Wave™ show that Rapid7’s strategy and execution following those acquisitions has already positioned us well against other vendors in the highly competitive cloud security market.

Get the Full Report

Download Now

A closer look at the results

“In its current CWS offering, the vendor provides excellent setup, configuration, and data integration solution features; identity and access management and CSPM is strong. Runtime and container orchestration platform protection is also strong and easy to use.”

The Forrester report gave Rapid7 the highest possible scores in the criteria of cloud security posture management (CSPM), infrastructure as code (IaC), identity and access management (IAM), and container protection, which to us emphasizes the breadth and depth of our current solution in both posture management and workload protection.

Rapid7 also received the highest possible score in the Setup, Configuration, and Data Integration criterion. When combined with the highest possible score in the Integration category, we believe this leads to faster time to value and more efficient ongoing cloud security operations compared to other vendors.

Within the Strategy category, Forrester gave Rapid7 the highest possible scores in the Cloud Workload Protection (CWP) Plans and Container Protection Plans criteria. According to the report, “In its CWS strategy, [Rapid7] has differentiated CWP and container protection plans.”

“The vendor plans to implement runtime analysis using machine learning (ML) to establish a baseline profile of activity and identify anomalous behaviors and unknown threats, simplifying runtime rules and detections,“ the report explains.

From our standpoint, this combination of current market-leading CSPM and shift-left capabilities, alongside a highly differentiated CWP and Container Protection roadmap, is evidence of the significant value Rapid7 is bringing to our customers by enabling organizations to innovate and accelerate their business strategies with secure adoption of cloud technologies.

Learn more

You can download The Forrester Wave™: Cloud Workload Security, Q1 2022 from our website here.

Interested in hearing more about Rapid7’s cloud security solution, and how we’re providing value to our current customers? Join us on Tuesday, March 29 for our third-annual Cloud Security Summit to hear from our leadership, customers, and partners about how Rapid7 is driving cloud security forward.

Join our 2022 Cloud Security Summit

Register Now

Additional reading:

Security updates for Wednesday

Post Syndicated from original https://lwn.net/Articles/888994/

Security updates have been issued by Mageia (cyrus-sasl, openssl, sphinx, and swtpm), openSUSE (qemu), Red Hat (expat, rh-mariadb103-mariadb, and rh-mariadb105-mariadb), SUSE (apache2, binutils, java-1_7_0-ibm, kernel-firmware, nodejs12, qemu, and xen), and Ubuntu (ckeditor and linux, linux-aws, linux-kvm, linux-lts-xenial).

Code Club in Wales with translations, teacher training and a country-wide codealong

Post Syndicated from Janina Ander original https://www.raspberrypi.org/blog/code-club-wales-translations-codealong/

Since the inception of Code Club in 2012, teachers in Wales have been part of the Code Club community, running extracurricular Code Club sessions for learners in their schools. As of late 2021, there are 84 active clubs in Wales. With our new Code Club Community Coordinator for Wales, Sarah Eve Roberts, on board, we are thrilled to be able to offer more dedicated support to the community in Wales.

A computing classroom filled with learners

Support and engagement for Welsh Code Clubs

Sarah introduced herself to the Welsh education community by running a Code Club training workshop for teachers. Educators from 32 Welsh schools joined her to learn how to start their own Code Club and then tried one of the free coding projects we provide for club sessions for themselves.

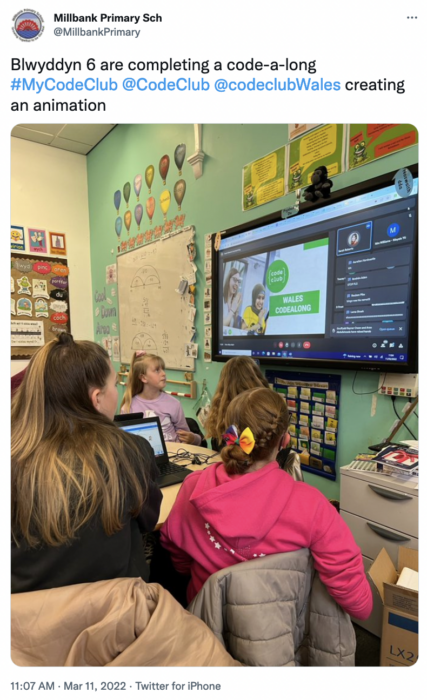
A tweet about a Code Club codealong in Wales.

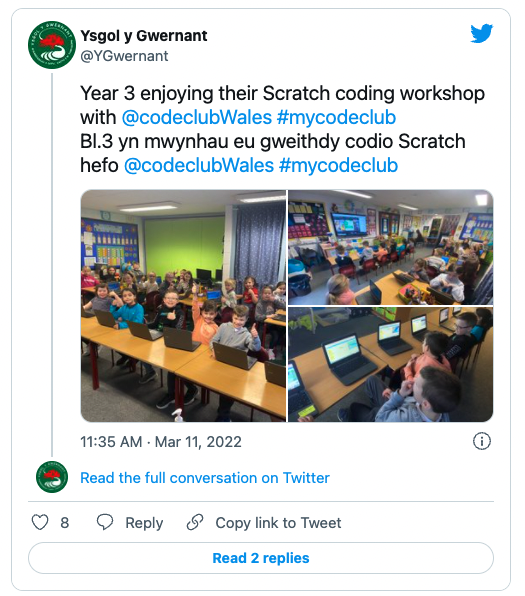
The Welsh Code Club network had a chance to meet Sarah at a country-wide online codealong on 11 March, just in time to kick off British Science Week 2022. In this one-hour codealong event, we took beginner coders through the first project of our new ‘Introduction to Scratch’ pathway, Space Talk. Space Talk is a fantastic project for Code Clubs: it provides beginners with a simple introduction to coding in Scratch, and also gives plenty of opportunity for more experienced learners to get creative and make the project their own.

The codealong was fantastically popular, with 90 teachers and 2900 learners from 59 schools participating. Several of the schools shared their excitement with us on Twitter, posting pictures and videos of their Space Talk projects.

Tamasin Greenough Graham, Head of Code Club, says: “It was wonderful to see so many children and teachers from Wales coding with us. I really loved the creativity they showed in all their projects!”

Welsh translations of Code Club learning materials

Although the codealong took place in English, Space Talk and the whole ‘Introduction to Scratch’ pathway are available in the Welsh language. The pathway includes a total of six projects, bringing the total number of Welsh-language coding projects we offer to 37. It’s really important to us to offer our learning materials in Welsh, especially because we know it helps young people engage with our free coding activities.

A child codes a Spiderman project at a laptop during a Code Club session.

The translation of learning materials is a collaborative effort at the Raspberry Pi Foundation: we work with a team of 1465 volunteer translators, who translate our materials into  33 languages, making them accessible for more children and educators around the world.

Two of these translators, Marcus and Julia Davage, are based in Wales. They help to make our projects accessible to Welsh-speaking learners. Marcus and Julia have been part of the community for 6 years, volunteering at Code Club and running their own club:

“I started volunteering for Code Club in 2016 when my daughter was in a Welsh-medium primary school and her teacher had started a Code Club. This lasted until 2019. Last year I started my own Code Club at the Welsh-medium primary school at which my wife Julia teaches. Since helping out, she has taught Scratch in her own lessons!”

– Marcus Davage, Code Club volunteer & Welsh translation volunteer

Marcus and Julia have translated numerous learning resources and communications for our Welsh community. Marcus describes the experience of translating:

“I noticed that several of the projects hadn’t been completely translated into Welsh, so when my company, BMC Software, promoted a Volunteering Day for all of its staff, I jumped at the opportunity to spend the whole day finishing off many of the missing translations! I must admit, I did laugh at a few terms, like ’emoji’ (which has no official translation), ’emoticon’ (‘gwenoglun’ or ‘smiley face’), and ‘wearable tech’ (‘technoleg gwisgadwy’).”

– Marcus Davage, Code Club volunteer & Welsh translation volunteer

We’re thankful to Marcus and Julia and to all the teachers and volunteers in Wales who bring coding skills to the young people in their schools.

Get involved in Code Club, in Wales or elsewhere

Keen readers may have noticed that this year marks the tenth anniversary of Code Club! We have lots of celebrations planned for the worldwide community of volunteers and learners, in long-running clubs as well as in brand-new ones.

A group of smiling children hold up large cardboard Code Club logos.

So now is an especially great time to get involved by starting a Code Club at your school, or by signing up to volunteer at an up-and-running club. Find out more at codeclub.org.

And if you’re interested in learning more about Code Club in Wales, email us at [email protected] so Sarah can get in touch.

The post Code Club in Wales with translations, teacher training and a country-wide codealong appeared first on Raspberry Pi.

NASA’s Insider Threat Program

Post Syndicated from Bruce Schneier original https://www.schneier.com/blog/archives/2022/03/nasas-insider-threat-program.html

The Office of Inspector General has audited NASA’s insider threat program:

While NASA has a fully operational insider threat program for its classified systems, the vast majority of the Agency’s information technology (IT) systems — including many containing high-value assets or critical infrastructure — are unclassified and are therefore not covered by its current insider threat program. Consequently, the Agency may be facing a higher-than-necessary risk to its unclassified systems and data. While NASA’s exclusion of unclassified systems from its insider threat program is common among federal agencies, adding those systems to a multi-faceted security program could provide an additional level of maturity to the program and better protect agency resources. According to Agency officials, expanding the insider threat program to unclassified systems would benefit the Agency’s cybersecurity posture if incremental improvements, such as focusing on IT systems and people at the most risk, were implemented. However, on-going concerns including staffing challenges, technology resource limitations, and lack of funding to support such an expansion would need to be addressed prior to enhancing the existing program.

Further amplifying the complexities of insider threats are the cross-discipline challenges surrounding cybersecurity expertise. At NASA, responsibilities for unclassified systems are largely shared between the Office of Protective Services and the Office of the Chief Information Officer. In addition, Agency contracts are managed by the Office of Procurement while grants and cooperative agreements are managed by the Office of the Chief Financial Officer. Nonetheless, in our view, mitigating the risk of an insider threat is a team sport in which a comprehensive insider threat risk assessment would allow the Agency to gather key information on weak spots or gaps in administrative processes and cybersecurity. At a time when there is growing concern about the continuing threats of foreign influence, taking the proactive step to conduct a risk assessment to evaluate NASA’s unclassified systems ensures that gaps cannot be exploited in ways that undermine the Agency’s ability to carry out its mission.

Стоте дни. Променливо, но без Промяна

Post Syndicated from Емилия Милчева original https://toest.bg/stote-dni-promenlivo-no-bez-promyana/

Първите сто дни на управляващата коалиция по традиция започнаха с обещания – и завършиха със страха и объркването, изписани по лицето на бившия вожд Бойко Борисов на излизане от ареста. Какво имаме между тези събития? Приет бюджет за 2022 г., един нов министър на отбраната и няколко нови шефове на регулатори, агенции и държавни фирми.

Премиерът Кирил Петков не е американският президент Рузвелт, лансирал концепцията за стоте дни и задвижил колелата на „Нов курс“ по време на своята „стотица“, встъпвайки в длъжност през 1933 г. (Единствената им прилика е, че и двамата имат дипломи от „Харвард“.) Независимо от мненията „за“ или „против“ тази мерна единица за политическа ефективност, първите сто дни задават бъдещото темпо на управление. Естествено е новите лидери, които за първи път ръководят държавата, да проявят енергия и проактивни решения във времена, които не просто изискват, а диктуват бързо темпо. Естествено е да очакваме техните проекти и реформи да бъдат лансирани в първите сто дни, когато все още се помни изборната победа, когато все още имат парламентарно мнозинство зад гърба си и смелостта и старанието не са ги напуснали.

Какво обеща и не изпълни новата власт в първите сто дни

Премиерът Кирил Петков например беше казал, че има идея за повишаване на нивото на ваксинацията срещу COVID-19 чрез привличане на специалисти, които да говорят как ваксините влияят на останалите заболявания, за да намалеят страховете на хората. Като изключим създаването на пандемичен комитет към Министерството на здравеопазването, нищо друго не се случи, а България все така е последна в ЕС по ваксинирано население. Темата за пандемията от COVID-19 бе „потопена“ от войната на руския президент Путин в Украйна, но проблемът е все така нерешен. Това не попречи на премиера Петков да отбележи в изявлението си за стоте дни на кабинета, че здравната криза, причинена от Омикрон варианта на коронавируса, е овладяна.

Не беше изпълнена и онази част от законодателната програма, одобрена на коалиционните преговори между четирите политически сили, срещу която е записан срокът „Незабавно, но не по-късно от 3 месеца от започване на работа на НС“. Тук спадат промените в Закона за публичните предприятия, както и в Закона за приватизацията и следприватизационния контрол, за да спре пилеенето на публичен ресурс. Само че тези промени ги няма.

Сред „незабавните“ законопроекти трябваше да е и преобразуването на КПКОНПИ (Комисията за противодействие на корупцията и за отнемане на незаконно придобитото имущество). След като лансираха намерения за разделянето ѝ на две, така че едната половина да придобие разследващи функции, управляващите смениха председателя ѝ Сотир Цацаров с временен – и спряха дотам. Законопроект в парламента не е внесен, нито е обявен за обществено обсъждане, макар да беше съобщено, че е готов още в средата на януари – заедно с проекта за изменение на Закона за съдебната власт, с който се закрива специализираното правосъдие. Законодателният процес за закриване на Спецпрокуратурата и Спецсъда започна преди дни при силна съпротива от страна на прокуратурата.

Петков съобщи вчера, че законът за разследващите функции на КПКОНПИ е готов, и призна, че „в сферата на корупцията борбата е трудна“, защото „реално ние нямаме работеща прокуратура и стъпките са по-бавни, отколкото ни се иска“. В Брюксел тази седмица правосъдната министърка Надежда Йорданова съобщи, че до средата на годината ще е готов проектът за контрол над главния прокурор, за да е „действащо право през 2023 г.“.

Като цяло обаче законодателната дейност на коалицията е слаба и поради липса на законопроекти парламентарните комисии започнаха да викат все по-често за изслушване министри или шефове на агенции. А създадената на 3 февруари временна парламентарна комисия за промени в Конституцията, начело на която е съпредседателят на „Демократична България“ Христо Иванов, още не е заседавала.

Докъде с овладяването на кризи

С овладяването на кризи, на първо място енергийната, на правителството не му се получи. Както обещаха управляващите в началото на годината, Комисията за енергийно и водно регулиране, заподозряна в диверсионни действия спрямо току-що избраната власт, бе намалена от 9 на 5 души, а председателят ѝ заедно с още един член са сменени. Наред с това парламентът одобри мораториума върху цените на тока, парното и водата за битовите потребители, в сила до края на март. До април включително бизнесът ще получава компенсации заради скъпия ток. Всички тези мерки бяха отбелязани в изявлението на премиера Кирил Петков, направено във вторник по повод стоте дни управление.

Според Петков правителството се е справило и с тази криза, изтъквайки, че в четвъртък България ще предложи на Европейската комисия таван на цените на газа и общи покупки на синьо гориво. За последното Брюксел мисли отдавна – и не по предложение на България, – а войната и новите санкции срещу Русия ускориха процеса. ЕК вече постави и цел: до 2030 г. Общността да е ограничила енергийната си зависимост от Москва. Световните агенции вече съобщиха, че в проекта за заключение от срещата на Европейския съвет, насрочена за 24–25 март в Брюксел, е предвидено ЕС да започне да прави поръчки за общо купуване на природен газ, втечнен газ и водород преди следващата зима.

Но след април токът за бизнеса няма да стане по-евтин, петролът в най-добрия случай ще се задържи на нива малко над $100 за барел, а природният газ – и руски, и азерски, и втечнен – няма да поевтинее особено. Какво ще прави кабинетът с високата инфлация, която влиза през горивата и енергийните суровини? Отново ще предложи повишения на доходи, които така и няма да догонят ускорилата се инфлация, и още компенсации, които са временни решения, или комплекс от мерки, в т.ч. и промени на данъци и акцизи, диверсификация на доставки? Скъпите храни са болезнени за държава с толкова бедни хора, каквато е България, и цената на олиото, уви, може да гътне нуждата от справедливост.

Бъдещата енергийна политика на правителството е функция на войната в Украйна, европейските цели за климатична неутралност и намаляване на енергийната зависимост от Русия. Но Националният план за възстановяване и устойчивост е отложен за четвърти път от ЕК, в заложения в него проект за батерии има съмнения за лобизъм, а управляващите дават разнопосочни сигнали по отношение на бъдещ договор с „Газпром“. Първоначално обявиха, че такъв няма да има, след като настоящият приключи в края на 2022 г. След остри реакции от енергийни експерти и политически сили премиерът Кирил Петков заяви, че „ако се оправят нещата и няма остра война, и може да се преговаря, да, ще преговаряме с „Газпром“ и руският газ ще е част от нашия микс“. Или е блъф, за да не бъдат осуетени преговорите за доставки от алтернативни източници, или Кирил Петков отново показва склонност да се съобразява и да не прекрачва червени линии, макар и не публично обявени.

„Сега Русия ни показва какво значи терор, но в миналото е показвала какво значи енергиен шантаж“, заяви вчера полският президент Анджей Дуда по време на визитата си в България. Полша е първата държава, която даде ясни сигнали, че няма да поднови доставките на руско синьо гориво след изтичане на контракта през 2022 г. За България решението ще е особено трудно предвид тежките зависимости, укрепвани през годините от правителства на БСП, НДСВ и ДПС, както и на ГЕРБ. Сега БСП е четвърти партньор в коалицията и вече се възпротиви на доставки на оръжие за Украйна и настоя за ремонти на българските МиГ-29 в Русия. Сега обаче Варшава може да съдейства за това.

Войната в Украйна зареди с допълнително напрежение вътрешнокоалиционните отношения и тези с президента Румен Радев, тъй като се наложи смяна на министъра (му) Стефан Янев – в името на националната сигурност, а не за да я застрашат, както се опита да внуши бившият президентски съветник.

Още няма отбор

Първите сто дни показаха, че в рамките на самата коалиция има тежки разминавания и несъгласия, механизмите за коалиционно взаимодействие не функционират, а най-важните решения не се съгласуват дори на лидерско ниво – като например ареста на бившия премиер Бойко Борисов. Всеки от коалицията говори на собствените си избиратели, коментира по БНР политологът Димитър Аврамов. Според него в началото тя е започнала добре, с публични преговори и опит за създаване на стандарт, „след това всичко се разпадна на сфери на влияние“ – и никой не иска другите да му се месят.

„24 часа“ съобщи, че коалицията не е в състояние да излезе с обща кандидатура за гуверньор на БНР и може да се представи с двама кандидати, като пленарната зала трябва да реши кой да управлява БНБ – Андрей Гюров (ПП) или Любомир Каримански (ИТН). Това би било лош сигнал, опозицията в лицето на ГЕРБ и ДПС ще се възползва, за да увеличи разрива, а другите двама партньори в коалицията – БСП и ДБ, ще трябва да избират с кого да се групират. Съпредседателят на ДБ Христо Иванов предупреди днес, че трябва да бъде осъзнат рискът от нарушаване на основния принцип на коалицията – постигане на общи мнозинства по важните въпроси, а преминаването към плаващи мнозинства ще има огромни последици.

В първите сто дни не пролича дали лидерите на „Продължаваме промяната“ Кирил Петков и Асен Василев смятат да създадат партия. Това ги облекчава откъм вземане на решения и отговорност, но също така и ги лишава от възможност за подкрепа в кризисни времена, когато доверието към правителството спада.

„Нека изразя твърдото си убеждение, че единственото, от което трябва да се страхуваме, е самият страх… Тази нация иска бързи действия. Нашата най-голяма задача е да накараме хората да работят“, казва Рузвелт в знаменитата си реч преди началото на стоте дни от март до юни 1933 г. към американците, изтерзани от Голямата депресия, потънали в страх, отчаяние и с икономика в разруха. Следват законодателните мерки и икономически пакети на „Нов курс“. Какво вижда нацията – силна личност, готова програма и ежеседмичните беседи на президента по радиото.

„Ние искаме да напредваме още по-бързо, не сме доволни от скоростта, с която идва промяната, но се радваме, че бързо или бавно, тя идва – с по-малки крачки, отколкото и на нас ни се иска, но в правилната посока“, заяви премиерът Петков.

И така да е, но скоростта, компетентността и реформите остават проблем. Изглежда, че единението по важни теми – също.

Заглавна снимка: government.bg

Източник

AMD’s Pluton implementation seems to be controllable

Post Syndicated from original https://mjg59.dreamwidth.org/58879.html

I’ve been digging through the firmware for an AMD laptop with a Ryzen 6000 that incorporates Pluton for the past couple of weeks, and I’ve got some rough conclusions. Note that these are extremely preliminary and may not be accurate, but I’m going to try to encourage others to look into this in more detail. For those of you at home, I’m using an image from here, specifically version 309. The installer is happy to run under Wine, and if you tell it to “Extract” rather than “Install” it’ll leave a file sitting in C:\\DRIVERS\ASUS_GA402RK_309_BIOS_Update_20220322235241 which seems to have an additional 2K of header on it. Strip that and you should have something approximating a flash image.

Looking for UTF16 strings in this reveals something interesting:

Pluton (HSP) X86 Firmware Support
Enable/Disable X86 firmware HSP related code path, including AGESA HSP module, SBIOS HSP related drivers.
Auto - Depends on PcdAmdHspCoreEnable build value
NOTE: PSP directory entry 0xB BIT36 have the highest priority.
NOTE: This option will NOT put HSP hardware in disable state, to disable HSP hardware, you need setup PSP directory entry 0xB, BIT36 to 1.
// EntryValue[36] = 0: Enable, HSP core is enabled.
// EntryValue[36] = 1: Disable, HSP core is disabled then PSP will gate the HSP clock, no further PSP to HSP commands. System will boot without HSP.

“HSP” here means “Hardware Security Processor” – a generic term that refers to Pluton in this case. This is a configuration setting that determines whether Pluton is “enabled” or not – my interpretation of this is that it doesn’t directly influence Pluton, but disables all mechanisms that would allow the OS to communicate with it. In this scenario, Pluton has its firmware loaded and could conceivably be functional if the OS knew how to speak to it directly, but the firmware will never speak to it itself. I took a quick look at the Windows drivers for Pluton and it looks like they won’t do anything unless the firmware wants to expose Pluton, so this should mean that Windows will do nothing.

So what about the reference to “PSP directory entry 0xB BIT36 have the highest priority”? The PSP is the AMD Platform Security Processor – it’s an ARM core on the CPU package that boots before the x86. The PSP firmware lives in the same flash image as the x86 firmware, so the PSP looks for a header that points it towards the firmware it should execute. This gives a pointer to a “directory” – a list of different object types and where they’re located in flash (there’s a description of this for slightly older AMDs here). Type 0xb is treated slightly specially. Where most types contain the address of where the actual object is, type 0xb contains a 64-bit value that’s interpreted as enabling or disabling various features – something AMD calls “soft fusing” (Intel have something similar that involves setting bits in the Firmware Interface Table). The PSP looks at the bits that are set here and alters its behaviour. If bit 36 is set, the PSP tells Pluton to turn itself off and will no longer send any commands to it.

So, we have two mechanisms to disable Pluton – the PSP can tell it to turn itself off, or the x86 firmware can simply never speak to it or admit that it exists. Both of these imply that Pluton has started executing before it’s shut down, so it’s reasonable to wonder whether it can still do stuff. In the image I’m looking at, there’s a blob starting at 0x0069b610 that appears to be firmware for Pluton – it contains chunks that appear to be the reference TPM2 implementation, and it broadly decompiles as valid ARM code. It should be viable to figure out whether it can do anything in the face of being “disabled” via either of the above mechanisms.

Unfortunately for me, the system I’m looking at does set bit 36 in the 0xb entry – as a result, Pluton is disabled before x86 code starts running and I can’t investigate further in any straightforward way. The implication that the user-controllable mechanism for disabling Pluton merely disables x86 communication with it rather than turning it off entirely is a little concerning, although (assuming Pluton is behaving as a TPM rather than having an enhanced set of capabilities) skipping any firmware communication means the OS has no way to know what happened before it started running even if it has a mechanism to communicate with Pluton without firmware assistance. In that scenario it’d be viable to write a bootloader shim that just faked up the firmware measurements before handing control to the OS.

The bit 36 disabling mechanism seems more solid? Again, it should be possible to analyse the Pluton firmware to determine whether it actually pays attention to a disable command being sent. But even if it chooses to ignore that, if the PSP is in a position to just cut the clock to Pluton, it’s not going to be able to do a lot. At that point we’re trusting AMD rather than trusting Microsoft, but given that you’re also trusting AMD to execute the code you’re giving them to execute, it’s hard to avoid placing trust in them.

Overall: I’m reasonably confident that systems that ship with Pluton disabled via setting bit 36 in the soft fuses are going to disable it sufficiently hard that the OS can’t do anything about it. Systems that give the user an option to enable or disable it are a little less clear in that respect, and it’s possible (but not yet demonstrated) that an OS could communicate with Pluton anyway. However, if that’s true, and if the firmware never communicates with Pluton itself, the user could install a stub loader in UEFI that mimicks the firmware behaviour and leaves the OS thinking everything was good when it absolutely is not.

So, assuming that Pluton in its current form on AMD has no capabilities outside those we know about, the disabling mechanisms are probably good enough. It’s tough to make a firm statement on this before I have access to a system that doesn’t just disable it immediately, so stay tuned for updates.

comment count unavailable comments

[$] Three candidates vying for Debian project leader

Post Syndicated from original https://lwn.net/Articles/888752/

Three candidates have thrown their hat into the ring as candidates for the
2022 Debian project
leader (DPL) election
. One is Jonathan Carter, who is now in his
second term as DPL, while the other two are Felix Lechner and Hideki
Yamane. As is the norm, the candidates self-nominated during the
nomination period and are now in the campaigning phase until April 1.
The vote commences April 2 and runs for two weeks; the results will be
announced shortly thereafter and the new DPL term will start on
April 21. The candidates have put out platforms and are fielding
questions from the voters, Debian developers, thus it seems like a good
time to look in on the election.

Managing and Securing AWS Outposts Instances using AWS Systems Manager, Amazon Inspector, and Amazon GuardDuty

Post Syndicated from sbbusser original https://aws.amazon.com/blogs/compute/managing-and-securing-aws-outposts-instances-using-aws-systems-manager-amazon-inspector-and-amazon-guardduty/

This post is written by Sumeeth Siriyur, Specialist Solutions Architect.

AWS Outposts is a family of fully managed solutions that deliver AWS infrastructure and services to virtually any on-premises or edge location for a truly consistent hybrid experience. Outposts is ideal for workloads that need low latency access to on-premises applications or systems, local data processing, and secure storage of sensitive customer data that must remain anywhere without an AWS region, including inside company-controlled environments or a specific country.

A key feature of Outposts is that it offers the same AWS hardware infrastructure, services, APIs, and tools to build and run your applications on-premises and “in AWS Regions”. Outposts is part of the cloud for a truly consistent hybrid experience. AWS compute, storage, database, and other services run locally on Outposts, and you can access the full range of AWS services available in the Region to build, manage, and scale your on-premises applications using familiar AWS services and tools.

Outposts comes in a variety of form factors, from 1U and 2U servers to 42U Outposts rack. This post focuses on the 42U form factor of Outposts.

This post demonstrates how to use some of the existing AWS services in the Region, such as AWS System Manager (SSM), Amazon Inspector, and Amazon GuardDuty to manage and secure your workload environment on Outposts rack. This is no different from how you use these services for workloads in the AWS Regions.

Solution overview

In this scenario, Outposts rack is locally installed in a customer premises. The service link connectivity to the AWS Region can be either via an AWS Direct Connect private virtual interface, a public virtual interface, or the public internet.

The local gateway (LGW) provides connectivity between the Outposts instances and the local on-premises network.

A virtual private cloud (VPC) spans all Availability Zones in its AWS Region. You can extend the VPC in the Region to the Outpost by adding an Outpost subnet. To add an Outpost subnet to a VPC, specify the Amazon Resource Name (ARN) – arn:aws:outposts:region:account-id – of the Outpost when you create the subnet. Outposts rack support multiple subnets. In this scenario, we have extended the VPC from the Region (us-west-2) to the Outpost.

To improve the security posture of the Outposts instance, you can configure AWS SSM to use an interface VPC endpoint in Amazon Virtual Private Cloud (VPC). An interface VPC endpoint lets you connect to services powered by AWS PrivateLink, a technology that lets you privately access AWS SSM APIs by using private IP addresses. See the details in the following AWS SSM section for the VPC endpoints.

Most importantly, to leverage any of the AWS services in the Region, Outposts rack relies on connectivity to the parent AWS Region. Outposts rack is not designed for disconnected operations or environments with limited to no connectivity. We recommend that you have highly-available networking connections back to your AWS Region. For an optimal experience and resiliency, AWS recommends that you use redundant connectivity of at least 500 Mbps (1 Gbps or higher) for the service link connection to the AWS Region.

An overview of the AWS Outposts setup and connectivity back to the region.

Outposts offers a consistent experience with the same hardware infrastructure, services, APIs, management, and operations on-premises as in the AWS Regions. Unlike other hybrid solutions that require different APIs, manual software updates, and purchase of third-party hardware and support, Outposts enables developers and IT operations teams to achieve the same pace of innovation across different environments.

In the first section, let’s see how we can use AWS SSM services for managing and operating Outposts instances.

Managing Outposts instances using AWS SSM

The Amazon Systems Manager Agent (SSM Agent) is installed and running on the Outposts instances.

SSM Agent is installed by default on Amazon Linux, Amazon Linux 2, Ubuntu Server16.04 and Ubuntu Server 18.04 LTS based Amazon Elastic Compute Cloud (EC2) AMIs. If SSM Agent isn’t preinstalled, then you must manually install the agent. Agent communication with SSM is via TCP port 443.

Linux: Manually install SSM Agent on EC2 instances for Linux

Windows: Manually install SSM Agent on EC2 instances for Windows Server

  1. Create an IAM instance profile for SSM

By default, SSM doesn’t have permission to perform actions on your instances. Grant access by using an AWS Identity and Access Management (IAM) instance profile. An instance profile is a container that passes IAM role information to an Amazon EC2 instance at launch. You can create an instance profile for SSM by attaching one or more IAM policies that define the necessary permissions to a new role or to a role that you already created. Make sure that you follow AWS best practices by having a least-privileges policy created.

  1. Create VPC endpoints for SSM.

a. amazonaws.us-west-2.ssm: The endpoint for the Systems Manager service.

b. amazonaws.us-west-2.ec2messages: Systems Manager uses this endpoint to make calls from the SSM Agent to the Systems Manager service.

c. amazonaws.us-west-2.ec2: If you’re using Systems Manager to create VSS-enabled snapshots, then you must make sure that you have an endpoint to the EC2 service. Without the EC2 endpoint defined, a call to enumerate attached Amazon Elastic Block Storage (EBS) volumes fails, which causes the Systems Manager command to fail.

d. amazonaws.us-west-2.ssmmessages: This endpoint is for connecting to your instances with a secure data channel using Session Manager.

e. amazonaws.us-west-2.s3: Systems Manager uses this endpoint to update SSM agent, perform patch operation, and for uploading logs into Amazon Simple Storage Service (S3) buckets.

  1. Once the SSM agent has been installed and the necessary permission has been provided for the Systems Manager, log in to Systems Manager Console and navigate to Fleet Manager to discover the Outposts instances as shown in the following image.

Fleet Manager to discover the Outposts instances.

4. You can use compliance to scan the Outposts instances for patch compliance and configuration inconsistencies.

Compliance to scan the Outposts instances for patch compliance and configuration inconsistencies.

5. AWS Systems Manager Inventory provides visibility into your Outposts computing environment. You can use this inventory to collect metadata about the instances.

AWS SSM inventory to collect metadata about the instances.

6. With Session Manager, you can log into your Outposts instances. You can use either an interactive one-click browser-based shell, or the AWS Command Line Interface (CLI) for Linux based EC2 instances. For Windows instances, you can connect using Remote Desktop Protocol (RDP). For better SEO, suggest replacing this with “Check out”, attach the link to “how to connect to Windows instances from the Fleet Manager console”, and delete can be found here. here.

Note that accessing the Outposts EC2 instances through SSH or RDP via the Region based Session Manager will have more latency via service link than accessing via the LGW.

Session Manager to connect to Outposts EC2 instances.

7. Patch Manager automated the process of patching the Outposts instances with both security-related and other types of updates. In the following you can see that one of the Outposts instances is scanned and updated with an operational update.

AWS SSM Patch Manager to patch the Outposts Instances.

Security at AWS is the highest priority. Security is a shared responsibility between AWS and customers. We offer the security tools and procedures to secure the Outposts instances as in the AWS region. By using AWS services, you can enhance your security posture on Outposts rack in these areas.

In the second section, let’s see how we can use Amazon Inspector running in the AWS Region to scan for vulnerabilities within the Outposts environment. Amazon Inspector uses the widely deployed SSM Agent to automatically scan for vulnerabilities on Outposts instances.

Scan Outposts instances for vulnerabilities using Amazon Inspector

Amazon Inspector is an automated vulnerability management service that continually scans AWS workloads for software vulnerabilities and unintended network exposure. Amazon Inspector automatically discovers all of the Outposts EC2 instances (installed with SSM Agent) and container images residing in Amazon Elastic Container Registry (ECR) that are identified for scanning. Then, it immediately starts scanning them for software vulnerabilities and unintended network exposure.

All workloads are continually rescanned when a new Common Vulnerabilities And Exposures (CVE) is published, or when there are changes in the workloads, such as installation of new software in an Outposts EC2 instance.

Amazon Inspector uses the widely deployed SSM Agent (deployed in the previous scenario) to collect the software inventory and configurations from your Outposts EC2 instances. Use the VPC interface endpoint – com.amazonaws.us-west-2.inspector2 – to privately access Amazon Inspector. The collected application inventory and configurations are used to assess workloads for vulnerabilities.

  1. The following Summary Dashboard provides information on how many Outposts EC2 instances and the container repositories are scanned and discovered.

Amazon Inspector Summary Console.

2. The findings by Vulnerability tab help to identify the most vulnerable Outposts EC2 instances in your environment. In the following, you can see Outposts instances with the following vulnerability highlighted.

a. Port range 0 to 65535 is reachable from an Internet Gateway

b. Port 22 is reachable from an Internet Gateway

Amazon Inspector Vulnerability console.

3. The findings by instance tab shows you all of the active findings for a Single Outposts instance in your environment. In the following, you can see that for this instance there are a total of 12 high and 19 medium findings based on the rules in the Common Vulnerabilities And Exposures (CVE) package.

Amazon Inspector Instances Console.

In the last section, let’s see how we can use GuardDuty to detect any threats within the Outposts environment.

Threat Detection service for your AWS accounts and Outposts workloads using Amazon GuardDuty

GuardDuty is a threat detection service that continuously monitors your AWS accounts and workloads for malicious activities and delivers detailed security findings for visibility and remediation.

GuardDuty continuously monitors and analyses the Outposts instances and reports suspicious activities using the GuardDuty console. It gets this information from CloudTrail Management Events, VPC Flow Logs, and DNS logs.

In this scenario, GuardDuty has detected an SSH brute force attack against an Outposts instance.

Amazon GuardDuty threat detection console.

Costs associated with the scenario

  • Systems Manager: With AWS Systems Manager, you pay only for what you use on the priced feature. In this scenario, we have used the following features.
    1. Inventory – No additional charges
    2. Session Manager – No additional charges
    3. Patch Manager – No additional charges

*Note that there will be charges for the VPC endpoint created.

  • Amazon Inspector: Costs for Amazon Inspector are based on container images scanned to ECR and the EC2 instances being scanned.
    1. The average number of EC2 instances scanned per month in US-WEST-2 region is $1.258 per instance. In the above scenario, there are three instances within the Outposts at $1.258 = $3.774
  • Amazon GuardDuty: VPC Flow logs and CloudWatch logs are used for GuardDuty analysis. In this scenario, Only VPC Flow logs are considered.
    1. VPC Flow log is charged per GB/month. In US-WEST-2 region – the First 500 GB/month is $1 per GB. In the above scenario, there are three instances within the Outposts that would generate approximately 80 MB of data, which is still within the 500 GB limit.
  • Understand more about AWS Outposts rack pricing on our website.

Cleaning up

Please delete example resources if they are no longer needed to avoid incurring future costs.

  • Amazon Inspector: Disable Amazon Inspector from the Amazon Inspector Console.
  • Amazon GuardDuty: You can use the GuardDuty console to suspend or disable GuardDuty. You are not charged for using GuardDuty when the service is suspended.
  • Delete unused IAM policies

Conclusion

On-premises data centers traditionally use a variety of infrastructure, tools, and APIs. This disparate assortment of hardware and software solutions results in complexity. In turn, this leads to greater management costs, inability of staff to translate skills from one setting to another, and limits in innovation and knowledge-sharing between environments.

Using a common set of tools, services in the AWS Regions and on Outposts on premises allows you to have a consistent operation environment, thereby delivering a true hybrid cloud experience. Equally, by using the same tools to deploy and manage workloads in both environments, you can reduce operational overhead.

To get started with Outposts, see AWS Outposts Family. For more information about Outposts availability, see the Outposts rack FAQ.

The collective thoughts of the interwebz