Computer Vision at the Edge with AWS Panorama

Post Syndicated from Sébastien Stormacq original https://aws.amazon.com/blogs/aws/computer-vision-at-the-edge-with-aws-panorama/

Today, the AWS Panorama Appliance is generally available to all of you. The AWS Panorama Appliance is a computer vision (CV) appliance designed to be deployed on your network to analyze images provided by your on-premises cameras.

AWS Panorama Appliance

Every week, I read about new and innovative use cases for computer vision. Some customers are using CV to verify pallet trucks are parked in designated areas to ensure worker safety in warehouses, some are analyzing customer walking flows in retail stores to optimize space and product placement, and some are using it to recognize cats and mice, just to name a few.

AWS customers agree the cloud is the most convenient place to train computer vision models thanks to its virtually infinite access to storage and compute resources. In the cloud, data scientists have access to powerful tools such as Amazon SageMaker and a wide variety of compute resources and frameworks.

However, when it’s time to analyze images from one or multiple video feeds, many of you are telling us the cloud is not the place where you want to run such workloads. There are a number of reasons for that: sometimes the facilities where the images are captured do not have enough bandwidth to send video feeds to the cloud, some use cases require very low latency, or some just want to keep their images on premises and not send them for analysis outside of their network.

At re:Invent 2020, we announced the AWS Panorama Appliance and SDK to address these requirements.

AWS Panorama is a machine learning appliance and software development kit (SDK) that allows you to bring computer vision to on-premises cameras to make predictions locally with high accuracy and low latency. With the AWS Panorama Appliance, you can automate tasks that have traditionally required human inspection to improve visibility into potential issues. For example, you can use AWS Panorama Appliance to evaluate manufacturing quality, identify bottlenecks in industrial processes, and monitor workplace security even in environments with limited or no internet connectivity. The software development kit allows camera manufacturers to bring equivalent capabilities directly inside their IP camera.

As usual on this blog, I would like to walk you through the development and deployment of a computer vision application for the AWS Panorama Appliance. The demo application from this blog uses a machine learning model to recognise objects in frames of video from a network camera. The application loads a model onto the AWS Panorama Appliance, gets images from a camera, and runs those images through the model. The application then overlays the results on top of the original video and outputs it to a connected display. The application uses libraries provided by AWS Panorama to interact with input and output video streams and the model, no low level programming is required.

Let’s first define a few concepts. I borrowed the following definitions from the AWS Panorama documentation page.

Concepts
The AWS Panorama Appliance is the hardware that runs your applications. You use the AWS Panorama console or AWS SDKs to register an appliance, update its software, and deploy applications to it. The software that runs on the appliance discovers and connects to camera streams, sends frames of video to your application, and optionally displays video output on an attached display.

The appliance is an edge device. Instead of sending images to the AWS Cloud for processing, it runs applications locally on optimized hardware. This enables you to analyze video in real time and process the results with limited connectivity. The appliance only requires an internet connection to report its status, upload logs, and get software updates and deployments.

An application comprises multiple components called nodes, which represent cameras, models, code, or global variables. A node can be configuration only (inputs and outputs), or include artifacts (models and code). Application nodes are bundled in node packages that you upload to an S3 access point, where the AWS Panorama Appliance can access them. An application manifest is a configuration file that defines connections between the nodes.

A computer vision model is a machine learning network that is trained to process images. Computer vision models can perform various tasks such as classification, detection, segmentation, and tracking. A computer vision model takes an image as input and outputs information about the image or objects in the image.

AWS Panorama supports models built with Apache MXNet, DarkNet, GluonCV, Keras, ONNX, PyTorch, TensorFlow, and TensorFlow Lite. You can build models with Amazon SageMaker and import them from an Amazon Simple Storage Service (Amazon S3) bucket.

AWS Panorama Context

Now that we grasp the concepts, let’s get our hands on.

Unboxing Your AWS Panorama Appliance
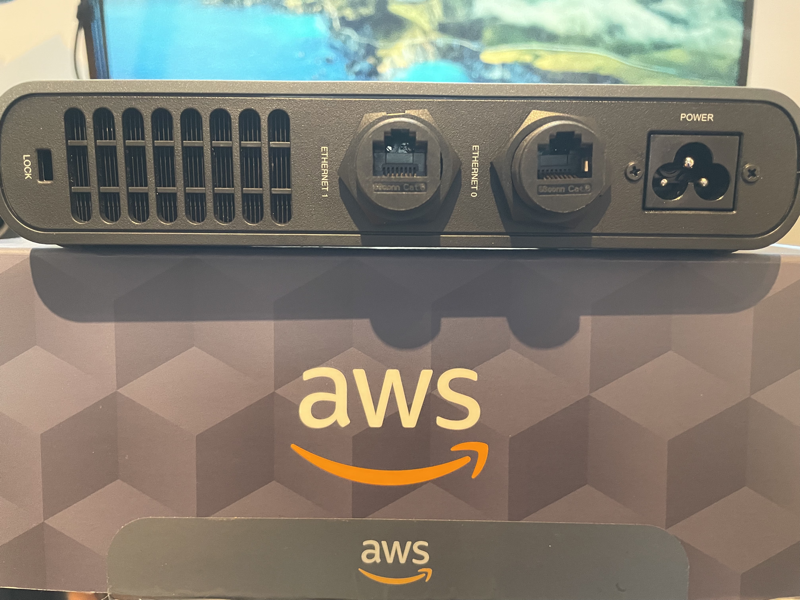
In the box the service team sent me, I found the appliance itself (no surprise!), a power cord and two ethernet cables. The box also contains a USB key to initially configure the appliance. The device is designed to work in industrial environments. It has two ethernet ports next to the power connector on the back. On the front, protected behind a sliding door, I found a SD card reader, one HDMI connector and two USB ports. There is also a power button and a reset button to reinitialise the device to its factory state.

AWS Panorama Appliance Front Side AWS Panorama Appliance Back Side AWS Panorama USB key

Configuring Your Appliance
I first configured it for my network (cable + DHCP, but it also supports static IP configuration) and registered it to securely connect back to my AWS Account. To do so, I navigated to the AWS Management Console, entered my network configuration details. It generated a set of configuration files and certificates. I copied them to the appliance using the provided USB key. My colleague Martin Beeby shared screenshots of this process. The team slightly modified the screens based on the feedback they received during the preview, but I don’t think it is worth going through the step-by-step process again. Tip from the field: be sure to use the USB key provided in the box, it is correctly formatted and automatically recognised by the appliance (my own USB key was not recognized properly).

I then downloaded a sample application from the Panorama GitHub repository and tried it with the Test Utility for Panorama, also available on this GitHub (the test utility is an EC2 instance configured to act as a simulator). The Test Utility for Panorama uses Jupyter notebooks to quickly experiment with sample applications or your code before deploying it to the appliance. It also lists commands allowing you to deploy your applications to the appliance programmatically.

Panorama Command Line
The Panorama command line simplifies the operations to create a project, import assets, package it, and deploy it to the AWS Panorama Appliance. You can follow these instructions to download and install the Panorama command line.

When receiving an application developed by someone else, like the sample application, I have to replace AWS account IDs in all application files and directory names. I do this with one single command:

panorama-cli import-application

Application Structure
A Panorama application structure looks as follows:

├── assets
├── graphs
│   └── example_project
│       └── graph.json
└── packages
    ├── accountXYZ-model-1.0
    │   ├── descriptor.json
    │   └── package.json
    └── accountXYZ-sample-app-1.0
        ├── Dockerfile
        ├── descriptor.json
        ├── package.json
        └── src
            └── app.py

  • graph.json lists all the packages and nodes in this application. Nodes are the way to define an application in Panorama.
  • in each package package.json has details about the package and the assets it uses.
  • model package model has a descriptor.json which contains the metadata required for compiling the model.
  • container packagesample-app package contains the application code in the src directory and a Dockerfile to build the container. descriptor.json has details about which command and file to use when the container is launched.
  • assets directory is where all the assets reside, such as packaged code and compiled models. You should not make any changes in this directory.

Note that package names are prefixed with your account number.

When my application is ready, I build the container (I am using a Linux machine with Docker Engine and Docker CLI to avoid using Docker Desktop for macOS or Windows.)

$ panorama-cli build-container                               \
               --container-asset-name {container_asset_name} \ 
               --package-path packages/{account_id}-{package_name}-1.0 

A Note About the Cameras
AWS Panorama Appliance has a concept of “abstract cameras”. Abstract camera sources are placeholders that can be mapped to actual camera devices during application deployment. The Test Utility for Panorama allows you to map abstract cameras to video files for easy, repeatable tests.

Adding a ML Model
The AWS Panorama Appliance supports multiple ML Model frameworks. Models may be trained on Amazon SageMaker or any other solution of your choice. I downloaded my ML model from S3 and import it to my project:

panorama-cli add-raw-model                                                 \
    --model-asset-name {asset_name}                                        \
    --model-s3-uri s3://{S3_BUCKET}/{project_name}/{ML_MODEL_FNAME}.tar.gz \
    --descriptor-path {descriptor_path}                                    \
    --packages-path {package_path}

Behind the scenes, ML Models are compiled to optimise them to the Nvidia Accelerated Linux Arm64 architecture of the AWS Panorama Appliance.

Package the Application
Now that I have a ML model and my application code packaged in a container, I am ready to package my application assets for AWS Panorama Appliance:

panorama-cli package-application

This command uploads all my application assets to the AWS cloud account along with all the manifests.

Deploy the Application
Finally I deploy the application to the AWS Panorama Appliance. A deployment copies the application and its configuration, like camera stream selection, from the AWS cloud to my on-premise AWS Panorama Appliance. I may deploy my application programmatically using Python code (and the Boto3 SDK you might know already):


client = boto3.client('panorama')
client.create_application_instance(
    Name="AWS News Blog Sample Application",
    Description="An object detection app",
    ManifestPayload={
       'PayloadData': manifest         # <== this is the graph.json file content 
    },
    RuntimeRoleArn=role,               # <== this is a role that gives my app permissions to use AWS Services such as Cloudwatch
    DefaultRuntimeContextDevice=device # <== this is my device name 
)

Alternatively, I may use the AWS Management Console:

On Deployed applications, I select Deploy application.

AWS Panorama - Start the deployment

I copy and paste the content of graphs/<project name>/graph.json to the console and select Next.

AWS Panorama - Copy Graph JSON

I give my application a name and an optional description. I select Proceed to deploy.

AWS Panoram Deploy - Application Name

The next steps are

  • declare an IAM role to give permissions to my application to use AWS Service. The minimal permissions set allows to call the PuMetricData API on CloudWatch.
  • select the AWS Panorama Appliance I want to deploy to
  • map the abstract cameras defined in the application descriptors.json to physical cameras known by the AWS Panorama Appliance
  • fill in any application-specific inputs, such as acceptable threshold value, log level etc.

An example IAM policy is

AWSTemplateFormatVersion: '2010-09-09'
Description: Resources for an AWS Panorama application.
Resources:
  runtimeRole:
    Type: AWS::IAM::Role
    Properties:
      AssumeRolePolicyDocument:
        Version: "2012-10-17"
        Statement:
          -
            Effect: Allow
            Principal:
              Service:
                - panorama.amazonaws.com
            Action:
              - sts:AssumeRole
      Policies:
        - PolicyName: cloudwatch-putmetrics
          PolicyDocument:
            Version: 2012-10-17
            Statement:
              - Effect: Allow
                Action: 'cloudwatch:PutMetricData'
                Resource: '*'
      Path: /service-role/

These six screenhots capture this process:

AWS Panorama - Deploy 2 AWS Panorama - Deploy 1 AWS Panorama - Deploy 3
AWS Panorama - Deploy 4 AWS Panorama - Deploy 5 AWS Panorama - Deploy 5

The deployment takes 15-30 minutes depending on the size of your code and your ML models, and the appliance available bandwidth. Eventually, the status turn green to “Running”.
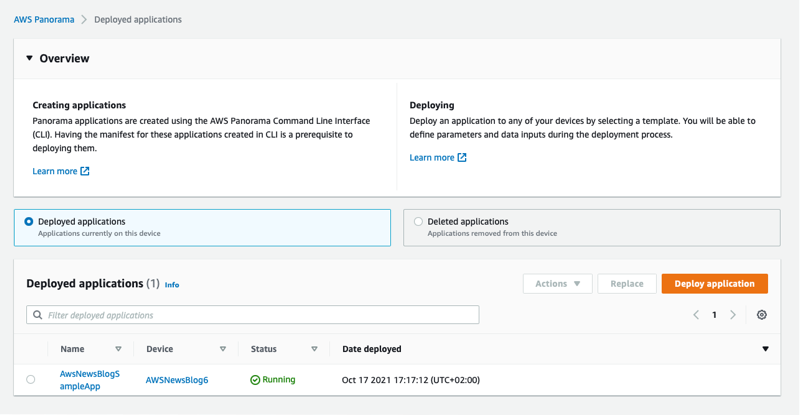
AWS Panorama - Deployment Completed

Once the application is deployed to your AWS Panorama Appliance it begins to run, continuously analyzing video and generating highly accurate predictions locally within milliseconds. I connect an HDMI cable to the AWS Panorama Appliance to monitor the output, and I can see:

AWS Panorama HDMI output

Should anything goes wrong during the deployment or during the life of the application, I have access to the logs on Amazon CloudWatch. There are two log streams created, one for the AWS Panorama Appliance itself and one for the application.

AWS Panorama Appliance log AWS Panorama application log

Pricing and Availability
The AWS Panorama Appliance is available to purchase at AWS Elemental order page in the AWS Console. You can place orders from the United States, Canada, the United Kingdom, and the European Union. There is a one-time charge of $4,000 for the appliance itself.

There is a usage charge of $8.33 / month / camera feed.

AWS Panorama stores versioned copies of all assets deployed to the AWS Panorama Appliance (including ML models and business logic) in the cloud. You are charged $0.10 per-GB, per-month for this storage.

You may incur additional charges if the business logic deployed to your AWS Panorama Appliance uses other AWS services. For example, if your business logic uploads ML predictions to S3 for offline analysis, you will be billed separately by S3 for any storage charges incurred.

The AWS Panorama Appliance can be installed anywhere. The appliance connects back to the AWS Panorama service in the AWS cloud in one of the following AWS Region : US East (N. Virginia), US West (Oregon), Canada (Central), or Europe (Ireland).
Go and build your first computer vision model today.

— seb

Amazon EC2 Auto Scaling will no longer add support for new EC2 features to Launch Configurations

Post Syndicated from Pranaya Anshu original https://aws.amazon.com/blogs/compute/amazon-ec2-auto-scaling-will-no-longer-add-support-for-new-ec2-features-to-launch-configurations/

This post is written by Scott Horsfield, Principal Solutions Architect, EC2 Scalability and Surabhi Agarwal, Sr. Product Manager, EC2.

In 2010, AWS released launch configurations as a way to define the parameters of instances launched by EC2 Auto Scaling groups. In 2017, AWS released launch templates, the successor of launch configurations, as a way to streamline and simplify the launch process for Auto Scaling, Spot Fleet, Amazon EC2 Spot Instances, and On-Demand Instances. Launch templates define the steps required to create an instance, by capturing instance parameters in a resource that can be used across multiple services. Launch configurations have continued to live alongside launch templates but haven’t benefitted from all of the features we’ve added to launch templates.

Today, AWS is recommending that customers using launch configurations migrate to launch templates. We will continue to support and maintain launch configurations, but we will not be adding any new features to them. We will focus on adding new EC2 features to launch templates only. You can continue using launch configurations, and AWS is committed to supporting applications you have already built using them, but in order for you to take advantage of our most recent and upcoming releases, a migration to launch templates is recommended. Additionally, we plan to no longer support new instance types with launch configurations by the end of 2022. Our goal is to have all customers moved over to launch templates by then.

Moving to launch templates is simple to accomplish and can be done easily today. In this blog, we provide more details on how you can transition from launch configurations to launch templates. If you are unable to transition to launch templates due to lack of tooling or specific functions, or have any concerns, please contact AWS Support.

Launch templates vs. launch configurations

Launch configurations have been a part of Amazon EC2 Auto Scaling Groups since 2010. Customers use launch configurations to define Auto Scaling group configurations that include AMI and instance type definition. In 2017, AWS released launch templates, which reduce the number of steps required to create an instance by capturing all launch parameters within one resource that can be used across multiple services. Since then, AWS has released many new features such as Mixed Instance Policies with Auto Scaling groups, Targeted Capacity Reservations, and unlimited mode for burstable performance instances that only work with launch templates.

Launch templates provide several key benefits to customers, when compared to launch configurations, that can improve the availability and optimization of the workloads you host in Auto Scaling groups and allow you to access the full set of EC2 features when launching instances in an Auto Scaling group.

Some of the key benefits of launch templates when used with Auto Scaling groups include:

How to determine where you are using launch configurations

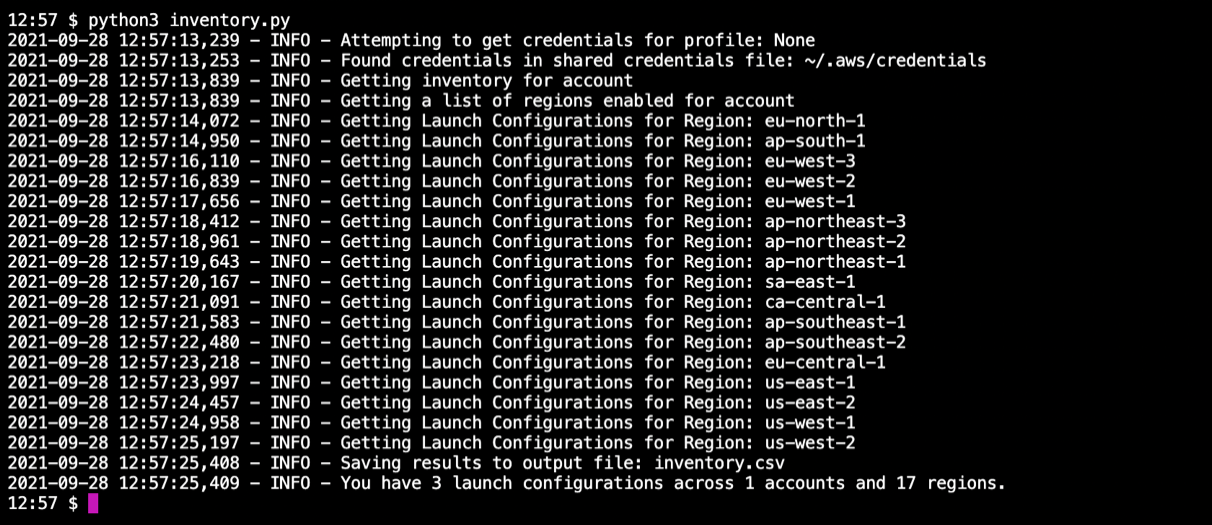
Use the Launch Configuration Inventory Script to find all of the launch configurations in your account. You can use this script to generate an inventory of launch configurations across all regions in a single account or all accounts in your AWS Organization.

The script can be run with a variety of options for different levels of account access. You can learn more about these options in this GitHub post. In its simplest form it will use the default credentials profile to inventory launch configurations across all regions in a single account.

Screenshot of Launch Configuration Inventory script

Once the script has completed, you can view the generated inventory.csv file to get a sense of how many launch configurations may need to be converted to launch templates or deleted.

Screenshot of script

How to transition to launch templates today

If you’re ready to move to launch templates now, making the transition is simple and mostly automated through the AWS Management Console. For customers who do not use the AWS Management Console, most popular Infrastructure as Code (IaC), such as CloudFormation and Terraform, already support launch templates, as do the AWS CLI and SDKs.

To perform this transition, you will need to ensure that your user has the required permissions.

Here are some examples to get you started.

AWS Management Console

  1. Open the EC2 Launch Configuration console. You must sign in if you are not already authenticated.
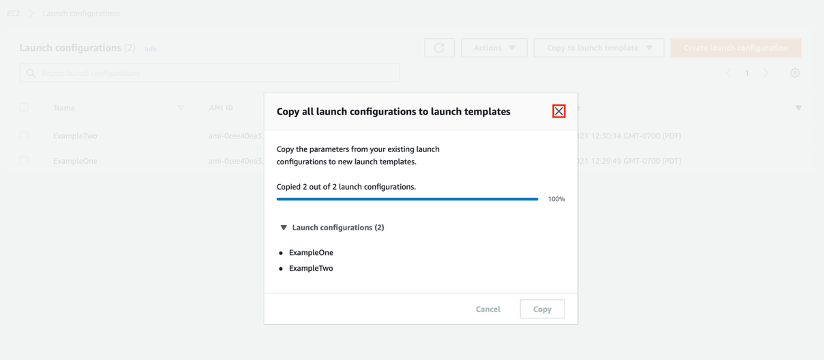
  2. From the Launch Configuration console, click on the Copy to launch template button and select Copy all.
    1. Alternatively, you can select individual launch configurations, and use the Copy selected option to selectively copy certain launch configurations.copy to launch template screenshot
  1. Review the list of templates and click on the Copy button when you’re ready to proceed.3. Review the list of templates and click on the Copy button when you’re ready to proceed.
  1. Once the copy process has completed, you can close the wizard.

4. Once the copy process has completed, you can close the wizard.

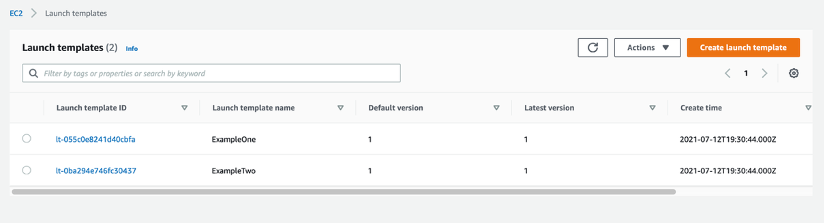
  1. Navigate to the EC2 Launch Template console to view your newly created launch templates.5. Navigate to the EC2 Launch Template console to view your newly created launch templates.
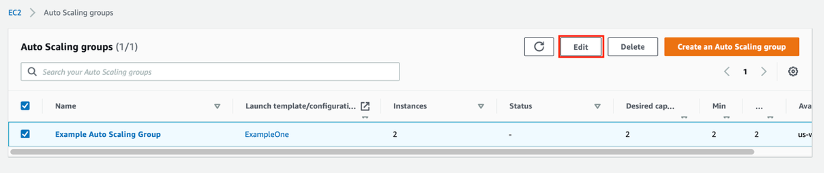
  1. Your launch templates are now ready to replace launch configurations in your Auto Scaling group configuration. Navigate to the Auto Scaling group console, select your Auto Scaling group, and click on the Edit.

. Navigate to the Auto Scaling group console, select your Auto Scaling group, and click on the Edit button.

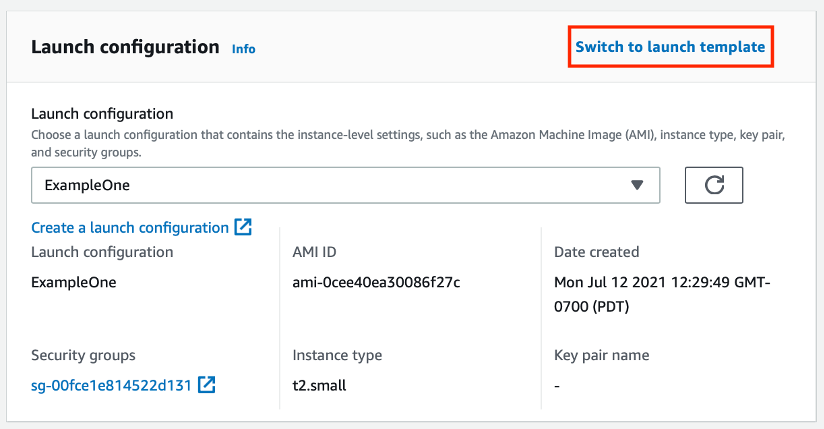
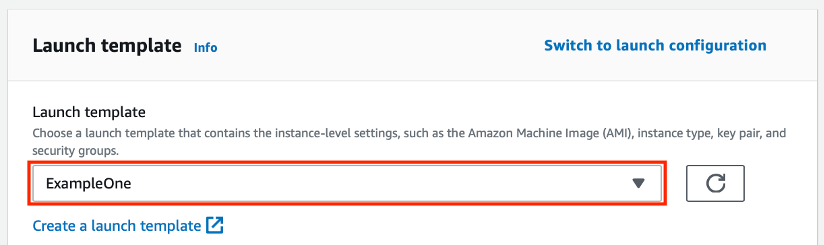
  1. Next, scroll down to the Launch configuration section, and click Switch to launch template.7. Next, scroll down to the Launch configuration section, and click Switch to launch template.
  1. Select your newly created Launch template, review and confirm your configuration, and when ready scroll down to the bottom of the page and click the Update button.when ready scroll down to the bottom of the page and click the Update button.
  2. Now that you’ve migrated your launch configurations to launch templates you can prevent users from creating new launch configurations by updating their IAM permissions to deny the autoscaling:CreateLaunchConfiguration action.

Instances launched by this Auto Scaling group continue to run and are not automatically be replaced by making this change. Any instance launched after making this change uses the launch template for its configuration. As your Auto Scaling group scales up and down, the older instances are replaced. If you’d like to force an update, you can use Instance Refresh to ensure that all instances are running the same launch template and version.

CloudFormation and Terraform

If you use CloudFormation to create and manage your infrastructure, you should use the AWS::EC2::LaunchTemplate resource to create launch templates. After adding a launch template resource to your CloudFormation stack template file update your Auto Scaling group resource definition by adding a LaunchTemplate property and removing the existing LaunchConfigurationName property. We have several examples available to help you get started.

Using launch templates with Terraform is a similar process. Update your template file to include a aws_launch_template resource and then update your aws_autoscaling_group resources to reference the launch template.

In addition to making these changes, you may also want to consider adding a MixedInstancesPolicy to your Auto Scaling group. A MixedInstancesPolicy allows you to configure your Auto Scaling group with multiple instance types and purchase options. This helps improve the availability and optimization of your applications. Some examples of these benefits include using Spot Instances and On-Demand Instances within the same Auto Scaling group, combining CPU architectures such as Intel, AMD, and ARM (Graviton2), and having multiple instance types configured in case of a temporary capacity issue.

You can generate and configure example templates for CloudFormation and Terraform in the AWS Management Console.

AWS CLI

If you’re using the AWS CLI to create and manage your Auto Scaling groups, these examples will show you how to accomplish common tasks when using launch templates.

SDKs

AWS SDKs already include APIs for creating launch templates. If you’re using one of our SDKs to create and configure your Auto Scaling groups, you can find more information in the SDK documentation for your language of choice.

Next steps

We’re excited to help you take advantage of the latest EC2 features by making the transition to launch templates as seamless as possible. As we make this transition together, we’re here to help and will continue to communicate our plans and timelines for this transition. If you are unable to transition to launch templates due to lack of tooling or functionalities or have any concerns, please contact AWS Support. Also, stay tuned for more information on tools to help make this transition easier for you.

Crash CORS: A Guide for Using CORS

Post Syndicated from Molly Clancy original https://www.backblaze.com/blog/crash-cors-a-guide-for-using-cors/

The dreaded CORS error is the bane of many a web developer’s day-to-day life. Even for experts, it can be eternally frustrating. Today, we’re digging into CORS, starting with the basics and working up to sharing specific code samples to help you enable CORS for your web development project. What is CORS? Why do you need it? And how can you enable it to save time and resources?

We’ll answer those questions so you can put the CORS bane behind you.

What Is CORS?

CORS stands for cross-origin resource sharing. To define CORS, we first need to explain its counterpoint—the same-origin policy, or SOP. The SOP is a policy that all modern web browsers use for security purposes, and it dictates that a web address with a given origin can only request data from the same origin. CORS is a mechanism that allows you to bypass the SOP so you can request data from websites with different origins.

Let’s break that down piece by piece, then we’ll get into why you’d want to bypass the same-origin policy in the first place.

What Is an Origin?

All websites have an origin, and it is defined by the protocol, domain, and port of its URL.

You’re probably familiar with the working parts of a URL, but they each have a different function. The protocol, also known as the scheme, identifies the method for exchanging data. Typical protocols are http, https, or mailto. The domain, also known as the hostname, is a specific webpage’s unique identifier. You may not be as familiar with the port as it’s not normally visible in a typical web address. Just like a port on the water, it’s the connection point where information comes in and out of a server. Different port numbers specify the types of information the port handles.

When you understand what an origin is, the “cross-origin” part of CORS makes a bit more sense. It simply means web addresses with different origins. In web addresses with the same origin, the protocol, domain, and port all match.

What Is the Same-origin Policy?

The same-origin policy was developed and implemented as a security measure against a specific website vulnerability that was discovered and exploited in the 2000s. Before the same-origin policy was in place, bad actors could use cookies stored in people’s browsers to make requests to other websites illicitly. This is known as cross-site request forgery, or CSRF, pronounced “sea surf.” It’s also known as “session riding.” Tubular.

Let’s say you log in to Netflix on your laptop to add Ridley Scott’s 1982 classic, “Blade Runner” to your queue, as one does. You click “Remember Me” so you don’t have to log in every time, and your browser keeps your credentials stored in a cookie so that the Netflix site knows you are logged in no matter where you navigate within their site.

Afterwards, you’re bored, so you fall down an internet rabbit hole wondering why “Blade Runner” is called “Blade Runner” when there are few blades and little running. You end up on a site about samurai swords that happens to be malicious—it has a script in its code that uses your authentication credentials stored in that cookie to make a request to Netflix that can change your address and add a bunch of DVDs to your queue (also, it’s 2006, and this actually happened). You’ve become a victim of cross-site request forgery.

To thwart this threat, browsers enabled the same-origin policy to prohibit requests from one origin to another.

Why Do You Need CORS?

While the same-origin policy helped stop bad actors from nefariously accessing websites, it posed a problem—sometimes you need or want assets and data from different origins. This is where the “resource sharing” part of cross-origin resource sharing comes in.

CORS allows you to set rules governing which origins are allowed to bypass the same-origin policy so you can share resources from those origins.

For example, you might host your website’s front end at www.catblaze.com, but you host your back-end API at api.catblaze.com. Or, you might need to display a bunch of cat videos stored in Backblaze B2 Cloud Storage on your website, www.catblaze.com (more on that below).

Do I Need CORS?

Let’s say you have a website, and you dabble in some coding. You’re probably thinking, “I can already use images and stuff from other websites. Do I need CORS?” And you’re right to ask. Most browsers allow simple http requests like get, head, and post without requiring CORS rules to be set in advance. Embedding images from other sites, for example, typically requires a get request to grab that data from a different origin. If that’s all you need, you’re good to go. You can use simple requests to embed images and other data from other websites without worrying about CORS.

But some assets, like fonts or iframes, might not work—then, you can use CORS—but if you’re a casual user, you can probably stop here.

Coding Explainer: What Is an http Request?

An http request is the way you, the client, use code to talk to a server. A complete http request includes a request line, request headers, and a message body if necessary. The request line specifies the method of the request. There are generally eight types:

  • get: “I want something from the server.”
  • head: “I want something from the server, but only give me the headers, not the content.”
  • post: “I want to send something to the server.”
  • put: “I want to send something to the server that replaces something else.”
  • delete: …self-explanatory.
  • patch: “I want to change something on the server.”
  • options: “Is this request going to go through?” (This one is important for CORS!)
  • trace: “Show me what you just did.” Useful for debugging.

After the method, the request line also specifies the path of the URL the method applies to as well as the http version.

The request headers communicate some specifics around how you want to receive the information. There are usually a whole bunch of these. (Wikipedia has a good list.) They’re typically formatted thusly: name:value. For example:

accept:text/plain means you want the response to be in text format.

Finally, the message body contains anything you might want to send. For example, if you use the method post, the message body would contain what you want to post.

Do I Need CORS With Cloud Storage?

People use cloud storage for all manner of data storage purposes, and most do not need to use CORS to access resources stored in a cloud instance. For example, you can make API calls to Backblaze B2 from any computer to use the resources you have stored in your storage buckets. If you’re running a mobile application and transferring data back and forth to Backblaze B2, for instance, you don’t need CORS. The mobile application doesn’t rely on a web browser.

You only need CORS if you’re specifically running code inside of a web browser and you need to make API calls from the browser to Backblaze B2. For example, if you’re using an in-browser video player and want to play videos stored in Backblaze B2.

Fortunately, if you do need CORS, Backblaze B2 allows you to configure CORS to your exact specifications while other cloud providers may have completely open CORS policies. Why is that important? An open CORS policy makes you vulnerable to CSRF attacks. To continue with the video example, let’s say you’re storing a bunch of videos that you want to make available on your website. If they’re stored with a cloud provider that has an open CORS policy, you have two choices—open or closed. You pick open so that your website visitors can call up those videos on demand, but that leaves you vulnerable to a CSRF that could allow a bad actor to download your videos. With Backblaze, you can specify the exact CORS rules you need.

If you are using Backblaze B2 to store data that will be displayed in a browser, or you’re just curious, read on to learn more about using CORS. CORS has saved developers lots of time and money by reducing maintenance effort and code complexity.

How Does CORS Work?

Unlike simple get, head, and post requests, some types of requests can alter the origin’s data. These include requests like delete, put, and patch. Any type of request that could alter the origin’s data will trigger CORS, as will simple requests that have non-standard http headers or requests in certain programming languages like AJAX. When CORS is triggered, the browser sends what’s called a preflight request to see if the CORS rules allow the request.

What Is a Preflight Request?

A preflight request, also known as an options request, asks the server if it’s okay to make the CORS request. If the preflight request comes back successfully, then the browser will complete the actual request. Few other systems in computing do this by default, so it’s important to understand when using CORS.

A preflight request has the following headers:

  • origin: Identifies the origin from which the CORS request originates.
  • access-control-request-method: Identifies the method of the CORS request.
  • access-control-request-headers: Lists the headers that will be included in the CORS request.

The web server then responds with the following headers:

  • access-control-allow-origin: Confirms the origin is allowed.
  • access-control-allow-method: Confirms the methods are allowed.
  • access-control-allow-headers: Confirms the headers are allowed.

The values that follow these headers must match the values specified in the preflight request. If so, the browser will permit the actual CORS request to come through.

Setting CORS Up: An Example

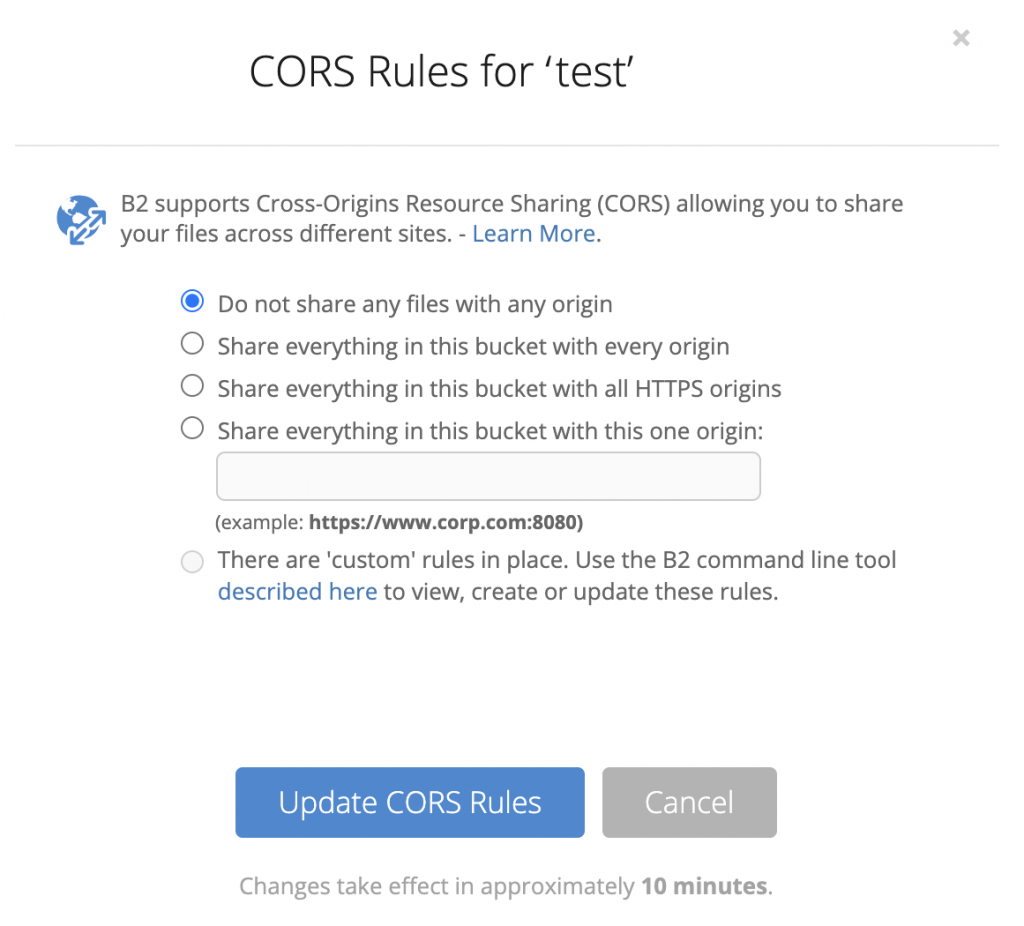
To provide an example for setting CORS up, we’ll use Backblaze B2. By default, the Backblaze B2 servers will say “no” to preflight requests. Adding CORS rules to your bucket tells Backblaze B2 which preflight requests to approve. You can enable CORS in the Backblaze B2 UI if you only need to allow one, specific origin or if you want to be able to share the bucket with all origins.

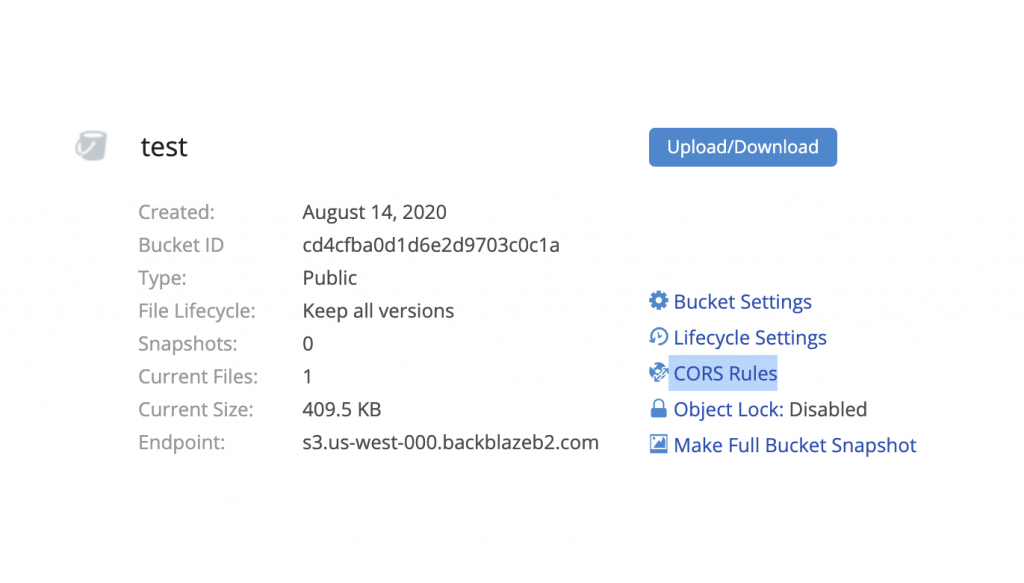
Click the CORS rules link to configure CORS.
In the CORS rules pop-up, you can choose how you want to configure CORS rules.

If you need more specificity than that, you can select the option for custom rules and use the Backblaze B2 command line tool.

When a CORS preflight or cross-origin download is requested, Backblaze B2 evaluates the CORS rules on the file’s bucket. Rules may be set at the time you create the bucket with b2_create_bucket or updated on an existing bucket using b2_update_bucket.

CORS rules only affect Backblaze B2 operations in their “allowedOperations” list. Every rule must specify at least one in their allowedOperations.

CORS Rule Structure

Each CORS rule may have the following parameters:

Required:

  • corsRuleName: A name that humans can recognize to identify the rule.
  • allowedOrigins: A list of the origins you want to allow.
  • allowedOperations: A list that specifies the operations you want to allow, including:
    • B2 Native API Operations:
    • B2_download_file_by_name
    • B2_download_file_by_id
    • B2_upload_file
    • B2_upload_part
    • S3 Compatible Operations:
    • S3_delete
    • S3_get
    • S3_head
    • S3_post
    • S3_put

Optional:

  • allowedHeaders: A list of headers that are allowed in a preflight request’s Access-Control-Request-Headers value.
  • exposeHeaders: A list of headers that may be exposed to an application inside the client.
  • maxAgeSeconds: The maximum number of seconds that a browser can cache the response to a preflight request.

The following sample configuration allows downloads, including range requests, from any https origin and will tell browsers that it’s okay to expose the ‘x-bz-content-sha1’ header to the web page.

[
{
"corsRuleName": "downloadFromAnyOrigin",
"allowedOrigins": [
"https"
],
"allowedHeaders": ["range"],
"allowedOperations": [
"b2_download_file_by_id",
"b2_download_file_by_name"
],
"exposeHeaders": ["x-bz-content-sha1"],
"maxAgeSeconds": 3600
}
]

You may add up to 100 CORS rules to each of your buckets. Backblaze B2 uses the first rule that matches the request. A CORS preflight request matches a rule if the origin header matches one of the rule’s allowedOrigins, if the operation is in the rule’s allowedOperations, and if every value in the Access-Control-Request-Headers is in the rule’s allowedHeaders.

Using CORS: Examples in Action

Using your browser’s console, you can copy and paste the following examples to see CORS requests succeed or fail. As a handy guide for you, the text files we’ll be requesting include the bucket configuration of the Backblaze B2 buckets we’re calling.

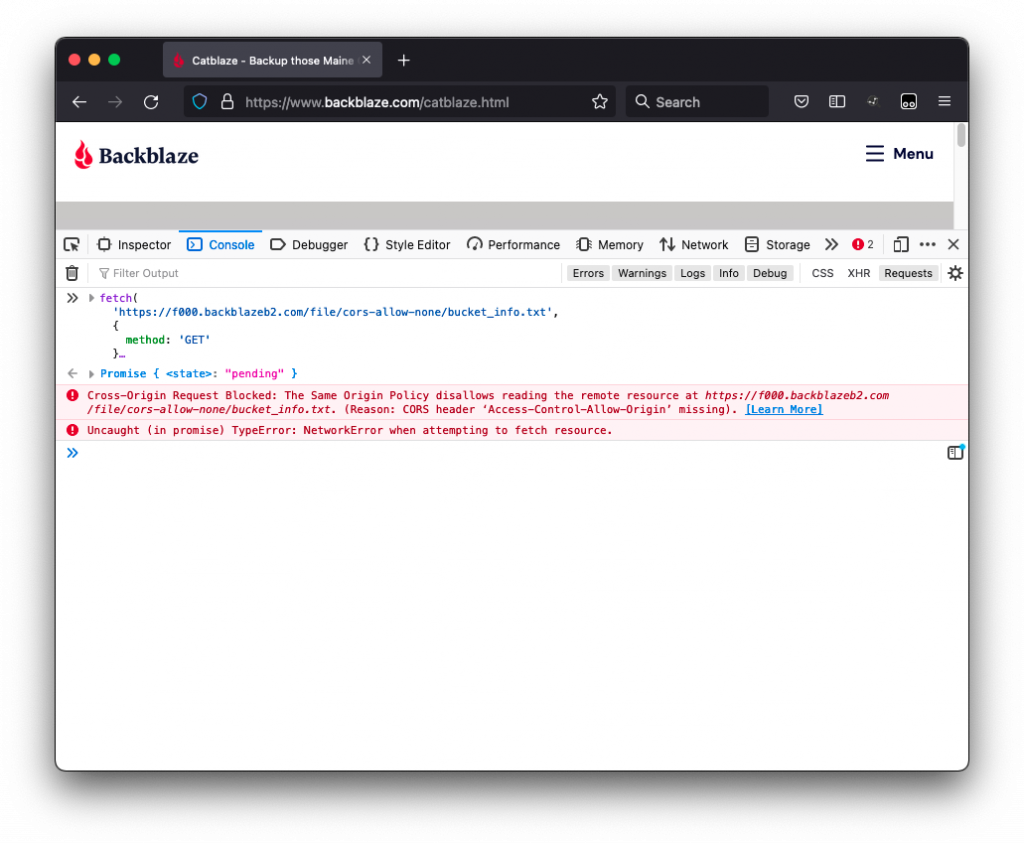
In the first example, we’ll make a request to get the text file bucket_info.txt from a bucket named “cors-allow-none” that does not allow CORS requests:

fetch(
'https://f000.backblazeb2.com/file/cors-allow-none/bucket_info.txt',
{
method: 'GET'
}
).then(resp => resp.text()).then(console.log)

As you can see, this request returns a CORS error:

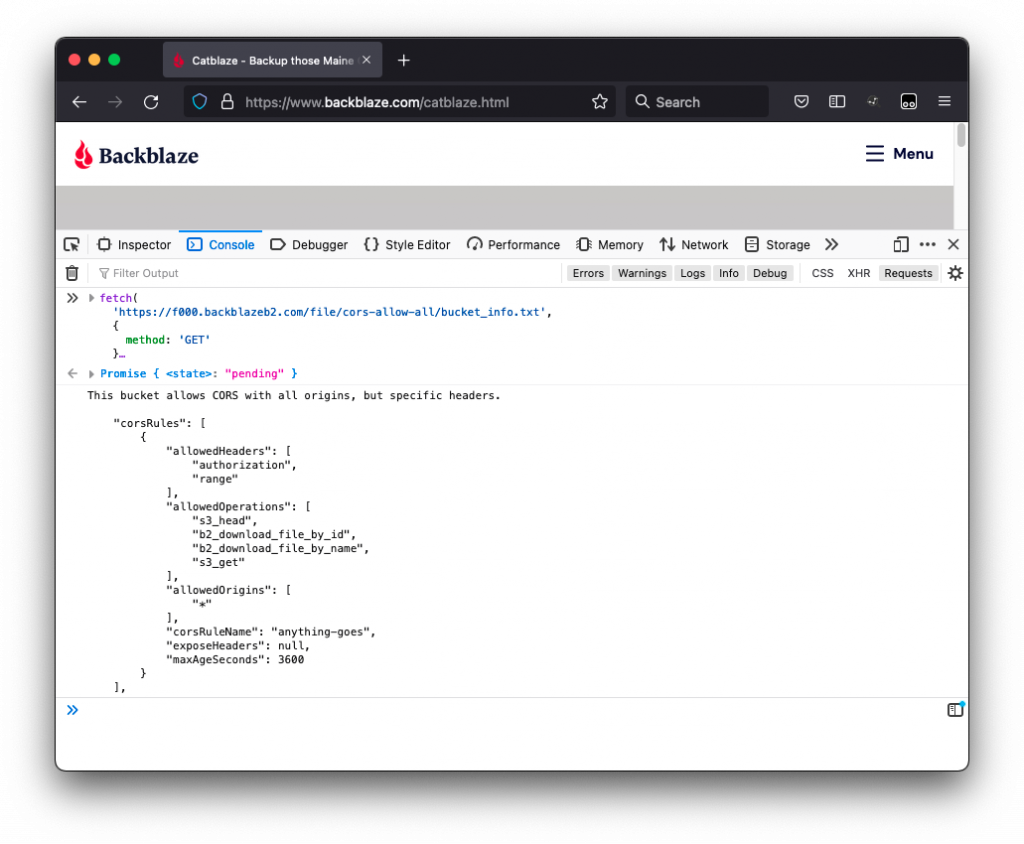
Next, we’ll try the same request on a bucket named “cors-allow-all” that allows CORS with any origin, but only specific headers.

fetch(
'https://f000.backblazeb2.com/file/cors-allow-all/bucket_info.txt',
{
method: 'GET'
}
).then(resp => resp.text()).then(console.log)

When you run the code, you will see some text output to the console indicating that, indeed, the bucket allows CORS with all origins, but specific headers:

We didn’t include any headers in our request, so the request was successful and the text file we wanted—bucket_info.txt—appears below the text output in the console. As you can see in the text output, the bucket is configured with an asterisk “*,” also known as a “wildcard,” to allow all origins (more on that later).

Next, we’ll try the same thing on the bucket that allows CORS with all origins, but this time triggers a pre-flight check for a header that is not allowed:

fetch(
'https://f000.backblazeb2.com/file/cors-allow-all/bucket_info.txt',
{
method: 'GET',
headers: { 'X-Fake-Header': 'breaking-cors-for-fun' }
}
).then(resp => resp.text()).then(console.log)

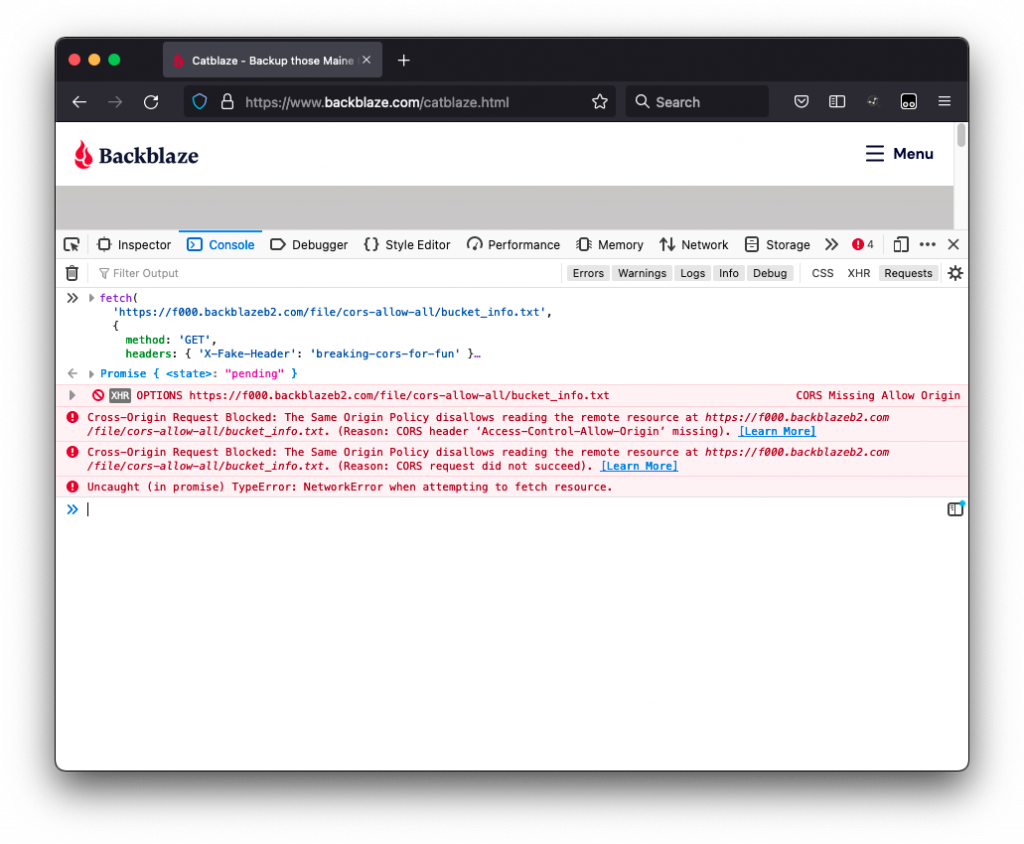
Our bucket is configured to only allow the headers authorization and range, but we’ve included the header X-Fake-Header with the value breaking-cors-for-fun—definitely not allowed—in the request.

When we run this request, we can see another type of failure:

Below the request, but above the CORS errors, you’ll see that the browser sent an options request. As we mentioned earlier, this is the pre-flight request that asks the server if it’s okay to make the get request. In this case, the pre-flight request failed.

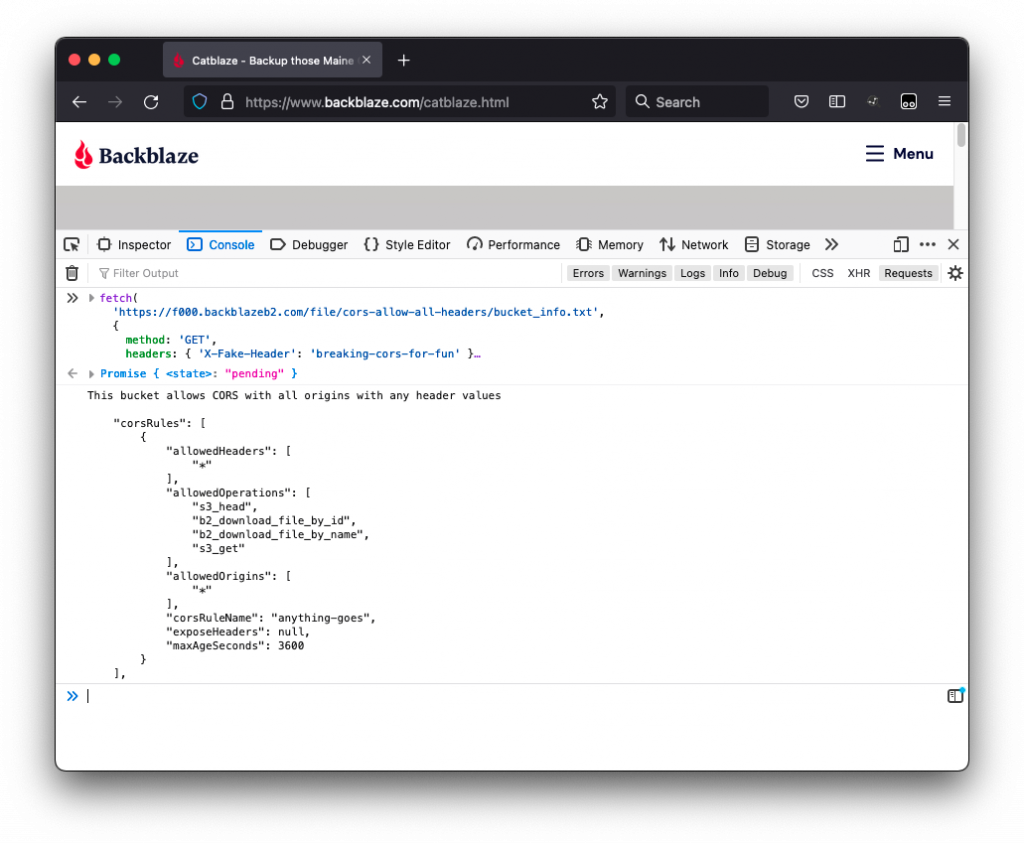
However, this request will succeed if we change our bucket settings to allow all headers.

fetch(
'https://f000.backblazeb2.com/file/cors-allow-all/bucket_info.txt',
{
method: 'GET',
headers: { 'X-Fake-Header': 'breaking-cors-for-fun' }
}
).then(resp => resp.text()).then(console.log)

Below, you can see the text output “This bucket allows CORS with all origins and any header values.”

The request was successful, and the text file we requested appears in the console.

At this point, it’s important to note that when configuring your own buckets, you should use caution when using the wildcard “*” to allow any origin or header. It’s probably best to avoid the wildcard if possible. It’s okay to allow any origin to access your bucket, but, if so, you’ll probably want to enumerate the headers that matter to avoid CSRF attacks.

For more information on using CORS with Backblaze B2, including some tips on using CORS with the Backblaze S3 Compatible API, check out our documentation here.

Stay on CORS

Ah, another inevitable CORS pun. Did you see it coming? I hope so. In conclusion, here are a few things to remember about CORS and how you can use it to avoid CORS errors in the future:

  • The same-origin policy was developed to make websites less vulnerable to threats, and it prevents requests between websites with different origins.
  • CORS bypasses the same-origin policy so that you can share and use data from different origins.
  • You only need to configure CORS rules for your Backblaze B2 data if you are making calls to Backblaze B2 from code within a web browser.
  • By setting CORS rules, you can specify which origins are allowed to request data from your Backblaze B2 buckets.

Are you using CORS? Do you have any other questions? Let us know in the comments.

The post Crash CORS: A Guide for Using CORS appeared first on Backblaze Blog | Cloud Storage & Cloud Backup.

Security updates for Wednesday

Post Syndicated from original https://lwn.net/Articles/873462/rss

Security updates have been issued by Debian (ffmpeg, smarty3, and strongswan), Fedora (udisks2), openSUSE (flatpak, strongswan, util-linux, and xstream), Oracle (redis:5), Red Hat (java-1.8.0-openjdk, java-11-openjdk, openvswitch2.11, redis:5, redis:6, and rh-redis5-redis), SUSE (flatpak, python-Pygments, python3, strongswan, util-linux, and xstream), and Ubuntu (linux, linux-aws, linux-aws-5.11, linux-azure, linux-azure-5.11, linux-gcp, linux-gcp-5.11, linux-hwe-5.11, linux-kvm, linux-raspi and strongswan).

A Matter of Perspective: Agent-Based and Agentless Approaches to Cloud Security, Part 1

Post Syndicated from Amit Bawer original https://blog.rapid7.com/2021/10/20/a-matter-of-perspective-agent-based-and-agentless-approaches-to-cloud-security-part-1/

A Matter of Perspective: Agent-Based and Agentless Approaches to Cloud Security, Part 1

When it comes to securing your cloud assets’ activities at runtime, the first step is deciding how. There are enough possible solutions that you’re likely to find yourself at a crossroads trying to decide between them. The factors that may affect your choice include:

  • Friction level — How time-consuming or disruptive is it to instrument the solution within the existing environment? What happens to normal operations when the solution malfunctions or becomes misconfigured?
  • Costs — How much am I going to pay for an effective solution?
  • Scalability — Would I have to bother with instrumenting this solution over and over again as more assets are being added to my environment (which might have just happened without any intervention)?
  • Blind spots — What coverage does a single instrumentation provide? Does it cover all an asset’s activities and communications? How is overall visibility impaired when it stops working?
  • Depth of view — How deep does the inspection go per asset? Is it capable of retrieving all viable information required for detection of vulnerabilities and ongoing malicious activities? Is it sufficient for a reliable detection of behavioral anomalies?
  • Breadth of view — Do I get the big picture of what is going on? Can suspicious activity be linked to all assets involved? And again, can the solution reliably detect behavioral anomalies?
  • Forensics — Am I able to keep the data for post-mortem analysis on the crime afterward? Does the solution allow me to make smart conclusions about the next steps for mitigation?

In addition to such questions, there are also practical aspects of your existing cloud platform settings that may affect your selection. For example, working on a serverless setup, in which the hosting instances are completely segregated from your reach, will rule out solutions involving security agents designed to run at underlying host-level scopes.

Agent-based solutions

A solution involving an applied process or a module that resides within the asset’s scope. These kinds of solutions are aware of the hosting platform and are tailored to probe its application, as well as valuable runtime information regarding process activities, incoming or outgoing network traffic of the monitored asset, and possibly other local resources that may play a part in denial-of-service attacks, such as CPU and memory consumption. Along with information access, an agent and its host also share resources. The agent is usually also deployed with privileged access rights (a “let’s run as root” kind of routine) so it can operate at the operating system level and even in the kernel space of its host.

So how does an agent-based solution stack up against the deciding factors we listed earlier?

  • Friction — Due to the nature of their deployment, agent-based solutions can cause a considerable amount of friction. In the absence of an inherent central management, these solutions are required to expose some APIs, which may be non-trivial to operate in order to control and configure their activation.
  • Cost — Agent-based deployments are not part of the provider service stack and, as such, are mostly subject to solution vendor licensing fees. These fees can be unrelated to the actual data billing and thus may save on costs in practice.
  • Scalability — Agent-based solutions are usually bound per specific asset, so they’re required to scale up and down as assets are added or removed. This may incur more resource consumption from the shared resources pool of the assets and agents.
  • Blind spots — Agents usually operate as a mesh of probes, providing the big picture by correlating their spot coverages, typically within a database and a management application. When a probe goes down, its spot coverage vanishes as well, and the runtime information will be missing for the assets it covers.
  • Depth of view — Agent-based solutions are tailored tightly to the asset’s platform, which they monitor and secure. As such, they can fish out information an external service would never be able to find from the depths of the operating system, kernel, and other local devices.
  • Breadth of view — As mentioned, the benefit of providing the overall picture comes from correlating a mesh of agent information within a single point. Agents can’t do this by themselves. It requires the help of external applications and possibly a central database to maintain the findings and make useful links between them.
  • Forensics — Having a realistic retention policy for findings can play a role in determining how far back to investigate an incident and what conclusions can be drawn about it.

Agentless solutions

Instead of deploying an agent per asset or per subset of assets, agentless solutions are deployed at the cluster or cloud account level. As they live outside of the assets themselves, these kinds of solutions are based on the cloud provider’s native APIs and services. They’re also affected by and confined to the provider’s specified functionality. In this case, the protected assets and the agentless service share no resources, and there’s a strong reliance on the cloud provider role schemes and APIs for accessing valuable information.

  • Friction — Agentless solutions are provided as part of the official provider services stack. The only effort on the operator’s end is to enable and customize it, and customization can usually be simplified to the default settings for less experienced users. Other aspects of updates and fixes should be seamless as part of the overall provider’s user experience suite.
  • Costs — The provider’s pricing model may vary, but there’s a trend of billing per data capacity used for tracking, so agentless solutions can become quite an expense for a full-blown active network of assets.
  • Scalability — Agentless solutions take advantage of centralized services within the provider’s platform. As such, they can scale well, since they aren’t relying on the same resource pool as the assets themselves.
  • Blind spots — Provider-based solutions aim to deliver the big picture of cloud activity as a whole. In this context, a blind spot would be related to poor depth of view per asset internals, so you might consider blind spots to actually be “blind layers.”
  • Depth of view — As we’ve discussed, agentless solutions rely mostly on platform data handled by the provider itself, such as the cluster networking and user accounts. This being the case, these solutions are less aware of the containerized internals, such as the processes being executed within the containers.
  • Breadth of view: Agentless solutions have a cluster-level view of asset activities, usually from a single collection point. This makes it easy to correlate between different cluster assets’ activities.
  • Forensics: The forensic capabilities of an agentless solution are mostly related to how well the solution is integrated with the data retention facilities of the provider.

So if both approaches have their strengths and weaknesses, which do you choose? Stay tuned for part 2, where we’ll discuss a third option and draw conclusions.

NEVER MISS A BLOG

Get the latest stories, expertise, and news about security today.

How a simple Linux kernel memory corruption bug can lead to complete system compromise (Project Zero)

Post Syndicated from original https://lwn.net/Articles/873410/rss

Over at the Project Zero blog, Jann Horn has a lengthy blog post on a kernel bug, ways to exploit it, and various ideas on mitigation. While the exploitation analysis is highly detailed, more than half of the post looks at various defenses to this kind of bug.

This blog post describes a straightforward Linux kernel locking bug and how I exploited it against Debian Buster’s 4.19.0-13-amd64 kernel. Based on that, it explores options for security mitigations that could prevent or hinder exploitation of issues similar to this one.

I hope that stepping through such an exploit and sharing this compiled knowledge with the wider security community can help with reasoning about the relative utility of various mitigation approaches.

A lot of the individual exploitation techniques and mitigation options that I am describing here aren’t novel. However, I believe that there is value in writing them up together to show how various mitigations interact with a fairly normal use-after-free exploit.

Getting Cloudflare Tunnels to connect to the Cloudflare Network with QUIC

Post Syndicated from Sudarsan Reddy original https://blog.cloudflare.com/getting-cloudflare-tunnels-to-connect-to-the-cloudflare-network-with-quic/

Getting Cloudflare Tunnels to connect to the Cloudflare Network with QUIC

Getting Cloudflare Tunnels to connect to the Cloudflare Network with QUIC

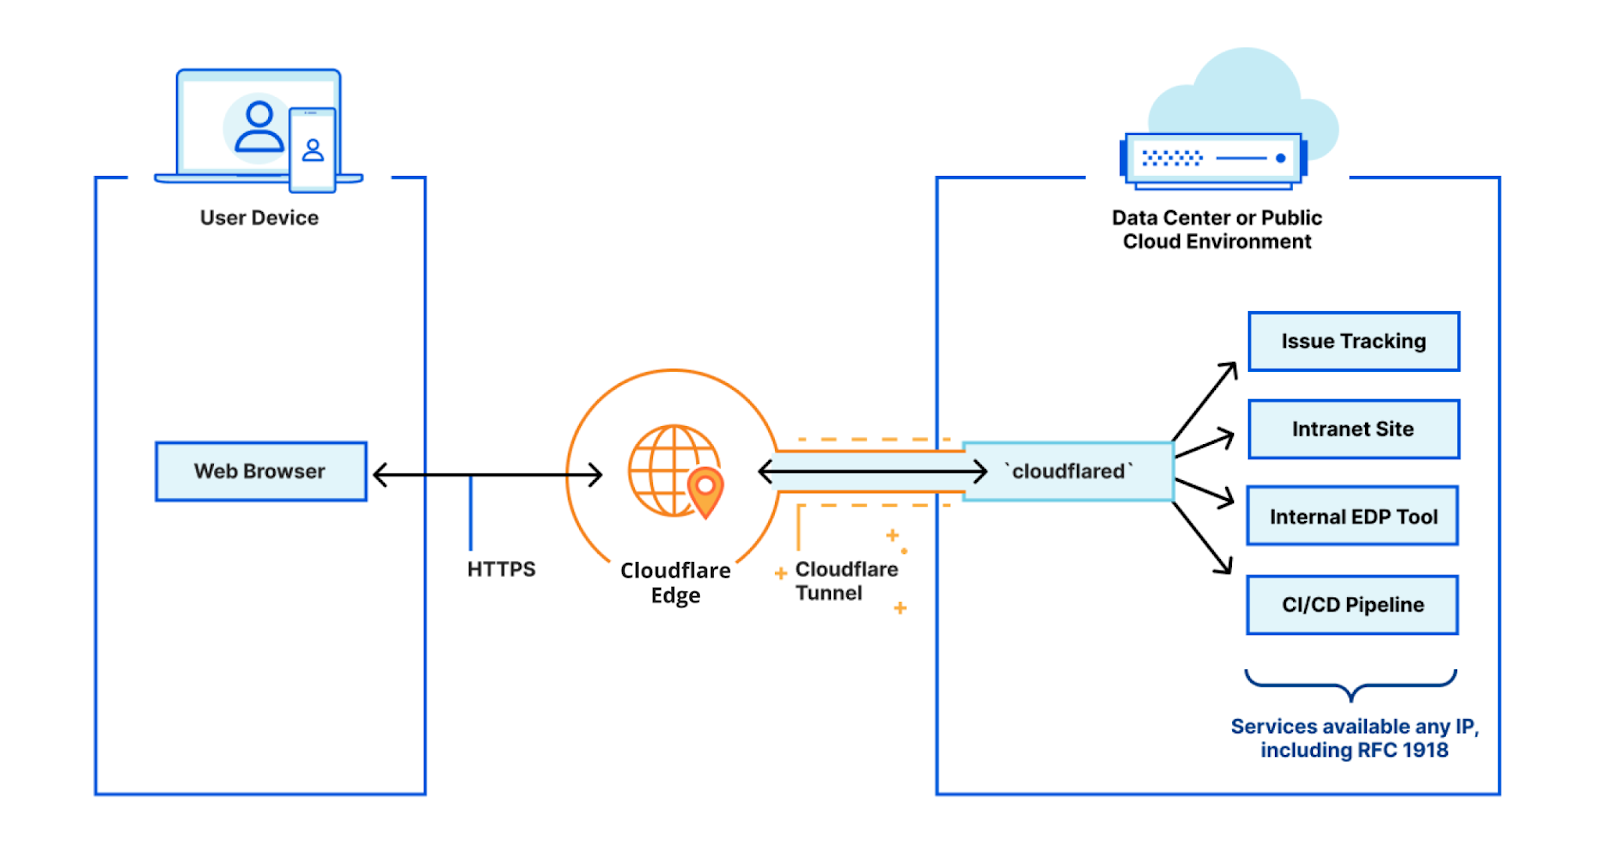
I work on Cloudflare Tunnel, which lets customers quickly connect their private services and networks through the Cloudflare network without having to expose their public IPs or ports through their firewall. Tunnel is managed for users by cloudflared, a tool that runs on the same network as the private services. It proxies traffic for these services via Cloudflare, and users can then access these services securely through the Cloudflare network.

Recently, I was trying to get Cloudflare Tunnel to connect to the Cloudflare network using a UDP protocol, QUIC. While doing this, I ran into an interesting connectivity problem unique to UDP. In this post I will talk about how I went about debugging this connectivity issue beyond the land of firewalls, and how some interesting differences between UDP and TCP came into play when sending network packets.

How does Cloudflare Tunnel work?

Getting Cloudflare Tunnels to connect to the Cloudflare Network with QUIC

cloudflared works by opening several connections to different servers on the Cloudflare edge. Currently, these are long-lived TCP-based connections proxied over HTTP/2 frames. When Cloudflare receives a request to a hostname, it is proxied through these connections to the local service behind cloudflared.

While our HTTP/2 protocol mode works great, we’d like to improve a few things. First, TCP traffic sent over HTTP/2 is susceptible to Head of Line (HoL) blocking — this affects both HTTP traffic and traffic from WARP routing. Additionally, it is currently not possible to initiate communication from cloudflared’s HTTP/2 server in an efficient way. With the current Go implementation of HTTP/2, we could use Server-Sent Events, but this is not very useful in the scheme of proxying L4 traffic.

The upgrade to QUIC solves possible HoL blocking issues and opens up avenues that allow us to initiate communication from cloudflared to a different cloudflared in the future.

Naturally, QUIC required a UDP-based listener on our edge servers which cloudflared could connect to. We already connect to a TCP-based listener for the existing protocols, so this should be nice and easy, right?

Failed to dial to the edge

Things weren’t as straightforward as they first looked. I added a QUIC listener on the edge, and the ability for cloudflared to connect to this new UDP-based listener. I tried to run my brand new QUIC tunnel and this happened.

$  cloudflared tunnel run --protocol quic my-tunnel
2021-09-17T18:44:11Z ERR Failed to create new quic connection, err: failed to dial to edge: timeout: no recent network activity

cloudflared wasn’t even establishing a connection to the edge. I started looking at the obvious places first. Did I add a firewall rule allowing traffic to this port? Check. Did I have iptables rules ACCEPTing or DROPping appropriate traffic for this port? Check. They seemed to be in order. So what else could I do?

tcpdump all the packets

I started by logging for UDP traffic on the machine my server was running on to see what could be happening.

$  sudo tcpdump -n -i eth0 port 7844 and udp
tcpdump: verbose output suppressed, use -v or -vv for full protocol decode
listening on eth0, link-type EN10MB (Ethernet), capture size 262144 bytes
14:44:27.742629 IP 173.13.13.10.50152 > 198.41.200.200.7844: UDP, length 1252
14:44:27.743298 IP 203.0.113.0.7844 > 173.13.13.10.50152: UDP, length 37

Looking at this tcpdump helped me understand why I had no connectivity! Not only was this port getting UDP traffic but I was also seeing traffic flow out. But there seemed to be something strange afoot. Incoming packets were being sent to 198.41.200.200:7844 while responses were being sent back from 203.0.113.0:7844 (this is an example IP used for illustration purposes)  instead.

Why is this a problem? If a host (in this case, the server) chooses an address from a network unable to communicate with a public Internet host, it is likely that the return half of the communication will never arrive. But wait a minute. Why is some other IP getting prioritized over a source address my packets were already being sent to? Let’s take a deeper look at some IP addresses. (Note that I’ve deliberately oversimplified and scrambled results to minimally illustrate the problem)

$  ip addr list
eth0: <BROADCAST,MULTICAST,UP,LOWER_UP> mtu 1600 qdisc noqueue state UP group default qlen 1000
inet 203.0.113.0/32 scope global eth0
inet 198.41.200.200/32 scope global eth0 

$ ip route show
default via 203.0.113.0 dev eth0

So this was clearly why the server was working fine on my machine but not on the Cloudflare edge servers. It looks like I have multiple IPs on the interface my service is bound to. The IP that is the default route is being sent back as the source address of the packet.

Why does this work for TCP but not UDP?

Connection-oriented protocols, like TCP, initiate a connection (connect()) with a three-way handshake. The kernel therefore maintains a state about ongoing connections and uses this to determine the source IP address at the time of a response.

Because UDP (unless SOCK_SEQPACKET is involved) is connectionless, the kernel cannot maintain state like TCP does. The recvfrom  system call is invoked from the server side and tells who the data comes from. Unfortunately, recvfrom  does not tell us which IP this data is addressed for. Therefore, when the UDP server invokes the sendto system call to respond to the client, we can only tell it which address to send the data to. The responsibility of determining the source-address IP then falls to the kernel. The kernel has certain heuristics that it uses to determine the source address. This may or may not work, and in the ip routes example above, these heuristics did not work. The kernel naturally (and wrongly) picks the address of the default route to respond with.

Telling the kernel what to do

I had to rely on my application to set the source address explicitly and therefore not rely on kernel heuristics.

Linux has some generic I/O system calls, namely recvmsg  and sendmsg. Their function signatures allow us to both read or write additional out-of-band data we can pass the source address to. This control information is passed via the msghdr struct’s msg_control field.

ssize_t sendmsg(int socket, const struct msghdr *message, int flags)
ssize_t recvmsg(int socket, struct msghdr *message, int flags);
 
struct msghdr {
     void    *   msg_name;   /* Socket name          */
     int     msg_namelen;    /* Length of name       */
     struct iovec *  msg_iov;    /* Data blocks          */
     __kernel_size_t msg_iovlen; /* Number of blocks     */
     void    *   msg_control;    /* Per protocol magic (eg BSD file descriptor passing) */
    __kernel_size_t msg_controllen; /* Length of cmsg list */
     unsigned int    msg_flags;
};

We can now copy the control information we’ve gotten from recvmsg back when calling sendmsg, providing the kernel with information about the source address.The library I used (https://github.com/lucas-clemente/quic-go) had a recent update that did exactly this! I pulled the changes into my service and gave it a spin.

But alas. It did not work! A quick tcpdump showed that the same source address was being sent back. It seemed clear from reading the source code that the recvmsg and sendmsg were being called with the right values. It did not make sense.

So I had to see for myself if these system calls were being made.

strace all the system calls

strace is an extremely useful tool that tracks all system calls and signals sent/received by a process. Here’s what it had to say. I’ve removed all the information not relevant to this specific issue.

17:39:09.130346 recvmsg(3, {msg_name={sa_family=AF_INET6,
sin6_port=htons(35224), inet_pton(AF_INET6, "::ffff:171.54.148.10", 
&sin6_addr), sin6_flowinfo=htonl(0), sin6_scope_id=0}, msg_namelen=112->28, msg_iov=
[{iov_base="_\5S\30\273]\275@\34\24\322\243{2\361\312|\325\n\1\314\316`\3
03\250\301X\20", iov_len=1452}], msg_iovlen=1, msg_control=[{cmsg_len=36, 
cmsg_level=SOL_IPV6, cmsg_type=0x32}, {cmsg_len=28, cmsg_level=SOL_IP, 
cmsg_type=IP_PKTINFO, cmsg_data={ipi_ifindex=if_nametoindex("eth0"),
ipi_spec_dst=inet_addr("198.41.200.200"),ipi_addr=inet_addr("198.41.200.200")}},
{cmsg_len=17, cmsg_level=SOL_IP, 
cmsg_type=IP_TOS, cmsg_data=[0]}], msg_controllen=96, msg_flags=0}, 0) = 28 <0.000007>
17:39:09.165160 sendmsg(3, {msg_name={sa_family=AF_INET6, 
sin6_port=htons(35224), inet_pton(AF_INET6, "::ffff:171.54.148.10", 
&sin6_addr), sin6_flowinfo=htonl(0), sin6_scope_id=0}, msg_namelen=28, 
msg_iov=[{iov_base="Oe4\37:3\344 &\243W\10~c\\\316\2640\255*\231 
OY\326b\26\300\264&\33\""..., iov_len=1302}], msg_iovlen=1, msg_control=
[{cmsg_len=28, cmsg_level=SOL_TCP, cmsg_type=0x8}], msg_controllen=28, 
msg_flags=0}, 0) = 1302 <0.000054>

Let’s start with recvmsg . We can clearly see that the ipi_addr for the source is being passed correctly: ipi_addr=inet_addr(“172.16.90.131”). This part works as expected. Looking at sendmsg  almost instantly tells us where the problem is. The field we want, ip_spec_dst is not being set as we make this system call. So the kernel continues to make wrong guesses as to what the source address may be.

This turned out to be a bug where the library was using IPROTO_TCP instead of IPPROTO_IPV4 as the control message level while making the sendmsg call. Was that it? Seemed a little anticlimactic. I submitted a slightly more typesafe fix and sure enough, straces now showed me what I was expecting to see.

18:22:08.334755 sendmsg(3, {msg_name={sa_family=AF_INET6, 
sin6_port=htons(37783), inet_pton(AF_INET6, "::ffff:171.54.148.10", 
&sin6_addr), sin6_flowinfo=htonl(0), sin6_scope_id=0}, msg_namelen=28, 
msg_iov=
[{iov_base="Ki\20NU\242\211Y\254\337\3107\224\201\233\242\2647\245}6jlE\2
70\227\3023_\353n\364"..., iov_len=33}], msg_iovlen=1, msg_control=
[{cmsg_len=28, cmsg_level=SOL_IP, cmsg_type=IP_PKTINFO, cmsg_data=
{ipi_ifindex=if_nametoindex("eth0"), 
ipi_spec_dst=inet_addr("198.41.200.200"),ipi_addr=inet_addr("0.0.0.0")}}
], msg_controllen=32, msg_flags=0}, 0) =
33 <0.000049>

cloudflared is now able to connect with UDP (QUIC) to the Cloudflare network from anywhere in the world!

$  cloudflared tunnel --protocol quic run sudarsans-tunnel
2021-09-21T11:37:30Z INF Starting tunnel tunnelID=a72e9cb7-90dc-499b-b9a0-04ee70f4ed78
2021-09-21T11:37:30Z INF Version 2021.9.1
2021-09-21T11:37:30Z INF GOOS: darwin, GOVersion: go1.16.5, GoArch: amd64
2021-09-21T11:37:30Z INF Settings: map[p:quic protocol:quic]
2021-09-21T11:37:30Z INF Initial protocol quic
2021-09-21T11:37:32Z INF Connection 3ade6501-4706-433e-a960-c793bc2eecd4 registered connIndex=0 location=AMS

While the programmatic bug causing this issue was a trivial one, the journey into systematically discovering the issue and understanding how Linux internals worked for UDP along the way turned out to be very rewarding for me. It also reiterated my belief that tcpdump and strace are indeed invaluable tools in anybody’s arsenal when debugging network problems.

What’s next?

You can give this a try with the latest cloudflared release at https://github.com/cloudflare/cloudflared/releases/latest. Just remember to set the protocol flag to quic. We plan to leverage this new mode to roll out some exciting new features for Cloudflare Tunnel. So upgrade away and keep watching this space for more information on how you can take advantage of this.

Textbook Rental Scam

Post Syndicated from Bruce Schneier original https://www.schneier.com/blog/archives/2021/10/textbook-rental-scam.html

Here’s a story of someone who, with three compatriots, rented textbooks from Amazon and then sold them instead of returning them. They used gift cards and prepaid credit cards to buy the books, so there was no available balance when Amazon tried to charge them the buyout price for non-returned books. They also used various aliases and other tricks to bypass Amazon’s fifteen-book limit. In all, they stole 14,000 textbooks worth over $1.5 million.

The article doesn’t link to the indictment, so I don’t know how they were discovered.

Take part in the UK Bebras Challenge 2021 for schools!

Post Syndicated from Duncan Maidens original https://www.raspberrypi.org/blog/uk-bebras-challenge-2021-for-schools/

The annual UK Bebras Computational Thinking Challenge is back to provide fun, brain-teasing puzzles for schools from 8 to 19 November!

The UK Bebras Challenge 2021 runs from 8 to 19 November.

In the free Bebras Challenge, your students get to practise their computational thinking skills while solving a set of accessible, puzzling, and engaging tasks over 40 minutes. It’s tailored for age groups from 6 to 18.

“I just want to say how much the children are enjoying this competition. It is the first year we have entered, and I have students aged 8 to 11 participating in my Computing lessons, with some of our older students also taking on the challenges. It is really helping to challenge their thinking, and they are showing great determination to try and complete each task!”

– A UK-based teacher

Ten key facts about Bebras

  1. It’s free!
  2. The challenge takes place in school, and it’s a great whole-school activity
  3. It’s open to learners aged 6 to 18, with activities for different age groups
  4. The challenge is made up of a set of short tasks, and completing it takes 40 minutes
  5. The closing date for registering your school is 4 November
  6. Your learners need to complete the challenge between 8 and 19 November 2021
  7. All the marking is done for you (hurrah!)
  8. You’ll receive the results and answers the week after the challenge ends, so you can go through them with your learners and help them learn more
  9. The tasks are logical thinking puzzles, so taking part does not require any computing knowledge
  10. There are practice questions you can use to help your learners prepare for the challenge, and throughout the year to help them practice their computational thinking

Do you want to support your learners to take on the Bebras Challenge? Then register your school today!

Remember to sign up by 4 November!

The benefits of Bebras

Bebras is an international challenge that started in Lithuania in 2004 and has grown into a worldwide event. The UK became involved in Bebras for the first time in 2013, and the number of participating students has increased from 21,000 in the first year to more than half a million over the last two years! Internationally, nearly 2.5 million learners took part in 2020 despite the disruptions to schools.

On the left, a drawing of a bracelet made of stars and moons.
On the left, a bracelet design from an activity for ages 10–12. On the right, a password checker from an activity for ages 14–16.

Bebras, brought to you in the UK by us and Oxford University, is a great way to give your learners of all age groups a taste of the principles behind computing by engaging them in fun problem-solving activities. The challenge results highlight computing principles, so Bebras can be educational for you as a teacher too.

Throughout the year, questions from previous years of the challenge are available to registered teachers on the bebras.uk website, where you can create self-marking quizzes to help you deliver the computational thinking part of the curriculum for your classes.

You can register your school at bebras.uk/admin.

Learn more about our work to support learners with computational thinking.

The post Take part in the UK Bebras Challenge 2021 for schools! appeared first on Raspberry Pi.

Zero Trust — Not a Buzzword

Post Syndicated from Fernando Serto original https://blog.cloudflare.com/zero-trust-not-a-buzzword/

Zero Trust — Not a Buzzword

Zero Trust — Not a Buzzword

Over the last few years, Zero Trust, a term coined by Forrester, has picked up a lot of steam. Zero Trust, at its core, is a network architecture and security framework focusing on not having a distinction between external and internal access environments, and never trusting users/roles.

In the Zero Trust model, the network only delivers applications and data to authenticated and authorised users and devices, and gives organisations visibility into what is being accessed and to apply controls based on behavioural analysis. It gained popularity as the media reported on several high profile breaches caused by misuse, abuse or exploitation of VPN systems, breaches into end-users’ devices with access to other systems within the network, or breaches through third parties — either by exploiting access or compromising software repositories in order to deploy malicious code. This would later be used to provide further access into internal systems, or to deploy malware and potentially ransomware into environments well within the network perimeter.

When we first started talking to CISOs about Zero Trust, it felt like it was just a buzzword, and CISOs were bombarded with messaging from different cybersecurity vendors offering them Zero Trust solutions. Recently, another term, SASE (Secure Access Services Edge), a framework released by Gartner, also came up and added even more confusion to the mix.

Then came COVID-19 in 2020, and with it the reality of lockdowns and remote work. And while some organizations took that as an opportunity to accelerate projects around modernising their access infrastructure, others, due to procurement processes, or earlier technology decisions, ended up having to take a more tactical approach, ramping up existing remote access infrastructure by adding more licenses or capacity without having an opportunity to rethink their approach, nor having an opportunity to take into account the impact of their employees’ experience while working remotely full time in the early days of the pandemic.

So we thought it might be a good time to check on organizations in Asia Pacific, and look at the following:

  • The pandemic’s impact on businesses
  • Current IT security approaches and challenges
  • Awareness, adoption and implementation of Zero Trust
  • Key drivers and challenges in adopting Zero Trust

In August 2021, we commissioned a research company called The Leading Edge to conduct a survey that touches on these topics. The survey was conducted across five countries — Australia, India, Japan, Malaysia, and Singapore, and 1,006 IT and cybersecurity decision-makers and influencers from companies with more than 500 employees participated.

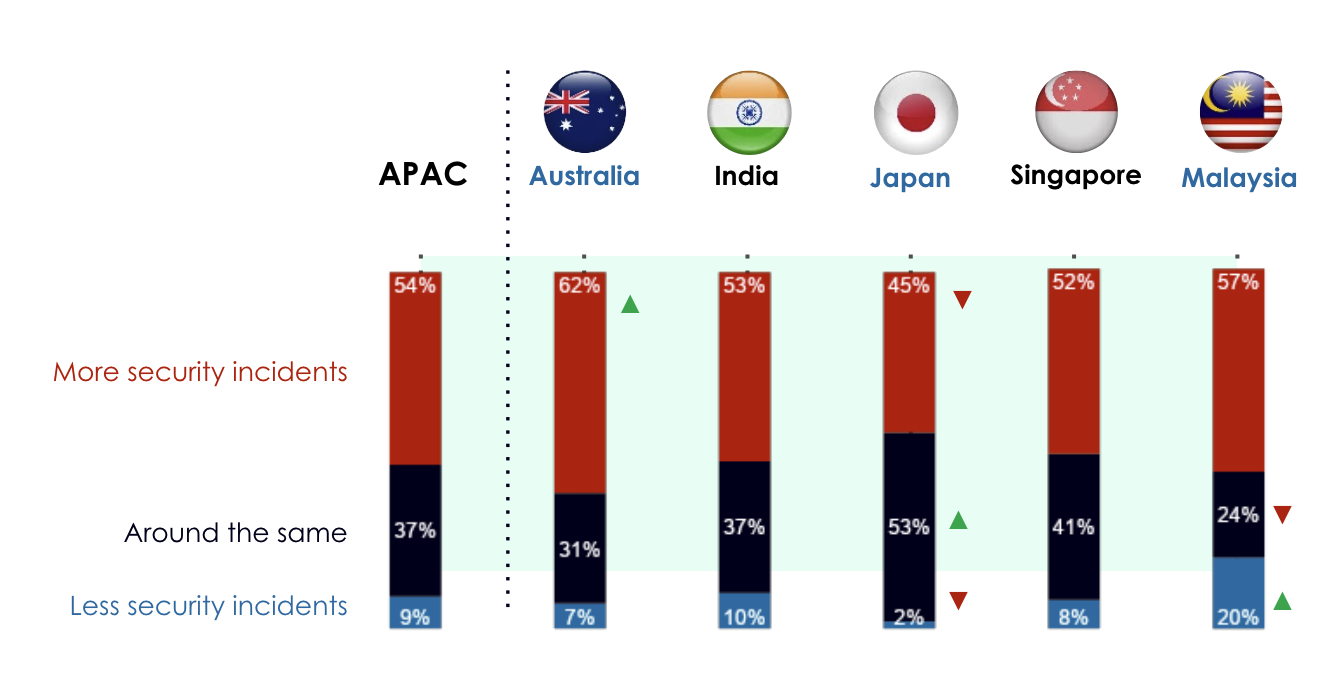
For example, 54% of organisations said they saw an increase in security incidents in 2021, when compared to the previous year, with 83% of respondents who experienced security incidents saying they had to make significant changes to their IT security procedures as a result.

Zero Trust — Not a Buzzword
Increase in security incidents when compared to 2020. ▲▼ Significantly higher/lower than total sample

And while the overall APAC stats are already quite interesting, I thought it would be even more fascinating to look at the unique characteristics of each of the five countries, so let’s have a look:

Australia

Australian organisations reported the highest impact of COVID-19 when it comes to their IT security approach, with 87% of the 203 respondents surveyed saying the pandemic had a moderate to significant impact on their IT security posture. The two biggest cities in Australia (Sydney and Melbourne) were in lockdown for over 100 days, each in the second half of 2021 alone. With the extensive lockdowns, it’s not a surprise that 48% of respondents reported challenges with maximising remote workers’ productivity without exposing them or their devices to new risks.

With 94% of organisations in Australia having reported they will be implementing a combination of return to office and work from home, building an effective and uniform security approach can be quite challenging. If you combine that with the fact that 62% saw an increase in security incidents over the last year, we can safely assume IT and cybersecurity decision-makers and influencers in Australia have been working on improving their security posture over the last year, even though 40% of respondents indicated they struggled to secure the right level of funding for such projects.

Australia seems to be well advanced on the journey into implementing Zero Trust when compared to other four countries included in the report, with 45% of the organisations that have adopted Zero Trust starting their Zero Trust journey over the last one to four years. Australian organisations have always been known for fast cloud adoption, and even in the early 2010s Australians were already consuming IaaS quite heavily.

India

When compared to the other countries in the report, India has a very challenging environment when it comes to working from home, with Internet connectivity being inconsistent, even though there’s been significant improvement in internet speeds in the country, and problems like power outages regularly occurring in certain areas outside of city centres. Surprisingly, the biggest challenge reported by Indian organisations was that they could benefit from newer security functionality, which goes to show that legacy security approaches are still widely present in India. Likewise, 37% of the respondents reported that their access technologies are too complex, which supports the previous point that newer security functionality would be beneficial to the same organisations.

When asked about their concerns around the shift in how their users will access applications, one of the biggest concerns raised by 59% of the respondents was around applications being protected by VPN or IP address controls alone. This shows Zero Trust would fit really well with their IT strategy moving forward, as controls can now be applied to users and their devices.

Another interesting point to make, and where Zero Trust can be leveraged, is 65% of respondents saying internal IT and security staff shortage and cuts is a huge challenge. Most security technologies out there would require special skills to build, maintain and operate, and this is where simplifying access with the right Zero Trust approach could really help improve the productivity of those teams.

Japan

When we look at the results of the survey across all five countries, it’s fairly obvious that Japan didn’t seem to have quite the same challenges as the other countries when the pandemic started. Businesses continued to operate normally for most of 2020 and 2021, which would explain why the impact wasn’t in line with the other countries. Having said that, 51% of the respondents surveyed in Japan still reported they saw a moderate to significant impact in their IT security approach, which is still significant, even though lower than the other countries.

Japanese organisations also reported an increase in the number of security incidents, which supports the fact that even though the impact of the pandemic wasn’t as severe as in other countries, 45% of the respondents still reported an increase in security incidents, and 63% still had to make changes to their IT security procedures as a direct result of incidents.

Malaysia

Malaysia rated second highest (at 80%) in our report on the impact the pandemic has had on organisations’ IT security approach, and rated highest on both employees using their home networks and using personal devices for work, at 94% and 92% respectively. From a security perspective, that poses a significant impact to an organization’s security posture and increases the attack surface for an organisation substantially.

From a risk perspective, Malaysian organisations rated lack of management over employees’ devices pretty highly, with 65% of them expressing concerns over it. Other areas worth calling out were applications and data being exposed to the public Internet, and lack of visibility into staff activity inside applications.

With 57% of the respondents calling out an increase in security incidents when compared to the previous year, 89% of the respondents said they had to make significant changes to their IT security procedures due to either security incidents or attack attempts against their environments.

Singapore

In Singapore, 79% of IT and cybersecurity decision-makers and influencers reported that the pandemic has impacted their IT security approach, and two in five organisations said they could benefit from more modern security functionality as a direct result of the impact caused by the pandemic. 52% of the organisations also reported an increase in security incidents compared to 2020, with almost half having seen an increase in phishing attempts.

Singaporean organisations were also not immune to a significant increase in IT security spend as a direct result of the pandemic, with 62% of them having reported more investment in security. Some of the challenges these organisations were facing were related to applications being directly exposed to the public Internet, limited oversight on third party access and applications being protected by username and password only.

While Singapore is known for high speed home Internet, it was quite a surprise for me to see that 40% of organisations surveyed reported issues with latency or slow connectivity into applications via VPN. This goes to show that the problem of concentrating traffic into a single location can impact application performance even across relatively small geographies, and even if bandwidth is not necessarily a problem, like what happens in Singapore.

The work in IT security never stops

While there were distinct differences in each country around IT security posture and Zero Trust adoption, across Asia Pacific, the similarities are what stand out the most:

  • Cyberattacks continue to rise
  • Flexible work is here to stay
  • Skilled in-house IT security workers are a scarce resource
  • Need to educate stakeholders around Zero Trust

These challenges are not easy to tackle, add to these the required focus on improving employee experience, reducing operational complexities, better visibility into 3rd party activity, and tighter controls due to the increase in security incidents, and you’ve got a heck of a huge responsibility for IT.

And this is where Cloudflare comes in. Not only have we been helping our employees work security throughout the pandemic, we have also been helping organisations all over the globe streamline their IT security operations when it comes to users accessing applications through Cloudflare Access, or securing their activity on the Internet through our Secure Web Gateway services, which even includes controls around SaaS applications and browser isolation, all with the best possible user experience.

So come talk to us!

[$] Moving toward Qubes OS 4.1

Post Syndicated from original https://lwn.net/Articles/873255/rss

On October 11, the first release candidate for Qubes OS version 4.1 was announced. Qubes OS
is a security-oriented desktop operating system that uses multiple virtual
machines (VMs or “qubes“) to isolate
various types of functionality. The idea is to compartmentalize different
applications and operating-system subsystems to protect them from each
other and to limit access to the user’s data if an application is
compromised. Version 4.1 will bring several important enhancements to
help Qubes OS continue to live up to its motto: “A reasonably secure operating
system
“.

s/bash/zsh/g

Post Syndicated from arp242.net original https://www.arp242.net/why-zsh.html

You would expect this to work, no?

bash% echo $(( .1 + .2 ))
bash: .1 + .2 : syntax error: operand expected (error token is ".1 + .2 ")

Well, bash says no, but zsh just works:

zsh% echo $(( .1 + .2 ))
0.30000000000000004      # Well, "works" insofar IEEE-754 works.

There is simply no way you can do calculations with fractions in bash without
relying on bc, dc, or some hacks. Compared to simply being able to use a +
b
it’s ugly, slow, and difficult.

There are other pretty frustrating omissions in bash; NUL bytes is another fun
one:

zsh% x=$(printf 'N\x00L'); printf $x | xxd -g1 -c3
00000000: 4e 00 4c  N.L

bash% x=$(printf 'N\x00L'); printf $x | xxd -g1 -c3
bash: warning: command substitution: ignored null byte in input
00000000: 4e 4c     NL

It looks like bash added a warning recently-ish (4.4-patch 2); this one
bit me pretty hard a few years ago; back then it would just get silently
discarded without warning; I guess a warning is an “improvement” of sorts
(fixing it, however, would be an actual improvement[1]).

NUL bytes aren’t that uncommon, think of e.g. find -print0, xargs -0, etc.
That all works grand, right up to the point you try to assign it to a variable.
You can use NUL bytes for array assignments though, if you evoke the right
incantation:

bash% read -rad arr < <(find . -print0)

There are all sorts of edge-cases where you need to resort to read or
readarray rather than being able to just assign in. In zsh it’s just
arr=($(find . -print0)).

Don’t even think of doing something like:

img=$(curl https://example.com/image.png)
if [[ $cond ]]; then
    optpng <<<"$img" > out.png
else
    cat <<<"$img" > out.png
fi

Of course you can refactor this to avoid the variable (and the example is a bit
contrived), but it really ought to work. I once wrote a script to import emails
from the Mailgun API. It worked great, yet sometimes images were mangled and I
just couldn’t figure out why. Turns out Mailgun “helpfully” decodes attachments
(i.e. removes the base64) and sends binary content, which bash (at the time)
would silently discard. It took me a very long time to figure out. I forgot why,
but it was hard to avoid storing the response in a variable. I ended up
rewriting it to Python because of this, which was just a waste of time really.
It’s this, specifically, that really soured me on bash and prompted The shell
scripting trap
in 2017. However, many items listed there are solved by
zsh, including this one.


zsh also fixes most of the quoting:

zsh% for f in *; ls -l $f
-rw-rw-r-- 1 martin martin 0 Oct 19 06:51 asd.txt
-rw-rw-r-- 1 martin martin 0 Oct 19 06:51 with space.txt

bash% for f in *; do ls -l $f; done
-rw-rw-r-- 1 martin martin 0 Oct 19 06:51 asd.txt
ls: cannot access 'with': No such file or directory
ls: cannot access 'space.txt': No such file or directory

It’s not POSIX compatible, but who cares? bash doesn’t follow POSIX in all
sorts of ways by default
either because it just makes more sense, and with
both you can still tell them to be POSIX-compatible if you must for one reason
or the other.

Also note the convenient short version of the
for loop: no need for do, done and muckery with ; before the done,
which is much more convenient for quick one-liners you interactively type in.
You can still do word splitting, but you need to do it explicitly:

zsh% for i in *; ls -l $=i
-rw-rw-r-- 1 martin martin 0 Oct 19 06:51 asd.txt
ls: cannot access 'with': No such file or directory
ls: cannot access 'space.txt': No such file or directory

[[ is supposed to fix [, but it still has weird quoting quirks:

zsh% a=foo; b=*;
zsh% if [[ $a = $b ]]; then
       print 'Equal!'
     else
       print 'Nope!'
     fi
Nope!

bash% a=foo; b=*
bash% if [[ $a = $b ]]; then
        echo 'Equal!'
      else
        echo 'Nope!'
      fi
Equal!

This is equal because without quotes it still interprets the right-hand side as
a pattern (i.e. glob). In zsh you need to use $~var to explicitly enable
pattern matching, which is a much better model than remembering when you do and
don’t need to quote things – sometimes you do want the pattern matching and
then you don’t want quotes; it’s not always immediately obvious if an if [[ ...
statement is correct if it’s lacking quotes.

“But Martin, you should always quote things, you’re being disingenuous!” Well, I
could make a comfortable living if I were paid to add quotes to other people’s
shell scripts. Telling people to “always quote things” is what we’ve been doing
for 40 years now and irrefutable observational evidence has demonstrated that it
just does not work.

Most people aren’t shell scripting wizards; they make a living writing Python or
C or Go or PHP programs, or maybe they’re sysadmins or scientists, and oh,
occasionally they also write a shell script. They just see something that works
and assume it has sane behaviour and don’t realize the subtle differences
between $@, $*, and "$@". I think that’s actually quite reasonable,
because the behaviour is odd, surprising, and confusing.

It’s also a lot more complex than just “quote your variables”, especially if you
use $(..) since command substitution often needs quotes too, as well as any
variables inside it. Before you know it you’ve got double, triple, or more
levels of nested quotes and if you forget one set of them you’re in trouble.

It’s such a fertile source of real-world bugs that it would merit entomologist
examination. If there’s a system that causes this many bugs then that system is
at fault, and not the people using it. Computers and software should adapt to
humans, not the other way around.

And “always quote things!” isn’t even right either, because you should always
quote things except when you shouldn’t:

zsh% a=foo; b=.*;
zsh% if [[ "$a" =~ "$b" ]]; then
       print 'Equal!'
     else
       print 'Nope!'
     fi
Equal!

bash% a=foo; b=.*
bash% if [[ "$a" =~ "$b" ]]; then
        echo 'Equal!'
      else
        echo 'Nope!'
      fi
Nope!

If there are quotes around a regexp then it’s treated as a literal string. I
mean, it’s consistent with = pattern matching, but also confusing because I
explicitly use =~ to match a regular expression.

Another famous quoting trap is $@ vs. "$@" vs. $* vs. "$*":

zsh% cat args
echo "unquoted @:"
for a in $@; do echo "  => $a"; done

echo "quoted @:"
for a in "$@"; do echo "  => $a"; done

echo "quoted *:"
for a in $*; do echo "  => $a"; done

echo "quoted *:"
for a in "$*"; do echo "  => $a"; done

bash% bash args
unquoted @:
  => hello
  => world
  => test
  => space
  => Guust1129.jpg
  => IEEESTD.2019.8766229.pdf
  [.. rest of my $HOME ..]
quoted @:
  => hello
  => world
  => test space
  => *
unquoted *:
  => hello
  => world
  => test
  => space
  => Guust1129.jpg
  => IEEESTD.2019.8766229.pdf
  [.. rest of my $HOME ..]
quoted *:
  => hello world test space *

Experiences shellers will know to (almost) always use "$@", but how often do
you see it being done wrong? It’s not that strange people do it wrong either; if
you learned about quoting and word splitting then $@ without quotes is
actually the logical thing to use because you would expect "$@" to be
treated as one argument (as "$*"). You tell people to “always add quotes to
prevent word splitting and treat things as a single argument”, and then you tell
them “oh, except in this one special case when the addition of quotes invokes
a special kind of splitting and doesn’t follow any of the rules we previously
told you about”.

In zsh, $@ and $* (and $argv) are all (read-only) arrays and it all
behaves identical as you would expect with no surprises:

zsh% zsh args hello world 'test space' '*'
unquoted @:
  => hello
  => world
  => test space
  => *
quoted @:
  => hello
  => world
  => test space
  => *
unquoted *:
  => hello
  => world
  => test space
  => *
quoted *:
  => hello world test space *

Actually in bash you can do argv=("$@") and then you have an array. This is
really how it should work by default.

You still need to loop over it with:

bash% for a in "${argv[@]}"; do
        echo "=> $a"
      done

Rather than just for a in $argv like in zsh. Aside from the pointless [@],
why would you ever want to word-split every element of an array? There is
probably some use case somewhere, but it’s exceedingly rare. Better to just skip
all of that by default unless explicitly enabled with = and/or ~.

Oh, here’s another interesting tidbit:

zsh% n=3; for i in {1..$n}; print $i
1
2
3

bash% n=3; for i in {1..$n}; do echo "$i"; done
{1..3}

bash% n=3; for i in {1..3}; do echo "$i"; done
1
2
3

Why does it work like that? That’s left as an exercise for the reader 😉


Aside from all sorts caveats that are handled much better, a lot of common
things are just much easier in zsh:

zsh% arr=(123 5 1 9)
zsh% echo ${(o)arr}     # Lexical order
1 123 5 9
zsh% echo ${(on)arr}    # Numeric order
1 5 9 123

bash% IFS=$'\n'; echo "$(sort <<<"${arr[*]}")"; unset IFS
1 123 5 9
bash% IFS=$'\n'; echo "$(sort -n <<<"${arr[*]}")"; unset IFS
1 5 9 123

I had to look up how to do it in bash; the Stack Overflow answer for that one
starts with “you don’t really need all that much code”. lol? I guess that’s in
reply to some of the other horrendously complex answers which implement “pure
bash” sorting algorithms and the like. I guess compared to that this is “not
that much code”. And of course the entire thing is a minefield of expansion
again; and if you forget a set of nested quotes you end up in trouble.

Arrays in general are just awkward in bash:

bash% arr=(first second third fourth)

bash% echo ${arr[0]}
first
bash% echo ${arr[@]::2}
first second

I mean, it works, and it’s not that much typing, but why do I need that [@]?
Probably some (historical) reason, but zsh implements it much more readable and
easier:

zsh% arr=(first second third fourth)

zsh% print ${arr[1]}        # Yeah, it's 1-based. Deal with it.
first
zsh% print ${arr[1,2]}
first second

The bash array syntax was copied from ksh; so I guess we have to blame David
Korn (zsh supports it too, if you must use it). But regular subscripts are just
so much easier.

And then there’s the useful features:

zsh% ls *.go
format.go  format_test.go  gen.go  old.go  uni.go  uni_test.go

zsh% ls *.go~*_test.go
format.go  gen.go  old.go  uni.go

zsh% ls *.go~*_test.go~f*
gen.go  old.go  uni.go

*.go gets expanded, and filters the pattern after the ~; *_test.go in this
case. Looks a bit obscure at first glance, but bash’s ksh-style extglobs are far
harder:

bash% ls !(*_test).go
format.go  gen.go  old.go  uni.go

bash% ls !(*_test|f*).go
gen.go  old.go  uni.go

!(..) is “match anything except the pattern”; the * is implied here (zsh
supports !(..) if you set ksh_glob). While it works, the the
pattern~filter~filter model is much easier, and also more flexible since you
don’t need to start with all matches.

There are many useful things you can do with globbing; you can replace many uses
of find with it, and you don’t need to worry about the caveats, -print0
hacks, etc. For example to recursively list all regular files:

zsh% ls **/*(.)
LICENSE         go.sum           unidata/gen.go             wasm/make*
README.md       old.go           unidata/gen_codepoints.go  wasm/srv*
[..]

Or directories:

zsh% ls -d /etc/**/*(/)
/etc/OpenCL/                      /etc/runit/runsvdir/default/dnscrypt-proxy/log/
/etc/OpenCL/vendors/              /etc/runit/runsvdir/default/ntpd/log/
/etc/X11/                         /etc/runit/runsvdir/default/postgresql/supervise/
[..]

Or files that were changed in the last week:

zsh% ls -l /etc/***(.m-7)    # *** is a shortcut for **/*; needs GLOB_STAR_SHORT
-rw-r--r-- 1 root root 28099 Oct 13 03:47 /etc/dnscrypt-proxy.toml.new-2.1.1_1
-rw-r--r-- 1 root root    97 Oct 13 03:47 /etc/environment
-rw-r--r-- 1 root root 37109 Oct 17 10:34 /etc/ld.so.cache
-rw-r--r-- 1 root root 77941 Oct 19 01:01 /etc/public-resolvers.md
-rw-r--r-- 1 root root  6011 Oct 19 01:01 /etc/relays.md
-rw-r--r-- 1 root root   142 Oct 19 07:57 /etc/shells

You can even order them by modified date with om (***(.m-7om)), although
that’s a bit pointless here as ls will reorder them again, but if you’re
looping over files it’s useful.

There is no way to do any of this in bash, you’ll have to use something like:

bash% find /etc -type f -mtime 7 -exec ls -l {} +
find: ‘/etc/sv/docker/supervise’: Permission denied
find: ‘/etc/sv/docker/log/supervise’: Permission denied
find: ‘/etc/sv/bluetoothd/log/supervise’: Permission denied
find: ‘/etc/sv/postgresql/supervise’: Permission denied
find: ‘/etc/sv/runsvdir-martin/supervise’: Permission denied
find: ‘/etc/wpa_supplicant/supervise’: Permission denied
find: ‘/etc/lvm/cache’: Permission denied
-rw-rw-r-- 1 root root  167 Oct 12 22:17 /etc/default/postgresql
-rw-r--r-- 1 root root  817 Oct 12 09:11 /etc/fstab
-rw-r--r-- 1 root root 1398 Oct 12 22:19 /etc/passwd
-rw-r--r-- 1 root root 1397 Oct 12 22:19 /etc/passwd.OLD
-rw-r--r-- 1 root root  307 Oct 12 23:10 /etc/public-resolvers.md.minisig
-rw-r--r-- 1 root root  297 Oct 12 23:10 /etc/relays.md.minisig
-r-------- 1 root root  932 Oct 12 09:57 /etc/shadow
-rwxrwxr-x 1 root root  397 Oct 12 22:23 /etc/sv/postgresql/run

Not sure how to make it ignore these errors too without redirecting stderr (more
typing!) And if you think adding single letters in (..) after a pattern is
hard then try understanding find’s weird flag syntax. Glob qualifies are
great.

csh-style parameter substitution is pretty useful:

zsh% for f in ~/photos/*.png; convert $f ${f:t:r}.jpeg

:t to get the tail, and :r to get the root (without extension). csh could do
this before I was even born, but bash can’t (it can for history expansion, but
not variables). According to the bash FAQ “Posix has specified a more powerful,
albeit somewhat more cryptic, mechanism cribbed from ksh”, which I find a
somewhat curious statement as the above in bash is:

bash% for f in ~/photos/*.png; do convert "$f" "$(basename "${f%%.*}")"; done

Technically “more powerful” in the sense that you can do other things with it,
but not really “more useful for common operations” (zsh, of course, implements
% and # as well).

Note you can’t nest ${..} in bash; e.g. "${${f%%.*}##*/}" is an error:

zsh% f=~/asd.png; print "${${f%%.*}##*/}"
asd

bash% f=~/a.png; echo "${${f%%.*}##*/}"
bash: ${${f%%.*}##*/}: bad substitution

While this can quickly lead to very unreadable ASCII vomit, it’s useful on
occasion, when used with care and wisdom. You can click below for a more
advanced example if the children are already in bed.

Click to see NSFW content. Not suitable for children under 18!

For example, this can be used to show the longest element in an array:

print ${array[(r)${(l.${#${(O@)array//?/X}[1]}..?.)}]}

Cribbed from the zsh User’s Guide.


There are many more things. I’m not going to list them all here. None of this is
new; much (if not all?) of this has around for 20 years, if not longer. I don’t
know why bash is the de-facto default, or why people spend time on complex
solutions to work around bash problems when zsh solves them. I guess because
Linux used a lot of GNU stuff and bash was came with it, and GNU stuff was (and
is) using bash. Not a very good reason, certainly not one 30 years later.

zsh still has plenty of limitations; the syntax isn’t always something you’d
want to show your mother for starters, as well as a number of other things.
Still, it’s clearly better. I genuinely can’t find a single thing bash does
better beyond “it’s installed on many systems already”.

Ubiquitousness is overrated anyway; zsh has no dependencies beyond libc and
curses and is 970K on my system[2] and is available for pretty much all
systems. Compared to most other interpreters it’s tiny, with only Lua being
smaller (275K). “Stick to POSIX sh for compatibility” was good advice in 1990
when you had some SunOS system with some sun-sh and that’s what you were stuck
with. Those days are long gone, and while there are a few poor souls still suck
on those systems (sometimes even with csh!) chances are they’re not going to try
and run your Docker or Arch Linux shell script or whatnot on those systems
anyway.

Contorting yourself in all sorts of strange bends to perhaps possibly maybe make
it work for a tiny fraction of users who are unlikely to use your script anyway
does not seem like a good trade-off, especially since these kind of limitations
tend to be organisational rather than technical, which is not my problem anyway
to be honest.

Using zsh is also more portable; since it allows you to avoid many shell tools
and the (potential) incompatibilities, and by explicitly setting zsh as the
interpreter you can rely on zsh behaviour, rather than hoping the /bin/sh on
$random_system behaves the same (even dash has some extensions to POSIX sh, such
as local).

What I typically do is save files as script.zsh with:

#!/usr/bin/env zsh
[ "${ZSH_VERSION:-}" = "" ] && echo >&2 "Only works with zsh" && exit 1

This makes sure it gets run by zsh when used as ./script.zsh, and gives an
error in case people type sh script.zsh or bash script.zsh in case the .zsh
extension isn’t enough of a clue.

So in conclusion: s/bash/zsh/g and everything will be just a little bit
better.

P.S. maybe fish is even better by the way, but I could never get over the bright
colouring and all these things popping in and out of my screen; it’s such a
“busy” chaotic experience! I’d have to spend time disabling all that stuff to
make it usable for me, and I never bothered – and if you’re disabling the key
selling points of a program then it’s probably not intended for you anyway.
Maybe I’ll have a crack at it at some point though.

Footnotes

  1. Which I assume isn’t so easy, otherwise it would have been done already.
    The reason it doesn’t work is an artifact from C’s NUL-terminated strings,
    but this kind of stuff really shouldn’t be exposed in a high-level language
    like the shell. It’s also a bit ironic since one of Stephen Bourne’s
    original goals with his shell was to get rid of arbitrary size limits on
    strings, which were common at the time. ↩

  2. A full install if ~8M, mostly in the optional completion functions it
    ships with. Bash is about 1.3M by the way. ↩

The collective thoughts of the interwebz