Post Syndicated from digiblurDIY original https://www.youtube.com/watch?v=TBINeEsw9MA
Field Notes: Building Multi-Region and Multi-Account Tools with AWS Organizations
Post Syndicated from Cody Penta original https://aws.amazon.com/blogs/architecture/field-notes-building-multi-region-and-multi-account-tools-with-aws-organizations/
It’s common to start with a single AWS account when you are beginning your cloud journey with AWS. Running operations such as creating, reading, updating, and deleting resources in a single AWS account can be straightforward with AWS application program interfaces (APIs). Because an organization grows, so does their account strategy, often splitting workloads across multiple accounts. Fortunately, AWS customers can use AWS Organizations to group these accounts into logical units, also known as organizational units (OUs), to apply common policies and deploy standard infrastructure. However, this will result in an increased difficulty to run an API against all accounts, moreover, every Region that account could use. How does an organization answer these questions:
- What is every Amazon FSx backup I own?
- How can I do an on-demand batch job that will apply to my entire organization?
- What is every internet access point across my organization?
This blog post shows us how we can use Organizations, AWS Single Sign-On (AWS SSO), AWS CloudFormation StackSets, and various AWS APIs to effectively build multi-account and multi-region tools that can address use cases like the ones above.
Running an AWS API sequentially across hundreds of accounts—potentially, many Regions—could take hours, depending on the API you call. An important aspect we will cover throughout this solution is the importance of concurrency for these types of tools.
Overview of solution
For this solution, we have created a fictional organization called Tavern that is set up with multiple organizational units (OUs), accounts, and Regions, to reflect a real-world scenario.

Figure 1. Organization configuration example
We will set up a user with multi-factor authentication (MFA) enabled so we can sign-in and access an admin user in the root account. Using this admin user, we will deploy a stack set across the organization that enables this user to assume limited permissions into each child account.
Next, we will use the Go programming language because of its native concurrency capabilities. More specifically, we will implement the pipeline concurrency pattern to build a multi-account and multi-region tool that will run APIs across our entire AWS footprint.
Additionally, we will add two common edge cases:
- We block mass API actions to an account in a suspended OU (not pictured) and the root account.
- We block API actions in disabled regions.
This will show us how to implement robust error handling in equally powerful tooling.
Walkthrough
Let us separate the solution into distinct steps:
- Create an automation user through AWS SSO.
- This user can optionally be an IAM user or role assumed into by a third-party identity provider (such as, Azure Active Directory). Note the ARN of this identity because that is the key piece of information we will use for crafting a policy document.
- Deploy a CloudFormation stack set across the organization that enables this user to assume limited access into each account.
- For this blog post, we will deploy an organization-wide role with `ec2:DescribeRouteTables` permissions. Feel free to expand or change the permission set based on the type of tool you build.
- Using Go, AWS Command Line Interface (CLI) v2, and AWS SDK for Go v2:
-
- Authenticate using AWS SSO.
- List every account in the organization.
- Assume permissions into that account.
- Run an API across every Region in that account.
- Aggregate results for every Region.
- Aggregate results for every account.
- Report back the result.
For additional context, review this GitHub repository that contains all code and assets for this blog post.
Prerequisites
For this walkthrough, you should have the following prerequisites:
- Multiple AWS accounts
- AWS Organizations
- AWS SSO (optional)
- AWS SDK for Go v2
- AWS CLI v2
- Go programming knowledge (preferred), especially Go’s concurrency model
- General programming knowledge
Create an automation user in AWS SSO
The first thing we need to do is create an identity to sign into. This can either be an AWS Identity and Access Management (IAM) user, an IAM role integrated with a third-party identity provider, or—in this case—an AWS SSO user.
- Log into the AWS SSO user console.
- Press Add user button.
- Fill in the appropriate information.

Figure 2. AWS SSO create user
- Assign the user to the appropriate group. In this case, we will assign this user to AWSControlTowerAdmins.

Figure 3. Assigning SSO user to a group
- Verify the user was created. (Optionally: enable MFA).

Figure 4. Verifying User Creation and MFA
Deploy a stack set across your organization
To effectively run any API across the organization, we need to deploy a common role that our AWS SSO user can assume across every account. We can use AWS CloudFormation StackSets to deploy this role at scale.
- Write the IAM role and associated policy document. The following is an example AWS Cloud Development Kit (AWS CDK) code for such a role. Note that orgAccount, roleName, and ssoUser in the below code will have to be replaced with your own values.
    const role = new iam.Role(this, 'TavernAutomationRole', {
      roleName: 'TavernAutomationRole',
      assumedBy: new iam.ArnPrincipal(`arn:aws:sts::${orgAccount}:assumed-role/${roleName}/${ssoUser}`),
    })
    role.addToPolicy(new PolicyStatement({
      actions: ['ec2:DescribeRouteTables'],
      resources: ['*']
}))- Log into the CloudFormation StackSets console.
- Press Create StackSet button.
- Upload the CloudFormation template containing the common role to be deployed to the organization by the preferred method.
- Specify name and optional description.
- Add any standard organization tags, and choose Service-managed permissions option.
- Choose Deploy to organization, and decide whether to disable or enable automatic deployment and appropriate account removal behavior. For this blog post, we choose to enable automatic deployment and accounts should remove the stack with removed from the target OU.
- For Specify regions, choose US East (N.Virginia). Note, because this stack contains only an IAM role, and IAM is a global service, region choice has no effect.
- For Maximum concurrent accounts, choose Percent, and enter 100 (this stack is not dependent on order).
- For Failure tolerance, choose Number, and enter 5, account deployment failures before a total rollback happens.
- For Region Concurrency, choose Sequential.
- Review your choices, note the deployment target (should be r-*), and acknowledge that CloudFormation might create IAM resources with custom names.
- Press the Submit button to deploy the stack.
Configure AWS SSO for the AWS CLI
To use our organization tools, we must first configure AWS SSO locally. With the AWS CLI v2, we can run:
aws configure sso
To configure credentials:
- Run the preceding command in your terminal.
- Follow the prompted steps.
-
- Specify your AWS SSO Start URL:
- AWS SSO Region:
- Authenticate through the pop-up browser window.
- Navigate back to the CLI, and choose the root account (this is where our principle for IAM originates).
- Specify the default client region.
- Specify the default output format.
Note the CLI profile name. Regardless if you choose to go with the autogenerated one or the custom one, we need this profile name for our upcoming code.
Start coding to utilize the AWS SSO shared profile
After AWS SSO is configured, we can start coding the beginning part of our multi-account tool. Our first step is to list every account belonging to our organization.
var (
    stsc    *sts.Client
    orgc    *organizations.Client
    ec2c    *ec2.Client
    regions []string
)

// init initializes common AWS SDK clients and pulls in all enabled regions
func init() {
    cfg, err := config.LoadDefaultConfig(context.TODO(), config.WithSharedConfigProfile("tavern-automation"))
    if err != nil {
        log.Fatal("ERROR: Unable to resolve credentials for tavern-automation: ", err)
    }

    stsc = sts.NewFromConfig(cfg)
    orgc = organizations.NewFromConfig(cfg)
    ec2c = ec2.NewFromConfig(cfg)

    // NOTE: By default, only describes regions that are enabled in the root org account, not all Regions
    resp, err := ec2c.DescribeRegions(context.TODO(), &ec2.DescribeRegionsInput{})
    if err != nil {
        log.Fatal("ERROR: Unable to describe regions", err)
    }

    for _, region := range resp.Regions {
        regions = append(regions, *region.RegionName)
    }
    fmt.Println("INFO: Listing all enabled regions:")
    fmt.Println(regions)
}

// main constructs a concurrent pipeline that pushes every account ID down
// the pipeline, where an action is concurrently run on each account and
// results are aggregated into a single json file
func main() {
    var accounts []string

    paginator := organizations.NewListAccountsPaginator(orgc, &organizations.ListAccountsInput{})
    for paginator.HasMorePages() {
        resp, err := paginator.NextPage(context.TODO())
        if err != nil {
            log.Fatal("ERROR: Unable to list accounts in this organization: ", err)
        }

        for _, account := range resp.Accounts {
            accounts = append(accounts, *account.Id)
        }
    }
    fmt.Println(accounts)
Implement concurrency into our code
With a slice of every AWS account, it’s time to concurrently run an API across all accounts. We will use some familiar Go concurrency patterns, as well as fan-out and fan-in.
// ... continued in main

    // Begin pipeline by calling gen with a list of every account
    in := gen(accounts...)

    // Fan out and create individual goroutines handling the requested action (getRoute)
    var out []<-chan models.InternetRoute
    for range accounts {
        c := getRoute(in)
        out = append(out, c)
    }

    // Fans in and collect the routing information from all go routines
    var allRoutes []models.InternetRoute
    for n := range merge(out...) {
        allRoutes = append(allRoutes, n)
    }
In the preceding code, we called a gen() function that started construction of our pipeline. Let’s take a deeper look into this function.
// gen primes the pipeline, creating a single separate goroutine
// that will sequentially put a single account id down the channel
// gen returns the channel so that we can plug it in into the next
// stage
func gen(accounts ...string) <-chan string {
    out := make(chan string)
    go func() {
        for _, account := range accounts {
            out <- account
        }
        close(out)
    }()
    return out
}
We see that gen just initializes the pipeline, and then starts pushing account ID’s down the pipeline one by one.
The next two functions are where all the heavy lifting is done. First, let’s investigate `getRoute()`.
// getRoute queries every route table in an account, including every enabled region, for a
// 0.0.0.0/0 (i.e. default route) to an internet gateway
func getRoute(in <-chan string) <-chan models.InternetRoute {
    out := make(chan models.InternetRoute)
    go func() {
        for account := range in {
            role := fmt.Sprintf("arn:aws:iam::%s:role/TavernAutomationRole", account)
            creds := stscreds.NewAssumeRoleProvider(stsc, role)

            for _, region := range regions {
                localCfg := aws.Config{
                    Region:      region,
                    Credentials: aws.NewCredentialsCache(creds),
                }

                localEc2Client := ec2.NewFromConfig(localCfg)

                paginator := ec2.NewDescribeRouteTablesPaginator(localEc2Client, &ec2.DescribeRouteTablesInput{})
                for paginator.HasMorePages() {
                    resp, err := paginator.NextPage(context.TODO())
                    if err != nil {
                        fmt.Println("WARNING: Unable to retrieve route tables from account: ", account, err)
                        out <- models.InternetRoute{Account: account}
                        close(out)
                        return
                    }

                    for _, routeTable := range resp.RouteTables {
                        for _, r := range routeTable.Routes {
                            if r.GatewayId != nil && strings.Contains(*r.GatewayId, "igw-") {
                                fmt.Println(
                                    "Account: ", account,
                                    " Region: ", region,
                                    " DestinationCIDR: ", *r.DestinationCidrBlock,
                                    " GatewayId: ", *r.GatewayId,
                                )

                                out <- models.InternetRoute{
                                    Account:         account,
                                    Region:          region,
                                    Vpc:             routeTable.VpcId,
                                    RouteTable:      routeTable.RouteTableId,
                                    DestinationCidr: r.DestinationCidrBlock,
                                    InternetGateway: r.GatewayId,
                                }
                            }
                        }
                    }
                }
            }

        }
        close(out)
    }()
    return out
}
A couple of key points to highlight are as follows:
for account := range inWhen iterating over a channel, the current goroutine blocks, meaning we wait here until we get an account ID passed to us before continuing. We’ll keep doing this until our upstream closes the channel. In our case, our upstream closes the channel once it pushes every account ID down the channel.
role := fmt.Sprintf("arn:aws:iam::%s:role/TavernAutomationRole", account)
creds := stscreds.NewAssumeRoleProvider(stsc, role)
Here, we can reference our existing role that we deployed to every account and assume into that role with AWS Security Token Service (STS).
for _, region := range regions {Lastly, when we have credentials into that account, we need to iterate over every region in that account to ensure we are capturing the entire global presence.
These three key areas are how we build organization-level tools. The remaining code is calling the desired API and delivering the result down to the next stage in our pipeline, where we merge all of the results.
// merge takes every go routine and "plugs" it into a common out channel
// then blocks until every input channel closes, signally that all goroutines
// are done in the previous stage
func merge(cs ...<-chan models.InternetRoute) <-chan models.InternetRoute {
    var wg sync.WaitGroup
    out := make(chan models.InternetRoute)

    output := func(c <-chan models.InternetRoute) {
        for n := range c {
            out <- n
        }
        wg.Done()
    }

    wg.Add(len(cs))
    for _, c := range cs {
        go output(c)
    }

    go func() {
        wg.Wait()
        close(out)
    }()
    return out
}
At the end of the main function, we take our in-memory data structures representing our internet entry points and marshal it into a JSON file.
    // ... continued in main

    savedRoutes, err := json.MarshalIndent(allRoutes, "", "\t")
    if err != nil {
        fmt.Println("ERROR: Unable to marshal internet routes to JSON: ", err)
    }
    ioutil.WriteFile("routes.json", savedRoutes, 0644)
With the code in place, we can run the code with `go run main.go` inside of your preferred terminal. The command will generate results like the following:
    // ... routes.json
    {
        "Account": "REDACTED",
        "Region": "eu-north-1",
        "Vpc": "vpc-1efd6c77",
        "RouteTable": "rtb-1038a979",
        "DestinationCidr": "0.0.0.0/0",
        "InternetGateway": "igw-c1b125a8"
    },
    {
        "Account": " REDACTED ",
        "Region": "eu-north-1",
        "Vpc": "vpc-de109db7",
        "RouteTable": "rtb-e042ce89",
        "DestinationCidr": "0.0.0.0/0",
        "InternetGateway": "igw-cbd457a2"
    },
    // ...
Cleaning up
To avoid incurring future charges, delete the following resources:
- Stack set through the CloudFormation console
- AWS SSO user (if you created one)
Conclusion
Creating organization tools that answer difficult questions such as, “show me every internet entry point in our organization,” are possible using Organizations APIs and CloudFormation StackSets. We also learned how to use Go’s native concurrency features to build these tools that scale across hundreds of accounts.
Further steps you might explore include:
- Visiting the Github Repo to capture the full picture.
- Taking our sequential solution for iterating over Regions and making it concurrent.
- Exploring the possibility of accepting functions and interfaces in stages to generalize specific pipeline features.
Thanks for taking the time to read, and feel free to leave comments.
Field Notes provides hands-on technical guidance from AWS Solutions Architects, consultants, and technical account managers, based on their experiences in the field solving real-world business problems for customers.
[$] The intersection of modules, GKI, and rocket science
Post Syndicated from original https://lwn.net/Articles/872209/rss
One does not normally expect a lot of controversy around a patch series
that makes changes to platform-specific configurations and drivers.
The furor over some work on the Samsung Exynos platform may thus be
surprising. When one looks into the discussion, things become more clear;
it mostly has to do with disagreements over the best ways to get hardware
vendors to cooperate with the kernel development community.
Automated security and compliance remediation at HDI
Post Syndicated from Uladzimir Palkhouski original https://aws.amazon.com/blogs/devops/automated-security-and-compliance-remediation-at-hdi/
with Dr. Malte Polley (HDI Systeme AG – Cloud Solutions Architect)
At HDI, one of the biggest European insurance group companies, we use AWS to build new services and capabilities and delight our customers. Working in the financial services industry, the company has to comply with numerous regulatory requirements in the areas of data protection and FSI regulations such as GDPR, German Supervisory Requirements for IT (VAIT) and Supervision of Insurance Undertakings (VAG). The same security and compliance assessment process in the cloud supports development productivity and organizational agility, and helps our teams innovate at a high pace and meet the growing demands of our internal and external customers.
In this post, we explore how HDI adopted AWS security and compliance best practices. We describe implementation of automated security and compliance monitoring of AWS resources using a combination of AWS and open-source solutions. We also go through the steps to implement automated security findings remediation and address continuous deployment of new security controls.
Background
Data analytics is the key capability for understanding our customers’ needs, driving business operations improvement, and developing new services, products, and capabilities for our customers. We needed a cloud-native data platform of virtually unlimited scale that offers descriptive and prescriptive analytics capabilities to internal teams with a high innovation pace and short experimentation cycles. One of the success metrics in our mission is time to market, therefore it’s important to provide flexibility to internal teams to quickly experiment with new use cases. At the same time, we’re vigilant about data privacy. Having a secure and compliant cloud environment is a prerequisite for every new experiment and use case on our data platform.
Cloud security and compliance implementation in the cloud is a shared effort between the Cloud Center of Competence team (C3), the Network Operation Center (NoC), and the product and platform teams. The C3 team is responsible for new AWS account provisioning, account security, and compliance baseline setup. Cross-account networking configuration is established and managed by the NoC team. Product teams are responsible for AWS services configuration to meet their requirements in the most efficient way. Typically, they deploy and configure infrastructure and application stacks, including the following:
- Network configuration – Amazon Virtual Private Cloud (Amazon VPC) subnets and routing
- Object storage setup – Amazon Simple Storage Service (Amazon S3) buckets and bucket policies
- Data encryption at rest configuration – Management of AWS Key Management Service (AWS KMS) customer master keys (CMKs) and key policies
- Managed services configuration – AWS Glue jobs, AWS Cloud9 environments, and others
We were looking for security controls model that would allow us to continuously monitor infrastructure and application components set up by all the teams. The model also needed to support guardrails that allowed product teams to focus on new use case implementation, but also inherited the security and compliance best practices promoted and ensured within our company.
Security and compliance baseline definition
We started with the AWS Well-Architected Framework Security Pillar whitepaper, which provides implementation guidance on the essential areas of security and compliance in the cloud, including identity and access management, infrastructure security, data protection, detection, and incident response. Although all five elements are equally important for implementing enterprise-grade security and compliance in the cloud, we saw an opportunity to improve controls of on-premises environments by automating detection and incident response elements. The continuous monitoring of AWS infrastructure and application changes complemented by the automated incident response of the security baseline helps us foster security best practices and allows for a high innovation pace. Manual security reviews are no longer required to asses security posture.
Our security and compliance controls framework is based on GDPR and several standards and programs, including ISO 27001, C5. Translation of the controls framework into the security and compliance baseline definition in the cloud isn’t always straightforward, so we use a number of guidelines. As a starting point, we use CIS Amazon Web Services benchmarks, because it’s a prescriptive recommendation and its controls cover multiple AWS security areas, including identity and access management, logging and monitoring configuration, and network configuration. CIS benchmarks are industry-recognized cyber security best practices and recommendations that cover a wide range of technology families, and are used by enterprise organizations around the world. We also apply GDPR compliance on AWS recommendations and AWS Foundational Security Best Practices, extending controls recommended by CIS AWS Foundations Benchmarks in multiple control areas: inventory, logging, data protection, access management, and more.
Security controls implementation
AWS provides multiple services that help implement security and compliance controls:
- AWS CloudTrail provides a history of events in an AWS account, including those originating from command line tools, AWS SDKs, AWS APIs, or the AWS Management Console. In addition, it allows exporting event history for further analysis and subscribing to specific events to implement automated remediation.
- AWS Config allows you to monitor AWS resource configuration, and automatically evaluate and remediate incidents related to unexpected resources configuration. AWS Config comes with pre-built conformance pack sample templates designed to help you meet operational best practices and compliance standards.
- Amazon GuardDuty provides threat detection capabilities that continuously monitor network activity, data access patterns, and account behavior.
With multiple AWS services to use as building blocks for continuous monitoring and automation, there is a strong need for a consolidated findings overview and unified remediation framework. This is where AWS Security Hub comes into play. Security Hub provides built-in security standards and controls that make it easy to enable foundational security controls. Then, Security Hub integrates with CloudTrail, AWS Config, GuardDuty, and other AWS services out of the box, which eliminates the need to develop and maintain integration code. Security Hub also accepts findings from third-party partner products and provides APIs for custom product integration. Security Hub significantly reduces the effort to consolidate audit information coming from multiple AWS-native and third-party channels. Its API and supported partner products ecosystem gave us confidence that we can adhere to changes in security and compliance standards with low effort.
While AWS provides a rich set of services to manage risk at the Three Lines Model, we were looking for wider community support in maintaining and extending security controls beyond those defined by CIS benchmarks and compliance and best practices recommendations on AWS. We came across Prowler, an open-source tool focusing on AWS security assessment and auditing and infrastructure hardening. Prowler implements CIS AWS benchmark controls and has over 100 additional checks. We appreciated Prowler providing checks that helped us meet GDPR and ISO 27001 requirements, specifically. Prowler delivers assessment reports in multiple formats, which makes it easy to implement reporting archival for future auditing needs. In addition, Prowler integrates well with Security Hub, which allows us to use a single service for consolidating security and compliance incidents across a number of channels.
We came up with the solution architecture depicted in the following diagram.

Automated remediation solution architecture HDI
Let’s look closely into the most critical components of this solution.
Prowler is a command line tool that uses the AWS Command Line Interface (AWS CLI) and a bash script. Individual Prowler checks are bash scripts organized into groups by compliance standard or AWS service. By supplying corresponding command line arguments, we can run Prowler against a specific AWS Region or multiple Regions at the same time. We can run Prowler in multiple ways; we chose to run it as an AWS Fargate task for Amazon Elastic Container Service (Amazon ECS). Fargate is a serverless compute engine that runs Docker-compatible containers. ECS Fargate tasks are scheduled tasks that make it easy to perform periodic assessments of an AWS account and export findings. We configured Prowler to run every 7 days in every account and Region it’s deployed into.
Security Hub acts as a single place for consolidating security findings from multiple sources. When Security Hub is enabled in a given Region, CIS AWS Foundations Benchmark and Foundational Security Best Practices standards are enabled as well. Enabling these standards also configures integration with AWS Config and Guard Duty. Integration with Prowler requires enabling product integration on the Security Hub side by calling the EnableImportFindingsForProduct API action for a given product. Because Prowler supports integration with Security Hub out of the box, posting security findings is a matter of passing the right command line arguments: -M json-asff to format reports as AWS Security Findings Format and -S to ship findings to Security Hub.
Automated security findings remediation is implemented using AWS Lambda functions and the AWS SDK for Python (Boto3). The remediation function can be triggered in two ways: automatically in response to a new security finding, or by a security engineer from the Security Hub findings page. In both cases, the same Lambda function is used. Remediation functions implement security standards in accordance with recommendations, whether they’re CIS AWS Foundations Benchmark and Foundational Security Best Practices standards, or others.
The exact activities performed depend on the security findings type and its severity. Examples of activities performed include deleting non-rotated AWS Identity and Access Management (IAM) access keys, enabling server-side encryption for S3 buckets, and deleting unencrypted Amazon Elastic Block Store (Amazon EBS) volumes.
To trigger the Lambda function, we use Amazon EventBridge, which makes it easy to build an event-driven remediation engine and allows us to define Lambda functions as targets for Security Hub findings and custom actions. EventBridge allows us to define filters for security findings and therefore map finding types to specific remediation functions. Upon successfully performing security remediation, each function updates one or more Security Hub findings by calling the BatchUpdateFindings API and passing the corresponding finding ID.
The following example code shows a function enforcing an IAM password policy:
import boto3
import os
import logging
from botocore.exceptions import ClientError

iam = boto3.client("iam")
securityhub = boto3.client("securityhub")

log_level = os.environ.get("LOG_LEVEL", "INFO")
logging.root.setLevel(logging.getLevelName(log_level))
logger = logging.getLogger(__name__)


def lambda_handler(event, context, iam=iam, securityhub=securityhub):
    """Remediate findings related to cis15 and cis11.

    Params:
        event: Lambda event object
        context: Lambda context object
        iam: iam boto3 client
        securityhub: securityhub boto3 client
    Returns:
        No returns
    """
    finding_id = event["detail"]["findings"][0]["Id"]
    product_arn = event["detail"]["findings"][0]["ProductArn"]
    lambda_name = os.environ["AWS_LAMBDA_FUNCTION_NAME"]
    try:
        iam.update_account_password_policy(
            MinimumPasswordLength=14,
            RequireSymbols=True,
            RequireNumbers=True,
            RequireUppercaseCharacters=True,
            RequireLowercaseCharacters=True,
            AllowUsersToChangePassword=True,
            MaxPasswordAge=90,
            PasswordReusePrevention=24,
            HardExpiry=True,
        )
        logger.info("IAM Password Policy Updated")
    except ClientError as e:
        logger.exception(e)
        raise e
    try:
        securityhub.batch_update_findings(
            FindingIdentifiers=[{"Id": finding_id, "ProductArn": product_arn},],
            Note={
                "Text": "Changed non compliant password policy",
                "UpdatedBy": lambda_name,
            },
            Workflow={"Status": "RESOLVED"},
        )
    except ClientError as e:
        logger.exception(e)
        raise e
A key aspect in developing remediation Lambda functions is testability. To quickly iterate through testing cycles, we cover each remediation function with unit tests, in which necessary dependencies are mocked and replaced with stub objects. Because no Lambda deployment is required to check remediation logic, we can test newly developed functions and ensure reliability of existing ones in seconds.
Each Lambda function developed is accompanied with an event.json document containing an example of an EventBridge event for a given security finding. A security finding event allows us to verify remediation logic precisely, including deletion or suspension of non-compliant resources or a finding status update in Security Hub and the response returned. Unit tests cover both successful and erroneous remediation logic. We use pytest to develop unit tests, and botocore.stub and moto to replace runtime dependencies with mocks and stubs.
Automated security findings remediation
The following diagram illustrates our security assessment and automated remediation process.

The workflow includes the following steps:
- An existing Security Hub integration performs periodic resource audits. The integration posts new security findings to Security Hub.
- Security Hub reports the security incident to the company’s centralized Service Now instance by using the Service Now ITSM Security Hub integration.
- Security Hub triggers automated remediation:
- Security Hub triggers the remediation function by sending an event to EventBridge. The event has a source field equal to
aws.securityhub, with the filter ID corresponding to the specific finding type and compliance status asFAILED. The combination of these fields allows us to map the event to a particular remediation function. - The remediation function starts processing the security finding event.
- The function calls the
UpdateFindingsSecurity Hub API to update the security finding status upon completing remediation. - Security Hub updates the corresponding security incident status in Service Now (Step 2)
- Security Hub triggers the remediation function by sending an event to EventBridge. The event has a source field equal to
- Alternatively, the security operations engineer resolves the security incident in Service Now:
- The engineer reviews the current security incident in Service Now.
- The engineer manually resolves the security incident in Service Now.
- Service Now updates the finding status by calling the
UpdateFindingsSecurity Hub API. Service Now uses the AWS Service Management Connector.
- Alternatively, the platform security engineer triggers remediation:
- The engineer reviews the currently active security findings on the Security Hub findings page.
- The engineer triggers remediation from the security findings page by selecting the appropriate action.
- Security Hub triggers the remediation function by sending an event with the source
aws.securityhubto EventBridge. The automated remediation flow continues as described in the Step 3.
Deployment automation
Due to legal requirements, HDI uses the infrastructure as code (IaC) principle while defining and deploying AWS infrastructure. We started with AWS CloudFormation templates defined as YAML or JSON format. The templates are static by nature and define resources in a declarative way. We figured out that as our solution complexity grows, the CloudFormation templates also grow in size and complexity, because all the resources deployed have to be explicitly defined. We wanted a solution to increase our development productivity and simplify infrastructure definition.
The AWS Cloud Development Kit (AWS CDK) helped us in two ways:
- The AWS CDK provides ready-to-use building blocks called constructs. These constructs include pre-configured AWS services following best practices. For example, a Lambda function always gets an IAM role with an IAM policy to be able to write logs to CloudWatch Logs.
- The AWS CDK allows us to use high-level programming languages to define configuration of all AWS services. Imperative definition allows us to build our own abstractions and reuse them to achieve concise resource definition.
We found that implementing IaC with the AWS CDK is faster and less error-prone. At HDI, we use Python to build application logic and define AWS infrastructure. The imperative nature of the AWS CDK is truly a turning point in fulfilling legal requirements and achieving high developer productivity at the same time.
One of the AWS CDK constructs we use is AWS CDK pipeline. This construct creates a customizable continuous integration and continuous delivery (CI/CD) pipeline implemented with AWS CodePipeline. The source action is based on AWS CodeCommit. The synth action is responsible for creating a CloudFormation template from the AWS CDK project. The synth action also runs unit tests on remediations functions. The pipeline actions are connected via artifacts. Lastly, the AWS CDK pipeline constructs offer a self-mutating feature, which allows us to maintain the AWS CDK project as well as the pipeline in a single code repository. Changes of the pipeline definition as well as automated remediation solutions are deployed seamlessly. The actual solution deployment is also implemented as a CI/CD stage. Stages can be eventually deployed in cross-Region and cross-account patterns. To use cross-account deployments, the AWS CDK provides a bootstrap functionality to create a trust relationship between AWS accounts.
The AWS CDK project is broken down to multiple stacks. To deploy the CI/CD pipeline, we run the cdk deploy cicd-4-securityhub command. To add a new Lambda remediation function, we must add remediation code, optional unit tests, and finally the Lambda remediation configuration object. This configuration object defines the Lambda function’s environment variables, necessary IAM policies, and external dependencies. See the following example code of this configuration:
prowler_729_lambda = {
    "name": "Prowler 7.29",
    "id": "prowler729",
    "description": "Remediates Prowler 7.29 by deleting/terminating unencrypted EC2 instances/EBS volumes",
    "policies": [
        _iam.PolicyStatement(
            effect=_iam.Effect.ALLOW,
            actions=["ec2:TerminateInstances", "ec2:DeleteVolume"],
            resources=["*"])
        ],
    "path": "delete_unencrypted_ebs_volumes",
    "environment_variables": [
        {"key": "ACCOUNT_ID", "value": core.Aws.ACCOUNT_ID}
    ],
    "filter_id": ["prowler-extra729"],
 }
Remediation functions are organized in accordance with the security and compliance frameworks they belong to. The AWS CDK code iterates over remediation definition lists and synthesizes corresponding policies and Lambda functions to be deployed later. Committing Git changes and pushing them triggers the CI/CD pipeline, which deploys the newly defined remediation function and adjusts the configuration of Prowler.
We are working on publishing the source code discussed in this blog post.
Looking forward
As we keep introducing new use cases in the cloud, we plan to improve our solution in the following ways:
- Continuously add new controls based on our own experience and improving industry standards
- Introduce cross-account security and compliance assessment by consolidating findings in a central security account
- Improve automated remediation resiliency by introducing remediation failure notifications and retry queues
- Run a Well-Architected review to identify and address possible areas of improvement
Conclusion
Working on the solution described in this post helped us improve our security posture and meet compliancy requirements in the cloud. Specifically, we were able to achieve the following:
- Gain a shared understanding of security and compliance controls implementation as well as shared responsibilities in the cloud between multiple teams
- Speed up security reviews of cloud environments by implementing continuous assessment and minimizing manual reviews
- Provide product and platform teams with secure and compliant environments
- Lay a foundation for future requirements and improvement of security posture in the cloud
The content and opinions in this post are those of the third-party author and AWS is not responsible for the content or accuracy of this post.
About the Authors
Security updates for Monday
Post Syndicated from original https://lwn.net/Articles/872547/rss
Security updates have been issued by Debian (apache2, mediawiki, neutron, and tiff), Fedora (chromium, dr_libs, firefox, and grafana), Mageia (apache), openSUSE (chromium and rabbitmq-server), Oracle (kernel), Red Hat (firefox and httpd24-httpd), SUSE (rabbitmq-server), and Ubuntu (libntlm).
Avoiding recursive invocation with Amazon S3 and AWS Lambda
Post Syndicated from James Beswick original https://aws.amazon.com/blogs/compute/avoiding-recursive-invocation-with-amazon-s3-and-aws-lambda/
Serverless applications are often composed of services sending events to each other. In one common architectural pattern, Amazon S3 send events for processing with AWS Lambda. This can be used to build serverless microservices that translate documents, import data to Amazon DynamoDB, or process images after uploading.
To avoid recursive invocations between S3 and Lambda, it’s best practice to store the output of a process in a different resource from the source S3 bucket. However, it’s sometimes useful to store processed objects in the same source bucket. In this blog post, I show three different ways you can do this safely and provide other important tips if you use this approach.
The example applications use the AWS Serverless Application Model (AWS SAM), enabling you to deploy the applications more easily to your own AWS account. This walkthrough creates resources covered in the AWS Free Tier but usage beyond the Free Tier allowance may incur cost. To set up the examples, visit the GitHub repo and follow the instructions in the README.md file.
Overview
Infinite loops are not a new challenge for developers. Any programming language that supports looping logic has the capability to generate a program that never exits. However, in serverless applications, services can scale as traffic grows. This makes infinite loops more challenging since they can consume more resources.
In the case of the S3 to Lambda recursive invocation, a Lambda function writes an object to an S3 object. In turn, it invokes the same Lambda function via a put event. The invocation causes a second object to be written to the bucket, which invokes the same Lambda function, and so on:

If you trigger a recursive invocation loop accidentally, you can press the “Throttle” button in the Lambda console to scale the function concurrency down to zero and break the recursion cycle.
The most practical way to avoid this possibility is to use two S3 buckets. By writing an output object to a second bucket, this eliminates the risk of creating additional events from the source bucket. As shown in the first example in the repo, the two-bucket pattern should be the preferred architecture for most S3 object processing workloads:

If you need to write the processed object back to the source bucket, here are three alternative architectures to reduce the risk of recursive invocation.
(1) Using a prefix or suffix in the S3 event notification
When configuring event notifications in the S3 bucket, you can additionally filter by object key, using a prefix or suffix. Using a prefix, you can filter for keys beginning with a string, or belonging to a folder, or both. Only those events matching the prefix or suffix trigger an event notification.
For example, a prefix of “my-project/images” filters for keys in the “my-project” folder beginning with the string “images”. Similarly, you can use a suffix to match on keys ending with a string, such as “.jpg” to match JPG images. Prefixes and suffixes do not support wildcards so the strings provided are literal.
The AWS SAM template in this example shows how to define a prefix and suffix in an S3 event notification. Here, the S3 invokes the Lambda function if the key begins with ‘original/’ and ends with ‘.txt’:
  S3ProcessorFunction:
    Type: AWS::Serverless::Function
    Properties:
      CodeUri: src/
      Handler: app.handler
      Runtime: nodejs14.x
      MemorySize: 128
      Policies:
        - S3CrudPolicy:
            BucketName: !Ref SourceBucketName
      Environment:
        Variables:
          DestinationBucketName: !Ref SourceBucketName
      Events:
        FileUpload:
          Type: S3
          Properties:
            Bucket: !Ref SourceBucket
            Events: s3:ObjectCreated:*
            Filter:
              S3Key:
                Rules:
                  - Name: prefix
                    Value: 'original/'
                  - Name: suffix
                    Value: '.txt'
You can then write back to the same bucket providing that the output key does not match the prefix or suffix used in the event notification. In the example, the Lambda function writes the same data to the same bucket but the output key does not include the ‘original/’ prefix.
To test this example with the AWS CLI, upload a sample text file to the S3 bucket:
aws s3 cp sample.txt s3://myS3bucketname
Shortly after, list the objects in the bucket. There is a second object with the same key with no folder name. The first uploaded object invoked the Lambda function due to the matching prefix. The second PutObject action without the prefix did not trigger an event notification and invoke the function.

Providing that your application logic can handle different prefixes and suffixes for source and output objects, this provides a way to use the same bucket for processed objects.
(2) Using object metadata to identify the original S3 object
If you need to ensure that the source object and processed object have the same key, configure user-defined metadata to differentiate between the two objects. When you upload S3 objects, you can set custom metadata values in the S3 console, AWS CLI, or AWS SDK.
In this design, the Lambda function checks for the presence of the metadata before processing. The Lambda handler in this example shows how to use the AWS SDK’s headObject method in the S3 API:
const AWS = require('aws-sdk')
AWS.config.region = process.env.AWS_REGION
const s3 = new AWS.S3()

exports.handler = async (event) => {
  await Promise.all(
    event.Records.map(async (record) => {
      try {
        // Decode URL-encoded key
        const Key = decodeURIComponent(record.s3.object.key.replace(/\+/g, " "))

        const data = await s3.headObject({
          Bucket: record.s3.bucket.name,
          Key
        }).promise()

        if (data.Metadata.original != 'true') {
          console.log('Exiting - this is not the original object.', data)
          return
        }

  // Do work ... /

      } catch (err) {
        console.error(err)
      }
    })
  )
}
To test this example with the AWS CLI, upload a sample text file to the S3 bucket using the “original” metatag:
aws s3 cp sample.txt s3://myS3bucketname --metadata '{"original":"true"}'
Shortly after, list the objects in the bucket – the original object is overwritten during the Lambda invocation. The second S3 object causes another Lambda invocation but it exits due to the missing metadata.
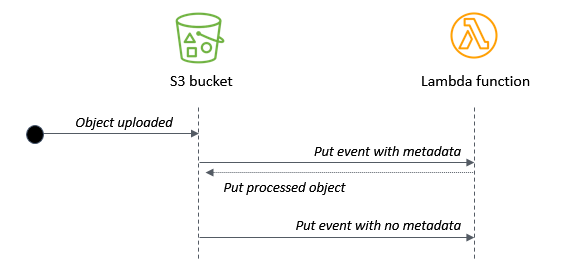
This allows you to use the same bucket and key name for processed objects, but it requires that the application creating the original object can set object metadata. In this approach, the Lambda function is always invoked twice for each uploaded S3 object.
(3) Using an Amazon DynamoDB table to filter duplicate events
If you need the output object to have the same bucket name and key but you cannot set user-defined metadata, use this design:

In this example, there are two Lambda functions and a DynamoDB table. The first function writes the key name to the table. A DynamoDB stream triggers the second Lambda function which processes the original object. It writes the object back to the same source bucket. Because the same item is put to the DynamoDB table, this does not trigger a new DynamoDB stream event.
To test this example with the AWS CLI, upload a sample text file to the S3 bucket:
aws s3 cp sample.txt s3://myS3bucketname
Shortly after, list the objects in the bucket. The original object is overwritten during the Lambda invocation. The new S3 object invokes the first Lambda function again but the second function is not triggered. This solution allows you to use the same output key without user-defined metadata. However, it does introduce a DynamoDB table to the architecture.
To automatically manage the table’s content, the example in the repo uses DynamoDB’s Time to Live (TTL) feature. It defines a TimeToLiveSpecification in the AWS::DynamoDB::Table resource:
  ## DynamoDB table
  DDBtable:
    Type: AWS::DynamoDB::Table
    Properties:
      AttributeDefinitions:
      - AttributeName: ID
        AttributeType: S
      KeySchema:
      - AttributeName: ID
        KeyType: HASH
      TimeToLiveSpecification:
        AttributeName: TimeToLive
        Enabled: true
      BillingMode: PAY_PER_REQUEST
      StreamSpecification:
        StreamViewType: NEW_IMAGE
When the first function writes the key name to the DynamoDB table, it also sets a TimeToLive attribute with a value of midnight on the next day:
        // Epoch timestamp set to next midnight
        const TimeToLive = new Date().setHours(24,0,0,0)

        // Create DynamoDB item
        const params = {
          TableName : process.env.DDBtable,
          Item: {
             ID: Key,
             TimeToLive
          }
        }
The DynamoDB service automatically expires items once the TimeToLive value has passed. In this example, if another object with the same key is stored in the S3 bucket before the TTL value, it does not trigger a stream event. This prevents the same object from being processed multiple times.
Comparing the three approaches
Depending upon the needs of your workload, you can choose one of these three approaches for storing processed objects in the same source S3 bucket:
| 1. Prefix/suffix | 2. User-defined metadata | 3. DynamoDB table | |
| Output uses the same bucket | Y | Y | Y |
| Output uses the same key | N | Y | Y |
| User-defined metadata | N | Y | N |
| Lambda invocations per object | 1 | 2 | 2 for an original object. 1 for a processed object. |
Monitoring applications for recursive invocation
Whenever you have a Lambda function writing objects back to the same S3 bucket that triggered the event, it’s best practice to limit the scaling in the development and testing phases.
Use reserved concurrency to limit a function’s scaling, for example. Setting the function’s reserved concurrency to a lower limit prevents the function from scaling concurrently beyond that limit. It does not prevent the recursion, but limits the resources consumed as a safety mechanism.
Additionally, you should monitor the Lambda function to make sure the logic works as expected. To do this, use Amazon CloudWatch monitoring and alarming. By setting an alarm on a function’s concurrency metric, you can receive alerts if the concurrency suddenly spikes and take appropriate action.
Conclusion
The S3-to-Lambda integration is a foundational building block of many serverless applications. It’s best practice to store the output of the Lambda function in a different bucket or AWS resource than the source bucket.
In cases where you need to store the processed object in the same bucket, I show three different designs to help minimize the risk of recursive invocations. You can use event notification prefixes and suffixes or object metadata to ensure the Lambda function is not invoked repeatedly. Alternatively, you can also use DynamoDB in cases where the output object has the same key.
To learn more about best practices when using S3 to Lambda, see the Lambda Operator Guide. For more serverless learning resources, visit Serverless Land.
Jörg Schilling is gone
Post Syndicated from original https://lwn.net/Articles/872489/rss
Jörg Schilling, a longtime free-software developer, has passed on. Most
people will remember him from his work on cdrtools and the seemingly endless drama that surrounded that
work. He was a difficult character to deal with, but he also contributed
some important code that, for a period, almost all of us depended on. Rest
well, Jörg.
Tamron 35-150mm f/2-2.8 – HANDS ON
Post Syndicated from Matt Granger original https://www.youtube.com/watch?v=jCXdcubDFtY
How to use domain with Amazon SES in multiple accounts or regions
Post Syndicated from Leonardo Azize original https://aws.amazon.com/blogs/messaging-and-targeting/how-to-use-domain-with-amazon-ses-in-multiple-accounts-or-regions/
Sometimes customers want to use their email domain with Amazon Simples Email Service (Amazon SES) across multiple accounts, or the same account but across multiple regions.
For example, AnyCompany is an insurance company with marketing and operations business units. The operations department sends transactional emails every time customers perform insurance simulations. The marketing department sends email advertisements to existing and prospective customers. Since they are different organizations inside AnyCompany, they want to have their own Amazon SES billing. At the same time, they still want to use the same AnyCompany domain.
Other use-cases include customers who want to setup multi-region redundancy, need to satisfy data residency requirements, or need to send emails on behalf of several different clients. In all of these cases, customers can use different regions, in the same or across different accounts.
This post shows how to verify and configure your domain on Amazon SES across multiple accounts or multiple regions.
Overview of solution
You can use the same domain with Amazon SES across multiple accounts or regions. Your options are: different accounts but the same region, different accounts and different regions, and the same account but different regions.

In all of these scenarios, you will have two SES instances running, each sending email for example.com domain – let’s call them SES1 and SES2. Every time you configure a domain in Amazon SES it will generate a series of DNS records you will have to add on your domain authoritative DNS server, which is unique for your domain. Those records are different for each SES instance.
You will need to modify your DNS to add one TXT record, with multiple values, for domain verification. If you decide to use DomainKeys Identified Mail (DKIM), you will modify your DNS to add six CNAME records, three records from each SES instance.
When you configure a domain on Amazon SES, you can also configure a MAIL FROM domain. If you decide to do so, you will need to modify your DNS to add one TXT record for Sender Policy Framework (SPF) and one MX record for bounce and complaint notifications that email providers send you.
Furthermore, your domain can be configured to support DMAC for email spoofing detection. It will rely on SPF or DKIM configured above. Below we walk you through these steps.
- Verify domain
You will take TXT values from both SES1 and SES2 instances and add them in DNS, so SES can validate you own the domain
- Verify DomainKeys Identified Mail (DKIM)
You will take CNAME values from both SES1 and SES2 instances and add them in DNS, so SES can verify DKIM for your domain
- Complying with DMAC
You will add a TXT value with DMAC policy that applies to your domain. This is not tied to any specific SES instance
- Custom MAIL FROM Domain and SPF
You will take TXT and MX records related from your MAIL FROM domain from both SES1 and SES2 instances and add them in DNS, so SES can comply with DMARC
Here is a sample matrix of the various configurations:
| Two accounts, same region | Two accounts, different regions | One account, two regions | |
| TXT records for domain verification* |
1 record with multiple values _amazonses.example.com = “VALUE FROM SES1” |
||
| CNAMES for DKIM verification |
6 records, 3 from each SES instance record1-SES1._domainkey.example.com = VALUE FROM SES1 |
||
| TXT record for DMARC |
1 record. It is not related to SES instance or region _dmarc.example.com = DMARC VALUE |
||
| MAIL FROM MX record to define message sender for SES |
1 record for entire region mail.example.com = 10 feedback-smtp.us-east-1.amazonses.com |
2 records, one for each region mail1.example.com = 10 feedback-smtp.us-east-1.amazonses.com |
|
| MAIL FROM TXT record for SPF |
1 record for entire region mail.example.com = “v=spf1 include:amazonses.com ~all” |
2 records, one for each region mail1.example.com = “v=spf1 include:amazonses.com ~all” |
|
* Considering your DNS supports multiple values for a TXT record
Setup SES1 and SES2
In this blog, we call SES1 your primary or existing SES instance. We assume that you have already setup SES, but if not, you can still follow the instructions and setup both at the same time. The settings on SES2 will differ slightly, and therefore you will need to add new DNS entries to support the two-instance setup.
In this document we will use configurations from the “Verification,” “DKIM,” and “Mail FROM Domain” sections of the SES Domains screen and configure SES2 and setup DNS correctly for the two-instance configuration.

Verify domain
Amazon SES requires that you verify, in DNS, your domain, to confirm that you own it and to prevent others from using it. When you verify an entire domain, you are verifying all email addresses from that domain, so you don’t need to verify email addresses from that domain individually.
You can instruct multiple SES instances, across multiple accounts or regions to verify your domain. The process to verify your domain requires you to add some records in your DNS provider. In this post I am assuming Amazon Route 53 is an authoritative DNS server for example.com domain.
Verifying a domain for SES purposes involves initiating the verification in SES console, and adding DNS records and values to confirm you have ownership of the domain. SES will automatically check DNS to complete the verification process. We assume you have done this step for SES1 instance, and have a _amazonses.example.com TXT record with one value already in your DNS. In this section you will add a second value, from SES2, to the TXT record. If you do not have SES1 setup in DNS, complete these steps twice, once for SES1 and again for SES2. This will prove to both SES instances that you own the domain and are entitled to send email from them.
Initiate Verification in SES Console
Just like you have done on SES1, in the second SES instance (SES2) initiate a verification process for the same domain; in our case example.com
- Sign in to the AWS Management Console and open the Amazon SES console.
- In the navigation pane, under Identity Management, choose Domains.
- Choose Verify a New Domain.
- In the Verify a New Domain dialog box, enter the domain name (i.e. example.com).
- If you want to set up DKIM signing for this domain, choose Generate DKIM Settings.
- Click on Verify This Domain.
- In the Verify a New Domain dialog box, you will see a Domain Verification Record Set containing a Name, a Type, and a Value. Copy Name and Value and store them for the step below, where you will add this value to DNS.
(This information is also available by choosing the domain name after you close the dialog box.)

To complete domain verification, add a TXT record with the displayed Name and Value to your domain’s DNS server. For information about Amazon SES TXT records and general guidance about how to add a TXT record to a DNS server, see Amazon SES domain verification TXT records.
Add DNS Values for SES2
To complete domain verification for your second account, edit current _amazonses TXT record and add the Value from the SES2 to it. If you do not have an _amazonses TXT record create it, and add the Domain Verification values from both SES1 and SES2 to it. We are showing how to add record to Route 53 DNS, but the steps should be similar in any DNS management service you use.
- Sign in to the AWS Management Console and open the Amazon Route 53 console.
- In the navigation pane, choose Hosted zones.
- Choose the domain name you are verifying.
- Choose the _amazonses TXT record you created when you verified your domain for SES1.
- Under Record details, choose Edit record.
- In the Value box, go to the end of the existing attribute value, and then press Enter.
- Add the attribute value for the additional account or region.

- Choose Save.
- To validate, run the following command:
dig TXT _amazonses.example.com +short - You should see the two values returned:
"4AjLMzUu4nSjrz4QVqDD8rXq8X2AHr+JhGSl4foiMmU="
"abcde12345Sjrz4QVqDD8rXq8X2AHr+JhGSl4foiMmU="

Please note:
- if your DNS provider does not allow underscores in record names, you can omit
_amazonsesfrom the Name. - to help you easily identify this record within your domain’s DNS settings, you can optionally prefix the Value with “
amazonses:”. - some DNS providers automatically append the domain name to DNS record names. To avoid duplication of the domain name, you can add a period to the end of the domain name in the DNS record. This indicates that the record name is fully qualified and the DNS provider need not append an additional domain name.
- if your DNS server does not support two values for a TXT record, you can have one record named _amazonses.example.com and another one called example.com.
Finally, after some time SES will complete its validation of the domain name and you should see the “pending validation” change to “verified”.

Verify DKIM
DomainKeys Identified Mail (DKIM) is a standard that allows senders to sign their email messages with a cryptographic key. Email providers then use these signatures to verify that the messages weren’t modified by a third party while in transit.
An email message that is sent using DKIM includes a DKIM-Signature header field that contains a cryptographically signed representation of the message. A provider that receives the message can use a public key, which is published in the sender’s DNS record, to decode the signature. Email providers then use this information to determine whether messages are authentic.
When you enable DKIM it generates CNAME records you need to add into your DNS. As it generates different values for each SES instance, you can use DKIM with multiple accounts and regions.
To complete the DKIM verification, copy the three (3) DKIM Names and Values from SES1 and three (3) from SES2 and add them to your DNS authoritative server as CNAME records.

You will know you are successful because, after some time SES will complete the DKIM verification and the “pending verification” will change to “verified”.
Configuring for DMARC compliance
Domain-based Message Authentication, Reporting and Conformance (DMARC) is an email authentication protocol that uses Sender Policy Framework (SPF) and/or DomainKeys Identified Mail (DKIM) to detect email spoofing. In order to comply with DMARC, you need to setup a “_dmarc” DNS record and either SPF or DKIM, or both. The DNS record for compliance with DMARC is setup once per domain, but SPF and DKIM require DNS records for each SES instance.
- Setup “_dmarc” record in DNS for your domain; one time per domain. See instructions here
- To validate it, run the following command:
dig TXT _dmarc.example.com +short
"v=DMARC1;p=quarantine;pct=25;rua=mailto:[email protected]" - For DKIM and SPF follow the instructions below
Custom MAIL FROM Domain and SPF
Sender Policy Framework (SPF) is an email validation standard that’s designed to prevent email spoofing. Domain owners use SPF to tell email providers which servers are allowed to send email from their domains. SPF is defined in RFC 7208.
To comply with Sender Policy Framework (SPF) you will need to use a custom MAIL FROM domain. When you enable MAIL FROM domain in SES console, the service generates two records you need to configure in your DNS to document who is authorized to send messages for your domain. One record is MX and another TXT; see screenshot for mail.example.com. Save these records and enter them in your DNS authoritative server for example.com.

Configure MAIL FROM Domain for SES2
- Open the Amazon SES console at https://console.aws.amazon.com/ses/.
- In the navigation pane, under Identity Management, choose Domains.
- In the list of domains, choose the domain and proceed to the next step.
- Under MAIL FROM Domain, choose Set MAIL FROM Domain.

- On the Set MAIL FROM Domain window, do the following:

-
- For MAIL FROM domain, enter the subdomain that you want to use as the MAIL FROM domain. In our case mail.example.com.
- For Behavior if MX record not found, choose one of the following options:
- Use amazonses.com as MAIL FROM – If the custom MAIL FROM domain’s MX record is not set up correctly, Amazon SES will use a subdomain of
amazonses.com. The subdomain varies based on the AWS Region in which you use Amazon SES. - Reject message – If the custom MAIL FROM domain’s MX record is not set up correctly, Amazon SES will return a
MailFromDomainNotVerifiederror. Emails that you attempt to send from this domain will be automatically rejected.
- Use amazonses.com as MAIL FROM – If the custom MAIL FROM domain’s MX record is not set up correctly, Amazon SES will use a subdomain of
- Click Set MAIL FROM Domain.
You will need to complete this step on SES1, as well as SES2. The MAIL FROM records are regional and you will need to add them both to your DNS authoritative server.
Set MAIL FROM records in DNS
From both SES1 and SES2, take the MX and TXT records provided by the MAIL FROM configuration and add them to the DNS authoritative server. If SES1 and SES2 are in the same region (us-east-1 in our example) you will publish exactly one MX record (mail.example.com in our example) into DNS, pointing to endpoint for that region. If SES1 and SES2 are in different regions, you will create two different records (mail1.example.com and mail2.example.com) into DNS, each pointing to endpoint for specific region.
Verify MX record
Example of MX record where SES1 and SES2 are in the same region
dig MX mail.example.com +short
10 feedback-smtp.us-east-1.amazonses.com.
Example of MX records where SES1 and SES2 are in different regions
dig MX mail1.example.com +short
10 feedback-smtp.us-east-1.amazonses.com.
dig MX mail2.example.com +short
10 feedback-smtp.eu-west-1.amazonses.com.
Verify if it works
On both SES instances (SES1 and SES2), check that validations are complete. In the SES Console:
- In Verification section, Status should be “verified” (in green color)
- In DKIM section, DKIM Verification Status should be “verified” (in green color)
- In MAIL FROM Domain section, MAIL FROM domain status should be “verified” (in green color)
If you have it all verified on both accounts or regions, it is correctly configured and ready to use.
Conclusion
In this post, we explained how to verify and use the same domain for Amazon SES in multiple account and regions and maintaining the DMARC, DKIM and SPF compliance and security features related to email exchange.
While each customer has different necessities, Amazon SES is flexible to allow customers decide, organize, and be in control about how they want to uses Amazon SES to send email.
Author bio
 |
Leonardo Azize Martins is a Cloud Infrastructure Architect at Professional Services for Public Sector. His background is on development and infrastructure for web applications, working on large enterprises. When not working, Leonardo enjoys time with family, read technical content, watch movies and series, and play with his daughter. |
Contributor
 |
Daniel Tet is a senior solutions architect at AWS specializing in Low-Code and No-Code solutions. For over twenty years, he has worked on projects for Franklin Templeton, Blackrock, Stanford Children’s Hospital, Napster, and Twitter. He has a Bachelor of Science in Computer Science and an MBA. He is passionate about making technology easy for common people; he enjoys camping and adventures in nature. |
Announcing Cloudflare Research Hub
Post Syndicated from Vânia Gonçalves original https://blog.cloudflare.com/announcing-cloudflare-research-hub/
As highlighted yesterday, research efforts at Cloudflare have been growing over the years as well as their scope. Cloudflare Research is proud to support computer science research to help build a better Internet, and we want to tell you where you can learn more about our efforts and how to get in touch.
Why are we announcing a website for Cloudflare Research?
Cloudflare is built on a foundation of open standards which are the result of community consensus and research. Research is integral to Cloudflare’s mission as is the commitment to contribute back to the research and standards communities by establishing and maintaining a growing number of collaborations.
Throughout the years we have cherished many collaborations and one-on-one relationships, but we have probably been missing a lot of interesting work happening elsewhere. This is our main motivation for this Research hub of information: to help us build further collaborations with industrial and academic research groups, and individuals across the world. We are eager to interface more effectively with the wider research and standards communities: practitioners, researchers and educators. And as for you, dear reader, we encourage you to recognize that you are our audience too: we often hear that Cloudflare’s commitment to sharing technical writing and resources is very attractive to many. This site also hopes to serve as a starting point for engagement with research that underpins development of the Internet.
We welcome you to reach out to us and share your ideas!
How we arrived at the site as it is
The opportunity to create a new website to share our growing library of information led us to an almost reflexive search for the right blog hosting system to fit the need. For our first prototype we gave the Docusaurus project a try. A few questions led us to evaluate our needs more carefully: does a static site need to use much JavaScript? Was an SPA (Single Page Application) the best fit and did we need to use a generic CSS framework?
Having this conversation led us to re-examine the necessity of using client-side scripts for the site at all. Why not remove the dependency on JavaScript? Cloudflare’s business model is based on making websites faster, not on tracking users, so why would we require JavaScript when we do not need much client-side dynamism? Could we build such an informational site simply, use tools easily inspectable by developers and deploy with Cloudflare Pages from Github?
We have avoided the use of frameworks, keeping our HTML simple and avoided minification since it is not really necessary here. We appreciate being able to peek under the hood and these choices allow the browser’s “View Page Source” right-click option on site pages to reveal human-readable code!
We did not want the HTML and CSS to be difficult to follow. Instead of something like:
<article class="w-100 w-50-l mb4 ph3 bb b--gray8 bn-l">
  <p class="f3 fw5 gray5 my">September 17, 2021 2:00PM</p>
  <a href="/tag/another/" class="dib pl2 pr2 pt1 pb1 mb2 bg-gray8 no-underline blue3 f2">Another</a>
...
</article>
where CSS classes are repeated, again and again, in source code we decided to lean on the kind of traditional hierarchical style declarations that put the C for “Cascading” in CSS.
We questioned whether in our serving of the site we needed to force the browser to re-check for content changes on every page visit. For this kind of website, always returning "max-age=0, must-revalidate, public" didn’t seem necessary.
The research.cloudflare.com site is a work in progress and embraces standards-based web development choices. We do not use JavaScript to enable lazy loading of images but instead lean on the loading attribute of the img tag. Because we do not have many images that lie beneath the fold it is okay for us to use this even as some browsers work to add support for this specification. We use the limited standardized CSS variable support to avoid needing a style pre-processor while still using custom colour variables.
Many times dynamic frameworks need to introduce quite complex mechanisms to restore accessibility for users. The standards-based choices we have made for the HTML and CSS that compose this site made a 100 accessibility score in Lighthouse (a popular performance, accessibility, and best practices measure) more easily achievable.
Explore and connect
While we wanted this website to be clean, we certainly didn’t want it to be empty!
Our research work spreads across multiple areas from network security, privacy, cryptography, authentication, Internet measurements, to distributed systems. We have compiled a first set of information about the research projects we have been recently working on, together with a handful of related resources, publications, and additional pointers to help you learn more about our work. We are also sharing results about the experiments we are running and code we have released to the community. This research work results in many cases from collaborations between multiple Cloudflare teams and industry and academic partners.
And, as will be highlighted during this week, you can learn more about our standardisation efforts, how we engage with standards bodies and contribute to several working groups and to shaping protocol specifications.
So, stay tuned, more is coming! Subscribe to our latest updates about research work and reach out if you want to collaborate with us. And if you are interested in joining the team, learn more about our career and internship opportunities and the visiting researcher program.
Internship Experience: Research Engineer
Post Syndicated from Sudheesh Singanamalla original https://blog.cloudflare.com/internship-experience-research-engineer/


I spent my summer of 2020 as an intern at Cloudflare working with the incredible research team. I had recently started my time as a PhD student at the University of Washington’s Paul G Allen School of Computer Science and Engineering working on decentralizing and securing cellular network infrastructure, and measuring the adoption of HTTPS by government websites worldwide. Here’s the story of how I ended up on Cloudflare TV talking about my award-winning research on a project I wasn’t even aware of when the pandemic hit.
Prior to the Internship
It all started before the pandemic, when I came across a job posting over LinkedIn for an internship with the research team at Cloudflare. I had been a happy user of Cloudflare’s products and services and this seemed like a very exciting opportunity to really work with them towards their mission to help build a better Internet. While working on research at UW, I came across a lot of prior research work published by the researchers at Cloudflare, and was excited to possibly be a part of the research team and interact with them. Without second thoughts, I submitted an application through LinkedIn and waited to hear back from the team.
I received a first call from a recruiter a few months later, asking me if I was still interested in the internship position, and informing me that the internships would be remote due to the pandemic. I was told that the research team was interested in interviewing me for the internship and during the call also informed about the process, which included a programming task to work with an existing open source Cloudflare project, a pair programming interview task with a member of the team, followed by phone calls with some research leads. I was extremely excited and said “Yes! I’d love to try out the interview process”.
Adding Certificate Transparency Log Scans to Scan families
Within the next few hours I received a task from Nick Sullivan with a clear problem statement to add support for producing a certificate transparency report in CFSSL, an open source project from Cloudflare which contained cfssl-scan, a tool that scanned hostnames for connectivity, TLS information, TLS session support, and PKI information (certificates). I was tasked with adding a new family of scanners to look into Certificate Transparency logs (CT Logs) and integrate the information from the CT logs into the output. After a few back and forth emails with Nick and other researchers CC’d on the email thread, I set out to work and submitted a draft detailing my design rationale, supported features and examples of how different error conditions were handled by the changes to the code.
The task was very exciting because it allowed me to gain more familiarity with Go, a language I would use even more at Cloudflare during my internship. With the task complete, I was invited for a pair programming task with Watson Ladd. We discussed my current research work at the university, the areas of research which interested me and learnt about new cool projects that Cloudflare was working on and problems they were interested in solving to help make the Internet better. We then started working on a pair programming problem and discussed the design rationale for solving the problem, extensibility, code-reuse and writing test coverage.
Soon after, I had a bunch of similar calls talking about my current research work, understanding potential research problems that Cloudflare was interested in solving before finally receiving an internship offer for the summer. Yay!
The Internship
My summer internship with Cloudflare was like none other. It all started with a seamless onboarding process with clear documentation and training. The access control for the account worked flawlessly from the first day, and I had all the tools, documentation and internal resources available to get started. However, this is where the first challenge started: there are too many interesting research problems to try and tackle! It felt like a kid at a carnival. I liked everything and wanted to try everything, but I knew, given the short duration of the internship, I had to pick one research problem which interested me. After a week of deliberation, long conversations with different researchers on the team and reading highly relevant prior research relevant in the different areas, I decided to explore and work on Oblivious DNS over HTTPS (ODoH).
Initially, I was worried about not being able to make a decision regarding which project to pursue, because the interactions with other people in Cloudflare were remote, with no in-person conversations like I’d had at other companies. I also worried this setup made me overlook something that might have been easier to discuss in person. But the team was super supportive through it and ensured that I had all the relevant information before making my decision.
Oblivious DNS over HTTPS (ODoH) is a protocol proposed at the IETF with the goal of providing privacy to the clients making DNS requests using DNS over HTTPS (DoH). Cloudflare operates a popular public recursive DNS resolver to which clients can make DNS queries. However, DNS over HTTPS (DoH) requests made by clients to the resolver leak client IP addresses despite providing a secure encrypted communication channel. While DoH enhances the security of the DNS queries and responses when used instead of the default insecure UDP based DNS requests, the leakage of client IP information could be problematic. Cloudflare maintains users’ privacy through a rigorous privacy policy, audits, and purging client information.
Along with my advisors, I spent time building interoperable versions of ODoH services, and the necessary components in Go and Rust which were experimentally deployed on cloud services for performing measurements of the protocol. Through frequent conversations, we identified interesting research questions, performed the necessary measurements, found both security and performance issues, improved our design and drove towards conclusions iteratively. Then, we worked with the help of the brilliant engineering and reliability engineering teams at Cloudflare to move the support for the protocol into production, to convince the community about the advantages and practicality of the ODoH protocol.
The interoperable implementations of the protocol were made open source. They served as a reference implementation presented during the standardization process and various presentations we made at IETF and OARC, through which we obtained valuable feedback. With all the experiments in place, we submitted our work to the proceedings of Privacy Enhancing Technologies Symposium (PETS 2021) where it was accepted and awarded the Andreas Pfitzmann best student paper.
Cloudflare strongly believes in transparency. The effects of this are visible within the company, from open and inclusive discussions about social and technological issues, to the way people across the company can collaborate and share information with the public. I was fortunate to present and share some work on ODoH on Cloudflare TV. I was definitely nervous about presenting the work on live Internet TV, but it became possible with the support and encouragement of the TV team and members of the research team.
Outside work
While the work that I did during my time as an intern at Cloudflare was exciting, it was not the only thing that kept me occupied. It was very easy to interact with engineers, designers, sales and marketing teams within the company, learn about their work, their experiences and gain an understanding of all the amazing work happening throughout the company. The internship also provided me an opportunity to engage in random engineer chats — a program which randomly matched me with other engineers, and researchers, allowing me to learn more about their work. The research team at Cloudflare operated very similarly to an academic research lab and frequently discussed papers during scheduled reading group meetings. The weekly intern hangouts allowed me to build friendships with the other interns in the team. However, not everything was rosy: it was hard to make it to all the intern hangouts, and time zone differences did add to the challenges for scheduling time to get to know the other interns.
Takeaways
Cloudflare is an incredibly transparent company built for scale, and a brilliant place to work with a lot of interesting research and engineering work that could move from prototype to production. The transparent collaboration between different teams, academia, and the shared mission to help build a better Internet make it possible to leverage the strengths of various teams, and highly motivated people to contribute to a project. In retrospect, I strongly believe that I got lucky working on a problem which interested me, and had value for Cloudflare’s mission. And while I get to write this blog post about my experience, this experience and the work I was able to do during my time at Cloudflare wouldn’t have been possible without the hundreds of motivated and brilliant people in various teams (media, content, design, legal etc.) with whom I interacted, along with the direct involvement of the research, engineering and reliability teams. The internship experience was truly humbling!
If this sort of experience interests you, and you would love to join an innovative and collaborative environment, Cloudflare Research is currently accepting applications for 2022 internships!
Cloudflare invites visiting researchers
Post Syndicated from Vânia Gonçalves original https://blog.cloudflare.com/visiting-researcher-program/


As part of Cloudflare’s effort to build collaborations with academia, we host research focused internships all year long. Interns collaborate cross-functionally in research projects and are encouraged to ship code and write a blog post and a peer-reviewed publication at the end of their internship. Post-internship, many of our interns have joined Cloudflare to continue their work and often connect back with their alma mater strengthening idea sharing and collaborative initiatives.
Last year, we extended the intern experience by hosting Thomas Ristenpart, Associate Professor at Cornell Tech. Thomas collaborated for half a year on a project related to password breach alerting. Based on the success of this experience we are taking a further step in creating a structured Visiting Researcher program, to broaden our capabilities and invest further on a shared motivation with academics.
Foster engagement and closer partnerships
Our current research focuses on applied cryptography, privacy, network protocols and architecture, measurement and performance evaluation, and, increasingly, distributed systems. With the Visiting Researcher program, Cloudflare aims to foster a shared motivation with academia and engage together in seeking innovative solutions to help build a better Internet in the mentioned domains.
We expect to support the operationalization of ideas that emerge in academia and put them to the test in deployable services that will be used worldwide, hence giving the opportunity to develop collaborative projects with real world applicability and also push industry forward.
About the Visiting Researcher Program
The Visiting Researcher Program is available to both postdocs and full-time faculty members who aim to collaborate primarily with Cloudflare Research for periods of three to 12 months. There are a few eligibility criteria to meet before expressing interest in the program:
- Have a PhD and a well-established research track record demonstrated by peer-reviewed journal publications and conference papers.
- Relevant research experience and interest in one of the research areas.
- Ability to design and execute on a research agenda.
We know we will receive excellent proposals but we expect selected expressions of interest to have the potential to have a significant impact on one of the mentioned domains and reinforce the contribution to the Internet community at large. Proposals should aim at wide dissemination and have the potential to deliver value to both technical and academic communities.
You can explore more about the program on the Cloudflare Research website and learn more about Thomas Ristenpart’s experience in the next section .
The Visiting Researcher experience so far
There are a lot of potential reasons for a short-term visit in industry. For senior researchers it’s an opportunity to refresh one’s perspectives on problems observed in practice, and potentially transfer research ideas from “the lab” to products. Compared to some companies, Cloudflare’s research organization is smaller, has clear connections with product teams, and has an outsized portfolio of exciting, high-impact research projects.
As mentioned above, I joined Cloudflare in the summer of 2020, during my academic sabbatical. I worked three days a week — remotely given the COVID-19 pandemic — and spent the rest of the work week advising my academic group at Cornell. A lot of my academic research over the past few years has focused on how to improve security for password-based authentication, including developing some of the first protocols for privacy-preserving password breach alerting. I knew Cloudflare well due to its ongoing engagement with the applied cryptography community, and it made sense to visit: Cloudflare’s focus on security, privacy, and its position as a first-line of defense for millions of websites made it a unique opportunity for working on improving authentication security.
I worked directly with research engineers in the team to implement a new type of password breach alerting service, that we called Might I Get Pwned (MIGP). While it built off prior work done in academia, we encountered a number of fascinating challenges in architecting and implementing the system. We also found new opportunities for impact, realizing that the Web Application Firewall (WAF) team was simultaneously interested in breach alerting and could utilize the infrastructure we were building. Ultimately, my work contributed directly to the WAF’s breach alerting feature that launched in Spring 2021.
At the same time, being embedded at Cloudflare surfaced fascinating new research questions. At one point, the CEO asked the team about how we could handle the potential threat of hoarding attacks against Privacy Pass, a deployed cryptographic protocol that Cloudflare customers rely on to help prevent bots from mounting attacks. This led to a foundational cryptographic protocol question: can we build partially oblivious pseudorandom function protocols that match the efficiency of standard oblivious pseudorandom functions? I won’t unpack that jargon here, but for those who are curious you can check out the preprint. We ended up tackling this question as a collaboration between my academic research group, the University of Washington, and Cloudflare, culminating in a new protocol that is sure to get deployed quite widely in the years to come.
Overall, this was a hugely successful visit. I’m excited to see the Cloudflare visiting scholar program expand and develop, and would definitely recommend it to interested academics.
Express your interest
We’re very excited to have this program going forward and diversifying our collaborations with academia! You can read more about the Visiting Researcher program and send us your expression of interest through Cloudflare Research website. We are expecting to host you in early 2022!
The European Parliament Voted to Ban Remote Biometric Surveillance
Post Syndicated from Bruce Schneier original https://www.schneier.com/blog/archives/2021/10/the-european-parliament-voted-to-ban-remote-biometric-surveillance.html
It’s not actually banned in the EU yet — the legislative process is much more complicated than that — but it’s a step: a total ban on biometric mass surveillance.
To respect “privacy and human dignity,” MEPs said that EU lawmakers should pass a permanent ban on the automated recognition of individuals in public spaces, saying citizens should only be monitored when suspected of a crime.
The parliament has also called for a ban on the use of private facial recognition databases — such as the controversial AI system created by U.S. startup Clearview (also already in use by some police forces in Europe) — and said predictive policing based on behavioural data should also be outlawed.
MEPs also want to ban social scoring systems which seek to rate the trustworthiness of citizens based on their behaviour or personality.
1763 Battle of Bushy Run
Post Syndicated from The History Guy: History Deserves to Be Remembered original https://www.youtube.com/watch?v=HIwXwVRXV60
Misinformation: Last Week Tonight with John Oliver (HBO)
Post Syndicated from LastWeekTonight original https://www.youtube.com/watch?v=l5jtFqWq5iU
Comic for 2021.10.11
Post Syndicated from Explosm.net original http://explosm.net/comics/5999/
New Cyanide and Happiness Comic
100 terabyte home NAS
Post Syndicated from original https://blog.erratasec.com/2021/10/100-terabyte-home-nas.html
So, as a nerd, let’s say you need 100 terabytes of home storage. What do you do?
My solution would be a commercial NAS RAID, like from Synology, QNAP, or Asustor. I’m a nerd, and I have setup my own Linux systems with RAID, but I’d rather get a commercial product. When a disk fails, and a disk will always eventually fail, then I want something that will loudly beep at me and make it easy to replace the drive and repair the RAID.
Some choices you have are:
- vendor (Synology, QNAP, and Asustor are the vendors I know and trust the most)
- number of bays (you want 8 to 12)
- redundancy (you want at least 2 if not 3 disks)
- filesystem (btrfs or ZFS) [not btrfs-raid builtin, but btrfs on top of RAID]
- drives (NAS optimized between $20/tb and $30/tb)
- networking (at least 2-gbps bonded, but box probably can’t use all of 10gbps)
- backup (big external USB drives)
The products I link above all have at least 8 drive bays. When you google “NAS”, you’ll get a list of smaller products. You don’t want them. You want somewhere between 8 and 12 drives.
The reason is that you want two-drive redundancy like RAID6 or RAIDZ2, meaning two additional drives. Everyone tells you one-disk redundancy (like RAID5) is enough, they are wrong. It’s just legacy thinking, because it was sufficient in the past when drives were small. Disks are so big nowadays that you really need two-drive redundancy. If you have a 4-bay unit, then half the drives are used for redundancy. If you have a 12-bay unit, then only 2 out of the 12 drives are being used for redundancy.
The next decision is the filesystem. There’s only two choices, btrfs and ZFS. The reason is that they both healing and snapshots. Note btrfs means btrfs-on-RAID6, not btrfs-RAID, which is broken. In other words, btrfs contains its own RAID feature that you don’t want to use.
Over long periods of time, errors creep into the file system. You want to scrub the data occasionally. This means reading the entire filesystem, checksuming the files, and repairing them if there’s a problem. That requires a filesystem that checksums each block of data.
Another thing you want snapshots to guard against things like ransomware. This means you mark the files you want to keep, and even if a workstation attempts to change or delete the file, it’ll still be held on the disk.
QNAP uses ZFS while others like Synology and Asustor use btrfs. I really don’t know which is better.
It’s cheaper to buy the NAS diskless then add your own disk drives. If you can’t do this, then you’ll be helpless when a drive fails and needs to be replaced.
Drives cost between $20/tb and $30/tb right now. This recent article has a good buying guide. You probably want to get a NAS optimized hard drive. You probably want to double-check that it’s CMR instead of SMR — SMR is “shingled” vs. “conventional” magnetic recording. SMR is bad. There’s only three hard drive makers (Seagate, Western Digital, and Toshiba), so there’s not a big selection.
Working with such large data sets over 1-gbps is painful. These units allow 802.3ad link aggregation as well as faster Ethernet. Some have 10gbe built-in, others allow a PCIe adapter to be plugged in.
However, due to the overhead of spinning disks, you are unlikely to get 10gbps speeds. I mention this because 10gbps copper Ethernet sucks, so is not necessarily a buying criteria. You may prefer multigig/NBASE-T that only does 5gbps with relaxed cabling requirements and lower power consumption.
This means that your NAS decision is going to be made with your home networking decision. I use a couple of these multigig switches as something that doesn’t cost too much for home networking.
Even though RAID is pretty darn reliable, you still need a backup solution. The way I do this is wither external USB hard drives. I schedule the NAS to backup to those drives automatically. As a home user, tapes aren’t an effective solution, so you are stuck with USB drives.
In the end, this means that your total storage costs, with the NAS server, the drives, and the backup drives, is going to cost you 3x the price of the raw storage. Spinning drives fail often. If you plan on keeping your data around for the next decade, there’s no way to do this without 3x the cost for storage.
I choose Synology because I have the most familiarity with the software, and its software gets the best reviews. But QNAP and Asustor also have great reputations.
Note that I’ve made the assumption here that you’ll want “desktop NAS” solutions. There are also rackmount solutions available.
Kernel prepatch 5.15-rc5
Post Syndicated from original https://lwn.net/Articles/872454/rss
The 5.15-rc5 kernel prepatch is out for
testing. “So things continue to look quite normal, and it looks like
the rough patch (hah!) we had early in the release is all behind us. Knock
wood.”
New Nobel Prizes
Post Syndicated from original https://xkcd.com/2527/