Post Syndicated from Matt Granger original https://www.youtube.com/watch?v=yQ5toa5D22g
Security updates for Tuesday
Post Syndicated from original https://lwn.net/Articles/872696/rss
Security updates have been issued by Debian (firefox-esr, hiredis, and icu), Fedora (kernel), Mageia (libreoffice), openSUSE (chromium, firefox, git, go1.16, kernel, mbedtls, mupdf, and nodejs8), Oracle (firefox and kernel), Red Hat (firefox, grafana, kernel, kpatch-patch, and rh-mysql80-mysql), and SUSE (apache2, containerd, docker, runc, curl, firefox, kernel, libqt5-qtsvg, and squid).
Airline Passenger Mistakes Vintage Camera for a Bomb
Post Syndicated from Bruce Schneier original https://www.schneier.com/blog/archives/2021/10/airline-passenger-mistakes-vintage-camera-for-a-bomb.html
I feel sorry for the accused:
The “security incident” that forced a New-York bound flight to make an emergency landing at LaGuardia Airport on Saturday turned out to be a misunderstanding — after an airline passenger mistook another traveler’s camera for a bomb, sources said Sunday.
American Airlines Flight 4817 from Indianapolis — operated by Republic Airways — made an emergency landing at LaGuardia just after 3 p.m., and authorities took a suspicious passenger into custody for several hours.
It turns out the would-be “bomber” was just a vintage camera aficionado and the woman who reported him made a mistake, sources said.
Why in the world was the passenger in custody for “several hours”? They didn’t do anything wrong.
Back in 2007, I called this the “war on the unexpected.” It’s why “see something, say something” doesn’t work. If you put amateurs in the front lines of security, don’t be surprised when you get amateur security. I have lots of examples.
Operating serverless at scale: Improving consistency – Part 2
Post Syndicated from James Beswick original https://aws.amazon.com/blogs/compute/operating-serverless-at-scale-improving-consistency-part-2/
This post is written by Jerome Van Der Linden, Solutions Architect.
Part one of this series describes how to maintain visibility on your AWS resources to operate them properly. This second part focuses on provisioning these resources.
It is relatively easy to create serverless resources. For example, you can set up and deploy a new AWS Lambda function in a few clicks. By using infrastructure as code, such as the AWS Serverless Application Model (AWS SAM), you can deploy hundreds of functions in a matter of minutes.
Before reaching these numbers, companies often want to standardize developments. Standardization is an effective way of reducing development time and costs, by using common tools, best practices, and patterns. It helps in meeting compliance objectives and lowering some risks, mainly around security and operations, by adopting enterprise standards. It can also reduce the scope of required skills, both in terms of development and operations. However, excessive standardization can reduce agility and innovation and sometimes even productivity.
You may want to provide application samples or archetypes, so that each team does not reinvent the wheel for every new project. These archetypes get a standard structure so that any developer joining the team is quickly up-to-speed. The archetypes also bundle everything that is required by your company:
- Security library and setup to apply a common security layer to all your applications.
- Observability framework and configuration, to collect and centralize logs, metrics and traces.
- Analytics, to measure usage of the application.
- Other capabilities or standard services you might have in your company.
This post describes different ways to create and share project archetypes.
Sharing AWS SAM templates
AWS SAM makes it easier to create and deploy serverless applications. It uses infrastructure as code (AWS SAM templates) and a command line tool (AWS SAM CLI). You can also create customizable templates that anyone can use to initialize a project. Using the sam init command and the --location option, you can bootstrap a serverless project based on the template available at this location.
For example, here is a CRUDL (Create/Read/Update/Delete/List) microservice archetype. It contains an Amazon DynamoDB table, an API Gateway, and five AWS Lambda functions written in Java (one for each operation):

You must first create a template. Not only an AWS SAM template describing your resources, but also the source code, dependencies and some config files. Using cookiecutter, you can parameterize this template. You add variables surrounded by {{ and }} in files and folders (for example, {{cookiecutter.my_variable}}). You also define a cookiecutter.json file that describes all the variables and their possible values.
In this CRUD microservice, I add variables in the AWS SAM template file, the Java code, and in other project resources:

You then need to share this template either in a Git/Mercurial repository or an HTTP/HTTPS endpoint. Here the template is available on GitHub.
After sharing, anyone within your company can use it and bootstrap a new project with the AWS SAM CLI and the init command:
$ sam init --location git+ssh://[email protected]/aws-samples/java-crud-microservice-template.git
project_name [Name of the project]: product-crud-microservice
object_model [Model to create / read / update / delete]: product
runtime [java11]:
The command prompts you to enter the variables and generates the following project structure and files.

Variable placeholders have been replaced with their values. The project can now be modified for your business requirements and deployed in the AWS Cloud.
There are alternatives to AWS SAM like AWS CloudFormation modules or AWS CDK constructs. These define high-level building blocks that can be shared across the company. Enterprises with multiple development teams and platform engineering teams can also use AWS Proton. This is a managed solution to create templates (see an example for serverless) and share them across the company.
Creating a base container image for Lambda functions
Defining complete application archetypes may be too much work for your company. Or you want to let teams design their architecture and choose their programming languages and frameworks. But you need them to apply a few patterns (centralized logging, standard security) plus some custom libraries. In that case, use Lambda layers if you deploy your functions as zip files or provide a base image if you deploy them as container images.
When building a Lambda function as a container image, you must choose a base image. It contains the runtime interface client to manage the interaction between Lambda and your function code. AWS provides a set of open-source base images that you can use to create your container image.
Using Docker, you can also build your own base image on top of these, including any library, piece of code, configuration, and data that you want to apply to all Lambda functions. Developers can then use this base image containing standard components and benefit from them. This also reduces the risk of misconfiguration or forgetting to add something important.
First, create the base image. Using Docker and a Dockerfile, specify the files that you want to add to the image. The following example uses the Python base image and installs some libraries (security, logging) thanks to pip and the requirements.txt file. It also adds Python code and some config files:
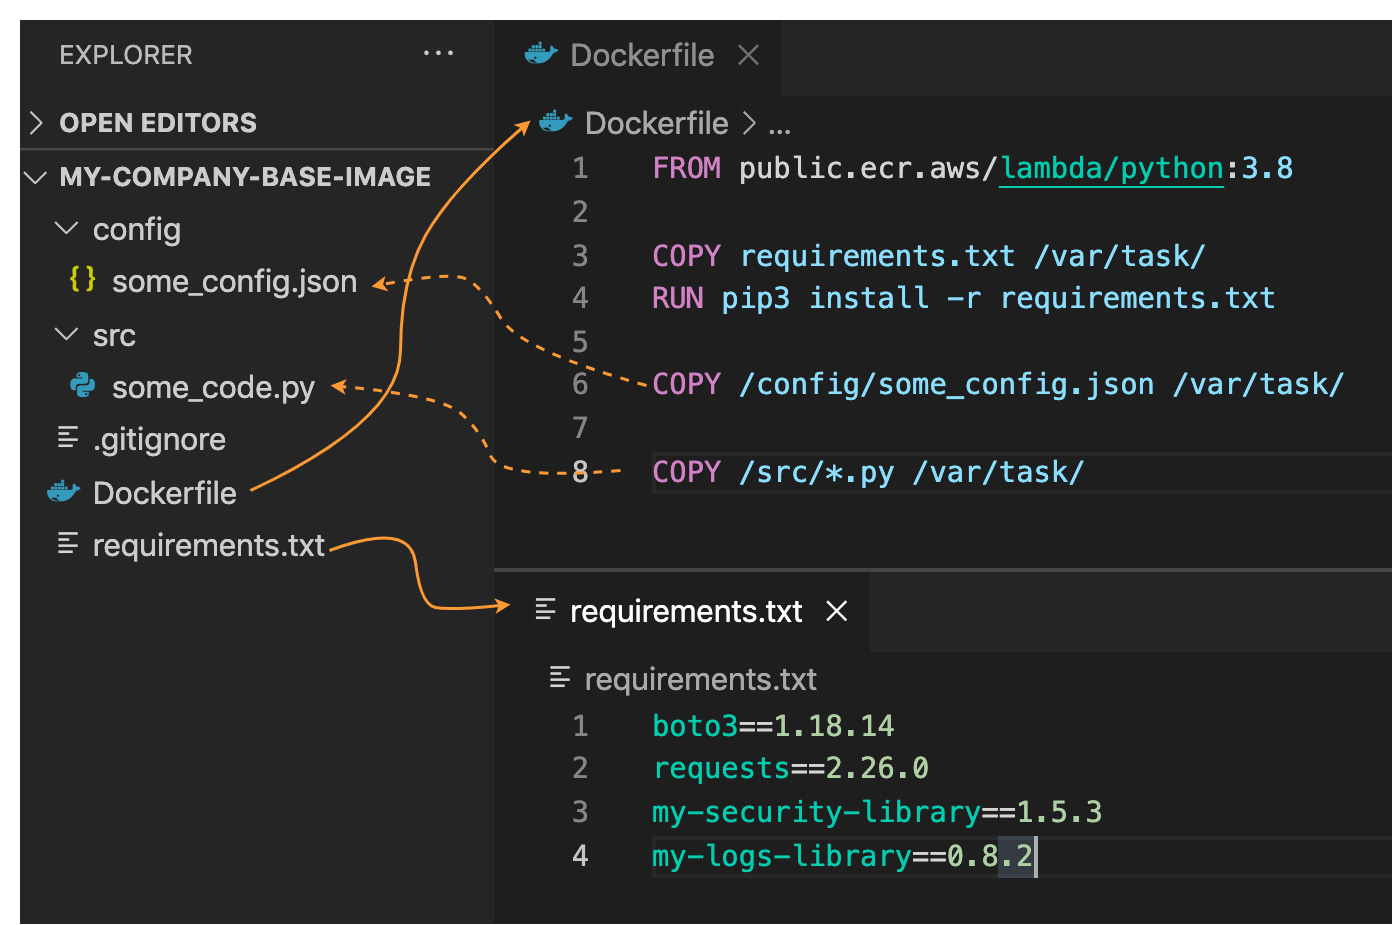
It uses the /var/task folder, which is the working directory for Lambda functions, and where code should reside. Next you must create the image and push it to Amazon Elastic Container Registry (ECR):
# login to ECR with Docker
$ aws ecr get-login-password --region <region> | docker login --username AWS --password-stdin <account-number>.dkr.ecr.<region>.amazonaws.com

# if not already done, create a repository to store the image
$ aws ecr create-repository --repository-name <my-company-image-name> --image-tag-mutability IMMUTABLE --image-scanning-configuration scanOnPush=true

# build the image
$ docker build -t <my-company-image-name>:<version> .

# get the image hash (alphanumeric string, 12 chars, eg. "ece3a6b5894c")
$ docker images | grep my-company-image-name | awk '{print $3}'

# tag the image
$ docker tag <image-hash> <account-number>.dkr.ecr.<region>.amazonaws.com/<my-company-image-name>:<version>

# push the image to the registry
$ docker push <account-number>.dkr.ecr.<region>.amazonaws.com/<my-company-image-name>:<version>
The base image is now available to use for everyone with access to the ECR repository. To use this image, developers must use it in the FROM instruction in their Lambda Dockerfile. For example:
FROM <account-number>.dkr.ecr.<region>.amazonaws.com/<my-company-image-name>:<version>

COPY app.py ${LAMBDA_TASK_ROOT}

COPY requirements.txt .

RUN pip3 install -r requirements.txt -t "${LAMBDA_TASK_ROOT}"

CMD ["app.lambda_handler"]
Now all Lambda functions using this base image include your standard components and comply with your requirements. See this blog post for more details on building Lambda container-based functions with AWS SAM.
Conclusion
In this post, I show a number of solutions to create and share archetypes or layers across the company. With these archetypes, development teams can quickly bootstrap projects with company standards and best practices. It provides consistency across applications and helps meet compliance rules. From a developer standpoint, it’s a good accelerator and it also allows them to have some topics handled by the archetype.
In governance, companies generally want to enforce these rules. Part 3 will describe how to be more restrictive using different guardrails mechanisms.
Read more information about AWS Proton, which is now generally available.
For more serverless learning resources, visit Serverless Land.
Field Notes: Building a Multi-Region Architecture for SQL Server using FCI and Distributed Availability Groups
Post Syndicated from Yogi Barot original https://aws.amazon.com/blogs/architecture/field-notes-building-a-multi-region-architecture-for-sql-server-using-fci-and-distributed-availability-groups/
A multiple-Region architecture for Microsoft SQL Server is often a topic of interest that comes up when working with our customers. The main reasons customers adopt a multiple-Region architecture approach for SQL Server deployments are:
- Business continuity and disaster recovery (DR)
- Geographically distributed customer base, and improved latency for end users
We will explain the architecture patterns that you can follow to effectively design a highly available SQL Server deployment, which spans two or more AWS Regions. You will also learn how to use the multiple-Region approach to scale out the read workloads, and improve the latency for your globally distributed end users.
This blog post explores SQL Server DR architecture using SQL Server Failover Cluster with Amazon FSx for Windows File Server, for primary site and secondary DR site, and describes how to set up a multiple-Region Always On distributed availability group.
Architecture overview
The architecture diagram in Figure 1 depicts two SQL Server clusters (multiple Availability Zones) in two separate Regions, and uses distributed availability group for replication and DR. This will also serve as the reference architecture for this solution.
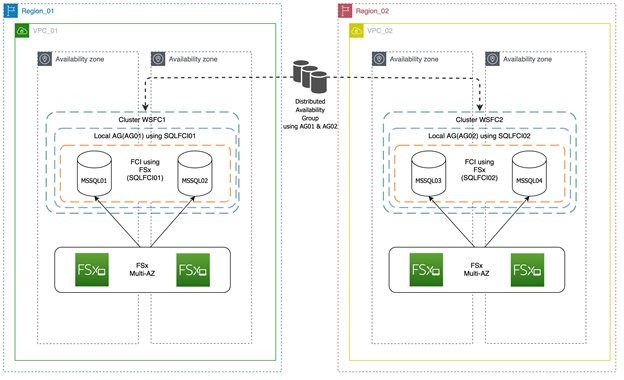
Figure 1. Two SQL Server clusters (multiple Availability Zones) in two separate Regions
In Figure 1, there are two separate clusters in different Regions. The primary cluster in Region_01 is initially configured with SQL Server Failover Cluster Instance (FCI) using Amazon FSx for its shared storage. Always On is enabled on both nodes, and is configured to use FCI SQL Network Name (SQLFCI01) as the single replica for local Availability Group (AG01). Region_02 has an identical configuration to Region_01, but with different hostnames, listeners, and SQL Network Name to avoid possible collisions.
Highlighted in Figure 1, the Always On distributed availability group is then configured to use both listener endpoints (AG01 and AG02). Depending on what type of authentication infrastructure you have, you can either use certificates (no domain and trust dependency), or just AWS Directory Service for Microsoft Active Directory authentication to build the local mirroring endpoint that will be used by the distributed availability group.
With Amazon FSx, you get a fully managed shared file storage solution, that automatically replicates the underlying storage synchronously across multiple Availability Zones. Amazon FSx provides high availability with automatic failure detection, and automatic failover if there are any hardware or storage issues. The service fully supports continuously available shares, a feature that allows SQL Server uninterrupted access to shared file data.
There is an asynchronous replication setup using a distributed availability group from Region A to Region B. In this type of configuration, because there is only one availability group replica, it also serves as the forwarder for the local FCI cluster. The concept of a forwarder is new, and it’s one of the core functionalities for the distributed availability group. Because Windows Failover Cluster1 and Windows Failover Cluster2 are standalone and independent clusters, don’t need to open a large set of ports, thus minimizing security risk.
In this solution, because FCI is our primary high availability solution, users and applications should then connect through FCI SQL Server Network Name with the latest supported drivers and key parameters (such as, MultiSubNetFailover=True – if supported) to facilitate the failover and make sure that the applications seamlessly connect to the new replica without any errors or timeouts.
Prerequisites
- Two SQL Server clusters configured with FCI. Learn more about how to set up SQL Server FCI with FSx.
- VPC peering and transit gateway are configured for the VPCs (where the SQL Server clusters reside) involved in the solution.
- VPC peering – Learn more about setting up Inter-Region VPC Peering.
- Transit gateway – Similar to VPC peering. Learn how to Use an AWS Transit Gateway to Simplify Your Network Architecture and Scaling VPN throughput using AWS Transit Gateway.
- Networking and security are properly configured to work across the peering connection and transit gateway.
Walkthrough
Following are the steps required to configure SQL Server DR using SQL Server Failover Cluster with Amazon FSx for Windows File Server for primary site and secondary DR site. We also show how to set up a multiple-Region Always On distributed availability group.
Assumed Variables
Region_01:
WSFC Cluster Name: SQLCluster1
FCI Virtual Network Name: SQLFCI01
Local Availability Group: SQLAG01
Region_02:
WSFC Cluster Name: SQLCluster2
FCI Virtual Network Name: SQLFCI02
Local Availability Group: SQLAG02
- Make sure to configure network connectivity between your clusters. In this solution, we are using two VPCs in two separate Regions.
- VPC peering is configured to enable network traffic on both VPCs.
- The domain controller (AWS Managed Microsoft AD) on both VPCs are configured with forest trust and conditional forwarding (this enables DNS resolution between the two VPCs).
- Create a local availability group, using FCI SQL Network Name as the replica. Because we will be setting up a domain-independent distributed availability group between the two clusters, we will be setting up certificates to authenticate between the two separate clusters.
-
Create master key and endpoint for SQLCluster1
use master
CREATE MASTER KEY ENCRYPTION BY PASSWORD = '<password>'
GO
CREATE CERTIFICATE [SQLAG01-Cert]
with SUBJECT = 'SQLAG01 Endpoint Cert'
GO

BACKUP CERTIFICATE [SQLAG01-Cert]
TO FILE = N'\\<FileShare>\SQLAG01-Cert.crt'
GO

CREATE ENDPOINT [SQLAG01-Endpoint]
STATE = STARTED
AS TCP
(
LISTENER_PORT = 5022
)
FOR DATABASE_MIRRORING
(
AUTHENTICATION = CERTIFICATE [SQLAG01-Cert],
ROLE = ALL,
ENCRYPTION = REQUIRED ALGORITHM AES
)
GO-
Create master key and endpoint for SQLCluster2
use master
CREATE MASTER KEY ENCRYPTION BY PASSWORD = '<password>'
GO
CREATE CERTIFICATE [SQLAG02-Cert]
with SUBJECT = 'SQLAG02 Endpoint Cert'
GO

BACKUP CERTIFICATE [SQLAG02-Cert]
TO FILE = N'\\<Fileshare>\SQLAG02-Cert.crt'
GO

CREATE ENDPOINT [SQLAG02-Endpoint]
STATE = STARTED
AS TCP
(
LISTENER_PORT = 5022
)
FOR DATABASE_MIRRORING
(
AUTHENTICATION = CERTIFICATE [SQLAG02-Cert],
ROLE = ALL,
ENCRYPTION = REQUIRED ALGORITHM AES
)
GO
-
- Make sure to place all exported certificates in a location that you can easily access from each FCI instance.
- Create a SQL Server login and user in the master database on each FCI instance.
-
Create database login in SQLCluster1
use master
CREATE LOGIN [SQLAG02_DAG] WITH PASSWORD = '<password>'
GO
CREATE USER [SQLAG02_DAG] FOR LOGIN [SQLAG02_DAG]
GO
CREATE CERTIFICATE [SQLAG02-Cert]
AUTHORIZATION [SQLAG02_DAG]
FROM FILE = N'\\<Fileshare>\SQLAG02-Cert.crt'
GO-
Create database login in SQLCluster2
use master
CREATE LOGIN [SQLAG01_DAG] WITH PASSWORD = '<password>'
GO
CREATE USER [SQLAG01_DAG] FOR LOGIN [SQLAG01_DAG]
GO
CREATE CERTIFICATE [SQLAG01-Cert]
AUTHORIZATION [SQLAG01_DAG]
FROM FILE = N'\\<Fileshare>\SQLAG01-Cert.crt'
GO-
- Now grant the newly created user endpoint access to the local mirroring endpoint in each FCI instance.
-
Grant permission on endpoint – SQLCluster1
GRANT CONNECT ON ENDPOINT::[SQLAG01-Endpoint] TO [SQLAG02_DAG]
GO-
Grant permission on endpoint – SQLCluster2
GRANT CONNECT ON ENDPOINT::[SQLAG02-Endpoint] TO [SQLAG01_DAG]
GO- Create distributed Always On availability group on SQLCluster1
Next, create the distributed availability group on the primary cluster.
CREATE AVAILABILITY GROUP [SQLFCIDAG]
   WITH (DISTRIBUTED)
   AVAILABILITY GROUP ON
    'SQLAG01' WITH
        (
            LISTENER_URL = 'tcp://SQLFCI01.DEMOSQL.COM:5022',
            AVAILABILITY_MODE = ASYNCHRONOUS_COMMIT,
            FAILOVER_MODE = MANUAL,
            SEEDING_MODE = AUTOMATIC
        ),
    'SQLAG02' WITH
        (
            LISTENER_URL = 'tcp://SQLFCI02.SQLDEMO.COM:5022',
            AVAILABILITY_MODE = ASYNCHRONOUS_COMMIT,
            FAILOVER_MODE = MANUAL,
            SEEDING_MODE = AUTOMATIC
); -
- Note that we are using the SQL Network Name of the FCI cluster as our listener URL.
- Now, join our secondary WSFC FCI cluster to the distributed availability group.
-
Join secondary cluster on SQLCluster2 to distributed availability group
ALTER AVAILABILITY GROUP [SQLFCIDAG]
   JOIN
   AVAILABILITY GROUP ON
      'SQLAG01' WITH
      (
         LISTENER_URL = 'tcp://SQLFCI01.DEMOSQL.COM:5022',
         AVAILABILITY_MODE = ASYNCHRONOUS_COMMIT,
         FAILOVER_MODE = MANUAL,
         SEEDING_MODE = AUTOMATIC
      ),
      'SQLAG02' WITH
      (
         LISTENER_URL = 'tcp://SQLFCI02.SQLDEMO.COM:5022',
         AVAILABILITY_MODE = ASYNCHRONOUS_COMMIT,
         FAILOVER_MODE = MANUAL,
         SEEDING_MODE = AUTOMATIC
      );
GO -
- After you run the join script, you should be able to see the database from the primary FCI cluster’s local availability group populate the secondary FCI cluster.
- To do a distributed availability group failover, it is best practice to synchronize both clusters first.
-
Synchronize primary cluster
ALTER AVAILABILITY GROUP [SQLFCIDAG]
 MODIFY AVAILABILITY GROUP ON
 'SQLAG01'
WITH
(
AVAILABILITY_MODE = SYNCHRONOUS_COMMIT
),
'SQLAG02'
WITH
(
AVAILABILITY_MODE = SYNCHRONOUS_COMMIT
);-
- You can verify synchronization lag and verify state displays as “SYNCHRONIZED”:
SELECT ag.name
       , drs.database_id
       , db_name(drs.database_id) as database_name
       , drs.group_id
       , drs.replica_id
       , drs.synchronization_state_desc
       , drs.last_hardened_lsn
FROM sys.dm_hadr_database_replica_states drs
INNER JOIN sys.availability_groups ag on drs.group_id = ag.group_id;-
Perform failover at primary cluster
After everything is ready, perform failover by first changing the DAG role on the global primary.
ALTER AVAILABILITY GROUP [SQLFCIDAG] SET (ROLE = SECONDARY);-
Perform failover at secondary cluster
After which, initiate the actual failover by running this script on the secondary cluster.
ALTER AVAILABILITY GROUP [SQLFCIDAG] FORCE_FAILOVER_ALLOW_DATA_LOSS;-
Change sync mode on primary and secondary clusters
Then make sure to change Sync mode on both clusters back to Asynchronous:
 ALTER AVAILABILITY GROUP [SQLFCIDAG]
 MODIFY AVAILABILITY GROUP ON
'SQLAG01'
WITH
(
AVAILABILITY_MODE = ASYNCHRONOUS_COMMIT
),
'SQLAG02'
WITH
(
AVAILABILITY_MODE = ASYNCHRONOUS_COMMIT
);
Conclusion
A multiple-Region strategy for your mission critical SQL Server deployments is key for business continuity and disaster recovery. This blog post focused on how to achieve that optimally by using distributed availability groups. You also learned about other benefits such as read scale outs by using distributed availability groups.
To learn more, check out Simplify your Microsoft SQL Server high availability deployments using Amazon FSx for Windows File Server.
Field Notes provides hands-on technical guidance from AWS Solutions Architects, consultants, and technical account managers, based on their experiences in the field solving real-world business problems for customers.
A study of data collection by Android devices
Post Syndicated from original https://lwn.net/Articles/872639/rss
A group of researchers at Trinity College in Dublin has released the
results of a study into the data collected by a number of Android
variants. There are few surprises here, but the picture is still
discouraging.
We find that the Samsung, Xiaomi, Huawei and Realme Android
variants all transmit a substantial volume of data to the OS
developer (i.e. Samsung etc) and to third-party parties that have
pre-installed system apps (including Google, Microsoft, Heytap,
LinkedIn, Facebook). LineageOS sends similar volumes of data to
Google as these proprietary Android variants, but we do not observe
the LineageOS developers themselves collecting data nor
pre-installed system apps other than those of Google. Notably,
/e/OS sends no information to Google or other third parties and
sends essentially no information to the /e/OS developers.
Engaging Black students in computing at school — interview with Lynda Chinaka
Post Syndicated from Janina Ander original https://www.raspberrypi.org/blog/engaging-black-students-in-computing-school-lynda-chinaka/

On the occasion of Black History Month UK, we speak to Lynda Chinaka, Senior Lecturer in Computing in Education at the University of Roehampton, about her experiences in computing education, her thoughts about underrepresentation of Black students in the subject, and her ideas about what needs to be done to engage more Black students.
Lynda, to start us off, can you share your thoughts about Black History Month?
Black history is a really important topic, obviously, and I think that, when Black History Month was first introduced, it was very powerful — and it continues to be in certain places. But I think that, for where we are as a society, it’s time to move past talking about Black history for only one month of the year, albeit an important, focused celebration. And certainly that would include integrating Black history and Black figures across subjects in school. That would be a very useful way to celebrate the contributions that Black people have made, and continue to make, to society. Children need to be taught a history in which they are included and valued. Good history is always a matter of different perspectives. Too often in schools, children experience a single perspective.
Please tell me a bit about your own history: how did you come to computing education as a field? What were the support or barriers you encountered?
In terms of my journey, I’ve always been passionate about Computing — formerly ICT. I’ve been a Computing subject lead in schools, moving on into senior management. Beyond my career in schools, I have worked as an ICT consultant and as a Teacher Leader for a London authority. During that time, my interest in Computing/ICT led me to undertake an MA in Computing in Education at King’s College London. This led me to become a teacher trainer in my current role. In some sense, I’m carrying on the work I did with the local authorities, but in a university setting. At the University of Roehampton, I teach computing to BA Primary Education and PGCE students. Training teachers is something that I’m very much interested in. It’s about engaging student teachers, supporting them in developing their understanding of Computing in the primary phases. Students learn about the principles of computing, related learning theories, and how children think and learn. Perhaps more importantly, I am keen to instil a love of the subject and broaden their notions about computing.
In terms of the support I’ve received, I’ve worked in certain schools where Computing was really valued by the Headteacher, which enabled me to promote my vision for the subject. Supportive colleagues made a difference in their willingness take on new initiatives that I presented. I have been fortunate to work in local authorities that have been forward-thinking; one school became a test bed for Computing. So in that sense, schools have supported me. But as a Black person, a Black woman in particular, I would say that I faced barriers throughout my career. And those barriers have been there since childhood. In the Black community, people experience all sorts of things, and prejudice and barriers have been at play in my career.
Prejudice sometimes is very overt. An example I think I can share because it prevented me from getting a job: I went for an interview in a school. It was a very good interview, the Headteacher told me, “It was fantastic, you’re amazing, you’re excellent,” the problem was that there weren’t “enough Black pupils”, so she “didn’t see the need…”. And this is a discussion that was shared with me. Now in 2021 a Headteacher wouldn’t say that, but let’s just wind the clock back 15 years. These are the kinds of experiences that you go through as a Black teacher.
So what happens is, you tend to build up a certain resilience. People’s perceptions and low expectations of me have been a hindrance. This can be debilitating. You get tired of having to go through the same thing, of having to overcome negativity. Yes, I would say this has limited my progress. Obviously, I am speaking about my particular experiences as a Black woman, but I would say that these experiences are shared by many people like me.

But it’s my determination and the investment I’ve made that has resulted in me staying in the field. And a source of support for me is always Black colleagues, they understand the issues that are inherent within the profession.
Black students are underrepresented in Computing as a subject. Drawing on your own work and experiences, could you share your thoughts about why that’s the case?
There need to be more Black teachers, because children need to see themselves represented in schools. As a Black teacher, I know that I have made a difference to Black children in my class who had a Black role model in front of them. When we talk about the poor performance of Black pupils, we need to be careful not to blame them for the failures of the education system. Policy makers, Headteachers, teachers, and practitioners need to be a lot more self-aware and examine the impact of racism in education. People need to examine their own policies and practice, especially people in positions of power.
A lot of collective work needs to be done.
Lynda Chinaka
Some local authorities do better than others, and some Headteachers I’ve worked with have been keen to build a diverse staff team. Black people are not well-represented at all in education. Headteachers need to be more proactive about their staff teams and recruitment. And they need to encourage Black teachers to go for jobs in senior management.

In all settings I taught in, no matter how many students of colour there were, these students would experience something in my classroom that their white counterparts had experienced all their lives: they would leave their home and come to school and be taught by someone who looks like them and perhaps speaks the same language as them. It’s enormously affirming for children to have that experience. And it’s important for all children actually, white children as well. Seeing a Black person teaching in the classroom, in a position of power or influence — it changes their mindset, and that ultimately changes perspectives.
So in terms of that route into Computing, Black students need to see themselves represented.
Why do you think it’s important to teach young people about Computing?
It’s absolutely vital to teach children about Computing. As adults, they are going to participate in a future that we know very little about, so I think it’s important that they’re taught computer science approaches, problem solving and computational thinking. So children need to be taught to be creators and not simply passive users of technology.

One of the things some of my university students say is, “Oh my goodness, I can’t teach Computing, all the children know much more than me.”, but actually, that’s a little bit of a myth, I think. Children are better at using technologies than solving computing problems. They need to learn a range of computational approaches for solving problems. Computing is a life skill; it is the future. We saw during the pandemic the effects of digital inequity on pupils.
What do you think needs to change in computing education, the tech sector, or elsewhere in order to engage more Black students in Computing?
In education, we need to look at the curriculum and how to decolonise it to really engage young people. This also includes looking out for bias and prejudice in the things that are taught. Even when you’re thinking about specific computer science topics. So for example, the traditional example for algorithm design is making a cup of tea. But tea is a universal drink, it originates in China, and as a result of colonialism made its way to India and Kenya. So we drink tea universally, but the method (algorithm) for making tea doesn’t necessarily always include a china tea pot or a tea bag. There are lots of ways to introduce it, thinking about how it’s prepared in different cultures, say Kenya or the Punjab, and using that as a basis for developing children’s algorithmic thinking. This is culturally relevant. It’s about bringing the interests and experiences children have into the classroom.

For children to be engaged in Computing, there needs to be a payoff for them. For example, I’ve seen young people developing their own African emojis. They need to see a point to it! They don’t necessarily have to become computer scientists or software engineers, but Computing should be an avenue that opens for them because they can see it as something to further their own aims, their own causes. Young people are very socially and politically aware. For example, Black communities are very aware of the way that climate change affects the Global South and could use data science to highlight this. Many will have extended family living in these regions that are affected now.
So you don’t compromise on the quality of your teaching, and it require teachers to be more reflective. There is no quick fix. For example, you can’t just insert African masks into a lesson without exploring their meaning in real depth within the culture they originate from.
So in your Computing or Computer Science lessons, you need to include topics young people are interested in: climate change, discrimination, algorithms and algorithmic bias in software, surveillance and facial recognition. Social justice topics are close to their hearts. You can get them interested in AI and data science by talking about the off-the-shelf datasets that Big Tech uses, and about what impact these have in terms of surveillance and on minority communities specifically.
Can you talk a bit about the different terms used to describe this kind of approach to education, ‘culturally relevant teaching’ and ‘decolonising the curriculum’?
‘Culturally relevant’ is easier to sit with. ‘Decolonising the curriculum’ provokes a reaction, but it’s really about teaching children about histories and perspectives on curricula that affect us all. We need to move towards a curriculum that is fit for purpose where children are taught different perspectives and truth that they recognise. Even if you’re in a school without any Black children at all, the curriculum still needs to be decolonised so that children can actually understand and benefit from the many ways that topics, events, subjects may be taught.

When we think about learning in terms of being culturally relevant and responsive, this is about harnessing children’s heritage, experiences, and viewpoints to engage learners such that the curriculum is meaningful and includes them. The goal here is to promote long-term and consistent engagement with Computing.
What is being missed by current initiatives to increase diversity and Black students’ engagement?
Diversity initiatives are a good step, but we need to give it time.
The selection process for subjects at GCSE can sometimes affect the uptake of computing. Then there are individual attitudes and experiences of pupils. It has been documented that Black and Asian students have often been in the minority and experience marginalisation, particularly noted in the case of female students in GCSE Computer Science.
ITE (Initial Teacher Education) providers need to consider their partnerships with schools and support schools to be more inclusive. We need more Black teachers, as I said. We also need to democratise pathways for young people getting into computing and STEM careers. Applying to university is one way — there should be others.
Schools could also develop partnerships with organisations that have their roots in the Black community. Research has also highlighted discriminatory practices in careers advice, and in the application and interview processes of Russell Group universities. These need to be addressed.

There are too few Black academics at universities. This can have an impact on student choice and decisions about whether to attend an institution or not. Institutions may seem unwelcoming or unsympathetic. Higher education institutions need to eliminate bias through feedback and measuring course take-up.
Outside the field of education, tech companies could offer summer schemes, short programmes to stimulate interest amongst young Black people. Really, the people in leadership positions, all the people with the power, need to be proactive.
A lot of collective work needs to be done. It’s a whole pipeline, and everybody needs to play a part.
What in your mind is a key thing right now that people in computing education who want to engage more Black students should do?
You can present children with Black pioneers in computing and tech. They can show Black children how to achieve their goals in life through computing. For example, create podcasts or make lists with various organisations that use data science to further specific causes.
It’s not a one-off, one teacher thing, it’s a project for the whole school.
Lynda Chinaka
Also, it’s not a one-off, one teacher thing, it’s project for the whole school. You need to build it into a whole curriculum map, do all the things you do to build a new curriculum map: get every teacher to contribute, so they take it on, own it, research it, make those links to the national curriculum so it’s relevant. Looking at it in isolation it’s a problem, but it’s a whole school approach that starts as a working group. And it’s senior management that sets the tone, and they really need to be proactive, but you can start by starting a working group. It won’t be implemented overnight. A bit like introducing a school uniform. Do it slowly, have a pilot year group. Get parents in, have a coffee evening, get school governors on board. It’s a whole staff team effort.
People need to recognise the size of the problem and not be discouraged by the fact that things haven’t happened overnight. But people who are in a position of influence need to start by having those conversations, because that’s the only way that change can happen, quite frankly.
Lynda, thank you for sharing your insights with us!
Lynda was one of the advisors in the group we worked with to create our recently published, practical guide on culturally relevant teaching. You can download it as a free PDF now. We hope it will help you kickstart conversations in your setting.
The post Engaging Black students in computing at school — interview with Lynda Chinaka appeared first on Raspberry Pi.
Introducing SSL/TLS Recommender
Post Syndicated from Suleman Ahmad original https://blog.cloudflare.com/ssl-tls-recommender/
Seven years ago, Cloudflare made HTTPS availability for any Internet property easy and free with Universal SSL. At the time, few websites — other than those that processed sensitive data like passwords and credit card information — were using HTTPS because of how difficult it was to set up.
However, as we all started using the Internet for more and more private purposes (communication with loved ones, financial transactions, shopping, healthcare, etc.) the need for encryption became apparent. Tools like Firesheep demonstrated how easily attackers could snoop on people using public Wi-Fi networks at coffee shops and airports. The Snowden revelations showed the ease with which governments could listen in on unencrypted communications at scale. We have seen attempts by browser vendors to increase HTTPS adoption such as the recent announcement by Chromium for loading websites on HTTPS by default. Encryption has become a vital part of the modern Internet, not just to keep your information safe, but to keep you safe.
When it was launched, Universal SSL doubled the number of sites on the Internet using HTTPS. We are building on that with SSL/TLS Recommender, a tool that guides you to stronger configurations for the backend connection from Cloudflare to origin servers. Recommender has been available in the SSL/TLS tab of the Cloudflare dashboard since August 2020 for self-serve customers. Over 500,000 zones are currently signed up. As of today, it is available for all customers!
How Cloudflare connects to origin servers
Cloudflare operates as a reverse proxy between clients (“visitors”) and customers’ web servers (“origins”), so that Cloudflare can protect origin sites from attacks and improve site performance. This happens, in part, because visitor requests to websites proxied by Cloudflare are processed by an “edge” server located in a data center close to the client. The edge server either responds directly back to the visitor, if the requested content is cached, or creates a new request to the origin server to retrieve the content.
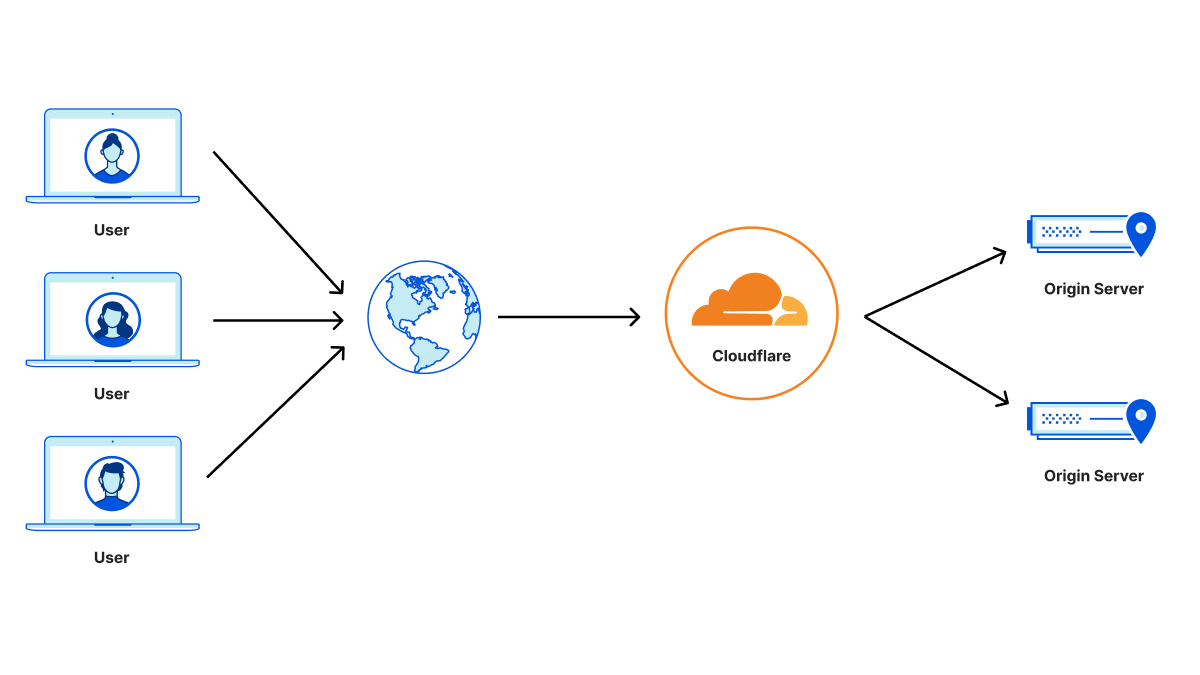
The backend connection to the origin can be made with an unencrypted HTTP connection or with an HTTPS connection where requests and responses are encrypted using the TLS protocol (historically known as SSL). HTTPS is the secured form of HTTP and should be used whenever possible to avoid leaking information or allowing content tampering by third-party entities. The origin server can further authenticate itself by presenting a valid TLS certificate to prevent active monster-in-the-middle attacks. Such a certificate can be obtained from a certificate authority such as Let’s Encrypt or Cloudflare’s Origin CA. Origins can also set up authenticated origin pull, which ensures that any HTTPS requests outside of Cloudflare will not receive a response from your origin.
Cloudflare Tunnel provides an even more secure option for the connection between Cloudflare and origins. With Tunnel, users run a lightweight daemon on their origin servers that proactively establishes secure and private tunnels to the nearest Cloudflare data centers. With this configuration, users can completely lock down their origin servers to only receive requests routed through Cloudflare. While we encourage customers to set up tunnels if feasible, it’s important to encourage origins with more traditional configurations to adopt the strongest possible security posture.
Detecting HTTPS support
You might wonder, why doesn’t Cloudflare always connect to origin servers with a secure TLS connection? To start, some origin servers have no TLS support at all (for example, certain shared hosting providers and even government sites have been slow adopters) and rely on Cloudflare to ensure that the client request is at least encrypted over the Internet from the browser to Cloudflare’s edge.
Then why don’t we simply probe the origin to determine if TLS is supported? It turns out that many sites only partially support HTTPS, making the problem non-trivial. A single customer site can be served from multiple separate origin servers with differing levels of TLS support. For instance, some sites support HTTPS on their landing page but serve certain resources only over unencrypted HTTP. Further, site content can differ when accessed over HTTP versus HTTPS (for example, http://example.com and https://example.com can return different results).
Such content differences can arise due to misconfiguration on the origin server, accidental mistakes by developers when migrating their servers to HTTPS, or can even be intentional depending on the use case.
A study by researchers at Northeastern University, the Max Planck Institute for Informatics, and the University of Maryland highlights reasons for some of these inconsistencies. They found that 1.5% of surveyed sites had at least one page that was unavailable over HTTPS — despite the protocol being supported on other pages — and 3.7% of sites served different content over HTTP versus HTTPS for at least one page. Thus, always using the most secure TLS setting detected on a particular resource could result in unforeseen side effects and usability issues for the entire site.
We wanted to tackle all such issues and maximize the number of TLS connections to origin servers, but without compromising a website’s functionality and performance.
Configuring the SSL/TLS encryption mode
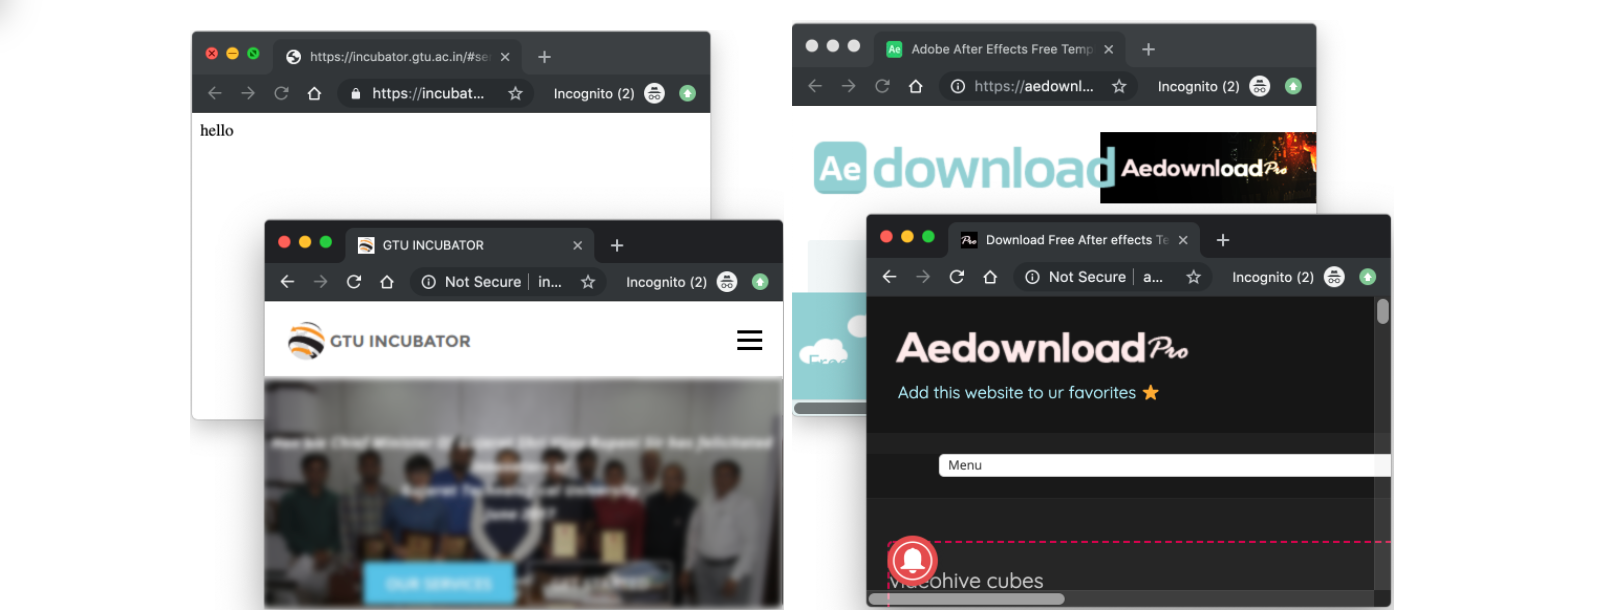
Cloudflare relies on customers to indicate the level of TLS support at their origins via the zone’s SSL/TLS encryption mode. The following SSL/TLS encryption modes can be configured from the Cloudflare dashboard:
- Off indicates that client requests reaching Cloudflare as well as Cloudflare’s requests to the origin server should only use unencrypted HTTP. This option is never recommended, but is still in use by a handful of customers for legacy reasons or testing.
- Flexible allows clients to connect to Cloudflare’s edge via HTTPS, but requests to the origin are over HTTP only. This is the most common option for origins that do not support TLS. However, we encourage customers to upgrade their origins to support TLS whenever possible and only use Flexible as a last resort.
- Full enables encryption for requests to the origin when clients connect via HTTPS, but Cloudflare does not attempt to validate the certificate. This is useful for origins that have a self-signed or otherwise invalid certificate at the origin, but leaves open the possibility for an active attacker to impersonate the origin server with a fake certificate. Client HTTP requests result in HTTP requests to the origin.
- Full (strict) indicates that Cloudflare should validate the origin certificate to fully secure the connection. The origin certificate can either be issued by a public CA or by Cloudflare Origin CA. HTTP requests from clients result in HTTP requests to the origin, exactly the same as in Full mode. We strongly recommend Full (strict) over weaker options if supported by the origin.
- Strict (SSL-Only Origin Pull) causes all traffic to the origin to go over HTTPS, even if the client request was HTTP. This differs from Full (strict) in that HTTP client requests will result in an HTTPS request to the origin, not HTTP. Most customers do not need to use this option, and it is available only to Enterprise customers. The preferred way to ensure that no HTTP requests reach your origin is to enable Always Use HTTPS in conjunction with Full or Full (strict) to redirect visitor HTTP requests to the HTTPS version of the content.
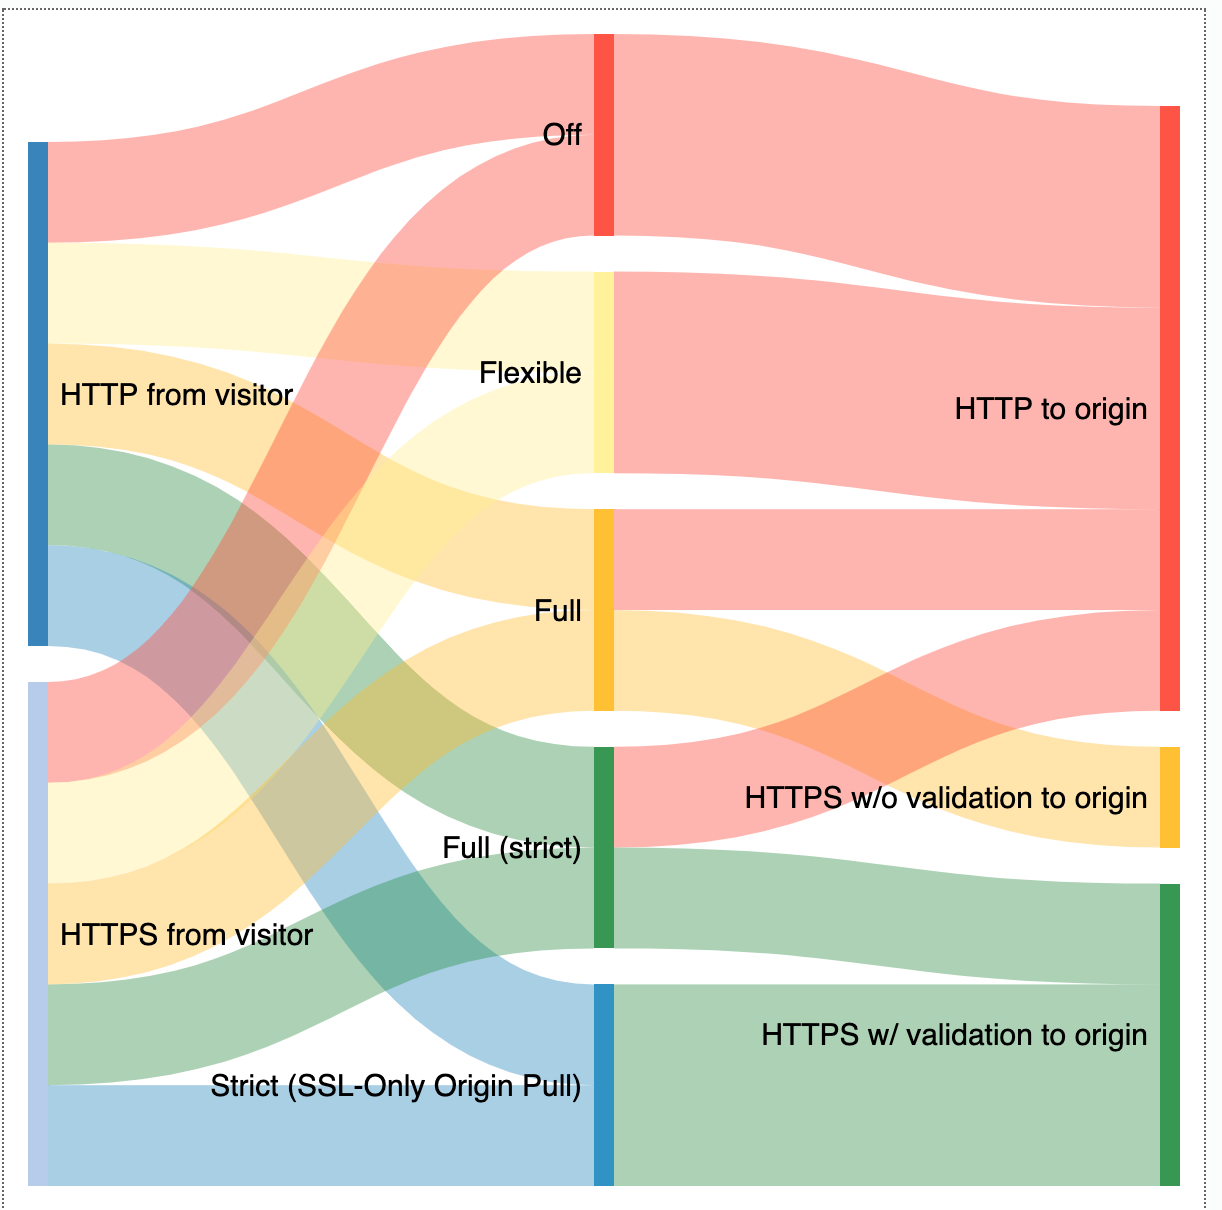
The SSL/TLS encryption mode is a zone-wide setting, meaning that Cloudflare applies the same policy to all subdomains and resources. If required, you can configure this setting more granularly via Page Rules. Misconfiguring this setting can make site resources unavailable. For instance, suppose your website loads certain assets from an HTTP-only subdomain. If you set your zone to Full or Full (strict), you might make these assets unavailable for visitors that request the content over HTTPS, since the HTTP-only subdomain lacks HTTPS support.
Importance of secure origin connections
When an end-user visits a site proxied by Cloudflare, there are two connections to consider: the front-end connection between the visitor and Cloudflare and the back-end connection between Cloudflare and the customer origin server. The front-end connection typically presents the largest attack surface (for example, think of the classic example of an attacker snooping on a coffee shop’s Wi-Fi network), but securing the back-end connection is equally important. While all SSL/TLS encryption modes (except Off) secure the front-end connection, less secure modes leave open the possibility of malicious activity on the backend.
Consider a zone set to Flexible where the origin is connected to the Internet via an untrustworthy ISP. In this case, spyware deployed by the customer’s ISP in an on-path middlebox could inspect the plaintext traffic from Cloudflare to the origin server, potentially resulting in privacy violations or leaks of confidential information. Upgrading the zone to Full or a stronger mode to encrypt traffic to the ISP would help prevent this basic form of snooping.
Similarly, consider a zone set to Full where the origin server is hosted in a shared hosting provider facility. An attacker colocated in the same facility could generate a fake certificate for the origin (since the certificate isn’t validated for Full) and deploy an attack technique such as ARP spoofing to direct traffic intended for the origin server to an attacker-owned machine instead. The attacker could then leverage this setup to inspect and filter traffic intended for the origin, resulting in site breakage or content unavailability. The attacker could even inject malicious JavaScript into the response served to the visitor to carry out other nefarious goals. Deploying a valid Cloudflare-trusted certificate on the origin and configuring the zone to use Full (strict) would prevent Cloudflare from trusting the attacker’s fake certificate in this scenario, preventing the hijack.
Since a secure backend only improves your website security, we strongly encourage setting your zone to the highest possible SSL/TLS encryption mode whenever possible.
Balancing functionality and security
When Universal SSL was launched, Cloudflare’s goal was to get as many sites away from the status quo of HTTP as possible. To accomplish this, Cloudflare provisioned TLS certificates for all customer domains to secure the connection between the browser and the edge. Customer sites that did not already have TLS support were defaulted to Flexible, to preserve existing site functionality. Although Flexible is not recommended for most zones, we continue to support this option as some Cloudflare customers still rely on it for origins that do not yet support TLS. Disabling this option would make these sites unavailable. Currently, the default option for newly onboarded zones is Full if we detect a TLS certificate on the origin zone, and Flexible otherwise.
Further, the SSL/TLS encryption mode configured at the time of zone sign-up can become suboptimal as a site evolves. For example, a zone might switch to a hosting provider that supports origin certificate installation. An origin server that is able to serve all content over TLS should at least be on Full. An origin server that has a valid TLS certificate installed should use Full (strict) to ensure that communication between Cloudflare and the origin server is not susceptible to monster-in-the-middle attacks.
The Research team combined lessons from academia and our engineering efforts to make encryption easy, while ensuring the highest level of security possible for our customers. Because of that goal, we’re proud to introduce SSL/TLS Recommender.
SSL/TLS Recommender
Cloudflare’s mission is to help build a better Internet, and that includes ensuring that requests from visitors to our customers’ sites are as secure as possible. To that end, we began by asking ourselves the following question: how can we detect when a customer is able to use a more secure SSL/TLS encryption mode without impacting site functionality?
To answer this question, we built the SSL/TLS Recommender. Customers can enable Recommender for a zone via the SSL/TLS tab of the Cloudflare dashboard. Using a zone’s currently configured SSL/TLS option as the baseline for expected site functionality, the Recommender performs a series of checks to determine if an upgrade is possible. If so, we email the zone owner with the recommendation. If a zone is currently misconfigured — for example, an HTTP-only origin configured on Full — Recommender will not recommend a downgrade.
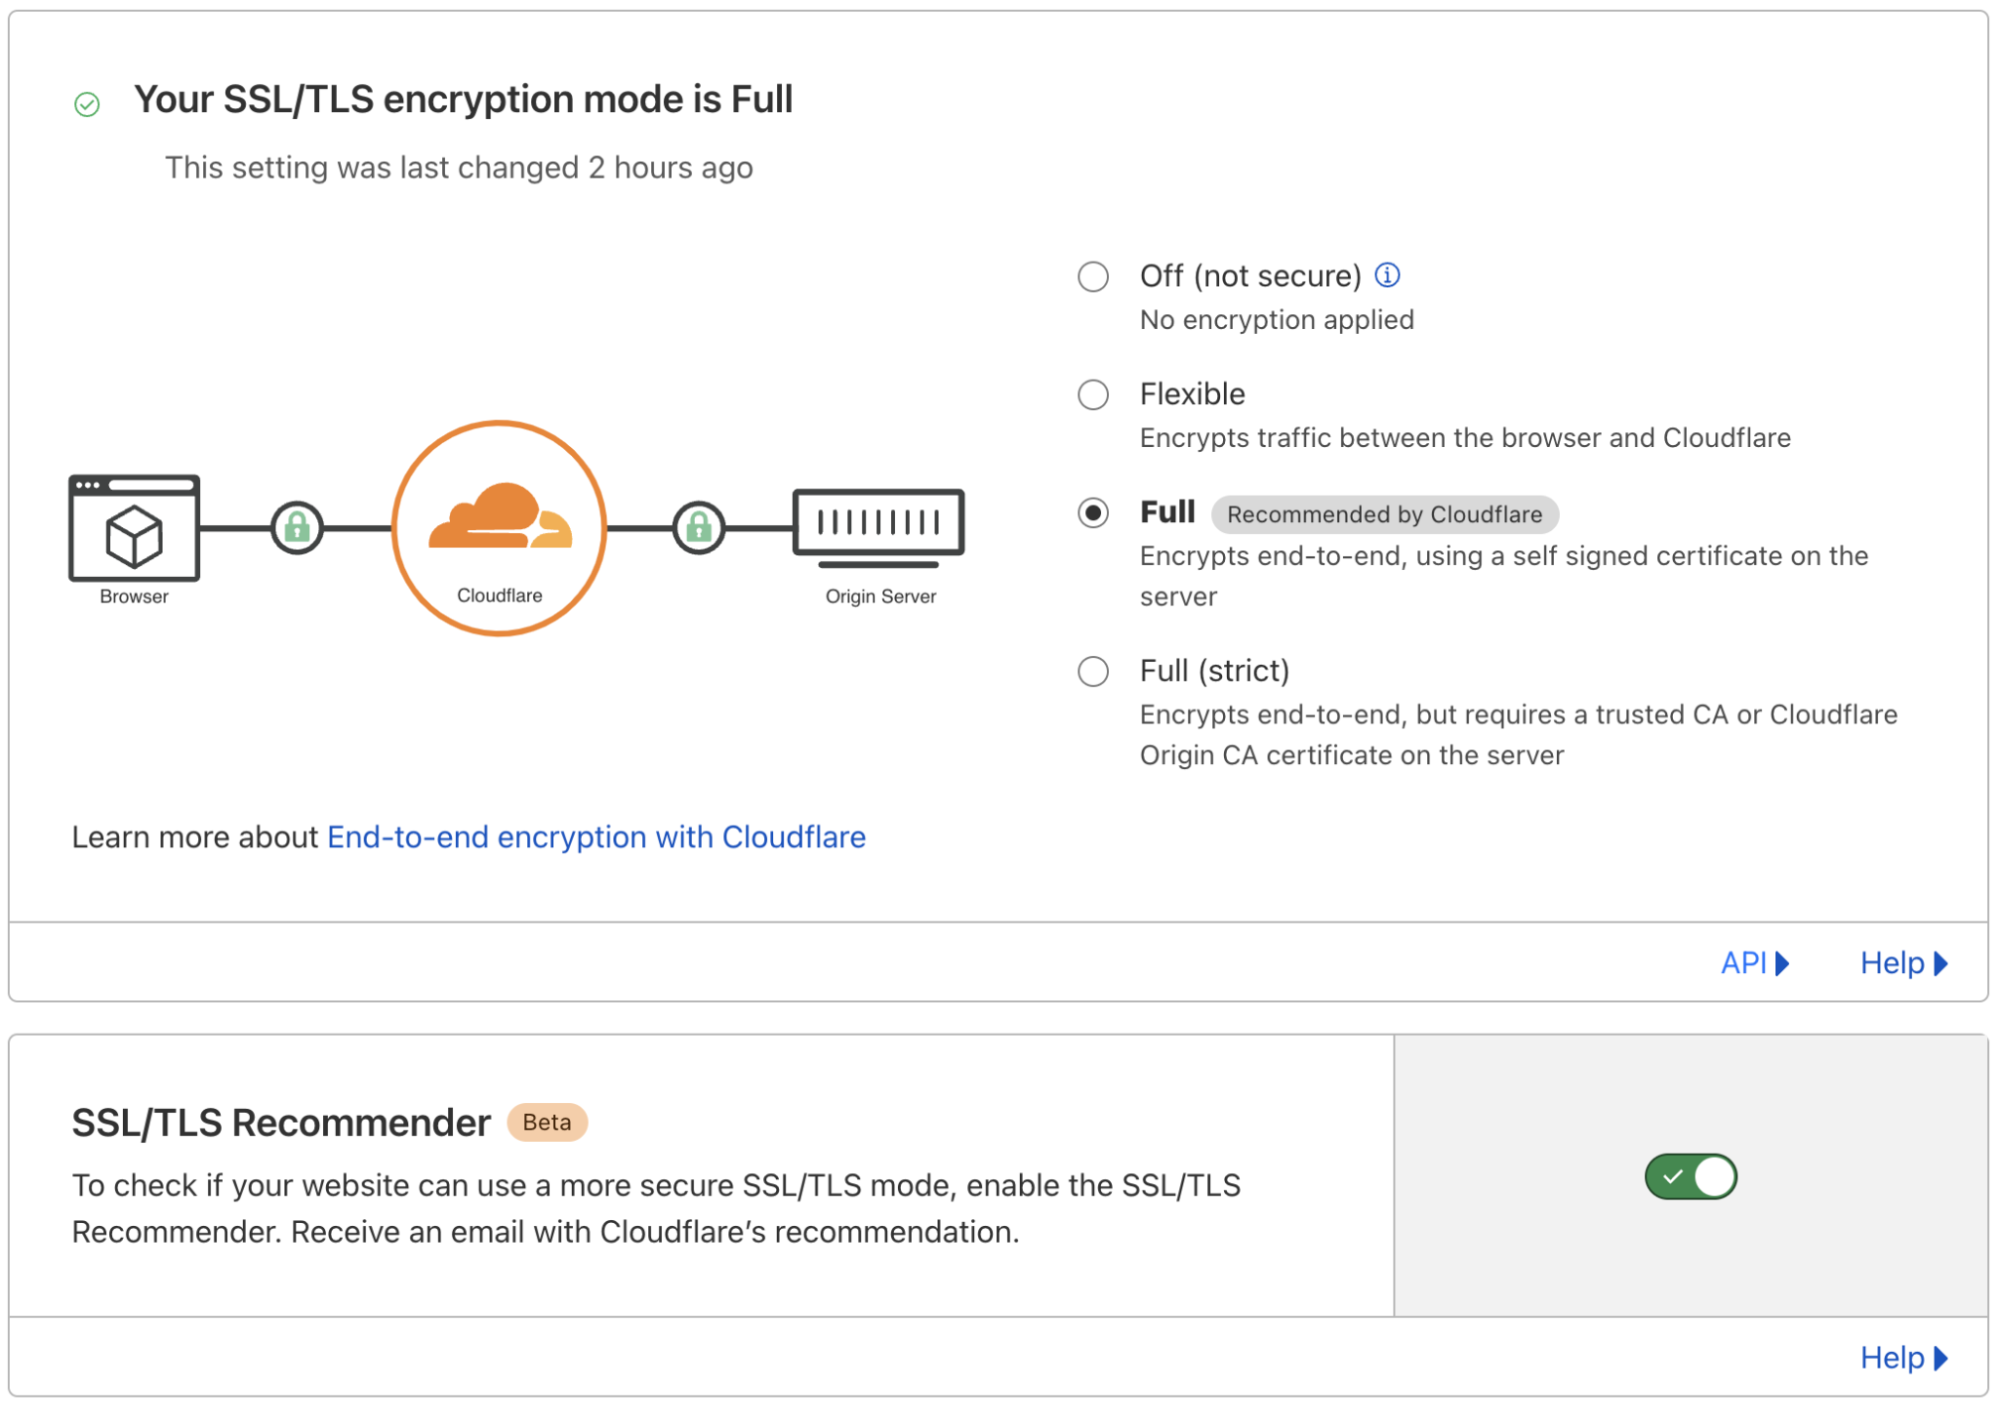
The checks that Recommender runs are determined by the site’s currently configured SSL/TLS option.
The simplest check is to determine if a customer can upgrade from Full to Full (strict). In this case, all site resources are already served over HTTPS, so the check comprises a few simple tests of the validity of the TLS certificate for the domain and all subdomains (which can be on separate origin servers).
The check to determine if a customer can upgrade from Off or Flexible to Full is more complex. A site can be upgraded if all resources on the site are available over HTTPS and the content matches when served over HTTP versus HTTPS. Recommender carries out this check as follows:
- Crawl customer sites to collect links. For large sites where it is impractical to scan every link, Recommender tests only a subset of links (up to some threshold), leading to a trade-off between performance and potential false positives. Similarly, for sites where the crawl turns up an insufficient number of links, we augment our results with a sample of links from recent visitors requests to the zone to provide a high-confidence recommendation. The crawler uses the user agent Cloudflare-SSLDetector and has been added to Cloudflare’s list of known good bots. Similar to other Cloudflare crawlers, Recommender ignores robots.txt (except for rules explicitly targeting the crawler’s user agent) to avoid negatively impacting the accuracy of the recommendation.
- Download the content of each link over both HTTP and HTTPS. Recommender makes only idempotent GET requests when scanning origin servers to avoid modifying server resource state.
- Run a content similarity algorithm to determine if the content matches. The algorithm is adapted from a research paper called “A Deeper Look at Web Content Availability and Consistency over HTTP/S” (TMA Conference 2020) and is designed to provide an accurate similarity score even for sites with dynamic content.
Recommender is conservative with recommendations, erring on the side of maintaining current site functionality rather than risking breakage and usability issues. If a zone is non-functional, the zone owner blocks all types of bots, or if misconfigured SSL-specific Page Rules are applied to the zone, then Recommender will not be able to complete its scans and provide a recommendation. Therefore, it is not intended to resolve issues with website or domain functionality, but rather maximize your zone’s security when possible.
Please send questions and feedback to [email protected]. We’re excited to continue this line of work to improve the security of customer origins!
Mentions
While this work is led by the Research team, we have been extremely privileged to get support from all across the company!
Special thanks to the incredible team of interns that contributed to SSL/TLS Recommender. Suleman Ahmad (now full-time), Talha Paracha, and Ananya Ghose built the current iteration of the project and Matthew Bernhard helped to lay the groundwork in a previous iteration of the project.
Have You Checked the New Kubernetes RBAC Swiss Army Knife?
Post Syndicated from Gadi Naor original https://blog.rapid7.com/2021/10/12/kubernetes-rbac-swiss-army-knife/

Kubernetes Role-Based Access Control (RBAC) is a method of regulating access to computer or network resources based on the roles of individual users within your organization. RBAC authorization uses the rbac.authorization.k8s.io API group to drive authorization decisions, allowing you to dynamically configure policies through the Kubernetes API. This is all quite useful, but Kubernetes RBAC is often viewed as complex and not very user-friendly.
Introducing Your Swiss Army Knife for RBAC Controls
InsightCloudSec’s RBAC tool is an all-in-one open-source tool for analyzing Kubernetes RBAC policies and simplifying any complexities associated with Kubernetes RBAC.
InsightCloudSec’s RBAC tool significantly simplifies querying, analyzing, and generating RBAC policies. It is available as a standalone tool or as a kubectl Krew Plugin.
Visualize Cluster RBAC Policies and Usage
A Kubernetes RBAC command can be used to analyze cluster policies and how they are being used and generate a simple relationship graph.

By default, rbac-tool viz will connect to the local cluster (pointed by kubeconfig) and create a RBAC graph of the actively running workload on all namespaces except kube-system.
Examples
# Scan the cluster pointed by the kubeconfig context 'myctx'
rbac-tool viz --cluster-context myctx
# Scan and create a PNG image from the graph
rbac-tool viz --outformat dot --exclude-namespaces=soemns && cat rbac.dot | dot -Tpng > rbac.png && google-chrome rbac.pngAnalyze Risky RBAC Permission
The command rbac-tool analysis analyzes RBAC permissions and highlights overly permissive principals, risky permissions, or any specific permissions that are not desired by cluster operators.
The command allows the use of a custom analysis rule set, as well as the ability to define custom exceptions (global and per-rule), and can integrate into deployment tools such as GitOps and automation analysis tasks in order to detect undesired permission changes, unexpected drifts, or risky roles.
Examples
# Analyze the cluster pointed by the kubeconfig context 'myctx' with the internal analysis rule set
rbac-tool analysis --cluster-context myctx
Query Who Can Perform Certain Kubernetes API Actions
The command rbac-tool who-can enables operators to simply query which subjects/principals are allowed to perform a certain action based on the presently configured RBAC policies.
Examples
# Who can read ConfigMap resources
rbac-tool who-can get configmaps
# Who can watch Deployments
rbac-tool who-can watch deployments.apps
# Who can read the Kubernetes API endpoint /apis
rbac-tool who-can get /apis
# Who can read a secret resource by the name some-secret
rbac-tool who-can get secret/some-secret
A Flat and Simple View of RBAC Permissions
The command rbac-tool policy-rules aggregates the policies and relationships from the various RBAC resources, and provides a flat view of the allowed permissions for any given User/ServiceAccount/Group.
Examples
# List policy rules for system unauthenticated group
rbac-tool policy-rules -e '^system:unauth'
Output:

Generate RBAC Policies Easily
Kubernetes RBAC lacks the notion of denying semantics, which means generating an RBAC policy that says “Allow everything except THIS” is not as straightforward as one would imagine.
Here are some examples that capture how rbac-tool generate can help:
- Generate a
ClusterRolepolicy that allows users to read everything except secrets and services - Generate a
Rolepolicy that allows create, update, get, list (read/write) everything except Secrets, Services, Ingresses, and NetworkPolicies - Generate a
Rolepolicy that allows create, update, get, list (read/write) everything except StatefulSets
Command Line Examples
Examples generated against Kubernetes cluster v1.16 deployed using KIND:
# Generate a ClusterRole policy that allows users to read everything except secrets and services
rbac-tool  gen  --deny-resources=secrets.,services. --allowed-verbs=get,list
# Generate a Role policy that allows create, update, get, list (read/write) everything except Secrets, Services, NetworkPolicies in core,Apps and networking.k8s.io API groups
rbac-tool  gen --generated-type=Role --deny-resources=secrets.,services.,networkpolicies.networking.k8s.io --allowed-verbs=* --allowed-groups=,extensions,apps,networking.k8s.i
# Generate a Role policy that allows create, update, get, list (read/write) everything except StatefulSets
rbac-tool  gen --generated-type=Role --deny-resources=apps.statefulsets --allowed-verbs=*
Example output
# Generate a Role policy that allows create, update, get, list (read/write) everything except Secrets, Services, NetworkPolicies in core,Apps & networking.k8s.io API groups
rbac-tool  gen --generated-type=Role --deny-resources=secrets.,services.,networkpolicies.networking.k8s.io --allowed-verbs=* --allowed-groups=,extensions,apps,networking.k8s.io
Output:

Another useful policy generation command is rbac-tool auditgen, which can generate RBAC policy from Kubernetes audit events.
Conclusion
InsightCloudSec’s RBAC tool fills various gaps that exist in the Kubernetes native tools, and addresses common RBAC-related use cases. This RBAC tool is an all-in-one solution that helps practitioners to perform RBAC analysis, querying, and policy curation.
You’ve got your full Swiss army knife now—what are you waiting for?
Check out this link for more information and a step-by-side installation guide.
Dynamic Process Isolation: Research by Cloudflare and TU Graz
Post Syndicated from Kenton Varda original https://blog.cloudflare.com/spectre-research-with-tu-graz/


Last year, I wrote about the Cloudflare Workers security model, including how we fight Spectre attacks. In that post, I explained that there is no known complete defense against Spectre — regardless of whether you’re using isolates, processes, containers, or virtual machines to isolate tenants. What we do have, though, is a huge number of tools to increase the cost of a Spectre attack, to the point where it becomes infeasible. Cloudflare Workers has been designed from the very beginning with protection against side channel attacks in mind, and because of this we have been able to incorporate many defenses that other platforms — such as virtual machines and web browsers — cannot. However, the performance and scalability requirements of edge compute make it infeasible to run every Worker in its own private process, so we cannot rely on the usual defenses provided by the operating system kernel and address space separation.
Given our different approach, we cannot simply rely on others to tell us if we are safe. We had to do our own research. To do this we partnered with researchers at Graz Technical University (TU Graz) to study the impact of Spectre on our environment. The team at TU Graz are some of the foremost experts on the topic, having co-discovered Spectre initially as well as discovered several follow-on bugs like NetSpectre, ZombieLoad, Fallout, and others.
Today we are publishing a paper describing our findings, authored by Martin Schwarzl, Pietro Borrello, Andreas Kogler, Thomas Schuster, Daniel Gruss, Michael Schwarz, and myself. This paper covers research done in 2019 and early 2020. The research both tests the possibility of attacking Workers using Spectre, and proposes a new defense mechanism, which we now employ in production.
For this research, the team at TU Graz had full access to the Workers Runtime source code and were able to compile and run it locally for testing.
The research has two basic components.
Part 1: Develop an attack
A side channel attack (of which Spectre is one variety) is kind of like playing poker with a CPU. In poker, players try to understand what their opponents are thinking by looking for subtle unconscious behaviors, such as a nervous look or a hand motion. These behaviors are called “tells”. In a side channel attack, the attacker wants to find out secrets that the CPU knows. The CPU won’t reveal these secrets directly, but they can sometimes subtly affect how long the CPU spends to perform certain operations, kind of like a poker tell. If an attacker can carefully time the CPU’s actions, they can potentially discover the underlying secrets. Spectre attacks in particular focus on side channels that result from the CPU’s use of speculative execution, in which the CPU executes code that it is not yet sure should be executed, and then attempts to roll it back if not. Speculative execution is a particularly potent tool in side channel attacks because it essentially allows the attacker to program custom side channels in speculatively-executed code.
Many Spectre defenses focus on eliminating the “tells” by trying to prevent the variability in the CPU’s timing. This is hard, because CPUs are extremely complex and there are many ways that their timing can be affected. While many specific “tells” have been found and mitigated, there are undoubtedly many more that haven’t been disclosed. This has led to a game of whack-a-mole, where researchers continuously find new “tells” while CPU vendors rush out kernel and microcode patches to solve them — often with large performance losses as a side effect.
In Workers, we have focused on a different approach: preventing the attacker from seeing the “tells”. The Workers Runtime is designed to prevent a Worker from measuring its own execution time, as well as to prevent other forms of non-deterministic behavior like multithreading that could be used in place of a timer. I described these techniques in detail in last year’s post.
However, this approach can’t be perfect as long as Workers are allowed to talk to the rest of the world. A Worker could always communicate with a remote time server to measure time. Such communications will be far less accurate than a local timer, and since the timing differences are extremely small, they will be hard to measure this way. But, by using amplification techniques to improve the strength of the signal, repeating the attack many times and applying statistics, it could still be possible to derive secrets.
We therefore set out to develop an attack based on this approach. Upon applying the best techniques available to us, we were indeed able to produce a working Spectre variant 1 attack that could leak memory at a rate of 120 bits per hour. Compared to attacks demonstrated on many other platforms, 120 bits per hour is pretty slow. However, it’s obviously still fast enough to be a problem.
It’s important to note, though, that this speed was achieved in an ideal scenario:
- Since the Workers Runtime prevents Workers from measuring their own execution time, any attack would need to rely on a remote time server. But for the purpose of our test, the “remote” server was in fact located on the same machine. In a real-world scenario, such a server would need to be accessed over the Internet, making the timing less accurate.
- The machine running the test had no other load. A real-world machine would be processing hundreds or thousands of requests concurrently, creating noise.
- The attack only demonstrated that it could read some bits that it shouldn’t. In order to read interesting bits, an attacker would first need to locate those bits, which likely would require reading hundreds or thousands of other bits first.
In the real world, these factors appear to make an attack too slow to be interesting. If an attack takes days or weeks to carry out, the contents of memory are highly likely to change before it can read them. For example, we update the Workers Runtime code at least once a week, which causes a restart of all processes.
That said, we did not feel comfortable relying on this argument as our defense. Instead, we set out to do better.
Part 2: Enhance our defenses
In the second part of the research, we designed and implemented a novel Spectre defense which we call Dynamic Process Isolation.
Dynamic Process Isolation was described in my blog post last year. At the time, this system was still in testing, but it has since been fully deployed in production.
In short, our defense uses hardware performance counters to detect Workers whose performance characteristics could be indicative of an attack. Before the attack has had enough time to leak any bits, we move the Worker into a separate operating system process, thus taking advantage of the additional defenses implemented by the OS kernel. Crucially, since a benign Worker can still operate normally while in an isolated process, we are able to use a detector that produces false positives, as long as the rate is relatively low. This affordance made it possible for us to develop a working classifier where previous work in the area had struggled.
Specifically, we developed a detector based on measuring branch mispredictions. Spectre variant 1 attacks — the fastest and easiest kind of Spectre attack — work by fooling the CPU’s branch predictor to trigger speculative code execution. Such an attack, when running in our environment, must trigger repeated mispredictions in a loop, in order to get enough data to apply statistics to overcome the noise floor. We can see these mispredictions in the hardware performance counters. While an attack could try to evade the detector by spreading out its trials over a longer time period, doing so would slow down the attack by orders of magnitude, which is exactly our goal. Classifiers for other Spectre variants might be straightforward to build as well, however, we find other variants already produce much lower bandwidth or are otherwise effectively mitigated by our existing defenses.
This defense successfully detects and mitigates the attack we developed. We also tested it against a number of Spectre proofs of concept and found it caught all of them. Meanwhile, the rate of false positives is well within the range we can tolerate: Out of many thousands of Workers running on our platform, we see only about 20 being falsely detected as attacks.
For more details, check out the paper and my blog post from last year.
Read the Paper
Collaborating with TU Graz was a great experience. We are very happy to work with some of the world’s foremost experts on this problem, and to have produced not just an attack but also a constructive defense.
Handshake Encryption: Endgame (an ECH update)
Post Syndicated from Christopher Wood original https://blog.cloudflare.com/handshake-encryption-endgame-an-ech-update/
Privacy and security are fundamental to Cloudflare, and we believe in and champion the use of cryptography to help provide these fundamentals for customers, end-users, and the Internet at large. In the past, we helped specify, implement, and ship TLS 1.3, the latest version of the transport security protocol underlying the web, to all of our users. TLS 1.3 vastly improved upon prior versions of the protocol with respect to security, privacy, and performance: simpler cryptographic algorithms, more handshake encryption, and fewer round trips are just a few of the many great features of this protocol.
TLS 1.3 was a tremendous improvement over TLS 1.2, but there is still room for improvement. Sensitive metadata relating to application or user intent is still visible in plaintext on the wire. In particular, all client parameters, including the name of the target server the client is connecting to, are visible in plaintext. For obvious reasons, this is problematic from a privacy perspective: Even if your application traffic to crypto.cloudflare.com is encrypted, the fact you’re visiting crypto.cloudflare.com can be quite revealing.
And so, in collaboration with other participants in the standardization community and members of industry, we embarked towards a solution for encrypting all sensitive TLS metadata in transit. The result: TLS Encrypted ClientHello (ECH), an extension to protect this sensitive metadata during connection establishment.
Last year, we described the current status of this standard and its relation to the TLS 1.3 standardization effort, as well as ECH’s predecessor, Encrypted SNI (ESNI). The protocol has come a long way since then, but when will we know when it’s ready? There are many ways by which one can measure a protocol. Is it implementable? Is it easy to enable? Does it seamlessly integrate with existing protocols or applications? In order to assess these questions and see if the Internet is ready for ECH, the community needs deployment experience. Hence, for the past year, we’ve been focused on making the protocol stable, interoperable, and, ultimately, deployable. And today, we’re pleased to announce that we’ve begun our initial deployment of TLS ECH.
What does ECH mean for connection security and privacy on the network? How does it relate to similar technologies and concepts such as domain fronting? In this post, we’ll dig into ECH details and describe what this protocol does to move the needle to help build a better Internet.
Connection privacy
For most Internet users, connections are made to perform some type of task, such as loading a web page, sending a message to a friend, purchasing some items online, or accessing bank account information. Each of these connections reveals some limited information about user behavior. For example, a connection to a messaging platform reveals that one might be trying to send or receive a message. Similarly, a connection to a bank or financial institution reveals when the user typically makes financial transactions. Individually, this metadata might seem harmless. But consider what happens when it accumulates: does the set of websites you visit on a regular basis uniquely identify you as a user? The safe answer is: yes.
This type of metadata is privacy-sensitive, and ultimately something that should only be known by two entities: the user who initiates the connection, and the service which accepts the connection. However, the reality today is that this metadata is known to more than those two entities.
Making this information private is no easy feat. The nature or intent of a connection, i.e., the name of the service such as crypto.cloudflare.com, is revealed in multiple places during the course of connection establishment: during DNS resolution, wherein clients map service names to IP addresses; and during connection establishment, wherein clients indicate the service name to the target server. (Note: there are other small leaks, though DNS and TLS are the primary problems on the Internet today.)
As is common in recent years, the solution to this problem is encryption. DNS-over-HTTPS (DoH) is a protocol for encrypting DNS queries and responses to hide this information from onpath observers. Encrypted Client Hello (ECH) is the complementary protocol for TLS.
The TLS handshake begins when the client sends a ClientHello message to the server over a TCP connection (or, in the context of QUIC, over UDP) with relevant parameters, including those that are sensitive. The server responds with a ServerHello, encrypted parameters, and all that’s needed to finish the handshake.
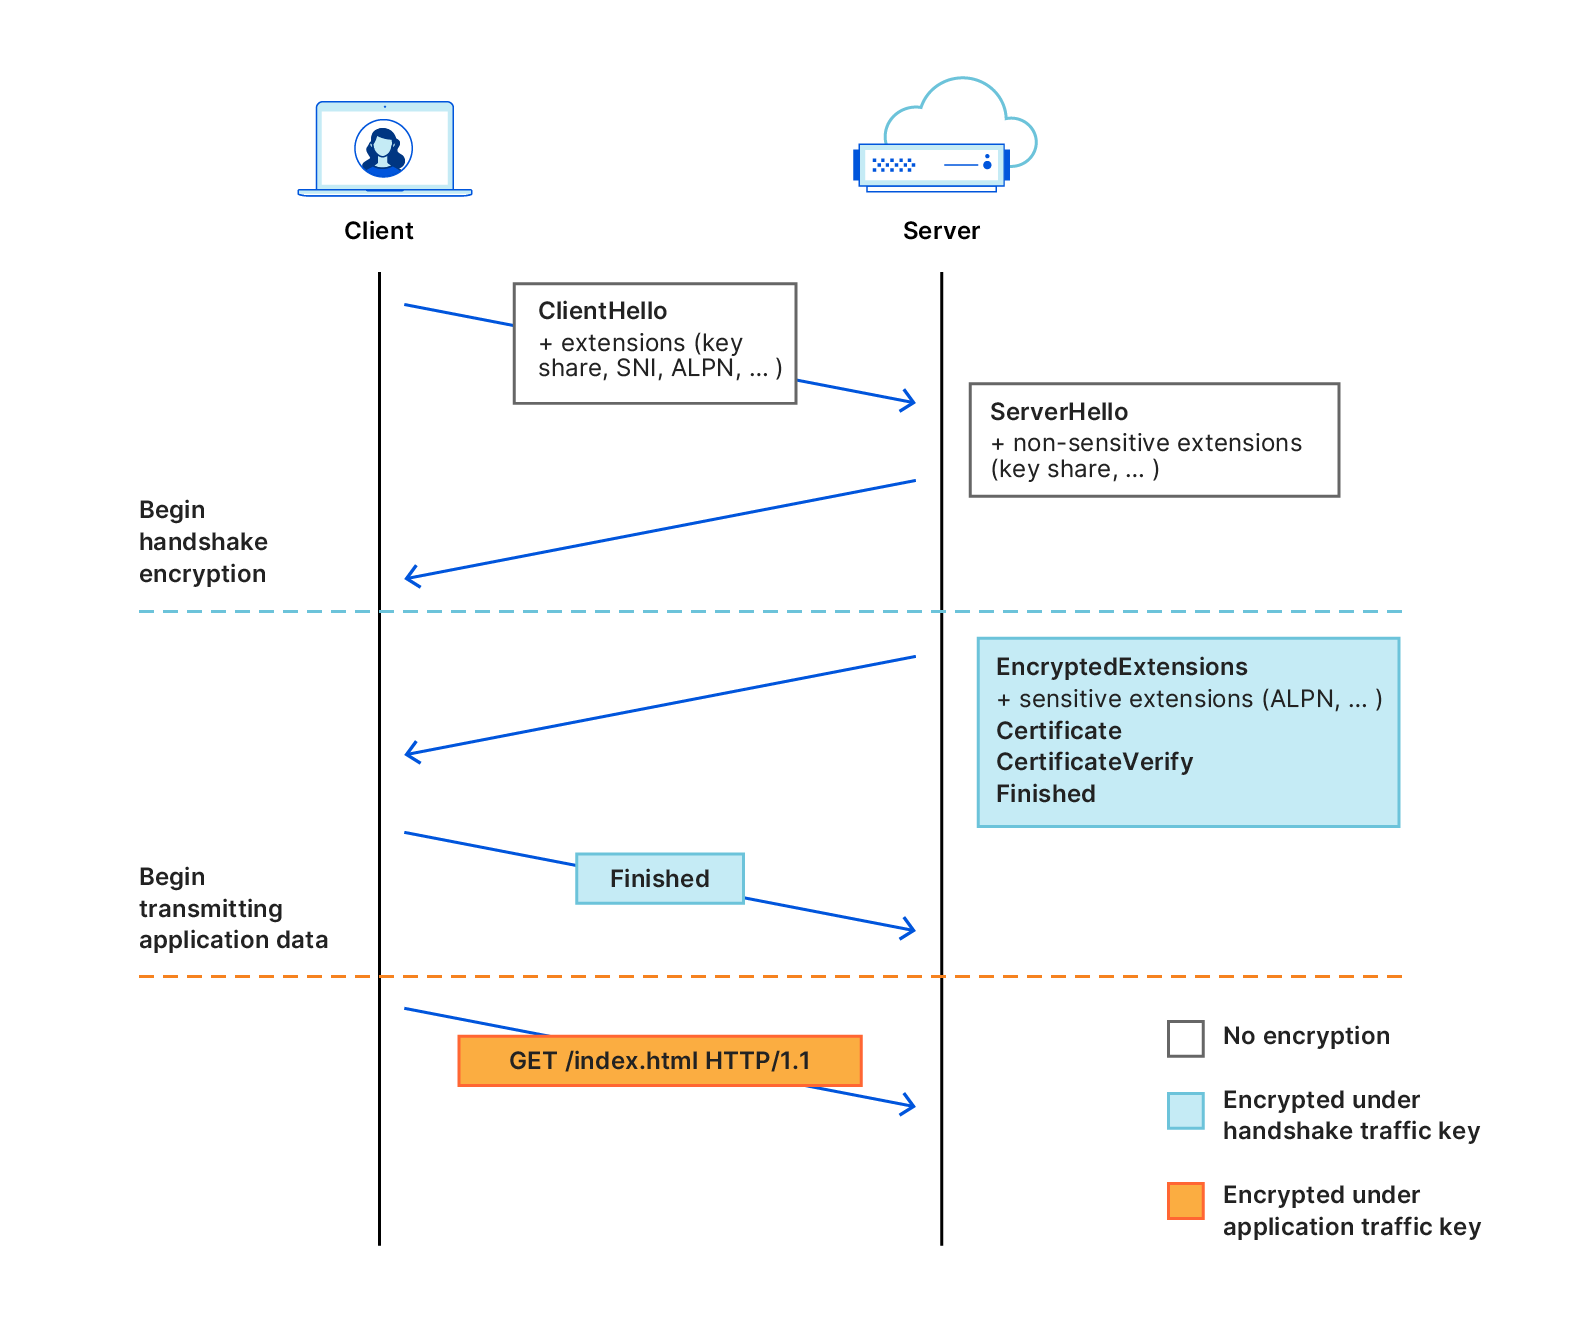
The goal of ECH is as simple as its name suggests: to encrypt the ClientHello so that privacy-sensitive parameters, such as the service name, are unintelligible to anyone listening on the network. The client encrypts this message using a public key it learns by making a DNS query for a special record known as the HTTPS resource record. This record advertises the server’s various TLS and HTTPS capabilities, including ECH support. The server decrypts the encrypted ClientHello using the corresponding secret key.
Conceptually, DoH and ECH are somewhat similar. With DoH, clients establish an encrypted connection (HTTPS) to a DNS recursive resolver such as 1.1.1.1 and, within that connection, perform DNS transactions.
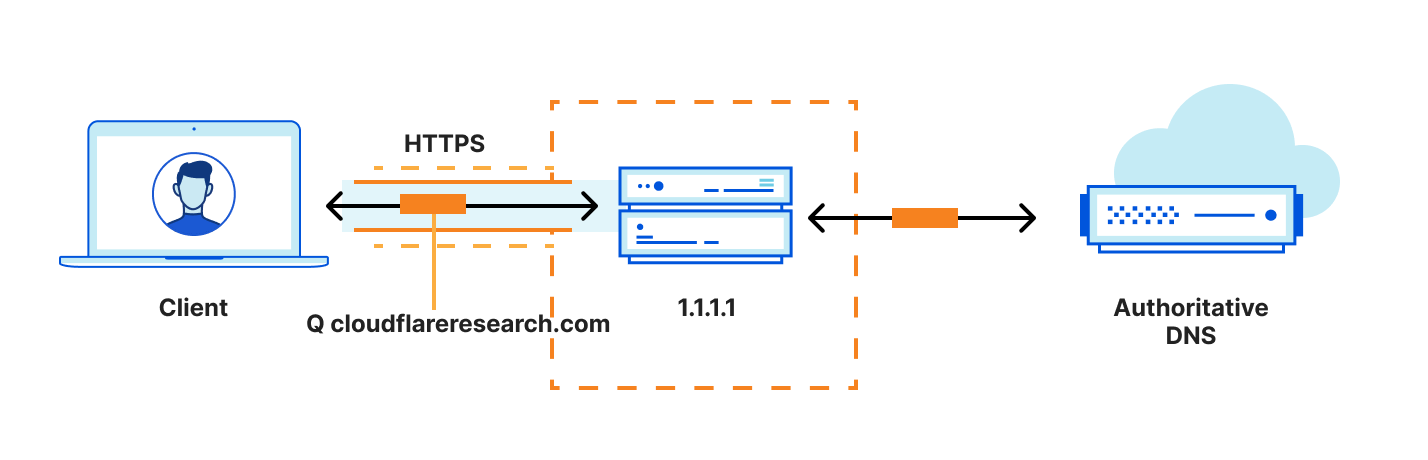
With ECH, clients establish an encrypted connection to a TLS-terminating server such as crypto.cloudflare.com, and within that connection, request resources for an authorized domain such as cloudflareresearch.com.
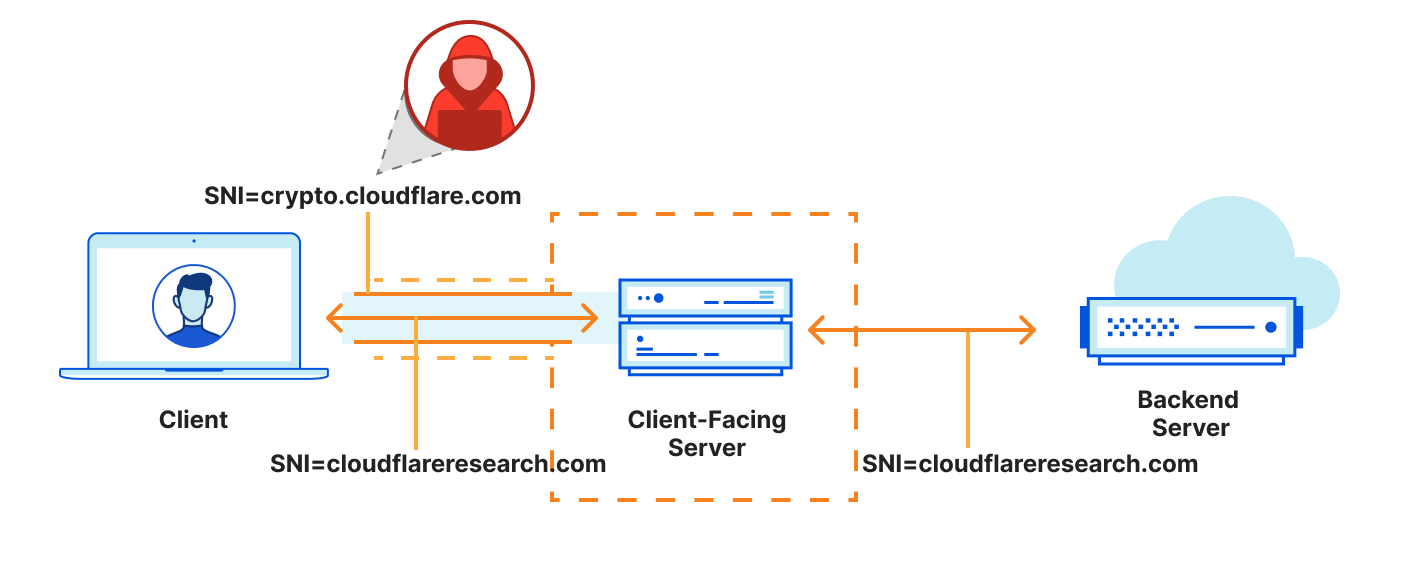
There is one very important difference between DoH and ECH that is worth highlighting. Whereas a DoH recursive resolver is specifically designed to allow queries for any domain, a TLS server is configured to allow connections for a select set of authorized domains. Typically, the set of authorized domains for a TLS server are those which appear on its certificate, as these constitute the set of names for which the server is authorized to terminate a connection.
Basically, this means the DNS resolver is open, whereas the ECH client-facing server is closed. And this closed set of authorized domains is informally referred to as the anonymity set. (This will become important later on in this post.) Moreover, the anonymity set is assumed to be public information. Anyone can query DNS to discover what domains map to the same client-facing server.
Why is this distinction important? It means that one cannot use ECH for the purposes of connecting to an authorized domain and then interacting with a different domain, a practice commonly referred to as domain fronting. When a client connects to a server using an authorized domain but then tries to interact with a different domain within that connection, e.g., by sending HTTP requests for an origin that does not match the domain of the connection, the request will fail.
From a high level, encrypting names in DNS and TLS may seem like a simple feat. However, as we’ll show, ECH demands a different look at security and an updated threat model.
A changing threat model and design confidence
The typical threat model for TLS is known as the Dolev-Yao model, in which an active network attacker can read, write, and delete packets from the network. This attacker’s goal is to derive the shared session key. There has been a tremendous amount of research analyzing the security of TLS to gain confidence that the protocol achieves this goal.
The threat model for ECH is somewhat stronger than considered in previous work. Not only should it be hard to derive the session key, it should also be hard for the attacker to determine the identity of the server from a known anonymity set. That is, ideally, it should have no more advantage in identifying the server than if it simply guessed from the set of servers in the anonymity set. And recall that the attacker is free to read, write, and modify any packet as part of the TLS connection. This means, for example, that an attacker can replay a ClientHello and observe the server’s response. It can also extract pieces of the ClientHello — including the ECH extension — and use them in its own modified ClientHello.
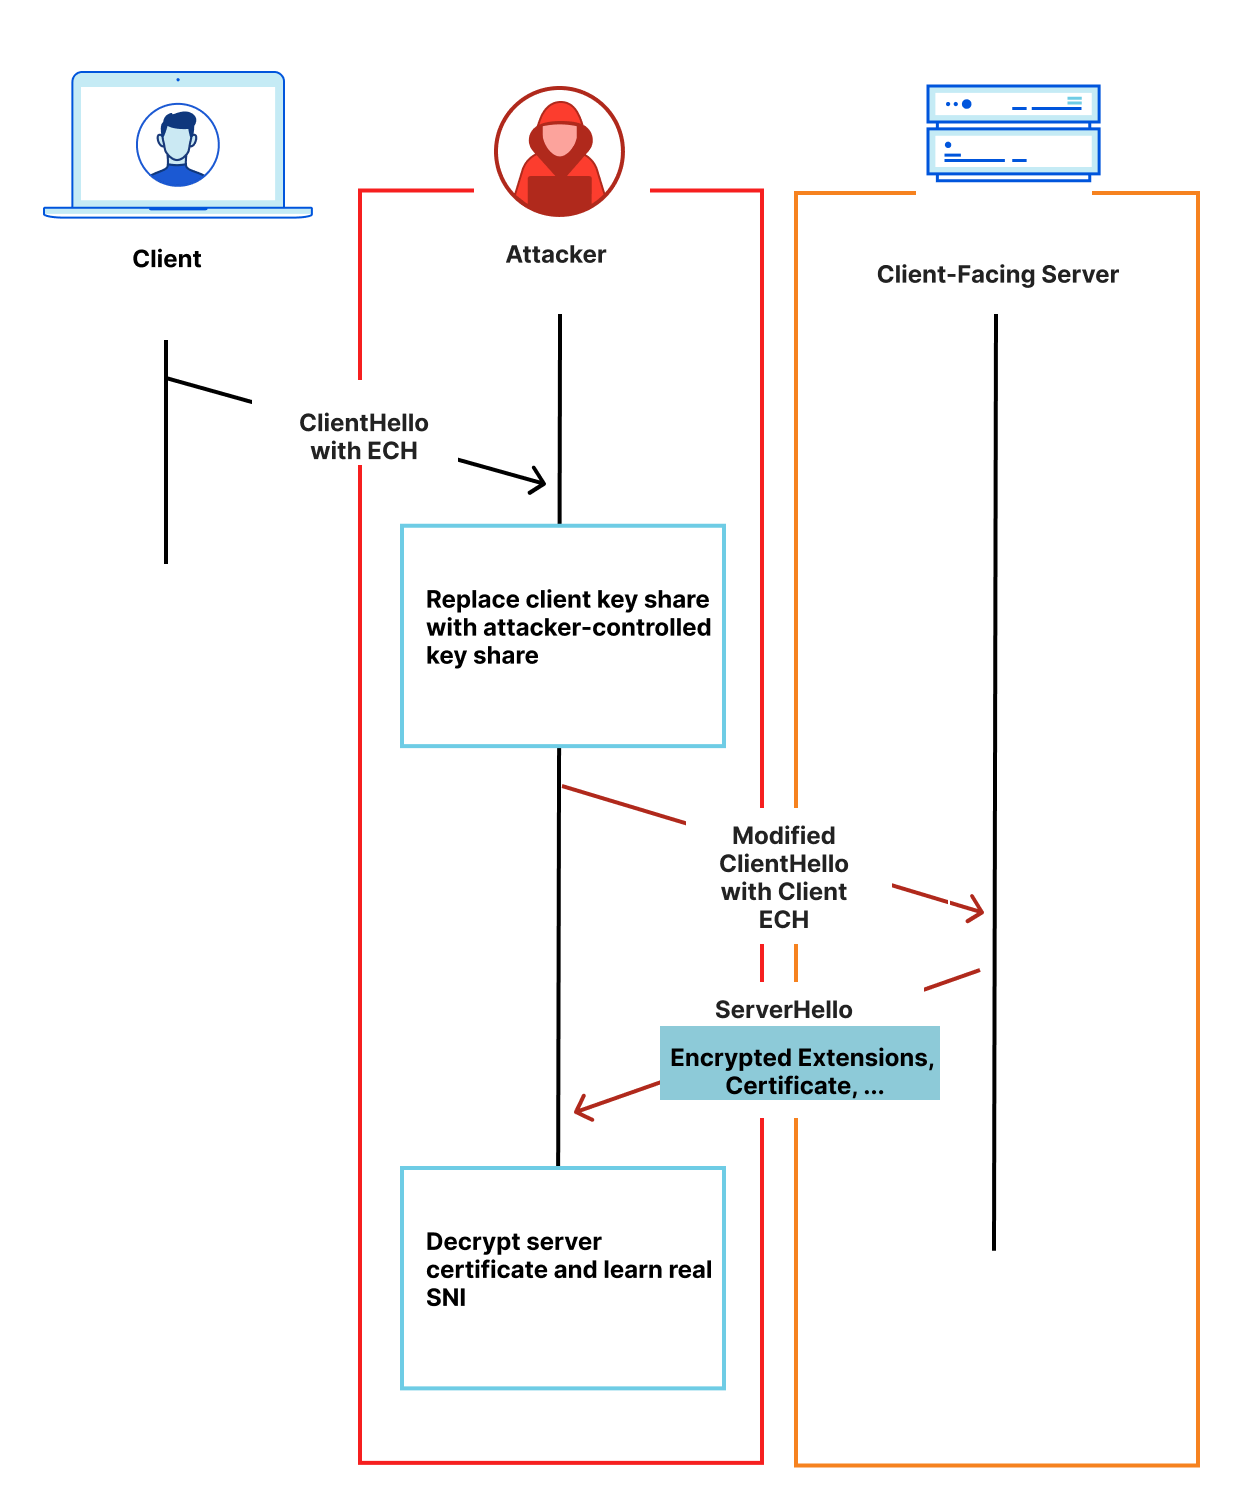
The design of ECH ensures that this sort of attack is virtually impossible by ensuring the server certificate can only be decrypted by either the client or client-facing server.
Something else an attacker might try is masquerade as the server and actively interfere with the client to observe its behavior. If the client reacted differently based on whether the server-provided certificate was correct, this would allow the attacker to test whether a given connection using ECH was for a particular name.
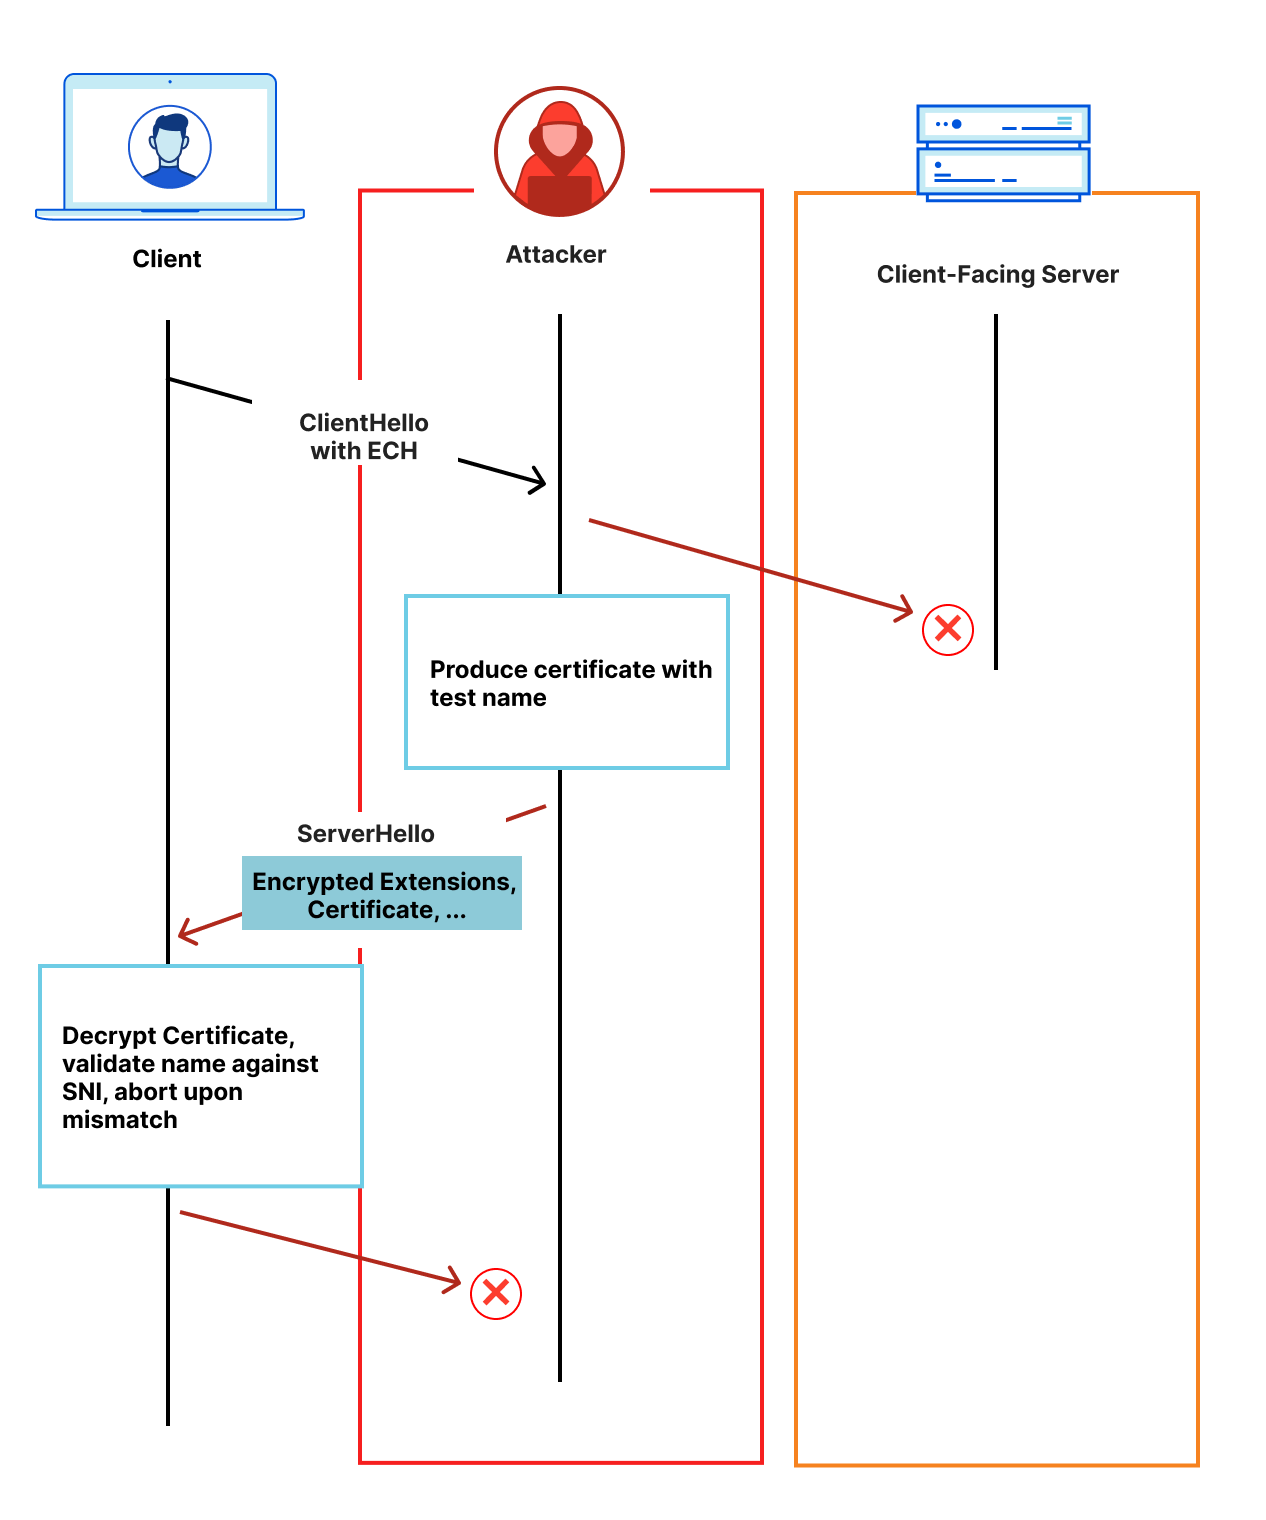
ECH also defends against this attack by ensuring that an attacker without access to the private ECH key material cannot actively inject anything into the connection.
The attacker can also be entirely passive and try to infer encrypted information from other visible metadata, such as packet sizes and timing. (Indeed, traffic analysis is an open problem for ECH and in general for TLS and related protocols.) Passive attackers simply sit and listen to TLS connections, and use what they see and, importantly, what they know to make determinations about the connection contents. For example, if a passive attacker knows that the name of the client-facing server is crypto.cloudflare.com, and it sees a ClientHello with ECH to crypto.cloudflare.com, it can conclude, with reasonable certainty, that the connection is to some domain in the anonymity set of crypto.cloudflare.com.
The number of potential attack vectors is astonishing, and something that the TLS working group has tripped over in prior iterations of the ECH design. Before any sort of real world deployment and experiment, we needed confidence in the design of this protocol. To that end, we are working closely with external researchers on a formal analysis of the ECH design which captures the following security goals:
- Use of ECH does not weaken the security properties of TLS without ECH.
- TLS connection establishment to a host in the client-facing server’s anonymity set is indistinguishable from a connection to any other host in that anonymity set.
We’ll write more about the model and analysis when they’re ready. Stay tuned!
There are plenty of other subtle security properties we desire for ECH, and some of these drill right into the most important question for a privacy-enhancing technology: Is this deployable?
Focusing on deployability
With confidence in the security and privacy properties of the protocol, we then turned our attention towards deployability. In the past, significant protocol changes to fundamental Internet protocols such as TCP or TLS have been complicated by some form of benign interference. Network software, like any software, is prone to bugs, and sometimes these bugs manifest in ways that we only detect when there’s a change elsewhere in the protocol. For example, TLS 1.3 unveiled middlebox ossification bugs that ultimately led to the middlebox compatibility mode for TLS 1.3.
While itself just an extension, the risk of ECH exposing (or introducing!) similar bugs is real. To combat this problem, ECH supports a variant of GREASE whose goal is to ensure that all ECH-capable clients produce syntactically equivalent ClientHello messages. In particular, if a client supports ECH but does not have the corresponding ECH configuration, it uses GREASE. Otherwise, it produces a ClientHello with real ECH support. In both cases, the syntax of the ClientHello messages is equivalent.
This hopefully avoids network bugs that would otherwise trigger upon real or fake ECH. Or, in other words, it helps ensure that all ECH-capable client connections are treated similarly in the presence of benign network bugs or otherwise passive attackers. Interestingly, active attackers can easily distinguish — with some probability — between real or fake ECH. Using GREASE, the ClientHello carries an ECH extension, though its contents are effectively randomized, whereas a real ClientHello using ECH has information that will match what is contained in DNS. This means an active attacker can simply compare the ClientHello against what’s in the DNS. Indeed, anyone can query DNS and use it to determine if a ClientHello is real or fake:
$ dig +short crypto.cloudflare.com TYPE65
\# 134 0001000001000302683200040008A29F874FA29F884F000500480046 FE0D0042D500200020E3541EC94A36DCBF823454BA591D815C240815 77FD00CAC9DC16C884DF80565F0004000100010013636C6F7564666C 6172652D65736E692E636F6D00000006002026064700000700000000 0000A29F874F260647000007000000000000A29F884F
Despite this obvious distinguisher, the end result isn’t that interesting. If a server is capable of ECH and a client is capable of ECH, then the connection most likely used ECH, and whether clients and servers are capable of ECH is assumed public information. Thus, GREASE is primarily intended to ease deployment against benign network bugs and otherwise passive attackers.
Note, importantly, that GREASE (or fake) ECH ClientHello messages are semantically different from real ECH ClientHello messages. This presents a real problem for networks such as enterprise settings or school environments that otherwise use plaintext TLS information for the purposes of implementing various features like filtering or parental controls. (Encrypted DNS protocols like DoH also encountered similar obstacles in their deployment.) Fundamentally, this problem reduces to the following: How can networks securely disable features like DoH and ECH? Fortunately, there are a number of approaches that might work, with the more promising one centered around DNS discovery. In particular, if clients could securely discover encrypted recursive resolvers that can perform filtering in lieu of it being done at the TLS layer, then TLS-layer filtering might be wholly unnecessary. (Other approaches, such as the use of canary domains to give networks an opportunity to signal that certain features are not permitted, may work, though it’s not clear if these could or would be abused to disable ECH.)
We are eager to collaborate with browser vendors, network operators, and other stakeholders to find a feasible deployment model that works well for users without ultimately stifling connection privacy for everyone else.
Next steps
ECH is rolling out for some FREE zones on our network in select geographic regions. We will continue to expand the set of zones and regions that support ECH slowly, monitoring for failures in the process. Ultimately, the goal is to work with the rest of the TLS working group and IETF towards updating the specification based on this experiment in hopes of making it safe, secure, usable, and, ultimately, deployable for the Internet.
ECH is one part of the connection privacy story. Like a leaky boat, it’s important to look for and plug all the gaps before taking on lots of passengers! Cloudflare Research is committed to these narrow technical problems and their long-term solutions. Stay tuned for more updates on this and related protocols.
Privacy Pass v3: the new privacy bits
Post Syndicated from Pop Chunhapanya original https://blog.cloudflare.com/privacy-pass-v3/


In November 2017, we released our implementation of a privacy preserving protocol to let users prove that they are humans without enabling tracking. When you install Privacy Pass’s browser extension, you get tokens when you solve a Cloudflare CAPTCHA which can be used to avoid needing to solve one again… The redeemed token is cryptographically unlinkable to the token originally provided by the server. That is why Privacy Pass is privacy preserving.
In October 2019, Privacy Pass reached another milestone. We released Privacy Pass Extension v2.0 that includes a new service provider (hCaptcha) which provides a way to redeem a token not only with CAPTCHAs in the Cloudflare challenge pages but also hCaptcha CAPTCHAs in any website. When you encounter any hCaptcha CAPTCHA in any website, including the ones not behind Cloudflare, you can redeem a token to pass the CAPTCHA.
We believe Privacy Pass solves an important problem — balancing privacy and security for bot mitigation— but we think there’s more to be done in terms of both the codebase and the protocol. We improved the codebase by redesigning how the service providers interact with the core extension. At the same time, we made progress on the standardization at IETF and improved the protocol by adding metadata which allows us to do more fabulous things with Privacy Pass.
Announcing Privacy Pass Extension v3.0
The current implementation of our extension is functional, but it is difficult to maintain two Privacy Pass service providers: Cloudflare and hCaptcha. So we decided to refactor the browser extension to improve its maintainability. We also used this opportunity to make following improvements:
- Implement the extension using TypeScript instead of plain JavaScript.
- Build the project using a module bundler instead of custom build scripts.
- Refactor the code and define the API for the cryptographic primitive.
- Treat provider-specific code as an encapsulated software module rather than a list of configuration properties.
As a result of the improvements listed above, the extension will be less error-prone and each service provider will have more flexibility and can be integrated seamlessly with other providers.
In the new extension we use TypeScript instead of plain JavaScript because its syntax is a kind of extension to JavaScript, and we already use TypeScript in Workers. One of the things that makes TypeScript special is that it has features that are only available in modern programming languages, like null safety.
Support for Future Service Providers
Another big improvement in v3.0 is that it is designed for modularity, meaning that it will be very easy to add a new potential service provider in the future. A new provider can use an API provided by us to implement their own request flow to use the Privacy Pass protocol and to handle the HTTP requests. By separating the provider-specific code from the core extension code using the API, the extension will be easier to update when there is a need for more service providers.
On a technical level, we allow each service provider to have its own WebRequest API event listeners instead of having central event listeners for all the providers. This allows providers to extend the browser extension’s functionality and implement any request handling logic they want.
Another major change that enables us to do this is that we moved away from configuration to programmable modularization.
Configuration vs Modularization
As mentioned in 2019, it would be impossible to expect different service providers to all abide by the same exact request flow, so we decided to use a JSON configuration file in v2.0 to define the request flow. The configuration allows the service providers to easily modify the extension characteristics without dealing too much with the core extension code. However, recently we figured out that we can improve it without using a configuration file, and using modules instead.
Using a configuration file limits the flexibility of the provider by the number of possible configurations. In addition, when the logic of each provider evolves and deviates from one another, the size of configuration will grow larger and larger which makes it hard to document and keep track of. So we decided to refactor how we determine the request flow from using a configuration file to using a module file written specifically for each service provider instead.
By using a programmable module, the providers are not limited by the available fields in the configuration. In addition, the providers can use the available implementations of the necessary cryptographic primitives in any point of the request flow because we factored out the crypto bits into a separate module which can be used by any provider. In the future, if the cryptographic primitives ever change, the providers can update the code and use it any time.
Towards Standard Interoperability
The Privacy Pass protocol was first published at the PoPETS symposium in 2018. As explained in this previous post, the core of the Privacy Pass protocol is a secure way to generate tokens between server and client. To that end, the protocol requires evaluating a pseudorandom function that is oblivious and verifiable. The first property prevents the server from learning information about the client’s tokens, while the client learns nothing about the server’s private key. This is useful to protect the privacy of users. The token generation must also be verifiable in the sense that the client can attest to the fact that its token was minted using the server’s private key.
The original implementation of Privacy Pass has seen real-world use in our browser extension, helping to reduce CAPTCHAs for hundreds of thousands of people without compromising privacy. But to guarantee interoperability between services implementing Privacy Pass, what’s required is an accurate specification of the protocol and its operations. With this motivation, the Privacy Pass protocol was proposed as an Internet draft at the Internet Engineering Task Force (IETF) — to know more about our participation at IETF look at the post.
In March 2020, the protocol was presented at IETF-107 for the first time. The session was a Birds-of-a-Feather, a place where the IETF community discusses the creation of new working groups that will write the actual standards. In the session, the working group’s charter is presented and proposes to develop a secure protocol for redeeming unforgeable tokens that attest to the validity of some attribute being held by a client. The charter was later approved, and three documents were integrated covering the protocol, the architecture, and an HTTP API for supporting Privacy Pass. The working group at IETF can be found at https://datatracker.ietf.org/wg/privacypass/.
Additionally, to its core functionality, the Privacy Pass protocol can be extended to improve its usability or to add new capabilities. For instance, adding a mechanism for public verifiability will allow a third party, someone who did not participate in the protocol, to verify the validity of tokens. Public verifiability can be implemented using a blind-signature scheme — this is a special type of digital signatures firstly proposed by David Chaum in which signers can produce signatures on messages without learning the content of the message. A diversity of algorithms to implement blind-signatures exist; however, there is still work to be done to define a good candidate for public verifiability.
Another extension for Privacy Pass is the support for including metadata in the tokens. As this is a feature with high impact on the protocol, we devote a larger section to explain the benefits of supporting metadata in the face of hoarding attacks.
Future work: metadata
What is research without new challenges that arise? What does development look like if there are no other problems to solve? During the design and development of Privacy Pass (both as a service, as an idea, and as a protocol), a potential vector for abuse was noted, which will be referred to as a “hoarding” or “farming” attack. This attack consists of individual users or groups of users that can gather tokens over a long period of time and redeem them all at once with the aim of, for example, overwhelming a website and making the service unavailable for other users. In a more complex scenario, an attacker can build up a stock of tokens that they could then redistribute amongst other clients. This redistribution ability is possible as tokens are not linked to specific clients, which is a property of the Privacy Pass protocol.
There have been several proposed solutions to this attack. One can, for example, make the verification of tokens procedure very efficient, so attackers will need to hoard an even larger amount of tokens in order to overwhelm a service. But the problem is not only about making verification times faster, and, therefore, this does not completely solve the problem. Note that in Privacy Pass, a successful token redemption could be exchanged for a single-origin cookie. These cookies allow clients to avoid future challenges for a particular domain without using more tokens. In the case of a hoarding attack, an attacker could trade in their hoarded number of tokens for a number of cookies. An attacker can, then, mount a layer 7 DDoS attack with the “hoarded” cookies, which would render the service unavailable.
In the next sections, we will explore other different solutions to this attack.
A simple solution and its limitations: key rotation
What does “key rotation” mean in the context of Privacy Pass? In Privacy Pass, each token is attested by keys held by the service. These keys are further used to verify the honesty of a token presented by a client when trying to access a challenge-protected service. “Key rotation” means updating these keys with regard to a chosen epoch (meaning, for example, that every two weeks — the epoch —, the keys will be rotated). Regular key rotation, then, implies that tokens belong to these epochs and cannot be used outside them, which prevents stocks of tokens from being useful for longer than the epoch they belong to.
Keys, however, should not be rotated frequently as:
- Rotating a key can lead to security implications
- Establishing trust in a frequently-rotating key service can be a challenging problem
- The unlinkability of the client when using tokens can be diminished
Let’s explore these problems one by one now:
Rotating a key can lead to security implications, as past keys need to be deleted from secure storage locations and replaced with new ones. This process is prone to failure if done regularly, and can lead to potential key material leakage.
Establishing trust in a frequently-rotating key service can be a challenging problem, as keys will have to be verified by the needed parties each time they are regenerated. Keys need to be verified as it has to be attested that they belong to the entity one is trying to communicate with. If keys rotate too frequently, this verification procedure will have to happen frequently as well, so that an attacker will not be able to impersonate the honest entity with a “fake” public key.
The unlinkability of the client when using tokens can be diminished as a savvy attacker (a malicious server, for example) could link token generation and token future-use. In the case of a malicious server, it can, for example, rotate their keys too often to violate unlinkability or could pick a separate public key for each client issuance. In these cases, this attack can be solved by the usage of public mechanisms to record which server’s public keys are used; but this requires further infrastructure and coordination between actors. Other cases are not easily solvable by this “public verification”: if keys are rotated every minute, for example, and a client was the only one to visit a “privacy pass protected” site in that minute, then, it’s not hard to infer (to “link”) that the token came only from this specific client.
A novel solution: Metadata
A novel solution to this “hoarding” problem that does not require key rotation or further optimization of verification times is the addition of metadata. This approach was introduced in the paper “A Fast and Simple Partially Oblivious PRF, with Applications”, and it is called the “POPRF with metadata” construction. The idea is to add a metadata field to the token generation procedure in such a way that tokens are cryptographically linked to this added metadata. The added metadata can be, for example, a number that signals which epoch this token belongs to. The service, when presented with this token on verification, promptly checks that it corresponds to its internal epoch number (this epoch number can correspond to a period of time, a threshold of number of tokens issued, etc.). If it does not correspond, this token is expired and cannot be further used. Metadata, then, can be used to expire tokens without performing key rotations, thereby avoiding some issues outlined above.
Other kinds of metadata can be added to the Partially Oblivious PRF (PO-PRF) construction as well. Geographic location can be added, which signals that tokens can only be used in a specific region.
The limits of metadata
Note, nevertheless, that the addition of this “metadata” should be carefully considered as adding, in the case of “time-metadata”, an explicit time bound signal will diminish the unlikability set of the tokens. If an explicit time-bound signal is added (for example, the specific time — year, month, day, hour, minute and seconds — in which this token was generated and the amount of time it is valid for), it will allow a malicious server to link generation and usage. The recommendation is to use “opaque metadata”: metadata that is public to both client and service but that only the service knows its precise meaning. A server, for example, can set a counter that gets increased after a period of time (for example, every two weeks). The server will add this counter as metadata rather than the period of time. The client, in this case, publicly knows what this counter is but does not know to which period it refers to.
Geographic location metadata should be coarse as well: it should refer to a large geographical area, such as a continent, or political and economic union rather than an explicit location.
Wrap up
The Privacy Pass protocol provides users with a secure way for redeeming tokens. At Cloudflare, we use the protocol to reduce the number of CAPTCHAs improving the user experience while browsing websites. A natural evolution of the protocol is expected, ranging from its standardization to innovating with new capabilities that help to prevent abuse of the service.
On the service side, we refactored the Privacy Pass browser extension aiming to improve the quality of the code, so bugs can be detected in earlier phases of the development. The code is available at the challenge-bypass-extension repository, and we invite you to try the release candidate version.
An appealing extension for Privacy Pass is the inclusion of metadata as it provides a non-cumbersome way to solve hoarding attacks, while preserving the anonymity (in general, the privacy) of the protocol itself. Our paper provides you more information about the technical details behind this idea.
The application of the Privacy Pass protocol in other use cases or to create other service providers requires a certain degree of compatibility. People wanting to implement Privacy Pass must be able to have a standard specification, so implementations can interoperate. The efforts along these lines are centered on the Privacy Pass working group at IETF, a space open for anyone to participate in delineating the future of the protocol. Feel free to be part of these efforts too.
We are continuously working on new ways of improving our services and helping the Internet be a better and a more secure place. You can join us on this effort and can reach us at research.cloudflare.com. See you next time.
The History Guy Podcast: Nuclear Near Misses
Post Syndicated from The History Guy: History Deserves to Be Remembered original https://www.youtube.com/watch?v=brcsefZx1wI
Back to the future with Zabbix
Post Syndicated from TimSmit original https://blog.zabbix.com/back-to-the-future-with-zabbix/15701/
In this blog post, we would like to show you a new theme that might seem a little familiar to you. Let’s take a little nostalgic trip down memory lane and take a look at this special frontend theme for Zabbix 5.4 reminiscent of Zabbix 1.8.
How it looks
Although the old Zabbix 1.8 design understandably has an outdated look, the colors have a nice feel to them, especially the old shade of blue.
The Zabbix 5.4 design is up to date with current standards and has a modern look and feel to it. It is meant to be simplistic with a lot of white and barely any color except for the navigation bar and widgets like the problems and availability.
My theme combines the two. It is up to date with modern standards, and it has a trusted feel to it with the old color scheme. The old color scheme gives us a nostalgic look, which will hopefully bring some joy both to the veterans and newcomers to Zabbix!

How it works
The way I made this was fairly simple. I copied a css file from the styles folder, placed it in the same folder, and renamed it. I also put the image used to change the appearance into the same folder so it is easy to find.
blue-theme.css
dark-theme.css
hc-dark.css
hc-dark.css
oldisnew.css
table_head2.gif
To figure out which changes should be made, I had the Zabbix GUI open in a web browser with the element inspect function. in the css file I would find the same tag/name/class/etc as in the web browser and change it to look like the appearance of version 1.8.
.menu-main > li {
line-height: 16px; }
.menu-main > li.is-selected > a {
background: url(../styles/table_head2.gif) repeat-x top left;
border-left-color: #87d1ff;
color: #ffffff; }
.menu-main > li.is-expanded > a, .menu-main > li.is-expanded > a:focus {
border-left-color: transparent;
color: #ffffff; }
.menu-main > li:not(.is-expanded) .submenu {
max-height: 0 !important; }
.menu-main > li > a {
background:url(../styles/table_head2.gif) repeat-x top left;
color: #ffffff; }
For example here is where I changed the background of the dropdowns from the side menu into the image from Zabbix 1.8 which gives the menu an appealing new look.
For the theme to show up in the User settings it uses an add-on for the APP.php.
class APP extends ZBase {
   public static function getThemes() {
   return array_merge(parent::getThemes(),
   ['oldisnew' => _('Old is New')]);
}
}
The add-on is included in our Github Repository, you can copy and paste it into the APP.php file.
I hope you like the theme. It is available for download at the Opensource ICT Solutions Github. Just follow the link below:
https://github.com/OpensourceICTSolutions/zabbix-5-old-version-1_8-theme .
The Github contains an up-to-date Readme for installation, but, here is a short explanation on how to install it:
1. Navigate to the link above.
2. Download the three files: (oldisnew.css),(tablehead2.gif) and (APP_add_on.text).
3. On your Zabbix server CLI there should be a directory called /usr/share/zabbix/assets/styles/. Put the (oldsinew.css) and (tablehead2.gif) files here.
4. For (APP_add_on.txt) add the text to the APP.php located at the directory /usr/share/zabbix/include/classes/core/ inside of (class APP extends ZBase). (this allows you to actually see the theme inside of the dropdown.)
5. Now, at the Zabbix GUI navigate to Profile under User settings and change the theme.
6. Enjoy your new theme!
Разследване на Валя Ахчиева: Пазителката на гората и злодеите
Post Syndicated from Екип на Биволъ original https://bivol.bg/%D0%BF%D0%B0%D0%B7%D0%B8%D1%82%D0%B5%D0%BB%D0%BA%D0%B0%D1%82%D0%B0-%D0%BD%D0%B0-%D0%B3%D0%BE%D1%80%D0%B0%D1%82%D0%B0-%D0%B8-%D0%B7%D0%BB%D0%BE%D0%B4%D0%B5%D0%B8%D1%82%D0%B5.html
вторник 12 октомври 2021

През последните няколко години, една схема се е развихрила, вместо да бъде ликвидирана. Дървесината от незаконна сеч в горите се узаконява с помощта на една горска Наредба, както и със…
Comic for 2021.10.12
Post Syndicated from Explosm.net original http://explosm.net/comics/6000/
New Cyanide and Happiness Comic
Implement a slowly changing dimension in Amazon Redshift
Post Syndicated from Milind Oke original https://aws.amazon.com/blogs/big-data/implement-a-slowly-changing-dimension-in-amazon-redshift/
Amazon Redshift is a fully managed, petabyte-scale data warehouse service in the cloud. A star schema is a database organization structure optimized for use in a data warehouse. In a star schema, a dimension is a structure that categorizes the facts and measures in order to enable you to answer business questions. The attributes (or columns) of the dimension table provide the business meaning to the measures of the fact table. Rows in a dimension table are identified using a unique identifier like a customer identification key, and the fact table’s rows have a referential key pointing to the dimension table’s primary key. Dimension and fact tables are joined using the dimension table’s primary key and the fact table’s foreign key.
Over time, the attributes of a given row in a dimension table may change. For example, the shipping address for a customer may change. This phenomenon is called a slowly changing dimension (SCD). For historical reporting purposes, it may be necessary to keep a record of the fact that the customer has a change in address. The range of options for dealing with this involves SCD management methodologies referred to as type 1 to type 7. Type 0 is when no changes are allowed to the dimension, for example a date dimension that doesn’t change. The most common types are 1, 2 and 3:
- Type 1 (No history) – The dimension table reflects the latest version; no history is maintained
- Type 2 (Maintain history) – All changes are recorded and versions are tracked with dates and flags
- Type 3 (Previous value) – The [latest – 1] value for specific columns in maintained as a separate attribute
Prerequisites
For this walkthrough, you should have the following prerequisites:
- An AWS account
- An Amazon Redshift cluster
Overview of solution
This post walks you through the process of implementing SCDs on an Amazon Redshift cluster. We go through the best practices and anti-patterns. To demonstrate this, we use the customer table from the TPC-DS benchmark dataset. We show how to create a type 2 dimension table by adding slowly changing tracking columns, and we go over the extract, transform, and load (ETL) merge technique, demonstrating the SCD process.
The following figure is the process flow diagram.
The following diagram shows how a regular dimensional table is converted to a type 2 dimension table.

Implement slowly changing dimensions
To get started, we use one of two AWS CloudFormation templates from Amazon Redshift Labs:
- lab2.yaml – Loads TPC data into an existing cluster
- lab2_cluster.yaml – Creates a new cluster and loads TPC data
In this post, we only show the important SQL statements; the complete SQL code is available in scd2_sample_customer_dim.sql.
The first step to implement SCD for a given dimension table is to create the dimension table with SCD tracking attributes. For example, record effective date, record end date, and active record indicator are typically added to track if a record is active or not. These fields are collectively referenced as the SCD fields (as shown in the following code) going forward in this post.
These SCD fields are added so that when a field is changed, for example, a customer’s address, the existing record in the dimension table is updated to indicate that the record isn’t active and a new record is inserted with an active flag. This way, every change to an SCD field is stored in the table and business users can run queries to see historical performance of a dimension for a given change that is being tracked.
We also introduce the following:
- Record hash value to easily track if the customer data fields have changed their values. This hash column is computed over all the customer fields. This single hash column is compared instead of comparing multiple individual columns to determine if the data has changed.
- Record insert and update timestamps to capture when the actual dimension row was added to the table and updated.
The following code shows the SCD fields added to the dimension table:
Next, we perform the initial load to the dimension table. Because this is the first time that the dimension records are loaded, the SCD tracking attributes are set to active. For example, record start date is set to a low date, like 1900-01-01, or to a business date value to reflect when a particular change became effective. The record end date is set to a high date, like 2999-12-31, and active record indicator is set 1, indicating these rows are active.
After the initial load is complete, we create a staging table to load the incremental changes that come from the source system. This table acts as temporary holding place for incoming records. To identify if a change has occurred or not for a given record, we left outer join the customer staging table to the customer dimension table on the customer primary key (c_cust_key). We use left outer join because we want to flag matching records for the update process and unmatched records for the insert process. Left outer joining the staging table to the customer table projects both matched and unmatched rows. Matched rows are treated as updates and unmatched rows are treated as inserts.
In our data warehouse system, let’s assume we have to meet the following criteria:
- Track changes on the address and phone fields only—type 2 with start and end timestamps
- Other attributes are required to be kept up to date without creating history records—type 1
- The source system provides incremental delta change records
If your source systems can’t provide delta change records and instead provides full load every time, then the data warehouse needs to have logic to identify the changed records. For such a workload, we build a second, uniquely identifiable value by using a built-in Amazon Redshift hash function on all the dimension columns to identify the changed rows.
The customer address and phone are being tracked as slowly changing dimensions. We use FNV_HASH to generate a 64-bit signed integer that accommodates 18.4 quintillion unique values. For smaller dimension tables, we can also use CHECKSUM to generate a 32-bit signed integer that accommodates 4.4 billion unique values.
We determine if the dimension row is a new record by using new_ind, or if the dimension row is changed by comparing the record hash and using track_ind for the change indicator.
Changes are identified by joining the staging table and target table on the primary key. See the following code:
For rows that aren’t matched (for example, completely new records such as new_ind = 1), the rows are inserted into the dimensional table with SCD tracking attributes set as new and an active record flag indicating Active = 1.
For matched records, two possibilities could happen:
- SCD type 2 field has changed – For this category, we use a two-step process to retain the previous version of the customer record and also record the latest version of the customer record for type 2 fields in our data warehouse. This satisfies our first business requirement. The steps are as follows:
- Step 1 – Update the existing record in the target customer dimension table as inactive by setting the record end date to the current timestamp and active record indicator to 0.
- Step 2 – Insert the new rows from the customer staging table into the customer target table with the record start date set to the current timestamp, record end date set to a high date, and the record active flag set to 1.
- SCD type 1 field has changed – For this category, the row in the customer target table is updated directly with the latest rows from staging table. While doing so, we don’t update any SCD tracking date fields or flags. With this step, we retain only the latest version of the record for type 1 fields in our data warehouse. This satisfies our second business requirement.
Apply changes to the dimension table with the following code:
Best practices
The Amazon Redshift cloud data warehouse can process a large number of updates efficiently. To achieve this, have a staging table that shares the same table definition as your target dimension table. Then, as shown in the earlier code snippet, you can join the staging and the target dimension tables and perform the update and insert in a transaction block. This operation performs bulk updates and inserts on the target table, yielding good performance.
The Amazon Redshift shared nothing architecture typically performs at its peak when operations can be run by each node independently with minimal data movement between nodes. The target customer dimension table and the intermediate staging table created with matched distribution keys provide the best performance because all operations can be completed within the node.
Anti-patterns
You can also approach this method by comparing dimension records in a row-by-row fashion using cursors and then updating or inserting a particular row on the target table. Although this method works on smaller tables, for larger tables, it’s advised to use the bulk operations method explained in this post.
Clean up
To avoid incurring future charges, you can delete all the resources created by the CloudFormation template by deleting the CloudFormation stack.
Conclusion
In this post, you learned about slowly changing dimensions, implementing SCDs on Amazon Redshift, best practices for running the ETL operations against the target table by using intermediate staging tables, and finally anti-patterns to avoid.
Refer to Amazon Redshift data loading best practices for further materials and additional best practices, and see Updating and inserting new data for instructions to implement updates and inserts.
About the Authors
 Milind Oke is a Data Warehouse Specialist Solutions Architect based out of New York. He has been building data warehouse solutions for over 15 years and specializes in Amazon Redshift. He is focused on helping customers design and build enterprise-scale well-architected analytics and decision support platforms.
 Bhanu Pittampally is an Analytics Specialist Solutions Architect based out of Dallas. He specializes in building analytical solutions. His background is in data warehouses—architecture, development, and administration. He has been in the data and analytical field for over 13 years.
Announcing the Crosstalk / ClearlyIP PBX Training Course – Nov 8th-11th, 2021
Post Syndicated from Crosstalk Solutions original https://www.youtube.com/watch?v=w38IkYSn9iE
ТОЙ се върна на бяла камила
Post Syndicated from original https://bivol.bg/%D1%82%D0%BE%D0%B9-%D1%81%D0%B5-%D0%B2%D1%8A%D1%80%D0%BD%D0%B0-%D0%BD%D0%B0-%D0%B1%D1%8F%D0%BB%D0%B0-%D0%BA%D0%B0%D0%BC%D0%B8%D0%BB%D0%B0.html
понеделник 11 октомври 2021

Не знам за вас, но лично аз съм изненадан от издигането на Делян Славчев Пеевски за водач на депутатската листа на ДПС за Велико Търново. Не съм изненадан, че е…
Analyst Firm Validates B2 Cloud Storage Platform’s Time and Budget Savings
Post Syndicated from Jeremy Milk original https://www.backblaze.com/blog/analyst-firm-validates-b2-cloud-storage-platforms-time-and-budget-savings/
92% time savings. 71% storage cost savings. 3.7 times lower total cost than the competition.
These are just some of the findings Enterprise Strategy Group (ESG) reported in a proprietary, economic validation analysis of Backblaze B2 Cloud Storage. To develop these findings, the ESG analysts did their proverbial research. They talked to customers. They validated use cases. They used our product and verified the accuracy of our listed pricing and cost calculator. And then, they took those results along with the knowledge they’ve gathered over 20 years of experience to quantify the bonafide benefits that organizations can expect by using the Backblaze B2 Cloud Storage platform.
Their findings are now available to the public in the new ESG Economic Validation report, “Analyzing the Economic Benefits of the Backblaze B2 Cloud Storage Platform.”
ESG’s models predicted that the Backblaze B2 Cloud Storage platform will give users an expected total cost of cloud storage that is 3.7 times lower than alternative cloud storage providers, including:
Predicted savings of up to:
- 92% less time to manage data.
- 72% lower cost of storage.
- 91% lower cost of downloads and transactions.
- 89% lower cost of migration.
If you don’t have time to read the full report, the infographic below illustrates the key findings. Click on the image to see it in full size.

If you want to share this infographic on your site, copy the code below and paste into a Custom HTML block.
<div><div><strong>Analyst Firm Validates B2 Cloud Storage Platform’s Time and Budget Savings</strong></div><a href="https://www.backblaze.com/blog/analyst-firm-validates-b2-cloud-storage-platforms-time-and-budget-savings/"><img src="https://www.backblaze.com/blog/wp-content/uploads/2021/10/ESG-Infographic-scaled.jpg" border="0" alt="The Economic Value of Backblaze B2 Cloud Storage" title="The Economic Value of Backblaze B2 Cloud Storage" /></a></div>The findings cut through the marketing noise to announce that by choosing Backblaze B2, customers benefit in both time and cost savings, and you don’t have to take it from us.
If that sounds like something you’d appreciate from a cloud partner, getting started couldn’t be easier. Sign up today to begin using Backblaze B2—your first 10GB are free.
If you’re already a B2 Cloud Storage customer—first, thank you! You can feel even more confident in your choice to work with Backblaze. Have a colleague or contact who you think would benefit from working with Backblaze, too? Feel free to share the report with your network.
The post Analyst Firm Validates B2 Cloud Storage Platform’s Time and Budget Savings appeared first on Backblaze Blog | Cloud Storage & Cloud Backup.