Post Syndicated from Crosstalk Solutions original https://www.youtube.com/watch?v=Jj7PdegP1E8
Отечество любезно, аз ще те спася!
Post Syndicated from Емилия Милчева original https://www.toest.bg/otechestvo-lyubezno-az-shte-te-spasya/

Отечеството е в опасност и аз идвам да го спася. Това е поантата в обръщението към нацията на 19 януари, с което Румен Радев прекрати предсрочно президентския си мандат и сложи край на залаганията кога ще слезе да се бие като равен с партиите.
Предстои ни битката за бъдещето на Отечеството и вярвам, че ще я водим заедно с всички вас – достойните, вдъхновените и непримиримите.
След девет години той напуска „Дондуков“ 2 със слогана си „Готови сме, можем и ще успеем!“, а мандата ще довърши Илияна Йотова, негова вицепрезидентка, за която се предполага и че ще бъде в предизборна кампания за поста. Кандидатурата ѝ все още не е официално обявена, нито е публично известно кои политически сили ще застанат зад нея.
След седем служебни правителства, пет от които с кадри, избирани от Радев и съветниците му, има видими резултати за „моженето“: назначенията в службите и попълването на квотите от президентски назначения. Неизгодният контракт с турската компания „Боташ“ не може да бъде предоговорен, но политическата отговорност остава. Като политик Радев ще се бори за парламентарно представителство и изпълнителна власт. Получи ли ги, договорът ще е негова грижа. Ако смята, че е полезен, нека намери място на бившия си енергиен министър Румен Христов в листите.
Крачка назад за Румен Радев
Според Емилия Милчева следва да очакваме оттук нататък президентът Румен Радев да направи крачка назад и да мине на втори план, отстъпвайки светлините на прожекторите на новото редовно правителство.
 Емилия Милчева
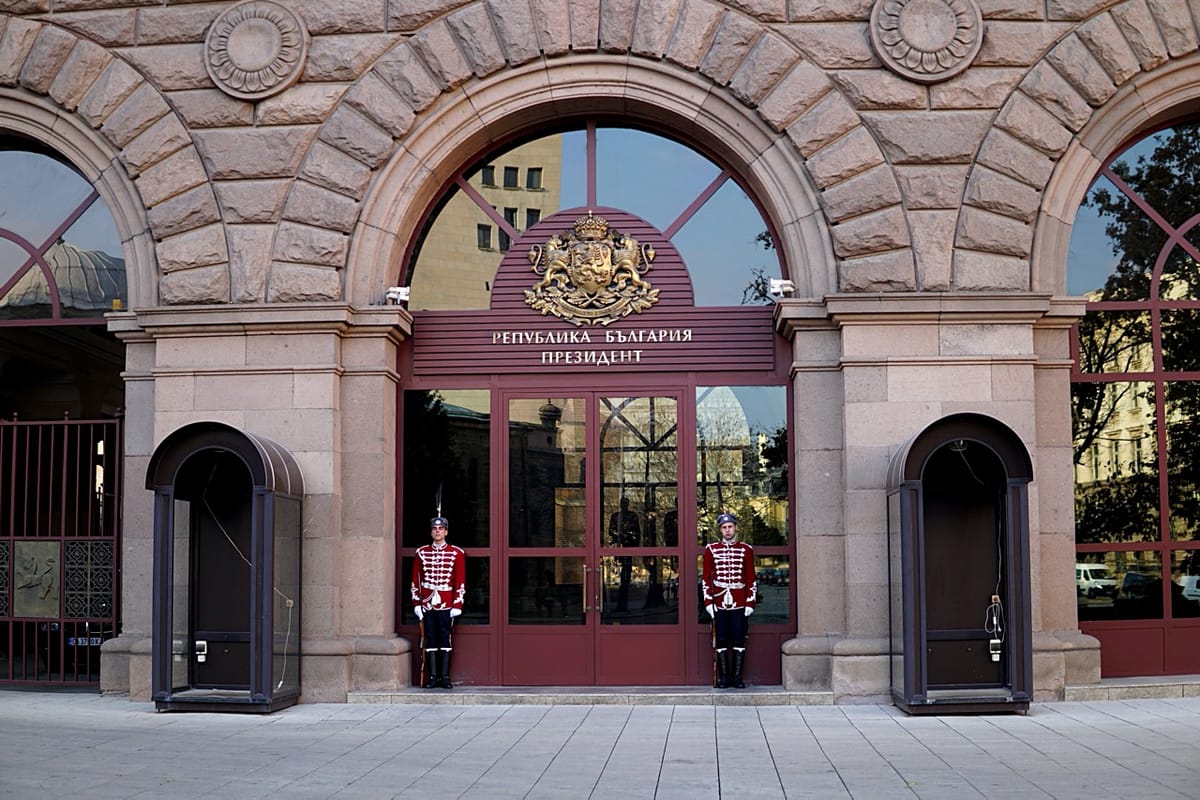
Патриотично вричане по вазовски
С последната си президентска реч Радев постъпи като Симеон Сакскобургготски – маскира личните си политически амбиции като морална необходимост. „Отечеството“ не се управлява, а се пази. Не че иска власт, дългът го зове. Влиза в политиката, защото е мисия, а не цел. Точно това се опитваха да внушат неговите говорители и оракули, докато обработваха обществото с „Кой, ако не той!?“.
От няколко месеца Радев отново беше назоваван „Генерала“, военния, за когото дългът е над всичко и не може повече да търпи беззаконието, корупцията и извършеното от политиците „в компромиси с олигархията“.
Радев се обърна към разочарованите аполитични избиратели, към онези, които имат ниско доверие в институциите и търсят силна фигура, а не програма. Той говори като призван водач с мисия, не като политик, който напролет ще се бори за 52-рия парламент.
„Отечество“ е обединителна дума за хора без идеологическа самоидентификация – това е, като да рецитираш Вазов. Повечето от тези хора не очакват платформа и приоритети, те искат Спасител и ще си го получат.
Политолози и социолози са единодушни, че избирателната активност ще се повиши (дали ще стигне 3 милиона?), а някои партии ще се изпразнят от избиратели. Към Радевия политически проект ще прииждат от БСП, „Величие“ и МЕЧ, както и разочаровани от „Възраждане“. Обезкървяването откъм електорат ще остави някои от тях извън бъдещия парламент. Четири формации от коалиционните партньори на БСП вече напуснаха обединената левица.
Тежко̀ им на позитанци! Имат незначителни шансове да прехвърлят четирите процента, ако съумеят да изберат нов лидер на конгреса си през февруари и инстинктите им за самосъхранение заработят.
Някои, като бившия председател на БСП Михаил Миков, са още по-крайни:
Проектът на Румен Радев може да приключи 130-годишната история на БСП.
До момента партийното зачатие на Радев е приветствано като „възможен съюзник“ от МЕЧ, БЗНС „Александър Стамболийски“, а „Величие“ пожела и мъдри решения. Бившият хазартен бос Васил Божков, част от списъка с българи, санкционирани по „Магнитски“, ще гласува за него като „единствената алтернатива“, отбелязвайки с пост: „Достоен Президент. Крайно време беше. Успех.“
По подобен начин го описа и руската държавна агенция ТАСС, която, позовавайки се на анонимни експерти, съобщи, че „едва ли не е единствената възможност за изход на страната от кризата“.
Но нищо не може да се сравни с изблика на някогашния почетен председател на ДПС Ахмед Доган, очевидно оценил жеста на Радев да връчи на малката му парламентарна група третия проучвателен мандат.
Поздравления, г-н Президент! Само Вие сте решаващият фактор за образуването на антимафиотски фронт срещу превзетата ни държава! Ние, от Алианс за права и свободи, сме безрезервно с Вас! Предстои ни много работа. Но с общи усилия, координация и заедност можем да мобилизираме всички поколения за демонтирането на „дълбоката държава“ и да зададем рестарт на демокрацията.
Ако един от бащите на „дълбоката държава“ ще участва в рестарта на демокрацията, процесът е обречен. А под юмрука на един о.з. генерал, профилиран от путинския режим, трудно може да се роди повече демокрация.
Но Доган и Радев не са си чужди, освен че ДПС го подкрепи с гласове на президентските избори за първия мандат, а частично и за втория – макар и не официално. И двамата са близки с бившия вицепрезидент на „Мултигруп“ и собственик на „Минстрой холдинг“ Николай Вълканов. През ноември 2022 г. с президентски указ той получи най-високото държавно отличие – орден „Стара планина“. Негова фирма плати през 2008 г. хонорара от 1,5 млн. лв. на Доган за консултантски услуги по хидроенергийния проект „Цанков камък“.
Кои други бизнесмени са зад Радев, освен разкрилите се досега? Националотговорни капиталисти. По всяка вероятност братя Бобокови, единият от които беше задвижил с няколко есемеса самото Президентство, Георги Гергов, оръжейният търговец Емилиян Гебрев. Преди време имаше спекулации и за Петър Манджуков, Валентин Златев и др.
Български националотговорни капиталисти
„Когато през 90-те години на миналия век мутрите с бухалките принуждаваха малките току-що създадени бизнеси да им плащат – или „закриваха“ други, държавата я нямаше. Две-три десетилетия по-късно…
 Емилия Милчева

Обикновено политиците избягват въпросите за голямото финансиране. За предстоящата предизборна кампания Радев обаче не може да се измъкне с обяснения за множество малки дарения от симпатизанти – нужна е по-правдоподобна версия.
За всеки по нещо
Докато не се е позиционирал, бившият президент предлага бонбонче за всеки. За проевропейските партии – обществен консенсус срещу мафията; за евроскептиците – отхвърления референдум за еврото; за русофилите и антинатовците – че „някои политици поставят на карта мирния живот на българите в условията на опасна война“ наблизо; за Gen Z – бъдеще в България. Консерватор и православен е като ГЕРБ, не така радикален в проруските си тези като „Възраждане“, но като всички тях, че и като БСП – противник на „джендъризма“. С този местен жаргон са обозначени либерални ценности, като защита на правата на ЛГБТИ хората.
Тоест всеки може да открие в посланията на Радев свое основание за подкрепа. Някои наричат това „центризъм“. В интервю за „Сега“ журналистът и анализатор Петко Георгиев казва, че „Боташ“, „Южен поток“ и „Турски поток“ „слагат Бойко Борисов, Делян Пеевски и Румен Радев логично в един и същи пакет“:
… представители или проводници на един и същи тип геополитически и икономически интереси. И затова за мен е абсолютно парадоксално, че това лице [Румен Радев – б.а.] се опитва да се представи сега като борец срещу модела.
Две са червените линии за бъдещия партиен проект, на който от месеци се предрича ефектът на Халеева комета:
- какъв Европейски съюз отстоява;
- какви възгледи за съдебната реформа има (защото Радев така и не представи обещания в първия си мандат проект за конституционни промени).
Повече лоялност към Тръмп или по-силен ЕС, защото в момента традиционното за българската политика „приклякване“ не е възможно? Радев се измъкна от Президентството, преди да отговори на този въпрос. Оказа се, че Тръмп му е изпратил покана България да се включи в изобретения от него Съвет за мир и това е станало, преди държавният глава да обяви оттеглянето си.
Допреди седмица въпросният формат включваше само рамка за развитие на палестинската територия Газа и беше част от плана за примирие между Израел и „Хамас“, който управлява Газа. Но амбицията е да се заеме и с други конфликти.
За мен е огромна чест да Ви поканя като президент на Република България да се присъедините към мен в исторически критично и невероятно усилие да затвърдим мира в Близкия изток и същевременно да предприемем смел нов подход към разрешаването на глобалните конфликти!
България е в менюто
България се оказа в менюто, което американският президент си поръча за участие в Съвета за мир – формат, определен от Τhe Conversation като „частно ООН с един-единствен акционер“ – самия Тръмп.
Форумът в Давос, на който президентът на САЩ обяви инициативата си, ще се запомни с речта на министър-председателя на Канада Марк Карни.
Средните сили трябва да действат заедно, защото, ако не сте на масата, вие сте в менюто. Великите сили могат да си позволят да действат сами. Те имат размера на пазара, военния капацитет и лостовете да диктуват условия. Средните сили – не. Но когато преговаряме само двустранно с хегемон, ние преговаряме от позиция на слабост. Приемаме това, което ни се предлага. Състезаваме се помежду си кой ще бъде по-отстъпчив. Това не е суверенитет. Това е инсценировка на суверенитет, докато се приема подчинение.
Унгарският премиер Виктор Орбан, близък с Тръмп и поддръжник на руския президент Путин, и българският министър-председател в оставка Росен Желязков единствени от ЕС приеха поканата, заставайки редом до петролни шейхове, автократи от бившите съветски републики, лидери от Латинска Америка и Азия. Европа бойкотира инициативата, Китай отказа, Русия обмисля.
Българското правителство в оставка тайно е взело решението за включване, без медийно огласяване, без точка в публикувания дневен ред на заседанието на Министерския съвет, след което Желязков и външният министър Георг Георгиев заминаха за Давос. В рамките на 24 часа Георгиев промени позицията си на 180 градуса. Преди да бъде взето решението, той заяви публично, че „българските граждани имат право да знаят къде се намира страната ни, какви позиции защитава, каква политика провежда и към кое ценностно и цивилизационно пространство принадлежи“.
Правителството на Република България, ръководено от министър-председателя Росен Желязков, последователно и отговорно ще продължи да изпълнява своите ангажименти в рамките на конституционния си мандат, отстоявайки европейската идентичност на България, принадлежността ѝ към ЕС, както и ролята ѝ на надежден партньор в трансатлантическото пространство и съюзник в НАТО.
В Давос обаче Георгиев заговори за мира и сигурността в Близкия изток като „предпоставка за сигурността и безопасността в Европа“, нямаше и помен за европейска идентичност и цитираше Тръмп.
Единствено ПП–ДБ от парламентарно представените политически сили определиха като опасно и нелегитимно вкарването на България в Съвета за мир. Съпредседателят на „Да, България“, част от коалицията ДБ, Божидар Божанов, коментира, че мястото на страната ни е в сърцето на Европа.
Това не е просто едно решение, това е пробив срещу общата политика на ЕС. Това, че България се превръща в троянски кон и застава заедно с Орбан – единствения представител на европейска държава там, е много тревожно. България не бива да има място там, особено преди това да бъде обсъдено и да бъде взета обща позиция на ЕС.
А тя вече е факт – Европа продължава сама. „Знаем, че трябва да работим като независима Европа“, заяви председателката на Еврокомисията Урсула фон дер Лайен след над 4-часовото заседание на европейските лидери. „Няма връщане назад“, беше тяхното послание.
България сателит на Тръмп ли остава, или част от Общността? Този въпрос е не само към управляващите в оставка, но и към всички останали политически сили.

По чие нареждане Желязков присъедини България? Лидерът на ГЕРБ Борисов мълчи, докато олигархът и санкциониран за корупция от САЩ и Великобритания Делян Пеевски призова преди два дни поканата да се внесе за обсъждане в парламента. След подписаното от премиера споразумение в Давос обаче за парламента остава само да ратифицира присъединяването към частен клуб, в който еднолично председателят му Тръмп ще решава, изключва и налага вето. Но ако мнозинството се пропука, както се получи с промените в Изборния закон, може и да не се случи.
Орбан има своите основания да е там. САЩ разреши на унгарската компания MOL, близка до Орбан, да купи дела от 56,2% на „Газпром“ в Naftna Industrija Srbije, която попадна под санкции на САЩ през октомври. По-рано Тръмп освободи от санкции по глобалния закон „Магнитски“ един от най-приближените до Орбан – Антал Роган, шеф на кабинета му. Впрочем MOL има апетити и към българската рафинерия на „Лукойл“, което обяснява честите визити на унгарския външен министър Сиярто в България и срещите му с президента Радев.
На 12 април обаче Орбан може да изгуби изборите, тъй като опозиционната партия ТИСА на бившия му съпартиец Петер Мадяр има преднина от 9% пред ФИДЕС. Придобитото остава.
Какви са основанията на Желязков?
Официалните: прави го заради отпадането на американските визи за България, дерогацията за „Лукойл“, която съвсем не беше неочаквана, и някакво имагинерно участие на български фирми във възстановяването на Газа. (Нали Николай Младенов е назначен за върховен представител на Съвета за мир за Газа…)
Предположенията обаче са, че зад този ход стои неистовото желание на един олигарх като Пеевски да се освободи от санкциите по „Магнитски“ в последните дни на управление, в което доминира.
Къде ще са в следващото управление днешните играчи на политическата сцена, зависи от пренареждането, което ще донесат пролетните избори. Там ще има много защитници на „Отечеството“. Най-трудното е да се разбере кой е за европейска България в независима Европа.
Тоест разговаряме – епизод 6
Post Syndicated from Владислав Севов original https://www.toest.bg/toest-razgovaryame-epizod-6/

В шестия епизод на „Тоест разговаряме“ се срещнахме с Йоанна Елми – писателка и журналистка, позната на читателите на „Тоест“ отдавна, а в последните месеци – и като автор на бюлетина „Гласовете на Америка“.
Тръгнахме от личния ѝ път: Америка на сезонния труд и първи сблъсък с общество, което обещава свобода, но често оставя човека сам. Йоанна предложи интересен обзор как доскоро Европа бе оформяна в постоянен диалог със САЩ и как този опит създава усещане, че знаем много за Америка – но тя всъщност е екзотична територия, за която ни трябва повече контекст.
Говорихме за поляризацията, за паралелните медийни вселени, за културните конфликти и за това какво всъщност се разпада днес – митовете, институциите или социалният договор. Разгледахме „американската мечта“ не като лозунг, а като напрежение между обещанието за свобода и цената на тази свобода. Говорихме как мечтата работи като митология, която привлича, но и заслепява.
Разговаряхме още за империите, за литературата като радар за бъдещето и за нуждата да се вглеждаме в принципи, а не само в личности.
Гледайте целия разговор в нашия YouTube канал:
Може да го чуете и като аудиозапис в SoundCloud:
На живо включихме и въпроси от публиката, но времето ни беше ограничено и не успяхме да обхванем всички. Помолих Йоанна да отговори тук на още един въпрос на зрител:
Защо няма почти никаква реална съпротива в САЩ от страна на Демократическата партия, при положение че всеки ден се случва нещо ново, което в миналото е водило до крайни мерки срещу държащите властта (Никсън – „Уотъргейт“, Картър – фермата за фъстъци…)?
Не знам дали съпротива няма, доколкото тази съпротива е неефективна спрямо проблемите, срещу които се бори. В същината си те не са идеологически, а системни: неравенства, концентрация на богатство, липса на добра регулация в обществена полза на услуги от съществено значение, например здравните застраховки. Тези проблеми в комбинация с безпрецедентно присъствие на парите в политиката след решението на Върховния съд през 2010 г., определило парите като „свобода на словото“ и създало система, в която корпоративните интереси могат безпрепятствено да си купуват политически гръб, създават една сложна политическа система.
Това е система, в която основните политически разлики са идеологически, а не съществени; с това не искам да кажа, че „всички са маскари“, но че за много малка част от съвременния политически елит – силно професионален, елитарен, наследник на поколенческа династична власт в немалко случаи и най-вече застаряващ – де факто няма инициатива за съществени промени, които действително да разклатят системата: промени в състава на Върховния съд, забрана за политиците да търгуват на борсата, изграждане на нови корупционни механизми, изграждане на по-добри търговски и антимонополни регулации, изграждане на ефективни механизми, за да ограничават купуването на политика, която често се прави с цел печалба, а не обществено добро.
Това също не са нови проблеми и напрежения, но в настоящето добиват безпрецедентен мащаб: според някои данни концентрацията на богатство днес надминава т.нар. Gilded Age, „Позлатената епоха“ по Марк Твен. Поради комфорта, който системата създава за онези, които извличат най-голяма полза от нея – сред тях и политиците, – няма желание за изконни, дълбоки реформи. Затова и политиката се свежда до спор може ли да има „Родител 1“ или „Родител 2“, или не.
Парадоксално е, че именно тези структурни дефицити допринесоха за издигането на Тръмп, който спечели като антисистемен кандидат, дошъл да разбие статуквото на парчета. Проблемът е, че Доналд Тръмп цели разбиването на статуквото не в името на колективното добро, а на собственото си (и това на съюзниците си) облагодетелстване. Другият проблем, разбира се, е, че повечето революционери вярват, че Земята е плоска, а откъде изгрява слънцето, е въпрос на мнение или на това, което дават по „Фокс Нюз“.
Така новата американска революция започва в патова ситуация: опозицията е слаба, немощна и зависима от същата система, която е пред разпад; силните на деня използват сривовете в системата, за да я обявят за мъртва и да извлекат максимална полза от нея.
Надеждата остава някъде в астрологията – астролозите казват, че Плутон се завръща в знака на Водолей за пръв път от революцията през 1776 г. Някъде там се завръщат и други, по-надеждни показатели, като коефициентите за неравенства. Ясно е, че така не може да се продължава. Въпросът какво предстои зависи и до голяма степен от това дали Демократическата партия ще има силите да се реформира. Личната ми прогноза е, че и двете партии ще претърпят колапс в идните две десетилетия – това вече се е случвало в историята на САЩ. Какво ще се роди от пепелта им, зависи от избирателите. И от кризите, които ще създадат – и които на свой ред ще ги оформят.
Преди срещата ви помолихме да отговорите на кратката ни анкета. Ето и резултатите от нея:
Американската мечта е в миналото.
Йоанна Елми е писателка и журналистка, част от екипа на „Тоест“ от 2019 г., където е писала публицистични и журналистически текстове по теми като европейските избори, демокрацията и гражданското образование, човешките права, историята, дезинформацията и манипулативното съдържание, а от 2024 г. води рубриката „Гласовете на Америка“, посветена на САЩ.
Завършила е международни отношения и английска филология в Новата Сорбона в Париж, както и магистратура по журналистика и комуникации в Амстердамския университет. Прекарва много години в САЩ, а в момента разделя времето си между София и Филаделфия. Авторка на романа „Направени от вина“, в който разказва модерната история на България и Америка през очите на три поколения жени. Романът се превежда и издава на над 15 езика.
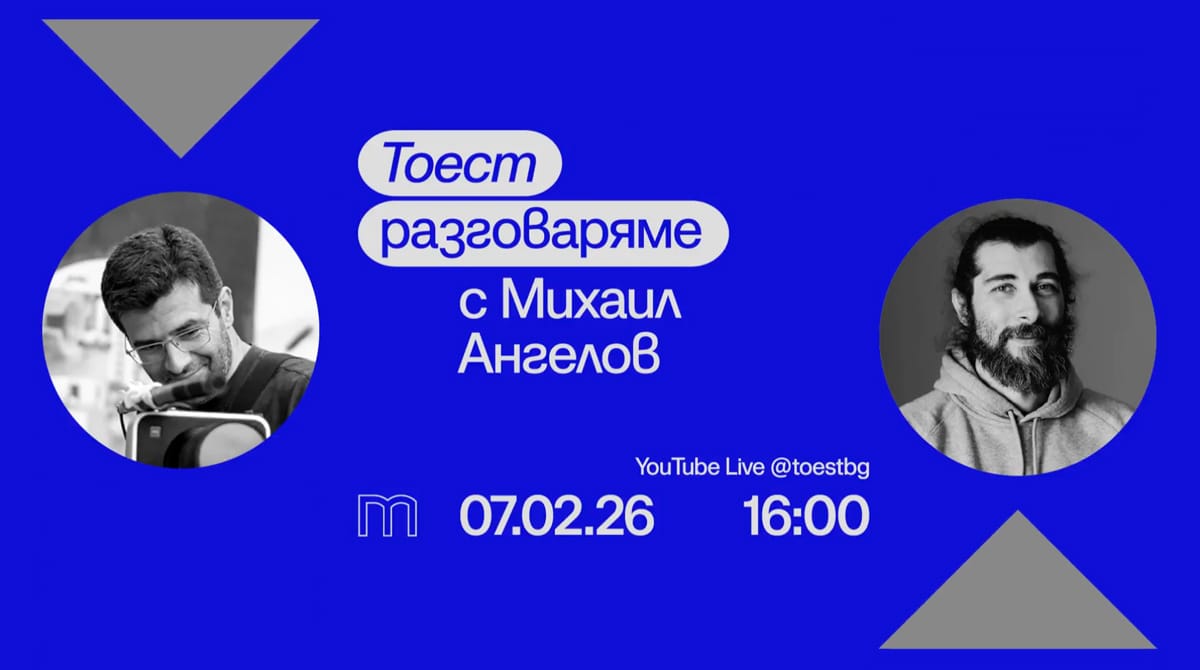
Следващата среща на „Тоест разговаряме“ ще бъде с Михаил Ангелов – биолог, агроном и водещ на рубриката „Научни новини“ в „Тоест“. Разговорът ще се излъчва на живо в YouTube Live на 7 февруари, събота, от 16:00 ч.
В „Тоест разговаряме“ всеки месец ви срещаме с автори, които познавате добре от анализите или от рубриките им в „Тоест“, но този път ще ги видите и чуете в по-личен и непосредствен формат. Във видеоразговорите, предавани на живо, активно участие имате и вие, нашата публика – със своите въпроси, коментари и включване в тематичната анкета. Водещ на поредицата е Владислав Севов, дългогодишен телевизионен журналист и съосновател на „Тоест“.

„Тоест разговаряме“ е поредица, подкрепена от Институт „Отворено общество – София“ и съфинансирана от Европейския съюз в рамките на проекта Media Resilience. Изразените възгледи и мнения са само и изцяло на техните автори и не отразяват непременно възгледите и мненията на Европейския съюз, на Европейската изпълнителна агенция за образование и култура (EACEA) или на Институт „Отворено общество – София“ (ИООС). Нито Европейският съюз, нито EACEA, нито ИООС могат да бъдат държани отговорни за тях.
[$] Filesystem medley: EROFS, NTFS, and XFS
Post Syndicated from corbet original https://lwn.net/Articles/1055062/
Filesystems seem to be one of those many areas where the problems are well
understood, but there is always somebody working toward a better solution.
As a result, filesystem development in the Linux kernel continues at a fast
pace even after all these years. In recent news, the EROFS filesystem is
on the path to gain a useful page-cache-sharing feature, there is a new
NTFS implementation on the horizon, and XFS may be about to get an
infrastructure for self healing.
GNU Guix 1.5.0 released
Post Syndicated from jzb original https://lwn.net/Articles/1055675/
Version
1.5.0 of the GNU Guix package manager and the Guix System have
been released. Notable improvements include the ability to run the
Guix daemon without root privileges, support for 64-bit RISC-V, and
experimental support for the GNU Hurd kernel.
The release comes with ISO-9660 installation images, virtual
machine images, and with tarballs to install the package manager on
top of your GNU/Linux distro, either from source or from
binaries—check out the download page. Guix users can update by running
guix pull.It’s been 3 years since the previous release. That’s a lot of time,
reflecting both the fact that, as a rolling release, users
continuously get new features and update by running guix pull; but it
also shows a lack of processes, something that we had to address
before another release could be made.During that time, Guix received about 71,338 commits by 744 people,
which include many new features.
LWN last looked at Guix in
February 2024.
Two new stable kernels for Friday
Post Syndicated from jzb original https://lwn.net/Articles/1055672/
Greg Kroah-Hartman has released the 6.18.7 and 6.12.67 stable kernels. As always, each
contains important fixes throughout the tree. Users are advised to
upgrade.
Route leak incident on January 22, 2026
Post Syndicated from Bryton Herdes original https://blog.cloudflare.com/route-leak-incident-january-22-2026/
On January 22, 2026, an automated routing policy configuration error caused us to leak some Border Gateway Protocol (BGP) prefixes unintentionally from a router at our data center in Miami, Florida. While the route leak caused some impact to Cloudflare customers, multiple external parties were also affected because their traffic was accidentally funnelled through our Miami data center location.
The route leak lasted 25 minutes, causing congestion on some of our backbone infrastructure in Miami, elevated loss for some Cloudflare customer traffic, and higher latency for traffic across these links. Additionally, some traffic was discarded by firewall filters on our routers that are designed to only accept traffic for Cloudflare services and our customers.
While we’ve written about route leaks before, we rarely find ourselves causing them. This route leak was the result of an accidental misconfiguration on a router in Cloudflare’s network, and only affected IPv6 traffic. We sincerely apologize to the users, customers, and networks we impacted yesterday as a result of this BGP route leak.
We have written multiple times about BGP route leaks, and we even record route leak events on Cloudflare Radar for anyone to view and learn from. To get a fuller understanding of what route leaks are, you can refer to this detailed background section, or refer to the formal definition within RFC7908.
Essentially, a route leak occurs when a network tells the broader Internet to send it traffic that it’s not supposed to forward. Technically, a route leak occurs when a network, or Autonomous System (AS), appears unexpectedly in an AS path. An AS path is what BGP uses to determine the path across the Internet to a final destination. An example of an anomalous AS path indicative of a route leak would be finding a network sending routes received from a peer to a provider.
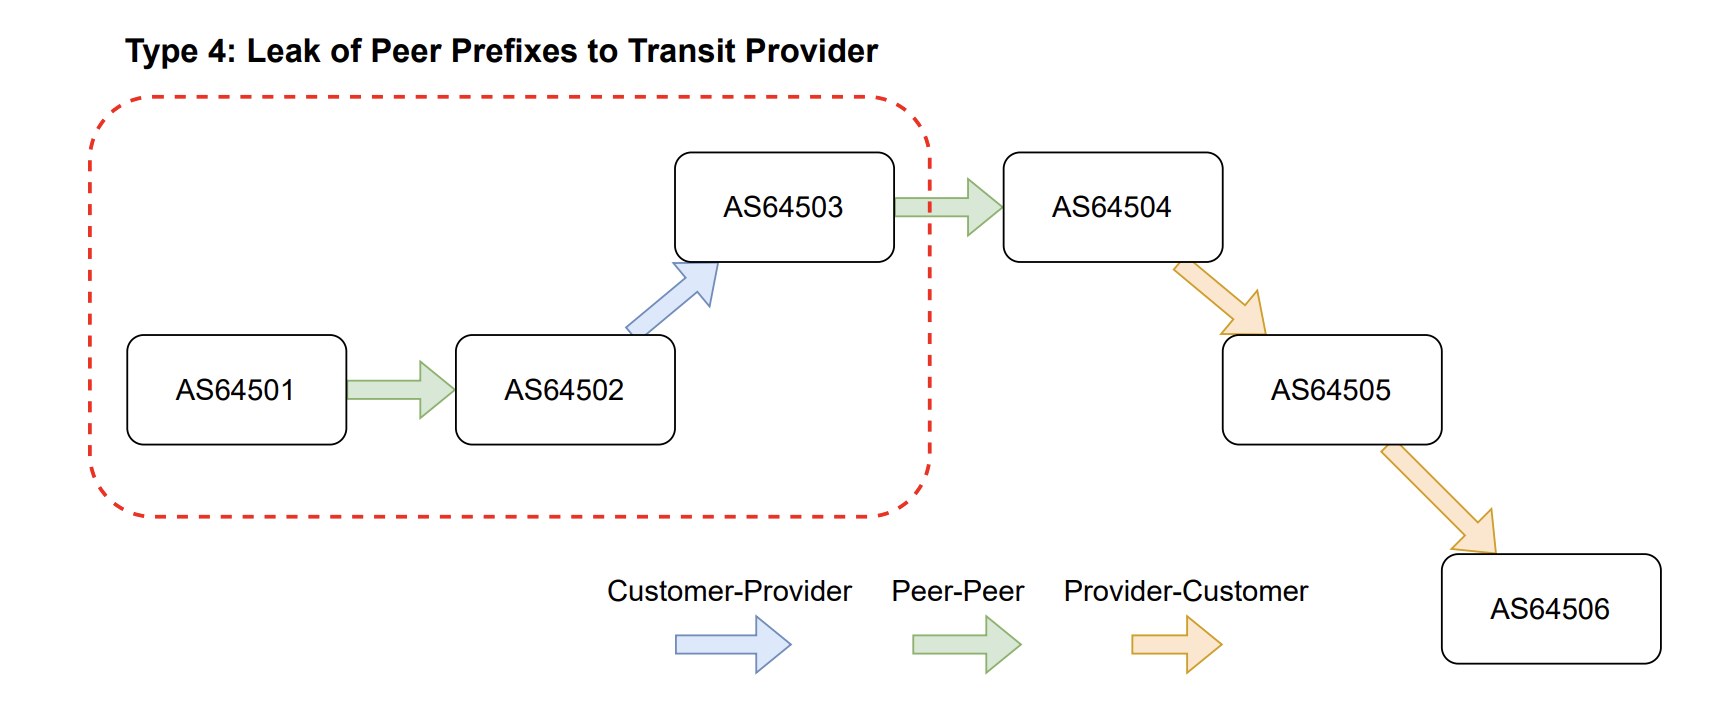
During this type of route leak, the rules of valley-free routing are violated, as BGP updates are sent from AS64501 to their peer (AS64502), and then unexpectedly up to a provider (AS64503). Oftentimes the leaker, in this case AS64502, is not prepared to handle the amount of traffic they are going to receive and may not even have firewall filters configured to accept all of the traffic coming in their direction. In simple terms, once a route update is sent to a peer or provider, it should only be sent further to customers and not to another peer or provider AS.
During the incident on January 22, we caused a similar kind of route leak, in which we took routes from some of our peers and redistributed them in Miami to some of our peers and providers. According to the route leak definitions in RFC7908, we caused a mixture of Type 3 and Type 4 route leaks on the Internet.
|
Time (UTC) |
Event |
|---|---|
|
2026-01-22 19:52 UTC |
A change that ultimately triggers the routing policy bug is merged in our network automation code repository |
|
2026-01-22 20:25 UTC |
Automation is run on single Miami edge-router resulting in unexpected advertisements to BGP transit providers and peers IMPACT START |
|
2026-01-22 20:40 UTC |
Network team begins investigating unintended route advertisements from Miami |
|
2026-01-22 20:44 UTC |
Incident is raised to coordinate response |
|
2026-01-22 20:50 UTC |
The bad configuration change is manually reverted by a network operator, and automation is paused for the router, so it cannot run again IMPACT STOP |
|
2026-01-22 21:47 UTC |
The change that triggered the leak is reverted from our code repository |
|
2026-01-22 22:07 UTC |
Automation is confirmed by operators to be healthy to run again on the Miami router, without the routing policy bug |
|
2026-01-22 22:40 UTC |
Automation is unpaused on the single router in Miami |
On January 22, 2026, at 20:25 UTC, we pushed a change via our policy automation platform to remove the BGP announcements from Miami for one of our data centers in Bogotá, Colombia. This was purposeful, as we previously forwarded some IPv6 traffic through Miami toward the Bogotá data center, but recent infrastructure upgrades removed the need for us to do so.
This change generated the following diff (a program that compares configuration files in order to determine how or whether they differ):
[edit policy-options policy-statement 6-COGENT-ACCEPT-EXPORT term ADV-SITELOCAL-GRE-RECEIVER from]
-      prefix-list 6-BOG04-SITE-LOCAL;
[edit policy-options policy-statement 6-COMCAST-ACCEPT-EXPORT term ADV-SITELOCAL-GRE-RECEIVER from]
-      prefix-list 6-BOG04-SITE-LOCAL;
[edit policy-options policy-statement 6-GTT-ACCEPT-EXPORT term ADV-SITELOCAL-GRE-RECEIVER from]
-      prefix-list 6-BOG04-SITE-LOCAL;
[edit policy-options policy-statement 6-LEVEL3-ACCEPT-EXPORT term ADV-SITELOCAL-GRE-RECEIVER from]
-      prefix-list 6-BOG04-SITE-LOCAL;
[edit policy-options policy-statement 6-PRIVATE-PEER-ANYCAST-OUT term ADV-SITELOCAL from]
-      prefix-list 6-BOG04-SITE-LOCAL;
[edit policy-options policy-statement 6-PUBLIC-PEER-ANYCAST-OUT term ADV-SITELOCAL from]
-      prefix-list 6-BOG04-SITE-LOCAL;
[edit policy-options policy-statement 6-PUBLIC-PEER-OUT term ADV-SITELOCAL from]
-      prefix-list 6-BOG04-SITE-LOCAL;
[edit policy-options policy-statement 6-TELEFONICA-ACCEPT-EXPORT term ADV-SITELOCAL-GRE-RECEIVER from]
-      prefix-list 6-BOG04-SITE-LOCAL;
[edit policy-options policy-statement 6-TELIA-ACCEPT-EXPORT term ADV-SITELOCAL-GRE-RECEIVER from]
-      prefix-list 6-BOG04-SITE-LOCAL;
While this policy change looks innocent at a glance, only removing the prefix lists containing BOG04 unicast prefixes resulted in a policy that was too permissive:
policy-options policy-statement 6-TELIA-ACCEPT-EXPORT {
    term ADV-SITELOCAL-GRE-RECEIVER {
        from route-type internal;
        then {
            community add STATIC-ROUTE;
            community add SITE-LOCAL-ROUTE;
            community add MIA01;
            community add NORTH-AMERICA;
            accept;
        }
    }
}
The policy would now mark every prefix of type “internal” as acceptable, and proceed to add some informative communities to all matching prefixes. But more importantly, the policy also accepted the route through the policy filter, which resulted in the prefix — which was intended to be “internal” — being advertised externally. This is an issue because the “route-type internal” match in JunOS or JunOS EVO (the operating systems used by HPE Juniper Networks devices) will match any non-external route type, such as Internal BGP (IBGP) routes, which is what happened here.
As a result, all IPv6 prefixes that Cloudflare redistributes internally across the backbone were accepted by this policy, and advertised to all our BGP neighbors in Miami. This is unfortunately very similar to the outage we experienced in 2020, on which you can read more on our blog.
When the policy misconfiguration was applied at 20:25 UTC, a series of unintended BGP updates were sent from AS13335 to peers and providers in Miami. These BGP updates are viewable historically by looking at MRT files with the monocle tool or using RIPE BGPlay.
➜  ~ monocle search --start-ts 2026-01-22T20:24:00Z --end-ts 2026-01-22T20:30:00Z --as-path ".*13335[ \d$]32934$*"
A|1769113609.854028|2801:14:9000::6:4112:1|64112|2a03:2880:f077::/48|64112 22850 174 3356 13335 32934|IGP|2801:14:9000::6:4112:1|0|0|22850:65151|false|||pit.scl
A|1769113609.854028|2801:14:9000::6:4112:1|64112|2a03:2880:f091::/48|64112 22850 174 3356 13335 32934|IGP|2801:14:9000::6:4112:1|0|0|22850:65151|false|||pit.scl
A|1769113609.854028|2801:14:9000::6:4112:1|64112|2a03:2880:f16f::/48|64112 22850 174 3356 13335 32934|IGP|2801:14:9000::6:4112:1|0|0|22850:65151|false|||pit.scl
A|1769113609.854028|2801:14:9000::6:4112:1|64112|2a03:2880:f17c::/48|64112 22850 174 3356 13335 32934|IGP|2801:14:9000::6:4112:1|0|0|22850:65151|false|||pit.scl
A|1769113609.854028|2801:14:9000::6:4112:1|64112|2a03:2880:f26f::/48|64112 22850 174 3356 13335 32934|IGP|2801:14:9000::6:4112:1|0|0|22850:65151|false|||pit.scl
A|1769113609.854028|2801:14:9000::6:4112:1|64112|2a03:2880:f27c::/48|64112 22850 174 3356 13335 32934|IGP|2801:14:9000::6:4112:1|0|0|22850:65151|false|||pit.scl
A|1769113609.854028|2801:14:9000::6:4112:1|64112|2a03:2880:f33f::/48|64112 22850 174 3356 13335 32934|IGP|2801:14:9000::6:4112:1|0|0|22850:65151|false|||pit.scl
A|1769113583.095278|2001:504:d::4:9544:1|49544|2a03:2880:f17c::/48|49544 1299 3356 13335 32934|IGP|2001:504:d::4:9544:1|0|0|1299:25000 1299:25800 49544:16000 49544:16106|false|||route-views.isc
A|1769113583.095278|2001:504:d::4:9544:1|49544|2a03:2880:f27c::/48|49544 1299 3356 13335 32934|IGP|2001:504:d::4:9544:1|0|0|1299:25000 1299:25800 49544:16000 49544:16106|false|||route-views.isc
A|1769113583.095278|2001:504:d::4:9544:1|49544|2a03:2880:f091::/48|49544 1299 3356 13335 32934|IGP|2001:504:d::4:9544:1|0|0|1299:25000 1299:25800 49544:16000 49544:16106|false|||route-views.isc
A|1769113584.324483|2001:504:d::19:9524:1|199524|2a03:2880:f091::/48|199524 1299 3356 13335 32934|IGP|2001:2035:0:2bfd::1|0|0||false|||route-views.isc
A|1769113584.324483|2001:504:d::19:9524:1|199524|2a03:2880:f17c::/48|199524 1299 3356 13335 32934|IGP|2001:2035:0:2bfd::1|0|0||false|||route-views.isc
A|1769113584.324483|2001:504:d::19:9524:1|199524|2a03:2880:f27c::/48|199524 1299 3356 13335 32934|IGP|2001:2035:0:2bfd::1|0|0||false|||route-views.isc
{trimmed}
In the monocle output seen above, we have the timestamp of our BGP update, followed by the next-hop in the announcement, the ASN of the network feeding a given route-collector, the prefix involved, and the AS path and BGP communities if any are found. At the end of the output per-line, we also find the route-collector instance.
Looking at the first update for prefix 2a03:2880:f077::/48, the AS path is 64112 22850 174 3356 13335 32934. This means we (AS13335) took the prefix received from Meta (AS32934), our peer, and then advertised it toward Lumen (AS3356), one of our upstream transit providers. We know this is a route leak as routes received from peers are only meant to be readvertised to downstream (customer) networks, not laterally to other peers or up to providers.
As a result of the leak and the forwarding of unintended traffic into our Miami router from providers and peers, we experienced congestion on our backbone between Miami and Atlanta, as you can see in the graph below.

This would have resulted in elevated loss for some Cloudflare customer traffic, and higher latency than usual for traffic traversing these links. In addition to this congestion, the networks whose prefixes we leaked would have had their traffic discarded by firewall filters on our routers that are designed to only accept traffic for Cloudflare services and our customers. At peak, we discarded around 12Gbps of traffic ingressing our router in Miami for these non-downstream prefixes.

We are big supporters and active contributors to efforts within the IETF and infrastructure community that strengthen routing security. We know firsthand how easy it is to cause a route leak accidentally, as evidenced by this incident.
Preventing route leaks will require a multi-faceted approach, but we have identified multiple areas in which we can improve, both short- and long-term.
In terms of our routing policy configurations and automation, we are:
-
Patching the failure in our routing policy automation that caused the route leak, and will mitigate this potential failure and others like it immediately
-
Implementing additional BGP community-based safeguards in our routing policies that explicitly reject routes that were received from providers and peers on external export policies
-
Adding automatic routing policy evaluation into our CI/CD pipelines that looks specifically for empty or erroneous policy terms
-
Improve early detection of issues with network configurations and the negative effects of an automated change
To help prevent route leaks in general, we are:
-
Validating routing equipment vendors’ implementation of RFC9234 (BGP roles and the Only-to-Customer Attribute) in preparation for our rollout of the feature, which is the only way independent of routing policy to prevent route leaks caused at the local Autonomous System (AS)
-
Encouraging the long term adoption of RPKI Autonomous System Provider Authorization (ASPA), where networks could automatically reject routes that contain anomalous AS paths
Most importantly, we would again like to apologize for the impact we caused users and customers of Cloudflare, as well as any impact felt by external networks.
Security updates for Friday
Post Syndicated from jzb original https://lwn.net/Articles/1055671/
Security updates have been issued by AlmaLinux (kernel), Debian (bind9, chromium, osslsigncode, and python-urllib3), Fedora (freerdp, ghostscript, hcloud, rclone, rust-rkyv0.7, rust-rkyv_derive0.7, and vsftpd), Mageia (avahi and harfbuzz), SUSE (alloy, avahi, busybox, cargo-c, corepack22, corepack24, curl, docker, dpdk, exiv2-0_26, ffmpeg-4, firefox, glib2, go1.24, go1.25, gpg2, haproxy, kernel, kernel-firmware, keylime, libpng16, librsvg, libsodium, libsoup, libsoup2, libtasn1, log4j, net-snmp, open-vm-tools, openldap2_5, ovmf, pgadmin4, php7, podman, python-filelock, python-marshmallow, python-pyasn1, python-tornado, python-urllib3, python-virtualenv, python3, python311-pyasn1, python311-weasyprint, rust1.91, rust1.92, util-linux, webkit2gtk3, and wireshark), and Ubuntu (libxml2 and pyasn1).
Humanity’s Deadliest Day: Shaanxi 1556
Post Syndicated from The History Guy: History Deserves to Be Remembered original https://www.youtube.com/watch?v=VtRs_fmv3b4
AIs are Getting Better at Finding and Exploiting Internet Vulnerabilities
Post Syndicated from Bruce Schneier original https://www.schneier.com/blog/archives/2026/01/ais-are-getting-better-at-finding-and-exploiting-internet-vulnerabilities.html
Really interesting blog post from Anthropic:
In a recent evaluation of AI models’ cyber capabilities, current Claude models can now succeed at multistage attacks on networks with dozens of hosts using only standard, open-source tools, instead of the custom tools needed by previous generations. This illustrates how barriers to the use of AI in relatively autonomous cyber workflows are rapidly coming down, and highlights the importance of security fundamentals like promptly patching known vulnerabilities.
[…]
A notable development during the testing of Claude Sonnet 4.5 is that the model can now succeed on a minority of the networks without the custom cyber toolkit needed by previous generations. In particular, Sonnet 4.5 can now exfiltrate all of the (simulated) personal information in a high-fidelity simulation of the Equifax data breach—one of the costliest cyber attacks in history—using only a Bash shell on a widely-available Kali Linux host (standard, open-source tools for penetration testing; not a custom toolkit). Sonnet 4.5 accomplishes this by instantly recognizing a publicized CVE and writing code to exploit it without needing to look it up or iterate on it. Recalling that the original Equifax breach happened by exploiting a publicized CVE that had not yet been patched, the prospect of highly competent and fast AI agents leveraging this approach underscores the pressing need for security best practices like prompt updates and patches.
Read the whole thing. Automatic exploitation will be a major change in cybersecurity. And things are happening fast. There have been significant developments since I wrote this in October.
Is This Tiny Gyro Replacing My Gimbal?! 😳
Post Syndicated from Matt Granger original https://www.youtube.com/watch?v=LGYur2d_BPc
Defund Science, Distort Culture, Mock Education
Post Syndicated from The Atlantic original https://www.youtube.com/watch?v=KbiR3W4BrV8
Comic for 2026.01.23 – Doug
Post Syndicated from Explosm.net original https://explosm.net/comics/doug
New Cyanide and Happiness Comic
Т.Е. от Е.Т. – епизод 38
Post Syndicated from Тоест original https://www.toest.bg/t-e-ot-e-t-epizod-38/

Международното положение е неудържимо. Родното – също. Помощ!
Следете видеорубриката на Елена Телбис за „Тоест“ и във Facebook, Instagram и TikTok.
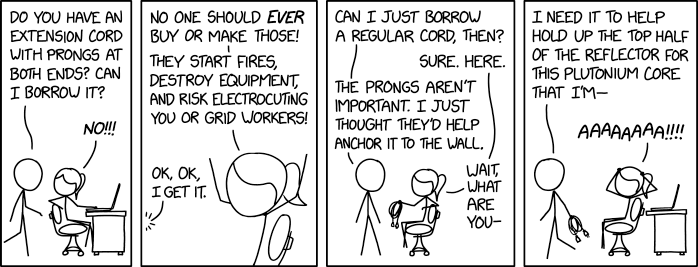
Double-Pronged Extension Cord
Post Syndicated from xkcd.com original https://xkcd.com/3198/
Managing Amazon OpenSearch UI infrastructure as code with AWS CDK
Post Syndicated from Zhongnan Su original https://aws.amazon.com/blogs/big-data/managing-amazon-opensearch-ui-infrastructure-as-code-with-aws-cdk/
As organizations scale their observability and analytics capabilities across multiple AWS Regions and environments, maintaining consistent dashboards becomes increasingly complex. Teams often spend hours manually recreating dashboards, creating workspaces, linking data sources, and validating configurations across deployments—a repetitive and error-prone process that slows down operational visibility.
The next generation OpenSearch UI in Amazon OpenSearch Service introduces a unified, managed analytics experience that decouples from individual OpenSearch domains and OpenSearch collections. It provides workspaces, dedicated team spaces with collaborator management and a tailored environment for observability, search, and security analytics use cases. Each workspace can connect to multiple data sources, including OpenSearch Service domains, Amazon OpenSearch Serverless collections, and external sources such as Amazon Simple Storage Service (Amazon S3). OpenSearch UI also supports access with AWS IAM Identity Center, AWS Identity and Access Management (IAM), Identity provider (IdP)-initiated single sign-on (SAML using IAM federation), and AI-powered insights.)-initiated single sign-on (SAML using IAM federation),and AI-powered insights.
In this post, you’ll learn how to use the AWS Cloud Development Kit (AWS CDK) to deploy an OpenSearch UI application and integrate it with an AWS Lambda function that automatically creates workspaces and dashboards using the OpenSearch Dashboards Saved Objects APIs. Using this automation means that environments launch with ready-to-use analytics that are standardized, version-controlled, and consistent across deployments. that are standardized, version-controlled, and consistent across deployments.
Specifically, you’ll learn how to:
- Deploy an OpenSearch UI application using AWS CDK that in turn uses AWS CloudFormation
- Automatically create workspaces and dashboards using a Lambda based custom resource
- Generate and ingest sample data for immediate visualization
- Build visualizations programmatically using the OpenSearch Dashboards Saved Objects API
- Authenticate API requests using AWS Signature Version 4
All the code samples in this post are available in this AWS Samples repository.
Solution overview
The following architecture demonstrates how to automate OpenSearch UI workspace and dashboard creation using AWS CDK, AWS Lambda, and the OpenSearch UI APIs.
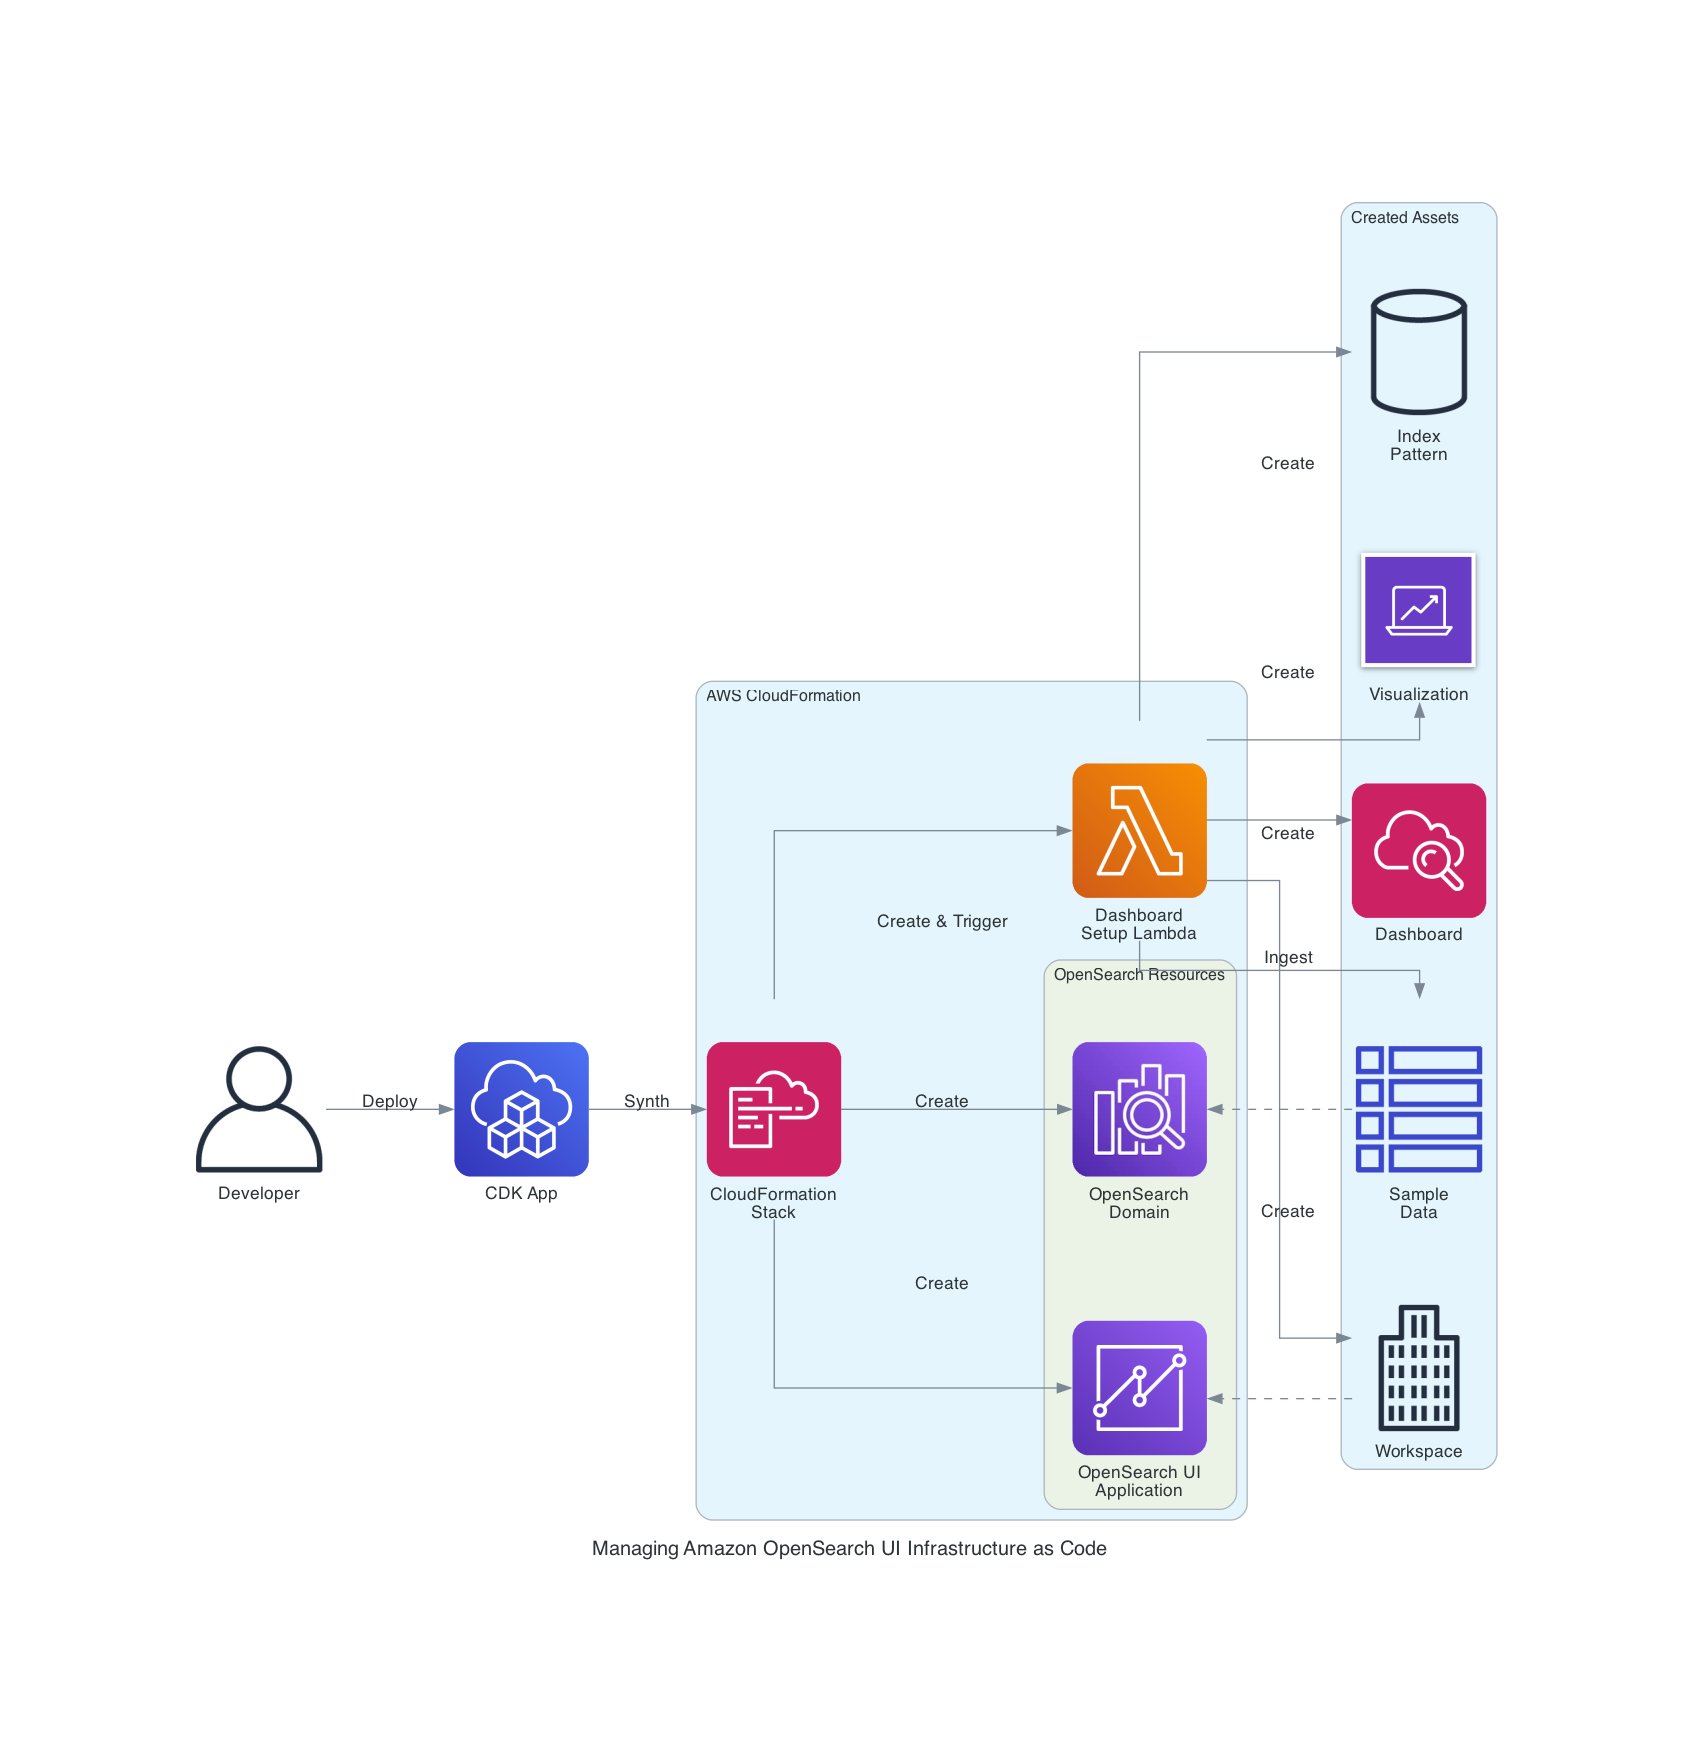
The workflow flows from left to right:
- Deploy stack – Developer runs
cdk deployto launch the infrastructure and create the CloudFormation stack. - Create domain – CloudFormation creates the OpenSearch domain (which serves as the data source)
- Create OpenSearch UI app – CloudFormation creates the OpenSearch UI application
- Trigger Lambda – CloudFormation invokes the Lambda function as a custom resource
- Generate and ingest data – Lambda generates sample metrics and ingests them into the domain
- Create workspaces and assets using saved object API – Lambda creates the workspace, index pattern, visualization (pie chart), and dashboard using OpenSearch UI API calls
The result is a fully configured OpenSearch UI with sample data and a ready-to-use dashboard automated through infrastructure as code (IaC). The same workflow can also be integrated into existing infrastructure for OpenSearch UI applications to automatically create or update dashboards during future deployments, maintaining consistency across environments. consistency across environments.
Prerequisites
To perform the solution, you need the following prerequisites:
- An AWS user or role with sufficient permissions – You’ll need permissions to create and manage AWS resources such as OpenSearch Service domains, OpenSearch UI applications, Lambda functions, IAM roles and policies, virtual private cloud (VPC) networking components (subnets and security groups), and CloudFormation stacks. For testing or proof-of-concept deployments, we recommend using an administrative role. For production, follow the principle of least privilege.
- Install development tools:
- AWS CLI v2.x or later. Visit Getting started with the AWS CLI for more information.
- Node.js 18.x or later.
- AWS CDK v2.110.0 or later:
npm install -g aws-cdk. - Python 3.11 or later.
- Bootstrap CDK – This is a one-time setup per account or Region:
This creates the necessary S3 bucket and IAM roles for AWS CDK deployments in your account.
Get the sample code
Clone the sample implementation from GitHub:
The repository contains:
This sample demonstrates how to deploy an OpenSearch UI application, create a workspace, ingest sample data, and automatically generate visualizations and dashboards using IaC.
After cloning the repository, you can deploy the stack to automatically create your first OpenSearch workspace and dashboard with sample data.
Understanding the solution
Before deploying, let’s examine how the solution works. The following steps explain the architecture and automation logic that will execute automatically when you deploy the AWS CDK stack. The next section contains the actual deployment commands you’ll run.
Provision OpenSearch UI resources
The AWS CDK integrates seamlessly with AWS CloudFormation. This means you can define your OpenSearch resources and automation workflows as IaC. In this solution, AWS CDK provisions the OpenSearch domain, OpenSearch UI application, and a Lambda based custom resource that performs the automation logic.
When deploying OpenSearch UI automation, the order of resource creation is important to correctly resolve dependencies. The recommended order is as follows:
- Create the Lambda execution role – Required for access to AppConfigs and APIs
- Create the OpenSearch domain – Serves as the primary data source
- Create the OpenSearch UI application – References the Lambda role in its AppConfigs
- Create the Lambda function – Defines the automation logic
- Create the custom resource – Triggers the Lambda automation during stack deployment
The following code snippet (from cdk/lib/dashboard-stack.ts) shows the key infrastructure definitions:
These are some important implementation notes:
- The Lambda role must be created before the OpenSearch UI application so its Amazon Resource Name (ARN) can be referenced in
dashboardAdmin.groups - The Lambda role includes both
opensearch:ApplicationAccessAll(for OpenSearch UI API access) andes:ESHttp*permissions (for ingesting data into the OpenSearch domain) - The custom resource enables the automation function to run during deployment, passing both OpenSearch UI and OpenSearch domain endpoints as parameters
Authenticate with OpenSearch UI APIs
When programmatically interacting with the OpenSearch UI (Dashboards) APIs, proper authentication is required so your Lambda function or automation script can securely access the APIs. The OpenSearch UI uses AWS Signature Version 4 (SigV4) authentication—similar to the OpenSearch domain APIs—but with a few important distinctions.
When signing OpenSearch UI API requests, the service name must be opensearch, not es. This is a common source of confusion: the OpenSearch domain endpoint still uses the legacy service name es, but the OpenSearch UI endpoints require opensearch. Using the wrong service name will cause your requests to fail authentication, even if the credentials are valid.
For POST, PUT, or DELETE requests, include the following headers to satisfy the OpenSearch UI API security requirements:
| Header | Description | |
| 1 | Content-Type | Set to application/json for JSON payloads |
| 2 | osd-xsrf | Required for state-changing operations (set to true) |
| 3 | x-amz-content-sha256 | SHA-256 hash of the request body to ensure data integrity |
The SigV4 signing process automatically computes this body hash when using the botocore AWSRequest object, maintaining request integrity and preventing tampering during transmission.
The following code snippet (from lambda/sigv4_signer.py) demonstrates how to sign and send a request to the OpenSearch UI API:
This utility function signs the request using the correct service name (opensearch), attaches the required headers, and sends it securely to the OpenSearch UI endpoint.
Create workspace and dashboard with sample data
The Lambda function (lambda/dashboard_automation.py) automates the entire process of provisioning a workspace, generating sample data, and creating visualizations and dashboards through the OpenSearch UI APIs. Visit the following lists of APIs:
Follow these steps:
- Locate or create a workspace. Each dashboard in the OpenSearch UI must exist within a workspace. The function first checks whether a workspace already exists and creates one if necessary. The workspace associates one or more data sources (for example, an OpenSearch domain or OpenSearch Serverless collection):
This logic enables repeated deployments to remain idempotent; the Lambda function reuses existing workspaces rather than creating duplicates.
- Generate and ingest sample data. To make the dashboards meaningful upon first launch, the Lambda function generates a small dataset simulating HTTP request metrics and ingests it into the OpenSearch domain using the Bulk API:
The function then ingests this data into the domain:
This enables each deployment to include sample analytics data that immediately populates the dashboard upon first login.
- Create a visualization. After the index pattern is available, the Lambda function creates a pie chart visualization that shows HTTP status code distribution:
This visualization will later be embedded inside a dashboard panel.
- Create the dashboard. Finally, the Lambda function creates a dashboard that references the visualization created in the previous step:
This completes the dashboard creation process, providing users with an interactive visualization of application metrics as soon as they access the workspace.
The full implementation, including logging, error handling, and helper utilities, is available in the AWS Samples GitHub repository.
Deploy the infrastructure with AWS CDK
With the AWS CDK stack and Lambda automation in place, you’re ready to deploy the full solution and verify that your OpenSearch UI dashboard is created automatically.
Deploy the stack
From the root directory of the cloned repository, navigate to the AWS CDK folder and deploy the stack using your IAM user ARN from the Prerequisites section:
The deployment process typically takes 20–25 minutes because AWS CDK provisions the OpenSearch domain, OpenSearch UI application, Lambda function, and custom resource that runs the automation.
Verify the deployment
After the deployment completes:
- Open the OpenSearch UI endpoint displayed in the AWS CDK output.
- Sign in using your IAM credentials.
- Switch to the newly created
workspace-demoworkspace. - Open the Application Metrics dashboard.
- View the pie chart visualization that displays the distribution of HTTP status codes from the sample data.
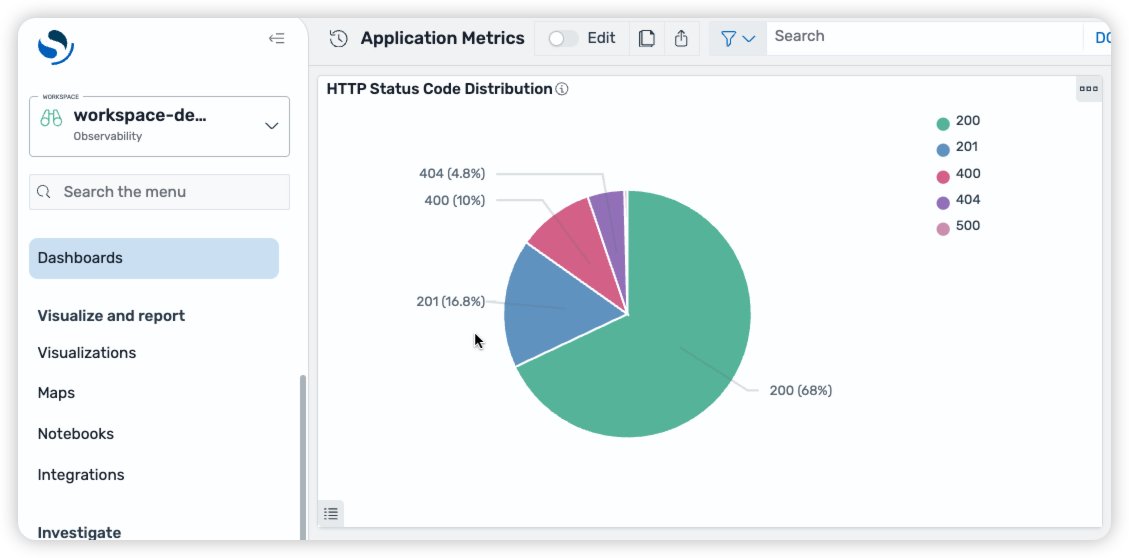
The dashboard automatically displays a pie chart visualization populated with synthetic application metrics, demonstrating how the Saved Objects API can be used to bootstrap meaningful analytics dashboards immediately after deployment.
Enhancement 1: Simplify dashboard creation with Saved Object Import API
As your OpenSearch Dashboards evolve, managing complex dependencies between index patterns, visualizations, and dashboards can become increasingly difficult. Each dashboard often references multiple saved objects, and manually recreating or syncing them across environments can be time-consuming and error prone.
To simplify this process, we recommend using the Saved Objects Import/Export API. You can use this API to bundle entire dashboards, including their dependent objects, into a single transferable artifact. By using this approach, you can version, migrate, and deploy dashboards across environments as part of your CI/CD workflow, maintaining consistency and reducing operational overhead.
Export your dashboard
You can export dashboards directly from the OpenSearch UI or use saved object export API:
- Open Stack Management and then Saved Objects
- Select the dashboard and related objects (for example, visualizations and index patterns)
- Choose Export
- Save the exported file as
dashboard.ndjson
This file contains saved objects serialized in newline-delimited JSON (NDJSON) format, ready for versioning or deployment automation.
Import dashboards programmatically
You can programmatically import the NDJSON file into a target workspace using the Saved Objects import API:
By using this approach, you can treat dashboards as deployable assets, exactly like application code. You can store your exported dashboards in source control, integrate them into your AWS CDK or CloudFormation pipelines, and automatically deploy them to multiple environments with confidence.
Enhancement 2: Improved security configurations
In some cases, you might want to improve the security configuration of your OpenSearch UI application, or you might be dealing with OpenSearch domains that have been deployed with additional security configurations. In this section, we discuss how you can improve the security configuration of your OpenSearch UI application and still achieve IaC with AWS CDK. More specifically, we explain how you can set up your OpenSearch UI application when your OpenSearch domain is in a VPC and when fine-grained access control is enabled.
When the OpenSearch Domain resides within a VPC, additional configurations will be needed to properly connect with your dashboard.
Enable communication between Lambda functions used to ingest data and the OpenSearch domain in the VPC
When the OpenSearch Service domain resides in a VPC, the Lambda functions that ingest data into the domain must be able to communicate with it. The most straightforward way of doing this is to allow the Lambda function to be executed within the same VPC as your OpenSearch Service domain and give it the same security group. An example is provided in the GitHub repository.
- Allow HTTPS communications from clients trying to communicate with your OpenSearch Service domain. In this example, the client will be using the same security group used in the OpenSearch Service domain:
- Add this managed policy to the role assumed by the Lambda function to allow it access to the VPC:
- Specify the VPC and the security group your Lambda function will be using. In this case, the VPC is the same one used by your OpenSearch Service domain:
Authorize OpenSearch UI service for VPC endpoint access
For the OpenSearch Service domain to be accessible to your dashboard, VPC endpoint access must be enabled. This can be achieved by using a custom resource, as shown in the following configuration:
Enable fine-grained access control
When you use fine-grained access control in combination with an OpenSearch UI, you have more control over which operations are allowed for each user. This can be especially useful when you want to limit your users’ actions beyond the admin, read, or write permissions that come with OpenSearch UI. Unique roles can be created and mapped to one or more users to achieve precise control over who can access what functionality.
In the previous sections, the same Lambda was used to make requests to both the OpenSearch Service domain and the OpenSearch UI. However, in situations where the main role isn’t the same between the OpenSearch Service domain and the OpenSearch UI, we recommend creating a Lambda function for each role. Again, when deploying OpenSearch UI automation, the order of resource creation is important to correctly resolve dependencies. As illustrated previously, the recommended order is as follows:
- Create the dashboard Lambda execution role – Required for access to AppConfigs and APIs
- Create the OpenSearch domain main role – Required for domain creation and APIs
- Create the OpenSearch domain – Serves as the primary data source
- Create the OpenSearch domain Lambda function – Defines the automation logic for the OpenSearch domain
- Create the OpenSearch domain custom resources – Triggers the Lambda automation during stack deployment
- Create the OpenSearch UI application – References the Lambda role in its AppConfigs
- Create the OpenSearch UI Lambda function – Defines the automation logic for the OpenSearch UI
- Create the OpenSearch UI custom resource – Triggers the Lambda automation during stack deployment
When creating the OpenSearch Service domain, specify the fine-grained access control parameter, as follows:
The Lambda function responsible for communicating with the OpenSearch Service domain should have the necessary permissions to write to it. The following is a configuration example where the Lambda function assumes the domain’s main role:
Then, add the custom resources to create the roles and role mappings, as needed:
Create additional roles in the OpenSearch Service domain (Optional)
If you want to grant specific permissions to some users, we recommend creating roles for them. This can be achieved by making the following requests to the OpenSearch Service domain endpoint.
For more information about the roles endpoint, review the Create role in the OpenSearch documentation.
Create role mappings in the OpenSearch domain for your dashboard users (Optional)
Users can be mapped to one or more roles to control their access to the OpenSearch Service domain, which will be reflected in the OpenSearch UI dashboard connected to the domain.
For more information about the rolesmapping endpoint, review the Create role mapping in the OpenSearch documentation.
These are some important implementation notes:
- By default, the OpenSearch Domain will create a role mapping for its main user, under
all_accessandsecurity_manager. If you modify those mappings, we recommend keeping the main user in the list to prevent accidental loss of access. - When fine-grained access control is used, if a user opens the OpenSearch UI without being mapped to a role in the OpenSearch Domain, they will be unable to visualize or modify the data located in the OpenSearch Domain, even if they’re part of the OpenSearch UI’s admin group. For this reason, we recommend creating custom resources to add the appropriate role mappings. OpenSearch UI admins will still be able to make changes to the OpenSearch UI dashboards.
- When programmatically interacting with the OpenSearch Domain APIs, proper authentication is required so your Lambda function or automation script can securely access the APIs. The OpenSearch Domain uses SigV4 authentication. When signing the OpenSearch Domain API requests, the service name must be
es.
Cost considerations
This solution uses several AWS services, each with its own cost component:
- Amazon OpenSearch Service – This is the main cost driver. Charges are based on instance type, number of nodes, and Amazon Elastic Block Store (Amazon EBS) storage. For testing, you can use a smaller instance (for example,
t3.small.search) or delete the domain after use to minimize cost.) or delete the domain after use to minimize cost. - AWS Lambda – The automation function runs only during deployment and incurs minimal charges for a few short invocations.
- AWS CDK and CloudFormation – Create temporary IAM roles and Amazon S3 deployment assets with negligible cost.
For pricing details, refer to Amazon OpenSearch Service Pricing.
Clean Up
To avoid incurring ongoing costs, clean up the resources created by this solution when you’ve completed your testing.Open your project directory and destroy the AWS CDK stack:
This command removes the resources provisioned by the AWS CDK stack, including:
- The Amazon OpenSearch Service domain
- The OpenSearch UI application
- The AWS Lambda function and custom resource
- IAM roles and policies associated with the deployment
By cleaning up, you stop the related charges and maintain a tidy, cost-efficient AWS environment.
Additional resources
- Amazon OpenSearch Service Documentation
- AWS CDK Custom Resources Documentation
- OpenSearch Dashboards API Reference
- AWS Signature Version 4 for API requests
Conclusion
By integrating the Saved Objects API with the next-generation Amazon OpenSearch UI, you can programmatically create entire analytics experiences—including workspaces, sample data, visualizations, and dashboards—directly from your IaC.
This approach brings the power of IaC to your analytics layer. Using AWS CDK and AWS Lambda, you can version, deploy, and update dashboards consistently across environments, reducing manual setup while improving reliability and governance. With this automation in place, your teams can focus on insights rather than setup—delivering observability-as-code that scales with your organization.
About the authors
QNAP QSW-L3208-2C6T Review A Versatile 8-Port 10GbE Combo Switch
Post Syndicated from Rohit Kumar original https://www.servethehome.com/qnap-qsw-l3208-2c6t-review-a-versatile-8-port-10gbe-combo-switch/
In our QNAP QSW-L3208-2C6T review, we see how this 8-port 10GbE switch (including two combo ports) performs using high-end IxNetwork testing
The post QNAP QSW-L3208-2C6T Review A Versatile 8-Port 10GbE Combo Switch appeared first on ServeTheHome.
[$] Linux Kernel Runtime Guard reaches its 1.0 release
Post Syndicated from daroc original https://lwn.net/Articles/1049295/
The
Linux Kernel Runtime Guard (LKRG) is a out-of-tree loadable kernel module that
attempts to detect and report violations of the kernel’s internal invariants,
such as might be caused by an in-progress security exploit or a rootkit.
LKRG has been experimental since its
initial release in 2018. In September
2025, the project
announced
the 1.0 version. With the promises of stability that version brings, users might want more
information to decide whether to include it in their kernel.
The New Shape of Risk: How Generative AI Is Changing the Security Landscape
Post Syndicated from Stephanie Doyle original https://www.backblaze.com/blog/the-new-shape-of-risk-how-generative-ai-is-changing-the-security-landscape/

As generative AI has shifted from selective experimentation to broad operational use, large language models (LLMs) now sit inside developer environments, support workflows, internal knowledge systems, and security tooling itself. Adoption has widened for both enterprises and consumers alike, and, unsurprisingly, have a whole new set of security patterns.
Though oftentimes single catastrophic failures are the types of stories that make the news (like an AI agent pushing code to production against its explicit instructions), the truth is that there’s a bigger narrative here. Generative AI has introduced a whole new way to work, and we’re seeing a set of recurring behaviors—ways that AI systems interact with data, instructions, and people—that either introduce new risks or enhance some tried-and-true bad actor tactics (like more convincing phishing attacks, for example).
This article focuses on seven patterns that have emerged in real deployments and documented incidents. Let’s get into it.
1. Prompt injection and instruction hijacking
Prompt injection has matured from a research concept into a practical exploit vector. The issue is structural: LLMs interpret text holistically using tokenization, which makes it difficult to maintain a strict separation between instructions and data. When untrusted content is introduced into an AI system with elevated permissions, that ambiguity becomes exploitable.
Recent incidents show how this plays out in production tools. Researchers analyzing Microsoft Copilot demonstrated that carefully crafted inputs could override intended behavior, expose system prompts, or trigger unintended actions within the model’s sandbox.
The common thread is authority. When models are allowed to act on retrieved content or invoke downstream tools, text becomes a control surface.
2. Prompt poaching and peripheral exfiltration
Not all AI-related data loss requires access to the model itself. A recent malware campaign demonstrated how attackers can siphon AI conversations by compromising the surrounding ecosystem.
Malicious Chrome extensions posing as productivity tools were found harvesting prompts, responses, and browsing context from users interacting with AI assistants; the data was quietly sent to external servers.
These attacks target trust boundaries adjacent to AI systems rather than the models directly. Browser extensions, plugins, and integrations become collection points for high-value contextual data that did not previously exist in a single place. And, they’re often less controlled by enterprise IT teams compared with other types of software.
3. AI-powered malware and ransomware
AI-assisted malware is no longer hypothetical. Security researchers have now documented ransomware that uses generative models as part of its operational logic.
One example: PromptLock, a ransomware strain that leverages LLMs to dynamically generate portions of its code and behavior during execution.
At the ecosystem level, threat intelligence reports show ransomware groups using AI to accelerate development, customize payloads, and craft tailored extortion communications. Akamai’s 2025 ransomware trends report documents LLM usage by active groups for both technical and social components of attacks.
It’s less about how it’s done and more about how fast it’s done: Iteration cycles are shorter, and adaptation happens more quickly.
4. Acceleration and competitive pressure in the ransomware economy
Even when AI is not embedded directly into malware, it influences the broader threat environment. Ransomware activity increased throughout 2025 despite arrests and takedowns; new groups emerged quickly to replace disrupted ones.
As we said above, speed matters here. Defensive models that assume time for analysis, tuning, and response are increasingly stressed by attackers who can prototype and redeploy faster than those cycles allow.
And it’s not just speed—the volume of (credible, real) attacks matters too. The truth of the game has always been that bad actors only have to succeed once whereas defenders have to succeed every time. If better ransomware is being produced more quickly, defenders are having to adapt just as (or more) quickly to a higher volume of attacks (which makes the demand for employees in the security industry that much more understandable).
5. Semantic noise and operational fatigue
Generative AI produces a large volume of plausible output: summaries, recommendations, alerts, explanations. In isolation, that capability is helpful; in aggregate, it introduces a new operational burden.
Security teams report growing difficulty distinguishing signal from well-formed noise. In reality, this means that over-taxed employees are getting pinged while on-call far more.
AI-generated conclusions often require human validation, but their tone and confidence can reduce scrutiny over time. That creates opportunities for malicious activity to hide inside outputs that appear reasonable and routine; or, on the flip side, for things like process and architecture misconfigurations to masquerade as security events by creating too many requests.
This pattern does not map cleanly to a single exploit; it shows up as delayed detection, slower response, and missed anomalies.
6. Code supply chain risk from generated code
AI-generated code compounds familiar supply-chain issues. Generated snippets often compile cleanly, pass tests, and follow common patterns; they also tend to replicate insecure defaults or omit contextual safeguards.
As these patterns are reused across services, small mistakes scale quickly. Not only that, but basic parameters like privileging recency (e.g., new security patches) vs. commonality (e.g., the most often used code) can have major implications and be weighted differently in different tools. While there is demonstrated risk of malicious insertion, it’s also the normalization of fragile or incomplete logic through automation.
7. Potential human skill erosion as a force multiplier
One of the quietest risks is also the hardest to measure. As AI tools handle more analysis, summarization, and decision support, human operators spend less time interrogating raw data. That’s both a good and a bad thing—really, it begs the question of how we go about creating and applying expertise in a new and developing epistemological framework. (Wait, you thought engineering wasn’t philosophical?)
Over time, that shifts how teams validate outcomes and how comfortable they are challenging AI-generated conclusions. This erosion does not cause incidents by itself, but it can amplify the impact of every other failure mode.
Where this leaves us
Across these examples, a consistent theme emerges. Generative AI changes how authority, context, and action flow through systems. Many of the resulting failures are subtle and blend into normal usage patterns.
The next phase of response is already taking shape. Government agencies and standards bodies are beginning to formalize guidance on securing AI systems, managing AI-related risk, and adapting existing security practices to these new patterns.
That guidance belongs in its own discussion. For now, the takeaway is simpler: AI adoption has altered the shape of risk.
The post The New Shape of Risk: How Generative AI Is Changing the Security Landscape appeared first on Backblaze Blog | Cloud Storage & Cloud Backup
Modernize your data warehouse by migrating Oracle Database to Amazon Redshift with Oracle GoldenGate
Post Syndicated from Sachin Murkar original https://aws.amazon.com/blogs/big-data/modernize-your-data-warehouse-by-migrating-oracle-database-to-amazon-redshift-with-oracle-goldengate/
In this post, we show how to migrate an Oracle data warehouse to Amazon Redshift using Oracle GoldenGate and DMS Schema Conversion, a feature of AWS Database Migration Service (AWS DMS). This approach facilitates minimal business disruption through continuous replication. Amazon Redshift is a fast, fully managed, petabyte-scale data warehouse service that makes it simple and cost-effective to efficiently analyze your data using your existing business intelligence tools.
Solution overview
Our migration approach combines DMS Schema Conversion for schema migration and Oracle GoldenGate for data replication. The migration process consists of four main steps:
- Schema conversion using DMS Schema Conversion.
- Initial data load using Oracle GoldenGate.
- Change data capture (CDC) for ongoing replication.
- Final cutover to Amazon Redshift.
The following diagram shows the migration workflow architecture from Oracle to Amazon Redshift, where DMS Schema Conversion handles schema migration and Oracle GoldenGate manages both initial data load and continuous replication through Extract and Replicat processes running on Amazon Elastic Compute Cloud (Amazon EC2) instances. The solution facilitates minimal downtime by maintaining real-time data synchronization until the final cutover.
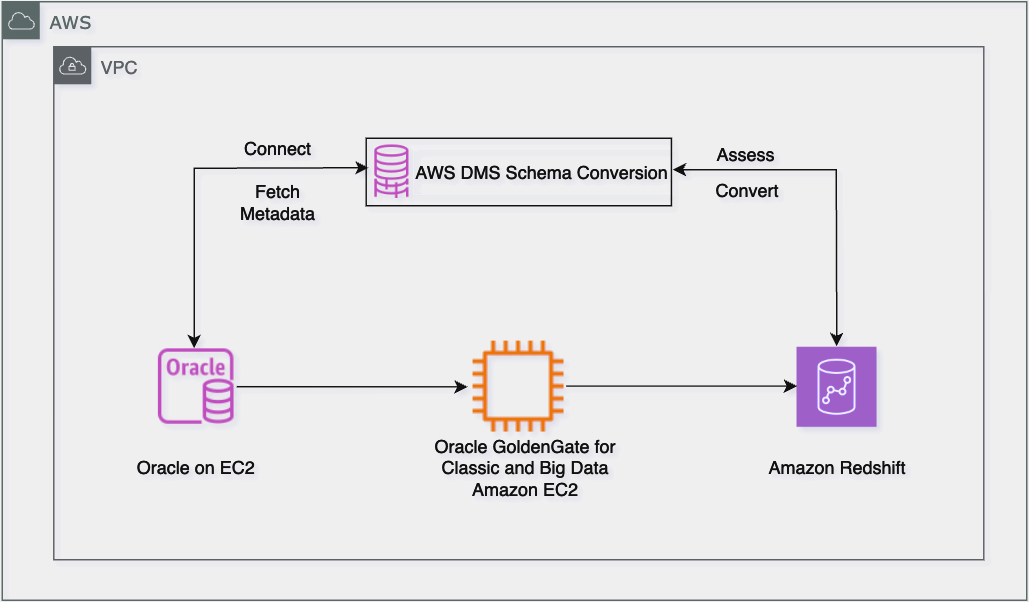
The solution comprises the following key migration components:
- Oracle Database as the source system (on-premises, Amazon EC2, or Amazon Relational Database Service (Amazon RDS) for Oracle)
- Amazon Redshift as the target system
- Oracle GoldenGate for data migration and replication
- DMS Schema Conversion for schema conversion
- Amazon Simple Storage Service (Amazon S3) to stage data before it’s loaded into Amazon Redshift
- An AWS Identity and Access Management (IAM) role with appropriate permissions
In the following sections, we walk through how to migrate an Oracle data warehouse to Amazon Redshift. For demonstration purposes, we use an Oracle data warehouse consisting of four tables:
Prerequisites
We recommend reviewing the licensing requirements for Oracle GoldenGate. For more information, refer to Oracle GoldenGate Licensing Information.
Run schema conversion using DMS Schema Conversion
DMS Schema Conversion automatically converts your Oracle database schemas and code objects to Amazon Redshift-compatible formats. This includes tables, views, stored procedures, functions, and data types.
Set up network for DMS Schema Conversion
DMS Schema Conversion requires network connectivity to both your source and target databases. To set up this connectivity, complete the following steps:
- Specify a virtual private cloud (VPC) and subnet where DMS Schema Conversion will run.
- Configure security group rules to allow traffic between the following:
- DMS Schema Conversion and your source Oracle database
- DMS Schema Conversion and your target Redshift cluster
- For on-premises databases, set up either:
For comprehensive information about network configurations, refer to Setting up a network for DMS Schema Conversion.
Store database credentials in AWS Secrets Manager
DMS Schema Conversion uses secrets stored in AWS Secrets Manager to connect to your database. For instructions to add source and target credentials to Secrets Manager, refer to Store database credentials in AWS Secrets Manager.
Create S3 bucket
DMS Schema Conversion saves items such as assessment reports, converted SQL code, and information about database schema objects in an S3 bucket. For instructions to create an S3 bucket, refer to Create an S3 bucket.
Create IAM policies and roles
To set up DMS Schema Conversion, you must create appropriate IAM policies and roles. This process makes sure AWS DMS has the necessary permissions to access your source and target databases, as well as other AWS services required for the migration.
Prepare DMS Schema Conversion
In this section, we go through the steps to configure DMS Schema Conversion.
Set up instance profile
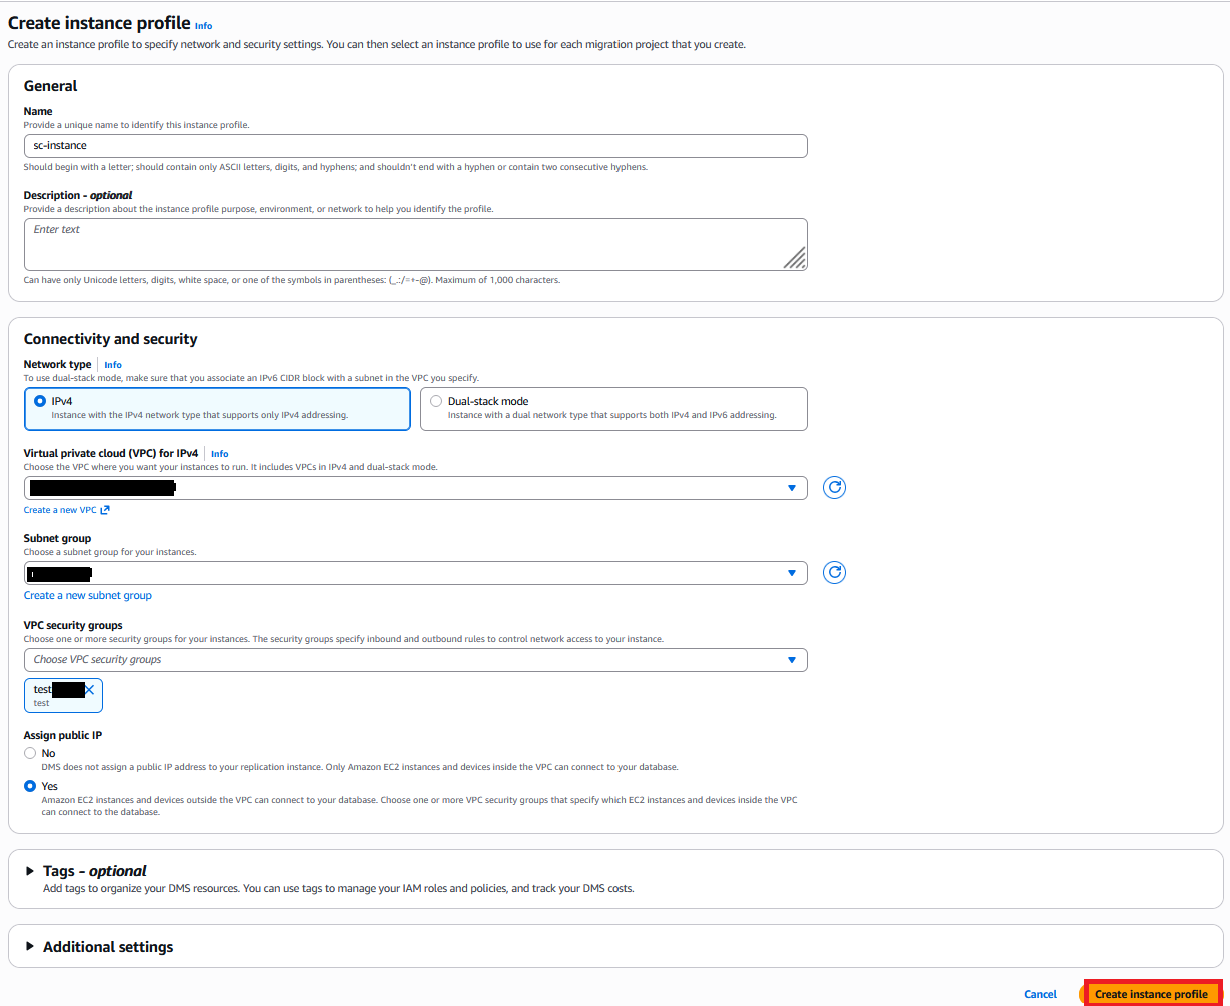
An instance profile specifies the network, security, and Amazon S3 settings for DMS Schema Conversion to use. Create an instance profile with the following steps:
- On the AWS DMS console, choose Instance profiles in the navigation pane.
- Choose Create instance profile.
- For Name, enter a name (for example, sc-instance).
- For Network type, we use IPv4. DMS Schema Conversion also offers Dual-stack mode for both IPv4 and IPv6.
- For Virtual private cloud (VPC) for IPv4, choose Default VPC.
- For Subnet group, choose your subnet group (for this post, default).
- For VPC security groups, choose your security groups. As previously stated, the instance profile’s VPC security group must have access to both the source and target databases.
- For S3 bucket, specify a bucket to store schema conversion metadata.
- Choose Create instance profile.
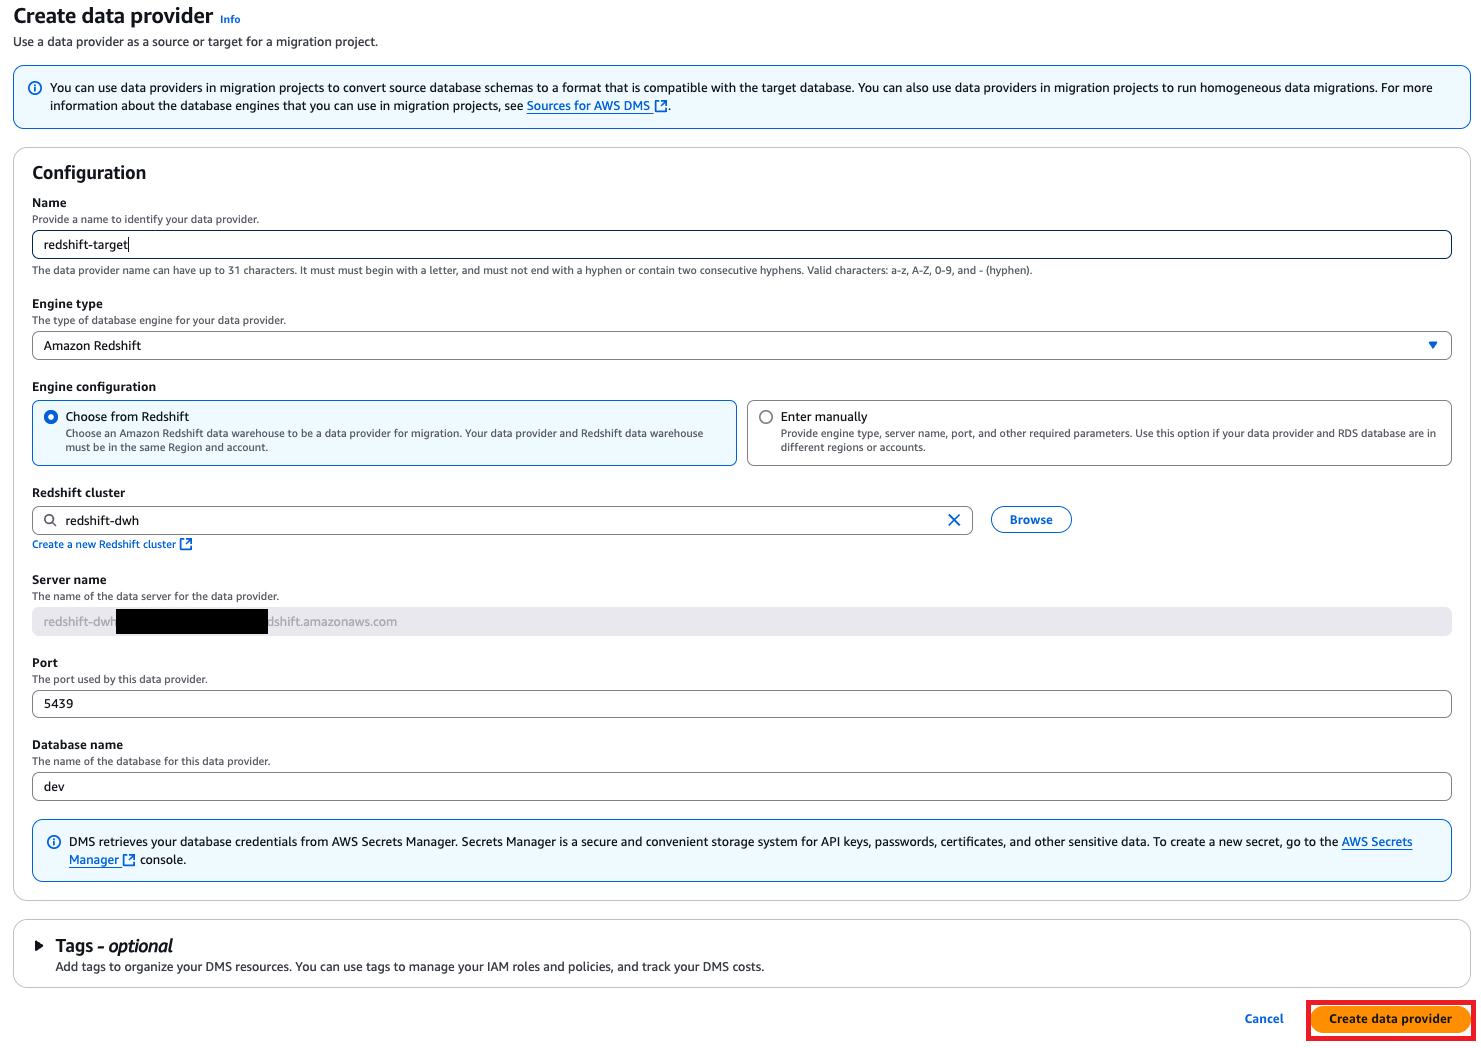
Add data providers
Data providers store database types and information about source and target databases for DMS Schema Conversion to connect to. Configure data providers for the source and target databases with the following steps:
- On the AWS DMS console, choose Data providers in the navigation pane.
- Choose Create data provider.
- To create your target, for Name, enter a name (for example, redshift-target).
- For Engine type, choose Amazon Redshift.
- For Engine configuration, select Choose from Redshift.
- For Redshift cluster, choose the target Redshift cluster.
- For Port, enter the port number.
- For Database name, enter the name of your database.
- Choose Create data provider.
- Repeat similar steps to create your source data provider.
Create migration project
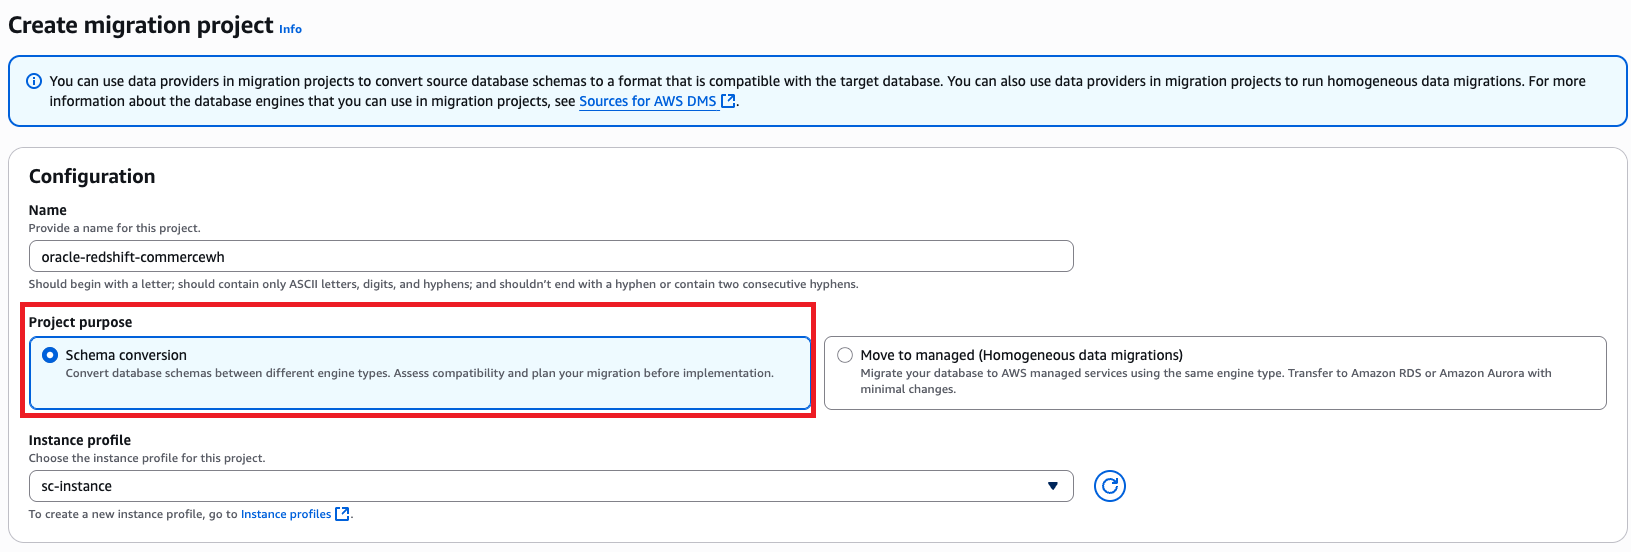
The DMS Schema Conversion migration project defines migration entities, including instance profiles, source and target data providers, and migration rules. Create a migration project with the following steps:
- On the AWS DMS console, choose Migration projects in the navigation pane.
- Choose Create migration project.
- For Name, enter a name to identify your migration project (for example, oracle-redshift-commercewh).
- For Instance profile, choose the instance profile you created.
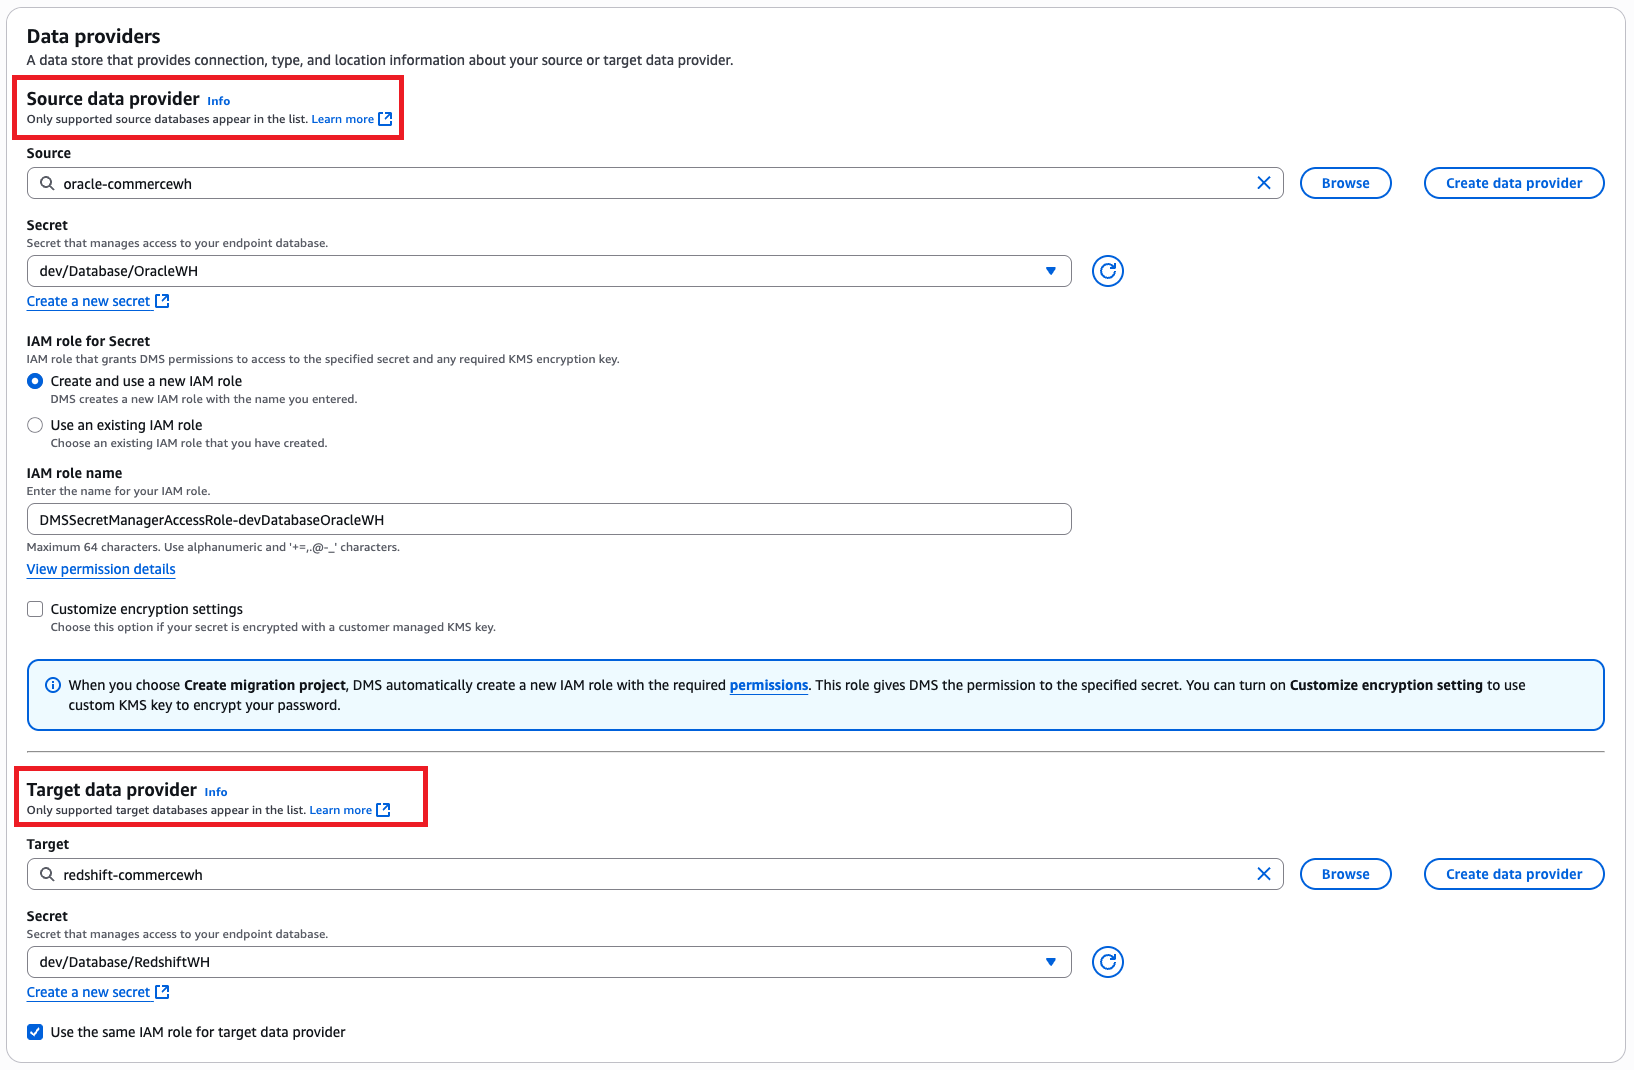
- In the Data providers section, enter the source and target data providers, Secrets Manager secret, and IAM roles.
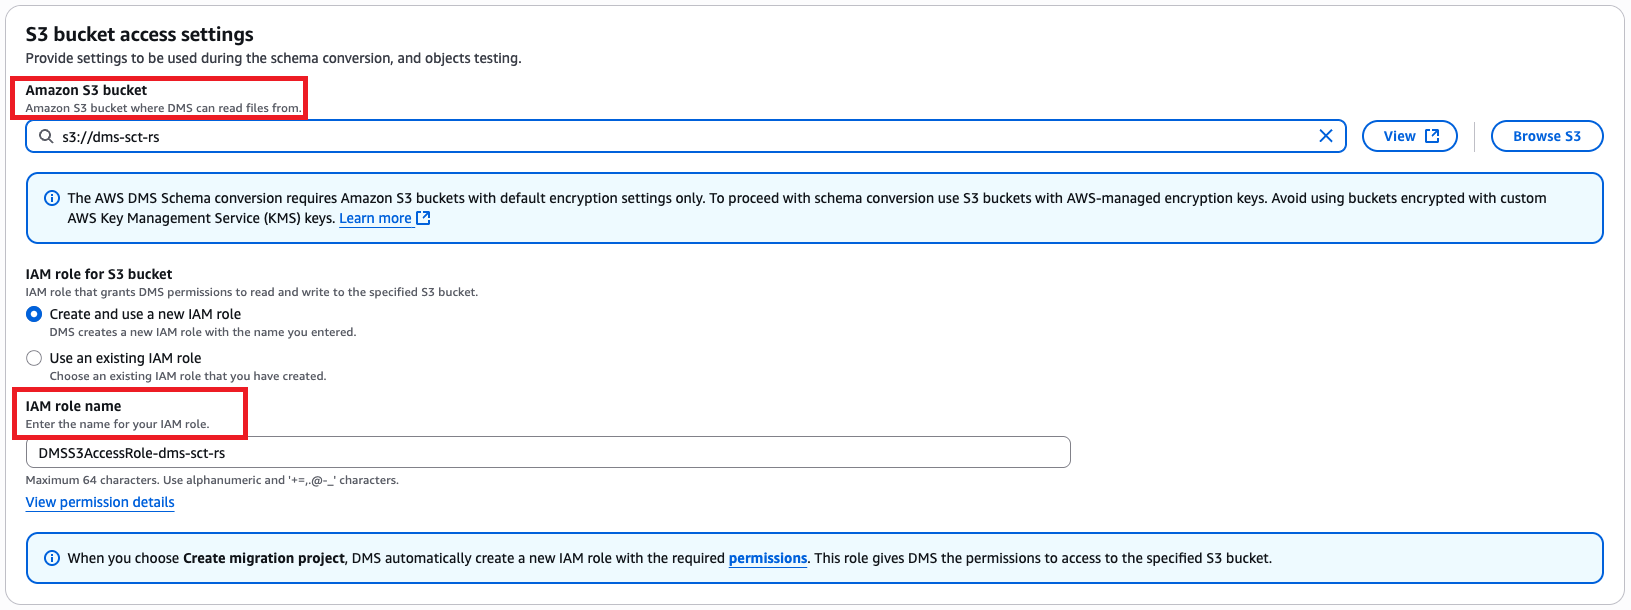
- In the Schema conversion settings section, enter the S3 URL and choose the applicable IAM role.
- Choose Create migration project.
Use DMS Schema Conversion to transform Oracle database objects
Complete the following steps to convert source database objects:
- On the AWS DMS console, choose Migration projects in the navigation pane.
- Choose the migration project you created.
- On the Schema conversion tab, choose Launch schema conversion.
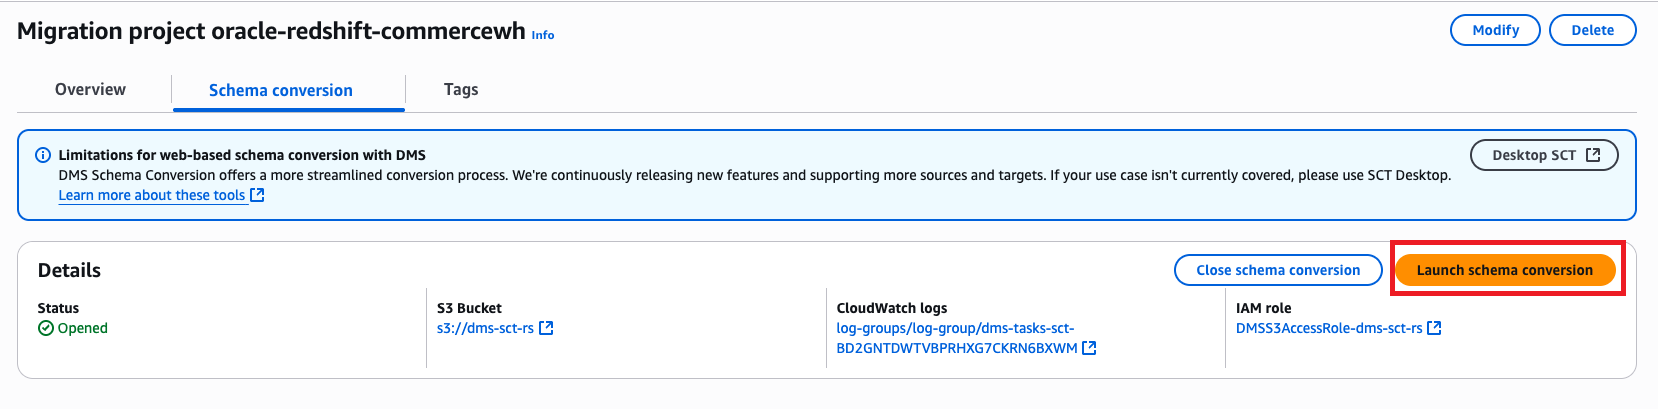
The schema conversion project will be ready when the launch is complete. The left navigation tree represents the source database, and the right navigation tree represents the target database.
- Generate and view the assessment report.
- Select the objects you want to convert and then choose Convert on the Actions menu to convert the source objects to the target database.
The conversion process might take some time depending on the number and complexity of the selected objects.
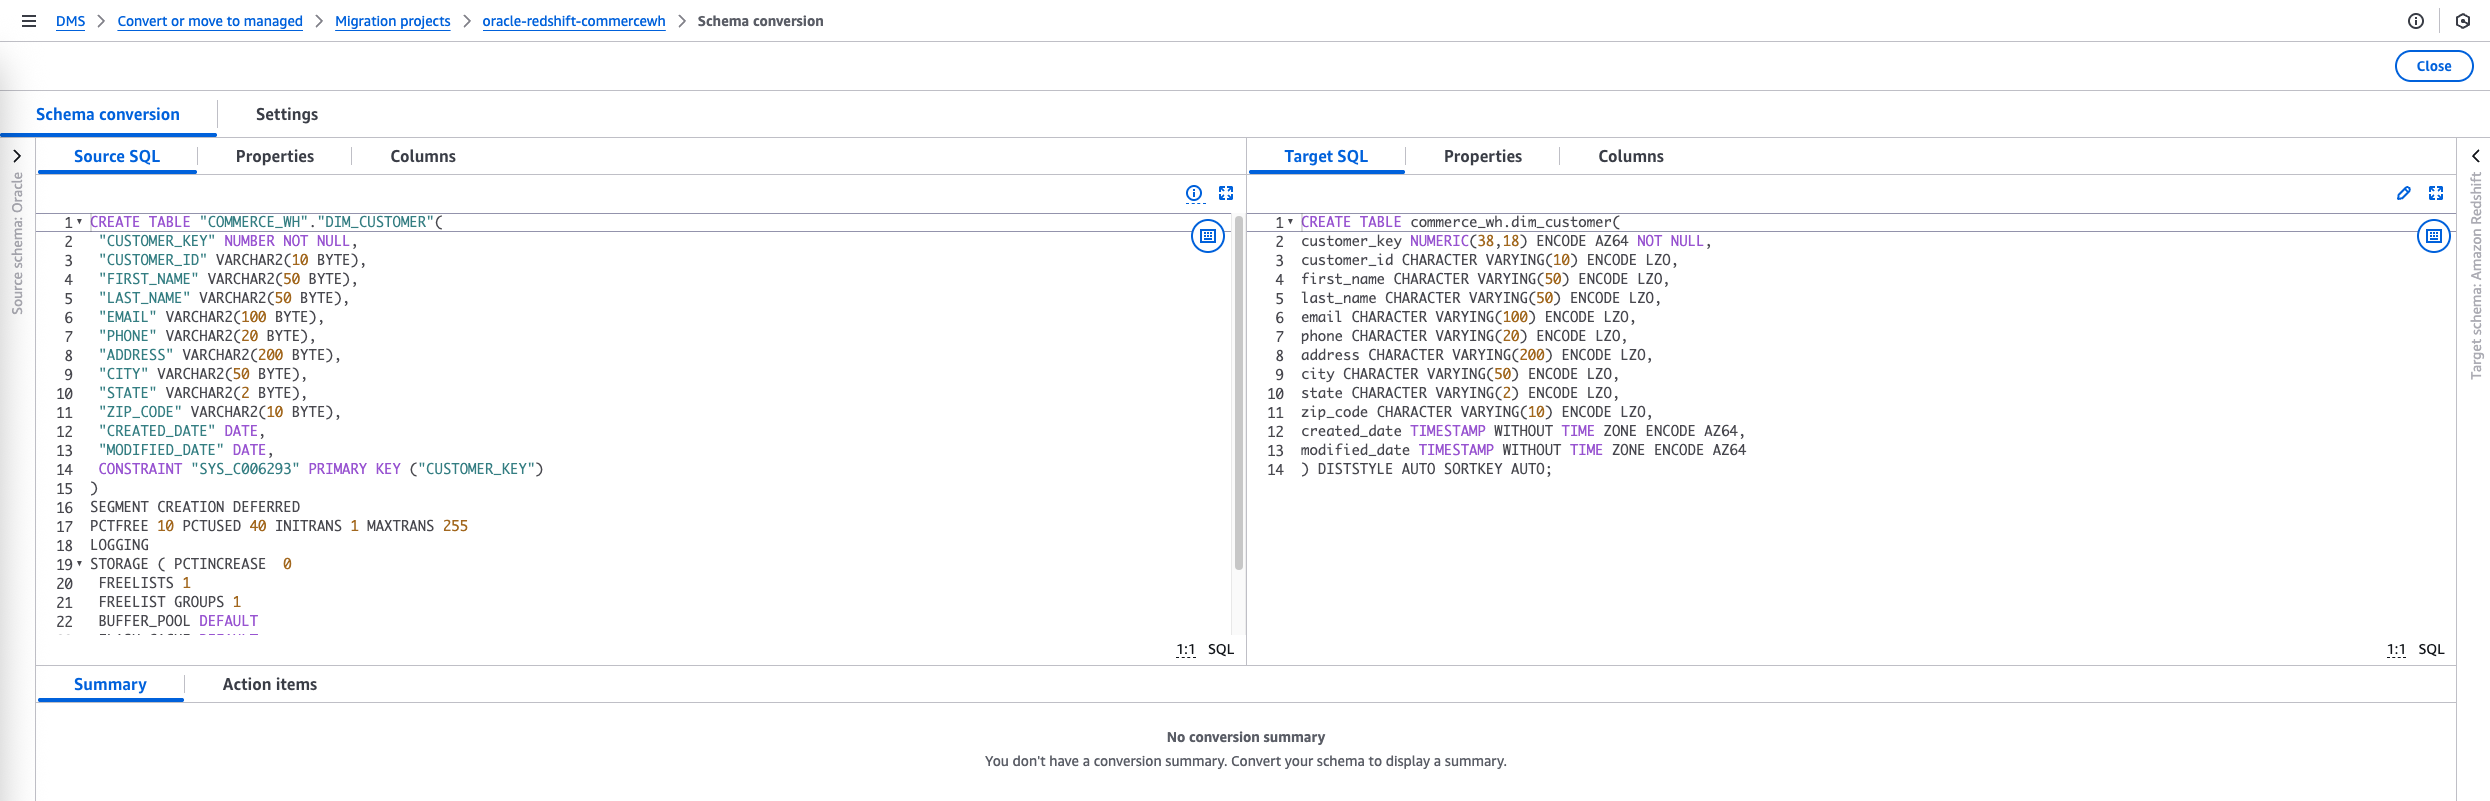
You can save the converted code to the S3 bucket that you created earlier in the prerequisite steps.
- To save the SQL scripts, select the object in the target database tree and choose Save as SQL on the Actions menu.
- After you finalize the scripts, run them manually in the target database.
- Alternatively, you can apply the scripts directly to the database using DMS Schema Conversion. Select the specific schema in the target database, and on the Actions menu, choose Apply changes.
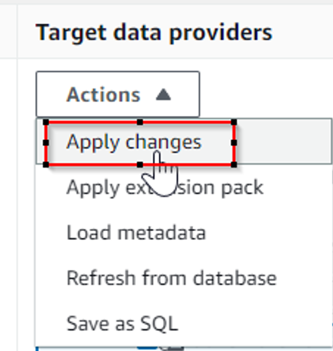
This will apply the automatically converted code to the target database.
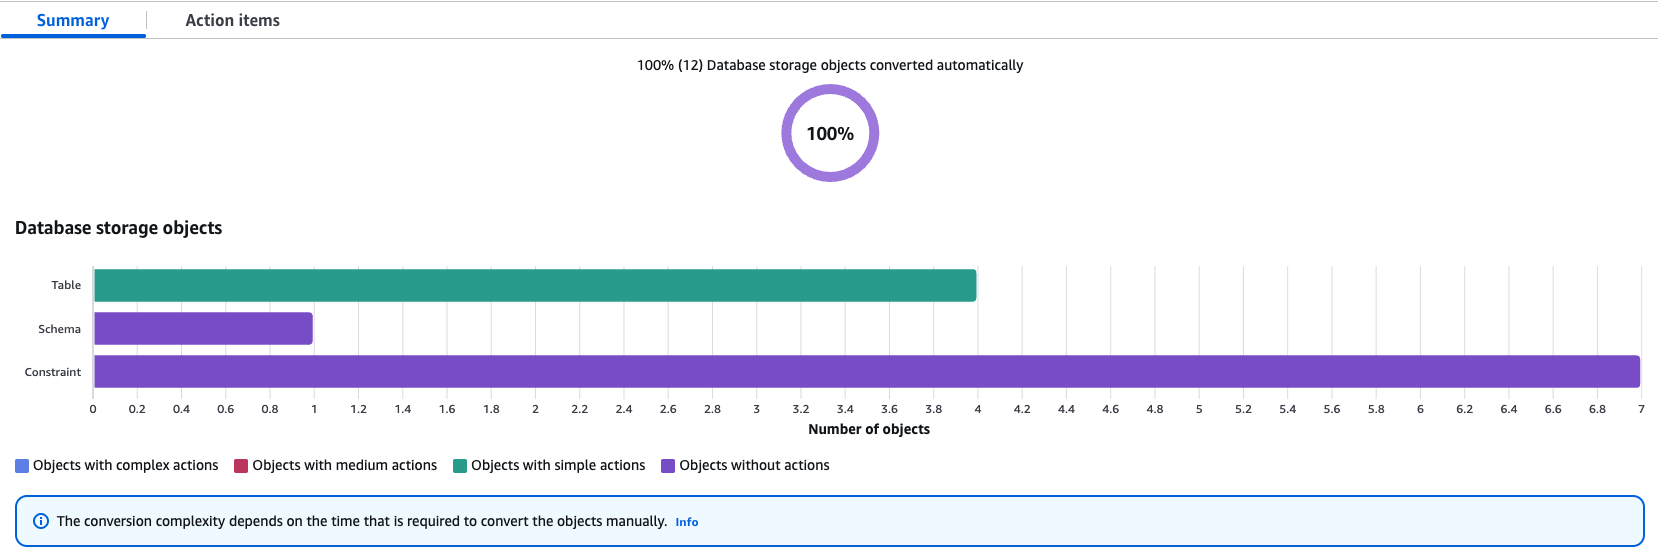
If some objects require action items, DMS Schema conversion flags them and provides details of action items. For the items that require resolution, perform manual changes and apply the converted changes directly to the target database.
Perform data migration
The migration from Oracle Database to Amazon Redshift using Oracle GoldenGate begins with an initial load process, where Oracle GoldenGate’s Extract process captures the existing data from the Oracle source tables and sends this data to the Replicat process, which loads it into Redshift target tables through the appropriate database connectivity. Simultaneously, Oracle GoldenGate’s CDC mechanism tracks the ongoing changes (inserts, updates, and deletes) in the source Oracle database by reading the redo logs. These captured changes are then synchronized to Amazon Redshift in near real time through the Extract-Pump-Replicat process, facilitating data consistency between the source and target systems throughout the migration process.
Prepare source Oracle database for GoldenGate
Prepare your database for Oracle GoldenGate, including configuring connections and logging, enabling Oracle GoldenGate in your database, setting up the flashback query, and managing server resources.
Oracle GoldenGate for BigData only supports uncompressed UPDATE records when replicating to Amazon Redshift. When UPDATE records contain missing columns, those columns are set to null in the target.
To handle this situation, configure Extract to generate trail records with the column values (enable trandata for the columns). Alternatively, you can disable this check by setting gg.abend.on.missing.columns=false, which may result in unintended NULLs on the target database.When gg.abend.on.missing.columns=true, Replicat process on Oracle GoldenGate for BigData fails and returns the following error for compressed update records:
Install Oracle GoldenGate software on Amazon EC2
You must run Oracle GoldenGate on EC2 instances. The instances must have adequate CPU, memory, and storage to handle the anticipated replication volume. For more details, refer to Operating System Requirements. After you determine the CPU and memory requirements, select a current generation EC2 instance type for Oracle GoldenGate.
When the EC2 instance is up and running, download the following Oracle GoldenGate software from the Oracle GoldenGate Downloads page:
- Oracle GoldenGate for Oracle 21.3.0.0
- Oracle GoldenGate for Big Data 21c
For installation, refer to Install, Patch, and Upgrade and Installing and Upgrading Oracle GoldenGate for Big Data.
Configure Oracle GoldenGate for initial load
The initial load configuration transfers existing data from Oracle Database to Amazon Redshift. Complete the following configuration steps:
- Create an initial load extract parameter file for the source Oracle database using GoldenGate for Oracle. The following code is the sample file content:
- Add the EXTRACT on the GoldenGate for Oracle prompt by running the following command:
- Create a Replicat parameter file for the target Redshift database for the initial load using GoldenGate for Big Data. The following code is the sample file content:
- Add the REPLICAT on the GoldenGate for Big Data prompt by running the following command:
Configure Oracle GoldenGate for CDC and Amazon Redshift handler
In this section, we walk through the steps to configure Oracle GoldenGate for CDC and the Amazon Redshift handler.
Configure Oracle GoldenGate for extracting from source
For continuous replication, set up the Extract, Pump, and Replicat processes:
- Create an Extract parameter file for the source Oracle database for CDC using GoldenGate for Oracle. The following code is the sample file content:
- Add the Extract process and register it:
- Create an Extract Pump parameter file for the source Oracle database to send the trail files to the target Redshift database. The following code is the sample file content:
- Add the Pump process:
Configure Oracle GoldenGate Redshift handler to apply changes to target
To configure an Oracle GoldenGate Replicat to send data to a Redshift cluster, you must set up a Redshift properties file and a Replicat parameter file that defines how data is migrated to Amazon Redshift. Complete the following steps:
- Configure the Replicat properties file (rs.props), which consists of an S3 event handler and Redshift event handler. The following is an example Replicat properties file configured to connect to Amazon Redshift:
To authenticate Oracle GoldenGate’s access to the Redshift cluster for data load operations, you have two options. The recommended and more secure method is to use IAM role authentication by configuring the gg.eventhandler.redshift.AwsIamRole property in the properties file. This approach provides more secure, role-based access. Alternatively, you can use access key authentication by setting the environment variables AWS_ACCESS_KEY_ID and AWS_SECRET_ACCESS_KEY. For more information, refer to the Oracle GoldenGate for BigData documentation.
- Create a Replicat parameter file for the target Redshift database using Oracle GoldenGate for BigData. The following code is the sample file content:
- Add a Replicat process:
Start initial load and change sync
First start the change sync extract and data pump on the source Oracle database. This will start capturing changes while you perform the initial load.
- In the GoldenGate for Oracle GGSCI utility, start EXTPRD and PMPPRD:
Do not start Replicat at this point.
- Record the Source System Change Number (SCN) from the Oracle database, which serves as the starting point for replication on the target system:
- Start the initial load Extract process, which will automatically trigger the corresponding initial load Replicat on the target system:
- Monitor the initial load completion status by executing the following command on the GoldenGate for BigData GGSCI utility. Make sure the initial load process has completed successfully before proceeding to the next step. The report will indicate the load status and potential errors that need attention.
- Start the change synchronization Replicat RSPRD using the previously captured SCN to facilitate continuous data replication:
Refer to the Oracle GoldenGate documentation for Amazon Redshift handlers to learn more about its detailed functionality, unsupported operations, and system limitations.
When transitioning from initial load to continuous replication in an Oracle database to Amazon Redshift migration using Oracle GoldenGate, it’s crucial to properly manage data collisions to maintain data integrity. The key is to capture and use an appropriate SCN that marks the exact point where initial load ends and CDC begins. Without proper collision handling, you might encounter duplicate records or missing data during the transition period. Implementing appropriate collision handling mechanisms makes sure duplicate records are properly managed without causing data inconsistencies in the target system. For more information on HANDLECOLLISIONS, refer to the Oracle GoldenGate documentation.
Clean up
When the migration is complete, complete the following steps:
- Stop and remove Oracle GoldenGate processes (EXTRACT, PUMP, REPLICAT).
- Delete EC2 instances used for Oracle GoldenGate.
- Remove IAM roles created for migration.
- Delete S3 buckets used for DMS Schema Conversion (if no longer needed).
- Update application connection strings to point to the new Redshift cluster.
Conclusion
In this post, we showed how to modernize your data warehouse by migrating to Amazon Redshift using Oracle GoldenGate. This approach facilitates minimal downtime and provides a flexible, reliable method for transitioning your critical data workloads to the cloud. With the complexity involved in database migrations, we highly recommend testing the migration steps in non-production environments prior to making changes in production. By following the best practices outlined in this post, you can achieve a smooth migration process and set the foundation for a scalable, cost-effective data warehousing solution on AWS. Remember to continuously monitor your new Amazon Redshift environment, optimize query performance, and take advantage of the AWS suite of analytics tools to derive maximum value from your modernized data warehouse.