In the weeks leading up to this release (and the week after) I have
posted a series of serieses of posts to Mastodon about key new
features in this release, under the #systemd257 hash tag. In
case you aren’t using Mastodon, but would like to read up, here’s a
list of all 37 posts:
I intend to do a similar series of serieses of posts for the next systemd
release (v258), hence if you haven’t left tech Twitter for Mastodon yet, now is
the opportunity.
The Sequoia PGP project has announced
version 1.0 of the sq command-line tool for managing OpenPGP
encryption and signatures. It also provides a decentralized public
key infrastructure (PKI), and key management facilities. This is
the first stable release since development began on the project in
2017.
sq‘s PKI is probably its most notable feature, and the one we invested
the most time in. The PKI is used to authenticate certificates, and
messages. Authentication is necessary to ensure that you are
encrypting to the person you think you are, and to identify who really
authored a message; without authentication, encryption and
verification are much weaker.
Today we’re announcing the general availability of Amazon Elastic Compute Cloud (Amazon EC2)U7inh instance, a new addition to EC2 High Memory family, built in collaboration with Hewlett Packard Enterprise (HPE). Amazon EC2 U7inh instance runs on the 16-socket HPE Compute Scale-up Server 3200, and are built on the AWS Nitro System to deliver a fully integrated and managed experience consistent with other EC2 instances.
Powered by the fourth generation Intel® Xeon® Scalable processors (Sapphire Rapids), U7inh instance supports 32 TB of memory and 1920 vCPUs. This instance offers the highest compute performance, largest compute and memory size in the Amazon Web Services (AWS) Cloud for running large, mission-critical database workloads, like SAP HANA.
In May 2024, we launched U7i instances to support up to 896 vCPUs and up to 32 TB of memory, which our enterprise customers could use to successfully migrate their large mission-critical in-memory databases to AWS and benefit from the flexibility, scalability, reliability, and cost advantages that AWS offers.
As customers continue to scale their business applications, they wanted the performance combined with the additional CPUs and memory along with SAP certification to generate real-time business insights. Other customers that currently run on-premises with HPE servers have also asked how we can help them migrate to AWS to take advantage of cloud benefits while continuing to use HPE hardware.
Here are the detailed specs of new U7inh instance:
Instance name
vCPUs
Memory (DDR5)
EBS bandwidth
Network bandwidth
U7inh-32tb.480xlarge
1920
32,768 GiB
160 Gbps
200 Gbps
U7inh instance offers up to two times vCPUs and 1.6 times EBS bandwidth in a single instance, compared with the largest U7i instance. You can run your largest in-memory database workloads like SAP HANA or seamlessly migrate workloads running on HPE hardware to AWS.
U7inh instance supports Amazon Linux, Red Hat Enterprise Linux, and SUSE Enterprise Linux Server. Operating system support for SAP HANA workloads on High Memory instances include: SUSE Linux Enterprise Server 15 SP3 for SAP and above and Red Hat Enterprise Linux 8.6/9.0 for SAP and above.
U7inh instance is SAP certified to run Business Suite on HANA (SoH), Business Suite S/4HANA, Business Warehouse on HANA (BW), and SAP BW/4HANA in production environments. U7inh instance is also certified for scale-out SAP HANA OLTP workloads such as S/4HANA and customers can deploy up to four U7inh instance (128TB) in a cluster for even larger SAP HANA workloads.
Establishing and maintaining an effective security and governance posture has never been more important for enterprises. This post explains how you, as a security administrator, can use Amazon Web Services (AWS) to enforce resource configurations in a manner that is designed to be secure, scalable, and primarily focused on feature gating.
In this context, feature gating means that newly supported AWS features and configurations can’t be used unless you explicitly approve them. With feature gating, you maintain control over your AWS environment when new services and capabilities are introduced.
This blog post demonstrates a unique approach to giving users, such as DevOps teams, controlled flexibility within safe boundaries by allowing resource provisioning that uses only approved configurations. This approach also accommodates configurations that will be supported in future versions of the resource, keeping them restricted until explicitly approved, as shown in Figure 1.
Figure 1: Restrict resource provisioning to approved configurations only
Apply your resource configuration enforcement
As shown in Figure 2, our solution for resource configuration enforcement (RCFGE) uses AWS CloudFormation Hooks. By using Hooks, you can run custom logic during the provisioning of resources. These are proactive controls because you inspect and enforce resource configurations before the resource is created, updated, or deleted.
Your Hook will only be effective if CloudFormation supports the AWS resources that you are using and if you implement a service control policy (SCP) that helps prevent users from provisioning resources outside of CloudFormation.
Figure 2: How CloudFormation Hooks work
The flow shown in Figure 2 consists of the following five steps:
DevSecOps registers and configures a CloudFormation Hook in the account.
DevOps specifies a CloudFormation template that defines the required resources and configurations.
CloudFormation creates a new stack resource, starting the provisioning process based on the template.
The Hook is triggered before provisioning for each resource that’s defined in the template, and runs custom validation logic.
If the validation checks pass, CloudFormation proceeds with provisioning; if not, the process is terminated.
Make your solution scalable
To achieve scalable operations, you should implement a reusable and generic Hook that targets all supported CloudFormation resource types. This Hook enforces resource configuration by loading resource specification files from an external object storage, such as an Amazon Simple Storage Service (Amazon S3) bucket.
These specification files define validation rules in a declarative language. Using this approach, you can add and remove resource configuration validation rules by editing the declarative files. When you externalize custom logic as decoupled validation rules from the Hook, DevSecOps personnel can manage these rules at scale without affecting your infrastructure.
Figure 3: Externalize custom logic as validation rule files in an S3 bucket
Figure 3 shows how the solution has been revised to support this approach. Steps 1–3 are the same as in the flow shown in Figure 2:
DevSecOps registers and configures a CloudFormation Hook in the account.
DevOps specifies a CloudFormation template that defines the required resources and configurations.
CloudFormation creates a new stack resource, starting the provisioning process based on the template.
The Hook is triggered before provisioning for each resource that’s defined in the template.
The Hook loads the relevant resource specification file from the S3 bucket and executes the validation rules against the current resource in the CloudFormation template.
If the validation checks pass, CloudFormation proceeds with provisioning; if not, the process is terminated.
You need to configure the Hook schema and the Hook configuration schema to evaluate the configurations of all supported resources across your AWS accounts before changes are provisioned. This setup should cover create, update, and delete operations so that the Hook can help prevent non-approved configurations across stacks.
By using AWS CloudFormation Guard, you can externalize validation rules from the Hook, as described in Extend your pre-commit hooks with AWS CloudFormation Guard. Guard is an open source, general purpose, policy-as-code (PaC) evaluation tool that validates CloudFormation templates against custom rules to help you stay aligned with your organizational policies. For example, the CT.S3.PR.1 rule specification demonstrates a Guard rule that requires an S3 bucket to have its settings configured to block public access. These validation rules apply to currently supported AWS resource configurations and features, but they don’t restrict potential future properties.
Boost your solution with feature gating
Your risk model might lead you to look for mechanisms that further restrict the AWS resource configurations that you allow in your environments. As you will see, the proposed solution restricts authorized workforce users so that they can use new configurations only if you enable them. The proposed approach uses feature gating because it continues to enforce your configurations even when AWS adds new options for your resources.
Guard aims to validate required constraints; but to meet the feature gating objective, you should implement validation rules that check whether resource configurations fulfill structural constraints described by the restricted version of CloudFormation resource schemas. These schemas help you confine the possible resource configurations that can be provisioned in your environment no matter what new configurations AWS introduces.
Figure 4: Enforce resource configuration with restricted resource schema templates
Figure 4 shows an updated version of the same flow where validation rules are implemented by using restricted resource schema templates, which are stored in an S3 bucket. These templates are based on the original CloudFormation resource schemas, representing a snapshot of these schemas at a specific point in time. Steps 1–4 are the same as in the flow shown in Figure 3:
DevSecOps registers and configures a CloudFormation Hook in the account.
DevOps specifies a CloudFormation template that defines the required resources and configurations.
CloudFormation creates a new stack resource, starting the provisioning process based on the template.
The Hook is triggered before provisioning for each resource that’s defined in the template.
The Hook loads the relevant restricted resource schema template file from the S3 bucket and uses it to execute schema validation against the current resource in the CloudFormation template.
If the validation checks pass, CloudFormation proceeds with provisioning; if not, the process is terminated.
A restricted resource schema template is a subset of its corresponding original CloudFormation resource schema. It includes additional constraints that limit certain properties to specific values and patterns or exclude certain properties entirely. Furthermore, these templates contain placeholders that you fill in with runtime values, such as the account ID, which your Hook provides as part of the Hook context.
As shown in Figure 5, the flow within the RCFGE CloudFormation Hook involves the following steps:
The CloudFormation Hook is invoked with the Hook context and the resource’s configuration JSON object.
The Hook loads the restricted resource schema template from the S3 bucket and substitutes placeholders with the Hook context runtime values, producing a valid JSON schema.
The Hook validates the stack’s resource configuration JSON object against the schema. If it returns OperationStatus.SUCCESS, then CloudFormation proceeds with the provisioning process. If it returns OperationStatus.FAILED, then CloudFormation terminates the provisioning process.
If a restricted resource schema template for a CloudFormation resource type isn’t found in the S3 bucket, the schema validation step fails by default.
Sample excerpt of a restricted schema template for an S3 bucket resource
The following is an excerpt from a restricted schema template for an S3 bucket. At runtime, your Hook processes this template, substituting the placeholders with relevant values from the Hook context. In this example, the Hook replaces the <accountID> placeholder in the topic’s pattern with the actual account ID. The resulting JSON schema disallows additional properties beyond those defined by the schema and restricts the Amazon Simple Notification Service (Amazon SNS) topics that can be used for event notifications.
Note: In the code samples that follow, we’ve omitted some code for brevity—we’ve indicated these omissions with three periods: ...
CloudFormation template for an S3 bucket that adheres to the restricted schema
Let’s assume that your account ID is 111122223333. The account ID is propagated to the Hook through the Hook context.
The following is an excerpt from a CloudFormation template that aligns with the restricted schema for an S3 bucket instantiated from the template shown previously. As a result, your Hook allows the corresponding CloudFormation stack to proceed.
CloudFormation template for an S3 bucket that diverges from the restricted schema (example 1)
The following is an excerpt from a CloudFormation template that doesn’t align with the restricted schema for an S3 bucket instantiated from the template shown previously because it attempts to configure the Amazon SNS topic for the notification configuration, which uses an Amazon Resource Name (ARN) of another account. As a result, your Hook causes the corresponding CloudFormation stack to fail.
CloudFormation template for an S3 bucket that diverges from the restricted schema (example 2)
The following is an excerpt from a CloudFormation template that doesn’t align with the restricted schema for an S3 bucket instantiated from the template shown previously. This time, it violates your feature gating objective by attempting to use a new, imaginary feature of an S3 bucket that isn’t approved for use by your restricted schema for an S3 bucket. As a result, your Hook causes the corresponding CloudFormation stack to fail.
If a security control itself isn’t protected adequately, it becomes a weak link in the security chain. For example, a surveillance camera (a physical security control) that isn’t securely mounted can be removed, rendering it useless. This principle also applies to your RCFGE solution.
Next, we will show you how to isolate management activities to a dedicated account and use SCPs as preventative controls.
Isolate RCFGE management in a dedicated account
Organizing your AWS environment by using multiple accounts is a best practice because it enhances security, simplifies management, and allows for better resource isolation and cost tracking. Isolating the operation and management of your RCFGE solution in its own dedicated account is essential for securing the solution’s resources.
With AWS CloudFormation StackSets, you can deploy and manage RCFGE stacks across multiple accounts and AWS Regions from a single central administrator account. This provides consistent and scalable infrastructure while maintaining centralized governance. With this functionality, you can deploy the RCFGE resources to existing accounts and automatically include new accounts as you add them to your organization, simplifying RCFGE management and providing uniformity across your environments. For more information, see Deploy CloudFormation Hooks to an Organization with service-managed StackSets.
Figure 6 shows how to extend that idea so that you can operate the RCFGE solution at scale while maintaining isolation and the separation of duties. The solution operates across three key account types:
Management account –use this account to create your organization and designate the CloudFormation StackSets delegated administrator account.
Delegated administrator account – this account serves as the centralized management point for the RCFGE solution. It contains a continuous integration and continuous delivery (CI/CD) pipeline that provisions RCFGE resources across the organization by using CloudFormation StackSets with service managed permissions. The account hosts a centralized S3 bucket that stores the RCFGE restricted resource schema templates. The security engineering team uses this account to submit Hook code and restricted resource schema template changes, which trigger the CI/CD pipeline.
Member accounts – each member account contains an RCFGE StackSet instance and an AWS Identity and Access Management (IAM) role for provisioning RCFGE resources. It also includes a CloudFormation Hook and an IAM role that allows the Hook to access the centralized S3 bucket with RCFGE restricted resource schema templates.
Figure 6: Securely operate the RCFGE solution
Let’s explore how the RCFGE solution architecture enforces resource configuration step by step, as shown in Figure 7.
Figure 7: CloudFormation stack deployment flow with RCFGE validation and enforcement
DevOps initiates the deployment by specifying a CloudFormation template that defines the resources and configurations needed.
CloudFormation creates a new stack resource, initiating the resource provisioning process based on the provided template.
The RCFGE CloudFormation Hook is triggered for each resource defined in the CloudFormation template.
The Hook loads the corresponding restricted resource schema template from the S3 bucket.
The Hook validates a resource configuration:
The Hook processes the restricted resource schema template to create a JSON schema.
It uses this JSON schema to validate the current resource in the CloudFormation template.
If the resource is invalid according to the schema, the provisioning process is terminated.
If the current resource passes validation, CloudFormation proceeds with the resource provisioning process by creating and configuring the resources as specified in the template.
Use SCPs as preventive controls for your organization to help protect RCFGE
The following SCP excerpt accomplishes three objectives:
Implements a statement (see AllowedListActions) to explicitly specify the access that is allowed while other access is implicitly blocked.
Implements control objectives to help prevent changes to resources set up by the RCFGE solution (see ProtectRCFGEResources and ProtectStackSetExecutionRole).
Makes sure that AWS resource provisioning does not occur outside of CloudFormation (see ProvisionResourcesViaCloudFormationOnly).
In this SCP excerpt, the ProvisionResourcesViaCloudFormationOnly statement restricts CloudFormation stacks to being managed only through forward access sessions (FAS) in AWS IAM.
The ProvisionResourcesViaCloudFormationOnly statement explicitly prohibits direct create, update, and delete actions for all supported resources used in your environment. If needed, split this statement into multiple parts so you don’t exceed SCP size limits, while providing comprehensive coverage of your resources to make sure that they are provisioned and managed only through CloudFormation.
The ProtectStackSetExecutionRole statement in this example assumes that CloudFormation trusted access is activated with AWS Organizations, which is required by StackSets to deploy across accounts and Regions by using service managed permissions.
To allow the Hook to retrieve the necessary restricted resource schema templates, member accounts must be able to access the S3 bucket that contains the RCFGE templates. The following code sample shows the bucket policy for the S3 bucket that contains the RCFGE templates.
As shown in the following code sample, the RCFGEHookExecutionRole IAM role in member accounts has a policy that grants read-only access to the RCFGE templates that are stored in an S3 bucket in the RCFGE delegated administrator account, where 555555555555 represents the account ID.
In the following code sample, the RCFGEHookExecutionRole IAM role in member accounts has a trust policy that allows it to be assumed only by the relevant CloudFormation service principals, where 444455556666 represents the account ID of the member account.
Define baseline configuration for RCFGE and continuous monitoring with AWS Config
Defense in depth is an effective strategy because if one line of defense fails, additional layers are in place to help stop threats at subsequent points. With AWS Config, you can capture the configuration of RCFGE resources over time. You can set up AWS Config custom rules to automatically assess the compliance of your RCFGE resources against predefined policies. For example, you can use an AWS Config custom rule to make sure that the RCFGE Hook hasn’t been altered or removed.
Conclusion
In this post, you learned how to use CloudFormation Hooks to create a resource configuration enforcement (RCFGE) solution on AWS that is designed to be secure and scalable and that supports feature gating. Using this approach, you, as a security administrator, can maintain strict control over resource configurations and feature adoption across your AWS environments. The solution provides a balanced approach to governance, so that DevOps teams have the flexibility to work within approved boundaries while making sure that new AWS features are only accessible after explicit approval.
If you have feedback about this post, submit comments in the Comments section. For questions, start a new thread on the CloudFormation re:Post or contact AWS Support.
As organizations continue their cloud journeys, effective data security in the cloud is a top priority. Whether it’s protecting customer information, intellectual property, or compliance-mandated data, encryption serves as a fundamental security control. This is where AWS Key Management Service (AWS KMS) steps in, offering a robust foundation for encryption key management on AWS.
One of the first questions that often arises for customers is, “How many keys do I actually need?” This seemingly simple question requires careful consideration of various factors. Although AWS KMS makes encryption straightforward, organizations need to consider several aspects of their key management strategy. These include choosing between AWS managed keys, customer managed keys, and importing your own keys (BYOK), as well as deciding between centralized and decentralized key management approaches. Each option has its own benefits and trade-offs in terms of security, control, and operational overhead. By understanding these choices and how they align with your organization’s needs, you can develop an effective and efficient key management strategy.
In this blog post, we explore the main considerations that drive your AWS KMS key strategy, from organizational structure to compliance requirements. Should you maintain a centralized key management approach with a single team controlling all keys, or adopt a decentralized model where individual teams manage their own keys? These decisions are important because they relate to the AWS shared responsibility model, where AWS maintains the security of the cloud, while customers remain responsible for security in the cloud, including the proper management and use of encryption keys.
Overview – What is AWS Key Management Service?
AWS Key Management Service (AWS KMS) is an AWS managed service that makes it convenient for you to create and control the encryption keys that are used to encrypt your data. The keys that you create in AWS KMS are protected by FIPS 140 Level 3 validated hardware security modules (HSM). The keys never leave AWS KMS unencrypted. To use or manage your KMS keys, you interact with AWS KMS.
Customers are responsible for deciding what data to encrypt, choosing the appropriate encryption keys, and implementing encryption across AWS services with the help of the key policy. Customers are responsible for monitoring and auditing the use of encryption keys through services such as AWS CloudTrail.
A critical aspect of customer responsibility is determining how to manage the keys and how many KMS keys are needed. This decision depends on various factors such as data classification, application architecture, regulatory requirements, and operational needs. We look at these areas in more detail in the next sections.
Guiding principles for key strategy
Following are four guiding engineering principles that, based on our experience, help create a secure and easier-to-maintain system. They will assist you in determining the approximate number of KMS keys for your organization based on your management requirements.
Principle 1 – Data Classification: If a system processes data of different classification levels, employ separate data resources and separate KMS keys to separately govern and audit access to the data. With similarly classified data or a single type of data, the usage of just one KMS key may be justified.
Why it matters: This principle helps to ensure that data that is classified into different sensitivity levels is protected appropriately based on access to encryption keys for that same classification, reducing the risk of unauthorized access and simplifying governance.
Principle 2 – Applications: Multiple applications can run in one AWS account. We recommend that you use distinct KMS keys for each application, because managing access to an individual key can become a complex task when it is delegated to two or more application administrators. Use separate KMS keys for applications running in distinct AWS accounts to further make use of the account boundary, limiting the potential impact in case of a security incident. Use separate keys for distinct application stages (such as development, staging, or production).
Why it matters: This approach isolates access to applications and application access to data. This reduces the potential impact of unintended access to a key.
Principle 3 – AWS Services: When you consider key management across multiple AWS services, focus on both the services and the nature of the data. If you are dealing with one type of data (for example, customer information) that flows through multiple AWS services as part of one application or workflow, consider using a single KMS key. This simplifies key management while maintaining consistent access control. For instance, a customer record that is stored in Amazon Simple Storage Service (Amazon S3), processed by AWS Lambda, and then stored in Amazon DynamoDB could use the same KMS key across these services as mentioned in Principle 1.
However, if you are handling different types of data (such as financial records and user preferences) across various AWS services, even within the same application, consider using separate KMS keys on a per-service basis. This allows for more granular access control and adheres to the principle of least privilege. For example, in an e-commerce application, you might use one KMS key for encrypting payment information in Amazon Relational Database Service (Amazon RDS) and a different key for encrypting user browsing history in Amazon Redshift.
The decision to use one key or multiple keys should be based on your data classification policies and access control requirements. With this approach, you can keep your key management strategy aligned with your data governance policies, regardless of which AWS services you are using.
Why it matters: This principle balances the need for simplicity with the requirement for granular control over data access across different AWS services.
Principle 4 – Separation of Duties: Key policies define who can administer and who can use the key. In the case of distinct encryption use cases and distinct administrators, we recommend that you create separate KMS keys. Another aspect of separation of duties is that, with KMS key policies, two different principals can be made responsible for governing data and data decryption access. However, this does not influence the count of keys.
Why it matters: This principle supports the implementation of least privilege access and helps maintain clear accountability in key management.
By applying these principles, you can develop a key management strategy that describes how many KMS keys you may need, and that balances security, compliance, and operational efficiency. In the following sections, we explore how to apply these principles in various scenarios.
Examples of key management strategy and comparison of centralized and decentralized approaches
In addition to the guiding principles discussed earlier, the structure of your organization and its specific needs play a crucial role in determining the most suitable approach to key management. When implementing key management strategies, organizations generally choose from three main approaches: centralized, decentralized, or a hybrid model. The choice depends on the organization’s structure, needs, and operational context. Each approach offers distinct advantages for specific organizational scenarios.
A decentralized approach is our recommended approach, as most customers fit into the following scenarios:
Organizations with autonomous business units or where governance controls provide oversight of key usage
Companies where development teams are agile and ownership of keys can be centrally audited
Companies that operate in multiple regulatory frameworks
Companies that require to operate in a particular AWS Region
A centralized KMS approach is best suited for the following scenarios:
Organizations that require strict compliance oversight and centralized management
Companies with centralized security or data protection functions
In a hybrid model, there is a blend between centralized and decentralized:
Core key policies are managed centrally
Day-to-day key operations are handled by teams
For example, organizations or companies could have independent product teams, but a centralized security team.
Example 1 (Hybrid): A retail website with public product catalog data and confidential customer data should use two KMS keys—one for the public catalog that is encrypted in Amazon S3, and one for customer data that is encrypted in Amazon RDS and other AWS services.
Rationale: This recommendation is based primarily on Principle 1 (Data Classification). The public catalog data and confidential customer data represent different classification levels, justifying the use of separate keys. This approach is further supported by Principle 3 (AWS Services), because the data resides in different AWS services and is of a varied nature.
The benefits of this approach:
Implement appropriate access controls for each data type
Manage encryption independently for each data classification
Enhance overall data security and compliance
Example 2 (Decentralized): A healthcare company with several application teams could use a separate KMS key for each application team, with distinct key policies for each key based on the data and roles of each team.
Rationale: This recommendation is primarily based on Principle 2 (Applications). With multiple application teams operating within the healthcare company, each potentially dealing with distinct types of data and having different access requirements, separate KMS keys provide for independent management of encryption and access for each team. This approach is further supported by Principle 4 (Separation of Duties), allowing for team-specific key policies.
The benefits of this approach:
Maintain granular control over data access.
Implement team-specific encryption policies.
Uphold the principle of least privilege across the organization.
Enhance data security: By using separate keys, the company limits the impact of improper access to any given key, enables more precise access control, facilitates independent key rotation schedules, and improves the ability to monitor and audit key usage for each application.
Simplify alignment with healthcare regulations: Separate keys support data segregation requirements, enable fine-grained role-based access control, provide clear audit trails for each application’s data access, and allow for tailored data lifecycle management. This functionality is crucial for aligning with various healthcare compliance standards such as HIPAA.
Allow for efficient and distributed key management that is tailored to each application team’s needs.
These examples demonstrate how applying the guiding principles can lead to a well-structured key management strategy, tailored to the specific needs of different organizations and use cases.
Considerations for key management
When you implement your key management strategy, several factors need to be considered beyond just the number of keys. This section explores these considerations to help you make informed decisions about your key management approach.
Key types
AWS offers different types of KMS keys, each with its own benefits and use cases.
AWS owned keys are managed by AWS in service accounts, used across multiple customer accounts, and provide no customer visibility or audit capability. Choose AWS owned keys when there are no management or audit requirements for the keys, but encryption of the data at rest is needed.
AWS managed keys are managed entirely by AWS and are used only for your AWS account. Although customers can view these keys in the AWS Management Console and track their usage in AWS CloudTrail logs, they have limited ability to directly control or modify these keys. Choose AWS managed keys when managing keys is not a requirement, but having an audit trail is. It’s worth noting that AWS managed keys are automatically rotated every year, which can be convenient for many use cases.
Customer-managed keys offer the highest level of control and customization, allowing creation of key policies and control over key rotation. However, customer managed keys provide more flexibility, allowing you to set your own rotation schedule or even enable rotation if you are required to do so for regulatory reasons. Choose customer managed keys when you need strict control over key usage and the ability to share keys or control access through key policies, detailed auditing capabilities, alignment with specific compliance requirements, or the ability to integrate key management with your existing processes and tools.
The decision between AWS managed and customer managed keys often comes down to balancing the convenience of automatic management with the need for granular control and customization. As the number of keys increases, so does the complexity of management. More keys mean more policies to create, manage, and audit. Making sure that the right people have access to the right keys becomes more challenging. However, to help audit KMS key access, you can use the IAM Access Analyzer to determine external access to your keys. Managing rotation schedules for multiple keys requires more effort, and more keys mean more policies to analyze and monitor, as well as growing costs.
Cost
Security should be the primary concern, but cost is also a factor. Each customer managed key incurs a monthly storage cost. Both AWS managed and customer managed KMS keys have API usage costs associated with them. Key rotation can increase costs over time, as old key versions are retained.
Manageability
Finding the right balance between security and manageability is crucial. Too few keys might not provide adequate separation of duties or granular access control, while too many keys can lead to increased complexity, higher costs, and potential mismanagement.
Specific requirements
Different industries and regions may have specific requirements for key management. Some regulations might require separation of duties, necessitating multiple keys. Certain compliance standards might dictate specific key rotation or audit trail requirements.
By carefully considering these factors alongside the guiding principles discussed earlier, you can develop a key management strategy that balances security, compliance, cost-effectiveness, and operational efficiency for your specific needs. It is important to approach your KMS strategy holistically, considering not just your immediate security needs, but also the long-term management implications. Regular review and adjustment of your key management strategy will provide assurance that it continues to meet your evolving needs while maintaining robust security and compliance.
Conclusion
As we explored throughout this post, determining the optimal number of AWS KMS keys for your organization is a nuanced decision that balances security, compliance, cost, and operational efficiency. The guiding principles we discussed—data classification, application segregation, AWS service integration, and separation of duties—provide a solid framework for making these decisions. Remember that there’s no one-size-fits-all solution; the right approach depends on your specific needs and circumstances.
As you move forward in implementing or refining your KMS key strategy, consider these next steps: First, conduct a thorough audit of your current data assets, their classifications, and the applications and services that interact with them. Next, map out your ideal key management structure based on the principles we’ve discussed. Then, evaluate the costs and operational overhead of your proposed strategy, adjusting as necessary to find the right balance for your organization. Finally, implement your strategy incrementally, starting with your most sensitive or critical data assets.
Remember that key management is an ongoing process. Regularly review and update your strategy as your data landscape evolves, new compliance requirements emerge, or AWS introduces new features. By thoughtfully applying the principles and considerations we’ve discussed, you can create a robust, scalable, and efficient key management strategy that helps your overall security posture and meets your organization’s unique needs.
If you have feedback about this post, submit comments in the Comments section below. If you have questions about this post, contact AWS Support.
After 20 years, and 3283 posts adding up to 1,577,106 words I am wrapping up my time as the lead blogger on the AWS News Blog.
It has been a privilege to be able to “live in the future” and to get to learn and write about so many of our innovations over the last two decades: message queuing, storage, on-demand computing, serverless, and quantum computing to name just a few and to leave many others out. It has also been a privilege to be able to meet and to hear from so many of you that have faithfully read and (hopefully) learned from my content over the years. I treasure those interactions and your kind words, and I keep both in mind when I write.
Next for Jeff I began my career as a builder. Over the years I have written tens of thousands of lines of assembly code (6502, Z80, and 68000), Visual Basic, and PHP, along with hundreds of thousands of lines of C. However, over the years I’ve progressively spent less time building and more time talking about building. As each new service and feature whizzed past my eyes I would reminiscence about days and decades past, when I could actually use these goodies to create something cool. I went from being a developer who could market, to a marketer who used to be able to develop. There’s absolutely nothing wrong with that, but I like to build. The medium could be code, 3D printing, LEGO bricks, electronics components, or even cardboard –creating and innovating is what motivates and sustains me.
With that as my driving force, my goal for the next step of my career is to invest more time focused on learning and using fewer things, building cool stuff, and creating fresh, developer-focused content as I do so. I’m still working to figure out the form that this will take, so stay tuned. I am also going to continue to make my weekly appearances at AWS OnAir (our Friday Twitch show), and I will continue to speak at AWS community events around the globe.
Next for the Blog As for the AWS News Blog, it has long been backed by an awesome team, both visible and invisible. Here we are at the recent AWS re:Invent celebration of the blog’s 20th anniversary (photo courtesy of Liz Fuentes with edits by Channy Yun to add those who were otherwise occupied):
During the celebration I told the team that I look forward to celebrating the 30 year anniversary with them at re:Invent 2034.
Going forward, the team will continue to grow and the goal remains the same: to provide our customers with carefully chosen, high-quality information about the latest and most meaningful AWS launches. The blog is in great hands and this team will continue to keep you informed even as the AWS pace of innovation continues to accelerate.
Thanks Again Once again I need to thank all of you for the very kind words and gestures over the years. Once in your life, if you work hard and get really lucky, you get a unique opportunity to do something that really and truly matters to people. And I have been lucky.
The need to integrate diverse data sources has grown exponentially, but there are several common challenges when integrating and analyzing data from multiple sources, services, and applications. First, you need to create and maintain independent connections to the same data source for different services. Second, the data connectivity experience is inconsistent across different services. For each service, you need to learn the supported authorization and authentication methods, data access APIs, and framework to onboard and test data sources. Third, some services require you to set up and manage compute resources used for federated connectivity, and capabilities like connection testing and data preview aren’t available in all services. This fragmented, repetitive, and error-prone experience for data connectivity is a significant obstacle to data integration, analysis, and machine learning (ML) initiatives.
To solve for these challenges, we launched Amazon SageMaker Lakehouse unified data connectivity. This feature offers the following capabilities and benefits:
With SageMaker Lakehouse unified data connectivity, you can set up a connection to a data source using a connection configuration template that is standardized for multiple services. Amazon SageMaker Unified Studio, AWS Glue, and Amazon Athena can share and reuse the same connection with proper permission configuration.
SageMaker Lakehouse unified data connectivity supports standard methods for data source connection authorization and authentications, such as basic authorization and OAuth2. This approach simplifies your data journey and helps you meet your security requirements.
The SageMaker Lakehouse data connection testing capability boosts your confidence in established connections. With the ability to browse metadata, you can understand the structure and schema of the data source, identify relevant tables and fields, and discover useful data assets you may not be aware of.
SageMaker Lakehouse unified data connectivity’s data preview capability helps you map source fields to target schemas, identify needed data transformation, and plan data standardization and normalization steps.
SageMaker Lakehouse unified data connectivity provides a set of APIs for you to use without the need to learn different APIs for various data sources, promoting coding efficiency and productivity.
With SageMaker Lakehouse unified data connectivity, you can confidently connect, explore, and unlock the full value of your data across AWS services and achieve your business objectives with agility.
This post demonstrates how SageMaker Lakehouse unified data connectivity helps your data integration workload by streamlining the establishment and management of connections for various data sources.
Solution overview
In this scenario, an e-commerce company sells products on their online platform. The product data is stored on Amazon Aurora PostgreSQL-Compatible Edition. Their existing business intelligence (BI) tool runs queries on Athena. Furthermore, they have a data pipeline to perform extract, transform, and load (ETL) jobs when moving data from the Aurora PostgreSQL database cluster to other data stores.
Now they have a new requirement to allow ad-hoc queries through SageMaker Unified Studio to enable data engineers, data analysts, sales representatives, and others to take advantage of its unified experience.
In the following sections, we demonstrate how to set up this connection and run queries using different AWS services.
Prerequisites
Before you begin, make sure you have the followings:
An AWS account.
A SageMaker Unified Studio domain.
An Aurora PostgreSQL database cluster.
A virtual private cloud (VPC) and private subnets required for SageMaker Unified Studio.
An Amazon Simple Storage Service (Amazon S3) bucket to store output from the AWS Glue ETL jobs. In the following steps, replace amzn-s3-demo-destination-bucket with the name of the S3 bucket.
An AWS Glue Data Catalog database. In the following steps, replace <your_database> with the name of your database.
Create an IAM role for the AWS Glue job
You can either create a new AWS Identity and Access Management (IAM) role or use an existing role that has permission to access the AWS Glue output bucket and AWS Secrets Manager.
If you want to create a new one, complete the following steps:
On the IAM console, in the navigation pane, choose Roles.
Choose Create role.
For Trusted entity type, choose AWS service.
For Service or use case, choose Glue.
Choose Next.
For Add permissions, choose AWSGlueServiceRole, then choose Next.
For Role name, enter a role name (for this post, GlueJobRole-demo).
Choose Create role.
Choose the created IAM role.
Under Permissions policies, choose Add permission and Create inline policy.
For Policy editor, choose JSON, and enter the following policy:
Let’s get started with the unified data connection experience. The first step is to create a SageMaker Lakehouse data connection. Complete the following steps:
Sign in to your SageMaker Unified Studio.
Open your project.
On your project, in the navigation pane, choose Data.
Choose the plus sign.
For Add data source, choose Add connection. Choose Next.
Select PostgreSQL, and choose Next.
For Name, enter postgresql_source.
For Host, enter your host name of your Aurora PostgreSQL database cluster.
For Port, enter your port number of your Aurora PostgreSQL database cluster (by default, it’s 5432).
For Database, enter your database name.
For Authentication, select Username and password.
Enter your username and password.
Choose Add data.
After the completion, it will create a new AWS Secrets Manager secret with a name like SageMakerUnifiedStudio-Glue-postgresql_source to securely store the specified username and password. It also creates a Glue connection with the same name postgresql_source.
Now you have a unified connection for Aurora PostgreSQL-Compatible.
Load data into the PostgreSQL database through the notebook
You will use a JupyterLab notebook on SageMaker Unified Studio to load sample data from an S3 bucket into a PostgreSQL database using Apache Spark.
On the top left menu, choose Build, and under IDE & APPLICATIONS, choose JupyterLab.
Choose Python 3 under Notebook.
For the first cell, choose Local Python, python, enter following code, and run the cell:
For the second cell, choose PySpark, spark, enter following code, and run the cell:
# Read sample data from S3 bucket
df = spark.read.parquet("s3://aws-bigdata-blog/generated_synthetic_reviews/data/product_category=Apparel/")

# Preview the data
df.show()
The code snippet reads the sample data Parquet files from the specified S3 bucket location and stores the data in a Spark DataFrame named df. The df.show() command displays the first 20 rows of the DataFrame, allowing you to preview the sample data in a tabular format. Next, you will load this sample data into a PostgreSQL database.
For the third cell, choose PySpark, spark, enter following code, and run the cell (replace <account-id> with your AWS account ID):
import boto3
import ast

# replace you account ID before running this cell

# Get secret
secretsmanager_client = boto3.client('secretsmanager')
get_secret_value_response = secretsmanager_client.get_secret_value(
    SecretId='SageMakerUnifiedStudio-Glue-postgresql_source' # replace the secret name if needed
)
secret = ast.literal_eval(get_secret_value_response["SecretString"])

# Get connection
glue_client = boto3.client('glue')
glue_client_response = glue_client.get_connection(
    CatalogId='<account-id>',
    Name='postgresql_source' # replace the connection name if needed
)
connection_properties = glue_client_response["Connection"]["ConnectionProperties"]
For the fourth cell, choose PySpark, spark, enter following code, and run the cell:
# Load data into the DB
jdbcurl = "jdbc:postgresql://{}:{}/{}".format(connection_properties["HOST"],connection_properties["PORT"],connection_properties["DATABASE"])
df.write \
    .format("jdbc") \
    .option("url", jdbcurl) \
    .option("dbtable", "public.unified_connection_test") \
    .option("user", secret["username"]) \
    .option("password", secret["password"]) \
    .save()
Let’s see if you could successfully create the new table unified_connection_test. You can navigate to the project’s Data page to visually verify the existence of the newly created table.
On the top left menu, choose your project name, and under CURRENT PROJECT, choose Data.
Within the Lakehouse section, expand the postgresql_source, then the public schema, and you should find the newly created unified_connection_test table listed there. Next, you will query the data in this table using SageMaker Unified Studio’s SQL query book feature.
Run queries on the connection through the query book using Athena
Now you can run queries using the connection you created. In this section, we demonstrate how to use the query book using Athena. Complete the following steps:
In your project on SageMaker Unified Studio, choose the Lakehouse section, expand the postgresql_source, then the public
On the options menu (three vertical dots) of the table unified_connection_test, choose Query with Athena.
This step will open a new SQL query book. The query statement select * from "postgresql_source"."public"."unified_connection_test" limit 10; is automatically filled.
On the Actions menu, choose Save to Project.
For Querybook title, enter the name of your SQL query book.
Choose Save changes.
This will save the current SQL query book, and the status of the notebook will change from Draft to Saved. If you want to revert a draft notebook to its last published state, choose Revert to published version to roll back to the most recently published version. Now, let’s start running queries on your notebook.
Choose Run all.
When a query finishes, results can be viewed in a few formats. The table view displays query results in a tabular format. You can download the results as JSON or CSV files using the download icon at the bottom of the output cell. Additionally, the notebook provides a chart view to visualize query results as graphs.
The sample data includes a column star_rating representing a 5-star rating for products. Let’s try a quick visualization to analyze the rating distribution.
Choose Add SQL to add a new cell.
Enter the following statement:
SELECT count() as counts, star_rating FROM "postgresql_source"."public"."unified_connection_test"
GROUP BY star_rating
Choose the run icon of the cell, or you can press Ctrl+Enter or Cmd+Enter to run the query.
This will display the results in the output panel. Now you have learned how the connection works on SageMaker Unified Studio. Next, we show how you can use the connection on AWS Glue consoles.
Run Glue ETL jobs on the connection on the AWS Glue console
Next, we create an AWS Glue ETL job that reads table data from the PostgreSQL connection, converts data types, transforms the data into Parquet files, and outputs them to Amazon S3. It also creates a table in the Glue Data Catalog and add partitions so downstream data engineers can immediately use the table data. Complete the following steps:
On the AWS Glue console, choose Visual ETL in the navigation pane.
Under Create job, choose Visual ETL.
At the top of the job, replace “Untitled job” with a name of your choice.
On the Job Details tab, under Basic properties, specify the IAM role that the job will use (GlueJobRole-demo).
For Glue version, choose Glue version 4.0
Choose Save.
On the Visual tab, choose the plus sign to open the Add nodes
Search for postgresql and add PostgreSQL as Source.
For JDBC source, choose JDBC connection details.
For PostgreSQLconnection, choose postgresql_source.
For Table name, enter unified_connection_test
As a child of this source, search in the Add nodes menu for timestamp and choose To Timestamp.
For Column to convert, choose review_date.
For Column type, choose iso.
On the Visual tab, search in the Add nodes menu for s3 and add Amazon S3 as Target.
For Format, choose Parquet.
For CompressionType, choose Snappy.
For S3 Target Location, enter your S3 output location (s3://amzn-s3-demo-destination-bucket).
For Data Catalog update options, choose Create a table in the Data Catalog and on subsequent runs, update the schema and add new partitions.
For Database, enter your Data Catalog database (<your_database>).
For Table name, enter connection_demo_tbl.
Under Partition keys, choose Add a partition key, and choose review_year.
Choose Save, then choose Run to run the job.
When the job is complete, it will output Parquet files to Amazon S3 and create a table named connection_demo_tbl in the Data Catalog. You have now learned that you can use the SageMaker Lakehouse data connection not only in SageMaker Unified Studio, but also directly in AWS Glue console without needing to create separate individual connections.
Clean up
Now to the final step, cleaning up the resources. Complete the following steps:
Delete the connection.
Delete the Glue job.
Delete the AWS Glue output S3 buckets.
Delete the IAM role AWSGlueServiceRole.
Delete the Aurora PostgreSQL cluster.
Conclusion
This post demonstrated how the SageMaker Lakehouse unified data connectivity works end to end, and how you can use the unified connection across different services such as AWS Glue and Athena. This new capability can simplify your data journey.
Chiho Sugimoto is a Cloud Support Engineer on the AWS Big Data Support team. She is passionate about helping customers build data lakes using ETL workloads. She loves planetary science and enjoys studying the asteroid Ryugu on weekends.
Noritaka Sekiyama is a Principal Big Data Architect on the AWS Glue team. He is responsible for building software artifacts to help customers. In his spare time, he enjoys cycling with his new road bike.
Shubham Agrawal is a Software Development Engineer on the AWS Glue team. He has expertise in designing scalable, high-performance systems for handling large-scale, real-time data processing. Driven by a passion for solving complex engineering problems, he focuses on building seamless integration solutions that enable organizations to maximize the value of their data.
Joju Eruppanal is a Software Development Manager on the AWS Glue team. He strives to delight customers by helping his team build software. He loves exploring different cultures and cuisines.
Julie Zhao is a Senior Product Manager at AWS Glue. She joined AWS in 2021 and brings three years of startup experience leading products in IoT data platforms. Prior to startups, she spent over 10 years in networking with Cisco and Juniper across engineering and product. She is passionate about building products to solve customer problems.
The week after AWS re:Invent builds on the excitement and energy of the event and is a good time to learn more and understand how the recent announcements can help you solve your challenges. As usual, we have you covered with our top announcements of AWS re:Invent 2024 post.
Drawing on experiences Amazon has had building distributed systems at massive scale, Werner Vogels, VP and CTO at Amazon, shared critical lessons and strategies he has learned for managing complex systems in his keynote.
Last week’s launches Here are the launches that got my attention.
Amazon Lex – Launches new multilingual streaming speech recognition models that enhance recognition accuracy through two specialized groupings: a European-based model (for Portuguese, Catalan, French, Italian, German, and Spanish) and a Asia Pacific-based model (for Chinese, Korean, and Japanese).
Amazon SageMaker AI – Inference optimized Amazon EC2 G6e instances (powered by NVIDIA L40S Tensor Core GPUs) and P5e (powered by NVIDIA H200 Tensor Core GPUs) are now available on Amazon SageMaker.
Emacs is, famously, an
editor—perhaps far more—that is extensible using its own
variant of the Lisp programming language, Emacs
Lisp (or Elisp). This year’s
edition of EmacsConf, which is an annual “gathering” that has been held
online for the past five years, had two separate talks on using a different
variant of Lisp, Guile,
for Emacs. Both projects would preserve Elisp compatibility, which is a
must, but they would use Guile differently. The first talk we will cover
was given by Robin Templeton, who described the relaunch of the Guile-Emacs project, which would replace
the Elisp in Emacs with a compiler using Guile. A subsequent article will look
at the other talk, which is about an Emacs clone written
using Guile.
Now that we’ve reached the end of another year, you may be looking around the cybersecurity infosphere and seeing a glut of posts offering “hot takes” on the 2024 threat landscape and predictions about what’s coming next. At Rapid7, we don’t truck in hot takes, but rather, cold hard facts. Staying ahead of adversaries requires more than just advanced tools — it requires the latest intelligence and collaborative insights from experts working from data that tells the whole story.
In this blog, the global experts across our Rapid7 Labs and Managed Services teams share real-time vulnerability insights and threat intelligence so that our customers can anticipate and prevent breaches, pinpoint critical threats, and confidently take command of their attack surface.
Our teams responded to hundreds of major incidents, significant vulnerabilities, and ransomware threats in 2024, bolstered by visibility into hundreds of trillions of events analyzed by the Rapid7 Threat Engine. Our response included emergent threat and external vulnerability research, which we share with the community regularly here on the Rapid7 blog, as well as incident response activities for our managed security customers around the globe.
The Rapid7 Labs team has rounded up statistics and trends that caught our eye throughout the year, spanning ransomware, initial access vectors, common malware strains, notable CVE exploitation, and more.
Ransomware Group Activity
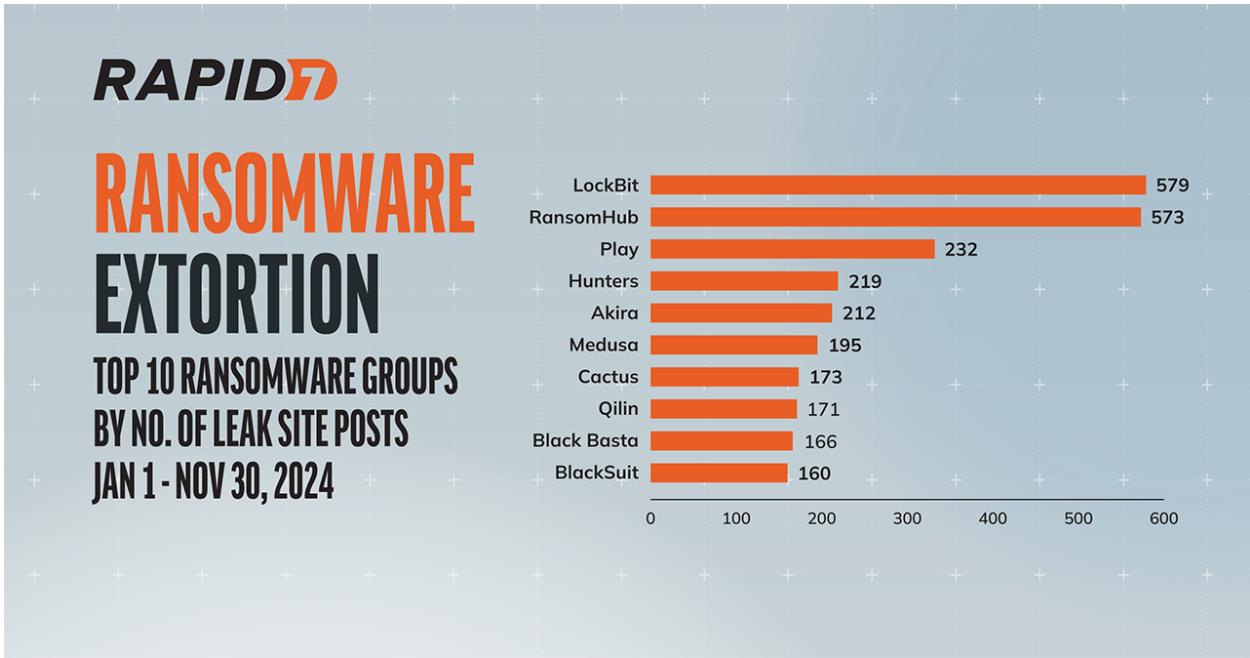
The 2024 ransomware landscape was all about pushing boundaries, with several groups striving to make a name for themselves in extortion circles. Based on Rapid7 Labs data, 33 new or rebranded threat actors appeared between January 1 and December 10, 2024. In that same time period, there were a total of 75 groups (including the newbies) actively seeking to extort their victims by posting stolen data to their leak sites. Between these 74 groups there have been a total of 5,477 leak site posts.
Ransomware-as-a-service (RaaS) groups like RansomHub exfiltrated data from hundreds of targets spanning healthcare, financial services, critical manufacturing, and many more. Rapid7’s ransomware data shows that since this group emerged in early February of this year, it has made 573 posts to its leak site (as of November 30). This high number of posts has earned RansomHub a spot in Rapid7’s “Top 10 Active Ransomware Groups” list for 2024, coming in a very close second to LockBit, which finished November with 579 posts. View the entire top 10 in the graphic below.
While not as prolific at posting on their leak site as RansomHub, Qilin is an example of an established player that has exposed troves of sensitive data as well as achieved significant payouts. Not one to shy away from the healthcare space, Qilin leaked just under 1 million patient records after an attempt to extort $50m from London hospitals earlier this year. With typical ransom demands ranging from $50,000 to $800,000, plus a generous affiliate scheme, Qilin will likely be a mainstay of 2025.
One or two new groups are combining high-visibility attacks with attention-grabbing marketing stunts, most likely to quickly work their way up the affiliate ladder. Hellcat has seemingly come from nowhere to demand $125,000 in “French bread” from one victim. This is, of course, a gimmick on their part, with the ransom expected to be paid in Monero cryptocurrency. There are frequently much larger ransoms demanded, but not all of them come with built-in press appeal.
Several groups have periods in which they seemingly “go dark,” where we do not see posts to their leak sites for weeks at a time. It may be that these groups are using this time to rework their infrastructure, or perhaps they are receiving quick payouts from victims wishing to avoid reputational damage and the negative press associated with a breach coming to light.
Incident Response Trends
Rapid7 incident responders have seen a combination of fresh-faced ransomware groups and old security tricks filling out much of the year. As organizations work to secure their externally facing systems, they must also account for criminals seeking to deceive employees with social engineering and psychological sleight of hand.
Looking out across organizations’ expansive attack surfaces, Rapid7 incident responders observed several vulnerabilities exploited in the wild for initial access this year. The verticals Rapid7 saw targeted the most were manufacturing, professional services, retail, and healthcare.
Social engineering in 2024 was geared toward easy initial access via exploitation of support services. One customer case involved a help desk employee being tricked into configuring a new MFA device and resetting a user password. A separate incident involved an SEO poisoning attack and the download and installation of a trojanized version of the freeware disk analyzer tool SpaceSniffer. Analysis and cleanup tools are popular targets for fake advertisements and bogus downloads, which are typically found at the top of sponsored search results.
Most Observed Malware
Several forms of malware have been at the front of the pack throughout 2024 across all industries. SocGholish, GootLoader, and AsyncRAT led the charge with a heady mix of remote access and credential theft. More than one-quarter (28%) of the customer incidents Rapid7 responded to in 2024 involved one of these three malware families.
SocGholish was observed in 14% of incidents during 2024. The first of three heavily observed malware mainstays of 2024, SocGholish (also known as FakeUpdates) is rooted in website compromise and drive-by attacks. Hijacked websites are used to offer bogus “updates” to unsuspecting end users. You can see an example similar to SocGholish in our analysis of ClearFake from August 2023.
SocGholish updates often masquerade as commonly used programs like web browsers. If the campaign owners find the target system to be of interest, JavaScript is used to trigger a payload drawn from a wide variety of malware. In July of this year, SocGholish was used to distribute AsyncRAT, another of our most commonly observed remote access trojans (RATs).
GootLoader was observed in 10% of incidents during 2024. It is frequently observed in SEO poisoning campaigns typically involving targeted keywords on compromised websites. It is the delivery method for payloads such as Cobalt Strike via diverse search engine queries such as “Bengal cats” and “employment agreements.”
Vulnerability exploitation and remote access to systems without multi-factor authentication (MFA) continued to be the largest drivers of incidents overall in 2024, at 17% and 56% of incidents, respectively. We saw a significant (and rather unfortunate) shift in year-over-year initial access data in 2024 when compared to 2023. Roughly 40% of the incidents the Rapid7 Managed Services team saw in Q3 2023 were remote access to systems with missing or lax enforcement of MFA, particularly for VPNs and virtual desktop infrastructure (VDI). In Q3 2024, fully two-thirds (67%) of incident responses involved abuse of valid accounts and missing or lax enforcement of MFA — once again, mainly on VPNs and VDI, though exposed RDP also added a small number of incidents to remote access counts.
Vulnerability exploitation also remains a prevalent initial access vector, holding firm at 13% of incidents for both Q3 2023 and Q3 2024. Rapid7 MDR observed exploitation of the following CVEs in customer environments between January and November 2024 (non-exhaustive):
As the CVEs above demonstrate, the vulnerability exploitation Rapid7 has observed in managed customer environments has included newer flaws in addition to older, known vulnerabilities that have previously been under attack. Both Adobe ColdFusion CVE-2018-15961 and Oracle WebLogic Server CVE-2020-14882 have been on the U.S. Cybersecurity and Infrastructure Security Agency’s (CISA) list of Known Exploited Vulnerabilities (KEV) since November 2021.
Notable Vulnerabilities
While Rapid7 observed continued adversary use of zero-day vulnerabilities in network edge technologies like VPNs and secure gateways, zero-day flaws represented a lower overall percentage of major 2024 vulnerabilities when compared with what we saw in 2023. File transfer technologies also had a number of severe vulnerabilities disclosed in 2024 — but surprisingly, several of these have remained unexploited beyond the usual attempts to attack internet-facing honeypots. Critical issues in both Fortra’s GoAnywhere MFT software and Progress Software’s MOVEit Transfer solution were expected to see large-scale attacks, but happily, thus far those attacks have not materialized.
In Rapid7’s 2024 Attack Intelligence Report, we found that fully a quarter of widespread threat vulnerabilities our team analyzed for the period were the result of broad, global, zero-day exploitation by a single highly skilled threat actor. That trend lost traction in the back half of the year, but we still saw it rear its head from time to time. October 2024’s FortiManager RCE (CVE-2024-47575) offers a salient example: By the time the vulnerability was disclosed publicly, dozens of organizations around the world had already been compromised by a targeted but prolific threat campaign. A pair of widely exploited zero-day flaws in Palo Alto Networks firewalls (CVE-2024-0012, CVE-2024-9474) made for another prominent example. Rumors of a possible zero-day vulnerability swirled for weeks before the vendor was able to confirm real-world attacks in mid-November.
Below is a sample of notable CVEs from Rapid7’s vulnerability intelligence data, most (but not all) of which came under attack over the past 11 months.
Rapid7’s open platform for vulnerability research, AttackerKB, incorporated new tags in 2024 to allow users to note when vulnerabilities were observed in ransomware or state-sponsored attacks. Our team and our community added ransomware tags to more than 250 CVEs in 2024, and 75-plus vulnerabilities have been tagged for their (verified) use in known, state-sponsored threat campaigns. More than 1,700 unique CVEs have been reported exploited in the wild in AttackerKB, and we’ve incorporated hundreds of detailed vulnerability assessments from security researchers, incident responders, and pen testers. Interested in exploring more vulnerability data? Join the community here.
Key Learnings
The threat landscape in 2024 saw a host of new ransomware actors creating chaos in novel ways, but it also showed that attackers are willing to use tried and true techniques to breach defenses. At the end of the day (ahem, year) the best practices remain the best practices. Having a strong vulnerability risk management program in place, building strong defenses against phishing and spear phishing campaigns, having robust patching procedures (particularly for zero-days), and instituting multi-factor authentication remain some of the strongest ways to prevent threat actors from making your organization another statistic. Speaking of statistics, here’s an infographic with some highlights from this post.
As always, Rapid7 Labs is here to help. We’ve spent 2024 doing unique and groundbreaking research into the behaviors of threat actors and we have no plans to let up in 2025. If you would like to see our work to date, head over to the Rapid7 Labs page. And keep an eye on it for big things to come next year.
Cloudflare Radar celebrated its fourth birthday in September 2024. As we’ve expanded Radar’s scope over the last four years, the value that it provides as a resource for the global Internet has grown over time, and with Radar data and graphs often appearing in publications and social media around the world, we knew that we needed to make it available in languages beyond English.
Localization is important because most Internet users do not speak English as a first language. According to W3Techs, English usage on the Internet has dropped 8.3 points (57.7% to 49.4%) since January 2023, whereas usage of other languages like Spanish, German, Japanese, Italian, Portuguese and Dutch is steadily increasing. Furthermore, a CSA Research study determined that 65% of Internet users prefer content in their language.
To successfully (and painlessly) localize any product, it must be internationalized first. Internationalization is the process of making a product ready to be translated and adapted into multiple languages and cultures, and it sets the foundation to enable your product to be localized later on at a much faster pace (and at a lower cost, both in time and budget). Below, we review how Cloudflare’s Radar and Globalization teams worked together to deliver a Radar experience spanning twelve languages.
What is localization?
Localization (l10n) is the process of adapting content for a region, including translation, associated imagery, and cultural elements that influence how your content will be perceived. The goal, ideally, is to make the content sound like it was originally written with the region in mind, incorporating relevant cultural nuances instead of merely replacing English with translated text.
Localization includes, among others:
Language: Translation, obviously, but it’s just the beginning.
Tone and message: Localization considers what will resonate with your target audience, not just what’s accurate.
Images: What may be appropriate in one country can be problematic in another (maps, for instance, that tend to include disputed territories).
Date, time, measurement, and number formats: Formats change based on location and may differ even within the same language. In the U.S., the date follows this format: “December 15, 2018.” But in the U.K., that same date would be written like this: “15 December 2018.” Not to mention a constant source of confusion: the month/day/year vs.day/month/year difference:
Pixar movies are a great example of localization. Pixar takes great care to internationalize their movie production process, so they can replace or insert scenes that will resonate with watchers all over the world, not just the US. Let’s consider Inside Out (2015). During the movie, Riley reminisces about playing ice hockey back in Minnesota. Most of the world is not as familiar with ice hockey as in the US, so Pixar wisely decided that they would use soccer elsewhere, allowing a more direct emotional connection with those audiences.
Images: scene from Inside Out (2015), produced by Pixar Animation Studios and Walt Disney Pictures. Copyright Pixar Animation Studios and Walt Disney Pictures. Images used under fair use.
And you don’t have to go to computer animated movies. Here’s an example from The Shining (1980) where the famous “All work and no play makes Jack a dull boy” typewriter scene was localized into all languages differently. The producers, in a pre-Information Technology example of internationalization, shot and cut the localized scene into the local versions of the movie.
Images: scene from The Shining (1980), directed by Stanley Kubrick. Copyright Warner Bros. Pictures. Images used under fair use.
Internationalization
Localization is hard, and no one in the business will tell you otherwise. Fortunately there’s a playbook: the first step to localization is internationalization (i18n). Internationalization is the process of making a product ready to be translated and adapted into multiple languages and cultures. It’s a preparatory step that helps with translation and localization. The more you internationalize your code and the more you take into account language and cultural nuances, the easier the localization will be.
Hard-coding and externalization
The first step to internationalize Radar was to assess how many of the localizable strings were hard-coded. Hard coding is the practice of embedding data directly into the source code of a program. Although a convenient and fast way to write your code, it makes it more difficult to change or localize the code later.
Most of the strings that make up the Radar pages used to be hard-coded, so before we could begin translating, externalization had to be done, which is the process of extracting any text that needs to be localized from the code and moving it into separate files.
Hard-coded strings:
import Card from “~/components/Card”;
import Chart from “~/components/Chart”;

export default function TrafficChart() {
  return (
    <Card
      title="Traffic"
      description="Share of HTTP requests"
    >
      <Chart />
    </Card>
  );
}
Externalized key placeholders:
import { useTranslation } from "react-i18next";
import Card from “~/components/Card”;
import Chart from “~/components/Chart”;

export default function TrafficChart() {
  const { t } = useTranslation();
  return (
    <Card
      title={t("traffic.chart.title")}
      description={t("traffic.chart.description")}
    >
      <Chart />
    </Card>
  );
}
There are several benefits to externalizing strings:
It allows translators to work on separate, isolated files that contain only localizable strings
It prevents accidental changes to the code
It allows developers to deploy updates, changes, and fixes without having to recompile or redeploy code for each language every time
If you look at the example below, when the code is compiled or deployed, upon reaching line 10 (on the left), it will find a key named traffic.chart.title. It will then proceed to match that key within the JSON file on the right, finding it on line 1090 and resolving it to “Traffic” for English, “Tráfego” for Portuguese and “トラフィック” for Japanese, doing this for every localized JSON file present in the code.
Pseudo translation
Not all strings are easily found and some are buried deep in the code, sometimes in legacy, inherited code or APIs. Fortunately, there are some strategies that help detect hard-coded strings. This is where pseudo translation comes into play.
Pseudo translation is a process that replaces all characters in a string with similar-looking ones; pseudo translated strings are enclosed within [ ] characters, and some extra characters are added to them to simulate text expansion (more on that later). It is an invaluable tool to help us find any hard coded strings, and to stress test the UI for language readiness and length variability, while still keeping the content mostly readable. For example, this string:
Routing Information
looks like this once pseudo translated:
[R~óútíñg Í~ñfó~rmát~íóñ]
Once pseudo translation is done, any English strings left intact are most likely hard coded or come from other sources. In the screenshot below you can see how ASN, Country, Name and Prefix Count did not get pseudo translated and had to be externalized by the Radar developers. The Globalization team collaborated with the Radar team to report and fix hard-coded text issues, as well as the issues that are mentioned in the next few sections.
Text expansion
Text expansion occurs when translated content from one language to another takes up more space than the original. Sometimes this expansion is horizontal, as English to German can expand up to an average of 35%, Spanish 30%, and French 20%). Asian languages might contract from the English but expand vertically. Interestingly, the fewer characters English has, the more the localized languages tend to expand.
UI designers and developers need to keep this in mind when creating their applications. Thus, one important consideration is to test the design mock-ups with larger texts and plan the UI to accommodate for text expansion. If some English content barely fits within its container, it will most likely not fit in other languages and possibly break the layout.
Here’s an example of the same button in different languages in Radar’s fixed-width sidebar. Since it’s the main navigation, truncating the text is not appropriate and the only viable option is wrapping, which means localized buttons can end up having different heights. Sometimes it’s necessary to trade visual consistency for usability.
String concatenation
In English, you can easily chain-connect words because most words lack inflections. Almost all programming languages are designed using the English language in mind. An old linguist joke goes like: an English teacher: a teacher of English or a teacher from England? Case in point, it would be nightmarish to translate this example:
A lovely little old rectangular green French silver whittling knife
Most Western languages need to connect words with some glue: prepositions, articles, or inflections. This is why, in general, string concatenation (putting together sentences or sentence parts by combining two or more strings) is a terrible practice for localization, even though it seems efficient from a development point of view. You can’t assume that all languages follow the same sentence structure as English. Most languages don’t.
Sentences may need to be completely reversed for them to sound grammatically correct in other languages. This becomes a particularly severe problem when a string doesn’t include a placeholder because it’s assumed to be concatenated at the beginning or the end of the string, such as this:
"is currently categorized as:"
Developers need to make sure to include any placeholders within the string itself, so that translators can easily move them as needed, for instance:
"Distribution of {{botClass}} traffic by IP version"
would look like this in Simplified Chinese (notice how the {{botClass}} placeholder got moved)
"{{botClass}} 流量分布(按 IP 版本)"
String reuse
As with string concatenation, string reuse (using the same string in more than one place and just swapping out the contents of a placeholder) seems efficient if you’re a developer. A problem arises when translating this into gendered languages, such as most European languages. In Spanish, depending on its position and context, a word as simple as “open” standing by itself, could have all these different translations:
Translators will need to know what will replace the placeholders in strings like the one below, because the surrounding wording may refer to a term that is masculine, feminine, or neutral (for languages that have those, such as German). If a placeholder could be more than one of these (a masculine noun but also a feminine noun), the translation will become grammatically incorrect in at least some of the cases. In the following example, translators would need to know what {link1} and {link2} will be replaced with, so they know which grammatically correct wording to use around them.
Your use of the URL Scanner is subject to our {{link1}}. Any personal data in a submitted URL will be handled in accordance with our {{link2}}.
A better way to do this is to have component placeholders and include the text to be translated for context:
Your use of the URL Scanner is subject to our <link1>Online Service Terms of Use</link1>. Any personal data in a submitted URL will be handled in accordance with our <link2>Privacy Policy</link2>.
Even simple words like Custom, Detected, or Disabled could have different translations depending on their position within a sentence, their location in the UI, depending on whether they accompany a singular, plural, masculine or feminine noun, so extra entries for these may need to be created.
Regional considerations
Date formats
Date formats vary greatly from country to country. Not only can’t you assume that all countries use a month/day/year format, but even the day that the week starts may be different based on the country or culture.
Here’s a comparison of Radar’s date picker in American English against European Spanish (which has weeks starting on Mondays instead of Sundays), and against Simplified Chinese (which uses a completely different format for dates).
Intl.DateTimeFormat receives a locale and formatting options that differ from string tokens commonly found on date libraries such as Day.js or Moment.js. Unless you specifically use the localized string tokens on those libraries, the order of the tokens is fixed, along with any characters or delimiters you might add to the format, which poses a problem because the date format parts order should change according to the locale.
Intl.DateTimeFormat handles all that and saves you the trouble of having to add a date formatting dependency to your project and loading library-specific locale resources.
Here’s an example of a generic React component using Intl.DateTimeFormat and react-i18next. The code below will render the date as “Tue, Oct 1, 2024” for American English (en-US) and as “2024年10月1日(火)” for Japanese (ja-JP).
Similarly, different locales use different notations for numbers. In the US and the UK, a period is used as the decimal separator, and a comma as the thousands separator. Instead, other countries use a comma as the decimal separator and a period (or a space) as the thousands separator. Again, it’s not necessary for developers to know all the odds and ends for this, as they can use Intl.NumberFormat.
Here’s an example of a generic React component using Intl.NumberFormat and react-i18next. The code below will render the number as “12,345,678.90” for American English (en-US) and as “12 345 678,90” for Portuguese (pt-PT). Intl.NumberFormat options can be passed to format numbers as decimals, percentages, currencies, etc, and specify things like number of decimal places and rounding strategies.
As of mid-December, regionalized number formatting is not fully implemented on Radar. We expect this to be complete by the end of Q1 2025.
List sorting
When you have a list of items that appears sorted, such as a country list in a dropdown, it’s not enough to simply translate the items. For instance, when translated into Portuguese, “South Africa” becomes “África do Sul”, which means it should then go near the top of the list. Besides that, each language has different sorting requirements, and those go way beyond the A-Z alphabet. For instance, several Asian languages don’t use Latin characters at all, and may get sorted by stroke or character radical order instead.
Here’s an example of a generic React country selector component using String.localeCompare and react-i18next. The code below imports a list of countries with name and alpha-2 code and sorts the options according to the translated country name for the active locale. Intl.Collator options can be passed to localeCompare() for specific sorting needs.
import { useTranslation } from "react-i18next";

import Select from "~/components/Select";
import COUNTRIES from "~/constants/geo";

export default function CountrySelector() {
  const { t, i18n } = useTranslation();
  const options = COUNTRIES.map(({ name, code }) => ({
    label: t(name, { ns: "countries" }),
    value: code,
  })).sort((a, b) => a.label.localeCompare(b.label, i18n.language));
  return <Select options={options} onChange={(option) => { /* do something */ }} />;
}
API localization
Many of the Radar screens and reports include output from Cloudflare or third-party APIs. Unfortunately, the vast majority of these APIs only output English content. When combining that with the translated part of the site, it may give the impression of a poorly localized site.
To solve this, we take API outputs and map everything into separate files, translate all possible messages, and then display that instead of the original output. But as APIs evolve over time and new messages are added, or existing ones get changed, keeping up with these translations becomes an endless game of “whac-a-mole“.
"Address unreachable error when attempting to load page": "Error de dirección inaccesible al intentar cargar la página",
"Authentication failed": "Autenticación fallida",
"Browser did not fully start before timeout": "El navegador no se ha iniciado por completo antes de agotar el tiempo de espera.",
"Certificate and/or SSL error when attempting to load page": "Error de certificado y/o SSL al intentar cargar la página",
"Crawl took too long to finish": "El rastreo ha tardado demasiado en completarse.",
"DNS resolution failed": "Error de resolución de DNS",
"Network connection aborted.": "Conexión de red cancelada"
It should be a best practice for APIs to accept a locale parameter or header, and for engineers to have multiple languages in mind when building these APIs, even if it’s just the error messages. That could save time and resources for any number of clients they might have.
Project setup
Radar is a Remix project running on Cloudflare Pages. While researching ways to implement internationalization, we came across this Remix blog post, and after some experimenting, we decided to go with Sergio Xalambrí’s remix-i18next. We mostly followed the installation instructions found on the repo, with some changes.
We have multiple translation files on every locale folder, one for each data source, to help us maintain strings that come from APIs. Each file can be used to create a namespace for translations, to avoid key collisions, and also to be loaded separately as needed for each route or component.
On remix-i18next’s instructions, you’ll find the concept of backend plugins to achieve the loading of these files, except that you cannot use i18next-fs-backend with Cloudflare Pages because there’s no access to the filesystem. To solve that we used the resources approach, similar to what can be found on this sample remix-i18next with vite setup, but we didn’t want to have to maintain the resources dictionary each time we add new namespaces, so vite’s Glob imports came in handy:
This creates a server-side only resources dictionary by importing all JSON files in the locales folder to be passed as the resources property for the i18next configuration in Remix’s entry.server.tsx.
To load namespaces on the client side, we created a Remix resource route that uses the resources dictionary and responds with the namespace object of the requested locale:
Namespaces on the server side get picked up by the getRouteNamespaces function on entry.server.tsx:
const ns = i18n.getRouteNamespaces(remixContext);
On the client-side, examples suggested that you’d have to declare the namespaces on each useTranslation() hook instance, but we worked around that in Remix’s root.tsx file:
import { useLocation, useMatches } from "@remix-run/react";
import { useTranslation } from "react-i18next";
import { defaultNS } from “~/i18n”;

export function Layout({ children }) {
  const location = useLocation();
  const matches = useMatches();
  const handle = matches?.find((m) => m.pathname === location.pathname)?.handle || {};
  useTranslation([...new Set([...defaultNS, ...(handle.i18n || [])])]);
  ...
}
This causes the client-side plugin to make calls to the resource route and load the required namespaces.
We also wanted to have the locale in the URL pathname, but not for the default language, so Remix’s optional segments allowed us to do just that. remix-i18next does not have URL locale detection by default, but you can provide your own findLocale function that will receive the request as an argument, and you can then parse the request URL to extract the locale.
Search engine optimization
Once you set up your project for internationalization, you can inform search engines of localized versions of your pages. This allows search engines to display localized results of your website in the same language that is being searched.
You should also localize page titles, descriptions, and relevant Open Graph metadata. To achieve this with Remix and remix-i18next, you use the getFixedT method in route loaders to resolve the translations and return data for the meta export:
import type { LoaderFunctionArgs, MetaArgs } from "@remix-run/server-runtime";
import i18n from "~/i18next.server";

export async function loader({ request }: LoaderFunctionArgs) {
  const t = await i18n.getFixedT(request);
  return {
    meta: {
      title: t("meta.about.title"),
      description: t("meta.about.description"),
      url: request.url,
    },
  };
}

export const meta = ({ data }: MetaArgs<typeof loader>) => data.meta;
If you are defining default meta tags in parent routes you may also need to merge the meta objects.
Conclusion
There is hardly ever an absolute when dealing with languages. Your Spanish, your French, your Japanese will be different from someone else’s, even if you grew up next door to each other. Family, education, environment, relationships will season and give color to your language. It is like a family recipe — it’s unique, it feels like home and it’s not negotiable. It does not make it better or worse, it just makes it yours. And yours will always be different from other languages.
Localization is hard. We have seen that there are many things that can and will go sideways, and there are many unknowns that bubble up to the surface in the process. It can also make a product better, as it stress tests the product’s code and design. A tight relationship between the globalization and Radar teams helped make our efforts go more smoothly. In addition, our translators stepped up to the challenge, familiarizing themselves with Radar, analyzing the English content, finding the right translation that will not only resonate with the audience but also fit in the space allotted, constantly checking for context, previous translations, consistency, industry standards, adapting to style guides, tone, and messaging, and after all of that, ultimately acknowledging the fact that there will be people who will disagree (to varying levels of zeal) with their choice of words.
If you haven’t done so already, we encourage you to explore the localized versions of Cloudflare Radar. Click the language drop-down in the upper right corner of the Radar interface and select your language of choice — Radar will be presented in that language until a new selection is made. Have comments or suggestions about the translations? Let us know at [email protected].
Our longstanding offering won’t fundamentally change next year, but we are going to introduce a new offering that’s a big shift from anything we’ve done before—short-lived certificates. Specifically, certificates with a lifetime of six days. This is a big upgrade for the security of the TLS ecosystem because it minimizes exposure time during a key compromise event.
Because we’ve done so much to encourage automation over the past decade, most of our subscribers aren’t going to have to do much in order to switch to shorter lived certificates. We, on the other hand, are going to have to think about the possibility that we will need to issue 20x as many certificates as we do now. It’s not inconceivable that at some point in our next decade we may need to be prepared to issue 100,000,000 certificates per day.
That sounds sort of nuts to me today, but issuing 5,000,000 certificates per day would have sounded crazy to me ten years ago.
To provide the best experiences, we use technologies like cookies to store and/or access device information. Consenting to these technologies will allow us to process data such as browsing behavior or unique IDs on this site. Not consenting or withdrawing consent, may adversely affect certain features and functions.
Functional
Always active
The technical storage or access is strictly necessary for the legitimate purpose of enabling the use of a specific service explicitly requested by the subscriber or user, or for the sole purpose of carrying out the transmission of a communication over an electronic communications network.
Preferences
The technical storage or access is necessary for the legitimate purpose of storing preferences that are not requested by the subscriber or user.
Statistics
The technical storage or access that is used exclusively for statistical purposes.The technical storage or access that is used exclusively for anonymous statistical purposes. Without a subpoena, voluntary compliance on the part of your Internet Service Provider, or additional records from a third party, information stored or retrieved for this purpose alone cannot usually be used to identify you.
Marketing
The technical storage or access is required to create user profiles to send advertising, or to track the user on a website or across several websites for similar marketing purposes.


 Chiho Sugimoto is a Cloud Support Engineer on the AWS Big Data Support team. She is passionate about helping customers build data lakes using ETL workloads. She loves planetary science and enjoys studying the asteroid Ryugu on weekends.
 Noritaka Sekiyama is a Principal Big Data Architect on the AWS Glue team. He is responsible for building software artifacts to help customers. In his spare time, he enjoys cycling with his new road bike.
 Shubham Agrawal is a Software Development Engineer on the AWS Glue team. He has expertise in designing scalable, high-performance systems for handling large-scale, real-time data processing. Driven by a passion for solving complex engineering problems, he focuses on building seamless integration solutions that enable organizations to maximize the value of their data.
 Joju Eruppanal is a Software Development Manager on the AWS Glue team. He strives to delight customers by helping his team build software. He loves exploring different cultures and cuisines.
 Julie Zhao is a Senior Product Manager at AWS Glue. She joined AWS in 2021 and brings three years of startup experience leading products in IoT data platforms. Prior to startups, she spent over 10 years in networking with Cisco and Juniper across engineering and product. She is passionate about building products to solve customer problems.