Securing applications with AWS Nitro Enclaves: TLS termination, TAP networking, and IMDSv2

Post Syndicated from David-Paul Dornseifer original https://aws.amazon.com/blogs/compute/securing-applications-with-aws-nitro-enclaves-tls-termination-tap-networking-and-imdsv2/

AWS Nitro Enclaves provide isolated environments that keep critical operations such as decryption and cryptographic key management secure from both from root user and external threats.

Many customers have applications that require end-to-end authentication using Transport Layer Security (TLS) and requiring control over TLS termination.

TLS termination refers to the process where encrypted TLS traffic is decrypted using the server’s private key, converting the secure encrypted communication back to plaintext for processing. TLS termination can be done directly within an enclave, helping to ensure that encrypted traffic is not exposed outside the trusted boundary.

This is particularly valuable for public-facing services such as anonymization proxies and Model Context Protocol (MCP) servers, where clients demand assurance that their communications are protected and the application’s integrity can be independently verified using cryptographic attestation in a remote fashion.

This post covers critical design and implementation decisions from the Build multi-party crypto wallets with AWS Nitro Enclaves workshop and the associated public GitHub repository.

Specifically, in this blog we explore patterns on how:

  1. you can build applications that are remotely verifiable by clients, including enclave-based TLS termination using Nitriding, an open-source framework built by Brave and AWS Nitro Enclaves.
  2. you can configure TAP networking devices for AWS Nitro Enclaves using gvproxy.
  3. your enclaves can access EC2 instance metadata service (IMDSv2) and fetch temporary AWS credentials.
  4. you can decrypt secrets via AWS Key Management Service (KMS) using cryptographic attestation and the Python Boto3 SDK.

Prerequisites and Deployment

This post builds on our workshop “Build multi-party crypto wallets with AWS Nitro Enclaves” which demonstrates a Shamir Secret Sharing (SSS) application. The SSS app securely splits cryptographic private keys into multiple shards, requiring a threshold number to reconstruct the original key, ideal for Nitro Enclaves as it prevents any single party from accessing the complete key while maintaining operational functionality.

To follow along hands-on, you’ll need to deploy the provided AWS Cloud Development Kit (CDK) stack from the workshop repository on GitHub. However, you can understand the concepts and architecture discussed in this post without deploying the solution yourself.

Solution architecture

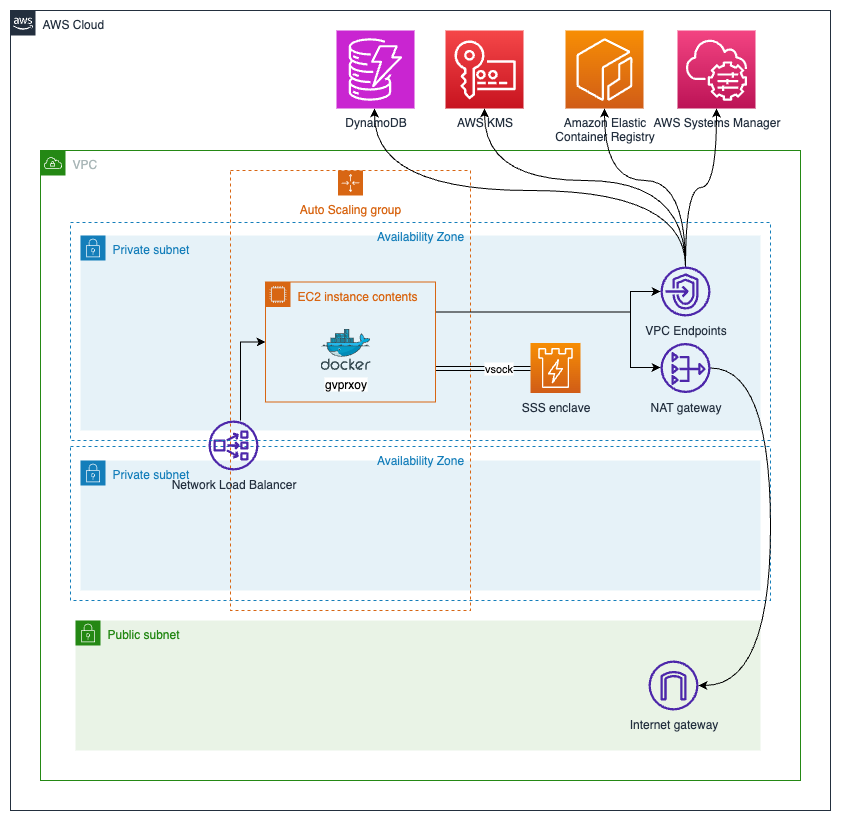
The following diagram depicts the high-level architecture of the solution.

Comprehensive AWS architecture showing VPC networking, container deployment, security services, and managed database integration

Before we dive deep into the application design, lets introduce the high-level components enclosed in the AWS Cloud Development Kit (AWS CDK) stack:

  • A dedicated virtual private cloud (VPC) and private subnets are created. Internet access is only possible through a NAT gateway, avoiding public exposure of the Amazon Elastic Compute Cloud (EC2) instances.
  • EC2 instances are placed in several private subnets and in different Availability Zones (AZ) using the auto-scaling group (ASG) to provide high availability. Network Load Balancer (NLB) is used to distribute the requests between different EC2 instances in the ASG. Each EC2 instance has one AWS Nitro enclave associated.
  • AWS Key Management Service (AWS KMS) manages the symmetric key required for secure private key management using AWS Nitro Enclaves.
  • Amazon DynamoDB is used to store the key shards for the Shamir Secret Sharing (SSS) solution.

Application design

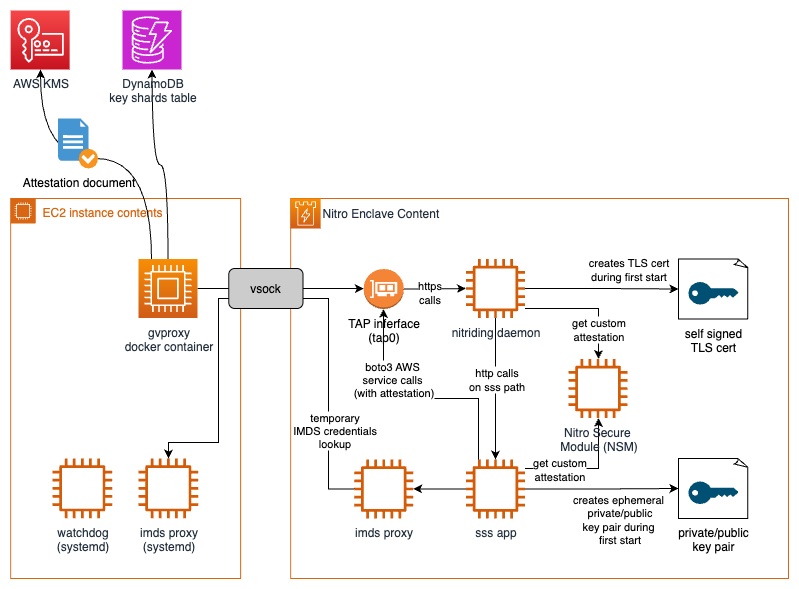
During the AWS CDK deployment process (shown in the following figure), the following application will be built and deployed to the EC2 instance and the associated enclave. You can review the Python source code for the different components in the public GitHub repository.

Detailed AWS Nitro Enclave security architecture illustrating attestation process, TLS certification, and DynamoDB integration

EC2 instance (left side)

  • gvproxy: Proxy component that manages outbound and inbound TCP to vsock connections.
  • watchdog: Systemd service that starts the enclave and makes sure it stays up and healthy.
  • imds proxy: Systemd service that forwards Instance Metadata calls originating from vsock to 169.254.169.254. This allows the enclave to request fresh IMDSv2 credentials.

Enclave (right side)

  • TAP interface: gvproxy counterpart. A fully routed network interface created by nitriding-daemon that allows inbound and outbound traffic routing in the enclave.
  • imds proxy: IMDS proxy counterpart that allows the enclave to request credentials from its parent instance metadata service.
  • nitriding-daemon: HTTPS service that terminates incoming HTTPS connections, responds to attestation requests, and forwards all /app* HTTP requests to the sss app HTTP listener.
  • SSS application: An SSS application that interacts with all AWS services such as AWS KMS or DynamoDB through Boto3 and provides key management and signing capabilities.
  • Nitro Secure Module: Enclave internal /dev/nsm device that provides attestation and random number generator capabilities. Attestation private/public keys are managed by AWS.

Enclave based TLS termination and Remote Validation

Let’s now see how we can achieve TLS termination inside the enclave and allow remote clients to verify the enclaves code.

To do so, we are using Nitriding, a Go toolkit that simplifies running web applications inside AWS Nitro Enclaves without requiring networking stack changes. It uses gvproxy to create a tap0 interface, enabling controlled inbound and outbound traffic for the application inside the enclave.

Let’s have a look at the most important features nitriding offers.

TLS Termination: Nitriding generates an ephemeral private/public key pair on first launch, issuing a self-signed certificate for TLS. Furthermore, it supports Let’s Encrypt certificates for production use.

Application integration: Nitriding terminates TLS and forwards all /app* HTTP requests to the HTTP listener of the configured application. In the workshop these requests are forwarded to the SSS application.

Attestation endpoint: By default, nitriding exposes an /attestation endpoint that accepts a nonce value and returns a signed cryptographic attestation document.

This cryptographic attestation document includes hash measurements, also referred to as platform configuration registers (PCR), such as the hash of the enclave images (PCR0) or details about the parent EC2 instance (PCR4). For details on these measurements, refer to Where to get an enclave’s measurements.

The attestation document supports optional, customizable fields, namely nonce, public-key and user_data, which can be set individually for every attestation doc. For more information on the Nitro Enclaves attestation process and document structure, refer to Nitro Enclaves Attestation Process or check out the workshop sections about Customizing Attestation or document Validation.

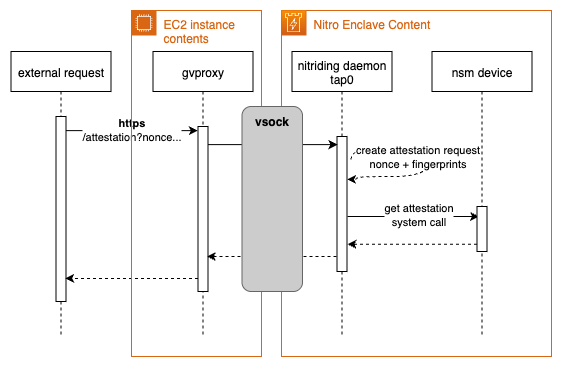
Nitriding adds the nonce to the attestation document as a measure of freshness. Furthermore, the fingerprint (hash) of TLS certificate used by the enclave, is being added to the user_data field, as shown in the following sequence diagram.

This binds the certificate to the specific enclave instance.

Detailed AWS Nitro Enclave attestation sequence showing vsock communication and system calls

By comparing the TLS certificate fingerprint presented during the HTTPs connection and the fingerprint in the attestation document, you can prove the following aspects:

  • The private key for TLS termination resides securely inside the enclave (in a trusted AWS environment).
  • The enclave is running trusted code, as verified by the attestation’s PCR (Platform Configuration Register) measurements.
  • The identity of the enclave is validated, whether the code is open source (allowing deterministic measurement through reproducible builds) or closed source (with measurements distributed by the provider). For more information on deterministic and reproducible builds, refer to Establishing verifiable security: Reproducible builds and AWS Nitro Enclaves.

Horizontal scaling

Let’s now have look into the scaling properties of a AWS Nitro Enclave based nitriding application and learn how we can improve the processing capacities of our application by scaling out horizontally.The provided CDK, by default, provisions a single EC2 instance with its associated enclave. As depicted in the preceding sequence diagram, nitriding generates a self-signed certificate at the start and uses it to terminate TLS connections. This approach is limited to a single worker because load balancing requests over several workers would introduce non-identical TLS certificates. Non-identical TLS certificates behind NLB can cause certificate mismatch errors and TLS handshake failures when clients are routed to different backend servers with certificates that don’t match (the expected domain name) or have different validation properties.There are different ways you can address this issue besides implementing your own cryptographic attestation-based method:

  • Create a symmetric KMS key and associate it with your enclaves using AWS KMS condition keys for AWS Nitro Enclaves. Use AWS Certificate Manager (ACM) to create an exportable TLS certificate. Alternatively, generate a custom TLS certificate in a trusted environment. Encrypt all sensitive key material via AWS KMS and store the ciphertext in a database such as DynamoDB. Provide the encrypted TLS certificate to each enclave that requires access and use cryptographic attestation to decrypt the TLS certificate or key.
  • Nitriding provides an enclave key synchronization mechanism based on AWS Nitro Enclaves cryptographic attestation. This mechanism supports Let’s Encrypt certificates out of the box so organizations can avoid all the operational and security challenges associated with self-signed certificates, particularly in context of web browsers.

Virtual Networking for Enclaves with Tap Interface

Now let’s deep dive into how nitriding provides tap0based networking (to the enclave) and learn how we can use tap0 networking without nitriding.

As mentioned previously, nitriding uses gvisor-tap-vsock package to provide tap0 based networking to the enclave.

gvisor-tap-vsock delivers a user-mode network stack for virtual machines (VMs) and containers, enabling secure, flexible connectivity between AWS Nitro Enclaves and external networks.

You can use gvisor-tap-vsock independently from nitriding if you only require tap0 networking without TLS termination and http forwarding capabilities. The setup remains the same as in the workshop; however instead of nitriding binary, you need to include the gvforwarder binary in the enclave Dockerfile. The build instructions can be found in Makefile.

After copying the binary into your Docker file, use a similar command in your enclave start.sh file to activate DNS resolution and start gvforwarder:

echo "nameserver 192.168.127.1" > /run/resolvconf/resolv.conf
./app/gvforwarder -url vsock://3:1024/connect &

After you have started your enclave with gvforwarder you can manage port forwarding using the gvproxy process running on EC2 parent instances as done in the workshop.

IMDSv2 access from inside Enclaves

This section explores the requirement of accessing EC2 Instance Metadata Service Version 2 (IMDSv2) from inside an enclave and discusses different ways on how access can be provided.

Applications inside AWS Nitro Enclaves often need access to IMDSv2 to obtain temporary AWS credentials to interact with AWS services such as AWS KMS for decrypt operations. IMDSv2 is only accessible from within the associated EC2 instance and can be accessed at 169.254.169.254.You can enable IMDSv2 access for enclaves using one of the following two approaches:

Dedicated vsock proxy route (as done in the workshop)

Run a vsock proxy on the EC2 parent instance and one inside the enclave to provide access to IMDSv2 from inside the enclave. Apply the following configuration to your enclave to map 169.254.169.254 from inside the enclave to the endpoint on the parent instance:

ip addr add 169.254.169.254/16 dev lo
IN_ADDRS=169.254.169.254:80 OUT_ADDRS=3:8002 ./app/proxy &

This method is suitable if you do not need a tap interface in the enclave and want to tightly control outbound communication.

TAP interface with gvisor-tap-vsock

If your enclave uses a tap interface via gvisor, pass the -ec2-instance-metadata flag in the gvisor start command on the parent EC2 instance. This allows the host process to forward IMDSv2 traffic from the enclave (via tap0) to the metadata service. Ensure you are using gvisor-tap-vsock version v0.8.7 or newer for this feature.

Any of the EC2 parent instance or enclave related changes described in this section can be applied to an existing workshop CDK stack by rerunning the cdk deploy command as described here: Deploy the CDK application.

Encrypting and decrypting secrets inside AWS Nitro Enclaves using Python and Cryptographic Attestation

In this section we will go in depth on how KMS based decryption can be implemented inside enclaves in Python using AWS SDK for Python (Boto3).

Decryption, leverages the enclave’s unique cryptographic attestation feature unavailable directly on standard EC2 instances – ensuring enhanced security by verifying the enclave’s integrity.Encryption inside an enclave using the Boto3 SDK however mirrors the process outside the enclave, so it’s not detailed here.

High-Level Decryption Flow

The process for decrypting content inside a Nitro Enclave follows these streamlined steps:

  1. Ensure that the enclave has outbound networking configured.
  2. Generate an ephemeral RSA key pair.
  3. Request an attestation document that includes the public key.
  4. Create a KMS decrypt request with the ciphertext and attached attestation document.
  5. Receive and parse the resulting ciphertext_for_recipient in Cryptographic Message Syntax (CMS) format.

This flow enables secure decryption in Python, aligning with workshop examples for practical implementation.

Make sure that the tap0 network Interface is up and running and DNS has been configured

The Python code example discussed uses Boto3 SDK. Boto3 requires a fully routed network interface such as tap0 as described previously and access to AWS credentials. The credentials can be managed manually as done in the workshop or managed automatically by the SDK. See the previous section about managing AWS credentials.

Generate an ephemeral RSA key pair inside the enclave

Generate a fresh RSA private/public key pair for each session. This key is just used for the re-encryption schema and does not need persisted.

from cryptography.hazmat.primitives.asymmetric import rsa
private_key = rsa.generate_private_key(
    public_exponent=65537,
    key_size=2048,
)
public_key = private_key.public_key() 

Request an attestation document included the public key

Use the Nitro Secure Module (NSM) to generate an attestation document that cryptographically proves enclave identity and includes the ephemeral public key.

import base64
import aws_nsm_interface_verifiably
file_desc = aws_nsm_interface_verifiably.open_nsm_device()
attestation_doc = aws_nsm_interface_verifiably.get_attestation_doc(
    file_desc, public_key=public_key_raw)["document"]
attestation_doc_b64 = base64.b64encode(attestation_doc).decode("utf-8") 

AWS Nitro Enclaves SDK for C can be used along with Python to interact with the NSM device as done in the Validate a Nitro Enclave Attestation Document sample code repository.

Create an AWS KMS decrypt request including the ciphertext and attestation document

Send the attestation document as part of the Recipient parameter in the AWS KMS decrypt API call. AWS KMS will verify the attestation and encrypt the response for your enclave’s public key.

response = kms_client.decrypt(
    KeyId=ssm_params["KMSKeyID"],
    CiphertextBlob=base64.standard_b64decode(ciphertext_blob_b64),
    Recipient={
        "KeyEncryptionAlgorithm": "RSAES_OAEP_SHA_256",
        "AttestationDocument": base64.standard_b64decode(attestation_doc_b64),
    },
)

Receive and parse the ciphertext_for_recipient CMS document

AWS KMS returns a Cryptographic Message Syntax (CMS) structure containing the encrypted symmetric key and ciphertext. To decrypt, use the following steps:

  1. Load the private key from Step 2
from cryptography.hazmat.primitives import serialization
with open(private_key_file, "rb") as f:
    private_key_raw = f.read()
private_key = serialization.load_der_private_key(private_key_raw, 
                                   password=None)
  1. Parse the CMS structure

Use a library such as asn1crypto to extract the encrypted key, initialization vector (IV), and encrypted content.

from asn1crypto import cms
content_info = cms.ContentInfo.load(ciphertext_for_recipient)
enveloped_data = content_info["content"]
recipient_infos = enveloped_data["recipient_infos"][0].chosenencrypted_key = recipient_infos["encrypted_key"].native
encrypted_content_info = enveloped_data["encrypted_content_info"]
content_encryption_algorithm = encrypted_content_info["content_encryption_algorithm"]
iv = content_encryption_algorithm["parameters"].native
encrypted_content = encrypted_content_info["encrypted_content"].native
  1. Decrypt the symmetric key

CMS uses private/public key cryptography to encrypt a symmetric key that is used for the payload. Use the enclave’s RSA private key to decrypt the symmetric key with OAEP padding.

from cryptography.hazmat.primitives.asymmetric import padding
from cryptography.hazmat.primitives import hashes
decrypted_sym_key = private_key.decrypt(
    encrypted_key,
    padding.OAEP(
        mgf=padding.MGF1(algorithm=hashes.SHA256()),
        algorithm=hashes.SHA256(),
        label=None,
    ),
)
  1. Decrypt the content with Advanced Encryption Standard (AES)

Use the decrypted symmetric key and IV to decrypt the content (typically using AES-CBC).

from cryptography.hazmat.primitives.ciphers import Cipher, algorithms, modes
from cryptography.hazmat.backends import default_backend
from cryptography.hazmat.primitives import padding as sym_padding
cipher = Cipher(
    algorithms.AES(decrypted_sym_key), modes.CBC(iv), backend=default_backend()
)
decryptor = cipher.decryptor()
decrypted_padded = decryptor.update(encrypted_content) + decryptor.finalize()
unpadder = sym_padding.PKCS7(128).unpadder()
decrypted_content = unpadder.update(decrypted_padded) + unpadder.finalize()
  1. Encode the content for transport

Encode the decrypted content as base64 for safe transport or further processing.

import base64
result = base64.b64encode(decrypted_content).decode("utf-8")

Cleanup

To avoid incurring future charges, delete the resources following the steps described in the workshop Cleanup section.

Conclusion

In this post, you learned how to use AWS Nitro Enclaves for building secure (public) applications using TLS termination, cryptographic attestation and TAP networking. The implementation includes practical examples using gvisor-tap-vsock tap networking, secure IMDSv2 access patterns and Python based CMS decrypt..

Ready to enhance your application security? Visit our GitHub repository and workshop to start building with AWS Nitro Enclaves today.
Upcoming Speaking Engagements

Post Syndicated from Bruce Schneier original https://www.schneier.com/blog/archives/2025/10/upcoming-speaking-engagements-49.html

This is a current list of where and when I am scheduled to speak:

  • Nathan E. Sanders and I will be giving a book talk on Rewiring Democracy at the Harvard Kennedy School’s Ash Center in Cambridge, Massachusetts, USA, on October 22, 2025, at noon ET.
  • Nathan E. Sanders and I will be speaking and signing books at the Cambridge Public Library in Cambridge, Massachusetts, USA, on October 22, 2025, at 6:00 PM ET. The event is sponsored by Harvard Bookstore.
  • Nathan E. Sanders and I will give a virtual talk about our book Rewiring Democracy on October 23, 2025, at 1:00 PM ET. The event is hosted by Data & Society.
  • I’m speaking at the Ted Rogers School of Management in Toronto, Ontario, Canada, on Thursday, October 29, 2025, at 1:00 PM ET.
  • Nathan E. Sanders and I will give a virtual talk about our book Rewiring Democracy on November 3, 2025, at 2:00 PM ET. The event is hosted by the Boston Public Library.
  • I’m speaking at the World Forum for Democracy in Strasbourg, France, November 5-7, 2025.
  • I’m speaking and signing books at the University of Toronto Bookstore in Toronto, Ontario, Canada, on November 14, 2025. Details to come.
  • Nathan E. Sanders and I will be speaking at the MIT Museum in Cambridge, Massachusetts, USA, on December 1, 2025, at 6:00 pm ET.
  • Nathan E. Sanders and I will be speaking at a virtual event hosted by City Lights on the Zoom platform, on December 3, 2025, at 6:00 PM PT.
  • I’m speaking and signing books at the Chicago Public Library in Chicago, Illinois, USA, on February 5, 2026. Details to come.

The list is maintained on this page.

NVIDIA DGX Spark Review The GB10 Machine is so Freaking Cool

Post Syndicated from Patrick Kennedy original https://www.servethehome.com/nvidia-dgx-spark-review-the-gb10-machine-is-so-freaking-cool/

In our NVIDIA DGX Spark review, we see how these Arm and NVIDIA Blackwell powered systems with 200GbE RDMA networking are just freaking cool

The post NVIDIA DGX Spark Review The GB10 Machine is so Freaking Cool appeared first on ServeTheHome.

[$] The FSF considers large language models

Post Syndicated from corbet original https://lwn.net/Articles/1040888/

The Free Software Foundation’s Licensing and Compliance Lab
concerns itself with many aspects of software licensing, Krzysztof Siewicz
said at the beginning of his 2025 GNU Tools
Cauldron
session. These include supporting projects that are facing
licensing challenges, collecting copyright assignments, and addressing GPL
violations. In this session, though, there was really only one topic that
the audience wanted to know about: the interaction between free-software
licensing and large language models (LLMs).

Security updates for Tuesday

Post Syndicated from corbet original https://lwn.net/Articles/1041886/

Security updates have been issued by Debian (ghostscript and libfcgi), Fedora (qt5-qtsvg), Red Hat (kernel, perl-FCGI, perl-FCGI:0.78, and vim), SUSE (bluez, curl, podman, postgresql14, python-xmltodict, and udisks2), and Ubuntu (linux-azure, linux-azure-5.4, linux-azure-fips, linux-oracle, and subversion).

На второ четене: „Живей бързо“

Post Syndicated from original https://www.toest.bg/na-vtoro-chetene-zhivey-burzo/

„Живей бързо“ от Брижит Жиро

На второ четене: „Живей бързо“

превод от френски Росица Ташева, София: изд. „Колибри“, 2024

Няма „ако“ – с тази реалистично-песимистична констатация завършва романът „Живей бързо“ на Брижит Жиро, построен в същото време изцяло върху условността. Носител на престижната френска награда „Гонкур“ за 2022 г., писан цели две десетилетия след събитията, този автобиографичен роман не само проследява дните преди мотоциклетната катастрофа и преждевременната смърт на съпругa на Жиро през далечната 1999 г., но е и фино проникновен портрет на поколението им в преддигиталните години, с неговите културни и поведенчески жалони и със социално-икономическите трансформации във френското общество. И може би ако текстът имаше епиграф, той би бил именно споменатият от Жиро цитат от Блез Паскал:

Всички нещастия на човека се дължат на неспособността му да стои тихо в своята стая.

Романът е организиран в поредица от глави, чиито заглавия представляват конкретни „сюжетни“ въпроси, започващи с най-безпомощното и безсмислено питане подир всяка трагедия: „Какво ли щеше… ако не беше…“ В този смисъл текстът е вид апофатичен разказ за неизбежното, за стъпките до фаталността, които биха могли да изглеждат толкова предотвратими, когато биват реконструирани и анализирани от паметта под тежнението на вината. „Живей бързо“ предлага разплитането на една трагедия, подобно на начина, по който в криминалните романи се разплитат убийствата – защото именно като такова изглежда тази смърт по невнимание и в нея съучастници са всички, включително жертвата и целият свят.

Настъпи ли драма, тръгваме по обратния път, връщаме се на местопроизшествието, възпроизвеждаме фактите. Искаме да разберем произхода на всеки жест, на всяко решение. Сто пъти пренавиваме лентата. Ставаме специалисти по причинно-следствените връзки. Преследваме, разнищваме, аутопсираме. Искаме всичко да знаем за човешката природа, за личните и колективните причини, поради които се случва каквото се случва.

Семейството на Брижит – тя, съпругът ѝ и синът им – тъкмо са се сдобили с толкова желаната къща, към която – какво удобство! – има и гараж. Именно в дните, преди да се нанесат окончателно, брат ѝ моли временно да остави в него своя мощен състезателен мотор, докато се оправи със собственото си паркомясто. С този мотоциклет, подкарвайки го уж абсолютно непредвидено, мъжът ѝ Клод ще катастрофира в деня, в който тя е извън града. Това обаче съвсем не обяснява всичко – поредиците от решения се навързват назад във времето и глава след глава Жиро размишлява върху на пръв поглед незначителните избори – свои, на близките ѝ, на напълно непознати, – довели последователно и вкупом до трагичния изход.

Без да звучи драматично или сълзливо (напротив, отвъд автентичната, сублимирана в разказването болка се усеща дори някаква странна иронична лекота), романът предлага тази „брутална хронология на фактите“ в един интензивен, изчистен, почти репортажен текст години след събитията, когато Жиро току-що е продала къщата, където с Клод така и не са успели да изградят бъдещето си. Чрез повторението, натрапчивата условност, настойчивите въпроси, съшиващи текста, авторката създава ритъм на ускорение към обратното броене – психологически водовъртеж, в който читателят е всмукан до последната страница (въпреки предизвестения край, абсурдната надежда за обратимост не ни напуска) и който води не към непредотвратимото, а сякаш към непредотвратеното. Да, отликата е фина, но ясна. Защото тя споява разказа с

толкова характерното за човека, преживяващ загуба, търсене на вина навсякъде – дори и в самата жертва, докато съзнанието неизбежно търси начин да рационализира въпросната загуба.

Без да дава изцяло превес нито на предопределението и съдбата в един метафизичен смисъл, нито на силата на свободната човешка воля и решимост, Жиро все пак си дава сметка за т.нар. butterfly effect – за значимостта и на най-дребното обстоятелство, жест и решение, произтичащо не само от нас, но и от обкръжението ни, от света. В този смисъл тя изследва – макар привидно (само)обвинително, но и с яснотата, че не можем да съдим – отговорността и случайността, упоритостта и инерцията, безразсъдството и разумността.

Връщам се на лутанията със съюза „ако“, обсебил ме през всичките тези години, през които животът ми протече в минало предварително време.

Да, логично е, че много от въпросите засягат личната отговорност. Там прави горчиво-иронично впечатление, че тъкмо изборите, които тя е избегнала, за да не се прояви като лоша дъщеря, сестра, приятелка или съпруга, биха се оказали спасителни; че егоизмът, отчуждението, несъобразяването със семейните връзки и отговорности биха могли да предотвратят инцидента, ако ги бе проявила. Жиро набляга особено на феминистичната нишка: оказва се пагубно именно преотстъпването ѝ на традиционни женски роли на опитващия се да бъде „нов тип“ антипатриархален баща Клод (както е модерно по това време). Пагубно е и решението ѝ да не бъде доминантна и контролираща, а освободена, независима и осъзната. Изобщо, най-логичните постъпки и най-удовлетворяващите подаръци от околните и съдбата се оказват най-деструктивни.

Проклинам този свят, който се подчиняваше на желанията ми. Проклинам свободата, от която се възползвах зле. 

Особено интересни за мен бяха страниците, на които цели обществени процеси и диагнози, фигури и явления се оказват „замесени“. Именно чрез тях тази лична трагедия бива уплътнена до достоен за „Гонкур“ роман. Всичко, оказва се, има значение: етническото и класовото разделение; травмата Алжир; вътрешната миграция и урбанизация; гентрификацията на западналите квартали; появата на боботата; модата да се живее близо до природата и по начин, сходен с днешното хипстърство; разделението между покрайнините и центъра, както и между провинцията и столицата; мултикултурността; екологичните проблеми; недъзите на работната етика; затварянето на очите пред правилата; неудържимият преход към консуматорската култура; финансовите спекулации, породени от стремежа към разширяване и спечелване на лесни пари; застрахователният и real-estate бизнесът; подмолните класови борби; лявото и интелектуалното срещу консервативното; бедните и парвенютата; културният достъп; феминистичните нагласи, преосмислящи и ролята на мъжа в семейството; законодателството в ЕС, позволило мотоциклет, забранен в Япония, да бъде внасян в Европа; самият факт, че създателят му го е измислил…

Фино коментирайки тези процеси, Жиро успява да създаде картина на времето и страната, отразено дори от архитектурно-дизайнерските уклони в начина, по който младите прогресивни двойки ремонтират купените си от предишните поколения стари жилища. Имотът се превръща в статус, символ и идентичност; сдобиването с не какъв да е дом – в центробежна сила на семейството, поглъщаща огромна част от ежедневието му.

Имаше голямо търсене, бях заобиколена от познати, които търсеха подобен апартамент на тихо място, това беше новото кредо на нашето поколение.

Прозира, разбира се, съжалението, че цялото съществуване сякаш се е завъртяло около недвижимата придобивка, която на този етап единствена е способна „да внесе оживление в съществуването ни“. Все още докосната от природата, тази скрита в предишния свят придобивка, която заварваме Жиро да продава, ще бъде изличена от нов път и много, много бетон в името на бъдещето.

На второ четене: „Живей бързо“

Писателката стига даже дотам да търси новинарски дописки от деня на смъртта на съпруга си, които биха го възпрели, биха го направили поне бдителен. Затова и почти комично звучи съжалението, че наскоро претърпелият пътен инцидент Стивън Кинг не е починал, ами само е бил ранен. Смъртта му вероятно би наплашила Клод достатъчно, за да не рискува в онзи ден на пътя. Жиро изследва дори алтернативния развой на събитията – какво би станало, ако беше валяло или ако културата на светофарите не беше се променила (замяната им с кръговото движение), за да угоди на човешкия устрем към свобода, към нищо, което да спира хода му напред, дори към социалното му удобство.

Спирането на червен светофар е станало двойно по-неприятно, нека си го признаем, откакто бедните, бездомните, бежанците ни приканват от другата страна на прозореца да си купим вестника, който може би ще задържи за малко главата им над водата, да им дадем няколко монети, за които никой не знае при кого ще отидат и които са се превърнали в пътна такса от нов тип…

В „Живей бързо“ Брижит Жиро се опитва да разсъди има ли непредвидимост и непредотвратимост и изчислим ли е животът –

как човек се превръща в статистическа цифра, в запетайка във вселенския текст, след като се е мислел за уникален и безсмъртен;

какво те прави в един момент обикновен гражданин, сключил с банката заем за жилище, добър баща на семейство, а в друг – бесен пънкар, готов да излезе от релси и всичко да оплеска.

Макар, парадоксално, да се занимава с битовизми около екзистенциално драматичната лична загуба, тази книга прераства в значим социален коментар, минава отвъд личното и засяга колективни измерения. Този хем интимен, но лишен от литературност, хем на места почти публицистичен в разследващата си прецизност текст е методично разплитане на паметта по дирите на загубата. В крайна сметка всички сме жертви на условностите, на социалните привички, трансформации и комплекси – на света и на себе си.


Никой от нас не чете единствено най-новите книги. Тогава защо само за тях се пише? „На второ четене“ е рубрика, в която отваряме списъците с книги, публикувани преди поне година, четем ги и препоръчваме любимите си от тях. За нея медията „Тоест“ е отличена с Националната награда „Христо Г. Данов“ (2025) за принос в представянето на българската книга.

Рубриката е част от партньорската програма Читателски клуб „Тоест“, благодарение на която активните дарители на „Тоест“ получават 20% отстъпка от коричната цена на всички книги на включените издателства. Изборът на заглавия обаче е единствено на авторите Стефан Иванов, Севда Семер и Антония Апостолова, които биха ви препоръчали тези книги и ако имаше как да се разходите с тях в книжарницата. 

The Trump Administration’s Increased Use of Social Media Surveillance

Post Syndicated from Bruce Schneier original https://www.schneier.com/blog/archives/2025/10/the-trump-administrations-increased-use-of-social-media-surveillance.html

This chilling paragraph is in a comprehensive Brookings report about the use of tech to deport people from the US:

The administration has also adapted its methods of social media surveillance. Though agencies like the State Department have gathered millions of handles and monitored political discussions online, the Trump administration has been more explicit in who it’s targeting. Secretary of State Marco Rubio announced a new, zero-tolerance “Catch and Revoke” strategy, which uses AI to monitor the public speech of foreign nationals and revoke visas of those who “abuse [the country’s] hospitality.” In a March press conference, Rubio remarked that at least 300 visas, primarily student and visitor visas, had been revoked on the grounds that visitors are engaging in activity contrary to national interest. A State Department cable also announced a new requirement for student visa applicants to set their social media accounts to public—reflecting stricter vetting practices aimed at identifying individuals who “bear hostile attitudes toward our citizens, culture, government, institutions, or founding principles,” among other criteria.

Да преведеш пари по заръката на Аллах (продължение)

Post Syndicated from Атанас Шиников original https://www.toest.bg/da-prevedesh-pari-po-zarukata-na-allah-produlzhenie/

<< Към първа част

Да преведеш пари по заръката на Аллах (продължение)

Къде са старите религиозни основания на хауала? 

Все ще да има такива. Ще кажете, че механизми, подобни на системата хауала, съществуват и извън предвиденото от мюсюлманския свещен закон. Практиката може да се проследи до Южна Азия или Индия, подобни неща се срещат и при еврейските финансови системи, откриват се и в Античността. Както казва и библейският класик Еклисиаст, син Давидов: „Случва се да казват за нещо: „виж, на, това е ново“; но то е било вече през вековете, що са били преди нас.“ Ала дори и да откриваме сходни механизми за парични преводи в други нормативни системи извън шариата, сега нас ни интересуват строго мюсюлманската мотивация и основания.

Нали така казва и Аристотел. Възможно е да имаме едни и същи следствия, породени от различни причини. Това не отменя каузалната връзка между тях. Или пък е възможно да има привидна корелация между два феномена, без непременно единият да бъде причинен от другия. Доста подхлъзващ сценарий, изнервящ всички анализатори. А е възможна и практика, оправдана от по-късна нормативна рамка, израснала на базата на практиката, която просто я описва и превръща в правило, казано на прост език. Модерният човек обича този тип подход. Щом нещо съществува и всички го правят, значи като цяло е „нормално“, ерго може да се превърне в „норма“.

Или пък най-класическият, желан религиозно-правен сценарий по шариата: практика, породена от устойчива отвъдна рамка извън човека или общността. Която рамка е удържана от Самия Съдия (Ал-Хакам), Правещия равносметка (Ал-Хасиб), Свидетеля (Аш-Шахид) на цялата вселена , т.е. Аллах. Обаче със сигурност, мисля си, ще да има някаква религиозна норма, на фона на която се разгръща хауала и с която се обосновава. 

И тук личното ми прозрение идва, докато прехвърлям други текстове по различен повод. В това е част от красотата на работата с оригинални извори на арабски, някои от които в ръкописи. Тръгваш да четеш съчинения за традиционното мюсюлманско образование и религиозните училища, а пък намираш достатъчно материали за възпитанието чрез чепика и тоягата. Възнамеряваш да обогатиш знанията си за педагогиката, а пък намираш неща, писани за глупците и брадите им. Обработваш „огледала за владетели“ – литература, която съдържа напътствия към управляващите, а пък откриваш предписания как се пие вино в двора на везира от XI век, по време на династията на Абасидите.

И сега се случва нещо подобно. Чета Авероес от XII век, чието арабско име всъщност е Ибн Рушд. Може би го познавате предимно като философ. Ако сте учили арабистика в България, е много вероятно по време на часовете по история на арабската философия да сте се сблъсквали с неговото съчинение за отношението между вярата и разума, философията и свещения закон. Ако сте учили история на философията пък, ще го познавате от съчиненията на Тома от Аквино, който го нарича просто „Коментатора“ на философа, който е самият Аристотел. 

Само че Ибн Рушд по професия не е бил философ. Философията, както бихме казали днес, му е била хоби. Заядлив философски инфлуенсър без социални медии, противоречива личност, без много лайкове, че даже от време на време са му горили книгите. Покрай всички други неща е работил като кадия – мюсюлмански съдия. На него принадлежи маститата компилация по сравнително право, озаглавена с гръмко звучащото „Началата на авторитетния тълкувател и крайната прицелна точка на онзи, що се стреми“. Това, разбира се, е мой забавен превод на нещо, които сигурно може да се преведе много по-сухо и сбито. Но така или иначе, предаването на заглавията на старите арабски съчинения винаги ще си остане предмет на отделно разсъждение в областта на преводаческата теория и практика.

Самият Ибн Рушд твърди, че пише този сборник, за да събере на едно място казуси – предмет на ислямското право, като изложи различните гледни точки върху тях. Затова и си позволява да разсъждава за яденето на конско месо или месо от муле например. За пиенето на различни видове ферментирали напитки. За употребата на възбранени от Свещения закон неща, ако има абсолютна необходимост. За брака. За прелюбодейството. Обхватът на религиозната регулация е много широк. Дори не може да си представите колко, преди да разлистите наръчниците по фикх, т.е. по мюсюлманско право. Ако пък можете да ги разлистите на арабски, толкова по-добре. И там някъде,

посред правни казуси за финанси, Авероес списва кратък раздел за хауала.

За него изглежда напълно нормално да обсъжда темата. Хауала, казва той, си е напълно изрядна транзакция (му‘амала сахиха), при която се обменя дълг. За Гешев незаконно – за Аллах изрядно. Защото самият Пророк от VII век по нашенското летоброене е казал в своето Предание, че ако богатият се забави да изплати пари, то това е „угнетителство“. На арабски е зулм, откъдето идва и нашето золум през турски. Да не си изплащаш парите, при условие че имаш възможност, е золум. Това, убеден съм, важи за всички, по всяко време, независимо от културата. А ако някой от вас, продължава Пророкът, бъде насочен за изплащане на дълга му към някой богат, да приеме. 

Ето това е нормативното основание за практиката. И Ибн Рушд разсъждава при какви условия транзакцията е валидна. Много бързо се открива откъде е разказът за живота на Пророка, превърнал се в мюсюлманското основание за съществуването на този финансово-икономически механизъм. Със сигурност го има в сборника с авторитетни предания на Пророка, съставен от Ал-Бухари през IX век. Той съдържа раздел, свързан с пренасянето на дълг от един човек към друг. И да, там терминът е хауала. Там са и думите на Пророка, с които се занимава Авероес от финансово-правна гледна точка. Но в същия раздел на сборник с предания на Ал-Бухари има и друг текст, по-обширен. И той върви така.

Докато съратниците на Пророка седели веднъж с него, внесли починал човек. Мохамед трябвало да отслужи погребална молитва. Преди това обаче Пратеникът на Аллах запитал дали този човек е бил длъжник. Отговорили му, че не. А дали бил оставил някакво богатство? Не, казали приближените. Тогава Пророкът отслужил молитвата. Сетне внесли друг починал. Преди да произнесе погребалната молитва, Пророкът отново задал същия въпрос. Този път му отвърнали, че има дългове. А дали бил оставил богатство? Да, три динара, оказало се. Мохамед отслужил молитвата. Накрая донесли трети мъртвец. Оставил ли е богатство? Не. Има ли дългове? Да, отвърнали, дължи три динара. Тогава Пророкът отказал да се помоли и накарал останалите да се помолят за него. 

И тук идва интересният момент с прехвърлянето на дълга. 

Абу Катада, известен съратник на Пророка, казал: „О, Пророче на Аллах! Помоли се за него, а аз ще поема неговия дълг.“ 

Лоша работа е да умреш длъжник, отказват ти застъпничеството на Пратеника на Аллах на земята. „Чисти сметки – добри приятели“, казва народът по нашите земи. Ала също и „Никой нищо не е занесъл на оня свят“. Само че тук явно не важи съвсем. Защото дълговете ти те следват и отвъд. Могат да възпрат Пророка да се застъпи за теб.

А когато нещо се намира в Сунната, вероятността то да породи разсъждение относно приложението му на практика е много голяма. Кой е онзи, който прехвърля дълг. Към кого се прехвърля. Какво означава „богат“ по смисъла на преданието. Дали веднъж поръчана, транзакцията няма някаква давност във времето. Какви са условията за всеки участник, за да бъде призната операцията за легитимна по смисъла на религиозния закон. Съществуват ли позволени и непозволени употреби. Какви са практическите механизми за осъществяване на операцията. Как може „брокерите“ впоследствие да си уредят сметките. 

Няма мърдане. Авероес не си измисля. Не открива топлата вода. Пророкът е казал това, което е казал, далеч преди съвремието на съдията от Кордоба. Но неговата цел е да събере тълкуванията, за да може една такава финансова транзакция да бъде максимално изрядна и да улесни работата на колегиума. Та така и въпросът за регулацията на хауала може да бъде открит в повечето стари наръчници по право, където се говори за пари. 

А за да не си помислите, че всичко това е прашасала теория, имаме и днешни нормативни разсъждения по въпроса. И то не от шейховете на терористични организации, а от съвсем легитимни авторитети. Вижте например египетското Главно мюфтийство. Какво било значението на преданието „отлагането на плащането от богатия“? Отговорът е доста типичен за официалните казионни дискурси и се отличава с дипломатичност. Лошо е богатият да не плаща задължението си, но пък може да има моменти, когато богатият да се окаже способен. Ама бил възпрепятстван в конкретен момент… Тогава това не е „угнетителство“ (въпросният золум) и не е грях. Между другото, отговорът съдържа позоваване на такива титани на правото, като имам Ан-Науауи от XIII век и Ибн Абд ал-Барр от XI век, за да си набави допълнителна легитимност. 

Сайтът за фетви, спонсориран от Министерството на религиозните дарения и ислямски дела в Катар, също предоставя интересен коментар. Дали хауала е утвърдена практика в Корана, пита читател. Не, не е, гласи авторитетният отговор, няма го в Свещения Коран. Но е утвърдена от Сунната и консенсуса на богословите, а това, трябва да отчетете, са основни стълбове на мюсюлманското право. Следователно така може да придобие и практически измерения. Също като друго запитване. „Имам пари при един човек – казва читател, – ала той не може се изплати.“ Питащият иска да си купи кола втора употреба. Тогава длъжникът му казва: плати колата в брой, а пък аз ще преведа остатъка, който не ти достига, към продавача. И тогава, гласи отговорът на богослова, имаме класически случай на хауала, т.е. пренос на задължение от един човек към друг.

Така излиза, че обратът в настоящия мисловен експеримент, който ни води от България през ИДИЛ и Авероес до Пророка Мохамед, не е чак толкова изненадващ. 

Хауала не е непременно „подземна система“ с криминален привкус, както нашумява в тукашните медии.

Подобно на понятието фетва (ар. фатуа), което може и да става популярно покрай „Сатанински строфи“ на Салман Рушди и да си мислим, че значи „смъртна присъда“, но реално означава „мнение на религиозен авторитет“ по даден въпрос. И този въпрос може да бъде всякакъв, включително и свързан с позволените начини за посещение на тоалетната. 

Тук ситуацията е сходна. Хауала може да бъде напълно легитимен механизъм в сложната структура на ислямските финанси. Начин да избегнеш мъкненето на тежки торби със златни динари и сребърни дирхами по Пътя на коприната. Метод да прехвърлиш събраните пари от данъци в Османската империя към централната хазна. Средство да пратиш пари на баба си в Танжер, за да си плати сметките. Но да, в хауала е заложен потенциал за избягване на официалните международни канали за превод на пари, включително и по въобразената в случая ос Пазарджик–Кандахар. А за какво ще преведеш пари, си е твоя работа. Естествено, ако трябва да сипя сол в раната, от една отвъдна, свише удържана шариатска гледна точка, най-добре ще е да бъде за борба (джихад) „по пътя на Аллах“ (Коран 2:218). Особено след като така и така си поел риска на вратата ти да похлопа някой бивш, настоящ или бъдещ главен прокурор… Поне да си струва. 


В рубриката „Ориент кафе“ Атанас Шиников поднася любопитни теми, свързани не толкова с горещата политика, колкото с историята и културата на Близкия изток. А той, древен и днешен, е по-близко до нас и съвремието ни, отколкото си представяме.

Добрият градски бюджет – не само числа, а и цели

Post Syndicated from Елена Гечева original https://www.toest.bg/dobriyat-gradski-byudzhet-ne-samo-chisla-a-i-tseli/

Добрият градски бюджет – не само числа, а и цели

Свикнали сме всяка предизборна кампания да ни залива с обещания – повече зелени площи, по-чист въздух, нови места в детските градини. Всичко звучи като рецепта за по-добър живот. Но щом мандатът започне, реалността обикновено е по-различна от очакваното – животът на гражданите не се променя с обещаната скорост, а големите визии често потъват в дребните ежедневни проблеми на управлението.

Къде се губи нишката и защо толкова често обещанията от кампанията остават само списък с красиви послания и идеи? Като изключим случаите на умишлен саботаж, било от страна на политици, институции или мрежи от икономически и задкулисни интереси, има и една проста причина – дори най-амбициозната програма, колкото и вдъхновяваща да изглежда, сама по себе си не върши много. Ако зад нея няма ясни цели и подреден бюджет, тя остава просто една хартия в архива. За да се избегне това, управлението трябва да направи трудния, но необходим преход – от намерения към конкретни задачи, за които има осигурени ресурси и срокове, а после и отчет какво от обещаното е постигнато. Именно тук идва силата на доброто целеполагане и отговорното бюджетиране: те превръщат идеите в реални резултати, които хората могат да усетят в ежедневието си.

Общинският бюджет: как идеите често (не) стават реалност

Когато говорим за бюджета на един град, повечето хора го асоциират със сухи и сложни таблици, но всъщност в него се решава как живеем всеки ден. Дали ще има нова детска градина в нашия квартал, дали автобусът ще идва по-често, или дали най-после ще се ремонтира улицата пред блока ни – всички тези примери зависят пряко от дейностите, които общината бюджетира, и от изпълнението на заложения план.

Общинският бюджет е инструмент, който показва не само какви са намеренията на управлението, но и доколко те ще се превърнат в реални резултати. В София именно тук често възникват трудностите. През последните години столичният бюджет е изправен пред някои хронични предизвикателства – забавени проекти, които се прехвърлят от година на година; силна финансова зависимост от държавните трансфери; усещането, че гражданите рядко виждат навреме изпълнението на обещаното. Съществуват множество стратегически документи за рамката за дългосрочно развитие на града, но те често не намират реално отражение в бюджета, което пречи визията да се превърне в изпълнение и готов резултат.

Ако искаме това да се промени, е нужно бюджетът да се трансформира от формално упражнение в реален инструмент за промяна. Това означава целите от стратегическите документи да се пренасят в конкретни бюджетни решения, а изпълнението им да се следи и отчита публично. Само тогава идеите ще имат шанс да излязат от хартията и да се превърнат в резултати, които хората могат да усетят в ежедневието си.

Бюджет на сметките или бюджет на целите?

Бюджетът на Столичната община (СО) нараства с всяка година и неизменно става тема на оживени обществени и политически дебати. Дискусиите обикновено се концентрират върху това колко средства да се отделят за бюджетните пера и какви суми да се заложат за конкретни обекти в капиталовата програма. От гледна точка на широката общественост обаче размерът на средствата – дали една програма струва 1, или 2 милиона лева – има второстепенно значение. За гражданите ключовият въпрос е как тези пари ще се отразят на ежедневието им: ще има ли нова детска градина, ще се подобри ли градският транспорт, ще се поддържат ли зелените площи в техния квартал. Именно тази връзка между разходите и реалния ефект е показателна за качеството на целеполагането и е индикатор доколко бюджетът служи като инструмент за подобряване на градската среда.

Ако средствата се разпределят според ясни цели, работи се последователно за реализирането им и изпълнението се проследява и отчита, резултатът се усеща пряко – по-кратко време за пътуване, по-чист въздух, повече места за децата ни. Ако обаче липсва добро целеполагане, проектите се бавят, средствата се размиват, а обещанията остават само на хартия. Именно тук се крие разликата между „бюджет на сметките“ и „бюджет на целите“ – първият просто инертно покрива текущите разходи, а вторият показва посока и изгражда доверие у гражданите, защото свързва ресурсите с конкретни резултати.

План за действие

Сега нека обърнем внимание на възможния план за действие, чрез който общинският бюджет би могъл да се основе на добрите практики в целеполагането и управлението на публични ресурси.

Стъпка 1. Голямата картина

Как искаме да изглежда София след пет години? А след още десет? Именно оттук следва да започва целеполагането, свързано с бюджета на общината. Първата стъпка е да се поставят стратегическите цели в дългосрочен план, които следва да са амбициозни, иновативни и съобразени с европейските стандарти за устойчиво и модерно градско развитие. 

СО предприе важни стъпки в посока очертаването на дългосрочната стратегия за развитие на града чрез документи като „Визия за София“ (2019 г.) и Плана за интегрирано развитие на Столична община за периода 2021–2027 г., които поставиха основата за стратегическо планиране и интегриране на различни секторни политики. За да има обаче реален ефект от тях, тези документи следва да се превърнат в управленски инструмент, който определя приоритетите на бюджетното планиране и гарантира последователност между дългосрочните цели и реалното разпределение на ресурсите. 

Не трябва да забравяме и че „голямата картина“ никога не е статична – тя следва да се променя, когато и София се променя. Затова и тези документи не бива да се възприемат като еднократни усилия, а като жива рамка, която да се актуализира периодично спрямо реалното развитие на града, динамиката на икономическите процеси и технологичния напредък. 

Стъпка 2. Поставяне на конкретни и измерими цели

Визията следва да се превърне в план с конкретни цели, а именно – какво искаме да постигнем, кога ще го направим и по какъв начин ще измерим успеха при изпълнението на поставената цел. В бюджета на София за 2025 г. добър пример в това отношение е заложеното изграждане на 26 нови детски градини и 11 училища – конкретна, измерима и значима цел, която отговаря на реална обществена нужда. В същия документ обаче има цели като „повече средства за текущ ремонт“ или „качествена поддръжка на зелените площи“, които остават твърде общи и не показват как ще се измери напредъкът. Подобни приоритети могат да се формулират по-конкретно – например чрез посочване на брой ремонтирани улици или процент увеличени зелени площи. Това би спомогнало да избегнем абстрактното и да превърнем целта в конкретен ангажимент, който да се планира в бюджета и след това да се отчете пред гражданите.

Стъпка 3. Избор на приоритети

Общината винаги има повече желания, отколкото пари. Затова доброто целеполагане помага да се каже кое е най-важно в настоящия момент, защото ресурсите никога не стигат за всичко. 

  • Някои проблеми изискват незабавни действия – например ремонти на опасни сгради или ремонти на ключови булеварди. Те дават сравнително бързи резултати и са важни за поддържане на общественото доверие. 
  • Средносрочните приоритети включват подобрения, които изискват цялостно планиране и координация – като модернизацията на кварталната инфраструктура или обособяването на нови зелени коридори. С такива инициативи не се решават спешни проблеми, но се променя качеството на живот и устойчивостта на града в рамките на три до пет години. 
  • Стратегическите приоритети имат по-дългосрочна перспектива и изискват последователност, която преминава през няколко бюджетни периода и дори през няколко управленски екипа. Такъв тип приоритети са дигитализацията на общинските услуги, разширяването на метрото, инвестициите в енергийна ефективност и зелени иновации. 

В крайна сметка е важно да осъзнаем, че приоритетите не са просто един списък със задачи – когато се приоритизира правилно и ефективно, това дава възможност да се действа не реактивно, а далновидно, с ясно разбиране за посоката и ефекта от всяко решение.

Стъпка 4. Участието на гражданите в процеса

Дори и най-добре подготвеният бюджет няма как да е успешен, ако остане само в рамките на администрацията. За да има реална стойност, процесът трябва да включва и жителите на града. Участието на гражданите дава на бюджета легитимност, осигурява по-добра информираност за местните нужди и създава доверие, че парите се харчат прозрачно и справедливо. През последната година инициативата „Решава София“ стана формална част от бюджета и изпълнява именно тази функция – дава възможност на гражданите да предложат своите идеи и да гласуват за тази, която искат да се осъществи. 

Гражданският бюджет несъмнено е важен инструмент за общинските финанси на София, защото дава възможност на хората да участват пряко в определянето на приоритетите за развитието на града. Въпреки това инициативата все още се нуждае от съществени подобрения, особено по отношение на проследимостта и отчетността при изпълнението на одобрените проекти. В същото време сумата за гражданските проекти остава сравнително ниска – през 2025 г. възлиза на около 0,08% от общия бюджет на СО. В сравнение с европейските практики този дял е значително по-нисък. В Полша например държавното законодателство задължава всички големи градове да отделят не по-малко от 0,5% от общинския си бюджет за граждански инициативи, което осигурява по-видим ефект и реално участие на местните общности в процеса на вземане на решения.

Стъпка 5. Проследяване и отчитане на резултатите

Прозрачността е условие за доверие, а именно то е ключът към успешния бюджет. Когато гражданите знаят какво е свършено, какво се бави и защо, те могат да оценят реалния напредък. Редовното отчитане на резултатите не е само формалност или задължение по закон, а начин да се покаже, че от всяка похарчена сума има конкретен ефект. 

В София частична стъпка в тази посока вече е направена – СО публикува информация за извършените месечни плащания, както и тримесечен отчет за усвояването на заложения бюджет в инвестиционната програма. Въпреки това липсват както цялостна система, която да позволява на гражданите в реално време да проследяват напредъка на проектите, така и визуални индикатори за степента на изпълнение. Въвеждането на публично достъпна платформа за прогреса по всяка заложена цел и всеки планиран обект би повишило значително гражданския интерес и участие в общинската дейност. По този начин бюджетът престава да бъде само документ с числа и се превръща в инструмент за обща отговорност и диалог между администрацията и гражданите.

От целеполагане към резултати: уроците за София

Доколко може да определим дали един бюджет е ефективен или успешен, не зависи от размера на средствата в него. Единственият истински измерител на стойността на общинския бюджет е доколко той успява да промени живота на хората, за които е предназначен.

За София уроците са ясни: необходимо е не просто да се генерират нови средства в бюджета, а и да се въведе различна култура на управление на ресурсите, в която целите са измерими, решенията са обосновани, а гражданите са активен участник, а не пасивен наблюдател. Доброто бюджетиране и целеполагане се крие не в сложните формули и големите числа, а в способността да се гледа отвъд рамките на текущата календарна година и настоящия мандат. Само тогава бюджетът може да бъде не просто инструмент за разпределяне на средства, а реален механизъм за промяна и развитие.


В настоящата ни съвместна поредица с „Екипът на София“ обсъждаме планирането, озеленяването, архитектурата, инфраструктурата, мобилността и още много други градски теми, описваме добрите примери и търсим възможните решения за подобряването на качеството на живот в нашите градове. 

Добрият градски бюджет – не само числа, а и цели

Integrate Amazon CloudWatch alarms with WhatsApp using AWS End User Messaging

Post Syndicated from Ruchikka Chaudhary original https://aws.amazon.com/blogs/messaging-and-targeting/integrate-amazon-cloudwatch-alarms-with-whatsapp-using-aws-end-user-messaging/

Timely and accessible alert notifications are crucial for maintaining operational excellence, but traditional alerting mechanisms often fall short. Email notifications can get buried in crowded inboxes, SMS messages might incur high costs for international teams, and pager systems lack the rich context modern teams need for rapid incident response. WhatsApp, with over 2 billion users worldwide, offers several advantages:

  • Universal accessibility – Available on virtually every smartphone
  • Rich media support – Sends formatted messages, images, and links
  • Global reach – No international SMS fees
  • High engagement – Messages are typically delivered within seconds
  • Familiar interface – Many teams already use WhatsApp for daily communication

This post walks through a solution to build a serverless alerting system that delivers Amazon CloudWatch alarms to WhatsApp using AWS End User Messaging.

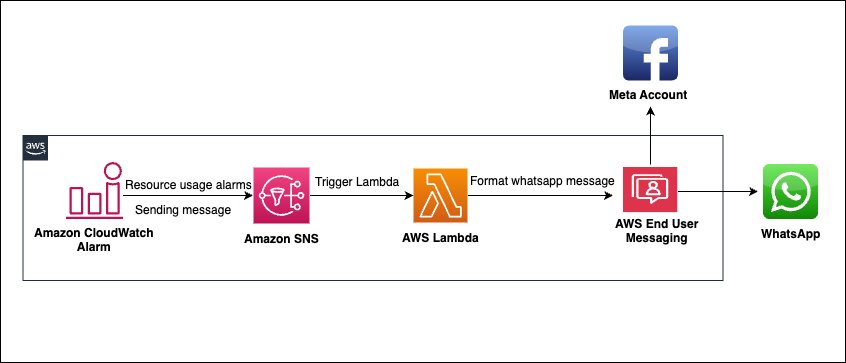
Overview of solution

The solution uses AWS End User Messaging Social to create a seamless bridge between CloudWatch alarms and WhatsApp notifications. This serverless architecture provides real-time infrastructure alerts through WhatsApp messaging platform teams already know and use.

The architecture consists of four main AWS services working together. The data flow begins when CloudWatch alarms detect breaches of predefined thresholds and publish notifications to an Amazon Simple Notification Service (Amazon SNS) topic. The SNS topic triggers an AWS Lambda function that processes the alarm data, formats contextual WhatsApp messages, and uses AWS End User Messaging Social to deliver notifications to specified recipients.

The following diagram illustrates the solution architecture.

Prerequisites

Implementation requires an AWS account with appropriate permissions for AWS CloudFormation, Lambda, Amazon SNS, and CloudWatch. You must also have a WhatsApp Business Account integrated with AWS End User Messaging and the WhatsApp phone number ID from the AWS End User Messaging console. (For instructions to locate this information, see View a phone number’s ID in AWS End User Messaging Social).

For more information about how to set up WhatsApp using AWS End User Messaging Social, refer to Automate workflows with WhatsApp using AWS End User Messaging Social.

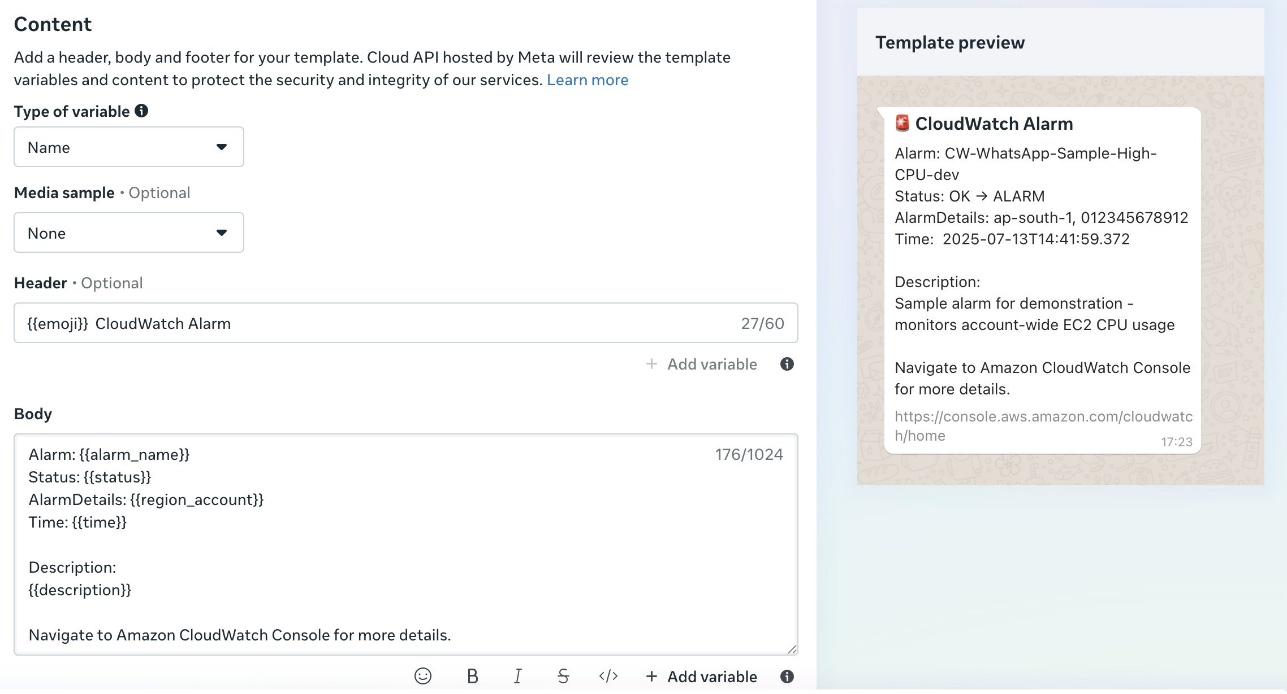
Before you deploy this solution, create an approved template in your Meta account named cw_alarm_notification. Alternatively, use your preferred template name and modify the Lambda function code accordingly (as shown in the following screenshot).

Lambda function code

The solution uses a Python-based Lambda function that processes CloudWatch alarm notifications and formats them for WhatsApp delivery. The function receives SNS events containing CloudWatch alarm data, extracts relevant information, formats contextual messages, and delivers notifications through AWS End User Messaging Social.

The following function code shows an example to parse the SNS message content and extract key alarm information, including alarm name, state value, and reason for state change:

def process_alarm_notification(record):
    # Parse SNS message
    sns_message = json.loads(record['Sns']['Message'])
    
    # Extract alarm details
    alarm_name = sns_message.get('AlarmName', 'Unknown Alarm')
    alarm_description = sns_message.get('AlarmDescription', '')
    new_state = sns_message.get('NewStateValue', 'UNKNOWN')
    old_state = sns_message.get('OldStateValue', 'UNKNOWN')
    reason = sns_message.get('NewStateReason', '')
    timestamp = sns_message.get('StateChangeTime', '')
    region = sns_message.get('Region', '')
    
    # Format WhatsApp message
    message = format_alarm_message(
        alarm_name, alarm_description, new_state, 
        old_state, reason, timestamp, region
    )
    
    # Send WhatsApp message
    send_whatsapp_message(message)
    

The following code shows an example to create a template message for WhatsApp (you can change the template name if required):

              # Build message
              template_name = 'cw_alarm_notification'
              template_message = {
                      "name": template_name,
                      "language": {
                          "code": "en"
                      },
                      "components": [
                          {
                              "type": "header",
                              "parameters": [{
                                  "type": "text",
                                  "parameter_name": "emoji",
                                  "text": state_emoji
                                  }
                              ]
                          },
                          {
                              "type": "body",
                              "parameters": [
                                  {
                                      "type": "text",
                                      "parameter_name": "alarm_name",
                                      "text": alarm_name
                                  },
                                  {
                                      "type": "text",
                                      "parameter_name": "status",
                                      "text": old_state + " → " + new_state
                                  },
                                  {
                                      "type": "text",
                                      "parameter_name": "region_account",
                                      "text": region + " - " + account_id
                                  },
                                  {
                                      "type": "text",
                                      "parameter_name": "time",
                                      "text": formatted_time
                                  },
                                  {
                                      "type": "text",
                                      "parameter_name": "description",
                                      "text": alarm_description + reason
                                  }
                              ]
                          }

                      ]
                  }
              
              return template_message

The send_whatsapp_message function uses AWS End User Messaging Social to deliver formatted messages through the socialmessaging client:

def send_whatsapp_message(message):
    """Send message via AWS End User Messaging"""
    client = boto3.client('socialmessaging')
    
    response = client.send_whats_app_message(
        originationPhoneNumberId=os.environ['WHATSAPP_PHONE_NUMBER_ID'],
        destinationPhoneNumber=os.environ['ALERT_RECIPIENT'],
        messageBody={'text': message}
    )

Deploy the solution

The solution uses AWS CloudFormation for infrastructure as code (IaC) deployment. The main template creates an SNS topic for alarm notifications, a Lambda function for message processing, and required AWS Identity and Access Management (IAM) roles with least-privilege permissions.

The CloudFormation template requires a recipient number with an active WhatsApp account to receive alarm notifications as messages. The template also requires the WhatsApp phone number ID retrieved from the AWS End User Messaging Social console, as noted in the prerequisites. The template must be deployed in the same AWS Region as AWS End User Messaging Social. See the following code:

aws cloudformation deploy \
  --template-file <cloudwatch-eum-whatsapp-alerts.yaml> \
  --stack-name cloudwatch-eum-whatsapp-alerts \
  --parameter-overrides \
    WhatsAppPhoneNumberId=<your-phone-number-id-from-eum> \
    AlertRecipient=<+1234567890> \
    Environment=dev \
  --capabilities CAPABILITY_IAM \
  --region <EUM-region>

The preceding template deploys an alarm called SampleHighCPUAlarm that triggers an SNS topic. The SNS topic triggers the WhatsApp alarm notifier Lambda function, which processes and sends the message using AWS End User Messaging Social.

Test the solution

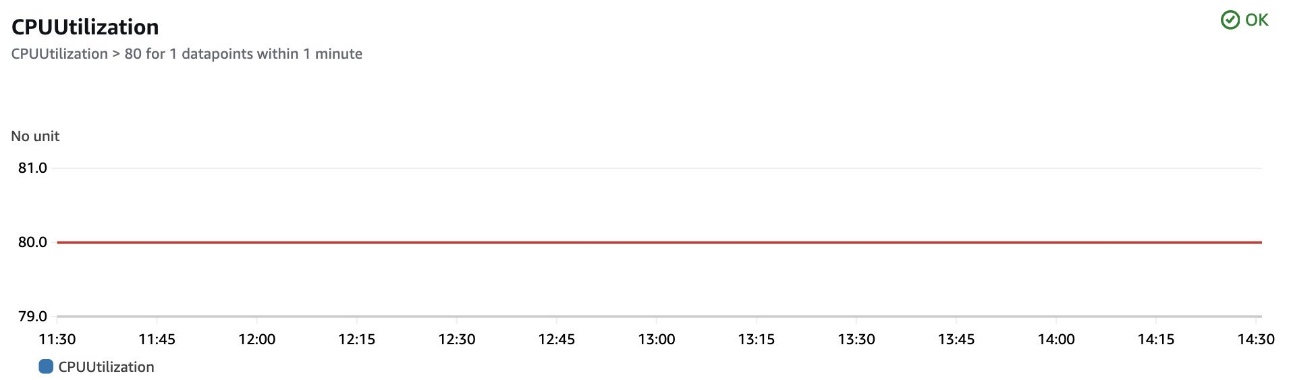
You can test the solution using the sample alarm created by the CloudFormation stack. The following screenshot shows an example alarm configuration and its CloudWatch metrics, currently in the OK state.

You can use the following code to trigger the alarm by updating this metric:

 aws cloudwatch put-metric-data --namespace "Custom/EC2" --metric-data MetricName=CPUUtilization,Value=85,Unit=Percent

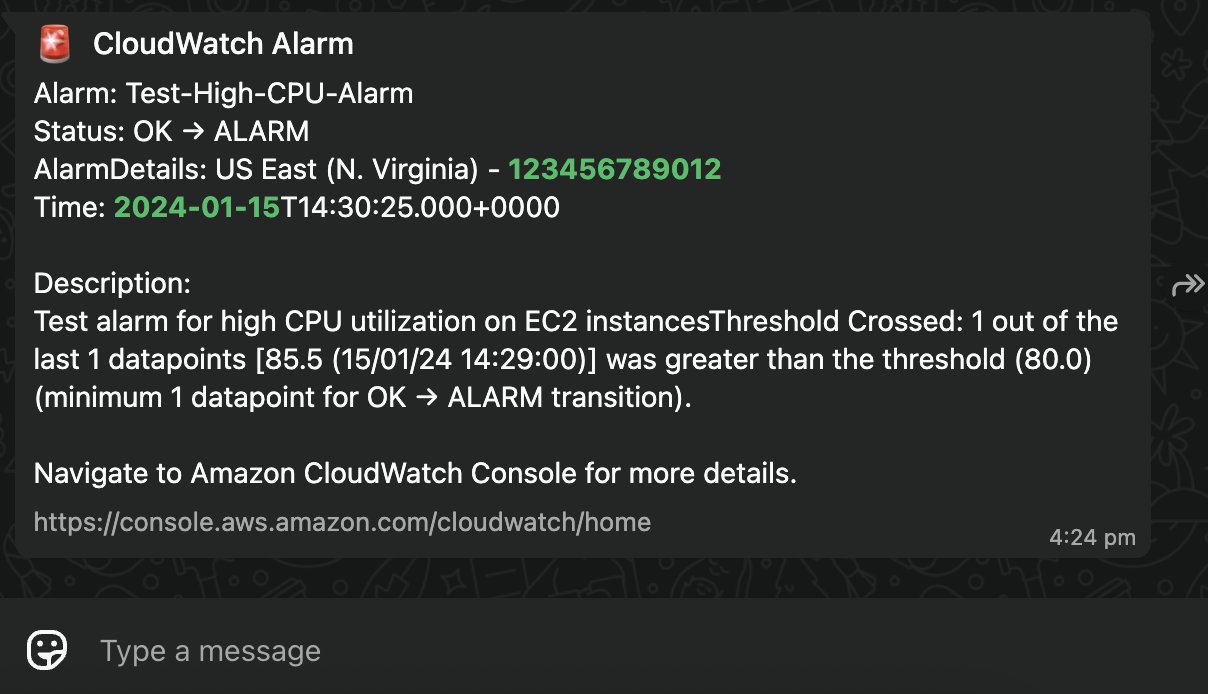
As the alarm switches from OK to ALARM state, a WhatsApp Message is delivered.

Conclusion

Integrating CloudWatch with WhatsApp notifications represents a significant step forward in modern infrastructure monitoring. By using AWS End User Messaging, teams can receive critical alerts through their preferred communication channel while maintaining the reliability and scalability of AWS services.

The solution’s modular architecture, simple yet effective security model, and cost-effective design make it suitable for organizations of various sizes.


About the author

Intel Blackout on VROC with Transition to Graid Technology in Another Streamlining Move

Post Syndicated from Patrick Kennedy original https://www.servethehome.com/intel-blackout-on-vroc-with-transition-to-graid-technology-in-another-streamlining-move/

Intel VROC will enter a blackout period as RMAs and new key sales transition to Graid Technology in a few weeks

The post Intel Blackout on VROC with Transition to Graid Technology in Another Streamlining Move appeared first on ServeTheHome.

Visualize data lineage using Amazon SageMaker Catalog for Amazon EMR, AWS Glue, and Amazon Redshift

Post Syndicated from Shubham Purwar original https://aws.amazon.com/blogs/big-data/visualize-data-lineage-using-amazon-sagemaker-catalog-for-amazon-emr-aws-glue-and-amazon-redshift/

Amazon SageMaker offers a comprehensive hub that integrates data, analytics, and AI capabilities, providing a unified experience for users to access and work with their data. Through Amazon SageMaker Unified Studio, a single and unified environment, you can use a wide range of tools and features to support your data and AI development needs, including data processing, SQL analytics, model development, training, inference, and generative AI development. This offering is further enhanced by the integration of Amazon Q and Amazon SageMaker Catalog, which provide an embedded generative AI and governance experience, helping users work efficiently and effectively across the entire data and AI lifecycle, from data preparation to model deployment and monitoring.

With the SageMaker Catalog data lineage feature, you can visually track and understand the flow of your data across different systems and teams, gaining a complete picture of your data assets and how they’re connected. As an OpenLineage-compatible feature, it helps you trace data origins, track transformations, and view cross-organizational data consumption, giving you insights into cataloged assets, subscribers, and external activities. By capturing lineage events from OpenLineage-enabled systems or through APIs, you can gain a deeper understanding of your data’s journey, including activities within SageMaker Catalog and beyond, ultimately driving better data governance, quality, and collaboration across your organization.

Additionally, the SageMaker Catalog data lineage feature versions each event, so you can track changes, visualize historical lineage, and compare transformations over time. This provides valuable insights into data evolution, facilitating troubleshooting, auditing, and data integrity by showing exactly how data assets have evolved, and generates trust in data.

In this post, we discuss the visualization of data lineage in SageMaker Catalog and how capture lineage from different AWS analytics services such as AWS Glue, Amazon Redshift, and Amazon EMR Serverless automatically, and visualize it with SageMaker Unified Studio.

Solution overview

The generation of data lineage in SageMaker Catalog operates through an automated system that captures metadata and relationships between different data artifacts for AWS Glue, Amazon EMR, and Amazon Redshift. When data moves through various AWS services, SageMaker automatically tracks these movements, transformations, and dependencies, creating a detailed map of the data’s journey. This tracking includes information about data sources, transformations, processing steps, and final outputs, providing a complete audit trail of data movement and transformation.

The implementation of data lineage in SageMaker Catalog offers several key benefits:

  • Compliance and audit support – Organizations can demonstrate compliance with regulatory requirements by showing complete data provenance and transformation history
  • Impact analysis – Teams can assess the potential impact of changes to data sources or transformations by understanding dependencies and relationships in the data pipeline
  • Troubleshooting and debugging – When issues arise, the lineage system helps identify the root cause by showing the complete path of data transformation and processing
  • Data quality management – By tracking transformations and dependencies, organizations can better maintain data quality and understand how data quality issues might propagate through their systems

Lineage capture is automated using several tools in SageMaker Unified Studio. To learn more, refer to Data lineage support matrix.

In the following sections, we show you how to configure your resources and implement the solution. For this post, we create the solution resources in the us-west-2 AWS Region using an AWS CloudFormation template.

Prerequisites

Before getting started, make sure you have the following:

Configure SageMaker Unified Studio with AWS CloudFormation

The vpc-analytics-lineage-sus.yaml stack creates a VPC, subnet, security group, IAM roles, NAT gateway, internet gateway, Amazon Elastic Compute Cloud (Amazon EC2) client, S3 buckets, SageMaker Unified Studio domain, and SageMaker Unified Studio project. To create the solution resources, complete the following steps:

  1. Launch the stack vpc-analytics-lineage-sus using the CloudFormation template:
  2. Provide the parameter values as listed in the following table.

    Parameters Sample value
    DatazoneS3Bucket s3://datazone-{account_id}/
    DomainName dz-studio
    EnvironmentName sm-unifiedstudio
    PrivateSubnet1CIDR 10.192.20.0/24
    PrivateSubnet2CIDR 10.192.21.0/24
    PrivateSubnet3CIDR 10.192.22.0/24
    ProjectName sidproject
    PublicSubnet1CIDR 10.192.10.0/24
    PublicSubnet2CIDR 10.192.11.0/24
    PublicSubnet3CIDR 10.192.12.0/24
    UsersList analyst
    VpcCIDR 10.192.0.0/16

The stack creation process can take approximately 20 minutes to complete. You can check the Outputs tab for the stack after the stack is created.

Next, we prepare source data, setup the AWS Glue ETL Job, Amazon EMR Serverless Spark Job and Amazon Redshift Job to generate the lineage and capture lineage from Amazon SageMaker Unified Studio

Prepare data

The following is example data from our CSV files:

attendance.csv

EmployeeID,Date,ShiftStart,ShiftEnd,Absent,OvertimeHours
E1000,2024-01-01,2024-01-01 08:00:00,2024-01-01 16:22:00,False,3
E1001,2024-01-08,2024-01-08 08:00:00,2024-01-08 16:38:00,False,2
E1002,2024-01-23,2024-01-23 08:00:00,2024-01-23 16:24:00,False,3
E1003,2024-01-09,2024-01-09 10:00:00,2024-01-09 18:31:00,False,0
E1004,2024-01-15,2024-01-15 09:00:00,2024-01-15 17:48:00,False,1

employees.csv

EmployeeID,Name,Department,Role,HireDate,Salary,PerformanceRating,Shift,Location
E1000,Employee_0,Quality Control,Operator,2021-08-08,33002.0,1,Night,Plant C
E1001,Employee_1,Maintenance,Supervisor,2015-12-31,69813.76,5,Evening,Plant B
E1002,Employee_2,Production,Technician,2015-06-18,46753.32,1,Evening,Plant A
E1003,Employee_3,Admin,Supervisor,2020-10-13,52853.4,5,Night,Plant A
E1004,Employee_4,Quality Control,Manager,2023-09-21,55645.27,5,Evening,Plant A

Upload the sample data from attendance.csv and employees.csv to the S3 bucket specified in the previous CloudFormation stack (s3://datazone-{account_id}/csv/).

Ingest employee data in Amazon Relational Database Dervice (Amazon RDS) for MySQL table

On the CloudFormation console, open the stack vpc-analytics-lineage-sus and collect the Amazon RDS for MySQL database endpoint to use in the following commands to create a default employeedb database.

  1. Connect to Amazon EC2 instance with mysql package installation
  2. Run the following command to connect to the database
    >MySQL -u admin -h database-1.cuqd06l5efvw.us-west-2.rds.amazonaws.com -p

  3. Run the following command to create an employee table
    Use employeedb;
    
    CREATE TABLE employee (
      EmployeeID longtext,
      Name longtext,
      Department longtext,
      Role longtext,
      HireDate longtext,
      Salary longtext,
      PerformanceRating longtext,
      Shift longtext,
      Location longtext
    );

  4. Running the following command to insert rows.
    INSERT INTO employee (EmployeeID, Name, Department, Role, HireDate, Salary, PerformanceRating, Shift, Location) VALUES ('E1000', 'Employee_0', 'Quality Control', 'Operator', '2021-08-08', 33002.00, 1, 'Night', 'Plant C'), ('E1001', 'Employee_1', 'Maintenance', 'Supervisor', '2015-12-31', 69813.76, 5, 'Evening', 'Plant B'), ('E1002', 'Employee_2', 'Production', 'Technician', '2015-06-18', 46753.32, 1, 'Evening', 'Plant A'), ('E1003', 'Employee_3', 'Admin', 'Supervisor', '2020-10-13', 52853.40, 5, 'Night', 'Plant A'), ('E1004', 'Employee_4', 'Quality Control', 'Manager', '2023-09-21', 55645.27, 5, 'Evening', 'Plant A');

Capture lineage from AWS Glue ETL job and notebook

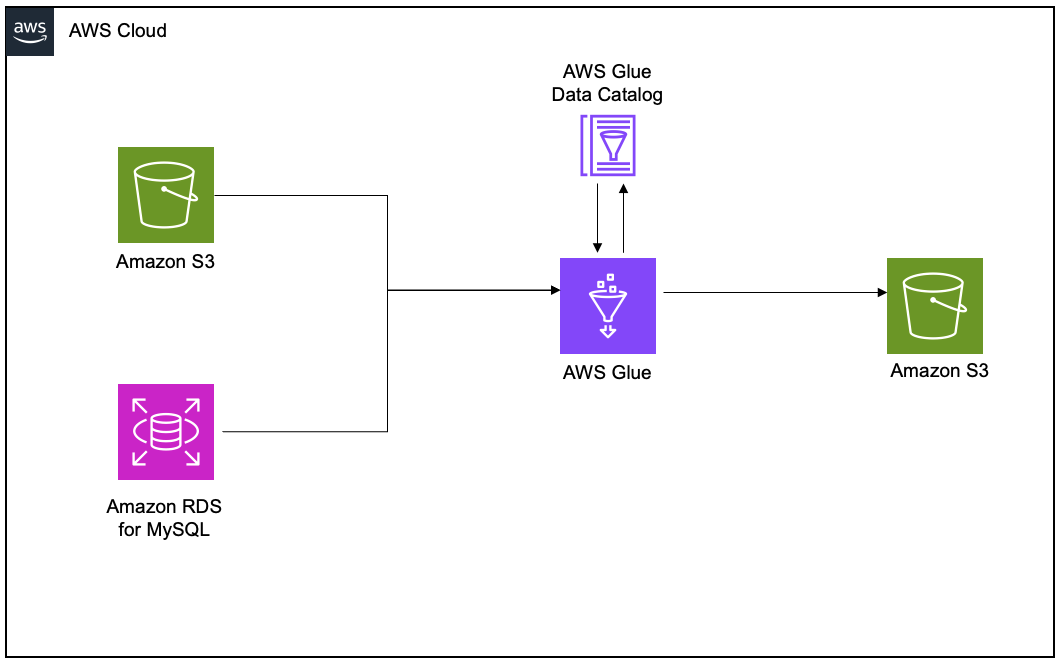
To demonstrate the lineage, we set up an AWS Glue extract, transform, and load (ETL) job to read the employee data from an Amazon RDS for MySQL table and the employee attendance data from Amazon S3, and join both datasets. Finally, we write the data to Amazon S3 and create the attendance_with_emp1 table in the AWS Glue Data Catalog.

Create and configure AWS Glue job for lineage generation

Complete the following steps to create your AWS Glue ETL job:

  1. On the AWS Glue console, create a new ETL job with AWS Glue version 5.0.
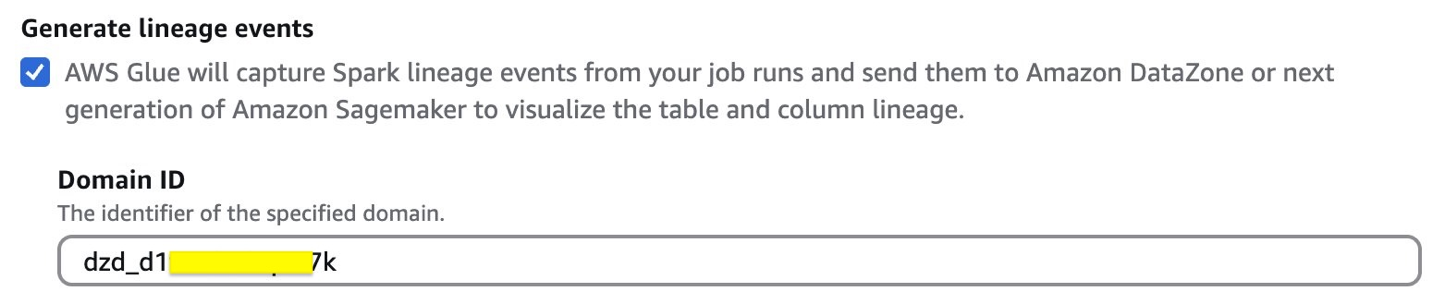
  2. Enable Generate lineage events and provide the domain ID (retrieve from the CloudFormation template output for DataZoneDomainid; it will have the format dzd_xxxxxxxx)
  3. Use the following code snippet in the AWS Glue ETL job script. Provide the S3 bucket (bucketname-{account_id}) used in the preceding CloudFormation stack.
    from pyspark.sql import SparkSession
    from pyspark.sql import SparkSession, DataFrame
    from pyspark.sql.functions import *
    from pyspark.sql.types import *
    from pyspark import SparkContext
    from pyspark.sql import SparkSession
    import sys
    import logging
    
    
    spark = SparkSession.builder.appName("lineageglue").enableHiveSupport().getOrCreate()
     
    connection_details = glueContext.extract_jdbc_conf(connection_name="connectionname")
    
    employee_df = spark.read.format("jdbc").option("url", "jdbc:MySQL://dbhost:3306/database_name").option("dbtable", "employee").option("user", connection_details['user']).option("password", connection_details['password']).load()
    
    s3_paths = {
    'absent_data': 's3://bucketname-{account_id}/csv/attendance.csv'
    }
    absent_df = spark.read.csv(s3_paths['absent_data'], header=True, inferSchema=True)
    
    joined_df = employee_df.join(absent_df, on="EmployeeID", how="inner")
    
    joined_df.write.mode("overwrite").format("parquet").option("path", "s3://datazone-{account_id}/attendanceparquet/").saveAsTable("gluedbname.tablename")

  4. Choose Run to start the job.
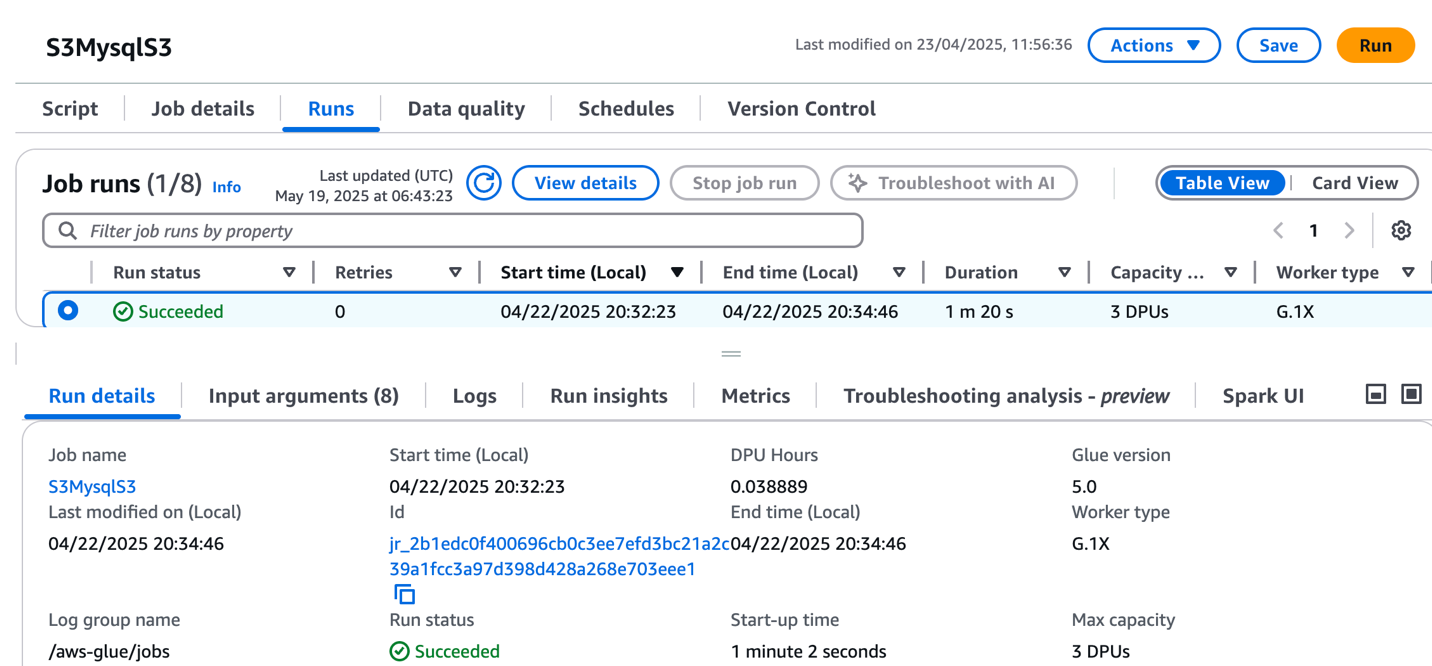
  5. On the Runs tab, confirm the job ran without failure.
  6. After the job has executed successfully, navigate to the SageMaker Unified Studio domain.
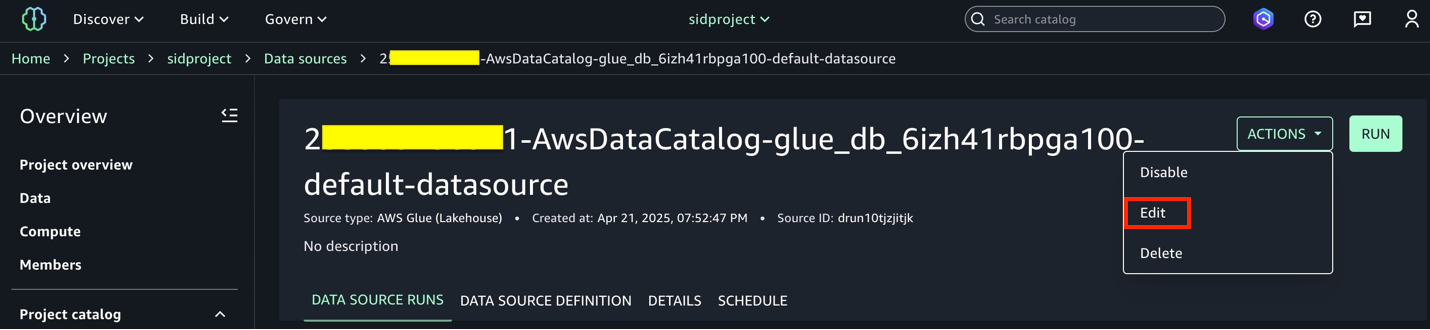
  7. Choose Project and under Overview, choose Data Sources.
  8. Select the Data Catalog source (accountid-AwsDataCatalog-glue_db_suffix-default-datasource).
  9. On the Actions dropdown menu, choose Edit.
  10. Under Connection, enable Import data lineage.
  11. In the Data Selection section, under Table Selection Criteria, provide a table name or use * to generate lineage.
  12. Update the data source and choose Run to create an asset called attendance_with_emp1 in SageMaker Catalog.
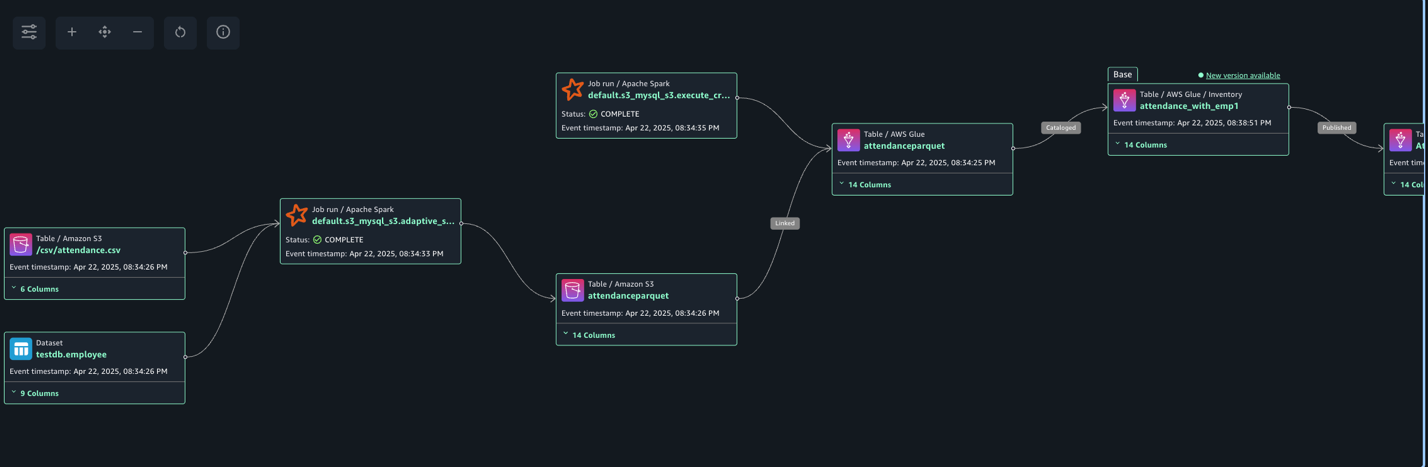
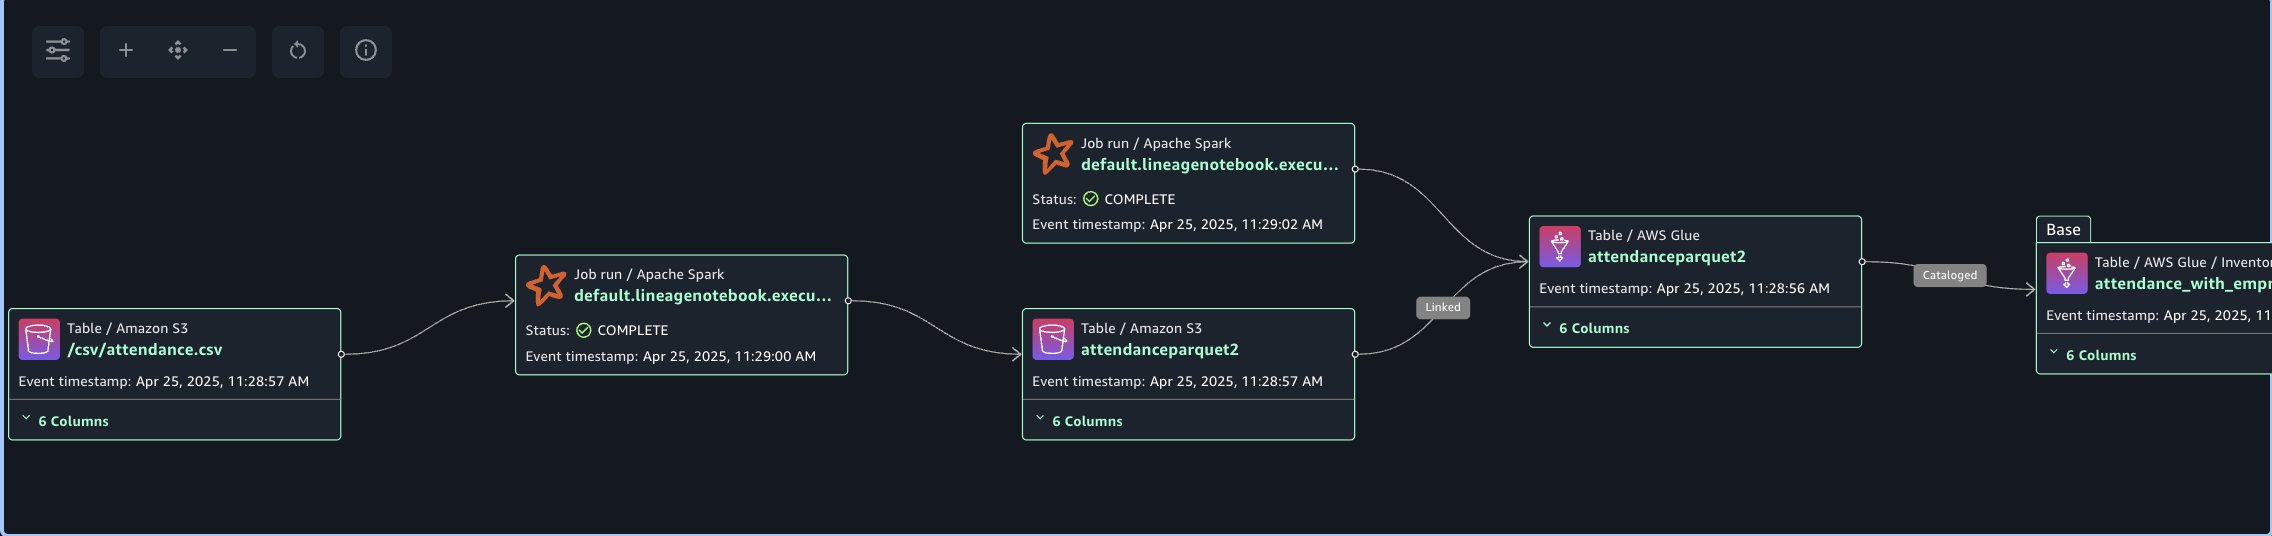
  13. Navigate to Assets, choose the attendance_with_emp1 asset, and navigate to the LINEAGE section.

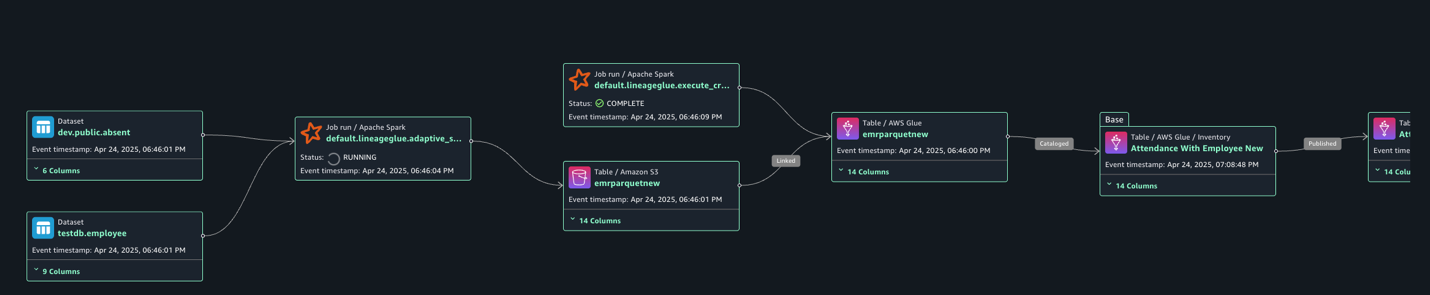
The following lineage diagram shows an AWS Glue job that integrates data from two sources: employee information stored in Amazon RDS for MySQL and employee absence records stored in Amazon S3. The AWS Glue job combines these datasets through a join operation, then creates a table in the Data Catalog and registers it as an asset in SageMaker Catalog, making the unified data available for further analysis or machine learning purposes.

Create and configure AWS Glue notebook for lineage generation

Complete the following steps to create the AWS Glue notebook:

  1. On the AWS Glue console, choose Author using an interactive code notebook.
  2. Under Options, choose Start fresh and choose Create notebook.
  3. In the notebook, use the following code to generate lineage.

    In the following code, we add the required Spark configuration to generate lineage and then read CSV data from Amazon S3 and write in Parquet format to the Data Catalog table. The Spark configuration includes the following parameters:

    • spark.extraListeners=io.openlineage.spark.agent.OpenLineageSparkListener – Registers the OpenLineage listener to capture Spark job execution events and metadata for lineage tracking
    • spark.openlineage.transport.type=amazon_datazone_api – Specifies Amazon DataZone as the destination service where the lineage data will be sent and stored
    • spark.openlineage.transport.domainId=dzd_xxxxxxx – Defines the unique identifier of your Amazon DataZone domain where the lineage data will be associated
    • spark.glue.accountId={account_id} – Specifies the AWS account ID where the AWS Glue job is running for proper resource identification and access
    • spark.openlineage.facets.custom_environment_variables – Lists the specific environment variables to capture in the lineage data for context about the AWS and AWS Glue environment
    • spark.glue.JOB_NAME=lineagenotebook – Sets a unique identifier name for the AWS Glue job that will appear in lineage tracking and logs

    See the following code:

    %%configure —name project.spark -f
    {
    "—conf":"spark.extraListeners=io.openlineage.spark.agent.OpenLineageSparkListener \
    --conf spark.openlineage.transport.type=amazon_datazone_api \
    --conf spark.openlineage.transport.domainId=dzd_xxxxxxxx \
    --conf spark.glue.accountId={account_id} \
    --conf spark.openlineage.facets.custom_environment_variables=[AWS_DEFAULT_REGION;GLUE_VERSION;GLUE_COMMAND_CRITERIA;GLUE_PYTHON_VERSION;] \
    --conf spark.glue.JOB_NAME=lineagenotebook"
    }
    
    from pyspark.sql import SparkSession
    from pyspark.sql import SparkSession, DataFrame
    from pyspark.sql.functions import *
    from pyspark.sql.types import *
    from pyspark import SparkContext
    from pyspark.sql import SparkSession
    import sys
    import logging
    
    
    spark = SparkSession.builder.appName("lineagegluenotebook").enableHiveSupport().getOrCreate()
    
    s3_paths = {
    'absent_data': 's3://datazone-{account_id}/csv/attendance.csv'
    }
    absent_df = spark.read.csv(s3_paths['absent_data'], header=True, inferSchema=True)
    
    absent_df.write.mode("overwrite").format("parquet").option("path", "s3://datazone-{account_id}/attendanceparquet2/").saveAsTable("gluedbname.tablename")

  4. After the notebook has executed successfully, navigate to the SageMaker Unified Studio domain.
  5. Choose Project and under Overview, choose Data Sources.
  6. Choose the Data Catalog source ({account_id}-AwsDataCatalog-glue_db_suffix-default-datasource).
  7. Choose Run to create the asset attendance_with_empnote in SageMaker Catalog.
  8. Navigate to Assets, choose the attendance_with_empnote asset, and navigate to the LINEAGE section.

The following lineage diagram shows an AWS Glue job that reads data from the employee absence records stored in Amazon S3. The AWS Glue job transform CSV data into Parquet format, then creates a table in the Data Catalog and registers it as an asset in SageMaker Catalog.

Capture lineage from Amazon Redshift

To demonstrate the lineage, we are creating an employee table and an attendance table and join both datasets. Finally, we create a new table called employeewithabsent in Amazon Redshift. Complete the following steps to create and configure lineage for Amazon Redshift tables:

  1. In SageMaker Unified Studio, open your domain.
  2. Under Compute, choose Data warehouse.
  3. Open project.redshift and copy the endpoint name (redshift-serverless-workgroup-xxxxxxx).
  4. On the Amazon Redshift console, open the Query Editor v2, and connect to the Redshift Serverless workgroup with a secret. Use the AWS Secrets Manager option and choose the secret redshift-serverless-namespace-xxxxxxxx.
  5. Use the following code to create tables in Amazon Redshift and load data from Amazon S3 using the COPY command. Make sure the IAM role has GetObject permission on the S3 files attendance.csv and employees.csv.

    Create Redshift table absent

    CREATE TABLE public.absent (
        employeeid character varying(65535),
        date date,
        shiftstart timestamp without time zone ,
        shiftend timestamp without time zone,
        absent boolean,
        overtimehours integer
    );

    Load data into absent table.

    COPY absent
    FROM 's3://datazone-{account_id}/csv/attendance.csv' 
    IAM_ROLE 'arn:aws:iam::accountid:role/RedshiftAdmin'
    csv
    IGNOREHEADER 1;

    Create Redshift table employee

    CREATE TABLE public.employee (
        employeeid character varying(65535),
        name character varying(65535),
        department character varying(65535),
        role character varying(65535),
        hiredate date,
        salary double precision,
        performancerating integer,
        shift character varying(65535),
        location character varying(65535)
    );

    Load data into employee table.

    COPY employee
    FROM 's3://datazone-{account_id}/csv/employees.csv' 
    IAM_ROLE 'arn:aws:iam::account-id:role/RedshiftAdmin'
    csv
    IGNOREHEADER 1;

  6. After the tables are created and the data is loaded, perform the join between the tables and create a new table with a CTAS query:
    CREATE TABLE public.employeewithabsent AS
    SELECT 
      e.*,
      a.absent,
      a.overtimehours
    FROM public.employee e
    INNER JOIN public.absent a
    ON e.EmployeeID = a.EmployeeID;

  7. Navigate to the SageMaker Unified Studio domain.
  8. Choose Project and under Overview, choose Data Sources.
  9. Select the Amazon Redshift source (RedshiftServerless-default-redshift-datasource).
  10. On the Actions dropdown menu, choose Edit.
  11. Under Connection, Enable Import data lineage.
  12. In the Data Selection section, under Table Selection Criteria, provide a table name or use * to generate lineage.
  13. Update the data source and choose Run to create an asset called employeewithabsent in SageMaker Catalog.
  14. Navigate to Assets, choose the employeewithabsent asset, and navigate to the LINEAGE section.

The following lineage diagram shows joining two redshift tables and creating a new redshift table and registers it as an asset in SageMaker Catalog.

Capture lineage from EMR Serverless job

To demonstrate the lineage, we read employee data from an RDS for MySQL table and an attendance dataset from Amazon Redshift, and join both datasets. Finally, we write the data to Amazon S3 and create the attendance_with_employee table in the Data Catalog. Complete the following steps:

  1. On the Amazon EMR console, choose EMR Serverless in the navigation pane.
  2. To create or manage EMR Serverless applications, you need the EMR Studio UI.
    1. If you already have an EMR Studio in the Region where you want to create an application, choose Manage applications to navigate to your EMR Studio, or select the EMR Studio that you want to use.
    2. If you don’t have an EMR Studio in the Region where you want to create an application, choose Get started and then choose Create and launch Studio. EMR Serverless creates an EMR Studio for you so you can create and manage applications.
  3. In the Create studio UI that opens in a new tab, enter the name, type, and release version for your application.
  4. Choose Create application.
  5. Create an EMR Spark serverless application with the following configuration:
    1. For Type, choose Spark.
    2. For Release version, choose emr-7.8.0.
    3. For Architecture, choose x86_64.
    4. For Application setup options, select Use custom settings.
    5. For Interactive endpoint, enable the endpoint for EMR Studio.
    6. For Application configuration, use the following configuration:
      [{
          "Classification": "iceberg-defaults",
          "Properties": {
              "iceberg.enabled": "true"
          }
      }]

  6. Choose Create and Start application.
  7. After application has started, submit the Spark application to generate lineage events. Copy the following script and upload it to the S3 bucket (s3://datazone-{account_id}/script/). Upload the MySQL-connector-java JAR file to the S3 bucket (s3://datazone-{account_id}/jars/) to read the data from MySQL.
    from pyspark.sql import SparkSession
    from pyspark.sql import SparkSession, DataFrame
    from pyspark.sql.functions import *
    from pyspark.sql.types import *
    from pyspark import SparkContext
    from pyspark.sql import SparkSession
    import sys
    import logging
    
    
    spark = SparkSession.builder.appName("lineageglue").enableHiveSupport().getOrCreate()
    
    employee_df = spark.read.format("jdbc").option("driver","com.MySQL.cj.jdbc.Driver").option("url", "jdbc:MySQL://dbhostname:3306/databasename").option("dbtable", "employee").option("user", "admin").option("password", "xxxxxxx").load()
    
    absent_df = spark.read.format("jdbc").option("url", "jdbc:redshift://redshiftserverlessendpoint:5439/dev").option("dbtable", "public.absent").option("user", "admin").option("password", "xxxxxxxxxx").load()
    
    joined_df = employee_df.join(absent_df, on="EmployeeID", how="inner")
    
    joined_df.write.mode("overwrite").format("parquet").option("path", "s3://datazone-{account_id}/emrparquetnew/").saveAsTable("gluedname.tablename")

  8. After you upload the script, use the following command to submit the Spark application. Change the following parameters according to your environment details:
    1. application-id: Provide the Spark application ID you generated.
    2. execution-role-arn: Provide the EMR execution role.
    3. entryPoint: Provide the Spark script S3 path.
    4. domainID: Provide the domain ID (from the CloudFormation template output for DataZoneDomainid: dzd_xxxxxxxx).
    5. accountID: Provide your AWS account ID.
      aws emr-serverless start-job-run --application-id 00frv81tsqe0ok0l --execution-role-arn arn:aws:iam::{account_id}:role/service-role/AmazonEMR-ExecutionRole-1717662744320 --name "Spark-Lineage" --job-driver '{
              "sparkSubmit": {
                  "entryPoint": "s3://datazone-{account_id}/script/emrspark2.py",
                  "sparkSubmitParameters": "--conf spark.executor.cores=1 --conf spark.executor.memory=4g --conf spark.driver.cores=1 --conf spark.driver.memory=4g --conf spark.executor.instances=2 --conf spark.hadoop.hive.metastore.client.factory.class=com.amazonaws.glue.catalog.metastore.AWSGlueDataCatalogHiveClientFactory --conf spark.jars=/usr/share/aws/datazone-openlineage-spark/lib/DataZoneOpenLineageSpark-1.0.jar,s3://datazone-{account_id}/jars/MySQL-connector-java-8.0.20.jar --conf spark.extraListeners=io.openlineage.spark.agent.OpenLineageSparkListener --conf spark.openlineage.transport.type=amazon_datazone_api --conf spark.openlineage.transport.domainId=dzd_xxxxxxxx --conf spark.glue.accountId={account_id}"
              }
          }'

  9. After the job has executed successfully, navigate to the SageMaker Unified Studio domain.
  10. Choose Project and under Overview, choose Data Sources.
  11. Select the Data Catalog source ({account_id}-AwsDataCatalog-glue_db_xxxxxxxxxx-default-datasource).
  12. On the Actions dropdown menu, choose Edit.
  13. Under Connection, enable Import data lineage.
  14. In the Data Selection section, under Table Selection Criteria, provide a table name or use * to generate lineage.
  15. Update the data source and choose Run to create an asset called attendancewithempnew in SageMaker Catalog.
  16. Navigate to Assets, choose the attendancewithempnew asset, and navigate to the LINEAGE section.

The following lineage diagram shows an AWS Glue job that integrates employee information stored in Amazon RDS for MySQL and employee absence records stored in Amazon Redshift. The AWS Glue job combines these datasets through a join operation, then creates a table in the Data Catalog and registers it as an asset in SageMaker Catalog.

Clean up

To clean up your resources, complete the following steps:

  1. On the AWS Glue console, delete the AWS Glue job.
  2. On the Amazon EMR console, delete the EMR Serverless Spark application and EMR Studio.
  3. On the AWS CloudFormation console, delete the CloudFormation stack vpc-analytics-lineage-sus.

Conclusion

In this post, we showed how data lineage in SageMaker Catalog helps you track and understand the complete lifecycle of your data across various AWS analytics services. This comprehensive tracking system provides visibility into how data flows through different processing stages, transformations, and analytical workflows, making it an essential tool for data governance, compliance, and operational efficiency.

Try out these lineage visualization methods for your own use cases, and share your questions and feedback in the comments section.


About the Authors

Shubham Purwar

Shubham Purwar

Shubham is an AWS Analytics Specialist Solution Architect. He helps organizations unlock the full potential of their data by designing and implementing scalable, secure, and high-performance analytics solutions on the AWS platform. With deep expertise in AWS analytics services, he collaborates with customers to uncover their distinct business requirements and create customized solutions that deliver actionable insights and drive business growth. In his free time, Shubham loves to spend time with his family and travel around the world.

Nitin Kumar

Nitin Kumar

Nitin is a Cloud Engineer (ETL) at Amazon Web Services, specialized in AWS Glue. With a decade of experience, he excels in aiding customers with their big data workloads, focusing on data processing and analytics. He is committed to helping customers overcome ETL challenges and develop scalable data processing and analytics pipelines on AWS. In his free time, he likes to watch movies and spend time with his family.

Prashanthi Chinthala

Prashanthi Chinthala

Prashanthi is a Cloud Engineer (DIST) at AWS. She helps customers overcome EMR challenges and develop scalable data processing and analytics pipelines on AWS.

The collective thoughts of the interwebz