The GNU C Library project has
been accepted as a CVE Numbering Authority (CNA), meaning that the
project is now in control of the CVE numbers assigned to its code.
As a CNA the glibc security team will be working to improve the
quality and response time of security advisories and mitigations.
Over the coming months, the glibc security team will define the
process for the CNA and establish best practices that can also be
used by the rest of the GNU Toolchain.
See this article for some background on
this change.
You can now access classroom resources created by us for the T Level in Digital Production, Design and Development. T Levels are a type of vocational qualification young people in England can gain after leaving school, and we are pleased to be able to support T Level teachers and students.
With our new resources, we aim to empower more young people to develop their digital skills and confidence while studying, meaning they can access more jobs and opportunities for further study once they finish their T Levels.
We worked collaboratively with the Gatsby Charitable Foundation on this pilot project as part of their Technical Education Networks Programme, the first time that we have created classroom resources for post-16 vocational education.
Post-16 vocational training and T Levels
T Levels are Technical Levels, 2-year courses for 16- to 18-year-old school leavers. Launched in England in September 2020, T Levels cover a range of subjects and have been developed in collaboration with employers, education providers, and other organisations. The aim is for T Levels to specifically prepare young people for entry into skilled employment, an apprenticeship, or related technical study in further or higher education.
For us, this T Level pilot project follows on from work we did in 2022 to learn more about post-16 vocational training and identify gaps where we could make a difference.
Something interesting we found was the relatively low number of school-age young people who started apprenticeships in the UK in 2019/20. For example, a 2021 Worldskills UK report stated that only 18% of apprentices were young people aged 19 and under. 39% were aged 19-24, and the remaining 43% were people aged 25 and over.
To hear from young people about their thoughts directly, we spoke to a group of year 10 students (ages 14 to 15) at Gladesmore School in Tottenham. Two thirds of these students said that digital skills were ‘very important’ to them, and that they would consider applying for a digital apprenticeship or T Level. When we asked them why, one of the key reasons they gave was the opportunity to work and earn money, rather than moving into further study in higher education and paying tuition fees. One student’s answer was for example, “It’s a good way to learn new skills while getting paid, and also gives effective work experience.”
T Level curriculum materials and project brief
To support teachers in delivering the Digital Production, Design and Development T Level qualification, we created a new set of resources: curriculum materials as well a project brief with examples to support the Occupational Specialism component of the qualification.
The curriculum materials on the topic ‘Digital environments’ cover content related to computer systems including hardware, software, networks, and cloud environments. They are designed for teachers to use in the classroom and consist of a complete unit of work: lesson plans, slide decks, activities, a progression chart, and assessment materials. The materials are designed in line with our computing content framework and pedagogy principles, on which the whole of our Computing Curriculum is based.
The project brief is a real-world scenario related to our work and gives students the opportunity to problem-solve as though they are working in an industry job.
Our thanks to the Gatsby Foundation for collaborating with us on this work to empower more young people to fulfil their potential through the power of computing and digital technologies.
It is no secret that Cloudflare is encouraging companies to deprecate their use of IPv4 addresses and move to IPv6 addresses. We have a couple articles on the subject from this year:
And many more in our catalog. To help with this, we spent time this last year investigating and implementing infrastructure to reduce our internal and egress use of IPv4 addresses. We prefer to re-allocate our addresses than to purchase more due to increasing costs. And in this effort we discovered that our cache service is one of our bigger consumers of IPv4 addresses. Before we remove IPv4 addresses for our cache services, we first need to understand how cache works at Cloudflare.
How does cache work at Cloudflare?
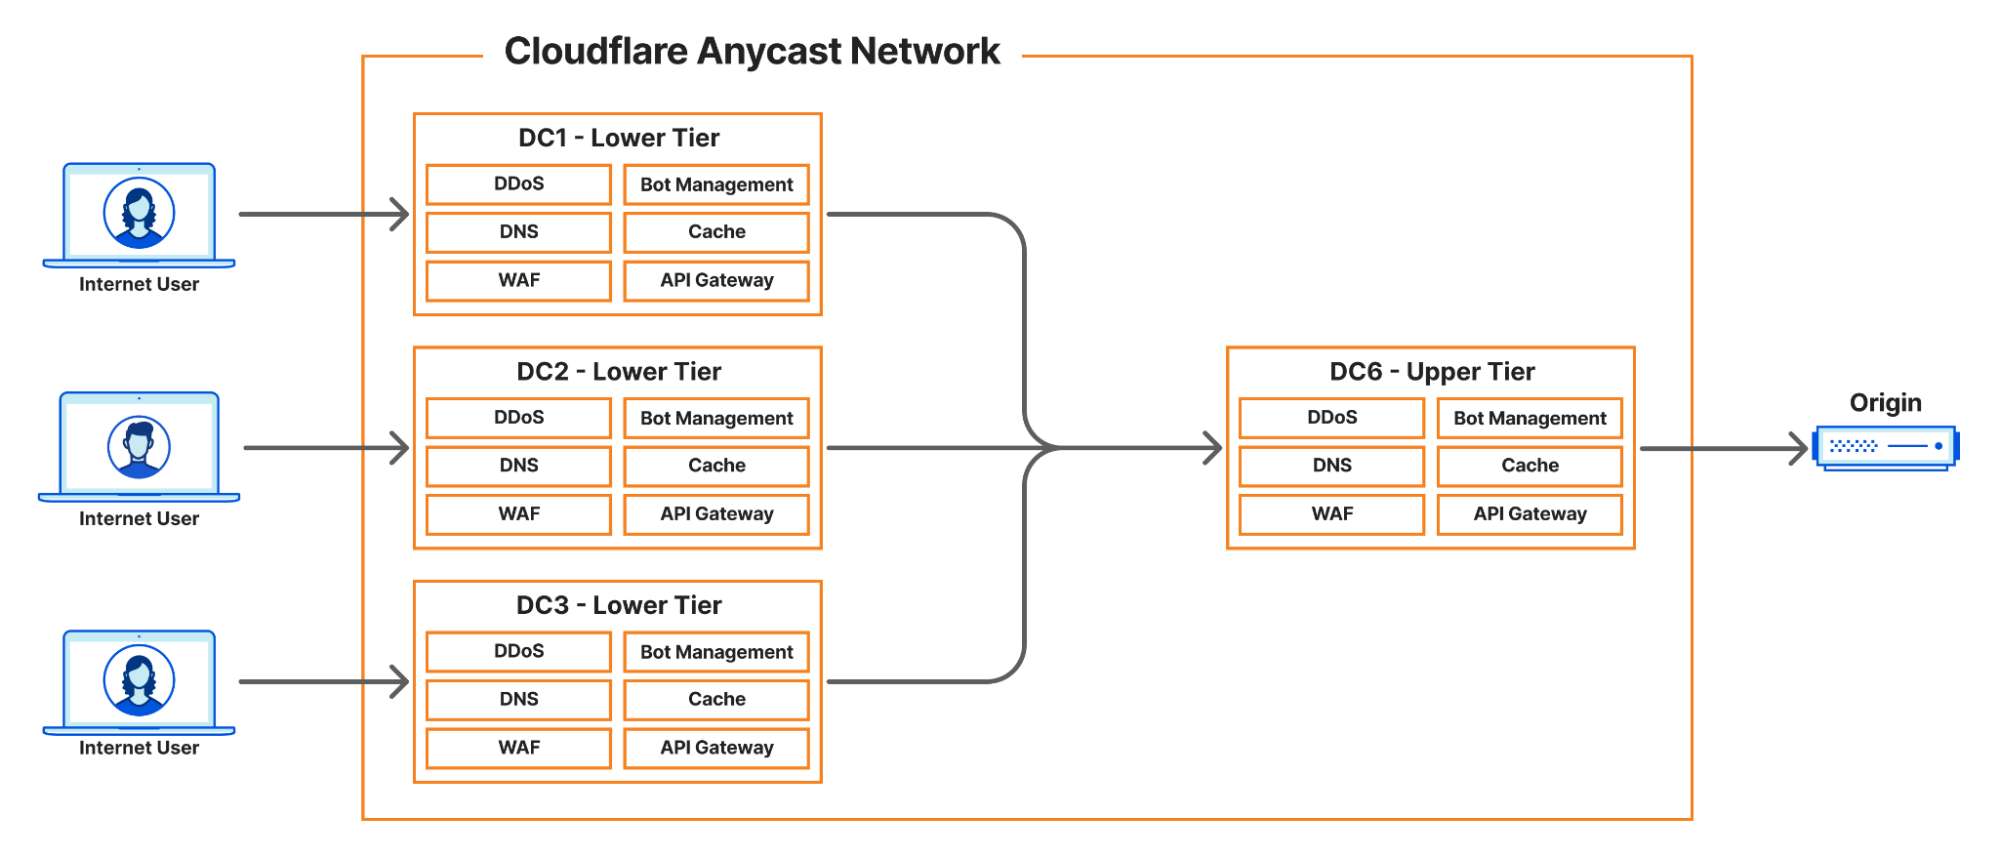
Describing the full scope of the architecture is out of scope of this article, however, we can provide a basic outline:
Internet User makes a request to pull an asset
Cloudflare infrastructure routes that request to a handler
Handler machine returns cached asset, or if miss
Handler machine reaches to origin server (owned by a customer) to pull the requested asset
The particularly interesting part is the cache miss case. When a very popular origin has an uncached asset that many Internet Users are trying to access at once, we may make upwards of: 50k TCP unicast connections to a single destination.
That is a lot of connections! We have strategies in place to limit the impact of this or avoid this problem altogether. But in these rare cases when it occurs, we will then balance these connections over two source IPv4 addresses.
Our goal is to remove the load balancing and prefer one IPv4 address. To do that, we need to understand the performance impact of two IPv4 addresses vs one.
TCP connect() performance of two source IPv4 addresses vs one IPv4 address
We leveraged a tool called wrk, and modified it to distribute connections over multiple source IP addresses. Then we ran a workload of 70k connections over 48 threads for a period of time.
During the test we measured the function tcp_v4_connect() with the BPF BCC libbpf-tool funclatency tool to gather latency metrics as time progresses.
Note that throughout the rest of this article, all the numbers are specific to a single machine with no production traffic. We are making the assumption that if we can improve a worse case scenario in an algorithm with a best case machine, that the results could be extrapolated to production. Lock contention was specifically taken out of the equation, but will have production implications.
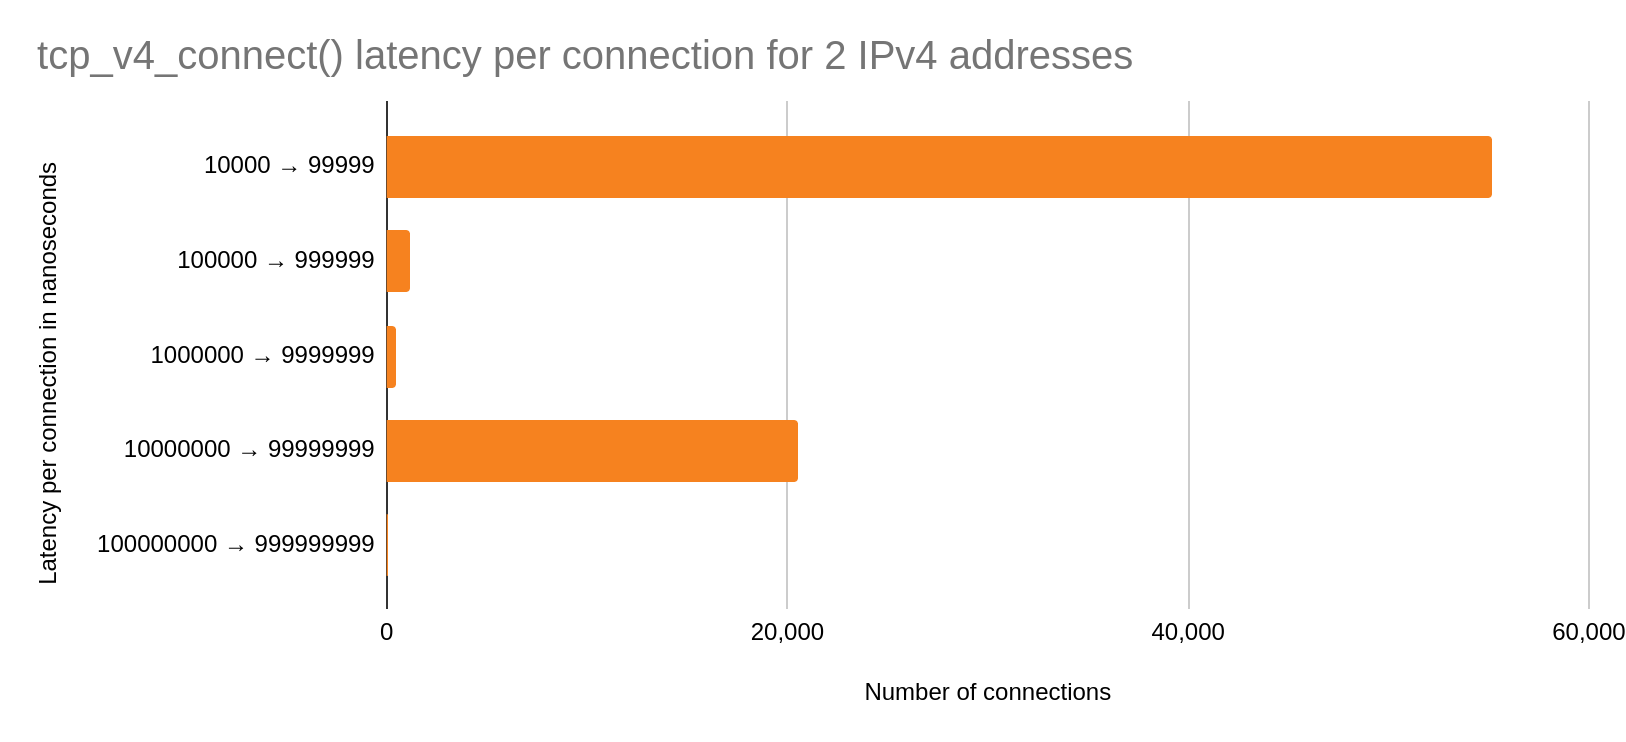
Two IPv4 addresses
The y-axis are buckets of nanoseconds in powers of ten. The x-axis represents the number of connections made per bucket. Therefore, more connections in a lower power of ten buckets is better.
We can see that the majority of the connections occur in the fast case with roughly ~20k in the slow case. We should expect this bimodal to increase over time due to wrk continuously closing and establishing connections.
Now let us look at the performance of one IPv4 address under the same conditions.
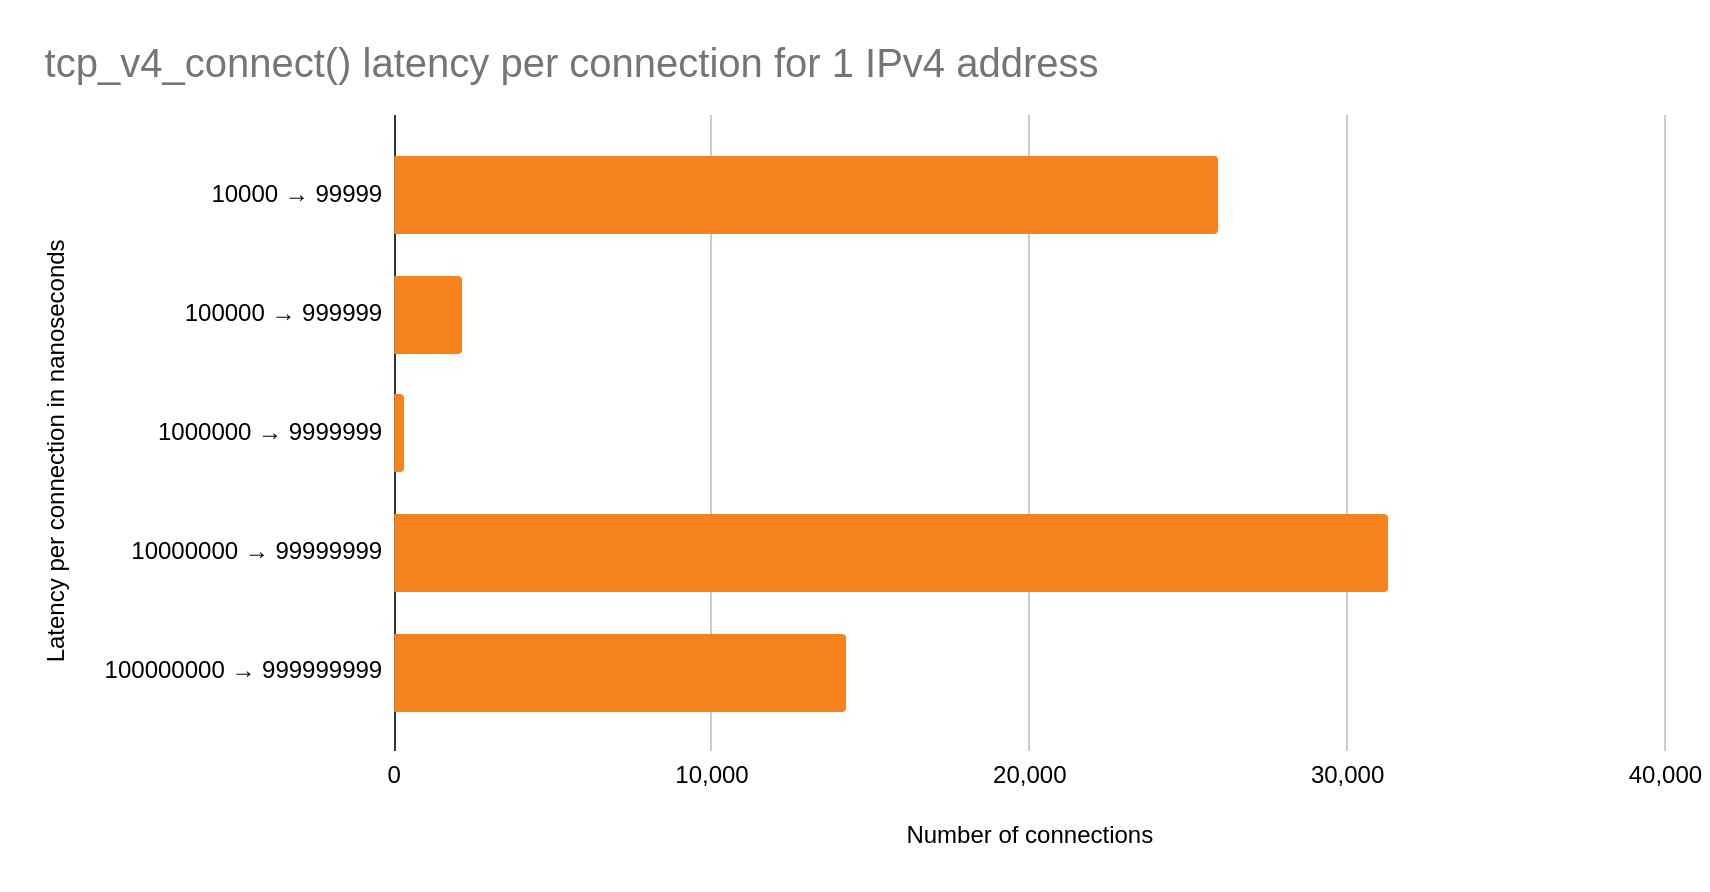
One IPv4 address
In this case, the bimodal distribution is even more pronounced. Over half of the total connections are in the slow case than in the fast! We may conclude that simply switching to one IPv4 address for cache egress is going to introduce significant latency on our connect() syscalls.
The next logical step is to figure out where this bottleneck is happening.
Port selection is not what you think it is
To investigate this, we first took a flame graph of a production machine:
Flame graphs depict a run-time function call stack of a system. Y-axis depicts call-stack depth, and x-axis depicts a function name in a horizontal bar that represents the amount of times the function was sampled. Checkout this in-depth guide about flame graphs for more details.
Most of the samples are taken in the function __inet_hash_connect(). We can see that there are also many samples for __inet_check_established() with some lock contention sampled between. We have a better picture of a potential bottleneck, but we do not have a consistent test to compare against.
Wrk introduces a bit more variability than we would like to see. Still focusing on the function tcp_v4_connect(), we performed another synthetic test with a homegrown benchmark tool to test one IPv4 address. A tool such as stress-ng may also be used, but some modification is necessary to implement the socket option IP_LOCAL_PORT_RANGE. There is more about that socket option later.
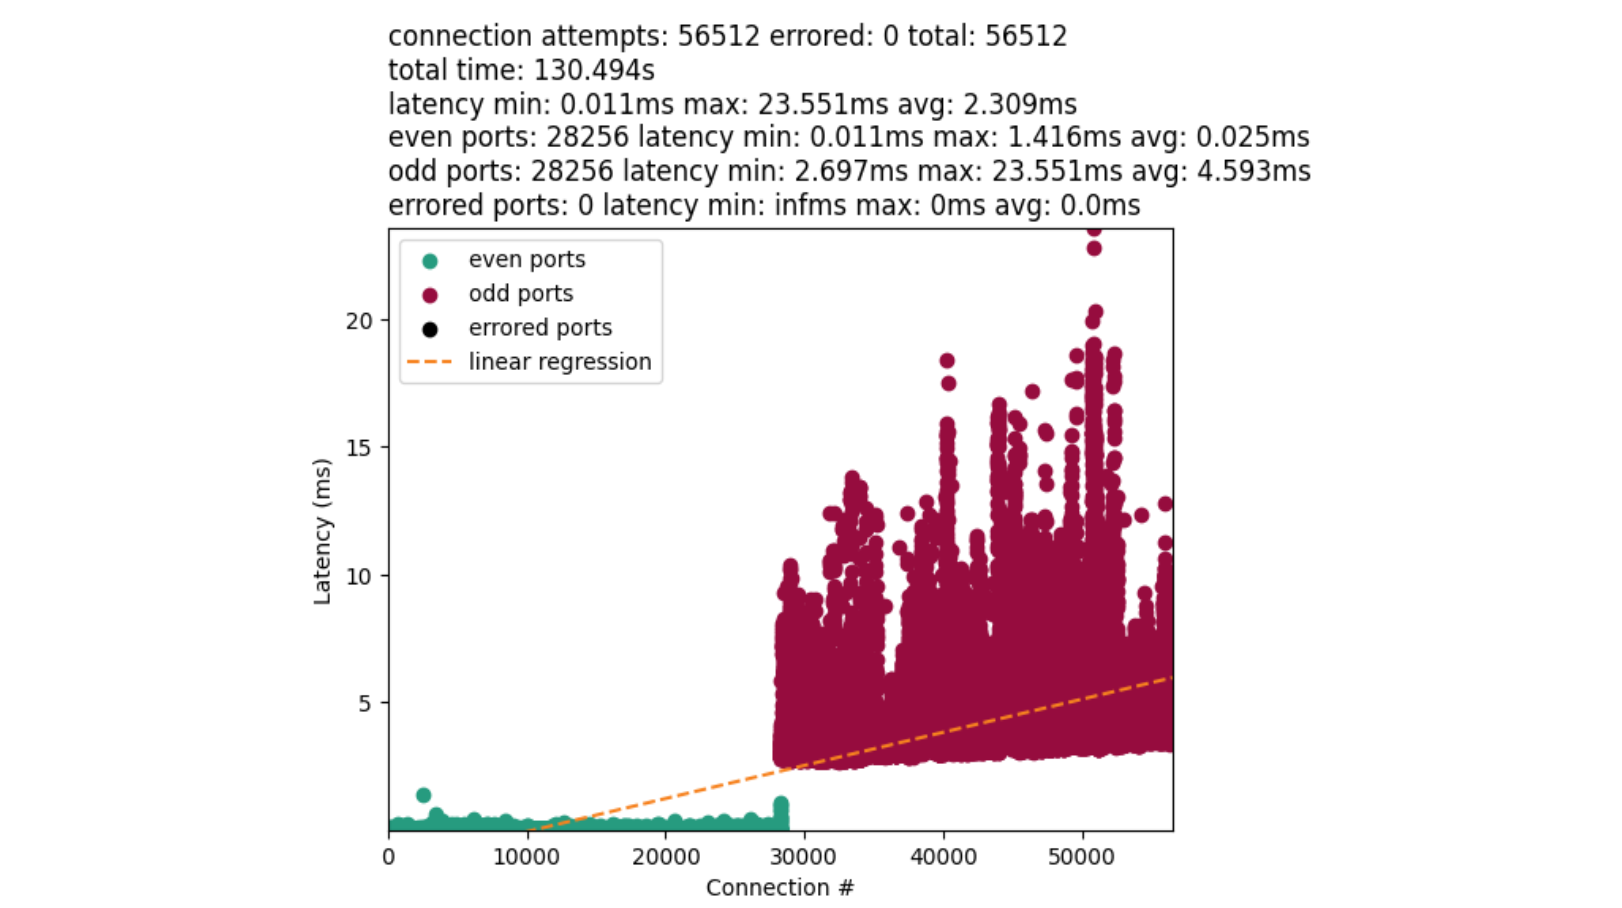
We are now going to ensure a deterministic amount of connections, and remove lock contention from the problem. The result is something like this:
On the y-axis we measured the latency between the start and end of a connect() syscall. The x-axis denotes when a connect() was called. Green dots are even numbered ports, and red dots are odd numbered ports. The orange line is a linear-regression on the data.
The disparity between the average time for port allocation between even and odd ports provides us with a major clue. Connections with odd ports are found significantly slower than the even. Further, odd ports are not interleaved with earlier connections. This implies we exhaust our even ports before attempting the odd. The chart also confirms our bimodal distribution.
__inet_hash_connect()
At this point we wanted to understand this split a bit better. We know from the flame graph and the function __inet_hash_connect() that this holds the algorithm for port selection. For context, this function is responsible for associating the socket to a source port in a late bind. If a port was previously provided with bind(), the algorithm just tests for a unique TCP 4-tuple (src ip, src port, dest ip, dest port) and ignores port selection.
Before we dive in, there is a little bit of setup work that happens first. Linux first generates a time-based hash that is used as the basis for the starting port, then adds randomization, and then puts that information into an offset variable. This is always set to an even integer.
   offset &= ~1U;

other_parity_scan:
    port = low + offset;
    for (i = 0; i < remaining; i += 2, port += 2) {
        if (unlikely(port >= high))
            port -= remaining;

        inet_bind_bucket_for_each(tb, &head->chain) {
            if (inet_bind_bucket_match(tb, net, port, l3mdev)) {
                if (!check_established(death_row, sk, port, &tw))
                    goto ok;
                goto next_port;
            }
        }
    }

    offset++;
    if ((offset & 1) && remaining > 1)
        goto other_parity_scan;
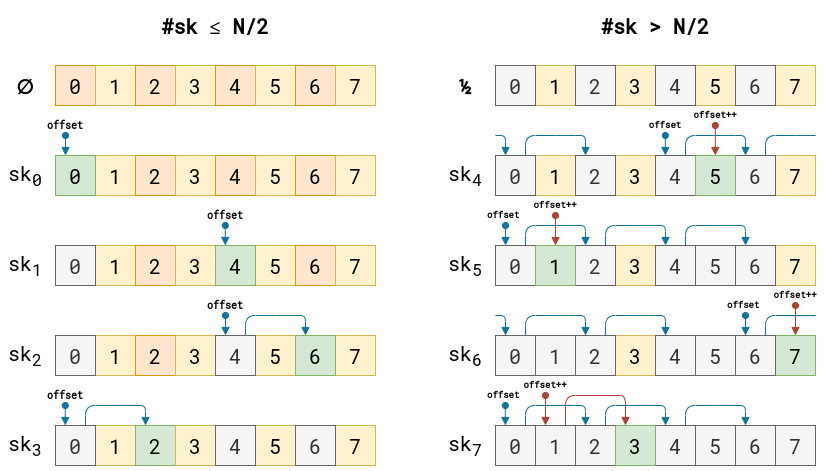
Then in a nutshell: loop through one half of ports in our range (all even or all odd ports) before looping through the other half of ports (all odd or all even ports respectively) for each connection. Specifically, this is a variation of the Double-Hash Port Selection Algorithm. We will ignore the bind bucket functionality since that is not our main concern.
Depending on your port range, you either start with an even port or an odd port. In our case, our low port, 9024, is even. Then the port is picked by adding the offset to the low port:
If low was odd, we will have an odd starting port because odd + even = odd.
There is a bit too much going on in the loop to explain in text. I have an example instead:
This example is bound by 8 ports and 8 possible connections. All ports start unused. As a port is used up, the port is grayed out. Green boxes represent the next chosen port. All other colors represent open ports. Blue arrows are even port iterations of offset, and red are the odd port iterations of offset. Note that the offset is randomly picked, and once we cross over to the odd range, the offset is incremented by one.
For each selection of a port, the algorithm then makes a call to the function check_established() which dereferences __inet_check_established(). This function loops over sockets to verify that the TCP 4-tuple is unique. The takeaway is that the socket list in the function is usually smaller than not. This grows as more unique TCP 4-tuples are introduced to the system. Longer socket lists may slow down port selection eventually. We have a blog post that dives into the socket list and port uniqueness criteria.
At this point, we can summarize that the odd/even port split is what is causing our performance bottleneck. And during the investigation, it was not obvious to me (or even maybe you) why the offset was initially calculated the way it was, and why the odd/even port split was introduced. After some git-archaeology the decisions become more clear.
Security considerations
Port selection has been shown to be used in device fingerprinting in the past. This led the authors to introduce more randomization into the initial port selection. Prior, ports were predictably picked solely based on their initial hash and a salt value which does not change often. This helps with explaining the offset, but does not explain the split.
Why the even/odd split?
Prior to this patch and that patch, services may have conflicts between the connect() and bind() heavy workloads. Thus, to avoid those conflicts, the split was added. An even offset was chosen for the connect() workloads, and an odd offset for the bind() workloads. However, we can see that the split works great for connect() workloads that do not exceed one half of the allotted port range.
Now we have an explanation for the flame graph and charts. So what can we do about this?
User space solution (kernel < 6.8)
We have a couple of strategies that would work best for us. Infrastructure or architectural strategies are not considered due to significant development effort. Instead, we prefer to tackle the problem where it occurs.
Select, test, repeat
For the “select, test, repeat” approach, you may have code that ends up looking like this:
sys = get_ip_local_port_range()
estab = 0
i = sys.hi
while i >= 0:
    if estab >= sys.hi:
        break

    random_port = random.randint(sys.lo, sys.hi)
    connection = attempt_connect(random_port)
    if connection is None:
        i += 1
        continue

    i -= 1
    estab += 1
The algorithm simply loops through the system port range, and randomly picks a port each iteration. Then test that the connect() worked. If not, rinse and repeat until range exhaustion.
This approach is good for up to ~70-80% port range utilization. And this may take roughly eight to twelve attempts per connection as we approach exhaustion. The major downside to this approach is the extra syscall overhead on conflict. In order to reduce this overhead, we can consider another approach that allows the kernel to still select the port for us.
Select port by random shifting range
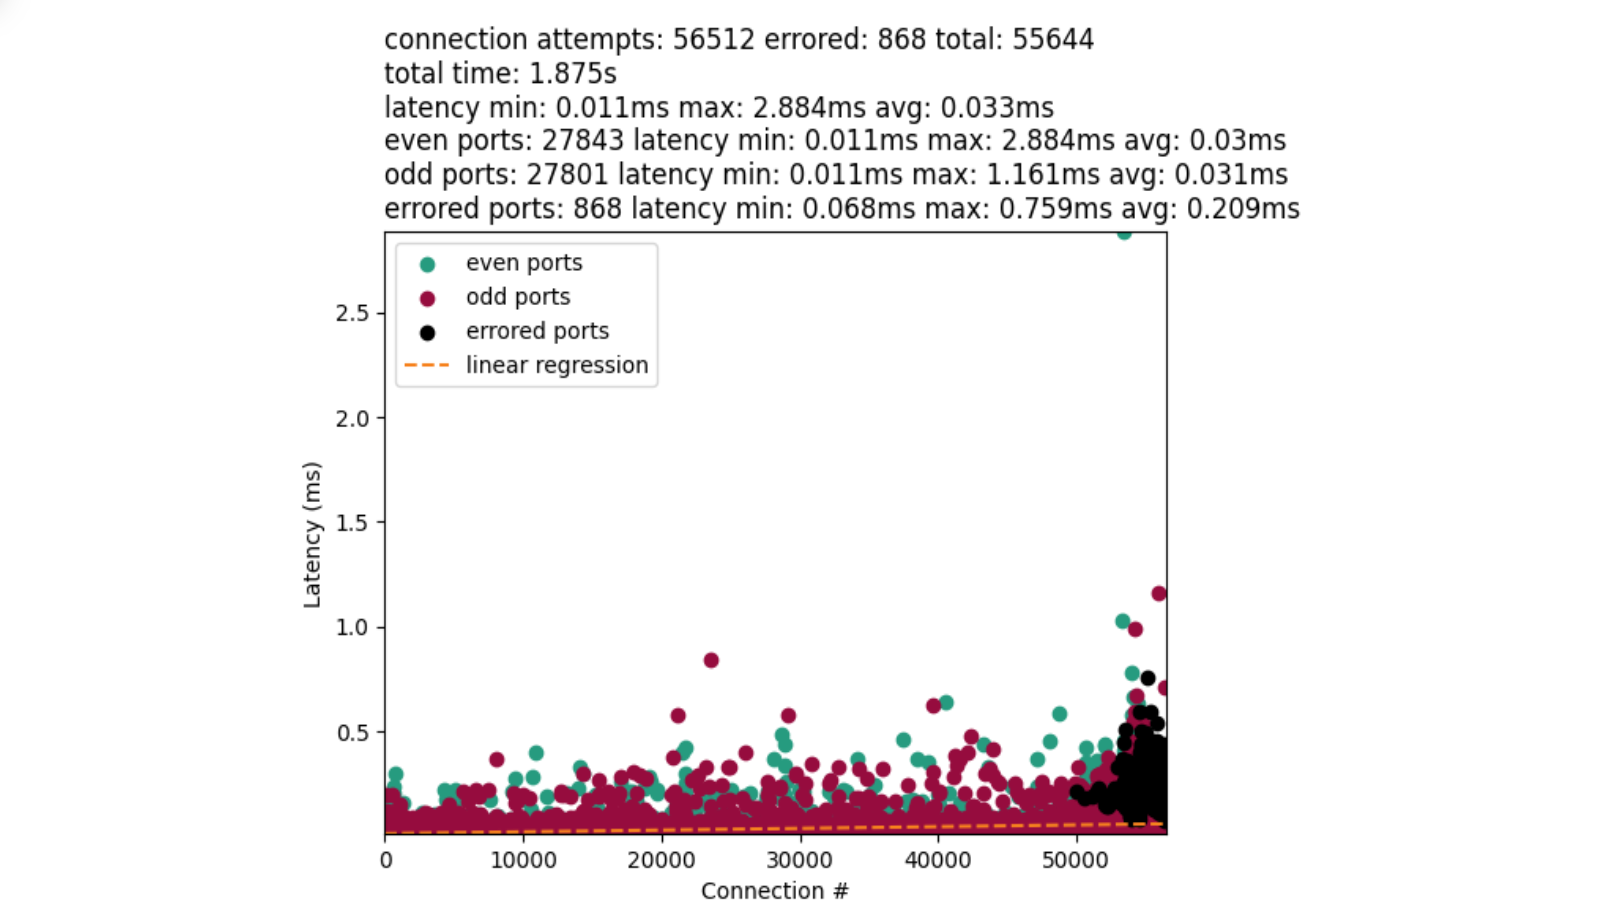
This approach leverages the IP_LOCAL_PORT_RANGE socket option. And we were able to achieve performance like this:
That is much better! The chart also introduces black dots that represent errored connections. However, they have a tendency to clump at the very end of our port range as we approach exhaustion. This is not dissimilar to what we may see in “select, test, repeat”.
We first fetch the system’s local port range, define a custom port range, and then randomly shift the custom range within the system range. Introducing this randomization helps the kernel to start port selection randomly at an odd or even port. Then reduces the loop search space down to the range of the custom window.
We tested with a few different window sizes, and determined that a five hundred or one thousand size works fairly well for our port range:
Window size
Errors
Total test time
Connections/second
500
868
~1.8 seconds
~30,139
1,000
1,129
~2 seconds
~27,260
5,000
4,037
~6.7 seconds
~8,405
10,000
6,695
~17.7 seconds
~3,183
As the window size increases, the error rate increases. That is because a larger window provides less random offset opportunity. A max window size of 56,512 is no different from using the kernels default behavior. Therefore, a smaller window size works better. But you do not want it to be too small either. A window size of one is no different from “select, test, repeat”.
In kernels >= 6.8, we can do even better.
Kernel solution (kernel >= 6.8)
A new patch was introduced that eliminates the need for the window shifting. This solution is going to be available in the 6.8 kernel.
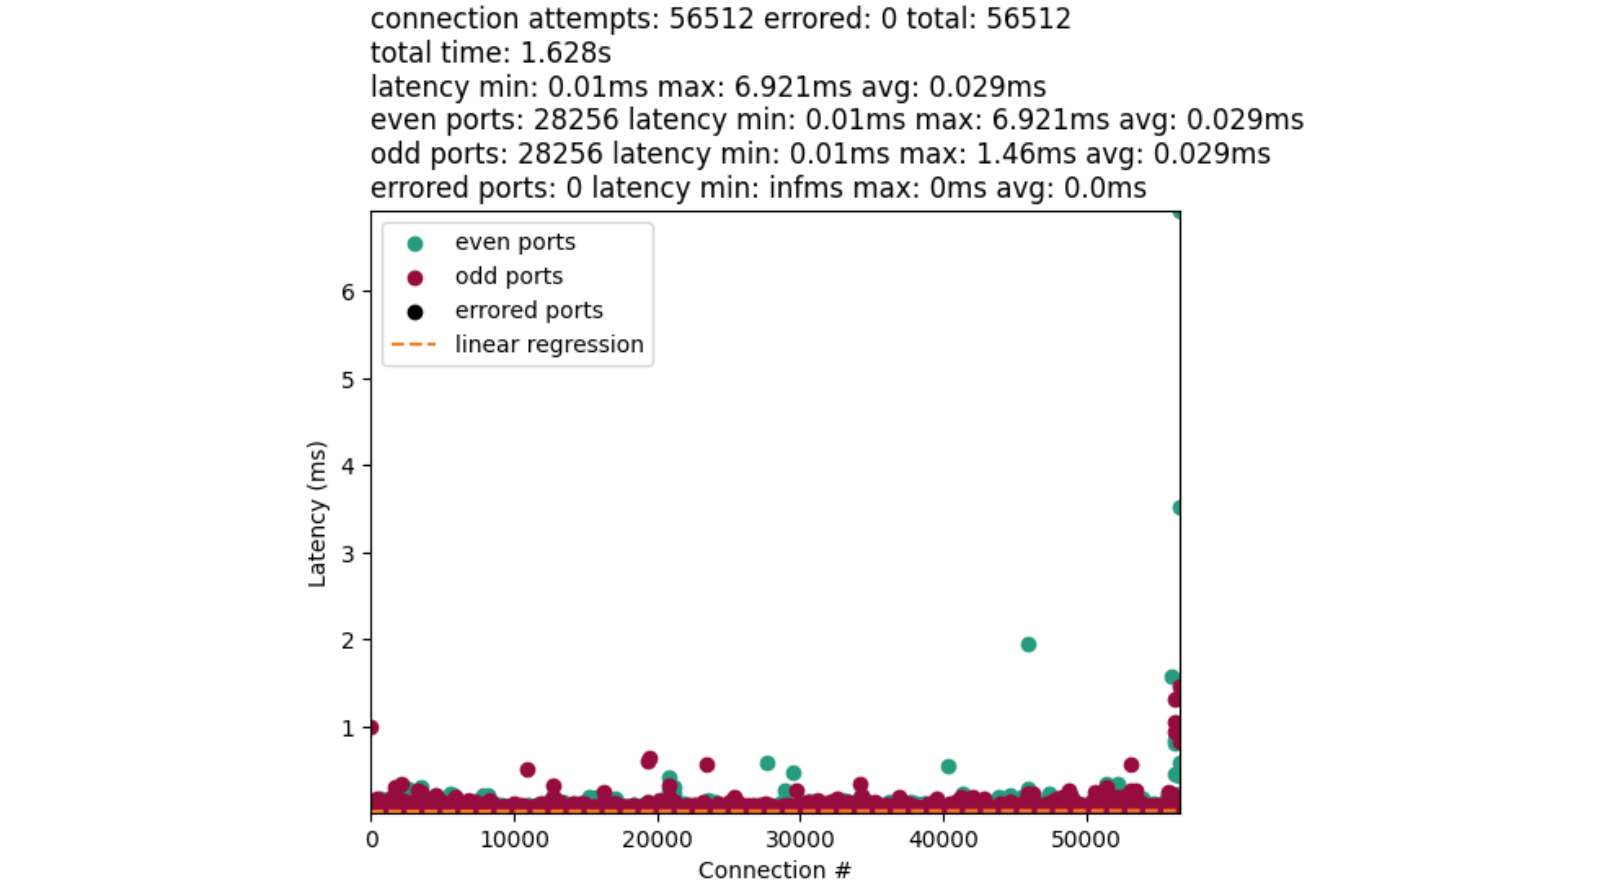
Instead of picking a random window offset for setsockopt(IPPROTO_IP, IP_LOCAL_PORT_RANGE, …), like in the previous solution, we instead just pass the full system port range to activate the solution. The code may look something like this:
Setting IP_LOCAL_PORT_RANGE option is what tells the kernel to use a similar approach to “select port by random shifting range” such that the start offset is randomized to be even or odd, but then loops incrementally rather than skipping every other port. We end up with results like this:
The performance of this approach is quite comparable to our user space implementation. Albeit, a little faster. Due in part to general improvements, and that the algorithm can always find a port given the full search space of the range. Then there are no cycles wasted on a potentially filled sub-range.
These results are great for TCP, but what about other protocols?
Other protocols & connect()
It is worth mentioning at this point that the algorithms used for the protocols are mostly the same for IPv4 & IPv6. Typically, the key difference is how the sockets are compared to determine uniqueness and where the port search happens. We did not compare performance for all protocols. But it is worth mentioning some similarities and differences with TCP and a couple of others.
DCCP
The DCCP protocol leverages the same port selection algorithm as TCP. Therefore, this protocol benefits from the recent kernel changes. It is also possible the protocol could benefit from our user space solution, but that is untested. We will let the reader exercise DCCP use-cases.
UDP & UDP-Lite
UDP leverages a different algorithm found in the function udp_lib_get_port(). Similar to TCP, the algorithm will loop over the whole port range space incrementally. This is only the case if the port is not already supplied in the bind() call. The key difference between UDP and TCP is that a random number is generated as a step variable. Then, once a first port is identified, the algorithm loops on that port with the random number. This relies on an uint16_t overflow to eventually loop back to the chosen port. If all ports are used, increment the port by one and repeat. There is no port splitting between even and odd ports.
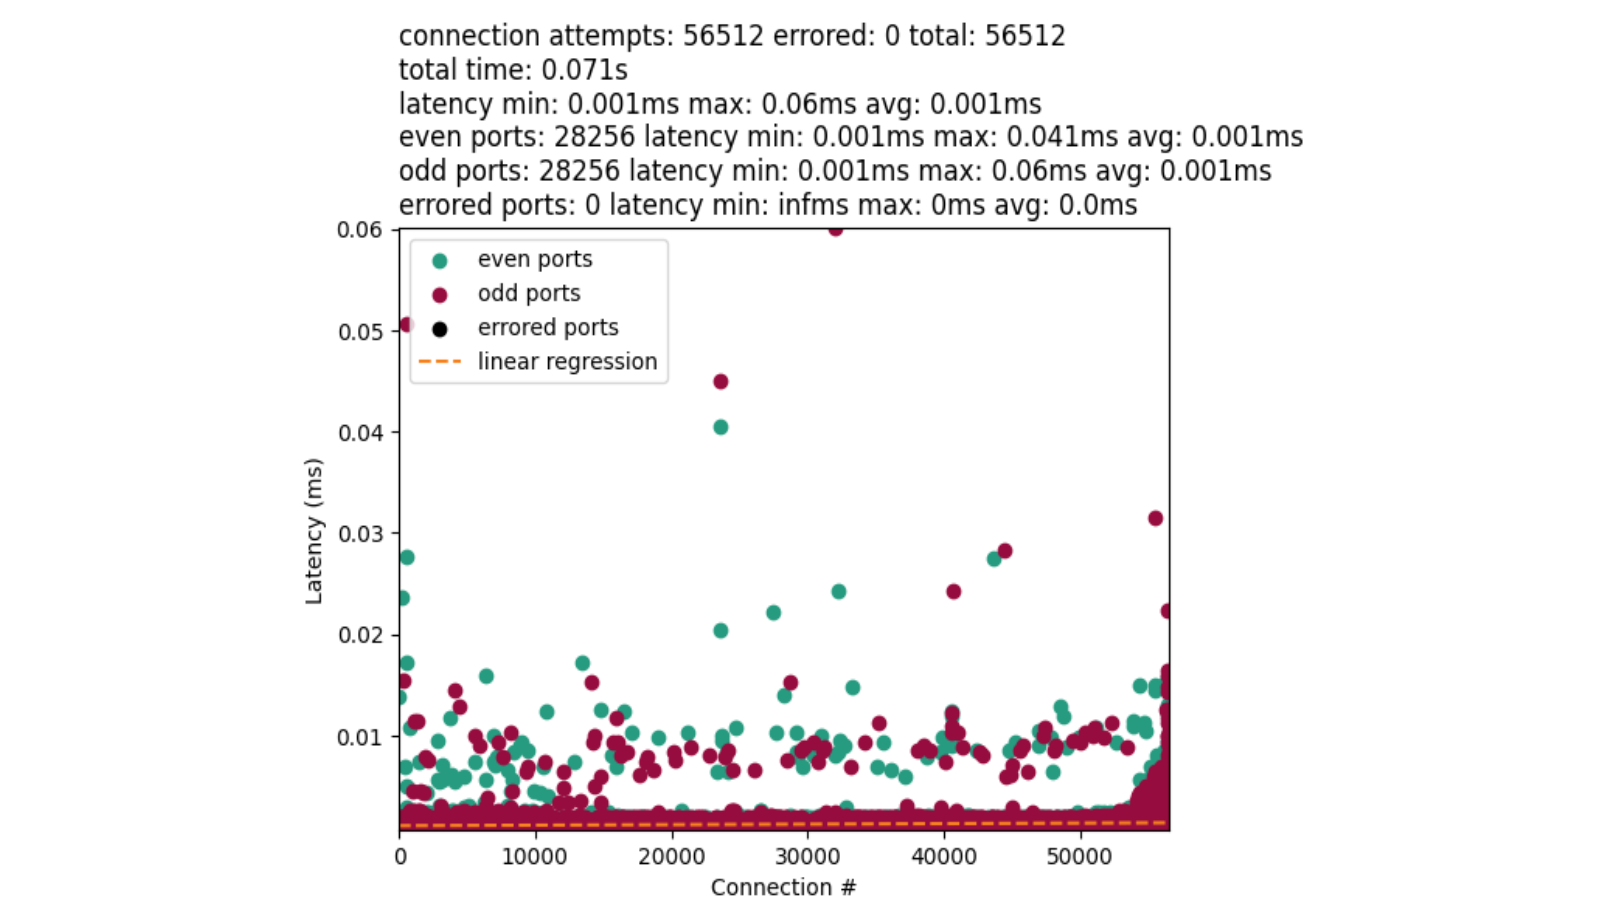
The best comparison to the TCP measurements is a UDP setup similar to:
sk = socket(AF_INET, SOCK_DGRAM)
sk.bind((src_ip, 0))
sk.connect((dest_ip, dest_port))
And the results should be unsurprising with one IPv4 source address:
UDP fundamentally behaves differently from TCP. And there is less work overall for port lookups. The outliers in the chart represent a worst-case scenario when we reach a fairly bad random number collision. In that case, we need to more-completely loop over the ephemeral range to find a port.
UDP has another problem. Given the socket option SO_REUSEADDR, the port you get back may conflict with another UDP socket. This is in part due to the function udp_lib_lport_inuse() ignoring the UDP 2-tuple (src ip, src port) check given the socket option. When this happens you may have a new socket that overwrites a previous. Extra care is needed in that case. We wrote more in depth about these cases in a previous blog post.
In summary
Cloudflare can make a lot of unicast egress connections to origin servers with popular uncached assets. To avoid port-resource exhaustion, we balance the load over a couple of IPv4 source addresses during those peak times. Then we asked: “what is the performance impact of one IPv4 source address for our connect()-heavy workloads?”. Port selection is not only difficult to get right, but is also a performance bottleneck. This is evidenced by measuring connect() latency with a flame graph and synthetic workloads. That then led us to discovering TCP’s quirky port selection process that loops over half your ephemeral ports before the other for each connect().
We then proposed three solutions to solve the problem outside of adding more IP addresses or other architectural changes: “select, test, repeat”, “select port by random shifting range”, and an IP_LOCAL_PORT_RANGE socket option solution in newer kernels. And finally closed out with other protocol honorable mentions and their quirks.
Do not take our numbers! Please explore and measure your own systems. With a better understanding of your workloads, you can make a good decision on which strategy works best for your needs. Even better if you come up with your own strategy!
Over on Lawfare, Jim Dempsey published a really interesting proposal for software liability: “Standard for Software Liability: Focus on the Product for Liability, Focus on the Process for Safe Harbor.”
Section 1 of this paper sets the stage by briefly describing the problem to be solved. Section 2 canvasses the different fields of law (warranty, negligence, products liability, and certification) that could provide a starting point for what would have to be legislative action establishing a system of software liability. The conclusion is that all of these fields would face the same question: How buggy is too buggy? Section 3 explains why existing software development frameworks do not provide a sufficiently definitive basis for legal liability. They focus on process, while a liability regime should begin with a focus on the product—that is, on outcomes. Expanding on the idea of building codes for building code, Section 4 shows some examples of product-focused standards from other fields. Section 5 notes that already there have been definitive expressions of software defects that can be drawn together to form the minimum legal standard of security. It specifically calls out the list of common software weaknesses tracked by the MITRE Corporation under a government contract. Section 6 considers how to define flaws above the minimum floor and how to limit that liability with a safe harbor.
Dempsey basically creates three buckets of software vulnerabilities: easy stuff that the vendor should have found and fixed, hard-to-find stuff that the vendor couldn’t be reasonably expected to find, and the stuff in the middle. He draws from other fields—consumer products, building codes, automobile design—to show that courts can deal with the stuff in the middle.
I have long been a fan of software liability as a policy mechanism for improving cybersecurity. And, yes, software is complicated, but we shouldn’t let the perfect be the enemy of the good.
Clearly this isn’t all or nothing. There are many parties involved in a typical software attack. There’s the company who sold the software with the vulnerability in the first place. There’s the person who wrote the attack tool. There’s the attacker himself, who used the tool to break into a network. There’s the owner of the network, who was entrusted with defending that network. One hundred percent of the liability shouldn’t fall on the shoulders of the software vendor, just as one hundred percent shouldn’t fall on the attacker or the network owner. But today one hundred percent of the cost falls on the network owner, and that just has to stop.
Courts can adjudicate these complex liability issues, and have figured this thing out in other areas. Automobile accidents involve multiple drivers, multiple cars, road design, weather conditions, and so on. Accidental restaurant poisonings involve suppliers, cooks, refrigeration, sanitary conditions, and so on. We don’t let the fact that no restaurant can possibly fix all of the food-safety vulnerabilities lead us to the conclusion that restaurants shouldn’t be responsible for any food-safety vulnerabilities, yet I hear that line of reasoning regarding software vulnerabilities all of the time.
My name is Mark Vilensky, and I’m currently the Scientific Computing Manager at the Weizmann Institute of Science in Rehovot, Israel. I’ve been working in High-Performance Computing (HPC) for the past 15 years.
Our base is at the Chemistry Faculty at the Weizmann Institute, where our HPC activities follow a traditional path — extensive number crunching, classical calculations, and a repertoire that includes handling differential equations. Over the years, we’ve embraced a spectrum of technologies, even working with actual supercomputers like the SGI Altix.
Table of Contents
Our setup
As of now, our system boasts nearly 600 compute nodes, collectively wielding about 25,000 cores. The interconnect is Infiniband, and for management, provisioning, and monitoring, we rely on Ethernet. Our storage infrastructure is IBM GPFS on DDN hardware, and job submissions are facilitated through PBS Professional.
We use VMware for the system management. Surprisingly, the team managing this extensive system comprises only three individuals. The hardware landscape features HPE, Dell, and Lenovo servers.
The path to Zabbix
Recent challenges have surfaced in the monitoring domain, prompting considerations for an upgrade to Red Hat 8 or a comparable distribution. Our existing monitoring framework involved Nagios and Ganglia, but they had some severe limitations — Nagios’ lack of scalability and Ganglia’s Python 2 compatibility issues have become apparent.
Exploring alternatives led us to Zabbix, a platform not commonly encountered in supercomputing conferences but embraced by the community. Fortunately, we found a great YouTube channel by Dmitry Lambert that not only gives some recipes for doing things but also provides an overview required for planning, sizing, and avowing future troubles.
Our Zabbix setup resides in a modest VM, sporting 16 CPUs, 32 GB RAM, and three Ethernet interfaces, all operating within the Rocky 8.7 environment. The database relies on PostgreSQL 14 and Timescale DB2 version 2.8, with slight adjustments to the default configurations for history and trend settings.
Getting the job done
The stability of our Zabbix system has been noteworthy, showcasing its ability to automate tasks, particularly in scenarios where nodes are taken offline, prompting Zabbix to initiate maintenance cycles automatically. Beyond conventional monitoring, we’ve tapped into Zabbix’s capabilities for external scripts, querying the PBS server and GPFS server, and even managing specific hardware anomalies.
The Zabbix dashboard has emerged as a comprehensive tool, offering a differentiated approach through host groups. These groups categorize our hosts, differentiating between CPU compute nodes, GPU compute nodes, and infrastructure nodes, allowing tailored alerts based on node types.
Alerting and visualization
Our alerting strategy involves receiving email alerts only for significant disasters, a conscious effort to avoid alert fatigue. The presentation emphasizes the nuanced differences in monitoring compute nodes versus infrastructure nodes, focusing on availability and potential job performance issues for the former and services, memory, and memory leaks for the latter.
The power of visual representations is underscored, with the utilization of heat maps offering quick insights into the cluster’s performance.
Final thoughts
In conclusion, our journey with Zabbix has not only delivered stability and automation but has also provided invaluable insights for optimizing resource utilization. I’d like to express my special appreciation for Andrei Vasilev, a member of our team whose efforts have been instrumental in making the transition to Zabbix.
Войната в Украйна радикално промени представите за сигурността в международните отношения. Руската агресия разкри множество слабости на Запада и едновременно с това даде тласък на усилията на Европейския съюз и НАТО да покрият дефицитите си в сферата на отбраната. Едно от ключовите направления за страните от Алианса е по-тясното сътрудничество с частния сектор в борбата за технологично превъзходство с техните геополитически опоненти.
В този материал ще поговорим за значението на бизнеса и стартъпите в областта на сигурността и отбраната, за компаниите с двоен предмет на дейност и ролята на дълбоките технологии в глобалната технологична надпревара. И за това как тези модерни и сложни иновации, почиващи на научни принципи и открития, имат потенциала да трансформират из основи логиката и функционирането на цели индустрии. (Значенията на „двойна употреба“ и „дълбоки технологии“ ще разясним по-подробно малко по-долу.)
Нови стъпки
През 2022 г. НАТО основа първия по рода си многостранен фонд за рисков капитал в сферата на отбраната – NATO Innovation Fund (NIF). В него участват 23 страни членки като ограничени партньори, сред които и България. Фондът ще оперира с бюджет от 1 млрд. евро, с опция да се повиши след евентуалното присъединяване на Швеция към Алианса. Скандинавската държава изрази готовност да се включи в начинанието, но засега пътят ѝ към пълноправно членство в НАТО е блокиран от Унгария, която е поставена под все по-голям натиск да преосмисли позицията си.
Фондът за иновации на НАТО ще инвестира в стартъпи от участващите страни и индиректно в други фондове за рисков капитал с фокус върху дълбоките технологии (deep tech). Инвестициите ще бъдат насочени към компании с двоен предмет на дейност и целят да осигурят технологичното предимство на Алианса в три стратегически направления:
намиране на най-съвременните технологични решения за решаване на предизвикателствата пред Алианса в областта на отбраната и сигурността;
укрепване и разгръщане на екосистемите за дълбоки технологии и иновации на територията на НАТО;
подкрепа за пазарния успех на стартиращите предприятия от портфолиото на фонда.
Впечатление прави, че всички партньорски държави в NIF са европейски, което отразява моментното изоставане на ЕС в технологичната надпревара спрямо гигантите САЩ и Китай и нуждата от покриване на дефицитите в страните от Стария континент.
На 30 януари тази година министърката на иновациите и растежа Милена Стойчева заедно с Бенджамин Балмфорт, който е част от инвестиционния екип на фонда, представихаNIF пред българска публика. Стойчева изтъкна, че присъединяването на България ще бъде ратифицирано от парламента през февруари, а на дневен ред стои и въпросът за включването на страната в натовския иновационен акселератор в отбраната – DIANA.
Двойна употреба и дълбоки технологии
Двойната употреба засяга компаниите, които произвеждат стоки, услуги или технологии с приложение и в гражданския, и във военния сектор. Терминът отразява двойната природа на технологиите, които могат да служат както за комерсиални, така и за отбранителни цели.
Компаниите с двоен предмет на дейност най-често оперират в областта на телекомуникациите, авиационното дело, информационните технологии, здравеопазването, енергетиката, транспорта, киберсигурността и др. Същевременно продуктите, услугите и експертността им могат да намерят приложение в националната сигурност и отбрана, разузнаването, разработването на военна техника и т.н.
Двойната употреба засяга различни етически казуси. Те са породени от крехкия баланс между бързото развитие на технологиите за комерсиални нужди и потенциалните рискове при използването им за военни цели. Неслучайно технологиите с двойно предназначение подлежат на сурови регулации в международното право. Добър пример тук е режимът на ЕС за контрол на износа, брокерската дейност, техническата помощ, транзита и трансфера на изделия с двойна употреба. Регулирайки изброените области, режимът цели да гарантира сигурната и целесъобразна употреба на технологиите с двойно приложение в унисон с международното право и да предотврати попадането им в ръцете на актьори, които застрашават мира и сигурността в международните отношения. Тук говорим и за такива изделия, които могат да бъдат използвани за разработване на химически и биологични оръжия или на оръжия за масово поразяване.
От своя страна дълбоките технологии представляват иновации в напреднал стадий на развитие, които стъпват на солидна научна основа и включват значими научни открития, които трансформират цели индустрии и оказват трайно въздействие върху икономиката и обществения живот. Характеризират се с висока технологическа сложност, обусловена от изследвания в различни области – физика, биология, химия, математика и информационни технологии. Често „разрушават“ съществуващи индустрии и създадат нови пазарни ниши (вж. disruptive technologies), като предоставят новаторски решения, процеси или продукти, които значително превъзхождат съществуващите в момента алтернативи. По този начин чертаят траекторията на индустриално развитие и технологичния напредък в обществата.
Такива например са технологиите за изкуствен интелект, квантовите компютри, нанотехнологиите, сложната роботика, космическите технологии и др.
Затвореният цикъл на НАТО
Създадените през 2022 г. DIANA и NIF са двата най-нови инструмента на Алианса за привличане на предприемачи и иноватори от частния сектор за укрепване на сигурността и отбраната. Те се допълват и надграждат. DIANA предоставя ресурси и тестова база за иновативните стартъпи, свързва ги с учените и крайните потребители и осигурява финансиране на начална или идейна фаза от техния растеж.
NIF от своя страна ще осигури инвестиции за компании в по-напреднал етап на развитие, които вече предлагат готов продукт или услуга на пазара. Заложена е възможността част от компаниите, преминали през иновационния акселератор DIANA, да получат последващо финансиране от иновационния фонд NIF засвоята експанзия на натовските пазари. Замисълът е да се създаде затворен цикъл за израстването на deep tech стартъпите от идейна фаза, през начално финансиране, създаване на (прототип на) продукт/услуга, тестване и валидиране, излизане на пазара и получаване на по-голямо финансиране за укрепване и растеж.
Защо сега?
През 2023 г. беше одобрена първата част от 44 deep tech стартъпа за участие в акселераторската програма на DIANA (сред тях и една българска). Скоро се очаква и подборът на първите компании, които ще получат финансиране от NIF. Моментът не е случаен. Две са ключовите причини за ускореното взаимодействие между държавите, международните организации и бизнеса.
Първата е усложнената геополитическа обстановка след руската инвазия в Украйна, гарнирана с напрежението между Китай и западните съюзници в Югоизточна Азия, непредвидимата политика на Северна Корея, а отскоро и ескалацията на израелско-палестинския конфликт и нестабилността в Близкия изток. Втората причина е свързана с водения от частния сектор и иновативните предприемачи бум на дълбоките технологии, създаващ съвсем нова динамика в глобалната технологична надпревара, в която Западът се нуждае от предимство.
Какви са предизвикателстватапред Алианса?
Съюзниците в НАТО имат нужда от частния сектор, за да си осигурят технологичен превес в отбраната. Все още обаче компаниите, разработващи изделия с двойна употреба, срещат сериозни трудности пред развитието си. Главната причина е, че основният им клиент често е държавата. Това отблъсква голяма част от потенциалните инвеститори, включително фондовете за рисков капитал (Venture Capital Funds, VCs), които търсят реални резултати и бърза възвръщаемост на инвестицията си. Проблемът тук е двупосочен.
Първо, взаимодействието на компаниите с държавата е в пъти по-бавно от това с клиентите и потребителите на свободния пазар. Множеството регулации на произвежданите продукти за целите на отбраната, времето за лицензиране и одобряване на сделките, както и моделът с обществени поръчки забавят изключително нормалния ритъм на покупко-продажба и генериране на печалба от компаниите. Време, което частните инвеститори и фондовете нямат.
И второ, най-съществената част от развитието на deep tech стартъпите е научноизследователската и развойната дейност. Поради сложността на създаваната технология обаче тези дейности отнемат чувствително по-дълго време и сериозен ресурс без гаранция за успех и положителен резултат. Това също разколебава много инвеститори.
Със създаването на иновационния си фонд NIF НАТО опитва да се справи с тези два проблема. Първо, като осигури нужното финансиране на deep tech стартъпите с двоен предмет на дейност. И второ, като разпредели инвестициите в дългосрочна перспектива (до 15 години според идеята на фонда).
Голямото предизвикателство обаче остава. За да се изгради процъфтяваща екосистема от нови стартъпи с бизнес в отбранителните технологии и за да се мотивират съществуващите компании в гражданския сектор да развиват технологии с двойна употреба, е необходимо включването на частните инвеститори и фондове за рисков капитал в процесите на финансиране, покриване на нуждите за научна и развойна дейност и набиране на талантливи кадри. Ребус, чието решаване минава през намаляване на бюрокрацията и разкриване на възможности за по-бърза възвръщаемост на инвестициите при запазване на високите етически стандарти.
Шанс за България?
Макар и малка, технологичната и deep tech екосистема в България е отворена, има добър потенциал за развитие и разполага с разнообразно портфолио от компании – например компании, които създават дронове за транспорт на стоки на далечни разстояния, космически технологии или дигитални системи за данни на големи корпорации и държавни институции. Други разработват решения в сферата на киберсигурността и изкуствения интелект, а трети – софтуер за термовизуална здравна диагностика. Доколко подобни компании ще имат стимул да развиват иновации за нуждите на сигурността и отбраната, зависи от дългосрочното взаимодействие между ключови организации като НАТО, държавите членки, инвеститорите и предприемачите от частния сектор.
Трите власти – законодателна, изпълнителна и съдебна – са разделени с цел взаимен контрол и предотвратяване на концентрация на власт. Традиционно към тях се добавя и т.нар. „четвъртна власт“ – медиите, които осигуряват допълнителен контрол върху трите власти чрез прозрачността, която осигуряват. Затова между властите има различни механизми – законоустановени или имплицитни – за проверки и баланси (checks and balances).
Поради все по-активното навлизане на технологиите в държавното управление, моята теза е, че те плавно се превръщат в „пета власт“. Във времето много елементи на обществения живот са били обявявани за „пета власт“, така че не твърдя, че това е единственият допълнителен механизъм за проверки и баланси, отвъд утвърдените 3+1 власти, но смятам, че ще става все по-централен и трябва да му обърнем специално внимание.
Общоприета теза е, че „властта корумпира“. Макар това да е опростена теза, както е разгледано в литературата, в сърцевината си тя е вярна – позициите на власт, върху които няма достатъчно външен контрол, създават корупционни практики – не само свързани със злоупотреби със средства, но и по-общо със злоупотреби с власт. Механизмите за възпиране на корупцията са много – съдебен контрол на актове, наказателна отговорност, публичност, парламентарен контрол и др.
проследимост на действията и техните автори, и то по начин, който не позволява да бъдат подменяни;
невъзможност за промяна и антидатиране на документи
защита на данните от неоторизиран достъп (т.е. без „само да погледна тука една папка“)
прозрачност и публичност на данни и докименти, с което да се подхранят разследванията на четвъртата власт
истинско случайно разпределени на преписки, проверки, дела – много експерименти показват, че използването на принципа на случайност намалява корупционния риск
автоматична валидация на данните, което премахва човешкия фактор и възможността за „затваряне на очите“ за някои пропуски
автоматизиране на максимално много дейности, което намалява дискрецията на овластените лица
автоматизиран анализ на риска на база на натрупаните данни, така че да бъдат откривани злоупотреби проактивно
Но преди да бъда обвинен в техно-утопизъм – че виждам технологично решение на всеки проблем – ще отбележка и негативната страна. Както всяка власт, и петата може да е неефективна, корумпирана и да работи в нечий интерес. Както изпълнителната може да се корумпира, както съдебната може да решава дела не само в съответствие със закона, както законодателната може да е прокарва частни интереси и както медиите могат да бъдат необективни и дори „бухалки“, така и технологиите могат да бъдат инструмент за корупция.
И трябва сериозно усилие, за да не бъде така. Институционално и технологично усилие, за да бъде проследимостта реална, а не „наши хора“ да могат да си зачистват следите, за да има реално случайно разпределени, а не едни административни ръководители да могат с тайни клавишни комбинации да предопределят избора, за да се публикуват максимално много данни, а не да се спестяват с оправдания „тя системата няма да издържи“.
Технологиите сами по себе си не са власт, но всички дейности около тях, са именно такава. Петата власт в момента е в ръцете на едни не особено видими хора – ИТ директори, системни администратори, администратори на бази данни, програмисти – в частни компании, в администрацията и в държавната компания Информационно обслужване. Това не е обвинение към тях и не е презумпция за злоупотреба – в мнозинството си това са честни експерти, които си вършат съвестно работата. Но отговорността е далеч по малка спрямо колективната тежест, която все повече ще имат (или „имаме“ – защото и аз продължавам да се причислявам към ИТ експертите).
Допълнителен проблем е и това, че технологиите трудно се разбира и от широката публика, и от политическата класа – както стана болезнено ясно от измислените скандали с машинното гласуване. Но те са само един пример.
Именно заради тези проблеми – че петатат власт се упражнява „между другото“, понякога неосъзнато и без политическа отчетност, трябва технологиите, използвани в държавното управление, да бъдат балансирани от останалите четири власти. Например в законите да е уредено, че не могат да се подменят данни; че има технически-гарантирано случайно разпределение; че кодът на системите е публичен, актуален и одитиран; че за достъп до определени данни не се разчита само на един човек; че чувствителни данни се съхраняват логически разделени; че се използват актуални криптографски методи за защита на конфиденциалността и целостта на данните. Нужно е в съдебната власт (и съдът, и органите на досъдебното производство) да разполага с по-широк набор от експерти по технологични теми. Нужно е изпълнителната власт да разработи механизми за повече прозрачност и проследимост в управлението на информационните и комуникационни технологии.
Петата власт – технологиите в държавното управление – е все още недостатъчно видима, но сме длъжни да говорим за нея, за да бъде използвана за предотвратяване на злоупотреби в другите власти, а не за скрито и трудно-разбираемо вмешателство в тях.
Amazon OpenSearch Service is a fully managed search and analytics service powered by the Apache Lucene search library that can be operated within a virtual private cloud (VPC). A VPC is a virtual network that’s dedicated to your AWS account. It’s logically isolated from other virtual networks in the AWS Cloud. Placing an OpenSearch Service domain within a VPC enables a secure communication between OpenSearch Service and other services within the VPC without the need for an internet gateway, NAT device, or a VPN connection. All traffic remains securely within the AWS Cloud, providing a safe environment for your data. To connect to an OpenSearch Service domain running inside a private VPC, enterprise customers use one of two available options: either integrate their VPC with their enterprise network through VPN or AWS Direct Connect, or make the cluster endpoint publicly accessible through a reverse proxy. Refer to How can I access OpenSearch Dashboards from outside of a VPC using Amazon Cognito authentication for a detailed evaluation of the available options and the corresponding pros and cons.
For managing access to OpenSearch Dashboards in enterprise customers’ environments, OpenSearch Service supports Security Assertion Markup Language (SAML) integration with the customer’s existing identity providers (IdPs) to offer single sign-on (SSO). Although SAML integration for publicly accessible OpenSearch Dashboards works out of the box, enabling SAML for OpenSearch Dashboards within a VPC requires careful design with various configurations.
This post outlines an end-to-end solution for integrating SAML authentication for OpenSearch Service domains running in a VPC. It provides a step-by-step deployment guideline and is accompanied by AWS Cloud Development Kit (AWS CDK) applications, which automate all the necessary configurations.
Overview of solution
The following diagram describes the step-by-step authentication flow for accessing a private OpenSearch Service domain through SSO using SAML identity federation. The access is enabled over public internet through private NGINX reverse proxy servers running on Amazon Elastic Container Service (Amazon ECS) for high availability.
The workflow consists of the following steps:
The user navigates to the OpenSearch Dashboards URL in their browser.
The browser resolves the domain IP address and sends the request.
AWS WAF rules make sure that only allow listed IP address ranges are allowed.
Application Load Balancer forwards the request to NGINX reverse proxy.
NGINX adds the necessary headers and forwards the request to OpenSearch Dashboards.
OpenSearch Dashboards detects that the request is not authenticated. It replies with a redirect to the integrated SAML IdP for authentication.
The user is redirected to the SSO login page.
The IdP verifies the user’s identity and generates a SAML assertion token.
The user is redirected back to the OpenSearch Dashboards URL.
The request goes through the Steps 1–5 again until it reaches OpenSearch. This time, OpenSearch Dashboards detects the accompanying SAML assertion and allows the request.
In the following sections, we set up a NGINX reverse proxy in private subnets to provide access to OpenSearch Dashboards for a domain deployed inside VPC private subnets. We then enable SAML authentication for OpenSearch Dashboards using a SAML 2.0 application and use a custom domain endpoint to access OpenSearch Dashboards to see the SAML authentication in action.
Prerequisites
Before you get started, complete the prerequisite steps in this section.
Create an Amazon Route 53 public hosted zone such as mydomain.com to be used for routing internet traffic to your domain. For instructions, refer to Creating a public hosted zone.
This post is accompanied with a standalone AWS CDK application (opensearch-domain) that deploys a sample OpenSearch Service domain in private VPC subnets. The deployed domain is for demonstration purposes only, and is optional.
If you have an existing OpenSearch Service domain in VPC that you want to use for SAML integration, apply the following configurations:
On the Cluster configuration tab, choose Edit and select Enable custom endpoint in the Custom endpoint section.
For Custom hostname, enter a fully qualified domain name (FQDN) such as opensearch.mydomain.com, which you want to use to access your cluster. Note that the domain name of the provided FQDN (for example, mydomain.com) must be the same as the public hosted zone you created earlier.
For AWS certificate, choose the SSL certificate you created earlier.
In the Summary section, optionally enable dry run analysis and select Dry run or deselect it and choose Save changes.
Otherwise, download the accompanied opensearch-domain AWS CDK application and unzip it. Then, edit the cdk.json file on the root of the unzipped folder and configure the required parameters:
vpc_cidr – The CIDR block in which to create the VPC. You may leave the default of 10.0.0.0/16.
opensearch_cluster_name – The name of the OpenSearch Service cluster. You may leave the default value of opensearch. It will also be used, together with the hosted_zone_name parameter, to build the FQDN of the custom domain URL.
hosted_zone_id – The Route 53 public hosted zone ID.
hosted_zone_name – The Route 53 public hosted zone name (for example, mydomain.com). The result FQDN with the default example values will then be opensearch.mydomain.com.
Finally, run the following commands to deploy the AWS CDK application:
cd opensearch-domain

# Create a Python environment and install the reuired dependencies
python3 -m venv .venv
source .venv/bin/activate
pip install -r requirements-dev.txt
pip install -r requirements.txt

# Deploy the CDK application
cdk deploy
With the prerequisites in place, refer to the following sections for a step-by-step guide to deploy this solution.
Create a SAML 2.0 application
We use IAM Identity Center as the source of identity for our SAML integration. The same configuration should apply to other SAML 2.0-compliant IdPs. Consult your IdP documentation.
On the IAM Identity Center console, choose Groups in the navigation pane.
Create a new group called Opensearch Admin, and add users to it. This will be the SAML group that receives full permissions in OpenSearch Dashboards. Take note of the group ID.
Choose Applications in the navigation pane.
Create a new custom SAML 2.0 application.
Download the IAM Identity Center SAML metadata file to use in a later step.
For Application start URL, enter [Custom Domain URL]/_dashboards/. The custom domain URL is composed of communication protocol (https://) followed by the FQDN, which you used for your OpenSearch Service cluster in the prerequisites (for example, https://opensearch.mydomain.com). Look under your OpenSearch Service cluster configurations, if in doubt.
For Application ACS URL, enter [Custom Domain URL]/_dashboards/_opendistro/_security/saml/acs.
For Application SAML audience, enter [Custom Domain URL] (without any trailing slash).
Choose Submit.
In the Assigned users section, select Opensearch Admin and choose Assign Users.
On the Actions menu, choose Edit attribute mappings.
Define attribute mappings as shown in the following screenshot and choose Save changes.
Deploy the AWS CDK application
Complete the following steps to deploy the AWS CDK application:
Edit the cdk.json file and set the required parameters inside the nested config object:
aws_region – The target AWS Region for your deployment (for example, eu-central-1).
vpc_id – The ID of the VPC into which the OpenSearch Service domain has been deployed.
opensearch_cluster_security_group_id – The ID of the security group used by the OpenSearch Service domain or any other security group that allows inbound connections to that domain on port 80 and 443. This group ID will be used by the Application Load Balancer to forward traffic to your OpenSearch Service domain.
hosted_zone_id – The Route 53 public hosted zone ID.
hosted_zone – The Route 53 public hosted zone name (for example, mydomain.com).
opensearch_custom_domain_name – An FQDN such as opensearch.mydomain.com, which you want to use to access your cluster. Note that the domain name of the provided FQDN (mydomain.com) must be the same as the hosted_zone parameter.
opensearch_custom_domain_certificate_arn – The ARN of the certificate stored in ACM.
opensearch_domain_endpoint – The OpenSearch Service VPC domain endpoint (for example, vpc-opensearch-abc123.eu-central-1.es.amazonaws.com).
vpc_dns_resolver – This must be 10.0.0. if your VPC CIDR is 10.0.0.0/16. See Amazon DNS server for further details.
alb_waf_ip_whitelist_cidrs – This is an optional list of zero or more IP CIDR ranges that will be automatically allow listed in AWS WAF to permit access to the OpenSearch Service domain. If not specified, after the deployment you will need to manually add relevant IP CIDR ranges to the AWS WAF IP set to allow access. For example, ["1.2.3.4/32", "5.6.7.0/24"].
Deploy the OpenSearch Service domain SAML integration AWS CDK application:
cd opensearch-domain-saml-integration

# Create a Python environment and install the required dependencies
python3 -m venv .venv
source .venv/bin/activate
pip install -r requirements-dev.txt
pip install -r requirements.txt

# Deploy the CDK application
cdk deploy
Enable SAML authentication for your OpenSearch Service cluster
When the application deployment is complete, enable SAML authentication for your cluster:
On the OpenSearch Service console, navigate to your domain.
On the Security configuration tab, choose Edit.
Select Enable SAML authentication.
Choose Import from XML file and import the IAM Identity Center SAML metadata file that you downloaded in an earlier step.
For SAML master backend role, use the group ID you saved earlier.
Expand the Additional settings section and for Roles, enter the SAML 2.0 attribute name you mapped earlier when you created the SAML 2.0 application in AWS Identity Center.
Submit changes and wait for OpenSearch Service to apply the configurations before proceeding to the next section.
Test the solution
Complete the following steps to see the solution in action:
On the IAM Identity Center console, choose Dashboard in the navigation pane.
In the Settings summary section, choose the link under AWS access portal URL.
Sign in with your user name and password (register your password if this is your first login). If your account was successfully added to the admin group, a SAML application logo is visible.
Choose Custom SAML 2.0 application to be redirected to the OpenSearch Service dashboards through SSO without any additional login attempts. Alternatively, you could skip logging in to the access portal and directly point your browser to the OpenSearch Dashboards URL. In that case, OpenSearch Dashboards would first redirect you to the access portal to log in, which would redirect you back to the OpenSearch Dashboards UI after a successful login, resulting in the same outcome as shown in the following screenshot.
Troubleshooting
Your public-facing IP must be allow listed by the AWS WAF rule, otherwise a 403 Forbidden error will be returned. Allow list your IP CIDR range via the AWS CDK alb_waf_ip_whitelist_cidrs property as described in the installation guide and redeploy the AWS CDK application for changes to take effect.
Clean up
When you’re finished with this configuration, clean up the resources to avoid future charges.
On the OpenSearch Service console, navigate to the Security configuration tab of your OpenSearch Service domain and choose Edit.
Deselect Enable SAML authentication and choose Save changes.
After the Amazon SAML integration is disabled, delete the opensearch-domain-saml-integration stack using cdk destroy.
Optionally, if you used the provided OpenSearch Service sample AWS CDK stack (opensearch-domain), delete it using cdk destroy.
Conclusion
OpenSearch Service allows enterprise customers to use their preferred federated IdPs such as SAML using IAM Identity Center for clusters running inside private VPC subnets following AWS best practices.
In this post, we showed you how to integrate an OpenSearch Service domain within a VPC with an existing SAML IdP for SSO access to OpenSearch Dashboards using IAM Identity Center. The provided solution securely manages network access to the resources using AWS WAF to restrict access only to authorized network segments or specific IP addresses.
Mahdi Ebrahimi is a Senior Cloud Infrastructure Architect with Amazon Web Services. He excels in designing distributed, highly-available software systems. Mahdi is dedicated to delivering cutting-edge solutions that empower his customers to innovate in the rapidly evolving landscape in the automotive industry.
Dmytro Protsiv is a Cloud Applications Architect for with Amazon Web Services. He is passionate about helping customers to solve their business challenges around application modernization.
Luca Menichetti is a Big Data Architect with Amazon Web Services. He helps customers develop performant and reusable solutions to process data at scale. Luca is passioned about managing organisation’s data architecture, enabling data analytics and machine learning. Having worked around the Hadoop ecosystem for a decade, he really enjoys tackling problems in NoSQL environments.
Krithivasan Balasubramaniyan is a Principal Consultant with Amazon Web Services. He enables global enterprise customers in their digital transformation journey and helps architect cloud native solutions.
Muthu Pitchaimani is a Search Specialist with Amazon OpenSearch Service. He builds large-scale search applications and solutions. Muthu is interested in the topics of networking and security, and is based out of Austin, Texas.
Customers from around the world often tell me that digital sovereignty is a top priority as they look to meet new compliance and industry regulations. In fact, 82% of global organizations are either currently using, planning to use, or considering sovereign cloud solutions in the next two years, according to the International Data Corporation (IDC). However, many leaders face complexity as policies and requirements continue to rapidly evolve, and have concerns on acquiring the right knowledge and skills, at an affordable cost, to simplify efforts in meeting digital sovereignty goals.
At Amazon Web Services (AWS), we understand that protecting your data in a world with changing regulations, technology, and risks takes teamwork. We’re committed to making sure that the AWS Cloud remains sovereign-by-design, as it has been from day one, and providing customers with more choice to help meet their unique sovereignty requirements across our offerings in AWS Regions around the world, dedicated sovereign cloud infrastructure solutions, and the recently announced independent European Sovereign Cloud. In this blog post, I’ll share how the cloud is helping organizations meet their digital sovereignty needs, and ways that we can help you navigate the ever-evolving landscape.
Digital sovereignty needs of customers vary based on multiple factors
Digital sovereignty means different things to different people, and every country or region has their own requirements. Adding to the complexity is the fact that no uniform guidance exists for the types of workloads, industries, and sectors that must adhere to these requirements.
Although digital sovereignty needs vary based on multiple factors, key themes that we’ve identified by listening to customers, partners, and regulators include data residency, operator access restriction, resiliency, and transparency. AWS works closely with customers to understand the digital sovereignty outcomes that they’re focused on to determine the right AWS solutions that can help to meet them.
Meet requirements without compromising the benefits of the cloud
We introduced the AWS Digital Sovereignty Pledge in 2022 as part of our commitment to offer all AWS customers the most advanced set of sovereignty controls and security features available in the cloud. We continue to deeply engage with regulators to help make sure that AWS meets various standards and achieves certifications that our customers directly inherit, allowing them to meet requirements while driving continuous innovation. AWS was recently named a leader in Sovereign Cloud Infrastructure Services (EU) by Information Services Group (ISG), a global technology research and IT advisory firm.
Customers who use our global infrastructure with sovereign-by-design features can optimize for increased scale, agility, speed, and reduced costs while getting the highest levels of security and protection. Our AWS Regions are powered by the AWS Nitro System, which helps ensure the confidentiality and integrity of customer data. Building on our commitment to provide greater transparency and assurances on how AWS services are designed and operated, the security design of our Nitro System was validated in an independent public report by the global cybersecurity consulting firm NCC Group.
Customers have full control of their data on AWS and determine where their data is stored, how it’s stored, and who has access to it. We provide tools to help you automate and monitor your storage location and encrypt your data, including data residency guardrails in AWS Control Tower. We recently announced more than 65 new digital sovereignty controls that you can choose from to help prevent actions, enforce configurations, and detect undesirable changes.
All AWS services support encryption, and most services also support encryption with customer managed keys that AWS can’t access such as AWS Key Management Service (KMS), AWS CloudHSM, and AWS KMS External Key Store (XKS). Both the hardware used in AWS KMS and the firmware used in AWS CloudHSM are FIPS 140-2 Level 3 compliant as certified by a NIST-accredited laboratory.
Infrastructure choice to support your unique needs and local regulations
AWS provides hybrid cloud storage and edge computing capabilities so that you can use the same infrastructure, services, APIs, and tools across your environments. We think of our AWS infrastructure and services as a continuum that helps meet your requirements wherever you need it. Having a consistent experience across environments helps to accelerate innovation, increase operational efficiencies and reduce costs by using the same skills and toolsets, and meet specific security standards by adopting cloud security wherever applications and data reside.
We work closely with customers to support infrastructure decisions that meet unique workload needs and local regulations, and continue to invent based on what we hear from customers. To help organizations comply with stringent regulatory requirements, we launched AWS Dedicated Local Zones. This is a type of infrastructure that is fully managed by AWS, built for exclusive use by a customer or community, and placed in a customer-specified location or data center to run sensitive or other regulated industry workloads. At AWS re:Invent 2023, I sat down with Cheow Hoe Chan, Government Chief Digital Technology Officer of Singapore, to discuss how we collaborated with Singapore’s Smart Nation and Digital Government Group to define and build this dedicated infrastructure.
We also recently announced our plans to launch the AWS European Sovereign Cloud to provide customers in highly regulated industries with more choice to help meet varying data residency, operational autonomy, and resiliency requirements. This is a new, independent cloud located and operated within the European Union (EU) that will have the same security, availability, and performance that our customers get from existing AWS Regions today, with important features specific to evolving EU regulations.
There is a lot of complexity involved with navigating the evolving digital sovereignty landscape—but you don’t have to do it alone. Using the cloud and working with AWS and our partners can help you move faster and more efficiently while keeping costs low. We’re committed to helping you meet necessary requirements while accelerating innovation, and can’t wait to see the kinds of advancements that you’ll continue to drive.
If you have feedback about this post, submit comments in the Comments section below. If you have questions about this post, contact AWS Support.
We’re excited to announce that Amazon Web Services (AWS) has completed the 2023 South Korea Cloud Service Providers (CSP) Safety Assessment Program, also known as the Regulation on Supervision on Electronic Financial Transactions (RSEFT) Audit Program. The financial sector in South Korea is required to abide by a variety of cybersecurity standards and regulations. Key regulatory requirements include RSEFT and the Guidelines on the Use of Cloud Computing Services in the Financial Industry (FSIGUC). Prior to 2019, the RSEFT guidance didn’t permit the use of cloud computing. The guidance was amended on January 1, 2019, to allow financial institutions to use the public cloud to store and process data, subject to compliance with security measures applicable to financial companies.
AWS is committed to helping our customers adhere to applicable regulations and guidelines, and we help ensure that our financial customers have a hassle-free experience using the cloud. Since 2019, our RSEFT compliance program has aimed to provide a scalable approach to support South Korean financial services customers’ adherence to RSEFT and FSIGUC. Financial services customers can annually either perform an individual audit by using publicly available AWS resources and visiting on-site, or request the South Korea Financial Security Institute (FSI) to conduct the primary audit on their behalf and use the FSI-produced audit reports. In 2023, we worked again with FSI and completed the annual RSEFT primary audit with the participation of 59 customers.
The audit scope of the 2023 assessment covered data center facilities in four Availability Zones (AZ) of the AWS Asia Pacific (Seoul) Region and the services that are available in that Region. The audit program assessed different security domains including security policies, personnel security, risk management, business continuity, incident management, access control, encryption, and physical security.
Completion of this audit program helps our customers use the results and audit report for their annual submission to the South Korea Financial Supervisory Service (FSS) for their adoption and continued use of our cloud services and infrastructure. To learn more about the RSEFT program, see the AWS South Korea Compliance Page. If you have questions, contact your AWS account manager.
If you have feedback about this post, submit comments in th Comments section below.
At the beginning of November, we let it be
known that we were looking to hire a writer/editor to augment the LWN
team. In past attempts, we have found it difficult to attract writers who
could produce the kind of content that LWN readers expect. This time
around, as we have said before, was different; we had a number of
candidates who could have filled the bill and were forced to make some
difficult choices.
While “hire them all” was an attractive idea, it was not one that our
budget would support. We did conclude, however, that we could stretch to a
second hire. So we are pleased to announce that the opportunity to bring
Joe Brockmeier on board was too good to pass up — so we didn’t. You will
start to see his work return to LWN within the next few days.
Go 1.22, the most recent version of the Go programming language, has been released. It comes with two language changes to for loops: a fix for a longstanding “gotcha” with accidentally sharing loop variables between iterations and adding the ability to range over integer values. There are also additions to the standard library, improved performance, and more. See the release notes for further information.
What is IP fragmentation, why is it important, and do people understand
it? The answer to that last question is “not as well as they think”. This
article will also answer the rest of those
questions and introduce fragquiz, a game that I
wrote to allow players to guess how IP packets will behave when they are
too large for the network. As evidence that IP fragmentation is not
well-understood, a room full of networking experts played fragquiz and got
a score that was
nowhere close to perfect. In addition, I will describe a new algorithm for
fragmentation avoidance, which some colleagues and I
developed, that helped motivate development of fragquiz.
Rapid7 is committed to promoting research that identifies the latest cybersecurity trends so that organizations can leverage these insights and create programs that make sense for the modern SOC. To that end, we’ve singled out five quick insights security professionals and stakeholders should consider when looking ahead. These findings are based on Top Trends in Cybersecurity for 2024, a new research report from Gartner®.
Organizations Will Focus on Improving Resilience
As cloud continues to be adopted at a frenzied pace across organizations large, small, and everything in between, it’s critical to maintain organizational resiliency as attack surfaces expand and security becomes more urgent than ever. Indeed, the research notes that: “Improving organizational resilience has become a primary driver of security investments for several interconnected reasons:
“Digital ecosystems continue to sprawl, due to increasing cloud adoption.
Organizations are entrenching hybrid work arrangements.
The threat environment continues to evolve as emerging capabilities also embolden attackers.”
Continuous Threat Exposure Management Programs Will Take Off
Organizational attack surfaces have expanded for many reasons: the adoption of SaaS, remote work, custom application development, and more. All of these changes are efficiency drivers for businesses, but can also become liabilities rife with vulnerabilities. As organizations put more products and policies into place – especially from multiple vendors – it can become more difficult to manage this new attack surface at scale.
The research stipulates that, in order to try and solve this issue, “security and risk management (SRM) leaders have introduced pilot processes that govern the volume and importance of threat exposures and the impact of dealing with them with continuous threat exposure management (CTEM) programs.” Short-term remediations can only go so far; the game is accelerating and long-term solutions must be put into place.
Generative AI Will Inspire Long-Term-Yet-Cautious Hope
Security organizations are embracing generative AI (GenAI) to help gain visibility across hybrid attack surfaces, spot threats fast, and automatically prioritize risk signals. In other sectors, unmanaged and uncontrolled uses of GenAI need reigning in before they can cause real societal damage with things like deepfakes, misinformation, and copyright infringement.
The research states that “the most notable issues were the use of confidential data in third-party GenAI applications and the copyright infringement and brand damage that could result from the use of unvetted generated content.” As AI companies continue to release new products that are more readily customizable by developers, laws and security policies will need to be put into place to curtail this potential third-party threat.
The C-Suite Communications Gap Will Narrow
With clearer outcome-driven metrics (ODMs) comes the ability to more easily convince the boardroom that direct investment in a cybersecurity initiative is imperative. Indeed, CISOs and other key security personnel and stakeholders have for years been running up against budgetary pushback that all too often leads to a porous attack surface as well as the inability to properly respond or prepare.
According to the research, “the 2023 Gartner Evolution of Cybersecurity Leader Survey asked chief information security officers (CISOs) the following question: ‘What has been the impact of changing business objectives on your cybersecurity strategy?’ In response, 60% said there had been some impact or a major impact.” When goals and/or key performance indicators (KPIs) shift, the security organization must be able to readily communicate where potential risk could lie in the changed environment.
ODMs can create a clearer path for security. From the report:
“Explain material cyber incidents to executives and guide specific investments to remediate them.
Support transparency to educate executives, lines of business and corporate functions about inappropriate or cavalier risk acceptance.
Expose matrixed management problems, such as the role the IT team plays in patching problems for which the security organization is typically held accountable.”
Cybersecurity Reskilling Will Help to Future-Proof
There is a continuing cybersecurity talent gap and, at the same time, there seems to be a shift in the types of skills practitioners need to bring to the job. Think of the implications this “moving target” has on both security organizations and people strategy teams tasked with scouring the marketplace for this magical unicorn.
The report details how, “in the U.S. alone, there are only enough qualified cybersecurity professionals to meet 70% of current demand – an all-time low over the past decade.” A plethora of trends are leading to this current disparity, including: accelerated cloud adoption, the emergence of GenAI, threat-landscape expansion, and vendor consolidation.
Greater business acumen as well as AI ethics and human psychology are just a few of the soft skills that will come to have greater prominence in job descriptions of security talent. Indeed, this may signal a stronger coming partnership between talent acquisition teams and security teams so that all parties involved can be sure that the right talent is recruited in the best way possible.
Gartner, Top Trends in Cybersecurity for 2024, Richard Addiscott, Jeremy D’Hoinne, et al., 2 January 2024
GARTNER is a registered trademark and service mark of Gartner, Inc. and/or its affiliates in the U.S. and internationally and is used herein with permission. All rights reserved.
To provide the best experiences, we use technologies like cookies to store and/or access device information. Consenting to these technologies will allow us to process data such as browsing behavior or unique IDs on this site. Not consenting or withdrawing consent, may adversely affect certain features and functions.
Functional
Always active
The technical storage or access is strictly necessary for the legitimate purpose of enabling the use of a specific service explicitly requested by the subscriber or user, or for the sole purpose of carrying out the transmission of a communication over an electronic communications network.
Preferences
The technical storage or access is necessary for the legitimate purpose of storing preferences that are not requested by the subscriber or user.
Statistics
The technical storage or access that is used exclusively for statistical purposes.The technical storage or access that is used exclusively for anonymous statistical purposes. Without a subpoena, voluntary compliance on the part of your Internet Service Provider, or additional records from a third party, information stored or retrieved for this purpose alone cannot usually be used to identify you.
Marketing
The technical storage or access is required to create user profiles to send advertising, or to track the user on a website or across several websites for similar marketing purposes.


 Mahdi Ebrahimi is a Senior Cloud Infrastructure Architect with Amazon Web Services. He excels in designing distributed, highly-available software systems. Mahdi is dedicated to delivering cutting-edge solutions that empower his customers to innovate in the rapidly evolving landscape in the automotive industry.
 Dmytro Protsiv is a Cloud Applications Architect for with Amazon Web Services. He is passionate about helping customers to solve their business challenges around application modernization.
 Luca Menichetti is a Big Data Architect with Amazon Web Services. He helps customers develop performant and reusable solutions to process data at scale. Luca is passioned about managing organisation’s data architecture, enabling data analytics and machine learning. Having worked around the Hadoop ecosystem for a decade, he really enjoys tackling problems in NoSQL environments.
 Krithivasan Balasubramaniyan is a Principal Consultant with Amazon Web Services. He enables global enterprise customers in their digital transformation journey and helps architect cloud native solutions.
 Muthu Pitchaimani is a Search Specialist with Amazon OpenSearch Service. He builds large-scale search applications and solutions. Muthu is interested in the topics of networking and security, and is based out of Austin, Texas.