Post Syndicated from Explosm.net original https://explosm.net/comics/crippling-addiction
New Cyanide and Happiness Comic
Post Syndicated from Explosm.net original https://explosm.net/comics/crippling-addiction
New Cyanide and Happiness Comic
Post Syndicated from Светла Енчева original https://www.toest.bg/kak-vanya-grigorova-za-malko-ne-stana-kmet-na-sofiya/

На втория тур на местните избори в София кандидатът на ПП–ДБ Васил Терзиев спечели с едва около 1,3 процентни пункта пред конкурентката си Ваня Григорова, подкрепена от БСП, „Атака“, комунистически и русофилски партии. Тази разлика се стопява до едва около 0,5%, ако вземем предвид не само гласувалите, а всички имащи право на глас. Малко повече от 2/3 от гласоподавателите в София не са отишли до урните. Реално Васил Терзиев е избран с гласовете на около 16,5% от софиянците, а Григорова са подкрепили към 16%. За да си го представим нагледно, разликата между двамата от около 4800 гласа е колкото два пъти учениците в най-голямото столично училище – 18. СУ „Уилям Гладстон“. Затова не беше изненада, когато Ваня Григорова заяви, че ще оспорва резултатите по съдебен ред.
Вечерта след изборния ден политолози и прочее с леви убеждения се надпреварваха да говорят по националните телевизии как имало силен „социален вот“ в София. И как дългогодишното дясно управление на столицата довело едва ли не до ляв ренесанс.
Председателката на БСП Корнелия Нинова побърза да пришие високия резултат на Григорова на ревера на БСП и най-вече на своя собствен. Тя удобно „забрави“, че номинирането на синдикалистката стана въпреки волята ѝ. И че лично тя я саботираше на практика до втория тур, призовавайки я да се разграничи от репликата на Бойко Борисов, че държавна собственост (Григорова) е за предпочитане пред Държавна сигурност (Терзиев).
По-сериозното вглеждане в изборните резултати обаче опровергава интерпретациите за олевяването на София. Гласувалите за листата на БСП за Столичния общински съвет (СОС) са 56% от всички подкрепили Григорова на първия тур и едва една четвърт (26,7%) от далите гласа си за нея на втория. А друга идентифицираща се като лява партия, влязла в СОС, няма.
Тезата за социалния вот в столицата не се потвърждава и от избора на кметовете по райони. 19 от 24-мата районни кметове са от ПП–ДБ, трима – от ГЕРБ и двама – независими (този на Студентски град през 2019 г. е спечелил като номинация на ДБ, а колегата му от Нови Искър през 2015 г. е бил кандидат на Реформаторския блок). От тях Ваня Григорова би могла да намери общ език единствено с преизбрания кмет на район „Изгрев“ Делян Георгиев. При предишния мандат той беше единственият районен кмет на БСП в София, но Столетницата го низвергна заради позициите му в защита на електронното гласуване и на сегашните избори беше издигнат от ПП–ДБ (по предложение на „Спаси София“). Георгиев обаче беше против именуването на алея „Героите на Украйна“ и площад „Борис Немцов“ в близост до Руското посолство.
Може да се каже просто: Васил Терзиев спечели, Ваня Григорова загуби, за какво е цялата драма? Въпросът е не само в близките резултати, а и в коренно различните изходни позиции. Терзиев беше сочен за фаворит от самото начало. Единствен риск пред неговата кандидатура изглеждаше евентуален силен кандидат, подкрепен от ГЕРБ, какъвто не се появи. А на номинацията на Григорова, приета с резерви дори от БСП, не се гледаше сериозно. Самата БСП никога не е печелила местни избори в София.
За разлика от Григорова, на първия тур резултатът на Терзиев (119 121 гласа) надхвърли със съвсем малко подкрепата, дадена за листата на ПП–ДБ–СС за СОС (112 087 гласа). На втория тур съоснователят на „Телерик“ успя да привлече още почти 56 000 избиратели. Синдикалистката от своя страна обаче увеличи резултата си повече от двойно, спечелвайки близо 90 000 нови гласа.
Откъде идват гласовете за Григорова на балотажа? По данни от екзитпола на „Алфа Рисърч“, зад нея са застанали цели 46% от подкрепилите кандидата на ГЕРБ Антон Хекимян на първия тур. За сравнение, тези от тях, които са гласували за Терзиев, са 38%. Очаквано, огромната част (84%) от избирателите на кандидата на „Възраждане“ Деян Николов са застанали зад Григорова, както и 55% от гласувалите за Ивайло Вълчев от ИТН. Дори една четвърт от „сините“ последователи на Вили Лилков са пуснали бюлетина за нея.
В електорален план най-голяма тежест имат именно онези 46% от избирателите на Хекимян, опровергаващи дългогодишната мантра „ГЕРБ ни пази от комунистите“. Те, изглежда, са се вслушали в Бойко Борисов, който заяви, че държавна собственост е за предпочитане пред Държавна сигурност. Той впрочем приписа тези думи на Антон Хекимян, но доскорошният директор на новините на bTV не беше казал това. Точните му думи бяха „предстои труден избор между Държавна сигурност и държавна собственост“; той не направи оценка кое от двете е по-добро.
В присъщия си стил след няколко дни Борисов промени позицията си, като заяви, че се бил пошегувал, и призова да се гласува за Терзиев. Шегата му обаче имаше сериозни последствия. Както в онзи виц за претъпкания автобус, в който мъж натрапчиво опирал определена част от анатомията си о пътничка. На протестите ѝ само отговарял, че си прави майтап. „Махнете го най-сетне този майтап от мене!“, не издържала накрая жената.
Повърхностно и неточно би било обаче да отдадем резултата на Григорова единствено на една реплика на Борисов. Както думите му, от които се отрече, бяха израз на разочарованието му от ниския резултат за ГЕРБ и Хекимян на първия тур в София, така много гласоподаватели, идентифициращи се като „десни“, вероятно са дали гласа си за Григорова напук. Без да очакват, че е възможно тя да спечели. За други вотът за нея е бил израз на антисистемност.
Трябва да се признае, че Ваня Григорова направи силна кампания. Тя беше наясно какви са избирателите ѝ и какви послания работят за различните групи от тях. Соцносталгици, путинофили, работници, хора от крайните квартали, „нови“ софиянци от провинцията, националисти, антиглобалисти, хора с увреждания – тя имаше точните думи за всички тях.
Кандидатурата на Васил Терзиев беше най-малкото общо кратно, около което успяха да се обединят ПП, ДБ, „Спаси София“ и „Екипът на София“. Тя обаче стана общо кратно и за избирателите; не успя да ги обедини и мотивира. Мнозина така и не можаха да преглътнат ДС родословието на Терзиев. Други биха предпочели кандидатът да е Трайчо Трайков, Борис Бонев или арх. Любо Георгиев. Към това се прибавят също масираната кампания срещу Терзиев и фактът, че всички останали партии са против ПП–ДБ, съответно и против кандидатурата им за кмет на София.
Предизборната кампания не успя да преодолее тези начални дефицити. Въпреки личностните качества на Васил Терзиев, образът му така и не придоби плътност. Той си остана привлекателен най-вече за ИТ сектора, от който произлиза. Послания като „да мечтаем повече“, каквито той отправяше, звучаха кухо и инфантилно. Комуникационните експерти, стоящи зад кампанията, не изглежда да имаха реалистична представа що за хора са избирателите в София и какво имат нужда да чуят.
Да не говорим пък за представянето на визионерски концепции за развитието на града, които да вдъхновяват. И Борис Бонев, и Любо Георгиев имат да предложат достатъчно в това отношение, но малко от идеите им станаха теми в кампанията на Терзиев.
Резултатите от местните избори в София са хубав повод изследователите, анализаторите и комуникационните експерти да предефинират досегашните си представи за населението на столицата. Както не е вярно, че софиянци внезапно са станали леви, така и вече не е валиден митът за „синя“ и „дясна“ София.
За коалицията „Синя София“ са дали гласа си едва 1,43% от всички гласоподаватели в столицата, а за кандидата ѝ за кмет Вили Лилков – 2%. Призивите за събаряне на Паметника на Съветската армия не изиграха особена роля в кампанията. Фактът, че Васил Терзиев е предприемач, натрупал милиони, предизвикваше повече критики и враждебност, отколкото одобрение.
Васил Терзиев ще бъде кмет на столицата в следващите най-малко четири години, ако ново преброяване на гласовете не доведе до обрат в резултата. Скоро ще престане да е тема с колко малка преднина е спечелил. Е, освен за БСП и за самата Ваня Григорова, която вероятно ще се опита да капитализира политически успеха си. Това, което не трябва да представа да бъде тема, е, че освен че расте, София се и променя. А за да се управлява един град, той трябва да се разбира.
Post Syndicated from Анета Василева original https://www.toest.bg/arhitektura-i-gradski-politiki-tri-uroka-ot-amerika/

Около местни избори градските проблеми в България винаги звучат мъчително. Но умните градове се учат от чуждите грешки. Когато се сравняваме с „другите“ и най-вече със „Запада“, обикновено се фокусираме върху хубавото, което у нас, уви, липсва. Всеки град обаче се развива в различен контекст, а универсални рецепти за успех няма.
С този текст аз предлагам да опитаме нещо друго. Да видим кои са грешките, които се отчитат като най-сериозни в градската среда в САЩ в момента, и какво правят архитекти, урбанисти, активисти и местна власт, за да се справят с тях. Част от тези грешки откриваме под някаква форма и в България (например в София), част от тях сме на път да направим на свой ред, но други можем успешно да избегнем. След всички разговори, които водих, и всички колеги, с които се видях по време на престоя ми в САЩ, три са, смятам, болезнено актуалните архитектурно-градски теми в момента:
Започвам отзад напред.
Но на първия кандидатпрезидентски дебат на Републиканската партия през август тази година предприемачът Вивек Рамасвами, изгряваща звезда, който по мнение на всички медии се справи най-добре (в отсъствието на Доналд Тръмп), категорично отрече реалността на климатичните промени. Много червени американски щати (с републиканско мнозинство) не окуражават законови промени в посока по-висока енергоефективност, ограничаване на изкопаемите горива или по-строги правила в новото строителство. Най-лошо е положението в Уайоминг, Южна Каролина, Канзас, Луизиана и Южна Дакота, които през 2022 г. са в дъното на ежегодната национална класация за енергоефективност на отделите щати.
Въглеродните емисии в строителството са болезнена тема при всеки сблъсък между демократи и републиканци. Щатите, контролирани от демократи, въвеждат закони за повишаване на енергоефективността на сградите, включително задължително използване на термопомпи и соларни системи и ограничаване на отоплението с изкопаеми горива. Републиканските щати, обратно, окуражават използването на природен газ в новите сгради например.
Фрапантен случай е Северна Каролина – южен републикански щат, който през август 2023 г. забрани промяна на строителните норми до 2031 г., за да изпревари енергоефективни корекции в жилищните нормативи (които не са променяни през последните десет години). Забраната е приета след активно лобиране от страна на North Carolina Home Builders Association, която е изчислила, че нови енергоефективни строителни норми ще увеличат строителните разходи, а оттам и цените на жилищата, без да калкулират дългосрочните спестявания на домакинствата от по-ниските сметки за електричество. Северна Каролина е сред щатите с най-много построени нови жилища през последните години.
Начело на екологичните отличници през 2023 г. е Калифорния. Но както ми каза миналата седмица Дан Сниф, дългогодишен главен архитект на кампуса на Университета в Джорджия, „гледай какво прави Калифорния, и след 15 години всички щати ще правят същото“. Самият той върши много за въвеждане на съобразена с архитектурата устойчивост в сградите на университета, повечето от които са паметници на културата, а някои са и над 200-годишни – включително внимателни реставрации и реконструкции, двойна дограма, дублираща оригиналната отвътре със съвременни системи, повече пешеходни зони и по-малко коли и открити паркинги в кампуса.

Пешеходни зони в Бруклин и Атина (Джорджия) © Анета Василева
Въпросът, на който Дан Сниф не можа да ми отговори, е дали разполагаме с 15 години. Защото в САЩ например жилищните и търговските сгради имат 40% дял в крайното енергийно потребление и 75% в общата консумация на електроенергия за 2022 г. Междувременно всички зелени теми са задължително, но и често самоцелно присъстващи в заданията на университетски дизайн студиа, в архитектурни проекти, публични разговори, събития и изложби. Реално обаче огромна част от застроения фонд остава незасегнат.
ограничаване на емисиите с 55% до 2030 г., въглеродна неутралност до 2050 г. и прочие. Само си представете това да трябва да се наложи на безкрайните полета еднофамилни къщи, построени в американските предградия от средата на миналия век до днес.
Онова, което трябва да избегнем, е изхабяването на темата. Тя не е просто успешна рецепта за „печелене на европроекти“, нито е мода, а трябва да се превърне от демонстрация на прогресивен либерализъм в нормален здрав разум.
И е добре да не забравяме, че това може да става и с добър дизайн, с качествени материали и детайли и без ликвидиране на характерния облик и специфичните архитектурни особености на сградите – на всички сгради, не само на културното наследство.
и това са над 315 000 души за 2022 г. Високите цени на жилищата, палатковите квартали от бездомни по улиците на големите американски градове, липсата на достатъчно на брой качествени и достъпни социални жилища, лошото състояние на много от последните останали общински жилищни комплекси в САЩ са все проблеми, които ежедневно занимават медиите в тази страна, където собственият дом е фундаментът на американската мечта.


Атланта, Филаделфия, Вашингтон © Анета Василева
Голяма част от социалните, икономическите и дори политическите причини, довели до жилищната криза в САЩ, са необясними в България. Трудно можем да си представим колко много жилища са разрушавани циклично в Щатите през ХХ в. И как определени федерални и щатски закони и разпоредби са променили толкова драматично архитектурния пейзаж в градовете.
„Новият курс“ на Рузвелт през 30-те години води до първия национален жилищен закон, който създава системата от социални жилища в страната и на базата на който се строят големите високоетажни жилищни комплекси в САЩ. Същите са масово разрушени през 90-те по програмата HOPE VI на американския Конгрес от 1994 г. (като зле поддържани и престъпни гета) и заменени с малки нискоетажни сгради, тъй като се изчислява, че това ще бъде по-евтино от реконструкция, а и престъпността е „по-добре контролирана, когато е разпръсната, а не концентрирана“.
Добре е също да помним данните след това – как разрушаването на гето от високи блокове като Кабрини Грийн в Чикаго през 90-те не е довело до намаляване на престъпността в града – напротив, тя се е увеличила. Как премахването на жилищата на емигрантски и чернокожи общности по пътя на магистралите през 50-те не е „обновило“ градовете, а е довело до още по-дълбока сегрегация и маргинализиране на различни групи.
Интересни обаче са алтернативните методи, които различните щати, градове и дори предприемачи използват, за да преборят жилищния проблем. Голяма част от Долен Манхатън нощем свети не защото много хора работят до късно, а защото
Въпреки усилията на компаниите да върнат хората на бюрата, тенденцията е видна, особено при новите поколения наемни работници – повече дистанционна работа, по-кратка работна седмица. Превръщането на празните офиси в жилища е архитектурно предизвикателство, което е неприложимо при стари широкоплощни сгради с много тъмни помещения в средата. Но редица федерални програми подкрепят и финансово подобни трансформации, а през 2023 г. Белият дом дори издава наръчник как да превърнем една търговска сграда в жилищна.
Има и частни филантропи, които помагат на бездомните (но това по принцип е страна на частни филантропи). Компания в Нашвил, Тенеси, например проверява в кои блокове с жилища под наем има продължително време незаети апартаменти, изкупува ги от собствениците на сградата (но това са собственици компании) и след това настанява безплатно там уязвими хора, самотни майки, жертви на домашно насилие или бездомни.
малки структури, средна плътност, нискоетажни модели с висока гъстота за градските зони. А там, в центровете, усилията за съживяване са все по-упорити, защото и проблемите са огромни.
„Когато пристигнах в Детройт в началото на 90-те, центърът ми изглеждаше като в Сараево, все едно е имало война.“ Това ми каза българка, която вече над 30 години живее в САЩ.


Атланта © Анета Василева
Детройт е сред най-шокиращите примери за свиващ се град с крайна субурбанизация. След 70-те години на миналия век центровете на американските градове действително изглеждат постапокалиптично – разсечени от многолентови магистрали и мостове, под които живеят наркомани и бездомни, с многоетажни паркинги и огромни празни незастроени пространства на мястото на съборени стари градски квартали, без пешеходци и с опасен градски живот. Истинско Готъм сити. Всичко това са последици от грешките на „градското обновяване“ (т.нар. urban renewal) от 60-те, когато се събарят големи зони от старите градове, както и следствие от икономическите кризи от 70-те и от редица социални процеси, като субурбанизация и гетоизиране на центровете за сметка на перифериите на градовете.
В момента фокусът обаче е как да върнем живота отново в градските центрове и как да се борим с последиците от ориентираната към автомобила градска среда (и икономика).
Те са изчислили, че наем на апартамент в центъра без разходи за ипотека и поддръжка на няколко автомобила за семейство ще им позволи да спестят пари за по-добри здравни осигуровки и по-спокойно пенсиониране. И искат нормален градски живот – паркове, пешеходни зони, тротоари, градски транспорт, велосипедни алеи, безопасни квартали.
Все повече градове работят за възстановяване на пешеходните връзки, за премахване на открити и многоетажни паркинги от центъра, които променят напълно вида и климата там, за създаване на нови паркове (особено популярни са линейните поради липса на свободна земя, включително върху стари железопътни линии по примера на нюйоркската High Line), за преместване на разсичащи градовете магистрали (като в Бостън, където безумно скъпият и скандален проект The Big Dig за вкарване на градска магистрала под земята се оказа успешен в дългосрочен план). Темата джентрификация неизменно се появява тук, но няма идеален свят. Градовете са за хората, бавно осъзнават американците (поне на север), не за колите.


High Line, Ню Йорк © Анета Василева
На този фон София не е Бейрут със сигурност. И всъщност е един много безопасен и зелен град. Но защо разказвам тези три американски истории? Защото местните избори в България приключиха и е време да излезем от социалните мрежи и да тръгнем отново по улиците на града. Да осъзнаем, че градските политики реално влияят на живота и че за съжаление, късно и трудно разбираме това. И колко много спешни и важни проблеми има за решаване всеки град – сам за себе си.
Post Syndicated from Юлия Георгиева original https://www.toest.bg/slavcho/
И като се събудя нощем, не мога да разбера къде съм.
Ставам. Отивам в кухнята. Святкам лампата. Правя си една топла попара. И след като я изям, започвам да вярвам, че съм си вкъщи, и мога наистина да заспя.

За първи път ще използвам истинско име в историите на Розовата къща. Чак сега мога да си го позволя без притеснение, че нещо лошо може да се случи с този човек. Името му е Славчо. На 42 години е, а 42 е отговорът на всички въпроси, както е казал един мъдър човек.
„Проблемен“ е бил винаги.
Отпада от училище някъде във втори клас, в едни времена, когато немалка част от хората на Розовата къща (несъществуваща тогава) също са били изплюти от системата. Защото въпросната система не търпи хиперактивни деца, не търпи деца със затруднения в обучението, не търпи деца с поведенчески проблеми, без учебници и тетрадки, без правилните дрехи, без родители на родителски срещи.
В онези времена всички такива деца набързо се превръщат в „проблемни“. Етикетът е татуиран, а подкрепа, разбиране и търпение не се предвиждат. Много скоро „проблемните“ спират да ходят на училище, забъркват се в глупости, което обикновено води до „настаняване“ в институции интернати. Създадени са в края на 50-те години на миналия век под името „трудово-възпитателни училища за морално застрашени деца“ в отговор на приетия през 1958 г. Закон за борба с противообществените прояви на малолетни и непълнолетни.
Всеки се бори да оцелява.
Славчо избутва ден след ден в очакване на свиждането с родителите си. В грижите си за всичките си девет деца те очевидно не са успели да покрият очакванията на системата, не са и получили подкрепа в нищо. Сами се борят за своето оцеляване – собственото си и на децата си, поне на тези, които системата още не е натикала в някой интернат. Пътуват всяка седмица, независимо къде е мястото, където този път е преместен Славчо. И до днес не е ясно как са се придвижвали, откъде са намирали пари. Просто са били там. Винаги когато е било възможно, са били близо до детето си.
Бъдещето на „проблемните“ деца е в интернат – може да те изпратят там, защото просиш или защото си избягал от дома, или защото си откраднал малка сума пари. Тези институции са си съвсем работещи и днес, като
Ходила съм по такива места, за да говоря с момчетата и момичетата за наркотици. Това на практика са си затвори за малолетни. Виждала съм наполовина остригани коси, като в концлагер. Виждала съм дете на 13 години, вкарано там за притежание на 5 цигари с марихуана. Виждала съм сутеньори, които стоят необезпокоявани пред вратата и чакат набелязаната девойка да си подаде носа навън, за да я върнат „да работи“, а когато това стане и тя бъде хваната отново, наказанието е за нея. Момичетата винаги твърдят, че са избрали сами да предлагат секс услуги, никога няма сводник… (Нали трябва да има и утре.)
Славчо се справя добре в обучението по престъпления в детско-юношеската школа за криминално проявени. Той е здраво, добре сложено момче, което успява да оцелее, а понякога при него се озовава и брат му. Определено е от помощ да не си сам на такова място.
В дните, когато е на свобода между различните присъди, вече не го свърта вкъщи. На 13 години е – започва да бяга, да взема наркотици, а това неизбежно е свързано с още кражби и продажби. И разбира се, наказват го отново и отново. Не може да пресметне точно колко време е прекарал в интернати и колко му се е събрало да живее вкъщи между присъдите. С математиката там не са се справили добре. И с писането не са. И с четенето.
На 18 вече е пълнолетен и системата запретва ръкави да се „справи с него“. Местят го в затвора. Не мисля, че някой на света е имал различно очакване за развитието му. Но животът е твърде креативен и може да е много, много зъл.
В рамките на няколко месеца Славчо губи и двамата си родители, както и големия си брат.
Вече съвсем официално няма дом, където да се прибере. Сестрите му си имат семейства и свой живот, а с другия му брат от малки са хванали този път.
И Славчо излиза от затвора, живее на улицата, издържа се от кражби, продажба на наркотици и дребни далавери. Влиза в затвора отново – оцелява криво-ляво. Излиза… Влиза…
Днес Славчо е на 42 години, 17 от тях е прекарал в затвора и по институции. Започнал е с наркотиците на 13, а с престъпленията – още преди това.
„Безнадежден“.
Чувала съм това определение за него от много хора в различни етапи от живота му.
Познавам го от поне 20 години. Един човек на улицата, съвсем различен човек в затвора.
Но винаги „безнадежден“.

Когато направихме Розовата къща, изобщо не си давахме сметка какво може да означава тя за някои хора. Първо при нас дойде братът на Славчо – веднага след едно излизане от затвора. Та къде другаде можел да отиде първо?
За съжаление, това настроение не се задържа дълго, но имаше достатъчно време да доведе и Славчо. Той също тъкмо беше излязъл от затвора и много бързо си влезе обратно в релсите на „безнадежден“. Дойде с тъмнината в погледа, с повишаването на тона, понякога се усещаше и агресията му. И двамата братя живееха под моста. (Розовата къща работи само през деня, няма как и къде да се настаняват хора за нощувки.)
Славчо обаче дойде и се задържа. Някак встрани от другите, някак сам, някак по различен начин. Правеше впечатление, че не иска да взема дрехи от нас. Купуваше си от магазините втора употреба, ползваше пералнята, за да ги изпере, но никога не прие дрехи или обувки от нас. Рядко се съгласяваше да вземе и храна, носеше си отнякъде. Другите имали по-голяма нужда, той се справял.
Илияна (нашата психоложка) успя да установи добър контакт с него. Заработиха заедно и започнаха да се случват странни неща. Тъмнината в погледа взе да изчезва понякога, а в някои моменти дори се появяваше усмивка. Лека-полека Славчо се разговори, дори за себе си. Започна да се преобразява ден след ден – като какавида.
Никой от нас не го е искал от него, но той реши и малко по малко спря всички незаконни вещества. Започна да мечтае. Мечти… да си намери работа, да наеме квартира, за нас това са битовизми, за него – огромни стъпки. И той ги следваше.
Веднъж, докато го карах с колата към един строеж, на който започваше работа, ми каза:
Не бих издържал още веднъж в затвора. По-скоро ще си направя нещо.
Свърза се със сестрите си, които не беше чувал и виждал от години. Запозна се с племенниците си. Отново започна да гради семейството си. Няколко пъти започва да работи, отиде да живее при приятел, който не взема наркотици. Взе си куче.
И тогава, в този супертежък период за всеки човек със зависимост, когато всичко на света те принуждава да отидеш и да си купиш наркотик, за да спреш болката, за да я забравиш, когато всяка стъпка е безкрайно страшна и всяко предизвикателство изглежда непреодолимо…
… точно тогава пристигна поредната призовка. Опит за кражба на велосипед. Опит.
По време на престоя му в следствието ни се обадиха от прокуратурата с молба за помощ. Беше се самонаранил, беше направил страшен панаир в цялото следствие и беше заявил, че е клиент на Розовата къща и че ще говори само с Илияна. И хората звъннаха. Издадоха ѝ пропуск и я помолиха да ходи колкото може по-често,
защото той е друг, след като се видите.
Славчо беше осъден на 6 месеца затвор. Колегите ходиха на свиждане в затвора, но за съжаление, срещите с Илияна нямаше как да продължат и там. Всички ние бяхме обезверени и всеки ден очаквахме да чуем най-лошото.
Но Славчо отново оцеля. В това е трениран най-добре.
Дойде в Розовата къща направо от затвора, както си беше със сака. Дойде с огромна усмивка. По време на престоя му в затвора неговите сестри се бяха организирали и бяха покрили разходите за квартирата му, бяха се погрижили и за кучето му. Сега Славчо имаше къде да се прибере, къде да изяде попарата си през нощта.
Започна работа. Новите му началници са изключително доволни от него и след първите 3-4 месеца започнаха да се съобразяват кои смени са му по-удобни. Смени квартирата си с по-добра, а кучетата вече са две.
Продължава да идва всеки ден в Розовата къща, но вече като член на екипа ни. От два месеца Славчо работи при нас на половин работен ден и е незаменим. Той е експерт в онзи, другия свят. Помага ни в търсенето на повече хора, които имат проблем. Помага ни с личния си пример, като често казва на другите: „Щом аз мога…“ Помага ни с усмивката си. Помага ни с абсолютната си отдаденост. (Поради банкова грешка не беше получил превод на първата си заплата и не се обади да ми каже. Когато разбрахме какво е станало, реакцията му беше: „Винаги бих работил тук без заплащане. Не затова го правя.“)
Има смисъл всеки човек да бъде подкрепен!
Post Syndicated from Matt Granger original https://www.youtube.com/watch?v=2TMj6KG6c7E
Post Syndicated from Grab Tech original https://engineering.grab.com/graph-modelling-guidelines
Graph modelling is a highly effective technique for representing and analysing complex and interconnected data across various domains. By deciphering relationships between entities, graph modelling can reveal insights that might be otherwise difficult to identify using traditional data modelling approaches. In this article, we will explore what graph modelling is and guide you through a step-by-step process of implementing graph modelling to create a social network graph.
Graph modelling is a method for representing real-world entities and their relationships using nodes, edges, and properties. It employs graph theory, a branch of mathematics that studies graphs, to visualise and analyse the structure and patterns within complex datasets. Common applications of graph modelling include social network analysis, recommendation systems, and biological networks.
Before diving into graph modelling, it’s crucial to have a clear understanding of the domain you’re working with. This involves getting acquainted with the relevant terms, concepts, and relationships that exist in your specific field. To create a social network graph, familiarise yourself with terms like users, friendships, posts, likes, and comments.
After defining your domain, you need to determine the entities (nodes) and relationships (edges) that exist within it. Entities are the primary objects in your domain, while relationships represent how these entities interact with each other. In a social network graph, users are entities, and friendships are relationships.
Each entity and relationship may have a set of properties that provide additional information. In this step, identify relevant properties based on their significance to the domain. A user entity might have properties like name, age, and location. A friendship relationship could have a ‘since’ property to denote the establishment of the friendship.
Once you’ve identified the entities, relationships, and properties, it’s time to choose a suitable graph model. Two common models are:
For a social network graph, a property graph model is typically suitable. This is because user entities have many attributes and features. Property graphs provide a clear representation of the relationships between people and their attribute profiles.
Although not required, developing a schema can be helpful for large-scale projects and team collaborations. A schema defines the structure of your graph, including entity types, relationships, and properties. In a social network graph, you might have a schema that specifies the types of nodes (users, posts) and the relationships between them (friendships, likes, comments).
Next, acquire the data needed to populate your graph. This can come in the form of existing datasets or generated data from your application. For a social network graph, you can import user information from a CSV file and generate simulated friendships, posts, likes, and comments.
Finally, you need to store your graph data using a suitable graph database. Neo4j, Amazon Neptune, or Microsoft Azure Cosmos DB are examples of graph databases. Alternatively, depending on your specific requirements, you can use a non-graph database or an in-memory data structure to store the graph.
After implementing the graph, you can perform various analyses using graph algorithms, such as shortest path, centrality, or community detection. In addition, visualising your graph can help you gain insights and facilitate communication with others.
By following these steps, you can effectively create and analyse graph models for your specific domain. Remember to adjust the steps according to your unique domain and requirements, and always ensure that confidential and sensitive data is properly protected.
Grab is the leading superapp platform in Southeast Asia, providing everyday services that matter to consumers. More than just a ride-hailing and food delivery app, Grab offers a wide range of on-demand services in the region, including mobility, food, package and grocery delivery services, mobile payments, and financial services across 428 cities in eight countries.
Powered by technology and driven by heart, our mission is to drive Southeast Asia forward by creating economic empowerment for everyone. If this mission speaks to you, join our team today!
Post Syndicated from xkcd.com original https://xkcd.com/2852/

Post Syndicated from Abhi Kalra original https://aws.amazon.com/blogs/big-data/configure-dynamic-tenancy-for-amazon-opensearch-dashboards/
Amazon OpenSearch Service securely unlocks real-time search, monitoring, and analysis of business and operational data for use cases like application monitoring, log analytics, observability, and website search. In this post, we talk about new configurable dashboards tenant properties.
OpenSearch Dashboards tenants in Amazon OpenSearch Service are spaces for saving index patterns, visualizations, dashboards, and other Dashboards objects. Users can switch between multiple tenants to access and share index patterns and visualizations.
When users use Dashboards, they select their Dashboards tenant view. There are three types of tenant:
One user can have access to multiple tenants, and this property is called multi-tenancy. With the OpenSearch 2.7 launch, administrators can dynamically configure the following tenancy properties:
Before OpenSearch 2.7, users of open-source OpenSearch, with security permissions, could enable and disable multi-tenancy and private tenant by changing the YAML configuration file and restarting their Dashboards environment. This had some drawbacks:
With OpenSearch 2.7 in Amazon OpenSearch Service, users can change tenancy configurations dynamically from both the REST API and from the Dashboards UI. This provides a faster and more reliable way to manage your Dashboards tenancy.
Before OpenSearch 2.7, by default, all new users would sign in to their private tenant when accessing OpenSearch Dashboards. With 2.7, we have added a new property, default tenant. Now administrators can set a default tenant for when users sign in to OpenSearch Dashboards, whether it’s their own, private tenant, the global tenant, or a custom tenant.
This feature will serve two basic functions:
Users will sign in to the default tenant only when they are signing in for the first time or from a new browser. For subsequent sign-ins, the user will sign in to the tenant they previously signed in to, which comes from browser storage.
The user sign-in flow is as follows:

Since even a small change in these configurations can impact all the users accessing Dashboards, take care when configuring and changing these features to ensure smooth use of Dashboards.
The following shows the default tenancy configuration on domain creation.
“multitenancy_enabled” : true“private_tenant_eabled”: true“default_tenant”: “”This means that by default for each new domain, multi-tenancy and private tenant will be enabled and the default tenant will be the global tenant. You can change this configuration after domain creation with admins or with users with access to the right FGAC or IAM roles.
You can use the following API call in OpenSearch 2.7+ to configure tenancy properties. All three tenancy properties are optional:
PUT _plugins/_security/api/tenancy/config
{
    "multitenancy_enabled":true,
    "private_tenant_enabled":false,
    "default_tenant":"mary_brown"
}
You can use the following API to retrieve the current tenancy configuration:
GET _plugins/_security/api/tenancy/config You can also configure tenancy properties from OpenSearch Dashboards. Amazon OpenSearch Service has introduced the option to configure and manage tenancy from the Getting started tab of the Security page. From the Manage tab of the Multi-tenancy page, admins can choose a tenant to be the default tenant and see tenancy status, which will tell whether a tenant is enabled or disabled. Admins can enable and disable multi-tenancy, private tenant, and choose the default tenant from the configure tab.
Since the release of OpenSearch 2.7, you can set your tenancy configuration dynamically, using both REST APIs and OpenSearch Dashboards. Dynamic, API-driven tenancy configuration will make use of tenancy features and Dashboards simpler and more efficient for both users and administrators. Administrators will have more control over which tenants are accessible to which users.
We would love to hear from you, especially about how this feature has helped your organization simplify your Dashboards usage. If you have other questions, please leave a comment.
To learn more, please visit the Amazon OpenSearch Service page.

Abhi Kalra
 Prabhat Chaturvedi
Post Syndicated from Rahul Pathak original https://aws.amazon.com/blogs/big-data/connect-your-data-for-faster-decisions-with-aws/
The most impactful data-driven insights come from connecting the dots between all your data sources—across departments, services, on-premises tools, and third-party applications. But typically, connecting data requires complex extract, transform, and load (ETL) pipelines, taking hours or days. That’s too slow for decision-making speed. ETL needs to be easier and sometimes eliminated.
AWS is investing in addressing this in several ways. First, for common use cases where ETL is repeated with little value-add, we’re integrating services to decrease or eliminate the need for ETL. Second, organizations still need transformations like cleansing, deduplication, and combining datasets for analysis and machine learning (ML). For these, AWS Glue provides fast, scalable data transformation. Third, AWS continues adding support for more data sources including connections to software as a service (SaaS) applications, on-premises applications, and other clouds so organizations can act on their data.
In this post, we discuss how we’re delivering on these investments with a number of data integration innovations that span AWS databases, analytics, business intelligence (BI), and ML services.

In June 2023, we announced the public preview of Amazon Aurora MySQL-Compatible Edition zero-ETL integration with Amazon Redshift. We are thrilled to announce that this zero-ETL integration is now generally available. Amazon Aurora MySQL zero-ETL integration with Amazon Redshift processes over 1 million transactions per minute, enabling near-real-time analytics. Within seconds of new data coming into Amazon Aurora MySQL, the data is replicated to Amazon Redshift. Updates in Amazon Aurora MySQL are automatically and continuously propagated to Amazon Redshift. Customers and partners can derive tremendous time savings by reducing traditional ETL bottlenecks. They can now analyze business metrics in near-real time and make data-driven decisions faster than ever before.
In the retail industry, for example, Infosys wanted to gain faster insights about their business, such as best-selling products and high-revenue stores, based on transactions in a store management system. They used Amazon Aurora MySQL zero-ETL integration with Amazon Redshift to achieve this. With this integration, Infosys replicated Aurora data to Amazon Redshift and created Amazon QuickSight dashboards for product managers and channel leaders in just a few seconds, instead of several hours. Now, as part of Infosys Cobalt and Infosys Topaz blueprints, enterprises can have near real-time analytics on transactional data, which can help them make informed decisions related to store management.
– Sunil Senan, SVP and Global Head of Data, Analytics, and AI, Infosys
We are empowering business analysts to create predictive, interactive dashboards by connecting Amazon SageMaker Canvas, our no-code ML service, with Amazon QuickSight, our BI service. Business analysts use SageMaker Canvas to build ML models and generate predictions without needing to write code. They can then seamlessly integrate these predictions in QuickSight to create interactive dashboards that can be shared across their organization. This enables democratization of predictive insights for better decision-making.
Moreover, we have enabled deep, bidirectional integration between SageMaker Canvas and QuickSight. Business analysts can send ML models from SageMaker Canvas to QuickSight and run predictions from within QuickSight. Analysts can now also directly send data from QuickSight to SageMaker Canvas with just a few clicks to rapidly build ML models using a simple point-and-click interface, without needing to create or maintain complex data pipelines between the two services. This integration empowers users to go from data to predictions and visualizations faster than ever.
AWS services already connect to hundreds of AWS and third-party data sources. Data engineers can use services such as Amazon AppFlow and AWS Glue to make data quickly accessible from diverse sources. This enables organizations to derive unified insights across siloed datasets. We recently added new Amazon AppFlow and AWS Glue integrations to our existing portfolio.
Amazon AppFlow, a fully managed integration service that helps you securely transfer data between AWS services and SaaS applications, now supports concurrent processing and configurable page sizes for faster data transfers from SAP. This reduces the time taken to move SAP data into AWS data and artificial intelligence (AI) services.
AWS Glue for Apache Spark has added native connectivity to Google BigQuery, enabling reading and writing of BigQuery data directly without the need to install or manage libraries. You can now add BigQuery as a source or target in AWS Glue Studio’s visual interface or directly in an AWS Glue ETL script.
The data integration innovations we have highlighted show our commitment to empowering organizations to easily connect their data. Whether it’s achieving near-real-time insights, democratizing predictive analytics, or connecting diverse data sources, we are focused on helping you derive more value from your data. With the new capabilities of Amazon Aurora MySQL, Amazon Redshift, SageMaker Canvas, QuickSight, Amazon AppFlow, and AWS Glue, data engineers and business analysts can break down data silos to uncover insights.
Visit Data integration with AWS to learn more.
 Rahul Pathak is VP of Relational Database Engines, leading Amazon Aurora, Amazon Redshift, and Amazon QLDB. Prior to his current role, he was VP of Analytics at AWS, where he worked across the entire AWS database portfolio. He has co-founded two companies, one focused on digital media analytics and the other on IP-geolocation.
 G2 Krishnamoorthy is VP of Analytics, leading AWS data lake services, data integration, Amazon OpenSearch Service, and Amazon QuickSight. Prior to his current role, G2 built and ran the Analytics and ML Platform at Facebook/Meta, and built various parts of the SQL Server database, Azure Analytics, and Azure ML at Microsoft.
Post Syndicated from Donnie Prakoso original https://aws.amazon.com/blogs/aws/amazon-aurora-mysql-zero-etl-integration-with-amazon-redshift-is-now-generally-available/
“Data is at the center of every application, process, and business decision,” wrote Swami Sivasubramanian, VP of Database, Analytics, and Machine Learning at AWS, and I couldn’t agree more. A common pattern customers use today is to build data pipelines to move data from Amazon Aurora to Amazon Redshift. These solutions help them gain insights to grow sales, reduce costs, and optimize their businesses.

To help you focus on creating value from data instead of preparing data for analysis, we announced Amazon Aurora zero-ETL integration with Amazon Redshift at AWS re:Invent 2022 and in public preview for Amazon Aurora MySQL-Compatible Edition in June 2023.
Now generally available: Amazon Aurora MySQL zero-ETL integration with Amazon Redshift
Today, we announced the general availability of Amazon Aurora MySQL zero-ETL integration with Amazon Redshift. With this fully managed solution, you no longer need to build and maintain complex data pipelines in order to derive time-sensitive insights from your transactional data to inform critical business decisions.

This zero-ETL integration between Amazon Aurora and Amazon Redshift unlocks opportunities for you to run near real-time analytics and machine learning (ML) on petabytes of transactional data in Amazon Redshift. As this data gets written into Aurora, it will be available in Amazon Redshift within seconds.
It also enables you to run consolidated analytics from multiple Aurora MySQL database clusters in Amazon Redshift to derive holistic insights across many applications or partitions. Amazon Aurora MySQL zero-ETL integration with Amazon Redshift processes over 1 million transactions per minute (an equivalent of 17.5 million insert/update/delete row operations per minute) from multiple Aurora databases and makes them available in Amazon Redshift in less than 15 seconds (p50 latency lag).
Furthermore, you can take advantage of the analytics and built-in ML capabilities of Amazon Redshift, such as materialized views, cross-Region data sharing, and federated access to multiple data stores and data lakes.
Let’s get started
In this article, I’ll highlight some steps along with information on how you can get started easily. I will use my existing Amazon Aurora MySQL serverless database and Amazon Redshift data warehouse.
To get started, I need to navigate to Amazon RDS and select Create zero-ETL integration on the Zero-ETL integrations page.

On the Create zero-ETL integration page, I need to follow a few steps to configure the integration for my Amazon Aurora database cluster and my Amazon Redshift data warehouse.
First, I define an identifier for my integration and select Next.

On the next page, I need to select the source database by selecting Browse RDS databases.

Here, I can select my existing database as the source.

The next step asks me the target Amazon Redshift data warehouse. Here, I have the flexibility to choose the Amazon Redshift Serverless or RA3 data warehouse in my account or in different account. I select Browse Redshift data warehouses.

Then, I choose the target data warehouse.

Because Amazon Aurora needs to replicate into the data warehouse, we need to add an additional resource policy and add the Aurora database as an authorized integration source in the Amazon Redshift data warehouse.
I can solve this by manually updating in the Amazon Redshift console or let Amazon RDS fix it for me. I tick the checkbox.

On the next page, it shows me the changes that Amazon RDS will perform for us. I select Continue.

On the next page, I can configure the tags and also the encryption. By default, zero-ETL integration encrypts your data using AWS Key Management Service (AWS KMS), and I have the option to use my own key.

Then, I need to review all the configurations and select Create zero-ETL integration to create the integration.

After a few minutes, my zero-ETL integration is sucessfully created. Then, I switch to Amazon Redshift, and on the Zero-ETL integrations page, I can see that I have my recently created zero-ETL integration.

Since the integration does not yet have a target database inside Amazon Redshift, I need to create one.

Now the integration configuration is complete. On this page, I can see the integration status is active, and there is one table that has been replicated.

For testing, I create a new table in my Amazon Aurora database and insert a record into this table.

Then I switched to the Redshift query editor v2 inside Amazon Redshift. Here I can make a connection to the database that I formed as part of the integration. By running a simple query, I can see that my data is already available inside Amazon Redshift.

I found this zero-ETL integration very convenient for two reasons. First, I could unify all data from multiple database clusters together and analyze it in aggregate. Second, within seconds of the transactional data being written into Amazon Aurora MySQL, this zero-ETL integration seamlessly made the data available in Amazon Redshift.
Things to know
Availability – Amazon Aurora zero-ETL integration with Amazon Redshift is available in US East (Ohio), US East (N. Virginia), US West (Oregon), Asia Pacific (Singapore), Asia Pacific (Sydney), Asia Pacific (Tokyo), Europe (Frankfurt), Europe (Ireland), and Europe (Stockholm).
Supported Database Engines – Amazon Aurora zero-ETL Integration with Amazon Redshift currently supports MySQL-compatible editions of Amazon Aurora. Support for Amazon Aurora PostgreSQL-Compatible Edition is a work in progress.
Pricing – Amazon Aurora zero-ETL integration with Amazon Redshift is provided at no additional cost. You pay for existing Amazon Aurora and Amazon Redshift resources used to create and process the change data created as part of a zero-ETL integration.
We’re one step closer to helping you focus more on creating value from data instead of preparing it for analysis. To learn more on how to get started, please visit the Amazon Aurora MySQL zero-ETL integration with Amazon Redshift page.
Happy integrating!
— Donnie
Post Syndicated from Jeff Barr original https://aws.amazon.com/blogs/aws/new-create-application-consistent-snapshots-using-amazon-data-lifecycle-manager-and-custom-scripts/
Amazon Data Lifecycle Manager now supports the use of pre-snapshot and post-snapshot scripts embedded in AWS Systems Manager documents. You can use these scripts to ensure that Amazon Elastic Block Store (Amazon EBS) snapshots created by Data Lifecycle Manager are application-consistent. Scripts can pause and resume I/O operations, flush buffered data to EBS volumes, and so forth. As part of this launch we are also publishing a set of detailed blog posts that show you how to use this feature with self-managed relational databases and Windows Volume Shadow Copy Service (VSS).
Data Lifecycle Manager (DLM) Recap
As a quick recap, Data Lifecycle Manager helps you to automate the creation, retention, and deletion of Amazon EBS volume snapshots. Once you have completed the prerequisite steps such as onboarding your EC2 instance to AWS Systems Manager, setting up an IAM role for DLM, and tagging your SSM documents, you simply create a lifecycle policy and indicate (via tags) the applicable Amazon Elastic Compute Cloud (Amazon EC2) instances, set a retention model, and let DLM do the rest. The policies specify when they are to be run, what is to be backed up, and how long the snapshots must be retained. For a full walk-through of DLM, read my 2018 blog post, New – Lifecycle Management for Amazon EBS Snapshots.
Application Consistent Snapshots
EBS snapshots are crash-consistent, meaning that they represent the state of the associated EBS volume at the time that the snapshot was created. This is sufficient for many types of applications, including those that do not use snapshots to capture the state of an active relational database. To make a snapshot that is application-consistent, it is necessary to take pending transactions into account (either waiting for them to finish or causing them to fail), momentarily pause further write operations, take the snapshot, and then resume normal operations.
And that’s where today’s launch comes in. DLM now has the ability to tell the instance to prepare for an application-consistent backup. The pre-snapshot script can manage pending transactions, flush in-memory data to persistent storage, freeze the filesystem, or even bring the application or database to a stop. Then the post-snapshot script can bring the application or database back to life, reload in-memory caches from persistent storage, thaw the filesystem, and so forth.
In addition to the base-level support for custom scripts, you can also use this feature to automate the creation of VSS Backup snapshots:
Pre and Post Scripts
The new scripts apply to DLM policies for instances. Let’s assume that I have created a policy that references SSM documents with pre-snapshot and post-snapshot scripts, and that it applies to a single instance. Here’s what happens when the policy is run per its schedule:
 The pre-snapshot script is started from the SSM document.
The policy contains options that give you control over the actions that are taken (retry, continue, or skip) when either of the scripts times out or fails. The status is logged, Amazon CloudWatch metrics are published, Amazon EventBridge events are emitted, and the status is also encoded in tags that are automatically assigned to each snapshot.
The pre-snapshot and post-snapshot scripts can perform any of the actions that are allowed in a command document: running shell scripts, running PowerShell scripts, and so forth. The actions must complete within the timeout specified in the policy, with an allowable range of 10 seconds to 120 seconds.
Getting Started
You will need to have a detailed understanding of your application or database in order to build a robust pair of scripts. In addition to handling the “happy path” when all goes well, your scripts need to plan for several failure scenarios. For example, a pre-snapshot script should fork a background task that will serve as a failsafe in case the post-snapshot script does not work as expected. Each script must return a shell-level status code, as detailed here.
Once I have written and tested my scripts and packaged them as SSM documents, I open the Data Lifecycle Manager page in the EC2 Console, select EBS snapshot policy, and click Next step:

I target all of my instances that are tagged with a Mode of Production, and use the default IAM role (if you use a different role, it must enable access to SSM), leave the rest of the values as-is, and proceed:

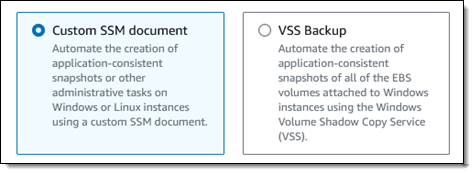
On the next page I scroll down to Pre and post scripts and expand the section. I click Enable pre and post scripts, choose Custom SSM document, and then select my SSM document from the menu. I also set the timeout and retry options, and choose to default to a crash-consistent backup if one of my scripts fails. I click Review policy, do one final check, and click Create policy on the following page:

My policy is created, and will take effect right away. After it has run at least once, I can inspect the CloudWatch metrics to check for starts, completions, and failures:

Additional Reading
Here are the first of the detailed blog posts that I promised you earlier:
We have more in the works for later this year and I will update the list above when they are published.
You can also read the documentation to learn more.
DLM Videos
While I’ve got your attention, I would like to share a couple of helpful videos with you:
This new feature is available now and you can start using it today!
— Jeff;
Post Syndicated from jake original https://lwn.net/Articles/950457/
There has been a lot of action for the Python C API in the last month or
so—much of it organizational in nature. As predicted in our late September article on using the “limited”
C API in the standard library, the core developer sprint in October was the
scene of some discussions about the API and the plans for it. Out
of those discussions have come two PEPs, one of which describes the API,
its purposes, strengths, and weaknesses, while the other would establish a C
API working group to coordinate and oversee the development and maintenance
of it.
Post Syndicated from Rushir Patel original https://aws.amazon.com/blogs/security/aws-kms-now-fips-140-2-level-3-what-does-this-mean-for-you/
AWS Key Management Service (AWS KMS) recently announced that its hardware security modules (HSMs) were given Federal Information Processing Standards (FIPS) 140-2 Security Level 3 certification from the U.S. National Institute of Standards and Technology (NIST). For organizations that rely on AWS cryptographic services, this higher security level validation has several benefits, including simpler set up and operation. In this post, we will share more details about the recent change in FIPS validation status for AWS KMS and explain the benefits to customers using AWS cryptographic services as a result of this change.
The FIPS 140 framework provides guidelines and requirements for cryptographic modules that protect sensitive information. FIPS 140 is the industry standard in the US and Canada and is recognized around the world as providing authoritative certification and validation for the way that cryptographic modules are designed, implemented, and tested against NIST cryptographic security guidelines.
Organizations follow FIPS 140 to help ensure that their cryptographic security is aligned with government standards. FIPS 140 validation is also required in certain fields such as manufacturing, healthcare, and finance and is included in several industry and regulatory compliance frameworks, such as the Payment Card Industry Data Security Standard (PCI DSS), the Federal Risk and Authorization Management Program (FedRAMP), and the Health Information Trust Alliance (HITRUST) framework. FIPS 140 validation is recognized in many jurisdictions around the world, so organizations that operate globally can use FIPS 140 certification internationally.
For more information on FIPS Security Levels and requirements, see FIPS Pub 140-2: Security Requirements for Cryptographic Modules.
Until recently, AWS KMS had been validated at Security Level 2 overall and at Security Level 3 in the following four sub-categories:
The latest certification from NIST means that AWS KMS is now validated at Security Level 3 overall in each sub-category. As a result, AWS assumes more of the shared responsibility model, which will benefit customers for certain use cases. Security Level 3 certification can assist organizations seeking compliance with several industry and regulatory standards. Even though FIPS 140 validation is not expressly required in a number of regulatory regimes, maintaining stronger, easier-to-use encryption can be a powerful tool for complying with FedRAMP, U.S. Department of Defense (DOD) Approved Product List (APL), HIPAA, PCI, the European Union’s General Data Protection Regulation (GDPR), and the ISO 27001 standard for security management best practices and comprehensive security controls.
Customers who previously needed to meet compliance requirements for FIPS 140-2 Level 3 on AWS were required to use AWS CloudHSM, a single-tenant HSM solution that provides dedicated HSMs instead of managed service HSMs. Now, customers who were using CloudHSM to help meet their compliance obligations for Level 3 validation can use AWS KMS by itself for key generation and usage. Compared to CloudHSM, AWS KMS is typically lower cost and easier to set up and operate as a managed service, and using AWS KMS shifts the responsibility for creating and controlling encryption keys and operating HSMs from the customer to AWS. This allows you to focus resources on your core business instead of on undifferentiated HSM infrastructure management tasks.
AWS KMS uses FIPS 140-2 Level 3 validated HSMs to help protect your keys when you request the service to create keys on your behalf or when you import them. The HSMs in AWS KMS are designed so that no one, not even AWS employees, can retrieve your plaintext keys. Your plaintext keys are never written to disk and are only used in volatile memory of the HSMs while performing your requested cryptographic operation.
The FIPS 140-2 Level 3 certified HSMs in AWS KMS are deployed in all AWS Regions, including the AWS GovCloud (US) Regions. The China (Beijing) and China (Ningxia) Regions do not support the FIPS 140-2 Cryptographic Module Validation Program. AWS KMS uses Office of the State Commercial Cryptography Administration (OSCCA) certified HSMs to protect KMS keys in China Regions. The certificate for the AWS KMS FIPS 140-2 Security Level 3 validation is available on the NIST Cryptographic Module Validation Program website.
As with many industry and regulatory frameworks, FIPS 140 is evolving. NIST approved and published a new updated version of the 140 standard, FIPS 140-3, which supersedes FIPS 140-2. The U.S. government has begun transitioning to the FIPS 140-3 cryptography standard, with NIST announcing that they will retire all FIPS 140-2 certificates on September 22, 2026. NIST recently validated AWS-LC under FIPS 140-3 and is currently in the process of evaluating AWS KMS and certain instance types of AWS CloudHSM under the FIPS 140-3 standard. To check the status of these evaluations, see the NIST Modules In Process List.
For more information on FIPS 140-3, see FIPS Pub 140-3: Security Requirements for Cryptographic Modules.
|
Legal Disclaimer This document is provided for the purposes of information only; it is not legal advice, and should not be relied on as legal advice. Customers are responsible for making their own independent assessment of the information in this document. This document: (a) is for informational purposes only, (b) represents current AWS product offerings and practices, which are subject to change without notice, and (c) does not create any commitments or assurances from AWS and its affiliates, suppliers or licensors. AWS products or services are provided “as is” without warranties, representations, or conditions of any kind, whether express or implied. The responsibilities and liabilities of AWS to its customers are controlled by AWS agreements, and this document is not part of, nor does it modify, any agreement between AWS and its customers. AWS encourages its customers to obtain appropriate advice on their implementation of privacy and data protection environments, and more generally, applicable laws and other obligations relevant to their business. AWS encourages its customers to obtain appropriate advice on their implementation of privacy and data protection environments, and more generally, applicable laws and other obligations relevant to their business. |
If you have feedback about this post, submit comments in the Comments section below. If you have questions about this post, contact AWS Support.
Want more AWS Security news? Follow us on Twitter.
Post Syndicated from Molly Clancy original https://www.backblaze.com/blog/anything-as-a-service-all-the-as-a-service-acronyms-you-didnt-know-you-needed/

Have you ever felt like you need a dictionary just to understand what tech-savvy folks are talking about? Well, you’re in luck, because we’re about to decode some of the most common jargon of the digital age, one acronym at a time. Welcome to the world of “as a Service” acronyms, where we take the humble alphabet and turn it into a digital buffet.
So, whether you’re SaaS-savvy or PaaS-puzzled, or just someone desperately searching for a little HaaS (Humor as a Service …yeah, we made that one up), you’ve come to the right place. Let’s take a big slurp from this alphabet soup of tech terms.
SaaS stands for software as a service, and it’s the founding member of the “as a service” nomenclature. (Though, very confusingly, there’s also Sales as a Service—it’s just not shortened to SaaS. Usually.)
Imagine your software as a pizza delivery service. You don’t need to buy all the ingredients, knead the dough, and bake it yourself. Instead, you simply order a slice, and it magically appears on your table (a.k.a. screen). SaaS products are like that, but instead of pizza they serve up everything from messaging to video conferencing to email marketing to …well, really you name it. Which brings us to…
XaaS stands for, variously, “everything” or “anything” as a service. No one is really sure about the term’s provenance, but it’s a fair guess to say it came into existence when, well, everything started to become a service, probably sometime around the mid-2010s. The thinking is: if it exists in the digital realm, you can probably get it “as a service.”
HaaS (Hardware as a Service): Instead of purchasing hardware yourself, like computers, servers, networking equipment, and other physical infrastructure components, with HaaS, you can lease or rent the equipment for a given period. It would be like renting a pizza kitchen to make your specialty pies specifically for your sister’s wedding or your grandma’s birthday.
IaaS (Infrastructure as a Service): Infrastructure as a service is kind of like hardware as a service, but it comes with some additional goodies thrown in. Instead of renting just the kitchen, you rent the whole restaurant, chair, tables, and servers (no pun intended) included. IaaS delivers virtualized computing resources, like virtual machines, storage (that’s us!), and networking, over the internet.
PaaS (Platform as a Service): Think of PaaS as a step even further than IaaS—you’re not just renting a pizza restaurant, you’re renting a test kitchen where you can develop your award-winning pie. PaaS provides developers the ability to build, manage, and deploy applications with services like development frameworks, databases, and infrastructure management. It’s the ultimate DIY platform for tech enthusiasts.
RaaS stands for Ransomware as a Service, and this is one “as a service” variant you don’t want to mess with. Basically, cybercriminals can purchase ransomware just as easily as you would purchase any app on the app store (it’s probably more complicated than that, but you get the general gist). This makes it easy for even the least savvy cybercriminal to get into the ransomware game. Not great.
BaaS (Backup as a Service): Backup as a Service is a cloud-based data protection solution that allows individuals and organizations to back up their data to a remote cloud. (Hey! That’s us too!) Instead of managing on-premises backup infrastructure, users can securely store their data off-site, often on highly redundant and geographically distributed servers.
DRaaS (Disaster Recovery as a Service): DRaaS stands for disaster recovery as a service, and it’s the antidote to RaaS. Of course, you need good backups to begin with, but adding DRaaS allows businesses to ensure specific recovery time objectives (RTOs, FYI) so they can get back up and running in the event they’re attacked by ransomware or there’s a natural disaster at your primary storage location. DRaaS solutions used to be made almost exclusively with the large enterprise in mind, but today, it’s possible to architect a DRaaS solution for your business affordably and easily.
DaaS stands for data as a service, and it’s your data’s personal chauffeur. It fetches the information you need and serves it up on a silver platter. DaaS offers data on-demand, making structured data accessible to users over the internet. It simplifies data sharing and access, often in real-time, without the need for complex data management.
CaaS (Containers as a Service): CaaS simplifies the deployment, scaling, and orchestration of containerized applications. It’s the tech version of a literal container ship. The individual containers “ship” individual pieces of software, and a CaaS tool helps carry all of those individual containers. Check out container management software Docker’s logo for a visualization:
BaaS (Backend as a Service): It wouldn’t be the first time an acronym has two meanings. BaaS, in this context, provides a backend infrastructure for mobile and web app developers, offering services like databases, user authentication, and APIs. Imagine your own team of digital butlers tending to the back end of your apps. They handle all the behind-the-scenes stuff, so you can focus on making your app shine.
FaaS (Function as a Service): FaaS is a serverless computing model where developers focus on writing and deploying individual functions or code snippets. These functions run in response to specific events, promoting scalability and efficiency in application development. It’s like having a team of tiny, code-savvy robots doing your bidding.
Now that you’ve sampled all of the flavors the vast “as a service” world has to offer, we hope you’ve gained a clearer understanding of these sometimes confounding terms. So whether you’re a business professional navigating the cloud or just curious about the tech world, you can wield these acronyms with confidence.
Did we miss any? I’m sure. Let us know in the comments.
The post Anything as a Service: All the “as a Service” Acronyms You Didn’t Know You Needed appeared first on Backblaze Blog | Cloud Storage & Cloud Backup.
Post Syndicated from Talks at Google original https://www.youtube.com/watch?v=XPhojsWL1Zc
Post Syndicated from Patrick Kennedy original https://www.servethehome.com/ventana-veyron-v2-risc-v-cpu-launched-for-the-dsa-future/
The Ventana Veyron V2 is a 192-core RISC-V server CPU designed for UCIe compute chiplets and domain-specific accelerator silicon integration
The post Ventana Veyron V2 RISC-V CPU Launched for the DSA Future appeared first on ServeTheHome.
Post Syndicated from Geographics original https://www.youtube.com/watch?v=GnvFGTQKddY
Post Syndicated from BeardedTinker original https://www.youtube.com/watch?v=GVz6p-jfdy4
Post Syndicated from Matt Granger original https://www.youtube.com/watch?v=8eYLF-7Pr6k
Post Syndicated from corbet original https://lwn.net/Articles/950538/
Alexander “Solar Designer” Peslyak, the longtime maintainer of the
oss-security and linux-distros mailing lists, has announced
that this work has gained a sponsor:
After 15+ years of being a 100% volunteer effort, Openwall’s
maintenance of oss-security and (linux-)distros is finally
sponsored by the OpenSSF, a project of the Linux Foundation. This
sponsorship does not provide the Linux Foundation with the ability
to set policies for community resources managed by Openwall. I am
grateful for the support, which will help ensure continued
operation of these resources on a new level while retaining
independence.
As part of this arrangement, Peslyak is now producing statistics on
vulnerability handling; the first
set for 2023 has been posted.