Post Syndicated from xkcd.com original https://xkcd.com/2969/

Post Syndicated from xkcd.com original https://xkcd.com/2969/
Post Syndicated from Brownell Combs original https://aws.amazon.com/blogs/security/spring-2024-soc-2-report-now-available-in-japanese-korean-and-spanish/
At Amazon Web Services (AWS), we continue to listen to our customers, regulators, and stakeholders to understand their needs regarding audit, assurance, certification, and attestation programs. We are pleased to announce that the AWS System and Organization Controls (SOC) 2 report is now available in Japanese, Korean, and Spanish. This translated report will help drive greater engagement and alignment with customer and regulatory requirements across Japan, Korea, Latin America, and Spain.
The Japanese, Korean, and Spanish language versions of the report do not contain the independent opinion issued by the auditors, but you can find this information in the English language version. Stakeholders should use the English version as a complement to the Japanese, Korean, or Spanish versions.
Going forward, the following reports in each quarter will be translated. Spring and Fall SOC 1 controls are included in the Spring and Fall SOC 2 reports, so this translation schedule will provide year-round coverage of the English versions.
Customers can download the translated Spring 2024 SOC 2 reports in Japanese, Korean, and Spanish through AWS Artifact, a self-service portal for on-demand access to AWS compliance reports. Sign in to AWS Artifact in the AWS Management Console, or learn more at Getting Started with AWS Artifact.
The Spring 2024 SOC 2 report includes a total of 177 services in scope. For up-to-date information, including when additional services are added, visit the AWS Services in Scope by Compliance Program webpage and choose SOC.
AWS strives to continuously bring services into scope of its compliance programs to help you meet your architectural and regulatory needs. Please reach out to your AWS account team if you have questions or feedback about SOC compliance.
To learn more about our compliance and security programs, see AWS Compliance Programs. As always, we value your feedback and questions; reach out to the AWS Compliance team through the Contact Us page.
If you have feedback about this post, submit comments in the Comments section below. If you have questions about this post, contact AWS Support.
当社はお客様、規制当局、利害関係者の声に継続的に耳を傾け、Amazon Web Services (AWS) における監査、保証、認定、認証プログラムに関するそれぞれのニーズを理解するよう努めています。この度、AWS System and Organization Controls (SOC) 2 レポートが、日本語、韓国語、スペイン語で利用可能になりました。この翻訳版のレポートは、日本、韓国、ラテンアメリカ、スペインのお客様および規制要件との連携と協力体制を強化するためのものです。
本レポートの日本語、韓国語、スペイン語版には監査人による独立した第三者の意見は含まれていませんが、英語版には含まれています。利害関係者は、日本語、韓国語、スペイン語版の補足として英語版を参照する必要があります。
今後、四半期ごとの以下のレポートで翻訳版が提供されます。SOC 1 統制は、第1四半期 および 第3四半期 SOC 2 レポートに含まれるため、英語版と合わせ、1 年間のレポートの翻訳版すべてがこのスケジュールで網羅されることになります。
第1四半期 2024 SOC 2 レポートの日本語、韓国語、スペイン語版は AWS Artifact (AWS のコンプライアンスレポートをオンデマンドで入手するためのセルフサービスポータル) を使用してダウンロードできます。AWS マネジメントコンソール内の AWS Artifact にサインインするか、AWS Artifact の開始方法ページで詳細をご覧ください。
第1四半期 2024 SOC 2 レポートの対象範囲には合計 177 のサービスが含まれます。その他のサービスが追加される時期など、最新の情報については、コンプライアンスプログラムによる対象範囲内の AWS のサービスで [SOC] を選択してご覧いただけます。
AWS では、アーキテクチャおよび規制に関するお客様のニーズを支援するため、コンプライアンスプログラムの対象範囲に継続的にサービスを追加するよう努めています。SOC コンプライアンスに関するご質問やご意見については、担当の AWS アカウントチームまでお問い合わせください。
コンプライアンスおよびセキュリティプログラムに関する詳細については、AWS コンプライアンスプログラムをご覧ください。当社ではお客様のご意見・ご質問を重視しています。お問い合わせページより AWS コンプライアンスチームにお問い合わせください。
Amazon은 고객, 규제 기관 및 이해 관계자의 의견을 지속적으로 경청하여 Amazon Web Services (AWS)의 감사, 보증, 인증 및 증명 프로그램과 관련된 요구 사항을 파악하고 있습니다. AWS System and Organization Controls(SOC) 2 보고서가 이제 한국어, 일본어, 스페인어로 제공됨을 알려 드립니다. 이 번역된 보고서는 일본, 한국, 중남미, 스페인의 고객 및 규제 요건을 준수하고 참여도를 높이는 데 도움이 될 것입니다.
보고서의 일본어, 한국어, 스페인어 버전에는 감사인의 독립적인 의견이 포함되어 있지 않지만, 영어 버전에서는 해당 정보를 확인할 수 있습니다. 이해관계자는 일본어, 한국어 또는 스페인어 버전을 보완하기 위해 영어 버전을 사용해야 합니다.
앞으로 분기마다 다음 보고서가 번역본으로 제공됩니다. SOC 1 통제 조치는 춘계 및 추계 SOC 2 보고서에 포함되어 있으므로, 이 일정은 영어 버전과 함께 모든 번역된 언어로 연중 내내 제공됩니다.
고객은 AWS 규정 준수 보고서를 필요할 때 이용할 수 있는 셀프 서비스 포털인 AWS Artifact를 통해 한국어, 일본어, 스페인어로 번역된 2024년 춘계 SOC 2 보고서를 다운로드할 수 있습니다. AWS Management Console의 AWS Artifact에 로그인하거나 Getting Started with AWS Artifact(AWS Artifact 시작하기)에서 자세한 내용을 알아보세요.
2024년 춘계 SOC 2 보고서에는 총 177개의 서비스가 포함됩니다. 추가 서비스가 추가되는 시기 등의 최신 정보는 AWS Services in Scope by Compliance Program(규정 준수 프로그램별 범위 내 AWS 서비스)에서 SOC를 선택하세요.
AWS는 고객이 아키텍처 및 규제 요구 사항을 충족할 수 있도록 지속적으로 서비스를 규정 준수 프로그램의 범위에 포함시키기 위해 노력하고 있습니다. SOC 규정 준수에 대한 질문이나 피드백이 있는 경우 AWS 계정 팀에 문의하시기 바랍니다.
규정 준수 및 보안 프로그램에 대한 자세한 내용은 AWS 규정 준수 프로그램을 참조하세요. 언제나 그렇듯이 AWS는 여러분의 피드백과 질문을 소중히 여깁니다. 문의하기 페이지를 통해 AWS 규정 준수 팀에 문의하시기 바랍니다.
Seguimos escuchando a nuestros clientes, reguladores y partes interesadas para comprender sus necesidades en relación con los programas de auditoría, garantía, certificación y acreditación en Amazon Web Services (AWS). Nos enorgullece anunciar que el informe de controles de sistema y organización (SOC) 2 de AWS se encuentra disponible en japonés, coreano y español. Estos informes traducidos ayudarán a impulsar un mayor compromiso y alineación con los requisitos normativos y de los clientes en Japón, Corea, Latinoamérica y España.
Estas versiones del informe en japonés, coreano y español no contienen la opinión independiente emitida por los auditores, pero se puede acceder a esta información en la versión en inglés del documento. Las partes interesadas deben usar la versión en inglés como complemento de las versiones en japonés, coreano y español.
De aquí en adelante, los siguientes informes trimestrales estarán traducidos. Dado que los controles SOC 1 se incluyen en los informes de primavera y otoño de SOC 2, esta programación brinda una cobertura anual para todos los idiomas traducidos cuando se la combina con las versiones en inglés.
Los clientes pueden descargar los informes de SOC 2 primavera 2024 traducidos al japonés, coreano y español a través de AWS Artifact, un portal de autoservicio para el acceso bajo demanda a los informes de cumplimiento de AWS. Inicie sesión en AWS Artifact mediante la Consola de administración de AWS u obtenga más información en Introducción a AWS Artifact.
El informe de SOC 2 primavera 2024 incluye un total de 177 servicios que se encuentran dentro del alcance. Para acceder a información actualizada, que incluye novedades sobre cuándo se agregan nuevos servicios, consulte los Servicios de AWS en el ámbito del programa de conformidad y seleccione SOC.
AWS se esfuerza de manera continua por añadir servicios dentro del alcance de sus programas de conformidad para ayudarlo a cumplir con sus necesidades de arquitectura y regulación. Si tiene alguna pregunta o sugerencia sobre la conformidad de los SOC, no dude en comunicarse con su equipo de cuenta de AWS.
Para obtener más información sobre los programas de conformidad y seguridad, consulte los Programas de conformidad de AWS. Como siempre, valoramos sus comentarios y preguntas; de modo que no dude en comunicarse con el equipo de conformidad de AWS a través de la página Contacte con nosotros.
Post Syndicated from Anusha Challa original https://aws.amazon.com/blogs/big-data/enrich-standardize-and-translate-streaming-data-in-amazon-redshift-with-generative-ai/
Amazon Redshift is a fast, scalable, secure, and fully managed cloud data warehouse that makes it straightforward and cost-effective to analyze your data. Tens of thousands of customers use Amazon Redshift to process exabytes of data per day and power analytics workloads such as BI, predictive analytics, and real-time streaming analytics.
Amazon Redshift ML is a feature of Amazon Redshift that enables you to build, train, and deploy machine learning (ML) models directly within the Redshift environment. Now, you can use pretrained publicly available large language models (LLMs) in Amazon SageMaker JumpStart as part of Redshift ML, allowing you to bring the power of LLMs to analytics. You can use pretrained publicly available LLMs from leading providers such as Meta, AI21 Labs, LightOn, Hugging Face, Amazon Alexa, and Cohere as part of your Redshift ML workflows. By integrating with LLMs, Redshift ML can support a wide variety of natural language processing (NLP) use cases on your analytical data, such as text summarization, sentiment analysis, named entity recognition, text generation, language translation, data standardization, data enrichment, and more. Through this feature, the power of generative artificial intelligence (AI) and LLMs is made available to you as simple SQL functions that you can apply on your datasets. The integration is designed to be simple to use and flexible to configure, allowing you to take advantage of the capabilities of advanced ML models within your Redshift data warehouse environment.

In this post, we demonstrate how Amazon Redshift can act as the data foundation for your generative AI use cases by enriching, standardizing, cleansing, and translating streaming data using natural language prompts and the power of generative AI. In today’s data-driven world, organizations often ingest real-time data streams from various sources, such as Internet of Things (IoT) devices, social media platforms, and transactional systems. However, this streaming data can be inconsistent, missing values, and be in non-standard formats, presenting significant challenges for downstream analysis and decision-making processes. By harnessing the power of generative AI, you can seamlessly enrich and standardize streaming data after ingesting it into Amazon Redshift, resulting in high-quality, consistent, and valuable insights. Generative AI models can derive new features from your data and enhance decision-making. This enriched and standardized data can then facilitate accurate real-time analysis, improved decision-making, and enhanced operational efficiency across various industries, including ecommerce, finance, healthcare, and manufacturing. For this use case, we use the Meta Llama-3-8B-Instruct LLM to demonstrate how to integrate it with Amazon Redshift to streamline the process of data enrichment, standardization, and cleansing.
The following diagram demonstrates how to use Redshift ML capabilities to integrate with LLMs to enrich, standardize, and cleanse streaming data. The process starts with raw streaming data coming from Amazon Kinesis Data Streams or Amazon Managed Streaming for Apache Kafka (Amazon MSK), which is materialized in Amazon Redshift as raw data. User-defined functions (UDFs) are then applied to the raw data, which invoke an LLM deployed on SageMaker JumpStart to enrich and standardize the data. The enhanced, cleansed data is then stored back in Amazon Redshift, ready for accurate real-time analysis, improved decision-making, and enhanced operational efficiency.

To deploy this solution, we complete the following steps:
The following code shows an example of raw order data from the stream:
The raw data has inconsistent formatting for email and phone numbers, the address is incomplete and doesn’t have a country, and comments are in various languages. To address the challenges with the raw data, we can implement a comprehensive data transformation process using Redshift ML integrated with an LLM in an ETL workflow. This approach can help standardize the data, cleanse it, and enrich it to meet the desired output format.
The following table shows an example of enriched address data.
| orderid | Address | Country (Identified using LLM) |
| 101 | 123 Elm Street, London | United Kingdom |
| 102 | 123 Main St, Chicago, 12345 | USA |
| 103 | Musterstrabe, Bayern 00000 | Germany |
| 104 | 000 main st, los angeles, 11111 | USA |
| 105 | 000 Jean Allemane, paris, 00000 | France |
The following table shows an example of standardized email and phone data.
| orderid |
cleansed_email (Using LLM) |
Phone | Standardized Phone (Using LLM) | |
| 101 | john. roe @example.com | john.roe@example.com | +44-1234567890 | +44 1234567890 |
| 102 | jane.s mith @example.com | jane.smith@example.com | (123)456-7890 | +1 1234567890 |
| 103 | max.muller @example.com | max.muller@example.com | 498912345678 | +49 8912345678 |
| 104 | julia @example.com | julia@example.com | (111) 4567890 | +1 1114567890 |
| 105 | roberto @example.com | roberto@example.com | +33 3 44 21 83 43 | +33 344218343 |
The following table shows an example of translated and enriched comment data.
| orderid | Comment |
english_comment (Translated using LLM) |
comment_language (Identified by LLM) |
| 101 | please cancel if items are out of stock | please cancel if items are out of st | English |
| 102 | Include a gift receipt | Include a gift receipt | English |
| 103 | Bitte nutzen Sie den Expressversand | Please use express shipping | German |
| 104 | Entregar a la puerta | Leave at door step | Spanish |
| 105 | veuillez ajouter un emballage cadeau | Please add a gift wrap | French |
Before you implement the steps in the walkthrough, make sure you have the following prerequisites:
customer_orders with on-demand capacity mode.customer_orders Use the source records in the example code as a template to generate the data. For more information, refer to Test Your Streaming Data Solution with the New Amazon Kinesis Data Generator.Complete the following steps to deploy your LLM:
Meta-Llama-3-8B-Instruct) and choose View model.


accept_eula = False to accept_eula = True.

It can take 30–45 minutes for the endpoint to be available.
In this step, you create a model using Redshift ML and the bring your own model (BYOM) capability. After the model is created, you can use the output function to make remote inference to the LLM model. To create a model in Amazon Redshift for the LLM endpoint you created previously, complete the following steps:
Use the following SQL to create materialized view for the data that is being streamed through the customer-orders stream. The materialized view is set to auto refresh and will be refreshed as data keeps arriving in the stream.
After you run these SQL statements, the materialized view mv_customer_orders will be created and continuously updated as new data arrives in the customer-orders Kinesis data stream.
Now you can call the Redshift ML LLM model function with prompts to transform the raw data and view the results. The input payload is a JSON with prompt and model parameters as attributes:
In the Invoke endpoint section of the SageMaker Studio notebook, you can find the model parameters and example payloads.
 k
The following SQL statement calls the Redshift ML LLM model function with prompts to standardize phone number and email data, identify the country from the address, and translate comments into English and identify the original comment’s language. The output of the SQL is stored in the table enhanced_raw_data_customer_orders.
Query the enhanced_raw_data_customer_orders table to view the data. The output of LLM is in JSON format with the result in the generated_text attribute. It’s stored in the SUPER data type and can be queried using PartiQL:
The following screenshot shows our output.

To avoid incurring future charges, delete the resources you created:


In this post, we showed you how to enrich, standardize, and translate streaming data in Amazon Redshift with generative AI and LLMs. Specifically, we demonstrated the integration of the Meta Llama 3 8B Instruct LLM, available through SageMaker JumpStart, with Redshift ML. Although we used the Meta Llama 3 model as an example, you can use a variety of other pre-trained LLM models available in SageMaker JumpStart as part of your Redshift ML workflows. This integration allows you to explore a wide range of NLP use cases, such as data enrichment, content summarization, knowledge graph development, and more. The ability to seamlessly integrate advanced LLMs into your Redshift environment significantly broadens the analytical capabilities of Redshift ML. This empowers data analysts and developers to incorporate ML into their data warehouse workflows with streamlined processes driven by familiar SQL commands.
We encourage you to explore the full potential of this integration and experiment with implementing various use cases that integrate the power of generative AI and LLMs with Amazon Redshift. The combination of the scalability and performance of Amazon Redshift, along with the advanced natural language processing capabilities of LLMs, can unlock new possibilities for data-driven insights and decision-making.
 Anusha Challa is a Senior Analytics Specialist Solutions Architect focused on Amazon Redshift. She has helped many customers build large-scale data warehouse solutions in the cloud and on premises. She is passionate about data analytics and data science.
Post Syndicated from Crosstalk Solutions original https://www.youtube.com/watch?v=osjlUCUCzvQ
Post Syndicated from Channy Yun original https://aws.amazon.com/blogs/aws/amazon-titan-image-generator-v2-is-now-available-in-amazon-bedrock/
Today, we are announcing the general availability of the Amazon Titan Image Generator v2 model with new capabilities in Amazon Bedrock. With Amazon Titan Image Generator v2, you can guide image creation using reference images, edit existing visuals, remove backgrounds, generate image variations, and securely customize the model to maintain brand style and subject consistency. This powerful tool streamlines workflows, boosts productivity, and brings creative visions to life.
Amazon Titan Image Generator v2 brings a number of new features in addition to all features of Amazon Titan Image Generator v1, including:
New features in Amazon Titan Image Generator v2
Before getting started, if you are new to using Amazon Titan models, go to the Amazon Bedrock console and choose Model access on the bottom left pane. To access the latest Amazon Titan models from Amazon, request access separately for Amazon Titan Image Generator G1 v2.

Here are details of the Amazon Titan Image Generator v2 in Amazon Bedrock:
Image conditioning
You can use the image conditioning feature to shape your creations with precision and intention. By providing a reference image (that is, a conditioning image), you can instruct the model to focus on specific visual characteristics, such as edges, object outlines, and structural elements, or segmentation maps that define distinct regions and objects within the reference image.
We support two types of image conditioning: Canny edge and segmentation.
Here are generation examples that use image conditioning.

To use the image conditioning feature, you can use Amazon Bedrock API, AWS SDK, or AWS Command Line Interface (AWS CLI) and choose CANNY_EDGE or SEGMENTATION for controlMode of textToImageParams with your reference image.
	"taskType": "TEXT_IMAGE",
	"textToImageParams": {
 		"text": "a cartoon deer in a fairy world.",
        "conditionImage": input_image, # Optional
        "controlMode": "CANNY_EDGE" # Optional: CANNY_EDGE | SEGMENTATION
        "controlStrength": 0.7 # Optional: weight given to the condition image. Default: 0.7
     }
The following a Python code example using AWS SDK for Python (Boto3) shows how to invoke Amazon Titan Image Generator v2 on Amazon Bedrock to use image conditioning.
import base64
import io
import json
import logging
import boto3
from PIL import Image
from botocore.exceptions import ClientError

def main():
    """
    Entrypoint for Amazon Titan Image Generator V2 example.
    """
    try:
        logging.basicConfig(level=logging.INFO,
                            format="%(levelname)s: %(message)s")

        model_id = 'amazon.titan-image-generator-v2:0'

        # Read image from file and encode it as base64 string.
        with open("/path/to/image", "rb") as image_file:
            input_image = base64.b64encode(image_file.read()).decode('utf8')

        body = json.dumps({
            "taskType": "TEXT_IMAGE",
            "textToImageParams": {
                "text": "a cartoon deer in a fairy world",
                "conditionImage": input_image,
                "controlMode": "CANNY_EDGE",
                "controlStrength": 0.7
            },
            "imageGenerationConfig": {
                "numberOfImages": 1,
                "height": 512,
                "width": 512,
                "cfgScale": 8.0
            }
        })

        image_bytes = generate_image(model_id=model_id,
                                     body=body)
        image = Image.open(io.BytesIO(image_bytes))
        image.show()

    except ClientError as err:
        message = err.response["Error"]["Message"]
        logger.error("A client error occurred: %s", message)
        print("A client error occured: " +
              format(message))
    except ImageError as err:
        logger.error(err.message)
        print(err.message)

    else:
        print(
            f"Finished generating image with Amazon Titan Image Generator V2 model {model_id}.")

def generate_image(model_id, body):
    """
    Generate an image using Amazon Titan Image Generator V2 model on demand.
    Args:
        model_id (str): The model ID to use.
        body (str) : The request body to use.
    Returns:
        image_bytes (bytes): The image generated by the model.
    """

    logger.info(
        "Generating image with Amazon Titan Image Generator V2 model %s", model_id)

    bedrock = boto3.client(service_name='bedrock-runtime')

    accept = "application/json"
    content_type = "application/json"

    response = bedrock.invoke_model(
        body=body, modelId=model_id, accept=accept, contentType=content_type
    )
    response_body = json.loads(response.get("body").read())

    base64_image = response_body.get("images")[0]
    base64_bytes = base64_image.encode('ascii')
    image_bytes = base64.b64decode(base64_bytes)

    finish_reason = response_body.get("error")

    if finish_reason is not None:
        raise ImageError(f"Image generation error. Error is {finish_reason}")

    logger.info(
        "Successfully generated image with Amazon Titan Image Generator V2 model %s", model_id)

    return image_bytes

class ImageError(Exception):
    "Custom exception for errors returned by Amazon Titan Image Generator V2"

    def __init__(self, message):
        self.message = message

logger = logging.getLogger(__name__)
logging.basicConfig(level=logging.INFO)

if __name__ == "__main__":
    main()
Color conditioning
Most designers want to generate images adhering to color branding guidelines so they seek control over color palette in the generated images.
With the Amazon Titan Image Generator v2, you can generate color-conditioned images based on a color palette—a list of hex colors provided as part of the inputs adhering to color branding guidelines. You can also provide a reference image as input (optional) to generate an image with provided hex colors while inheriting style from the reference image.
In this example, the prompt describes:
a jar of salad dressing in a rustic kitchen surrounded by fresh vegetables with studio lighting
The generated image reflects both the content of the text prompt and the specified color scheme to align with the brand’s color guidelines.

To use color conditioning feature, you can set taskType to COLOR_GUIDED_GENERATION with your prompt and hex codes.
       "taskType": "COLOR_GUIDED_GENERATION",
       "colorGuidedGenerationParam": {
             "text": "a jar of salad dressing in a rustic kitchen surrounded by fresh vegetables with studio lighting",
	         "colors": ['#ff8080', '#ffb280', '#ffe680', '#e5ff80'], # Optional: list of color hex codes
             "referenceImage": input_image, #Optional
        }
Background removal
Whether you’re looking to composite an image onto a solid color backdrop or layer it over another scene, the ability to cleanly and accurately remove the background is an essential tool in the creative workflow. You can instantly remove the background from your images with a single step. Amazon Titan Image Generator v2 can intelligently detect and segment multiple foreground objects, ensuring that even complex scenes with overlapping elements are cleanly isolated.
The example shows an image of an iguana sitting on a tree in a forest. The model was able to identify the iguana as the main object and remove the forest background, replacing it with a transparent background. This lets the iguana stand out clearly without the distracting forest around it.

To use background removal feature, you can set taskType to BACKGROUND_REMOVAL with your input image.
    "taskType": "BACKGROUND_REMOVAL",
    "backgroundRemovalParams": {
 		"image": input_image,
    }
Subject consistency with fine-tuning
You can now seamlessly incorporate specific subjects into visually captivating scenes. Whether it’s a brand’s product, a company logo, or a beloved family pet, you can fine-tune the Amazon Titan model using reference images to learn the unique characteristics of the chosen subject.
Once the model is fine-tuned, you can simply provide a text prompt, and the Amazon Titan Generator will generate images that maintain a consistent depiction of the subject, placing it naturally within diverse, imaginative contexts. This opens up a world of possibilities for marketing, advertising, and visual storytelling.
For example, you could use an image with the caption Ron the dog during fine-tuning, give the prompt as Ron the dog wearing a superhero cape during inference with the fine-tuned model, and get a unique image in response.

To learn, visit model inference parameters and code examples for Amazon Titan Image Generator in the AWS documentation.
Now available
The Amazon Titan Generator v2 model is available today in Amazon Bedrock in the US East (N. Virginia) and US West (Oregon) Regions. Check the full Region list for future updates. To learn more, check out the Amazon Titan product page and the Amazon Bedrock pricing page.
Give Amazon Titan Image Generator v2 a try in Amazon Bedrock today, and send feedback to AWS re:Post for Amazon Bedrock or through your usual AWS Support contacts.
Visit our community.aws site to find deep-dive technical content and to discover how our Builder communities are using Amazon Bedrock in their solutions.
— Channy
Post Syndicated from Cliff Robinson original https://www.servethehome.com/kioxia-optical-interface-ssd-demoed-at-fms-2024/
Kioxia has new optical interconnect SSD that uses optics rather than electrical wires to connect SSDs over greater distances
The post Kioxia Optical Interface SSD Demoed at FMS 2024 appeared first on ServeTheHome.
Post Syndicated from Explosm.net original https://explosm.net/comics/line-up-2
New Cyanide and Happiness Comic
Post Syndicated from Cliff Robinson original https://www.servethehome.com/intel-18a-booted-and-clearwater-forest-up/
Both Panther Lake on the consumer side and Clearwater Forest on the server side are booting on Intel 18A in a big step for Intel Foundry
The post Clearwater Forest and Panther Lake Booted on Intel 18A appeared first on ServeTheHome.
Post Syndicated from Ryan Smith original https://blog.rapid7.com/2024/08/06/details-matter-pentesting-a-single-device-to-guarantee-security/

Rapid7’s penetration testing services regularly assess internal networks of various sizes. For this particular engagement, however, Rapid7 was tasked with performing a penetration test of just one device on an internal network.
The device was being piloted for future deployment and the customer had specific concerns around the security posture of the device. Specifically, the customer tasked Rapid7 with three focus areas: First, ensure the device could not reach any hosts on a separate, segmented network. Second, ensure the standard user provided to Rapid7 could not elevate privileges and gain root access to the device. Third, ensure no unauthorized tools could be downloaded onto the device.
Beginning with segmentation validation, Rapid7 logged on to the device with the provided credentials including the dynamic proxy option. This allowed Rapid7 to run port scans from the deployed Penetration Testing Kit (PTK), but with the traffic going through the device before attempting to reach the segmented network. Rapid7 was only able to interact with hosts on the other network over ICMP and could not log in to or otherwise interact with the hosts. The current configuration of the device appeared to prevent the device from interacting with other hosts, the customer’s first concern.
Moving to privilege escalation, Rapid7 enumerated the device with the provided credentials. One step during this enumeration was to check which commands, if any, the standard user could run as root using the Linux command sudo. Among the available commands were a handful of Bash scripts. Rapid7 reviewed the permissions set on those Bash files and found an installation script was configured to only allow the low privilege user to execute the script and did not allow for reading or writing of the script. However, Rapid7 also observed this restricted file was owned by the low privilege user, which allowed modifying the permissions on the script. Rapid7 created a backup of the script and then modified the script to launch a new Bash shell. Running this modified script with sudo provided Rapid7 with root access to the device.
Enumeration of the device with root access revealed a strong firewall configuration in place which prevented the device from communicating with the segmented network or with the external web sites. Rapid7 disabled the firewall on the device and could connect to hosts on the other network as well as install additional, unauthorized tools.
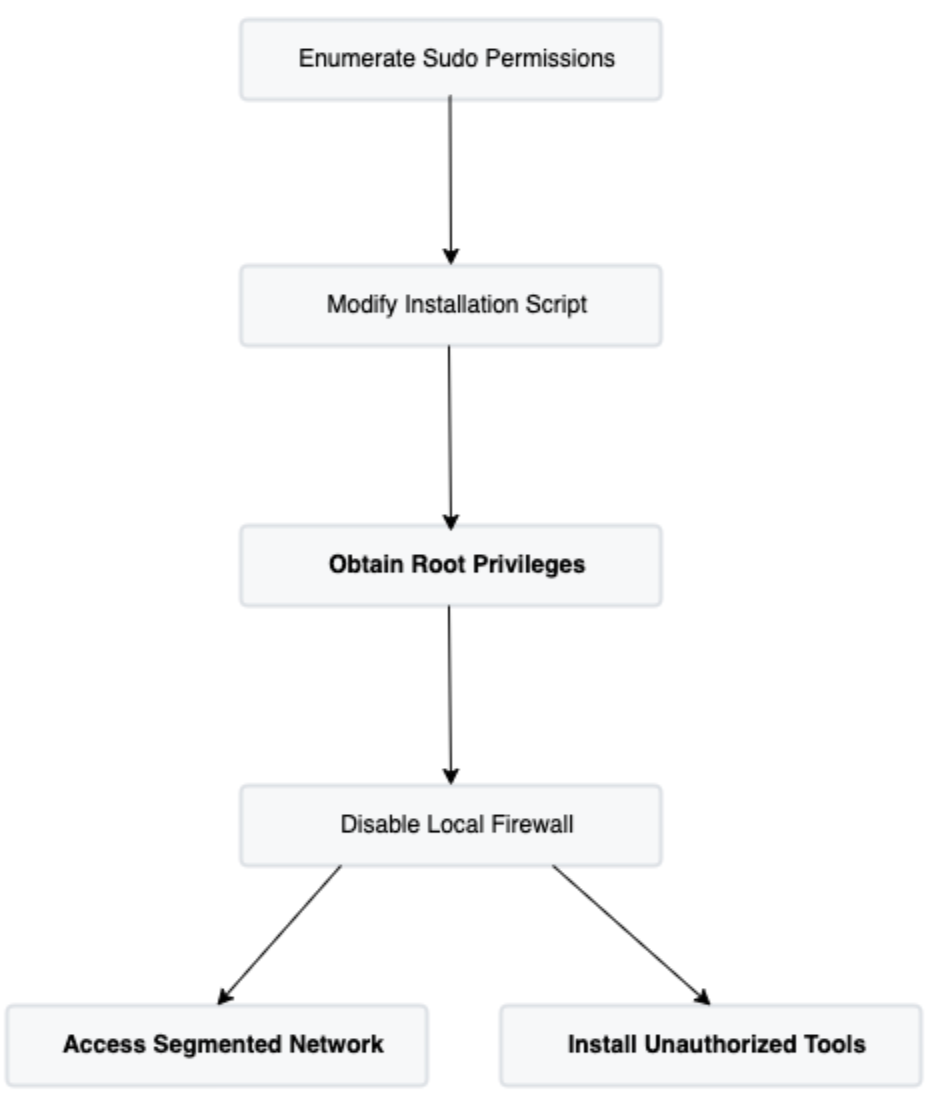
This engagement highlighted the importance of attention to detail when hardening systems. The file ownership misconfiguration on the script enabled Rapid7 to achieve all three of the customer’s concerns around the system’s security posture. The penetration test report provided by Rapid7 to the customer demonstrated the impact of the misconfiguration and outlined recommended remediation steps to secure the device.
Post Syndicated from Cliff Robinson original https://www.servethehome.com/solidigm-d7-ps1010-and-d7-ps1030-pcie-gen5-nvme-ssds-launched/
The new Solidigm D7-PS1010 and D7-PS1030 are the company’s newest PCIe Gen5 NVMe SSDs for performance storage clusters
The post Solidigm D7-PS1010 and D7-PS1030 PCIe Gen5 NVMe SSDs Launched appeared first on ServeTheHome.
Post Syndicated from Louis Hourcade original https://aws.amazon.com/blogs/big-data/how-amazon-gtts-runs-large-scale-etl-jobs-on-aws-using-amazon-mwaa/
The Amazon Global Transportation Technology Services (GTTS) team owns a set of products called INSITE (Insights Into Transportation Everywhere). These products are user-facing applications that solve specific business problems across different transportation domains: network topology management, capacity management, and network monitoring. As of this writing, GTTS serves around 10,000 customers globally on a monthly basis, managing the outbound transportation network.
INSITE applications are in general data intensive. They ingest and transform large volumes of data in different formats and processing patterns (such as batch and near real time) from various sources internal and external to Amazon. Datasets are often shared between applications both within domains and across domains, and are consumed in complex data pipelines that run under tight SLAs. To enable and meet these requirements, GTTS built its own data platform.
A critical component of the data platform is the data pipeline orchestrator. GTTS built its own orchestrator named Langley in 2018, and used it to schedule and monitor extract, transform, and load (ETL) jobs on a variety of compute platforms, such as Amazon EMR, Amazon Redshift, Amazon Relational Database Service (Amazon RDS).
As the Langley user base grew, GTTS engineers faced a couple of challenges on key dimensions, such as maintainability, scalability, multi-tenancy, observability, and interoperability.
Amazon GTTS partnered with AWS Professional Services to modernize their orchestration platform, relying as much as possible on managed services with auto scaling capabilities. After analyzing candidate solutions, the team decided to build a target solution relying on Amazon Managed Workflows for Apache Airflow (Amazon MWAA). This post elaborates on the drivers of the migration and its achieved benefits.
Amazon GTTS works with diverse and distributed data stores, storing petabytes of data. Data engineers need a tool to define ETL jobs which run on various compute environments, as illustrated in the following diagram.

GTTS built Langley as their custom orchestrator in 2018, and have been operating it ever since. At a high level, the core of Langley’s architecture is based on a set of Amazon Simple Queue Service (Amazon SQS) queues and AWS Lambda functions, and a dedicated RDS database to store ETL job data and metadata. It also uses AWS Data Pipeline to run SQL-based workloads, Amazon Simple Storage Service (Amazon S3) to store configuration files, and Amazon CloudWatch for alarming on failures. Every day, Langley handles the lifecycle of more than 17,000 ETL jobs in Europe and 5,000 ETL jobs in North America.
The following diagram illustrates the Langley architecture.

Langley started as a simple solution to a team-internal problem, but its growth over the years surfaced key issues:
GTTS partnered with AWS to design and implement a solution to overcome those challenges. AWS used the following evaluation matrix to build a durable solution:
| Maintainability | The level of effort required to maintain the orchestrating system in a functional state, encompassing updates, patches, bug fixes, and routine checks for optimal performance. |
| Costs | The overall expenditure associated with the orchestrator, including infrastructure costs, licensing fees, personnel expenses, and other relevant costs. This criterion particularly assesses the system’s ability to effectively control and reduce costs. |
| Scheduling | The capabilities related to running and scheduling jobs, including the ability to resume an ETL job from a failed step. |
| User experience | The overall satisfaction and usability of a system from the end-users’ perspective, considering factors such as responsiveness, accessibility, interoperability, and ease of use. |
| Security | Mechanisms in place to safeguard data and applications from unauthorized access at all times. |
| Monitoring and alerting | The continuous observation and analysis of system components and performance metrics to detect and address issues, optimize resource usage, and provide overall health and reliability. |
| Scalability | The orchestrator’s capacity to efficiently adapt its resources to handle increased workload or demand, providing sustained performance. |
Among the explored solutions, Amazon MWAA was finally determined as the best overall performer across this matrix.
The next section is a dive deep into the rationales that led GTTS and AWS Professional Services to choose Amazon MWAA as the best performer.
Amazon GTTS and AWS Professional Services worked together to release a Minimum Viable Product (MVP) of the solution described earlier, which showcases the benefits on the agreed decision criteria.
With their legacy system, Amazon GTTS had to manage the orchestrator database, web servers, activity queue, dispatch functions, and worker nodes.
Amazon MWAA eliminates the need for underlying infrastructure management. It takes care of provisioning and maintenance of the Apache Airflow web server, scheduler, worker nodes, and relational database, allowing GTTS teams to focus on building their ETL jobs.
Amazon MWAA offers one-click updates of the infrastructure for minor versions, like moving from Airflow version x.4.z to x.5.z. During the upgrade process, Amazon MWAA captures a snapshot of your environment metadata; upgrades the workers, schedulers, and web server to the new Airflow version; and finally restores the metadata database using the snapshot, backing it with an automated rollback mechanism.
Amazon MWAA contributes to a more cost-effective solution by automatically scaling workers depending on the workload. This dynamic scaling in and out avoids over-provisioning and allows the organization to pay for the compute they actually use, without the risk of downtime during activity spikes. Because this is an AWS-managed solution, it also reduced GTTS’s Total Cost of Ownership (TCO) by freeing up time from engineers that were managing the legacy system.
Amazon MWAA supports all the trigger mechanisms that the Amazon orchestrator needed:
In this section, we discuss three aspects of the user experience: the web UI, the interoperability, and the programming interface.
Web UI
Amazon MWAA comes with a managed web server that hosts the Airflow UI. As a result, and without any maintenance needed, you can use it to quickly run DAGs, check run history, visualize dependencies between DAGs, troubleshoot with a direct access to task logs, manage variables and database connections, and define granular permissions. The following screenshot shows an example of the UI.

Interoperability
One of the most important features evaluated was the ability for the new orchestrator to effortlessly integrate with GTTS multiple data storage services, compute components, and monitoring services.
Amazon MWAA comes with a wide variety of providers preinstalled, such as apache-airflow-providers-amazon, apache-airflow-providers-postgres, and apache-airflow-providers-common-sql. This allowed GTTS to connect with those services using multiple connection methodologies, including AWS IAM Identity Center or AWS Secrets Manager password-based authentications, without having to write a single custom Airflow operator.
Amazon MWAA also makes it straightforward to upgrade providers version and install new ones. By providing a requirements.txt file, GTTS was able to change the major version of apache-airflow-providers-amazon and install the apache-airflow-providers-mysql provider.
Programming interface
Airflow is an orchestrator with a low barrier to entry, especially for those familiar with the Python programming language. Its workflow management is defined in Python scripts, with a well-documented set of native operators and external providers, making it straightforward for Python developers to get started with Airflow and create complex data pipelines.
The following are two key Airflow features:
The following screenshot shows an example of these features.

The new Amazon MWAA-based architecture improves GTTS’s posture by introducing granular access control. Amazon MWAA integrates with AWS services such as AWS Key Management Service (AWS KMS), Secrets Manager, and IAM Identity Center to keep data safely encrypted at all times, both at rest and in transit using TLS-based communications. Airflow also includes a role-based access control (RBAC) model to determine what users can do on the platform and enforce the principle of least privilege. Amazon MWAA also natively integrates with AWS CloudTrail for auditing purposes.
The Airflow RBAC model enables administrators to define roles with specific privileges to access Airflow system settings and DAGs themselves. This granular access control reduces the risk of data breaches and malicious activities by limiting access to critical DAGs and sensitive Airflow environment variables. Airflow includes five default roles with different sets of permissions (as shown in the following screenshot), but it is possible to create new roles depending on your security requirements.

GTTS used the Airflow RBAC model to restrict permissions of certain teams and consumers of the application. They also used priority weights and Airflow pools to prioritize tasks and control run concurrency. However, if you want to run a multi-tenant orchestration platform, it’s recommended to use a separate environment for each team. You can assume that everything accessible by the Amazon MWAA role is also accessible to users who can write DAGs to the environment.
To ease authentication in Amazon MWAA, GTTS federated their identity provider (IdP) through Amazon Cognito and SAML. With this integration, users log in to the Amazon MWAA UI using the same identity as in other internal systems, which removes the need for new credentials. The user’s group membership is retrieved from the IdP through Amazon Cognito, and a Lambda function redirects the user to Amazon MWAA with the appropriate Airflow role. This process is illustrated in the following architecture, and is abstracted from the user and attached to a public Application Load Balancer that redirects at the end of the process to an Amazon MWAA private cluster, making the authentication workflow seamless and secure. Refer to Accessing a private Amazon MWAA environment using federated identities to implement it using your own IdP.

Amazon MWAA integrates with CloudWatch, which manages all infrastructure logs for you. When creating an Amazon MWAA environment, you can configure what level of logs should be saved. GTTS enabled CloudWatch logging for all of the five types of components: Airflow task logs, Airflow web server logs, Airflow scheduler logs, Airflow worker logs, and Airflow DAG processing logs.

These logs are all accessible in CloudWatch for continuous monitoring, but Amazon MWAA users can also access task logs directly from the Airflow UI by looking at the DAG run history. The following screenshot shows an example of task-level logs in Airflow 2.5.1.

You can also build CloudWatch monitoring dashboards to keep an eye on the state of your environment and alert administrators when required. Amazon MWAA natively provides Airflow environment metrics and Amazon MWAA infrastructure-related metrics.
Each Amazon MWAA environment includes the schedulers, web server, and worker nodes. Scheduler nodes are responsible for the overall orchestration and parsing of DAG files. These tasks happen in worker nodes that Amazon MWAA auto scales up and down according to system load. When creating a new Amazon MWAA environment, you need to specify the type of worker nodes, the minimum and maximum number of worker nodes, and the scheduler count, as shown in the following screenshot.

There are notably two ways GTTS controlled how Amazon MWAA scales to handle the load:

With Amazon MWAA, GTTS can therefore run up to 4,000 concurrent tasks in a single Amazon MWAA environment (50 worker nodes x 80 tasks per node with mw1.2xlarge). This remains an order of magnitude for the load that can fit into the workers vCPUs and RAM, but it is possible to edit the default configuration to add even more tasks per worker. For more information regarding Amazon MWAA automatic scaling, see Configuring Amazon MWAA automatic scaling.
After selecting Amazon MWAA as the core service for their orchestrating system, Amazon GTTS and AWS worked together to develop an end-to-end data platform with automation capabilities, access management, monitoring, and integration with downstream systems. The following diagram illustrates the solution architecture.

The following are notable components of the architecture:
PythonOperator or creating dedicated custom operators.Amazon GTTS partnered with AWS Professional Services to overcome the challenges faced by their legacy custom orchestrator against various dimensions such as maintainability, cost efficiency, security, scalability, and observability.
The new Amazon MWAA-based architecture offers significant improvements in the context of the AWS Well-Architected Framework compared to their former system. In terms of operational excellence, the new orchestration platform is built with evolutivity in mind and enables the GTTS team to use the most adapted ETL service to run their jobs. Regarding performance efficiency, GTTS observed up to 70% improvement in end-to-end runtime on their jobs running in Amazon MWAA. In terms of security, the new solution implements best practices such as the deployment in private subnets, authentication of users through Amazon internal federation systems, and data encryption at rest and in transit. Reliability is achieved with Multi-AZ failover and built-in auto scaling to meet the workload demand at all times. Finally, cost is reduced because Amazon MWAA is an AWS-managed service, which decreases the human effort from GTTS to maintain the orchestration platform.
Amazon GTTS is now bringing the MVP into production, where it is planned to handle petabytes of data and host more than 2,000 jobs migrated from the legacy system. Additionally, the migration to Amazon MWAA has empowered GTTS to enhance its operational scalability, paving the way for the integration of new jobs and further expansion with greater efficiency and confidence.
To learn more, refer to the following resources:
Béntor Bautista is a Senior Data Engineer at Amazon GTTS
Louis Hourcade is a Solutions Architect at AWS
Raphael Ducay is a Senior DataOps Architect at AWS
Konstantin Zarudaev is a DevOps Consultant at AWS
Dorra Elboukari is a DevOps Architect at AWS
Marcin Zapal is an Engagement Manager at AWS
Grigorios Pikoulas is a Strategic Program Lead at AWS
Antonio Cennamo is a Senior Customer Practice Manager at AWS
Post Syndicated from BeardedTinker original https://www.youtube.com/watch?v=U2pj_MF7688
Post Syndicated from Raj Ramasubbu original https://aws.amazon.com/blogs/big-data/build-a-real-time-analytics-solution-with-apache-pinot-on-aws/
Online Analytical Processing (OLAP) is crucial in modern data-driven apps, acting as an abstraction layer connecting raw data to users for efficient analysis. It organizes data into user-friendly structures, aligning with shared business definitions, ensuring users can analyze data with ease despite changes. OLAP combines data from various data sources and aggregates and groups them as business terms and KPIs. In essence, it’s the foundation for user-centric data analysis in modern apps, because it’s the layer that translates technical assets into business-friendly terms that enable users to extract actionable insights from data.
Traditionally, OLAP datastores were designed for batch processing to serve internal business reports. The scope of data analytics has grown, and more user personas are now seeking to extract insights themselves. These users often prefer to have direct access to the data and the ability to analyze it independently, without relying solely on scheduled updates or reports provided at fixed intervals. This has led to the emergence of real-time OLAP solutions, which are particularly relevant in the following use cases:
Building these capabilities in real time means that real-time OLAP solutions have stricter SLAs and larger scalability requirements than traditional OLAP datastores. Accordingly, a purpose-built solution is needed to address these new requirements.
Apache Pinot is an open source real-time distributed OLAP datastore designed to meet these requirements, including low latency (tens of milliseconds), high concurrency (hundreds of thousands of queries per second), near real-time data freshness, and handling petabyte-scale data volumes. It ingests data from both streaming and batch sources and organizes it into logical tables distributed across multiple nodes in a Pinot cluster, ensuring scalability.
Pinot provides functionality similar to other modern big data frameworks, supporting SQL queries, upserts, complex joins, and various indexing options.
Pinot has been tested at very large scale in large enterprises, serving over 70 LinkedIn data products, handling over 120,000 Queries Per Second (QPS), ingesting over 1.5 million events per second, and analyzing over 10,000 business metrics across over 50,000 dimensions. A notable use case is the user-facing Uber Eats Restaurant Manager dashboard, serving over 500,000 users with instant insights into restaurant performance.
Pinot clusters are designed for high availability, horizontal scalability, and live configuration changes without impacting performance. To that end, Pinot is architected as a distributed datastore to enable all of the above requirements, and utilizes similar architectural constructs as Apache Kafka and Apache Hadoop in its design.
In this, we will provide a step-by-step guide showing you how you can build a real-time OLAP datastore on Amazon Web Services (AWS) using Apache Pinot on Amazon Elastic Compute Cloud (Amazon EC2) and do near real-time visualization using Tableau. You can use Apache Pinot for batch processing use cases as well but, in this post, we will focus on a near real-time analytics use case.
You can use Amazon Managed Service for Apache Flink service. The objective in the preceding figure is to ingest streaming data into Pinot, where it can perform.

The objective in the preceding figure is to ingest streaming data into Pinot, where it can perform aggregations, update current data models, and serve OLAP queries in real time to consuming users and applications, which in this case is a user-facing Tableau dashboard.
The data flow as follows:
To ensure high availability, the solution deploys application load balancers for the brokers and servers. We can access the Apache Pinot UI using the controller load balancer and use it to run queries and monitor the Apache Pinot cluster
Let’s start to deploy this solution and perform near real-time visualizations using Apache Pinot and Tableau.
Before you get started, make sure you have the following prerequisites:
C:\Program Files\Tableau\Drivers folder when using Tableau Desktop on Windows. For other operating systems, see the instructions.The AWS CDK is an open source project that you can use to define your cloud infrastructure using familiar programming languages. It uses high-level constructs to represent AWS components to simplify the build process. In this post, we use TypeScript and Python to define the cloud infrastructure.
cdk bootstrap aws://<account-id>/<aws-region>.In the following example, I’m running a bootstrap command for a fictitious AWS account with ID 123456789000 and us-east-1 N.Virginia Region:

package.json by running the following commands from the root of the cloned repository.
Deployment of the AWS CDK stack takes approximately 10–12 minutes. You should see a stack deployment message that will display the creation of AWS objects, followed by the deployment time, the Stack ARN, and the total time, similar to the following screenshot:


Now that we have provisioned all AWS Cloud resources, we will stream some sample web transactions to a Kinesis data stream and visualize the data in near real time from Tableau Desktop.
You can follow these steps to open the Tableau workbook to visualize

You should be able to see the web transactions data in Tableau Desktop as shown in the following screenshot.

To clean up the AWS resources you created:
ApachePinotSolutionStack/bastionHostApachePinotSolutionStack/zookeeperNode1ApachePinotSolutionStack/zookeeperNode2ApachePinotSolutionStack/zookeeperNode3y when prompted.
The example in this post uses minimal resources to demonstrate functionality. Taking this to production requires a higher level of scalability. The solution provides autoscaling policies for independently scaling brokers and servers in and out, allowing the Apache Pinot custer to scale based on CPU requirements.
When autoscaling is initiated, the solution will invoke an AWS Lambda Function, to run the logic needed to add or remove brokers and servers in Apache Pinot.
In Apache Pinot, tables are tagged with an identifier that’s used for routing queries to the appropriate servers. When creating a table, you can specify a table name and optionally tag it. This is useful when you want to route queries to specific servers or build a multi-tenant Apache Pinot cluster. However, tagging adds additional considerations when removing brokers or servers. You need to make sure that neither have any active tables or tags associated with them. And when adding new components, rebalance the segments, so you can use the new brokers and servers.
Therefore, when scaling is needed in the solution, the autoscaling policy will invoke a Lambda function that either rebalances the segments of the tables when you add a new broker or server, or removes any tags associated with the broker or server you remove from the cluster.
Just like you would commonly use a distributed NoSQL datastore to serve a mobile application that requires low latency, high concurrency, high data freshness, high data volume, and high throughput, a distributed real-time OLAP datastore like Apache Pinot is purpose-built for achieving the same requirements for the analytics workload within your user-facing application. In this post, we walked you through how to deploy a scalable Apache Pinot-based near real-time user facing analytics solution on AWS. If you have any questions or suggestions, write to us in the comments section
 Raj Ramasubbu is a Senior Analytics Specialist Solutions Architect focused on big data and analytics and AI/ML with Amazon Web Services. He helps customers architect and build highly scalable, performant, and secure cloud-based solutions on AWS. Raj provided technical expertise and leadership in building data engineering, big data analytics, business intelligence, and data science solutions for over 18 years prior to joining AWS. He helped customers in various industry verticals like healthcare, medical devices, life science, retail, asset management, car insurance, residential REIT, agriculture, title insurance, supply chain, document management, and real estate.
 Francisco Morillo is a Streaming Solutions Architect at AWS. Francisco works with AWS customers, helping them design real-time analytics architectures using AWS services, supporting Amazon Managed Streaming for Apache Kafka (Amazon MSK) and Amazon Managed Service for Apache Flink.
 Ismail Makhlouf is a Senior Specialist Solutions Architect for Data Analytics at AWS. Ismail focuses on architecting solutions for organizations across their end-to-end data analytics estate, including batch and real-time streaming, big data, data warehousing, and data lake workloads. He primarily partners with airlines, manufacturers, and retail organizations to support them to achieve their business objectives with well-architected data platforms.
Post Syndicated from Macey Neff original https://aws.amazon.com/blogs/compute/migrating-your-on-premises-workloads-to-aws-outposts-rack/
This post is written by Craig Warburton, Senior Solutions Architect, Hybrid. Sedji Gaouaou, Senior Solutions Architect, Hybrid. Brian Daugherty, Principal Solutions Architect, Hybrid.
Migrating workloads to AWS Outposts rack offers you the opportunity to gain the benefits of cloud computing while keeping your data and applications on premises.
For organizations with strict data residency requirements, by deploying AWS infrastructure and services on premises, you can keep sensitive data and mission-critical applications within your own data centers or facilities, helping ensure compliance with data sovereignty laws and regulatory frameworks.
On the other hand, if your organization does not have stringent data residency requirements, you may opt for a hybrid approach, using both Outposts rack and the AWS Regions. With this flexibility, you can process and store data in the most appropriate location based on factors such as latency, cost optimization, and application requirements.
In this post, we cover the best options to migrate your workloads to Outposts rack, taking into account your specific data residency requirements. We explore strategies, tools, and best practices to enable a successful migration tailored to your organization’s needs.
AWS has a number of services to help you migrate and rehost workloads, including AWS Migration Hub, AWS Application Migration Service, AWS Elastic Disaster Recovery. Alternatively, you can use backup and recovery solutions provided by AWS partners.
At AWS, we use the 7 Rs framework to help organizations evaluate and choose the appropriate migration strategy for moving applications and workloads to the AWS Cloud. The 7 Rs represent:
This post focuses on rehosting and the services available to help rehost on-premises applications to Outposts rack.
Before getting started with any migration, AWS recommends a three-phase approach to migrating workloads to the cloud (AWS Region or Outposts rack). The three phases are assess, mobilize, and migrate and modernize.

Figure 1: Diagram showing the three migration phases of assess, mobilize, and migrate and modernize
This post describes the steps that you can take in the migrate and modernize phase. However, the assess and mobilize phases are also critical to allow you to understand what applications will be migrated, the dependencies between them, and the planning associated with how and when migration will occur.
AWS Migration Hub is a cloud migration service provided by AWS that helps organizations accelerate and simplify the process of migrating workloads to AWS. It provides a unified location to track the progress of application migrations across multiple AWS and partner services. This service can be used to help work through all three phases of migration, and we recommend that you start with this service and complete each phase accordingly. The assess phase should help you identify any applications that require consideration when migrating (including any data residency requirements), and the mobilize phase defines the approach to take.
After deploying an Outpost rack to your desired on-premises location, you can perform migrations of on-premises systems and virtual machines using either Application Migration Service or third-party backup and recovery services. Both scenarios are described in the following sections.
Application Migration Service is able to lift and shift a large number of physical or virtual servers without compatibility issues, performance disruption, or long cutover windows.
In this scenario, at least one Outpost rack is deployed on premises with the following prerequisites:
The following diagram shows the solution architecture and includes the on-premises servers that will be migrated from the local network to the Outposts rack. It also includes the staging VPC in Region used to deploy the replication servers, Amazon S3 to store the Amazon EBS snapshots and the target VPC extended to Outposts rack.

Figure 2: Architecture diagram showing migration with Application Migration Service
Step 1: Outposts rack configuration
You can work with AWS specialists to size your Outpost for your workload and application requirements. In this scenario, you don’t need additional Outposts rack capacity for the migration because the staging area will be deployed in the Region (see 1 in Figure 2).
Step 2: Prepare Application Migration service
Set up Application Migration Service from the console in the Region your Outposts rack is anchored to. If this is your first setup, choose Get started on the AWS Application Migration Service console. When creating the replication settings template, make sure your staging area is using subnets in the parent Region (see 2 in Figure 2).
Step 3: Install the AWS Replication Agent to the source servers or machines
For large migrations, source servers may have a wide variety of operating system versions and may be distributed across multiple data centers. AWS Application Migration Service offers the MGN connector, a feature that allows you to automate running commands on your source environment. Finally, ensure that communication is possible between the agent and Application Migration Service (see 3 in Figure 2).
In the following image, there is an example of deploying the AWS Replication Agent providing the required parameters (Region, AWS access key and AWS secret access key).

Once the AWS Replication Agent is installed, the server will be added to the AWS Application Migration Service console. Next, it will undergo the initial sync process, which will be completed when showing the Ready for testing lifecycle state in the Application Migration Service console.
Step 4: Configure launch settings
Prior to testing or cutting over an instance, you must configure the launch settings by creating Amazon Elastic Compute Cloud (Amazon EC2) launch templates, ensuring that you select your extended virtual private cloud (VPC) and subnet deployed on Outposts rack and using an appropriate, available instance type (see 4 in Figure 2).
To identify EC2 instances configured on your Outpost, you can use the following AWS Command Line Interface (AWS CLI):
Outposts get-outpost-instance-types \
--outpost-id op-abcdefgh123456789
The output of this command lists the instance types and sizes configured on your Outpost:
InstanceTypes:
- InstanceType: c5.xlarge
- InstanceType: c5.4xlarge
- InstanceType: r5.2xlarge
- InstanceType: r5.4xlarge
With knowledge of the instance types configured, you can now determine how many of each are available. For example, the following AWS CLI command, which is run on the account that owns the Outpost, lists the number of c5.xlarge instances available for use:
aws cloudwatch get-metric-statistics \
--namespace AWS/Outposts \
--metric-name AvailableInstanceType_Count \
--statistics Average --period 3600 \
--start-time $(date -u -Iminutes -d '-1hour') \
--end-time $(date -u -Iminutes) \
--dimensions \
Name=OutpostId,Value=op-abcdefgh123456789 \
Name=InstanceType,Value=c5.xlarge
This command returns:
Datapoints:
- Average: 10.0
Timestamp: '2024-04-10T10:39:00+00:00'
Unit: Count
Label: AvailableInstanceType_Count
The output indicates that there were (on average) 10 c5.xlarge instances available in the specified time period (1 hour). Using the same command for the other instance types, you discover that there are also 20 c5.4xlarge, 10 r5.2xlarge, and 6 r5.4xlarge available for use in completing the required EC2 launch templates.
Step 5: Install AWS Systems Manager Agent in your on your target instances
Once the launch settings are defined, you must activate the post-launch actions for either a specific server or all the servers. You must leave the Install the Systems Manager agent and allow executing actions on launched servers option toggled on in order for post-launch actions to work. Untoggling the option would disallow Application Migration Service to install the AWS Systems Manager Agent (SSM Agent) on your servers, and post-launch actions would no longer be executed on them (see 5 in Figure 2).

Figure 3: Post-launch actions on the Application Migration Service console
Step 6: Testing and cutover
Once you have configured the launch settings for each source server, you are ready to launch the servers as test instances. Best practice is to test instances before cutover.

Figure 4: Application Migration Service console ready to launch test instances
Finally, after completing the testing of all the source servers, you are ready for cutover (see 6 on Figure 2). Prior to launching cutover instances, check that the source servers are listed as Ready for cutover under Migration lifecycle and Healthy under Data replication status.

Figure 5: Application Migration Console ready for cutover
The AWS Application Migration Service console will indicate Cutover finalized when the cutover has completed successfully, the selected source servers’ Migration lifecycle column will show the Cutover complete status, the Data replication status column will show Disconnected, and the Next step column will show Mark as archived. The source servers have now been successfully migrated into AWS. You can now archive your source servers that have launched cutover instances.
You may already be using a third-party or AWS Partner solution to create on-premises backups of bare-metal or virtualized systems. These solutions often use local disk-arrays or object stores to create tiered backups of systems covering restore-points going back years, days, or just a few hours or minutes.
These solutions may also have inherent capabilities to restore from these backups directly to the AWS, enabling migration of on-premises systems to EC2 instances deployed to Outposts rack.
In the scenario illustrated in Figure 6, the partner backup and replication service (BR) creates backups (see 1 in Figure 6) of virtual machines to on-premises disk or object storage repositories. Using the service’s AWS integration, virtual machines can be restored (see 2 in Figure 6) to an EC2 instance deployed on Outposts rack, which is also on premises. The restoration may follow a process that uses helper instances and volumes (see 3 in Figure 6) during intermediate steps to create Amazon Elastic Block Store (Amazon EBS) snapshots (see 4 in Figure 6) and then Amazon Machine Images (AMIs) of the systems being migrated (see 5 in Figure 6), which are ultimately deployed (see 6 in Figure 6) to Outposts rack.

Figure 6: Architecture diagram of the partner backup and replication scenario
When performing this type of migration, there will typically be a stage where you are asked to specify parameters defining the target VPC and subnets. These should be the VPC being extended to the Outpost and a subnet that has been created in that VPC on the Outpost. You will also need to specify an EC2 instance type that is available on the Outpost, which can be discovered using the process described in the previous section.
Data residency can be a critical consideration for organizations that collect and store sensitive information, such as personally identifiable information (PII), financial data or medical records. AWS Elastic Disaster Recovery, supported on Outposts rack, helps enable seamless replication of on-premises data to Outposts rack and addresses data residency concerns by keeping data within your on-premises environment, using Amazon EBS and Amazon S3 on Outposts.
In this scenario, an Outpost rack is deployed on premises with the following prerequisites:
The following diagram shows the solution architecture and includes the on-premises servers that will be migrated from the local network to the Outposts rack. It also includes the staging VPC used to deploy the replication servers on Outposts rack, Amazon S3 on Outposts to store the local Amazon EBS snapshots and the target VPC extended to Outposts rack.

Figure 7: Architecture diagram for workflow migration to AWS Outposts rack
Step 1: Outposts rack configuration
To use Elastic Disaster Recovery on Outposts rack, you need to configure both Amazon EBS and Amazon S3 on Outposts to support nearly continuous replication and point-in-time recovery for your workload needs (see 1 in Figure 7). Specifically, you need to size Amazon EBS and Amazon S3 on Outposts capacity according to your workload capacity requirements and application interdependencies. To do this, you can define dependency groups–each dependency group is a collection of applications and their underlying infrastructure with technical or non-technical dependencies. A 2:1 ratio is recommended for the EBS volumes to be used for near-continuous replication; a 1:1 ratio is recommended for the Amazon S3 on Outposts ratio for EBS snapshots. For example, to migrate 40 terabytes (TB) of workloads, you need to plan for 80TB of EBS volumes and 40TB of S3 on Outposts capacity.
Step 2: Extend VPC to your Outposts rack
Once your Outpost has been provisioned and is available, extend the required Amazon Virtual Private Cloud (Amazon VPC) connection to the Outpost from the Region by creating the desired staging and target subnets (see 2 in Figure 7).
Step 3: Prepare AWS Elastic Disaster Recovery service
Prepare the AWS Elastic Disaster Recovery service from the AWS console to set the default replication and launch settings. When defining these settings, make sure that the Outposts resources available are chosen for staging and target subnets and instance and storage type (see 3 in Figure 7).
Step 4: Install the AWS Replication Agent to the source servers or machines
The next phase will be to install the AWS Replication Agent to the source servers and to ensure that communication is possible between the replication agent and your Outposts replication subnet through the Outposts local gateway to ensure that replication traffic uses the local network (see 4 in Figure 7).
Step 5: Continuous block-level replication
Staging area resources are automatically created and managed by Elastic Disaster Recovery. Once the AWS Replication Agent has been deployed, continuous block-level replication (compressed and encrypted in transit) will occur (see 5 in Figure 7) over the local network.
Step 6: Launch Outposts rack resources
Finally, migrated instances can now be launched using Outposts rack resources based on the launch settings defined previously (see 6 in Figure 7).
In this post, you have learned how to migrate your workloads from your on-premises environment to Outposts rack based on your specific data residency requirements. When you have the flexibility of using Regional services, AWS migration services or partner solutions can be used with infrastructure already in place. If your data must stay on-premises, using AWS Elastic Disaster Recovery allows you to migrate your data without using Regional services, allowing you to migrate to Outposts rack without your data leaving the boundary of a certain geographic location.
To learn more about an end-to-end migration and modernization journey, visit AWS Migration Hub.
Post Syndicated from jake original https://lwn.net/Articles/983870/
CircuitPython is an open-source
implementation of the Python programming language for microcontroller
boards. The project, which is sponsored by Adafruit Industries, is designed with
new programmers in mind, but it also has many features that may be of
interest to more-experienced developers. The recent 9.1.0 release
adds a few minor features, but it follows just a few months after CircuitPython 9.0.0,
which brings some more significant changes, including improved graphics and
USB support.
Post Syndicated from corbet original https://lwn.net/Articles/984617/
Version
129.0 of the Firefox browser has been released. Changes include some
improvements to the reader mode, tab previews, and use of HTTPS by default.
Post Syndicated from Shozo Moritz Takaya original https://blog.cloudflare.com/backbone2024
The modern use of “cloud” arguably traces its origins to the cloud icon, omnipresent in network diagrams for decades. A cloud was used to represent the vast and intricate infrastructure components required to deliver network or Internet services without going into depth about the underlying complexities. At Cloudflare, we embody this principle by providing critical infrastructure solutions in a user-friendly and easy-to-use way. Our logo, featuring the cloud symbol, reflects our commitment to simplifying the complexities of Internet infrastructure for all our users.
This blog post provides an update about our infrastructure, focusing on our global backbone in 2024, and highlights its benefits for our customers, our competitive edge in the market, and the impact on our mission of helping build a better Internet. Since the time of our last backbone-related blog post in 2021, we have increased our backbone capacity (Tbps) by more than 500%, unlocking new use cases, as well as reliability and performance benefits for all our customers.
As of July 2024, Cloudflare has data centers in 330 cities across more than 120 countries, each running Cloudflare equipment and services. The goal of delivering Cloudflare products and services everywhere remains consistent, although these data centers vary in the number of servers and amount of computational power.
These data centers are strategically positioned around the world to ensure our presence in all major regions and to help our customers comply with local regulations. It is a programmable smart network, where your traffic goes to the best data center possible to be processed. This programmability allows us to keep sensitive data regional, with our Data Localization Suite solutions, and within the constraints that our customers impose. Connecting these sites, exchanging data with customers, public clouds, partners, and the broader Internet, is the role of our network, which is managed by our infrastructure engineering and network strategy teams. This network forms the foundation that makes our products lightning fast, ensuring our global reliability, security for every customer request, and helping customers comply with data sovereignty requirements.
The Internet is an interconnection of different networks and separate autonomous systems that operate by exchanging data with each other. There are multiple ways to exchange data, but for simplicity, we’ll focus on two key methods on how these networks communicate: Peering and IP Transit. To better understand the benefits of our global backbone, it helps to understand these basic connectivity solutions we use in our network.
Peering: The voluntary interconnection of administratively separate Internet networks that allows for traffic exchange between users of each network is known as “peering”. Cloudflare is one of the most peered networks globally. We have peering agreements with ISPs and other networks in 330 cities and across all major
Internet Exchanges (IX’s). Interested parties can register to peer with us anytime, or directly connect to our network with a link through a private network interconnect (PNI).
IP transit: A paid service that allows traffic to cross or “transit” somebody else’s network, typically connecting a smaller Internet service provider (ISP) to the larger Internet. Think of it as paying a toll to access a private highway with your car.
The backbone is a dedicated high-capacity optical fiber network that moves traffic between Cloudflare’s global data centers, where we interconnect with other networks using these above-mentioned traffic exchange methods. It enables data transfers that are more reliable than over the public Internet. For the connectivity within a city and long distance connections we manage our own dark fiber or lease wavelengths using Dense Wavelength Division Multiplexing (DWDM). DWDM is a fiber optic technology that enhances network capacity by transmitting multiple data streams simultaneously on different wavelengths of light within the same fiber. It’s like having a highway with multiple lanes, so that more cars can drive on the same highway. We buy and lease these services from our global carrier partners all around the world.
Operating a global backbone is challenging, which is why many competitors don’t do it. We take this challenge for two key reasons: traffic routing control and cost-effectiveness.
With IP transit, we rely on our transit partners to carry traffic from Cloudflare to the ultimate destination network, introducing unnecessary third-party reliance. In contrast, our backbone gives us full control over routing of both internal and external traffic, allowing us to manage it more effectively. This control is crucial because it lets us optimize traffic routes, usually resulting in the lowest latency paths, as previously mentioned. Furthermore, the cost of serving large traffic volumes through the backbone is, on average, more cost-effective than IP transit. This is why we are doubling down on backbone capacity in regions such as Frankfurt, London, Amsterdam, and Paris and Marseille, where we see continuous traffic growth and where connectivity solutions are widely available and competitively priced.
Our backbone serves both internal and external traffic. Internal traffic includes customer traffic using our security or performance products and traffic from Cloudflare’s internal systems that shift data between our data centers. Tiered caching, for example, optimizes our caching delivery by dividing our data centers into a hierarchy of lower tiers and upper tiers. If lower-tier data centers don’t have the content, they request it from the upper tiers. If the upper tiers don’t have it either, they then request it from the origin server. This process reduces origin server requests and improves cache efficiency. Using our backbone to transport the cached content between lower and upper-tier data centers and the origin is often the most cost-effective method, considering the scale of our network. Magic Transit is another example where we attract traffic, by means of BGP anycast, to the Cloudflare data center closest to the end user and implement our DDoS solution. Our backbone transports the clean traffic to our customer’s data center, which they connect through a Cloudflare Network Interconnect (CNI).
External traffic that we carry on our backbone can be traffic from other origin providers like AWS, Oracle, Alibaba, Google Cloud Platform, or Azure, to name a few. The origin responses from these cloud providers are transported through peering points and our backbone to the Cloudflare data center closest to our customer. By leveraging our backbone we have more control over how we backhaul this traffic throughout our network, which results in more reliability and better performance and less dependency on the public Internet.
This interconnection between public clouds, offices, and the Internet with a controlled layer of performance, security, programmability, and visibility running on our global backbone is our Connectivity Cloud.
This map is a simplification of our current backbone network and does not show all paths
As mentioned in the introduction, we have increased our backbone capacity (Tbps) by more than 500% since 2021. With the addition of sub-sea cable capacity to Africa, we achieved a big milestone in 2023 by completing our global backbone ring. It now reaches six continents through terrestrial fiber and subsea cables.
Building out our backbone within regions where Internet infrastructure is less developed compared to markets like Central Europe or the US has been a key strategy for our latest network expansions. We have a shared goal with regional ISP partners to keep our data flow localized and as close as possible to the end user. Traffic often takes inefficient routes outside the region due to the lack of sufficient local peering and regional infrastructure. This phenomenon, known as traffic tromboning, occurs when data is routed through more cost-effective international routes and existing peering agreements.
Our regional backbone investments in countries like India or Turkey aim to reduce the need for such inefficient routing. With our own in-region backbone, traffic can be directly routed between in-country Cloudflare data centers, such as from Mumbai to New Delhi to Chennai, reducing latency, increasing reliability, and helping us to provide the same level of service quality as in more developed markets. We can control that data stays local, supporting our Data Localization Suite (DLS), which helps businesses comply with regional data privacy laws by controlling where their data is stored and processed.
This strategic expansion has not only extended our global reach but has also significantly improved our overall latency. One illustration of this is that since the deployment of our backbone between Lisbon and Johannesburg, we have seen a major performance improvement for users in Johannesburg. Customers benefiting from this improved latency can be, for example, a financial institution running their APIs through us for real-time trading, where milliseconds can impact trades, or our Magic WAN users, where we facilitate site-to-site connectivity between their branch offices.
The table above shows an example where we measured the round-trip time (RTT) for an uncached origin fetch, from an end-user in Johannesburg to various origin locations, comparing our backbone and the public Internet. By carrying the origin request over our backbone, as opposed to IP transit or peering, local users in Johannesburg get their content up to 22% faster. By using our own backbone to long-haul the traffic to its final destination, we are in complete control of the path and performance. This improvement in latency varies by location, but consistently demonstrates the superiority of our backbone infrastructure in delivering high performance connectivity.
Consider a navigation system using 1) GPS to identify the route and 2) a highway toll pass that is valid until your final destination and allows you to drive straight through toll stations without stopping. Our backbone works quite similarly.
Our global backbone is built upon two key pillars. The first is BGP (Border Gateway Protocol), the routing protocol for the Internet, and the second is Segment Routing MPLS (Multiprotocol label switching), a technique for steering traffic across predefined forwarding paths in an IP network. By default, Segment Routing provides end-to-end encapsulation from ingress to egress routers where the intermediate nodes execute no route lookup. Instead, they forward traffic across an end-to-end virtual circuit, or tunnel, called a label-switched path. Once traffic is put on a label-switched path, it cannot detour onto the public Internet and must continue on the predetermined route across Cloudflare’s backbone. This is nothing new, as many networks will even run a “BGP Free Core” where all the route intelligence is carried at the edge of the network, and intermediate nodes only participate in forwarding from ingress to egress.
While leveraging Segment Routing Traffic Engineering (SR-TE) in our backbone, we can automatically select paths between our data centers that are optimized for latency and performance. Sometimes the “shortest path” in terms of routing protocol cost is not the lowest latency or highest performance path.
Argo Smart Routing is a service that uses Cloudflare’s portfolio of backbone, transit, and peering connectivity to find the most optimal path between the data center where a user’s request lands and your back-end origin server. Argo may forward a request from one Cloudflare data center to another on the way to an origin if the performance would improve by doing so. Orpheus is the counterpart to Argo, and routes around degraded paths for all customer origin requests free of charge. Orpheus is able to analyze network conditions in real-time and actively avoid reachability failures. Customers with Argo enabled get optimal performance for requests from Cloudflare data centers to their origins, while Orpheus provides error self-healing for all customers universally. By mixing our global backbone using Segment Routing as an underlay with Argo Smart Routing and Orpheus as our connectivity overlay, we are able to transport critical customer traffic along the most optimized paths that we have available.
So how exactly does our global backbone fit together with Argo Smart Routing? Argo Transit Selection is an extension of Argo Smart Routing where the lowest latency path between Cloudflare data center hops is explicitly selected and used to forward customer origin requests. The lowest latency path will often be our global backbone, as it is a more dedicated and private means of connectivity, as opposed to third-party transit networks.
Consider a multinational Dutch pharmaceutical company that relies on Cloudflare’s network and services with our SASE solution to connect their global offices, research centers, and remote employees. Their Asian branch offices depend on Cloudflare’s security solutions and network to provide secure access to important data from their central data centers back to their offices in Asia. In case of a cable cut between regions, our network would automatically look for the best alternative route between them so that business impact is limited.
Argo measures every potential combination of the different provider paths, including our own backbone, as an option for reaching origins with smart routing. Because of our vast interconnection with so many networks, and our global private backbone, Argo is able to identify the most performant network path for requests. The backbone is consistently one of the lowest latency paths for Argo to choose from.
In addition to high performance, we care greatly about network reliability for our customers. This means we need to be as resilient as possible from fiber cuts and third-party transit provider issues. During a disruption of the AAE-1 (Asia Africa Europe-1) submarine cable, this is what Argo saw between Singapore and Amsterdam across some of our transit provider paths vs. the backbone.
The large (purple line) spike shows a latency increase on one of our third-party IP transit provider paths due to congestion, which was eventually resolved following likely traffic engineering within the provider’s network. We saw a smaller latency increase (yellow line) over other transit networks, but still one that is noticeable. The bottom (green) line on the graph is our backbone, where round-trip time more or less remains flat throughout the event, due to our diverse backbone connectivity between Asia and Europe. Throughout the fiber cut, we remained stable at around 200ms between Amsterdam and Singapore. There was no noticeable network hiccup as was seen on the transit provider paths, so Argo actively leveraged the backbone for optimal performance.
As Argo improves performance in our network, Cloudflare Network Interconnects (CNIs) optimize getting onto it. We encourage our Enterprise customers to use our free CNI’s as on-ramps onto our network whenever practical. In this way, you can fully leverage our network, including our robust backbone, and increase overall performance for every product within your Cloudflare Connectivity Cloud. In the end, our global network is our main product and our backbone plays a critical role in it. This way we continue to help build a better Internet, by improving our services for everybody, everywhere.
If you want to be part of our mission, join us as a Cloudflare network on-ramp partner to offer secure and reliable connectivity to your customers by integrating directly with us. Learn more about our on-ramp partnerships and how they can benefit your business here.
Post Syndicated from corbet original https://lwn.net/Articles/984598/
Security updates have been issued by Debian (libreoffice), Gentoo (containerd and firefox), Red Hat (httpd), SUSE (ca-certificates-mozilla, ksh, openssl-3-livepatches, podman, python-Twisted, and skopeo), and Ubuntu (imagemagick).
Post Syndicated from Magesh Dhanasekaran original https://aws.amazon.com/blogs/security/hardening-the-rag-chatbot-architecture-powered-by-amazon-bedrock-blueprint-for-secure-design-and-anti-pattern-migration/
This blog post demonstrates how to use Amazon Bedrock with a detailed security plan to deploy a safe and responsible chatbot application. In this post, we identify common security risks and anti-patterns that can arise when exposing a large language model (LLM) in an application. Amazon Bedrock is built with features you can use to mitigate vulnerabilities and incorporate secure design principles. This post highlights architectural considerations and best practice strategies to enhance the reliability of your LLM-based application.
Amazon Bedrock unleashes the fusion of generative artificial intelligence (AI) and LLMs, empowering you to craft impactful chatbot applications. As with technologies handling sensitive data and intellectual property, it’s crucial that you prioritize security and adopt a robust security posture. Without proper measures, these applications can be susceptible to risks such as prompt injection, information disclosure, model exploitation, and regulatory violations. By proactively addressing these security considerations, you can responsibly use Amazon Bedrock foundation models and generative AI capabilities.
The chatbot application use case represents a common pattern in enterprise environments, where businesses want to use the power of generative AI foundation models (FMs) to build their own applications. This falls under the Pre-trained models category of the Generative AI Security Scoping Matrix. In this scope, businesses directly integrate with FMs like Anthropic’s Claude through Amazon Bedrock APIs to create custom applications, such as customer support Retrieval Augmented Generation (RAG) chatbots, content generation tools, and decision support systems.
This post provides a comprehensive security blueprint for deploying chatbot applications that integrate with Amazon Bedrock, enabling the responsible adoption of LLMs and generative AI in enterprise environments. We outline mitigation strategies through secure design principles, architectural considerations, and best practices tailored to the challenges of integrating LLMs and generative AI capabilities.
By following the guidance in this post, you can proactively identify and mitigate risks associated with deploying and operating chatbot applications that integrate with Amazon Bedrock and use generative AI models. The guidance can help you strengthen the security posture, protect sensitive data and intellectual property, maintain regulatory compliance, and responsibly deploy generative AI capabilities within your enterprise environments.
This post contains the following high-level sections:
The chatbot application architecture described in this post represents an example implementation that uses various AWS services and integrates with Amazon Bedrock and Anthropic’s Claude 3 Sonnet LLM. This baseline architecture serves as a foundation to understand the core components and their interactions. However, it’s important to note that there can be multiple ways for customers to design and implement a chatbot architecture that integrates with Amazon Bedrock, depending on their specific requirements and constraints. Regardless of the implementation approach, it’s crucial to incorporate appropriate security controls and follow best practices for secure design and deployment of generative AI applications.
The chatbot application allows users to interact through a frontend interface and submit prompts or queries. These prompts are processed by integrating with Amazon Bedrock, which uses the Anthropic Claude 3 Sonnet LLM and a knowledge base built from ingested data. The LLM generates relevant responses based on the prompts and retrieved context from the knowledge base. While this baseline implementation outlines the core functionality, it requires incorporating security controls and following best practices to mitigate potential risks associated with deploying generative AI applications. In the subsequent sections, we discuss security anti-patterns that can arise in such applications, along with their corresponding mitigation strategies. Additionally, we present a secure and responsible architecture blueprint for the chatbot application powered by Amazon Bedrock.

Figure 1: Baseline chatbot application architecture using AWS services and Amazon Bedrock
The chatbot application architecture uses various AWS services and integrates with the Amazon Bedrock service and Anthropic’s Claude 3 Sonnet LLM to deliver an interactive and intelligent chatbot experience. The main components of the architecture (as shown in Figure 1) are:
This section outlines a comprehensive logging and monitoring strategy for the Amazon Bedrock-powered chatbot application, using various AWS services to enable centralized logging, auditing, and proactive monitoring of security events, performance metrics, and potential threats.
This section identifies and explores common security anti-patterns associated with the Amazon Bedrock chatbot application architecture. By recognizing these anti-patterns early in the development and deployment phases, you can implement effective mitigation strategies and fortify your security posture.
Addressing security anti-patterns in the Amazon Bedrock chatbot application architecture is crucial for several reasons:
The security anti-patterns that are covered in this post include:
In a generative AI chatbot application using Amazon Bedrock, a lack of secure authentication and access controls poses significant risks to the confidentiality, integrity, and availability of the system. Identity spoofing and unauthorized access can enable threat actors to impersonate legitimate users or systems, gain unauthorized access to sensitive data processed by the chatbot application, and potentially compromise the integrity and confidentiality of the customer’s data and intellectual property used by the application.
Identity spoofing and unauthorized access are important areas to address in this architecture, as the chatbot application handles user prompts and responses, which may contain sensitive information or intellectual property. If a threat actor can impersonate a legitimate user or system, they can potentially inject malicious prompts, retrieve confidential data from the knowledge base, or even manipulate the responses generated by the Anthropic Claude 3 LLM integrated with Amazon Bedrock.
To mitigate the risks associated with a lack of secure authentication and access controls, implement robust IAM controls, as well as continuous logging, monitoring, and threat detection mechanisms.
IAM controls:
Continuous logging and monitoring and threat detection:
Insufficient input validation and sanitization in a generative AI chatbot application can expose the system to various threats, including injection events, data tampering, adversarial events, and data poisoning events. These vulnerabilities can lead to unauthorized access, data manipulation, and compromised model outputs.
Injection events: If user prompts or inputs aren’t properly sanitized and validated, a threat actor can potentially inject malicious code, such as SQL code, leading to unauthorized access or manipulation of the DynamoDB chat history data. Additionally, if the chatbot application or components process user input without proper validation, a threat actor can potentially inject and run arbitrary code on the backend systems, compromising the entire application.
Data tampering: A threat actor can potentially modify user prompts or payloads in transit between the chatbot interface and Amazon Bedrock service, leading to unintended model responses or actions. Lack of data integrity checks can allow a threat actor to tamper with the context data exchanged between Amazon Bedrock and OpenSearch, potentially leading to incorrect or malicious search results influencing the LLM responses.
Data poisoning events: If the training data or context data used by the LLM or chatbot application isn’t properly validated and sanitized, bad actors can potentially introduce malicious or misleading data, leading to biased or compromised model outputs.
To mitigate the risks associated with insufficient input validation and sanitization, implement robust input validation and sanitization mechanisms throughout the chatbot application and its components.
Input validation and sanitization:
Data flow validation:
Protective controls:
Insecure communication channels between chatbot application components can expose sensitive data to interception, tampering, and unauthorized access risks. Unsecured channels enable man-in-the-middle events where threat actors intercept, modify data in transit such as user prompts, responses, and context data, leading to data tampering, malicious payload injection, and unauthorized information access.
To mitigate the risks associated with insecure communication channels, implement secure communication mechanisms and enforce data integrity throughout the chatbot application’s components and their interactions. Proper encryption, authentication, and integrity checks should be employed to protect sensitive data in transit and help prevent unauthorized access, data tampering, and man-in-the-middle events.
Secure communication channels:
Continuous logging and monitoring:
Network segmentation and isolation controls
Inadequate logging, auditing, and non-repudiation mechanisms in a generative AI chatbot application can lead to several risks, including a lack of accountability, challenges in forensic analysis, and compliance concerns. Without proper logging and auditing, it’s challenging to track user activities, diagnose issues, perform forensic analysis in case of security incidents, and demonstrate compliance with regulations or internal policies.
To mitigate the risks associated with inadequate logging, auditing, and non-repudiation, implement comprehensive logging and auditing mechanisms to capture critical events, user activities, and data flows across the chatbot application components. Additionally, measures must be taken to maintain the integrity and authenticity of log data, help prevent tampering or repudiation, and securely store and protect log information from unauthorized access.
Comprehensive logging and auditing:
User activity monitoring and tracking:
Data integrity and non-repudiation:
Insecure data storage and access controls in a generative AI chatbot application can lead to significant risks, including information disclosure, data tampering, and unauthorized access. Storing sensitive data, such as chat history, in an unencrypted or insecure manner can result in information disclosure if the data store is compromised or accessed by unauthorized entities. Additionally, a lack of proper access controls can allow unauthorized parties to access, modify, or delete data, leading to data tampering or unauthorized access.
To mitigate the risks associated with insecure data storage and access controls, implement robust encryption mechanisms, secure key management practices, and fine-grained access control policies. Encrypting sensitive data at rest and in transit, using customer-managed encryption keys from AWS KMS, and implementing least- privilege access controls based on IAM policies and resource-based policies can significantly enhance the security and protection of data within the chatbot application architecture.
Key management and encryption at rest:
Fine-grained access controls:
Continuous improvement:
Inadequate security measures for FMs and generative AI components in a chatbot application can lead to severe risks, including model tampering, unintended information disclosure, and denial of service. Threat actors can manipulate unsecured FMs and generative AI models to generate biased, harmful, or malicious responses, potentially causing significant harm or reputational damage.
Lack of proper access controls or input validation can result in unintended information disclosure, where sensitive data is inadvertently included in model responses. Additionally, insecure FM or generative AI components can be vulnerable to denial-of-service events, disrupting the availability of the chatbot application and impacting its functionality.
To mitigate the risks associated with inadequately secured foundational models (FMs) and generative AI components, implement secure integration mechanisms, robust model fine-tuning and deployment practices, continuous monitoring, and effective guardrails and safety measures. These mitigation strategies help prevent model tampering, unintended information disclosure, denial-of-service events, and the generation of harmful or undesirable content, while ensuring the security, reliability, and ethical alignment of the chatbot application’s generative AI capabilities.
Secure integration with LLMs and knowledge bases:
Secure model fine tuning, deployment, and monitoring:
While the previous anti-patterns focused on technical security aspects, it is equally important to address the ethical and responsible governance of generative AI systems. Without strong governance frameworks, ethical guidelines, and accountability measures, chatbot applications can result in unintended consequences, biased outcomes, and a lack of transparency and trust.
To minimize a lack of responsible AI governance and ethics, establish a comprehensive ethical AI governance framework, promote transparency and interpretability, engage stakeholders and consider societal impacts, address potential biases and fairness issues, implement continuous improvement and monitoring processes, and use guardrails and safety measures. These mitigation strategies help to foster trust, accountability, and ethical alignment in the development and deployment of the generative AI chatbot application, mitigating the risks of unintended consequences, biased outcomes, and a lack of transparency.
Ethical AI governance framework:
Transparency and interpretability:
Stakeholder engagement and societal impact:
Bias and fairness:
Continuous improvement and monitoring:
Guardrails and safety measures:
Jailbreak robustness testing:
Inadequate testing and validation processes for the LLM system and the generative AI chatbot application can lead to unidentified vulnerabilities, performance bottlenecks, and availability issues. Without comprehensive testing and validation, organizations might fail to detect potential security risks, functionality gaps, or scalability and performance limitations before deploying the application in a production environment.
To address the lack of comprehensive testing and validation, implement a robust testing strategy encompassing functional, performance, security, and integration testing. Integrate automated testing into a CI/CD pipeline, conduct security testing like threat modeling and penetration testing, and use adversarial validation techniques. Continuously improve testing processes to verify the reliability, security, and scalability of the generative AI chatbot application.
Comprehensive testing strategy:
Automated testing and CI/CD integration:
Security testing and adversarial validation:
Performance and load testing:
Integration testing:
Continuous improvement:
After discussing the baseline chatbot application architecture and identifying critical security anti-patterns associated with generative AI applications built using Amazon Bedrock, we now present the secure and responsible architecture blueprint. This blueprint (Figure 2) incorporates the recommended mitigation strategies and security controls discussed throughout the anti-pattern analysis.

Figure 2: Secure and responsible generative AI chatbot architecture blueprint
In this target state architecture, unauthenticated users interact with the chatbot application through the frontend interface (1), where it’s crucial to mitigate the anti-pattern of insufficient input validation and sanitization by implementing secure coding practices and input validation. The user inputs are then processed through AWS Shield, AWS WAF, and CloudFront (2), which provide DDoS protection, web application firewall capabilities, and a content delivery network, respectively. These services help mitigate insufficient input validation, web exploits, and lack of comprehensive testing by using AWS WAF for input validation and conducting regular security testing.
The user requests are then routed through API Gateway (3), which acts as the entry point for the chatbot application, facilitating API connections to the Streamlit frontend. To address anti-patterns related to authentication, insecure communication, and LLM security, it’s essential to implement secure authentication protocols, HTTPS/TLS, access controls, and input validation within API Gateway. Communication between the VPC resources and API Gateway is secured through VPC endpoints (4), using PrivateLink for secure private communication and attaching endpoint policies to control which AWS principals can access the API Gateway service (8), mitigating the insecure communication channels anti-pattern.
The Streamlit application (5) is hosted on Amazon ECS in a private subnet within the VPC. It hosts the frontend interface and must implement secure coding practices and input validation to mitigate insufficient input validation and sanitization. User inputs are then processed by Lambda (6), a serverless compute service hosted within the VPC, which connects to Amazon Bedrock, OpenSearch, and DynamoDB through VPC endpoints (7). These VPC endpoints have endpoint policies attached to control access, enabling secure private communication between the Lambda function and the services, mitigating the insecure communication channels anti-pattern. Within Lambda, strict input validation rules, allow-lists, and user input sanitization are implemented to address the input validation anti-pattern.
User requests from the chatbot application are sent to Amazon Bedrock (12), a generative AI solution that powers the LLM capabilities. To mitigate the failure to secure FM and generative AI components anti-pattern, secure communication channels, input validation, and sanitization for prompts and context data must be implemented when interacting with Amazon Bedrock.
Amazon Bedrock interacts with OpenSearch Service (9) using Amazon Bedrock knowledge bases to retrieve relevant context data for the user’s question. The knowledge base is created by ingesting public documents from Amazon S3 (10). To mitigate the anti-pattern of insecure data storage and access controls, implement encryption at rest using AWS KMS and fine-grained IAM policies and roles for access control within OpenSearch Service. Titan Embeddings (11) are the format of the vector embeddings, which represent the documents stored in Amazon S3. The vector format enables similarity calculation and retrieval of relevant information (12). To address the failure to secure FM and generative AI components anti-pattern, secure integration with Titan Embeddings and input data validation should be implemented.
The knowledge base data, user prompts, and context data are processed by Amazon Bedrock (13) with the Claude 3 LLM (14). To address the anti-patterns of failure to secure FM and generative AI components, as well as lack of responsible AI governance and ethics, secure communication channels, input validation, ethical AI governance frameworks, transparency and interpretability measures, stakeholder engagement, bias mitigation, and guardrails like Guardrails for Amazon Bedrock should be implemented.
The generated responses and recommendations are then stored and retrieved in Amazon DynamoDB (15) by the Lambda function. To mitigate insecure data storage and access, encrypting data at rest with AWS KMS (16) and implement fine-grained access controls through IAM policies and roles.
Comprehensive logging, auditing, and monitoring mechanisms are provided by CloudTrail (17), CloudWatch (18), and AWS Config (19) to address the inadequate logging, auditing, and non-repudiation anti-pattern. See the Comprehensive logging and monitoring strategy section for detailed guidance on implementing comprehensive logging, auditing, and monitoring mechanisms using CloudTrail, CloudWatch, CloudWatch Logs, and AWS Config to address the inadequate logging, auditing, and non-repudiation anti-pattern; including logging API calls made to Amazon Bedrock service, monitoring Amazon Bedrock-specific metrics, capturing and analyzing Bedrock invocation logs, and monitoring and auditing the configuration of resources related to the chatbot application and Amazon Bedrock service.
IAM (20) plays a crucial role in the overall architecture and in mitigating anti-patterns related to authentication and insecure data storage and access. IAM roles and permissions are critical in enforcing secure authentication mechanisms, least privilege access, multi-factor authentication, and robust credential management across the various components of the chatbot application. Additionally, service control policies (SCPs) can be configured to restrict access to specific models or knowledge bases within Amazon Bedrock, preventing unauthorized access or use of sensitive intellectual property.
Finally, GuardDuty (21), Amazon Inspector (22), Security Hub (23), and Security Lake (24) have been included as additional recommended services to further enhance the security posture of the chatbot application. GuardDuty (21) provides threat detection across the control and data planes, Amazon Inspector (22) enables vulnerability assessments and continuous monitoring of Amazon ECS and Lambda workloads. Security Hub (23) offers centralized security posture management and compliance checks, while Security Lake (24) acts as a centralized data lake for log analysis, integrated with CloudTrail and SecurityHub.
By identifying critical anti-patterns and providing comprehensive mitigation strategies, you now have a solid foundation for a secure and responsible deployment of generative AI technologies in enterprise environments.
The secure and responsible architecture blueprint presented in this post serves as a comprehensive guide for organizations that want to use the power of generative AI while ensuring robust security, data protection, and ethical governance. By incorporating industry-leading security controls—such as secure authentication mechanisms, encrypted data storage, fine-grained access controls, secure communication channels, input validation and sanitization, comprehensive logging and auditing, secure FM integration and monitoring, and responsible AI guardrails—this blueprint addresses the unique challenges and vulnerabilities associated with generative AI applications.
Moreover, the emphasis on comprehensive testing and validation processes, as well as the incorporation of ethical AI governance principles, makes sure that you can not only mitigate potential risks, but also promote transparency, explainability, and interpretability of the LLM components, while addressing potential biases and ensuring alignment with organizational values and societal norms.
By following the guidance outlined in this post and depicted in the architectural blueprint, you can proactively identify and mitigate potential risks, enhance the security posture of your generative AI-based chatbot solutions, protect sensitive data and intellectual property, maintain regulatory compliance, and responsibly deploy LLMs and generative AI technologies in your enterprise environments.
If you have feedback about this post, submit comments in the Comments section below. If you have questions about this post, contact AWS Support.
Post Syndicated from Shozo Moritz Takaya original https://blog.cloudflare.com/backbone2024
The modern use of “cloud” arguably traces its origins to the cloud icon, omnipresent in network diagrams for decades. A cloud was used to represent the vast and intricate infrastructure components required to deliver network or Internet services without going into depth about the underlying complexities. At Cloudflare, we embody this principle by providing critical infrastructure solutions in a user-friendly and easy-to-use way. Our logo, featuring the cloud symbol, reflects our commitment to simplifying the complexities of Internet infrastructure for all our users.
This blog post provides an update about our infrastructure, focusing on our global backbone in 2024, and highlights its benefits for our customers, our competitive edge in the market, and the impact on our mission of helping build a better Internet. Since the time of our last backbone-related blog post in 2021, we have increased our backbone capacity (Tbps) by more than 500%, unlocking new use cases, as well as reliability and performance benefits for all our customers.
As of July 2024, Cloudflare has data centers in 330 cities across more than 120 countries, each running Cloudflare equipment and services. The goal of delivering Cloudflare products and services everywhere remains consistent, although these data centers vary in the number of servers and amount of computational power.
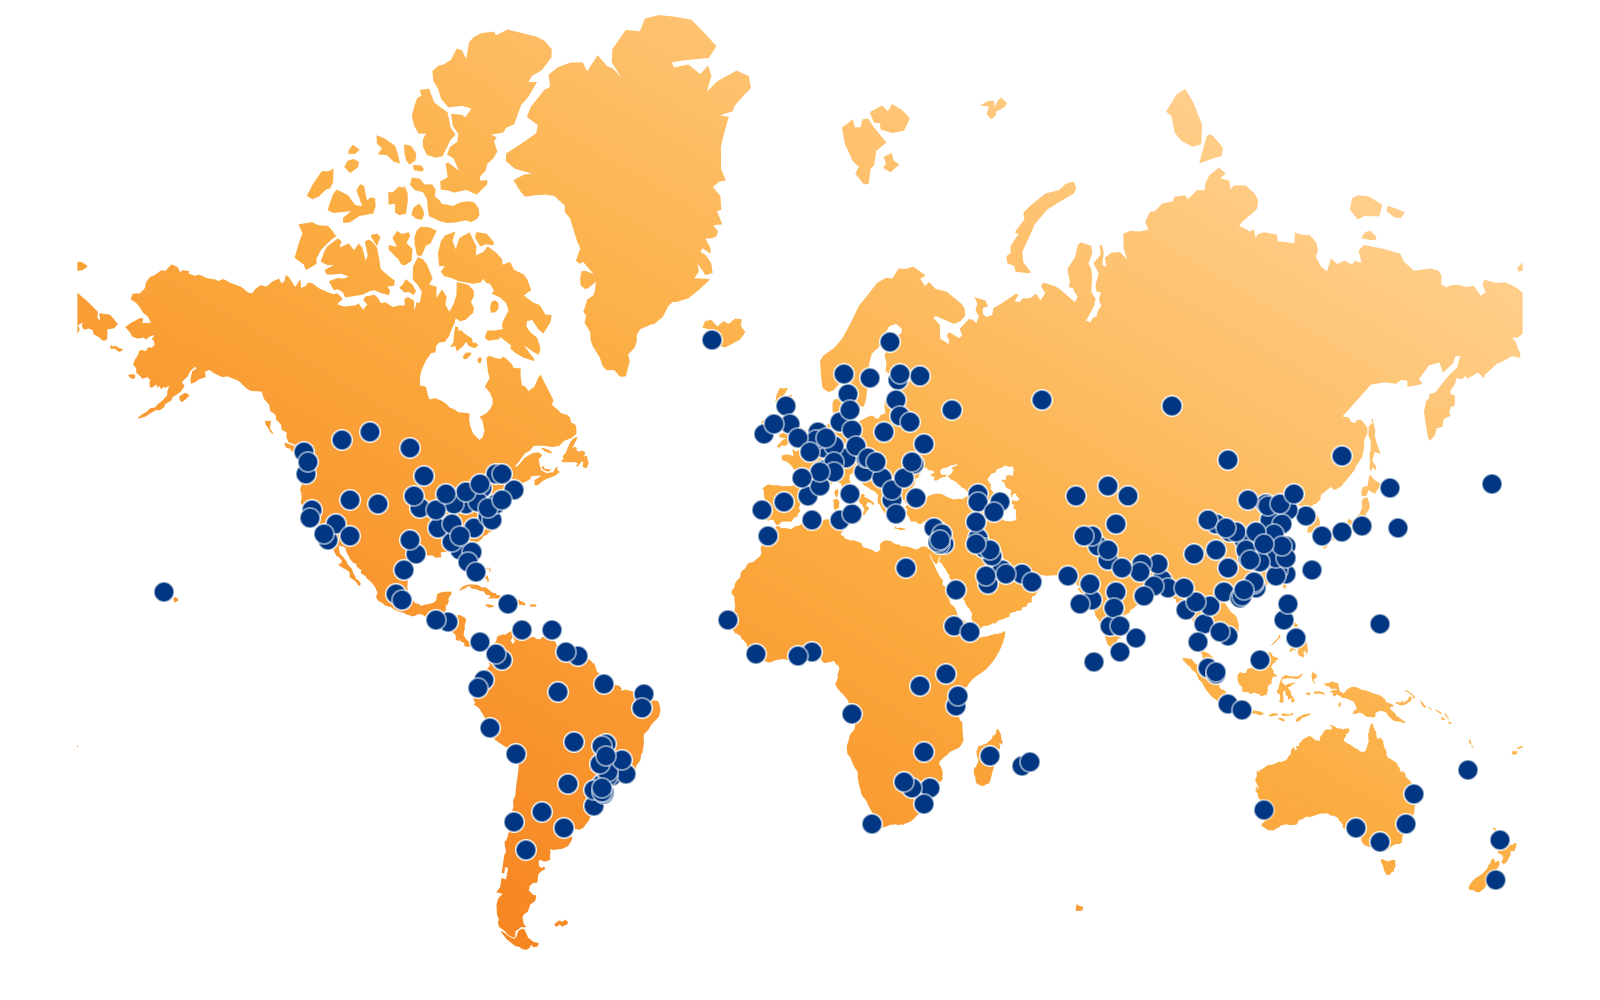
These data centers are strategically positioned around the world to ensure our presence in all major regions and to help our customers comply with local regulations. It is a programmable smart network, where your traffic goes to the best data center possible to be processed. This programmability allows us to keep sensitive data regional, with our Data Localization Suite solutions, and within the constraints that our customers impose. Connecting these sites, exchanging data with customers, public clouds, partners, and the broader Internet, is the role of our network, which is managed by our infrastructure engineering and network strategy teams. This network forms the foundation that makes our products lightning fast, ensuring our global reliability, security for every customer request, and helping customers comply with data sovereignty requirements.
The Internet is an interconnection of different networks and separate autonomous systems that operate by exchanging data with each other. There are multiple ways to exchange data, but for simplicity, we’ll focus on two key methods on how these networks communicate: Peering and IP Transit. To better understand the benefits of our global backbone, it helps to understand these basic connectivity solutions we use in our network.
The backbone is a dedicated high-capacity optical fiber network that moves traffic between Cloudflare’s global data centers, where we interconnect with other networks using these above-mentioned traffic exchange methods. It enables data transfers that are more reliable than over the public Internet. For the connectivity within a city and long distance connections we manage our own dark fiber or lease wavelengths using Dense Wavelength Division Multiplexing (DWDM). DWDM is a fiber optic technology that enhances network capacity by transmitting multiple data streams simultaneously on different wavelengths of light within the same fiber. It’s like having a highway with multiple lanes, so that more cars can drive on the same highway. We buy and lease these services from our global carrier partners all around the world.

Operating a global backbone is challenging, which is why many competitors don’t do it. We take this challenge for two key reasons: traffic routing control and cost-effectiveness.
With IP transit, we rely on our transit partners to carry traffic from Cloudflare to the ultimate destination network, introducing unnecessary third-party reliance. In contrast, our backbone gives us full control over routing of both internal and external traffic, allowing us to manage it more effectively. This control is crucial because it lets us optimize traffic routes, usually resulting in the lowest latency paths, as previously mentioned. Furthermore, the cost of serving large traffic volumes through the backbone is, on average, more cost-effective than IP transit. This is why we are doubling down on backbone capacity in regions such as Frankfurt, London, Amsterdam, and Paris and Marseille, where we see continuous traffic growth and where connectivity solutions are widely available and competitively priced.
Our backbone serves both internal and external traffic. Internal traffic includes customer traffic using our security or performance products and traffic from Cloudflare’s internal systems that shift data between our data centers. Tiered caching, for example, optimizes our caching delivery by dividing our data centers into a hierarchy of lower tiers and upper tiers. If lower-tier data centers don’t have the content, they request it from the upper tiers. If the upper tiers don’t have it either, they then request it from the origin server. This process reduces origin server requests and improves cache efficiency. Using our backbone to transport the cached content between lower and upper-tier data centers and the origin is often the most cost-effective method, considering the scale of our network. Magic Transit is another example where we attract traffic, by means of BGP anycast, to the Cloudflare data center closest to the end user and implement our DDoS solution. Our backbone transports the clean traffic to our customer’s data center, which they connect through a Cloudflare Network Interconnect (CNI).
External traffic that we carry on our backbone can be traffic from other origin providers like AWS, Oracle, Alibaba, Google Cloud Platform, or Azure, to name a few. The origin responses from these cloud providers are transported through peering points and our backbone to the Cloudflare data center closest to our customer. By leveraging our backbone we have more control over how we backhaul this traffic throughout our network, which results in more reliability and better performance and less dependency on the public Internet.
This interconnection between public clouds, offices, and the Internet with a controlled layer of performance, security, programmability, and visibility running on our global backbone is our Connectivity Cloud.
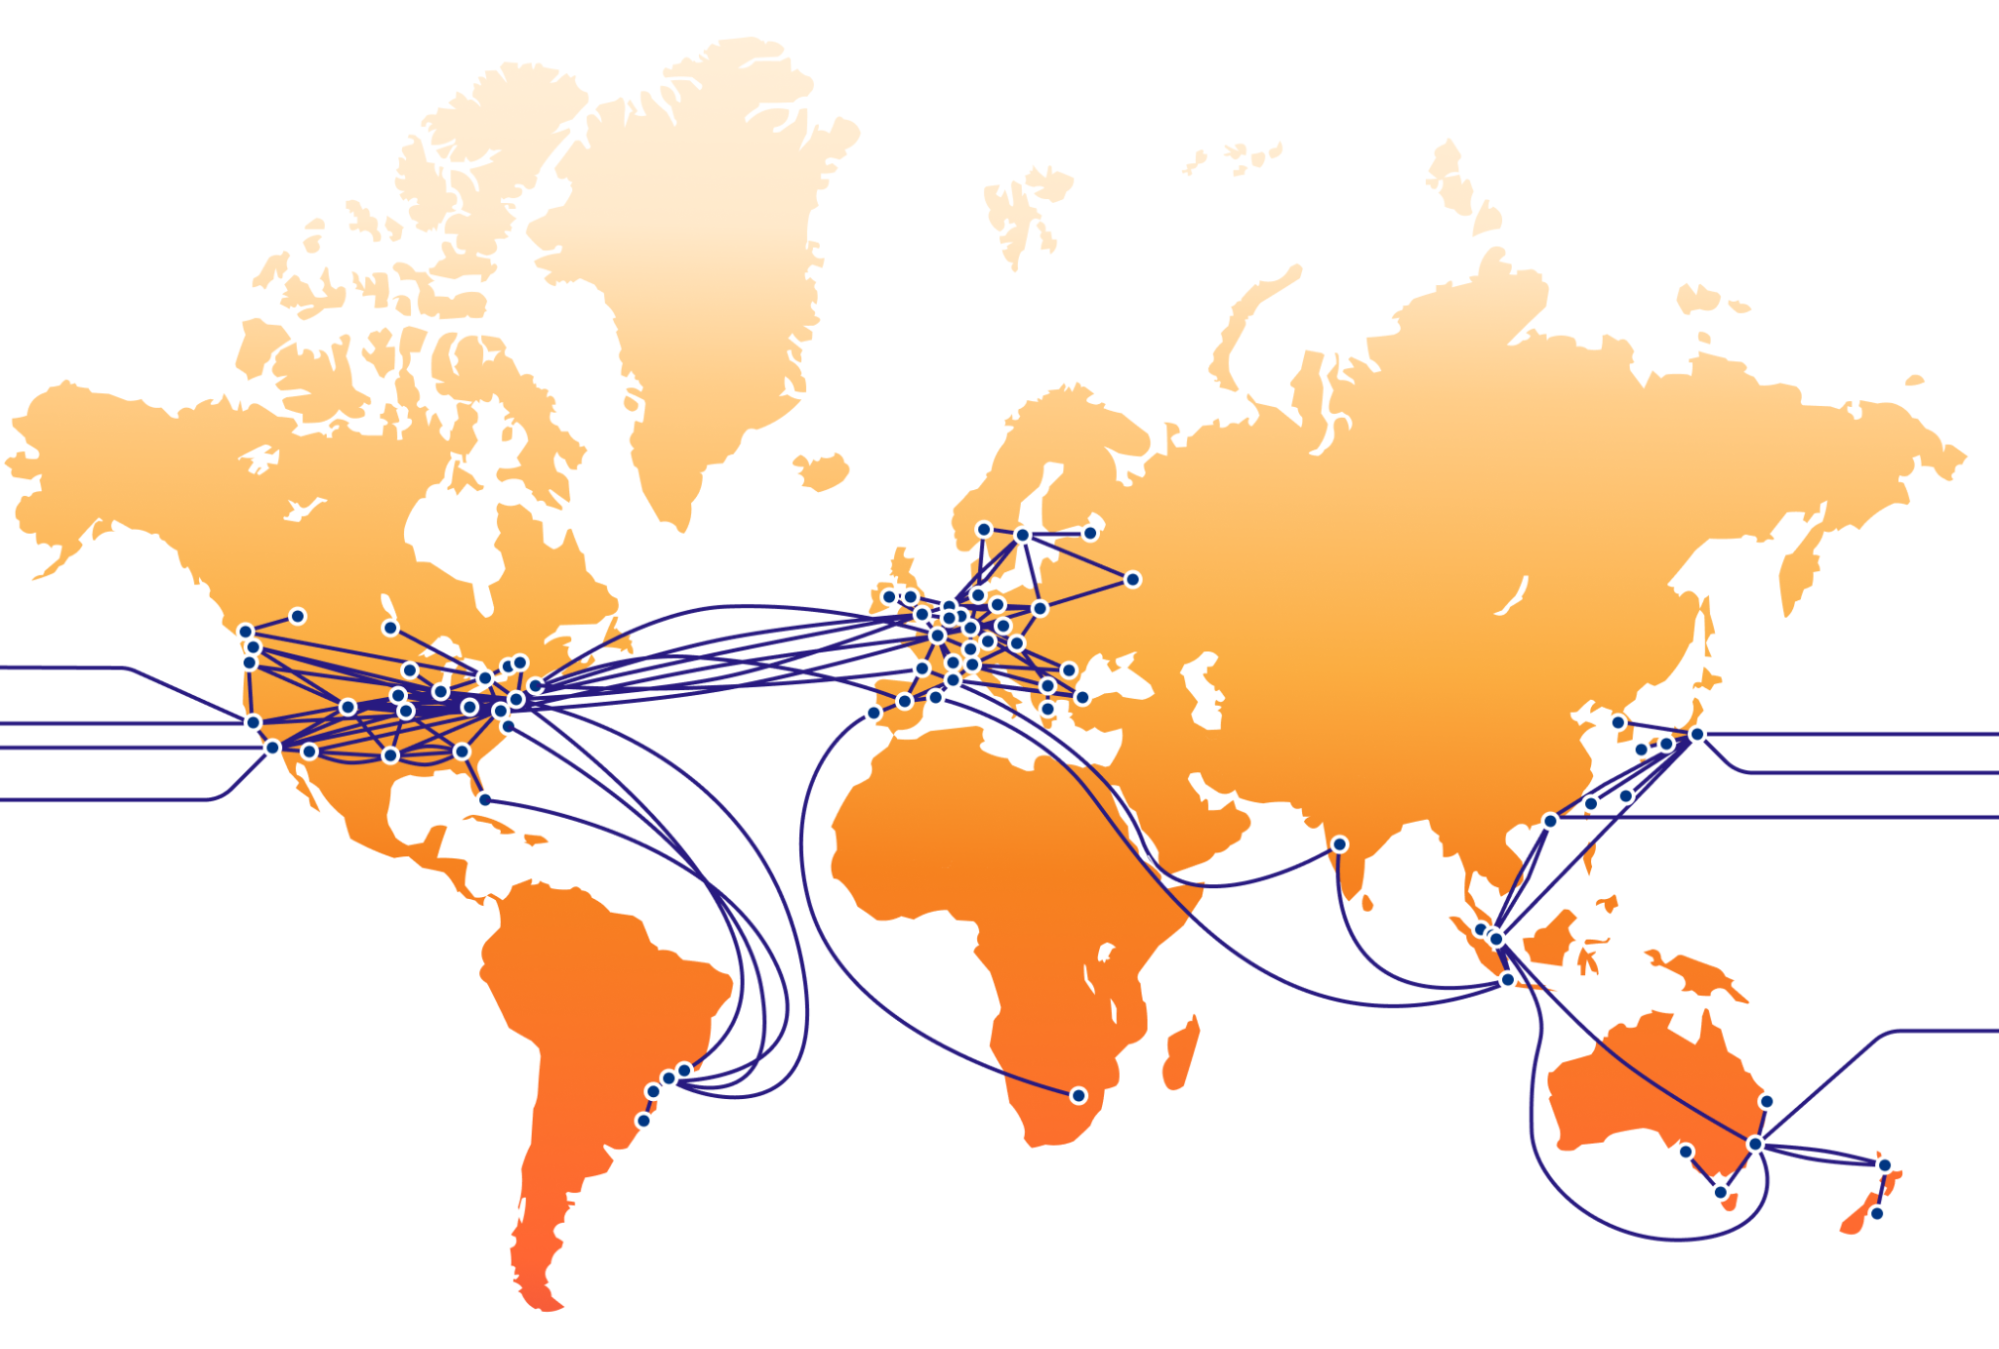
As mentioned in the introduction, we have increased our backbone capacity (Tbps) by more than 500% since 2021. With the addition of sub-sea cable capacity to Africa, we achieved a big milestone in 2023 by completing our global backbone ring. It now reaches six continents through terrestrial fiber and subsea cables.
Building out our backbone within regions where Internet infrastructure is less developed compared to markets like Central Europe or the US has been a key strategy for our latest network expansions. We have a shared goal with regional ISP partners to keep our data flow localized and as close as possible to the end user. Traffic often takes inefficient routes outside the region due to the lack of sufficient local peering and regional infrastructure. This phenomenon, known as traffic tromboning, occurs when data is routed through more cost-effective international routes and existing peering agreements.
Our regional backbone investments in countries like India or Turkey aim to reduce the need for such inefficient routing. With our own in-region backbone, traffic can be directly routed between in-country Cloudflare data centers, such as from Mumbai to New Delhi to Chennai, reducing latency, increasing reliability, and helping us to provide the same level of service quality as in more developed markets. We can control that data stays local, supporting our Data Localization Suite (DLS), which helps businesses comply with regional data privacy laws by controlling where their data is stored and processed.
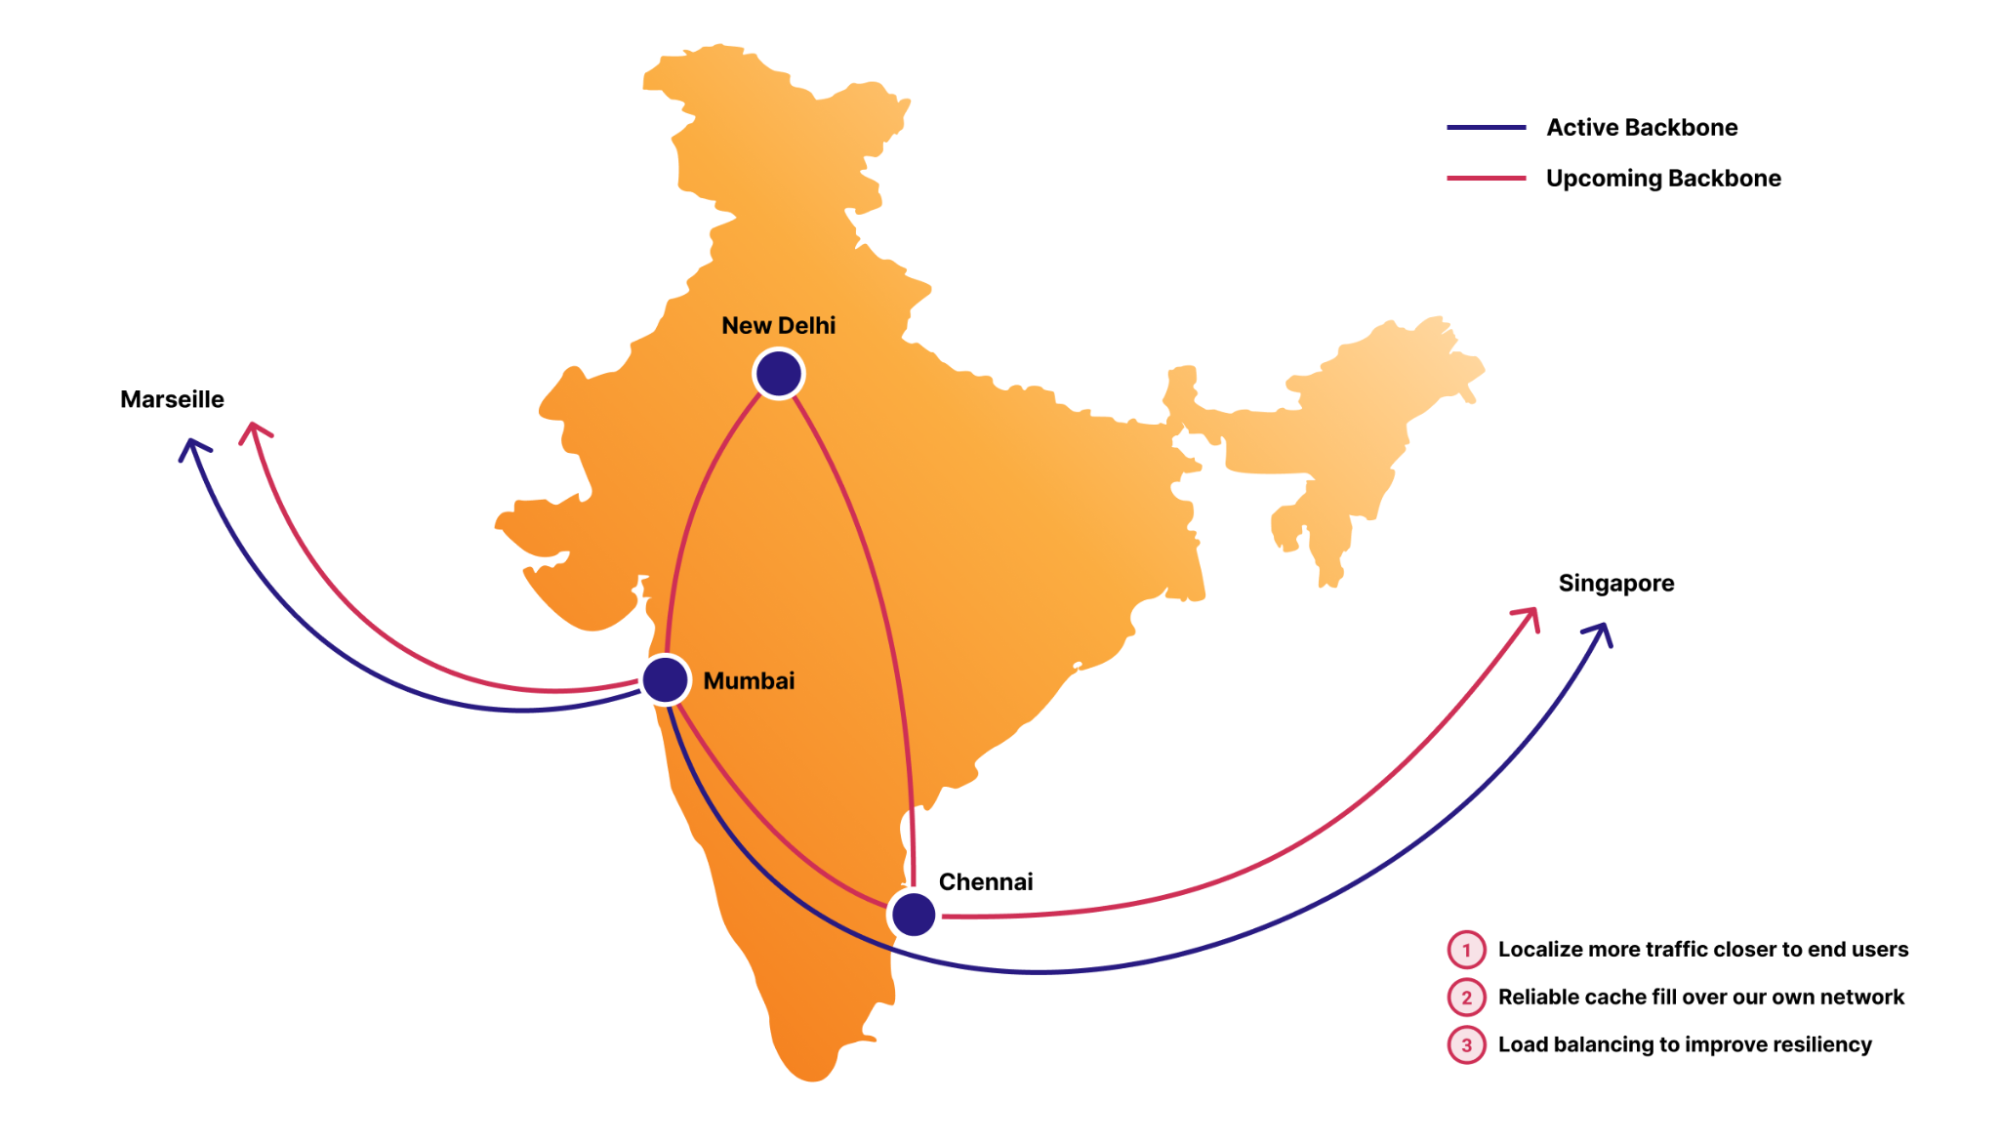
This strategic expansion has not only extended our global reach but has also significantly improved our overall latency. One illustration of this is that since the deployment of our backbone between Lisbon and Johannesburg, we have seen a major performance improvement for users in Johannesburg. Customers benefiting from this improved latency can be, for example, a financial institution running their APIs through us for real-time trading, where milliseconds can impact trades, or our Magic WAN users, where we facilitate site-to-site connectivity between their branch offices.
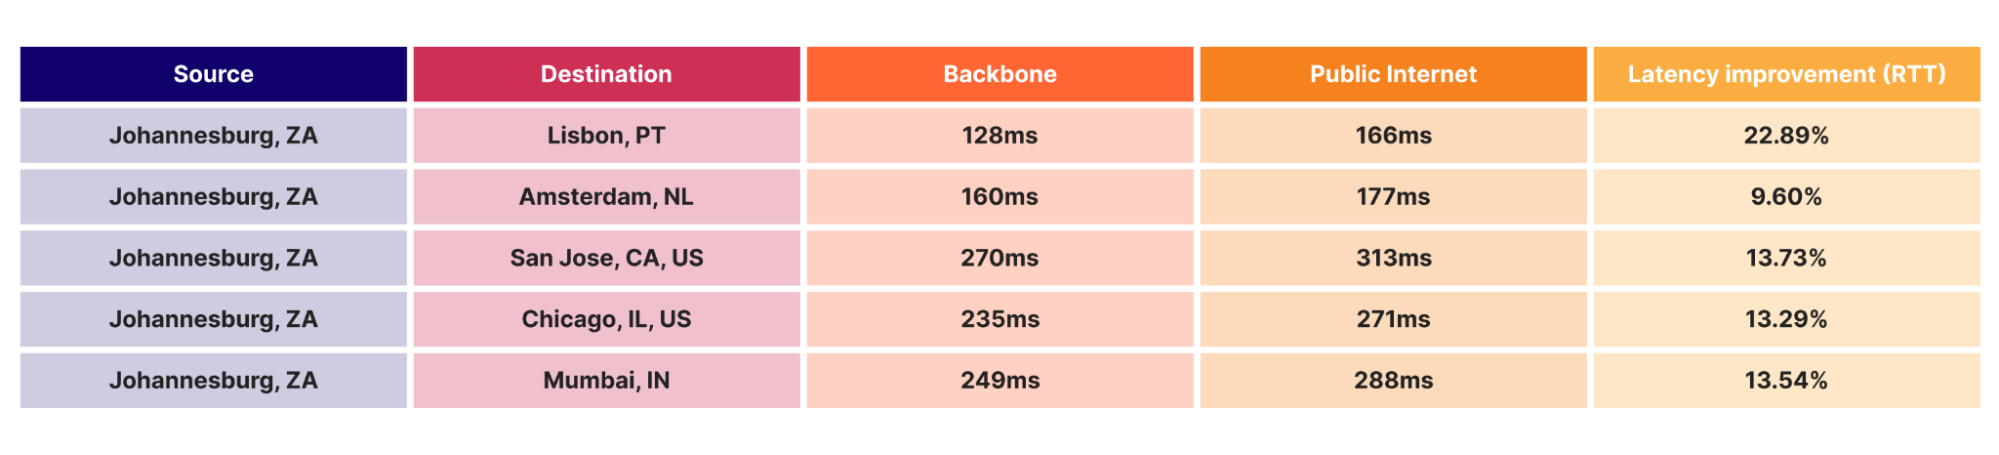
The table above shows an example where we measured the round-trip time (RTT) for an uncached origin fetch, from an end-user in Johannesburg to various origin locations, comparing our backbone and the public Internet. By carrying the origin request over our backbone, as opposed to IP transit or peering, local users in Johannesburg get their content up to 22% faster. By using our own backbone to long-haul the traffic to its final destination, we are in complete control of the path and performance. This improvement in latency varies by location, but consistently demonstrates the superiority of our backbone infrastructure in delivering high performance connectivity.

Consider a navigation system using 1) GPS to identify the route and 2) a highway toll pass that is valid until your final destination and allows you to drive straight through toll stations without stopping. Our backbone works quite similarly.
Our global backbone is built upon two key pillars. The first is BGP (Border Gateway Protocol), the routing protocol for the Internet, and the second is Segment Routing MPLS (Multiprotocol label switching), a technique for steering traffic across predefined forwarding paths in an IP network. By default, Segment Routing provides end-to-end encapsulation from ingress to egress routers where the intermediate nodes execute no route lookup. Instead, they forward traffic across an end-to-end virtual circuit, or tunnel, called a label-switched path. Once traffic is put on a label-switched path, it cannot detour onto the public Internet and must continue on the predetermined route across Cloudflare’s backbone. This is nothing new, as many networks will even run a “BGP Free Core” where all the route intelligence is carried at the edge of the network, and intermediate nodes only participate in forwarding from ingress to egress.
While leveraging Segment Routing Traffic Engineering (SR-TE) in our backbone, we can automatically select paths between our data centers that are optimized for latency and performance. Sometimes the “shortest path” in terms of routing protocol cost is not the lowest latency or highest performance path.

Argo Smart Routing is a service that uses Cloudflare’s portfolio of backbone, transit, and peering connectivity to find the most optimal path between the data center where a user’s request lands and your back-end origin server. Argo may forward a request from one Cloudflare data center to another on the way to an origin if the performance would improve by doing so. Orpheus is the counterpart to Argo, and routes around degraded paths for all customer origin requests free of charge. Orpheus is able to analyze network conditions in real-time and actively avoid reachability failures. Customers with Argo enabled get optimal performance for requests from Cloudflare data centers to their origins, while Orpheus provides error self-healing for all customers universally. By mixing our global backbone using Segment Routing as an underlay with Argo Smart Routing and Orpheus as our connectivity overlay, we are able to transport critical customer traffic along the most optimized paths that we have available.
So how exactly does our global backbone fit together with Argo Smart Routing? Argo Transit Selection is an extension of Argo Smart Routing where the lowest latency path between Cloudflare data center hops is explicitly selected and used to forward customer origin requests. The lowest latency path will often be our global backbone, as it is a more dedicated and private means of connectivity, as opposed to third-party transit networks.
Consider a multinational Dutch pharmaceutical company that relies on Cloudflare’s network and services with our SASE solution to connect their global offices, research centers, and remote employees. Their Asian branch offices depend on Cloudflare’s security solutions and network to provide secure access to important data from their central data centers back to their offices in Asia. In case of a cable cut between regions, our network would automatically look for the best alternative route between them so that business impact is limited.
Argo measures every potential combination of the different provider paths, including our own backbone, as an option for reaching origins with smart routing. Because of our vast interconnection with so many networks, and our global private backbone, Argo is able to identify the most performant network path for requests. The backbone is consistently one of the lowest latency paths for Argo to choose from.
In addition to high performance, we care greatly about network reliability for our customers. This means we need to be as resilient as possible from fiber cuts and third-party transit provider issues. During a disruption of the AAE-1 (Asia Africa Europe-1) submarine cable, this is what Argo saw between Singapore and Amsterdam across some of our transit provider paths vs. the backbone.
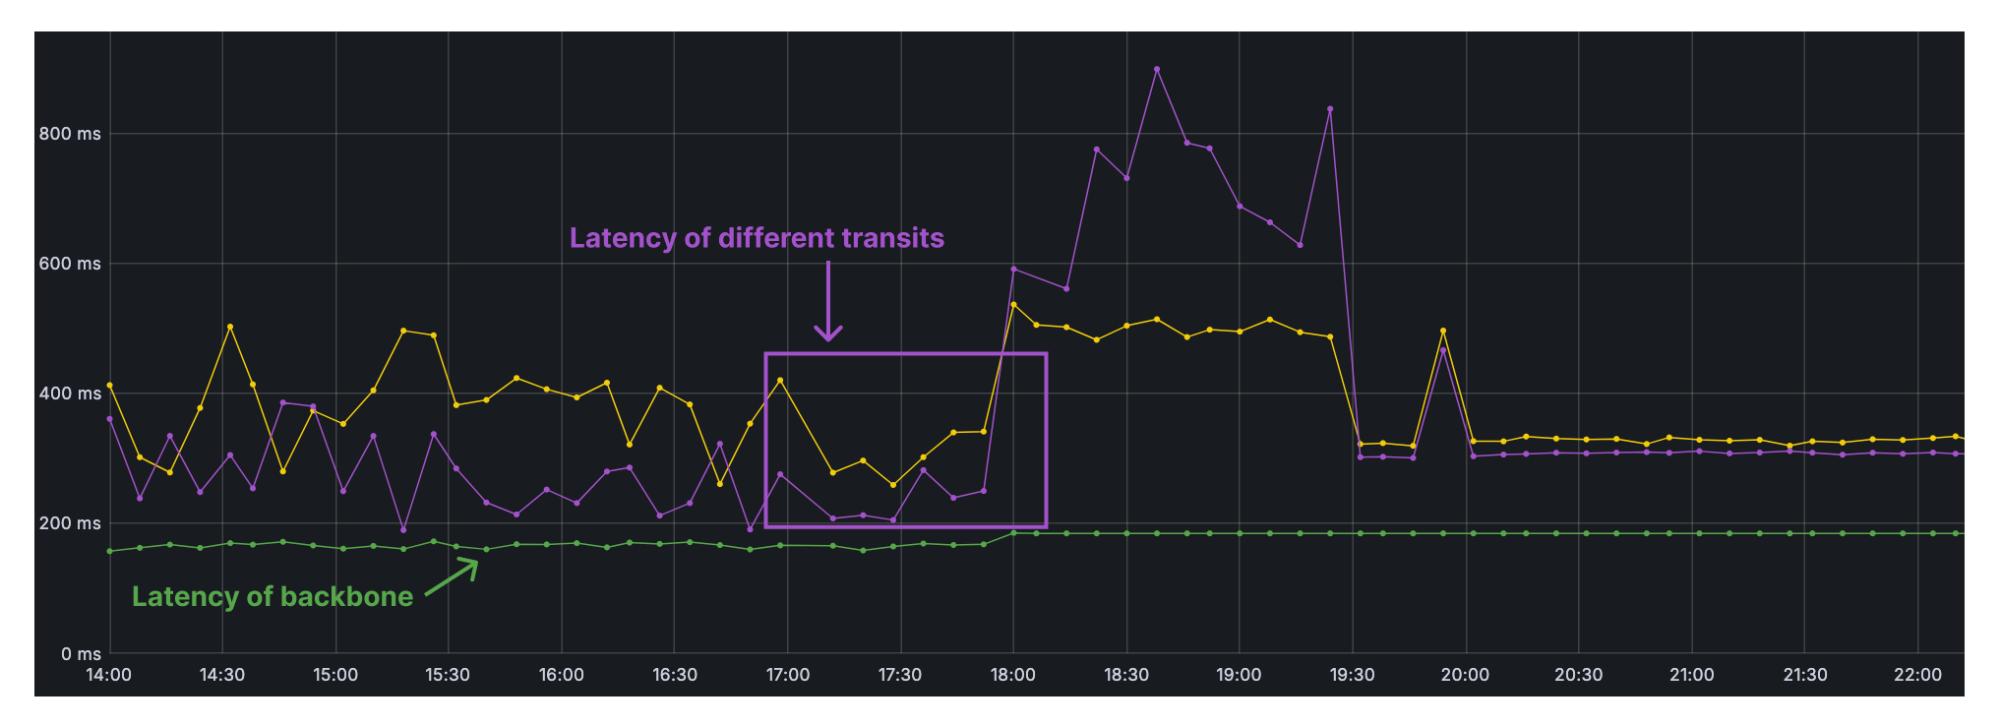
The large (purple line) spike shows a latency increase on one of our third-party IP transit provider paths due to congestion, which was eventually resolved following likely traffic engineering within the provider’s network. We saw a smaller latency increase (yellow line) over other transit networks, but still one that is noticeable. The bottom (green) line on the graph is our backbone, where round-trip time more or less remains flat throughout the event, due to our diverse backbone connectivity between Asia and Europe. Throughout the fiber cut, we remained stable at around 200ms between Amsterdam and Singapore. There was no noticeable network hiccup as was seen on the transit provider paths, so Argo actively leveraged the backbone for optimal performance.

As Argo improves performance in our network, Cloudflare Network Interconnects (CNIs) optimize getting onto it. We encourage our Enterprise customers to use our free CNI’s as on-ramps onto our network whenever practical. In this way, you can fully leverage our network, including our robust backbone, and increase overall performance for every product within your Cloudflare Connectivity Cloud. In the end, our global network is our main product and our backbone plays a critical role in it. This way we continue to help build a better Internet, by improving our services for everybody, everywhere.
If you want to be part of our mission, join us as a Cloudflare network on-ramp partner to offer secure and reliable connectivity to your customers by integrating directly with us. Learn more about our on-ramp partnerships and how they can benefit your business here.