The conversion of the kernel’s memory-management subsystem over to folios was never going to be done in a day.
At a plenary session at the start of the second day of the 2023 Linux Storage, Filesystem,
Memory-Management and BPF Summit, Matthew Wilcox discussed the current
state and future direction of this work. Quite a lot of progress has been
made — and a lot of work remains to be done.
The Debian Technical Committee has announced
a new moratorium on moving files from the root into /usr, a
necessary part of its UsrMerge
project. Many distributions have made this change, but Debian has had
more difficulties than most; LWN last looked at
this project one year ago.
This moratorium lasts until we vote to repeal it. We expect to do
that during the trixie development cycle, and sooner rather than
later. We will continue to facilitate efforts to resolve the
remaining issues that stand in the way of safely repealing the
moratorium.
Trixie is the codename
for Debian 13, the upcoming major release cycle.
A new development in the NVMe world was the subject of a combined storage
and filesystem session led by Stephen Bates at the 2023 Linux Storage, Filesystem,
Memory-Management and BPF Summit. Computational storage namespaces
will allow NVMe devices to offer various types of computation—anything from
simple compression through complex queries and data manipulations—to be
performed
on the data stored on the device.
If your decentralized application (dApp) must interact directly with AWS services like Amazon S3 or Amazon API Gateway, you must authorize your users by granting them temporary AWS credentials. This solution uses Amazon Cognito in combination with your users’ digital wallet to obtain valid Amazon Cognito identities and temporary AWS credentials for your users. It also demonstrates how to use Amazon API Gateway to secure and proxy API calls to third-party Web3 APIs.
In this blog, you will build a fully serverless decentralized application (dApp) called “NFT Gallery”. This dApp permits users to look up their own non-fungible token (NFTs) or any other NFT collections on the Ethereum blockchain using one of the following two Web3 providers HTTP APIs: Alchemy or Moralis. These APIs help integrate Web3 components in any web application without Blockchain technical knowledge or access.
Solution overview
The user interface (UI) of your dApp is a single-page application (SPA) written in JavaScript using ReactJS, NextJS, and Tailwind CSS.
The dApp interacts with Amazon Cognito for authentication and authorization, and with Amazon API Gateway to proxy data from the backend Web3 providers’ APIs.
Architecture diagram
Figure 1. Architecture diagram showing authentication and API request proxy solution for Web3
You’ll use AWS SAM as your framework to define, build, and deploy your backend resources. AWS SAM is built on top of AWS CloudFormation and enables developers to define serverless components using a simpler syntax.
backend: contains the AWS SAM Template template.yaml. Examine the template.yaml file for more information about the resources deployed in this project.
dapp: contains the code for the dApp
1. Go to the backend folder and copy the prod.parameters.example file to a new file called prod.parameters. Edit it to add your Alchemy and Moralis API keys.
3. You can now deploy the SAM Template by running the following command (review the sam deploy Developer Guide).
sam deploy --parameter-overrides $(cat prod.parameters) --capabilities CAPABILITY_NAMED_IAM --guided --confirm-changeset
4. SAM will ask you some questions and will generate a samconfig.toml containing your answers.
You can edit this file afterwards as desired. Future deployments will use the .toml file and can be run using sam deploy. Don’t commit the samconfig.toml file to your code repository as it contains private information.
Your CloudFormation stack should be deployed after a few minutes. The Outputs should show the resources that you must reference in your web application located in the dapp folder.
Run the dApp
You can now run your dApp locally.
1. Go to the dapp folder and copy the .env.example file to a new file named .env. Edit this file to add the backend resources values needed by the dApp. Follow the instructions in the .env.example file.
2. Run the following command to install the JavaScript dependencies:
yarn
3. Start the development web server locally by running:
You can access your dApp from the internet with the URL of the CloudFront distribution. It is visible in your CloudFormation stack Output tab in the AWS Management Console, or as output of the sam deploy command.
For now, your S3 bucket is empty. Build the dApp for production and upload the code to the S3 bucket by running these commands:
cd dapp yarn build cd out aws s3 sync . s3://${BUCKET_NAME}
Replace ${BUCKET_NAME} by the name of your S3 bucket.
Automate deployment using SAM Pipelines
SAM Pipelines automatically generates deployment pipelines for serverless applications. If changes are committed to your Git repository, it automates the deployment of your CloudFormation stack and dApp code.
With SAM Pipeline, you can choose a Git provider like AWS CodeCommit, and a build environment like AWS CodePipeline to automatically provision and manage your deployment pipeline. It also supports GitHub Actions.
Host your dApp using Interplanetary File System (IPFS)
IPFS is a good solution to host dApps in a decentralized way. IPFS Gateway can serve as Origin to your CloudFront distribution and serve IPFS content over HTTP.
dApps are often hosted on IPFS to increase trust and transparency. With IPFS, your web application source code and assets are not tied to a DNS name and a specific HTTP host. They will live independently on the IPFS network.
Your dApp is usable by both authenticated and unauthenticated users. Unauthenticated users can look up NFT collections while authenticated users can also look up their own NFTs.
In your dApp, there is no login/password combination or Identity Provider (IdP) in place to authenticate your users. Instead, users connect their digital wallet to the web application.
You can create a custom authentication flow by implementing an Amazon Cognito custom authentication challenge, which uses AWS Lambda triggers. This challenge requires your users to sign a generated message using their digital wallet. If the signature is valid, it confirms that the user owns this wallet address. The wallet address is then used as a user identifier in the Amazon Cognito user pool.
Figure 2 details the Amazon Cognito authentication process. Three Lambda functions are used to perform the different authentication steps.
Figure 2. Amazon Cognito authentication process
To define the authentication success conditions, the Amazon Cognito user pool calls the “Define auth challenge” Lambda function (defineAuthChallenge.js).
To generate the challenge, Amazon Cognito calls the “Create auth challenge” Lambda function (createAuthChallenge.js). In this case, it generates a random message for the user to sign. Amazon Cognito forwards the challenge to the dApp, which prompts the user to sign the message using their digital wallet and private key. The dApp then returns the signature to Amazon Cognito as a response.
To verify if the user’s wallet effectively signed the message, Amazon Cognito forwards the user’s response to the “Verify auth challenge response” Lambda function (verifyAuthChallengeResponse.js). If True, then Amazon Cognito authenticates the user and creates a new identity in the user pool with the wallet address as username.
Finally, Amazon Cognito returns a JWT Token to the dApp containing multiple claims, one of them being cognito:username, which contains the user’s wallet address. These claims will be passed to your AWS Lambda event and Amazon API Gateway mapping templates allowing your backend to securely identify the user making those API requests.
Authorization
Amazon API Gateway offers multiple ways of authorizing access to an API route. This example showcases three different authorization methods:
AWS_IAM: Authorization with IAM Roles. IAM roles grant access to specific API routes or any other AWS resources. The IAM Role assumed by the user is granted by Amazon Cognito identity pool.
COGNITO_USER_POOLS: Authorization with Amazon Cognito user pool. API routes are protected by validating the user’s Amazon Cognito token.
NONE: No authorization. API routes are open to the public internet.
API Gateway backend integrations
HTTP proxy integration
The HTTP proxy integration method allows you to proxy HTTP requests to another API. The requests and responses can passthrough as-is, or you can modify them on the fly using Mapping Templates.
This method is a cost-effective way to secure access to any third-party API. This is because your third-party API keys are stored in your API Gateway and not on the frontend application.
You can also activate caching on API Gateway to reduce the amount of API calls made to the backend APIs. This will increase performance, reduce cost, and control usage.
Inspect the GetNFTsMoralisGETMethod and GetNFTsAlchemyGETMethod resources in the SAM template to understand how you can use Mapping Templates to modify the headers, path, or query string of your incoming requests.
Lambda proxy integration
API Gateway can use AWS Lambda as backend integration. Lambda functions enable you to implement custom code and logic before returning a response to your dApp.
In the backend/src folder, you will find two Lambda functions:
getNFTsMoralisLambda.js: Calls Moralis API and returns raw response
getNFTsAlchemyLambda.js: Calls Alchemy API and returns raw response
To access your authenticated user’s wallet address from your Lambda function code, access the cognito:username claim as follows:
var wallet_address = event.requestContext.authorizer.claims["cognito:username"];
Using Amplify Libraries in the dApp
The dApp uses the AWS Amplify Javascript Libraries to interact with Amazon Cognito user pool, Amazon Cognito identity pool, and Amazon API Gateway.
With Amplify Libraries, you can interact with the Amazon Cognito custom authentication flow, get AWS credentials for your frontend, and make HTTP API calls to your API Gateway endpoint.
The Amplify Auth library is used to perform the authentication flow. To sign up, sign in, and respond to the Amazon Cognito custom challenge, use the Amplify Auth library. Examine the ConnectButton.js and user.js files in the dapp folder.
To make API calls to your API Gateway, you can use the Amplify API library. Examine the api.js file in the dApp to understand how you can make API calls to different API routes. Note that some are protected by AWS_IAM authorization and others by COGNITO_USER_POOL.
Based on the current authentication status, your users will automatically assume the CognitoAuthorizedRole or CognitoUnAuthorizedRole IAM Roles referenced in the Amazon Cognito identity pool. AWS Amplify will automatically use the credentials associated with your AWS IAM Role when calling an API route protected by the AWS_IAM authorization method.
Amazon Cognito identity pool allows anonymous users to assume the CognitoUnAuthorizedRole IAM Role. This allows secure access to your API routes or any other AWS services you configured, even for your anonymous users. Your API routes will then not be publicly available to the internet.
Cleaning up
To avoid incurring future charges, delete the CloudFormation stack created by SAM. Run the sam delete command or delete the CloudFormation stack in the AWS Management Console directly.
Conclusion
In this blog, we’ve demonstrated how to use different AWS managed services to run and deploy a decentralized web application (dApp) on AWS. We’ve also shown how to integrate securely with Web3 providers’ APIs, like Alchemy or Moralis.
You can use Amazon Cognito user pool to create a custom authentication challenge and authenticate users using a cryptographically signed message. And you can secure access to third-party APIs, using API Gateway and keep your secrets safe on the backend.
Finally, you’ve seen how to host a single-page application (SPA) using Amazon S3 and Amazon CloudFront as your content delivery network (CDN).
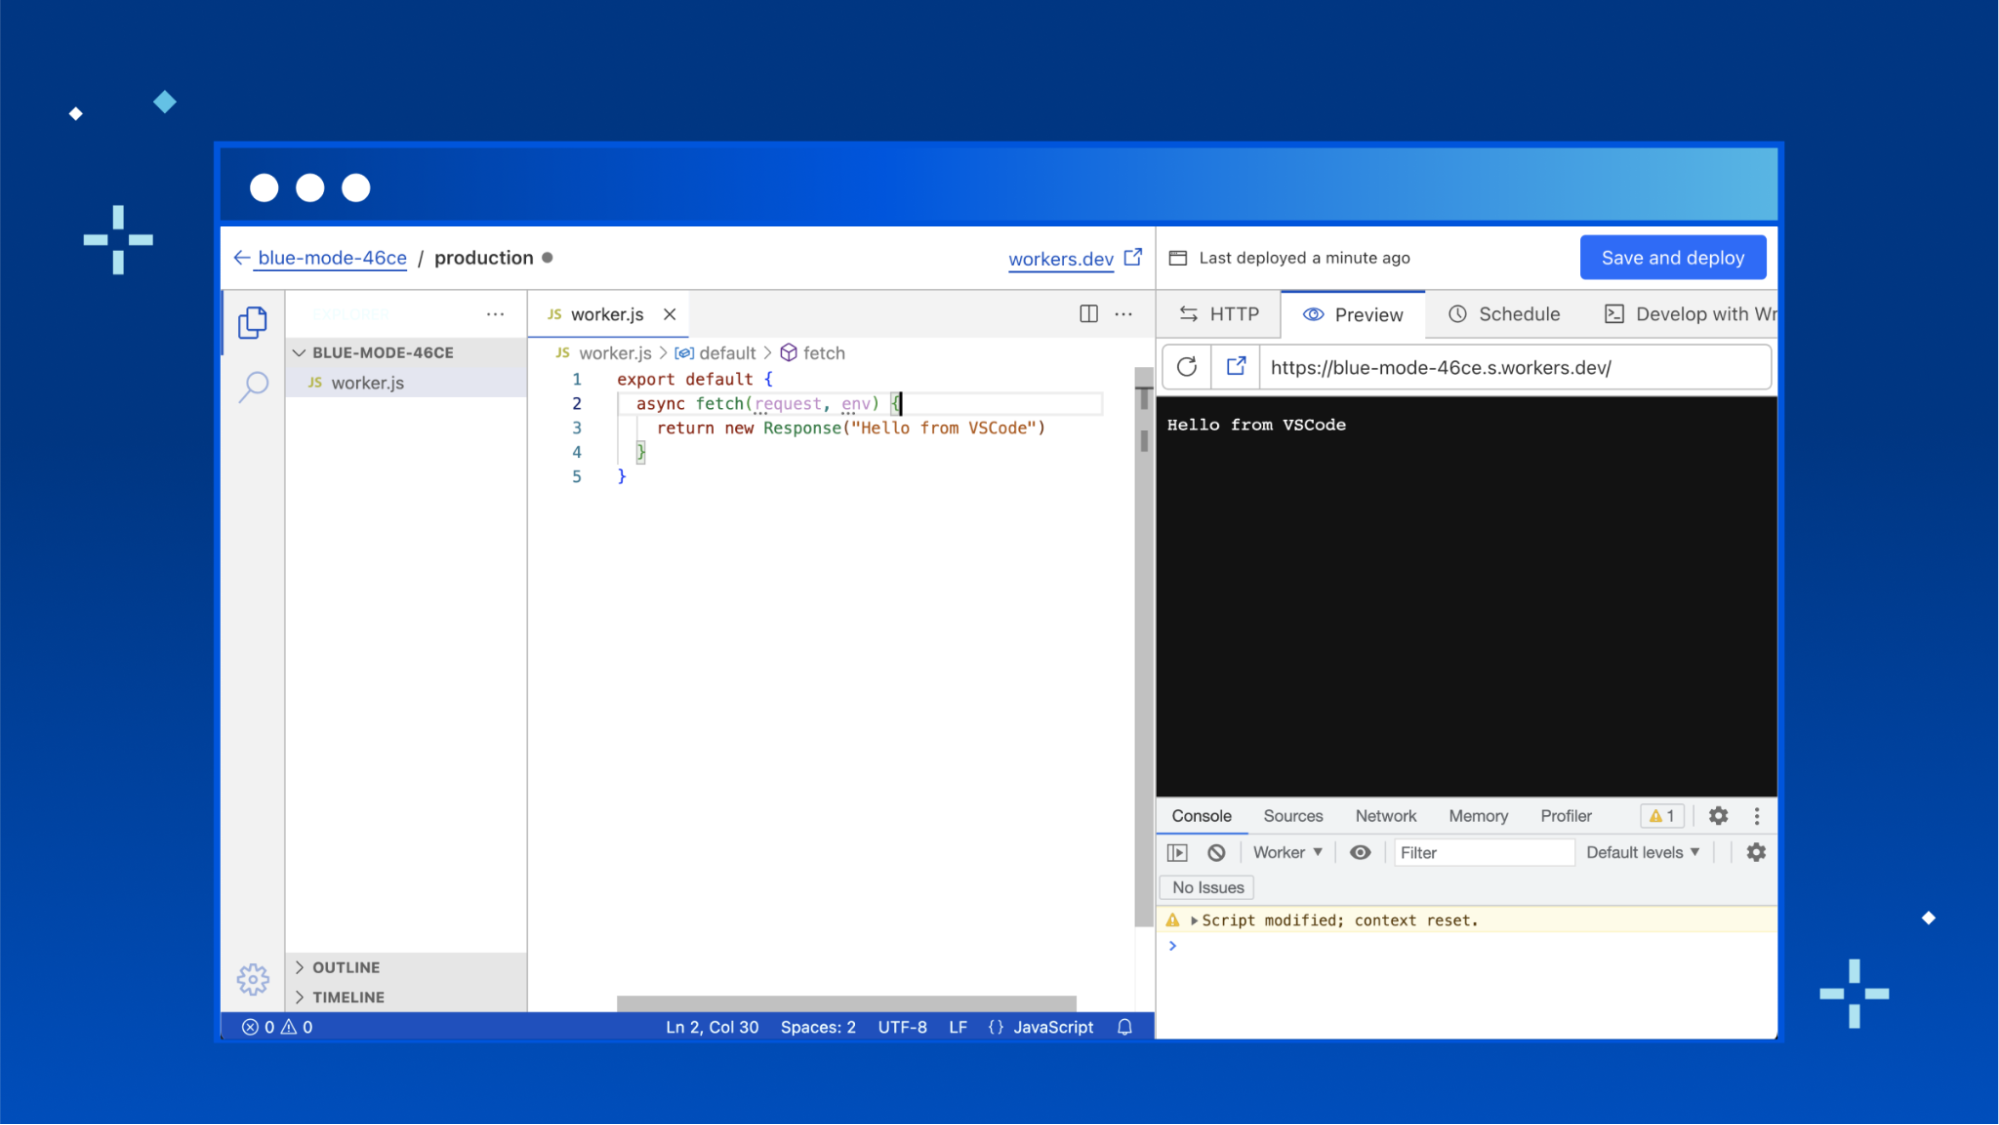
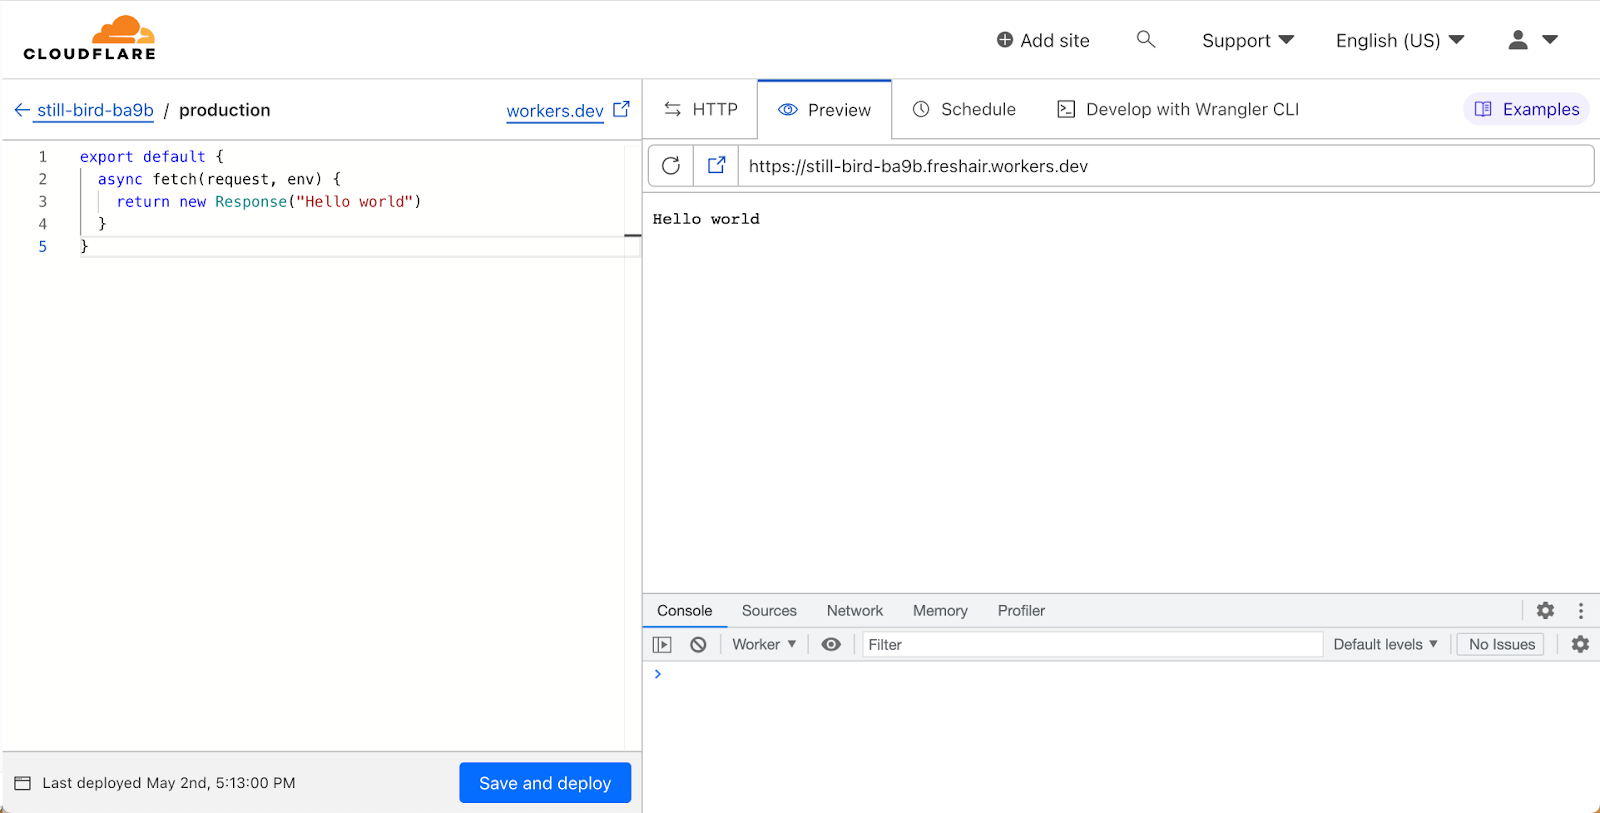
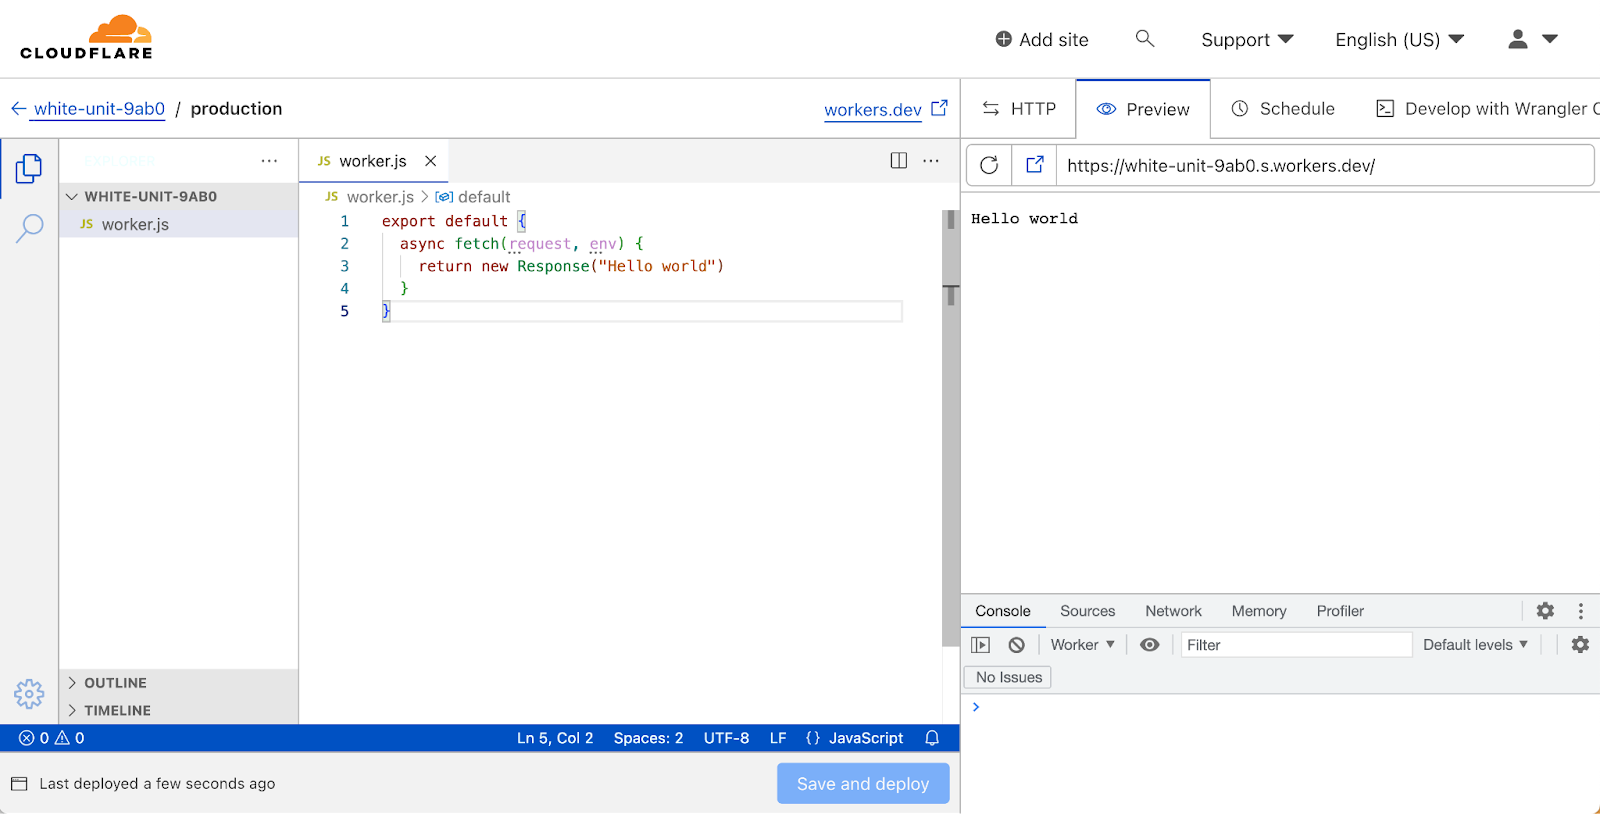
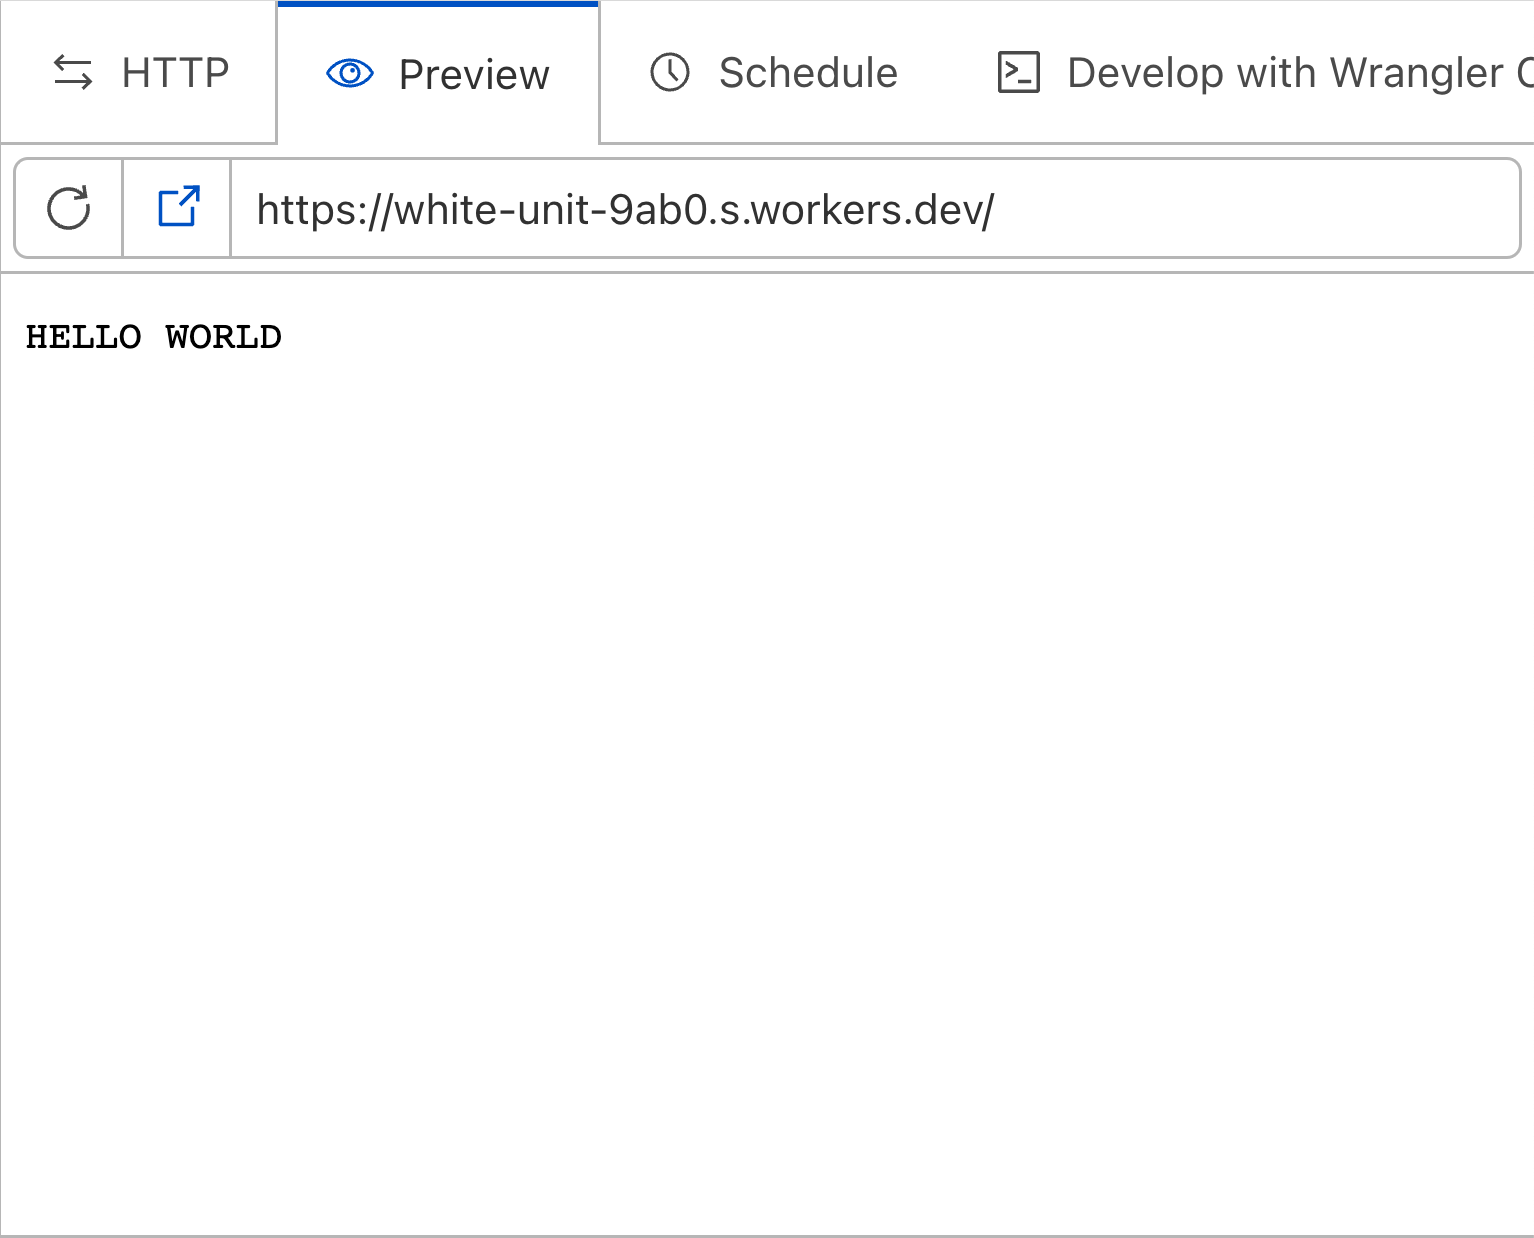
Quick Edit is a development experience for Cloudflare Workers, embedded right within the Cloudflare dashboard. It’s the fastest way to get up and running with a new worker, and lets you quickly preview and deploy changes to your code.
We’ve spent a lot of recent time working on upgrading the local development experience to be as useful as possible, but the Quick Edit experience for editing Workers has stagnated since the release of workers.dev. It’s time to give Quick Edit some love and bring it up to scratch with the expectations of today's developers.
Before diving into what’s changed—a quick overview of the current Quick Edit experience:
We used the robust Monaco editor, which took us pretty far—it’s even what VSCode uses under the hood! However, Monaco is fairly limited in what it can do. Developers are used to the full power of their local development environment, with advanced IntelliSense support and all the power of a full-fledged IDE. Compared to that, a single file text editor is a step-down in expressiveness and functionality.
VSCode for Web
Today, we’re rolling out a new Quick Edit experience for Workers, powered by VSCode for Web. This is a huge upgrade, allowing developers to work in a familiar environment. This isn’t just about familiarity though—using VSCode for Web to power Quick Edit unlocks significant new functionality that was previously only possible with a local development setup using Wrangler.
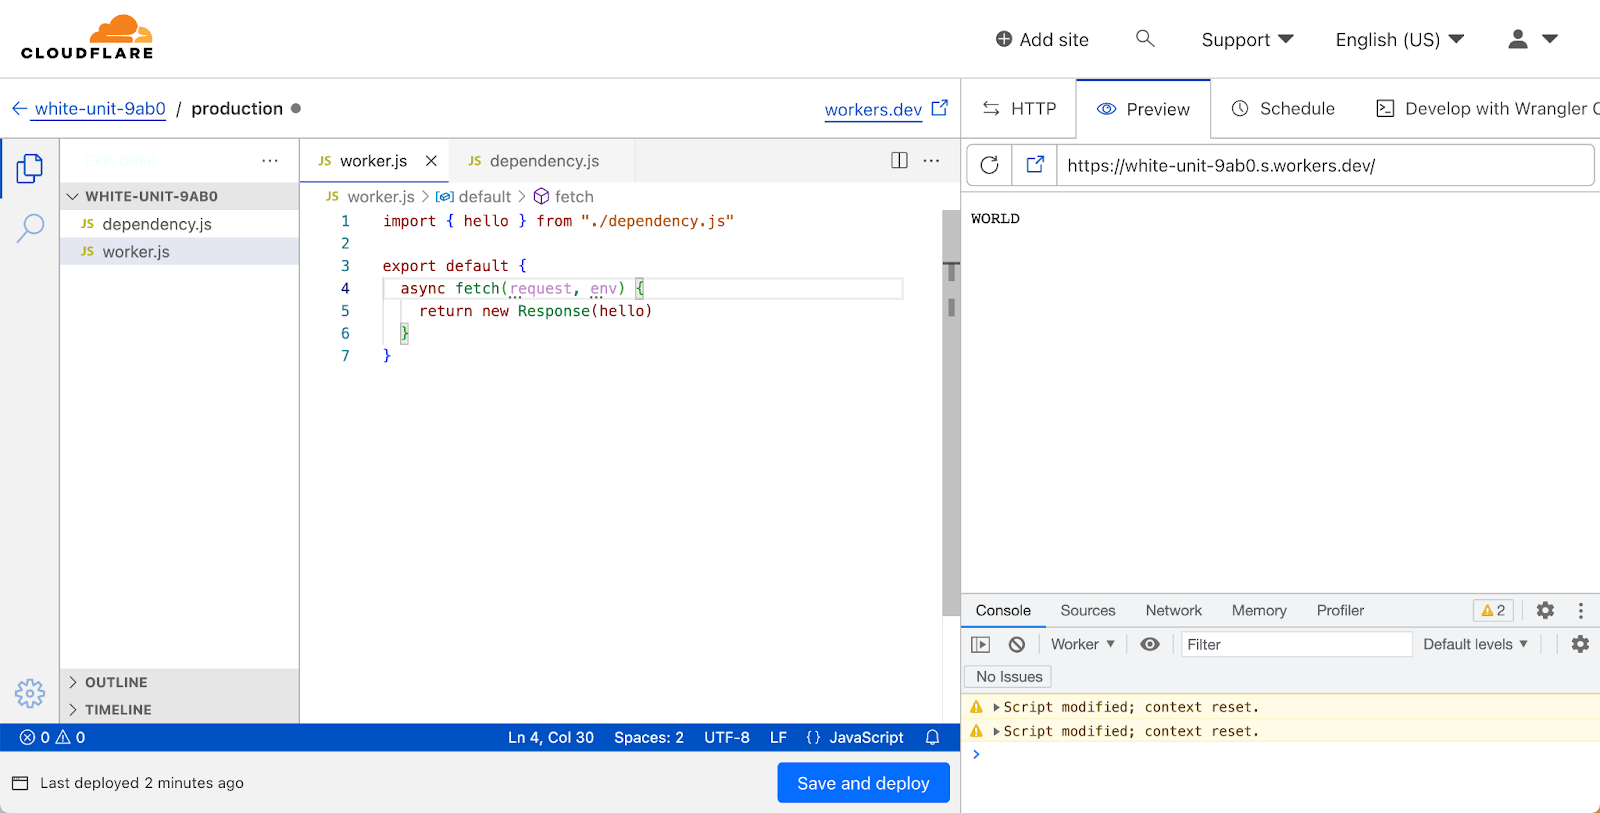
Support for multiple modules!
Cloudflare Workers released support for the Modules syntax in 2021, which is the recommended way to write Workers. It leans into modern JavaScript by leveraging the ES Module syntax, and lets you define Workers by exporting a default object containing event handlers.
There are two sides of the coin when it comes to ES Modules though: exports and imports. Until now, if you wanted to organise your worker in multiple modules you had to use Wrangler and a local development setup. Now, you’ll be able to write multiple modules in the dashboard editor, and import them, just as you can locally. We haven’t enabled support for importing modules from npm yet, but that’s something we’re actively exploring—stay tuned!
Edge Preview
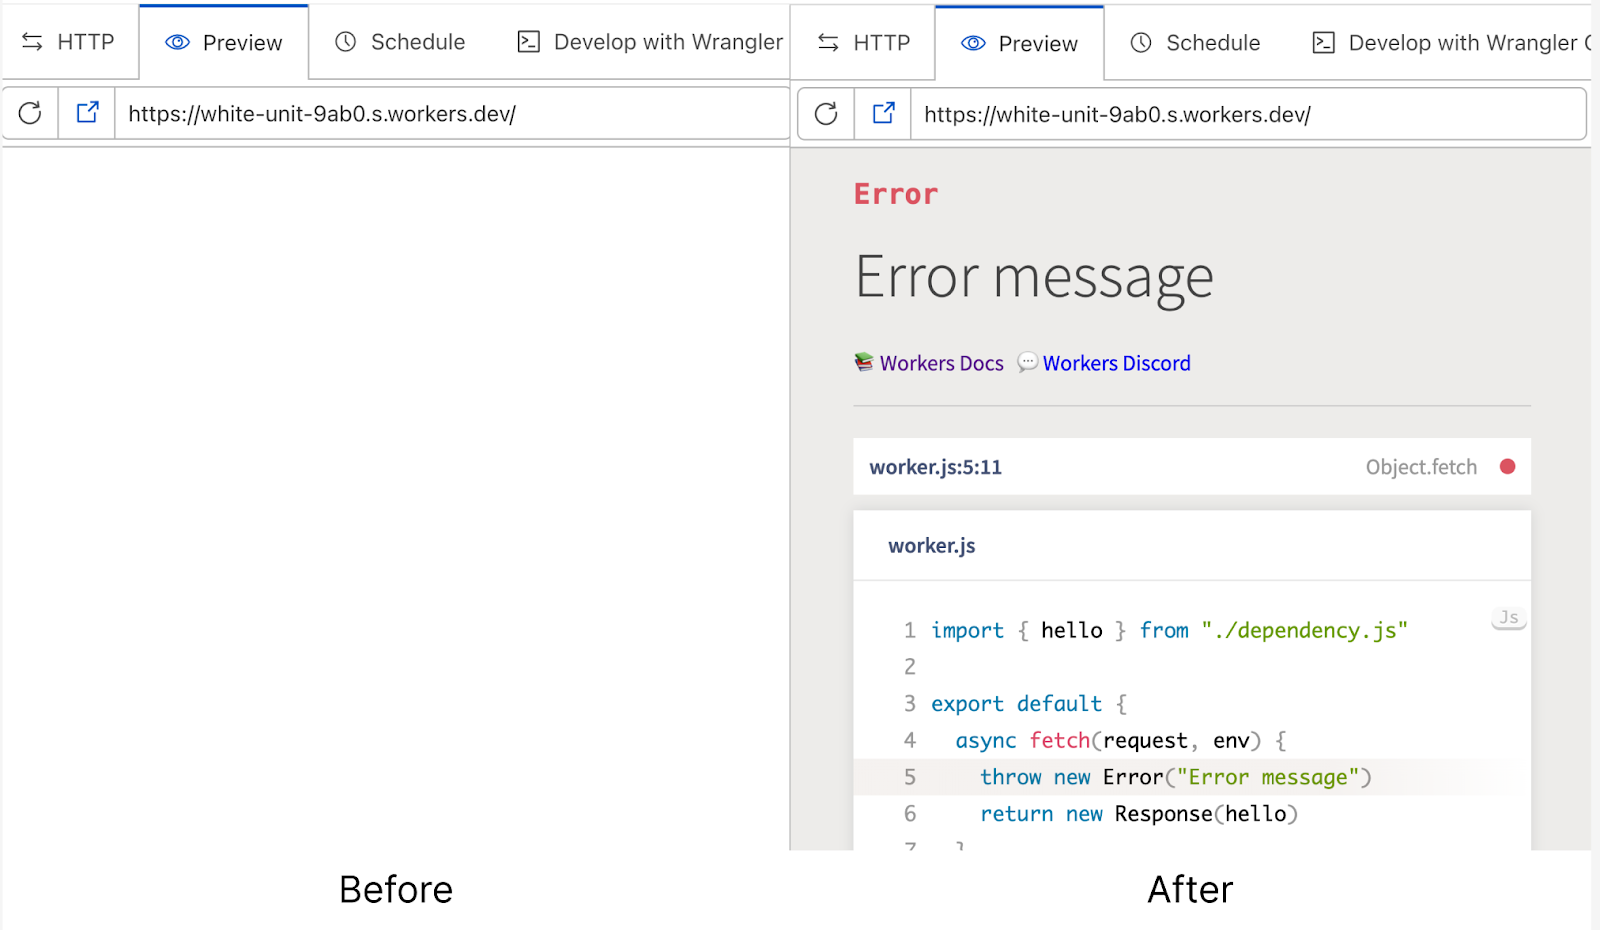
When editing a worker in the dashboard, Cloudflare spins up a preview of your worker, deployed from the code you’re currently working on. This helps speed up the feedback loop when developing a worker, and makes it easy to test changes without impacting production traffic (see also, wrangler dev).
However, the in-dashboard preview hasn’t historically been a high-fidelity match for the deployed Workers runtime. There were various differences in behaviour between the dashboard preview environment and a deployed worker, and it was difficult to have full confidence that a worker that worked in the preview would work in the deployed environment.
That changes today! We’ve changed the dashboard preview environment to use the same system that powers wrangler dev. This means that your preview worker will be run on Cloudflare's global network, the same environment as your deployed workers.
Helpful error messages
In the previous dashboard editor, the experience when your code throws an error wasn’t great. Unless you wrap your worker code in a try-catch handler, the preview will show a blank page when your worker throws an error. This can make it really tricky to debug your worker, and is pretty frustrating. With the release of the new Quick Editor, we now wrap your worker with error handling code that shows helpful error pages, complete with error stack traces and detailed descriptions.
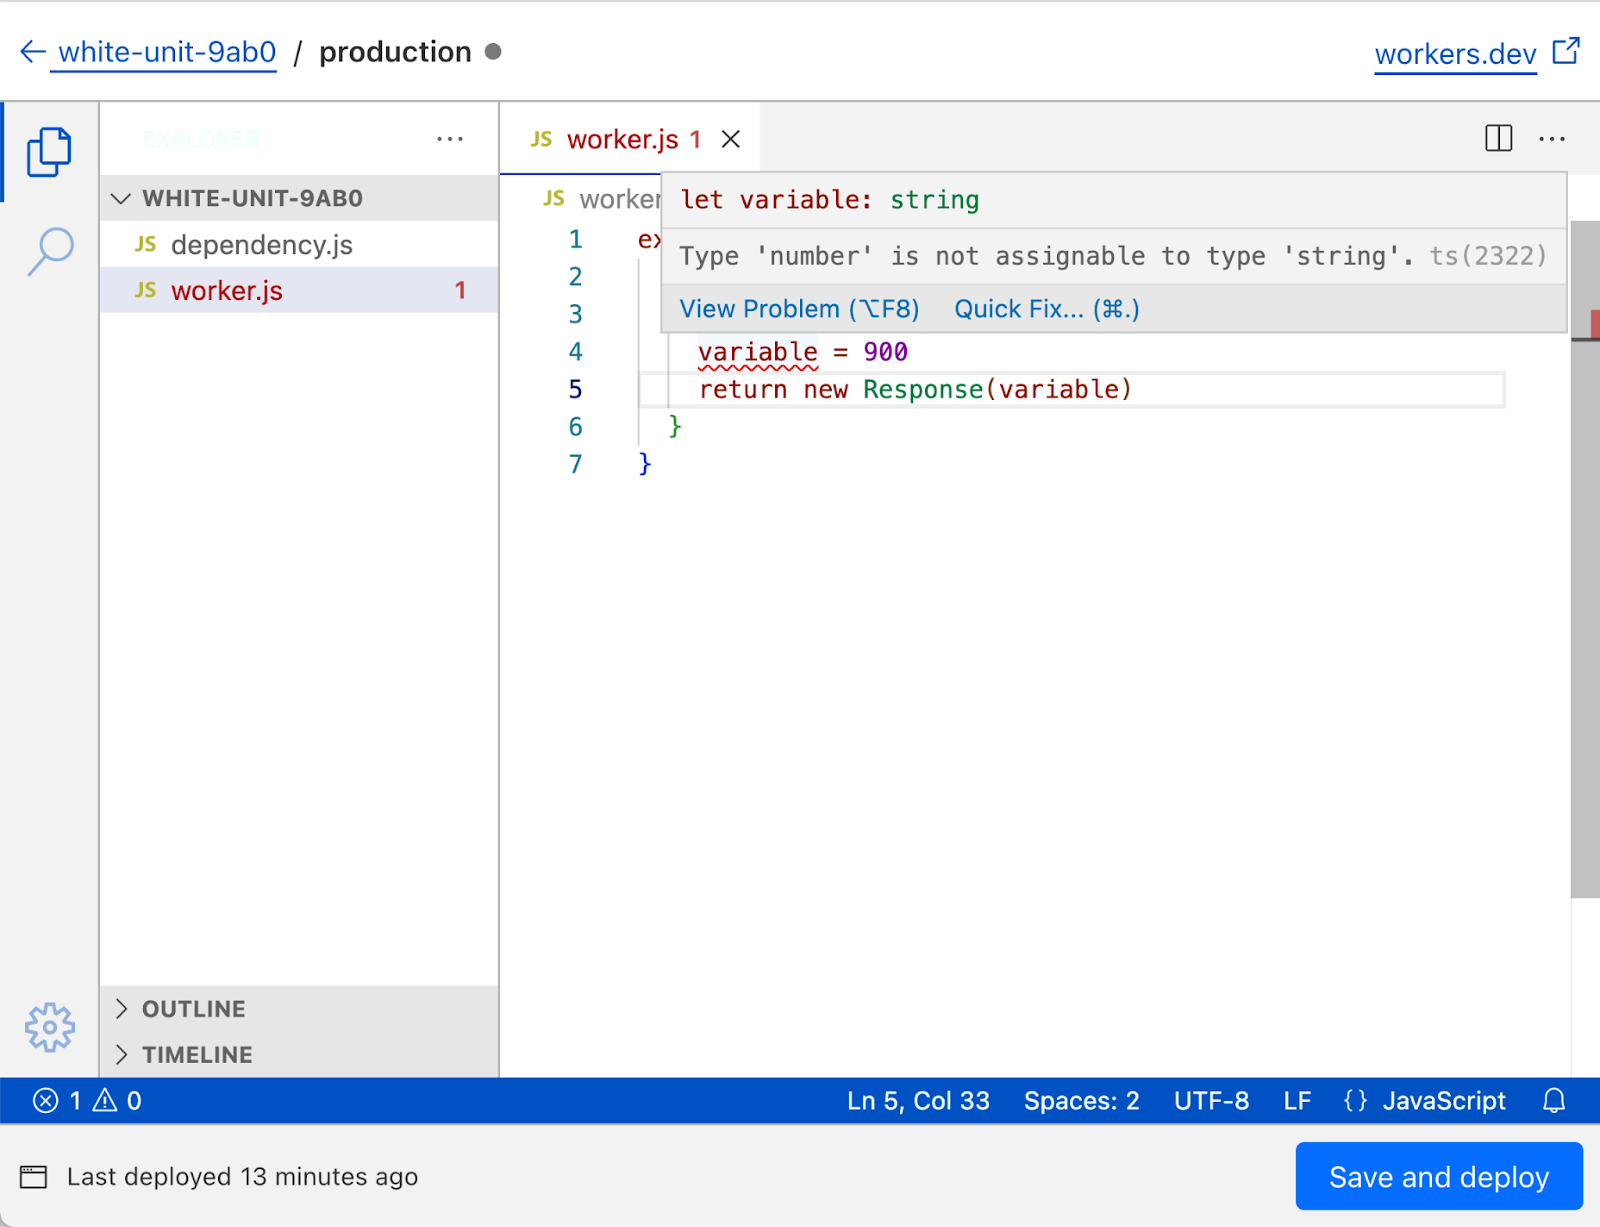
Typechecking
TypeScript is incredibly popular, and developers are more and more used to writing their workers in TypeScript. While the dashboard editor still only allows JavaScript files (and you’re unable to write TypeScript directly) we wanted to support modern typed JavaScript development as much as we could. To that end, the new dashboard editor has full support for JSDoc TypeScript syntax, with the TypeScript environment for workers (link) preloaded. This means that writing code with type errors will show a familiar squiggly red line, and Cloudflare APIs like HTMLRewriter will be autocompleted.
How we built it
It wouldn’t be a Cloudflare blog post without a deep dive into the nuts and bolts of what we’ve built!
First, an overview—how does this work at a high level? We embed VSCode for Web in the Cloudflare dashboard as an iframe, and communicate with it over a MessageChannel. When the iframe is loaded, the Cloudflare dashboard sends over the contents of your worker to a VSCode for Web extension. This extension seeds an in-memory filesystem from which VSCode for Web reads. When you edit files in VSCode for Web, the updated files are sent back over the same MessageChannel to the Cloudflare dashboard, where they’re uploaded as a previewed worker to Cloudflare's global network.
As with any project of this size, the devil is in the details. Let’s focus on a specific area —how we communicate with VSCode for Web’s iframe from the Cloudflare dashboard.
The MessageChannel browser API enables relatively easy cross-frame communication—in this case, from an iframe embedder to the iframe itself. To use it, you construct an instance and access the port1 and port2 properties:
const channel = new MessageChannel()

// The MessagePort you keep a hold of
channel.port1

// The MessagePort you send to the iframe
channel.port2
We store a reference to the MessageChannel to use across component renders with useRef(), since React would otherwise create a new MessageChannel instance with every render.
With that out of the way, all that remains is to send channel.port2 to VSCode for Web’s iframe, via a call to postMessage().
// A reference to the iframe embedding VSCode for Web
const editor = document.getElementById("vscode")

// Wait for the iframe to load
editor.addEventListener('load', () => {
	// Send over the MessagePort
editor.contentWindow.postMessage('PORT', '*', [
channel.port2
]);
});
An interesting detail here is how the MessagePort is sent over to the iframe. The third argument to postMessage() indicates a sequence of Transferable objects. This transfers ownership of port2 to the iframe, which means that any attempts to access it in the original context will throw an exception.
At this stage the dashboard has loaded an iframe containing VSCode for Web, initialised a MessageChannel, and sent over a MessagePort to the iframe. Let’s switch context—the iframe now needs to catch the MessagePort and start using it to communicate with the embedder (Cloudflare’s dashboard).
window.onmessage = (e) => {
if (e.data === "PORT") {
	// An instance of a MessagePort
const port = e.ports[0]
}
};
Relatively straightforward! With not that much code, we’ve set up communication and can start sending more complex messages across. Here’s an example of how we send over the initial worker content from the dashboard to the VSCode for Web iframe:
// In the Cloudflare dashboard

// The modules that make up your worker
const files = [
  {
    path: 'index.js',
    contents: `
		import { hello } from "./world.js"
export default {
			fetch(request) {
				return new Response(hello)
			}
		}`
  },
  {
    path: 'world.js',
    contents: `export const hello = "Hello World"`
  }
];

channel.port1.postMessage({
  type: 'WorkerLoaded',
  // The worker name
  name: 'your-worker-name',
  // The worker's main module
  entrypoint: 'index.js',
  // The worker's modules
  files: files
});
If you’d like to learn more about our approach, you can explore the code we’ve open sourced as part of this project, including the VSCode extension we’ve written to load data from the Cloudflare dashboard, our patches to VSCode, and our VSCode theme.
We’re not done!
This is a huge overhaul of the dashboard editing experience for Workers, but we’re not resting on our laurels! We know there’s a long way to go before developing a worker in the browser will offer the same experience as developing a worker locally with Wrangler, and we’re working on ways to close that gap. In particular, we’re working on adding Typescript support to the editor, and supporting syncing to external Git providers like GitHub and GitLab.
We’d love to hear any feedback from you on the new editing experience—come say hi and ask us any questions you have on the Cloudflare Discord!
Today, we’re thrilled to announce that Pages and Workers will be joining forces into one singular product experience!
We’ve all been there. In a surge of creativity, you visualize in your head the application you want to build so clearly with the pieces all fitting together – maybe a server side rendered frontend and an SQLite database for your backend. You head to your computer with the wheels spinning. You know you can build it, you just need the right tools. You log in to your Cloudflare dashboard, but then you’re faced with an incredibly difficult decision:
Cloudflare Workers or Pages?
Both seem so similar at a glance but also different in the details, so which one is going to make your idea become a reality? What if you choose the wrong one? What are the tradeoffs between the two? These are questions our users should never have to think about, but the reality is, they often do. Speaking with our wide community of users and customers, we hear it ourselves! Decision paralysis hits hard when choosing between Pages and Workers with both products made to build out serverless applications.
In short, we don’t want this for our users — especially when you’re on the verge of a great idea – no, a big idea. That’s why we’re excited to show off the first milestone towards bringing together the best of both beloved products — Workers and Pages into one powerful development platform! This is the beginning of the journey towards a shared fate between the two products, so we wanted to take the opportunity to tell you why we were doing this, what you can use today, and what’s next.
More on the “why”
The relationship between Pages and Workers has always been intertwined. Up until today, we always looked at the two as siblings — each having their own distinct characteristics but both allowing their respective users to build rich and powerful applications. Each product targeted its own set of use cases.
Workers first started as a way to extend our CDN and then expanded into a highly configurable general purpose compute platform. Pages first started as a static web hosting that expanded into Jamstack territory. Over time, Pages began acquiring more of Workers' powerful compute features, while Workers began adopting the rich developer features introduced by Pages. The lines between these two products blurred, making it difficult for our users to understand the differences and pick the right product for their application needs.
We know we can do better to help alleviate this decision paralysis and help you move fast throughout your development experience.
Cool, but what do you mean?
Instead of being forced to make tradeoffs between these two products, we want to bring you the best of the both worlds: a single development platform that has both powerful compute and superfast static asset hosting – that seamlessly integrates with our portfolio of storage products like R2, Queues, D1, and others, and provides you with rich tooling like CI/CD, git-ops workflows, live previews, and flexible environment configurations.
All the details in one place
Today, a lot of our developers use both Pages and Workers to build pieces of their applications. However, they still live in separate parts of the Cloudflare dashboard and don’t always translate from one to the other, making it difficult to combine and keep track of your app’s stack. While we’re still vision-boarding the look and feel, we’re planning a world where users have the ability to manage all of their applications in one central place.
No more scrambling all over the dashboard to find the pieces of your application – you’ll have all the information you need about a project right at your fingertips.
Primitives
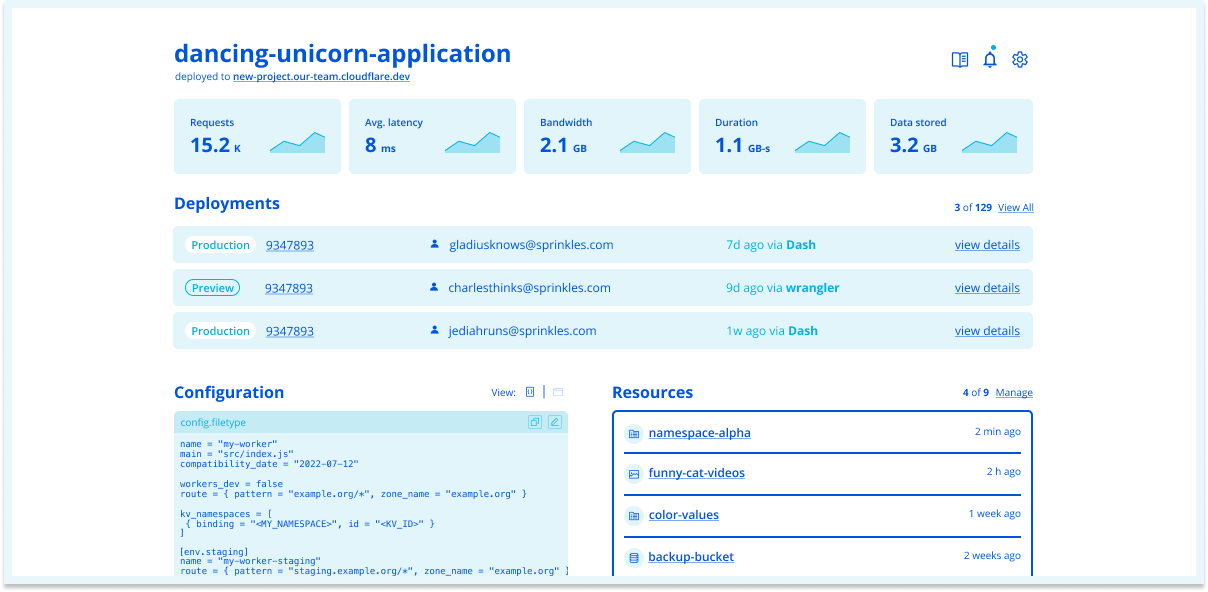
With Pages and Workers converging, we’ll also be redefining the concept of a “project” , introducing a new blank canvas of possibilities to plug and play. Within a project, you will be able to add (1) static assets, (2) serverless functions (Workers), (3) resources or (4) any combination of each.
To unlock the full potential of your application, we’re exploring project capabilities that allow you to auto-provision and directly integrate with resources like KV, Durable Objects, R2 and D1. With the possibility of all of these primitives on a project, more importantly, you'll be able to safely perform rollbacks and previews, as we'll keep the versions of your assets, functions and resources in sync with every deployment. No need to worry about any of them becoming stale on your next deployment.
Deployments
One of Pages’ most notable qualities is its git-ops centered deployments. In our converged world, you’ll be able to optionally connect, build and deploy git repos that contain any combination of static assets, serverless functions and bindings to resources, as well as take advantage of the same high-performance CI system that exists in Pages today.
Like Pages, you will be able to preview deployments of your project with unique URLs protected by Cloudflare Access, available in your PRs or via Wrangler command. Because we know that great ideas take lots of vetting before the big release, we’ll also have a first-class concept of environments to enable testing in different setups.
Local development
Arguably one of the most important parts to consider is our local development story in a post-converged world. This developer experience should be no different from how we’re converging the products. In the future, as you work with our Wrangler CLI, you can expect a unified and predictable set of commands to use on your project – e.g. a simple wrangler dev and wrangler deploy. Using a configuration file that applies to your entire project along with all of its components, you can have the confidence that your command will act on the entire project – not just pieces of it!
What are the benefits?
With Workers and Pages converging, we’re not just unlocking all the golden developer features of each product into one development platform. We’re bringing all the performance, cost and load benefits too. This includes:
Super low latency with globally distributed static assets and compute on our network that is just 50ms away from 95% of Internet-connected world-wide population.
Free egress and also free static asset hosting.
Standards-based JavaScript runtime with seamless compatibility across the packages and libraries you're already familiar with.
Seamless migrations for all
If you’re already a Pages or Workers user and are starting to get nervous about what this means for your existing projects – never fear. As we build out this merged architecture, seamless migration is our top priority and the North Star for every step on the way to a unified development platform. Existing projects on both Pages and Workers will continue to work without users needing to lift a finger. Instead, you'll see more and more features become available to enrich your existing projects and workflows, regardless of the product you started with.
What’s new today?
We’ll be working over the next year to converge Pages and Workers into one singular experience, blending not only the products themselves but also our product, engineering and design teams behind the scenes.
While we can’t wait to welcome you to the new converged world, this change unfortunately won’t happen overnight. We’re planning to hit some big but incremental milestones over the next few quarters to ensure a smooth transition into convergence, and this Developer Week, we’re excited to take our first step toward convergence. In the dashboard, things might feel a bit different!
Get started together
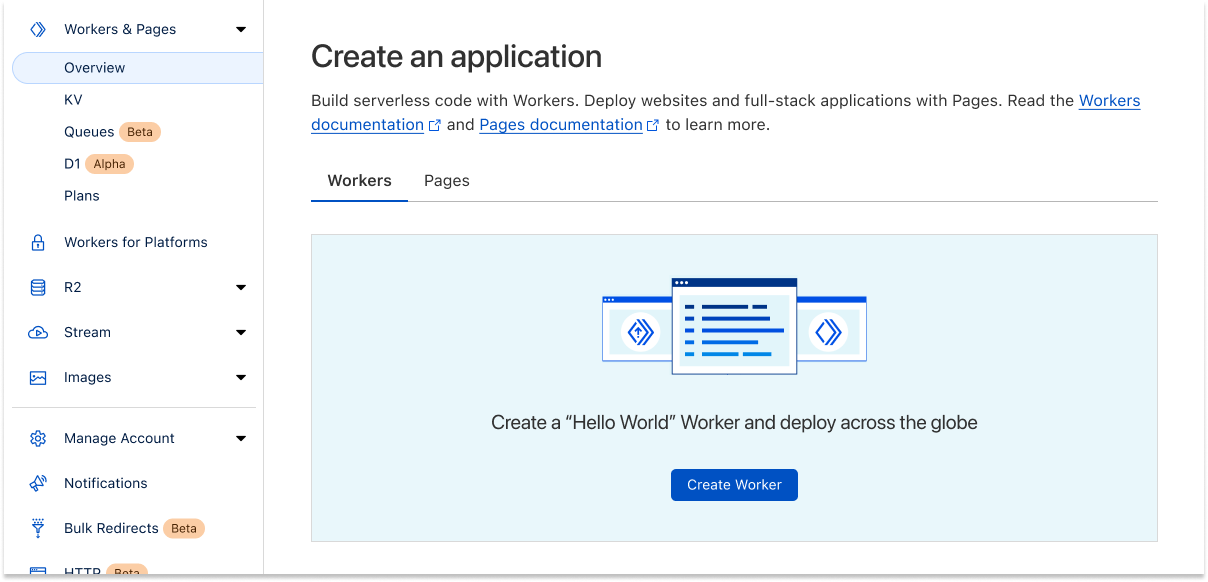
Combining the onboarding experience for Pages and Workers into one flow, you’ll notice some changes on our dashboard when you’re creating a project. We’re slowly bringing the two products closer together by unifying the creation flow giving you access to create either a Pages project or Worker from one screen.
Go faster with templates
We understand the classic developer urge to immediately get hands dirty and hit the ground running on their big vision. We’re making it easier than ever to go from an idea to an application that’s live on the Cloudflare network. In a couple of clicks, you can deploy a starter template, ranging from a simple Hello World Worker to a ChatGPT plugin. In the future, we’re working on Pages templates in our dashboard, allowing you to automatically create a new repo and deploy starter full-stack apps with a couple of buttons.
Your favorite full stack frameworks at your fingertips
We're not stopping with static templates or our dashboard either. Bringing the framework of your choice doesn't mean you have to leave behind the tools you already know and love. If you’re itching to see just what we mean when we say “deploy with your favorite full-stack framework” or “check out the power of Workers”, simply execute:
npm create cloudflare@latest
from your terminal and enjoy the ride! This new CLI experience integrates with CLIs from some of our first class and solidly supported full-stack frameworks like Angular, Next, Qwik and Remix giving you full control of how you create new projects. From this tool you can also deploy a variety of Workers using our powerful starter templates, with a wizard-like experience.
One singular place to find all of your applications
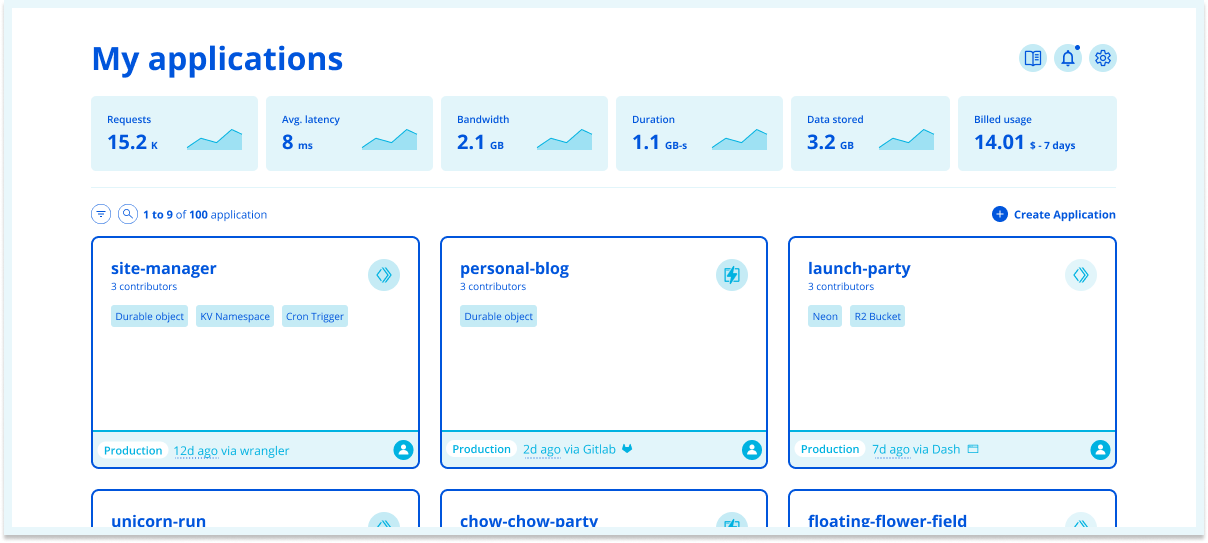
We’re taking one step closer to a unified experience by merging the Pages and Workers project list dashboards together. Once you’ve deployed your application, you’ll notice all of your Pages and Workers on one page, so you don’t have to navigate to different parts of your dashboard. Track your usage analytics for Workers / Pages Functions in one spot. In the future, these cards won’t be identifiable as Pages and Workers – just “projects” with a combination of assets, functions and resources!
What’s next?
As we begin executing, you’ll notice that each product will slowly become more and more similar as we unlock features for each platform until they’re ready to be one such as git integration for your Workers and a config file for your Pages projects!
Keep an eye out on Twitter to hear about the newest capabilities and more on what’s to come in every milestone.
Have thoughts?
Of course, we wouldn’t be able to build an amazing platform without first listening to the voice of our community. In fact, we’ve put together a survey to collect more information about our users and receive input on what you’d like to see. If you have a few minutes, you can fill it out or reach out to us on the Cloudflare Developers Discord or Twitter @CloudflareDev.
Cloudflare Pages launched over two years ago in December 2020, and since then, we have grown Pages to build millions of deployments for developers. In May 2022, to support developers with more complex requirements, we opened up Pages to empower developers to create deployments using their own build environments — but that wasn't the end of our journey. Ultimately, we want to be able to allow anyone to use our build platform and take advantage of the git integration we offer. You should be able to connect your repository and have it just work on Cloudflare Pages.
Today, we're introducing a new beta version of our build system (a.k.a. "build image") which brings the default set of tools and languages up-to-date, and sets the stage for future improvements to builds on Cloudflare Pages. We now support the latest versions of Node.js, Python, Hugo and many more, putting you on the best path for any new projects that you undertake. Existing projects will continue to use the current build system, but this upgrade will be available to opt-in for everyone.
New defaults, new possibilities
The Cloudflare Pages build system has been updated to not only support new versions of your favorite languages and tools, but to also include new versions by default. The versions of 2020 are no longer relevant for the majority of today's projects, and as such, we're bumping these to their more modern equivalents:
Node.js' default is being increased from 12.18.0 to 18.16.0,
Python 2.7.18 and 3.10.5 are both now available by default,
Ruby's default is being increased from 2.7.1 to 3.2.2,
Yarn's default is being increased from 1.22.4 to 3.5.1,
And we're adding pnpm with a default version of 8.2.0.
These are just some of the headlines — check out our documentation for the full list of changes.
We're aware that these new defaults constitute a breaking change for anyone using a project without pinning their versions with an environment variable or version file. That's why we're making this new build system opt-in for existing projects. You'll be able to stay on the existing system without breaking your builds. If you do decide to adventure with us, we make it easy to test out the new system in your preview environments before rolling out to production.
Additionally, we're now making your builds more reproducible by taking advantage of lockfiles with many package managers. npm ci and yarn --pure-lockfile are now used ahead of your build command in this new version of the build system.
For new projects, these updated defaults and added support for pnpm and Yarn 3 mean that more projects will just work immediately without any undue setup, tweaking, or configuration. Today, we're launching this update as a beta, but we will be quickly promoting it to general availability once we're satisfied with its stability. Once it does graduate, new projects will use this updated build system by default.
We know that this update has been a long-standing request from our users (we thank you for your patience!) but part of this rollout is ensuring that we are now in a better position to make regular updates to Cloudflare Pages' build system. You can expect these default languages and tools to now keep pace with the rapid rate of change seen in the world of web development.
We very much welcome your continued feedback as we know that new tools can quickly appear on the scene, and old ones can just as quickly drop off. As ever, our Discord server is the best place to engage with the community and Pages team. We’re excited to hear your thoughts and suggestions.
Our modular and scalable architecture
Powering this updated build system is a new architecture that we've been working on behind-the-scenes. We're no strangers to sweeping changes of our build infrastructure: we've done a lot of work to grow and scale our infrastructure. Moving beyond purely static site hosting with Pages Functions brought a new wave of users, and as we explore convergence with Workers, we expect even more developers to rely on our git integrations and CI builds. Our new architecture is being rolled out without any changes affecting users, so unless you're interested in the technical nitty-gritty, feel free to stop reading!
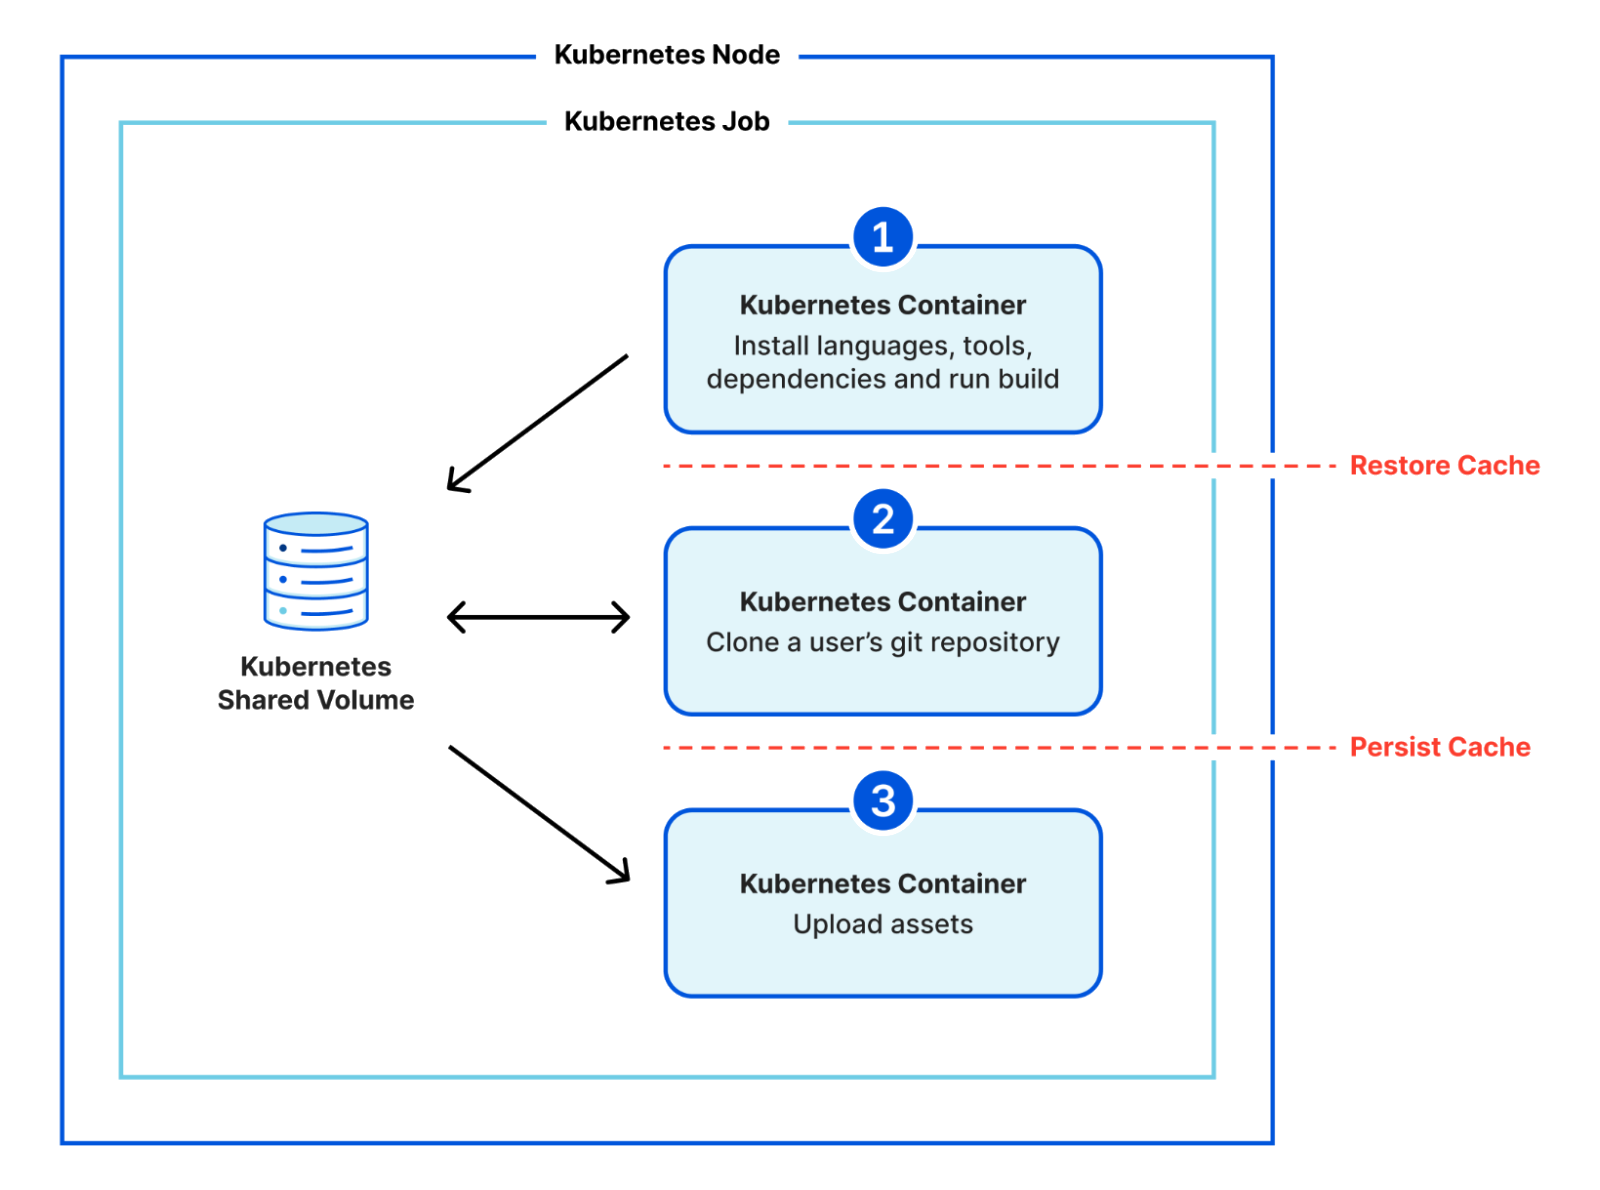
The biggest change we're making with our architecture is its modularity. Previously, we were using Kubernetes to run a monolithic container which was responsible for everything for the build. Within the same image, we'd stream our build logs, clone the git repository, install any custom versions of languages and tools, install a project's dependencies, run the user's build command, and upload all the assets of the build. This was a lot of work for one container! It meant that our system tooling had to be compatible with versions in the user's space and therefore new default versions were a massive change to make. This is a big part of why it took us so long to be able to update the build system for our users.
In the new architecture, we've broken these steps down into multiple separate containers. We make use of Kubernetes' init containers feature and instead of one monolithic container, we have three that execute sequentially:
clone a user's git repository,
install any custom versions of languages and tools, install a project's dependencies, run the user's build command, and
upload all the assets of a build.
We use a shared volume to give the build a persistent workspace to use between containers, but now there is clear isolation between system stages (cloning a repository and uploading assets) and user stages (running code that the user is responsible for). We no longer need to worry about conflicting versions, and we've created an additional layer of security by isolating a user's control to a separate environment.
We're also aligning the final stage, the one responsible for uploading static assets, with the same APIs that Wrangler uses for Direct Upload projects. This reduces our maintenance burden going forward since we'll only need to consider one way of uploading assets and creating deployments. As we consolidate, we're exploring ways to make these APIs even faster and more reliable.
Logging out
You might have noticed that we haven't yet talked about how we're continuing to stream build logs. Arguably, this was one of the most challenging pieces to work out. When everything ran in a single container, we were able to simply latch directly into the stdout of our various stages and pipe them through to a Durable Object which could communicate with the Cloudflare dashboard.
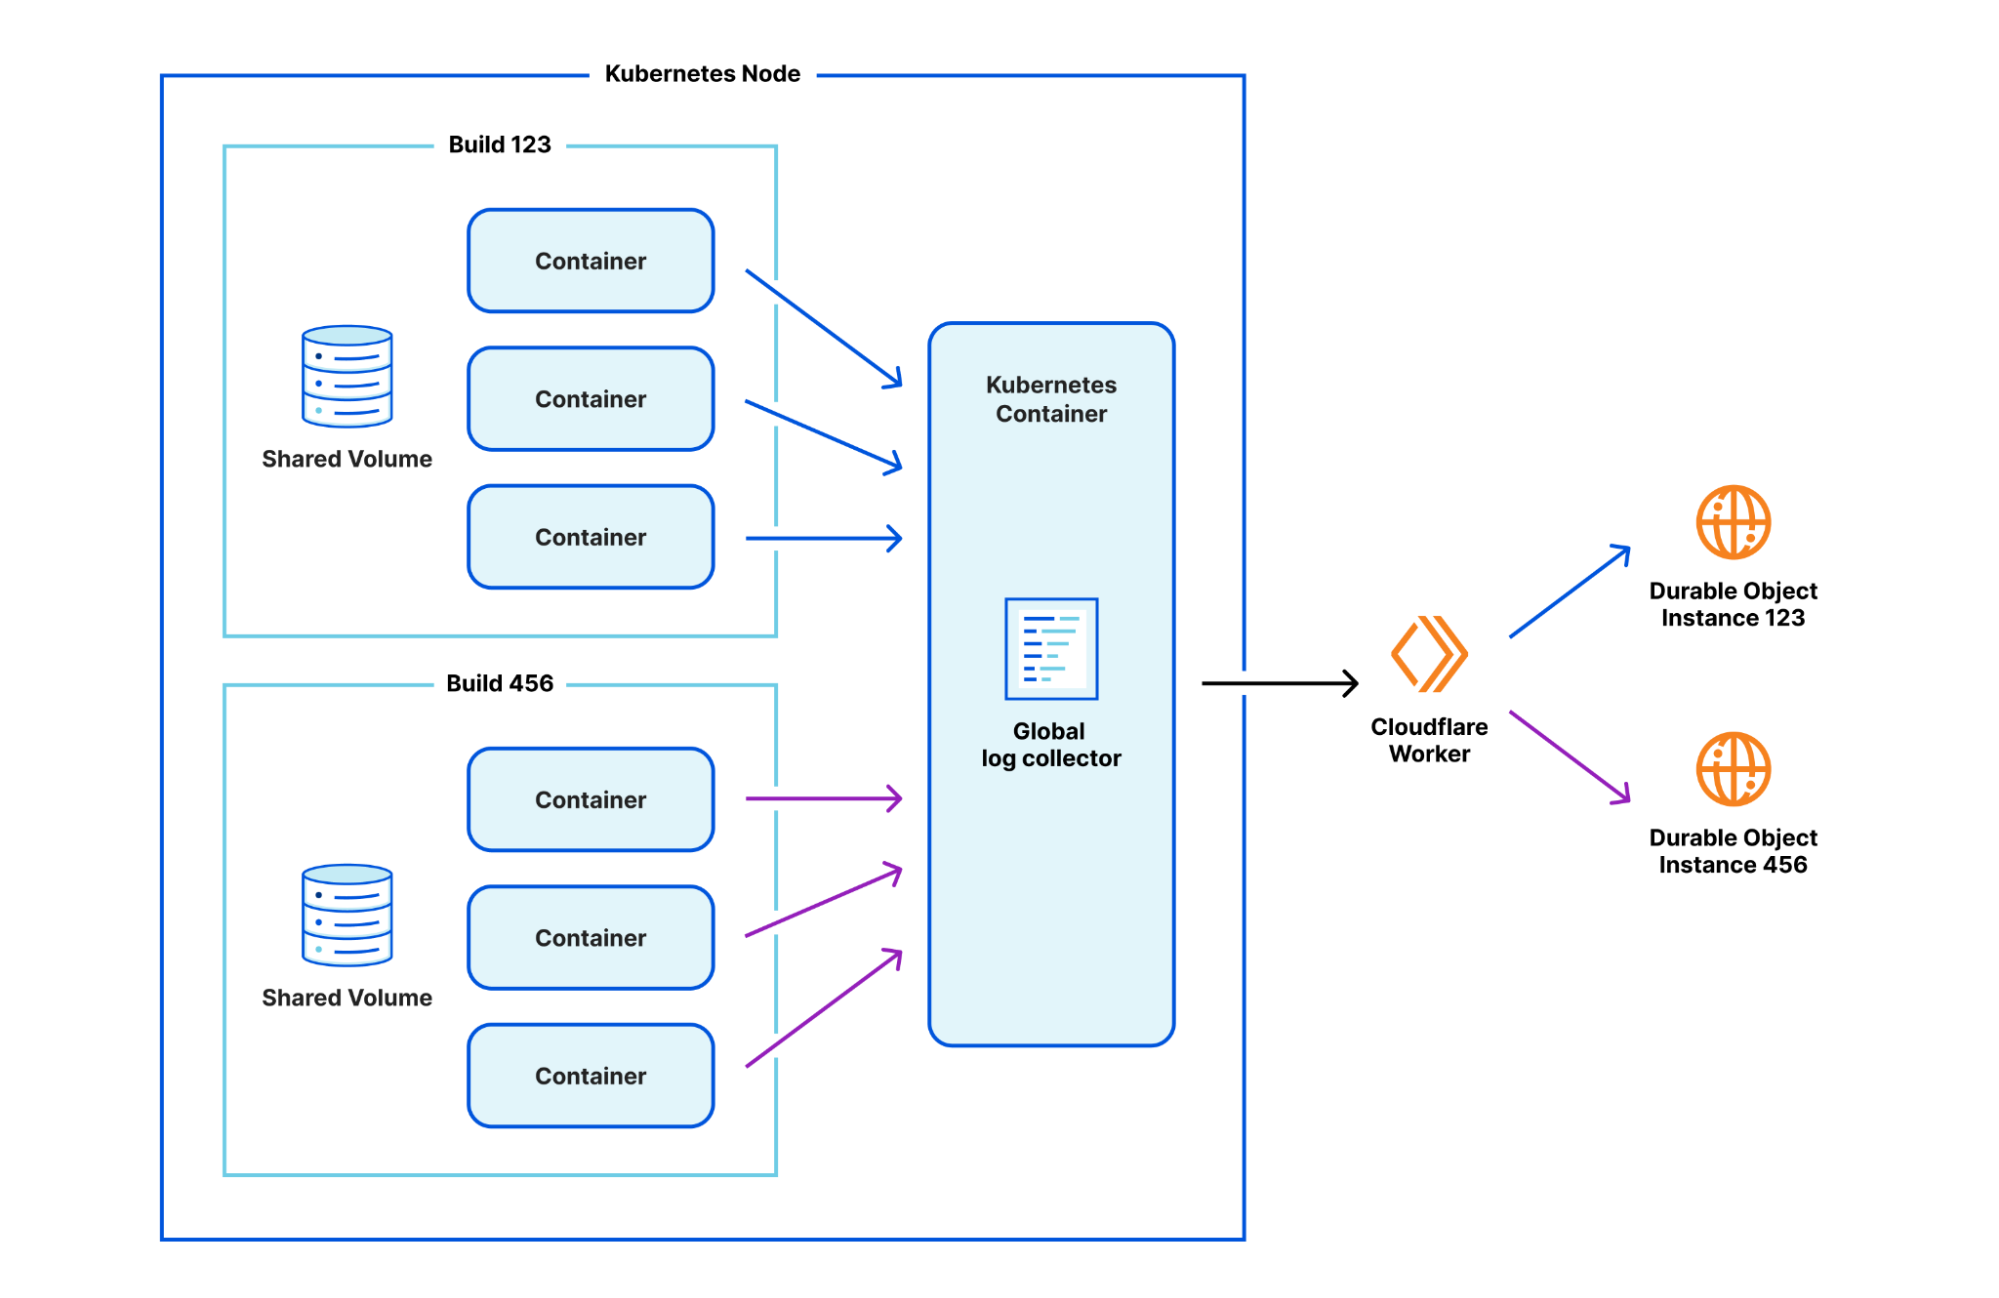
By introducing this new isolation between containers, we had to get a bit more inventive. After prototyping a number of approaches, we've found one that we like. We run a separate, global log collector container inside Kubernetes which is responsible for collating logs from a build, and passing them through to that same Durable Object infrastructure. The one caveat is that the logs now need to be annotated with which build they are coming from, since one global log collector container accepts logs from multiple builds. A Worker in front of the Durable Object is responsible for reading the annotation and delegating to the relevant build's Durable Object instance.
Caching in
With this new modular architecture, we plan to integrate a feature we've been teasing for a while: build caching. Today, when you run a build in Cloudflare Pages, we start fresh every time. This works, but it's inefficient.
Very often, only small changes are actually made to your website between deployments: you might tweak some text on your homepage, or add a new blog post; but rarely does the core foundation of your site actually change between deployments. With build caching, we can reuse some of the work from earlier builds to speed up subsequent builds. We'll offer a best-effort storage mechanism that allows you to persist and restore files between builds. You'll soon be able to cache dependencies, as well as the build output itself if your framework supports it, resulting in considerably faster builds and a tighter feedback loop from push to deploy.
This is possible because our new modular design has clear divides between the stages where we'd want to restore and cache files.
Start building
We're excited about the improvements that this new modular architecture will afford the Pages team, but we're even more excited for how this will result in faster and more scalable builds for our users. This architecture transition is rolling out behind-the-scenes, but the updated beta build system with new languages and tools is available to try today. Navigate to your Pages project settings in the Cloudflare Dashboard to opt-in.
Let us know if you have any feedback on the Discord server, and stay tuned for more information about build caching in upcoming posts on this blog. Later today (Wednesday 17th, 2023), the Pages team will be hosting a Q&A session to talk about this announcement on Discord at 17:30 UTC.
Hey web developers! We are about to shake things up a bit here at Cloudflare and wanted to give you a heads-up, so that you know what we are doing and where we are going. You might know Cloudflare as one of the best places to come to when you need to protect, speed up, or scale your web application, but increasingly Cloudflare is also becoming the best place to deploy and run your application!
Why deploy your application to Cloudflare? Two simple reasons. First, it removes lots of hassle of managing many separate systems and allows you to develop, deploy, monitor, and tune your application all in one place. Second, by deploying to Cloudflare directly, there is so much more we can do to optimize your application and get it to the hands, ears, or eyes of your users more quickly and smoothly.
So what’s changing? Quite a bit, actually. I’m not going to bore you with rehashing all the details as my most-awesome colleagues have written separate blog posts with all the details, but here is a high level rundown.
Cloudflare Workers + Pages = awesome development platform
Cloudflare Pages and Workers are merging into a single unified development and application hosting platform that offers:
Standards-based JavaScript and WASM runtime that already serves over 10 million requests per second at peak globally.
Access to powerful features like R2 (object storage with an S3-compatible API), low-latency globally replicated KV storage, Queues, D1 database, and many more.
Support for GitOps and CI/CD workflows and preview environments to boost development velocity.
… and so much more.
While mathematically proven to be wrong, we stubbornly believe that 1+1=3, and in this case this translates to Cloudflare Pages + Workers = way more than the sum of the parts. In fact, it’s an awesome foundation for one of a kind development platform that we are thrilled to be building for you.
We started this product convergence journey a few quarters ago, and early on agreed upon not leaving any of the existing applications behind. Instead, we’ll be bringing them over to this new world. Today we are ready to start sharing the incremental results, with so much more to come over the upcoming quarters. Want to know more? My colleague Nevi posted lots of spicy details in her blog post.
Smart Placement for Workers takes us beyond the edge!
Smart placement is, to put it simply, revolutionary for Cloudflare. It enables a new compute paradigm on our platform, unmatched by any other application hosting providers today. Do you have a typical full-stack application built with one of the many popular web frameworks? This feature is for you! And it works with both Workers and Pages!
While previously we always executed all applications at the “edge” of our global network — meaning, as close to the user as possible. With smart placement, we intelligently determine the best location within our network where the compute (your application) should run. We do this by observing your application’s behavior and what other network resources or endpoints the application interacts with. We then transparently spawn your application at an optimal location, usually close to where your data is stored, and route the incoming requests via our network to this location.
Smart placement enables applications to run near to the data these applications need to get stuff done. This is especially powerful for applications that interact with databases, object stores, or other backend endpoints, especially if these are centralized and not globally distributed.
Your user or clients requests still enter our lightning fast network in one of our 285+ datacenters in the world, close to their current location, but instead of spawning the application right there, we route the request to the most optimal datacenter, the one that is near the data or backend system the application talks to.
This doesn’t mean that compute at the edge is not cool anymore! It is! There are still many use-cases where running your application at the edge makes sense, and smart placement will determine this scenario and keep the application at the edge if that’s the right place for it to be. A/B testing, localization, asset serving, and others are use-cases that should almost always happen at the edge.
We continue to deliver on our goal to build the best development environment integrated directly into our lightning fast and globally distributed application platform. We’re launching Wrangler v3, with complete support for local-by-default development workflow. Powered by the open-source Cloudflare Workers JavaScript runtime — workerd, this change reduces development server startup time by 10x and script reload times by 60x — boosting your productivity and keeping you in the flow longer.
In the dashboard, we're introducing an upgraded and far more powerful online editor powered by VSCode – you can now finally edit multiple JavaScript modules in your browser, get an accurate edge preview of your code, friendly error pages, and type checking!
Finally, in both our dashboard editor and Wrangler, we've updated our workerd-customized Chrome DevTools to the latest version, providing even greater debugging and profiling capabilities, wherever you choose to work.
This is just the first wave of improvements to our development tooling space, you’ll see us iterating in this space over the next few quarters, but in the meantime, check out in-depth posts from Adam, Brendan, and Samuel with all the Wrangler v3 details and VSCode and dash editor improvements.
Increased memory, CPU, and application size limits and simplified pricing!
In the age of AI, WASM, and powerful full-stack applications, we’ve noticed that developers are hitting our current resource limits with increased frequency. We want to be a place where these applications thrive and developers are empowered to build bigger and more sophisticated applications. Therefore, within the next week we’ll be increasing application size limits (JavaScript/WASM bundle size) to 10MB (after gzip) and startup latency limit (script compile time) is being increased from 200ms to 400ms.
To further empower developers, we’re thinking about how to unify and simplify our billing model to make our pricing more straightforward, and increase limits such as memory limits by introducing tiers. Stay tuned for more information on these!
With these changes developers can build cooler apps and operate them for less! Cool, right?!?
Pages CI now with a modern build image!
The wait is finally over! Pages now use a modern build image to power the CI and integrated build system. With this improvement you can finally use recent versions of Node.js, pnpm, and many other tools used by developers today.
While delivering this improvement, we made it much easier for us to keep things up to date in the future, but also unlocked new features like build caching!
The updates are available to all new projects by default, while existing projects can opt in to newer defaults. Sounds like your cup of coffee? Read on in this blog post by Greg.
Enough already, let’s get started! …with your framework of choice and C3!
In addition to being a CDN, and place to deploy your Worker applications, Cloudflare is now also becoming the best place to run your full-stack web applications. This includes all full-stack web frameworks like Angular, Astro, Next, Nuxt, Qwik, Remix, Solid, Svelte, Vue, and others.
Our overall mission is to help build a better Internet, and my team’s contribution to this mission is to enable developers, but really just about anyone, to go from an idea to a deployed application in no time.
To enable developers to turn their ideas into deployed applications quickly and without any hassle we’ve built two things.
First, we partnered with many web framework authors to build new or improve existing adapters for all the popular JavaScript web frameworks. These adapters ensure that your application runs on our platform in the most efficient way, while having access to all the capabilities and features of our platform.
These adapters include the highly requested Next.js adapter, that we’ve just overhauled to be production ready and are launching 1.0.0 today! In partnership with the respective teams, we’ve built brand-new adapters for Angular, and Qwik, while improving Astro, Nuxt, Solid, and a few others.
Second, we developed a brand new sassy CLI we call C3 — short for create-cloudflare CLI, a sibling to our existing Wrangler CLI. If you are a developer who lives your life in terminal or local editors like VSCode, then this CLI is your single entry-point to the Cloudflare universe.
Run the C3 command, and we’ll get you started. You pick your framework of choice, we hand the control over to the CLI of the chosen framework as we don’t want to stand in between you and the hard-working framework authors that craft the experience for their framework. A minute or so later once all npm dependencies are installed, you get a URL from us with your application deployed. That’s it. From an idea to a URL that you can share with friends almost instantly! Boom.
The best place for your web applications
So to recap, our first class support for full-stack web frameworks, combined with the low latency and cost-effectiveness of our platform, as well as smart placement that allows the backend of the full-stack web application to run in the optimal location automagically, and all the remaining significant improvements in our developer tooling, makes Cloudflare THE best place to build and host web applications. This is our contribution to our mission to build a better Internet and push the Web forward.
We aspire to be the place people turn to when they want to get business done, or when they just want to be creative, explore ideas and have fun. It’s a long journey, and we’ve got a lot of interesting challenges ahead of us. Your input will be critical in guiding us. We are all thrilled to have the opportunity to be part of it and give it our best shot. You can join this journey too, and get started today:
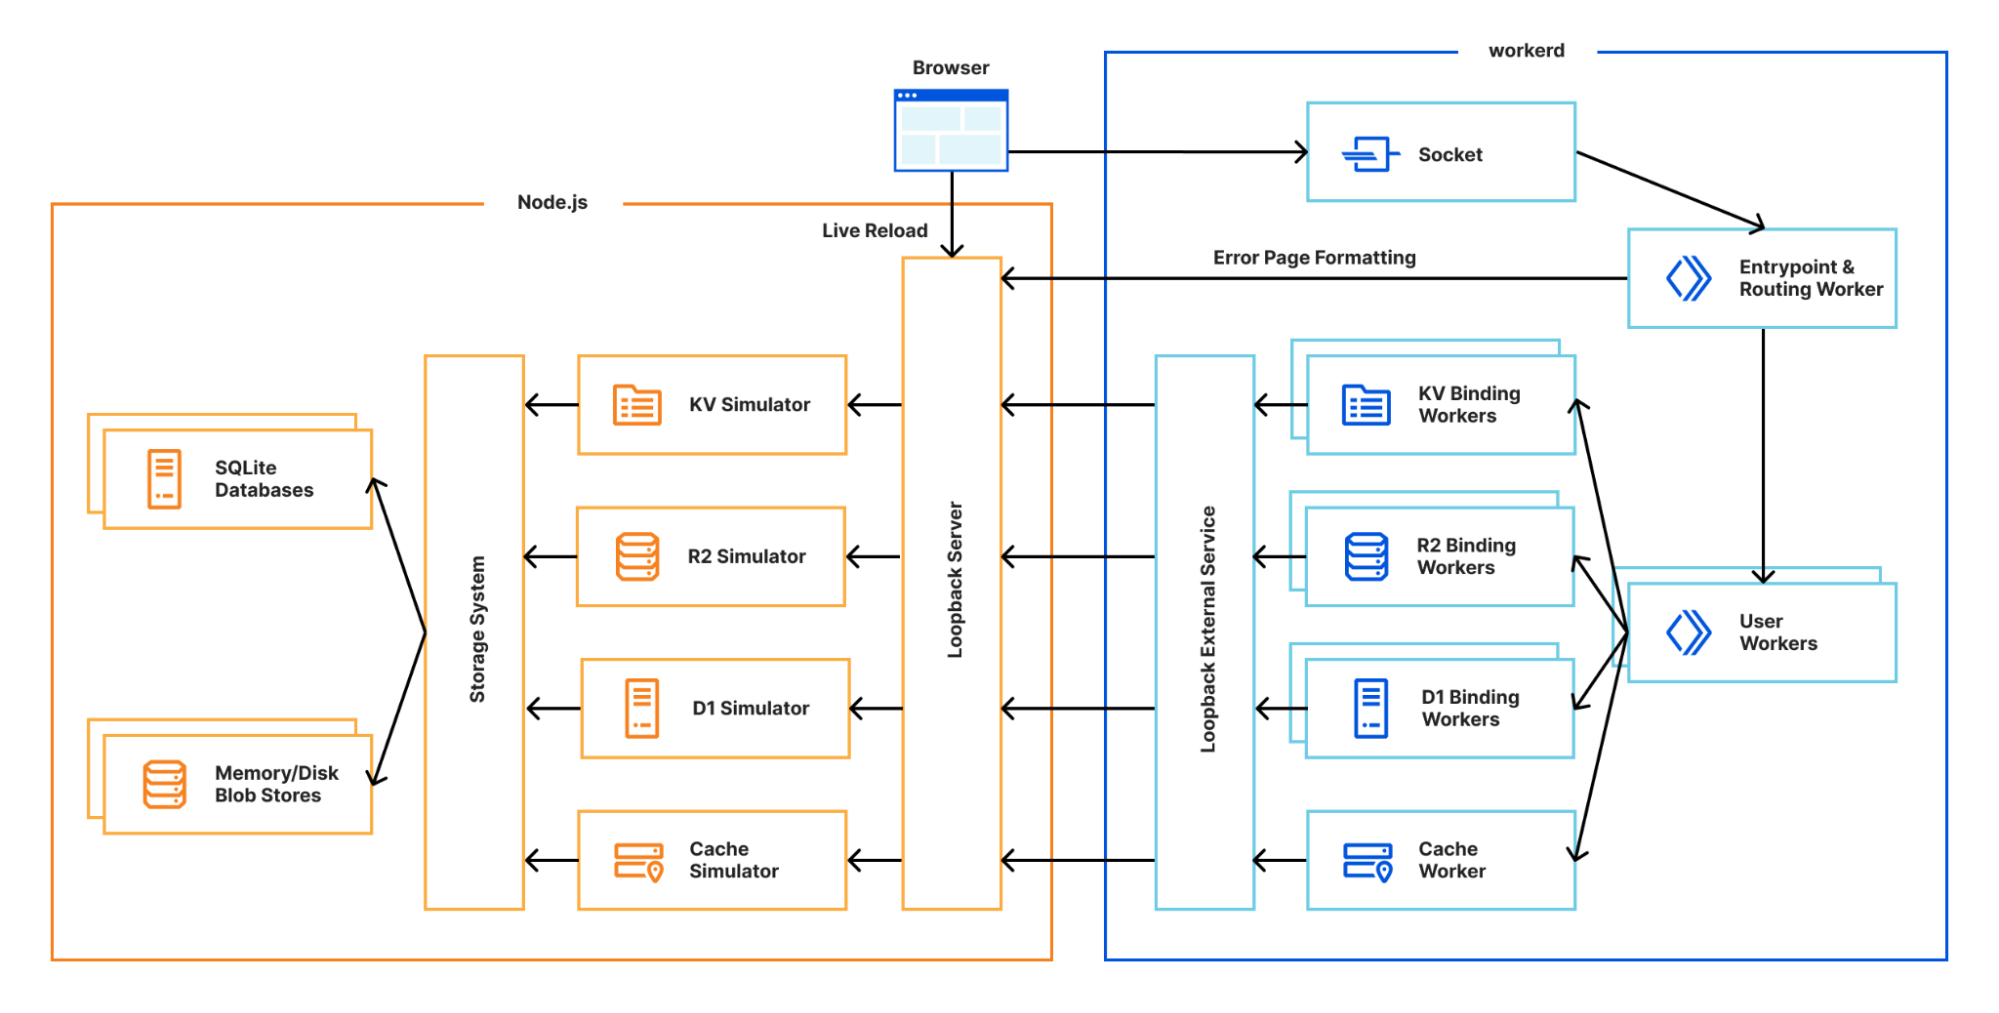
For over a year now, we’ve been working to improve the Workers local development experience. Our goal has been to improve parity between users' local and production environments. This is important because it provides developers with a fully-controllable and easy-to-debug local testing environment, which leads to increased developer efficiency and confidence.
To start, we integrated Miniflare, a fully-local simulator for Workers, directly into Wrangler, the Workers CLI. This allowed users to develop locally with Wrangler by running wrangler dev --local. Compared to the wrangler dev default, which relied on remote resources, this represented a significant step forward in local development. As good as it was, it couldn’t leverage the actual Workers runtime, which led to some inconsistencies and behavior mismatches.
Last November, we announced the experimental version of Miniflare v3, powered by the newly open-sourced workerd runtime, the same runtime used by Cloudflare Workers. Since then, we’ve continued to improve upon that experience both in terms of accuracy with the real runtime and in cross-platform compatibility.
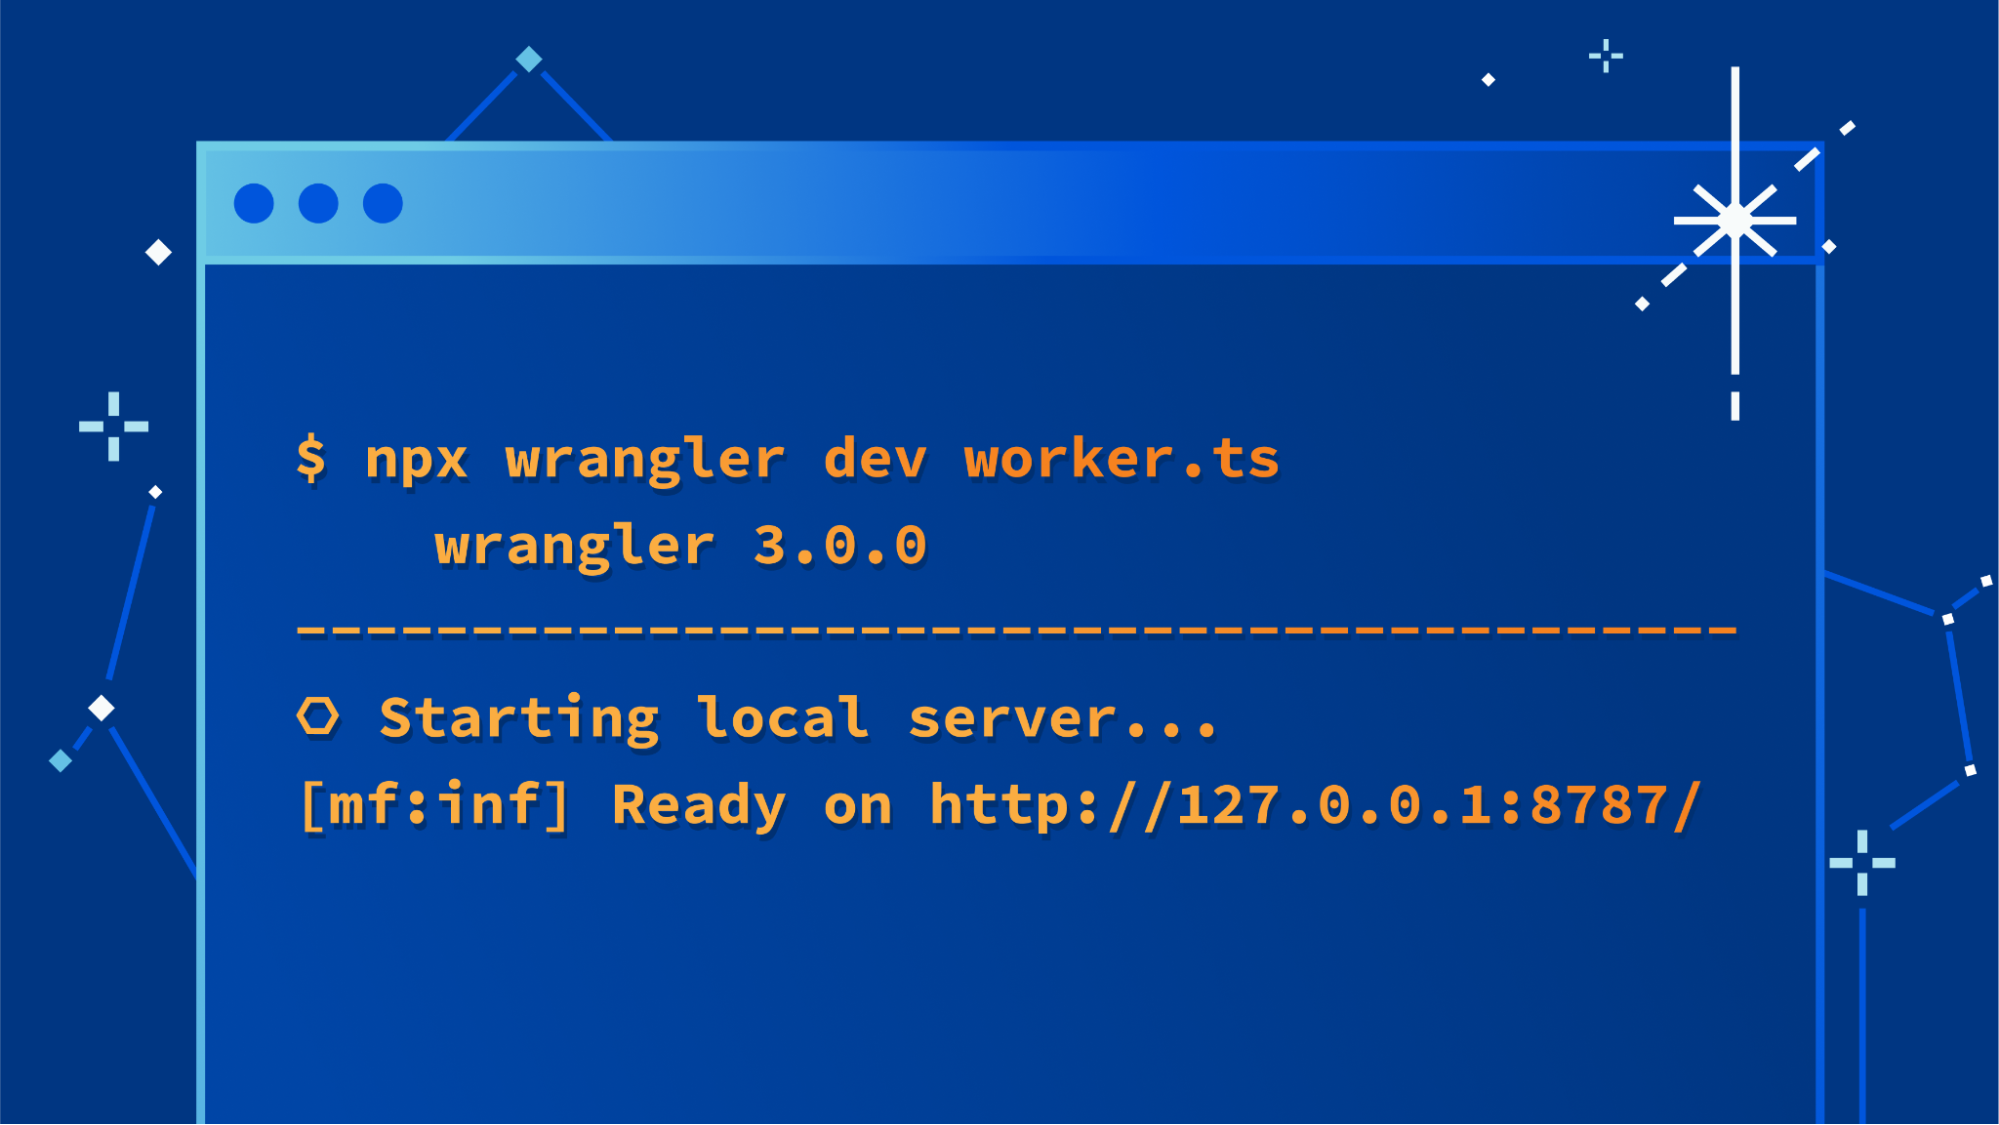
As a result of all this work, we are proud to announce the release of Wrangler v3 – the first version of Wrangler with local-by-default development.
A new default for Wrangler
Starting with Wrangler v3, users running wrangler dev will be leveraging Miniflare v3 to run your Worker locally. This local development environment is effectively as accurate as a production Workers environment, providing an ability for you to test every aspect of your application before deploying. It provides the same runtime and bindings, but has its own simulators for KV, R2, D1, Cache and Queues. Because you’re running everything on your machine, you won’t be billed for operations on KV namespaces or R2 buckets during development, and you can try out paid-features like Durable Objects for free.
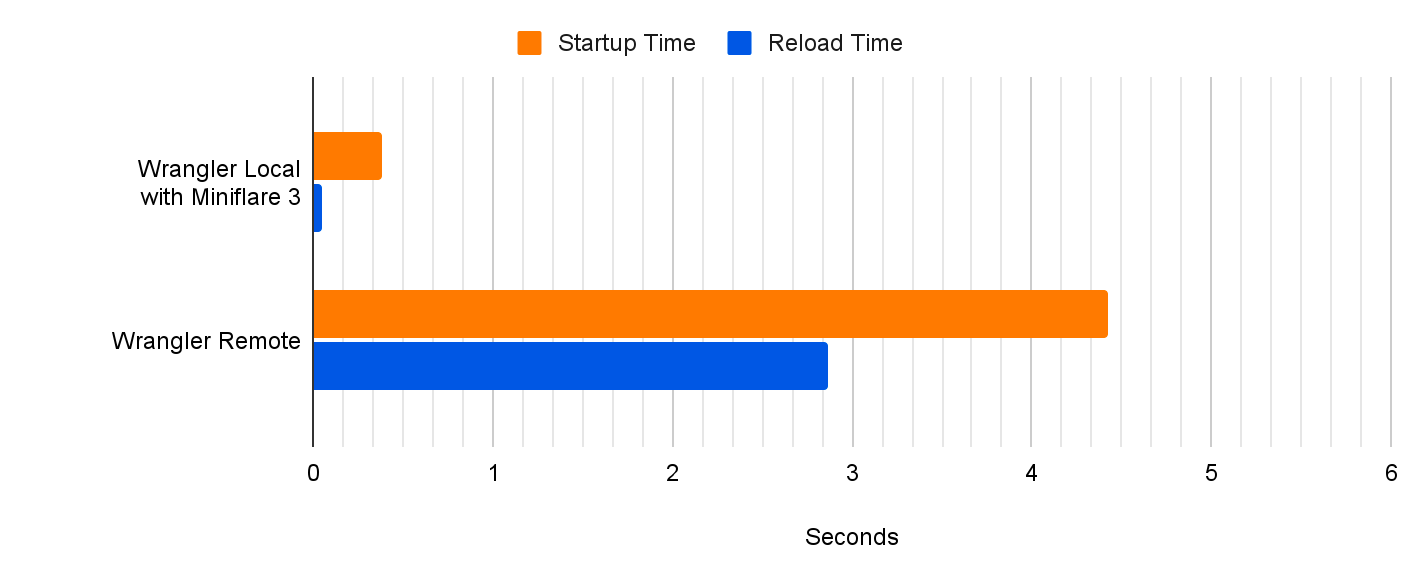
In addition to a more accurate developer experience, you should notice performance differences. Compared to remote mode, we’re seeing a 10x reduction to startup times and 60x reduction to script reload times with the new local-first implementation. This massive reduction in reload times drastically improves developer velocity!
Remote development isn’t going anywhere. We recognise many developers still prefer to test against real data, or want to test Cloudflare services like image resizing that aren’t implemented locally yet. To run wrangler dev on Cloudflare’s network, just like previous versions, use the new --remote flag.
Deprecating Miniflare v2
For users of Miniflare, there are two important pieces of information for those updating from v2 to v3. First, if you’ve been using Miniflare’s CLI directly, you’ll need to switch to wrangler dev. Miniflare v3 no longer includes a CLI. Secondly, if you’re using Miniflare’s API directly, upgrade to miniflare@3 and follow the migration guide.
How we built Miniflare v3
Miniflare v3 is now built using workerd, the open-source Cloudflare Workers runtime. As workerd is a server-first runtime, every configuration defines at least one socket to listen on. Each socket is configured with a service, which can be an external server, disk directory or most importantly for us, a Worker! To start a workerd server running a Worker, create a worker.capnp file as shown below, run npx workerd serve worker.capnp and visit http://localhost:8080 in your browser:
If you’re interested in what else workerd can do, check out the other samples. Whilst workerd provides the runtime and bindings, it doesn’t provide the underlying implementations for the other products in the Developer Platform. This is where Miniflare comes in! It provides simulators for KV, R2, D1, Queues and the Cache API.
Building a flexible storage system
As you can see from the diagram above, most of Miniflare’s job is now providing different interfaces for data storage. In Miniflare v2, we used a custom key-value store to back these, but this had afewlimitations. For Miniflare v3, we’re now using the industry-standard SQLite, with a separate blob store for KV values, R2 objects, and cached responses. Using SQLite gives us much more flexibility in the queries we can run, allowing us to support future unreleased storage solutions. 👀
A separate blob store allows us to provide efficient, ranged, streamed access to data. Blobs have unguessable identifiers, can be deleted, but are otherwise immutable. These properties make it possible to perform atomic updates with the SQLite database. No other operations can interact with the blob until it's committed to SQLite, because the ID is not guessable, and we don't allow listing blobs. For more details on the rationale behind this, check out the original GitHub discussion.
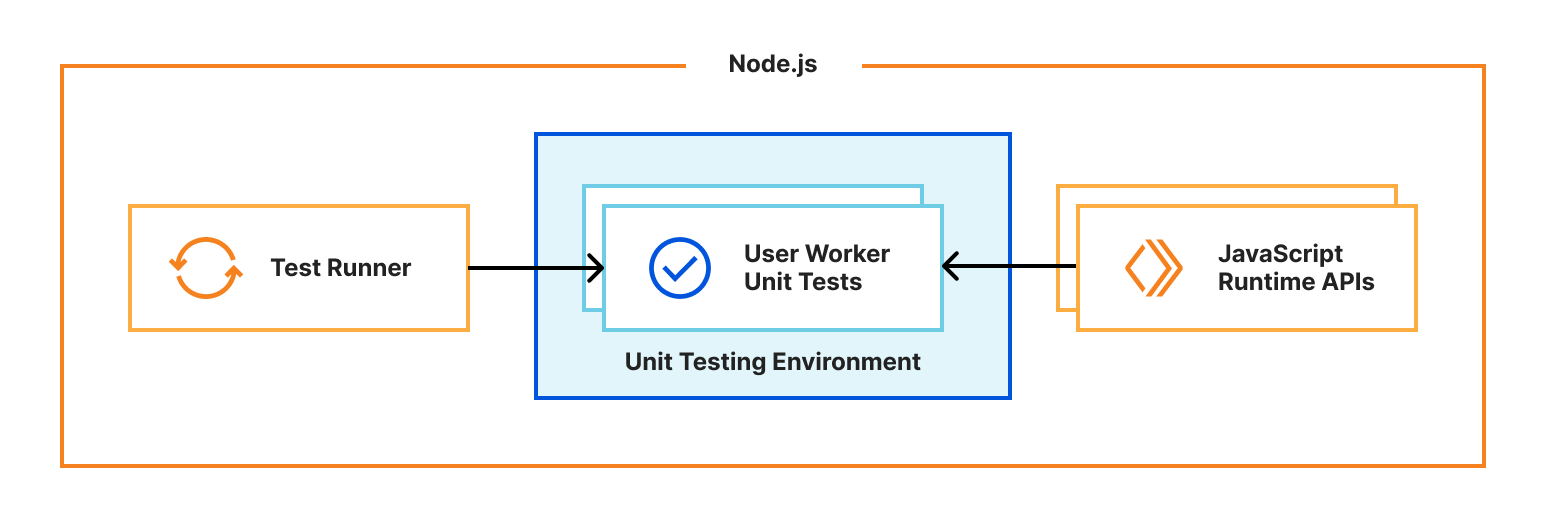
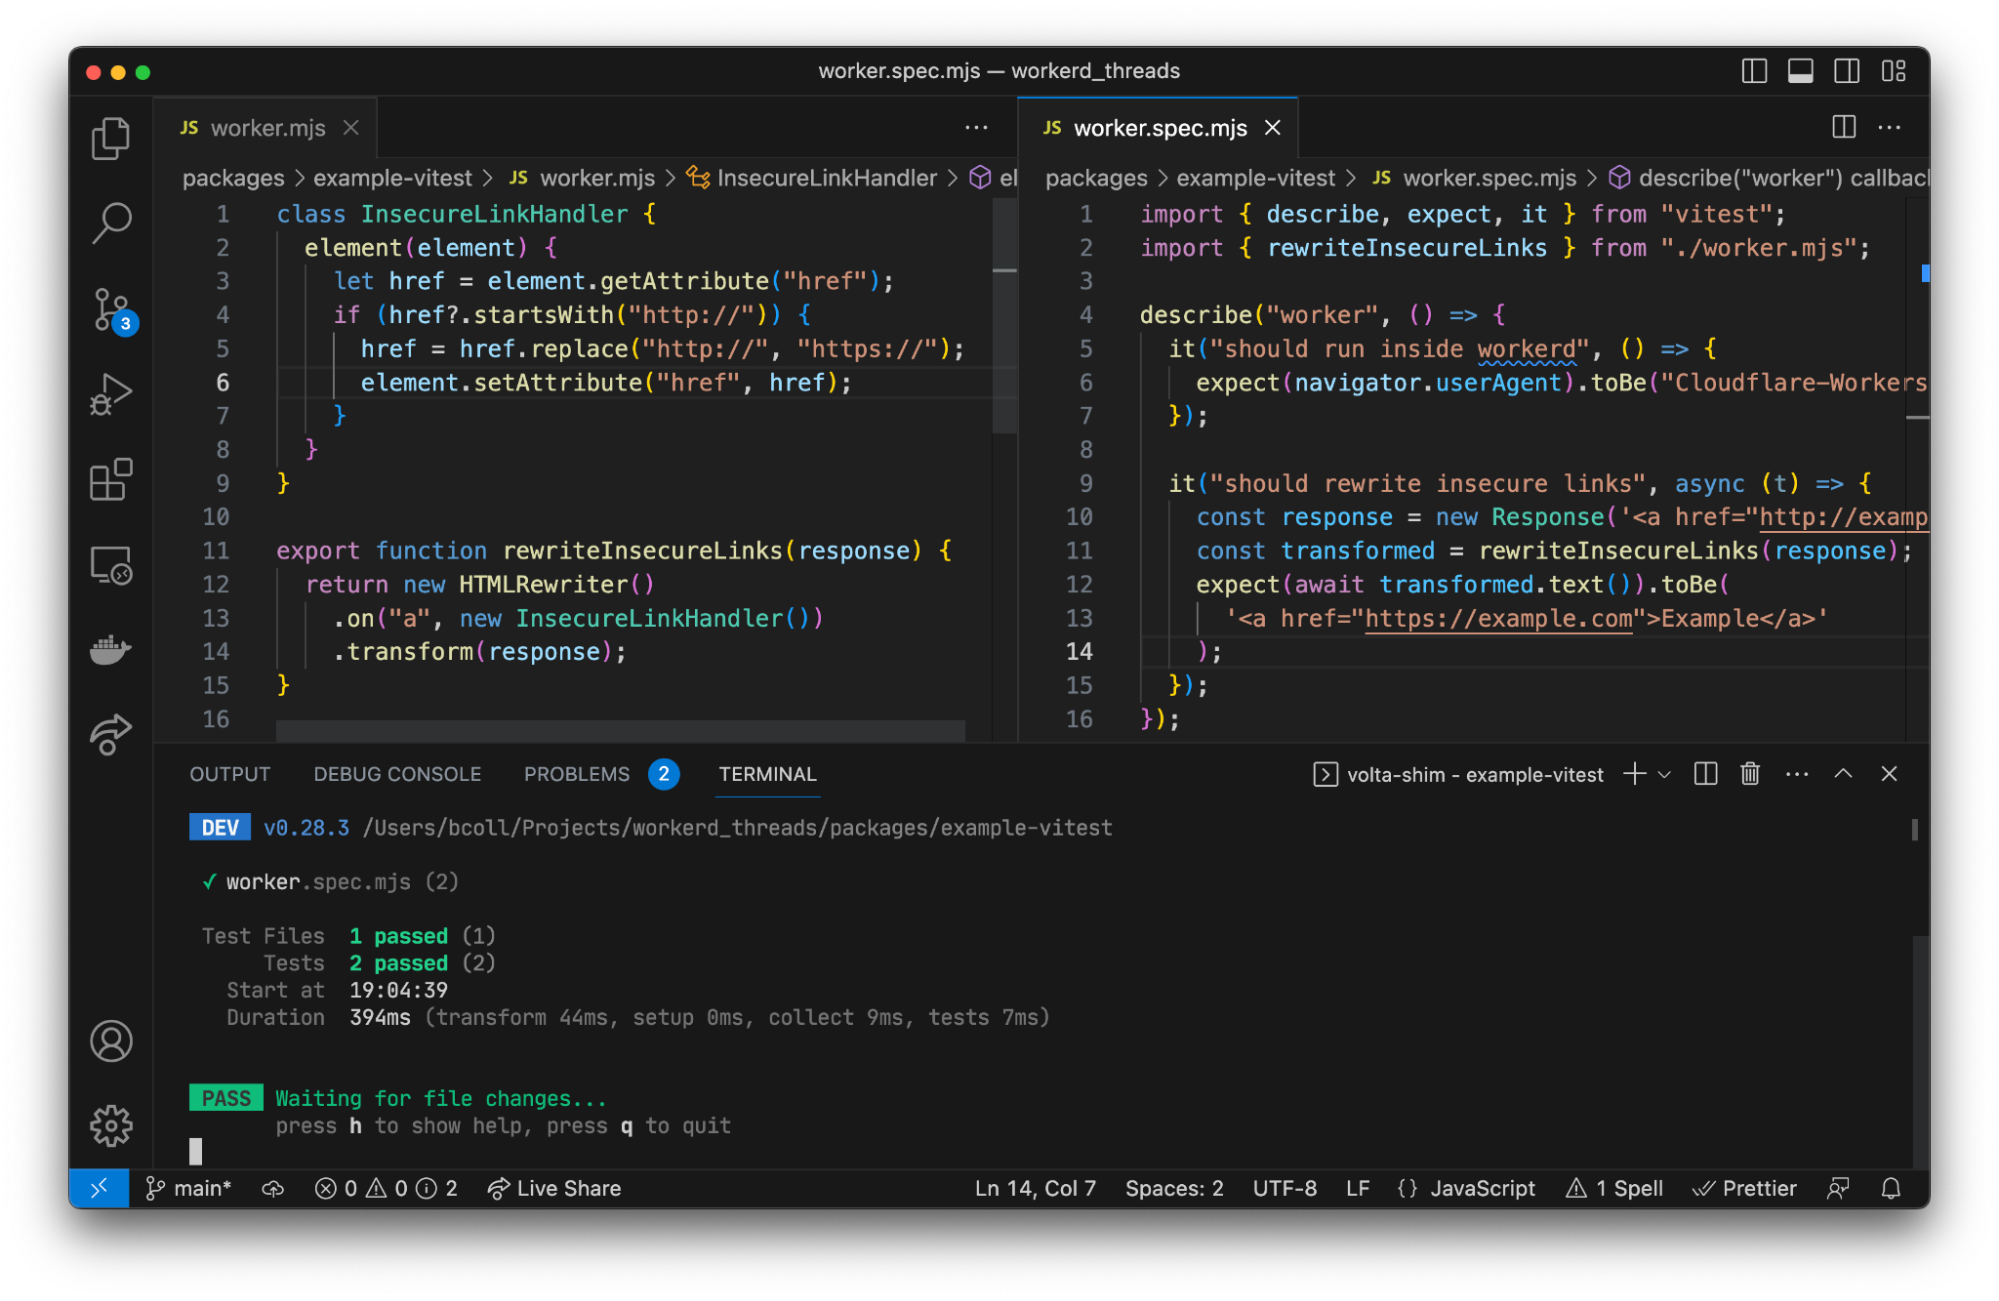
Running unit tests inside Workers
One of Miniflare’s primary goals is to provide a great local testing experience. Miniflare v2 provided custom environments for popular Node.js testing frameworks that allowed you to run your tests inside the Miniflare sandbox. This meant you could import and call any function using Workers runtime APIs in your tests. You weren’t restricted to integration tests that just send and receive HTTP requests. In addition, these environments provide per-test isolated storage, automatically undoing any changes made at the end of each test.
In Miniflare v2, these environments were relatively simple to implement. We’d already reimplemented Workers Runtime APIs in a Node.js environment, and could inject them using Jest and Vitest’s APIs into the global scope.
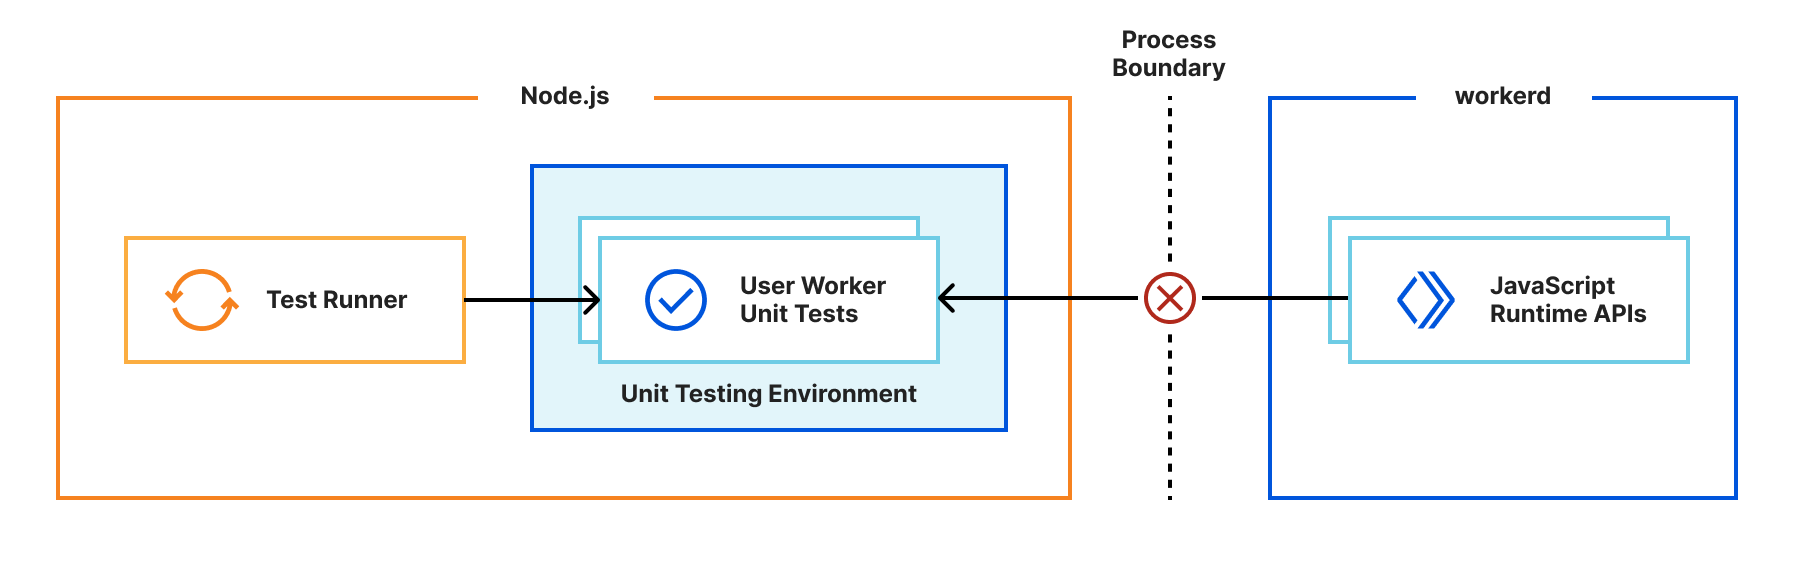
For Miniflare v3, this is much trickier. The runtime APIs are implemented in a separate workerd process, and you can’t reference JavaScript classes across a process boundary. So we needed a new approach…
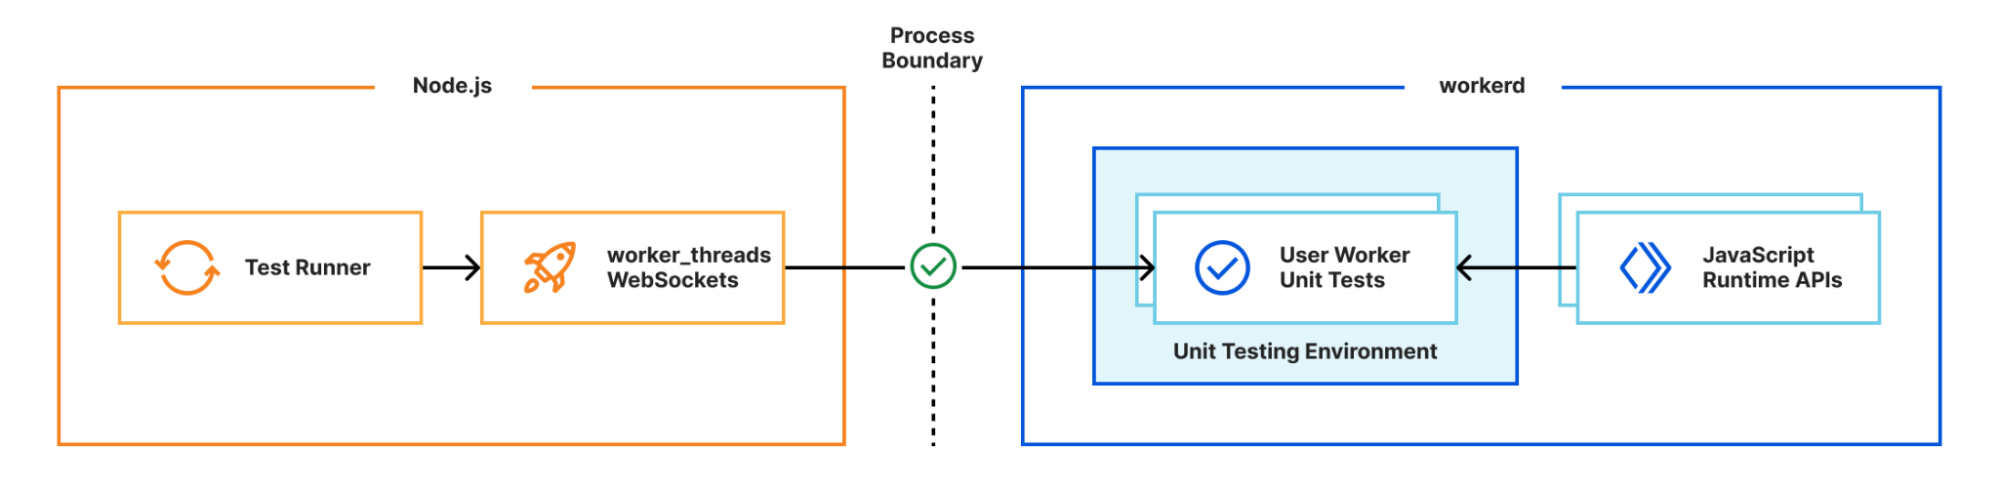
Many test frameworks like Vitest use Node’s built-in worker_threads module for running tests in parallel. This module spawns new operating system threads running Node.js and provides a MessageChannel interface for communicating between them. What if instead of spawning a new OS thread, we spawned a new workerd process, and used WebSockets for communication between the Node.js host process and the workerd “thread”?
We have a proof of concept using Vitest showing this approach can work in practice. Existing Vitest IDE integrations and the Vitest UI continue to work without any additional work. We aren’t quite ready to release this yet, but will be working on improving it over the next few months. Importantly, the workerd “thread” needs access to Node.js built-in modules, which we recently started rolling out support for.
Running on every platform
We want developers to have this great local testing experience, regardless of which operating system they’re using. Before open-sourcing, the Cloudflare Workers runtime was originally only designed to run on Linux. For Miniflare v3, we needed to add support for macOS and Windows too. macOS and Linux are both Unix-based, making porting between them relatively straightforward. Windows on the other hand is an entirely different beast… 😬
The workerd runtime uses KJ, an alternative C++ base library, which is already cross-platform. We’d also migrated to the Bazel build system in preparation for open-sourcing the runtime, which has good Windows support. When compiling our C++ code for Windows, we use LLVM's MSVC-compatible compiler driver clang-cl, as opposed to using Microsoft’s Visual C++ compiler directly. This enables us to use the "same" compiler frontend on Linux, macOS, and Windows, massively reducing the effort required to compile workerd on Windows. Notably, this provides proper support for #pragma once when using symlinked virtual includes produced by Bazel, __atomic_* functions, a standards-compliant preprocessor, GNU statement expressions used by some KJ macros, and understanding of the .c++ extension by default. After switching out unix API calls for their Windows equivalents using #if _WIN32 preprocessor directives, and fixing a bunch of segmentation faults caused by execution order differences, we were finally able to get workerd running on Windows! No WSL or Docker required! 🎉
Let us know what you think!
Wrangler v3 is now generally available! Upgrade by running npm install --save-dev wrangler@3 in your project. Then run npx wrangler dev to try out the new local development experience powered by Miniflare v3 and the open-source Workers runtime. Let us know what you think in the #wrangler channel on the Cloudflare Developers Discord, and please open a GitHub issue if you hit any unexpected behavior.
The use of huge pages can make memory management more efficient in a number
of ways, but it can also impose costs in the form of internal fragmentation and
I/O amplification. At the 2023 Linux
Storage, Filesystem, Memory-Management and BPF Summit, James Houghton
ran a session on a scheme to get the best of both worlds: using huge pages
while maintaining base-page mappings within them.
The 6.3.3, 6.2.16, 6.1.29, 5.15.112, 5.10.180, 5.4.243, 4.19.283, and 4.14.315
stable kernels have all been released; each contains another set of
important fixes. Note that 6.2.16 will be the final update for the 6.2
kernel.
Microsoft is currently patching a zero-day Secure-Boot bug.
The BlackLotus bootkit is the first-known real-world malware that can bypass Secure Boot protections, allowing for the execution of malicious code before your PC begins loading Windows and its many security protections. Secure Boot has been enabled by default for over a decade on most Windows PCs sold by companies like Dell, Lenovo, HP, Acer, and others. PCs running Windows 11 must have it enabled to meet the software’s system requirements.
Microsoft says that the vulnerability can be exploited by an attacker with either physical access to a system or administrator rights on a system. It can affect physical PCs and virtual machines with Secure Boot enabled.
That’s important. This is a nasty vulnerability, but it takes some work to exploit it.
The problem with the patch is that it breaks backwards compatibility: “…once the fixes have been enabled, your PC will no longer be able to boot from older bootable media that doesn’t include the fixes.”
And:
Not wanting to suddenly render any users’ systems unbootable, Microsoft will be rolling the update out in phases over the next few months. The initial version of the patch requires substantial user intervention to enable—you first need to install May’s security updates, then use a five-step process to manually apply and verify a pair of “revocation files” that update your system’s hidden EFI boot partition and your registry. These will make it so that older, vulnerable versions of the bootloader will no longer be trusted by PCs.
A second update will follow in July that won’t enable the patch by default but will make it easier to enable. A third update in “first quarter 2024” will enable the fix by default and render older boot media unbootable on all patched Windows PCs. Microsoft says it is “looking for opportunities to accelerate this schedule,” though it’s unclear what that would entail.
So it’ll be almost a year before this is completely fixed.
Европейският парламент гласува за присъединяването на ЕС към Конвенцията на Съвета на Европа за превенция и борба с насилието над жени и домашното насилие, по-известна като Истанбулската конвенция (ИК). Парламентът я ратифицира на 10 март 2023 г. От това следва, че отделни елементи от нея стават задължителни за страните членки. Дали поради усилията на ГЕРБ в настоящия момент да се представя като истинска европейска партия, или по друга причина, ратифицирането на Конвенцията от страна на ЕП не произведе скандал в България. Не стана дори запомняща се новина. Превърна се основно в повод позабравеният евродепутат от ВМРО Ангел Джамбазки да напомни за себе си, получавайки трибуна в една от най-гледаните телевизии.
Какво точно е ратифицирал ЕП?
Още през 2016 г. Европейската комисия препоръча ЕС да се присъедини към Конвенцията, но това не става поради съпротивата на шест страни членки, между които и България. През 2021 г. съдът на ЕС излезе с решение, по силата на което ЕС може да ратифицира ИК с квалифицирано мнозинство, но по такъв начин, че само отделни нейни аспекти да са задължително приложими за държавите членки. Именно в изпълнение на това решение е гласуването от 10 март.
Тематичните области от ИК, които са подложени на ратифициране, са разделени в две отделни гласувания. Това се налага, тъй като според Договора за функционирането на ЕС за Ирландия и Дания важат някои изключения, които правят гласуването на част от предложенията безпредметно. А ратифицирането на ИК е именно с цел да бъде синхронизирана с този договор.
Първото гласуване засяга не толкова страните членки, колкото функционирането на европейските институции. Става дума за прилагането на ИК по отношение на правилата за длъжностните служители на ЕС и условията за работа на другите служители на Съюза. С други думи, при работата на администрацията на ЕС да не се допуска насилие, основано на пола.
Второто гласуване (което не включва Ирландия и Дания) се отнася до съдебното сътрудничество по въпросите на наказателното право, както и до убежището.
Що се отнася до наказателното право, става дума за това, че страните членки трябва да признават взаимно присъдите и съдебните решения в областта на ИК, които издават, и полицейските органи на тези страни да си сътрудничат. За целта ЕП и Европейският съвет могат да установят минимални правила, които да се спазват, като се отчитат различните правни традиции на отделните държави. Двете европейски институции могат и да приемат мерки, с които да насърчат държавите членки да осъществяват превенция.
По въпроса за убежището ЕП прие да има единни стандарти за предоставяне на бежански статут, включително в случаите, когато молбите за убежище се основават на пола. Също и лица, потърсили убежище на такова основание, да не бъдат принудително връщани в страна, в която са изложени на риск.
Какво следва за България от тази ратификация?
След ратифицирането на ИК от ЕП българските (както, разбира се, и останалите) евродепутати и други служители в европейските институции няма да могат безнаказано да упражняват върху свои колежки и подчинени насилие, основано на факта, че те са жени. Не че подобно отношение беше приемливо и досега, но то вече ще бъде недопустимо и по силата на Конвенцията.
Ако някой бъде осъден за домашно насилие или насилие към жена в някоя страна членка, той ще бъде смятан за такъв и в България. Осъдените в България пък ще се признават за такива в целия ЕС (с уточнението, че тук не влизат Ирландия и Дания). Същото важи и за хората, по отношение на които има мерки за защита от такова насилие. Ако някой, който е обявен за издирване например в Швеция заради тормоз върху бившата си приятелка, дойде на почивка в Слънчев бряг, българските полицаи ще трябва да съдействат на шведските си колеги за залавянето му.
Ако една жена от Афганистан или Иран кандидатства у нас за убежище на основание, че в страната си няма право на образование или на работа, или на свободно изразяване, България ще трябва да се отнесе сериозно към мотивите ѝ. Същото важи например и за жените, склонявани към принудителни бракове, подлагани на обрязване или заплашени от т.нар. убийства на честта.
Как гласуваха българските евродепутати?
И на двата вота, свързани с ратификацията на ИК, българските евродепутати гласуваха по един и същи начин. За ратификацията бяха шестима – Атидже Алиева-Вели, Илхан Кючюк и Искра Михайлова от парламентарната група „Обнови Европа“ (представители на ДПС), Сергей Станишев и Елена Йончева от групата на социалистите и демократите (излъчени от БСП, но понастоящем в конфликт с партията под ръководството на Корнелия Нинова) и Радан Кънев от Европейската народна партия (ДСБ).
С „въздържал се“ гласуваха двама – Асим Адемов и Андрей Новаков от Европейската народна партия (ГЕРБ).
Против ратификацията бяха отново двама – Ангел Джамбазки от групата на европейските консерватори и реформисти (ВМРО–БНД) и Александър Йорданов от ЕНП (СДС). Последният впрочем и при двете гласувания първоначално фигурира в списъка на въздържалите се, после коригира вота си на „против“.
Останалите 7 от общо 17-те български евродепутати не участваха в гласуването, макар някои от тях да присъстваха на заседанието същия ден и да дадоха гласа си по други въпроси.
Какви са следващите стъпки и каква е драмата с ИК?
След ратификацията на ИК от ЕП от България се очаква да се съобразява с конкретните аспекти от Конвенцията, които стават задължителни за отделните страни. Няма обаче изискване страните да хармонизират законодателството си в тази област, още по-малко да променят собствените си правни традиции.
Няма и принуда върху България да ратифицира ИК. Евродепутати нееднократно призовават страната ни, както и Чехия, Унгария, Латвия, Литва и Словакия, да ратифицират Конвенцията, за да могат жените в тези държави да получат цялата защита, предвидена в нея. Решението дали това да стане обаче, принадлежи единствено на отделните страни.
Конвенцията на Съвета на Европа за превенция и борба с насилието над жени и домашното насилие не беше ратифицирана от България и останалите изброени по-горе страни след целенасочена кампания за демонизирането ѝ, чиито корени могат да се намерят както в руската пропагандна машина, така и в някои християнски фундаменталистки кръгове.
Основен аргумент срещу ИК стана изопачаването на понятието „джендър“, включващо тези измерения на пола, които не се свеждат до биологията (например защо до 40-те години на ХХ век розовият цвят се е свързвал с мъжествеността, а синият с женствеността, а днес е обратното). Тъй като обаче съществува и понятие „джендър идентичност“ (дали идентичността на даден човек съответства на пола, приписан му при раждане), което се отнася към трансхората, се тиражира внушението, че всичко, що е джендър, се свежда до това.
В допълнение, този пропаганден език слага знак на равенство между джендър идентичност и сексуална ориентация, да не говорим за по-фини дистинкции като тези между трансджендър, транссексуалност и трети пол. Затова и хомо-, и бисексуалните започнаха да бъдат наричани „джендъри“. А на организациите, които се борят с насилието над жени, им се лепна етикетът, че „искат да узаконят третия пол“.
Струва ли си заради това жените да продължават да бъдат убивани?
В чл. 4 от ИК впрочем действително се споменават понятията идентичност, основана на пола (тоест джендър идентичност), и сексуална ориентация, за да се каже, че Конвенцията важи и за носителите на тези дискриминационни признаци, наред с много други. Но да не забравяме, че тя е посветена на борбата с насилието над жени и с домашното насилие. В този смисъл целият вой как с ратифицирането ѝ ще се узакони „третият пол“, всъщност означава едва ли не едно – по-добре жените да продължават да бъдат бити и убивани, отколкото защитата, която получат те, да важи и за ЛГБТИ хората.
В България впрочем правата на ЛГБТИ хората са защитени и от Закона за защита от дискриминация, по силата на който е забранена дискриминацията на основата на сексуална ориентация и на пол, като признакът „пол“ включва и случаите на промяната му. Друг е въпросът в каква степен този закон работи.
А докато България гордо и патриотично отказва да ратифицира Конвенцията на Съвета на Европа за превенция и борба с насилието над жени и домашното насилие, понеже се бори с „джендъра“, една жена на седмица-две бива убивана от настоящ или бивш съпруг или партньор.
Cyber Essentials Plus is a UK Government-backed, industry-supported certification scheme intended to help organizations demonstrate organizational cyber security against common cyber attacks. An independent third-party auditor certified by the Information Assurance for Small and Medium Enterprises (IASME) completed the audit. The scope of our Cyber Essentials Plus certificate covers AWS Europe (London), AWS Europe (Ireland), and AWS Europe (Frankfurt) Regions.
The NHS DSPT is a self-assessment that organizations use to measure their performance against data security and information governance requirements. The UK Department of Health and Social Care sets these requirements.
When customers move to the AWS Cloud, AWS is responsible for protecting the global infrastructure that runs our services offered in the AWS Cloud. AWS customers are the data controllers for patient health and care data, and are responsible for anything they put in the cloud or connect to the cloud. For more information, see the AWS Shared Security Responsibility Model.
As always, we value your feedback and questions. Reach out to the AWS Compliance team through the Contact Us page. If you have feedback about this post, submit a comment in the Comments section below. To learn more about our other compliance and security programs, see AWS Compliance Programs.
Want more AWS Security news? Follow us on Twitter.
The collective thoughts of the interwebz
Manage Consent
To provide the best experiences, we use technologies like cookies to store and/or access device information. Consenting to these technologies will allow us to process data such as browsing behavior or unique IDs on this site. Not consenting or withdrawing consent, may adversely affect certain features and functions.
Functional
Always active
The technical storage or access is strictly necessary for the legitimate purpose of enabling the use of a specific service explicitly requested by the subscriber or user, or for the sole purpose of carrying out the transmission of a communication over an electronic communications network.
Preferences
The technical storage or access is necessary for the legitimate purpose of storing preferences that are not requested by the subscriber or user.
Statistics
The technical storage or access that is used exclusively for statistical purposes.The technical storage or access that is used exclusively for anonymous statistical purposes. Without a subpoena, voluntary compliance on the part of your Internet Service Provider, or additional records from a third party, information stored or retrieved for this purpose alone cannot usually be used to identify you.
Marketing
The technical storage or access is required to create user profiles to send advertising, or to track the user on a website or across several websites for similar marketing purposes.