Security updates have been issued by Debian (firefox-esr and mediawiki), openSUSE (firefox, libqt5-qtbase, and rubygem-actionpack-5_1), Red Hat (qemu-kvm, qemu-kvm-ma, and virt:rhel), SUSE (dpdk, firefox, and go1.15), and Ubuntu (dpdk, imagemagick, italc, libpgf, libuv1, pam-python, squid3, ssvnc, and teeworlds).
Everyone with a website needs to know some basic facts about their website: what pages are people visiting? Where in the world are they? What other sites sent traffic to my website?
There are “free” analytics tools out there, but they come at a cost: not money, but your users’ privacy. Today we’re announcing a brand new, privacy-first analytics service that’s open to everyone — even if they’re not already a Cloudflare customer. And if you’re a Cloudflare customer, we’ve enhanced our analytics to make them even more powerful than before.
The most important analytics feature: Privacy
The most popular analytics services available were built to help ad-supported sites sell more ads. But, a lot of websites don’t have ads. So if you use those services, you’re giving up the privacy of your users in order to understand how what you’ve put online is performing.
Cloudflare’s business has never been built around tracking users or selling advertising. We don’t want to know what you do on the Internet — it’s not our business. So we wanted to build an analytics service that gets back to what really matters for web creators, not necessarily marketers, and to give web creators the information they need in a simple, clean way that doesn’t sacrifice their visitors’ privacy. And giving web creators these analytics shouldn’t depend on their use of Cloudflare’s infrastructure for performance and security. (More on that in a bit.)
What does it mean for us to make our analytics “privacy-first”? Most importantly, it means we don’t need to track individual users over time for the purposes of serving analytics. We don’t use any client-side state, like cookies or localStorage, for the purposes of tracking users. And we don’t “fingerprint” individuals via their IP address, User Agent string, or any other data for the purpose of displaying analytics. (We consider fingerprinting even more intrusive than cookies, because users have no way to opt out.)
Counting visits without tracking users
One of the most essential stats about any website is: “how many people went there”? Analytics tools frequently show counts of “unique” visitors, which requires tracking individual users by a cookie or IP address.
We use the concept of a visit: a privacy-friendly measure of how people have interacted with your website. A visit is defined simply as a successful page view that has an HTTP referer that doesn’t match the hostname of the request. This tells you how many times people came to your website and clicked around before navigating away, but doesn’t require tracking individuals.
A visit has slightly different semantics from a “unique”, and you should expect this number to differ from other analytics tools.
All of the details, none of the bots
Our analytics deliver the most important metrics about your website, like page views and visits. But we know that an essential analytics feature is flexibility: the ability to add arbitrary filters, and slice-and-dice data as you see fit. Our analytics can show you the top hostnames, URLs, countries, and other critical metrics like status codes. You can filter on any of these metrics with a click and see the whole dashboard update.
I’m especially excited about two features in our time series charts: the ability to drag-to-zoom into a narrower time range, and the ability to “group by” different dimensions to see data in a different way. This is a super powerful way to drill into an anomaly in traffic and quickly see what’s going on. For example, you might notice a spike in traffic, zoom into that spike, and then try different groupings to see what contributed the extra clicks. A GIF is worth a thousand words:
And for customers of our Bot Management product, we’re working on the ability to detect (and remove) automated traffic. Coming very soon, you’ll be able to see which bots are reaching your website — with just a click, block them by using Firewall Rules.
This is all possible thanks to our ABR analytics technology, which enables us to serve analytics very quickly for websites large and small. Check out our blog post to learn more about how this works.
Edge or Browser analytics? Why not both?
There are two ways to collect web analytics data: at the edge (or on an origin server), or in the client using a JavaScript beacon.
Historically, Cloudflare has collected analytics data at our edge. This has some nice benefits over traditional, client-side analytics approaches:
It’s more accurate because you don’t miss users who block third-party scripts, or JavaScript altogether
You can see all of the traffic back to your origin server, even if an HTML page doesn’t load
We can detect (and block bots), apply Firewall rules, and generally scrub traffic of unwanted noise
You can measure the performance of your origin server
More commonly, most web analytics providers use client-side measurement. This has some benefits as well:
You can understand performance as your users see it — e.g. how long did the page actually take to render
You can detect errors in client-side JavaScript execution
You can define custom event types emitted by JavaScript frameworks
Ultimately, we want our customers to have the best of both worlds. We think it’s really powerful to get web traffic numbers directly from the edge. We also launched Browser Insights a year ago to augment our existing edge analytics with more performance information, and today Browser Insights are taking a big step forward by incorporating Web Vitals metrics.
But, we know not everyone can modify their DNS to take advantage of Cloudflare’s edge services. That’s why today we’re announcing a free, standalone analytics product for everyone.
How do I get it?
For existing Cloudflare customers on our Pro, Biz, and Enterprise plans, just go to your Analytics tab! Starting today, you’ll see a banner to opt-in to the new analytics experience. (We plan to make this the default in a few weeks.)
But when building privacy-first analytics, we realized it’s important to make this accessible even to folks who don’t use Cloudflare today. You’ll be able to use Cloudflare’s web analytics even if you can’t change your DNS servers — just add our JavaScript, and you’re good to go.
We’re still putting on the finishing touches on our JavaScript-based analytics, but you can sign up here and we’ll let you know when it’s ready.
The evolution of analytics at Cloudflare
Just over a year ago, Cloudflare’s analytics consisted of a simple set of metrics: cached vs uncached data transfer, or how many requests were blocked by the Firewall. Today we provide flexible, powerful analytics across all our products, including Firewall, Cache, Load Balancing and Network traffic.
While we’ve been focused on building analytics about our products, we realized that our analytics are also powerful as a standalone product. Today is just the first step on that journey. We have so much more planned: from real-time analytics, to ever-more performance analysis, and even allowing customers to add custom events.
We want to hear what you want most out of analytics — drop a note in the comments to let us know what you want to see next.
Many of us at Cloudflare obsess about how to make websites faster. But to improve performance, you have to measure it first. Last year we launched Browser Insights to help our customers measure web performance from the perspective of end users.
Today, we’re partnering with the Google Chrome team to bring Web Vitals measurements into Browser Insights. Web Vitals are a new set of metrics to help web developers and website owners measure and understand load time, responsiveness, and visual stability. And with Cloudflare’s Browser Insights, they’re easier to measure than ever – and it’s free for anyone to collect data from the whole web.
Why do we need Web Vitals?
When trying to understand performance, it’s tempting to focus on the metrics that are easy to measure — like Time To First Byte (TTFB). While TTFB and similar metrics are important to understand, we’ve learned that they don’t always tell the whole story.
Our partners on the Google Chrome team have tackled this problem by breaking down user experience into three components:
Loading: How long did it take for content to become available?
Interactivity: How responsive is the website when you interact with it?
Visual stability: How much does the page move around while loading? (I think of this as the inverse of “jankiness”)
It’s challenging to create a single metric that captures these high-level components. Thankfully, the folks at Google Chrome team have thought about this, and earlier this year introduced three “Core” Web Vitals metrics: Largest Contentful Paint, First Input Delay, and Cumulative Layout Shift.
How do Web Vitals help make your website faster?
Measuring the Core Web Vitals isn’t the end of the story. Rather, they’re a jumping off point to understand what factors impact a website’s performance. Web Vitals tells you what is happening at a high level, and other more detailed metrics help you understand why user experience could be slow.
Take loading time, for example. If you notice that your Largest Contentful Paint score is “needs improvement”, you want to dig into what is taking so long to load! Browser Insights still measures navigation timing metrics like DNS lookup time and TTFB. By analyzing these metrics in turn, you might want to dig further into optimizing cache hit rates, tuning the performance of your origin server, or tweaking order in which resources like JavaScript and CSS load.
For more information about improving web performance, check out Google’s guides to improving LCP, FID, and CLS.
Why measure Web Vitals with Cloudflare?
First, we think that RUM (Real User Measurement) is a critical companion to synthetic measurement. While you can always try a few page loads on your own laptop and see the results, gathering data from real users is the only way to take into account real-life device performance and network conditions.
There are other great RUM tools out there. Google’s Chrome User Experience Report (CrUX) collects data about the entire web and makes it available through tools like Page Speed Insights (PSI), which combines synthetic and RUM results into useful diagnostic information.
One major benefit of Cloudflare’s Browser Insights is that it updates constantly; new data points are available shortly after seeing a request from an end-user. The data in the Chrome UX Report is a 28-day rolling average of aggregated metrics, so you need to wait until you can see changes reflected in the data.
Another benefit of Browser Insights is that we can measure any browser — not just Chrome. As of this writing, the APIs necessary to report Web Vitals are only supported in Chromium browsers, but we’ll support Safari and Firefox when they implement those APIs.
Finally, Brower Insights is free to use! We’ve worked really hard to make our analytics blazing fast for websites with any amount of traffic. We’re excited to support slicing and grouping by URL, Browser, OS, and Country, and plan to support several more dimensions soon.
Push a button to start measuring
To start using Browser Insights, just head over to the Speed tab in the dashboard. Starting today, Web Vitals metrics are now available for everyone!
Behind the scenes, Browser Insights works by inserting a JavaScript “beacon” into HTML pages. You can control where the beacon loads if you only want to measure specific pages or hostnames. If you’re using CSP version 3, we’ll even automatically detect the nonce (if present) and add it to the script.
Coming soon, we’re excited to make this available for all our Web Analytics customers — even those who don’t use Cloudflare today. We’re also hard at work adding much-requested features like client-side error reporting, and diagnostics tools to make it easier to understand where to improve.
Cloudflare’s analytics products help customers answer questions about their traffic by analyzing the mind-boggling, ever-increasing number of events (HTTP requests, Workers requests, Spectrum events) logged by Cloudflare products every day. The answers to these questions depend on the point of view of the question being asked, and we’ve come up with a way to exploit this fact to improve the quality and responsiveness of our analytics.
Useful Accuracy
Consider the following questions and answers:
What is the length of the coastline of Great Britain? 12.4K km
What is the total world population? 7.8B
How many stars are in the Milky Way? 250B
What is the total volume of the Antarctic ice shelf? 25.4M km3
What is the worldwide production of lentils? 6.3M tonnes
How many HTTP requests hit my site in the last week? 22.6M
Useful answers do not benefit from being overly exact. For large quantities, knowing the correct order of magnitude and a few significant digits gives the most useful answer. At Cloudflare, the difference in traffic between different sites or when a single site is under attack can cross nine orders of magnitude and, in general, all our traffic follows a Pareto distribution, meaning that what’s appropriate for one site or one moment in time might not work for another.
Because of this distribution, a query that scans a few hundred records for one customer will need to scan billions for another. A report that needs to load a handful of rows under normal operation might need to load millions when a site is under attack.
To get a sense of the relative difference of each of these numbers, remember “Powers of Ten”, an amazing visualization that Ray and Charles Eames produced in 1977. Notice that the scale of an image determines what resolution is practical for recording and displaying it.
Using ABR to determine resolution
This basic fact informed our design and implementation of ABR for Cloudflare analytics. ABR stands for “Adaptive Bit Rate”. It’s essentially an eponym for the term as used in video streaming such as Cloudflare’s own Stream Delivery. In those cases, the server will select the best resolution for a video stream to match your client and network connection.
In our case, every analytics query that supports ABR will be calculated at a resolution matching the query. For example, if you’re interested to know from which country the most firewall events were generated in the past week, the system might opt to use a lower resolution version of the firewall data than if you had opted to look at the last hour. The lower resolution version will provide the same answer but take less time and fewer resources. By using multiple, different resolutions of the same data, our analytics can provide consistent response times and a better user experience.
You might be aware that we use a columnar store called ClickHouse to store and process our analytics data. When using ABR with ClickHouse, we write the same data at multiple resolutions into separate tables. Usually, we cover seven orders of magnitude – from 100% to 0.0001% of the original events. We wind up using an additional 12% of disk storage but enable very fast ad hoc queries on the reduced resolution tables.
Aggregations and Rollups
The ABR technique facilitates aggregations by making compact estimates of every dimension. Another way to achieve the same ends is with a system that computes “rollups”. Rollups save space by computing either complete or partial aggregations of the data as it arrives.
For example, suppose we wanted to count a total number of lentils. (Lentils are legumes and among the oldest and most widely cultivated crops. They are a staple food in many parts of the world.) We could just count each lentil as it passed through the processing system. Of course because there a lot of lentils, that system is distributed – meaning that there are hundreds of separate machines. Therefore we’ll actually have hundreds of separate counters.
Also, we’ll want to include more information than just the count, so we’ll also include the weight of each lentil and maybe 10 or 20 other attributes. And of course, we don’t want just a total for each attribute, but we’ll want to be able to break it down by color, origin, distributor and many other things, and also we’ll want to break these down by slices of time.
In the end, we’ll have tens of thousands or possibly millions of aggregations to be tabulated and saved every minute. These aggregations are expensive to compute, especially when using aggregations more complicated than simple counters and sums. They also destroy some information. For example, once we’ve processed all the lentils through the rollups, we can’t say for sure that we’ve counted them all, and most importantly, whichever attributes we neglected to aggregate are unavailable.
The number we’re counting, 6.3M tonnes, only includes two significant digits which can easily be achieved by counting a sample. Most of the rollup computations used on each lentil (on the order 1013 to account for 6.3M tonnes) are wasted.
Other forms of aggregations
So far, we’ve discussed ABR and its application to aggregations, but we’ve only given examples involving “counts” and “sums”. There are other, more complex forms of aggregations we use quite heavily. Two examples are “topK” and “count-distinct”.
A “topK” aggregation attempts to show the K most frequent items in a set. For example, the most frequent IP address, or country. To compute topK, just count the frequency of each item in the set and return the K items with the highest frequencies. Under ABR, we compute topK based on the set found in the matching resolution sample. Using a sample makes this computation a lot faster and less complex, but there are problems.
The estimate of topK derived from a sample is biased and dependent on the distribution of the underlying data. This can result in overestimating the significance of elements in the set as compared to their frequency in the full set. In practice this effect can only be noticed when the cardinality of the set is very high and you’re not going to notice this effect on a Cloudflare dashboard. If your site has a lot of traffic and you’re looking at the Top K URLs or browser types, there will be no difference visible at different resolutions. Also keep in mind that as long as we’re estimating the “proportion” of the element in the set and the set is large, the results will be quite accurate.
The other fascinating aggregation we support is known as “count-distinct”, or number of uniques. In this case we want to know the number of unique values in a set. For example, how many unique cache keys have been used. We can safely say that a uniform random sample of the set cannot be used to estimate this number. However, we do have a solution.
We can generate another, alternate sample based on the value in question. For example, instead of taking a random sample of all requests, we take a random sample of IP addresses. This is sometimes called distinct reservoir sampling, and it allows us to estimate the true number of distinct IPs based on the cardinality of the sampled set. Again, there are techniques available to improve these estimates, and we’ll be implementing some of those.
ABR improves resilience and scalability
Using ABR saves us resources. Even better, it allows us to query all the attributes in the original data, not just those included in rollups. And even better, it allows us to check our assumptions against different sample intervals in separate tables as a check that the system is working correctly, because the original events are preserved.
However, the greatest benefits of employing ABR are the ones that aren’t directly visible. Even under ideal conditions, a large distributed system such as Cloudflare’s data pipeline is subject to high tail latency. This occurs when any single part of the system takes longer than usual for any number of a long list of reasons. In these cases, the ABR system will adapt to provide the best results available at that moment in time.
For example, compare this chart showing Cache Performance for a site under attack with the same chart generated a moment later while we simulate a failure of some of the servers in our cluster. In the days before ABR, your Cloudflare dashboard would fail to load in this scenario. Now, with ABR analytics, you won’t see significant degradation.
Stretching the analogy to ABR in video streaming, we want you to be able to enjoy your analytics dashboard without being bothered by issues related to faulty servers, or network latency, or long running queries. With ABR you can get appropriate answers to your questions reliably and within a predictable amount of time.
In the coming months, we’re going to be releasing a variety of new dashboards and analytics products based on this simple but profound technology. Watch your Cloudflare dashboard for increasingly useful and interactive analytics.
As a thought experiment, Martin Hron, a researcher at security company Avast, reverse engineered one of the older coffee makers to see what kinds of hacks he could do with it. After just a week of effort, the unqualified answer was: quite a lot. Specifically, he could trigger the coffee maker to turn on the burner, dispense water, spin the bean grinder, and display a ransom message, all while beeping repeatedly. Oh, and by the way, the only way to stop the chaos was to unplug the power cord.
[…]
In any event, Hron said the ransom attack is just the beginning of what an attacker could do. With more work, he believes, an attacker could program a coffee maker — and possibly other appliances made by Smarter — to attack the router, computers, or other devices connected to the same network. And the attacker could probably do it with no overt sign anything was amiss.
Пускам тези числа с големи уговорки за източника на информация. Макар доста политици и самото Министерство на здравеопазването да го цитират редовно, доста е под изискванията ми за качество. В случая обаче това са единствените данни, които имаме. Повече за проблемите със здравната статистика писах през май.
Та с тази уговорка, според НЦОЗА за първата половината на 2020-та има 8.3% намаление на вероятността една жена да има аборт в България спрямо същия период на 2019-та. При абортите по желание намалението е с 1158 случая или 16.3%, но тези по медицински показания са скочили с 429 случая или 47.5%. Спонтанните са намалели с 6.4%. При всички числа приемам 2.36% намаление на жените в страната в разглежданите възрастови групи, каквато беше разликта между 2018-2019 г.
Дори контролирайки за спад в населението, очаквано е да има намаление в броя абортите. Виждаме го всяка година. Темата обаче е редовна спирка и източник на сензации за националисти, кафяви медии, религиозни секти и други шарлатани и затова рядко чуваме тези числа. Такова голямо намаление обаче има две обяснения, които най-вероятно поравно допринасят за виждания ефект.
На първо място неизменнен фактор е COVID19. Промените в работата на болничните заведения са повлияли както на решението да се прави аборт, така и дали и как се отчита. Самата криза накара много да избягват търсене на здравна помощ. В огромна степен това е сериозен проблем, негативното ехо от който ще виждаме години напред и трудно ще се различни от трайните здравни последици от преболедуването на коронавируса – особено при сърдечното здраве. При аборите навярно някои жени или не са се решили, или са нямали достъп до възможността за аборт. Последното също може да създаде здравни проблеми, тъй като предполага и липса на достъп до АГ помощ и наложителни интервенции.
Това не означава, че същия брой жени не са направили аборт. Силното ограничаване на работата на болниците може да е накарало много жени да търсят „алтернативни“ решения, които поставят живота и здравето им в риск. Няма адекватна статистика за нелегалните аборти, още повече по тримесечия. Общите оценки през годините са за не повече от 20% от официлния брой, но не може да кажем колко са били конкретно през последните 6 месеца.
Това, което виждаме, обаче е значително увеличние на тези по медицински показания. Това отново може да се препише като ефект от кризата, тъй като доста АГ специалисти са писали аборти по желание като спешни интервенции, за да заобколят наложените ограничения преди няколко месеца. Така докато между 2018 и 2019-та виждаме намаление от около 4% в наложителните аборти, сега виждаме почти 50% увеличние.
Тук отново засягаме проблемите в отчитането, липсата на контрол, непостоянство на методологията и ниското качество на данните на НЦОЗА и Министерството на здравеопазването като цяло. Това е и второто обяснение за сериозният спад в абортите. Голямото намаление на спонтанните аборти, например, в улика именно за това.
Разбира се, това не означава, че нямаление няма въобще – напротив. Означава просто, че не може да си вадим генерални изводи само въз основа на тези числа. Всичко, което описах дотук са предположения на база работата ми с подобна информация, опита ми от данните специално на НЦОЗА и разговори с хора в системата. За жалост, не само, че няма изгледи да се подобри здравната статистика, но и се разтурва това, което преди е работило добре, като например раковия регистър.
Ниското качество на данните, разбира се, няма да попречи на знайни и незнайни стожери на нацията, традициите и религията да рисуват апокалиптични карти и да настояват за правото на обществото да диктува какво може и не може една жена да прави с тялото си. Всъщност, както винаги голяма част от твърденията им ще бъде измислица и дори няма да си направят труда да четат малкото налична статистика, тък като ги оборва.
Customers today want to establish a single identity and access strategy across all of their own apps, such as on-premises apps, third-party cloud apps (SaaS), or apps in AWS. If your organization use Azure Active Directory (Azure AD) for cloud applications, you can enable single sign-on (SSO) for applications like Amazon QuickSight without needing to create another user account or remember passwords. You can also enable role-based access control to make sure users get appropriate role permissions in QuickSight based on their entitlement stored in Active Directory attributes or granted through Active Directory group membership. The setup also allows administrators to focus on managing a single source of truth for user identities in Azure AD while having the convenience of configuring access to other AWS accounts and apps centrally.
In this post, we walk through the steps required to configure federated SSO between QuickSight and Azure AD. We also demonstrate ways to assign a QuickSight role based on Azure AD group membership. Administrators can publish the QuickSight app in the Azure App portal to enable users to SSO to QuickSight using their Azure AD or Active Directory credentials.
The solution in this post uses an identity provider (IdP)-initiated SSO, which means your end-users must log in to Azure AD and choose the published QuickSight app in the Azure App Portal portal to sign in to QuickSight.
Registering a QuickSight application in Azure AD
Your first step is to create a QuickSight application in Azure AD.
Log in to your Azure portal using the administrator account in the Azure AD tenant where you want to register the QuickSight application.
Under Azure Services, open Azure Active Directory and under Manage, choose Enterprise Application.
Choose New Application.
Select Non-gallery application.
For Name, enter Amazon QuickSight.
Choose Add to register the application.
Creating users and groups in Azure AD
You can now create new users and groups or choose existing users and groups that can access QuickSight.
Under Manage, choose All applications and open Amazon QuickSight
Under Getting Started, choose Assign users and groups.
For this post, you create three groups, one for each QuickSight role:
You can now start configuring the SSO settings for the app.
Under Manage, choose Single sign-on.
For Select a single sign-on method, choose SAML.
To configure the sections, choose Edit.
In the Basic SAML Configuration section, for Identifier (Entity ID), enter URN:AMAZON:WEBSERVICES.
This is the entity ID passed during the SAML exchange. Azure requires that this value be unique for each application. For additional AWS applications, you can append a number to the string; for example, URN:AMAZON:WEBSERVICES2.
For Reply URL, enter https://signin.aws.amazon.com/saml.
Leave Sign on URL blank.
For Relay State, enter https://quicksight.aws.amazon.com.
Leave Logout Url blank.
Under SAML Signing Certificate, choose Download next to Federation Metadata XML.
Next, create the roles that your Azure AD users assume when federating into QuickSight. The following steps set up the admin role:
On the IAM console, choose Roles.
Choose Create role.
For Select type of trusted entity, choose SAML 2.0 federation.
For SAML provider, choose the provider you created earlier (AzureActiveDirectory).
Select Allow programmatic and AWS Management Console access.
For Attribute, make sure SAML:aud is selected.
Value should show https://signin.aws.amazon.com/saml.
Choose Next: Permissions.
Choose the QuickSight-Federated-Admin IAM policy you created earlier.
Choose Next: Tags.
Choose Next: Review
For Role name, enter QuickSight-Admin-Role.
For Role description, enter a description.
Choose Create role.
On the IAM console, in the navigation pane, choose Roles.
Choose the QuickSight-Admin-Role role you created to open the role’s properties.
Record the role ARN to use later.
On the Trust Relationships tab, choose Edit Trust Relationship.
Under Trusted Entities, verify that the IdP you created is listed.
Under Conditions, verify that SAML:aud with a value of https://signin.aws.amazon.com/saml is present.
Repeat these steps to create your author and reader roles and attach the appropriate policies:
For QuickSight-Author-Role, use the policy QuickSight-Federated-Author.
For QuickSight-Reader-Role, use the policy QuickSight-Federated-Reader.
Configuring user attributes and claims in Azure AD
In this step, you return to the application in Azure portal and configure the user claims that Azure AD sends to AWS.
By default, several SAML attributes are populated for the new application, but you don’t need these attributes for federation into QuickSight. Under Additional Claims, select the unnecessary claims and choose Delete.
For this post, you create three claims:
Role
RoleSessionName
SAML_SUBJECT
Creating the Role claim
To create the Role claim, complete the following steps:
Under Manage, choose Single sign-on.
Choose Edit on User Attributes & Claims section
Choose Add new claim.
For Name, enter Role.
For Namespace, enter https://aws.amazon.com/SAML/Attributes.
Under Claim conditions, add a condition for the admin, author, and reader roles. Use the parameters in the following table:
To create your RoleSessionName claim, complete the following steps:
Choose Add new claim.
For Name, enter RoleSessionName.
For Namespace, enter https://aws.amazon.com/SAML/Attributes.
For Source, choose Transformation.
For Transformation, enter ExtractMailPrefix().
For Parameter 1, enter user.userprincipalname.
We use the ExtractMailPrefix() function to extract the name from the userprincipalname attribute. For example, the function extracts the name joe from the user principal name value of [email protected]. IAM uses RoleSessionName to build the role session ID for the user signing into QuickSight. The role session ID is made up of the Role name and RoleSessionName, in Role/RoleSessionName format. Users are registered in QuickSight with the role session ID as the username.
Creating the SAML_SUBJECT claim
To create your final claim, SAML_SUBJECT, complete the following steps:
Choose Add new claim.
For Name, enter SAML_SUBJECT.
For Namespace, enter https://aws.amazon.com/SAML/Attributes.
For Source, choose Attribute.
For Source attribute, enter ““Azure AD - QuickSight SSO””.
Testing the application
You’re now ready to test the application.
In the Azure portal, on the Azure Active Directory page, choose All groups.
Update the group membership of the QuickSight-Admin group by adding the current user to it.
Under Enterprise Applications, choose Amazon QuickSight.
Under Manage, choose Single sign-on.
Choose Test this application to test the authentication flow.
Log in to QuickSight as an admin.
The following screenshot shows you the QuickSight dashboard for the admin user.
Remove the current user from QuickSight-Admin Azure AD group and add it to QuickSight-Author group.
When you test the application flow, you log in to QuickSight as an author.
Remove the current user from QuickSight-Author group and add it to QuickSight-Reader group.
When you test the application flow again, you log in as a reader.
By removing the user from the Azure AD group will not automatically remove the registered user in QuickSight. You have to remove the user manually in the QuickSight admin console. The user management inside QuickSight is documented in this article.
Deep-linking QuickSight dashboards
You can share QuickSight dashboards using the sign-on URL for the QuickSight application published in the Azure Apps portal. This allows users to federate directly into the QuickSight dashboard without having to land first on the QuickSight homepage.
To deep-link to a specific QuickSight dashboard with SSO, complete the following steps:
Under Enterprise Applications, choose Amazon QuickSight
Under Manage, choose Properties.
Locate the User access URL.
Append ?RelayState to the end of the URL containing the URL of your dashboard. For example, https://myapps.microsoft.com/signin/Amazon%20QuickSight/a06d28e5-4aa4-4888-bb99-91d6c2c4eae8?RelayState=https://us-east-1.quicksight.aws.amazon.com/sn/dashboards/224103be-0470-4de4-829f-390e55b3ef96.
You can test it by creating a custom sign-in URL using the RelayState parameter pointing to an existing dashboard. Make sure the user signing in to the dashboard has been granted proper access.
Summary
This post provided step-by-step instructions to configure a federated SSO with Azure AD as the IdP. We also discussed how to map users and groups in Azure AD to IAM roles for secure access into QuickSight.
If you have any questions or feedback, please leave a comment.
About the Author
Adnan Hasan is a Global GTM Analytics Specialist at Amazon Web Services, helping customers transform their business using data, machine learning and advanced analytics.
Single sign-on (SSO) enables users to have a seamless user experience while accessing various applications in the organization. If you’re responsible for setting up security and database access privileges for users and tasked with enabling SSO for Amazon Redshift, you can set up SSO authentication using ADFS, PingIdentity, Okta, Azure AD or other SAML browser based Identity Providers.
With federation, you can centralize management and governance of authentication and permissions by managing users and groups within the enterprise identity provider (IdP) and use them to authenticate to Amazon Redshift. For more information about the federation workflow using IAM and an identity provider, see Federate Database User Authentication Easily with IAM and Amazon Redshift.
This post shows you how to set up PingOne as your IdP. I provide step-by-step guidance to set up a trial account at pingidentity.com, build users and groups within your organization’s directory, and enable federated SSO into Amazon Redshift to maintain group-level access controls for your data warehouse.
Solution overview
The steps in this post are structured into the following sections:
IdP (PingOne) groups configuration – Create groups and assign users to logical groups in PingOne.
IdP (PingOne) application configuration – Create PingOne application(s) and configure AWS Identity and Access Management (IAM) roles, and groups allowed to be passed to Amazon Redshift.
IAM SAML federation configuration – Setup a role that allows PingOne to access Amazon Redshift by establishing a trust relationship between PingOne IdP and AWS.
Amazon Redshift groups and privileges setup – Setup groups within the Amazon Redshift database to match the PingOne groups. You also authorize these groups to access certain schemas and tables.
Amazon Redshift server and client setup and test SSO – Finally, configure SQL client tools to use your enterprise credentials and sign in to Amazon Redshift.
The process flow for federated authentication is shown in the following diagram and steps:
The user logs in using a JDBC/ODBC SQL client.
The IdP authenticates using the corporate user name and password, and returns a SAML assertion.
The client uses the temporary AWS credentials to get temporary cluster credentials.
The client connects to Amazon Redshift using the temporary credentials.
Setting up PingOne provider groups and users
Before you get started, sign up for a free trial of PingOne for Enterprise. You then create the users and groups, and assign the users to the groups they belong to and are authorized to access.
You create groups and users in the PingOne user directory. You can set up the groups according to the read/write access privileges or by business functions in your organization to control access to the database objects.
In this post, we set up groups based on ReadOnly and ReadWrite privileges across all functions.
On the Identity Repository tab, choose Connect to an Identity Repository.
For Select an Identity Repository, you will see options for PingOne Directory, Active Directory, PingFederate and others. Choose PingOne Directory and go to Next.
After you connect to the PingOne repository, you should see the status CONFIGURED.
You can now create your groups and assign users.
Choose Users from the menu bar.
On the User Directory tab, choose Groups.
Choose Add Group.
For Name, enter readonly.
For Directly Applied Role, select No Access.
Choose Save.
Repeat these steps for your readwrite group.
To create the users, choose Users from the menu bar.
On the User Directory tab, choose Users.
Choose Add Users.
For this post, we create two users, Bob and Rachel.
Under Group Memberships, for Memberships, select the group to add your user to.
For this post, we add Bob to readonly and Rachel to readwrite.
Choose Add.
Choose Save.
Repeat these steps to create both users.
Configuring your IdP (PingOne) application
The next step is to set up the applications in the IdP for Amazon Redshift. Because we decided to control access through two groups, we create two applications.
pingreadonlyrole is the name of the IAM role you create in the next step.
pingreadonlyprov is the Identity Provider name in IAM where the metadata is imported. You use this name in next step to create your Identity Provider and import the metadata downloaded from this PingOne application configuration.
Choose Advanced and for Function, choose ExtractByRegularExpression. For Expression, enter (readonly|readwrite).+
This regular expression is to remove the @directory value from the PingIdentiy group name to be in line with the Amazon Redshift DB group names and send only the relevant groups to the Application.
On the Group Access page, add the groups that this application can access.
This adds the users who are members of that group so they can SSO to the application.
On the Review Setup page, for SAML Metadata, choose Download.
Save the file as ping-saml-readonly.xml.
You use this file later to import the metadata to create the PingOne IdP.
Record the URL for Initiate Single Sign-On (SSO).
You use this URL to set up the SQL client for federated SSO.
Choose Finish.
Repeat these steps to create the second application, AmazonRedshiftReadWrite, with the following changes:
On the SSO Attribute Mapping page, use the IAM role name pingreadwriterole and IdP name pingreadwriteprov.
Save the SAML metadata file as ping-saml-readwrite.xml.
You should now see the two application names on the My Applications tab.
Configuring IAM SAML federation
To set up your IAM SAML configuration, you create the IAM IdP and the roles and policies for the groups.
Setting up the IAM SAML IdP
You set up the IAM IdP and the roles used in the PingOnereadonly and PingOnereadwrite applications to establish a trust relationship between the IdP and AWS. You need to create two IAM IdPs, one for each application. Complete the following steps:
On the IAM console, under Access management, choose Identity providers.
Choose Create Provider.
For Provider Type, choose SAML.
For Provider name, enter pingreadonlyprov.
For Metadata Document, choose the metadata XML file you downloaded from the AmazonRedshiftReadOnly application.
Repeat these steps to create the provider pingreadwriteprov.
Choose the metadata XML file you downloaded from the AmazonRedshiftReadWrite application.
You now have two IdP providers: pingreadonlyprov and pingreadwriteprov.
Creating the IAM role and policy for the groups
You control access privileges to database objects for specific user groups by using IAM roles. In this section, you create separate IAM roles with policies to map to each of the groups defined in PingOne. These roles allow the user to access Amazon Redshift through the IdP.
You use the same role names that you used to set up applications in PingOne: pingreadonlyrole and pingreadwriterole.
Before you create the role, create the policies with the appropriate joingroup privileges.
On the IAM console, under Access Management, choose Policies.
Choose Create policy.
On the JSON tab, enter the following code to create the two policies.
Replace <cluster> with your cluster name and <dbname> with your database name.
The only difference between the two policies is the Action- redshift:JoinGroup section:
“JoinGroup”: pingreadonlypolicy allows users to join the readonly group
“JoinGroup”: pingreadwritepolicy allows users to join the readwrite group
The group membership lasts only for the duration of the user session, and there is no CreateGroup permission because you need to manually create groups and grant DB privileges in Amazon Redshift.
The following code is the pingreadonlypolicy policy:
For Select type of trusted entity, choose SAML 2.0 federation.
For SAML provider, choose the provider you created.
Select Allow programmatic access only.
For Attribute, choose SAML:aud.
For Value, enter http://localhost:7890/redshift/.
Select pingreadonlypolicy for the first role and pingreadwritepolicy for the second role.
Enter a name and description for each role.
The following screenshot shows your new roles: pingreadonlyrole and pingreadwriterole.
Setting up your groups and privileges in Amazon Redshift
In this section, you create the database groups in Amazon Redshift. These group names should match the group names you used when you set up your PingOne groups. Then you assign privileges to the groups to access the database objects including schemas and tables. User assignment to groups is done only one time in PingOne; you don’t assign users to groups in Amazon Redshift.
Log in to your Amazon Redshift cluster with an admin account using the admin database credentials.
Use the following scripts to create groups that match the IdP group names and grant the appropriate permissions to tables and schemas:
CREATE GROUP readonly;
CREATE GROUP readwrite;

ALTER DEFAULT PRIVILEGES IN SCHEMA finance
GRANT SELECT on TABLES to GROUP readonly;
GRANT USAGE on SCHEMA finance to GROUP readonly;
GRANT SELECT on ALL TABLES in SCHEMA finance to GROUP readonly;

ALTER DEFAULT PRIVILEGES IN SCHEMA finance
GRANT ALL on TABLES to GROUP readwrite;
GRANT USAGE on SCHEMA finance to GROUP readwrite;
GRANT ALL on ALL TABLES in SCHEMA finance to GROUP readwrite;
Setting up your Amazon Redshift server and client and testing SSO
In these final steps, you set up your client tools to use your enterprise credentials and sign in to Amazon Redshift.
Configuring the JDBC SQL Client using SQL Workbench/J
If you haven’t installed the JDBC driver, you can download the Amazon Redshift JDBC driver from the console. You then set up a new connection to your cluster using your PingOne IdP credentials.
Create two new connection profiles, Redshift-ReadOnly and Redshift-ReadWrite.
For URL, enter jdbc:redshift:iam://<cluster endpoint>.
IAM authentication requires using the JDBC driver with the AWS SDK included or making sure the AWS SDK is within your Java classpath.
You don’t need to enter a user name or password in JDBC setting. PingIdentity prompts you to log in on the web browser.
Choose Extended Properties to define the SSO parameters for loging_url and plugin_name.
In the Edit extended properties section, enter the following properties and values:
The login_url is the URL from the PingOne AmazonRedshift applications you set up earlier. Choose the SSO URL from the RedshiftReadOnly application for the readonly connection and the SSO URL from RedshiftReadWrite application for the readwrite connection.
The configuration in your extended properties screen should look like the screenshot below:
Choose OK.
Testing SSO authentication and access privileges
When you log in from the SQL client, you’re redirected to the browser to sign in with your PingOne user name and password.
Log in as user bob with the IdP password.
This user has access to SELECT all tables in the finance schema and not INSERT/UPDATE access. You can enter the following statements to test your access.
The following query shows the results from the finance.revenue table:
/* Finance ReadOnly Query */
select * from finance.revenue limit 10;

customer		salesamt
--------------------------------------
ABC Company	        12000
Tech Logistics		175400
XYZ Industry		24355
The tax experts        186577
When you run an INSERT statement, you get the message that you’re not authorized to insert data:
/* Finance ReadWrite Insert */
insert into finance.revenue
values (10001, 'ABC Company', 12000);

You should see the results below:

INSERT INTO finance.revenue not successful
An error occurred when executing the SQL command:
insert into finance.revenue
values(10001, 'ABC Company', 12000)

[Amazon]()500310)Invalid operation:permission denied for relation revenue;1 statement failed.
Execution time:0.05s
You can repeat these steps for the user rachel, who has access to read and write (INSERT) data into the finance schema.
Configuring the ODBC client
To configure your ODBC client, complete the following steps.
Open the ODBC Data source administrator from your desktop.
On the System DSN tab, choose Add.
For Server, enter your Amazon Redshift ODBC endpoint.
For Port, enter 5439.
For Database, enter your database name.
For Auth Type, choose Identity Provider: Browser SAML to use browser-based authentication.
For Cluster ID, enter your cluster ID.
For Preferred Role, enter your IAM role ARN.
For Login URL, enter your PingOne login URL from the application configuration (https://sso.connect.PingOne.com/sso/sp/initsso?saasid=<saasid>&idpid=<idpid>).
For Listen port, enter 7890 (default).
For Timeout, enter 60.
Summary
In this blog post, I walked you through a step-by-step guide to configure and use PingOne as your IdP and enabled federated SSO to an Amazon Redshift cluster. You can follow these steps to setup federated SSO for your organization and manage access privileges based on read/write privileges or by business function and passing group membership defined in your PingOne IdP to your Amazon Redshift cluster.
About the Authors
Rajesh Francis is a Sr. Analytics Specialist Solutions Architect at AWS. He specializes in Amazon Redshift and works with customers to build scalable Analytic solutions.
This week marks Cloudflare’s 10th birthday, and we’re excited to continue our annual tradition of launching an array of products designed to help give back to the Internet. (Check back here each morning for the latest!)
We also see this milestone as an opportunity to reflect on where the Internet was ten years ago, and where it might be headed over the next decade. So we reached out to some of the people we respect most to see if they’d be interested in joining us for a series of Fireside Chats on Cloudflare TV.
We’ve been blown away by the response, and are thrilled to announce our lineup of speakers, featuring many of the most celebrated names in tech and beyond. Among the highlights: Apple co-founder Steve Wozniak, Zoom CEO Eric Yuan, OpenTable CEO Debby Soo, Stripe co-founder and President John Collison, Former CEO & Executive Chairman, Google // Co-Founder, Schmidt Futures. Eric Schmidt, former McAfee CEO Chris Young, Magic Leap CEO and longtime Microsoft executive Peggy Johnson, former Seal Team 6 Commander Dave Cooper, Project Include CEO Ellen Pao, and so many more. All told, we have over 24 hours of live discussions scheduled throughout the week.
To tune in, just head to Cloudflare TV (no registration required). You can view the details for each session by clicking the links below, where you’ll find handy Add to Calendar buttons to make sure you don’t miss anything. We’ll also be rebroadcasting these talks throughout the week, so they’ll be easily accessible in different timezones.
A tremendous thank you to everyone on this list for helping us celebrate Cloudflare’s 10th annual Birthday Week!
Jay Adelson
Founder of Equinix and Chairman & Co-Founder of Scorbit
Former Assistant Attorney General for the US Department of Justice’s National Security Division and current Chair of Morrison & Foerster’s Global Risk + Crisis Management practice
Recently, the Mercurial project has
been discussing its plans to migrate away from the compromisedSHA-1 hashing algorithm in favor of
a more secure alternative. So far, the discussion is in the planning stages
of algorithm selection and migration strategy, with a general transition plan
for users. The project, for the moment, is favoring the BLAKE2 hashing algorithm.
OpenSSH 8.4 is out. The SHA-1 algorithm is deprecated and the “ssh-rsa”
public key signature algorithm will be disabled by default “in a
near-future release.” They note that it is possible to perform
chosen-prefix attacks against the SHA-1 algorithm for less than USD$50K.
Most serverless application architectures use a combination of different AWS services, microservices, and AWS Lambda functions. Messaging services are important in allowing distributed applications to communicate with each other, and are fundamental to most production serverless workloads.
Messaging services can improve the resilience, availability, and scalability of applications, when used appropriately. They can also enable your applications to communicate beyond your workload or even the AWS Cloud, and provide extensibility for future service features and versions.
In this blog post, I compare the primary messaging services offered by AWS and how you can use these in your serverless application architectures. I also show how you use and deploy these integrations with the AWS Serverless Application Model (AWS SAM).
Examples in this post refer to code that can be downloaded from this GitHub repository. The README.md file explains how to deploy and run each example.
Overview
Three of the most useful messaging patterns for serverless developers are queues, publish/subscribe, and event buses. In AWS, these are provided by Amazon SQS, Amazon SNS, and Amazon EventBridge respectively. All of these services are fully managed and highly available, so there is no infrastructure to manage. All three integrate with Lambda, allowing you to publish messages via the AWS SDK and invoke functions as targets. Each of these services has an important role to play in serverless architectures.
SNS enables you to send messages reliably between parts of your infrastructure. It uses a robust retry mechanism for when downstream targets are unavailable. When the delivery policy is exhausted, it can optionally send those messages to a dead-letter queue for further processing. SNS uses topics to logically separate messages into channels, and your Lambda functions interact with these topics.
SQS provides queues for your serverless applications. You can use a queue to send, store, and receive messages between different services in your workload. Queues are an important mechanism for providing fault tolerance in distributed systems, and help decouple different parts of your application. SQS scales elastically, and there is no limit to the number of messages per queue. The service durably persists messages until they are processed by a downstream consumer.
EventBridge is a serverless event bus service, simplifying routing events between AWS services, software as a service (SaaS) providers, and your own applications. It logically separates routing using event buses, and you implement the routing logic using rules. You can filter and transform incoming messages at the service level, and route events to multiple targets, including Lambda functions.
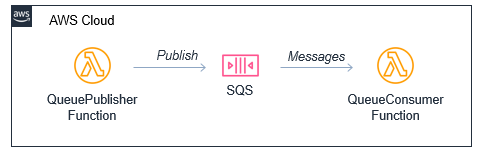
Integrating an SQS queue with AWS SAM
The first example shows an AWS SAM template defining a serverless application with two Lambda functions and an SQS queue:
You can declare an SQS queue in an AWS SAM template with the AWS::SQS::Queue resource:
  MySqsQueue:
    Type: AWS::SQS::Queue
To publish to the queue, the publisher function must have permission to send messages. Using an AWS SAM policy template, you can apply policy that enables send messaging to one specific queue:
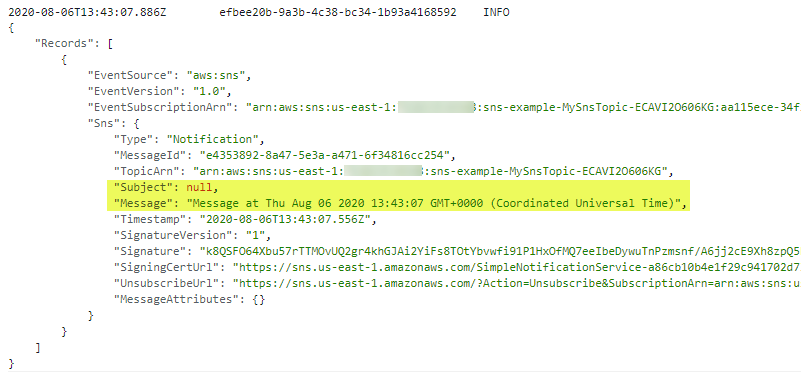
The AWS SAM template passes the queue name into the Lambda function as an environment variable. The function uses the sendMessage method of the AWS.SQS class to publish the message:
const AWS = require('aws-sdk')
AWS.config.region = process.env.AWS_REGION
const sqs = new AWS.SQS({apiVersion: '2012-11-05'})

// The Lambda handler
exports.handler = async (event) => {
  // Params object for SQS
  const params = {
    MessageBody: `Message at ${Date()}`,
    QueueUrl: process.env.SQSqueueName
  }

  // Send to SQS
  const result = await sqs.sendMessage(params).promise()
  console.log(result)
}
When the SQS queue receives the message, it publishes to the consuming Lambda function. To configure this integration in AWS SAM, the consumer function is granted the SQSPollerPolicy policy. The function’s event source is set to receive messages from the queue in batches of 10:
The payload for the consumer function is the message from SQS. This is an array of messages up to the batch size, containing a body attribute with the publishing function’s MessageBody. You can see this in the CloudWatch log for the function:
Integrating an SNS topic with AWS SAM
The second example shows an AWS SAM template defining a serverless application with three Lambda functions and an SNS topic:
You declare an SNS topic and the subscribing Lambda functions with the AWS::SNS:Topic resource:
The SNSPublishMessagePolicy policy template grants permission to the publishing function to send messages to the topic. In the function, the publish method of the AWS.SNS class handles publishing:
const AWS = require('aws-sdk')
AWS.config.region = process.env.AWS_REGION
const sns = new AWS.SNS({apiVersion: '2012-11-05'})

// The Lambda handler
exports.handler = async (event) => {
  // Params object for SNS
  const params = {
    Message: `Message at ${Date()}`,
    Subject: 'New message from publisher',
    TopicArn: process.env.SNStopic
  }

  // Send to SQS
  const result = await sns.publish(params).promise()
  console.log(result)
}
The payload for the consumer functions is the message from SNS. This is an array of messages, containing subject and message attributes from the publishing function. You can see this in the CloudWatch log for the function:
Differences between SQS and SNS configurations
SQS queues and SNS topics offer different functionality, though both can publish to downstream Lambda functions.
An SQS message is stored on the queue for up to 14 days until it is successfully processed by a subscriber. SNS does not retain messages so if there are no subscribers for a topic, the message is discarded.
SNS topics may broadcast to multiple targets. This behavior is called fan-out. It can be used to parallelize work across Lambda functions or send messages to multiple environments (such as test or development). An SNS topic can have up to 12,500,000 subscribers, providing highly scalable fan-out capabilities. The targets may include HTTP/S endpoints, SMS text messaging, SNS mobile push, email, SQS, and Lambda functions.
In AWS SAM templates, you can retrieve properties such as ARNs and names of queues and topics, using the following intrinsic functions:
Amazon SQS
Amazon SNS
Channel type
Queue
Topic
Get ARN
!GetAtt MySqsQueue.Arn
!Ref MySnsTopic
Get name
!GetAtt MySqsQueue.QueueName
!GetAtt MySnsTopic.TopicName
Integrating with EventBridge in AWS SAM
The third example shows the AWS SAM template defining a serverless application with two Lambda functions and an EventBridge rule:
The default event bus already exists in every AWS account. You declare a rule that filters events in the event bus using the AWS::Events::Rule resource:
The rule describes an event pattern specifying matching JSON attributes. Events that match this pattern are routed to the list of targets. You provide the EventBridge service with permission to invoke the Lambda functions in the target list:
The publishing function then uses the putEvents method of the AWS.EventBridge class, which returns after the events have been durably stored in EventBridge:
The payload for the consumer function is the message from EventBridge. This is an array of messages, containing subject and message attributes from the publishing function. You can see this in the CloudWatch log for the function:
Comparing SNS with EventBridge
SNS and EventBridge have many similarities. Both can be used to decouple publishers and subscribers, filter messages or events, and provide fan-in or fan-out capabilities. However, there are differences in the list of targets and features for each service, and your choice of service depends on the needs of your use-case.
EventBridge offers two newer capabilities that are not available in SNS. The first is software as a service (SaaS) integration. This enables you to authorize supported SaaS providers to send events directly from their EventBridge event bus to partner event buses in your account. This replaces the need for polling or webhook configuration, and creates a highly scalable way to ingest SaaS events directly into your AWS account.
The second feature is the Schema Registry, which makes it easier to discover and manage OpenAPI schemas for events. EventBridge can infer schemas based on events routed through an event bus by using schema discovery. This can be used to generate code bindings directly to your IDE for type-safe languages like Python, Java, and TypeScript. This can help accelerate development by automating the generation of classes and code directly from events.
This table compares the major features of both services:
You can subscribe your AWS Lambda functions to an Amazon SNS topic in any Region.
Targets must be in the same Region. You can publish across Regions to another event bus.
Retry policy
For SQS/Lambda, exponential backoff over 23 days.
For SMTP, SMS and Mobile push, exponential backoff over 6 hours.
At-least-once event delivery to targets, including retry with exponential backoff for up to 24 hours.
Conclusion
Messaging is an important part of serverless applications and AWS services provide queues, publish/subscribe, and event routing capabilities. This post reviews the main features of SNS, SQS, and EventBridge and how they provide different capabilities for your workloads.
I show three example applications that publish and consume events from the three services. I walk through AWS SAM syntax for deploying these resources in your applications. Finally, I compare differences between the services.
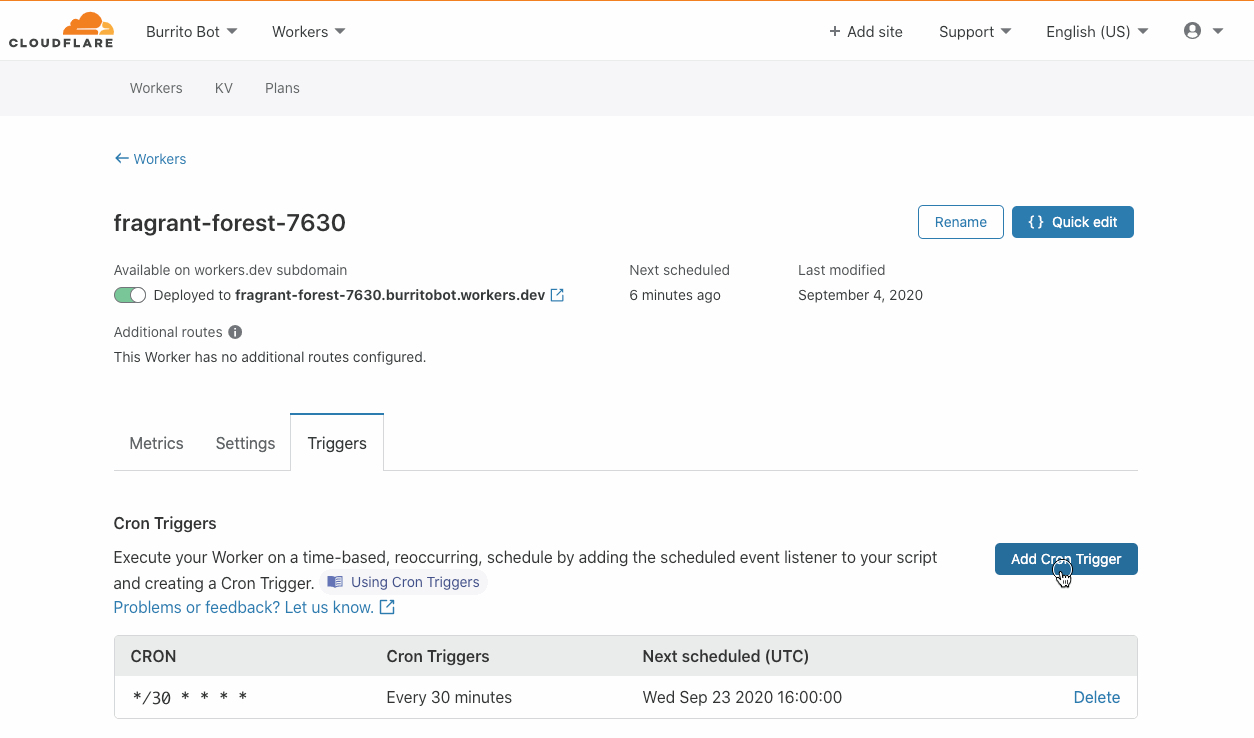
Today the Cloudflare Workers team is thrilled to announce the launch of Cron Triggers. Before now, Workers were triggered purely by incoming HTTP requests but starting today you’ll be able to set a scheduler to run your Worker on a timed interval. This was a highly requested feature that we know a lot of developers will find useful, and we’ve heard your feedback after Serverless Week.
We are excited to offer this feature at no additional cost, and it will be available on both the Workers free tier and the paid tier, now called Workers Bundled. Since it doesn’t matter which city a Cron Trigger routes the Worker through, we are able to maximize Cloudflare’s distributed system and send scheduled jobs to underutilized machinery. Running jobs on these quiet machines is both efficient and cost effective, and we are able to pass those cost savings down to you.
What is a Cron Trigger and how might I use such a feature?
In case you’re not familiar with Unix systems, the cron pattern allows you to schedule jobs to run periodically at fixed intervals or at scheduled times. Cron Triggers in the context of Workers allow users to set time-based invocations for the job. These Workers happen on a recurring schedule, and differ from traditional Workers in that they do not fire on HTTP requests.
Most developers are familiar with the cron pattern and its usefulness across a wide range of applications. Pulling the latest data from APIs or running regular integration tests on a preset schedule are common examples of this.
“We’re excited about Cron Triggers. Workers is crucial to our stack, so using this feature for live integration tests will boost the developer experience.” – Brian Marks, Software Engineer at Bazaarvoice
How much does it cost to use Cron Triggers?
Triggers are included at no additional cost! Scheduled Workers count towards your request cap for both the free tier and Workers Bundled, but rest assured that there will be no hidden or extra fees. Our competitors charge extra for cron events, or in some cases offer a very limited free tier. We want to make this feature widely accessible and have decided not to charge on a per-trigger basis. While there are no limits for the number of triggers you can have across an account, note that there is a limit of 3 triggers per Worker script for this feature. You can read more about limits on Workers plans in this documentation.
How are you able to offer this feature at no additional cost?
Cloudflare supports a massive distributed system that spans the globe with 200+ cities. Our nodes are named for the IATA airport code that they are closest to. Most of the time we run Workers close to the request origin for performance reasons (ie SFO if you are in the Bay Area, or CDG if you are lucky enough to be in Paris 🥐🍷🧀). In a typical HTTP Worker, we do this because we know that performance is of material importance when someone is waiting for the response.
In the case of Cron Triggers, where the user is running a task on a timed basis, those performance needs are different. A few milliseconds of extra latency do not matter as much when the user isn’t actively waiting for the response. The nature of the feature gives us much more flexibility on where to run the job, since it doesn’t have to necessarily be in a city close to the end user.
Cron Triggers are run on underutilized machines to make the best use of our capacity and route traffic efficiently. For example, a job scheduled from San Francisco at 7pm Pacific Time might be sent to Paris because it’s 4am there and traffic across Europe is low. Sending traffic to these machines during quiet hours is very efficient, and we are more than happy to pass those cost savings down to you. Aside from this scheduling optimization, Workers that are called by Cron Triggers behave similarly to and have all of the same performance and security benefits as typical HTTP Workers.
What’s happening below the hood?
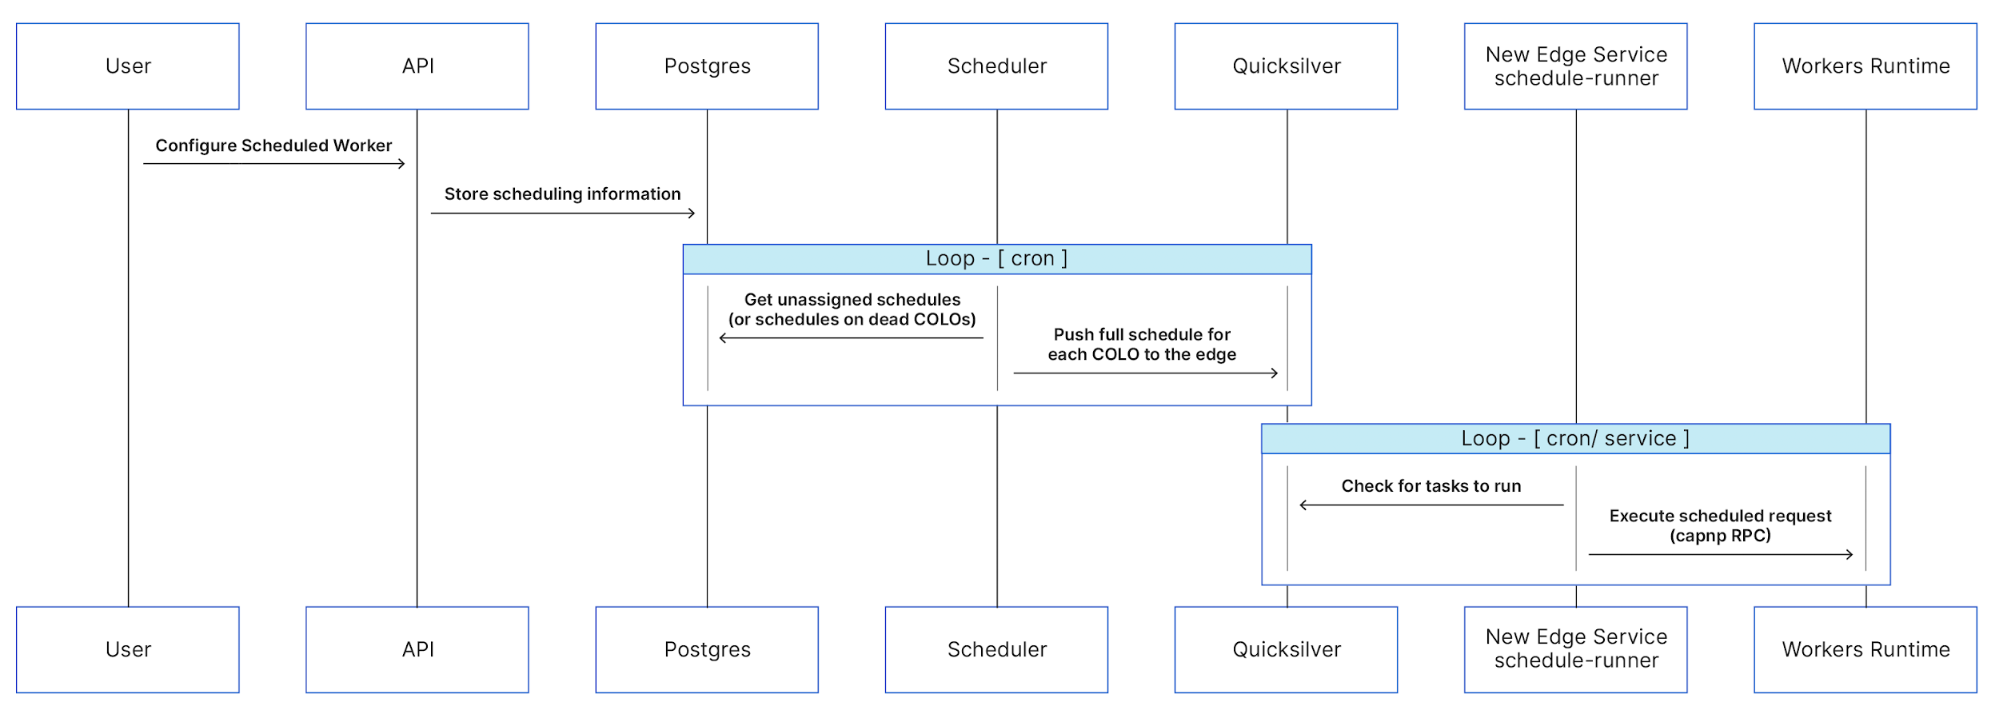
At a high level, schedules created through our API create records in our database. These records contain the information necessary to execute the Worker on the given cron schedule. These records are then picked up by another service which continuously evaluates the state of our edge and distributes the schedules among cities. Once the schedules have been distributed to the edge, a service running in the node polls for changes to the schedules and makes sure they get sent to our runtime at the appropriate time.
If you want to know more details about how we implemented this feature, please refer to the technical blog.
What’s coming next?
With this feature, we’ve expanded what’s possible to build with Workers, and further simplified the developer experience. While Workers previously only ran on web requests, we believe the future of edge computing isn’t strictly tied to HTTP requests and responses. We want to introduce more types of Workers in the future.
We plan to expand out triggers to include different types, such as data or event-based triggers. Our goal is to give users more flexibility and control over when their Workers run. Cron Triggers are our first step in this direction. In addition, we plan to keep iterating on Cron Triggers to make edge infrastructure selection even more sophisticated and optimized — for example, we might even consider triggers that allow our users to run in the most energy-efficient data centers.
How to try Cron Triggers
Cron triggers are live today! You can try it in the Workers dashboard by creating a new Worker and setting up a Cron Trigger.
Today, we are excited to launch Cron Triggers to the Cloudflare Workers serverless compute platform. We’ve heard the developer feedback, and we want to give our users the ability to run a given Worker on a scheduled basis. In case you’re not familiar with Unix systems, the cron pattern allows developers to schedule jobs to run at fixed intervals. This pattern is ideal for running any types of periodic jobs like maintenance or calling third party APIs to get up-to-date data. Cron Triggers has been a highly requested feature even inside Cloudflare and we hope that you will find this feature as useful as we have!
Where are Cron Triggers going to be run?
Cron Triggers are executed from the edge. At Cloudflare, we believe strongly in edge computing and wanted our new feature to get all of the performance and reliability benefits of running on our edge. Thus, we wrote a service in core that is responsible for distributing schedules to a new edge service through Quicksilver which will then trigger the Workers themselves.
What’s happening under the hood?
At a high level, schedules created through our API create records in our database with the information necessary to execute the Worker and the given cron schedule. These records are then picked up by another service which continuously evaluates the state of our edge and distributes the schedules between cities.
Once the schedules have been distributed to the edge, a service running in the edge node polls for changes to the schedules and makes sure they get sent to our runtime at the appropriate time.
New Event Type
Cron Triggers gave us the opportunity to finally recognize a new Worker ‘type’ in our API. While Workers currently only run on web requests, we have lots of ideas for the future of edge computing that aren’t strictly tied to HTTP requests and responses. Expect to see even more new handlers in the future for other non-HTTP events like log information from your Worker (think custom wrangler tail!) or even TCP Workers.
Where event has the following interface in Typescript:
interface ScheduledEvent {
  type: 'scheduled';
  scheduledTime: int; // milliseconds since the Unix epoch
}
As long as your Worker has a handler for this new event type, you’ll be able to give it a schedule.
New APIs
PUT /client/v4/accounts/:account_identifier/workers/scripts/:name
The script upload API remains the same, but during script validation we now detect and return the registered event handlers.
PUT /client/v4/accounts/:account_identifier/workers/scripts/:name/schedules
Body
[
 {"cron": "* * * * *"},
 ...
]
This will create or modify all schedules for a script, removing all schedules not in the list. For now, there’s a limit of 3 distinct cron schedules. Schedules can be set to run as often as one minute and don’t accept schedules with years in them (sorry, you’ll have to run your Y3K migration script another way).
GET /client/v4/accounts/:account_identifier/workers/scripts/:name/schedules
The Scheduler service is responsible for reading the schedules from Postgres and generating per-node schedules to place into Quicksilver. For now, the service simply avoids trying to execute your Worker on an edge node that may be disabled for some reason, but such an approach also gives us a lot of flexibility in deciding where your Worker executes.
In addition to edge node availability, we could optimize for compute cost, bandwidth, or even latency in the future!
What’s actually executing these schedules?
To consume the schedules and actually trigger the Worker, we built a new service in Rust and deployed to our edge using HashiCorp Nomad. Nomad ensures that the schedule runner remains running in the edge node and can move it between machines as necessary. Rust was the best choice for this service since it needed to be fast with high availability and Cap’n Proto RPC support for calling into the runtime. With Tokio, Anyhow, Clap, and Serde, it was easy to quickly get the service up and running without having to really worry about async, error handling, or configuration.
On top of that, due to our specific needs for cron parsing, we built a specialized cron parser using nom that allowed us to quickly parse and compile expressions into values that check against a given time to determine if we should run a schedule.
Once the schedule runner has the schedules, it checks the time and selects the Workers that need to be run. To let the runtime know it’s time to run, we send a Cap’n Proto RPC message. The runtime then does its thing, calling the new ‘scheduled’ event handler instead of ‘fetch’.
How can I try this?
As of today, the Cron Triggers feature is live! Please try it out by creating a Worker and finding the Triggers tab – we’re excited to see what you build with it!
We launched Cloudflare Workers® in 2017 with a radical vision: code running at the network edge could not only improve performance, but also be easier to deploy and cheaper to run than code running in a single datacenter. That vision means Workers is about more than just edge compute — we’re rethinking how applications are built.
Using a “serverless” approach has allowed us to make deploys dead simple, and using isolate technology has allowed us to deliver serverless more cheaply and without the lengthy cold starts that hold back other providers. We added easy-to-use eventually-consistent edge storage to the platform with Workers KV.
But up until today, it hasn’t been possible to manage state with strong consistency, or to coordinate in real time between multiple clients, entirely on the edge. Thus, these parts of your application still had to be hosted elsewhere.
Durable Objects provide a truly serverless approach to storage and state: consistent, low-latency, distributed, yet effortless to maintain and scale. They also provide an easy way to coordinate between clients, whether it be users in a particular chat room, editors of a particular document, or IoT devices in a particular smart home. Durable Objects are the missing piece in the Workers stack that makes it possible for whole applications to run entirely on the edge, with no centralized “origin” server at all.
Today we are beginning a closed beta of Durable Objects.
I’m going to be honest: naming this product was hard, because it’s not quite like any other cloud technology that is widely-used today. This proverbial bike shed has many layers of paint, but ultimately we settled on “Unique Durable Objects”, or “Durable Objects” for short. Let me explain what they are by breaking that down:
Objects: Durable Objects are objects in the sense of Object-Oriented Programming. A Durable Object is an instance of a class — literally, a class definition written in JavaScript (or your language of choice). The class has methods which define its public interface. An object is an instance of this class, combining the code with some private state.
Unique: Each object has a globally-unique identifier. That object exists in only one location in the whole world at a time. Any Worker running anywhere in the world that knows the object’s ID can send messages to it. All those messages end up delivered to the same place.
Durable: Unlike a normal object in JavaScript, Durable Objects can have persistent state stored on disk. Each object’s durable state is private to it, which means not only that access to storage is fast, but the object can even safely maintain a consistent copy of the state in memory and operate on it with zero latency. The in-memory object will be shut down when idle and recreated later on-demand.
What can they do?
Durable Objects have two primary abilities:
Storage: Each object has attached durable storage. Because this storage is private to a specific object, the storage is always co-located with the object. This means the storage can be very fast while providing strong, transactional consistency. Durable Objects apply the serverless philosophy to storage, splitting the traditional large monolithic databases up into many small, logical units. In doing so, we get the advantages you’ve come to expect from serverless: effortless scaling with zero maintenance burden.
Coordination: Historically, with Workers, each request would be randomly load-balanced to a Worker instance. Since there was no way to control which instance received a request, there was no way to force two clients to talk to the same Worker, and therefore no way for clients to coordinate through Workers. Durable Objects change that: requests related to the same topic can be forwarded to the same object, which can then coordinate between them, without any need to touch storage. For example, this can be used to facilitate real-time chat, collaborative editing, video conferencing, pub/sub message queues, game sessions, and much more.
The astute reader may notice that many coordination use cases call for WebSockets — and indeed, conversely, most WebSocket use cases require coordination. Because of this complementary relationship, along with the Durable Objects beta, we’ve also added WebSocket support to Workers. For more on this, see the Q&A below.
Region: Earth
When using Durable Objects, Cloudflare automatically determines the Cloudflare datacenter that each object will live in, and can transparently migrate objects between locations as needed.
Traditional databases and stateful infrastructure usually require you to think about geographical “regions”, so that you can be sure to store data close to where it is used. Thinking about regions can often be an unnatural burden, especially for applications that are not inherently geographical.
With Durable Objects, you instead design your storage model to match your application’s logical data model. For example, a document editor would have an object for each document, while a chat app would have an object for each chat. There is no problem creating millions or billions of objects, as each object has minimal overhead.
Let’s say you have a spreadsheet editor application — or, really, any kind of app where users edit a complex document. It works great for one user, but now you want multiple users to be able to edit it at the same time. How do you accomplish this?
For the standard web application stack, this is a hard problem. Traditional databases simply aren’t designed to be real-time. When Alice and Bob are editing the same spreadsheet, you want every one of Alice’s keystrokes to appear immediately on Bob’s screen, and vice versa. But if you merely store the keystrokes to a database, and have the users repeatedly poll the database for new updates, at best your application will have poor latency, and at worst you may find database transactions repeatedly fail as users on opposite sides of the world fight over editing the same content.
The secret to solving this problem is to have a live coordination point. Alice and Bob connect to the same coordinator, typically using WebSockets. The coordinator then forwards Alice’s keystrokes to Bob and Bob’s keystrokes to Alice, without having to go through a storage layer. When Alice and Bob edit the same content at the same time, the coordinator resolves conflicts instantly. The coordinator can then take responsibility for updating the document in storage — but because the coordinator keeps a live copy of the document in-memory, writing back to storage can happen asynchronously.
Every big-name real-time collaborative document editor works this way. But for many web developers, especially those building on serverless infrastructure, this kind of solution has long been out-of-reach. Standard serverless infrastructure — and even cloud infrastructure more generally — just does not make it easy to assign these coordination points and direct users to talk to the same instance of your server.
Durable Objects make this easy. Not only do they make it easy to assign a coordination point, but Cloudflare will automatically create the coordinator close to the users using it and migrate it as needed, minimizing latency. The availability of local, durable storage means that changes to the document can be saved reliably in an instant, even if the eventual long-term storage is slower. Or, you can even store the entire document on the edge and abandon your database altogether.
With Durable Objects lowering the barrier, we hope to see real-time collaboration become the norm across the web. There’s no longer any reason to make users refresh for updates.
Example: An atomic counter
Here’s a very simple example of a Durable Object which can be incremented, decremented, and read over HTTP. This counter is consistent even when receiving simultaneous requests from multiple clients — none of the increments or decrements will be lost. At the same time, reads are served entirely from memory, no disk access needed.
export class Counter {
  // Constructor called by the system when the object is needed to
  // handle requests.
  constructor(controller, env) {
    // `controller.storage` is an interface to access the object's
    // on-disk durable storage.
    this.storage = controller.storage
  }

  // Private helper method called from fetch(), below.
  async initialize() {
    let stored = await this.storage.get("value");
    this.value = stored || 0;
  }

  // Handle HTTP requests from clients.
  //
  // The system calls this method when an HTTP request is sent to
  // the object. Note that these requests strictly come from other
  // parts of your Worker, not from the public internet.
  async fetch(request) {
    // Make sure we're fully initialized from storage.
    if (!this.initializePromise) {
      this.initializePromise = this.initialize();
    }
    await this.initializePromise;

    // Apply requested action.
    let url = new URL(request.url);
    switch (url.pathname) {
      case "/increment":
        ++this.value;
        await this.storage.put("value", this.value);
        break;
      case "/decrement":
        --this.value;
        await this.storage.put("value", this.value);
        break;
      case "/":
        // Just serve the current value. No storage calls needed!
        break;
      default:
        return new Response("Not found", {status: 404});
    }

    // Return current value.
    return new Response(this.value);
  }
}
Once the class has been bound to a Durable Object namespace, a particular instance of Counter can be accessed from anywhere in the world using code like:
// Derive the ID for the counter object named "my-counter".
// This name is associated with exactly one instance in the
// whole world.
let id = COUNTER_NAMESPACE.idFromName("my-counter");

// Send a request to it.
let response = await COUNTER_NAMESPACE.get(id).fetch(request);
Demo: Chat
Chat is arguably real-time collaboration in its purest form. And to that end, we have built a demo open source chat app that runs entirely at the edge using Durable Objects.
This chat app uses a Durable Object to control each chat room. Users connect to the object using WebSockets. Messages from one user are broadcast to all the other users. The chat history is also stored in durable storage, but this is only for history. Real-time messages are relayed directly from one user to others without going through the storage layer.
Additionally, this demo uses Durable Objects for a second purpose: Applying a rate limit to messages from any particular IP. Each IP is assigned a Durable Object that tracks recent request frequency, so that users who send too many messages can be temporarily blocked — even across multiple chat rooms. Interestingly, these objects don’t actually store any durable state at all, because they only care about very recent history, and it’s not a big deal if a rate limiter randomly resets on occasion. So, these rate limiter objects are an example of a pure coordination object with no storage.
This chat app is only a few hundred lines of code. The deployment configuration is only a few lines. Yet, it will scale seamlessly to any number of chat rooms, limited only by Cloudflare’s available resources. Of course, any individual chat room’s scalability has a limit, since each object is single-threaded. But, that limit is far beyond what a human participant could keep up with anyway.
Other use cases
Durable Objects have infinite uses. Here are just a few ideas, beyond the ones described above:
Shopping cart: An online storefront could track a user’s shopping cart in an object. The rest of the storefront could be served as a fully static web site. Cloudflare will automatically host the cart object close to the end user, minimizing latency.
Game server: A multiplayer game could track the state of a match in an object, hosted on the edge close to the players.
IoT coordination: Devices within a family’s house could coordinate through an object, avoiding the need to talk to distant servers.
Social feeds: Each user could have a Durable Object that aggregates their subscriptions.
Comment/chat widgets: A web site that is otherwise static content can add a comment widget or even a live chat widget on individual articles. Each article would use a separate Durable Object to coordinate. This way the origin server can focus on static content only.
The Future: True Edge Databases
We see Durable Objects as a low-level primitive for building distributed systems. Some applications, like those mentioned above, can use objects directly to implement a coordination layer, or maybe even as their sole storage layer.
However, Durable Objects today are not a complete database solution. Each object can see only its own data. To perform a query or transaction across multiple objects, the application needs to do some extra work.
That said, every big distributed database – whether it be relational, document, graph, etc. – is, at some low level, composed of “chunks” or “shards” that store one piece of the overall data. The job of a distributed database is to coordinate between chunks.
We see a future of edge databases that store each “chunk” as a Durable Object. By doing so, it will be possible to build databases that operate entirely at the edge, fully distributed with no regions or home location. These databases need not be built by us; anyone can potentially build them on top of Durable Objects. Durable Objects are only the first step in the edge storage journey.
Join the Beta
Storing data is a big responsibility which we do not take lightly. Because of the critical importance of getting it right, we are being careful. We will be making Durable Objects available gradually over the next several months.
As with any beta, this product is a work in progress, and some of what is described in this post is not fully enabled yet. Full details of beta limitations can be found in the documentation.
If you’d like to try out Durable Objects now, tell us about your use case. We’ll be selecting the most interesting use cases for early access.
As part of the Durable Objects beta, we’ve made it possible for Workers to act as WebSocket endpoints — including as a client or as a server. Before now, Workers could proxy WebSocket connections on to a back-end server, but could not speak the protocol directly.
While technically any Worker can speak WebSocket in this way, WebSockets are most useful when combined with Durable Objects. When a client connects to your application using a WebSocket, you need a way for server-generated events to be sent back to the existing socket connection. Without Durable Objects, there’s no way to send an event to the specific Worker holding a WebSocket. With Durable Objects, you can now forward the WebSocket to an Object. Messages can then be addressed to that Object by its unique ID, and the Object can then forward those messages down the WebSocket to the client.
Two years ago, we introduced Workers KV, a global key-value data store. KV is a fairly minimalist global data store that serves certain purposes well, but is not for everyone. KV is eventually consistent, which means that writes made in one location may not be visible in other locations immediately. Moreover, it implements “last write wins” semantics, which means that if a single key is being modified from multiple locations in the world at once, it’s easy for those writes to overwrite each other. KV is designed this way to support low-latency reads for data that doesn’t frequently change. However, these design decisions make KV inappropriate for state that changes frequently, or when changes need to be immediately visible worldwide.
Durable Objects, in contrast, are not primarily a storage product at all — many use cases for them do not actually utilize durable storage. To the extent that they do provide storage, Durable Objects sit at the opposite end of the storage spectrum from KV. They are extremely well-suited to workloads requiring transactional guarantees and immediate consistency. However, since transactions inherently must be coordinated in a single location, and clients on the opposite side of the world from that location will experience moderate latency due to the inherent limitations of the speed of light. Durable Objects will combat this problem by auto-migrating to live close to where they are used.
In short, Workers KV remains the best way to serve static content, configuration, and other rarely-changing data around the world, while Durable Objects are better for managing dynamic state and coordination.
Going forward, we plan to utilize Durable Objects in the implementation of Workers KV itself, in order to deliver even better performance.
Why not use CRDTs?
You can build CRDT-based storage on top of Durable Objects, but Durable Objects do not require you to use CRDTs.
Conflict-free Replicated Data Types (CRDTs), or their cousins, Operational Transforms (OTs), are a technology that allows data to be edited from multiple places in the world simultaneously without synchronization, and without data loss. For example, these technologies are commonly used in the implementation of real-time collaborative document editors, so that a user’s keypresses can show up in their local copy of the document in real time, without waiting to see if anyone else edited another part of the document first. Without getting into details, you can think of these techniques like a real time version of “git fork” and “git merge”, where all merge conflicts are resolved automatically in a deterministic way, so that everyone ends up with the same state in the end.
CRDTs are a powerful technology, but applying them correctly can be challenging. Only certain kinds of data structures lend themselves to automatic conflict resolution in a way that doesn’t lead to easy data loss. Any developer familiar with git can see the problem: arbitrary conflict resolution is hard, and any automated algorithm for it will likely get things wrong sometimes. It’s all the more difficult if the algorithm has to handle merges in arbitrary order and still get the same answer.
We feel that, for most applications, CRDTs are overly complex and not worth the effort. Worse, the set of data structures that can be represented as a CRDT is too limited for many applications. It’s usually much easier to assign a single authoritative coordination point for each document, which is exactly what Durable Objects accomplish.
With that said, CRDTs can be used on top of Durable Objects. If an object’s state lends itself to CRDT treatment, then an application could replicate that object into several objects serving different regions, which then synchronize their states via CRDT. This would make sense for applications to implement as an optimization if and when they find it is worth the effort.
Last thoughts: What does it mean for state to be “serverless”?
Traditionally, serverless has focused on stateless compute. In serverless architectures, the logical unit of compute is reduced to something fine-grained: a single event, such as an HTTP request. This works especially well because events just happened to be the logical unit of work that we think about when designing server applications. No one thinks about their business logic in units of “servers” or “containers” or “processes” — we think about events. It is exactly because of this semantic alignment that serverless succeeds in shifting so much of the logistical burden of maintaining servers away from the developer and towards the cloud provider.
However, serverless architecture has traditionally been stateless. Each event executes in isolation. If you wanted to store data, you had to connect to a traditional database. If you wanted to coordinate between requests, you had to connect to some other service that provides that ability. These external services have tended to re-introduce the operational concerns that serverless was intended to avoid. Developers and service operators have to worry not just about scaling their databases to handle increasing load, but also about how to split their database into “regions” to effectively handle global traffic. The latter concern can be especially cumbersome.
So how can we apply the serverless philosophy to state? Just like serverless compute is about splitting compute into fine-grained pieces, serverless state is about splitting state into fine-grained pieces. Again, we seek to find a unit of state that corresponds to logical units in our application. The logical unit of state in an application is not a “table” or a “collection” or a “graph”. Instead, it depends on the application. The logical unit of state in a chat app is a chat room. The logical unit of state in an online spreadsheet editor is a spreadsheet. The logical unit of state in an online storefront is a shopping cart. By making the physical unit of storage provided by the storage layer match the logical unit of state inherent in the application, we can allow the underlying storage provider (Cloudflare) to take responsibility for a wide array of logistical concerns that previously fell on the developer, including scalability and regionality.
This is what Durable Objects do.
The collective thoughts of the interwebz
By continuing to use the site, you agree to the use of cookies. more information
The cookie settings on this website are set to "allow cookies" to give you the best browsing experience possible. If you continue to use this website without changing your cookie settings or you click "Accept" below then you are consenting to this.

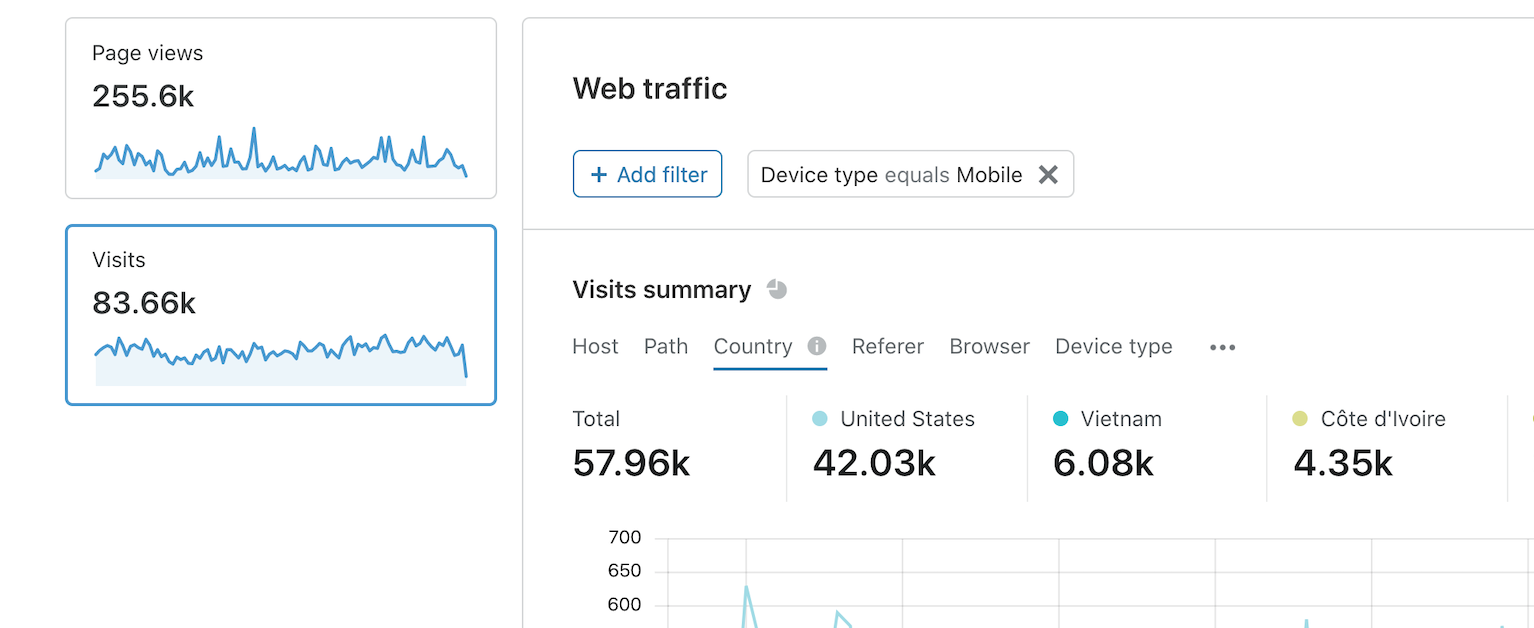
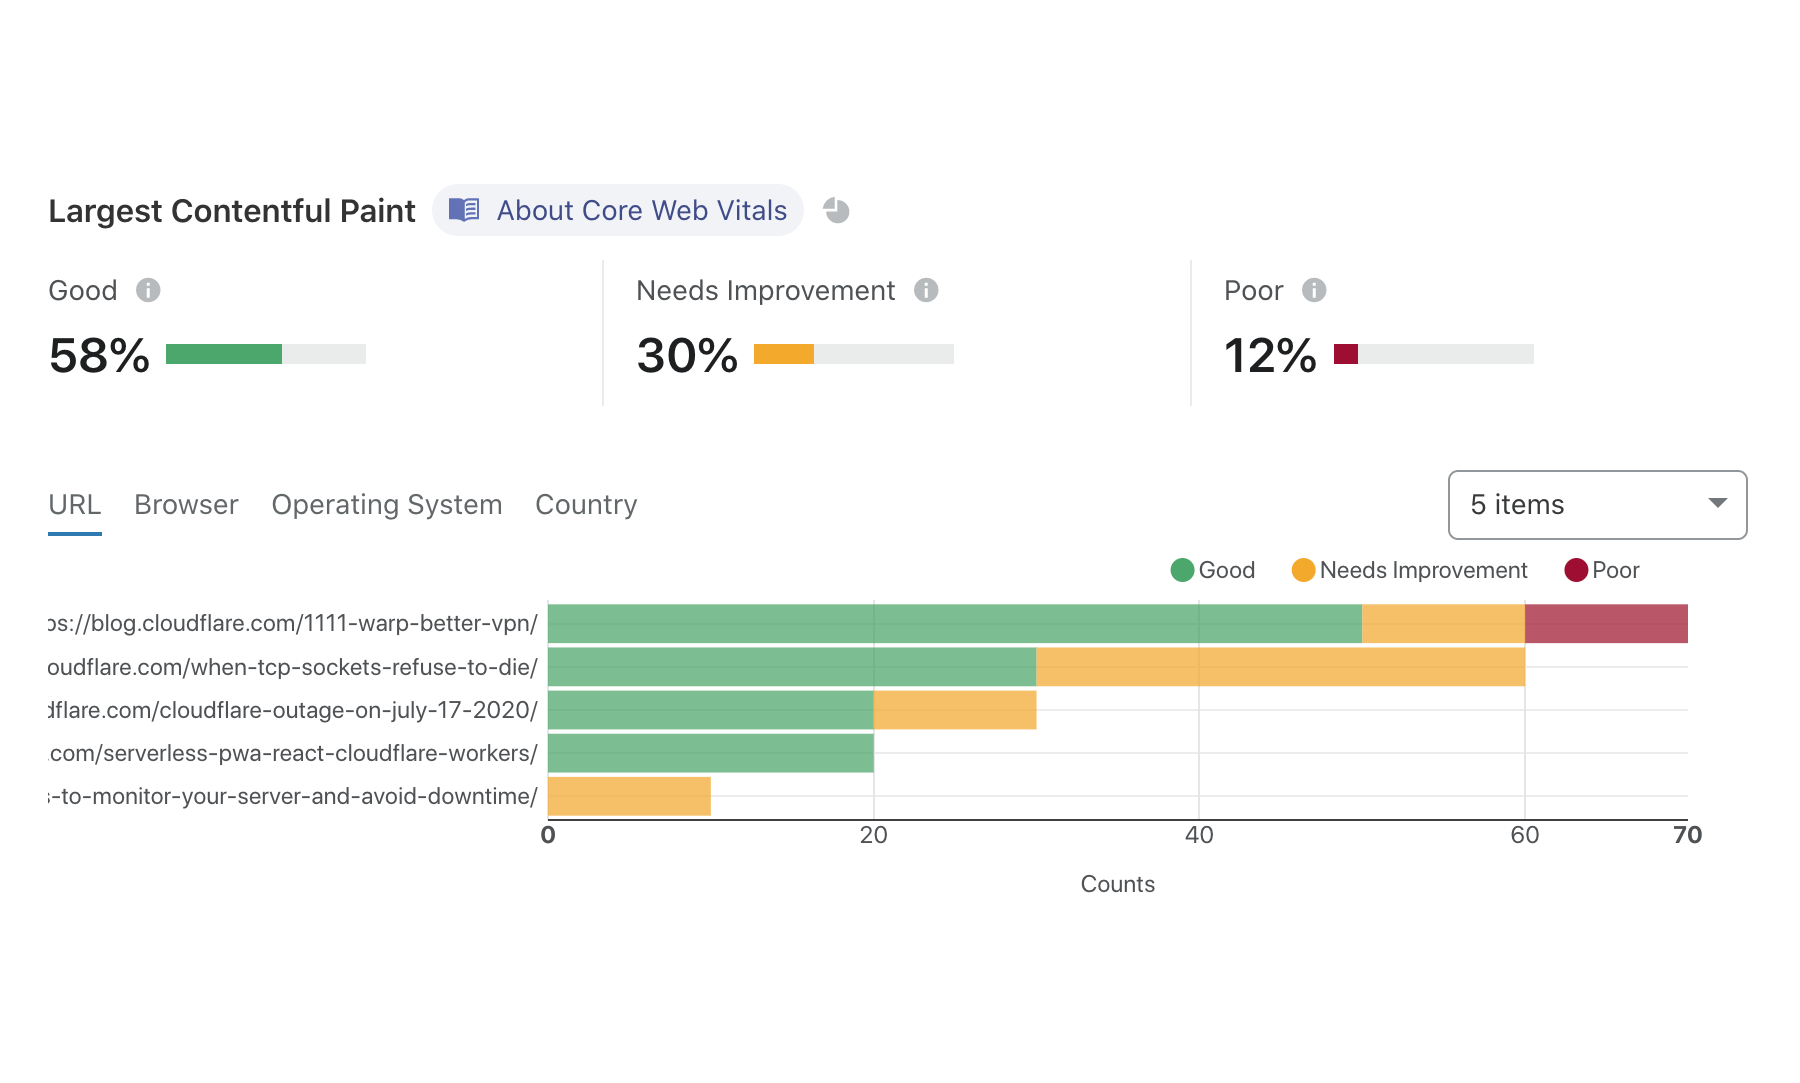
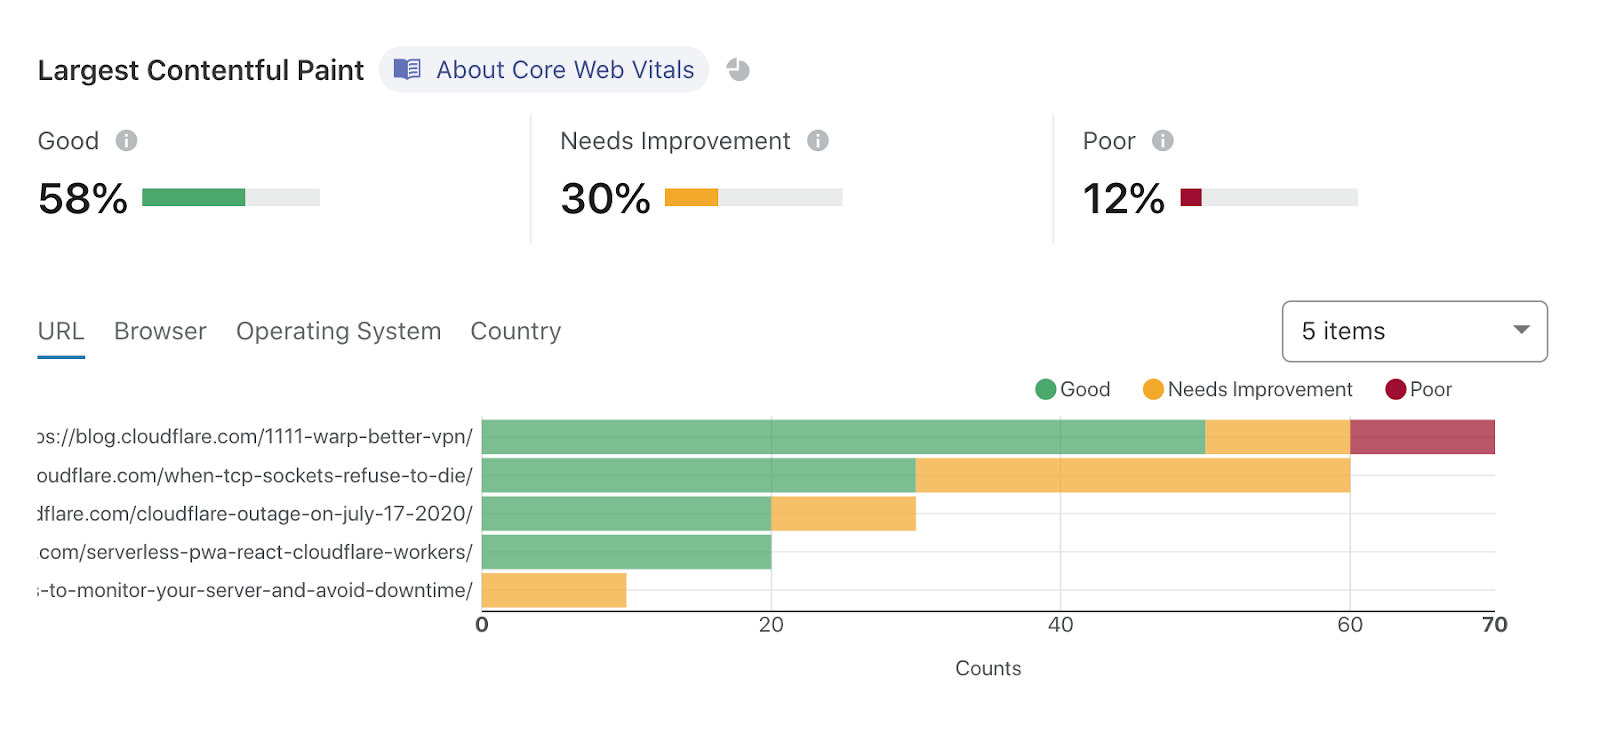

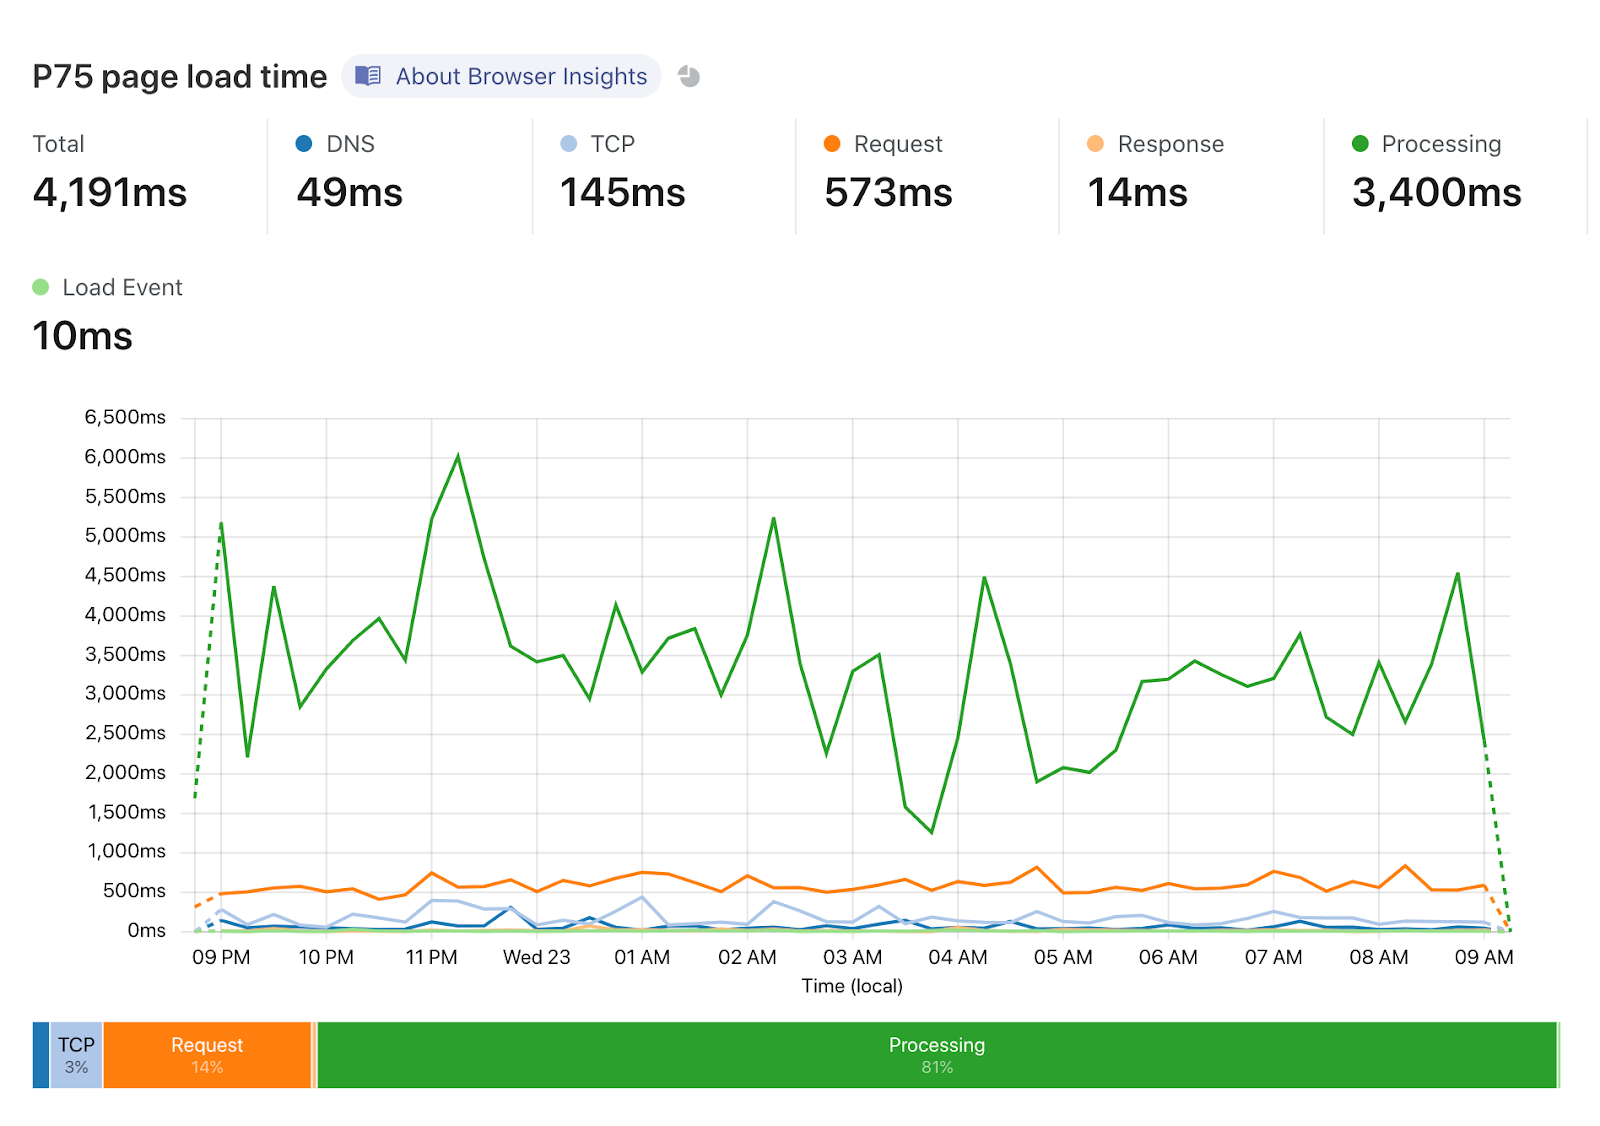
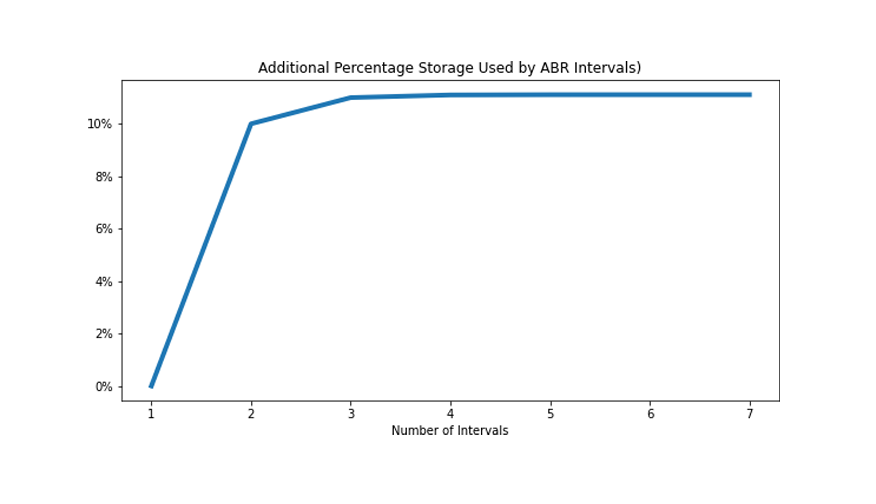
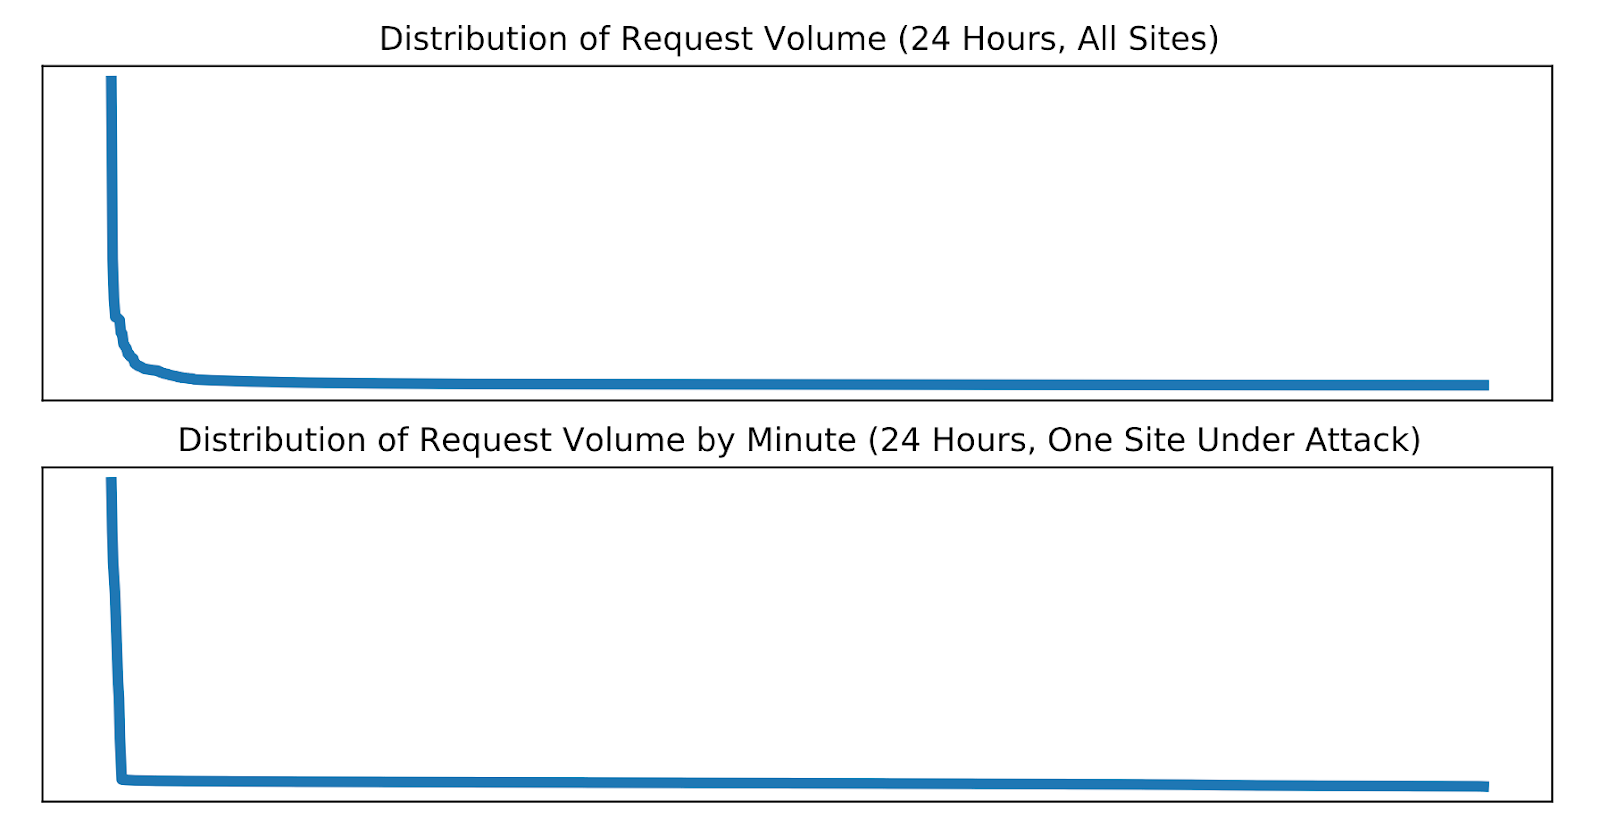

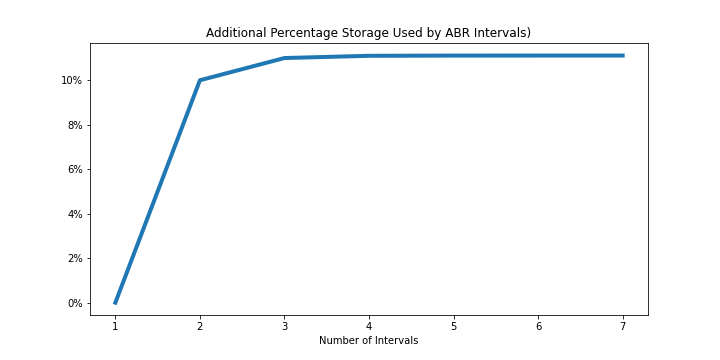


 Adnan Hasan is a Global GTM Analytics Specialist at Amazon Web Services, helping customers transform their business using data, machine learning and advanced analytics.


 Rajesh Francis is a Sr. Analytics Specialist Solutions Architect at AWS. He specializes in Amazon Redshift and works with customers to build scalable Analytic solutions.