Post Syndicated from digiblurDIY original https://www.youtube.com/watch?v=H_KnzI8noVs
Xfce 4.18 released
Post Syndicated from original https://lwn.net/Articles/917949/
Version 4.18 of
the Xfce desktop environment has been released.
Since Xfce 4.16 a lot
of major development happened. Our team added multiple nice new features,
did a gazillion of bug fixes and did various minor improvements. Finally,
all that is going to be released for your pleasure.
See the announcement for a long list of new features.
[$] 6.2 Merge window, part 1
Post Syndicated from original https://lwn.net/Articles/917733/
Once upon a time, Linus Torvalds would try to set a pace of about 1,000
changesets pulled into the mainline each day during the early part of the
merge window. For 6.2, though, the situation is different; no less than
9,278 non-merge changesets were pulled during the first two days. Needless
to say, these commits affect the kernel in numerous ways, even though there
are fewer fundamental changes than were seen in 6.1.
Architecture patterns for consuming private APIs cross-account
Post Syndicated from Eric Johnson original https://aws.amazon.com/blogs/compute/architecture-patterns-for-consuming-private-apis-cross-account/
This blog written by Thomas Moore, Senior Solutions Architect and Josh Hart, Senior Solutions Architect.
Amazon API Gateway allows developers to create private REST APIs that are only accessible from a virtual private cloud (VPC). Traffic to the private API uses secure connections and does not leave the AWS network, meaning AWS isolates it from the public internet. This makes private API Gateway endpoints a good fit for publishing internal APIs, such as those used by backend microservice communication.
In microservice architectures, where multiple teams build and manage components, different AWS accounts often consume private API endpoints.
This blog post shows how a service can consume a private API Gateway endpoint that is published in another AWS account securely over AWS PrivateLink.

Consuming API Gateway private endpoint cross-account via AWS PrivateLink.
This blog covers consuming API Gateway endpoints cross-account. For exposing cross-account resources behind an API Gateway, read this existing blog post.
Overview
To access API Gateway private endpoints, you must create an interface VPC endpoint (named execute-api) inside your VPC. This creates an AWS PrivateLink connection between your AWS account VPC and the API Gateway service VPC. The PrivateLink connection allows traffic to flow over private IP address space without traversing the internet.
PrivateLink allows access to private API Gateway endpoints in different AWS accounts, without VPC peering, VPN connections, or AWS Transit Gateway. A single execute-api endpoint is used to connect to any API Gateway, regardless of which AWS account the destination API Gateway is in. Resource policies control which VPC endpoints have access to the API Gateway private endpoint. This makes the cross-account architecture simpler, with no complex routing or inter-vpc connectivity.
The following diagram shows how interface VPC endpoints in a consumer account create a PrivateLink connection back to the API Gateway service account VPC. The resource policy applied to the private API determines which VPC endpoint can access the API. For this reason, it is critical to ensure that the resource policy is correct to prevent unintentional access from other AWS account VPC endpoints.

Access to private API Gateway endpoints requires an AWS PrivateLink connection to an AWS service account VPC.
In this example, the resource policy denies all connections to the private API endpoint unless the aws:SourceVpce condition matches vpce-1a2b3c4d in account A. This means that connections from other execute-api VPC endpoints are denied. To allow access from account B, add vpce-9z8y7x6w to the resource policy. Refer to the documentation to learn about other condition keys you can use in API Gateway resource policies.
For more detail on how VPC links work, read Understanding VPC links in Amazon API Gateway private integrations.
The following sections cover three architecture patterns to consume API Gateway private endpoints cross-account:
- Regional API Gateway to private API Gateway
- Lambda function calling API Gateway in another account
- Container microservice calling API Gateway in another account using mTLS
Regional API Gateway to private API Gateway cross-account
When building microservices in different AWS accounts, private API Gateway endpoints are often used to allow service-to-service communication. Sometimes a portion of these endpoints must be exposed publicly for end user consumption. One pattern for this is to have a central public API Gateway, which acts as the front-door to multiple private API Gateway endpoints. This allows for central governance of authentication, logging and monitoring.
The following diagram shows how to achieve this using a VPC link. VPC links enable you to connect API Gateway integrations to private resources inside a VPC. The API Gateway VPC interface endpoint is the VPC resource that you want to connect to, as this is routing traffic to the private API Gateway endpoints in different AWS accounts.

API Gateway Regional endpoint consuming API Gateway private endpoints cross-account
VPC link requires the use of a Network Load Balancer (NLB). The target group of the NLB points to the private IP addresses of the VPC endpoint, normally one for each Availability Zone. The target group health check must validate the API Gateway service is online. You can use the API Gateway reserved /ping path for this, which returns an HTTP status code of 200 when the service is healthy.
You can deploy this pattern in your own account using the example CDK code found on GitHub.
Lambda function calling private API Gateway cross-account
Another popular requirement is for AWS Lambda functions to invoke private API Gateway endpoints cross-account. This enables service-to-service communication in microservice architectures.
The following diagram shows how to achieve this using interface endpoints for Lambda, which allows access to private resources inside your VPC. This allows Lambda to access the API Gateway VPC endpoint and, therefore, the private API Gateway endpoints in another account.

Consuming API Gateway private endpoints from Lambda cross-account
Unlike the previous example, there is no NLB or VPC link required. The resource policy on the private API Gateway must allow access from the VPC endpoint in the account where the consuming Lambda function is.
As the Lambda function has a VPC attachment, it will use DNS resolution from inside the VPC. This means that if you selected the Enable Private DNS Name option when creating the interface VPC endpoint for API Gateway the https://{restapi-id}.execute-api.{region}.amazonaws.com endpoint will automatically resolve to private IP addresses. Note that this DNS configuration can block access from Regional and edge-optimized API endpoints from inside the VPC. For more information, refer to the knowledge center article.
You can deploy this pattern in your own account using the sample CDK code found on GitHub.
Calling private API Gateway cross-account with mutual TLS (mTLS)
Customers that operate in regulated industries, such as open banking, must often implement mutual TLS (mTLS) for securely accessing their APIs. It is also great for Internet of Things (IoT) applications to authenticate devices using digital certificates.

Mutual TLS (mTLS) verifies both the client and server via certificates with TLS
Regional API Gateway has native support for mTLS but, currently, private API Gateway does not support mTLS, so you must terminate mTLS before the API Gateway. One pattern is to implement a proxy service in the producer account that resolves the mTLS handshake, terminates mTLS, and proxies the request to the private API Gateway over regular HTTPS.
The following diagram shows how to use a combination of PrivateLink, an NGINX-based proxy, and private API Gateway to implement mTLS and consume the private API across accounts.
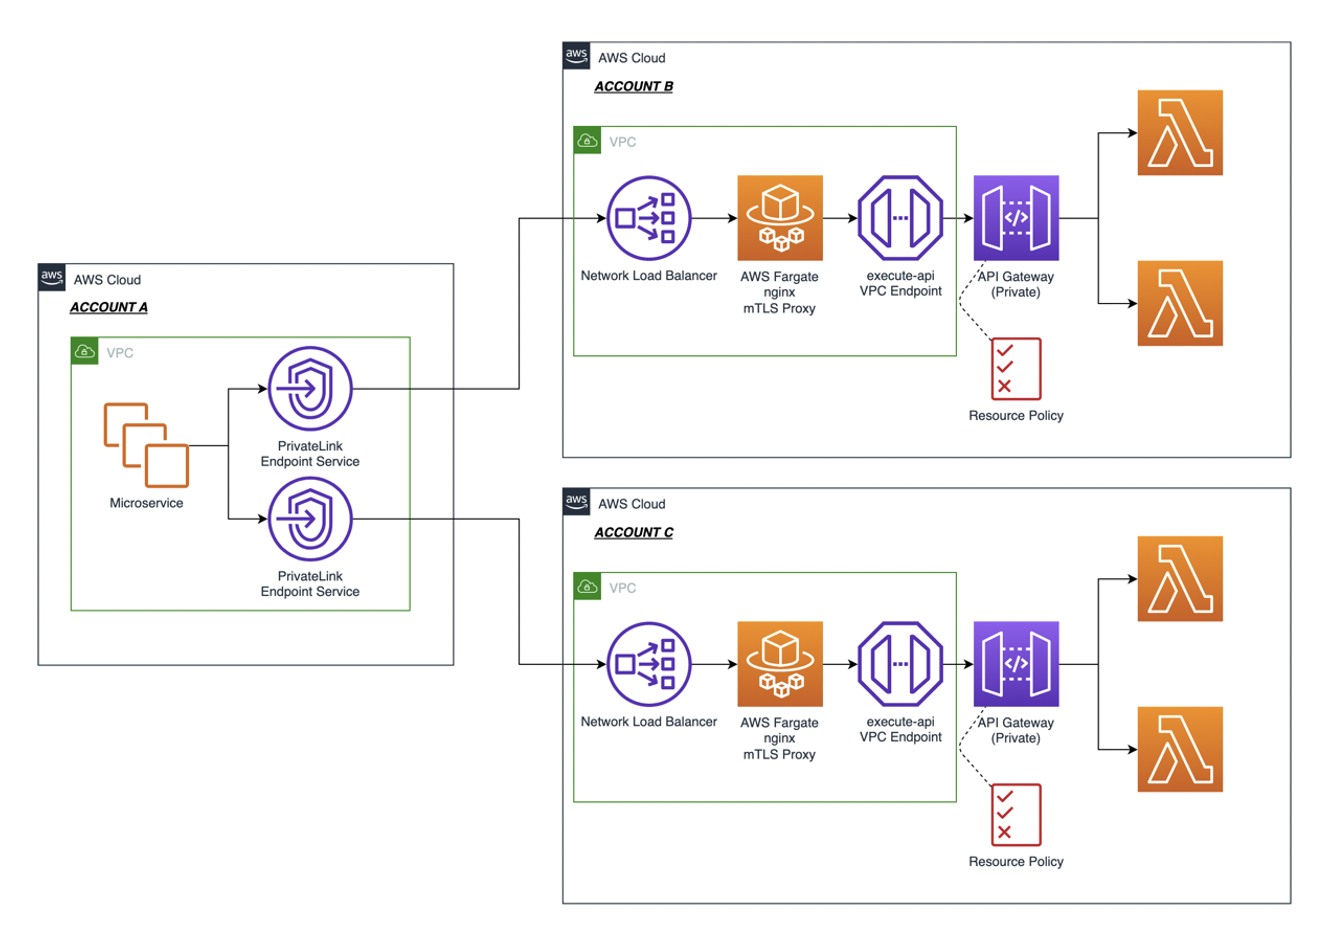
Consuming API Gateway private endpoints cross-account with mTLS
In this architecture diagram, Amazon ECS Fargate is used to host the container task running the NGINX proxy server. This proxy validates the certificate passed by the connecting client before passing the connection to API Gateway via the execute-proxy VPC endpoint. The following sample NGINX configuration shows how the mTLS proxy service works by using ssl_verify_client and ssl_client_certificate settings to verify the connecting client’s certificate, and proxy_pass to forward the request onto API Gateway.
server {
    listen 443 ssl;

    ssl_certificate     /etc/ssl/server.crt;
    ssl_certificate_key /etc/ssl/server.key;
    ssl_protocols       TLSv1.2;
    ssl_prefer_server_ciphers on;
    ssl_ciphers ECDH+AESGCM:ECDH+AES256:ECDH+AES128:DH+3DES:!ADH:!AECDH:!MD5;

    ssl_client_certificate /etc/ssl/client.crt;
    ssl_verify_client      on;

    location / {
        proxy_pass https://{api-gateway-endpoint-api};
    }
}
The connecting client must supply the client certificate when connecting to the API via the VPC endpoint service:
curl --key client.key --cert client.crt --cacert server.crt https://{vpc-endpoint-service-url}Use VPC security group rules on both the VPC endpoint and the NGINX proxy to prevent clients bypassing the mTLS endpoint and connecting directly to the API Gateway endpoint.
There is an example NGINX config and Dockerfile to configure this solution in the GitHub repository.
Conclusion
This post explores three solutions to consume private API Gateway across AWS accounts. A key component of all the solutions is the VPC interface endpoint. Using VPC Endpoints & PrivateLink, you can consume resources securely and even your own microservices across AWS accounts. For more details, read Enabling New SaaS Strategies with AWS PrivateLink. Visit the GitHub repository to get started implementing one of these solutions today.
For more serverless learning resources, visit Serverless Land.
Spoiler Alert: Your Favorite Content Might Not Be Secure
Post Syndicated from Aaron Wells original https://blog.rapid7.com/2022/12/15/spoiler-alert-your-favorite-content-isnt-secure/
Securing intellectual property in the age of consolidation

Rapid7, of course, is not in the entertainment industry. However, we have worked with some clients out there in that golden land of dreams and enchantment—also known as Hollywood. Case in point: the company formerly known as Discovery, Inc. A few years back, Rapid7 helped the entertainment conglomerate transform itself into a cloud-first company. Discovery’s IT team leveraged InsightCloudSec to facilitate the company’s strategic shift.
In the time since, the company has undergone some, shall we say, changes. Now known as Warner Bros. Discovery following a merger of the two legacy media companies, there’s a new CEO at the helm who is likely feeling pressure to offset the billions of dollars in debt the company currently holds.
From an intellectual property (IP) security standpoint, there are a number of factors that could put the company in a potentially vulnerable position, as we’ve seen with other entertainment giants. In this blog, the first of a two part series, we’ll look at the macro issue of the entertainment business shifting to a streaming-first focus, and the increasingly loud alerts of cybersecurity professionals to the fact that content and IP must be better secured—especially prior to its release.
The big content-distribution shift
Direct-to-consumer services and maximum choice are at the center of the content-distribution shift of the past decade. Netflix kicked off their streaming project with little fanfare back in the early 2010s, but quickly became the gold standard for popular, on-demand content from Hollywood’s biggest studios. And nothing accelerates a seismic shift in any industry like competition. Like dominoes falling, Paramount, Universal, Disney, Warner Bros., and Apple launched their own proprietary streaming services—all in the past few years. Try to picture the digital earthquake that resulted as cloud operations at all of those companies scaled up with blazing speed, challenging their security teams to keep pace.
A few years back, Netflix was one of the first to experience an IP theft of the type we now see in the current age of streaming-service proliferation. A vendor vulnerability exploited by an attacker became a supply-chain issue that saw an entire unreleased season of the popular Netflix series Orange is the New Black dumped online before it could premiere. This was especially disconcerting due to the nature of Netflix’s binge model dictating that all episodes of a series are completely finished prior to release—in the can, as they say in Hollywood. This meant all episodes were stolen as opposed to one or two.
That breach occurred just as the other previously mentioned streaming services were being prepped but prior to market entry, perhaps suggesting that cybersecurity naiveté on Netflix’s part could have been to blame. It seemed they simply weren’t ready for this next stage in digital theft that attackers were about to unleash upon the world.
Since then, companies have begun to realize the education and actions they must undertake—not to mention the talent they must hire—to secure not just finished TV shows and movies, but all forms of valuable IP that exist under a production company or studio’s purview: scripts, unfinished edits of completed footage, the musical score of a piece of content, and much more.
Warner Bros. Discovery IP security
We, of course, have no inside knowledge of Warner Bros. Discovery’s actual current security posture. However, from an outside perspective, there are a few factors that could potentially increase its IP security risk:
- The skip-hop of Warner Bros. from one conglomerate to another: The legacy Hollywood studio was formerly owned by AT&T and then departed that relationship to merge with Discovery, Inc. As cybersecurity professionals know, a time of mergers and acquisitions (M&A) can be quite joyous for attackers and put the cloud security of organizations at severe risk. Without taking the proper steps to keep environments secure during that time of change, companies leave themselves open to massive financial, regulatory, and reputational risk.
- The race to make their streaming service competitive in an extremely crowded market: Warner Bros. Discovery’s streaming service is stuffed with a legacy Hollywood studio’s back catalog, original series, and all sorts of additional content. In the race to be competitive by getting as much of that content as possible up on the service, are they leaving the door more open to attackers? Everyone knows that as soon as a film goes live on any sort of digital service, it’s almost immediately pirated and disseminated globally, cutting into the profits of streaming services.
- The axing of high-profile projects in favor of tax write-offs: In some cases, content was complete—or nearly so—when the decision was made to cancel the release. In the high-profile case of Batgirl, the filmmakers made public their attempt to save a copy of the film from its digital storage before they were locked out and the project forever shelved.
As we can see from that last point, the moves the company is making are decisive and have little mercy for talent or content. As a recent mega-merged conglomerate, the new company has its work cut out for it in several areas. Combining the content catalogs of the two previously separate companies is most certainly the largest and most critical challenge facing the current business. Protecting those decades worth of valuable IP from attackers should be just as much of a priority as the creation of the next Batman or Harry Potter film.
Making film and TV projects is a painstaking, long, and laborious process. All of the hard work by hundreds of people that goes into each project can be devalued by attackers in the blink of an eye. Plus, there’s nothing bad actors love more than a high-profile Hollywood hack. So, to all cybersecurity professionals who are also major film and TV fans, let’s take up the call to Hollywood studios: Protect the IP!
Next week, in the second part of this blog series, we’ll look at cloud-based content delivery systems for Hallmark Channel’s holiday programming as well as actionable steps studios (and other organizations) can take to protect their valuable IP.
A new, configurable and scalable version of Geo Key Manager, now available in Closed Beta
Post Syndicated from Dina Kozlov original https://blog.cloudflare.com/configurable-and-scalable-geo-key-manager-closed-beta/

Today, traffic on the Internet stays encrypted through the use of public and private keys that encrypt the data as it’s being transmitted. Cloudflare helps secure millions of websites by managing the encryption keys that keep this data protected. To provide lightning fast services, Cloudflare stores these keys on our fleet of data centers that spans more than 150 countries. However, some compliance regulations require that private keys are only stored in specific geographic locations.
In 2017, we introduced Geo Key Manager, a product that allows customers to store and manage the encryption keys for their domains in different geographic locations so that compliance regulations are met and that data remains secure. We launched the product a few months before General Data Protection Regulation (GDPR) went into effect and built it to support three regions: the US, the European Union (EU), and a set of our top tier data centers that employ the highest security measures. Since then, GDPR-like laws have quickly expanded and now, more than 15 countries have comparable data protection laws or regulations that include restrictions on data transfer across and/or data localization within a certain boundary.
At Cloudflare, we like to be prepared for the future. We want to give our customers tools that allow them to maintain compliance in this ever-changing environment. That’s why we’re excited to announce a new version of Geo Key Manager — one that allows customers to define boundaries by country, ”only store my private keys in India”, by a region ”only store my private keys in the European Union”, or by a standard, such as “only store my private keys in FIPS compliant data centers” — now available in Closed Beta, sign up here!
Learnings from Geo Key Manager v1
Geo Key Manager has been around for a few years now, and we’ve used this time to gather feedback from our customers. As the demand for a more flexible system grew, we decided to go back to the drawing board and create a new version of Geo Key Manager that would better meet our customers’ needs.
We initially launched Geo Key Manager with support for US, EU, and Highest Security Data centers. Those regions were sufficient at the time, but customers wrestling with data localization obligations in other jurisdictions need more flexibility when it comes to selecting countries and regions. Some customers want to be able to set restrictions to maintain their private keys in one country, some want the keys stored everywhere except in certain countries, and some may want to mix and match rules and say “store them in X and Y, but not in Z”. What we learned from our customers is that they need flexibility, something that will allow them to keep up with the ever-changing rules and policies — and that’s what we set out to build out.
The next issue we faced was scalability. When we built the initial regions, we included a hard-coded list of data centers that met our criteria for the US, EU, “high security” data center regions. However, this list was static because the underlying cryptography did not support dynamic changes to our list of data centers. In order to distribute private keys to new data centers that met our criteria, we would have had to completely overhaul the system. In addition to that, our network significantly expands every year, with more than 100 new data centers since the initial launch. That means that any new potential locations that could be used to store private keys are currently not in use, degrading the performance and reliability of customers using this feature.
With our current scale, automation and expansion is a must-have. Our new system needs to dynamically scale every time we onboard or remove a data center from our Network, without any human intervention or large overhaul.
Finally, one of our biggest learnings was that customers make mistakes, such as defining a region that’s so small that availability becomes a concern. Our job is to prevent our customers from making changes that we know will negatively impact them.
Define your own geo-restrictions with the new version of Geo Key Manager

Cloudflare has significantly grown in the last few years and so has our international customer base. Customers need to keep their traffic regionalized. This region can be as broad as a continent — Asia, for example. Or, it can be a specific country, like Japan.
From our conversations with our customers, we’ve heard that they want to be able to define these regions themselves. This is why today we’re excited to announce that customers will be able to use Geo Key Manager to create what we call “policies”.
A policy can be a single country, defined by two-letter (ISO 3166) country code. It can be a region, such as “EU” for the European Union or Oceania. It can be a mix and match of the two, “country:US or region: EU”.
Our new policy based Geo Key Manager allows you to create allowlist or blocklists of countries and supported regions, giving you control over the boundary in which your private key will be stored. If you’d like to store your private keys globally and omit a few countries, you can do that.
If you would like to store your private keys in the EU and US, you would make the following API call:
curl -X POST "https://api.cloudflare.com/client/v4/zones/zone_id/custom_certificates" \
     -H "X-Auth-Email: [email protected]" \
     -H "X-Auth-Key: auth-key" \
     -H "Content-Type: application/json" \
     --data '{"certificate":"certificate","private_key":"private_key","policy":"(country: US) or (region: EU)", "type": "sni_custom"}'
If you would like to store your private keys in the EU, but not in France, here is how you can define that:
curl -X POST "https://api.cloudflare.com/client/v4/zones/zone_id/custom_certificates" \
     -H "X-Auth-Email: [email protected]" \
     -H "X-Auth-Key: auth-key" \
     -H "Content-Type: application/json" \
     --data '{"certificate":"certificate","private_key":"private_key","policy": "region: EU and (not country: FR)", "type": "sni_custom"}'
Geo Key Manager can now support more than 30 countries and regions. But that’s not all! The superpower of our Geo Key Manager technology is that it doesn’t actually have to be “geo” based, but instead, it’s attribute based. In the future, we’ll have a policy that will allow our customers to define where their private keys are stored based on a compliance standard like FedRAMP or ISO 27001.
Reliability, resiliency, and redundancy
By giving our customers the remote control for Geo Key Manager, we want to make sure that customers understand the impact of their changes on both redundancy and latency.
On the redundancy side, one of our biggest concerns is allowing customers to choose a region small enough that if a data center is removed for maintenance, for example, then availability is drastically impacted. To protect our customers, we’ve added redundancy restrictions. These prevent our customers from setting regions with too few data centers, ensuring that all the data centers within a policy can offer high availability and redundancy.
Not just that, but in the last few years, we’ve significantly improved the underlying networking that powers Geo Key Manager. For more information on how we did that, keep an eye out for a technical deep dive inside Geo Key Manager.
Performance matters

With the original regions (US, EU, and Highest Security Data Centers), we learned customers may overlook possible latency impacts that occur when defining the key manager to a certain region. Imagine your keys are stored in the US. For your Asia-based customers, there’s going to be some latency impact for the requests that go around the world. Now, with customers being able to define more granular regions, we want to make sure that before customers make that change, they see the impact of it.
If you’re an E-Commerce platform then performance is always top-of-mind. One thing that we’re working on right now is performance metrics for Geo Key Manager policies both from a regional point of view — “what’s the latency impact for Asia based customers?” and from a global point of view — “for anyone in the world, what is the average impact of this policy?”.
By seeing the latency impact, if you see that the impact is unacceptable, you may want to create a separate domain for your service that’s specific to the region that it’s serving.
Closed Beta, now available!
Interested in trying out the latest version of Geo Key Manager? Fill out this form.
Coming soon!
Geo Key Manager is only available via API at the moment. But, we are working on creating an easy-to-use UI for it, so that customers can easily manage their policies and regions. In addition, we’ll surface performance measurements and warnings when we see any degraded impact in terms of performance or redundancy to ensure that customers are mindful when setting policies.
We’re also excited to extend our Geo Key Manager product beyond custom uploaded certificates. In the future, certificates issued through Advanced Certificate Manager or SSL for SaaS will be allowed to add policy based restrictions for the key storage.
Finally, we’re looking to add more default regions to make the selection process simple for our customers. If you have any regions that you’d like us to support, or just general feedback or feature requests related to Geo Key Manager, make a note of it on the form. We love hearing from our customers!
How Cloudflare helps next-generation markets
Post Syndicated from David Tuber original https://blog.cloudflare.com/how-cloudflare-helps-next-generation-markets/


One of the many magical things about the Internet is that it doesn’t have a country. The Internet doesn’t go through customs, it doesn’t need a visa, and it doesn’t speak any one language. To reach the world’s greatest information innovation, a user – no matter what country they’re in – only needs a device with a connection. The Internet will take care of the rest. At Cloudflare, part of our role is to make sure every person on the planet with an Internet connection has a good experience, whether they’re in a next-generation market or a current-gen market. In this blog we’re going to talk about how we define next-generation markets, how we help people in these markets get faster access to the websites and applications they use on a daily basis, and how we make it easy for developers to deploy services geographically close to users in next-generation markets.
What are next-generation markets?
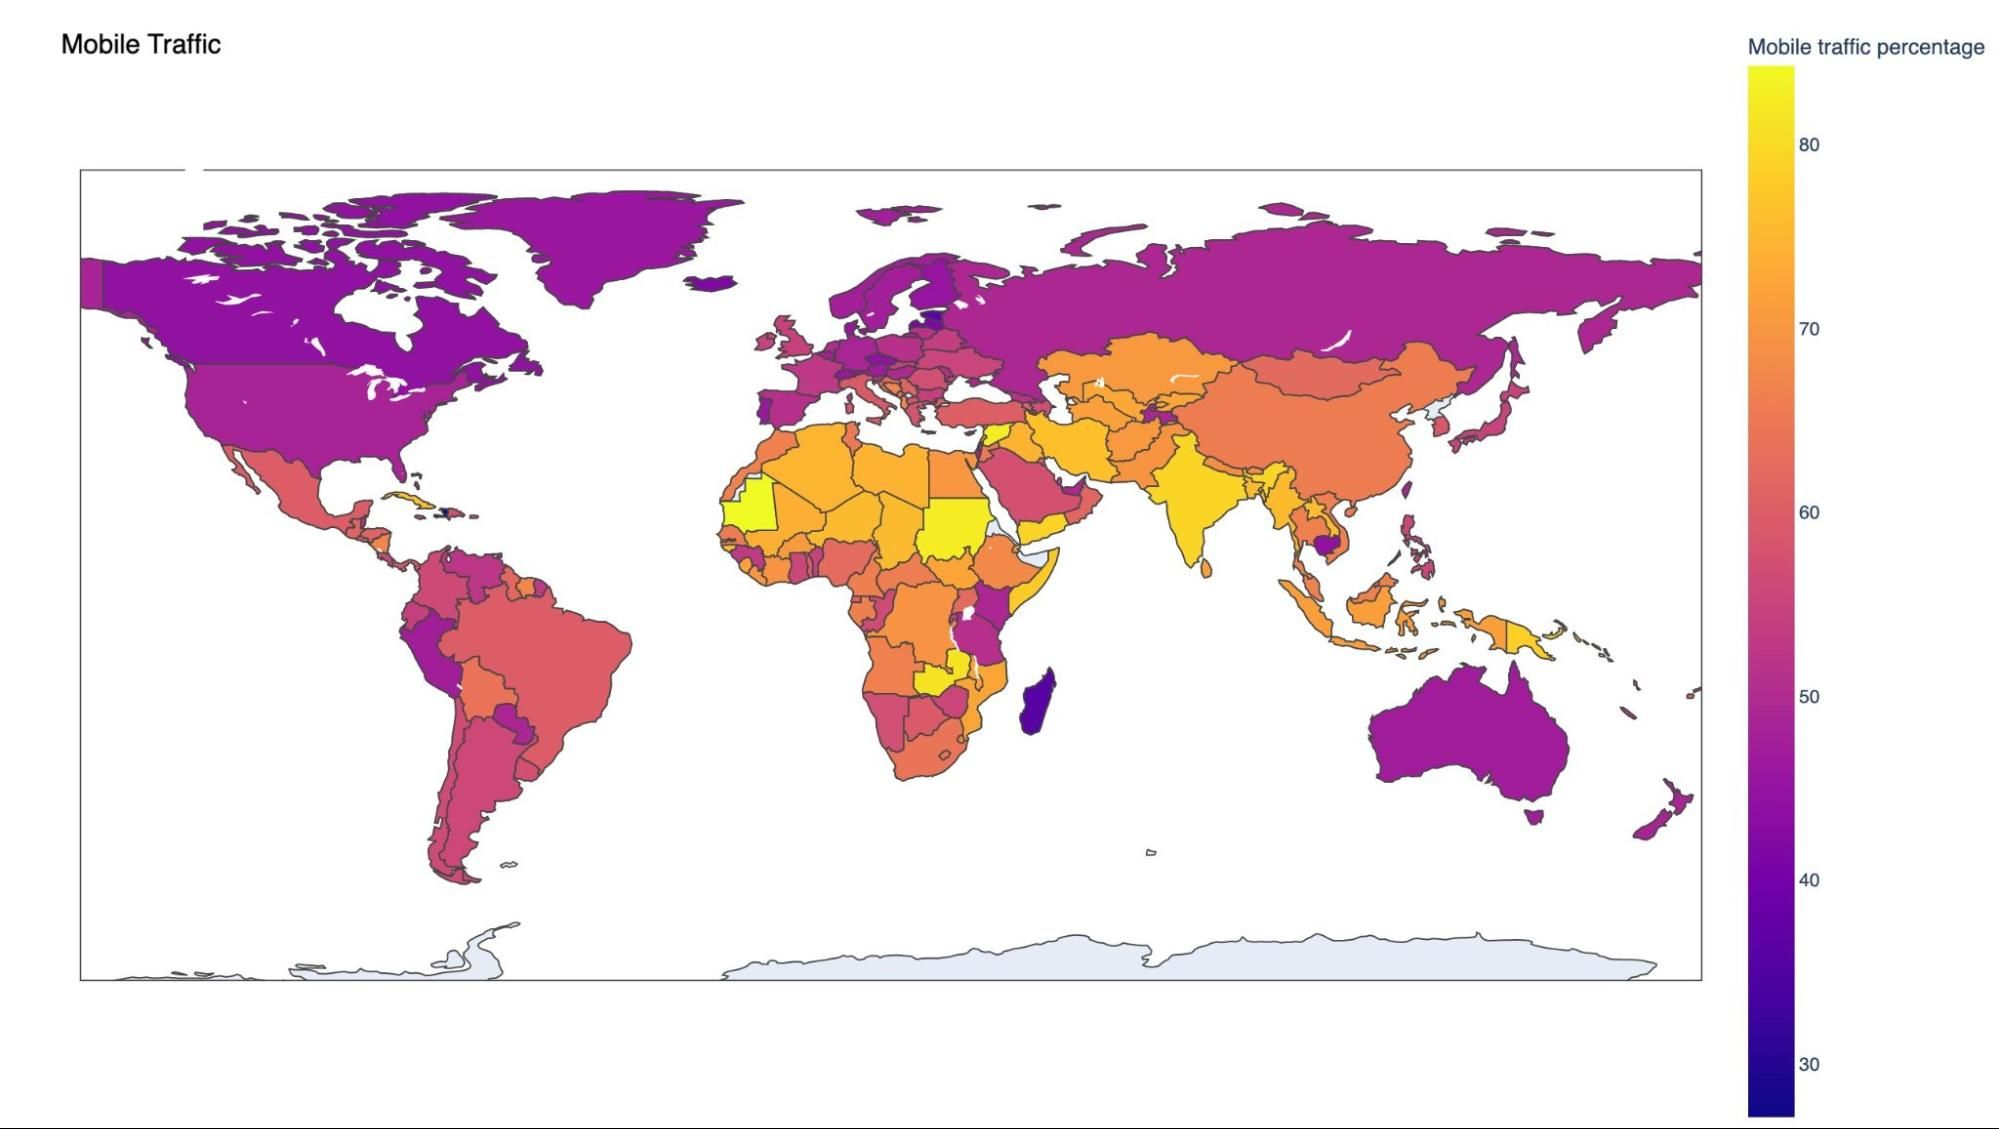
Next-generation markets are the future of the Internet. Not only are there billions of people who will use the Internet more, as affordable access increases, but the trends in application development already point towards the mobile-first, sometimes mobile-only, way of providing content and services. The Internet may look different (more desktop-centric) in the so-called Global North or countries the IMF defines as Advanced Economies, but those differences will shrink as application developers build products for all markets, not just current-generation markets. We call these markets next-generation markets as opposed to using the IMF or World Bank definitions because we want to classify markets by how users interact with the Internet as opposed to how their governments interact with the global economy. Compared to North America and Europe, where users access the Internet through a combination of desktop computers and mobile devices, users in next-generation markets access the Internet via mobile devices 50% of the time or more, sometimes even as high as 80%. Some examples of these markets are China, India, Indonesia, Thailand, and countries in Africa and the Middle East.
Most of this traffic is also using HTTP/S, which is the industry standard for secure, performant, reliable communication on the Internet. HTTP/S is used broadly across the Internet about 88% of the time. Countries and regions that have a higher percentage of mobile users will also have a higher percentage of traffic over HTTP/S, as shown in the table below. For example, countries in Africa and APJC use HTTP/S more than any other protocol, beating all other regions. By contrast, in North America, more traffic uses older protocols like SMTP, FTP, or RTMP.
| Region | % of traffic that is HTTP/S |
|---|---|
| Africa (AFR) | 92% |
| Asia Pacific, Japan, and China (APJC) | 92% |
| Western North America (WNAM) | 90% |
| Eastern North America (ENAM) | 89% |
| Oceania (OC) | 89% |
| Eastern Europe (EEUR) | 88% |
| Middle East (ME) | 85% |
| Western Europe (WEUR) | 83% |
| South America (SAM) | 64% |
The prevalence of mobile Internet connections is also represented by the types of applications developers are building in these regions: local models of popular applications designed specifically for local users in mind. For example, ecommerce companies like Carousell and ticketing companies like BookMyShow rely on mobile and app-based users for most of their business that is unique to the region they’re based in. Getting more broad, apps like Instagram and TikTok famously do not have web or desktop-based applications, and they encourage users to be mobile-only. These markets are next-generation because most of their users are using mobile devices and applications like Carousell, which are designed for a mobile, performant Internet.
In these markets there are two groups who have similar concerns but are different enough that we need to address them separately: users, and the application developers who build the apps for users. They both want one thing: to be fast. But being fast manifests itself in slightly different ways for users versus application developers. Let’s talk about each group and how Cloudflare helps solve their problems.
Next-generation users
Users in these markets care about observed experience: they want real-time interaction with their applications. This is no different from what users in other markets expect from the Internet, but achieving this is much harder over mobile networks, which tend to have higher latency, loss, and lower bandwidth.
Another challenge in next-generation markets is, roughly speaking, how geographically dispersed Internet connectivity is. Imagine you are sending a message to someone on the other side of a park, but you have to play telephone: the only way you can send the message is by telling someone next to you, and they tell it to the person next to them, and so on and so forth until the message reaches the other side of the park. That may look a little something like this:
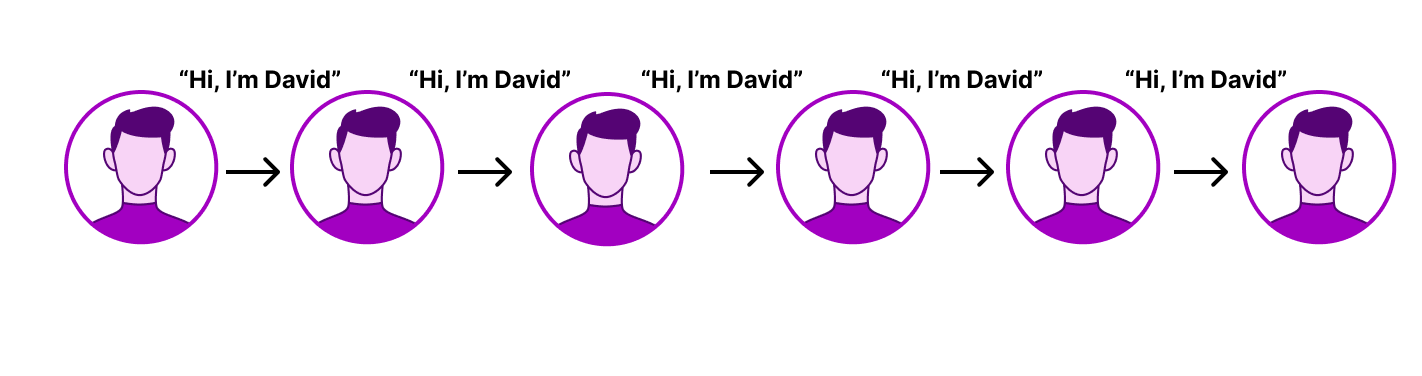
If you’ve ever played Telephone, you know that this is optimistic: even when someone is right next to you, it’s unlikely that they’ll be able to get all the message you’re trying to send. But let’s say that the optimistic case is real: in this above scenario, you’re able to transmit the message between people end-to-end across the park. Now let’s say you take half of those people away, meaning that everyone who’s sending the message needs to shout twice as far. That’s when things can start to get a little more garbled:
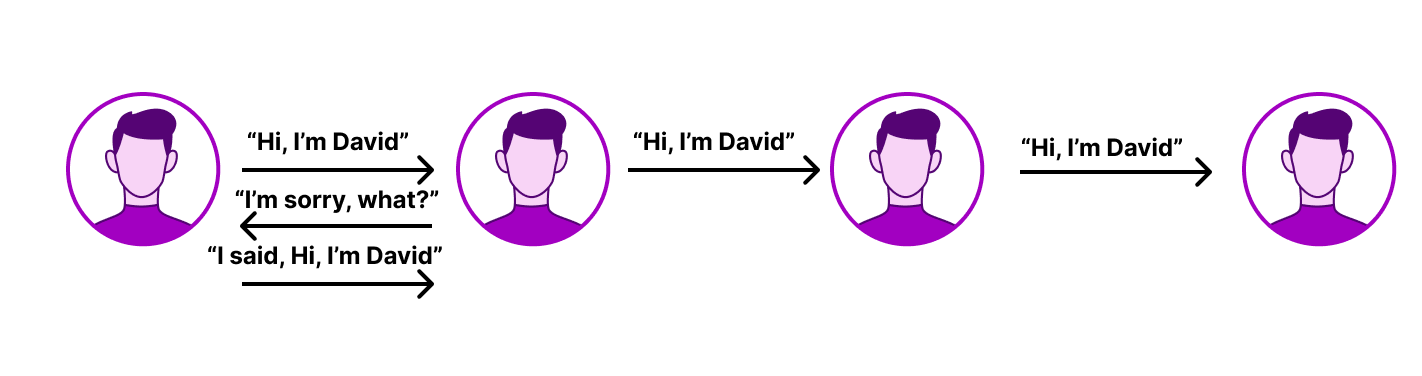
In this case, the receiver of the message didn’t hear the message properly the first time, and asked for the sender to yell it again. This process, called retransmission, reduces the amount of data that can be sent at once over the Internet. Retransmission rates depend on the cellular density of wireless networks, the light signal of fiber optic cables, and on the broader Internet, the number of hops between the end user and the website or receiver of the connection.
Retransmission rates are impacted by something called packet loss, when some packets don’t make it to the receiver end due to things like poor signal transmission, or errors on devices in the path between sender and receiver. When packet loss occurs, protocols on the Internet like the Transmission Control Protocol (TCP) will reduce the amount of data that can be transmitted over the connection. The amount of data that can be sent at one time is called the congestion window, and the protocol will shrink the congestion window to help preserve the connection until TCP is sure that the connection won’t drop packets again. This process of shrinking the congestion window is called backoff, and the congestion window will shrink exponentially when packet loss is first detected, and then will increase linearly over time. This means that connections and networks with high retransmission rates can seriously impact how users interact with websites and applications on the Internet.
The Edge Partner Program gets us closer to users
Since most users in next-generation markets are mobile, getting closer to users is paramount for a fast experience. Mobile devices tend to be slower because interference with the radio waves can often add additional instability to the Internet connection, which can lead to poor performance. In next generation markets, there could be added challenges from issues like power consumption: if a power grid can’t support large radio towers, smaller ones with a smaller range are required, which can further add instability, increase retransmission, and add latency.
However, in addition to challenges in the local network, there’s another challenge with interconnecting these networks to the rest of the Internet. Networks in next-generation markets may not be able to reach as many peering points as larger networks and may need to optimize their peering by going into Internet Exchanges that have denser connectivity with more networks, even if they’re farther away. For example, places like Frankfurt, London, and Singapore are especially useful for interconnecting a large amount of networks in a few Internet Exchanges in regions like the Middle East, Africa, and Asia respectively.
The downside for end-users is that in order to connect to the Internet and the sites they care about, networks in these markets have to go a long way to get to the rest of the Internet. For content that is cacheable, meaning it doesn’t change often, sending requests for data (and the response) across oceans and continents is a poor use of Internet capacity. Worse, it leads to problems like congestion, retransmission, and packet loss, which in turn cause poor performance.
One area where we see latency directly impact Internet performance is in TLS, or Transport Layer Security. TLS ensures that an end-user interaction with an application is private. When TLS is established, it performs a three-way handshake that requires the end user to initiate a connection, the server to respond, and the end-user to acknowledge the response before any data can be sent. The farther away an end-user is from a website or CDN that performs this handshake, the longer it will take, and the worse performance will be:
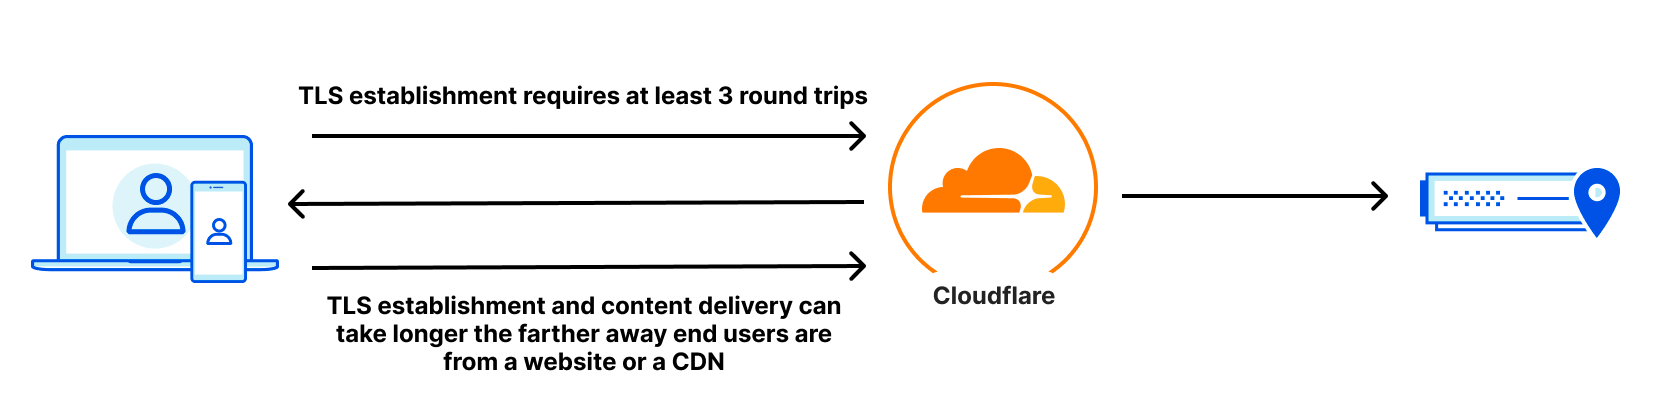
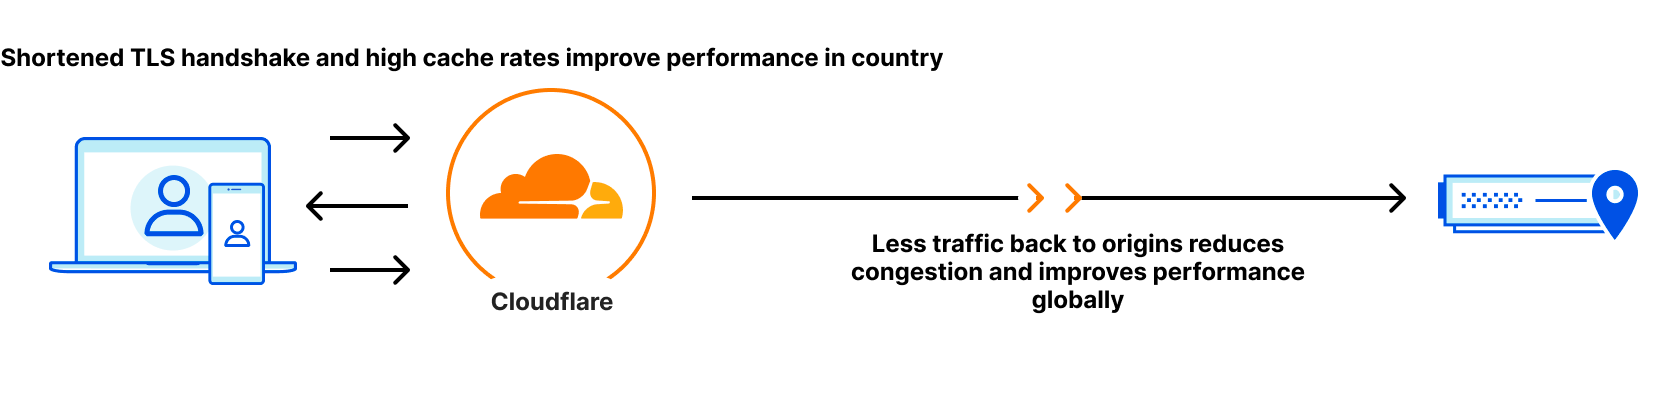
Getting close to users often improves not just end-user performance, but the basic stability of an Internet experience on the network. Cloudflare helps solve this through our Edge Partner Program (EPP), which allows ISPs to integrate their networks physically and locally with Cloudflare, bringing us as close as possible to their users. When we embed a Cloudflare node in an ISP, we shorten the physical distance between end-users and Cloudflare, and by extension, the amount of time end-users’ data requests spend on the backbone of the Internet. Over the past four years, 80% of our 107 new cities have been in next-generation markets to help improve our cached and dynamic performance.
Another additional benefit of having the content and services delivered close to end users: we can use our network intelligence to route traffic out of your last mile network and where it needs to go, helping improve the user experience out to the rest of the Internet as well. On average, Argo Smart Routing helps improve dynamic and uncached content performance by over 30%, which is especially valuable if the content users need to fetch is far away from their devices.
Now that we’ve talked about why the Edge Partner Program is important and how it can theoretically help users, let’s talk about one set of those deployments in Saudi Arabia to show you how it actually helps users.
Edge Partner Program in Saudi Arabia
A great example of a place that can benefit greatly from the Edge Partner Program is Saudi Arabia, a country whose closest peering to Cloudflare was previously in Frankfurt. As we mentioned above, for many countries in the Middle East, Frankfurt is where these networks choose to peer with other networks despite Frankfurt being over 5,300 km away from Riyadh.
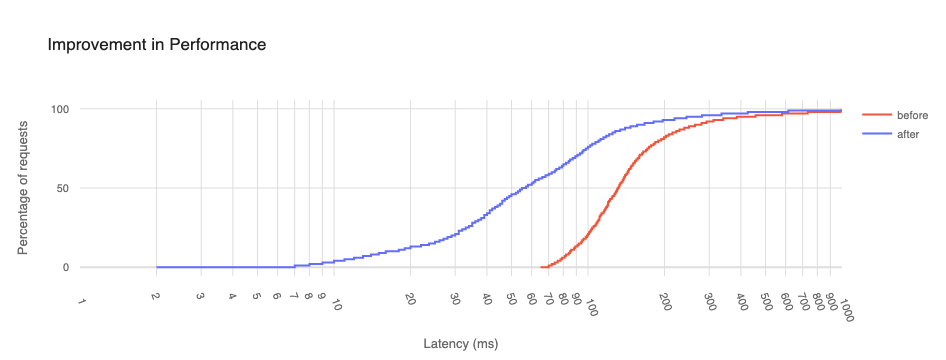
But by landing Cloudflare network hardware in the mobile network Mobily, we were able to improve median RTT by over 50% for their users. Before our deployment, end users on Mobily had a median RTT of 131ms via Frankfurt. Once we added three sites in Dammam, Riyadh, and Jeddah on this network, Mobily users saw a huge decrease in latency, to the point where the median RTT (131ms) before these deployments now became around the 85th percentile afterwards. Before, one out of every two requests took longer than 131ms, while afterward almost every request (85% of them) took less than that time. So users in Saudi Arabia get a faster path to the sites and services they care about through their ISP and Cloudflare. Everyone wins.
Staying local also helps reduce retransmission and the amount of data that has to be sent over these networks. Consider two data centers: one of our largest data centers in Los Angeles, California, and one of those new data centers in Jeddah, Saudi Arabia. Los Angeles takes traffic from all over the world: from places like China, Indonesia, Australia, as well as locally in the Los Angeles area. Take a look at the average retransmission rate for connections coming into Los Angeles from all over the world:
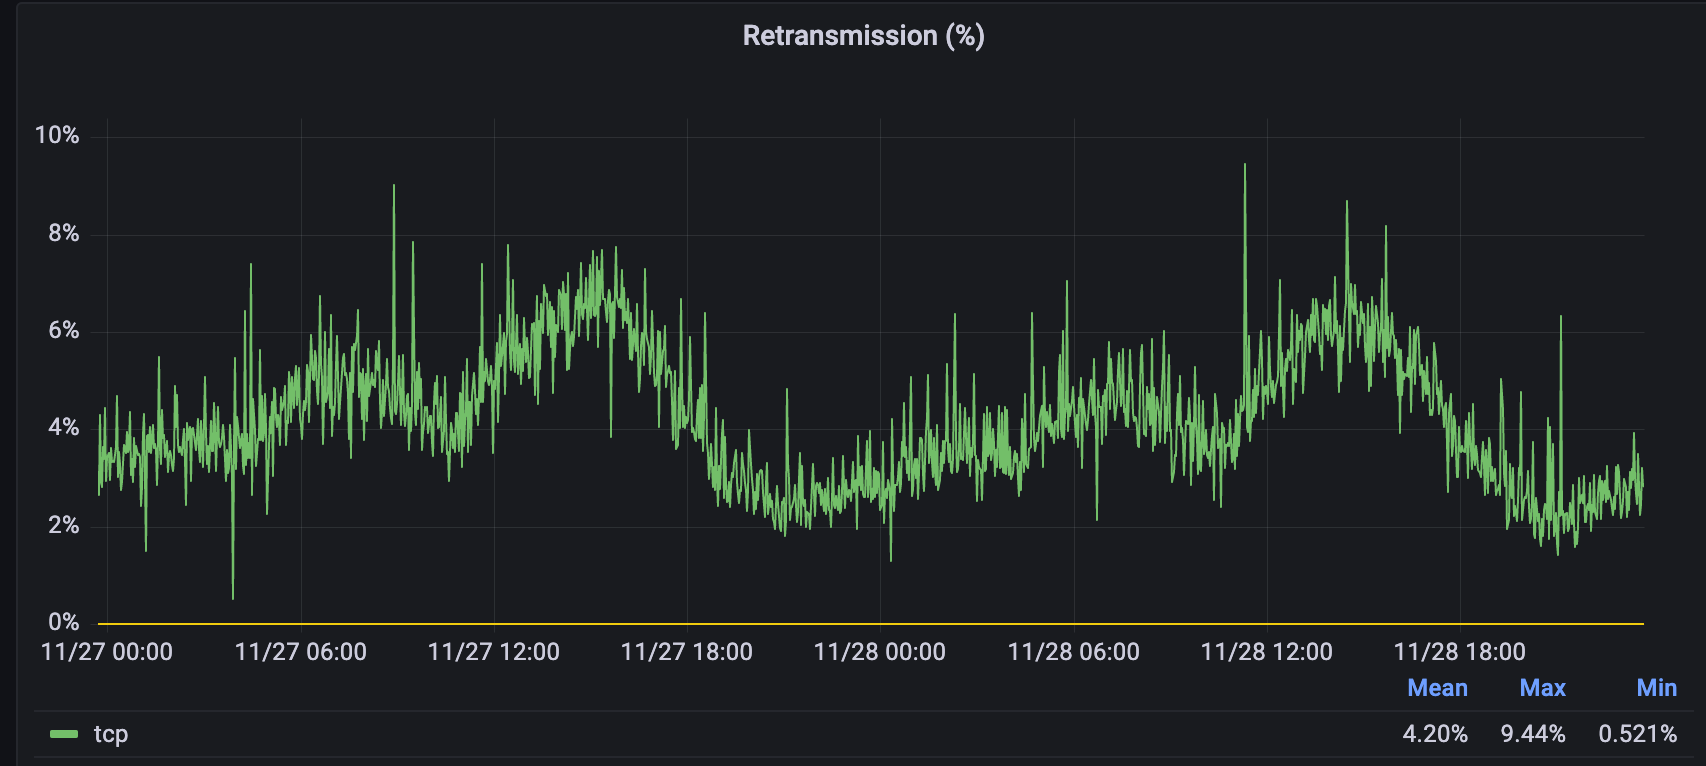
The average rate is quite high for Los Angeles, mostly due to users from all places like China, Indonesia, Taiwan, South Korea, and Japan coming to Los Angeles for their websites. But if you take a look at Jeddah, you’ll see a different story:

Users in Jeddah have a much lower, more constant retransmission rate because users on Mobily are terminating their connections closer to their devices. By being embedded in Mobily’s network, we decrease the number of hops that are needed and also make the hops that travel over less reliable paths shorter. Initial requests are more likely to succeed the first time and don’t need multiple tries to succeed.
WARP in next-generation markets
Cloudflare WARP is a great privacy-preserving tool for users in any market to help ensure a privacy-first, performant path to the Internet. While users around the world can use WARP, users in next-generation markets are ahead of the curve when it comes to WARP adoption. Here are the total year-to-date WARP downloads from the Apple App Store:
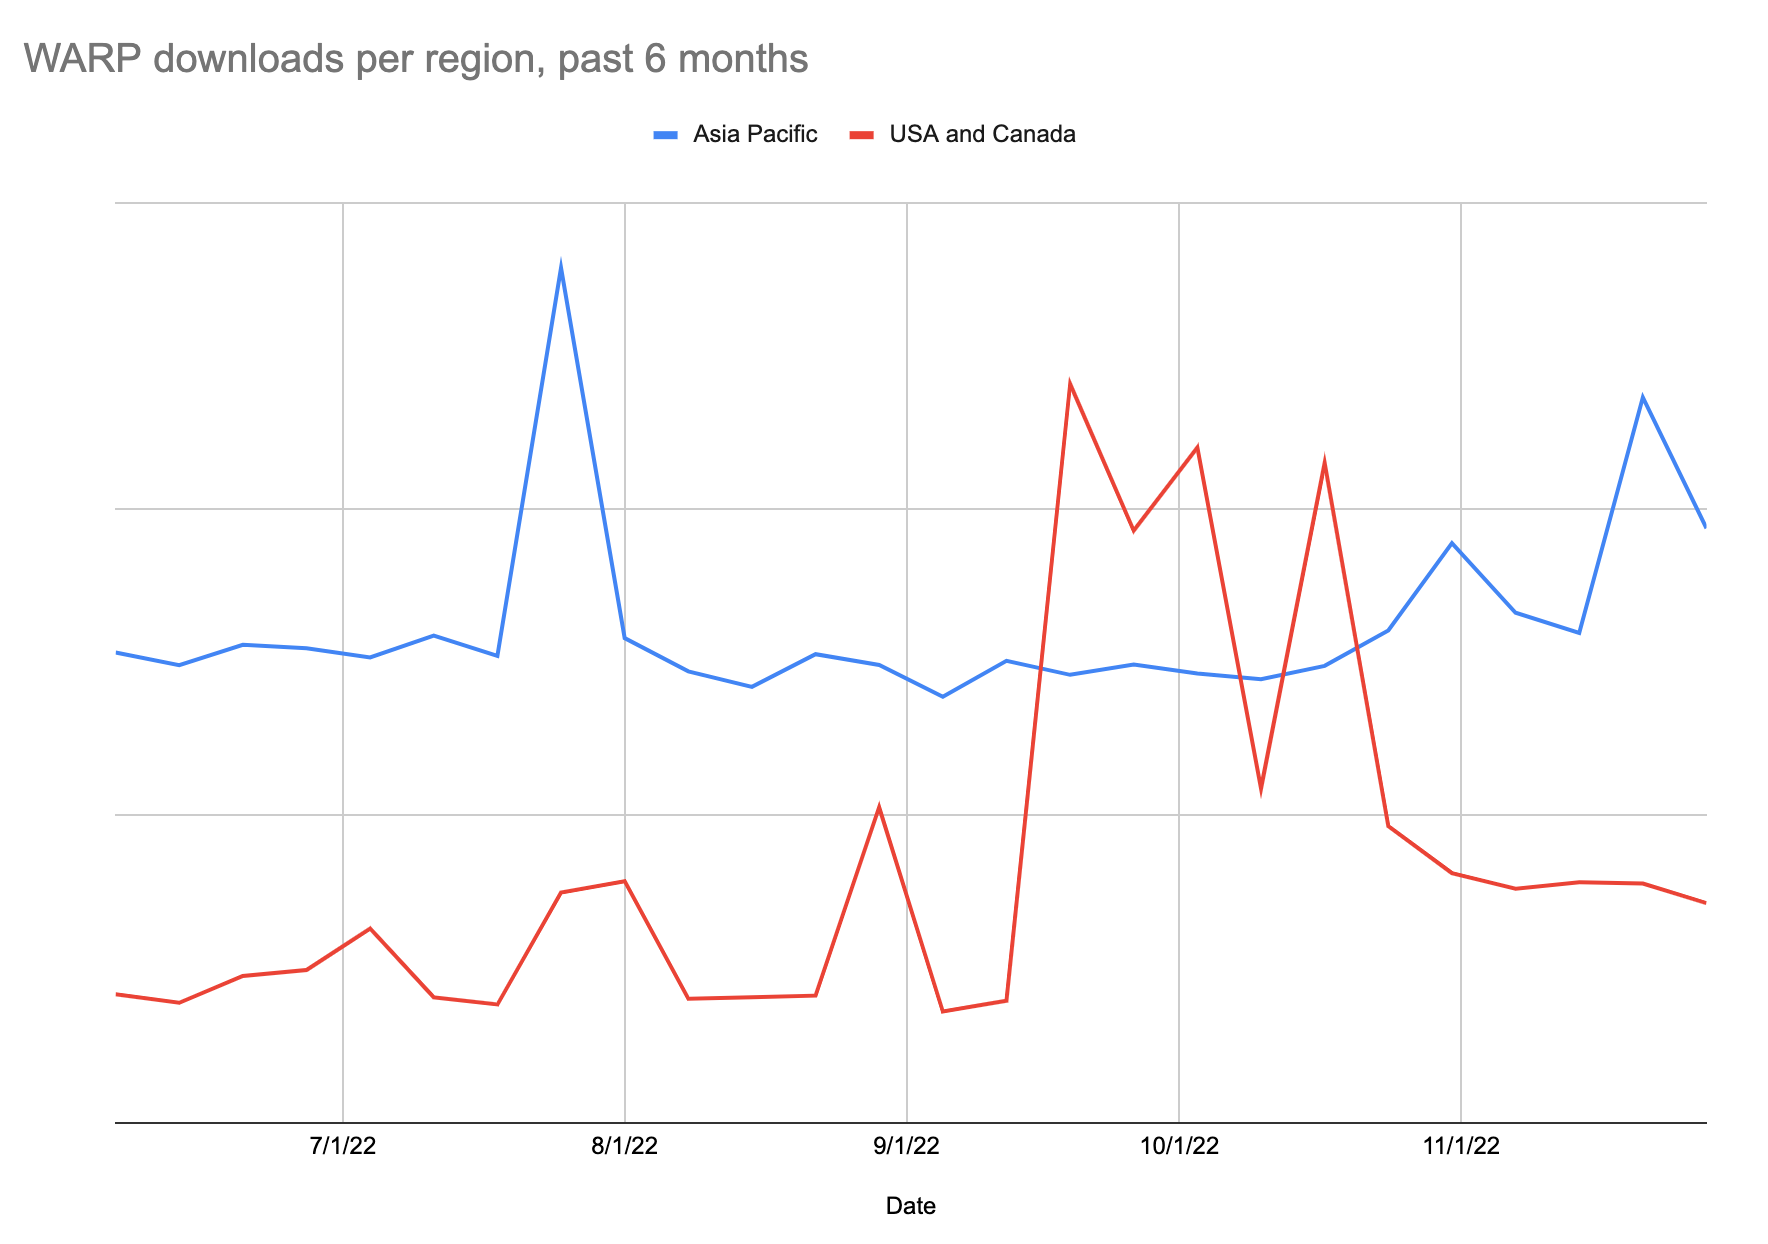
We’ve recently made changes to add WARP support to more Edge Partner locations, which provides a faster, more private experience to these locations. Now even more WARP users can see better performance in more locations.
WARP pairs well with the Cloudflare network to ensure a fast, private Internet experience. In a growing number of networks in next-generation markets, WARP users will connect to Cloudflare in the same location as their ISP before going out to the rest of the Internet. If the websites they are trying to connect to are protected by Cloudflare, then they get a fast path to the websites they care about through Cloudflare. If not, then the users can still get sent out through Cloudflare to the websites they need while preserving their privacy throughout the connection.
Next-generation developers
Let’s say you’re an app developer in Muscat, Oman, trying to make a new shopping app specific to your market. To compete with other existing apps, you not only need a differentiator, but you need an in-app performance experience that is on par with your competitors while also being able to deliver your service and make money. Global shopping apps offer a real-time browsing experience that your regional app also needs to meet, or beat. If outside competitors have a faster shopping app than you, it doesn’t really matter if your app is “the Amazon of Oman” if actual Amazon is faster in the country.
But in next-generation markets, performance is often a differentiator between their applications and incumbent applications — often because incumbent apps tend to not perform as well in these markets. This is often because incumbent applications will host using cloud providers that may not offer services in-region. For example, users in the APJC region may often see their traffic get sent to Hong Kong, Singapore, or even Los Angeles because that is the closest cloud datacenter to them. So when you’re making “the Amazon of Indonesia” and you need your app to be faster than Amazon’s in Indonesia, having your application be as local as possible to your users will help realize your app’s appeal: a specialized, high-performance experience for Indonesian users.
It’s worth noting that many cloud locations do offer local options for developers: if you’re in Oman, there is a local cloud datacenter to you where you can host your service. But most startup and smaller businesses built in next-generation markets will opt to host their app in larger, farther away locations to optimize for cost.
For example, localizing in the Middle East can be very costly compared to farther away options. Developers in the Middle East may be able to save 30% or more on their monthly data transfer costs simply by moving to Frankfurt; a region that is farther away from their users but is cheaper for them to serve out of. Application developers are constantly trying to balance cost with user experience, and may make some tradeoffs for user experience that allow them to optimize costs in the short term. So even though Cloudflare-protected developers are taking advantage of the local peering from the Edge Partner Program, developers in Oman may end up sending their users to Frankfurt anyways because that’s where they chose to host their services to save costs. In many cases, this is a tradeoff developers in these markets have to make: making your service slightly less performant to enable it to run more cheaply.
Cloudflare Workers in country
Luckily for these developers, Cloudflare’s developer platform allows application developers to build a distributed application that runs right where their users are, so they don’t have to choose between performance and cost savings. Taking the Saudi Arabia case, users on Mobily now get their traffic terminated locally in Jeddah. This is okay from an end-to-end perspective because it means that Cloudflare gets to find the fastest path through the Internet using technologies like Argo Smart Routing which will help them save 30% on their Time to First Byte if their users have to go out of the country. But what if users didn’t ever have to leave Jeddah at all?
By moving applications to Cloudflare, you can push more and more of your applications to these data centers in next-generation markets, ensuring that users get a better experience in-country. For example, let’s consider the same comparison data we used to evaluate ourselves versus Lambda@Edge during our Developer Week performance tests. The purpose of this comparison is to show how far your users have to travel if you’re hosting application compute on Cloudflare versus on AWS. When you compare us versus Lambda@Edge, we have a significant advantage for P95 TCP Connection time in next-generation markets. This chart and table below show that in Africa and Asia Cloudflare Workers is about 3x as fast as Lambda@Edge from AWS:
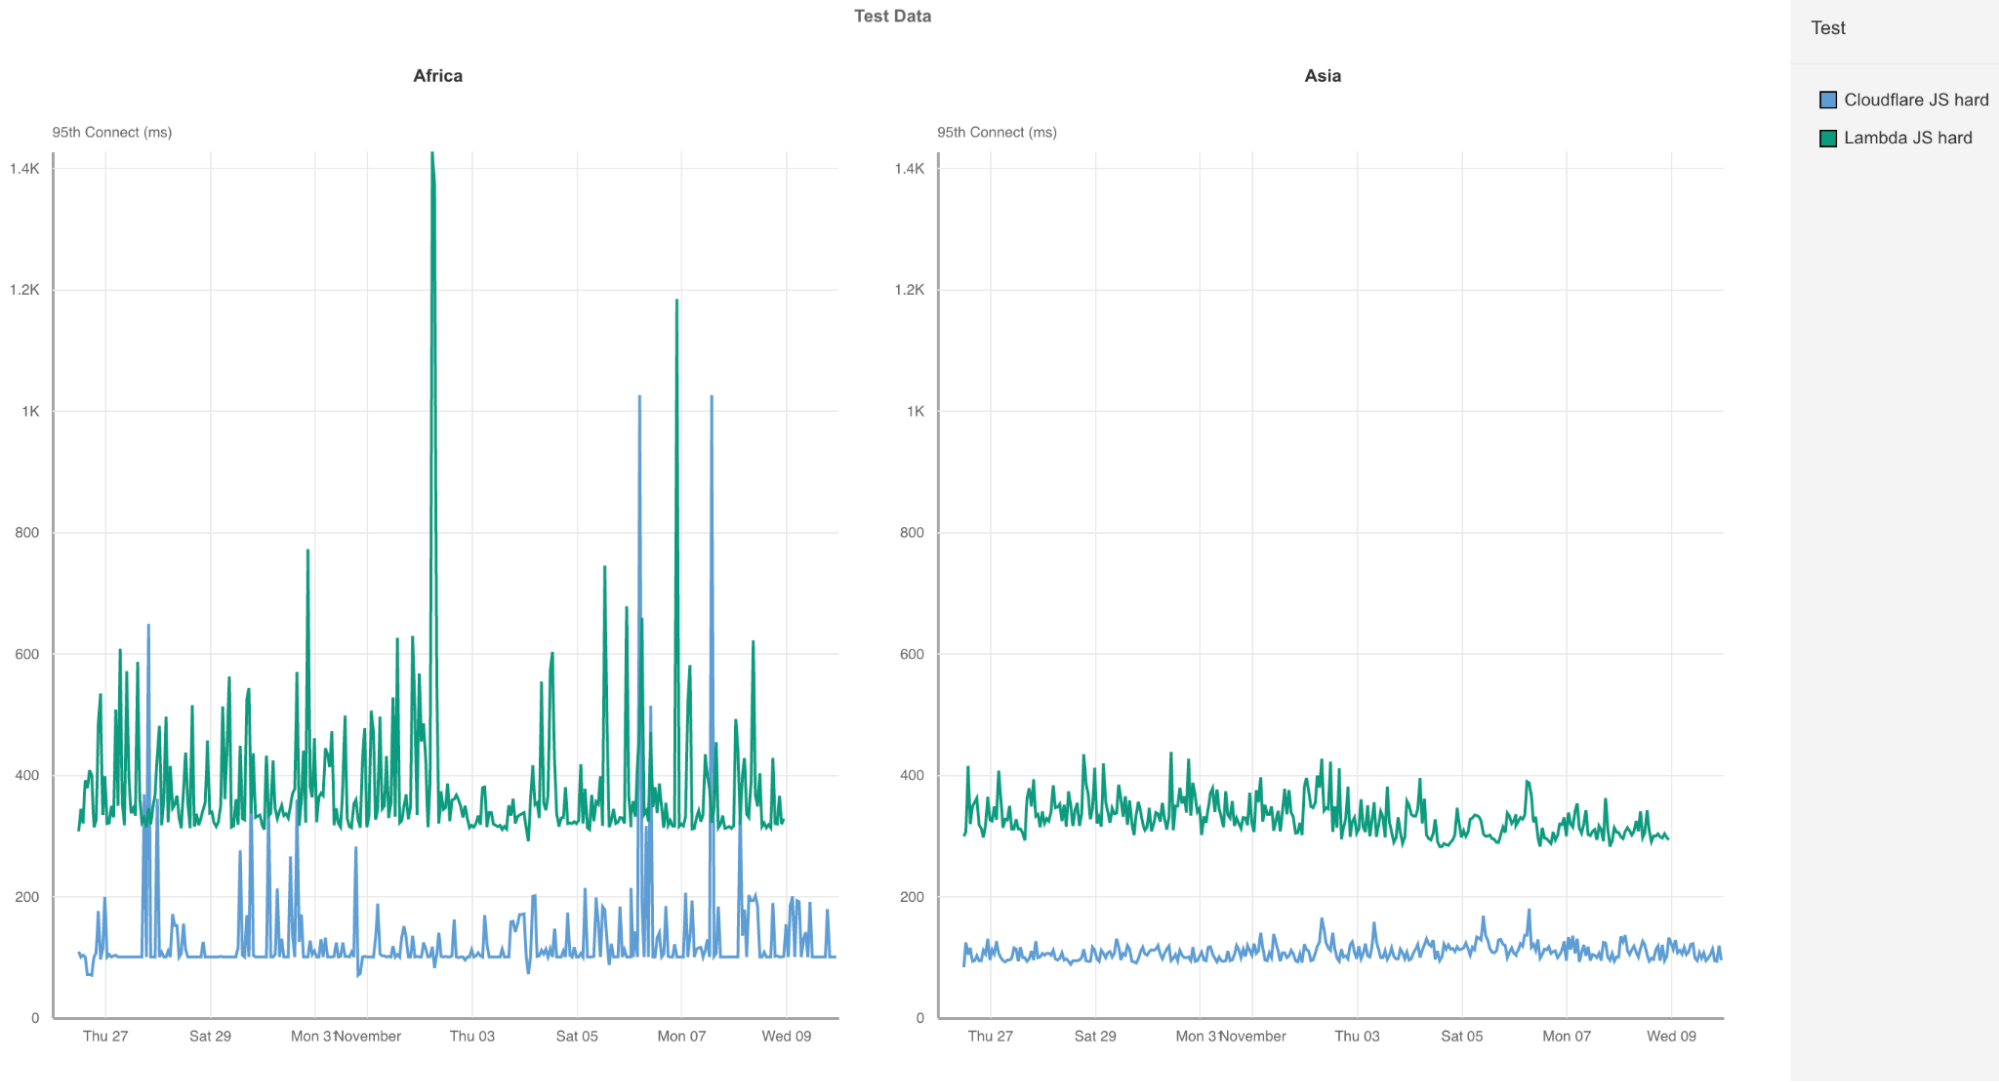
| P95 Connect (ms) Africa |
Asia | |
|---|---|---|
| Lambda JS | 358 | 330 |
| Cloudflare JS | 104 | 111 |
This means that operations and functions that get built into Cloudflare get executed closer to the user, ensuring better end-to-end performance. The Lambda@Edge scenarios are bad enough on their own, but consider that not everything can be done in Lambda@Edge and may need to reach AWS instances that may sit even farther away than the AWS edge. Cloudflare’s supercloud looks especially attractive because we allow you to build everything you need in an application entirely local to end-users. This helps ensure next-generation markets see the same performance as the rest of the world for the applications they care about.
Making everyone faster everywhere
Cloudflare helps users in next-generation markets get connected to the Internet faster, get connected to the Internet more privately, and helps their applications get closer to where they are. Through initiatives like our Edge Partner Program, we can help bring applications closer to users in next-generation markets, and through our powerful developer platform, we can ensure that applications built for these markets have world-class performance.
If you’re an application developer, and you haven’t yet tried out our powerful developer platform and all it can do, try it today!
If you’re a network operator, and you want to have Cloudflare in your network to help bring a next-level experience to your users, check out our Edge Partner Program and let’s get connected.
Users in next-generation markets are the future of the Internet: they are how we expect most people on the Internet to act in the future. Cloudflare is uniquely positioned to ensure that all of these users and developers can have the Internet experience they expect.

Applying Human Rights Frameworks to our approach to abuse
Post Syndicated from Alissa Starzak original https://blog.cloudflare.com/applying-human-rights-frameworks-to-our-approach-to-abuse/


Last year, we launched Cloudflare’s first Human Rights Policy, formally stating our commitment to respect human rights under the UN Guiding Principles on Business and Human Rights (UNGPs) and articulating how we planned to meet the commitment as a business to respect human rights. Our Human Rights Policy describes many of the concrete steps we take to implement these commitments, from protecting the privacy of personal data to respecting the rights of our diverse workforce.
We also look to our human rights commitments in considering how to approach complaints of abuse by those using our services. Cloudflare has long taken positions that reflect our belief that we must consider the implications of our actions for both Internet users and the Internet as a whole. The UNGPs guide that understanding by encouraging us to think systematically about how the decisions Cloudflare makes may affect people, with the goal of building processes to incorporate those considerations.
Human rights frameworks have also been adopted by policymakers seeking to regulate content and behavior online in a rights-respecting way. The Digital Services Act recently passed by the European Union, for example, includes a variety of requirements for intermediaries like Cloudflare that come from human rights principles. So using human rights principles to help guide our actions is not only the right thing to do, it is likely to be required by law at some point down the road.
So what does it mean to apply human rights frameworks to our response to abuse? As we’ll talk about in more detail below, we use human rights concepts like access to fair process, proportionality (the idea that actions should be carefully calibrated to minimize any effect on rights), and transparency.
Human Rights online
The first step is to understand the integral role the Internet plays in human rights. We use the Internet not only to find and share information, but for education, commerce, employment, and social connection. Not only is the Internet essential to our rights of freedom of expression, opinion and association, the UN considers it an enabler of all of our human rights.
The Internet allows activists and human rights defenders to expose abuses across the globe. It allows collective causes to grow into global movements. It provides the foundation for large-scale organizing for political and social change in ways that have never been possible before. But all of that depends on having access to it.
And as we’ve seen, access to a free, open, and interconnected Internet is not guaranteed. Authoritarian governments take advantage of the critical role it plays by denying access to it altogether and using other tactics to intimidate their populations. As described by a recent UN report, government-mandated Internet “shutdowns complement other digital measures used to suppress dissent, such as intensified censorship, systematic content filtering and mass surveillance, as well as the use of government-sponsored troll armies, cyberattacks and targeted surveillance against journalists and human rights defenders.” Online access is limited by the failure to invest in infrastructure or lack of individual resources. Private interests looking to leverage Internet infrastructure to solve commercial content problems result in overblocking of unrelated websites. Cyberattacks make even critical infrastructure inaccessible. Gatekeepers limit entry for business reasons, risking the silencing of those without financial or political clout.
If we want to maintain an Internet that is for everyone, we need to develop rules within companies that don’t take access to it for granted. Processes that could limit Internet access should be thoughtful and well-grounded in human rights principles.
The impact of free services
Cloudflare is unique among our competitors because we offer a variety of services that entities can sign up for free online. Our free services make it possible for everyone – nonprofits, small businesses, developers, and vulnerable voices around the world – to have access to security services they otherwise might be unable to afford.
Cloudflare’s approach of providing free and low cost security services online is consistent with human rights and the push for greater access to the Internet for everyone. Having a free plan removes barriers to the Internet. It means you don’t have to be a big company, a government, or an organization with a popular cause to protect yourself from those who might want to silence you through a cyberattack.
Making access to security services easily available for free also has the potential to relegate DDoS attacks to the dustbin of history. If we can stop DDoS from being an effective means of attack, we may yet be able to divert attackers from using them. Ridding the world of the scourge of DDoS attacks would benefit everyone. In particular, though, it would benefit vulnerable entities doing good for the world who do not otherwise have the means to defend themselves.
But that same free services model that empowers vulnerable groups and has the potential to eliminate DDoS attacks once and for all means that we at Cloudflare are often not picking our customers; they are picking us. And that comes with its own risk. For every dissenting voice challenging an oppressive regime that signs up for our service, there may also be a bad actor doing things online that are inconsistent with our values.
To reflect that reality, we need an abuse framework that satisfies our goals of expanding access to the global Internet and getting rid of cyberattacks, while also finding ways, both as a company and together with the broader Internet community, to address human rights harms.
Applying the UNGP framework to online activity
As we’ve described before, the UNGPs assign businesses and governments different obligations when it comes to human rights. Governments are required to protect human rights within their territories, taking appropriate steps to prevent, investigate, punish and redress harms. Companies, on the other hand, are expected to respect human rights. That means that companies should conduct due diligence to avoid taking actions that would infringe on the rights of others, and remedy any harms that do occur.
It can be challenging to apply that UNGP protect/respect/remedy framework to online activities. Because the Internet serves as an enabler of a variety of human rights, decisions that alter access to the Internet – from serving a particular market to changing access to particular services – can affect the rights of many different people, sometimes in competing ways.
Access to the Internet is also not typically provided by a single company. When you visit a website online, you’re experiencing the services of many different providers. Just for that single website, there’s probably a website owner who created the website, a website host storing the content, a domain name registrar providing the domain name, a domain name registry running the top level domain like .com or .org, a reverse proxy helping keep the website online in case of attack, a content delivery network improving the efficiency of Internet transmissions, a transit provider transmitting the website content across the Internet, the ISPs delivering the content to the end user, and a browser to make the website’s content intelligible to you.
And that description doesn’t even include the captcha provider that helps make sure the site is visited by humans rather than bots, the open source software developer whose code was used to build the site, the various plugins that enable the site to show video or accept payments, or the many other providers online who might play an important role in your user experience. So our ability to exercise our human rights online is dependent on the actions of many providers, acting as part of an ecosystem to bring us the Internet.
Trying to understand the appropriate role for companies is even more complicated when it comes to questions of online abuse. Online abuse is not generally caused by one of the many infrastructure providers who facilitate access to the Internet; the harm is caused by a third party. Because of the variety of providers mentioned above, a company may have limited options at its disposal to do anything that would help address the online harm in a targeted way, consistent with human rights principles. For example, blocking access to parts of the Internet, or stepping aside to allow a site to be subjected to a cyberattack, has the potential to have profound negative impact on others’ access to the Internet and thus human rights.
To help work through those competing human rights concerns, Cloudflare strives to build processes around online abuse that incorporate human rights principles. Our approach focuses on three recognized human rights principles: (1) fair process for both complainants and users, (2) proportionality, and (3) transparency. And we have engaged, and continue to engage, extensively with human rights focused groups like the Global Network Initiative and the UN’s B-Tech Project, as well as our Project Galileo partners and many other stakeholders, to understand the impact of our policies.
Fair abuse processes – Grievance mechanisms for complainants
Human rights law, and the UNGPs in particular, stress that individuals and communities who are harmed should have mechanisms for remediation of the harm. Those mechanisms – which include both legal processes like going to court and more informal private processes – should be applied equitably and fairly, in a predictable and transparent way. A company like Cloudflare can help by establishing grievance mechanisms that give people an opportunity to raise their concerns about harm, or to challenge deprivation of rights.
To address online abuse by entities that might be using Cloudflare services, Cloudflare has an abuse reporting form that is open to anyone online. Our website includes a detailed description of how to report problematic activity. Individuals worried about retaliation, such as those submitting complaints of threatening or harassing behavior, can choose to submit complaints anonymously, although it may limit the ability to follow up on the complaint.
Cloudflare uses the information we receive through that abuse reporting process to respond to complaints about online abuse based on the types of services we may be providing as well as the nature of the complaint.
Because of the way Cloudflare protects entities from cyberattack, a complainant may not know who is hosting the content that is the source of the alleged harm. To make sure that someone who might have been harmed has an opportunity to remediate that harm, Cloudflare has created an abuse process to get complaints to the right place. If the person submitting the complaint is seeking to remove content, something that Cloudflare cannot do if it is providing only performance or security services, Cloudflare will forward the complaint to the website owner and hosting provider for appropriate action.
Fair abuse processes – Notice and Appeal for Cloudflare users
Trying to build a fair policy around abuse requires understanding that complaints are not always submitted in good faith, and that abuse processes can themselves be abused. Cloudflare, for example, has received abuse complaints that appear to be intended to intimidate journalists reporting on government corruption, to silence political opponents, and to disrupt competitors.
A fair abuse process therefore also means being fair to Cloudflare users or website owners who might suffer consequences of a complaint. Cloudflare generally provides notice to our users of potential complaints so that they can respond to allegations of abuse, although individual circumstances and anonymous complaints sometimes make that difficult.
We also strive to provide users with notice of potential actions we might take, as well as an opportunity to provide additional information that might inform our decisions about appropriate action. Users can also seek reconsideration of decisions.
Proportionality – Differentiating our products
Proportionality is a core principle of human rights. In human rights law, proportionality means that any interference with rights should be as limited and narrow as possible in seeking to address the harm. In other words, the goal of proportionality is to minimize the collateral effect of an action on other human rights.
Proportionality is an important principle for Internet infrastructure because of the dependencies among different providers required to access the Internet. A government demand that a single ISP shut off or throttle access to the Internet can have dramatic real-life effects,“depriving thousands or even millions of their only means of reaching their loved ones, continuing their work or participating in political debates or decision-making.” Voluntary action by individual providers can have a similar broad cascading effect, completely eliminating access to certain services or swaths of content.
To avoid these kinds of consequences, we apply the concept of proportionality to address abuse on our network, particularly when a complaint implicates other rights, like freedom of expression. Complaints about content are best addressed by those able to take the most targeted action possible. A complaint about a single image or post, for example, should not result in an entire website being taken down.
The principle of proportionality is the basis for our use of different approaches to address abuse for different types of products. If we’re hosting content with products like Cloudflare Pages, Cloudflare Images, or Cloudflare Stream, we’re able to take more granular, specific action. In those cases, we have an acceptable hosting policy that enables us to take action on particular pieces of content. We give the Cloudflare user an opportunity to take down the content themselves before following notice and takedown, which allows them to contest the takedown if they believe it is inappropriate.
But when we’re only providing security services that prevent the site being removed from the Internet by a cyberattack, Cloudflare can’t take targeted action on particular pieces of content. Nor do we generally see termination of DDoS protection services as the right or most effective remedy for addressing a website with harmful content. Termination of security services only resolves the concerns if the site is removed from the Internet by DDoS attack, an act which is illegal in most jurisdictions. From a human rights standpoint, making content inaccessible through a vigilante cyber attack is not only inconsistent with the principle of proportionality, but with the principles of notice and due process. It also provides no opportunities for remediation of harm in the event of a mistake.
Likewise, when we’re providing core Internet technology services like DNS, we do not have the ability to take granular action. Our only options are blunt instruments.
In those circumstances, there are actors in the broader Internet ecosystem who can take targeted action, even if we can’t. Typically, that would be a website owner or hosting provider that has the ability to remove individual pieces of content. Proportionality therefore sometimes means recognizing that we can’t and shouldn’t try to solve every problem, particularly when we are not the right party to take action. But we can still play an important role in helping complainants identify the right provider, so they can have their concerns addressed.
The EU recently formally embraced the concept of proportionality in abuse processes in the Digital Services Act. They pointed out that when intermediaries must be involved to address illegal content, requests “should, as a general rule, be directed to the specific provider that has the technical and operational ability to act against specific items of illegal content, to prevent and minimize any possible negative effects on the availability and accessibility of information that is not illegal content.” [DSA, Recital 27]
Transparency – Reporting on abuse
Human rights law emphasizes the importance of transparency – from both governments and companies – on decisions that have an effect on human rights. Transparency allows for public accountability and improves trust in the overall system.
This human rights principle is one that has always made sense to us, because transparency is a core value to Cloudflare as well. And if you believe, as we do, that the way different providers tackle questions of abuse will have long term ripple effects, we need to make sure people understand the trade-offs with decisions we make that could impact human rights. We have never taken the easy option of making a difficult decision quietly. We try to blog about the difficult decisions we have made, and then use those blogs to engage with external stakeholders to further our own learning.
In addition to our blogs, we have worked to build up more systematic reporting of our evaluation process and decision-making. Last year, we published a page on our website describing our approach to abuse. We continue to take steps to expand information in our biannual transparency report about our full range of responses to abuse, from removal of content in our storage products to reports on child sexual abuse material to the National Center for Missing and Exploited Children (NCMEC).
Transparency – Reporting on the circumstances when we terminate services
We’ve also sought to be transparent about the limited number of circumstances where we will terminate even DDoS protection services, consistent with our respect for human rights and our view that opening a site up to DDoS attack is almost never a proportional response to address content. Most of the circumstances in which we terminate all services are tied to legal obligations, reflecting the judgment of policymakers and impartial decision makers about when barring entities from access to the Internet is appropriate.
Even in those circumstances, we try to provide users notice, and where appropriate, an opportunity to address the harm themselves. The legal areas that can result in termination of all services are described in more detail below.
Child Sexual Abuse Material: As described in more detail here, Cloudflare has a policy to report any allegation of child sexual abuse material (CSAM) to the National Center for Missing and Exploited Children (NCMEC) for additional investigation and response. When we have reason to believe, in conjunction with those working in child safety, that a website is solely dedicated to CSAM or that a website owner is deliberately ignoring legal requirements to remove CSAM, we may terminate services. We recently began reporting on those terminations in our biannual transparency report.
Sanctions: The United States has a legal regime that prohibits companies from doing business with any entity or individual on a public list of sanctioned parties, called the Specially Designated Nationals (SDN) list. US provides entities on the SDN list, which includes designated terrorist organizations, human rights violators, and others, notice of the determination and an opportunity to challenge the US designation. Cloudflare will terminate services to entities or individuals that it can identify as having been added to the SDN list.
The US sanctions regime also restricts companies from doing business with certain sanctioned countries and regions – specifically Cuba, North Korea, Syria, Iran, and the Crimea, Luhansk and Donetsk regions of Ukraine. Cloudflare may terminate certain services if it identifies users as coming from those countries or regions. Those country and regional sanctions, however, generally have a number of legal exceptions (known as general licenses) that allow Cloudflare to offer certain kinds of services even when individuals and entities come from the sanctioned regions.
Court orders: Cloudflare occasionally receives third-party orders in the United States directing Cloudflare and other service providers to terminate services to websites due to copyright or other prohibited content. Because we have no ability to remove content from the Internet that we do not host, we don’t believe that termination of Cloudflare’s security services is an effective means for addressing such content. Our experience has borne that out. Because other service providers are better positioned to address the issues, most of the domains that we have been ordered to terminate are no longer using Cloudflare’s services by the time Cloudflare must take action. Cloudflare nonetheless may terminate services to repeat copyright infringers and others in response to valid orders that are consistent with due process protections and comply with relevant laws.
SESTA/FOSTA: In 2018, the United States passed the Fight Online Sex Trafficking Act (FOSTA) and the Stop Enabling Sex Traffickers Act (SESTA), for the purpose of fighting online sex trafficking. The law’s broad establishment of criminal penalties for the provision of online services that facilitate prostitution or sex trafficking, however, means that companies that provide any online services to sex workers are at risk of breaking the law. To be clear, we think the law is profoundly misguided and poorly drafted. Research has shown that the law has had detrimental effects on the financial stability, safety, access to community and health outcomes of online sex workers, while being largely ineffective for addressing human trafficking. But to avoid the risk of criminal liability, we may take steps to terminate services to domains that appear to fall under the ambit of the law. Since the law’s passage, we have terminated services to a few domains due to SESTA/FOSTA. We intend to incorporate any SESTA/FOSTA terminations in our biannual transparency report.
Technical abuse: Cloudflare sometimes receives reports of websites involved in phishing or malware attacks using our services. As a security company, our preference when we receive those reports is to do what we can to prevent the sites from causing harm. When we confirm the abuse, we will therefore place a warning interstitial page to protect users from accidentally falling victim to the attack or to disrupt the attack. Potential phishing victims also benefit from learning that they nearly fell victim to a phishing attack. In cases when we believe a user to be intentionally phishing or distributing malware and the security interests appear to support additional action, however, we may opt to terminate services to the intentionally malicious domain.
Voluntary terminations: In three well-publicized instances, Cloudflare has taken steps to voluntarily terminate services or block access to sites whose users were intentionally causing harm to others. In 2017, we terminated the neo-Nazi troll site The Daily Stormer. In 2019, we terminated the conspiracy theory forum 8chan. And earlier this year, we blocked access to Kiwi Farms. Each of those circumstances had their own unique set of facts. But part of our consideration for the actions in those cases was that the sites had inspired physical harm to people in the offline world. And notwithstanding the real world threats and harm, neither law enforcement nor other service providers who could take more targeted action had effectively addressed the harm.
We continue to believe that there are more effective, long term solutions to address online activity that leads to real world physical threats than seeking to take sites offline by DDoS and cyberattack. And we have been heartened to see jurisdictions like the EU try to grapple with a regulatory response to illegal online activity that preserves human rights online. Looking forward, we hope to see a day when states have developed rights-respecting ways to successfully protect human rights offline based on online activity, and remedy does not depend on vigilante justice through cyberattack.
Continuous learning
Addressing abuse online is a long term and ever-shifting challenge for the entire Internet ecosystem. We continuously refine our abuse processes based on the reports we receive, the many conversations we have with stakeholders affected by online abuse, and our engagement with policymakers, other industry participants, and civil society. Make no mistake, the process can sometimes be a bumpy one, where perspectives on the right approach collide. But the one thing we can promise is that we will continue to try to engage, learn, and adapt. Because, together, we think we can build abuse frameworks that reflect respect for human rights and help build a better Internet.
Cloudflare is joining the AS112 project to help the Internet deal with misdirected DNS queries
Post Syndicated from Hunts Chen original https://blog.cloudflare.com/the-as112-project/


Today, we’re excited to announce that Cloudflare is participating in the AS112 project, becoming an operator of this community-operated, loosely-coordinated anycast deployment of DNS servers that primarily answer reverse DNS lookup queries that are misdirected and create significant, unwanted load on the Internet.
With the addition of Cloudflare global network, we can make huge improvements to the stability, reliability and performance of this distributed public service.
What is AS112 project
The AS112 project is a community effort to run an important network service intended to handle reverse DNS lookup queries for private-only use addresses that should never appear in the public DNS system. In the seven days leading up to publication of this blog post, for example, Cloudflare’s 1.1.1.1 resolver received more than 98 billion of these queries — all of which have no useful answer in the Domain Name System.
Some history is useful for context. Internet Protocol (IP) addresses are essential to network communication. Many networks make use of IPv4 addresses that are reserved for private use, and devices in the network are able to connect to the Internet with the use of network address translation (NAT), a process that maps one or more local private addresses to one or more global IP addresses and vice versa before transferring the information.
Your home Internet router most likely does this for you. You will likely find that, when at home, your computer has an IP address like 192.168.1.42. That’s an example of a private use address that is fine to use at home, but can’t be used on the public Internet. Your home router translates it, through NAT, to an address your ISP assigned to your home and that can be used on the Internet.
Here are the reserved “private use” addresses designated in RFC 1918.
| Address block | Address range | Number of addresses |
|---|---|---|
| 10.0.0.0/8 | 10.0.0.0 – 10.255.255.255 | 16,777,216 |
| 172.16.0.0/12 | 172.16.0.0 – 172.31.255.255 | 1,048,576 |
| 192.168.0.0/16 | 192.168.0.0 – 192.168.255.255 | 65,536 |
Although the reserved addresses themselves are blocked from ever appearing on the public Internet, devices and programs in private environments may occasionally originate DNS queries corresponding to those addresses. These are called “reverse lookups” because they ask the DNS if there is a name associated with an address.
Reverse DNS lookup
A reverse DNS lookup is an opposite process of the more commonly used DNS lookup (which is used every day to translate a name like www.cloudflare.com to its corresponding IP address). It is a query to look up the domain name associated with a given IP address, in particular those addresses associated with routers and switches. For example, network administrators and researchers use reverse lookups to help understand paths being taken by data packets in the network, and it’s much easier to understand meaningful names than a meaningless number.
A reverse lookup is accomplished by querying DNS servers for a pointer record (PTR). PTR records store IP addresses with their segments reversed, and by appending “.in-addr.arpa” to the end. For example, the IP address 192.0.2.1 will have the PTR record stored as 1.2.0.192.in-addr.arpa. In IPv6, PTR records are stored within the “.ip6.arpa” domain instead of “.in-addr.arpa.”. Below are some query examples using the dig command line tool.
# Lookup the domain name associated with IPv4 address 172.64.35.46
# “+short” option make it output the short form of answers only
$ dig @1.1.1.1 PTR 46.35.64.172.in-addr.arpa +short
hunts.ns.cloudflare.com.

# Or use the shortcut “-x” for reverse lookups
$ dig @1.1.1.1 -x 172.64.35.46 +short
hunts.ns.cloudflare.com.

# Lookup the domain name associated with IPv6 address 2606:4700:58::a29f:2c2e
$ dig @1.1.1.1 PTR e.2.c.2.f.9.2.a.0.0.0.0.0.0.0.0.0.0.0.0.8.5.0.0.0.0.7.4.6.0.6.2.ip6.arpa. +short
hunts.ns.cloudflare.com.

# Or use the shortcut “-x” for reverse lookups
$ dig @1.1.1.1 -x 2606:4700:58::a29f:2c2e +short
hunts.ns.cloudflare.com.
The problem that private use addresses cause for DNS
The private use addresses concerned have only local significance and cannot be resolved by the public DNS. In other words, there is no way for the public DNS to provide a useful answer to a question that has no global meaning. It is therefore a good practice for network administrators to ensure that queries for private use addresses are answered locally. However, it is not uncommon for such queries to follow the normal delegation path in the public DNS instead of being answered within the network. That creates unnecessary load.
By definition of being private use, they have no ownership in the public sphere, so there are no authoritative DNS servers to answer the queries. At the very beginning, root servers respond to all these types of queries since they serve the IN-ADDR.ARPA zone.
Over time, due to the wide deployment of private use addresses and the continuing growth of the Internet, traffic on the IN-ADDR.ARPA DNS infrastructure grew and the load due to these junk queries started to cause some concern. Therefore, the idea of offloading IN-ADDR.ARPA queries related to private use addresses was proposed. Following that, the use of anycast for distributing authoritative DNS service for that idea was subsequently proposed at a private meeting of root server operators. And eventually the AS112 service was launched to provide an alternative target for the junk.
The AS112 project is born
To deal with this problem, the Internet community set up special DNS servers called “blackhole servers” as the authoritative name servers that respond to the reverse lookup of the private use address blocks 10.0.0.0/8, 172.16.0.0/12, 192.168.0.0/16 and the link-local address block 169.254.0.0/16 (which also has only local significance). Since the relevant zones are directly delegated to the blackhole servers, this approach has come to be known as Direct Delegation.
The first two blackhole servers set up by the project are: blackhole-1.iana.org and blackhole-2.iana.org.
Any server, including DNS name server, needs an IP address to be reachable. The IP address must also be associated with an Autonomous System Number (ASN) so that networks can recognize other networks and route data packets to the IP address destination. To solve this problem, a new authoritative DNS service would be created but, to make it work, the community would have to designate IP addresses for the servers and, to facilitate their availability, an AS number that network operators could use to reach (or provide) the new service.
The selected AS number (provided by American Registry for Internet Numbers) and namesake of the project, was 112. It was started by a small subset of root server operators, later grown to a group of volunteer name server operators that include many other organizations. They run anycasted instances of the blackhole servers that, together, form a distributed sink for the reverse DNS lookups for private network and link-local addresses sent to the public Internet.
A reverse DNS lookup for a private use address would see responses like in the example below, where the name server blackhole-1.iana.org is authoritative for it and says the name does not exist, represented in DNS responses by NXDOMAIN.
$ dig @blackhole-1.iana.org -x 192.168.1.1 +nord

;; Got answer:
;; ->>HEADER<<- opcode: QUERY, status: NXDOMAIN, id: 23870
;; flags: qr aa; QUERY: 1, ANSWER: 0, AUTHORITY: 1, ADDITIONAL: 1

;; OPT PSEUDOSECTION:
; EDNS: version: 0, flags:; udp: 4096
;; QUESTION SECTION:
;1.1.168.192.in-addr.arpa.	IN	PTR

;; AUTHORITY SECTION:
168.192.in-addr.arpa.	10800	IN	SOA	168.192.in-addr.arpa. nobody.localhost. 42 86400 43200 604800 10800
At the beginning of the project, node operators set up the service in the direct delegation fashion (RFC 7534). However, adding delegations to this service requires all AS112 servers to be updated, which is difficult to ensure in a system that is only loosely-coordinated. An alternative approach using DNAME redirection was subsequently introduced by RFC 7535 to allow new zones to be added to the system without reconfiguring the blackhole servers.
Direct delegation
DNS zones are directly delegated to the blackhole servers in this approach.
RFC 7534 defines the static set of reverse lookup zones for which AS112 name servers should answer authoritatively. They are as follows:
- 10.in-addr-arpa
- 16.172.in-addr.arpa
- 17.172.in-addr.arpa
- 18.172.in-addr.arpa
- 19.172.in-addr.arpa
- 20.172.in-addr.arpa
- 21.172.in-addr.arpa
- 22.172.in-addr.arpa
- 23.172.in-addr.arpa
- 24.172.in-addr.arpa
- 25.172.in-addr.arpa
- 26.172.in-addr.arpa
- 27.172.in-addr.arpa
- 28.172.in-addr.arpa
- 29.172.in-addr.arpa
- 30.172.in-addr.arpa
- 31.172.in-addr.arpa
- 168.192.in-addr.arpa
- 254.169.in-addr.arpa (corresponding to the IPv4 link-local address block)
Zone files for these zones are quite simple because essentially they are empty apart from the required SOA and NS records. A template of the zone file is defined as:
  ; db.dd-empty
   ;
   ; Empty zone for direct delegation AS112 service.
   ;
   $TTL    1W
   @  IN  SOA  prisoner.iana.org. hostmaster.root-servers.org. (
                                  1         ; serial number
                                  1W      ; refresh
                                  1M      ; retry
                                  1W      ; expire
                                  1W )    ; negative caching TTL
   ;
          NS     blackhole-1.iana.org.
          NS     blackhole-2.iana.org.
IP addresses of the direct delegation name servers are covered by the single IPv4 prefix 192.175.48.0/24 and the IPv6 prefix 2620:4f:8000::/48.
| Name server | IPv4 address | IPv6 address |
|---|---|---|
| blackhole-1.iana.org | 192.175.48.6 | 2620:4f:8000::6 |
| blackhole-2.iana.org | 192.175.48.42 | 2620:4f:8000::42 |
DNAME redirection
Firstly, what is DNAME? Introduced by RFC 6672, a DNAME record or Delegation Name Record creates an alias for an entire subtree of the domain name tree. In contrast, the CNAME record creates an alias for a single name and not its subdomains. For a received DNS query, the DNAME record instructs the name server to substitute all those appearing in the left hand (owner name) with the right hand (alias name). The substituted query name, like the CNAME, may live within the zone or may live outside the zone.
Like the CNAME record, the DNS lookup will continue by retrying the lookup with the substituted name. For example, if there are two DNS zone as follows:
# zone: example.com
www.example.com.	A		203.0.113.1
foo.example.com.	DNAME	example.net.

# zone: example.net
example.net.		A		203.0.113.2
bar.example.net.	A		203.0.113.3
The query resolution scenarios would look like this:
| Query (Type + Name) | Substitution | Final result |
|---|---|---|
| A www.example.com | (no DNAME, don’t apply) | 203.0.113.1 |
| DNAME foo.example.com | (don’t apply to the owner name itself) | example.net |
| A foo.example.com | (don’t apply to the owner name itself) | <NXDOMAIN> |
| A bar.foo.example.com | bar.example.net | 203.0.113.2 |
RFC 7535 specifies adding another special zone, empty.as112.arpa, to support DNAME redirection for AS112 nodes. When there are new zones to be added, there is no need for AS112 node operators to update their configuration: instead, the zones’ parents will set up DNAME records for the new domains with the target domain empty.as112.arpa. The redirection (which can be cached and reused) causes clients to send future queries to the blackhole server that is authoritative for the target zone.
Note that blackhole servers do not have to support DNAME records themselves, but they do need to configure the new zone to which root servers will redirect queries at. Considering there may be existing node operators that do not update their name server configuration for some reasons and in order to not cause interruption to the service, the zone was delegated to a new blackhole server instead – blackhole.as112.arpa.
This name server uses a new pair of IPv4 and IPv6 addresses, 192.31.196.1 and 2001:4:112::1, so queries involving DNAME redirection will only land on those nodes operated by entities that also set up the new name server. Since it is not necessary for all AS112 participants to reconfigure their servers to serve empty.as112.arpa from this new server for this system to work, it is compatible with the loose coordination of the system as a whole.
The zone file for empty.as112.arpa is defined as:
   ; db.dr-empty
   ;
   ; Empty zone for DNAME redirection AS112 service.
   ;
   $TTL    1W
   @  IN  SOA  blackhole.as112.arpa. noc.dns.icann.org. (
                                  1         ; serial number
                                  1W      ; refresh
                                  1M      ; retry
                                  1W      ; expire
                                  1W )    ; negative caching TTL
   ;
          NS     blackhole.as112.arpa.
The addresses of the new DNAME redirection name server are covered by the single IPv4 prefix 192.31.196.0/24 and the IPv6 prefix 2001:4:112::/48.
| Name server | IPv4 address | IPv6 address |
|---|---|---|
| blackhole.as112.arpa | 192.31.196.1 | 2001:4:112::1 |
Node identification
RFC 7534 recommends every AS112 node also to host the following metadata zones as well: hostname.as112.net and hostname.as112.arpa.
These zones only host TXT records and serve as identifiers for querying metadata information about an AS112 node. At Cloudflare nodes, the zone files look like this:
$ORIGIN hostname.as112.net.
;
$TTL    604800
;
@       IN  SOA     ns3.cloudflare.com. dns.cloudflare.com. (
                       1                ; serial number
                       604800           ; refresh
                       60               ; retry
                       604800           ; expire
                       604800 )         ; negative caching TTL
;
            NS      blackhole-1.iana.org.
            NS      blackhole-2.iana.org.
;
            TXT     "Cloudflare DNS, <DATA_CENTER_AIRPORT_CODE>"
            TXT     "See http://www.as112.net/ for more information."
;

$ORIGIN hostname.as112.arpa.
;
$TTL    604800
;
@       IN  SOA     ns3.cloudflare.com. dns.cloudflare.com. (
                       1                ; serial number
                       604800           ; refresh
                       60               ; retry
                       604800           ; expire
                       604800 )         ; negative caching TTL
;
            NS      blackhole.as112.arpa.
;
            TXT     "Cloudflare DNS, <DATA_CENTER_AIRPORT_CODE>"
            TXT     "See http://www.as112.net/ for more information."
;
Helping AS112 helps the Internet
As the AS112 project helps reduce the load on public DNS infrastructure, it plays a vital role in maintaining the stability and efficiency of the Internet. Being a part of this project aligns with Cloudflare’s mission to help build a better Internet.
Cloudflare is one of the fastest global anycast networks on the planet, and operates one of the largest, highly performant and reliable DNS services. We run authoritative DNS for millions of Internet properties globally. We also operate the privacy- and performance-focused public DNS resolver 1.1.1.1 service. Given our network presence and scale of operations, we believe we can make a meaningful contribution to the AS112 project.
How we built it
We’ve publicly talked about the Cloudflare in-house built authoritative DNS server software, rrDNS, several times in the past, but haven’t talked much about the software we built to power the Cloudflare public resolver – 1.1.1.1. This is an opportunity to shed some light on the technology we used to build 1.1.1.1, because this AS112 service is built on top of the same platform.
A platform for DNS workloads
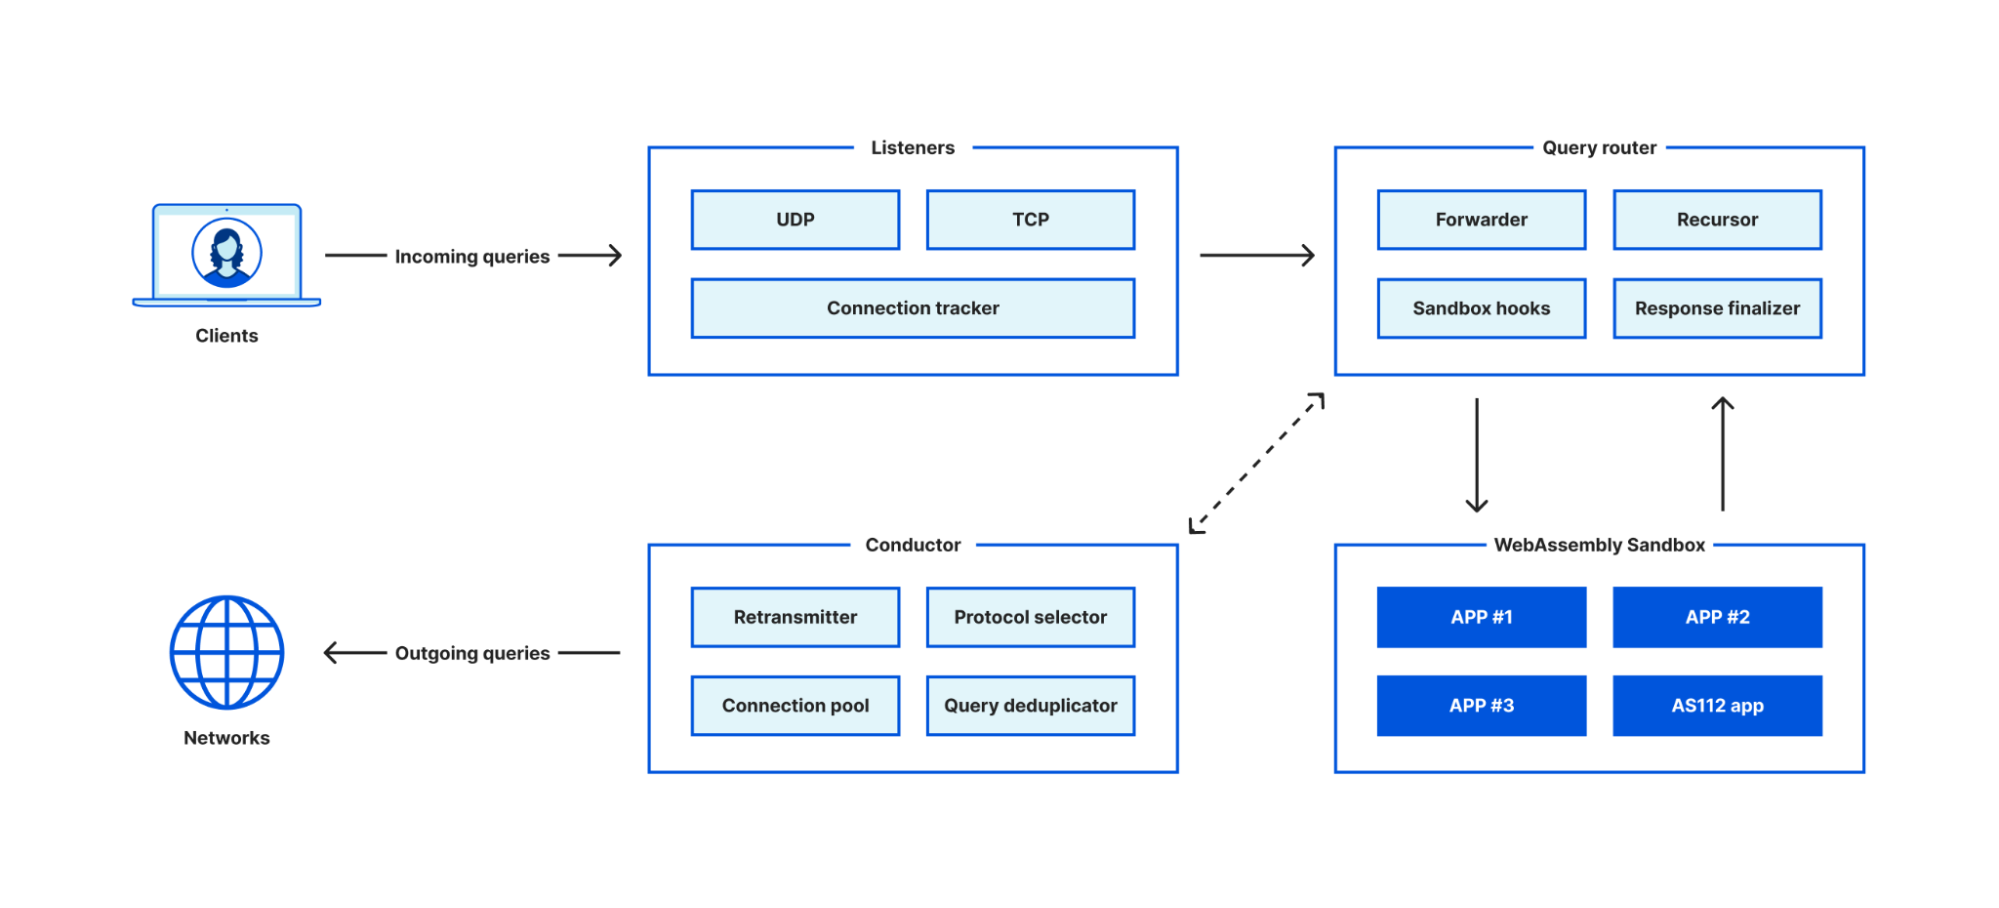
We’ve created a platform to run DNS workloads. Today, it powers 1.1.1.1, 1.1.1.1 for Families, Oblivious DNS over HTTPS (ODoH), Cloudflare WARP and Cloudflare Gateway.
The core part of the platform is a non-traditional DNS server, which has a built-in DNS recursive resolver and a forwarder to forward queries to other servers. It consists of four key modules:
- A highly efficient listener module that accepts connections for incoming requests.
- A query router module that decides how a query should be resolved.
- A conductor module that figures out the best way of exchanging DNS messages with upstream servers.
- A sandbox environment to host guest applications.
The DNS server itself doesn’t include any business logic, instead the guest applications run in the sandbox environment can implement concrete business logic such as request filtering, query processing, logging, attack mitigation, cache purging, etc.
The server is written in Rust and the sandbox environment is built on top of a WebAssembly runtime. The combination of Rust and WebAssembly allow us to implement high efficient connection handling, request filtering and query dispatching modules, while having the flexibility of implementing custom business logic in a safe and efficient manner.
The host exposes a set of APIs, called hostcalls, for the guest applications to accomplish a variety of tasks. You can think of them like syscalls on Linux. Here are few examples functions provided by the hostcalls:
- Obtain the current UNIX timestamp
- Lookup geolocation data of IP addresses
- Spawn async tasks
- Create local sockets
- Forward DNS queries to designated servers
- Register callback functions of the sandbox hooks
- Read current request information, and write responses
- Emit application logs, metric data points and tracing spans/events
The DNS request lifecycle is broken down into phases. A request phase is a point in processing at which sandboxed apps can be called to change the course of request resolution. And each guest application can register callbacks for each phase.

AS112 guest application
The AS112 service is built as a guest application written in Rust and compiled to WebAssembly. The zones listed in RFC 7534 and RFC 7535 are loaded as static zones in memory and indexed as a tree data structure. Incoming queries are answered locally by looking up entries in the zone tree.
A router setting in the app manifest is added to tell the host what kind of DNS queries should be processed by the guest application, and a fallback_action setting is added to declare the expected fallback behavior.
# Declare what kind of queries the app handles.
router = [
    # The app is responsible for all the AS112 IP prefixes.
    "dst in { 192.31.196.0/24 192.175.48.0/24 2001:4:112::/48 2620:4f:8000::/48 }",
]

# If the app fails to handle the query, servfail should be returned.
fallback_action = "fail"
The guest application, along with its manifest, is then compiled and deployed through a deployment pipeline that leverages Quicksilver to store and replicate the assets worldwide.
The guest application is now up and running, but how does the DNS query traffic destined to the new IP prefixes reach the DNS server? Do we have to restart the DNS server every time we add a new guest application? Of course there is no need. We use software we developed and deployed earlier, called Tubular. It allows us to change the addresses of a service on the fly. With the help of Tubular, incoming packets destined to the AS112 service IP prefixes are dispatched to the right DNS server process without the need to make any change or release of the DNS server itself.
Meanwhile, in order to make the misdirected DNS queries land on the Cloudflare network in the first place, we use BYOIP (Bringing Your Own IPs to Cloudflare), a Cloudflare product that can announce customer’s own IP prefixes in all our locations. The four AS112 IP prefixes are boarded onto the BYOIP system, and will be announced by it globally.
Testing
How can we ensure the service we set up does the right thing before we announce it to the public Internet? 1.1.1.1 processes more than 13 billion of these misdirected queries every day, and it has logic in place to directly return NXDOMAIN for them locally, which is a recommended practice per RFC 7534.
However, we are able to use a dynamic rule to change how the misdirected queries are handled in Cloudflare testing locations. For example, a rule like following:
phase = post-cache and qtype in { PTR } and colo in { test1 test2 } and qname-suffix in { 10.in-addr.arpa 16.172.in-addr.arpa 17.172.in-addr.arpa 18.172.in-addr.arpa 19.172.in-addr.arpa 20.172.in-addr.arpa 21.172.in-addr.arpa 22.172.in-addr.arpa 23.172.in-addr.arpa 24.172.in-addr.arpa 25.172.in-addr.arpa 26.172.in-addr.arpa 27.172.in-addr.arpa 28.172.in-addr.arpa 29.172.in-addr.arpa 30.172.in-addr.arpa 31.172.in-addr.arpa 168.192.in-addr.arpa 254.169.in-addr.arpa } forward 192.175.48.6:53
The rule instructs that in data center test1 and test2, when the DNS query type is PTR, and the query name ends with those in the list, forward the query to server 192.175.48.6 (one of the AS112 service IPs) on port 53.
Because we’ve provisioned the AS112 IP prefixes in the same node, the new AS112 service will receive the queries and respond to the resolver.
It’s worth mentioning that the above-mentioned dynamic rule that intercepts a query at the post-cache phase, and changes how the query gets processed, is executed by a guest application too, which is named override. This app loads all dynamic rules, parses the DSL texts and registers callback functions at phases declared by each rule. And when an incoming query matches the expressions, it executes the designated actions.
Public reports
We collect the following metrics to generate the public statistics that an AS112 operator is expected to share to the operator community:
- Number of queries by query type
- Number of queries by response code
- Number of queries by protocol
- Number of queries by IP versions
- Number of queries with EDNS support
- Number of queries with DNSSEC support
- Number of queries by ASN/Data center
We’ll serve the public statistics page on the Cloudflare Radar website. We are still working on implementing the required backend API and frontend of the page – we’ll share the link to this page once it is available.
What’s next?
We are going to announce the AS112 prefixes starting December 15, 2022.
After the service is launched, you can run a dig command to check if you are hitting an AS112 node operated by Cloudflare, like:
$ dig @blackhole-1.iana.org TXT hostname.as112.arpa +short

"Cloudflare DNS, SFO"
"See http://www.as112.net/ for more information."
Partnering with civil society to track Internet shutdowns with Radar Alerts and API
Post Syndicated from Jocelyn Woolbright original https://blog.cloudflare.com/partnering-with-civil-society-to-track-shutdowns/

This post is also available in 简体中文, 繁體中文, 日本語, 한국어, Deutsch, Français and Español.

Internet shutdowns have long been a tool in government toolboxes when it comes to silencing opposition and cutting off access from the outside world. The KeepItOn campaign by Access Now, a group that defends the digital rights of global Internet users, documented at least 182 Internet shutdowns in 34 countries in 2021. Many of these shutdowns occurred during public protests, elections, and wars as an extreme form of censorship in places like Afghanistan, Democratic Republic of the Congo, Ukraine, India, and Iran.
There are a range of ways governments block or slow communications, including throttling, IP blocking, DNS interference, mobile data shutoffs, and deep packet inspection, all with similar goals: exerting control over information.
Although Internet shutdowns are largely public, it is difficult to document and track the ways in which governments implement them. The shutdowns not only impact people’s ability to participate in civil and political life and the economy but also have grave consequences for trust in democratic institutions.
We have reported on these shutdowns in the past, and for Cloudflare Impact Week, we want to tell you more about how we work with civil society organizations to provide tools to track and document the scope of these disruptions. We want to support their critical work and provide the tools they need so they can demand accountability and condemn the use of shutdowns to silence dissent.
Radar Internet shutdown alerts for civil society
We launched Radar in 2020 to shine light on the Internet’s patterns, insights, threats, and trends based on aggregated data from our network. Once we launched Radar, we found that many civil society organizations and those who work in democracy-building use Radar to track trends in countries to better understand the rise and fall of Internet usage.
Internally, we had an alert system for potential Internet disruptions that we use as an early warning regarding shifts in network patterns and incidents. When we engaged with these organizations that use Radar to track Internet trends, we learned more about how our internal tool to identify traffic distributions could be useful for organizations that work with human rights defenders on the ground that are impacted by these shutdowns.
To determine the best way to provide a tool to alert organizations when Cloudflare has seen these disruptions, we spoke with organizations such as Access Now, Internews, The Carter Center, National Democratic Institute, Internet Society, and the International Foundation for Electoral Systems. After our conversations, we launched Radar Internet shutdown alerts in 2021 to provide alerts on when Cloudflare has detected significant drops in traffic with the hope that the information is used to document, track, and hold institutions accountable for these human rights violations.
Since 2021, we have been providing these alerts to civil society partners to track these shutdowns. As we have collected feedback to improve the alerts, we have seen many partners looking for more ways to integrate Radar and the alerts into their existing tracking mechanisms. With this, we announced Radar 2.0 with API access for free so academics, data sleuths, civil society, human rights organizations, and other web enthusiasts can analyze, visualize, and investigate Internet usage across the globe, based on data from our global network. In addition, we launched Cloudflare Radar Outage Center to archive Internet outages and make it easier for civil society organizations, journalists/news media, and impacted parties to track past shutdowns.
Highlighting the work of our civil society partners to track Internet shutdowns
We believe our job at Cloudflare is to build tools that improve privacy and security for a range of players on the Internet. With this, we want to highlight the work of our civil society partners. These organizations are pushing back against targeted shutdowns that inflict lasting damage to democracies around the world. Here are their stories.

Access Now’s #KeepItOn coalition was launched in 2016 to help unite and organize the efforts of activists and organizations across the world to end Internet shutdowns. It now represents more than 280 organizations from 105 countries across the globe. The goal of STOP Project (Shutdown Tracker Optimization Project) is ultimately to document and report shutdowns accurately, which requires diligent verification. Access Now regularly uses multiple sources to identify and understand the shutdown, the choice and combination of which depends on where and how the shutdown occurred.
The tracker uses both quantitative and qualitative data to record the number of Internet shutdowns in the world in a given year and to characterize the nature of the shutdowns, including their magnitude, scope, and causes.
Zach Rosson, #KeepItOn Data Analyst, Access Now, details, “Sometimes, we confirm an Internet shutdown through means such as technical measurement, while at other times we rely upon contextual information, such as news reports or personal accounts. We also work hard to document how a particular shutdown was ordered and how it impacted society, including why and how it happened.”
On how Access Now’s #KeepItOn coalition uses Cloudflare Radar, Rosson says, “We use Radar Internet shutdown alerts in both email and tweet form, as a trusted source to help verify a shutdown occurrence. These alerts and their underlying measurements are used as primary sources in our dataset when compiling shutdowns for our annual report, so they are used in an archival sense as well. Cloudflare Radar is sometimes the first place that we hear about a shutdown, which is quite useful in a rapid response context, since we can quickly mobilize to verify the shutdown and have strong evidence when advocating against it.”
The recorded instances of shutdowns include events reported through local or international news sources that are included in the dataset, from local actors through Access Now’s Digital Security Helpline or the #KeepItOn Coalition email list, or directly from telecommunication and Internet companies.
Rosson notes, “When it comes to Radar 2.0 and API, we plan to use these resources to speed up our response, verification, and publication of shutdown data as compiled from different sources. Thus, the Cloudflare Radar Outage Center (CROC) and related API endpoint will be very useful for us to access timely information on shutdowns, either through visual inspection of the CROC in the short term or through using the API to pull data into a centralized database in the long term.”

On the Internet Society Pulse platform, Susannah Gray, Director, Communications, Internet Society, explains that they strive to curate meaningful information around a government-mandated Internet shutdown by using data from multiple trusted sources, and making it available to everyone, everywhere in an easy-to-understand manner. ISOC does this by monitoring Internet traffic using various tools, including Radar. When they see something that might indicate that an Internet shutdown is in progress, they check if the shutdown meets their criteria. For a shutdown to appear on the Pulse Shutdowns Tracker it needs to meet all the following requirements. It must:
- Be artificially induced, as evident from reputable sources, including government statements and orders.
- Remove Internet access.
- Affect access to a group of people.
Once ISOC is certain that a shutdown is the result of government action, and isn’t the result of technical errors, routing misconfigurations, or infrastructure failures, they prepare an incident page, collate related measurements from their trusted data partners, and then publish the information on the Pulse shutdowns tracker.
ISOC uses many resources to track shutdowns. Gray explains, “Radar Internet shutdown alerts are incredibly useful for bringing incidents to our attention as they are happening. The easy access to the data provided helps us assess the nature of an outage. If an outage is established as a government-mandated shutdown, we often use screenshots of Radar charts on the Pulse shutdowns tracker incident page to help illustrate how traffic stopped flowing in and out of a country during the shutdown. We provide a link back to the Radar platform so that people interested in getting more in-depth data can find out more.”
ISOC’s aim has never been to be the first to report a government-mandated shutdown: instead, their mission is to report accurate and meaningful information about the shutdown and explore its impact on the economy and society.
Gray adds, “For Radar 2.0 and the API, we plan to use it as part of the data aggregation tool we are developing. This internal tool will combine several outage alert and monitoring tools and sources into one single system so that we are able to track incidents more efficiently.”
Open Observatory of Network Interference: OONI

OONI is a nonprofit that measures Internet censorship, including the blocking of websites, instant messaging apps, and circumvention tools. Cloudflare Radar is one of the main public data sources that they use when examining reported Internet connectivity shutdowns. For example, OONI relied on Radar data when reporting on shutdowns in Iran amid ongoing protests. In 2022, the team launched the Measurement Aggregation Toolkit (MAT), which enables the public to track censorship worldwide and create their own charts based on real-time OONI data. OONI also forms partnerships with multiple digital rights organizations that use OONI tools and data to monitor and respond to censorship events in their regions.
Maria Xynou, OONI Research and Partnerships Director, explains “Cloudflare Radar is one of the main public data sources that OONI has referred to when examining reported internet connectivity shutdowns. Specifically, OONI refers to Cloudflare Radar to check whether the platform provides signals of a reported internet connectivity shutdown; compare Cloudflare Radar signals with those visible in other, relevant public data sources (such as IODA, and Google traffic data).”
Tracking the shutdowns of tomorrow
As we work with more organizations in the human rights space and learn how our global network can be used for good, we are eager to improve and create new tools to protect human rights in the digital age.
If you would like to be added to Radar Internet Shutdown alerts, please contact [email protected] and follow the Cloudflare Radar alert Twitter page and Cloudflare Radar Outage Center (CROC). For access to the Radar API, please visit Cloudflare Radar.
Security updates for Thursday
Post Syndicated from original https://lwn.net/Articles/917947/
Security updates have been issued by Debian (firefox-esr and git), Slackware (mozilla and xorg), SUSE (apache2-mod_wsgi, capnproto, xorg-x11-server, xwayland, and zabbix), and Ubuntu (emacs24, firefox, linux-azure, linux-azure-5.15, linux-azure-fde, linux-oem-6.0, and xorg-server, xorg-server-hwe-18.04, xwayland).
A Security Vulnerability in the KmsdBot Botnet
Post Syndicated from Bruce Schneier original https://www.schneier.com/blog/archives/2022/12/a-security-vulnerability-in-the-kmsdbot-botnet.html
Security researchers found a software bug in the KmsdBot cryptomining botnet:
With no error-checking built in, sending KmsdBot a malformed command—like its controllers did one day while Akamai was watching—created a panic crash with an “index out of range” error. Because there’s no persistence, the bot stays down, and malicious agents would need to reinfect a machine and rebuild the bot’s functions. It is, as Akamai notes, “a nice story” and “a strong example of the fickle nature of technology.”
The Linux kernel contribution maturity model
Post Syndicated from original https://lwn.net/Articles/917913/
Ted Ts’o, in collaboration with the Linux Foundation Technical Advisory
Board, has put together a document called the Linux kernel
contribution maturity model to help companies improve their
participation in the kernel development process.
The goal is to encourage, in a management-friendly way, companies
to allow their engineers to contribute with the upstream Linux
Kernel development community, so we can grow the “talent pipeline”
for contributors to become respected leaders, and eventually kernel
maintainers.
Another set of stable kernel updates
How To Make Money with Your Internet Connection
Post Syndicated from Crosstalk Solutions original https://www.youtube.com/watch?v=B6EdJdVZkuk
Reimagining Democracy
Post Syndicated from Bruce Schneier original https://www.schneier.com/blog/archives/2022/12/reimagining-democracy.html
Last week, I hosted a two-day workshop on reimagining democracy.
The idea was to bring together people from a variety of disciplines who are all thinking about different aspects of democracy, less from a “what we need to do today” perspective and more from a blue-sky future perspective. My remit to the participants was this:
The idea is to start from scratch, to pretend we’re forming a new country and don’t have any precedent to deal with. And that we don’t have any unique interests to perturb our thinking. The modern representative democracy was the best form of government mid-eighteenth century politicians technology could invent. The twenty-first century is a very different place technically, scientifically, and philosophically. What could democracy look like if it were reinvented today? Would it even be democracy—what comes after democracy?
Some questions to think about:
- Representative democracies were built under the assumption that travel and communications were difficult. Does it still make sense to organize our representative units by geography? Or to send representatives far away to create laws in our name? Is there a better way for people to choose collective representatives?
- Indeed, the very idea of representative government is due to technological limitations. If an AI system could find the optimal solution for balancing every voter’s preferences, would it still make sense to have representatives—or should we vote for ideas and goals instead?
- With today’s technology, we can vote anywhere and any time. How should we organize the temporal pattern of voting—and of other forms of participation?
- Starting from scratch, what is today’s ideal government structure? Does it make sense to have a singular leader “in charge” of everything? How should we constrain power—is there something better than the legislative/judicial/executive set of checks and balances?
- The size of contemporary political units ranges from a few people in a room to vast nation-states and alliances. Within one country, what might the smaller units be—and how do they relate to one another?
- Who has a voice in the government? What does “citizen” mean? What about children? Animals? Future people (and animals)? Corporations? The land?
- And much more: What about the justice system? Is the twelfth-century jury form still relevant? How do we define fairness? Limit financial and military power? Keep our system robust to psychological manipulation?
My perspective, of course, is security. I want to create a system that is resilient against hacking: one that can evolve as both technologies and threats evolve.
The format was one that I have used before. Forty-eight people meet over two days. There are four ninety-minute panels per day, with six people on each. Everyone speaks for ten minutes, and the rest of the time is devoted to questions and comments. Ten minutes means that no one gets bogged down in jargon or details. Long breaks between sessions and evening dinners allow people to talk more informally. The result is a very dense, idea-rich environment that I find extremely valuable.
It was amazing event. Everyone participated. Everyone was interesting. (Details of the event—emerging themes, notes from the speakers—are in the comments.) It’s a week later and I am still buzzing with ideas. I hope this is only the first of an ongoing series of similar workshops.
[$] LWN.net Weekly Edition for December 15, 2022
Post Syndicated from original https://lwn.net/Articles/917337/
The LWN.net Weekly Edition for December 15, 2022 is available.
Let’s Encrypt improves how we manage OCSP responses
Post Syndicated from Let's Encrypt original https://letsencrypt.org/2022/12/15/ocspcaching.html
Let’s Encrypt has improved how we manage Online Certificate Status Protocol (OCSP) responses by deploying Redis and generating responses on-demand rather than pre-generating them, making us more reliable than ever.
About OCSP Responses
OCSP is used to communicate the revocation status of TLS certificates. When an ACME agent signs a request to revoke a certificate, our Let’s Encrypt Certificate Authority (CA) verifies whether or not the request is authorized and if it is, we begin publishing a ‘revoked’ OCSP response for that certificate. Each time a relying party, such as a browser, visits a domain with a Let’s Encrypt certificate, they can request information about whether the certificate has been revoked and we serve a reply containing ‘good’ or ‘revoked’, signed by our CA, which we call an OCSP response.
An Enormous OCSP Response Load: 100,000 Every Second
Let’s Encrypt currently serves over 300 million domains, which means we receive an enormous number of certificate revocation status requests — fielding around 100,000 OCSP responses every second!
Normally 98-99% of our OCSP responses are handled by our Content Delivery Network (CDN). But there are times when our CDN has an issue resulting in Let’s Encrypt being required to directly accept a larger number of requests. Historically, we could effectively respond to a maximum of 6% of our OCSP response traffic on our own. Should the need arise for us to accept much higher than that, some of our systems might begin to take too long to return results, return significant numbers of errors, or even stop accepting new requests. Not an ideal situation for us, or the Internet.
Our inability to serve OCSP responses during an issue with one of our CDNs could result in a slowdown in users’ browsing speed or not being able to connect to a website — or worse, Internet users unintentionally visiting domains for which a certificate has been revoked. Browsers react differently to unresponsive OCSP, but one thing was clear, our systems needed to handle these occasions much better.
Increasing our Reliability
After working on this throughout most of 2022, our engineers have dramatically improved our ability to independently serve OCSP responses. We did that by deploying Redis as an in-memory caching layer that helps protect our database by absorbing traffic spikes, whether due to CDN issues or our own actions, such as CDN cache clearing.
Pivot in Design
Our team developed a system architecture design to organize/change all of the various interconnected systems needed to make Redis trusted to serve our OCSP responses. Amidst the fervor of developing this design, our engineers identified a resource we could depend upon more heavily to simplify the overall architecture and still realize incredible reliability gains. Rather than pre-signing OCSP status responses at regular intervals, storing the results in a relational database, and asking Redis to keep copies—we could keep simple but authoritative certificate status information in our database. We could then leverage fast, concurrent signing power from our HSMs to Just-in-Time sign a fresh OCSP response, cache it in Redis, and return it to the requester. Thanks to this, the demands on the relational database became much lighter (especially total table-writes and write-contention), the speed was impressive, and Redis wasn’t holding anything that couldn’t be (very very quickly) regenerated.
Testing our Systems
The first test was to directly accept 1/16 of the requests by dropping a segment of our CDN cache. In that initial test we handled ~12,500 requests per second. Successive tests ratcheted up to 1/8th CDN cache drop, then 1/4th, then 1/2, then a 100% cache drop. With each ratcheting up of the test load we were able to monitor and glean insights as to how our deployment could handle the traffic. In the final test of 100% of requests, our systems remained responsive. This means that if we experience a spike in the number of OCSP responses we need to accept moving forward, we are equipped to handle them, dramatically reducing the risks to Internet users.
Supporting Let’s Encrypt
As a project of the Internet Security Research Group (ISRG), 100% of our funding comes from contributions from our community of users and supporters. We depend on their support in order to provide our public benefit services. If your company or organization would like to sponsor Let’s Encrypt please email us at [email protected]. If you can support us with a donation, we ask that you make an individual contribution.
Migrate Google BigQuery to Amazon Redshift using AWS Schema Conversion tool (SCT)
Post Syndicated from Jagadish Kumar original https://aws.amazon.com/blogs/big-data/migrate-google-bigquery-to-amazon-redshift-using-aws-schema-conversion-tool-sct/
Amazon Redshift is a fast, fully-managed, petabyte scale data warehouse that provides the flexibility to use provisioned or serverless compute for your analytical workloads. Using Amazon Redshift Serverless and Query Editor v2, you can load and query large datasets in just a few clicks and pay only for what you use. The decoupled compute and storage architecture of Amazon Redshift enables you to build highly scalable, resilient, and cost-effective workloads. Many customers migrate their data warehousing workloads to Amazon Redshift and benefit from the rich capabilities it offers. The following are just some of the notable capabilities:
- Amazon Redshift seamlessly integrates with broader analytics services on AWS. This enables you to choose the right tool for the right job. Modern analytics is much wider than SQL-based data warehousing. Amazon Redshift lets you build lake house architectures and then perform any kind of analytics, such as interactive analytics, operational analytics, big data processing, visual data preparation, predictive analytics, machine learning (ML), and more.
- You don’t need to worry about workloads, such as ETL, dashboards, ad-hoc queries, and so on, interfering with each other. You can isolate workloads using data sharing, while using the same underlying datasets.
- When users run many queries at peak times, compute seamlessly scales within seconds to provide consistent performance at high concurrency. You get one hour of free concurrency scaling capacity for 24 hours of usage. This free credit meets the concurrency demand of 97% of the Amazon Redshift customer base.
- Amazon Redshift is easy-to-use with self-tuning and self-optimizing capabilities. You can get faster insights without spending valuable time managing your data warehouse.
- Fault Tolerance is inbuilt. All of the data written to Amazon Redshift is automatically and continuously replicated to Amazon Simple Storage Service (Amazon S3). Any hardware failures are automatically replaced.
- Amazon Redshift is simple to interact with. You can access data with traditional, cloud-native, containerized, and serverless web services-based or event-driven applications and so on.
- Redshift ML makes it easy for data scientists to create, train, and deploy ML models using familiar SQL. They can also run predictions using SQL.
- Amazon Redshift provides comprehensive data security at no extra cost. You can set up end-to-end data encryption, configure firewall rules, define granular row and column level security controls on sensitive data, and so on.
- Amazon Redshift integrates seamlessly with other AWS services and third-party tools. You can move, transform, load, and query large datasets quickly and reliably.
In this post, we provide a walkthrough for migrating a data warehouse from Google BigQuery to Amazon Redshift using AWS Schema Conversion Tool (AWS SCT) and AWS SCT data extraction agents. AWS SCT is a service that makes heterogeneous database migrations predictable by automatically converting the majority of the database code and storage objects to a format that is compatible with the target database. Any objects that can’t be automatically converted are clearly marked so that they can be manually converted to complete the migration. Furthermore, AWS SCT can scan your application code for embedded SQL statements and convert them.
Solution overview
AWS SCT uses a service account to connect to your BigQuery project. First, we create an Amazon Redshift database into which BigQuery data is migrated. Next, we create an S3 bucket. Then, we use AWS SCT to convert BigQuery schemas and apply them to Amazon Redshift. Finally, to migrate data, we use AWS SCT data extraction agents, which extract data from BigQuery, upload it into the S3 bucket, and then copy to Amazon Redshift.

Prerequisites
Before starting this walkthrough, you must have the following prerequisites:
- A workstation with AWS SCT, Amazon Corretto 11, and Amazon Redshift drivers.
- You can use an Amazon Elastic Compute Cloud (Amazon EC2) instance or your local desktop as a workstation. In this walkthrough, we’re using Amazon EC2 Windows instance. To create it, use this guide.
- To download and install AWS SCT on the EC2 instance that you previously created, use this guide.
- Download the Amazon Redshift JDBC driver from this location.
- Download and install Amazon Corretto 11.
- A GCP service account that AWS SCT can use to connect to your source BigQuery project.
- Grant BigQuery Admin and Storage Admin roles to the service account.
- Copy the Service account key file, which was created in the Google cloud management console, to the EC2 instance that has AWS SCT.
- Create a Cloud Storage bucket in GCP to store your source data during migration.
This walkthrough covers the following steps:
- Create an Amazon Redshift Serverless Workgroup and Namespace
- Create the AWS S3 Bucket and Folder
- Convert and apply BigQuery Schema to Amazon Redshift using AWS SCT
- Connecting to the Google BigQuery Source
- Connect to the Amazon Redshift Target
- Convert BigQuery schema to an Amazon Redshift
- Analyze the assessment report and address the action items
- Apply converted schema to target Amazon Redshift
- Migrate data using AWS SCT data extraction agents
- Generating Trust and Key Stores (Optional)
- Install and start data extraction agent
- Register data extraction agent
- Add virtual partitions for large tables (Optional)
- Create a local migration task
- Start the Local Data Migration Task
- View Data in Amazon Redshift
Create an Amazon Redshift Serverless Workgroup and Namespace
In this step, we create an Amazon Redshift Serverless workgroup and namespace. Workgroup is a collection of compute resources and namespace is a collection of database objects and users. To isolate workloads and manage different resources in Amazon Redshift Serverless, you can create namespaces and workgroups and manage storage and compute resources separately.
Follow these steps to create Amazon Redshift Serverless workgroup and namespace:
- Navigate to the Amazon Redshift console.
- In the upper right, choose the AWS Region that you want to use.
- Expand the Amazon Redshift pane on the left and choose Redshift Serverless.
- Choose Create Workgroup.
- For Workgroup name, enter a name that describes the compute resources.
- Verify that the VPC is the same as the VPC as the EC2 instance with AWS SCT.
- Choose Next.

- For Namespace name, enter a name that describes your dataset.
- In Database name and password section, select the checkbox Customize admin user credentials.
- For Admin user name, enter a username of your choice, for example awsuser.
- For Admin user password: enter a password of your choice, for example MyRedShiftPW2022.


- Choose Next. Note that data in Amazon Redshift Serverless namespace is encrypted by default.
- In the Review and Create page, choose Create.
- Create an AWS Identity and Access Management (IAM) role and set it as the default on your namespace, as described in the following. Note that there can only be one default IAM role.
- Navigate to the Amazon Redshift Serverless Dashboard.
- Under Namespaces / Workgroups, choose the namespace that you just created.
- Navigate toSecurity and encryption.
- Under Permissions, choose Manage IAM roles.
- Navigate to Manage IAM roles. Then, choose the Manage IAM roles drop-down and choose Create IAM role.
- Under Specify an Amazon S3 bucket for the IAM role to access, choose one of the following methods:
- Choose No additional Amazon S3 bucket to allow the created IAM role to access only the S3 buckets with a name starting with redshift.
- Choose Any Amazon S3 bucket to allow the created IAM role to access all of the S3 buckets.
- Choose Specific Amazon S3 buckets to specify one or more S3 buckets for the created IAM role to access. Then choose one or more S3 buckets from the table.
- Choose Create IAM role as default. Amazon Redshift automatically creates and sets the IAM role as default.
- Capture the Endpoint for the Amazon Redshift Serverless workgroup that you just created.
- Navigate to the Amazon Redshift Serverless Dashboard.
- Under Namespaces / Workgroups, choose the workgroup that you just created.
- Under General information, copy the Endpoint.
Create the S3 bucket and folder
During the data migration process, AWS SCT uses Amazon S3 as a staging area for the extracted data. Follow these steps to create the S3 bucket:
- Navigate to the Amazon S3 console
- Choose Create bucket. The Create bucket wizard opens.
- For Bucket name, enter a unique DNS-compliant name for your bucket (e.g., uniquename-bq-rs). See rules for bucket naming when choosing a name.
- For AWS Region, choose the region in which you created the Amazon Redshift Serverless workgroup.
- Select Create Bucket.
- In the Amazon S3 console, navigate to the S3 bucket that you just created (e.g., uniquename-bq-rs).
- Choose “Create folder” to create a new folder.
- For Folder name, enter incoming and choose Create Folder.
Convert and apply BigQuery Schema to Amazon Redshift using AWS SCT
To convert BigQuery schema to the Amazon Redshift format, we use AWS SCT. Start by logging in to the EC2 instance that we created previously, and then launch AWS SCT.
Follow these steps using AWS SCT:
Connect to the BigQuery Source
- From the File Menu choose Create New Project.
- Choose a location to store your project files and data.
- Provide a meaningful but memorable name for your project, such as BigQuery to Amazon Redshift.
- To connect to the BigQuery source data warehouse, choose Add source from the main menu.
- Choose BigQuery and choose Next. The Add source dialog box appears.
- For Connection name, enter a name to describe BigQuery connection. AWS SCT displays this name in the tree in the left panel.
- For Key path, provide the path of the service account key file that was previously created in the Google cloud management console.
- Choose Test Connection to verify that AWS SCT can connect to your source BigQuery project.
- Once the connection is successfully validated, choose Connect.


Connect to the Amazon Redshift Target
Follow these steps to connect to Amazon Redshift:
- In AWS SCT, choose Add Target from the main menu.
- Choose Amazon Redshift, then choose Next. The Add Target dialog box appears.
- For Connection name, enter a name to describe the Amazon Redshift connection. AWS SCT displays this name in the tree in the right panel.
- For Server name, enter the Amazon Redshift Serverless workgroup endpoint captured previously.
- For Server port, enter 5439.
- For Database, enter dev.
- For User name, enter the username chosen when creating the Amazon Redshift Serverless workgroup.
- For Password, enter the password chosen when creating Amazon Redshift Serverless workgroup.
- Uncheck the “Use AWS Glue” box.
- Choose Test Connection to verify that AWS SCT can connect to your target Amazon Redshift workgroup.
- Choose Connect to connect to the Amazon Redshift target.
Note that alternatively you can use connection values that are stored in AWS Secrets Manager.

Convert BigQuery schema to an Amazon Redshift
After the source and target connections are successfully made, you see the source BigQuery object tree on the left pane and target Amazon Redshift object tree on the right pane.
Follow these steps to convert BigQuery schema to the Amazon Redshift format:
- On the left pane, right-click on the schema that you want to convert.
- Choose Convert Schema.
- A dialog box appears with a question, The objects might already exist in the target database. Replace?. Choose Yes.
Once the conversion is complete, you see a new schema created on the Amazon Redshift pane (right pane) with the same name as your BigQuery schema.

The sample schema that we used has 16 tables, 3 views, and 3 procedures. You can see these objects in the Amazon Redshift format in the right pane. AWS SCT converts all of the BigQuery code and data objects to the Amazon Redshift format. Furthermore, you can use AWS SCT to convert external SQL scripts, application code, or additional files with embedded SQL.
Analyze the assessment report and address the action items
AWS SCT creates an assessment report to assess the migration complexity. AWS SCT can convert the majority of code and database objects. However, some of the objects may require manual conversion. AWS SCT highlights these objects in blue in the conversion statistics diagram and creates action items with a complexity attached to them.
To view the assessment report, switch from the Main view to the Assessment Report view as follows:

The Summary tab shows objects that were converted automatically, and objects that weren’t converted automatically. Green represents automatically converted or with simple action items. Blue represents medium and complex action items that require manual intervention.

The Action Items tab shows the recommended actions for each conversion issue. If you select an action item from the list, AWS SCT highlights the object to which the action item applies.
The report also contains recommendations for how to manually convert the schema item. For example, after the assessment runs, detailed reports for the database/schema show you the effort required to design and implement the recommendations for converting Action items. For more information about deciding how to handle manual conversions, see Handling manual conversions in AWS SCT. Amazon Redshift takes some actions automatically while converting the schema to Amazon Redshift. Objects with these actions are marked with a red warning sign.

You can evaluate and inspect the individual object DDL by selecting it from the right pane, and you can also edit it as needed. In the following example, AWS SCT modifies the RECORD and JSON datatype columns in BigQuery table ncaaf_referee_data to the SUPER datatype in Amazon Redshift. The partition key in the ncaaf_referee_data table is converted to the distribution key and sort key in Amazon Redshift.

Apply converted schema to target Amazon Redshift
To apply the converted schema to Amazon Redshift, select the converted schema in the right pane, right-click, and then choose Apply to database.
Migrate data from BigQuery to Amazon Redshift using AWS SCT data extraction agents
AWS SCT extraction agents extract data from your source database and migrate it to the AWS Cloud. In this walkthrough, we show how to configure AWS SCT extraction agents to extract data from BigQuery and migrate to Amazon Redshift.
First, install AWS SCT extraction agent on the same Windows instance that has AWS SCT installed. For better performance, we recommend that you use a separate Linux instance to install extraction agents if possible. For big datasets, you can use several data extraction agents to increase the data migration speed.
Generating trust and key stores (optional)
You can use Secure Socket Layer (SSL) encrypted communication with AWS SCT data extractors. When you use SSL, all of the data passed between the applications remains private and integral. To use SSL communication, you must generate trust and key stores using AWS SCT. You can skip this step if you don’t want to use SSL. We recommend using SSL for production workloads.
Follow these steps to generate trust and key stores:
- In AWS SCT, navigate to Settings → Global Settings → Security.
- Choose Generate trust and key store.

- Enter the name and password for trust and key stores and choose a location where you would like to store them.

- Choose Generate.


Install and configure Data Extraction Agent
In the installation package for AWS SCT, you find a sub-folder agent (\aws-schema-conversion-tool-1.0.latest.zip\agents). Locate and install the executable file with a name like aws-schema-conversion-tool-extractor-xxxxxxxx.msi.
In the installation process, follow these steps to configure AWS SCT Data Extractor:
- For Listening port, enter the port number on which the agent listens. It is 8192 by default.
- For Add a source vendor, enter no, as you don’t need drivers to connect to BigQuery.
- For Add the Amazon Redshift driver, enter YES.
- For Enter Redshift JDBC driver file or files, enter the location where you downloaded Amazon Redshift JDBC drivers.
- For Working folder, enter the path where the AWS SCT data extraction agent will store the extracted data. The working folder can be on a different computer from the agent, and a single working folder can be shared by multiple agents on different computers.
- For Enable SSL communication, enter yes. Choose No here if you don’t want to use SSL.
- For Key store, enter the storage location chosen when creating the trust and key store.
- For Key store password, enter the password for the key store.
- For Enable client SSL authentication, enter yes.
- For Trust store, enter the storage location chosen when creating the trust and key store.
- For Trust store password, enter the password for the trust store.
Starting Data Extraction Agent(s)
Use the following procedure to start extraction agents. Repeat this procedure on each computer that has an extraction agent installed.
Extraction agents act as listeners. When you start an agent with this procedure, the agent starts listening for instructions. You send the agents instructions to extract data from your data warehouse in a later section.
To start the extraction agent, navigate to the AWS SCT Data Extractor Agent directory. For example, in Microsoft Windows, double-click C:\Program Files\AWS SCT Data Extractor Agent\StartAgent.bat.
- On the computer that has the extraction agent installed, from a command prompt or terminal window, run the command listed following your operating system.
- To check the status of the agent, run the same command but replace start with status.
- To stop an agent, run the same command but replace start with stop.
- To restart an agent, run the same RestartAgent.bat file.
Register the Data Extraction Agent
Follow these steps to register the Data Extraction Agent:
- In AWS SCT, change the view to Data Migration view (other) and choose + Register.
- In the connection tab:

- For Description, enter a name to identify the Data Extraction Agent.
- For Host name, if you installed the Data Extraction Agent on the same workstation as AWS SCT, enter 0.0.0.0 to indicate local host. Otherwise, enter the host name of the machine on which the AWS SCT Data Extraction Agent is installed. It’s recommended to install the Data Extraction Agents on Linux for better performance.
- For Port, enter the number entered for the Listening Port when installing the AWS SCT Data Extraction Agent.
- Select the checkbox to use SSL (if using SSL) to encrypt the AWS SCT connection to the Data Extraction Agent.
- If you’re using SSL, then in the SSL Tab:
- For Trust store, choose the trust store name created when generating Trust and Key Stores (optionally, you can skip this if SSL connectivity isn’t needed).
- For Key Store, choose the key store name created when generating Trust and Key Stores (optionally, you can skip this if SSL connectivity isn’t needed).

- Choose Test Connection.
- Once the connection is validated successfully, choose Register.


Add virtual partitions for large tables (optional)
You can use AWS SCT to create virtual partitions to optimize migration performance. When virtual partitions are created, AWS SCT extracts the data in parallel for partitions. We recommend creating virtual partitions for large tables.
Follow these steps to create virtual partitions:
- Deselect all objects on the source database view in AWS SCT.
- Choose the table for which you would like to add virtual partitioning.
- Right-click on the table, and choose Add Virtual Partitioning.

- You can use List, Range, or Auto Split partitions. To learn more about virtual partitioning, refer to Use virtual partitioning in AWS SCT. In this example, we use Auto split partitioning, which generates range partitions automatically. You would specify the start value, end value, and how big the partition should be. AWS SCT determines the partitions automatically. For a demonstration, on the Lineorder table:
- For Start Value, enter 1000000.
- For End Value, enter 3000000.
- For Interval, enter 1000000 to indicate partition size.
- Choose Ok.


You can see the partitions automatically generated under the Virtual Partitions tab. In this example, AWS SCT automatically created the following five partitions for the field:
-
- <1000000
- >=1000000 and <=2000000
- >2000000 and <=3000000
- >3000000
- IS NULL

Create a local migration task
To migrate data from BigQuery to Amazon Redshift, create, run, and monitor the local migration task from AWS SCT. This step uses the data extraction agent to migrate data by creating a task.
Follow these steps to create a local migration task:
- In AWS SCT, under the schema name in the left pane, right-click on Standard tables.
- Choose Create Local task.

- There are three migration modes from which you can choose:
- Extract source data and store it on a local pc/virtual machine (VM) where the agent runs.
- Extract data and upload it on an S3 bucket.
- Choose Extract upload and copy, which extracts data to an S3 bucket and then copies to Amazon Redshift.

- In the Advanced tab, for Google CS bucket folder enter the Google Cloud Storage bucket/folder that you created earlier in the GCP Management Console. AWS SCT stores the extracted data in this location.

- In the Amazon S3 Settings tab, for Amazon S3 bucket folder, provide the bucket and folder names of the S3 bucket that you created earlier. The AWS SCT data extraction agent uploads the data into the S3 bucket/folder before copying to Amazon Redshift.

- Choose Test Task.
- Once the task is successfully validated, choose Create.


Start the Local Data Migration Task
To start the task, choose the Start button in the Tasks tab.

- First, the Data Extraction Agent extracts data from BigQuery into the GCP storage bucket.
- Then, the agent uploads data to Amazon S3 and launches a copy command to move the data to Amazon Redshift.
- At this point, AWS SCT has successfully migrated data from the source BigQuery table to the Amazon Redshift table.
View data in Amazon Redshift
After the data migration task executes successfully, you can connect to Amazon Redshift and validate the data.
Follow these steps to validate the data in Amazon Redshift:
- Navigate to the Amazon Redshift QueryEditor V2.
- Double-click on the Amazon Redshift Serverless workgroup name that you created.
- Choose the Federated User option under Authentication.
- Choose Create Connection.

- Create a new editor by choosing the + icon.
- In the editor, write a query to select from the schema name and table name/view name you would like to verify. Explore the data, run ad-hoc queries, and make visualizations and charts and views.


The following is a side-by-side comparison between source BigQuery and target Amazon Redshift for the sports data-set that we used in this walkthrough.

Clean up up any AWS resources that you created for this exercise
Follow these steps to terminate the EC2 instance:
- Navigate to the Amazon EC2 console.
- In the navigation pane, choose Instances.
- Select the check-box for the EC2 instance that you created.
- Choose Instance state, and then Terminate instance.
- Choose Terminate when prompted for confirmation.
Follow these steps to delete Amazon Redshift Serverless workgroup and namespace
- Navigate to Amazon Redshift Serverless Dashboard.
- Under Namespaces / Workgroups, choose the workspace that you created.
- Under Actions, choose Delete workgroup.
- Select the checkbox Delete the associated namespace.
- Uncheck Create final snapshot.
- Enter delete in the delete confirmation text box and choose Delete.

Follow these steps to delete the S3 bucket
- Navigate to Amazon S3 console.
- Choose the bucket that you created.
- Choose Delete.
- To confirm deletion, enter the name of the bucket in the text input field.
- Choose Delete bucket.
Conclusion
Migrating a data warehouse can be a challenging, complex, and yet rewarding project. AWS SCT reduces the complexity of data warehouse migrations. Following this walkthrough, you can understand how a data migration task extracts, downloads, and then migrates data from BigQuery to Amazon Redshift. The solution that we presented in this post performs a one-time migration of database objects and data. Data changes made in BigQuery when the migration is in progress won’t be reflected in Amazon Redshift. When data migration is in progress, put your ETL jobs to BigQuery on hold or replay the ETLs by pointing to Amazon Redshift after the migration. Consider using the best practices for AWS SCT.
AWS SCT has some limitations when using BigQuery as a source. For example, AWS SCT can’t convert sub queries in analytic functions, geography functions, statistical aggregate functions, and so on. Find the full list of limitations in the AWS SCT user guide. We plan to address these limitations in future releases. Despite these limitations, you can use AWS SCT to automatically convert most of your BigQuery code and storage objects.
Download and install AWS SCT, sign in to the AWS Console, checkout Amazon Redshift Serverless, and start migrating!
About the authors
 Cedrick Hoodye is a Solutions Architect with a focus on database migrations using the AWS Database Migration Service (DMS) and the AWS Schema Conversion Tool (SCT) at AWS. He works on DB migrations related challenges. He works closely with EdTech, Energy, and ISV business sector customers to help them realize the true potential of DMS service. He has helped migrate 100s of databases into the AWS cloud using DMS and SCT.
 Amit Arora is a Solutions Architect with a focus on Database and Analytics at AWS. He works with our Financial Technology and Global Energy customers and AWS certified partners to provide technical assistance and design customer solutions on cloud migration projects, helping customers migrate and modernize their existing databases to the AWS Cloud.
 Jagadish Kumar is an Analytics Specialist Solution Architect at AWS focused on Amazon Redshift. He is deeply passionate about Data Architecture and helps customers build analytics solutions at scale on AWS.
 Anusha Challa is a Senior Analytics Specialist Solution Architect at AWS focused on Amazon Redshift. She has helped many customers build large-scale data warehouse solutions in the cloud and on premises. Anusha is passionate about data analytics and data science and enabling customers achieve success with their large-scale data projects.
Create, Train and Deploy Multi Layer Perceptron (MLP) models using Amazon Redshift ML
Post Syndicated from Anuradha Karlekar original https://aws.amazon.com/blogs/big-data/create-train-and-deploy-multi-layer-perceptron-mlp-models-using-amazon-redshift-ml/
Amazon Redshift is a fully managed and petabyte-scale cloud data warehouse which is being used by tens of thousands of customers to process exabytes of data every day to power their analytics workloads. Amazon Redshift comes with a feature called Amazon Redshift ML which puts the power of machine learning in the hands of every data warehouse user, without requiring the users to learn any new programming language, ML concepts or ML tools. Redshift ML abstracts all the intricacies that are involved in the traditional ML approach around data warehouse which traditionally involved repetitive, manual steps to move data back and forth between the data warehouse and ML tools for running long, complex, iterative ML workflow.
Redshift ML uses Amazon SageMaker Autopilot and Amazon SageMaker Neo in the background to make it easy for SQL users such as data analysts, data scientists, BI experts and database developers to create, train, and deploy machine learning (ML) models using familiar SQL commands and then use these models to make predictions on new data for use cases such as customer churn prediction, basket analysis for sales prediction, manufacturing unit lifetime value prediction, and product recommendations. Redshift ML makes the model available as SQL function within the Amazon Redshift data warehouse so you can easily use it in queries and reports.
Amazon Redshift ML supports supervised learning, including regression, binary classification, multi-class classification, and unsupervised learning using K-Means. You can optionally specify XGBoost, MLP, and linear learner model types, which are supervised learning algorithms used for solving either classification or regression problems, and provide a significant increase in speed over traditional hyperparameter optimization techniques. Amazon Redshift ML also supports bring-your-own-model to either import existing SageMaker models that are built using algorithms supported by SageMaker Autopilot, which can be used for local inference; or for the unsupported algorithms, one can alternatively invoke remote SageMaker endpoints for remote inference.
In this blog post, we show you how to use Redshift ML to solve binary classification problem using the Multi Layer Perceptron (MLP) algorithm, which explores different training objectives and chooses the best solution from the validation set.
A multilayer perceptron (MLP) is a deep learning method which deals with training multi-layer artificial neural networks, also called Deep Neural Networks. It is a feedforward artificial neural network that generates a set of outputs from a set of inputs. An MLP is characterized by several layers of input nodes connected as a directed graph between the input and output layers. MLP uses backpropagation for training the network. MLP is widely used for solving problems that require supervised learning as well as research into computational neuroscience and parallel distributed processing. It is also used for speech recognition, image recognition and machine translation.
As far as MLP usage with Redshift ML (powered by Amazon SageMaker Autopilot) is concerned, it supports tabular data as of now.
Solution Overview
To use the MLP algorithm, you need to provide inputs or columns representing dimensional values and also the label or target, which is the value you’re trying to predict.
With Redshift ML, you can use MLP on tabular data for regression, binary classification or multiclass classification problems. What is more unique about MLP is, is that the output function of MLP can be a linear or a continuous function as well. It need not be a straight line like the general regression model provides.
In this solution, we use binary classification to detect frauds based upon the credit cards transaction data. The difference between classification models and MLP is that logistic regression uses a logistic function, while perceptrons use a step function. Using the multilayer perceptron model, machines can learn weight coefficients that help them classify inputs. This linear binary classifier is highly effective in arranging and categorizing input data into different classes, allowing probability-based predictions and classifying items into multiple categories. Multilayer Perceptrons have the advantage of learning non-linear models and the ability to train models in real-time.
For this solution, we first ingest the data into Amazon Redshift, we then distribute it for model training and validation, then use Amazon Redshift ML specific queries for model creation and thereby create and utilize the generated SQL function for being able to finally predict the fraudulent transactions.
Prerequisites
To get started, we need an Amazon Redshift cluster or an Amazon Redshift Serverless endpoint and an AWS Identity and Access Management (IAM) role attached that provides access to SageMaker and permissions to an Amazon Simple Storage Service (Amazon S3) bucket.
For an introduction to Redshift ML and instructions on setting it up, see Create, train, and deploy machine learning models in Amazon Redshift using SQL with Amazon Redshift ML.
To create a simple cluster with a default IAM role, see Use the default IAM role in Amazon Redshift to simplify accessing other AWS services.
Data Set Used
In this post, we use the Credit Card Fraud detection data to create, train and deploy MLP model which can be used further to identify fraudulent transactions from the newly captured transaction records.
The dataset contains transactions made by credit cards in September 2013 by European cardholders.
This dataset presents transactions that occurred in two days, where we have 492 frauds out of 284,807 transactions. The dataset is highly unbalanced, the positive class (frauds) account for 0.172% of all transactions.
It contains only numerical input variables which are the result of a Principal Component Analysis transformation. Due to confidentiality issues, the original features and more background information about the data is not provided. Features V1, V2, … V28 are the principal components obtained with PCA, the only features which have not been transformed with PCA are ‘Time’ and ‘Amount’. Feature ‘Time’ contains the seconds elapsed between each transaction and the first transaction in the dataset. The feature ‘Amount’ is the transaction Amount. Feature ‘Class’ is the response variable and it takes value 1 in case of fraud and 0 otherwise.
Here are sample records:

Prepare the data
Load the credit card dataset into Amazon Redshift using the following SQL. You can use the Amazon Redshift query editor v2 or your preferred SQL tool to run these commands.
Alternately we have provided a notebook you may use to execute all the sql commands that can be downloaded here. You will find instructions in this blog on how to import and use notebooks.
To create the table, use the following command:
Load the data
To load data into Amazon Redshift, use the following COPY command:
Before creating the model, we want to divide our data into two sets by splitting 80% of the dataset for training and 20% for validation, which is a common practice in ML. The training data is input to the ML model to identify the best possible algorithm for the model. After the model is created, we use the validation data to validate the model accuracy.
So, in ‘creditcardsfrauds’ table, we check the distribution of data based upon ‘txtime’ value and identify the cutoff for around 80% of the data to train the model.
With this, the highest txtime value comes to 120954 (based upon the distribution of txtime’s min, max, ranking by window function and ceil(count(*)*0.80) values)), based upon which we consider the transaction records having ‘txtime’ field value less than 120954 for creating training data. We then validate the accuracy of that model by seeing if it correctly identifies the fraudulent transactions by predicting its ‘class’ attribute on the remaining 20% of the data.
This distribution for 80% cutoff need not always be based upon ordered time. It can be picked up randomly as well, based upon the use case under consideration.
Create a model in Redshift ML
To create the model, use the following command:
Here, in the settings section of the command, you need to set up an S3_BUCKET which is used to export the data that is sent to SageMaker and store model artifacts.
S3_BUCKET setting is a required parameter of the command, whereas MAX_RUNTIME is an optional one which specifies the maximum amount of time to train. The default value of this parameter is 90 minutes (5400 seconds), however you can override it by explicitly specifying it in the command, just like we have done it here by setting it to run for 9600 seconds.
The preceding statement initiates an Amazon SageMaker Autopilot process in the background to automatically build, train, and tune the best ML model for the input data. It then uses Amazon SageMaker Neo to deploy that model locally in the Amazon Redshift cluster or Amazon Redshift Serverless as a user-defined function (UDF).
You can use the SHOW MODEL command in Amazon Redshift to track the progress of your model creation, which should be in the READY state within the max_runtime parameter you defined while creating the model.
To check the status of the model, use the following command:
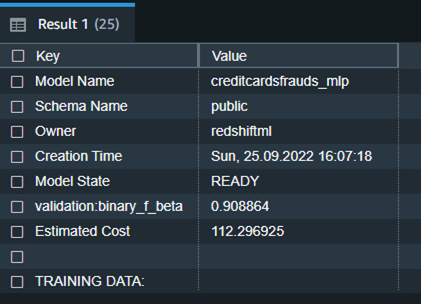
We notice from the preceding table that the F1-score for the training data is 0.908, which shows very good performance accuracy.
To elaborate, F1-score is the harmonic mean of precision and recall. It combines precision and recall into a single number using the following formula:
![]()
Where, Precision means: Of all positive predictions, how many are really positive?
And Recall means: Of all real positive cases, how many are predicted positive?
F1 scores can range from 0 to 1, with 1 representing a model that perfectly classifies each observation into the correct class and 0 representing a model that is unable to classify any observation into the correct class. So higher F1 scores are better.
The following is the detailed tabular outcome for the preceding command after model training was done.
| Model Name | creditcardsfrauds_mlp |
| Schema Name | public |
| Owner | redshiftml |
| Creation Time | Sun, 25.09.2022 16:07:18 |
| Model State | READY |
| validation:binary_f_beta | 0.908864 |
| Estimated Cost | 112.296925 |
| TRAINING DATA: | . |
| Query | SELECT * FROM CREDITCARDSFRAUDS WHERE TXTIME < 120954 |
| Target Column | CLASS |
| PARAMETERS: | . |
| Model Type | mlp |
| Problem Type | BinaryClassification |
| Objective | F1 |
| AutoML Job Name | redshiftml-20221118035728881011 |
| Function Name | creditcardsfrauds_mlp_fn |
| . | creditcardsfrauds_mlp_fn_prob |
| Function Parameters | txtime v1 v2 v3 v4 v5 v6 v7 v8 v9 v10 v11 v12 v13 v14 v15 v16 v17 v18 v19 v20 v21 v22 v23 v24 v25 v26 v27 v28 amount |
| Function Parameter Types | int4 float8 float8 float8 float8 float8 float8 float8 float8 float8 float8 float8 float8 float8 float8 float8 float8 float8 float8 float8 float8 float8 float8 float8 float8 float8 float8 float8 float8 float8 |
| IAM Role | default |
| S3 Bucket | redshift-ml-blog-mlp |
| Max Runtime | 54000 |
Redshift ML now supports Prediction Probabilities for binary classification models. For classification problem in machine learning, for a given record, each label can be associated with a probability that indicates how likely this record really belongs to the label. With option to have probabilities along with the label, customers could use the classification results when confidence based on chosen label is higher than a certain threshold value returned by the model
Prediction probabilities are calculated by default for binary classification models and an additional function is created while creating model without impacting performance of the ML model.
In above snippet, you will notice that predication probabilities enhancements have added another function as a suffix (_prob) to model function with a name ‘creditcardsfrauds_mlp_fn_prob’ which could be used to get prediction probabilities.
Additionally, you can check the model explainability to understand which inputs contributed effectively to derive the prediction.
Model explainability helps to understand the cause of prediction by answering questions such as:
- Why did the model predict a negative outcome such as blocking of credit card when someone travels to a different country and withdraws a lot of money in different currency?
- How does the model make predictions? Lots of data for credit cards can be put in a tabular format and as per MLP process where a fully connected neural network of several layers is involved, we can tell which input feature actually contributed to the model output and its magnitude.
- Why did the model make an incorrect prediction? E.g. Why is the card blocked even though the transaction is legitimate?
- Which features have the largest influence on the behavior of the model? Is it just based upon the location where the credit card is swiped, or even the time of the day and unusual credit consumption that is influencing the prediction?
Run the following SQL command to retrieve the values from the explainability report:

In the preceding screenshot, we have only selected the column that projects shapley values from the response returned by the explain_model function. If you notice the response of the query, the values in every json object show the contribution of different features in terms of influencing the prediction. E.g. from the preceding snippet, v14 feature is influencing the prediction the most and txtime feature does not really play any significant role in predicting ‘class’.
Model validation
Now let’s run the prediction query and validate the accuracy of the model on the validation dataset:

We can observe here that Redshift ML is able to identify 99.88 percent of the transactions correctly as fraudulent or non-fraudulent.
Now you can continue to use this SQL function creditcardsfrauds_mlp_fn for local inference in any part of the SQL query while analyzing, visualizing or reporting the newly arriving as well as existing data!
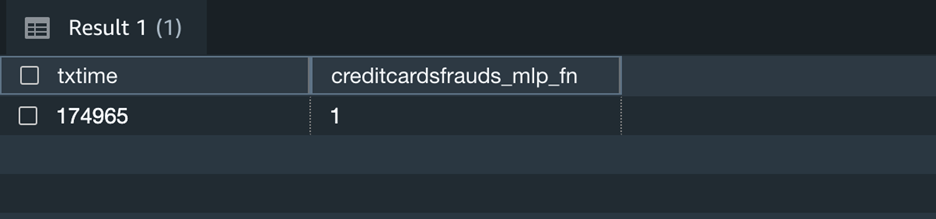
Here the output 1 means that the newly captured transaction is fraudulent as per the inference.
Additionally, you can change the above query to include prediction probabilities of label output for the above scenario and decide if you still like to use the prediction by the model.
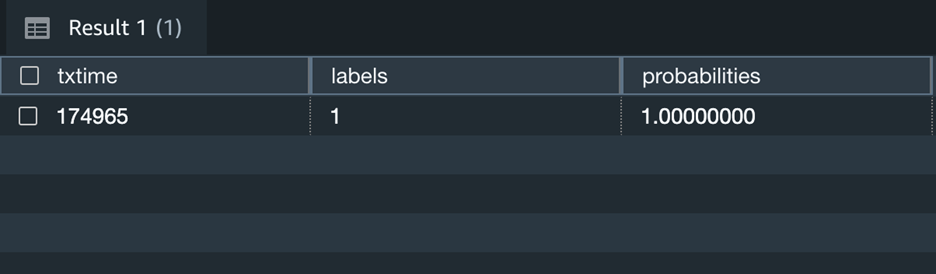
The above screenshot shows that this transaction has 100% likelihood of being fraudulent.
Clean up
To avoid incurring future charges, you can stop the Redshift cluster when not being used. You can even terminate the Redshift cluster altogether if you have run the exercise in this blog post just for experimental purpose. If you are instead using serverless version of Redshift, it will not cost you anything, until it is used. However, like mentioned before, you will have to stop or terminate the cluster if you are using a provisioned version of Redshift.
Conclusion
Redshift ML makes it easy for users of all levels to create, train, and tune models using SQL interface. In this post, we walked you through how to use the MLP algorithm to create binary classification model. You can then use those models to make predictions using simple SQL commands and gain valuable insights.
To learn more about RedShift ML, visit Amazon Redshift ML.
About the authors
 Anuradha Karlekar is a Solutions Architect at AWS working majorly for Partners and Startups. She has over 15 years of IT experience extensively in full stack development, deployment, building data ETL pipelines and visualizations. She is passionate about data analytics and text search. Outside work – She is a travel enthusiast!
 Phil Bates is a Senior Analytics Specialist Solutions Architect at AWS with over 25 years of data warehouse experience.
 Abhishek Pan is a Solutions Architect-Analytics working at AWS India. He engages with customers to define data driven strategy, provide deep dive sessions on analytics use cases & design scalable and performant Analytical applications. He has over 11 years of experience and is passionate about Databases, Analytics and solving customer problems with help of cloud solutions. An avid traveller and tries to capture world through my lenses
 Debu Panda is a Senior Manager, Product Management at AWS, is an industry leader in analytics, application platform, and database technologies, and has more than 25 years of experience in the IT world. Debu has published numerous articles on analytics, enterprise Java, and databases and has presented at multiple conferences such as re:Invent, Oracle Open World, and Java One. He is lead author of the EJB 3 in Action (Manning Publications 2007, 2014) and Middleware Management (Packt).