Tag Archives: AWS IoT SiteWise

AWS Weekly Roundup — AWS Lambda, AWS Amplify, Amazon OpenSearch Service, Amazon Rekognition, and more — December 18, 2023

Post Syndicated from Donnie Prakoso original https://aws.amazon.com/blogs/aws/aws-weekly-roundup-aws-lambda-aws-amplify-amazon-opensearch-service-amazon-rekognition-and-more-december-18-2023/

My memories of Amazon Web Services (AWS) re:Invent 2023 are still fresh even when I’m currently wrapping up my activities in Jakarta after participating in AWS Community Day Indonesia. It was a great experience, from delivering chalk talks and having thoughtful discussions with AWS service teams, to meeting with AWS Heroes, AWS Community Builders, and AWS User Group leaders. AWS re:Invent brings the global AWS community together to learn, connect, and be inspired by innovation. For me, that spirit of connection is what makes AWS re:Invent always special.

Here’s a quick look of my highlights at AWS re:Invent and AWS Community Day Indonesia:

If you missed AWS re:Invent, you can watch the keynotes and sessions on demand. Also, check out the AWS News Editorial Team’s Top announcements of AWS re:Invent 2023 for all the major launches.

Recent AWS launches
Here are some of the launches that caught my attention in the past two weeks:

Query MySQL and PostgreSQL with AWS Amplify – In this post, Channy wrote how you can now connect your MySQL and PostgreSQL databases to AWS Amplify with just a few clicks. It generates a GraphQL API to query your database tables using AWS CDK.

Migration Assistant for Amazon OpenSearch Service – With this self-service solution, you can smoothly migrate from your self-managed clusters to Amazon OpenSearch Service managed clusters or serverless collections.

AWS Lambda simplifies connectivity to Amazon RDS and RDS Proxy – Now you can connect your AWS Lambda to Amazon RDS or RDS proxy using the AWS Lambda console. With a guided workflow, this improvement helps to minimize complexities and efforts to quickly launch a database instance and correctly connect a Lambda function.

New no-code dashboard application to visualize IoT data – With this announcement, you can now visualize and interact with operational data from AWS IoT SiteWise using a new open source Internet of Things (IoT) dashboard.

Amazon Rekognition improves Face Liveness accuracy and user experience – This launch provides higher accuracy in detecting spoofed faces for your face-based authentication applications.

AWS Lambda supports additional concurrency metrics for improved quota monitoring – Add CloudWatch metrics for your Lambda quotas, to improve visibility into concurrency limits.

AWS Malaysia now supports 3D-Secure authentication – This launch enables 3DS2 transaction authentication required by banks and payment networks, facilitating your secure online payments.

Announcing AWS CloudFormation template generation for Amazon EventBridge Pipes – With this announcement, you can now streamline the deployment of your EventBridge resources with CloudFormation templates, accelerating event-driven architecture (EDA) development.

Enhanced data protection for CloudWatch Logs – With the enhanced data protection, CloudWatch Logs helps identify and redact sensitive data in your logs, preventing accidental exposure of personal data.

Send SMS via Amazon SNS in Asia Pacific – With this announcement, now you can use SMS messaging across Asia Pacific from the Jakarta Region.

Lambda adds support for Python 3.12 – This launch brings the latest Python version to your Lambda functions.

CloudWatch Synthetics upgrades Node.js runtime – Now you can use Node.js 16.1 runtimes for your canary functions.

Manage EBS Volumes for your EC2 fleets – This launch simplifies attaching and managing EBS volumes across your EC2 fleets.

See you next year!
This is the last AWS Weekly Roundup for this year, and we’d like to thank you for being our wonderful readers. We’ll be back to share more launches for you on January 8, 2024.

Happy holidays!

Donnie

Connecting an Industrial Universal Namespace to AWS IoT SiteWise using HighByte Intelligence Hub

Post Syndicated from Michael Brown original https://aws.amazon.com/blogs/architecture/connecting-an-industrial-universal-namespace-to-aws-iot-sitewise-using-highbyte-intelligence-hub/

This post was co-authored with Michael Brown, Sr. Manufacturing Specialist Architect, AWS; Dr. Rajesh Gomatam, Sr. Partner Solutions Architect, Industrial Software Specialist, AWS; Scott Robertson, Sr. Partner Solutions Architect, Manufacturing, AWS; John Harrington, Chief Business Officer, HighByte; and Aron Semie, Chief Technology Officer, HighByte

Merging industrial and enterprise data across multiple on-premises deployments and industrial verticals can be challenging. This data comes from a complex ecosystem of industrial-focused products, hardware, and networks from various companies and service providers. This drives the creation of data silos and isolated systems that propagate one-to-one integration strategy.

To avoid these issues and scale industrial IoT implementations, you must have a universal namespace. This software solution acts as a centralized repository for data, information, and context, where any application or device can consume and publish data needed for a specific action.

HighByte Intelligence Hub does just that. It is a middleware solution for universal namespace that helps you build scalable, modern industrial data pipelines in AWS. It also allows users to collect data from various sources, add context to the data being collected, and transform it to a format that other systems can understand.

Overview of solution

HighByte Intelligence Hub, illustrated in Figure 1, lets you configure a single dedicated abstraction layer (HighByte refers to this as the DataOps layer). This allows you to connect with various vendor schema standards, protocols, and databases. From there, you can model data and apply context for data sustainability.

HighByte Intelligence Hub

Figure 1. HighByte Intelligence Hub

HighByte Intelligence Hub uses a unique modeling engine. This allows you to act on real-time data to transform, normalize, and combine it with other sources into an asset model. This model can be deployed and reused as necessary. It represents the real world, and it is available to multiple connections and configurable flow paths simultaneously.

For example, Figure 2 shows a model of a hydronic heating system that was created with HighByte Intelligence Hub.

Creating a model of a hydronic heating system in HighByte Intelligence Hub

Figure 2. Creating a model of a hydronic heating system in HighByte Intelligence Hub

With this model, you can define a connection to AWS IoT SiteWise and publish the model directly. This way, the general model and the instance of the model will immediately be available in AWS.

This model can also:

  • Send the temperature and current information from this system to a database for reporting. You can do this without changing anything from the original configuration.
  • Add another connection in HighByte Intelligence Hub for AWS IoT Core (MQTT) and publish the existing model information to the fully managed AWS IoT Core service.
  • Stream the hydronic data into an industrial data lake on AWS, as shown in Figure 3, by adding an Amazon Kinesis Data Firehose connection in HighByte Intelligence Hub and attaching the existing flows to it.
AWS reference architecture for HighByte Intelligence Hub

Figure 3. AWS reference architecture for HighByte Intelligence Hub

The next sections will take a closer look at how to configure HighByte Intelligence Hub to work with AWS.

Prerequisites

For this walkthrough, you must have the following prerequisites:

Note that this post shows the major steps to connect HighByte Intelligence Hub to AWS IoT SiteWise; we will not dive too deeply into all areas of configuration. Please refer to the HighByte Intelligence Hub documentation for specific questions and the AWS service documentation for a full explanation.

Let’s get started!

  1. After logging into HighByte Intelligence Hub, create connections to AWS by selecting the “Connections” tab on the menu on the top right corner of the screen.

Figure 4 shows the following four connections to AWS resources:

  • AWS IoT Core – US East 1 Region
  • AWS IoT SiteWise – US East 1 Region
  • Kinesis Data Firehose – US East 1 Region
  • AWS IoT Greengrass edge device – located on-premises
HighByte Intelligence Hub AWS connections

Figure 4. HighByte Intelligence Hub AWS connections

For each connection, HighByte Intelligence Hub uses native AWS security and connectivity patterns. Figure 5 shows the AWS IoT SiteWise connection settings as an example.

AWS IoT SiteWise connection settings

Figure 5. AWS IoT SiteWise connection settings

Figure 5 shows where to provide an AWS access key and secret key that’s attached to an appropriate AWS Identity and Access Management (IAM) role. This role must have the required AWS IoT SiteWise permissions.

  1. Now that you have your connections created, let’s build a model. Select “Modeling” on the menu on the top right corner of the screen. Define all the attribute names and the data types that you want to include in the model. When you are finished, you should have something that looks like Figure 6, which shows the attribute names, attribute types, if it is an array or not, and if it a required attribute for the model.
HighByte Intelligence Hub hydronic heating model

Figure 6. HighByte Intelligence Hub hydronic heating model

  1. Next, create an instance of the asset model. To do this, use the “Actions” dropdown menu on the upper right corner and select “create instance,” because it will preserve your model name.
Hydronic model instance

Figure 7. Hydronic model instance

As shown in Figure 7, you can produce a standardized model and attach normalized labels that map multiple protocols such as OPC, MQTT, and SQL data sources. In our example, our data sources are all MQTT.

  1. Now, take your new model instance and assign a flow (Figure 8) that details the source and destination.
HighByte Intelligence Hub flow

Figure 8. HighByte Intelligence Hub flow

In this step, as shown in Figure 8, drag and drop the instance of the hydronic model from the right side of the screen to the “Sources” box in the middle of the screen. Then, change the reference type to “Output” from the dropdown menu, select AWS IoT SiteWise as the connection, and drag and drop the AWS IoT SiteWise instance to the “Target” box.

From here, you’ll select the following flow settings, as shown on Figure 9:

  • Interval – How often you send data
  • Mode – Always send, On-Change, On-True, or While True
  • Publish Mode – All Data, Only Changes, Only Changes Compressed
  • Enabled – On or Off

Once you turn the Enabled switch to On and submit, your data will show up in AWS IoT SiteWise.

HighByte Intelligence Hub flow settings

Figure 9. HighByte Intelligence Hub flow settings

Now you’ve configured your MQTT data sources, created a HighByte Intelligence Hub model and instance, and defined a flow to send the data to AWS IoT SiteWise!

Next, let’s see how your model and data are represented.

When HighByte Intelligence Hub first connects to AWS IoT SiteWise, the hub creates an AWS IoT SiteWise model. The model is configured through the AWS IoT SiteWise API. As shown in Figure 10, the name and type from the HighByte Intelligence Hub model are copied to the measurement name and data type in the AWS IoT SiteWise model. Likewise, the AWS IoT SiteWise model name will inherit from the HighByte Intelligence Hub model name.

AWS IoT SiteWise model

Figure 10. AWS IoT SiteWise model

After the model has been created, HighByte Intelligence Hub will create an AWS IoT SiteWise asset using the model it just created. The asset name will be inherited from the hub instance name. As Figure 11 shows, data will flow from the HighByte Intelligence Hub input data source and through the flow definition, using the attributes defined in the model.

AWS IoT SiteWise asset

Figure 11. AWS IoT SiteWise asset

The final step in this process is to set up a visualization of the data in the AWS IoT SiteWise portal by creating a dashboard and adding visualization to it. After you do this, the display shown in Figure 12 will update as new data comes into AWS IoT SiteWise.

AWS IoT SiteWise portal dashboard

Figure 12. AWS IoT SiteWise portal dashboard

Conclusion

HighByte Intelligence Hub is the first industrial DataOps solution designed specifically for operational technology and information technology teams. It allows you to securely connect, merge, model, and flow industrial data to enterprise systems in AWS Cloud without writing or maintaining code.

This post showed you how to integrate HighByte Intelligence Hub with AWS to quickly model and extract data so that multiple teams can simultaneously analyze, interpret, and use the data without constraint and generate rich data models in minutes.

Ready to get started? Try out HighByte Intelligence Hub today.

Securely Ingest Industrial Data to AWS via Machine to Cloud Solution

Post Syndicated from Ajay Swamy original https://aws.amazon.com/blogs/architecture/securely-ingest-industrial-data-to-aws-via-machine-to-cloud-solution/

As a manufacturing enterprise, maximizing your operational efficiency and optimizing output are critical factors in this competitive global market. However, many manufacturers are unable to frequently collect data, link data together, and generate insights to help them optimize performance. Furthermore, decades of competing standards for connectivity have resulted in the lack of universal protocols to connect underlying equipment and assets.

Machine to Cloud Connectivity Framework (M2C2) is an Amazon Web Services (AWS) Solution that provides the secure ingestion of equipment telemetry data to the AWS Cloud. This allows you to use AWS services to conduct analysis on your equipment data, instead of managing underlying infrastructure operations. The solution allows for robust data ingestion from industrial equipment that use OPC Data Access (OPC DA) and OPC Unified Access (OPC UA) protocols.

Secure, automated configuration and ingestion of industrial data

M2C2 allows manufacturers to ingest their shop floor data into various data destinations in AWS. These include AWS IoT SiteWise, AWS IoT Core, Amazon Kinesis Data Streams, and Amazon Simple Storage Service (S3). The solution is integrated with AWS IoT SiteWise so you can store, organize, and monitor data from your factory equipment at scale. Additionally, the solution provides customers an intuitive user interface to create, configure, monitor, and manage connections.

Automated setup and configuration

Figure 1. Automatically create and configure connections

Figure 1. Automatically create and configure connections

With M2C2, you can connect to your operational technology assets (see Figure 1). The solution automatically creates AWS IoT certificates, keys, and configuration files for AWS IoT Greengrass. This allows you to set up Greengrass to run on your industrial gateway. It also automates the deployment of any Greengrass group configuration changes required by the solution. You can define a connection with the interface, and specify attributes about equipment, tags, protocols, and read frequency for equipment data.

Figure 2. Send data to different destinations in the AWS Cloud

Figure 2. Send data to different destinations in the AWS Cloud

Once the connection details have been specified, you can send data to different destinations in AWS Cloud (see Figure 2). M2C2 provides capability to ingest data from industrial equipment using OPC-DA and OPC-UA protocols. The solution collects the data, and then publishes the data to AWS IoT SiteWise, AWS IoT Core, or Kinesis Data Streams.

Publishing data to AWS IoT SiteWise allows for end-to-end modeling and monitoring of your factory floor assets. When using the default solution configuration, publishing data to Kinesis Data Streams allows for ingesting and storing data in an Amazon S3 bucket. This gives you the capability for custom advanced analytics use cases and reporting.

You can choose to create multiple connections, and specify sites, areas, processes, and machines, by using the setup UI.

Management of connections and messages

Figure 3. Manage your connections

Figure 3. Manage your connections

M2C2 provides a straightforward connections screen (see Figure 3), where production managers can monitor and review the current state of connections. You can start and stop connections, view messages and errors, and gain connectivity across different areas of your factory floor. The Manage connections UI allows you to holistically manage data connectivity from a centralized place. You can then make changes and corrections as needed.

Architecture and workflow

Figure 4. Machine to Cloud Connectivity (M2C2) Framework architecture

Figure 4. Machine to Cloud Connectivity (M2C2) Framework architecture

The AWS CloudFormation template deploys the following infrastructure, shown in Figure 4:

  1. An Amazon CloudFront user interface that deploys into an Amazon S3 bucket configured for web hosting.
  2. An Amazon API Gateway API provides the user interface for client requests.
  3. An Amazon Cognito user pool authenticates the API requests.
  4. AWS Lambda functions power the user interface, in addition to the configuration and deployment mechanism for AWS IoT Greengrass and AWS IoT SiteWise gateway resources. Amazon DynamoDB tables store the connection metadata.
  5. An AWS IoT SiteWise gateway configuration can be used for any OPC UA data sources.
  6. An Amazon Kinesis Data Streams data stream, Amazon Kinesis Data Firehose, and Amazon S3 bucket to store telemetry data.
  7. AWS IoT Greengrass is installed and used on an on-premises industrial gateway to run protocol connector Lambda functions. These connect and read telemetry data from your OPC UA and OPC DA servers.
  8. Lambda functions are deployed onto AWS IoT Greengrass Core software on the industrial gateway. They connect to the servers and send the data to one or more configured destinations.
  9. Lambda functions that collect the telemetry data write to AWS IoT Greengrass stream manager streams. The publisher Lambda functions read from the streams.
  10. Publisher Lambda functions forward the data to the appropriate endpoint.

Data collection

The Machine to Cloud Connectivity solution uses Lambda functions running on Greengrass to connect to your on-premises OPC-DA and OPC-UA industrial devices. When you deploy a connection for an OPC-DA device, the solution configures a connection-specific OPC-DA connector Lambda. When you deploy a connection for an OPC-UA device, the solution uses the AWS IoT SiteWise Greengrass connector to collect the data.

Regardless of protocol, the solution configures a publisher Lambda function, which takes care of sending your streaming data to one or more desired destinations. Stream Manager enables the reading and writing of stream data from multiple sources and to multiple destinations within the Greengrass core. This enables each configured collector to write data to a stream. The publisher reads from that stream and sends the data to your desired AWS resource.

Conclusion

Machine to Cloud Connectivity (M2C2) Framework is a self-deployable solution that provides secure connectivity between your technology (OT) assets and the AWS Cloud. With M2C2, you can send data to AWS IoT Core or AWS IoT SiteWise for analytics and monitoring. You can store your data in an industrial data lake using Kinesis Data Streams and Amazon S3. Get started with Machine to Cloud Connectivity (M2C2) Framework today.

Automating Your Home with Grafana and Siemens Controllers

Post Syndicated from Viktoria Semaan original https://aws.amazon.com/blogs/architecture/automating-your-home-with-grafana-and-siemens-controllers/

Imagine that you have access to a digital twin of your house that allows you to remotely monitor and control different devices inside your home. Forgot to turn off the heater or air conditioning? Didn’t close water faucets? Wondering how long your kids have been watching TV? Wouldn’t it be nice to have all the information from multiple devices in a single place?

Nowadays, many of us have smart things at home, such as thermostats, security cameras, wireless sensors, switches, etc. The problem is that most of these smart things come with different mobile applications. To get a full picture, we end up switching between applications that serve limited needs.

In this blog, we explain how to use Siemens controllers, AWS IoT, and the open-source visualization platform Grafana to quickly build a digital twin of any processes. This includes home automation, industrial applications, security systems, and others. As an example, we will monitor environmental conditions, including temperature and humidity sensors, thermostat settings, light switches, as well as monthly water and energy consumption. We will go through the architecture and steps required to integrate different building components to store data for historical analysis, enable voice control, and create interactive near real-time dashboards showing a digital representation of your house. If you would like to learn more about the solution, we will provide links to all the architecture components and detailed configuration steps.

Smart home automation solution with Siemens LOGO! compact controller

Figure 1. Smart home automation solution with Siemens LOGO! compact controller

Architecture

In this solution overview, we are using a low-cost Siemens LOGO! controller (hardware version 8.3 or higher). This controller supports traditional industrial protocols such as Simatic S7 and Modbus TCP/IP as well as MQTT through the native AWS IoT Core interface. Automation controllers are the brains behind smart systems that allow orchestrating all the devices in your home. This reference architecture can be extended to other devices that support MQTT protocol, have programmatic APIs, or Software Development Kits (SDKs). It could serve as a starting point for building a home automation solution using AWS IoT and Grafana and further customized based on customer needs.

Reference architecture for smart home automation solution

Figure 2. Reference architecture for smart home automation solution

The components of this solution are:

  • The LOGO! controller controls home automation equipment and ingests data to AWS IoT Core.
  • AWS IoT Core collects data at scale and routes messages to multiple AWS services.
  • AWS Lambda is called inside the AWS IoT Core statement to transform the incoming data prior to ingestion.
  • Amazon Timestream stores time series data and optimizes it for fast analytical queries.
  • AWS IoT SiteWise models and stores data from equipment for large scale deployments.
  • Grafana installed on Amazon Elastic Compute Cloud (Amazon EC2) visualizes data in near real-time using interactive dashboards.
  • The Alexa Skills Kit (ASK) allows interaction with devices using voice commands.
Remote monitoring dashboard allows homeowners to view and control conditions

Figure 3. Remote monitoring dashboard allows homeowners to view and control conditions

Solution overview

Step 1: Ingest data to AWS IoT

The IoT-enabled LOGO! controller provides the out-of-box capability to send data to AWS IoT Core service. In a few clicks, you can configure variables and their update frequency to be published to the AWS Cloud. To get started with the LOGO! controller, please refer to Siemens E-learning portal. AWS IoT Core collects and processes messages from remote devices transmitted over the secured MQTT protocol.

The LOGO! controller publishes data to AWS IoT Core in hexadecimal format. The Lambda function converts the data from hexadecimal to the standard decimal numeric system. If your home automation equipment sends data in the standard decimal format, then AWS IoT Core can directly write data to other AWS services without Lambda.

Step 2: Store data in Timestream or AWS IoT SiteWise

The ingested IoT data is saved for historical analysis. Timestream is a serverless time series database service that is optimized for high throughput ingestion and has built-in analytical functions. It is one of the options you can use to store IoT data. Time series is a common data format to observe how things are changing over time and it is suitable for building IoT applications.

AWS IoT SiteWise is an alternative option to store and organize data at scale. It is beneficial for large-scale commercial building automation and management systems, including offices, hotels, and factories. You can structure data by using built-in asset modeling capabilities.

Step 3: Visualize data in Grafana dashboard

Once data is stored, it can be made available to multiple applications. Grafana is a data visualization platform that you can use to monitor data. It supports near real-time visualization with a refresh rate of 5 seconds or higher. You can visualize data from multiple AWS sources (such as AWS IoT SiteWise, Timestream, and Amazon CloudWatch) and other data sources with a single Grafana dashboard. Grafana can be installed on an Amazon Linux system, Windows, macOS, or deployed on Kubernetes (K8S) or Docker containers. For customers who don’t want to manage infrastructure and are interested in developing completely serverless solution, Amazon offers an Amazon Managed Service for Grafana. At the time of writing this post, this service is available in preview with a limited number of supported plugins.

To build Grafana dashboard and retrieve data from Timestream, you can use SQL queries. Timestream query example to retrieve humidity values and timestamps for the past 24 hours:

SELECT measure_value::double as humidity, time FROM "myhome_db"."livingroom" WHERE measure_name='humidity' and time >=ago(1d)

To retrieve data from AWS IoT SiteWise, you can select asset properties from the asset navigation tab, which makes it simple for non-technical users to build dashboards.

Grafana dashboard configuration with AWS IoT SiteWise

Figure 4. Grafana dashboard configuration with AWS IoT SiteWise

One of the common issues of operational dashboards is that it’s hard to get a physical representation by looking at a cluster of multiple readings. To reflect conditions of physical assets, the information from sensors must be overlaid on top of original physical objects. ImageIt Panel Plugin for Grafana allows you to overcome this issue. You can upload a picture of your house or a system and drag sensor readings to their exact locations, thus creating digital representations of physical objects.

Step 4: Control using Alexa

Using the Alexa Skills Kit, you can build voice skills to be used on devices enabled by Alexa globally. Alexa and AWS IoT enables you to create an end-to-end voice-controlled experience without using any additional hardware. Instead, your functions run on the cloud only when you invoke Alexa with voice commands.

The easiest way to build a custom Alexa skill is to use a Lambda function. You can upload the code for your Alexa skill to a Lambda function. The code will execute in response to Alexa voice interactions and send commands to the LOGO! controller.

Conclusion

In this blog, we reviewed how you can create a digital twin of your home automation or industrial systems using Siemens controllers, AWS IoT, and Grafana dashboards. Connecting the LOGO! controller to AWS gives it access to the Internet of Things (IoT) and opens many potential applications such as anomaly detection, predictive maintenance, intrusion detection, and others.

AWS IoT SiteWise Edge Is Now Generally Available for Processing Industrial Equipment Data on Premises

Post Syndicated from Channy Yun original https://aws.amazon.com/blogs/aws/aws-iot-sitewise-edge-is-now-generally-available-for-processing-industrial-equipment-data-on-premises/

At AWS re:Invent 2020, we announced the preview of AWS IoT SiteWise Edge, a new feature of AWS IoT SiteWise that provides software that runs on premises at industrial sites and makes it easy to collect, process, and monitor equipment data locally before sending the data to AWS Cloud destinations. AWS IoT SiteWise Edge software can be installed on local hardware such as third-party industrial gateways and computers, or on AWS Outposts and AWS Snow Family compute devices. It uses AWS IoT Greengrass, an edge runtime that helps build, deploy, and manage applications.

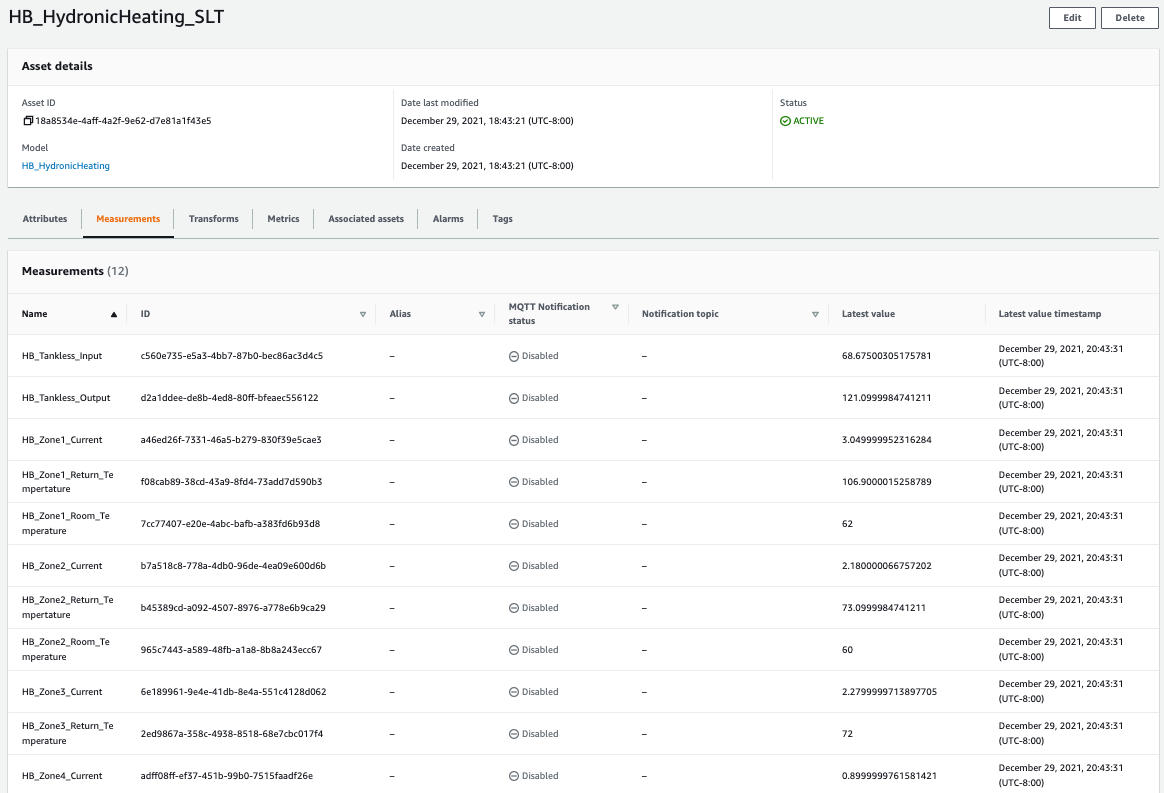
With AWS IoT SiteWise Edge, you can organize and process your equipment data in the on-premises SiteWise gateway using AWS IoT SiteWise asset models. You can then read the equipment data locally from the gateway using the same application programming interfaces (APIs) that you use with AWS IoT SiteWise in the cloud. For example, you can compute metrics such as Overall Equipment Effectiveness (OEE) locally for use in a production-line monitoring dashboard on the factory floor.

You can use AWS IoT SiteWise Edge for these use cases to quickly assess and demonstrate the value of industrial IoT to your organization:

  • Localized testing of products: The testing of automotive, electronics, or aerospace products might generate thousands of data points per second from multiple sensors embedded in the product and the testing equipment. You can process data locally in the gateway for near-real-time dashboards and store just the results in the cloud to optimize your bandwidth and storage costs.
  • Lean manufacturing in the smart factory: You can compute key performance metrics such as OEE, Mean Time Between Failures (MTBF), and Mean Time to Resolution (MTTR) in the gateway and monitor local dashboards that must continue to work even if the connection of the factory to the cloud is temporarily interrupted. This ensures that factory staff can identify and identify the root cause of every bottleneck as soon as it arises.
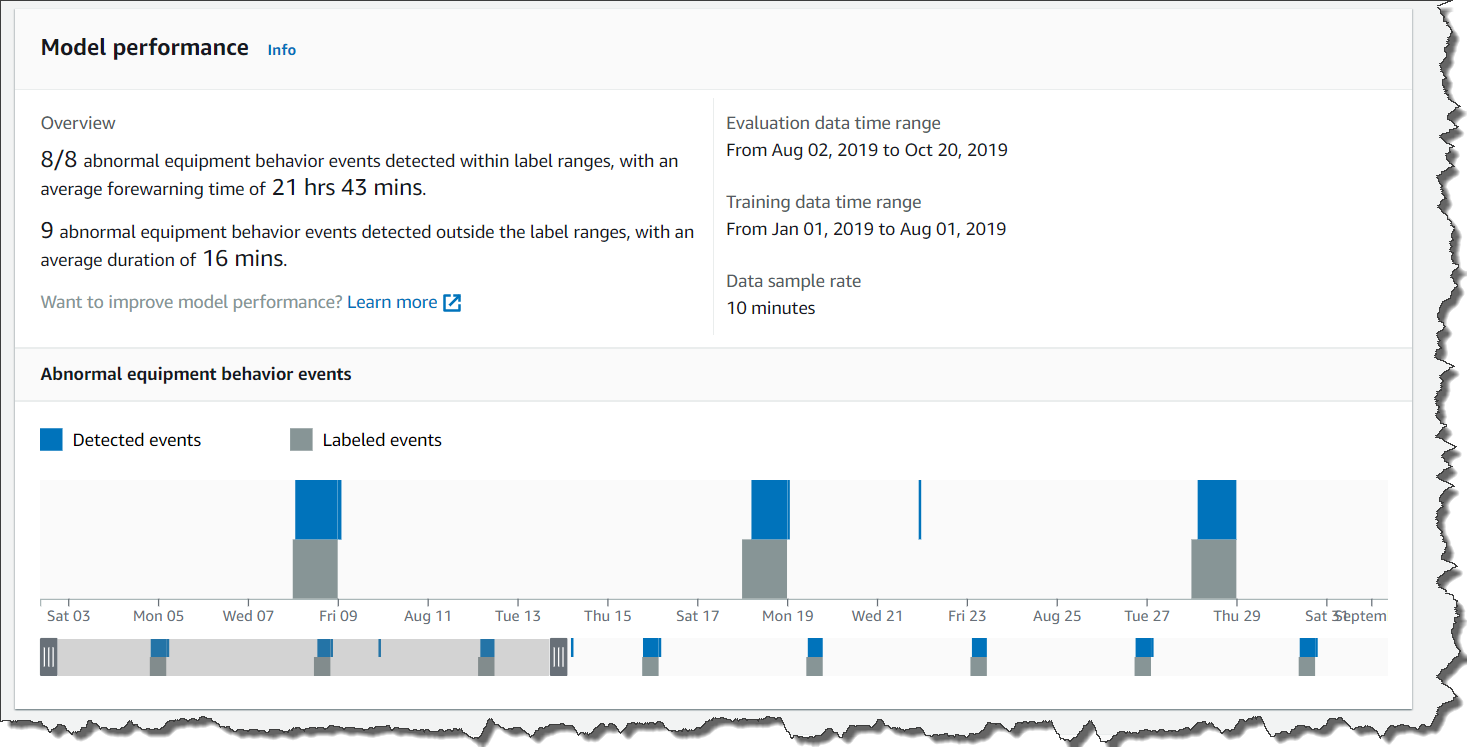
  • Improving product quality: Your local applications can read equipment and sensor data from AWS IoT SiteWise Edge on the gateway as it is collected, and combine it with data from other sources like enterprise resource planning (ERP) systems and manufacturing execution systems to help catch defect-causing conditions. The data can be further processed through machine learning models to identify anomalies that are used to trigger alerts for staff on the factory floor.

To securely connect and read sensor data from historian databases or directly from equipment, AWS IoT SiteWise Edge supports three common industrial protocols: OPC-UA (Open Platform Communications Unified Architecture), Modbus TCP, and EtherNet/IP.

After data is collected by the gateway, you can filter, transform, and aggregate the data locally using asset models defined in the cloud. You can also run AWS Lambda functions locally on the gateway to customize how the data is processed. You can keep sensitive data on premises to help comply with data residency requirements, and you can send data to AWS IoT SiteWise or other AWS services in the cloud, such as Amazon S3 and Amazon Timestream, for long term storage and further analysis.

At GA, we added new features and made improvements based on customer feedback during the preview:

  • Easy setup with Edge Gateway Installer: You can obtain an edge device installer from the AWS IoT SiteWise console and run it on your industrial gateway to install AWS IoT SiteWise Edge software and all prerequisites, including the AWS IoT Greengrass v2 runtime, Docker, Python, and Java.
  • Support for AWS IoT Greengrass v2: The OPC-UA data collection and data processing pack will be supported on AWS IoT Greengrass version 2.
  • Integration with LDAP/Active Directory: Edge gateway now integrates with LDAP servers or a local user pool to authenticate users at the edge. These users will use their corporate or Linux credentials to authenticate themselves on OpsHub or monitor portals at the edge.

AWS IoT SiteWise Edge – Getting Started
To get started with AWS IoT SiteWise Edge, complete the following steps to create a gateway that connects to data servers to deliver your industrial data streams to the AWS Cloud:

  1. Create a gateway and an get edge installer.
  2. Install edge software onto your industrial gateway.
  3. Configure your edge gateway from the cloud.
  4. Configure your monitoring applications at the edge and in the cloud.

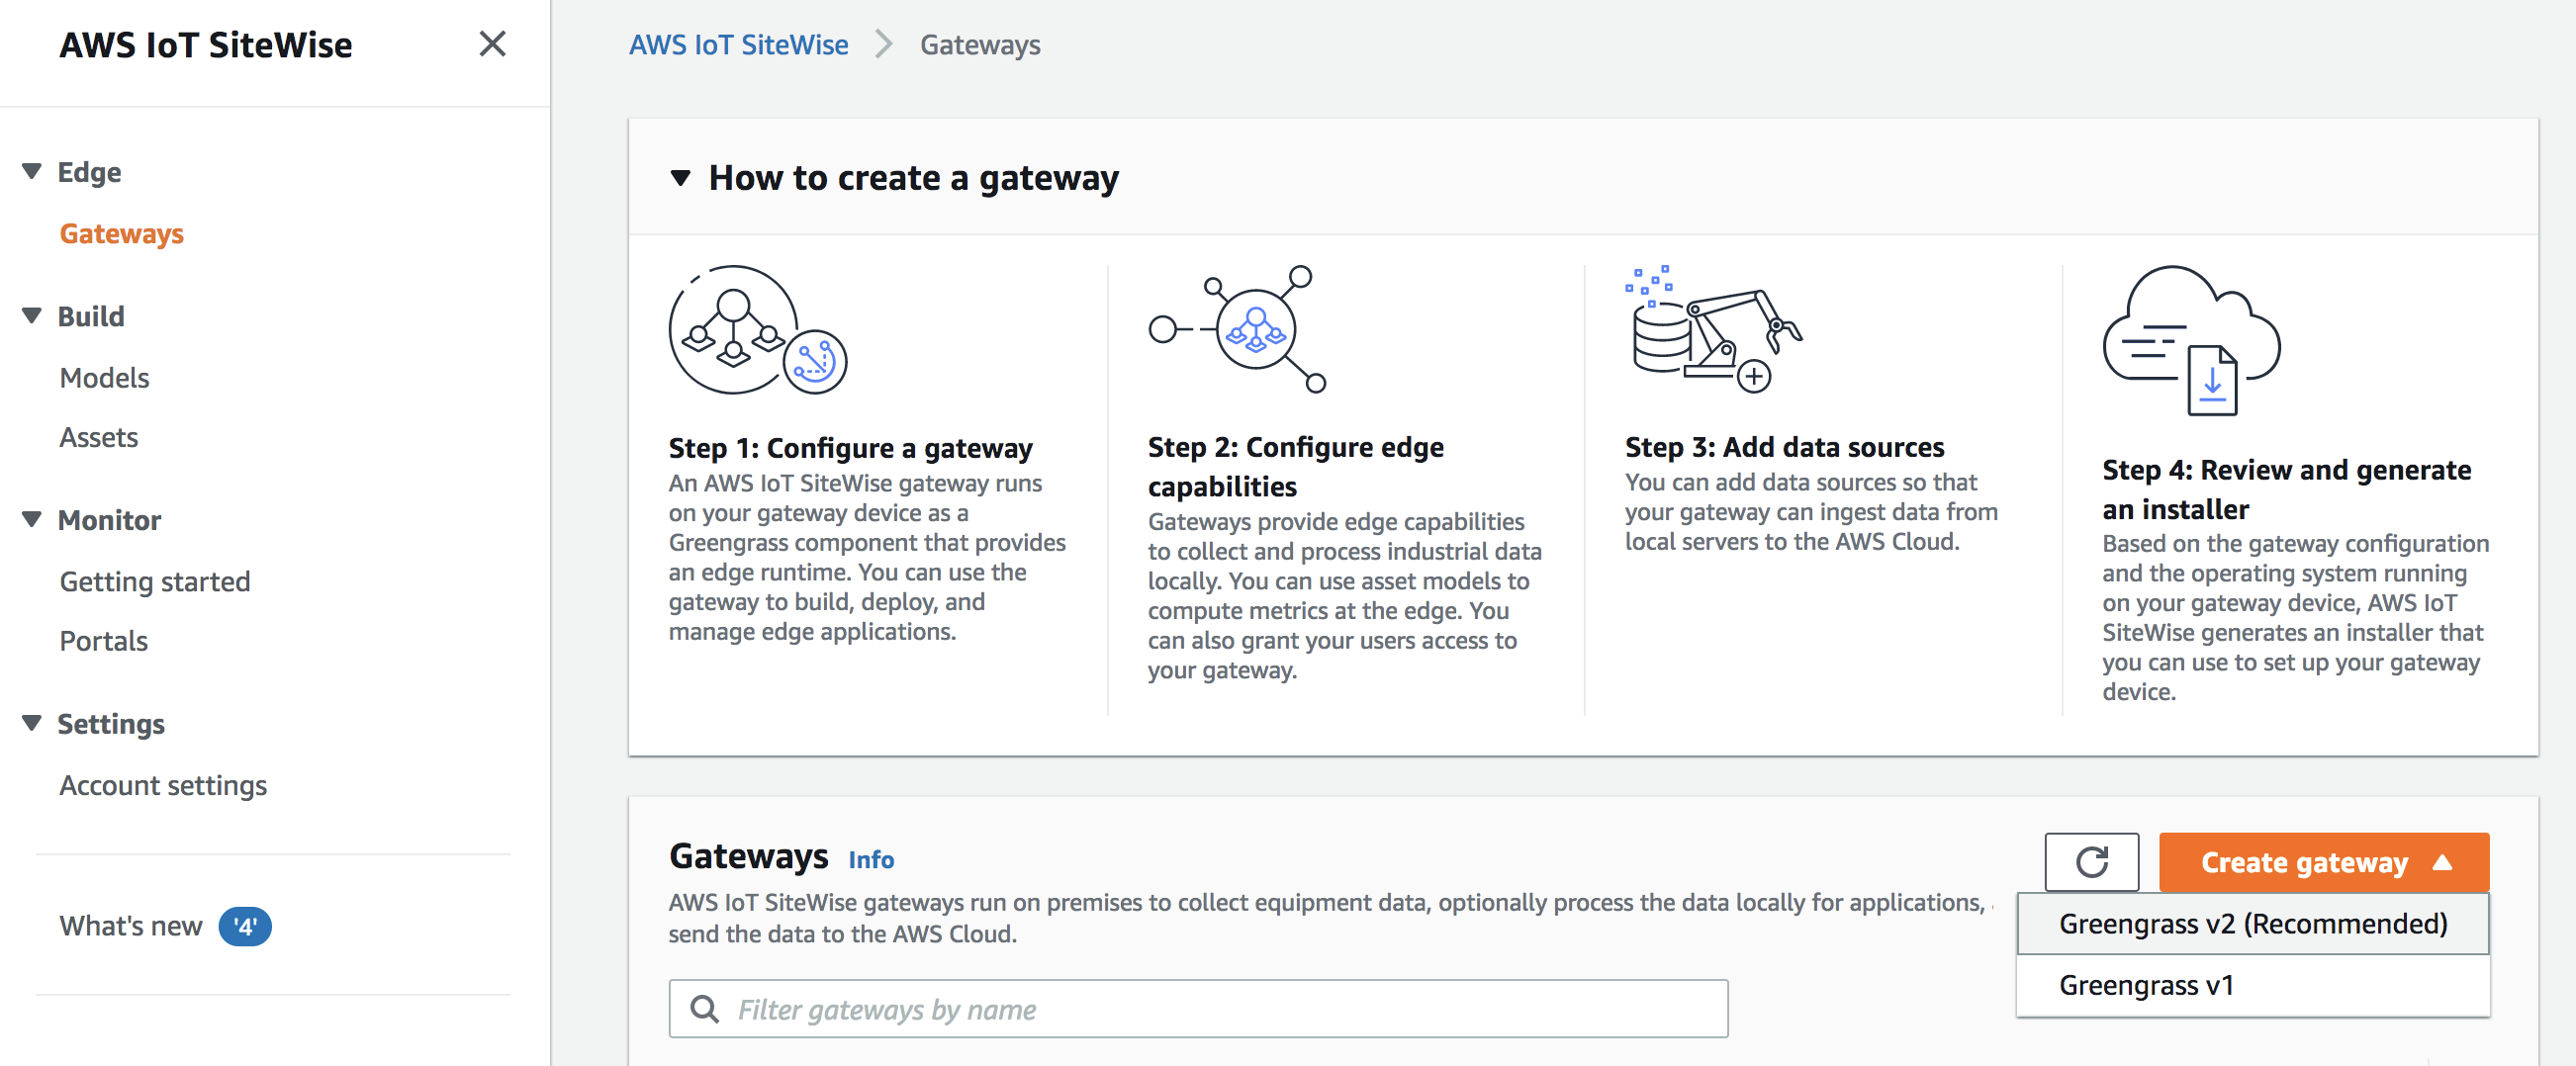
To create your gateway, from the left navigation pane of the AWS IoT SiteWise console, expand Edge, and choose Gateways. On the Gateways page, choose Create gateway. You can select Greengrass v2 to configure your gateway. If you are existing customer, you can select to make a gateway for Greengrass v1.

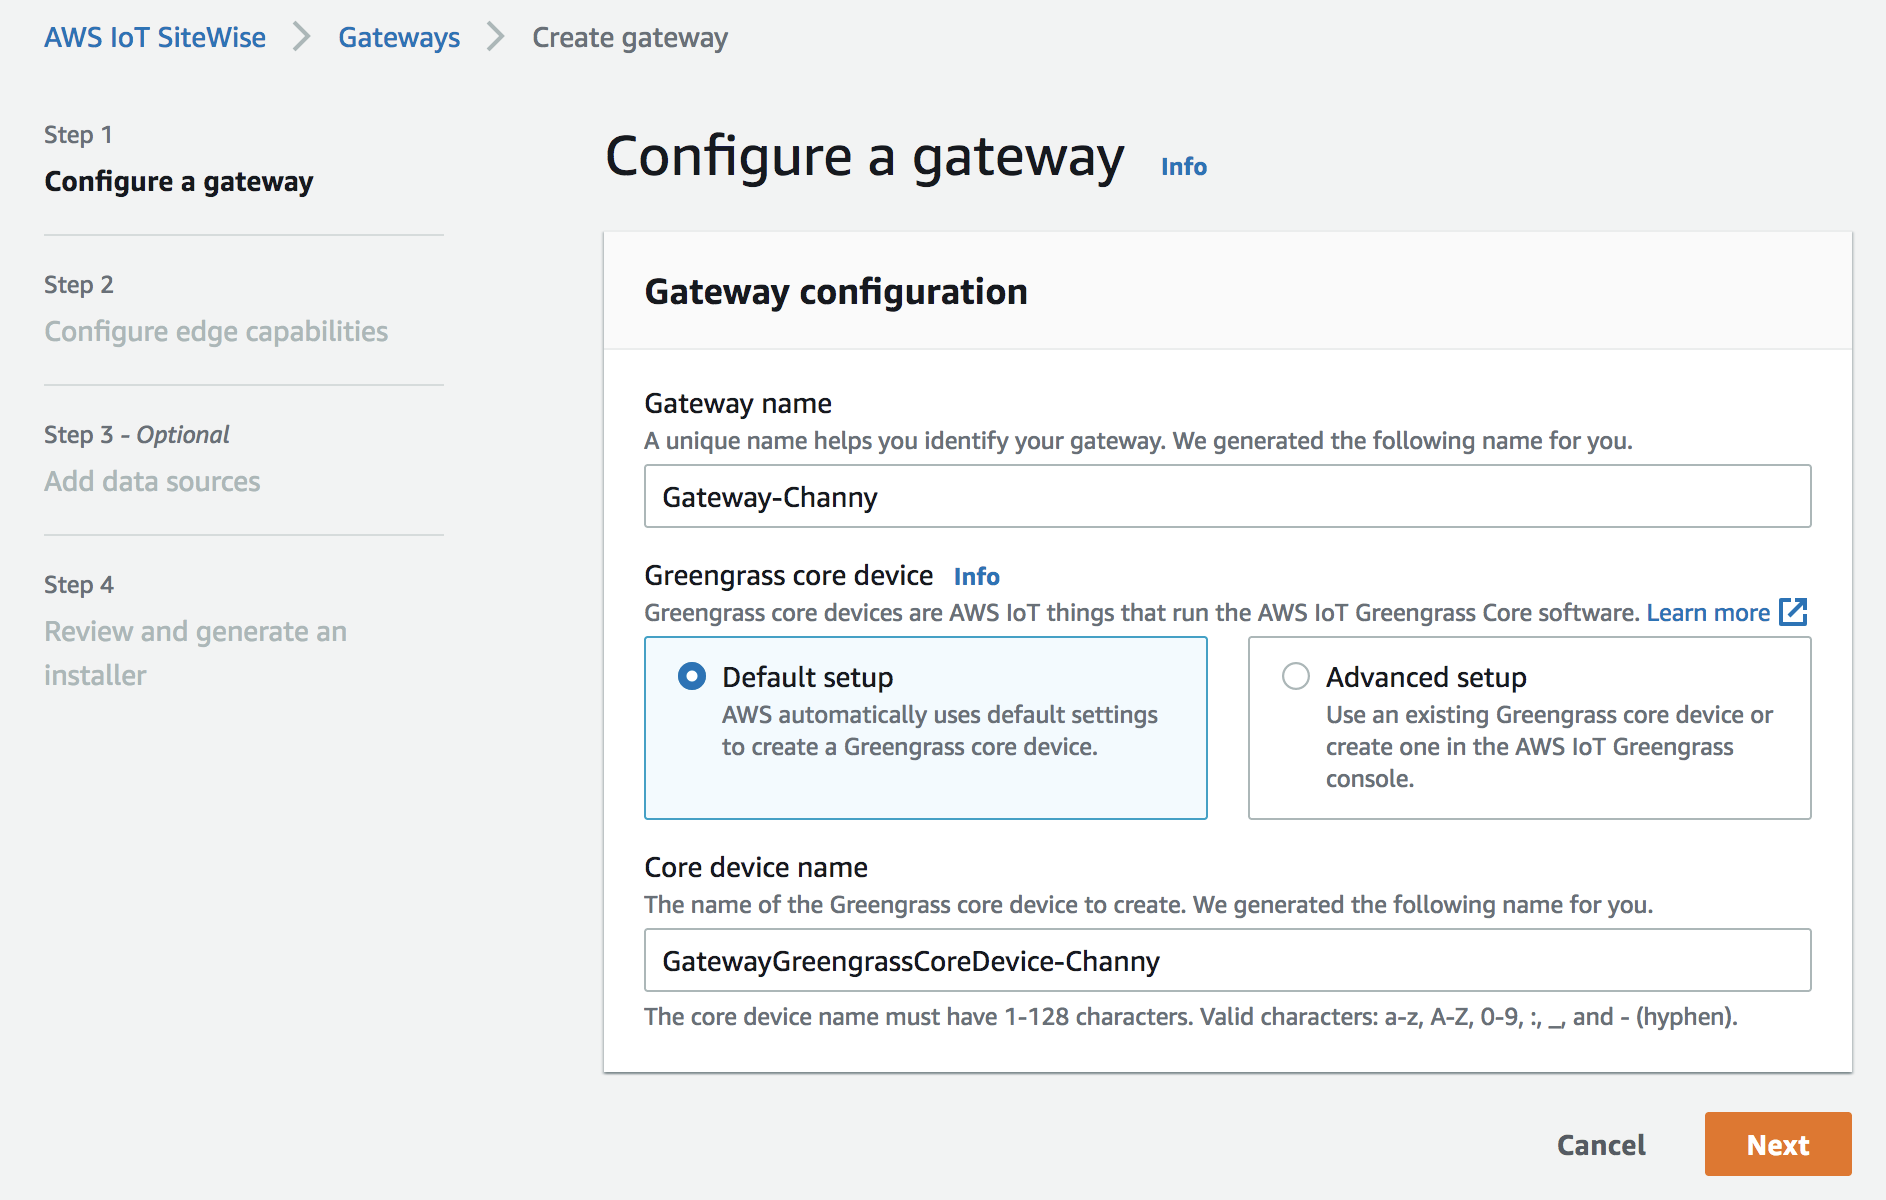
To configure your first gateway, enter your gateway name and core device name, and then choose Default setup to create a Greengrass core device for this gateway with default settings. Choose Next.

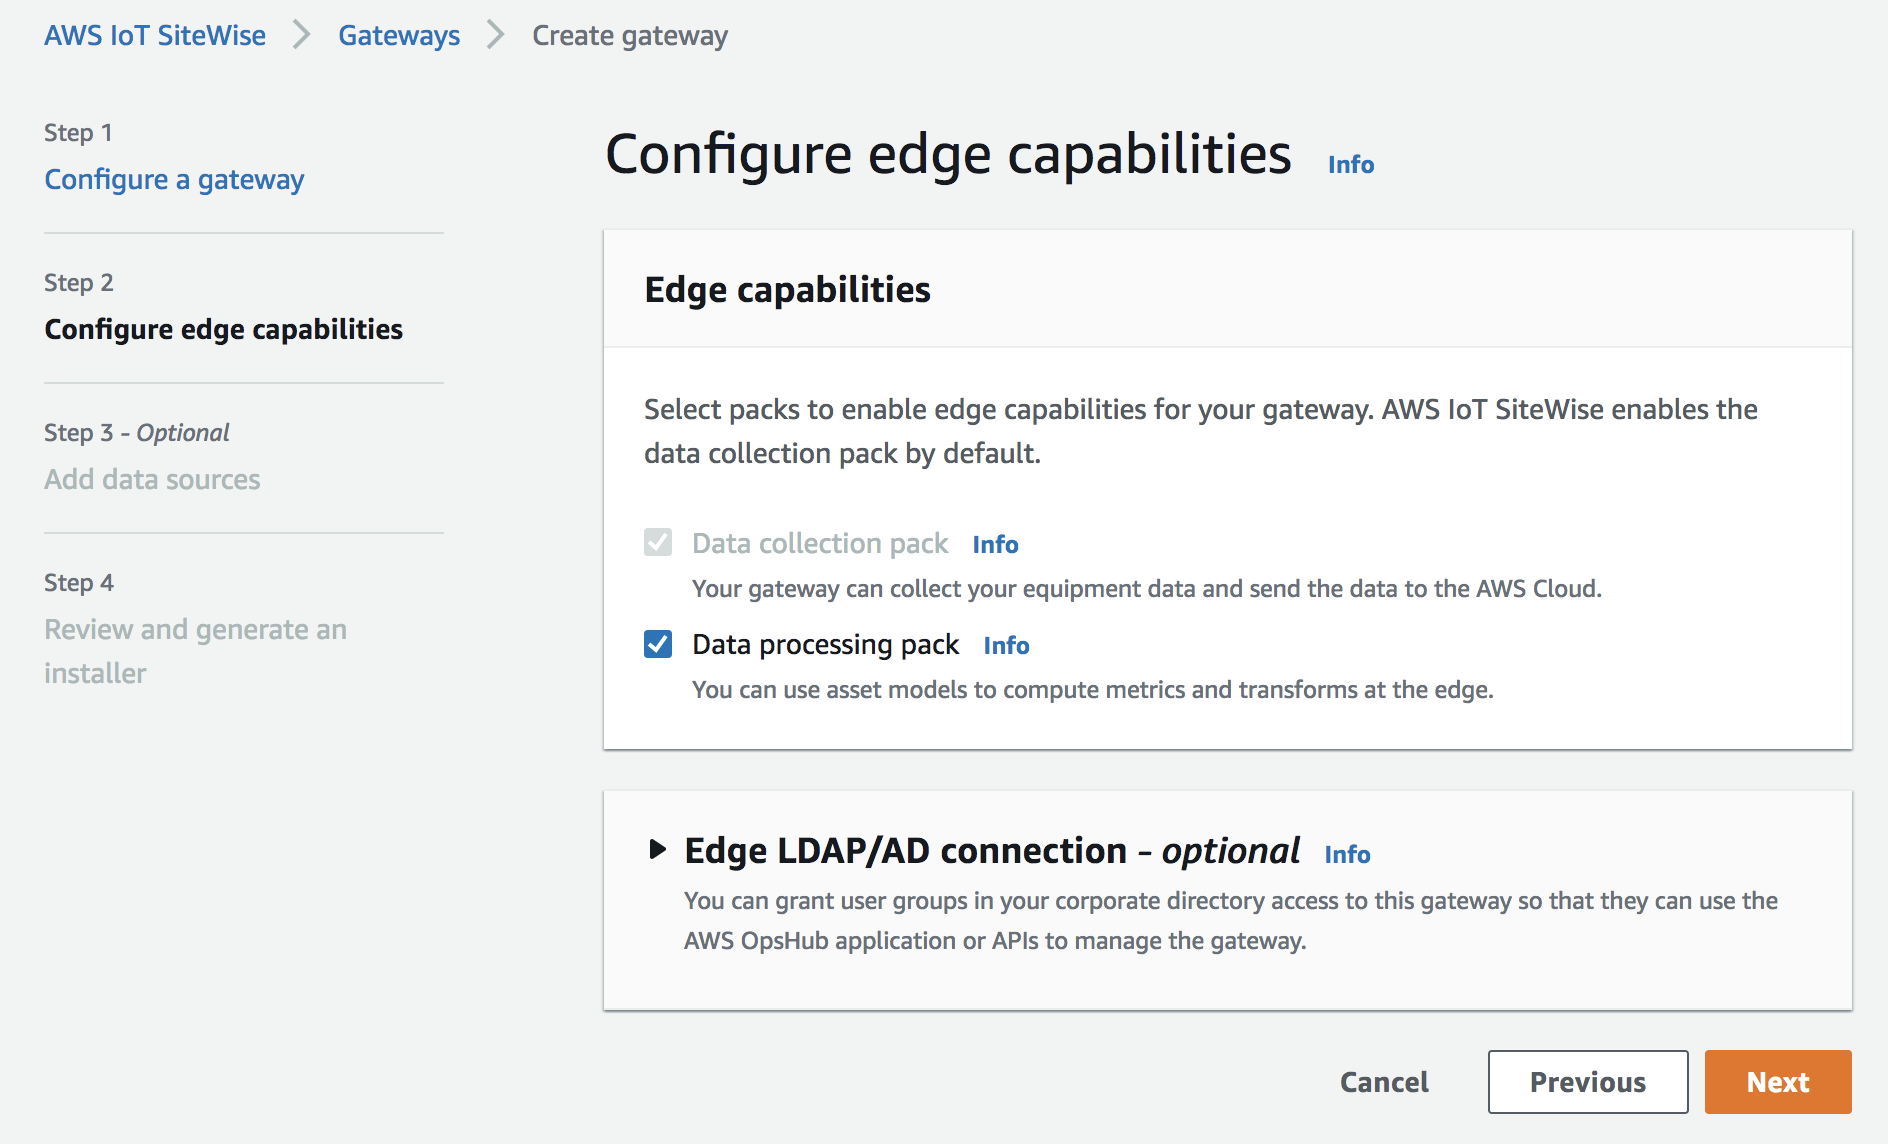
By default, AWS IoT SiteWise enables the data collection pack to collect and send your equipment data to the AWS Cloud. To compute metrics and transforms using asset models at the edge, choose Data processing pack. You can also give users access to manage this gateway through the command line or the local monitor dashboards of an OpsHub application from the LDAP/Active Directory in your organization. Choose Next.

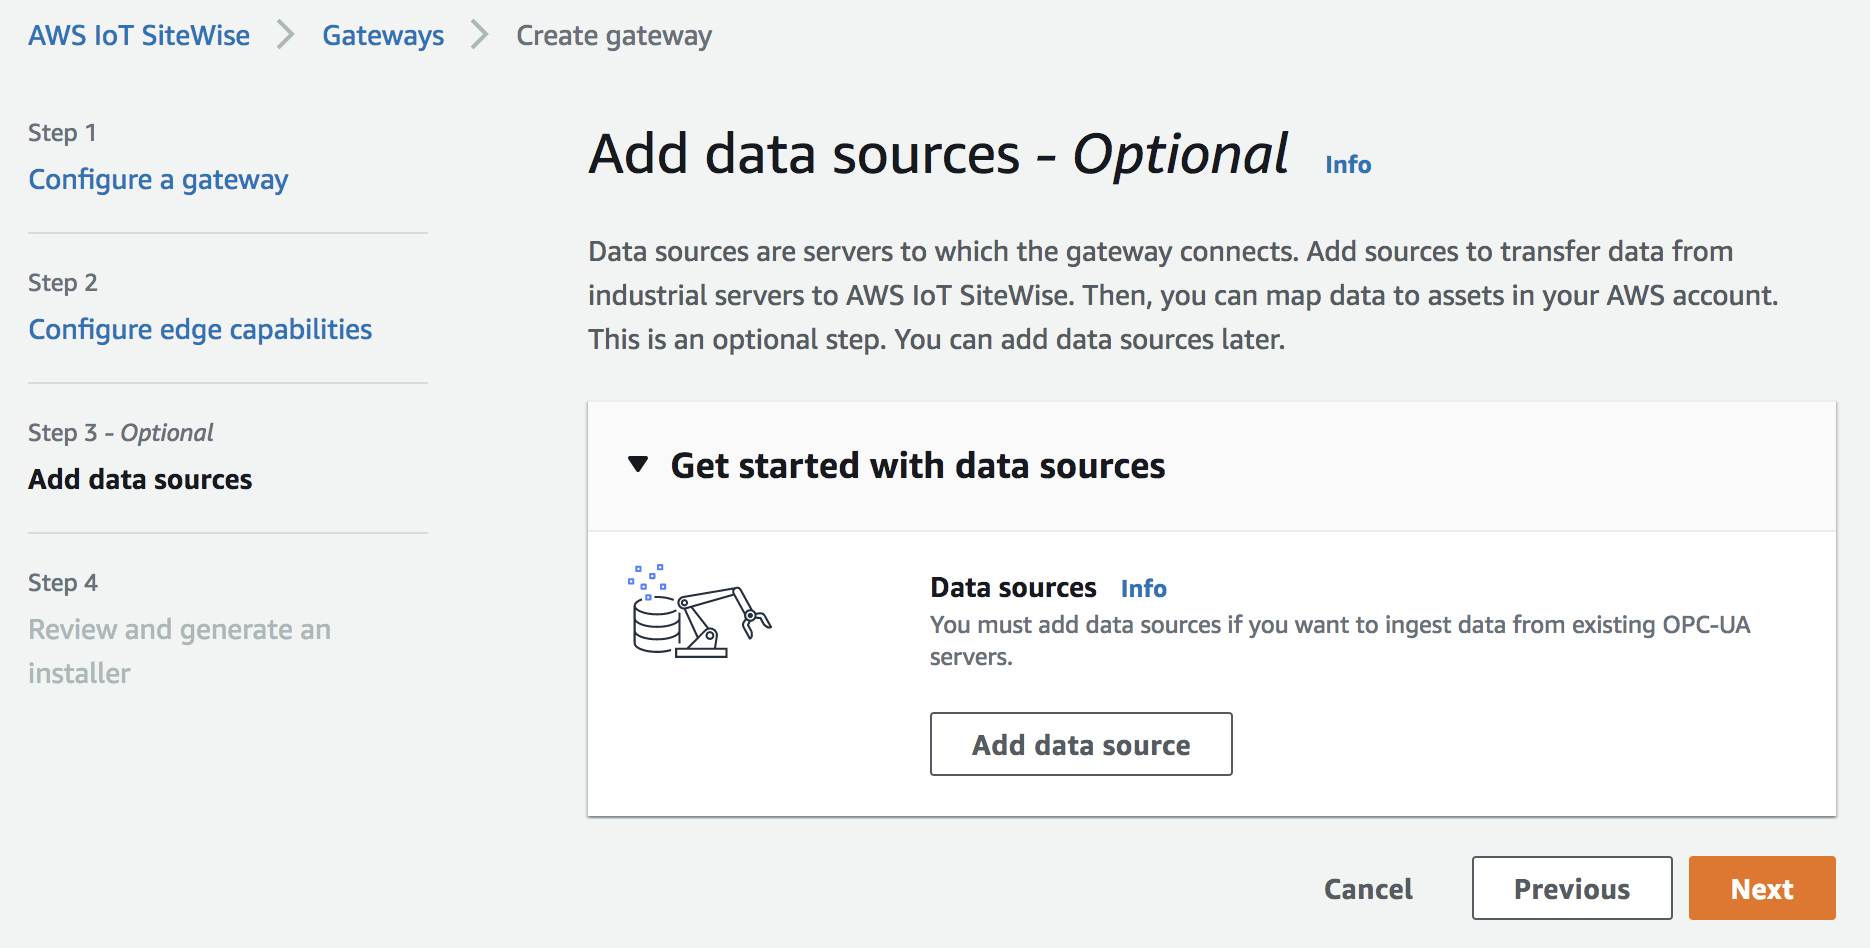
Optionally, you can add existing OPC-UA data servers to ingest data to the gateway. You can add data sources later. For more information, see Configuring data sources in the AWS IoT SiteWise User Guide. Choose Next.

Review your gateway configuration and choose the operating system of your edge gateway. We currently support the Linux OS distributions of Amazon Linux, Red Hat, or Ubuntu. Choose Generate.

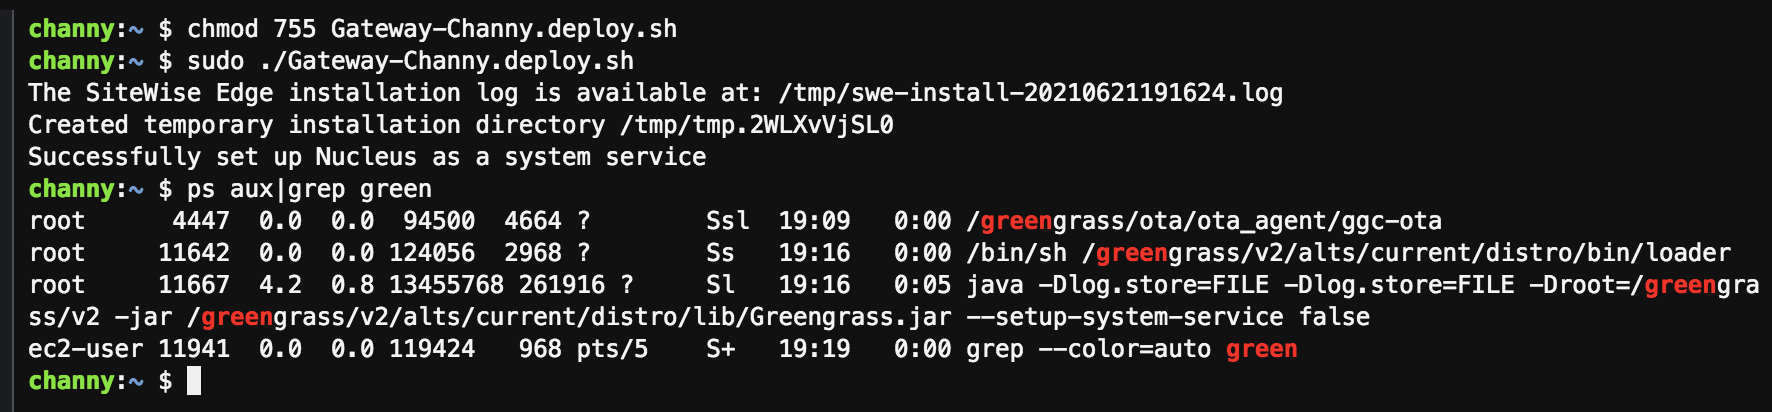
AWS IoT SiteWise will generate an installer with these configuration values for your gateway. We provide an install script that you can download, <Gateway-name>.deploy.sh, where <Gateway-name> is the name of the gateway you just created.

To set up AWS IoT SiteWise Edge on your device, run the install script and verify the AWS IoT Greengrass runtime for your gateway.

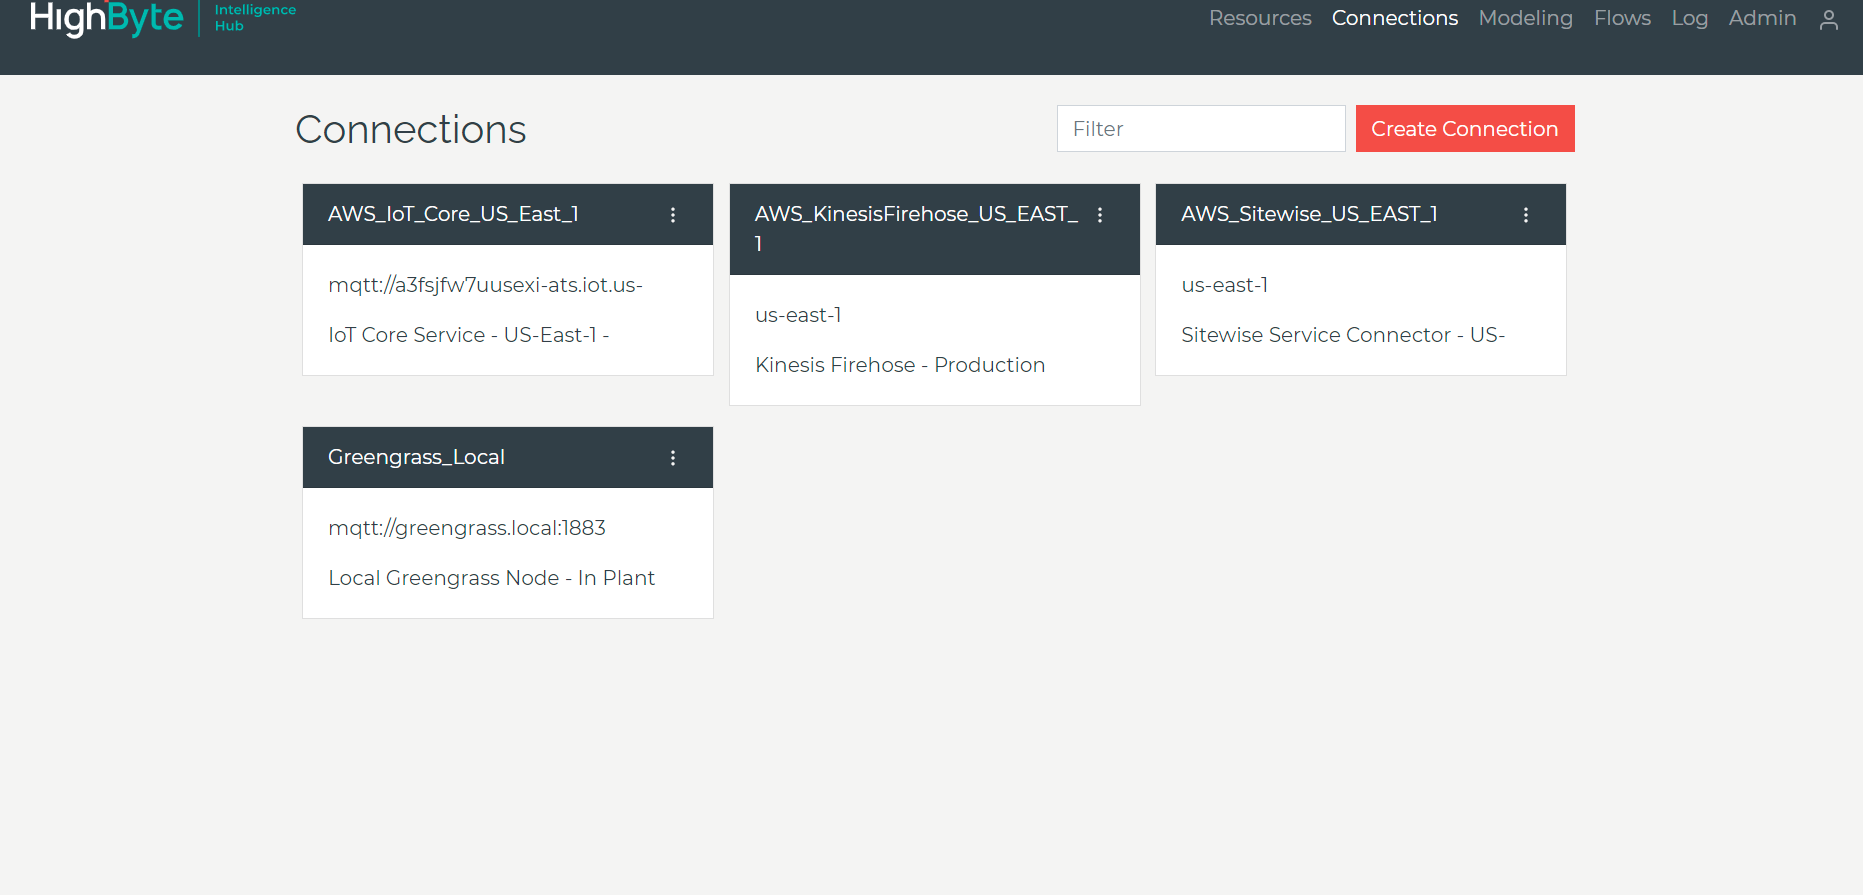
Once the gateway is created, you configure its data sources from the gateway detail page. You can configure OPC-UA, Modbus, and EtherNet/IP data sources. To learn more, please see Configuring data sources in AWS IoT SiteWise User Guide.

Now you can see the created gateway, its configuration, edge capabilities, and data sources. Once you have configured your data sources, deploy the AWS IoT Greengrass connectors with “SiteWise” in the title to your device. To learn more, see Configuring a gateway in AWS IoT SiteWise User Guide.

Processing Model Data and Monitoring the Gateway
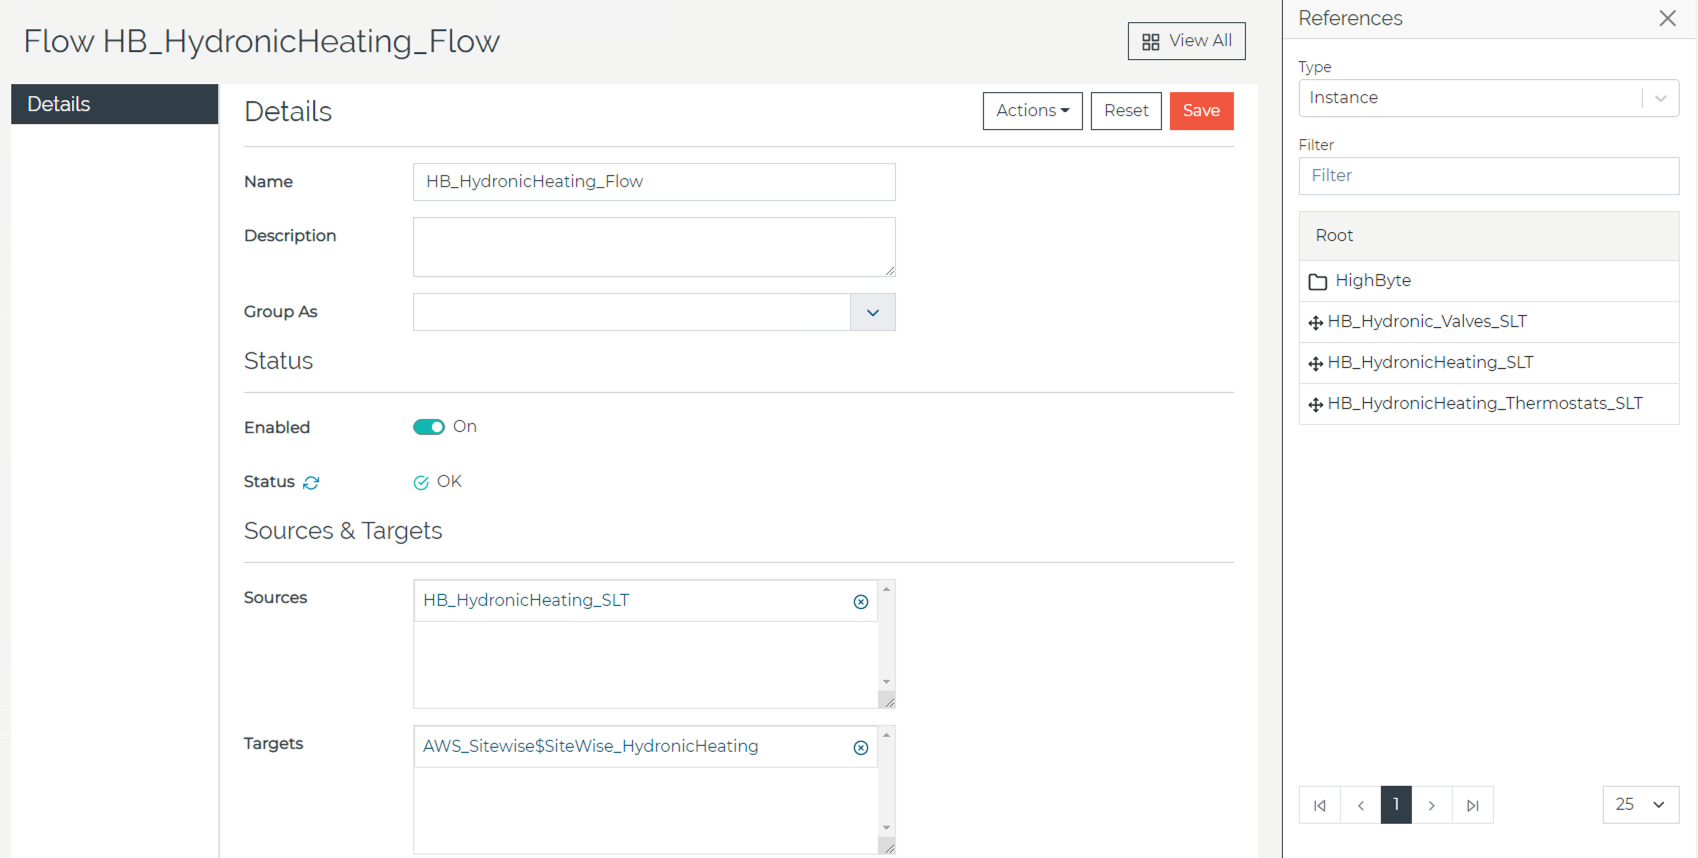
You can use asset models defined in AWS IoT SiteWise to specify which data, transforms, and metrics to process in the gateway locally, and visualize equipment data using local AWS IoT SiteWise Monitor dashboards served from the gateway.

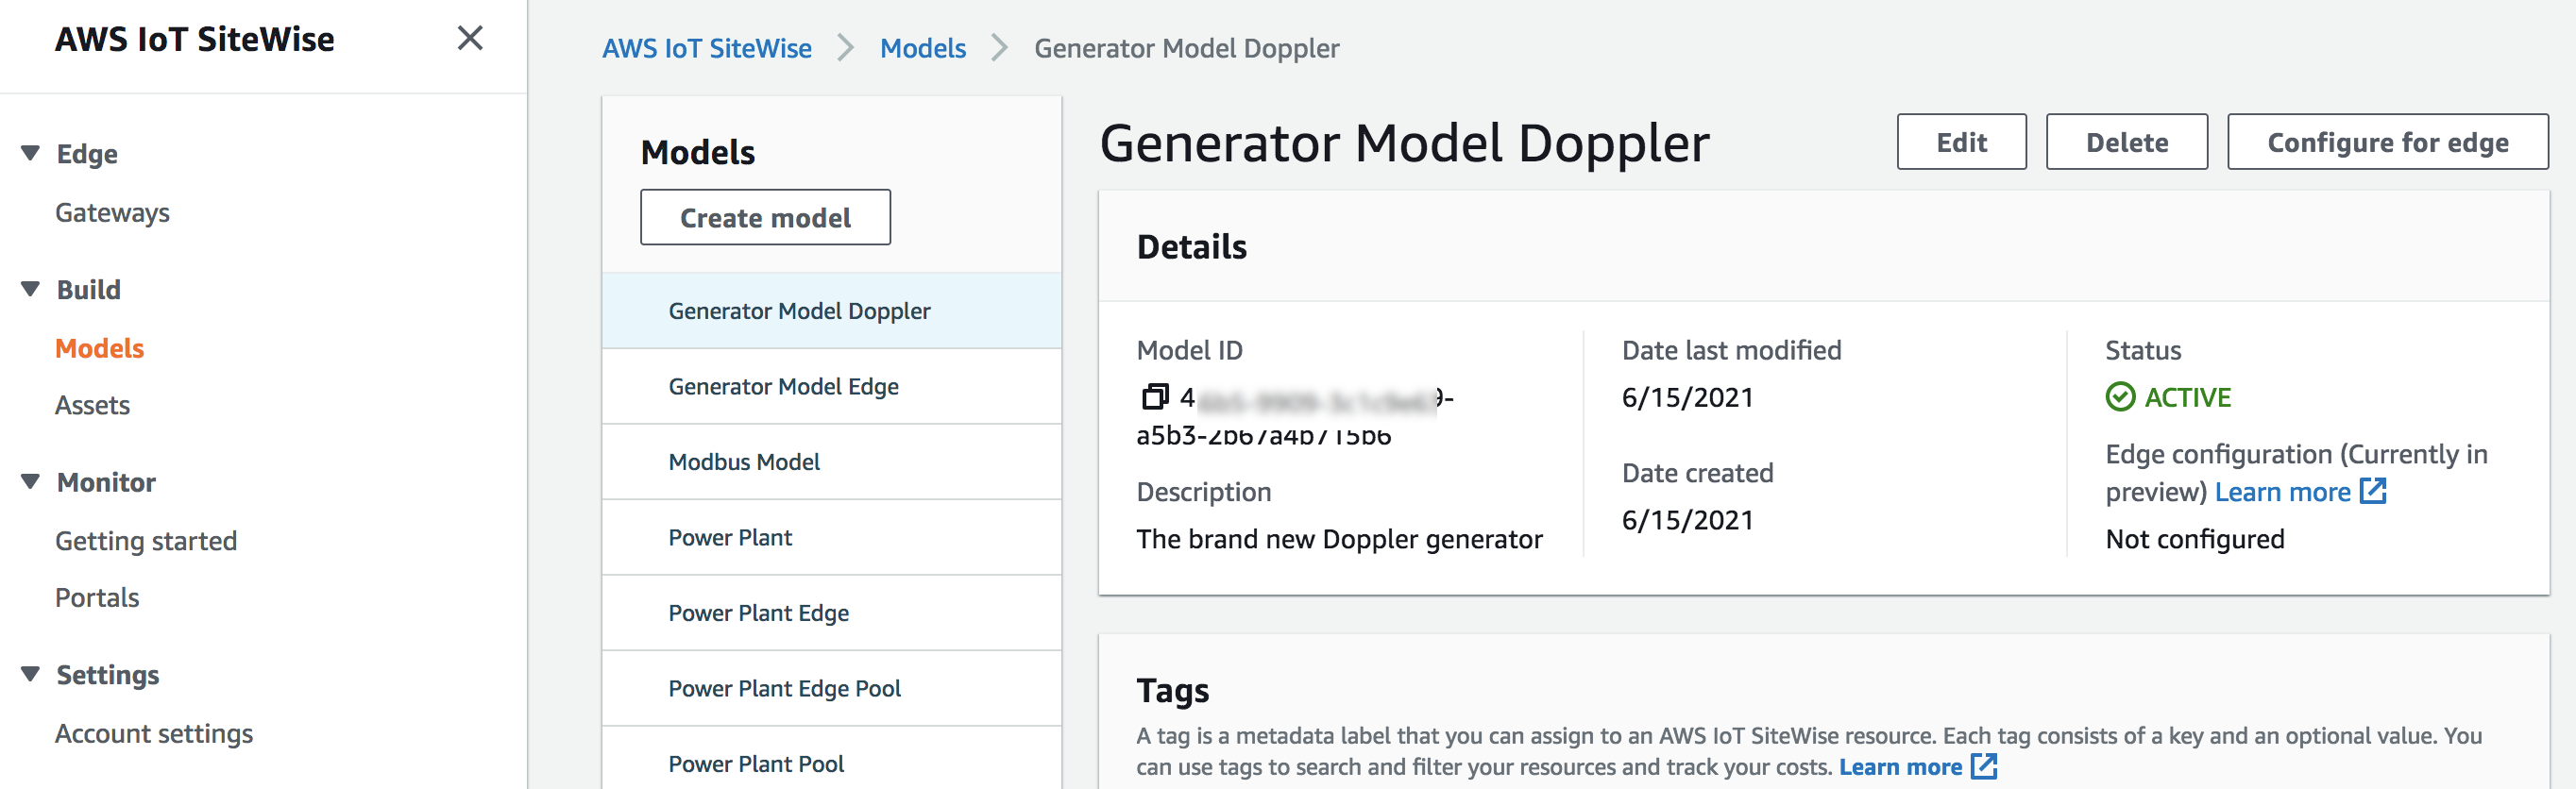
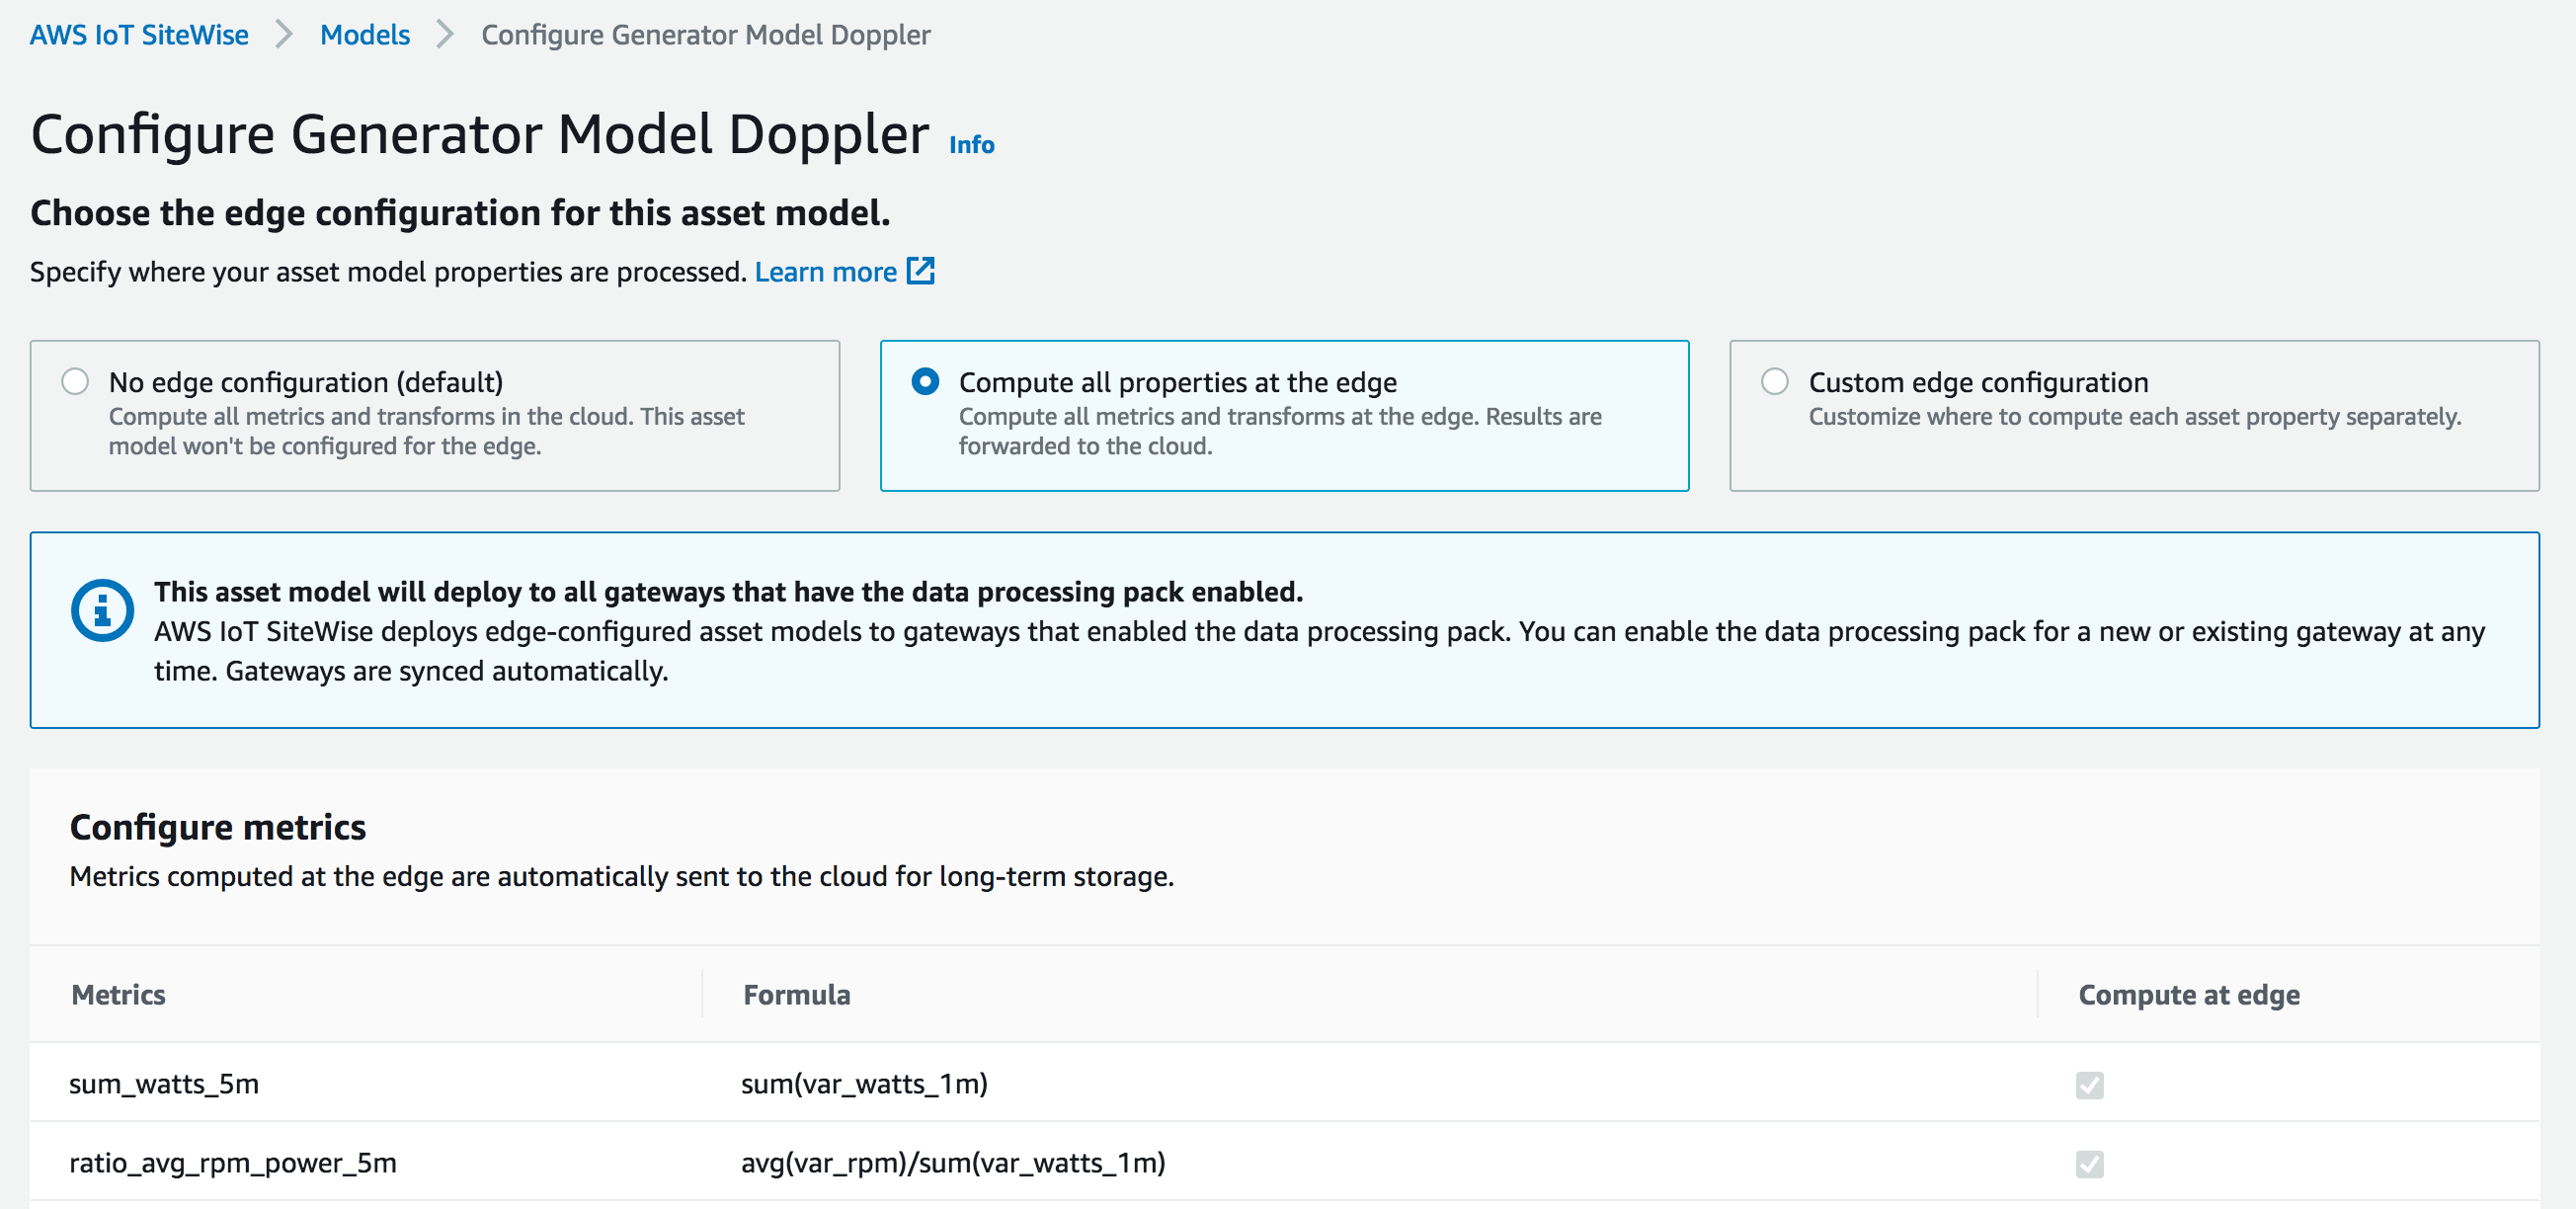
To add your models to the gateway, in the left navigation pane of the AWS IoT SiteWise console, expand Build, and then choose Models. On the Models page, choose Configure for edge.

There are three options for an edge configuration for an asset model: no edge configuration (that is, all properties are computed in the cloud), compute all properties at the edge, and custom edge configuration.

AWS IoT SiteWise gateway fetches all instances of the asset model from the service and processes all data it is able to collect for measurement. All you need to do is configure the asset models themselves and keep the load guidance in mind.

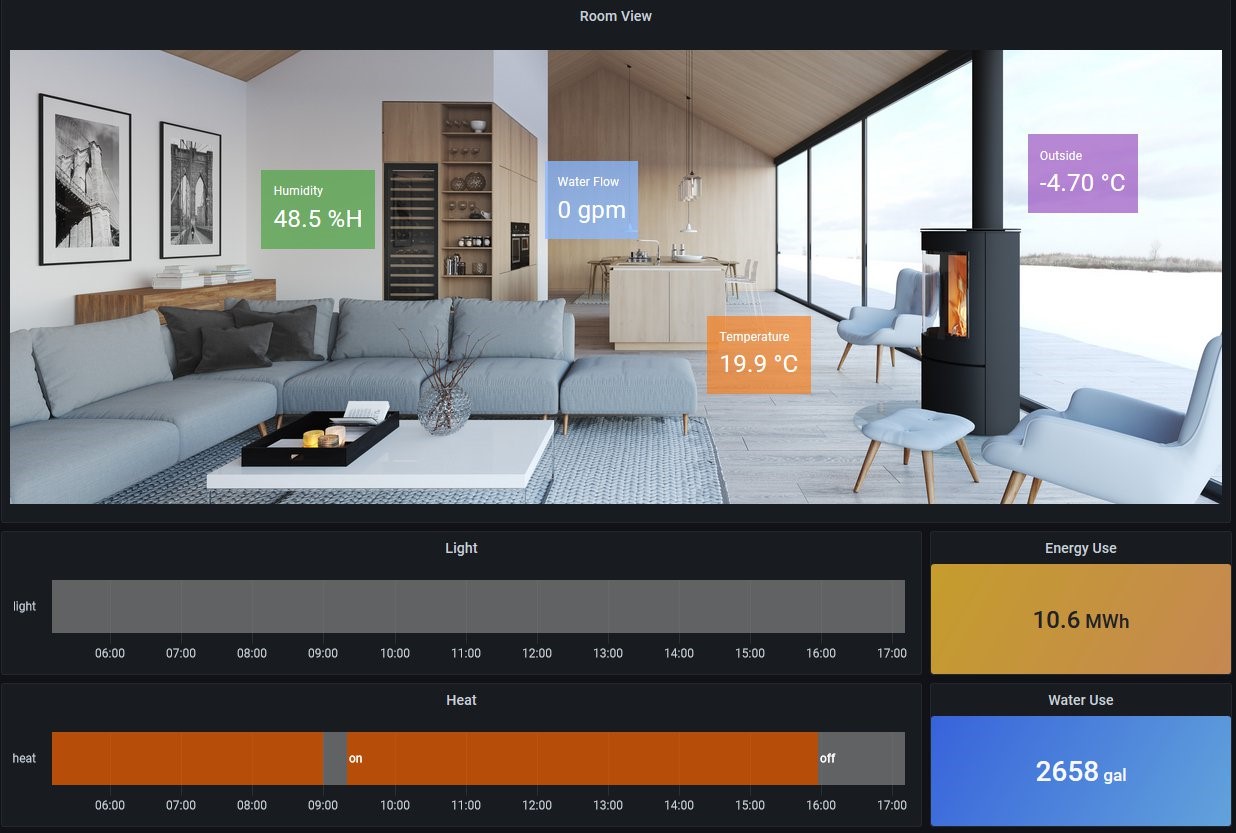
With AWS IoT SiteWise Edge, you can also deploy AWS IoT SiteWise Monitor web applications locally so users like process engineers can visualize equipment data in near-real time on the factory floor and use this information to improve the uptime of equipment, reduce waste, and increase production output.

At the GA release of AWS IoT SiteWise Edge, we improved the SiteWise Monitor configuration by allowing users to configure which dashboards they want to run at the edge, and to reduce clutter and bandwidth requirements, to make only those dashboards available locally. To learn more, see Getting started with AWS IoT SiteWise Monitor in the AWS IoT SiteWise Monitor Application Guide.

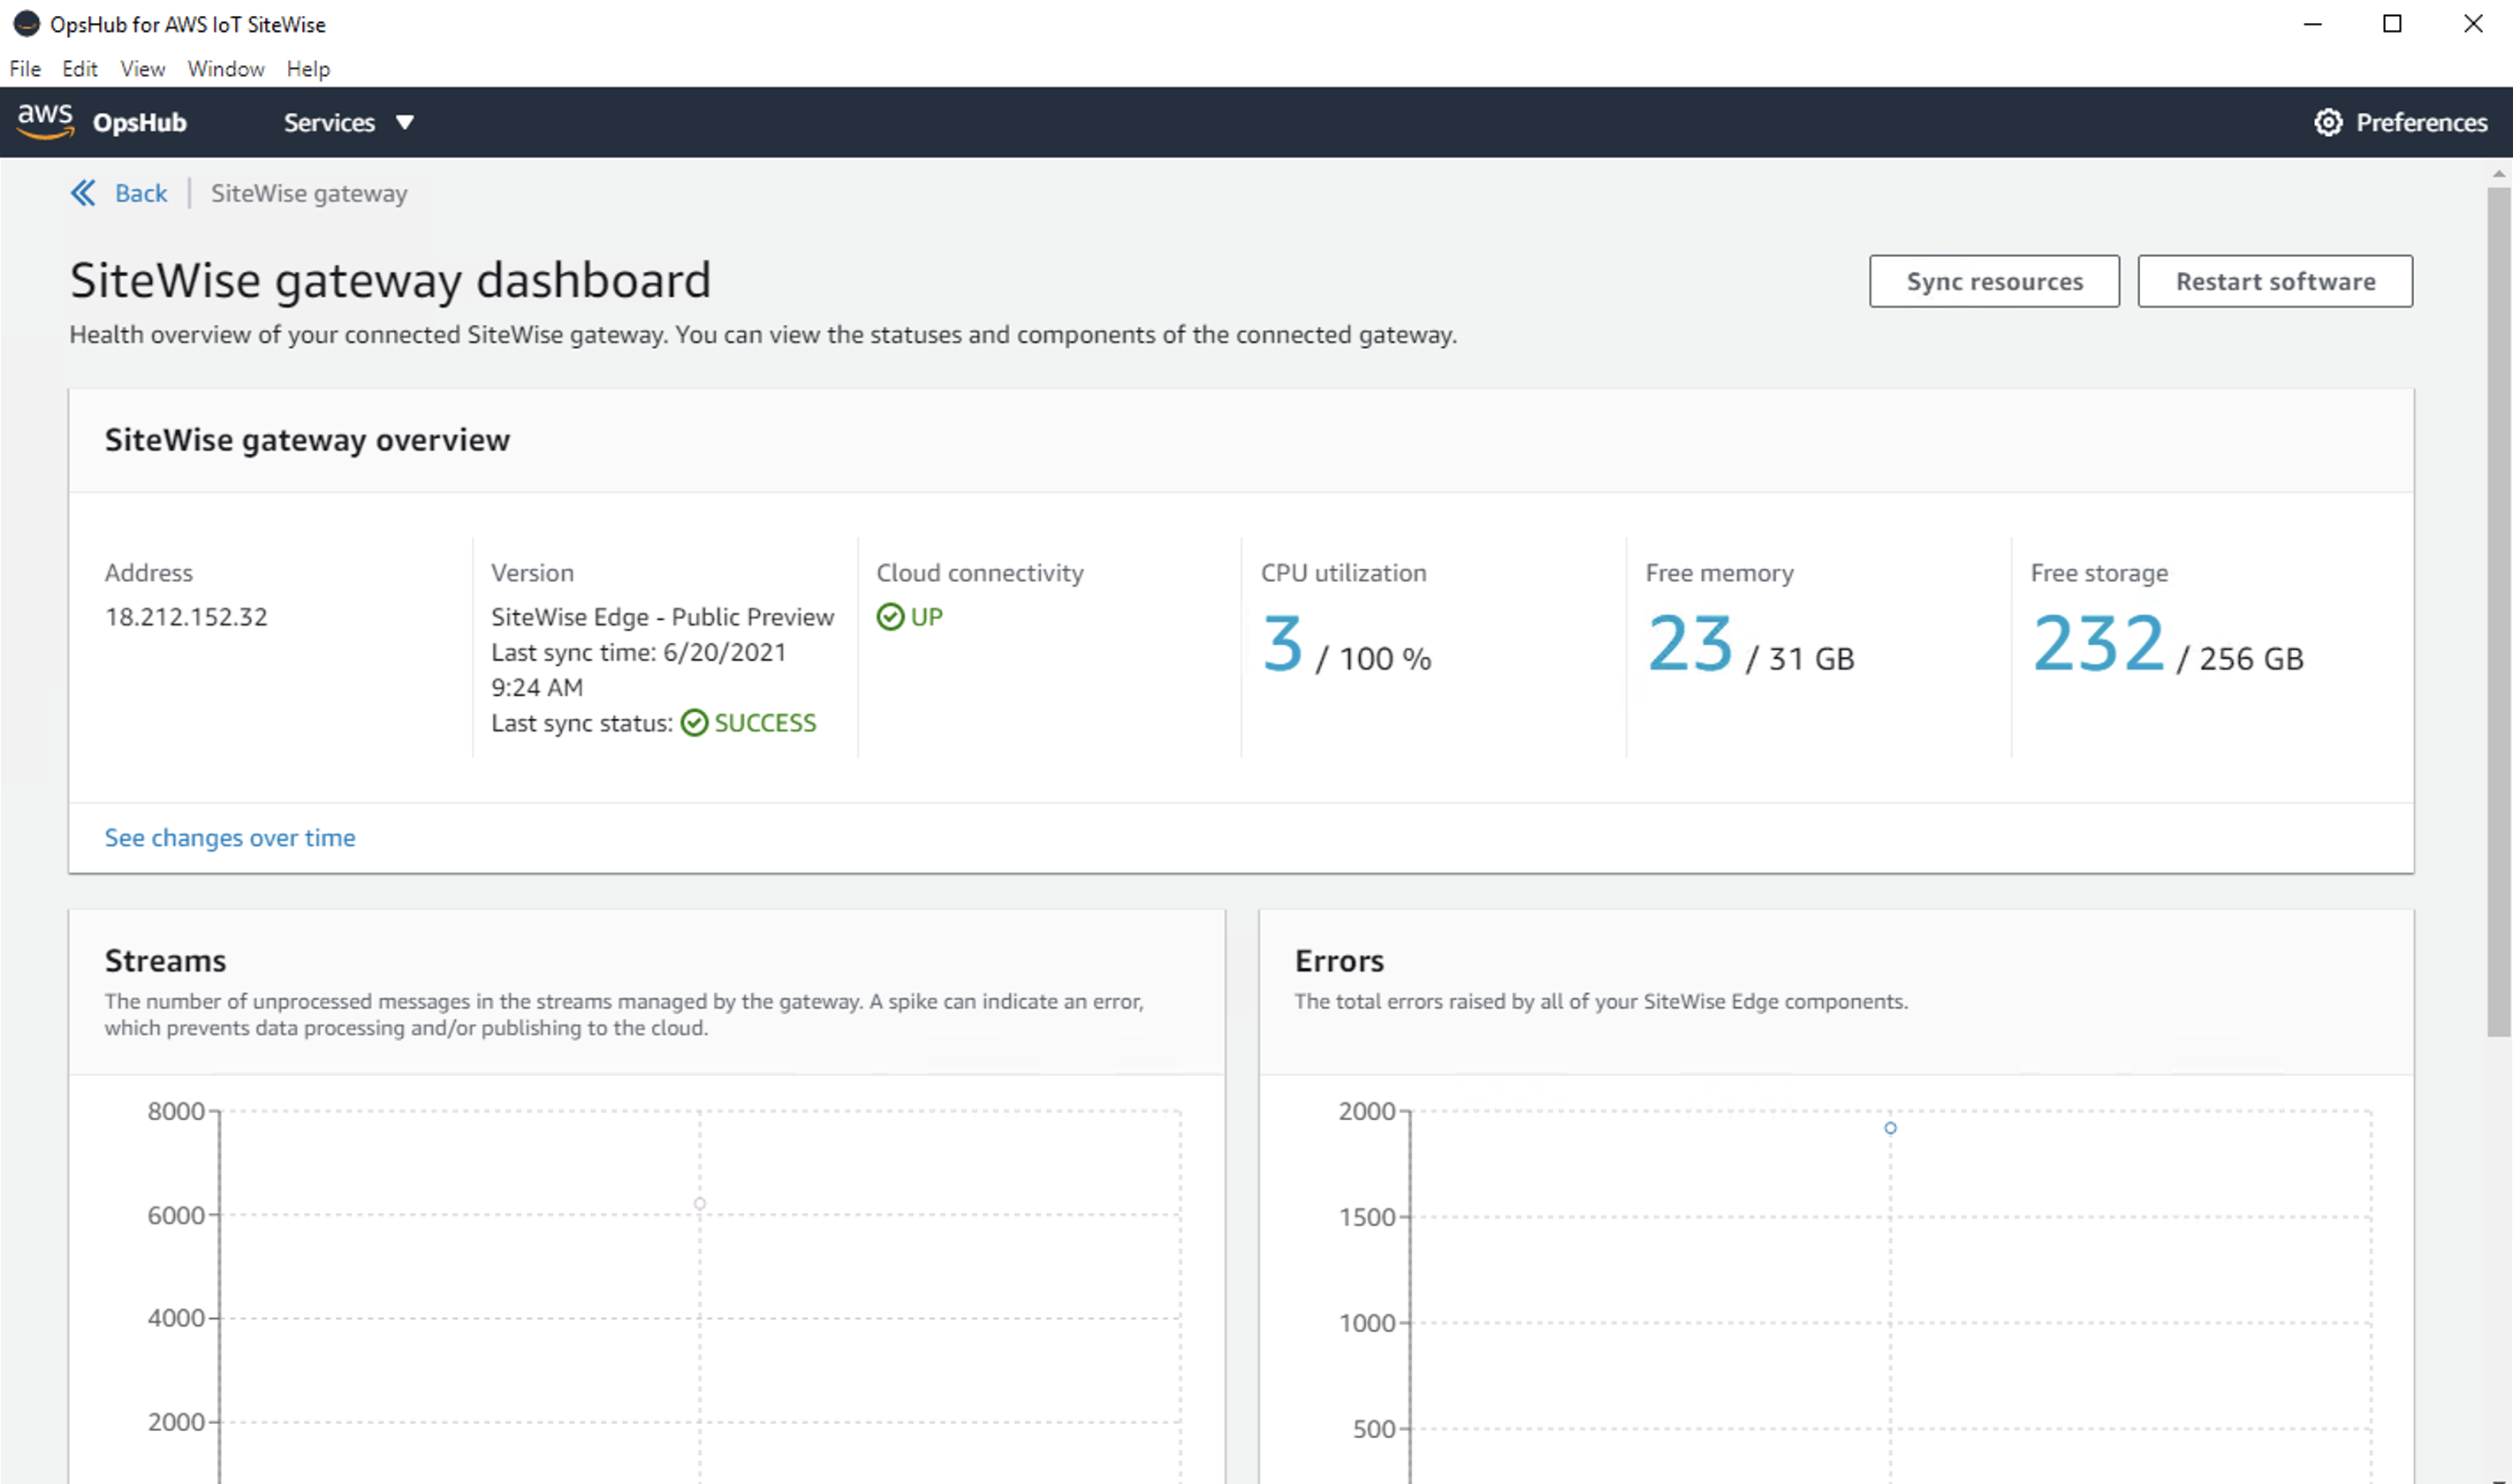
The OpsHub for AWS IoT SiteWise application can be installed on any Windows PC for monitoring and troubleshooting gateways entirely locally. The application connects directly to your gateway over the local network to monitor health metrics (for example, memory, CPU, cloud connectivity), status of edge software (for example, uptime of dashboard applications), and recent data collected from equipment.

We also improved the visualization of gateway health metrics and the ability to download gateway activity logs. To learn more, see Monitor data at the edge in the AWS IoT SiteWise User Guide.

Available Now
AWS IoT SiteWise Edge is available in all AWS Regions where AWS IoT SiteWise is available. AWS IoT SiteWise Edge provides the data collection and processing pack in the gateway for local applications. The data collection pack is free. The data processing pack is charged at $200 per active gateway, per month. See the AWS IoT SiteWise pricing page for details.

To learn more, visit the AWS IoT SiteWise Edge page or see Ingesting data using a gateway in the AWS IoT SiteWise User Guide.

You can send feedback through the AWS IoT SiteWise forum or through your usual AWS Support contacts.

Channy

New – Amazon Lookout for Equipment Analyzes Sensor Data to Help Detect Equipment Failure

Post Syndicated from Harunobu Kameda original https://aws.amazon.com/blogs/aws/new-amazon-lookout-for-equipment-analyzes-sensor-data-to-help-detect-equipment-failure/

Companies that operate industrial equipment are constantly working to improve operational efficiency and avoid unplanned downtime due to component failure. They invest heavily and repeatedly in physical sensors (tags), data connectivity, data storage, and building dashboards over the years to monitor the condition of their equipment and get real-time alerts. The primary data analysis methods are single-variable threshold and physics-based modeling approaches, and while these methods are effective in detecting specific failure types and operating conditions, they can often miss important information detected by deriving multivariate relationships for each piece of equipment.

With machine learning, more powerful technologies have become available that can provide data-driven models that learn from an equipment’s historical data. However, implementing such machine learning solutions is time-consuming and expensive owing to capital investment and training of engineers.

Today, we are happy to announce Amazon Lookout for Equipment, an API-based machine learning (ML) service that detects abnormal equipment behavior. With Lookout for Equipment, customers can bring in historical time series data and past maintenance events generated from industrial equipment that can have up to 300 data tags from components such as sensors and actuators per model. Lookout for Equipment automatically tests the possible combinations and builds an optimal machine learning model to learn the normal behavior of the equipment. Engineers don’t need machine learning expertise and can easily deploy models for real-time processing in the cloud.

Customers can then easily perform ML inference to detect abnormal behavior of the equipment. The results can be integrated into existing monitoring software or AWS IoT SiteWise Monitor to visualize the real-time output or to receive alerts if an asset tends toward anomalous conditions.

How Lookout for Equipment Works
Lookout for Equipment reads directly from Amazon S3 buckets. Customers can publish their industrial data in S3 and leverage Lookout for Equipment for model development. A user determines the value or time period to be used for training and assigns an appropriate label. Given this information, Lookout for Equipment launches a task to learn and creates the best ML model for each customer.

Because Lookout for Equipment is an automated machine learning tool, it gets smarter over time as users use Lookout for Equipment to retrain their models with new data. This is useful for model re-creation when new invisible failures occur, or when the model drifts over time. Once the model is complete and can be inferred, Lookout for Equipment provides real-time analysis.

With the equipment data being published to S3, the user can scheduled inference that ranges from 5 minutes to one hour. When the user data arrives in S3, Lookout for Equipment fetches the new data on the desired schedule, performs data inference, and stores the results in another S3 bucket.

Set up Lookout for Equipment with these simply steps:

  1. Upload data to S3 buckets
  2. Create datasets
  3. Ingest data
  4. Create a model
  5. Schedule inference (if you need real-time analysis)

1. Upload data
You need to upload tag data from equipment to any S3 bucket.

2. Create Datasets

Select Create dataset, and set Dataset name, and set Data Schema. Data schema is like a data design document that defines the data to be fed in later. Then select Create.

creating datasets console

3. Ingest data
After a dataset is created, the next step is to ingest data. If you are familiar with Amazon Personalize or Amazon Forecast, doesn’t this screen feel familiar? Yes, Lookout for Equipment is as easy to use as those are.

Select Ingest data.

Ingesting data consoleSpecify the S3 bucket location where you uploaded your data, and an IAM role. The IAM role has to have a trust relationship to “lookoutequipment.amazonaws.com” You can use the following policy file for the test.

{
  "Version": "2012-10-17",
  "Statement": [
    {
      "Effect": "Allow",
      "Principal": {
        "Service": "lookoutequipment.amazonaws.com"
      },
      "Action": "sts:AssumeRole"
    }
  ]
}

The data format in the S3 bucket has to match the Data Schema you set up in step 2. Please check our technical documents for more detail. Ingesting data takes a few minutes to tens of minutes depending on your data volume.

4. Create a model
After data ingest is completed, you can train your own ML model now. Select Create new model. Fields show us a list of fields in the ingested data. By default, no field is selected. You can select fields you want Lookout for Equipment to learn. Lookout for Equipment automatically finds and trains correlations from multiple specified fields and creates a model.

Image illustrates setting up fields.

If you are sure that your data has some unusual data included, you can optionally set the windows to exclude that data.

setting up maintenance windowOptionally, you can divide ingested data for training and then for evaluation. The data specified during the evaluation period is checked compared to the trained model.

setting up evaluation window

Once you select Create, Lookout for Equipment starts to train your model. This process takes minutes to hours depending on your data volume. After training is finished, you can evaluate your model with the evaluation period data.

model performance console

5. Schedule Inference
Now it is time to analyze your real time data. Select Schedule Inference, and set up your S3 buckets for input.

setting up input S3 bucket

You can also set Data upload frequency, which is actually the same as inferencing frequency, and Offset delay time. Then, you need to set up Output data as Lookout for Equipment outputs the result of inference.

setting up inferenced output S3 bucket

Amazon Lookout for Equipment is In Preview Today
Amazon Lookout for Equipment is in preview today at US East (N. Virginia), Asia Pacific (Seoul), and Europe (Ireland) and you can see the documentation here.

– Kame