As organizations increasingly adopt AI-powered development tools, a critical challenge emerges: how do you maintain security governance when AI assistants execute AWS operations on behalf of users? Organizations want to leverage AI assistance for development and read operations while maintaining strict controls over write operations that impact production systems and auditing calls made via AI assistants. Consider this scenario: A developer asks Amazon Q Developer“List my S3 buckets”, Q Developer suggests aws s3 ls, the developer approves, and Q Developer executes the command via AWS CLI. From an AWS perspective, this looks identical to the developer manually running the aws s3 ls command on the terminal outside of Amazon Q Developer. But what if your organization needs to distinguish between AI-assisted operations and manual commands for governance or compliance?
Amazon Q Developer, the most capable generative AI–powered assistant for software development, generates AWS CLI commands in response to user requests and executes them using its use_aws and execute_bashbuilt-in tools. The challenge of distinguishing AI-assisted operations from manual commands is a key consideration for Amazon Q Developer adoption in enterprise environments. To address this governance challenge, Amazon Q Developer includes a built-in solution: user-agent markers that automatically identify AWS CLI calls made through Q Developer in CloudTrail logs, enabling precise IAM policy controls.
This blog post explores how Amazon Q Developer’s built-in user agent markers set for AWS CLI calls enable precise IAM policy controls, allowing organizations to distinguish and govern AI-assisted AWS operations while maintaining the productivity benefits of AI-powered development. The following sections demonstrate how these user agent markers work, how to implement IAM policies that leverage them, and how to monitor their effectiveness in your environment.
Understanding Amazon Q Developer User Agent Markers
Prerequisites
This section builds on your knowledge of these concepts and assumes you have the necessary setup in place. These foundational elements are essential for understanding how user agent markers work and for implementing the governance controls discussed later in this post. If you need guidance on any of these topics, please refer to the linked documentation:
Amazon Q Developer setup for CLI and/or IDE extensions – Needed to generate the user agent markers this post examines
AWS CloudTrail concepts and API logging – Essential for monitoring and verifying user agent markers in practice
IAM policies and permissions management – Critical for implementing the governance controls that leverage these markers
Amazon Q Developer automatically includes identifiable markers in the user agent string of all AWS API calls it makes via AWS CLI. These markers appear in two primary contexts: CLI tool operations and IDE integration operations.
Q Developer CLI Tool
When using Amazon Q Developer CLI (both use_aws and execute_bash tools), all AWS CLI calls include:
exec-env/AmazonQ-For-CLI-Version-<QCLI-VersionNo>
How It Works: Amazon Q Developer CLI automatically sets:
This means all AWS CLI commands executed through Q Developer CLI – whether via the use_aws tool or execute_bash commands – automatically include this marker.
This applies when Q Developer makes AWS API calls through IDE integrations, such as when analyzing your codebase or suggesting AWS resource configurations. The IDE marker enables you to distinguish between CLI-based and IDE-based Q Developer operations.
Complete User Agent Example
Here’s how a complete user agent string appears in CloudTrail:
The key identifiers are exec-env/AmazonQ-For-CLI-Version-* and exec-env/AmazonQ-For-IDE-Version-*, which clearly distinguish Amazon Q Developer operations from regular AWS CLI/SDK usage executed outside of Q Developer.
Use the aws:userAgent condition in IAM policies to control Amazon Q Developer operations through two approaches:
IAM Policies: Deploy in each AWS account where developers have access for deploying workloads or performing AWS operations. Q Developer operates using the developer’s existing AWS credentials and permissions – it doesn’t have additional access beyond what the user already possesses. Attach these policies to the same IAM users, groups, or roles that developers use for their regular AWS work.
Service Control Policies (SCPs): Deploy once at the AWS Organizations level for organization-wide governance. SCPs apply to all member accounts automatically and cannot be overridden by account-level policies.
The following policy allows read operations from Q Developer, blocks write operations from Q Developer, and allows write operations from regular AWS CLI executed outside Q Developer:
Note: This IAM policy example is for illustration purposes only. Follow least privilege principles in production environments. For more details refer prepare for least previlege permissions.
Note on User Agent Reliability: While AWS warns that user agents can be “spoofed,” this concern is reduced for Q Developer governance use cases. The user agent is automatically set by Q Developer’s tools, not manually controlled by users. Any spoofing would require deliberate effort and would be detectable through usage pattern analysis. This approach is designed for operational governance and policy differentiation, not as a sole security control.
Additional Control Layer: Custom Agent Configuration
For an additional layer of control, you can create a custom agent configuration that restricts which AWS services Amazon Q Developer can access using allowedServices and deniedServices parameters for the use_aws tool:
This custom agent configuration works in conjunction with IAM policies to provide defense-in-depth governance of AI-assisted AWS operations. For more details, refer to the agent configuration documentation.
Verification and Monitoring
CloudTrail Event Analysis
To verify that your policies are working correctly, examine CloudTrail events. Here’s what to look for:
Create a simple monitoring script to track Amazon Q Developer usage:
#!/bin/bash
# Monitor Amazon Q Developer AWS API usage
# Get events from last 24 hours and filter for Q Developer user agents
aws cloudtrail lookup-events \
  --start-time $(date -u -v-24H '+%Y-%m-%dT%H:%M:%SZ') \
  --lookup-attributes AttributeKey=EventName,AttributeValue=GetCallerIdentity \
  --query 'Events[?contains(CloudTrailEvent, `AmazonQ-For-CLI`)].[EventTime,EventName,UserIdentity.userName]' \
  --output table
Conclusion
Amazon Q Developer’s built-in user agent markers provide a powerful foundation for implementing enterprise-grade security controls around AI-assisted AWS operations. By leveraging these markers in IAM policies, organizations can:
Distinguish between AI-assisted and manual AWS operations
Implement differentiated security policies based on operation source
Maintain detailed audit trails for compliance requirements
Enable secure Amazon Q Developer adoption in enterprise environments while maintaining strict controls over write operations that could impact production systems
For organizations currently evaluating Amazon Q Developer adoption, implementing user agent marker-based controls is a key component of your deployment strategy. This approach enables you to realize the productivity benefits of AI-assisted development while maintaining the governance and security controls your organization requires.
Experience the power of Amazon Q Developer as your AI-powered coding assistant, and implement the governance controls outlined in this post to ensure secure adoption in your enterprise environment. These built-in user agent markers enable you to maintain enterprise-grade security while unlocking the productivity benefits of AI-assisted development.
Kirankumar Chandrashekar is a Generative AI Specialist Solutions Architect at AWS, focusing on Amazon Q Developer/Kiro and developer productivity. Bringing deep expertise in AWS cloud services, DevOps, modernization, and infrastructure as code, he helps customers accelerate their development cycles and elevate developer productivity through innovative AI-powered solutions. By leveraging Amazon Q Developer and Kiro, he enables teams to build applications faster, automate routine tasks, and streamline development workflows. Kirankumar is dedicated to enhancing developer efficiency while solving complex customer challenges, and enjoys music, cooking, and traveling.
AWS Lake Formation makes it straightforward to centrally govern, secure, and globally share data for analytics and machine learning (ML).
With Lake Formation, you can centralize data security and governance using the AWS Glue Data Catalog, letting you manage metadata and data permissions in one place with familiar database-style features. It also delivers fine-grained data access control, so you can make sure users have access to the right data down to the row and column level.
Lake Formation also makes it straightforward to share data internally across your organization and externally, which lets you create a data mesh or meet other data sharing needs with no data movement.
Additionally, because Lake Formation tracks data interactions by role and user, it provides comprehensive data access auditing to verify the right data was accessed by the right users at the right time.
In this two-part series, we show how to integrate custom applications or data processing engines with Lake Formation using the third-party services integration feature.
In this post, we dive deep into the required Lake Formation and AWS Glue APIs. We walk through the steps to enforce Lake Formation policies within custom data applications. As an example, we present a sample Lake Formation integrated application implemented using AWS Lambda.
The second part of the series introduces a sample web application built with AWS Amplify. This web application showcases how to use the custom data processing engine implemented in the first post.
By the end of this series, you will have a comprehensive understanding of how to extend the capabilities of Lake Formation by building and integrating your own custom data processing components.
In this section, we dive deeper into the steps required to establish trust between Lake Formation and an external application, the API operations that are involved, and the AWS Identity and Access Management (IAM) permissions that must be set up to enable the integration.
Lake Formation application integration external data filtering
In Lake Formation, it’s possible to control which third-party engines or applications are allowed to read and filter data in Amazon Simple Storage Service (Amazon S3) locations registered with Lake Formation.
To do so, you can navigate to the Application integration settings page on the Lake Formation console and enable Allow external engines to filter data in Amazon S3 locations registered with Lake Formation, specifying the AWS account IDs from where third-party engines are allowed to access locations registered with Lake Formation. In addition, you have to specify the allowed session tag values to identify trusted requests. We discuss in later sections how these tags are used.
Lake Formation application integration involved AWS APIs
The following is a list of the main AWS APIs needed to integrate an application with Lake Formation:
sts:AssumeRole – Returns a set of temporary security credentials that you can use to access AWS resources.
glue:GetUnfilteredTableMetadata – Allows a third-party analytical engine to retrieve unfiltered table metadata from the Data Catalog.
lakeformation:GetTemporaryGlueTableCredentials – Allows a caller in a secure environment to assume a role with permission to access Amazon S3. To vend such credentials, Lake Formation assumes the role associated with a registered location, for example an S3 bucket, with a scope down policy that restricts the access to a single prefix.
lakeformation:GetTemporaryGluePartitionCredentials – This API is identical to GetTemporaryTableCredentials except that it’s used when the target Data Catalog resource is of type Partition. Lake Formation restricts the permission of the vended credentials with the same scope down policy that restricts access to a single Amazon S3 prefix.
Later in this post, we present a sample architecture illustrating how you can use these APIs.
External application and IAM roles to access data
For an external application to access resources in an Lake Formation environment, it needs to run under an IAM principal (user or role) with the appropriate credentials. Let’s consider a scenario where the external application runs under the IAM role MyApplicationRole that is part of the AWS account 123456789012.
In Lake Formation, you have granted access to various tables and databases to two specific IAM roles:
AccessRole1
AccessRole2
To enable MyApplicationRole to access the resources that have been granted to AccessRole1 and AccessRole2, you need to configure the trust relationships for these access roles. Specifically, you need to configure the following:
Allow MyApplicationRole to assume each of the access roles (AccessRole1 and AccessRole2) using the sts:AssumeRole
Allow MyApplicationRole to tag the assumed session with a specific tag, which is required by Lake Formation. The tag key should be LakeFormationAuthorizedCaller, and the value should match one of the session tag values specified in the Application integration settings page on the Lake Formation console (for example, “application1“).
The following code is an example of the trust relationships configuration for an access role (AccessRole1 or AccessRole2):
Additionally, the data access IAM roles (AccessRole1 and AccessRole2) must have the following IAM permissions assigned in order to read Lake Formation protected tables:
For our solution, Lambda serves as our external trusted engine and application integrated with Lake Formation. This example is provided in order to understand and see in action the access flow and the Lake Formation API responses. Because it’s based on a single Lambda function, it’s not meant to be used in production settings or with high volumes of data.
Moreover, the Lambda based engine has been configured to support a limited set of data files (CSV, Parquet, and JSON), a limited set of table configurations (no nested data), and a limited set of table operations (SELECT only). Due to these limitations, the application should not be used for arbitrary tests.
In this post, we provide instructions on how to deploy a sample API application integrated with Lake Formation that implements the solution architecture. The core of the API is implemented with a Python Lambda function. We also show how to test the function with Lambda tests. In the second post in this series, we provide instructions on how to deploy a web frontend application that integrates with this Lambda function.
Access flow for unpartitioned tables
The following diagram summarizes the access flow when accessing unpartitioned tables.
The workflow consists of the following steps:
User A (authenticated with Amazon Cognito or other equivalent systems) sends a request to the application API endpoint, requesting access to a specific table inside a specific database.
The API endpoint, created with AWS AppSync, handles the request, invoking a Lambda function.
The function checks which IAM data access role the user is mapped to. For simplicity, the example uses a static hardcoded mapping (mappings={ "user1": "lf-app-access-role-1", "user2": "lf-app-access-role-2"}).
The function invokes the sts:AssumeRole API to assume the user-related IAM data access role (lf-app-access-role-1AccessRole1). The AssumeRole operation is performed with the tag LakeFormationAuthorizedCaller, having as its value one of the session tag values specified when configuring the application integration settings in Lake Formation (for example, {'Key': 'LakeFormationAuthorizedCaller','Value': 'application1'}). The API returns a set of temporary credentials, which we refer to as StsCredentials1.
Using StsCredentials1, the function invokes the glue:GetUnfilteredTableMetadata API, passing the requested database and table name. The API returns information like table location, a list of authorized columns, and data filters, if defined.
Using StsCredentials1, the function invokes the lakeformation:GetTemporaryGlueTableCredentials API, passing the requested database and table name, the type of requested access (SELECT), and CELL_FILTER_PERMISSION as the supported permission types (because the Lambda function implements logic to apply row-level filters). The API returns a set of temporary Amazon S3 credentials, which we refer to as S3Credentials1.
Using S3Credentials1, the function lists the S3 files stored in the table location S3 prefix and downloads them.
The retrieved Amazon S3 data is filtered to remove those columns and rows that the user is not allowed access to (authorized columns and row filters were retrieved in Step 5) and authorized data is returned to the user.
Access flow for partitioned tables
The following diagram summarizes the access flow when accessing partitioned tables.
The steps involved are almost identical to the ones presented for partitioned tables, with the following changes:
After invoking the glue:GetUnfilteredTableMetadata API (Step 5) and identifying the table as partitioned, the Lambda function invokes the glue:GetUnfilteredPartitionsMetadata API using StsCredentials1 (Step 6). The API returns, in addition to other information, the list of partition values and locations.
For each partition, the function performs the following actions:
Invokes the lakeformation:GetTemporaryGluePartitionCredentials API (Step 7), passing the requested database and table name, the partition value, the type of requested access (SELECT), and CELL_FILTER_PERMISSION as the supported permissions type (because the Lambda function implements logic to apply row-level filters). The API returns a set of temporary Amazon S3 credentials, which we refer to as S3CredentialsPartitionX.
Uses S3CredentialsPartitionX to list the partition location S3 files and download them (Step 8).
The function appends the retrieved data.
Before the Lambda function returns the results to the user (Step 9), the retrieved Amazon S3 data is filtered to remove those columns and rows that the user is not allowed access to (authorized columns and row filters were retrieved in Step 5).
Prerequisites
The following prerequisites are needed to deploy and test the solution:
Lake Formation should be enabled in the AWS Region where the sample application will be deployed
The steps must be run with an IAM principal with sufficient permissions to create the needed resources, including Lake Formation databases and tables
Deploy solution resources with AWS CloudFormation
We create the solution resources using AWS CloudFormation. The provided CloudFormation template creates the following resources:
One S3 bucket to store table data (lf-app-data-<account-id>)
Two IAM roles, which will be mapped to client users and their associated Lake Formation permission policies (lf-app-access-role-1 and lf-app-access-role-2)
Two IAM roles used for the two created Lambda functions (lf-app-lambda-datalake-population-role and lf-app-lambda-role)
One AWS Glue database (lf-app-entities) with two AWS Glue tables, one unpartitioned (users_tbl) and one partitioned (users_partitioned_tbl)
One Lambda function used to populate the data lake data (lf-app-lambda-datalake-population)
One Lambda function used for the Lake Formation integrated application (lf-app-lambda-engine)
One IAM role used by Lake Formation to access the table data and perform credentials vending (lf-app-datalake-location-role)
One Lake Formation data lake location (s3://lf-app-data-<account-id>/datasets) associated with the IAM role created for credentials vending (lf-app-datalake-location-role)
One Lake Formation data filter (lf-app-filter-1)
One Lake Formation tag (key: sensitive, values: true or false)
Tag associations to tag the created unpartitioned AWS Glue table (users_tbl) columns with the created tag
To launch the stack and provision your resources, complete the following steps:
Download the code zip bundle for the Lambda function used for the Lake Formation integrated application (lf-integrated-app.zip).
Upload the zip bundles to an existing S3 bucket location (for example, s3://mybucket/myfolder1/myfolder2/lf-integrated-app.zip and s3://mybucket/myfolder1/myfolder2/datalake-population-function.zip)
Choose Launch Stack.
This automatically launches AWS CloudFormation in your AWS account with a template. Make sure that you create the stack in your intended Region.
Choose Next to move to the Specify stack details section
For Parameters, provide the following parameters:
For powertoolsLogLevel, specify how verbose the Lambda function logger should be, from the most verbose to the least verbose (no logs). For this post, we choose DEBUG.
For s3DeploymentBucketName, enter the name of the S3 bucket containing the Lambda functions’ code zip bundles. For this post, we use mybucket.
For s3KeyLambdaDataPopulationCode, enter the Amazon S3 location containing the code zip bundle for the Lambda function used to populate the data lake data (datalake-population-function.zip). For example, myfolder1/myfolder2/datalake-population-function.zip.
For s3KeyLambdaEngineCode, enter the Amazon S3 location containing the code zip bundle for the Lambda function used for the Lake Formation integrated application (lf-integrated-app.zip). For example, myfolder1/myfolder2/lf-integrated-app.zip.
Choose Next.
Add additional AWS tags if required.
Choose Next.
Acknowledge the final requirements.
Choose Create stack.
Enable the Lake Formation application integration
Complete the following steps to enable the Lake Formation application integration:
On the Lake Formation console, choose Application integration settings in the navigation pane.
Enable Allow external engines to filter data in Amazon S3 locations registered with Lake Formation.
For Session tag values, choose application1.
For AWS account IDs, enter the current AWS account ID.
Choose Save.
Enforce Lake Formation permissions
The CloudFormation stack created one database named lf-app-entities with two tables named users_tbl and users_partitioned_tbl.
To be sure you’re using Lake Formation permissions, you should confirm that you don’t have any grants set up on those tables for the principal IAMAllowedPrincipals. The IAMAllowedPrincipals group includes any IAM users and roles that are allowed access to your Data Catalog resources by your IAM policies, and it’s used to maintain backward compatibility with AWS Glue.
To confirm Lake Formations permissions are enforced, navigate to the Lake Formation console and choose Data lake permissions in the navigation pane. Filter permissions by Database=lf-app-entities and remove all the permissions given to the principal IAMAllowedPrincipals.
Check the created Lake Formation resources and permissions
The CloudFormation stack created two IAM roles—lf-app-access-role-1 and lf-app-access-role-2—and assigned them different permissions on the users_tbl (unpartitioned) and users_partitioned_tbl (partitioned) tables. The specific Lake Formation grants are summarized in the following table.
IAM Roles
lf-app-entities (Database)
users _tbl (Table)
_tbl _partitioned_tbl (Table)
lf-app-access-role-1
No access
Read access on columns uid, state, and city for all the records. Read access to all columns except for address only on rows with value state=united kingdom.
lf-app-access-role-2
Read access on columns with the tag sensitive = false
Read access to all columns and rows.
To better understand the full permissions setup, you should review the CloudFormation created Lake Formation resources and permissions. On the Lake Formation console, complete the following steps:
Review the data filters:
Choose Data filters in the navigation pane.
Inspect the lf-app-filter-1
Review the tags:
Choose LF-Tags and permissions in the navigation pane.
Inspect the sensitive
Review the tag associations:
Choose Tables in the navigation pane.
Choose the users_tbl
Inspect the LF-Tags associated to the different columns in the Schema
Review the Lake Formation permissions:
Choose Data lake permissions in the navigation pane.
Filter by Principal = lf-app-access-role-1 and inspect the assigned permissions.
Filter by Principal = lf-app-access-role-2 and inspect the assigned permissions.
Test the Lambda function
The Lambda function created by the CloudFormation template accepts JSON objects as input events. The JSON events have the following structure:
Although the identity field is always needed in order to identify the called identity, depending on the requested operation (fieldName), different arguments should be provided. The following table lists these arguments.
Operation
Description
Needed Arguments
Output
getDbs
List databases
No arguments needed
List of databases the user has access to
getTablesByDb
List tables
db: <db_name>
List of tables inside a database the user has access to
To troubleshoot the Lambda function, you can navigate to the Monitoring tab, choose View CloudWatch logs, and inspect the latest log stream.
Clean up
If you plan to explore Part 2 of this series, you can skip this part, because you will need the resources created here. You can refer to this section at the end of your testing.
Complete the following steps to remove the resources you created following this post and avoid incurring additional costs:
On the AWS CloudFormation console, choose Stacks in the navigation pane.
Choose the stack you created and choose Delete.
Additional considerations
In the proposed architecture, Lake Formation permissions were granted to specific IAM data access roles that requesting users (for example, the identity field) were mapped to. Another possibility is to assign permissions in Lake Formation to SAML users and groups and then work with the AssumeDecoratedRoleWithSAML API.
Conclusion
In the first part of this series, we explored how to integrate custom applications and data processing engines with Lake Formation. We delved into the required configuration, APIs, and steps to enforce Lake Formation policies within custom data applications. As an example, we presented a sample Lake Formation integrated application built on Lambda.
The information provided in this post can serve as a foundation for developing your own custom applications or data processing engines that need to operate on an Lake Formation protected data lake.
Refer to the second part of this series to see how to build a sample web application that uses the Lambda based Lake Formation application.
About the Authors
Stefano Sandonà is a Senior Big Data Specialist Solution Architect at AWS. Passionate about data, distributed systems, and security, he helps customers worldwide architect high-performance, efficient, and secure data platforms.
Francesco Marelli is a Principal Solutions Architect at AWS. He specializes in the design, implementation, and optimization of large-scale data platforms. Francesco leads the AWS Solution Architect (SA) analytics team in Italy. He loves sharing his professional knowledge and is a frequent speaker at AWS events. Francesco is also passionate about music.
In this post, we explore how to deploy a fully functional web client application, built with JavaScript/React through AWS Amplify (Gen 1), that uses the same Lambda function as the backend. The provisioned web application provides a user-friendly and intuitive way to view the Lake Formation policies that have been enforced.
For the purposes of this post, we use a local machine based on MacOS and Visual Studio Code as our integrated development environment (IDE), but you could use your preferred development environment and IDE.
Solution overview
AWS AppSync creates serverless GraphQL and pub/sub APIs that simplify application development through a single endpoint to securely query, update, or publish data.
GraphQL is a data language to enable client apps to fetch, change, and subscribe to data from servers. In a GraphQL query, the client specifies how the data is to be structured when it’s returned by the server. This makes it possible for the client to query only for the data it needs, in the format that it needs it in.
Amplify streamlines full-stack app development. With its libraries, CLI, and services, you can connect your frontend to the cloud for authentication, storage, APIs, and more. Amplify provides libraries for popular web and mobile frameworks, like JavaScript, Flutter, Swift, and React.
Prerequisites
The web application that we deploy depends on the Lambda function that was deployed in the first post of this series. Make sure the function is already deployed and working in your account.
We create a JavaScript application using the React framework.
In the terminal, enter the following command:
npm create vite@latest
Enter a name for your project (we use lfappblog), choose React for the framework, and choose JavaScript for the variant.
You can now run the next steps, ignore any warning messages. Don’t run the npm run dev command yet.
Enter the following command:
cd lfappblog && npm install
You should now see the directory structure shown in the following screenshot.
You can now test the newly created application by running the following command:
npm run dev
By default, the application is available on port 5173 on your local machine.
The base application is shown in the workspace browser.
You can close the browser window and then the test web server by entering the following in the terminal: q + enter
Set up and configure Amplify for the application
To set up Amplify for the application, complete the following steps:
Run the following command in the application directory to initialize Amplify:
amplify init
Refer to the following screenshot for all the options required. Make sure to change the value of Distribution Directory Path to dist. The command creates and runs the required AWS CloudFormation template to create the backend environment in your AWS account.
Install the node modules required by the application with the following command:
The output of this command will vary depending on the packages already installed on your development machine.
Add Amplify authentication
Amplify can implement authentication with Amazon Cognito user pools. You run this step before adding the function and the Amplify API capabilities so that the user pool created can be set as the authentication mechanism for the API, otherwise it would default to the API key and further modifications would be required.
Run the following command and accept all the defaults:
amplify add auth
Add the Amplify API
The application backend is based on a GraphQL API with resolvers implemented as a Python Lambda function. The API feature of Amplify can create the required resources for GraphQL APIs based on AWS AppSync (default) or REST APIs based on Amazon API Gateway.
Run the following command to add and initialize the GraphQL API:
amplify add api
Make sure to set Blank Schema as the schema template (a full schema is provided as part of this post; further instructions are provided in the next sections).
Make sure to select Authorization modes and then Amazon Cognito User Pool.
Add Amplify hosting
Amplify can host applications using either the Amplify console or Amazon CloudFront and Amazon Simple Storage Service (Amazon S3) with the option to have manual or continuous deployment. For simplicity, we use the Hosting with Amplify Console and Manual Deployment options.
Run the following command:
amplify add hosting
Copy and configure the GraphQL API schema
You’re now ready to copy and configure the GraphQL schema file and update it with the current Lambda function name.
In the schema.graphql file, you can see that the lf-app-lambda-engine function is set as the data source for the GraphQL queries.
Copy and configure the AWS AppSync resolver template
AWS AppSync uses templates to preprocess the request payload from the client before it’s sent to the backend and postprocess the response payload from the backend before it’s sent to the client. The application requires a modified template to correctly process custom backend error messages.
From the project directory, run the following command to verify all resources are ready to be created on AWS:
amplify status
Run the following command to publish the full application:
amplify publish
This will take several minutes to complete. Accept all defaults apart from Enter maximum statement depth [increase from default if your schema is deeply nested], which must be set to 5.
All the resources are now deployed on AWS and ready for use.
Use the application
You can start using the application from the Amplify hosted domain.
Run the following command to retrieve the application URL:
amplify status
At first access, the application shows the Amazon Cognito login page.
Choose Create Account and create a user with user name user1 (this is mapped in the application to the role lf-app-access-role-1 for which we created Lake Formation permissions in the first post).
Enter the confirmation code that you received through email and choose Sign In.
When you’re logged in, you can start interacting with the application.
Controls
The application offers several controls:
Database – You can select a database registered with Lake Formation with the Describe permission.
Table – You can choose a table with Select permission.
Number of records – This indicates the number of records (between 5–40) to display on the Data Because this is a sample application, no pagination was implemented in the backend.
Row type – Enable this option to display only rows that have at least one cell with authorized data. If all cells in a row are unauthorized and checkbox is selected, the row is not displayed.
Outputs
The application has four outputs, organized in tabs.
Unfiltered Table Metadata
This tab displays the response of the AWS Glue API GetUnfilteredTableMetadata policies for the selected table. The following is an example of the content:
This tab displays the response of the AWS Glue API GetUnfileteredPartitionsMetadata policies for the selected table. The following is an example of the content:
This tab displays a table that shows the columns, rows, and cells that the user is authorized to access.
A cell is marked as Unauthorized if the user has no permissions to access its contents, according to the cell filter definition. You can choose the unauthorized cell to view the relevant cell filter condition.
In this example, the user can’t access the value of column surname in the first row because for the row, state is canada, but the cell can only be accessed when state=’united kingdom’.
If the Only rows with authorized data control is unchecked, rows with all cells set to Unauthorized are also displayed.
All Data
This tab contains a table that contains all the rows and columns in the table (the unfiltered data). This is useful for comparison with authorized data to understand how cell filters are applied to the unfiltered data.
Test Lake Formation permissions
Log out of the application and go to the Amazon Cognito login form, choose Create Account, and create a new user with called user2 (this is mapped in the application to the role lf-app-access-role-2 that we created Lake Formation permissions for in the first post). Get table data and metadata for this user to see how Lake Formation permissions are enforced and so the two users can see different data (on the Authorized Data tab).
The following screenshot shows that the Lake Formation permissions we created grant access to the following data (all rows, all columns) of table users_partitioned_tbl to user2 (mapped to lf-app-access-role-2).
The following screenshot shows that the Lake Formation permissions we created grant access to the following data (all rows, but only city, state, and uid columns) of table users_tbl to user2 (mapped to lf-app-access-role-2).
Considerations for the GraphQL API
You can use the AWS AppSync GraphQL API deployed in this post for other applications; the responses of the GetUnfilteredTableMetadata and GetUnfileteredPartitionsMetadata AWS Glue APIs were fully mapped in the GraphQL schema. You can use the Queries page on the AWS AppSync console to run the queries; this is based on GraphiQL.
You can use the following object to define the query variables:
In this post, we showed how to implement a web application that uses a GraphQL API implemented with AWS AppSync and Lambda as the backend for a web application integrated with Lake Formation. You should now have a comprehensive understanding of how to extend the capabilities of Lake Formation by building and integrating your own custom data processing applications.
Try out this solution for yourself, and share your feedback and questions in the comments.
About the Authors
Stefano Sandonà is a Senior Big Data Specialist Solution Architect at AWS. Passionate about data, distributed systems, and security, he helps customers worldwide architect high-performance, efficient, and secure data platforms.
Francesco Marelli is a Principal Solutions Architect at AWS. He specializes in the design, implementation, and optimization of large-scale data platforms. Francesco leads the AWS Solution Architect (SA) analytics team in Italy. He loves sharing his professional knowledge and is a frequent speaker at AWS events. Francesco is also passionate about music.
This post is co-written with Matt Vogt from Immuta.
Organizations are looking for products that let them spend less time managing data and more time on core business functions. Data security is one of the key functions in managing a data warehouse. With Immuta integration with Amazon Redshift, user and data security operations are managed using an intuitive user interface. This blog post describes how to set up the integration, access control, governance, and user and data policies.
Amazon Redshift is a fully managed, petabyte-scale, massively parallel data warehouse that makes it fast and cost-effective to analyze all your data using standard SQL and your existing business intelligence (BI) tools. Today, tens of thousands of customers run business-critical workloads on Amazon Redshift. Amazon Redshift natively supports coarse-grained and fine-grained access control with features such as role-based access control, scoped permissions, row-level security, column-level access control and dynamic data masking.
Immuta enables organizations to break down the silos that exist between data engineering teams, business users, and security by providing a centralized platform for creating and managing policy. Access and security policies are inherently technical, forcing data engineering teams to take responsibility for creating and managing these policies. Immuta empowers business users to effectively manage access to their own datasets and it enables business users to create tag and attribute-based policies. Through Immuta’s natural language policy builder, users can create and deploy data access policies without needing help from data engineers. This distribution of policies to the business enables organizations to rapidly access their data while ensuring that the right people use it for the right reasons.
Solution overview
In this blog, we describe how data in Redshift can be protected by defining the right level of access using Immuta. Let’s consider the following example datasets and user personas. These datasets, groups, and access policies are for illustration only and have been simplified to illustrate the implementation approach.
Datasets:
patients: Contains patients’ personal information such as name, address, date of birth (DOB), phone number, gender, and doctor ID
conditions: Contains the history of patients’ medical conditions
immunization: Contains patients’ immunization records
encounters: Contains patients’ medical visits and the associated payment and coverage costs
Groups:
Doctor: Groups users who are doctors
Nurse: Groups users who are nurses
Admin: Groups the administrative users
Following are the four permission policies to enforce.
Doctor should have access to all four datasets. However, each doctor should see only the data for their own patients. They should not be able to see all the patients
Nurse can access only the patients and immunization And can see all patients data.
Admin can access only the patients and encounters And can see all patients data.
Patients’ social security numbers and passport information should be masked for all users.
Pre-requisites
Complete the following steps before starting the solution implementation.
Download the SQL commands and replace the Amazon S3 file path in the COPY command with the file path of the uploaded files in your account.
Implementation
The following diagram describes the high-level steps in the following sections, which you will use to build the solution.
1. Map users
In the Immuta portal, navigate to People and choose Users. Select a user name to map to an Amazon Redshift user name.
Choose Edit for the Amazon Redshift user name and enter the corresponding Redshift username.
Repeat the steps for the other users.
2. Set up native integration
To use Immuta, you must configure Immuta native integration, which requires privileged access to administer policies in your Redshift data warehouse. See the Immuta documentation for detailed requirements.
Use the following steps to create native integration between Amazon Redshift and Immuta.
In Immuta, choose App Settings from the navigation pane.
Click on Integrations.
Click on Add Native Integration.
Enter the Redshift data warehouse endpoint name, port number, and a database name where Immuta will create policies.
Enter privileged user credentials to connect with administrative privileges. These credentials aren’t stored on the Immuta platform and are used for one-time setup.
You should see a successful integration with a status of Enabled.
3. Create a connection
The next step is to create a connection to the Redshift data warehouse and select specific data sources to import.
In Immuta, choose Data Sources and then New Data sources in the navigation pane and choose New Data Source.
Select Redshift as the Data Platform.
Enter the Redshift data warehouse endpoint as the Server and the credentials to connect. Ensure the Redshift security group has inbound rules created to open access from Immuta IP addresses.
Immuta will show the schemas available on the connected database.
Choose Edit under Schema/Table section.
Select pschema from the list of schemas displayed.
Leave the values for the remaining options as the default and choose Create. This will import the metadata of the datasets and run default data discovery. In 2 to 5 minutes, you should see the table imported with status as Healthy.
4. Tag the data fields
Immuta automatically tags the data members using a default framework. It’s a starter framework that contains all the built-in and custom defined identifiers. However, you might want to add custom tags to the data fields to fit your use case. In this section, you will create custom tags and attach them to data fields. Optionally, you can also integrate with an external data catalog such as Alation, or Colibra. For this post, you will use custom tags.
Create tags
In Immuta, choose Governance from the navigation pane, and then choose Tags.
Choose Add Tags to open the Tag Builder dialog box
Enter Sensitive as a custom tag and choose Save.
Repeat steps 1–3 to create the following tags.
Doctor ID: Tag to mark the doctor ID field. It will be used for defining an attribute bases access policy (ABAC).
Doctor Datasets: Tag to mark data sources accessible to Doctors.
Admin Datasets: Tag to mark data sources accessible to Admins.
Nurse Datasets: Tag to mark data sources accessible to Nurses.
Add tags
Now add the Sensitive tag to the ssn and passport fields in the Pschema Patient data source.
In Immuta, choose Data and then Data Sources in the navigation pane and select Pschema Patient as the data source.
Choose the Data Dictionary tab
Find ssn in the list and choose Add Tags.
Search for Sensitive tag and choose Add.
Repeat the same step for the passport
You should see tags applied to the fields.
Using the same procedure, add the Doctor ID tag to the drid (doctor ID) field in the Pschema Patients data source.
Now tag the data sources as required by the access policy you’re building.
Choose Data and then Data Sources and select Pschema Patients as the data source.
Scroll down to Tags and choose Add Tags
Add Doctor Datasets, Nurse Datasets, and Admin Datasets tags to the patients data source (because this data source should be accessible by the Doctors, Nurses, and Admins groups).
Data Source
Tags
Patients
Doctor Datasets, Nurse Datasets, Admin Datasets
Conditions
Doctor Datasets
Immunizations
Doctor Datasets, Nurse Datasets
Encounters
Doctor Datasets, Admin Datasets
You can create more tags and tag fields as required by your organization’s data classification rules. The Immuta data source page is where stewards and governors will spend a lot of time.
5. Create groups and add users
You must create user groups before you define policies.
In Immuta, choose People and then Groups from the navigation pane and then choose New Group.
Provide doctor as the group name and select Save.
Repeat step1 and step2 to create the following groups:
nurse
admin
You should see three groups created.
Next, you need to add users to these groups.
Choose People and then Groups in the navigation pane.
Select the doctor
Choose Settings and choose Add Members in the Members
Search for Dr Jon King in the search bar and select the user from the results. Choose close to add the user and exit the screen.
You should see Dr Jon King added to the doctor.
Repeat to add additional users as shown in the following table.
Group
Users
Doctor
Dr Jon King, Dr Chris
Nurse
Jane D
admin
David Mill, Ema Joseph
6. Add attributes to users
One of the security requirements is that doctors can only see the data of their patients. They shouldn’t be able to see other doctors’ patient data. To implement this requirement, you must define attributes for users who are doctors.
Choose People and then Users in the navigation pane, and then select Dr Chris.
Choose Settings and scroll down to the Attributes
Choose Add Attributes. Enter drid as the Attribute and d1001 as the Attribute value.
This will assign the attribute value of d1001 to Dr Chris. In Step 8 Define data policies, you will define a policy to show data with the matching drid attribute value.
Repeat steps 1–4; selecting Dr Jon King and entering d1002 as the Attribute value
7. Create subscription policy
In this section, you will provide data sources access to groups as required by the permission policy.
Doctors can access all four datasets: Patients, Conditions, Immunizations, and Encounters.
Nurses can access only Patients and Immunizations.
Admins can access only Patients and Encounters.
In 4.Tag the data fields, you added tags to the datasets as shown in the following table. You will now use the tags to define subscription policies.
Data source
Tags
Patients
Doctor Datasets, Nurse Datasets, Admin Datasets
Conditions
Doctor Datasets
Immunizations
Doctor Datasets, Nurse Datasets
Encounters
Doctor Datasets, Admin Datasets
In Immuta, choose Policies and then Subscription Policies from the navigation pane, and then choose Add Subscription Policy.
Enter Doctor Access as the policy name.
For the Subscription level, select Allow users with specific groups/attributes.
Under Allow users to subscribe when user, select doctor. This allows only users who are members of the doctor group to access data sources accessible by doctor group.
Scroll down and select Share Responsibility. This will ensure users aren’t blocked from accessing datasets even if they don’t meet all the subscription policies, which isn’t required.
Scroll further down and under Where should this policy be applied, choose On data sources, tagged and Doctor Dataset as options. It selects the datasets tagged as Doctor Dataset. You can notice that this policy applies all 4 data sources as all four data sources are tagged as Doctor Datasets.
Next, create the policy by choose Activate This will create the view and policies in Redshift and enforce the permission policy.
Repeat the same steps to define Nurse Access and Admin Access
For the Nurse Access policy, select users who are a member of the Nurse group and data sources that are tagged as Nurse Datasets.
For the Admin Access policy, select users who are member of the Admin group and data sources that are tagged as Admin Datasets.
In Subscription policies, you should see all three policies in Active Notice the Data Sources count for how many data sources the policy is applied to.
8. Define data policies
So far, you have defined permission policies at the data sources level. Now, you will define row and column level access using data policies. The fine-grained permission policy that you should define to restrict rows and columns is:
Doctors can see only the data of their own patients. In other words, when a doctor queries the patients table, then they should see only patients that match their doctor ID (drid).
Sensitive fields, such as ssn or passport, should be masked for everyone.
In Immuta, Choose Policies and then Data Policies in the navigation pane and then choose Add Data Policy.
Enter Filter by Doctor ID as the Policy name.
Under How should this policy protect the data?, choose options as Only show rows , where, user possesses an attribute in drid that matches the value in column tagged Doctor ID. These settings will enforce that a doctor can see only the data of patients that have a matching Doctor ID. All other users (members of the nurse and admin groups) can see all of the patients
Scroll down and under Where should this policy be applied?, choose On data sources, with columns tagged, Doctor ID as options. It selects the data sources that have columns tagged as Doctor ID. Notice the number of data sources it selected. It applied the policy to one data source out of the four available. Remember that you added the Doctor ID tag to the drid field for the Patients data source. So, this policy identified the Patients data source as a match and applied the policy.
Choose Activate Policy to create the policy.
Similarly, create another policy to mask sensitive data for everyone.
Provide Mask Sensitive Data as policy name.
Under How should this policy protect the data?, choose Mask, columns tagged, Sensitive, using hashtag, for, everyone.
Under Where should this policy be applied?, choose on data sources, with columns tagged, Sensitive.
In the Data Policies screen, you should now see both data policies in Active
9. Query the data to validate policies
The required permission policies are now in place. Sign in to the Redshift Query Editor as different users to see the permission policies in effect.
For example,
Sign in as Dr. Jon King using the Redshift user ID jon. You should see all four tables, and if you query the patients table, you should see only the patients of Dr. Jon King; that is, patients with the Doctor ID d10002.
Sign in as Ema Joseph using the Redshift user ID ema. You should see only two tables, Patients and Encounters, which are Admin datasets.
You will also notice that ssn and passport are masked for both users.
Audit
Immuta’s comprehensive auditing capabilities provide organizations with detailed visibility and control over data access and usage within their environment. The platform generates rich audit logs that capture a wealth of information about user activities, including:
Who’s subscribing to each data source and the reasons behind their access
When users are accessing the data
The specific SQL queries and blob fetches they are executing
The individual files they are accessing
The following is an example screenshot.
Industry use cases
The following are example industry use cases where Immuta and Amazon Redshift integration adds value to customer business objectives. Consider enabling the following use cases on Amazon Redshift and using Immuta.
Patient records management
In the healthcare and life sciences (HCLS) industry, efficient access to quality data is mission critical. Disjointed tools can hinder the delivery of real-time insights that are critical for healthcare decisions. These delays negatively impact patient care, as well as the production and delivery of pharmaceuticals. Streamlining access in a secure and scalable manner is vital for timely and accurate decision-making.
Data from disparate sources can easily become siloed, lost, or neglected if not stored in an accessible manner. This makes data sharing and collaboration difficult, if not impossible, for teams who rely on this data to make important treatment or research decisions. Fragmentation issues lead to incomplete or inaccurate patient records, unreliable research results, and ultimately slow down operational efficiency.
Maintaining regulatory compliance
HCLS organizations are subject to a range of industry-specific regulations and standards, such as Good Practices (GxP) and HIPAA, that ensure data quality, security, and privacy. Maintaining data integrity and traceability is fundamental, and requires robust policies and continuous monitoring to secure data throughout its lifecycle. With diverse data sets and large amounts of sensitive personal health information (PHI), balancing regulatory compliance with innovation is a significant challenge.
Complex advanced health analytics
Limited machine learning and artificial intelligence capabilities—hindered by legitimate privacy and security concerns—restrict HCLS organizations from using more advanced health analytics. This constraint affects the development of next-generation, data-driven tactics, including patient care models and predictive analytics for drug research and development. Enhancing these capabilities in a secure and compliant manner is key to unlocking the potential of health data.
Conclusion
In this post, you learned how to apply security policies on Redshift datasets using Immuta with an example use case. That includes enforcing data-set level access, attribute-level access and data masking policies. We also covered implementation step by step. Consider adopting simplified Redshift access management using Immuta and let us know your feedback.
About the Authors
Satesh Sonti is a Sr. Analytics Specialist Solutions Architect based out of Atlanta, specialized in building enterprise data platforms, data warehousing, and analytics solutions. He has over 19 years of experience in building data assets and leading complex data platform programs for banking and insurance clients across the globe.
Matt Vogt is a seasoned technology professional with over two decades of diverse experience in the tech industry, currently serving as the Vice President of Global Solution Architecture at Immuta. His expertise lies in bridging business objectives with technical requirements, focusing on data privacy, governance, and data access within Data Science, AI, ML, and advanced analytics.
Navneet Srivastava is a Principal Specialist and Analytics Strategy Leader, and develops strategic plans for building an end-to-end analytical strategy for large biopharma, healthcare, and life sciences organizations. His expertise spans across data analytics, data governance, AI, ML, big data, and healthcare-related technologies.
Somdeb Bhattacharjee is a Senior Solutions Architect specializing on data and analytics. He is part of the global Healthcare and Life sciences industry at AWS, helping his customer modernize their data platform solutions to achieve their business outcomes.
Ashok Mahajan is a Senior Solutions Architect at Amazon Web Services. Based in NYC Metropolitan area, Ashok is a part of Global Startup team focusing on Security ISV and helps them design and develop secure, scalable, and innovative solutions and architecture using the breadth and depth of AWS services and their features to deliver measurable business outcomes. Ashok has over 17 years of experience in information security, is CISSP and Access Management and AWS Certified Solutions Architect, and have diverse experience across finance, health care and media domains.
Many organizations continuously receive security-related findings that highlight resources that aren’t configured according to the organization’s security policies. The findings can come from threat detection services like Amazon GuardDuty, or from cloud security posture management (CSPM) services like AWS Security Hub, or other sources. An important question to ask is: How, and how soon, are your teams notified of these findings?
Often, security-related findings are streamed to a single centralized security team or Security Operations Center (SOC). Although it’s a best practice to capture logs, findings, and metrics in standardized locations, the centralized team might not be the best equipped to make configuration changes in response to an incident. Involving the owners or developers of the impacted applications and resources is key because they have the context required to respond appropriately. Security teams often have manual processes for locating and contacting workload owners, but they might not be up to date on the current owners of a workload. Delays in notifying workload owners can increase the time to resolve a security incident or a resource misconfiguration.
This post outlines a decentralized approach to security notifications, using a self-service mechanism powered by AWS Service Catalog to enhance response times. With this mechanism, workload owners can subscribe to receive near real-time Security Hub notifications for their AWS accounts or workloads through email. The notifications include those from Security Hub product integrations like GuardDuty, AWS Health, Amazon Inspector, and third-party products, as well as notifications of non-compliance with security standards. These notifications can better equip your teams to configure AWS resources properly and reduce the exposure time of unsecured resources.
End-user experience
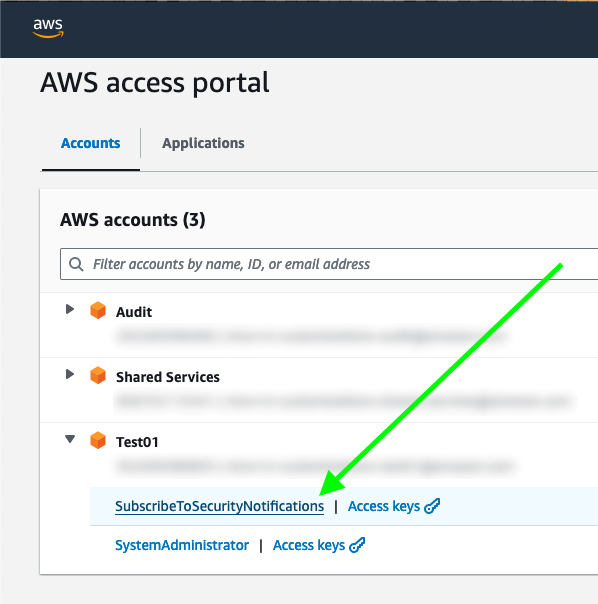
After you deploy the solution in this post, users in assigned groups can access a least-privilege AWS IAM Identity Center permission set, called SubscribeToSecurityNotifications, for their AWS accounts (Figure 1). The solution can also work with existing permission sets or federated IAM roles without IAM Identity Center.
Figure 1: IAM Identity Center portal with the permission set to subscribe to security notifications
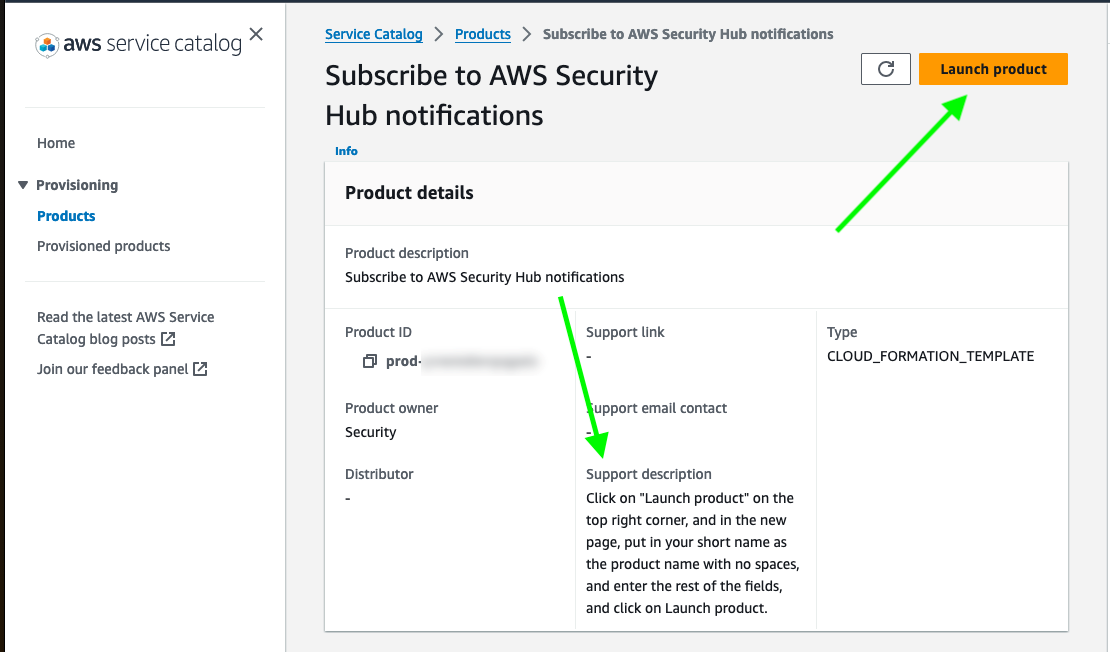
After the user chooses SubscribeToSecurityNotifications, they are redirected to an AWS Service Catalog product for subscribing to security notifications and can see instructions on how to proceed (Figure 2).
Figure 2: AWS Service Catalog product view
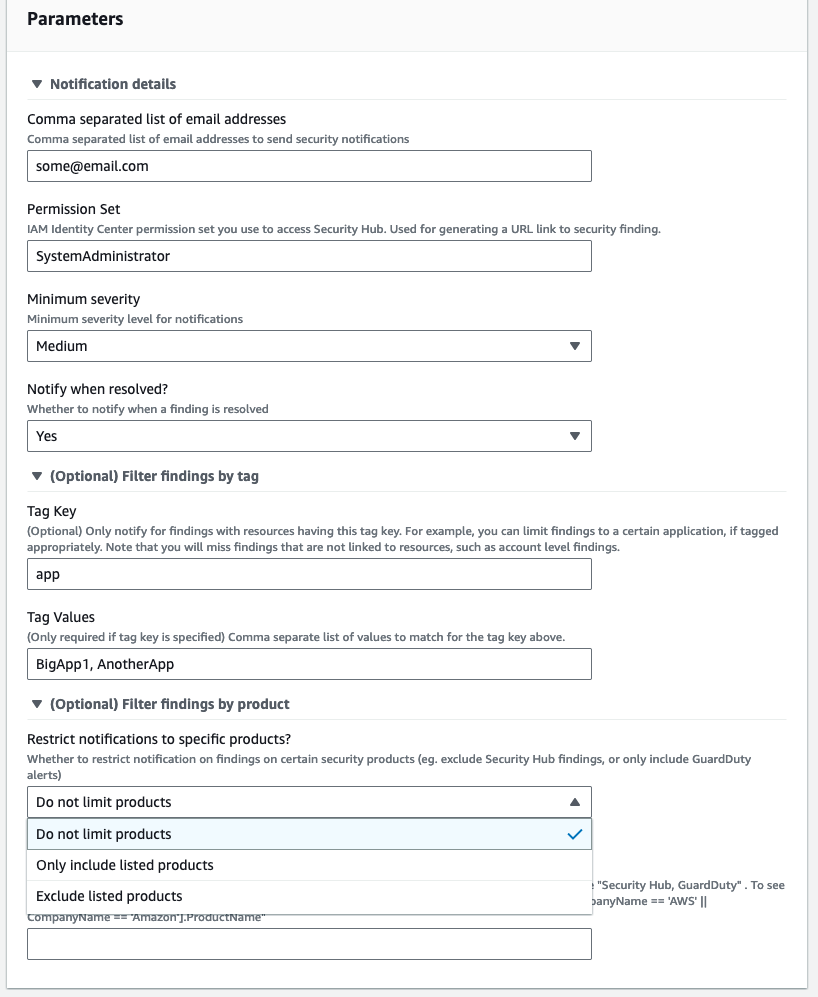
The user can then choose the Launch product utton and enter one or more email addresses and the minimum severity level for notifications (Critical, High, Medium, or Low). If the AWS account has multiple workloads, they can choose to receive only the notifications related to the applications they own by specifying the resource tags. They can also choose to restrict security notifications to include or exclude specific security products (Figure 3).
Figure 3: Service Catalog security notifications product parameters
You can update the Service Catalog product configurations after provisioning by doing the following:
In the Service Catalog console, in the left navigation menu, choose Provisioned products.
Select the provisioned product, choose Actions, and then choose Update.
Update the parameters you want to change.
For accounts that have multiple applications, each application owner can set up their own notifications by provisioning an additional Service Catalog product. You can use the Filter findings by tag parameters to receive notifications only for a specific application. The example shown in Figure 3 specifies that the user will receive notifications only from resources with the tag key app and the tag value BigApp1 or AnotherApp.
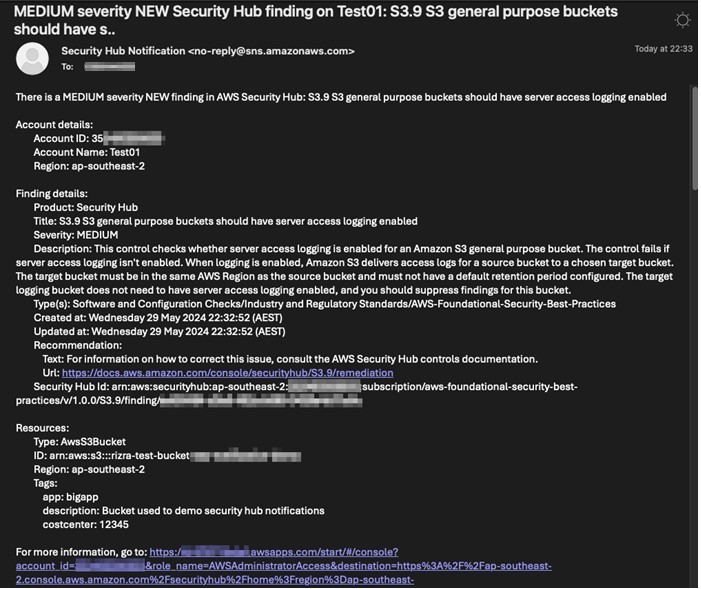
After confirming the subscription, the user starts to receive email notifications for new Security Hub findings in near real-time. Each email contains a summary of the finding in the subject line, the account details, the finding details, recommendations (if any), the list of resources affected with their tags, and an IAM Identity Center shortcut link to the Security Hub finding (Figure 4). The email ends with the raw JSON of the finding.
Figure 4: Sample email showing details of the security notification
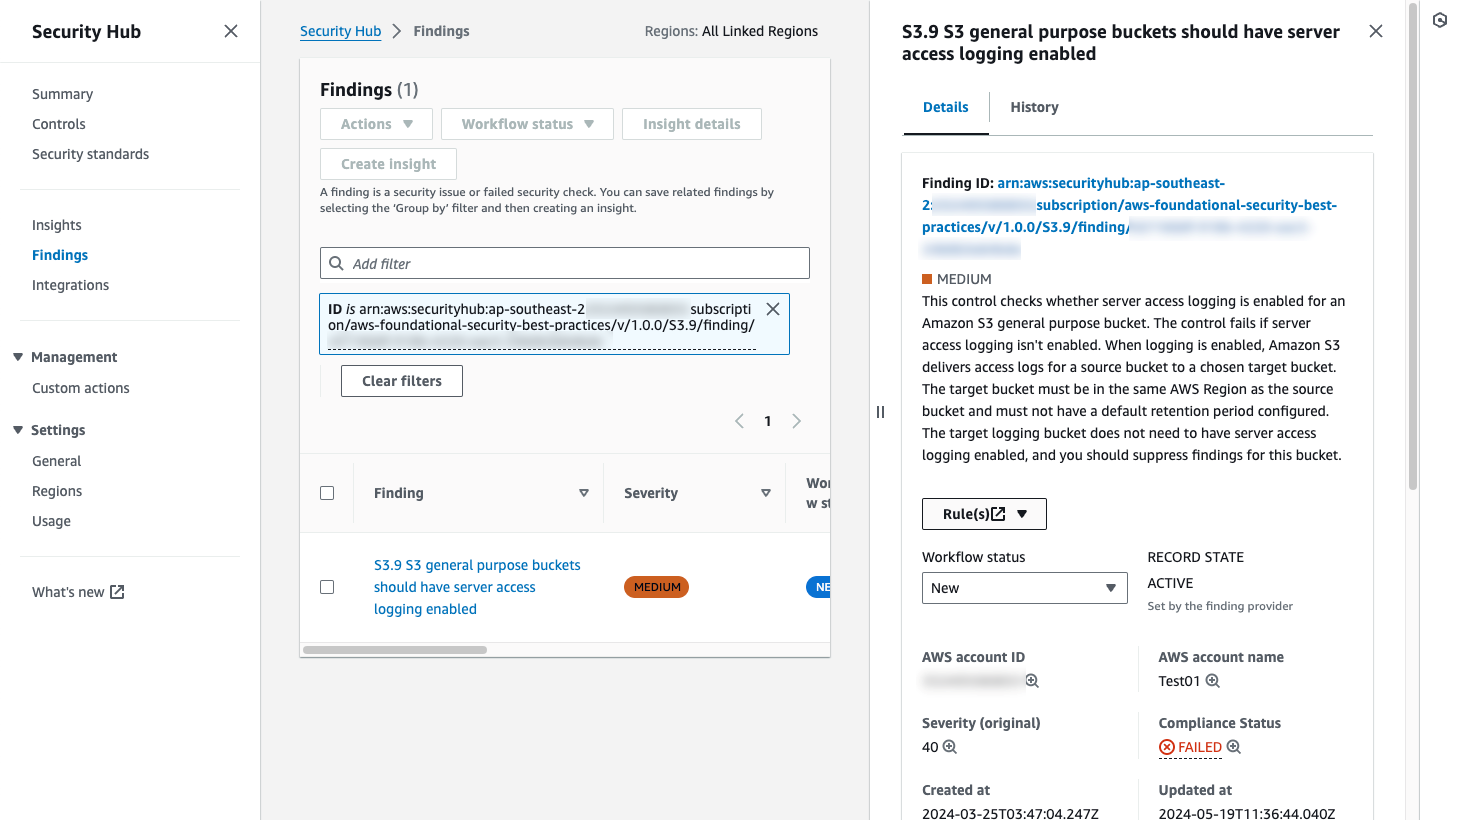
Choosing the link in the email takes the user directly to the AWS account and the finding in Security Hub, where they can see more details and search for related findings (Figure 5).
Figure 5: Security Hub finding detail page, linked from the notification email
Solution overview
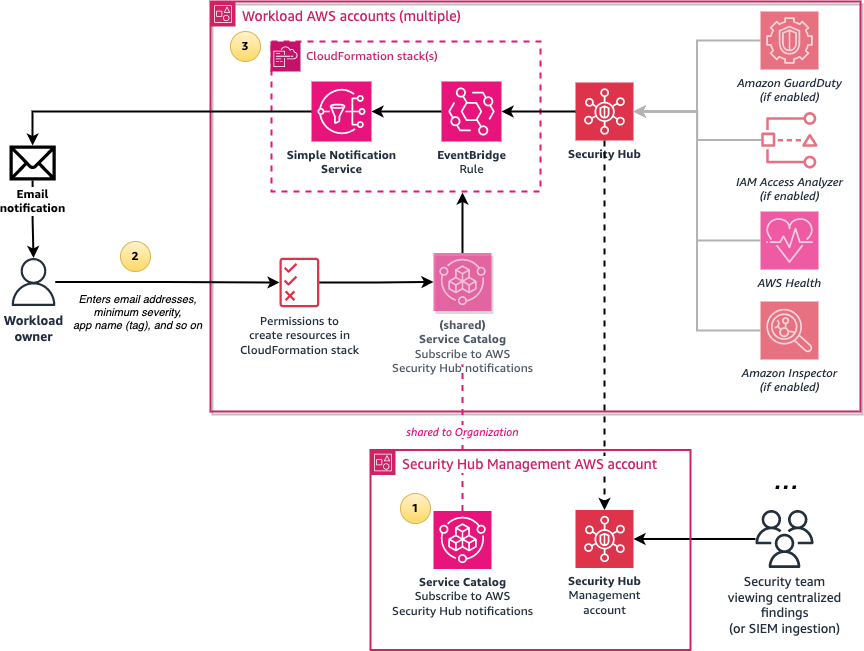
We’ve provided two deployment options for this solution; a simpler option and one that is more advanced.
Figure 6 shows the simpler deployment option of using the requesting user’s IAM permissions to create the resources required for notifications.
Figure 6: Architecture diagram of the simpler configuration of the solution
The solution involves the following steps:
Create a central Subscribe to AWS Security Hub notifications Service Catalog product in an AWS account which is shared with the entire organization in AWS Organizations or with specific organizational units (OUs). Configure the product with the names of IAM roles or IAM Identity Center permission sets that can launch the product.
Users who sign in through the designated IAM roles or permission sets can access the shared Service Catalog product from the AWS Management Console and enter the required parameters such as their email address and the minimum severity level for notifications.
The Service Catalog product creates an AWS CloudFormation stack, which creates an Amazon Simple Notification Service (Amazon SNS) topic and an Amazon EventBridge rule that filters new Security Hub finding events that match the user’s parameters, such as minimum severity level. The rule then formats the Security Hub JSON event message to make it human-readable by using native EventBridge input transformers. The formatted message is then sent to SNS, which emails the user.
We also provide a more advanced and recommended deployment option, shown in Figure 7. This option involves using an AWS Lambda function to enhance messages by doing conversions from UTC to your selected time zone, setting the email subject to the finding summary, and including an IAM Identity Center shortcut link to the finding. To not require your users to have permissions for creating Lambda functions and IAM roles, a Service Catalog launch role is used to create resources on behalf of the user, and this role is restricted by using IAM permissions boundaries.
Figure 7: Architecture diagram of the solution when using the calling user’s permissions
The architecture is similar to the previous option, but with the following changes:
Create a CloudFormation StackSet in advance to pre-create an IAM role and an IAM permissions boundary policy in every AWS account. The IAM role is used by the Service Catalog product as a launch role. It has permissions to create CloudFormation resources such as SNS topics, as well as to create IAM roles that are restricted by the IAM permissions boundary policy that allows only publishing SNS messages and writing to Amazon CloudWatch Logs.
Users who want to subscribe to security notifications require only minimal permissions; just enough to access Service Catalog and to pass the pre-created role (from the preceding step) to Service Catalog. This solution provides a sample AWS Identity Center permission set with these minimal permissions.
The Service Catalog product uses a Lambda function to format the message to make it human-readable. The stack creates an IAM role, limited by the permissions boundary, and the role is assumed by the Lambda function to publish the SNS message.
Security Hub enabled in the accounts you are monitoring.
An AWS account to host this solution, for example the Security Hub administrator account or a shared services account. This cannot be the management account.
One or more AWS accounts to consume the Service Catalog product.
Authentication that uses AWS IAM Identity Center or federated IAM role names in every AWS account for users accessing the Service Catalog product.
(Optional, only required when you opt to use Service Catalog launch roles) CloudFormation StackSet creation access to either the management account or a CloudFormation delegated administrator account.
This solution supports notifications coming from multiple AWS Regions. If you are operating Security Hub in multiple Regions, for a simplified deployment evaluate the Security Hub cross-Region aggregation feature and enable it for the applicable Regions.
Walkthrough
There are four steps to deploy this solution:
Configure AWS Organizations to allow Service Catalog product sharing.
(Optional, recommended) Use CloudFormation StackSets to deploy the Service Catalog launch IAM role across accounts.
Service Catalog product creation to allow users to subscribe to Security Hub notifications. This needs to be deployed in the specific Region you want to monitor your Security Hub findings in, or where you enabled cross-Region aggregation.
(Optional, recommended) Provision least-privileged IAM Identity Center permission sets.
Step 1: Configure AWS Organizations
Service Catalog organizations sharing in AWS Organizations must be enabled, and the account that is hosting the solution must be one of the delegated administrators for Service Catalog. This allows the Service Catalog product to be shared to other AWS accounts in the organization.
To enable this configuration, sign in to the AWS Management Console in the management AWS account, launch the AWS CloudShell service, and enter the following commands. Replace the <Account ID> variable with the ID of the account that will host the Service Catalog product.
# Enable AWS Organizations integration in Service Catalog
aws servicecatalog enable-aws-organizations-access

# Nominate the account to be one of the delegated administrators for Service Catalog
aws organizations register-delegated-administrator --account-id <Account ID> --service-principal servicecatalog.amazonaws.com
Step 2: (Optional, recommended) Deploy IAM roles across accounts with CloudFormation StackSets
The following steps create a CloudFormation StackSet to deploy a Service Catalog launch role and permissions boundary across your accounts. This is highly recommended if you plan to enable Lambda formatting, because if you skip this step, only users who have permissions to create IAM roles will be able to subscribe to security notifications.
To deploy IAM roles with StackSets
Sign in to the AWS Management Console from the management AWS account, or from a CloudFormation delegated administrator
Choose Create stack, and then choose With new resources (standard).
Choose Upload a template file and upload the CloudFormation template that you downloaded earlier:SecurityHub_notifications_IAM_role_stackset.yaml. Then choose Next.
Enter the stack name SecurityNotifications-IAM-roles-StackSet.
Enter the following values for the parameters:
AWS Organization ID: Start AWS CloudShell and enter the command provided in the parameter description to get the organization ID.
Organization root ID or OU ID(s): To deploy the IAM role and permissions boundary to every account, enter the organization root ID using CloudShell and the command in the parameter description. To deploy to specific OUs, enter a comma-separated list of OU IDs. Make sure that you include the OU of the account that is hosting the solution.
Current Account Type: Choose either Management account or Delegated administrator account, as needed.
Formatting method: Indicate whether you plan to use the Lambda formatter for Security Hub notifications, or native EventBridge formatting with no Lambda functions. If you’re unsure, choose Lambda.
Choose Next, and then optionally enter tags and choose Submit. Wait for the stack creation to finish.
Step 3: Create Service Catalog product
Next, run the included installation script that creates the CloudFormation templates that are required to deploy the Service Catalog product and portfolio.
To run the installation script
Sign in to the console of the AWS account and Region that will host the solution, and start the AWS CloudShell service.
In the terminal, enter the following commands:
git clone https://github.com/aws-samples/improving-security-incident-response-times-by-decentralizing-notifications.git

cd improving-security-incident-response-times-by-decentralizing-notifications

./install.sh
The script will ask for the following information:
Whether you will be using the Lambda formatter (as opposed to the native EventBridge formatter).
The timezone to use for displaying dates and times in the email notifications, for example Australia/Melbourne. The default is UTC.
The Service Catalog provider displayname, which can be your company, organization, or team name.
The Service Catalog product version, which defaults to v1. Increment this value if you make a change in the product CloudFormation template file.
Whether you deployed the IAM role StackSet in Step 2, earlier.
The principal type that will use the Service Catalog product. If you are using IAM Identity Center, enter IAM_Identity_Center_Permission_Set. If you have federated IAM roles configured, enter IAM role name.
If you entered IAM_Identity_Center_Permission_Set in the previous step, enter the IAM Identity Center URL subdomain. This is used for creating a shortcut URL link to Security Hub in the email. For example, if your URL looks like this: https://d-abcd1234.awsapps.com/start/#/, then enter d-abcd1234.
The principals that will have access to the Service Catalog product across the AWS accounts. If you’re using IAM Identity Center, this will be a permission set name. If you plan to deploy the provided permission set in the next step (Step 4), press enter to accept the default value SubscribeToSecurityNotifications. Otherwise, enter an appropriate permission set name (for example AWSPowerUserAccess) or IAM role name that users use.
The script creates the following CloudFormation stacks:
SecurityHub_notifications_SC-Bucket.yaml: This stack creates an Amazon Simple Storage (Amazon S3) bucket that contains the file SecurityHub-Notifications.yaml, which is the CloudFormation template file associated with the Service Catalog product. The script modifies the Mappings section of the template file that has the configuration details depending on the answers to the installation script questions, and then uploads the file to the bucket.
SecurityHub_notifications_ServiceCatalog_Portfolio.yaml: This stack creates a Service Catalog portfolio and product using the Amazon S3 bucket from the previous step and gives permissions to the required principals to launch the product.
After the script finishes the installation, it outputs the Service Catalog Product ID, which you will need in the next step. The script then asks whether it should automatically share this Service Catalog portfolio with the entire organization or a specific account, or whether you will configure sharing to specific OUs manually.
(Optional) To manually configure sharing with an OU
In the Service Catalog console, choose Portfolios.
Choose Subscribe to AWS Security Hub notifications.
On the Share tab, choose Add a share.
Choose AWS Organization, and then select the OU. The product will be shared to the accounts and child OUs within the selected OU.
Select Principal sharing, and then choose Share.
To expand this solution across Regions, enable Security Hub cross-Region aggregation. This results in the email notifications coming from the linked Regions that are configured in Security Hub, even though the Service Catalog product is instantiated in a single Region. If cross-Region aggregation isn’t enabled and you want to monitor multiple Regions, you must repeat the preceding steps in all the Regions you are monitoring.
Step 4: (Optional, recommended) Provision IAM Identity Center permission sets
This step requires you to have completed Step 2 (Deploy IAM roles across accounts with CloudFormation StackSets).
If you’re using IAM Identity Center, the following steps create a custom permission set, SubscribeToSecurityNotifications, that provides least-privileged access for users to subscribe to security notifications. The permission set redirects to the Service Catalog page to launch the product.
To provision Identity Center permission sets
Sign in to the AWS Management Console from the management AWS account, or from an IAM Identity Center delegated administrator
Choose Create stack, and then choose With new resources (standard).
Choose Upload a template file and upload the CloudFormation template you downloaded earlier: SecurityHub_notifications_PermissionSets.yaml. Then choose Next.
Enter the stack name SecurityNotifications-PermissionSet.
Enter the following values for the parameters:
AWS IAM Identity Center Instance ARN: Use the AWS CloudShell command in the parameter description to get the IAM Identity Center ARN.
Permission set name: Use the default value SubscribeToSecurityNotifications.
Service Catalog product ID: Use the last output line of the install.sh script in Step 3, or alternatively get the product ID from the Service Catalog console for the product account.
Choose Next. Then optionally enter tags and choose Next Wait for the stack creation to finish.
Next, go to the IAM Identity Center console, select your AWS accounts, and assign access to the SubscribeToSecurityNotifications permission set for your users or groups.
Testing
To test the solution, sign in to an AWS account, making sure to sign in with the designated IAM Identity Center permission set or IAM role. Launch the product in Service Catalog to subscribe to Security Hub security notifications.
Wait for a Security Hub notification. For example, if you have the AWS Foundational Security Best Practices (FSBP) standard enabled, creating an S3 bucket with no server access logging enabled should generate a notification within a few minutes.
Consider enabling Security Hub consolidated control findings so you don’t receive multiple email notifications for a control that applies to multiple standards.
To remove unneeded resources after testing the solution, follow these steps:
In the workload account or accounts where the product was launched:
Go to the Service Catalog provisioned products page and terminate each associated provisioned product. This stops security notifications from being sent to the email address associated with the product.
In the AWS account that is hosting the directory:
In the Service Catalog console, choose Portfolios, and then choose Subscribe to AWS Security Hub notifications. On the Share tab, select the items in the list and choose Actions, then choose Unshare.
In the CloudFormation console, delete the SecurityNotifications-Service-Catalog stack.
In the Amazon S3 console, for the two buckets starting with securitynotifications-sc-bucket, select the bucket and choose Empty to empty the bucket.
In the CloudFormation console, delete the SecurityNotifications-SC-Bucket stack.
If applicable, go to the management account or the CloudFormation delegated administrator account and delete the SecurityNotifications-IAM-roles-StackSet stack.
If applicable, go to the management account or the IAM Identity Center delegated administrator account and delete the SecurityNotifications-PermissionSet stack.
Conclusion
This solution described in this blog post enables you to set up a self-service standardized mechanism that application or workload owners can use to get security notifications within minutes through email, as opposed to being contacted by a security team later. This can help to improve your security posture by reducing the incident resolution time, which reduces the time that a security issue remains active.
If you have feedback about this post, submit comments in the Comments section below. If you have questions about this post, contact AWS Support.
AWS offers regulated customers tools, guidance and third-party audit reports to help meet compliance requirements. Regulated industry customers often require a service-by-service approval process when adopting cloud services to make sure that each adopted service aligns with their regulatory obligations and risk tolerance. How financial institutions can approve AWS services for highly confidential data walks through the key considerations that customers should focus on to help streamline the approval of cloud services. In this post we cover how regulated customers, especially FSI customers, can approach secrets management on Amazon Elastic Kubernetes Service (Amazon EKS) to help meet data protection and operational security requirements. Amazon EKS gives you the flexibility to start, run, and scale Kubernetes applications in the AWS Cloud or on-premises.
Applications often require sensitive information such as passwords, API keys, and tokens to connect to external services or systems. Kubernetes has secrets objects for managing these types of sensitive information. Additional tools and approaches have evolved to supplement the Kubernetes Secrets to help meet the compliance requirements of regulated organizations. One of the driving forces behind the evolution of these tools for regulated customers is that the native Kubernetes Secrets values aren’t encrypted but encoded as base64 strings; meaning that their values can be decoded by a threat actor with either API access or authorization to create a pod in a namespace containing the secret. There are options such as GoDaddy Kubernetes External Secrets, AWS Secrets and Configuration Provider (ASCP) for the Kubernetes Secrets Store CSI Driver, Hashicorp Vault, and Bitnami Sealed secrets that you can use to can help to improve the security, management, and audibility of your secrets usage.
Security and compliance is a shared responsibility between AWS and the customer. The AWS Shared Responsibility Model describes this as security of the cloud and security in the cloud:
AWS responsibility – Security of the cloud: AWS is responsible for protecting the infrastructure that runs the services offered in the AWS Cloud. For Amazon EKS, AWS is responsible for the Kubernetes control plane, which includes the control plane nodes and etcd database. Amazon EKS is certified by multiple compliance programs for regulated and sensitive applications. The effectiveness of the security controls are regularly tested and verified by third-party auditors as part of the AWS compliance programs.
Customer responsibility – Security in the cloud: Customers are responsible for the security and compliance of customer configured systems and services deployed on AWS. This includes responsibility for securely deploying, configuring and managing ESO within their Amazon EKS cluster. For Amazon EKS, the customer responsibility depends upon the worker nodes you pick to run your workloads and cluster configuration as shown in Figure 1. In the case of Amazon EKS deployment using Amazon Elastic Compute Cloud (Amazon EC2) hosts, the customer responsibility includes the following areas:
The security configuration of the data plane, including the configuration of the security groups that allow traffic to pass from the Amazon EKS control plane into the customer virtual private cloud (VPC).
The configuration of the nodes and the containers themselves.
The nodes’ operating system, including updates and security patches.
Other associated application software:
Setting up and managing network controls, such as firewall rules.
The sensitivity of your data, such as personally identifiable information (PII), keys, passwords, and tokens
Customers are responsible for enforcing access controls to protect their data and secrets.
Customers are responsible for monitoring and logging activities related to secrets management including auditing access, detecting anomalies and responding to security incidents.
Your company’s requirements, applicable laws and regulations
When using AWS Fargate, the operational overhead for customers is reduced in the following areas:
The customer is not responsible for updating or patching the host system.
Fargate manages the placement and scaling of containers.
Figure 1: AWS Shared Responsibility Model with Fargate and Amazon EC2 based workflows
As an example of the Shared Responsibility Model in action, consider a typical FSI workload accepting or processing payments cards and subject to PCI DSS requirements. PCI DSS v4.0 requirement 3 focuses on guidelines to secure cardholder data while at rest and in transit:
Control ID
Control description
3.6
Cryptographic keys used to protect stored account data are secured.
3.6.1.2
Store secret and private keys used to encrypt and decrypt cardholder data in one (or more) of the following forms:
Encrypted with a key-encrypting key that is at least as strong as the data-encrypting key, and that is stored separately from the data-encrypting key.
Stored within a secure cryptographic device (SCD), such as a hardware security module (HSM) or PTS-approved point-of-interaction device.
Has at least two full-length key components or key shares, in accordance with an industry-accepted method. Note: It is not required that public keys be stored in one of these forms.
3.6.1.3
Access to cleartext cryptographic key components is restricted to the fewest number of custodians necessary.
NIST frameworks and controls are also broadly adopted by FSI customers. NIST Cyber Security Framework (NIST CSF) and NIST SP 800-53 (Security and Privacy Controls for Information Systems and Organizations) include the following controls that apply to secrets:
Regulation or framework
Control ID
Control description
NIST CSF
PR.AC-1
Identities and credentials are issued, managed, verified, revoked, and audited for authorized devices, users and processes.
NIST CSF
PR.DS-1
Data-at-rest is protected.
NIST 800-53.r5
AC-2(1) AC-3(15)
Secrets should have automatic rotation enabled. Delete unused secrets.
Based on the preceding objectives, the management of secrets can be categorized into two broad areas:
Identity and access management ensures separation of duties and least privileged access.
Strong encryption, using a dedicated cryptographic device, introduces a secure boundary between the secrets data and keys, while maintaining appropriate management over the cryptographic keys.
Choosing your secrets management provider
To help choose a secrets management provider and apply compensating controls effectively, in this section we evaluate three different options based on the key objectives derived from the PCI DSS and NIST controls described above and other considerations such as operational overhead, high availability, resiliency, and developer or operator experience.
Architecture and workflow
The following architecture and component descriptions highlight the different architectural approaches and responsibilities of each solution’s components, ranging from controllers and operators, command-line interface (CLI) tools, custom resources, and CSI drivers working together to facilitate secure secrets management within Kubernetes environments.
External Secrets Operator (ESO) extends the Kubernetes API using a custom resource definition (CRD) for secret retrieval. ESO enables integration with external secrets management systems such as AWS Secrets Manager, HashiCorp Vault, Google Secrets Manager, Azure Key Vault, IBM Cloud Secrets Manager, and various other systems. ESO watches for changes to an external secret store and keeps Kubernetes secrets in sync. These services offer features that aren’t available with native Kubernetes Secrets, such as fine-grained access controls, strong encryption, and automatic rotation of secrets. By using these purpose-built tools outside of a Kubernetes cluster, you can better manage risk and benefit from central management of secrets across multiple Amazon EKS clusters. For more information, see the detailed walkthrough of using ESO to synchronize secrets from Secrets Manager to your Amazon EKS Fargate cluster.
ESO is comprised of a cluster-side controller that automatically reconciles the state within the Kubernetes cluster and updates the related secrets anytime the external API’s secret undergoes a change.
Figure 2: ESO workflow
Sealed Secrets is an open source project by Bitnami comprised of a Kubernetes controller coupled with a client-side CLI tool with the objective to store secrets in Git in a secure fashion. Sealed Secrets encrypts your Kubernetes secret into a SealedSecret, which can also be deployed to a Kubernetes cluster using kubectl. For more information, see the detailed walkthough of using tools from the Sealed Secrets open source project to manage secrets in your Amazon EKS clusters.
Sealed Secrets comprises of three main components: First, there is an operator or a controller which is deployed onto a Kubernetes cluster. The controller is responsible for decrypting your secrets. Second, you have a CLI tool called Kubeseal that takes your secret and encrypts it. Third, you have a CRD. Instead of creating regular secrets, you create SealedSecrets, which is a CRD defined within Kubernetes. That is how the operator knows when to perform the decryption process within your Kubernetes cluster.
Upon startup, the controller looks for a cluster-wide private-public key pair and generates a new 4096-bit RSA public-private key pair if one doesn’t exist. The private key is persisted in a secret object in the same namespace as the controller. The public key portion of this is made publicly available to anyone wanting to use Sealed Secrets with this cluster.
Figure 3: Sealed Secrets workflow
The AWS Secrets Manager and Config Provider (ASCP) for Secret Store CSI driver is an open source tool from AWS that allows secrets from Secrets Manager and Parameter Store, a capability of AWS Systems Manager, to be mounted as files inside Amazon EKS pods. It uses a CRD called SecretProviderClass to specify which secrets or parameters to mount. Upon a pod start or restart, the CSI driver retrieves the secrets or parameters from AWS and writes them to a tmpfs volume mounted in the pod. The volume is automatically cleaned up when the pod is deleted, making sure that secrets aren’t persisted. For more information, see the detailed walkthrough on how to set up and configure the ASCP to work with Amazon EKS.
ASCP comprises of a cluster-side controller acting as the provider, allowing secrets from Secrets Manager, and parameters from Parameter Store to appear as files mounted in Kubernetes pods. Secrets Store CSI Driver is a DaemonSet with three containers: node-driver-registrar, which registers the CSI driver with Kubelet; secrets-store, which implements the CSI Node service gRPC services for mounting and unmounting volumes during pod creation and deletion; and liveness-probe, which monitors the health of the CSI driver and reports to Kubernetes for automatic issue detection and pod restart.
Figure 4: AWS Secrets Manager and configuration provider
In the next section, we cover some of the key decisions involved in choosing whether to use ESO, Sealed Secrets, or ASCP for regulated customers to help meet their regulatory and compliance needs.
Comparing ESO, Sealed Secrets, and ASCP objectives
All three solutions address different aspects of secure secrets management and aim to help FSI customers meet their regulatory compliance requirements while upholding the protection of sensitive data in Kubernetes environments.
ESO synchronizes secrets from external APIs into Kubernetes, targeting the cluster operator and application developer personas. The cluster operator is responsible for setting up ESO and managing access policies. The application developer is responsible for defining external secrets and the application configuration.
Sealed Secrets encrypts your Kubernetes secrets before storing them in version control systems such as public Git repositories. This is the case if you decide to check in your Kubernetes manifest to a Git repository granting access to your sensitive secrets to anyone who has access to the Git repository. This is ultimately the reason why Sealed Secrets was created and the sealed secret can be decrypted only by the controller running in the target cluster.
Using ASCP, you can securely store and manage your secrets in Secrets Manager and retrieve them through your applications running on Kubernetes without having to write custom code. Secrets Manager provides features such as rotation, auditing, and access control that can help FSI customers meet regulatory compliance requirements and maintain a robust security posture.
Installation
The deployment and configuration details that follow highlight the different approaches and resources used by each solution to integrate with Kubernetes and external secret stores, catering to the specific requirements of secure secrets management in containerized environments.
ESO provides Helm charts for ease of operator deployment. External Secrets provides custom resources like SecretStore and ExternalSecret for configuring the required operator functionality to synchronize external secrets to your cluster. For instance, SecretStore can be used by the cluster operator to be able to connect to AWS Secrets Manager using appropriate credentials to pull in the secrets.
To install Sealed Secrets, you can deploy the Sealed Secrets Controller onto the Kubernetes cluster. You can deploy the manifest by itself or you can use a Helm chart to deploy the Sealed Secrets Controller for you. After the controller is installed, you use the Kubeseal client-side utility to encrypt secrets using asymmetric cryptography. If you don’t already have the Kubeseal CLI installed, see the installation instructions.
ASCP provides Helm charts to assist in operator deployment. The ASCP operator provides custom resources such as SecretProviderClass to provide provider-specific parameters to the CSI driver. During pod start and restart, the CSI driver will communicate with the provider using gRPC to retrieve the secret content from the external secret store you specified in the SecretProviderClass custom resource. Then the volume is mounted in the pod as tmpfs and the secret contents are written to the volume.
Encryption and key management
These solutions use robust encryption mechanisms and key management practices provided by external secret stores and AWS services such as AWS Key Management Service (AWS KMS) and Secrets Manager. However, additional considerations and configurations might be required to meet specific regulatory requirements, such as PCI DSS compliance for handling sensitive data.
ESO relies on encryption features within the external secrets management system. For instance, Secrets Manager supports envelope encryption with AWS KMS which is FIPS 140-2 Level 3 certified. Secrets Manager has several compliance certifications making it a great fit for regulated workloads. FIPS 140-2 Level 3 ensures only strong encryption algorithms approved by NIST can be used to protect data. It also defines security requirements for the cryptographic module, creating logical and physical boundaries.
Both AWS KMS and Secrets Manager help you to manage key lifecycle and to integrate with other AWS Services. In terms of key rotation, both provide automatic rotation of secrets that runs on a schedule (which you define), and abstract the complexity of managing different versions of keys. For AWS managed keys, the key rotation happens automatically once every year by default. With customer managed keys (CMKs), automatic key rotation is available but not enabled by default.
When using SealedSecrets, you use the Kubeseal tool to convert a standard Kubernetes Secret into a Sealed Secrets resource. The contents of the Sealed Secrets are encrypted with the public key served by the Sealed Secrets Controller as described in the Sealed Secrets project homepage.
In the absence of cloud native secrets management integration, you might have to add compensating controls to achieve the regulatory standards required by your organization. In cases where the underlying SealedSecrets data is sensitive in nature, such as cardholder PII, PCI requires that you store sensitive secrets in a cryptographic device such as a hardware security module (HSM). You can use Secrets Manager to store the master key generated to seal the secrets. However, this you will have to enable additional integration with Amazon EKS APIs to fetch the master key securely from the EKS cluster. You will also have to modify your deployment process to use a master key from Secrets Manager. The applications running in the EKS cluster must have permissions to fetch the SealedSecret and master key from Secrets Manager. This might involve configuring the application to interact with Amazon EKS APIs and Secrets Manager. For non-sensitive data, Kubeseal can be used directly within the EKS cluster to manage secrets and sealing keys.
For key rotation, you can store the controller generated private key in Parameter Store as a SecureString. You can use the advanced tier in Parameter Store if the file containing the private keys exceeds the Standard tier limit of up to 4,096 characters. In addition, if you want to add key rotation, you can use AWS KMS.
The ASCP relies on encryption features within the chosen secret store, such as Secrets Manager. Secrets Manager supports integration with AWS KMS for an additional layer of security by storing encryption keys separately. The Secrets Store CSI Driver facilitates secure interaction with the secret store, but doesn’t directly encrypt secrets. Encrypting mounted content can provide further protection, but introduces operational overhead related to key management.
ASCP relies on Secrets Manager and AWS KMS for encryption and decryption capabilities. As a recommendation, you can encrypt mounted content to further protect the secrets. However, this introduces the additional operational overhead of managing encryption keys and addressing key rotation.
Additional considerations
These solutions address various aspects of secure secrets management, ranging from centralized management, compliance, high availability, performance, developer experience, and integration with existing investments, catering to the specific needs of FSI customers in their Kubernetes environments.
ESO can be particularly useful when you need to manage an identical set of secrets across multiple Kubernetes clusters. Instead of configuring, managing, and rotating secrets at each cluster level individually, you can synchronize your secrets across your clusters. This simplifies secrets management by providing a single interface to manage secrets across multiple clusters and environments.
External secrets management systems typically offer advanced security features such as encryption at rest, access controls, audit logs, and integration with identity providers. This helps FSI customers ensure that sensitive information is stored and managed securely in accordance with regulatory requirements.
FSI customers usually have existing investments in their on-premises or cloud infrastructure, including secrets management solutions. ESO integrates seamlessly with existing secrets management systems and infrastructure, allowing FSI customers to use their investment in these systems without requiring significant changes to their workflow or tooling. This makes it easier for FSI customers to adopt and integrate ESO into their existing Kubernetes environments.
ESO provides capabilities for enforcing policies and governance controls around secrets management such as access control, rotation policies, and audit logging when using services like Secrets Manager. For FSI customers, audits and compliance are critical and ESO verifies that access to secrets is tracked and audit trails are maintained, thereby simplifying the process of demonstrating adherence to regulatory standards. For instance, secrets stored inside Secrets Manager can be audited for compliance with AWS Config and AWS Audit Manager. Additionally, ESO uses role-based access control (RBAC) to help prevent unauthorized access to Kubernetes secrets as documented in the ESO security best practices guide.
High availability and resilience are critical considerations for mission critical FSI applications such as online banking, payment processing, and trading services. By using external secrets management systems designed for high availability and disaster recovery, ESO helps FSI customers ensure secrets are available and accessible in the event of infrastructure failure or outages, thereby minimizing service disruption and downtime.
FSI workloads often experience spikes in transaction volumes, especially during peak days or hours. ESO is designed to efficiently managed a large volume of secrets by using external secrets management that’s optimized for performance and scalability.
In terms of monitoring, ESO provides Prometheus metrics to enable fine-grained monitoring of access to secrets. Amazon EKS pods offer diverse methods to grant access to secrets present on external secrets management solutions. For example, in non-production environments, access can be granted through IAM instance profiles assigned to the Amazon EKS worker nodes. For production, using IAM roles for service accounts (IRSA) is recommended. Furthermore, you can achieve namespace level fine-grained access control by using annotations.
ESO also provides options to configure operators to use a VPC endpoint to comply with FIPS requirements.
Additional developer productivity benefits provided by ESO include support for JSON objects (Secret key/value in the AWS Management console) or strings (Plaintext in the console). With JSON objects, developers can programmatically update multiple values atomically when rotating a client certificate and private key.
The benefit of Sealed Secrets, as discussed previously, is when you upload your manifest to a Git repository. The manifest will contain the encrypted SealedSecrets and not the regular secrets. This assures that no one has access to your sensitive secrets even when they have access to your Git repository. Sealed Secrets offer a few benefits to developers in terms of developer experience. Sealed Secrets gives you access to manage your secrets, making them more readily available to developers. Sealed Secrets offers VSCode extension to assist in integrating it into the software development lifecycle (SDLC). Using Sealed Secrets, you can store the encrypted secrets in the version control systems such as Gitlab and GitHub. Sealed Secrets can reduce operational overhead related to updating dependent objects because whenever a secret resource is updated, the same update is applied to the dependent objects.
ASCP integration with the Kubernetes Secrets Store CSI Driver on Amazon EKS offers enhanced security through seamless integration with Secrets Manager and Parameter Store, ensuring encryption, access control, and auditing. It centralizes management of sensitive data, simplifying operations and reducing the risk of exposure. The dynamic secrets injection capability facilitates secure retrieval and injection of secrets into Kubernetes pods, while automatic rotation provides up-to-date credentials without manual intervention. This combined solution streamlines deployment and management, providing a secure, scalable, and efficient approach to handling secrets and configuration settings in Kubernetes applications.
Consolidated threat model
We created a threat model based on the architecture of the three solution offerings. The threat model provides a comprehensive view of the potential threats and corresponding mitigations for each solution, allowing organizations to proactively address security risks and ensure the secure management of secrets in their Kubernetes environments.
X = Mitigations applicable to the solution
Threat
Mitigations
ESO
Sealed Secrets
ASCP
Unauthorized access or modification of secrets
Implement least privilege access principles
Rotate and manage credentials securely
Enable RBAC and auditing in Kubernetes
X
X
X
Insider threat (for example, a rogue administrator who has legitimate access)
Implement least privilege access principles
Enable auditing and monitoring
Enforce separation of duties and job rotation
X
X
Compromise of the deployment process
Secure and harden the deployment pipeline
Implement secure coding practices
Enable auditing and monitoring
X
Unauthorized access or tampering of secrets during transit
Enable encryption in transit using TLS
Implement mutual TLS authentication between components
Use private networking or VPN for secure communication
X
X
X
Compromise of the Kubernetes API server because of vulnerabilities or misconfiguration
Secure and harden the Kubernetes API server
Enable authentication and authorization mechanisms (for example, mutual TLS and RBAC)
Keep Kubernetes components up-to-date and patched
Enable Kubernetes audit logging and monitoring
X
Vulnerability in the external secrets controller leading to privilege escalation or data exposure
Keep the external secrets controller up-to-date and patched
Regularly monitor for and apply security updates
Implement least privilege access principles
Enable auditing and monitoring
X
Compromise of the Secrets Store CSI Driver, node-driver-registrar, Secrets Store CSI Provider, kubelet, or Pod could lead to unauthorized access or exposure of secrets
Implement least privilege principles and role-based access controls
Regularly patch and update the components
Monitor and audit the component activities
X
Unauthorized access or data breach in Secrets Manager could expose sensitive secrets
Implement strong access controls and access logging for Secrets Manager
Encrypt secrets at rest and in transit
Regularly rotate and update secrets
X
X
Shortcomings and limitations
The following limitations and drawbacks highlight the importance of carefully evaluating the specific requirements and constraints of your organization before adopting any of these solutions. You should consider factors such as team expertise, deployment environments, integration needs, and compliance requirements to promote a secure and efficient secrets management solution that aligns with your organization’s needs.
ESO doesn’t include a default way to restrict network traffic to and from ESO using network policies or similar network or firewall mechanisms. The application team is responsible for properly configuring network policies to improve the overall security posture of ESO within your Kubernetes cluster.
Any time an external secret associated with ESO is rotated, you must restart the deployment that uses that particular external secret. Given the inherent risks associated with integrating an external entity or third-party solution into your system, including ESO, it’s crucial to implement a comprehensive threat model similar to the Kubernetes Admission Control Threat Model.
Also, ESO set up is complicated and the controller must be installed on the Kubernetes cluster.
SealedSecrets cannot be reused across namespaces unless they’re re-encrypted or made cluster-wide, which makes it challenging to manage secrets across multiple namespaces consistently. The need to manually rotate and re-encrypt SealedSecrets with new keys can introduce operational overhead, especially in large-scale environments with numerous secrets. The old sealing keys pose a potential risk of misuse by unauthorized users, which increases the risk. To mitigate both risks (high overhead and old secrets), you should implement additional controls such as deleting older keys as part of the key rotation process or periodically rotate sealing keys and make sure that old sealed secret resources are re-encrypted with the new keys. Sealed Secrets doesn’t support external secret stores such as HashiCorp Vault, or cloud provider services such as Secrets Manager, Parameter Store, or Azure Key Vault. Sealed Secrets requires a Kubeseal client-side binary to encrypt secrets. This can be a concern in FSI environments where client-side tools are restricted by security policies.
While ASCP provides seamless integration with Secrets Manager and Parameter Store, teams unfamiliar with these AWS services might need to invest some additional effort to fully realize the benefits. This additional effort is justified by the long-term benefits of centralized secrets management and access control provided by these services. Additionally, relying primarily on AWS services for secrets management can potentially limit flexibility in deploying to alternative cloud providers or on-premises environments in the future. These factors should be carefully evaluated based on the specific needs and constraints of the application and deployment environment.
Conclusion
We have provided a summary of three options for managing secrets in Amazon EKS, ESO, Sealed Secrets, and AWS Secrets and Configuration Provider (ASCP), and the key considerations for FSI customers when choosing between them. The choice depends on several factors including existing investments in secrets management systems, specific security needs and compliance requirements, preference for a Kubernetes native solution or willingness to accept vendor lock-in.
The guidance provided here covers the strengths, limitations, and trade-offs of each option, allowing regulated institutions to make an informed decision based on their unique requirements and constraints. This guidance can be adapted and tailored to fit the specific needs of an organization, providing a secure and efficient secrets management solution for their Amazon EKS workloads, while aligning with the stringent security and compliance standards of the regulated institutions.
If you have feedback about this post, submit comments in the Comments section below. If you have questions about this post, contact AWS Support.
The collective thoughts of the interwebz
Manage Consent
To provide the best experiences, we use technologies like cookies to store and/or access device information. Consenting to these technologies will allow us to process data such as browsing behavior or unique IDs on this site. Not consenting or withdrawing consent, may adversely affect certain features and functions.
Functional
Always active
The technical storage or access is strictly necessary for the legitimate purpose of enabling the use of a specific service explicitly requested by the subscriber or user, or for the sole purpose of carrying out the transmission of a communication over an electronic communications network.
Preferences
The technical storage or access is necessary for the legitimate purpose of storing preferences that are not requested by the subscriber or user.
Statistics
The technical storage or access that is used exclusively for statistical purposes.The technical storage or access that is used exclusively for anonymous statistical purposes. Without a subpoena, voluntary compliance on the part of your Internet Service Provider, or additional records from a third party, information stored or retrieved for this purpose alone cannot usually be used to identify you.
Marketing
The technical storage or access is required to create user profiles to send advertising, or to track the user on a website or across several websites for similar marketing purposes.


 Stefano Sandonà is a Senior Big Data Specialist Solution Architect at AWS. Passionate about data, distributed systems, and security, he helps customers worldwide architect high-performance, efficient, and secure data platforms.
 Francesco Marelli is a Principal Solutions Architect at AWS. He specializes in the design, implementation, and optimization of large-scale data platforms. Francesco leads the AWS Solution Architect (SA) analytics team in Italy. He loves sharing his professional knowledge and is a frequent speaker at AWS events. Francesco is also passionate about music.


 Satesh Sonti is a Sr. Analytics Specialist Solutions Architect based out of Atlanta, specialized in building enterprise data platforms, data warehousing, and analytics solutions. He has over 19 years of experience in building data assets and leading complex data platform programs for banking and insurance clients across the globe.
 Matt Vogt is a seasoned technology professional with over two decades of diverse experience in the tech industry, currently serving as the Vice President of Global Solution Architecture at Immuta. His expertise lies in bridging business objectives with technical requirements, focusing on data privacy, governance, and data access within Data Science, AI, ML, and advanced analytics.
 Navneet Srivastava is a Principal Specialist and Analytics Strategy Leader, and develops strategic plans for building an end-to-end analytical strategy for large biopharma, healthcare, and life sciences organizations. His expertise spans across data analytics, data governance, AI, ML, big data, and healthcare-related technologies.
 Somdeb Bhattacharjee is a Senior Solutions Architect specializing on data and analytics. He is part of the global Healthcare and Life sciences industry at AWS, helping his customer modernize their data platform solutions to achieve their business outcomes.
 Ashok Mahajan is a Senior Solutions Architect at Amazon Web Services. Based in NYC Metropolitan area, Ashok is a part of Global Startup team focusing on Security ISV and helps them design and develop secure, scalable, and innovative solutions and architecture using the breadth and depth of AWS services and their features to deliver measurable business outcomes. Ashok has over 17 years of experience in information security, is CISSP and Access Management and AWS Certified Solutions Architect, and have diverse experience across finance, health care and media domains.