Post Syndicated from Cheng Wang original https://aws.amazon.com/blogs/security/improve-security-incident-response-times-by-using-aws-service-catalog-to-decentralize-security-notifications/
Many organizations continuously receive security-related findings that highlight resources that aren’t configured according to the organization’s security policies. The findings can come from threat detection services like Amazon GuardDuty, or from cloud security posture management (CSPM) services like AWS Security Hub, or other sources. An important question to ask is: How, and how soon, are your teams notified of these findings?
Often, security-related findings are streamed to a single centralized security team or Security Operations Center (SOC). Although it’s a best practice to capture logs, findings, and metrics in standardized locations, the centralized team might not be the best equipped to make configuration changes in response to an incident. Involving the owners or developers of the impacted applications and resources is key because they have the context required to respond appropriately. Security teams often have manual processes for locating and contacting workload owners, but they might not be up to date on the current owners of a workload. Delays in notifying workload owners can increase the time to resolve a security incident or a resource misconfiguration.
This post outlines a decentralized approach to security notifications, using a self-service mechanism powered by AWS Service Catalog to enhance response times. With this mechanism, workload owners can subscribe to receive near real-time Security Hub notifications for their AWS accounts or workloads through email. The notifications include those from Security Hub product integrations like GuardDuty, AWS Health, Amazon Inspector, and third-party products, as well as notifications of non-compliance with security standards. These notifications can better equip your teams to configure AWS resources properly and reduce the exposure time of unsecured resources.
End-user experience
After you deploy the solution in this post, users in assigned groups can access a least-privilege AWS IAM Identity Center permission set, called SubscribeToSecurityNotifications, for their AWS accounts (Figure 1). The solution can also work with existing permission sets or federated IAM roles without IAM Identity Center.
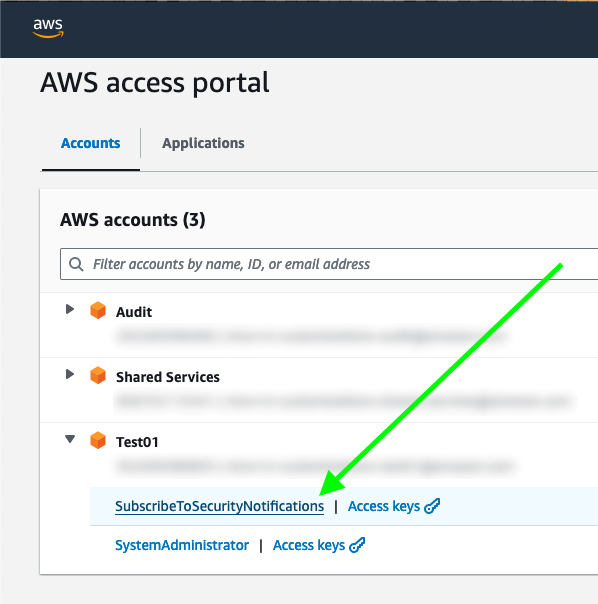
Figure 1: IAM Identity Center portal with the permission set to subscribe to security notifications
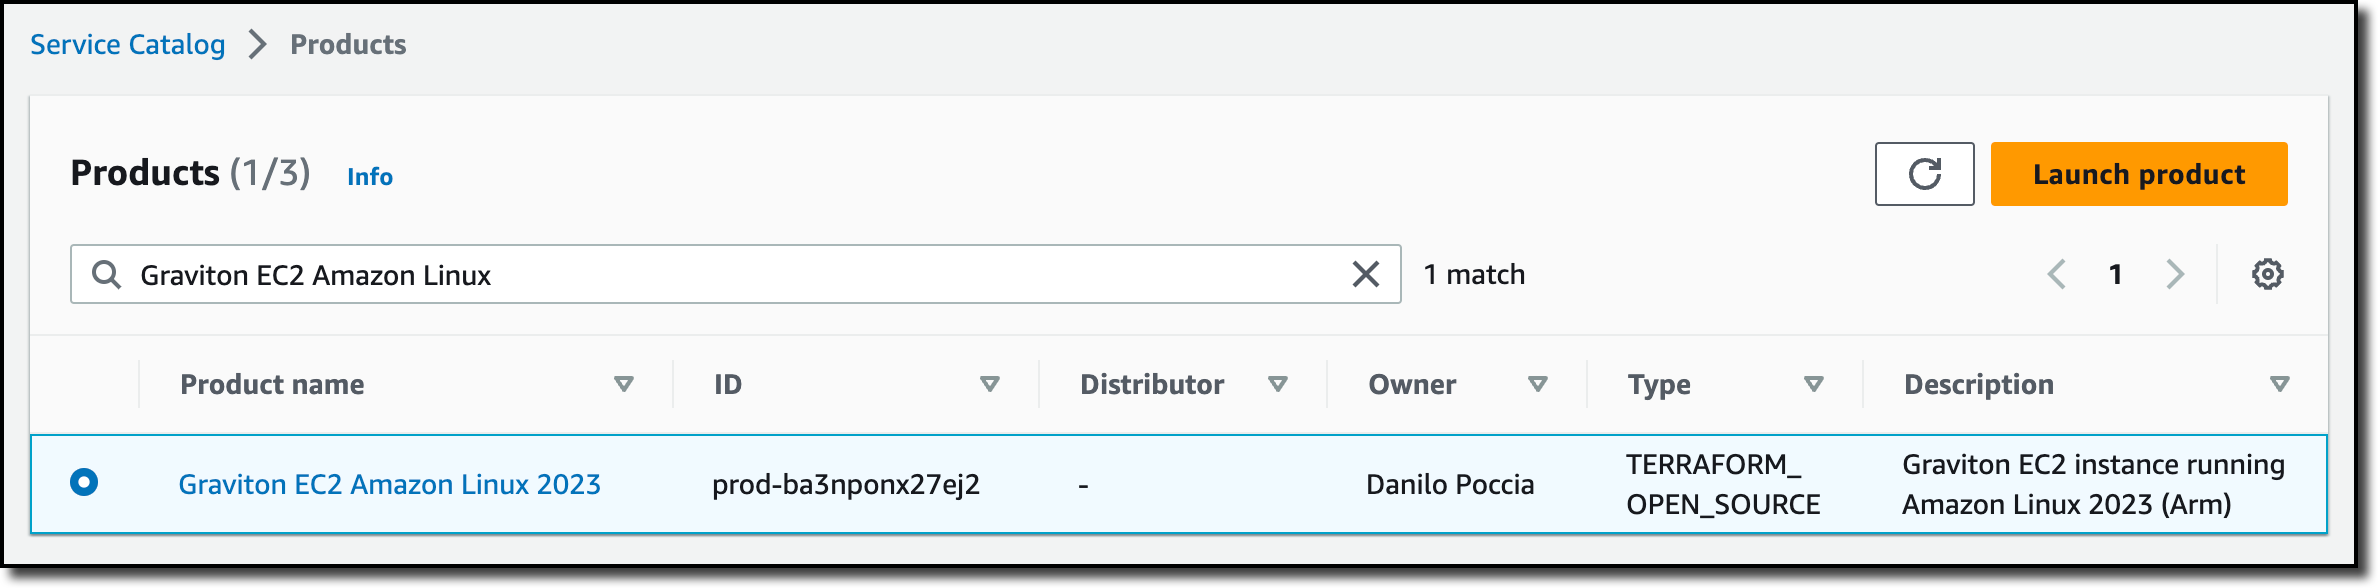
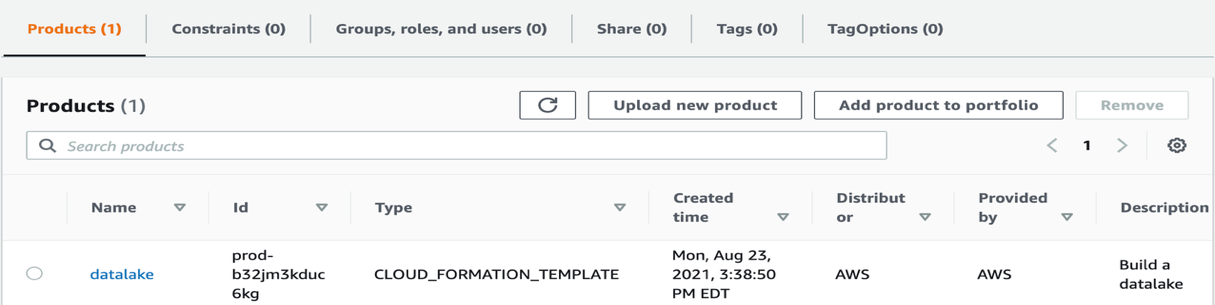
After the user chooses SubscribeToSecurityNotifications, they are redirected to an AWS Service Catalog product for subscribing to security notifications and can see instructions on how to proceed (Figure 2).
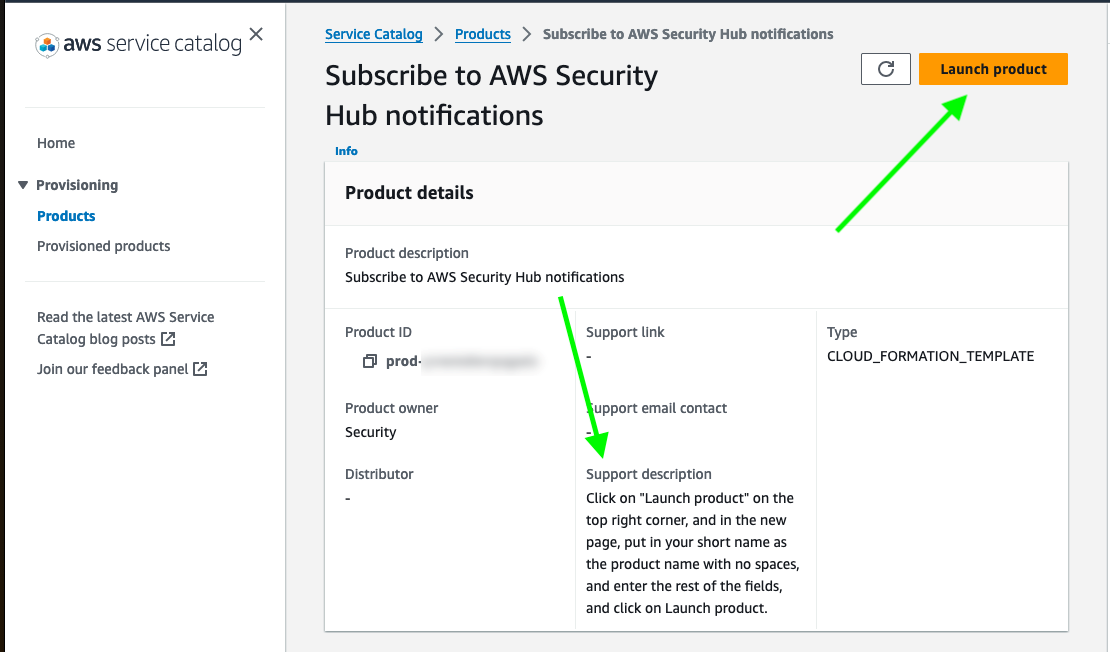
Figure 2: AWS Service Catalog product view
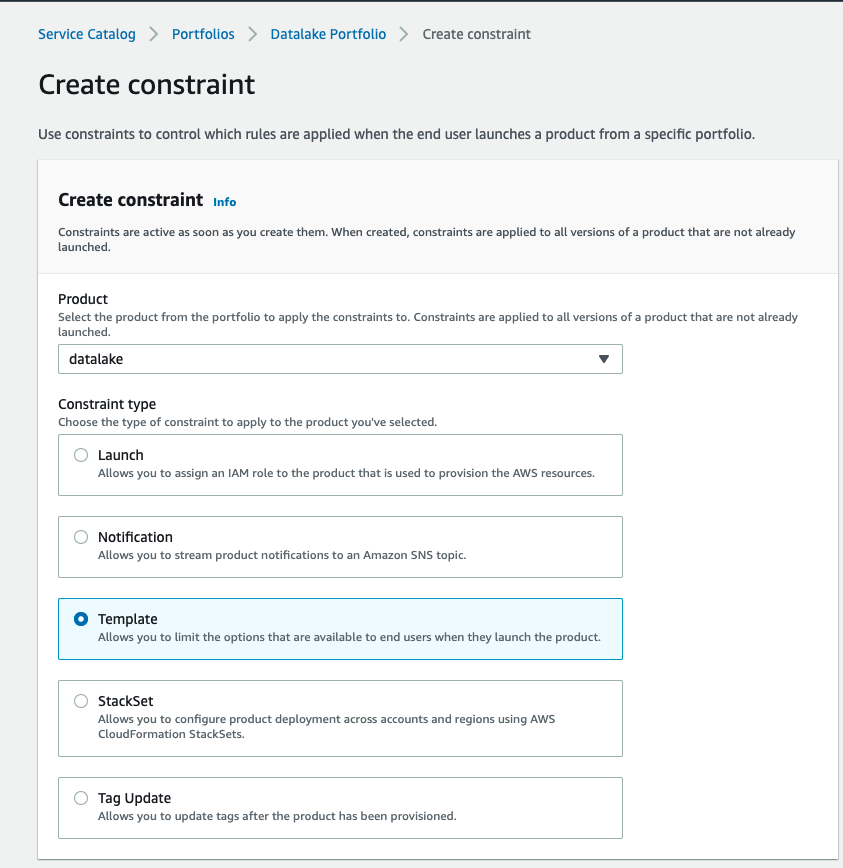
The user can then choose the Launch product utton and enter one or more email addresses and the minimum severity level for notifications (Critical, High, Medium, or Low). If the AWS account has multiple workloads, they can choose to receive only the notifications related to the applications they own by specifying the resource tags. They can also choose to restrict security notifications to include or exclude specific security products (Figure 3).
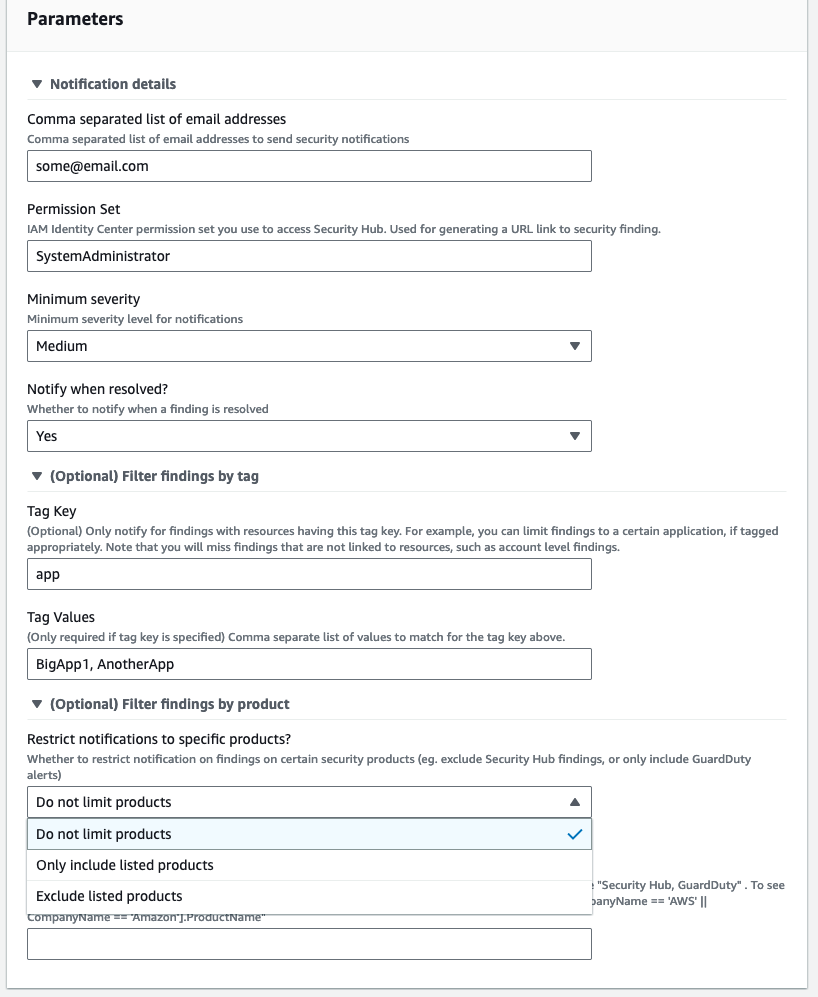
Figure 3: Service Catalog security notifications product parameters
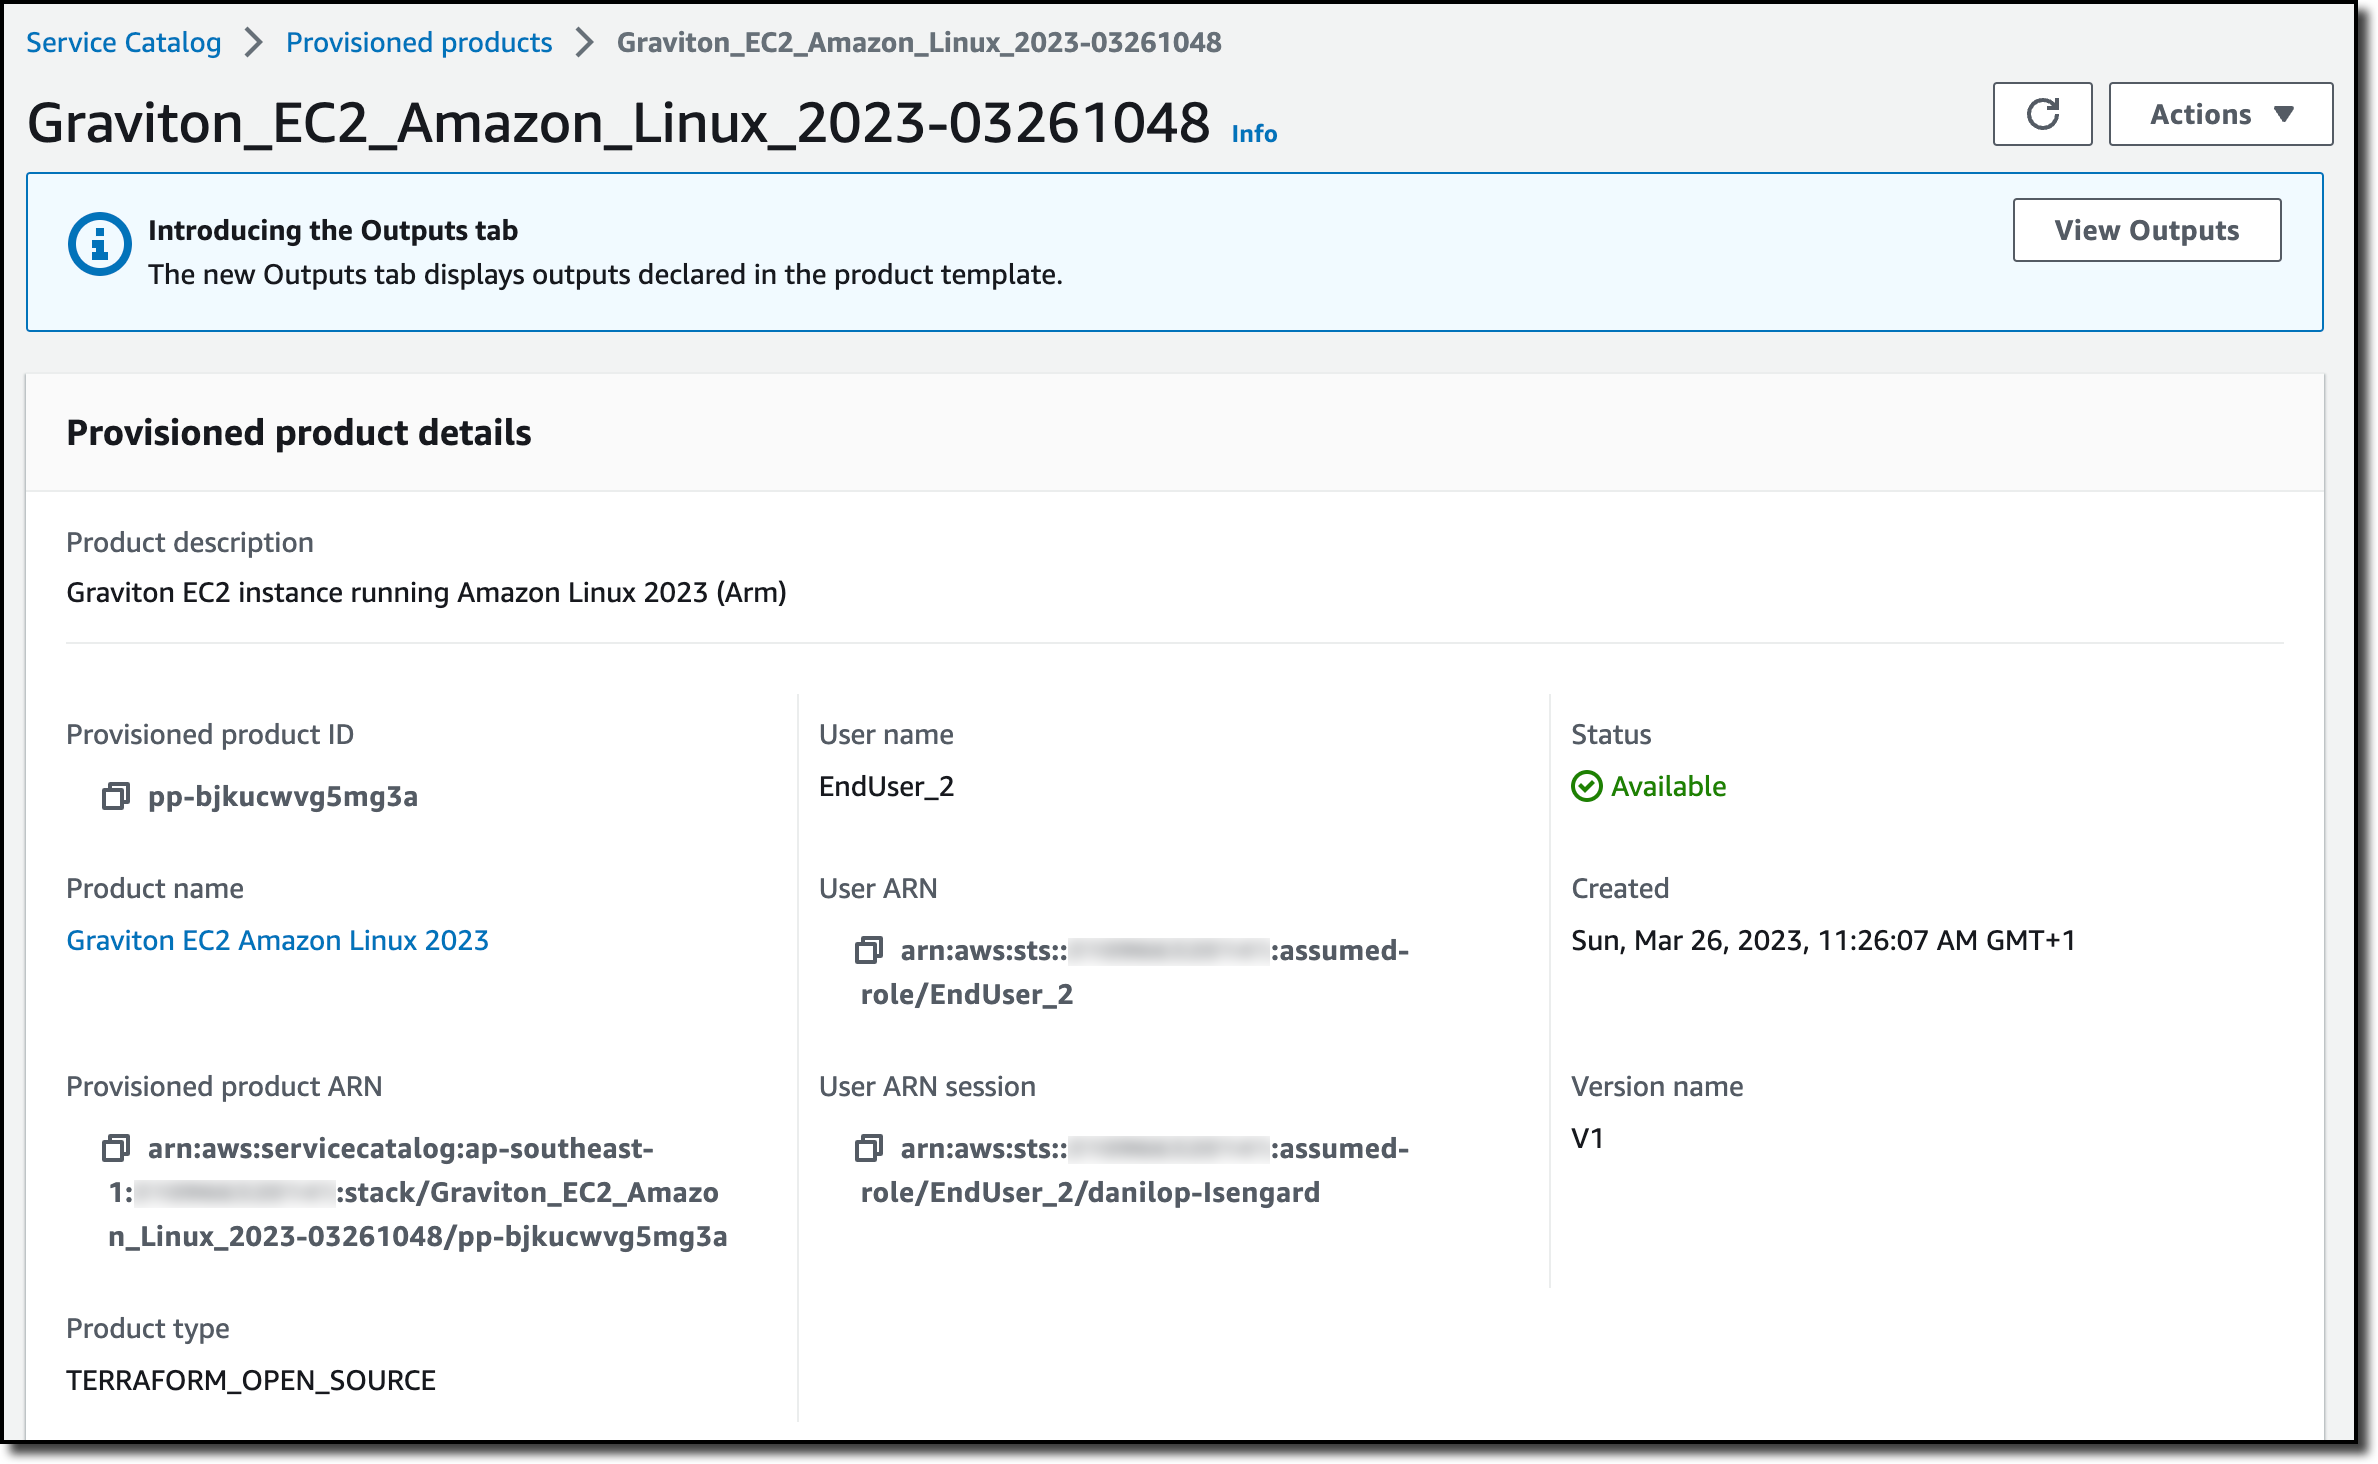
You can update the Service Catalog product configurations after provisioning by doing the following:
- In the Service Catalog console, in the left navigation menu, choose Provisioned products.
- Select the provisioned product, choose Actions, and then choose Update.
- Update the parameters you want to change.
For accounts that have multiple applications, each application owner can set up their own notifications by provisioning an additional Service Catalog product. You can use the Filter findings by tag parameters to receive notifications only for a specific application. The example shown in Figure 3 specifies that the user will receive notifications only from resources with the tag key app and the tag value BigApp1 or AnotherApp.
After confirming the subscription, the user starts to receive email notifications for new Security Hub findings in near real-time. Each email contains a summary of the finding in the subject line, the account details, the finding details, recommendations (if any), the list of resources affected with their tags, and an IAM Identity Center shortcut link to the Security Hub finding (Figure 4). The email ends with the raw JSON of the finding.
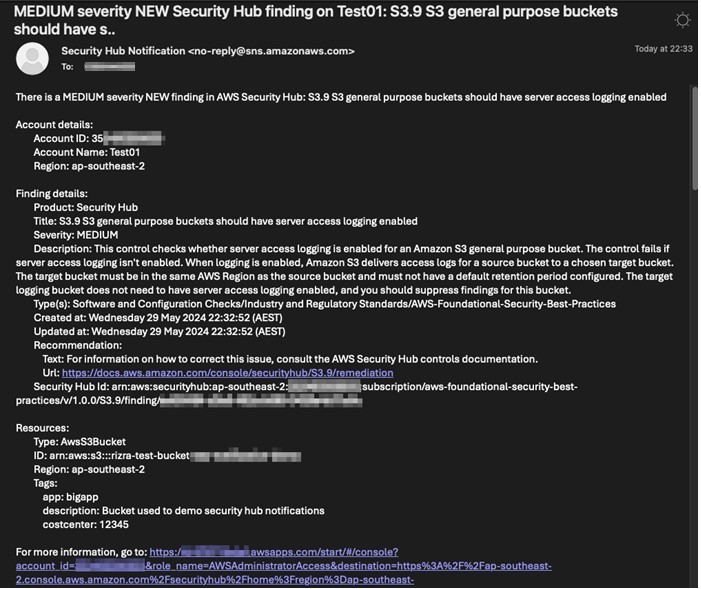
Figure 4: Sample email showing details of the security notification
Choosing the link in the email takes the user directly to the AWS account and the finding in Security Hub, where they can see more details and search for related findings (Figure 5).
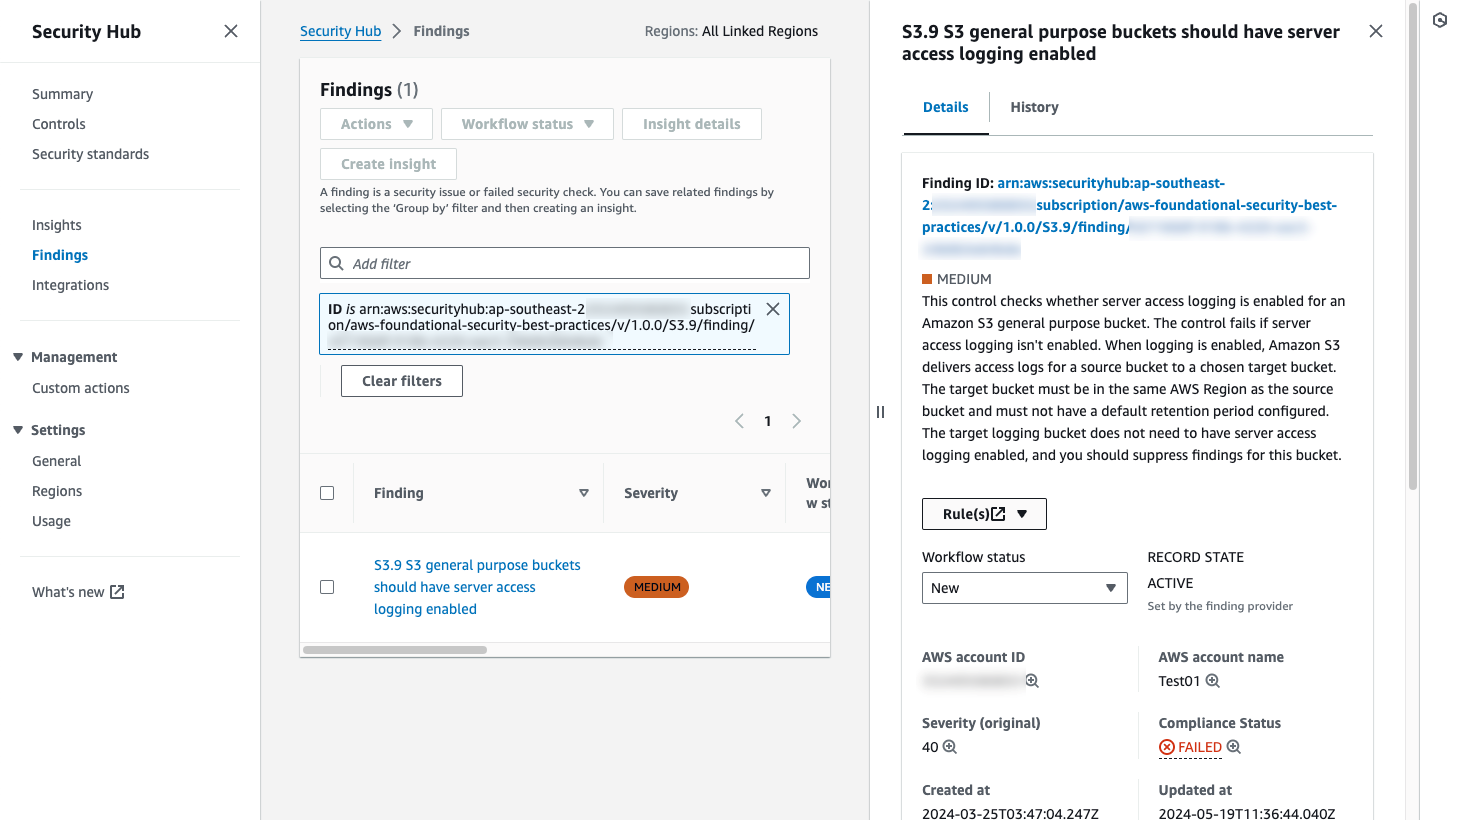
Figure 5: Security Hub finding detail page, linked from the notification email
Solution overview
We’ve provided two deployment options for this solution; a simpler option and one that is more advanced.
Figure 6 shows the simpler deployment option of using the requesting user’s IAM permissions to create the resources required for notifications.
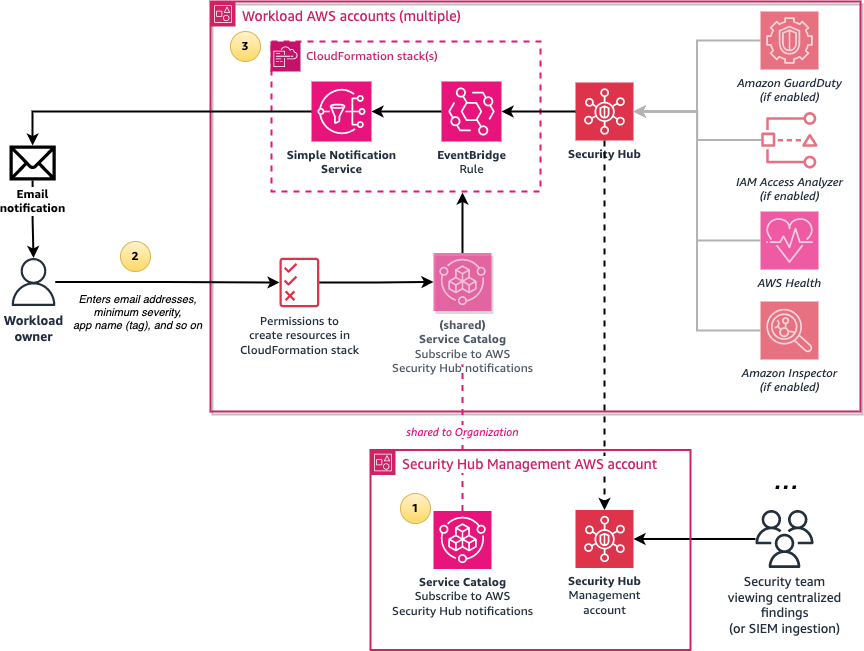
Figure 6: Architecture diagram of the simpler configuration of the solution
The solution involves the following steps:
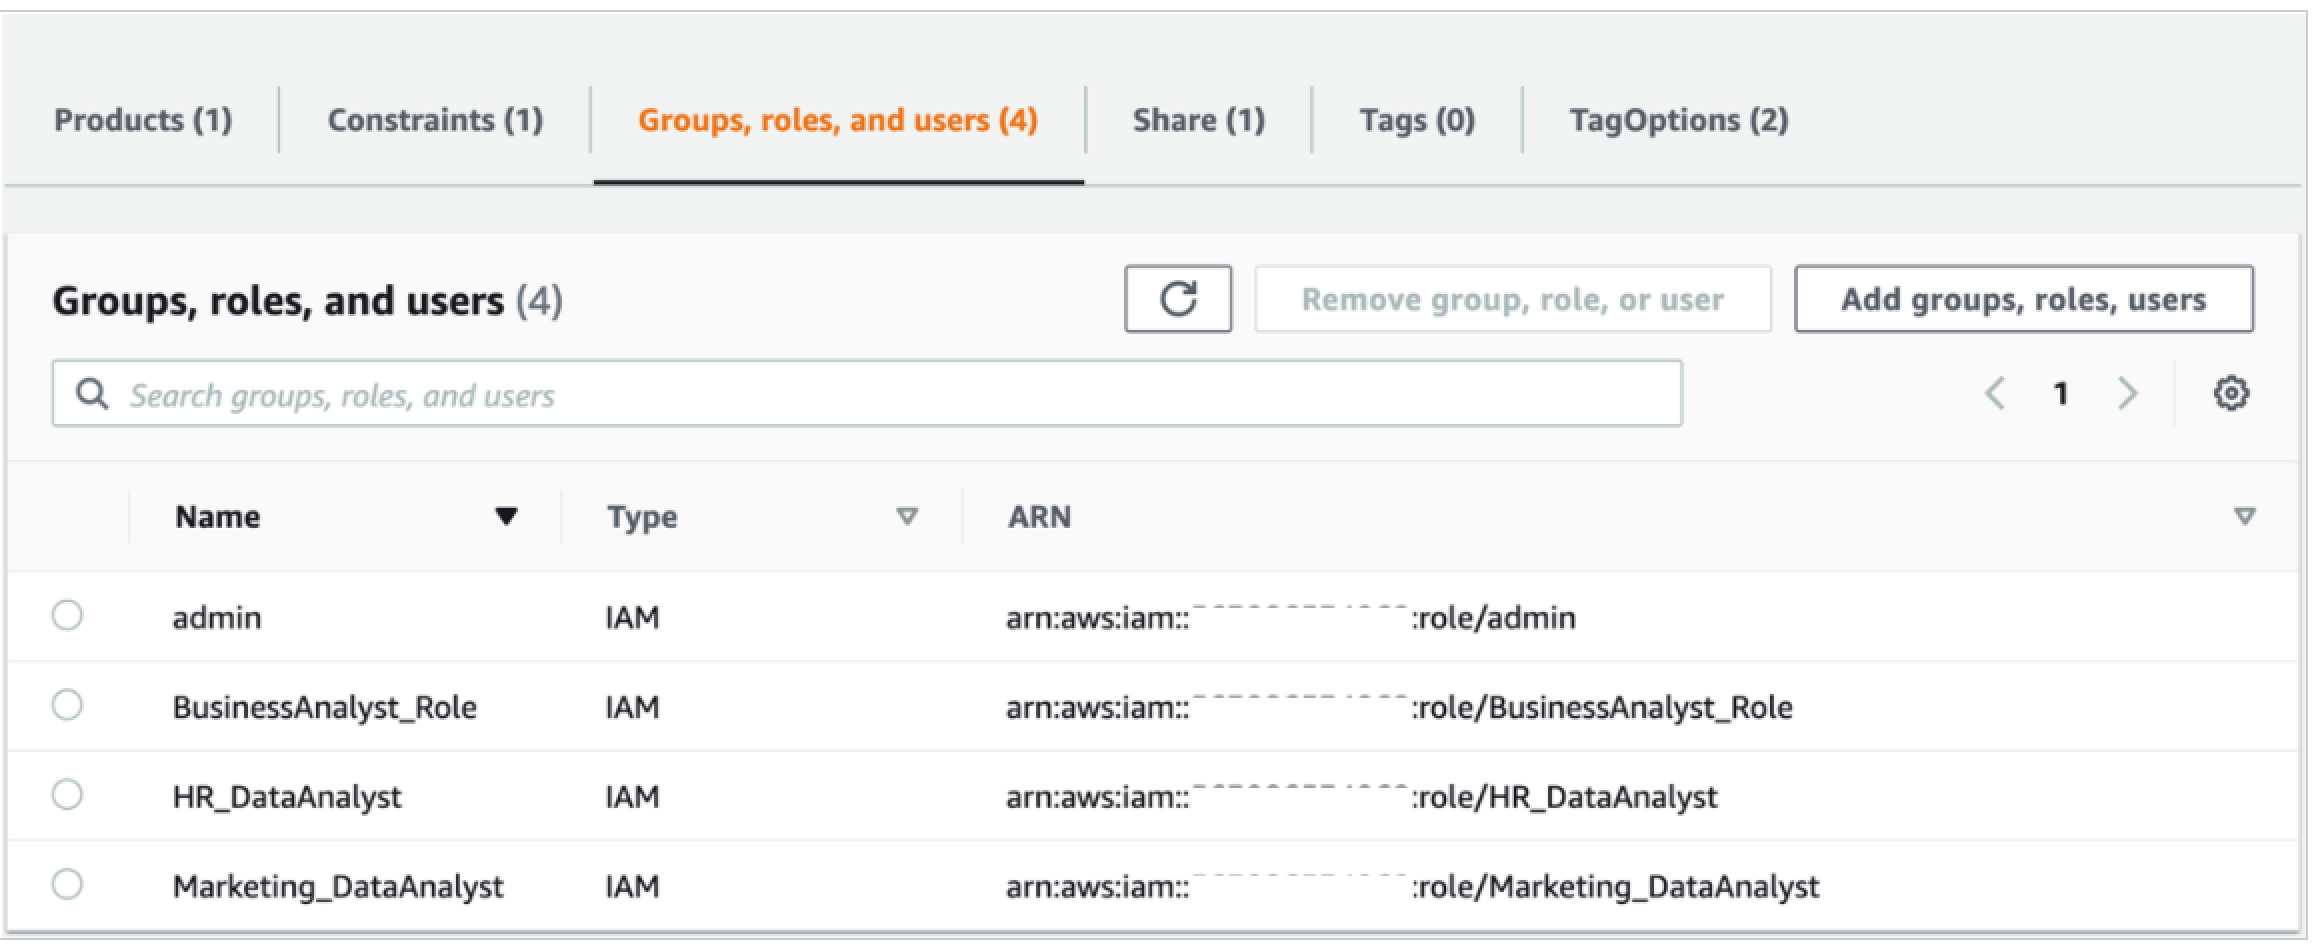
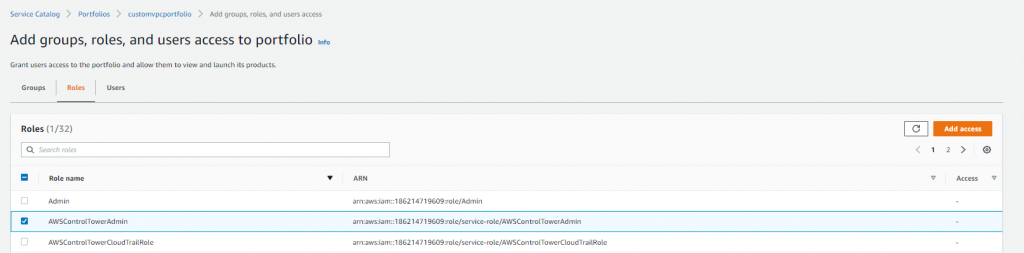
- Create a central Subscribe to AWS Security Hub notifications Service Catalog product in an AWS account which is shared with the entire organization in AWS Organizations or with specific organizational units (OUs). Configure the product with the names of IAM roles or IAM Identity Center permission sets that can launch the product.
- Users who sign in through the designated IAM roles or permission sets can access the shared Service Catalog product from the AWS Management Console and enter the required parameters such as their email address and the minimum severity level for notifications.
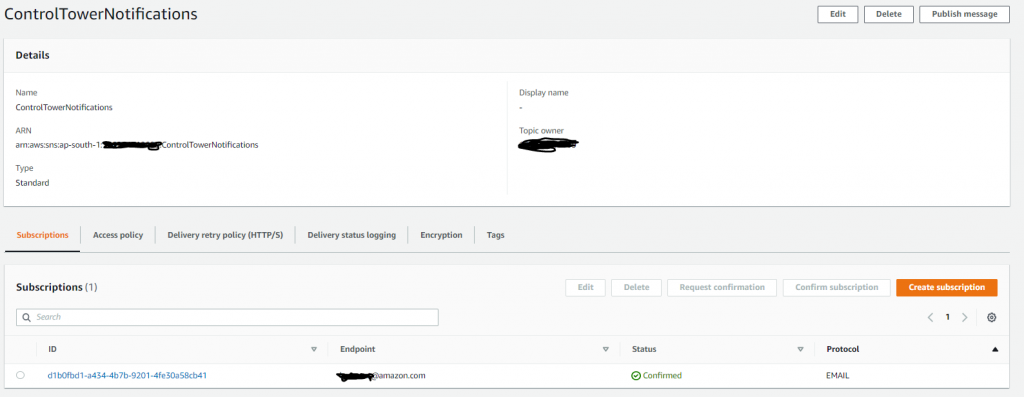
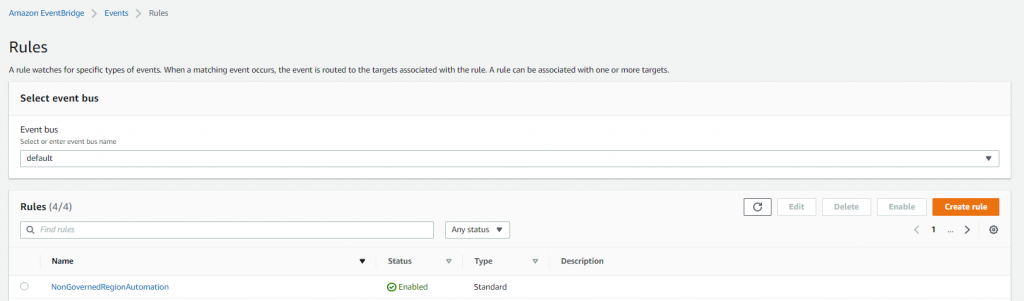
- The Service Catalog product creates an AWS CloudFormation stack, which creates an Amazon Simple Notification Service (Amazon SNS) topic and an Amazon EventBridge rule that filters new Security Hub finding events that match the user’s parameters, such as minimum severity level. The rule then formats the Security Hub JSON event message to make it human-readable by using native EventBridge input transformers. The formatted message is then sent to SNS, which emails the user.
We also provide a more advanced and recommended deployment option, shown in Figure 7. This option involves using an AWS Lambda function to enhance messages by doing conversions from UTC to your selected time zone, setting the email subject to the finding summary, and including an IAM Identity Center shortcut link to the finding. To not require your users to have permissions for creating Lambda functions and IAM roles, a Service Catalog launch role is used to create resources on behalf of the user, and this role is restricted by using IAM permissions boundaries.

Figure 7: Architecture diagram of the solution when using the calling user’s permissions
The architecture is similar to the previous option, but with the following changes:
- Create a CloudFormation StackSet in advance to pre-create an IAM role and an IAM permissions boundary policy in every AWS account. The IAM role is used by the Service Catalog product as a launch role. It has permissions to create CloudFormation resources such as SNS topics, as well as to create IAM roles that are restricted by the IAM permissions boundary policy that allows only publishing SNS messages and writing to Amazon CloudWatch Logs.
- Users who want to subscribe to security notifications require only minimal permissions; just enough to access Service Catalog and to pass the pre-created role (from the preceding step) to Service Catalog. This solution provides a sample AWS Identity Center permission set with these minimal permissions.
- The Service Catalog product uses a Lambda function to format the message to make it human-readable. The stack creates an IAM role, limited by the permissions boundary, and the role is assumed by the Lambda function to publish the SNS message.
Prerequisites
The solution installation requires the following:
- Administrator-level access to AWS Organizations. AWS Organizations must have all features
- Security Hub enabled in the accounts you are monitoring.
- An AWS account to host this solution, for example the Security Hub administrator account or a shared services account. This cannot be the management account.
- One or more AWS accounts to consume the Service Catalog product.
- Authentication that uses AWS IAM Identity Center or federated IAM role names in every AWS account for users accessing the Service Catalog product.
- (Optional, only required when you opt to use Service Catalog launch roles) CloudFormation StackSet creation access to either the management account or a CloudFormation delegated administrator account.
- This solution supports notifications coming from multiple AWS Regions. If you are operating Security Hub in multiple Regions, for a simplified deployment evaluate the Security Hub cross-Region aggregation feature and enable it for the applicable Regions.
Walkthrough
There are four steps to deploy this solution:
- Configure AWS Organizations to allow Service Catalog product sharing.
- (Optional, recommended) Use CloudFormation StackSets to deploy the Service Catalog launch IAM role across accounts.
- Service Catalog product creation to allow users to subscribe to Security Hub notifications. This needs to be deployed in the specific Region you want to monitor your Security Hub findings in, or where you enabled cross-Region aggregation.
- (Optional, recommended) Provision least-privileged IAM Identity Center permission sets.
Step 1: Configure AWS Organizations
Service Catalog organizations sharing in AWS Organizations must be enabled, and the account that is hosting the solution must be one of the delegated administrators for Service Catalog. This allows the Service Catalog product to be shared to other AWS accounts in the organization.
To enable this configuration, sign in to the AWS Management Console in the management AWS account, launch the AWS CloudShell service, and enter the following commands. Replace the <Account ID> variable with the ID of the account that will host the Service Catalog product.
# Enable AWS Organizations integration in Service Catalog
aws servicecatalog enable-aws-organizations-access

# Nominate the account to be one of the delegated administrators for Service Catalog
aws organizations register-delegated-administrator --account-id <Account ID> --service-principal servicecatalog.amazonaws.com
Step 2: (Optional, recommended) Deploy IAM roles across accounts with CloudFormation StackSets
The following steps create a CloudFormation StackSet to deploy a Service Catalog launch role and permissions boundary across your accounts. This is highly recommended if you plan to enable Lambda formatting, because if you skip this step, only users who have permissions to create IAM roles will be able to subscribe to security notifications.
To deploy IAM roles with StackSets
- Sign in to the AWS Management Console from the management AWS account, or from a CloudFormation delegated administrator
- Download the CloudFormation template for creating the StackSet.
- Navigate to the AWS CloudFormation page.
- Choose Create stack, and then choose With new resources (standard).
- Choose Upload a template file and upload the CloudFormation template that you downloaded earlier:
SecurityHub_notifications_IAM_role_stackset.yaml. Then choose Next. - Enter the stack name SecurityNotifications-IAM-roles-StackSet.
- Enter the following values for the parameters:
- AWS Organization ID: Start AWS CloudShell and enter the command provided in the parameter description to get the organization ID.
- Organization root ID or OU ID(s): To deploy the IAM role and permissions boundary to every account, enter the organization root ID using CloudShell and the command in the parameter description. To deploy to specific OUs, enter a comma-separated list of OU IDs. Make sure that you include the OU of the account that is hosting the solution.
- Current Account Type: Choose either Management account or Delegated administrator account, as needed.
- Formatting method: Indicate whether you plan to use the Lambda formatter for Security Hub notifications, or native EventBridge formatting with no Lambda functions. If you’re unsure, choose Lambda.
- Choose Next, and then optionally enter tags and choose Submit. Wait for the stack creation to finish.
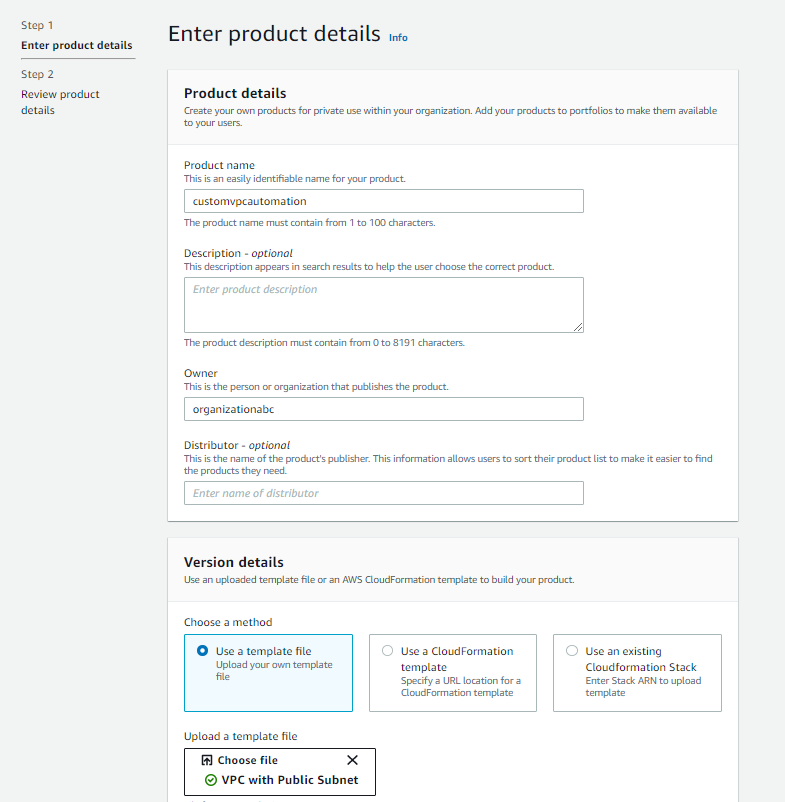
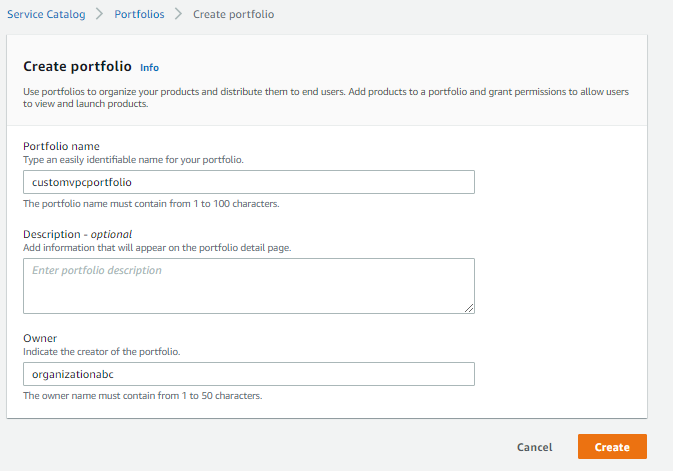
Step 3: Create Service Catalog product
Next, run the included installation script that creates the CloudFormation templates that are required to deploy the Service Catalog product and portfolio.
To run the installation script
- Sign in to the console of the AWS account and Region that will host the solution, and start the AWS CloudShell service.
- In the terminal, enter the following commands:
git clone https://github.com/aws-samples/improving-security-incident-response-times-by-decentralizing-notifications.git

cd improving-security-incident-response-times-by-decentralizing-notifications

./install.sh
The script will ask for the following information:
- Whether you will be using the Lambda formatter (as opposed to the native EventBridge formatter).
- The timezone to use for displaying dates and times in the email notifications, for example Australia/Melbourne. The default is UTC.
- The Service Catalog provider display name, which can be your company, organization, or team name.
- The Service Catalog product version, which defaults to v1. Increment this value if you make a change in the product CloudFormation template file.
- Whether you deployed the IAM role StackSet in Step 2, earlier.
- The principal type that will use the Service Catalog product. If you are using IAM Identity Center, enter
IAM_Identity_Center_Permission_Set. If you have federated IAM roles configured, enterIAM role name. - If you entered
IAM_Identity_Center_Permission_Setin the previous step, enter the IAM Identity Center URL subdomain. This is used for creating a shortcut URL link to Security Hub in the email. For example, if your URL looks like this:https://d-abcd1234.awsapps.com/start/#/, then enterd-abcd1234. - The principals that will have access to the Service Catalog product across the AWS accounts. If you’re using IAM Identity Center, this will be a permission set name. If you plan to deploy the provided permission set in the next step (Step 4), press enter to accept the default value SubscribeToSecurityNotifications. Otherwise, enter an appropriate permission set name (for example
AWSPowerUserAccess) or IAM role name that users use.
The script creates the following CloudFormation stacks:
- SecurityHub_notifications_SC-Bucket.yaml: This stack creates an Amazon Simple Storage (Amazon S3) bucket that contains the file SecurityHub-Notifications.yaml, which is the CloudFormation template file associated with the Service Catalog product. The script modifies the Mappings section of the template file that has the configuration details depending on the answers to the installation script questions, and then uploads the file to the bucket.
- SecurityHub_notifications_ServiceCatalog_Portfolio.yaml: This stack creates a Service Catalog portfolio and product using the Amazon S3 bucket from the previous step and gives permissions to the required principals to launch the product.
After the script finishes the installation, it outputs the Service Catalog Product ID, which you will need in the next step. The script then asks whether it should automatically share this Service Catalog portfolio with the entire organization or a specific account, or whether you will configure sharing to specific OUs manually.
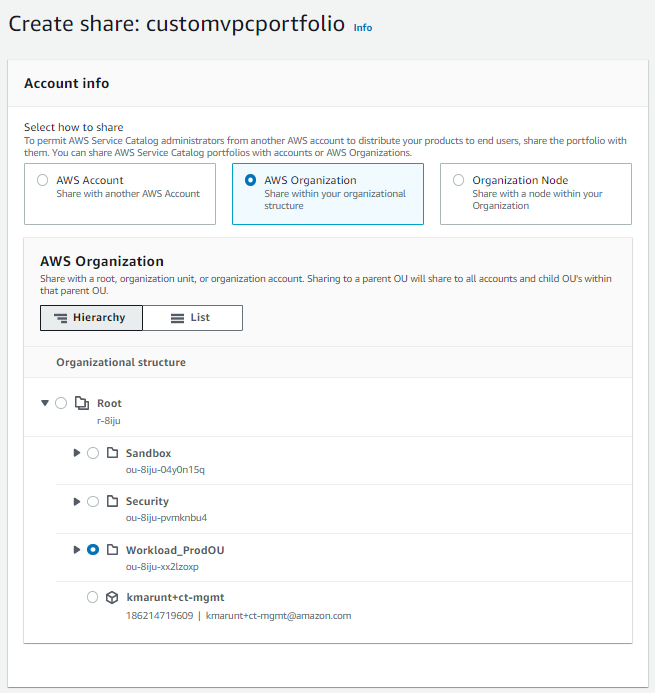
(Optional) To manually configure sharing with an OU
- In the Service Catalog console, choose Portfolios.
- Choose Subscribe to AWS Security Hub notifications.
- On the Share tab, choose Add a share.
- Choose AWS Organization, and then select the OU. The product will be shared to the accounts and child OUs within the selected OU.
- Select Principal sharing, and then choose Share.
To expand this solution across Regions, enable Security Hub cross-Region aggregation. This results in the email notifications coming from the linked Regions that are configured in Security Hub, even though the Service Catalog product is instantiated in a single Region. If cross-Region aggregation isn’t enabled and you want to monitor multiple Regions, you must repeat the preceding steps in all the Regions you are monitoring.
Step 4: (Optional, recommended) Provision IAM Identity Center permission sets
This step requires you to have completed Step 2 (Deploy IAM roles across accounts with CloudFormation StackSets).
If you’re using IAM Identity Center, the following steps create a custom permission set, SubscribeToSecurityNotifications, that provides least-privileged access for users to subscribe to security notifications. The permission set redirects to the Service Catalog page to launch the product.
To provision Identity Center permission sets
- Sign in to the AWS Management Console from the management AWS account, or from an IAM Identity Center delegated administrator
- Download the CloudFormation template for creating the permission set.
- Navigate to the AWS CloudFormation page.
- Choose Create stack, and then choose With new resources (standard).
- Choose Upload a template file and upload the CloudFormation template you downloaded earlier:
SecurityHub_notifications_PermissionSets.yaml. Then choose Next. - Enter the stack name SecurityNotifications-PermissionSet.
- Enter the following values for the parameters:
- AWS IAM Identity Center Instance ARN: Use the AWS CloudShell command in the parameter description to get the IAM Identity Center ARN.
- Permission set name: Use the default value SubscribeToSecurityNotifications.
- Service Catalog product ID: Use the last output line of the install.sh script in Step 3, or alternatively get the product ID from the Service Catalog console for the product account.
- Choose Next. Then optionally enter tags and choose Next Wait for the stack creation to finish.
Next, go to the IAM Identity Center console, select your AWS accounts, and assign access to the SubscribeToSecurityNotifications permission set for your users or groups.
Testing
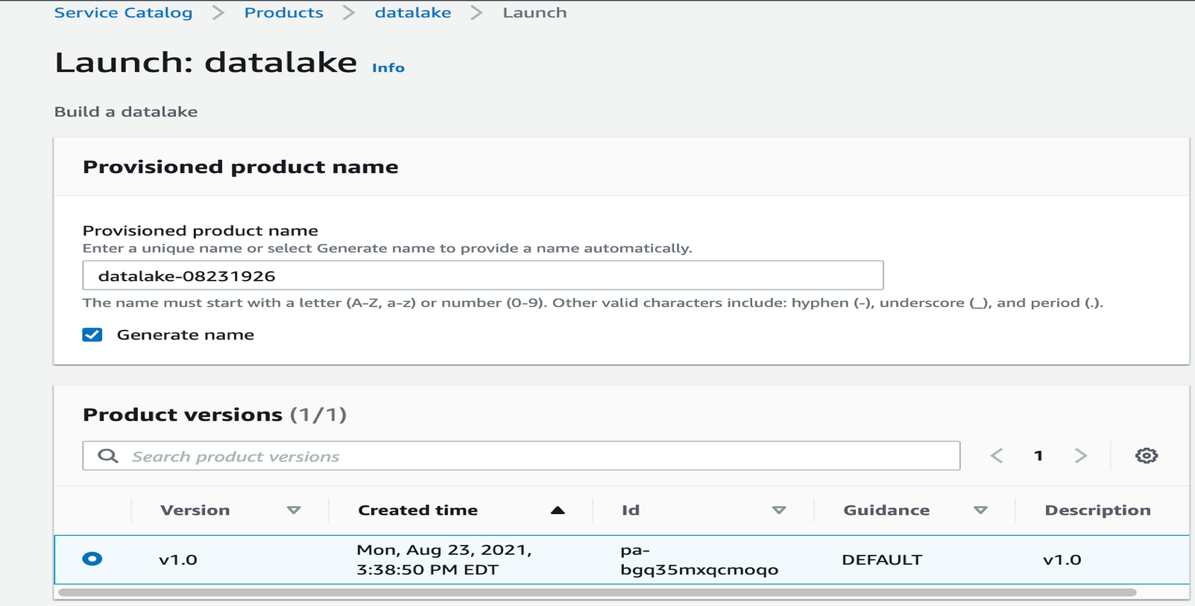
To test the solution, sign in to an AWS account, making sure to sign in with the designated IAM Identity Center permission set or IAM role. Launch the product in Service Catalog to subscribe to Security Hub security notifications.
Wait for a Security Hub notification. For example, if you have the AWS Foundational Security Best Practices (FSBP) standard enabled, creating an S3 bucket with no server access logging enabled should generate a notification within a few minutes.
Additional considerations
Keep in mind the following:
- There is a cost for each SNS email notification sent out, as well as for Service Catalog API calls and execution of Lambda functions (if enabled).
- Consider enabling Security Hub consolidated control findings so you don’t receive multiple email notifications for a control that applies to multiple standards.
- The blog post Considerations for security operations in the cloud compares and contrasts the centralized, decentralized, and hybrid models for security operations.
- The Initiate remediation for non-compliant resources and Incident response sections of the Security Pillar of the AWS Well-Architected Framework walk through best practices for remediation and incident response.
Cleanup
To remove unneeded resources after testing the solution, follow these steps:
- In the workload account or accounts where the product was launched:
- Go to the Service Catalog provisioned products page and terminate each associated provisioned product. This stops security notifications from being sent to the email address associated with the product.
- In the AWS account that is hosting the directory:
- In the Service Catalog console, choose Portfolios, and then choose Subscribe to AWS Security Hub notifications. On the Share tab, select the items in the list and choose Actions, then choose Unshare.
- In the CloudFormation console, delete the SecurityNotifications-Service-Catalog stack.
- In the Amazon S3 console, for the two buckets starting with securitynotifications-sc-bucket, select the bucket and choose Empty to empty the bucket.
- In the CloudFormation console, delete the SecurityNotifications-SC-Bucket stack.
- If applicable, go to the management account or the CloudFormation delegated administrator account and delete the SecurityNotifications-IAM-roles-StackSet stack.
- If applicable, go to the management account or the IAM Identity Center delegated administrator account and delete the SecurityNotifications-PermissionSet stack.
Conclusion
This solution described in this blog post enables you to set up a self-service standardized mechanism that application or workload owners can use to get security notifications within minutes through email, as opposed to being contacted by a security team later. This can help to improve your security posture by reducing the incident resolution time, which reduces the time that a security issue remains active.
If you have feedback about this post, submit comments in the Comments section below. If you have questions about this post, contact AWS Support.

 .Net Developer Day –
  AWS Global Summits – Check your calendars and sign up for the AWS Summit close to where you live or work:


 Tanzir Musabbir is a Data & Analytics Architect with AWS. At AWS, he works with our customers to provide them architectural guidance for running analytics solutions on Amazon EMR, Amazon Athena & AWS Glue. Tanzir is a big Real Madrid fan and he loves to travel in his free time.