I speak English. Super well. And I can read the rough, overall vibe of writing in French. I can also order beer and taxis in Spanish. Alas, my dog can do none of these things, and we are left in communication limbo. I try asking them (in English) why they’re so mean to that one Cockapoo who lives across the road, or why they don’t understand the importance of the eyedrops the vet insists I have to hold their eyelids open to administer. They just respond with a variety of noises that I cannot translate. We need to fix this, and thankfully NerdStroke has harnessed Raspberry Pi to build a solution.
NerdStroke’s YouTube channel is new, but good. Subscribe to it! (Video features some bleeped-out strong language, as well as one unbleeped mild swear)
How does it work?
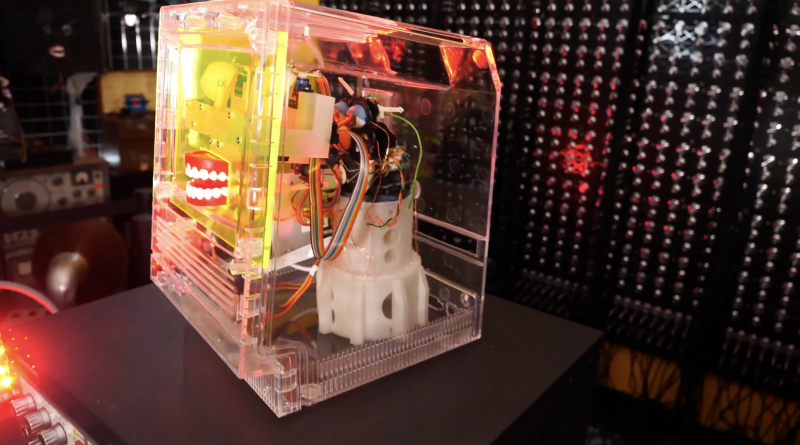
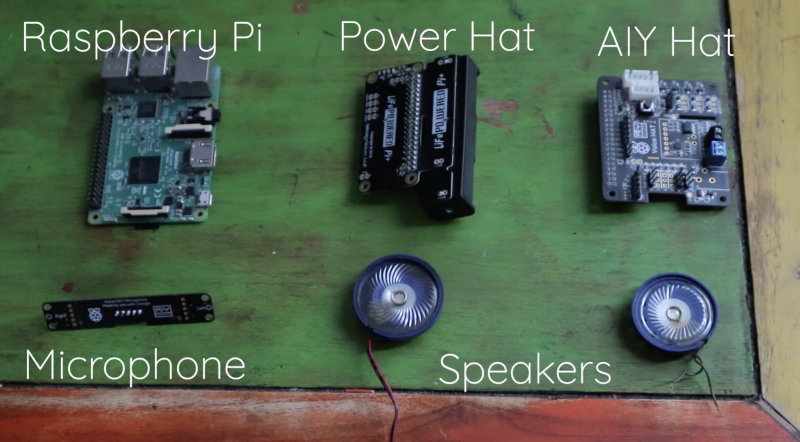
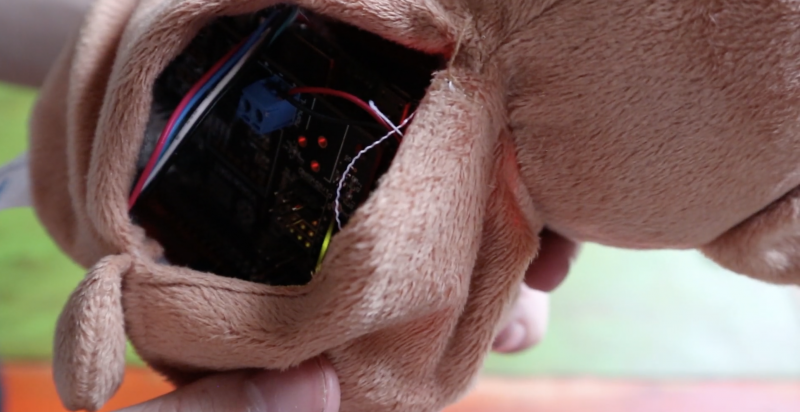
The dog wears a harness with a microphone that picks up its barks. The barks get processed through a device that determines what the dog is saying and then outputs it through speakers.
Raspberry Pi Zero is the affordable brain powering NerdStroke’s solution to this age-old human-and-pup problem. But writing code that could translate the multitude of frequencies coming out of a dog’s mouth when it barks was a trickier problem. NerdStroke tried to work it through on Twitch with fellow hobbyists, but alas, the original dream had to be modified.
The kit worked fine – it was the coding challenge that changed the course of this project
Spoiler alert: fast Fourier transforms did not work. You would need a clear, pure tone for that to work in a project like this, but as we said above, dogs bark in a rainbow of tones, pitches, and all the rest.
So what’s the solution?
Because of this, a time-based model was devised to predict what a dog is likely to be barking about at any given time of day. For example, if it’s early morning, they probably want to go out to pee. But if it’s mid-morning, they’re probably letting you know the postman has arrived and is trying to challenge your territory by pushing thin paper squares through the flap in your front door. It’s a dangerous world out there, and dogs just want to protect us.
Nerdstroke had his good friend record some appropriate soundbites to go with each bark, depending on what time of day it happened. And now, Nugget the dog can tell you “I want to cuddle” or “Why aren’t you feeding me?”
Same, Nugget, same
While the final project couldn’t quite translate the actual thoughts of a dog, we love the humour behind this halfway solution. And we reckon the product name, Holler Collar, would definitely sell.
Follow NerdStroke’s future projects
NerdStroke is all over the socials, so follow them on your platform of choice:
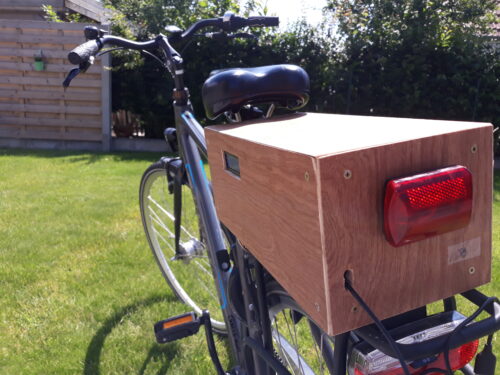
Maker keanuDav was always forgetting to turn on his bike lights when riding out in the dark. He also never knew how fast he was going, or how long his rides were. So he created a shareable smart bike that automatically turns the lights on or off and keeps track of where you’ve ridden. The project uses a RFID scanner so somebody else can use the bike without messing with Keanu’s personal ride data.
Keanu’s creation sits neatly on the bike’s rear rack
And features an LCD screen
Here in Cambridge, if you forget to take your clip-on lights off your bike when you lock it up, chances are they won’t be there when you go back. We reckon this Raspberry Pi-powered solution could work for us here in the UK’s leading cycling city too, since there’s nothing to easily unclip and walk away with.
Keanu totted up the total price of the build, including wood and the light, at around €145.
How does it all fit together?
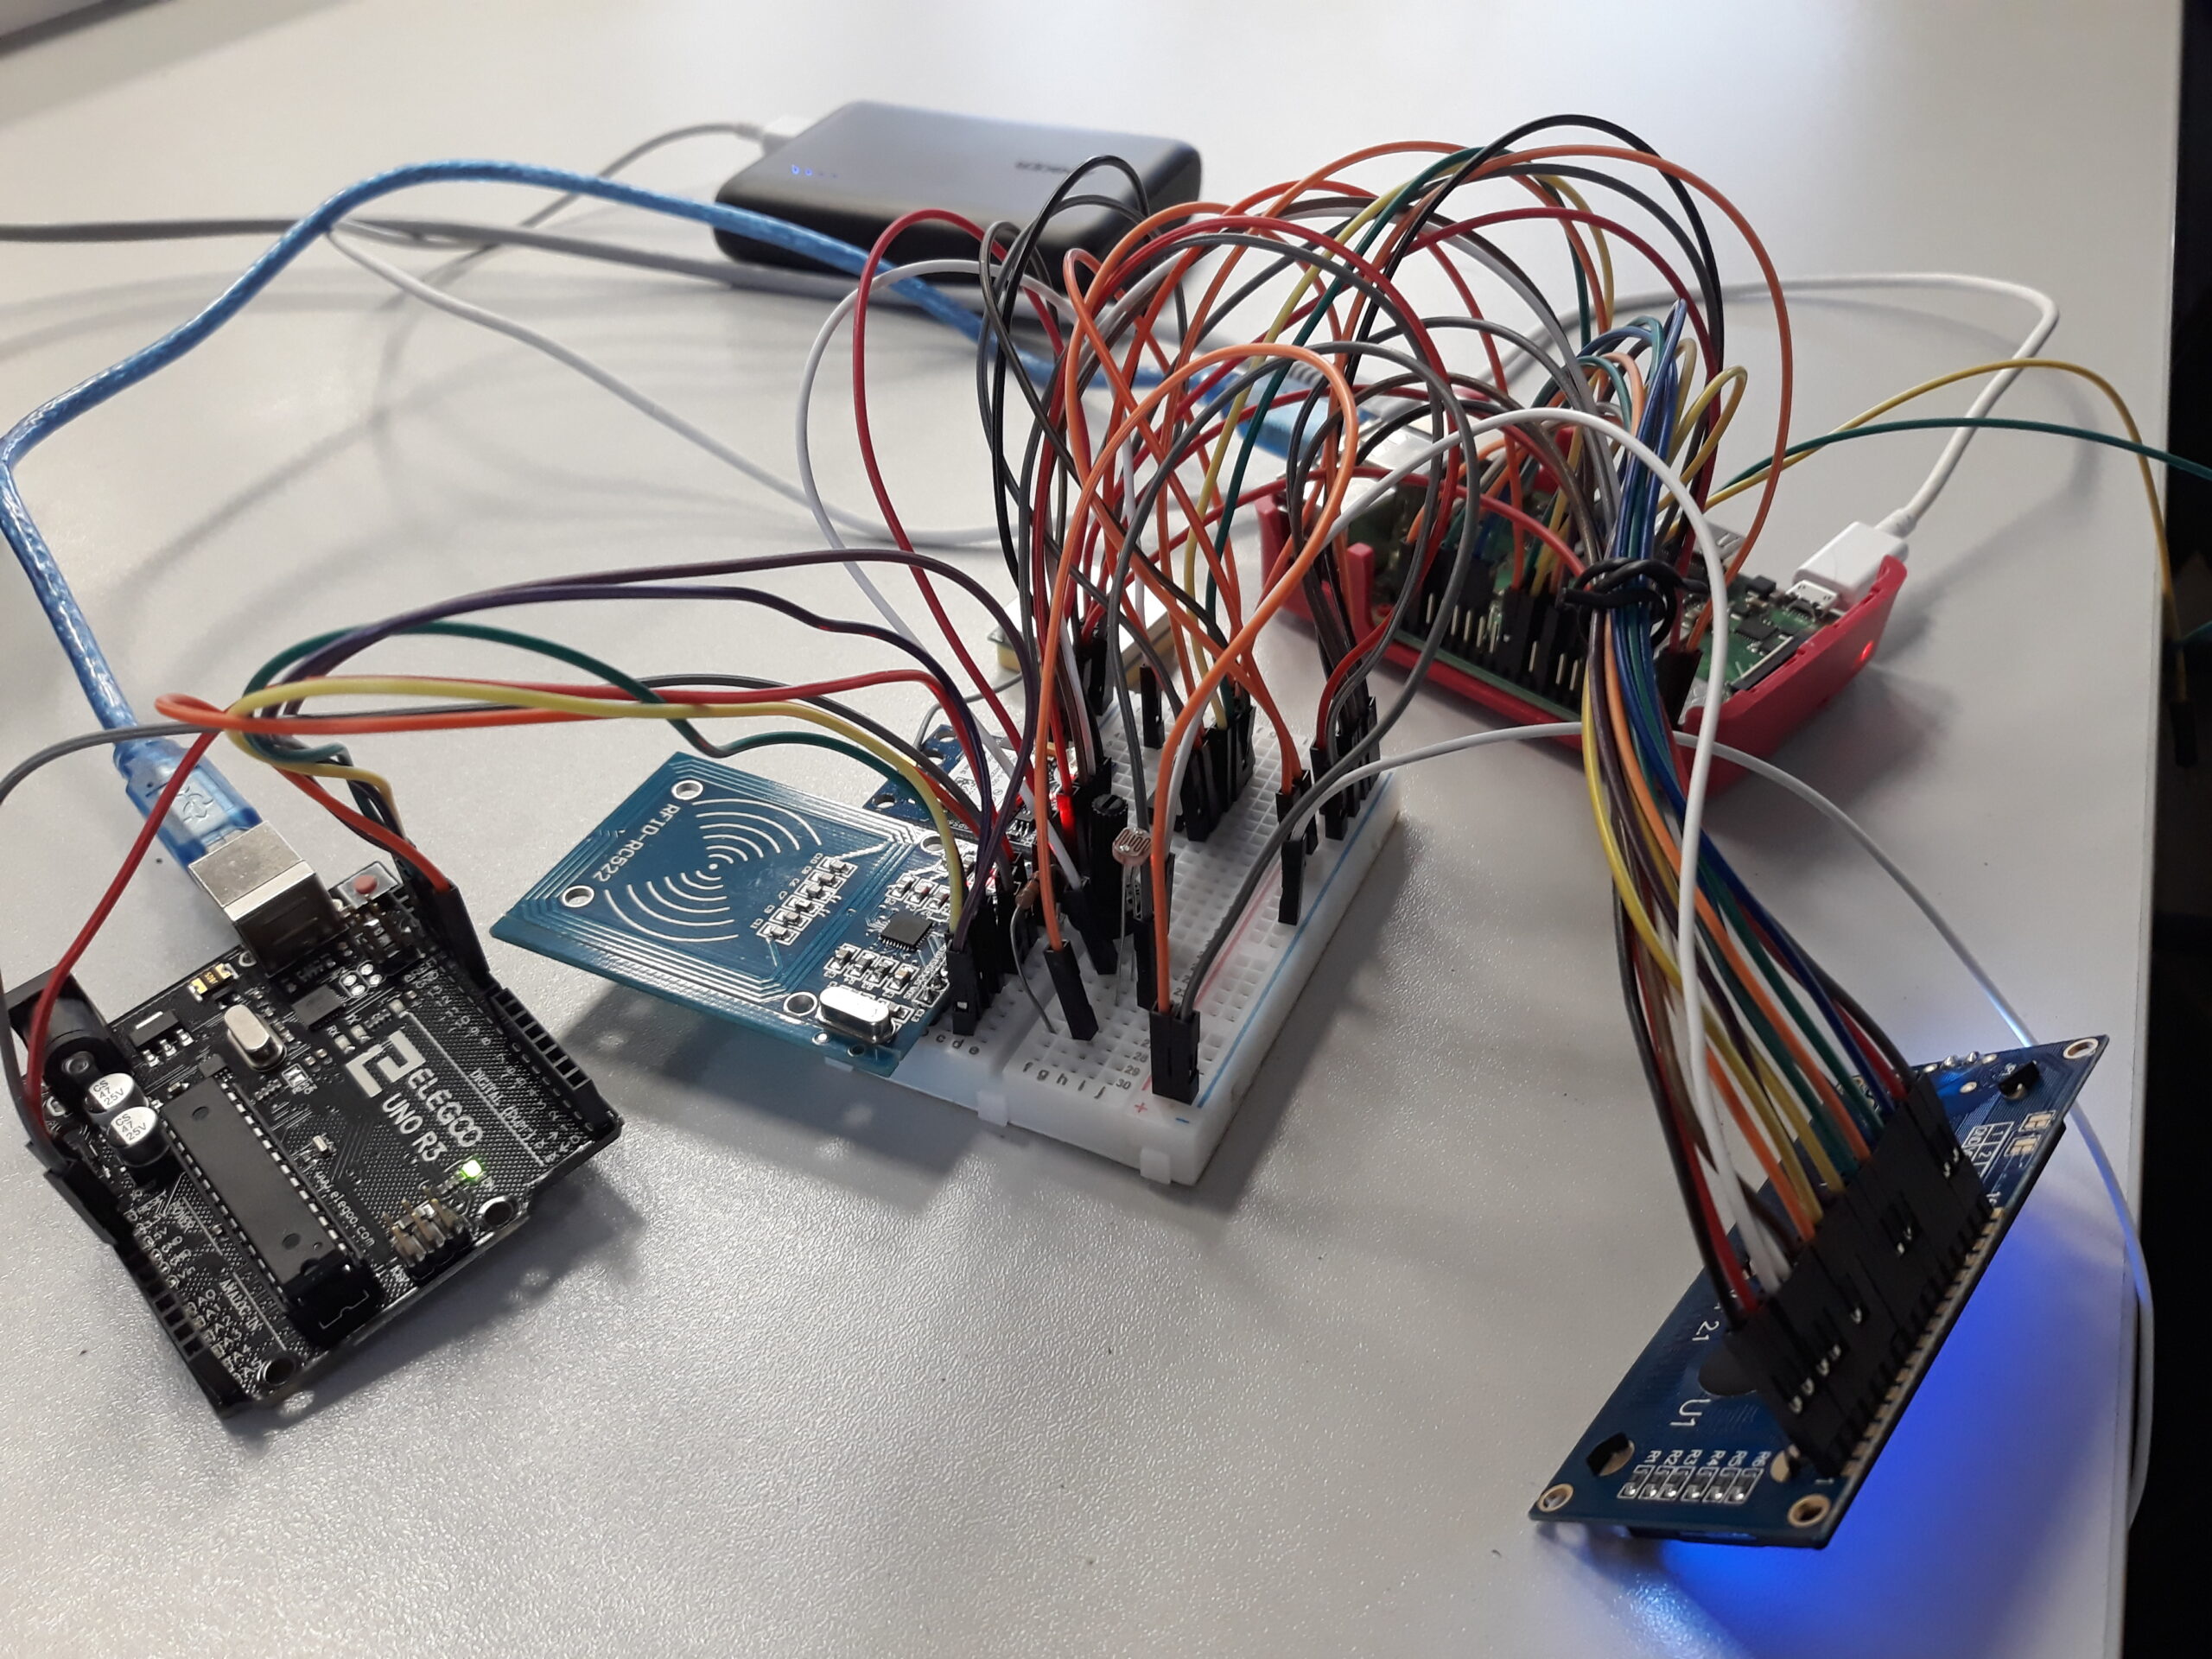
We’re not going to lie: the smart bike looks tricky to recreate. I mean, that is a lot of wires. And several bits of hardware. But it does perform multiple functions for the rider, so we can put up with a little fiddliness.
So many wires. *Rocks back and forth* So many wires.
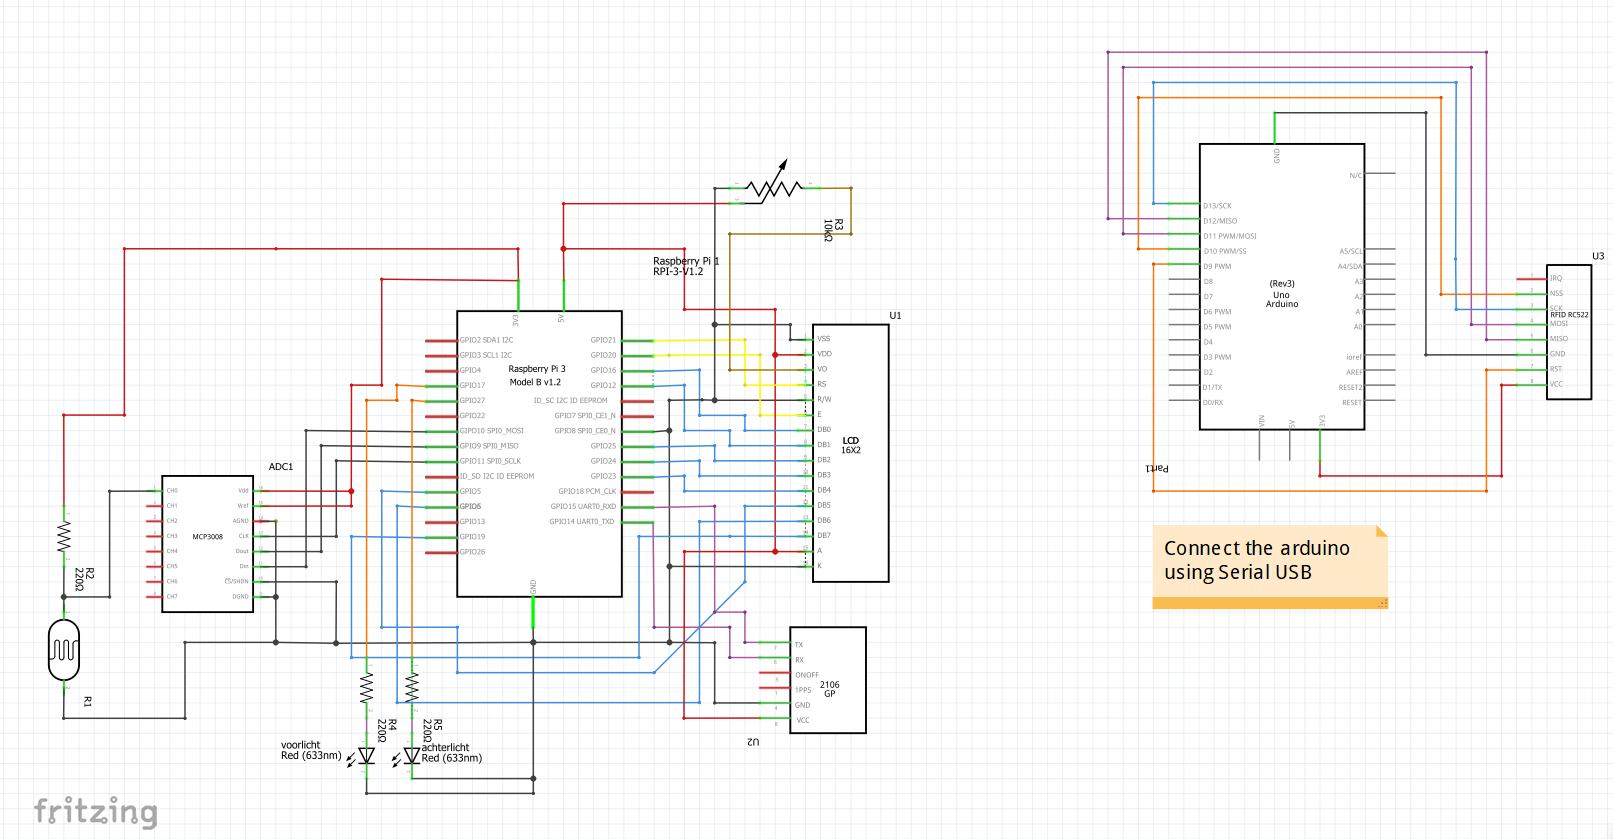
And don’t worry, Keanu is a hero and shared this Fritzing diagram on his instructable, which is handily set out in a twelve-step format so you can follow along easily.
See, it’s all simple once you know how
How do you collect all the data?
Keanu explains:
“The RFID scanner is used with the arduino. I read out the data from the scanner with the arduino and send it to the Raspberry Pi with Serial USB.
The GPS module is also using serial communication. The data the GPS sends to the Raspberry Pi is not that well formatted, so I used a library to parse the data and make it a lot easier to use.
The analog values from the LDR are converted using the mcp3008 (an adc), then I transform the value to a percentage.”
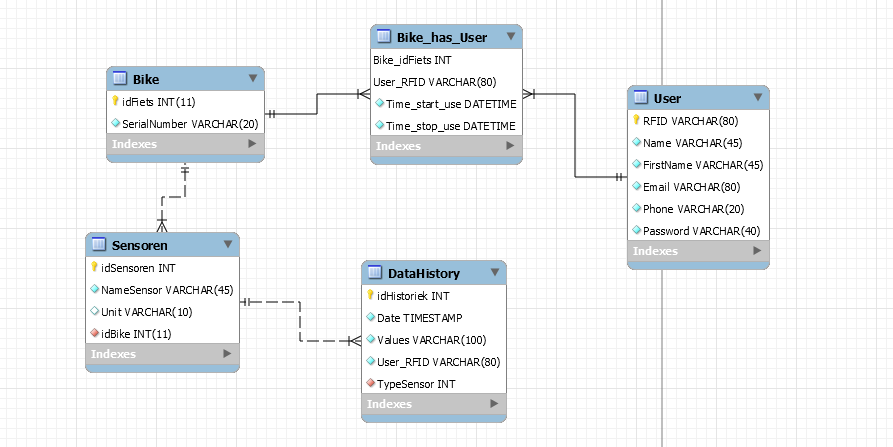
Keanu stores the data in a relational database in mySQL. Then the database and a python script run together on the Raspberry Pi. Here’s everything you need on GitHub.
Take a ride
On top of the impressive coding and electrical skills, Keanu is a dab hand at woodwork. You could use a pre-made box in another material if that’s not your thing. It just needs a hole for the LCD screen to show through.
Make sure to check out maker Keanu’s step-by-step tutorial explaining how he made the smart bike.
When maker Stéphane (aka HalStar) set about building this self-playing xylophone, their goal was to learn more about robotics, and to get hands-on with some mechanical parts they had never used before, in this case solenoids.
They also wanted to experiment with Raspberry Pi to build something that reflected their love of music. This automated instrument, capable of playing hundreds of MIDI files, fits the brief.
Let me introduce you to Stéphane’s self-playing xylophone
Two factors constrained the design: Stéphane wanted to be able to do it all using parts from the local DIY store, and to use as many regular modules as possible. So, no breadboard or wires everywhere, and no custom PCB. Just something simple to assemble and neat.
This extra video goes into more detail about the build process
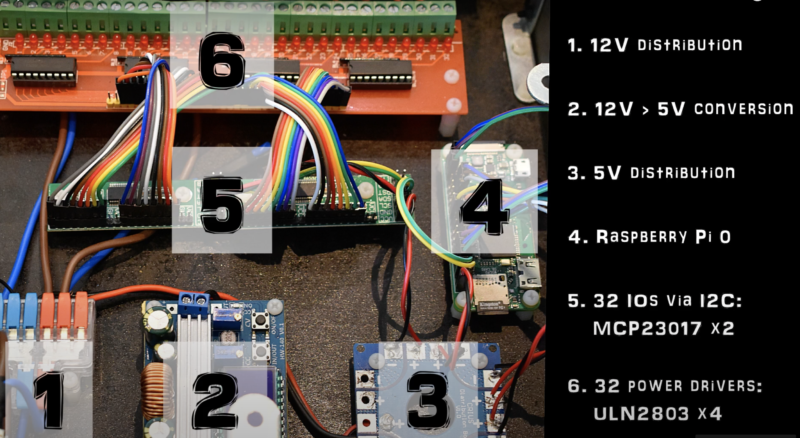
Hardware
Raspberry Pi Zero WH is the teeny tiny brain of the self-playing xylophone. And its maker’s build details video very helpfully labels all the parts, where they sit, and what’s connected to what.
There we are (#4) working away to make the xylophone play
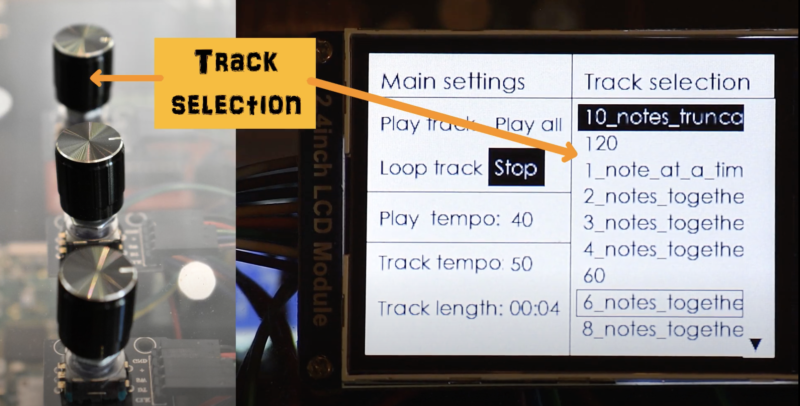
These three buttons select the tracks, set the tempo, and set the mode. Choose between playing all loaded tracks or just one. You can also decide whether you want all tracks to play on repeat in a loop, or stop after your selections have played through. A two-inch LCD screen shows you what’s going on.
Twist and click to choose your settings
The right notes
While there are thousands of MIDI files freely available online, very few of them could actually be played by the xylophone. With only 32 notes, the instrument is limited in what it can play without losing any notes. Also, even when a MIDI file uses just 32 consecutive notes, they might not be the same range of 32 notes as the xylophone has, so you need to transpose. Stéphane developed a tool in Python to filter out 32-note tunes from thousands of MIDI files and automatically transpose them so the xylophone can play them. And, yes, everything you need to copy this filtering and transposing function is on GitHub.
In all its glory
Now, Stéphane says that whenever friends or family visit their home, they’re curious and impressed to see this strange instrument play by itself. Sadly, we are not among Stéphane’s family or friends; fortunately, though, this project has an entire YouTube playlist, so we can still have a look and a listen to see it in action up close.
Wait, isn’t that a glockenspiel?
We know it’s technically a glockenspiel. Stéphane acknowledges it is technically a glockenspiel. But we are firm fans of their going down the xylophone route, because way more people know what one of those is. If you’re interested, the difference between a xylophone and the glockenspiel is the material used for the bars. A xylophone has wooden bars, whereas glockenspiel bars are metal.
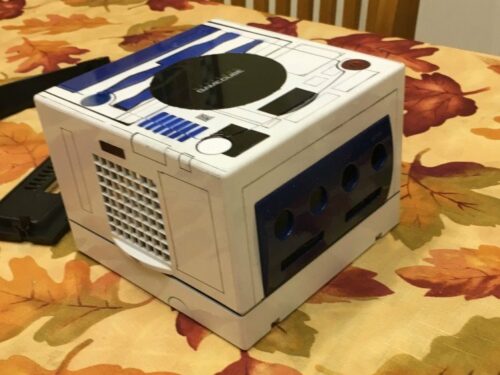
Diehard Nintendo and Star Wars fan electrouser301 is behind this customised R2D2 Raspberry Pi-powered console. Raspberry Pi 3 Model B is its brain, and a Nintendo GameCube was customised with spray paint and hand-cut stencils.
“When I saw what people were doing with Raspberry Pi and emulation it opened up a new world to me. If you would have shown kid-me that I could play the whole libraries of NES, N64, Arcade games, Genesis, SNES, etc. all on one console that you create yourself, to your own specifications, my mind would have been blown. That’s what this whole project was about, bringing back my inner child. I wanted to create and own something that no one else has.”
Inner workings of R2D2 Cube
Of course, you could just deck out a GameCube case with decals or paint and keep the internals the same if you don’t want to swap a Raspberry Pi in for emulation. But where’s the fun in that?
See the machine’s power circuit plugged into the Raspberry Pi’s micro USB power slot below. The red and green wires are LED wires, and the power switch wires are pink.
And here’s a side view of the guts of the project:
R2D2 makeover
Hand-cut R2D2-inspired paper stencils spray-painted onto the GameCube give it its instantly recognisable style. A unique retro device now adorns electrouser301’s gaming space, and new life has been breathed into one of Nintendo’s finest creations.
R2D2-approved blue and white colour scheme
Top Star Wars maker projects
Take a look at electromaker’s list of Best Star Wars Maker Projects – it’s where we came across this R2D2 GameCube mashup. Naturally, the list features a fair few homemade lightsabers, so check it out if you’re in the market for an upgrade; however, we wanted to share a few Star Wars-themed builds we hadn’t seen before.
First up, an animated Star Wars: The Force Awakens movie poster made with NeoPixel LEDs and an Arduino Mega. Steve from Making at Home coded a built-in motion sensor and customisable brightness settings. Check it out below, because this isn’t just any old poster with a few LEDs taped in the back, oh no.
Pimp my poster
You know we love wearable tech around here, so this DIY Boba Fett helmet with a built-in LED chaser was definitely going to be a favourite. This is a fairly affordable build too, consisting of a few cheap components like LEDs and resistors, while the helmet itself is made from crafty stuff found around the house. Crazy Couple created this project and you should check out their tutorial-packed YouTube channel.
“I am Boba Fett. The ship you seek is nearby.”
BB8 occupies a special place in our hearts, so we love this 3D-printed robot, which is controlled by an Arduino Uno over a Bluetooth connection from your smartphone. Watch maker Lewis’s video below and share in his love for this spherical droid.
Drop some links in the comments to show off your Star Wars-themed builds so we can share in your intergalactic wisdom. Then go be friends with Electromaker on YouTube. Because subscribers of them you should be.
It has been a cold winter for Tom Shaffner, and since he is working from home and leaving the heating on all day, he decided it was finally time to see where his house’s insulation could be improved.
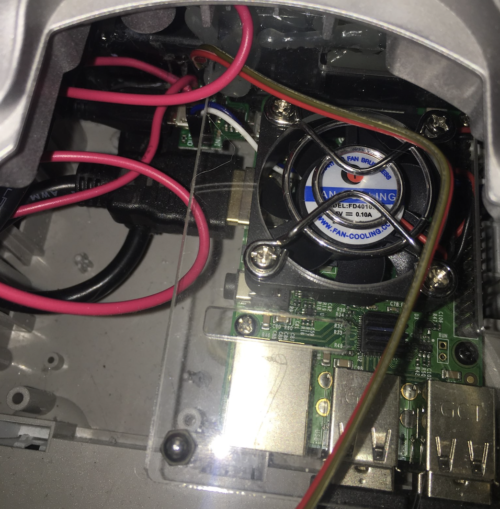
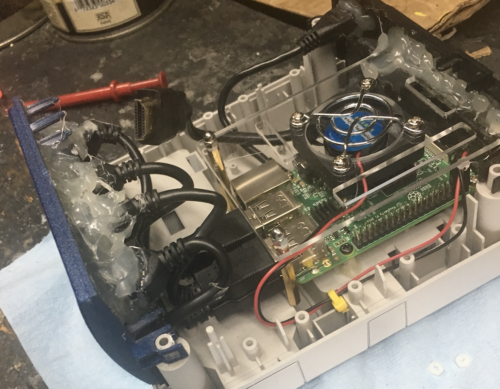
Tom’s setup inside a case with a cooling fan; the camera is taped on bottom right
An affordable solution
His first thought was to get a thermal IR (infrared) camera, but he found the price hasn’t yet come down as much as he’d hoped. They range from several thousand dollars down to a few hundred, with a $50 option just to rent one from a hardware store for 24 hours.
When he saw the $50 option, he realised he could just buy the $60 (£54) MLX90640 Thermal Camera from Pimoroni and attach it to a Raspberry Pi. Tom used a Raspberry Pi 4 for this project. Problem affordably solved.
A joint open source effort
Once Tom’s hardware arrived, he took advantage of the opportunity to combine elements of several other projects that had caught his eye into a single, consolidated Python library that can be downloaded via pip and run both locally and as a web server. Tom thanks Валерий Курышев, Joshua Hrisko, and Adrian Rosebrock for their work, on which this solution was partly based.
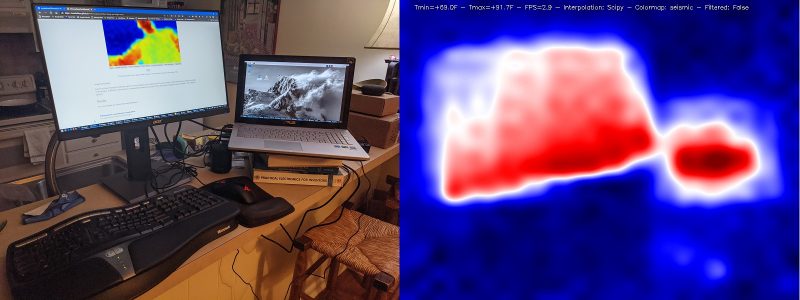
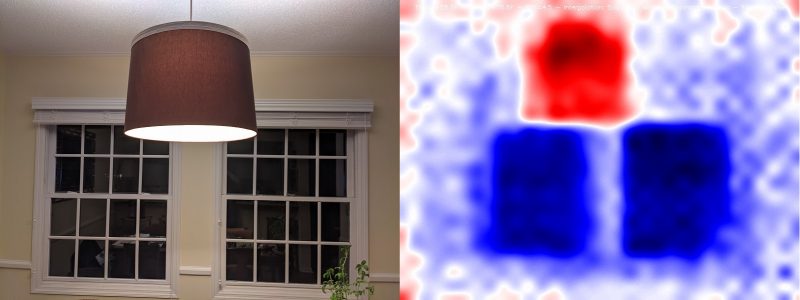
The heat image on the right shows that Tom’s computer and laptop screens are the hottest parts of the room
Tom has also published everything on GitHub for further open source development by any enterprising individuals who are interested in taking this even further.
Quality images
The big question, though, was whether the image quality would be good enough to be of real use. A few years back, the best cheap thermal IR camera had only an 8×8 resolution – not great. The magic of the MLX90640 Thermal Camera is that for the same price the resolution jumps to 24×32, giving each frame 768 different temperature readings.
Thermal image showing heat generated by a ceiling lamp but lost through windows
Add a bit of interpolation and image enlargement and the end result gets the job done nicely. Stream the video over your local wireless network, and you can hold the camera in one hand and your phone in the other to use as a screen.
Bonus security feature
Bonus: If you leave the web server running when you’re finished thermal imaging, you’ve got yourself an affordable infrared security camera.
Live camera cycling through interpolation and colour modes and varying view
Documentation on the setup, installation, and results are all available on Tom’s GitHub, along with more pictures of what you can expect.
And you can connect with Tom on LinkedIn if you’d like to learn more about this “technically savvy mathematical modeller”.
We shared Dennis Mellican’s overly effective anti-burglary project last month. Now he’s back with something a whole lot more musical and mini.
Inspiration
Dennis was inspired by other jukebox projects that use Raspberry Pi, NFC readers, and tags to make music play. Particularly this one by Mark Hank, which we shared on the blog last year. The video below shows Dennis’s first attempt at creating an NFC Raspberry Pi music player, similar to Mark’s.
LEGO twist
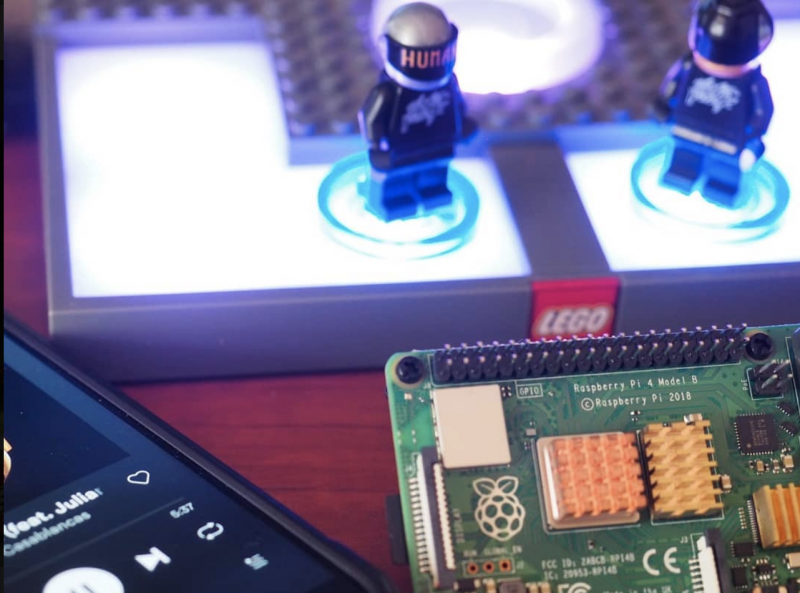
After some poking around, Dennis realised that the LEGO Dimensions toy pad is a three-in-one NFC reader with its own light show. He hooked it up to a Raspberry Pi and developed a Python application to play music when LEGO Dimension Minifigures are placed on the toy pad. So, if an Elvis minifigure is placed on the reader, you’ll hear Elvis’s music.
Mini KISS rocking out on the NFC reader
The Raspberry Pi is hooked up to the LEGO Dimensions toy pad, with Musicfig (Dennis’s name for his creation) playing tracks via Spotify over Bluetooth. The small screen behind the minifigures is displaying the Musicfig web application which, like the Spotify app, displays the album art for the track that’s currently playing.
No Spotify or LEGO? No problem!
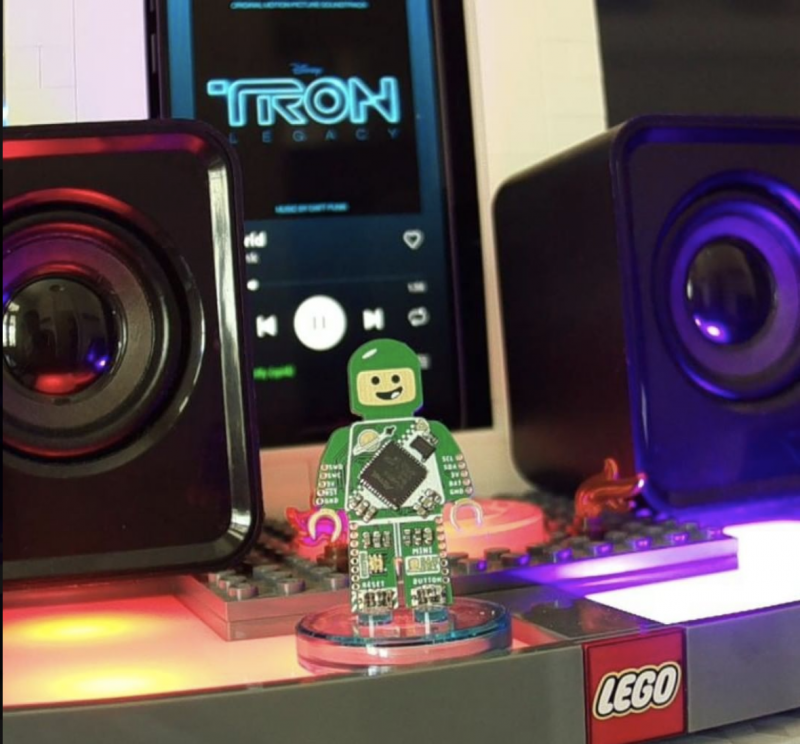
Daft Punk LOVES Raspberry Pi
Spotify playback is optional, as you can use your own MP3 music file collection instead. You also don’t have to use LEGO Minifigures: most NFC-enabled devices or tags can be used, including Disney Infinity, Nintendo Amiibo, and Skylander toy characters.
Why not have Elsa sing… what’s that song again? Let it… what was it?
Dennis thought Musicfig could be a great marketable LEGO product for kids and grown-ups alike, and and he submitted it to the LEGO Ideas website. Unfortunately, he had tinkered a little too much (we approve) and it wasn’t accepted, due to rules that don’t allow non-LEGO parts or customisations.
Want to build one?
The LEGO Dimensions toy pad was discontinued in 2017, but Dennis has seen some sets on sale at a few department stores, and even more cheaply on second-hand market sites like Bricklink. We’ve spotted them on eBay and Amazon too. Dennis also advises that the toy pad often sells for less than a dedicated NFC reader.
What’s the best movie soundtrack and why is it Tron?
Watch Dennis’s seven-year-old son Benny show you how it all works, from Elvis through to Prodigy via Daft Punk and Queen.
You can tell which songs Benny likes best because the volume goes to 11
There are some really simple step-by-step instructions for a quick install here, as well as a larger gallery of Musicfig rigs. And Dennis hosts a more detailed walkthrough of the project, plus code examples, here.
You can find all things Dennis-related, including previous Raspberry Pi projects, here.
The upside of headless is that my Raspberry Pi can be anywhere, not tied to a monitor, keyboard and mouse. The downside is programming and debugging it – do you plug your Raspberry Pi into a monitor and run the full Raspberry Pi OS desktop, or do you use Raspberry Pi OS Lite and try to program and debug over SSH using the command line? Or is there a better way?
Remote development with VS Code to the rescue
There is a better way – using Visual Studio Code remote development! Visual Studio Code, or VS Code, is a free, open source, developer’s text editor with a whole swathe of extensions to support you coding in multiple languages, and provide tools to support your development. I practically live day to day in VS Code: whether I’m writing blog posts, documentation or Python code, or programming microcontrollers, it’s my work ‘home’. You can run VS Code on Windows, macOS, and of course on a Raspberry Pi.
One of the extensions that helps here is the Remote SSH extension, part of a pack of remote development extensions. This extension allows you to connect to a remote device over SSH, and run VS Code as if you were running on that remote device. You see the remote file system, the VS Code terminal runs on the remote device, and you access the remote device’s hardware. When you are debugging, the debug session runs on the remote device, but VS Code runs on the host machine.
Raspberry Pi 4
For example – I can run VS Code on my MacBook Pro, and connect remotely to a Raspberry Pi 4 that is running headless. I can access the Raspberry Pi file system, run commands on a terminal connected to it, access whatever hardware my Raspberry Pi has, and debug on it.
Remote SSH needs a Raspberry Pi 3 or 4. It is not supported on older Raspberry Pis, or on Raspberry Pi Zero.
Set up remote development on Raspberry Pi
For remote development, your Raspberry Pi needs to be connected to your network either by ethernet or WiFi, and have SSH enabled. The Raspberry Pi documentation has a great article on setting up a headless Raspberry Pi if you don’t already know how to do this.
You also need to know either the IP address of the Raspberry Pi, or its hostname. If you don’t know how to do this, it is also covered in the Raspberry Pi documentation.
Connect to the Raspberry Pi from VS Code
Once the Raspberry Pi is set up, you can connect from VS Code on your Mac or PC.
First make sure you have VS Code installed. If not, you can install it from the VS Code downloads page.
From inside VS Code, you will need to install the Remote SSH extension. Select the Extensions tab from the sidebar menu, then search for Remote development. Select the Remote Development extension, and select the Install button.
Next you can connect to your Raspberry Pi. Launch the VS Code command palette using Ctrl+Shift+P on Linux or Windows, or Cmd+Shift+P on macOS. Search for and select Remote SSH: Connect current window to host (there’s also a connect to host option that will create a new window).
Enter the SSH connection details, using user@host. For the user, enter the Raspberry Pi username (the default is pi). For the host, enter the IP address of the Raspberry Pi, or the hostname. The hostname needs to end with .local, so if you are using the default hostname of raspberrypi, enter raspberrypi.local.
The .local syntax is supported on macOS and the latest versions of Windows or Linux. If it doesn’t work for you then you can install additional software locally to add support. On Linux, install Avahi using the command sudo apt-get install avahi-daemon. On Windows, install either Bonjour Print Services for Windows, or iTunes for Windows.
For example, to connect to my Raspberry Pi 400 with a hostname of pi-400 using the default pi user, I enter [email protected].
The first time you connect, it will validate the fingerprint to ensure you are connecting to the correct host. Select Continue from this dialog.
Enter your Raspberry Pi’s password when promoted. The default is raspberry, but you should have changed this (really, you should!).
VS Code will then install the relevant tools on the Raspberry Pi and configure the remote SSH connection.
Code!
You will now be all set up and ready to code on your Raspberry Pi. Start by opening a folder or cloning a git repository and away you go coding, debugging and deploying your applications.
In the remote session, not all extensions you have installed locally will be available remotely. Any extensions that change the behavior of VS Code as an application, such as themes or tools for managing cloud resources, will be available.
Things like language packs and other programming tools are not installed in the remote session, so you’ll need to re-install them. When you install these extensions, you’ll see the Install button has changed to Install in SSH:< hostname > to show it’s being installed remotely.
VS Code may seem daunting at first – it’s a powerful tool with a huge range of extensions. The good news is Microsoft has you covered with lots of hands-on, self-guided learning guides on how to use it with different languages and development tools, from using Git version control, to developing web applications. There’s even a guide to learning Python basics with Wonder Woman!
Do you remember the Danger Shed? New Orleans-based Raspberry Pi-powered home brewing monitoring set up in a… shed? Well, Patrick Murphy and his brewing crew are back with a new toy.
How does it work?
What is it?
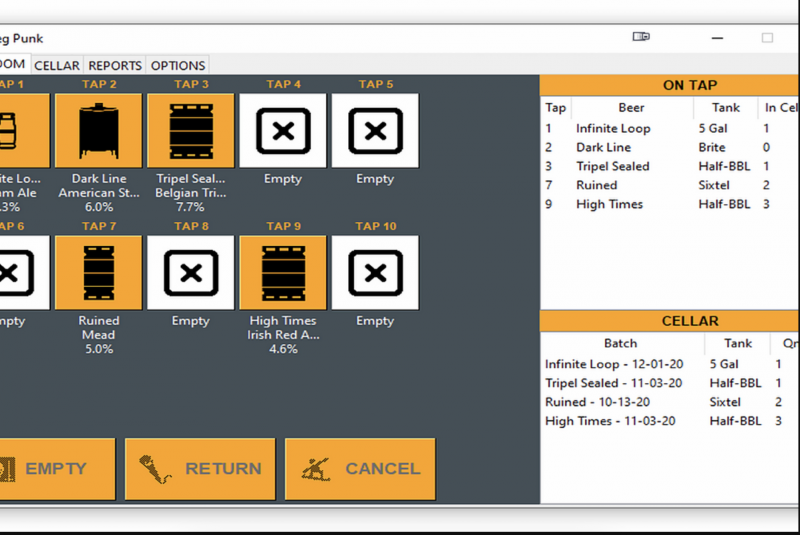
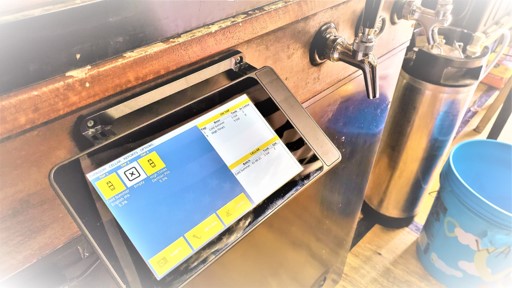
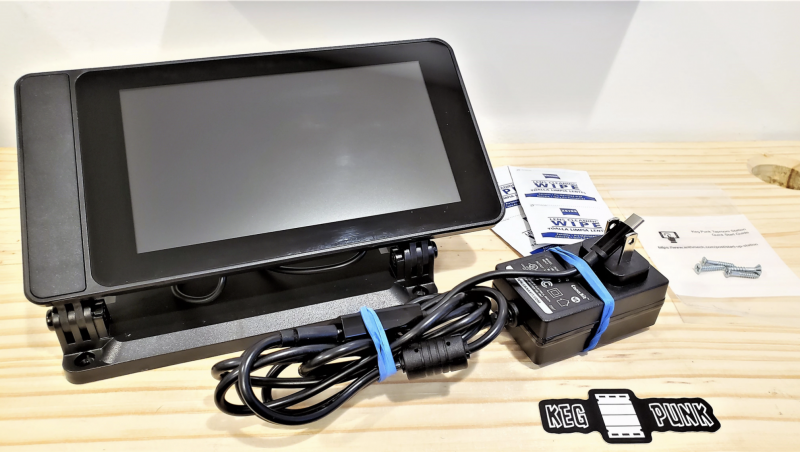
It’s called Keg Punk – inventory software written in Python, specifically for running on Raspberry Pi and the 7″ Raspberry Pi Touch Display. You mount the touchscreen station in a convenient place and run the program on an embedded Raspberry Pi 4.
Nice clean interface
Keg Punk is written in Python and is about 2500 lines of code. Since the program is small with a simple interface, it runs on anything from Raspberry Pi Zero to Raspberry Pi 4.
Who needs it?
As a manager at a local craft brewery, Patrick hated not knowing (or not being able to remember) how many kegs of each beer were left in the cellar.
So he started developing a cellar inventory program with the intention of being able to run it within arm’s reach of the beer taps.
Small enough to sit discreetly next to the beer taps behind the bar
The station needed to have a touchscreen and be tough enough to cope with harsh environments (beer gets EVERYWHERE). Raspberry Pi is the perfect platform for the job as it’s small and easy to connect a touchscreen to.
It can be mounted discreetly close to workstations, so bartenders can quickly see how much stock is left without needing to go down to the cellar.
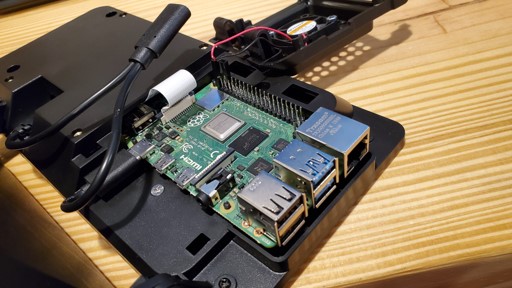
Everything fits neatly behind the Raspberry Pi Touch Display
While requirements in a professional setting inspired the idea of Keg Punk, it was developed with the home brewer in mind. The touchscreen station can easily be mounted to a kegerator (a portmanteau of keg and refrigerator) and the tap display can be configured to your setup.
Three installation options
One of the things the Danger Shed team admire most about Raspberry Pi users is their willingness to do a little hands-on tinkering. With that in mind, they launched Keg Punk in three packages, so you can choose an option based on how much of that you’d like to do:
The Taproom Package
The Taproom Package: This is a full plug-in-and-go setup for those who don’t have a Raspberry Pi or who simply do not have time to tinker while also running a bar.
Keg Punk pre-loaded SD card: Perfect for beer slingers who already have a Raspberry Pi but don’t want to install on their current SD card or deal with the hassle of installation.
Keg Punk software only: If you already have a Raspberry Pi and don’t mind a fair bit of tinkering, you can download the Keg Punk software and manually install.
Microsoft’s Visual Studio Code is an excellent C development environment, and now it’s an easy install on Raspberry Pi. Here’s Jim Bennett from Microsoft to show you all how to get VS Code up and running on our tiny computer. Take it away, Jim…
There are a few products in the tech sphere that get me really excited. One of them is Raspberry Pi (obviously), and the other is Visual Studio Code or VS Code. I always hoped that the two would come together one day — and now, to my great pleasure, they have!
VS Code is a free, open source developer text editor originally released for Windows, macOS and x64 Linux. Out of the box it supports generic text editing and git source code control, as well as full web development with JavaScript, TypeScript and Node.js, with debugging, intellisense and all the goodness you’d expect from a full-featured IDE. What makes it super powerful is extensions — bringing a huge range of programming languages, developer tools and other capabilities.
For example my VS Code setup includes a Python extension so I can code and debug in Python, a set of Microsoft Azure extensions so I can manage my cloud services, PlatformIO to allow me to program micro-controllers like Arduino boards coupled with a C++ extension to support coding in C and C++, and even some Docker support. Not a bad setup for a completely free developer tool.
Jim’s Raspberry Pi 400 running VS Code
I’ve been hoping for years VS Code would come to Raspberry Pi, and finally it’s here. As well as supporting Debian Linux on x64, there are now builds for ARM and ARM64 – both of which can run on Raspberry Pi OS (the ARM build on Raspberry Pi OS, the ARM64 on the beta of the 64-bit Raspberry Pi OS). And yes — I am writing this right now on a Raspberry Pi 400 running VS Code!
Why am I so excited about this?
Well, there are a couple of reasons.
Firstly, it brings an exceptional developer tool to Raspberry Pi. There are already some great editors, but nothing of the calibre of VS Code. I can take my $35 computer, plug it into a keyboard and mouse, connect a monitor and a TV and code in a wide range of languages from the same place.
I see kids learning Python at school using one tool, then learning web development in an after-school coding club with a different tool. They can now do both in the same application, reducing the cognitive load – they only have to learn one tool, one debugger, one setup. Combine this with the new Raspberry Pi 400 and you have an all-in-one solution to learning to code, reminiscent of my ZX Spectrum of decades ago, but so much more powerful.
The second reason is to me the most important — it allows kids to share the same development environment as their grown-ups. Imagine the joy of a 10-year-old coding Python using VS Code on their Raspberry Pi plugged into the family TV, then seeing their Mum working from home coding Python in exactly the same tool on her work laptop as part of her job as an AI engineer or data scientist. It also makes it easier when Mum has to inevitably help with unblocking the issues that always come up with learners.
As a young child it was mind-blowing when my Dad brought home a work PC so he could write reports and I could use it to write up my school work – I was using what Dad used at work, making me feel important. I see this with my seven-year-old daughter, seeing her excitement that I use Microsoft Teams for work, the same as she uses for her virtual schooling (she’s even offered to teach me how to use it if I get stuck). To be able to bring that unadulterated joy of using ‘grown-up tools’ to our young learners is priceless.
Installing VS Code
The great news is VS Code is now available as part of the Raspberry Pi OS apt packages. Launch the Raspberry Pi Terminal and run the following commands:
sudo apt update
sudo apt install code -y
This will download and install VS Code. If you’ve got your hands on a Pico, then you may not even need to do this – VS Code is installed as part of the Pico setup from the Getting Started guide.
After installing VS Code, you can run it from the Programming folder in the Raspberry Pi menu.
Getting started with VS Code
VS Code may seem daunting at first – it’s a powerful tool with a huge range of extensions. The good news is Microsoft has you covered with lots of hands-on, self-guided learning guides on how to use it with different languages and development tools, from using Git version control, to developing web applications — there’s even a guide to learning Python basics with Wonder Woman.
Go grab it and happy coding!
There he is – that’s the real life Jim!
Brilliant Jim Bennett shares loads of Raspberry Pi builds and tutorials over on Expecting Someone Geekier and tweets @jimbobbennett. He also works in Developer Relations at Microsoft. You can learn pretty much everything there is to know about him on github.
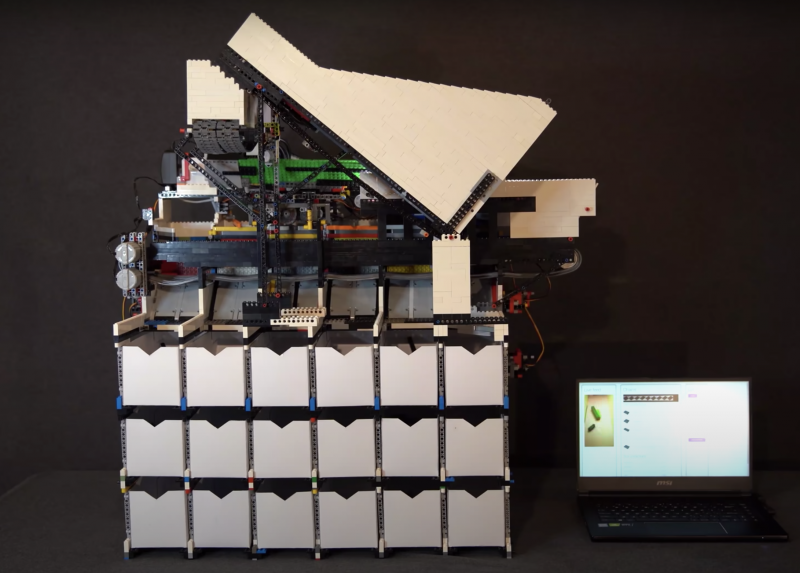
Raspberry Pi is at the heart of this AI–powered, automated sorting machine that is capable of recognising and sorting any LEGO brick.
And its maker Daniel West believes it to be the first of its kind in the world!
Best ever
This mega-machine was two years in the making and is a LEGO creation itself, built from over 10,000 LEGO bricks.
A beast of 10,000 bricks
It can sort any LEGO brick you place in its input bucket into one of 18 output buckets, at the rate of one brick every two seconds.
While Daniel was inspired by previous LEGO sorters, his creation is a huge step up from them: it can recognise absolutely every LEGO brick ever created, even bricks it has never seen before. Hence the ‘universal’ in the name ‘universal LEGO sorting machine’.
9 servo motors (controlled through a servo multiplexer communicating with the Raspberry Pi on I2C)
6 LEGO motors (controlled through L298N motor controllers using digital I/O ports on Raspberry Pi)
Software
The artificial intelligence algorithm behind the LEGO sorting is a convolutional neural network, the go-to for image classification.
What makes Daniel’s project a ‘world first’ is that he trained his classifier using 3D model images of LEGO bricks, which is how the machine can classify absolutely any LEGO brick it’s faced with, even if it has never seen it in real life before.
We LOVE a thorough project video, and we love TWO of them even more
Daniel has made a whole extra video (above) explaining how the AI in this project works. He shouts out all the open source software he used to run the Raspberry Pi Camera Module and access 3D training images etc. at this point in the video.
LEGO brick separation
The vibration plate in action, feeding single parts into the scanner
Daniel needed the input bucket to carefully pick out a single LEGO brick from the mass he chucks in at once.
This is achieved with a primary and secondary belt slowly pushing parts onto a vibration plate. The vibration plate uses a super fast LEGO motor to shake the bricks around so they aren’t sitting on top of each other when they reach the scanner.
Scanning and sorting
The underside of the beast
A Raspberry Pi Camera Module captures video of each brick, which Raspberry Pi 3 Model B+ then processes and wirelessly sends to a more powerful computer able to run the neural network that classifies the parts.
The classification decision is then sent back to the sorting machine so it can spit the brick, using a series of servo-controlled gates, into the right output bucket.
Extra-credit homework
In all its bricky beauty, with the 18 output buckets visible at the bottom
Daniel is such a boss maker that he wrote not one, but two further reading articles for those of you who want to deep-dive into this mega LEGO creation:
How to improve upon the standard burglar deterring method of leaving lights switched on? Dennis Mellican turned to Raspberry Pi for a much more effective solution. It actually proved too effective when a neighbour stopped by, but more on that in a bit.
Here you can see Dennis’s system in action scaring off a trespasser:
Good job, Raspberry Pi chatbots!
The burglar deterrent started out as Dennis’s regular home automation system. Not content with the current software offerings, and having worked in DevOps, Dennis decided to create his own solution. Enter Raspberry Pi (well, several of them).
Chatterboxes
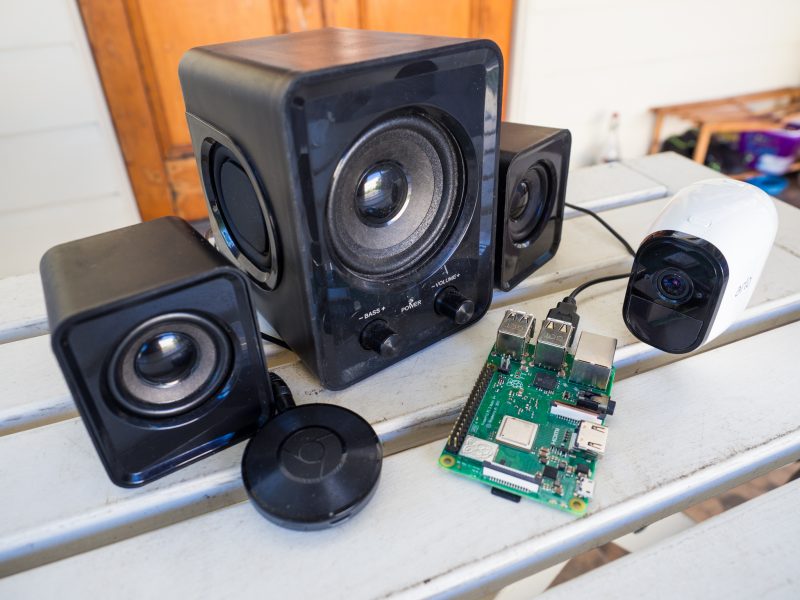
Dennis has multiple Raspberry Pi–powered devices dotted around his home, doing things such as turning on lights, powering up a garden sprinkler, and playing fake dog barks on wireless speakers. All these burglar deterrents work together and are run by a chat bot.
A simulation of the chatbots responding to Dennis’ commands
Each Raspberry Pi controls a single automated item in Dennis’s home. All the Raspberry Pis communicate with each other via Slack. Dennis issues commands if he, for example, wants lights to turn on while he is away, but the Raspberry Pis can also talk to each other when a trigger event occurs, such as when a motion sensor is tripped.
Smart sound
Speaker, Google Chromecast, CCTV camera and Raspberry Pi
Google Chromecast enables ‘dumb’ speakers to be smart. Dennis has such speakers set up inside, close to windows at the front and back of the house, and they play an .mp3 file of a fake dog bark when commanded.
The security cameras Dennis uses in his home setup are a wireless CCTV variety, and the lights are a mix of TP-Link and Lifx smart bulbs.
Here’s all the Python code running Dennis’ entire security system.
Too effective?
Dennis’s smart system has backfired on him a few times. Once a neighbour visited while he was out and thought Dennis was rudely not answering the door, because she saw the lights go on inside, making it appear like he was home. Awkward.
The fake dog barking has also startled the postman and a few joggers — Dennis says it adds to the realism.
You’re cute, but you wreck stuff, so get out
The troupe of Raspberry Pis has also scared away an Australian possum (video above). These critters are notorious for making nests in roof cavities, so Dennis dodged another problematic home invasion there.
Future upgrades
Dennis is a maker after our own hearts when explaining where he’d like to go next with his anti-burglary build:
“I feel like Kevin McCallister from Home Alone, with these home security ‘traps’. I’m still waiting to catch the Wet Bandits for the sequel to this story. So far only stray cats have been caught by the sprinkler. Perhaps the next adventure of the chat bot is to order pizza and have Gangster ‘Johnny’ complete the transaction when the pizza delivery triggers the sensors.”
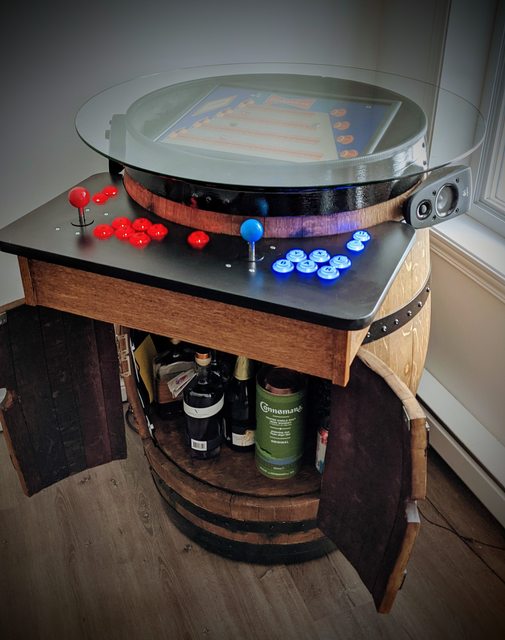
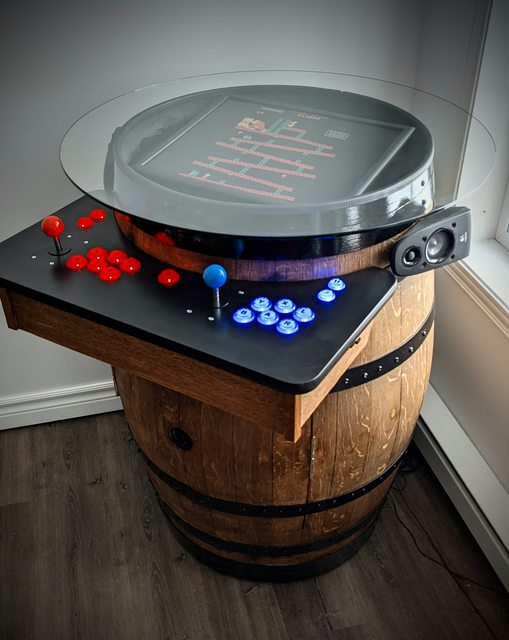
The addition of a sneaky hiding spot for your favourite tipple, plus a musical surprise, set this build apart from the popular barrel arcade projects we’ve seen before, like this one featured a few years back on the blog.
Retro gaming
A Raspberry Pi 3 Model B+ runs RetroPie, offering all sorts of classic games to entertain you while you sample from the grownup goodies hidden away in the drinks cabinet.
The maker’s top choice is Tetris Attack for the SNES.
Such a beautiful finish
Background music
What more could you want now you’ve got retro games and an elegantly hidden drinks cabinet at your fingertips? u/breadtangle‘s creation has another trick hidden inside its smooth wooden curves.
The Raspberry Pi computer used in this build also runs Raspotify, a Spotify Connect client for Raspberry Pi that allows you to stream your favourite tunes and playlists from your phone while you game.
You can set Raspotify to play via Bluetooth speakers, but if you’re using regular speakers and are after a quick install, whack this command in your Terminal:
curl -sL https://dtcooper.github.io/raspotify/install.sh | sh
Behind the scenes
u/breadtangle neatly tucked a pair of Logitech z506 speakers on the sides of the barrel, where they could be protected by the overhang of the glass screen cover.
Hardware
The build’s joysticks and buttons came from Amazon, and they’re set into an off-cut piece of kitchen countertop. The glass screen protector is another Amazon find and sits on a rubber car-door edge protector.
The screen itself is lovingly tilted towards the controls, to keep players’ necks comfortable, and u/breadtangle finished off the build’s look with a barstool to sit on while gaming.
We love it, but we have one very important question left…
Hacking apart a sweet, innocent Raspberry Pi – who would do such a thing? Network Chuck, that’s who. But he has a very cool reason for it so, we’ll let him off the hook.
He’s figured out how to install VMware ESXi on Raspberry Pi, and he’s sharing the step-by-step process with you because he loves you. And us. We think. We hope.
Get cutting
In a nutshell, Chuck hacks apart a Raspberry Pi, turning it into three separate computers, each running different software at the same time. He’s a wizard.
Our poor sweet baby 😮
VMware is cool because it’s Virtual Machine software big companies use on huge servers, but you can deploy it on one of our tiny devices and learn how to use it in the comfort of your own home if you follow Chuck’s instructions.
Useful labels explaining which bit of Raspberry Pi is capable of what
Firstly, you need to make sure you’re running the latest version of Raspberry Pi OS. Chuck uses Raspberry Pi Imager to do this, and the video above shows you how to do the same.
Format your SD card
It’s teeny, but powerful
Then you’ll need to format your SD card ready for VMware ESXi. This can be done with Raspberry Pi Imager too. You’ll need to download these two things:
Chuck is the kind of good egg who walks you through how to do this on screen at this point in the project video.
VMware installation
Then you’ll need to create the VMWare Installer to install the actual software. It’s at this point your USB flash drive takes centre stage. Here’s everything you’ll need:
And this is the point in the video at which Chuck walks you through the process.
Once that’s all done, stick your USB flash drive into your Raspberry Pi and get going. You need to be quick off the mark for this bit – there’s some urgent Escape key pressing required, but don’t worry, Chuck walks you through everything.
Create a VM and expand your storage
Once you’ve followed all those steps, you will be up, running, and ready to go. The installation process only takes up the first 15 minutes of Chuck’s project video, and he spends the rest of his time walking you through creating your first VM and adding more storage.
Top job, Chuck.
Keep up with Chuck
Fun fact: Raspberry Pi 4 is the same length as Network Chuck’s beard
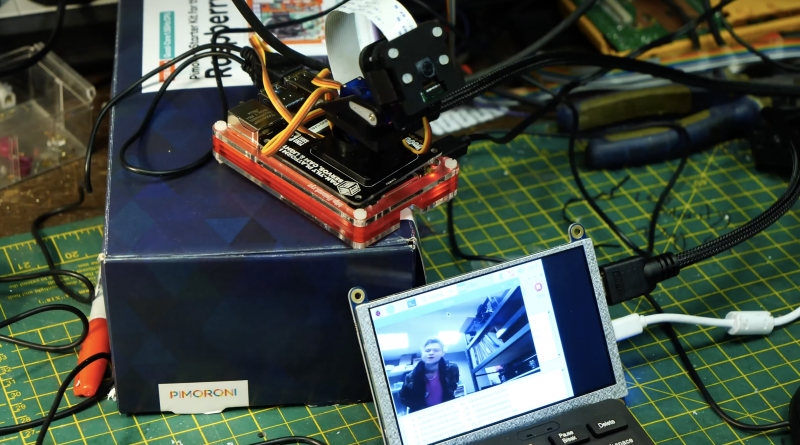
Sam Battle aka LOOK MUM NO COMPUTER couldn’t resist splashing out on a clear Macintosh case for a new project in his ‘Cosmo’ series of builds, which inject new life into retro hardware.
AAGGGGHHHHHHH!
This time around, a Raspberry Pi, running facial recognition software, and one of our Camera Modules enable Furby-style eyes to track movement, detect faces, and follow you around the room.
He loves a good Furby does Sam. Has a whole YouTube playlist dedicated to projects featuring them. Seriously.
Sam got all the Raspberry Pi kit needed from Pimoroni
Our favourite bit of the video is when Sam meets Raspberry Pi for the first time, boots it up, and says:
“Wait, I didn’t know it was a computer. It’s an actual computer computer. What?!”
Face recognition software up and running on Raspberry Pi
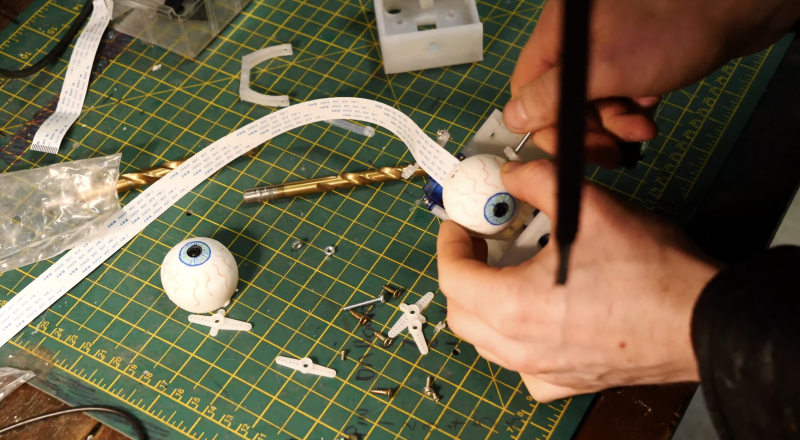
The eyes are ping pong balls cut in half so you can fit a Raspberry Pi Camera Module inside them. (Don’t forget to make a hole in the ‘pupil’ so the lens can peek through).
Raspberry Pi Camera Module tucked inside ping pong ball as it’s mounted to a 3D-printed part
The Raspberry Pi and display screen are neatly mounted on the side of the Macintosh so they’re easily accessible should you need to make any changes.
Easy access
All the hacked, repurposed junky bits sit inside or are mounted on swish 3D-printed parts.
Add some joke shop chatterbox teeth, and you’ve got what looks like the innards of a Furby staring at you. See below for a harrowing snapshot of Zach’s ‘Furlexa’ project, featured on our blog last year. We still see it when we sleep.
It gets worse the more you look around
It wasn’t enough for Furby-mad Sam to have created a Furby look-a-like face-tracking robot, he needed to go further. Inside the clear Macintosh case, you can see a de-furred Furby skeleton atop a 3D-printed plinth, with redundant ribbon cables flowing from its eyes into the back of the face-tracking robot face, thus making it appear as though the Furby is the brains behind this creepy creation that is following your every move.
Hey in there. We see you! You dark lord of robo-controlling
Eventually, Sam’s Raspberry Pi–powered creation will be on display at the Museum of Everything Else, so you can go visit it and play with all the “obsolete and experimental technology” housed there. The museum is funded by the Look Mum No Computer Patreon page.
This is creepy, and we love it. OK, it’s not REALLY creepy, it’s just that some people have an aversion to dolls that appear to move of their own accord, due to a disturbing childhood experience — but enough about me.
Smart Fairy Tale is a whimsical, unique community project created by Berlin-based installation artist Niklas Roy and interaction designer Felix Fisgus.
Using a smartphone app, viewers determine which way a ball travels through transparent pipes, and depending on which light barriers the ball interrupts on its journey, various toys are animated to tell different stories.
The server of the installation is a Raspberry Pi 4. Via its GPIO pins, it controls the track switches and releases the ball.
Raspberry Pi 4 tucked in the top right-hand corner, mounted together with the router. Photo courtesy of Niklas’ project page
The apparatus is full of toys donated by residents of Wolfsburg, Germany. The artists wanted local people to not only be able to operate the mechanical piece, but also to have a hand in creating it. Each animatronic toy is made as a separate module, controlled by its own Arduino Nano.
Smart Fairy Tale can be remotely controlled by viewers who want to check in on the toys they gifted to the installation, and by any other curious people elsewhere in the world.
Better yet, the stories the toys tell were devised by local school students. The artists showed the gifted toys to a few elementary school classes, and the students drew several stories featuring toys they liked. The makers then programmed the toys to match what the drawings said they could do. A servo here, a couple of LEDs there, and the students’ stories were brought to life.
Some of the storylines drawn by local children. Photo courtesy of Felix’s project page.
So what kind of stories did Wolfsburg’s finest come up with? One of the creators explains:
“There were a lot of scenes to interpret, like the blow-up love story, the chemtrail conspiracy, and the fossil fuel disaster, which culminates in a major traffic jam. The latter one even involved a laboratory for breeding synthetic dinosaurs by the use of renewable energies.”
Felix Fisgus
We LOVE it. Don’t tell me this isn’t creepy though…
WHY DO YOU HAUNT MY DREAMS???
You’ll find tonnes of extra technical specs and images in the project posts on both Felix and Niklas‘ websites.
Why use a regular swear jar to retrain your potty-mouthed brain when you can build a Swear Bear to help you instead?
Swear Bear listens to you. All the time. And Swear Bear can tell when a swear word is used. Swear Bear tells you off and saves all the swear words you said to the cloud to shame you. Swear Bear subscribes to the school of tough love.
To teach Swear Bear the art of profanity detection, Swear Bear creators 8 Bits and a Byte turned to the profanity check Python library. You can find the info to install and use the library on this page, as well as info on how it works and why it’s so accurate.
You’ll hear at this point in the video that Swear Bear says “Oh dear” when a swear word is used within earshot.
The microphone allows Swear Bear to ‘hear’ your speech, and through its speakers it can then tell you off for swearing.
All of hardware is squeezed into the stuffing-free bear once the text-to-speech and profanity detection software is working.
Babbage Bear hack?
Babbage the Bear
8 Bits and a Byte fan Ben Scarboro took to the comments on YouTube to suggest they rework one of our Babbage Bears into a Swear Bear. Babbage is teeny tiny, so maybe you would need to fashion a giant version to accomplish this. Just don’t make us watch while you pull out its stuffing.
Mike reports a “substantial difference in sound quality” compared to his previous setup (the aforementioned and reviled Bluetooth and RCA plug options).
This project lets you use a Raspberry Pi as a music player and control it from your mobile phone.
You can use an Ethernet cable, but Mike wanted to utilise Raspberry Pi 4’s wireless connectivity to boot the Volumio app. This way, the Raspberry Pi music player can be used anywhere in the house, as it’ll create its own wireless hotspot within your home network called ‘Volumio’.
Eew! No more direct audio connection to your phone to listen to music.
You’ll need a different version of the Volumio app depending on whether you have an Android phone or iPhone. Mike touts the app as “super easy, really robust”. You just select the music app you usually use from the ‘Plugins’ section of the Volumio app, and all your music, playlists, and cover art will be there ready for you once downloaded.
And that’s basically it. Just connect to the Volumio OS via the app and tell your Raspberry Pi what to play.
Amp it up
To get his new music player booming all around the house, Mike used a Starke Sound AD4, which you can watch him unbox and review.
What kind of amplification system have you got paired up with your Raspberry Pi–powered music player?
Today we have a guest post from Igalia’s Iago Toral, who has spent the past year working on the Mesa graphic driver stack for Raspberry Pi 4.
It’s been nearly a year since we first announced that we were developing a Vulkan driver for the latest generation of Raspberry Pi devices (Raspberry Pi 4, Raspberry Pi 400, and Compute Module 4).
Sascha Willems’ Vulkan radial blur demo
In June we released the source code for our prototype driver, and last month we announced that the driver had been successfully merged to Mesa upstream.
Today we have some very exciting news to share: as of 24 November the V3DV Vulkan Mesa driver for Raspberry Pi 4 has demonstrated Vulkan 1.0 conformance.
Khronos describes the conformance process as a way to ensure that its standards are consistently implemented by multiple vendors, so as to create a reliable platform for application developers. For each standard, Khronos provides a large conformance test suite (CTS) that implementations must pass successfully to be declared conformant; in the case of Vulkan 1.0, the CTS contains over 100,000 tests.
Vulkan 1.0 conformance is a major milestone in bringing Vulkan to Raspberry Pi, but it isn’t the end of the journey. Our team continues to work on all fronts to expand the Vulkan feature set, improve performance, and fix bugs. So stay tuned for future Vulkan updates!
Maker Jen Fox took to hackster.io to share a Raspberry Pi–powered trash classifier that tells you whether the trash in your hand is recyclable, compostable, or just straight-up garbage.
Jen reckons this project is beginner-friendly, as you don’t need any code to train the machine learning model, just a little to load it on Raspberry Pi. It’s also a pretty affordable build, costing less than $70 including a Raspberry Pi 4.
“Haz waste”?!
Hardware:
Raspberry Pi 4 Model B
Raspberry Pi Camera Module
Adafruit push button
Adafruit LEDs
Watch Jen giving a demo of her creation
Software
The code-free machine learning model is created using Lobe, a desktop tool that automatically trains a custom image classifier based on what objects you’ve shown it.
The image classifier correctly guessing it has been shown a bottle cap
Training the image classifier
Basically, you upload a tonne of photos and tell Lobe what object each of them shows. Jen told the empty classification model which photos were of compostable waste, which were of recyclable and items, and which were of garbage or bio-hazardous waste. Of course, as Jen says, “the more photos you have, the more accurate your model is.”
Loading up Raspberry Pi
The Raspberry Pi Camera Module attached to Raspberry Pi 4
As promised, you only need a little bit of code to load the image classifier onto your Raspberry Pi. The Raspberry Pi Camera Module acts as the image classifier’s “eyes” so Raspberry Pi can find out what kind of trash you hold up for it.
The push button and LEDs are wired up to the Raspberry Pi GPIO pins, and they work together with the camera and light up according to what the image classifier “sees”.
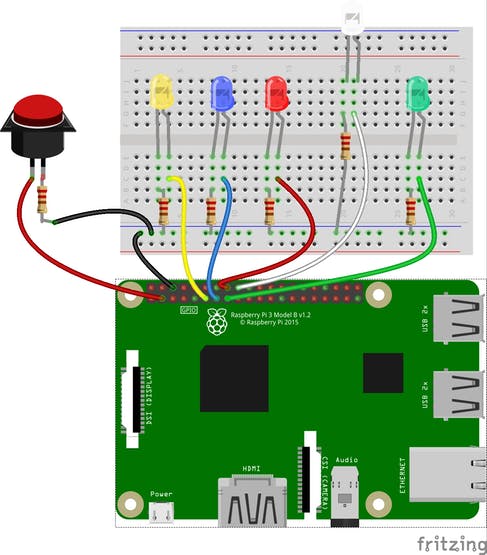
Here’s the fritzing diagram showing how to wire the push button and LEDS to the Raspberry Pi GPIO pins
You’ll want to create a snazzy case so your trash classifier looks good mounted on the wall. Kate cut holes in a cardboard box to make sure that the camera could “see” out, the user can see the LEDs, and the push button is accessible. Remember to leave room for Raspberry Pi’s power supply to plug in.
Jen’s hand-painted case mounted to the wall, having a look at a plastic bag
The trick with spy devices is to make sure they look as much like the object they’re hidden inside as possible. Where Raspberry Pi comes in is making sure the foam camera can be used as a real photo-taking camera too, to throw the baddies off the scent if they start fiddling with your spyware.
The foam-firing bit of Nathan’s invention was relatively simple to recreate – a modified chef’s squirty cream dispenser, hidden inside a camera-shaped box, gets the job done.
Squirty cream thing painted black and mounted onto camera-shaped frame
Ruth and Shawn drew a load of 3D-printed panels to mount on the box frame in the image above. One of those cool coffee cups that look like massive camera lenses hides the squirty cream dispenser and gives this build an authentic camera look.
THOSE cool camera lens-shaped coffee cups, see?
Techy bits from the build:
Raspberry Pi
Infrared LED
Camera module
Mini display screen
All the bits mentioned in the list above
The infrared LED is mounted next to the camera module and switches on when it gets dark, giving you night vision.
The mini display screen serves as a ‘lid’ to the blue case protecting the Raspberry Pi and mounts into the back panel of the ‘camera’
The Raspberry Pi computer and its power bank are crammed inside the box-shaped part, with the camera module and infrared LED mounted to peek out of custom-made holes in one of the 3D-printed panels on the front of the box frame.
The night vision mini display screen in action on the back of the camera
The foam-firing chef’s thingy is hidden inside the big fake lens, and it’s wedged inside so that when you lift the big fake lens, the lever on the chef’s squirty thing is depressed and foam fires out of a tube near to where the camera lens and infrared LED peek out on the front panel of the build.
Watch the #KidsInventStuff presenters test out Nathan’s invention
By continuing to use the site, you agree to the use of cookies. more information
The cookie settings on this website are set to "allow cookies" to give you the best browsing experience possible. If you continue to use this website without changing your cookie settings or you click "Accept" below then you are consenting to this.