Post Syndicated from James Beswick original https://aws.amazon.com/blogs/compute/building-a-serverless-multiplayer-game-that-scales/
This post is written by Tim Bruce, Sr. Solutions Architect, Developer Acceleration.
Game development is a highly iterative process with rapidly changing requirements. Many game developers want to maximize the time spent building features and less time configuring servers, managing infrastructure, and mastering scale.
AWS Serverless provides four key benefits for customers. First, it can help move from idea to market faster, by reducing operational overhead. Second, customers may realize lower costs with serverless by not over-provisioning hardware and software to operate. Third, serverless scales with user activity. Finally, serverless services provide built-in integration, allowing you to focus on your game instead of connecting pieces together.
For AWS Gaming customers, these benefits allow your teams to spend more time focusing on gameplay and content, instead of undifferentiated tasks such as setting up and maintaining servers and software. This can result in better gameplay and content, and a faster time-to-market.
This blog post introduces a game with a serverless-first architecture. Simple Trivia Service is a web-based game showing architectural patterns that you can apply in your own games.
Introducing the Simple Trivia Service
The Simple Trivia Service offers single- and multi-player trivia games with content created by players. There are many features in Simple Trivia Service found in games, such as user registration, chat, content creation, leaderboards, game play, and a marketplace.

Authenticated players can chat with other players, create and manage quizzes, and update their profile. They can play single- and multi-player quizzes, host quizzes, and buy and sell quizzes on the marketplace. The single- and multi-player game modes show how games with different connectivity and technical requirements can be delivered with serverless first architectures. The game modes and architecture solutions are covered in the Simple Trivia Service backend architecture section.
Simple Trivia Service front end
The Simple Trivia Service front end is a Vue.js single page application (SPA) that accesses backend services. The SPA app, accessed via a web browser, allows users to make requests to the game endpoints using HTTPS, secure WebSockets, and WebSockets over MQTT. These requests use integrations to access the serverless backend services.
Vue.js helps make this reference architecture more accessible. The front end uses AWS Amplify to build, deploy, and host the SPA without the need to provision and manage any resources.
Simple Trivia Service backend architecture
The backend architecture for Simple Trivia Service is defined in a set of AWS Serverless Application Model (AWS SAM) templates for portions of the game. A deployment guide is included in the README.md file in the GitHub repository. Here is a visual depiction of the backend architecture.
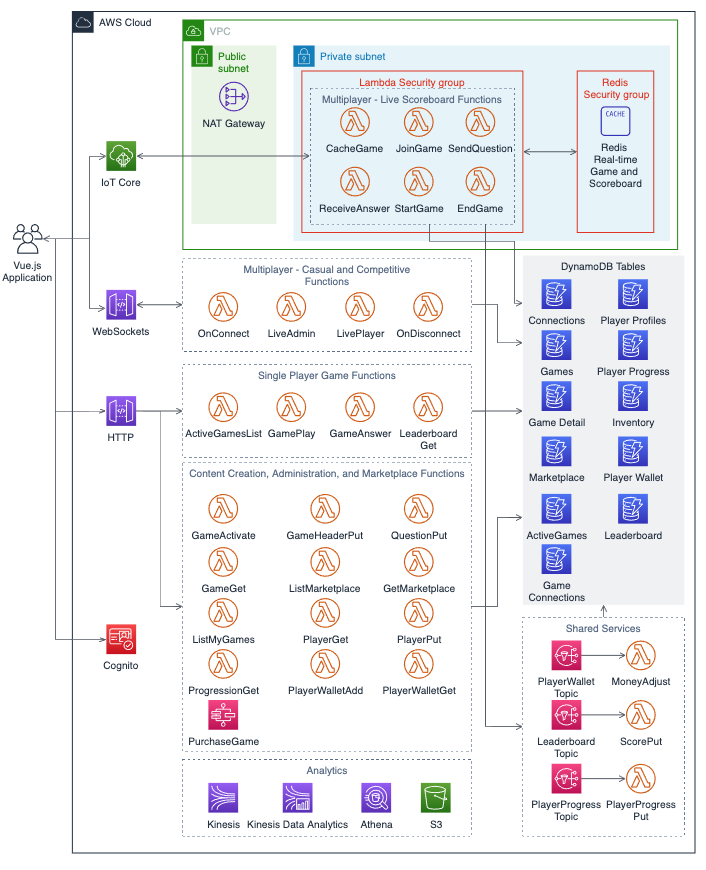
Services used
Simple Trivia Service is built using AWS Lambda, Amazon API Gateway, AWS IoT, Amazon DynamoDB, Amazon Simple Notification Service (SNS), AWS Step Functions, Amazon Kinesis, Amazon S3, Amazon Athena, and Amazon Cognito:
- Lambda enables serverless microservice features in Simple Trivia Service.
- API Gateway provides serverless endpoints for HTTP/RESTful and WebSocket communication while IoT delivers a serverless endpoint for WebSockets over MQTT communication.
- DynamoDB enables data storage and retrieval for internet-scale applications.
- SNS provides microservice communications via publish/subscribe functionality.
- Step Functions coordinates complex tasks to ensure appropriate outcomes.
- Analytics for Simple Trivia Service are delivered via Kinesis and S3 with Athena providing a query/visualization capability.
- Amazon Cognito provides secure, standards-based login and a user directory.
Two managed services that are not serverless, Amazon VPC NAT Gateway and Amazon ElastiCache for Redis, are also used. VPC NAT Gateway is required by VPC-enabled Lambda functions to reach services outside of the VPC, such as DynamoDB. ElastiCache provides an in-memory database suited for applications with submillisecond latency requirements.
User security and enabling communications to backend services
Players are required to register and log in before playing. Registration and login credentials are sent to Amazon Cognito using the Secure Remote Password protocol. Upon successfully logging in, Amazon Cognito returns a JSON Web Token (JWT) and an Amazon Cognito user session.
The JWT is included within requests to API Gateway, which validates the token before allowing the request to be forwarded to Lambda.
IoT requires additional security for users by using an AWS Identity and Access Management (IAM) policy. A policy attached to the Amazon Cognito user allows the player to connect, subscribe, and send messages to the IoT endpoint.
Game types and supporting architectures
Simple Trivia Service’s three game modes define how players interact with the backend services. These modes align to different architectures used within the game.
“Single Player” quiz architecture

Single player quizzes have simple rules, short play sessions, and appeal to wide audiences. Single player game communication is player-to-endpoint only. This is accomplished with API Gateway via an HTTP API.
Four Lambda functions (ActiveGamesList, GamePlay, GameAnswer, and LeaderboardGet) enable single player games. These functions are integrated with API Gateway and respond to specific requests from the client. API Gateway forwards the request, including URI, body, and query string, to the appropriate Lambda function.
When a player chooses “Play”, a request is sent to API Gateway, which invokes the ActiveGamesList function. This function queries the ActiveGames DynamoDB table and returns the list of active games to the user.
The player selects a game, resulting in another request triggering the GamePlay function. GamePlay retrieves the game’s questions from the GamesDetail DynamoDB table. The front end maintains the state for the user during the game.
When all questions are answered, the SPA sends the player’s responses to API Gateway, invoking the GameAnswer function. This function scores the player’s responses against the GameDetails table. The score and answers are sent to the user.
Additionally, this function sends the player score for the leaderboard and player experience to two SNS topics (LeaderboardTopic and PlayerProgressTopic). The ScorePut and PlayerProgressPut functions subscribe to these topics. These two functions write the details to the Leaderboard and Player Progress DynamoDB tables.
This architecture processes these two actions asynchronously, resulting in the player receiving their score and answers without having to wait. This also allows for increased security for player progress, as only the PlayerProgressPut function is allowed to write to this table.
Finally, the player can view the game’s leaderboard, which is returned to the player as the response to the GetLeaderboard function. The function retrieves the top 10 scores and the current player’s score from the Leaderboard table.
“Multi-player – Casual and Competitive” architecture
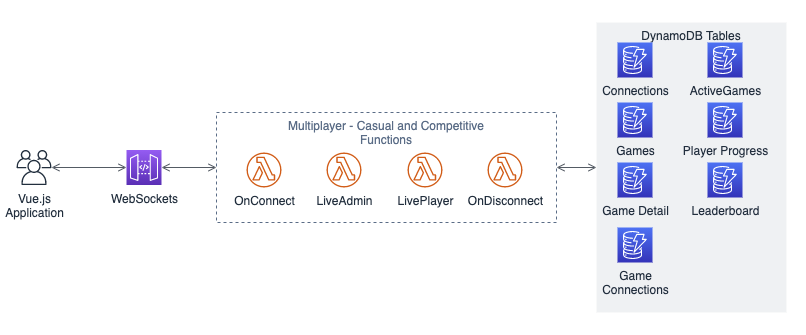
These game types require player-to-player and service-to-player communication. This is typically performed using TCP/UDP sockets or the WebSocket protocol. API Gateway WebSockets provides WebSocket communication and enables Lambda functions to send messages to and receive messages from game hosts and players.
Game hosts start games via the “Host” button, messaging the LiveAdmin function via API Gateway. The function adds the game to the LiveGames table, which allows players to find and join the game. A list of questions for the game is sent to the game host from the LiveAdmin function at this time. Additionally, the game host is added to the GameConnections table, which keeps track of which connections are related to a game. Players, via the LivePlayer function, are also added to this table when they join a game.
The game host client manages the state of the game for all players and controls the flow of the game, sending questions, correct answers, and leaderboards to players via API Gateway and the LiveAdmin function. The function only sends game messages to the players in the GameConnections table. Player answers are sent to the host via the LivePlayer function.
To end the game, the game host sends a message with the final leaderboard to all players via the LiveAdmin function. This function also stores the leaderboard in the Leaderboard table, removes the game from the ActiveGames table, and sends player progression messages to the Player Progress topic.
“Multi-player – Live Scoreboard” architecture
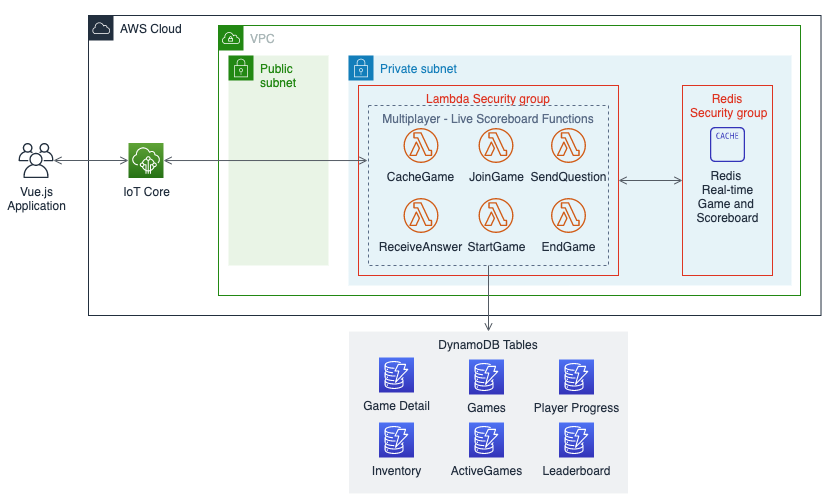
This is an extension of other multi-player game types requiring similar communications. This uses IoT with WebSockets over MQTT as the transport. It enables the client to subscribe to a topic and act on messages it receives. IoT manages routing messages to clients based on their subscriptions.
This architecture moves the state management from the game host client to a data store on the backend. This change requires a database that can respond quickly to user actions. Simple Trivia Service uses ElastiCache for Redis for this database. Game questions, player responses, and the leaderboard are all stored and updated in Redis during the quiz. The ElastiCache instance is blocked from internet traffic by placing it in a VPC. A security group configures access for the Lambda functions in the same VPC.
Game hosts for this type of game start the game by hosting it, which sends a message to IoT, triggering the CacheGame function. This function adds the game to the ActiveGames table and caches the quiz details from DynamoDB into Redis. Players join the game by sending a message, which is delivered to the JoinGame function. This adds the user record to Redis and alerts the game host that a player has joined.
Game hosts can send questions to the players via a message that invokes the AskQuestion function. This function updates the current question number in Redis and sends the question to subscribed players via the AskQuestion function. The ReceiveAnswer function processes player responses. It validates the response, stores it in Redis, updates the scoreboard, and replies to all players with the updated scoreboard after the first correct answer. The game scoreboard is updated for players in real time.
When the game is over, the game host sends a message to the EndGame function via IoT. This function writes the game leaderboard to the Leaderboard table, sends player progress to the Player Progress SNS topic, deletes the game from cache, and removes the game from the ActiveGames table.
Conclusion
This post introduces the Simple Trivia Service, a single- and multi-player game built using a serverless-first architecture on AWS. I cover different solutions that you can use to enable connectivity from your game client to a serverless-first backend for both single- and multi-player games. I also include a walkthrough of the architecture for each of these solutions.
You can deploy the code for this solution to your own AWS account via instructions in the Simple Trivia Service GitHub repository.
For more serverless learning resources, visit Serverless Land.