Security updates have been issued by Fedora (poppler), Oracle (firefox and thunderbird), Red Hat (firefox, java-1.8.0-openjdk, java-11-openjdk, and java-17-openjdk), SUSE (bind, clone-master-clean-up, grafana, libksba, python3, tiff, and v4l2loopback), and Ubuntu (libreoffice).
Can you monitor a banana with Zabbix? Of course, you can! By day, I am a monitoring tech lead in a global cyber security company. By night, I monitor my home with Zabbix & Grafana and do some weird experiments with them. Welcome to my blog about this project.
From that moment, the rest of the summit went all bananas. So, what’s a better way for me to contribute to this ba-na-na meme than to attempt to monitor a banana, as anyway I am now known for monitoring weird things? Here we go!
Apart from a monkey wrench and a gorilla leg for your camera to get perfectly steady photos or videos of your precious snacks, what do we need to monitor bananas with Zabbix? Not much:
Some Python (I guess snakes might like bananas, too)
OpenCV image recognition libraries (no, that’s not a tool to help you create resumes on LinkedIn, the CV stands for Computer Vision)
This banana monitoring is just a simulation, so I downloaded a random picture of a vector graphics banana from our dear Internet. See, it’s beautiful!
Feed the snake
OK, I now have a nice picture of a banana, but how on earth would I monitor that with Zabbix? With OpenCV, that’s not too hard. No, I do not know anything about OpenCV, but with some lucky search engine hits and some copy-pasting, I managed to get my super intelligent image recognition script to work.
It’s tailored to check a pixel I know belongs to our banana and then check the hue value of that pixel. With hue, it’s easier and more reliable to check the actual color, no matter its brightness, or so I was told by the articles I found.
Anyway, here’s the script!
Really, most of this was just copy-paste, so I do not take any credit for this code. But, it seems to do its job, as this is what happens when I run the script from the command line.
Fantastic! Or maybe, to honor Steve, I should say This was I-ZI.
Configuring Zabbix
To send this data to Zabbix, I’m going to use the good old zabbix_sender command. For that to work, I needed to set up a new trapper-type item for Zabbix.
And, well… that’s it. Now if I run the following from the command line, it works:
Let’s check from Latest data, too:
But it needs a dashboard!
Now that it’s working, it definitely needs a dashboard. This is what I created for it with just an Item value and URL widgets.
Ain’t technology fantastic? Now if only Zabbix would have dynamic colors for the item value widget, but I guess they told us at the Summit that it’s coming.
Of course, like with most of my blog posts, this kind of monitoring could have some real-world use cases, too: make OpenCV check pictures, video streams, photos, whatever and if the color of something that should be the same all the time is not the same anymore, make Zabbix go bananas about it.
I have been working at Forcepoint since 2014 and writing these posts has never been tastier. — Janne Pikkarainen
This post was originally published on the author’s LinkedIn account.
Machine learning security is extraordinarily difficult because the attacks are so varied—and it seems that each new one is weirder than the next. Here’s the latest: a training-time attack that forces the model to exhibit a point of view: Spinning Language Models: Risks of Propaganda-As-A-Service and Countermeasures.”
Abstract: We investigate a new threat to neural sequence-to-sequence (seq2seq) models: training-time attacks that cause models to “spin” their outputs so as to support an adversary-chosen sentiment or point of view—but only when the input contains adversary-chosen trigger words. For example, a spinned summarization model outputs positive summaries of any text that mentions the name of some individual or organization.
Model spinning introduces a “meta-backdoor” into a model. Whereas conventional backdoors cause models to produce incorrect outputs on inputs with the trigger, outputs of spinned models preserve context and maintain standard accuracy metrics, yet also satisfy a meta-task chosen by the adversary.
Model spinning enables propaganda-as-a-service, where propaganda is defined as biased speech. An adversary can create customized language models that produce desired spins for chosen triggers, then deploy these models to generate disinformation (a platform attack), or else inject them into ML training pipelines (a supply-chain attack), transferring malicious functionality to downstream models trained by victims.
To demonstrate the feasibility of model spinning, we develop a new backdooring technique. It stacks an adversarial meta-task onto a seq2seq model, backpropagates the desired meta-task output to points in the word-embedding space we call “pseudo-words,” and uses pseudo-words to shift the entire output distribution of the seq2seq model. We evaluate this attack on language generation, summarization, and translation models with different triggers and meta-tasks such as sentiment, toxicity, and entailment. Spinned models largely maintain their accuracy metrics (ROUGE and BLEU) while shifting their outputs to satisfy the adversary’s meta-task. We also show that, in the case of a supply-chain attack, the spin functionality transfers to downstream models.
This new attack dovetails with something I’ve been worried about for a while, something Latanya Sweeney has dubbed “persona bots.” This is what I wrote in my upcoming book (to be published in February):
One example of an extension of this technology is the “persona bot,” an AI posing as an individual on social media and other online groups. Persona bots have histories, personalities, and communication styles. They don’t constantly spew propaganda. They hang out in various interest groups: gardening, knitting, model railroading, whatever. They act as normal members of those communities, posting and commenting and discussing. Systems like GPT-3 will make it easy for those AIs to mine previous conversations and related Internet content and to appear knowledgeable. Then, once in a while, the AI might post something relevant to a political issue, maybe an article about a healthcare worker having an allergic reaction to the COVID-19 vaccine, with worried commentary. Or maybe it might offer its developer’s opinions about a recent election, or racial justice, or any other polarizing subject. One persona bot can’t move public opinion, but what if there were thousands of them? Millions?
These are chatbots on a very small scale. They would participate in small forums around the Internet: hobbyist groups, book groups, whatever. In general they would behave normally, participating in discussions like a person does. But occasionally they would say something partisan or political, depending on the desires of their owners. Because they’re all unique and only occasional, it would be hard for existing bot detection techniques to find them. And because they can be replicated by the millions across social media, they could have a greater effect. They would affect what we think, and—just as importantly—what we think others think. What we will see as robust political discussions would be persona bots arguing with other persona bots.
Attacks like these add another wrinkle to that sort of scenario.
Today, with AWS Glue DataBrew, data analysts and data scientists can easily access and visually explore any amount of data across their organization directly from their Amazon Simple Storage Service (Amazon S3) data lake, Amazon Redshift data warehouse, and Amazon Aurora and Amazon Relational Database Service (Amazon RDS) databases. Customers can choose from over 250 built-in functions to combine, pivot, and transpose the data without writing code.
Now, with added support for JDBC-accessible databases, DataBrew also supports additional data stores including PostgreSQL, MySQL, Oracle, and Microsoft SQL Server. In this blog post, we will be using DataBrew to clean data from an on-premise database, and storing the cleaned data in an Amazon S3 data lake.
Solution Overview
I will be configuring an existing subnet in an Amazon VPC for use with DataBrew. Then configuring DataBrew to securely connect to an existing on-premise database and executing a data preparation job.
This guide will walk through creation of a DataBrew dataset, project, and job.
DataBrew requires access to Amazon S3 and AWS Glue. This guide will walk through creating VPC endpoints to enable private connections between your VPC and these AWS services for DataBrew to use.
To establish network connectivity, DataBrew will provision an Amazon VPC elastic network interface in the VPC you specify. This blog will cover securing this network interface with a security group.
Prerequisites
To complete this blog, you should have the following prerequisites:
If you are unsure if you have enabled access from your VPC subnet to your on-premise database, you can test access by running the AWS Systems Manager automation AWSSupport-SetupIPMonitoringFromVPC. From the User Guide, choose Run this Automation. In the Systems Manager console, under Input Parameters, you will need to enter the Amazon VPC subnet ID for SubnetId and the IP address of your on-premise host for TargetIPs. Then choose Execute. Once the automation completes, locate the Outputs section and open the URL linked under createCloudWatchDashboard.Output. From that dashboard, confirm from the Ping log group that pings are successful. If they are not, you will need to investigate. A useful resource for this is How do I troubleshoot instance connection timeout errors in Amazon VPC.
Step 1: Configure the Amazon VPC
Ensure your Amazon VPC has DNS Support and DNS Hostnames enabled. You can verify this by selecting your VPC in the Amazon VPC console and checking the details for DNS hostnames and DNS resolution. If they are disabled, they can be enabled by choosing Actions then the corresponding Edit option.
On-premise or hybrid DNS are also supported, but requires additional setup. See Other Considerations at the end of this post for more.
Step 2: Configure the Amazon VPC Subnet
Your subnet must have access to Amazon S3 and AWS Glue services. I will add VPC endpoints for Amazon S3 and AWS Glue services to keep my traffic within the AWS network.
In the navigation pane, choose Endpoints, Create Endpoint.
Filter by “s3”.
Choose the service where the Type column indicates Gateway.
Select the route tables associated with the subnet to be used with DataBrew.
Choose Create endpoint.
To add the VPC endpoint for AWS Glue, again choose Create Endpoint.
Filter by “glue”.
Choose the service where the Type column indicates Interface.
Select the route tables associated with the subnet to be used with DataBrew.
Choose Create endpoint.
Step 3 : Configure Network ACL
By default Network ACLs allow all inbound and outbound traffic. If you have customized your network ACL, ensure inbound return traffic from and outbound traffic to your on-premise network, Amazon S3, and AWS Glue are allowed.
From the Amazon VPC console, choose Subnets.
Choose the subnet you are using with DataBrew.
From the Details tab, choose the Network ACL link.
Validate your inbound and outbound rules, updating your rules to allow the required traffic if needed. The screenshot below shows the default rules I am using.
Step 4: Configure the VPC security group
To provide connectivity to your VPC, DataBrew will create an Elastic Network Interface (ENI) in the VPC subnet you specify. DataBrew attaches the security group you specify to the ENI to limit network access. This security group must have a self-referential rule to allow all inbound TCP traffic from itself. This will block access from unspecified sources. I will be using the default security group, which has the following configuration.
Your security group must allow outbound traffic to itself, Amazon S3, AWS Glue, and your on-premise network. I’ll be using the default security group, which allows all outbound traffic.
Optionally, you may wish to explicitly restrict outbound traffic to only your on-premise network, Amazon S3, and AWS Glue. To do so, remove the All TPC outbound rule. Ensure your security group has a self-referential rule to allow all outbound TCP traffic to itself. Allow traffic to your on-premise network by specifying the CIDR block associated with your network. In my case, it is 10.196.0.0/16. Allow traffic to Amazon S3 with the AWS-managed S3 prefix list, which includes the set of CIDR blocks for Amazon S3. Allow traffic to the AWS Glue VPC endpoint by associating the same security group with the AWS Glue VPC endpoint created above from the Amazon VPC console.
An example of what these scoped-down outbound rules may look like:
Ensure your on-premise network security rules allow traffic from your Amazon VPC subnet’s CIDR block.
Step 5 : Create database credentials
Following best practices, I will be creating a database user with scoped down permissions for use with DataBrew.
Connect to your database. In my case with psql -h 10.196.0.20
Create a user, which I’ll call postgresql, with readonly access to the table that will be used with DataBrew. My table is called demo in database postgres. I’ll do this by executing the following queries:
CREATE USER postgresql WITH PASSWORD ‘****’;
GRANT CONNECT ON DATABASE postgres TO postgresql;
GRANT USAGE ON SCHEMA public TO postgresql;
REVOKE CREATE ON SCHEMA public FROM postgresql;
GRANT SELECT ON demo TO postgresql;
Step 6 : Create DataBrew project
From the AWS DataBrew console, choose Create project.
Enter a Project name.
Under Select a dataset choose New dataset.
Enter a Dataset name.
Under Connect to new dataset choose JDBC.
Choose Add JDBC connection.
Enter a Connection name, I use my-connection.
Choose Enter JDBC details.
Choose Database type, in my case PostgreSQL.
For Host/endpoint, enter your host’s private IP address.
Enter your Database name, Database user, and Database password.
Choose your VPC, and the Subnet and Security Group you configured above.
Review “Additional configurations”, where you can optionally configure the following:
If you are using a recent database version, such as MySQL 8, you may need to provide a custom JDBC driver. For more information, see the Developer Guide.
DataBrew can be set to fail the connection to your database if it is unable to connect over SSL. Additionally, DataBrew provides default certificates for establishing SSL connections. If you obtained a certificate from a third-party issuer, or the default certificates provided by DataBrew do not meet your requirements, you can provide your own. DataBrew handles only X.509 certificates. The certificate must be DER-encoded and supplied in base64 encoding PEM format.
Choose Create connection at the bottom of the modal.
Choose the newly created connection by clicking on its name.
Enter the name of the table within your database you want to bring into DataBrew.
Under the Permissions header, choose Create new IAM role from the dropdown and enter a role suffix.
Start by applying some simple transforms, I’m dropping some columns that are not needed in my data lake. To do so, from the action bar I choose COLUMN, then Delete.
This opens the side-bar where I choose the column to delete, and choose Apply.
Step 7 : Create DataBrew job
Once I’ve got a few transforms added to my project’s recipe, I will run a job to execute the recipe against my full dataset, and store the result in my Amazon S3 bucket.
Choose Create job from the top of the project grid view.
On the job page, provide a Job name and S3 output location.
Under the header Permissions, choose Create new IAM role. This will create a new scoped down IAM role with the permissions required to execute your job.
Finally, choose Create and run job. Once the job completes, you can view the output in Amazon S3.
Cleanup
From the DataBrew console, delete your Job, Project, Recipe, and Dataset.
If you executed the Systems Manager automation to test access, under the Systems Manager console, choose CloudWatch Dashboard. Select the dashboard created by the automation. Choose Terminate test. Then choose Execute.
Other considerations
AWS Glue DataBrew’s networking requirements are similar to that of AWS Glue ETL jobs. Below summarizes some of those advanced networking conditions. For more details on AWS Glue ETL, see How to access and analyze on-premises data stores using AWS Glue by Rajeev Meharwal.
DNS
If you are using AWS VPC provided DNS, ensure you have enabled DnsHostnames and DnsSupport for your VPC. For more information, see DNS support in your VPC.
If you have configured a custom DNS server with your AWS VPC, you must implement forward and reverse lookups for Amazon EC2 private DNS hostnames. For more information, see Amazon DNS server. Alternatively, setup hybrid DNS resolution to resolve both on-premise DNS servers and the VPC provided DNS. For implementation details, see the following AWS Security Blog posts:
If you are joining a database dataset into your project, the database must be accessible from the project dataset’s subnet.
For example, if you have completed the setup above using Private Subnet 1, and you have another Amazon RDS database in Private Subnet 2 in the same VPC, as shown below. You will want a local route for the route table associated with Subnet 1. You will also need to ensure the security group attached to your Amazon RDS database allows inbound traffic from your DataBrew security group.
If your Amazon RDS database is in a different AWS VPC than you are using with DataBrew, you will need to setup VPC peering.
About the Authors
John Espenhahn is a Software Engineer working on AWS Glue DataBrew service. He has also worked on Amazon Kendra user experience as a part of Database, Analytics & AI AWS consoles. He is passionate about technology and building in the analytics space.
Nitya Sheth is a Software Engineer working on AWS Glue DataBrew service. He has also worked on AWS Synthetics service as well as on user experience implementations for Database, Analytics & AI AWS consoles. In his free time, he divides his time between exploring new hiking places and new books.
In this post, we show how to use MSK Connect for MirrorMaker 2 deployment with AWS Identity and Access Management (IAM) authentication. We create an MSK Connect custom plugin and IAM role, and then replicate the data between two existing Amazon Managed Streaming for Apache Kafka (Amazon MSK) clusters. The goal is to have replication successfully running between two MSK clusters that are using IAM as an authentication mechanism. It’s important to note that although we’re using IAM authentication in this solution, this can be accomplished using no authentication for the MSK authentication mechanism.
Solution overview
This solution can help Amazon MSK users run MirrorMaker 2 on MSK Connect, which eases the administrative and operational burden because the service handles the underlying resources, enabling you to focus on the connectors and data to ensure correctness. The following diagram illustrates the solution architecture.
Apache Kafka is an open-source platform for streaming data. You can use it to build building various workloads like IoT connectivity, data analytic pipelines, or event-based architectures.
Kafka Connect is a component of Apache Kafka that provides a framework to stream data between systems like databases, object stores, and even other Kafka clusters, into and out of Kafka. Connectors are the executable applications that you can deploy on top of the Kafka Connect framework to stream data into or out of Kafka.
MirrorMaker is the cross-cluster data mirroring mechanism that Apache Kafka provides to replicate data between two clusters. You can deploy this mirroring process as a connector in the Kafka Connect framework to improve the scalability, monitoring, and availability of the mirroring application. Replication between two clusters is a common scenario when needing to improve data availability, migrate to a new cluster, aggregate data from edge clusters into a central cluster, copy data between Regions, and more. In KIP-382, MirrorMaker 2 (MM2) is documented with all the available configurations, design patterns, and deployment options available to users. It’s worthwhile to familiarize yourself with the configurations because there are many options that can impact your unique needs.
MSK Connect is a managed Kafka Connect service that allows you to deploy Kafka connectors into your environment with seamless integrations with AWS services like IAM, Amazon MSK, and Amazon CloudWatch.
In the following sections, we walk you through the steps to configure this solution:
Create an IAM policy and role.
Upload your data.
Create a custom plugin.
Create and deploy connectors.
Create an IAM policy and role for authentication
IAM helps users securely control access to AWS resources. In this step, we create an IAM policy and role that has two critical permissions:
MSK Connect can assume the created role (see the following trust policy example)
A common mistake made when creating an IAM role and policy needed for common Kafka tasks (publishing to a topic, listing topics) is to assume that the AWS managed policy AmazonMSKFullAccess (arn:aws:iam::aws:policy/AmazonMSKFullAccess) will suffice for permissions.
The following is an example of a policy with both full Kafka and Amazon MSK access:
This policy supports the creation of the cluster within the AWS account infrastructure and grants access to the components that make up the cluster anatomy like Amazon Elastic Compute Cloud (Amazon EC2), Amazon Virtual Private Cloud (Amazon VPC), logs, and kafka:*. There is no managed policy for a Kafka administrator to have full access on the cluster itself.
After you create the KafkaAdminFullAccess policy, create a role and attach the policy to it. You need two entries on the role’s Trust relationships tab:
The first statement allows Kafka Connect to assume this role and connect to the cluster.
The second statement follows the pattern arn:aws:sts::(YOUR ACCOUNT NUMBER):assumed-role/(YOUR ROLE NAME)/(YOUR ACCOUNT NUMBER). Your account number should be the same account number where MSK Connect and the role are being created in. This role is the role you’re editing the trust entity on. In the following example code, I’m editing a role called MSKConnectExample in my account. This is so that when MSK Connect assumes the role, the assumed user can assume the role again to publish and consume records on the target cluster.
In the following example trust policy, provide your own account number and role name:
MSK Connect custom plugins accept a file or folder with a .jar or .zip ending. For this step, create a dummy folder or file and compress it. Then upload the .zip object to your Amazon Simple Storage Service (Amazon S3) bucket:
mkdir mm2
zip mm2.zip mm2
aws s3 cp mm2.zip s3://mytestbucket/
Because Kafka and subsequently Kafka Connect have MirrorMaker libraries built in, you don’t need to add additional JAR files for this functionality. MSK Connect has a prerequisite that a custom plugin needs to be present at connector creation, so we have to create an empty one just for reference. It doesn’t matter what the contents of the file are or what the folder contains, as long as there is an object in Amazon S3 that is accessible to MSK Connect, so MSK Connect has access to MM2 classes.
Create a custom plugin
On the Amazon MSK console, follow the steps to create a custom plugin from the .zip file. Enter the object’s Amazon S3 URI and for this post, and name the plugin Mirror-Maker-2.
Create and deploy connectors
You need to deploy three connectors for a successful mirroring operation:
MirrorSourceConnector
MirrorHeartbeatConnector
MirrorCheckpointConnector
Complete the following steps for each connector:
On the Amazon MSK console, choose Create connector.
For Connector name, enter the name of your first connector.
Select the target MSK cluster that the data is mirrored to as a destination.
Choose IAM as the authentication mechanism.
Pass the config into the connector.
Connector config files are JSON-formatted config maps for the Kafka Connect framework to use in passing configurations to the executable JAR. When using the MSK Connect console, we must convert the config file from a JSON config file to single-lined key=value (with no spaces) file.
You need to change some values within the configs for deployment, namely bootstrap.server, sasl.jaas.config and tasks.max. Note the placeholders in the following code for all three configs.
The following code is for MirrorHeartBeatConnector:
A general guideline for the number of tasks for a MirrorSourceConnector is one task per up to 10 partitions to be mirrored. For example, if a Kafka cluster has 15 topics with 12 partitions each for a total partition count of 180 partitions, we deploy at least 18 tasks for mirroring the workload.
Exceeding the recommended number of tasks for the source connector may lead to offsets that aren’t translated (negative consumer group offsets). For more information about this issue and its workarounds, refer to MM2 may not sync partition offsets correctly.
For the heartbeat and checkpoint connectors, use provisioned scale with one worker, because there is only one task running for each of them.
For the source connector, we set the maximum number of workers to the value decided for the tasks.max property. Note that we use the defaults of the auto scaling threshold settings for now.
Although it’s possible to pass custom worker configurations, let’s leave the default option selected.
In the Access permissions section, we use the IAM role that we created earlier that has a trust relationship with kafkaconnect.amazonaws.com and kafka-cluster:* permissions. Warning signs display above and below the drop-down menu. These are to remind you that IAM roles and attached policies is a common reason why connectors fail. If you never get any log output upon connector creation, that is a good indicator of an improperly configured IAM role or policy permission problem. On the bottom of this page is a warning box telling us not to use the aptly named AWSServiceRoleForKafkaConnect role. This is an AWS managed service role that MSK Connect needs to perform critical, behind-the-scenes functions upon connector creation. For more information, refer to Using Service-Linked Roles for MSK Connect.
Choose Next. Depending on the authorization mechanism chosen when aligning the connector with a specific cluster (we chose IAM), the options in the Security section are preset and unchangeable. If no authentication was chosen and your cluster allows plaintext communication, that option is available under Encryption – in transit.
Choose Next to move to the next page.
Choose your preferred logging destination for MSK Connect logs. For this post, I select Deliver to Amazon CloudWatch Logs and choose the log group ARN for my MSK Connect logs.
Choose Next.
Review your connector settings and choose Create connector.
A message appears indicating either a successful start to the creation process or immediate failure. You can now navigate to the Log groups page on the CloudWatch console and wait for the log stream to appear.
The CloudWatch logs indicate when connectors are successful or have failed faster than on the Amazon MSK console. You can see a log stream in your chosen log group get created within a few minutes after you create your connector. If your log stream never appears, this is an indicator that there was a misconfiguration in your connector config or IAM role and it won’t work.
Verify that the connector launched successfully
In this section, we walk through two confirmation steps to determine a successful launch.
Check the log stream
Open the log stream that your connector is writing to. In the log, you can check if the connector has successfully launched and is publishing data to the cluster. In the following screenshot, we can confirm data is being published.
Mirror data
The second step is to create a producer to send data to the source cluster. We use the console producer and consumer that Kafka ships with. You can follow Step 1 from the Apache Kafka quickstart.
Download the latest stable JAR for IAM authentication from the repository. As of this writing, it is 1.1.3:
cd libs/
wget https://github.com/aws/aws-msk-iam-auth/releases/download/v1.1.3/aws-msk-iam-auth-1.1.3-all.jar
Next, we need to create our client.properties file that defines our connection properties for the clients. For instructions, refer to Configure clients for IAM access control. Copy the following example of the client.properties file:
You can place this properties file anywhere on your machine. For ease of use and simple referencing, I place mine inside kafka_2.13-3.1.0/bin. After we create the client.properties file and place the JAR in the libs directory, we’re ready to create the topic for our replication test.
From the bin folder, run the kafka-topics.sh script:
The details of the command are as follows: –bootstrap-server – Your bootstrap server of the source cluster. –topic – The topic name you want to create. –create – The action for the script to perform. –replication-factor – The replication factor for the topic. –partitions – Total number of partitions to create for the topic. –command-config – Additional configurations needed for successful running. Here is where we pass in the client.properties file we created in the previous step.
We can list all the topics to see that it was successfully created:
When defining bootstrap servers, it’s recommended to use one broker from each Availability Zone. For example:
export bss=broker1:9098,broker2:9098,broker3:9098
Similar to the create topic command, the preceding step simply calls list to show all topics available on the cluster. We can run this same command on our target cluster to see if MirrorMaker has replicated the topic. With our topic created, let’s start the consumer. This consumer is consuming from the target cluster. When the topic is mirrored with the default replication policy, it will have a source. prefixed to it.
For our topic, we consume from source.MirrorMakerTest as shown in the following code:
The details of the code are as follows: –bootstrap-server – Your target MSK bootstrap servers –topic – The mirrored topic –consumer.config – Where we pass in our client.properties file again to instruct the client how to authenticate to the MSK cluster After this step is successful, it leaves a consumer running all the time on the console until we either close the client connection or close our terminal session. You won’t see any messages flowing yet because we haven’t started producing to the source topic on the source cluster.
Open a new terminal window, leaving the consumer open, and start the producer:
The details of the code are as follows: –bootstrap-server – The source MSK bootstrap servers –topic – The topic we’re producing to –producer.config – The client.properties file indicating which IAM authentication properties to use
After this is successful, the console returns >, which indicates that it’s ready to produce what we type. Let’s produce some messages, as shown in the following screenshot. After each message, press Enter to have the client produce to the topic.
Switching back to the consumer’s terminal window, you should see the same messages being replicated and now showing on your console’s output.
Clean up
We can close the client connections now by pressing Ctrl+C to close the connections or by simply closing the terminal windows.
We can delete the topics on both clusters by running the following code:
Delete the source cluster topic first, then the target cluster topic.
Finally, we can delete the three connectors via the Amazon MSK console by selecting them from the list of connectors and choosing Delete.
Conclusion
In this post, we showed how to use MSK Connect for MM2 deployment with IAM authentication. We successfully deployed the Amazon MSK custom plugin, and created the MM2 connector along with the accompanying IAM role. Then we deployed the MM2 connector onto our MSK Connect instances and watched as data was replicated successfully between two MSK clusters.
Using MSK Connect to deploy MM2 eases the administrative and operational burden of Kafka Connect and MM2, because the service handles the underlying resources, enabling you to focus on the connectors and data. The solution removes the need to have a dedicated infrastructure of a Kafka Connect cluster hosted on Amazon services like Amazon Elastic Compute Cloud (Amazon EC2), AWS Fargate, or Amazon EKS. The solution also automatically scales the resources for you (if configured to do so), which eliminates the need for the administers to check if the resources are scaling to meet demand. Additionally, using the Amazon managed service MSK Connect allows for easier compliance and security adherence for Kafka teams.
If you have any feedback or questions, please leave a comment.
About the Authors
Tanner Pratt is a Practice Manager at Amazon Web Services. Tanner is leading a team of consultants focusing on Amazon streaming services like Managed Streaming for Apache Kafka, Kinesis Data Streams/Firehose and Kinesis Data Analytics.
Ed Berezitsky is a Senior Data Architect at Amazon Web Services.Ed helps customers design and implement solutions using streaming technologies, and specializes on Amazon MSK and Apache Kafka.
As the industry grows with more data volume, big data analytics is becoming a common requirement in data analytics and machine learning (ML) use cases. Data comes from many different sources in structured, semi-structured, and unstructured formats. For semi-structured data, one of the most common lightweight file formats is JSON. However, due to the complex nature of data, JSON often includes nested key-value structures. Analysts may want a simpler graphical user interface to conduct data analysis and profiling.
To support these requirements, AWS Glue DataBrew offers an easy visual data preparation tool with over 350 pre-built transformations. You can use DataBrew to analyze complex nested JSON files that would otherwise require days or weeks writing hand-coded transformations. You can then use Amazon QuickSight for data analysis and visualization.
In this post, we demonstrate how to configure DataBrew to work with nested JSON objects and use QuickSight for data visualization.
Solution overview
To implement our solution, we create a DataBrew project and DataBrew job for unnesting data. We profile the unested data in DataBrew and analyze data in QuickSight. The following diagram illustrates the architecture of this solution.
Prerequisites
Before you get started, make sure you have the following prerequisites:
Select the first dataset (customer_1.json) and choose Download to save the files on your local machine.
Repeat this step to download all three JSON files. You can view the sample data from your local machine using any text editor, as shown in the following screenshot.
Create input and output S3 buckets with subfolders nestedjson and outputjson to capture data.
Choose Upload and upload the three JSON files to the nestedjson folder.
Create a DataBrew project
To create your Amazon S3 connection, complete the following steps:
On the DataBrew console, choose Projects in the navigation pane.
Choose Create project.
For Project name, enter Glue-DataBew-NestedJSON-Blog.
Select New dataset.
For Dataset name, enter Glue-DataBew-NestedJSON-Dataset.
For Enter your source from S3, enter the path to the nestedjson folder.
Choose Select the entire folder to select all the files.
Under Additional configurations, select JSON as the file type, then select JSON document.
In the Permissions section, choose Choose existing IAM role if you have one available, or choose Create new IAM role.
Choose Create project.
Skip the preview steps and wait for the project to be ready. As shown in the following screenshot, the three JSON files were uploaded to the S3 bucket, so three rows of customer order details are loaded. The orders column contains nested files. We can use DataBrew to unnest or nest transform to flatten the columns and rows.
Choose the menu icon (three dots) and choose Nest-unnest.
Depending on the nesting, either choose Unnest to columns or Unnest to rows. In this blog post, we choose Unnest to columns to flatten example JSON file. Repeat this step until you get a flattened json for all the nested json data and this will create the AWS Glue Databrew recipe as shown below.
Choose Apply. DataBrew automatically creates the required recipe steps with updated column values.
Choose Create job.
For Job name, enter Glue-DataBew-NestedJSON-job.
For S3 location, enter the path to the outputjson folder.
In the Permissions section, for Role name, choose the role you created earlier.
Choose Create and run job.
On the Jobs page, you can choose the job to view its run history, details, and data lineage.
Profile the metadata with DataBrew
After you have a flattened file in the S3 output bucket, you can use DataBrew to carry out the data analysis and profiling for the flattened file. Complete the following steps:
On the Datasets page, choose Connect new datasets.
Provide your dataset details and choose Create dataset.
Choose the newly added data source, then choose the Data profile overview tab.
Enter the name of the job and the S3 path to save the output.
Choose Create and run job.
The job takes around two minutes to complete and display all the updated information. You can explore the data further on the Data profile overview and Column statistics tabs.
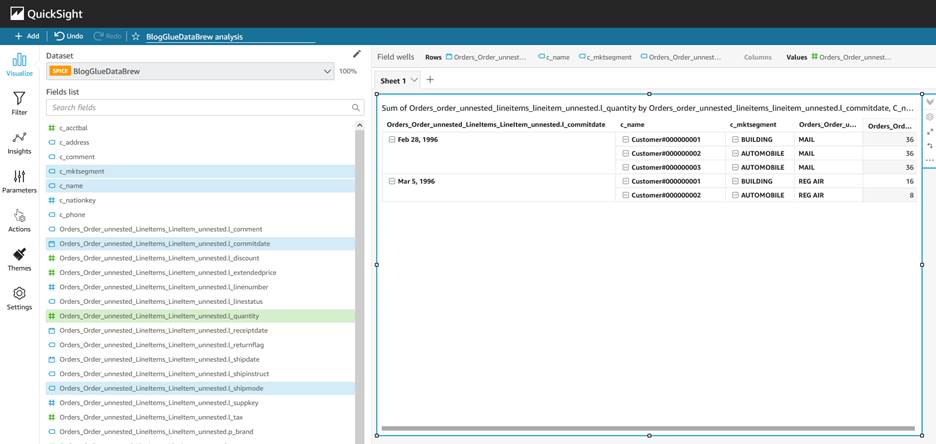
Visualize the data in QuickSight
After you have the output file generated by DataBrew in the S3 output bucket, you can use QuickSight to query the JSON data. QuickSight is a scalable, serverless, embeddable, ML-powered business intelligence (BI) service built for the cloud. QuickSight lets you easily create and publish interactive BI dashboards that include ML-powered insights. QuickSight dashboards can be accessed from any device, and seamlessly embedded into your applications, portals, and websites.
Launch QuickSight
On the console, enter quicksight into the search bar and choose QuickSight.
You’re presented with the QuickSight welcome page. If you haven’t signed up for QuickSight, you may have to complete the signup wizard. For more information, refer to Signing up for an Amazon QuickSight subscription.
After you have signed up, QuickSight presents a “Welcome wizard.” You can view the short tutorial, or you can close it.
Grant Amazon S3 access
To grant Amazon S3 access, complete the following steps:
On the QuickSight console, choose your user name, choose Manage QuickSight, then choose Security & permissions.
Choose Add or remove.
Locate Amazon S3 in the list. Choose one of the following:
If the check box is clear, select Amazon S3.
If the check box is already selected, choose Details, then choose Select S3 buckets.
Choose the buckets that you want to access from QuickSight, then choose Select.
Choose Update.
If you changed your Region during the first step of this process, change it back to the Region that you want to use.
Create a dataset
Now that you have QuickSight up and running, you can create your dataset. Complete the following steps:
On the QuickSight console, choose Datasets in the navigation pane.
Choose New dataset. QuickSight supports several data sources. For a complete list, refer to Supported data sources.
For your data source, choose S3. The S3 import requires a data source name and a manifest file.
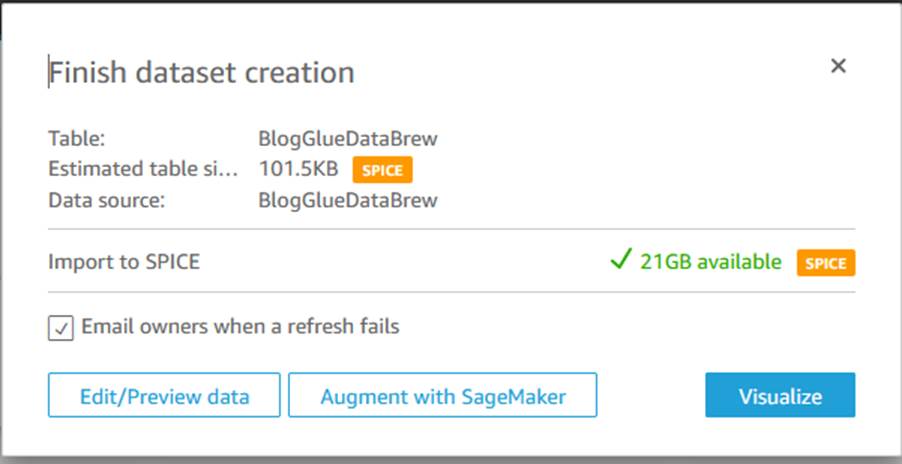
On your machine, use a text editor to create a manifest file called BlogGlueDataBrew.manifest using the following structure (provide the name of the your output bucket):
Complete the following steps to avoid incurring future charges:
On the DataBrew console, choose Projects in the navigation pane.
Select the project you created and on the Actions menu, choose Delete.
Choose Jobs in the navigation pane.
Select the job you created and on the Actions menu, choose Delete.
Choose Recipes in the navigation pane.
Select the recipe you created and on the Actions menu, choose Delete.
On the QuickSight dashboard, choose your user name on the application bar, then choose Manage QuickSight.
Choose Account settings, then choose Delete account.
Choose Delete account.
Enter confirm and choose Delete account.
Conclusion
This post walked you through the steps to configure DataBrew to work with nested JSON objects and use QuickSight for data visualization. We used Glue DataBrew to unnest our JSON file and profile the data, and then used QuickSight to create dashboards and visualizations for further analysis.
You can use this solution for your own use cases when you need to unnest complex semi-structured JSON files without writing code. If you have comments or feedback, please leave them in the comments section.
About the authors
Sriharsh Adari is a Senior Solutions Architect at Amazon Web Services (AWS), where he helps customers work backwards from business outcomes to develop innovative solutions on AWS. Over the years, he has helped multiple customers on data platform transformations across industry verticals. His core area of expertise include Technology Strategy, Data Analytics, and Data Science. In his spare time, he enjoys playing sports, binge-watching TV shows, and playing Tabla.
Rahul Sonawane is a Principal Analytics Solutions Architect at AWS with AI/ML and Analytics as his area of specialty.
Amogh Gaikwad is a Solutions Developer at Amazon Web Services. He helps global customers build and deploy AI/ML solutions. His work is mainly focused on computer vision, and NLP uses-cases and helping customers optimize their AI/ML workloads for sustainability. Amogh has received his master’s in Computer Science specializing in Machine Learning.
AWS re:Invent 2022 is fast approaching, and this post can help you plan your agenda with a look at the sessions in the security track. AWS re:Invent, your opportunity to catch up on the latest technologies in cloud computing, will take place in person in Las Vegas, NV, from November 28 – December 2, 2022.
This post provides abbreviated abstracts for all of the security, identity, and compliance sessions. For the full description, visit the AWS re:Invent session catalog. If you plan to attend AWS re:Invent 2022, and you’re interested in connecting with a security, identity, or compliance product team, reach out to your AWS Account Team. Don’t have a ticket yet? Join us in Las Vegas by registering for re:Invent 2022.
Leadership session
SEC214-L: What we can learn from customers: Accelerating innovation at AWS Security CJ Moses, CISO at AWS, showcases part of the peculiar AWS culture of innovation—the working backwards process—and how new security products, services, and features are built with the customer in mind. AWS Security continuously innovates based directly on customer feedback so that organizations can accelerate their pace of innovation while integrating powerful security architecture into the heart of their business and operations.
Breakout sessions
Lecture-style presentations that cover topics at all levels (200-400) and are delivered by AWS experts, builders, customers, and partners.
SEC201: Proactive security: Considerations and approaches Security is our top priority at AWS. Discover how the partnership between builder experience and security helps everyone ship securely. Hear about the tools, mechanisms, and programs that help AWS builders and security teams.
SEC203: Revitalize your security with the AWS Security Reference Architecture As your team continually evolves its use of AWS services and features, it’s important to understand how AWS security services work together to improve your security posture. In this session, learn about the recently updated AWS Security Reference Architecture (AWS SRA), which provides prescriptive guidance for deploying the full complement of AWS security services in a multi-account environment.
SEC207: Simplify your existing workforce access with IAM Identity Center In this session, learn how to simplify operations and improve efficiencies by scaling and securing your workforce access. You can easily connect AWS IAM Identity Center (successor to AWS Single Sign-On) to your existing identity source. IAM Identity Center integrated with AWS Managed Microsoft Active Directory provides a centralized and scalable access management solution for your workplace users across multiple AWS accounts while improving the overall security posture of your organization.
SEC210: AWS and privacy engineering: Explore the possibilities Learn about the intersection of technology and governance, with an emphasis on solution building. With the privacy regulation landscape continuously changing, organizations need innovative technical solutions to help solve privacy compliance challenges. This session covers a series of unique customer challenges and explores how AWS services can be used as building blocks for privacy-enhancing solutions.
SEC212: AWS data protection: Using locks, keys, signatures, and certificates AWS offers a broad array of cryptographic tools and PKI platforms to help you navigate your data protection and digital signing needs. Discover how to get this by default and how to build your own locks, keys, signatures, and certificates when needed for your next cloud application. Learn best practices for data protection, data residency, digital sovereignty, and scalable certificate management, and get a peek into future considerations around crypto agility and encryption by default.
SEC309: Threat detection and incident response using cloud-native services Threat detection and incident response processes in the cloud have many similarities to on premises, but there are some fundamental differences. In this session, explore how cloud-native services can be used to support threat detection and incident response processes in AWS environments.
SEC310: Security alchemy: How AWS uses math to prove security AWS helps you strengthen the power of your security by using mathematical logic to answer questions about your security controls. This is known as provable security. In this session, explore the math that proves security systems of the cloud.
SEC312: Deploying egress traffic controls in production environments Private workloads that require access to resources outside of the VPC should be well monitored and managed. There are solutions that can make this easier, but selecting one requires evaluation of your security, reliability, and cost requirements. Learn how Robinhood evaluated, selected, and implemented AWS Network Firewall to shape network traffic, block threats, and detect anomalous activity on workloads that process sensitive financial data.
SEC313: Harness the power of IAM policies & rein in permissions with Access Analyzer Explore the power of IAM policies and discover how to use IAM Access Analyzer to set, verify, and refine permissions. Learn advanced skills that empower builders to apply fine-grained permissions across AWS. This session dives deep into IAM policies and explains IAM policy evaluation, policy types and their use cases, and critical access controls.
SEC327: Zero-privilege operations: Running services without access to data AWS works with organizations and regulators to host some of the most sensitive workloads in industry and government. Learn how AWS secures data, even from trusted AWS operators and services. Explore the AWS Nitro System and how it provides confidential computing and a trusted runtime environment, and dive deep into the cryptographic chains of custody that are built into AWS Identity and Access Management (IAM).
SEC329: AWS security services for container threat detection Containers are a cornerstone of many AWS customers’ application modernization strategies. The increased dependence on containers in production environments requires threat detection that is designed for container workloads. To help meet the container security and visibility needs of security and DevOps teams, new container-specific security capabilities have recently been added to Amazon GuardDuty, Amazon Inspector, and Amazon Detective. The head of cloud security at HBO Max will share container security monitoring best practices.
SEC332: Build Securely on AWS: Insights from the C-Suite Security shouldn’t be top of mind only when it’s a headline in the news. A strong security posture is a proactive one. In this panel session, hear how CISOs and CIOs are taking a proactive approach to security by building securely on AWS.
SEC403: Protecting secrets, keys, and data: Cryptography for the long term This session covers the range of AWS cryptography services and solutions, including AWS KMS, AWS CloudHSM, the AWS Encryption SDK, AWS libcrypto (AWS-LC), post-quantum hybrid algorithms, AWS FIPS accreditations, configurable security policies for Application Load Balancer and Amazon CloudFront, and more.
SEC404: A day in the life of a billion requests Every day, sites around the world authenticate their callers. That is, they verify cryptographically that the requests are actually coming from who they claim to come from. In this session, learn about unique AWS requirements for scale and security that have led to some interesting and innovative solutions to this need.
SEC405: Zero Trust: Enough talk, let’s build better security Zero Trust is a powerful new security model that produces superior security outcomes compared to the traditional network perimeter model. However, endless competing definitions and debates about what, Zero Trust is have kept many organizations’ Zero Trust efforts at or near the starting line. Hear from Delphix about how they put Zero Trust into production and the results and benefits they’ve achieved.
Builders’ sessions
Small-group sessions led by an AWS expert who guides you as you build the service or product on your own laptop. Use your laptop to experiment and build along with the AWS expert.
SEC202: Vulnerability management with Amazon Inspector and AWS Systems Manager Join this builders’ session to learn how to use Amazon Inspector and AWS Systems Manager Patch Manager to scan and patch software vulnerabilities on Amazon EC2 instances. Walk through how to understand, prioritize, suppress, and patch vulnerabilities using AWS security services.
SEC204: Analyze your network using Amazon VPC Network Access Analyzer In this builders’ session, review how the new Amazon VPC Network Access Analyzer can help you identify network configurations that might lead to unintended network access. Learn ways that you can improve your security posture while still allowing you and your organization to be agile and flexible.
SEC211: Disaster recovery and resiliency for AWS data protection services Resiliency is a core consideration when architecting cloud workloads. Preparing and implementing disaster recovery (DR) strategies is an important step for ensuring the resiliency of your solution in the face of regional disasters. Gain hands-on experience with implementing backup-restore and active-active DR strategies when working with AWS database services like Amazon DynamoDB and Amazon Aurora and data protection services like AWS KMS, AWS Secrets Manager, and AWS Backup.
SEC303: AWS CIRT toolkit for automating incident response preparedness When it comes to life in the cloud, there’s nothing more important than security. At AWS, the Customer Incident Response Team (CIRT) creates tools to support customers during active security events and to help them anticipate and respond to events using simulations. CIRT members demonstrate best practices for using these tools to enable service logs with Assisted Log Enabler for AWS, run a security event simulation using AWS CloudSaga, and analyze logs to respond to a security event with Amazon Athena.
SEC304: Machine-to-machine authentication on AWS This session offers hands-on learning around the pros and cons of several methods of machine-to-machine authentication. Examine how to implement and use Amazon Cognito, AWS Identity and Access Management (IAM), and Amazon API Gateway to authenticate services to each other with various types of keys and certificates.
SEC305: Kubernetes threat detection and incident response automation In this hands-on session, learn how to use Amazon GuardDuty and Amazon Detective to effectively analyze Kubernetes audit logs from Amazon EKS and alert on suspicious events or malicious access such as an increase in “403 Forbidden” or “401 Unauthorized” logs.
SEC308: Deploying repeatable, secure, and compliant Amazon EKS clusters Learn how to deploy, manage, and scale containerized applications that run Kubernetes on AWS with AWS Service Catalog. Walk through how to deploy the Kubernetes control plane into a virtual private cloud, connect worker nodes to the cluster, and configure a bastion host for cluster administrative operations.
Chalk talks
Highly interactive sessions with a small audience. Experts lead you through problems and solutions on a digital whiteboard as the discussion unfolds.
SEC206: Security operations metrics that matter Security tooling can produce thousands of security findings to act on. But what are the most important items and metrics to focus on? Learn about a framework you can use to develop and implement security operations metrics in order to prioritize the highest-risk issues across your AWS environment.
SEC209: Continuous innovation in AWS threat detection & monitoring services AWS threat detection teams continue to innovate and improve foundational security services for proactive and early detection of security events and posture management. Learn about recent launches that address use cases like container threat detection, protection from malware, and sensitive data identification. Services covered in this session include Amazon GuardDuty, Amazon Detective, Amazon Inspector, Amazon Macie, and centralized cloud security posture assessment with AWS Security Hub.
SEC311: Securing serverless workloads on AWS Walk through design patterns for building secure serverless applications on AWS. Learn how to handle secrets with AWS Lambda extensions and AWS Secrets Manager, detect vulnerabilities in code with Amazon CodeGuru, ensure security-approved libraries are used in the code with AWS CodeArtifact, provide security assurance in code with AWS Signer, and secure APIs on Amazon API Gateway.
SEC314: Automate security analysis and code reviews with machine learning Join this chalk talk to learn how developers can use machine learning to embed security during the development phase and build guardrails to automatically flag common issues that deviate from best practices. This session is tailored to developers and security professionals who are involved in improving the security of applications during the development lifecycle.
SEC315: Security best practices for Amazon Cognito applications Customer identity and access management (CIAM) is critical when building and deploying web and mobile applications for your business. To mitigate the risks of unauthorized access, you need to implement strong identity protections by using the right security measures, such as multi-factor authentication, activity monitoring and alerts, adaptive authentication, and web firewall integration.
SEC316: Establishing trust with cryptographically attested identity Cryptographic attestation is a mechanism for systems to make provable claims of their identity and state. Dive deep on the use of cryptographic attestation on AWS, powered by technologies such as NitroTPM and AWS Nitro Enclaves to assure system integrity and establish trust between systems. Come prepared for a lively discussion as you explore various use cases, architectures, and approaches for utilizing attestation to raise the security bar for workloads on AWS.
SEC317: Implementing traffic inspection capabilities at scale on AWS Learn about a broad range of security offerings that can help you integrate firewall services into your network, including AWS WAF, AWS Network Firewall, and partner appliances used in conjunction with a Gateway Load Balancer. Learn how to choose network architectures for these firewall options to protect inbound traffic to your internet-facing applications.
SEC318: Scaling the possible: Digitizing the audit experience Do you want to increase the speed and scale of your audits? As companies expand to new industries and markets, so does the scale of regulatory compliance. AWS undergoes hundreds of audits in a year. In this chalk talk, AWS experts discuss how they digitize and automate the regulator and auditor experience. Learn about pre-audit educational training, self-service of control evidence and walkthrough information, live chats with audit control owners, and virtual data center tours.
SEC319: Prevent unintended access with AWS IAM Access Analyzer policy validation In this chalk talk, walk through several approaches to building automated AWS Identity and Access Management (IAM) policy validation into your CI/CD pipeline. Consider some tools that can be used for policy validation, including AWS IAM Access Analyzer, and learn how mechanisms like AWS CloudFormation hooks and CI/CD pipeline controls can be used to incorporate these tools into your DevSecOps workflow.
SEC320: To Europe and beyond: Architecting for EU data protection regulation Companies innovating on AWS are expanding to geographies with new data transfer and privacy challenges. Explore how to navigate compliance with EU data transfer requirements and discuss how the GDPR certification initiative can simplify GDPR compliance. Dive deep in a collaborative whiteboarding session to learn how to build GDPR-certifiable architectures.
SEC321: Building your forensics capabilities on AWS You have a compromised resource on AWS. How do you acquire evidence and artifacts? Where do you transfer the data, and how do you store it? How do you analyze it safely within an isolated environment? Walk through building a forensics lab on AWS, methods for implementing effective data acquisition and analysis, and how to make sure you are getting the most out of your investigations.
SEC322: Transform builder velocity with security Learn how AWS Support uses data to measure security and make informed decisions to grow the people side of security culture while embedding security expertise within development teams. This is empowering developers to deliver production-quality code with the highest security standards at the speed of business.
SEC324: Reimagine the security perimeter with Zero Trust Zero Trust encompasses everything from the client to the cloud, so where do you start on your journey? In this chalk talk, learn how to look at your environment through a Zero Trust lens and consider architectural patterns that you can use to redefine your security perimeter.
SEC325: Beyond database password management: 5 use cases for AWS Secrets Manager AWS Secrets Manager is integrated with AWS managed databases to make it easy for you to create, rotate, consume, and monitor database user names and passwords. This chalk talk explores how client applications use Secrets Manager to manage private keys, API keys, and generic credentials.
SEC326: Establishing a data perimeter on AWS, featuring Goldman Sachs Organizations are storing an unprecedented and increasing amount of data on AWS for a range of use cases including data lakes, analytics, machine learning, and enterprise applications. They want to prevent intentional or unintentional transfers of sensitive non-public data for unauthorized use. Hear from Goldman Sachs about how they use data perimeter controls in their AWS environment to meet their security control objectives.
SEC328: Learn to create continuous detective security controls using AWS services A risk owner needs to ensure that no matter what your organization is building in the cloud, certain security invariants are in place. While preventive controls are great, they are not always sufficient. Deploying detective controls to enable early identification of configuration issues or availability problems not only adds defense in depth, but can also help detect changes in security posture as your workloads evolve. Learn how to use services like AWS Security Hub, AWS Config, and Amazon CloudWatch Synthetics to deploy canaries and perform continuous checks.
SEC330: Harness the power of temporary credentials with IAM Roles Anywhere Get an introduction to AWS Identity and Access Management (IAM) Roles Anywhere, and dive deep into how you can use IAM Roles Anywhere to access AWS services from outside of AWS. Learn how IAM Roles Anywhere securely delivers temporary AWS credentials to your workloads.
SEC331: Security at the industrial edge Industrial organizations want to process data and take actions closer to their machines at the edge, and they need innovative and highly distributed patterns for keeping their critical information and cyber-physical systems safe. In modern industrial environments, the exponential growth of IoT and edge devices brings enormous benefits but also introduces new risks.
SEC333: Designing compliance as a code with AWS security services Supporting regulatory compliance and mitigating security risks is imperative for most organizations. Addressing these challenges at scale requires automated solutions to identify compliance gaps and take continuous proactive measures. Hear about the architecture of compliance monitoring and remediation solutions, based on the example of the CPS 234 Information Security guidelines of the Australian Prudential Regulatory Authority (APRA), which are mandated for the financial services industry in Australia and New Zealand.
SEC334: Understanding the evolution of cloud-based PKI use cases Since AWS Private Certificate Authority (CA) launched in 2018, the service has evolved based on user needs. This chalk talk starts with a primer on certificate use for securing network connections and information. Learn about the predominant ways AWS customers are using ACM Private CA, and explore new use cases, including identifying IoT devices, customer-managed Kubernetes, and on premises.
SEC402: The anatomy of a ransomware event targeting data residing in Amazon S3 Ransomware events can cost governments, nonprofits, and businesses billions of dollars and interrupt operations. Early detection and automated responses are important steps that can limit your organization’s exposure. Walk through the anatomy of a ransomware event that targets data residing in Amazon S3 and hear detailed best practices for detection, response, recovery, and protection.
Workshops
Interactive learning sessions where you work in small teams to solve problems using AWS Cloud security services. Come prepared with your laptop and a willingness to learn!
SEC208: Executive security simulation This workshop features an executive security simulation, designed to take senior security management and IT or business executive teams through an experiential exercise that illuminates key decision points for a successful and secure cloud journey. During this team-based, game-like simulation, use an industry case study to make strategic security, risk, and compliance decisions and investments.
SEC301: Threat detection and response workshop This workshop takes you through threat detection and response using Amazon GuardDuty, AWS Security Hub, and Amazon Inspector. The workshop simulates different threats to Amazon S3, AWS Identity and Access Management (IAM), Amazon EKS, and Amazon EC2 and illustrates both manual and automated responses with AWS Lambda. Learn how to operationalize security findings.
SEC302: AWS Network Firewall and DNS Firewall security in multi-VPC architectures This workshop guides participants through configuring AWS Network Firewall and Amazon Route 53 Resolver DNS Firewall in an AWS multi-VPC environment. It demonstrates how VPCs can be interconnected with a centralized AWS Network Firewall and DNS Firewall configuration to ease the governance requirements of network security.
SEC306: Building a data perimeter to allow access to authorized users In this workshop, learn how to create a data perimeter by building controls that allow access to data only from expected network locations and by trusted identities. The workshop consists of five modules, each designed to illustrate a different AWS Identity and Access Management (IAM) principle or network control.
SEC307: Ship securely: Automated security testing for developers Learn how to build automated security testing into your CI/CD pipelines using AWS services and open-source tools. The workshop highlights how to identify and mitigate common risks early in the development cycle and also covers how to incorporate code review steps.
SEC323: Data discovery and classification on AWS Learn how to use Amazon Macie to discover and classify data in your Amazon S3 buckets. Dive deep into best practices as you follow the process of setting up Macie. Also use AWS Security Hub custom actions to set up a manual remediation, and investigate how to perform automated remediation using Amazon EventBridge and AWS Lambda.
SEC401: AWS Identity and Access Management (IAM) policy evaluation in action Dive deep into the logic of AWS Identity and Access Management (IAM) policy evaluation. Gain experience with hands-on labs that walk through IAM use cases and learn how different policies interact with each other.
Part of the early appeal of the World Wide Web was the promise that anybody
could create a site and publish interesting content to the world. A few
decades later, that promise seems to have been transformed into the ability to
provide content for a small number of proprietary platforms run by huge
corporations.
But, arguably, the dream of widespread independent publishing is enjoying a
resurgence. The Ghost publishing platform
is built around the goal of making publishing technology — and the ability
to make money from it — available with free software.
Ubuntu
22.10 has been released. “Codenamed ‘Kinetic Kudu’, this interim
release improves the experience of enterprise developers and IT
administrators. It also includes the latest toolchains and applications
with a particular focus on the IoT ecosystem.” See the
release notes for details.
To help developers build better web applications we researched and devised a fragments architecture to build micro-frontends using Cloudflare Workers that is lightning fast, cost-effective to develop and operate, and scales to the needs of the largest enterprise teams without compromising release velocity or user experience.
Here we share a technical overview and a proof of concept of this architecture.
Why micro-frontends?
One of the challenges of modern frontend web development is that applications are getting bigger and more complex. This is especially true for enterprise web applications supporting e-commerce, banking, insurance, travel, and other industries, where a unified user interface provides access to a large amount of functionality. In such projects it is common for many teams to collaborate to build a single web application. These monolithic web applications, usually built with JavaScript technologies like React, Angular, or Vue, span thousands, or even millions of lines of code.
When a monolithic JavaScript architecture is used with applications of this scale, the result is a slow and fragile user experience with low Lighthouse scores. Furthermore, collaborating development teams often struggle to maintain and evolve their parts of the application, as their fates are tied with fates of all the other teams, so the mistakes and tech debt of one team often impacts all.
Drawing on ideas from microservices, the frontend community has started to advocate for micro-frontends to enable teams to develop and deploy their features independently of other teams. Each micro-frontend is a self-contained mini-application, that can be developed and released independently, and is responsible for rendering a “fragment” of the page. The application then combines these fragments together so that from the user’s perspective it feels like a single application.
An application consisting of multiple micro-frontends
Fragments could represent vertical application features, like “account management” or “checkout”, or horizontal features, like “header” or “navigation bar”.
Client-side micro-frontends
A common approach to micro-frontends is to rely upon client-side code to lazy load and stitch fragments together (e.g. via Module Federation). Client-side micro-frontend applications suffer from a number of problems.
Common code must either be duplicated or published as a shared library. Shared libraries are problematic themselves. It is not possible to tree-shake unused library code at build time resulting in more code than necessary being downloaded to the browser and coordinating between teams when shared libraries need to be updated can be complex and awkward.
Also, the top-level container application must bootstrap before the micro-frontends can even be requested, and they also need to boot before they become interactive. If they are nested, then you may end up getting a waterfall of requests to get micro-frontends leading to further runtime delays.
These problems can result in a sluggish application startup experience for the user.
Server-side rendering could be used with client-side micro-frontends to improve how quickly a browser displays the application but implementing this can significantly increase the complexity of development, deployment and operation. Furthermore, most server-side rendering approaches still suffer from a hydration delay before the user can fully interact with the application.
Addressing these challenges was the main motivation for exploring an alternative solution, which relies on the distributed, low latency properties provided by Cloudflare Workers.
Micro-frontends on Cloudflare Workers
Cloudflare Workers is a compute platform that offers a highly scalable, low latency JavaScript execution environment that is available in over 275 locations around the globe. In our exploration we used Cloudflare Workers to host and render micro-frontends from anywhere on our global network.
Fragments architecture
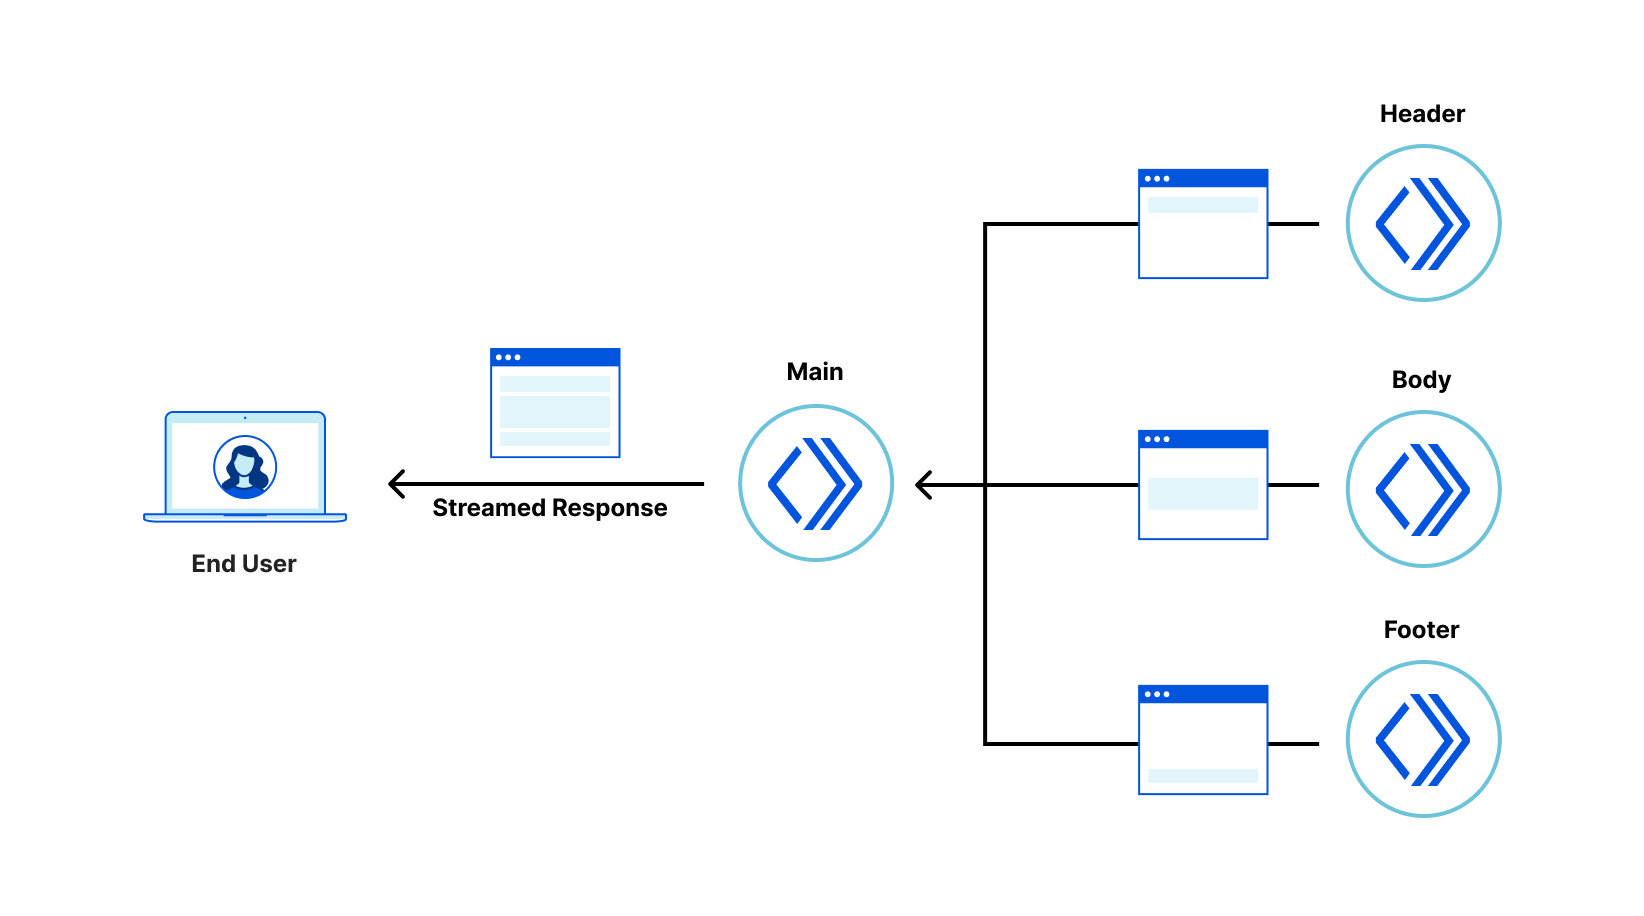
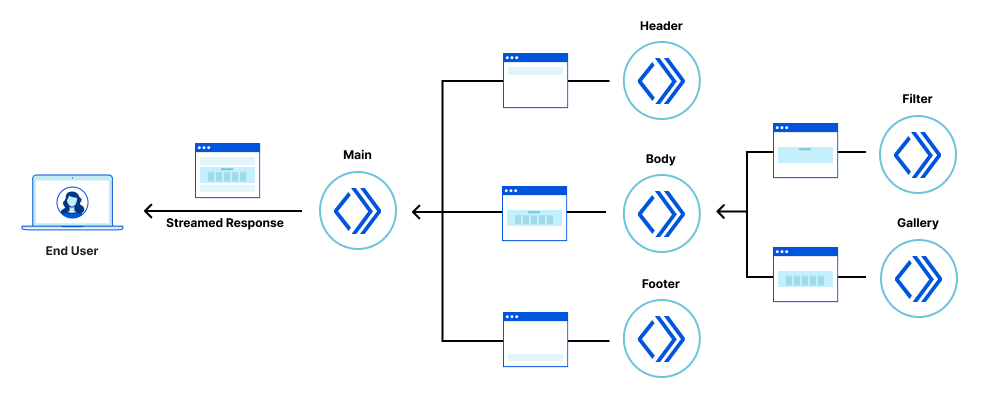
In this architecture the application consists of a tree of “fragments” each deployed to Cloudflare Workers that collaborate to server-side render the overall response. The browser makes a request to a “root fragment”, which will communicate with “child fragments” to generate the final response. Since Cloudflare Workers can communicate with each other with almost no overhead, applications can be server-side rendered quickly by child fragments, all working in parallel to render their own HTML, streaming their results to the parent fragment, which combines them into the final response stream delivered to the browser.
The demo application is a simple filtered gallery of cloud images built using our fragments architecture. Try selecting a tag in the type-ahead to filter the images listed in the gallery. Then change the delay on the stream of cloud images to see how the type-ahead filtering can be interactive before the page finishes loading.
Multiple Cloudflare Workers
The application is composed of a tree of six collaborating but independently deployable Cloudflare Workers, each rendering their own fragment of the screen and providing their own client-side logic, and assets such as CSS stylesheets and images.
Architectural overview of the Cloud Gallery app
The “main” fragment acts as the root of the application. The “header” fragment has a slider to configure an artificial delay to the display of gallery images. The “body” fragment contains the “filter” fragment and “gallery” fragments. Finally, the “footer” fragment just shows some static content.
The full source code of the demo app is available on GitHub.
Benefits and features
This architecture of multiple collaborating server-side rendered fragments, deployed to Cloudflare Workers has some interesting features.
Encapsulation
Fragments are entirely encapsulated, so they can control what they own and what they make available to other fragments.
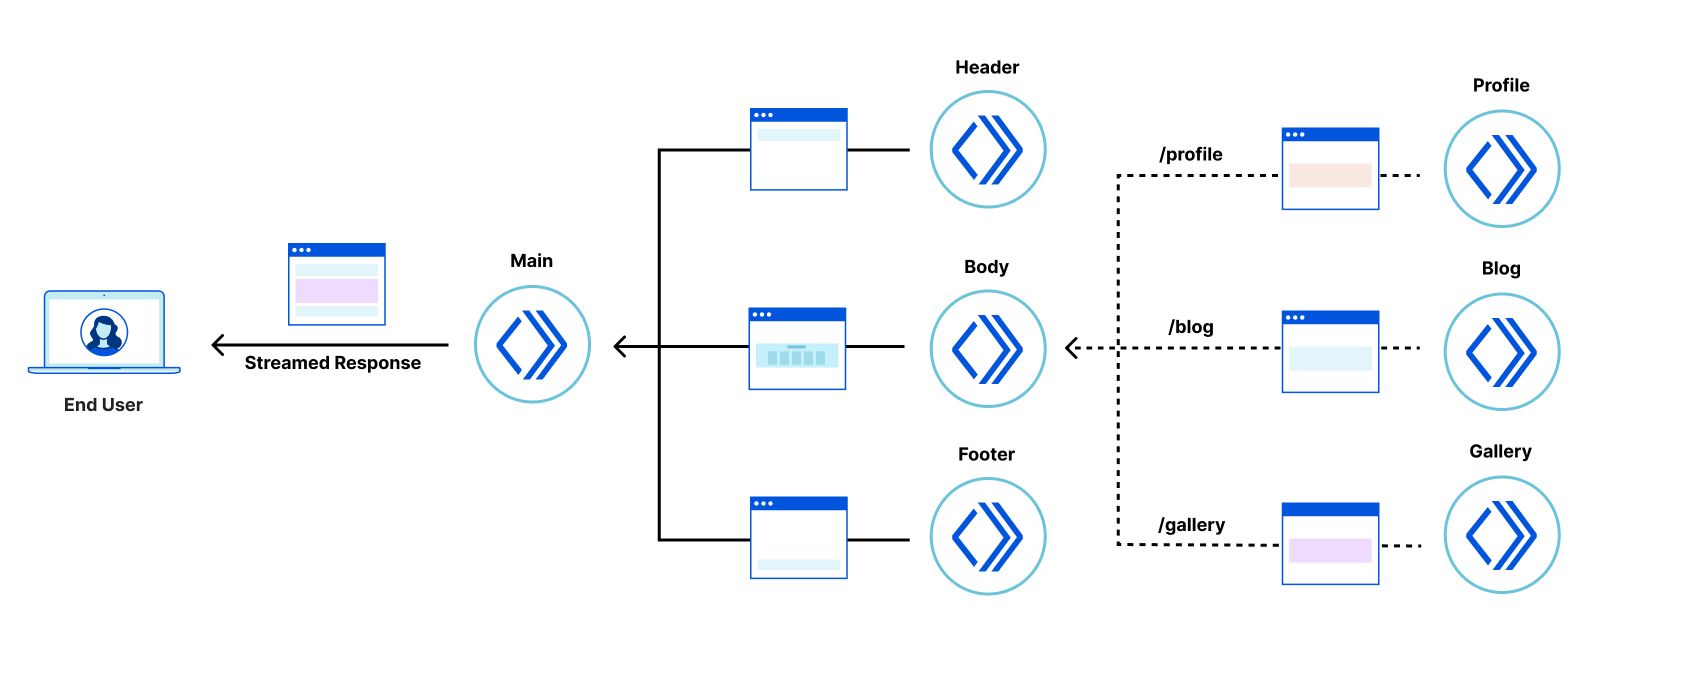
Fragments can be developed and deployed independently
Updating one of the fragments is as simple as redeploying that fragment. The next request to the main application will use the new fragment. Also, fragments can host their own assets (client-side JavaScript, images, etc.), which are streamed through their parent fragment to the browser.
Server-only code is not sent to the browser
As well as reducing the cost of downloading unnecessary code to the browser, security sensitive code that is only needed for server-side rendering the fragment is never exposed to other fragments and is not downloaded to the browser. Also, features can be safely hidden behind feature flags in a fragment, allowing more flexibility with rolling out new behavior safely.
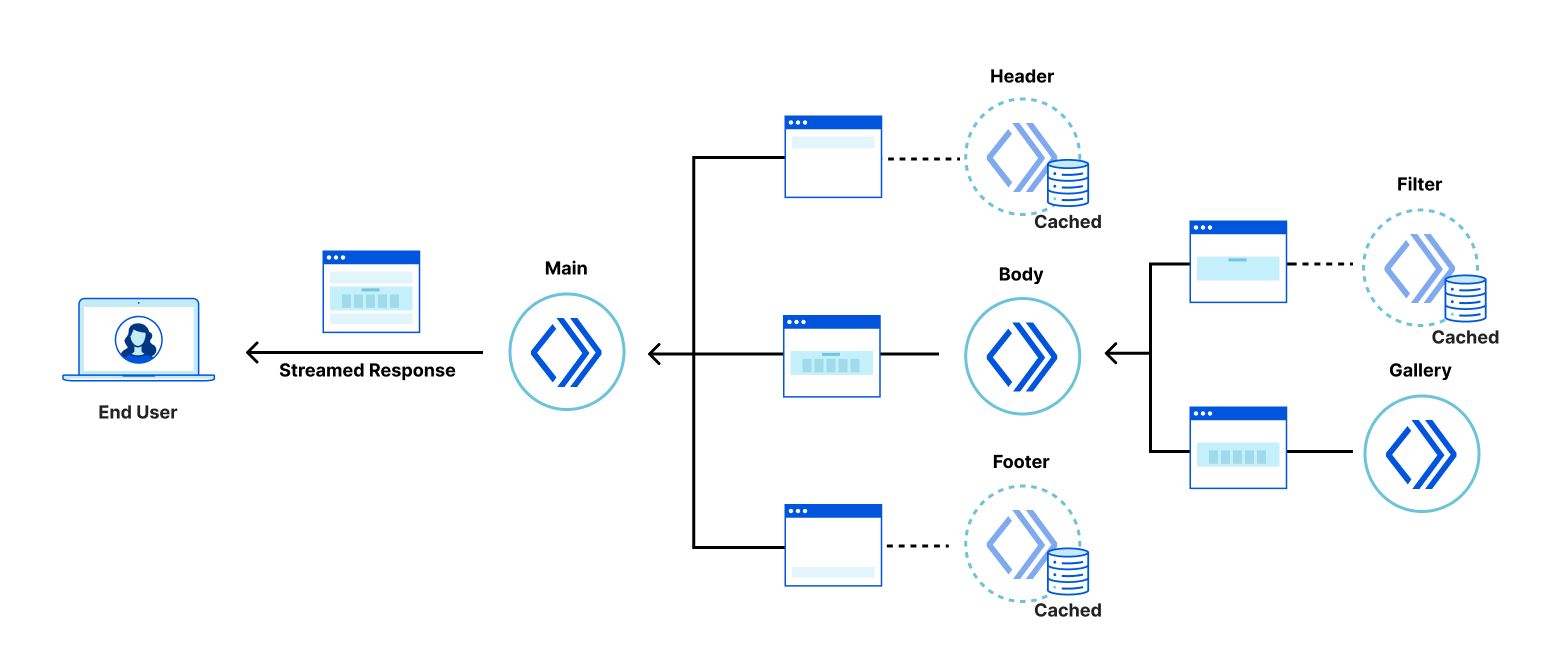
Composability
Fragments are fully composable – any fragment can contain other fragments. The resulting tree structure gives you more flexibility in how you architect and deploy your application. This helps larger projects to scale their development and deployment. Also, fine-grain control over how fragments are composed, could allow fragments that are expensive to server-side render to be cached individually.
Fantastic Lighthouse scores
Streaming server-rendered HTML results in great user experiences and Lighthouse scores, which in practice means happier users and higher chance of conversions for your business.
Lighthouse scores for the Cloud Gallery app
Each fragment can parallelize requests to its child fragments and pipe the resulting HTML streams into its own single streamed server-side rendered response. Not only can this reduce the time to render the whole page but streaming each fragment through to the browser reduces the time to the first byte of each fragment.
Eager interactivity
One of the powers of a fragments architecture is that fragments can become interactive even while the rest of the application (including other fragments) is still being streamed down to the browser.
In our demo, the “filter” fragment is immediately interactive as soon as it is rendered, even if the image HTML for the “gallery” fragment is still loading.
To make it easier to see this, we added a slider to the top of the “header” that can simulate a network or database delay that slows down the HTML stream which renders the “gallery” images. Even when the “gallery” fragment is still loading, the type-ahead input, in the “filter” fragment, is already fully interactive.
Just think of all the frustration that this eager interactivity could avoid for web application users with unreliable Internet connection.
Under the hood
As discussed already this architecture relies upon deploying this application as many cooperating Cloudflare Workers. Let’s look into some details of how this works in practice.
We experimented with various technologies, and while this approach can be used with many frontend libraries and frameworks, we found the Qwik framework to be a particularly good fit, because of its HTML-first focus and low JavaScript overhead, which avoids any hydration problems.
Implementing a fragment
Each fragment is a server-side rendered Qwik application deployed to its own Cloudflare Worker. This means that you can even browse to these fragments directly. For example, the “header” fragment is deployed to https://cloud-gallery-header.web-experiments.workers.dev/.
A screenshot of the self-hosted “header” fragment
The header fragment is defined as a Header component using Qwik.This component is rendered in a Cloudflare Worker via a fetch() handler:
The renderResponse() function is a helper we wrote that server-side renders the fragment and streams it into the body of a Response that we return from the fetch() handler.
The header fragment serves its own JavaScript and image assets from its Cloudflare Worker. We configure Wrangler to upload these assets to Cloudflare and serve them from our network.
Implementing fragment composition
Fragments that contain child fragments have additional responsibilities:
Request and inject child fragments when rendering their own HTML.
Proxy requests for child fragment assets through to the appropriate fragment.
Injecting child fragments
The position of a child fragment inside its parent can be specified by a FragmentPlaceholder helper component that we have developed. For example, the “body” fragment has the “filter” and “gallery” fragments.
The FragmentPlaceholder component is responsible for making a request for the fragment and piping the fragment stream into the output stream.
Proxying asset requests
As mentioned earlier, fragments can host their own assets, especially client-side JavaScript files. When a request for an asset arrives at the parent fragment, it needs to know which child fragment should receive the request.
In our demo we use a convention that such asset paths will be prefixed with /_fragment/<fragment-name>. For example, the header logo image path is /_fragment/header/cf-logo.png. We developed a tryGetFragmentAsset() helper which can be added to the parent fragment’s fetch() handler to deal with this:
If a fragment hosts its own assets, then we need to ensure that any HTML it renders uses the special _fragment/<fragment-name> path prefix mentioned above when referring to these assets. We have implemented a strategy for this in the helpers we developed.
The FragmentPlaceholder component adds a base searchParam to the fragment request to tell it what this prefix should be. The renderResponse() helper extracts this prefix and provides it to the Qwik server-side renderer. This ensures that any request for client-side JavaScript has the correct prefix. Fragments can apply a hook that we developed called useFragmentRoot(). This allows components to gather the prefix from a FragmentContext context.
For example, since the “header” fragment hosts the Cloudflare and GitHub logos as assets, it must call the useFragmentRoot() hook:
Cloudflare Workers provide a mechanism called service bindings to make requests between Cloudflare Workers efficiently that avoids network requests. In the demo we use this mechanism to make the requests from parent fragments to their child fragments with almost no performance overhead, while still allowing the fragments to be independently deployed.
Comparison to current solutions
This fragments architecture has three properties that distinguish it from other current solutions.
Unlike monoliths, or client-side micro-frontends, fragments are developed and deployed as independent server-side rendered applications that are composed together on the server-side. This significantly improves rendering speed, and lowers interaction latency in the browser.
Unlike server-side rendered micro-frontends with Node.js or cloud functions, Cloudflare Workers is a globally distributed compute platform with a region-less deployment model. It has incredibly low latency, and a near-zero communication overhead between fragments.
Unlike solutions based on module federation, a fragment’s client-side JavaScript is very specific to the fragment it is supporting. This means that it is small enough that we don’t need to have shared library code, eliminating the version skew issues and coordination problems when updating shared libraries.
Future possibilities
This demo is just a proof of concept, so there are still areas to investigate. Here are some of the features we’d like to explore in the future.
Caching
Each micro-frontend fragment can be cached independently of the others based on how static its content is. When requesting the full page, the fragments only need to run server-side rendering for micro-frontends that have changed.
An application where the output of some fragments are cached
With per-fragment caching you can return the HTML response to the browser faster, and avoid incurring compute costs in re-rendering content unnecessarily.
Fragment routing and client-side navigation
Our demo application used micro-frontend fragments to compose a single page. We could however use this approach to implement page routing as well. When server-side rendering, the main fragment could insert the appropriate “page” fragment based on the visited URL. When navigating, client-side, within the app, the main fragment would remain the same while the displayed “page” fragment would change.
An application where each route is delegated to a different fragment
This approach combines the best of server-side and client-side routing with the power of fragments.
Using other frontend frameworks
Although the Cloud Gallery application uses Qwik to implement all fragments, it is possible to use other frameworks as well. If really necessary, it’s even possible to mix and match frameworks.
To achieve good results, the framework of choice should be capable of server-side rendering, and should have a small client-side JavaScript footprint. HTML streaming capabilities, while not required, can significantly improve performance of large applications.
An application using different frontend frameworks
Incremental migration strategies
Adopting a new architecture, compute platform, and deployment model is a lot to take in all at once, and for existing large applications is prohibitively risky and expensive. To make this fragment-based architecture available to legacy projects, an incremental adoption strategy is a key.
Developers could test the waters by migrating just a single piece of the user-interface within their legacy application to a fragment, integrating with minimal changes to the legacy application. Over time, more of the application could then be moved over, one fragment at a time.
Convention over configuration
As you can see in the Cloud Gallery demo application, setting up a fragment-based micro-frontend requires quite a bit of configuration. A lot of this configuration is very mechanical and could be abstracted away via conventions and better tooling. Following productivity-focused precedence found in Ruby on Rails, and filesystem based routing meta-frameworks, we could make a lot of this configuration disappear.
Try it yourself!
There is still so much to dig into! Web applications have come a long way in recent years and their growth is hard to overstate. Traditional implementations of micro-frontends have had only mixed success in helping developers scale development and deployment of large applications. Cloudflare Workers, however, unlock new possibilities which can help us tackle many of the existing challenges and help us build better web applications.
If all of these sounds interesting to you, and you would like to work with us on improving the developer experience for Cloudflare Workers, we are also happy to share that we are hiring!
Passwords, amirite? We all have them. Probably a lot of them. And they are among the most important lines of defense against nefarious attackers seeking access to our online accounts. Sadly, as we all know too well, password health isn’t exactly our collective strong suit and too often we hear about breaches coming from loosely or poorly managed passwords.
At Rapid7, we are constantly conducting original research into the latest trends in attacker behavior, vulnerabilities, and cyber security trends that could lead to the next big breach (or the next big goal line save). In our latest report, Good Passwords for Bad Bots, we took a look at two of the most popular protocols used for remote administration, SSH and RDP, to get a sense of how attackers are taking advantage of weaker password management to gain access to systems. What we found in many ways confirmed our assumptions 1) attackers aren’t “cracking” passwords on the internet; and 2) we still collectively stink at password management.
Here’s how we did it.
As a cybersecurity company we are sometimes called upon to dabble in the “dark arts” in order to better prepare ourselves and our customers for the types of attacks they can expect to see in the real world. Sometimes that means penetration testing (hire us to hack into your systems, trust us, it’s fun). And sometimes we deploy honeypots to entice and capture behavior of attackers in a risk-free environment in order to study them.
For this report, we used our network of honeypots (a few hundred of them) to monitor SSH and RDP login attempts. Once we zeroed in on authentication attempts (as opposed to vulnerability exploit attempts, low-touch scans, and the like) we found 512,002 unique passwords were attempted to be used by attackers.
We then turned to the rockyou2021.txt list to determine how many of those passwords existed in this industry-standard list of exposed passwords. Prepare to be shocked: nearly all of them were. In fact, we found just 14 of the passwords being brute forced into our honeypots were NOT found in the rockyou2021.txt file. And we think those were likely errors as they included a string of the honeypots’ IP addresses in them. Unless they are signs of some dastardly attack that we haven’t seen before <cue dramatic music> they are likely insignificant.
But if attackers were using automated tools to “crack” passwords online we’d see more of them, a lot more. There are something to the tune of 8.4 billion passwords on the rockyou2021.txt file. We found less than half a million in our honeypots. What’s more likely to happen is attackers still rely on the human connection to security infrastructure which is notoriously one of the weakest links in the chain. Social engineering, like phishing for passwords, and credential stuffing (ie. trying known passwords across other targeted platforms to catch someone reusing identical usernames and passwords) are still stronger ways for attackers to gain access to passwords than cracking them automatically.
What this tells us in practicality is that it’s not terribly hard to avoid this class of attack. In fact, some of the most attacked credentials were ones that should make any internet-literate person facepalm hard. The three most popular user names for RDP were “administrator,” “user,” and “admin.” The three most common passwords? Brace yourselves: “root,” “admin,” and “nproc.” One of the most popular passwords was literally “123456” which is definitely not the combination to our luggage. So, yeah, we’re not doing well enough with our passwords.
But as we said earlier, it’s not that hard to beat this kind of attack. You don’t even have to have a particularly strong password in order to protect yourself, just one with randomness in it. Maybe throw in a few strange characters. Don’t reuse it for multiple logins. And above all don’t use default passwords. All of these things would be covered by the use of password manager services that create unique, random passwords for every one of your online accounts. We’re not getting paid by these services to say this, I assure you, they just happen to be a strong but underutilized way to have good credential hygiene.
If you want to learn more, download our new report Good Passwords for Bad Bots. And then, go change your passwords. All of them. You’ll be glad you did.
Long and interesting interview with Signal’s new president, Meredith Whittaker:
WhatsApp uses the Signal encryption protocol to provide encryption for its messages. That was absolutely a visionary choice that Brian and his team led back in the day - and big props to them for doing that. But you can’t just look at that and then stop at message protection. WhatsApp does not protect metadata the way that Signal does. Signal knows nothing about who you are. It doesn’t have your profile information and it has introduced group encryption protections. We don’t know who you are talking to or who is in the membership of a group. It has gone above and beyond to minimize the collection of metadata.
WhatsApp, on the other hand, collects the information about your profile, your profile photo, who is talking to whom, who is a group member. That is powerful metadata. It is particularly powerful—and this is where we have to back out into a structural argument for a company to collect the data that is also owned by Meta/Facebook. Facebook has a huge amount, just unspeakable volumes, of intimate information about billions of people across the globe.
It is not trivial to point out that WhatsApp metadata could easily be joined with Facebook data, and that it could easily reveal extremely intimate information about people. The choice to remove or enhance the encryption protocols is still in the hands of Facebook. We have to look structurally at what that organization is, who actually has control over these decisions, and at some of these details that often do not get discussed when we talk about message encryption overall.
I am a fan of Signal and I use it every day. The one feature I want, which WhatsApp has and Signal does not, is the ability to easily export a chat to a text file.
Йордан Д. Радичков е автор на четири сборника с разкази: „Малка човешка мелодия“ (2015), „Игра на гъски“ (2016), „Двеста линейки на час“ (2018) и „Навалица! Или 25 часа в град София“ (2022). Последният беше отразен в рубриката „По буквите“ от Зорница Христова, която междувременно предложи Стефан Русинов да проведе разговор с автора. Според Стефан идеята ѝ е хрумнала, защото той е „сред малкото хора, които не уважават достатъчно собственото си време и са чели всичките споменати сборници“. Но аз подозирам, че е по-скоро заради невероятно задълбоченото му интервю с Йордан за „Нашето литературно предаване“ преди няколко години.
„Дори ще ви оставя да се полигавите“, казах на Стефан, за да го убедя. И така двамата започват да водят този разговор по имейл, кореспонденцията продължава десетина дни и ето го резултата. Не познах, не са се полигавили. Преди всичко защото отвъд „дрънкането“ и привидния небрежен келешлък тези двама млади и талантливи хора на словото могат да бъдат много, много сериозни. А и „думите никога не са маловажни“, както казва Йордан в интервюто.
Щом човек го поканят на интервю, изведнъж почва да му се струва, че има разни много важни неща за казване.
Щом човек го поканят на интервю, той мигновено започва да важничи. Ние с тебе хора ли сме и важничим ли, когато ни поканят на интервю? Естествено! Някой ни е обърнал внимание и искаме да се представим в най-чудесна светлина. Има и друг момент – форматът като че ли е такъв и често въпросите, които ни задават, сами по себе си важничат. Разбираш ли ме? Самите въпроси започват да се докарват пред самите себе си и да се превъзнасят. Често се стига дотам, че те настояват да бъде разбродирана самата материя на света и да се отговори на невъзможни неща – какво представлява човекът и какъв е смисълът на съществуването.
Забеляза ли как започнах и аз да важнича? И може би от тези натрупвания има едно такова разбиране, че задължително трябва да се каже нещо важно. Лично за себе си не смятам, че имам да кажа нещо твърде важно. Също така, освен да се чувства задължен да казва важни неща, интервюираният задължително трябва и да скромничи и кокетничи. И това може би е върхът на важниченeто. Защото и аз, и ти в момента се правим на много интересни, затова ти предлагам да спреш с глупостите и да караме по същество.
На тебе са ти поръчали (искам да подчертая тая дума, тъй като сам ти не си имал желание да си говорим, а са ти поръчали този разговор) да си говориш с мене, аз съм приел да си говорим. Затова сме длъжни, от уважeние към хората, които ще си загубят времето да четат нашите глупости (пак кокетничене и скромничене), да проведем един открит разговор, пък накрая ще стане ясно имали ли сме да кажем нещо важно!
И да завърша все пак с един цитат: „Разбира се, защото интервюираният човек струва много повече от човека, дето не е интервюиран. Познавах едного, той не бе интервюиран и трябва да Ви кажа, че беше нищо човек. Добре, ама един ден му излезе късметът, интервюираха го и след като го интервюираха, той много се издигна и стана значителен човек. Затова всеки гледа да го интервюират.“
Впрочем твоите разказвачи усилено избягват да важничат. Те често отбелязват с разбиране как хората са потънали в „някаква си тяхна работа“, допускат, че никой не иска да се занимава с техните или с които и да е чужди глупости, понякога им се струва, че сякаш никой не забелязва, че „не е сам в цялата тая работа“. Примирени са с липсата на интерес, съзнават маловажността на думите си, но въпреки това разказват, настояват да поглеждат извън себе си, извън „своята си работа“. За мен е важен този глас на разказвача, който не смята, че някой изобщо му дължи внимание.
Не мисля, че бягат, не мисля, че избягват, просто знаят, че от подобна суета полза няма. Именно че може би притежават някакво разбиране за „цялата работа“, тоест разбирането, че хем сме сами, хем непрестанно сме заедно, хем не можем да настояваме някой да ни обърне внимание, когато всички заедно сме сами, и често ни е трудно да се справим с предизвикателствата и фрустрациите на собствения си живот. Как можем да настояваме за нещо от човека до нас, когато познаваме този човек и виждаме колко и на него му е трудно?
Не смятам и че са примирени, те просто виждат и разбират сложнотията на ежедневието, което всеки ден ни удря по муцуните и настоява да се борим с него. И не че думите им са маловажни, не че нашите думи са маловажни. Не мисля, че има маловажни думи. Има дрънкане със сигурност, но сами по себе си думите никога не са маловажни. И как да не продължават да разказват и да говорят, когато именно в разказването и говоренето се крие животът ни.
Виж, не се опитвам да важнича, опитвам се да ти отговоря конкретно точка по точка на въпросите, които засягаш. Но със сигурност никой нищо не ни дължи. Полага ни се нещо, когато съществува някаква транзакция. Предполагам, че ни се полага адекватно здравеопазване и така нататък. Но в човешките взаимоотношения може би е деградивно и даже опасно да се говори за нещо, което се дължи.
Това тяхно разбиране за „цялата работа“, този малко по-отдръпнат и по-висок поглед обаче не ги изключва от дереджето. Една от най-удовлетворителните (и подривните) особености на тяхната разказваческа настройка е, че за човешките слабости и абсурди говорят най-често в първо лице множествено число: „Ами да! Нима нашето съществуване не превъзхожда всички останали съществувания? Нима нашата работа не е по-спешна и не е по-важна! И нима ние не сме твърде интелигентни, за да се занимаваме с подобни тривиалности, като задръствания? Ама ако всички сме толкова интелигентни, че да не се занимаваме с подобни задръствания, защо всички сме се емнали в задръстването да правим още по-голямо задръстване?“
Да, не ги изключва, и нас не изключва. Можем ли да съществуваме изолирани от всичко, ама всичко, което е около нас? Можем ли да настояваме, че ще успеем да наредим една градина по средата на целия свят, който ври и кипи, и ще посадим в тази градина невъзможно красиви цветя? И наистина ли можем да повярваме, че каквито и огради да вдигаме около нашата градина, те никога няма да бъдат прескочени от никого и никога никой няма да посегне на нашите цветя, никой никога няма да ги откъсне и стъпче? И нима, когато това се случи, ние ще сме изненадани?
Предполагам, че можем да говорим безкрайно за настояването ни, че ние все някак ще сме си добре, независимо от всичко, което е около нас. Но то винаги ще е част от нас, то съществува вътре в нас също и може би нежеланието ни да го погледнем е от страх и чувство за немощ. Затова и на мен ми харесва, че героите винаги говорят в това лице и число, защото така ни напомнят, че ние всички сме такива, ние всички сме избродирани от безчетно много слабости, и макар да ни е неприятно да говорим за тях, струва ми се, че е по-добре да ги адресираме навреме. Ако не се погрижим за една рана навреме, тя само ще се задълбочи.
Както казва твоят персонаж Кларинета: „Сивотата на човека е тъжна работа.“ Може би това е причината разказвачите ти да не са склонни да поставят прибързани граници между себе си и другите, независимо дали живеят в просторна къща, или в малък апартамент, дали спят върху възглавница от гъши пух, или върху изрязан дунапрен – защото далеч по-важни от тези повърхностни признаци са сивотите, неподозираностите, подводните чудовища, които ни обединяват „в дълбините на нашите съзнания“. Ето още една „работа“, която някои от твоите разказвачи наблюдават внимателно – неведомите вътрешни светове.
Тъжна работа е, естествено! Но е част от нас и ми се струва, че е хубаво да не забравяме това, когато имаме друг човек пред себе си. Струва ми се, че повечето ужасяващи явления, които ни заобикалят, са пряко свързани с тази сивота, с тази тъга и този страх. И ако се търси в дълбочина причината за подобни явления, именно там ще я намерим. Когато не обръщаме внимание на тези неприятности, които са толкова естествени, ние като че ли не обръщаме внимание на човека срещу нас. Ние така го пренебрегваме и така пренебрегваме и себе си. Не казвам, че трябва да заровим муцуна в дълбините на нашите съзнания (боже, само как звучи!), но се надявам да не оставаме слепи за тях.
Може би това е нещо, което само литературата може да прави, или поне може да прави доста добре – да осветява слепите ни петна, да се завира в мътните ни дълбини, да ни посочва реалността, която не виждаме. И най-важното – да ни напомня за възможността човешкото в нас да се изчерпи, опасността човек да се превърне във функция.
Дано не се превърнем в прости функции, прости дроби и прости числа и дано не гледаме на хората около нас като на функции, продавачи, шофьори и чистачи!
„Ама като хванем гьостерицата“, изокаха в социалните мрежи след провала на 48-мия парламент да избере председател в първия работен ден. Все едно какъв изход ще намерят днес депутатите, всички те вкупом орезилиха парламентаризма. Скорошни предсрочни избори вече са съвсем реални, а предизборната кампания не е спирала.
Нито една от първите две политически сили, които по конституция имат право на мандат за съставяне на правителство и дават заявка, че искат да управляват – ГЕРБ и „Продължаваме промяната“, не успя да осигури мнозинство, за да наложи кандидата си. Противоборството между тях изглежда непреодолимо, противоречията между публичните им изявления и реални действия – ослепителни.
От една страна, ГЕРБ, първи след изборите на 2 октомври, изявиха намерение да преговарят с ПП и „Демократична България“, от друга – не спират да бичуват „Промяната“ за резултатите от управлението им. От една страна, ПП си избраха ролята на „конструктивна опозиция“, от друга – няма да откажат да съставят правителство с втория мандат, ако първият се провали (което не подлежи на съмнение).
Изпреварващ ход
Изненадващо на брифинг късно снощи от ПП оттеглиха своя кандидат за председател на НС Никола Минчев с мотива, че са „конструктивна опозиция“ – и няма да подкрепят кандидат на ГЕРБ. След като видели, че никой от претендентите няма нужните 121 гласа, ПП не искат да вкарват страната в конституционна криза. „Даваме стъпка назад“, обясни Асен Василев. Стъпката назад не помага особено за стъпка напред в избора на председател на 48-мия парламент. Тя обезсмисля предложението на ДБ Желязков и Минчев да управляват парламента на ротационен принцип, което единствено ГЕРБ посрещнаха с решение да го подкрепят, но не получиха одобрение нито от ПП, нито от БСП.
Сега остава вариантът да бъде избран представител на някоя от по-малките политически сили – Кристиан Вигенин, който е вече предложен от БСП, но не събра необходимото мнозинство, или кандидат, издигнат от ДБ. Съществува и хипотезата ДПС и „Български възход“ (БВ) да подкрепят Желязков – не без съучастието на „Възраждане“. Но вчера ДПС, които подкрепиха ГЕРБ в първата процедура, за втората номинираха свой кандидат – Йордан Цонев. Техният политически нюх може и да им е подсказал да не залагат на куц кон, тъй като ГЕРБ са в явна изолация, и да се ориентират към други залози.
Лагерите
В осемте часа на първото заседание (де юре неприключило) се очертаха и различни мнозинства, които затрудняват още повече този обречен парламент, тъй като зануляват надеждите да свърши нещо повече от приемането на бюджета за догодина.
Едно такова мнозинство оформят президентът Румен Радев, БСП и „Възраждане“, също и БВ. Те настояват България да се въздържа от подкрепа за Украйна, развявайки тези за „войнолюбци“, някакъв ефимерен мир и неутралитет. „Голямата задача пред политическата класа днес е да опазим България от пожара, който бушува. Българските избиратели и историята няма да простят на онези, които поради лекомислие или корист тласкат страната във войната“, заяви държавният глава в словото си, изразявайки надежда подобни „войнолюбци“ да бъдат малцинство в парламента. „Възраждане“ не изневерява на реториката си, наричайки „евро-атлантическа тълпа“ депутатите, които ще „вкарат във война“ България. А „националните консерватори“ от БВ просто игнорираха темата за руската агресия в Украйна. За същото това мнозинство не е приоритет и еврозоната.
Следвайки евро-атлантизма като червена линия, от другата ѝ страна са ДБ и ПП, както и ГЕРБ и ДПС. Но в този лагер евро-атлантизмът е нюансиран – за първите две политически сили е неразделно свързан със съдебна реформа и очистване на българските институции от руско влияние и корупция. Възможностите за руско влияние следват от корупционната разруха на българските институции, заяви в пленарната зала съпредседателят на ДБ Христо Иванов.
За другите две партии не е баш така – разбира се, Десислава Атанасова (ГЕРБ) назова „борбата с корупцията“ и „правосъдната реформа“ като приоритети на партията, но толкоз – просто необходими клишета. Лидерът на ДПС Мустафа Карадайъ изобщо не ги назова, затова пък беше ясен по темата за евро-атлантизма като обективна необходимост: „България е член на НАТО и България трябва да продължи своето евро-атлантическо развитие, и всички ние тук трябва да сме част от този процес. Нямаме друга алтернатива, членове сме на НАТО и ЕС и точка по въпроса.“ Сходна, но не така членоразделна позиция споделя и председателят на „Български възход“, който лаконично отбеляза да не отправяме призиви за излизане от съюзи, а „ясни послания с изправен гръбнак“ към съюзниците.
Големият вододел
„Заплахата от войната в Украйна не трябва да притъпява нуждата от законност в България. Няма как да си евро-атлантик, ако не уважаваш върховенството на закона, не държиш на работеща, реформирана съдебна система и не отстояваш премахването на корупцията по всички етажи на властта“, заяви от парламентарната трибуна съпредседателят на ПП Кирил Петков.
Христо Иванов беше съвсем ясен, повтаряйки, че реформата на прокуратурата и ВСС е условие на коалицията му за подкрепа на кабинет. А по повод Украйна той казва: „Не може да си затваряме очите за тази война. Не може, като кажем, че България е за мир, да очакваме, че мирът ще настъпи, че мирът ще се кондензира като роса. Замитането на войната под килима, да се твърди, че България може да е като Северна Корея на Балканите, не е въпрос дали си войнолюбец, или не, а е въпрос дали се разбира каква е реалната ситуация.“
ДБ внесе вчера проекторешение за военна помощ за Украйна, в което фигурират и консултации със съюзниците от Алианса за предоставяне на заместващо въоръжение и „всеобхватна програма за въоръжаване на българската армия“. (За последното настояват и президентът, и служебният министър на отбраната Димитър Стоянов.)
За „Възраждане“ и „Български възход“ темите за корупцията и върховенството на закона липсваха. Лидерът на БВ отправи някакво мъгляво послание в речта при откриването на парламента за някакви 10–15 личности, на които трябвало да се направи одит, но без да спомене думата „корупция“, камо ли „реформа на прокуратурата“.
„Справедливостта изисква редът и правилата да се спазват от всички. В същото време в обществото ни има 10–15 личности, които ни разделят и поляризират, личности, чиято репутация е в основата на разделителни линии и липсата на диалог. Ние ще работим за създаване на механизъм за одит на дейността на тези хора, който или да завърши с обвинения, или да спрем отровата и злобата в ежедневието си“, заяви Янев.
В декларацията на БСП всичко се изчерпи с една-единствена фраза (също като при ГЕРБ) за „безкомпромисна борба с корупцията“.
Колко да е безкомпромисна
Това е истинското мнозинство в парламента – на мълчащите за корупцията и безконтролната власт на главния прокурор, като ДПС, „Възраждане“ и „Български възход“, и на формалистите за битката с тях, като ГЕРБ и БСП. Подобно мнозинство провали първия опит за истинска съдебна реформа. Вторият опит тепърва предстои – и в словото си президентът напомни, че е неизбежен поради факта, че е предвиден в Плана за възстановяване и устойчивост (ПВУ):
„… очаквам те [проектозаконите за ПВУ] да бъдат разгледани и приети в спешен порядък. Не само заради очакваното финансиране, а най-вече заради ролята на тези закони за отключването на важни и дългоочаквани реформи – за укрепване на държавността, утвърждаване на върховенството на правото, борбата с корупцията по високите етажи на властта и фактическата недосегаемост на главния прокурор, за цялостна модернизация на икономиката и страната.“
Става въпрос за антикорупционния проектозакон, който включва и преструктурирането на КПКОНПИ, и за законопроект за отчетност и контрол на прокуратурата и главния прокурор. И двата са ключови, за да бъдат получени средствата по ПВУ, а според заложените срокове законопроектът за прокуратурата трябва да е приет и обнародван до юни догодина. Опциите са реформите да бъдат смачкани още в този парламент – или надеждите за същински промени да се възложат на 49-тия парламент, в навечерието на местни избори.
Главният прокурор Иван Гешев, разбирайки, че промените са неминуеми, пое инициативата в свои ръце и тази седмица разпрати писма до депутатите, в които призовава за спешна правосъдна реформа, овладяване на престъпността и диалог с институциите. С аргументи, че се рушат устоите на държавността и демократичните стандарти, Гешев очаква депутатите да се заемат „незабавно и отговорно“ с проблемите на правосъдната система. Ход, който на пръв поглед показва диалогичност, но също така издава и страх, и пореден опит да брани своята неуязвимост – също и на тези, чието куче пазач е.
Вчера пред bTV Даниел Лорер (ПП) определи като „терапевтично“ първото заседание, защото излезли конфликтите. Това да не му е семейна констелация, където разкриването на фамилните драми действа оздравително? В политиката конфликтите остават до разрешаването им чрез преговори, подкупи или чрез битка до победа/загуба на единия от противниците.
Докато траеха парламентарните гърчове, лидерът на ГЕРБ Бойко Борисов играеше в мача на ветераните между „Витоша Бистрица“ и ЦСКА 1948, спечелен от отбора му с 4:0. Във футбола още му върви.
За следящите с половин ухо парламентарните драми, нека обясня какво се случи вчера.
По Конституция на първото заседание трябва да бъде избран председател на Народното събрание. 4 партии бяха заявили, че ще издигнат кандидат – ГЕРБ (Росен Желязков), ПП (Никола Минчев), БСП (Крисриян Вигенин) и Възраждане (Петър Петров).
Процедурните правила, ползвани в предишни парламенти, бяха внесени и сега и предвиждат ако никой не събере повече от половината гласове, двамата кандидати с най-много да отидат на балотаж, и там който е събрал повече – става председател.
На балотажа Желязков събра 103 (ГЕРБ и ДПС), Минчев 97 (ПП, ДБ и БСП). Възраждане и Възход се въздържаха. Обаче Конституцията не позволява решение с по-малко от 50%+1, така че избран председател нямаше.
Трябваше да се направи втора процедура, около която имаше дебати. ГЕРБ казваха на ПП „Вие хем искате да се опозиция, хем да имате председател“, казваха на ДБ „вие защо не ни подкрепите, за да тръгне това Народно събрание, оставете ги тия ПП“.
Ние на това отговорихме, че изборът на председател е сигнал за формиране на мнозинство, а ние с ГЕРБ мнозинство няма да формираме и затова няма как да очакват подкрепа.
Изборът се повтори (на втория път ДПС издигнаха Йордан Цонев), но логично никой нямаше 121 гласа. Така се оттеглихме на почивка за вечерта, а заседанието ще продължи днес.
В ДБ се събрахме и отчетохме реалностите – мнозинство няма и съответно никой не може да има председател, ако следваме трайната политическа логика. Липсата на председател, обаче, блокира парламента. Първото засесание не може да приключи и нищо друго не може да бъде гласувано.
А тъй като дори без кабинет, НС трябва да гласува важни неща – бюджет, закони по Плана за възстановяване, в т.ч. за разследване на главния прокурор, не може просто да се саморазпуснем. А и ще излгежда несериозно и ще срине допълнително доверието в парламентарната демокрация.
Затова в този блокаж обмислихме как да действаме и предложихме ротационно председателство (такова има в Европейския парламент, а механиката как да стане това у нас няма да я обсъждам тук, но тя включва както официални решения на НС, така и разбирателство, обявено пред хората, което никой няма интерес дс наруши).
Такъв подход прескача темата за мнозинствата, каквито няма. Решава техническия въпрос, без да сме избрали председател нито от ГЕРБ, нито от ПП, макар формално един от двамата в даден момент да бъде с функцията на председател и има позитивния аспект, че най-големите партии ще са начело.
Заедно с решаване на техническия въпрос, можем да вземем решение за бързо формиране на комисии, приоритизиране на законопроекти, деприоритизиране на други (напр. че няма да се връща хартията в Изборния кодекс) и да започнем работа по това, за което са ни избрали.
Снощи ПП оттеглиха Никола Минчев, което допълнително ще покаже и затвърди това, което отвътре беше очевидно вчера – дори само Желязков да беше кандидат, ГЕРБ нямат мнозинство. На практика ще зависят от Възраждане, но те едва ли биха подкрепили нещо различно от своя кандидат.
Надявам се след това да влезем в алтернативни, „технически“ сценарии за избиране на председател, за да разблокираме парламента. Нашето предложение е един такъв вариант, но има и други. Плюсът е, че липсата на мнозинство предполага, че никой няма монопол над дневния ред.
Фрагментираният парламент изисква разговори, но не необявени договорки. Изисква компромиси, но не в нарушение на принципи. Но можеше да спестим вчерашния ден на българските граждани. ГЕРБ знаят, че нямат мнозинство и вместо да са назидателни от трибуната, можеше днешните предстоящи разговори да са се случили онзи ден, а вчера да обясним на хората, че тъй като в обичайната хипотеза не можем да изберем предсесател, за да отключим работата на парламента, предлагаме определен компромис.
Предстои ден втори от първото заседание на може би най-трудния парламент в новата ни история.
За следящите с половин ухо парламентарните драми, нека обясня какво се случи вчера.
По Конституция на първото заседание трябва да бъде избран председател на Народното събрание. 4 партии бяха заявили, че ще издигнат кандидат – ГЕРБ (Росен Желязков), ПП (Никола Минчев), БСП (Крисриян Вигенин) и Възраждане (Петър Петров).
Процедурните правила, ползвани в предишни парламенти, бяха внесени и сега и предвиждат ако никой не събере повече от половината гласове, двамата кандидати с най-много да отидат на балотаж, и там който е събрал повече – става председател.
На балотажа Желязков събра 103 (ГЕРБ и ДПС), Минчев 97 (ПП, ДБ и БСП). Възраждане и Възход се въздържаха. Обаче Конституцията не позволява решение с по-малко от 50%+1, така че избран председател нямаше.
Трябваше да се направи втора процедура, около която имаше дебати. ГЕРБ казваха на ПП „Вие хем искате да се опозиция, хем да имате председател“, казваха на ДБ „вие защо не ни подкрепите, за да тръгне това Народно събрание, оставете ги тия ПП“.
Ние на това отговорихме, че изборът на председател е сигнал за формиране на мнозинство, а ние с ГЕРБ мнозинство няма да формираме и затова няма как да очакват подкрепа.
На изказванията на ДПС, че такава била традицията – да се избира председател от най-голямата партия, отговорът е, че такава ситуация е нямало, че да има традиция. Имало е управляващо мнозинство без първия (2013) и „опозиционно мнозинство“ (2021). Но сега ме сме в нито една от тези хипотези.
Изборът се повтори (на втория път ДПС издигнаха Йордан Цонев), но логично никой нямаше 121 гласа. Така се оттеглихме на почивка за вечерта, а заседанието ще продължи днес.
В ДБ се събрахме и отчетохме реалностите – мнозинство няма и съответно никой не може да има председател, ако следваме трайната политическа логика. Липсата на председател, обаче, блокира парламента. Първото засесание не може да приключи и нищо друго не може да бъде гласувано.
А тъй като дори без кабинет, НС трябва да гласува важни неща – бюджет, закони по Плана за възстановяване, в т.ч. за разследване на главния прокурор, не може просто да се саморазпуснем. А и ще излгежда несериозно и ще срине допълнително доверието в парламентарната демокрация.
Затова в този блокаж обмислихме как да действаме и предложихме ротационно председателство (такова има в Европейския парламент, а механиката как да стане това у нас няма да я обсъждам тук, но тя включва както официални решения на НС, така и разбирателство, обявено пред хората, което никой няма интерес дс наруши).
Такъв подход прескача темата за мнозинствата, каквито няма. Решава техническия въпрос, без да сме избрали председател нито от ГЕРБ, нито от ПП, макар формално един от двамата в даден момент да бъде с функцията на председател и има позитивния аспект, че най-големите партии ще са начело.
Заедно с решаване на техническия въпрос, можем да вземем решение за бързо формиране на комисии, приоритизиране на законопроекти, деприоритизиране на други (напр. че няма да се връща хартията в Изборния кодекс) и да започнем работа по това, за което са ни избрали.
Снощи ПП оттеглиха Никола Минчев, което допълнително ще покаже и затвърди това, което отвътре беше очевидно вчера – дори само Желязков да беше кандидат, ГЕРБ нямат мнозинство. На практика ще зависят от Възраждане, но те едва ли биха подкрепили нещо различно от своя кандидат.
Надявам се след това да влезем в алтернативни, „технически“ сценарии за избиране на председател, за да разблокираме парламента. Нашето предложение е един такъв вариант, но има и други. Плюсът е, че липсата на мнозинство предполага, че никой няма монопол над дневния ред.
Фрагментираният парламент изисква разговори, но не необявени договорки. Изисква компромиси, но не в нарушение на принципи. Но можеше да спестим вчерашния ден на българските граждани. ГЕРБ знаят, че нямат мнозинство и вместо да са назидателни от трибуната, можеше днешните предстоящи разговори да са се случили онзи ден, а вчера да обясним на хората, че тъй като в обичайната хипотеза не можем да изберем предсесател, за да отключим работата на парламента, предлагаме определен компромис.
Предстои ден втори от първото заседание на може би най-трудния парламент в най-новата ни история.
To provide the best experiences, we use technologies like cookies to store and/or access device information. Consenting to these technologies will allow us to process data such as browsing behavior or unique IDs on this site. Not consenting or withdrawing consent, may adversely affect certain features and functions.
Functional
Always active
The technical storage or access is strictly necessary for the legitimate purpose of enabling the use of a specific service explicitly requested by the subscriber or user, or for the sole purpose of carrying out the transmission of a communication over an electronic communications network.
Preferences
The technical storage or access is necessary for the legitimate purpose of storing preferences that are not requested by the subscriber or user.
Statistics
The technical storage or access that is used exclusively for statistical purposes.The technical storage or access that is used exclusively for anonymous statistical purposes. Without a subpoena, voluntary compliance on the part of your Internet Service Provider, or additional records from a third party, information stored or retrieved for this purpose alone cannot usually be used to identify you.
Marketing
The technical storage or access is required to create user profiles to send advertising, or to track the user on a website or across several websites for similar marketing purposes.


 John Espenhahn is a Software Engineer working on AWS Glue DataBrew service. He has also worked on Amazon Kendra user experience as a part of Database, Analytics & AI AWS consoles. He is passionate about technology and building in the analytics space.
 Nitya Sheth is a Software Engineer working on AWS Glue DataBrew service. He has also worked on AWS Synthetics service as well as on user experience implementations for Database, Analytics & AI AWS consoles. In his free time, he divides his time between exploring new hiking places and new books.


 Tanner Pratt is a Practice Manager at Amazon Web Services. Tanner is leading a team of consultants focusing on Amazon streaming services like Managed Streaming for Apache Kafka, Kinesis Data Streams/Firehose and Kinesis Data Analytics.
 Ed Berezitsky is a Senior Data Architect at Amazon Web Services.Ed helps customers design and implement solutions using streaming technologies, and specializes on Amazon MSK and Apache Kafka.