Automatic Cheating Detection in Human Racing

Post Syndicated from Bruce Schneier original https://www.schneier.com/blog/archives/2022/09/automatic-cheating-detection-in-human-racing.html

This is a fascinating glimpse of the future of automatic cheating detection in sports:

Maybe you heard about the truly insane false-start controversy in track and field? Devon Allen—a wide receiver for the Philadelphia Eagles—was disqualified from the 110-meter hurdles at the World Athletics Championships a few weeks ago for a false start.

Here’s the problem: You can’t see the false start. Nobody can see the false start. By sight, Allen most definitely does not leave before the gun.

But here’s the thing: World Athletics has determined that it is not possible for someone to push off the block within a tenth of a second of the gun without false starting. They have science that shows it is beyond human capabilities to react that fast. Of course there are those (I’m among them) who would tell you that’s nonsense, that’s pseudoscience, there’s no way that they can limit human capabilities like that. There is science that shows it is humanly impossible to hit a fastball. There was once science that showed human beings could not run a four-minute mile.

Besides, do you know what Devon Allen’s reaction time was? It was 0.99 seconds. One thousandth of a second too fast, according to World Athletics’ science. They’re THAT sure that .01 seconds—and EXACTLY .01 seconds—is the limit of human possibilities that they will disqualify an athlete who has trained his whole life for this moment because he reacted one thousandth of a second faster than they think possible?

We in the computer world are used to this sort of thing. “The computer is always right,” even when it’s obviously wrong. But now computers are leaving the world of keyboards and screens, and this sort of thing will become more pervasive. In sports, computer systems are used to detect when a ball is out of bounds in tennis and other games and when a pitch is a strike in baseball. I’m sure there’s more—are computers detecting first downs in football?—but I’m not enough of a sports person to know them.

Юбилейното издание на надпреварата дава още една възможност за участие – чрез видео разказ Център „Алеф” обявява Десетия международен литературен ученически конкурс „Който спаси един човешки живот, спасява цяла вселена”

Post Syndicated from original https://bivol.bg/%D1%86%D0%B5%D0%BD%D1%82%D1%8A%D1%80-%D0%B0%D0%BB%D0%B5%D1%84-%D0%BE%D0%B1%D1%8F%D0%B2%D1%8F%D0%B2%D0%B0-%D0%B4%D0%B5%D1%81%D0%B5%D1%82%D0%B8%D1%8F-%D0%BC%D0%B5%D0%B6%D0%B4%D1%83-2.html

сряда 21 септември 2022


Център за еврейско-българско сътрудничество „Алеф” дава старт на Десетия международен литературен ученически конкурс „Който спаси един човешки живот, спасява цяла вселена”. Десетият конкурс на „Алеф”  е посветен на 80-та годишнина…

Debian’s firmware vote

Post Syndicated from original https://lwn.net/Articles/908825/

The Debian project has begun voting on
changes to its approach to firmware needed to install a working
distribution. The original ballot option described in this article is still there, but this is
Debian so there are several others as well. Some of the additions include
changes to the Debian Social Contract that explicitly allow the shipping of
firmware needed to use Debian on hardware requiring that firmware.

AWS achieves its second ISMAP authorization in Japan

Post Syndicated from Hidetoshi Takeuchi original https://aws.amazon.com/blogs/security/aws-achieves-its-second-ismap-authorization-in-japan/

Earning and maintaining customer trust is an ongoing commitment at Amazon Web Services (AWS). Our customers’ security requirements drive the scope and portfolio of the compliance reports, attestations, and certifications we pursue. We’re excited to announce that AWS has achieved authorization under the Information System Security Management and Assessment Program (ISMAP) program, effective from April 1, 2022 to March 31, 2023. The authorization scope covers a total of 145 AWS services (an increase of 22 services over the previous authorization) across 22 AWS Regions, including the Asia Pacific (Tokyo) Region and the Asia Pacific (Osaka) Region. This is the second time AWS has undergone an assessment since ISMAP was first published by the ISMAP steering committee in March 2020.

ISMAP is a Japanese government program for assessing the security of public cloud services. The purpose of ISMAP is to provide a common set of security standards for cloud service providers (CSPs) to comply with as a baseline requirement for government procurement. ISMAP introduces security requirements for cloud domains, practices, and procedures that CSPs must implement. CSPs must engage with an ISMAP-approved third-party assessor to assess compliance with the ISMAP security requirements in order to apply as an ISMAP-registered CSP. The ISMAP program will evaluate the security of each CSP and register those that satisfy the Japanese government’s security requirements. Upon successful ISMAP registration of CSPs, government procurement departments and agencies can accelerate their engagement with the registered CSPs and contribute to the smooth introduction of cloud services in government information systems.

The achievement of this authorization demonstrates the proactive approach AWS has taken to help customers meet compliance requirements set by the Japanese government and to deliver secure AWS services to our customers. Service providers and customers of AWS can use the ISMAP authorization of AWS services to support their own ISMAP authorization programs. The full list of 145 ISMAP-authorized AWS services is available on the AWS Services in Scope by Compliance Program webpage, and you can also use the ISMAP Customer Package on AWS Artifact. You can confirm the AWS ISMAP authorization status and find detailed scope information on the ISMAP Portal.

As always, we are committed to bringing new services and Regions into the scope of our ISMAP program, based on your business needs. If you have any questions, don’t hesitate to contact your AWS Account Manager.

If you have feedback about this post, submit comments in the Comments section below.
Want more AWS Security how-to content, news, and feature announcements? Follow us on Twitter.

Hidetoshi Takeuchi

Hidetoshi Takeuchi

Hidetoshi is the Audit Program Manager for the Asia Pacific Region, leading Japan security certification and authorization programs. Hidetoshi has worked in information technology security, risk management, security assurance, and technology audits for the past 25 years. He is passionate about delivering programs that build customers’ trust and provide them with assurance on cloud security.

[$] Introducing io_uring_spawn

Post Syndicated from original https://lwn.net/Articles/908268/

The traditional mechanism for launching a program in a new process on Unix
systems—forking and execing—has been with us for decades, but it is not
really the most efficient of operations. Various alternatives have been
tried along the way but have not supplanted the traditional approach. A new
mechanism created by Josh Triplett adds process creation
to the io_uring asynchronous I/O API and
shows great promise; he came to the 2022
Linux Plumbers Conference
(LPC) to introduce io_uring_spawn.

Detect and process sensitive data using AWS Glue Studio

Post Syndicated from Leonardo Gomez original https://aws.amazon.com/blogs/big-data/detect-and-process-sensitive-data-using-aws-glue-studio/

Data lakes offer the possibility of sharing diverse types of data with different teams and roles to cover numerous use cases. This is very important in order to implement a data democratization strategy and incentivize the collaboration between lines of business. When a data lake is being designed, one of the most important aspects to consider is data privacy. Without it, sensitive information could be accessed by the wrong team, which may affect the reliability of a data platform. However, identifying sensitive data inside a data lake could represent a challenge due to the diversity of the data and also its volume.

Earlier this year, AWS Glue announced the new sensitive data detection and processing feature to help you identify and protect sensitive information in a straightforward way using AWS Glue Studio. This feature uses pattern matching and machine learning to automatically recognize personally identifiable information (PII) and other sensitive data at the column or cell level as part of AWS Glue jobs.

Sensitive data detection in AWS Glue identifies a variety of sensitive data like phone and credit card numbers, and also offers the option to create custom identification patterns or entities to cover your specific use cases. Additionally, it helps you take action, such as creating a new column that contains any sensitive data detected as part of a row or redacting the sensitive information before writing records into a data lake.

This post shows how to create an AWS Glue job that identifies sensitive data at the row level. We also show how create a custom identification pattern to identify case-specific entities.

Overview of solution

To demonstrate how to create an AWS Glue job to identify sensitive data, we use a test dataset with customer comments that contain private data like Social Security number (SSN), phone number, and bank account number. The goal is to create a job that automatically identifies the sensitive data and triggers an action to redact it.

Prerequisites

For this walkthrough, you should have the following prerequisites:

If the AWS account you use to follow this post uses AWS Lake Formation to manage permissions on the AWS Glue Data Catalog, make sure that you log in as a user with access to create databases and tables. For more information, refer to Implicit Lake Formation permissions.

Launch your CloudFormation stack

To create your resources for this use case, complete the following steps:

  1. Launch your CloudFormation stack in us-east-1:
  2. Under Parameters, enter a name for your S3 bucket (include your account number).
  3. Select I acknowledge that AWS CloudFormation might create IAM resources with custom names.
  4. Choose Create stack.
  5. Wait until the creation of the stack is complete, as shown on the AWS CloudFormation console.

Launching this stack creates AWS resources. You need the following resources from the Outputs tab for the next steps:

  • GlueSenRole – The IAM role to run AWS Glue jobs
  • BucketName – The name of the S3 bucket to store solution-related files
  • GlueDatabase – The AWS Glue database to store the table related to this post

Create and run an AWS Glue job

Let’s first create the dataset that is going to be used as the source of the AWS Glue job:

  1. Open AWS CloudShell.
  2. Run the following command:
    aws s3 cp s3://aws-bigdata-blog/artifacts/gluesendata/sourcedata/customer_comments.csv s3://glue-sendata-blog-<YOUR ACCOUNT NUMBER>/customer_comments/customer_comments.csv


    This action copies the dataset that is going to be used as the input for the AWS Glue job covered in this post.

    Now, let’s create the AWS Glue job.

  1. On the AWS Glue Studio console, choose Jobs in the navigation pane.
  2. Select Visual with blank canvas.
  3. Choose the Job Details tab to configure the job.
  4. For Name, enter GlueSenJob.
  5. For IAM Role, choose the role GlueSenDataBlogRole.
  6. For Glue version, choose Glue 3.0.
  7. For Job bookmark, choose Disable.

  8. Choose Save.
  9. After the job is saved, choose the Visual tab and on the Source menu, choose Amazon S3.
  10. On the Data source properties -S3 tab, for S3 source type, select S3 location.
  11. Add the S3 location of the file that you copied previously using CloudShell.
  12. Choose Infer schema.

This last action infers the schema and file type of the of the source for this post, as you can see in the following screenshot.

Now, let’s see what the data looks like.

  1. On the Data preview tab, choose Start data preview session.
  2. For IAM role, choose the role GlueSeDataBlogRole.
  3. Choose Confirm.

This last step may take a couple of minutes to run.

When you review the data, you can see that sensitive data like phone numbers, email addresses, and SSNs are part of the customer comments.

Now let’s identify the sensitive data in the comments dataset and mask it.

  1. On the Transform menu, choose Detect PII.

The AWS Glue sensitive data identification feature allows you to find sensitive data at the row and column level, which covers a diverse number of use cases. For this post, because we scan comments made by customers, we use the row-level scan.

  1. On the Transform tab, select Find sensitive data in each row.
  2. For Types of sensitive information to detect, select Select specific patterns.

Now we need to select the entities or patterns that are going to be identified by the job.

  1. For Selected patterns, choose Browse.
  2. Select the following patterns:
    1. Credit Card
    2. Email Address
    3. IP Address
    4. Mac Address
    5. Person’s Name
    6. Social Security Number (SSN)
    7. US Passport
    8. US Phone
    9. US/Canada bank account
  3. Choose Confirm.

After the sensitive data is identified, AWS Glue offers two options:

  • Enrich data with detection results – Adds a new column to the dataset with the list of the entities or patterns that were identified in that specific row.
  • Redact detected text – Replaces the sensitive data with a custom string. For this post, we use the redaction option.
  1. For Actions, select Redact detected text.
  2. For Replacement text, enter ####.

Let’s see how the dataset looks now.

  1. Check the result data on the Data preview tab.

As you can see, the majority of the sensitive data was redacted, but there is a number on row 11 that isn’t masked. This is because it’s a Canadian permanent resident number, and this pattern isn’t part of the ones that the sensitive data identification feature offers. However, we can add a custom pattern to identify this number.

  1. On the Transform tab, for Selected patterns, choose Create new.

This action opens the Create detection pattern window, where we create the custom pattern to identify the Canadian permanent resident number.

  1. For Pattern name, enter Can_PR_Number.
  2. For Expression, enter the regular expression [P]+[D]+[0]\d\d\d\d\d\d
  3. Choose Validate.
  4. Wait until you get the validation message, then choose Create pattern.

Now you can see the new pattern listed under Custom patterns.

  1. On the AWS Glue Studio Console, for Selected patterns, choose Browse.

Now you can see Can_PR_Number as part of the pattern list.

  1. Select Can_PR_Number and choose Confirm.

On the Data preview tab, you can see that the Canadian permanent resident number has been redacted.

Let’s add a destination for the dataset with redacted information.

  1. On the Target menu, choose Amazon S3.
  2. On the Data target properties -S3 tab, for Format, choose Parquet.
  3. For S3 Target Location, enter s3://glue-sendata-blog-<YOUR ACCOUNT ID>/output/redacted_comments/.
  4. For Data Catalog update options, select Create a table in the Data Catalog and on subsequent runs, update the schema and add new partitions.
  5. For Database, choose gluesenblog.
  6. For Table name, enter custcomredacted.
  7. Choose Save, then choose Run.

You can view the job run details on the Runs tab.

Wait until the job is complete.

Query the dataset

Now let’s see what the final dataset looks like. To do so, we query the data with Athena. As part of this post, we assume that a query result location for Athena is already configured; if not, refer to Working with query results, recent queries, and output files.

  1. On the Athena console, open the query editor.
  2. For Database, choose the gluesenblog database.
  3. Run the following query:
    SELECT * FROM "gluesenblog"."custcomredacted" limit 15;

  1. Verify the results; you can observe that all the sensitive data is redacted.

Clean up

To avoid incurring future charges, and to clean up unused roles and policies, delete the resources you created: Datasets, CloudFormation stack, S3 bucket, AWS Glue job, AWS Glue database, and AWS Glue table.

Conclusion

AWS Glue sensitive data detection offers an easy way to identify and process private data, without coding. This feature allows you to detect and redact sensitive data when it’s ingested into a data lake, enforcing data privacy before the data is available to data consumers. AWS Glue sensitive data detection is generally available in all Regions that support AWS Glue.

To learn more and get started using AWS Glue sensitive data detection, refer to Detect and process sensitive data.


About the author

Leonardo Gómez is a Senior Analytics Specialist Solutions Architect at AWS. Based in Toronto, Canada, he has over a decade of experience in data management, helping customers around the globe address their business and technical needs. Connect with him on LinkedIn

Deploy your Amazon EKS Clusters Locally on AWS Outposts

Post Syndicated from Sébastien Stormacq original https://aws.amazon.com/blogs/aws/deploy-your-amazon-eks-clusters-locally-on-aws-outposts/

I am pleased to announce the availability of local clusters for Amazon Elastic Kubernetes Service (Amazon EKS) on AWS Outposts. It means that starting today, you can deploy your Amazon EKS cluster entirely on Outposts: both the Kubernetes control plane and the nodes.

Amazon EKS is a managed Kubernetes service that makes it easy for you to run Kubernetes on AWS and on premises. AWS Outposts is a family of fully managed solutions delivering AWS infrastructure and services to virtually any on-premises or edge location for a truly consistent hybrid experience.

To fully understand the benefits of local clusters for Amazon EKS on Outposts, I need to first share a bit of background.

Some customers use Outposts to deploy Kubernetes cluster nodes and pods close to the rest of their on-premises infrastructure. This allows their applications to benefit from low latency access to on-premises services and data while managing the cluster and the lifecycle of the nodes using the same AWS API, CLI, or AWS console as they do for their cloud-based clusters.

Until today, when you deployed Kubernetes applications on Outposts, you typically started by creating an Amazon EKS cluster in the AWS cloud. Then you deployed the cluster nodes on your Outposts machines. In this hybrid cluster scenario, the Kubernetes control plane runs in the parent Region of your Outposts, and the nodes are running on your on-premises Outposts. The Amazon EKS service communicates through the network with the nodes running on the Outposts machine.

But, remember: everything fails all the time. Customers told us the main challenge they have in this scenario is to manage site disconnections. This is something we cannot control, especially when you deploy Outposts on rough edges: areas with poor or intermittent network connections. When the on-premises facility is temporarily disconnected from the internet, the Amazon EKS control plane running in the cloud is unable to communicate with the nodes and the pods. Although the nodes and pods work perfectly and continue to serve the application on the on-premises local network, Kubernetes may consider them unhealthy and schedule them for replacement when the connection is reestablished (see pod eviction in Kubernetes documentation). This may lead to application downtimes when connectivity is restored.

I talked with Chris, our Kubernetes Product Manager and expert, while preparing this blog post. He told me there are at least seven distinct options to configure how a control plane reconnects to its nodes. Unless you master all these options, the system status at re-connection is unpredictable.

To simplify this, we are giving you the ability to host your entire Amazon EKS cluster on Outposts. In this configuration, both the Kubernetes control plane and your worker nodes run locally on premises on your Outposts machine. That way, your cluster continues to operate even in the event of a temporary drop in your service link connection. You can perform cluster operations such as creating, updating, and scaling applications during network disconnects to the cloud.

EKS Local Cluster DiagramLocal clusters are identical to Amazon EKS in the cloud and automatically deploy the latest security patches to make it easy for you to maintain an up-to-date, secure cluster. You can use the same tooling you use with Amazon EKS in the cloud and the AWS Management Console for a single interface for your clusters running on Outposts and in AWS Cloud.

Let’s See It In Action
Let’s see how we can use this new capability. For this demo, I will deploy the Kubernetes control plane on Amazon Elastic Compute Cloud (Amazon EC2) instances running on premises on an Outposts rack.

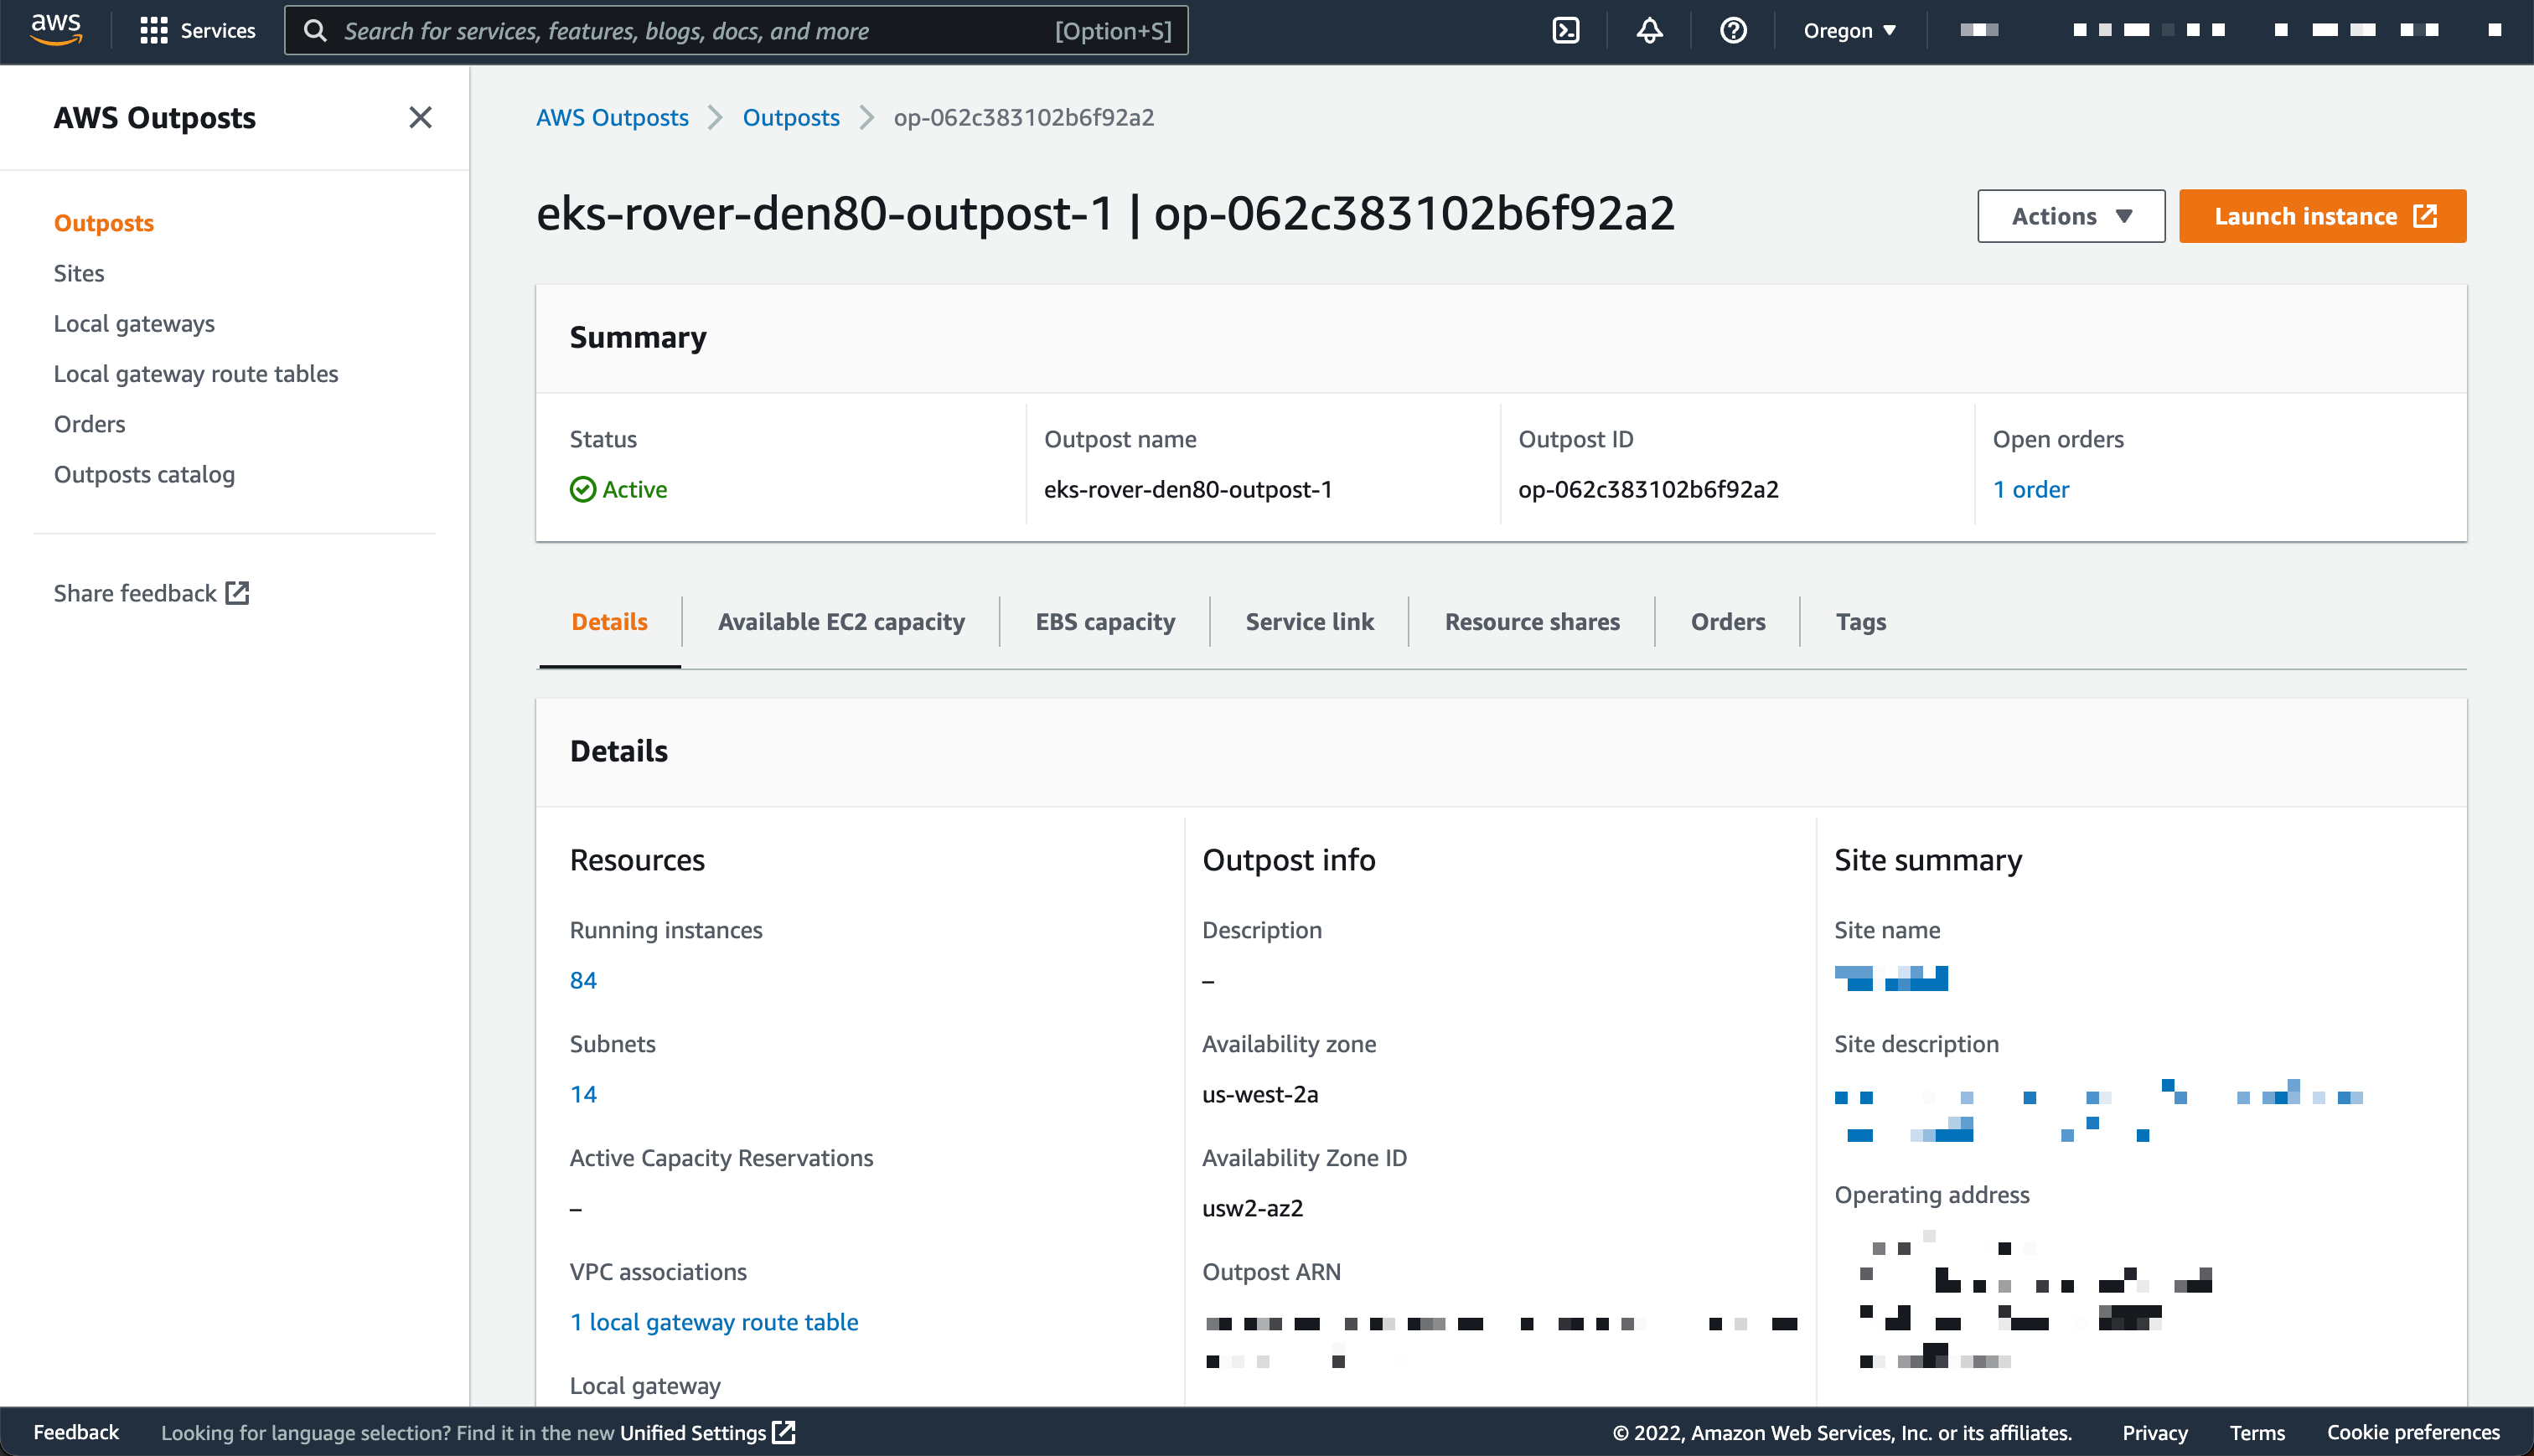
I use an Outposts rack already configured. If you want to learn how to get started with Outposts, you can read the steps on the Get Started with AWS Outposts page.

AWS Outposts Configuration

This demo has two parts. First, I create the cluster. Second, I connect to the cluster and create nodes.

Creating Cluster
Before deploying the Amazon EKS local cluster on Outposts, I make sure I created an IAM cluster role and attached the AmazonEKSLocalOutpostClusterPolicy managed policy. This IAM cluster role will be used in cluster creation.

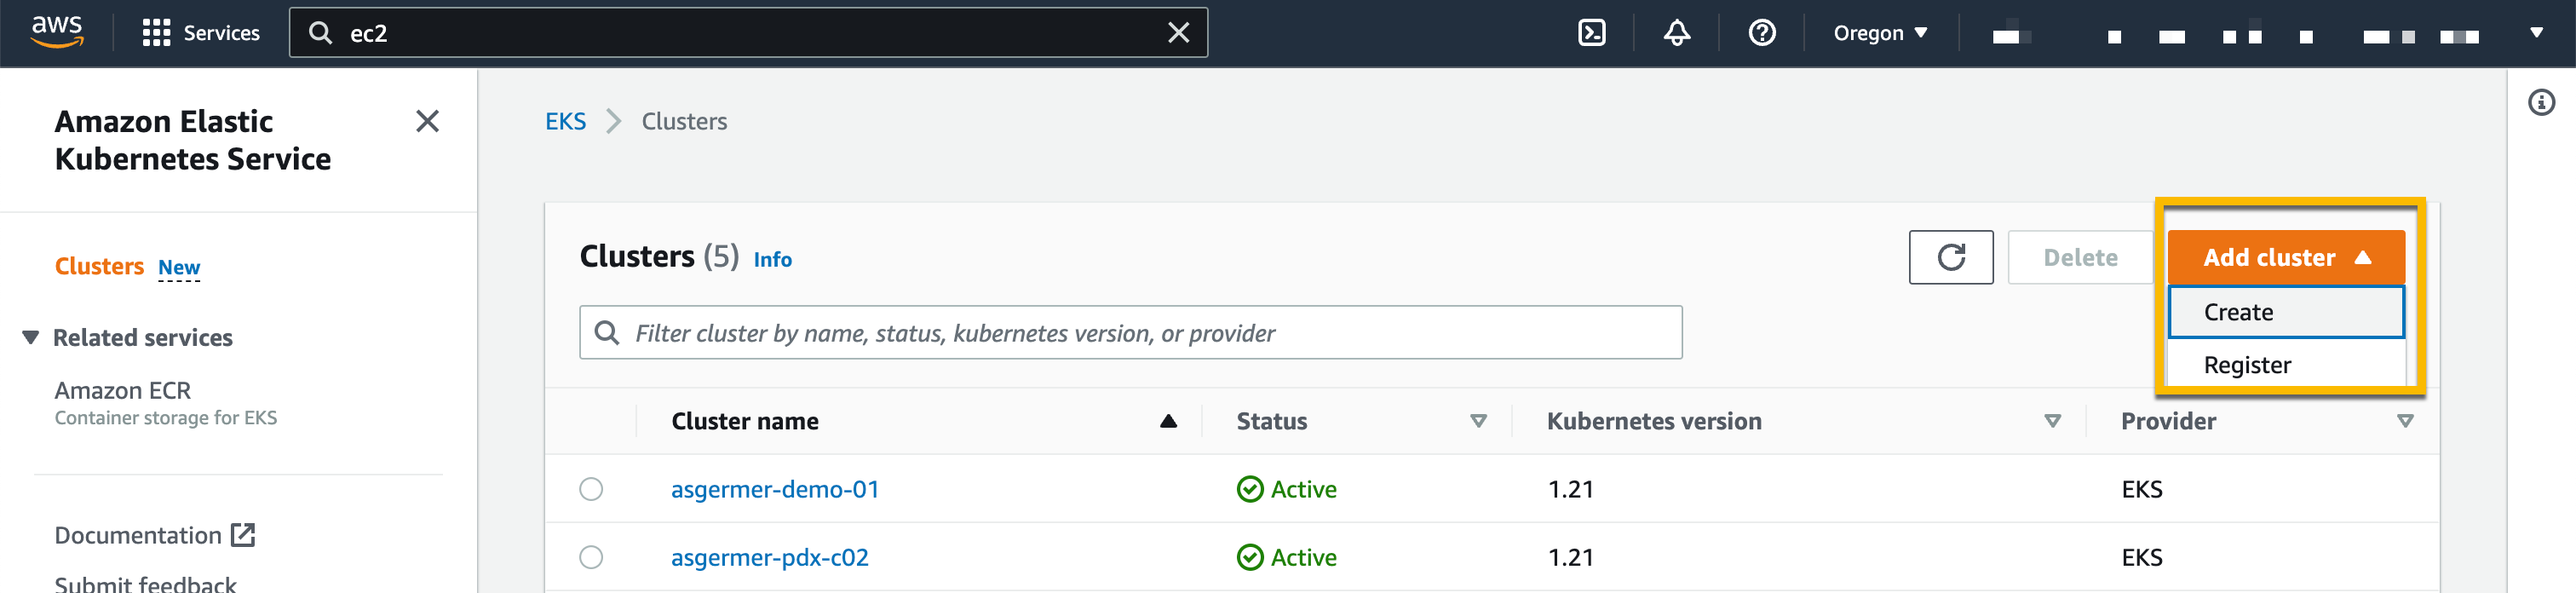
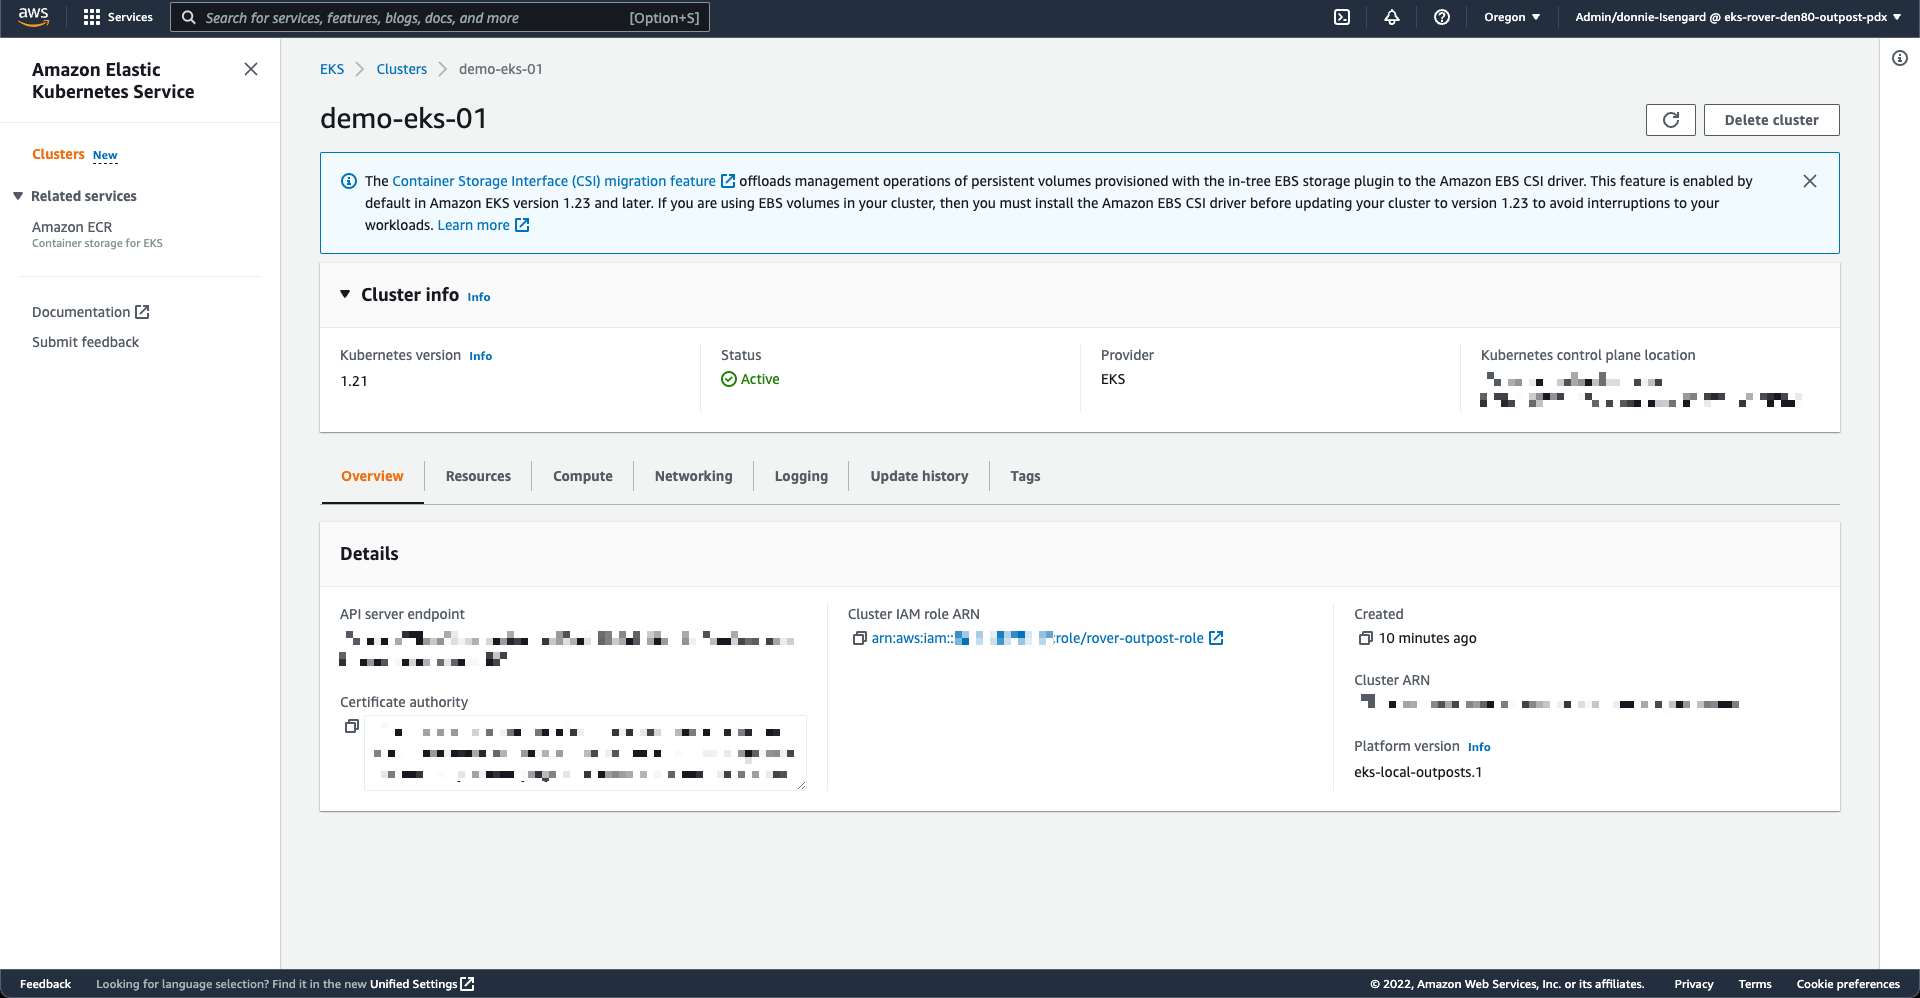
Then, I switch to the Amazon EKS dashboard, and I select Add Cluster, then Create.

Creating Cluster

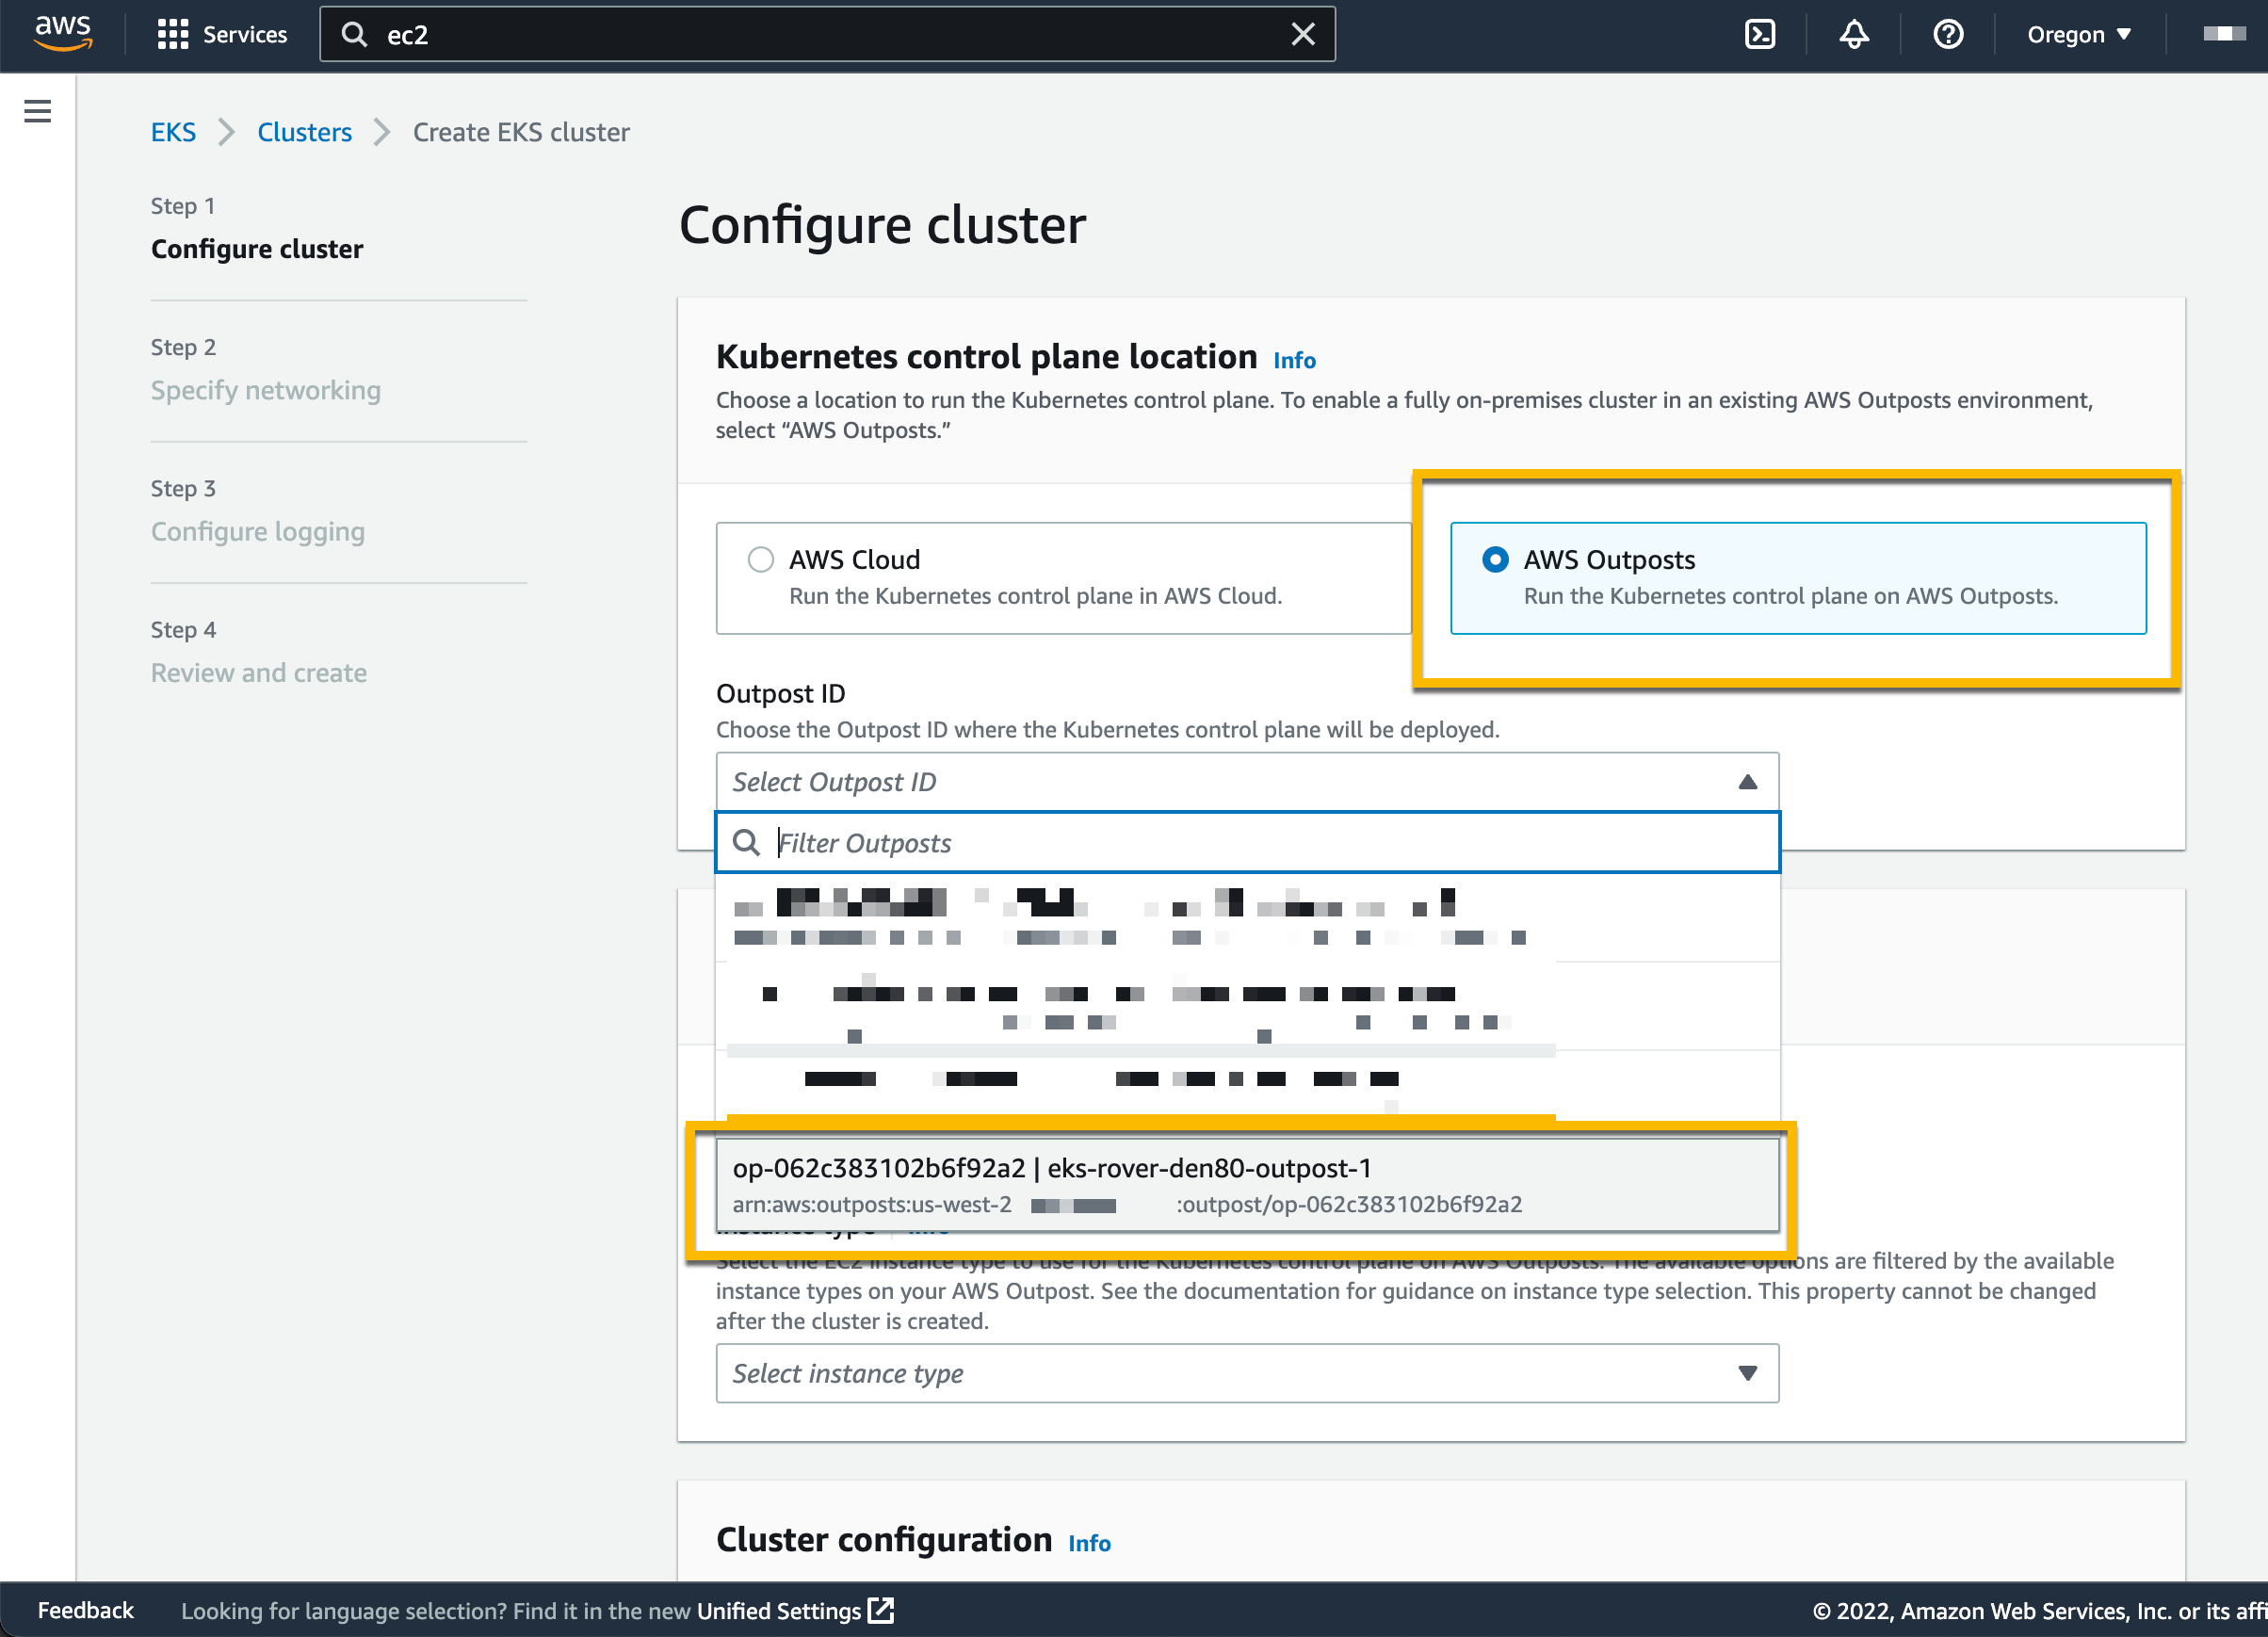
On the following page, I chose the location of the Kubernetes control plane: the AWS Cloud or AWS Outposts. I select AWS Outposts and specify the Outposts ID.

Configure EKS Cluster to Use AWS Outposts

The Kubernetes control plane on Outposts is deployed on three EC2 instances for high availability. That’s why I see three Replicas. Then, I choose the instance type according to the number of worker nodes needed for workloads. For example, to handle 0–20 worker nodes, it is recommended to use m5d.large EC2 instances.

Setting Instance Type

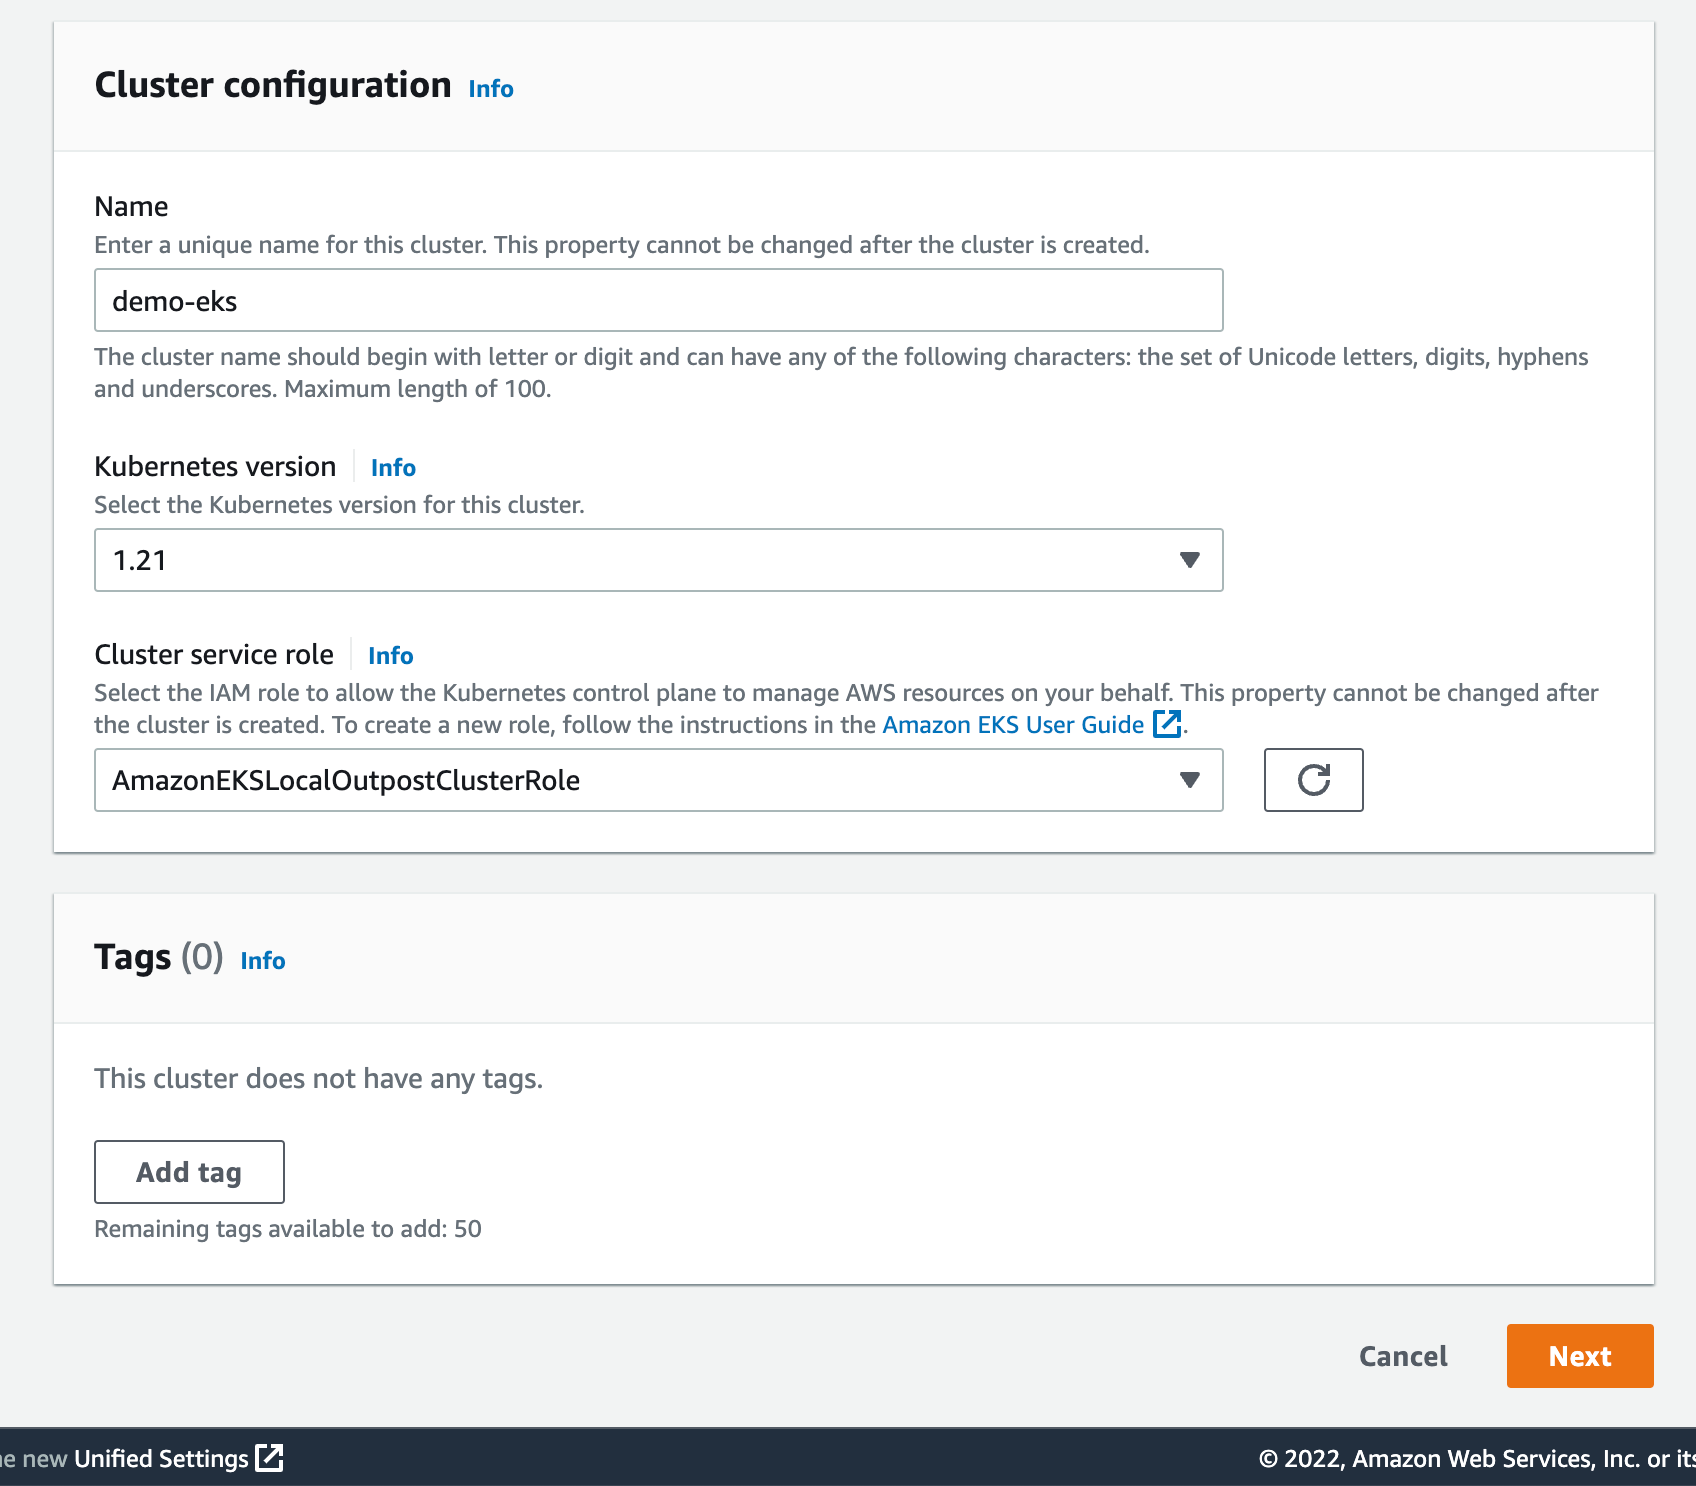
On the same page, I specify configuration values for the Kubernetes cluster, such as its Name, Kubernetes version, and the Cluster service role that I created earlier.

Cluster Configuration

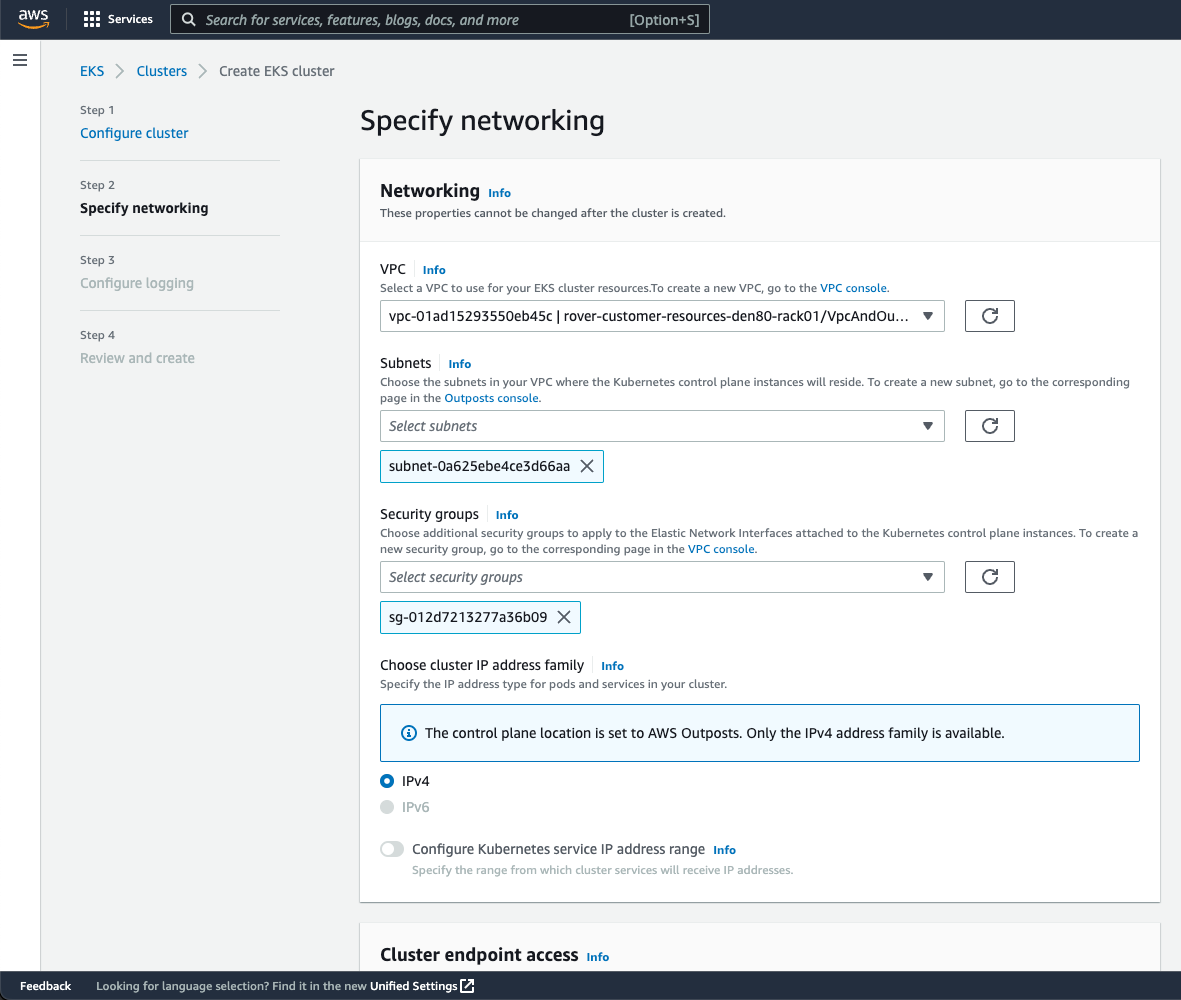
On the next page, I configure the networking options. Since Outposts is an extension of an AWS Region, I need to use the VPC and Subnets used by Outposts to enable communication between Kubernetes control plane and worker nodes. For Security Groups, Amazon EKS creates a security group for local clusters that enables communication between my cluster and my VPC. I can also define additional security groups according to my application requirements.

Specify Networking

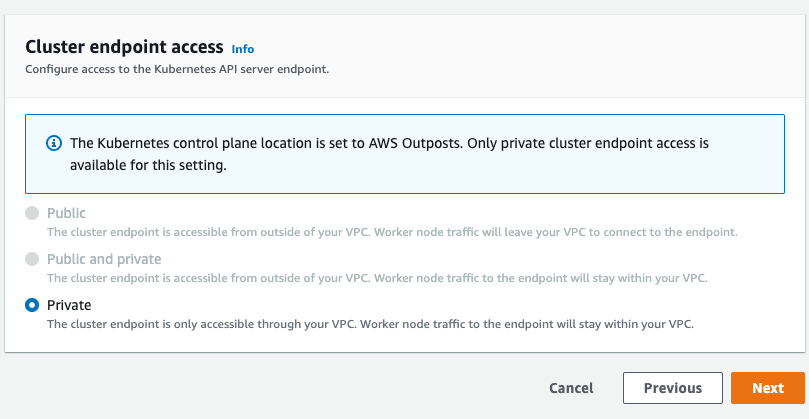
As we run the Kubernetes control plane inside Outposts, the Cluster endpoint access can only be accessed privately. This means I can only access the Kubernetes cluster through machines that are deployed in the same VPC or over the local network via the Outposts local gateway with Direct VPC Routing.

Private Cluster Endoint Access
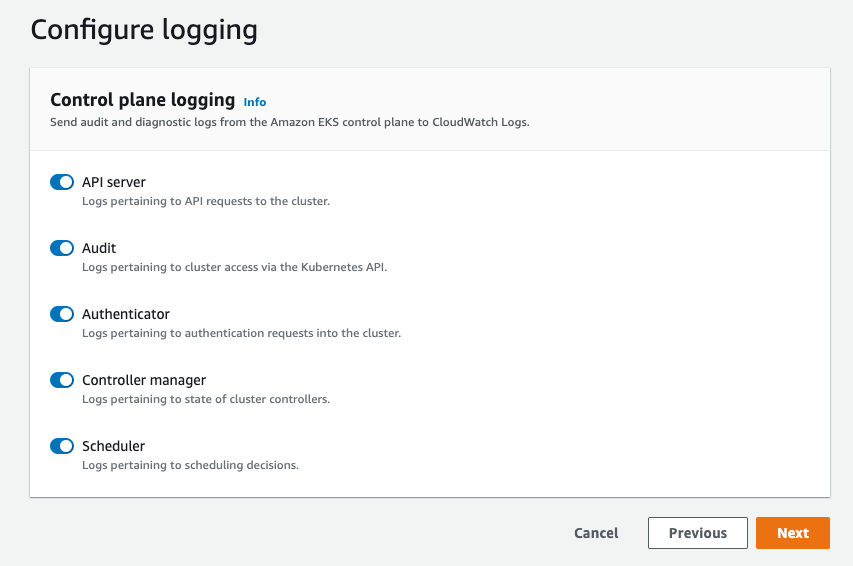
On the next page, I define logging. Logging is disabled by default, and I may enable it as needed. For more details about logging, you can read the Amazon EKS control plane logging documentation.

Configure Logging

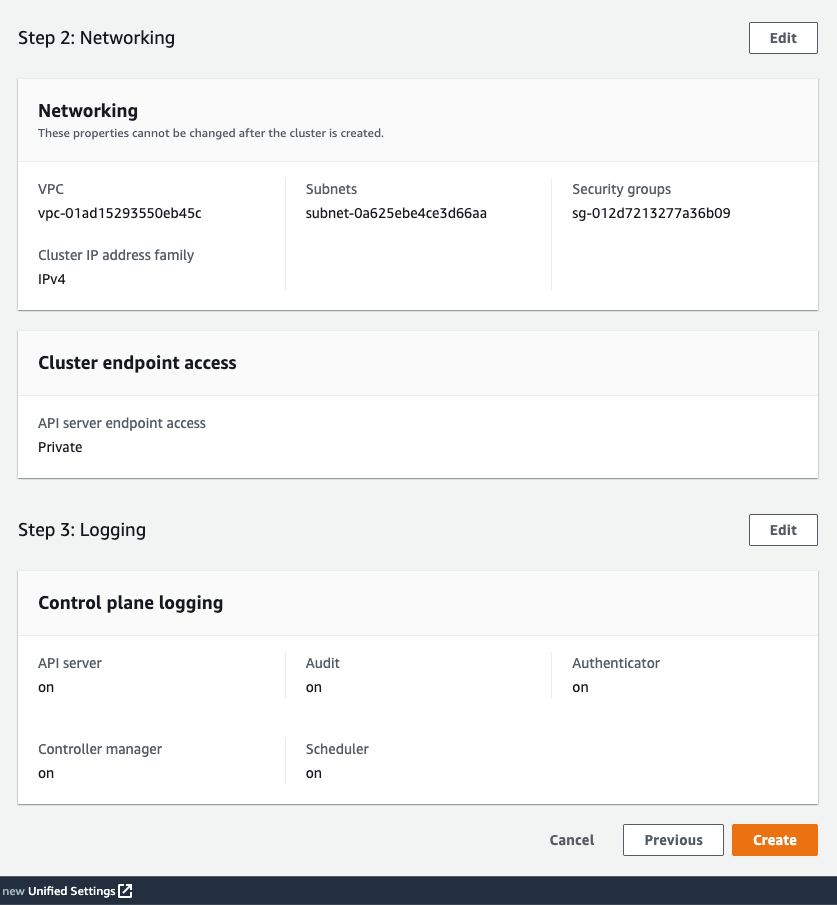
The last screen allows me to review all configuration options. When I’m satisfied with the configuration, I select Create to create the cluster.

Networking

The cluster creation takes a few minutes. To check the cluster creation status, I can use the console or the terminal with the following command:

$ aws eks describe-cluster \ 
--region <REGION_CODE> \ 
--name <CLUSTER_NAME> \ 
--query "cluster.status"

The Status section tells me when the cluster is created and active.

Active Cluster

In addition to using the AWS Management Console, I can also create a local cluster using the AWS CLI. Here is the command snippet to create a local cluster with the AWS CLI:

$ aws eks create-cluster \ 
--region <REGION_CODE> \ 
--name <CLUSTER_NAME> \ 
--resources-vpc-config subnetIds=<SUBNET_ID>\ 
--role-arn <ARN_CLUSTER_ROLE> \ 
--outpost-config controlPlaneInstanceType=<INSTANCE_TYPE> \ 
--outpostArns=<ARN_OUTPOST>

Connecting to the Cluster
The endpoint access for a local cluster is private; therefore, I can access it from a local gateway with Direct VPC Routing or from machines that are in the same VPC. To find out how to use local gateways with Outposts, you can follow the information on the Working with local gateways page. For this demo, I use an EC2 instance as a bastion host, and I manage the Kubernetes cluster using kubectl command.

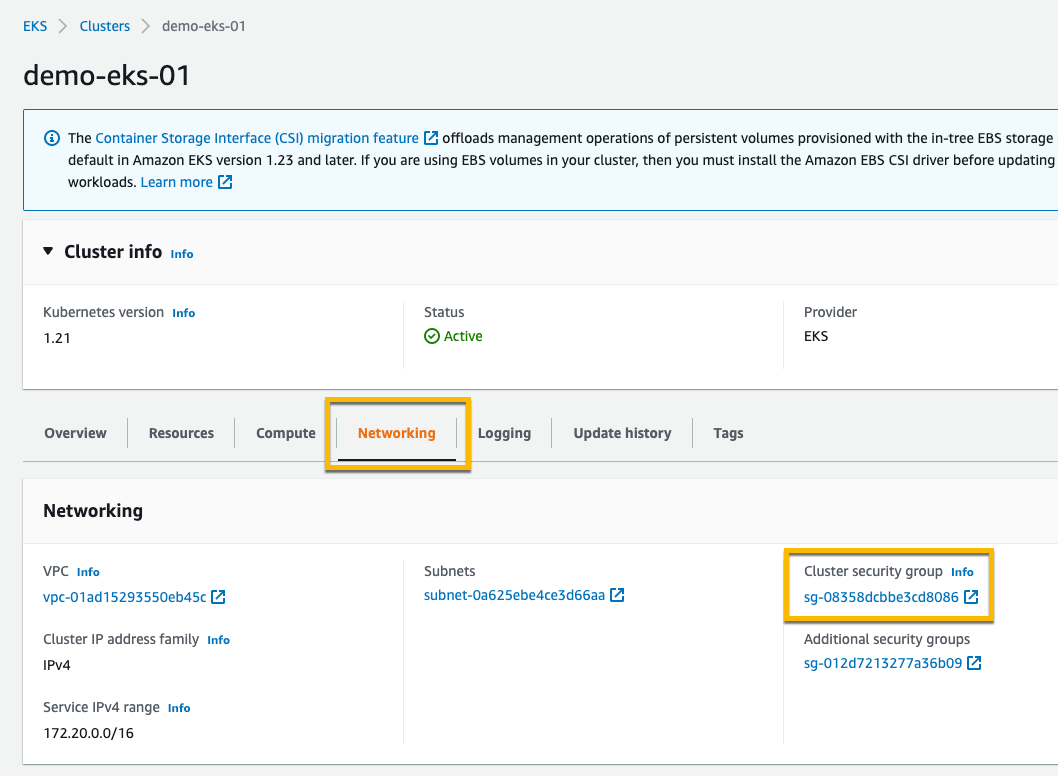
The first thing I do is edit Security Groups to open traffic access from the bastion host. I go to the detail page of the Kubernetes cluster and select the Networking tab. Then I select the link in Cluster security group.

Networking & Security Group

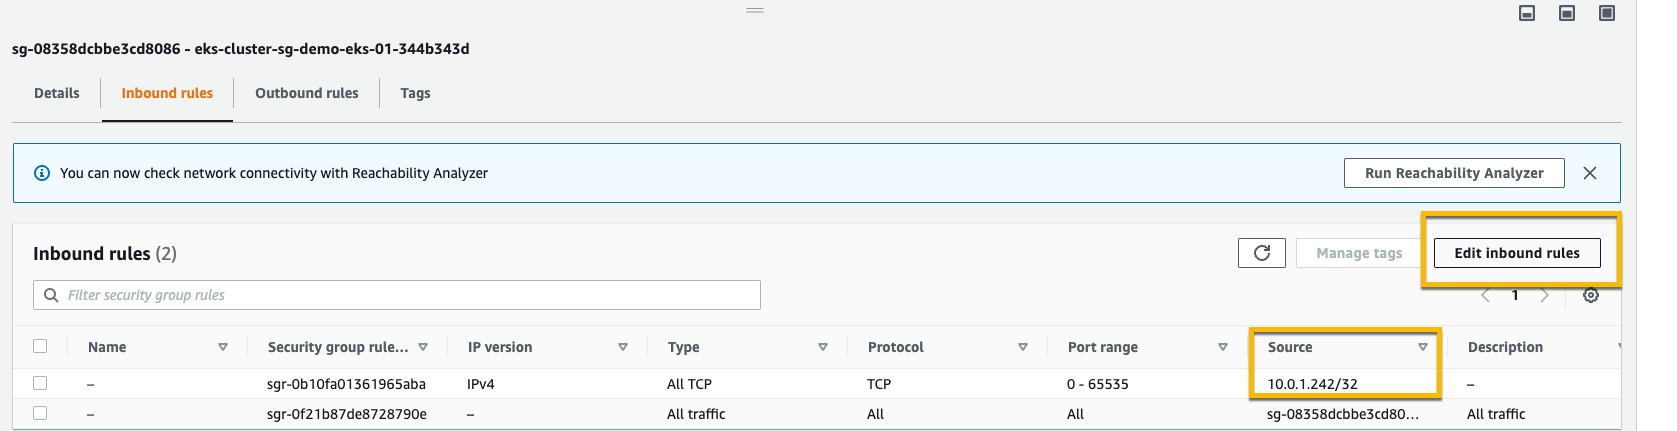
Then, I add inbound rules, and I provide access for the bastion host by specifying its IP address.

Adding Inbound Rule in Security Group

Once I’ve allowed the access, I create kubeconfig in the bastion host by running the command:

$ aws eks update-kubeconfig --region <REGION_CODE> --name <CLUSTER_NAME>

Finally, I use kubectl to interact with the Kubernetes API server, just like usual.

$ kubectl get nodes -o wide
NAME STATUS ROLES AGE VERSION INTERNAL-IP EXTERNAL-IP OS-IMAGE KERNEL-VERSION CONTAINER-RUNTIME
ip-10-X-Y-Z.us-west-2.compute.internal NotReady control-plane,master 10h v1.21.13 10.X.Y.Z <none> Bottlerocket OS 1.8.0 (aws-k8s-1.21) 5.10.118 containerd://1.6.6+bottlerocket
ip-10-X-Y-Z.us-west-2.compute.internal NotReady control-plane,master 9h v1.21.13 10.X.Y.Z <none> Bottlerocket OS 1.8.0 (aws-k8s-1.21) 5.10.118 containerd://1.6.6+bottlerocket

Kubernetes local clusters running on AWS Outposts run on three EC2 instances. We see on the output above that the status of three worker nodes is NotReady. This is because they are used by the control plane exclusively, and we cannot use them to schedule pods.

From this stage, you can deploy self-managed node groups using the Amazon EKS local cluster.

Pricing and Availability
Amazon EKS local clusters are charged at the same price as traditional EKS clusters. It starts at $0.10/hour. The EC2 instances required to deploy the Kubernetes control plane and nodes on Outposts are included in the price of the Outposts. As usual, the pricing page has the details.

Amazon EKS local clusters are available in all AWS Regions where Outposts is available.

Go build and create your first EKS local cluster today!

— seb and Donnie.

Announcing: Backblaze Computer Backup v8.5

Post Syndicated from original https://www.backblaze.com/blog/announcing-backblaze-computer-backup-v8-5/

Announcing Backblaze Computer Backup 8.5! Our latest release builds on version 8.0’s speed boosts and brings with it not only a redesigned application for Mac and PC, but an improvement to our Safety Freeze feature, which prevents your backups from becoming corrupted. Here’s a brief overview of what’s new for this release:

macOS and Windows:

  • Safety Freeze enhancements: improved efficiency and reduced false-positives.
  • Visual refresh: We’ve completely refreshed both of our client apps.
  • Minor text, bug, and performance improvements: We’ve cleaned up some of the language to make things easier to understand and have tightened up some of the code.

macOS:

  • SwiftUI redesign: the macOS app has been completely redesigned from the ground up using SwiftUI.

In More Detail

Safety Freeze Enhancements

Our Safety Freeze feature is designed to protect your backups and prevent them from being corrupted if something goes wrong on your computer. Over the years we’ve updated the feature based on feedback and tried to make it more transparent to the end user. With the updates in version 8.5, we’ve added a self-healing component which attempts to fix some of the false positives that caused an erroneous Safety Freeze to occur, especially when a user is moving from one computer to another.

Visual Refresh

With the Swift redesign on macOS, we felt now would be the perfect time to also change some of the visuals in our apps. We’ve updated both of our client apps to make them better looking, simpler to use, less cluttered, and easier to understand.

SwiftUI Redesign

In preparation for macOS Ventura, we’ve rewritten the macOS app in SwiftUI. There’s nothing but good news here. This refresh helps future-proof our macOS app and also keeps the same system efficiency you know and love from Backblaze-built applications.

General Performance Improvements

Everyone’s favorite: “general bug fixes and performance improvements.” We’ve also updated and simplified a lot of our client text to go along with the visual refresh and deliver a better, easier-to-understand overall app.

Backblaze v8.5 Is Available Today: September 15, 2022

We hope you love this new release! We will be slowly auto-updating all users in the coming weeks, but if you can’t wait and want to update now on your Mac or PC:

  1. Right click on the Backblaze icon in your menu or taskbar.
  2. Select Check for Updates.
  3. Download v8.5 from the Backblaze Updates page.

Also, this version is now the default download on www.backblaze.com. Please reach out to support if you have any questions or if you want to give feedback—we always like to know how things are going.

The post Announcing: Backblaze Computer Backup v8.5 appeared first on Backblaze Blog | Cloud Storage & Cloud Backup.

CVE-2022-36804: Easily Exploitable Vulnerability in Atlassian Bitbucket Server and Data Center

Post Syndicated from Ron Bowes original https://blog.rapid7.com/2022/09/20/cve-2022-36804-easily-exploitable-vulnerability-in-atlassian-bitbucket-server-and-data-center/

CVE-2022-36804: Easily Exploitable Vulnerability in Atlassian Bitbucket Server and Data Center

On August 24, 2022, Atlassian published an advisory for Bitbucket Server and Data Center alerting users to CVE-2022-36804. The advisory reveals a command injection vulnerability in multiple API endpoints, which allows an attacker with access to a public repository or with read permissions to a private Bitbucket repository to execute arbitrary code by sending a malicious HTTP request. CVE-2022-36804 carries a CVSSv3 score of 9.8 and is easily exploitable. Rapid7’s vulnerability research team has a full technical analysis in AttackerKB, including how to use CVE-2022-36804 to create a simple reverse shell.

According to Shodan, there are about 1,400 internet-facing servers, but it’s not immediately obvious how many have a public repository. There are no public reports of exploitation in the wild as of September 20, 2022, but there has been strong interest in the vulnerability from researchers and exploit brokers, and there are now multiple public exploits available. Because the vulnerability is trivially exploitable and the patch is relatively simple to reverse- engineer, it’s likely that targeted exploitation has already occurred in the wild. We expect to see larger-scale exploitation of CVE-2022-36804 soon.

Affected products:
Bitbucket Server and Data Center 7.6 prior to 7.6.17
Bitbucket Server and Data Center 7.17 prior to 7.17.10
Bitbucket Server and Data Center 7.21 prior to 7.21.4
Bitbucket Server and Data Center 8.0 prior to 8.0.3
Bitbucket Server and Data Center 8.1 prior to 8.1.3
Bitbucket Server and Data Center 8.2 prior to 8.2.2
Bitbucket Server and Data Center 8.3 prior to 8.3.1

Mitigation guidance

Organizations that use Bitbucket Server and Data Center in their environments should patch as quickly as possible using Atlassian’s guide, without waiting for a regular patch cycle to occur. Blocking network access to Bitbucket may also function as a temporary stop-gap solution, but this should not be a substitute for patching.

Rapid7 customers

Our engineering team is in the process of developing a vulnerability check for CVE-2022-36804. We will update this blog with further information as it becomes available.

NEVER MISS A BLOG

Get the latest stories, expertise, and news about security today.

Additional reading:

Cloudflare Area 1 – how the best Email Security keeps getting better

Post Syndicated from Joao Sousa Botto original https://blog.cloudflare.com/email-security/

Cloudflare Area 1 - how the best Email Security keeps getting better

Cloudflare Area 1 - how the best Email Security keeps getting better

On February 23, 2022, after being a customer for two years and seeing phishing attacks virtually disappear from our employee’s mailboxes, Cloudflare announced the acquisition of Area 1 Security.

Thanks to its unique technology (more on that below) Cloudflare Area 1 can proactively identify and protect against phishing campaigns before they happen, and potentially prevent the 90%+ of all cyberattacks that Deloitte research identified as starting with an email. All with little to no impact on employee productivity.

But preventing 90% of the attacks is not enough, and that’s why Cloudflare Area 1 email security is part of our Zero Trust platform. Here’s what’s new.

Email Security on your Cloudflare Dashboard

Starting today you will find a dedicated Email Security section on your Cloudflare dashboard. That’s the easiest way for any Cloudflare customer to get familiar with and start using Cloudflare Area 1 Email Security.

From there you can easily request a trial, which gives you access to the full product for 30 days.

Our team will guide you through the setup, which will take just a few minutes. That’s the beauty of not having to install and tune a Secure Email Gateway (SEG). You can simply configure Area 1 inline or connect through the API, journaling, or other connectors – none of these options disrupt mail flow or the end user experience. And you don’t need any new hardware, appliances or agents.

Once the trial starts, you’ll be able to review detection metrics and forensics in real time, and will receive real-time updates from the Area 1 team on incidents that require immediate attention.

At the end of the trial you will also have a Phishing Risk Assessment where our team will walk you through the impact of the mitigated attacks and answer your questions.

Cloudflare Area 1 - how the best Email Security keeps getting better

Another option you’ll see on the Email Security section of the Cloudflare Dashboard is to explore the Area 1 demo.

At the click of a button you’ll enter the Area 1 portal of a fictitious company where you can see the product in action. You can interact with the full product, including our advanced message classifiers, the BEC protections, real time view of spoofed domains, and our unique message search and trace capabilities.

Cloudflare Area 1 - how the best Email Security keeps getting better

Product Expansions

Being cloud-native has allowed us to develop some unique capabilities. Most notably, we scan the Internet for attacker infrastructure, sources and delivery mechanisms to stop phishing attacks days before they hit an inbox. These are state of the art machine-learning models using the threat intelligence data that Area 1 has accumulated since it was founded nine years ago, and now they also incorporate data from the 124 billion cyber threats that Cloudflare blocks each day and its 1.7 trillion daily DNS queries.

Since the product is cloud-based and no local appliances are involved, these unique datasets and models benefit every customer immediately and apply to the full range of email attack types (URLs, payloads, BEC), vectors (email, web, network), and attack channels (external, internal, trusted partners). Additionally, the threat datasets, observables and Indicators of Compromise (IOC) are now additional signals to Cloudflare Gateway (part of Zero Trust), extending protection beyond email and giving Cloudflare customers the industry’s utmost protection against converged or blended threats.

The expertise Area 1 gained through this relentless focus on Threat Research and Threat Operations (i.e., disrupting actors once identified) is also leading to a new large scale initiative to make every Cloudflare customer, and the broader Internet, safer – Cloudforce One.

The Cloudforce One team is composed of analysts assigned to five subteams: Malware Analysis, Threat Analysis, Active Mitigation and Countermeasures, Intelligence Analysis, and Intelligence Sharing. Collectively, they have tracked many of the most sophisticated cyber criminals on the Internet while at the National Security Agency (NSA), USCYBERCOM, and Area 1 Security, and have worked closely with similar organizations and governments to disrupt these threat actors. They’ve also been prolific in publishing “finished intel” reports on security topics of significant geopolitical importance, such as targeted attacks against governments, technology companies, the energy sector, and law firms, and have regularly briefed top organizations around the world on their efforts.

The team will help protect all Cloudflare customers by working closely with our existing product, engineering, and security teams to improve our products based on tactics, techniques, and procedures (TTPs) observed in the wild. Customers will get better protection without having to take any action.

Additionally, customers can purchase a subscription to Cloudforce One (now generally available), and get access to threat data and briefings, dedicated security tools, and the ability to make requests for information (RFIs) to the team’s threat operations staff. RFIs can be on any security topic of interest, and will be analyzed and responded to in a timely manner. For example, the Cloudforce One Malware Analysis team can accept uploads of possible malware and provide a technical analysis of the submitted resource.

Lastly, SPF/DKIM/DMARC policies are another tool that can be used to prevent Email Spoofing and have always been a critical part of Area 1’s threat models. Cloudflare Area 1 customers receive weekly DMARC sender reports to understand the efficacy of their configuration, but customers have also asked for help in setting up SPF/DKIM/DMARC records for their own domains.

It was only logical to make Cloudflare’s Email Security DNS Wizard part of our Email Security stack to guide customers through their initial SPF, DKIM and DMARC configuration. The wizard is now available to all customers using Cloudflare DNS, and will soon be available to Cloudflare Area 1 customers using a third party DNS. Getting SPF/DKIM/DMARC right can be complex, but it is a necessary and vital part of making the Internet safer, and this solution will help you build a solid foundation.

You’ll be hearing from us very soon regarding more expansions to the Area 1 feature set. In the meantime, if you want to experience Area 1 first-hand sign up for a Phishing Risk Assessment here or explore the interactive demo through the Email section of your Cloudflare Dashboard.

Isolate browser-borne threats on any network with WAN-as-a-Service

Post Syndicated from Tim Obezuk original https://blog.cloudflare.com/magic-gateway-browser-isolation/

Isolate browser-borne threats on any network with WAN-as-a-Service

Isolate browser-borne threats on any network with WAN-as-a-Service

Defending corporate networks from emerging threats is no easy task for security teams who manage complex stacks of firewalls, DNS and HTTP filters, and DLP and sandboxing appliances. Layering new defenses, such as Remote Browser Isolation to mitigate browser-borne threats that target vulnerabilities in unpatched browsers, can be complex for administrators who first have to plan how to integrate a new solution within their existing networks.

Today, we’re making it easier for administrators to integrate Cloudflare Browser Isolation into their existing network from any traffic source such as IPsec and GRE via our WAN-as-a-service, Magic WAN. This new capability enables administrators to connect on-premise networks to Cloudflare and protect Internet activity from browser-borne malware and zero day threats, without installing any endpoint software or nagging users to update their browsers.

Before diving into the technical details, let’s recap how Magic WAN and Browser Isolation fit into network perimeter architecture and a defense-in-depth security strategy.

Isolate browser-borne threats on any network with WAN-as-a-Service

Securing networks at scale with Magic WAN

Companies have historically secured their networks by building a perimeter out of on-premise routers, firewalls, dedicated connectivity and additional appliances for each layer of the security stack. Expanding the security perimeter pushes networks to their limits as centralized solutions become saturated, congested and add latency, and decentralizing adds complexity, operational overhead and cost.

These challenges are further compounded as security teams introduce more sophisticated security measures such as Browser Isolation. Cloudflare eliminates the complexity, fragility and performance limitations of legacy network perimeters by displacing on-premise firewalls with cloud firewalls hosted on our global network. This enables security teams to focus on delivering a layered security approach and successfully deploy Browser Isolation without the latency and scale constraints of legacy approaches.

Securing web browsing activity with Browser Isolation

A far cry from their humble origins as document viewers, web browsers have evolved into extraordinarily complex pieces of software capable of running untrusted code from any connected server on the planet. In 2022 alone, Chromium, the engine that powers more than 70% of all web browsing activity and is used by everyone to access sensitive data in email and internal applications has seen six disclosed zero-day vulnerabilities.

In spite of this persistent and ongoing security risk, the patching of browsers is often left to the end-user who chooses when to hit update (while also restarting their browser and disrupting productivity). Patching browsers typically takes days and users remain exposed to malicious website code until it is complete.

Isolate browser-borne threats on any network with WAN-as-a-Service

To combat this risk Browser Isolation takes a zero trust approach to web browsing and executes all website code in a remote browser. Should malicious code be executed, it occurs remotely from the user in an isolated container. The end-user and their connected network is insulated from the impact of the attack.

Magic WAN + Browser Isolation

Customers who have networks protected by Magic WAN can now enable Browser Isolation through HTTP policies.

Connect your network to Cloudflare and enable Secure Web Gateway

Magic WAN enables connecting any network to Cloudflare over IPsec, GRE, Private Network connectivity. The steps for this process may vary significantly depending on your vendor. See our developer documentation for more information.

Create an isolation policy

Isolation policies function the same with Magic WAN as they do for traffic sourced from devices with our Roaming Client (WARP) installed.

Navigate to the Cloudflare Zero Trust dashboard → Gateway → HTTP Policies and create a new HTTP policy with an isolate action.

Isolate browser-borne threats on any network with WAN-as-a-Service

See our developer documentation to learn more about isolation policies.

Enable non-identity on-ramp support

Prior to this release, Magic WAN + Browser Isolation traffic presented a block page. Existing customers will continue to see this block page. To enable Browser Isolation traffic for Magic Gateway navigate to: Cloudflare Zero Trust → Settings → Browser Isolation → Non-identity on-ramp support and select Enable.

Configuration complete

Once configured traffic that matches your isolation criteria is transparently intercepted and served through a remote browser. End-users are automatically connected to a remote browser at the closest Cloudflare data center. This keeps latency to a minimum, ensuring a positive end-user experience while mitigating security threats.

Try Cloudflare Browser

Isolate browser-borne threats on any network with WAN-as-a-Service

Interested in testing our remote browsing experience? Visit this landing page to request demo access to Browser Isolation. This service is hosted on our global network, and you’ll be connected to a real remote browser hosted in a nearby Cloudflare data center.

What’s next?

We’re excited to continue integrating new on-ramps to consistently protect users from web based threats on any device and any network. Stay tuned for updates on deploying Browser Isolation via Proxy PAC files and deploying in-line on top of self-hosted Access applications.

Cloudflare Data Loss Prevention now Generally Available

Post Syndicated from Noelle Gotthardt original https://blog.cloudflare.com/inline-dlp-ga/

Cloudflare Data Loss Prevention now Generally Available

This post is also available in 简体中文, 日本語, Deutsch, Français and Español.

Cloudflare Data Loss Prevention now Generally Available

In July 2022, we announced beta access to our newest Zero Trust product, Data Loss Prevention (DLP). Today, we are even more excited to announce that DLP is Generally Available to customers! Any customer can now get visibility and control of sensitive data moving into, out of, and around their corporate network. If you are interested, check out the bottom of this post.

What is DLP?

Data Loss Prevention helps you overcome one of their biggest challenges: identifying and protecting sensitive data. The migration to the cloud has made tracking and controlling sensitive information more difficult than ever. Employees are using an ever-growing list of tools to manipulate a vast amount of data. Meanwhile, IT and security managers struggle to identify who should have access to sensitive data, how that data is stored, and where that data is allowed to go.

Data Loss Prevention enables you to protect your data based on its characteristics, such as keywords or patterns. As traffic moves into and out of corporate infrastructure, the traffic is inspected for indicators of sensitive data. If the indicators are found, the traffic is allowed or blocked based on the customers’ rules.

The most common use for DLP is the protection of Personally Identifiable Information (PII), but many customers are interested in protecting intellectual property, source code, corporate financial information, or any other information vital to the business. Proper data usage can include who used the data, where the data was sent, and how the data is stored.

How does DLP see my corporate traffic?

DLP is part of Cloudflare One, our Zero Trust network-as-a-service platform that connects users to enterprise resources. Cloudflare One runs traffic from data centers, offices, and remote users, through the Cloudflare network. This offers a wide variety of opportunities to secure the traffic, including validating identity and device posture, filtering corporate traffic to protect from malware and phishing, checking the configurations on SaaS applications, and using Browser Isolation to make web surfing safer for employees. All of this is done with the performance of our global network and managed with one control plane.

Cloudflare Data Loss Prevention now Generally Available

How does it work?

DLP leverages the HTTP filtering abilities of Cloudflare One. As your traffic runs through our network, you can apply rules and route traffic based on information in the HTTP request. There are a wide variety of options for filtering, such as domain, URL, application, HTTP method, and many more. You can use these options to segment the traffic you wish to DLP inspect.

When DLP is applied, the relevant HTTP requests are decompressed, decoded, and scanned for regex matches. Numeric regex matches are then algorithmically validated when possible, such as with checksum calculations or Luhn’s algorithm. However, some numeric detections do not adhere to algorithmic validation, such as US Social Security numbers.

If sensitive data is identified by the detection, the data transfer can be allowed or blocked according to the customer’s ruleset.

How do I use it?

Let’s dive further in to see how this all actually comes to life. To use DLP in the Zero Trust Dashboard, navigate to the DLP Profiles tab under Gateway:

Cloudflare Data Loss Prevention now Generally Available

Decide on the type of data you want to protect. We currently detect credit card numbers and US Social Security numbers, but this is where we intend to grow a robust library of DLP detections.  Our next steps are custom and additional predefined detections, including more international identifiers and financial record numbers, which will be arriving soon.

When you have decided, select Configure to enable detections:

Cloudflare Data Loss Prevention now Generally Available

Enable the detections you want to use. As described above, these card number detections are made using regexes and validated with Luhn’s algorithm. You can make numeric detections for card numbers or detect strings matching card names, such as “American Express.”

Cloudflare Data Loss Prevention now Generally Available

Then apply the detections to a Gateway HTTP policy on the traffic of your choosing. Here we applied DLP to Google Drive traffic. This policy will block uploads and downloads to Google Drive that contain US Social Security Numbers.

Cloudflare Data Loss Prevention now Generally Available

Holistic data protection with Cloudflare Zero Trust

Inspecting HTTP traffic for the presence of sensitive data with DLP is one critical way organizations can reduce the risk of data exfiltration, strengthen regulatory compliance, and improve overall data governance.

Implementing DLP is just one step towards a more holistic approach to securing data.

To that end, our Cloudflare Zero Trust platform offers more comprehensive controls over how any user on any device accesses and interacts with data – all from a single management interface:

We have architected our DLP service to work seamlessly with these ZTNA, SWG, CASB, and other security services. As we continue to deepen our DLP capabilities, this platform approach uniquely equips us to address our customers’ needs with flexibility.

Get Access to Data Loss Prevention

To get access to DLP, reach out for a consultation, or contact your account manager.

Detect security issues in your SaaS apps with Cloudflare CASB

Post Syndicated from Alex Dunbrack original https://blog.cloudflare.com/casb-ga/

Detect security issues in your SaaS apps with Cloudflare CASB

This post is also available in 简体中文, 日本語, Deutsch, Français and Español.

Detect security issues in your SaaS apps with Cloudflare CASB

It’s GA Week here at Cloudflare, meaning some of our latest and greatest endeavors are here and ready to be put in the hands of Cloudflare customers around the world. One of those releases is Cloudflare’s API-driven Cloud Access Security Broker, or CASB, one of the newest additions to our Zero Trust platform.

Starting today, IT and security administrators can begin using Cloudflare CASB to connect, scan, and monitor their third-party SaaS applications for a wide variety of security issues – all in just a few clicks.

Detect security issues in your SaaS apps with Cloudflare CASB

Whether it’s auditing Google Drive for data exposure and file oversharing, checking Microsoft 365 for misconfigurations and insecure settings, or reviewing third-party access for Shadow IT, CASB is now here to help organizations establish a direct line of sight into their SaaS app security and DLP posture.

The problem

Try to think of a business or organization that uses fewer than 10 SaaS applications. Hard, isn’t it?

It’s 2022, and by now, most of us have noticed the trend of mass SaaS adoption balloon over recent years, with some organizations utilizing hundreds of third-party services across a slew of internal functions. Google Workspace and Microsoft 365 for business collaboration. Slack and Teams for communication. Salesforce for customer management, GitHub for version control… the list goes on and on and on.

And while the average employee might see these products as simply tools used in their day-to-day work, the reality is much starker than that. Inside these services lie some of an organization’s most precious, sensitive, business-critical data – something IT and security teams don’t take lightly and strive to protect at all costs.

But there hasn’t been a great way for these teams to ensure their data and the applications that contain it are kept secure. Go user by user, file by file, SaaS app by SaaS app and review everything for what could be potentially problematic? For most organizations, that’s just simply not realistic.

So, doing what Cloudflare does best, how are we helping our users get a grip on this wave of growing security risk in an intuitive and manageable way?

The solution

Connect your most critical SaaS applications in just minutes and clicks

It all starts with a simple integration process, connecting your favorite SaaS applications to Cloudflare CASB in just a few clicks. Once connected, you’ll instantly begin to see Findings – or identified security issues – appear on your CASB home page.

CASB utilizes each vendor’s API to scan and identify a range of application-specific security issues that span several domains of information security, including misconfigurations and insecure settings, file sharing security, Shadow IT, best practices not being followed, and more.

Today CASB supports integrations with Google Workspace, Microsoft 365, Slack, and GitHub, with a growing list of other critical applications not far behind. Have a SaaS app you want to see next? Let us know!

See how all your files have been shared

Detect security issues in your SaaS apps with Cloudflare CASB

One of the easiest ways for employees to accidentally expose internal information is usually with just the flick of a switch – changing a sharing setting to Share this file to anyone with the link.

Cloudflare CASB provides users an exhaustive list of files that have questionable, often insecure, sharing settings, giving them a fast and reliable way to address low-hanging fruit exposures and get ahead of data protection incidents.

Identify insecure settings and bad practices

Detect security issues in your SaaS apps with Cloudflare CASB

How we configure our SaaS apps dictates how they keep our data secure. Would you know if that one important GitHub repository had its visibility changed from Private to Public overnight? And why does one of our IT admins not have 2FA enabled on their account?

With Cloudflare CASB, users can now see those issues in just a few clicks and prioritize misconfigurations that might not expose just one file, but the entirety of them across your organization’s SaaS footprint.

Discover third-party apps with shadowy permissions

Detect security issues in your SaaS apps with Cloudflare CASB

With the advent of frictionless product signups comes the rise of third-party applications that have breezed past approval processes and internal security reviews to lay claim to data and other sensitive resources. You guessed it, we’re talking about Shadow IT.

Cloudflare CASB adds a layer of access visibility beyond what traditional network-based Shadow IT discovery tools (like Cloudflare Gateway) can accomplish on their own, providing a detailed list of access that’s been granted to third-party services via those easy Sign in with Google buttons.

So, why does this matter in the context of Zero Trust?

While we’re here to talk about CASB, it would be remiss if we didn’t acknowledge how CASB is only one piece of the puzzle in the wider context of Zero Trust.

Zero Trust is all about broad security coverage and simple interconnectivity with how employees access, navigate, and leverage the complex systems and services needed to operate every day. Where Cloudflare Access and Gateway have provided users with granular access control and visibility into how employees traverse systems, and where Browser Isolation and our new in-line DLP offering protect users from malicious sites and limit sensitive data flying over the wire, CASB adds coverage for one of enterprise security’s final frontiers: visibility into data at-rest, who/what has access to it, and the practices that make it easier or harder for someone to access it inappropriately.

How to get started

As we’ve found through CASB’s beta program over the last few months, SaaS sprawl and misuse compounds with time – we’ve already identified more than five million potential security issues across beta users, with some organizations seeing several thousand files flagged as needing a sharing setting review.

So don’t hesitate to get started on your SaaS app wrangling and cleanup journey; it’s easier than you might think.

To get started, create a free Zero Trust account to try it out with 50 free seats, and then get in touch with our team here to learn more about how Cloudflare CASB can help at your organization. We can’t wait to hear what you think.

The collective thoughts of the interwebz