New additions to line charts in Amazon QuickSight

Post Syndicated from Bhupinder Chadha original https://aws.amazon.com/blogs/big-data/new-additions-to-line-charts-in-amazon-quicksight/

Amazon QuickSight is a fully-managed, cloud-native business intelligence (BI) service that makes it easy to create and deliver insights to everyone in your organization or even with your customers and partners. You can make your data come to life with rich interactive charts and create beautiful dashboards to be shared with thousands of users, either directly within the QuickSight application, or embedded in web apps and portals.

Line charts are ubiquitous to the world of data visualization and are used to visualize change in data over a dimension. They are a great way to analyze trends and patterns where data points are connected with a straight line to visualize the overall trend. In this post, we look at some of the new improvements to our line charts:

  • Support for missing data points for line and area charts
  • Improved performance and increased data limit to 10,000 data points

Missing data points

Line charts in QuickSight expect you to have data for each X axis item. If data is missing for any X axis item, it can lead to broken lines (default behavior) because there is no line drawn connecting the missing data points.

Drawing lines with points of missing data could be misleading because it would represent incorrect data, and there are valid use cases to do so. For example, imagine a scenario of a retail sales report for a given time period where data is recorded during days of operation (Monday through Saturday). In such cases, instead of displaying a broken line chart that skips Sunday, you may want to show a continuous trend by directly connecting Saturday to Monday, hiding the fact that Sunday isn’t operational. Alternatively, you may want to view store traffic for Sunday as 0 instead of displaying a broken line.

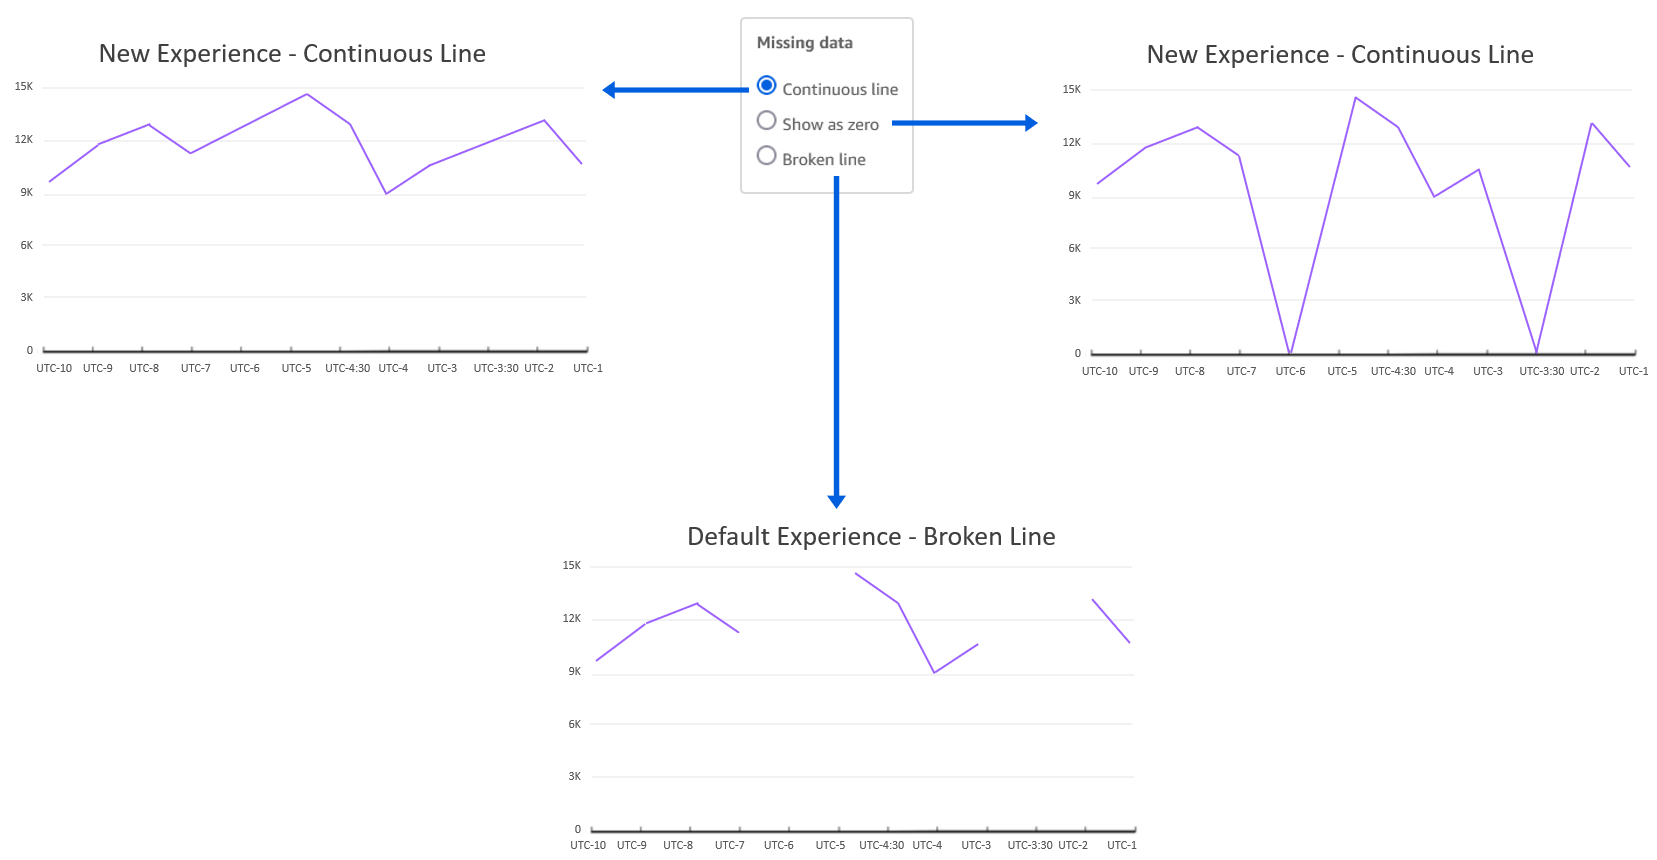
Previously, line charts only supported treating missing data for date/time fields. Now, we have added support for categorical data for both line and area charts. The following are the different line treatment options:

  1. Continuous line – Display continuous lines by directly connecting the line to the next available data point in the series
  2. Show as zero – Interpolate the missing values with zero and display a continuous line
  3. Broken line – Retain the default experience to display disjointed lines over missing values

The following diagram illustrates a line chart using each option.

This new feature applies for both categorical and time series data on area charts as well, as shown in the following graphs.

Authors can also configure different data treatments for the left and right Y axis for dual axis charts, as shown in the following example.

Increased data limit for line charts

With the recent update, we have improved line chart performance to support a maximum of 10,000 data points instead of the previous 2,500 data point limit. This also increases the limit for more line series created by the Color by field, which is also bound by the total data limit. For example, if the line chart has 1,000 data points for each series, you could display up to 10 unique colored series.

This update enables use cases where authors want to show a higher number of data points, such as hourly trends or daily trends for a year (365 data points) for multiple groups. This update doesn’t change the default limits of the Color by field (25) and X axis data point limit (100) that exist today to be compatible with existing dashboards and analysis, until authors choose to customize the limits.

Summary

In this post, we looked at how to treat missing data for line charts, where instead of viewing broken lines, you can display continuous lines. This helps you customize how you want to visualize overall trends and variations depending on the business context. Additionally, we looked at the new data handling limit for line charts, which supports 10,000 data points—four times more data than before. To learn more refer customizing missing data control.

Try out the new feature and share your feedback and questions in the comments section.


About the author

Bhupinder Chadha is a senior product manager for Amazon QuickSight focused on visualization and front end experiences. He is passionate about BI, data visualization and low-code/no-code experiences. Prior to QuickSight he was the lead product manager for Inforiver, responsible for building a enterprise BI product from ground up. Bhupinder started his career in presales, followed by a small gig in consulting and then PM for xViz, an add on visualization product.

Integrating Cloud Security With DevOps and CI/CD Tools

Post Syndicated from Clint Merrill original https://blog.rapid7.com/2022/09/09/integrating-cloud-security-with-devops-and-ci-cd-tools/

Integrating Cloud Security With DevOps and CI/CD Tools

This is the latest post in our blog series on shifting left in cloud security. In our last post, we kicked off the series with a high-level overview about Rapid7’s approach to shifting cloud security into the application development lifecycle. For this post, we’ll dive into a key aspect of our approach: integrating cloud security with developer and DevOps tooling.

Incentivizing adoption by reducing friction

When integrating security into any part of the development lifecycle there are some important factors to consider, including the security tools you’ll integrate, the processes you’ll ask developers to follow, and how aggressively you intend to enforce certain policies. When making these decisions, it’s important to consider the goals of adopting DevOps practices and infrastructure as code (IaC) respectively: to improve the velocity of application development and delivery, and to empower development teams to provision cloud infrastructure resources on a self-service basis.  

Infusing security into these goals requires guardrails and routine checks to make sure the need for speed doesn’t create vulnerabilities or potentially exploitable misconfigurations. For IaC development, this is accomplished by having individual developers scan templates and plans as early as possible, and at key points in the CI/CD pipeline, before they’re considered for use in staging or production deployment. This is much easier said than done, as it relies on organizational buy-in, particularly from the developers who are typically laser-focused on bringing new products and features to market as fast as possible with the highest quality possible.

As with anything that relies on multiple teams collaborating in a process, the goal is to make it as easy as possible to adopt and demonstrate tangible value to all involved. Shifting security left into the software development lifecycle (SDLC) via developers and CI/CD tool integrations is a perfect application of this. One common example is allowing developers to execute scans on IaC templates or plans prior to a push or pull request, using a local command-line interface (CLI) tool.

The comfort of the CLI

In this context, a CLI tool allows a developer to interact with IaC security scanning features via a terminal prompt for familiarity and convenience. This comfortable experience will encourage adoption by using the CLI rather than engaging with a security product interface or API directly. In late 2021, we released our first CLI tool to initiate IaC scans in InsightCloudSec (ICS): mimics.

mimics has many intended uses that will expand over the time, but for now, the primary goals are:

  1. Enabling developers to execute on-demand security scans of their IaC plans and templates with results delivered directly in the CLI, thereby shortening the discovery and feedback loop for security and compliance issues to the point of immediate remediation
  2. Enabling DevOps teams to easily integrate IaC security scans at any point in the CI/CD workflow, thereby standardizing the process and enforcing security compliance checks and remediation as needed before progressing to the next integration or deployment step

In all cases, the mimics CLI simplifies integration and doesn’t require more costly script-based integration with the ICS API.  In some cases, unique IaC security capabilities are exclusively available via mimics.

Introducing GitHub Actions integration

InsightCloudSec recently launched a GitHub Action to facilitate a bidirectional integration with our IaC scanning feature. Our goal is to streamline the incorporation of IaC security scans into your cloud application CI/CD process governed by GitHub. If you’re not familiar with GitHub Actions, they allow you to automate, customize, and execute workflow steps, including security and compliance checks. In doing so, users can discover, create, and share Actions with other community members.

A great use of the mimics CLI is to integrate with GitHub using our Action to trigger an ICS IaC scan at defined points in your workflow. Upon completion of the scan, you’ll receive an overall pass/fail result in reply, as well as detailed findings, if any, in SARIF format for display in the GitHub Advanced Security module as security alerts. If you don’t subscribe to the GitHub Advance Security module, you can still trigger IaC security scans and receive an overall pass/fail result to govern the workflow step, plus a detailed findings report in one of various readable formats.

More DevOps tool integrations on the way

As you can see, Rapid7’s InsightCloudSec is meeting developers and DevOps teams where they are today and expanding in the near future. We want to make integrating security controls by development teams easier. And we aren’t stopping there. We have a deep roadmap of additional integrations that will be coming soon. However, it’s important to note that you’re not limited by our formal integrations. The mimics CLI makes your custom integrations a snap, and we have examples in our product documents.

We understand the profound impact shifting security left can have on organizational buy-in, overall team efficiency, and of course, cloud security outcomes. Keep an eye out for upcoming enhancements that will further help you seamlessly integrate security throughout the entire SDLC.

If you’re interested in learning more about how InsightCloudSec helps your team get contextualized insight into your cloud security and risk posture, be sure to check out our bi-weekly demo series Gaining Layered Context in Cloud Security, which goes live every other Wednesday at 1pm EST.

Additional reading:

NEVER MISS A BLOG

Get the latest stories, expertise, and news about security today.

[$] Compiling Rust with GCC: an update

Post Syndicated from original https://lwn.net/Articles/907405/

While the Rust language has appeal for kernel development, many developers are
concerned by the fact that there is only one compiler available; there are
many reasons why a second implementation would be desirable. At the 2022
Kangrejos gathering, three developers
described projects to build Rust
programs with GCC in two different ways. A fully featured, GCC-based Rust
implementation is still going to take some time, but rapid progress is
being made.

Responsible Disclosure for Cryptocurrency Security

Post Syndicated from Bruce Schneier original https://www.schneier.com/blog/archives/2022/09/responsible-disclosure-for-cryptocurrency-security.html

Stewart Baker discusses why the industry-norm responsible disclosure for software vulnerabilities fails for cryptocurrency software.

Why can’t the cryptocurrency industry solve the problem the way the software and hardware industries do, by patching and updating security as flaws are found? Two reasons: First, many customers don’t have an ongoing relationship with the hardware and software providers that protect their funds­—nor do they have an incentive to update security on a regular basis. Turning to a new security provider or using updated software creates risks; leaving everything the way it was feels safer. So users won’t be rushing to pay for and install new security patches.

Second, cryptocurrency is famously and deliberately decentralized, anonymized, and low friction. That means that the company responsible for hardware or software security may have no way to identify who used its product, or to get the patch to those users. It also means that many wallets with security flaws will be publicly accessible, protected only by an elaborate password. Once word of the flaw leaks, the password can be reverse engineered by anyone, and the legitimate owners are likely to find themselves in a race to move their assets before the thieves do. Even in the software industry, hackers routinely reverse engineer Microsoft’s patches to find the security flaws they fix and then try to exploit them before the patches have been fully installed.

He doesn’t have any good ideas to fix this. I don’t either. Just add it to the pile of blockchain’s many problems.

Setup a high availability design for Oracle Data Guard (Fast-Start Failover) using Amazon Route 53

Post Syndicated from Viqash Adwani original https://aws.amazon.com/blogs/architecture/setup-a-high-availability-design-for-oracle-data-guard-fast-start-failover-using-amazon-route-53/

Many customers use Oracle Database deployed on Amazon Elastic Compute Cloud (Amazon EC2) to run their Oracle E-Business Suite applications. They rely on Oracle Data Guard for high availability databases, with a standby database running in a different availability zone. Oracle Data Guard can switch a standby database to the primary role in case a production database becomes unavailable due to planned/unplanned outage.

Oracle E-Business Suite has AutoConfig Database Context files that points to Domain Name System (DNS), like a private IP DNS name or IP address on Amazon EC2. In case of switchover/failover, Database Context files in Oracle E-Business Suite need to be updated. With this solution, database context files do not need to be updated in case of switchover/failover. This is achieved by providing a single DNS name hosted on Amazon Route 53, always pointing to a primary database irrespective of running on any node.

This post demonstrates setting up a Route 53 hosted zone that points to primary and standby databases and will route requests to the database having a primary role. We will setup Route 53 health checks to monitor Amazon CloudWatch alarms, based on Oracle Data Guard Fast-Start Failover (FSFO) logs pushed from Oracle Database using CloudWatch agent.

Prerequisites

Before getting started, you must have the following:

  • Oracle databases running on two separate EC2 instances for 1\Primary and 2\Standby node
  • EC2 instance for 3\Observer node, with either Oracle Client Administrator software or the full Oracle Database software stack
  • Oracle Data Guard configured to maintain standby databases as transactional consistent copy of the primary database
  • Oracle Data Guard Command-Line Interface (DGMGRL) configured with observer process to facilitate FSFO
  • FSFO enabled with observer configuration

Solution overview

Figure 1 depicts AWS services that are used build an architecture using a single Domain Name System (DNS) and Route 53 to have requests route to the primary database for Oracle Data Guard deployed on EC2 instances.

Using a single DNS and Amazon Route 53 to route requests

Figure 1. Using a single DNS and Amazon Route 53 to route requests

We encourage you to explore these articles prior to launching this architecture:

Architecture components

  • Primary node: An Oracle Data Guard configuration contains one production database (primary database) that functions in the primary role. This is the database that is accessed by most of your applications.
  • Standby node: A standby database is a transactional consistent copy of the primary database. Once created, Oracle Data Guard automatically maintains each standby database by transmitting redo data from the primary database and applying it to the standby database.
  • Observer node: A component of DGMGRL that is configured on a separate server with Oracle Client Interface outside the systems running the Oracle Data Guard configuration, which monitors the availability of the primary database. We recommend it is in a separate availability zone than the primary and standby databases. Should it detect that the primary database is unavailable or the connection cannot be made, it will issue a failover after waiting for the 30 seconds or specified by the FastStartFailoverThreshold property.

Note: This solution was tested on Oracle Database 19c Enterprise Edition Release 19.0.0.0.0 and Oracle Enterprise Linux OL7.5-x86_64. Select the required combination of operating system and database by referring to E-Business Suite Database Certifications. Active Oracle Data Guard configuration is not used in this solution; therefore, the database stays in mount state and unavailable for customer reads. However, this solution can be used with an active Oracle Data Guard configuration as well.

Infrastructure setup

This table details the lab environment and the database instance names used throughout this post.

Database role IP address Instance name Database unique name Database open mode Database port
Primary node 172.31.xx.xx ORCLVIQ orclviq Read write 1522
Secondary node 172.31.xx.xx ORCLVIQ orclviq Mounted 1522
FSFO observer node 172.31.xx.xx
Route 53 hosted zone Dataguardviq.com Dataguardviq.com

Solution implementation

1. IAM policy

To configure the CloudWatch agent on an EC2 instance, create an IAM role via the console, AWS Command Line Interface, or AWS API. By default, an IAM role does not have any privileges and cannot access AWS resources. Before creating an IAM role, create an IAM policy with the permissions required to access CloudWatch logs, specifying the CloudWatch resources you want to monitor or *, which will allow access to CloudWatch logs.

Create the IAM policy using the following JSON and give it a name, like dgpolicy, which grants specific permissions. In this case, the permissions include creating log groups and log streams, inputting log events, and describing log stream for all logs.

{
    "Version": "2012-10-17",
    "Statement": [
        {
            "Action": [
                "logs:DescribeLogGroups",
                "logs:DescribeLogStreams",
                "logs:GetLogEvents",
                "s3:GetBucketLocation"
            ],
            "Effect": "Allow",
            "Resource": "*"
        }
    ]
}

2. IAM role

Create the IAM role (for example, dgrole) and attach the policy created in Step 1.

3. Associate IAM role with Amazon EC2 having FSFO observer node running on it

Associate the IAM role with Amazon EC2 from AWS console:

  1. Open the Amazon EC2 console.
  2. In the navigation pane, choose Instances.
  3. Select the instance, and choose Action, Security, Modify IAM role.
  4. Select the IAM role to attach to your instance; choose Save.

You also can use the associate-iam-instance-profile command to attach the IAM role to the instance by specifying the instance profile:

aws ec2 associate-iam-instance-profile \
    --instance-id i-1234567890lmnopq1 \
    --iam-instance-profile Name=" dgrole"

4. Install CloudWatch log agent on observer node

Install CloudWatch Logs agent on the observer node that already has FSFO log configuration setup on it. After installation is complete, logs will automatically flow from the instance to the log stream you created while installing the agent, as depicted in Figures 2 and 3.

$curl https://s3.amazonaws.com/aws-cloudwatch/downloads/latest/awslogs-agent-setup.py -O
$sudo python ./awslogs-agent-setup.py --region ap-southeast-2

Steps to install Amazon CloudWatch agent

Figure 2. Steps to install Amazon CloudWatch agent

Example of output

Figure 3. Example of output

At this point, FSFO logs are visible in CloudWatch logs. Perform a database switchover to confirm that logs are being published to CloudWatch logs.

5. Create CloudWatch metric filter

Create primary metric filter

  • Create metric filter on “Standby database has changed to orclviq” and set value to “1”.
  • Open the CloudWatch log group and search for “Standby database has changed to orclviq“. Once results are displayed, “Create Metric Filter” button will appear at top right (as demonstrated in Figure 4).
Amazon CloudWatch log group

Figure 4. Amazon CloudWatch log group

  • Filter name” and “Filter pattern” are filled automatically, as we already filtered that while accessing the CloudWatch log. Create a new name space in the metric, which we will later use in second metric filter. Specify “Metric namespace”, which will also be the same for the second metric filter. “Metric value” is “1”, as detailed in Figure 5.
Amazon CloudWatch metric filter

Figure 5. Amazon CloudWatch metric filter

Create secondary metric filter

  • To create a second metric filter, follow steps to create the primary metric filter but the filter pattern will be “Standby database has changed to orclstd“. The only difference in this step will be setting the “Metric value” to “0”.
  • Verify the metric filter is working and able to find desired entries in the FSFO logs that will decide which instance is the primary database by:
    • Click on one of the metric filters
    • Select log data to test, and choose and EC2 instance ID
    • Testing the pattern to verify if metric filters are working properly
    • Select “Next”
    • Save changes

6. Create a CloudWatch alarm

Create a CloudWatch alarm that will monitor CloudWatch metrics and perform actions based on the value of the metric.

  • Within CloudWatch Alarms section (Step 1), select “Create alarm” and then select “Metric”, as in Figure 6.
  • In Step 2, you can create a new topic and specify the email address where you would like to receive notifications regarding changes in primary or standby database.
  • In Step 3, you can specify the alarm name and optional alarm description.
Amazon CloudWatch alarm

Figure 6. Amazon CloudWatch alarm

  • To configure Conditions, as detailed in Figure 7, be sure the threshold type is set to “Static”, the alarm condition is “Greater/Equal”, and the threshold value is “1”.
Amazon CloudWatch alarm condition

Figure 7. Amazon CloudWatch alarm condition

  • Figure 8 demonstrates the summary of the ready CloudWatch metrics and configured alarm.  At this point, “orclviq” is the primary database, so the alarm state will be “Insufficient data”. Try to do a switchover and the alarm state should be changed to “In alarm”.
  • Switch it back to original primary before proceeding further
Final view of both metric filters combined

Figure 8. Final view of both metric filters combined

7. Create Route 53 health checks

Creating Route 53 health checks based on the CloudWatch alarm identifies DNS failover. Health checks can be created on public IP directly without creating above metric filters and alarms, but it is unlikely that customers will have a public IP on database servers. Route 53 cannot check the health of an IP address endpoint despite if it is local, private, non-routable, or multi-cast ranges. Therefore, health checks will have to be created on the state of CloudWatch alarm (Figure 9):

  • Within the Route 53 console, select “Configure health check”.
  • Select “State of CloudWatch alarm”, then select the region of your CloudWatch metrics and choose the CloudWatch alarm that was created earlier from the dropdown menu.
  • Skip creating an alarm for health check, as the alarm is already configured for CloudWatch metric filter.
Amazon Route 53 health check parameters

Figure 9. Amazon Route 53 health check parameters

  • The health check is now ready and status will be “Unknown”. It will change to “Healthy”, as it is currently having primary orclviq, which means it’s satisfying “Standby database has changed to orclstd“.
  • At this point, try doing a failover and observe if health check status changes to “Unhealthy”. Switch it back to the original primary before proceeding.
  • The health check should return to “Healthy” state.
  • Check the status of the alarm:
    • OK: the status is healthy
    • ALARM: the status is unhealthy
    • INSUFFICIENT: use last known status

8. Create Route 53 hosted zone

A Route 53 hosted zone in this solution will have failover routing based on records pointing to IP addresses of primary and standby database server. When the Route 53 health check is in an “Unhealthy” state, failover routing kicks in and the hosted zone starts routing requests to the IP address of the standby database server.

  • A Route 53 hosted zone will have records of your primary and standby database instance private IP. Because it is a private hosted zone, it will use the same VPC as the observer node on which we deployed the CloudWatch agent (Figure 10).
Amazon Route 53 hosted zone

Figure 10. Amazon Route 53 hosted zone

  • Once the Route 53 hosted zone is ready, the last step is to create records by adding private IP addresses of primary and secondary database servers (Figures 11 and 12). Routing policy is set as a failover. That means, if the Route 53 health check fails, the hosted zone does a DNS failover to standby server IP.
Amazon Route 53 hosted zone record for primary servers

Figure 11. Amazon Route 53 hosted zone record for primary servers

Amazon Route 53 hosted zone record for secondary servers

Figure 12. Amazon Route 53 hosted zone record for secondary servers

Once the records are created, the hosted zone will have an IP address of primary and secondary database servers, as demonstrated in Figure 13.

Final view of Amazon Route 53 hosted zone

Figure 13. Final view of Amazon Route 53 hosted zone

Solution testing

To test the solution, do a telnet utility test to evaluate network connectivity on the Route 53 hosted zone that was created. It should display the IP address of the primary database server: 172.31.10.89.

[ec2-user@ip-172-xx-xx-xx ~]$ telnet dataguardviq.com 1522
Trying 172.31.10.89…
Connected to dataguardviq.com.
Escape character is ‘^]’.

Next, perform a switchover or failover of the primary to secondary database server. This can be done with the DGMGRL command “switchover to orclstd”. Output will be:

DGMGRL> switchover to orclstd;
Performing switchover NOW, please wait…
Operation requires a connection to database “orclstd”
Connecting …
Connected to “orclstd”
Connected as SYSDBA.
New primary database “orclstd” is opening…
Oracle Clusterware is restarting database “orclviq” …
Connected to an idle instance.
Connected to “orclviq”
Switchover succeeded, new primary is “orclstd”

Now, the new primary is “orclstd”. In the backend, the Route 53 health check will be initiated and cause a failover. This means the telnet Route 53 hosted zone will give the IP address of the new primary (old secondary), which is 172.31.36.241.

[ec2-user@ip-172-xx-xx-xx ~]$ telnet dataguardviq.com 1522
Trying 172.31.36.241…
Connected to dataguardviq.com.
Escape character is ‘^]’.

Cleanup

To cleanup, remove:

  • Route 53 host zone
  • CloudWatch metric filter
  • CloudWatch alarm
  • CloudWatch agent from observer node
  • IAM role and policy created specifically for this solution

Conclusion

This solution demonstrated how to use a Route 53 hosted zone to route requests to the active primary node for Oracle Data Guard on Amazon EC2.

What’s Up, Home? – Zabbix the Climate Remote

Post Syndicated from Janne Pikkarainen original https://blog.zabbix.com/whats-up-home-zabbix-the-climate-remote/23207/

Can you control your air conditioner using Zabbix? Of course, you can!

By day, I am a monitoring technical lead in a global cyber security company. By night, I monitor my home with Zabbix and Grafana and do some weird experiments with them. Welcome to my weekly blog about this project.

A few months ago I added our recently bought air conditioner to Zabbix monitoring by utilizing MQTT. Reading values is nice and mandatory for monitoring; but can we also send commands to the air conditioner using Zabbix? Yes.

Testing, testing

MQTT is a little unknown area for me, so please don’t hit me too hard if I’m doing this completely wrong. Anyway, this seems to work! I know that Zabbix supports MQTT for reading data, but I’m not sure if it can do writing, so that’s why I am using a command line and external scripts for my example.

At first, I tested if my whole idea would work just by using the command line:

The mosquitto_pub command might sound like a bar where some summer-time insects spend their free time, but no, this one instead publishes an MQTT message with value 22 to that aircon topic. In other words, I tried to change the temperature to 22 degrees Celsius.

And it worked!

From here, the rest was easy. I created three shell one-liners:

  • One for setting AC mode (off, cooling, etc.)
  • One for setting AC fan speed
  • One for setting AC temperature

These then receive some value from Zabbix by taking the command line argument. Yeah, I know, I didn’t add any input validation here.

Adding it to Zabbix

Now that I have my scripts, I then went to Zabbix Administration –> Scripts and added some scripts there.

I gave these scripts a menu tree structure, so from now on I can control my AC from Zabbix and it looks like this.

Setting fan speed:

Setting AC mode:

Setting temperature:

… and whenever I execute any of these, I get mosquitto_pub command output back, here setting the temperature to 22 C.

Of course, the scripts could be hooked with triggers, so if for example, our living room would be too hot, Zabbix could power on the AC automatically. For now, I’m not taking the automatic route as we might not be at home all the time.

A Grafana dashboard

And, like for so many other monitored items, I also have a separate Grafana dashboard for our air conditioning, with values being read from Zabbix. From the dashboard, I can easily see whenever our AC has been on or off, what’s the fan speed and so on.

And btw, those of you using Zabbix 6.2 and Grafana — please make sure you upgrade your Grafana Zabbix plugin to at least version 4.2.9 (released on July 12th, 2022), as the previous versions did not work with Zabbix 6.2 at all. I found this out the hard way at home, but I patiently waited for the update.

I have been working at Forcepoint since 2014 and it never has been cooler to work from home. — Janne Pikkarainen

This post was originally published on the author’s LinkedIn account.

The post What’s Up, Home? – Zabbix the Climate Remote appeared first on Zabbix Blog.

Елегия за пасти и избиратели

Post Syndicated from Емилия Милчева original https://toest.bg/elegiya-za-pasti-izbirateli/

Предизборната кампания e времето, в което българските политици се запознават с избирателите – с тези, които ще гласуват, и с тези, които няма да гласуват. Обещават им пасти, а гражданите не им вярват, защото са зрели хора и са наясно, че пастите ще си ги изядат политиците. Също и първото, и второто преди пастите, след като сложат табелата „Забранено за външни лица“.

Политиците наричат това предизборни платформи, гражданите – реалност, иначе си е политически цинизъм. Медиите дежурно критикуват, че партиите (пак) не представят идеи и политики, макар и те, и аудиториите им да са наясно, че повечето избиратели не четат предизборни програми, дори да ги има, а политическите сили не ги изпълняват, когато спечелят властта.

Парадоксът на обещанията

Защо политиците нарушават обещанията си, които са техният залог да бъдат избирани от гражданите? Лъжат съзнателно, неискрени са, знаейки, че могат да се справят само с някои проблеми, или наистина си вярват? Разбира се, обещанията се изпълняват по-често, когато една политическа формация не трябва да споделя властта с други, както е в коалиционните правителства. Макар че и първият самостоятелен кабинет на ГЕРБ не изпълни най-значимото обещание, с което Бойко Борисов дойде на власт – да накаже за корупцията на тройната коалиция. Впоследствие този Батман на политическия ни Готъм се утвърди чрез други митологеми – като Строителя например.

Коалиционното управление вече е норма за българската политика, което означава политики на компромиса. В българския модел коалицията се разбира не като споделена, а разпарчетосана власт на принципа „всяка коза за свой крак“ – тоест „концесиониране“ на министерства. Въпреки това някои червени линии в бившата четворна коалиция се оказаха непреодолими. Например онази на БСП да не се изпраща оръжие за Украйна. Други, като получервената линия за „депутинизация“ на страната ни, заявена от „Демократична България“, си остана на ниво декларация. „Продължаваме промяната“ пък преди изборите през ноември м.г. предлагаше закриване на Българския енергиен холдинг, но впоследствие от тази идея не остана и помен, след като БСП се възпротивиха на масата на преговорите. Така че няма гаранция за изпълнение на нито едно предизборно обещание, дадено от политическите сили с шанс за представителство в 48-мия парламент.

Освен коалиционните компромиси, фактори за изпълнение на обещанията са и икономическата ситуация, бизнес лобитата зад съответните политически сили, ефективното лидерство и също така предишен управленски опит. Последното се оказа съществен проблем за управлявалата половин година коалиция, тъй като, с изключение на БСП, нито една от останалите три политически сили нямаше такъв опит, а в добавка – и кадрови капацитет. В контекста на войната в Украйна обаче някои компромиси са просто неприемливи – като например кремълският уклон на „Позитано“ 20, който ПП и ДБ се правеха, че не забелязват преди 24 февруари.

Битка, ама не съвсем

Предизборната кампания в България щеше да придобие смисъл и добавена стойност, ако имаше поредица дебати между политическите сили по проблеми, които най-силно вълнуват избирателите. Но не в познатия формат по БНР и БНТ, където журналистите са секунданти, а кандидат-депутатите – високоговорители. В настоящия си вид кампанията е скучна като слово на чиновник от обреден дом, движейки се по пунктира на опорките: „говорете това“, „не говорете онова“, „повтаряйте и потретяйте следното“, изливайки се в официални или скрити платени форми. Преглед на сайтовете на политическите сили и профилите им в YouTube и социалните мрежи показва нейната вялост и еднообразие.

Отваряте например сайта на ГЕРБ и Бойко Борисов е на преден – и всякакъв – план. Борисов тук, Борисов там, Борисов каза, Борисов на трибуна, на пресконференция, сред мъже, жени и деца, награбил баби и гражданки, че и Лили Иванова в Стара Загора. Шестнайсети поредни избори „Граждани за европейско развитие на България“ все още е равно на Борисов. Лидерът иска да вдъхне оптимизъм, защото „държавата е счупена“, да въведе ред, изобщо – да я поправи. И както му отива на такъв ред, от ГЕРБ извадиха и антикризисна програма – единствени. Година и половина откакто партията на Борисов загуби властта, бездействието на прокуратурата по множество сигнали в комбинация с войната в Украйна притъпи спомените за „наследството“ от ГЕРБ – корупцията и безправовата държава.

Иначе в обкръжението на граждани Борисов е естествен, благ, насмешлив, даже костюмиран и внушава онова, което в криза всички ожидат – ста-бил-ност. Но въпреки тия феромони ГЕРБ не регистрира ръст на подкрепящите я. Само Борисов вече не е достатъчен.

А обиколката на автобуса на Промяната, срещан радушно от хората по места в кампанията миналата есен, този път не проработи. Затова липсват видеа, в които Кирил Петков, Асен Василев и други от ПП слизат по стъпалата и ги понася потокът от екзалтирани граждани. Визуалните материали от обиколките са доста селектирани, повечето видеа показват говорещи глави, а коментарите под тях са впечатляващо еднотипни – „Успех“ и „С вас сме“. Срещите с хора са сведени до възторжени изблици или ръкуване и кратък диалог – като този от Монтана.

От изброените три успеха – увеличението на пенсиите, безплатните детски градини и спрения канал на ГКПП „Капитан Андреево“ – видно този път ПП са се прицелили в пенсионерите. И не обелват дума срещу президента дори когато той ги напада с откровено неверни твърдения – че огромният скок в цената на газа се дължи на два танкера за втечнен газ, договорени през юли. От изявления на енергийни експерти и мениджъри на „Булгаргаз“ стана ясно, че втечненият газ, закупен от американската компания „Шениер“, е по-евтин от руския газ. Освен това танкерите дойдоха през юни, а „Булгаргаз“ предложи с 13% по-ниска цена на природния газ от 1 юни.

И все пак от ПП замълчаха. Ще им се да си върнат ония гласове, които получиха през ноември м.г. – и не говорят за геополитика, Русия и газови зависимости.

Самураи, физзарядка, платна, гъби… и „кални бани“

ГЕРБ и ПП, на които известните до момента социологически проучвания отреждат съответно първо и второ място, влизат в леки схватки – като спаринг партньори. Кирил Петков подхвърля нещо за пенсиониране на Бойко Борисов, който пък му отвръща, че е най-скоростно пенсионираният премиер – и толкоз. Като цяло до момента между политическите сили липсват сериозни атаки, както беше с „изчегъртването“ на ГЕРБ миналата година. Сега работата опря май само до изчегъртване на Борисов. Всички в момента ходят на пръсти и не преиграват повече от минимума, нужен за предизборна кампания. Дори в парламента бяха по-настървени.

Този стереотип бива разчупен от „криейтив“, който особено забавлява публиката. Като самураите с мечове от предизборния клип на „Има такъв народ“ или „физзарядката“ на ПП при откриването на кампанията в Пловдив, на която партийците изобразяват българския трикольор с цветни листове в ръце.

Кампанията на „Демократична България“ – коалицията между „Да, България“, ДСБ и Зеленото движение, също се отличи с проблясък. Лидерът на ДСБ ген. Атанас Атанасов, изпратен да води във Варна (ДСБ за първи път няма водач в нито една от трите софийски листи), пусна видео от платноходка с призив да „вдигаме платната“. Чудесно, но вдигането на платната означава само едно – да отплаваме. Видеото вече е свалено, оставени са само снимки от откриването на кампанията.

„Атака“ пробват с анимирано видео, озаглавено „Ти отказа ли ментетата“, в което главният герой се разхожда в гора, натъква се на две гъби (не халюциногенни, а като от детска книжка за Гъбарко) и се колебае коя от двете да избере. Избира отровния двойник… Развръзката – в образа на Волен Сидеров.

В кампанията бе употребена и човешката трагедия – калният потоп, унищожил домове, покъщнина, дърва за огрев и зимнина на хората от няколко карловски села. Селфи с текст „На кални бани сме. Честит празник!“ пуснаха двама кандидати на „Демократична България“ – Теодор Михайлов и Елисавета Белобрадова, широко усмихнати. По-късно неуместната снимка бе изтрита, останаха фотоси как помагат за разчистването на терена. Последваха ги и от „Продължаваме промяната“ – Кирил Петков, който се бори с лопата, при това по тениска, брандирана с логото на ПП, и Никола Минчев, който се преоблича в защитен костюм, за да направи същото. Щеше да е по-полезно вместо този изблик на хуманизъм да бяха купили дърва за колкото семейства могат – мнозина загубиха огрева си за зимата в потопа. Е, нямаше как да има снимки в социалните мрежи, но и от тези имиджовият ефект едва ли ще е значим.

Иначе кампанията си бълбука – като за начало. До 2 октомври може и да се ожълти. А „Български възход“ на Стефан Янев я стартира в Бургас, от откритата сцена „Охлюва“. Чудесно място да вдигнат платната.

Заглавна снимка: © Севда Семер

Източник

Introducing message data protection for Amazon SNS

Post Syndicated from Julian Wood original https://aws.amazon.com/blogs/compute/introducing-message-data-protection-for-amazon-sns/

This post is written by Otavio Ferreira, Senior Software Development Manager, Marc Pinaud, Senior Product Manager, Usman Nisar, Senior Software Engineer, Hardik Vasa, Senior Solutions Architect, and Mithun Mallick, Senior Specialist Solution Architect.

Today, we are announcing the public preview release of new data protection capabilities for Amazon Simple Notification Service (SNS), message data protection. This is a new way to discover and protect sensitive data in motion at scale, without writing custom code.

SNS is a fully managed serverless messaging service. It provides topics for push-based, many-to-many pub/sub messaging for decoupling distributed systems, microservices, and event-driven serverless applications. As applications grow, so does the amount of data transmitted and the number of systems sending and receiving data. When moving data between different applications, guardrails can help you comply with data privacy regulations that require you to safeguard sensitive personally identifiable information (PII) or protected health information (PHI).

With message data protection for SNS, you can scan messages in real time for PII/PHI data and receive audit reports containing scan results. You can also prevent applications from receiving sensitive data by blocking inbound messages to an SNS topic or outbound messages to an SNS subscription. Message data protection for SNS supports a repository of over 25 unique PII/PHI data identifiers. These include people’s names, addresses, social security numbers, credit card numbers, and prescription drug codes.

These capabilities can help you adhere to a variety of compliance regulations, including HIPAA, FedRAMP, GDPR, and PCI. For more information, including the complete list of supported data identifiers, see message data protection in the SNS Developer Guide.

Overview

SNS topics enable you to integrate distributed applications more easily. As applications become more complex, it can become challenging for topic owners to manage the data flowing through their topics. Developers that publish messages to a topic may inadvertently send sensitive data, increasing regulatory risk. Message data protection enables SNS topic owners to protect sensitive application data with built-in, no-code, scalable capabilities.

To discover and protect data flowing through SNS topics with message data protection, topic owners associate data protection policies to their topics. Within these policies, you can write statements that define which types of sensitive data you want to discover and protect. As part of this, you can define whether you want to act on data flowing inbound to a topic or outbound to a subscription, which AWS accounts or specific AWS Identity and Access Management (AWS IAM) principals the policy is applicable to, and the actions you want to take on the data.

Message data protection provides two actions to help you protect your data. Auditing, to report on the amount of PII/PHI found, and blocking, to prevent the publishing or delivery of payloads that contain PII/PHI data. Once the data protection policy is set, message data protection uses pattern matching and machine learning models to scan your messages in real time for PII/PHI data identifiers and enforce the data protection policy.

For auditing, you can choose to send audit reports to Amazon Simple Storage Service (S3) for archival, Amazon Kinesis Data Firehose for analytics, or Amazon CloudWatch for logging and alarming. Message data protection does not interfere with the topic owner’s ability to use message data encryption at rest, nor with the subscriber’s ability to filter out unwanted messages using message filtering.

Applying message data protection in a use case

Consider an application that processes a variety of transactions for a set of health clinics, an organization that operates in a regulated environment. Compliance frameworks require that the organization take measures to protect both sensitive health records and financial information.

Reference architecture

The application is based on an event-driven serverless architecture. It has a data protection policy attached to the topic to audit for sensitive data and prevent downstream systems from processing certain data types.

The application publishes an event to an SNS topic every time a patient schedules a visit or sees a doctor at a clinic. The SNS topic fans out the event to two subscribed systems, billing and scheduling. Each system stores events in an Amazon SQS queue, which is processed using an AWS Lambda function.

Setting a data protection policy to an SNS topic

You can apply a data protection policy to an SNS topic using the AWS Management Console, the AWS CLI, or the AWS SDKs. You can also use AWS CloudFormation to automate the provisioning of the data protection policy.

This example uses CloudFormation to provision the infrastructure. You have two options for deploying the resources:

  • Deploy the resources by using the message data protection deploy script within the aws-sns-samples repository in GitHub.
  • Alternatively, use the following four CloudFormation templates in order. Allow time for each stack to complete before deploying the next stack, to create the following resources:

1. Prerequisites template

  • Two IAM roles with a managed policy that allows access to receive messages from the SNS topic, one for the billing and another for scheduling system, respectively.

2. Topic owner template

  • SNS topic that delivers events to two distinct systems.
  • A data protection policy that defines both auditing and blocking actions for specific types of PII and PHI.
  • S3 bucket to archive audit findings.
  • CloudWatch log group to monitor audit findings.
  • Kinesis Data Firehose to deliver audit findings to other destinations.

3. Scheduling subscriber template

  • SQS queue for the Scheduling system.
  • Lambda function for the Scheduling system.

4. Billing subscriber template

  • SQS queue for the Billing system.
  • Lambda function for the Billing system.

CloudFormation creates the following data protection policy as part of the topic owner template:

  ClinicSNSTopic:
    Type: 'AWS::SNS::Topic'
    Properties:
      TopicName: SampleClinic
      DataProtectionPolicy:
        Name: data-protection-example-policy
        Description: Policy Description
        Version: 2021-06-01
        Statement:
          - Sid: audit
            DataDirection: Inbound
            Principal:
             - '*'
            DataIdentifier:
              - 'arn:aws:dataprotection::aws:data-identifier/Address'
              - 'arn:aws:dataprotection::aws:data-identifier/AwsSecretKey'
              - 'arn:aws:dataprotection::aws:data-identifier/DriversLicense-US'
              - 'arn:aws:dataprotection::aws:data-identifier/EmailAddress'
              - 'arn:aws:dataprotection::aws:data-identifier/IpAddress'
              - 'arn:aws:dataprotection::aws:data-identifier/NationalDrugCode-US'
              - 'arn:aws:dataprotection::aws:data-identifier/PassportNumber-US'
              - 'arn:aws:dataprotection::aws:data-identifier/Ssn-US'
            Operation:
              Audit:
                SampleRate: 99
                FindingsDestination:
                  CloudWatchLogs:
                    LogGroup: !Ref AuditCWLLogs
                  Firehose:
                    DeliveryStream: !Ref AuditFirehose
                NoFindingsDestination:
                  S3:
                    Bucket: !Ref AuditS3Bucket
          - Sid: deny-inbound
            DataDirection: Inbound
            Principal:
              - '*'
            DataIdentifier:
              - 'arn:aws:dataprotection::aws:data-identifier/PassportNumber-US'
              - 'arn:aws:dataprotection::aws:data-identifier/Ssn-US'
            Operation:
              Deny: {}
          - Sid: deny-outbound-billing
            DataDirection: Outbound
            Principal:
              - !ImportValue "BillingRoleExportDataProtectionDemo"
            DataIdentifier:
              - 'arn:aws:dataprotection::aws:data-identifier/NationalDrugCode-US'
            Operation:
              Deny: {}
          - Sid: deny-outbound-scheduling
            DataDirection: Outbound
            Principal:
              - !ImportValue "SchedulingRoleExportDataProtectionDemo"
            DataIdentifier:
              - 'arn:aws:dataprotection::aws:data-identifier/Address'
              - 'arn:aws:dataprotection::aws:data-identifier/CreditCardNumber'
            Operation:
              Deny: {}

This data protection policy defines:

  • Metadata about the data protection policy, for example name, description, version, and statement IDs (sid).
  • The first statement (sid: audit) scans inbound messages from all principals for addresses, social security numbers, driver’s license, email addresses, IP addresses, national drug codes, passport numbers, and AWS secret keys.
    • The sampling rate is set to 99% so almost all messages are scanned for the defined PII/PHI.
    • Audit results with findings are delivered to CloudWatch Logs and Kinesis Data Firehose for analytics. Audit results without findings are archived to S3.
  • The second statement (sid: deny-inbound) blocks inbound messages to the topic coming from any principal, if the payload includes either a social security number or passport number.
  • The third statement (sid: deny-outbound-billing) blocks the delivery of messages to subscriptions created by the BillingRole, if the messages include any national drug codes.
  • The fourth statement (sid: deny-outbound-scheduling) blocks the delivery of messages to subscriptions created by the SchedulingRole, if the messages include any credit card numbers or addresses.

Testing the capabilities

Test the message data protection capabilities using the following steps:

  1. Publish a message without PII/PHI data to the Clinic Topic. In the CloudWatch console, navigate to the log streams of the respective Lambda functions to confirm that the message is delivered to both subscribers. Both messages are delivered because the payload contains no sensitive data for the data protection policy to deny. The log message looks as follows:
    "This is a demo! received from queue arn:aws:sqs:us-east-1:111222333444:Scheduling-SchedulingQueue"
  2. Publish a message with a social security number (try ‘SSN: 123-12-1234’) to the Clinic Topic. The request is denied, and an audit log is delivered to your CloudWatch Logs log group and Firehose delivery stream.
  3. Navigate to the CloudWatch log console and confirm that the audit log is visible in the /aws/vendedlogs/clinicaudit CloudWatch log group. The following example shows that the data protection policy (sid: deny-inbound) denied the inbound message as the payload contains a US social security number (SSN) between the 5th and the 15th character.
    {
        "messageId": "77ec5f0c-5129-5429-b01d-0457b965c0ac",
        "auditTimestamp": "2022-07-28T01:27:40Z",
        "callerPrincipal": "arn:aws:iam::111222333444:role/Admin",
        "resourceArn": "arn:aws:sns:us-east-1:111222333444:SampleClinic",
        "dataIdentifiers": [
            {
                "name": "Ssn-US",
                "count": 1,
                "detections": [
                    {
                        "start": 5,
                        "end": 15
                    }
                ]
            }
        ]
    }
    
  4. You can use the CloudWatch metrics, MessageWithFindings and MessageWithNoFindings, to track how frequently PII/PHI data is published to an SNS topic. Here’s an example of what the CloudWatch metric graph looks like as the amount of sensitive data published to a topic varies over time:
    CloudWatch metric graph
  5. Publish a message with an address (try ‘410 Terry Ave N, Seattle 98109, WA’). The request is only delivered to the Billing subscription. The data protection policy (sid: deny-outbound-scheduling) denies the outbound message to the Scheduling subscription as the payload contains an address.
  6. Confirm that the message is only delivered to the Billing Lambda function by navigating to the CloudWatch console and inspecting the logs of the two respective Lambda functions. The CloudWatch log of the Billing Lambda function contains the sensitive message that was delivered to it as it was an authorized subscriber. Here’s an example of what the log contains:410 Terry Ave N, Seattle 98109, WA received from queue arn:aws:sqs:us-east-1:111222333444:Billing-BillingQueue
  7. Publish a message with a drug code (try ‘NDC: 0777-3105-02’). The request is only delivered to the Scheduling subscription. The data protection policy (sid: deny-outbound-billing) denies the outbound message to the Billing subscription as the payload contains a drug code.
  8. Confirm that the message is only delivered to the Scheduling Lambda function by navigating to the CloudWatch console and inspecting the logs of the two respective Lambda functions. The CloudWatch log of the Scheduling Lambda function contains the sensitive message that was delivered to it as it was an authorized subscriber. Here’s an example of what the log contains:
    NDC: 0777-3105-02 received from queue arn:aws:sqs:us-east-1:111222333444:Scheduling-SchedulingQueue

Cleaning up

After testing, avoid incurring usage charges by deleting the resources that you created. Navigate to the CloudFormation console and delete the four CloudFormation stacks that you created during the walkthrough. Remember, you must delete all the objects from the S3 bucket before deleting the stack.

Conclusion

This post shows how message data protection enables a topic owner to discover and protect sensitive data that is exchanged through SNS topics. The example shows how to create a data protection policy that generates audit reports for sensitive data and blocks messages from delivery to specific subscribers if the payload contains sensitive data.

Get started with SNS and message data protection by using the AWS Management Console, AWS Command Line Interface (CLI), AWS SDKs, or CloudFormation.

For more details, see message data protection in the SNS Developer Guide. For information on pricing, see SNS pricing.

For more serverless learning resources, visit Serverless Land.

[$] The transparent huge page shrinker

Post Syndicated from original https://lwn.net/Articles/906511/

Huge pages are a mechanism implemented by the CPU that allows the management
of memory in larger chunks. Use of huge pages can increase performance
significantly, which is why the kernel has a “transparent huge page”
mechanism to try to create them when possible. But a huge page will only
be helpful if most of the memory contained within it is actually in use;
otherwise it is just an expensive waste of memory. This patch
set
from Alexander Zhu implements a mechanism to detect underutilized
huge pages and recover that wasted memory for other uses.

Integrate AWS IAM Identity Center (successor to AWS Single Sign-On) with AWS Lake Formation fine-grained access controls

Post Syndicated from Benon Boyadjian original https://aws.amazon.com/blogs/big-data/integrate-aws-iam-identity-center-successor-to-aws-single-sign-on-with-aws-lake-formation-fine-grained-access-controls/

Data lakes are a centralized repository for storing structured and unstructured data at scale. Data lakes enable you to create dashboards, perform big data processing and real-time analytics, and create machine learning (ML) models on your data to drive business decisions.

Many customers are choosing AWS Lake Formation as their data lake management solution. Lake Formation is an integrated data lake service that makes it simple for you to ingest, clean, catalog, transform, and secure your data and make it available for analysis and ML.

However, some companies require account authentication and authorization to be managed through AWS IAM Identity Center (successor to AWS Single Sign-On), which doesn’t have a built-in integration with Lake Formation.

Integrating Lake Formation with IAM Identity Center can help you manage data access at the organization level, consolidating AWS account and data lake authentication and authorization.

In this post, we walk through the steps to integrate IAM Identity Center with Lake Formation.

Solution overview

In this post, we configure IAM Identity Center with permission sets for your data lake personas. These are the permissions that allow your data lake users to access Lake Formation. When the permission sets are assigned to your data lake account, IAM Identity Center creates Identity and Access Management (IAM) roles in that account. The IAM roles are prefixed with AWSReservedSSO_<Permission Set Name>.

In Lake Formation, you can grant data resource permissions to IAM users and roles. To integrate with IAM Identity Center, you will grant data resource access to the IAM roles created by IAM Identity Center.

Now, when users access the data lake account through the IAM Identity Center portal, they assume an IAM role that has access to Lake Formation resources.

The following diagram illustrates this solution architecture.

To implement the solution, complete the following high-level steps:

  1. Create a permission set within IAM Identity Center
  2. Grant Users or Groups access to the data lake account in IAM Identity Center
  3. Assign an IAM Identity Center role as a Data Lake Administrator
  4. Grant IAM Identity Center generated IAM role data lake permissions in Lake Formation
  5. Grant IAM Identity Center generated IAM role data location permissions in Lake Formation

Prerequisites

For this walkthrough, you should have the following prerequisites: 

Create a permission set with IAM Identity Center

To create your permission set, complete the following steps:

  1. Sign into the AWS Management Console with your management account and go to the Region where IAM Identity Center is configured.
  2. On the IAM Identity Center Console, choose Permissions sets in the navigation pane.
  3. Choose Create permission set.

  4. Select Custom permission set, then choose Next.

  5. Next, you must specify policies. The first permission set you create should have data lake admin privileges.
    AWS recommends granting data lake admins the following AWS managed policies: AWSGlueConsoleFullAccess, AWSLakeFormationCrossAccountManager, AWSLakeFormationDataAdmin, AmazonAthenaFullAccess, and CloudWatchLogsReadOnlyAccess. However, if these permissions are too permissive or not permissive enough, you may prefer using customer managed policies.
  6. Choose Next
  7. Specify permission set details, then choose Next.

  8. Review your settings, then choose Create.

Repeat the steps to create a data analyst role to grant Lake Formation access. For this post, we created the role LakeFormationDataAnalyst with the policy AmazonAthenaFullAccess.

Grant users or groups access to the data lake account in IAM Identity Center

To grant access to users and groups, complete the following steps:

  1. On the IAM Identity Center console, chose AWS accounts in the navigation pane.
  2. Choose Assign users or groups.

  3. Select the user or group you want to assign the data lake account permissions to (DataLakeAdmin).
  4. Choose Next.

  5. Select the permission you created earlier.
  6. Choose Next.

  7. Review your settings, then choose Submit.

Verify your IAM Identity Center permissions have been successfully granted by visiting your IAM Identity Center Portal, choosing the data lake admin, and signing in to the console.

Assign an IAM Identity Center role as a data lake administrator

The following steps set up a data lake administrator with the IAM role created by IAM Identity Center. Administrators have full access to the Lake Formation console, and control the initial data configuration and access permissions. For all users and groups that don’t need to be data lake administrators, skip to the next series of steps.

  1. Sign in to the console as the data lake account with admin access.
  2. Open the Lake Formation console.A pop-up window appears, prompting you to define your administrators.
  3. Select Add other AWS users or roles.
  4. Choose the permission set you created earlier (starting with AWSReservedSSO_DataLakeAdmin).
  5. Choose Get started.
  6. On the Administrative roles and tasks page, under Database creators, choose Grant.
  7. Choose your data lake admin role.
  8. Select Create database under Catalog permissions and Grantable permissions.
  9. Choose Grant.

You now have an IAM Identity Center-generated IAM principal that is assigned as the data lake administrator and database creator.

Grant the IAM Identity Center role data lake permissions in Lake Formation

You now manage data lake permissions. For more information, refer to Managing Lake Formation permissions. 

Whether you’re managing permissions with LF-tags or named resources, the steps for granting access remain the same

  1. On the Lake Formation console, under Permissions in the navigation pane, choose Data lake permissions.
  2. Choose Grant.
  3. Select IAM users and roles.
  4. Choose the AWSReservedSSO_LakeFormationDataAnalyst role.
  5. Grant access to database and table permissions as applicable, then choose Grant.

You now have an IAM Identity Center-generated IAM principal data permissions.

Grant the IAM Identity Center role data location permissions in Lake Formation

When granting access to data locations, the process remains the same.

  1. On the Lake Formation console, under Permissions in the navigation pane, choose Data locations.
  2. Choose Grant.
  3. Choose the AWSReservedSSO_LakeFormationDataAnalyst role.
  4. Complete the remaining fields and choose Grant.

You now have an IAM Identity Center-generated IAM principal with Data location access.

Validate data access

We now validate data access for the IAM Identity Center principal.

  1. Sign in to the console through IAM Identity Center as the principal you granted access to. For this post, we’re logging in as the LakeFormationDataAnalyst role.

    To test data access, we run some queries in Amazon Athena.
  2. On the Athena console, choose Query editor.
  3. On the Settings tab, confirm that a query result location is set up.
  4. If you don’t have a query result location, choose Manage and configure your query result location and encryption.
  5. In the Athena query editor, on the Editor tab, choose the database that you granted access to.If the principal doesn’t have access to the Lake Formation table and data location, you won’t be able to view data in Athena.
  6. Choose the menu icon next to your table and choose Generate table DDL.

Confirm that the data appears on the Query results tab.

Conclusion

In this post, we demonstrated how to integrate IAM Identity Center with Lake Formation permissions. You can now grant IAM Identity Center identities administrator, database creation, database and table, and data location access in Lake Formation. Managing data lake permissions through IAM Identity Center allows you to control data access from your management account, helping to improve your scalability and security.

If you’re wondering how to adapt this solution to Tag-based access control, read Easily manage your data lake at scale using AWS Lake Formation Tag-based access control and apply the techniques you learned from this blog.


About the authors

Benon Boyadjian is a Private Equity Solutions Architect at AWS. He is passionate about helping customers understand the impact AWS can have on their businesses and guiding their AWS implementations. In his free time, he enjoys swimming, snowboarding, and playing with his cat Dirt.

Janakiraman Shanmugam is a Senior Data Architect at Amazon Web Services . He has a focus in Data & Analytics and enjoys helping customers to solve Big data & machine learning problems. Outside of the office, he loves to be with his friends and family and spend time outdoors.

Baxter SIGMA Spectrum Infusion Pumps: Multiple Vulnerabilities (FIXED)

Post Syndicated from Deral Heiland original https://blog.rapid7.com/2022/09/08/baxter-sigma-spectrum-infusion-pumps-multiple-vulnerabilities-fixed/

Baxter SIGMA Spectrum Infusion Pumps: Multiple Vulnerabilities (FIXED)

Rapid7, Inc. (Rapid7) discovered vulnerabilities in two TCP/IP-enabled medical devices produced by Baxter Healthcare. The affected products are:

  • SIGMA Spectrum Infusion Pump (Firmware Version 8.00.01)
  • SIGMA Wi-Fi Battery (Firmware Versions 16, 17, 20 D29)

Rapid7 initially reported these issues to Baxter on April 20, 2022. Since then, members of our research team have worked alongside the vendor to discuss the impact, resolution, and a coordinated response for these vulnerabilities.

Product description

Baxter’s SIGMA Spectrum product is a commonly used brand of infusion pumps, which are typically used by hospitals to deliver medication and nutrition directly into a patient’s circulatory system. These TCP/IP-enabled devices deliver data to healthcare providers to enable more effective, coordinated care.

Credit

The vulnerabilities in two TCP/IP-enabled medical devices were discovered by Deral Heiland, Principal IoT Researcher at Rapid7. They are being disclosed in accordance with Rapid7’s vulnerability disclosure policy after coordination with the vendor.

Vendor statement

“In support of our mission to save and sustain lives, Baxter takes product security seriously. We are committed to working with the security researcher community to verify and respond to legitimate vulnerabilities and ask researchers to participate in our responsible reporting process. Software updates to disable Telnet and FTP (CVE-2022-26392) are in process. Software updates to address the format string attack (CVE-2022-26393) are addressed in WBM version 20D30 and all other WBM versions. Authentication is already available in Spectrum IQ (CVE-2022-26394). Instructions to erase all data and settings from WBMs and pumps before decommissioning and transferring to other facilities (CVE-2022-26390) are in process for incorporation into the Spectrum Operator’s Manual and are available in the Baxter Security Bulletin.”

Exploitation and remediation

This section details the potential for exploitation and our remediation guidance for the issues discovered and reported by Rapid7, so that defenders of this technology can gauge the impact of, and mitigations around, these issues appropriately.

Battery units store Wi-Fi credentials (CVE-2022-26390)

Rapid7 researchers tested Spectrum battery units for vulnerabilities. We found all units that were tested store Wi-Fi credential data in non-volatile memory on the device.

When a Wi-Fi battery unit is connected to the primary infusion pump and the infusion pump is powered up, the pump will transfer the Wi-Fi credential to the battery unit.

Exploitation

An attacker with physical access to an infusion pump could install a Wi-Fi battery unit (easily purchased on eBay), and then quickly power-cycle the infusion pump and remove the Wi-Fi battery – allowing them to walk away with critical Wi-Fi data once a unit has been disassembled and reverse-engineered.

Also, since these battery units store Wi-Fi credentials in non-volatile memory, there is a risk that when the devices are de-acquisitioned and no efforts are made to overwrite the stored data, anyone acquiring these devices on the secondary market could gain access to critical Wi-Fi credentials of the organization that de-acquisitioned the devices.

Remediation

To mitigate this vulnerability, organizations should restrict physical access by any unauthorized personnel to the infusion pumps or associated Wi-Fi battery units.

In addition, before de-acquisitioning the battery units, batteries should be plugged into a unit with invalid or blank Wi-Fi credentials configured and the unit powered up. This will overwrite the Wi-Fi credentials stored in the non-volatile memory of the batteries. Wi-Fi must be enabled on the infusion pump unit for this overwrite to work properly.

Format string vulnerabilities

“Hostmessage” (CVE-2022-26392)

When running a telnet session on the Baxter Sigma Wi-Fi Battery Firmware Version 16, the command “hostmessage” is vulnerable to format string vulnerability.

Exploitation

An attacker could trigger this format string vulnerability by entering the following command during a telnet session:

Baxter SIGMA Spectrum Infusion Pumps: Multiple Vulnerabilities (FIXED)

To view the output of this format string vulnerability, `settrace state=on` must be enabled in the telnet session. `set trace` does not need to be enabled for the format string vulnerability to be triggered, but it does need to be enabled if the output of the vulnerability is to be viewed.

Once `set trace` is enabled and showing output within the telnet session screen, the output of the vulnerability can be viewed, as shown below, where each `%x` returned data from the device’s process stack.

Baxter SIGMA Spectrum Infusion Pumps: Multiple Vulnerabilities (FIXED)

SSID (CVE-2022-26393)

Rapid7 also found another format string vulnerability on Wi-Fi battery software version 20 D29. This vulnerability is triggered within SSID processing by the `get_wifi_location (20)` command being sent via XML to the Wi-Fi battery at TCP port 51243 or UDP port 51243.

Baxter SIGMA Spectrum Infusion Pumps: Multiple Vulnerabilities (FIXED)

Exploitation

This format string vulnerability can be triggered by first setting up a Wi-Fi access point containing format string specifiers in the SSID. Next, an attacker could send a `get_wifi_location (20)` command via TCP Port 51243 or UDP port 51243 to the infusion pump. This causes the device to process the SSID name of the access point nearby and trigger the exploit.  The results of the triggering of format strings can be viewed with trace log output within a telnet session as shown below.

Baxter SIGMA Spectrum Infusion Pumps: Multiple Vulnerabilities (FIXED)

The SSID of `AAAA%x%x%x%x%x%x%x%x%x%x%x%x%x%x` allows for control of 4 bytes on the stack, as shown above, using the `%x` to walk the stack until it reaches 41414141. By changing the leading `AAAA` in the SSID, a malicious actor could potentially use the format string injection to read and write arbitrary memory. At a minimum, using format strings of `%s` and `%n` could allow for a denial of service (DoS) by triggering an illegal memory read (`%s`) and/or illegal memory write (`%n`).

Note that in order to trigger this DoS effect, the attacker would need to be within normal radio range and either be on the device’s network or wait for an authorized `get_wifi_location` command (the latter would itself be a usual, non-default event).

Remediation

To prevent exploitation, organizations should restrict access to the network segments containing the infusion pumps. They should also monitor network traffic for any unauthorized host communicating over TCP and UDP port 51243 to infusion pumps. In addition, be sure to monitor Wi-Fi space for rogue access points containing format string specifiers within the SSID name.

Unauthenticated network reconfiguration via TCP/UDP (CVE-2022-26394)

All Wi-Fi battery units tested (versions 16, 17, and 20 D29) allowed for remote unauthenticated changing of the SIGMA GW IP address. The SIGMA GW setting is used for configuring the back-end communication services for the devices operation.

Exploitation

An attacker could accomplish a remote redirect of SIGMA GW by sending an XML command 15 to TCP or UDP port 51243. During testing, only the SIGMA GW IP was found to be remotely changeable using this command. An example of this command and associated structure is shown below:

Baxter SIGMA Spectrum Infusion Pumps: Multiple Vulnerabilities (FIXED)

This could be used by a malicious actor to man-in-the-middle (MitM) all the communication initiated by the infusion pump. This could lead to information leakage and/or data being manipulated by a malicious actor.

Remediation

Organizations using SIGMA Spectrum products should restrict access to the network segments containing the infusion pumps. They should also monitor network traffic for any unauthorized host communicating over TCP and UDP port 51243 to the infusion pumps.

UART configuration access to Wi-Fi configuration data (additional finding)

The SIGMA Spectrum infusion pump unit transmits data unencrypted to the Wi-Fi battery unit via universal asynchronous receiver-transmitter (UART). During the power-up cycle of the infusion pump, the first block of data contains the Wi-Fi configuration data. This communication contains the SSID and 64-Character hex PSK.

Baxter SIGMA Spectrum Infusion Pumps: Multiple Vulnerabilities (FIXED)

Exploitation

A malicious actor with physical access to an infusion pump can place a communication shim between the units (i.e., the pump and the Wi-Fi battery) and capture this data during the power-up cycle of the unit.

Baxter SIGMA Spectrum Infusion Pumps: Multiple Vulnerabilities (FIXED)

Remediation

To help prevent exploitation, organizations should restrict physical access by unauthorized persons to the infusion pumps and associated Wi-Fi battery units.

Note that this is merely an additional finding based on physical, hands-on access to the device. While Baxter has addressed this finding through better decommissioning advice to end users, this particular issue does not rank for its own CVE identifier, as local encryption is beyond the scope of the hardware design of the device.

Disclosure timeline

Baxter is an exemplary medical technology company with an obvious commitment to patient and hospital safety. While medtech vulnerabilities can be tricky and expensive to work through, we’re quite pleased with the responsiveness, transparency, and genuine interest shown by Baxter’s product security teams.

  • April, 2022: Issues discovered by Deral Heiland of Rapid7
  • Wed, April 20, 2022: Issues reported to Baxter product security
  • Wed, May 11, 2022: Update requested from Baxter
  • Wed, Jun 1, 2022: Teleconference with Baxter and Rapid7 presenting findings
  • Jun-Jul 2022: Several follow up conversations and updates between Baxter and Rapid7
  • Tue, Aug 2, 2022: Coordination tracking over VINCE and more teleconferencing involving Baxter, Rapid7, CERT/CC, and ICS-CERT (VU#142423)
  • Wed, Aug 31, 2022: Final review of findings and mitigations
  • Thu Sep 8, 2022: Baxter advisory published
  • Thu, Sep 8, 2022: Public disclosure of these issues
  • Thu, Sep 8, 2022: ICS-CERT advisory published

NEVER MISS A BLOG

Get the latest stories, expertise, and news about security today.

Additional reading:

The collective thoughts of the interwebz