Post Syndicated from Talks at Google original https://www.youtube.com/watch?v=01uAAyuxvvA
Ekstrand: NVK update: Enabling new extensions, conformance status & more
Post Syndicated from original https://lwn.net/Articles/936554/
Faith Ekstrand has provided
an update on the status of the NVK
Vulkan driver for NVIDIA GPUs.
Probably the single most common question I get from folks is, “When
will NVK be in upstream mesa?” The short answer is that it’ll be
upstreamed along with the new kernel API. The new API is going to
be required in order to implement Vulkan correctly in a bunch of
cases. Even though it mostly works on top of upstream nouveau, I
don’t want to be maintaining support for that interface for another
10 years when it only partially works.We don’t yet have an exact timetable for when the new API will be
ready. I’m currently hoping that we get it all upstream this year
but I can’t say when exactly.
How To Install Matter Server w/ Docker on Home Assistant!
Post Syndicated from digiblurDIY original https://www.youtube.com/watch?v=8a7ZUQqY2JA
Security updates for Tuesday
Post Syndicated from original https://lwn.net/Articles/936549/
Security updates have been issued by Debian (c-ares and libx11), Fedora (chromium and kubernetes), Red Hat (python3 and python38:3.8, python38-devel:3.8), and SUSE (amazon-ssm-agent, kernel, kubernetes1.24, libvirt, nodejs16, openssl-1_1, and webkit2gtk3).
Cloudflare Zaraz supports JSONata
Post Syndicated from Yo'av Moshe original http://blog.cloudflare.com/zaraz-adds-jsonata-support/


Cloudflare users leverage Zaraz for loading their third-party JavaScript tools. Tools like analytics, conversion pixels, widgets and alike, load faster and safer when loaded through Zaraz.
When configuring a tool in Zaraz, users can specify the payload to be included when sending information to it. This allows for the transmission of more detailed data. For example, when sending the "Button Clicked" event to Google Analytics, users can include additional information such as the ID of the button element and the content of the user_id cookie at the time of the button press. In Zaraz, users have the flexibility to add as many fields as desired when configuring the action.
Typically, information reaches Zaraz through the execution of zaraz.track("event name", { properties }) within the website's code. The properties object can contain relevant details that will be sent to third-party tools, such as the button ID in the previous example. However, there are cases where users may need to process and manipulate the information before sending it to their third-party tools.
To address this requirement, we recently introduced Worker Variables, which enables users to send information to a Cloudflare Worker, perform manipulations on it, and return a modified value. This feature offers immense power and flexibility. For instance, users can communicate with their backend server to retrieve data and leverage JavaScript to perform necessary calculations. With Worker Variables, users have access to a fully-featured Worker, opening up endless possibilities.
However, feedback from our users highlighted the need for a middle-ground solution. Sometimes, the data manipulation required is minor, and employing a Cloudflare Worker might feel like overkill. It is in response to this feedback that we decided to integrate with JSONata.
What is JSONata?
JSONata calls itself a JSON query and transformation language. While some developers may already be familiar with jq, the command-line JSON processor, JSONata offers similar features with a syntax that we believe is more intuitive and easier to understand. Since JSONata is a JavaScript library, it was very easy to integrate into Cloudflare Zaraz.
Let’s say we have JSON document like the following:
{
  "name": "Jane Smith",
  "address": {
    "street": "123 High St",
    "city": "London"
  },
  "pets": [
    { "type": "hamster", "name": "Rex" },
    { "type": "parrot", "name": "Milo" },
    { "type": "parrot", "name": "Alfie" }
  ]
}
With JSONata, with JSONata, one can run interesting queries on the document:
$count(pets) // 3

address.city // London

pets[type="parrot"].name // ["Alfie", "Milo"]
The JSONata documentation includes many examples for what you do with it, and there’s even a playground where you can try your JSONata queries live.
Using JSONata with Zaraz
JSONata has been tightly integrated with Cloudflare Zaraz, allowing you to leverage its capabilities in the fields of all Actions, Triggers, and Variables. Before diving into writing your JSONata expressions, it's essential to understand the JSON document you'll be working with.
Similar to Worker Variables or the HTTP Request tool, JSONata has access to the Zaraz Context. This object contains information from your zaraz.track() and zaraz.ecommerce() calls, as well as automatically gathered data by Zaraz, such as the current page URL, cookies, page title, user-agent string, and more. You can find the complete reference for this object in the Zaraz documentation.
Using your JSONata query is straightforward once you are familiar with it. To incorporate the query into your field content, simply enclose it within double curly brackets. The expression will be passed to JSONata along with the Zaraz Context object, and the resulting value will be used for the field.
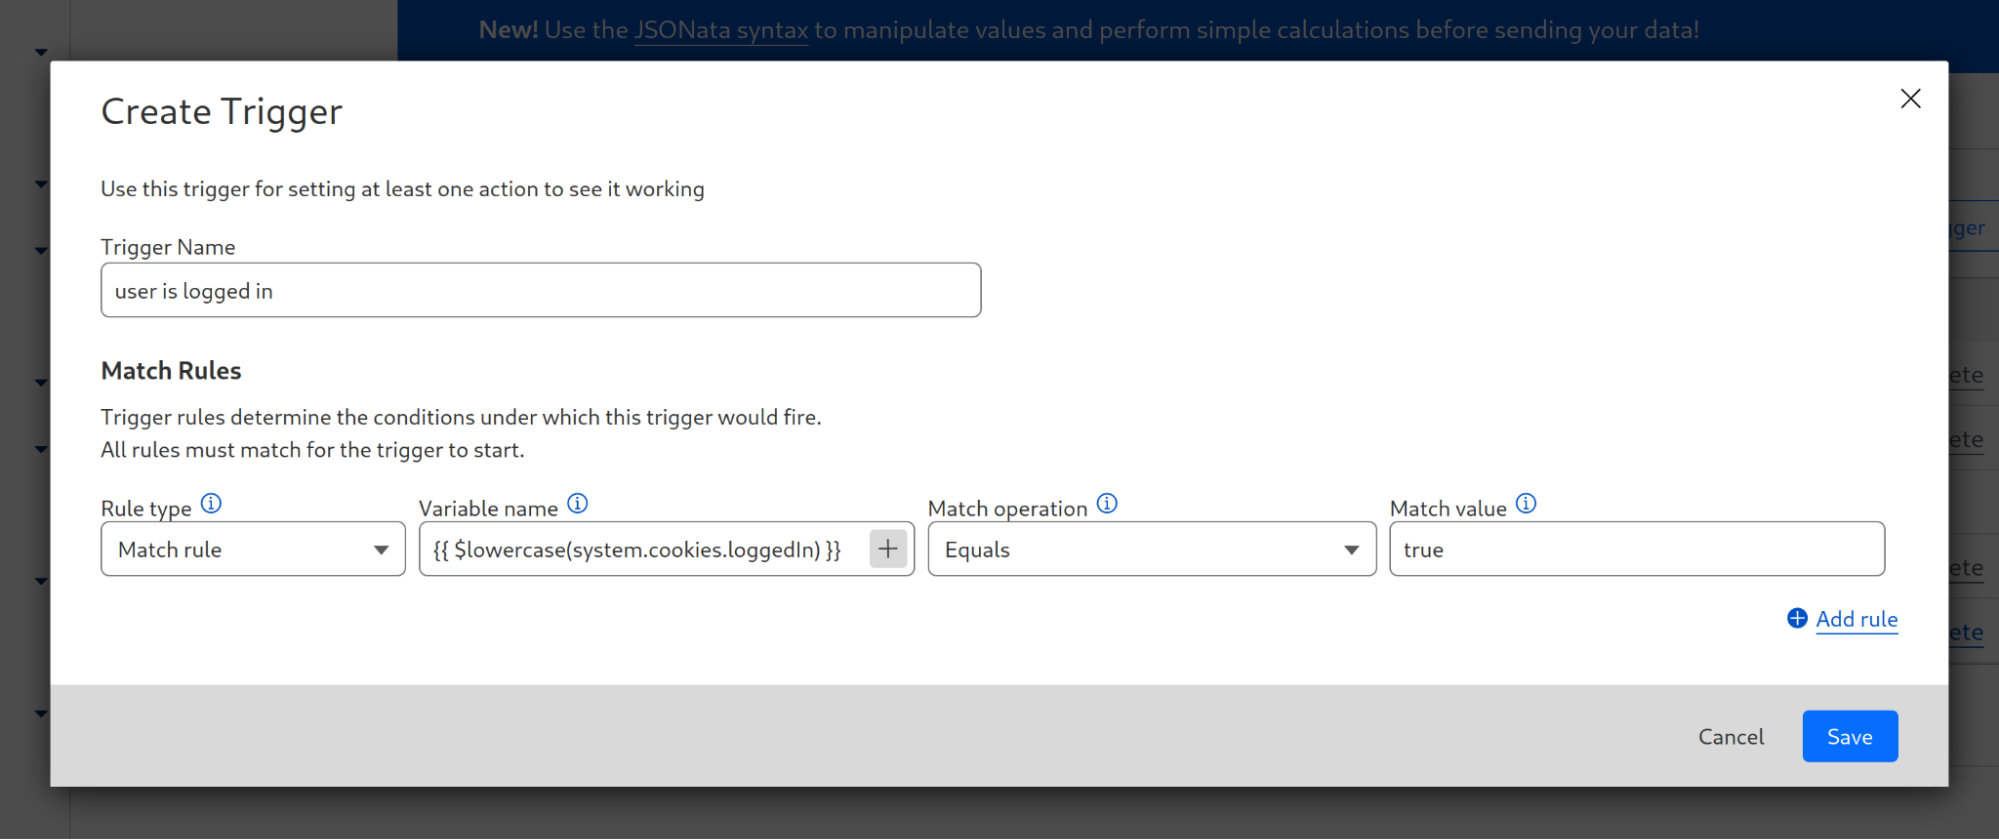
Let's explore two examples from our documentation. Often, there's a need to convert a string to lowercase, such as when comparing it to another value in a regular expression. Suppose the original string is derived from a cookie named loggedIn, that specifies if the current user is logged in. In that case, we can use JSONata to transform the value to lowercase using the expression $lowercase(system.cookies.loggedIn). If we want to use this expression within a trigger, we navigate to the Zaraz dashboard and choose our trigger, locate the relevant match rule, and enter {{ $lowercase(system.cookies.loggedIn) }} as the value. Now, the cookie value will be compared in its lowercase format.
You can also run simple calculations. Assuming you are using zaraz.track() to send the cart content like this:
zaraz.track("Cart Viewed",
  {  products:
	[
	{
  	sku: '2671033',
  	name: 'V-neck T-shirt',
  	price: 14.99,
  	quantity: 3
	},{
  	sku: '2671034',
  	name: 'T-shirt',
  	price: 10.99,
  	quantity: 2
	},
	],
  }
);
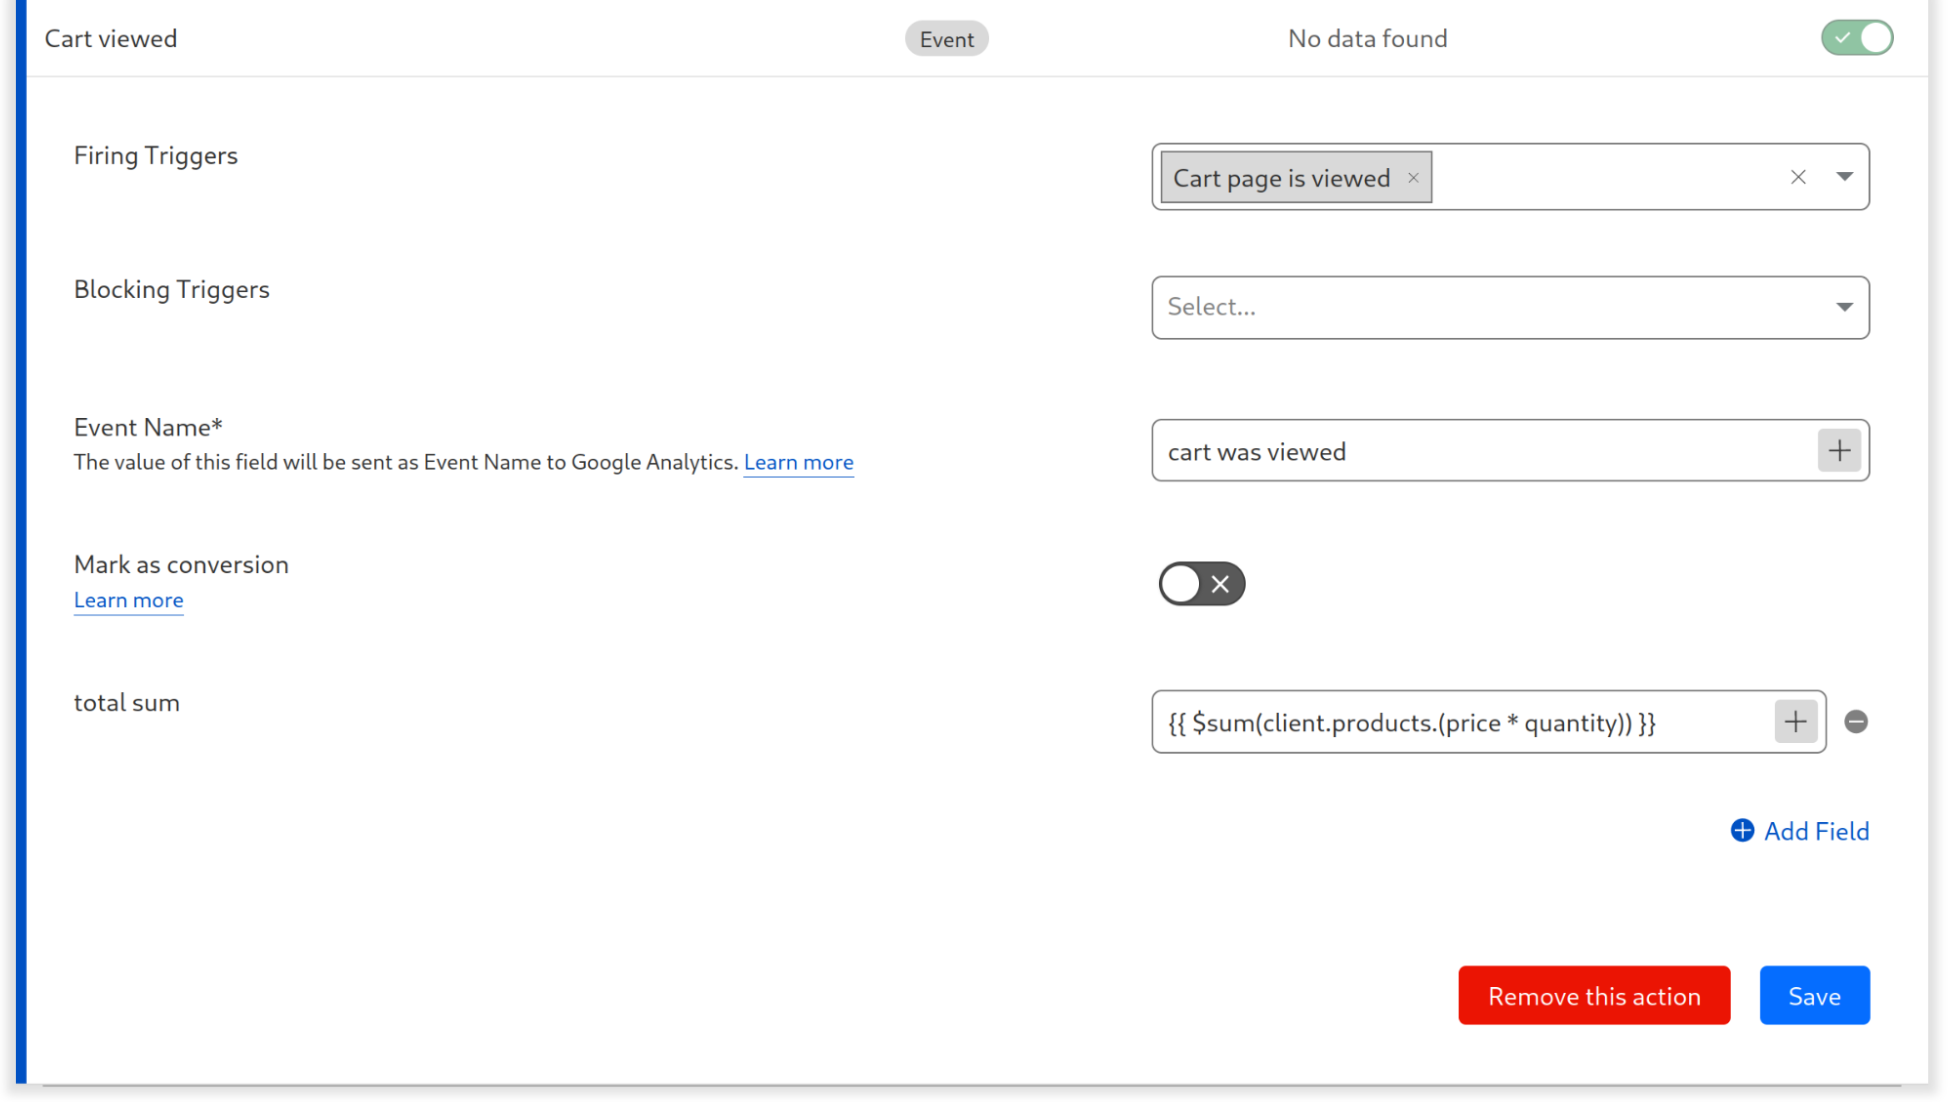
If the field in which you want to include the total sum of all products, you will enter {{ $sum(client.products.(price * quantity)) }}. This will multiply the price of each product by its quantity, and then sum up the total.
Start using JSONata today
JSONata support is available to all Zaraz users at no cost, and it is enabled automatically for all websites. Start using JSONata today to send finely tuned data to your providers or APIs with minimal code and zero maintenance for your data infrastructure. If you need any help – join our Discord channel!
AMD VP1902 is Leviathan FPGA Doubling the Previous-Gen Largest FPGA
Post Syndicated from Patrick Kennedy original https://www.servethehome.com/amd-vp1902-is-leviathan-fpga-doubling-the-previous-gen-largest-fpga/
Built around for chiplets, the new AMD VP1902 is an enormous FPGA that doubles the previous generation’s biggest FPGA’s capabilities
The post AMD VP1902 is Leviathan FPGA Doubling the Previous-Gen Largest FPGA appeared first on ServeTheHome.
More Unity: Dive deeper into 3D worlds, game design and programming
Post Syndicated from Marc Scott original https://www.raspberrypi.org/blog/more-unity-3d-game-design/
Our ‘Intro to Unity’ educational project path is a big success, sparking lots of young people’s passion for 3D game design and programming. Today we introduce the ‘More Unity‘ project path — the perfect next step for young people who have completed our ‘Intro to Unity‘ path. This new free path is designed to bridge the gap for young people before they start on the tutorials on the Unity learning platform.
Our work to create this path builds on our partnership with Unity, through which we aim to offer any young person, anywhere, the opportunity to take their first steps in creating virtual worlds using real-time 3D.
More Unity builds on foundations
After young people have tried out the Unity Engine and C# programming through the ‘Intro to Unity’ path, they’re ready for a deeper exploration of 3D game design. ‘More Unity’ helps them build on the foundational skills they learned in the ‘Intro to Unity’ path. After completing this new path, they’ll be able to add complexity, new challenges, and heaps of fun to all their 3D creations.
We’ve prepared a comprehensive Unity Guide to assist with getting ready to start either the ‘Intro to Unity’ or ‘More Unity’ path. To create with Unity, learners need access to a computer with a graphics card, the latest version of the free Unity Games Engine, and a code editor. For the extra Blender-based projects (see below), they need the latest version of the free Blender software.
Dive into the projects in the ‘More Unity’ path
The project path consists of six projects. Like in ‘Intro to Unity’, each project introduces new skills bit by bit, enabling young people to independently code their own, next-level Unity creation in the final project.
Rainbow run
This first project shows how to build an exciting 3D simulation. With ‘Rainbow run’, learners create colourful tracks and guide a marble to race along them. We also offer them an extra project guide where they can customise the look of their marble using Blender.

Disco dance floor
Next, with ‘Disco dance floor’, learners code an interactive, tilting dance floor that responds to a rolling ball with sound and colour. They can add their own style to the dance floor by following our extra Blender project.

Don’t fall through
‘Don’t fall through’ is the third project in the path. Here, learners code a two-player game that requires strategy and timing as marbles traverse a vanishing tiled floor.

Pixel art reveal
‘Pixel art reveal’ comes next in the path. It helps learners design unique pixel art on a tiled floor and reveal their awesome artwork by rolling a ball across the surface.

Track designer
In ‘Track designer’, we invite learners to truly think like game designers. This project empowers learners to design unique tilting tracks filled with obstacles, personalised effects, sounds, and more.

Marble mayhem
Finally ‘Marble mayhem’ lets young people bring to life all the principles of physics and materials in the Unity Game Engine they’ve learned about while following the ‘More Unity’ path. This is their place to create a one-of-a-kind game or digital toy that truly reflects their creativity.

Growing skills through Unity
‘More Unity’ promotes young people’s creativity, problem-solving, and independence. Each project presents them with the chance to create a virtual world of physics, materials, and mechanics. With each project they’ll learn lots of new skills in 3D modeling, gameplay design, and programming.
The path includes a community gallery where young people can share their new 3D creations and see what their peers all over the world have made.
The skills young people gain through the ‘Intro to Unity’ and ‘More Unity’ path provide them with a solid foundation to continue to learn and create with Unity. To follow their passion for 3D worlds, game design, and programming further, they can move on to the hundreds of tutorials available on Unity’s learning platform.
Get ready for ‘More Unity’: Our support for educators, volunteers and parents
Our detailed Unity guide will help you get everything set up for your young people to start with Unity, and the ‘Intro to Unity‘ path is the place for them to begin before they move on to ‘More Unity‘.
If you or your young people want to get a taste of the fun ‘More Unity’ has in store, there’s the Collision and colours Discover project to try out. This short learning experience showcases the new components the ‘More Unity’ path introduces.
To help our community of CoderDojo and Code Club volunteers bring Unity to their learners, we will host a free Unity-focused webinar on 13 July. Sign up to get a walkthrough of the path from our Learning Manager Mac Bowley, and to ask him any questions you might have.
The post More Unity: Dive deeper into 3D worlds, game design and programming appeared first on Raspberry Pi Foundation.
Implementing AWS Well-Architected best practices for Amazon SQS – Part 3
Post Syndicated from Pascal Vogel original https://aws.amazon.com/blogs/compute/implementing-aws-well-architected-best-practices-for-amazon-sqs-part-3/
This blog is written by Chetan Makvana, Senior Solutions Architect and Hardik Vasa, Senior Solutions Architect.
This is the third part of a three-part blog post series that demonstrates best practices for Amazon Simple Queue Service (Amazon SQS) using the AWS Well-Architected Framework.
This blog post covers best practices using the Performance Efficiency Pillar, Cost Optimization Pillar, and Sustainability Pillar. The inventory management example introduced in part 1 of the series will continue to serve as an example.
See also the other two parts of the series:
- Implementing AWS Well-Architected Best Practices for Amazon SQS – Part 1: Operation Excellence
- Implementing AWS Well-Architected Best Practices for Amazon SQS – Part 2: Security and Reliability
Performance Efficiency Pillar
The Performance Efficiency Pillar includes the ability to use computing resources efficiently to meet system requirements, and to maintain that efficiency as demand changes and technologies evolve. It recommends best practices to use trade-offs to improve performance, such as learning about design patterns and services and identify how tradeoffs impact customers and efficiency.
By adopting these best practices, you can optimize the performance of SQS by employing appropriate configurations and techniques while considering trade-offs for the specific use case.
Best practice: Use action batching or horizontal scaling or both to increase throughput
For achieving high throughput in SQS, optimizing the performance of your message processing is crucial. You can use two techniques: horizontal scaling and action batching.
When dealing with high message volume, consider horizontally scaling the message producers and consumers by increasing the number of threads per client, by adding more clients, or both. By distributing the load across multiple threads or clients, you can handle a high number of messages concurrently.
Action batching distributes the latency of the batch action over the multiple messages in a batch request, rather than accepting the entire latency for a single message. Because each round trip carries more work, batch requests make more efficient use of threads and connections, improving throughput. You can combine batching with horizontal scaling to provide throughput with fewer threads, connections, and requests than individual message requests.
In the inventory management example that we introduced in part 1, this scaling behavior is managed by AWS for the AWS Lambda function responsible for backend processing. When a Lambda function subscribes to an SQS queue, Lambda polls the queue as it waits for the inventory updates requests to arrive. Lambda consumes messages in batches, starting at five concurrent batches with five functions at a time. If there are more messages in the queue, Lambda adds up to 60 functions per minute, up to 1,000 functions, to consume those messages.
This means that Lambda can scale up to 1,000 concurrent Lambda functions processing messages from the SQS queue. Batching enables the inventory management system to handle a high volume of inventory update messages efficiently. This ensures real-time visibility into inventory levels and enhances the accuracy and responsiveness of inventory management operations.
Best practice: Trade-off between SQS standard and First-In-First-Out (FIFO) queues
SQS supports two types of queues: standard queues and FIFO queues. Understanding the trade-offs between SQS standard and FIFO queues allows you to make an informed choice that aligns with your application’s requirements and priorities. While SQS standard queues support a nearly unlimited throughput, it sacrifices strict message ordering and occasionally delivers messages in an order different from the one they were sent in. If maintaining the exact order of events is not critical for your application, utilizing SQS standard queues can provide significant benefits in terms of throughput and scalability.
On the other hand, SQS FIFO queues guarantee message ordering and exactly-once processing. This makes them suitable for applications where maintaining the order of events is crucial, such as financial transactions or event-driven workflows. However, FIFO queues have a lower throughput compared to standard queues. They can handle up to 3,000 transactions per second (TPS) per API method with batching, and 300 TPS without batching. Consider using FIFO queues only when the order of events is important for the application, otherwise use standard queues.
In the inventory management example, since the order of inventory records is not crucial, the potential out-of-order message delivery that can occur with SQS standard queues is unlikely to impact the inventory processing. This allows you to take advantage of the benefits provided by SQS standard queues, including their ability to handle a high number of transactions per second.
Cost Optimization Pillar
The Cost Optimization Pillar includes the ability to run systems to deliver business value at the lowest price. It recommends best practices to build and operate cost-aware workloads that achieve business outcomes while minimizing costs and allowing your organization to maximize its return on investment.
Best practice: Configure cost allocation tags for SQS to organize and identify SQS for cost allocation
A well-defined tagging strategy plays a vital role in establishing accurate chargeback or showback models. By assigning appropriate tags to resources, such as SQS queues, you can precisely allocate costs to different teams or applications. This level of granularity ensures fair and transparent cost allocation, enabling better financial management and accountability.
In the inventory management example, tagging the SQS queue allows for specific cost tracking under the Inventory department, enabling a more accurate assessment of expenses. The following code snippet shows how to tag the SQS queue using AWS Could Development Kit (AWS CDK).
# Create the SQS queue with DLQ setting
queue = sqs.Queue(
    self,
    "InventoryUpdatesQueue",
    visibility_timeout=Duration.seconds(300),
)

Tags.of(queue).add("department", "inventory")
Best practice: Use long polling
SQS offers two methods for receiving messages from a queue: short polling and long polling. By default, queues use short polling, where the ReceiveMessage request queries a subset of servers to identify available messages. Even if the query found no messages, SQS sends the response right away.
In contrast, long polling queries all servers in the SQS infrastructure to check for available messages. SQS responds only after collecting at least one message, respecting the specified maximum. If no messages are immediately available, the request is held open until a message becomes available or the polling wait time expires. In such cases, an empty response is sent.
Short polling provides immediate responses, making it suitable for applications that require quick feedback or near-real-time processing. On the other hand, long polling is ideal when efficiency is prioritized over immediate feedback. It reduces API calls, minimizes network traffic, and improves resource utilization, leading to cost savings.
In the inventory management example, long polling enhances the efficiency of processing inventory updates. It collects and retrieves available inventory update messages in a batch of 10, reducing the frequency of API requests. This batching approach optimizes resource utilization, minimizes network traffic, and reduces excessive API consumption, resulting in cost savings. You can configure this behavior using batch size and batch window:
# Add the SQS queue as a trigger to the Lambda function
sqs_to_dynamodb_function.add_event_source_mapping(
    "MyQueueTrigger", event_source_arn=queue.queue_arn, batch_size=10
)
Best practice: Use batching
Batching messages together allows you to send or retrieve multiple messages in a single API call. This reduces the number of API requests required to process or retrieve messages compared to sending or retrieving messages individually. Since SQS pricing is based on the number of API requests, reducing the number of requests can lead to cost savings.
To send, receive, and delete messages, and to change the message visibility timeout for multiple messages with a single action, use Amazon SQS batch API actions. This also helps with transferring less data, effectively reducing the associated data transfer costs, especially if you have many messages.
In the context of the inventory management example, the CSV processing Lambda function groups 10 inventory records together in each API call, forming a batch. By doing so, the number of API requests is reduced by a factor of 10 compared to sending each record separately. This approach optimizes the utilization of API resources, streamlines message processing, and ultimately contributes to cost efficiency. Following is the code snippet from the CSV processing Lambda function showcasing the use of SendMessageBatch to send 10 messages with a single action.
# Parse the CSV records and send them to SQS as batch messages
csv_reader = csv.DictReader(csv_content.splitlines())
message_batch = []
for row in csv_reader:
    # Convert the row to JSON
    json_message = json.dumps(row)

    # Add the message to the batch
    message_batch.append(
        {"Id": str(len(message_batch) + 1), "MessageBody": json_message}
    )

    # Send the batch of messages when it reaches the maximum batch size (10 messages)
    if len(message_batch) == 10:
        sqs_client.send_message_batch(QueueUrl=queue_url, Entries=message_batch)
        message_batch = []
        print("Sent messages in batch")
Best practice: Use temporary queues
In case of short-lived, lightweight messaging with synchronous two-way communication, you can use temporary queues. The temporary queue makes it easy to create and delete many temporary messaging destinations without inflating your AWS bill. The key concept behind this is the virtual queue. Virtual queues let you multiplex many low-traffic queues onto a single SQS queue. Creating a virtual queue only instantiates a local buffer to hold messages for consumers as they arrive; there is no API call to SQS, and no costs associated with creating a virtual queue.
The inventory management example does not use temporary queues. However, in use cases that involve short-lived, lightweight messaging with synchronous two-way communication, adopting the best practice of using temporary queues and virtual queues can enhance the overall efficiency, reduce costs, and simplify the management of messaging destinations.
Sustainability Pillar
The Sustainability Pillar provides best practices to meet sustainability targets for your AWS workloads. It encompasses considerations related to energy efficiency and resource optimization.
Best practice: Use long polling
Besides its cost optimization benefits explained as part of the Cost Optimization Pillar, long polling also plays a crucial role in improving resource efficiency by reducing API requests, minimizing network traffic, and optimizing resource utilization.
By collecting and retrieving available messages in a batch, long polling reduces the frequency of API requests, resulting in improved resource utilization and minimized network traffic. By reducing excessive API consumption through long polling, you can effectively use resources. It collects and retrieves messages in batches, reducing excessive API consumption and unnecessary network traffic.
By reducing API calls, it optimizes data transfer and infrastructure operations. Additionally, long polling’s batching approach optimizes resource allocation, utilizing system resources more efficiently and improving energy efficiency. This enables the inventory management system to handle high message volumes effectively while operating in a cost-efficient and resource-efficient manner.
Conclusion
This blog post explores best practices for SQS using the Performance Efficiency Pillar, Cost Optimization Pillar, and Sustainability Pillar of the AWS Well-Architected Framework. We cover techniques such as batch processing, message batching, and scaling considerations. We also discuss important considerations, such as resource utilization, minimizing resource waste, and reducing cost.
This three-part blog post series covers a wide range of best practices, spanning the Operational Excellence, Security, Reliability, Performance Efficiency, Cost Optimization, and Sustainability Pillars of the AWS Well-Architected Framework. By following these guidelines and leveraging the power of the AWS Well-Architected Framework, you can build robust, secure, and efficient messaging systems using SQS.
For more serverless learning resources, visit Serverless Land.
Implementing AWS Well-Architected best practices for Amazon SQS – Part 2
Post Syndicated from Pascal Vogel original https://aws.amazon.com/blogs/compute/implementing-aws-well-architected-best-practices-for-amazon-sqs-part-2/
This blog is written by Chetan Makvana, Senior Solutions Architect and Hardik Vasa, Senior Solutions Architect.
This is the second part of a three-part blog post series that demonstrates implementing best practices for Amazon Simple Queue Service (Amazon SQS) using the AWS Well-Architected Framework.
This blog post covers best practices using the Security Pillar and Reliability Pillar of the AWS Well-Architected Framework. The inventory management example introduced in part 1 of the series will continue to serve as an example.
See also the other two parts of the series:
- Implementing AWS Well-Architected Best Practices for Amazon SQS – Part 1: Operational Excellence
- Implementing AWS Well-Architected Best Practices for Amazon SQS – Part 3: Performance Efficiency, Cost Optimization, and Sustainability
Security Pillar
The Security Pillar includes the ability to protect data, systems, and assets and to take advantage of cloud technologies to improve your security. This pillar recommends putting in place practices that influence security. Using these best practices, you can protect data while in-transit (as it travels to and from SQS) and at rest (while stored on disk in SQS), or control who can do what with SQS.
Best practice: Configure server-side encryption
If your application has a compliance requirement such as HIPAA, GDPR, or PCI-DSS mandating encryption at rest, if you are looking to improve data security to protect against unauthorized access, or if you are just looking for simplified key management for the messages sent to the SQS queue, you can leverage Server-Side Encryption (SSE) to protect the privacy and integrity of your data stored on SQS.
SQS and AWS Key Management Service (KMS) offer two options for configuring server-side encryption. SQS-managed encryptions keys (SSE-SQS) provide automatic encryption of messages stored in SQS queues using AWS-managed keys. This feature is enabled by default when you create a queue. If you choose to use your own AWS KMS keys to encrypt and decrypt messages stored in SQS, you can use the SSE-KMS feature.

SSE-KMS provides greater control and flexibility over encryption keys, while SSE-SQS simplifies the process by managing the encryption keys for you. Both options help you protect sensitive data and comply with regulatory requirements by encrypting data at rest in SQS queues. Note that SSE-SQS only encrypts the message body and not the message attributes.
In the inventory management example introduced in part 1, an AWS Lambda function responsible for CSV processing sends incoming messages to an SQS queue when an inventory updates file is dropped into the Amazon Simple Storage Service (Amazon S3) bucket. SQS encrypts these messages in the queue using SQS-SSE. When a backend processing Lambda polls messages from the queue, the encrypted message is decrypted, and the function inserts inventory updates into Amazon DynamoDB.
The AWS Could Development Kit (AWS CDK) code sets SSE-SQS as the default encryption key type. However, the following AWS CDK code shows how to encrypt the queue with SSE-KMS.
# Create the SQS queue with DLQ setting
queue = sqs.Queue(
    self,
    "InventoryUpdatesQueue",
    visibility_timeout=Duration.seconds(300),
    encryption=sqs.QueueEncryption.KMS_MANAGED,
)
Best practice: Implement least-privilege access using access policy
For securing your resources in AWS, implementing least-privilege access is critical. This means granting users and services the minimum level of access required to perform their tasks. Least-privilege access provides better security, allows you to meet your compliance requirements, and offers accountability via a clear audit trail of who accessed what resources and when.
By implementing least-privilege access using access policies, you can help reduce the risk of security breaches and ensure that your resources are only accessed by authorized users and services. AWS Identity and Access Management (IAM) policies apply to users, groups, and roles, while resource-based policies apply to AWS resources such as SQS queues. To implement least-privilege access, it’s essential to start by defining what actions are required for each user or service to perform their tasks.
In the inventory management example, the CSV processing Lambda function doesn’t perform any other task beyond parsing the inventory updates file and sending the inventory records to the SQS queue for further processing. To ensure that the function has the permissions to send messages to the SQS queue, grant the SQS queue access to the IAM role that the Lambda function assumes. By granting the SQS queue access to the Lambda function’s IAM role, you establish a secure and controlled communication channel. The Lambda function can only interact with the SQS queue and doesn’t have unnecessary access or permissions that might compromise the system’s security.
# Create pre-processing Lambda function
csv_processing_to_sqs_function = _lambda.Function(
    self,
    "CSVProcessingToSQSFunction",
    runtime=_lambda.Runtime.PYTHON_3_8,
    code=_lambda.Code.from_asset("sqs_blog/lambda"),
    handler="CSVProcessingToSQSFunction.lambda_handler",
    role=role,
    tracing=Tracing.ACTIVE,
)

# Define the queue policy to allow messages from the Lambda function's role only
policy = iam.PolicyStatement(
    actions=["sqs:SendMessage"],
    effect=iam.Effect.ALLOW,
    principals=[iam.ArnPrincipal(role.role_arn)],
    resources=[queue.queue_arn],
)

queue.add_to_resource_policy(policy)
Best practice: Allow only encrypted connections over HTTPS using aws:SecureTransport
It is essential to have a secure and reliable method for transferring data between AWS services and on-premises environments or other external systems. With HTTPS, a network-based attacker cannot eavesdrop on network traffic or manipulate it, using an attack such as man-in-the-middle.
With SQS, you can choose to allow only encrypted connections over HTTPS using the aws:SecureTransport condition key in the queue policy. With this condition in place, any requests made over non-secure HTTP receive a 400 InvalidSecurity error from SQS.
In the inventory management example, the CSV processing Lambda function sends inventory updates to the SQS queue. To ensure secure data transfer, the Lambda function uses the HTTPS endpoint provided by SQS. This guarantees that the communication between the Lambda function and the SQS queue remains encrypted and resistant to potential security threats.
# Create an IAM policy statement allowing only HTTPS access to the queue
secure_transport_policy = iam.PolicyStatement(
    effect=iam.Effect.DENY,
    actions=["sqs:*"],
    resources=[queue.queue_arn],
    conditions={
        "Bool": {
            "aws:SecureTransport": "false",
        },
    },
)
Best practice: Use attribute-based access controls (ABAC)
Some use-cases require granular access control. For example, authorizing a user based on user roles, environment, department, or location. Additionally, dynamic authorization is required based on changing user attributes. In this case, you need an access control mechanism based on user attributes.
Attribute-based access controls (ABAC) is an authorization strategy that defines permissions based on tags attached to users and AWS resources. With ABAC, you can use tags to configure IAM access permissions and policies for your queues. ABAC hence enables you to scale your permission management easily. You can author a single permission policy in IAM using tags created for each business role, and no longer need to update the policy when adding new resources.
ABAC for SQS queues enables two key use cases:
- Tag-based access control: use tags to control access to your SQS queues, including control plane and data plane API calls.
- Tag-on-create: enforce tags at the time of creation of an SQS queues and deny the creation of SQS resources without tags.
Reliability Pillar
The Reliability Pillar encompasses the ability of a workload to perform its intended function correctly and consistently when it’s expected to. By leveraging the best practices outlined in this pillar, you can enhance the way you manage messages in SQS.
Best practice: Configure dead-letter queues
In a distributed system, when messages flow between sub-systems, there is a possibility that some messages may not be processed right away. This could be because of the message being corrupted or downstream processing being temporarily unavailable. In such situations, it is not ideal for the bad message to block other messages in the queue.
Dead Letter Queues (DLQs) in SQS can improve the reliability of your application by providing an additional layer of fault tolerance, simplifying debugging, providing a retry mechanism, and separating problematic messages from the main queue. By incorporating DLQs into your application architecture, you can build a more robust and reliable system that can handle errors and maintain high levels of performance and availability.
In the inventory management example, a DLQ plays a vital role in adding message resiliency and preventing situations where a single bad message blocks the processing of other messages. If the backend Lambda function fails after multiple attempts, the inventory update message is redirected to the DLQ. By inspecting these unconsumed messages, you can troubleshoot and redrive them to the primary queue or to custom destination using the DLQ redrive feature. You can also automate redrive by using a set of APIs programmatically. This ensures accurate inventory updates and prevents data loss.
The following AWS CDK code snippet shows how to create a DLQ for the source queue and sets up a DLQ policy to only allow messages from the source SQS queue. It is recommended not to set the max_receive_count value to 1, especially when using a Lambda function as the consumer, to avoid accumulating many messages in the DLQ.
# Create the Dead Letter Queue (DLQ)
dlq = sqs.Queue(self, "InventoryUpdatesDlq", visibility_timeout=Duration.seconds(300))

# Create the SQS queue with DLQ setting
queue = sqs.Queue(
    self,
    "InventoryUpdatesQueue",
    visibility_timeout=Duration.seconds(300),
    dead_letter_queue=sqs.DeadLetterQueue(
        max_receive_count=3,  # Number of retries before sending the message to the DLQ
        queue=dlq,
    ),
)
# Create an SQS queue policy to allow source queue to send messages to the DLQ
policy = iam.PolicyStatement(
    effect=iam.Effect.ALLOW,
    actions=["sqs:SendMessage"],
    resources=[dlq.queue_arn],
    conditions={"ArnEquals": {"aws:SourceArn": queue.queue_arn}},
)
queue.queue_policy = iam.PolicyDocument(statements=[policy])
Best practice: Process messages in a timely manner by configuring the right visibility timeout
Setting the appropriate visibility timeout is crucial for efficient message processing in SQS. The visibility timeout is the period during which SQS prevents other consumers from receiving and processing a message after it has been polled from the queue.
To determine the ideal visibility timeout for your application, consider your specific use case. If your application typically processes messages within a few seconds, set the visibility timeout to a few minutes. This ensures that multiple consumers don’t process the message simultaneously. If your application requires more time to process messages, consider breaking them down into smaller units or batching them to improve performance.
If a message fails to process and is returned to the queue, it will not be available for processing again until the visibility timeout period has elapsed. Increasing the visibility timeout will increase the overall latency of your application. Therefore, it’s important to balance the tradeoff between reducing the likelihood of message duplication and maintaining a responsive application.
In the inventory management example, setting the right visibility timeout helps the application fail fast and improve the message processing times. Since the Lambda function typically processes messages within milliseconds, a visibility timeout of 30 seconds is set in the following AWS CDK code snippet.
queue = sqs.Queue(
    self,
    " InventoryUpdatesQueue",
    visibility_timeout=Duration.seconds(30),
)
It is recommended to keep the SQS queue visibility timeout to at least six times the Lambda function timeout, plus the value of MaximumBatchingWindowInSeconds. This allows Lambda function to retry the messages if the invocation fails.
Conclusion
This blog post explores best practices for SQS using the Security Pillar and Reliability Pillar of the AWS Well-Architected Framework. We discuss various best practices and considerations to ensure the security of SQS. By following these best practices, you can create a robust and secure messaging system using SQS. We also highlight fault tolerance and processing a message in a timely manner as important aspects of building reliable applications using SQS.
The next part of this blog post series focuses on the Performance Efficiency Pillar, Cost Optimization Pillar, and Sustainability Pillar of the AWS Well-Architected Framework and explore best practices for SQS.
For more serverless learning resources, visit Serverless Land.
Implementing AWS Well-Architected best practices for Amazon SQS – Part 1
Post Syndicated from Pascal Vogel original https://aws.amazon.com/blogs/compute/implementing-aws-well-architected-best-practices-for-amazon-sqs-part-1/
This blog is written by Chetan Makvana, Senior Solutions Architect and Hardik Vasa, Senior Solutions Architect.
Amazon Simple Queue Service (Amazon SQS) is a fully managed message queuing service that makes it easy to decouple and scale microservices, distributed systems, and serverless applications. AWS customers have constantly discovered powerful new ways to build more scalable, elastic, and reliable applications using SQS. You can leverage SQS in a variety of use-cases requiring loose coupling and high performance at any level of throughput, while reducing cost by only paying for value and remaining confident that no message is lost. When building applications with Amazon SQS, it is important to follow architectural best practices.
To help you identify and implement these best practices, AWS provides the AWS Well-Architected Framework for designing and operating reliable, secure, efficient, cost-effective, and sustainable systems in the AWS Cloud. Built around six pillars—operational excellence, security, reliability, performance efficiency, cost optimization, and sustainability, AWS Well-Architected provides a consistent approach for customers and partners to evaluate architectures and implement scalable designs.
This three-part blog series covers each pillar of the AWS Well-Architected Framework to implement best practices for SQS. This blog post, part 1 of the series, discusses best practices using the Operational Excellence Pillar of the AWS Well-Architected Framework.
See also the other two parts of the series:
- Implementing AWS Well-Architected Best Practices for Amazon SQS – Part 2: Security and Reliability
- Implementing AWS Well-Architected Best Practices for Amazon SQS – Part 3: Performance Efficiency, Cost Optimization, and Sustainability
Solution overview

This solution architecture shows an example of an inventory management system. The system leverages Amazon Simple Storage Service (Amazon S3), AWS Lambda, Amazon SQS, and Amazon DynamoDB to streamline inventory operations and ensure accurate inventory levels. The system handles frequent updates from multiple sources, such as suppliers, warehouses, and retail stores, which are received as CSV files.
These CSV files are then uploaded to an S3 bucket, consolidating and securing the inventory data for the inventory management system’s access. The system uses a Lambda function to read and parse the CSV file, extracting individual inventory update records. The backend Lambda function transforms each inventory update record into a message and sends it to an SQS queue. Another Lambda function continually polls the SQS queue for new messages. Upon receiving a message, it retrieves the inventory update details and updates the inventory levels in DynamoDB accordingly.
This ensures that the inventory quantities for each product are accurate and reflect the latest changes. This way, the inventory management system provides real-time visibility into inventory levels across different locations and suppliers, enabling the company to monitor product availability with precision. Find the example code for this solution in the GitHub repository.
This example is used throughout this blog series to highlight how SQS best practices can be implemented based on the AWS Well Architected Framework.
Operational Excellence Pillar
The Operational Excellence Pillar includes the ability to support development and run workloads effectively, gain insight into their operation, and continuously improve supporting processes and procedures to deliver business value. To achieve operational excellence, the pillar recommends best practices such as defining workload metrics and implementing transaction traceability. This enables organizations to gain valuable insights into their operations, identify potential issues, and optimize services accordingly to improve customer experience. Furthermore, understanding the health of an application is critical to ensuring that it is functioning as expected.
Best practice: Use infrastructure as code to deploy SQS
Infrastructure as Code (IaC) helps you model, provision, and manage your cloud resources. One of the primary advantages of IaC is that it simplifies infrastructure management. With IaC, you can quickly and easily replicate your environment to multiple AWS Regions with a single turnkey solution. This makes it easy to manage your infrastructure, regardless of where your resources are located. Additionally, IaC enables you to create, deploy, and maintain infrastructure in a programmatic, descriptive, and declarative way repeatably. This reduces errors caused by manual processes, such as creating resources in the AWS Management Console. With IaC, you can easily control and track changes in your infrastructure, which makes it easier to maintain and troubleshoot your systems.
For managing SQS resources, you can use different IaC tools like AWS Serverless Application Model (AWS SAM), AWS CloudFormation, or AWS Could Development Kit (AWS CDK). There are also third-party solutions for creating SQS resources, such as the Serverless Framework. AWS CDK is a popular choice because it allows you to provision AWS resources using familiar programming languages such as Python, Java, TypeScript, Go, JavaScript, and C#/.Net.
This blog series showcases the use of AWS CDK with Python to demonstrate best practices for working with SQS. For example, the following AWS CDK code creates a new SQS queue:
from aws_cdk import (
    Duration,
    Stack,
    aws_sqs as sqs,
)
from constructs import Construct


class SqsCdBlogStack(Stack):
    def __init__(self, scope: Construct, construct_id: str, **kwargs) -> None:
        super().__init__(scope, construct_id, **kwargs)

        # The code that defines your stack goes here

        # example resource
        queue = sqs.Queue(
            self,
            "InventoryUpdatesQueue",
            visibility_timeout=Duration.seconds(300),
        )
Best practice: Configure CloudWatch alarms for ApproximateAgeofOldestMessage
It is important to understand Amazon CloudWatch metrics and dimensions for SQS, to have a plan in place to assess its behavior, and to add custom metrics where necessary. Once you have a good understanding of the metrics, it is essential to identify the key metrics that are most relevant to your use case and set up appropriate alerts to monitor them.
One of the key metrics that SQS provides is the ApproximateAgeOfOldestMessage metric. By monitoring this metric, you can determine the age of the oldest message in the queue, and take appropriate action to ensure that messages are processed in a timely manner. To set up alerts for the ApproximateAgeOfOldestMessage metric, you can use CloudWatch alarms. You configure these alarms to issue alerts when messages remain in the queue for extended periods of time. You can use these alerts to act, for instance by scaling up consumers to process messages more quickly or investigating potential issues with message processing.
In the inventory management example, leveraging the ApproximateAgeOfOldestMessage metric provides valuable insights into the health and performance of the SQS queue. By monitoring this metric, you can detect processing delays, optimize performance, and ensure that inventory updates are processed within the desired timeframe. This ensures that your inventory levels remain accurate and up-to-date. The following code creates an alarm which is triggered if the oldest inventory updates request is in the queue for more than 30 seconds.
# Create a CloudWatch alarm for ApproximateAgeOfOldestMessage metric
alarm = cloudwatch.Alarm(
	self,
	"OldInventoryUpdatesAlarm",
	alarm_name="OldInventoryUpdatesAlarm",
	metric=queue.metric_approximate_age_of_oldest_message(),
	threshold=600,  # Specify your desired threshold value in seconds
	evaluation_periods=1,
	comparison_operator=cloudwatch.ComparisonOperator.GREATER_THAN_OR_EQUAL_TO_THRESHOLD,
)
Best practice: Add a tracing header while sending a message to the queue to provide distributed tracing capabilities for faster troubleshooting
By implementing distributed tracing, you can gain a clear understanding of the flow of messages in SQS queues, identify any bottlenecks or potential issues, and proactively react to any signals that indicate an unhealthy state. Tracing provides a wider continuous view of an application and helps to follow a user journey or transaction through the application.
AWS X-Ray is an example of a distributed tracing solution that integrates with Amazon SQS to trace messages that are passed through an SQS queue. When using the X-Ray SDK, SQS can propagate tracing headers to maintain trace continuity and enable tracking, analysis, and debugging throughout downstream services. SQS supports tracing headers through the Default HTTP header and the AWSTraceHeader System Attribute. AWSTraceHeader is available for use even when auto-instrumentation through the X-Ray SDK is not, for example, when building a tracing SDK for a new language. If you are using a Lambda downstream consumer, trace context propagation is automatic.
In the inventory management example, by utilizing distributed tracing with X-Ray for SQS, you can gain deep insights into the performance, behavior, and dependencies of the inventory management system. This visibility enables you to optimize performance, troubleshoot issues more effectively, and ensure the smooth and efficient operation of the system. The following code sets up a CSV processing Lambda function and a backend processing Lambda function with active tracing enabled. The Lambda function automatically receives the X-Ray TraceId from SQS.
# Create pre-processing Lambda function
csv_processing_to_sqs_function = _lambda.Function(
    self,
    "CSVProcessingToSQSFunction",
    runtime=_lambda.Runtime.PYTHON_3_8,
    code=_lambda.Code.from_asset("sqs_blog/lambda"),
    handler="CSVProcessingToSQSFunction.lambda_handler",
    role=role,
    tracing=Tracing.ACTIVE,  # Enable active tracing with X-Ray
)

# Create a post-processing Lambda function with the specified role
sqs_to_dynamodb_function = _lambda.Function(
    self,
    "SQSToDynamoDBFunction",
    runtime=_lambda.Runtime.PYTHON_3_8,
    code=_lambda.Code.from_asset("sqs_blog/lambda"),
    handler="SQSToDynamoDBFunction.lambda_handler",
    role=role,
    tracing=Tracing.ACTIVE,  # Enable active tracing with X-Ray
)
Conclusion
This blog post explores best practices for SQS with a focus on the Operational Excellence Pillar of the AWS Well-Architected Framework. We explore key considerations for ensuring the smooth operation and optimal performance of applications using SQS. Additionally, we explore the advantages of infrastructure as code in simplifying infrastructure management and showcase how AWS CDK can be used to provision and manage SQS resources.
The next part of this blog post series addresses the Security Pillar and Reliability Pillar of the AWS Well-Architected Framework and explores best practices for SQS.
For more serverless learning resources, visit Serverless Land.
Конституция, поставена на изпитание
Post Syndicated from Bozho original https://blog.bozho.net/blog/4113
В последните няколко години реалността и политическата криза поставиха на изпитание много норми от Конституцията, които преди това са се приемали за формалност или за даденост.
Свърховластеността на главния прокурор беше даденост три десетилетия. Главните прокурори отричаха да има такава (освен в редки моменти на откровение). Политическите партии пазеха техните правомощия. Докато в един момент не стана кристално ясно, че не може повече така и че има проблем в конструкцията, а не просто в личността на един или друг.
Служебните кабинети бяха една формалност между избори, ако предишният кабинет не е завършил мандата си. Те бяха с ясен хоризонт от 3 месеца и не правеха кой знае какво, с малки изключения. През последните над две години служебни кабинети са управлявяли повече от редовни, поемайки дългосрочни ангажименти за страната, сменяйки шефове на служби на практика без съгласуване с друт център на власт, каквато е логиката на закона. И това логично поставя под въпрос докъде трябва да може да се простира едно неизбрано правителство.
Почти всички регулаторни и контролни органи в държавата са с изтекъл мандат. Това в някои случаи поставя под въпрос законосъобразността на техните действия, но дори когато са законосъобразни, тяхната легитимност е под въпрос. „Те са пред уволнение, едва ли ще свършат нещо“ е валиден коментар. А тези органи са имунната система на държавата.
Имунитетът на народния представител беше някаква формалност, докато всички не разбраха (или не си признаха), че прокуратурата не действа безпристрастно, а понякога като чадър или бухалка. И това наложи Народното събрание да разглежда по-внимателно тези случаи.
Ограничението за двойно гражданство на министри и депутати беше формалмост, но стана горещ казус, довел и до решение на Конституционния съд, и до досъдебно производство. И до въпроса защо ни е нужно това ограничение.
Задължителността на решенията на парламента беше тествана пред Конституционния съд, тъй като заради липсата на твърди мнозинства и редовни управления, парламентът на няколко пъти навлезе със свои рршения на територията на изпълнителната власт.
Независимостта на следствието, което през годините се мести напред-назад, също беше обект на много въпроси, свързани с логиката на устройството ма съдебната власт. Именно заради нейните дефицити, осветени през последните години.
Политически партии говорятнза унищожаване на групи хора и конституционните текстове за правата на гражданите и за ограниченията пред партии и други организации вече не звучат като декларативен преамбюл, а като важна част от обществения договор (каквато винаги са били, все пак).
И не на последно място, технологичната реалност също поставя някои норми на изпитание. Неприкосновеността на кореспонденцията е под въпрос не заради законния ред за СРС-та, а заради софтуери като Pegasus и Quadream, за чието притежание няма законов ред. Скоро ще стигнем и до въпроси, свързани с изкуствения интелект (напр. за легитимността на актове на органи на власт, ако решенията по тях са взети от изкуствен интелект, уж само подпомагащ органа).
Всичко това ни се е изсипало на главата в последните две години, а конституционните норми се „огъват“, понякога до счупване, и е крайно време да решим предпоставките за политическата криза. Именно затова графикът за конституционните промени е толкова важен.
Материалът Конституция, поставена на изпитание е публикуван за пръв път на БЛОГодаря.
Comic for 2023.06.27 – More Muscles
Post Syndicated from Explosm.net original https://explosm.net/comics/more-muscles
New Cyanide and Happiness Comic
AWS Week in Review – Step Functions Versions and Aliases, EC2 Instances with Graviton3E Processors, and More – June 26, 2023
Post Syndicated from Danilo Poccia original https://aws.amazon.com/blogs/aws/aws-week-in-review-step-functions-versions-and-aliases-ec2-instances-with-graviton3e-processors-and-more-june-26-2023/
It’s now summer in the northern hemisphere, and you can feel it in London where I live. But let’s not get distracted by the nice weather and go through your AWS updates from the previous seven days.
Last Week’s Launches
Another interesting week with many announcements! Here are some that got more of my attention:
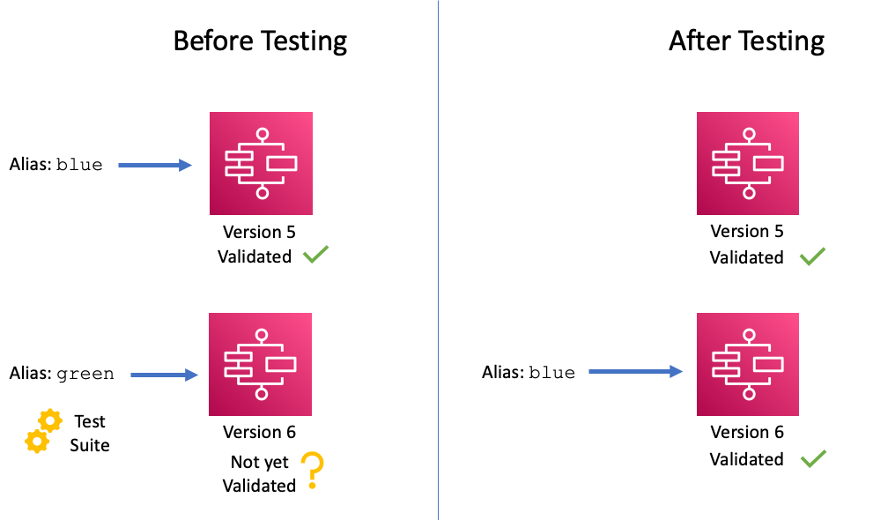 AWS Step Functions – You can now use versions and aliases to maintain multiple versions of your workflows, track which version was used for each execution, and create aliases that route traffic between workflow versions. To learn more, refer to this blog post.
AWS SAM – You can now simplify the way you define an AppSync GraphQL API in AWS SAM with the new a resource abstraction that includes everything necessary for a typical AppSync GraphQL API definition, including the API schema, the resolver pipeline functions, and data sources.
AWS Amplify – With the new Amplify UI Builder Figma plugin, you can theme your components, upgrade to new Amplify UI kit versions, and generate and preview React code from your designs directly in Figma.
AWS Local Zones – Now available in Manila, Philippines. You can use AWS Local Zones for applications that require single-digit millisecond latency or local data processing.
AWS Control Tower – The integration with Security Hub is now generally available. You can now enable over 170 Security Hub detective controls that map to related control objectives from AWS Control Tower. AWS Control Tower also detects drifts when you disable a control from Security Hub.
Amazon Kinesis Data Firehose – You can now deliver streaming data to Amazon Redshift Serverless. In this way, you can build an analytics platform without having to manage ingestion infrastructure or data warehouse clusters.
Amazon CloudWatch Internet Monitor – Now available in all standard AWS Regions. Internet Monitor helps you diagnose internet issues between your AWS hosted applications and your application’s end users.
AWS Verified Access – Now provides improved logging functionality. With that, It’s easier to author and troubleshoot application access policies by reviewing the end-user context received from third-party services.
Amazon Managed Grafana – Now supports Trace Analytics with the OpenSearch Grafana data source plugin in addition to the existing support for Log Analytics. You can simplify the correlation and analysis of logs and trace data stored in OpenSearch along with metrics from other data sources.
Amazon CloudWatch Logs Insights – You can now use the new dedup command in your queries to view unique results based on one or more fields. Duplicates are discarded based on the sort order so that only the first result is kept.
AWS Config – Now supports 21 more resource types for services such as AWS Amplify, AWS App Mesh, AWS App Runner, Amazon Kinesis Data Firehose, and Amazon SageMaker.
Amazon EC2 – Announcing the new EC2 C7gn and Hpc7g instances that use Graviton3E processors. The Graviton3E processor delivers higher memory bandwidth and compute performance than Graviton2, and higher vector instruction performance than Graviton3. Read more in Jeff’s C7gn and Channy’s Hpc7g blog posts.
Amazon EFS – Provisioned Throughput now supports up to 10 GiB/s (from 3 GiB/s) for reads and 3 GiB/s (from 1 GiB/s) for writes.
For a full list of AWS announcements, be sure to keep an eye on the What’s New at AWS page.
Other AWS News
 A few more news items and blog posts you might have missed:
Good tips – Mitigate Common Web Threats with One Click in Amazon CloudFront
A nice series – Let’s Architect! Open-source technologies on AWS
An interesting solution – Deploy a serverless ML inference endpoint of large language models using FastAPI, AWS Lambda, and AWS CDK
For AWS open-source news and updates, check out the latest newsletter curated by Ricardo to bring you the most recent updates on open-source projects, posts, events, and more.
Upcoming AWS Events
Here are some opportunities to meet and learn:
AWS Applications Innovation Day (June 27) – Learn how product teams across applications, security, and artificial intelligence (AI) are collaborating with AWS Partners like Asana, Slack, Splunk, Atlassian, Okta, and more to help organizations work smarter together. For more information on the event, refer to this blog post.
AWS Summits – Get together to connect, collaborate, and learn about AWS in Hong Kong (July 20), New York (July 26), Taiwan (Aug 2 & 3), Sao Paulo (Aug 3).
AWS re:Invent (Nov 27 – Dec 1) – Join us to hear the latest from AWS, learn from experts, and connect with the global cloud community. Registration is now open.
Amazon Prime Day (July 11-12) is coming, and you can learn more in this blog post. We should keep an eye out for Jeff’s annual Prime Day post following the event.
That’s all from me for this week. Come back next Monday for another Week in Review!
— Danilo
Comic for 2023.06.26 – Giraffe
Post Syndicated from Explosm.net original https://explosm.net/comics/giraffe
New Cyanide and Happiness Comic
What are the odds of a safe rocket launch?
Post Syndicated from Curious Droid original https://www.youtube.com/watch?v=OoqklebOhl8
How to Manage SMS Opt-Outs with Amazon Pinpoint
Post Syndicated from Tyler Holmes original https://aws.amazon.com/blogs/messaging-and-targeting/how-to-manage-sms-opt-outs-with-amazon-pinpoint/
Managing SMS can be challenging due to the continued increase in global regulation. One of the common functions that needs to exist for you to be in compliance is to be able to opt out your customers from receiving your communication when they request. Amazon Pinpoint has the ability to automatically opt your customers out of SMS communications using predefined keywords such as, “stop” or “unsubscribe” when responding back to the number from which they do not want to receive communications. This is great in many cases because it does not require any extra configuration for you to remain in compliance with SMS regulations but if you are sending communications across multiple use cases this is not ideal. In this blog post we will explain how to manage SMS sending for multiple use cases while still remaining in compliance with SMS regulations.
The default setup for Pinpoint SMS includes an Opt-Out List whose standard functionality is to block opted-out numbers from all SMS communications from the entire account. With the standard configuration, your only option to remove an endpoint from the default Opt-Out List is to use the DeleteOptedOutNumber action via the API. This can only be done once every 30 days to curtail abusive sending so it’s not the ideal method for managing opt-outs. Note: If you do want to opt-out endpoints completely from your account you can always add Endpoints manually to the Opt-Out List via the PutOptedOutNumber Action and use “default” as the “OptOutListName.” Given the previous this means that the common scenario for many customers, needing to send transactional messages such as One Time Password (OTP) as well as marketing related materials, requires configuring new Opt-Out Lists.
The first step in allowing your customers to receive critical communications like OTPs but opt out of other communications like marketing materials is to make sure that each use case has its own Origination Identity (OID). This means that if you have two use cases for SMS, such as OTP and marketing related messaging, you need to procure an OID for each of them. This needs to be done for each country you plan on having support for sending SMS. While this increases your cost, it is the only way to accomplish differentiated sending across multiple use cases.
Prerequisites
- In order to manage Opt-Out Lists you need to use the V2 API for SMS and voice
- You can do the setup using the V2 APIs and still use SendMessage if you would like, but setup of Opt-Out Lists are only available in the V2 API
- You must Purchase/Register an OID for each use-case in each country you plan to support
- Example: If you are sending marketing materials and OTP messages in the US and are using a short code then you will need to purchase at least two short codes and register each use case.
- If you need help determining what OID you need use this guide.
- Example: If you are sending marketing materials and OTP messages in the US and are using a short code then you will need to purchase at least two short codes and register each use case.
How to Create Opt-Out Lists and Send SMS
In order to manage opt-outs per origination identity(OID) you need to create an Opt-Out List for each use case. There are two ways to accomplish this, below you will find the process for each The basic process for this is below:
- Option 1
- The easiest way to add an Opt-Out List to an OID is when you procure the number.
- First create an Opt-Out List using CreateOptOutList
- Then, when procuring a new number either by opening a case or using RequestPhoneNumber, specify the name of that Opt-Out List
- Note: If you already have a number you can add an Opt-Out List with the UpdatePhoneNumber action
- Use the PutKeyword action to add keywords
- Create at least one Opt-In Action Keyword
- This is the keyword that recipients can use to opt in to receiving your messages for the first time or they can also opt back into previously unsubscribed communications
- Create at least one Opt-In Action Keyword
- You can now send messages using this phone number and opted-out recipients will be put in your Opt-Out List, not the default Global Account Opt-Out List
- The easiest way to add an Opt-Out List to an OID is when you procure the number.
While this is a simple way of creating Opt-Out Lists it does not scale well if you are sending globally or are operating as an Independent Software Vendor (ISV) and have multiple locations, use cases, and configurations that you need to assign to lots of numbers.
- Option 2
- Create a Pool
- A Pool is a container for OIDs that share the same use case and thus, the same Opt-Out List. See the image below
- Set an Opt-Out List for the Pool by using the UpdatePool Action and specifying the “OptOutListName”
- Associate an OID to that Pool
- You can have multiple OIDs per Pool if necessary
- Note: Opt-Out Lists of OIDs and Pools must match, so if you previously associated an Opt-Out List to any OIDs you may need to update those OIDs to match that of the Pool prior to associating it with the Pool.
- Send your SMS using the Pool Id or Pool Arn for the “OriginationIdentity” using the SendTextMessage Action
- Create a Pool
Conclusion
In this post you have learned how to create Opt-Out Lists that give you better control over how your customers opt out of your communications. Using custom Opt-Out Lists allows you to have multiple SMS use cases and gives your customers the ability to receive critical communications such as OTP, but not receive communications like marketing that they are not interested in. The V2 API for SMS and Voice has many more useful actions not possible with the V1 API so we encourage you to explore how it can further help you simplify and automate your applications.
Review the documentation for the V2 SMS and Voice API here
Confirm the origination IDs you will need here
Check out the support tiers comparison here
Resources
https://docs.aws.amazon.com/pinpoint/latest/apireference_smsvoicev2/Welcome.html
https://docs.aws.amazon.com/pinpoint/latest/userguide/channels-sms-originating-identities-choosing.html
https://docs.aws.amazon.com/pinpoint/latest/userguide/channels-sms-limitations-opt-out.html
Harmonize data using AWS Glue and AWS Lake Formation FindMatches ML to build a customer 360 view
Post Syndicated from Nishchai JM original https://aws.amazon.com/blogs/big-data/harmonize-data-using-aws-glue-and-aws-lake-formation-findmatches-ml-to-build-a-customer-360-view/
In today’s digital world, data is generated by a large number of disparate sources and growing at an exponential rate. Companies are faced with the daunting task of ingesting all this data, cleansing it, and using it to provide outstanding customer experience.
Typically, companies ingest data from multiple sources into their data lake to derive valuable insights from the data. These sources are often related but use different naming conventions, which will prolong cleansing, slowing down the data processing and analytics cycle. This problem particularly impacts companies trying to build accurate, unified customer 360 profiles. There are customer records in this data that are semantic duplicates, that is, they represent the same user entity, but have different labels or values. It’s commonly referred to as a data harmonization or deduplication problem. The underlying schemas were implemented independently and don’t adhere to common keys that can be used for joins to deduplicate records using deterministic techniques. This has led to so-called fuzzy deduplication techniques to address the problem. These techniques utilize various machine learning (ML) based approaches.
In this post, we look at how we can use AWS Glue and the AWS Lake Formation ML transform FindMatches to harmonize (deduplicate) customer data coming from different sources to get a complete customer profile to be able to provide better customer experience. We use Amazon Neptune to visualize the customer data before and after the merge and harmonization.
Overview of solution
In this post, we go through the various steps to apply ML-based fuzzy matching to harmonize customer data across two different datasets for auto and property insurance. These datasets are synthetically generated and represent a common problem for entity records stored in multiple, disparate data sources with their own lineage that appear similar and semantically represent the same entity but don’t have matching keys (or keys that work consistently) for deterministic, rule-based matching. The following diagram shows our solution architecture.

We use an AWS Glue job to transform the auto insurance and property insurance customer source data to create a merged dataset containing fields that are common to both datasets (identifiers) that a human expert (data steward) would use to determine semantic matches. The merged dataset is then used to deduplicate customer records using an AWS Glue ML transform to create a harmonized dataset. We use Neptune to visualize the customer data before and after the merge and harmonization to see how the transform FindMacthes can bring all related customer data together to get a complete customer 360 view.
To demonstrate the solution, we use two separate data sources: one for property insurance customers and another for auto insurance customers, as illustrated in the following diagram.


The data is stored in an Amazon Simple Storage Service (Amazon S3) bucket, labeled as Raw Property and Auto Insurance data in the following architecture diagram. The diagram also describes detailed steps to process the raw insurance data into harmonized insurance data to avoid duplicates and build logical relations with related property and auto insurance data for the same customer.

The workflow includes the following steps:
- Catalog the raw property and auto insurance data, using an AWS Glue crawler, as tables in the AWS Glue Data Catalog.
- Transform raw insurance data into CSV format acceptable to Neptune Bulk Loader, using an AWS Glue extract, transform, and load (ETL) job.
- When the data is in CSV format, use an Amazon SageMaker Jupyter notebook to run a PySpark script to load the raw data into Neptune and visualize it in a Jupyter notebook.
- Run an AWS Glue ETL job to merge the raw property and auto insurance data into one dataset and catalog the merged dataset. This dataset will have duplicates and no relations are built between the auto and property insurance data.
- Create and train an AWS Glue ML transform to harmonize the merged data to remove duplicates and build relations between the related data.
- Run the AWS Glue ML transform job. The job also catalogs the harmonized data in the Data Catalog and transforms the harmonized insurance data into CSV format acceptable to Neptune Bulk Loader.
- When the data is in CSV format, use a Jupyter notebook to run a PySpark script to load the harmonized data into Neptune and visualize it in a Jupyter notebook.
Prerequisites
To follow along with this walkthrough, you must have an AWS account. Your account should have permission to provision and run an AWS CloudFormation script to deploy the AWS services mentioned in the architecture diagram of the solution.
Provision required resources using AWS CloudFormation:
To launch the CloudFormation stack that configures the required resources for this solution in your AWS account, complete the following steps:
- Log in to your AWS account and choose Launch Stack:

- Follow the prompts on the AWS CloudFormation console to create the stack.
- When the launch is complete, navigate to the Outputs tab of the launched stack and note all the key-value pairs of the resources provisioned by the stack.

Verify the raw data and script files S3 bucket
On the CloudFormation stack’s Outputs tab, choose the value for S3BucketName. The S3 bucket name should be cloud360-s3bucketstack-xxxxxxxxxxxxxxxxxxxxxxxx and should contain folders similar to the following screenshot.

The following are some important folders:
- auto_property_inputs – Contains raw auto and property data
- merged_auto_property – Contains the merged data for auto and property insurance
- output – Contains the delimited files (separate subdirectories)
Catalog the raw data
To help walk through the solution, the CloudFormation stack created and ran an AWS Glue crawler to catalog the property and auto insurance data. To learn more about creating and running AWS Glue crawlers, refer to Working with crawlers on the AWS Glue console. You should see the following tables created by the crawler in the c360_workshop_db AWS Glue database:
- source_auto_address – Contains address data of customers with auto insurance
- source_auto_customer – Contains auto insurance details of customers
- source_auto_vehicles – Contains vehicle details of customers
- source_property_addresses – Contains address data of customers with property insurance
- source_property_customers – Contains property insurance details of customers
You can review the data using Amazon Athena. For more information about using Athena to query an AWS Glue table, refer to Running SQL queries using Amazon Athena. For example, you can run the following SQL query:
Convert the raw data into CSV files for Neptune
The CloudFormation stack created and ran the AWS Glue ETL job prep_neptune_data to convert the raw data into CSV format acceptable to Neptune Bulk Loader. To learn more about building an AWS Glue ETL job using AWS Glue Studio and to review the job created for this solution, refer to Creating ETL jobs with AWS Glue Studio.
Verify the completion of job run by navigating to the Runs tab and checking the status of most recent run.

Verify the CSV files created by the AWS Glue job in the S3 bucket under the output folder.

Load and visualize the raw data in Neptune
This section uses SageMaker Jupyter notebooks to load, query, explore, and visualize the raw property and auto insurance data in Neptune. Jupyter notebooks are web-based interactive platforms. We use Python scripts to analyze the data in a Jupyter notebook. A Jupyter notebook with the required Python scripts has already been provisioned by the CloudFormation stack.
- Start Jupyter Notebook.
- Choose the
Neptunefolder on the Files tab.

- Under the
Customer360folder, open the notebookexplore_raw_insurance_data.ipynb.

- Run Steps 1–5 in the notebook to analyze and visualize the raw insurance data.
The rest of the instructions are inside the notebook itself. The following is a summary of the tasks for each step in the notebook:
- Step 1: Retrieve Config – Run this cell to run the commands to connect to Neptune for Bulk Loader.
- Step 2: Load Source Auto Data – Load the auto insurance data into Neptune as vertices and edges.
- Step 3: Load Source Property Data – Load the property insurance data into Neptune as vertices and edges.
- Step 4: UI Configuration – This block sets up the UI config and provides UI hints.
- Step 5: Explore entire graph – The first block builds and displays a graph for all customers with more than four coverages of auto or property insurance policies. The second block displays the graph for four different records for a customer with the name
James.
These are all records for the same customer, but because they’re not linked in any way, they appear as different customer records. The AWS Glue FindMatches ML transform job will identify these records as customer James, and the records provide complete visibility on all policies owned by James. The Neptune graph looks like the following example. The vertex covers represents the coverage of auto or property insurance by the owner (James in this case) and the vertex locatedAt represents the address of the property or vehicle that is covered by the owner’s insurance.

Merge the raw data and crawl the merged dataset
The CloudFormation stack created and ran the AWS Glue ETL job merge_auto_property to merge the raw property and auto insurance data into one dataset and catalog the resultant dataset in the Data Catalog. The AWS Glue ETL job does the following transforms on the raw data and merges the transformed data into one dataset:
- Changes the following fields on the source table
source_auto_customer:
-
- Changes
policyidtoidand data type to string - Changes
fnametofirst_name - Changes
lnametolast_name - Changes
worktocompany - Changes
dobtodate_of_birth - Changes
phonetohome_phone - Drops the fields
birthdate,priority,policysince, andcreateddate
- Changes
- Changes the following fields on the
source_property_customers:
-
- Changes
customer_idtoidand data type to string - Changes
socialtossn - Drops the fields
job,email,industry,city,state,zipcode,netnew,sales_rounded,sales_decimal,priority, andindustry2
- Changes
- After converting the unique ID field in each table to string type and renaming it to
id, the AWS Glue job appends the suffix-autoto all id fields in thesource_auto_customertable and the suffix-propertyto allidfields in thesource_propery_customertable before copying all the data from both tables into themerged_auto_propertytable.
Verify the new table created by the job in the Data Catalog and review the merged dataset using Athena using below Athena SQL query:
For more information about how to review the data in the merged_auto_property table, refer to Running SQL queries using Amazon Athena.
Create, teach, and tune the Lake Formation ML transform
The merged AWS Glue job created a Data Catalog called merged_auto_property. Preview the table in Athena Query Editor and download the dataset as a CSV from the Athena console. You can open the CSV file for quick comparison of duplicates.

The rows with IDs 11376-property and 11377-property are mostly same except for the last two digits of their SSN, but these are mostly human errors. The fuzzy matches are easy to spot by a human expert or data steward with domain knowledge of how this data was generated, cleansed, and processed in the various source systems. Although a human expert can identify those duplicates on a small dataset, it becomes tedious when dealing with thousands of records. The AWS Glue ML transform builds on this intuition and provides an easy-to-use ML-based algorithm to automatically apply this approach to large datasets efficiently.
Create the FindMatches ML transform
- On the AWS Glue console, expand Data Integration and ETL in the navigation pane.
- Under Data classification tools, choose Record Matching.
This will open the ML transforms page.
- Choose Create transform.
- For Name, enter
c360-ml-transform. - For Existing IAM role, choose
GlueServiceRoleLab. - For Worker type, choose G.2X (Recommended).
- For Number of workers, enter
10. - For Glue version, choose as Spark 2.4 (Glue Version 2.0).
- Keep the other values as default and choose Next.

- For Database, choose
c360_workshop_db. - For Table, choose
merged_auto_property. - For Primary key, select
id. - Choose Next.

- In the Choose tuning options section, you can tune performance and cost metrics available for the ML transform. We stay with the default trade-offs for a balanced approach.
We have specified these values to achieve balanced results. If needed, you can adjust these values later by selecting the transform and using the Tune menu.

- Review the values and choose Create ML transform.

The ML transform is now created with the status Needs training.
Teach the transform to identify the duplicates
In this step, we teach the transform by providing labeled examples of matching and non-matching records. You can create your labeling set yourself or allow AWS Glue to generate the labeling set based on heuristics. AWS Glue extracts records from your source data and suggests potential matching records. The file will contain approximately 100 data samples for you to work with.
- On the AWS Glue console, navigate to the ML transforms page.
- Select the transform
c360-ml-transformand choose Train model.

- Select I have labels and choose Browse S3 to upload labels from Amazon S3.

Two labeled files have been created for this example. We upload these files to teach the ML transform.
- Navigate to the folder
labelin your S3 bucket, select the labeled file (Label-1-iteration.csv), and choose Choose. And Click “Upload labeling file from S3”.

- A green banner appears for successful uploads.

- Upload another label file (
Label-2-iteration.csv) and select Append to my existing labels. - Wait for the successful upload, then choose Next.


- Review the details in the Estimate quality metrics section and choose Close.

Verify that the ML transform status is Ready for use. Note that the label count is 200 because we successfully uploaded two labeled files to teach the transform. Now we can use it in an AWS Glue ETL job for fuzzy matching of the full dataset.

Before proceeding to the next steps, note the transform ID (tfm-xxxxxxx) for the created ML transform.
Harmonize the data, catalog the harmonized data, and convert the data into CSV files for Neptune
In this step, we run an AWS Glue ML transform job to find matches in the merged data. The job also catalogs the harmonized dataset in the Data Catalog and converts the merged [A1] dataset into CSV files for Neptune to show the relations in the matched records.
- On the AWS Glue console, choose Jobs in the navigation pane.
- Choose the job
perform_ml_dedup.

- On the job details page, expand Additional properties.
- Under Job parameters, enter the transform ID you saved earlier and save the settings.

-
- Choose Run and monitor the job status for completion.

- Run the following query in Athena to review the data in the new table
ml_matched_auto_property, created and cataloged by the AWS Glue job, and observe the results:


 Nishchai JM is an Analytics Specialist Solutions Architect at Amazon Web services. He specializes in building Big-data applications and help customer to modernize their applications on Cloud. He thinks Data is new oil and spends most of his time in deriving insights out of the Data.
 Varad Ram is Senior Solutions Architect in Amazon Web Services. He likes to help customers adopt to cloud technologies and is particularly interested in artificial intelligence. He believes deep learning will power future technology growth. In his spare time, he like to be outdoor with his daughter and son.
 Narendra Gupta is a Specialist Solutions Architect at AWS, helping customers on their cloud journey with a focus on AWS analytics services. Outside of work, Narendra enjoys learning new technologies, watching movies, and visiting new places
 Arun A K is a Big Data Solutions Architect with AWS. He works with customers to provide architectural guidance for running analytics solutions on the cloud. In his free time, Arun loves to enjoy quality time with his family
McGrath: Red Hat’s commitment to open source
Post Syndicated from original https://lwn.net/Articles/936405/
Red Hat’s Mike McGrath responds
to the many criticisms aimed at the company since it changed its policy
regarding RHEL source code.
Ultimately, we do not find value in a RHEL rebuild and we are not
under any obligation to make things easier for rebuilders; this is
our call to make. That brings me to CentOS Stream, of which there
is immense confusion. I acknowledge that this is a change in a
longstanding tradition where we went above and beyond, and change
like this can cause some confusion. That confusion manifested as
accusations about us going closed-source and about alleged GPL
violations. There is CentOS Stream the binary deliverable, and
CentOS Stream the source repository. The CentOS Stream
gitlab source is where we build RHEL releases, in the open for
all to see. To call RHEL “closed source” is categorically untrue
and inaccurate. CentOS Stream moves faster than RHEL, so it might
not be on HEAD, but the code is there. If you can’t find it, it’s a
bug – please let us know.
Пътят на парите в #БарселонаГейт: Къщата, Бизнеса и Издръжката на Борислава Йовчева
Post Syndicated from Екип на Биволъ original https://bivol.bg/barcelonagate-money-trail.html
понеделник 26 юни 2023

Три основни източника на пари са обособени за осигуряване на луксозния живот на Борислава Йовчева и нейната дъщеря в Испания, а впоследствие и в Италия. Това се установява от обработени…
Mushkin Redline 96GB 2x 48GB DDR5-5600 SODIMM Non-Binary Upgrade Kit
Post Syndicated from John Lee original https://www.servethehome.com/mushkin-redline-96gb-2x-48gb-ddr5-5600-sodimm-non-binary-upgrade-kit/
We take Mushkin Redline 96GB (2x 48GB) DDR5-5600 kit for a spin and show why this is 96GB kit is the biggest advancement in eight years
The post Mushkin Redline 96GB 2x 48GB DDR5-5600 SODIMM Non-Binary Upgrade Kit appeared first on ServeTheHome.