Post Syndicated from original https://lwn.net/Articles/884970/
The
5.16.10,
5.15.24,
5.10.101,
5.4.180,
4.19.230,
4.14.267, and
4.9.302
stable kernel updates are available. As usual, each contains another set
of important fixes.
Post Syndicated from original https://lwn.net/Articles/884969/
Security updates have been issued by CentOS (firefox and thunderbird), Debian (librecad, libxstream-java, and zsh), Fedora (expat, util-linux, varnish-modules, xterm, and zsh), Mageia (Intel-nonfree, kernel, kernel-linus, and microcode), openSUSE (zabbix), Red Hat (kernel, kpatch-patch, Red Hat Virtualization Host, and thunderbird), Scientific Linux (thunderbird), and Ubuntu (cryptsetup).
Post Syndicated from Rapid7 original https://blog.rapid7.com/2022/02/16/the-future-of-finserv-security-cloud-expert-and-former-ciso-anthony-johnson-weighs-in/

In today’s increasingly mobile, fast-paced world, it’s no surprise that financial services (finserv) organizations have a massive bullseye on their backs. The amount of personal data they access daily makes them an attractive target for those with malicious intent. In fact, the average cost of a data breach in the financial services sector is $18.9 million, according to data from IBM. With so much at stake, finserv security professionals need to remain vigilant and up-to-date on evolving trends and best practices occurring throughout the sector.
That’s where Anthony Johnson comes in. Johnson is a cloud security expert who has experienced almost every facet of cybersecurity. From being a hands-on red team technician to serving as a Global Chief Information Security Officer (CISO) at JP Morgan Chase, Johnson has seen it all.
We caught up with Johnson to get his take on the latest developments in cloudsec and how these developments are being received within the financial services sector.
When I think about the challenges I faced as a CISO in this space, all roads lead back to innovation and the need to move quickly. Business units in financial services are generally expected to move at the speed of consumer demand.
And this need to innovate is different from other industries, adding even more pressure. Consumers demand the latest and greatest technology for convenience and ease of use. They place financial institutions under intense pressure to continuously improve. Financial services organizations will always strive for the latest innovation because they need to in order to compete for consumer attention.
Many financial services organizations have started utilizing the cloud because it allows them to innovate quickly. But another component of cloud adoption, and specifically cloud security, is managing technical debt.
If you think about the myriad of mergers and acquisitions that have happened in the finserv industry over the past few decades, it’s easy to see how so many organizations have inherited disparate technologies that aren’t fully integrated. There could be some systems that you quite literally cannot turn off without major risk to the entire economy, considering how much financial information flows through those systems on a regular basis. The stakes are high. It’s essential that technology upgrades and security advancements be handled with care.
Despite this, there is still a high volume of outdated technology and many legacy systems still operating – although it’s worth noting that this is different for post-2010 companies that have built everything to truly be ephemeral.
Financial services organizations have to defend every business practice; they can’t just identify one area to go big and win. People want the shiny, new thing that will give them an advantage in the market, so development and innovation have been a high priority over the last year. (See? I mentioned innovation again.)
A major upcoming challenge for finserv organizations and cloud security will be the specific tools they are required to use, and how to leverage them in a way that enables them to still move fast while remaining compliant with industry regulations.
I think CISOs in the finserv industry truly need to understand why cloud security is so important. It’s not just about remaining compliant — the scale and speed of the cloud is what makes it so great, but also so dangerous. When you have an automated system, what might at first appear to be a minor disruption can quickly compound. And the cloud makes everything way faster. That’s why hygiene practices are essential. You need to have your house in order.
The best strategy for this is tight asset management. Most organizations don’t actually see their assets expanding. Asset creep is a real problem, especially now. Business users are increasingly technical and can spin up new sets of instances that put the company at risk (think shadow IT). This is quite different from the data centers of the past when unauthorized users weren’t even allowed in the building to plug something in. Bottom line: Security teams need visibility.
CISOs who are looking to mature their security strategy will want to start by making distinctions between roles of the security leaders. There are some CISOs who have a governance risk background and others who have technical experience. Understanding your unique skill set is a major part of knowing how to approach the role and hire the right staff for your success. And this extends to identifying and using the best platforms, as well.
Your “supporting cast” of security team members can help you gain big-picture visibility into the cloud. Leaning on their expertise can be invaluable, especially considering that many security leaders do a lot of coaching for regulators to keep them educated in the constant evolution of cloud security. Similar to the need for innovation, it’s worth noting that this need for security knowledge in financial services also differs greatly from the expectations of leaders within retail, hospitality, or manufacturing industries. For example, in those industries, they don’t need to train a regulator on how autoscaling is applicable to cyberspace.
There’s a different expectation in financial services and leaders in this industry need to be aware of that when strategizing growth.
Right now, organizations in financial services are facing the challenge of having too many tools. Having a larger security budget than other sectors usually means you get one of everything; it’s a real mixed blessing. Finserv has been driving a big integration story about how the tools really work together, so I anticipate we’ll see more large security vendors starting to shift to an integrated approach.
Another trend that’s unique to this industry is the fact that financial services also have investment arms, and we’re seeing these shift the strategy of security leaders, as well. Basically, when a financial services organization invests in a product, it tends to have a trickle-down effect, and the IT security team can find themselves being asked to adopt those new technologies. I think we’ll see more of this over the next year, and IT security teams are going to need to determine how to best implement new solutions in a seamless and effective way.
Security and cloud leaders in financial services need to watch for true innovation in the space and examine how competitors are embracing digital transformation. What does it look like, and what could it mean for you?
Let’s navigate the future of cloud security for finserv together. Learn more here.
Additional reading:
Post Syndicated from Николай Марченко original https://bivol.bg/%D0%B4%D1%8A%D1%80%D0%B6%D0%B0%D0%B2%D0%BD%D0%B8%D1%8F%D1%82-%D1%80%D0%B5%D0%B7%D0%B5%D1%80%D0%B2-%D1%82%D1%8A%D1%80%D0%B3%D1%83%D0%B2%D0%B0-%D1%83%D0%B4%D0%B0%D1%80%D0%BD%D0%BE-%D1%81-%D0%B3%D0%BE.html

Агенцията за държавния резерв и военновременни запаси търгува горива с една определена фирмa, коqто може да бъдe афилирана с лицето Младен Михалев – Маджо. Такива сигнали получи “Биволъ” от поне…
Post Syndicated from Bruce Schneier original https://www.schneier.com/blog/archives/2022/02/vendors-are-fixing-security-flaws-faster.html
Google’s Project Zero is reporting that software vendors are patching their code faster.
tl;dr
- In 2021, vendors took an average of 52 days to fix security vulnerabilities reported from Project Zero. This is a significant acceleration from an average of about 80 days 3 years ago.
- In addition to the average now being well below the 90-day deadline, we have also seen a dropoff in vendors missing the deadline (or the additional 14-day grace period). In 2021, only one bug exceeded its fix deadline, though 14% of bugs required the grace period.
- Differences in the amount of time it takes a vendor/product to ship a fix to users reflects their product design, development practices, update cadence, and general processes towards security reports. We hope that this comparison can showcase best practices, and encourage vendors to experiment with new policies.
- This data aggregation and analysis is relatively new for Project Zero, but we hope to do it more in the future. We encourage all vendors to consider publishing aggregate data on their time-to-fix and time-to-patch for externally reported vulnerabilities, as well as more data sharing and transparency in general.
Post Syndicated from The History Guy: History Deserves to Be Remembered original https://www.youtube.com/watch?v=pgXo1DKFVOg
Post Syndicated from original https://xkcd.com/2582/

Post Syndicated from Curious Droid original https://www.youtube.com/watch?v=4ypxVQUWNMg
Post Syndicated from boB Rudis original https://blog.rapid7.com/2022/02/15/prudent-cybersecurity-preparation-for-the-potential-russia-ukraine-conflict/

Tensions between Russia and Ukraine remain elevated, with a high degree of uncertainty surrounding the likelihood of military conflict and its aftermath. As the US Cybersecurity and Infrastructure Agency (CISA) noted in a recent statement on these circumstances, while “there are not currently any specific credible threats to the US homeland,” there is the “potential for the Russian government to consider escalating its destabilizing actions in ways that may impact others outside of Ukraine.”
There are reports that Russia is leveraging offensive cyber capabilities as the situation between Russia and Ukraine escalates. If the situation draws closer to conflict, these actions may also extend to potential retaliatory cyberattacks, or cyberattack campaigns, against critical physical and cyber infrastructure within countries that provide support to Ukraine. This may seem alarmist, but US and other Western entities have been under considerable attack from Russian-affiliated hacking groups for years. Government officials have long reported that such activities are supported or, at best, overlooked by the Russian government, and commentators and researchers have suggested this helps advance Russia’s political agenda. In June 2021, the sustained high level of these attacks against US critical infrastructure resulted in the US President Biden addressing the matter directly with Russia’s President Putin.
Moreover, events like NotPetya and Conficker have shown us that targeting in cyberspace is rarely precise, and collateral damage from cyberattacks can spread far beyond the original target.
Given the increased risk of damage from cyberattacks — whether a direct attack against Ukraine and its supporters or an indirect effect from an attack — it is prudent, as CISA notes, that “all organizations — regardless of size — adopt a heightened posture when it comes to cybersecurity and protecting their most critical assets” and business processes.
The following actions are highly recommended for all organizations. These practices should be taken even in the absence of a geopolitical conflict — threats to organizational cybersecurity were present before the recent Ukraine-Russian tensions and will be present afterwards.
Fending off an attack from a well-resourced nation state is a nightmare scenario for most cybersecurity teams. However, there are some fundamental steps your organization can take to reduce both the likelihood of becoming a target, the severity of the damage, and the chances of success for an attacker.
CISA’s Shields Up advisory itemizes many steps that are sound practices to defend against any potential cyberattack, and we encourage all organizations to review each of them as part of their preparation plans.
Fundamentally, the guidance comes down to ensuring you have:
If your organization currently works with Ukrainian organizations, we echo CISA’s guidance to take extra care to monitor, inspect, and isolate traffic from those organizations and closely review access controls for that traffic.
US organizations should also keep CISA’s contact information (located at the end of their report) handy in both digital and physical form (in the event you cannot access digital assets) so you can engage them or the FBI in the event you are the victim of a direct cyberattack.
As noted, Russia is a very capable cyber adversary, but they cannot attack every asset/organization individually, all at once. There is a greater likelihood for larger-scale disruption or damage through the targeting of digital resources and Internet services that many people and organizations rely on.
Such attacks could take many forms, such as:
Now would be a good time to itemize all the third-party dependencies in your critical business processes and to draft a plan for ensuring continuity of these processes if each of those services became unavailable for some period of time. It would also be prudent to start identifying alternate providers for each service component and drafting rapid migration plans for each.
For the network-level attacks mentioned above, there isn’t much you can do when it comes to centralized network point DoS, but you can help increase your resilience to BGP hijacking by implementing safe BGP practices and encouraging your business partners and ISPs to do the same.
If tensions become seriously strained, there is a non-zero (but likely very low) chance of direct cyberattacks aimed at causing damage to US and allied physical infrastructure. The US alone has a large number of critical infrastructure facilities — many of which are privately owned — that are still in the process of strengthening their cybersecurity defenses and capabilities. This includes entities that all businesses rely on, such as electricity providers, emergency health services, transportation, and financial institutions.
Acknowledging the relatively low likelihood but high impact of a crippling cyberattack, now would be a good time to review and update (as necessary) your business continuity and disaster recovery (BC/DR) plans and playbooks, and perhaps run an exercise (or two!) that involves loss of one or more critical infrastructure components.
While there is cause for concern and preparation, there is no cause for panic or overreaction. It is, however, very appropriate to take some time to review your security posture, understand this heightened threat level, and engage stakeholders in an assessment of if — and how — you should proceed to shore up any areas that have gaps.
Additional reading:
Post Syndicated from original https://lwn.net/Articles/884864/
Over on the Bootlin blog, Michael Opdenacker has an introduction to using device tree overlays to support changes to the standard device tree definition for a particular system-on-chip (SoC). This allows users to add new hardware or modify the hardware configuration for their system relatively easily—and without recompiling the kernel or the full device tree source files.
For a given CPU architecture (ARM, PowerPC, etc), such a description allows to have a unique kernel supporting many different systems with distinct Systems on a Chip. The compiled Device Tree (DTB: Device Tree Binary), passed to the kernel by the bootloader at boot time, lets the kernel know which SoC and devices to initialize. Therefore, when you create a new board, and want to use a standard GNU/Linux distribution on it, all you have to do is create a new Device Tree describing your new hardware, compile it, and boot the distribution’s kernel with it. You don’t need to recompile that kernel, at least when it supports your SoC and the devices on your board.
[…] However, this is still an inconvenient solution. Any time you plug in a new device or an expansion board, or want to tweak other settings, you have to rebuild and update the full Device Tree for your board. What if you could prepare Device Tree fragments for each change to make, compile them once for all, and then, when you boot your device, load the main Device Tree and only the fragments you need, without having anything else to recompile?
Post Syndicated from Kevin Rivera original https://aws.amazon.com/blogs/architecture/deploying-sample-ui-forms-using-react-formik-and-aws-cdk/
Companies in many industries use UI forms to collect customer data for account registrations, online shopping, and surveys. It can be tedious to create form fields. Proper use of input validation can help users easily find and fix mistakes. Best practice is that users should not see a form filled with “this field is required” or “your email is invalid” errors until they have first attempted to complete the form.
Forms can be difficult to write, maintain, and test. They often have to be repeated in multiple areas on even the most basic interactive web application. Fortunately, third-party libraries provide front-end developers with tools to manage these complexities.
This blog post will describe an example solution for implementing simple forms for a user interface using the JavaScript libraries React and Formik. We will also use AWS resources to host the application. The blog will describe how the application is provisioned using the AWS Cloud Development Kit (CDK).
Our solution demonstrates a straightforward way for a front-end or full stack developer to rapidly create forms. We will show how a popular React form library, Formik, abstracts input field state management and reduces the amount of written code.
Our sample form will collect the user’s information (name, email, and date of birth) and store the data to a private Amazon S3 bucket for later retrieval using a presigned URL. The sample code gives developers a structure with which to build on and experiment. The code provides example integration with AWS services to host a React form application.
Figure 1 demonstrates how the user’s information flows through various AWS services and finally gets uploaded to private Amazon S3 bucket.
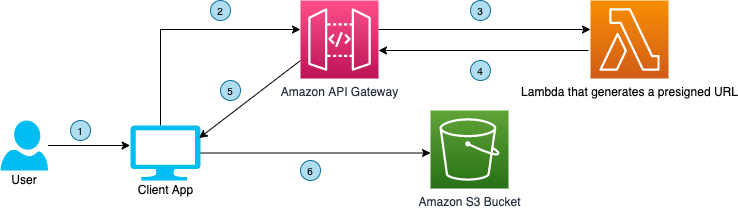
Figure 1. User interface communicating with API Gateway to upload a file to a S3 bucket using a presigned URL
The code also demonstrates the flow of data when a download request is made by the user. The download process is shown in Figure 2.
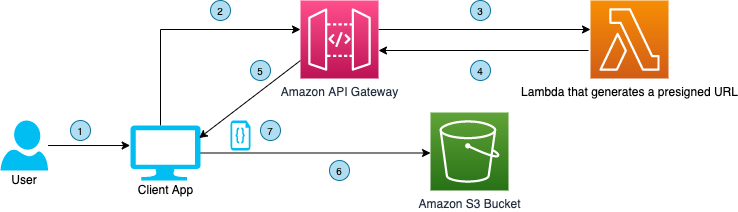
Figure 2. User interface communicating with API Gateway to download a file from a S3 bucket using presigned URL
Here are the four steps to demonstrate this solution:
For this walkthrough, you should have the following prerequisites:
The sample code for this application is available on GitHub. Clone the repo to follow along in a terminal.
git clone https://github.com/aws-samples/react-formik-on-aws
Change the directory to the folder the clone created and install dependencies for the API.
cd formik-presigned-s3/ npm install
After installing the dependencies for the API, let’s install the dependencies in the UI.
cd ui/formik-s3-react-app
 npm install
Let’s bundle our Lambda function that currently exists in the index.js file inside the resources/lambda directory. This will create our Lambda function inside a directory that our stack can read from, to create the handler.
npx esbuild resources/lambda/index.js –bundle –platform=node –target=node12 –external:aws-sdk –outfile=dist/lambda/build/index.js
Let’s go into more detail about the function of the Lambda handler. As seen in Figure 3, the handler is using three helper functions that are written in the file (isExisted, fetchUploadUrl, fetchViewUrl). It creates a presigned URL for uploads/downloads of data, confirms that the URL was created, and fetches the URL. Lines 68–74 are calling the helper functions based on the API request needed.

Figure 3. Lambda’s handler function for GET request type
#Make sure you are in the ui/formik-s3-react-app directory
 npm run build
This command will create your index.html file and its dependencies, which will be the source of your UI site. When we deploy our stack, we will inspect the CDK code. The Lambda bundler and the React app build step work together to source the directory and create the S3 bucket that will eventually host the React application.
Note: If you are deploying AWS CDK apps into an AWS environment, you must provision these resources for a specific location and account. In this case you must run the following command:
cdk bootstrap aws://<aws_account_number>/<aws_region>
This is the error that you will see if you do not bootstrap:
This stack uses assets, so the toolkit stack must be deployed to the environment (Run "cdk bootstrap aws://aws_account_number/aws_region")
Before we run the deploy command, let’s understand what exactly we are deploying and the advantages of the CDK.
Note: We won’t go into depth on how the AWS CDK works, but we will demonstrate implementation of the code for our infrastructure and website hosting.
Our configuration code for deploying our CDK is found in the root directory in a file called cdk.json. It’s important that we can configure certain properties. This is where we map to our bin file that creates our CDK app. As you can see in Figure 4, the app key points to bin/formic-s3.ts.
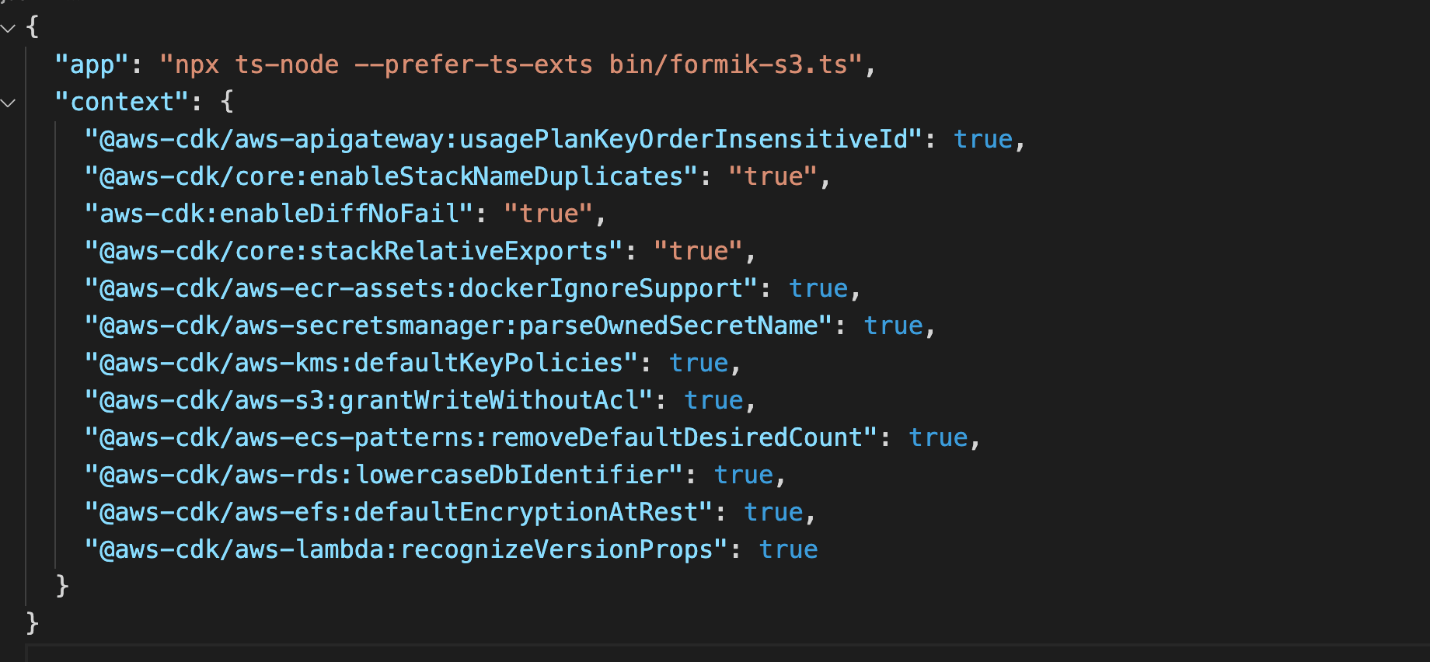
Figure 4. Contents of cdk.json file
Now let’s look at the CDK stack code, shown in Figure 5. This can be found in the lib directory of the root file and it is called formik-s3-stack.ts.
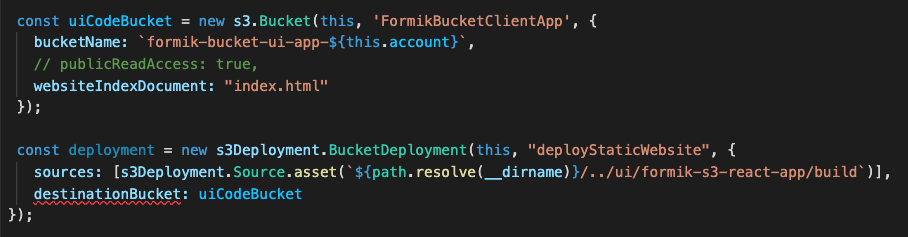
Figure 5. CDK stack code that creates a new S3 bucket for hosting the React webpage
This is the part of the code that creates our S3 bucket for hosting our React UI. The first few lines create the bucket name and point to the file that will be seen by the world (index.html). The deployment function has a source that will be searching for the path in your local directory where the build files were created. This will source the directory and then create it in an S3 bucket in the cloud.
Notice how our publicReadAccess is commented out. This is because it is not best practice to leave your bucket exposed publicly. For this blog, we will host this simple form site and allow public access. However, a CDN such as Amazon CloudFront should be used for distribution of traffic to keep your S3 bucket secure.
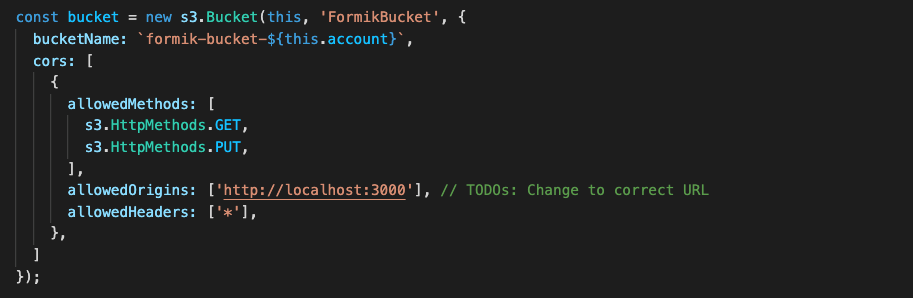
Figure 6. CDK stack code that creates a new S3 bucket for uploading and downloading data using S3 presigned URL
Figure 6 shows the second S3 bucket that will be used for our Formik data.
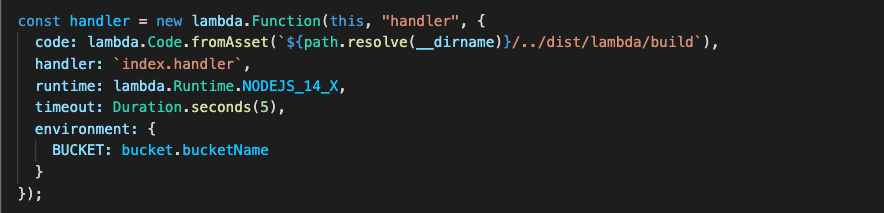
Figure 7. CDK code stack used to create the Lambda function
Figure 7 shows how to create your Lambda function, which also will be reading from the ‘bundling’ step.
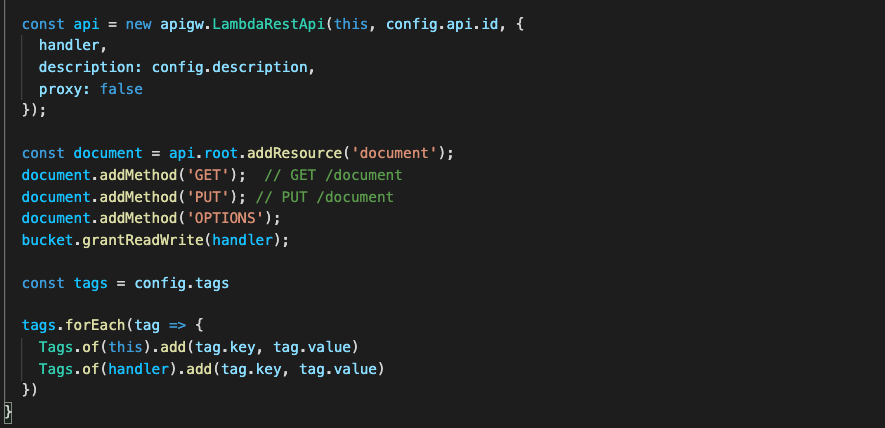
Figure 8. CDK code stack used to create API Gateway
Figure 8 shows how to create your API Gateway resources. Notice the ‘OPTIONS’ document is used here. This is because our front-end request URLs are not from the same origin as our APIs. Including the ‘OPTIONS’ document enables our browser to succeed in its preflight request and avoid any CORS issues.
Now that we understand our CDK, let’s finally DEPLOY!
npx cdk deploy
You will receive the output in the terminal that will be the storage API endpoint. You can also view this in CloudFormation under the Output tab for the stack the CDK spun up (FormikS3Stack). You should also see your S3 URL to view your React app.
Once you have your URL, you should see the form, shown in Figure 9.
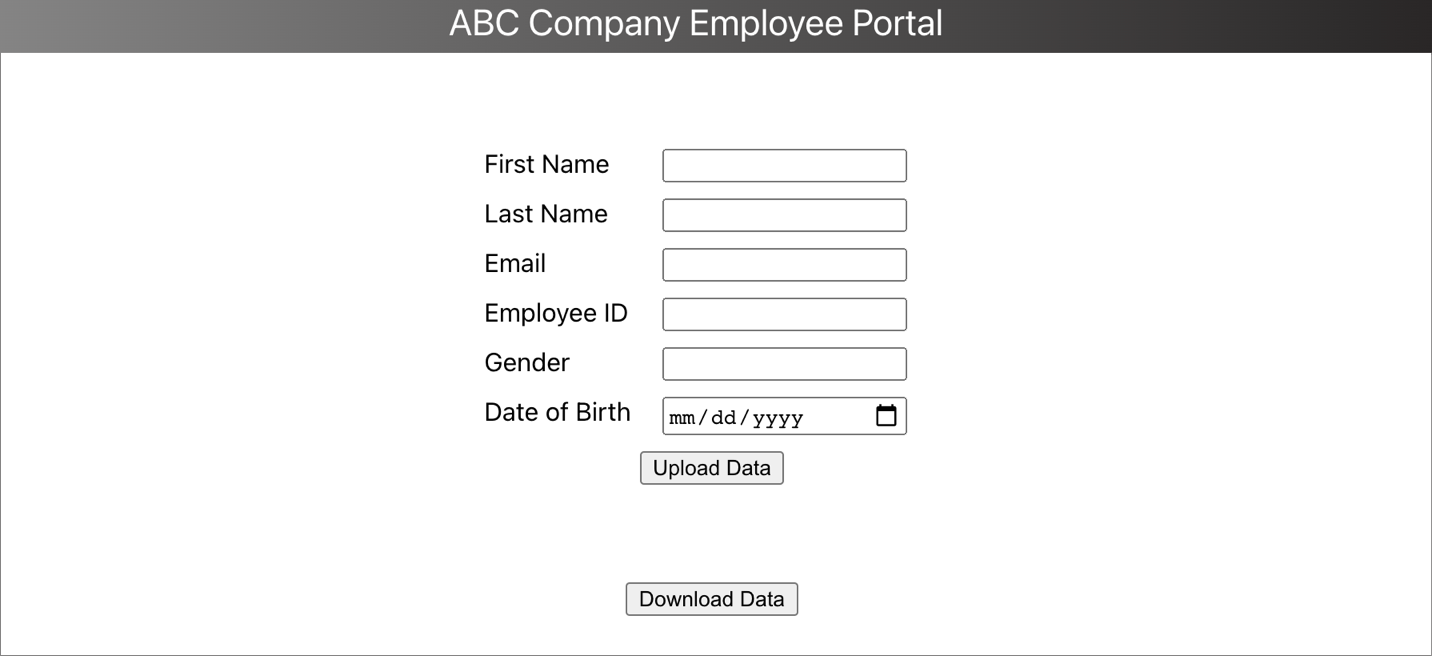
Figure 9. Portal form designed using Formik in ReactJS
Let’s preface this with how our forms had to be created using the old method, shown in Figure 10.
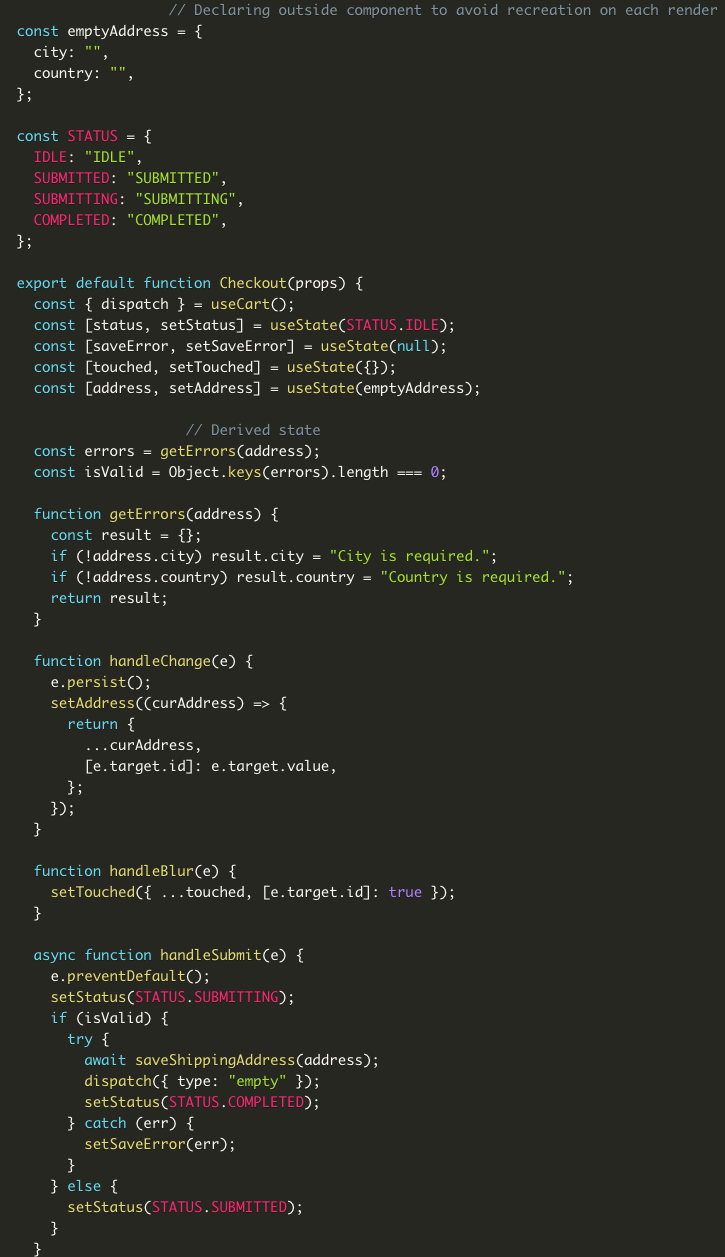
Figure 10. This is from https://www.bitnative.com/2020/08/19/formik-vs-plain-react-for-forms-worth-it/ showing a form without Formik
Figure 11 shows our code:
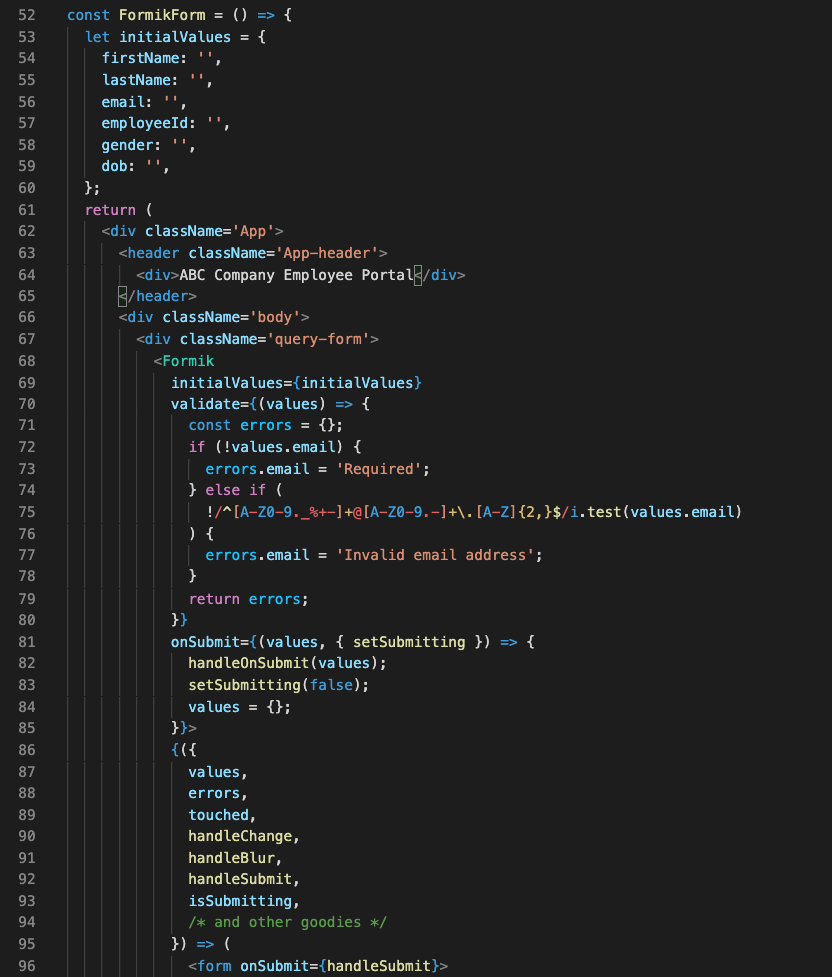
Figure 11. React code with the UI components
One of the first things you can notice when comparing both methods, is the location of your initial values. Formik handles the state of your fields. Without it, we would need to manage this with React’s state object if we were using class components, or with hooks inside functional components. With Formik, we don’t have to handle these tasks.
Another benefit of using Formik is its handling of input validation, errors, and handler functions that we can use to manage our UI (lines 70–79 and 87–93.) Formik reduces the need to write extra lines of code to handle validation and errors, managing states, and creating event handler logic.
Read this blog post that compares both methods of creating forms.
Our Formik form is simple to implement, but one more step remains. We need to handle uploading the information, and then downloading it.
With all our resources created and our form done, we put it all together by creating our API requests, shown in Figure 12.
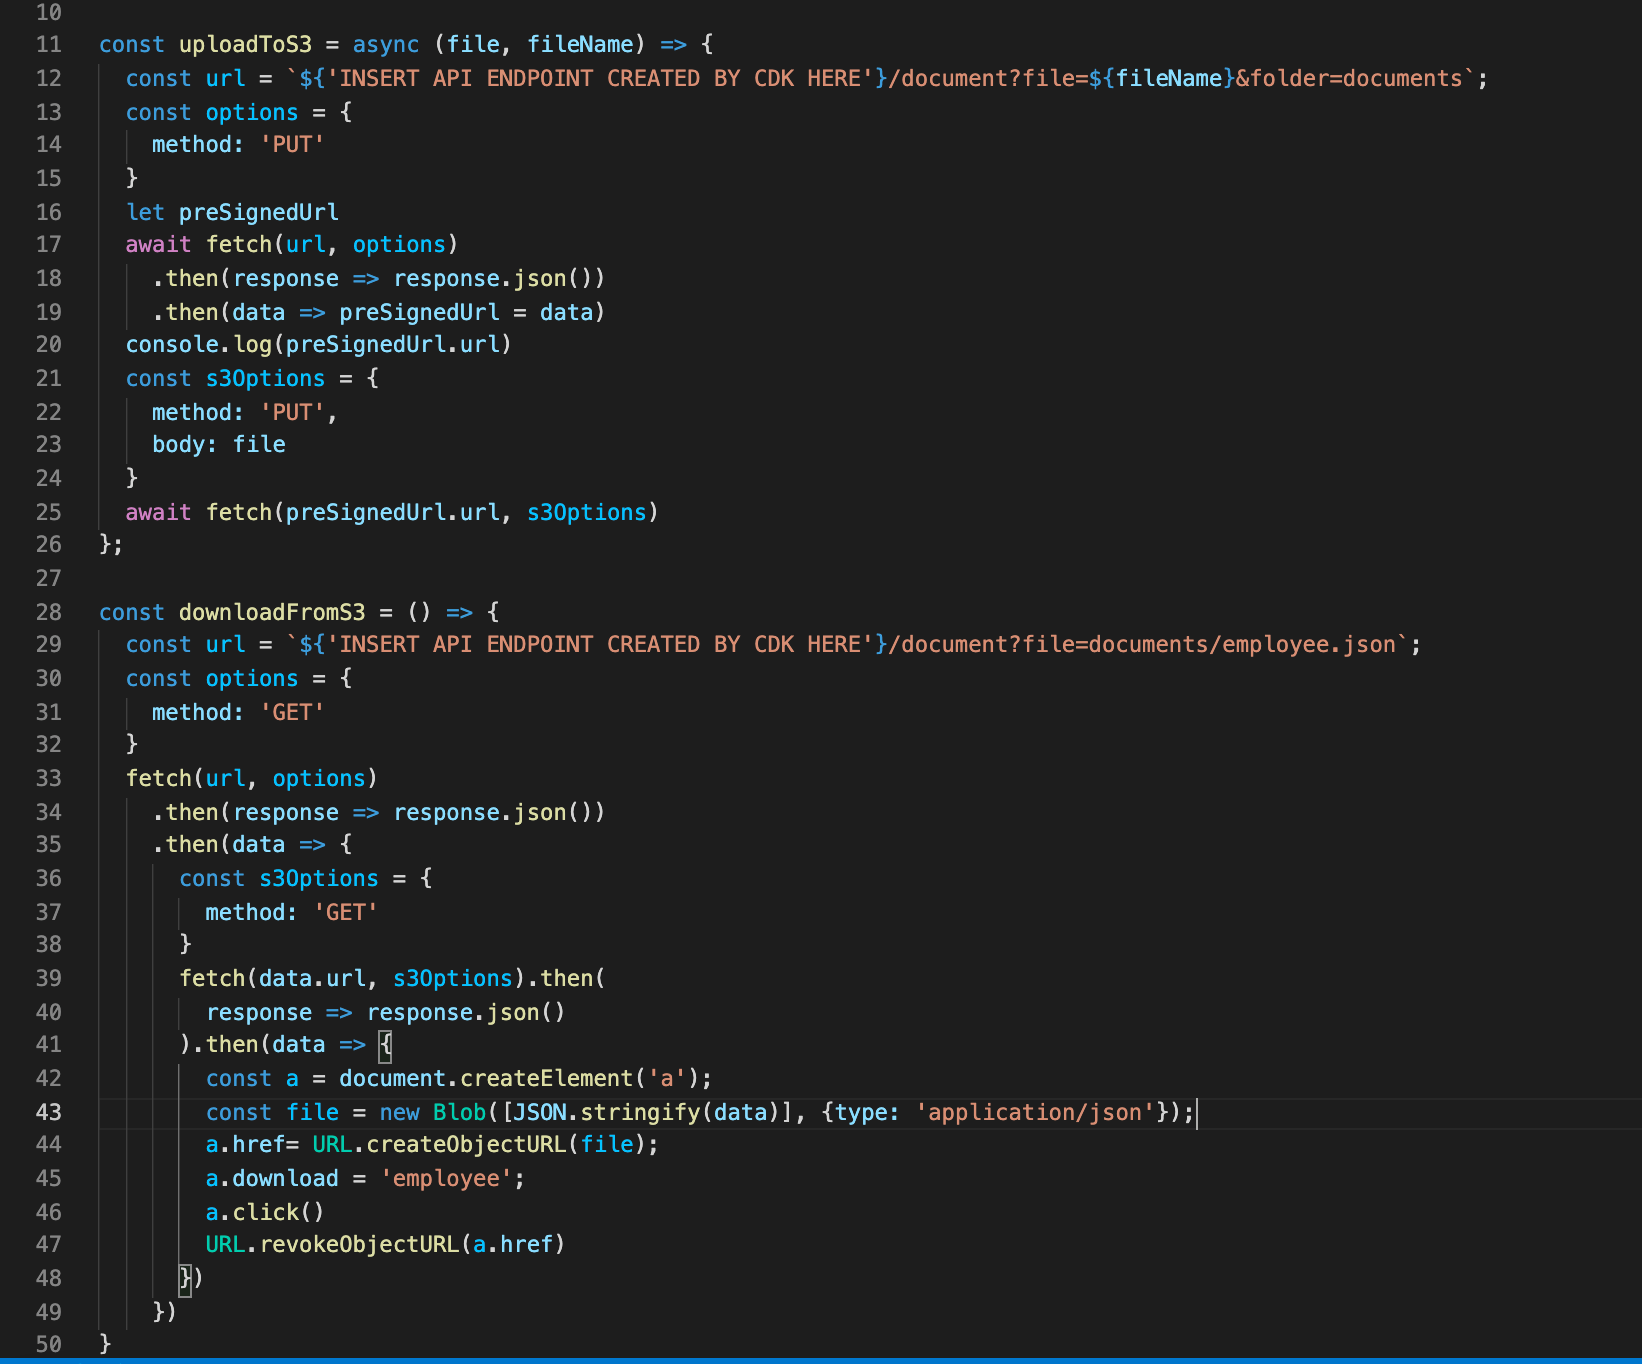
Figure 12. Code to upload to S3 bucket and download from S3 bucket
Due to the efficiency of AWS and Formik, we can upload and download with fewer than 50 lines of code.
Lines 11–26 is where we call our API Gateway URL that our CDK created for us. With this API, when the user first clicks the upload button, the request hits the endpoint to create the presigned URL. It waits for its creation and in lines 21–25 we PUT our data into our S3 bucket.
Lastly, we are able to hit that same presigned URL to download our information we uploaded into a JSON file.
To avoid incurring future charges, delete the resources. Let’s run:
npx cdk destroy
You can confirm the removal by going into CloudFormation and confirming the resources were deleted.
In this blog post, we learned how we can create a simple server for our form submissions. We spun it up easily with the CDK toolkit and provisioned our resources. We hosted our UI and created a sample form using Formik, which handles state and reduces the amount of code we must write. We then hit the endpoints given to us by the deployment and tested the app by uploading and downloading our form data. Traditional form data management requires a separate function for handling data and errors in forms. This is a cleaner and more efficient way to handle form data.
For further reading:
Post Syndicated from Techmoan original https://www.youtube.com/watch?v=GXMtaZTBMzw
Post Syndicated from Molly Clancy original https://www.backblaze.com/blog/what-is-private-cloud-storage/
No matter what business you’re in, you’re in the data business. Your files are the backbone of your entire operation and losing access to them would be a disaster. As such, it’s perfectly understandable if you’re a little protective of these all-important 1s and 0s. As you begin your search for a data storage solution, understanding some cloud basics can help you make the best decision, and one option that may cross your desk is the private cloud.
A private cloud is essentially storage dedicated solely to your organization, but accessible from anywhere. While you can outsource the physical infrastructure of this private cloud to a data center, you do have the option to keep it on-premises. It is a costlier solution than typical public cloud storage, but the trade-off is a higher level of security and control over your data.
By contrast, a public cloud storage service would be open to many different organizations or tenants. In a public cloud, tenants share the same physical hardware resources as other tenants, and their individual instances are virtually separated so that one tenant can’t access another’s data. Public clouds typically don’t involve on-premises hardware as everything is managed by the public cloud provider in a data center.
In 2020, spending on cloud services grew significantly: Public cloud spending reached $14 billion, and private cloud spending reached $5 billion, according to an IDC study. IDC also found that “on-premises private clouds” make up nearly two-thirds (i.e., 64%) of private cloud spending.
According to the Flexera 2021 State of the Cloud Report, 97% of respondents used a public cloud and 80% of respondents used a private cloud. As you can see, there is plenty of overlap. Using a public cloud versus a private cloud is not an either/or decision—78% of respondents use both public and private clouds in a hybrid cloud solution.
Both the private cloud and the public cloud have their advantages. Benefits of the public cloud include low cost and a higher adoption rate than the private cloud. Therefore, a public cloud can be cheaper to run and it can be easier to find employees who know how to use the public cloud. The high adoption rate also means it is easier to find third-party consultants and experts to provide help when you need it. On the other hand, a private cloud offers advantages such as faster access to data when using on-premises infrastructure and more control over security.
To better understand how private cloud services can be beneficial, let’s take a closer look at use cases. There are a few reasons organizations are investing time and resources into private cloud deployments:
Using both private and public clouds simultaneously is called a hybrid cloud solution, and it may be the best way to balance your security needs against your budget constraints to optimize your storage infrastructure. You can use an on-premises private cloud for sensitive files or larger files that will be accessed on a daily basis, while maintaining public cloud storage space for archives or files that need to be accessed remotely by outside vendors or clients. The reduced cost of public cloud storage gives you greater flexibility in tweaking your private vs. public cloud needs to fit your budget.
Using private cloud data storage services has the potential to offer greater security. If your cloud portfolio includes the private cloud, use the following tips to get the most from those services.
We’re all in the data business, but nobody knows your business like you. Ultimately, the decision to balance data security against financial concerns will come down to your individual needs and budgetary realities. But for those files that require an extra layer of security, whether it’s for regulatory or operational reasons, a private cloud solution gives you control over your data that is worth the added expense.
Are you using a public cloud, a private cloud, or both? Let us know in the comments.
The post What Is Private Cloud Storage? appeared first on Backblaze Blog | Cloud Storage & Cloud Backup.
Post Syndicated from Talks at Google original https://www.youtube.com/watch?v=6EAt63JHAPs
Post Syndicated from The History Guy: History Deserves to Be Remembered original https://www.youtube.com/watch?v=GP8_scls6As
Post Syndicated from Dhiraj Thakur original https://aws.amazon.com/blogs/devops/automate-code-reviews-with-amazon-codeguru-reviewer/
A common problem in software development is accidentally or unintentionally merging code with bugs, defects, or security vulnerabilities into your main branch. Finding and mitigating these faulty lines of code deployed to the production environment can cause severe outages in running applications and can cost unnecessary time and effort to fix.
Amazon CodeGuru Reviewer tackles this issue using automated code reviews, which allows developers to fix the issue based on automated CodeGuru recommendations before the code moves to production.
This post demonstrates how to use CodeGuru for automated code reviews and uses an AWS CodeCommit approval process to set up a code approval governance model.
In this post, you create an end-to-end code approval workflow and add required approvers to your repository pull requests. This can help you identify and mitigate issues before they’re merged into your main branches.
Let’s discuss the core services highlighted in our solution. CodeGuru Reviewer is a machine learning-based service for automated code reviews and application performance recommendations. CodeCommit is a fully managed and secure source control repository service. It eliminates the need to scale infrastructure to support highly available and critical code repository systems. CodeCommit allows you to configure approval rules on pull requests. Approval rules act as a gatekeeper on your source code changes. Pull requests that fail to satisfy the required approvals can’t be merged into your main branch for production deployment.
The following diagram illustrates the architecture of this solution.

The solution has three personas:
The solution workflow contains the following steps:
In the following sections, we walk you through configuring the CodeCommit repository and creating a pull request and approval rule. We then run the workflow to test the code, review recommendations and make appropriate changes, and run the workflow again to confirm that the code is ready to be merged.
Before we get started, we create an AWS Cloud9 development environment, which we use to check in the Python code for this solution. The sample Python code for the exercise is available at the link. Download the .py files to a local folder.
Complete the following steps to set up the prerequisite resources:
us-east-1 Region.This template creates three IAM users for Repository admin, Code Approver, Developer that are required at different steps while following this blog.
Let’s start with CodeCommit repository. The repository works as the source control for the Java and Python code.

transaction_alert_repo.
The repository is created.


You can see our CodeCommit repository is associated with CodeGuru.

This action clones the repository and creates the transaction_alert_repo folder in the environment.
![git clone CodeCommit repo to Cloud9 using git clone command, readme.md file is created locally and pushed back to CodeCommit repo]](https://d2908q01vomqb2.cloudfront.net/7719a1c782a1ba91c031a682a0a2f8658209adbf/2022/02/02/Picture7.png)
README.md file is copied and available in the CodeCommit repository.
transaction_alert_repo folder.
read_file.py and read_rule.py.
transaction_alert_repo folder:
read_file.py and read_rule.py files are copied in the repository.
Now we create our pull request.


We now create an approval rule as the repository admin.

Require an approval before merge.
We can now view any recommendations regarding our pull request code review.

You can now review the recommendation details, as shown in the following screenshot.


The developer can see this comment as feedback from the approver to fix the issue.


Let’s say the developer makes the required changes in the code to address the issue and uploads the new code in the AWS Cloud9 environment. If CodeGuru doesn’t find additional issues, we can merge the environments.

CodeGuru hasn’t found any issue in the updated code, so there are no recommendations.


Now the developer can see on the CodeCommit console that the pull request is approved.


You can see a success message.

The read_file.py and read_rule.py files are available under the main branch.

To avoid incurring future charges, remove the resources created by this solution by
This post highlighted the benefits of CodeGuru automated code reviews. You created an end-to-end code approval workflow and added required approvers to your repository pull requests. This solution can help you identify and mitigate issues before they’re merged into your main branches.
You can get started from the CodeGuru console by integrating CodeGuru Reviewer with your supported CI/CD pipeline.
For more information about automating code reviews and check out the documentation.
Post Syndicated from Geographics original https://www.youtube.com/watch?v=lrM9XV_aFUA
Post Syndicated from Danilo Poccia original https://aws.amazon.com/blogs/aws/new-for-amazon-codeguru-reviewer-detector-library-and-security-detectors-for-log-injection-flaws/
Amazon CodeGuru Reviewer is a developer tool that detects security vulnerabilities in your code and provides intelligent recommendations to improve code quality. For example, CodeGuru Reviewer introduced Security Detectors for Java and Python code to identify security risks from the top ten Open Web Application Security Project (OWASP) categories and follow security best practices for AWS APIs and common crypto libraries. At re:Invent, CodeGuru Reviewer introduced a secrets detector to identify hardcoded secrets and suggest remediation steps to secure your secrets with AWS Secrets Manager. These capabilities help you find and remediate security issues before you deploy.
Today, I am happy to share two new features of CodeGuru Reviewer:
Let’s see these new features in more detail.
Using the Detector Library
To help you understand more clearly which detectors CodeGuru Reviewer uses to review your code, we are now sharing a Detector Library where you can find detailed information and code samples.
These detectors help you build secure and efficient applications on AWS. In the Detector Library, you can find detailed information about CodeGuru Reviewer’s security and code quality detectors, including descriptions, their severity and potential impact on your application, and additional information that helps you mitigate risks.
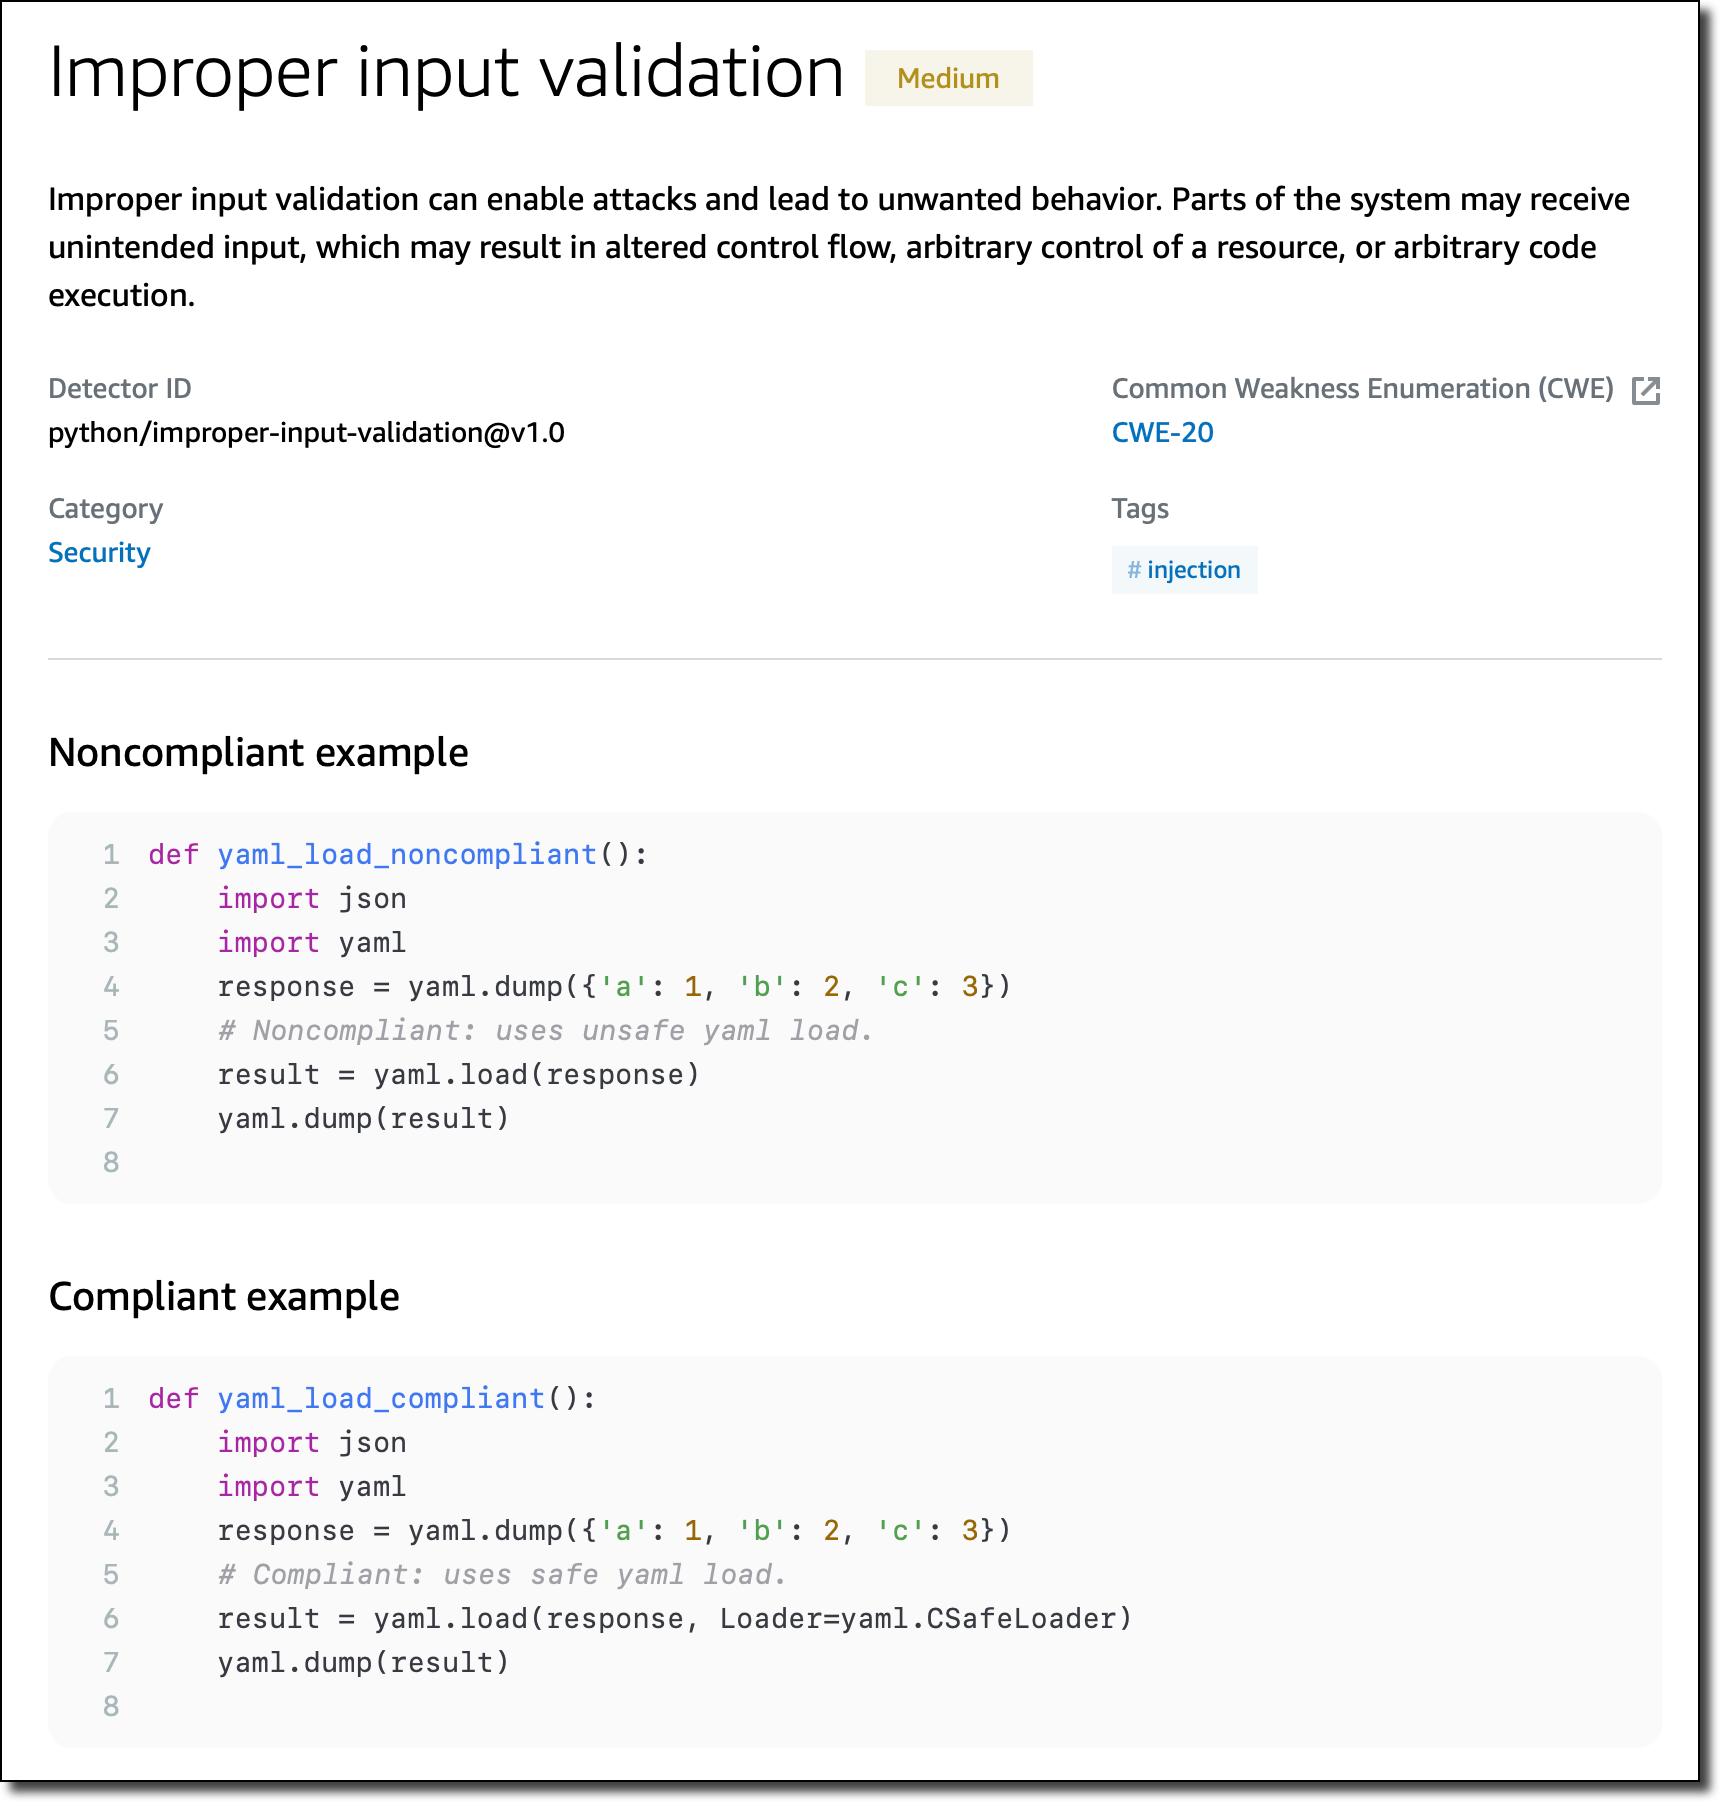
Note that each detector looks for a wide range of code defects. We include one noncompliant and compliant code example for each detector. However, CodeGuru uses machine learning and automated reasoning to identify possible issues. For this reason, each detector can find a range of defects in addition to the explicit code example shown on the detector’s description page.
Let’s have a look at a few detectors. One detector is looking for insecure cross-origin resource sharing (CORS) policies that are too permissive and may lead to loading content from untrusted or malicious sources.

Another detector checks for improper input validation that can enable attacks and lead to unwanted behavior.
Specific detectors help you use the AWS SDK for Java and the AWS SDK for Python (Boto3) in your applications. For example, there are detectors that can detect hardcoded credentials, such as passwords and access keys, or inefficient polling of AWS resources.
New Detectors for Log-Injection Flaws
Following the recent Apache Log4j vulnerability, we introduced in CodeGuru Reviewer new detectors that check if you’re logging anything that is not sanitized and possibly executable. These detectors cover the issue described in CWE-117: Improper Output Neutralization for Logs.
These detectors work with Java and Python code and, for Java, are not limited to the Log4j library. They don’t work by looking at the version of the libraries you use, but check what you are actually logging. In this way, they can protect you if similar bugs happen in the future.

Following these detectors, user-provided inputs must be sanitized before they are logged. This avoids having an attacker be able to use this input to break the integrity of your logs, forge log entries, or bypass log monitors.
Availability and Pricing
These new features are available today in all AWS Regions where Amazon CodeGuru is offered. For more information, see the AWS Regional Services List.
The Detector Library is free to browse as part of the documentation. For the new detectors looking for log-injection flaws, standard pricing applies. See the CodeGuru pricing page for more information.
Start using Amazon CodeGuru Reviewer today to improve the security of your code.
— Danilo
Post Syndicated from original https://lwn.net/Articles/884845/
Neil McGovern announces his
departure from the helm of the GNOME Foundation.
GNOME has changed a lot in the last 5 years, and a lot has happened
in that time. As a Foundation, we’ve gone from a small team of 3,
to employing people to work on marketing, investment in technical
frameworks, conference organisation and much more beyond. We’ve
become the default desktop on all major Linux distributions. We’ve
launched Flathub to help connect application developers directly to
their users. We’ve dealt with patent suits, trademarks, and bylaw
changes. We’ve moved our entire development platform to GitLab. We
released 10 new GNOME releases, GTK 4 and GNOME 40.
Post Syndicated from Bruce Schneier original https://www.schneier.com/blog/archives/2022/02/secret-cia-data-collection-program.html
Two US senators claim that the CIA has been running an unregulated — and almost certainly illegal — mass surveillance program on Americans.
The senator’s statement. Some declassified information from the CIA.
No real details yet.