Post Syndicated from Matt Granger original https://www.youtube.com/shorts/EMQZgNT2lZU
[$] LWN.net Weekly Edition for July 17, 2025
Post Syndicated from corbet original https://lwn.net/Articles/1029426/
Inside this week’s LWN.net Weekly Edition:
- Front: Python JIT; Anubis; Secure Boot certificate expiration; SFrame; Exported symbols; Python packaging in Fedora.
- Briefs: Parrot 6.4; SPI report; Quotes; …
- Announcements: Newsletters, conferences, security updates, patches, and more.
The 340th Bomb Group vs Mount Vesuvius
Post Syndicated from The History Guy: History Deserves to Be Remembered original https://www.youtube.com/shorts/IQkO-9ejQrw
Comic for 2025.07.17 – Every Day
Post Syndicated from Explosm.net original https://explosm.net/comics/every-day
New Cyanide and Happiness Comic
AWS successfully completes CCAG 2024 pooled audit with European financial institutions
Post Syndicated from Hassan A. Malik original https://aws.amazon.com/blogs/security/aws-successfully-completes-ccag-2024-pooled-audit-with-eu-financial-institutions/
Amazon Web Services (AWS) has completed its annual Collaborative Cloud Audit Group (CCAG) audit engagement with leading European financial institutions.
At AWS, security remains our highest priority. As customers continue to embrace the scalability and flexibility of the cloud, we support them in evolving security, identity, and compliance into core business enablers. The AWS Compliance Program helps customers understand the robust controls in place at AWS and empowers them to architect secure and resilient environments aligned to regulatory expectations.
What is CCAG?
The CCAG is a not-for-profit association representing a growing number of regulated financial services institutions across Europe. Its mission is to execute pooled audits of cloud service providers, enabling participating institutions to exercise their audit rights in alignment with supervisory expectations, including those set out by the European Banking Authority (EBA).
The CCAG audit methodology is grounded in recognized international standards and frameworks, including:
- The Cloud Controls Matrix (CCM) by the Cloud Security Alliance (CSA)
- IIA International Professional Practices Framework (IPPF)
- ISACA IT Assurance Framework (ITAF)
Conducting pooled audits at scale
While there are many established security frameworks, CCAG uses the CSA Cloud Controls Matrix to assess the control environment of cloud service providers. This framework provides foundational security principles tailored to cloud environments and enables risk-informed assurance in regulated industries.
Between February and December 2024, AWS collaborated with CCAG member auditors through a structured, multi-phase audit program. Fieldwork activities were conducted entirely on site across two AWS locations in Europe and North America. The scope of the audit covered selected AWS services and corresponding enterprise-wide controls, aligned to the expectations of European financial regulators.
As part of the audit, CCAG evaluated the ability of AWS to protect the confidentiality, integrity, and sovereignty of customer data across AWS Regions; to detect and respond effectively to security incidents and make sure of forensic readiness; to enforce strict access controls and manage privileged users with precision; and to maintain operational resilience through structured change and configuration management processes. Further areas of assessment included the security of APIs and customer-facing interfaces, the ability to support interoperability and data portability, the governance of supplier relationships and workforce lifecycle management, and the enforcement of centralized policy, risk, and compliance oversight across the AWS environment.
CCAG 2024: A collaborative milestone in assurance
The 2024 engagement exemplified strong alignment between CCAG’s audit strategy and the commitment of AWS to assurance. Through effective governance structures, shared timelines, and continuous dialogue, AWS supported the audit with clarity, responsiveness, and precision.
“CCAG proudly acknowledges the exceptional collaboration with AWS in delivering a strategically significant and highly complex audit. This engagement brought together CCAG’s deep-rooted expertise in banking and financial services—including decades of regulatory insight, audit precision, and sector-specific resilience knowledge—with AWS’s outstanding technical leadership, operational agility, and commitment to transparency.
This partnership exemplified the highest standards of professional alignment, mutual accountability, and excellence. The shared focus on rigor and process integrity enabled CCAG to conduct a risk-informed, regulatory-grade audit within agreed timelines—reinforcing what best-in-class assurance in cloud-enabled financial services can look like.” Audit Coordinators of the CCAG Group
|
“CCAG proudly acknowledges the exceptional collaboration with AWS in delivering a strategically significant and highly complex audit. This engagement brought together CCAG’s deep-rooted expertise in banking and financial services—including decades of regulatory insight, audit precision, and sector-specific resilience knowledge—with AWS’s outstanding technical leadership, operational agility, and commitment to transparency. This partnership exemplified the highest standards of professional alignment, mutual accountability, and excellence. The shared focus on rigor and process integrity enabled CCAG to conduct a risk-informed, regulatory-grade audit within agreed timelines—reinforcing what best-in-class assurance in cloud-enabled financial services can look like.” — Audit Coordinators of the CCAG Group |
Looking ahead
Following the successful completion of the 2024 cycle, AWS has already initiated the 2025 CCAG engagement. We remain committed to strengthening trust, improving transparency, and continuing to collaborate with customers and regulators to support the secure and compliance-aligned adoption of cloud services across the financial sector.
To learn more about AWS compliance programs, visit AWS Compliance Programs. For audit-specific inquiries, reach out to your AWS account team or contact the Security Assurance team.
If you have feedback about this post, submit comments in the section below.
Seagate Shipping 30TB HAMR IronWolf Pro and Exos M Hard Drives
Post Syndicated from Cliff Robinson original https://www.servethehome.com/seagate-shipping-30tb-hamr-ironwolf-pro-and-exos-m-hard-drives/
Seagate is now shippint 30TB IronWolf Pro NAS SSDs and Exos M data center hard drives that use HAMR technology
The post Seagate Shipping 30TB HAMR IronWolf Pro and Exos M Hard Drives appeared first on ServeTheHome.
Infrastructure as code translation for serverless using AI code assistants
Post Syndicated from Debasis Rath original https://aws.amazon.com/blogs/compute/infrastructure-as-code-translation-for-serverless-using-ai-code-assistants/
Serverless applications commonly use infrastructure as code (IaC) frameworks to define and manage their cloud resources. Teams choose different IaC tools based on their skills, existing tooling, or compliance needs. As applications grow, the need to shift between IaC formats may arise to adopt new features or align with evolving standards. Developers are rapidly adopting AI-powered coding assistants to help with these evolving demands. In this post, we focus on Amazon Q Developer as an example, but the guidance applies broadly to any coding assistant. Amazon Q Developer is an AI-powered assistant that helps developers with code generation, problem-solving, and development tasks within the Amazon Web Services (AWS) ecosystem. Amazon Q Developer command line interface (CLI) allows developers to convert infrastructure definitions between popular IaC frameworks. This post demonstrates how to use Amazon Q CLI to translate a serverless project from a source IaC such as Serverless Framework version 3 to an IaC framework of choice such as the AWS Serverless Application Model (AWS SAM). To make demonstration more accessible, we have chosen a low-complexity project. However, Amazon Q CLI supports bidirectional translation across multiple IaC formats. We walk through how to migrate a reference architecture to show how the process works, as shown in the following figure.
Figure 1. Architecture diagram of example AWS solution to translate
This sample project orchestrates the deployment of a REST API using Amazon API Gateway, acting as an Amazon Simple Storage Service (Amazon S3) proxy for write operations. It includes API-Key setup, basic request validator, AWS Lambda invocation on Amazon S3 events, and enables Amazon CloudWatch Logs and AWS X-Ray tracing for API Gateway and Lambda using the Powertools for Lambda developer toolkit.
Solution overview
Amazon Q Developer is trained on AWS best practices and provides an AI-powered experience through its CLI. It automates IaC translation by reducing manual effort, minimizing errors, and preserving the original intent across frameworks. The translation process follows four steps: assess, translate, test and refine, and deploy. The following figure shows this workflow.
Figure 2. Logical flow for assessment, translation, testing, and deployment
- Assess: Analyze existing Serverless Framework projects for compatibility and readiness.
- Translate: Convert Serverless Framework configuration into AWS SAM templates using Amazon Q Developer CLI.
- Test and refine: Validate and improve translated templates to make sure of functional accuracy and best practices.
- Deploy: Package and deploy the finalized AWS SAM templates to AWS environments.
Prerequisites and considerations
The following prerequisites and considerations are necessary to complete this solution.
Define custom rules to guide automation with Amazon Q Developer
Amazon Q Developer uses a rule-based model to automate tasks that is guided by user-defined rules. These rules encode your team’s standards to make sure that the automation is consistent and repeatable. You can create a library of custom rules to enforce best practices when using Amazon Q in your integrated development environment (IDE) or through the CLI. To help you get started, we’ve included a sample rules file that provides a baseline configuration. This file defines the structure of the output, sequence of the automation steps, and best practices to follow during each phase of the project. You can customize these rules to align with your organization’s architectural guidelines, security policies, or compliance needs.
Understand and categorize project complexity
Serverless projects differ in scale and structure, which directly impacts how you assess them. Smaller projects with minimal configuration and a few functions typically present fewer challenges. Larger, more complex projects can include dozens of Lambda functions, shared layers, and integrations across services such as Amazon Simple Queue Service (Amazon SQS), Amazon DynamoDB, or Amazon EventBridge. Start by categorizing the project as low, medium, or high complexity based on factors such as the number of functions, the diversity of event sources, and the presence of shared configurations. Use this categorization to prioritize and scope your assessment efforts. For complex workloads, assess individual components separately to reduce the surface area for troubleshooting and remediation.
Handle framework-specific tooling and plugins
Plugins or dependencies in different IaC frameworks extend core functionality or introduce custom behaviors. AWS SAM supports similar capabilities but in a different way. For example, you may be able to use AWS SAM, but for capabilities not found in AWS SAM, you can use AWS CloudFormation macros or Lambda-backed custom resources. During assessment, identify all active plugins and document their purpose and integration points. Evaluate whether each plugin’s functionality can be replicated using native AWS services or custom resources in AWS SAM. For common patterns—such as packaging optimizations, function warmers, or custom deploy hooks—consider using the CloudFormation macros and custom resources. When plugin functionality cannot be translated directly, annotate it in your assessment report for manual intervention. Clearly mapping each plugin’s role helps maintain parity and reduces surprises during deployment in the new environment.
With all of this you are ready to start the conversion.
Assess with Amazon Q Developer
The animated diagrams included in this post offer step-by-step visuals to explain the Amazon Q behavior throughout the workflow. Remember that you have already set rules for Amazon Q for each phase. Now your prompt to Amazon Q is clear. At this point Amazon Q has enough context to get you crisper and deterministic result. Use the following prompt to start the assessment:
Prompt
Figure 3. Assessment step using Amazon Q Developer
After the assessment, Amazon Q Developer generates translation recommendations based on AWS best practices. It produces an evaluation_summary.md file with detailed insights, mapping guidance, and technical considerations for converting components to AWS SAM resources. The report serves as the foundation for the next step: automated translation into AWS SAM resources.
Translate using Amazon Q Developer
After completing the assessment, begin the translation using the baseline rules defined in .amazonq/rules/translation_rules.md. These rules guide the conversion and make sure of consistency with the assessment outputs. Amazon Q Developer CLI uses these rules to parse the serverless.yml file, scaffold a new project structure, and generate a complete AWS SAM template. During translation, Amazon Q Developer performs the following actions:
- Converts each Lambda function into an
AWS::Serverless::Function, preserving runtime, handler, memory, timeout, and environment settings. - Translates event sources such as HTTP APIs and Amazon SQS into SAM event definitions.
- Maps AWS Identity and Access Management (IAM) policies and permissions into CloudFormation-compatible resources.
- Removes development-only settings such as the
serverless-offlineplugin.
Serverless Framework v3 often uses CloudFormation orchestration and custom resources to deliver certain capabilities. For example, it may use custom resources to provision S3 bucket notifications. Amazon Q detects these patterns during assessment and translates them into explicit, well-structured AWS SAM resources. This makes sure of functional parity in the target IaC.Use the following prompt to begin the translation:
Prompt
Figure 4. Translation using Amazon Q Developer
After translation, Amazon Q Developer produces a complete AWS SAM project with test scripts and documentation. The project supports local testing, automated deployment, consistent resource management, and native integration with AWS tools. You also receive a development_summary.md file with a structured project overview and step-by-step testing instructions.
Amazon Q Developer replaces resources created implicitly by Serverless Framework plugins (such as Serverless Lift or custom resources for handling circular dependencies) with explicit CloudFormation definitions. To support custom or unsupported plugins, define the translation logic in .amazonq/rules/development_rules.md. Specify mappings or flag resources for manual review. This maximizes automation while highlighting exceptions early in the workflow.
Test and refine using Amazon Q Developer
Validate the translated AWS SAM application using the local testing rules defined in .amazonq/rules/local_testing_rules.md. These rules guide high-fidelity simulation and verification.
Amazon Q Developer generates test commands that use the AWS SAM CLI to replicate real-world behavior. It uses sam local invoke to test Lambda functions and sam local start-api to simulate HTTP API calls. This makes sure of the translated application behaves as expected when compared to the original Serverless Framework project.
To simulate Amazon S3 events, provision temporary S3 buckets, and instruct Amazon Q Developer to reference them during testing, it enables full end-to-end validation by combining real Amazon S3 interactions with a local function execution.Use the following prompt to begin testing:
Figure 5. Testing and refinement step using Amazon Q Developer
Use AWS SAM Accelerate with sam sync to run cloud-based integration tests in a lower environment after completing local validation. This complements early testing and helps catch runtime issues before deployment. Combining Amazon Q Developer automation with AWS SAM CLI allows you to speed up feedback cycles and make sure of functional accuracy in the cloud environment.
Deploy
The translated and tested AWS SAM application is ready, thus the final step is deployment. Using AWS SAM CLI, package and deploy the application to an AWS environment where it becomes fully operational. Begin by running the following:sam build
This command prepares the application for deployment by packaging the Lambda function code, resolving dependencies, and creating build artifacts in the .aws-sam directory.Next, deploy the application using the following:
The --guided flag walks you through the initial configuration, such as stack name, AWS Region, and necessary capabilities such as IAM role creation. When it’s complete, CloudFormation provisions all resources defined in the template.yaml, such as Lambda functions, API Gateway endpoints, SQS queues, and IAM policies. Here is how the output looks from the deployment:
AWS SAM emphasizes explicit definitions such as resource names and parameters. Therefore, using the AWS SAM guided deployment here helps by presenting change set reviews to verify these changes.Now that you’ve translated and tested your AWS SAM application, verify its parity with the original Serverless Framework stack. Compare CloudFormation outputs—API Gateway endpoints, S3 bucket names, Lambda Amazon Resource Names (ARNs), and queue URLs—and automate integration or A/B tests to confirm functional equivalence. Then, deploy the AWS SAM version using a canary release, monitor performance and user metrics, and shift traffic gradually to minimize risk.
Cleaning up
If you no longer need the AWS resources that you created by running this example, then you can remove them by deleting the CloudFormation stack that you deployed.
To delete the CloudFormation stack, use the sam delete command:
Conclusion
In this post you’ve learned how Amazon Q Developer CLI can streamline the translation of IaC by using an example of migrating Serverless Framework to AWS SAM. Using AI-powered conversational interfaces and deep integration with AWS knowledge means that Amazon Q Developer substantially reduces the manual effort and potential errors involved in these translations. Comprehensive assessment, translation, testing, and deployment can be difficult to accelerate, but this can be streamlined with new generative AI tools from AWS.
For more information on Amazon Q, you can check out Amazon Q Developer. For more serverless learning resources, visit Serverless Land. To find more patterns, go directly to the Serverless Patterns Collection.
Hyprland 0.50.0 released
Post Syndicated from corbet original https://lwn.net/Articles/1030177/
Version 0.50.0 of Hyprland, a compositor for Wayland, has been
released. Changes include a new render-scheduling option that “can
“, an
drastically improve FPS on underpowered devices, while coming at no
performance or latency cost when the system is doing alright
option to exclude applications from screen sharing, a new test suite, and
more.
Unifying metadata governance across Amazon SageMaker and Collibra
Post Syndicated from Vasiliki Nikolopoulou original https://aws.amazon.com/blogs/big-data/unifying-metadata-governance-across-amazon-sagemaker-and-collibra/
This post was co-written with Vasiliki Nikolopoulou from Collibra.
Managing metadata across tools and teams is a growing challenge for organizations building modern data and AI platforms. As data volumes grow and generative AI becomes more central to business strategy, teams need a consistent way to define, discover, and govern their datasets, features, and models.
Collibra is a widely adopted data intelligence platform that helps organizations centralize governance workflows, define business glossaries, and enforce policies across data assets. Teams use Collibra to curate business context, classify sensitive data, and manage access to information in line with compliance requirements.
Amazon SageMaker Catalog, part of the next generation of Amazon SageMaker, provides a unified environment where users can register, search, and govern AI and data assets. It allows organizations to organize datasets, trained models, features, and pipelines and apply metadata such as business terms, classifications, ownership, and usage context. Amazon SageMaker Catalog is designed to support collaboration across roles, including data scientists, engineers, and business stakeholders.
As organizations scale their data and AI initiatives, ensuring consistency and trust in metadata becomes increasingly important. Teams need a unified way to manage glossary terms, asset descriptions, classifications, and access governance across platforms. Without this consistency, it becomes difficult to enforce standards, support compliance, and drive collaboration across teams building and consuming data.
To address this challenge, Amazon Web Services (AWS) and Collibra have built a new integrated solution that demonstrates the integration between the Collibra Platform and the next generation of Amazon SageMaker. Developed collaboratively by both companies, the solution is based on the APIs of both products and is designed to help customers explore what’s possible through hands-on testing. It provides a practical example of how metadata synchronization between Collibra and SageMaker can be accomplished in real-world scenarios. With this integration, you can align business and technical metadata across both platforms, so you can extend your governance workflows to AI and analytics assets managed in Amazon SageMaker.
This solution allows metadata to remain consistent across both platforms, regardless of where it was created. It helps reduce duplication, improve metadata quality, and ensure that business context travels with data and AI assets throughout their lifecycle. The integration supports metadata synchronization, glossary term mapping, and access approval workflows using native APIs and automation.
In this post, we take a closer look at the integration, describe the use cases it enables, walk through the architecture, and show how to implement the solution in your environment.
Solution overview
The integration between Amazon SageMaker Catalog and Collibra offers automated, bidirectional metadata synchronization and access governance across both platforms. It’s built using the built-in APIs of Amazon SageMaker and Collibra Data Governance Center (DGC) to provide a scalable and configurable mechanism for metadata exchange. The solution consists of two main capabilities: metadata synchronization and access subscription workflow integration. The following diagram illustrates the solution architecture.
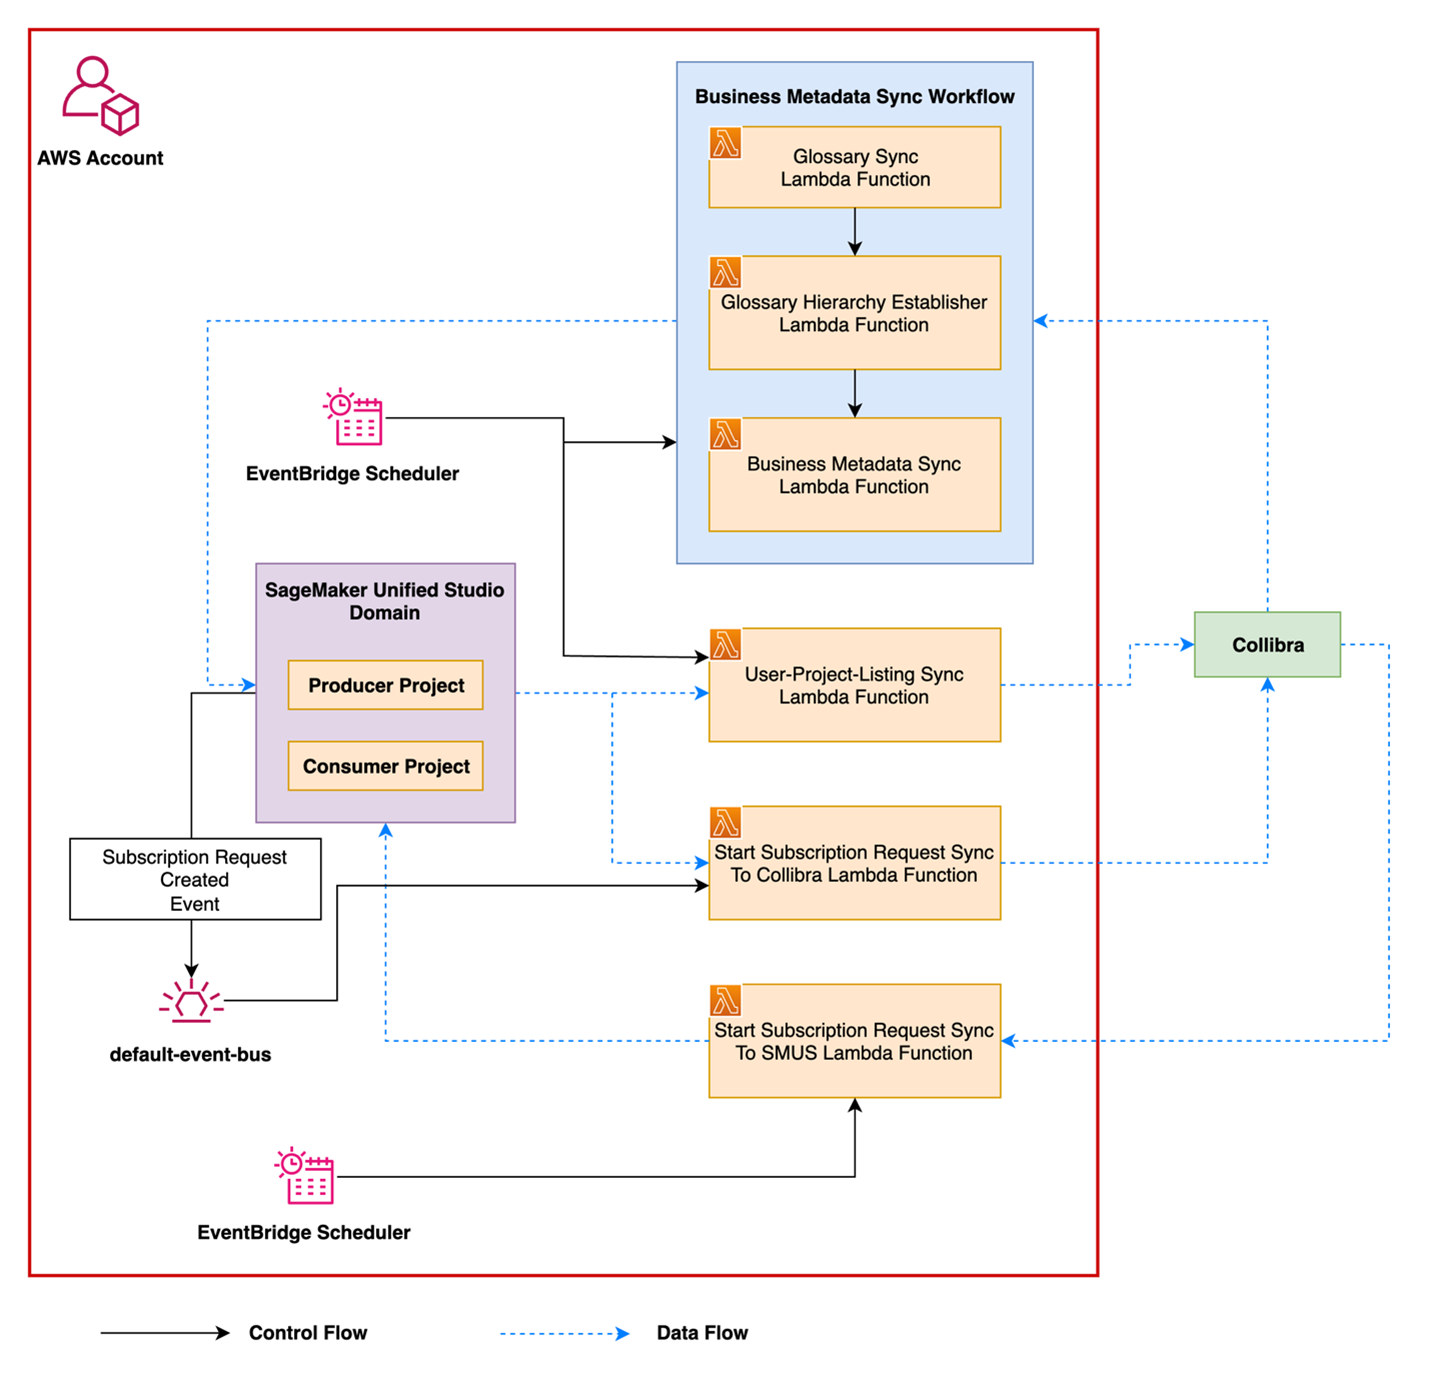
Metadata synchronization
Many organizations manage business and technical metadata across multiple systems. Without synchronization, glossary terms, asset descriptions, and classifications can become inconsistent, leading to duplicated work and misalignment across teams.
This integration allows metadata to flow between Amazon SageMaker Catalog and Collibra, regardless of where it was created. Key elements such as glossary terms, their hierarchy, associated descriptions, and relationships to assets like datasets or columns are automatically synchronized between platforms.
The solution supports:
- Bidirectional synchronization of glossary terms and descriptions
- Preservation of glossary structure, including parent-child relationships
- Association of terms with data assets such as datasets, tables, and columns
- Synchronization of additional business metadata, such as classifications and data categories
- Alignment of technical descriptions for datasets and columns between systems
By keeping metadata consistent, the integration reduces manual work, avoids duplication, and provides users in both platforms with the same trusted context.
Subscription and approval flow
Organizations that rely on Collibra for access governance can now extend those workflows to assets cataloged in Amazon SageMaker. After metadata is synchronized, users can discover and request access to datasets directly from within Collibra, using familiar approval processes.
This integration connects Collibra’s workflow engine with the access control mechanism offered by Amazon SageMaker. When an asset is registered in Amazon SageMaker and shared into Collibra, users can initiate a subscription request in Collibra. When it’s approved, access is granted using Amazon the SageMaker built-in access management, which supports multiple AWS services such as AWS Glue and Amazon Redshift.
Key capabilities include:
- Discovery and access request initiation from Collibra or Amazon SageMaker
- Centralized review and approval processes managed within Collibra
- Access provisioning using the Amazon SageMaker grant mechanism
- Consistent metadata and asset context available throughout the request lifecycle
This flow helps streamline the experience for both business and technical users while keeping access to governed data traceable, auditable, and aligned with organizational policies.
Prerequisites
To perform the solution, you need the following prerequisites:
- An Amazon Simple Storage Service (Amazon S3) bucket. For information on using buckets, refer to Getting started with Amazon S3.
- An AWS Secrets Manager secret containing Collibra configuration and credentials
- A Collibra Edge site
- An Amazon SageMaker domain
- Two Amazon SageMaker projects (one consumer and one producer)
- Amazon Redshift or AWS Glue databases with tables
Walkthrough
The next section provides a walkthrough that shows how the integration works from start to finish. It highlights how a user discovers a data asset, submits a subscription request, and how that request is reviewed, approved, and fulfilled. Throughout the process, metadata and governance policies remain aligned between Collibra and Amazon SageMaker Catalog. This example helps illustrate what the integration enables and how it fits into a typical data access workflow.
Setup on the Collibra environment
To enable this solution, some initial setup is needed in the Collibra environment. This involves configuring the key components that users will need to discover, request, and manage access to data. The following steps outline the basic setup required to support the overall experience.
Operating Model changes and import workflows in Collibra
The operating model of the Collibra instance needs two new asset types and attribute types as well as two new relations and statuses for the scripts and workflows to work properly. These new asset types are recommended because Amazon SageMaker introduces its own concepts and architecture, such as domains and projects. Using the same names in Collibra makes it easier for users to understand and navigate both systems consistently. In the following diagram, the new asset types are shown with dotted lines along with the corresponding new relations, attributes, and statuses.
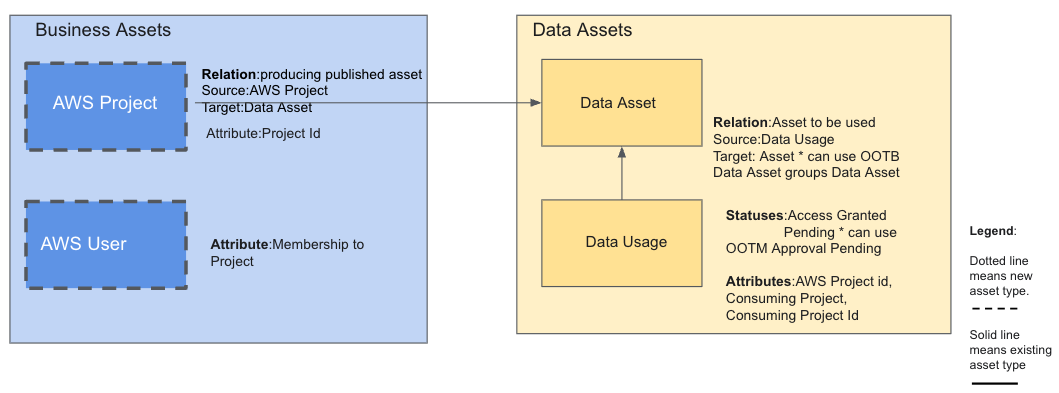
In addition to AWS projects, the implementation requires synchronization of AWS users beyond the standard capabilities. This is necessary because in AWS, a user can’t subscribe to an asset directly as an individual. They can only do so as a member of a project. As a result, when a user subscribes to an asset, they must specify which project they’re subscribing through. To support this behavior, membership to projects information for AWS users needs to be maintained and synchronized within Collibra. AWS project to user mapping needs to be maintained in Collibra, which is accessed by administrative users. The metadata information about AWS user membership to projects can be kept in a Collibra environment or community, which isn’t accessible to anyone except authorized users. Steps for implementation of Collibra operating model changes:
- Go to Settings, then Operating model, and add two new asset types, AWS Project and AWS User.
- In Settings, navigate to Attribute types and add the new attribute types. The new attribute types are: Project id assigned to the AWS Project asset type, Membership to Project assigned to the AWS User, AWS Project id, Consuming Project and Consuming Project Id to be assigned to the existing asset type Data Usage. Refer to the documentation for more details on how to add new attribute types and how to assign them to asset types
- In Settings, go to Relation types and add the Asset to be used relation between asset types data usage and data asset. Refer to the documentation for guidance on how to add a new relation to a pair of asset types.
- In Settings, go to Statuses and add the new statuses, which are Access granted and Pending, to be assigned to the asset type data usage.
- Go back to the Operating model and, for each new asset type, add the newly created relations, attributes, and statuses. Don’t skip this step. If it isn’t completed, the new configurations will won’t take effect.
- Create the following domains:
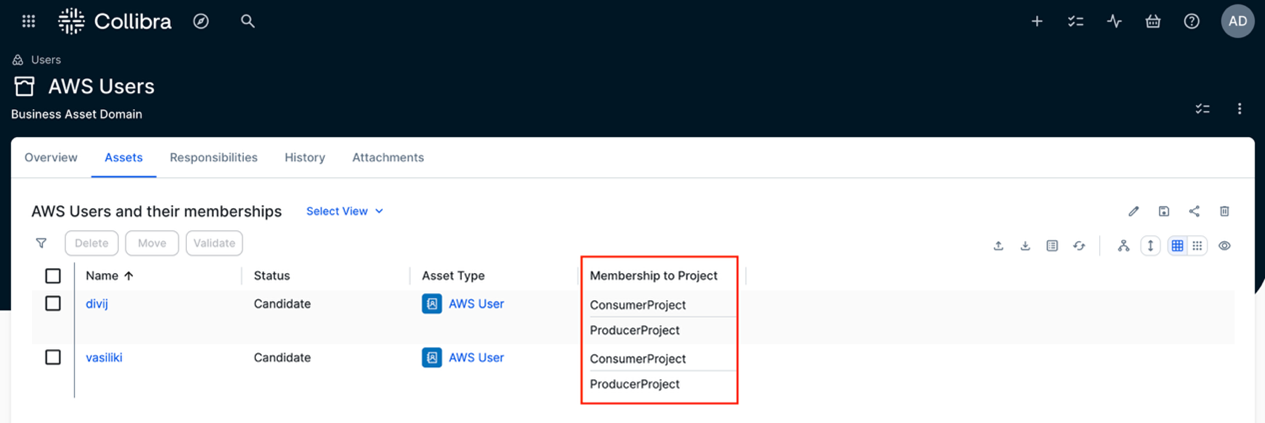
- AWS Users – This is a business asset domain where the metadata for AWS user memberships will be stored. Users and their memberships are automatically imported into Collibra through the solution. An example is shown in the screenshot.

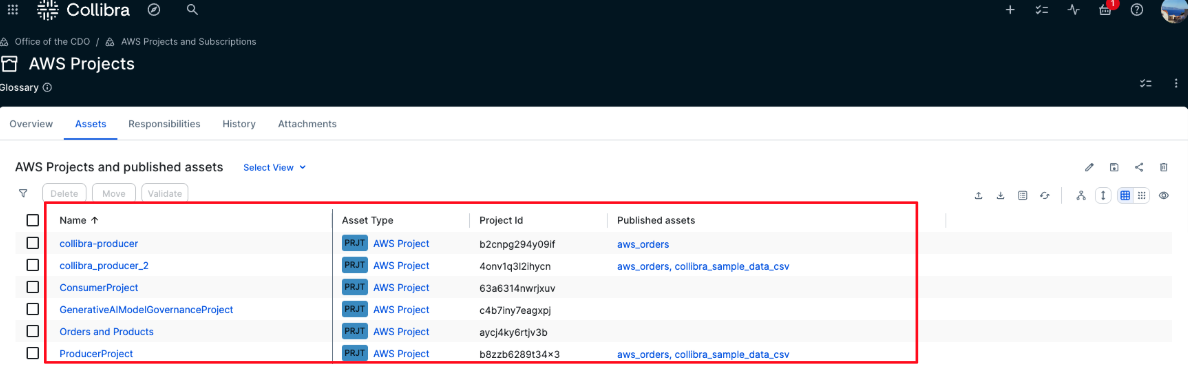
- AWS Projects – This is also a business asset domain where AWS projects and their metadata will be automatically imported. The following screenshot shows an example of such a domain. The AWS projects, along with their published assets, are brought into Collibra through the solution.

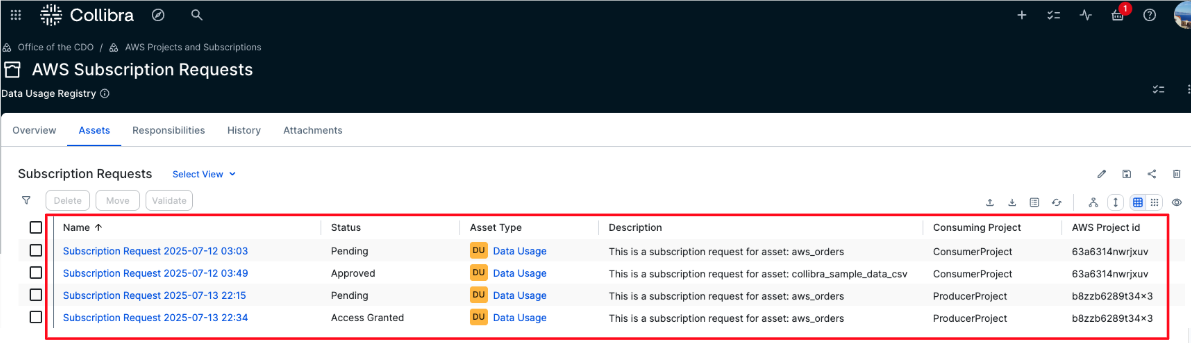
- AWS Subscription Requests – This is a domain of type data usage registry. It will hold all new AWS subscription requests along with their context, such as the consuming project and the subscribed data asset. The status of each request is especially important because it drives the integration workflow that users can use to track the current state of their request.

- AWS Users – This is a business asset domain where the metadata for AWS user memberships will be stored. Users and their memberships are automatically imported into Collibra through the solution. An example is shown in the screenshot.
Workflows installation
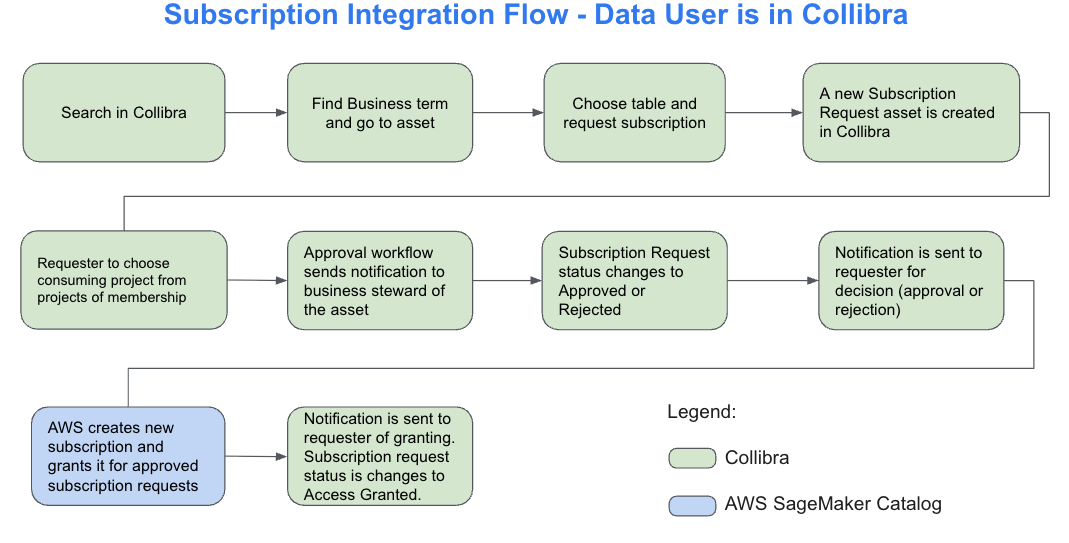
This solution includes two workflows: one for managing subscription request approvals and another for notifying users when access is granted.
The first workflow handles the full subscription process. It begins by prompting the user to select the consuming project because only projects the user is a member of are eligible for subscriptions. After it’s selected, a new subscription request asset is created in Collibra with a timestamp, the consuming project details, and a status set to Pending.
An approval task is then assigned to the business steward of the requested data asset. If the steward approves the request, the status changes to Approved. This triggers a notification to the requester and signals the AWS solution to pick up the request and grant access. When access is granted, the status is updated to Access granted.
If the steward rejects the request, the status is changed to Rejected and the requester is notified. No further action is taken in that case.
The second workflow notifies the requester that the access was granted. It’s triggered by the functions in AWS when the subscription grant is completed. The steps to deploy the two workflows are as follows:
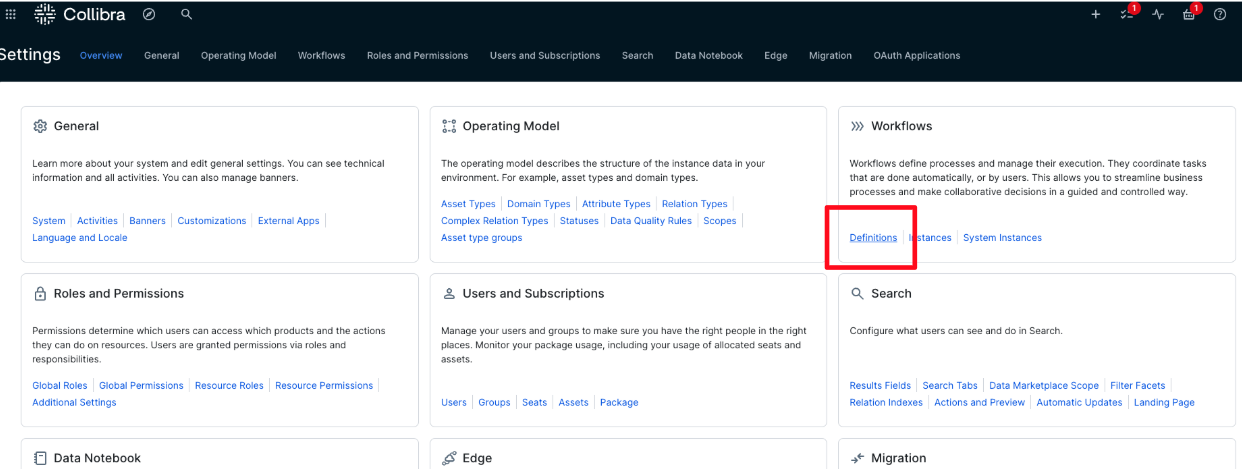
- Go to Settings, then select Workflows followed by Definitions, as shown in the following screenshot.
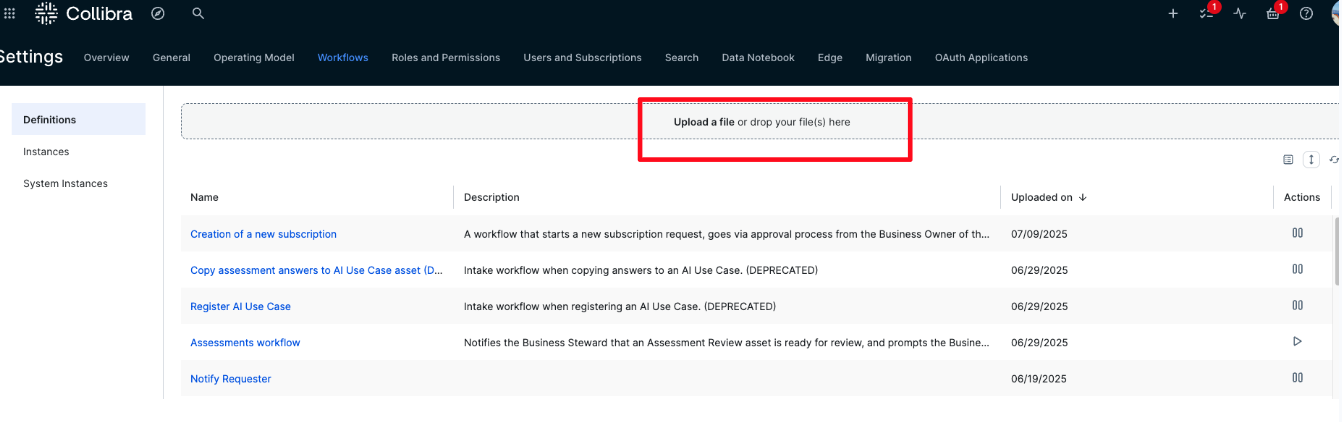
- Choose Upload a file, as shown in the following screenshot. Then, upload both workflow files from the GitHub directory where all the files are provided. In that GitHub directory, there is a directory with the workflow files called Workflows.
- After the workflows are uploaded, complete the following steps for each one, as shown in the following screenshot:
- Enable the workflow by choosing Play. When enabled, the button will display a Pause icon.
- Under Rules, set it to apply to Assets, then choose Add Rules and choose Asset: Table. You can also use Data Asset for a broader scope, but in this case, published assets in AWS are tables.
- Clear This workflow can only run once at the same time on a specific resource. This provides that multiple users can request subscriptions to the same asset simultaneously.

The workflows are now uploaded, enabled, and ready for use.
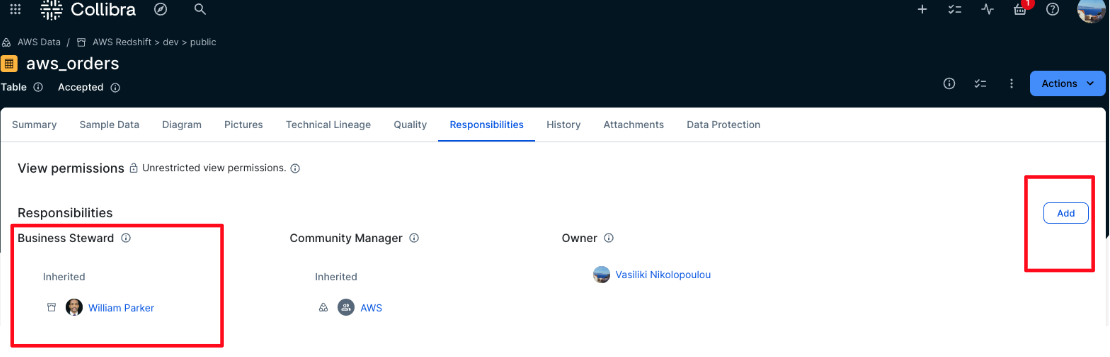
Add responsibilities
We need to assign business stewards to the ingested AWS assets so that when the workflows are triggered, there is a designated user responsible for approving subscription requests. In this version of the solution, it’s assumed that each asset has only one Business Steward.
To add a Business Steward, follow these steps:
- In the domain or community where the AWS data assets have been ingested using the Edge integration, choose Responsibilities. Then choose Add, as shown in the following screenshot
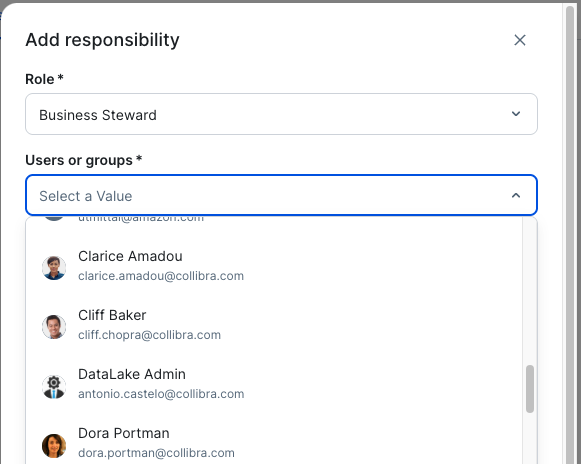
- Choose Business Steward from the Role dropdown list, as shown in the following screenshot. From the Users or groups dropdown list, choose the user who will be responsible for approving subscription requests for these assets. This solution allows only one business steward per asset. You can assign a business steward at the community level, and this way this role will be inherited to all assets under this community.
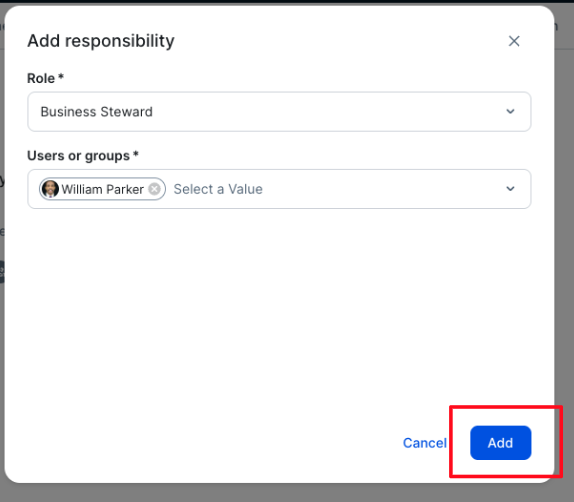
- Choose Add, as shown in the following screenshot. This will assign the selected user to the Business Steward role for the specified asset, domain, or community of assets.
Setup on the AWS environment
Now that the configuration on the Collibra side is complete, set up the Amazon SageMaker domain that is used for this walkthrough. We provide the following assets to help users set up this solution
- An AWS CloudFormation template in YAML format, called
template.yaml - Instructions to generate a lambda zip file that contains all the scripts that the Cloud Formation will run, called
lambda_build.zip - Instructions to create a secret using AWS Secrets Manager that will store Collibra credentials.
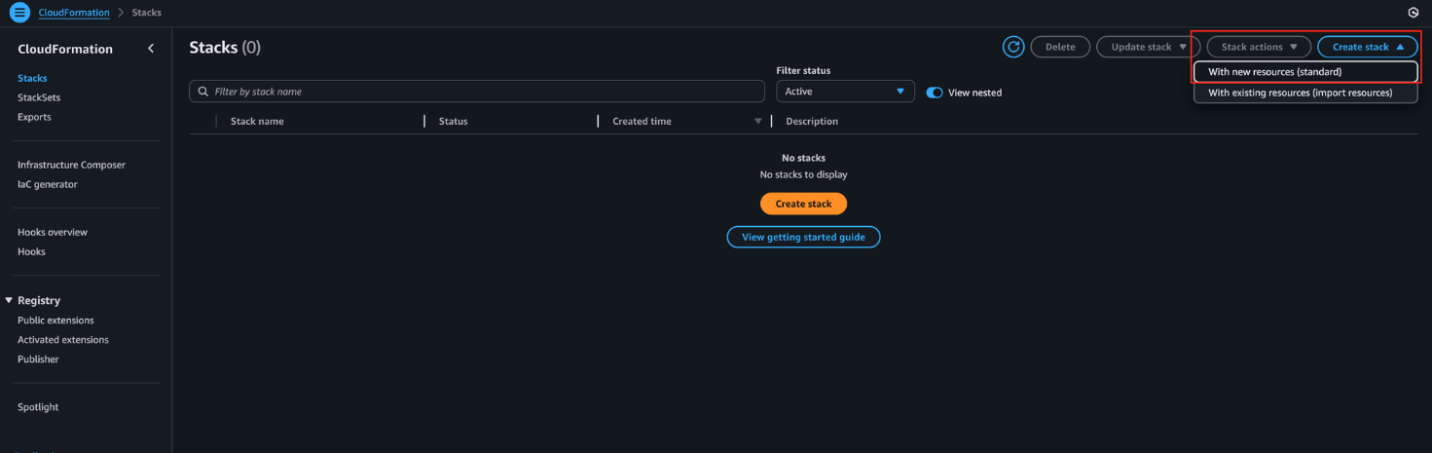
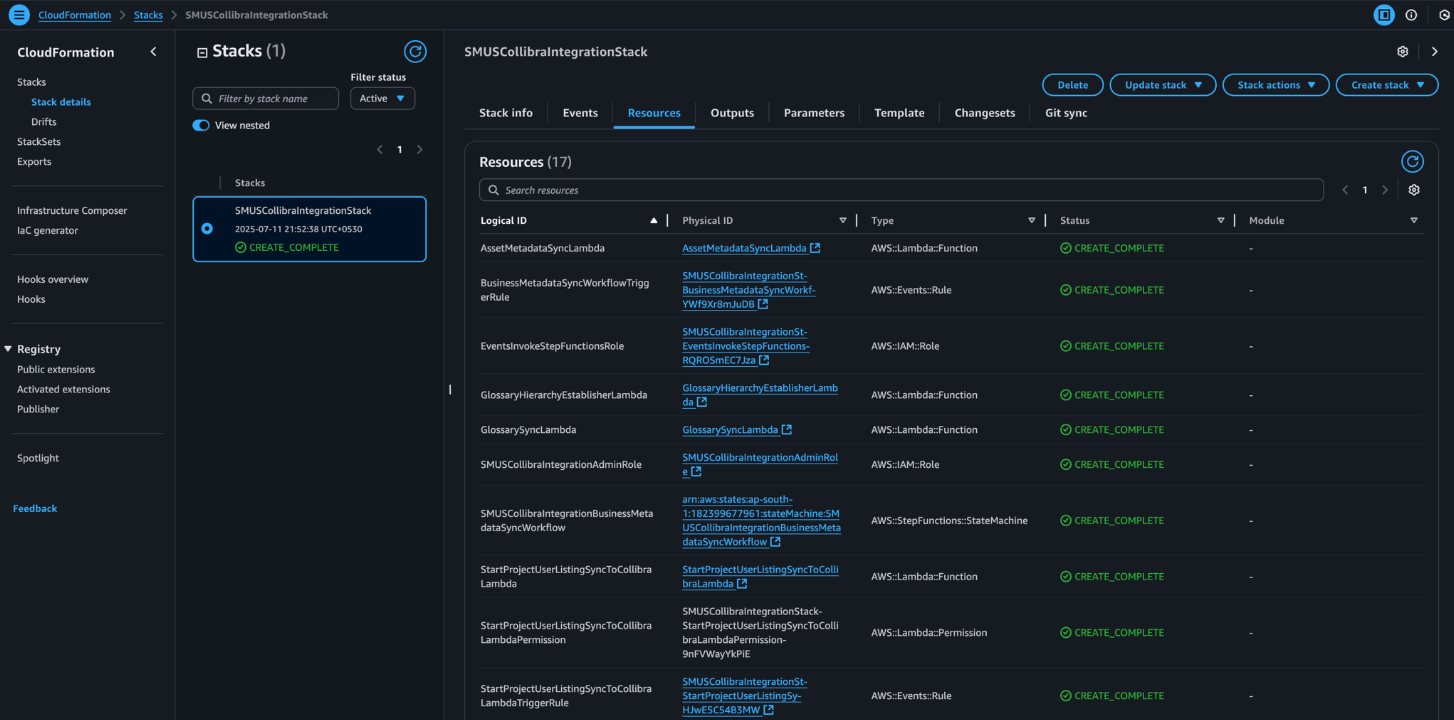
Create the CloudFormation stack
To support this solution, provision a set of AWS resources that facilitate communication between environments and automate key tasks. In this section, we show how to deploy the foundational infrastructure using AWS CloudFormation, which simplifies resource provisioning and provides consistency across environments.
- On the AWS Management Console, navigate to CloudFormation and choose Create stack, then choose With new resources (standard), as shown in the following screenshot.
- Choose the provided CloudFormation template and choose Next.
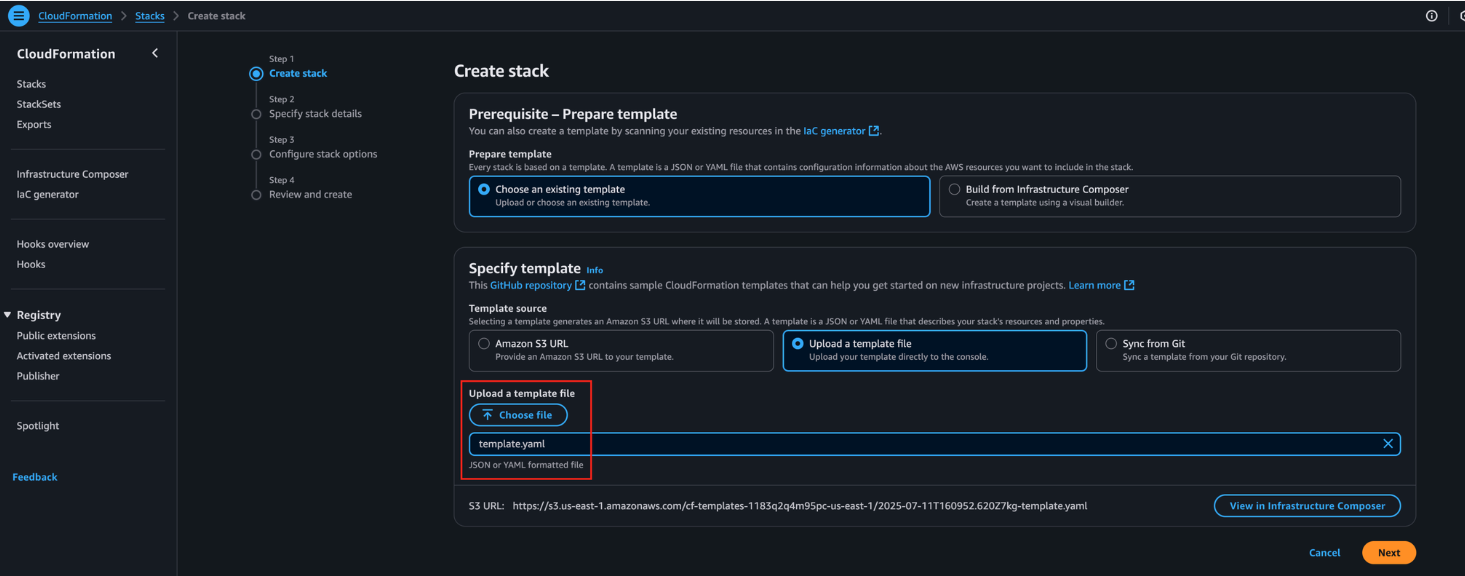
- Enter a name for the stack and complete all required parameters below:
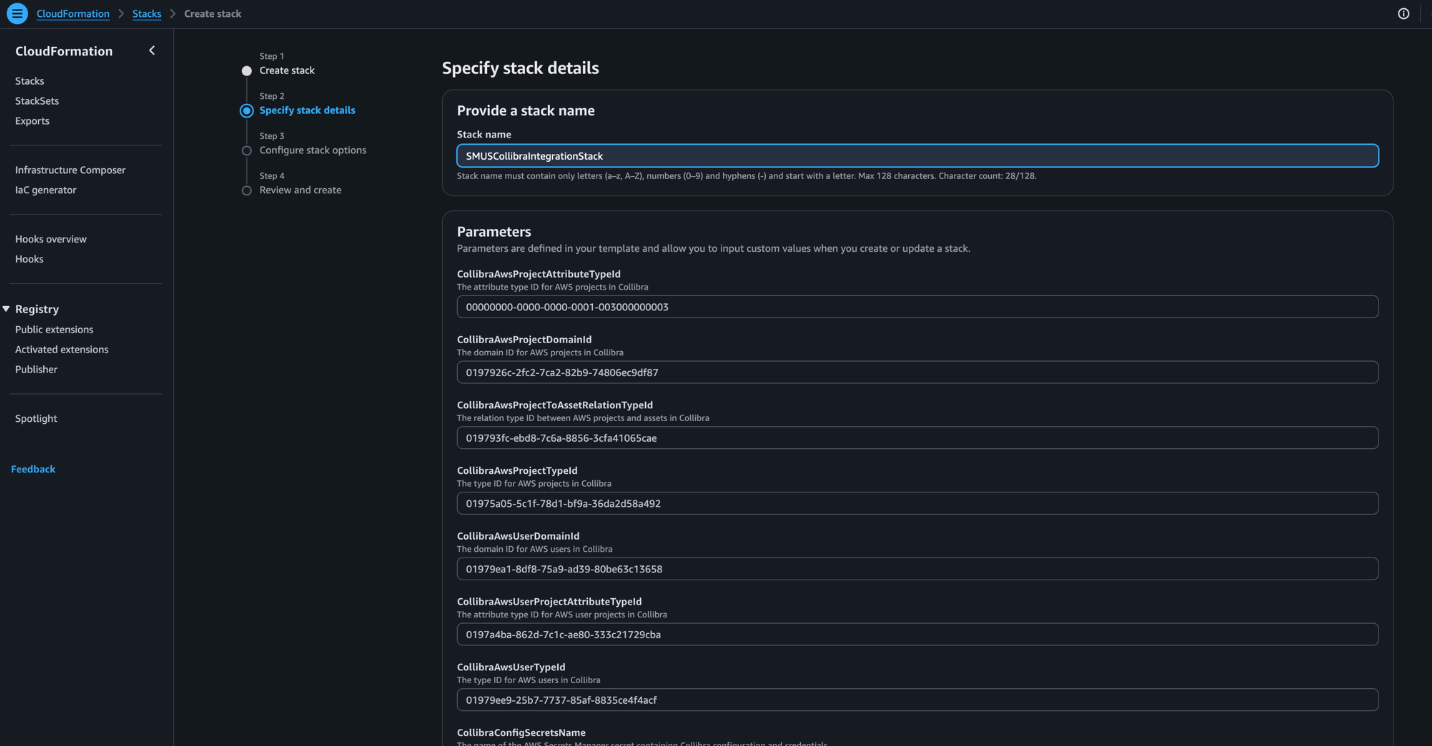
- CollibraAwsProjectAttributeTypeId – The attribute type ID for AWS projects in Collibra.
- CollibraAwsProjectDomainId – The domain ID for AWS projects in Collibra.
- CollibraAwsProjectToAssetRelationTypeId – The relation type ID between AWS projects and assets in Collibra.
- CollibraAwsProjectTypeId – The type ID for AWS projects in Collibra.
- CollibraAwsUserDomainId – The domain ID for AWS users in Collibra.
- CollibraAwsUserProjectAttributeTypeId – The attribute type ID for AWS user projects in Collibra.
- CollibraAwsUserTypeId – The type ID for AWS users in Collibra.
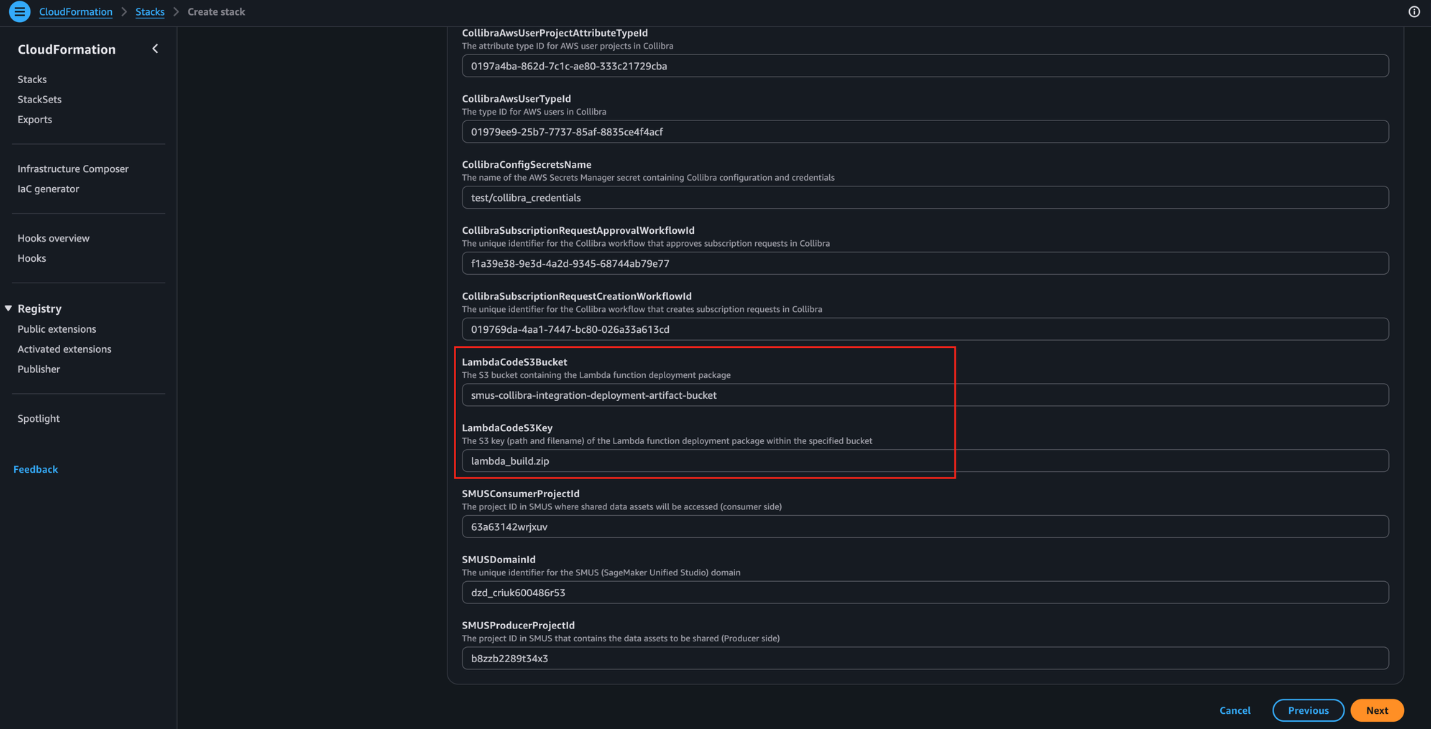
- CollibraConfigSecretsName – The name of the AWS Secrets Manager secret containing Collibra configuration and credentials.
- SMUSProducerProjectId – The project ID in SMUS that contains the data assets to be shared (producer side).
- SMUSConsumerProjectId – The project ID in SMUS where shared data assets will be accessed (consumer side).
- SMUSDomainId – The unique identifier for the SageMaker Unified Studio (SMUS) domain.
- CollibraSubscriptionRequestCreationWorkflowId – The unique identifier for the Collibra workflow that creates subscription requests in Collibra.
- CollibraSubscriptionRequestApprovalWorkflowId – The unique identifier for the Collibra workflow that approves subscription requests in Collibra.
- LambdaCodeS3Bucket – The S3 bucket containing the Lambda function deployment package.
- LambdaCodeS3Key – The S3 key (path and filename) of the Lambda function deployment package within the specified bucket.
- Select the acknowledgement checkbox, then choose Next, as shown in the following screenshot.
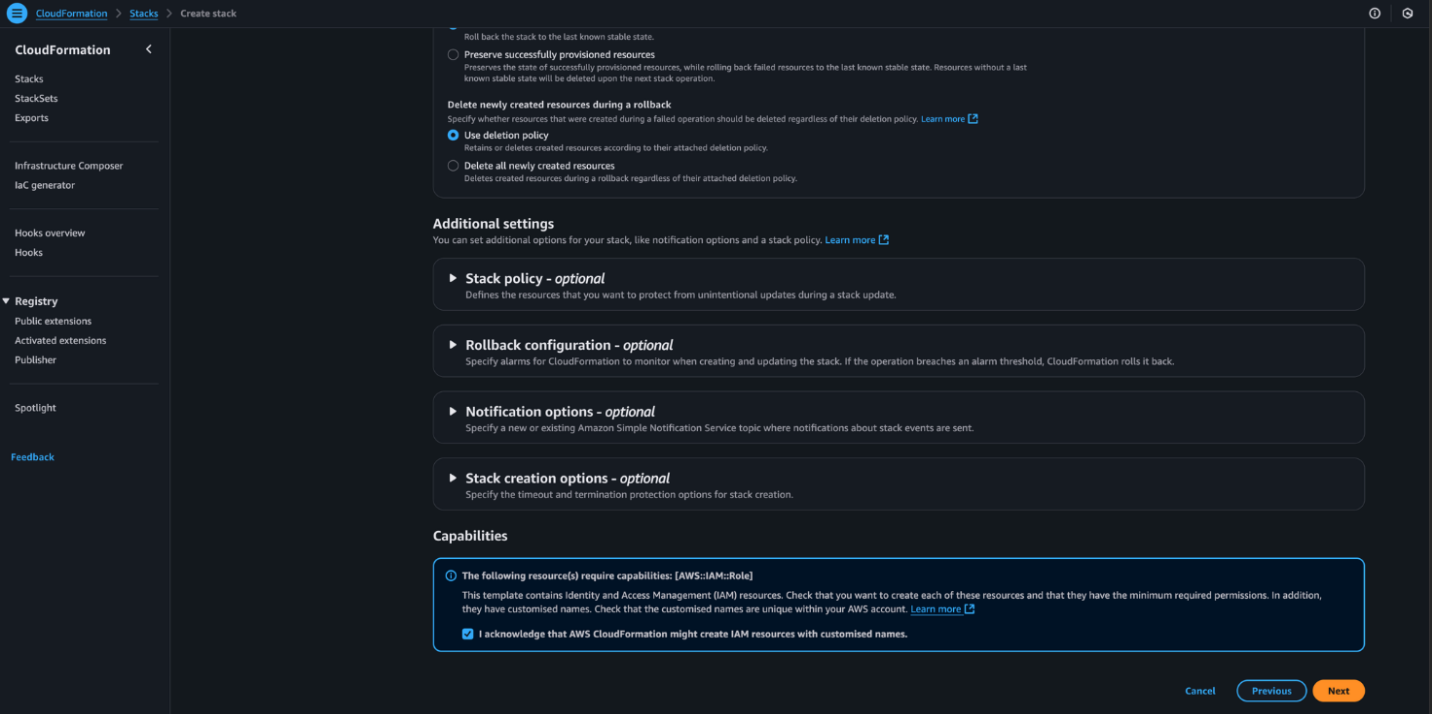
- Choose Submit to start the stack deployment. When the process is complete, the stack status will update to CREATE_COMPLETE.
Configure consumer and producer projects
For this post, only two projects are used: one serving as the producer and one as the consumer. Future versions of the solution are planned to support all projects.
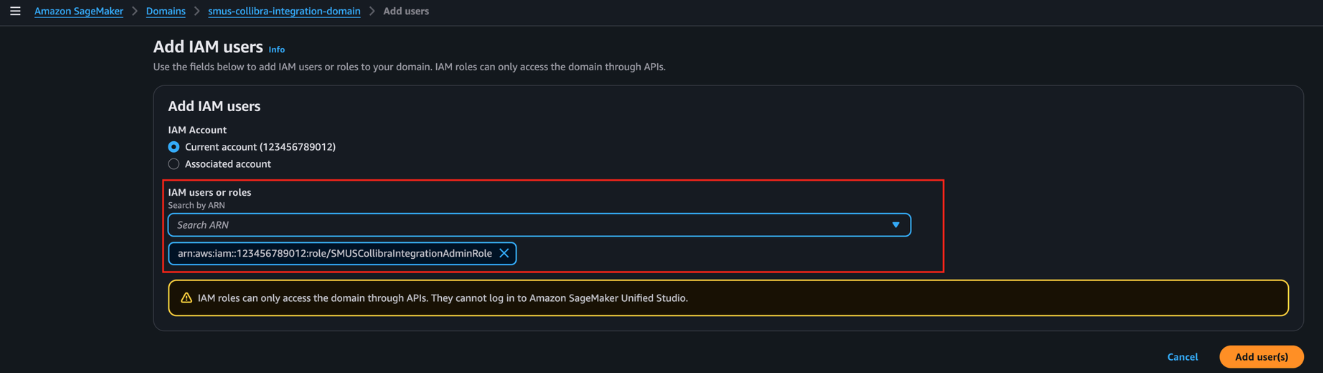
- On the AWS Management Console, go to the SMUS Domain detail page. Under the Users section, choose Add, then select Add IAM users.

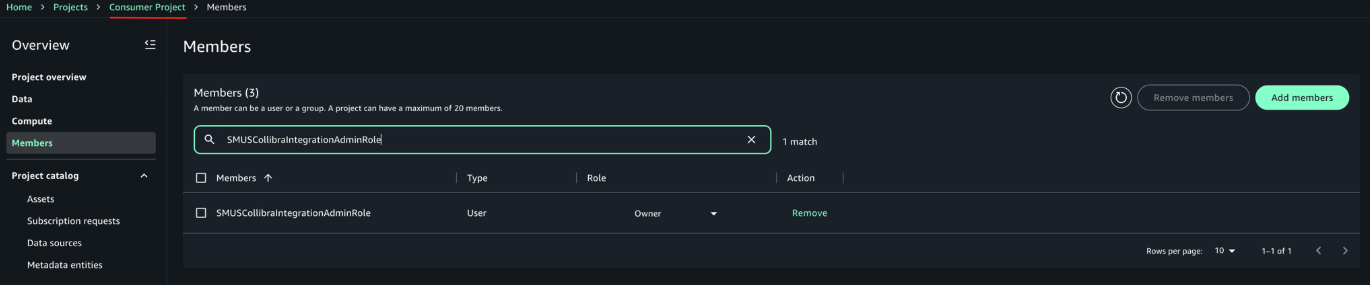
- From the dropdown, select the SMUSCollibraIntegrationAdminRole created by the CloudFormation template, then choose Add user(s), as shown in the following screenshot.
- Open the Unified Studio portal for this domain and navigate to the Producer Project. Go to the Members tab and choose Add members.
- Search for SMUSCollibraIntegrationAdminRole and select it from the results.
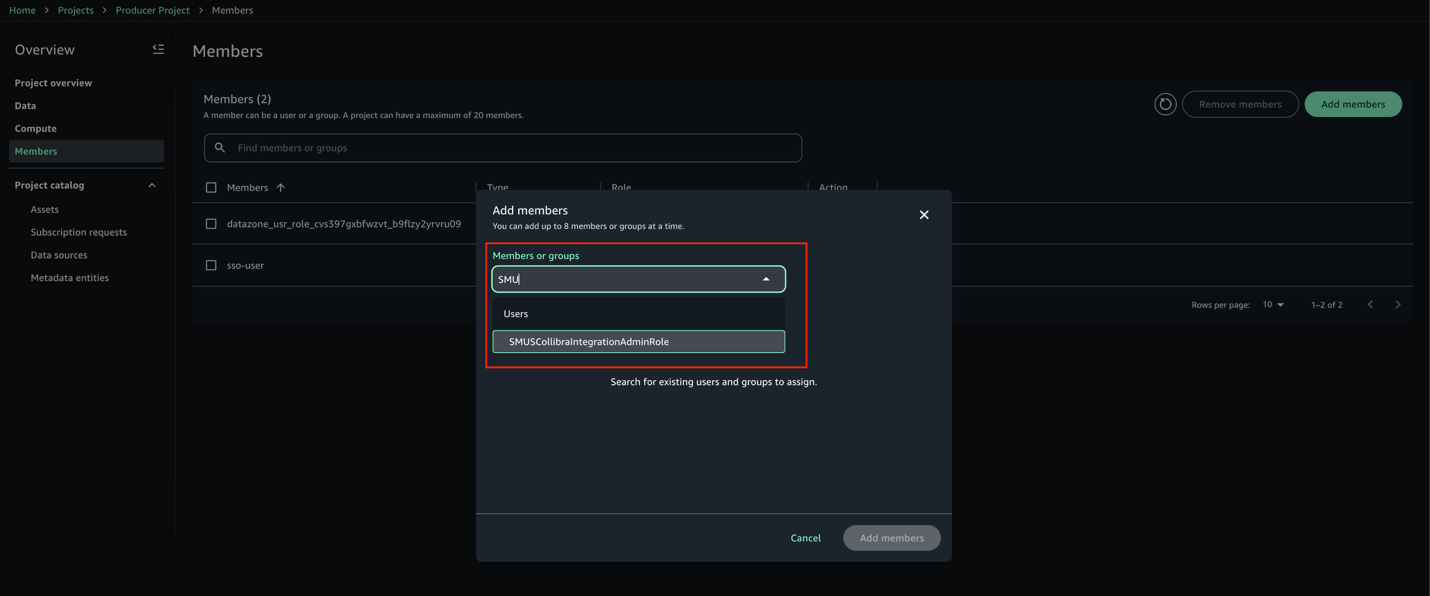
- Set the role to Owner, then choose Add members.
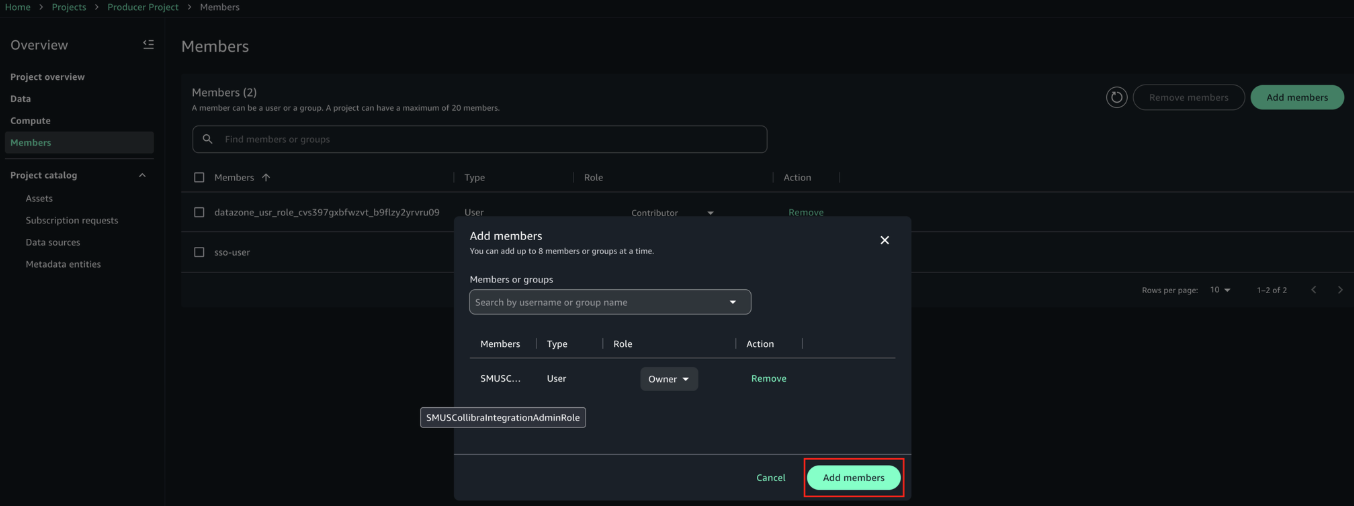
- Repeat the same steps for the Consumer Project. After adding the member, the configuration should look like the example in the following screenshot.
Make sure the producer project has the necessary authorization to create glossary terms in the domain unit it belongs to. For more information, refer to Domain units and authorization policies in Amazon SageMaker Unified Studio in the Amazon SageMaker Unified Studio documentation.
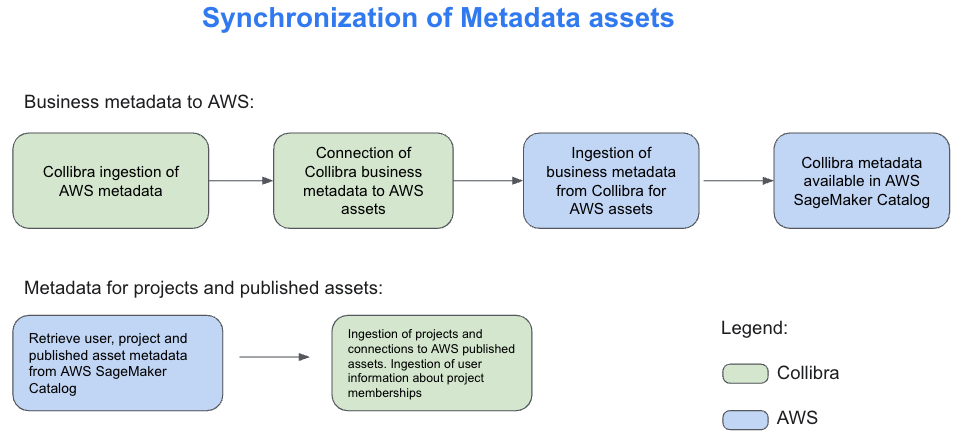
Synchronization of metadata
Metadata synchronization between Collibra and SageMaker Catalog happens on two distinct levels, each serving a specific purpose.The first level focuses on technical metadata. Collibra connects to services such as Amazon Redshift and AWS Glue using JDBC and other supported connection methods. Through these connections, it ingests schema details including tables, columns, and data types. This helps technical teams maintain visibility into the structure of the datasets available in SageMaker Catalog.The second level, which is the focus of this solution, handles business metadata synchronization. Using Collibra APIs, SageMaker Catalog retrieves business glossary terms, column descriptions, asset definitions, and the relationships among them. Additionally, Collibra ingests information about SageMaker projects, the assets published within them, and project membership details. This supports approval workflows and helps manage subscriptions based on project-level access. The following diagram illustrates how these two levels of metadata synchronization work together to bridge technical and business perspectives across both platforms.
For the technical metadata ingestion from AWS to Collibra, follow these steps:
- Within the Collibra Edge site, create a new connection for each type of AWS data store you want to ingest metadata from. For detailed instructions, refer to the About Edge and Collibra Cloud site connections in the Collibra Documentation.
- Depending on the type of connection, especially if it’s JDBC, you might need to add a capability such as JDBC catalog ingestion. Refer to the official documentation for more details.
- So the integration works correctly, name all your AWS connections in Edge with “AWS” at the start of the name. The integration script relies on this naming convention to accurately identify assets that originate from AWS.
- In Collibra, go to Catalog, select your connection, configure the rules for your schemas (such as which tables to include or exclude), and run the synchronization. You can also schedule the synchronization to run automatically at intervals defined in the user interface.
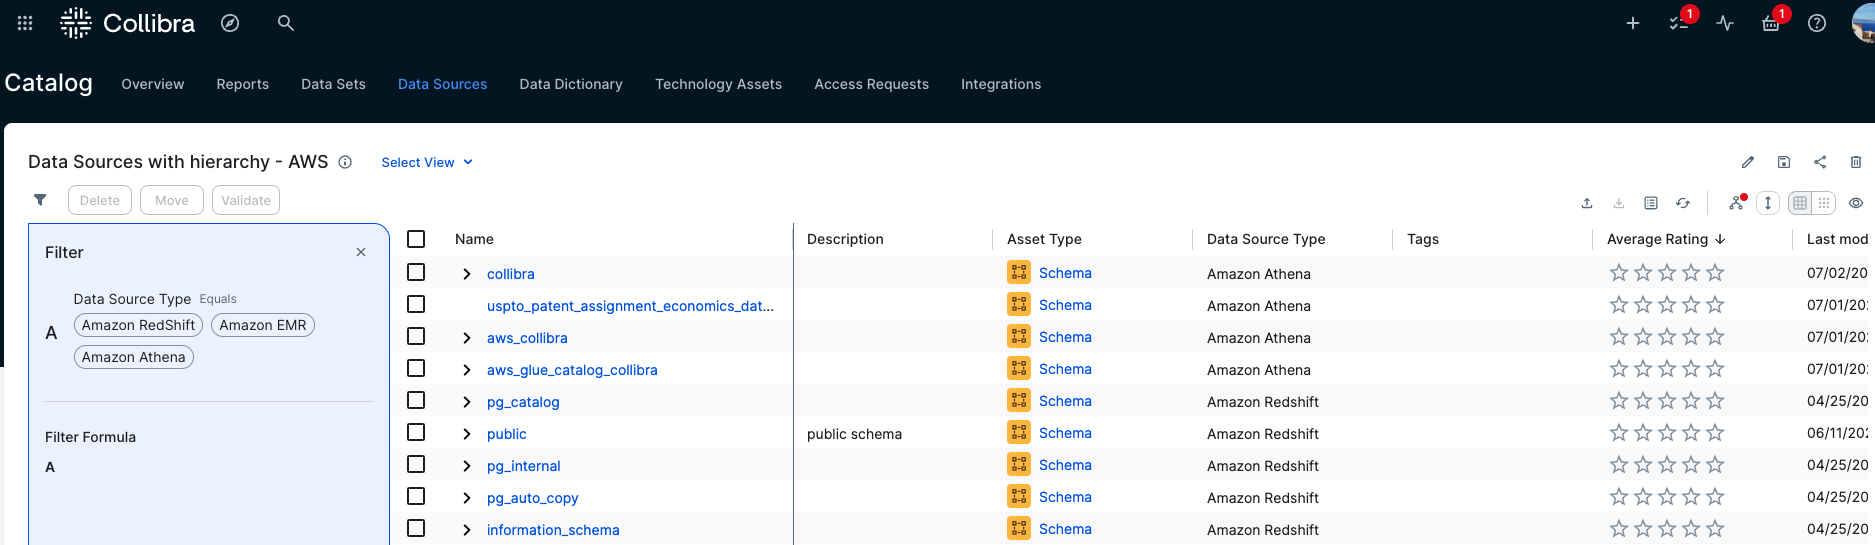
- When metadata ingestion is complete, go to Catalog, then Data Sources. You can optionally filter by a specific AWS source or keep the default view to view all sources. From there, you can review the schemas, tables, and other metadata imported from AWS, as shown in the following diagram.
These data assets are imported using the JDBC connections that are available from Collibra Edge. The AWS solution we present here, in addition to these data assets, will import AWS projects and will link them to the assets ingested here that are published in these projects.
Technical and business stewardship in Collibra
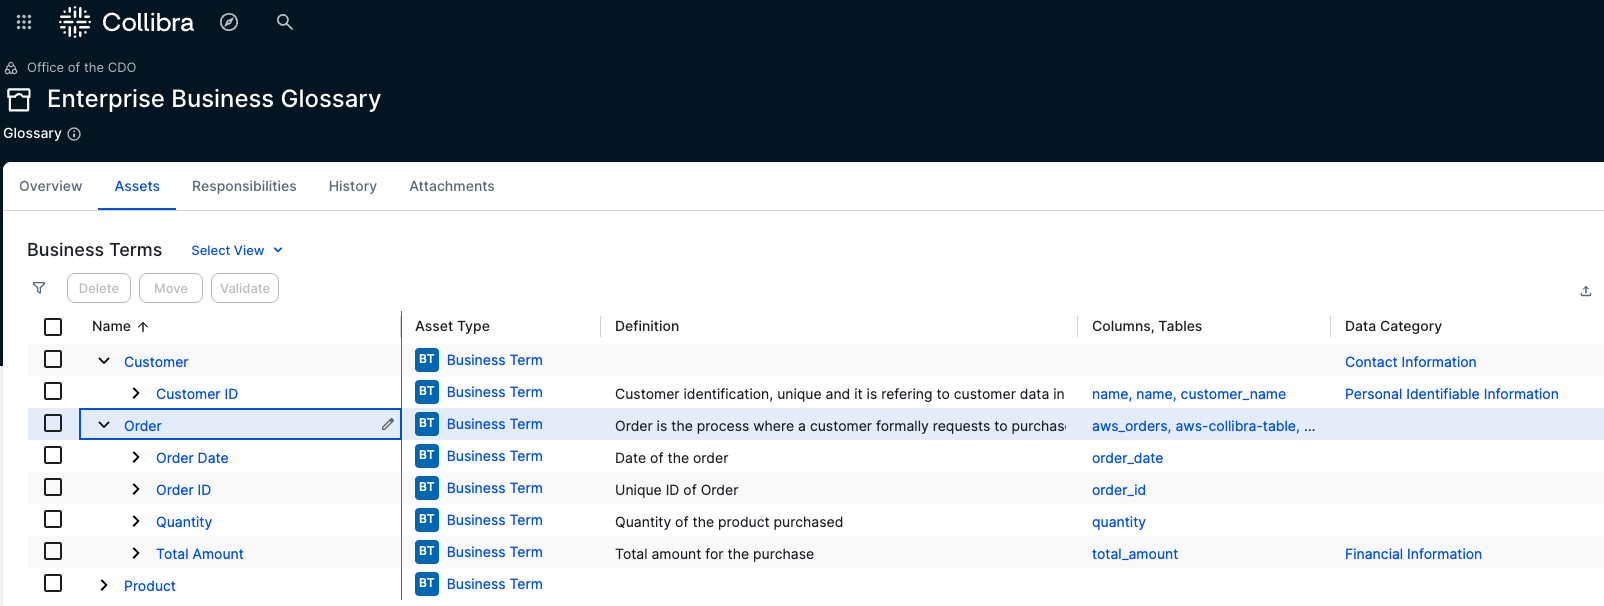
Collibra provides business glossaries to define business context. These glossaries can also include a hierarchy or taxonomy of business terms based on their interdependence. The following is an example of a glossary used for this post.
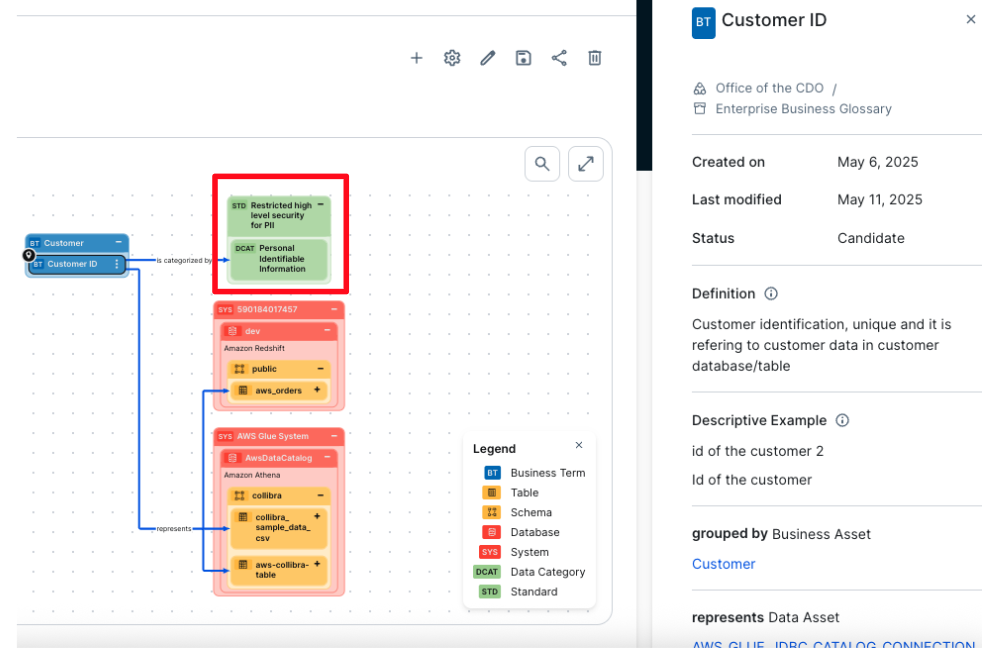
An Order includes components such as Order Date, Order ID, and others. In Collibra, Business and Technical Stewards are responsible for linking Business Terms to the columns and tables ingested from AWS, as shown in the following diagram. For detailed guidance on how to perform stewardship activities, refer to the official Collibra documentation.
The entire business glossary with its one-level hierarchy is imported into AWS SageMaker Unified Studio automatically with this solution. Some business terms are also linked to data categories that are associated with data privacy, regulatory policies, and standards. In the example in the following screenshot, customer ID is connected to a data category. This connection between business terms and data categories links the associated data to relevant policies and standards. As a result, a table or column connected to a business term that is linked to a data category will also inherit the associated policy or standard.
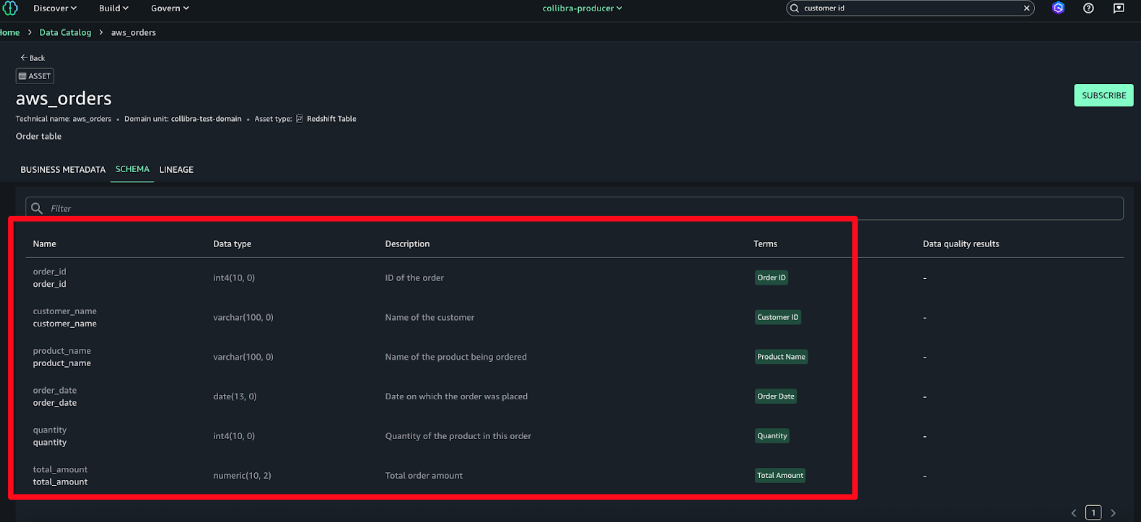
The business term customer ID is linked to the data category personally identifiable information (PII). With this relation, all columns or tables that are linked to this business term automatically inherit the PII data category, and therefore the policies linked and associated with it.
The metadata is imported into AWS SageMaker Unified Studio at the asset and schema levels.
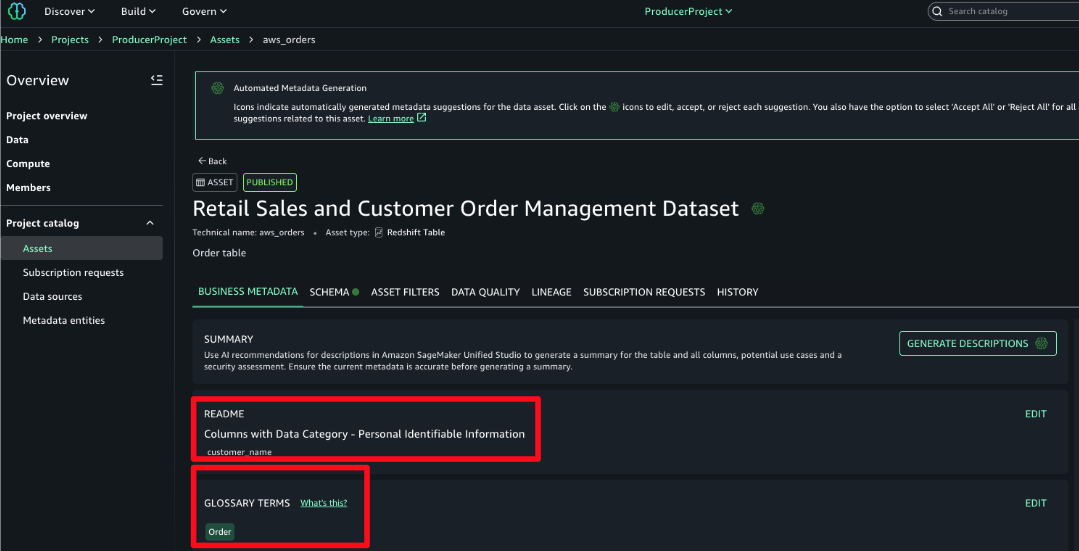
All the business metadata described previously is synchronized with AWS using this solution. Descriptions, data categories, tags, business terms are all imported into AWS and linked to respective assets. In the README, the data category is associated with one of the columns and the business term associated with a table or dataset.From Collibra we import into AWS the following:
- Business terms and their hierarchies and descriptions
- The link of the business terms to the technical assets
- Data category of business terms inherited in the technical assets imported in the README section of the technical asset
- Tags and descriptions of technical data assets
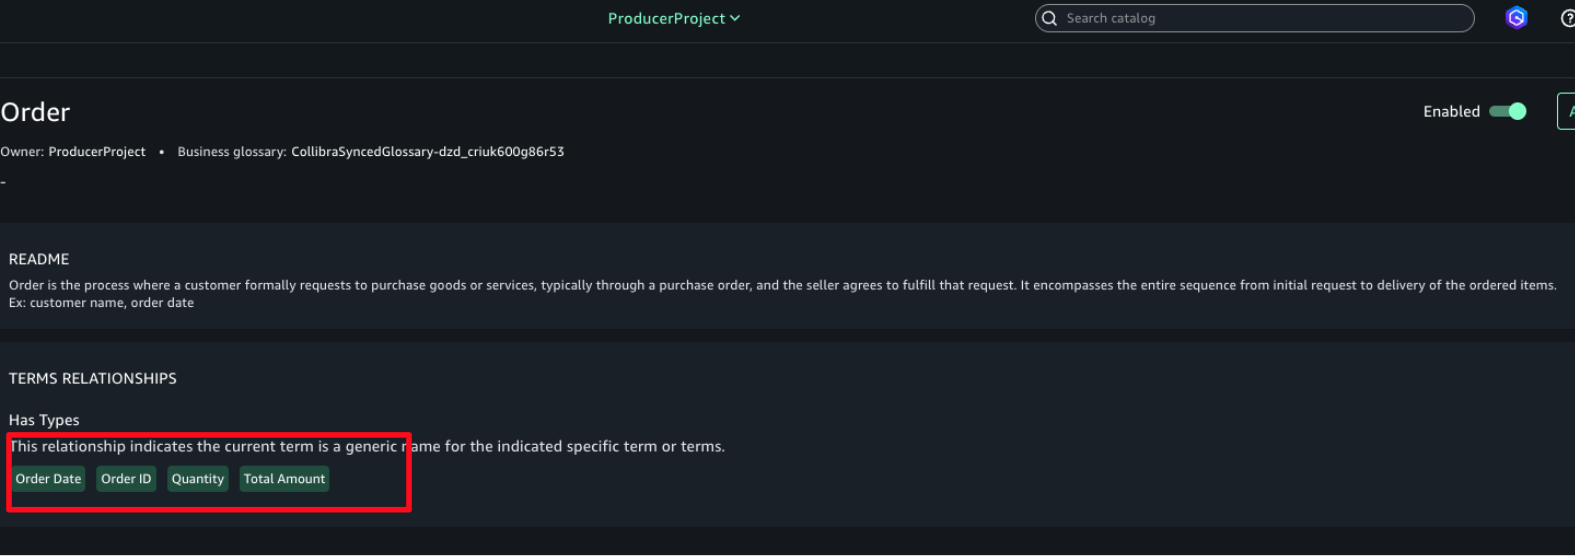
Not only is the business term imported into AWS SageMaker Unified Studio, its taxonomy is imported exactly as it is in Collibra. The following screenshot shows an example where order is imported to have under it the business terms order ID, quantity, and so on.
Subscription to published assets
For the subscription process, the same workflows and series of tasks occur whether the request is initiated from AWS or from Collibra. An overview of these tasks and the end-to-end flow from both platforms is shown in the following diagrams:
This diagram outlines the subscription request flow when initiated from Collibra. A user searches for a business term, locates the related asset, and submits a subscription request. The system creates a corresponding request asset in Collibra. The user then selects the destination project for the data. An approval workflow is triggered, notifying the designated business steward. If the request is approved, SageMaker Catalog automatically provisions access and updates the request status to Access Granted. The user receives a final notification confirming access. This process provides controlled, transparent data sharing across platforms.
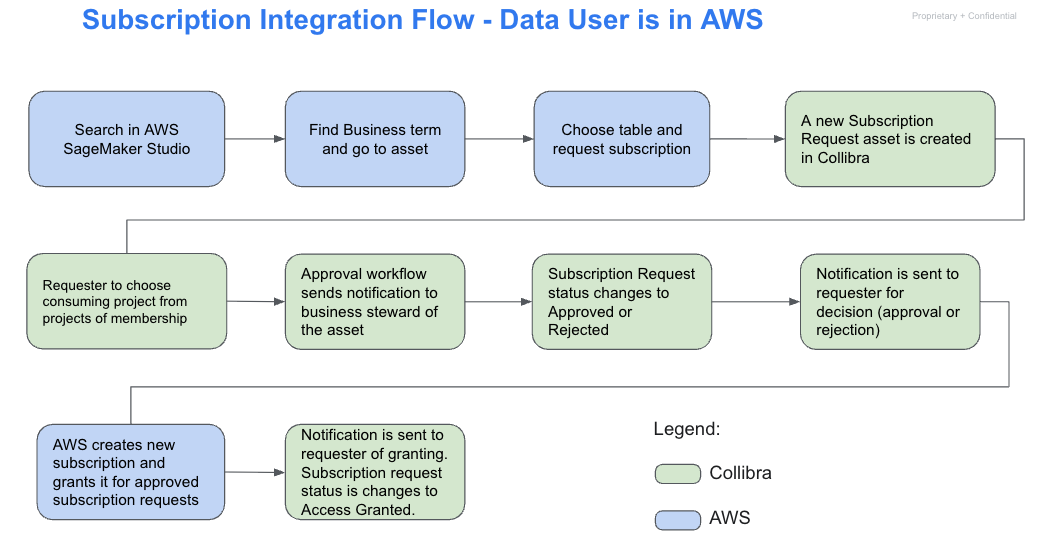
The following diagram illustrates the end-to-end subscription flow when the data user initiates the process from within SageMaker Studio. The user begins by searching for data using a business term and selecting the relevant asset. After choosing the appropriate table, they request access, which triggers the creation of a subscription request asset in Collibra. The user then selects a destination project based on their memberships. Collibra sends an approval request to the designated business steward, who reviews and either approves or rejects it. If approved, SageMaker Catalog automatically provisions the subscription and notifies the requester. The subscription request status is then updated to Access Granted, completing the workflow.
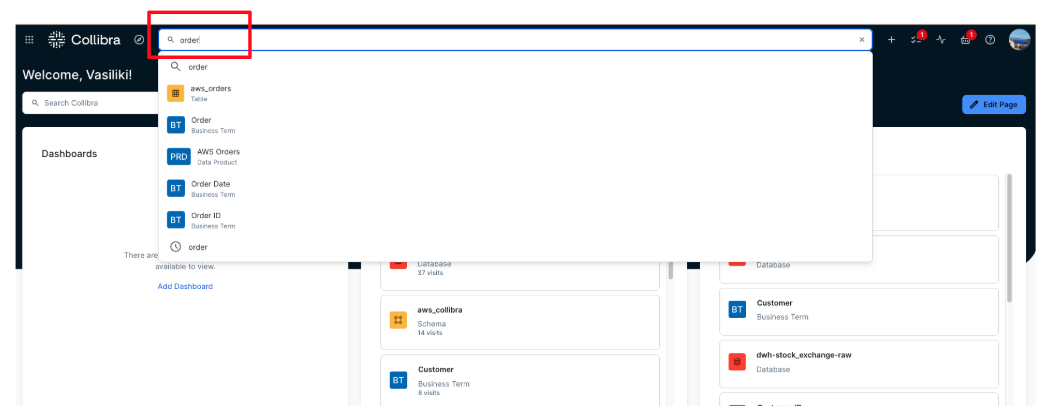
For this post, the process is described starting from Collibra, although it functions the same way if initiated from AWS. In this example, a data consumer is searching for data related to AWS orders using the Collibra interface.
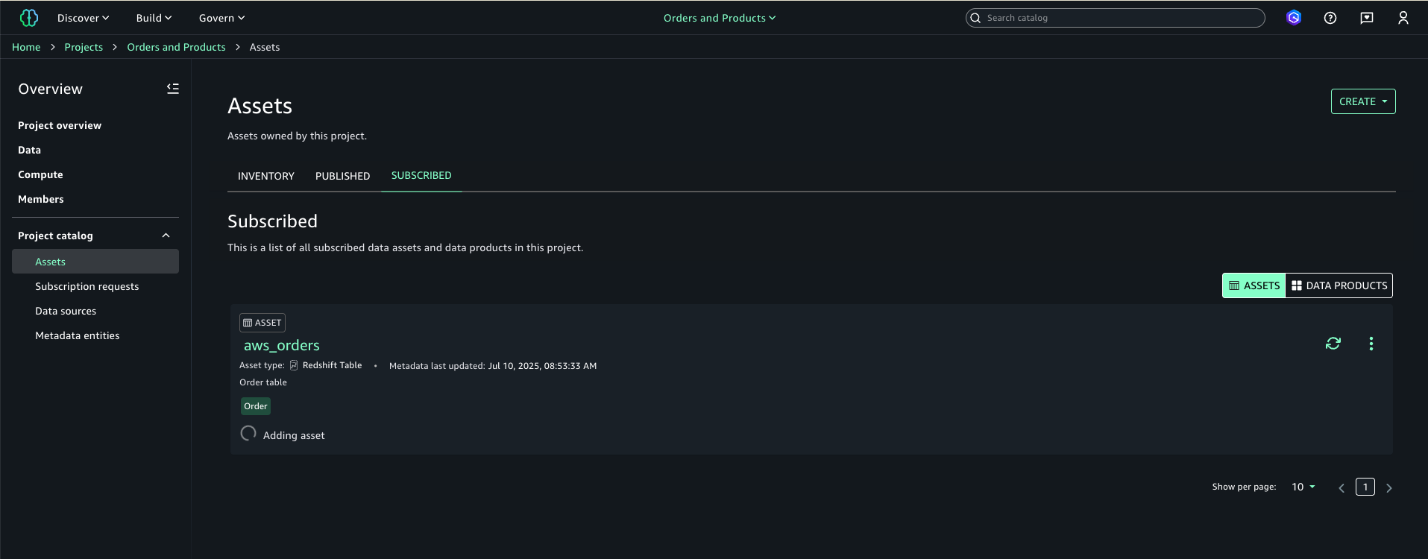
In Amazon SageMaker Unified Studio, the data consumer is a member of the Orders and Products project. At this stage, the user has no active subscriptions or access to data assets. The following screenshot is included to illustrate the state before the integration takes effect.

- In Collibra, navigate to the Search area and enter a business-friendly term describing what the user is looking for. In this example, enter order.
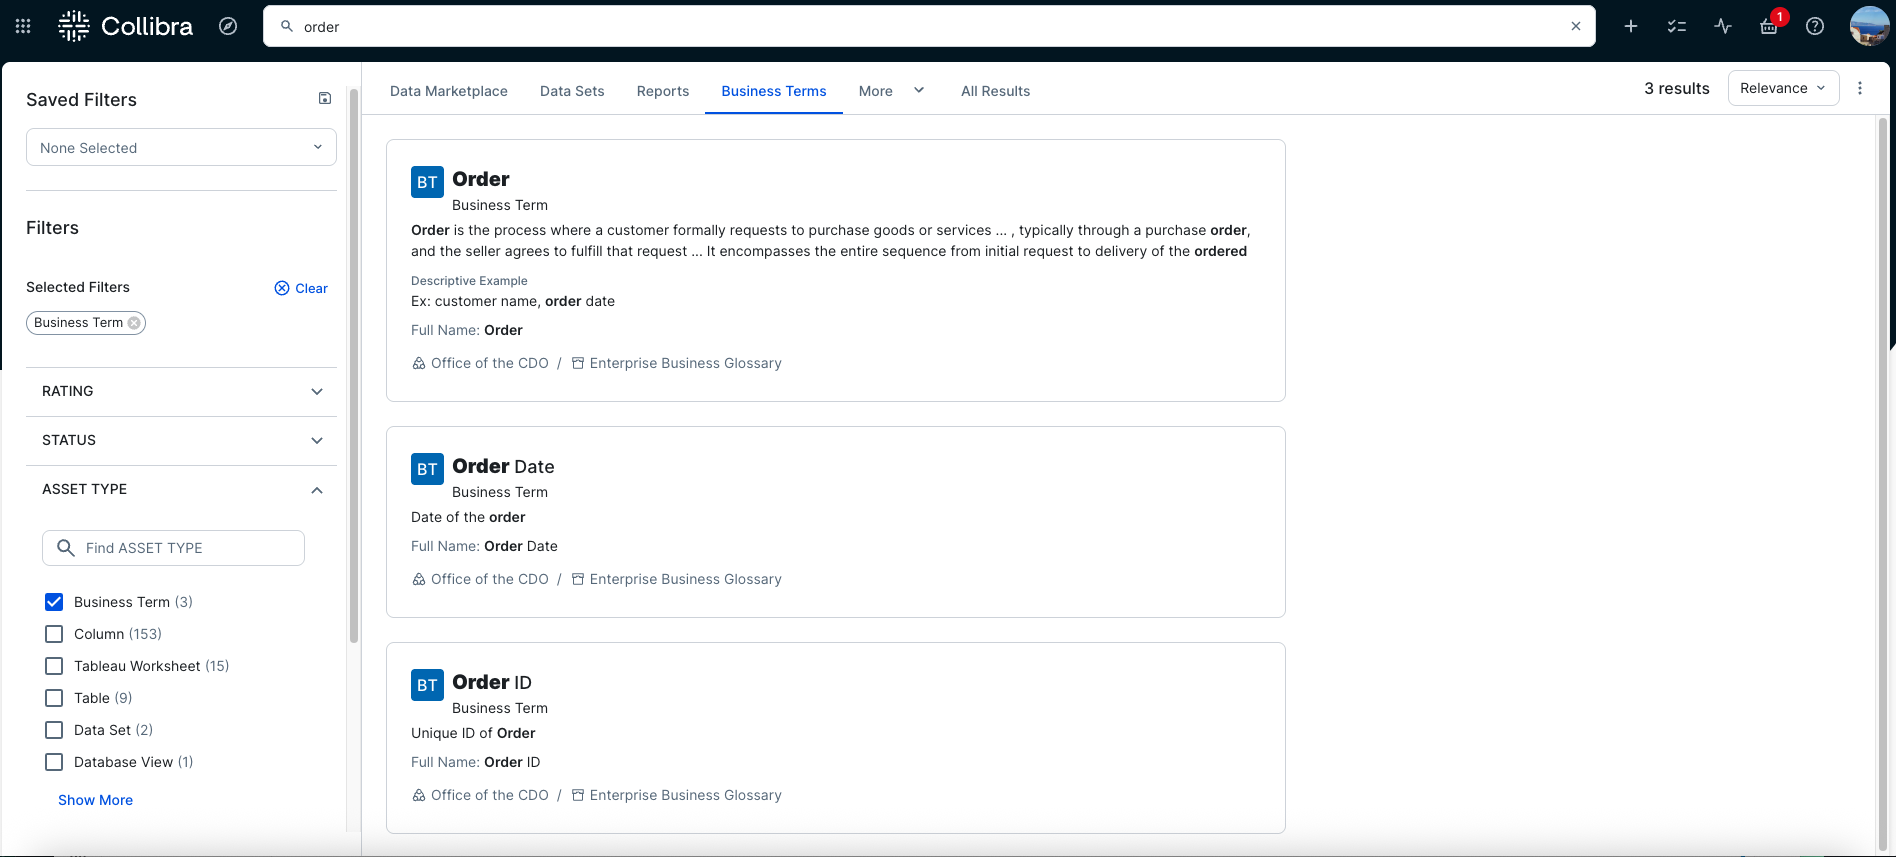
- In the Data Marketplace, filters such as Business Terms can be applied to narrow the results by asset type, as shown in the following screenshot. This approach helps users focus on relevant assets by starting from clear business context, which is especially useful when dealing with many similarly named tables or columns.
- In the example shown in the following screenshot, the business term Order is selected, and the Diagram view is opened to display its full logical lineage. The diagram shows that the term is linked to the aws_orders table. Selecting the table in the diagram reveals its metadata details, which appear on the right side of the page. From there, users can navigate directly to the table.

- In the aws_orders table asset, access can be requested by initiating an AWS subscription request. From the asset view, selecting Actions reveals the list of available workflows. In this example, the Creation of a new subscription workflow is selected to start the approval process.
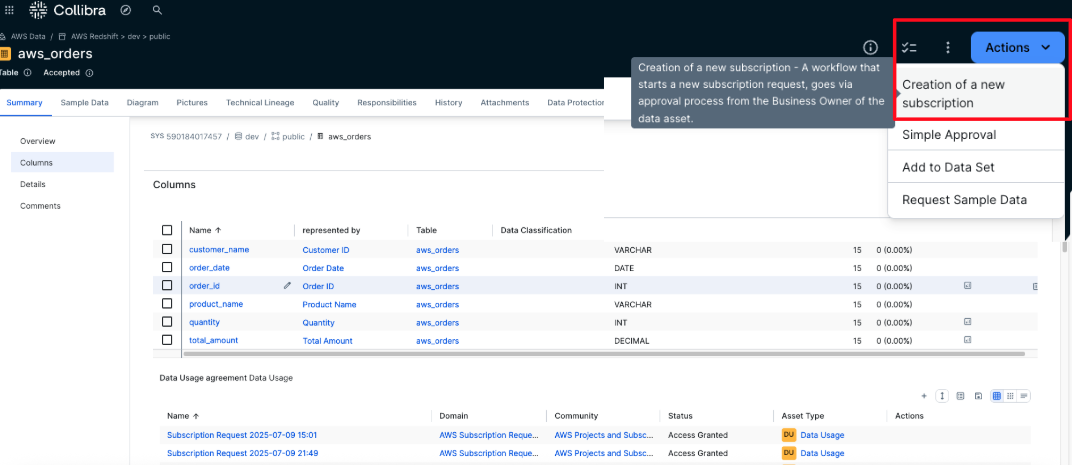
- The user must select the AWS project to use as the consuming project for the subscription. A list of all projects the user is a member of is displayed to facilitate the selection. After choosing the appropriate project, choose Send to submit the request.
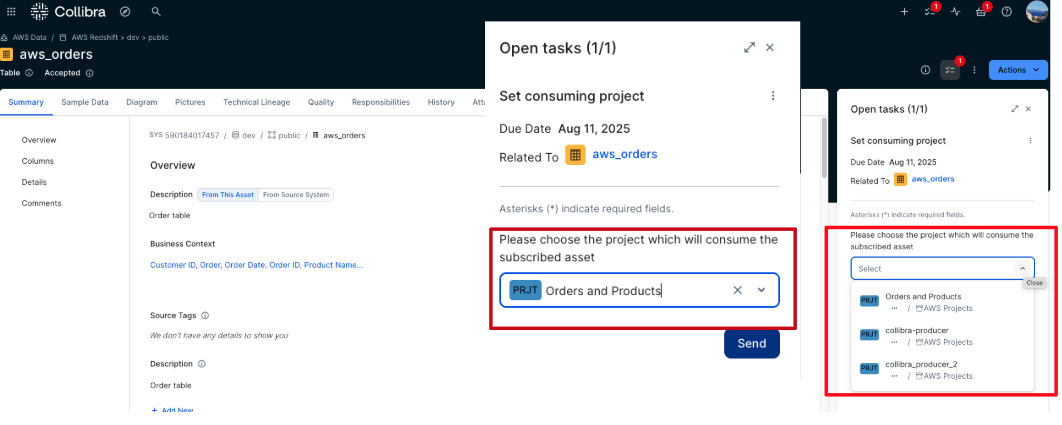
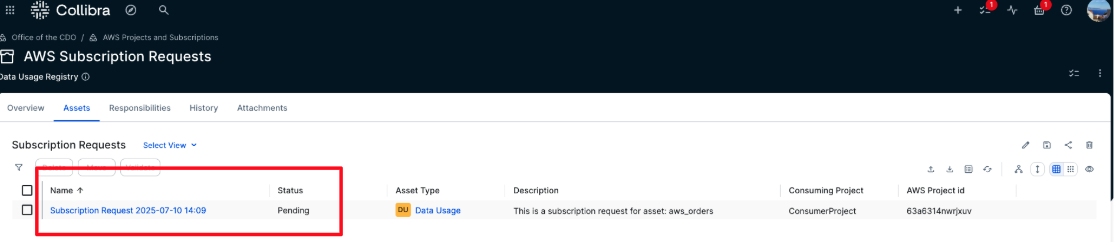
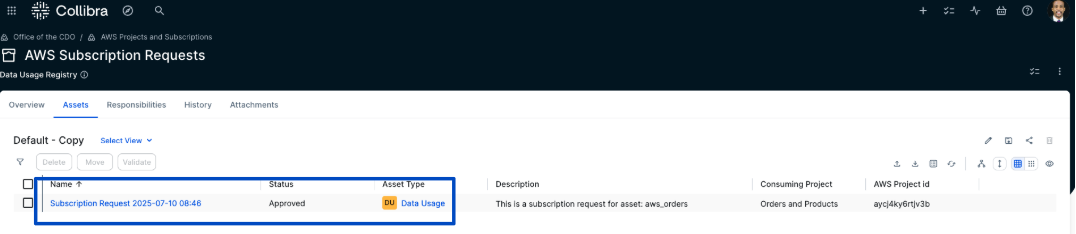
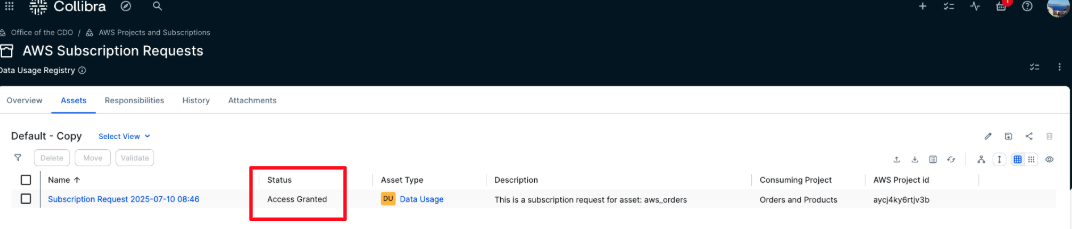
- After it’s submitted, the workflow is triggered, and a task is assigned to the business steward of the asset for which the subscription is requested. A new subscription request is also created in the AWS Subscription Requests domain with a status of Pending, and it’s automatically linked to the requested asset.
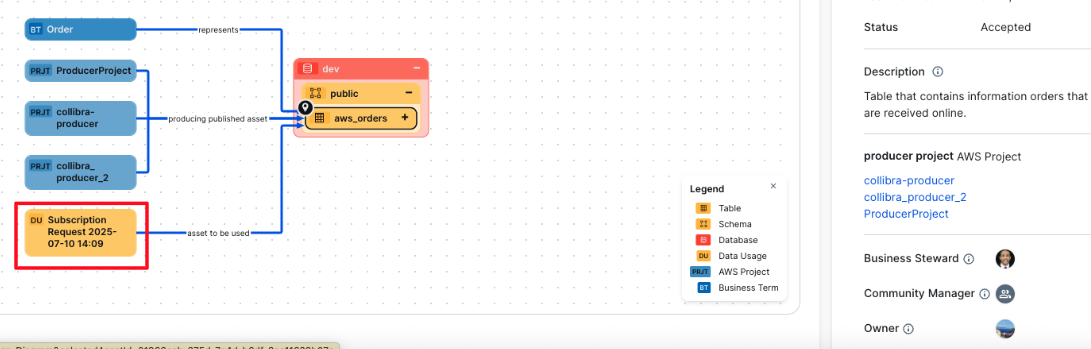
The new subscription request is also reflected in the lineage of the data asset, as shown in the following screenshot.
- The business steward assigned to the asset receives an approval notification.
- Choose Tasks button in the top right corner.
- Locate the most recent task titled Accept or Reject, which is associated with the aws_orders asset.
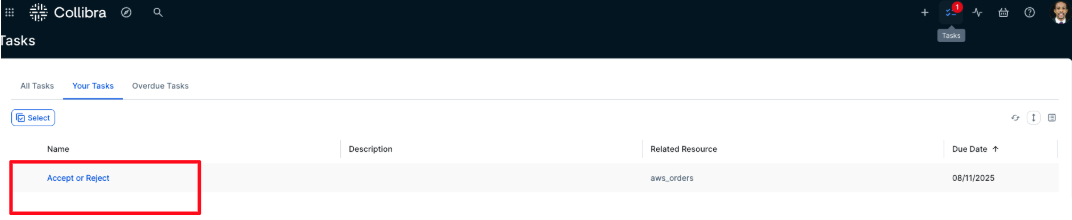
- The business steward opens the task and chooses either Approve or Reject, depending on the request. In this example, Approve is selected. The task is then marked as complete.
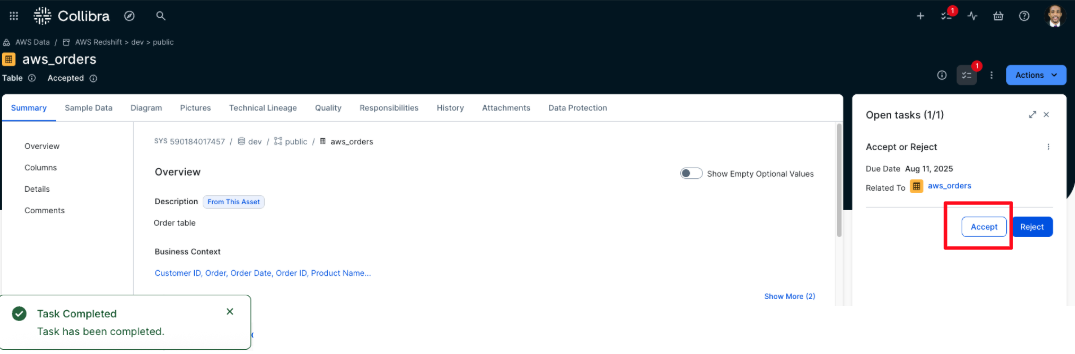
- After the business steward approves the subscription request, the corresponding Subscription Request asset is automatically updated to the status Approved.
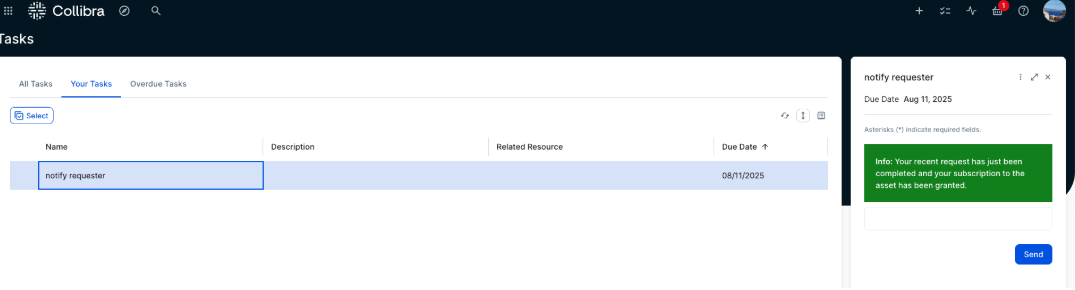
- The requester is notified that the subscription request has been approved. To acknowledge, the requester choose Tasks, locates the approval notification, and chooses Done to confirm receipt, as shown in the following screenshot.

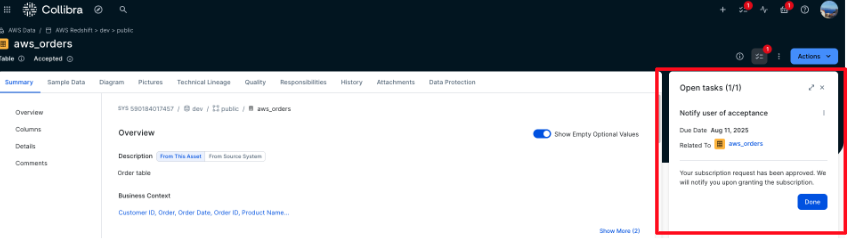
- After a subscription request is approved, the integration solution automatically process the request by creating and granting the corresponding subscription in AWS using the asset’s metadata. The user can then confirm the new subscription is reflected in Amazon SageMaker, as shown in the following screenshot.
- After the subscription is granted, the status of the Subscription Request is updated to Access Granted.
- The requester now receives a new task, which is a notification confirming that the subscription request has been granted. Choose the Send button to acknowledge and complete the task.
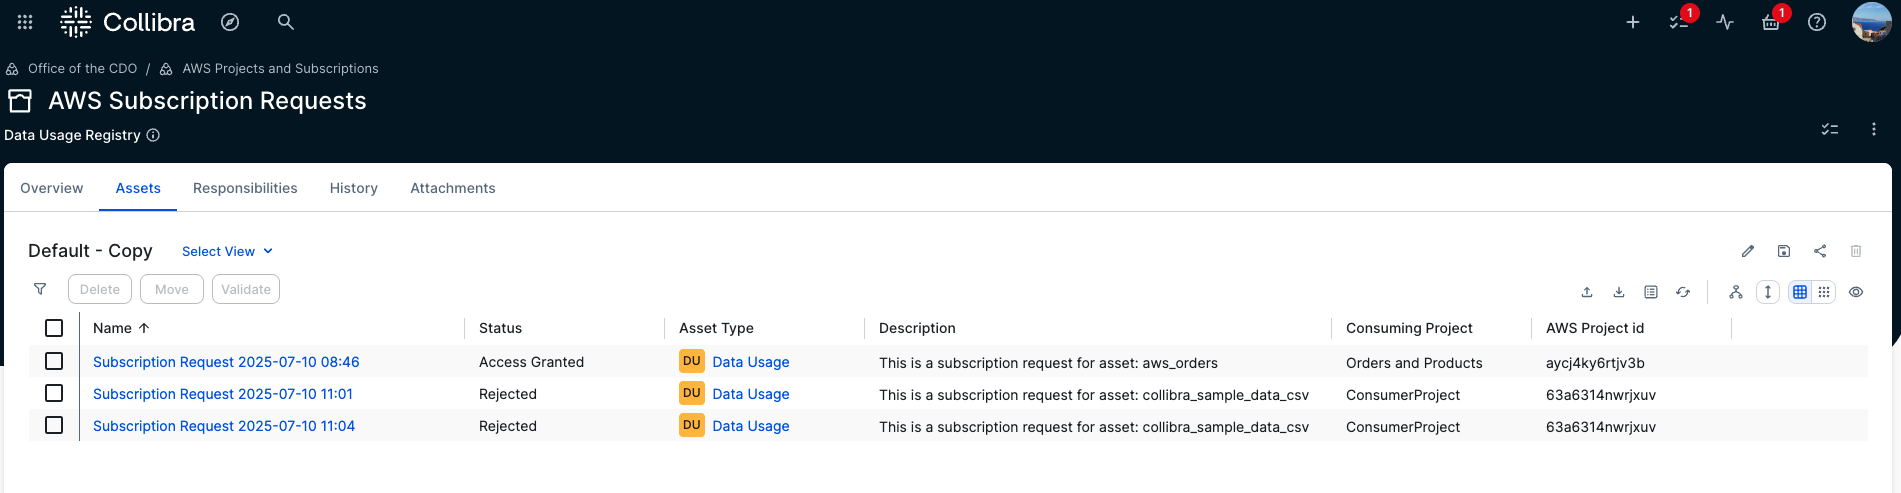
- In the AWS Subscription Requests domain, all requests and their status are visible. In addition to Approved and Access Granted statuses, Rejected requests are also listed. If a request is rejected by the approver, its status changes to Rejected and no subscription is created in AWS.
Synchronization Interval
The solution keeps Collibra and Amazon SageMaker Catalog in sync through regular updates. Core elements including business metadata of Collibra, user profiles, project information & published assets of Amazon SageMaker Catalog, and subscription requests originating in Collibra are synchronized every 5 minutes. However, when subscription requests are created in Amazon SageMaker Catalog, they are instantly synchronized to Collibra.
Cleanup
To avoid incurring unnecessary costs after testing or exploring the solution, delete the provisioned resources. Follow these steps:
- Remove the CloudFormation stack – Go to the AWS CloudFormation console, select the stack you created for this solution, and choose Delete. This will automatically remove the associated AWS resources provisioned by the stack.
- Clean up Collibra configurations – In the Collibra environment, remove test domains, projects, or workflows created for this solution to ensure a clean slate for future experiments.
- Revoke access tokens or credentials – If you used API credentials or access tokens for integration, ensure they’re revoked or deleted if no longer needed.
Performing these steps ensures your environments stay clean and you avoid unintended resource usage.
Conclusion
The solution connecting Amazon SageMaker Catalog and Collibra gives organizations a simple way to unify metadata and streamline access workflows. It helps reduce duplication, improve governance, and build trust in data for both analytics and AI.We demonstrated how to synchronize metadata and manage access requests using APIs, enabling a shared view of data across teams.Learn more by exploring:
We welcome your feedback as you explore what’s possible with this solution.
About the authors
 Vasiliki Nikolopoulou is a Principal Integrations Architect at Collibra, where she is working for the past 11 years. Her extensive career includes roles such as Director, Enterprise Architect at AXA Insurance US, Principal Sales Engineer at Oracle, and Certified Senior IT Professional in technical sales at IBM for over 15 years. She holds numerous technical certifications. Connect with her on LinkedIn.
 Divij Bhatia is a Software Development Engineer at AWS. He is passionate about building resilient and scalable cloud-native solutions that solve real-world problems for customers. His free time often takes him outdoors, traveling and shooting landscapes. Connect with him on LinkedIn.
 Leonardo Gomez is a Principal Analytics Specialist Solutions Architect at AWS. He has over a decade of experience in data management, helping customers around the globe address their business and technical needs. Connect with him on LinkedIn.
[$] Linux and Secure Boot certificate expiration
Post Syndicated from jake original https://lwn.net/Articles/1029767/
Linux users who have Secure Boot
enabled on their systems knowingly or unknowingly rely on a key from
Microsoft that is set to expire in September. After that point, Microsoft
will no longer use that key to sign the shim
first-stage UEFI bootloader that is used by Linux distributions to boot the
kernel with Secure Boot. But the replacement key, which has been available
since 2023, may not be installed on many systems; worse yet, it may require
the hardware vendor to issue an update for the system firmware, which may
or may not happen. It seems that the vast majority of systems will not be
lost in the shuffle, but it may require extra work from distributors and
users.
Hacking Trains
Post Syndicated from Bruce Schneier original https://www.schneier.com/blog/archives/2025/07/hacking-trains.html
Seems like an old system system that predates any care about security:
The flaw has to do with the protocol used in a train system known as the End-of-Train and Head-of-Train. A Flashing Rear End Device (FRED), also known as an End-of-Train (EOT) device, is attached to the back of a train and sends data via radio signals to a corresponding device in the locomotive called the Head-of-Train (HOT). Commands can also be sent to the FRED to apply the brakes at the rear of the train.
These devices were first installed in the 1980s as a replacement for caboose cars, and unfortunately, they lack encryption and authentication protocols. Instead, the current system uses data packets sent between the front and back of a train that include a simple BCH checksum to detect errors or interference. But now, the CISA is warning that someone using a software-defined radio could potentially send fake data packets and interfere with train operations.
Dutch government successfully completes privacy audit of AWS data protection practices
Post Syndicated from Gokhan Akyuz original https://aws.amazon.com/blogs/security/dutch-government-successfully-completes-privacy-audit-of-aws-data-protection-practices/
We are pleased to announce the successful completion of a comprehensive privacy audit conducted by Ernst & Young (EY) Netherlands on behalf of the Netherlands Ministry of Justice and Security. This customer audit examined the data protection measures implemented by AWS for a limited number of internal AWS operations when AWS is processing personal data as a data controller (referred to as “Legitimate Business Operations” in the audit report).
This audit is the first major assessment focusing on the role of AWS as a data controller, examining how we protect customers’ personal data beyond customer content. The audit specifically addressed the Dutch government’s need to make sure that personal data is processed strictly according to Dutch government organizations’ instructions when used for Legitimate Business Operations of AWS.
Beginning in January 2025, EY Netherlands conducted thorough fieldwork to evaluate the compliance of AWS with our contractual commitments. The audit report was finalized on June 16, 2025, and made publicly available on July 16, 2025, on Strategic Vendor Management for Microsoft, Google Cloud, and AWS (SLM) website, the team in the Ministry that manages the national agreements between the Dutch government and cloud service providers. The audit report provides insight into our data protection practices and demonstrates the commitment of AWS to data protection and privacy when acting as a data controller.
We remain committed to maintaining the highest standards of data protection and privacy for our customers. This successful audit reinforces our dedication to transparency and compliance with stringent data protection requirements.
For more information about AWS privacy and data protection practices, visit our Data Privacy Center, the EU data protection section of the AWS Cloud Security website, or contact your AWS account team. To learn more about our compliance and security programs, see AWS Compliance Programs of the AWS Cloud Security website. As always, we value your feedback and questions; reach out to the AWS Compliance team through the Contact Us page.
If you have feedback about this post, submit comments in the Comments section below.
Top announcements of the AWS Summit in New York, 2025
Post Syndicated from AWS News Blog Team original https://aws.amazon.com/blogs/aws/top-announcements-of-the-aws-summit-in-new-york-2025/
Today at the AWS Summit in New York City, Swami Sivasubramanian, AWS VP of Agentic AI, provided the day’s keynote on how we’re enabling customers to deliver production-ready AI agents at scale. See below for a roundup of the biggest announcements from the event.
Introducing Amazon Bedrock AgentCore: Securely deploy and operate AI agents at any scale (preview)
Amazon Bedrock AgentCore enables rapid deployment and scaling of AI agents with enterprise-grade security. It provides memory management, identity controls, and tool integration—streamlining development while working with any open-source framework and foundation model.
Announcing Amazon Nova customization in Amazon SageMaker AI
AWS now enables extensive customization of Amazon Nova foundation models through SageMaker AI across all stages of model training. Available as ready-to-use SageMaker recipes, these capabilities allow customers to adapt Nova understanding models across pre-training and post-training, including fine-tuning and alignment recipes to better address business-specific requirements across industries.
AWS Free Tier update: New customers can get started and explore AWS with up to $200 in credits
AWS is enhancing its Free Tier program with up to $200 in credits for new users: $100 upon sign-up and an additional $100 earned by completing activities with services like Amazon EC2, Amazon Bedrock, and AWS Budgets.
TwelveLabs video understanding models are now available in Amazon Bedrock
TwelveLabs video understanding models are now available on Amazon Bedrock and enable customers to search through videos, classify scenes, summarize content, and extract insights with precision and reliability.
Amazon S3 Metadata now supports metadata for all your S3 objects
Amazon S3 Metadata now provides comprehensive visibility into all objects in S3 buckets through live inventory and journal tables, enabling SQL-based analysis of both existing and new objects with automatic updates within an hour of changes.
Introducing Amazon S3 Vectors: First cloud storage with native vector support at scale (preview)
Amazon S3 Vectors is a new cloud object store that provides native support for storing and querying vectors at massive scale, offering up to 90% cost reduction compared to conventional approaches while seamlessly integrating with Amazon Bedrock Knowledge Bases, SageMaker, and OpenSearch for AI applications.
Streamline the path from data to insights with new Amazon SageMaker capabilities
Amazon SageMaker has introduced three new capabilities—Amazon QuickSight integration for dashboard creation, governance, and sharing, Amazon S3 Unstructured Data Integration for cataloging documents and media files, and automatic data onboarding from Lakehouse—that eliminate data silos by unifying structured and unstructured data management, visualization, and governance in a single experience.
Monitor and debug event-driven applications with new Amazon EventBridge logging
Amazon EventBridge now offers enhanced logging capabilities that provide comprehensive event lifecycle tracking, helping users monitor and troubleshoot their event-driven applications with detailed logs that show when events are published, matched against rules, delivered to subscribers, or encounter failures.
Amazon EKS enables ultra scale AI/ML workloads with support for 100K nodes per cluster
Amazon EKS now scales to 100,000 nodes per cluster, enabling massive AI/ML workloads with up to 1.6M AWS Trainium accelerators or 800K NVIDIA GPUs. This allows organizations to efficiently train and run large AI models while maintaining Kubernetes compatibility and existing tooling integration.
Hookii Neomow X: Robotic Lawn Mower Won’t Eat Your Dog — or Freak Out Near Tree Branches
Post Syndicated from BeardedTinker original https://www.youtube.com/watch?v=TZeBvkN-z-A
Announcing Amazon Nova customization in Amazon SageMaker AI
Post Syndicated from Betty Zheng (郑予彬) original https://aws.amazon.com/blogs/aws/announcing-amazon-nova-customization-in-amazon-sagemaker-ai/
Today, we’re announcing a suite of customization capabilities for Amazon Nova in Amazon SageMaker AI. Customers can now customize Nova Micro, Nova Lite, and Nova Pro across the model training lifecycle, including pre-training, supervised fine-tuning, and alignment. These techniques are available as ready-to-use Amazon SageMaker recipes with seamless deployment to Amazon Bedrock, supporting both on-demand and provisioned throughput inference.
Amazon Nova foundation models power diverse generative AI use cases across industries. As customers scale deployments, they need models that reflect proprietary knowledge, workflows, and brand requirements. Prompt optimization and retrieval-augmented generation (RAG) work well for integrating general-purpose foundation models into applications, however business-critical workflows require model customization to meet specific accuracy, cost, and latency requirements.
Choosing the right customization technique
Amazon Nova models support a range of customization techniques including: 1) supervised fine-tuning, 2) alignment, 3) continued pre-training, and 4) knowledge distillation. The optimal choice depends on goals, use case complexity, and the availability of data and compute resources. You can also combine multiple techniques to achieve your desired outcomes with the preferred mix of performance, cost, and flexibility.
Supervised fine-tuning (SFT) customizes model parameters using a training dataset of input-output pairs specific to your target tasks and domains. Choose from the following two implementation approaches based on data volume and cost considerations:
- Parameter-efficient fine-tuning (PEFT) — updates only a subset of model parameters through lightweight adapter layers such as LoRA (Low-Rank Adaptation). It offers faster training and lower compute costs compared to full fine-tuning. PEFT-adapted Nova models are imported to Amazon Bedrock and invoked using on-demand inference.
- Full fine-tuning (FFT) — updates all the parameters of the model and is ideal for scenarios when you have extensive training datasets (tens of thousands of records). Nova models customized through FFT can also be imported to Amazon Bedrock and invoked for inference with provisioned throughput.
Alignment steers the model output towards desired preferences for product-specific needs and behavior, such as company brand and customer experience requirements. These preferences may be encoded in multiple ways, including empirical examples and policies. Nova models support two preference alignment techniques:
- Direct preference optimization (DPO) — offers a straightforward way to tune model outputs using preferred/not preferred response pairs. DPO learns from comparative preferences to optimize outputs for subjective requirements such as tone and style. DPO offers both a parameter-efficient version and a full-model update version. The parameter-efficient version supports on-demand inference.
- Proximal policy optimization (PPO) — uses reinforcement learning to enhance model behavior by optimizing for desired rewards such as helpfulness, safety, or engagement. A reward model guides optimization by scoring outputs, helping the model learn effective behaviors while maintaining previously learned capabilities.
Continued pre-training (CPT) expands foundational model knowledge through self-supervised learning on large quantities of unlabeled proprietary data, including internal documents, transcripts, and business-specific content. CPT followed by SFT and alignment through DPO or PPO provides a comprehensive way to customize Nova models for your applications.
Knowledge distillation transfers knowledge from a larger “teacher” model to a smaller, faster, and more cost-efficient “student” model. Distillation is useful in scenarios where customers do not have adequate reference input-output samples and can leverage a more powerful model to augment the training data. This process creates a customized model of teacher-level accuracy for specific use cases and student-level cost-effectiveness and speed.
Here is a table summarizing the available customization techniques across different modalities and deployment options. Each technique offers specific training and inference capabilities depending on your implementation requirements.
| Recipe | Modality | Training | Inference | ||
|---|---|---|---|---|---|
| Amazon Bedrock | Amazon SageMaker | Amazon Bedrock On-demand | Amazon Bedrock Provisioned Throughput | ||
| Supervised fine tuning | Text, image, video | ||||
| Parameter-efficient fine-tuning (PEFT) |  |
|
|
|
|
| Full fine-tuning | |
|
|||
| Direct preference optimization (DPO) | Text, image, video | ||||
| Parameter-efficient DPO | |
|
|
||
| Full model DPO | |
|
|||
| Proximal policy optimization (PPO) | Text-only | |
|
||
| Continuous pre-training | Text-only | |
|
||
| Distillation | Text-only | |
|
|
|
Early access customers, including Cosine AI, Massachusetts Institute of Technology (MIT) Computer Science and Artificial Intelligence Laboratory (CSAIL), Volkswagen, Amazon Customer Service, and Amazon Catalog Systems Service, are already successfully using Amazon Nova customization capabilities.
Customizing Nova models in action
The following walks you through an example of customizing the Nova Micro model using direct preference optimization on an existing preference dataset. To do this, you can use Amazon SageMaker Studio.
Launch your SageMaker Studio in the Amazon SageMaker AI console and choose JumpStart, a machine learning (ML) hub with foundation models, built-in algorithms, and pre-built ML solutions that you can deploy with a few clicks.
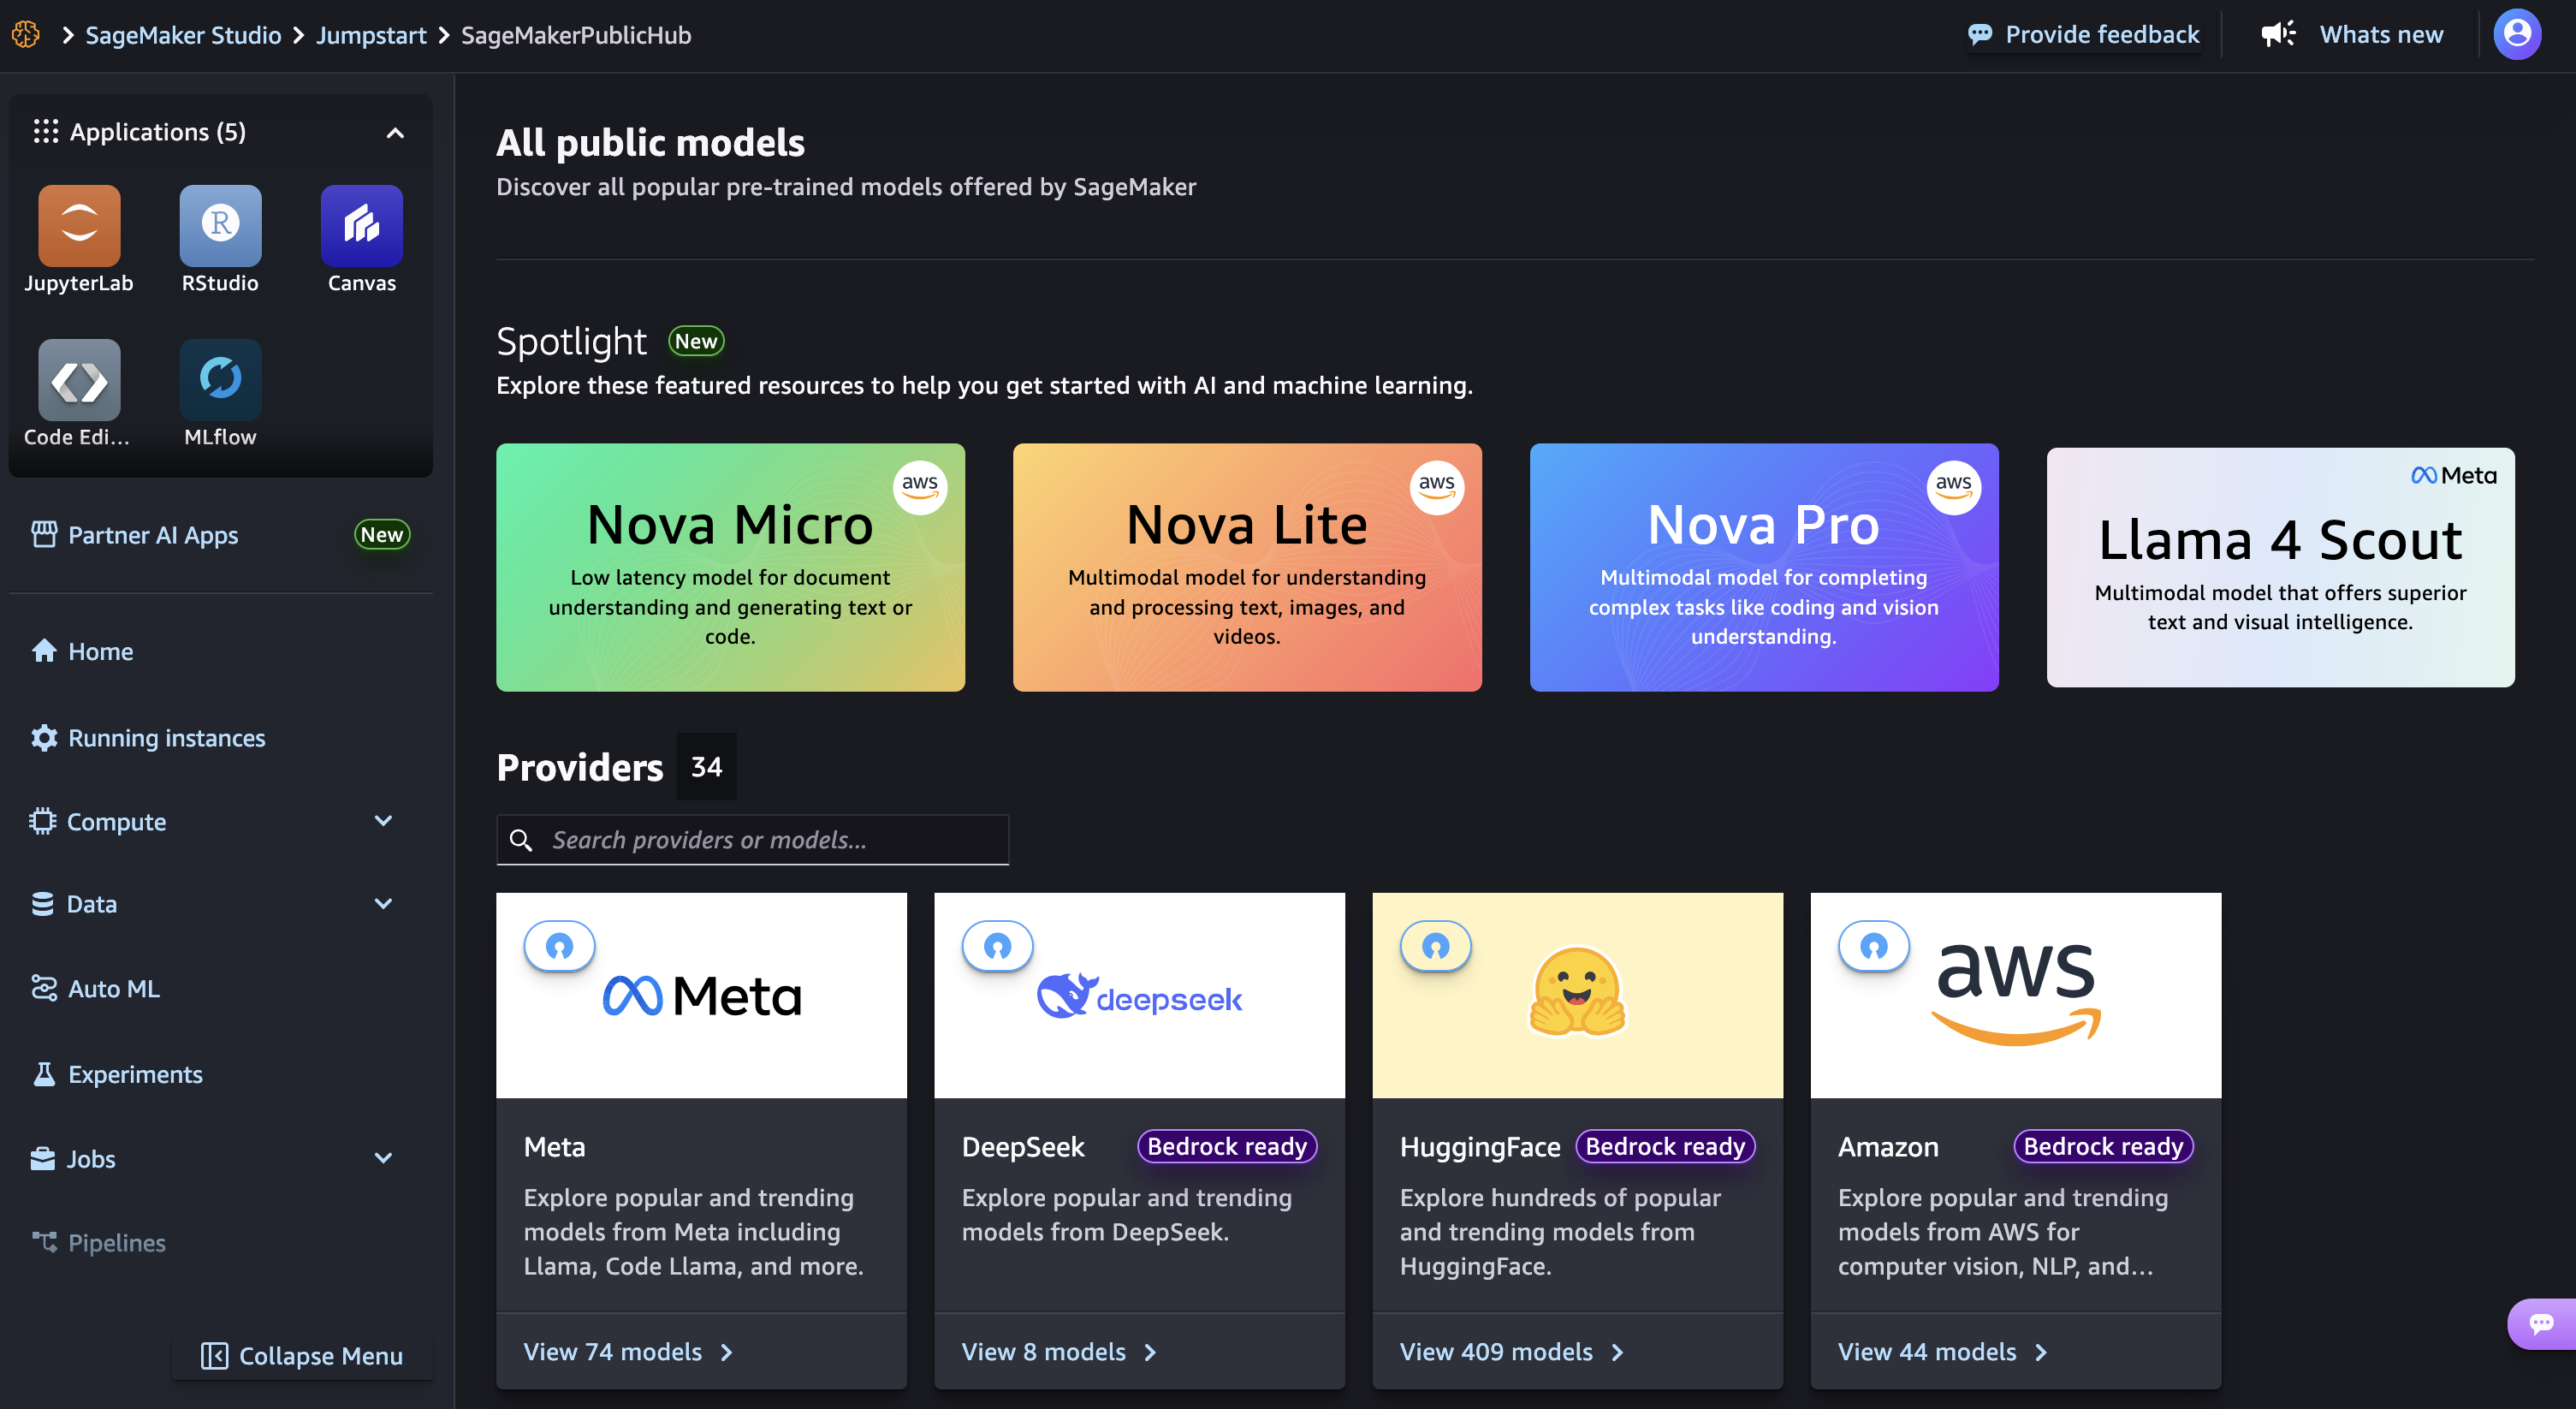
Then, choose Nova Micro, a text-only model that delivers the lowest latency responses at the lowest cost per inference among the Nova model family, and then choose Train.
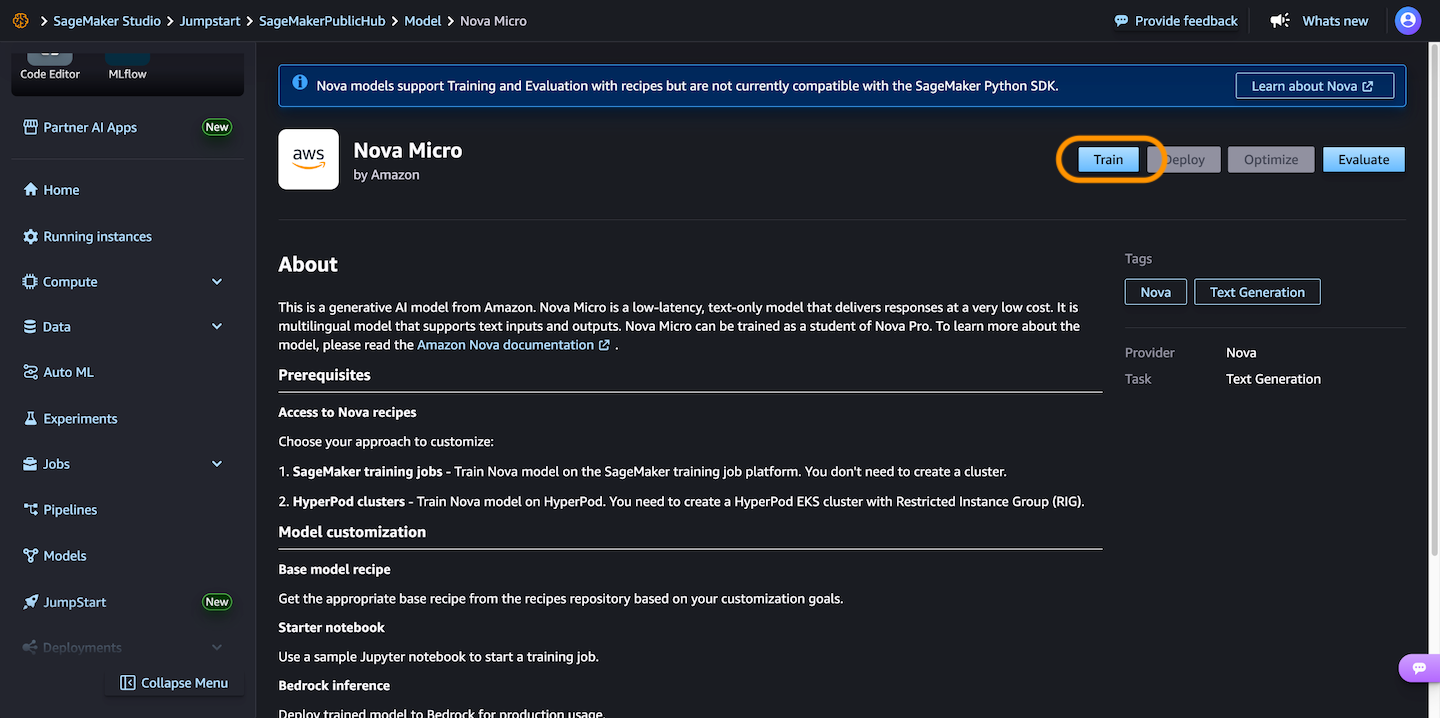
Next, you can choose a fine-tuning recipe to train the model with labeled data to enhance performance on specific tasks and align with desired behaviors. Choosing the Direct Preference Optimization offers a straightforward way to tune model outputs with your preferences.
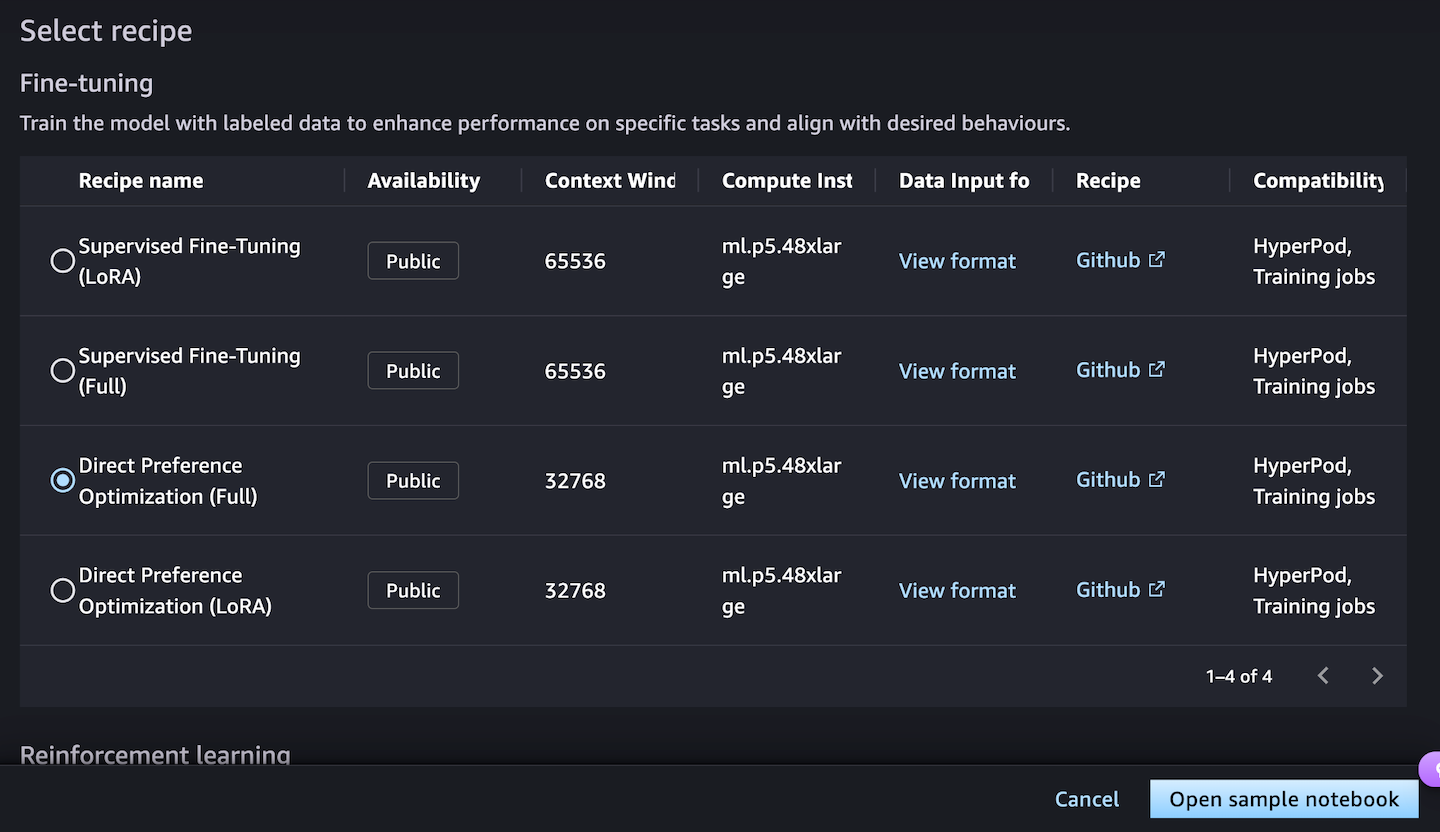
When you choose Open sample notebook, you have two environment options to run the recipe: either on the SageMaker training jobs or SageMaker Hyperpod:
Choose Run recipe on SageMaker training jobs when you don’t need to create a cluster and train the model with the sample notebook by selecting your JupyterLab space.
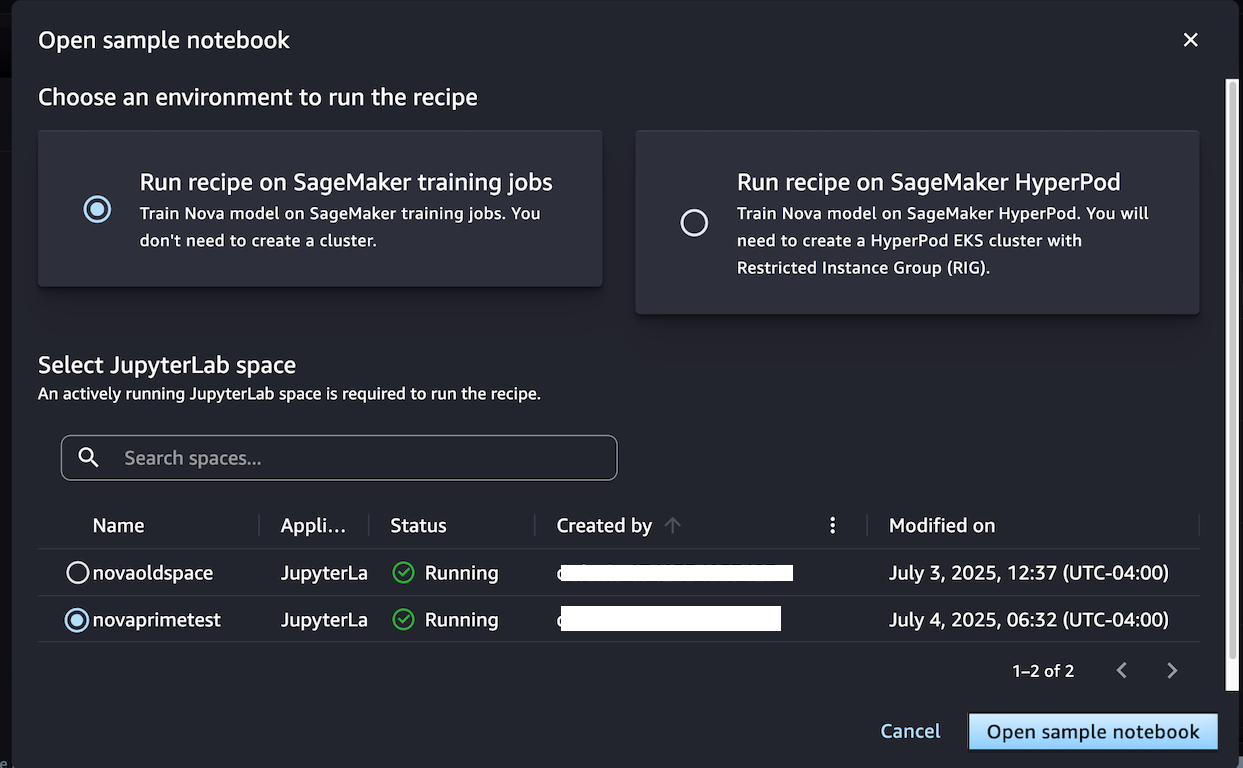
Alternately, if you want to have a persistent cluster environment optimized for iterative training processes, choose Run recipe on SageMaker HyperPod. You can choose a HyperPod EKS cluster with at least one restricted instance group (RIG) to provide a specialized isolated environment, which is required for such Nova model training. Then, choose your JupyterLabSpace and Open sample notebook.

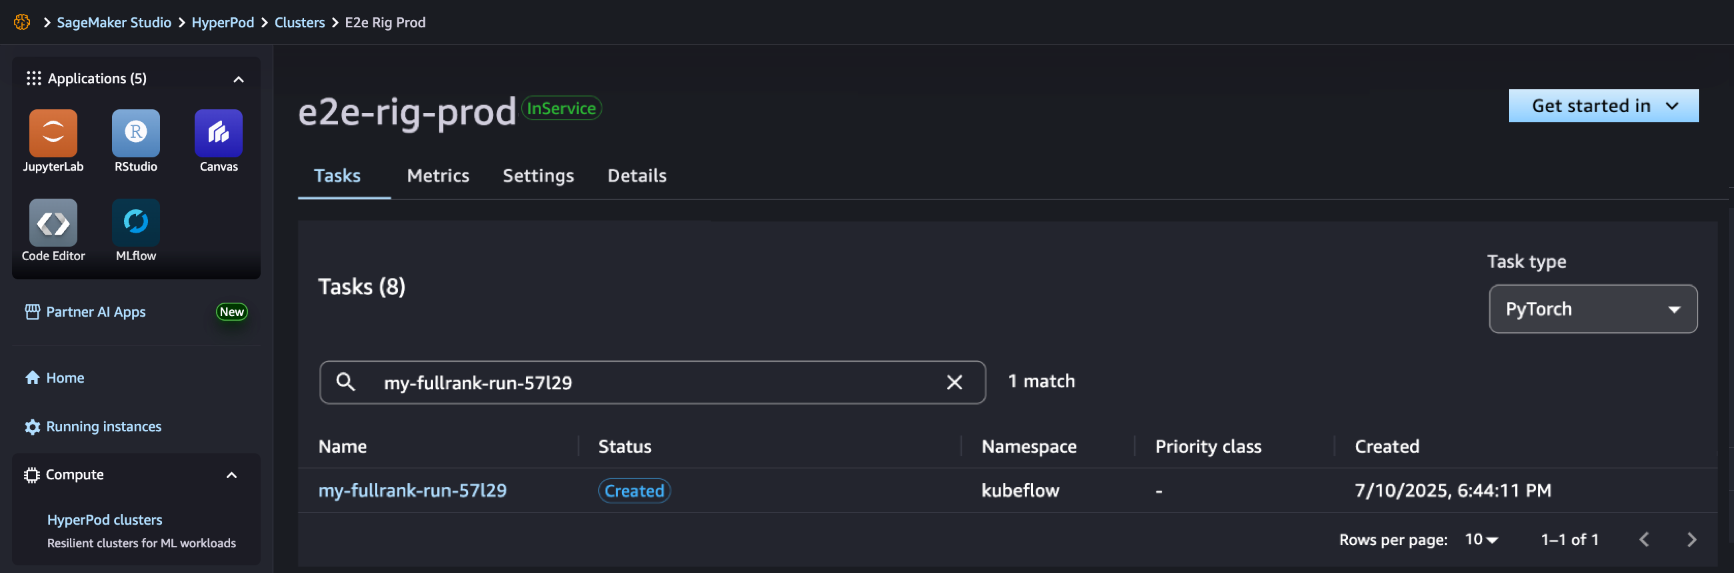
This notebook provides an end-to-end walkthrough for creating a SageMaker HyperPod job using a SageMaker Nova model with a recipe and deploying it for inference. With the help of a SageMaker HyperPod recipe, you can streamline complex configurations and seamlessly integrate datasets for optimized training jobs.
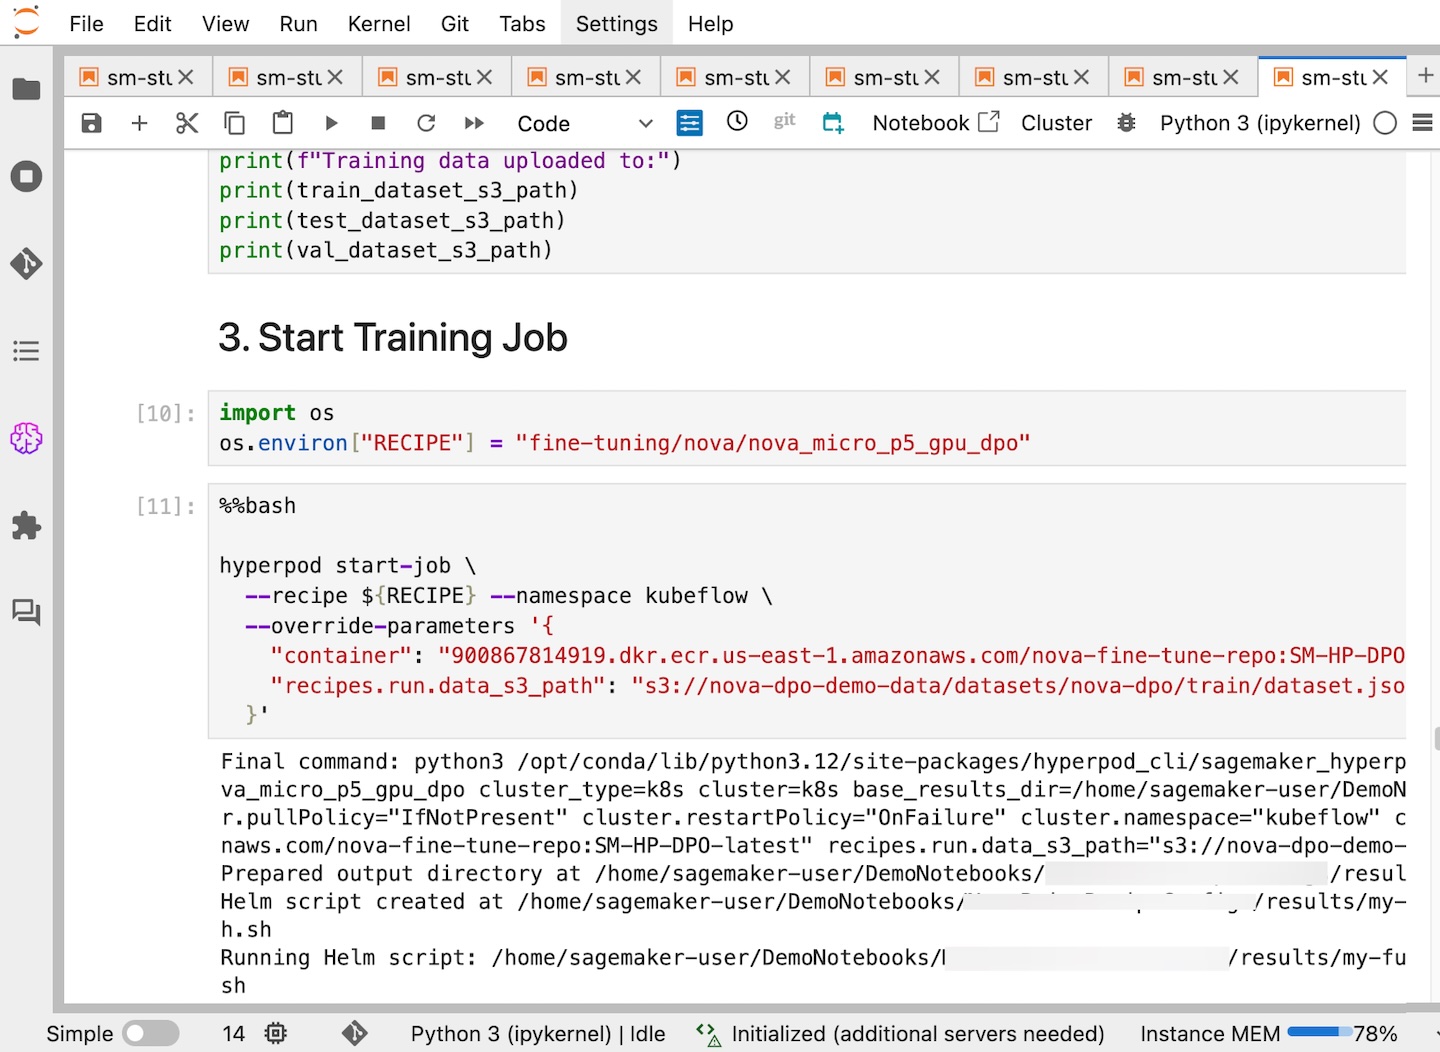
In SageMaker Studio, you can see that your SageMaker HyperPod job has been successfully created and you can monitor it for further progress.
After your job completes, you can use a benchmark recipe to evaluate if the customized model performs better on agentic tasks.
For comprehensive documentation and additional example implementations, visit the SageMaker HyperPod recipes repository on GitHub. We continue to expand the recipes based on customer feedback and emerging ML trends, ensuring you have the tools needed for successful AI model customization.
Availability and getting started
Recipes for Amazon Nova on Amazon SageMaker AI are available in US East (N. Virginia). Learn more about this feature by visiting the Amazon Nova customization webpage and Amazon Nova user guide and get started in the Amazon SageMaker AI console.
Introducing Amazon Bedrock AgentCore: Securely deploy and operate AI agents at any scale (preview)
Post Syndicated from Danilo Poccia original https://aws.amazon.com/blogs/aws/introducing-amazon-bedrock-agentcore-securely-deploy-and-operate-ai-agents-at-any-scale/
In just a few years, foundation models (FMs) have evolved from being used directly to create content in response to a user’s prompt, to now powering AI agents, a new class of software applications that use FMs to reason, plan, act, learn, and adapt in pursuit of user-defined goals with limited human oversight. This new wave of agentic AI is enabled by the emergence of standardized protocols such as Model Context Protocol (MCP) and Agent2Agent (A2A) that simplify how agents connect with other tools and systems.
In fact, building AI agents that can reliably perform complex tasks has become increasingly accessible thanks to open source frameworks like CrewAI, LangGraph, and Strands Agents. However, moving from a promising proof-of-concept to a production-ready agent that can scale to thousands of users presents significant challenges.
Instead of being able to focus on the core features of the agent, developers and AI engineers have to spend months building foundational infrastructure for session management, identity controls, memory systems, and observability—at the same time supporting security and compliance.
Today, we’re excited to announce the preview of Amazon Bedrock AgentCore, a comprehensive set of enterprise-grade services that help developers quickly and securely deploy and operate AI agents at scale using any framework and model, hosted on Amazon Bedrock or elsewhere.
More specifically, we are introducing today:
AgentCore Runtime – Provides sandboxed low-latency serverless environments with session isolation, supporting any agent framework including popular open source frameworks, tools, and models, and handling multimodal workloads and long-running agents.
AgentCore Memory – Manages session and long-term memory, providing relevant context to models while helping agents learn from past interactions.
AgentCore Observability – Offers step-by-step visualization of agent execution with metadata tagging, custom scoring, trajectory inspection, and troubleshooting/debugging filters.
AgentCore Identity – Enables AI agents to securely access AWS services and third-party tools and services such as GitHub, Salesforce, and Slack, either on behalf of users or by themselves with pre-authorized user consent.
AgentCore Gateway – Transforms existing APIs and AWS Lambda functions into agent-ready tools, offering unified access across protocols, including MCP, and runtime discovery.
AgentCore Browser – Provides managed web browser instances to scale your agents’ web automation workflows.
AgentCore Code Interpreter – Offers an isolated environment to run the code your agents generate.
These services can be used individually and are optimized to work together so developers don’t need to spend time piecing together components. AgentCore can work with open source or custom AI agent frameworks, giving teams the flexibility to maintain their preferred tools while gaining enterprise capabilities. To integrate these services into their existing code, developers can use the AgentCore SDK.
You can now discover, buy, and run pre-built agents and agent tools from AWS Marketplace with AgentCore Runtime. With just a few lines of code, your agents can securely connect to API-based agents and tools from AWS Marketplace with AgentCore Gateway to help you run complex workflows while maintaining compliance and control.
AgentCore eliminates tedious infrastructure work and operational complexity so development teams can bring groundbreaking agentic solutions to market faster.
Let’s see how this works in practice. I’ll share more info on the services as we use them.
Deploying a production-ready customer support assistant with Amazon Bedrock AgentCore (Preview)
When customers reach out with an email, it takes time to provide a reply. Customer support needs to check the validity of the email, find who the actual customer is in the customer relationship management (CRM) system, check their orders, and use product-specific knowledge bases to find the information required to prepare an answer.
An AI agent can simplify that by connecting to the internal systems, retrieve contextual information using a semantic data source, and draft a reply for the support team. For this use case, I built a simple prototype using Strands Agents. For simplicity and to validate the scenario, the internal tools are simulated using Python functions.
When I talk to developers, they tell me that similar prototypes, covering different use cases, are being built in many companies. When these prototypes are demonstrated to the company leadership and receive confirmation to proceed, the development team has to define how to go in production and satisfy the usual requirements for security, performance, availability, and scalability. This is where AgentCore can help.
Step 1 – Deploying to the cloud with AgentCore Runtime
AgentCore Runtime is a new service to securely deploy, run, and scale AI agents, providing isolation so that each user session runs in its own protected environment to help prevent data leakage—a critical requirement for applications handling sensitive data.
To match different security postures, agents can use different network configurations:
Sandbox – To only communicate with allowlisted AWS services.
Public – To run with managed internet access.
VPC-only (coming soon) – This option will allow to access resources hosted in a customer’s VPC or connected via AWS PrivateLink endpoints.
To deploy the agent to the cloud and get a secure, serverless endpoint with AgentCore Runtime, I add to the prototype a few lines of code using the AgentCore SDK to:
- Import the AgentCore SDK.
- Create the AgentCore app.
- Specify which function is the entry point to invoke the agent.
Using a different or custom agent framework is a matter of replacing the agent invocation inside the entry point function.
Here’s the code of the prototype. The three lines I added to use AgentCore Runtime are the ones preceded by a comment.
from strands import Agent, tool
from strands_tools import calculator, current_time

# Import the AgentCore SDK
from bedrock_agentcore.runtime import BedrockAgentCoreApp

WELCOME_MESSAGE = """
Welcome to the Customer Support Assistant! How can I help you today?
"""

SYSTEM_PROMPT = """
You are an helpful customer support assistant.
When provided with a customer email, gather all necessary info and prepare the response email.
When asked about an order, look for it and tell the full description and date of the order to the customer.
Don't mention the customer ID in your reply.
"""

@tool
def get_customer_id(email_address: str):
    if email_address == "[email protected]":
        return { "customer_id": 123 }
    else:
        return { "message": "customer not found" }

@tool
def get_orders(customer_id: int):
    if customer_id == 123:
        return [{
            "order_id": 1234,
            "items": [ "smartphone", "smartphone USB-C charger", "smartphone black cover"],
            "date": "20250607"
        }]
    else:
        return { "message": "no order found" }

@tool
def get_knowledge_base_info(topic: str):
    kb_info = []
    if "smartphone" in topic:
        if "cover" in topic:
            kb_info.append("To put on the cover, insert the bottom first, then push from the back up to the top.")
            kb_info.append("To remove the cover, push the top and bottom of the cover at the same time.")
        if "charger" in topic:
            kb_info.append("Input: 100-240V AC, 50/60Hz")
            kb_info.append("Includes US/UK/EU plug adapters")
    if len(kb_info) > 0:
        return kb_info
    else:
        return { "message": "no info found" }

# Create an AgentCore app
app = BedrockAgentCoreApp()

agent = Agent(
    system_prompt=SYSTEM_PROMPT,
    tools=[calculator, current_time, get_customer_id, get_orders, get_knowledge_base_info]
)

# Specify the entrypoint function invoking the agent
@app.entrypoint
def invoke(payload, context: RequestContext):
    """Handler for agent invocation"""
    user_message = payload.get(
        "prompt", "No prompt found in input, please guide customer to create a json payload with prompt key"
    )
    result = agent(user_message)
    return {"result": result.message}

if __name__ == "__main__":
    app.run()
I install the AgentCore SDK and the starter toolkit in the Python virtual environment:
After I activate the virtual environment, I have access to the AgentCore command line interface (CLI) provided by the starter toolkit.
First, I use agentcore configure --entrypoint my_agent.py -er <IAM_ROLE_ARN> to configure the agent, passing the AWS Identity and Access Management (IAM) role that the agent will assume. In this case, the agent needs access to Amazon Bedrock to invoke the model. The role can give access to other AWS resources used by an agent, such as an Amazon Simple Storage Service (Amazon S3) bucket or a Amazon DynamoDB table.
I launch the agent locally with agentcore launch --local. When running locally, I can interact with the agent using agentcore invoke --local <PAYLOAD>. The payload is passed to the entry point function. Note that the JSON syntax of the invocations is defined in the entry point function. In this case, I look for prompt in the JSON payload, but can use a different syntax depending on your use case.
When I am satisfied by local testing, I use agentcore launch to deploy to the cloud.
After the deployment is succesful and an endpoint has been created, I check the status of the endpoint with agentcore status and invoke the endpoint with agentcore invoke <PAYLOAD>. For example, I pass a customer support request in the invocation:
agentcore invoke '{"prompt": "From: [email protected] – Hi, I bought a smartphone from your store. I am traveling to Europe next week, will I be able to use the charger? Also, I struggle to remove the cover. Thanks, Danilo"}'
Step 2 – Enabling memory for context
After an agent has been deployed in the AgentCore Runtime, the context needs to be persisted to be available for a new invocation. I add AgentCore Memory to maintain session context using its short-term memory capabilities.
First, I create a memory client and the memory store for the conversations:
from bedrock_agentcore.memory import MemoryClient

memory_client = MemoryClient(region_name="us-east-1")

memory = memory_client.create_memory_and_wait(
    name="CustomerSupport",
    description="Customer support conversations"
)
I can now use create_event to stores agent interactions into short-term memory:
memory_client.create_event(
    memory_id=memory.get("id"), # Identifies the memory store
    actor_id="user-123",        # Identifies the user
    session_id="session-456",   # Identifies the session
    messages=[
        ("Hi, ...", "USER"),
        ("I'm sorry to hear that...", "ASSISTANT"),
        ("get_orders(customer_id='123')", "TOOL"),
        . . .
    ]
)
I can load the most recent turns of a conversations from short-term memory using list_events:
conversations = memory_client.list_events(
    memory_id=memory.get("id"), # Identifies the memory store
    actor_id="user-123",        # Identifies the user
    session_id="session-456",   # Identifies the session
    max_results=5               # Number of most recent turns to retrieve
)
With this capability, the agent can maintain context during long sessions. But when a users come back with a new session, the conversation starts blank. Using long-term memory, the agent can personalize user experiences by retaining insights across multiple interactions.
To extract memories from a conversation, I can use built-in AgentCore Memory policies for user preferences, summarization, and semantic memory (to capture facts) or create custom policies for specialized needs. Data is stored encrypted using a namespace-based storage for data segmentation.
I change the previous code creating the memory store to include long-term capabilities by passing a semantic memory strategy. Note that an existing memory store can be updated to add strategies. In that case, the new strategies are applied to newer events.
memory = memory_client.create_memory_and_wait(
    name="CustomerSupport",
    description="Customer support conversations",
    strategies=[{
        "semanticMemoryStrategy": {
            "name": "semanticFacts",
            "namespaces": ["/facts/{actorId}"]
        }
    }]
)
After long-term memory has been configured for a memory store, calling create_event will automatically apply those strategies to extract information from the conversations. I can then retrieve memories extracted from the conversation using a semantic query:
memories = memory_client.retrieve_memories(
    memory_id=memory.get("id"),
    namespace="/facts/user-123",
    query="smartphone model"
)
In this way, I can quickly improve the user experience so that the agent remembers customer preferences and facts that are outside of the scope of the CRM and use this information to improve the replies.
Step 3 – Adding identity and access controls
Without proper identity controls, access from the agent to internal tools always uses the same access level. To follow security requirements, I integrate AgentCore Identity so that the agent can use access controls scoped to the user’s or agent’s identity context.
I set up an identity client and create a workload identity, a unique identifier that represents the agent within the AgentCore Identity system:
from bedrock_agentcore.services.identity import IdentityClient

identity_client = IdentityClient("us-east-1")
workload_identity = identity_client.create_workload_identity(name="my-agent")
Then, I configure the credential providers, for example:
google_provider = identity_client.create_oauth2_credential_provider(
    {
        "name": "google-workspace",
        "credentialProviderVendor": "GoogleOauth2",
        "oauth2ProviderConfigInput": {
            "googleOauth2ProviderConfig": {
                "clientId": "your-google-client-id",
                "clientSecret": "your-google-client-secret",
            }
        },
    }
)

perplexity_provider = identity_client.create_api_key_credential_provider(
    {
        "name": "perplexity-ai",
        "apiKey": "perplexity-api-key"
    }
)
I can then add the @requires_access_token Python decorator (passing the provider name, the scope, and so on) to the functions that need an access token to perform their activities.
Using this approach, the agent can verify the identity through the company’s existing identity infrastructure, operate as a distinct, authenticated identity, act with scoped permissions and integrate across multiple identity providers (such as Amazon Cognito, Okta, or Microsoft Entra ID) and service boundaries including AWS and third-party tools and services (such as Slack, GitHub, and Salesforce).
To offer robust and secure access controls while streamlining end-user and agent builder experiences, AgentCore Identity implements a secure token vault that stores users’ tokens and allows agents to retrieve them securely.
For OAuth 2.0 compatible tools and services, when a user first grants consent for an agent to act on their behalf, AgentCore Identity collects and stores the user’s tokens issued by the tool in its vault, along with securely storing the agent’s OAuth client credentials. Agents, operating with their own distinct identity and when invoked by the user, can then access these tokens as needed, reducing the need for frequent user consent.
When the user token expires, AgentCore Identity triggers a new authorization prompt to the user for the agent to obtain updated user tokens. For tools that use API keys, AgentCore Identity also stores these keys securely and gives agents controlled access to retrieve them when needed. This secure storage streamlines the user experience while maintaining robust access controls, enabling agents to operate effectively across various tools and services.
Step 4 – Expanding agent capabilities with AgentCore Gateway
Until now, all internal tools are simulated in the code. Many agent frameworks, including Strands Agents, natively support MCP to connect to remote tools. To have access to internal systems (such as CRM and order management) via an MCP interface, I use AgentCore Gateway.
With AgentCore Gateway, the agent can access AWS services using Smithy models, Lambda functions, and internal APIs and third-party providers using OpenAPI specifications. It employs a dual authentication model to have secure access control for both incoming requests and outbound connections to target resources. Lambda functions can be used to integrate external systems, particularly applications that lack standard APIs or require multiple steps to retrieve information.
AgentCore Gateway facilitates cross-cutting features that most customers would otherwise need to build themselves, including authentication, authorization, throttling, custom request/response transformation (to match underlying API formats), multitenancy, and tool selection.
The tool selection feature helps find the most relevant tools for a specific agent’s task. AgentCore Gateway brings a uniform MCP interface across all these tools, using AgentCore Identity to provide an OAuth interface for tools that do not support OAuth out of the box like AWS services.
Step 5 – Adding capabilities with AgentCore Code Interpreter and Browser tools
To answer to customer requests, the customer support agent needs to perform calculations. To simplify that, I use the AgentCode SDK to add access to the AgentCore Code Interpreter.
Similarly, some of the integrations required by the agent don’t implement a programmatic API but need to be accessed through a web interface. I give access to the AgentCore Browser to let the agent navigate those web sites autonomously.
Step 6 – Gaining visibility with observability
Now that the agent is in production, I need visibility into its activities and performance. AgentCore provides enhanced observability to help developers effectively debug, audit, and monitor their agent performance in production. It comes with built-in dashboards to track essential operational metrics such as session count, latency, duration, token usage, error rates, and component-level latency and error breakdowns. AgentCore also gives visibility into an agent’s behavior by capturing and visualizing both the end-to-end traces, as well as “spans” that capture each step of the agent workflow including tool invocations, memory
The built-in dashboards offered by this service help reveal performance bottlenecks and identify why certain interactions might fail, enabling continuous improvement and reducing the mean time to detect (MTTD) and mean time to repair (MTTR) in case of issues.
AgentCore supports OpenTelemetry to help integrate agent telemetry data with existing observability platforms, including Amazon CloudWatch, Datadog, LangSmith, and Langfuse.
Step 7 – Conclusion
Through this journey, we transformed a local prototype into a production-ready system. Using AgentCore modular approach, we implemented enterprise requirements incrementally—from basic deployment to sophisticated memory, identity management, and tool integration—all while maintaining the existing agent code.
Things to know
Amazon Bedrock AgentCore is available in preview in US East (N. Virginia), US West (Oregon), Asia Pacific (Sydney), and Europe (Frankfurt). You can start using AgentCore services through the AWS Management Console , the AWS Command Line Interface (AWS CLI), the AWS SDKs, or via the AgentCore SDK.
You can try AgentCore services at no charge until September 16, 2025. Standard AWS pricing applies to any additional AWS Services used as part of using AgentCore (for example, CloudWatch pricing will apply for AgentCore Observability). Starting September 17, 2025, AWS will bill you for AgentCore service usage based on this page.
Whether you’re building customer support agents, workflow automation, or innovative AI-powered experiences, AgentCore provides the foundation you need to move from prototype to production with confidence.
To learn more and start deploying production-ready agents, visit the AgentCore documentation. For code examples and integration guides, check out the AgentCore samples GitHub repo.
Join the AgentCore Preview Discord server to provide feedback and discuss use cases. We’d like to hear from you!
— Danilo
Top Budget UniFi Picks for Home Networks in 2025!
Post Syndicated from Crosstalk Solutions original https://www.youtube.com/watch?v=jfWxpvg-0WU
Former FBI Agent Peter Strzok on the End of the Independent FBI | The David Frum Show
Post Syndicated from The Atlantic original https://www.youtube.com/watch?v=oiF9DHOBGEw
[$] Fedora SIG changes Python packaging strategy
Post Syndicated from jzb original https://lwn.net/Articles/1029354/
Fedora’s NeuroFedora
special-interest group (SIG) is considering a change of strategy
when it comes to packaging Python modules. The SIG, which consists of
three active members, is struggling to keep up with maintaining the
hundreds of packages that it has taken on. What’s more, it’s not
clear that the majority of packages are even being consumed by Fedora
users; the group is trying to determine the right strategy to meet its
goals and shed unnecessary work. If its new packaging strategy is
successful, it may point the way to a more sustainable model for Linux
distributions to provide value to users without trying to package
everything under the sun.
Security updates for Wednesday
Post Syndicated from corbet original https://lwn.net/Articles/1030106/
Security updates have been issued by Oracle (cloud-init, emacs, firefox, glib2, go-toolset:rhel8, kernel, lz4, python-setuptools, python3.11-setuptools, python3.12-setuptools, and socat), Red Hat (fence-agents, glib2, glibc, java-17-openjdk, kernel, kernel-rt, python-setuptools, python3.11-setuptools, and python3.12-setuptools), Slackware (libxml2), SUSE (glib2, gpg2, kernel, libxml2, poppler, rmt-server, runc, stalld, and xen), and Ubuntu (jpeg-xl).