Post Syndicated from Amit Kumar original https://aws.amazon.com/blogs/architecture/field-notes-perform-automations-in-ungoverned-regions-during-account-launch-using-aws-control-tower-lifecycle-events/
This post was co-authored by Amit Kumar; Partner Solutions Architect at AWS, Pavan Kumar Alladi; Senior Cloud Architect at Tech Mahindra, and Thooyavan Arumugam; Senior Cloud Architect at Tech Mahindra.
Organizations use AWS Control Tower to set up and govern secure, multi-account AWS environments. Frequently enterprises with a global presence want to use AWS Control Tower to perform automations during the account creation including in AWS Regions where AWS Control Tower service is not available. To review the current list of Regions where AWS Control Tower is available, visit the AWS Regional Services List.
This blog post shows you how we can use AWS Control Tower lifecycle events, AWS Service Catalog, and AWS Lambda to perform automation in the Region where AWS Control Tower service is unavailable. This solution depicts the scenario for a single Region and the solution need to be changed to work with a multi-Regions scenario.
We use an AWS CloudFormation template to create a virtual private cloud (VPC) with subnet and internet gateway as an example and use it in shared service catalog products at the organization level to make it available in child accounts. Every time AWS Control Tower lifecycle events related to account creation occurs, a Lambda function is initiated to perform automation activities in AWS Regions that are not governed by AWS Control Tower.
The solution in this blog post uses the following AWS services:
- AWS CloudFormation
- AWS Control Tower
- Amazon CloudWatch
- Amazon EventBridge
- AWS Lambda
- AWS Organizations
- AWS Service Catalog
- Amazon Simple Storage Service (Amazon S3)
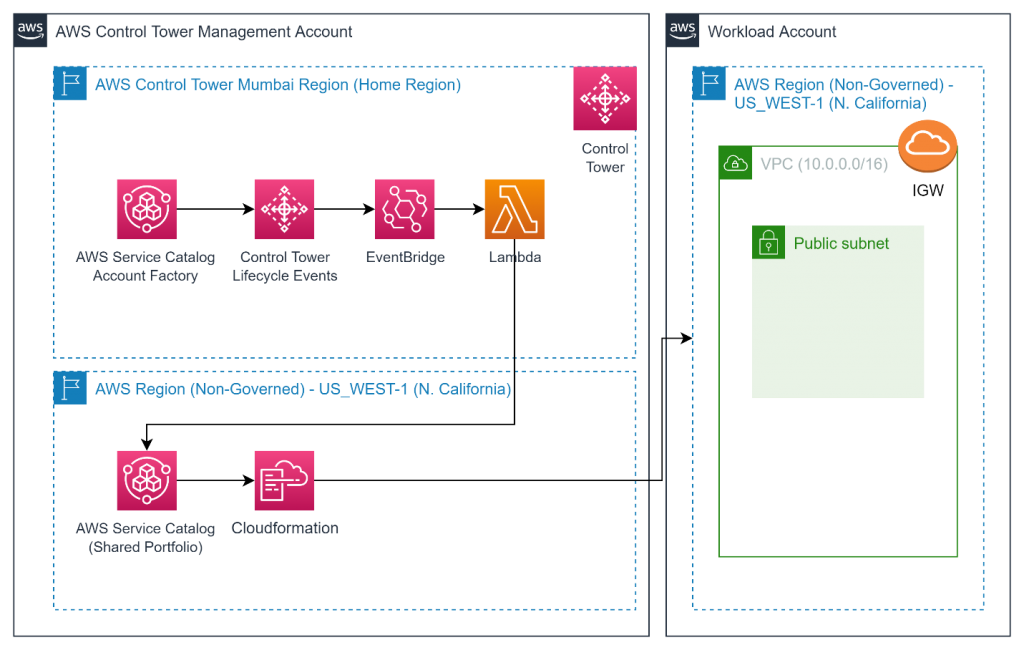
Figure 1. Solution architecture
Prerequisites
For this walkthrough, you need the following prerequisites:
- AWS Control Tower configured with AWS Organizations defined and registered within AWS Control Tower. For this blog post, AWS Control Tower is deployed in AWS Mumbai Region and with an AWS Organizations structure as depicted in Figure 2.
- Working knowledge of AWS Control Tower.
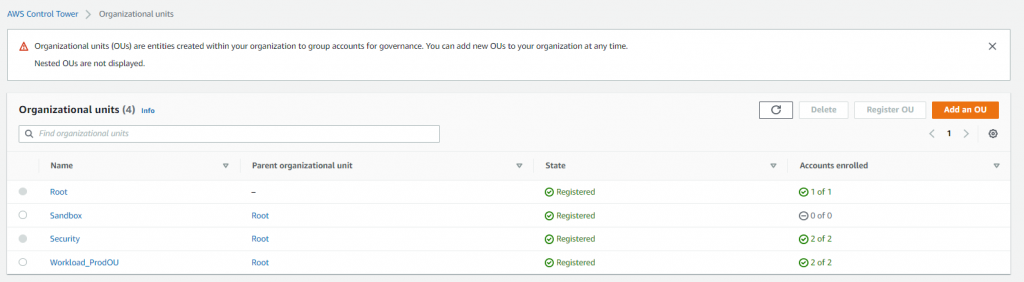
Figure 2. AWS Organizations structure
Create an AWS Service Catalog product and portfolio, and share at the AWS Organizations level
- Sign in to AWS Control Tower management account as an administrator, and select an AWS Region which is not governed by AWS Control Tower (for this blog post, we will use AWS us-west-1 (N. California) as the Region because at this time it is unavailable in AWS Control Tower).
- In the AWS Service Catalog console, in the left navigation menu, choose Products.
- Choose upload new product. For Product Name enter customvpcautomation, and for Owner enter organizationabc. For method, choose Use a template file.
- In Upload a template file, select Choose file, and then select the CloudFormation template you are going to use for automation. In this example, we are going to use a CloudFormation template which creates a VPC with CIDR 10.0.0.0/16, Public Subnet, and Internet Gateway.
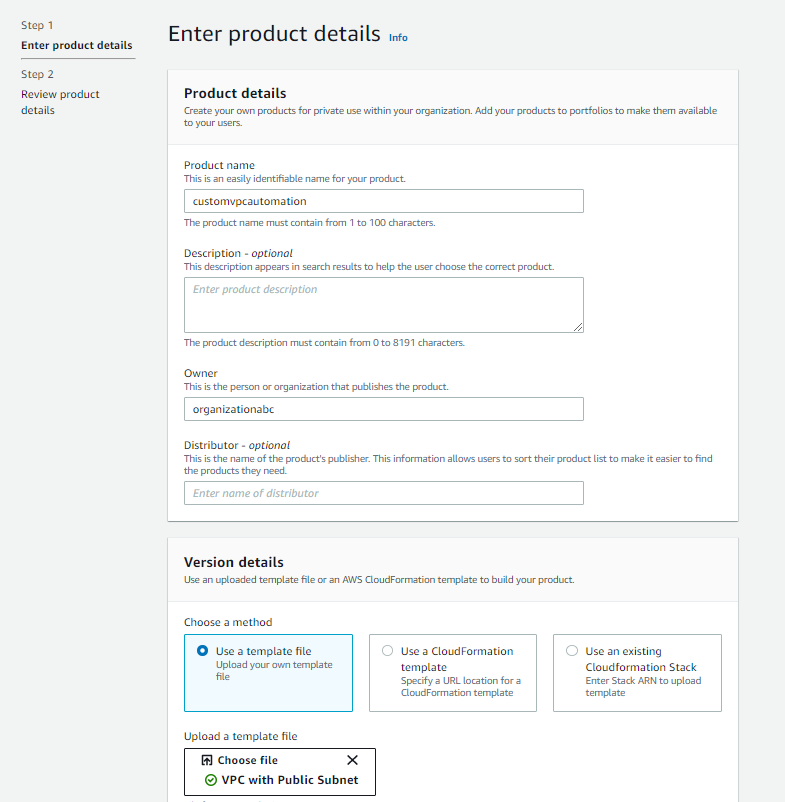
Figure 3. AWS Service Catalog product
CloudFormation template: save this as a YAML file before selecting this in the console.
AWSTemplateFormatVersion: 2010-09-09
Description: Template to create a VPC with CIDR 10.0.0.0/16 with a Public Subnet and Internet Gateway.

Resources:
  VPC:
    Type: AWS::EC2::VPC
    Properties:
      CidrBlock: 10.0.0.0/16
      EnableDnsSupport: true
      EnableDnsHostnames: true
      Tags:
        - Key: Name
          Value: VPC

  IGW:
    Type: AWS::EC2::InternetGateway
    Properties:
      Tags:
        - Key: Name
          Value: IGW

  VPCtoIGWConnection:
    Type: AWS::EC2::VPCGatewayAttachment
    DependsOn:
      - IGW
      - VPC
    Properties:
      InternetGatewayId: !Ref IGW
      VpcId: !Ref VPC

  PublicRouteTable:
    Type: AWS::EC2::RouteTable
    DependsOn: VPC
    Properties:
      VpcId: !Ref VPC
      Tags:
        - Key: Name
          Value: Public Route Table

  PublicRoute:
    Type: AWS::EC2::Route
    DependsOn:
      - PublicRouteTable
      - VPCtoIGWConnection
    Properties:
      DestinationCidrBlock: 0.0.0.0/0
      GatewayId: !Ref IGW
      RouteTableId: !Ref PublicRouteTable

  PublicSubnet:
    Type: AWS::EC2::Subnet
    DependsOn: VPC
    Properties:
      VpcId: !Ref VPC
      MapPublicIpOnLaunch: true
      CidrBlock: 10.0.0.0/24
      AvailabilityZone: !Select
        - 0
        - !GetAZs
          Ref: AWS::Region
      Tags:
        - Key: Name
          Value: Public Subnet

  PublicRouteTableAssociation:
    Type: AWS::EC2::SubnetRouteTableAssociation
    DependsOn:
      - PublicRouteTable
      - PublicSubnet
    Properties:
      RouteTableId: !Ref PublicRouteTable
      SubnetId: !Ref PublicSubnet

Outputs:

 PublicSubnet:
    Description: Public subnet ID
    Value:
      Ref: PublicSubnet
    Export:
      Name:
        'Fn::Sub': '${AWS::StackName}-SubnetID'

 VpcId:
    Description: The VPC ID
    Value:
      Ref: VPC
    Export:
      Name:
'Fn::Sub': '${AWS::StackName}-VpcID'- After the CloudFormation template is selected, choose Review, and then choose Create Product.

Figure 4. AWS Service Catalog product
- In the AWS Service Catalog console, in the left navigation menu, choose Portfolios, and then choose Create portfolio.
- For Portfolio name, enter customvpcportfolio, for Owner, enter organizationabc, and then choose Create.
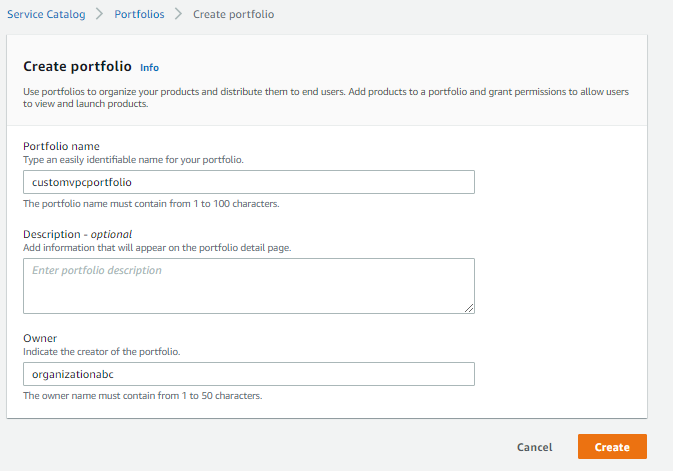
Figure 5. AWS Service Catalog portfolio
- After the portfolio is created, select customvpcportfolio. In the actions dropdown, select Add product to portfolio. Then select customvpcautomation product, and choose Add Product to Portfolio.
- Navigate back to customvpcportfolio, and select the portfolio name to see all the details. On the portfolio details page, expand the Groups, roles, and users tab, and choose Add groups, roles, users. Next, select the Roles tab and search for AWSControlTowerAdmin role, and choose Add access.
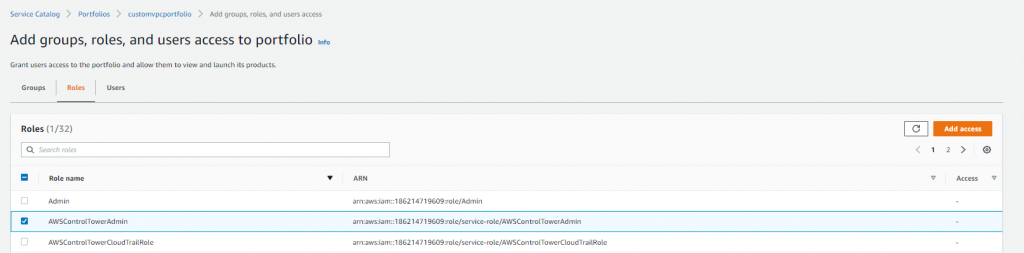
Figure 6. AWS Service Catalog portfolio role selection
- Navigate to the Share section in portfolio details, and choose Share option. Select AWS Organization, and choose Share.
Note: If you get a warning stating “AWS Organizations sharing is not enabled”, then choose Enable and select the organizational unit (OU) where you want this portfolio to be shared. In this case, we have shared at Workload OU where all workload account is created.
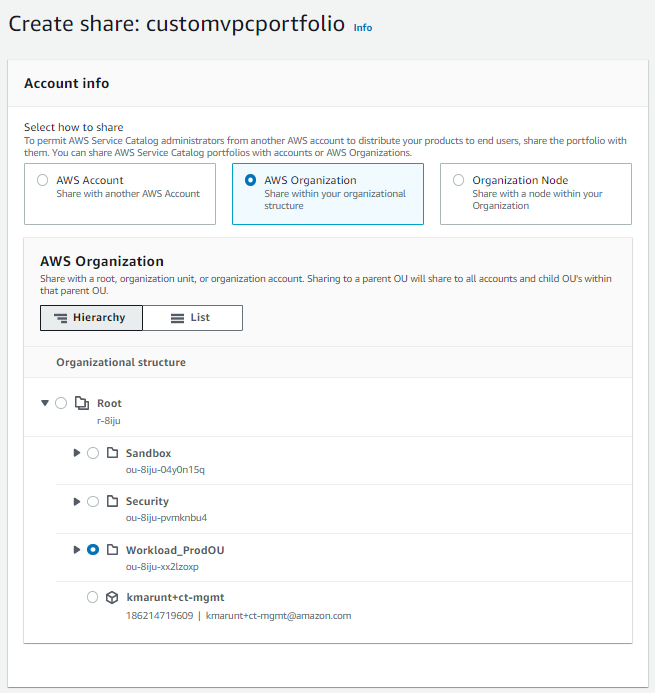
Figure 7. AWS Service Catalog portfolio sharing
Create an AWS Identity and Access Management (IAM) role
- Sign in to AWS Control Tower management account as an administrator and navigate to IAM Service.
- In the IAM console, choose Policies in the navigation pane, then choose Create Policy.
- Click on Choose a service, and select STS. In the Actions menu, choose All STS Actions, in Resources, choose All resources, and then choose Next: Tags.
- Skip the Tag section, go to the Review section, and for Name enter lambdacrossaccountSTS, and then choose Create policy.
- In the navigation pane of the IAM console, choose Roles, and then choose Create role. For the use case, select Lambda, and then choose Next: Permissions.
- Select AWSServiceCatalogAdminFullAccess and AmazonSNSFullAccess, then choose Next: Tags (skip tag screen if needed), then choose Next: Review.
- For Role name, enter Automationnongovernedregions, and then choose Create role.

Figure 8. AWS IAM role permissions
Create an Amazon Simple Notification Service (Amazon SNS) topic
- Sign in to AWS Control Tower management account as an administrator and select AWS Mumbai Region (Home Region for AWS CT). Navigate to Amazon SNS Service, and on the navigation panel, choose Topics.
- On the Topics page, Choose Create topic. On the Create topic page, in the Details section, for Type select Standard, and for Name enter ControlTowerNotifications. Keep default for other options, and then choose Create topic.
- In the Details section, in the left navigation pane, choose Subscriptions.
- On the Subscriptions page, choose Create subscription. For Protocol, choose Email and for Endpoint mention the email id where notification need to come and choose Create Subscription.
You will receive an email stating that the subscription is in pending status. Follow the email instructions to confirm the subscription. Check in the Amazon SNS Service console to verify subscription confirmation.
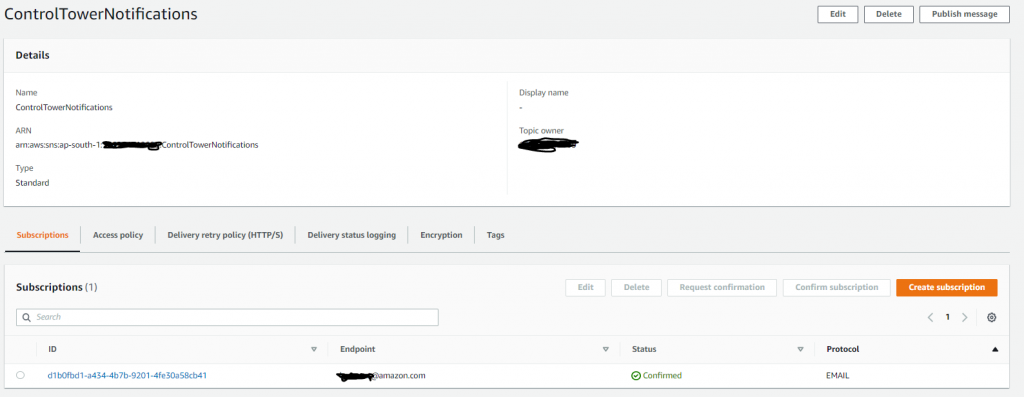
Figure 9. Amazon SNS topic creation and subscription
Create an AWS Lambda function
- Sign in to AWS Control Tower management account as an administrator and select AWS Mumbai Region (Home Region for AWS Control Tower). Open the Functions page on the Lambda console, and choose Create function.
- In the Create function section, choose Author from scratch.
- In the Basic information section:
-
- For Function name, enter NonGovernedCrossAccountAutomation.
- For Runtime, choose Python 3.8.
- For Role, select Choose an existing role.
- For Existing role, select the Lambda role that you created earlier.
- Choose Create function.
- Copy and paste the following code in to the Lambda editor (replace the existing code).
- In the File menu, choose Save.
Lambda function code: The Lambda function is developed to initiate the AWS Service Catalog product, shared at Organizations level from AWS Control Tower management account, onto all member accounts in a hub and spoke model. Key activities performed by the Lambda function are:
-
- Assume role – Provides the mechanism to assume AWSControlTowerExecution role in the child account.
- Launch product – Launch the AWS Service Catalog product shared in the non-governed Region with the member account.
- Email notification – Send notifications to the subscribed recipients.
When this Lambda function is invoked by the AWS Control Tower lifecycle event, it performs the activity of provisioning the AWS Service Catalog products in the Region which is not governed by AWS Control Tower.
#####################################################################################
# Decription:This Lambda used execute service catalog products in unmanaged ControlTower
# regions while creation of AWS accounts
# Environment: Control Tower Env
# Version 1.0
#####################################################################################

import boto3
import os
import time

SSM_Master = boto3.client('ssm')
STS_Master = boto3.client('sts')
SC_Master = boto3.client('servicecatalog',region_name = 'us-west-1')
SNS_Master = boto3.client('sns')

def lambda_handler(event, context):

    if event['detail']['serviceEventDetails']['createManagedAccountStatus']['state'] == 'SUCCEEDED':

        account_name = event['detail']['serviceEventDetails']['createManagedAccountStatus']['account']['accountName']
        account_id = event['detail']['serviceEventDetails']['createManagedAccountStatus']['account']['accountId']
        ##Assume role to member account
        assume_role(account_id)

        try:

            print("-- Executing Service Catalog Procduct in the account: ", account_name)
            ##Launch Product in member account
            launch_product(os.environ['ProductName'], SC_Member)
            sendmail(f'-- Product Launched successfully ')

        except Exception as err:

            print(f'-- Error in Executing Service Catalog Procduct in the account: : {err}')
            sendmail(f'-- Error in Executing Service Catalog Procduct in the account: : {err}')

 ##Function to Assume Role and create session in the Member account.
def assume_role(account_id):

    global SC_Member, IAM_Member, role_arn

    ## Assume the Member account role to execute the SC product.
    role_arn = "arn:aws:iam::$ACCOUNT_NUMBER$:role/AWSControlTowerExecution".replace("$ACCOUNT_NUMBER$", account_id)

    ##Assuming Member account Service Catalog.
    Assume_Member_Acc = STS_Master.assume_role(RoleArn=role_arn,RoleSessionName="Member_acc_session")
    aws_access_key_id=Assume_Member_Acc['Credentials']['AccessKeyId']
    aws_secret_access_key=Assume_Member_Acc['Credentials']['SecretAccessKey']
    aws_session_token=Assume_Member_Acc['Credentials']['SessionToken']

    #Session to Connect to IAM and Service Catalog in Member Account
    IAM_Member = boto3.client('iam',aws_access_key_id=aws_access_key_id, aws_secret_access_key=aws_secret_access_key,aws_session_token=aws_session_token)
    SC_Member = boto3.client('servicecatalog', aws_access_key_id=aws_access_key_id, aws_secret_access_key=aws_secret_access_key,aws_session_token=aws_session_token,region_name = "us-west-1")

    ##Accepting the portfolio share in the Member account.
    print("-- Accepting the portfolio share in the Member account.")

    length = 0

    while length == 0:

        try:

            search_product = SC_Member.search_products()
            length = len(search_product['ProductViewSummaries'])

        except Exception as err:

            print(err)

        if length == 0:

            print("The shared product is still not available. Hence waiting..")
            time.sleep(10)
            ##Accept portfolio share in member account
            Accept_portfolio = SC_Member.accept_portfolio_share(PortfolioId=os.environ['portfolioID'],PortfolioShareType='AWS_ORGANIZATIONS')
            Associate_principal = SC_Member.associate_principal_with_portfolio(PortfolioId=os.environ['portfolioID'],PrincipalARN=role_arn, PrincipalType='IAM')

        else:

            print("The products are listed in account.")

    print("-- The portfolio share has been accepted and has been assigned the IAM Role principal.")

    return SC_Member

##Function to execute product in the Member account.
def launch_product(ProductName, session):

    describe_product = SC_Master.describe_product_as_admin(Name=ProductName)
    created_time = []
    version_ID = []

    for version in describe_product['ProvisioningArtifactSummaries']:

        describe_provisioning_artifacts = SC_Master.describe_provisioning_artifact(ProvisioningArtifactId=version['Id'],Verbose=True,ProductName=ProductName,)

        if describe_provisioning_artifacts['ProvisioningArtifactDetail']['Active'] == True:

            created_time.append(describe_provisioning_artifacts['ProvisioningArtifactDetail']['CreatedTime'])
            version_ID.append(describe_provisioning_artifacts['ProvisioningArtifactDetail']['Id'])

    latest_version = dict(zip(created_time, version_ID))
    latest_time = max(created_time)
    launch_provisioned_product = session.provision_product(ProductName=ProductName,ProvisionedProductName=ProductName,ProvisioningArtifactId=latest_version[latest_time],ProvisioningParameters=[
        {
            'Key': 'string',
            'Value': 'string'
        },
    ])
    print("-- The provisioned product ID is : ", launch_provisioned_product['RecordDetail']['ProvisionedProductId'])

    return(launch_provisioned_product)

def sendmail(message):

     sendmail = SNS_Master.publish(
     TopicArn=os.environ['SNSTopicARN'],
     Message=message,
     Subject="Alert - Attention Required",
MessageStructure='string')- Choose Configuration, then choose Environment variables.
- Choose Edit, and then choose Add environment variable for each of the following:
-
- Variable 1: Key as ProductName, and Value as “customvpcautomation” (name of the product created in the previous step).
- Variable 2: Key as SNSTopicARN, and Value as “arn:aws:sns:ap-south-1:<accountid>:ControlTowerNotifications” (ARN of the Amazon SNS topic created in the previous step).
- Variable 3: Key as portfolioID, and Value as “port-tbmq6ia54yi6w” (ID for the portfolio which was created in the previous step).

Figure 10. AWS Lambda function environment variable
- Choose Save.
- On the function configuration page, on the General configuration pane, choose Edit.
- Change the Timeout value to 5 min.
- Go to Code Section, and choose the Deploy option to deploy all the changes.
Create an Amazon EventBridge rule and initiate with a Lambda function
- Sign in to AWS Control Tower management account as an administrator, and select AWS Mumbai Region (Home Region for AWS Control Tower).
- On the navigation bar, choose Services, select Amazon EventBridge, and in the left navigation pane, select Rules.
- Choose Create rule, and for Name enter NonGovernedRegionAutomation.
- Choose Event pattern, and then choose Pre-defined pattern by service.
- For Service provider, choose AWS.
- For Service name, choose Control Tower.
- For Event type, choose AWS Service Event via CloudTrail.
- Choose Specific event(s) option, and select CreateManagedAccount.
- In Select targets, for Target, choose Lambda. Select the Lambda function which was created earlier named as NonGovernedCrossAccountAutomation in Function dropdown.
- Choose Create.
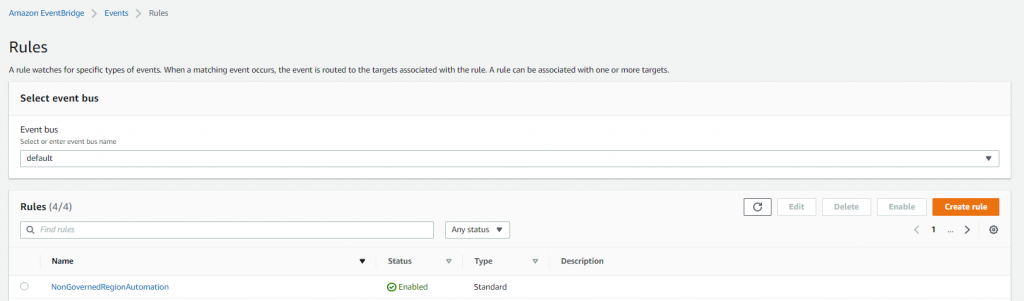
Figure 11. Amazon EventBridge rule initiated with AWS Lambda
Solution walkthrough
-
- Sign in to AWS Control Tower management account as an administrator, and select AWS Mumbai Region (Home Region for AWS Control Tower).
- Navigate to the AWS Control Tower Account Factory page, and select Enroll account.
- Create a new account and complete the Account Details section. Enter the Account email, Display name, AWS SSO email, and AWS SSO user name, and select the Organizational Unit dropdown. Choose Enroll account.
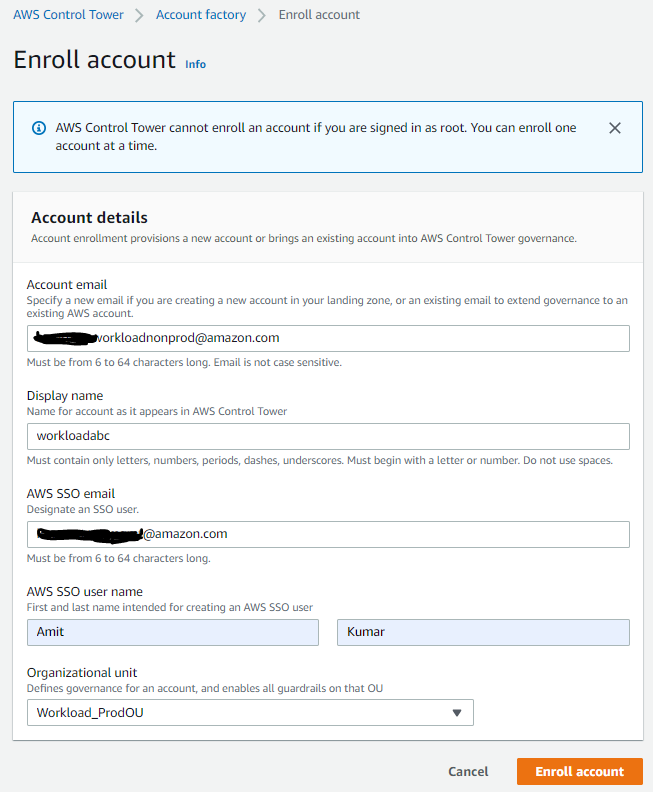
Figure 12. AWS Control Tower new account creation
-
-
- Wait for account creation and enrollment to succeed.
-
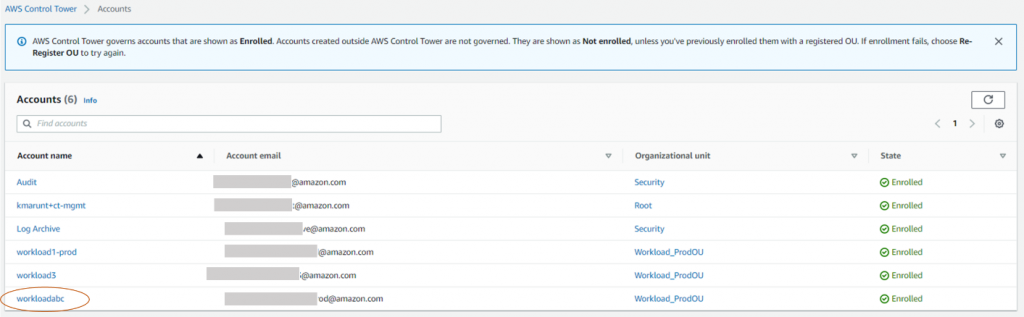
Figure 13. AWS Control Tower new account enrollment
-
-
- Sign out of the AWS Control Tower management account, and log in to the new account. Select the AWS us-west-1 (N. California) Region. Navigate to AWS Service Catalog and then to Provisioned products. Select the Access filter as Account and you will observe that one provisioned product is created and available.
-

Figure 14. AWS Service Catalog provisioned product
-
-
- Go to VPC service to verify if a new VPC is created by the AWS Service Catalog product with a CIDR of 10.0.0.0/16.
-

Figure 15. AWS VPC creation validation
-
-
- Step 4 and Step 5 validates that you are able to perform the automation during account creation through the AWS Control Tower lifecycle events in non-governed Regions.
-
Cleaning up
To avoid incurring future charges, clean up the resources created as part of this blog post.
- Delete the AWS Service Catalog product and portfolio you created.
- Delete the IAM role, Amazon SNS topic, Amazon EventBridge rule, and AWS Lambda function you created.
- Delete the AWS Control Tower setup (if created).
Conclusion
In this blog post, we demonstrated how to use AWS Control Tower lifecycle events to perform automation tasks during account creation in Regions not governed by AWS Control Tower. AWS Control Tower provides a way to set up and govern a secure, multi-account AWS environment. With this solution, customers can use AWS Control Tower to automate various tasks during account creation in Regions regardless if AWS Control Tower is available in that Region.