The Debian project is discussing a General Resolution (GR) that
would, if approved, clarify that AI models must include training data
to be compliant with the Debian
Free Software Guidelines (DFSG) and be distributed by Debian as
free software. While GR discussions are sometimes contentious, the
discussion around the proposal from Debian developer Mo Zhou has
been anything but—there seems to be
consensus that AI models are not DFSG-compliant if they lack training
data. There are, however, some questions about the exact language and
questions about the impact the GR will have on existing packages in
the Debian archive.
AD CS workflow improvement with new PKCS12 features
Given the increasing popularity of AD CS misconfiguration exploitation in recent years, Metasploit has been consistently improving its capabilities in this area. This week’s release introduces a new certs command to the msfconsole, enabling users to manage PKCS12 certificates stored in the database, similar to the klistcommand. The certs command provides functionalities such as listing, searching, activating, deactivating, exporting, and deleting certificates.
Available options:
msf6 auxiliary(scanner/smb/smb_login) > certs --help
List Pkcs12 certificate bundles in the database
Usage: certs [options] [username[@domain_upn_format]]


OPTIONS:

    -a, --activate    Activates *all* matching pkcs12 entries
    -A, --deactivate  Deactivates *all* matching pkcs12 entries
    -d, --delete      Delete *all* matching pkcs12 entries
    -e, --export      The file path where to export the matching pkcs12 entry
    -h, --help        Help banner
    -i, --index       Pkcs12 entry ID(s) to search for, e.g. `-i 1` or `-i 1,2,3` or `-i 1 -i 2 -i 3`
    -v, --verbose     Verbose output
Example output
msf6 auxiliary(admin/dcerpc/icpr_cert) > certs
Pkcs12
======
id  username       realm         subject    issuer                                              ADCS CA                   ADCS Template  status
--  --------       -----         -------    ------                                              -------                   -------------  ------
1   administrator  mydomi.local  /CN=muser  /DC=local/DC=pro/DC=ad/CN=mssrv-dc-mydomi.local-CA  mssrv-dc-mydomi.local-CA  ESC1           active
Additionally, it automates PKCS12 authentication via the pkinit protocol when the kerberos option is set for authentication and no Kerberos tickets are found in the cache. This automation allows the framework to transparently utilize stored certificates to acquire Kerberos tickets, streamlining the authentication process for modules supporting Kerberos and Schannel protocols. Any modules that support these authentication protocols can benefit from this, as long as a suitable certificate is present in the database.
Here is an example with the scanner/winrm/winrm_cmd module. This shows how the Kerberos tickets are automatically retrieved using a PKCS12 stored in the database (see the output of the certs command above):
msf6 auxiliary(admin/dcerpc/icpr_cert) > klist
Kerberos Cache
==============
No tickets
msf6 auxiliary(scanner/winrm/winrm_cmd) > run verbose=true RHOSTS=10.100.32.94 Winrm::Auth=kerberos Winrm::Rhostname=mspro-dc username=administrator domain=mydomi.local DomainControllerRhost=10.100.32.94 cmd=whoami
[*] Using stored certificate for [email protected]
[+] 10.100.32.94:88 - Received a valid TGT-Response
[*] 10.100.32.94:5985     - TGT MIT Credential Cache ticket saved to /home/n00tmeg/.msf4/loot/20241218141549_default_10.100.32.94_mit.kerberos.cca_125955.bin
[+] 10.100.32.94:88 - Received a valid TGS-Response
[*] 10.100.32.94:5985     - TGS MIT Credential Cache ticket saved to /home/n00tmeg/.msf4/loot/20241218141549_default_10.100.32.94_mit.kerberos.cca_751667.bin
[+] 10.100.32.94:88 - Received a valid delegation TGS-Response
[+] 10.100.32.94:88 - Received AP-REQ. Extracting session key...
ad\administrator
[+] Results saved to /home/n00tmeg/.msf4/loot/20241218141553_default_10.100.32.94_winrm.cmd_result_401191.txt
[*] Scanned 1 of 1 hosts (100% complete)
[*] Auxiliary module execution completed
New module content (1)
BentoML’s runner server RCE
Authors: SeaWind and Takahiro Yokoyama
Type: Exploit
Pull request: #20046 contributed by Takahiro-Yoko
Path: linux/http/bentoml_runner_server_rce_cve_2025_32375
AttackerKB reference: CVE-2025-32375
Description: This adds an exploit module for an insecure deserialization in BentoML’s runner server which leads to unauthenticated RCE. Versions prior to 1.4.8 but after 1.0.0a1 are affected.
Enhanced modules (2)
Modules which have either been enhanced, or renamed:
#20044 from jheysel-r7 – Adds a target to the service_permissions module supporting CVE-2025-21293, allowing a lower privileged user to add a DLL entry to HKLM\System\CurrentControlSet\Services\Dnscache\ and coerce execution of the DLL as system.
#20052 from bcoles – Moves the module exploits/dialup/multi/login/manyargs to exploits/solaris/dialup/manyargs.
Enhancements and features (11)
#19760 from cdelafuente-r7 – This introduces a new certs command that allows users to manage and display PKCS12 certificates stored in the credentials database, with options for searching, exporting, activating, and deleting certificates. It also enables automatic PKCS12-based Kerberos (and Schannel) authentication through PKINIT when no Kerberos ticket is cached, streamlining TGT acquisition using existing certificates. This enhances both usability and flexibility when working with certificate-based authentication workflows.
#20028 from jheysel-r7 – This change modifies existing pgAdmin modules by replacing some functionalities with new library for pgAdmin.
#20049 from bcoles – Improves the check method metadata for modules/exploits/mainframe/ftp/ftp_jcl_creds.
#20052 from bcoles – Moves the module exploits/dialup/multi/login/manyargs to exploits/solaris/dialup/manyargs.
#20057 from bcoles – Improves the code quality of the example modules included in Metasploit.
#20059 from bcoles – Improves the code quality of multiple payload modules.
#20065 from bcoles – Improves the metadata and code quality for the exploits/hpux/lpd/cleanup_exec module.
#20066 from bcoles – Enhances the code quality of multiple payloads/singles modules, and fixes nested method definitions in 6 pingback modules.
#20068 from bcoles – Improves the exploits/solaris/sunrpc/sadmind_adm_build_path and exploits/solaris/sunrpc/sadmind_exec modules to have check methods, improved metadata, and code quality.
#20069 from sjanusz-r7 – Allow overwriting reported module name within the report_vuln API.
#20077 from adfoster-r7 – Update haraka module to work with newer Python 3.12 and above.
Bugs fixed (3)
#20051 from bcoles – Fixes out of date metadata for the exploits/dialup/multi/login/manyargs module, and fixes a logic bug code when handling bad characters.
#20063 from bcoles – Updates Ruby pingback payloads to correctly close the opened socket after use.
#20064 from bcoles – Fixes IPv6 support in the cmd/unix/reverse_php_ssl payload.
Documentation
You can find the latest Metasploit documentation on our docsite at docs.metasploit.com.
Get it
As always, you can update to the latest Metasploit Framework with msfupdate
and you can get more details on the changes since the last blog post from
GitHub:
Most developers are familiar with the standard Git workflow. You create a branch, make changes, and push those changes back to the same branch on the main repository. Git calls this a centralized workflow. It’s straightforward and works well for many projects.
However, sometimes you might want to pull changes from a different branch directly into your feature branch to help you keep your branch updated without constantly needing to merge or rebase. However, you’ll still want to push local changes to your own branch. This is where triangular workflows come in.
It’s possible that some of you have already used triangular workflows, even without knowing it. When you fork a repo, contribute to your fork, then open a pull request back to the original repo, you’re working in a triangular workflow. While this can work seamlessly on github.com, the process hasn’t always been seamless with the GitHub CLI.
The GitHub CLI team has recently made improvements (released in v2.71.2) to better support these triangular workflows, ensuring that the gh pr commands work smoothly with your Git configurations. So, whether you’re working on a centralized workflow or a more complex triangular one, the GitHub CLI will be better equipped to handle your needs.
If you’re already familiar with how Git handles triangular workflows, feel free to skip ahead to learn about how to use gh pr commands with triangular workflows. Otherwise, let’s get into the details of how Git and the GitHub CLI have historically differed, and how four-and-a-half years after it was first requested, we have finally unlocked managing pull requests using triangular workflows in the GitHub CLI.
First, a lesson in Git fundamentals
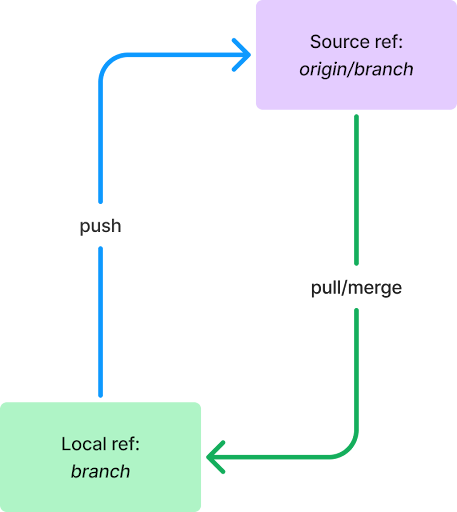
To provide a framework for what we set out to do, it’s important to first understand some Git basics. Git, at its core, is a way to store and catalog changes on a repository and communicate those changes between copies of that repository. This workflow typically looks like the diagram below:
Figure 1: A typical git branch setup
The building blocks of this diagram illustrate two important Git concepts you likely use every day, a ref and push/pull.
Refs
A ref is a reference to a repository and branch. It has two parts: the remote, usually a name like origin or upstream, and the branch. If the remote is the local repository, it is blank. So, in the example above, origin/branch in the purple box is a remote ref, referring to a branch named branch on the repository name origin, while branch in the green box is a local ref, referring to a branch named branch on the local machine.
While working with GitHub, the remote ref is usually the repository you are hosting on GitHub. In the diagram above, you can consider the purple box GitHub and the green box your local machine.
Pushing and pulling
A push and a pull refer to the same action, but from two different perspectives. Whether you are pushing or pulling is determined by whether you are sending or receiving the changes. I can push a commit to your repo, or you can pull that commit from my repo, and the references to that action would be the same.
To disambiguate this, we will refer to different refs as the headRef or baseRef, where the headRef is sending the changes (pushing them) and the baseRef is receiving the changes (pulling them).
Figure 2: Disambiguating headRef and baseRef for push/pull operations
When dealing with a branch, we’ll often refer to the headRef of its pull operations as its pullRef and the baseRef of its push operations as its pushRef. That’s because, in these instances, the working branch is the pull’s baseRef and the push’s headRef, so they’re already disambiguated.
The @{push} revision syntax
Turns out, Git has a handy built-in tool for referring to the pushRef for a branch: the @{push} revision syntax. You can usually determine a branch’s pushRef by running the following command:
git rev-parse --abbrev-ref @{push}
This will result in a human-readable ref, like origin/branch, if one can be determined.
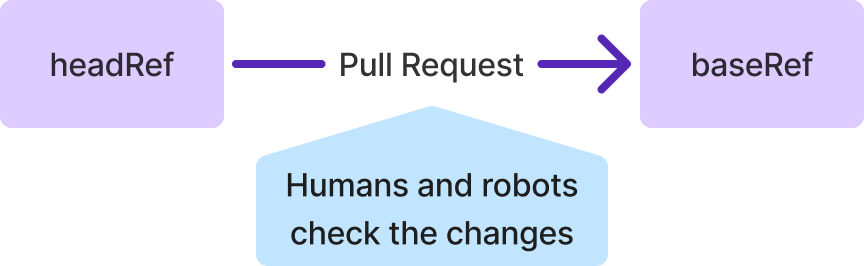
Pull Requests
On GitHub, a pull request is a proposal to integrate changes from one ref to another. In particular, they act as a simple “pause” before performing the actual integration operation, often called a merge, when changes are being pushed from ref to another. This pause allows for humans (code reviews) and robots (GitHub Copilot reviews and GitHub Actions workflows) to check the code before the changes are integrated. The name pull request came from this language specifically: You are requesting that a ref pulls your changes into itself.
Figure 3: Demonstrating how GitHub Pull Requests correspond to pushing and pulling
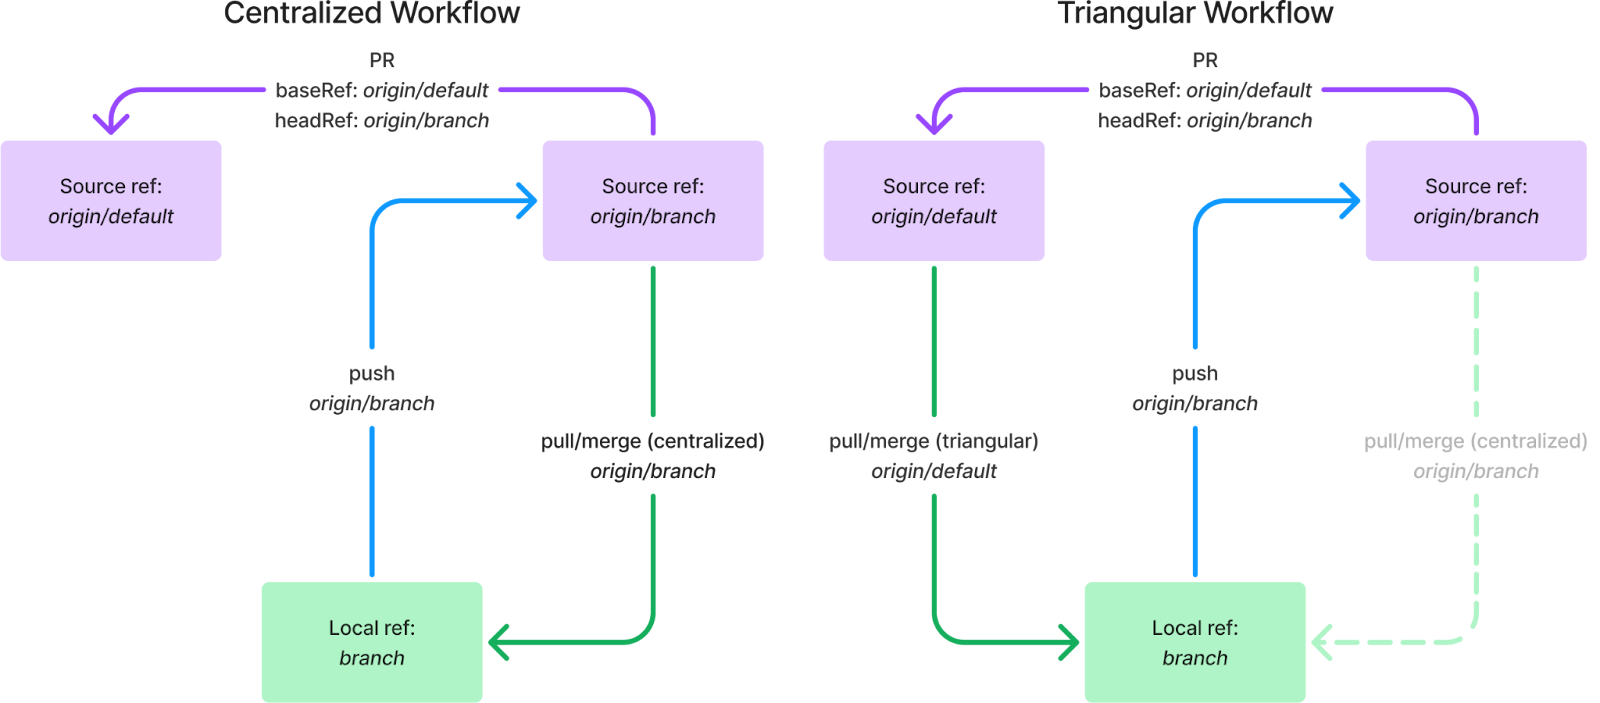
Common Git workflows
Now that you understand the basics, let’s talk about the workflows we typically use with Git every day.
A centralized workflow is how most folks interact with Git and GitHub. In this configuration, any given branch is pushing and pulling from a remote ref with the same branch name. For most of us, this type of configuration is set up by default when we clone a repo and push a branch. It is the situation shown in Figure 1.
In contrast, a triangular workflow pushes to and pulls from different refs. A common use case for this configuration is to pull directly from a remote repository’s default branch into your local feature branch, eliminating the need to run commands like git rebase <default> or git merge <default> on your feature branch to ensure the branch you’re working on is always up to date with the default branch. However, when pushing changes, this configuration will typically push to a remote ref with the same branch name as the feature branch.
Figure 4: juxtaposing centralized workflows from triangular workflows.
We complete the triangle when considering pull requests: the headRef is the pushRef for the local ref and the baseRef is the pullRef for the local branch:
Figure 5: a triangular workflow
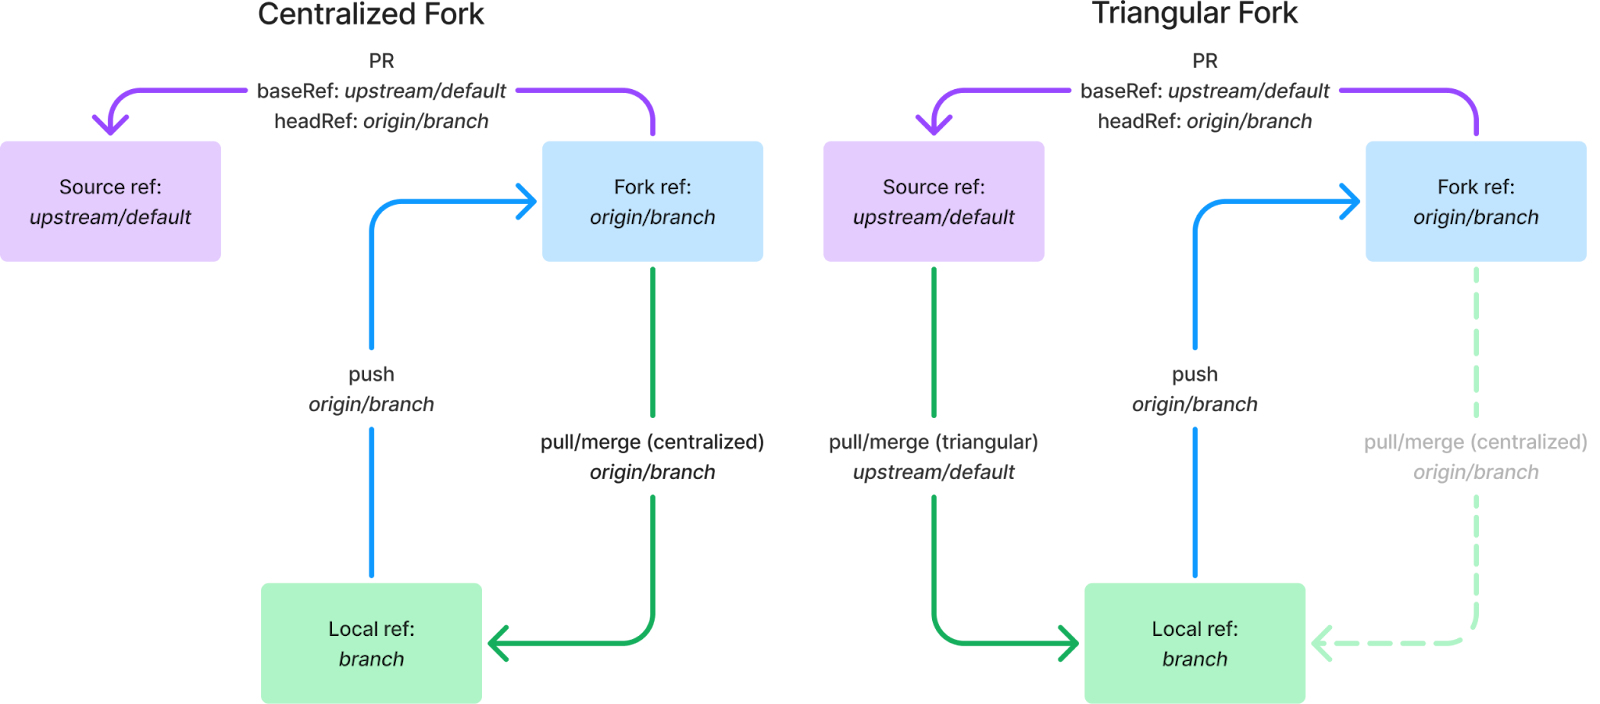
We can go one step further and set up triangular workflows using different remotes as well. This most commonly occurs when you’re developing on a fork. In this situation, you usually give the fork and source remotes different names. I’ll use origin for the fork and upstream for the source, as these are common names used in these setups. This functions exactly the same as the triangular workflows above, but the remotes and branches on the pushRef and pullRef are different:
Figure 6: juxtaposing triangular workflows and centralized workflows with different remotes such as with forks
Using a Git configuration file for triangular workflows
There are two primary ways that you can set up a triangular workflow using the Git configuration – typically defined in a `.git/config` or `.gitconfig` file. Before explaining these, let’s take a look at what the relevant bits of a typical configuration look like in a repo’s `.git/config` file for a centralized workflow:
Figure 7: A typical Git configuration setup found in .git/config
The [remote “origin”] part is naming the Git repository located at github.com/OWNER/REPO.git to origin, so we can reference it elsewhere by that name. We can see that reference being used in the specific [branch] configurations for both the default and branch branches in their remote keys. This key, in conjunction with the branch name, typically makes up the branch’s pushRef: in this example, it is origin/branch.
The remote and merge keys are combined to make up the branch’s pullRef: in this example, it is origin/branch.
Setting up a triangular branch workflow
The simplest way to assemble a triangular workflow is to set the branch’s merge key to a different branch name, like so:
Figure 8: a triangular branch’s Git configuration found in .git/config
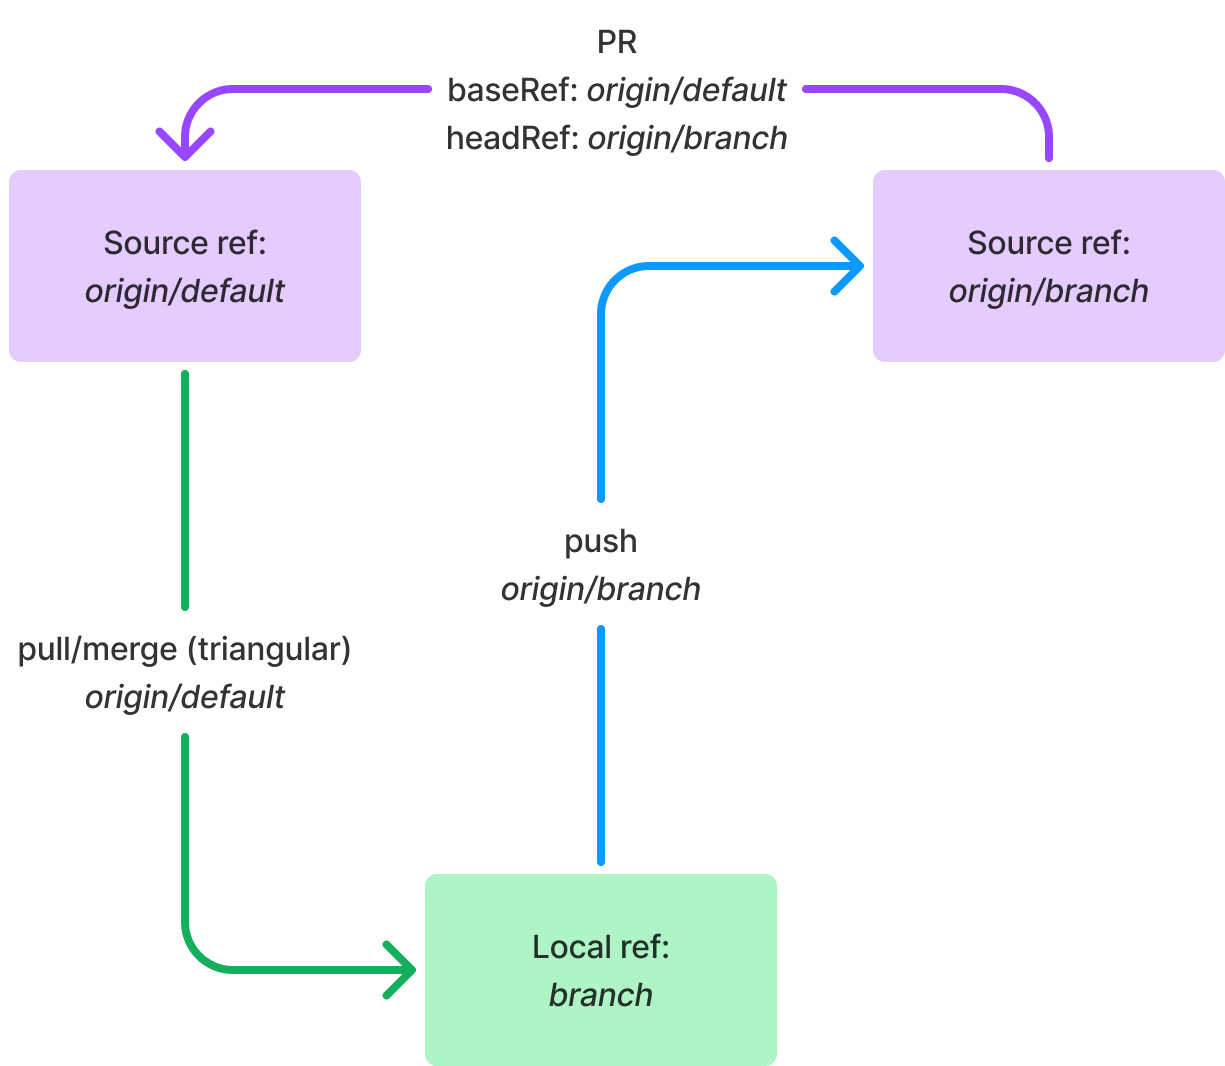
This will result in the branch pullRef as origin/default, but pushRef as origin/branch, as shown in Figure 9.
Figure 9: A triangular branch workflow
Setting up a triangular fork workflow
Working with triangular forks requires a bit more customization than triangular branches because we are dealing with multiple remotes. Thus, our remotes in the Git config will look different than the one shown previously in Figure 7:
Figure 10: a Git configuration for a multi-remote Git setup found in .git/config
Upstream and origin are the most common names used in this construction, so I’ve used them here, but they can be named anything you want1.
However, toggling a branch’s remote key between upstream and origin won’t actually set up a triangular fork workflow—it will just set up a centralized workflow with either of those remotes, like the centralized workflow shown in Figure 6. Luckily, there are two common Git configuration options to change this behavior.
Setting a branch’s pushremote
A branch’s configuration has a key called pushremote that does exactly what the name suggests: configures the remote that the branch will push to. A triangular fork workflow config using pushremote may look like this:
Figure 11: a triangular fork’s Git config using pushremote found in .git/config
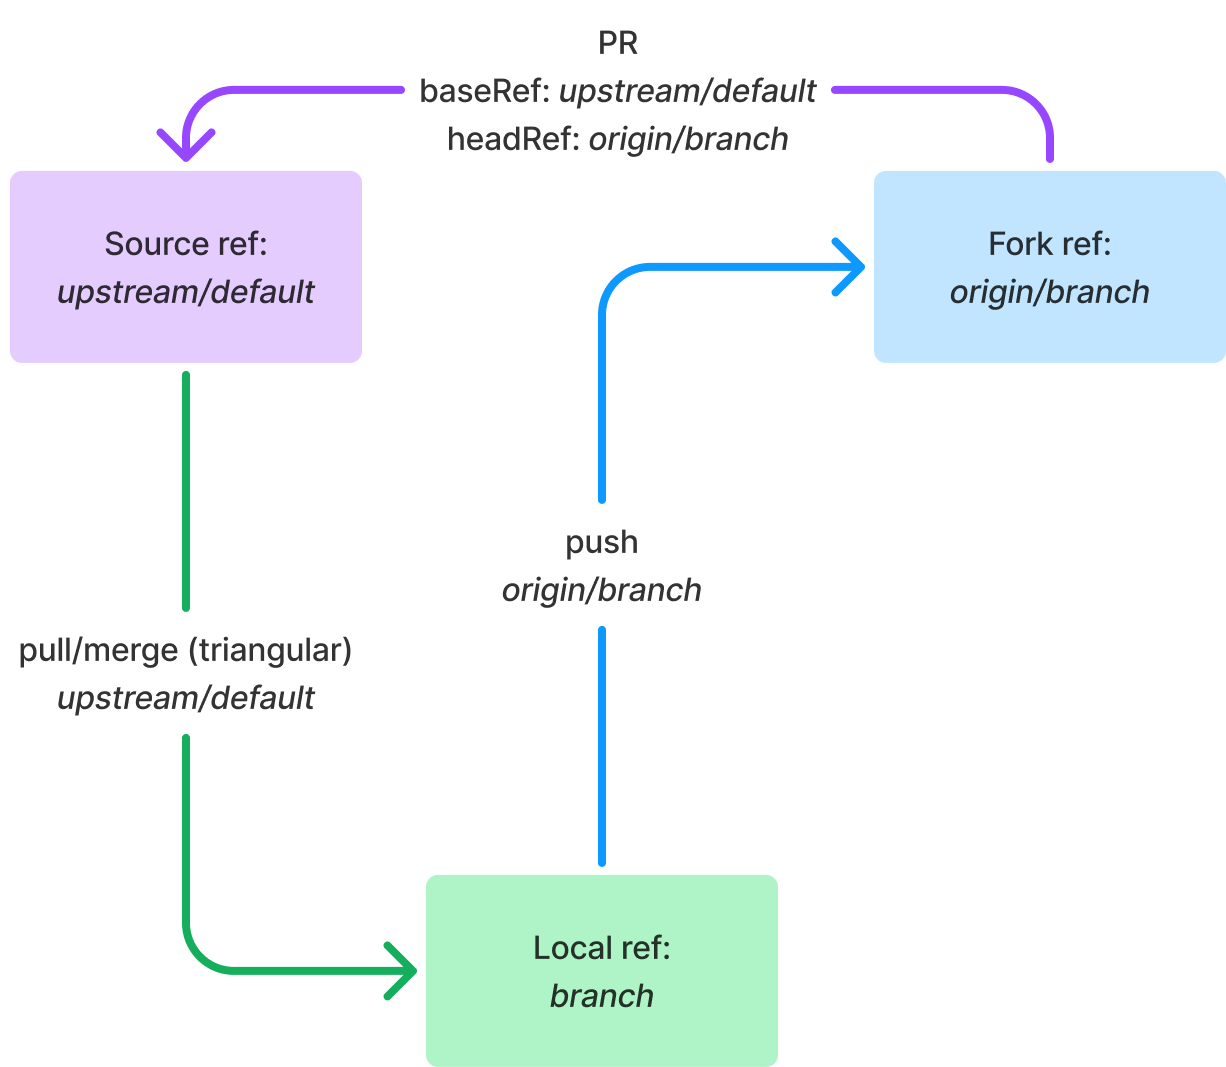
This assembles the triangular fork repo we see in Figure 12. The pullRef is upstream/default, as determined by combining the remote and merge keys, while the pushRef is origin/branch, as determined by combining the pushremote key and the branch name.
Figure 12: A triangular fork workflow
Setting a repo’s remote.pushDefault
To configure all branches in a repository to have the same behavior as what you’re seeing in Figure 12, you can instead set the repository’s pushDefault. The config for this is below:
Figure 13: a triangular fork’s Git config using remote.pushDefault found in .git/config
This assembles the same triangular fork repo as shown in Figure 12 above, however this time the pushRef is determined by combining the remote.pushDefault key and the branch name, resulting in origin/branch.
When using the branch’s pushremote and the repo’s remote.pushDefault keys together, Git will preferentially resolve the branch’s configuration over the repo’s, so the remote set on pushremote supersedes the remote set on remote.pushDefault.
Updating the gh pr command set to reflect Git
Previously, the gh pr command set did not resolve pushRefs and pullRefs in the same way that Git does. This was due to technical design decisions that made this change both difficult and complex. Instead of discussing that complexity—a big enough topic for a whole article in itself—I’m going to focus here on what you can now do with the updated gh pr command set.
If you set up triangular Git workflows in the manner described above, we will automatically resolve gh pr commands in accordance with your Git configuration.
To be slightly more specific, when trying to resolve a pull request for a branch, the GitHub CLI will respect whatever @{push} resolves to first, if it resolves at all. Then it will fall back to respect a branch’s pushremote, and if that isn’t set, finally look for a repo’s remote.pushDefault config settings.
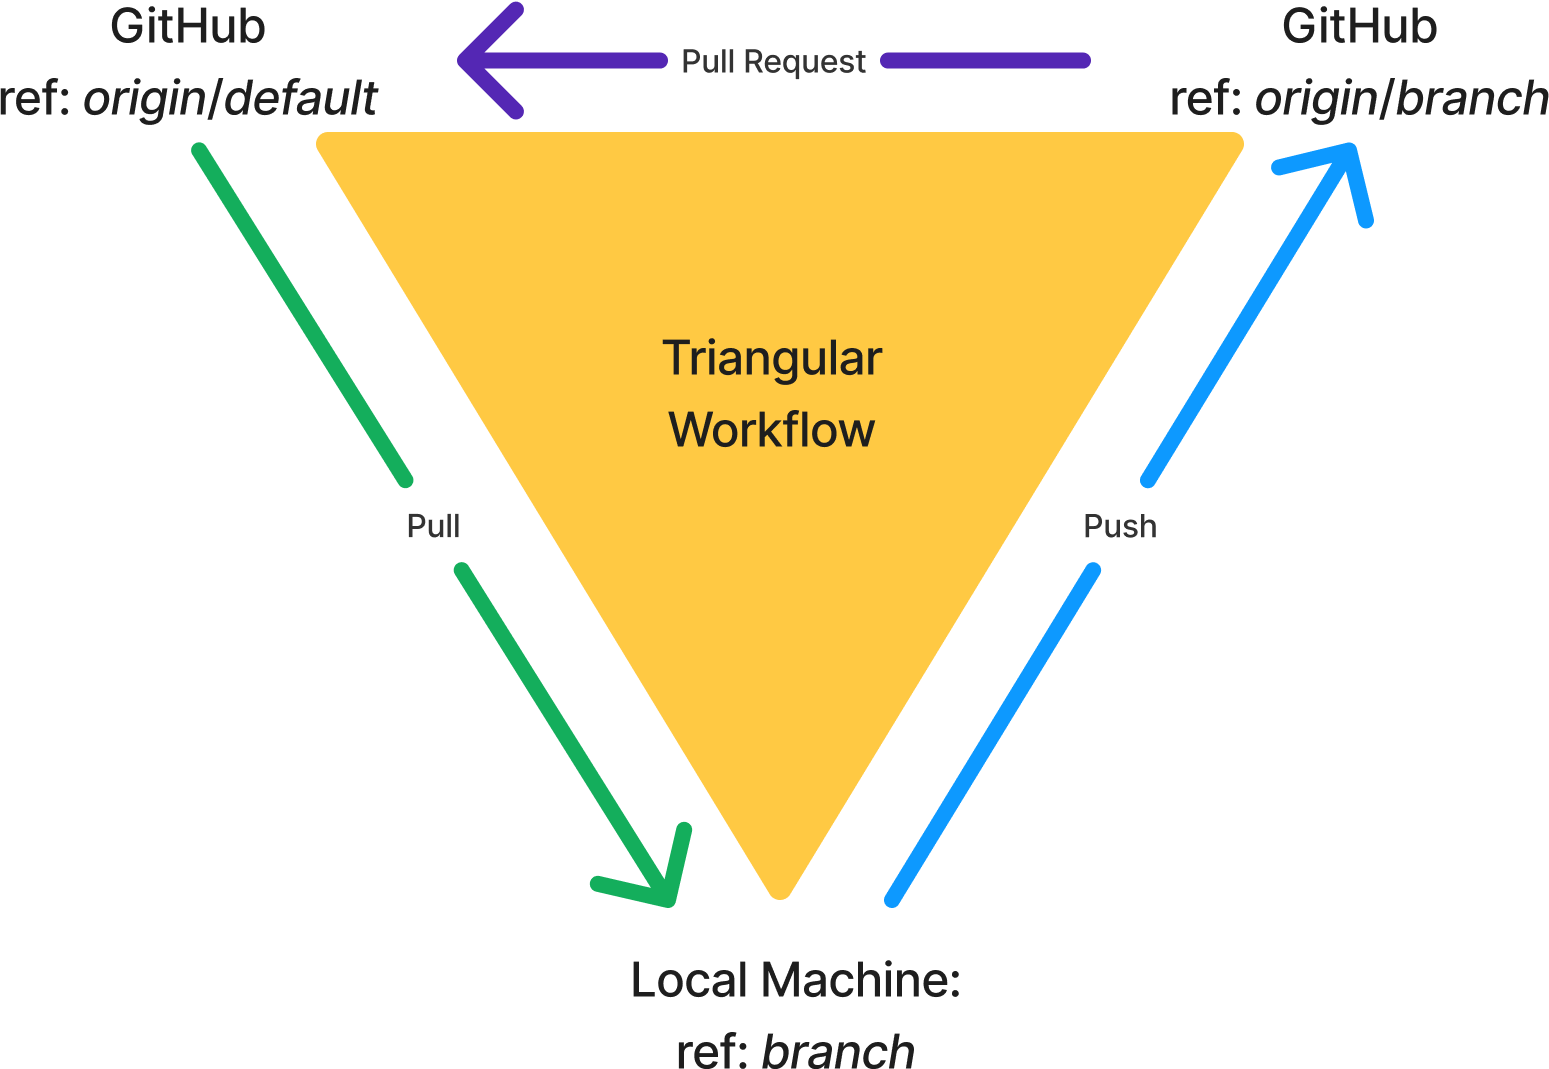
What this means is that the CLI is assuming your branch’s pullRef is the pull request’s baseRef and the branch’s pushRef is the pull requests headRef. In other words, if you’ve configured git pull and git push to work, then gh pr commands should just work.2 The diagram below, a general version of Figure 5, demonstrates this nicely:
Figure 14: the triangular workflow supported by the GitHub CLI with respect to a branch’s pullRef and pushRef. This is the generalized version of Figure 5
Conclusion
We’re constantly working to improve the GitHub CLI, and we’d like the behavior of the GitHub CLI to reasonably reflect the behavior of Git. This was a team effort—everyone contributed to understanding, reviewing, and testing the code to enable this enhanced gh pr command set functionality.
It also couldn’t have happened without the support of our contributors, so we extend our thanks to them:
CLI native support for triangular workflows was 4.5 years in the making, and we’re proud to have been able to provide this update for the community.
The GitHub CLI Team @andyfeller, @babakks, @bagtoad, @jtmcg, @mxie, @RyanHecht, and @williammartin
Some commands in gh are opinionated about remote names and will resolve remotes in this order: upstream, github, origin, <other remotes unstably sorted>. There is a convenience command you can run to supersede this:* gh repo set-default [<repository>]to override the default behavior above and preferentially resolve<repository>as the default remote repo.↩
If you find a git configuration that doesn’t work, please open an issue in the OSS repo so we can fix it. ↩
Version 15.1 of the GNU
Compiler Collection has been released. Changes include implementing the
C23 dialect by default, a number of new C++26 features, experimental
support for unsigned integers in Fortran, a new COBOL front end, and
more. See the GCC 15
changes page for details.
Накъде отива София заедно с една трета България в нея? В политически план това е въпрос на живот и смърт за „Продължаваме промяната“ и „Демократична България“, чието разрешаване ще повлияе и на разпределението на силите в българската политика. Защото който загуби София, губи не само най-големия електорат, а и легитимност като алтернатива. А когато „промяната“ започне да губи в собствения си двор, другите вече се подреждат край масата, на първо време – за да предизвикат нови кметски избори в София.
Тон даде излизането на Борис Бонев и „Спаси София“ (СС) от коалицията зад кмета Васил Терзиев, което наруши крехката стабилност. (По съдебен път кметският пост също се атакува – с делото за касиране на изборите през 2023 г. заради допуснати нарушения. Наскоро то бе отменено от Върховния административен съд (ВАС) и върнато за ново разглеждане на друг състав на Административен съд – София-град.)
Със своя позиция заради случващото се вече излязоха общинските съветници от „Синя България“, които подкрепят ГЕРБ–СДС, но отдавна търсят път и към ДБ (без ПП).
Предлагаме обединение за дясно управление на Столична община не около някого, а в името на съгласие за провеждане на комплекс от десни политики в интерес на софиянци. Общинският съвет трябва да прояви волята си и да наложи посока за развитие на общината като алтернатива на хаотичното управление на администрацията на кмета и разпада и скандалите между партиите в Общинския съвет.
Управлението на столицата от Терзиев, подкрепата за когото намаля с излизането на СС от издигналата го коалиция, е от значение за ръста или спада на избирателите на ПП–ДБ. В средата на мандата бездруго липсващото мнозинство зад него в Столичния общински съвет (СОС) отъня до 14 души, след като осемте общински съветници на СС се отделиха в самостоятелна група. Бонев свали доверието си от коалицията с ПП–ДБ и я напусна.
Според Терзиев – започнали са предизборна кампания. Според Бонев – защото в Столичната община (СО) действа втори властови център, „паралелна община“ от мрежа от съветници и консултанти на кмета“, които вземат важните решения. Още в началото на април той постави пет маркера, по които ще преценят дали да продължат да поддържат кмета: конкурса за главен архитект; ревизия на управлението на ГЕРБ; новите договори за почистване; бюджета на София за 2025 г.; новата структура на СО, която още не е приета, макар да беше обещана преди повече от година.
За управление с гръб са необходими 31 съветници от 61-членния СОС, каквито и преди ПП–ДБ–СС нямаха – затова и не държат икономическата власт в СО. ГЕРБ взеха ключовите пет от общо 14 комисии в СОС, сред които бюджетната, антикорупционната и тази по сигурността, докато ПП–ДБ получиха само две – за младежта и спорта и за международно сътрудничество и европейски проекти.
Който държи СОС, той управлява
ГЕРБ – партията, управлявалата София дълги години, си осигури монопол върху решенията на СОС още в началото на управлението на Терзиев, групирайки се заедно с БСП и формирайки гръбнака на „икономическото мнозинство“ (както го нарекоха ПП–ДБ): ГЕРБ–СДС, БСП, „Има такъв народ“ и отцепниците от „Възраждане“ (заедно с Карлос Контрера от ВМРО). Това обезсили кмета и реализирането на определени промени спрямо неговите виждания, но също се оказа удобно – бяха продължени и реализирани проекти, заложени от управлението на ГЕРБ, защото… ами няма как.
Васил Терзиев не се и опита да потърси тематични мнозинства, както правят в 51-вия парламент. Сега обаче ще му се наложи, ако иска да прокара и най-обикновено предложение. А предстоят съществени решения – бюджетът на столицата за 2025 г. с разходи, доближаващи 3 млрд. лв., тепърва ще влезе в СОС. Още по-значимо заради силните икономически интереси в него е сметосъбирането, за което са заложени над 1 млрд. лв. за следващите четири години (само за 2025 г. сумата надхвърля 302 млн. лв.).
Договорите с фирмите, чистили София години наред, изтичат (а значи и един от сигурните бизнеси на Румен Гайтански – Вълка). Екипът на Терзиев наскоро освети схема за източване на пари от събирането на боклук. Амбициите на СО са да избере нови фирми, но предвид загубата на подкрепа не е сигурно дали ще осъществи намерението си.
„Благодарение“ на мнозинството в СОС, вместо постепенно да бъде разграждан обраслият с корупционни зависимости предишен модел, той продължи безпроблемното си съществуване. Затова и критиките към СС и към нейния лидер Борис Бонев, че от напускането им печели ГЕРБ, изглеждат повече като политически послания.
През юли 2024 г. „икономическото мнозинство“ успя да наложи без конкурси свои избраници в управлението на шест ключови общински дружества в София: „Топлофикация София“, Центъра за градска мобилност, „Столичен автотранспорт“, „Столичен електротранспорт“, „Метрополитен“ и „Софинвест“. Тогава Стоян Братоев беше запазен като директор на „Метрополитен“ благодарение на политическа сделка – за да подкрепи Ваня Григорова (БСП) рокадите в общинските дружества. Борис Бонев обяви, че постигнатото е победа за „икономическото мнозинство“, но каза и още нещо:
Това е войната за преразпределяне на влиянието в общинските фирми между Орлин Алексиев (бивш общински съветник от ГЕРБ, 12 години шеф на бюджетната комисия в СОС, със славата на разпределител на обществени поръчки в СО – б.а.) и Красьо Черния (Красимир Георгиев, известен брокер в съдебната система със своето прословуто тефтерче – б.а.). Сега се наместват хората на втория.
Терзиев се опита да върне доклада за избора на ръководство на дружествата, но областната управа отмени изцяло акта му, обявявайки го за нищожен. Сега отново са вдигнали мерника на Братоев, а Терзиев се опитва да го спаси от отстраняване, в основата на което стои обществена поръчка за 8 метровлака за над 140 млн. лв. без ДДС, прекратена заради това, че имаше един участник.
Епилогът за софийското метро беше тази седмица, когато Съветът на директорите на „Метрополитен“ все пак отстрани Братоев, чиито заслуги при строителството на подземната железница са безспорни, но той остава като член на борда. Мотивите за свалянето му бяха „влошено здравословно състояние“. СС се опитаха да осуетят избора на нов директор, но неуспешно.
Изпълняват се проекти от Фандъкова
Новият столичен кмет така и не ревизира наследството на ГЕРБ и управлявалата няколко мандата Йорданка Фандъкова, макар да критикува централизирания модел, фаворизирането на определени фирми, както и липсата на прозрачност в управлението на София.
Нещо повече – като временен главен архитект Богдана Панайотова (вече избрана за титуляр на поста) продължи проблемни строителни проекти, наследени от ГЕРБ. Такава е бъдещата 6-етажна офис сграда с подземен гараж на две нива до ресторант „Синия лъв“. Нейният устройствен план и планът за застрояване са одобрени от арх. Панайотова на 5 декември 2024 г. Тя беше дала и разрешение за строеж на мястото на стара къща на ул. „Стара планина“ 9, в която е живял Кемал Ататюрк, докато е пребивавал в България. След обществен натиск разрешението беше отменено, но още не е сигурно дали къщата е спасена. Нова 60-метрова кула ще се вдигне при кръстовището на бул. „Филип Кутев“ и „Симеоновско шосе“ благодарение на издаденото разрешение за строеж. На път е да бъде разрешено още високо строителство.
Затова и чашата преля, когато за главен архитект на София беше избрана Панайотова, участвала в изготвянето на правилата за провеждане на самия конкурс. Дори ПП изрази загриженост от решението на Терзиев заради „досегашната ѝ професионална история, която не дава достатъчно основания за доверие“:
София има нужда от управление, което поставя публичния интерес над всичко. Ние ще продължим да настояваме именно за такъв подход.
За капак Борис Бонев съобщи по bTV, че като временно изпълняваща длъжността Панайотова се е срещала нерегламентирано с инвеститорите на 215-метровия небостъргач на бул. „Черни връх“, чието строителство е замразено от 7 години, и обвини ръководството на СО в нерегламентирани срещи с Пеевски и Христофор Аманатидис – Таки. Срещата на Панайотова е документирана със снимки, предадени на столичния кмет Васил Терзиев, който пък в коментар по темата обяви, че я е пратил на полиграф. Строежът на небостъргача до мол „Парадайс“ е уреден с решение на СОС през 2017 г., с което се прокарва това изключение от Общия устройствен план на София.
Тестът с полиграф не е убедително доказателство за честност и почтеност, особено в контекста на досегашните спорни решения на арх. Панайотова. Но за да бъдат предотвратени още репутационни щети, тя отказа да издаде разрешение за строежа на 215-метровия небостъргач, който щеше да е най-високата сграда в България. Според съобщение на СО експерти проверяват законосъобразно ли е било решението на СОС от 2017 г., с което се изменя устройственият план на мястото. Вероятно спорът ще се разреши по съдебен път.
Само преди месец столичният кмет заяви по БНТ, че „Столична община няма законови механизми да спре небостъргача“ и че строителството му е едва ли не предопределено. Сега се оказва, че някакви механизми все пак има.
Последиците
Трусът с напускането на СС ще се отрази и на местното управление в София, и на националното. Партията има силна гражданска база, особено сред младите, активни и критично мислещи избиратели. Тяхното отдръпване изпраща сигнал, че Терзиев (а и ПП–ДБ) не изпълнява собствените си обещания. Това ще рефлектира на следващи (парламентарни) избори, които ще се проведат преди местните през 2027 г. Но кой знае…
Васил Терзиев, който се намира в пресата между изпълнителната власт и „икономическото мнозинство“ в СОС, ще бъде ежедневно блокиран в работата си, докато ГЕРБ кресливо ще го обвиняват в застой.
Дошъл като символ на новото, на промяната за София, в средата на мандата си бившият предприемач е по-скоро безличен. Той избягва директните срещи – и с граждани, и с журналисти (телевизионните интервюта не се броят) – и трудно може да бъде наречен лидер, камо ли да продължи в голямата политика, както му предричаха. Кметският пост в столицата е добър трамплин – за Бойко Борисов се оказа даже катапулт, който го изстреля на премиерския пост.
Терзиев е непартиен технократ и бизнесмен, продал компанията, на която е съосновател, за над 262 млн. долара. Той и екипът му предпочитат да вземат сами решенията си, включително и за назначения. Но ако те са лоши и неефективни, загуби калкулира именно ПП–ДБ. За обединението този ефект е допълнителна щета наред с критиките, които още търпи заради сглобката, в която участваше и Делян Пеевски. Освен това лидерът на СС разясни в социалните мрежи, че е имало одобрен механизъм за назначения в СО преди изборите.
Имаше номинационна комисия с представители на партиите и кмета за избор на всички длъжности. Имаше предложения за всички позиции спрямо коалиционното споразумение, с които кметът не се съобрази.
„Решенията са мои – и добрите, и лошите – и до момента си заставам зад тях“, казва кметът на София. Ако беше чисто партийна кандидатура, политическата сила би могла да му повлияе за едно или за друго решение, както и за публичния му образ, но сега това е невъзможно.
Управлението на Васил Терзиев от възможност за еманципация на ПП–ДБ се превърна в бреме, което направи още по-прозрачна липсата на коалиционна спойка, лидерство и реална реформа. Ако София отиде на нови избори и Терзиев падне (предишната победа я спечели трудно, с преднина от 5000 гласа), той ще изгуби само поста си. Но ПП–ДБ рискуват много повече – не просто да загубят столицата, а и амбицията за алтернатива на национално ниво.
Всички сме във вица, в който един рибар постоянно хващал с въдицата си крави, които излизали от водата, невъзмутимо питали колко е часът, и необезпокоявани се отправяли в неизвестна посока, минавайки покрай рибаря, неговата зяпнала уста и кучето му. На третата крава кучето не издържало, казало на стопанина си: „Копеле, и аз не знам какво става…“ и си тръгнало и то. Та и ние така – или сме кравите, или сме кучето, но при всички положения сме за скенер.
Следете видеорубриката на Елена Телбис за „Тоест“ и в Instagram и TikTok.
We’re excited to introduce an innovative Large Language Model (LLM) agent framework that reimagines how enterprises can harness the power of AI to streamline operations and boost productivity. At its core, this framework leverages Standard Operating Procedures (SOPs) to guide AI-driven execution, ensuring reliability and consistency in complex processes. Initial evaluations have shown remarkable results, with over 99.8% accuracy in real-world use cases. For example, the framework has powered solutions like the Account Takeover Investigations (ATI) bot, which achieved a 0 false rate while reducing investigation time from 23 minutes to just 3, automating 87% of cases. The fraud investigation use case also reduced the average handling time (AHT) by 45%, saving over 300 man-hours monthly with a 0 false rate, demonstrating its potential to transform even the most intricate enterprise operations with a high degree of accuracy.
The framework’s capabilities extend far beyond just accuracy, it offers a versatile suite of tools that revolutionise automation and app development, enabling AI-powered solutions up to 10 times faster than traditional methods.
The power of SOPs in AI automation
Traditional agent-based applications often use LLMs as the core controller to navigate through standard operating procedure (SOPs). However, this approach faces several challenges. LLMs may make incorrect decisions or invent non-existent steps due to hallucination. As generative models, they struggle to consistently produce results in a fixed format. Moreover, navigating complex SOPs with multiple branching pathways is particularly challenging for LLMs. These issues can lead to inefficiencies and inaccuracies in implementing business operations, especially when dealing with intricate, multi-step procedures.
Our framework addresses these challenges head-on by leveraging the structure and reliability of SOPs. We represent SOPs as a tree, with nodes encapsulating individual actions or decision points. This structure supports both sequential and conditional branching operations, mirroring the hierarchical nature of real-world business processes.
To make this powerful tool accessible to all, we’ve developed an intuitive SOP editor that allows non-technical users to easily define and visualise complex workflows. These visual representations are then converted into a structured, indented format that our system can interpret and execute efficiently.
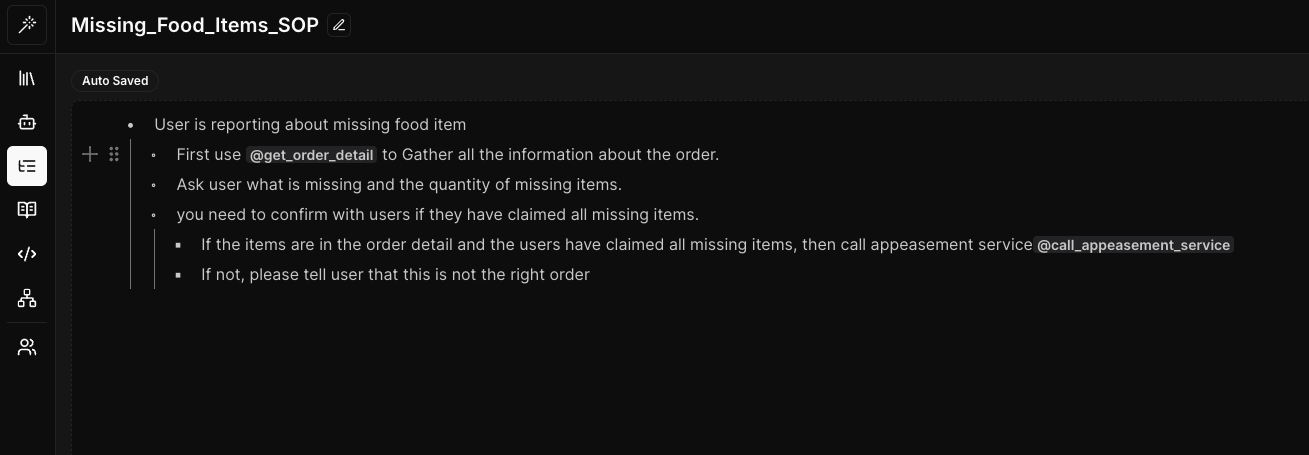
Figure 1: SOP editor in our framework
The example above demonstrates how our framework transforms the customer support process by mirroring manual workflows while leveraging advanced automation. The SOP is written in natural language using an indentation format, making it easy for users to define and understand. The @function_name (@get_order_detail) notation clearly identifies where external calls are made within the process, highlighting the integration points between the SOP-driven LLM agent framework and existing systems or databases.
The magic behind the scenes
The framework’s strength lies in the synergy between three key components: the planner module, LLM-powered worker agent, and user agent. This intelligent trio works in harmony to deliver a seamless, efficient, and adaptable automation experience.
The planner module employs a Depth-First Search (DFS) algorithm to navigate the SOP tree, ensuring thorough execution with step-by-step prompt generation and sophisticated backtracking mechanisms. The LLM-powered worker agent dynamically updates its understanding and makes decisions based on the most current information. Our approach tackles hallucination and improves efficiency through context compression and strategic limitation of available Application Programming Interface tools (APIs). The framework’s dynamic branching capability allows for adaptive navigation based on real-time data and analysis.
Serving as the primary user interface, the user agent offers multilingual interaction, accurate intent identification, and seamless handling of out-of-order scenarios.
By combining structured SOPs with flexible LLM-powered agents and advanced algorithmic approaches, our framework adeptly handles complex, real-world scenarios while maintaining reliability and consistency. This innovative architecture effectively mitigates common LLM challenges, resulting in a robust system capable of navigating intricate business processes with high accuracy and adaptability.
Beyond SOPs: A suite of powerful features
While SOPs form the backbone of our framework, we’ve incorporated several other cutting-edge features to create a truly comprehensive solution. Our Graph Retrieval-Augmented Generation (GRAG) pipeline enhances information retrieval and content generation tasks, allowing for more accurate and context-aware responses. The workflow feature enables chaining multiple plugins together to handle complex processes effortlessly, improving efficiency across various departments.
Our plugin system seamlessly integrates with various technologies such as API, Python, and SQL, providing the flexibility to meet diverse needs. Whether you’re an engineer coding in Python, a data analyst working with SQL, or a risk operations specialist, our plugin system adapts to your preferred tools. Additionally, our playground feature allows users to develop, test, and refine LLM applications easily in an interactive environment, supporting the latest multi-modal APIs for accelerated innovation.
Figure 2: Workflow builder feature in our framework
Empowering teams through versatility and accessibility
Our framework is designed to empower teams across the organisation. The multilingual capabilities of our user agent ensure that language barriers don’t hinder adoption or efficiency. For scenarios requiring human intervention, we’ve implemented a state stack that allows for pausing and resuming execution seamlessly. This feature ensures that complex processes can be handled with the right balance of automation and human oversight.
Security and transparency at the forefront
In an era where data security and process transparency are paramount, our framework doesn’t fall short. It’s designed with a security-first approach, ensuring granular access control so that users only access information they’re authorised to see. Additionally, we provide detailed logging and visualisation of each execution, offering complete explainability of the automation process. This level of transparency not only aids in troubleshooting but also helps in building trust in the AI-driven processes across the organisation.
Looking ahead
As we continue to refine and expand this LLM agent framework, we’re excited to explore its potential across different industries. We’ll be sharing more about each of these features in the future and showcase how they can be leveraged to solve specific business challenges and explore real-world applications.
Look forward to more in-depth explorations of the framework’s capabilities, use cases, and technical innovations. With this revolutionary approach, you’re not just automating tasks – you’re transforming the way your enterprise operates, unleashing the true power of LLM in your organisation.
Join us
Grab is a leading superapp in Southeast Asia, operating across the deliveries, mobility and digital financial services sectors. Serving over 800 cities in eight Southeast Asian countries, Grab enables millions of people everyday to order food or groceries, send packages, hail a ride or taxi, pay for online purchases or access services such as lending and insurance, all through a single app. Grab was founded in 2012 with the mission to drive Southeast Asia forward by creating economic empowerment for everyone. Grab strives to serve a triple bottom line – we aim to simultaneously deliver financial performance for our shareholders and have a positive social impact, which includes economic empowerment for millions of people in the region, while mitigating our environmental footprint.
Powered by technology and driven by heart, our mission is to drive Southeast Asia forward by creating economic empowerment for everyone. If this mission speaks to you, join our team today!
The US East (Northern Virginia) Region was the first Region launched by Amazon Web Services (AWS), and it has seen tremendous growth and customer adoption over the past several years. Now hosting active customers ranging from startups to large enterprises, AWS has steadily expanded the US East (Northern Virginia) Region infrastructure and capacity. The US East (Northern Virginia) Region consists of six Availability Zones, providing customers with enhanced redundancy and the ability to architect highly available applications.
Today, we’re announcing that a new Availability Zone located in Maryland will be added to the US East (Northern Virginia) Region, which is expected to open in 2026. This new Availability Zone will be connected to other Availability Zones by high-bandwidth, low-latency network connections over dedicated, fully redundant fiber. The upcoming Availability Zone in Maryland will also be instrumental in supporting the rapid growth of generative AI and advanced computing workloads in the US East (Northern Virginia) Region.
All Availability Zones are physically separated in a Region by a meaningful distance, many kilometers (km) from any other Availability Zone, although all are within 100 km (60 miles) of each other. The network performance is sufficient to accomplish synchronous replication between Availability Zones in Maryland and Virginia within the US East (Northern Virginia) Region. If your application is partitioned across multiple Availability Zones, your workloads are better isolated and protected from issues such as power outages, lightning strikes, tornadoes, earthquakes, and more.
Geographic information for the new Availability Zone In March, we provided more granular visibility into the geographic location information of all AWS Regions and Availability Zones. We have updated the AWS Regions and Availability Zones page to reflect the new geographic information for this upcoming Availability Zone in Maryland. As shown in the following screenshot, the infrastructure for the upcoming Availability Zone will be located in Maryland, United States of America, for the US East (Northern Virginia) us-east-1 Region.
You can continue to use this geographic information to choose Availability Zones that align with your regulatory, compliance, and operational requirements.
Stay tuned We plan to make this new Availability Zone in the US East (Northern Virginia) Region generally available in 2026. As usual, check out the Regional news of the AWS News Blog so that you’ll be among the first to know when the new Availability Zone is open!
(This survey is hosted by an external company. AWS handles your information as described in the AWS Privacy Notice. AWS will own the data gathered via this survey and will not share the information collected with survey respondents.)
Today, we are announcing that AWS AppSync Events now supports data source integrations for channel namespaces, enabling developers to create more sophisticated real-time applications. With this new capability you can associate AWS Lambda functions, Amazon DynamoDB tables, Amazon Aurora databases, and other data sources with channel namespace handlers. With AWS AppSync Events, you can build rich, real-time applications with features like data validation, event transformation, and persistent storage of events.
With these new capabilities, developers can create sophisticated event processing workflows by transforming and filtering events using Lambda functions or save batches of events to DynamoDB using the new AppSync_JS batch utilities. The integration enables complex interactive flows while reducing development time and operational overhead. For example, you can now automatically persist events to a database without writing complex integration code.
First look at data source integrations
Let’s walk through how to set up data source integrations using the AWS Management Console. First, I’ll navigate to AWS AppSync in the console and select my Event API (or create a new one).
Persisting event data directly to DynamoDB
There are multiple kinds of data source integrations to choose from. For this first example, I’ll create a DynamoDB table as a data source. I’m going to need a DynamoDB table first, so I head over to DynamoDB in the console and create a new table called event-messages. For this example, all I need to do is create the table with a Partition Key called id. From here, I can click Create table and accept the default table configuration before I head back to AppSync in the console.
Back in the AppSync console, I return to the Event API I set up previously, select Data Sources from the tabbed navigation panel and click the Create data source button.
After giving my Data Source a name, I select Amazon DynamoDB from the Data source drop down menu. This will reveal configuration options for DynamoDB.
Once my data source is configured, I can implement the handler logic. Here’s an example of a Publish handler that persists events to DynamoDB:
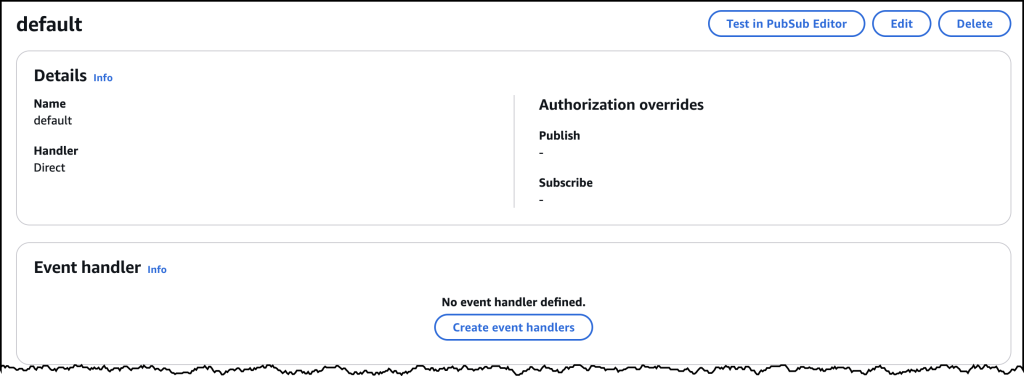
To add the handler code, I go the tabbed navigation for Namespaces where I find a new default namespace already created for me. If I click to open the default namespace, I find the button that allows me to add an Event handler just below the configuration details.
Clicking on Create event handlers brings me to a new dialog where I choose Code with data source as my configuration, and then select the DynamoDB data source as my publish configuration.
After saving the handler, I can test the integration using the built-in testing tools in the console. The default values here should work, and as you can see below, I’ve successfully written two events to my DynamoDB table.
Here’s all my messages captured in DynamoDB!
Error handling and security
The new data source integrations include comprehensive error handling capabilities. For synchronous operations, you can return specific error messages that will be logged to Amazon CloudWatch, while maintaining security by not exposing sensitive backend information to clients. For authorization scenarios, you can implement custom validation logic using Lambda functions to control access to specific channels or message types.
Available now
AWS AppSync Events data source integrations are available today in all AWS Regions where AWS AppSync is available. You can start using these new features through the AWS AppSync console, AWS command line interface (CLI), or AWS SDKs. There is no additional cost for using data source integrations – you pay only for the underlying resources you use (such as Lambda invocations or DynamoDB operations) and your existing AppSync Events usage.
To learn more about AWS AppSync Events and data source integrations, visit the AWS AppSync Events documentation and get started building more powerful real-time applications today.
(This survey is hosted by an external company. AWS handles your information as described in the AWS Privacy Notice. AWS will own the data gathered via this survey and will not share the information collected with survey respondents.)
Amazon SageMaker Lakehouse now supports attribute-based access control (ABAC) with AWS Lake Formation, using AWS Identity and Access Management (IAM) principals and session tags to simplify data access, grant creation, and maintenance. With ABAC, you can manage business attributes associated with user identities and enable organizations to create dynamic access control policies that adapt to the specific context.
SageMaker Lakehouse is a unified, open, and secure data lakehouse that now supports ABAC to provide unified access to general purpose Amazon S3 buckets, Amazon S3 Tables, Amazon Redshift data warehouses, and data sources such as Amazon DynamoDB or PostgreSQL. You can then query, analyze, and join the data using Redshift, Amazon Athena, Amazon EMR, and AWS Glue. You can secure and centrally manage your data in the lakehouse by defining fine-grained permissions with Lake Formation that are consistently applied across all analytics and machine learning(ML) tools and engines. In addition to its support for role-based and tag-based access control, Lake Formation extends support to attribute-based access to simplify data access management for SageMaker Lakehouse, with the following benefits:
Flexibility – ABAC policies are flexible and can be updated to meet changing business needs. Instead of creating new rigid roles, ABAC systems allow access rules to be modified by simply changing user or resource attributes.
Efficiency – Managing a smaller number of roles and policies is more straightforward than managing a large number of roles, reducing administrative overhead.
Scalability – ABAC systems are more scalable for larger enterprises because they can handle a large number of users and resources without requiring a large number of roles.
Attribute-based access control overview
Previously, within SageMaker Lakehouse, Lake Formation granted access to resources based on the identity of a requesting user. Our customers were requesting the capability to express the full complexity required for access control rules in organizations. ABAC allows for more flexible and nuanced access policies that can better reflect real-world needs. Organizations can now grant permissions on a resource based on user attribute and is context-driven. This allows administrators to grant permissions on a resource with conditions that specify user attribute keys and values. IAM principals with matching IAM or session tag key-value pairs will gain access to the resource.
Instead of creating a separate role for each team member’s access to a specific project, you can set up ABAC policies to grant access based on attributes like membership and user role, reducing the number of roles required. For instance, without ABAC, a company with an account manager role that covers five different geographical territories needs to create five different IAM roles and grant data access for only the specific territory for which the IAM role is meant. With ABAC, they can simply add those territory attributes as keys/values to the principal tag and provide data access grants based on those attributes. If the value of the attribute for a user changes, access to the dataset will automatically be invalidated.
With ABAC, you can use attributes such as department or country and use IAM or sessions tags to determine access to data, making it more straightforward to create and maintain data access grants. Administrators can define fine-grained access permissions with ABAC to limit access to databases, tables, rows, columns, or table cells.
In this post, we demonstrate how to get started with ABAC in SageMaker Lakehouse and use with various analytics services.
Solution overview
To illustrate the solution, we are going to consider a fictional company called Example Retail Corp. Example Retail’s leadership is interested in analyzing sales data in Amazon S3 to determine in-demand products, understand customer behavior, and identify trends, for better decision-making and increased profitability. The sales department sets up a team for sales analysis with the following data access requirements:
All data analysts in the Sales department in the US get access to only sales-specific data in only US regions
All BI analysts in the Sales department have full access to data in only US regions
All scientists in the Sales department get access to only sales-specific data across all regions
Anyone outside of Sales department have no access to sales data
For this post, we consider the database salesdb, which contains the store_sales table that has store sales details. The table store_sales has the following schema.
To demonstrate the product sales analysis use case, we will consider the following personas from the Example Retail Corp:
Ava is a data administrator in Example Retail Corp who is responsible for supporting team members with specific data permission policies
Alice is a data analyst who should be able to access sales specific US store data to perform product sales analysis
Bob is a BI analyst who should be able to access all data from US store sales to generate reports
Charlie is a data scientist who should be able to access sales specific across all regions to explore and find patterns for trend analysis
Ava decides to use SageMaker Lakehouse to unify data across various data sources while setting up fine-grained access control using ABAC. Alice is excited about this decision as she can now build daily reports using her expertise with Athena. Bob now knows that he can quickly build Amazon QuickSight dashboards with queries that are optimized using Redshift’s cost-based optimizer. Charlie, being an open source Apache Spark contributor, is excited that he can build Spark based processing with Amazon EMR to build ML forecasting models.
Ava defines the user attributes as static IAM tags that could also include attributes stored in the identity provider (IdP) or as session tags dynamically to represent the user metadata. These tags are assigned to IAM users or roles and can be used to define or restrict access to specific resources or data. For more details, refer to Tags for AWS Identity and Access Management resources and Pass session tags in AWS STS.
For this post, Ava assigns users with static IAM tags to represent the user attributes, including their department membership, Region assignment, and current role relationship. The following table summarizes the tags that represent user attributes and user assignment.
User
Persona
Attributes
Access
Alice
Data Analyst
Department=sales Region=US Role=Analyst
Sales specific data in US and no access to customer data
Bob
BI Analyst
Department=sales Region=US Role=BIAnalyst
All data in US
Charlie
Data Scientist
Department=sales Region=ALL Role=Scientist
Sales specific data in All regions and no access to customer data
Ava then defines access control policies in Lake Formation that grant or restrict access to certain resources based on predefined criteria (user attributes defined using IAM tags) being satisfied. This allows for flexible and context-aware security policies where access privileges can be adjusted dynamically by modifying the user attribute assignment without changing the policy rules. The following table summarizes the policies in the Sales department.
Access
User Attributes
Policy
All analysts (including Alice) in US get access to sales specific data in US regions
Have an existing AWS Glue database or table and Amazon Simple Storage Service (Amazon) S3 bucket that holds the table data. For this post, we use salesdb as our database, store_sales as our table, and data is stored in an S3 bucket.
Define attributes for the IAM principals Alice, Bob, Charlie
Ava completes the following steps to define the attributes for the IAM principal:
Log in as an admin user and navigate to the IAM console.
Choose Users under Access management in the navigation pane and search for the user Alice.
Choose the user and choose the Tags tab.
Choose Add new tag and provide the following key pairs:
Key: Department and value: sales
Key: Region and value: US
Key: Role and value: Analyst
Choose Save changes.
Repeat the process for the user Bob and provide the following key pairs:
Key: Department and value: sales
Key: Region and value: US
Key: Role and value: BIAnalyst
Repeat the process for the user Charlie and IAM role scientist_role and provide the following key pairs:
Key: Department and value: sales
Key: Region and value: ALL
Key: Role and value: Scientist
Grant permissions to Alice, Bob, Charlie using ABAC
Ava now grants database and table permissions to users with ABAC.
Grant database permissions
Complete the following steps:
Ava logs in as data lake admin and navigate to the Lake Formation console.
In the navigation pane, under Permissions, choose Data lake permissions.
Choose Grant.
On the Grant permissions page, choose Principals by attribute.
Specify the following attributes:
Key: Department and value: sales
Key: Role and value: Analyst,Scientist
Review the resulting policy expression.
For Permission scope, select This account.
Next, choose the catalog resources to grant access:
For Catalogs, enter the account ID.
For Databases, enter salesdb.
For Database permissions, select Describe.
Choose Grant.
Ava now verifies the database permission by navigating to the Databases tab under the Data Catalog and searching for salesdb. Select salesdb and choose View under Actions.
Grant table permissions to Alice
Complete the following steps to create a data filter to view sales specific columns in store_sales records whose country=US:
On the Lake Formation console, choose Data filters under Data Catalog in the navigation pane.
Choose Create new filter.
Provide the data filter name as us_sales_salesonlydata.
For Target catalog, enter the account ID.
For Target database, choose salesdb.
For Target table, choose store_sales.
For column-level access, choose Include columns: store_id, item_code, transaction_date, product_name, country, sales_price, and quantity.
For Row-level access, choose Filter rows and enter the row filter country='US'.
Choose Create data filter.
On the Grant permissions page, choose Principals by attribute.
Specify the attributes:
Key: Department and value: sales
Key: Role as value: Analyst
Key: Region and value: US
Review the resulting policy expression.
For Permission scope, select This account.
Choose the catalog resources to grant access:
Catalogs: Account ID
Databases: salesdb
Table: store_sales
Data filters: us_sales
For Data filter permissions, select Select.
Choose Grant.
Grant table permissions to Bob
Complete the following steps to create a data filter to view only store_sales records whose country=US:
On the Lake Formation console, choose Data filters under Data Catalog in the navigation pane.
Choose Create new filter.
Provide the data filter name as us_sales.
For Target catalog, enter the account ID.
For Target database, choose salesdb.
For Target table, choose store_sales.
Leave Column-level access as Access to all columns.
For Row-level access, enter the row filter country='US'.
Choose Create data filter.
Complete the following steps to grant table permissions to Bob:
On the Grant permissions page, choose Principals by attribute.
Specify the attributes:
Key: Department and value: sales
Key: Role as value: BIAnalyst
Key: Region and value: US
Review the resulting policy expression.
For Permission scope, select This account.
Choose the catalog resources to grant access:
Catalogs: Account ID
Databases: salesdb
Table: store_sales
For Data filter permissions, select Select.
Choose Grant.
Grant table permissions to Charlie
Complete the following steps to grant table permissions to Charlie:
On the Grant permissions page, choose Principals by attribute.
Specify the attributes:
Key: Department and value: sales
Key: Role as value: Scientist
Key: Region and value: ALL
Review the resulting policy expression.
For Permission scope, select This account
Choose the catalog resources to grant access:
Catalogs: Account ID
Databases: salesdb
Table: store_sales
For Table permissions, select Select.
For Data permissions, specify the following columns: store_id, transaction_date, product_name, country, sales_price, and quantity.
Choose Grant.
Alice now verifies the table permission by navigating to the Tables tab under the Data Catalog and searching for store_sales. Select store_sales and choose View under Actions. The following screenshots show the details for both sets of permissions.
Data Analyst uses Athena for building daily sales reports
Alice, the data analyst logs in to the Athena console and run the following query:
select * from "salesdb"."store_sales" limit 5
Alice has the user attributes as Department=sales, Role=Analyst, Region=US, and this attribute combination allows her access to US sales data to specific sales only column, without access to customer data as shown in the following screenshot.
BI Analyst uses Redshift for building sales dashboards
Bob, the BI Analyst, logs in to the Redshift console and run the following query:
select * from "salesdb"."store_sales" limit 10
Bob has the user attributes Department=sales, Role=BIAnalyst, Region=US, and this attribute combination allows him access to all columns including customer data for US sales data.
Data Scientist uses Amazon EMR to process sales data
Finally, Charlie logs in to the EMR console and submit the EMR job with runtime role as scientist_role. Charlie uses the script sales_analysis.py that is uploaded to s3 bucket created for the script. He chooses the EMR Serverless application created with Lake Formation enabled.
Charlie submits batch job runs by choosing the following values:
For spark properties, provide key as spark.emr-serverless.lakeformation.enabled and value as true.
Additional configurations: Under Metastore configuration select Use AWS Glue Data Catalog as metastore. Charlie keeps rest of the configuration as default.
Once the job run is completed, Charlie can view the output by selecting stdout under Driver log files.
Charlie uses scientist_role as job runtime role with the attributes Department=sales, Role=Scientist, Region=ALL, and this attribute combination allows him access to select columns of all sales data.
Clean up
Complete the following steps to delete the resources you created to avoid unexpected costs:
Delete the IAM users created.
Delete the AWS Glue database and table resources created for the post, if any.
Delete the Athena, Redshift and EMR resources created for the post.
Conclusion
In this post, we showcased how you can use SageMaker Lakehouse attribute-based access control, using IAM principals and session tags to simplify data access, grant creation, and maintenance. With attribute-based access control, you can manage permissions using dynamic business attributes associated with user identities and secure your data in the lakehouse by defining fine-grained permissions in the Lake Formation that are enforced across analytics and ML tools and engines.
For more information, refer to documentation. We encourage you to try out the SageMaker Lakehouse with ABAC and share your feedback with us.
About the authors
Sandeep Adwankar is a Senior Product Manager at AWS. Based in the California Bay Area, he works with customers around the globe to translate business and technical requirements into products that enable customers to improve how they manage, secure, and access data.
Srividya Parthasarathy is a Senior Big Data Architect on the AWS Lake Formation team. She enjoys building data mesh solutions and sharing them with the community.
The collective thoughts of the interwebz
Manage Consent
To provide the best experiences, we use technologies like cookies to store and/or access device information. Consenting to these technologies will allow us to process data such as browsing behavior or unique IDs on this site. Not consenting or withdrawing consent, may adversely affect certain features and functions.
Functional
Always active
The technical storage or access is strictly necessary for the legitimate purpose of enabling the use of a specific service explicitly requested by the subscriber or user, or for the sole purpose of carrying out the transmission of a communication over an electronic communications network.
Preferences
The technical storage or access is necessary for the legitimate purpose of storing preferences that are not requested by the subscriber or user.
Statistics
The technical storage or access that is used exclusively for statistical purposes.The technical storage or access that is used exclusively for anonymous statistical purposes. Without a subpoena, voluntary compliance on the part of your Internet Service Provider, or additional records from a third party, information stored or retrieved for this purpose alone cannot usually be used to identify you.
Marketing
The technical storage or access is required to create user profiles to send advertising, or to track the user on a website or across several websites for similar marketing purposes.


 Sandeep Adwankar is a Senior Product Manager at AWS. Based in the California Bay Area, he works with customers around the globe to translate business and technical requirements into products that enable customers to improve how they manage, secure, and access data.
 Srividya Parthasarathy is a Senior Big Data Architect on the AWS Lake Formation team. She enjoys building data mesh solutions and sharing them with the community.