Post Syndicated from Aaron Sempf original https://aws.amazon.com/blogs/devops/multi-agent-collaboration-with-strands/
In the evolving landscape of autonomous systems, multi-agent collaboration is becoming not only feasible but necessary. As agents gain more capabilities, like advanced reasoning, adaptation, and tool use, the challenge shifts from individual performance to effective coordination. The question is no longer “can an agent solve a task?” but “how do we organize execution across many intelligent agents?”
A foundational step toward answering this came with the Supervisor pattern, introduced in our article on creating asynchronous AI agents with Amazon Bedrock. The Supervisor addresses the first generation of coordination challenges by acting as a centralized orchestrator, monitoring and delegating tasks across agents in a structured, serverless workflow. It provides asynchronous orchestration, fallback handling, and state tracking across loosely coupled agents, giving organizations a reliable way to move from single-agent prototypes to multi-agent systems.
Yet as agentic systems scale and become more dynamic, the limitations of static supervision become clear. The Supervisor model assumes a relatively stable set of agents and predictable workflows; but modern systems face constantly shifting tasks, emergent capabilities, and the need for adaptive coordination. This is where the Arbiter pattern emerges as the natural evolution: a next-generation supervisory model that extends the Supervisor with dynamic agent generation, semantic task routing, and blackboard-model-based coordination. By addressing the unpredictability and fluidity of large, evolving agent ecosystems, the Arbiter pattern enables systems not only to manage complexity but to thrive in it.
The Arbiter pattern builds directly on this by adding three key capabilities:
- Semantic Capability Matching: Instead of only assigning known tasks to known agents, the Arbiter reasons about what kind of agent should exist for a task—even if that agent doesn’t exist yet.
- Delegated Agent Creation: If no suitable agent is found, the Arbiter escalates the request to a Fabricator agent that dynamically generates a task-specific agent on demand. This moves beyond delegation to true adaptive generation.
- Task Planning + Contextual Memory: Building on the Supervisors task coordination capability, Arbiter decomposes complex inputs into structured task plans, and uses contextual memory to track execution, retry logic, and agent performance.
In short, the Arbiter transforms static orchestration into adaptive coordination.
The Blackboard Model Revisited
To enable loose, extensible collaboration across agents, the Arbiter Pattern incorporates principles from the blackboard model – a classic architecture from distributed AI. In this model, agents contribute opportunistically to a shared data space (the “blackboard”), reacting to changes and collectively solving problems.
Reference: See “The Blackboard Model of Control” (Hayes-Roth et al.), and early applications like Hearsay-II for foundational research.
In our extended Arbiter Pattern, the blackboard becomes a semantic event substrate. Agents, including the Arbiter, publish and consume task-relevant state, enabling loosely coupled, event-driven collaboration.
How It Works
When an event enters the system, the Arbiter takes on the supervisory role but extends it with greater dynamism and adaptability. Like the Supervisor pattern, it begins by interpreting the event and identifying the required objectives and sub-tasks. It then performs a capability assessment, using a local index or peer-published manifests, much like the Supervisor querying an Agents config table.
- Interpretation: The Arbiter uses LLM-based reasoning to extract task objectives and sub-tasks.
- Capability Assessment: It evaluates which agents can handle each sub-task using a local index or peer capability manifests.
- Delegation or Generation:
- If a suitable agent exists, the task is routed accordingly.
- If not, the Arbiter sends a generation request to the fabricator agent.
- Blackboard Coordination: All agents involved read/write to a shared semantic blackboard, contributing as needed based on observed task state.
- Reflection and Adaptation: Performance data is logged and used to inform future agent creation, adaptation, or deprecation.
Arbiter Pattern Architecture
Unlike the Supervisor, which maintains orchestration through a static config list, the Arbiter introduces a shared semantic blackboard that allows all participating agents to read, write, and coordinate based on evolving task state. This blackboard serves as a dynamic collaboration space, enabling mid-task adaptation and richer multi-agent coordination.
The following Diagram 1: Agentic AI Arbiter pattern implemented as a code example can be downloaded here
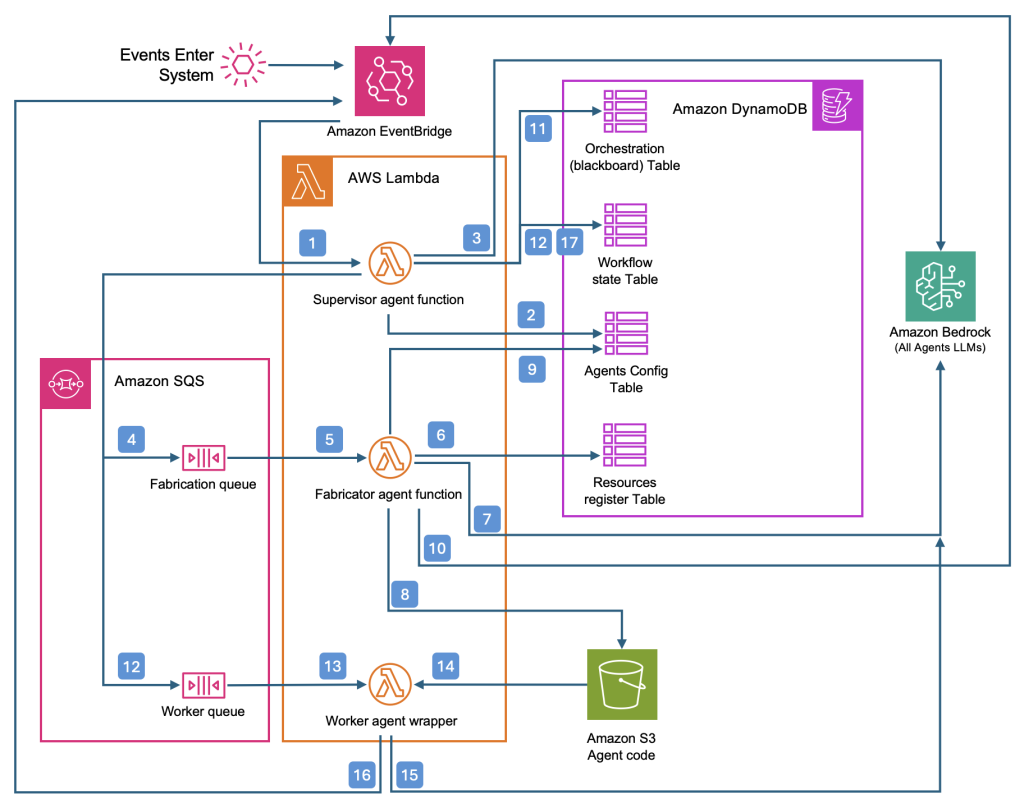
Diagram 1: Agentic AI Arbiter pattern
The following sequence describes the Arbiter pattern, according to the numbered steps in the diagram 1: Agentic AI Arbiter pattern
- Events entering the system trigger the Supervisor function
- Supervisor queries Agents Config table for agent capabilities
- Supervisor uses Agents config list as context to plan orchestration of tasks
Option: New Agent:
If no capable agent is found, the Arbiter goes further than the basic supervisor pattern: it issues a generation request to a fabricator agent, which synthesizes new worker code, stores it for runtime access, and updates the capability registry so the agentic system can immediately benefit from the new skill.
- Task cannot be completed, request create new capability
- Request to fabricate triggers Fabrication agent instance
- Fabrication agent queries resources register for available tools (capabilities)
- Fabricator generates worker agent code
- Worker agent code stored in bucket for runtime access
- New worker added to Agents config list with agent capabilities description
- Result of fabrication posted to message bus
Repeat steps 1, 2 & 3
Option: Orchestrate workflow:
If a suitable agent exists, the Arbiter orchestrates the workflow by invoking the appropriate worker agents, tracking progress and state as in the Supervisor model.
- Orchestration of tasks is stored for tracking end-to-end process
- Request to invoke worker agent, by name/id. Add workflow state for agent invocation.
- Request to invoke worker agent triggers worker agent wrapper instance
- Worker agent wrapper loads agent code
- Worker agent reasons and takes action
- Worker agent sends response to message bus
- Supervisor agent updates workflow state and tracks against orchestration
The Arbiter incorporates a reflection and adaptation loop: performance data from task execution is logged, analyzed, and fed back into the fabricator and coordination logic. This ensures that not only are tasks completed in the moment, but the system continuously adapts, retires underperforming agents, and evolves toward greater efficiency.
The Arbiter Agent: Event Orchestration Engine
The Supervisor Agent (Arbiter Agent) serves as the central coordinator component, managing complex event-driven workflows through intelligent task delegation.
Event Processing Workflow:
The Arbiter pattern follows a structured approach to handle incoming events
- Configuration Loading: Loads available agent configurations from Amazon DynamoDB via load_config_from_dynamodb()
- LLM Invocation: Invokes Amazon Bedrock LLM with event context and available tool specifications
- Decision Analysis: LLM analyzes the event and returns tool invocation decisions with parameters
- Task Dispatch: For each specified tool call:
- Extracts tool name, input parameters, and tool use ID
- Dispatches message to corresponding Amazon Simple Queue Service (SQS) queue via process_tool_call()
- Maintains tool invocation list for workflow tracking
Workflow State Management:
The system maintains comprehensive state tracking throughout execution
- Creates workflow tracking record in DynamoDB with create_workflow_tracking_record()
- Initializes all invoked agents as incomplete
- Associates unique request ID with orchestration instance
- Persists orchestration state including conversation history and request mapping
Completion Coordination:
The Arbiter coordinates task completion through a systematic process
- Event Reception: Receives agent completion events via Amazon EventBridge
- Status Updates: Updates workflow tracking with update_workflow_tracking()
- Completion Check: Performs completion check across all tracked agents
- Result Aggregation: When all agents complete:
- Aggregates results from DynamoDB data field
- Appends tool results to conversation as user messages
- Re-invokes orchestration with updated context
- Continuation: Continues until LLM provides final response without tool calls
The Fabricator Agent: Dynamic Capability Generation
The Fabricator Agent implements just-in-time agent development using the Strands agents framework, creating new capabilities when required functionality doesn’t exist in the system.
Agent Development Architecture:
The Fabricator operates as a specialized Strands Agent with specific characteristics
- Implemented as a Strands Agent with specialized system prompt for code generation
- Triggered by “New worker agent” events from the Arbiter
- Receives capability requirements through prompt augmentation with agent directive
- System prompt includes:
- Strands Agent implementation examples
- Complete catalog of available Strands Tools
- Code generation patterns and conventions
- Standardized handler() function requirements
Code Generation Process:
The agent follows a structured development workflow
- Requirement Analysis: LLM analyzes capability requirements and generates Python implementation
- Tool Selection: Prioritizes use of existing Strands Tools over custom @tool implementations
- Code Structure: Creates agents following standardized patterns:
- Bedrock model initialization with models.BedrockModel()
- Agent instantiation with appropriate tool selection
- Standardized handler() function interface
- Event-driven completion signaling
- File Creation: Writes generated code to /tmp/ directory for immediate availability
Capability Registration Pipeline:
New capabilities are registered through a multi-step process
- File Storage: File upload to Amazon Simple Storage Service (S3) via upload_file_to_s3() tool
- Metadata Registration: Registration in DynamoDB via store_agent_config_dynamo():
- toolId: Unique capability identifier
- filename: S3 object reference
- schema: OpenAPI specification for LLM tool calling
- description: Human-readable capability documentation
- action: SQS queue routing configuration for Generic Wrapper
- Completion Notification: Completion event publication to Arbiter via complete_task() tool
Testing Considerations:
The original implementation revealed important insights about testing approaches
- Previous Approach: Agent testing within the Fabricator resulted in:
- Unstructured testing leading to false negatives
- Overzealous optimization of generated agents
- Recommendation: Separate testing agent with standardized harness for validation feedback
The Generic Wrapper: Dynamic Execution Runtime
The Generic Wrapper implements a hot-loading pattern that enables unlimited agent creation without infrastructure scaling, providing a universal execution environment for Fabricator-generated agents.
This hot-loading approach is critical because it decouples capability growth from infrastructure scaling. Instead of provisioning and maintaining new infrastructure components for every new agent, which could be dozens or even hundreds of agents, the system reuses a single execution wrapper that can dynamically load and execute arbitrary agent code.
This not only makes agent creation effectively limitless but also ensures infrastructure efficiency, cost optimization, and simplified operations, allowing the Arbiter and Fabricator to evolve system capabilities without operational bottlenecks.
In the AWS Samples code, found here, the Hot-loading handler is implemented as am AWS Lambda function, represented in the following code snippet:
def process_event(event, context):
    orchestration_id = event["orchestration_id"]
    tool_use_id = event["tool_use_id"]
    request = event["tool_input"]
    tool_name = event['node']

    # Based on the tool from the event, load the details from DDB
    tool = load_config_from_dynamodb(tool_name)
    config = tool['config']

    if isinstance(config, str):
        config = json.loads(config)

    file_name = config['filename']

    load_file_from_s3_into_tmp(os.environ["AGENT_BUCKET_NAME"], file_name)

    # Hot load the module from the tmp directory
    spec = importlib.util.spec_from_file_location("module.name", "/tmp/loaded_module.py")
    loaded_module = importlib.util.module_from_spec(spec)
    sys.modules["module.name"] = loaded_module
    spec.loader.exec_module(loaded_module)

    # Invoke the generic handler with whatever args were passed in by the Arbiter
    try:
        print("attempting to use module")
        response = loaded_module.handler(**request)
        print(f"response: {response}")
    except Exception as e:
        print(f"error running module: {e}")
        response = "The task could not be completed, this agent has issues, please ignore for now."

    # Finally. report back to the Arbiter. Handled by the wrapper. To avoid the Frabricator from attempting to code this part itself
    post_task_complete(response, tool_use_id, tool_name, orchestration_id)
Although this example is demonstrated through a lambda function, the Hot-Loading code can be executed in Amazon Bedrock AgentCore Runtime, or AWS native container services, such as Amazon Elastic Container Service (ECS) or Amazon Elastic Kubernetes Service (EKS)
Hot-Loading Architecture:
The wrapper implements several key architectural principles
- Single infrastructure component handles execution of all dynamically created agents
- Eliminates need for separate infrastructure provisioning per agent
- Implements runtime code loading from S3 storage
- Accepts latency trade-off for infrastructure efficiency in non-ultra-low-latency environment
Dynamic Loading Process:
The system follows a precise loading sequence
- Message Processing: Extracts agent identifier from incoming SQS message
- Configuration Retrieval: Queries DynamoDB for agent configuration via load_config_from_dynamodb()
- Code Download: Downloads agent implementation from S3 to /tmp/ directory
- Runtime Loading: Module loading using importlib.util:
- spec_from_file_location() creates module specification
- module_from_spec() instantiates module object
- exec_module() performs actual code loading and execution
Execution Management:
The wrapper provides comprehensive execution oversight
- Invokes standardized handler() function with provided parameters
- Captures execution results and handles error conditions gracefully
- Maintains execution isolation between different agent invocations
- Implements resource cleanup after agent execution completion
Standardized Communication Protocol:
Communication follows strict standardization to ensure system reliability, which is critical in multi-agent environments where dozens or even hundreds of dynamically generated agents may interact. Without consistent message formats, routing rules, and completion signals, orchestration would become brittle, errors would propagate unpredictably, and debugging would be nearly impossible. Standardization guarantees that every agent, no matter when it was created, can interoperate seamlessly, enabling the Arbiter to maintain end-to-end visibility, traceability, and fault-tolerance across the entire system.
Event Handling Principles:
- Event posting handled exclusively by Generic Wrapper, not individual agents
- Ensures consistent event-driven communication patterns across all agents
Completion Event Structure:
- orchestration_id: Workflow context linkage
- tool_use_id: LLM tool invocation mapping
- node: Agent identifier for tracking
- data: Execution results or error information
Reliability Measures:
- Publishes completion events to EventBridge for Arbiter processing
- Guarantees workflow tracking receives completion signals regardless of execution outcome
Scalability Characteristics:
The hot-loading approach provides significant scalability benefits
- Enables agent scaling creation without minimal infrastructure impact
- S3 download latency acceptable within overall system performance profile
- Single wrapper instance can execute multiple agent types
- Memory and resource management handled at container level
Conclusion
The Arbiter Pattern represents a significant evolution beyond the Supervisor architecture, delivering the flexibility required for truly autonomous agentic systems. By introducing semantically rich, context-aware orchestration, it enables dynamic scalability, where agent capabilities grow in step with task demands. The architecture is resilient, redistributing or regenerating tasks when agents fail, and it achieves loose coupling by having agents interact through semantically meaningful events rather than rigid APIs. Most importantly, it embeds continuous adaptation through Arbiter-guided feedback loops, allowing systems to learn and evolve over time. This marks a shift from pre-programmed logic to generative, blackboard-model-based coordination, paving the way for decentralized, intelligent systems that can learn, adapt, and collaborate effectively at scale.
The system delivers several critical capabilities
- Asynchronous Processing: SQS-based message passing for scalable execution
- Persistent State Management (Short-term memory): DynamoDB-based workflow tracking
- Scalability: Hot-loading architecture for unlimited agent creation
- Intelligent Orchestration: LLM-driven task decomposition and sequencing
- Self-Expanding Capabilities: Strands-based agent creation on demand
- Standardized Communication: Reliable event-driven protocols
This architecture enables processing of arbitrary event types by dynamically creating necessary processing capabilities and coordinating their execution through LLM-driven workflow orchestration, while maintaining infrastructure efficiency through hot-loading patterns.
About the Authors
 Aaron Sempf is Next Gen Tech Lead for the AWS Partner Organization in Asia-Pacific and Japan. With over 20 years in distributed system engineering design and development, he focuses on solving for large scale complex integration and event driven systems. In his spare time, he can be found coding prototypes for autonomous robots, IoT devices, distributed solutions, and designing agentic architecture patterns for generative AI assisted business automation.
 Joshua Toth is a Senior Prototyping Engineer with over a decade of experience in software engineering and distributed systems. He specializes in solving complex business challenges through technical prototypes, demonstrating the art of the possible. With deep expertise in proof of concept development, he focuses on bridging the gap between emerging technologies and practical business applications. In his spare time, he can be found developing next-generation interactive demonstrations and exploring cutting-edge technological innovations.