Over the past few decades, it’s become easier and easier to create fake receipts. Decades ago, it required special paper and printers—I remember a company in the UK advertising its services to people trying to cover up their affairs. Then, receipts became computerized, and faking them required some artistic skills to make the page look realistic.
Several receipts shown to the FT by expense management platforms demonstrated the realistic nature of the images, which included wrinkles in paper, detailed itemization that matched real-life menus, and signatures.
[…]
The rise in these more realistic copies has led companies to turn to AI to help detect fake receipts, as most are too convincing to be found by human reviewers.
The software works by scanning receipts to check the metadata of the image to discover whether an AI platform created it. However, this can be easily removed by users taking a photo or a screenshot of the picture.
To combat this, it also considers other contextual information by examining details such as repetition in server names and times and broader information about the employee’s trip.
No matter what business you’re in, there is one universal truth – your success or failure depends on customer satisfaction and trust. And when your IT systems fail, it’s your customers who pay the price. Being unable to place an order due to unexpected downtime (which can cost a large organization as much as $9,000 per minute) or having their credit card data compromised in a preventable security breach (which costs the average organization nearly $5 million) will force even your most loyal customers to go somewhere else.
Monitoring with Zabbix doesn’t just keep your infrastructure safe, it keeps your reputation safe and makes sure that your customers continue to be your customers. It does this by guaranteeing the performance, reliability, and security of your digital services – while also supporting better customer service and continuous improvement. Keep reading to see how it’s possible.
Table of Contents
Say goodbye to downtime
Your customers are looking to meet their needs quickly and effectively. Unexpected service disruptions cause them to feel neglected and force them to look elsewhere for solutions.
Monitoring your infrastructure with Zabbix can effectively eliminate downtime through proactive issue detection, which locates anomalies and performance issues like high CPU usage, packet loss, and latency in real time – before they have a chance to make life harder for customers.
If an issue does occur, Zabbix’s predictive alerting capabilities let your tech teams know about anything that could potentially impact an application or service, which lets them meet SLAs and provide a better, more reliable customer experience with fewer service disruptions, which in turns leads to higher levels of trust and satisfaction.
Outperform your competitors
No matter how good your products or services happen to be, you still need to provide smooth and fast online user experience if you want repeat use and positive reviews. Monitoring with Zabbix optimizes network traffic by helping you to identify bandwidth bottlenecks or misconfigured devices with a single glance at a dashboard, allowing better traffic management and a better online experience for customers.
It also improves response times, which allows you to be confident that your applications and services remain responsive. This is especially important for real-time services like video conferencing, e-commerce, or customer support.
Turn good customer service into outstanding customer service
What turns a casual, one-time user into a repeat customer? In most cases, it all comes down to making that user feel seen, informed, and supported. Zabbix helps you maintain consistent system performance, and nothing builds trust like stability.
With a bit of configuration and the help of IT service management tools like ServiceNow, Zabbix can provide clear, easy-to-access logs and metrics that help your customer service reps better understand your customers and the process of serving them, including:
• Customer satisfaction (CSAT)
• Preferred communication channel
• Average ticket count
• Average response time
• Average ticket resolution time
• Ticket resolution rate
• Ticket backlog
• Interactions per ticket
With this information, your team will be able to communicate proactively when issues happen, giving customers accurate information about the issue and the expected resolution time.
Keep your customers safe from cyber threats
The consequences of a data breach are deep and far-reaching, and they include financial losses, reputational damage, legal troubles, regulatory fines, and a loss of customer trust. Despite a greater emphasis on data security, hackers are constantly finding new ways to gain access to valuable corporate data and credentials by combining next-generation AI technologies with long-established tools.
Monitoring with Zabbix gives IT and security teams the visibility and early warning systems they need to spot and react to potential threats. Zabbix continuously monitors systems, networks, and applications for predefined thresholds and anomalies, identifying possible network intrusions or misconfigurations and notifying the relevant security stakeholders.
On top of that, Zabbix can monitor any existing security tools your team runs, tracking antivirus software, firewalls, IDS/IPS tools, and endpoint protection solutions to make sure they are functioning properly and running the latest versions. It can also integrate with SIEM systems (like Splunk, ELK, or Wazuh) as well as custom scripts in order to provide extended security analytics.
Meet (and exceed) your SLAs
Service Level Agreements (SLAs) are a framework for managing the expectations of both customers and businesses. They define agreed-on standards of service, but tracking them is more than just a way to measure compliance – it’s a tool that you can use to improve your overall service delivery and operations.
With Zabbix, you can monitor any quantifiable metric that’s relevant to your SLAs, such as system uptime/downtime, response time, the availability of web services, databases, or network devices, transaction success and failure rates, and much more. In addition, Zabbix can use real-time data and built-in SLA calculation to automatically calculate current SLA compliance and send an alert if an SLA is at risk of being breached, by using triggers based on thresholds.
If you’d rather track the metrics on your own, no problem – by using Zabbix dashboards, you can visualize SLA compliance in real-time, with the dashboards showing availability percentages, event timelines, and breach summaries, while giving you easy-to-understand views of service health. The result is better products and services that are aligned with customer expectations.
Build a continuous improvement culture
When it’s time to roll out a new feature or upgrade, you naturally want to have ALL the necessary data at your fingertips. Monitoring usage patterns and performance metrics with Zabbix not only gives you advanced visualizations (forecasting, capacity planning insights, etc.) but can also highlight cases where data analysis led to tangible improvements.
Want more input from customers and users? Zabbix can make sure that the improvements to your product are community-driven by giving you the data you need to run regular user surveys and forums to gather product feedback. It can even help you publish a public roadmap with transparent prioritization based on community input.
Conclusion
Customer satisfaction is about a lot more than just good service – it’s also about consistency, reliability, and transparency. Zabbix empowers businesses to deliver all three by providing a comprehensive, proactive, and scalable monitoring solution.
That’s why customers in verticals as diverse as aerospace and education turn to Zabbix to keep them informed about what’s working – and what isn’t. By integrating Zabbix into your IT operations, you’re not just improving system performance – you’re actively investing in customer satisfaction and loyalty.
Find out more about what Zabbix can do for you and your customers by taking a look at real-world case studies from companies like yours.
Борисов, който не лъже, че не му пука. „Дидо“, който, разбира се, „се занимава, където има теми за хората“. Йордан Цонев, който ще чисти „цялата обществена среда в страната“, ама не каза себе си накъде ще почисти. Малко костенурки и змии във вземане-даване с АПИ и един бюджет от една Теменужка, дето не се знае какво ще става с него.
Our member project representatives and others who collaborate with
SFC on projects
know that I’ve been on part-time medical leave this year. As I recently announced publicly on the Fediverse, I was diagnosed in March 2025 with early-stage Type
2 Diabetes. I had no idea that that the diagnosis would become a
software freedom and users’ rights endeavor.
After the diagnosis, my doctor suggested immediately that I see the diabetes nurse-practitioner
specialist in their practice. It took some time get an appointment with him,
so I saw him first in mid-April 2025.
I walked into the office, sat down, and within minutes the specialist
asked me to “take out your phone and install the Freestyle Libre app
from Abbott”. This is the first (but, will probably not be the only) time a medical practitioner
asked me to install proprietary software as the first step of
treatment.
The specialist told me that in his experience, even early-stage diabetics
like me should use a Continuous Glucose Monitor (CGM). CGM’s
are an amazing (relatively) recent invention that allows diabetics to
sample their blood sugar level constantly. As we software developers and
engineers know: great things happen when your diagnostic readout is as low
latency as possible. CGMs lower the latency of readouts from 3–4
times a day to every five minutes. For example, diabetics can see
what foods are most likely to cause blood sugar spikes for them
personally. CGMs put patients on a path to manage this chronic condition
well.
But, the devices themselves, and the (default) apps that control them are
hopelessly proprietary. Fortunately, this was (obviously) not my first time
explaining
FOSS from first
principles. So, I read through the license and terms and conditions of the
ironically named “Freestyle Libre” app, and pointed out to the
specialist how patient-unfriendly the terms were. For example, Abbott (the
manufacturer of my CGM) reserves the right to collect your data
(anonymously of course, to “improve the product”). They also
require patients to agree that if they take any action to reverse engineer,
modify, or otherwise do the normal things our community does with
software, the patient must agree that such actions “constitute
immediate, irreparable harm to Abbott, its affiliates, and/or its
licensors”. I briefly explained to the specialist that I could not
possibly agree. I began in real-time (still sitting with the specialist) a
search for a FOSS solution.
As I was searching, the specialist said: “Oh, I don’t use any of it
myself, but I think I’ve heard of this ‘open source’ thing
— there is a program called xDrip+ that is for insulin-dependent
diabetics that I’ve heard of and some patients report it is quite
good”.
While I’m (luckily) very far from insulin-dependency, I eventually found
the FOSS Android app called Juggluco (a
portmanteau for “Juggle glucose”). I asked the specialist to
give me the prescription and I’d try Juggluco to see if it would work.
CGM‘s are very small
and their firmware is (by obvious necessity) quite simple. As such, their
interfaces are standard. CGM’s are activated with Near Field Communication
(NFC) — available on even quite old Android devices.
The Android device sends a simple integer identifier via NFC that activates
the CGM. Once activated — and through the 15-day life of the device
— the device responds via Bluetooth with the patient’s current
glucose reading to any device presenting that integer.
Fortunately, I quickly discovered that the FOSS community was already
“on this”. The NFC activation worked just fine, even on the
recently updated “Freestyle Libre 3+”. After
the sixty minute calibration period, I had a continuous readout in Juggluco.
CGM‘s lower latency
feedback enables diabetics to have more control of their illness
management. one example among many: the patient can see (in real time)
what foods most often cause blood sugar spikes for them personally. Diabetes hits everyone differently; data allows
everyone to manage their own chronic condition better.
My personal story with Juggluco will continue — as I hope (although
not until after FOSDEM 2026 😆) to become an upstream contributor to
Juggluco. Most importantly, I hope to help the app appear in F-Droid. (I
must currently side-load or use Aurora Store to make it work on
LineageOS.)
Fitting with the history that many projects that interact with proprietary
technology must so often live through, Juggluco has
faced surreptitious
removal from Google’s Play Store. Abbott even accused Juggluco of
using their proprietary libraries and encryption methods, but the so-called
“encryption method” is literally sending an single integer as
part of NFC activation.
While Abbott backed off, this is another example of why the movement of
patients taking control of the technology remains
essential. FOSS
fits perfectly with this goal. Software freedom gives control of
technology to those who actually rely on it — rather than for-profit
medical equipment manufacturers.
When I returned to my specialist for a follow-up, we reviewed the data and
graphs that I produced with Juggluco. I, of course, have never installed,
used, or even agreed to Abbott’s licenses and terms, so I have never seen
what the Abbott app does. I was thus surprised when I showed my specialist
Juggluco’s summary graphs. He excitedly told me “this is much better
reporting than the Abbott app gives you!”. We all know that
sometimes proprietary software has better and more features than the FOSS
equivalent, so it’s a particularly great success when our community efforts
outdoes a wealthy 200 billion-dollar megacorp on software features!
Please do watch SFC’s site in 2026 for more posts about my ongoing work
with Juggluco, and
please give generously as an
SFC Sustainer to help this and our other work continue in 2026!
At AWS, a common question we hear is: “Which AWS capabilities are available in different Regions?” It’s a critical question whether you’re planning Regional expansion, ensuring compliance with data residency requirements, or architecting for disaster recovery.
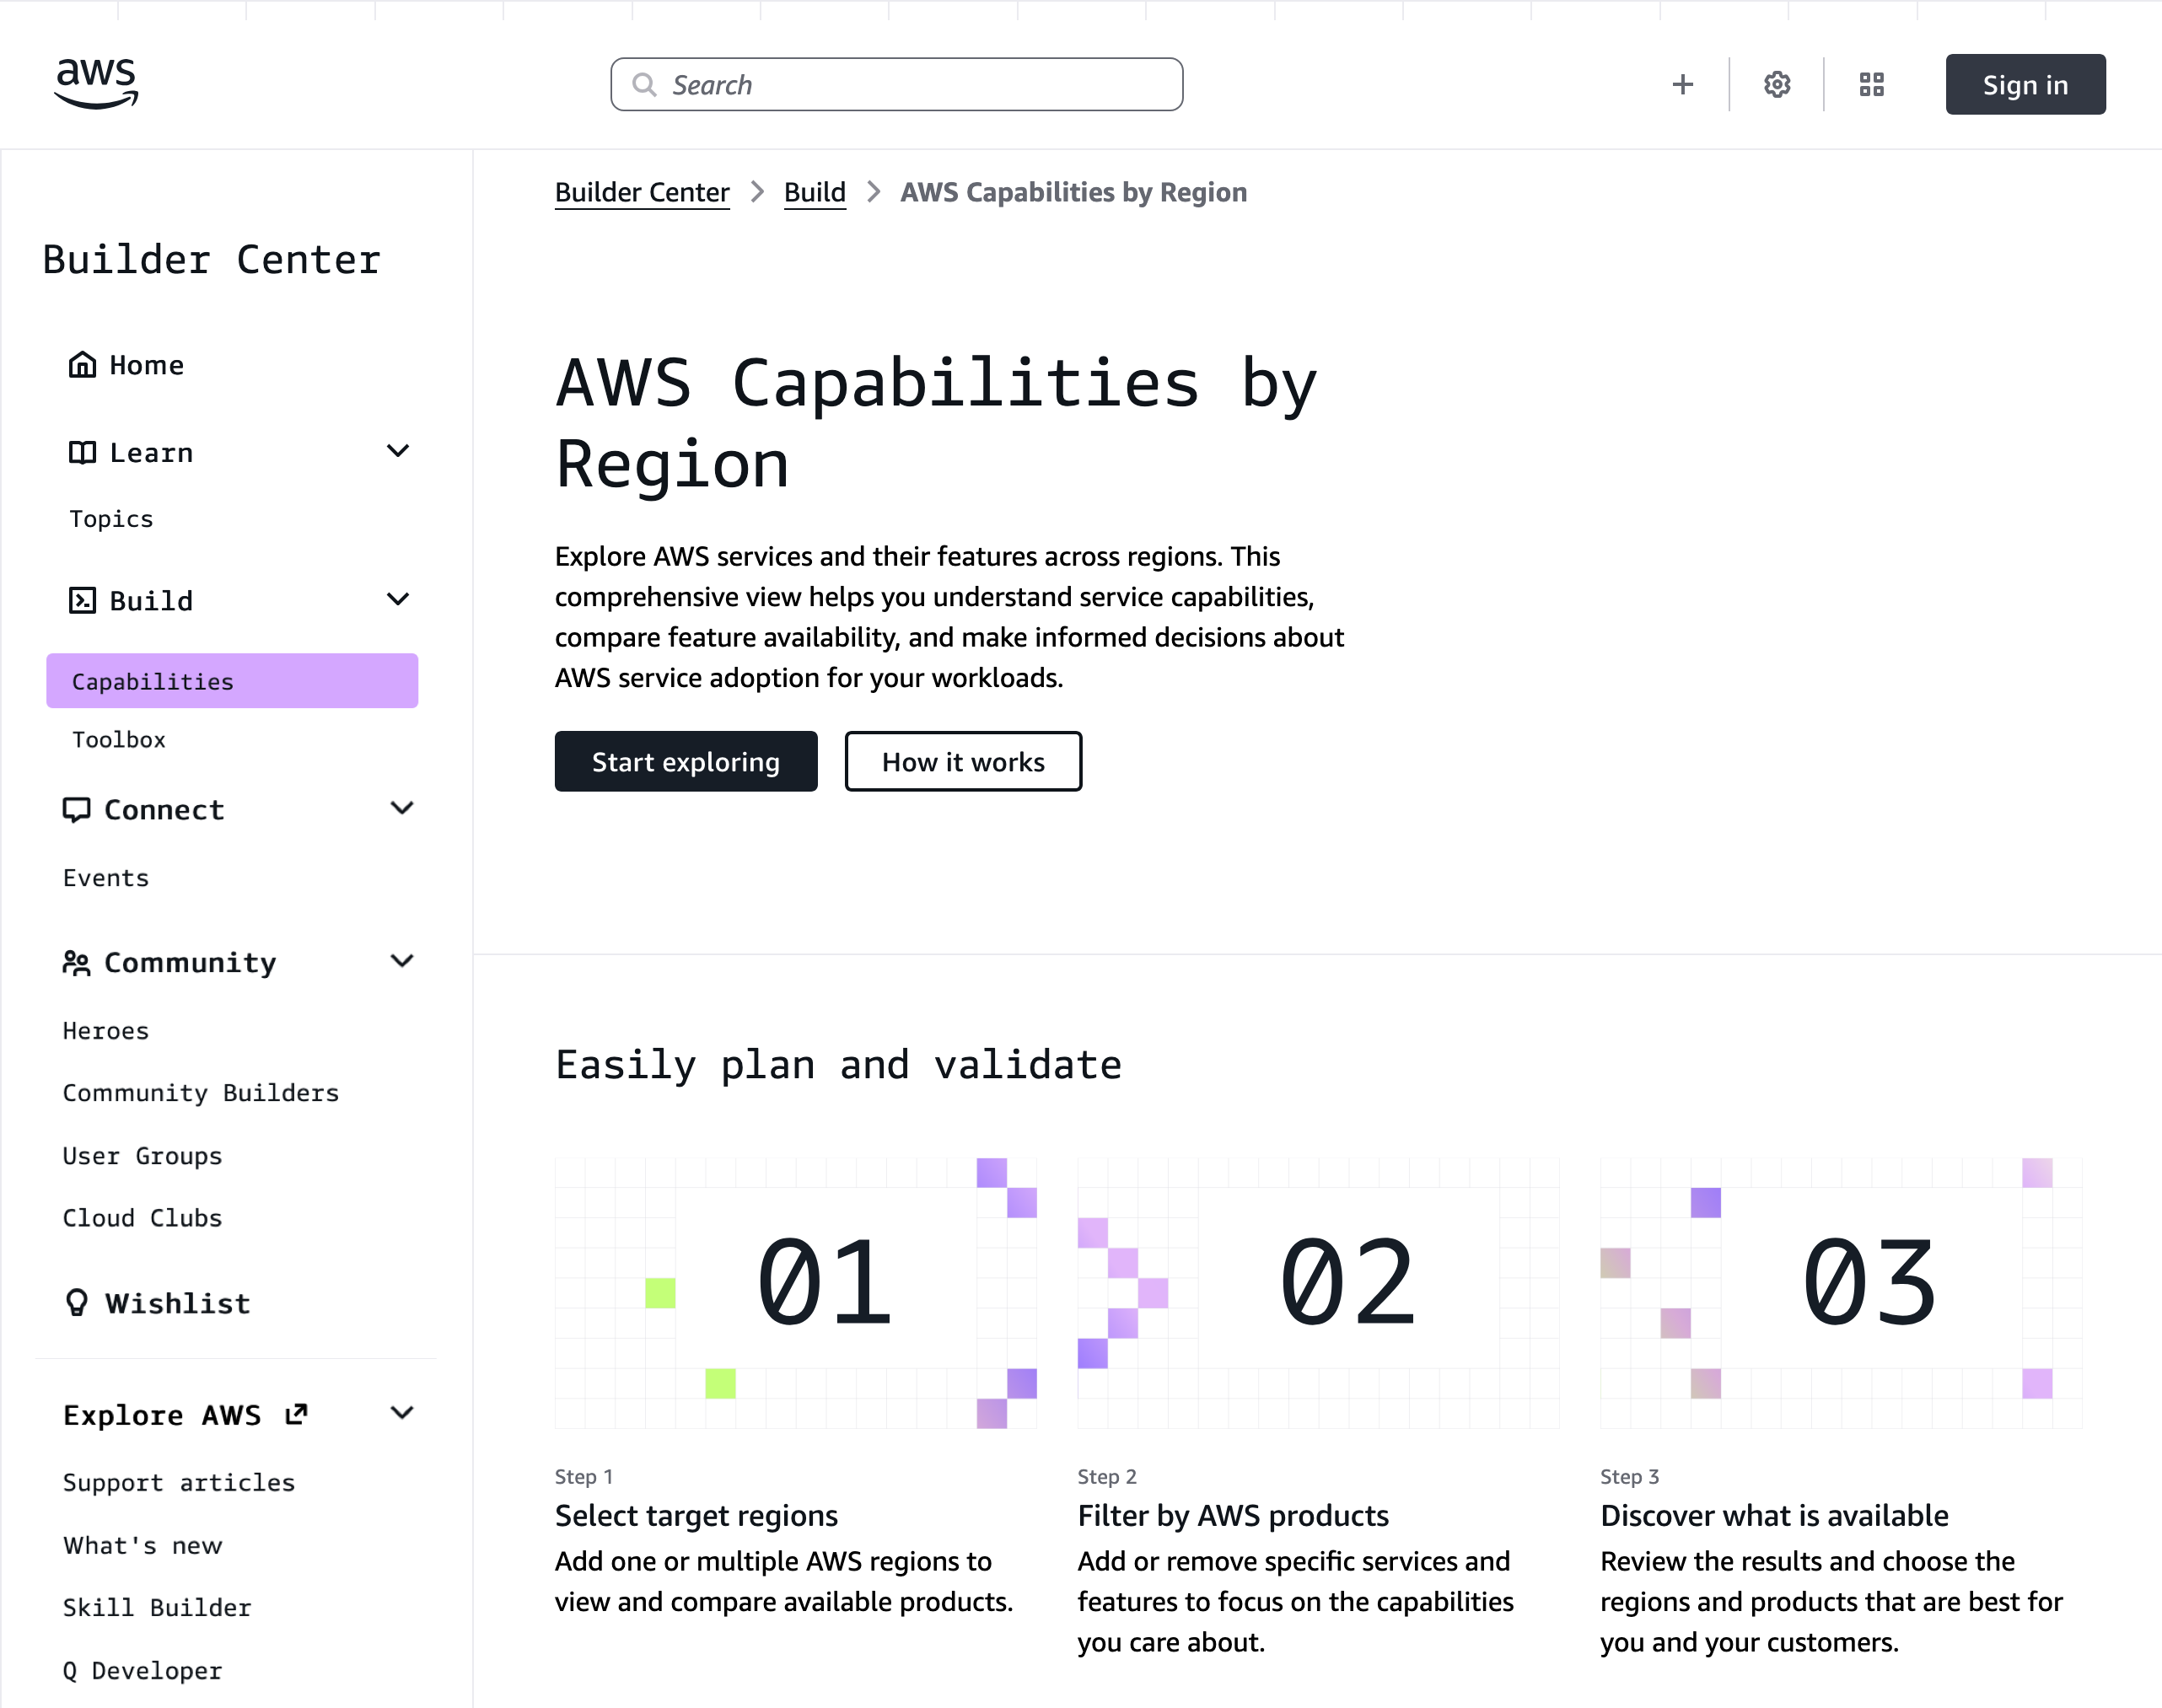
Today, I’m excited to introduce AWS Capabilities by Region, a new planning tool that helps you discover and compare AWS services, features, APIs, and AWS CloudFormation resources across Regions. You can explore service availability through an interactive interface, compare multiple Regions side-by-side, and view forward-looking roadmap information. This detailed visibility helps you make informed decisions about global deployments and avoid project delays and costly rework.
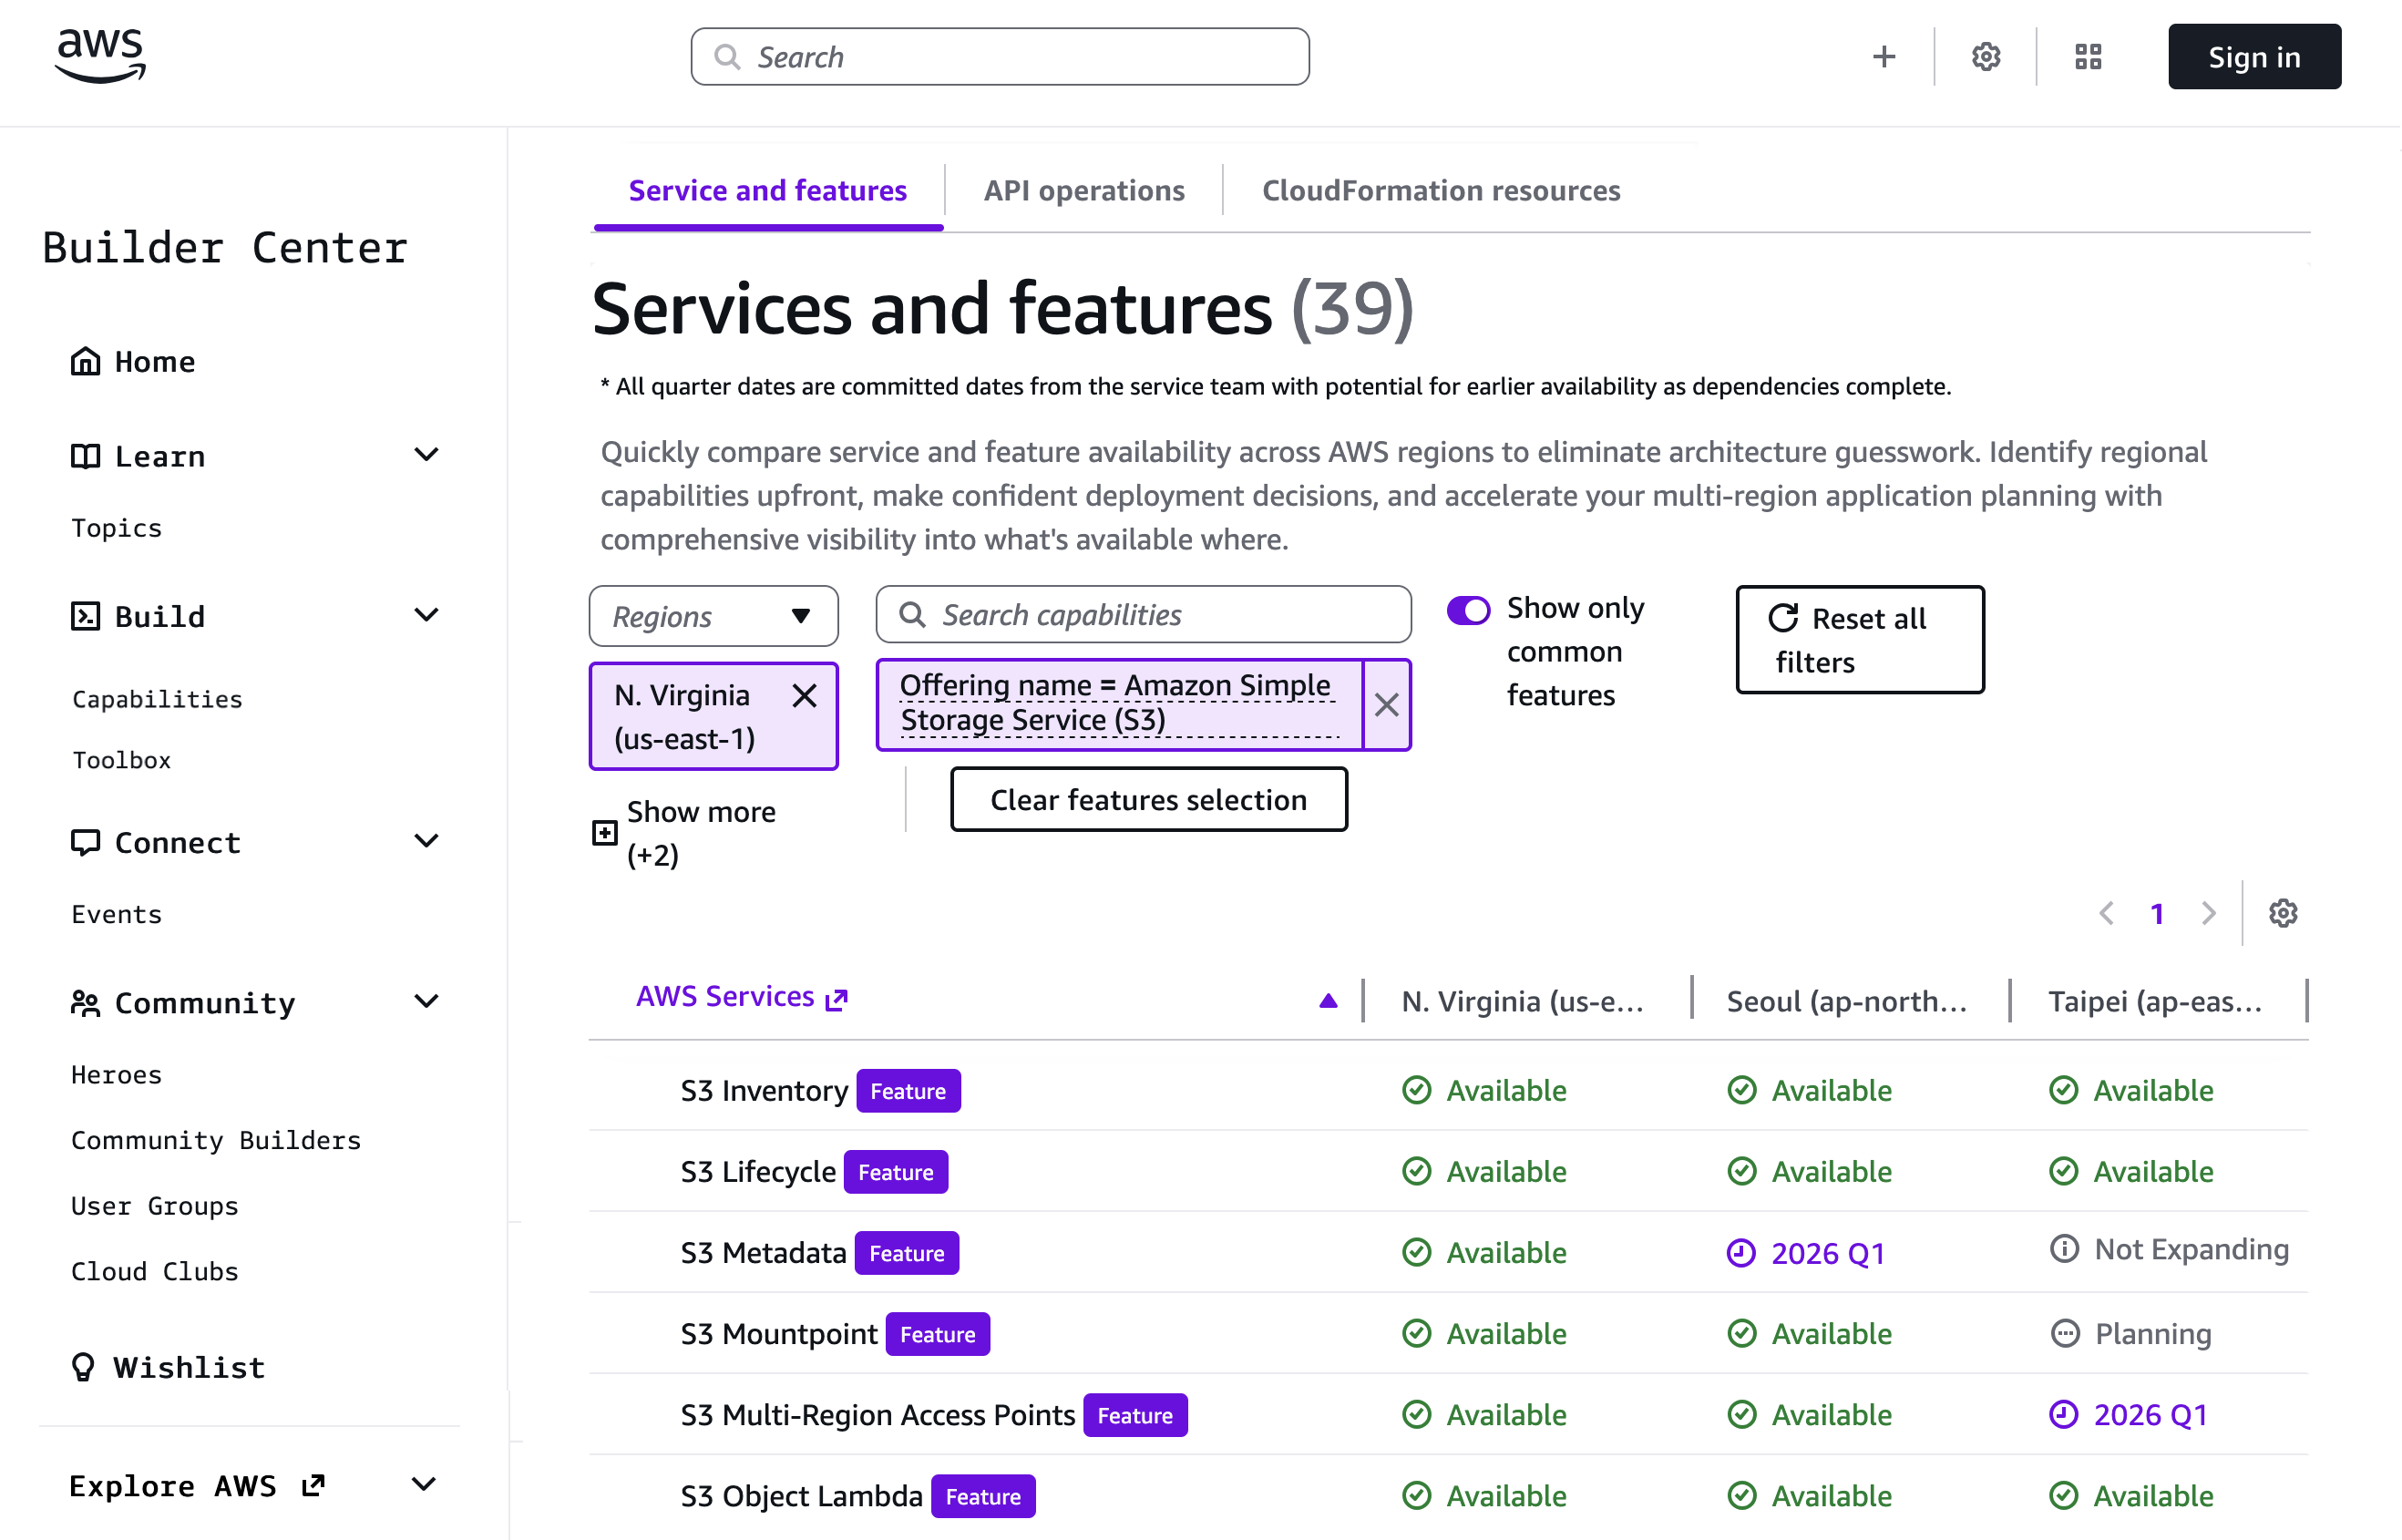
Getting started with Regional comparison To get started, go to AWS Builder Center and choose AWS Capabilities and Start Exploring. When you select Services and features, you can choose the AWS Regions you’re most interested in from the dropdown list. You can use the search box to quickly find specific services or features. For example, I chose US (N. Virginia), Asia Pacific (Seoul), and Asia Pacific (Taipei) Regions to compare Amazon Simple Storage Service (Amazon S3) features.
Now I can view the availability of services and features in my chosen Regions and also see when they’re expected to be released. Select Show only common features to identify capabilities consistently available across all selected Regions, ensuring you design with services you can use everywhere.
The result will indicate availability using the following states: Available (live in the region); Planning (evaluating launch strategy); Not Expanding (will not launch in region); and 2026 Q1 (directional launch planning for the specified quarter).
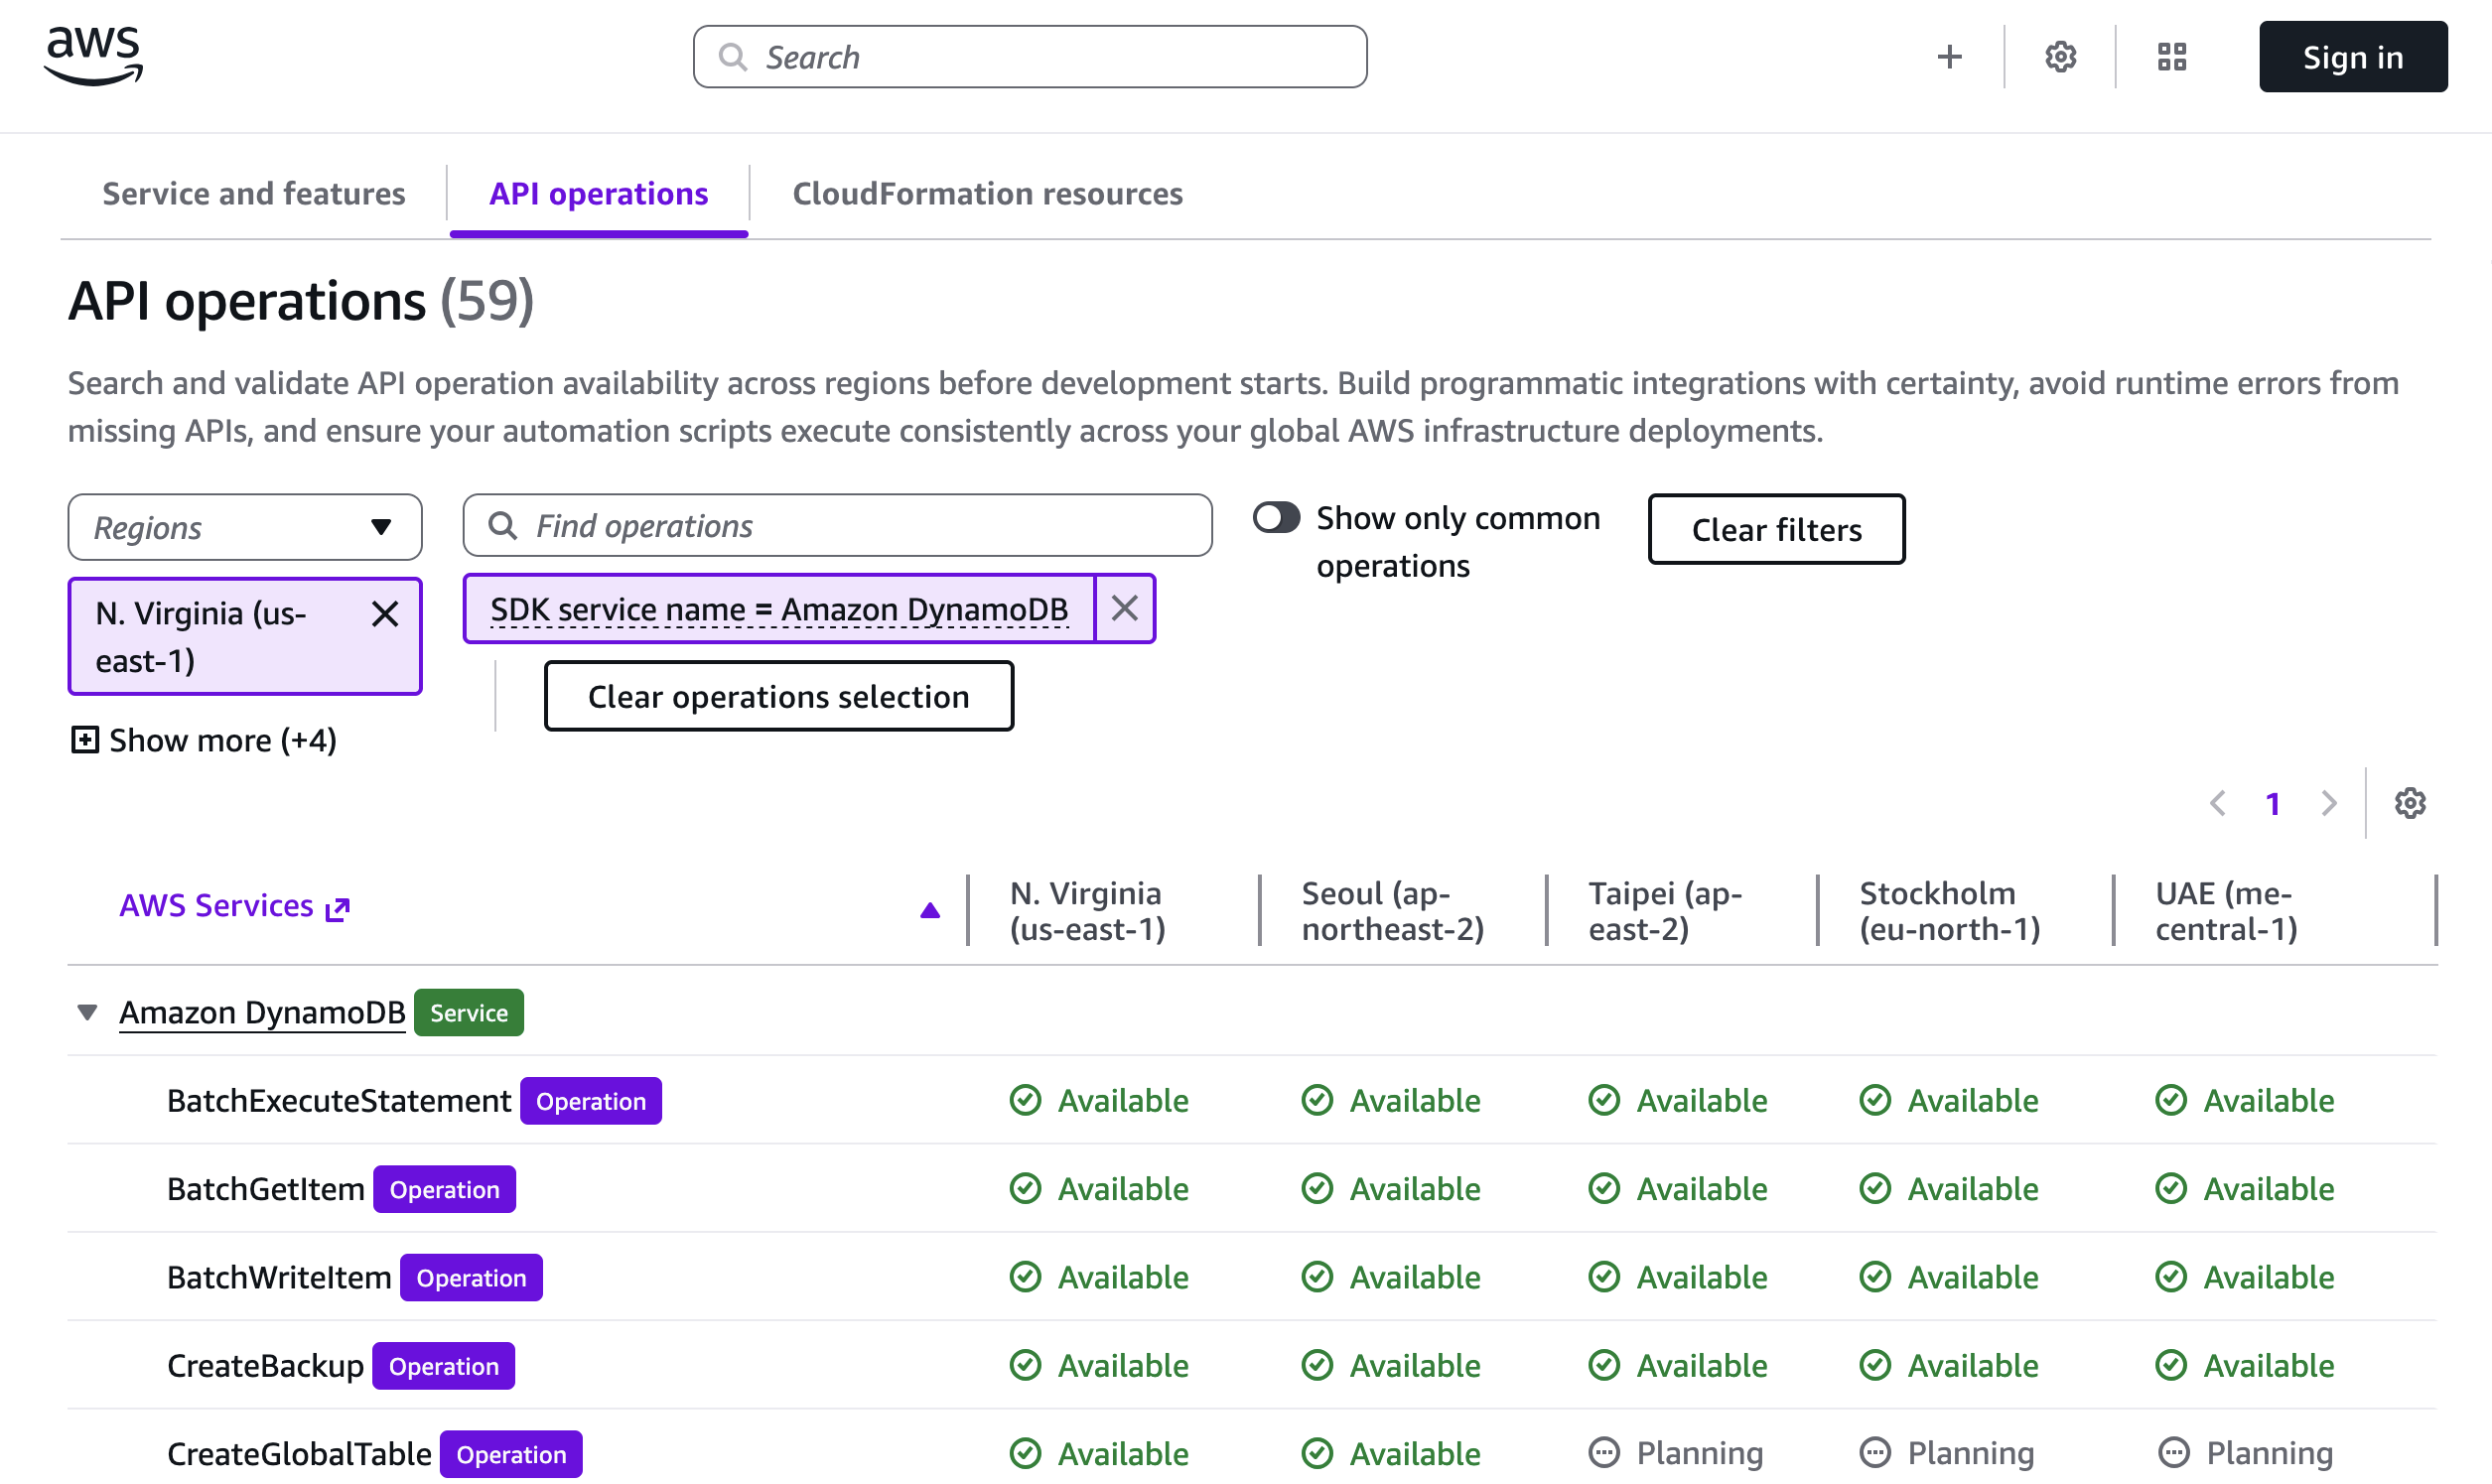
In addition to exploring services and features, AWS Capabilities by Region also helps you explore available APIs and CloudFormation resources. As an example, to explore API operations, I added Europe (Stockholm) and Middle East (UAE) Regions to compare Amazon DynamoDB features across different geographies. The tool lets you view and search the availability of API operations in each Region.
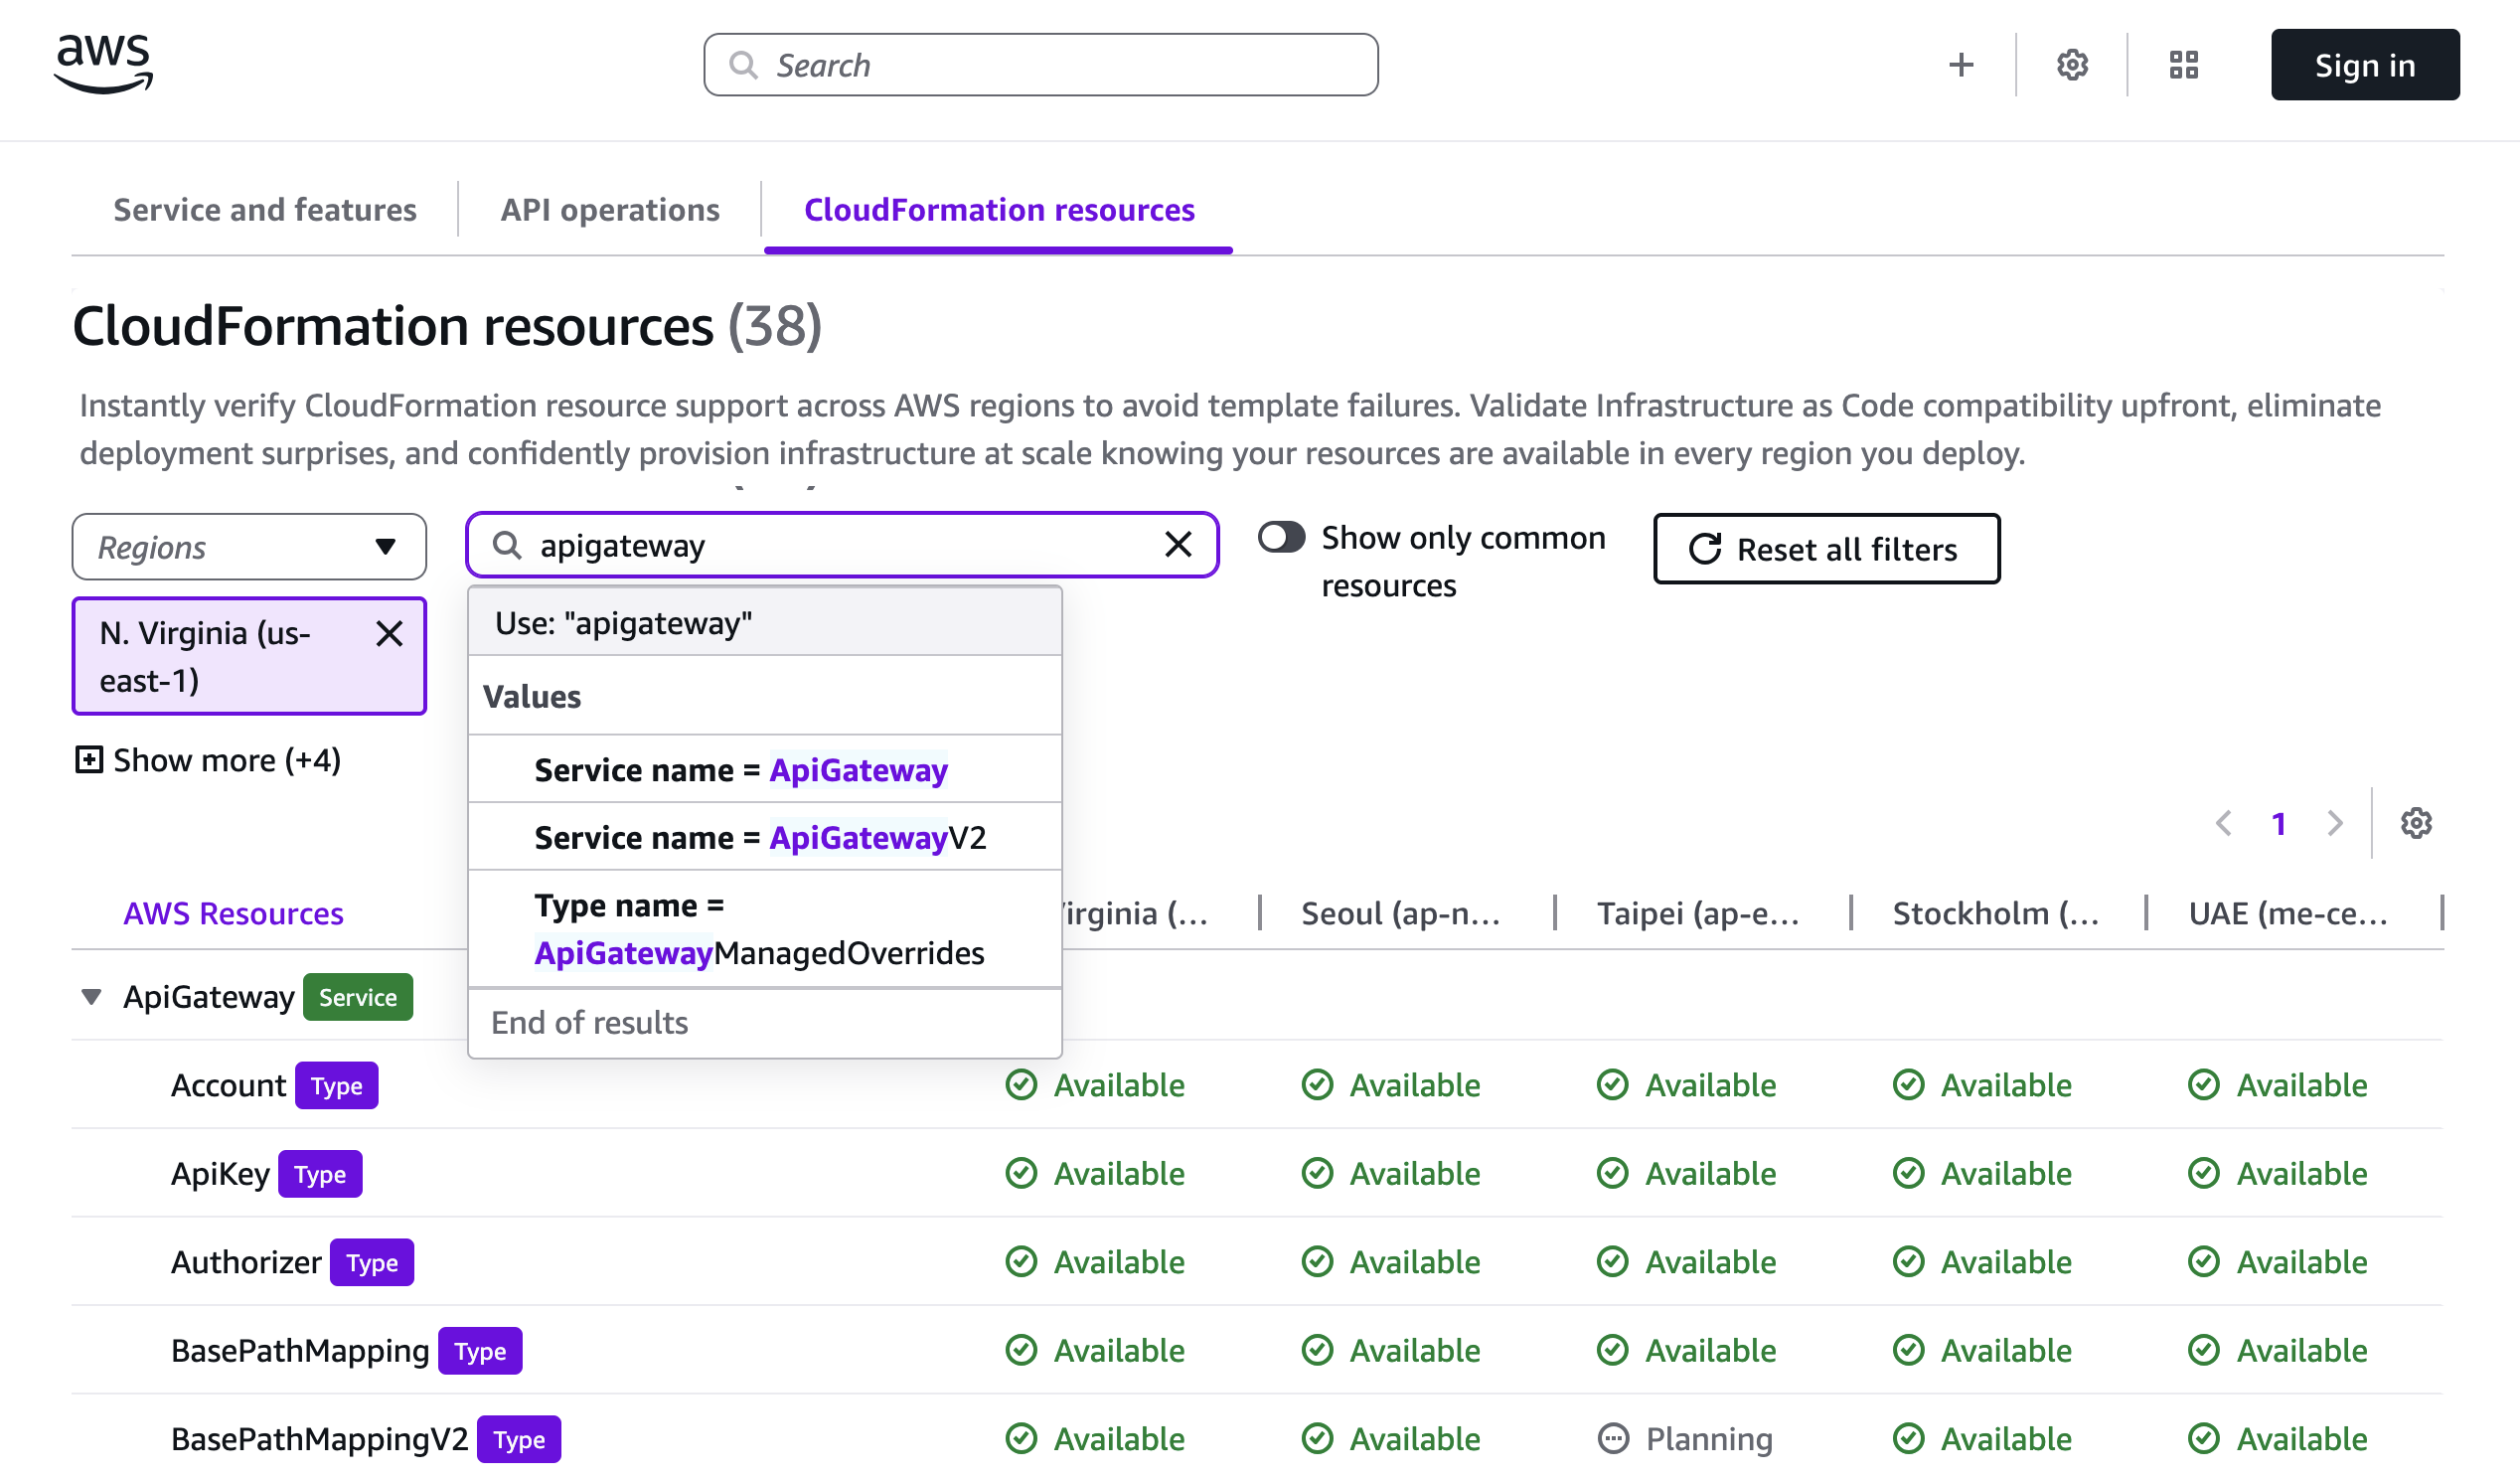
The CloudFormation resources tab helps you verify Regional support for specific resource types before writing your templates. You can search by Service, Type, Property, and Config.For instance, when planning an Amazon API Gateway deployment, you can check the availability of resource types like AWS::ApiGateway::Account.
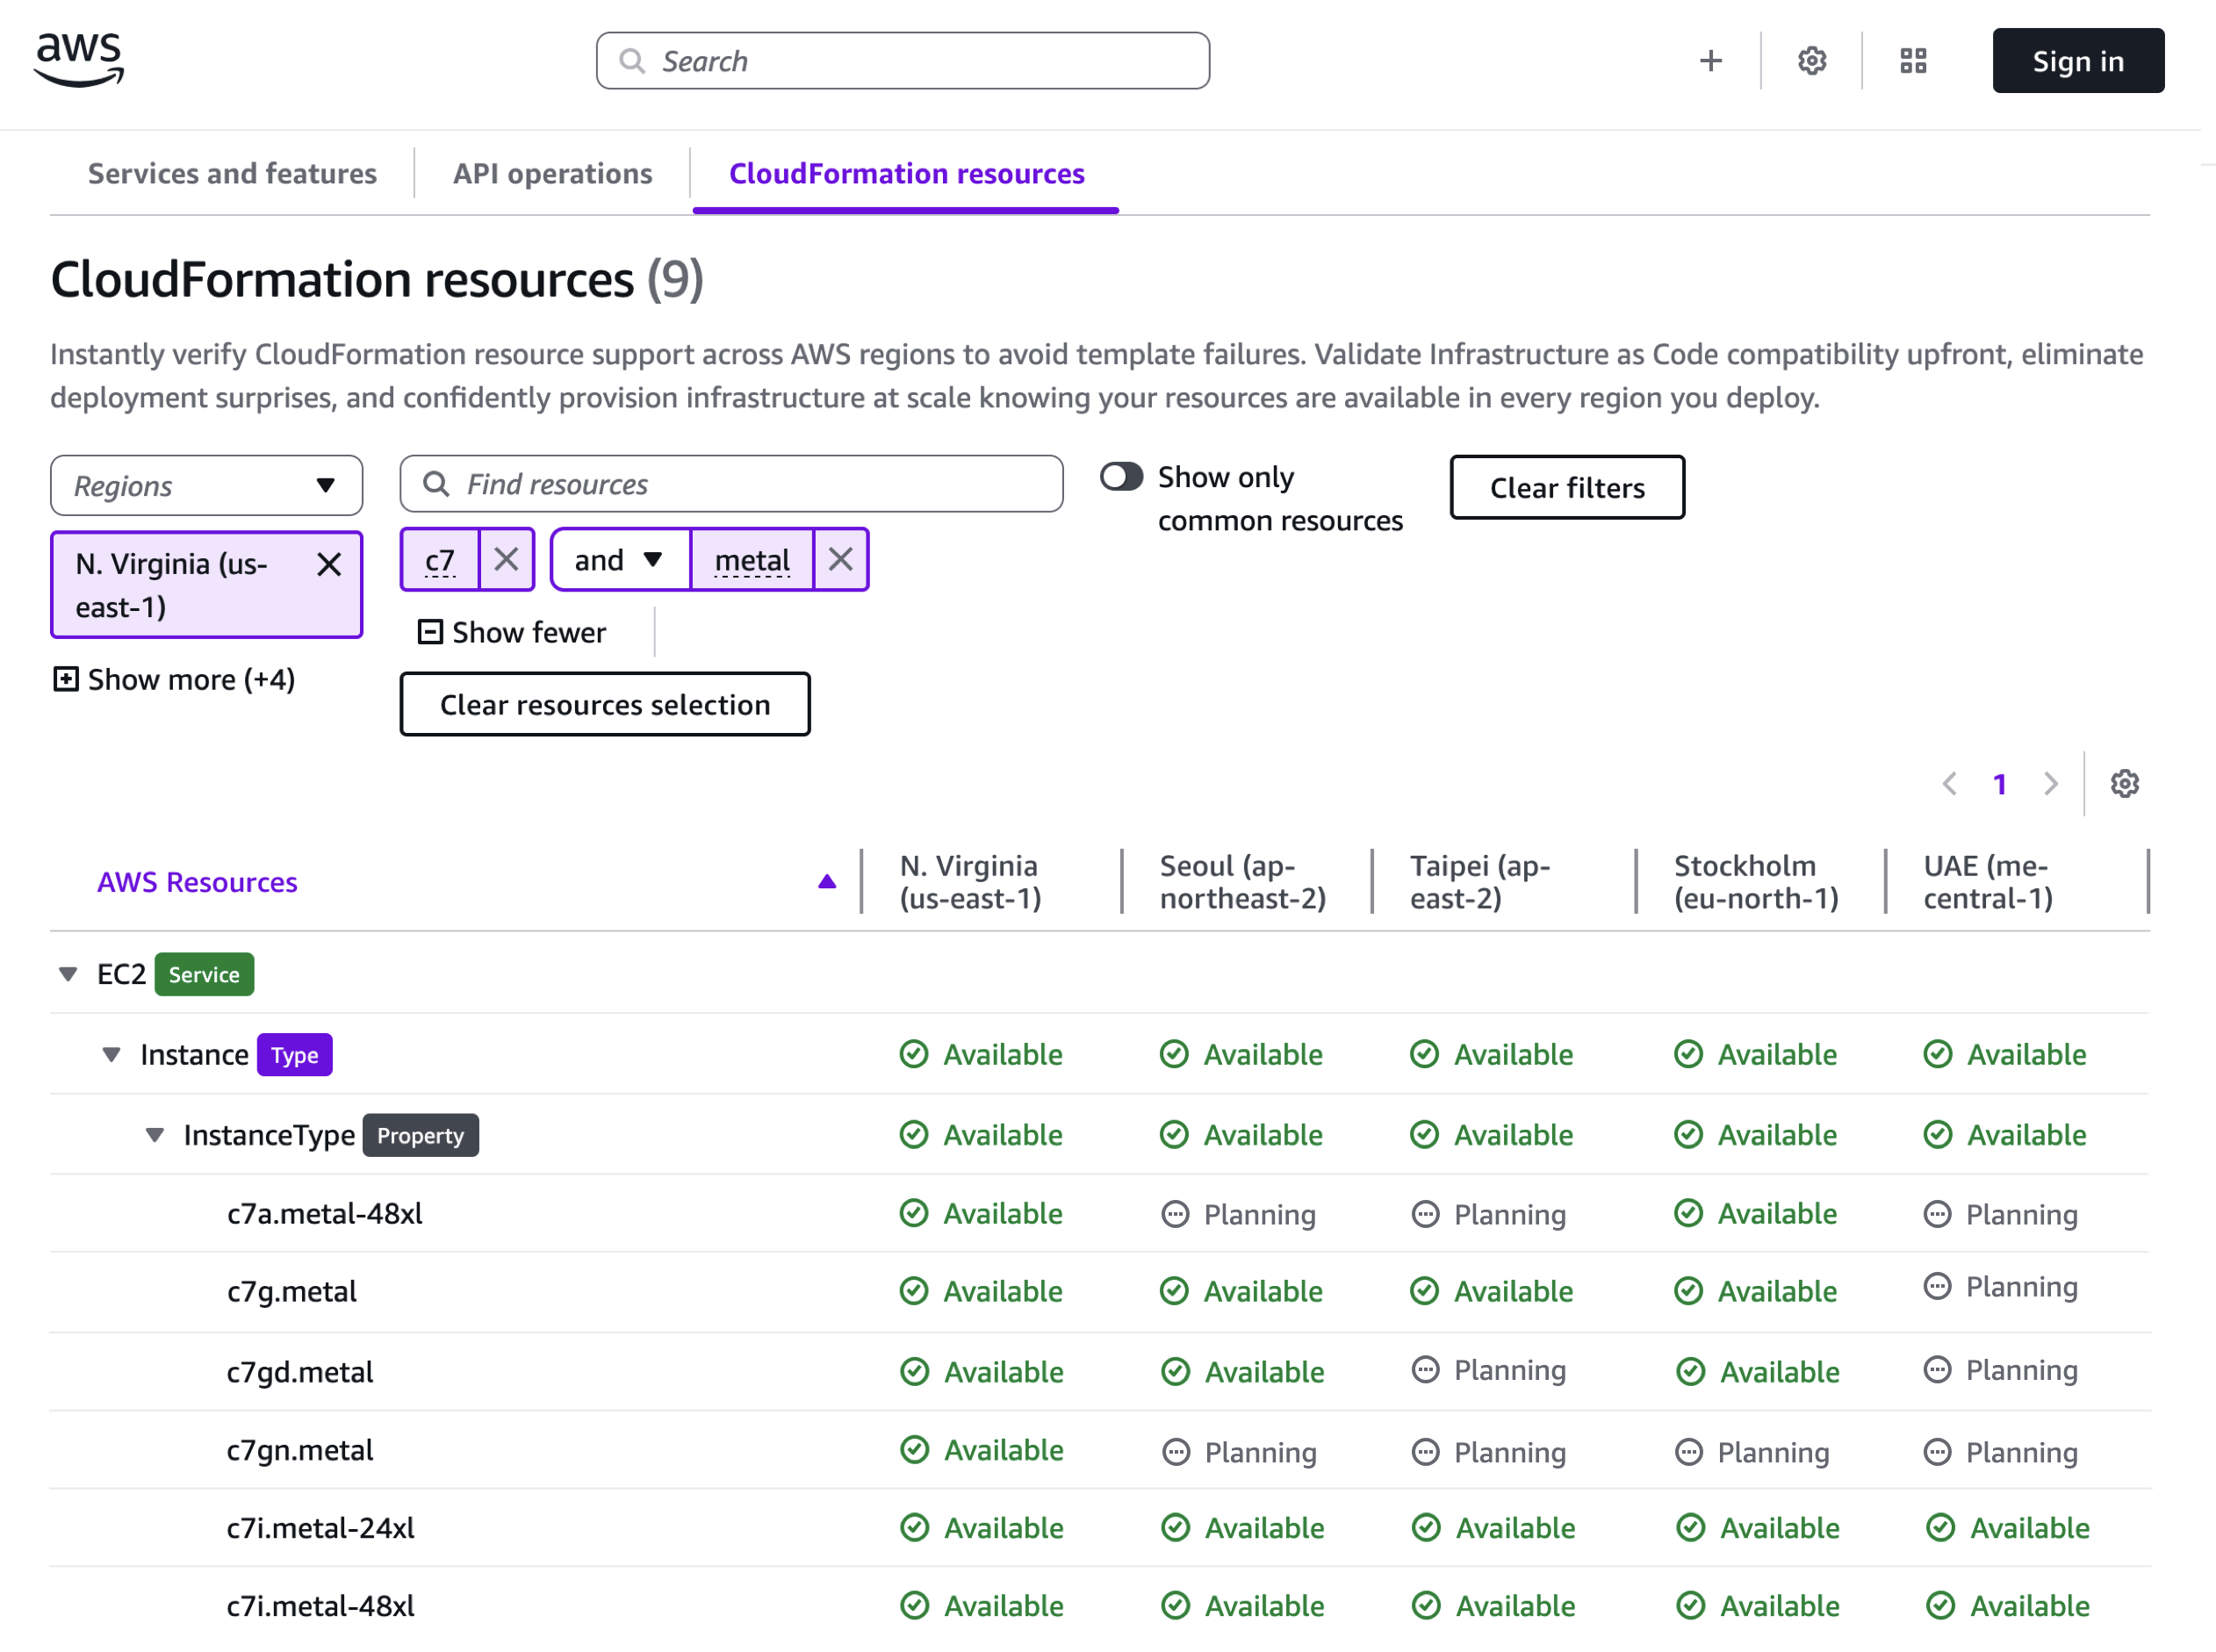
You can also search detailed resources such as Amazon Elastic Compute Cloud (Amazon EC2) instance type availability, including specialized instances such as Graviton-based, GPU-enabled, and memory-optimized variants. For example, I searched 7th generation compute-optimized metal instances and could find c7i.metal-24xl and c7i.metal-48xl instances are available across all targeted Regions.
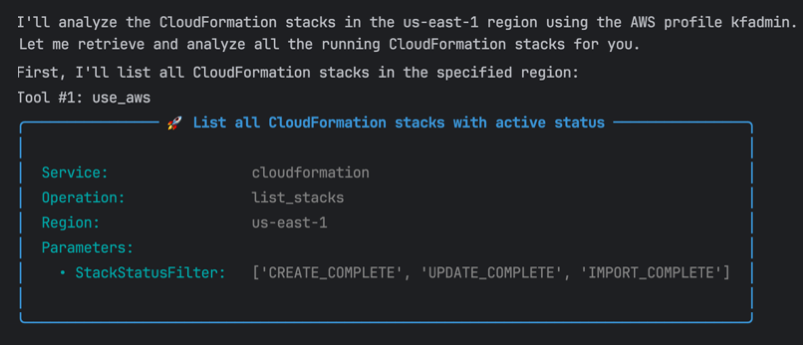
Beyond the interactive interface, the AWS Capabilities by Region data is also accessible through the AWS Knowledge MCP Server. This allows you to automate Region expansion planning, generate AI-powered recommendations for Region and service selection, and integrate Regional capability checks directly into your development workflows and CI/CD pipelines.
Now available You can begin exploring AWS Capabilities by Region in AWS Builder Center immediately. The Knowledge MCP server is also publicly accessible at no cost and does not require an AWS account. Usage is subject to rate limits. Follow the getting started guide for setup instructions.
We would love to hear your feedback, so please send us any suggestions through the Builder Support page.
A new meeting on your calendar or a new attack vector?
It starts innocently enough. A new meeting appears in your Google calendar and the subject seems ordinary, perhaps even urgent: “Security Update Briefing,”“Your Account Verification Meeting,” or “Important Notice Regarding Benefits.” You assume you missed this invitation in your overloaded email inbox, and click “Yes” to accept.
Unfortunately, calendar invites have become an overlooked delivery mechanism for social engineering and phishing campaigns. Attackers are increasingly abusing the .ics file format, a universally trusted, text-based standard to embed malicious links, redirect victims to fake meeting pages, or seed events directly into users’ calendars without interaction.
Because calendar files often bypass traditional email and attachment defenses, they offer a low-friction attack path into corporate environments.
Defenders should treat .ics files as active content, tighten client defaults, and raise awareness that even legitimate-looking calendar invites can carry hidden risk.
The underestimated threat of .ics files
The iCalendar (.ics) format is one of those technologies we all rely on without thinking. It’s text-based, universally supported, and designed for interoperability between Outlook, Google Calendar, Apple, and countless other clients.
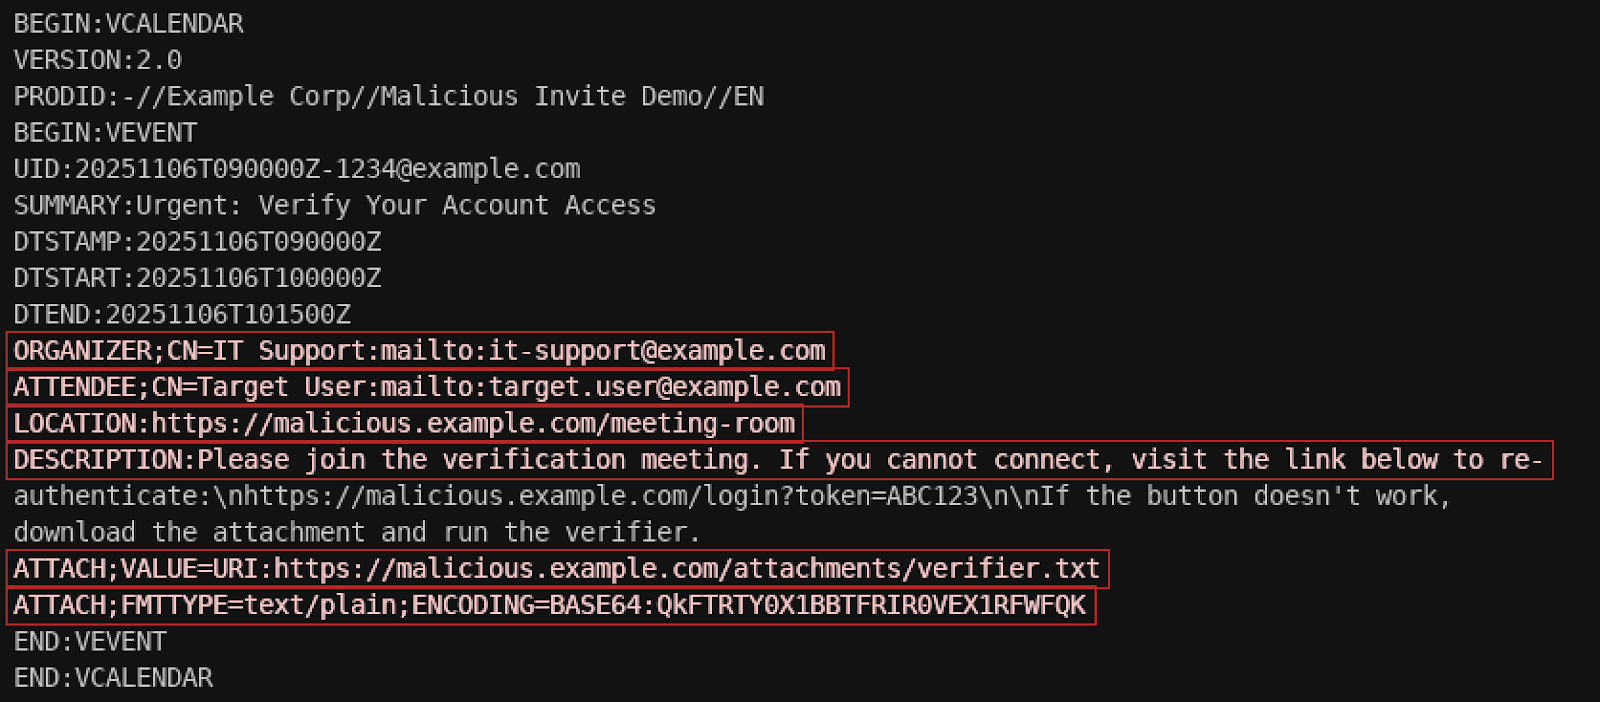
Each invite contains a structured list of fields like SUMMARY, LOCATION, DESCRIPTION, and ATTACH. Within these, attackers have found an opportunity: they can embed URLs, malicious redirects, or even base64-encoded content. The result is a file that appears completely legitimate to a calendar client, yet quietly delivers the attacker’s message, link, or payload.
Because calendar files are plain text, they easily slip through traditional security controls. Most email gateways and endpoint filters don’t treat .ics files with the same scrutiny as executables or macros. And since users expect to receive meeting invites, often from outside their organization, it’s an ideal format for social engineering.
How threat actors abuse the invite
Over the past year, researchers have observed a rise in campaigns abusing calendar invites to phish credentials, deliver malware, or trick users into joining fake meetings. These attacks often look mundane but rely on subtle manipulation:
The lure: A professional-looking meeting name and sender, sometimes spoofed from a legitimate organization.
The link: A URL hidden in the DESCRIPTION or LOCATION field, often pointing to a fake login page or document-sharing site.
The timing: Invites scheduled within minutes, creating urgency (“Your access expires in 15 minutes — join now”).
The automation: Calendar clients that automatically add external invites, ensuring the trap appears directly in the user’s daily schedule.
⠀
Example of where some of the malicious components would reside in the .ics file
⠀
It’s clever, low-effort social engineering leveraging trust in a system built for collaboration.
The “invisible click” problem
The real danger of malicious calendar invites isn’t just the link inside, it’s the automatic delivery mechanism. In certain configurations, Outlook and Google Calendar will automatically process .ics attachments and create tentative events, even if the user never opens or even receives the email. That means the malicious link is now part of the user’s trusted interface with their calendar.
This bypasses the usual cognitive warning signs. The email might look suspicious, but the event reminder popping up later? That feels like part of your day. It’s phishing that moves in quietly and waits.
Why traditional defenses miss it
Security tooling has historically focused on attachments that execute code or scripts. By contrast, .ics files are plain text and standards-based, so they don’t inherently appear dangerous. Many detection engines ignore or minimally parse them.
Attackers exploit that gap. They rely on the fact that few organizations monitor for BEGIN:VCALENDAR content or inspect calendar metadata for embedded URLs. Once delivered, the file can bypass filters, land in the user’s calendar, and lead to a high-confidence click.
What defenders can do now
Defending against calendar-based attacks begins with recognizing that these are not edge cases anymore. They’re a natural evolution of phishing where user convenience becomes the delivery mechanism.
Here are a few pragmatic steps every organization should consider:
Treat .ics files like active content. Configure email filters and attachment scanners to inspect calendar files for URLs, base64-encoded data, or ATTACH fields.
Review calendar client defaults. Disable automatic addition of external events when possible, or flag external organizers with clear warnings.
Sanitize incoming invites. Content disarm and reconstruction (CDR) tools can strip out or neutralize dangerous links embedded in calendar fields.
Raise awareness among users. Train employees to verify unexpected invites — especially those urging immediate action or containing meeting links they didn’t anticipate. Employees can also follow the helpful advice in this Google Support article.
Use strong identity protection. Multi-factor authentication and conditional access policies mitigate the impact if a phishing link successfully steals credentials.
These steps don’t eliminate the threat, but they significantly increase friction for attackers and their malware.
A quiet evolution in social engineering campaigns
Malicious calendar invites represent a subtle yet telling shift in attacker behavior: blending into legitimate business processes rather than breaking them. In the same way that invoice-themed phishing emails once exploited trust in accounting workflows, .ics abuse leverages the quiet reliability of collaboration tools.
As organizations continue to integrate calendars with chat, cloud storage, and video platforms, the attack surface will only expand. Links inside invites will lead to files in shared drives, authentication requests, and embedded meeting credentials. These are all opportunities for exploitation.
Rethinking trust in everyday workflows
Defenders often focus on the extraordinary like zero days, ransomware binaries, and new exploits. Yet the most effective attacks remain the simplest: exploiting human trust in ordinary digital habits. A calendar invite feels harmless and that’s exactly why it works.
The next time an unexpected meeting appears in your calendar, it might be more than just a double-booking. It could be a reminder that security isn’t only about blocking malware, but about questioning what we assume to be safe.
Version
4.5 of the Mastodon
decentralized social-media platform has been released. Notable
features in this release include quote
posts, native emoji support, as well as enhanced moderation and
blocking features for server administrators. The project also has a post
detailing new features in 4.5 for developers of clients and other
software that interacts with Mastodon.
The future of the Filesystem Hierarchy Standard (FHS) has been under discussion for some time; now,
Neal Gompa has announced
that the FHS is “hosted and stewarded” by Freedesktop.org.
For those who are unaware, the Filesystem Hierarchy Standard (FHS)
is the definition for POSIX operating systems to organize system
and user data. It is broadly adopted by Linux, BSD, and other
operating systems that follow POSIX-like conventions.
Filesystems are complex and performance-sensitive beasts. They can also
present security concerns. Microkernel-based systems have long pushed
filesystems into separate processes in order to contain any vulnerabilities
that may be found there. Linux can do the same with the Filesystem in
Userspace (FUSE) subsystem, but using FUSE brings a significant
performance penalty. Darrick Wong is working on ways to eliminate that
penalty, and he has a massive patch
set showing how ext4 filesystems can be safely implemented in user space by
unprivileged processes with good performance. This work has the potential
to radically change how filesystems are managed on Linux systems.
Social media can have a powerful impact on the way we see and experience the world. What we see in our feeds is not random: it is determined by AI-driven systems that collect vast amounts of data, build user profiles, analyse engagement, and generate recommendations. But while young people are prolific users of social media, studies show that many have little understanding of what is happening ‘under the hood’
Researchers Henriikka Vartiainen and Matti Tedre.
In our September research seminar, we welcomed back Henriikka Vartiainen and Matti Tedre from the University of Eastern Finland. They introduced Somekone, a social media simulator that is designed to help learners understand some of the fundamental processes behind social media platforms. Their team has been developing AI education materials and tools since 2019, including GenAI Teachable Machine, which they presented at our May research seminar.
Collaboration and co-design
Henriikka explained that the development of the Somekone tool emerged from the team’s long-term collaboration with teachers and schools in Finland. They co-developed the tool with the aim of making concepts like data collection, engagement, profiling, recommendations, filter bubbles, and polarisation visible and explainable for students aged 11 to 13 years old.
A four-phase learning model
Henriikka described the pedagogical model that the team follows in all of their AI education interventions. Their goal is not only to support students to develop their understanding of AI concepts, but also to foster ethical awareness and a sense of agency.
Phase 1: Contextualisation and familiarisation Students begin by discussing their experiences with social media and their initial ideas about how platforms such as TikTok, YouTube, and Instagram work. This activates students’ prior knowledge and helps connect the learning to their own interests. It also enables teachers to uncover any misconceptions the students may have.
Phase 2: Exploration Students explore their initial ideas by experimenting with the Somekone tool. They discover how different types of data are collected and combined for profiling in a way that connects these new concepts to their own everyday lives.
Phase 3: Design and inquiry Students explore the Somekone tool more deeply. Teachers guide them through activities where the students analyse, interpret, and discuss the data they can see in the tool. Importantly, the data they are using has all been gathered from their activity on the platform. Students can see how the likes, follows, and comments they and their classmates make change the images they are shown, and this is all real time.
Phase 4: Ethical and societal reflection Students reflect on what they have learnt and consider the broader impacts of social media. Teachers encourage them to think critically, question the way social media platforms currently work, and imagine alternatives. At the end of the project, students write letters to decision-makers with their suggestions for how social media could better serve children’s interests.
Inside the simulator
Matti then gave a live demonstration of Somekone. Nothing compares to seeing the tool in action, so do check out the video of his demo here!
Students log on to the tool and are presented with an Instagram-style feed of images. They scroll through the feed and like, share, or comment on images that catch their attention or match their interests. For many students this is a very familiar type of environment, and they really enjoy playing with the app!
However, the unique value of Somekone is that it provides students with a real-time view of the way data is collected from every single user interaction, and demonstrates what is done with that data. It also allows students to experiment with a social media tool in the classroom without any data protection issues, as all of the data is stored locally.
Learners explore:
Data collection in real time. Working in pairs, one student browses the image feed, while the other watches a live view of the data that the simulator is collecting every time their partner interacts with or simply pauses on a post.
Profile building. Somekone shows how all this data accumulates to build a profile. Students watch their profiles developing based on the way they and their classmates are interacting with their feeds.
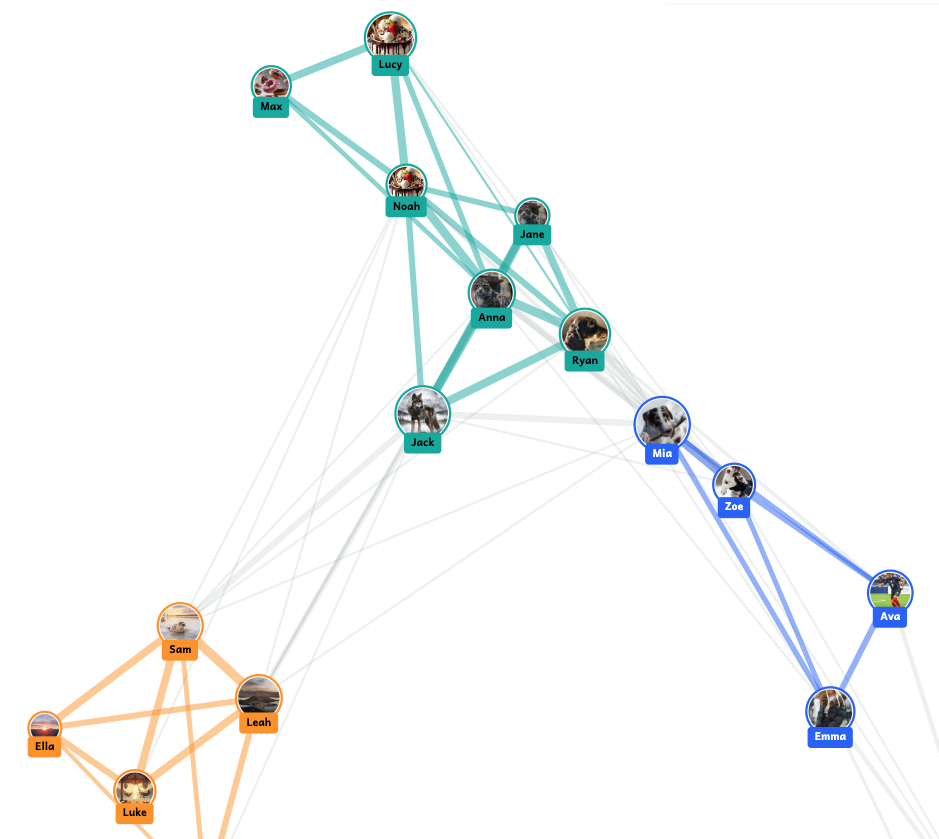
Clustering and connections. Students then see how the tool groups profiles to create clusters of users with similar interests. Often friendship groups in the classroom are evident on screen because students sitting next to each other have all chosen to engage with the same things!
The simulator creates clusters of users with similar interests, which update in real time as students interact with posts on their feeds
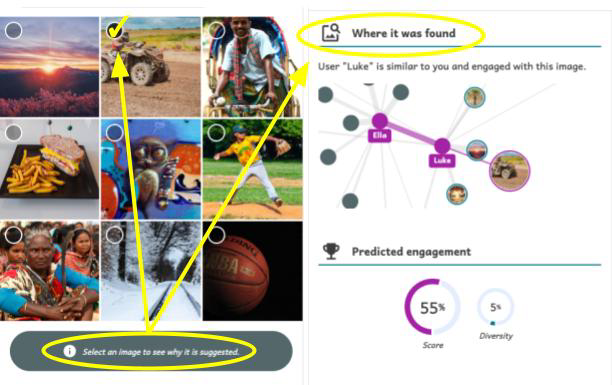
Explainable recommendations. A key feature of Somekone is that it provides explanations for why it recommends posts to users. Students learn that recommendations can be based on various things, such as the image’s tag matching the tag on other posts they liked, or the image being popular among other users with similar profiles to theirs. These are the mechanisms that underpin real recommendation systems, but Somekone makes them explicit.
The tool provides an explanation for why each post is recommended
Filter bubbles and polarisation. A filter bubble forms when a user only sees social media posts that match their existing interests or beliefs, due to highly personalised recommendation systems. Somekone presents this concept in a visually compelling way through a heatmap showing all the content in the system, with a colour scale indicating which posts are most likely to be shown to a particular user, and which they will never encounter. By comparing different users’ filter bubbles side by side, students start to understand how polarisation can arise. As Matti said: “If our feeds are so different from each other that I never see the pictures that you see and you never see the pictures I see, then […] we don’t even share the same reality”.
Two users’ heatmaps presented side by side, showing their respective filter bubbles
Algorithm settings. A key learning opportunity is that students can adjust the algorithm’s parameters and observe how this changes their feed and their filter bubble. They can choose between personalised or non-personalised recommendations, select how posts are ranked, and decide whether to allow any diversity in the popularity of posts recommended to them. This is key to ‘opening up the box’.
For teachers, the tool has a simple guided interface to make it easy to use in class. There is also a button that teachers can use to pause the app, stopping students from scrolling (much to their dismay!) in order to focus their attention on the teacher when they are explaining concepts.
Evidence of impact
The research team used pre- and post-tests to evaluate what impact the intervention had on students’ understanding of social media mechanisms and on their sense of agency in relation to data. They conducted the post-test a week after the intervention, and then also did a delayed post-test six months later to see whether any changes were sustained. They found:
Improved understanding of key concepts. Learners showed statistically significant improvements in identifying different types of data traces and in understanding how data profiling works. They also showed some improvement in grasping recommendation mechanisms.
Retention over time. These improvements were generally still evident six months later, particularly in the case of understanding data traces.
Stronger sense of agency. The team found that students’ sense of data agency improved after taking part in the intervention. This is really important as students are more likely to want to study a topic further if they have feelings of agency and self-efficacy.
Accessing the tool
The Somekone tool is freely available online — in Finnish, English, German, and French — at somekone.gen-ai.fi. The developer Nick Pope has also made the source code available on GitHub at github.com/knicos/genai-somekone.
However, the supporting materials and teacher resources are currently only available in Finnish and the underpinning pedagogies relate to the Finnish context.
Join our next seminar
Join us at our next seminar on Tuesday, 11 November from 17:00 to 18:30 GMT to hear Karl-Emil Bilstrup (Copenhagen University) speak about using the micro:bit to explore machine learning practices. We hope to see you there!
To sign up and take part in our research seminars, click below:
Cloudflare Stream loves video. But we know not every workflow needs the full picture, and the popularity of podcasts highlights how compelling stand-alone audio can be. For developers, processing a video just to access audio is slow, costly, and complex.
What makes video so expensive? A video file is a dense stack of high-resolution images, stitched together over time. As such, it is not just “one file” — it’s a container of high-dimensional data such as frames per second, resolution, codecs. Analyzing video means traversing time resolution frame rate.
Why audio extraction
By comparison, an audio file is far simpler. If an audio file consists of only one channel, it is defined as a single waveform. The technical characteristics of this waveform are defined by the sample rate (the number of audio samples taken per second), and the bit depth (the precision of each sample).
With the rise of computationally intensive AI inference pipelines, many of our customers want to perform downstream workflows that require only analyzing the audio. For example:
Power AI and Machine Learning: In addition to translation and transcription, you can feed the audio into Voice-to-Text models for speech recognition or analysis, or AI-powered summaries.
Improve content moderation: Analyze the audio within your videos to ensure the content is safe and compliant.
Using video data in such cases is expensive and unnecessary.
That’s why we’re introducing audio extraction. Through this feature, with just a single API call or click in the dashboard, you can now extract a lightweight M4A audio track from any video.
We’re introducing two flexible methods to extract audio from your videos.
1. On-the-Fly audio extraction through Media Transformations
Media Transformations is perfect for processing and transforming short-form videos, like social media clips, that you store anywhere you’d like. It works by fetching your media directly from its source, optimizing it at our edge, and delivering it efficiently.
We extended this workflow to include audio. By simply adding mode=audio to the transformation URL, you can now extract audio on-the-fly from a video file stored anywhere.
The above request generates a 10 second M4A audio clip from the source video, beginning at the 5-second mark. You can learn more about setup and other options in the Media Transformations documentation.
2. Audio downloads
You can now download the audio track directly for any content that you manage within Stream. Alongside the ability to generate a downloadable MP4 for offline viewing, you can also now create and store a persistent M4A audio file.
Workers AI demo
Here, you can see a sample piece of code that demonstrates how to use Media Transformations with one of Cloudflare’s own products — Workers AI. The following code creates a two-step process: first transcribing the video’s audio to English, then translating it into Spanish.
export default {
 async fetch(request, env, ctx) {


   // 1. Use Media Transformations to fetch only the audio track
   const res = await fetch( "https://blog.cloudflare.com/cdn-cgi/media/mode=audio/https://pub-d9fcbc1abcd244c1821f38b99017347f.r2.dev/announcing-audio-mode.mp4" );
   const blob = await res.arrayBuffer();


   // 2. Transcribe the audio to text using Whisper
   const transcript_response = await env.AI.run(
     "@cf/openai/whisper-large-v3-turbo",
     {
       audio: base64Encode(blob), // A base64 encoded string is required by @cf/openai/whisper-large-v3-turbo
     }
   );


   // Check if transcription was successful and text exists
   if (!transcript_response.text) {
       return Response.json({ error: "Failed to transcribe audio." }, { status: 500 });
   }


   // 3. Translate the transcribed text using the M2M100 model
   const translation_response = await env.AI.run(
     '@cf/meta/m2m100-1.2b',
     {
       text: transcript_response.text,
       source_lang: 'en', // The source language (English)
       target_lang: 'es'  // The target language (Spanish)
     }
   );


   // 4. Return both the original transcription and the translation
    return Response.json({
        transcription: transcript_response.text,
        translation: translation_response.translated_text
    });


 }
};


export function base64Encode(buf) {
 let string = '';
 (new Uint8Array(buf)).forEach(
   (byte) => { string += String.fromCharCode(byte) }
 )
 return btoa(string)
}
After running, the worker returns a clean JSON response. Shown below is a snippet of the transcribed and then translated response the worker returned.
Transcription:
{
  "transcription": "I'm excited to announce that Media Transformations from Cloudflare has added audio-only mode. Now you can quickly extract and deliver just the audio from your short form video. And from there, you can transcribe it or summarize it on Worker's AI or run moderation or inference tasks easily.",
  "translation": "Estoy encantado de anunciar que Media Transformations de Cloudflare ha añadido el modo solo de audio. Ahora puede extraer y entregar rápidamente sólo el audio de su vídeo de forma corta. Y desde allí, puede transcribirlo o resumirlo en la IA de Worker o ejecutar tareas de moderación o inferencia fácilmente."
}
Technical details
As a summer intern on the Stream team, I worked on shipping this long-requested feature. My first step was to understand the complex architecture of Stream’s media pipelines.
When a video is processed by Stream, it can follow one of two paths. The first is our video-on-demand (VOD) pipeline, which handles videos directly uploaded to Stream. It generates and stores a set of encoded video segments for adaptive bitrate streaming that can be streamed via HLS/DASH. The other path is our on-the-fly-encoding (or OTFE) pipeline, that drives the Stream Live and Media Transformations service. Instead of pre-processing and storing files, OTFE fetches media from a customer’s own website and performs transformations at the edge.
My project involved extending both of these pipelines to support audio extraction.
OTFE pipeline
The OTFE pipeline is designed for real-time operations. The existing flow was engineered for visual tasks. When a customer with Media Transformations enabled makes a request on their own website, it’s routed to our edge servers, which acts as the entry point. The request is then validated, and per the user’s request, OTFE would fetch the video and generate a resized version or a still-frame thumbnail.
In order to support audio-only extraction, I built upon our existing workflow to add a new mode. This involved:
Extending the validation logic: Specifically for audio, a crucial validation step was to verify that the source video contained an audio track before attempting extraction. This was in addition to pre-existing validation steps that ensure the requested URL was correctly formatted.
Building a new transformation handler: This was the core of my project. I built a new handler within the OTFE platform that specifically discarded the visual tracks in order to deliver a high-quality M4A file.
VOD pipeline
Similar to my work on OTFE, this project involved extending our current MP4 downloads workflow to audio-only, M4A downloads. This presented a series of interesting technical decisions.
The typical flow for creating a video download begins with a POST request to our main API layer, which handles authentication and validation, and creates a corresponding database record. Which then enqueues a job in our asynchronous queue where workers perform the processing task. To enable audio downloads for VOD, I introduced new, type-specific API endpoints (POST /downloads/{type}) while preserving the legacy POST /downloads route as an alias for creating downloads of the default, or video, download type. This ensured full backward compatibility.
The core work, of creating a download, is performed by our asynchronous queue. Which included:
Adding logic to the consumer to detect the new audio download type
Pulling the ffmpeg template we define in our API layer to properly encode the audio stream into a high-quality M4A container
By extending each component of this pipeline– from the API routes to the media processing commands– I was able to deliver a new, highly-requested feature that unlocks audio-centric workflows for our customers!
Dash screenshots
We’re excited to announce that this feature is also available in the Stream dashboard. Simply navigate to any of your videos, and you’ll find the option to download the video or just the audio.
Once the download is ready, you will see the URL for the file, along with the option to disable it.
That’s a wrap
This project addressed a long-standing customer need, providing a simpler way to work with audio from video. I’m truly grateful for this entire journey, from understanding the problem to shipping the solution, and especially for the mentorship and guidance I received from my team along the way. We are excited to see how developers use this new capability to build more efficient and exciting applications on Cloudflare Stream.
A little over 6 years ago, we presented quiche, our open source QUIC implementation written in Rust. Today we’re announcing the open sourcing of tokio-quiche, our battle-tested, asynchronous QUIC library combining both quiche and the Rust Tokio async runtime. Powering Cloudflare’s Proxy B in Apple iCloud Private Relay and our next-generation Oxy-based proxies, tokio-quiche handles millions of HTTP/3 requests per second with low latency and high throughput. tokio-quiche also powers Cloudflare Warp’s MASQUE client, replacing our WireGuard tunnels with QUIC-based tunnels, and the async version of h3i.
quiche was developed as a sans-io library, meaning that it implements the state machine required to handle the QUIC transport protocol while not making any assumptions about how its user intends to perform IO. This means that, with enough elbow grease, anyone can write an IO integration with quiche! This entails connecting or listening on a UDP socket, managing sending and receiving UDP datagrams on that socket while feeding all network information to quiche. Given we need this integration to be async, we’d have to do all this while integrating with an async Rust runtime. tokio-quiche does all of that for you, no grease required.
Lowering the barrier to entry
Originally, tokio-quiche was only used as the core of Oxy’s HTTP/3 server. But the spark to create tokio-quiche as a standalone library was our need for a MASQUE-capable HTTP/3 client. Our Zero Trust and Privacy Teams need MASQUE clients to tunnel data through WARP and our Privacy Proxies respectively, and we wanted to use the same technology to build both the client and server.
We initially open-sourced quiche to share our memory-safe QUIC and HTTP/3 implementation with as many stakeholders as possible. Our focus at the time was a low-level, sans-io design that could integrate into many types of software and be deployed widely. We achieved this goal, with quiche deployed in many different clients and servers. However, integrating sans-io libraries into applications is an error-prone and time-consuming process. Our aim with tokio-quiche is to lower the barrier of entry by providing much of the needed code ourselves.
Cloudflare alone embracing HTTP/3 is not of much use if others wanting to interact with our products and systems don’t also adopt it. Open sourcing tokio-quiche makes integration with our systems more straightforward, and helps propel the industry into the new standard of HTTP. By contributing tokio-quiche back to the Rust ecosystem, we hope to promote the development and usage of HTTP/3, QUIC and new privacy preserving technologies.
tokio-quiche has been used internally for some years now. This gave us time to refine and battle-test it, demonstrating that it can handle millions of RPS. tokio-quiche is not intended to be a standalone HTTP/3 client or server, but implements low-level protocols and allows for higher-level projects in the future. The README contains examples of server and client client event loops.
It’s actors all the way down
Tokio is a wildly popular asynchronous Rust runtime. It efficiently manages, schedules and executes the billions of asynchronous tasks which run on our edge. We use Tokio extensivelyatCloudflare, so we decided to tightly integrate quiche with it – thus the name, tokio-quiche. Under the hood, tokio-quiche uses actors to drive different parts of the QUIC and HTTP/3 state machine. Actors are small tasks with internal state that usually use message passing over channels to communicate with the outside world.
The actor model is a great abstraction to use for async-ifying sans-io libraries due to the conceptual similarities between the two. Both actors and sans-io libraries have some kind internal state which they want exclusive access to. They both usually interact with the outside world by sending and receiving “messages”. quiche’s “messages” are really raw byte buffers which represent incoming and outgoing network data. One of tokio-quiche’s “messages” is the Incoming struct which describes incoming UDP packets. Due to these similarities, async-ifying a sans-io library means: awaiting new messages or IO, translating the messages or IO into something the sans-io library understands, advancing the internal state machine, translating the state machine’s output to a message or IO, and finally sending the message or IO. (For more discussion on actors with Tokio, make sure to take a look at Alice Rhyl’s excellent blog post on the topic.)
The primary actor in tokio-quiche is the IO loop actor, which moves packets between quiche and the socket. Since QUIC is a transport protocol, it can carry any application protocol you want. HTTP/3 is quite common, but DNS over QUIC and the upcoming Media over QUIC are other examples. There’s even an RFC to help you create your own QUIC application! tokio-quiche exposes the ApplicationOverQuic trait to abstract over application protocols. The trait abstracts over quiche’s methods and the underlying I/O, allowing you to focus on your application logic. For example, our HTTP/3 debug and test client, h3i, is powered by a client-focused, non-HTTP/3 ApplicationOverQuic implementation.
Server Architecture Diagram
tokio-quiche ships with an HTTP/3-focused ApplicationOverQuic called H3Driver. H3Driver hooks up quiche’s HTTP/3 module to this IO loop to provide the building blocks for an async HTTP/3 client or server. The driver turns quiche’s raw HTTP/3 events into higher-level events and asynchronous body data streams, allowing you to respond to them in kind. H3Driver is itself generic, exposing ServerH3Driver and ClientH3Driver variants that each stack additional behavior on top of the core driver’s events.
Internal Data Flow
Inside tokio-quiche, we spawn two important tasks that facilitate data movement from a socket to quiche. The first is the InboundPacketRouter, which owns the receiving half of the socket and routes inbound datagrams by their connection ID (DCID) to a per-connection channel. The second task, the IoWorker actor, is the aforementioned IO loop and drives a single quiche Connection. It intersperses quiche calls with ApplicationOverQuic methods, ensuring you can inspect the connection before and after any IO interaction.
More blog posts on the creation of tokio-quiche are coming soon. We’ll discuss actor models and mutexes, UDP GRO and GSO, tokio task coop budgeting, and more.
Next up: more on QUIC and beyond!
tokio-quiche is an important foundation for Cloudflare’s investment into the QUIC and HTTP/3 ecosystem for Tokio – but it is still only a building block with its own complexity. In the future, we plan to release the same easy-to-use HTTP client and server abstractions that power our Oxy proxies and WARP clients today. Stay tuned for more blog posts on QUIC and HTTP/3 at Cloudflare, including an open-source client for customers of our Privacy Proxies and a completely new service that’s handling millions of RPS with tokio-quiche!
For now, check out the tokio-quiche crate on crates.io and its source code on GitHub to build your very own QUIC application. Could be a simple echo server, a DNS-over-QUIC client, a custom VPN, or even a fully-fledged HTTP server. Maybe you will beat us to the punch?
Cybersecurity ROI is notoriously difficult to define, but not impossible.
In this Experts on Experts: Commanding Perspectivesepisode, Craig Adams chats with Steve Edwards, Director of Threat Intelligence & Detection Engineering, about what customers really get from Rapid7 MDR and how to think more clearly about value.
They cut through buzzwords and talk real-world outcomes: visibility, consolidation, faster response, and trust.
What ROI really looks like
As Steve explains, the ROI conversation starts with confidence. Once customers know they can trust the MDR team to cut through noise and take action, the benefits snowball from reduced false positives, to better visibility and smarter spend.
The IDC study highlighted a 422% ROI over three years. But the real signal is what teams can do with the time and clarity they gain.
To bring these numbers into your own context, you can use the Rapid7 MDR ROI Calculator – simply plug in your own parameters and apply IDC’s methodology to estimate your unique return. Try the ROI Calculator!
Telemetry without tradeoffs
Craig and Steve also dig into one of the biggest detection challenges today: partial visibility. Many orgs still pay by the log, creating disincentives for full data ingestion. MDR’s all-in access model helps customers detect threats earlier and act faster, without needing to triage upstream data decisions.
MITRE mapping makes it click
One of the most actionable insights? MITRE mapping. Steve talks about how customers are using visual coverage data to pinpoint gaps and prioritize onboarding new tech, or building compensating controls.
No-cap incident response
They also walk through what happens during the first 24 – 48 hours of an incident, and why having no cap on IR hours means Rapid7 can stay involved from containment to eradication.
Missed our earlier episodes? Catch up on Episode 1 with Laura Ellis on agentic AI and system governance [here], Episode 2 with Jon Hencinski on MDR strategy and SOC readiness [here] and Episode 3 with Raj Samani on cybercrime-as-a-service [here]
The collective thoughts of the interwebz
Manage Consent
To provide the best experiences, we use technologies like cookies to store and/or access device information. Consenting to these technologies will allow us to process data such as browsing behavior or unique IDs on this site. Not consenting or withdrawing consent, may adversely affect certain features and functions.
Functional
Always active
The technical storage or access is strictly necessary for the legitimate purpose of enabling the use of a specific service explicitly requested by the subscriber or user, or for the sole purpose of carrying out the transmission of a communication over an electronic communications network.
Preferences
The technical storage or access is necessary for the legitimate purpose of storing preferences that are not requested by the subscriber or user.
Statistics
The technical storage or access that is used exclusively for statistical purposes.The technical storage or access that is used exclusively for anonymous statistical purposes. Without a subpoena, voluntary compliance on the part of your Internet Service Provider, or additional records from a third party, information stored or retrieved for this purpose alone cannot usually be used to identify you.
Marketing
The technical storage or access is required to create user profiles to send advertising, or to track the user on a website or across several websites for similar marketing purposes.