Post Syndicated from The History Guy: History Deserves to Be Remembered original https://www.youtube.com/watch?v=YeNJEc-BKNs
We Issued Our First Six Day Cert
Post Syndicated from Let's Encrypt original https://letsencrypt.org/2025/02/20/first-short-lived-cert-issued.html
Earlier this year we announced our intention to introduce short-lived certificates with lifetimes of six days as an option for our subscribers. Yesterday we issued our first short-lived certificate. You can see the certificate at the bottom of our post, or here thanks to Certificate Transparency logs. We issued it to ourselves and then immediately revoked it so we can observe the certificate’s whole lifecycle. This is the first step towards making short-lived certificates available to all subscribers.
The next step is for us to make short-lived certificates available to a small set of our subscribers so we can make sure our systems scale as expected prior to general availability. We expect this next phase to begin during Q2 of this year.
We expect short-lived certificates to be generally available by the end of this year.
How To Get Six-Day Certificates
Once short-lived certificates are an option for you, you’ll need to use an ACME client that supports ACME certificate profiles and select the short-lived certificate profile (“shortlived”). The lego client recently added this functionality.
In the meantime, the best way to prepare to take advantage of short-lived certificates is to make sure your ACME client is reliably renewing certificates in an automated fashion. If that’s working well then there should be no costs to switching to short-lived certificates.
You’ll also want to be sure your ACME client is running frequently – both for the sake of renewing short-lived certificates and so as to take advantage of ACME Renewal Information (ARI). ARI allows Let’s Encrypt to notify your client if it should renew early for some reason. ARI checks should happen at least once per day, and short-lived certificates should be renewed every two to three days, so we recommend having your client run at least once per day.
Shorter Certificate Lifetimes Are Good for Security
When the private key associated with a certificate is compromised, the recommendation has always been to have the certificate revoked so that people will know not to use it. Unfortunately, certificate revocation doesn’t work very well. This means that certificates with compromised keys (or other issues) may continue to be used until they expire. The longer the lifetime of the certificate, the longer the potential for use of a problematic certificate.
The primary advantage of short-lived certificates is that they greatly reduce the potential compromise window because they expire relatively quickly. This reduces the need for certificate revocation, which has historically been unreliable. Our six-day certificates will not include OCSP or CRL URLs. Additionally, short-lived certificates practically require automation, and we believe that automating certificate issuance is important for security.
Questions
If you have questions or comments about our plans, feel free to let us know on our community forums.
We’d like to thank Open Technology Fund for supporting this work.
Our First 6-Day Certificate
PEM format:
-----BEGIN CERTIFICATE-----
MIIDSzCCAtGgAwIBAgISA7CwFcGk4mQWEXMacRtxHeDvMAoGCCqGSM49BAMDMDIx
CzAJBgNVBAYTAlVTMRYwFAYDVQQKEw1MZXQncyBFbmNyeXB0MQswCQYDVQQDEwJF
NjAeFw0yNTAyMTkxNzMwMDFaFw0yNTAyMjYwOTMwMDBaMAAwWTATBgcqhkjOPQIB
BggqhkjOPQMBBwNCAAQoSItt2V1aocI5dxrKR8iLfmm0KiVvOhiwKByzu2kLeC7C
0BdfAgtwdICdkuEhAXokhXLq6DNZZgmh5T4flVwZo4IB9zCCAfMwDgYDVR0PAQH/
BAQDAgeAMBMGA1UdJQQMMAoGCCsGAQUFBwMBMAwGA1UdEwEB/wQCMAAwHwYDVR0j
BBgwFoAUkydGmAOpUWiOmNbEQkjbI79YlNIwVQYIKwYBBQUHAQEESTBHMCEGCCsG
AQUFBzABhhVodHRwOi8vZTYuby5sZW5jci5vcmcwIgYIKwYBBQUHMAKGFmh0dHA6
Ly9lNi5pLmxlbmNyLm9yZy8wKAYDVR0RAQH/BB4wHIIaaGVsbG93b3JsZC5sZXRz
ZW5jcnlwdC5vcmcwEwYDVR0gBAwwCjAIBgZngQwBAgEwggEFBgorBgEEAdZ5AgQC
BIH2BIHzAPEAdgDM+w9qhXEJZf6Vm1PO6bJ8IumFXA2XjbapflTA/kwNsAAAAZUf
d/zOAAAEAwBHMEUCIFNd51TfSNiJrO+294t49C5ANc4oC7gTUzf7xnlNlhKsAiEA
wi5hfiC9SsKLxlTQ0sctUxhLmdYh40r6ECWQS/yWw2AAdwDgkrP8DB3I52g2H95h
uZZNClJ4GYpy1nLEsE2lbW9UBAAAAZUfd/0TAAAEAwBIMEYCIQCs2NuZIUIloOaH
1t9eXDKb8bjoWESBPsK4i2BxMvEIswIhAOMNaQNyr1YkzrcNUz15qGV0oVLg5BJN
+ikWxXOdcRHFMAoGCCqGSM49BAMDA2gAMGUCMDANqy7G09AIwzXcd7SNl7uFwhC+
xlfduvp1PeEDHc/FA9K3mRYkGXuKtzNdOh7wcAIxALjEMDmBQiwXbB447oGkaZAe
0rqxA3EtNV5wj0obeObluj/NgUsVEG9OqiBIoggFRw==
-----END CERTIFICATE-----
openssl x509 -text output:
Certificate:
    Data:
        Version: 3 (0x2)
        Serial Number:
            03:b0:b0:15:c1:a4:e2:64:16:11:73:1a:71:1b:71:1d:e0:ef
        Signature Algorithm: ecdsa-with-SHA384
        Issuer: C=US, O=Let's Encrypt, CN=E6
        Validity
            Not Before: Feb 19 17:30:01 2025 GMT
            Not After : Feb 26 09:30:00 2025 GMT
        Subject:
        Subject Public Key Info:
            Public Key Algorithm: id-ecPublicKey
                Public-Key: (256 bit)
                pub:
                    04:28:48:8b:6d:d9:5d:5a:a1:c2:39:77:1a:ca:47:
                    c8:8b:7e:69:b4:2a:25:6f:3a:18:b0:28:1c:b3:bb:
                    69:0b:78:2e:c2:d0:17:5f:02:0b:70:74:80:9d:92:
                    e1:21:01:7a:24:85:72:ea:e8:33:59:66:09:a1:e5:
                    3e:1f:95:5c:19
                ASN1 OID: prime256v1
                NIST CURVE: P-256
        X509v3 extensions:
            X509v3 Key Usage: critical
                Digital Signature
            X509v3 Extended Key Usage:
                TLS Web Server Authentication
            X509v3 Basic Constraints: critical
                CA:FALSE
            X509v3 Authority Key Identifier:
                93:27:46:98:03:A9:51:68:8E:98:D6:C4:42:48:DB:23:BF:58:94:D2
            Authority Information Access:
                OCSP - URI:http://e6.o.lencr.org
                CA Issuers - URI:http://e6.i.lencr.org/
            X509v3 Subject Alternative Name: critical
                DNS:helloworld.letsencrypt.org
            X509v3 Certificate Policies:
                Policy: 2.23.140.1.2.1
            CT Precertificate SCTs:
                Signed Certificate Timestamp:
                    Version   : v1 (0x0)
                    Log ID    : CC:FB:0F:6A:85:71:09:65:FE:95:9B:53:CE:E9:B2:7C:
                                22:E9:85:5C:0D:97:8D:B6:A9:7E:54:C0:FE:4C:0D:B0
                    Timestamp : Feb 19 18:28:32.078 2025 GMT
                    Extensions: none
                    Signature : ecdsa-with-SHA256
                                30:45:02:20:53:5D:E7:54:DF:48:D8:89:AC:EF:B6:F7:
                                8B:78:F4:2E:40:35:CE:28:0B:B8:13:53:37:FB:C6:79:
                                4D:96:12:AC:02:21:00:C2:2E:61:7E:20:BD:4A:C2:8B:
                                C6:54:D0:D2:C7:2D:53:18:4B:99:D6:21:E3:4A:FA:10:
                                25:90:4B:FC:96:C3:60
                Signed Certificate Timestamp:
                    Version   : v1 (0x0)
                    Log ID    : E0:92:B3:FC:0C:1D:C8:E7:68:36:1F:DE:61:B9:96:4D:
                                0A:52:78:19:8A:72:D6:72:C4:B0:4D:A5:6D:6F:54:04
                    Timestamp : Feb 19 18:28:32.147 2025 GMT
                    Extensions: none
                    Signature : ecdsa-with-SHA256
                                30:46:02:21:00:AC:D8:DB:99:21:42:25:A0:E6:87:D6:
                                DF:5E:5C:32:9B:F1:B8:E8:58:44:81:3E:C2:B8:8B:60:
                                71:32:F1:08:B3:02:21:00:E3:0D:69:03:72:AF:56:24:
                                CE:B7:0D:53:3D:79:A8:65:74:A1:52:E0:E4:12:4D:FA:
                                29:16:C5:73:9D:71:11:C5
    Signature Algorithm: ecdsa-with-SHA384
    Signature Value:
        30:65:02:30:30:0d:ab:2e:c6:d3:d0:08:c3:35:dc:77:b4:8d:
        97:bb:85:c2:10:be:c6:57:dd:ba:fa:75:3d:e1:03:1d:cf:c5:
        03:d2:b7:99:16:24:19:7b:8a:b7:33:5d:3a:1e:f0:70:02:31:
        00:b8:c4:30:39:81:42:2c:17:6c:1e:38:ee:81:a4:69:90:1e:
        d2:ba:b1:03:71:2d:35:5e:70:8f:4a:1b:78:e6:e5:ba:3f:cd:
        81:4b:15:10:6f:4e:aa:20:48:a2:08:05:47
We Issued Our First Six Day Cert
Post Syndicated from Let's Encrypt original https://letsencrypt.org/2025/02/20/first-short-lived-cert-issued/
Earlier this year we announced our intention to introduce short-lived certificates with lifetimes of six days as an option for our subscribers. Yesterday we issued our first short-lived certificate. You can see the certificate at the bottom of our post, or here thanks to Certificate Transparency logs. We issued it to ourselves and then immediately revoked it so we can observe the certificate’s whole lifecycle. This is the first step towards making shorter-lived certificates available to all subscribers.
The next step is for us to make short-lived certificates available to a small set of our subscribers so we can make sure our systems scale as expected prior to general availability. We expect this next phase to begin during Q2 of this year.
We expect short-lived certificates to be generally available by the end of this year.
How To Get Six-Day Certificates
Once short-lived certificates are an option for you, you’ll need to use an ACME client that supports ACME certificate profiles and select the short-lived certificate profile (“shortlived”). The lego client recently added this functionality.
In the meantime, the best way to prepare to take advantage of short-lived certificates is to make sure your ACME client is reliably renewing certificates in an automated fashion. If that’s working well then there should be no costs to switching to short-lived certificates.
You’ll also want to be sure your ACME client is running frequently – both for the sake of renewing short-lived certificates and so as to take advantage of ACME Renewal Information (ARI). ARI allows Let’s Encrypt to notify your client if it should renew early for some reason. ARI checks should happen at least once per day, and short-lived certificates should be renewed every two to three days, so we recommend having your client run at least once per day.
Shorter Certificate Lifetimes Are Good for Security
When the private key associated with a certificate is compromised, the recommendation has always been to have the certificate revoked so that people will know not to use it. Unfortunately, certificate revocation doesn’t work very well. This means that certificates with compromised keys (or other issues) may continue to be used until they expire. The longer the lifetime of the certificate, the longer the potential for use of a problematic certificate.
The primary advantage of short-lived certificates is that they greatly reduce the potential compromise window because they expire relatively quickly. This reduces the need for certificate revocation, which has historically been unreliable. Our six-day certificates will not include OCSP or CRL URLs. Additionally, short-lived certificates practically require automation, and we believe that automating certificate issuance is important for security.
Questions
If you have questions or comments about our plans, feel free to let us know on our community forums.
We’d like to thank Open Technology Fund for supporting this work.
Our First 6-Day Certificate
PEM format:
-----BEGIN CERTIFICATE-----
MIIDSzCCAtGgAwIBAgISA7CwFcGk4mQWEXMacRtxHeDvMAoGCCqGSM49BAMDMDIx
CzAJBgNVBAYTAlVTMRYwFAYDVQQKEw1MZXQncyBFbmNyeXB0MQswCQYDVQQDEwJF
NjAeFw0yNTAyMTkxNzMwMDFaFw0yNTAyMjYwOTMwMDBaMAAwWTATBgcqhkjOPQIB
BggqhkjOPQMBBwNCAAQoSItt2V1aocI5dxrKR8iLfmm0KiVvOhiwKByzu2kLeC7C
0BdfAgtwdICdkuEhAXokhXLq6DNZZgmh5T4flVwZo4IB9zCCAfMwDgYDVR0PAQH/
BAQDAgeAMBMGA1UdJQQMMAoGCCsGAQUFBwMBMAwGA1UdEwEB/wQCMAAwHwYDVR0j
BBgwFoAUkydGmAOpUWiOmNbEQkjbI79YlNIwVQYIKwYBBQUHAQEESTBHMCEGCCsG
AQUFBzABhhVodHRwOi8vZTYuby5sZW5jci5vcmcwIgYIKwYBBQUHMAKGFmh0dHA6
Ly9lNi5pLmxlbmNyLm9yZy8wKAYDVR0RAQH/BB4wHIIaaGVsbG93b3JsZC5sZXRz
ZW5jcnlwdC5vcmcwEwYDVR0gBAwwCjAIBgZngQwBAgEwggEFBgorBgEEAdZ5AgQC
BIH2BIHzAPEAdgDM+w9qhXEJZf6Vm1PO6bJ8IumFXA2XjbapflTA/kwNsAAAAZUf
d/zOAAAEAwBHMEUCIFNd51TfSNiJrO+294t49C5ANc4oC7gTUzf7xnlNlhKsAiEA
wi5hfiC9SsKLxlTQ0sctUxhLmdYh40r6ECWQS/yWw2AAdwDgkrP8DB3I52g2H95h
uZZNClJ4GYpy1nLEsE2lbW9UBAAAAZUfd/0TAAAEAwBIMEYCIQCs2NuZIUIloOaH
1t9eXDKb8bjoWESBPsK4i2BxMvEIswIhAOMNaQNyr1YkzrcNUz15qGV0oVLg5BJN
+ikWxXOdcRHFMAoGCCqGSM49BAMDA2gAMGUCMDANqy7G09AIwzXcd7SNl7uFwhC+
xlfduvp1PeEDHc/FA9K3mRYkGXuKtzNdOh7wcAIxALjEMDmBQiwXbB447oGkaZAe
0rqxA3EtNV5wj0obeObluj/NgUsVEG9OqiBIoggFRw==
-----END CERTIFICATE-----
openssl x509 -text output:
Certificate:
    Data:
        Version: 3 (0x2)
        Serial Number:
            03:b0:b0:15:c1:a4:e2:64:16:11:73:1a:71:1b:71:1d:e0:ef
        Signature Algorithm: ecdsa-with-SHA384
        Issuer: C=US, O=Let's Encrypt, CN=E6
        Validity
            Not Before: Feb 19 17:30:01 2025 GMT
            Not After : Feb 26 09:30:00 2025 GMT
        Subject:
        Subject Public Key Info:
            Public Key Algorithm: id-ecPublicKey
                Public-Key: (256 bit)
                pub:
                    04:28:48:8b:6d:d9:5d:5a:a1:c2:39:77:1a:ca:47:
                    c8:8b:7e:69:b4:2a:25:6f:3a:18:b0:28:1c:b3:bb:
                    69:0b:78:2e:c2:d0:17:5f:02:0b:70:74:80:9d:92:
                    e1:21:01:7a:24:85:72:ea:e8:33:59:66:09:a1:e5:
                    3e:1f:95:5c:19
                ASN1 OID: prime256v1
                NIST CURVE: P-256
        X509v3 extensions:
            X509v3 Key Usage: critical
                Digital Signature
            X509v3 Extended Key Usage:
                TLS Web Server Authentication
            X509v3 Basic Constraints: critical
                CA:FALSE
            X509v3 Authority Key Identifier:
                93:27:46:98:03:A9:51:68:8E:98:D6:C4:42:48:DB:23:BF:58:94:D2
            Authority Information Access:
                OCSP - URI:http://e6.o.lencr.org
                CA Issuers - URI:http://e6.i.lencr.org/
            X509v3 Subject Alternative Name: critical
                DNS:helloworld.letsencrypt.org
            X509v3 Certificate Policies:
                Policy: 2.23.140.1.2.1
            CT Precertificate SCTs:
                Signed Certificate Timestamp:
                    Version   : v1 (0x0)
                    Log ID    : CC:FB:0F:6A:85:71:09:65:FE:95:9B:53:CE:E9:B2:7C:
                                22:E9:85:5C:0D:97:8D:B6:A9:7E:54:C0:FE:4C:0D:B0
                    Timestamp : Feb 19 18:28:32.078 2025 GMT
                    Extensions: none
                    Signature : ecdsa-with-SHA256
                                30:45:02:20:53:5D:E7:54:DF:48:D8:89:AC:EF:B6:F7:
                                8B:78:F4:2E:40:35:CE:28:0B:B8:13:53:37:FB:C6:79:
                                4D:96:12:AC:02:21:00:C2:2E:61:7E:20:BD:4A:C2:8B:
                                C6:54:D0:D2:C7:2D:53:18:4B:99:D6:21:E3:4A:FA:10:
                                25:90:4B:FC:96:C3:60
                Signed Certificate Timestamp:
                    Version   : v1 (0x0)
                    Log ID    : E0:92:B3:FC:0C:1D:C8:E7:68:36:1F:DE:61:B9:96:4D:
                                0A:52:78:19:8A:72:D6:72:C4:B0:4D:A5:6D:6F:54:04
                    Timestamp : Feb 19 18:28:32.147 2025 GMT
                    Extensions: none
                    Signature : ecdsa-with-SHA256
                                30:46:02:21:00:AC:D8:DB:99:21:42:25:A0:E6:87:D6:
                                DF:5E:5C:32:9B:F1:B8:E8:58:44:81:3E:C2:B8:8B:60:
                                71:32:F1:08:B3:02:21:00:E3:0D:69:03:72:AF:56:24:
                                CE:B7:0D:53:3D:79:A8:65:74:A1:52:E0:E4:12:4D:FA:
                                29:16:C5:73:9D:71:11:C5
    Signature Algorithm: ecdsa-with-SHA384
    Signature Value:
        30:65:02:30:30:0d:ab:2e:c6:d3:d0:08:c3:35:dc:77:b4:8d:
        97:bb:85:c2:10:be:c6:57:dd:ba:fa:75:3d:e1:03:1d:cf:c5:
        03:d2:b7:99:16:24:19:7b:8a:b7:33:5d:3a:1e:f0:70:02:31:
        00:b8:c4:30:39:81:42:2c:17:6c:1e:38:ee:81:a4:69:90:1e:
        d2:ba:b1:03:71:2d:35:5e:70:8f:4a:1b:78:e6:e5:ba:3f:cd:
        81:4b:15:10:6f:4e:aa:20:48:a2:08:05:47
Mozilla announces leadership updates and next chapter
Post Syndicated from jzb original https://lwn.net/Articles/1010922/
Mark Surman, president of the Mozilla Corporation, has announced
leadership updates for Mozilla. This includes a Mozilla Leadership
Council made up of executives from each Mozilla organization, and new
board chairs for the not-for-profit Mozilla Foundation, the
Mozilla Corporation, and Mozilla.ai. The announcement also
indicates a desire to further “diversify
” Mozilla’s focus:
We’ve recognized that Mozilla faces major headwinds in terms of both
financial growth and mission impact. While Firefox remains the core of
what we do, we also need to take steps to diversify: investing in
privacy-respecting advertising to grow new revenue in the near term;
developing trustworthy, open source AI to ensure technical and product
relevance in the mid term; and creating online fundraising campaigns
that will draw a bigger circle of supporters over the long
run. Mozilla’s impact and survival depend on us simultaneously
strengthening Firefox AND finding new sources of revenue AND
manifesting our mission in fresh ways. That is why we’re working hard
on all of these fronts.
[$] Extending time slices for user-space locks
Post Syndicated from daroc original https://lwn.net/Articles/1009509/
Steven Rostedt recently posted
a patch set that could help improve the performance of certain user-space
applications by giving the scheduler more context about when they are safe to
interrupt. The patch set lets programs request a small grace window
before they can be interrupted so that they can relinquish any locks, decreasing the
amount of time that other threads have to spend waiting. Rostedt shared
performance numbers suggesting that the patch might cut the amount of time spent
acquiring locks in half for some programs — although, since his test was
specifically tuned for this case, real-world projects should expect a somewhat
less dramatic improvement. The change received some pushback from scheduler
maintainer Peter Zijlstra, who objected to the patch set’s approach.
Dynamically reconfigure your AWS Outposts capacity using Capacity Tasks
Post Syndicated from aostan original https://aws.amazon.com/blogs/compute/dynamically-reconfigure-your-aws-outposts-capacity-using-capacity-tasks/
This post is written by Brianna Rosentrater, Hybrid Edge Specialist SA and Adam Duffield, Senior Technical Account Manager.
AWS Outposts extends AWS infrastructure, AWS services, APIs, and tools to on-premises locations for workloads that require low latency, local data processing, or data residency. Outposts comes in a variety form factors, from 42U Outposts racks to 1U and 2U Outposts servers. Outposts now supports self-service capacity management, making it easy for you to view and manage compute capacity on your Outposts. A default capacity configuration for each new Outpost is determined during the ordering process. This default configuration can subsequently be modified to create a range of instance sizes and quantities to meet your changing business needs. To do so, you create a capacity task, specify the instance sizes and quantity, and run the capacity task to implement the changes. This post focuses on how to use capacity tasks to perform multi-host reconfigurations and view existing capacity configurations.
Overview
Amazon Elastic Compute Cloud (Amazon EC2) capacity on an Outpost is determined by the total volume of compute capacity within the Outpost when ordered. Outposts can also be scaled up or out as needed during your commitment term. For further details on Outpost capacity planning including best practices, refer to the Capacity Planning – AWS Outposts High Availability Design and Architecture whitepaper. We recommend planning spare capacity for N+M host availability when making modifications to your Outpost capacity configuration if your workloads need to be highly available. To calculate, take the number of hosts (N) you need to run all your workloads, and then add (M) additional hosts to meet your requirements for server availability during failure and maintenance events.
Viewing existing Outposts capacity configuration
Outposts users now have visibility into capacity configurations at both an instance family and host level. This gives greater insight into capacity usage and instance placements. Within the Outposts console, after choosing the Outpost ID on which you want to view the capacity configuration, two new views have been provided: the Instance view and the Rack view.
Instance view
The Instance view provides a granular breakdown of the currently deployed instances on the Outpost along with an overall view of instance family capacity pools and their usage, as shown in the preceding figure. The Instances section gives detailed information around the deployed instances, their associated instance ID, instance size, AWS managed service (if applicable), and asset ID of where the instance is running.

Figure 1 – Outposts Instance View
The Instance capacity distribution summary displays how the various instance sizes are allocated within each instance family, as shown in the following figure. Each host of the same instance family contributes its capacity to the overall pool, which is represented in this section as a percentage rather than number of instance slots. This shows the configured capacity, but it doesn’t reflect any level of usage.

Figure 2 – Outposts Instance Capacity Distribution Summary
The Instance capacity distribution details section, shown in the following figure, provides a more detailed breakdown of each instance family capacity pool. This section provides a view of the total available instance capacity, the number of used instances, and the number of instances that are unavailable you at that time (such as when a hardware failure occurs).

Figure 3 – Instance Capacity Distribution Details
Rack view
The Rack view tab provides a more granular view of the overall configuration of each host on a per rack basis, as shown in the following figure. It allows you to analyze the spread and usage of the instance size allocations across each host (asset) and, when choosing the show instance details button, provides the instance ID of each used slot. Using the search box, you can filter by Instance Family or Instance Size to provide a more concise view. If you’re using Outposts server, the Rack view tab will show the capacity configuration of your server.

Figure 4 – Rack View
Obtaining a view of current configuration
Alongside these views, two buttons are available on each of the pages. The Export JSON button gives the ability to download a JSON formatted copy of the current configuration for an Outpost. This is especially useful if you’re looking to record current state, or wanting to use the JSON upload option when submitting a new capacity task. The JSON file structure provides the overall configuration of each capacity pool. However, it doesn’t provide any details in terms of usage. The second button, Modify Instance Capacity, provides a shortcut to creating a capacity task.
This level of capacity visibility is also now available through AWS Command Line Interface (AWS CLI)/Outposts API calls, which some may prefer over the console. For example, the list-assets CLI command can be used to obtain a breakdown of the capacity configuration of each Outpost host:
aws outposts list-assets --outpost-identifier outpost-arn

Figure 5 – list-assets CLI command sample output
If you want to obtain details of running instances on an Outpost, such as the instance size, the asset ID on which an instance is running, and the related AWS service name (if relevant), then the list-asset-instances CLI command can be used:
aws outposts list-asset-instances --outpost-identifier outpost-arn

Figure 6 – list-asset-instances CLI command sample output
The list-asset-instances CLI command also allows you to filter through numerous dimensions, such as instance type or AWS service. For example, this can be particularly useful for quickly identifying all running instances of a certain type, such as the m5d.large instance type by using the following command:
aws outposts list-asset-instances --outpost-identifier outpost-arn --instance-type-filter m5d.large
Modifying the Outposts capacity configuration
Due to the finite nature of Outposts capacity, changing operational requirements often mean that adjustments need to be made to your Outposts capacity configuration over time as new workloads are identified or applications need scaling.
From the Outposts console page, choosing Capacity Tasks from the left-hand menu gives a list of previously run capacity tasks and their status. From here, you can choose Create Capacity Task to start the process. To create a capacity task there are two options available: using an interactive capacity configuration tool through the Modify an Outpost capacity configuration option, or uploading a JSON file containing the necessary configuration through the Upload a capacity configuration option.

Figure 7 – Capacity Tasks web form
The interactive Modify an Outpost capacity configuration option using the simple Auto-balance feature and UI is the easiest way for those unfamiliar with Outpost capacity management to get started with making changes. Using this option, you can also choose one of two methods for the task:
- Run once: This results in the capacity task attempting to run a single time. If any instances block the successful application of the configuration, then the task fails.
- Run periodically over 48 hours or less: In the event of blocking instances, the capacity task is paused until the instances are stopped. The task rechecks the status every 10 minutes until it can run. If instances aren’t stopped within 48 hours, then the task is cancelled.
To build out the capacity task, capacity pools are displayed, grouped by instance families, and automatically populated with the current configuration of instance sizes and corresponding vCPU allocation. From here, you can make necessary changes to the existing capacity. Specifically, you can add new instance sizes and amend instance quantities in the corresponding fields. The total vCPU count for each instance family will update automatically to reflect your changes. The Auto-balance allows you to automatically adjust the quantities of individual instance sizes to fit within the total vCPU capacity available for the host, which is reflected for each capacity pool at the end. In the event that a capacity pool is over- or under-used, a warning is displayed. You can under provision a host if you choose, but the unprovisioned capacity is unusable, and attempting to overprovision the host results in the capacity task failing to run.

Figure 8 – Modifying existing capacity configuration
When the necessary changes have been made to the capacity pools, the second part of the capacity task configuration is choosing instances that should not be impacted by the running of the capacity task. During the run, you may not be in a position to stop certain instances, such as databases or AWS managed services such as Elastic Load Balancing (ELB) or Amazon ElastiCache, due to the impact to production workloads. Choosing these instances allows the capacity task to automatically try to find a path that avoids impacting them. However, in some situations capacity tasks may fail if the chosen instances block the successful running of the task, and there is no possible solution that avoids all the chosen instances. For example, if a capacity task was to remove all c5.xlarge instances and an instance was chosen to ‘keep as-is’ that was running on this instance size, then the task would fail. To avoid this, make sure to include these instances in your capacity configuration. For example, if you have five critical m5.4xlarge instances that must remain running, then include 5 m5.4xlarge instances in your m5 capacity pool configuration.

Figure 9 – Instances to keep as-is
After configuring the capacity pools and choosing the necessary instances to keep as-is, an overview of the changes is presented allowing you to validate the configuration prior to running. When you have reviewed the summary, select Create Task to trigger the execution of the capacity task using the chosen method. You can observe the status of a capacity task by choosing the capacity task ID. When it’s initially submitted, the status shows as Requested. During this time, the capacity task evaluates the necessary changes to determine if the task can proceed or if instances need stopping. If the Run once option was chosen and instances do need stopping, then the task moves to a cancelled status and provides details of the blocking instances. Alternatively, if Run periodically was chosen, the task remains in the Requested status until the listed instances have been stopped. In the event that the blocking instances can’t be stopped, the capacity task is cancelled after 48 hours. While a task is running, the Outpost hosts that are impacted by the configuration changes are placed into an isolated state. This means that capacity for new instance launches may be impacted. This isolation only lasts a few minutes while the capacity task is running, but it may impact auto scaling groups if a capacity task coincides with a scaling event.
Instead of using the interactive capacity configurator UI, you can also choose to upload a JSON file to the console containing the necessary configuration. Using this method, choosing instances to keep as-is isn’t available, and the method is automatically chosen as Run once. When a capacity task JSON file is uploaded, the resulting plan is displayed in the following text box and can be amended if needed. Alternatively, rather than uploading the file, the contents can be directly pasted into the text box. Choosing Next moves to the review screen where the remainder of the process continues in line with using the interactive capacity configurator UI.

Figure 10 – Upload a Capacity Configuration using JSON
You may also prefer using the AWS CLI/Outposts API for creating capacity tasks, and a number of new CLI/API actions are now available to support this:
cancel-capacity-task/ CancelCapacityTaskget-capacity-task/ GetCapacityTasklist-blocking-instances-for-capacity-task/ ListBlockingInstancesForCapacityTasklist-capacity-tasks/ ListCapacityTasksstart-capacity-task/ StartCapacityTask
In addition to the same options available within the console, it is possible to request a dry run of the capacity task to determine if the instance type and instance size changes are above or below the available instance capacity. Requesting a dry run doesn’t make any changes to your plan.
For example, using the CLI to submit a capacity task to homogeneously slot an Outpost with 2 x m5 and 2 x c5 hosts (192 vCPU for each capacity pool) with xlarge instance sizes, and using periodic running could be achieved by running the following:
aws outposts start-capacity-task \
--outpost-identifier outpost-arn \
--instance-pools '[{"InstanceType":"c5.xlarge","Count":48},{"InstanceType":"m5.xlarge","Count":48}]' \
--task-action-on-blocking-instances WAIT_FOR_EVACUATION
Conclusion
This post demonstrated how to run a capacity task on Outposts and view your existing capacity configuration. For more information on how to manage and monitor your capacity configuration on Outposts, see Capacity management for AWS Outposts user guide and the Capacity planning section of the AWS Outposts High Availability Design and Architecture Considerations whitepaper, and the Modify AWS Outposts instance capacity – Outposts rack/Modify AWS Outposts instance capacity – Outposts server user guide sections for your respective environment. Reach out to your AWS account team to learn more about Outposts and self-service capacity management.
Enhance your workload resilience with new Amazon EMR instance fleet features
Post Syndicated from Deepmala Agarwal original https://aws.amazon.com/blogs/big-data/enhance-your-workload-resilience-with-new-amazon-emr-instance-fleet-features/
Big data processing and analytics have emerged as fundamental components of modern data architectures. Organizations worldwide use these capabilities to extract actionable insights and facilitate data-driven decision-making processes. Amazon EMR has long been a cornerstone for big data processing in the cloud. Now, with a suite of exciting new features for EMR instance fleets that enables you to effectively manage your compute, Amazon is taking cloud-based analytics to the next level.
Amazon EMR has introduced new features for instance fleets that address critical challenges in big data operations. This post explores how these innovations improve cluster resilience, scalability, and efficiency, enabling you to build more robust data processing architectures on AWS. This comprehensive post introduces instance fleets, demonstrates using this new allocation strategy, explores how enhanced Availability Zone and subnet selection works, and examines how these features improve cluster’s resilience. This technical exploration will equip you with the knowledge to implement more resilient and efficient EMR clusters for your organization’s big data processing needs.
The current challenges
Organizations using big data operations might face several challenges:
- When preferred instance types are unavailable, finding suitable alternatives often delays cluster launches and disrupts workflows
- Selecting the optimal Availability Zone for cluster launch is challenging due to constantly changing available compute capacity, especially when considering future scaling needs
- Maintaining uninterrupted operation of mission-critical long-running clusters becomes complex as data processing requirements evolve over time
- Organizations frequently struggle to scale their operations to meet growing data processing demands, leading to performance bottlenecks and delayed insights
These challenges underscore the need for more advanced, flexible, and intelligent solutions in the realm of big data operations, driving the demand for innovative features in cloud-based data processing platforms.
Introducing improved EMR instance fleets
Amazon EMR, a cloud-based big data platform, allows you to process large datasets using various open source tools such as Apache Spark, Apache Flink, and Trino. To address the aforementioned challenges, Amazon EMR introduced instance fleets, with a robust set of features.
When setting up an EMR cluster, Amazon EMR offers two configuration options for configuring the primary, core, and task nodes: uniform instance groups or instance fleets.
Uniform instance groups offer a streamlined approach to cluster setup, allowing up to 50 instance groups per cluster. An EMR cluster has a primary instance group for primary node, a core instance group with one or more Amazon Elastic Compute Cloud (Amazon EC2) instances, and the option to add up to 48 task instance groups. Both core and task instance groups are flexible, allowing any number of EC2 instances within each group. Both core and task groups offer flexibility in instance count, and each node type (primary, core, or task) consists of instances sharing the same specifications and purchasing model (On-Demand or Spot). However, this approach limits the ability to mix different instance types or purchasing options within a single group.
Instance fleets provide a versatile approach to provisioning EC2 instances, offering unparalleled flexibility in cluster configuration. This setup assigns one instance fleet each for primary and core nodes, with the task instance fleet being optional. It allows you to specify up to five EC2 instance types (or up to 30 when using the Amazon Command Line Interface (AWS CLI) or API with an instance allocation strategy) for each node type in a cluster, providing enhanced instance diversity to optimize cost and performance while increasing the likelihood of fulfilling capacity requirements. Instance fleets automatically manage the mix of instance types to meet specified target capacities for On-Demand and Spot, reducing operational overhead and improving compute availability.
Key benefits of instance fleets include improved cluster resilience to capacity fluctuations, superior management of Spot Instances with the ability to set timeouts and specify actions if Spot capacity can’t be provisioned, and faster cluster provisioning. The feature also allows you to select multiple subnets for different Availability Zones, enabling Amazon EMR to optimally launch clusters and automatically route traffic away from impacted zones during large-scale events. Additionally, instance fleets offer capacity reservation options for On-Demand Instances and support allocation strategies that prioritize instance types based on user-defined criteria, further enhancing the flexibility and efficiency of EMR cluster management.
Achieve resiliency with instance fleets
Now that you have a good understanding of instance fleets, let’s explore how the new instance fleet capabilities help achieve resiliency for your workloads through the following methods:
- EC2 instance allocation – Enables precise control over instance type selection and prioritization
- Enhanced subnet selection – Optimizes cluster deployment across Availability Zones
EC2 instance allocation
EMR instance fleets now offer newer allocation strategies for both Spot and On-Demand Instances, giving you control over selection and prioritization of instance types and allowing you to optimize for greater flexibility, resilience, and cost-efficiency.
Amazon EMR supports the following allocation strategies for On-Demand Instances:
- Prioritized (new) – Allows you to define a priority order for instance types, giving you precise control over instance selection
- Lowest-price (existing) – Selects the lowest-priced instance type from the available options
Amazon EMR supports the following allocation strategies for Spot Instances:
- Price-capacity optimized (new) – Selects instances with the lowest price while also considering the available capacity
- Capacity-optimized-prioritized (new) – Similar to capacity-optimized, but respects instance type priorities that you specify, on a best-effort basis
- Capacity-optimized (existing) – Selects instances from the pools with the most available capacity
- Lowest-price (existing) – Selects the lowest-priced Spot Instances
- Diversified (existing) – Distributes instances across all pools
When using the prioritized On-Demand allocation strategy, Amazon EMR applies the same priority value to both your On-Demand and Spot Instances when you set priorities.
For Spot Instances, Amazon EMR recommends the capacity-optimized allocation strategy. This approach allocates instances from the most available capacity pools, thereby reducing the chance of interruptions and enhancing cluster stability. Amazon EMR also allows you to launch a cluster without an allocation strategy. However, using an allocation strategy is recommended for faster cluster provisioning, more accurate Spot Instance allocation, and fewer Spot Instance interruptions.
Enhanced subnet selection
Amazon EMR on EC2 offers improved reliability and cluster launch experience for instance fleet clusters through the newly launched enhanced subnet selection. With this feature, EMR on EC2 reduces cluster launch failures resulting from an IP address shortage. Previously, the subnet selection for EMR clusters only considered the available IP addresses for the core instance fleet. Amazon EMR now employs subnet filtering at cluster launch and selects one of the subnets that have adequate available IP addresses to successfully launch all instance fleets. If Amazon EMR can’t find a subnet with sufficient IP addresses to launch the whole cluster, it will prioritize the subnet that can at least launch the core and primary instance fleets. In this scenario, Amazon EMR will also publish an Amazon CloudWatch alert event to notify the user. If none of the configured subnets can be used to provision the core and primary fleet, Amazon EMR will fail the cluster launch and provide a critical error event. These CloudWatch events enable you to monitor your clusters and take remedial actions as necessary. This capability is enabled by default when you configure more than one subnet for cluster launch, and you don’t need to make any configuration changes to benefit from it.
Solution overview
Now that you have a comprehensive grasp of the two new features, let’s integrate the elements of instance fleets and look at the implementation flow for each feature.
EC2 instance allocation
The following diagram illustrates the instance fleet lifecycle management architecture.

The workflow consists of the following steps:
- Create a cluster configuration with the prioritized allocation strategy, specifying instance types, their priority, and a list of potential subnets.
- When you launch an EMR cluster, it evaluates compute capacity and available IPs across the specified subnets. Amazon EMR then selects a single Availability Zone that best meets capacity and instance availability needs for the entire cluster.
- Amazon EMR launches the cluster using available instance types in one of the configured Availability Zones based on enhanced subnet selection.
- During a scale-up scenario, Amazon EMR adds new instances to the clusters while following the configured compute allocation strategy.
- If a specific instance type is unavailable, Amazon EMR will select the next available instance types based on the priority order. This flexibility provides capacity availability for production workloads while maintaining scalability.
The following example code provisions an EMR cluster with a primary and core instance fleet configuration with both Spot and On-Demand Instances, using the Capacity-optimized-prioritized allocation strategy for Spot Instances and the Prioritized strategy for On-Demand Instances:
Enhanced subnet selection
To better understand Step 3 in the preceding workflow, let’s explore how enhanced subnet selection works with instance fleet EMR clusters.
For our example, let’s configure an EMR instance fleet as follows:
- Primary fleet (1 unit) – r8g.xlarge, r6g.xlarge, r8g.2xlarge
- Core fleet (48 units) – r6g.xlarge, r6g.2xlarge, m7g.2xlarge
- Task fleet (48 units) – m7g.2xlarge, r6g.xlarge, r6a.4xlarge
For this example, let’s use the lowest price allocation strategy. Next, let’s check the available IP addresses in our subnets using the AWS CLI:
We get the following results:
When launching an EMR cluster, Amazon EMR follows a specific subnet filtering process. First, EMR on EC2 evaluates subnets based on the total IP addresses required for all node types: primary, core, and task nodes. If multiple subnets have sufficient IP capacity to accommodate all instance fleets, Amazon EMR selects one based on the cluster’s allocation strategy. However, if no subnet has enough IPs to support all node types, Amazon EMR considers subnets that can at least accommodate the primary and core nodes, again using the allocation strategy to make the final selection. In our case, Amazon EMR selected a subnet in Availability Zone us-east-1b that had 251 available IPs that can support 97 instances to launch the whole cluster, bypassing smaller subnets with only 27 or 11 available IPs because they didn’t meet the minimum IP requirements for the cluster configuration.
- Primary fleet (1 unit) – r6g.xlarge
- Core fleet (48 units) – m7g.2xlarge
- Task fleet (48 units) – r6g.xlarge
The EMR and CloudWatch event for this cluster would be:
If Amazon EMR can’t find a subnet with sufficient IP addresses to launch the entire cluster, it will prioritize launching the core and primary instance fleets. If no configured subnet can accommodate even the core and primary fleets, Amazon EMR will fail the cluster launch and provide a critical error event. These CloudWatch events enable you to monitor your clusters and take necessary actions.
Conclusion
The latest enhancements to EMR instance fleets mark a significant advancement in cloud-based big data processing, addressing key challenges in resource allocation, scalability, and reliability. These features, including priority-based instance selection and enhanced subnet selection, provide you with greater control over resource strategies, improved cluster availability, enhanced capacity optimization across Availability Zones, and more efficient fallback mechanisms for production workloads. Instance fleets help you tackle current resource management challenges while laying the groundwork for future scalability.
Get started today by setting up an EMR cluster using the example configuration provided in this post. For additional configuration options and implementation guidance, refer here or reach out to your AWS account team.
About the Authors
 Deepmala Agarwal works as an AWS Data Specialist Solutions Architect. She is passionate about helping customers build out scalable, distributed, and data-driven solutions on AWS. When not at work, Deepmala likes spending time with family, walking, listening to music, watching movies, and cooking!
 Ravi Kumar Singh is a Senior Product Manager Technical-ES (PMT) at Amazon Web Services, specialized in building petabyte-scale data infrastructure and analytics platforms. With a passion for building innovative tools, he helps customers unlock valuable insights from their structured and unstructured data. Ravi’s expertise lies in creating robust data foundations using open source technologies and advanced cloud computing that power advanced artificial intelligence and machine learning use cases. A recognized thought leader in the field, he advances the data and AI ecosystem through pioneering solutions and collaborative industry initiatives. As a strong advocate for customer-centric solutions, Ravi constantly seeks ways to simplify complex data challenges and enhance user experiences. Outside of work, Ravi is an avid technology enthusiast who enjoys exploring emerging trends in data science, cloud computing, and machine learning.
 Mandisa Nxumalo is a Cloud Engineer at Amazon Web Services (AWS) with over 5 years experience in topics related to cloud services (databases, automation, and others). Currently, specializing in Big data service Amazon EMR. She is passionate about engaging customers to effectively adopt and utilize data driven approaches to improve their big data workflows. Outside work, Mandisa enjoys hiking mountains, chasing waterfalls and travelling across countries.
 Kashif Khan is a Sr. Analytics Specialist Solutions Architect at AWS, specializing in big data services like Amazon EMR, AWS Lake Formation, AWS Glue, Amazon Athena, and Amazon DataZone. With over a decade of experience in the big data domain, he possesses extensive expertise in architecting scalable and robust solutions. His role involves providing architectural guidance and collaborating closely with customers to design tailored solutions using AWS analytics services to unlock the full potential of their data.
 Gaurav Sharma is a Specialist Solutions Architect (Analytics) at AWS, supporting US public sector customers on their cloud journey. Outside of work, Gaurav enjoys spending time with his family and reading books.
Update on Support for Amazon Chime
Post Syndicated from Beth Styles original https://aws.amazon.com/blogs/messaging-and-targeting/update-on-support-for-amazon-chime/
Amazon Chime is a communications service that lets you meet, chat, and place business calls inside and outside your organization, all using a single application.
After careful consideration, we have decided to end support for the Amazon Chime service, including Business Calling features, effective February 20, 2026. Amazon Chime will no longer accept new customers beginning February 19, 2025. Existing customers can continue to use Amazon Chime features, including Business Calling, scheduling and hosting meetings, adding and managing users, and other capabilities supported through the Amazon Chime administration console. To qualify as an existing customer, you must have created an Amazon Chime Team or Enterprise account prior to February 19, 2025. After February 20, 2026, you will no longer be able to host Amazon Chime meetings, manage users, or use any of the Business Calling features. If you cannot delete your data prior to February 20, 2026, please reach out to us via Amazon Support for help. Note: This does not impact the availability of the Amazon Chime SDK service.
We know that you may need support to transition to other collaboration solutions. Please review our documentation which provides instructions and best practices for Amazon Chime IT administrators and users to move to alternate collaboration solutions. This may include solutions provided by AWS, such as AWS Wickr, or from AWS partners, such as Zoom from Zoom Video Communications Inc., Webex from Cisco Systems, Inc., and Slack from Salesforce, Inc. Visit the AWS Marketplace for more information about our AWS partners’ solutions. If you need additional assistance transitioning, please contact AWS Support.
Organizations with at least one Amazon Chime Team or Enterprise account can continue to use Amazon Chime and Business Calling features until February 20, 2026, when support for the service will end. Features that will no longer be supported include scheduling and hosting meetings, adding and managing users, and other capabilities available using the Amazon Chime console.
Additional Resources
- View Amazon Chime documentation for more information on managing your users and usage reporting, how chat room administrators can export their members and users can export their personal contacts, and porting your Business Calling numbers.
- Amazon Chime website
- Amazon Chime Help Center
- Learn more about AWS Wickr and AWS partner solutions
- If you need assistance or have feedback, please reach out to AWS support
ЦЕНИТЕ НА ИМОТИТЕ след ПРИЕМАНЕ НА ЕВРОТО
Post Syndicated from VassilKendov original https://kendov.com/%D1%86%D0%B5%D0%BD%D0%B8%D1%82%D0%B5-%D0%BD%D0%B0-%D0%B8%D0%BC%D0%BE%D1%82%D0%B8%D1%82%D0%B5-%D1%81%D0%BB%D0%B5%D0%B4-%D0%BF%D1%80%D0%B8%D0%B5%D0%BC%D0%B0%D0%BD%D0%B5-%D0%BD%D0%B0-%D0%B5%D0%B2%D1%80/
В предходно видео анализирах данните на Агенцията по вписвания за сделките с недвижими имоти през последните 5 години и стигнахме до извода, че в този етап от развитиено на пазара на недвижими имоти, търсенето и предлагането реално не влияят на цената на недвижимите имоти. Видеата можете да намерите тук на новия ни сайт или в Youtube канала на Kendov.com.
В това видео разглеждам факторите които определят цените на имотите в момента и как те ще работят в условията след приемането на еврото. С кои други фактори ще се комбинират и в кои случаи цените ще растат и съответно намалят.
За съжаление държавната и дори международната политика играят все по-голяма роля на пазара на недвижими имоти в България. и макар търсенето и предлагането да не определят цените в момента, дългосрочно това ще си дойд ена мястото.
Ако желаете се абонирайте за канала Kendov.com в Youtube и проселдете дискусиите под видеата по този въпрос.
Васил Кендов – финансов консултант
Съвет на деня
„Уредете си кредит преди да започнете търсенето на имот. Така ще знаете точно с колко пари ще разполагате“
The post ЦЕНИТЕ НА ИМОТИТЕ след ПРИЕМАНЕ НА ЕВРОТО appeared first on KENDOV.COM.
Take Command | Rapid7’s 2025 Cybersecurity Summit: First Look at Our Speaker Lineup
Post Syndicated from Rapid7 original https://blog.rapid7.com/2025/02/19/take-command-rapid7s-2025-cybersecurity-summit-first-look-at-our-speaker-lineup/

Take Command Summit 2025 is shaping up to be one of the most impactful cybersecurity events of the year, bringing together Rapid7’s own security experts alongside leading industry voices for a full day of insights into today’s evolving attack landscape. This virtual summit will offer actionable strategies, real-world case studies, and expert discussions designed to help security teams take command of their defenses.
While we’ll be revealing the full agenda soon, we’re excited to share a first look at some of the key voices joining us this year to explore proactive risk management and offensive security strategies. These industry leaders will be part of a speaker lineup that includes Rapid7’s own security researchers, SOC experts, and product leaders, all focused on equipping security teams with the knowledge they need to outpace today’s adversaries.
Building a Modern Approach to Risk and Exposure Management
Tyler Shields, Industry Analyst at ESG, brings more than 25 years of experience in cybersecurity research, threat intelligence, and market strategy. As attack surfaces grow—spanning cloud, identity, data, and applications—security teams must shift from reactive to proactive risk management.
At Take Command 2025, he’ll explore how organizations can prioritize risk signals across diverse attack surfaces to build smarter, more proactive defense strategies. His session will provide a roadmap for understanding evolving threats and ensuring security teams focus on the most critical risks before they escalate.
Staying Ahead of Attackers with Continuous Red Teaming
Will Hunt, IT Consultant at In.Security, is a recognized expert in red teaming, penetration testing, and security training, having delivered workshops at Black Hat USA, Asia, and EU. As cyber threats evolve, static defenses and annual penetration tests are no longer enough—security teams need continuous testing strategies to stay ahead of adversaries.
At Take Command 2025, Hunt will join a panel of security experts to discuss how red teaming is evolving in response to expanding and increasingly complex attack surfaces and helping organisations stay ahead of adversaries. This session will explore how proactive testing is helping organizations identify and eliminate weaknesses before attackers can exploit them.
More to Come: A Full Day of Cybersecurity Insights
Take Command 2025 is more than just individual sessions—it’s a full day of expert discussions, deep technical insights, and strategic guidance from some of the best minds in cybersecurity. In addition to these featured speakers, Rapid7’s own security leaders, researchers, and SOC practitioners will provide critical perspectives on:
- The evolving threat landscape and attacker mindset
- How AI is redefining security operations and automation
- Managing risk exposure across complex environments
- Threat detection, response, and red teaming strategies
…and this is just the beginning! More speakers and sessions will be announced soon, covering the most pressing challenges facing security teams today.
Save Your Spot
Take Command Summit 2025 takes place on April 9, 2025, as a fully virtual, one-day event. Don’t miss the opportunity to hear from industry leaders, engage with Rapid7 experts, and walk away with actionable security strategies.
Mesa 25.0.0 released
Post Syndicated from corbet original https://lwn.net/Articles/1010898/
Version
25.0.0 of the Mesa graphics library has been released. “The flashiest addition is probably the support for Vulkan 1.4 by Anv (Intel),
Asahi (Apple), Lavapipe (software), NVK (NVIDIA), PanVK (Mali), RADV (AMD),
and Turnip (Qualcomm).
Users can expect the usual flurry of improvements across all drivers and
components.“
Intel Xeon 6700P Granite Rapids-SP Breaks Cover Almost Everywhere
Post Syndicated from Cliff Robinson original https://www.servethehome.com/intel-xeon-6700p-granite-rapids-sp-breaks-cover-almost-everywhere/
The Intel Xeon 6700P series codenamed “Granite Rapids-SP” has been teased for many quarters, but it is starting to break cover online
The post Intel Xeon 6700P Granite Rapids-SP Breaks Cover Almost Everywhere appeared first on ServeTheHome.
A Playbook for Migrating Your Media to a MAM System
Post Syndicated from Laquie TN Campbell original https://www.backblaze.com/blog/workflow-playbook-migrating-your-media-assets-to-a-mam/

Media asset management systems (MAM) have become a standard tool in the tech stack of many media organizations. MAM systems have evolved from basic file storage to sophisticated platforms with advanced organization features, increasing efficiency, collaboration, and distribution speeds.
In this post, I’ll explain some media asset management basics and introduce five key plays you can put into practice to get the most out of your assets, including how to move them into a MAM system or migrate from an older system to a new one.
Why do you need a MAM system?
As a media professional, I’ve come across some, let’s say, creative file naming conventions in my day. While it’s hilarious, “Episode6-Final-final-v2.3_OH_YEAH_THIS_IS_DEFINITELY_THE_FINAL_ONE_2_LOL.mp4” isn’t going to be the easiest thing to find years later when you’re searching through hundreds of files for the (for real) final one.
Whether you make videos, images, or music, the more you produce, the more difficult those assets become to manage, organize, find, and protect. Managing files by carefully placing them in specific folders and implementing more logical naming conventions can only get you so far. At some point, as the scale of your business grows, you’ll find your current way of organizing and searching for assets can’t keep up. That’s where media asset management systems come in.
MAM systems explained: Key concepts
Before you start building a playbook to get the most from your creative assets, let’s review a few key concepts.
Assets and metadata
Asset: A rich media file with intrinsic metadata.
An asset is simply a file that is the result of your creative operation. Most often, it is a rich media file like an image or a video. Typically, these files are captured or created in a raw state, then your creative team adds value to that raw asset by editing it and creating a finished story that in turn, becomes another asset to manage.
Metadata: Information about a file, either embedded within the file itself or associated with the file by another system, typically a MAM application.
Any given file carries information about itself that can be understood by your laptop or workstation’s operating system. Some of these seem obvious, like the name of the file, how much storage space it occupies, when it was first created, and when it was last modified. These would all be helpful ways to try to find one particular file you are looking for among thousands just using the tools available in your OS’s file manager.
File metadata: Information about a file specifically pertaining to the technical attributes of the file.
There’s usually another level of metadata embedded in media files that is not so obvious but potentially enormously useful: Metadata embedded in the file when it’s created by a camera, film scanner, or output by a program.
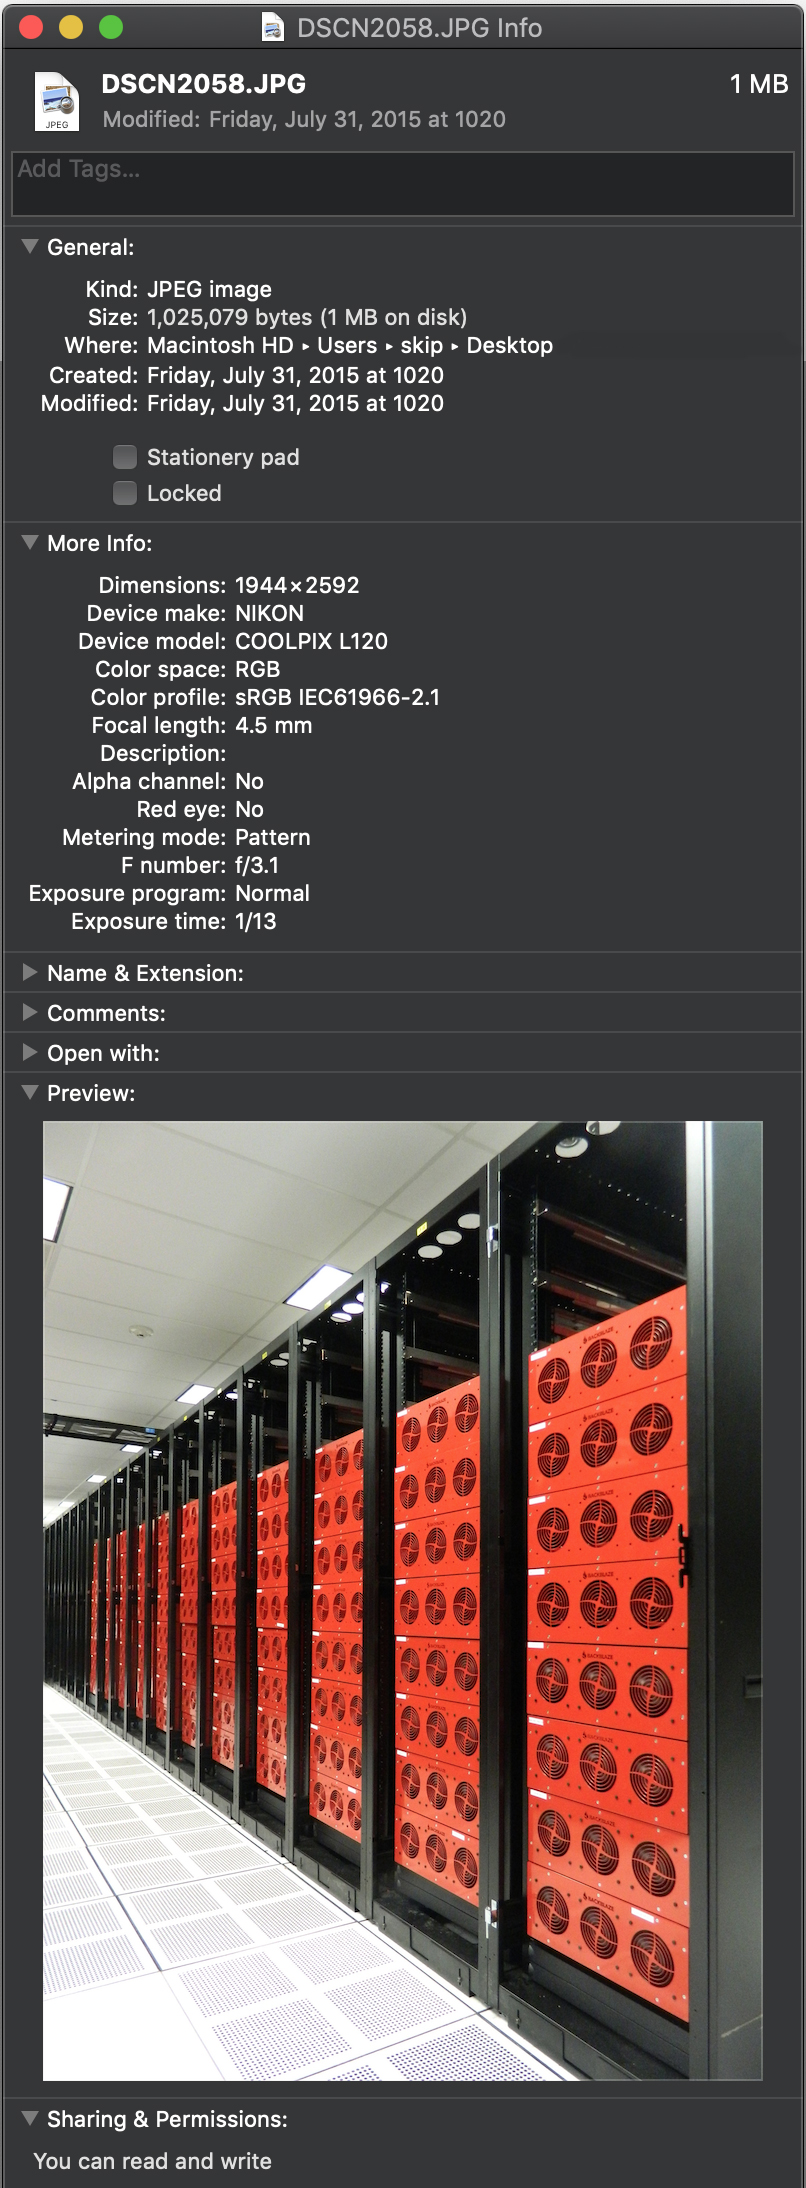
For example, this image taken in Backblaze’s data center carries all kinds of interesting information. When I inspect the file, I can see a wealth of information. I now know the image’s dimensions and when the image was taken, as well as exactly what kind of camera took this picture and the lens settings that were used.
As you can see, this metadata could be very useful if you want to find all images taken on that day, or even images taken with that same camera, focal length, F-stop, or exposure.
Going through files one at a time to find the one you need is incredibly inefficient. Yet that’s how things still work in many creative environments—an ad hoc system of folders plus the memory of whoever’s been with the team longest. Files are often kept on the same storage used for production or even on an external hard drive.
Teams quickly outgrow that system when they find themselves juggling multiple hard drives or they run out of space on production storage. Worst of all, assets kept on a single hard drive are vulnerable to disk damage or to being accidentally copied or overwritten. Even if standard protocol is a redundant backup process, natural disasters can become a serious threat depending on the location of the physical tapes or drives.
Why your assets need to be managed
To meet this challenge, creative teams have often turned to MAMs. A MAM automatically extracts all of the assets’ inherent metadata, helps move files to protected storage, and makes them instantly available to MAM users. As time has gone on, we’ve seen MAM systems be powerfully enhanced by AI. In a way, these MAMs become a private media search engine where any file attribute can be a search query to instantly uncover the needed files in even the largest media asset libraries.
Beyond that, asset management systems are rapidly becoming highly effective collaboration and workflow tools. For example, tagging a series of files as Field Interviews — April 2019, or flagging an edited piece of content as HOLD — do not show customer can be very useful indeed.
Inner workings of a media asset manager
When you add files into an asset management system, the application inspects each file, extracting every available bit of information about the file, noting the file’s location on storage, and often creating a proxy version of the file that is easier to present to users.
To keep track of this information, asset manager applications employ a database and keep information about your files in it. This way, when you’re searching for a particular set of files among your entire asset library, you can simply make a query of your asset manager’s database in an instant rather than rifling through your entire asset library storage system. The application takes the results of that database query and retrieves the files you need.
A MAM Case Study: Complex Networks
Complex Networks was running out of space. Whenever local shared storage filled up, they had to pull assets off to give everybody enough room to continue working. They moved all of their assets to iconik media asset management software and backed them all up to the Backblaze B2 Cloud Storage. They’re now free to focus on what they do best—making culture-defining content—rather than spending time searching for assets.

Asset migration playbook
Whether you need to move from a file and folder based system to a new asset manager, or have been using an older system and want to move to a new one without losing all of the metadata that you have painstakingly developed, a sound playbook for migrating your assets can help guide you. Below we’ll explain five plays you can use to approach your asset management journey:
Play 1: Protecting assets saved in a folder hierarchy without an asset management system
In this scenario, your assets are in a set of files and folders, and you aren’t ready to implement your asset management system yet.
The first consideration is for the safety of the assets—backup and archive. Files on a single hard drive are vulnerable, so if you are not ready to choose an asset manager your first priority should be to get those files into a secure cloud storage service like Backblaze B2.
Then, when you have chosen an asset management system, you can simply point the system at your cloud-based asset storage to extract the metadata out of the files and populate the asset information in your asset manager.
How to run it:
- Get assets archived or moved to cloud storage.
- Choose your asset management system.
- Ingest assets directly from your cloud storage.
Play 2: Moving assets saved in a folder hierarchy into your asset management system and archiving in cloud storage
In this scenario, you’ve chosen your asset management system, and need to get your local assets in files and folders ingested and protected in the most efficient way possible.
You’ll ingest all of your files into your asset manager from local storage, then back them up to cloud storage. Once your asset manager has been configured with your cloud storage credentials, it can automatically move a copy of local files to the cloud for you. Later, when you have confirmed that the file has been copied to the cloud, you can safely delete the local copy.
How to run it:
- Ingest assets from local storage directly into your asset manager system.
- From within your asset manager system archive a copy of files to your cloud storage.
- Once safely archived, the local copy can be deleted.
Play 3: Getting a lot of assets on local storage into your asset management system and backing up to cloud storage
If you have a lot of content, more than say, 20TB, you will want to use a rapid ingest service similar to the Backblaze Fireball system. You copy the files to the Backblaze Fireball, Backblaze puts them directly into your asset management bucket, and the asset manager is then updated with the file’s new location in your Backblaze B2 account.
This can be a manual process, or can be done with scripting to make the process faster.
How to run it:
- Ingest assets from local storage directly into your asset manager system.
- Archive your local assets to Fireball (up to 90TB at a time).
- Once the files have been uploaded by Backblaze, relink the new location of the cloud copy in your asset management system.
Play 4: Moving from one asset manager system to another without losing metadata
In this scenario you have an existing asset management system and need to move to a new one as efficiently as possible. You want to take advantage of your new system’s features and safeguard in cloud storage in a way that does not impact your existing production.
Some asset management systems will allow you to export the database contents in a format that can be imported by a new system. Some older systems may not have that feature and will require the expertise of a database expert to manually extract the metadata. Either way, you can expect to need to map the fields from the old system to the fields in the new system.
Making a copy of your old database is a must. Don’t work on the primary copy, and be sure to conduct tests on small groups of files as you’re migrating from the older system to the new. You need to ensure that the metadata is correct in the new system, with special attention that the actual file location is mapped properly. It’s wise to keep the old system up and running for a while before completely phasing it out.
How to run it:
- Export the database from the old system.
- Import the records into the new system.
- Ensure that the metadata is correct in the new system and file locations are working properly.
- Make archive copies of your files to cloud storage.
- Once the new system has been running through a few production cycles, it’s safe to power down the old system.
Play 5: Moving quickly from a MAM on local storage to a cloud-based system
In this variation of Play 4, you can move content to object storage with a rapid ingest service like Backblaze Fireball at the same time that you migrate to a cloud-based system. This step will benefit from scripting to create records in your new system with all of your metadata, then relink with the actual file location in your cloud storage all in one pass.
You should test that your asset management system can recognize a file already in the system without creating a duplicate copy of the file. This is done differently by each asset management system.
How to run it:
- Export the database from the old system.
- Import the records into the new system while creating placeholder records with the metadata only.
- Archive your local assets to the Backblaze Fireball (up to 90TB at a time).
- Once the files have been uploaded by Backblaze, relink the cloud based location to the asset record.
Bonus play: Using cloud storage to scale a media heavy workload
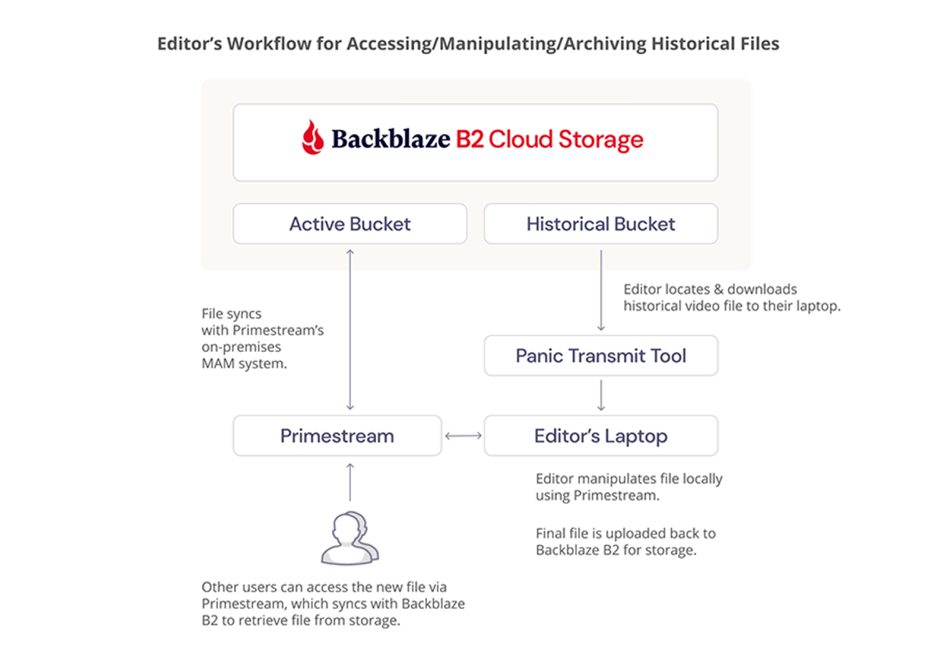
Fortune Media’s tech stack was expensive, difficult to use, and not 100% reliable. They migrated over 300TB of data, mainly video files, to Backblaze B2 Cloud Storage, which integrated with their preferred MAM system, Primestream Xchange, removing the need for archiving middleware and simplifying the tech stack.
Wrapping up
Every creative environment is different, but all need the same thing: to be able to find assets fast and organize content to enhance productivity and rest easy knowing that content is safe.
With these plays, you can take that step and be ready for any future production challenges and opportunities.
The post A Playbook for Migrating Your Media to a MAM System appeared first on Backblaze Blog | Cloud Storage & Cloud Backup
[$] Meshtastic: decentralized communication with low-power devices
Post Syndicated from jake original https://lwn.net/Articles/1009782/
Many of us enjoy uninterrupted access to mobile networks. However, in
remote areas or during emergencies, that connectivity may not always be
available. For such scenarios, Meshtastic offers a decentralized
wireless mesh network with open-source firmware that runs on affordable,
low-power devices.
At FOSDEM 2025, the Meshtastic
project was represented by one of its core developers, Thomas Göttgens, who
gave a talk, “Meshtastic
– off-grid communication for everyone“, in the Radio developer
room (devroom).
More from HACS: Entity Progress Card, Dynamic DNS & HA Tracker
Post Syndicated from BeardedTinker original https://www.youtube.com/watch?v=td3B5-VwxXQ
Device Code Phishing
Post Syndicated from Bruce Schneier original https://www.schneier.com/blog/archives/2025/02/device-code-phishing.html
This isn’t new, but it’s increasingly popular:
The technique is known as device code phishing. It exploits “device code flow,” a form of authentication formalized in the industry-wide OAuth standard. Authentication through device code flow is designed for logging printers, smart TVs, and similar devices into accounts. These devices typically don’t support browsers, making it difficult to sign in using more standard forms of authentication, such as entering user names, passwords, and two-factor mechanisms.
Rather than authenticating the user directly, the input-constrained device displays an alphabetic or alphanumeric device code along with a link associated with the user account. The user opens the link on a computer or other device that’s easier to sign in with and enters the code. The remote server then sends a token to the input-constrained device that logs it into the account.
Device authorization relies on two paths: one from an app or code running on the input-constrained device seeking permission to log in and the other from the browser of the device the user normally uses for signing in.
RISC-V and Fedora: All Aboard! (Fedora Magazine)
Post Syndicated from jzb original https://lwn.net/Articles/1010857/
The Fedora Project has announced
two milestones in its journey to supporting the RISC-V architecture: a
dedicated RISC-V Koji build system instance is live in the Fedora data
center, and Fedora
41-based images are now available for RISC-V. It is also possible
to run Fedora RISC-V images using QEMU for those without supported
hardware.
Lange: The secret maze of Debian images
Post Syndicated from jzb original https://lwn.net/Articles/1010855/
Debian Developer Thomas Lange has written a blog post
in the attempt to help users find the right Debian image for their
systems.
It’s difficult to find the right Debian image. We have thousands of
ISO files and cloud images and we support multiple CPU architectures
and several download methods. The directory structure of our main
image server is like a maze, and our web pages for downloading are
also confusing.
Security updates for Wednesday
Post Syndicated from jzb original https://lwn.net/Articles/1010853/
Security updates have been issued by AlmaLinux (gcc-toolset-14-gcc, nodejs:18, and nodejs:22), Fedora (bootc), Gentoo (OpenSSH), Oracle (doxygen, libxml2, mingw-glib2, and NetworkManager), Red Hat (bind, bind9.16, bind9.18, kernel, kernel-rt, mysql, and mysql:8.0), Slackware (openssh), SUSE (buildah, emacs, glibc, google-osconfig-agent, grub2, java-11-openj9, kernel, netty, netty-tcnative, openssh, openvswitch, podman, and ucode-intel), and Ubuntu (atril, libsndfile, libtasn1-6, openssh, python-virtualenv, and symfony).
Rapid7 Fills Gaps in the CVE Assessment Process with AI-Generated Vulnerability Scoring in Exposure Command
Post Syndicated from Rapid7 original https://blog.rapid7.com/2025/02/19/rapid7-fills-gaps-in-the-cve-assessment-process-with-ai-generated-vulnerability-scoring-in-exposure-command/

The National Vulnerability Database (NVD) announced in February 2024 that it would no longer provide common vulnerability scoring system (CVSS) scores for all CVEs. Due to resource constraints and an inability to keep up with the volume of newly-disclosed vulnerabilities, NVD shifted its focus to processing vulnerabilities more efficiently by relying on vendor-provided and third-party scores rather than scoring each CVE independently.
Many organizations rely on NVD’s CVSS scores as a consistent, centralized guide to measuring the potential risk of vulnerabilities. This is especially useful for teams that don’t have the resources to conduct their own in-depth vulnerability analysis given the pace at which new CVEs are cropping up.
To address this widening gap in vulnerability scoring and ensure our customers are making informed decisions with the most accurate understanding of their current risk posture we’re excited to announce the release of AI-Generated Risk Scoring in Exposure Command. By integrating an advanced machine learning model, Exposure Command supplements existing CVSS scores by providing AI-Generated Risk Scores for CVEs where NVD does not provide them, ensuring all vulnerabilities are provided an accurate score.
The need to evolve from traditional vulnerability management practices to continuous threat and Exposure Management
Moving beyond simple risk scoring methodologies is critical for modern vulnerability management teams to stay ahead of advanced threats. For many organizations, this means adopting a Risk-Based Vulnerability Management (RBVM) approach.
Put simply, this means incorporating not just a deep and accurate understanding of how risky a given CVE is in a vacuum, but also layering on additional context related to reachability and exploitability, asset criticality, and a real-world understanding of what threat actors are actively targeting in the wild. And how all these inputs relate to the organization’s specific environment.
AI-Generated CVSS scoring in Exposure Command feeds directly into our broader Active Risk scoring methodology. More importantly, it empowers Rapid7 to produce predictive CVSS scores by analyzing vulnerability information and comparing with previous expert vulnerability analysis.
The model generates each vector individually, and once combined to form a score, results in 76% of these generated scores being in the correct severity classification. Combined with Rapid7’s Active Risk calculator, this increases to 87% of scores returning the correct classification. The remaining scores are never more than one classification out.
This insight will feed directly into and improve the overall accuracy of our Active Risk scoring models, as well as, ensure severity scores are assigned and provided to security teams faster than humanly possible, making your entire security program more resilient to external change.
By leveraging AI/ML to generate predictive risk scores, security teams benefit from:
- Enhanced accuracy: Our expertly designed model trained on historical NVD data accurately provides CVSS scores.
- Predictive scoring: Get immediate insight into the severity of newly-disclosed CVEs that are left unscored, without the need for manual aggregation and analysis.
- Improved security posture: Ensuring all CVEs are assigned an accurate severity score, organizations are equipped with the necessary context to effectively prioritize remediation efforts and in turn strengthen their organization’s security posture.
This release represents a major step forward in our mission to provide industry-leading cybersecurity solutions. We expect these enhancements will significantly improve your ability to assess and manage vulnerabilities, giving you the confidence to stay ahead of potential threats.For more detailed information and implementation guidelines, please refer to the release notes. If you’d like to learn more about the Rapid7 AI Engine and how we’re leveraging AI across the platform, download the eBook today!