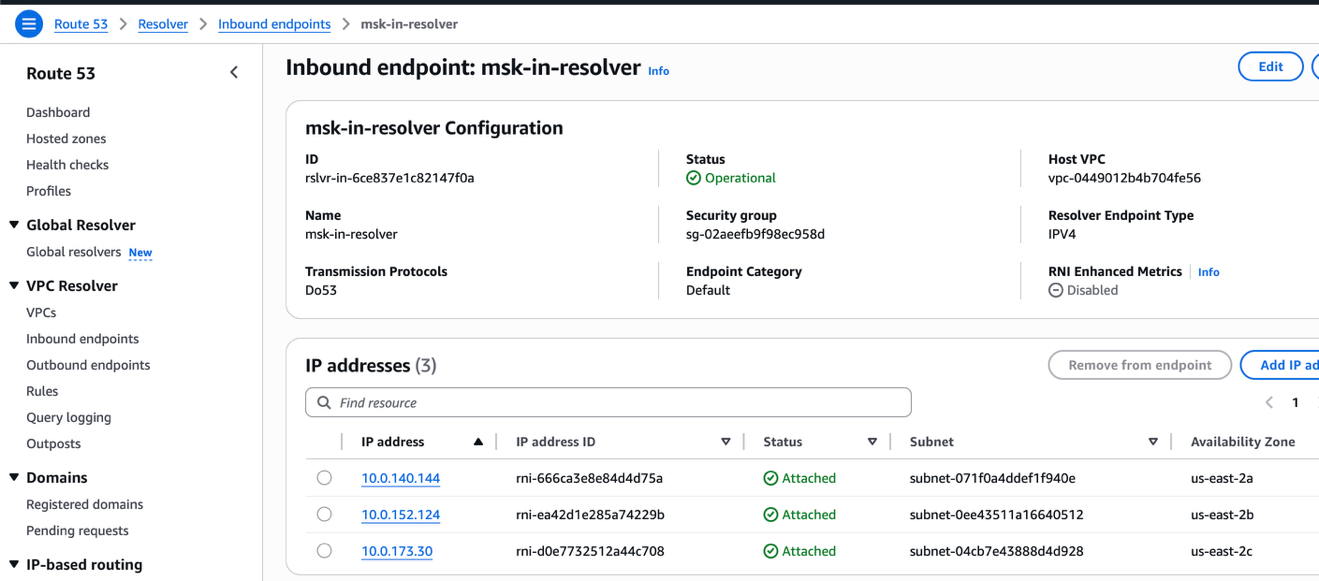
Intel’s Granite Rapids CPUs have finally made it to the workstation market as the Xeon 600 family. Today we are reviewing the Xeon 658X, a 24 core chip that packs a punch, thanks in part to its memory bandwidth
Amazon Web Services (AWS) is gradually introducing updates to the AWS Sign-In and sign-up experience to a limited number of customers. We’re sharing these changes so you will know what to expect as we gradually make the updated experience available to more customers. These updates include new options for creating and accessing AWS accounts. To support these options and provide a more consistent experience, we’ve redesigned the AWS sign-in page and refreshed the session selection page. While some screens and interactions have changed, existing customers will continue using the same sign-in methods and credentials they use today. If you see a sign-in page that looks different from what you’re used to, this is an expected change.
In this post, we walk through what’s new with screenshots so you’ll know what to expect. If your organization relies on the current sign-in interface for browser automation or scripted workflows, review these updates to understand how they might affect your configuration.
Redesigned Sign-In page
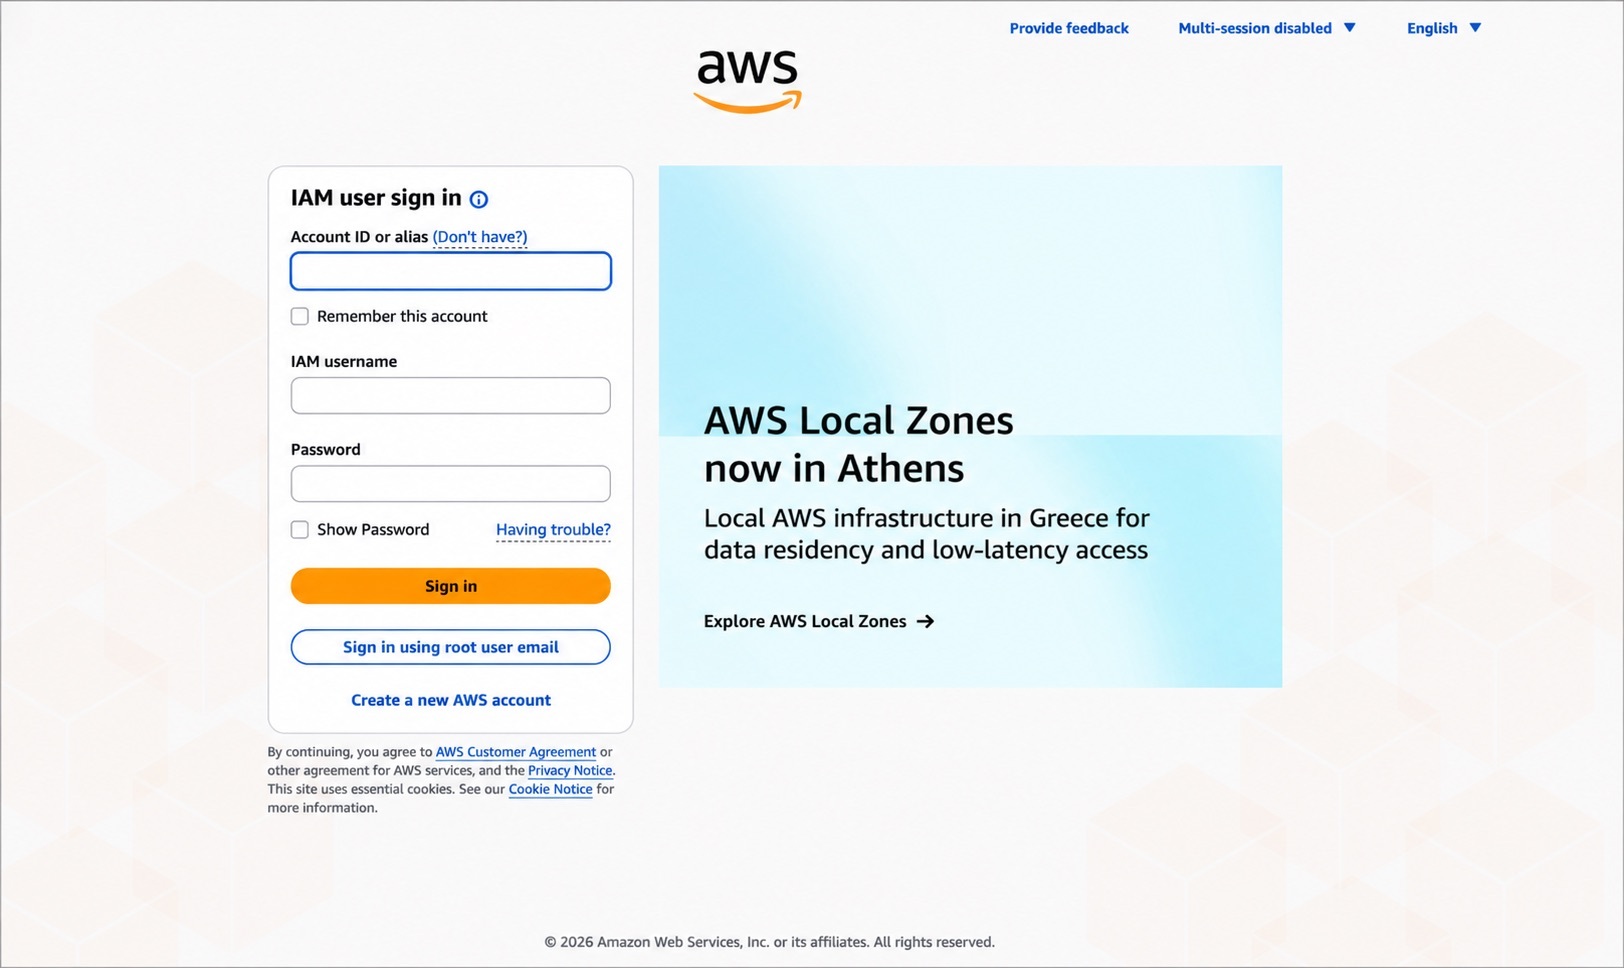
The AWS Sign-In page is getting a new look. Figure 1 shows the current sign-in page, where you choose between Root user and IAM user before entering your sign-in information.
Figure 1: Current AWS sign-in page
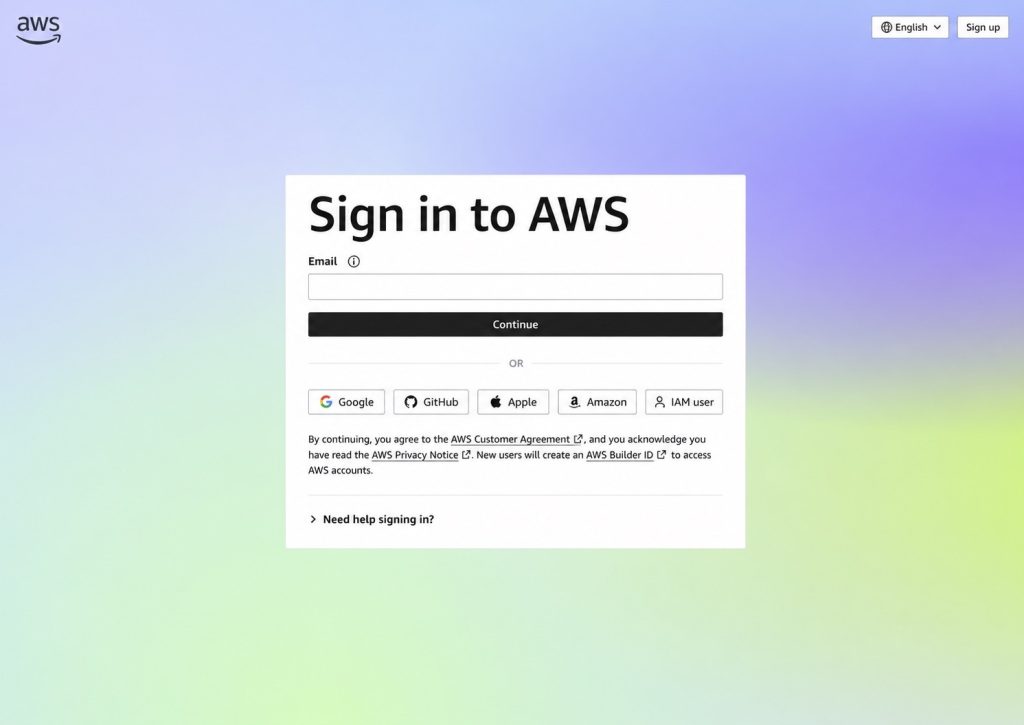
The redesigned sign-in page, shown in Figure 2, introduces a unified email entry point for signing in to AWS. Root users and customers using the new email-based sign-in method for AWS accounts created with the updated sign-up experience enter their email address and choose Continue. AWS automatically determines the appropriate sign-in flow based on the email address provided.
If you’re signing in as an IAM user, choose IAM User to continue to the IAM User Sign-In page. Enter your account ID or alias, AWS Identity and Access Management (IAM) username, and password to sign in.
Figure 2: Redesigned AWS sign-in page
The redesigned page also includes sign-in options for customers whose AWS account was created using a supported identity provider, such as Google, GitHub, Apple, or an Amazon.com account. If you’re an existing AWS customer, continue using the same credentials you use today, and AWS will guide you through the appropriate sign-in experience. Sign-in with a supported identity provider is available only for AWS accounts that were created using that identity provider.
If your organization uses AWS IAM Identity Center or IAM federation to access AWS, continue signing in through your organization’s access portal or federation URL. Your existing sign-in process doesn’t change.
Note: Although you don’t need to take specific actions to benefit from these updates, if your setup depends on the current UI for automated tasks, you might notice changes. For the most reliable and stable experience, use the AWS supported options to grant programmatic access to your users. For more information, see the programmatic access options.
Try the redesigned sign-in experience
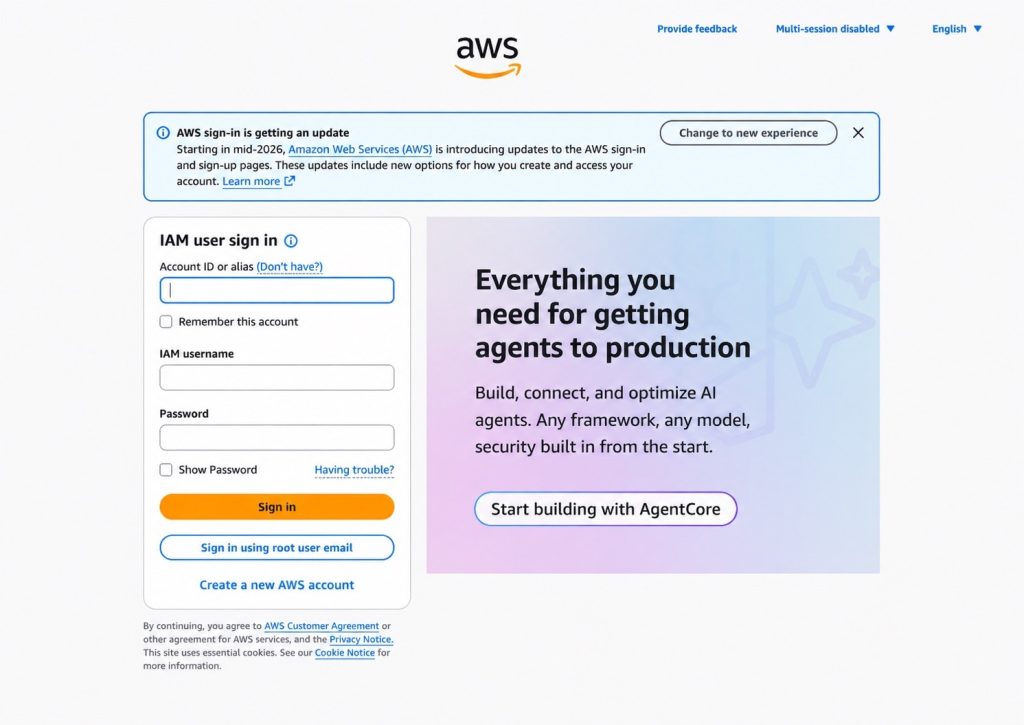
Before the redesigned sign-in experience becomes the default, AWS will display a banner on the existing sign-in page inviting you to try it, as shown in Figure 3. Selecting Change to new experience takes you to the updated sign-in flow. The existing experience remains available until the redesigned experience becomes the default.
Note: After you select Change to new experience, you’ll continue to see the redesigned sign-in experience in that browser. To return to the existing experience while it’s still available, clear your browser cookies.
Figure 3: Current AWS sign-in page with the banner to try the redesigned experience
Redesigned session selection experience
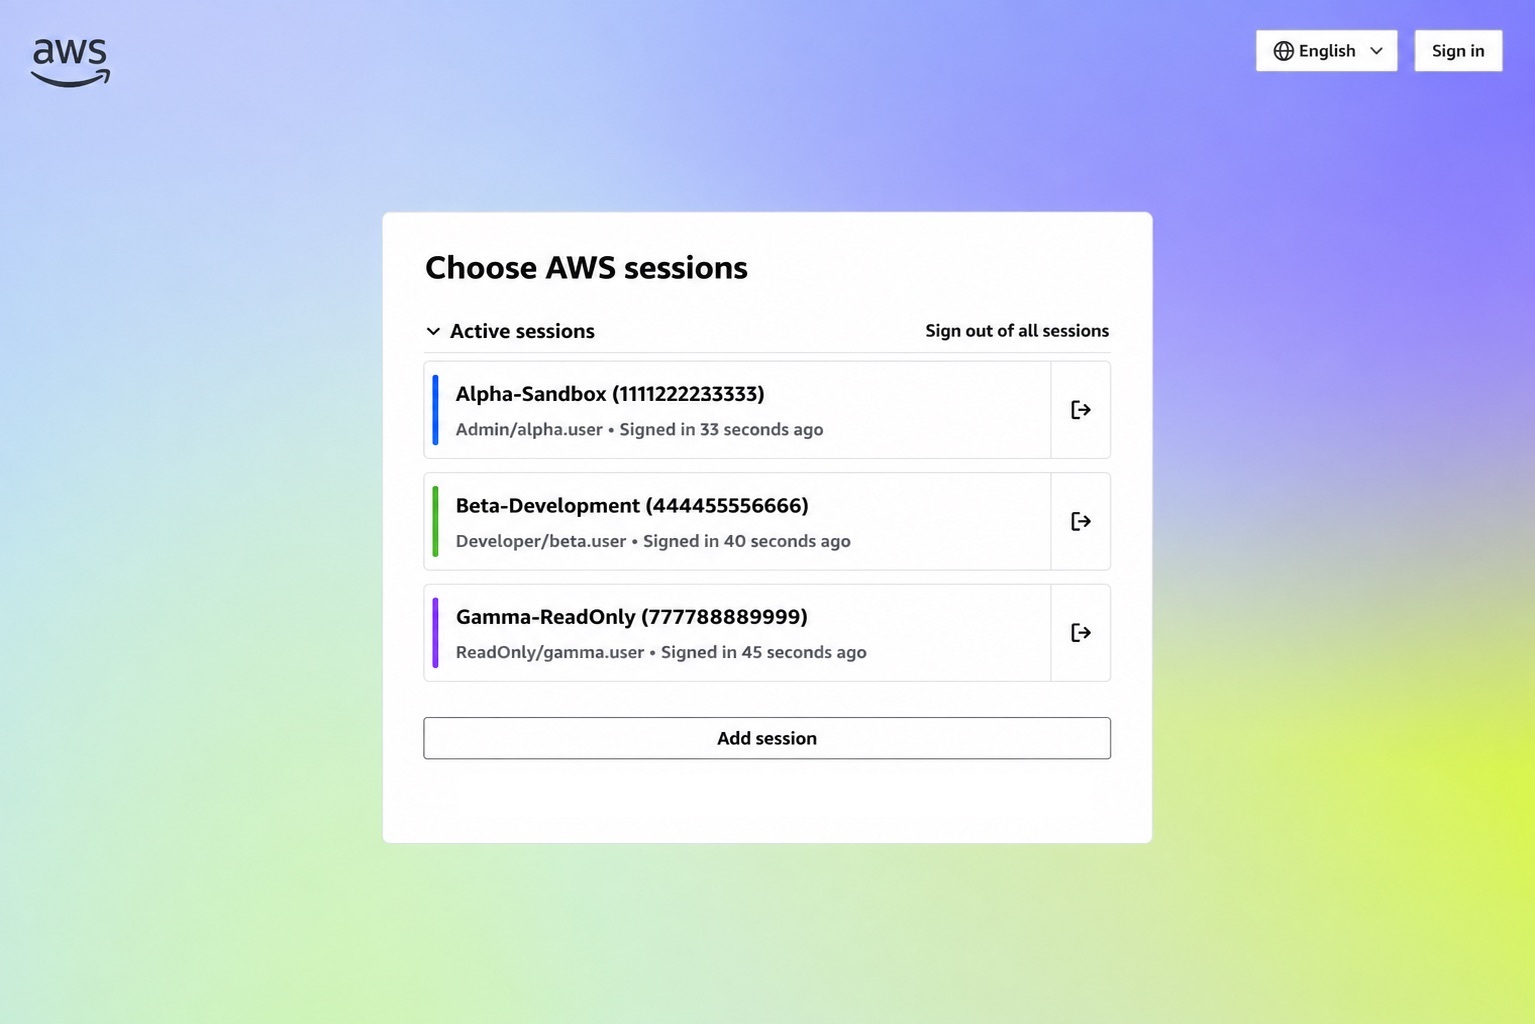
AWS supports multiple active account and role sessions, so you can stay signed in to more than one account at a time. We’ve redesigned the AWS session selection page with a refreshed look that simplifies viewing and managing your active sessions. When you return to AWS while you have active account or role sessions, the session selection page displays those sessions in one place, including the account, role, and recent sign-in information to help you identify the session you want to use, as shown in Figure 4.
Figure 4: New session selection page
From this page, you can select an existing session, sign out of one or all sessions, or add another AWS session. Choose Add session to sign in to another AWS account while remaining signed in to your existing sessions.
Conclusion
The redesigned AWS Sign-In and session selection pages provide an updated experience while continuing to support the sign-in methods you use today. If you’re an existing AWS customer, there’s no change to how you sign in to your account. We encourage users who rely on browser automation or other workflows that interact with the sign-in experience to review these updates and ensure their systems are compatible with the redesigned experience.
To learn more, see the AWS Sign-In User Guide. If you have questions or feedback, start a new thread in IAM re:Post or reach out to AWS Support.
Sub-second search is the starting point of every order on Zepto, a fast-growing quick-commerce platform in India, founded in 2021 with endeavor to provide delivery in minutes. Powering the search experience is Amazon OpenSearch Service, a managed retrieval engine built on OpenSearch for agentic AI, search, and analytics.
Zepto operates hundreds of delivery hubs (dark stores) across Indian cities where it provides logistics services to sellers operating on Zepto Platform. Each hub maintains its own inventory levels, pricing, and assortment spanning thousands of Stock Keeping Units (SKUs). As the company scaled to hundreds of hubs, driving linear increases in indexing volume and maintaining sub-second product search latency while controlling costs became increasingly challenging.
To address this, Zepto migrated its OpenSearch Service data nodes from memory-optimized instances to OpenSearch Optimized instances. This instance family is purpose-built for high indexing throughput and cost efficiency. It uses local storage as the primary data tier, with Apache Lucene segments copied synchronously to Amazon Simple Storage Service (Amazon S3) for durability. With this migration, Zepto now serves the same workload with two-thirds of their previous data node count, achieving over 100% higher indexing throughput and 30% cost savings.
In this post, we explore the architecture decisions along with the load testing outcomes that led Zepto to select OpenSearch Optimized instances for latency-sensitive product search. We also discuss the key lessons learned during the production migration.
Zepto’s search platform
Zepto’s search platform is built around a localized delivery hub model. Each hub maintains its own inventory, capacity, and fulfillment priority. When a customer searches for a product, the query is not resolved against a global catalog. Instead, it is resolved in the context of the specific delivery hub or hubs serving that customer’s delivery address. This distinction is critical: Every customer journey on Zepto’s application begins with product discovery through search, browse, and promotional surfaces. All these must reflect hub-specific availability in real time to fulfill orders in minutes.
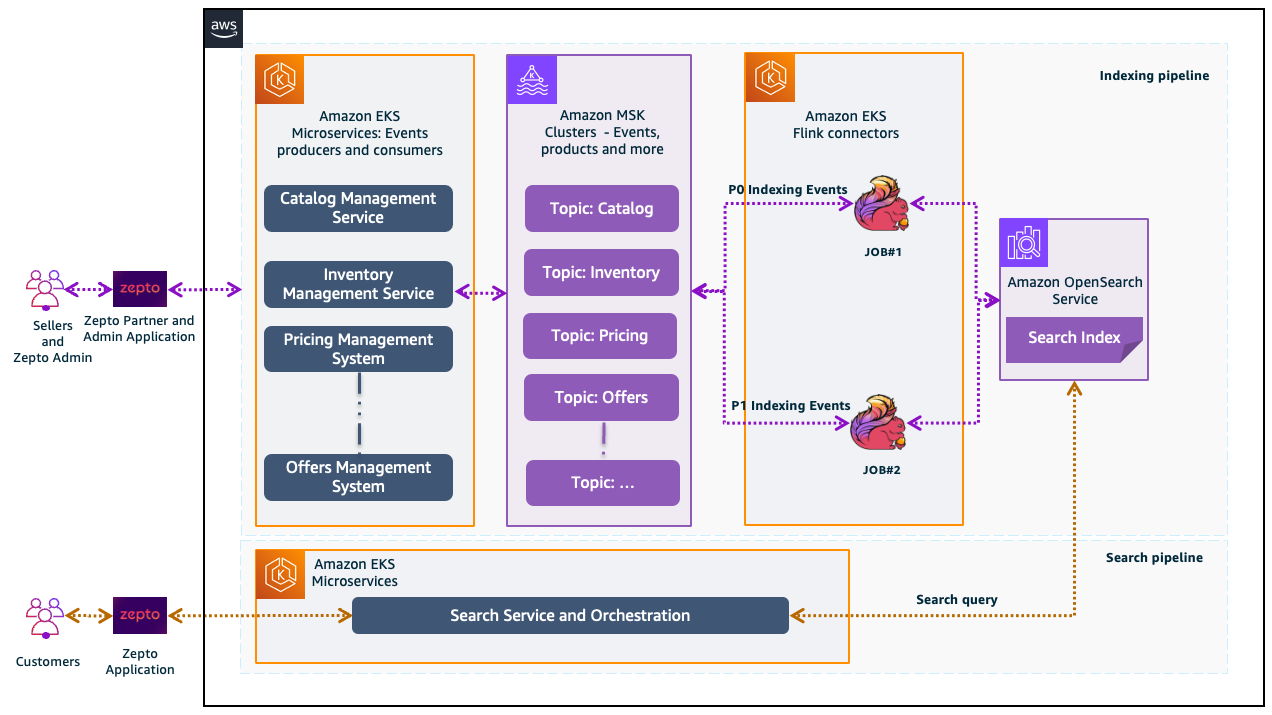
An event-driven architecture powers this experience, keeping results fresh as products, prices, offers, and inventory change across hundreds of delivery hubs. The following architecture diagram illustrates Zepto’s end-to-end indexing and search pipeline, from event production through stream processing to the search indices on OpenSearch Service.
Figure 1: Zepto’s end-to-end indexing and search pipeline architecture
Event producers and consumers: Zepto’s application microservices are deployed on Amazon Elastic Kubernetes Service (Amazon EKS), a fully managed service for running Kubernetes workloads on AWS. These microservices serve as both event producers and consumers. Sellers and Zepto Admin users interact with the Zepto Partner and Admin application.
Key microservices: The Catalog Management Service emits events when product metadata changes like new product additions, attribute updates, and category reclassifications. The Inventory Management Service publishes stock-level changes across delivery hubs in real time as warehouse teams pick, pack, and replenish inventory. The Pricing Management Service generates events whenever sellers update pricing. The Offers Management Service broadcasts events when promotional offers are created, activated, modified, or expired. Together, these microservices capture every relevant update for downstream indexing, producing events into the streaming layer whenever business state changes.
Search events streaming: All domain events flow through Amazon Managed Streaming for Apache Kafka (Amazon MSK), a managed streaming data service that manages Apache Kafka infrastructure and operations.
The system organizes events into dedicated Kafka topics by business domain. These include Catalog for product metadata changes, Inventory for hub-level stock updates, Pricing for price changes across stores, and Offers for promotional offer lifecycle events and more. This topic-based partitioning provides independent scaling per domain, ensures ordered delivery within each topic and consumer isolation, so that a surge in inventory events does not disrupt catalog indexing.
Stream processing and routing: Events from MSK topics are consumed and routed into two priority-based indexing pipelines through dedicated Apache Flink OpenSearch Connector jobs deployed on an Amazon EKS cluster:
Job #1: P0 indexing events (Pipeline #1): Processes high-priority events requiring near real-time index freshness, such as inventory changes, catalog enrichment, and pricing updates.
Job #2: P1 indexing events (Pipeline #2): Handles lower-priority but higher-volume events, such as tag updates, semantic embedding generation, offer activations, and nightly revenue per impression (RPI) score recomputation. These updates improve search quality but can tolerate slightly higher latency.
With this dual-job approach, Zepto maintains sub-second freshness for critical signals like stock availability and current pricing. Compute-heavy enrichment updates are processed separately without creating backpressure on real-time updates.
Search indices: Zepto hosts the search index on OpenSearch Service, structured at the city-product level. Delivery hub-specific metadata, such as stock status and hub-level demand signals, is stored as nested documents within each record. The following example depicts a typical document in the search index.
The document structure supports store-level personalization while organizing the index by city-product pairs.
Search pipeline: Zepto’s search platform decouples the search request flow from the indexing pipeline at the application layer. When a customer initiates a search, the request passes through the Zepto application to the Search Service and Orchestration layer, which queries the OpenSearch index and assembles the response.
The Search Service and Orchestration layer handles the complete query lifecycle. This includes query understanding, candidate retrieval, machine learning (ML) ranking, ad slotting, and response assembly. For a detailed overview of Zepto’s full search architecture, refer to Building Search for a 10-Minute World on the Zepto engineering blog.
Scaling challenge
Zepto’s search platform started with a single use case, basic product search. As the business expanded, the platform introduced increasingly sophisticated experiences and each new experience added indexing signals to the pipeline like offer events, liquidation tags, pricing changes, ranking scores and more. All needed to be ingested and reflected in the index. Simultaneously, growing user traffic and the expansion of browse surfaces increased read throughput demands on the cluster.
The challenge was most acute during festive events like Diwali and New Year, when traffic surges required scaling to 1.4× the data node count. Although the cluster handled the node additions, the team needed to monitor shard relocation progress and validate that search latencies remained within service level agreements (SLAs) at each step. This operational overhead grew with each scaling event.
Adding more nodes to the cluster would address the immediate throughput constraints, but at the cost of proportionally higher infrastructure spend. To find a solution, Zepto set a clear goal: “Improve throughput without increasing the data node count.”
Solution overview
With the goal of keeping the node count intact, Zepto experimented with multiple configurations. One approach was resharding, adjusting the number of primary shards to better distribute the workload across existing nodes. However, load testing under production-representative traffic revealed that each resharding configuration degraded search latencies. The resharding operations themselves were also operationally expensive, requiring full index recreation, data migration, and extended validation windows.
The team needed a fundamentally different approach. The approach needed to improve throughput without adding nodes or resharding the index.
Evaluating OpenSearch Optimized instances
OpenSearch Optimized instances are an instance family purpose-built for workloads that require high indexing throughput with cost efficiency. They are commonly used for log analytics and time series use cases. These instances store data on Amazon Elastic Block Store (Amazon EBS) volumes for fast local access. Apache Lucene segments are synchronously replicated to Amazon S3, providing 11 nines of data durability.
Despite the common use case association with log analytics, we recommended evaluating OpenSearch Optimized instances type OR2 for Zepto’s product search workload. The team assessed two key criteria to determine viability:
Criterion 1: Does segment replication address the throughput bottleneck?
With document replication (the default on memory-optimized instances), every write is indexed on the primary shard and then re-indexed independently on each replica. This duplicates CPU work across the cluster. With segment replication on OpenSearch Optimized instances, segments are built once on the primary shard. They are then copied as complete files to replicas. This eliminates the duplicate indexing pipeline on replicas and frees their compute for serving search queries. Zepto’s workload involved continuous indexing from multiple pipelines that competed with search traffic. This separation was the key architectural advantage.
Criterion 2: Can the search platform tolerate the 10-second refresh interval?
OpenSearch Optimized instances use a 10-second segment replication refresh interval that is longer than the default one-second refresh on memory-optimized instances. This means newly indexed documents become searchable with up to 10 seconds of additional delay. The team evaluated whether this trade-off was acceptable for their search use cases.
Rahul Pradeep, Senior Architect at Zepto, explains:
“Out-of-stock or in-stock is not a primary parameter for retrieval. It is more like a tiebreaker. Relevance is our primary parameter. We retrieve hundreds of products in one query and then do a last-minute validation against our real-time inventory service. That is why we may not need one-second refresh.”
Zepto’s existing architecture where the Product Enrichment Service validates inventory after retrieval indicated that the 10-second refresh interval would not impact customer experience; see how Zepto built Product Enrichment at scale for further details. The migration was viable without any application-level changes.
Based on this evaluation, the solution involved migrating from memory-optimized Graviton-based data nodes to OpenSearch Optimized instances. This shift changed how indexing work is distributed across the cluster. Instead of a model where every node duplicates the full indexing pipeline, only the primary shard performs indexing, and replicas receive pre-built segments.
Load testing
To validate the hypothesis before committing to a migration, we designed a proof of concept, a load testing setup in their lower environment that mirrored production characteristics:
Baseline cluster with r7g.12xlarge instances and a parallel testing cluster with or2.12xlarge instances, having four nodes per cluster.
Identical shard configuration (X primary shards, Y replica, Z shard copies per node).
Simultaneous indexing and read load simulation.
Document structure improvements
In addition to validating the infrastructure change, the team identified an opportunity to optimize the document structure itself to further improve search latency. They added an active_hubs attribute to the base document, a flat array listing only the hubs where the product is currently stocked and active as shown in the following updated document structure.
The following table summarizes the key metrics from the load test comparing the r7g.12xlarge baseline cluster against the or2.12xlarge test cluster under identical conditions.
Metric
r7g.12xlarge
or2.12xlarge
Change
Peak indexing lag
~12M docs
~6M docs
2X Faster
Indexing throughput
Baseline
2× higher
100% Improvement
Search latency (p90)
187 ms
89.1 ms
52% Improvement
Search latency (p99)
244 ms
175 ms
28% Improvement
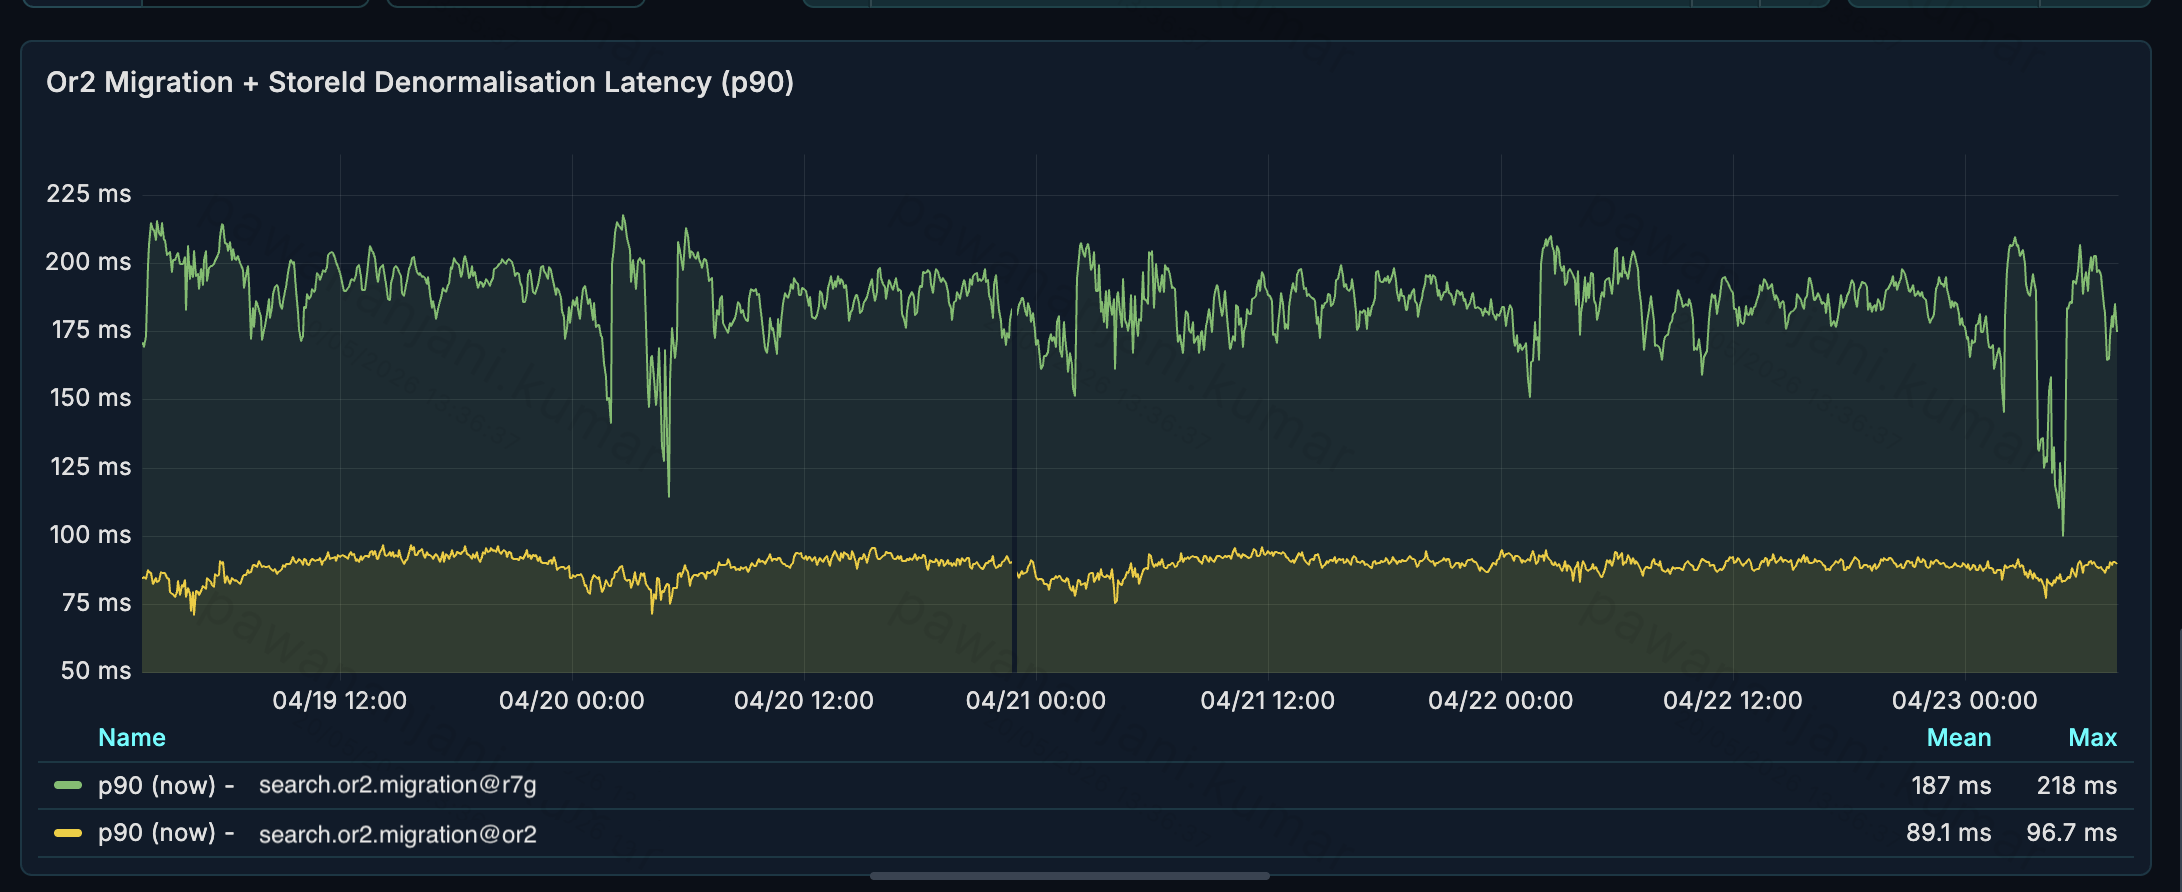
The following graph depicts the P90 search latency comparison between the two clusters.
Figure 2: P90 search latency comparison between the r7g and OR2 clusters
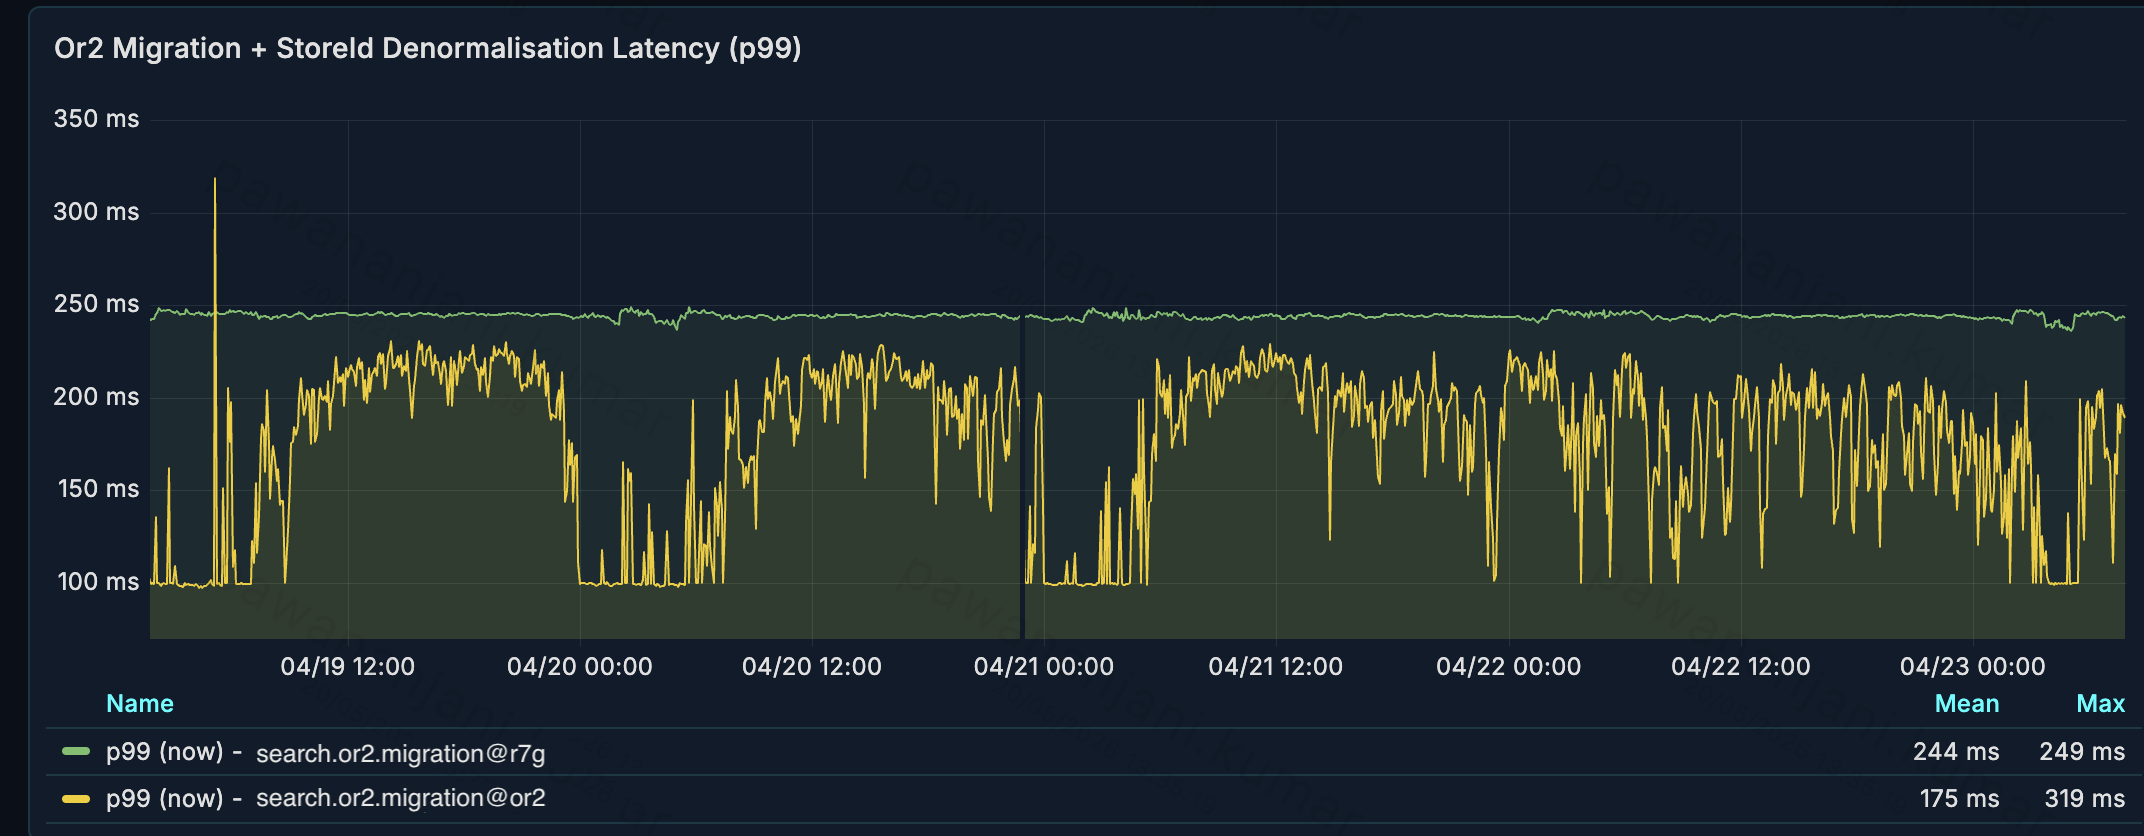
The following graph depicts the P99 search latency comparison between the two clusters.
Figure 3: P99 search latency comparison between the r7g and OR2 clusters
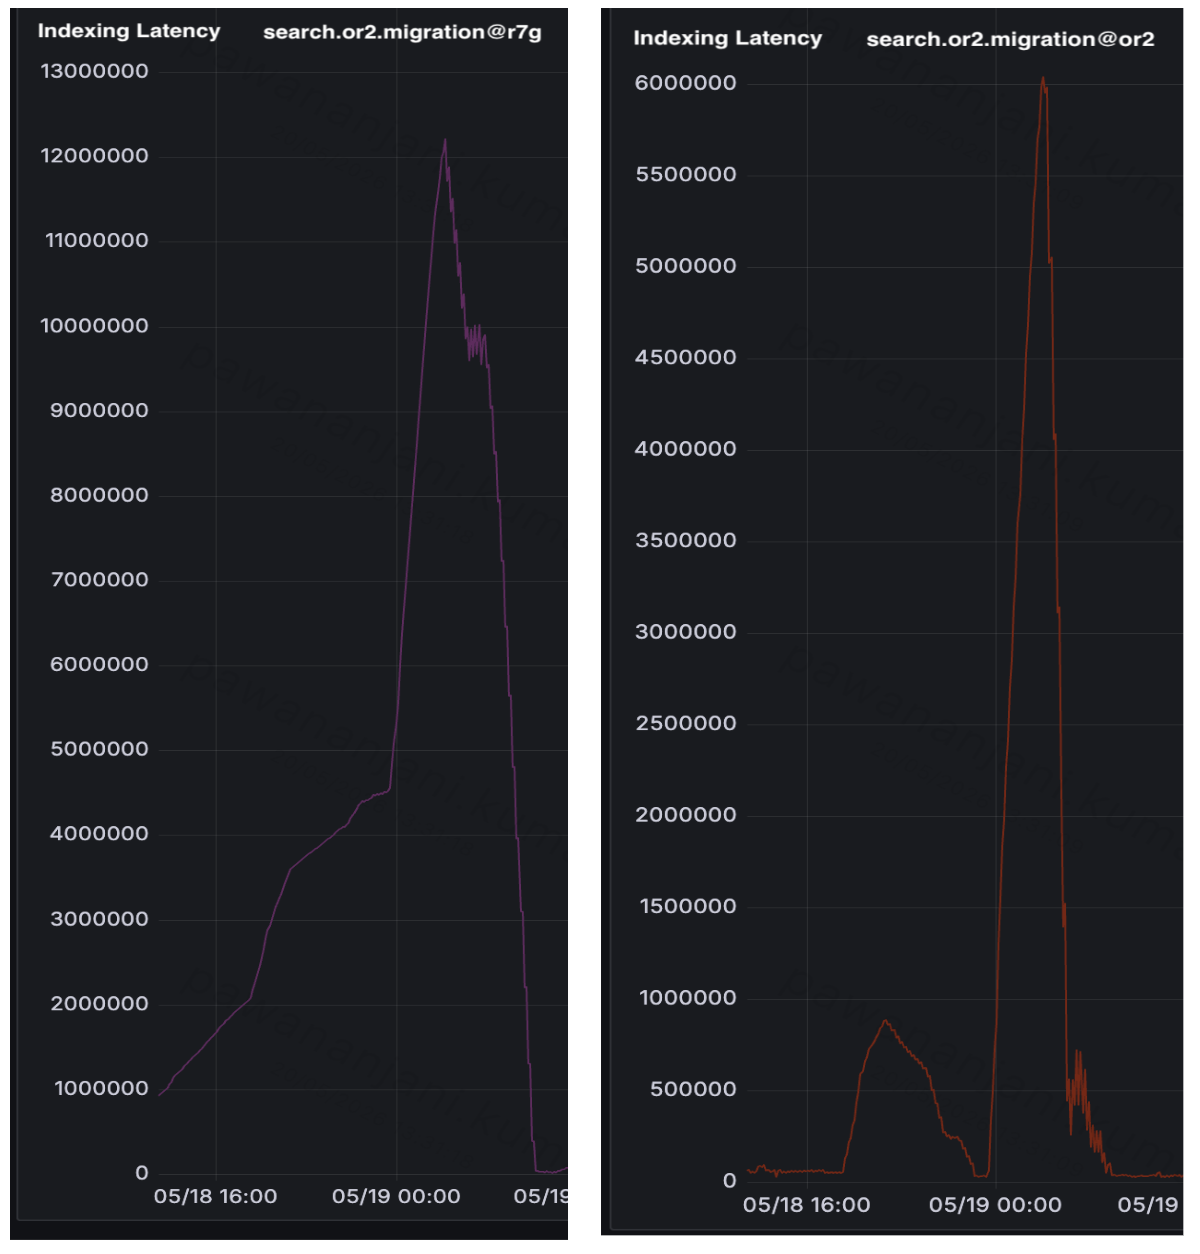
The following graphs depict the indexing latency comparison between the two clusters.
Figure 4: Indexing latency comparison between the r7g (left) and OR2 (right) clusters
Key insights
Improvement in indexing throughput: The higher indexing throughput of OR2 is most visible during nightly batch operations when events from RPI score recomputation, tag updates, and catalog enrichment flood the indexing pipeline simultaneously. On the r7g cluster, the P1 indexing lag peaked at over 12M docs. On OR2, with approximately 2× the indexing throughput, the same event volume produced a peak lag of only 6M docs. Higher throughput translates directly to lower lag and fresher search results. It is attributed to the segment replication approach of OR2 that eliminates redundant indexing work on replicas. Each document is indexed once on the primary shard rather than being replayed on each replica.
Reduction in search latency: P90 search latency dropped from 187 ms to 89.1 ms (52% improvement) and P99 from 244 ms to 175 ms (28% improvement). These gains are primarily attributable to the active_hubs document structure change rather than the instance type migration alone. By pre-computing a flat list of active hubs at index time, the query no longer needs to traverse nested hub documents to determine availability. This creates a lightweight pre-filter that eliminates unnecessary computation at search time.
Production planning and rollout
The load test results gave Zepto the confidence to make a key architectural decision: reduce the overall data node count. Higher per-node indexing throughput meant the same workload could be served with fewer nodes with OR2, and the cost savings compounded. Each eliminated node removed compute, storage, and operational overhead from the cluster. Zepto carried this forward into production, provisioning the OR2 cluster at two-thirds of the original node count. The following table summarizes the before-and-after comparison.
Metric
r7g.12xlarge
or2.12xlarge
Change
Data nodes required
3X Nodes
2X Nodes
-33.3%
Cost savings
Baseline
2/3 of Baseline
+30%
Rather than a complete cutover, Zepto adopted a phased rollout strategy using bucket-based traffic routing, completing the migration over approximately two months with zero downtime:
Provisioned a new OpenSearch Service domain on OR2 instances with segment replication turned on.
Executed parallel indexing pipelines to populate the OR2 cluster while the existing r7g cluster continued serving production traffic.
Routed internal users to the OR2 cluster first to validate search quality, relevance, and latency characteristics under real query patterns.
Gradually increased external user traffic in buckets, monitoring comparison dashboards at each increment for latency regressions or relevance drift.
Maintained parallel dashboards throughout the migration to compare the OR2 and r7g clusters in real time. Key metrics monitored included p50 and p99 search latency, indexing throughput, replica lag, Java Virtual Machine (JVM) heap utilization, circuit breaker events, I/O operations per second (IOPS) utilization, and disk throughput.
Challenges and lessons learned
During the migration, the team encountered one notable challenge: latency spikes during segment merges. This observation offers practical guidance for teams evaluating OpenSearch Optimized instances for search workloads.
Symptom: After shifting significant traffic to OR2, Zepto observed intermittent p99 latency spikes correlating with segment merge operations.
Root cause: Large segment merges consumed significant I/O bandwidth, temporarily impacting concurrent search query performance. The original 256 GB EBS volumes did not provide sufficient IOPS buffer for concurrent merge and search operations.
Resolution: Implemented the following two changes:
Increased EBS volume size to 1 TB per node. For gp3 volumes, baseline IOPS increase with volume size. This provided buffer for concurrent operations.
Tuned the segment merge policy. Reduced max_merged_segment (see OpenSearch: Force Merge API for more details) from 5 GB to 2 GB and segments_per_tier (see OpenSearch: Index Settings for more details) from 10 to 5. This produces smaller, more frequent merges that distribute I/O load more evenly rather than infrequent large merges that spike latency.
After increasing EBS volume size and tuning the segment merge policy, latency spikes decreased. Transient spikes still occurred during merges but settled quickly within acceptable bounds.
Production cutover
Finally, Zepto shifted from partial to 100% traffic over four weeks and decommissioned the previous cluster after confirming stable performance across multiple peak traffic cycles. The following table summarizes the cluster configuration before and after migration.
Parameter
Previous Cluster
Current Cluster
Instance type
r7g.12xlarge
or2.12xlarge
Data nodes
3X Nodes
2X Nodes
RAM per node
384 GiB
384 GiB
Replication strategy
Document replication
Segment replication
Default refresh interval
1 Second
10 Seconds
Durability
Cross-Availability Zone replicas
S3 synchronous replication
Conclusion
In this post, we described Zepto’s evaluation of OpenSearch Optimized instances for latency-sensitive product search and the results of their production migration. By moving from memory-optimized data nodes to OpenSearch Optimized instances with segment replication enabled, Zepto achieved over 100% higher indexing throughput and 30% cost savings while reducing their cluster to two-thirds of the previous data node count.
Zepto’s migration demonstrates that OpenSearch Optimized instances are a viable choice for latency-sensitive product search and not just log analytics. Workloads where the retrieval layer can tolerate seconds-level staleness because real-time consistency is resolved at a different layer are candidates for adopting OR2 instances. For ecommerce and quick-commerce platforms that separate candidate generation from availability validation, this pattern can deliver significant infrastructure cost reduction.
If your workload has high indexing volume, and can tolerate a 10-second refresh interval, consider evaluating OpenSearch Optimized instances for your cluster. To get started:
Assess your workload fit: review your current indexing throughput, replica count, and refresh interval requirements. Prioritize this approach if your workload has a high write-to-read ratio.
Execute a proof of concept: provision a small OpenSearch Optimized cluster in a lower environment with identical shard configuration and restore a production index snapshot. Execute simultaneous indexing and search load to validate throughput and latency.
Plan a phased rollout: use parallel indexing and bucket-based traffic routing to migrate incrementally with zero downtime, monitoring indexing lag and search latency at each step.
This is Part 3 of a three-part series on authentication and authorization for Amazon MQ for RabbitMQ. For an overview of all available methods, see Authentication and Authorization Options for Amazon MQ for RabbitMQ. For certificate-based mTLS and SSL authentication, see Part 1. For OAuth 2.0, LDAP, Entra ID, and HTTP authentication, see Part 2.
When you run Amazon MQ for RabbitMQ at scale without AWS Identity and Access Management (IAM) authentication, you face a common challenge: managing static credentials across multiple services, each requiring its own username and password. This approach creates operational overhead through password rotation, credential distribution, and the risk of inadvertent secret disclosure. IAM authentication with OAuth 2.0 removes these static credentials. Clients authenticate with their existing IAM identity instead.
This post covers the key configuration options for using IAM as an OAuth 2.0 provider and demonstrates a multi-tenant use case with vhost-level isolation enforced by IAM roles and broker-level scope aliases.
Amazon MQ for RabbitMQ supports IAM-based authentication through OAuth 2.0, so you have centralized access control without managing broker-local credentials. The clients authenticate using their existing IAM identity. Tokens expire automatically, and access control lives entirely in IAM roles and broker configuration.
Note: IAM authentication for Amazon MQ for RabbitMQ requires RabbitMQ versions 3.13 and 4.2 or later. Amazon MQ for ActiveMQ brokers doesn’t support this feature.
Important: IAM outbound federation must be configured and available in your AWS account before you enable IAM authentication on your broker.
Overview
This post covers two aspects of IAM-based authentication for Amazon MQ for RabbitMQ:
IAM as an OAuth 2.0 identity provider: How Amazon MQ uses IAM outbound federation and the RabbitMQ OAuth 2.0 plugin to authenticate clients using short-lived JSON Web Tokens (JWTs) issued by AWS Security Token Service (AWS STS), eliminating broker-local credentials.
Multi-tenant isolation with IAM roles and scope aliases: How per-tenant IAM roles combined with RabbitMQ scope aliases restrict access to specific virtual hosts (vhosts), enforcing tenant isolation at both the authentication and broker layers.
Both capabilities work together to provide credential-free authentication, centralized access control, and a comprehensive audit trail through AWS CloudTrail.
How IAM authentication works
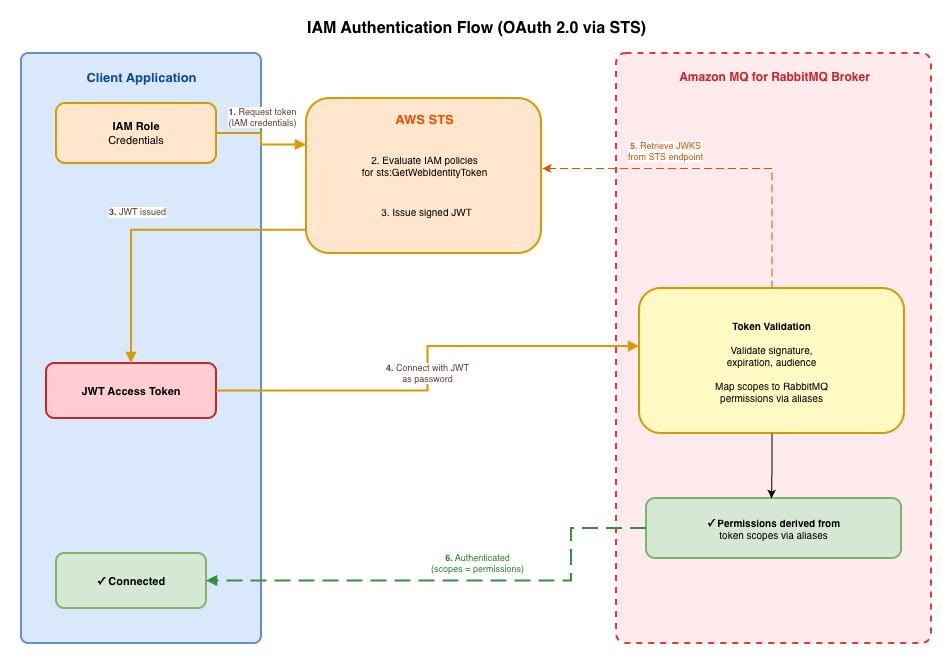
IAM authentication for Amazon MQ for RabbitMQ uses the RabbitMQ OAuth 2.0 plugin with IAM serving as the identity provider through IAM outbound federation. Instead of managing usernames and passwords in the broker, clients authenticate using short-lived JWTs issued by AWS STS.
When a client connects to a broker configured with IAM authentication:
The client application uses its IAM credentials from an IAM role attached to its AWS Lambda function, Amazon Elastic Container Service (Amazon ECS) task, Amazon Elastic Kubernetes Service (Amazon EKS) pod, or Amazon Elastic Compute Cloud (Amazon EC2) instance to call AWS STS.
AWS STS evaluates the caller’s IAM policies for sts:GetWebIdentityToken.
If the policy allows the request, AWS STS issues a signed JWT that encodes the caller’s identity and the permitted RabbitMQ scopes.
The client connects to the Amazon MQ broker and presents the JWT as an OAuth 2.0 bearer token (passed as the password).
The broker retrieves the AWS STS public keys through the JSON Web Key Set (JWKS) endpoint and validates the token signature, expiration, and audience claim.
The broker extracts the caller’s IAM role ARN from the token’s sub claim, matches it against configured scope aliases, and grants the corresponding RabbitMQ permissions.
The following diagram shows the IAM authentication flow.
Benefits over traditional username/password authentication
The following table compares traditional username/password authentication with IAM-based OAuth 2.0 authentication across the operational dimensions that matter most at scale.
Aspect
Traditional (username/password)
IAM-based (OAuth 2.0 JWT)
Credential management
Manual creation, distribution, and rotation
Automatic through IAM roles. No broker-local credentials
Centralized through IAM roles mapped to broker scope aliases
Audit trail
Broker logs only
AWS CloudTrail logs every token issuance and policy evaluation
Tenant isolation
Manual permission configuration per user
Per-role scope aliases enforce vhost restrictions at the broker
Onboarding/offboarding
Create/delete RabbitMQ users and distribute credentials
Create/delete IAM roles. No credential distribution needed
Key configuration
The following rabbitmq.conf snippet shows the essential settings for IAM-based OAuth 2.0 authentication:
# Enable OAuth 2.0 authentication with IAM, with internal as fallback
auth_backends.1 = oauth2
auth_backends.2 = internal

# Token validation - account-specific JWKS endpoint
auth_oauth2.jwks_uri = https://<issuer-id>.tokens.sts.global.api.aws/.well-known/jwks.json
auth_oauth2.https.hostname_verification = wildcard

# Resource server configuration
auth_oauth2.resource_server_id = rabbitmq
auth_oauth2.scope_prefix = rabbitmq/

# Required: extract identity from the 'sub' claim in STS JWTs
auth_oauth2.additional_scopes_key = sub

# Scope alias maps IAM role ARN to RabbitMQ permissions
auth_oauth2.scope_aliases.1.alias = arn:aws:iam::<account-id>:role/RabbitMqAdminRole
auth_oauth2.scope_aliases.1.scope = rabbitmq/tag:administrator rabbitmq/read:*/* rabbitmq/write:*/* rabbitmq/configure:*/*

# Enable OAuth for the Management UI
management.oauth_enabled = true
Note: The auth_oauth2.jwks_uri value is account-specific. Obtain it by running aws iam enable-outbound-web-identity-federation, which returns an issuer identifier URL. Append /.well-known/jwks.json to form the full JWKS URI.
The following table describes each configuration setting shown in the preceding snippet.
Setting
Purpose
auth_backends.1 = oauth2
Enables the OAuth 2.0 authentication backend
auth_backends.2 = internal
Fallback to internal auth for the system monitoring user
auth_oauth2.jwks_uri
Account-specific JWKS endpoint (from IAM outbound federation) for validating token signatures
auth_oauth2.resource_server_id
Identifies this broker as a resource server. Must match the --audience value used when requesting tokens
auth_oauth2.scope_prefix
Prefix applied to scope values (for example, rabbitmq/)
auth_oauth2.additional_scopes_key
JWT claim key where RabbitMQ looks for the identity used in scope alias matching (must be sub for STS JWTs)
auth_oauth2.scope_aliases..alias
The IAM role ARN that maps to a set of RabbitMQ permissions
auth_oauth2.scope_aliases..scope
The RabbitMQ permissions granted when the alias matches
auth_oauth2.https.hostname_verification
Set to wildcard for AWS STS endpoint certificate validation
management.oauth_enabled
Enables OAuth token authentication for the Management API/UI
IAM policy with vhost restriction
The IAM policy condition is what enforces tenant isolation at the authentication layer. The following policy restricts a role to requesting tokens scoped to a specific vhost:
Allows attaching request tags (such as scope) to the token request
Vhost-level isolation is enforced at the broker layer through scope aliases (see the following Multi-tenant isolation with IAM section), not through IAM policy conditions. Each IAM role maps to a specific set of RabbitMQ permissions through the broker configuration, and the broker denies any access not granted by the matching scope alias.
Important considerations
IAM authentication is supported on Amazon MQ for RabbitMQ versions 3.13 and 4.2 or later. It isn’t supported on Amazon MQ for ActiveMQ brokers.
IAM authentication requires IAM outbound federation to be configured and available in your AWS account. Make sure that the outbound federation is enabled before configuring IAM-based authentication on your broker.
With AWS STS, you can request web identity tokens with a duration between 300 seconds (5 minutes) and 3600 seconds (1 hour) with the --duration-seconds parameter. Implement token caching and refresh logic in your client applications to avoid requesting a new token on every connection.
Don’t embed IAM user credentials in application code or environment variables. Attach IAM roles to AWS Lambda functions, Amazon ECS tasks, Amazon EKS pods, or Amazon EC2 instances so that credentials are issued and rotated automatically by the AWS runtime.
The IAM policy evaluation happens before any broker interaction. If the policy denies the sts:GetWebIdentityToken request, AWS STS returns AccessDenied and no connection is attempted.
Amazon MQ automatically creates a system user named monitoring-AWS-OWNED-DO-NOT-DELETE with monitoring-only permissions. This user uses RabbitMQ’s internal authentication system even on IAM-enabled brokers, and Amazon MQ restricts it to loopback interface access only.
Limitations
Scope claim configuration: You can’t use a scope claim directly because the JWT token from AWS STS places the caller’s identity (IAM role ARN) in the sub claim rather than a standard scope claim. This requires setting auth_oauth2.additional_scopes_key = sub and using scope aliases in the RabbitMQ configuration to map IAM role ARNs to RabbitMQ permissions. This limitation also prevents using IAM policies for authorization fully, requiring RabbitMQ configuration for authorization instead.
For information about how to configure IAM authentication and authorization for your Amazon MQ for RabbitMQ brokers, see the following Implementation guide section.
Multi-tenant isolation with IAM
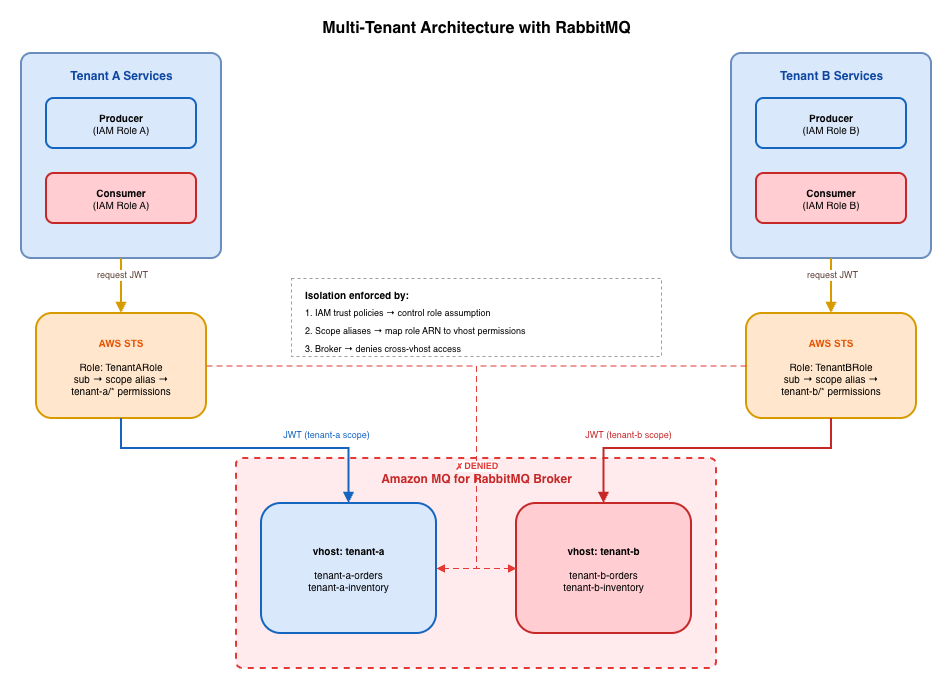
IAM-based authentication is particularly effective for multi-tenant architectures where you need to enforce data isolation across a shared RabbitMQ infrastructure. By combining per-tenant IAM roles with RabbitMQ scope aliases, you enforce isolation at three layers:
IAM layer: Trust policies restrict which principals (Lambda functions, ECS tasks, EKS pods) can assume each tenant’s IAM role. A service belonging to Tenant A cannot assume Tenant B’s role.
Broker layer: Scope aliases make sure that each role ARN only receives permissions for its own vhost. Even if a client attempts to connect to a different vhost, the broker denies access because the token’s sub claim maps to permissions for a different vhost only.
Audit layer: CloudTrail logs every role assumption and AWS STS token request, including the IAM principal and whether the request was granted or denied.
The following diagram shows the multi-tenant architecture.
Broker configuration for multi-tenant isolation
AMQP-only access (default): For tenants that connect through AMQP to produce and consume messages:
# Tenant A - AMQP access to tenant-a vhost only
auth_oauth2.scope_aliases.2.alias = arn:aws:iam::<account-id>:role/TenantARole
auth_oauth2.scope_aliases.2.scope = rabbitmq/configure:tenant-a/* rabbitmq/write:tenant-a/* rabbitmq/read:tenant-a/*

# Tenant B - AMQP access to tenant-b vhost only
auth_oauth2.scope_aliases.3.alias = arn:aws:iam::<account-id>:role/TenantBRole
auth_oauth2.scope_aliases.3.scope = rabbitmq/configure:tenant-b/* rabbitmq/write:tenant-b/* rabbitmq/read:tenant-b/*
With Management API access (optional): For tenants that also need HTTP API access for monitoring or management:
# Tenant A - AMQP + Management API access to tenant-a vhost
auth_oauth2.scope_aliases.2.alias = arn:aws:iam::<account-id>:role/TenantARole
auth_oauth2.scope_aliases.2.scope = rabbitmq/tag:management rabbitmq/configure:tenant-a/* rabbitmq/write:tenant-a/* rabbitmq/read:tenant-a/*

# Tenant B - AMQP + Management API access to tenant-b vhost
auth_oauth2.scope_aliases.3.alias = arn:aws:iam::<account-id>:role/TenantBRole
auth_oauth2.scope_aliases.3.scope = rabbitmq/tag:management rabbitmq/configure:tenant-b/* rabbitmq/write:tenant-b/* rabbitmq/read:tenant-b/*
The tag:management scope grants access to the RabbitMQ Management HTTP API, limited to resources the tenant already has permissions for. Most producer/consumer workloads (Lambda, ECS tasks) connect through AMQP and do not need this tag. Add it only for tenants that require monitoring or management capabilities through the HTTP API.
How isolation is enforced
When Tenant A’s service connects to the broker:
The service assumes TenantARole using its attached IAM role credentials.
AWS STS issues a JWT with sub = arn:aws:iam::<account-id>:role/TenantARole.
The service connects to the broker with the JWT as the password.
The broker matches the sub claim against scope aliases and grants configure:tenant-a/*, write:tenant-a/*, and read:tenant-a/*.
If the service attempts to connect to vhost tenant-b, the broker returns NOT_ALLOWED - access to vhost 'tenant-b' refused for user 'arn:aws:iam::<account-id>:role/TenantARole'.
Trust policy for tenant isolation
Each tenant role uses a trust policy that restricts which principals can assume it:
This ensures that only Tenant A’s services can obtain tokens that map to Tenant A’s vhost permissions.
Client authentication pattern
Each client application uses its IAM role credentials to obtain a short-lived token from AWS STS, then presents that token as the password when connecting to the broker:
The token manager caches tokens and refreshes them before expiration, so your application does not request a new token on every connection. For long-running connections outside Lambda (such as Amazon ECS tasks or EC2-hosted services), add connection recovery logic to handle token expiry gracefully and reconnect with a fresh token when needed.
Comparing IAM authentication with other approaches
The following table compares IAM authentication with the other authentication methods available for Amazon MQ for RabbitMQ, so you can choose the approach that best fits your security and operational requirements.
Aspect
IAM (OAuth 2.0 through STS)
OAuth 2.0 (external IdP)
Username/Password
Identity provider
IAM / STS
External OAuth 2.0 IdP
Broker-local
Credential type
Short-lived JWT
Short-lived JWT
Static password
Credential management
Automatic through IAM roles
Managed by external IdP
Manual creation and rotation
Tenant isolation
Per-role scope aliases restrict vhost access at the broker layer
To avoid ongoing charges, delete the resources you created during this walkthrough:
Delete the test IAM roles (TenantARole, TenantBRole) and their associated trust policies.
If you created a dedicated Amazon MQ broker for testing, delete the broker from the Amazon MQ console.
Remove any test virtual hosts and their queues from your broker configuration.
For production deployments, retain your IAM roles and broker configuration but review your scope aliases periodically to remove unused tenant mappings.
Conclusion
This post demonstrated how IAM-based OAuth 2.0 authentication works for Amazon MQ for RabbitMQ, and how per-tenant IAM roles combined with broker scope aliases enforce multi-tenant isolation. Clients authenticate using their existing IAM roles, AWS STS issues short-lived JWTs, and the broker validates tokens using the AWS STS JWKS endpoint. Scope aliases map each role ARN to vhost-specific permissions, ensuring tenants can only access their own resources.
Combined with the certificate-based authentication covered in Part 1 and the OAuth 2.0, LDAP, Entra ID, and HTTP integrations covered in Part 2, you now have a detailed picture of the authentication and authorization options available for Amazon MQ for RabbitMQ. Choose the approach that fits your identity infrastructure or combine multiple methods for defense-in-depth security.
If you have questions or feedback about this post, leave a comment in the Comments section. For troubleshooting help, visit the AWS re:Post community for Amazon MQ.
For more information about Amazon MQ security, see the following resources:
This is Part 2 of a three-part series on authentication and authorization for Amazon MQ for RabbitMQ. For an overview of all available methods, see Authentication and Authorization Options for Amazon MQ for RabbitMQ. For certificate-based mTLS and SSL authentication, see Part 1. For AWS Identity and Access Management (IAM) authentication, see Part 3.
When you deploy Amazon MQ for RabbitMQ in an enterprise environment, authentication quickly becomes more complex than a single broker configuration. Your organization might already have an Active Directory managing thousands of users, or a cloud identity provider handling application access, or workloads that require short-lived, token-based credentials. Maintaining a separate set of static RabbitMQ credentials alongside these systems creates operational overhead and introduces security gaps. This is especially true when users change roles, leave the organization, or when credentials need to be rotated across multiple brokers.
Amazon MQ for RabbitMQ supports OAuth 2.0, LDAP, and HTTP-based authentication backends, so you can connect your broker directly to the identity infrastructure you already use. This post explains how each approach works, highlights the key configurations, and helps you decide which one fits your use case.
Overview
This post covers three authentication and authorization integrations for Amazon MQ for RabbitMQ:
OAuth 2.0: Token-based authentication where clients obtain short-lived tokens from an identity provider and present them to the broker as bearer credentials. The broker validates tokens using JSON Web Key Sets (JWKS) and derives permissions from token scopes.
LDAP: Directory-based authentication where the broker delegates credential verification to an LDAP directory such as Active Directory. Users authenticate with their directory credentials, and RabbitMQ permissions map to LDAP group memberships.
HTTP authentication backend: A flexible approach where the broker delegates authentication and authorization decisions to an external HTTP service, so you can implement custom logic or integrate with identity systems that don’t support OAuth 2.0 or LDAP natively.
All three approaches eliminate the need to manage broker-local credentials. They provide centralized user management, fine-grained access control, and audit capabilities through your existing identity infrastructure.
How OAuth 2.0 authentication works
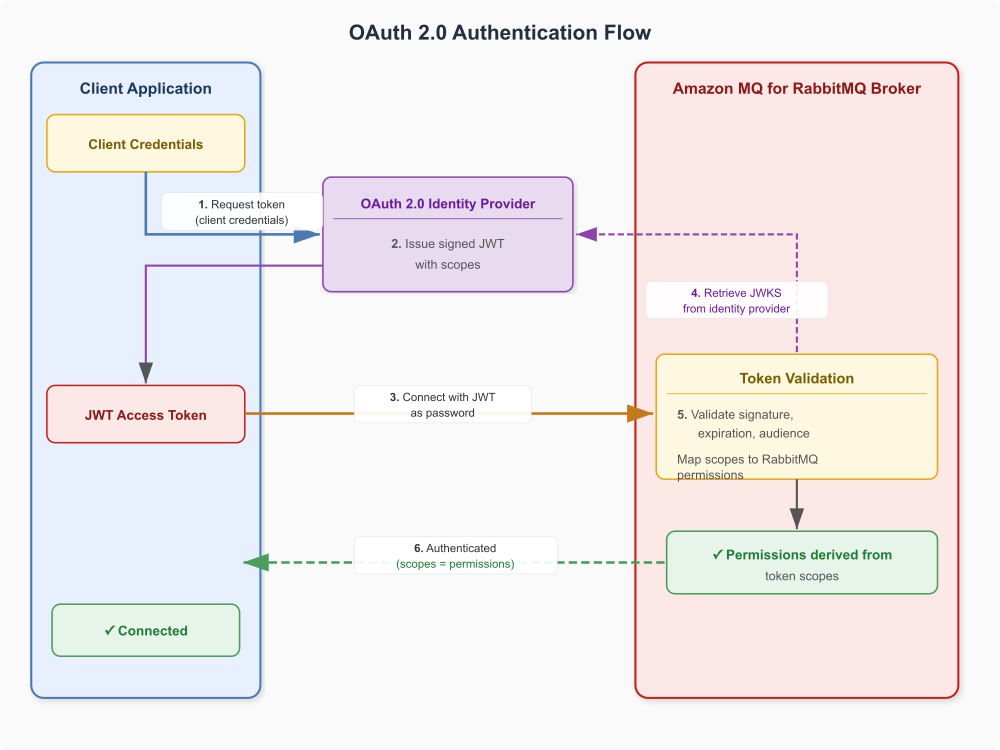
OAuth 2.0 authentication eliminates static broker credentials by using short-lived tokens issued by an external identity provider. Instead of storing usernames and passwords in the broker, clients obtain access tokens and present them as credentials when connecting.
When a client connects to a broker configured with OAuth 2.0 authentication:
The client requests an access token from the OAuth 2.0 identity provider, specifying the required scopes.
The identity provider validates the client credentials and issues a signed JWT (JSON Web Token) containing the granted scopes.
The client connects to the Amazon MQ broker and presents the JWT as the password.
The broker retrieves the identity provider’s public keys through the JWKS endpoint.
The broker validates the token signature, expiration, and audience claim.
The broker extracts RabbitMQ permissions from the token scopes and grants access accordingly.
The following diagram shows the OAuth 2.0 authentication flow.
Figure 1: OAuth 2.0 authentication flow for Amazon MQ for RabbitMQ
Scope-to-permission mapping
The broker maps OAuth 2.0 scopes to RabbitMQ permissions using a configurable prefix. For example, with the resource server ID rabbitmq, the following scopes grant specific access:
OAuth 2.0 scope
RabbitMQ permission
rabbitmq.read:*/*
Read access to all resources in all vhosts
rabbitmq.write:*/*
Write access to all resources in all vhosts
rabbitmq.configure:*/*
Configure access to all resources in all vhosts
rabbitmq.read:orders/*
Read access to all resources in the orders vhost
rabbitmq.tag:management
Management UI access
rabbitmq.tag:administrator
Administrator access
Key configuration
The following rabbitmq.conf snippet shows the essential settings for OAuth 2.0 authentication:
# Enable OAuth 2.0 authentication (with internal fallback for the monitoring user)
auth_backends.1 = oauth2
auth_backends.2 = internal

# OAuth 2.0 resource server configuration
auth_oauth2.resource_server_id = rabbitmq
auth_oauth2.preferred_username_claims.1 = sub

# JWKS endpoint for token validation
auth_oauth2.jwks_uri = https://your-idp.example.com/.well-known/jwks.json

# Additional token validation
auth_oauth2.issuer = https://your-idp.example.com
auth_oauth2.scope_prefix = rabbitmq.

# Skip audience validation for IdPs that do not emit an aud claim matching resource_server_id
auth_oauth2.verify_aud = false
The following table describes each configuration setting.
Setting
Purpose
auth_backends.1 = oauth2
Enables the OAuth 2.0 authentication backend (use auth_backends.2 = internal for the monitoring user fallback)
auth_oauth2.resource_server_id
Identifies this broker as a resource server. Used as the scope prefix
auth_oauth2.preferred_username_claims.1
JWT claim used to extract the username for display and logging
auth_oauth2.jwks_uri
URL of the identity provider’s JWKS endpoint for token signature validation (named jwks_url on RabbitMQ 3.x, jwks_uri on 4.x)
auth_oauth2.issuer
Expected token issuer. Tokens from other issuers are rejected
auth_oauth2.verify_aud
Whether the broker validates the token’s aud claim against resource_server_id. Set to false for IdPs that do not emit a matching aud
auth_oauth2.scope_prefix
Prefix applied to scopes when mapping to RabbitMQ permissions
Important considerations
By default the broker validates the token’s aud (audience) claim against the resource_server_id and rejects tokens without a match. Some identity providers (for example, Amazon Cognito) don’t emit an aud claim matching the resource server. For those, set auth_oauth2.verify_aud = false.
If your identity provider cannot issue scopes in the native RabbitMQ form (for example, it disallows the * wildcard), use auth_oauth2.scope_aliases entries to translate the provider’s scope names to RabbitMQ scopes such as rabbitmq.read:*/*.
Configure short-lived tokens (one hour or less) and implement token refresh logic in your client applications.
The JWKS endpoint must be reachable from the broker’s network. For private identity providers, verify network connectivity and DNS resolution.
On RabbitMQ 3.x the JWKS endpoint setting is auth_oauth2.jwks_url. On RabbitMQ 4.x it is auth_oauth2.jwks_uri. Use the setting name that matches your broker engine version.
Amazon MQ automatically creates a system user named monitoring-AWS-OWNED-DO-NOT-DELETE with monitoring-only permissions. This user uses the internal RabbitMQ authentication system even on OAuth 2.0-enabled brokers.
How LDAP authentication works
LDAP authentication connects your RabbitMQ broker to an existing directory service such as Active Directory. Instead of managing users locally in the broker, the broker delegates authentication to the LDAP server and derives permissions from directory group memberships. This centralizes user management and lets you apply your existing password policies, account lockout rules, and audit trails to broker access.
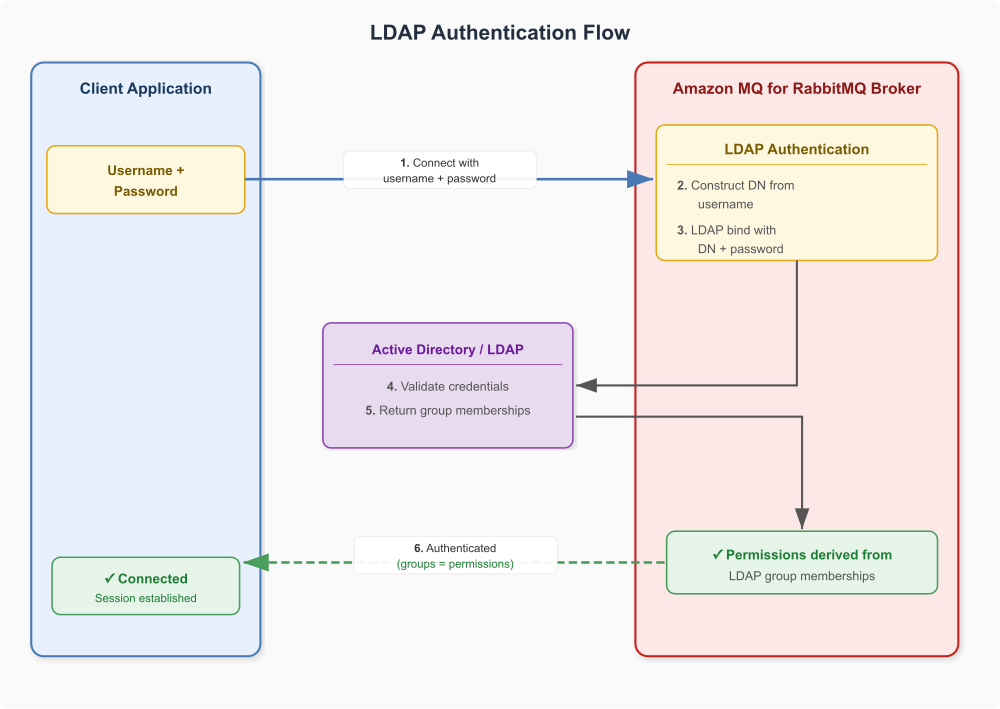
When a client connects to a broker configured with LDAP authentication:
The client connects to the Amazon MQ broker with a username and password.
The broker constructs a Distinguished Name (DN) from the username using the configured user_dn_pattern.
The broker performs an LDAP bind operation against the directory server using the constructed DN and the client’s password.
If the bind succeeds, the broker queries the directory for the user’s group memberships.
The broker maps group memberships to RabbitMQ permissions (vhost access, resource permissions, and management tags).
The client is authenticated and authorized based on the LDAP query results.
The following diagram shows the LDAP authentication flow.
Figure 2: LDAP authentication flow for Amazon MQ for RabbitMQ
LDAP directory structure
This implementation uses a group-centric LDAP model where RabbitMQ concepts (vhosts, exchanges, queues, and tags) are represented as sub-OUs under a single groups hierarchy:
Users are assigned to groups based on their required access. For example, app-orders-producer would be a member of vhost-orders and orders-publisher, granting it access to the orders vhost and write permissions on the orders exchange.
Key configuration
The following rabbitmq.conf snippet shows the essential settings for LDAP authentication:
# Enable LDAP as primary backend with internal as fallback
auth_backends.1 = ldap
auth_backends.2 = internal

# LDAP server connection (LDAPS on port 636)
auth_ldap.servers.1 = your-active-directory-server.example.com
auth_ldap.port = 636
auth_ldap.user_dn_pattern = CN=${username},OU=users,OU=rabbitmq,DC=example,DC=com
auth_ldap.use_ssl = true
auth_ldap.ssl_options.verify = verify_peer
auth_ldap.log = true

# AWS integration: assume an IAM role to retrieve the CA certificate for LDAPS
aws.arns.assume_role_arn = arn:aws:iam::111122223333:role/AmazonMqLdapRole
aws.arns.auth_ldap.ssl_options.cacertfile = arn:aws:s3:::your-ca-cert-bucket/ca-cert.pem

# Management console tags
auth_ldap.queries.tags = '''
[{administrator, {in_group, "CN=rmq-admin,OU=tags,OU=groups,OU=rabbitmq,DC=example,DC=com"}},
{management, {in_group, "CN=rmq-monitor,OU=tags,OU=groups,OU=rabbitmq,DC=example,DC=com"}}]
'''

# Vhost access control
auth_ldap.queries.vhost_access = '''
{in_group, "CN=vhost-${vhost},OU=vhosts,OU=groups,OU=rabbitmq,DC=example,DC=com"}
'''

# Resource access control
auth_ldap.queries.resource_access = '''
{for, [{permission, configure,
{in_group, "CN=rmq-admin,OU=tags,OU=groups,OU=rabbitmq,DC=example,DC=com"}},
{permission, write,
{for, [{resource, exchange,
{in_group, "CN=orders-publisher,OU=exchanges,OU=groups,OU=rabbitmq,DC=example,DC=com"}}]}},
{permission, read,
{for, [{resource, queue,
{in_group, "CN=orders-consumer,OU=queues,OU=groups,OU=rabbitmq,DC=example,DC=com"}}]}}]}
'''
The following table describes each configuration setting.
Setting
Purpose
auth_backends.1 = ldap
Sets LDAP as the primary authentication backend
auth_backends.2 = internal
Falls back to internal authentication if LDAP is unavailable
auth_ldap.servers.1
LDAP server hostname or IP address
auth_ldap.user_dn_pattern
Template for constructing the user DN from the provided username
auth_ldap.port
LDAP server port; 636 for LDAPS
auth_ldap.use_ssl
Enables an encrypted LDAPS connection to the directory server. Amazon MQ requires that you explicitly set either auth_ldap.use_ssl = true or auth_ldap.use_starttls = true. The broker fails configuration validation if neither is set.
auth_ldap.ssl_options.verify
Certificate verification mode for the LDAPS connection. Verify_peer validates the server certificate
aws.arns.assume_role_arn
ARN of the IAM role the broker assumes to retrieve the CA certificate
aws.arns.auth_ldap.ssl_options.cacertfile
ARN of the CA certificate (in S3) used to validate the LDAP server’s TLS certificate
auth_ldap.queries.tags
Maps directory group membership to the administrator and management console tags
auth_ldap.queries.vhost_access
LDAP query that determines which vhosts a user can access based on group membership
auth_ldap.queries.resource_access
LDAP query that determines resource-level permissions (configure, write, read) based on group membership
Important considerations
Amazon MQ requires an encrypted LDAP connection: you must explicitly set either auth_ldap.use_ssl = true (LDAPS on port 636) or auth_ldap.use_starttls = true (StartTLS on port 389). The broker rejects the configuration if neither is set. Unencrypted LDAP transmits credentials in plaintext, so always use one of these options to protect credentials in transit between the broker and your directory server.
The user_dn_pattern must match your directory’s organizational structure exactly. Verify the pattern with an LDAP browser before applying it to the broker.
With Active Directory, user DNs are usually based on the display name rather than the sign-in name, so a fixed user_dn_pattern often will not match. In that case, configure DN lookup (auth_ldap.dn_lookup_bind, auth_ldap.dn_lookup_base, and auth_ldap.dn_lookup_attribute = sAMAccountName) so the broker resolves each username to its full DN before binding.
LDAP configuration changes require a broker reboot to take effect. However, user permission changes in the directory (group membership additions or removals) take effect immediately for new connections.
Configure the internal backend as a fallback to maintain access if the LDAP server becomes temporarily unavailable.
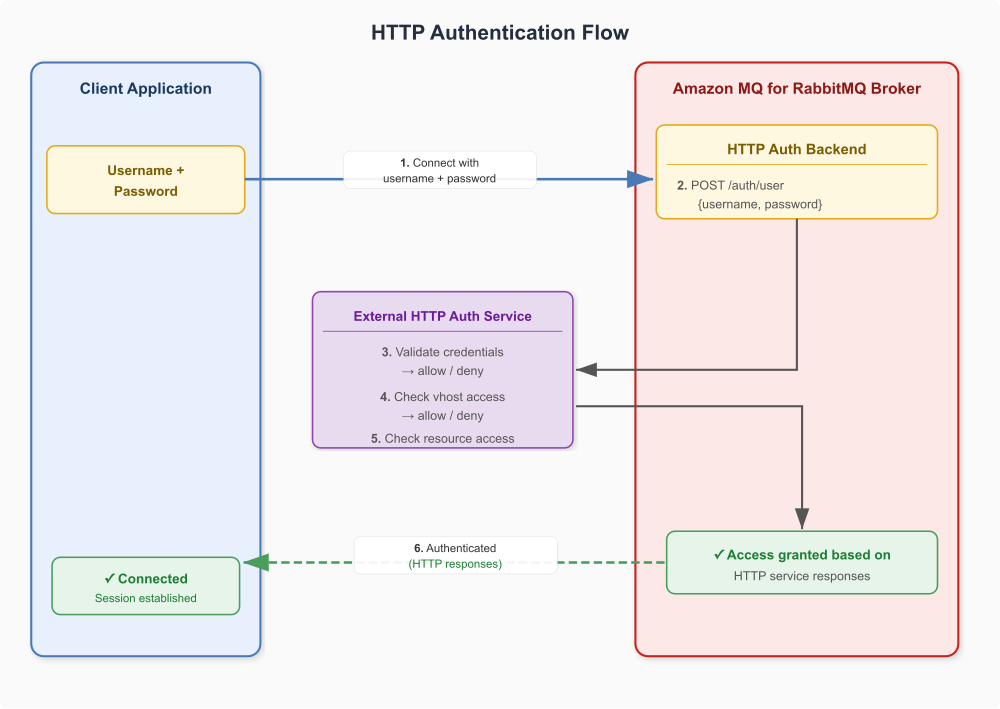
How HTTP authentication works
The HTTP authentication backend delegates all authentication and authorization decisions to an external HTTP service. When a client connects, the broker sends requests over HTTPS to your service, which responds with allow or deny decisions. Amazon MQ requires encrypted connections and rejects any configuration that uses a plain http endpoint. This approach provides maximum flexibility for integrating with identity systems that don’t support OAuth 2.0 or LDAP natively, or when you need custom authentication logic. The HTTP authentication backend is available on Amazon MQ for RabbitMQ version 4 and above.
When a client connects to a broker configured with HTTP authentication:
The client connects to the Amazon MQ broker with a username and password.
The broker sends an HTTPS POST request to the configured authentication endpoint with the username and password.
The external authentication service validates the credentials against its identity store and responds with allow or deny.
For each authorization check (vhost access, resource permissions, topic permissions), the broker sends additional HTTPS requests to the corresponding endpoints.
The authentication service evaluates the authorization request and responds with allow, deny, or allow with tags.
The client is authenticated and authorized based on the authentication service responses.
The following diagram shows the HTTP authentication flow.
Figure 3: HTTP authentication flow for Amazon MQ for RabbitMQ
The broker sends HTTPS POST requests to four endpoints. Each endpoint must return a plain-text response:
The following rabbitmq.conf snippet shows the essential settings for HTTP authentication:
# Enable the HTTP backend with caching to reduce load on the auth service
auth_backends.1 = cache
auth_backends.2 = http
auth_cache.cached_backend = http

# HTTP authentication endpoints (HTTPS required)
auth_http.http_method = post
auth_http.user_path = https://your-auth-service.example.com/auth/user
auth_http.vhost_path = https://your-auth-service.example.com/auth/vhost
auth_http.resource_path = https://your-auth-service.example.com/auth/resource
auth_http.topic_path = https://your-auth-service.example.com/auth/topic

# TLS configuration for the HTTPS connection to the auth service
auth_http.ssl_options.verify = verify_peer
auth_http.ssl_options.sni = your-auth-service.example.com

# AWS integration: IAM role and CA certificate for secure credential retrieval
aws.arns.assume_role_arn = <your-assume-role-arn>
aws.arns.auth_http.ssl_options.cacertfile = <your-ca-cert-arn>
The following table describes each configuration setting.
Setting
Purpose
auth_backends.1 = cache auth_backends.2 = http
Enables the HTTP authentication backend with a cache layer in front, which reduces the number of calls to your authentication service
auth_http.user_path
URL the broker calls to authenticate users
auth_http.vhost_path
URL the broker calls to check vhost access
auth_http.resource_path
URL the broker calls to check resource permissions (queues, exchanges)
auth_http.topic_path
URL the broker calls to check topic-level permissions
auth_http.http_method
HTTP method the broker uses to call the endpoints. Set to post
auth_http.ssl_options.verify
Certificate verification mode for the HTTPS connection to the auth service. Verify_peer validates the server certificate
auth_http.ssl_options.sni
Server Name Indication hostname sent during the TLS handshake with the auth service
aws.arns.assume_role_arn
ARN of the IAM role the broker assumes to securely retrieve the CA certificate
aws.arns.auth_http.ssl_options.cacertfile
ARN of the CA certificate the broker uses to validate the auth service’s TLS certificate
Important considerations
The HTTP authentication service must be highly available. If the service is unreachable, all authentication attempts fail. Consider deploying it behind a load balancer with health checks.
HTTPS is mandatory for all authentication endpoints. The broker rejects any endpoint configured with a plain http URL, ensuring credentials are always protected in transit.
Front the HTTP backend with the cache backend (auth_backends.1 = cache) to reduce the number of calls to your authentication service and improve connection latency. Also keep your service’s response times low to avoid connection timeouts and degraded broker performance.
The authentication service receives plaintext passwords. Make sure the service handles credentials securely and doesn’t log them.
The broker connects to your authentication service over TLS. Configure certificate validation with auth_http.ssl_options.verify = verify_peer, and provide the CA certificate and the IAM role for retrieving it through the aws.arns.auth_http.ssl_options.cacertfile and aws.arns.assume_role_arn settings.
Implementation guides
For step-by-step deployment and validation instructions, see the following resources:
Amazon MQ samples repository – AWS Cloud Development Kit (AWS CDK) stacks and sample code for LDAP and OAuth 2.0 integrations.
Conclusion
This post explained how OAuth 2.0, LDAP, and HTTP authentication backends work for Amazon MQ for RabbitMQ, and when to use each one. OAuth 2.0 provides token-based, passwordless authentication with automatic credential expiration. LDAP connects your broker to existing directory infrastructure for centralized user and group management. The HTTP backend offers maximum flexibility for custom identity integrations. Used individually or in combination, these approaches eliminate broker-local credential management and provide centralized access control through your existing identity infrastructure.
If you have questions or feedback about this post, leave a comment in the Comments section. For troubleshooting help, visit the AWS re:Post community for Amazon MQ.
When you use Amazon MQ for RabbitMQ to handle sensitive data, standard TLS encryption alone might not meet your compliance requirements. Compliance frameworks like SOX, HIPAA, and PCI DSS often require verification of the identity of both parties in a connection. Features like mutual TLS (mTLS) and SSL certificate authentication can help support those requirements by adding certificate-based identity verification to your messaging infrastructure.
Amazon MQ for RabbitMQ version 4 or later supports two certificate-based security features that address these needs: SSL certificate authentication for passwordless certificate-only login, and mTLS for certificate-based peer verification with username and password authentication. This post explains how each approach works, highlights the key configuration options, and helps you decide which one fits your use case.
Overview
This post covers two certificate-based security features for Amazon MQ for RabbitMQ:
SSL certificate authentication: Passwordless authentication where clients authenticate solely using X.509 client certificates through the EXTERNAL SASL mechanism. The broker extracts the username directly from the certificate, eliminating the need for passwords.
Mutual TLS (mTLS): Certificate-based peer verification where both the client and broker prove their identities using certificates, while clients still authenticate with a username and password. This secures AMQP connections and the RabbitMQ management interface.
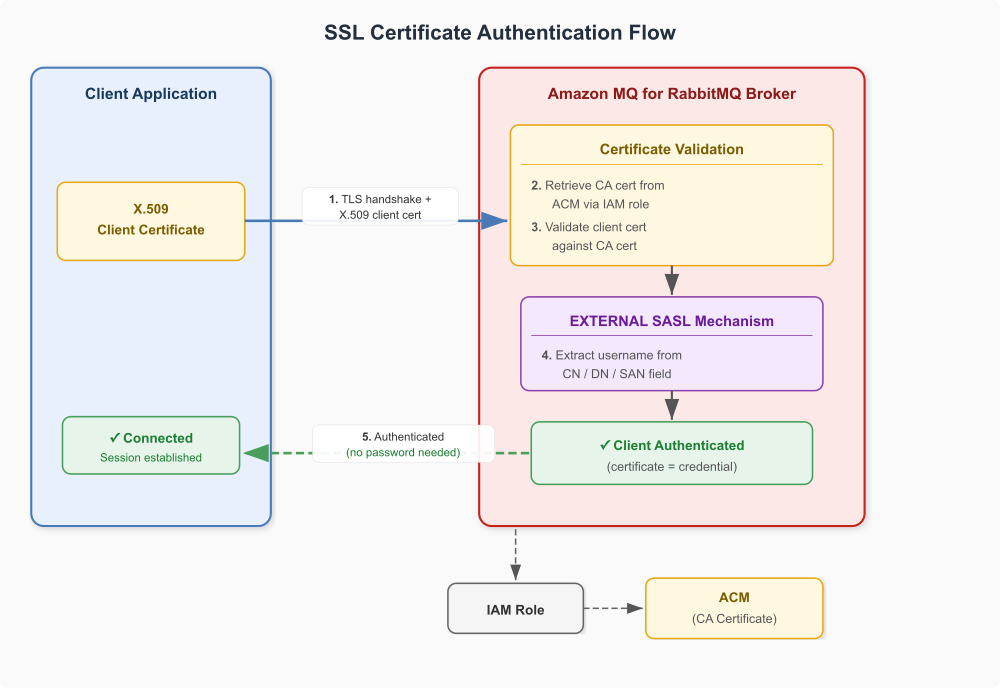
SSL certificate authentication eliminates the need to transmit credentials during connection. The broker extracts the client’s identity from the certificate, though the corresponding user must exist in RabbitMQ’s internal store for authorization. Instead of using certificates only for transport-layer verification, the broker uses the EXTERNAL SASL mechanism to extract the client’s identity directly from the X.509 certificate.
When a client connects to a broker configured with SSL certificate authentication:
The client initiates a TLS connection and presents its client certificate.
The Amazon MQ broker assumes an IAM role to retrieve the CA certificate from ACM.
The broker validates the client certificate against the configured CA certificate.
The broker extracts the username from the client certificate using the configured field (Common Name, Distinguished Name, or Subject Alternative Name).
The broker authenticates the client using the extracted username. No password required.
The following diagram shows the SSL certificate authentication flow. On the left, the client application holds only an X.509 client certificate with no credentials. In the center, the arrows show the TLS handshake carrying the client certificate to the broker, and the return path confirming authentication with no password needed. On the right, the Amazon MQ for RabbitMQ broker performs certificate validation, assuming an IAM role to retrieve the CA certificate from ACM. It then uses the EXTERNAL SASL mechanism to extract the username from the certificate’s CN, DN, or SAN field and establishes the authenticated session.
Figure 1: SSL certificate authentication flow
Username extraction options
The broker can extract the client identity from different fields of the X.509 certificate:
ssl_cert_login_from value
Certificate field used
Example
common_name
Common Name (CN)
CN=myapp → username myapp
distinguished_name
Full Distinguished Name
CN=myapp,O=MyOrg → username CN=myapp,O=MyOrg
subject_alternative_name
Subject Alternative Name (SAN) entry
SAN dns:myapp.example.com → username myapp.example.com
When you use subject_alternative_name, you also configure ssl_cert_login_san_type (dns, ip, email, uri, or other_name) and ssl_cert_login_san_index to specify which SAN entry to use.
Note: The username extraction options for ssl_cert_login_from apply only to SSL certificate authentication. mTLS doesn’t extract identity from the client certificate.
Key configuration
The following rabbitmq.conf snippet shows the essential settings for SSL certificate authentication:
The following table describes what each setting controls:
Setting
Purpose
auth_mechanisms.1 = EXTERNAL
Enables the EXTERNAL SASL mechanism, authenticating clients using their X.509 certificate instead of a username and password
ssl_cert_login_from = common_name
Tells the broker which certificate field to extract the username from
ssl_options.verify = verify_peer
Enables client certificate verification
ssl_options.fail_if_no_peer_cert = true
Rejects connections from clients that do not present a certificate
aws.arns.assume_role_arn
IAM role ARN the broker assumes to retrieve certificates from ACM
aws.arns.ssl_options.cacertfile
ARN of the CA certificate in ACM used to validate client certificates
Note:EXTERNAL and internal serve different purposes. EXTERNAL is the authentication mechanism that verifies client identity using the X.509 certificate. internal is the authorization backend that resolves permissions for the authenticated user from RabbitMQ’s built-in user store.
Important considerations
Client certificates must be signed by a trusted Certificate Authority (CA). The broker validates the certificate chain during authentication.
Amazon MQ enforces the use of AWS ARNs for certificate-related settings. Use aws.arns.ssl_options.cacertfile instead of ssl_options.cacertfile.
Amazon MQ automatically creates a system user named monitoring-AWS-OWNED-DO-NOT-DELETE with monitoring-only permissions. This user uses RabbitMQ’s internal authentication system even on SSL certificate-enabled brokers and is restricted to loopback interface access only.
If any setting requires the use of an AWS ARN, you must also provide aws.arns.assume_role_arn.
Amazon MQ doesn’t currently support CRL or OCSP for certificate revocation. To revoke a client certificate that’s no longer trusted, replace the CA certificate on AWS Private Certificate Authority (AWS Private CA), re-issue valid client certificates, and apply a configuration update to the broker.
To rotate certificates, update the CA certificate on AWS Private CA and update the broker configuration. Configuration changes don’t take effect immediately. To apply your changes, wait for the next maintenance window or reboot the broker.
How mutual TLS (mTLS) works
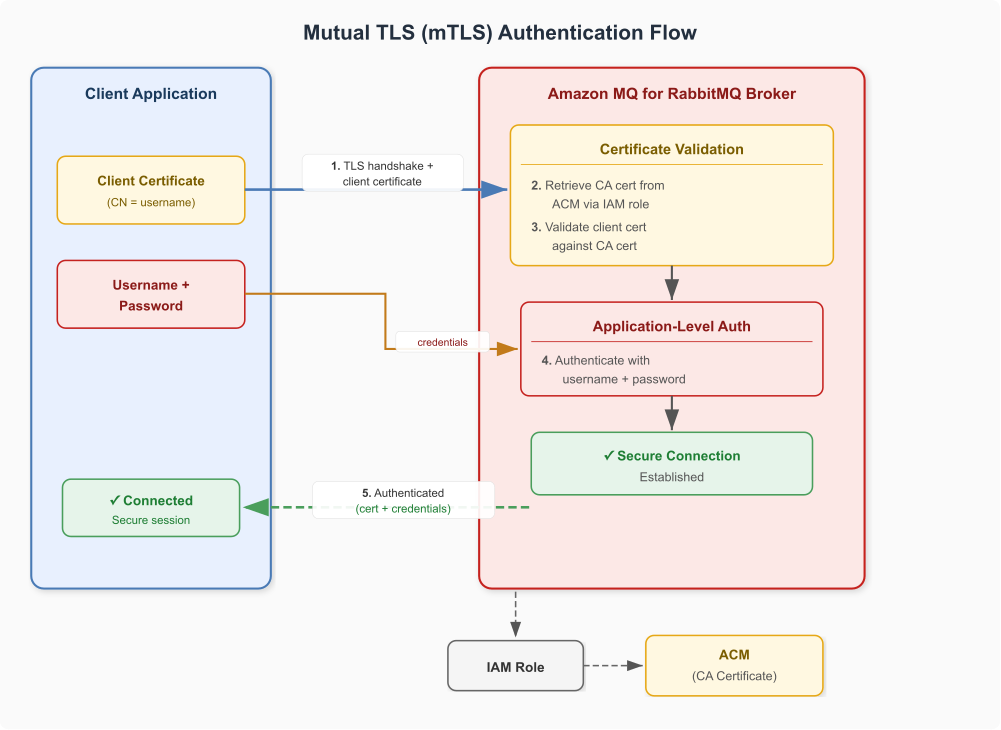
Standard TLS works like visiting a secure website: only the server proves its identity to your browser using a certificate. With mTLS, both your client application and the message broker must prove their identities using certificates. This two-way authentication helps verify that only authorized clients can connect to your broker. Unlike SSL certificate authentication, mTLS still requires a username and password at the application layer.
When your client connects to an Amazon MQ broker with mTLS enabled, the following authentication process occurs:
The client initiates a TLS connection and presents its client certificate.
The Amazon MQ broker assumes an IAM role to retrieve the CA certificate from ACM.
The broker validates the client certificate against the CA certificate.
The client authenticates with a username and password in the application layer.
Authentication succeeds, and the broker establishes a secure, encrypted connection with the client.
Note: Unlike SSL certificate authentication, mTLS doesn’t extract the username from the certificate. The client certificate proves transport-layer trust only. The broker validates it against the CA certificate but does not use any certificate fields for application-level authentication. The username provided at login doesn’t need to match the client certificate’s CN.
The following diagram illustrates this two-layer flow. On the left, the client application holds both a client certificate and a username and password. In the center, the arrows show the TLS handshake carrying the client certificate to the broker, followed by the credentials. On the right, the Amazon MQ for RabbitMQ broker performs certificate validation at the transport layer, assuming an IAM role to retrieve the CA certificate from ACM. It then authenticates the username and password at the application layer before establishing the secure connection to the client.
Figure 2: Mutual TLS authentication flow
With mTLS, you can secure:
Client connections to the AMQP endpoint.
The RabbitMQ management interface.
Connections to OAuth 2.0 identity providers.
HTTPS authentication server connections.
Lightweight Directory Access Protocol (LDAP) server communications.
Key configuration
The following rabbitmq.conf snippet shows the essential settings for mTLS:
Client certificates: Authenticate each client application to the broker. Issue from your organization’s CA or AWS Private CA.
CA certificate: Validates client certificates on the broker side. Store in ACM and reference in the broker’s SSL configuration.
Comparing SSL certificate authentication and mTLS
Use the following table to decide which method fits your security requirements:
Aspect
SSL certificate authentication
Mutual TLS (mTLS)
Authentication mechanism
EXTERNAL SASL — certificate is the sole credential
Transport-layer cert verification + username/password at application layer
Password required
No
Yes
Username source
Extracted from certificate (CN, DN, or SAN)
Provided by client at login
SASL mechanism
EXTERNAL
PLAIN (default)
Management interface cert verification
Not included by default
Supported through management.ssl.verify
Key config directive
auth_mechanisms.1 = EXTERNAL
ssl_options.verify = verify_peer
Use case
Passwordless environments, PKI-managed identities
Adding cert verification to existing credential-based auth
Compliance fit
Environments requiring no passwords on the wire
Frameworks requiring two-factor (something you have + something you know)
Choose SSL certificate authentication when eliminating passwords entirely from your messaging layer, or when your PKI infrastructure already manages client identities. Choose mTLS when adding transport-layer certificate verification to an existing deployment that relies on username/password authentication, or when compliance frameworks mandate two-factor authentication.
Additional SSL options
Both methods support the following additional configuration options:
Configuration
Description
ssl_options.depth
Maximum certificate chain depth for verification
ssl_options.hostname_verification
Hostname verification mode: wildcard or none
ssl_cert_login_san_type
SAN type when using Subject Alternative Name: dns, ip, email, uri, or other_name
ssl_cert_login_san_index
Zero-based index of the SAN entry to use
Implementation guides
For step-by-step deployment and validation instructions, see the following resources:
Both tutorials use AWS CDK for infrastructure deployment and include validation scripts to test connectivity.
Conclusion
SSL certificate authentication and mTLS each address different security requirements for Amazon MQ for RabbitMQ. SSL certificate authentication uses the X.509 certificate as the sole credential through the EXTERNAL SASL mechanism, eliminating passwords entirely. mTLS adds transport-layer certificate verification on top of existing username/password authentication, giving you two-factor security. If you are building a regulated environment, SSL certificate authentication removes passwords from the wire entirely, which might help support security requirements in frameworks that address credential management. If you’re incrementally hardening an existing deployment, mTLS lets you add transport-layer verification without changing how clients authenticate. In the next post in this series, we cover OAuth 2.0, LDAP, and HTTP authentication for Amazon MQ for RabbitMQ.
Managing authentication for message brokers at scale is complex: credentials sprawl, audit requirements, and integration with existing identity providers create operational overhead. The default approach of creating RabbitMQ users with static usernames and passwords works for getting started, but it quickly becomes a liability at scale. Credentials must be distributed securely, rotated regularly, and revoked promptly when team members change roles or leave the organization. For regulated industries, auditors want to see that your messaging infrastructure enforces the same identity and access controls as the rest of your environment.
Different organizations have different identity infrastructures. Some manage users through Active Directory. Others have standardized on OAuth 2.0. Platform teams building on AWS want to use AWS Identity and Access Management (IAM) roles and policies they understand. Security-conscious environments might require certificate-based authentication where no passwords are transmitted over the network at all.
Amazon MQ for RabbitMQ supports multiple authentication and authorization methods, so you can connect your broker to the identity infrastructure you already use. This post introduces the available options and helps you choose the right one for your use case.
Custom auth logic, centralized user management across brokers
SSL certificate authentication
Certificate only (passwordless)
Broker-local (username extracted from cert)
Eliminating passwords entirely with certificate-only identity
Mutual TLS (mTLS)
Certificate and username/password
Broker-local
Adding transport-layer certificate verification to existing credential-based auth
Choosing the right method
The right choice depends on your existing identity infrastructure, security requirements, and operational preferences.
Simple credentials
The default method. You create RabbitMQ users with usernames and passwords directly on the broker. This is a straightforward way to get started, but it requires you to manage credentials manually. Choose this for development, testing, or small-scale deployments where credential management overhead is acceptable.
OAuth 2.0
Clients obtain short-lived tokens from any OAuth 2.0-compatible identity provider and present them to the broker as bearer tokens. Choose this when you have an existing identity provider (other than IAM) that issues tokens for your applications, and you want automatic token expiration without managing broker-local credentials.
IAM authentication
IAM serves as an identity provider. Client applications use their IAM credentials to obtain a short-lived JWT from AWS Security Token Service (AWS STS) and present it as a bearer token. IAM policies control which roles can obtain tokens. RabbitMQ scope aliases on the broker map each role’s Amazon Resource Name (ARN) to specific resource permissions (read, write, configure, and administrator). AWS CloudTrail logs every token issuance for auditing. Choose this when your workloads run on AWS compute services with IAM roles, and you want credential-free, IAM-native authentication with broker-level authorization.
LDAP
Connect your broker to an existing directory service such as Active Directory. Users authenticate with their directory credentials, and RabbitMQ permissions map to LDAP group memberships. Choose this when your organization already manages users and groups through a directory service, and you want to apply existing password policies and group-based access control to broker access.
HTTP-based auth backend
Delegates authentication and authorization decisions to a custom HTTPS server. The broker sends HTTP requests to your server for user validation, virtual host access, resource permissions, and topic permissions. Choose this when you need custom authentication logic, want to centralize user management across multiple brokers, or need to integrate with an identity system that doesn’t support OAuth 2.0 or LDAP natively.
SSL certificate authentication
Removes passwords entirely. The broker uses the EXTERNAL Simple Authentication and Security Layer (SASL) mechanism to extract the client’s identity directly from the X.509 certificate (for example, from the Common Name field) and uses it as the RabbitMQ username. With this method, your application doesn’t transmit credentials over the network. Choose this when your security policy requires passwordless authentication, and you manage client identities through a public key infrastructure (PKI).
Mutual TLS (mTLS)
Adds certificate verification on top of existing username/password authentication. During the TLS handshake, the client validates the broker’s certificate and the broker validates the client’s certificate, then the client provides a username and password at the application layer. This gives you two-factor security: something you have (the certificate) plus something you know (the password). Choose this when compliance frameworks require mutual authentication, but you want to retain your existing username/password authentication flow.
Conclusion
Amazon MQ for RabbitMQ version 4 supports seven authentication and authorization methods. With these methods, you can align your message broker security with your existing identity infrastructure. Your organization might standardize on IAM, manage identities through Active Directory, federate access through a third-party identity providers like Okta or Microsoft Entra ID, or rely on PKI for certificate-based trust. In each case, you can eliminate the operational overhead of managing static credentials at scale.
NaranjaX is a leading fintech platform that aims to simplify and improve the daily financial lives of millions of people in Argentina. Through its digital ecosystem, NaranjaX offers a complete suite of financial products and services, including payments, collections, financing, savings, and protection products.
NaranjaX needed to evolve from their REST-based architecture to an event-driven architecture using Amazon Managed Streaming for Apache Kafka (Amazon MSK) Serverless. In a multi-account environment, MSK Serverless clusters resolve DNS names within their hosting account. AWS published a cross-account connectivity pattern that centralizes clusters in a single account. This is an effective approach for many organizations. NaranjaX required additional flexibility to distribute clusters across accounts while avoiding centralized quota dependencies.
NaranjaX addressed this requirement by developing an approach that uses AWS Resource Access Manager (AWS RAM) and Amazon Route 53 Resolver. In this post, we show you how to expand Amazon MSK Serverless adoption across multiple accounts while maintaining scalability, availability, and reduced operational overhead.
Solution overview
NaranjaX’s solution supports cross-account MSK Serverless deployment through a centralized networking architecture that combines shared virtual private cloud (VPC) resources and DNS resolution capabilities. The solution uses a central AWS account that hosts shared private subnets and Route 53 resolver endpoints, so that MSK Serverless clusters in different accounts can communicate across account boundaries.
The architecture consists of three main components:
A central VPC with private subnets that are shared across accounts using AWS RAM.
Route 53 resolver endpoints and rules that resolve DNS across accounts for MSK Serverless clusters.
Network security configurations that control communication between components.
When an application team creates an MSK Serverless cluster in their account, they can associate it with the shared VPC subnets. The Route 53 resolver rules handle DNS resolution for the cluster’s domain names, while security groups manage access control. This design supports direct connectivity between MSK Serverless clusters and applications across different AWS accounts.
Figure 1: Cross-account architecture with a central networking account sharing subnets and Route 53 resolver endpoints
Implementation requirements and configuration
This section walks you through the steps to configure cross-account MSK Serverless connectivity using shared VPC subnets and Route 53 resolver rules. Before you begin, make sure you have the prerequisites in place.
Prerequisites
Before implementing this solution, confirm the following:
AWS RAM is enabled in your AWS Organization. For instructions, see Enabling resource sharing within AWS Organizations.
Amazon MSK supports shared subnets. When you create an MSK Serverless cluster in any account, you can associate the shared VPC as one of the up to five VPCs supported by the service.
You have a multi-account environment with at least one central networking account and one or more application accounts.
You have permissions to create VPCs, subnets, Route 53 resolver endpoints, and AWS RAM resource shares in the central account.
Step 1: Share subnets with AWS RAM in a central account
First, create a VPC with private subnets in your central networking account. These subnets are the resources you will share through AWS RAM. For details, see Creating a VPC in the Amazon VPC User Guide.
Next, create a resource share for those subnets in AWS RAM. Select the subnets you created and specify the target accounts.
Finally, specify the principals (account IDs) authorized to use the shared subnets. These are the accounts where you will create your Amazon MSK Serverless clusters.
Figure 2: Creating a resource share for the private subnets in AWS RAM
Figure 3: Specifying the target accounts for the resource share
Figure 4: Confirming the principals authorized to use the shared subnets
Step 2: Configure Amazon Route 53 Resolver rules
In your central account, create a Route 53 Resolver rule for the domain *.kafka-serverless.<Region>.amazonaws.com. Don’t associate this rule with any VPC at this point.
Figure 5: Route 53 Resolver rule for the kafka-serverless domain
Configure this as a forward rule for the kafka-serverless subdomain. Set up an outbound endpoint in the central account and point the target IP addresses to the inbound endpoint in the same account.
Figure 6: Forward rule configuration with outbound and inbound resolver endpoints
Share the resolver rule with your application accounts using AWS RAM so they can resolve the DNS names of their MSK Serverless clusters.
Make sure the central VPC has both inbound and outbound resolver endpoints configured to support cross-account DNS resolution.
Step 3: Configure network security groups
Configure security groups in each consuming account to allow inbound and outbound traffic on port 53 (DNS resolution) and port 9098 (Kafka IAM authentication). This supports both name resolution and secure connectivity to your MSK Serverless brokers across account boundaries.
Step 4: Enable and test many-to-many connectivity
With the networking infrastructure in place, you can now create MSK Serverless clusters in any of your application accounts. To do this, create an MSK Serverless cluster in your application account and associate it with the shared VPC subnets from the central account. The Route 53 resolver rules automatically handle DNS resolution for the cluster endpoints, and the security groups you configured control access. This eliminates the restriction of hosting all clusters in a single account.
You have flexibility in how you configure DNS resolution for your clients. For example, in a client account, you can associate the shared resolver rule with a VPC directly, or you can use the inbound endpoint IP addresses from the central account as custom DNS servers. Configure these either in per-connection scripts or in DHCP option sets for a separate VPC.
To verify connectivity, use the dig command from an instance in a client account VPC to test DNS resolution of MSK Serverless bootstrap strings across different accounts. The following example uses the +short flag for clarity:
Figure 7: The dig command resolving MSK Serverless bootstrap strings across accounts
The output shows that two MSK Serverless clusters (bootstrap strings starting with boot-*) in different accounts and VPCs resolve to the actual IP addresses of the three brokers listening for connections.
This confirms that the architecture supports scalable, consistent cross-account communication for event-driven workloads.
Key benefits
NaranjaX’s implementation of MSK Serverless as its integration backbone delivered measurable advantages across 15+ application teams and over 40 AWS accounts, transforming application development and operations.
Scalability with optimized cost
With MSK Serverless, teams can scale workloads automatically without managing broker capacity. Combined with AWS RAM and Route 53, the architecture supports growth across over 40 accounts while maintaining cost efficiency. By removing the need for dedicated Kafka operations staff and self-managed clusters, NaranjaX reduced infrastructure management costs by approximately 40 percent compared to their previous self-managed Kafka deployment.
Simplified governance and security
Centralized DNS management and VPC sharing keep configurations standardized across all accounts. IAM-based access control, integrated with KATHU, provides clear visibility into topic ownership and consumer access, reducing security review cycles from days to hours.
Faster developer onboarding through IDP integration
By integrating Kafka control-plane operations directly into their internal developer platform (IDP), teams can provision clusters and topics through Terraform modules or a graphical interface. This reduced onboarding time for new teams adopting event-driven architecture from weeks to less than one day.
Reduced operational overhead
Application teams can focus on delivering business features rather than managing Kafka infrastructure. Central operations handle DNS, networking, and resource sharing, while MSK Serverless abstracts broker administration. This reduced operational tickets related to Kafka by over 70 percent and freed the platform team to focus on higher-value initiatives.
Next steps
NaranjaX is evaluating extending this solution by incorporating automatic topic replication across accounts using MSK Replicator, so that certain topics can be exposed as Enterprise Topics in a central hub for global consumption. This will further simplify the architecture, improve data resiliency, and enhance visibility across event domains.
Conclusion
Through this architecture, NaranjaX successfully implemented a many-to-many connectivity model for Amazon MSK Serverless across more than 20 AWS accounts. By using AWS RAM and Amazon Route 53 Resolver, the organization achieved a scalable, secure, and centralized network topology that accelerates the adoption of event-driven architecture without operational bottlenecks. This approach complements the cross-account connectivity pattern published by Tamer Soliman, and provides additional flexibility for organizations that require distributed Kafka clusters in large-scale multi-account environments. To get started, see the Amazon MSK documentation and try this approach in your own multi-account environment.
Linus Torvalds released
the 7.2 kernel on August 17, after noting that the number of fixes
coming in was still “bigger than I would have wished for“. In fact,
7.2 was one of the busiest development cycles in the kernel’s history,
adding nearly 600,000 lines of code. It’s time to look at some statistics
to get a handle on how the kernel’s development community is changing.
This year’s edition of the Free and Open
Source Software Yearly conference, better known as “FOSSY”, moved north to the
beautiful (and enormous) campus of the University of British Columbia (UBC)
in Vancouver, Canada from its home for the three previous editions:
Portland, Oregon, in the US. There were many different types of talks at
FOSSY, from deeply technical kernel-track topics, through talks on legal
and community issues, to the “FOSS in Daily Life” talks. In the “Toolchains
and Other Development Tools” track, Timothy Sample gave a presentation
about bootstrappable builds,
which is somewhat less well-known than its cousin, reproducible builds, though LWN
did look at the topic just over two years
ago. In short, a bootstrappable build is one that starts with a tiny
program that can build another slightly larger program, which can build yet
another, and so on, until the entirety of a modern Linux user space is
built from a small seed. Ultimately, it results in code with a
completely understood origin—unlike a typical Linux user space today.
Last week, the OpenSearch and Valkey teams visited Seoul to meet open source developers and contributors in the Open Source Summit Korea 2026 and MCP DevSummit Seoul 2026. At the four-day event, community leaders and users of open source projects and emerging agent AI gathered to share knowledge, collaborate on solutions, and push the projects forward.
Leaders of the Korean OpenSearch communities volunteered to participate in the booth, and also had time to network and interact in the user group meetup.
OpenSearch is an open source, enterprise-grade search and observability suite that brings order to unstructured data at scale. On June 9, 2026, OpenSearch 3.7 introduced new tools designed to query, alert, and track SLOs across logs, traces, and metrics through a single interface and retrieve vectors up to 5.5x faster for improved search performance. Since July 30, 2026, you can run OpenSearch version 3.7 on Amazon OpenSearch Service for improvements in vector search performance, search relevance, and Query Insights.
Valkey is an open source high-performance key/value datastore that supports a variety of workloads such as caching, message queues, and it can act as a primary database. On May 19, 2026, Valkey 9.1 introduced a redesigned I/O threading model that improves throughput by up to 17% and reduces memory usage for strings under 128 bytes by up to 20%. Since June 23, 2026, you can run Valkey 9.1 in Amazon ElastiCache for node-based clusters, delivering higher throughput, improved memory efficiency, and stronger access control for multi-tenant workloads.
Last week’s launches Here are some launches that got my attention:
Amazon EC2 application status checks: Amazon EC2 introduces a new status check that helps you detect and respond to application-level issues on your EC2 instances. With application status checks, EC2 monitors applications to detect issues such as a web server that has stopped accepting requests, a Docker daemon that is not running, an incorrect networking configuration, or a network interface that is no longer passing traffic. To learn more, visit the Application status checks documentation.
AWS IAM role manager to set up IAM roles automatically: You can use a new role manager that automatically sets up the IAM roles your AWS services need. When you set up a supported service in the console, role manager creates a default role on your behalf, or reuses one that already exists in your account if it matches the required permissions. Role manager supports six AWS service consoles at launch. To learn more, read How AWS IAM role manager rethinks the starting point for IAM roles.
OpenAI Daybreak available to eligible customers on Amazon Bedrock: Daybreak is the cyber defense initiative from OpenAI that gives defenders governed access to frontier AI for cybersecurity work. For most security teams, Daybreak Blue, powered by GPT-5.6 Sol, serves as the starting point across defensive workflows including vulnerability discovery, detection engineering, and incident response. Daybreak Red, powered by a new GPT-5.6 Cyber, is designed for advanced, authorized tasks such as vulnerability research, exploit reproduction, and mitigation development. To enroll, contact OpenAI or reach out to your AWS account team for guidance on eligibility. To learn more, read the AI Blog post.
New foundation models in Amazon SageMaker JumpStart: We’re expanding the portfolio of foundation models available to AWS customers. These models address different enterprise AI challenges with specialized capabilities:
For a full list of AWS announcements, be sure to keep an eye on the What’s New with AWS page.
Other AWS news Here are some additional projects and news items you may find interesting:
The deprecation of email validation in AWS Certificate Manager: ACM will discontinue support for email-validated public certificates by September 30, 2027. If you use email validation for your ACM public certificates, you need to migrate to DNS validation before that date. For Amazon CloudFront distributions, HTTP validation is also available.
The next-generation AWS VPN Client with CLI support and admin controls: You can use a new AWS VPN Client built on OpenVPN3. With the new client, you get full backward compatibility with existing AWS Client VPN endpoints while delivering the automation capabilities and security posture that enterprise networking teams have been asking for.
Oracle Exadata on Exascale for Oracle AI Database@AWS: ExaDB-XS brings Exadata-class performance and availability through a consumption-based model. With ExaDB-XS, you can scale compute and storage independently in small increments and pay only for what you consume.
For a full list of AWS blog posts, be sure to keep an eye on the AWS Blogs page.
Version 5.0 of GNU Poke,
a binary-data editor, has been released. This release includes a
number of improvements to the Poke compiler, additions to the Poke
language, as well as runtime and standard library updates. See below
for the full list of changes.
The Software Freedom
Conservancy has announced
that Mark J. Wielaard has been honored with the second annual
Distinguished Service Award in Software Freedom for his many years of
service to software freedom.
Mark is one of many key FOSS developers who has designed his career so
that his employers have funded much of his FOSS work. Nevertheless,
Mark continues his volunteer work after hours as a key contributor who
maintains Sourceware — the
oldest FOSS collaboration and developer infrastructure hosting site in
history.
In addition to his work on Sourceware, Wielaard is a member of the DWARF Debugging Standard Committee,
the maintainer for Valgrind and elfutils, as well as a contributor to
various other GNU projects.
When CI/CD deployment failures occur for GitHub hosted applications, AWS DevOps Agent reduces the hours that Development and Site Reliability Engineering (SRE) teams typically spend manually investigating across multiple AWS services, logs, and pipeline stages. This process delays critical deployments and impacts software delivery velocity. This is especially true when teams need to correlate data between GitHub commit histories, AWS CodePipeline execution logs, and Amazon CloudWatch metrics. When continuous integration and continuous delivery (CI/CD) pipelines fail, engineers often find themselves context-switching between GitHub pull requests, code build logs, deployment artifacts, and downstream service health metrics. This process of identifying root causes can extend resolution time from minutes to hours, especially in multi-service architectures.
AWS DevOps Agent reduces this manual investigation by automatically correlating pipeline failures with specific code changes. Rather than spending hours manually tracing deployment failures through multiple systems, engineers can use AWS DevOps Agent to perform this correlation. It identifies which specific code changes caused pipeline failures and provides remediation guidance. The agent analyzes pipeline failures, correlates them with specific commits and pull requests, and identifies root causes across the deployment chain.
AWS CodePipeline combined with AWS DevOps Agent helps address this challenge by creating a streamlined path from GitHub repositories to AWS deployments. This solution reduces manual handoffs, reduces configuration complexity, and provides end-to-end visibility across the entire development lifecycle.
In this post, you learn how to integrate AWS DevOps Agent with your GitHub repositories to automatically correlate deployment failures with specific commits, providing root cause analysis and remediation steps across your entire CI/CD pipeline.
Solution overview
Modern software delivery teams face a persistent challenge: when deployments fail, engineers spend valuable time manually correlating logs, tracing pipeline errors, and diagnosing root causes across disconnected tools. This reactive cycle slows recovery and increases mean time to resolution (MTTR). By integrating the AWS DevOps Agent with GitHub, AWS CodePipeline, Amazon CloudWatch, and AWS Lambda, teams can shift from manual triage to automated incident investigation, directly within their existing GitHub-based workflows.
This solution integrates AWS DevOps Agent with GitHub to automate deployment failure investigation. The following sections explain the architecture and operational benefits.
How it works
The architecture creates an automated monitoring and remediation flow that monitors your deployment pipeline and responds to issues. Your source code resides in a GitHub repository, and AWS CodePipeline orchestrates the build, test, and deployment stages. Amazon CloudWatch continuously monitors pipeline execution metrics and logs and generates alarms when it detects anomalies or failures, such as failed build stages, deployment rollbacks, or threshold breaches in downstream application of health metrics. When a failure occurs, it generates an error metric in CloudWatch. The CloudWatch Alarm detects this error and transitions to an ALARM state, which directly invokes the WebHook Executor Lambda. The WebHook Executor then sends an authenticated HTTP POST request to DevOps Agent, which receives the incident and begins an investigation.
Webhook integration acts as the bridge between the Amazon CloudWatch, the monitoring layer. Lambda parses the alarm payload and extracts contextual metadata and then invokes the DevOps Agent with a structured investigation request.
Integration with Operational Excellence
This solution directly supports the AWS Well-Architected Framework’s Operational Excellence pillar by automating the investigation process and reducing the MTTR. The investigation capability of AWS DevOps Agent aligns with AWS Incident Detection and Response (IDR) best practices, helping teams to detect, diagnose, and develop mitigation plans for pipeline failures faster while maintaining a full audit trail of agent actions and findings. This creates a delivery pipeline that accelerates resolution workflows through automated diagnostics and actionable remediation recommendations, keeping deployments moving and engineering teams focused on building rather than firefighting.
Figure 1: GitHub and DevOps Agent integration
Prerequisites
For this walkthrough, you should have access to and understanding of the following:
An AWS account with permissions to create AWS Identity and Access Management (IAM) roles: 1. Agent Space role – for basic service operations. 2. Agent Space web app role – for using the Agent Space web app functionality. 3. (Optional) Secondary source account roles if monitoring multiple AWS accounts. Refer to the DevOps Agent user guide for the details on setting up these roles.
A GitHub account: 1. You have a GitHub account with administrative permissions for your repositories, or an organization you belong to. 2. Your repositories contain code that deploys to AWS resources you want to monitor. 3. You have identified the GitHub repositories you want AWS DevOps agent to access.
Access to register DevOps Agent with your GitHub Account or Organization.
CloudWatch monitoring enabled for your application.
Create an AWS DevOps Agent Space and configure the webhook The first step is to create a dedicated Agent Space that serves as the central hub for your automated investigation workflow. The Agent Space connects your monitoring infrastructure to the DevOps Agent’s analysis capabilities. Create the DevOps Agent space by following the steps outlined in the Getting Started with AWS DevOps Agent guide Navigate to the DevOps Agent console. Create an Agent Space named after your application (for example, `myhotelapp`) 1) “Auto-create both IAM roles”. 2) “Edit the role names to be descriptive (for example, DevOpsAgentRole-AgentSpace-hotel-app and DevOpsAgentRole-WebappAdmin-hotel-app)”
Figure 2: Agent Spaces Screen
On the Capabilities tab, generate a webhook and save the credentials
Store the webhook credentials in AWS Secrets Manager:
2. Configure GitHub integration with your AgentSpace
With your Agent Space created and webhook configured, the next step is to connect your GitHub repositories. This integration allows the DevOps Agent to access commit histories, pull request data, and code changes when investigating pipeline failures.
To configure GitHub integration with your AgentSpace: 1. From the Capabilities tab within your configured AgentSpace, navigate to the GitHub Configuration section and choose “Register”
Figure 3: Capability Providers
2. Your GitHub repositories will be listed with their connection status.
3. To connect to a repository, verify that the Status shows “Ready to connect” and choose the + button in the Actions column.
4. Upon successful connection, the Status updates to ‘Connected’.
To automatically trigger AWS DevOps Agent investigations via Webhook when a CloudWatch enters the ALARM state, you can refer to sample-aws-devops-agent-cloudwatch and build based on your use case.
3. Troubleshooting application deployment 5XX errors with CloudWatch and AWS DevOps Agent
When your application encounters 5XX errors during deployment, CloudWatch alarms detect the anomaly and trigger the DevOps Agent investigation workflow. The following dashboard shows the alarm state that initiates the automated investigation process.
Figure 4: CloudWatch Dashboard
4. Resolving deployment/build errors during CI/CD deployment
The following use cases demonstrate how AWS DevOps Agent investigates and resolves common CI/CD pipeline failures. Each scenario walks through the failure trigger, the automated investigation, and the remediation guidance that the agent provides
Use case 1: Push a code change that introduces an invalid DynamoDB table name
Simulate: Push a code change that breaks the DynamoDB table name — e.g., change DYNAMODB_TABLE_NAME env var but don’t update CloudFormation to make the CodePipeline unit testing fail
A – dynamodb_table: process.env.DYNAMODB_TABLE_NAME || “Rooms”,
B + dynamodb_table: “HotelRooms”
The CodePipeline triggers 5xx alarms and the webhook triggers a DevOps Agent investigation.
DevOps Agent analyzes the 500 errors in relation to the configuration change, identifies the invalid DynamoDB endpoint, and shows the timeline: configuration update → service redeployment → requests fail with connection errors.
Figure 5: Unit test failed for the CodePipeline
Use case 2: Identifying dependency resolution failures from bad commits
1. Navigate to `package.json`
2. Change any dependency name to something invalid — for example, change `”express”` to `”expresss”` (extra ‘s’)
3. Commit the change directly to `main`
CodePipeline detects the push and starts a new execution. The CI stage runs `npm install`, which fails because the misspelled package doesn’t exist. The Amazon EventBridge rule catches the stage failure and invokes the webhook executor Lambda, which triggers a DevOps Agent investigation.
In the DevOps Agent console, select your Agent Space, then choose Operator access to open the web app. Navigate to the Incident Response tab to view the new investigation.
Figure 6: Mitigation plan step1
Figure 7: Mitigation plan steps 2-4
DevOps Agent investigates the pipeline failure, examines the CodeBuild logs showing the `npm install` error, and correlates it with the recent commit to the repository. It identifies the root cause as a dependency resolution failure introduced by the latest code change.
Clean up
This walkthrough creates AWS resources that incur charges, including AWS DevOps Agent (pay-per-use), Lambda functions, CodePipeline executions, CloudWatch alarms, and Secrets Manager secrets. Follow the cleanup steps when finished to avoid ongoing charges.
2. Delete your Agent Space from the AWS DevOps Agent console
3. Remove the GitHub pipeline connection from your settings.
4. Delete the IAM roles created for the Agent Space.
5. Delete the Lambda function, EventBridge rule, and CloudWatch alarms created for webhook integration.
6. (Optional) If you created additional source account roles, remove those as well.
Conclusion
The AWS DevOps Agent integration with GitHub fundamentally transforms how engineering teams approach CI/CD reliability by shifting from reactive troubleshooting to proactive incident prevention. By autonomously correlating CodePipeline failures with specific GitHub commits, analyzing root causes across the deployment chain, and providing intelligent remediation recommendations, this solution reduces mean time to resolution from hours to minutes while maintaining the human oversight necessary for production environments.
Organizations implementing this integration gain a resilient software delivery pipeline that combines the collaborative strengths of GitHub source control with AWS’s intelligent automation capabilities. This helps teams maintain deployment velocity, strengthen operational excellence, and focus engineering effort on innovation rather than incident response.
AWS CodePipeline, Amazon CloudWatch, AWS Lambda, and the AWS DevOps Agent integrate natively to provide end-to-end visibility and autonomous investigation capabilities. Together, they accelerate recovery workflows, reduce operational friction, and build the foundation for continuous delivery at scale.
About authors
Anjani Reddy
Anjani is a Sr. Solutions Architect at AWS. She works with Enterprise customers to provide operational guidance to innovate and build a secure, scalable cloud on the AWS platform. Outside of work, she is an Indian classical & salsa dancer, loves to travel and Volunteers for American Red Cross & Hands on Atlanta.
Jared Thompson Jared Thompson is a Senior Technical Account Manager at AWS, where he partners with strategic enterprise customers to optimize cloud operations and accelerate AI/ML workloads at scale. Jared specializes in GPU-accelerated computing, capacity planning, and cloud observability, with a passion for turning complex infrastructure challenges into automated, self-healing systems. He is a recipient of the AWS Golden Jacket award and when not at work, he can be found on a cruise ship.
Aneesh Varghese is a Senior Technical Account Manager at AWS with more than 19 years of Information Technology industry experience. Aneesh supports enterprise customers in cost optimization strategies, Cloud operations, MLOps, providing advocacy and strategic technical guidance to help plan and build solutions using AWS best practices. Outside of work, Aneesh likes to spend time with family, play Basketball and Badminton.
To provide the best experiences, we use technologies like cookies to store and/or access device information. Consenting to these technologies will allow us to process data such as browsing behavior or unique IDs on this site. Not consenting or withdrawing consent, may adversely affect certain features and functions.
Functional
Always active
The technical storage or access is strictly necessary for the legitimate purpose of enabling the use of a specific service explicitly requested by the subscriber or user, or for the sole purpose of carrying out the transmission of a communication over an electronic communications network.
Preferences
The technical storage or access is necessary for the legitimate purpose of storing preferences that are not requested by the subscriber or user.
Statistics
The technical storage or access that is used exclusively for statistical purposes.The technical storage or access that is used exclusively for anonymous statistical purposes. Without a subpoena, voluntary compliance on the part of your Internet Service Provider, or additional records from a third party, information stored or retrieved for this purpose alone cannot usually be used to identify you.
Marketing
The technical storage or access is required to create user profiles to send advertising, or to track the user on a website or across several websites for similar marketing purposes.